Introduction
So, you’re new to OmniGraffle and you’re trying to sort out what all of these inspectors and doohickeys do. Fortunately, you’ve come to the right place—and, finally, we’ve cooked up a new tutorial to help you learn the ins and outs of OmniGraffle.
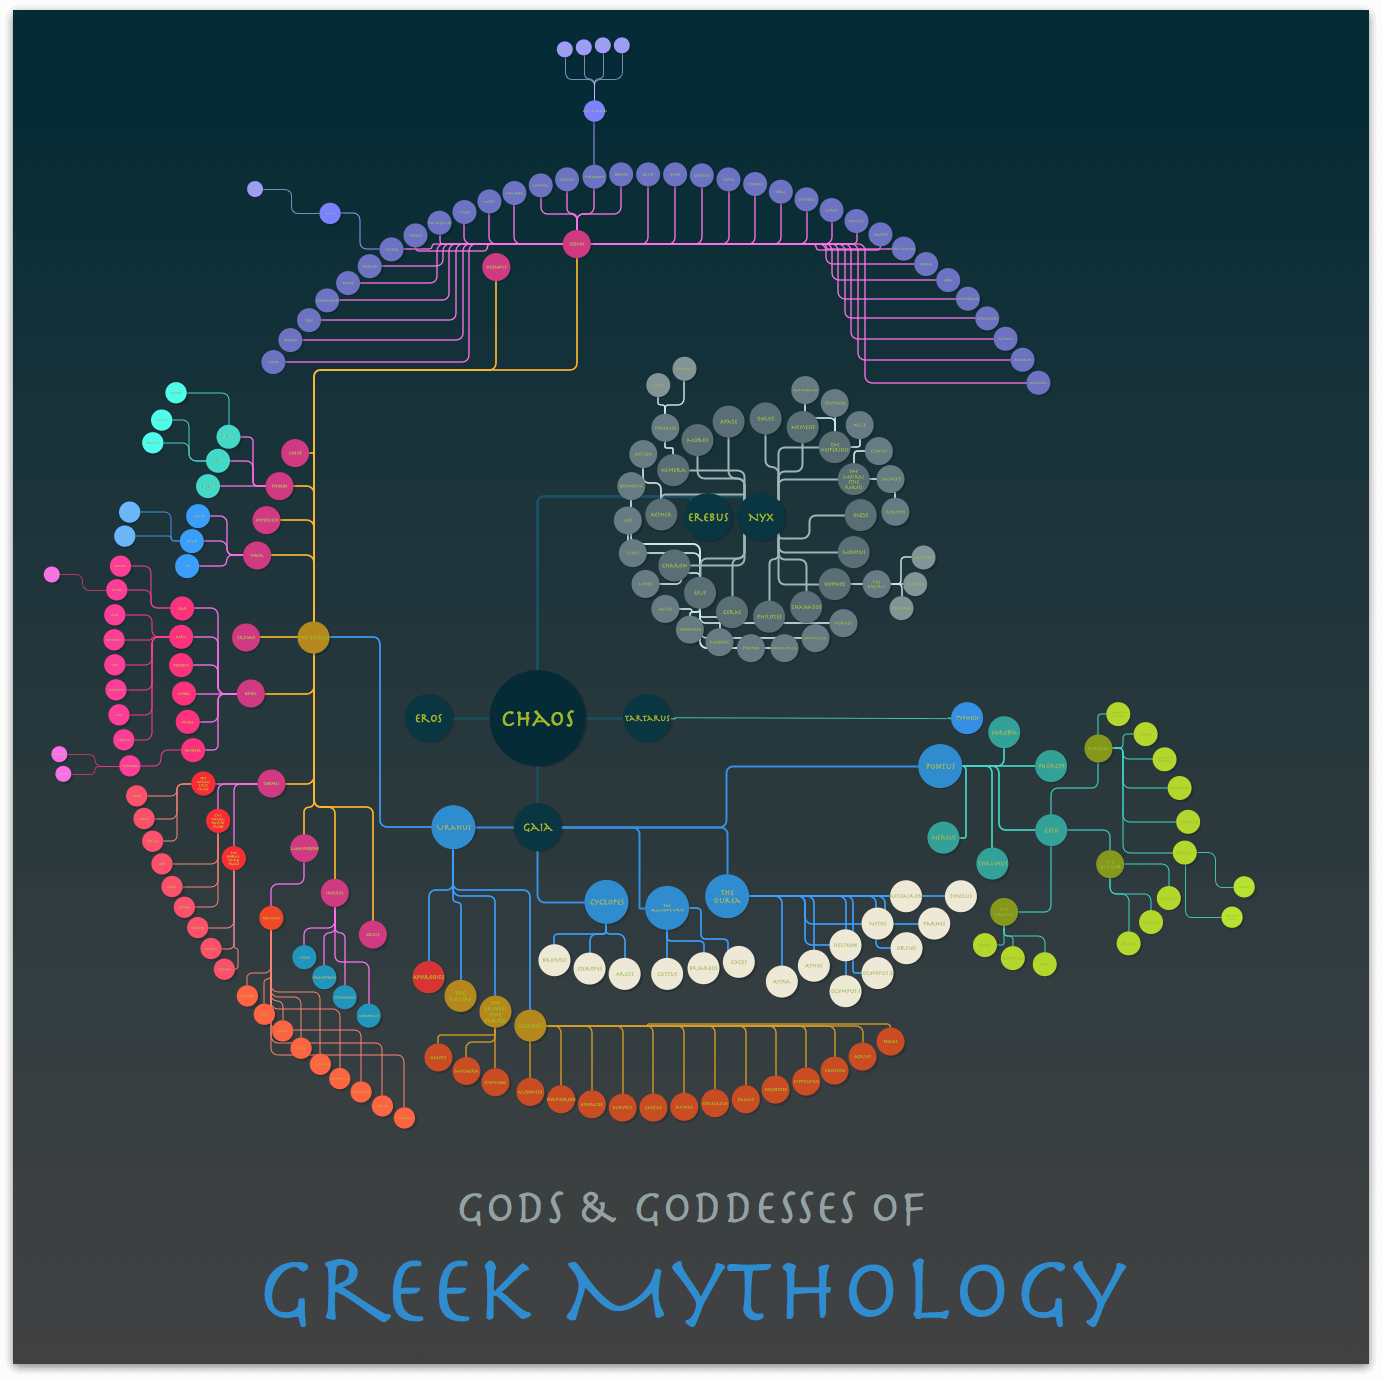
This tutorial walks you through the process of creating a family tree of some of the Gods and Goddesses of Greek Mythology; just take a gander at what you’re about to create!

You will learn how to use OmniGraffle’s Outline Editor for structuring hierarchical data. Along the way, you will use various Tools and Inspectors while discovering some not-so-well-known tricks to help you master OmniGraffle.
You don’t need to know anything about Greek mythology to work through this tutorial. As one of our developers said:
All you need to know about Greek mythology before you start is…
- Hammer way out of Father God’s head
- Sneak past Cerberus
- Slay Lernaean Hydra
You are now a Hero and Goddess of OmniGraffle!
Granted, that’s a little vague without the proper backstory and context; we’ll circle back to that a little later, though. However, if you are a Greek scholar or fan, you’ll be happy to know that our source for the family tree is Hesiod’s Theogony.
The “Getting Started” Part of “Getting Started”
To get started, open OmniGraffle on your Mac. This tutorial assumes you are using at least OmniGraffle 6 (currently at v6.5, as of this writing). To determine which version you have, open OmniGraffle and then choose OmniGraffle ▸ About OmniGraffle. This opens OmniGraffle’s About Box, which tells you interesting things like which version of OmniGraffle you’re running, and whether you have purchased the upgrade to OmniGraffle Pro.
Note
You may be able to follow along using an older version of OmniGraffle, but things will definitely look different, and there’s a fair chance that some things in the user interface might not even exist. If you are running OS X Yosemite (v10.10) or higher, your Mac can handle OmniGraffle 6.1 or higher. Go ahead, do that upgrade; we’ll be right here.
Before jumping in, there are a few minor details that you should consider doing to help you work through this tutorial:
Review or read through the OmniGraffle 6 for Mac User Manual.
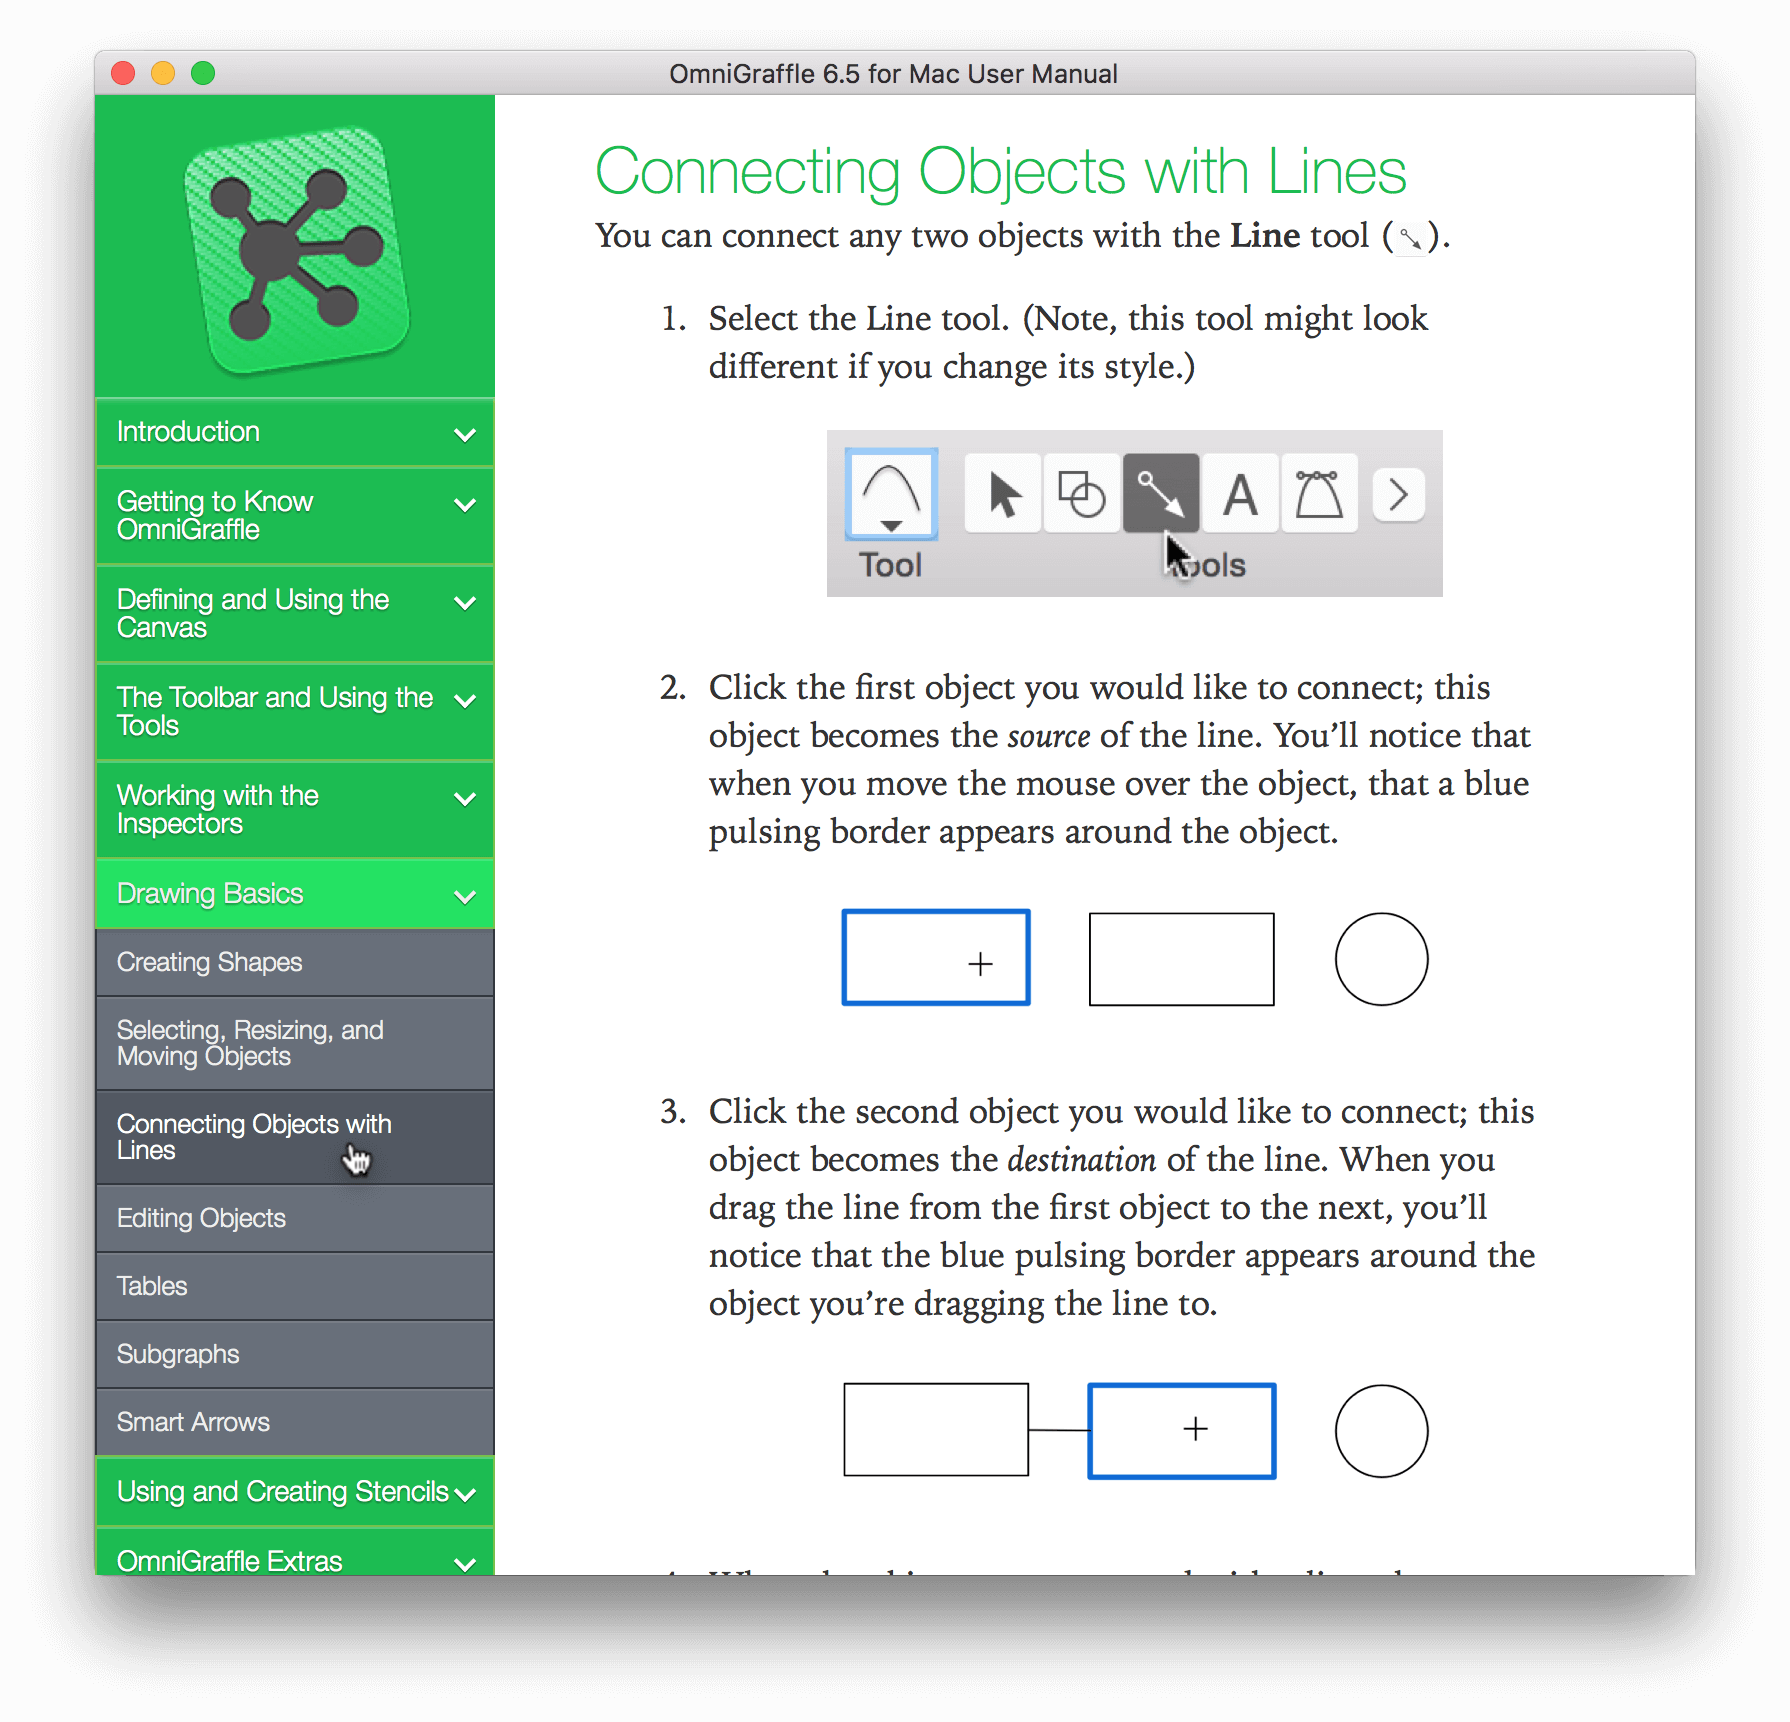
Yes, we know it’s long, but if it wasn’t thorough, you wouldn’t understand just how powerful and useful OmniGraffle can be. Sure, you’ll learn a lot more from this tutorial, but the User Manual provides the foundation you need to get the most from OmniGraffle.To access OmniGraffle’s built-in help, choose Help ▸ OmniGraffle Help:
Update All The Things!
Depending on where you purchased OmniGraffle, you might want to make sure that you are using the latest release of OmniGraffle.- If you purchased OmniGraffle from the Mac App Store, open the App Store on your Mac and click Updates and see if there’s an update waiting for you to download.
- If you purchased OmniGraffle from us (The Omni Group), open OmniGraffle and then choose OmniGraffle ▸ Check for Updates from the menu bar. You must be connected to the Internet for this to work, but if there’s an update available, you will be prompted to download and install the latest release.
As part of checking for upgrades, you might also want to check for any system updates in the App Store. Go ahead and do all of that right now; we’ll be right here when you get back.
Download the Tutorial Resources...On Your Mac.
To help move things along in the tutorial, we have provided some additional resources, which you will need to download on your Mac. This Zip file includes the following:- GreekMythology.oo3: At the end of Part 1, you are asked to open this OmniOutliner file in OmniGraffle. This file contains the full hierarchy for the diagram that you will work on in Parts 2 and 3. You do not need OmniOutliner to work through this tutorial; just this file.
NSColorPanelSwatches.plist: In the section, Choosing a Color Scheme to Highlight Relationships, you will download and install the Solarized color scheme on your Mac, and then add those colors to the Color Well as clickable swatches you can apply to objects and connecting lines. And while the 16 colors that come with Solarized are nice, you’ll need some additional shades of those colors—that’s where the NSColorPanelSwatches.plist file comes in.
If you don’t feel like mixing your own palette of shades, you can install the NSColorPanelSwatches.plist file in ~/Library/Colors instead.
Find Your Happy Place.
We realize that learning a new piece of software can be stressful, if not downright frightening. Relax, you’re among friends; we’re here to help you.Go slowly; don’t try to rush through this. It should take you about 2–3 hours to work through this tutorial—give or take. Don’t fret if it takes you a little longer; nobody’s keeping score here.
If you get stuck at any point along the way through this tutorial, you can do one of two things:
- Scrap everything you’ve worked on up to that point and start over; or,
- Contact our amazing Support Humans for help.
We hope you don’t have to use the first option (that’s entirely your choice), because we really do have the best team of Support Humans on the planet. (We tried Support Ferrets once. Once.)
Finally, before you actually start work on this tutorial, we want you to remember one thing:
Used courtesy of the awesome and super-powerful Allie Brosh, Hyperbole and a Half.
Seriously. You can do this!
How This Tutorial is Organized
This tutorial comes to you just as any classic work should—in three parts (except without the tragedy):
- Part 1: The Cast of Olympians and Titans
The first part of the tutorial takes you through the process of using OmniGraffle’s Outline Editor to enter the list of Olympians and Titans found in Greek mythology. This sets up the base hierarchy of relationships in their “family tree” of sorts. - Part 2: Styling and Laying Out the Objects
Once you have the basic relationship structure down, the next phase is to further define these relationships because—Greek mythology being what it is—some of them are a little sketchy. Here you’ll dive more into line, object, and text styles. - Part 3: Applying the Finishing Touches
In this final phase of the tutorial, you’ll apply a background color to the canvas itself, and also add a couple text blocks to the canvas to provide a title for the diagram. Simple stuff; finally.
Note
You do not need OmniGraffle Pro for this tutorial. If you have it, great (and thank you!), but this tutorial focuses on the most basic of features as a way of introducing you to all that is possible with OmniGraffle.
Visit our website to learn more about OmniGraffle Pro.
There are plenty of ways you can model the data in this tutorial, and the path we chose to get here took many turns:
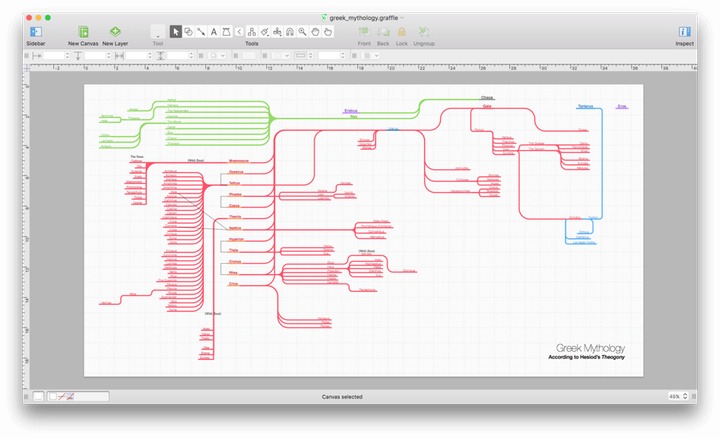
But the final design we settled on…
…is one that not only shows how OmniGraffle can handle complex relationships, it helps us show off the power of OmniGraffle.
That’s No Moon!
If you squint while looking at the previous image, you might think that the diagram closely resembles the Death Star. We can assure you, this was not intentional (despite the number of times our documentation team might have seen Star Wars, Episode VII: The Force Awakens).
And while we’re chasing conspiracy theories, have you ever noticed the similarities between one of Saturn’s moons, Mimas, and the Death Star? George…?

Left: Mimas, courtesy NASA/JPL-Caltech/Space Science Institute.
Right: Death Star, Star Wars TM & © Lucasfilm Ltd. All rights reserved.
Despite the rumors that George Lucas modeled the Death Star after Mimas, the reality is that Mimas was never clearly imaged until Voyager 1 made a pass through the neighborhood in 1980…three years after Star Wars, Episode IV: A New Hope released!
And let’s not even start down the path that Mimas’ temperature pattern looks like Pac-Man is trying to eat Herschel Crater.
We live in a funky solar system.
We won’t deny, this diagram is pretty complex, but that’s Greek Mythology for you. If you know how the story goes, at first there’s Chaos, from which spawns Erebus and Nyx. Then Gaia comes along and, with Chaos, she creates Uranus, Pontus, and The Ourea. From there, things get more complicated. Gaia and Uranus hookup to create the Titans, the Titans pair up and create many of the more well-known Greek Gods, such as Apollo, Atlas, Prometheus, Poseidon, and Zeus. And speaking of Zeus…well, let’s just say he’s prolific.
The relationships are multidimensional, and this makes for some really interesting possibilities for how you design this particular diagram. And, since—at its heart—OmniGraffle is great at diagramming, we thought this would make for an interesting—and somewhat educational—tutorial.
Just follow along with the steps and you should be fine.
So, without further ado, let’s get Kraken. (Bad pun. Also wrong mythos.)