Basic Setup and Configuration
Everyone has a different style of working, and for that, OmniGraffle offers many ways that you can customize and configure the way you use the app. This chapter covers how to:
- Choose or create a default template that OmniGraffle uses whenever you create a new document
- Set options in the Preference panes (Command-,) to make your workflow smoother
- Use the new Keyboard Shortcuts window to change OmniGraffle’s default shortcuts, or share shortcut sets with other users
- Change the default set of buttons you see in toolbar
- Rearrange the tools found in the Tool Palette
- Rearrange the inspectors in the Inspector sidebar
- “Tear-off” OmniGraffle’s inspectors to create custom Workspaces to give you quick access to just the inspectors you need
Part FAQ, part tutorial, this chapter provides you with the assistance you need to customize your OmniGraffle user experience.
Choosing a Default Template
One of the most frequent questions our Support Humans receive is “How do I change the default template in OmniGraffle?”, so let’s get this one out of the way first.
The first way to change OmniGraffle’s default template is in the General Preferences pane (OmniGraffle ▸ Preferences ▸ General):
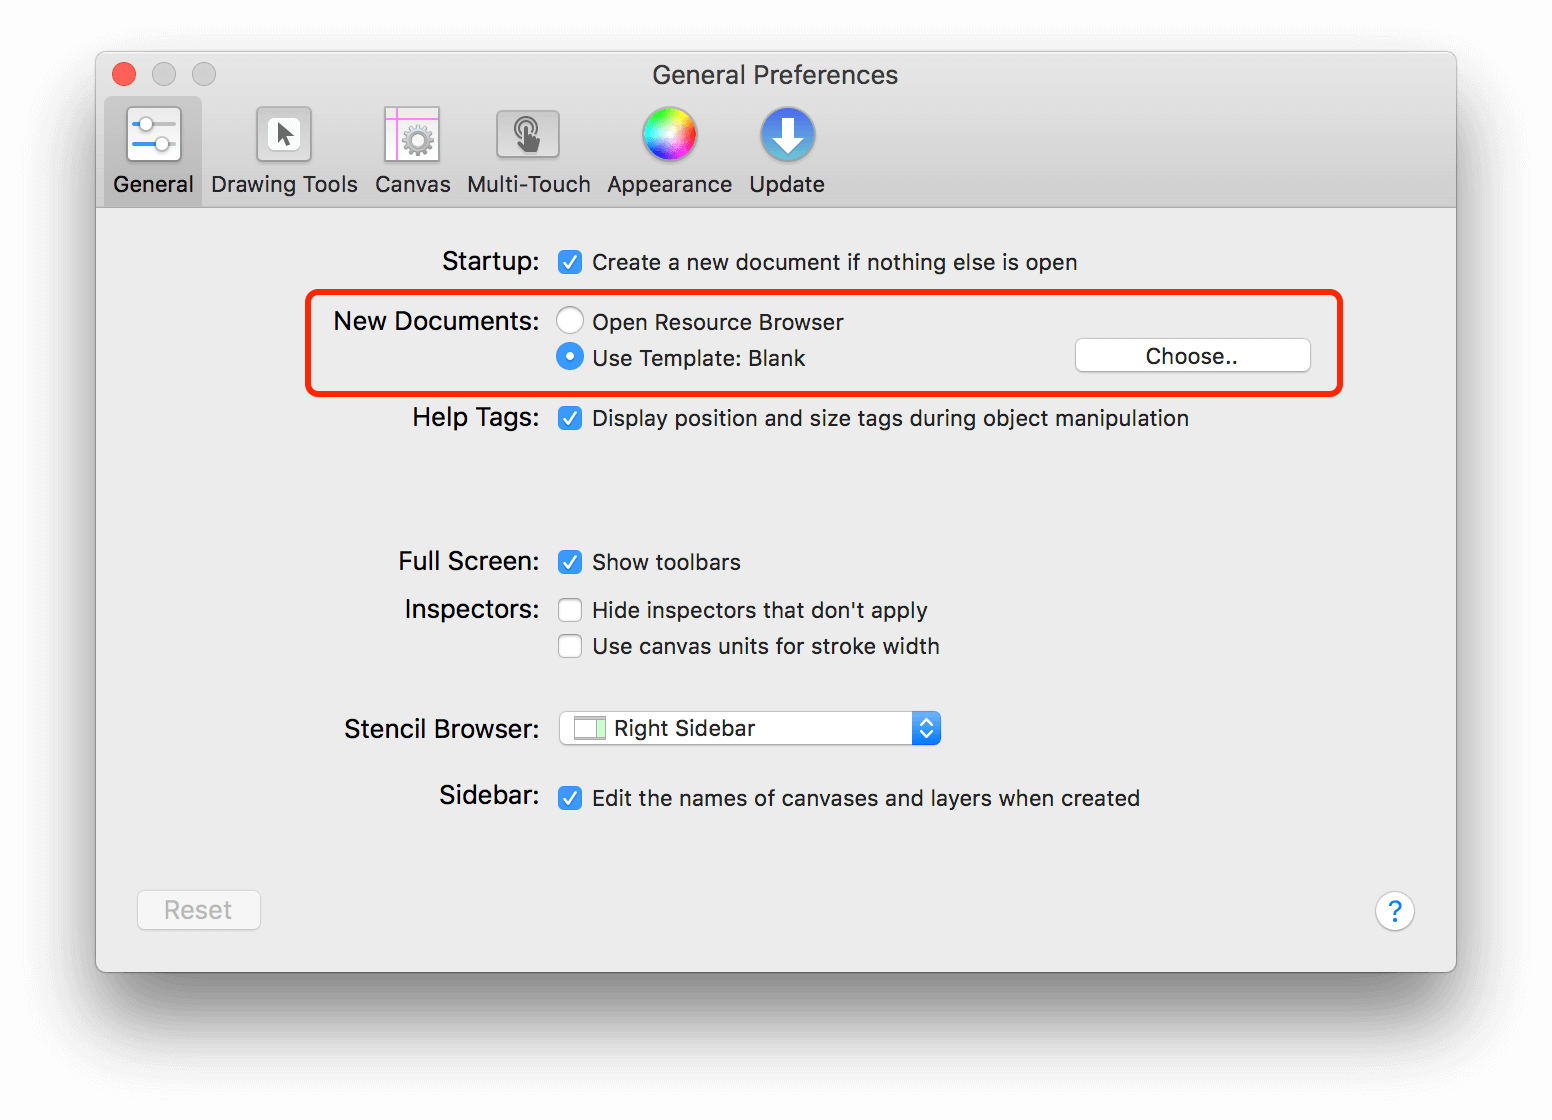
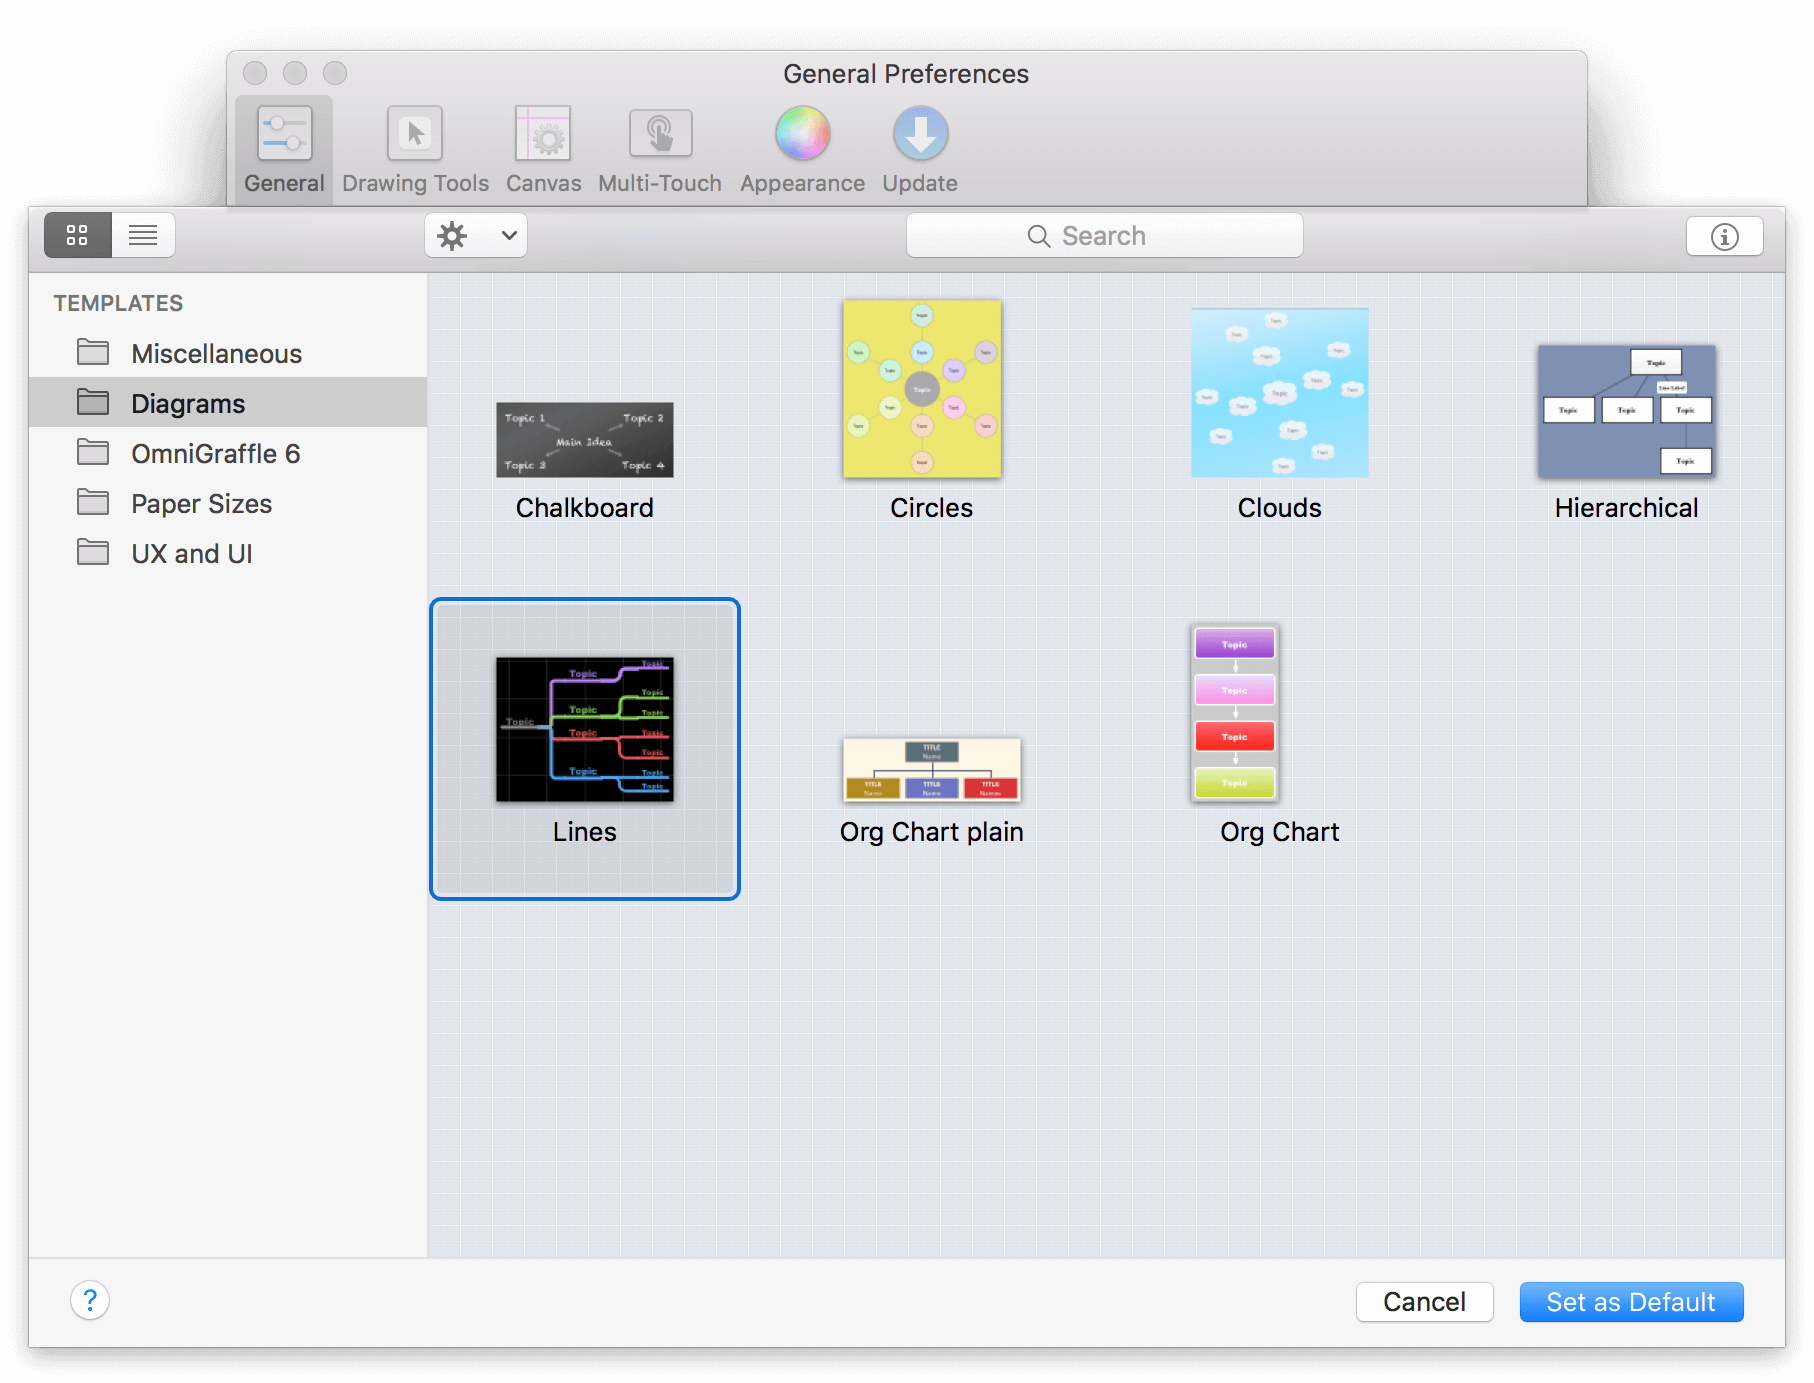
- Next to New Documents, click Choose
- A sheet slides down, providing you with access to OmniGraffle’s available templates.
- Click to select the desired template, and then click Set as Default.
The next time you create a New Document, OmniGraffle will use your choice of template as the default.
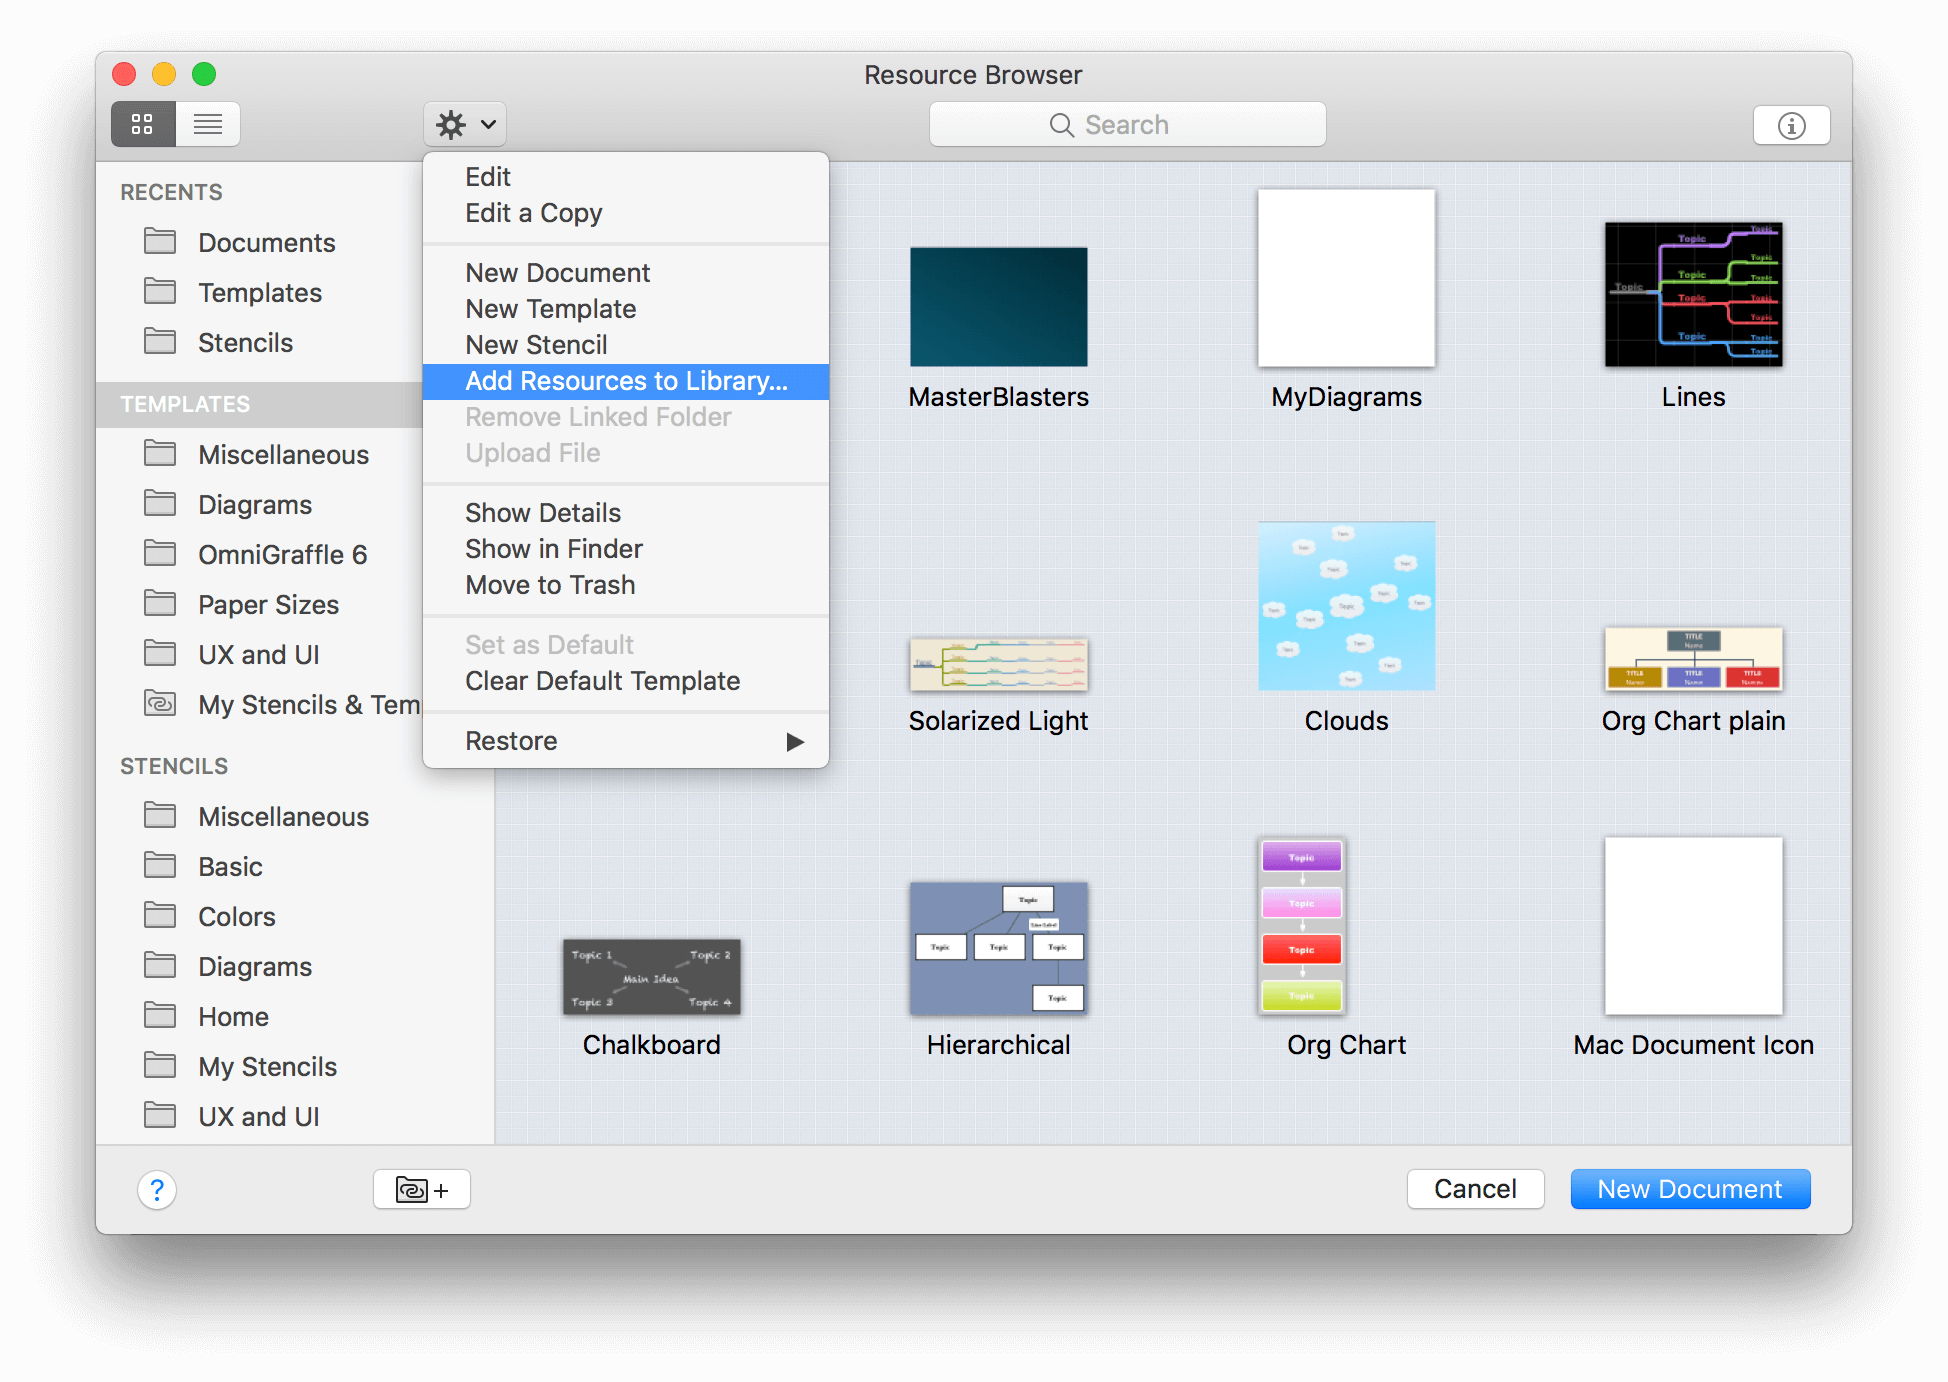
The next way to set a default template in OmniGraffle is with the Resource Browser. To open the Resource Browser, choose File ▸ Resource Browser (Shift-Command-N):
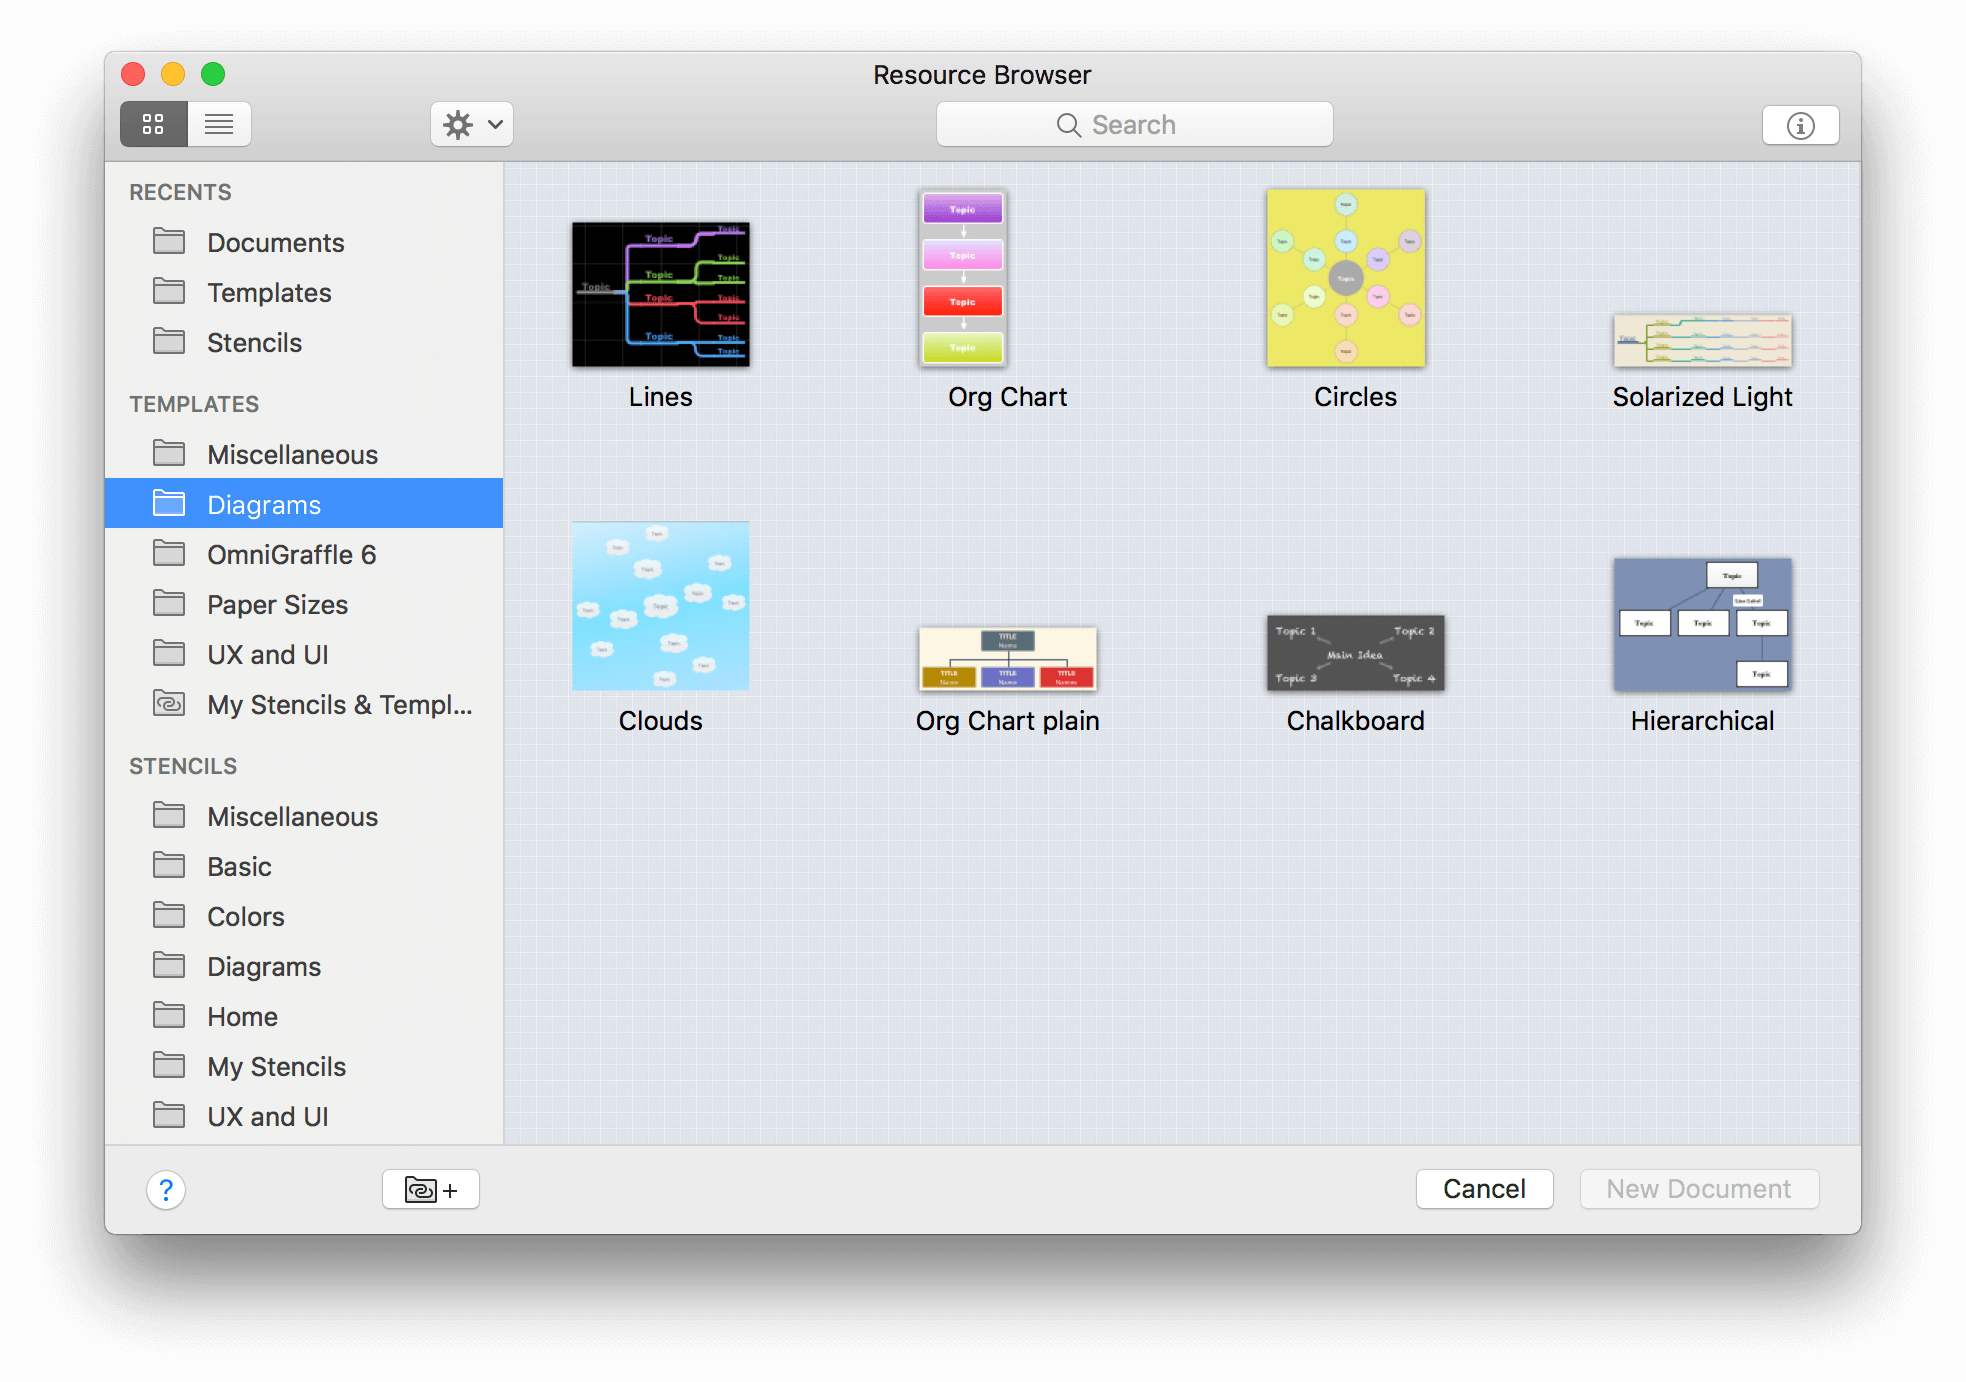
- In the Resource Browser’s sidebar, select one of the folders under Templates, and then browse around until you find a template you’d like to set as the default.
- Click to select the desired template.
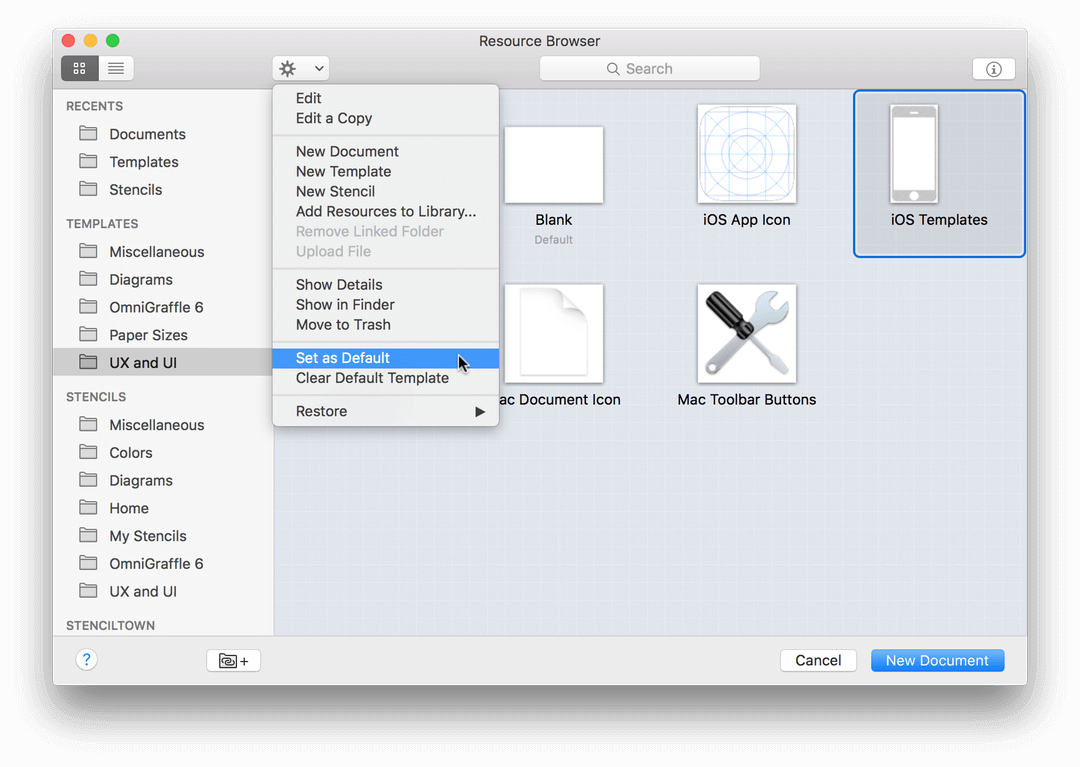
- In the Resource Browser’s toolbar, click
 , and then choose Set as Default from the Action Menu.
To learn how to create a new template based on your own needs, see Creating a New Template, later in this guide.
If you ever need to switch OmniGraffle back to using the default Blank template, go to OmniGraffle ▸ Preferences ▸ General, and then click the Reset button in the General preference pane.
Adding Resources to OmniGraffle
If you ever need to add a new stencil or template file to OmniGraffle, the easiest way to do this is with the Resource Browser:
- Choose File ▸ Resource Browser (Shift-Command-N).
- In the Resource Browser’s toolbar, click , and then choose Add Resources to Library from the Action Menu:
OmniGraffle opens a window that you can use to find, select, and add OmniGraffle Stencil and Template files to make them available in OmniGraffle 7. Use the window’s Search field to search for stencil and template file extensions (.gstencil and .gtemplate, respectively).
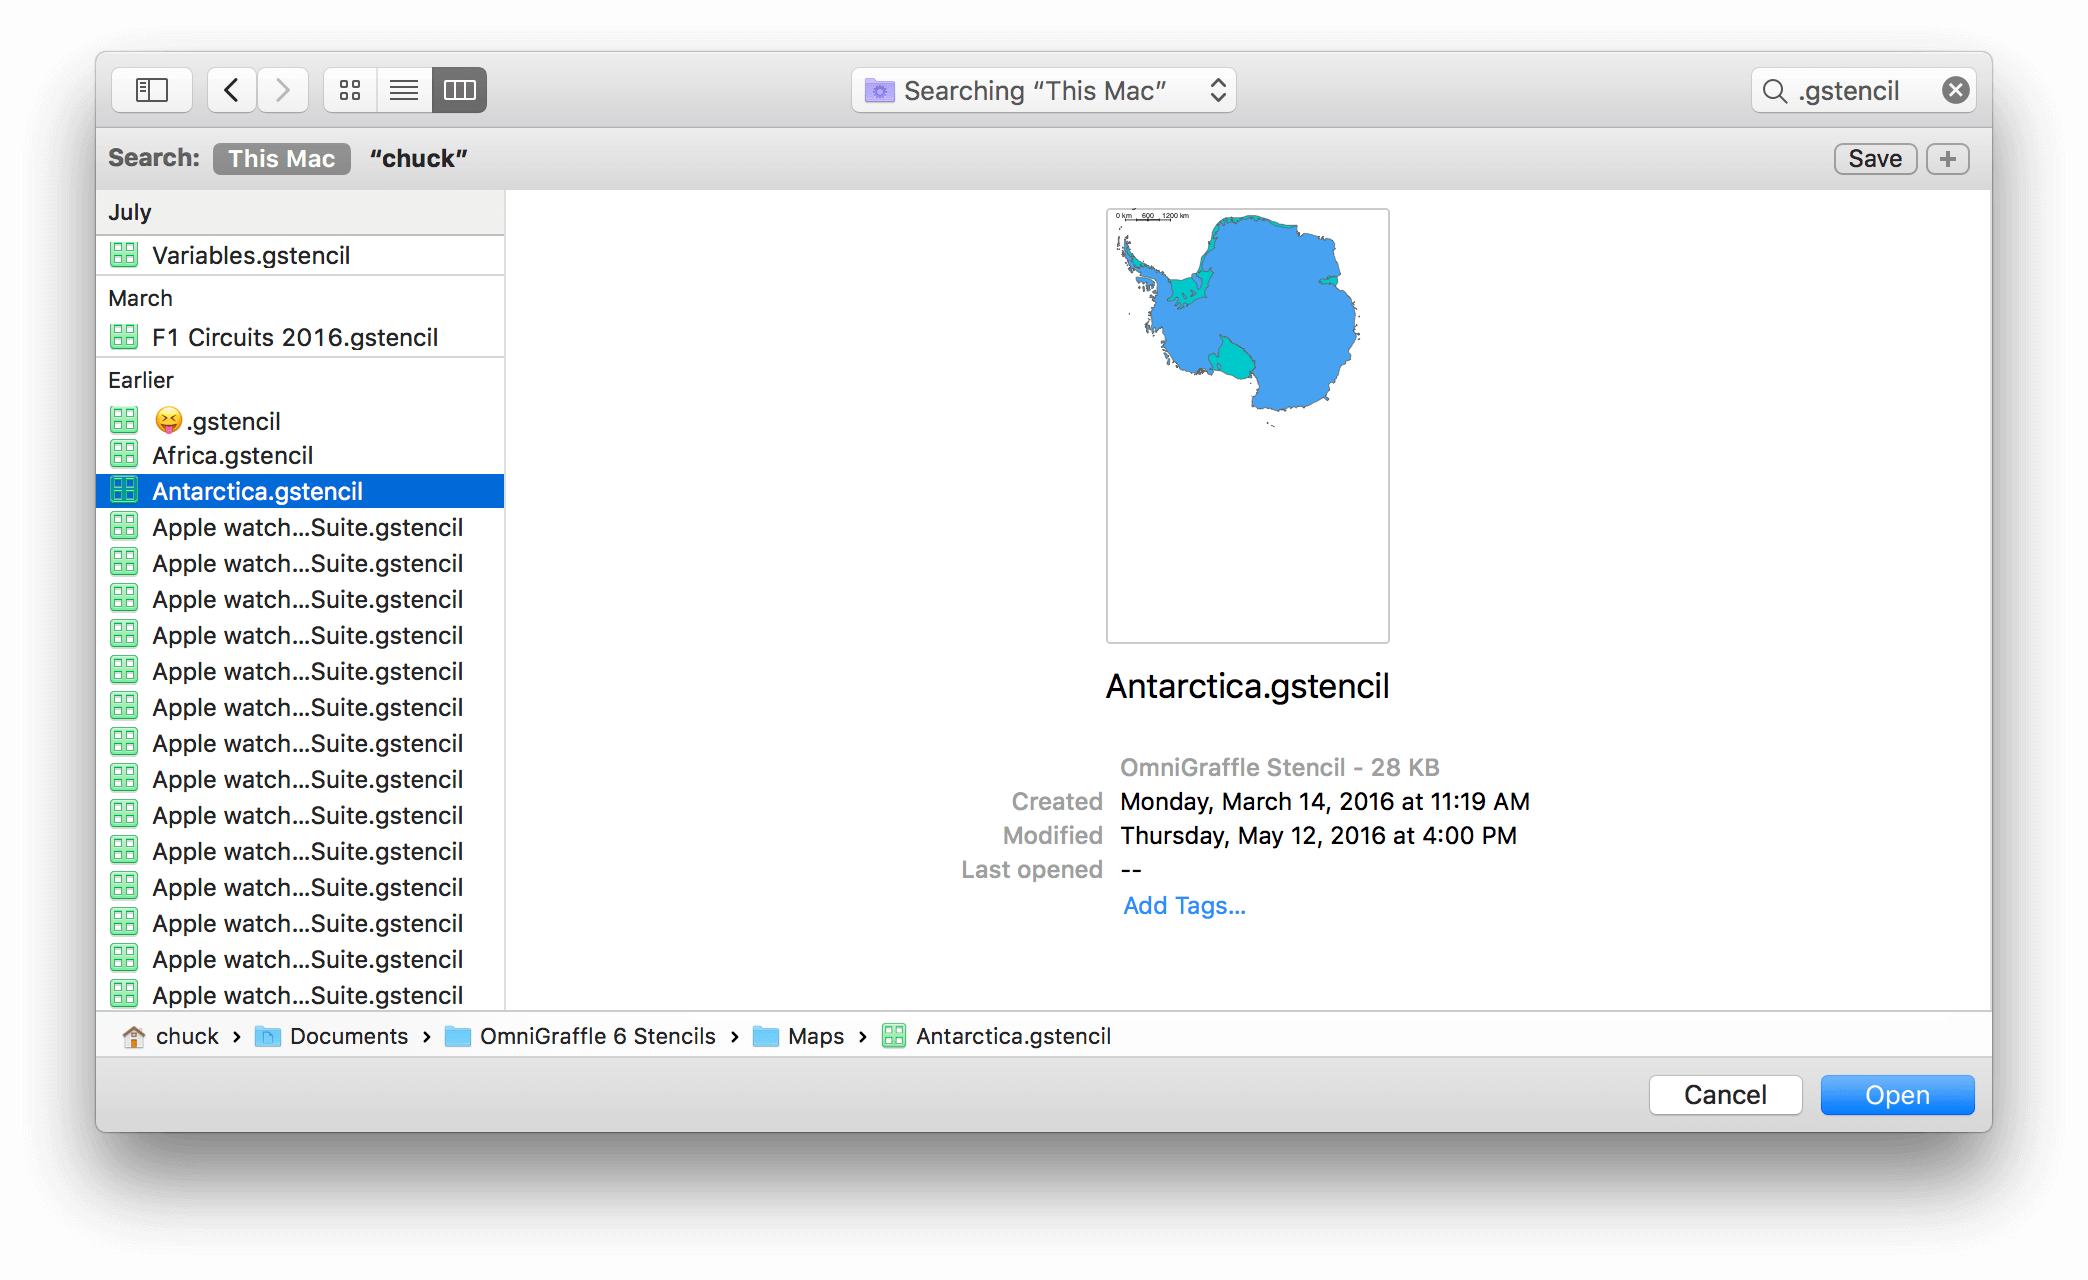
Command-click the files you would like to import, and then click Open.
See Importing Microsoft Visio Files for information on how to open and export Microsoft Visio files with OmniGraffle Pro.
Setting OmniGraffle’s Preferences
The most common way to configure any Mac app is by changing some of the default preferences. To open OmniGraffle’s preferences window, choose OmniGraffle ▸ Preferences, or use the standard Command-, keyboard shortcut.
Two features that all of the OmniGraffle preference panes offer are the ability to Reset ( ) any changes you’ve made to their default state, and quick access to Help (
 ) documentation for that pane.
The following sections closely examine all of the preferences you’ll find in OmniGraffle.
General Preferences
The General preferences give you control over basic OmniGraffle settings, such as what OmniGraffle does at startup, whether new documents open with a blank canvas or you’re taken to the template chooser, and things like text editing and selection behaviors. You can also turn on Multi-Touch for trackpad support, and opt for OmniGraffle to only show you the inspectors you need when you’re working on the canvas.
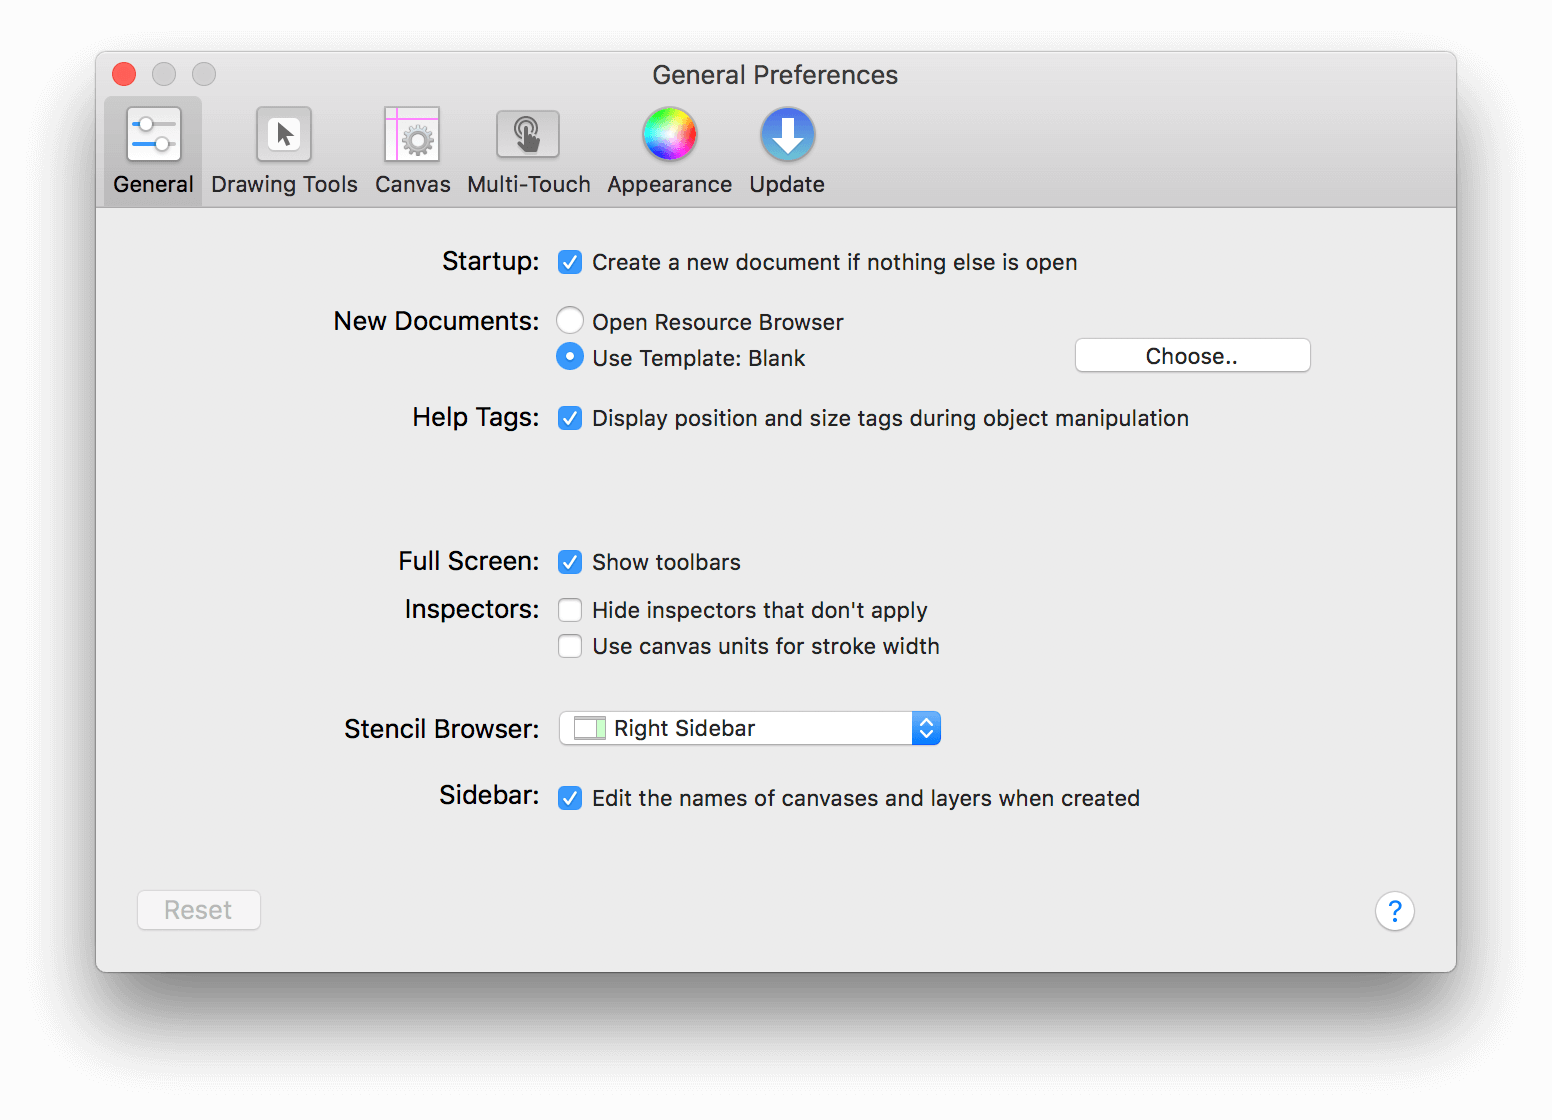
Options include:
- Startup
- Select Create new document if nothing else is open to start with a new document when you aren’t making OmniGraffle remember open documents (with System Preferences ▸ General ▸ Close windows when quitting an app), or if there were no open documents the last time you quit.
- New Documents
- Select Open Resource Browser to be presented with a window for choosing from a variety of file sources each time you create a new document. Select Use Template, and choose your default template, if you’d rather bypass the browser. Either way, you can always open the Resource Browser from the File menu or with the Shift-Command-N keyboard shortcut.
- Help Tags
- When you move or resize an object, a little help tag appears to let you know the object’s exact new location or size.
- Help Tags (PRO)
- If you have OmniGraffle Pro, a second option is available for displaying any notes and metadata you’ve assigned to an object in the Object Data inspector when you mouse over them.
- Object ID Numbers (PRO)
- If you’re accessing OmniGraffle objects with AppleScript, or you’re otherwise endeared to unique IDs, you can select Show object identification numbers to add a column to the list sidebar.
- Full Screen
- Choose whether to display the toolbar when in full screen mode.
- Inspectors
- Choose whether to hide inspectors that don’t apply to the currently selected object. You can also opt to turn on the ability to define stroke widths based on the template’s Ruler Units instead of the default, points.
- Stencil Browser
-
By default, OmniGraffle’s Stencil Browser is available in the right sidebar. However, you can use the Stencil Browser pop-up menu to change the default location to one of the following:
- Left Sidebar
- Right Sidebar
- Popover
- Floating Window
- Sidebar
- Choose whether you'd like to edit the names of newly-created canvases and layers in the Sidebar. When new canvases and layers are added to a document, their default names (e.g., Canvas 1, Canvas 2, or Layer 1, Layer 2, and so on) are highlighted in the Sidebar so you can enter a relevant name.
Drawing Tools
The Drawing Tools preferences provide you with a way to organize the tools you see in OmniGraffle’s toolbar. You can also define how you interact with the tools, and set the behaviors for line creation and editing.
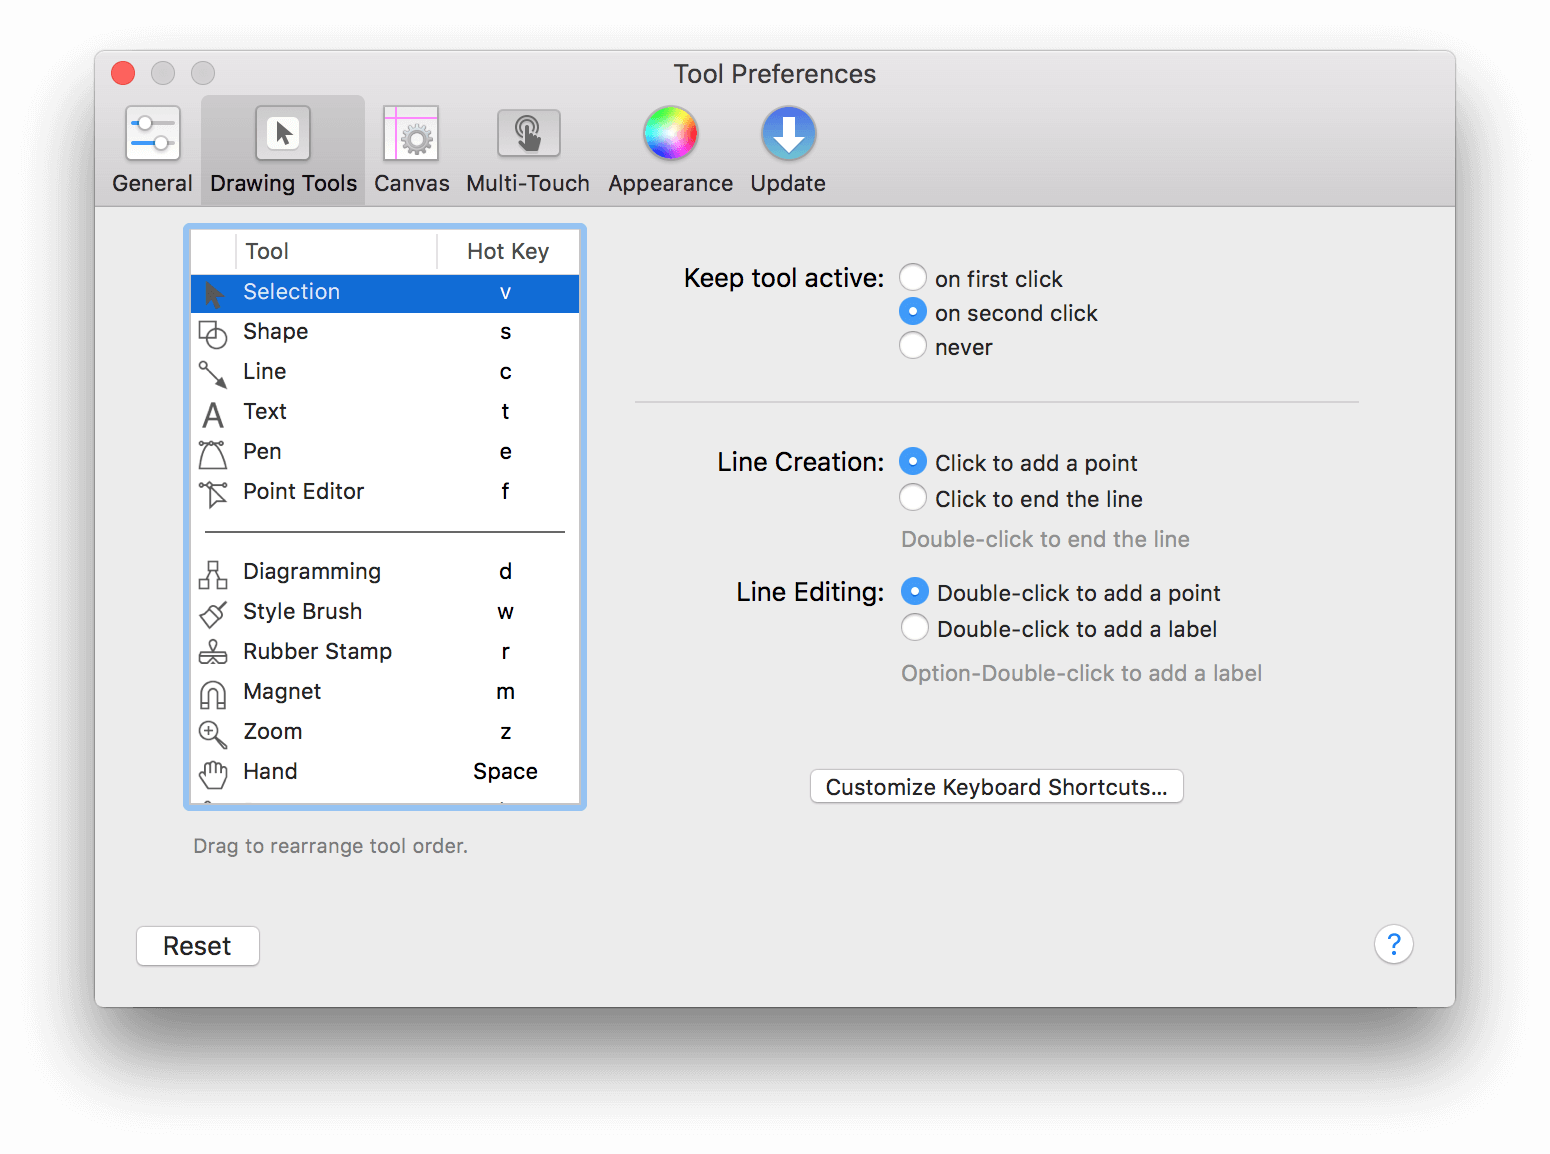
- Keep tool active
- By default, it takes one click to temporarily activate a tool, and two clicks to make a tool “stick” in an active state. You can choose to make the tools stick after only one click, or make it so that every tool selection is temporary.
- Line Creation
- When you are creating a line, clicking an object will always connect the line to the object and end the line. If you click in an empty area of the canvas, though, you might want to end the line there or you might want to add a point there and continue creating the line. Use this preference setting to indicate which you prefer.
- Line Editing
- When you double-click a line, you might prefer to add a new point to the line, or you might prefer to add a label. Choose one; Option-double-click performs the opposite action.
Clicking the Customize Keyboard Shortcuts button opens the Keyboard Shortcuts window, which you can use to set, change, or remove any keyboard shortcut in OmniGraffle. Each menu item is represented in the Keyboard Shortcuts window, allowing you to set shortcuts for submenu and sub-submenu items as well.
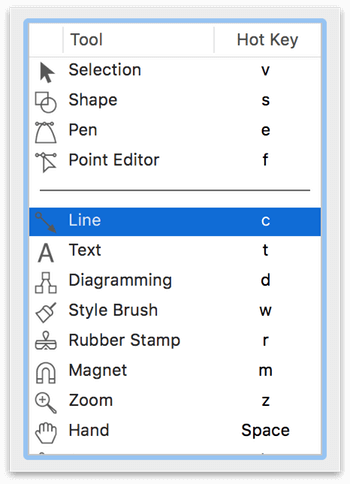
Customizing the Tool Palette
You can change which tools are available on the left side of the Tool Palette by moving the dividing bar or dragging the tools into a different position.
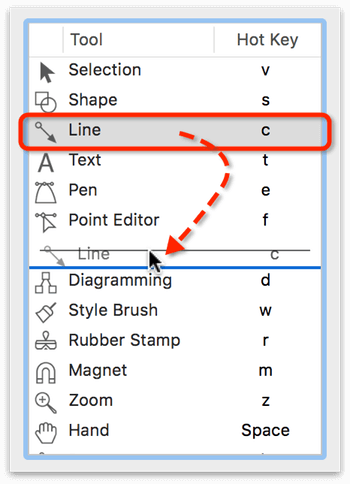
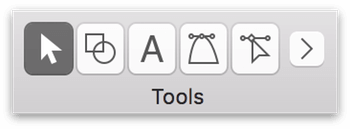
For example, if you mostly use the Selection, Shape, Pen, and Point Editor tools, you can could set up your toolbar as follows:
Which results in the Tool Palette appearing as follows when collapsed:
Canvas
The Canvas preferences pertain to how you work with things on the Canvas.
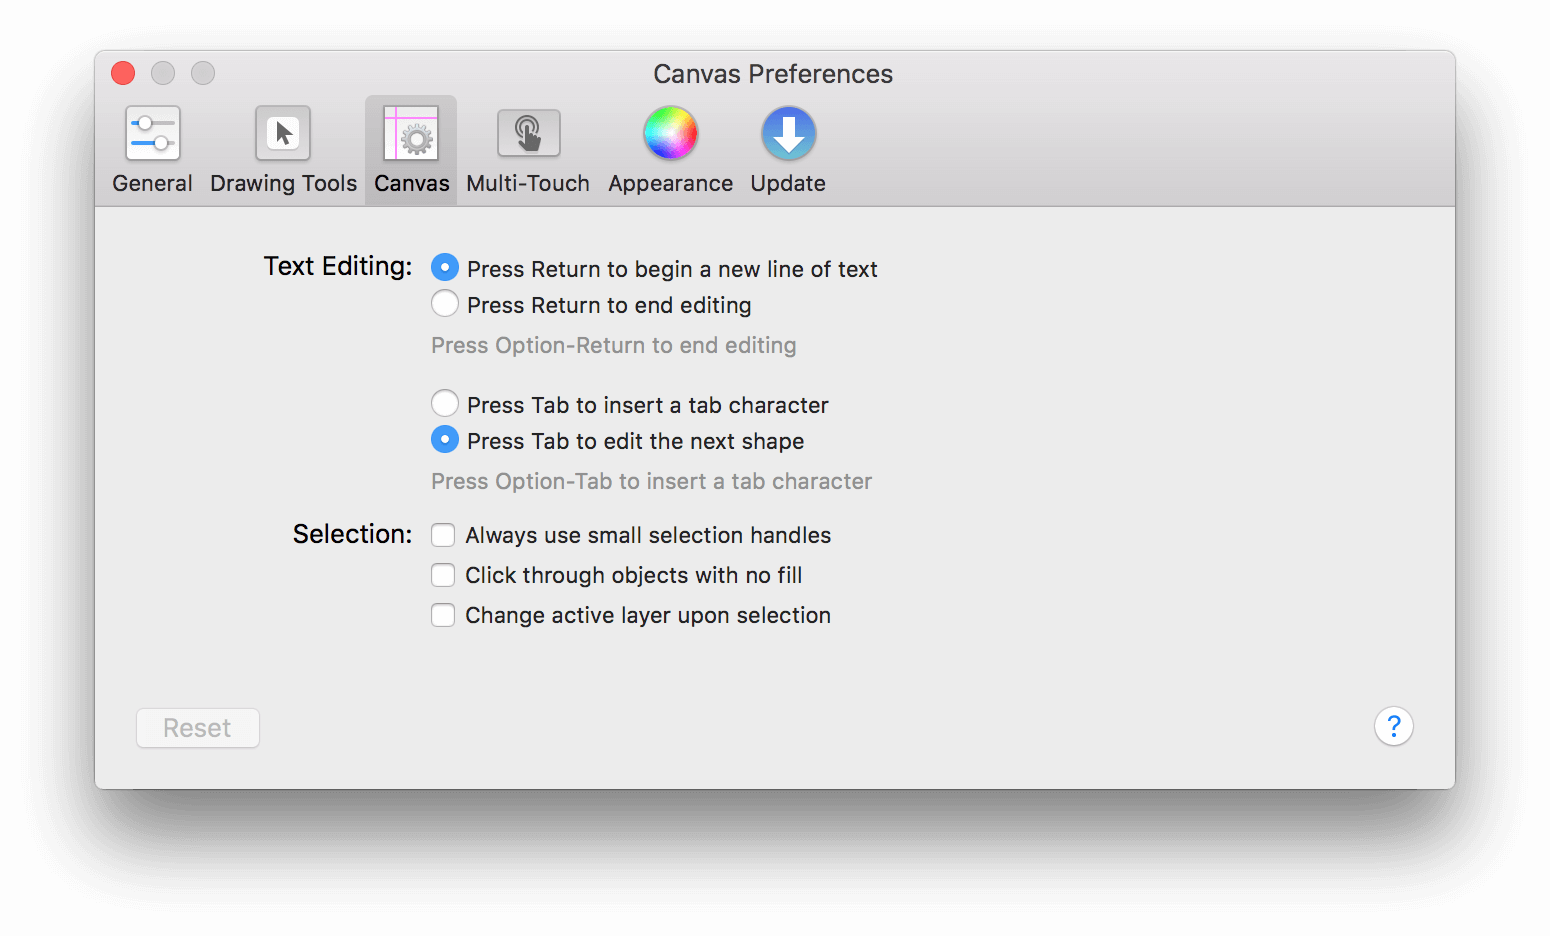
- Text Editing
-
Decide how you would like the Return and Tab keys to behave when you are editing the label of an object or line, or when working with text blocks on the canvas:
- Return — When pressing Return, you can opt to have that start a new line of text or to end editing (similar to pressing the Escape key).
- Tab — When pressing Tab, you can opt to have that insert a Tab character, or to switch from the currently selected object to the next object so you can edit its text.
Whichever way you choose, you can hold Option while pressing Return or Tab to do the reverse instead.
- Selection
-
These three options further define the behavior of selected objects:
- Always use small selection handles — reduces the size of the selection handles.
- Click through objects with no fill — objects that don’t have a fill applied, such as Artboard objects, can be clicked through regardless of their placement in the layer stack.
- Change active layer upon selection — when you click to select an object, that object will be selected, regardless of which layer the object is on. If you frequently work on projects with multiple layers, you should consider enabling this option.
Multi-Touch
If you are using a laptop or touch-sensitive trackpad, you can enable Multi-Touch trackpad gestures. For example, you can use the two-finger touch gesture to zoom in or out on the Canvas, or to rotate a selected object.
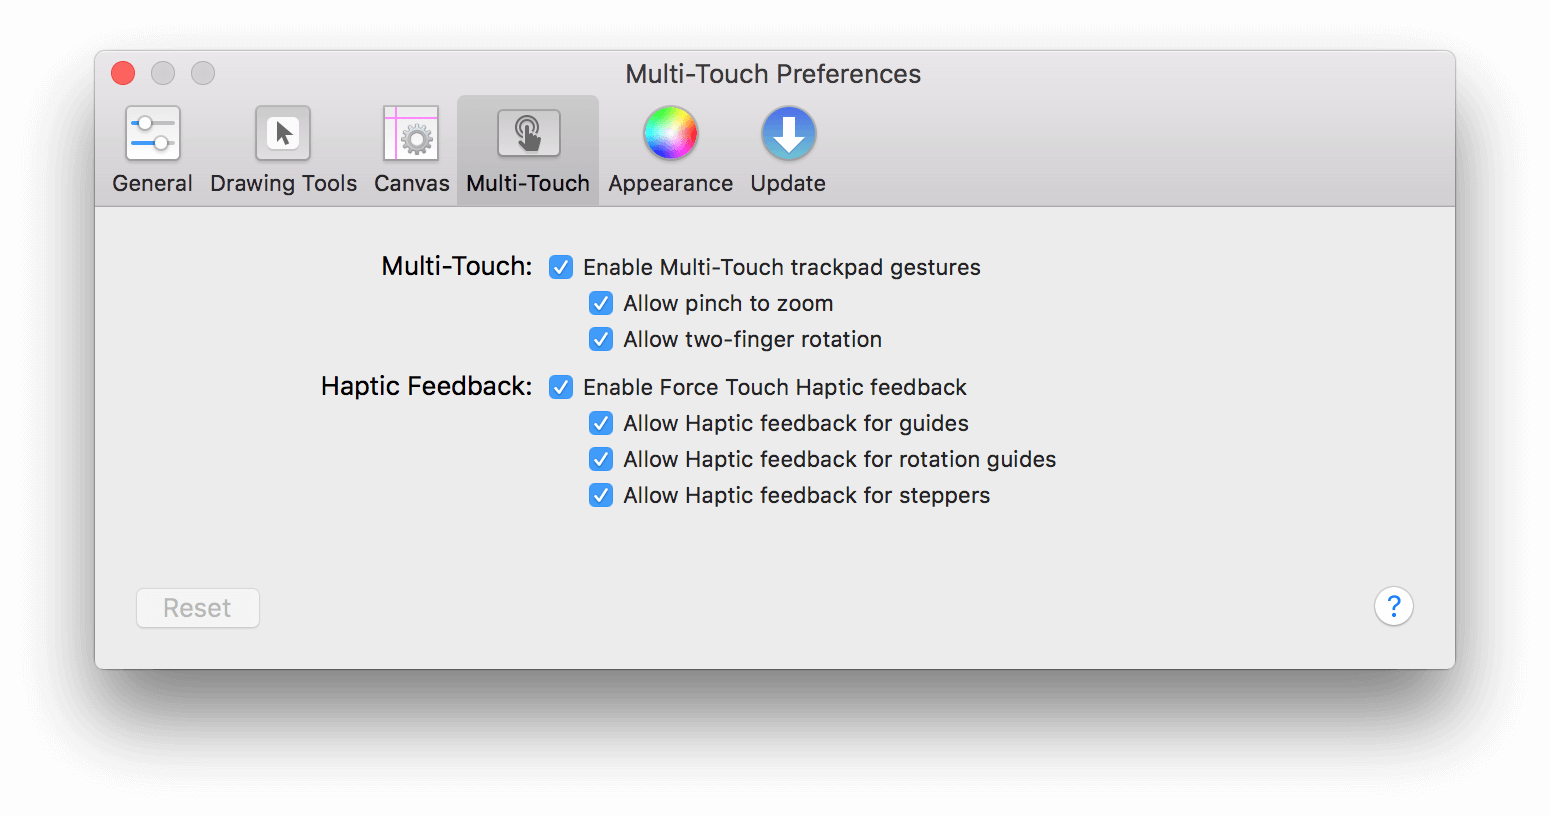
OmniGraffle can also provide Haptic Feedback through the trackpad (on supported devices) for things such as guides, object rotation, and whenever you use a stepper control in one of the inspectors.
Appearance
The Appearance preference panel allows you to change the default colors used for Ruler Guides, Smart Guides, and Bézier control handles.

You can also change the colors of Ruler Guides in the Sidebar (Option-Command-3). For more information on Ruler Guides, see The Guides Tab in Managing Canvases, Layers, and Objects in the Sidebar.
Presentation (PRO)
For those times when you need to make a presentation, say to show off the new user interface for an app you’re developing or when you’re showing a client how you plan to redesign their home, OmniGraffle Pro offers Presentation mode. Available by choosing View ▸ Start Presentation, OmniGraffle takes over your entire screen so you can easily show off your work to everyone in the room.
Use the Presentation preferences to configure your settings for making presentations.
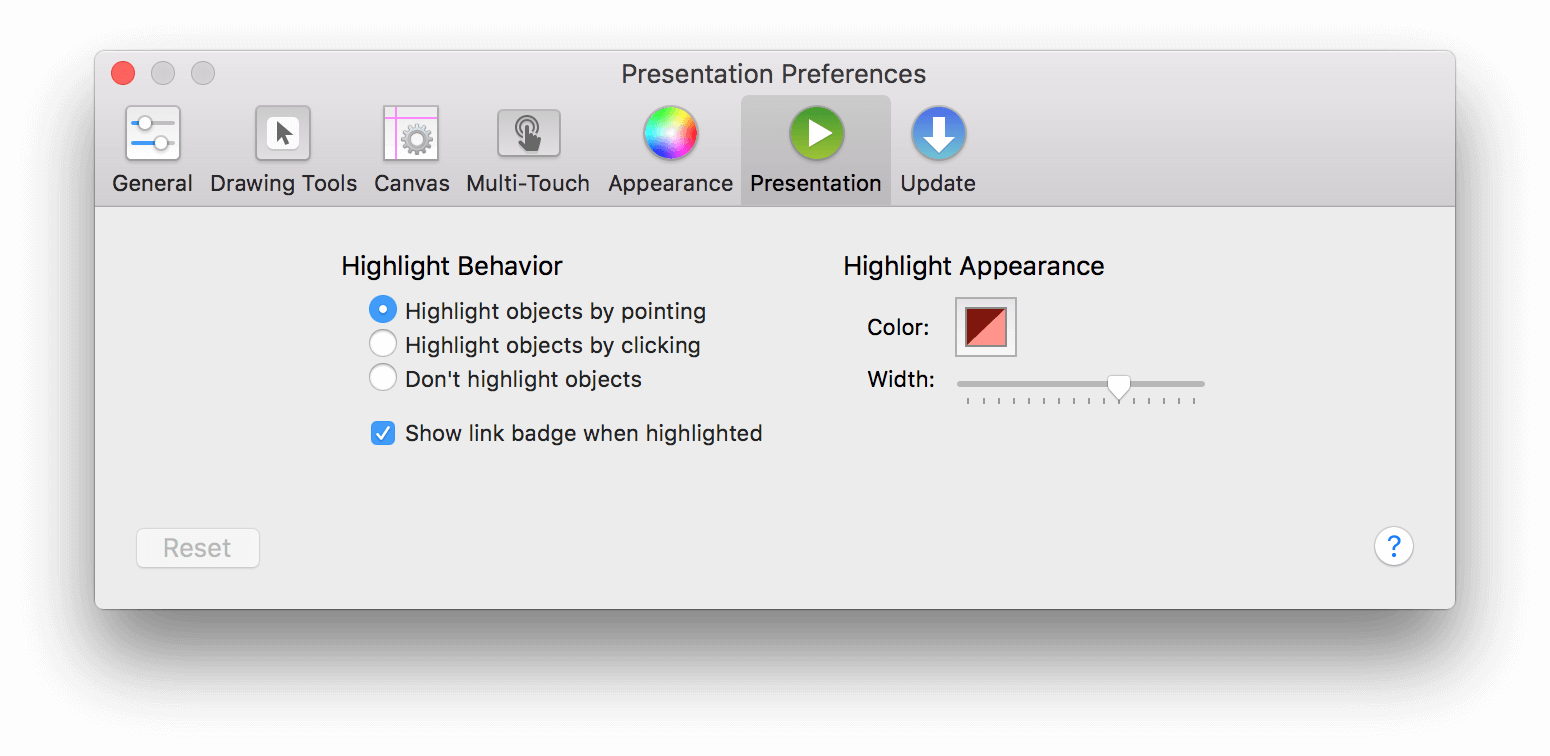
- Highlight Behavior
- Choose whether to have an object become highlighted whenever you put the pointer on it, whenever you click it, or never. You can also choose to display a badge for objects that have actions set up in the Action inspector.
- Highlight Appearance
- Click the Color well
 to choose a color for the highlight. Use the slider to adjust the thickness of the highlight.
To learn more about using OmniGraffle’s Presentation Mode, see Using OmniGraffle in Presentation Mode (PRO) later in this guide.
Update Preferences
If you’ve purchased your copy of OmniGraffle 7 from The Omni Group’s website, OmniGraffle can automatically use your Internet connection to check for updated releases.
The Update Preferences panel doesn’t exist if you have purchased OmniGraffle 7 from the Mac App Store. When a new version of OmniGraffle is available, the Mac App Store will alert you to download and install that on your Mac.
If Check for updates is turned on, you will be automatically notified when there is a new version of OmniGraffle ready for you to download and enjoy. Click Check for Updates Now to look for the newest version manually; you can also choose OmniGraffle ▸ Check for Updates from the menu bar. This is particularly helpful if you have Check for updates set to check Monthly and you’ve recently heard that a new update is available.
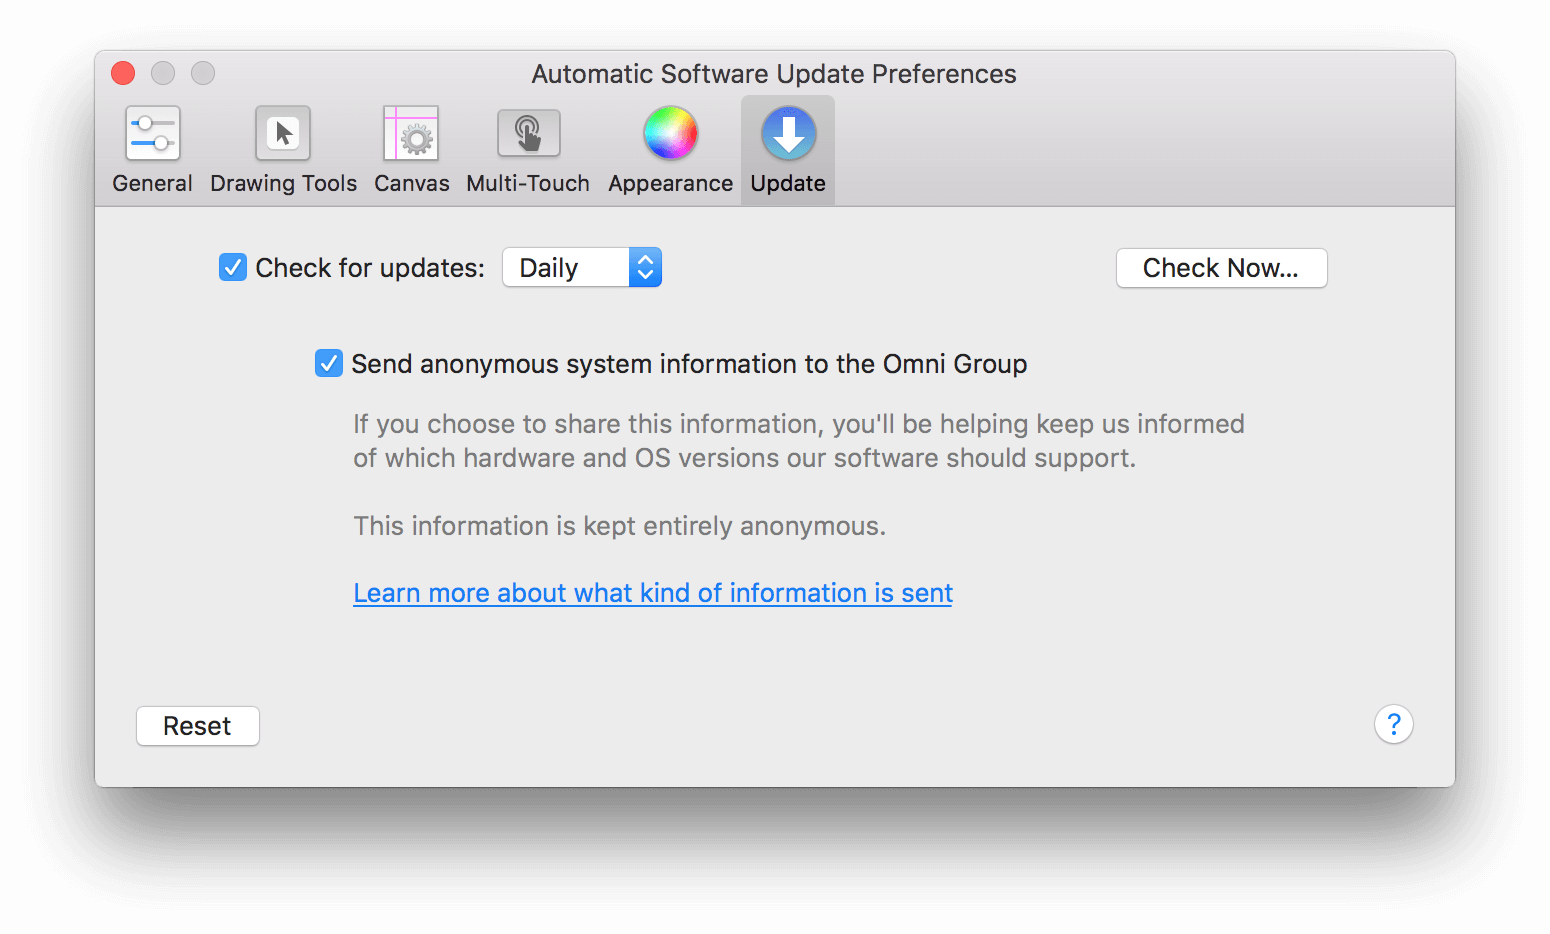
Additionally, you can opt in to Include system information when OmniGraffle checks for updates. This sends basic information about your system to us, which we only use to better support various systems with future releases of OmniGraffle. And, as the Update preferences pane says: “This information is kept entirely anonymous,” which means that the information we receive about your system stays with us and is only used by us as we work on future updates of OmniGraffle.
Customizing OmniGraffle’s Keyboard Shortcuts
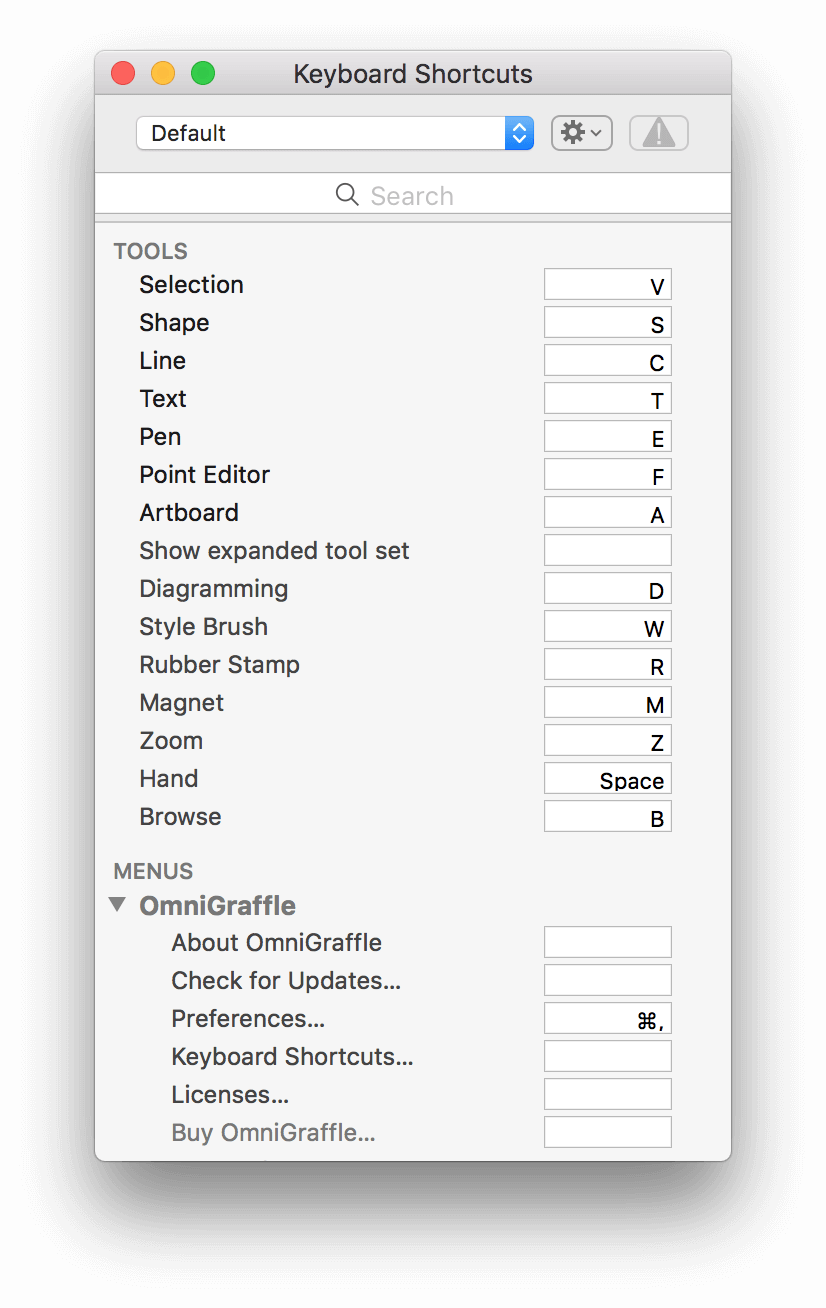
The Keyboard Shortcuts window is divided into two sections: Tools and Menus:
- Tools — lists the tools found in the Tool Palette at center of the toolbar; things you use in OmniGraffle to create lines, shapes, and such.
- Menus — lists the menus found at the top of the screen, along with each menu item found in that menu or submenu.
You can hide and show each section by clicking to the right of those sections (the Hide button text appears on mouseover). You can also expand and collapse the menu subsections by clicking the disclosure triangles (
 ) along the left.
Keyboard shortcuts for Tools can either be a single letter or number without the use of special key combinations, such as the Control, Option, Shift, or Command keys. This makes it really easy for you to access and use the Tool you need with just a single key press.
With keyboard access to OmniGraffle’s tools, a single press of the keyboard shortcut (for example, pressing the s key for the Shape tool) activates the tool.
To make the tool active, you can either press and hold the tool’s shortcut key, or press the key a second time to make it sticky.
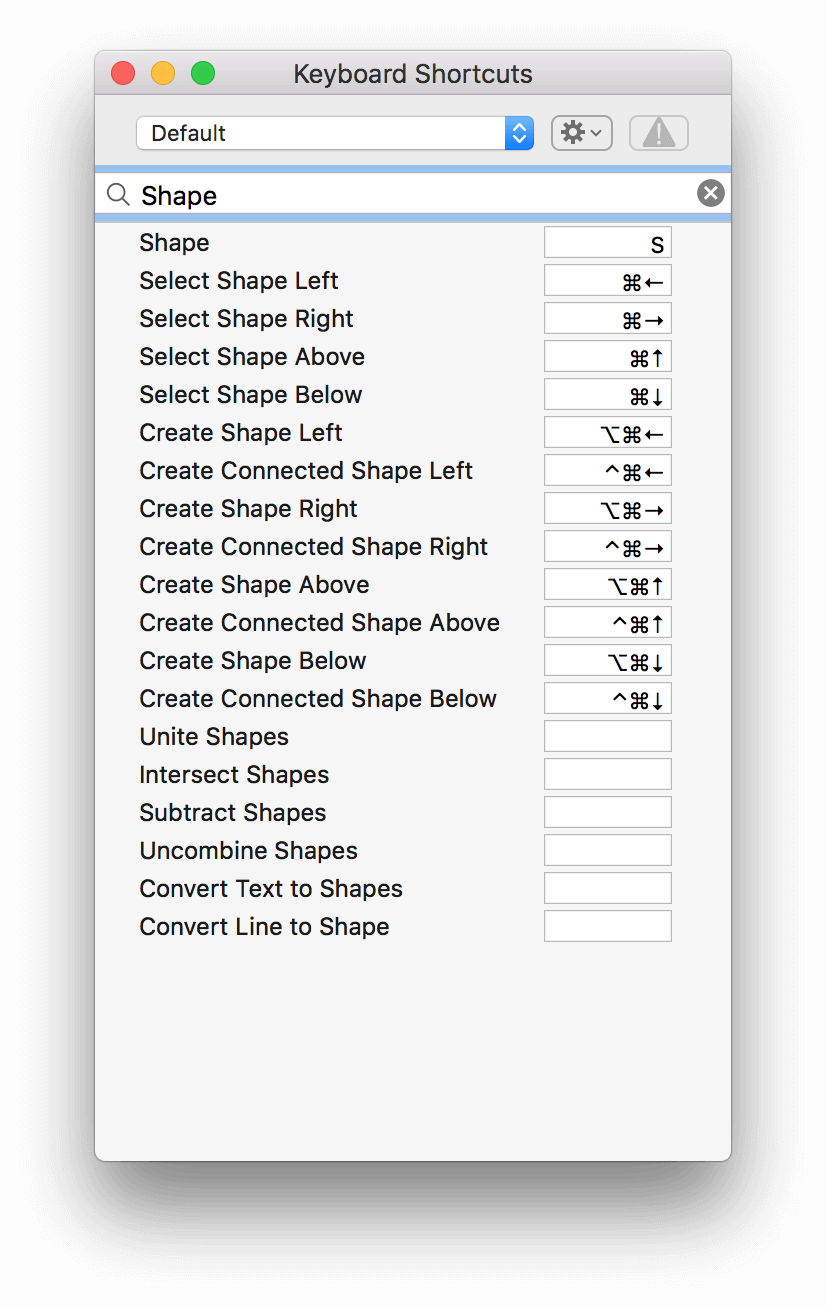
Use the Search field to search for a Tool or Menu option. This makes it easy for you to see how the assigned keyboard shortcuts relate to each other, and to reassign or set keys, if desired.
Editing OmniGraffle’s Keyboard Shortcuts
Changing a keyboard shortcut is easy; simply click the field to the right of a Tool or Menu item and enter a new shortcut. The changes are automatically available for use, without requiring you to quit and restart OmniGraffle.
If you enter a shortcut that is used by another Tool or Menu item, the Keyboard Shortcuts window displays a warning symbol within both shortcut fields, and the normally-grayed out warning button at the top of the window becomes available. This makes it easy for you to identify, and correct, the conflict.
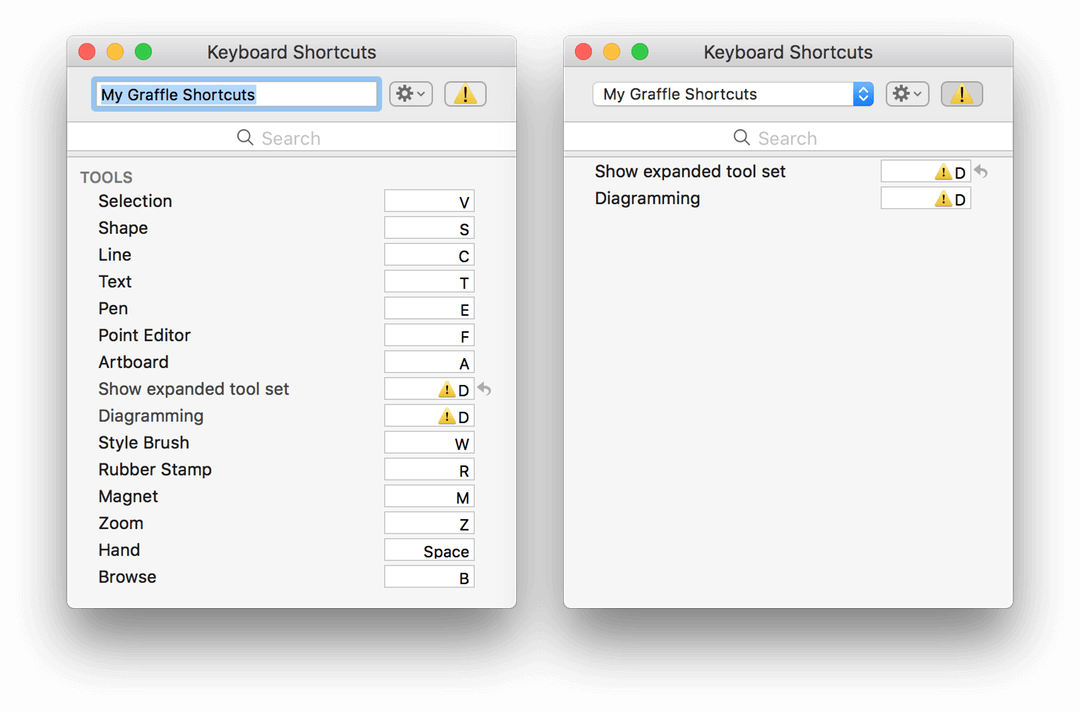
Pressing the Warning button at the top of the Keyboard Shortcuts window focuses on the conflicting items, and a revert arrow ![]() is placed to the right of the item that’s causing the conflict. Clicking
is placed to the right of the item that’s causing the conflict. Clicking ![]() changes that particular item back to its default keyboard shortcut, or no shortcut if none was previously assigned.
changes that particular item back to its default keyboard shortcut, or no shortcut if none was previously assigned.
To remove a keyboard shortcut for an item, click the field to the right of a Tool or Menu item and press the Delete key. This removes the keyboard shortcut for that item, which can be useful if the revert arrow sets the key binding to a conflicting value.
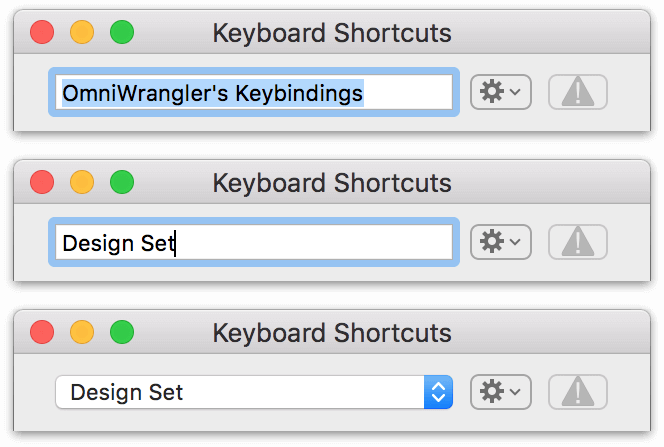
The moment you make a change to the Default keyboard set, the name of the current keyboard set used in the drop-down menu becomes editable. By default, OmniGraffle places your user account name in the field, but you can change this to whatever you’d like; for example, Design Set or Diagramming.
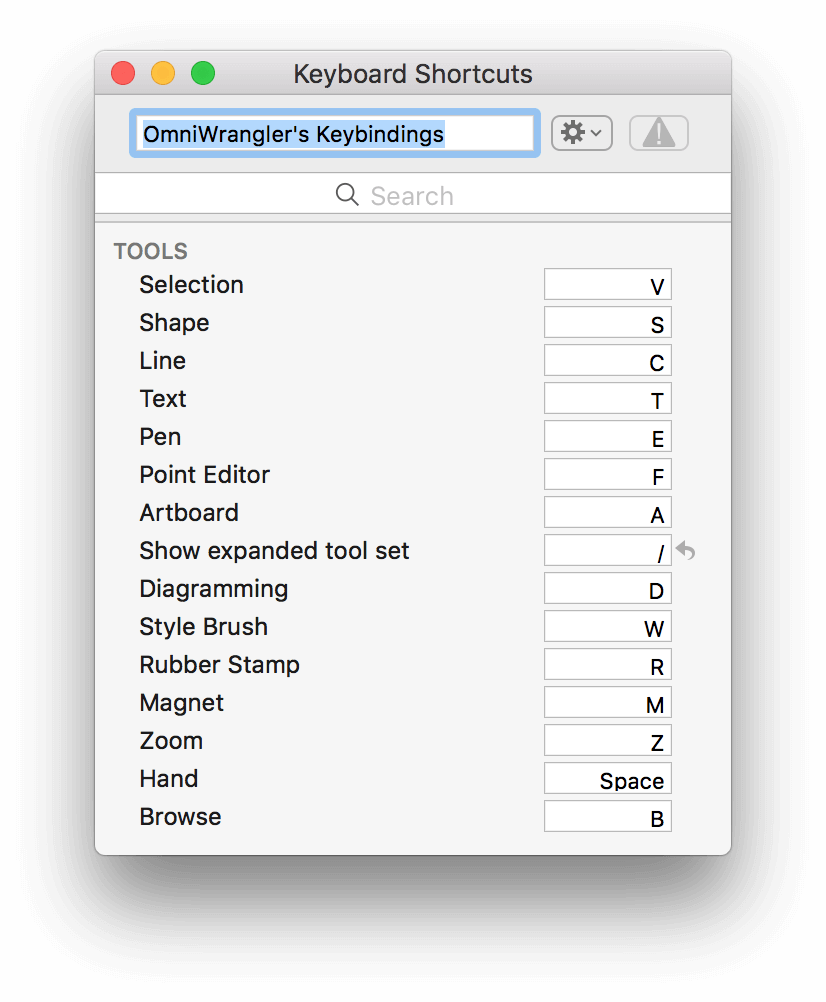
If you later decide that you want to change the name of a keyboard set, do the following:
-
Click
 next to the drop-down menu and choose the Rename option from the menu:
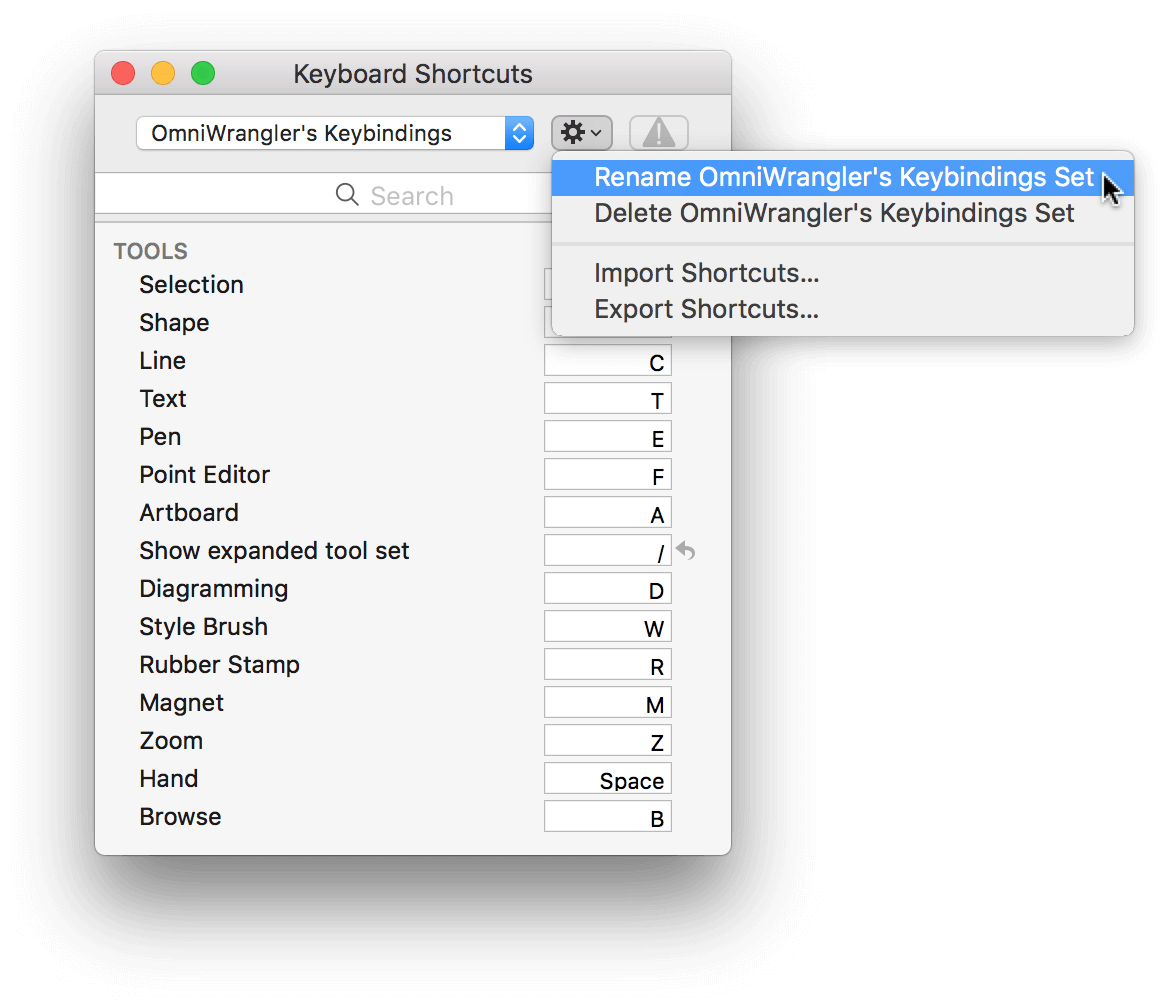
-
The name of the keyboard set in the drop-down menu becomes editable. Enter a new name, and press Return to apply the new name.
Using Another Keyboard Set
Because we know designers have many tools in their toolbox, OmniGraffle 7 also ships with keyboard shortcut sets based on Adobe Illustrator® and Sketch. If you use one of those apps alongside OmniGraffle, you can use the drop-down menu at the top of the Keyboard Shortcuts window to choose the set that most closely matches your workflow in other applications.
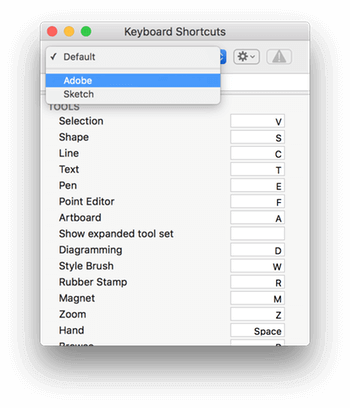
To revert the shortcuts back to OmniGraffle’s default set, choose OmniGraffle ▸ Keyboard Shortcuts and then select Default in the drop-down menu.
Sharing Keyboard Sets (PRO)
After changing some keys and setting the name for your new keyboard set, you can export your keyboard set by clicking and choosing Export Shortcuts. When you export a keyboard set, OmniGraffle uses the name of the set by default, paired with a .graffle-shortcuts file extension.
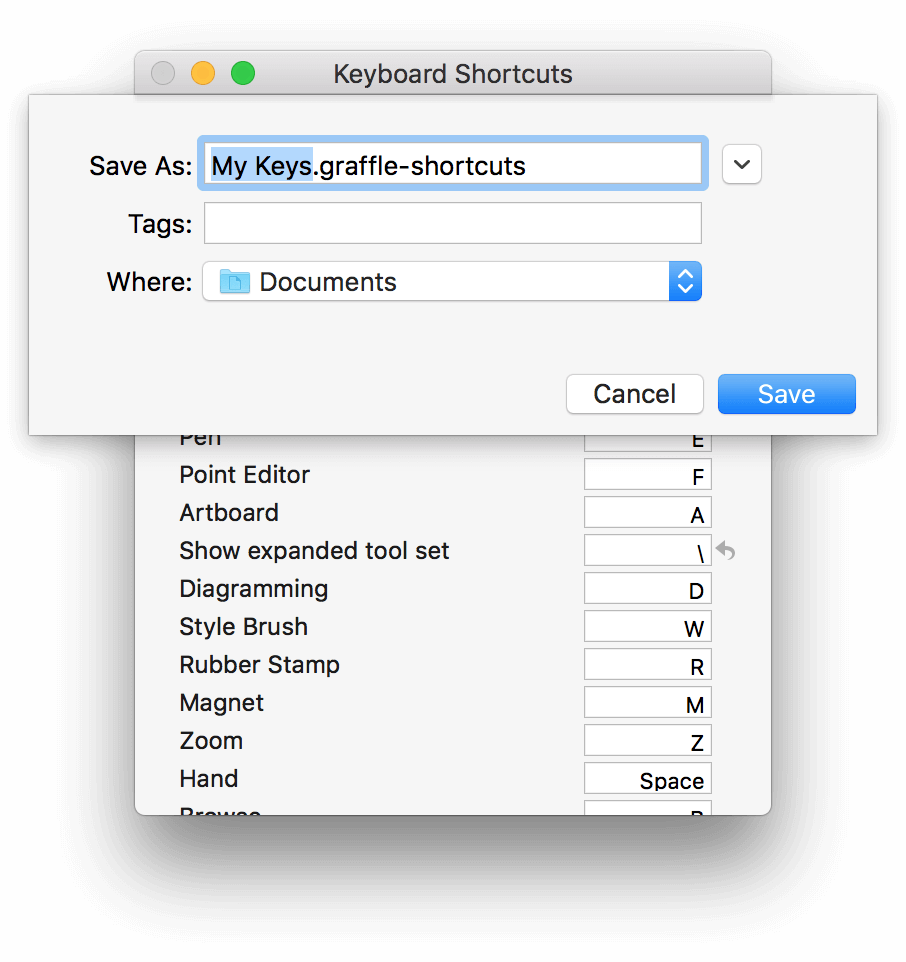
You can change the first part—the filename—but do not change the file extension. OmniGraffle expects the .graffle-shortcuts file extension on keyboard sets you import.
Similarly, you can also import a keyboard set, using one of the following methods:
- Click and choose Import Shortcuts. In the sheet that slides down, locate and select the .graffle-shortcuts file you’d like to import, and then click Open to add that keyboard set to the Keyboard Shortcuts drop-down menu.
- Use the Finder to locate and then double-click the .graffle-shortcuts file. The Keyboard Shortcuts window will open with that shortcuts file already selected in the pop-up menu.
Customizing the Toolbar
Along the top of OmniGraffle’s window is the Toolbar, packed with buttons that can be customized to suit the needs of your workflow and most common interactions.

Like most Toolbars, OmniGraffle’s comes with a default set of buttons, based on what we believe are common things you’d want to do. However, you can customize the toolbar by adding additional buttons or rearranging their order, to suit your needs.
To customize the toolbar, choose View ▸ Customize Toolbar or Control-click on the toolbar and select Customize Toolbar. When you do, a sheet slides down from under the toolbar, revealing a slew of function-related buttons that you can drag up to the toolbar. For example, you could add the New Artboard Layer or Start Presentation buttons to the toolbar if you’ve purchased OmniGraffle 7 Pro.
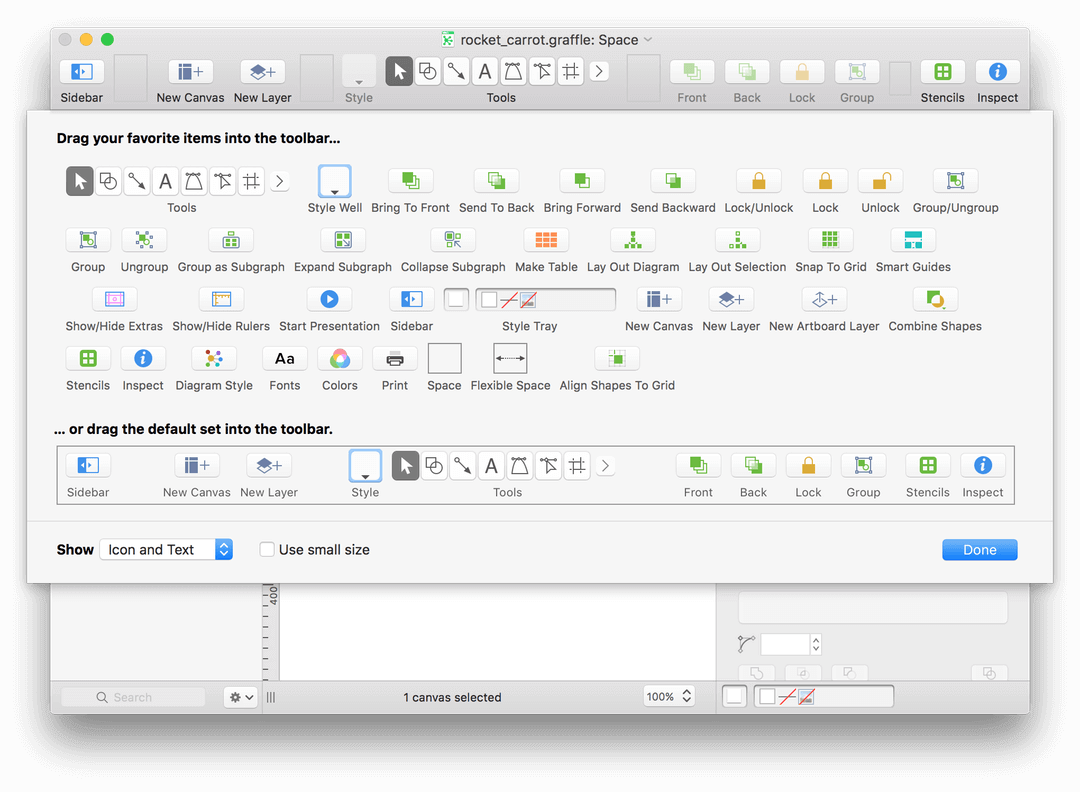
If you don’t like the changes you’ve made, or if you ever want to reset the toolbar to it’s default state, all you need to do is drag the bottom row up to the toolbar.
Click Done when you’ve finished making changes to the toolbar.