When it’s time to share your project with colleagues or the outside world, in addition to exporting to a variety of formats, OmniPlan offers a robust and customizable set of printing features — and with OmniPlan Pro, an all-new interface for creating beautiful custom reports.
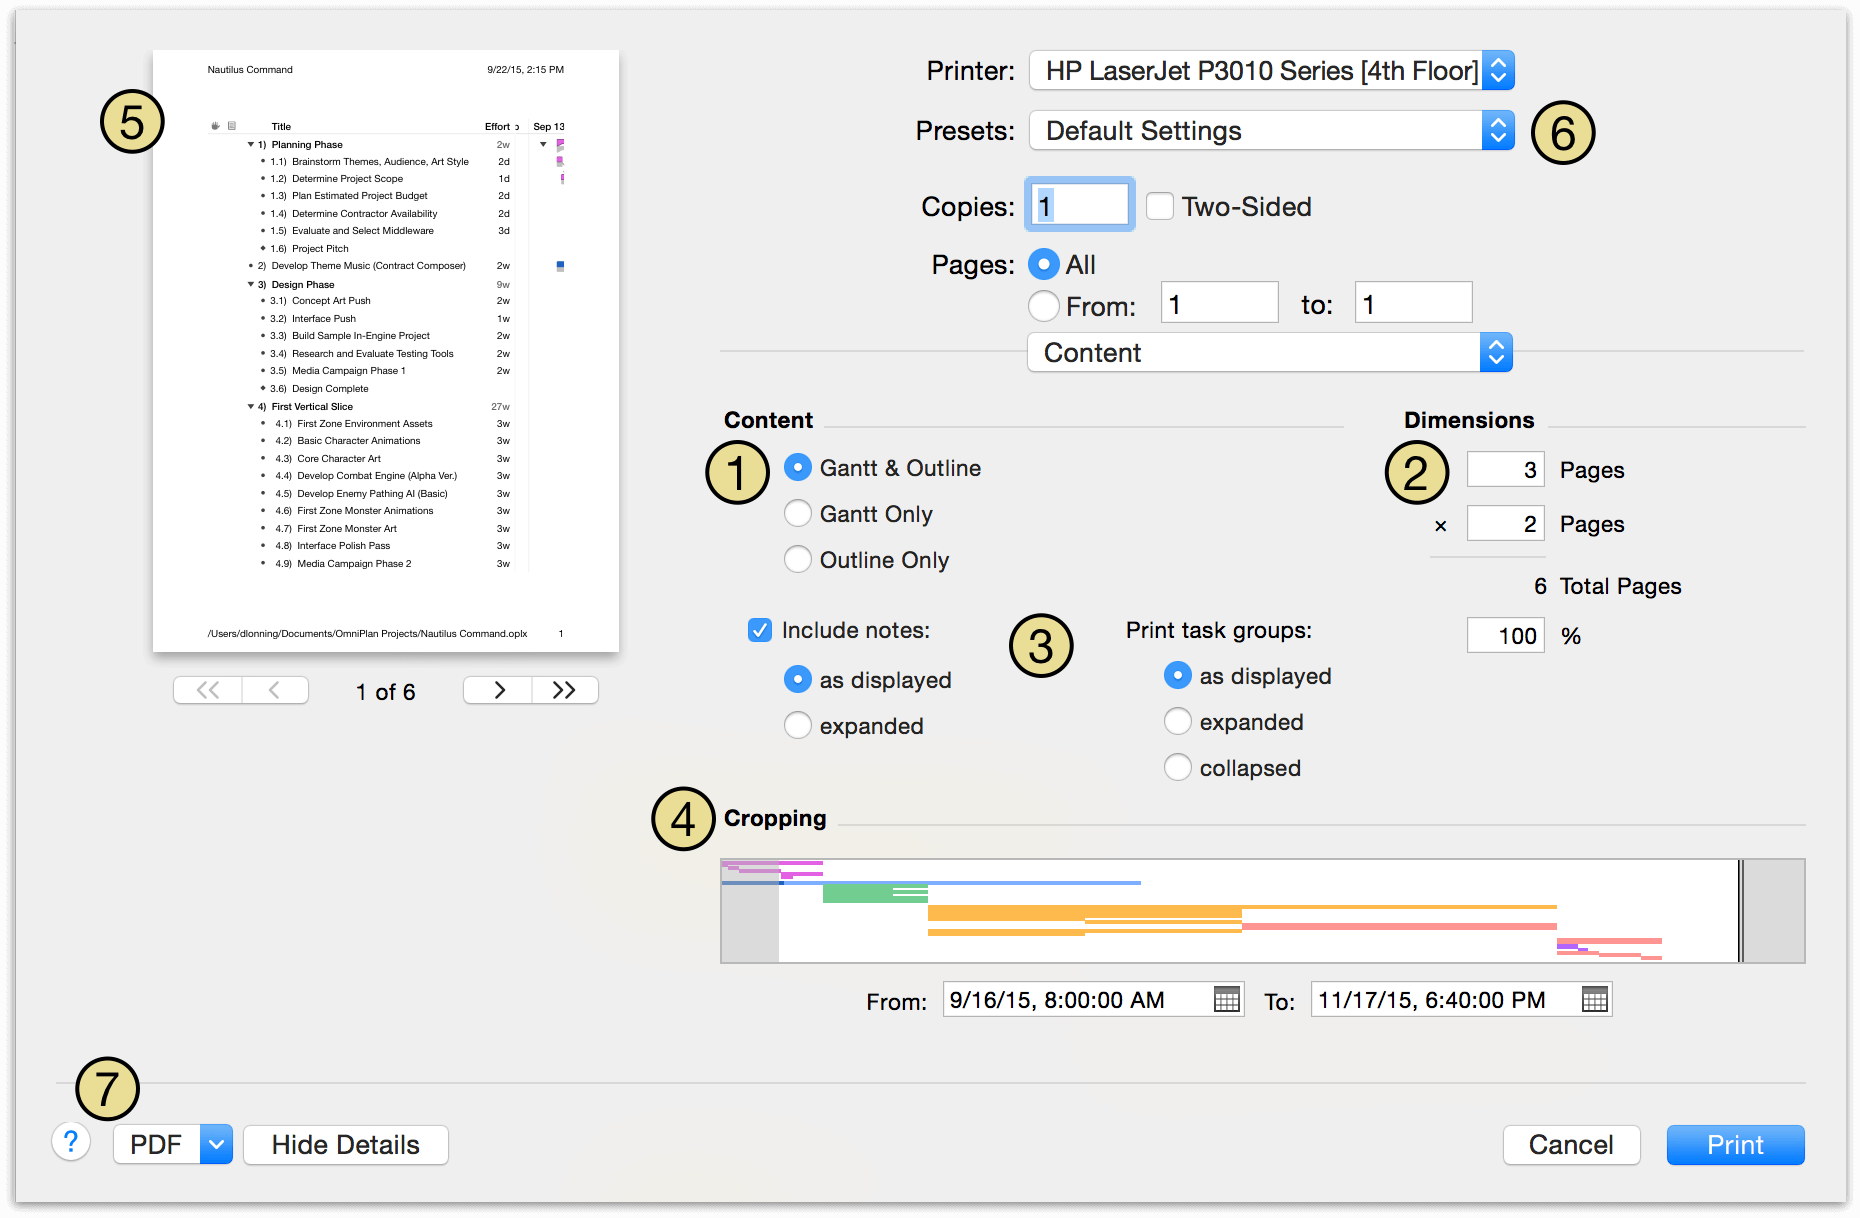
OmniPlan offers a highly flexible set of options for printing your document straight from the standard print dialog of Mac OS X.
Choose File ▸ Print (Command-P), and choose Show Details from the pop-up menu in the print dialog to see OmniPlan’s print options.
You can print the Task View, the Resource View, or the Network View — whichever one is open in the main window. In Task and Resource views you can choose whether to print the outline, the Gantt chart or resource diagram, or both; since Network View has no outline, you’re taken right to the headers and footers section instead.
The dimensions are calculated based on the size of the project and the scale set in the percentile field here. When you change the width or height, the other one changes accordingly. Note that this overrides the Scale setting in the Page Setup dialog. When printing in Network View, a Scale percentage setting is available in the headers and footers section.
You can choose whether to include notes when printing from the outline, either as displayed or all expanded. Task and resource groups can be printed as displayed in the project, or all expanded or collapsed.
You can use the Cropping settings to chop off any part of the project you don’t need. An overview of your project is here. To define the area to print, resize the cropping box by dragging its left or right edge, or move the box by draging its center. If you enter dates in the From and To fields, the cropping box updates to match.
The preview shows what your project will look like on paper. Use the buttons to step through the pages and get an idea of the scale and layout.
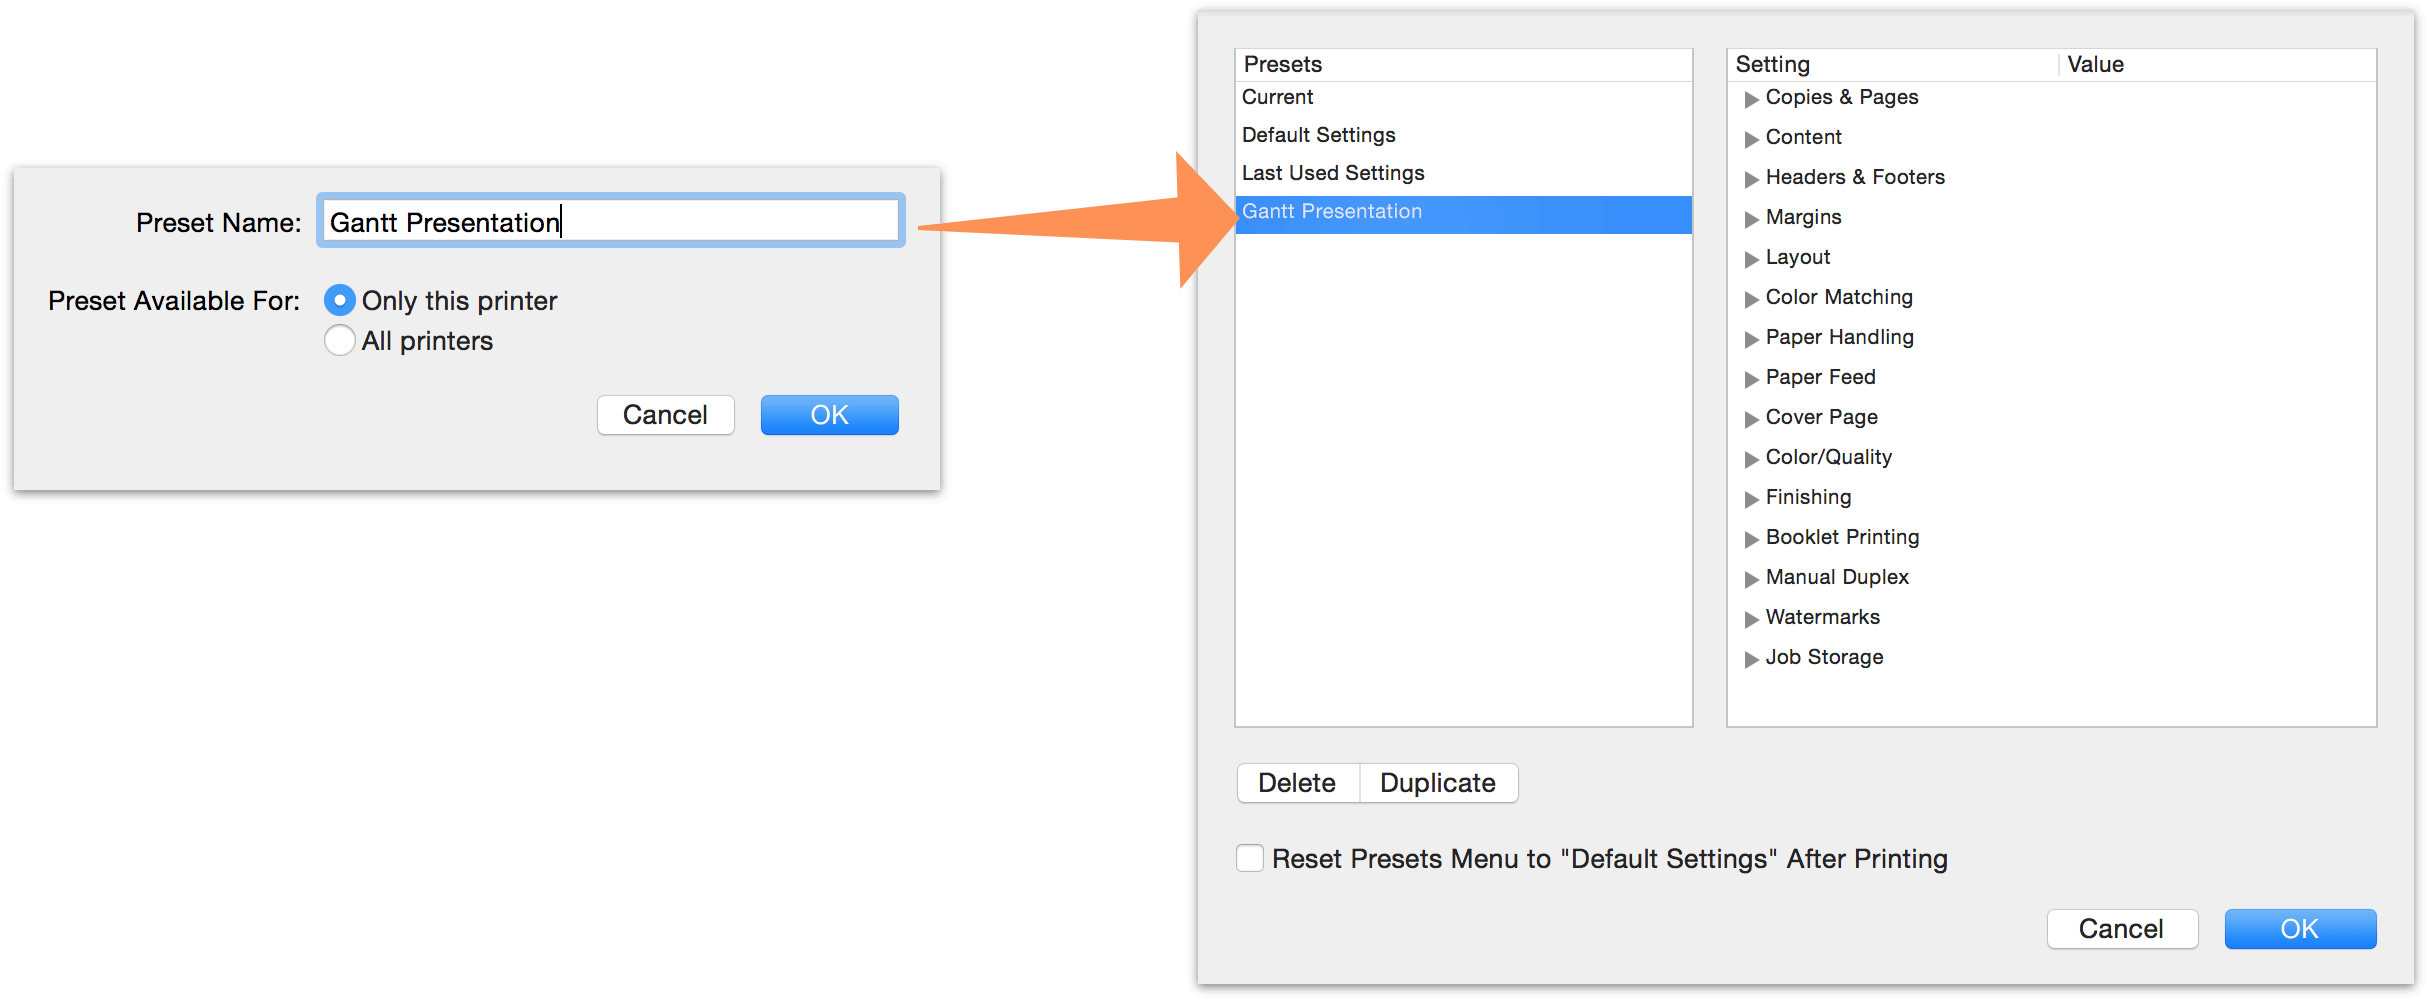
When you have your print options set up just the way you like, you can use the Presets menu to Save Current Settings as Preset. You can choose whether the preset applies to the currently selected printer or all printers, and view and edit your new preset — along with others — from Show Presets in the Presets menu.
As with other applications that use the Mac OS X printing system, you can “print” to a PDF file instead of to real paper.
Note
When printing from Network View, the scale of the diagram in the view itself determines the initial scale at which it will be printed via the print dialog. You can edit this with the Scale control in the print dialog, or by changing the scale in Network View (Use (-) and (+) or the zoom controls in the bottom right corner of Network View to zoome out and in).
In addition to the print dialog options described above, OmniPlan supports the standard Mac OS X Page Setup dialog; choose Page Setup from the File menu to access it. You can set the paper size, print orientation, and document scale here; this information is saved with the document.
Headers and footers can be customized extensively for printing by choosing Headers & Footers from the dropdown menu in the Print dialog’s detail view.
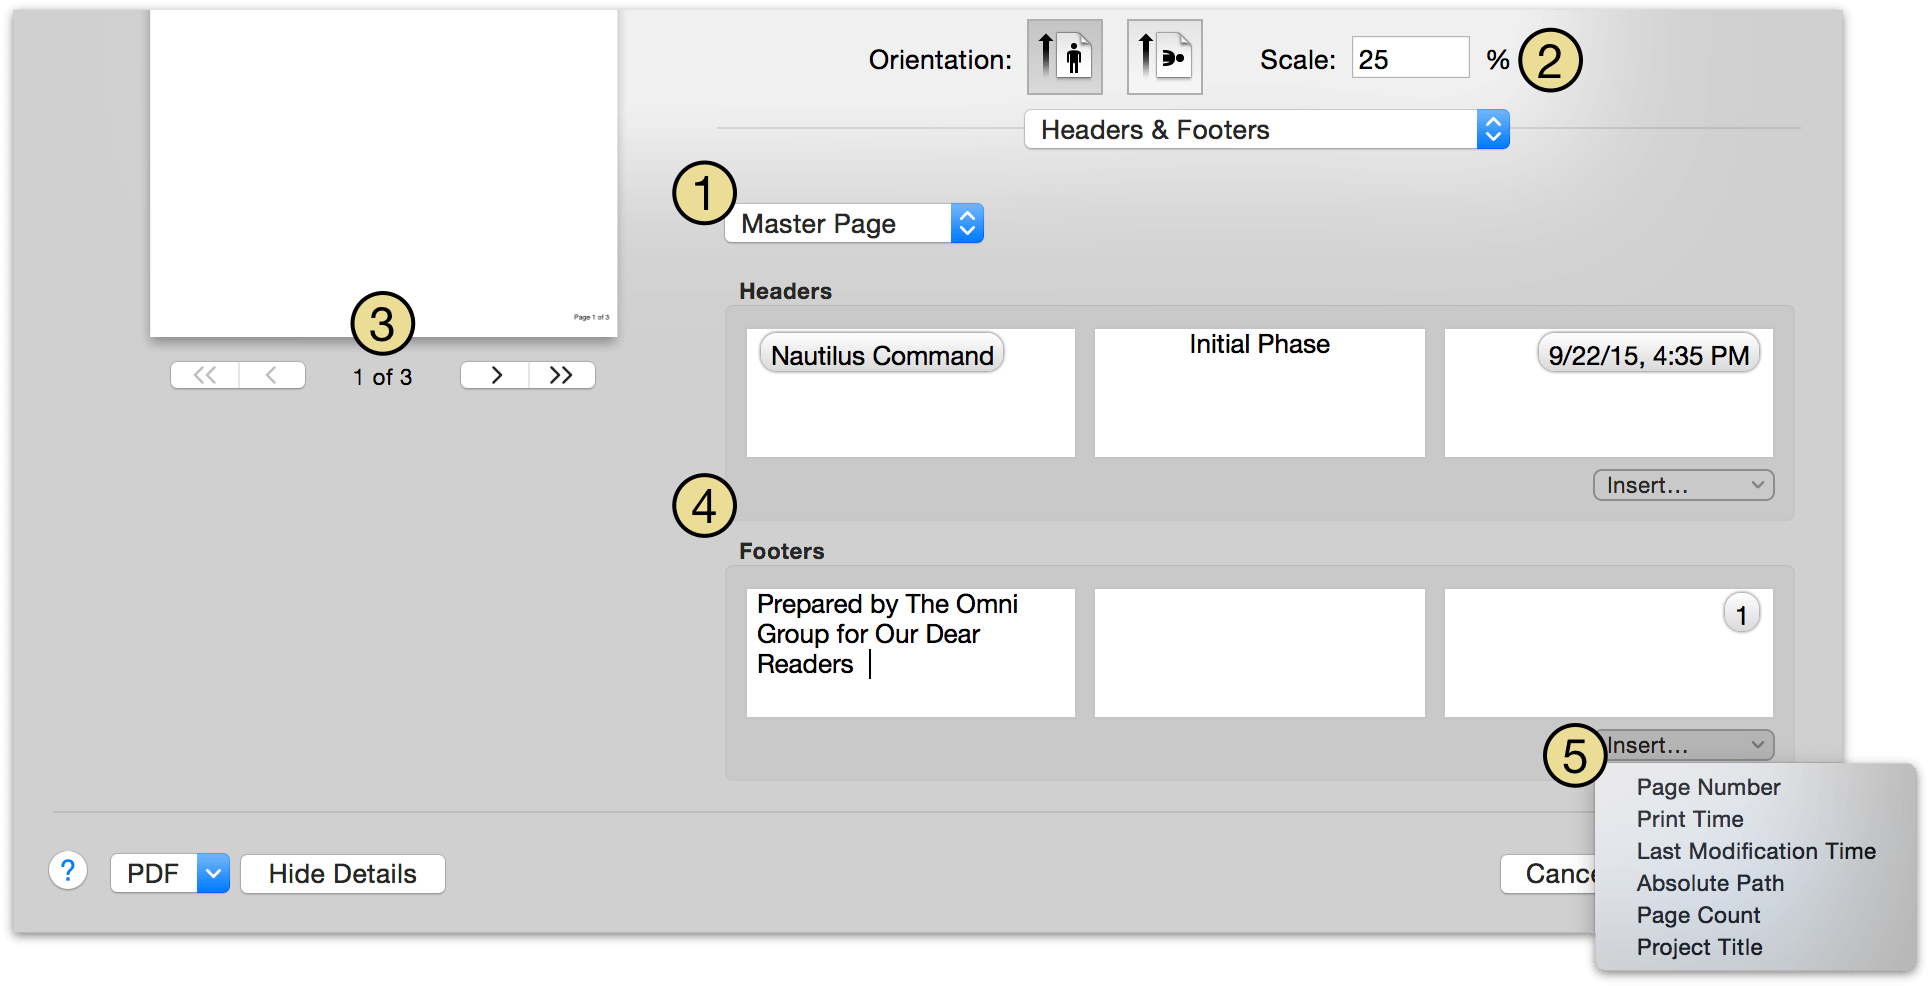
Use this menu to choose where custom headers and footers will appear in your printed document. Options include the Master Page (applied to every page printed, unless overridden by another page style), the First Page, Odd Pages, and Even Pages.
This Scale setting appears when printing from Network View, and controls the scale (as a percentile) at which the document is printed relative to its original size.
Scales for printing from Task and Resource Views are defined in the Dimensions section of the print dialog’s Content details.
As you update your custom headers and footers, changes are reflected in the print preview to give you an idea of how your document will look on paper.
The header and footer sections each have three fields that can be customized: left, right, and center-justified. You can enter custom text here, or:
Use the Insert menu to add information automatically derived from your document to a header or footer field. These automatically generated attributes include:
Note
If you print the project while a filter is on, only the visible tasks are included in the printed copy.
With OmniPlan 3 Pro, we’ve prepared some great new reporting templates for your project that you can use to print or export your data with a more polished and easily readable look.
To preview your project with any of the available templates, use the Reports button in the toolbar or choose File ▸Report... (Option-Command-R) to access the new HTML reports interface. You can print or export your report with the chosen template directly from the interface.
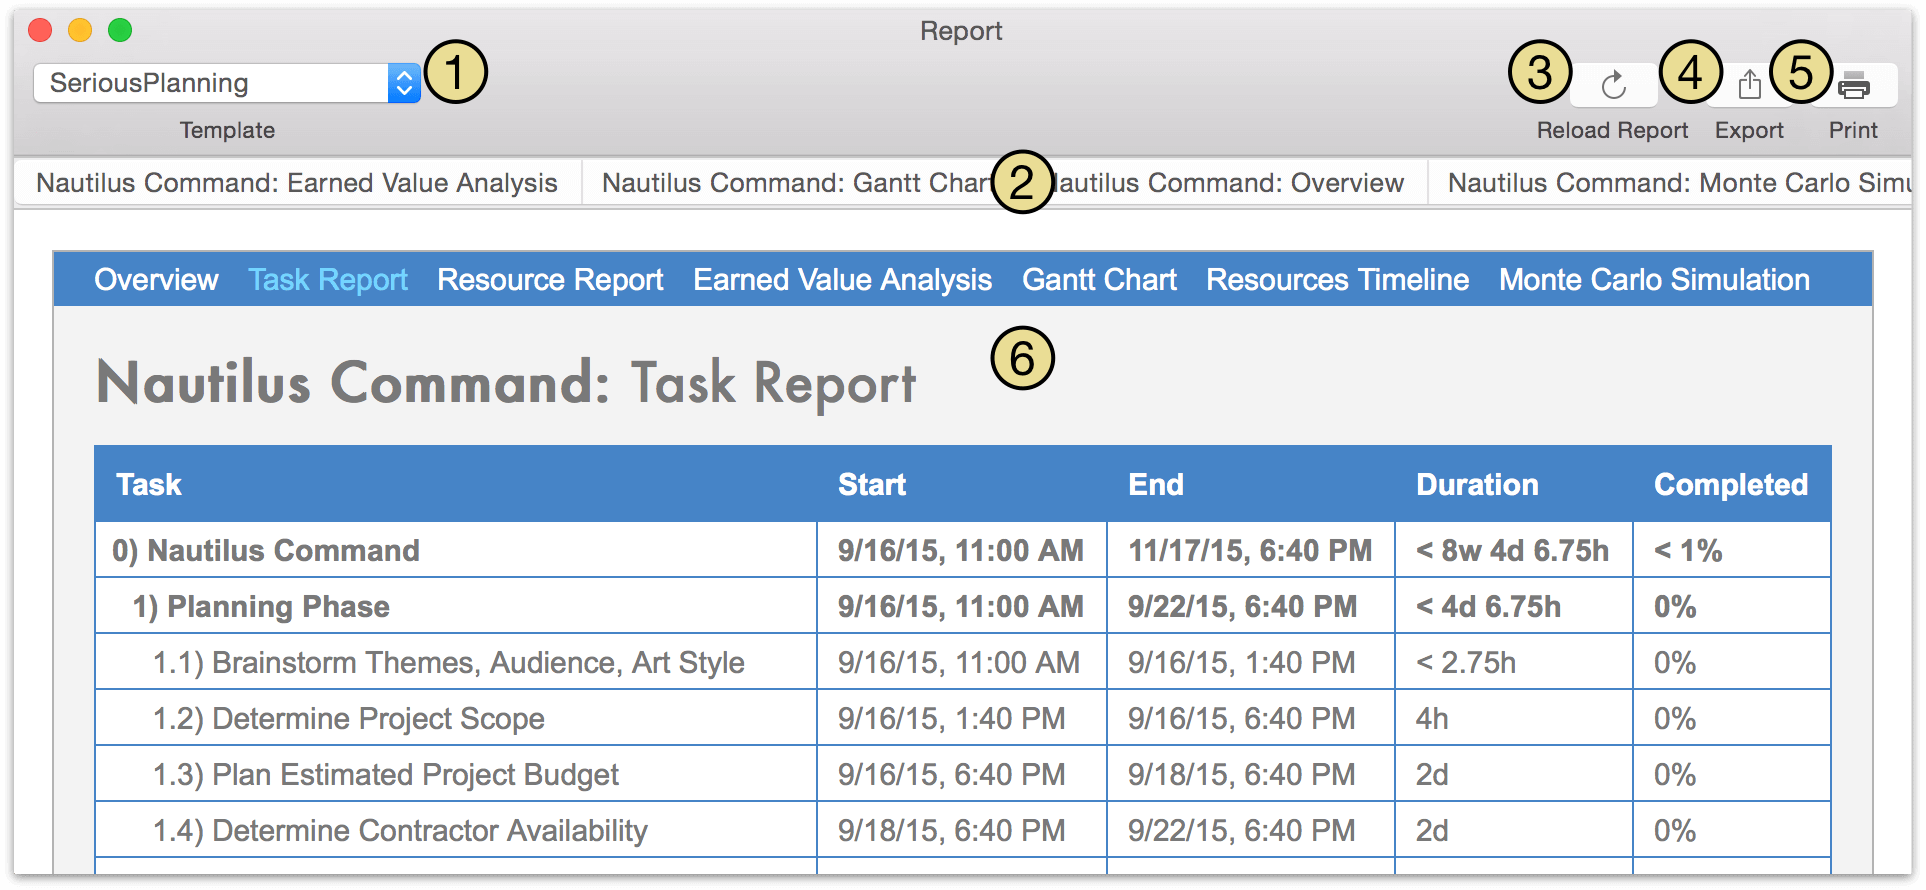
Use the dropdown menu to choose the template you’d like to use to print or export your project.
Swipe or scroll horizontally to browse the available report types in the current template. You’ll see the report types duplicated in the body of the report as well — this is to provide navigation internal to the report when it’s exported as HTML.
Available report types include:
Use the Reload Report button to generate an up-to-date version of the report based on any new changes made to your project.
Use the Export button to generate a PDF or HTML exported copy of your full project report (including all of the report types available). Details on the contents of an HTML Full Report can be found below.
Use the Print button to print the currently selected report type using the standard Mac OS X print dialog options. The option to save the print output as a PDF file is also available here.
This is the HTML preview of your report, representing how it will appear when exported.
When you choose the HTML Full Report option from the Export dialog of the Report window, you’ll have the option to pick a location in Finder to save the report.
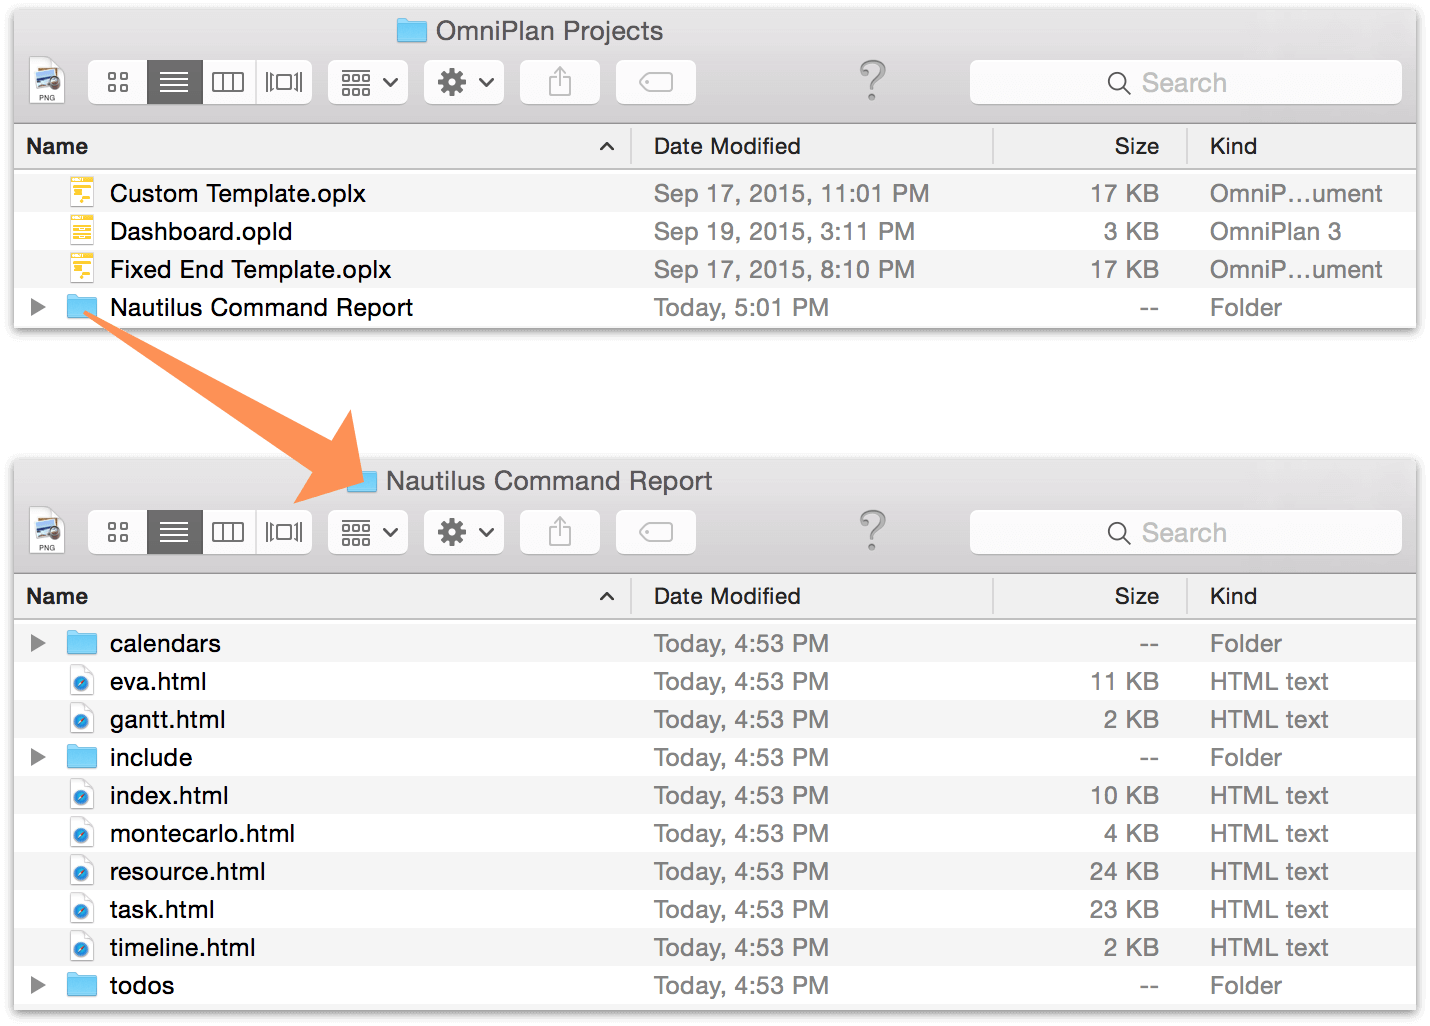
Upon saving, a folder is created that contains a full report of the project in HTML format. Depending on the template used for export, the following items may be included (the built-in SeriousBusiness template includes all of these):
HTML files corresponding to each type of report previewed in the Report Window (Overview, Task Report, Resource Report, Earned Value Analysis report, Gantt Chart, Resource Timeline, and Monte Carlo Simulation).
A folder labeled calendars that contains a Reminders checklist of the project’s milestones (in .ics format), and each resource’s tasks as Calendar events (also in .ics format).
A folder labeled todos that contains Reminders checklists of each resource’s tasks.
A folder labeled include that contains image assets and a .css file that describes the appearance of your report.
Note
While both Apple Calendar events and Reminders checklists are exported using the same file format (.ics), OS X is smart about figuring out which one goes where, and will prompt you with the correct location to add your scheduled items when you double-click the file.
Once you’ve exported your full report, you can open and print individual pages in Safari, send Calendar events and Reminders to your team, or edit the CSS and HTML for a pixel-perfect representation of your project status.
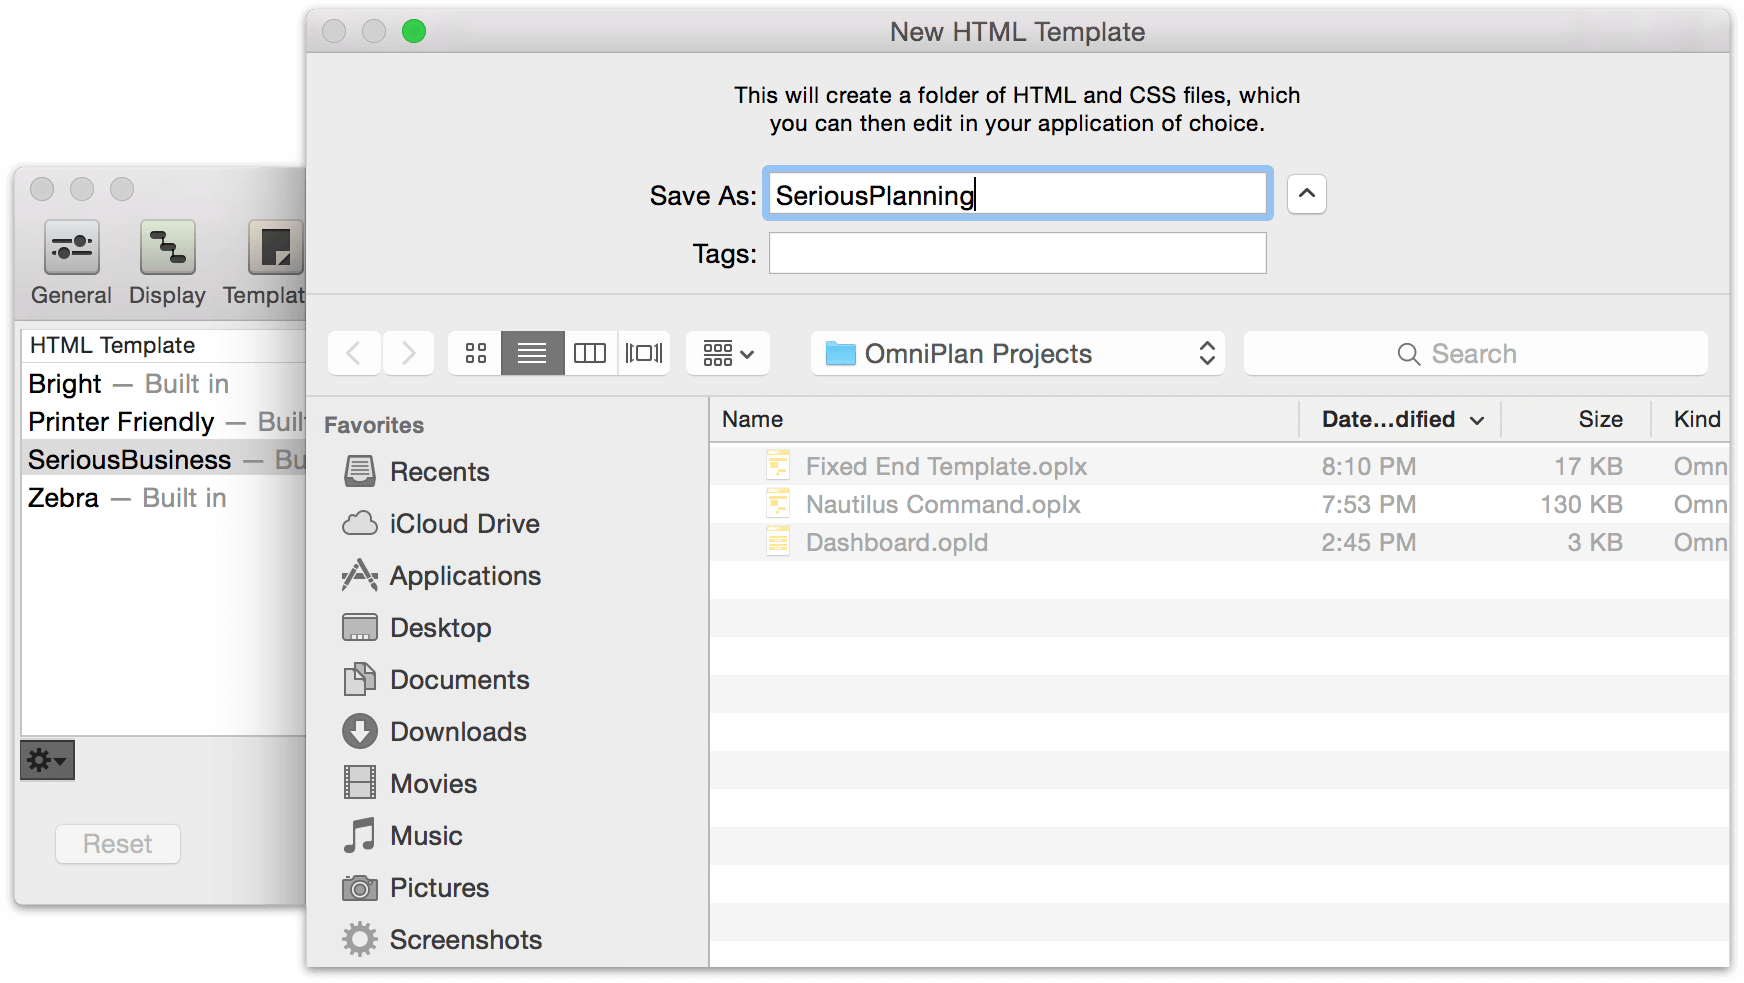
With some knowledge of HTML and CSS, you can make your own HTML templates for printing and exporting. Get started with your custom template in a few quick steps:
First, go to the HTML pane of OmniPlan Preferences.
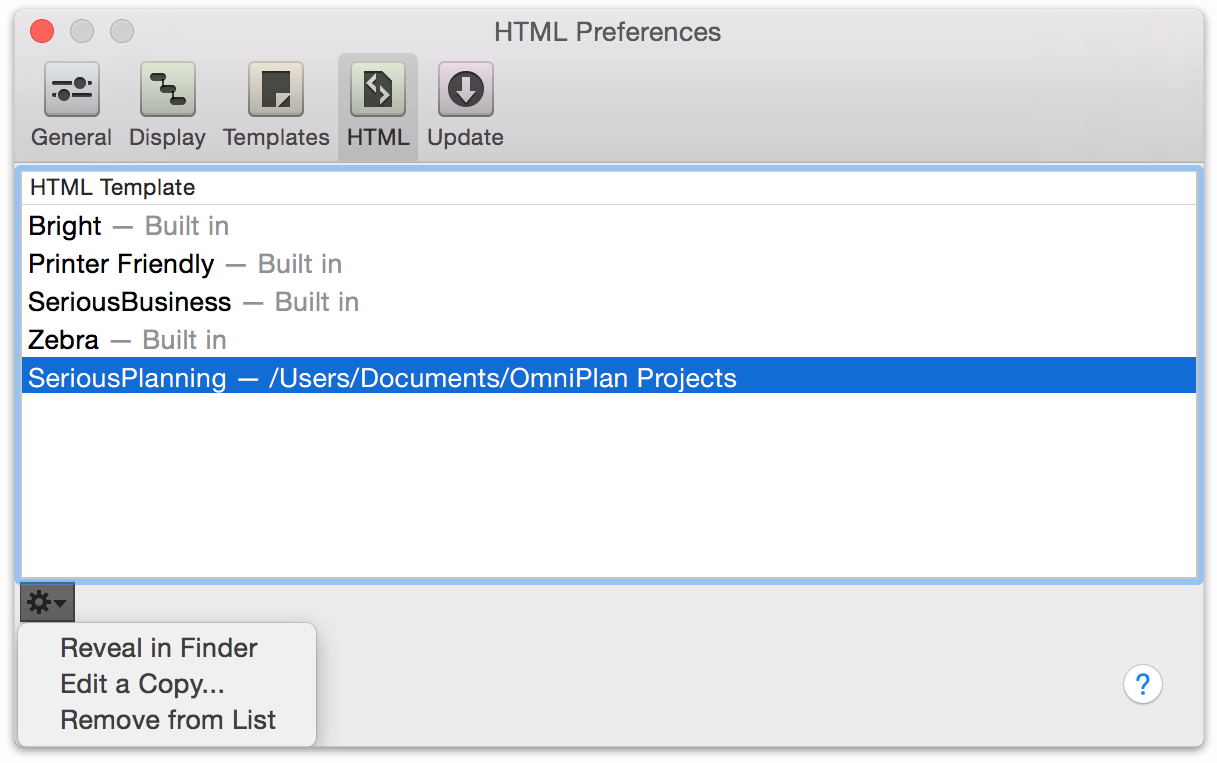
To create a new template, select an existing template and choose Edit a Copy from the gear menu below the list.
Enter a name for the template and save it in a convenient location.
The new template opens in Finder; it is a folder of HTML and CSS files that you can customize to your liking.
Note
Due to security changes in OS X, HTML templates created in versions prior to OmniPlan 2.3 are automatically relocated and not available for direct editing. To change the contents of a migrated template, select it and choose Edit a Copy from the gear menu.
When you have the template set up the way you want, you can manage it from the HTML Preferences pane and choose it in the Report Window as a template for printing and exporting.
HTML reporting templates use a special syntax for inserting data from your project. Open one of the HTML files in the text editor of your choice, and you’ll find standard XHTML interspersed with OmniPlan tokens that look like this:
{@Token Name@}
These tokens are placeholders for data about the project as a whole. When the template is used to export an OmniPlan file, each token is replaced by the data corresponding to the token name.
A reference for the various available tokens follows:
Project Tokens
{@Date@} — The date of the export.
{@Version@} — The version of OmniPlan that exported the report.
{@Project Title@} — The title of the project, as set in the Project inspector’s Project Info section.
{@StartDate@}, {@EndDate@} — The start or end date of the project.
{@StartTime@}, {@EndTime@} — The start or end time of the project.
{@Duration@} — The duration of the whole project.
{@Completion@} — The completion percentage of the whole project, as calculated from all tasks.
{@Cost@} — The cost of the whole project.
{@ResourceData@} — Place this at the tr level of a table; for each resource it creates a row of three cells, containing the resource name, a link to an iCalendar file of the resource’s assignments as events, and a link to an iCalendar file of the resource’s assignments as to-do items.
{@ProjectCalendarLink@} — A link to the Project Milestones calendar, if there are any milestones.
Stylesheet Token
If exporting a full HTML report, a link to the stylesheet as an external file. This lets all of the exported HTML files link to the same stylesheet.
<link rel="stylesheet" href="include/style.css"type="text/css" />
If exporting just one HTML page (a task list or resource list), an embedded copy of the stylesheet. This keeps everything in one HTML file.
<style type="text/css"> [...] </style>
Loop Tokens
These work like open/close HTML or XML tags. When the export happens, OmniPlan cycles through everything between the opening and closing tokens, inserting data about each task or resource. The Assignments loop has to happen inside the Resources loop, as it lists tasks that are assigned to a particular resource. Make sure that you include the closing token, and that your task-specific or resource-specific tokens are between the appropriate loop tokens.
{@Tasks@} and {@/Tasks@} — Lists all tasks in the export; inside this loop you can use task-specific tokens.
{@Resources@} and {@/Resources@} — Lists all resources in the project; inside this loop you can use resource-specific tokens and Assignments loops.
{@Assignments@} and {@/Assignments@} — Lists all assigned tasks for a resource; this can only be used inside the Resources loop. Inside this loop you can use task-specific tokens.
Tip
A handy option for a svelte template is to remove the {@Assignments@}{@/Assignments@} section from the Resources loop. {@Resources@} gives you each resource, while {@Assignments@} gives you each assignment for the current resource; if you omit the {@Assignments@} that leaves just the resource summary info. This is demonstrated in the index page of the built-in Printer Friendly template.
Tokens for Tasks
These tokens can be used inside the Tasks loop or the Assignments loop of a resource.
{@ID@} — The task’s number in the outline.
{@Title@} — The task name.
{@Start@}, {@End@} — The actual start or end time of the task.
{@Time@} — The duration of the task.
{@Effort@} — The effort value for the task.
{@%Done@} — The completion percentage for the task.
{@Dependencies@} — A list of the task’s dependencies, in the same format as the Dependencies column in the task outline.
{@Cost@} — The Cost of the task itself.
{@Resources Cost@} — The cost of the assigned resources.
{@Total Cost@} — The cost of the task and the assigned resources.
{@Assigned@} — A list of assigned resources.
{@Planned Start@}, {@Planned End@} — The baseline start or end time of the task.
{@Start Variance@}, {@End Variance@} — The difference between the baseline and actual times for the start or end of the task.
{@Constraint Start@}, {@Constraint End@} — The constraint on the task’s start or end time, if any.
{@Notes@} — Text of the task’s note, if any.
{@Priority@} — The task priority, just like the column in the task outline.
{@Status@} — Some words to describe the task’s due or overdue state, like the Status icons in the task outline.
{@Violations@} — The number of violations that involve this task.
Tokens for Resources
These tokens can be used inside the Resources loop.
{@Resource@} — The resource name.
{@Start@}, {@End@} — The actual start time of the resource’s earliest assignment, or end time of the resource’s latest assignment.
{@Time@} — The total duration of all tasks assigned to the resource.
{@%Done@} — The completion percentage of all tasks assigned to the resource.
{@Resources Cost@} — The total cost of assigning this resource to its assigned tasks.
{@Resource Type@} — The type of resource (Staff, Equipment, Material, or Group).
{@#@} — The "total units" value of the resource.
{@Notes@} — Text of the resource’s note, if any.
{@Efficiency@} — The resource’s efficiency value.
{@Cost/Use@}, {@Cost/Hour@} — Cost per use and cost per hour values as defined in the Resource Info section of the Resource inspector.
{@Total Uses@}, {@Total Hours@} — The total number of assignments, or total amount of effort assigned, for the resource.
{@ResourceCalendarLink@} — A link to the resource’s assigned tasks as an iCalendar file of events, if it has any tasks assigned.
{@ResourceToDoLink@} — A link to the resource’s assigned tasks as an iCalendar file of to-do items, if it has any tasks assigned.
Custom data keys — If you include a token that exactly matches the name of one of your custom data keys, it is converted to the value of that key for the given resource. For example, if you have a “Phone Number” key for your resources, you can use a {@Phone Number@} token in your template.
Path Tokens
These provide the path to a particular page in the HTML export. You can use these to create links between pages; for example:
<a href="file:{@TaskReportPath@}">
{@TaskReportPath@} — The file path to this HTML export’s Task Report page.
{@ResourceReportPath@} — The file path to this HTML export’s Resource Report page.
{@ResourceTimelinePath@} — The file path to this HTML export’s Resource Timeline image.
{@GanttChartPath@} — The file path to this HTML export’s Gantt Chart image.
{@ProjectCalendarPath@} — The file path to this HTML export’s Project Milestones calendar.
Earned Value Analysis Tokens
These tokens correspond to the columns employed in the outline of Task View by the Earned Value Analysis feature.
{@ev_budgetedCostOfWorkScheduled@} — The budgeted cost of work scheduled; represents the Planned Value column in the Task outline.
{@ev_budgetedCostOfWorkPerformed@} — The budgeted cost of work performed; represents the Earned Value column of the Task outline.
{@ev_actualCostOfWorkPerformed@} — Actual cost of work performed; represents the Actual Cost column of the Task outline.
{@ev_costVariance@} — The cost variance between earned value and actual cost; represents the column by the same name in the Task outline.
{@ev_scheduleVariance@} — The distance (in currency) from the planned value; represents the column by the same name in the Task outline.
{@ev_estimateAtCompletion@} — Estimate at completion; represents the column of the same name in the Task outline.
{@ev_budgetedAtCompletion@} — Budgeted at completion; represents the column of the same name in the Task outline.
{@ev_varianceAtCompletion@} — Variance at completion; represents the column of the same name in the Task outline.
{@ev_costPerformanceIndex@} — The cost performance index; represents the column by the same name in the Task outline.
{@ev_schedulePerformanceIndex@} — The schedule performance index; represents the column of the same name in the Task outline.
{@ev_costVariancePercent@} — The cost variance percent; represents the Cost Variance % column in the Task outline.
{@ev_scheduleVariancePercent@} — The schedule variance percent; represents the Schedule Variance % column in the Task outline.
{@ev_toCompletePerformanceIndex@} — The "to complete performance" index; represents the column of the same name in the Task outline.
Monte Carlo Simulation Tokens
These tokens correspond to values used in computing Monte Carlo simulations to estimate milestone completion. They don’t run simulations themselves; rather, they use the most recently computed results for your project.
{@Milestones@} and {@/Milestones@} — Repeats a template for each milestone in the project.
{@chainCost@} — The cost of the entire prerequisite chain up to this task or milestone.
{@mc_minimumCost@} — The lowest chainCost for any Monte Carlo simulation run.
{@mc_averageCost@} — The average chainCost for every Monte Carlo simulation run.
{@mc_maximumCost@} — The highest chainCost for any Monte Carlo simulation run.
{@mc_earliestCompletion@} — The earliest date completed for any Monte Carlo simulation run.
{@mc_fiftyPercentCompletion@} — The date on which 50% or more of simulations completed.
{@mc_latestCompletion@} — The latest date completed for any Monte Carlo simulation run.