Welcome to OmniOutliner 2 for iOS!
Since we last met, your friends at The Omni Group have been busy working on squashing bugs and adding features to OmniOutliner 2 for iOS 9.
Some of the changes and improvements we’ve made to OmniOutliner for iOS 9 (and otherwise) include:
- 3D Touch—If you have an iPhone 6s or iPhone 6s Plus, you can Peek and Pop into OmniOutliner with a long press on the app icon:
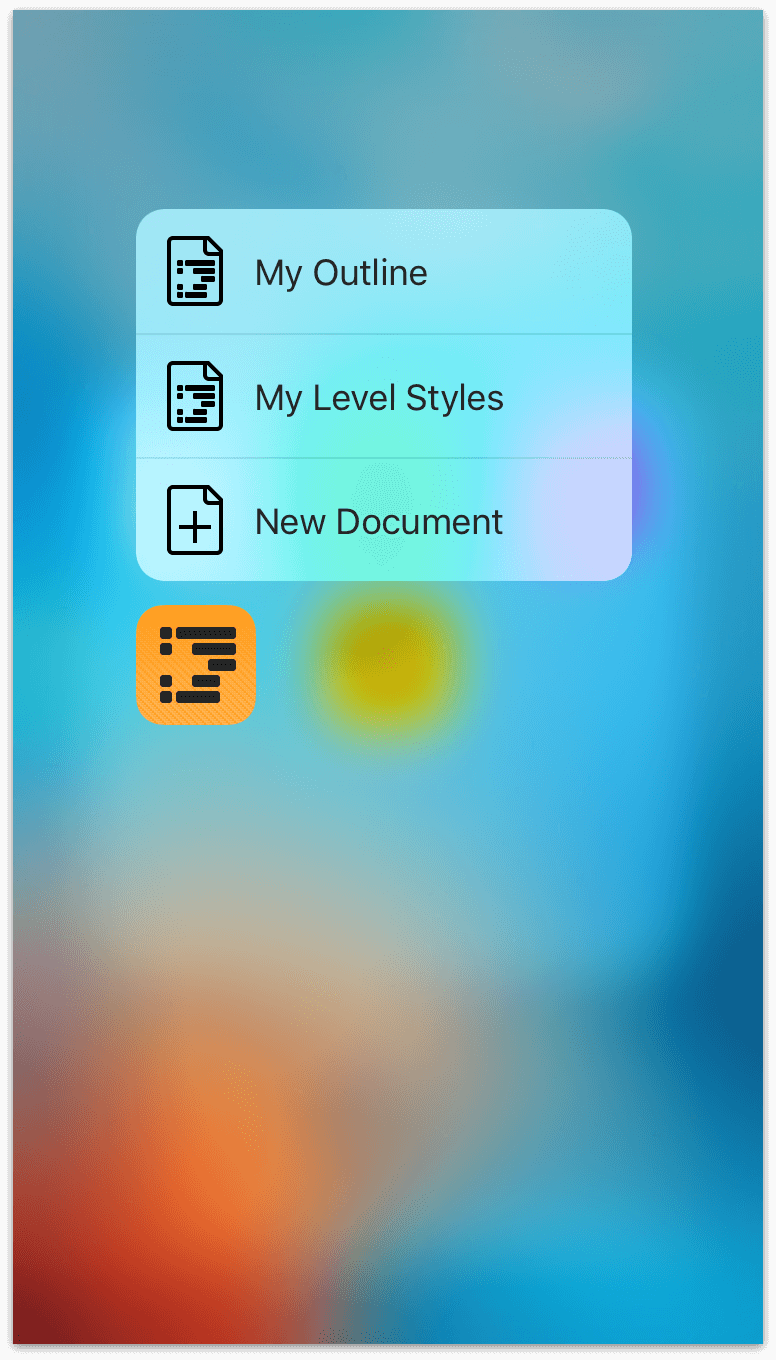
When you feel the iPhone’s Taptic Engine react to your finger press, OmniOutliner’s app icon takes the focus, and a tiny menu appears showing you the last three files you’ve worked on, and provides you with another option to create a New Document.
You can also take advantage of 3D Touch from within the Document Browser. When viewing the files within a folder, you can Peek at the contents of an outline with a long press:
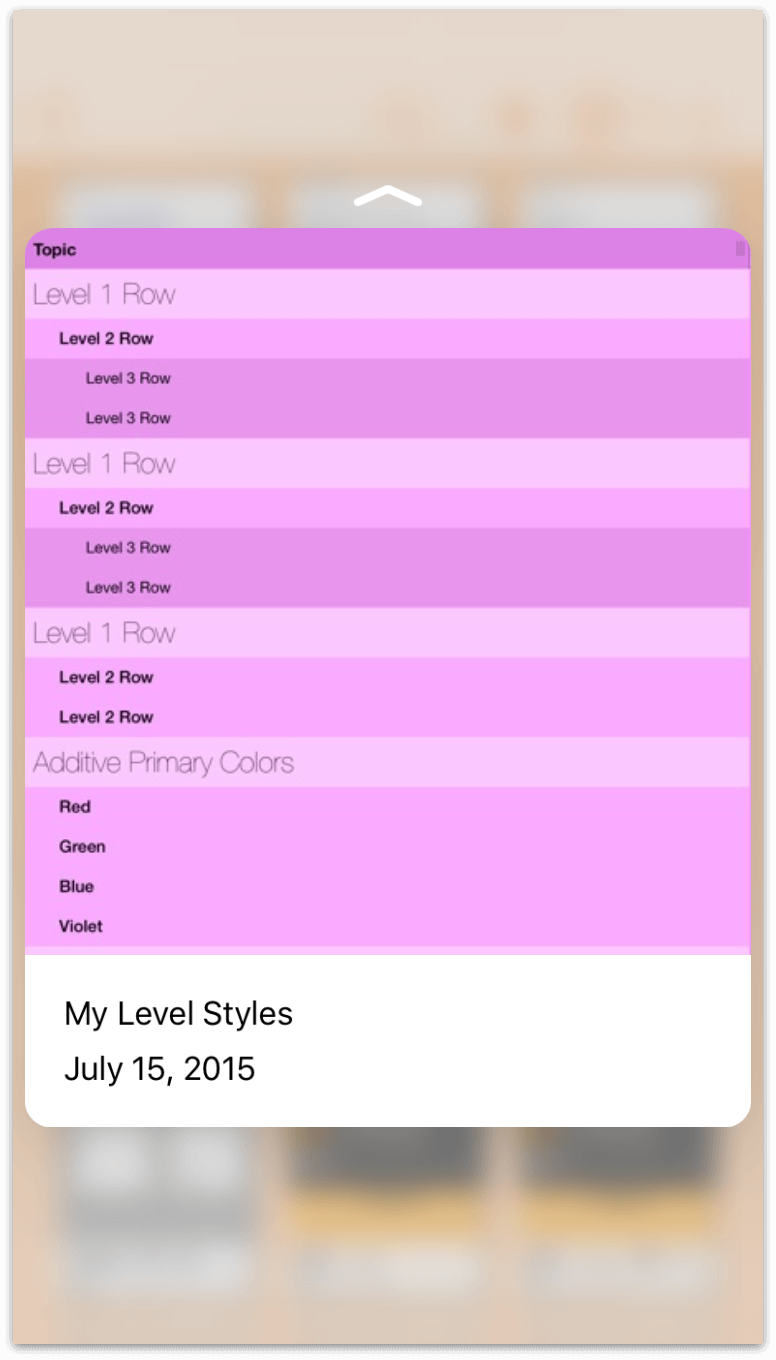
If you look just above the document preview, you’ll notice a little upward-pointing arrow. Slide your finger up to see options for Export, Move, Duplicate, or Move to Trash.
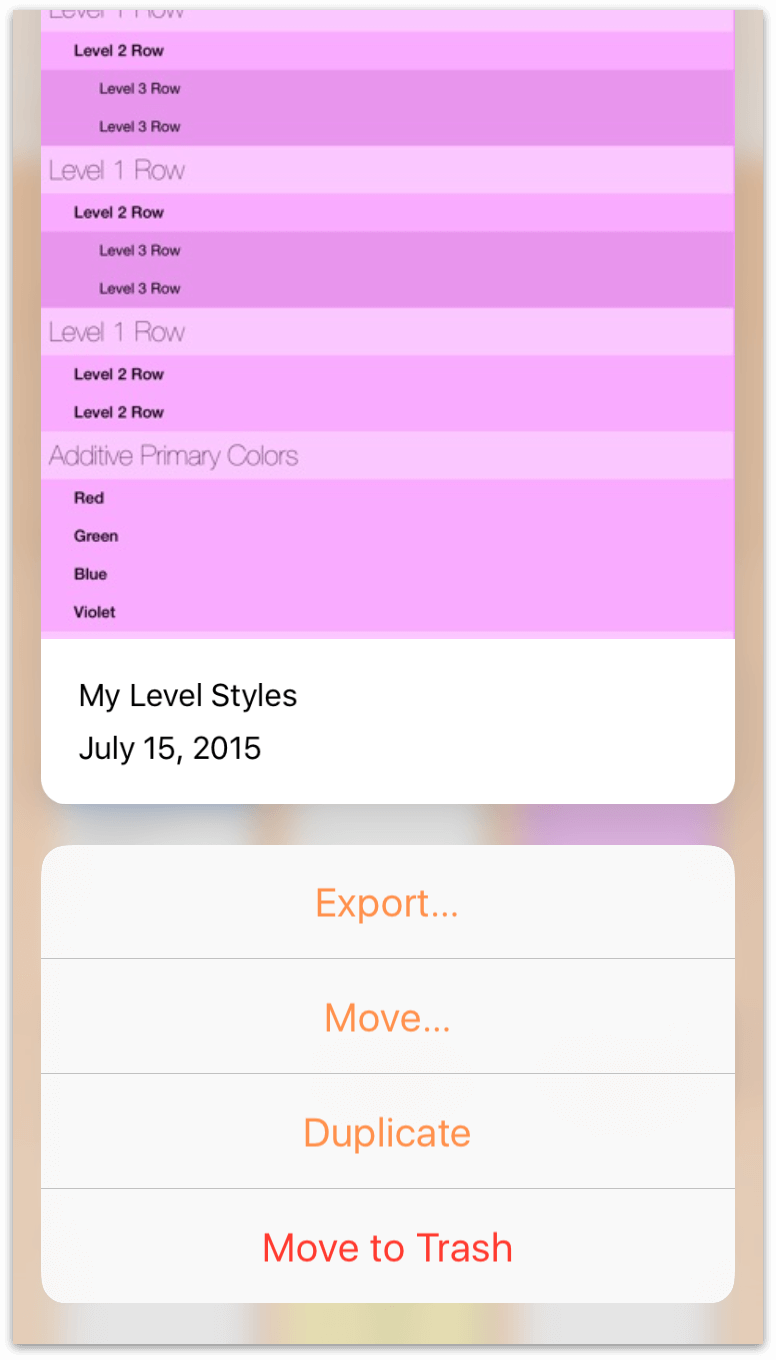
You can either choose one of those four options, continue sliding up to open the document, or slide down to dismiss any actions and return to the Document Browser.
- Keyboard Shortcuts!—While OmniOutliner for iOS has long-supported keyboard shortcuts, you can now view them in a heads-up overlay if you are using a Bluetooth keyboard with your iPad or iPhone. Just hold down the Command key (⌘) to find the keyboard shortcut you’re looking for:
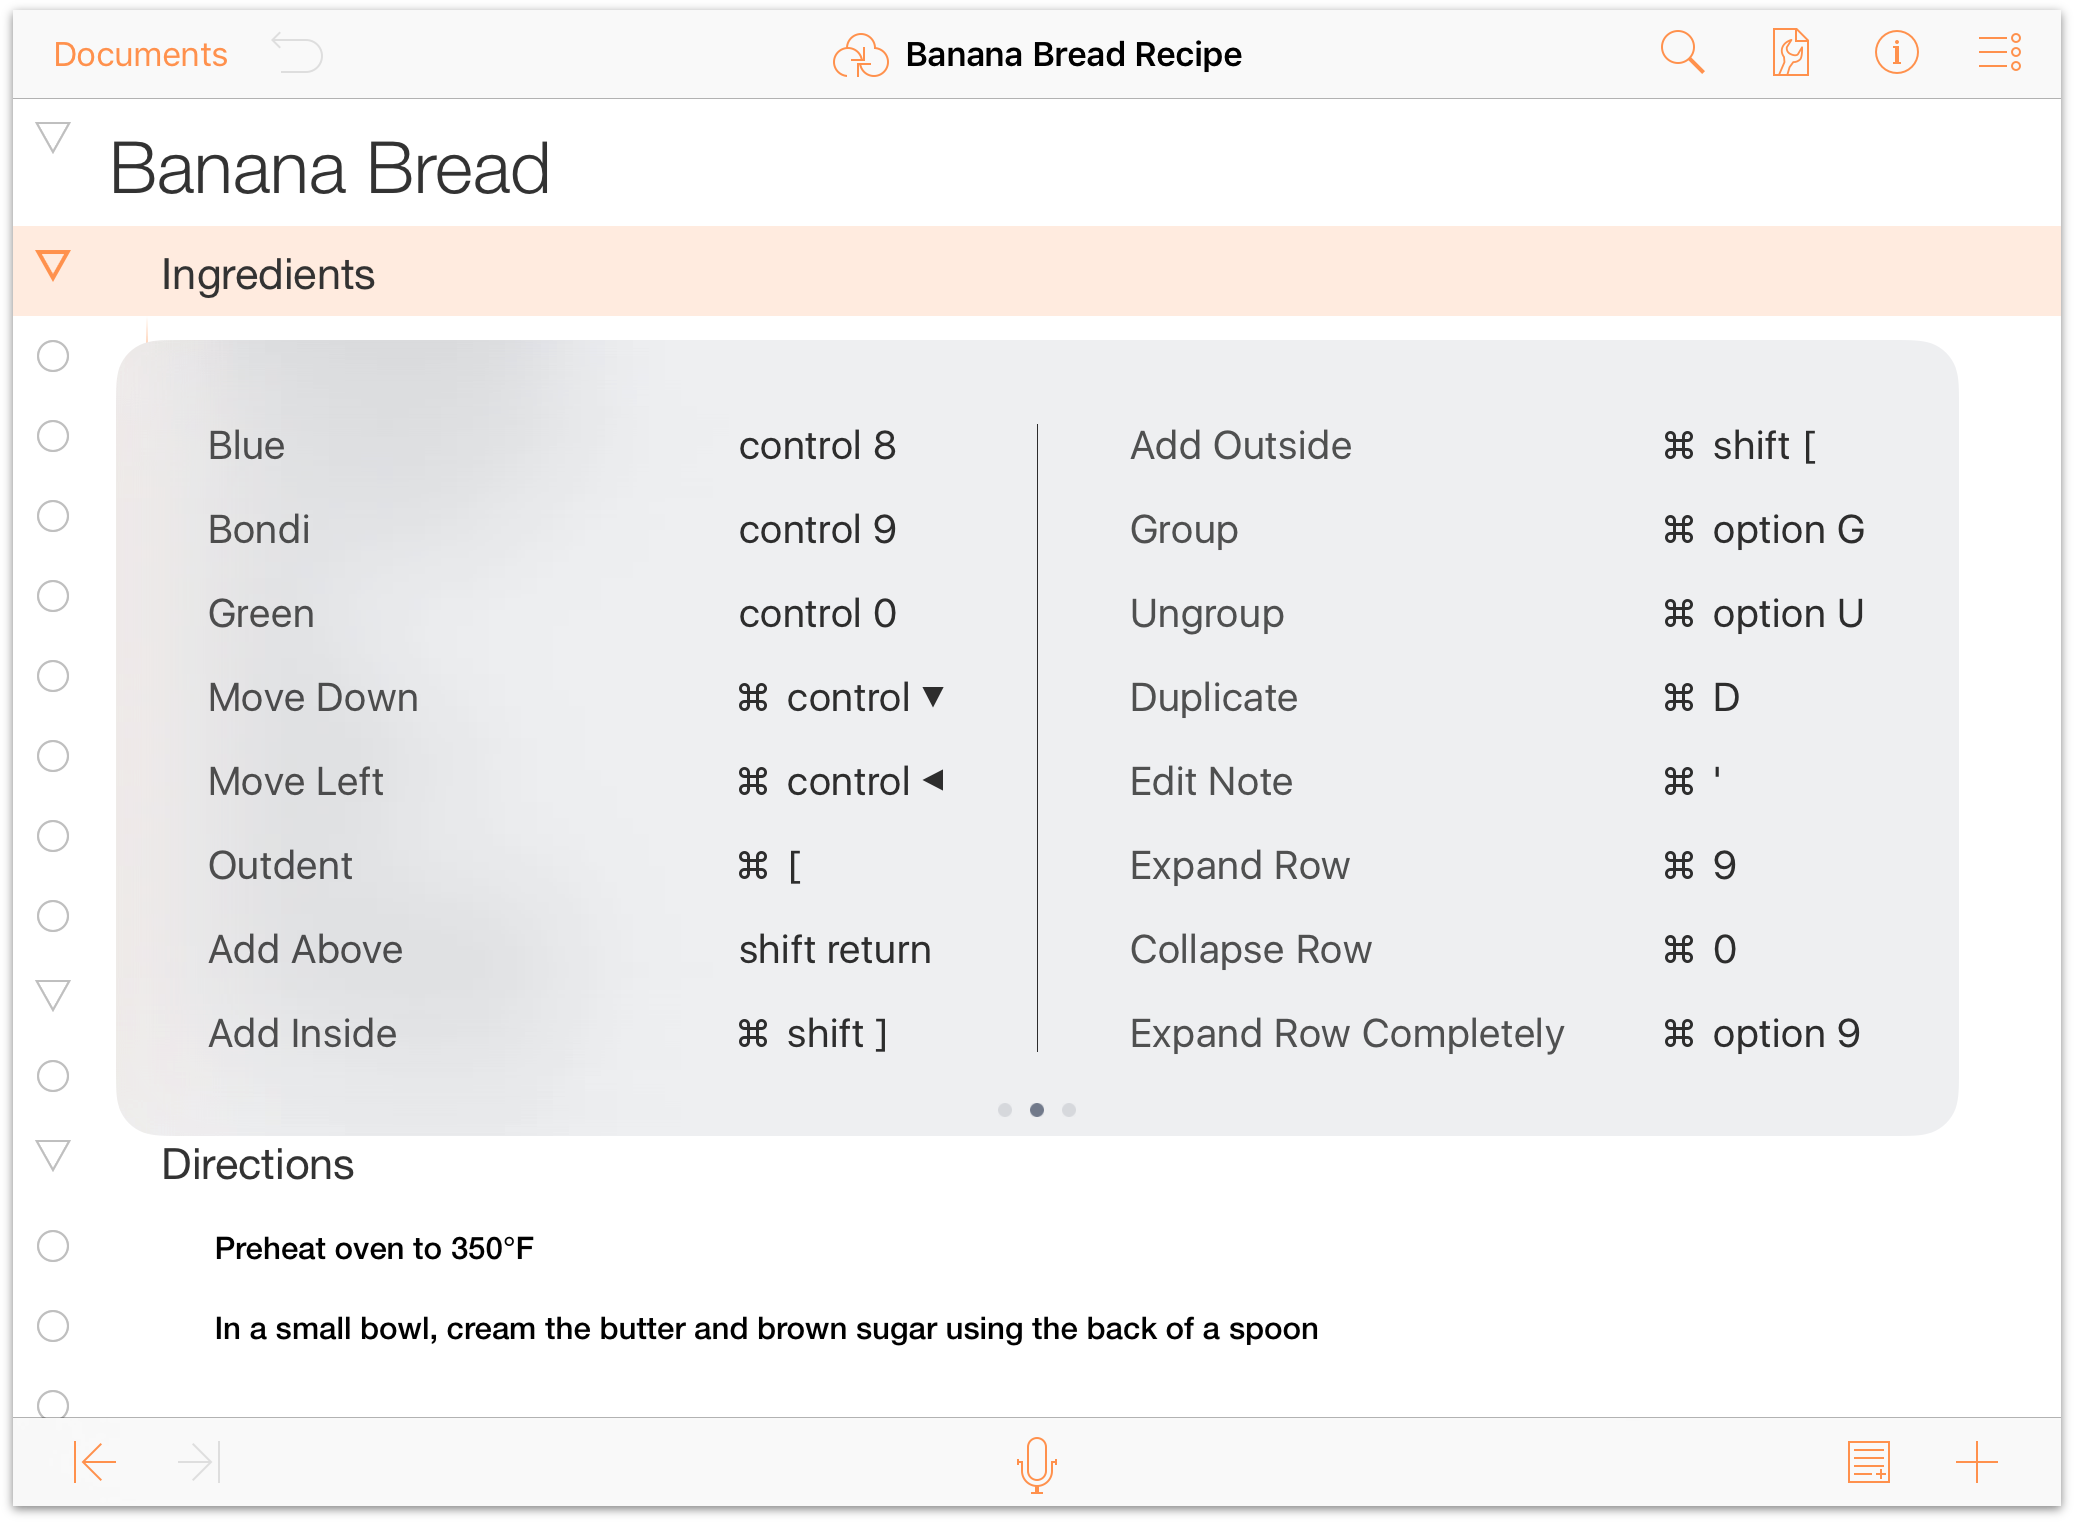
For more information about the keyboard shortcut overlay, and for a complete list of shortcuts, see Keyboard Shortcuts later in this book.
- iPad Pro-Ready—Just in case you’re thinking about getting the new iPad Pro, rest assured that OmniOutliner 2 has already been retooled to work on the iPad Pro. So go ahead, splurge on that iPad Pro upgrade and get ready to multitask with OmniOutliner alongside our other apps on iOS 9.
- Multitasking in iOS 9—OmniOutliner 2 supports Multitasking in iOS 9 (on iPad Pro, iPad Air 2, and iPad mini 4), giving you the ability to use Slide Over and Split View so you can work on OmniOutliner files and keep track of your tasks in OmniFocus or look at something you’ve been drawing in OmniGraffle!
- Export to Microsoft PowerPoint (.pptx): You can also use OmniOutliner for creating presentations in Keynote. Just export the outline for your presentation as a PowerPoint file (with a .pptx file extension), and then open the exported file in Keynote.
- Improvements to the Document Browser — The Document Browser now gives you access to outlines saved in the cloud. This new
 feature provides a means for you to work with files stored on iCloud Drive, Box, Dropbox, and more. For more details, see Working in the Cloud, later in this book.
 - Improved VoiceOver Support — Significant work has been done to improve the way OmniOutliner supports VoiceOver for accessibility.
- Export to Microsoft Word .docx Indented — If you use Microsoft Word as part of your workflow, you will be happy to find the new .docx Indented file format as an Export option from OmniOutliner, which replicates the outline structure outside of outline mode.
- Other Export Fixes — When exporting an outline to Microsoft Word .docx format, you’ll notice the following fixes:
- The sort order, rather than the document order, is used.
- Background colors have been changed to use borderless cell fills, which allow for a much greater color range than the highlight function.
- When exporting a document that uses prefixes or suffixes but no numbering format for numbered rows, row numbering is now handled correctly.
- Images are scaled to fit on an 8.5 × 11-inch (US Letter) page in Microsoft Word, rather than scaling the image to the column width of the OmniOutliner document.
- OmniOutliner no longer produces a corrupt .docx file when there is an image attachment far down in the document.
- HTML Export — Duration values are correctly formatted when exporting to HTML.
- Document Browser — RTF files are now viewable in the Document Browser.
- Outline View — The outline view now freely scrolls, so the outline column can be scrolled off the screen.
- Images — Image attachments automatically scale to fit the width of the column.
- Outline View — The indentation amount for rows now scales with the zoom level.
- New Templates — Additional templates used in OmniOutliner 4 for Mac have been added.
- Appearance — The app icon and file browser have been redesigned.
- TextExpander support — For all your text expanding needs! If you have TextExpander installed on your device, open Settings from the gear menu in the document browser to update your snippets.
- Row linking — Row links created in OmniOutliner 4 for Mac will function for jumping to other sections of the document.
- Style theming — Have one document that you wished looked like another? Turn that other document into a template and apply it to any file you would like.
- External keyboard support — Outline faster! Navigate around your document, rearrange rows, and add new content, all without touching the screen. If you use OmniOutliner for the Mac, you will already be familiar with all these shortcuts.
- Export formats — Finished with the outlining portion of your project? Export your data to a word processing app using the DOCX format for the next phase. Need to switch to a spreadsheet app? Send your data over in CSV format.
- Search — In-document searching has been moved to be a top level item in the toolbar for easier access.
- AirDrop — Easily AirDrop files between iOS 8 and OS X Yosemite (v10.10) clients.
- Templates — When you create a new document, you are presented with a list of available templates which you can start from. Easily turn an existing document into a template or create one from scratch.
- Folders — Have a lot of outlines on your iPhone or iPad? Organize them with folders, and if you’re syncing with OmniPresence, the same folders and files are visible on your other iOS devices and Mac.
For a complete list of changes we’ve made in OmniOutliner for iOS, be sure to read the Release Notes by tapping the Gear icon in the toolbar and choosing Release Notes from the list of options. You can also find OmniOutliner for iOS’s release notes on our Support website.
Created with love,
The Omni Group
How This Documentation is Organized
This wonderful manual that you have before you (either in OmniOutliner itself, online, or in iBooks on your Mac or iOS device—or both) has been assembled in such a way that you’re provided with a complete tour of OmniOutliner.
You’ll start out with an overview of OmniOutliner’s interface. Don’t skip over this chapter, as you’ll find many nuggets of information and fine details about OmniOutliner that you might otherwise miss. And, if you do decide to skip this chapter and later find yourself wondering, “Hey, what’s that doohickey do?”, you can always come back here to discover what it’s all about.
To help guide you through the documentation and better learn all the things you need to know about OmniOutliner, here’s a list of all of the chapters in this book:
- Chapter 1, A Quick Tour of OmniOutliner for iOS
- This brief chapter provides you with a quick overview of OmniOutliner 2’s user interface. Not sure what a certain button does? This chapter is your guide to the basics.
- Chapter 2, Working in the Cloud
- With OmniOutliner 2, we’ve expanded the range of possibilities for storing files in the cloud. In addition to our own OmniPresence sync service, we’re trying something new as a feature: Cloud Storage Providers.
This new service is something many of you have been asking for; the ability to store files on other services, such as Box, Dropbox, Google Drive, OneDrive, and others. It’s not perfect—which is why we are calling this a BETA feature—but we know the demand is great, so we want to let you try it out.
This first chapter walks you through the process of setting up a cloud account in OmniOutliner, discusses how get the best performance out of Omni Sync Server, and shows you how to turn on and store files with other Cloud Storage Providers.
- Chapter 3, Managing Files with the Document Browser
- Since OmniOutliner is a document-based application, you’ll need a way to manage the outlines on your devices. This chapter provides an overview of the Document Browser, which is what you use to manage the outlines you create with OmniOutliner.
Note
Chapters 4 and 5 make up a two-part tutorial on using OmniOutliner for iOS. You’ll learn how to create new outlines and get familiar with the Editing tools before jumping in to the basics of styling an outline and creating a template.
- Chapter 4, Creating a New OmniOutliner Document
- If you need to learn the basics of using OmniOutliner, this chapter is for you. This chapter takes you—step-by-step—through the process of creating a new outline in OmniOutliner.
- Chapter 5, Working with Templates and Styles
- Following on the heels of the previous chapter, here you’re taken deeper still into OmniOutliner’s style model. You will create a new outline for use in building your own template that you can apply as a theme to the outlines you create.
- Chapter 6, Importing from an Older Version of OmniOutliner for iPad
- If you have the original version of OmniOutliner for iPad (version 1.x), this chapter guides you through the process of using iTunes 12 to transfer your OmniOutliner files for use with OmniOutliner for iOS.
- Chapter 7, Keyboard Shortcuts
- If you use OmniOutliner for Mac, you know just how essential keyboard shortcuts are to making your outline work move along swiftly. We have brought most of OmniOutliner for Mac’s keyboard shortcuts over to OmniOutliner for iOS. If you have a Bluetooth keyboard connected to your iOS device, you can access a list of keyboard shortcuts by holding down the Command key, or you can peruse the list of shortcuts found in this chapter.
- Chapter 8, Getting Help
- There’s no shame in admitting that you need help. In fact, that’s what we’re here for. If you ever get stuck when working on something in OmniOutliner, or if you have a problem with the app’s license, or you just want to tell our Support Humans and the DocWranglers what an awesome job they’re doing, feel free to get in touch. This chapter points you to all of the resources we have available: Support Humans, Support Articles, Videos, and Documentation.
Using This Book
One of the beauties of having OmniOutliner’s documentation available in electronic form is that it’s always available whenever you need it. We have put all of the documentation on our website where it can be searched, bookmarked, and printed (either to paper or saved as a PDF). And we’re continuing the ongoing trend of creating EPUB versions of the documentation and making them freely available on the iBooks Store.
Get the Ebook
![]() Our preferred method of delivering the Help docs is via the iBooks Store in EPUB3 format. The documentation there is the same documentation you’ll find on our website and bundled within the app.
Our preferred method of delivering the Help docs is via the iBooks Store in EPUB3 format. The documentation there is the same documentation you’ll find on our website and bundled within the app.
The advantage to getting the EPUB version of the docs is that whenever we update the docs for a new version of OmniOutliner, you’ll receive a notification in iBooks telling you that there’s an update waiting for you. And the big win of EPUB over PDF is that any notations or bookmarks you make in the book carry forward to new versions of the documentation.
Tell Us What You Think
We’re constantly working on updates for our documentation. Whether it’s CSS work, correcting the occasional typo (yeah, they do sometimes slip through), or adding details or clarification for a specific feature based on something we’ve heard from a customer, we’re always trying to make our documentation better and more useful for you.
If you have any specific comments you’d like to send us about the documentation, please do. You can email us, or ping us on Twitter.
Finally, thank you for taking time to read the docs.