Working in the Project Editor
When the time comes to build a new project or edit an existing one, tap the project in the document browser to enter OmniPlan’s Project Editor. The Project Editor consists of the Gantt chart, Network Diagram and associated controls you’ll use to add and manage the tasks, resources, and calendars that form your project.
This chapter describes navigating the Project Editor and outlines the tools available within. As you read, one option is to dive right in and start building a new project. However, if you’re new to OmniPlan, exploring one of the pre-populated sample projects may help provide some initial context. The next chapter, Building a Project, offers a tutorial for when you’re ready to begin building in earnest.
As you explore the Project Editor, there are a few navigational tools that can help you get your bearings and fully contextualize the scope of the project at hand.
Landscape Mode—Because tasks progress chronologically along the x-axis of both the Gantt chart and Network Diagram, their information is presented most efficiently in landscape mode. Rotate your device to try it out—it’s where OmniPlan for iOS is most comfortable.
Pinch to Zoom—Many projects have more tasks than will fit on the screen at once at the default zoom level. When you need to view an entire project, use the vertical pinch gesture to zoom in or out.
Changing Time Scale—In the Gantt chart, pinch horizontally to change the view’s time scale on the fly, or tap the date header to choose a scale from among granular options (including the ever-handy Scale to Fit Project).
The Project Editor By Device
While the capabilities of OmniPlan’s Project Editor are identical across devices, the following figures show the differences in control placement between OmniPlan for iOS on larger devices (iPad and iPhone 6 Plus/6s Plus in landscape orientation) and smaller devices (iPhone 6 Plus/6s Plus in portrait orientation, and any smaller iPhone), respectively.

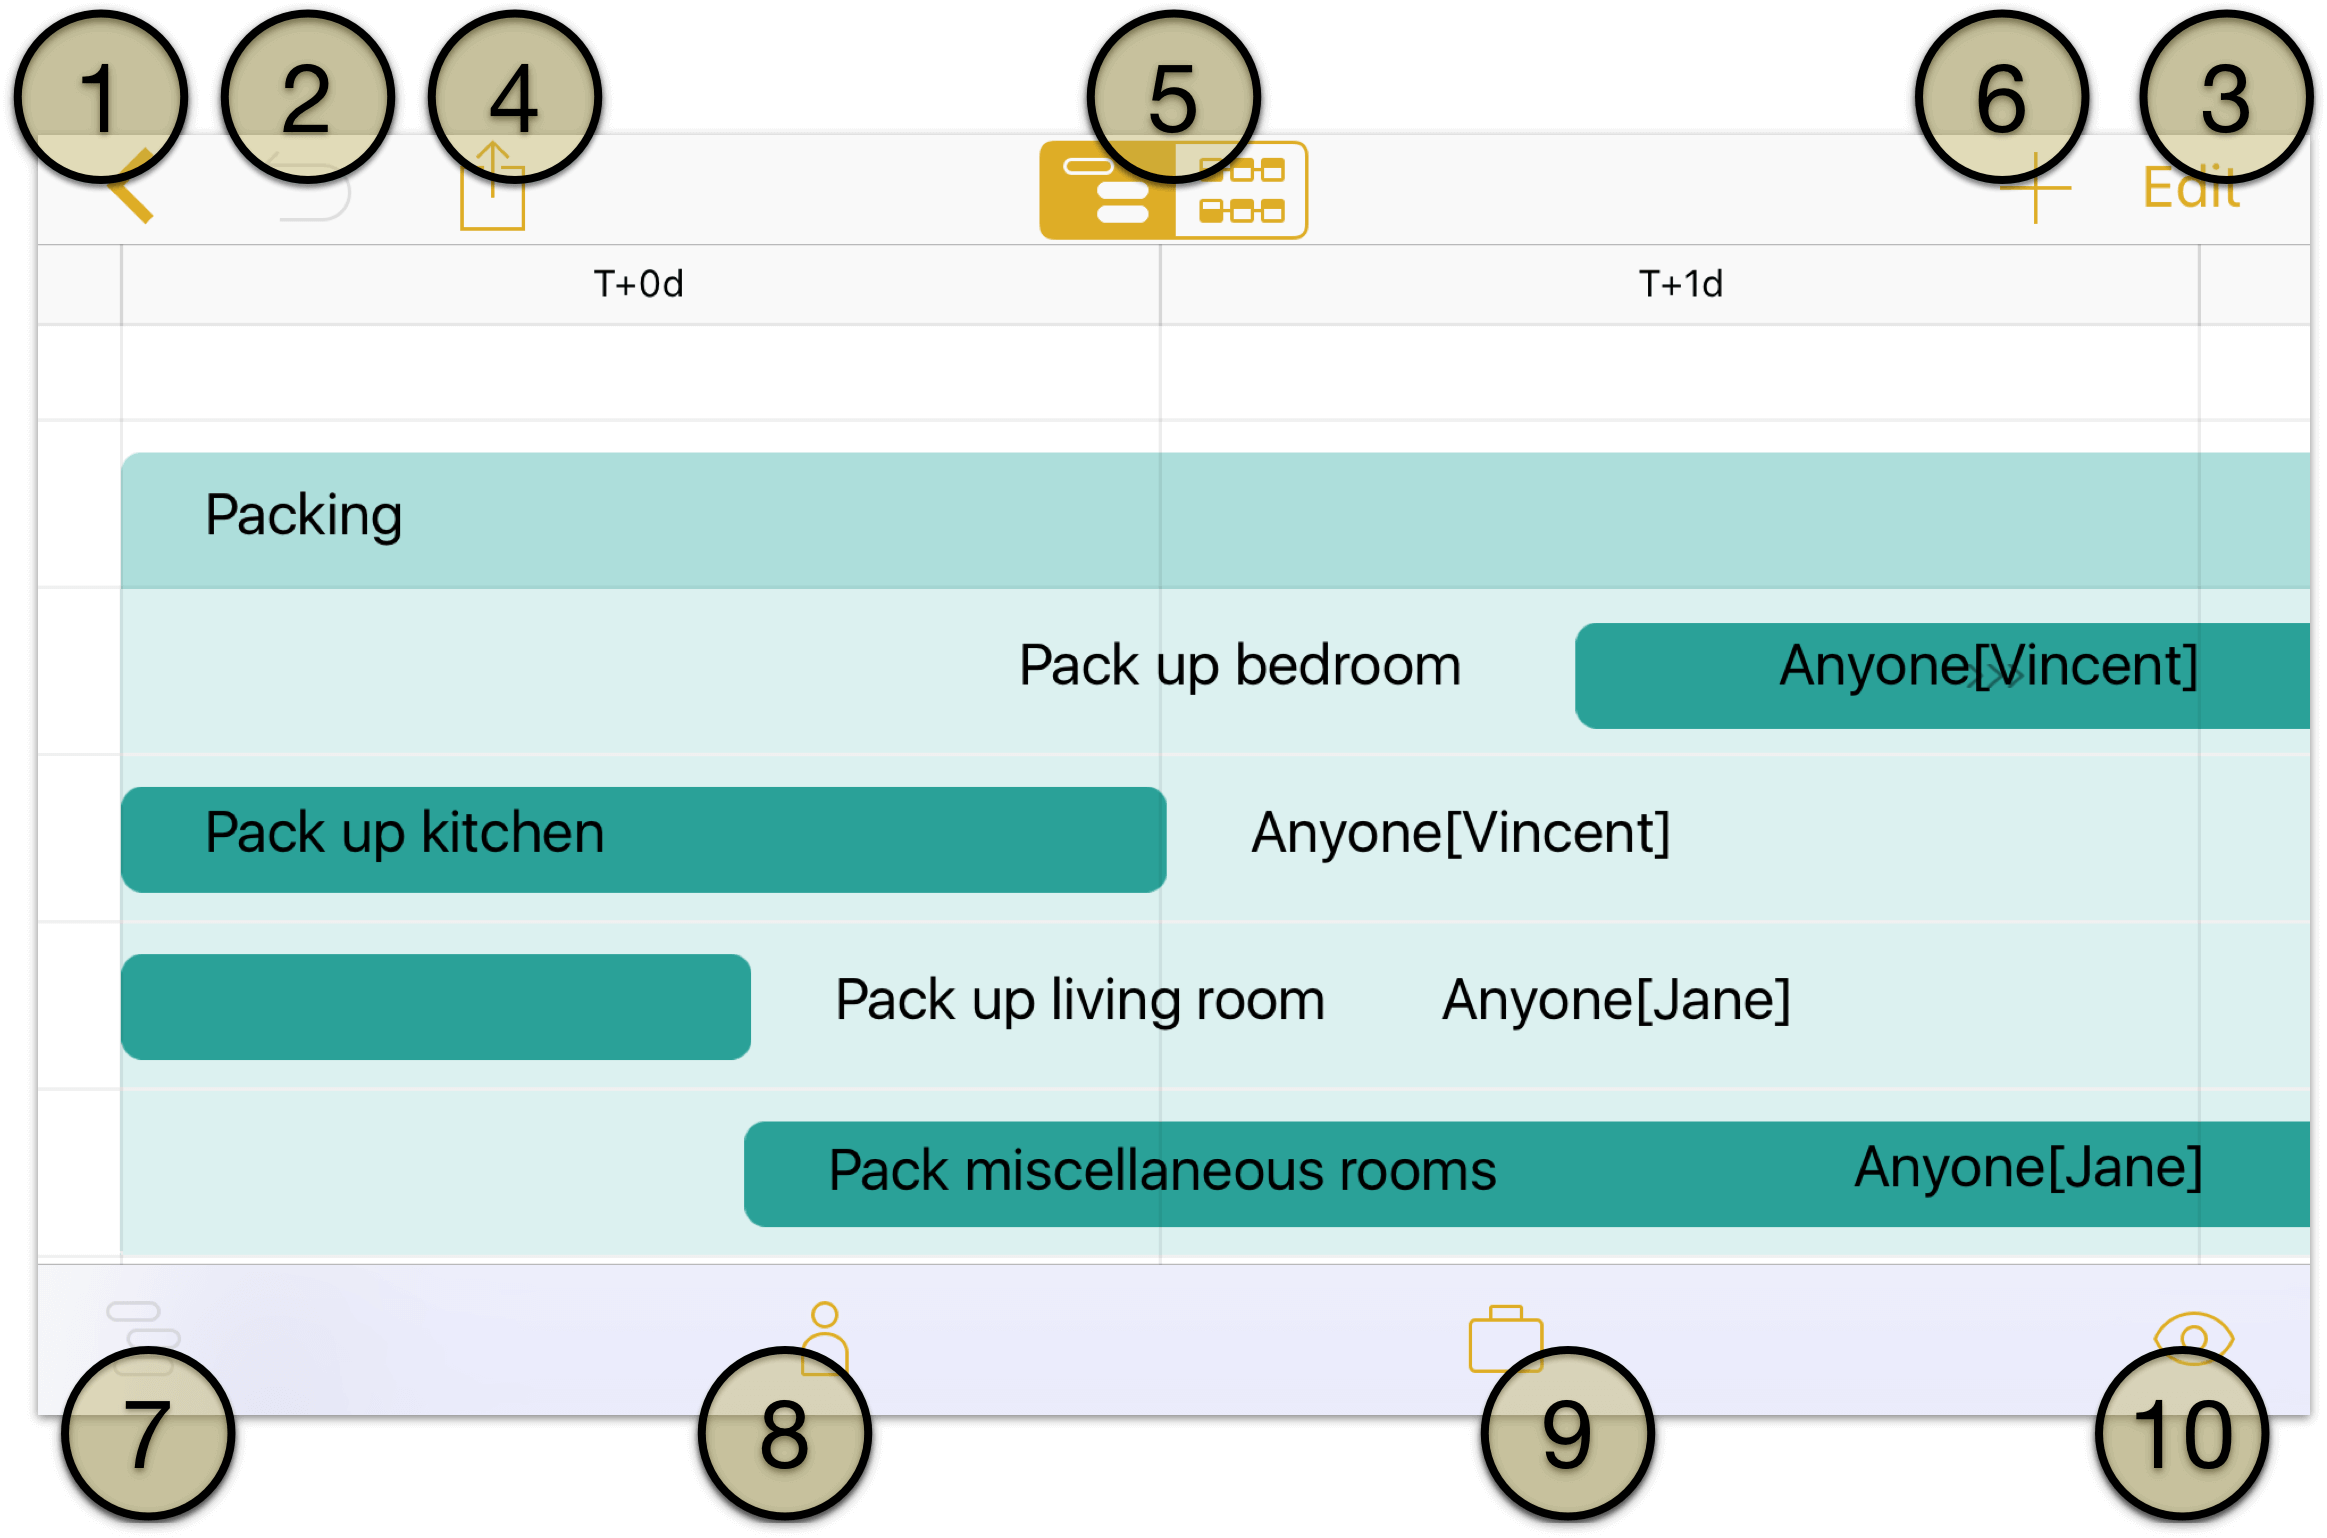
The numbered controls on the figures correspond to the following tools that make OmniPlan’s Project Editor tick. These tools are available both in the Gantt chart and in the Network Diagram, and function similarly in each view.
Projects—tap to exit the project you’re working on and return to the current folder in the Document Browser.
Undo/Redo—tap to undo or redo the previous change.
Edit—tap to enter edit mode and reveal the editing controls at the bottom of the screen. See Working in Edit Mode for details.
Share—tap to choose an export method for the current project: Send via Mail, Send to App, or Print.
View Switcher—tap to switch between the Gantt chart and Network Diagram views.
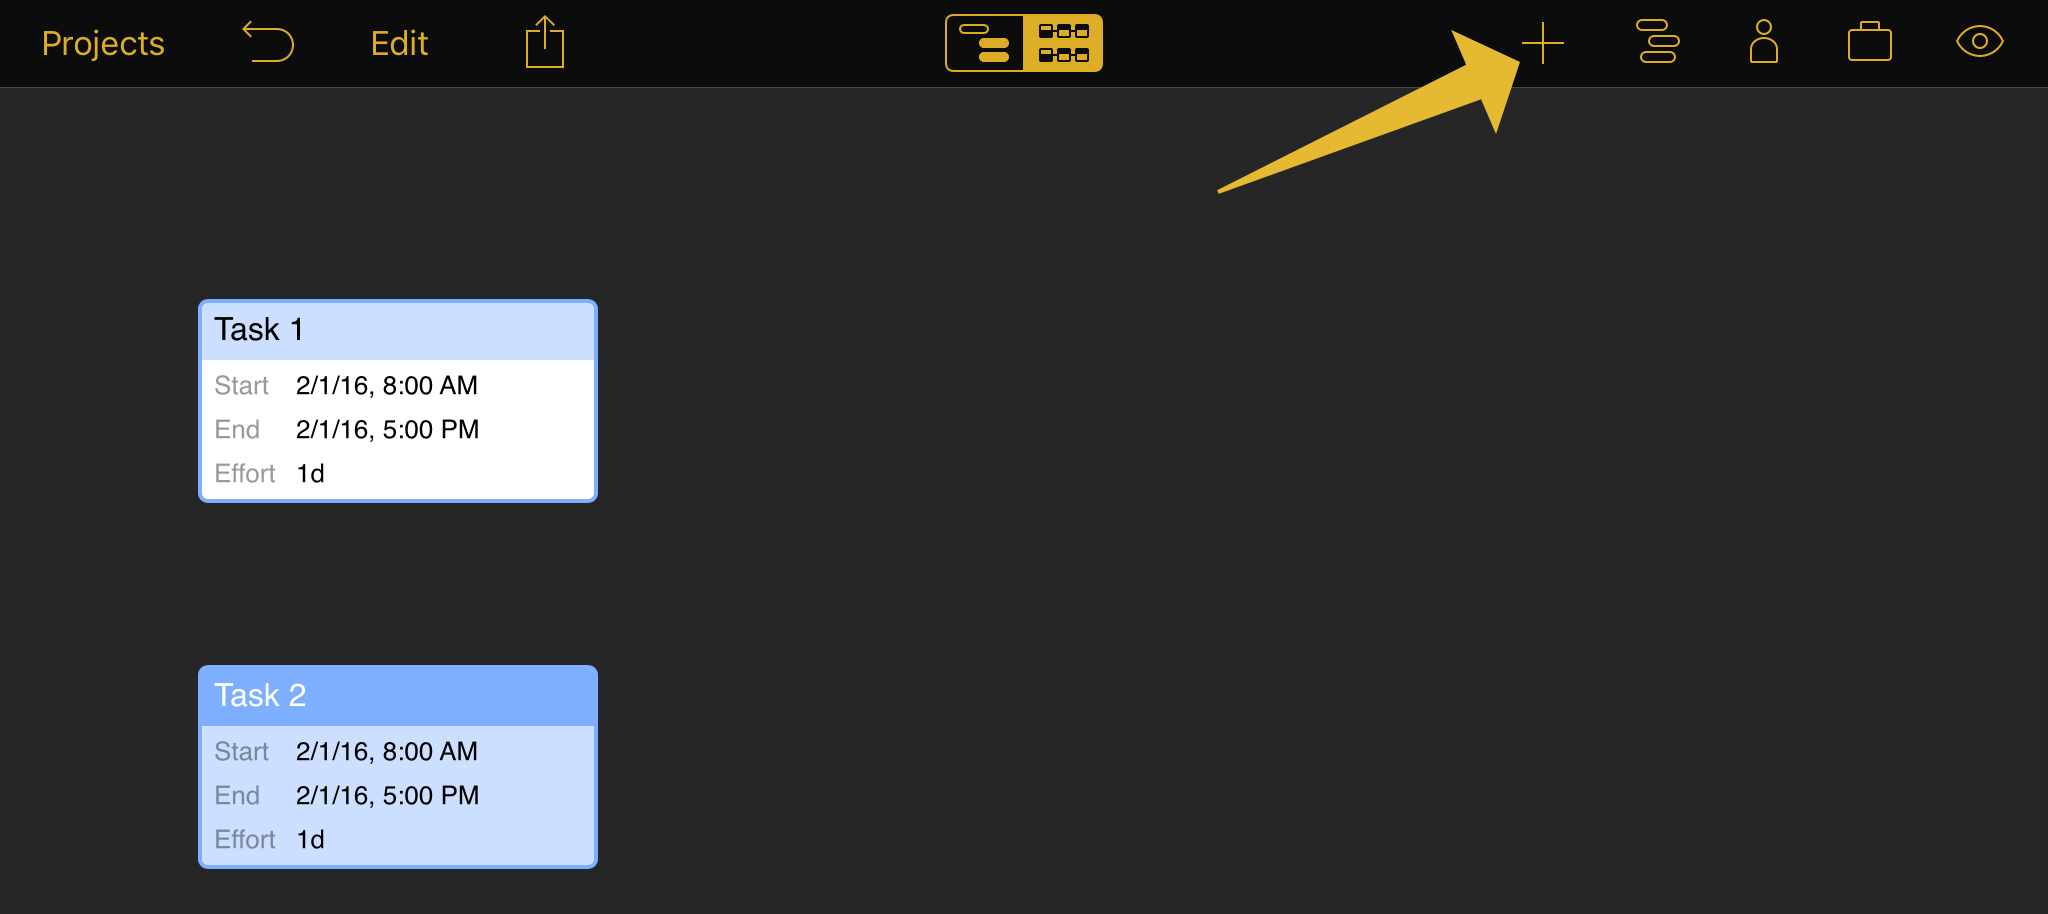
Add—tap to add a new task to the project. Touch and hold to add a new Task, Milestone, or Group from the popover menu that appears.
View Inspector—use the View Inspector to set a project filter, turn on change tracking, check for violations, and view baselines and critical paths.
Task Inspector—with a task or group selected, tap to open the Task Inspector. Use the Task Inspector to customize various aspects of the task across three panes: Task Info, Scheduling, and Assignments.
Resources Inspector—Use the Resources Inspector to create and edit resources (Staff, Equipment, Materials, and Groups), and to modify their calendars of working hours.
Project Inspector—use the Project Inspector to set the structure and parameters for your project.
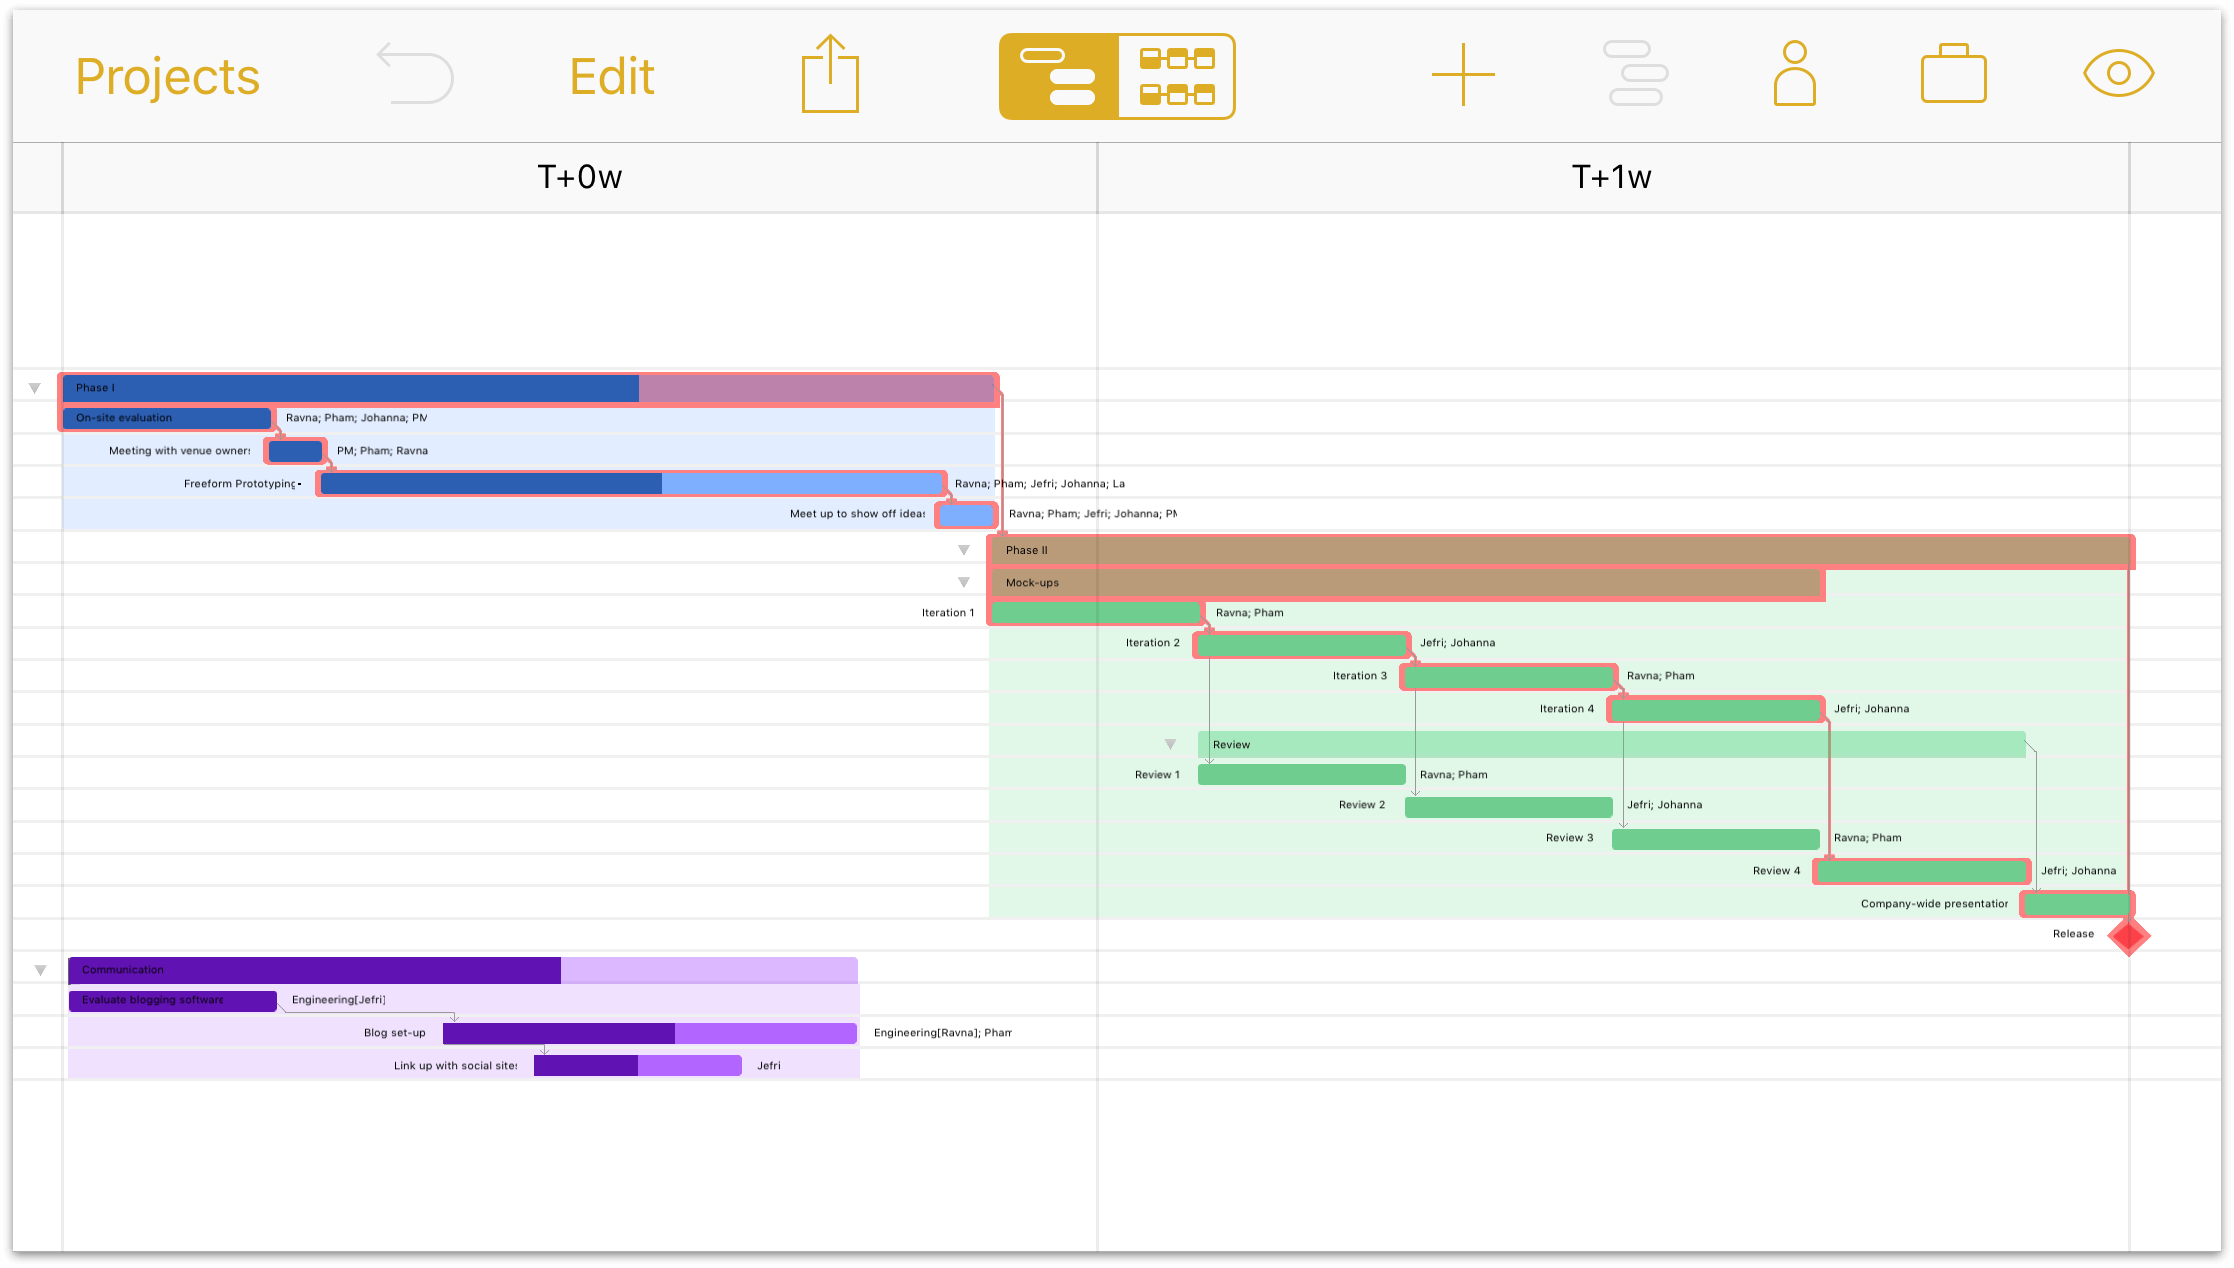
Using the Gantt Chart
The Gantt chart is a chronological list of the tasks that comprise your project, displayed as horizontal bars whose length represents their duration. Tasks that depend on other tasks are connected via a series of stepwise dependencies (dependencies are explained in greater detail in the Building a Project chapter). The Gantt chart is where you will spend much of your time in OmniPlan for iOS—whether you’re creating a new project or guiding one to fruition, this is where the hard work comes together.
Working in Edit Mode
The Add button in the toolbar—mentioned in the Project Editor section—is the easiest way to rapidly add tasks to your project. But beyond simply adding new tasks and milestones, the Gantt chart includes a suite of editing tools that provide more fine-grained control over your tasks and the relationships between them.
Tap Edit in the toolbar to enter edit mode and reveal the editing controls at the bottom of the screen. Selecting an item (or multiples) allows the following actions to be performed.

Cut—Delete the selected item or items and copy them to be pasted later. Paste by tapping Done to exit edit mode and touching and holding an item on the Gantt chart to reveal the contextual menu. When pasted, the copied items will appear below the one selected.
Copy—Copy the selected item(s) to be pasted later.
Delete—Delete the selected item(s) from the Gantt chart.
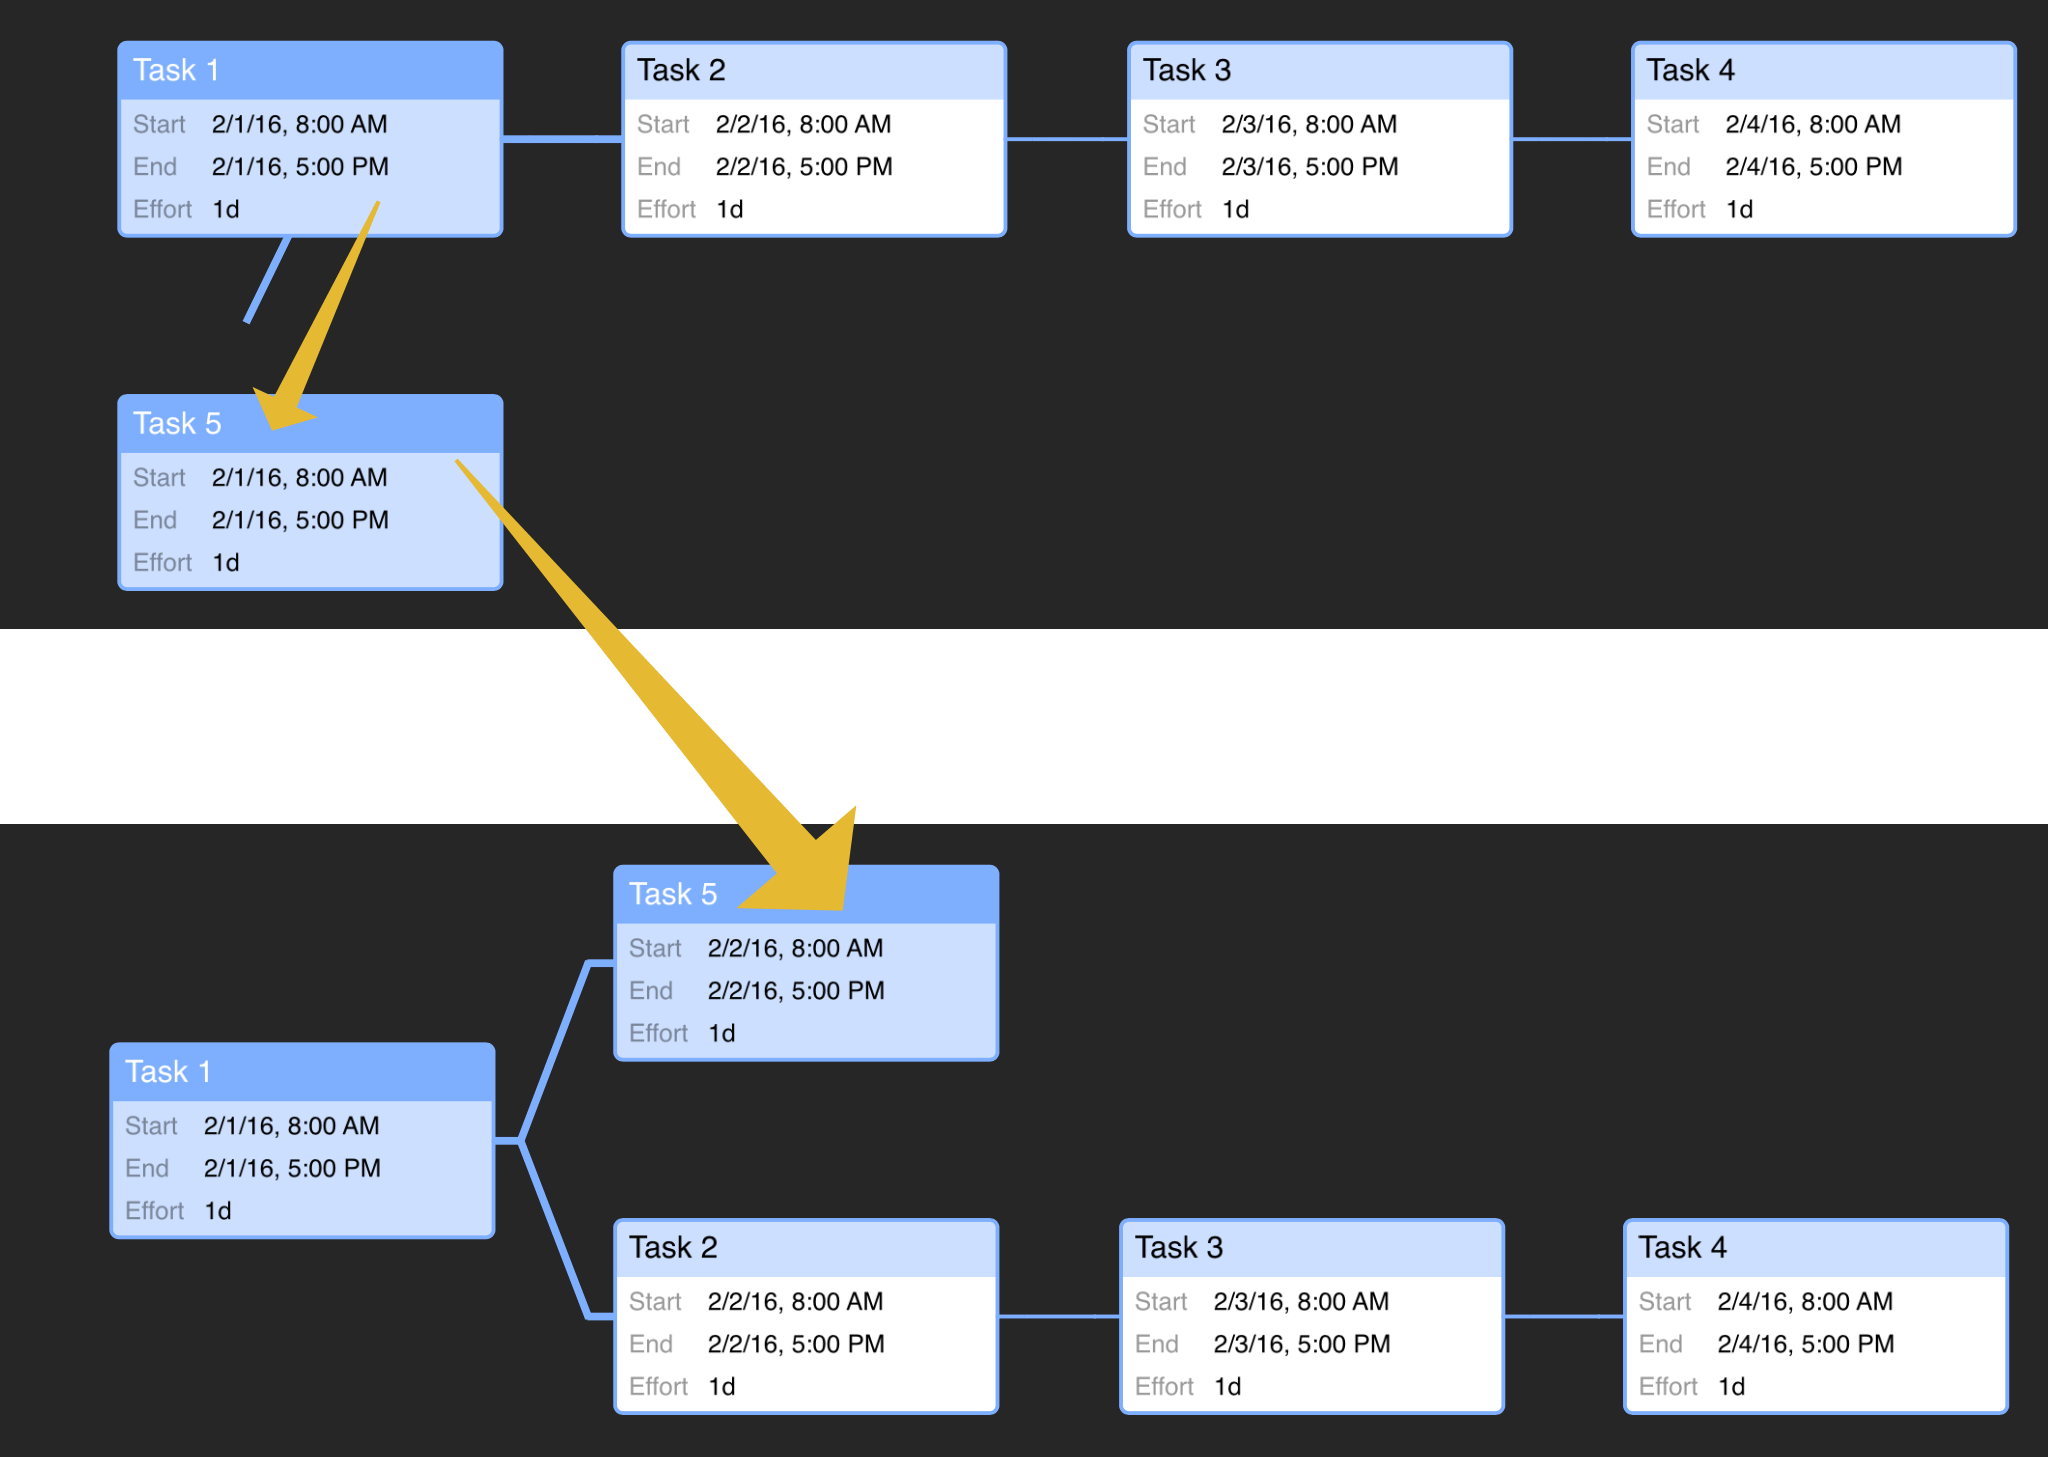
Group/Ungroup—With multiple items selected, Group creates a group containing those items. With a group selected, Ungroup removes the grouping container (but not the tasks inside it).
Move—Move the selected item or items elsewhere in the Gantt chart.
To move an item or items in edit mode, tap to select them, then tap Move. To choose their destination, tap another row. A contextual menu appears that provides three location options: Above the chosen row, Below it, and Inside. Choosing Inside converts the chosen row into a group (if it isn’t one already) and adds the items to be moved as tasks inside it.
Connect/Disconnect—With multiple items selected, this command connects them with finish ▸ start dependencies (if they’re not already connected) or removes dependencies between them (if they’re currently connected).
Note
Edit mode is available in both the Gantt chart and Network Diagram views. However, due to the Network Diagram’s node-based task flow, editing actions that rely on row placement (such as Paste and Move) aren’t available in Network Diagram view.
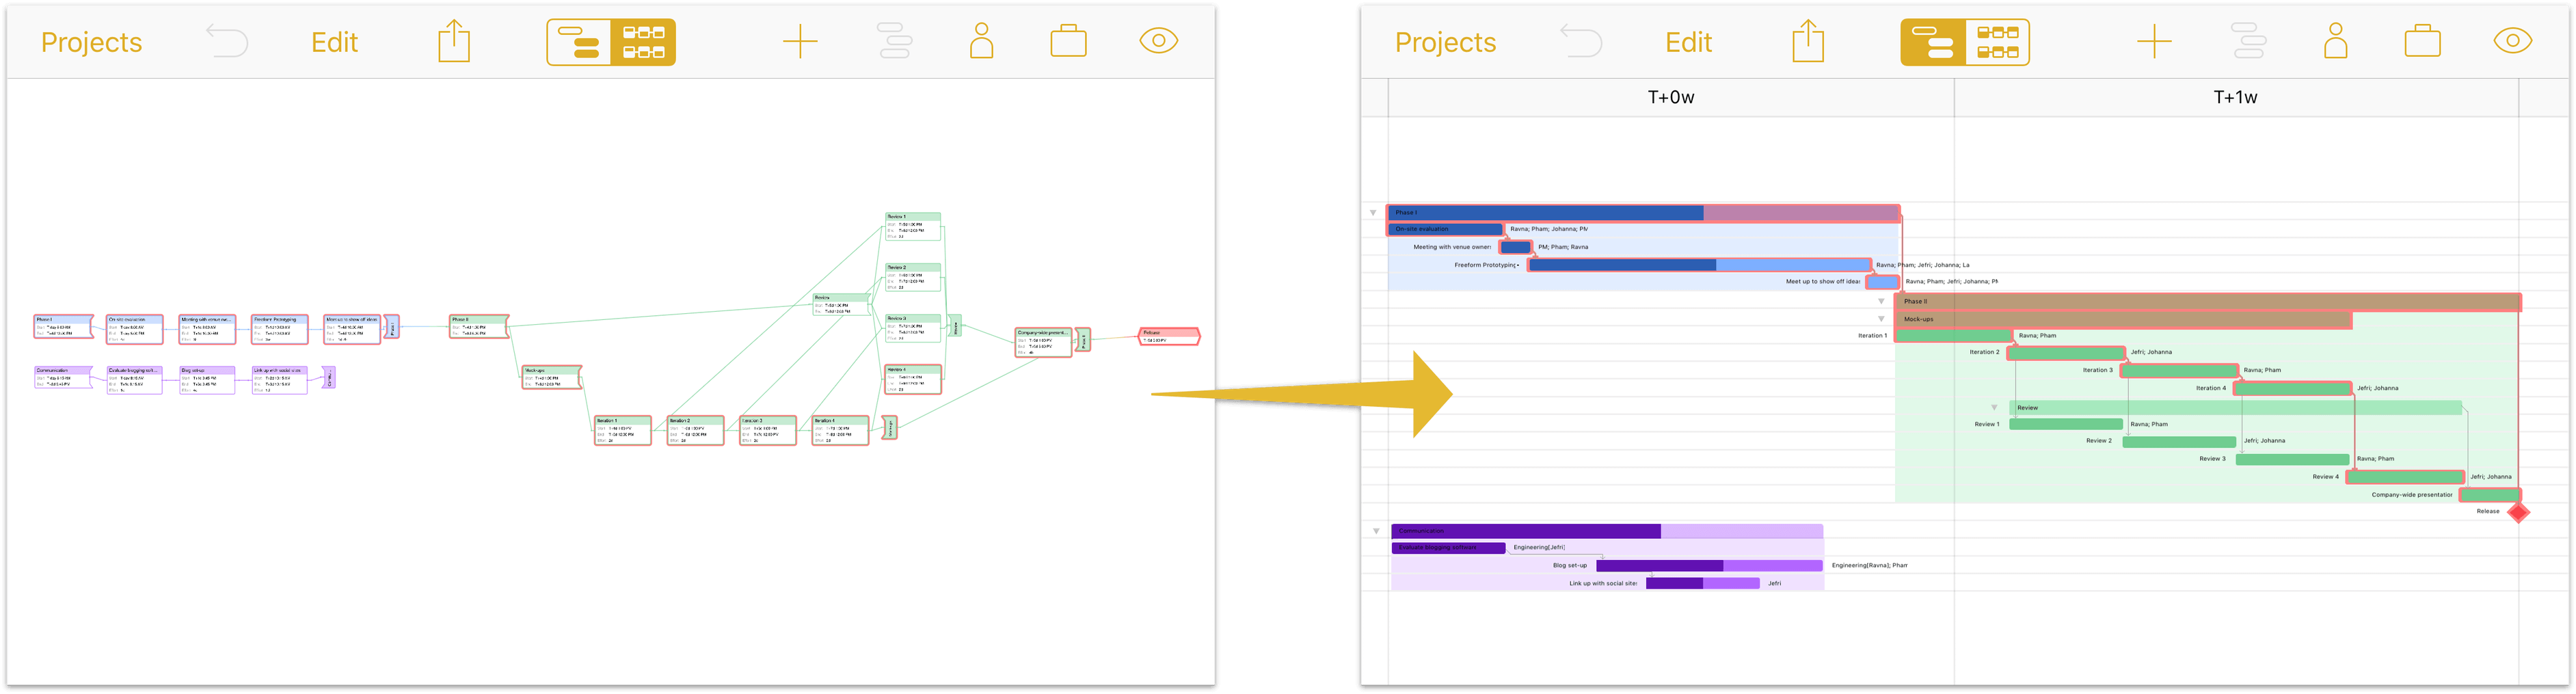
Using the Network Diagram
A project’s Network Diagram offers an elegant, visually descriptive view that depicts the project’s tasks as a collection of nodes connected by dependencies. Whether used as a tool for rapidly prototyping a new project or getting a handle on the complexities of an existing one, using the Network Diagram provides a great new perspective on your project.

Charting Tasks and Dependencies
When you’re ready to start building (or adding to) a project in Network View, tap the View Switcher to toggle away from the Gantt chart, and tap Add. That’s it! A new task is created.
If you had a task selected previously, the new task will be connected to it by a line that represents a Finish ▸ Start dependency. As long as a task is selected, you can quickly create a chain of tasks connected with Finish ▸ Start dependencies by continuing to tap Add. If no tasks were selected, the newly created task is independent of any others.
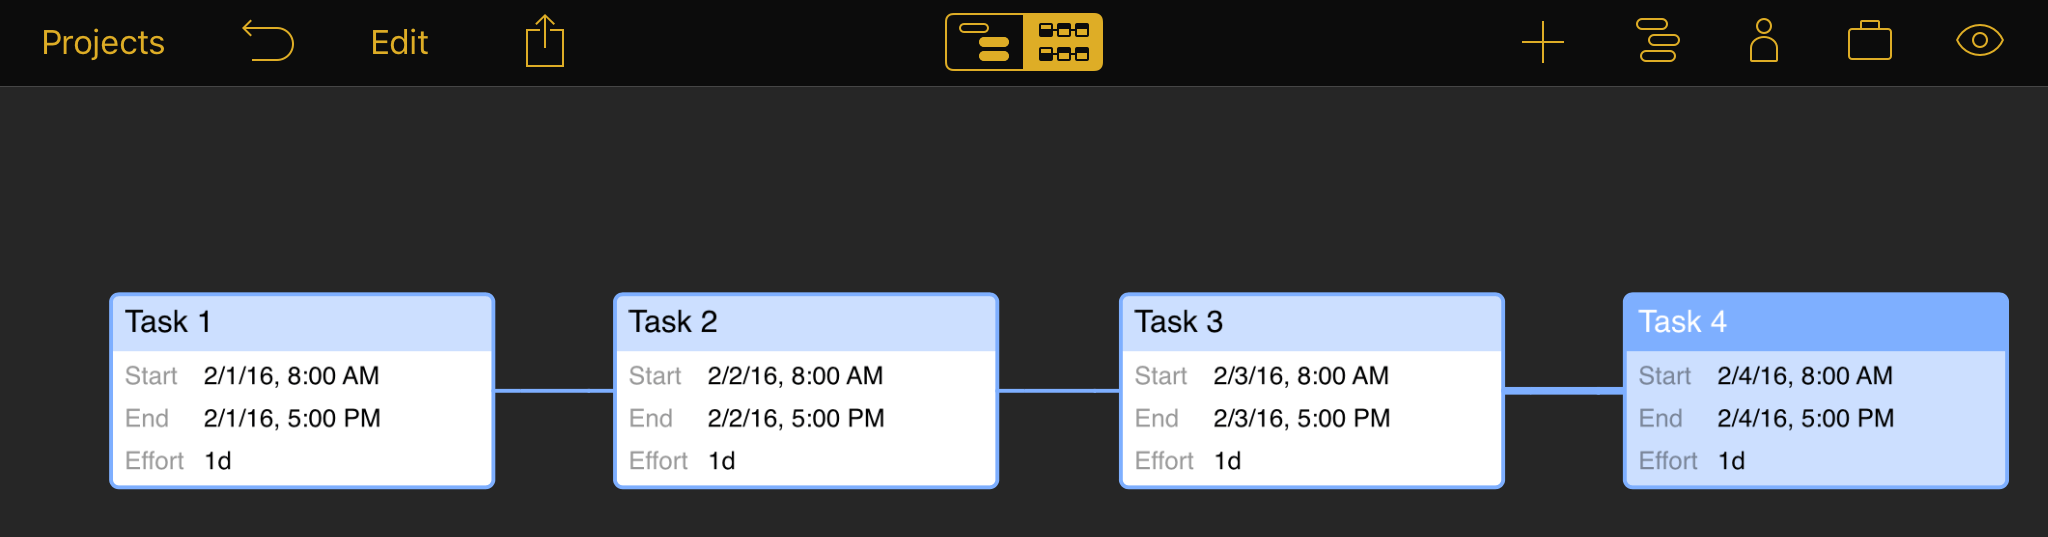
An unbroken chain of tasks with Finish ▸ Start dependencies is arrayed in a straight horizontal line.
To create other dependency relationships, tap a task node to select it and drag the line that appears to another task. This creates a dependency between them, and you’ll see the tasks rearrange in the diagram automatically to reflect this new relationship.
At any time while working in the Network Diagram, you can switch to the Gantt chart to see how your project-building exercise is looking, and see how its dependencies are described there.
When you’re working on a project of considerable size, you can zoom in and out on the Network Diagram using the vertical pinch gesture shared by the Gantt chart.
Using the Project Inspector
Accessed from the toolbar, inspectors are menus that contain sets of controls and input options for defining the parameters of all aspects of your project.
The Project Inspector contains tools for fine-tuning the details of your project’s structure and operating parameters.

Project Title—edit the project’s name here.
Publish and Subscribe (Pro)—configure the publication and subscription settings for this particular project. The Multi-User Collaboration chapter describes this feature in detail.
Dates—choose from Undetermined or Specific dates for your project. Undetermined dates are represented by T+0d, T+1d, T+2d, and so on, while Specific dates are chronologically anchored to set days in the calendar.
Direction—choose whether work on your project proceeds Forward from a Fixed Start or Backward from a Fixed End. This determines the direction from which tasks will be scheduled; the former schedules tasks as soon as possible, while the latter schedules them as late as possible. Individual task directions can be set in the Task Inspector. Projects typically have a predefined start date or final deadline (and sometimes both), so choose whichever is appropriate for your project.
Work Hours—set the calendar of normal working hours for the project here.
Monte Carlo Simulations (Pro)—in OmniPlan Pro, use this control to assign effort estimates and run Monte Carlo simulations to estimate on-time milestone completion.
Start Date—set the start date for the project. This option is only available if you have set a Specific start date for your project, rather than an Undetermined date.
End Date—set the end date for the project. This option is only available if you have set a Specific end date for your project, rather than an Undetermined date.
Total Cost—check here to see the total cost for your project, based on Cost/Hour and Cost/Use values you’ve assigned to resources contributing to the project.
Currency—set the currency type for your project’s expenses and costs.
Granularity—choose from Exact, Hourly, or Daily to specify how precisely to schedule task start and end times (this applies when leveling, too).
Duration Format—choose how to display time amounts throughout the project. The duration at the top of the screen is a preview that changes based on which time units you choose to display.
Effort Format—choose how to display effort amounts throughout the project. The effort value at the top of the screen is a preview that changes based on which units you choose to display.
Effort Conversions—choose how many work hours to count as one day, week, month, or year. This affects how large amounts of effort are entered an displayed.
Using the Task Inspector
The Task Inspector contains tools for setting details of tasks (with the Task Info pane), scheduling influences and constraints on the task (with the Scheduling pane), and resources allocated to the task (with the Assignments pane).
The Task Info Pane
The Task Info pane of the Task Inspector provides settings for describing the parameters of the task, including its name, note, type, amount of effort or duration required to complete, and its visual appearance in the Gantt chart and Network Diagram.
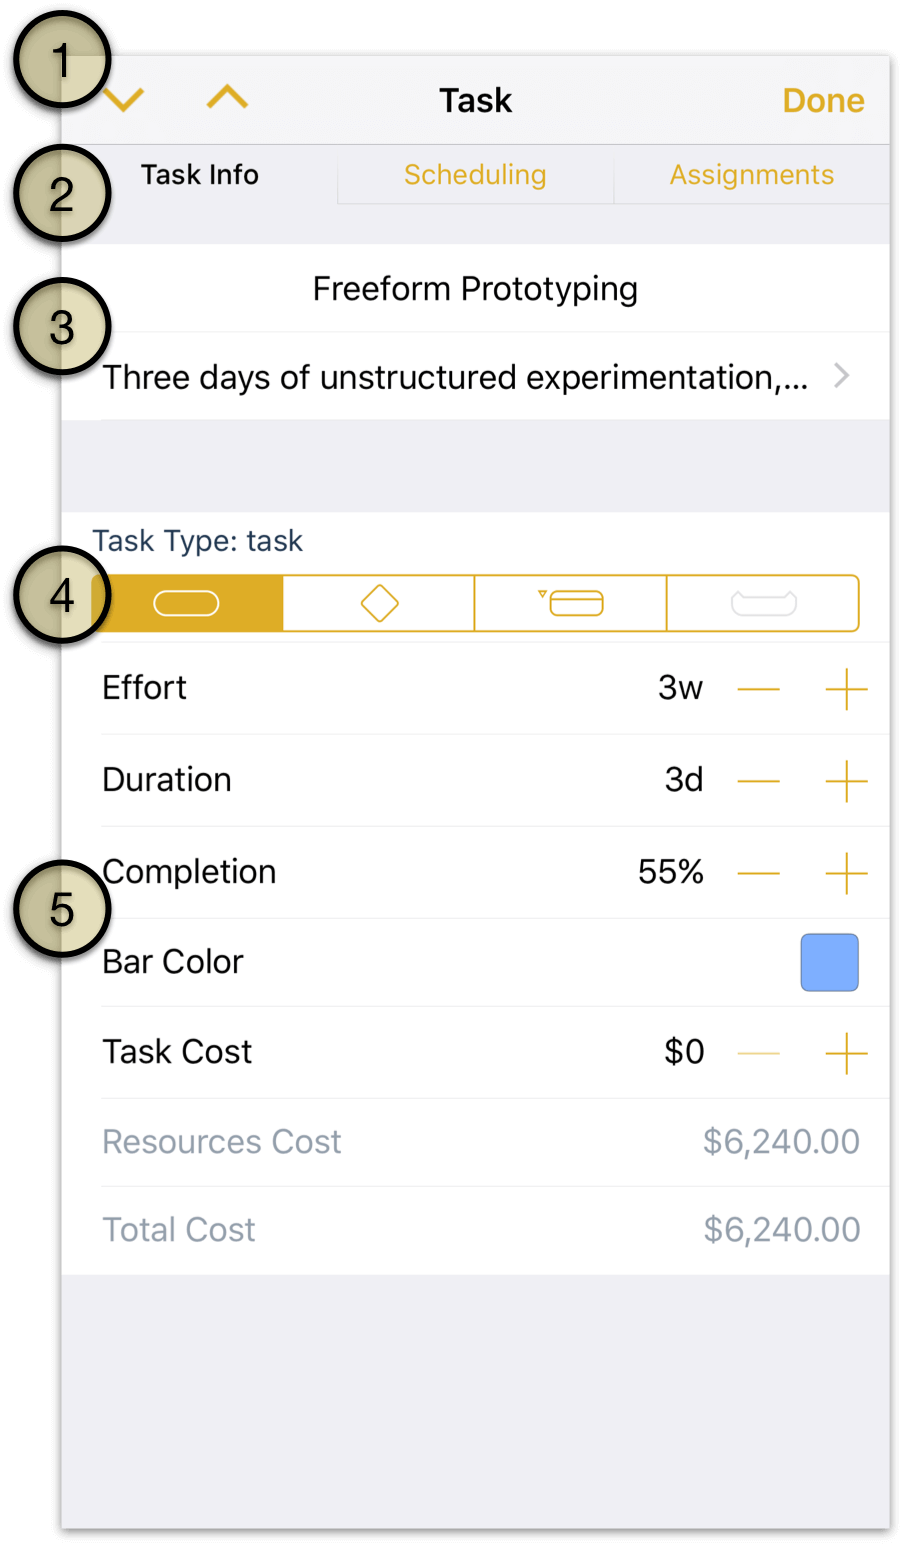
Task Switcher—use the up and down arrows to move between tasks in the Project Editor while keeping the Task Inspector open.
Inspector Panes—switch between the three panes of the Task Inspector (Task Info, Scheduling, and Assignments).
Task Name and Note—edit the task’s name, and add a text note containing any additional relevant information.
Task Type—choose a type for the task: Task, Milestone, Group, or Hammock.
Task Metadata—attributes of the task that determine its scope, progress, cost, and visual presentation.
Effort—the amount of work hours required to complete the task. This value may be automatically adjusted based on the method for assigning resources chosen in Resource Assignment Options in the Assignments pane of the Task Inspector.
Duration—the length in actual time required to complete the task, based on the amount of effort assigned to it. This value may be automatically adjusted based on the method for assigning resources chosen in Resource Assignment Options in the Assignments pane of the Task Inspector.
Completion—the amount of work on the task that is currently complete, expressed as a percentage.
Task Cost—the cost of the task, in addition to the cost/hour or cost/use of any resources assigned to it. Expressed in the units of currency set up in the Project Inspector.
Bar Color—the color of the task’s bar in the Gantt chart.
Resources Cost—this value isn’t edited directly, but represents the total cost of the resources currently assigned to the project based on the resources’ cost per hour or cost per use.
Total Cost—as with Resources Cost, this value isn’t edited directly. It combines the Task Cost and Resources Cost values for an at-a-glance summary of the projected cost of the task in its entirety.
The Scheduling Pane
The Scheduling pane of the Task Inspector describes how the task is contextually integrated into the project. It lists other factors influencing when the task is allowed to begin, provides controls for locking the task at a point in the project’s calendar, and shows any other tasks that are dependent on the tasks completion to begin.
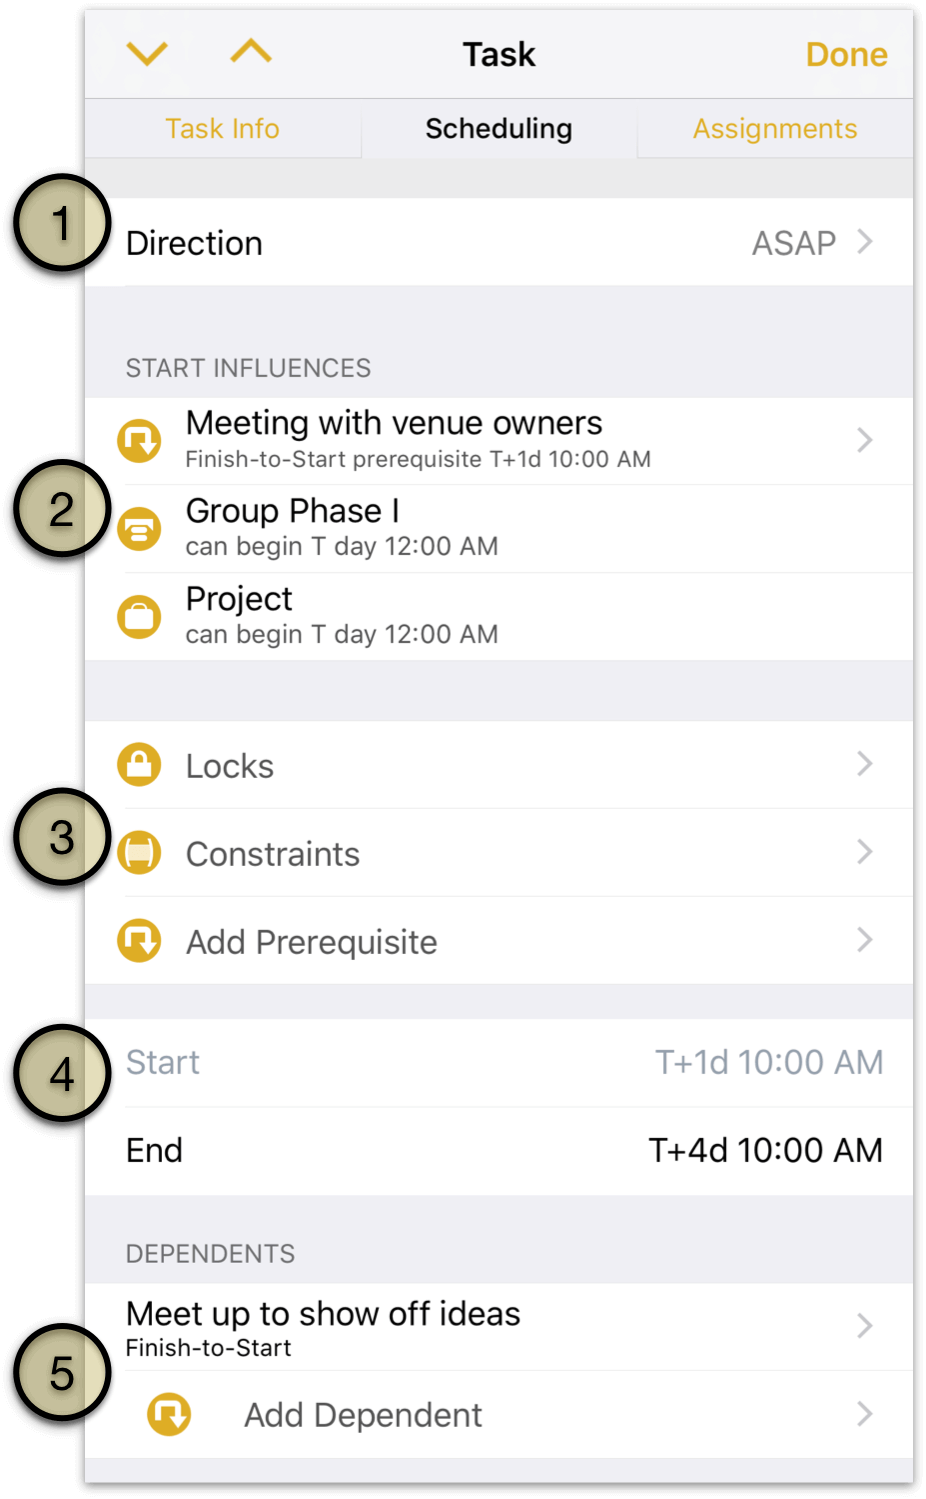
Task Scheduling Direction—choose whether the task should be scheduled as soon as possible (ASAP) or as late as possible (ALAP). This affects how the task is scheduled when leveling resources, and overrides the Direction setting in the Project Inspector for this individual task.
Task Influences—this section lists other aspects of the project that affect when the task can be scheduled, such as the project’s overall start date or the date a task group containing the task can begin.
Task Constraint Editors—these editors control various task parameters that limit when the task can be scheduled.
Locks—lock the task’s start and/or end dates here. Locking either or both of these dates prevents other factors, such as leveling after assigning additional resources to the task, from changing the dates its work is scheduled for.
Constraints—add bounding constraints to anchor the task loosely in time between “bracket periods” during which the task is allowed to start or end.
Add Prerequisite—choose a task from the list to create a finish ▸ start dependency between that task and the one currently being edited, adding a new prerequisite task that must be completed before this one can begin.
Task Start and End—edit the task’s start and end dates. One or the other may be inaccessible; this can be due to a scheduling rule or other constraint (such as the absolute start date of the project). Note that unless they’re locked in, setting these dates doesn’t prevent them from being changed by leveling later.
Task Dependents/Prerequisites—a list of tasks dependent on the current task’s completion to begin. Tap a task to view its details and add lead time if desired. Tap Add Dependent to select another existing task to add as a dependent using a finish ▸ start dependency from the current task.
If the selected task has any prerequisites to its own beginning, those will be listed here as well.
The Assignments Pane
The Assignments pane of the Task Inspector controls how the task should be prioritized when leveling, and provides tools for assigning and configuring resources assigned to the task.
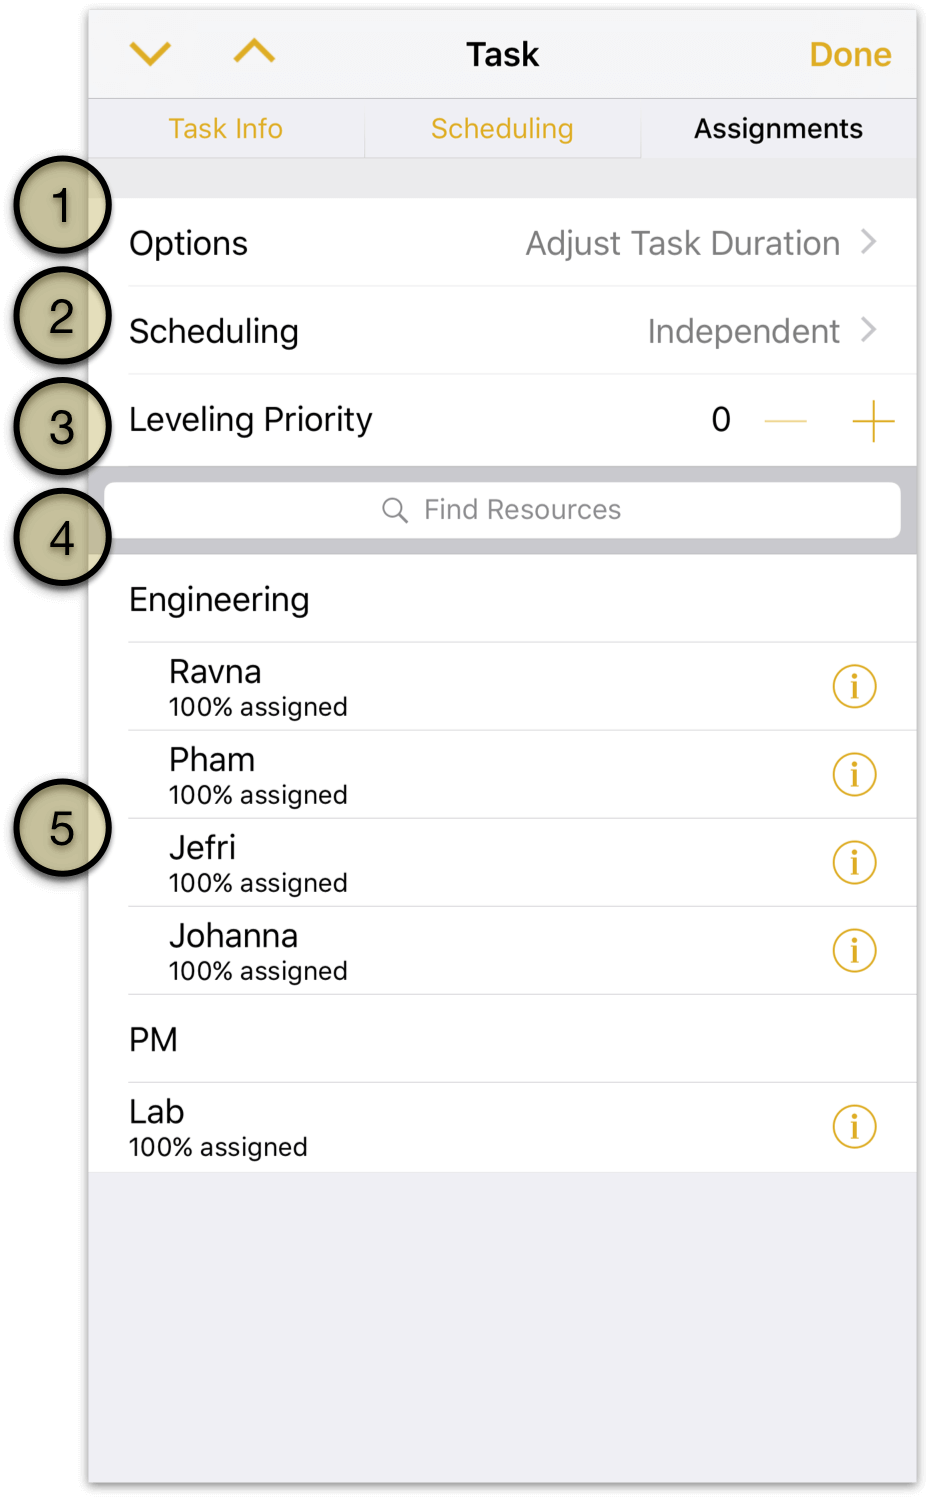
Resource Assignment Options—when resources are assigned to (or removed from) the task, set how the task’s effort, duration, and assignment percentages should change based on the revised resource allocation.
Resource Scheduling Method—by default, resources assigned to a task can put in their hours whenever is most convenient based on other scheduled work. The Meeting task type adds the option, when leveling, to require all resources be present to work on the task simultaneously.
Task Leveling Priority—when leveling, tasks with no constraints or dependencies will be queued based on their order in the Gantt chart unless they are given a priority here. Lower positive integers indicate higher priority (1 is the highest); tasks do not require consecutive priority numbers for their order to be respected.
Resource Selector—use this field to filter the resource list alphabetically. If a desired resource doesn’t already exist, add it using the Plus button that appears at the bottom of the filtered list.
Assigned Resources—view a list of all the project’s resources here, along with information about their assignments relative to the selected task. Any resource assigned to the task will list the percentage of its effort assigned below its name, and will have an Info button with details about the assignment and the option to change the percentage of effort being contributed.
Using the Resources Inspector
The Resources Inspector contains tools for resource creation, calendar customization, and resource leveling.
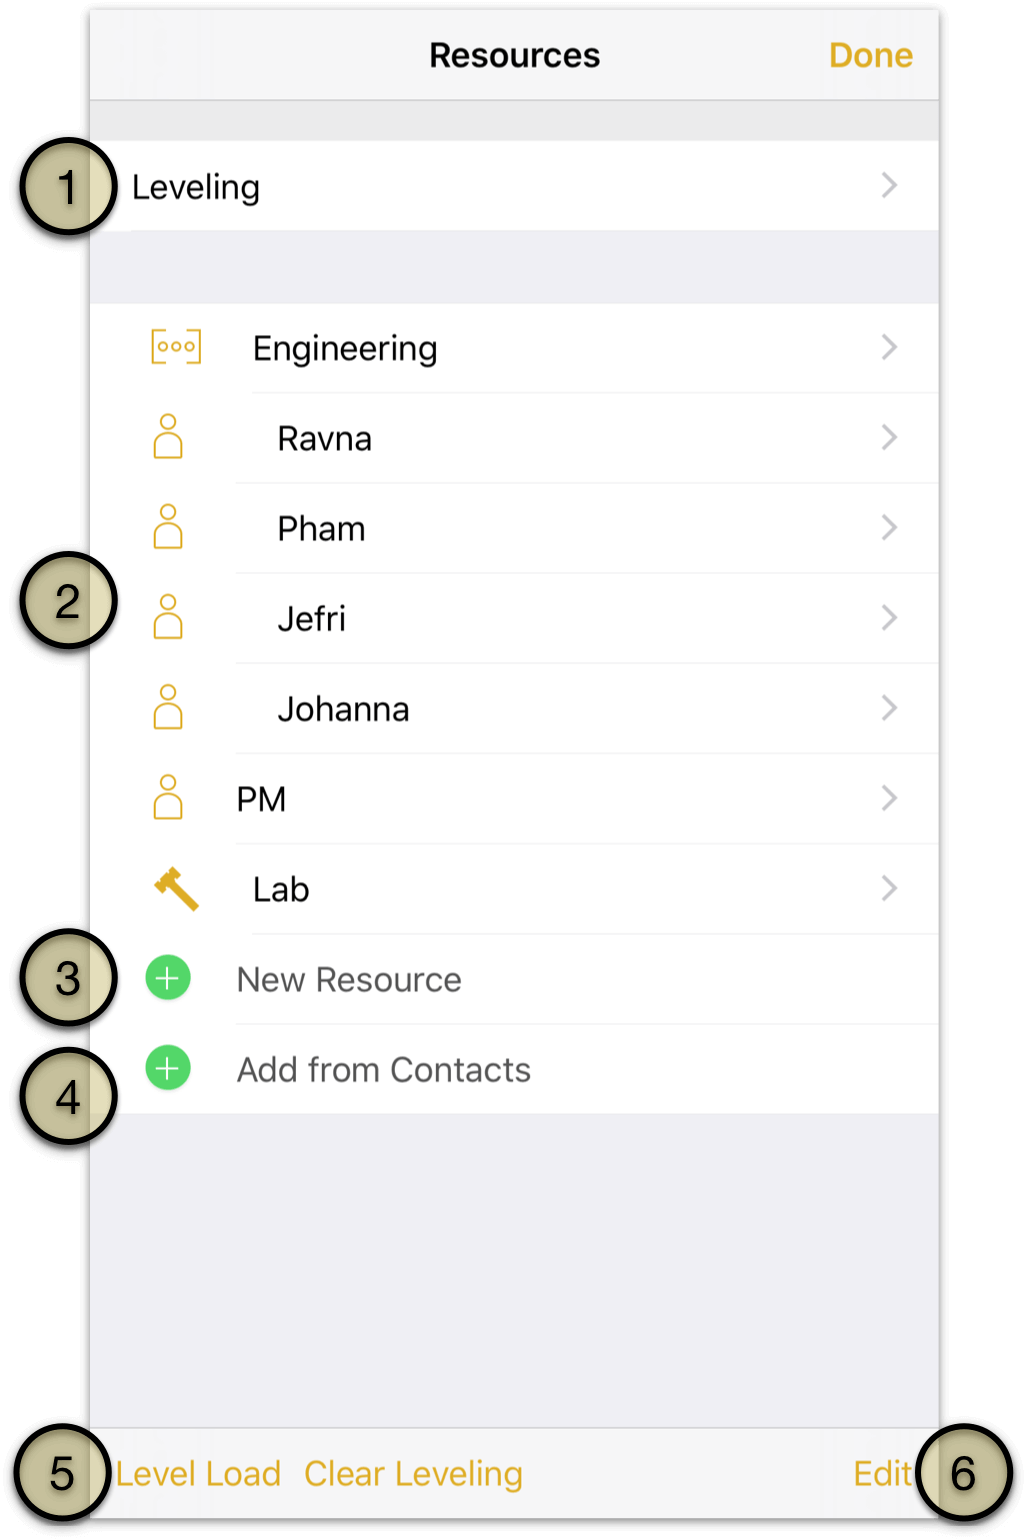
Resource Load Leveling Controls—choose whether to automatically level resource loads across the project whenever a change is made, whether leveling affects only the schedules of tasks in the future (from the current date), and whether to allow tasks to be split as part of the leveling process.
Resource List—a list of all resources currently assigned to the project. Tap a resource to view its details, including type, email address, regular work hours and off hours calendar, units and efficiency, cost/use and cost/hour, and bar color (only relevant when sharing resources with a project in OmniPlan Pro for Mac).
Add New Resource—add a new resource to the project and customize its details.
Add from Contacts—grant OmniPlan access to your Contacts list to add resources to your project directly from there.
Level Resource Loads/Clear Leveling—reschedule tasks and change resource loads to most efficiently complete your project based on all the other parameters you’ve set up for individual tasks, resources, and the project as a whole. Or, remove leveling optimization with Clear Leveling.
Edit Resources—Switch to Edit mode, where resources can be removed with the deletion switch next to their names, and reorganized—including movement between resource groups—with their reordering handles.
Using the View Inspector
The View Inspector contains tools for customizing how data is displayed in the Project Editor, with a particular emphasis on tracking project progress.
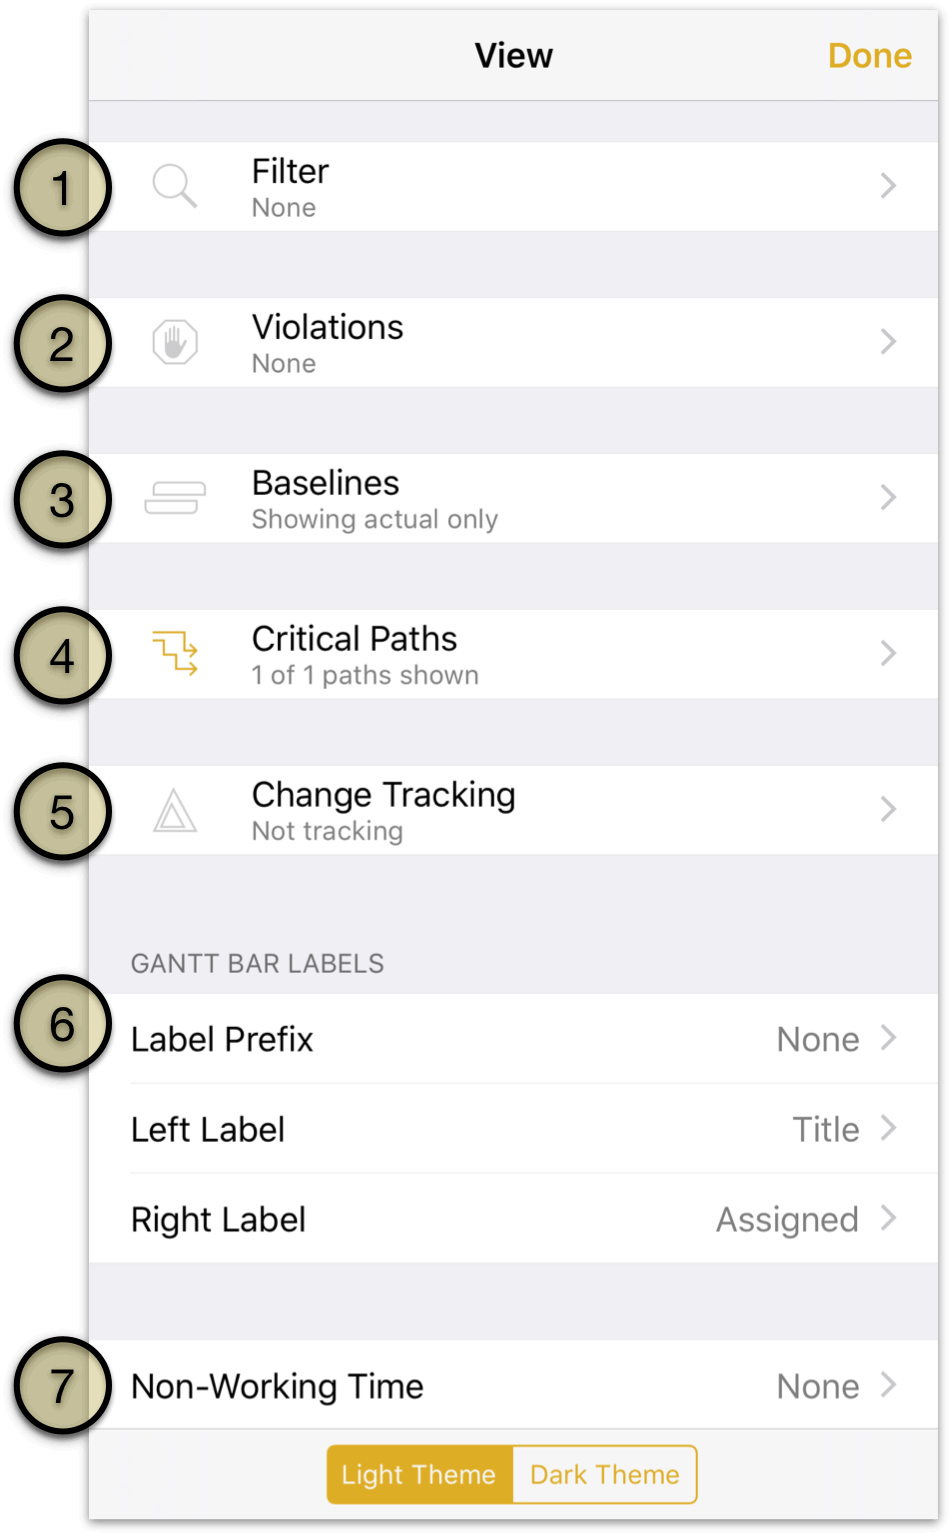
Project Task Filter—apply a filter to the Project Editor that limits which tasks are visible. Choosing a filtering parameter here doesn’t affect the hidden items beyond removing them from view.
Violations—when a logical contradiction arises in your project, such as a result of an impossible dependency relationship or a scheduling change that violates date restrictions you’ve set up, you’ll see details on the problem here along with a suggested solution to resolve it.
Show Baselines—a baseline is a snapshot of project’s state of affairs against which the actual schedule can be compared. Set a baseline with Set Baseline in the bottom toolbar, and choose which you’d like to compare against the actual schedule from the list. Tap Edit to remove baselines with the deletion switches next to their names.
Show Critical Paths—choose which critical paths you would like to display in the Gantt chart, including critical paths to each milestone and the overall project. Tap a milestone to edit details of its critical path display: choose whether or not resource constraints are considered in charting the path, pick a color for the path line, and set an amount of slack OmniPlan considers built in to tasks for purposes of considering them part of the critical path to that milestone.
Change Tracking—if you’re publishing your project to a shared server repository with multiple contributors, enable change tracking to view and approve changes made to the project by yourself and others. Select changes in the list and tap Accept Change or Reject Change at the bottom to approve or deny them.
Gantt Bar Labels—pick metadata to attach to the left and right side of task bars in the Gantt chart, and to add as a prefix.
Non-Working Time—add shading to date columns in the Gantt chart that correspond to time where no work is scheduled (based on Calendar settings in the Project inspector). Visualization options include None, Holidays, Holidays & Weekends, and All Hours.
With an overview of the tools in the Project Editor complete, the next step in mastering OmniPlan is to begin building your first original project.