Guided Tour (iPhone)
Getting to know OmniFocus by navigating through its various bits and pieces is a great way to start working with the app. This chapter takes you on a tour through OmniFocus 2 for iOS as it appears on iPhone (other than iPhone 6/6s Plus); if you're using OmniFocus on another device, your adventure begins elsewhere:
- Guided Tour (iPad)
- Guided Tour (iPhone 6/6s Plus)
- OmniFocus for Apple Watch (online support)
Home Screen
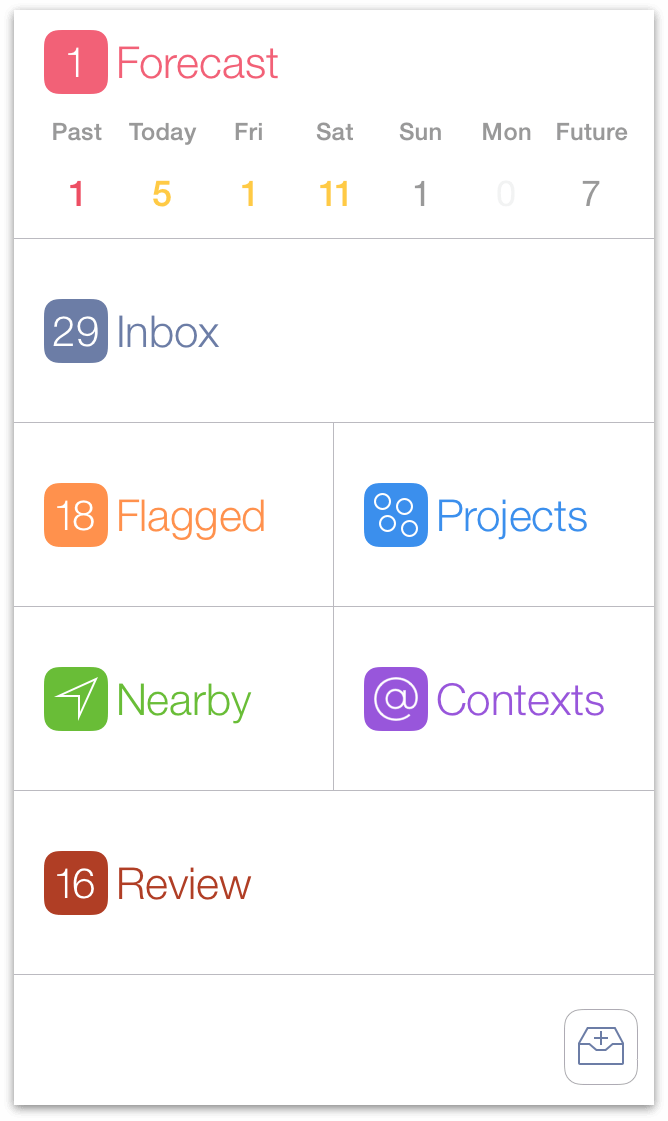
An exploration of OmniFocus begins at the Home Screen, which acts as the central hub of your OmniFocus activity. Navigate between perspectives by tapping their tiles here, and see what’s on your plate for the day and week ahead with badge icons showing a count of your most important actions.
On iPhone, navigate to the home screen by following the chevron ![]() back from whatever view you're in (or touch and hold it to return home in an instant).
back from whatever view you're in (or touch and hold it to return home in an instant).
The home screen includes the following perspective tiles by default (with OmniFocus Pro, these can be hidden, rearranged, or supplemented by your own custom perspectives):
 Forecast
- Tap Forecast to enter forecast view, where tasks for the day are shown alongside any calendars you’ve chosen to include. The badge icon counts the number of tasks currently overdue.
 Inbox
Inbox- Tap Inbox to view and process items collected in your Inbox.
 Projects
- Tap Projects to view a list of your projects, and estimate their urgency using the handy summary dots beneath each project title.
 Contexts
- Tap Contexts to view a list of your contexts, and likewise get an at-a-glance appraisal of each from the summary dots.
 Flagged
- Tap Flagged to see a list of items you’ve flagged for visibility. The number of flagged items is shown in the badge icon in the sidebar.
 Nearby
- If you’ve assigned locations to your contexts, tap Nearby to view the available actions near your location.
 Review
- Tap Review for a periodic organized check up on the progress of your projects — easily assess the status of projects one at a time, mark items complete or on hold, and adjust them as circumstances change. The badge icon shows the number of projects currently scheduled for review.
For a deeper look at how each of these perspectives work to help you accomplish your goals, see their individual chapters throughout this manual.
Note
Hovering in the bottom right corner of the home screen you'll find the ![]() New Inbox Item button. Formerly known as Quick Entry, this button lets you add a new task to your Inbox from virtually anywhere in the app (you'll see it elsewhere as you explore, too — try tapping it, it won't bite!).
New Inbox Item button. Formerly known as Quick Entry, this button lets you add a new task to your Inbox from virtually anywhere in the app (you'll see it elsewhere as you explore, too — try tapping it, it won't bite!).
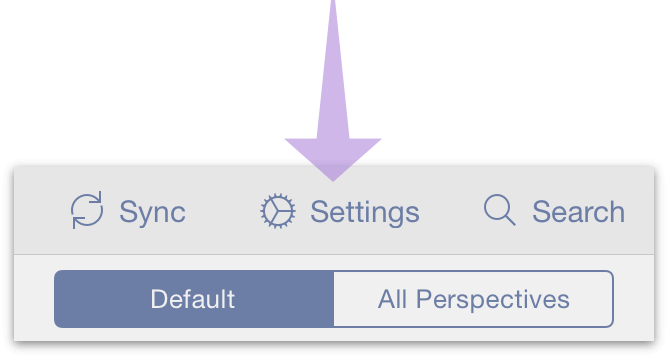
The Secret Bar (Home Screen)
Whenever you're "home" — viewing the list of perspectives in the OmniFocus home screen — drag down on the list to reveal the secret bar. The secret bar holds tools of great power, but relatively infrequent use; that’s why they’re safely kept out of the way for just when you need them.
 Sync
Sync- Tap Sync to trigger a sync manually. This is useful any time you want to update OmniFocus on your other devices, or make sure your device is up to date with your remote database.
Note
OmniFocus syncs automatically whenever changes are made, so you shouldn't have to do this very often (if ever).
 Settings
- Tap Settings to customize your OmniFocus experience, contact Omni Support, find help, and more. Read about the available options in detail in the Settings chapter.
- Default and All Perspectives
- Use this switch to choose the set of perspectives that appears in the sidebar. Default shows the seven built-in perspectives, while All Perspectives reveals Completed and Changed as well. With the Pro upgrade installed Default becomes Favorites, a space that's fully customizable using the Tile Editor (see below).
The OmniFocus Pro upgrade adds two additional buttons to the secret bar that unlock some pretty powerful features: creating custom perspectives with the perspective editor, and customizing the home screen with the tile editor.
 New Perspective (Pro)
With the OmniFocus Pro upgrade installed, tap New Perspective to create a new custom perspective. To change the view settings of a currently existing perspective, go to the perspective and drag down to reveal its secret bar, then tap View
 . The icon changes to
  when editing a custom perspective.
 Tile Editor (Pro)
In OmniFocus Pro, tap this button to enter tile editing mode. Completely customize the appearance of your sidebar by touching and dragging perspective tiles into the desired full- and half-width rows (existing perspectives will kindly get out of your way), or drag them down to the Other Perspectives section to indicate that they aren't part of your favorites.
Tap Done — or anywhere else on the screen — to confirm your layout change, or tap Cancel to exit tile editing without saving your changes.
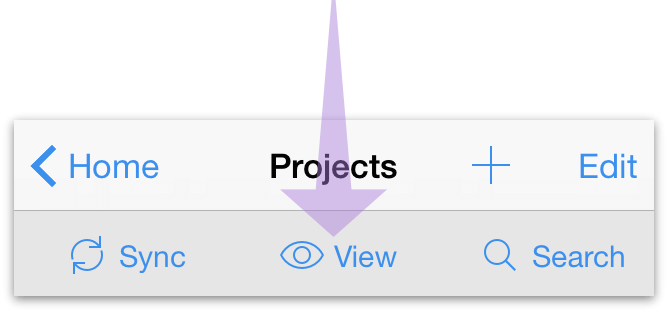
The Secret Bar (Perspectives)
Drag down on the main outline in individual perspective views to reveal the secret bar there, too. Unlike the home screen's secret bar, these perspective-specific bars hold tools relevant to your location (along with the ever-present option to Sync).
 Search
- Filter title text and note field contents for search terms across three useful scopes: Here, which includes everything visible in the main outline; Remaining, which includes all items not completed or dropped; or Everything, which searches your entire database.
 View
View- Choose which items are visible in the current perspective's main outline. View settings are based on item status, and include First Available, Available, Remaining, and All. In context-based perspectives, view settings also control how items are sorted: either with items shown in order of soonest Due Date & Flagged status, or grouped by Project.
The Toolbar
When viewing the main outline you'll also see the toolbar at the top of the screen. It contains a few helpful functions, described below:

 Add New…
Add a new item based on your current view in the main outline. When multiple options for new items are available (such as at the top level of a perspective), tapping Add New displays a list of available items to create.
When you're deep inside a project, looking at a specific day in Forecast, or using the Flagged perspective, this icon changes to
 to indicate that it'll create a new action there right away (the only possible option).
- Edit
- Tap Edit to delete and rearrange items in the main outline using the deletion switch
 and reordering handles
  that appear.
Note
While there isn't a button for it, iPhone's built-in "shake to undo" feature works to revert the latest change made to your database. This is the fastest way to restore an accidentally completed or deleted item, or revert a change made while editing.
The Main Outline
This is where you’ll view, add, and manipulate the tasks you’re working on at a given moment. What you see here is based on which perspective you’re viewing, what you have selected in the sidebar (or where you've navigated from the home screen), and more—you can narrow your concentration on just a few things you’d like to accomplish in the near term, or get a broad overview of the tasks ahead across a number of projects.
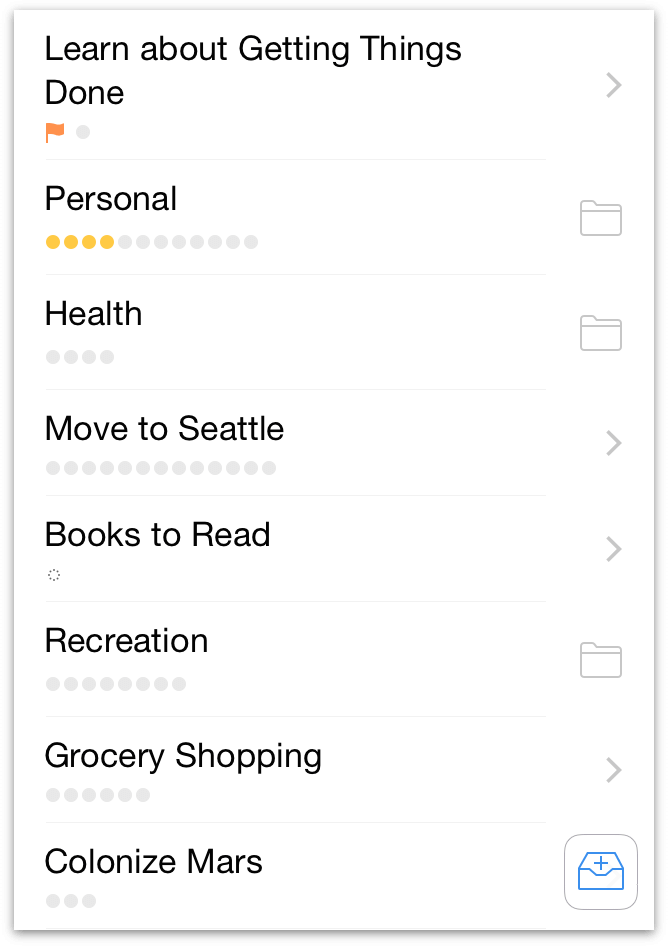
The main outline shows a list of items — inbox items, projects, actions, or groups — that fit the criteria you've established with your other view parameters. Each item shows associated information — like Project, Context, or Due Date — important to accomplishing the task.
To delete an item in the main outline, touch and drag from right to left until the Delete button appears. This removes the item from your database entirely; to mark it complete instead, just tap its status circle.
How Items Are Ordered
Actions, projects, and other items in the main outline are ordered based on the sequence in which you entered them, or how you’ve manually arranged them in edit mode, with a couple of exceptions: when you’re in a context-based view with a different sort priority set, or in Forecast, where items are sorted by due date and time.
Other sorting parameters can also be applied with custom perspectives when the Pro upgrade is installed.
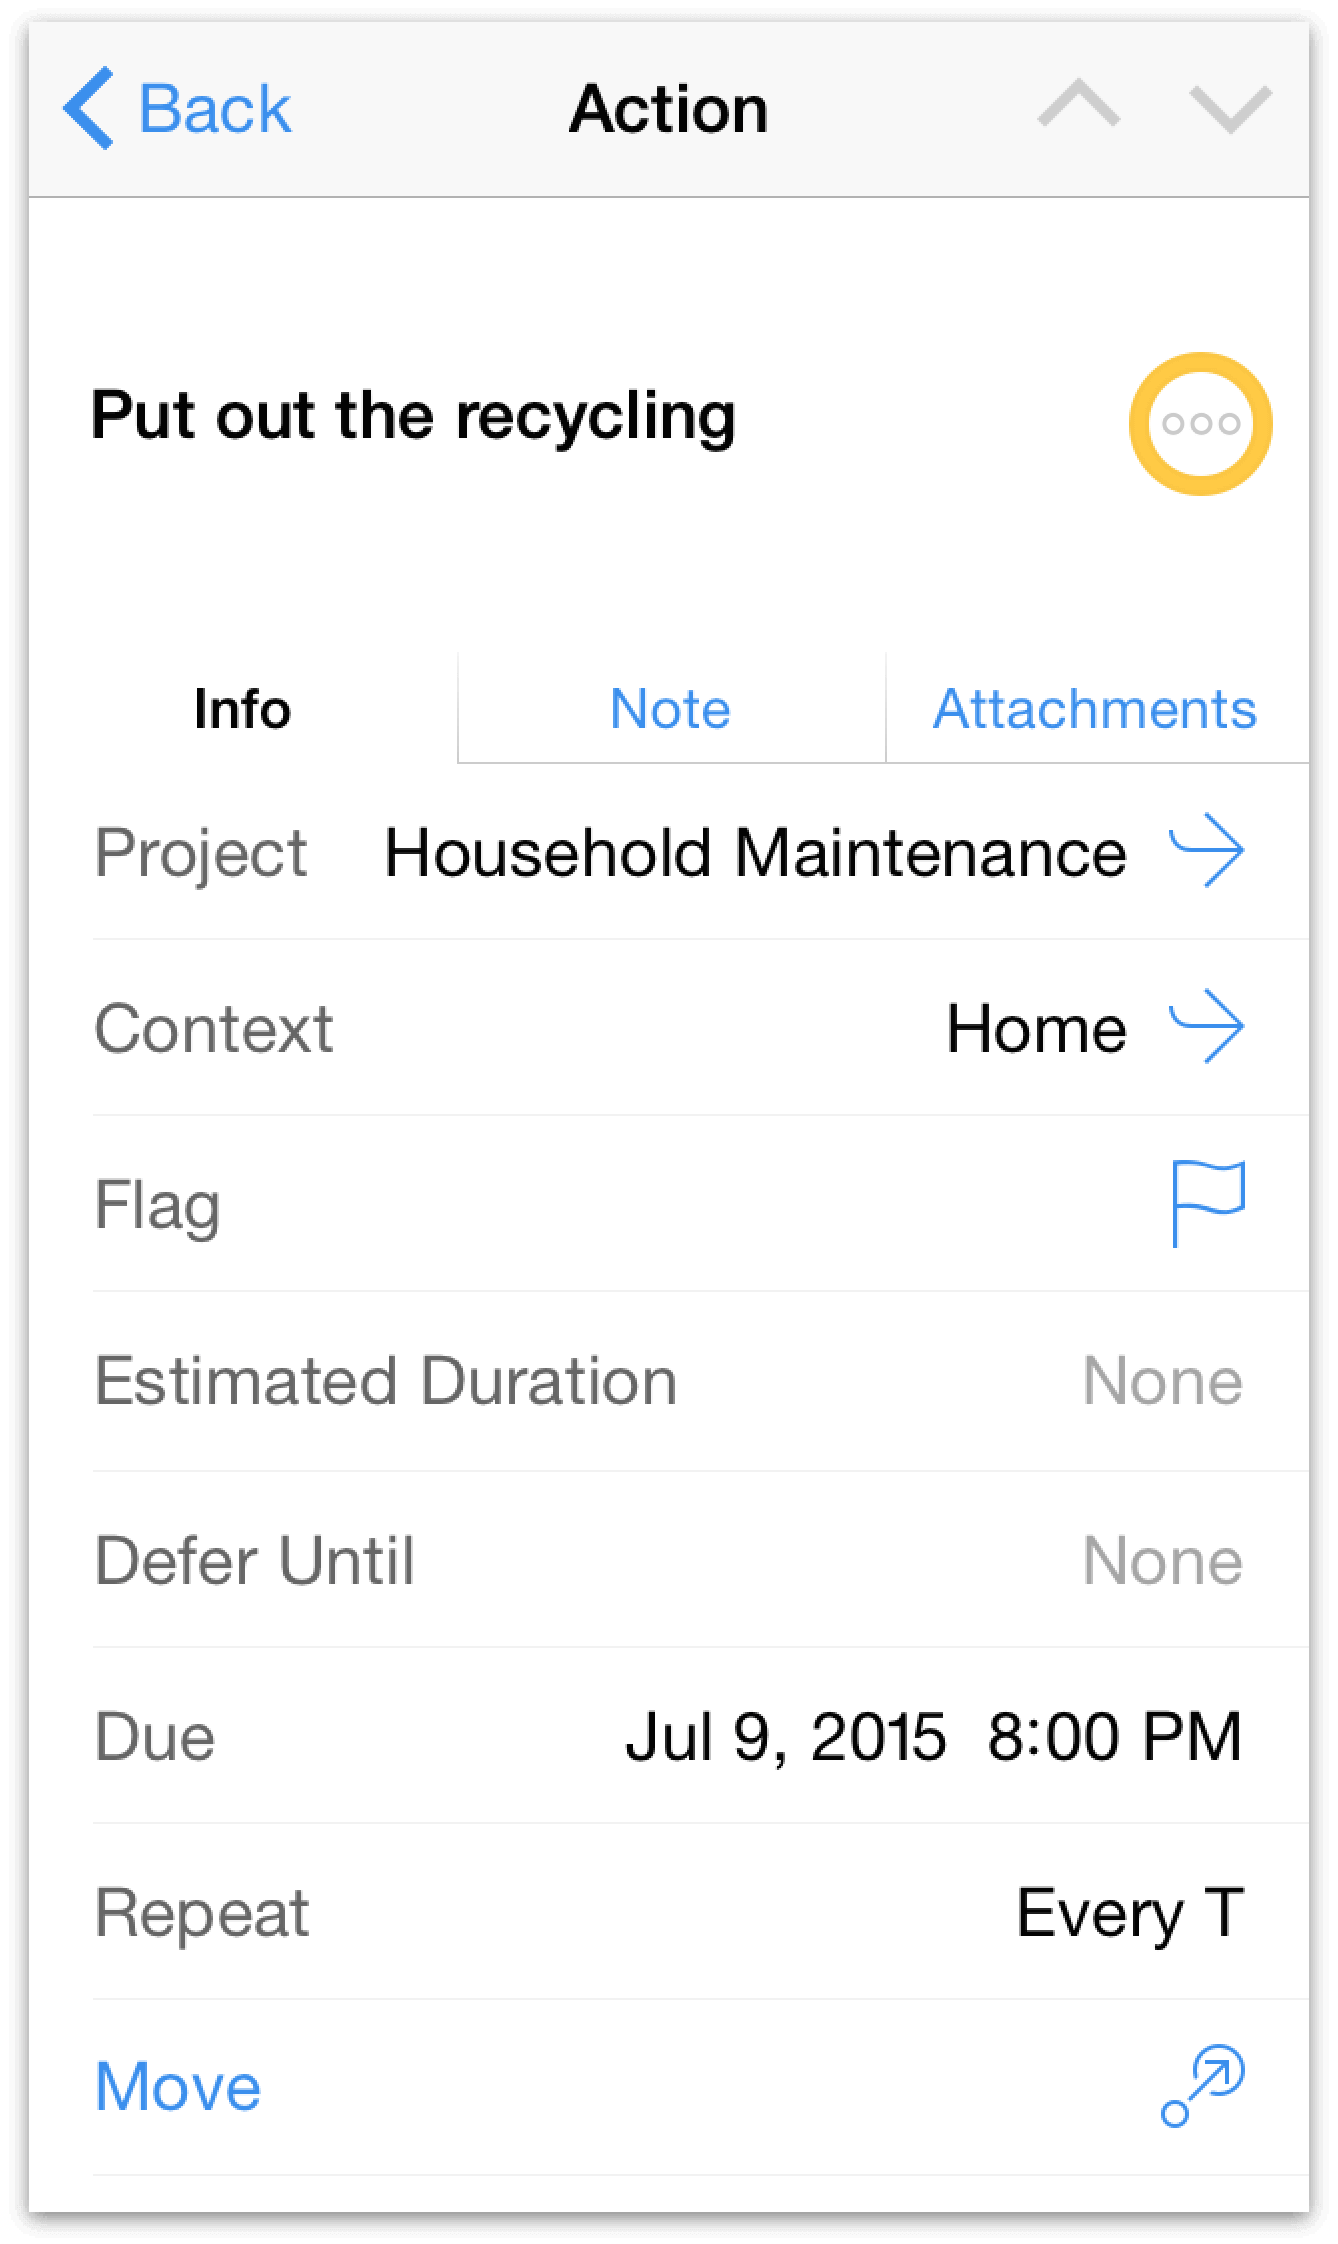
The Editor
To delve deeper into the details of a task, just tap its name. The main outline makes way for the editor, where you can flesh out the task at hand with additional bits of info like when it’s due for completion, whether it’s part of a larger project, how long it’ll take, whether (and how) it repeats, and more. Enrich an item further with a text note and add audio and image attachments, all from tabs within the editor.
Note
The editors for inbox items, actions, and projects are pretty similar, since these all represent tasks that can be accomplished. The editor for contexts is special because it represents a person, place, or thing that you need to help accomplish a goal; importantly, the context editor is where you give a context a location so it can be tracked from the Nearby screen.
Ways that inbox items, actions, projects, and contexts can be enriched using the editor are explored in their individual chapters.
Editor Tools
When using the editor on iPhone, a set of useful commands becomes available in rows at the bottom of the editor's Info pane.
 Move
Move- Tap to create a nesting hierarchy of items within the Inbox; actions within projects; or contexts within other contexts.
 Convert
- When editing an inbox item or an action, tap to convert it to a project. When editing a project, tap to convert it to an action (the action will appear in the “Miscellaneous” project).
 Share
Share- Tap to send the current selection as a message, an email, or via any other service that shares with OmniFocus.
 Delete
- Tap to remove the edited item from your OmniFocus database entirely.
Contextual Menus
A long press on many of the items in OmniFocus reveals the contextual menu with commands relevant to that item. These commands work in ways that are specific to OmniFocus, and might not be completely obvious at first glance.
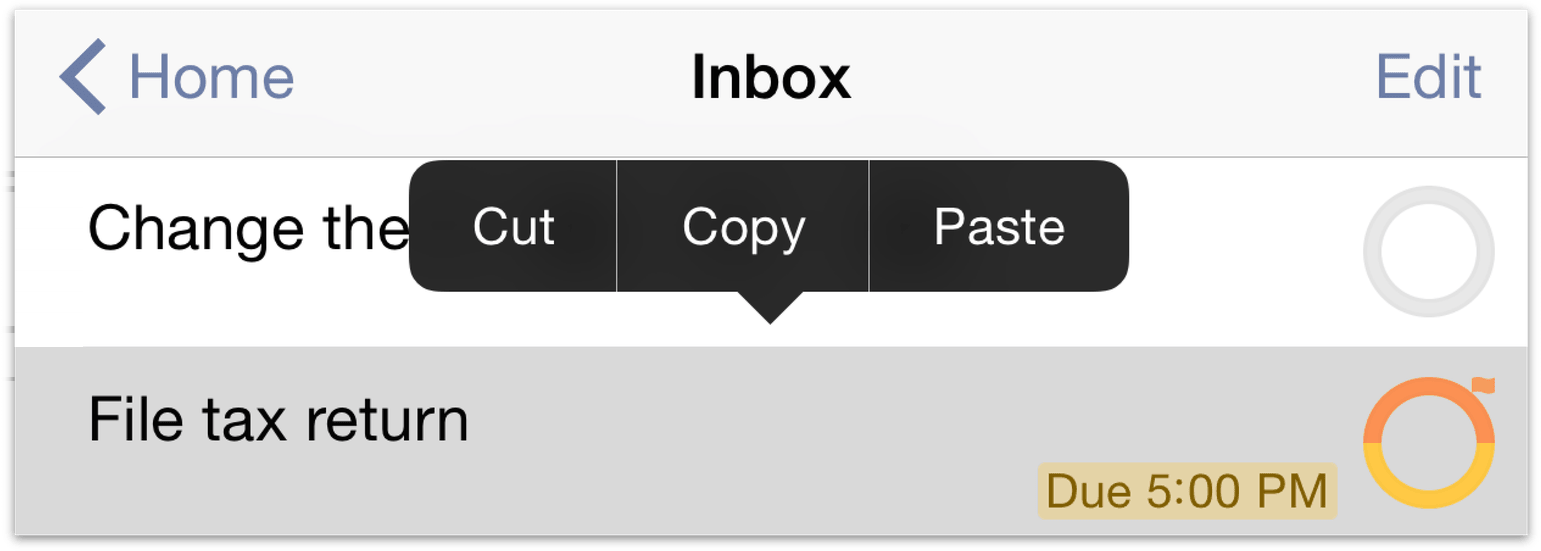
The Cut and Copy commands appear only in the contextual menus of inbox items and actions. They act as you'd expect: the selected item is either removed and copied, or simply copied.
When Pasted via the contextual menu, a copied action will appear either inside the selected item (if it's a project) or as a peer to it (if it's another action). Text copied from other sources can also be pasted into OmniFocus from the contextual menu; in this case, choosing Paste creates a new action with the copied text as its title.
Now that you have an idea of the road ahead, let's start putting the pieces together with the first — and most fundamental — OmniFocus perspective: the Inbox.