Glossary
Action
- An item that’s part of a project, or part of a group within a project.
Action Group
- Also referred to as a sub-project, an action group is a set of actions nested hierarchically within a parent action (which itself can be part of a project).
Active
- The status for an item that’s planned for completion, or a tag that’s currently in use. Active status can be set on projects and tags using the inspector.
Available
- An item state and View option that includes items that aren’t blocked, deferred, or on hold. Availablilty is derived from an item’s defer date, project type, and project or tag status.
Blocked
- The state of an action in a sequential project that comes after the first available action. The blocked state is derived from an action’s position in its project; to unblock an action, either change the project to another type or move the action to the top of the project list.
Complete
- The status assigned to an item when you’ve finished it, or finished all the actions that comprise it (in the case of a project or group). Click an item’s status circle to mark it complete.
Database
- The file that OmniFocus uses to hold all of the information that you add to the app. OmniFocus and its various perspectives act as windows onto your database, interpreting the data there in ways that help you get stuff done. Typically, you’ll only interact with your primary default OmniFocus database; you can open multiple windows onto it at once to maintain different view states simultaneously. More rarely, you can open multiple database files at once to restore from a backup or archive, or view the contents of an OmniFocus database other than your own.
Defer Date
- A date and time assigned to an item that you don’t want to (or can’t) consider for completion until later. When the defer date is reached, the item becomes available for work. Also referred to as the Defer Until date.
Dropped
- The status for a project, folder, action, or tag that is no longer being considered for completion. Use the inspector to set one of these as dropped.
Due Date
- A date and time assigned to an item by which the item must be completed.
Due Soon
- A designation for items whose due dates are approaching. Items that are due soon are styled in amber for greater visibility. The exact meaning of Due Soon is configurable in Dates and Times preferences.
First Available
- An item state and View option that represents a project’s first action as the only one available. First Available status is derived from an action’s position within a project and the project’s type: for sequential and parallel projects, the first available action is the first action in the project list. For single action lists, all actions are equally available.
Flag
- A mark of privileged, eye-catching status bestowed on an item. What this special designation means is completely up to you, but it’s a great way to keep important things from falling through the cracks. Items that are flagged are styled in orange for greater visibility.
Group
- A collection of items nested hierarchically within another item. Groups created from inbox items are item groups, while groups created within projects are action groups (also sometimes called sub-projects).
Hidden
- An item that exists in your database but isn’t exposed by the View options of your current perspective. Relevant when the app gives notice that you might be deleting something by mistake.
Inbox
- The built-in perspective designed to hold tasks and to-dos that you’ve entered into OmniFocus as items, prior to processing them into projects, actions, and groups.
Inspector
- A pane on the right side of the OmniFocus window that holds the suite of tools for adding and changing the details of an action, project, or tag. With something selected in the outline or sidebar, the inspector automatically shows fields relevant to the details of the selection. Click the Inspector button in the toolbar, or choose Show/Hide Inspector from the View menu to show or hide it.
Item
- Items are representations of tasks and to-dos in an OmniFocus database. Types of items include: inbox items, actions, projects, and groups.
On Hold
- A status for projects and tags that aren’t relevant to your plans right now, but may be in the foreseeable future. Use the inspector to set projects and tags on hold.
Outline
- The place where you see and interact with your items in OmniFocus, usually through a hierarchical view of your database. Specific perspectives (such as Tags and Forecast) have specialized ways of showing your data that eschew or modify the typical project hierarchy.
Overdue
- A state for items whose due dates are past. Items that are overdue are styled in red for greater visibility.
Parallel
- A project or group that doesn’t place particular emphasis on the order in which its actions are completed. All actions are considered available, though the topmost action is still considered the first available action for the purposes of View options.
Perspective
- A view on your OmniFocus database that appears in the perspective list and is detailed in the outline. OmniFocus comes with six built-in perspectives and two transient reference perspectives (Completed and Changed). Custom perspectives can be created in OmniFocus Pro.
Perspective Editor 
- With OmniFocus Pro, the editor used to create new perspectives or edit existing custom perspectives. To open the Perspective Editor, choose Show Perspectives from the Perspectives menu.
- Plug-In
- With OmniFocus Pro, Omni Automation Plug-Ins are JavaScript tools for automating various tasks in OmniFocus. See Omni Automation for more information.
Project
- A to-do item that’s larger in scope or permanence than a simple action, potentially containing several actions and groups within it that must be completed before the project can be marked complete.
Remaining
- An item state and View option that represents all items that haven’t been completed or dropped. Remaining is derived from an item’s attributes and not set directly.
Resolved
- An item state that includes all items that have either been completed or dropped.
Sequential
- A project or group whose actions must be completed in a specific order. The first action in the list is the only one available for completion; all later actions are considered blocked.
Sidebar
- A pane that holds the vertical column of perspective tabs, and displays additional levels of hierarchy for perspectives that support them. The sidebar appears to the left of the outline; click the Sidebar button in the toolbar or choose Show/Hide Sidebar from the View menu to show or hide it.
Single Action List
- A project whose actions are equally available regardless of sequence. Unlike other project types where completion is the goal, single action lists persist regardless of whether they contain available actions.
Status Circle
- A graphical depiction of an item’s status (due soon, overdue, flagged, or repeating), as well as a target to click to mark an item completed.
Sub-Project
- A term synonymous with action group; a group of actions nested hierarchically within a project.
Sync
- Storing your database on a cloud server to keep it in sync on all of your devices with OmniFocus. Or, the act of synchronizing with such a remotely stored database.
Tag
- A person, place, thing, state of mind, or other factor relevant to the completion of a given action or project. These exist outside the project hierarchy and represent another axis from which to view the items you’ve accumulated in your database. An item can have as many tags as you find to be useful.
Task
- In the context of this manual, a task is something you’d like to accomplish in the real world that you’d capture with OmniFocus (where it would then become an item). To-do is another word with the same meaning.
Toolbar
- A region along the top or bottom of the OmniFocus window that contains controls for modifying the contents of that window.
The Outline
Tasks that you add to OmniFocus are represented as a list of actionable items in the outline. Interacting with items in the outline—adding new ones, marking them complete, or organizing them into projects and groups—is one of the main ways OmniFocus helps you get stuff done.
This chapter describes the outline in its component parts, and details the purpose of each.

The Perspective Header
The items you see in the outline depend on the perspective you are viewing. You can narrow your concentration on a few things you’d like to accomplish in the near term with Forecast, tackle things contextually with Tags, or get a broad overview of the work ahead across a number of Projects, for example.

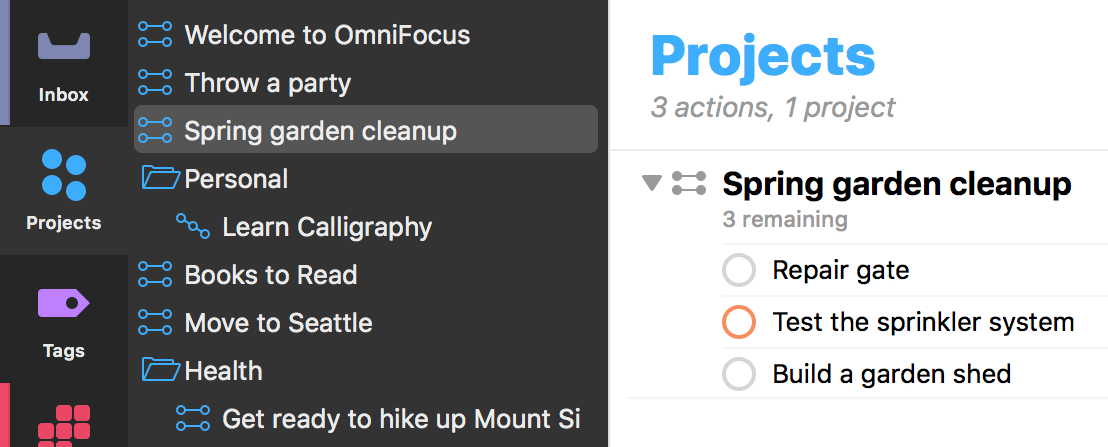
The name of your current perspective appears at the top of the outline, along with a count of the items currently visible.
The Anatomy of a Row
The OmniFocus outline is composed of rows that represent items (to-dos that you capture with OmniFocus) or other pieces of your organizational framework like folders or tags.
Rows display all sorts of information about an item, like the project it belongs to, any relevant tags, due dates, and completion status in the form of status circles.
By default, rows in the outline use the Columns layout option for presenting data.
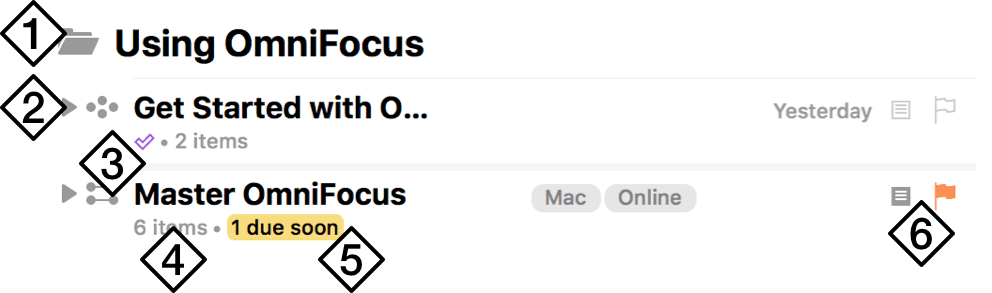
The figure below is a breakdown of an item in the Inbox that’s packed with additional information about the task at hand, using the default Columns presentation.

-
Status Circle—A visual representation of the completion status of the item, along with other important attributes. Click an active item’s status circle to mark it complete.
-
Title—The item’s title. Black title text generally indicates that an item is actionable; items that are completed, blocked, on hold, or parents of groups have grey title text instead (unless they are due soon or overdue).
-
Project—If the item has a project assigned, its location in the project hierarchy appears here. Since this is an Inbox item (and Inbox items with projects are usually cleaned up), this item is listed without a project.
-
Tags—Any tags assigned to the item appear here. An item can have as many tags as you want; if there are more tags than horizontal space in the row, additional tags are indicated by an ellipsis.
-
Dates—If the item has due or defer dates assigned, they will appear here when relevant (once a defer date has passed it is no longer displayed).
-
Notes and Attachments, Flag—These icons indicate whether or not the item includes notes or attachments (the
 icon is filled when a note or attachment is present), and whether the item is flagged.
Project, Folder, and Tag Rows
In addition to the common attributes of Inbox items, rows for projects, folders, and tags can have a variety of other useful information.
-
Row Type Icon—Projects, folders, and tags have icons next to them to help remind you of your current perspective and the row’s relation to those around it. Projects are further broken down by type: Sequential, Parallel, and Single Actions.
-
Disclosure Triangle—Click to collapse or expand the folder, project, or tag to hide or reveal its contents.
-
Row Status—Projects and tags with a status other than Active display it here. In addition to Active (no icon), Projects can be On Hold, Completed, or Dropped, while tags can be Active, On Hold, or Dropped.
-
Item Count—The total number of items in the project or tag.
-
Due Summary—When there is enough room in the row, this line shows a breakdown of the due states (due soon and overdue) of items in the project, folder, or tag.
-
Notes and Attachments, Flag—These icons indicate whether there are notes or attachments associated with the project itself (as opposed to the items within it), and whether the project is flagged. Notes, attachments, and flagged status can’t be assigned to folders or tags.
Status Circles
An item’s status circle  is the target for checking it off when it is done. Click the circle to mark the item complete
  ; option-click to drop the item instead
  .
.
Status circles also convey important information about an item: items can be due soon  (amber), overdue
  (red), or flagged
  (orange). Repeating items are also distinguished by the ellipsis
  in their center.
If you have an item with more than one status, the circle will take on multiple colors simultaneously to communicate each relevant attribute.
Cleaning Up
When you mark an item complete by clicking its status circle , the item may not immediately disappear from the outline. If you’ve set items to clean up when changing perspectives, they remain until you navigate elsewhere or clean up manually by clicking Clean Up in the toolbar, or choosing Organize > Clean Up (Command-K).
You can choose what causes OmniFocus to clean up automatically in Organization preferences.
If a completed item doesn’t disappear even after you’ve cleaned up your current view, check your View options for the perspective. It’s likely that the view is set to All. Try setting the View options to Remaining or Available to hide those completed items.
If you change an action’s status to one that would hide it from the current view settings (marking an item Complete in a perspective with View options set to Available, for example) and later delete the project or tag that contains it, OmniFocus warns you that you may be about to delete something unintentionally. To see those hidden items, change the current perspective’s View options to All.
Sometimes after cleaning up, a project named Miscellaneous will appear in your Projects perspective.
The Miscellaneous project is a single action list that OmniFocus automatically creates whenever items are cleaned up that don’t have a project assigned. Since removing items from the Inbox requires that they be assigned a project, if your Clean Up preferences are tag-based the Miscellaneous project becomes their home until you assign them another.
Since the Miscellaneous project is automatically created by the app based on how you’ve chosen for clean up to work, it can’t be permanently removed; if you’d prefer not to use it, try cleaning up based on project assignment instead.
Grouping Items
Groups can be used to create nested lists of items in the outline: either groups of items in the inbox, or action groups within a project (also sometimes called sub-projects).

When you create an action group you’re creating a parent-child hierarchical relationship between an action and the actions within it. If the desired parent and children are actions that already exist, this can be done by selecting the soon-to-be child actions and:
-
Dragging them on top of the parent action so the parent action is selected and shows a vertical insertion line indented beneath it, then dropping them inside, or
-
Positioning them immediately below the intended parent action in the outline and choosing Organize > Indent (Command-]).
If either the group’s parent action or its child actions have yet to be created, there are two other ways to create groups.
To create a group from an existing action intended as its parent:
- Create child actions from scratch by choosing Organize > Add Inside (Shift-Command-]) with the intended parent action selected. A new action is created with the selected action as its parent.
To create a group from existing actions with no existing parent action:
- Select the items you’d like to group and choose Organize > Group (Option-Command-G). A new untitled action is created to represent the group, and the selected items are indented to become its children.
Once you’ve created a group, you can use the inspector to change its type and determine whether the group auto-completes when the last action within it is marked complete.
Grouping Projects with Folders
In addition to grouping action items within other items, when using the Projects perspective you can group related projects together using folders.
To create a project folder, follow these steps:
-
Select two or more projects in the sidebar.
-
Choose Organize > Group (Option-Command-G). This places the selected projects within a newly created folder.
-
Enter a name for the folder to replace the New Folder text.
-
Press Return to accept the new folder name.
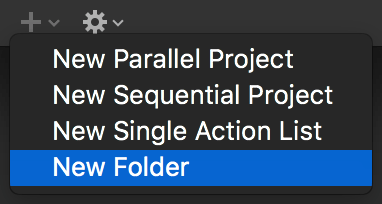
Alternatively, while in the Projects perspective choose New Folder from the Plus menu beneath the sidebar, or choose File > New Folder.
Folders can be created or moved inside other folders, to create a nesting hierarchy of projects that’s as deep or wide as you need it to be.
Layout Options
The overall appearance of items in the outline is determined by your Layout preferences.
The primary choice is between two layout types:
- A Columns layout, where the title appears next to item details of your choice on a single line. This is the default setting.

- A Fluid layout, where the title extends the width of the outline and has its details listed below the title.

The default layout includes columns for the item’s project, tags, due date, note icon, and flag icon next to the title. Changes you make in Layout preferences affect the outline view throughout the app.
If you make changes and later decide you prefer the original default layout, you can revert to it by clicking Reset.
The default column layout is designed to help you get a feel for the most commonly used item attributes, and is a subset of all the options available. As you become more familiar with OmniFocus you may want to experiment with changing this default based on the attributes you find most useful.
To further customize the appearance of items in the outline, you can use the View > Show Full Item Title submenu to choose whether item titles are truncated to a single line when they’re not selected, or always extend to multiple lines when necessary.
Custom Perspective Layouts
With OmniFocus Pro, you can customize the outline layout for individual perspectives to fit your needs using each perspective’s View options.
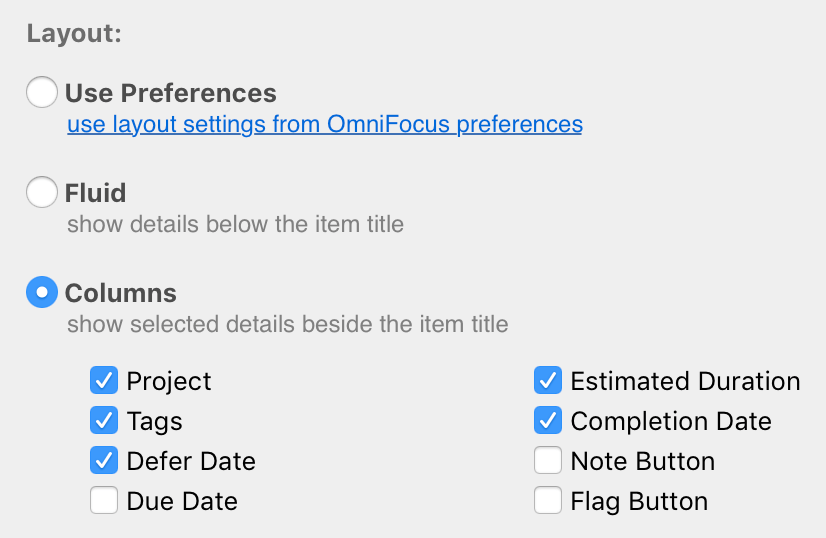
In an individual perspective’s View options, choose a layout other than Use Preferences to overwrite the default for that perspective, either with the Fluid layout or a set of columns that you choose.
The Toolbar
The toolbar at the top of your OmniFocus window contains a customizable set of buttons for commonly used app functions that you’d like to have accessible at a single click. This chapter describes the controls available in the toolbar, and also explains the notice bars that appear beneath it when your OmniFocus window is in an unusual state.
Toolbar Tools
The toolbar contains a customizable set of tools for interacting with your OmniFocus data. When you first install the app, the toolbar contains a default subset of all of the tools available; Control-click the toolbar or choose View > Customize Toolbar to add or remove tools from the list below.
Sidebar 
Click to open and close the sidebar on the left side of OmniFocus.
New Action 
Click to add an action item at the current location (inside the topmost level of whatever hierarchy is visible in the outline).
Quick Entry 
Click to open the Quick Entry window for speedily adding new items from anywhere in OmniFocus.
Complete 
Click to mark the selected items complete.
Clean Up 
Click to tidy any items in the outline that may belong elsewhere after a change of project, tag, or status.
Use Organization preferences to determine when items are removed from the outline automatically.
Attach 
Click to open a browser for selecting files to attach to the selected item.
Flag 
Click to flag or unflag the selected items, adding (or removing) them from the Flagged perspective.
Mark Reviewed 
Click to mark the current project as reviewed (and in the Review perspective, advance to the next project in the list). The project’s next review date is updated to the present plus its review interval.
This button is dimmed and unavailable when anything other than a project is selected.
Quick Open 
Click to open the Quick Open dialog for speedy navigation to an item, folder, tag, or perspective.
Focus 
With OmniFocus Pro, click to temporarily narrow the scope of your database to just the selected items.
View 
Click to customize which items appear in the current perspective’s outline based on their completion status, project order, and other perspective-specific features. See each perspective for details on its View options.
Inspect 
Click to open and close the inspector on the right side of OmniFocus.
Sync 
Click to prompt your OmniFocus database to sync with its counterpart in the cloud. (This happens automatically at regular intervals, so you shouldn’t need to manually sync often.)
Share 
With items selected in the outline, click to open a menu with a list of macOS share destinations. Choose one to share the current selection to it as a text list.
Search 
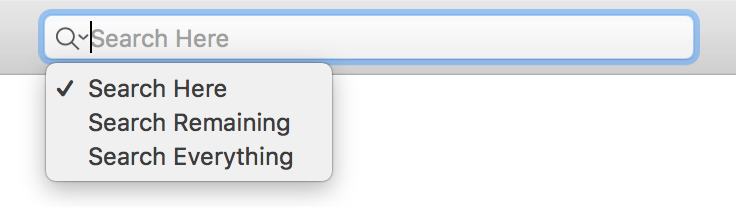
By default, entering a term in the toolbar’s search field combs through the current contents of your outline and shows items that match the terms of your search. Click the magnifying glass icon to the left of the search field to change the scope of the search from the current view.
-
Here—The search is limited to the content currently visible in the outline. For many perspectives this includes the entire content of the perspective, but for those grouped by project it may not—if you’re viewing the contents of a specific project or folder, items in projects outside that scope will not be shown in the results.
-
Remaining—The search includes everything in your database with an implicit status of Remaining: all items except those marked Completed or Dropped.
-
Everything—The search includes every item in your database, regardless of status or location.
Search looks for text matching the keywords in item titles, notes, and tags, and displays results as a list of items in the outline.
Flexible Space 
Drag this from the toolbar customization sheet to add an area of space to the toolbar that expands to fill the width available.
Space 
Drag this from the toolbar customization sheet to add a fixed area of space to the toolbar (roughly the size of a toolbar button).
With OmniFocus Pro, you can also add toolbar buttons for:
-
Custom perspectives—When you save a new custom perspective, a button for it appears automatically in the toolbar customization sheet.
-
AppleScript scripts—When you add a script to the scripts folder, a button appears for it in the toolbar customization sheet.
Notice Bars
When a special circumstance impacts your use of OmniFocus, a notice bar appears beneath the toolbar to alert you about the status of the app.
Notice bars appear in the following situations:

- When viewing an archive of your database. The bar includes the date of the archive, and is present to note that the window does not reflect your currently active OmniFocus data.

- When viewing a backup of your database. The bar includes the date of the backup and a button to revert your current database to it.

- When viewing a foreign database. OmniFocus is designed to work with one active database at a time, so this notice alerts you that you’re looking at a file from somewhere else.

- When focusing on a subset of items in your database. The bar includes a button to unfocus and return to the full view.

- When news impacting OmniFocus is available. This usually refers to a significant app update (such as one affecting the database file format), or a change in macOS or iOS that causes OmniFocus to behave differently. The bar includes a button that links to the relevant news.

- When you’re running a test build of OmniFocus. The bar provides notice of when the test build will expire, and buttons to dismiss the bar or check for updates to a newer build.
Perspectives and the Sidebar
All of your to-dos in OmniFocus live in a database behind the scenes, and perspectives are how you look at and interact with the contents of that database. OmniFocus 3 for Mac comes with six built-in perspectives that represent specialized, commonly-used view states specifically designed to help you organize, prioritize, schedule, and review your tasks.

The sidebar appears on left side of the OmniFocus window, and controls what is displayed in the outline.
The Sidebar
Nestled on the left side of the OmniFocus window, next to the outline, lives the sidebar. The sidebar consists of perspective tabs for quick navigation between your perspectives, and (for perspective other than the Inbox) provides a high-level means for surveying what’s on your plate. The function of the sidebar for each built-in perspective is discussed in the section for that perspective.
Perspective Tabs
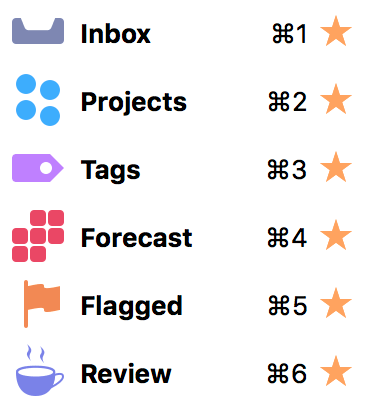
You can switch between perspectives using the tabs on the left side of the OmniFocus window. By default this includes the following built-in perspectives:
-
The Inbox, where you’ll stash all the tasks and to-dos that come to mind for later processing.
-
Projects, where related tasks are grouped together into overarching plans and hierarchies.
-
Tags, the places, people, things, and states of mind most relevant or conducive to accomplishing your tasks.
-
Forecast, where you can view your tasks chronologically and integrate them into your schedule.
-
Flagged, where tasks designated with the most important priority or visibility are gathered.
-
Review, the place to regularly check up on your progress and determine the status of projects.
Completed and Changed are two additional perspectives, available from the Perspectives menu, that can help you recover misplaced items or review progress and recent changes to your database. These are designed as temporary views on your database, so switching away from them to another tab removes the tab from your sidebar (you can open them from the Perspectives menu again at any time).
![]() With OmniFocus Pro you can hide or rearrange perspectives in the list to bring them to prominence, and you can create custom perspectives that you can set to appear as perspective tabs as well.
With OmniFocus Pro you can hide or rearrange perspectives in the list to bring them to prominence, and you can create custom perspectives that you can set to appear as perspective tabs as well.
Sidebar Bottom Buttons
The bottom of the sidebar contains buttons for quick access to commands based on your current perspective and sidebar selection.
-
When in the Projects or Tags perspectives, use the Add button
 to create new projects or tags, respectively. This button is unavailable in other perspectives.
 -
The Action menu
 provides a host of tools contextually relevant to your current perspective and sidebar selection. These are a subset of the commands available from the contextual menu that appears when you control-click an item in the sidebar.
Inbox 
The Inbox is the catch-all perspective for depositing everything that you’d like to do. To add an item to the Inbox, navigate to the Inbox and choose File > New Action. Alternatively, use Quick Entry (Window > Quick Entry) to add items to the Inbox from anywhere in OmniFocus.
Many workflows use the Inbox as an initial point of entry, a transient receptacle for ideas big and small. Once you’ve processed an Inbox item (added a project or tag, converted it to a project, or assigned it some other fate), it will likely disappear off to its new location (this depends on your Organization preferences).
While it’s not required, many workflows encourage regularly processing items out of the inbox in a practice known as "Inbox Zero". This is subtly rewarded in the app by the appearance of a graphic in the background of the Inbox when no items are present.
Inbox Outline
The Inbox contains a list of individual items that can be organized hierarchically into item groups. Since the Inbox primarily serves as a temporary resting place for new tasks, it doesn’t support complexity beyond simple grouping; to add hierarchical nuance to a task with many parts, consider assigning it to an existing project with the inspector or converting it to a project with Edit > Convert to Project.
If you convert an Inbox item to a project it will immediately reopen in the Projects perspective.
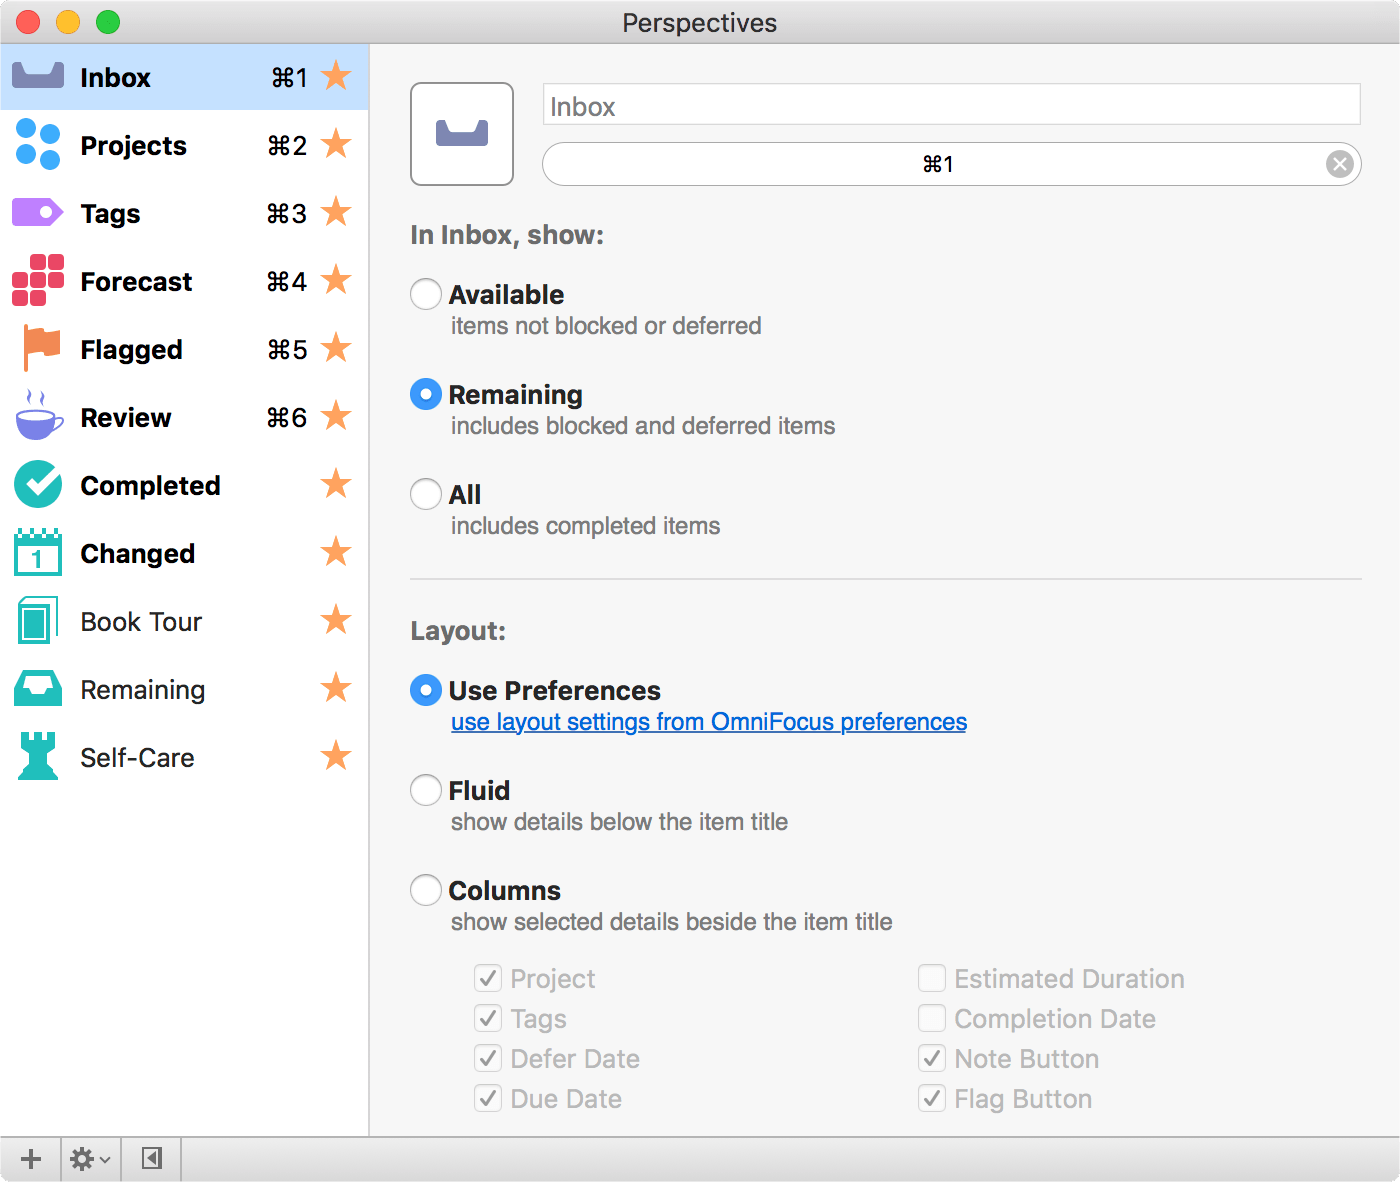
Inbox View Options
-
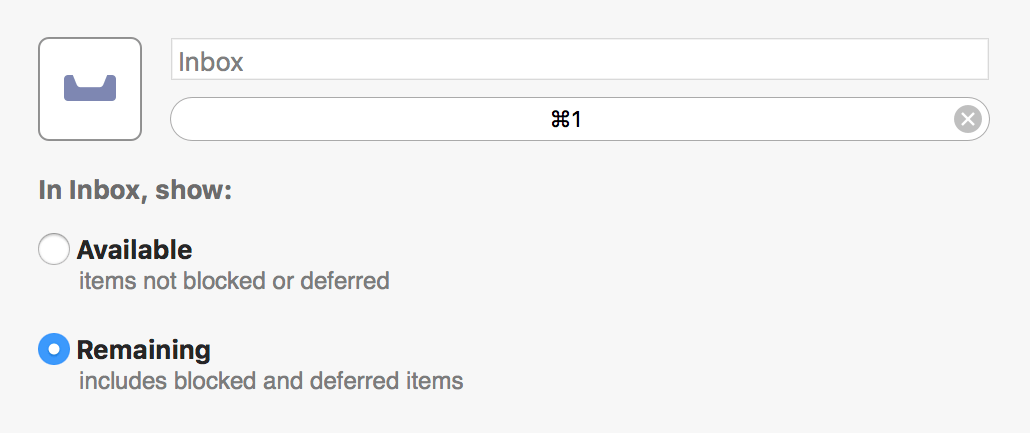
In Inbox, show:—Choose the setting for items that you would like to be visible in the outline (Available is the default). Each option describes the requirements for items that it includes or excludes; see the Glossary for further details on each view state.
-
Layout—OmniFocus Pro adds a Layout section to Inbox View options where you can customize the outline to show a set of attributes specific to this perspective. See Layout Options for details.
Item Status
The states described here apply both to items in the inbox and actions within projects. Items can have additional states described by their status circles; the ones here are common to all and appear in the inspector.
-
Active—The default status for a newly added item, indicating an item that is currently planned for work.
-
Completed—The status for an item that has been successfully completed. Click the item's status circle, press Space with the item selected, use the inspector, or Edit > Status > Completed to mark an item complete.
When completing an item group, items within the group inherit the completed status and are represented with an inherited completion status circle
 in the outline.
 -
Dropped—The status for an item no longer planned for work. Option-click the item's status circle, press Option-Space with the item selected, use the inspector, or Edit > Status > Dropped to mark an item dropped.
When dropping an item group, items within the group inherit the dropped status and are represented with an inherited dropped status circle
 in the outline.
Projects 
A project is a task made up of multiple items, referred to in OmniFocus as actions. Projects are typically more complex than individual action items, and can include several related actions. The Projects perspective displays all of your projects in a list, which can be grouped into folders to create hierarchy.
Projects Outline
The Projects outline displays a list of your projects and the actions they contain, with visibility determined by your View options.
Projects Sidebar
The Projects sidebar displays a list of your projects grouped hierarchically into folders. Click a project in the sidebar to view it alone; click the Projects tab or an empty space in the sidebar to view the full list in the outline.
Drag and drop to rearrange projects in the sidebar. If you drop a project on top of another, the project is converted to an action group inside its destination.
Projects View Options
-
In Projects, show:—Choose the setting for items that you would like to be visible in the outline (Remaining is the default). Each option describes the requirements for items that it includes or excludes; see the Glossary and the Project Type and Project Status sections for further details.
-
Show folders in the outline—When this checkbox is selected, the outline includes rows for folders as well as the projects within them.
-
Layout—OmniFocus Pro adds a Layout section to Projects View options where you can customize the outline to show a set of attributes specific to this perspective. See Layout Options for details.
Project Type
Projects are distinguished by their type, which varies based on how actions inside the project must be completed. Project type also affects how actions within the project show up according to the perspective’s View options.
-
 Sequential—Sequential projects have actions that need to be completed in a predetermined order; the first item must be finished before you can move on to the next. In a sequential project, there is only ever one action available at a time. (this is also, by definition, the project’s first available action).
 -
 Parallel—Parallel projects consist of actions that can be completed in any order. In a parallel project, all incomplete actions are available, and the first available is the first one in the list.
 -
 Single Actions—A single action list isn’t a project in the traditional sense; it’s a list of loosely-related items that aren’t interdependent (a shopping list is an example of this). In a single action list, all actions are considered both available and first available.
The difference between parallel and sequential projects is most visible when Projects View options are set to show only Available actions. (Actions beyond the first available action in a sequential project are blocked, and therefore hidden.)
Project Status
When planning and subsequently reviewing a project, it can be useful to give it a status to indicate whether work is progressing or plans have changed.
-
 Active—The default status for a new or ongoing project. It can be useful to review active projects regularly to determine what progress you’ve made, and whether they are still things you want to do.
 -
 On Hold—If you’re not sure whether you want to continue a project, you can change the project’s status from Active to On Hold. If you’ve chosen to show only Available items in View options, the project and its actions are removed from the project list in the sidebar and outline.
Projects placed on hold are still available for review and reconsideration if you decide to prioritize them again in the future.
-
 Completed—Eventually you’ll reach the successful end of a project. Select the project and then choose Completed in the Status section of the inspector (this automatically marks any unfinished actions in the project complete). If you’d like to revisit a completed project, change your View options to All or search for the project with the Everything filter.
 -
 Dropped—If you’ve decided not to work on a project any further, you can Drop it completely. It disappears from the Projects list, and its actions are likewise hidden. You could delete the project instead, but then you wouldn’t have any record of it; keeping it around in a dropped state means you can go back and check on actions you’ve completed regardless of whether they’re from still-relevant projects, and so on.
To find a dropped project in your database, choose All in View options or search for it with the Everything filter.
Dropped and completed items accumulate in your database over time. If you find that things are becoming unwieldy, archiving can help lighten the load.
Tags 
In OmniFocus, a tag represents an association that a task has to the world around it. A tag could be a person, place, or thing most relevant to completion of a project, or it could represent a mindset most applicable to execution of an action item.
An item can have as many tags as you find useful, and there is no specific purpose assigned to them; use tags to assign priority, group items by energy level or required equipment, or don’t use them at all.
The Tags perspective displays a list of your tags in the sidebar, and a list of all your actions grouped by the tags they belong to in the outline.
Tags Outline
The Tags outline displays all of your Inbox items and actions, grouped by the tags they have assigned.
While tags can be assigned to projects, projects themselves do not appear in the Tags perspective. Actions added to the project after it is tagged inherit the tag, and those actions appear in the Tags outline where appropriate.
If an item has multiple tags, it appears in the list under each tag assigned to it.
Tags Sidebar
The Tags sidebar shows a list of your tags in the order they were created (by default). You can drag to rearrange them in the list, and to create hierarchical tag arrangements: Home : Yard or Errands : Hardware Store, for example.
Click a tag in the sidebar to view it alone; click the Tags tab to view the full list in the outline.
Tags View Options
-
In Tags, Show:—Choose the setting for items that you would like to be visible in the outline (Available is the default). Each option describes the requirements for items that it includes or excludes; see the Glossary for further details on each view state.
-
Layout—OmniFocus Pro adds a Layout section to Tags View options where you can customize the outline to show a set of attributes specific to this perspective. See Layout Options for details.
Tag Status
Like projects, tags have a status that indicates whether they are currently relevant to your work. View options that depend on status apply similarly between projects and tags; however, the implications of tag status vary.
-
Active—The default status for a tag. When a tag is active, it exists and is relevant to you in some way.
-
On Hold—When a tag is temporarily irrelevant or unavailable for some reason (a required tool is loaned out, a colleague is on sabbatical, or the public library is closed for remodeling), you can change the tag’s status from Active to On Hold. The tag remains in the sidebar, but when viewing Available items its actions are removed from the outline.
-
Dropped—If a tag becomes permanently irrelevant or unavailable, you can drop it completely. It disappears from the Tags list, and its actions are likewise hidden. You could delete the tag instead, but then you wouldn’t have any record of it; keeping it around in a dropped state means you can go back and check on actions you’ve completed regardless of whether they’re from still-relevant tags, and so on.
To find a dropped tag in your database, choose All in View options or search for it with the Everything filter.
The Completed status doesn’t exist for tags, because tags aren’t actionable for completion themselves: they are things or conditions that exist in the world.
Tag Sorting
By default, items inside a tag are sorted in the order they appear in their respective projects (project order), or in the order they appear in the Inbox if no project is assigned (inbox order).
You can drag to rearrange items within a tag. The tag saves its new custom order once you make a change, and the previous default rules no longer apply: any items subsequently added to the tag appear at the end of the list, and can be reordered manually from there.
Forecast 
Forecast helps you keep an eye on the progress of your projects, check upcoming due dates, and schedule OmniFocus to-dos alongside important events in your calendar.
To create a new action that is due on a day that you are viewing, click the date in the sidebar and choose File > New Action (Command-N).
Forecast Outline
The Forecast outline displays a chronological list of items due each day (across a selection of days, if you have multiple selected in the sidebar), interleaved with events from any calendars you’ve chosen to display in OmniFocus.
Calendar events in the outline are for display purposes and can’t be interacted with from inside OmniFocus. Click the calendar icon ![]() next to an event to open it in macOS Calendar.
next to an event to open it in macOS Calendar.
If you have designated a Forecast tag ![]() in View options, items with that tag appear in a separate section of the outline when browsing items due Today.
in View options, items with that tag appear in a separate section of the outline when browsing items due Today.
Forecast Sidebar
A range of dates spanning the next month is displayed in a grid in the forecast sidebar, letting you know at a glance what’s on your plate in the coming weeks.
Each date button displays the number of actions associated with that date. For due items, the count is color-coded according to the most urgent item: amber indicates that an item is due soon, and red indicates an item is due or past due. To create a new action that is due on a particular day, click the appropriate date button and choose File > New Action.
The Forecast sidebar has several other useful interactions:
-
Click and drag on a range of dates to select them, bringing items due on those dates to view in the outline.
-
Command-click to select discontiguous dates—Each Saturday in the coming month, for example, to see whether your next few weekends are clear.
-
Drag and drop an item from the outline onto a date in the sidebar to make it due that day.
-
If you hold down the Command key while dragging an item, OmniFocus sets the defer date rather than the due date when you drop it. Similarly, if you hold down Option-Command while dragging, OmniFocus sets both the defer date and the due for the item.
Forecast View Options
-
Show only one week in sidebar—With this setting turned on, the calendar in the Forecast sidebar will display a single row of dates (the past, the future, and a span of five days in between) rather than the full month default.
-
Show deferred items—With this setting turned on, deferred items scheduled to begin on a given day will appear in a separate Deferred section on the dates when they become available. With this turned off, deferred items do not appear in the outline until they are due.
-
Today shows items with this tag:—With OmniFocus Pro, choose a tag here to have its items appear in the Today view of Forecast in their own section of the outline. Once set, this Forecast tag can be applied to items from anywhere in the outline by choosing Edit > Add Tag "tagname".
-
Show calendar events—With this setting turned on, events from calendars you’ve chosen to display in Forecast will appear alongside OmniFocus items on the dates when they occur. With this turned off, calendar events do not appear in the outline.
-
Calendars—When Show calendar events is turned on, use this submenu to pick the calendars that you would like to appear in OmniFocus. Events from the selected calendars appear interspersed chronologically with your OmniFocus items in the Forecast outline.
Calendars works with the macOS Calendar app to find calendars you own or have subscribed to across services and devices, including iCloud, Google Calendar, and more. Use Internet Accounts settings in macOS System Preferences to connect to your shared calendars.
-
Layout—OmniFocus Pro adds a Layout section to Forecast View options where you can customize the outline to show a set of attributes specific to this perspective. See Layout Options for details.
Adding your Calendars to OmniFocus
OmniFocus plays well with your calendars, including those you might sync through Apple’s iCloud from Calendar on macOS or iOS, Google Calendar, or any CalDAV servers to which you have subscribed. The calendars which you can view in OmniFocus are based upon the calendars that the Calendar app on your Mac can see; to add to, remove, or modify the calendars available on your Mac, use the Calendar app’s Accounts preferences or File menu commands.
The first time you launch OmniFocus, you’ll receive a prompt informing you that the app would like to access your calendar. Choose OK to connect the app with your calendars. If you previously chose Don’t Allow, your Forecast calendars will come up blank. If that’s happened, no need to fear — you can always go back and change this setting.
Head to System Preferences > Security & Privacy > Privacy > Calendars, then click the lock to make changes and allow OmniFocus to access your calendars.
Events on your calendar show up interspersed with the daily events you’ve scheduled in OmniFocus. To view additional details of an event in the Calendar app, click the calendar icon ![]() next to the event.
next to the event.
While OmniFocus is great at talking with Apple’s Calendar, we can’t guarantee compatibility with other calendar apps that may be on your Mac. Calendar is considered the default go-to resource when OmniFocus seeks out calendar information to display alongside your OmniFocus items in Forecast view.
To modify what you see in the list or to adjust the time shown for the Calendar events, choose View > Show View Options or click View in the toolbar. Forecast View options include a Calendars section that lets you customize which external calendars are shown, including those stored in iCloud and more.
Flagged 
The Flagged perspective contains a collection of all items you have assigned the Flagged status.
To flag an item, click the flag icon ![]() on its row in the outline (or in Fluid layout, click on the upper-right corner of its status circle), click the flag in the inspector, or choose Edit > Set Flag (Shift-Command-L). You can also use this to remove the flag from an item.
on its row in the outline (or in Fluid layout, click on the upper-right corner of its status circle), click the flag in the inspector, or choose Edit > Set Flag (Shift-Command-L). You can also use this to remove the flag from an item.
When you flag an item, its status circle changes color to orange to help catch your eye and let you know that something important is going on.
If you flag a project or an action group all of the actions within it inherit that flag, and the sense of urgency it imparts. Flags on items that are inherited rather than directly applied are noted with a hollow flag icon ![]() on the row, in the inspector, or attached to their status circles.
on the row, in the inspector, or attached to their status circles.
Inherited flags can’t be directly removed; the parent item must be unflagged, or the action moved elsewhere, to lose the inherited property.
Flagged Outline
Items in the Flagged outline are sorted first by due date (from oldest to most recent), then by project (for items with the same due date). Sorting isn’t affected by whether a flag is inherited or directly applied, and the only items that appear in Flagged are those that are directly actionable (flagged projects don’t appear).
Flagged Sidebar
The Flagged sidebar shows a list of your tags, presented identically to their appearance in the Tags perspective. They appear in the order they were created, and (as with Tags) you can drag to rearrange them in the list, and to create hierarchical tag arrangements.
Flagged View Options
-
In Flagged, Show:—Choose the setting for items that you would like to be visible in the outline (Available is the default). Each option describes the requirements for items that it includes or excludes; see the Glossary for further details on each view state.
-
Layout—OmniFocus Pro adds a Layout section to Flagged View options where you can customize the outline to show a set of attributes specific to this perspective. See Layout Options for details.
Review 
The Review perspective contains a flat list of projects that are due for review.
Reviewing helps make sure your projects are accurately portrayed in OmniFocus, leaving them in good shape and ready for action. If you have projects that need items added, projects that aren’t relevant anymore, or projects you don’t mean to do any time soon, following a regular review process can help you keep them from falling through the cracks.
Each project has an interval for how often you intend to review it and a date when the next review is planned. You can change the default review interval in Date & Time preferences, and you can change the review interval and next review date of individual projects with the inspector.
To review your remaining projects:
-
Choose the Review perspective in the sidebar (there’s also a corresponding button you can add to your toolbar). In this view, your remaining projects are grouped in order of their next-scheduled review date.
-
For each project, check whether it has the proper status. Do you need to revise its actions, or add new ones? Should you put the project on hold, drop it, or mark it completed? Or is everything moving along just fine?
-
Once you’re satisfied with the state of the project, select it. You’ll see that some review-specific handy controls appear at the top of the outline—click Mark Reviewed, choose Edit > Mark Reviewed, or Control-click and choose Mark Reviewed from the shortcut menu. The project’s next review date moves forward and you can go on to review another project.
If you would like to look a project over again before its next scheduled review, select it and use the Review section of the inspector to change its next review date to today. The project appears in the Review perspective ready for your perusal.
Alternatively, you can drag and drop the project onto the Review perspective icon in the sidebar. This sets the project’s next scheduled review date to today, and adds it to the queue for review.
Drag and drop works similarly for other items in ways that you might find useful—try moving items between perspectives or from the sidebar to the outline (and vice versa) for more flexible editing shortcuts.
Review Outline
When you enter the Review perspective the sidebar displays a flat list of your review-ready projects (folders are not included). The project with the earliest review date will be open in the outline for your inspection.
In Review, the outline only shows a single project at a time to facilitate inspection of its contents. Use the arrow buttons in the outline header to navigate between projects, or click Mark Reviewed when you’re ready to move on to the next one.
Review View Options
-
In Review, Show:—Choose the setting for items that you would like to be visible in the outline (Remaining is the default). Each option describes the requirements for items that it includes or excludes; see the Glossary for further details on each view state.
-
Layout—OmniFocus Pro adds a Layout section to Review View options where you can customize the outline to show a set of attributes specific to this perspective. See Layout Options for details.
Completed and Changed
The final two built-in perspectives—Completed ![]() and Changed
and Changed ![]() —are available from the Perspectives menu. These are a great way to find items in your database that may have been filed away by mistake or otherwise disappeared under mysterious circumstances.
—are available from the Perspectives menu. These are a great way to find items in your database that may have been filed away by mistake or otherwise disappeared under mysterious circumstances.
Completed and Changed are designed to track movement of items in your database, but have no other specific purpose for helping to get stuff done.
The Inspector
The Inspector holds tools for editing your actions, projects, and tags.
With something selected in the outline or sidebar, the inspector automatically shows fields relevant to the selection. Click the Inspect button in the toolbar or choose Show/Hide Inspector from the View menu to show or hide it.
This chapter explains the purpose and function of the inspector’s various sections and the options they contain for editing your OmniFocus items.
Each section of the inspector has a disclosure triangle  next to its name. Click it to collapse or expand the section.
Title
Every item or tag you add to OmniFocus has a title, which you can edit with this section of the inspector.
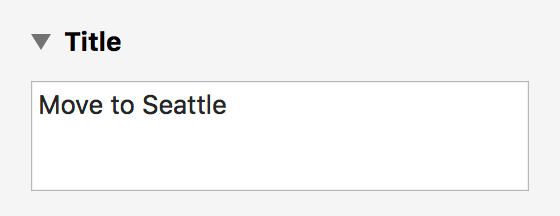
Select the title text in the inspector to edit it.
Most workflows use an item’s title to represent an actionable task—either a standalone action item, a step in a project, or the project goal itself.
By contrast, titles for tags typically represent people, places, things, or situations relevant to completion of the tasks at hand.
Type and Status
Use this section of the inspector to set attributes specific to the type and status of items selected in the outline.
The name of this section changes depending on what you select.
Inbox Item
The Inbox Item section appears when you select one or more Inbox items or item groups.
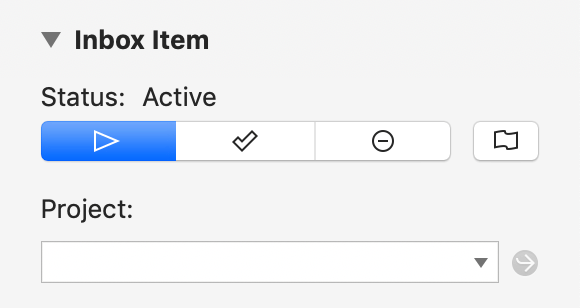
This section includes the following attributes:
-
Status—A switch for setting the status of the selection. Inbox items and groups can be Active, Completed, or Dropped.
-
Flag—A flag that is either empty (unflagged), filled orange (flagged), half filled (mixed selection), or with an orange outline (inherited flag). Click it to set or remove flagged status on the selection.
When a flag is set on an inbox item, it appears in the Flagged perspective. If a flag is set on an item group, the items within it inherit the flag.
-
Type (item groups only)—A switch for setting the type of the group. Item groups can be either Parallel or Sequential.
-
Project—A field for setting the items’ project. For Inbox items and groups, this field is empty; assigning a project to an Inbox item typically causes it to leave the Inbox (this depends on your Organization preferences).
Assign a project to the selection by entering its name in the field, or click the down arrow for a list. To create a new project for the selection, enter it in the field and choose Create new project name (or press Command-Return). Click Go to Project
 to open the assigned project in the Projects perspective.
 -
Complete with last action (item groups only)—A checkbox that determines whether the group status automatically changes to Completed when the last item is completed. (If deselected, the group status must be changed to Completed manually.)
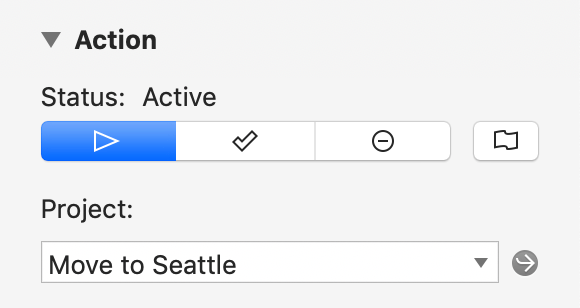
Action
The Action section appears when you select one or more actions or action groups (across any number of projects).
This section includes the following attributes:
-
Status—A switch for setting the status of the selection. Action items and groups can be Active, Completed, or Dropped.
-
Flag—A flag that is either empty (unflagged), filled orange (flagged), half filled (mixed selection), or with an orange outline (inherited flag). Click it to set or remove flagged status on the selection.
When a flag is set on an action, it appears in the Flagged perspective. If a flag is set on an action group, the actions within it inherit the flag.
-
Type (action groups only)—A switch for setting the type of the group. Action groups can be either Parallel or Sequential.
-
Project—A field for setting the actions’ project.
Change the actions’ project by entering a different project name in the field, or click the down arrow for a list. To create a new project for the selection, enter it in the field and choose Create new project name (or press Command-Return). Click Go to Project
to open the assigned project in the Projects perspective. -
Complete with last action (action groups only)—A checkbox that determines whether the group status automatically changes to Completed when the last item is completed. (If deselected, the group status must be changed to Completed manually.)
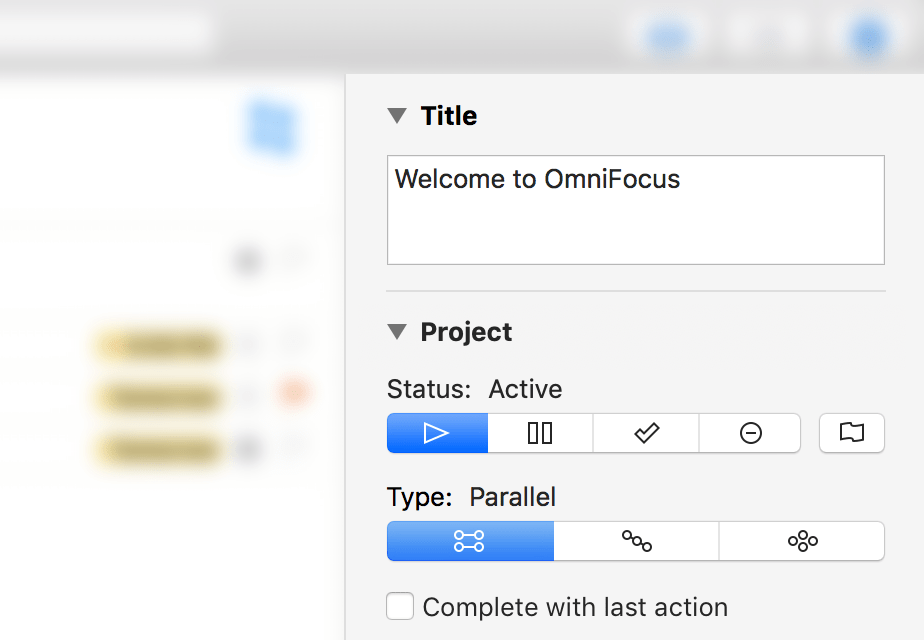
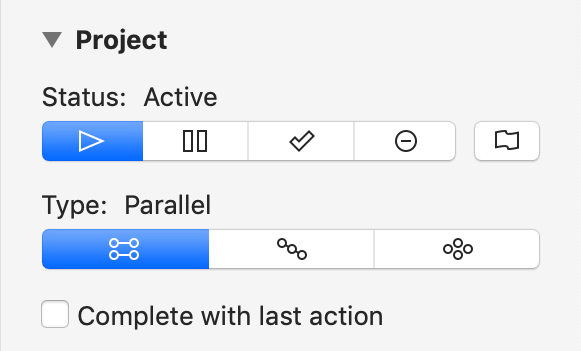
Project
The Project section appears when you select one or more projects.
This section includes the following attributes:
-
Status—A switch for setting the status of the selection. Project status can be Active, On Hold, Completed, or Dropped.
Projects have the Active status by default. For more on the meaning of each status and how it affects availability of items within the project, see Project Status.
-
Flag—A flag that is either empty (unflagged), filled orange (flagged), half filled (mixed selection), or with an orange outline (inherited flag). Click it to set or remove flagged status on the selection.
When a project is flagged, the actions inside it inherit the flag and appear in the Flagged perspective.
-
Type—A switch for setting the type of the selection. Projects can be Sequential, Parallel, or Single Actions.
Projects have the Parallel type by default (this can be changed in Organization preferences). For more on the meaning of each type and how it affects availability of items within the project, see Project Type.
-
Complete with last action—A checkbox that determines whether the project status automatically changes to Completed when its last action is completed. (If deselected, the project status must be changed to Completed manually.)
Projects of the Single Actions type do not display this attribute, since they have no last action and are not conventionally considered complete.
Tag
The Tag section appears when you select one or more tags in a view that lists tags in the outline or sidebar.

This section includes the following attributes:
-
Status—A switch for setting the status of the selection. Tag status can be Active, On Hold, or Dropped.
Tags have the Active status by default. For more on the meaning of each status and how it affects availability of items the tag is assigned to, see Tag Status.
-
Added—Lists the date that the tag was added to your OmniFocus database. This value is set when the tag is created and cannot be edited.
-
Changed—Lists the date when the tag was last changed. This value is updated automatically when you edit the tag and cannot be directly edited.
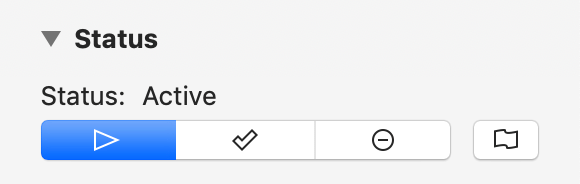
Status
The Status section appears when you select multiple items of different types.
This section includes the following attributes:
-
Status—A switch for setting the status of the selection. Multi-type selections can have their status changed to Active, Completed, or Dropped.
-
Flag—A flag that is either empty (unflagged), filled orange (flagged), half filled (mixed selection), or with an orange outline (inherited flag). Click it to set or remove flagged status on the selection.
Tags
Use the Tags section of the inspector to add tags to items in the current selection, or review any tags they already have. When multiple items are selected, the list includes all tags assigned to them.
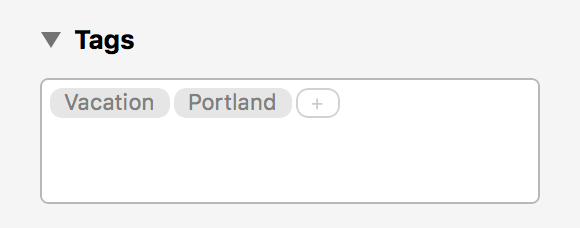
Tags represent associations that tasks have to you and the surrounding world. Click the field in the inspector and start typing to add a tag to an item; existing tags are available to autocomplete. To create a new tag for the selection, enter it in the field and choose Create new tag name (or press Command-Return).
Items can have as many tags as you like. When tags are assigned to a selection, Control-click one to either show it in the Tags perspective or remove it from the selection.
Dates
Use the Dates section of the inspector to set time-related attributes for items that have requirements for when they should start, end, or both. This section also displays times related to the items’ creation, modification, and completion.
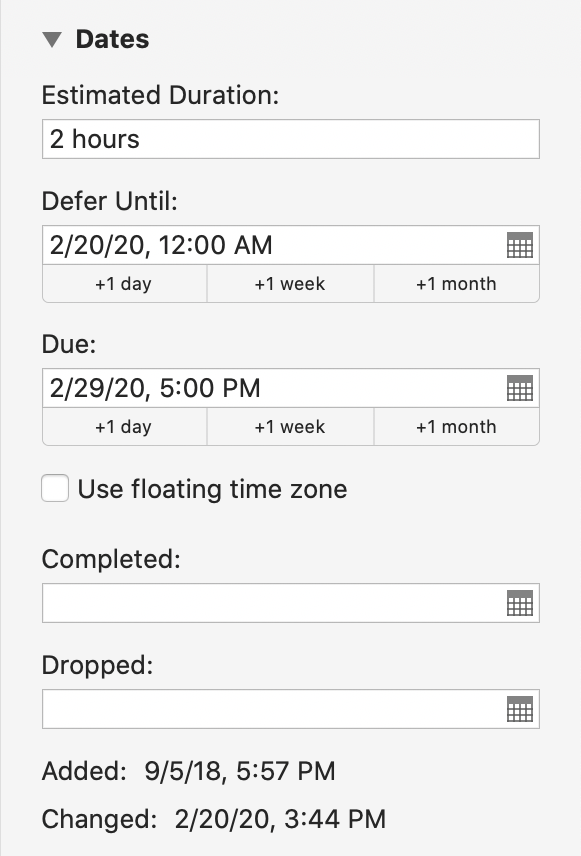
Estimated Duration
Use the Estimated Duration field for the amount of time (in minutes or hours) that you think it will take to complete a task.
Estimated duration is particularly useful when setting up ![]() custom perspectives, where you can use this value to create perspectives for tasks that require a certain amount of time to complete.
custom perspectives, where you can use this value to create perspectives for tasks that require a certain amount of time to complete.
Defer Until
Use the Defer Until field to set or change the selection’s defer date. Use the +1 day, +1 week, and +1 month buttons beneath the field to add a new defer date at the present time plus the button’s value, or augment the existing date by the value of the button.
When a defer date is set on an item, it is not considered available for action until that date is reached.
If a defer date is set on a project or group, items within it inherit that date. (A defer date set directly on the item will override the inherited date, if it is later.)
Due
Use the Due field to set or change the selection’s due date. Use the +1 day, +1 week, and +1 month buttons beneath the field to add a new due date at the present time plus the button’s value, or augment the existing date by the value of the button.
When a due date is set on an item, it is considered due at that date (and due soon based on your Dates and Times preferences).
If a due date is set on a project or group, items within it inherit that date. (A due date set directly on the item will override the inherited date, if it is sooner.)
Use Floating Time Zone
Use the Use floating time zone checkbox to choose whether dates and times associated with the selection are floating (the default for new items) or not.
-
Using a floating time zone means that your time zone location is ignored: date and time values you assign to the selection remain the same no matter which time zone you are in. (If you indicate an item is due at 5:00 PM, it will always be due at 5:00 PM no matter where you are.)
-
Choosing not to use a floating time zone means that your dates and times are associated with the time zone where they are entered. When you change time zones, OmniFocus updates the date and time values of the selection to correspond with the new time zone. (An item due at 5:00 PM Seattle time will always be due at 5:00 PM Seattle time—so if you're in New York, you'll see that time as 8:00 PM.)
Completed
Use the Completed field to set or change the selection’s completion date. If the selection has a status other than Completed, entering a date here (even a date in the future) changes its status to Completed.
Dropped
Use the Dropped field to set or change the selection’s dropped date. If the selection has a status other than Dropped, entering a date here (even a date in the future) changes its status to Dropped.
Added and Changed
The date the selection was added to OmniFocus and the date it was last edited. These values are derived from your editing history, and can’t be changed directly.
Supported Date Formats
You can be creative with the way you enter dates; OmniFocus is good at guessing what you mean. For example:
-
2d, –3w, 1h, 1y1m, and so on — Relative dates and times put the date at a certain amount of time from right now. Negative numbers represent times in the past.
-
2 days, –3 weeks, 1 hour, 1 year 1 month, and so on — You can use the full names of units too.
-
yesterday, tomorrow, tonight, next thursday, last month, this friday, and so on — You can refer to relative dates using common words. “This”, “next”, and “last” have specific meanings: this friday always means the Friday in this week, next friday always means the Friday in the next week, and last friday always means the Friday in last week, regardless of what day today is. Other units work in the same way.
-
september, fri, 2019, and so on — If you enter the name of a specific time period, the date will be at its beginning. So september means September first.
-
5/23/08 10a, 9.30.09 2:00 PM,* and so on — You can use the short date format as defined in your Language & Region system preferences.
-
2w sat, 4d @ 5p, mon 6a, aug 6 tue 5p, and so on — Mix the available formats however you like.
-
now, 9, 14:00, tom, and so on — OmniFocus makes its best guess at things like bare numbers, times, and word fragments. If you think something might work, give it a try.
Repeat
Use the Repeat section of the inspector to set up tasks that occur on a regular basis.
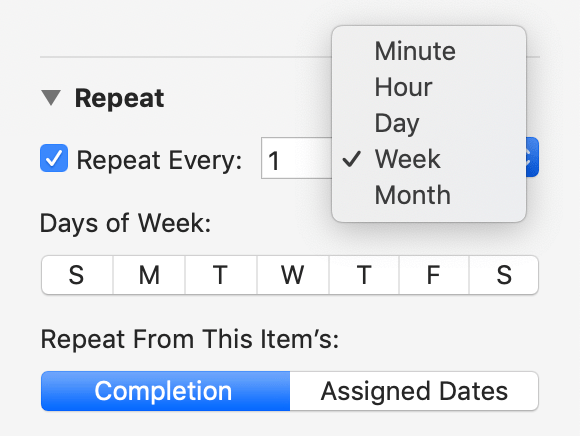
Select the Repeat Every checkbox to indicate that an item repeats. Items can be set to repeat based on a variety of criteria that are progressively disclosed as you make changes in the repeat editor.
Repeat Interval
Choose a number minutes, hours, days, weeks, or months which elapse for every repeat cycle. When weeks or months are chosen, additional custom options become available.
Days of Week
With an interval of weeks, the option becomes available to repeat every weekday chosen here (Monday, Wednesday, and Friday, for example). With an interval of months, the option becomes available to repeat every first through fifth (or last) weekday of the month.
Days in Month
With an interval of months, the option becomes available to repeat on the chosen calendar dates of the month (or the last day of the month).
Schedule the Next
If the item has a defer date, choose whether completing the item will schedule the next occurrence as a:
- Due Date—The item must be completed again by that date. Or;
- Defer Until Date—The item becomes available again on that date.
Repeat From This Item’s
Choose whether completing the item will schedule the next occurrence from:
- Completion—The repeat interval begins when the item is completed. Or;
- Assigned Dates—The repeat interval begins at the originally assigned date.
Notifications
Use the Notifications inspector to view any notifications set for a selected item, to add new custom notifications, and to remove unwanted notifications.
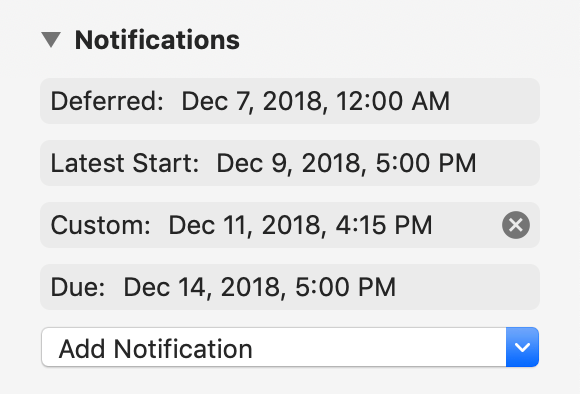
This inspector contains a list of notifications currently set for the item, followed by a control for adding new custom notifications.
Any notifications, including those automatically created based on your preferences, can be removed from an item by clicking the ![]() next to them on their respective rows.
next to them on their respective rows.
If you have notifications set that don't appear when you expect them to, make sure that Notify on this Mac is checked in Notification preferences.
Preference-Based Notifications
Depending on your Notifications preferences and the attributes you have set on an item, as many as three notifications are created for it automatically.
-
Deferred—With a defer date set and Deferred checked in preferences, a notification for the defer date is automatically added.
-
Latest Start—With a due date and an estimated duration supplied for the item and Latest Start checked in preferences, a notification is created for the latest possible time the task could start for it to be completed by the due date.
-
Due—With a due date set and Due checked in preferences, a notification for the due date is automatically added.
Custom Notifications
Use the Add Notification dropdown menu to create a new notification of one of the following types:
-
Before Due—Adds a notification that occurs a set amount of time before the item is due. A notification of this type depends on the item's due date, so if the due date is changed or removed the time of the notification is likewise altered.
-
Custom—Adds a notification at a custom date and time that you choose from the calendar that accompanies this option. This is a fixed notification that doesn't depend on any other factors, so its date and time won't change even if you change the item's other dates.
Note that while custom notifications are independent of other dates assigned to an item, they do obey the item's floating time zone setting.
Review
Use the Review section of the inspector to change the frequency with which the project comes up for review, and edit the date of a project’s next scheduled review.
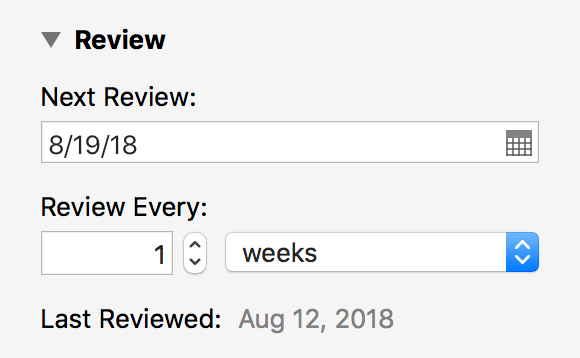
Next Review
Use this field to set the date of the project’s next scheduled review.
Review Every
Set the interval at which the project comes up for review, expressed in days, weeks, months, or years. (The default is every week, beginning a week from the project’s creation.)
Last Reviewed
The date the project was last reviewed. This is derived from your editing history, and can’t be changed directly.
Notes and Attachments
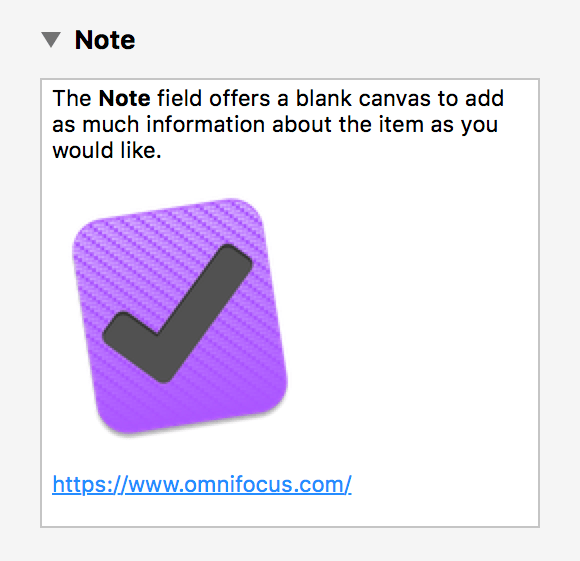
Use the Note section of the inspector to add, view, and edit any notes or attachments associated with the selection.
To add a note to an item, click the note icon ![]() in the outline near the item’s title, edit the note field in the inspector, or choose Edit > Edit Note (Command-’).
in the outline near the item’s title, edit the note field in the inspector, or choose Edit > Edit Note (Command-’).
Note text is indexed along with item titles for the purposes of searching within OmniFocus. Adding longer form text in notes is a great way to include searchable information related to an item without cluttering up its title field.
In addition to plain text, notes support rich text including custom fonts, colors, and styles. Notes also support hyperlinks; enter a URL in the note field and it automatically becomes an interactive link.
The notes field also displays any file attachments associated with the currently selected item.
Attaching Files
With an action or project selected, choose Edit > Attach File. This opens a file selection dialog, where you can browse to find the file you’d like to attach. You can choose whether to link to the file on your system, or embed it into your database (the Embed option is chosen by default).
When you embed an attachment and sync OmniFocus, that file is copied into your OmniFocus database and is stored on the sync server so it can be pulled down wherever you need it.
If you want access to the file on your other devices, this is the option you want—if you attach the file as a link, it stays locally on your system and isn’t included with the rest of your OmniFocus data.
OmniFocus is not intended to replace a dedicated file syncing service.
OmniFocus sync is designed to accommodate a wide range of uses, but slowness and other problems may occur when syncing large volumes of archival attachments or multiple files of great size.
If you make frequent use of the attachments feature, consider using the Attachment List to review the files attached to your database and remove large or unneeded files.
The Attachment List
The Attachment List (Window > Attachment List) gives you quick access to all of the files attached to your database. This can be handy for finding the little pieces of reference material you have added to your actions and projects.
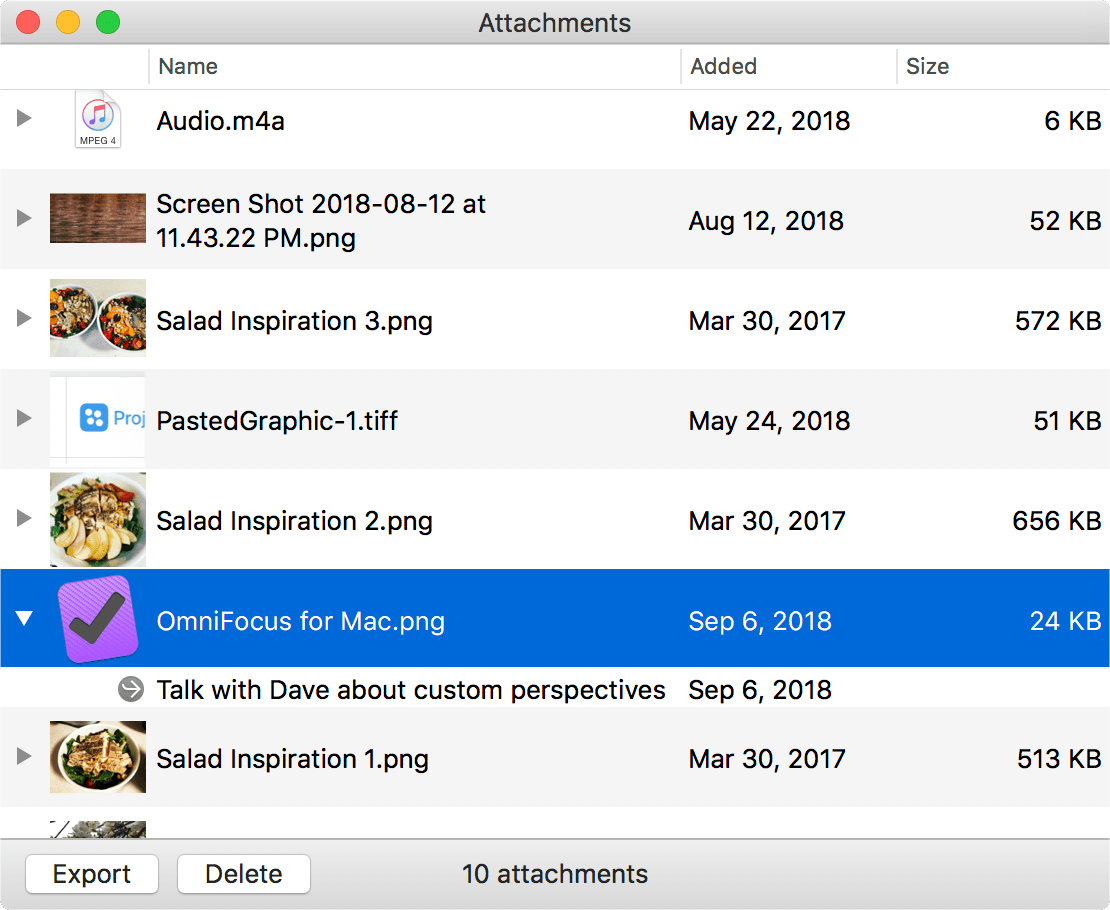
The Attachment List displays a list of all of your attachments along with a thumbnail image, file size, and the date they were added. Click any of the column headers to sort the list by that attribute (in ascending or descending order). Click the disclosure triangle on the left of an attachment row to reveal its associated database items, or double-click the attachment to go straight there.
The Attachment List can also be used for clearing out old attachments, thus slimming your database to take up less space on your devices (especially useful when syncing).
To delete an attachment that you don’t need anymore, select it in the list and click the Delete button in the window’s lower left corner. The Delete dialog indicates how many attachments are selected for deletion, and how many individual database items those attachments are associated with.
Select multiple attachments at once by Command-clicking them, Shift-click to select a range, or use Select All (Command-A) to select all attachments in the list.
If you would like to retrieve attachments from your database (perhaps prior to a big deletion), select them in the list and click Export. An export panel appears where you can choose a location on your Mac to store the attachments. Navigate to the directory you would like to use as the export destination, and click Export again to save copies of the files to your drive.
The Perspectives Window (Pro)
OmniFocus Pro adds the Perspectives window to OmniFocus, where you can choose which perspectives to display as tabs in the sidebar (and determine their order), and create custom perspectives that reflect views on your OmniFocus data that you want to come back to again and again.
Choose Show Perspectives (Control-Command-P) from the Perspectives menu to open the Perspectives window.
The Perspective List
On the left side of the Perspectives window you’ll see a list of your existing OmniFocus perspectives, including the built-in ones, where you can choose which ones to display as tabs in the sidebar and drag and drop to arrange them in your preferred order.
To set a perspective as a sidebar tab, click the star  next to the perspective name.
The perspective list also serves as a way to navigate between perspectives in the main OmniFocus window: double-click a perspective in the list to open it. If you find this useful, you can click Collapse  in the bottom bar to hide the Editor when all you need is the list.
The Perspective Editor
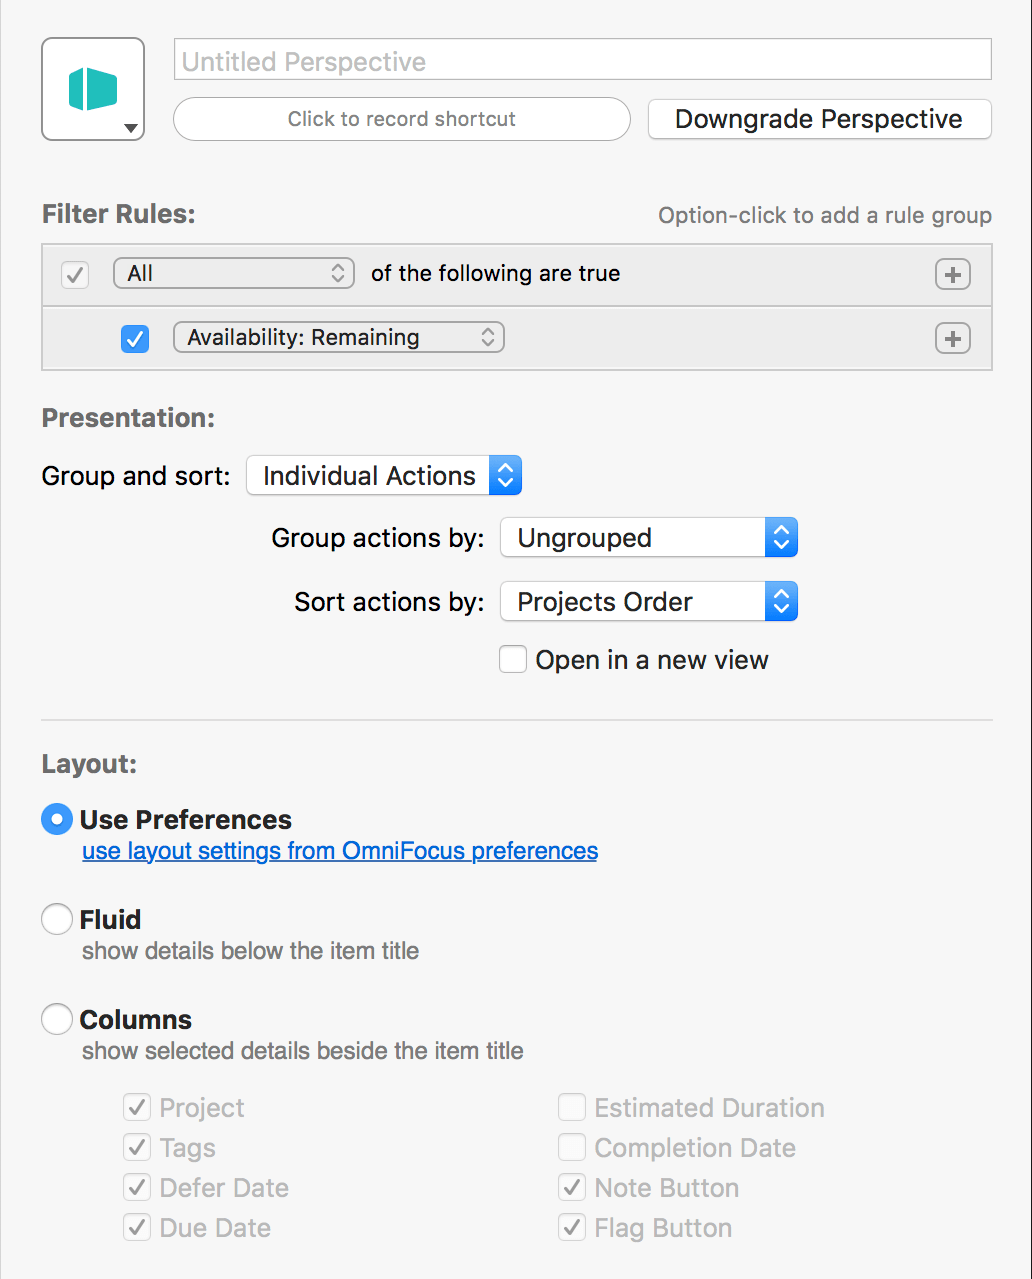
The Perspective Editor appears on the right side of the Perspectives window, and contains controls you can use to edit existing perspectives and create new ones.
The controls in the Perspective Editor are mostly identical to those found in View options for the selected perspective, with a few additional features described in the sections below.
To add a new custom perspective, choose Perspectives > Add Perspective... or click Add Perspective  in the Perspectives window’s bottom bar.
Name and Icon
When editing a custom perspective, click the name field to enter a new name or change an existing one (the default is Untitled Perspective).
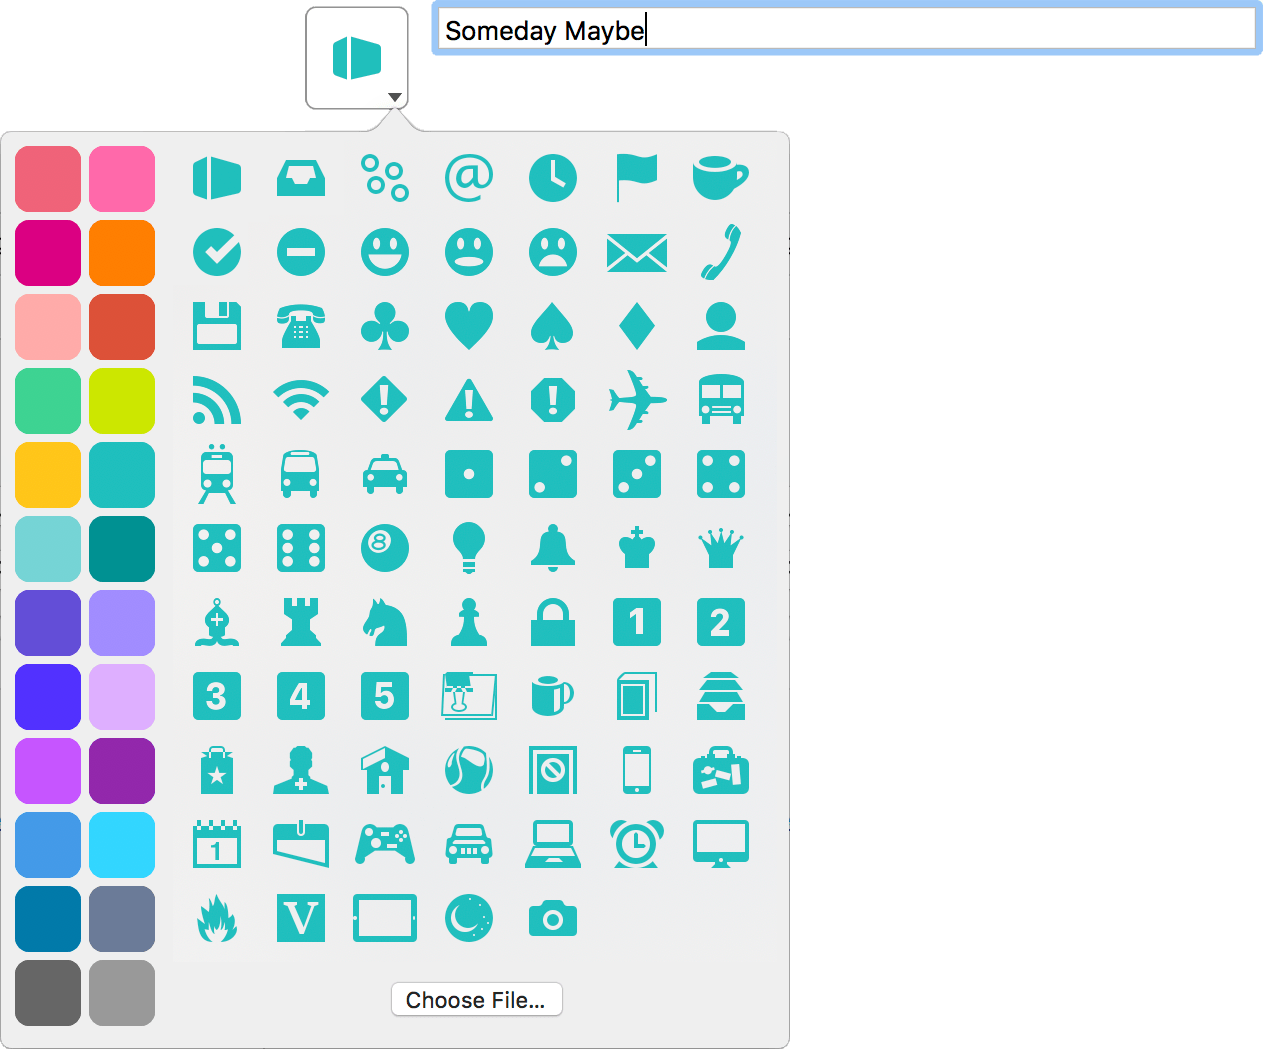
Click the down arrow in the corner of the icon well to open the icon picker, where you can choose from among a set of Omni-designed icons included with OmniFocus, or click Choose File... to add an image stored elsewhere on your Mac.
Click a color on the left side of the icon picker to choose a custom color for your perspective and its iconography throughout the app.
Shortcut Recorder
Beneath the name field is a place for you to assign a keyboard shortcut to the selected perspective.

To record a shortcut, click the button and then press the keys for the keyboard shortcut you want to use. The characters appear in the field as you type, and are saved when you’ve entered a valid combination.

Press esc to cancel recording, or click Revert  to restore the previous shortcut.
You can choose any shortcut as long as it isn’t already used, and contains a combination of one of:
- the Command key
- the Control key
and any other key. Alternatively, an unused Function key (such as F13) can be used.
Upgrade or Downgrade Perspective
Custom perspectives you create, as well as names, icons, and colors assigned to them, are synced between all of your devices that sync with your OmniFocus database.
Older versions of OmniFocus do not support all the features of perspectives created with OmniFocus 3. (These perspectives will still sync provided the database version is compatible, however they will be hidden.)
To make a perspective created with OmniFocus 3 visible in earlier versions of OmniFocus, choose Downgrade Perspective. Choosing to downgrade a perspective may remove some advanced filter rules or other features of the perspective.
Alternatively, if you are syncing a perspective created with an older version of OmniFocus to OmniFocus 3, you can choose to Upgrade the perspective to take advantage of the features described in this chapter. Existing perspective rules and presentation settings will be converted to the newer perspective format.
Perspectives created in OmniFocus 3 for Mac use the editor described in this chapter. You can still sync and use perspectives created in OmniFocus 2, which will open in the old version of the editor if you choose not to upgrade them.
Filter Rules
This section of the editor determines which items the perspective includes. Items are included by setting filters with the parameters for specific item attributes: if an item matches the filter rules, it is included in the perspective. If an item doesn’t match the rules, it won’t appear.

Filter rules are set up in hierarchy, with an All, Any, or None of the following are true operation at the top of the tree. This indicates that all, any, or none of the rules inside it must apply to items for them to be included in the perspective. (This forms the root of the hierarchy, and therefore can’t be deleted.)
By default a new custom perspective includes one Availability: Remaining rule as an example. Since it is nested beneath All of the following are true, this rule means that the perspective will only show items with an availability status of Remaining (completed and dropped items will not appear).
If you don’t want to include the default rule in your perspective, either change it to something else, deselect the checkbox to the left to turn it off, or add another rule and click Remove Rule  to delete the first one. (All custom perspectives must contain at least one rule, so you can’t delete the default rule outright.)
Click Add Rule  to add a new rule that applies to items in the perspective.
When adding a filter rule, note that it will apply based on its position in the hierarchy. All rules added beneath the root use its logic: either Any, All, or None of them must apply for items meeting those criteria to appear in the perspective.
To create additional hierarchy in the list, press option and click Add Rule Group  (with option held down, this replaces Add Rule).
As with the root operation, you can choose the condition that applies to rules in the group:
-
All of the following are true: Each of the rules in the group must be true for an item to appear in the perspective (or for it to be considered by the rules above it in the hierarchy). This corresponds to a Boolean AND operation.
-
Any of the following are true: If an item meets even one of the rules nested below Any of the following, it will be included in the perspective (provided it also meets conditions described elsewhere in the tree). This corresponds to a Boolean OR operation.
-
None of the following are true: If an item meets one of the rules nested below it, it will be excluded from the perspective regardless of any other rules applied. This corresponds to a Boolean NOT operation.
If your filter rules have several levels of hierarchy, you can drag and drop a rule elsewhere in the structure to change its effect on item visibility in the perspective.
Presentation
This section of the Editor defines how items in the perspective are displayed in the outline. You can choose from two main modes using the Group and sort setting: to view items as a list of Individual Actions, or as items hierarchically grouped within Entire Projects.
If your perspective’s filter rules exclude items of a type that would be grouped or sorted by one of the criteria listed below, it is possible to choose an option that offers no meaningful structure (such as choosing to group by Completed when the perspective is set to display only items that are Remaining).
Grouping and Sorting by Individual Actions
When displayed as individual actions, the outline contains a flat list of all items that meet the filter rule criteria, and the sidebar contains the tags list. Further refinement of grouping and sorting within the perspective offers additional options, and the option to Show project paths can be turned on or off to show or hide the project row above each item.
When grouped by individual actions, actions can additionally be grouped by:
-
Ungrouped—Actions are not grouped and presented as a flat list.
-
Tag—Actions are grouped by individual tag. If an action has more than one tag, it appears within each of its tags.
-
Tags (Combined)—Actions are grouped by tag combination. Regardless of the number of tags on an action, it appears only once (in a group named with its tag combination).
-
Project—Actions are grouped by project.
-
Due—Actions are grouped by due date, from oldest to newest. The granularity of the grouping increases as it nears the present day. Actions with no due date assigned are grouped at the bottom of the outline.
-
Defer Date—Actions are grouped by defer date, from oldest to newest. The granularity of the grouping increases as it nears the present day. Actions with no defer date assigned are grouped at the bottom of the outline.
-
Completed—Actions are grouped by completion date, from most recently completed to oldest. The granularity of the grouping increases as it nears the present day. Actions with no completion date are grouped at the bottom of the outline.
-
Dropped—Actions are grouped by dropped date, from most recently dropped to oldest. The granularity of the grouping increases as it nears the present day. Active actions are grouped at the top of the outline.
-
Added—Actions are grouped by the date they were added to OmniFocus, from newest to oldest. The granularity of the grouping increases as it nears the present day.
-
Changed—Actions are grouped by the date they were most recently edited, from newest to oldest. The granularity of the grouping increases as it nears the present day.
-
Flagged—Actions are grouped according to their flagged status, with flagged actions first, followed by unflagged actions.
When grouped by individual actions, actions can additionally be sorted by:
-
Due Date & Flagged—Actions are sorted based on their due and flagged states. Items that are both due and flagged appear first (in the order that they are due), followed by all remaining flagged items, all other due items, and finally items that are neither flagged nor due.
-
Projects Order / Tags Order—Actions are sorted within their grouping in the order they appear in the Projects perspective (or the Tags perspective, if the grouping is based on tags.)
-
Tag—Actions are sorted by tag. Actions with multiple tags appear only once, alongside other actions in the grouping with the same tag combination.
-
Flagged—Actions are sorted by flagged status, with flagged actions appearing first within their grouping.
-
Name—Actions are sorted alphabetically by name.
-
Due—Actions are sorted by due date. Actions with the earliest due (or overdue) dates appear first, followed in descending order by actions with the latest due dates, and finally by actions without due dates.
-
Defer Date—Actions are sorted by defer date. Actions with the soonest defer dates appear first, followed by more remote actions and finally actions without defer dates.
-
Added—Actions are sorted by the date they were added to OmniFocus, from newest to oldest.
-
Changed—Actions are sorted by the date they were most recently edited, from newest to oldest.
-
Completed—Actions are sorted by the date they were completed, with active actions first, followed by completed actions from newest to oldest.
-
Dropped—Actions are sorted by the date they were dropped, with active actions first, followed by dropped actions from newest to oldest.
-
Duration—Actions are sorted by estimated duration, from shortest to longest. Actions without an estimated duration appear at the bottom of the outline.
Grouping and Sorting by Entire Projects
When displayed as entire projects, the outline contains a list of projects with items that meet the filter rules organized hierarchically inside them, and the sidebar contains the projects list. Further refinement of grouping and sorting offers additional options. The Show project paths option is not available for this setting because actions are already displayed within their corresponding projects.
Items without a project that otherwise meet the filter rules are grouped into an Inbox section at the top of the outline.
When grouped by entire project, the projects within the perspective can additionally be grouped by:
-
Ungrouped—Projects are not grouped and presented as a flat list.
-
Folder—Projects are grouped into the folders that contain them. Projects outside of folders are grouped in a No Folder section at the bottom of the outline.
-
Due—Projects are grouped by due date, from oldest to newest. The granularity of the grouping increases as it nears the present day. Projects with no due date are grouped in a No Due Date section at the bottom of the outline.
-
Defer Date—Projects are grouped by defer date, from oldest to newest. The granularity of the grouping increases as it nears the present day. Projects with no defer date are grouped in a No Defer Date section at the bottom of the outline.
-
Completed—Projects are grouped by the date they were completed, from most recently completed to oldest. The granularity of the grouping increases as it nears the present day. Projects with no completion date are grouped in a No Completion Date section at the bottom of the outline.
-
Dropped—Projects are grouped by the date they were dropped, from most recently dropped to oldest. The granularity of the grouping increases as it nears the present day. Projects with no drop date are grouped in a Not Dropped section at the top of the outline.
-
Next Review—Projects are grouped by the date of their next scheduled review, from soonest to furthest. The granularity of the grouping increases as it nears the present day.
-
Added—Projects are grouped by the date they were added to OmniFocus, from newest to oldest. The granularity of the grouping increases as it nears the present day.
-
Changed—Projects are grouped by the date of their most recent edit, from newest to oldest. (This includes changes to actions within the project.) The granularity of the grouping increases as it nears the present day.
When grouped by entire project, the projects within the perspective can additionally be sorted by:
-
Projects Order—Projects are sorted within their grouping by the order they appear in the Projects perspective.
-
Name—Projects are sorted alphabetically by name.
-
Flagged—Projects are sorted by flagged status, with flagged projects appearing first. The flagged status of individual actions within projects has no effect on this sorting.
-
Due—Projects are sorted by due dates of actions within the project, from oldest to newest. (Projects containing actions with the oldest due dates appear first.) This sorting applies regardless of whether the project itself has a due date. Projects containing no due dates appear at the bottom of the outline.
-
Defer Date—Projects are sorted by defer date, from oldest to newest. Projects with no defer date appear at the bottom of the outline.
-
Completed—Projects are sorted by the date they were completed, with active projects first, followed by completed projects from newest to oldest.
-
Dropped—Projects are sorted by the date they were dropped, with active projects first, followed by dropped projects from newest to oldest.
-
Next Review—Projects are sorted by the date of their next scheduled review, from oldest to newest.
-
Added—Projects are sorted by the date they were added to OmniFocus, from newest to oldest.
-
Changed—Projects are sorted by the date they were most recently edited, from newest to oldest. (This includes changes to actions within the project.)
-
Duration—Projects are sorted by estimated duration, from shortest to longest. Projects without an estimated duration appear at the bottom of the outline.
Open in a New View
Check this box to open the perspective in a new view when you navigate to it using the perspective list or the Perspectives menu. When checked, the perspective opens either in a new window or a new tab, depending on your macOS System Preferences.
To have a perspective open by default in a new tab rather than a new window, open the macOS System Preferences' Dock pane and change the Prefer tabs when opening documents: setting to Always.
Layout
Choose a layout for the perspective. The customization settings here are identical to those available for built-in perspectives with OmniFocus Pro, meaning you have the freedom to override the defaults set up in Layout Preferences if you so choose.
Bottom Bar
The bar at the bottom of the Perspectives window contains controls for adding and removing perspectives, and showing or hiding parts of the window to optimize it for various use cases.
Add Perspective
Creates a new custom perspective ready to be customized using the tools described in this chapter.
Gear Menu 
Contains controls to Open, Duplicate, or Delete the selected perspective. Deleting a perspective also removes it from any other synced OmniFocus devices. Since a perspective is simply a view on your data, removing one doesn’t affect the tasks in your OmniFocus database in any way.
Collapse/Expand Editor
Hides or reveals the Editor portion of the Perspectives window. If you primarily use the window to navigate between perspectives, it can be useful to keep the Editor hidden most of the time.
Preferences
Preferences in OmniFocus govern ways the app behaves and how you interact with it, with settings that can be customized to suit your needs. Choose OmniFocus > Preferences (Command-,) to open the Preferences window.
General
The General tab includes settings for common interactions you’ll have with OmniFocus.
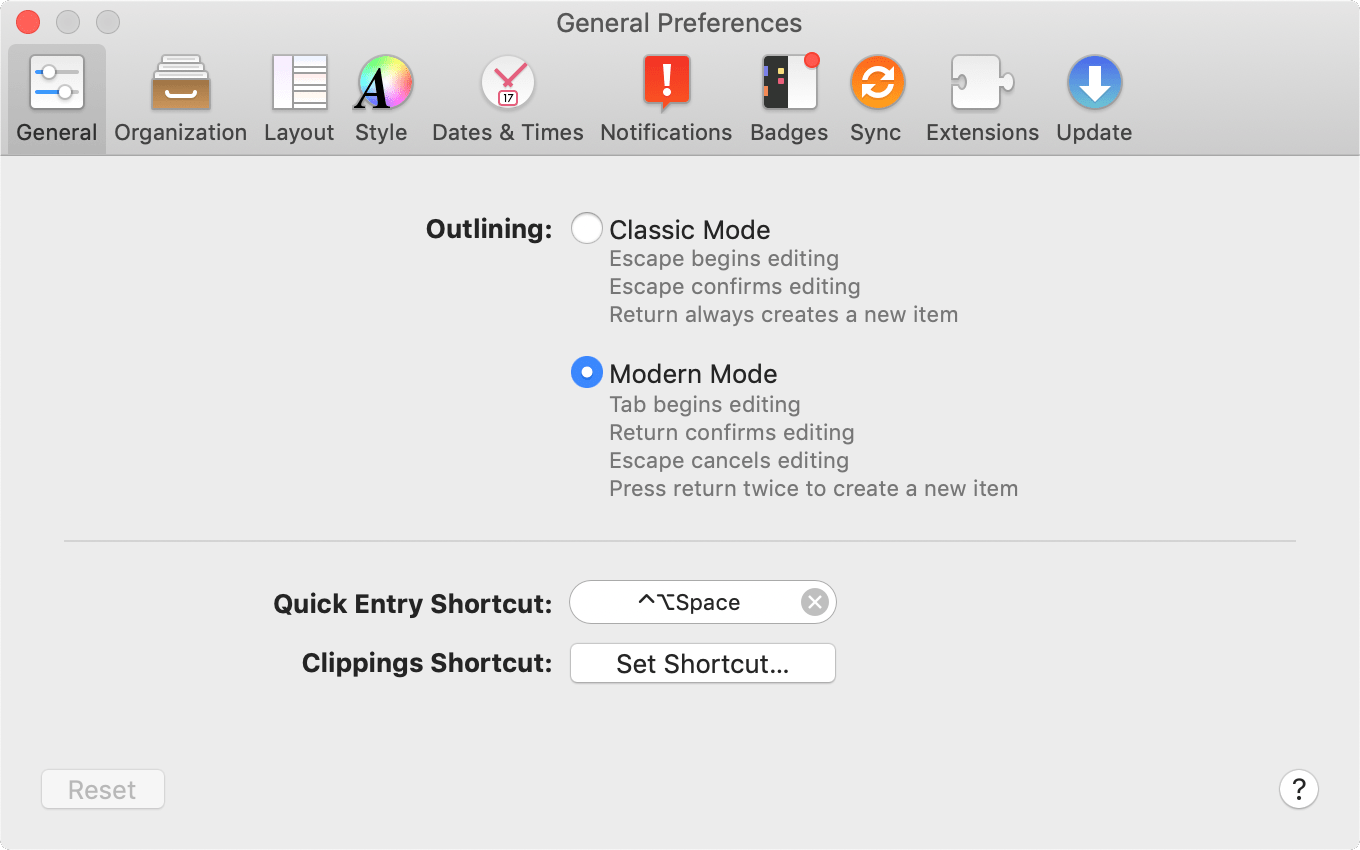
Outlining
Choose between Classic Mode and Modern Mode outlining, governing the behavior of common keyboard actions when items in the outline are selected.
Quick Entry Shortcut
Set a custom keyboard shortcut for Quick Entry here (the default is Control-Option-Space).
Clippings Shortcut
Use the Clippings Shortcut button to open System Preferences and set up your system-wide keyboard shortcut for Clippings.
Organization
The Organization tab includes settings for keeping your database views tidy and determining how projects and perspectives are organized.
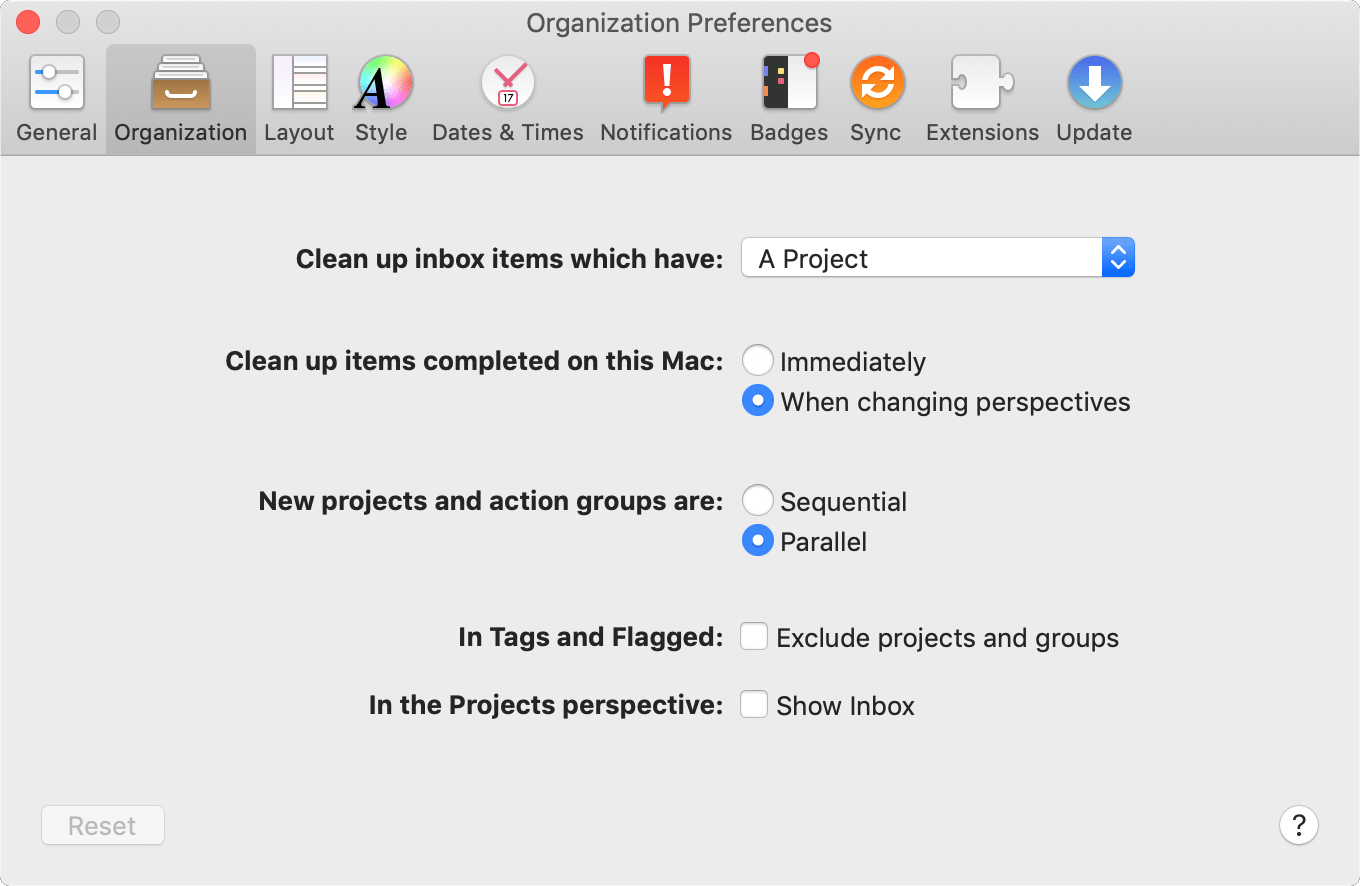
Clean up inbox items which have
You can choose Organize > Clean Up (Command-K) to help keep your Inbox tidy by moving items with changed status or metadata to their correct locations. This preference governs which changes cause an item to be swept up in the cleanup process.
Clean up items completed on this Mac
If you’d prefer that items be cleaned up as soon as they are marked complete, choose Immediately. Otherwise, completed items will be cleaned up when you switch between perspectives or when you invoke a cleanup manually.
New projects and action groups are
Choose Sequential if you tend to create projects whose actions must be completed in a specific order, or choose Parallel if your projects and groups are often closer to unordered lists.
In Tags and Flagged
If you’d prefer to display items completely detached from the projects or groups they belong to when you’re looking at the Tags or Flagged perspectives, uncheck the box for this preference.
In the Projects perspective
Choose Show Inbox to display the Inbox as the first item in your Projects list (unlike other items, this one cannot be reordered in the list). This option is available for convenience of interaction between your Inbox and Projects perspectives, and does not otherwise change the behavior of the Inbox.
Layout
The Layout tab controls how data is displayed in OmniFocus’s outline.
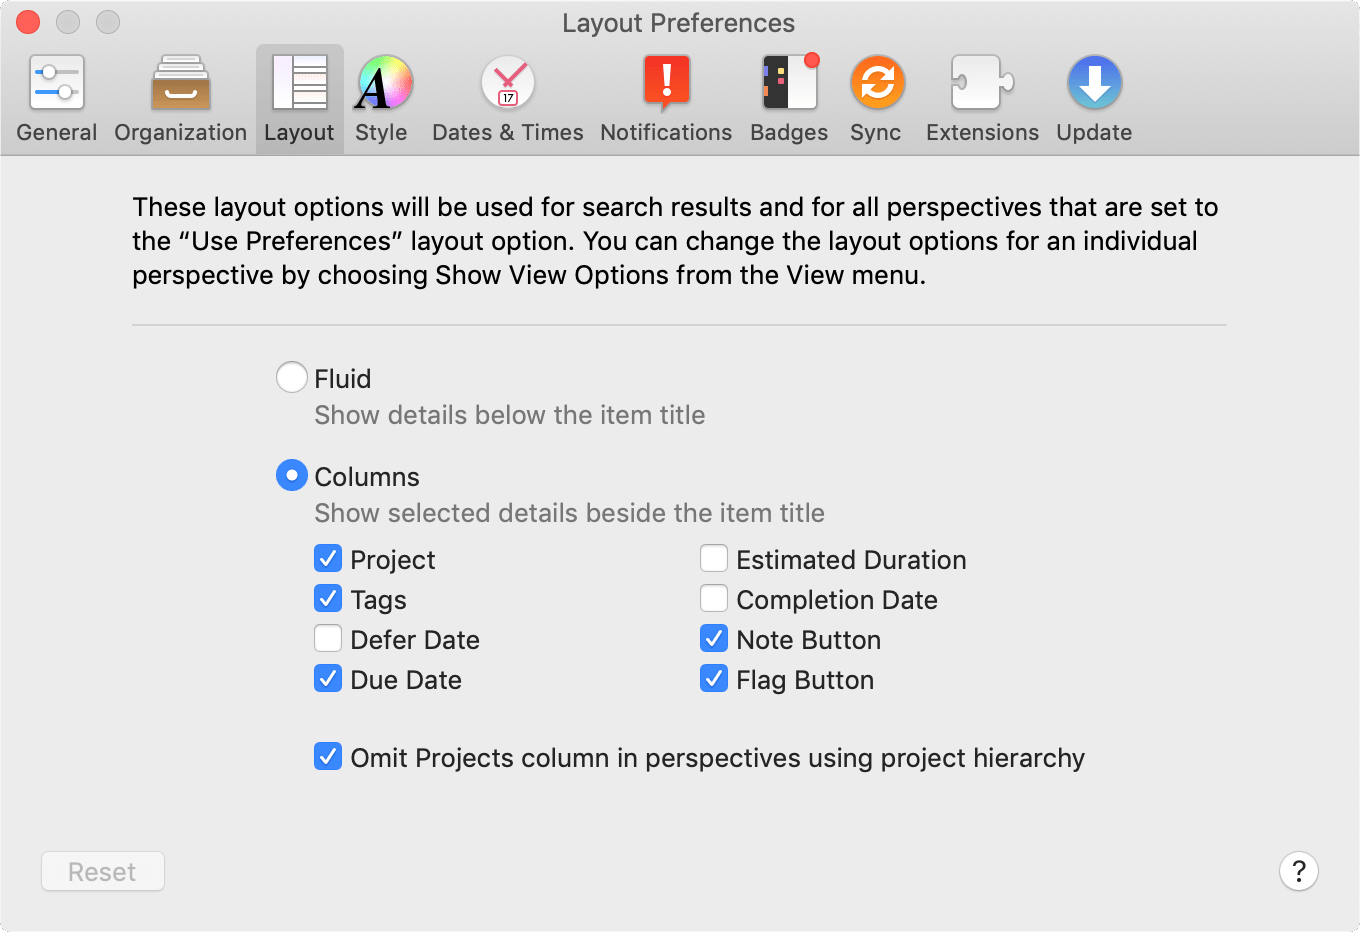
Fluid
This option displays information related to items in the outline in a row beneath each item’s title.
Columns
This option provides a configurable set of columns for each item. Your data appears in columns on the same row as each item’s title, and these columns can be selectively shown or hidden with the checkboxes in this section.
With OmniFocus Pro, you can use individual perspectives’ View options to choose whether Layout preferences apply to that particular perspective. If you use a variant layout, you can further customize it by choosing columns that show only the data most relevant to the perspective.
Style
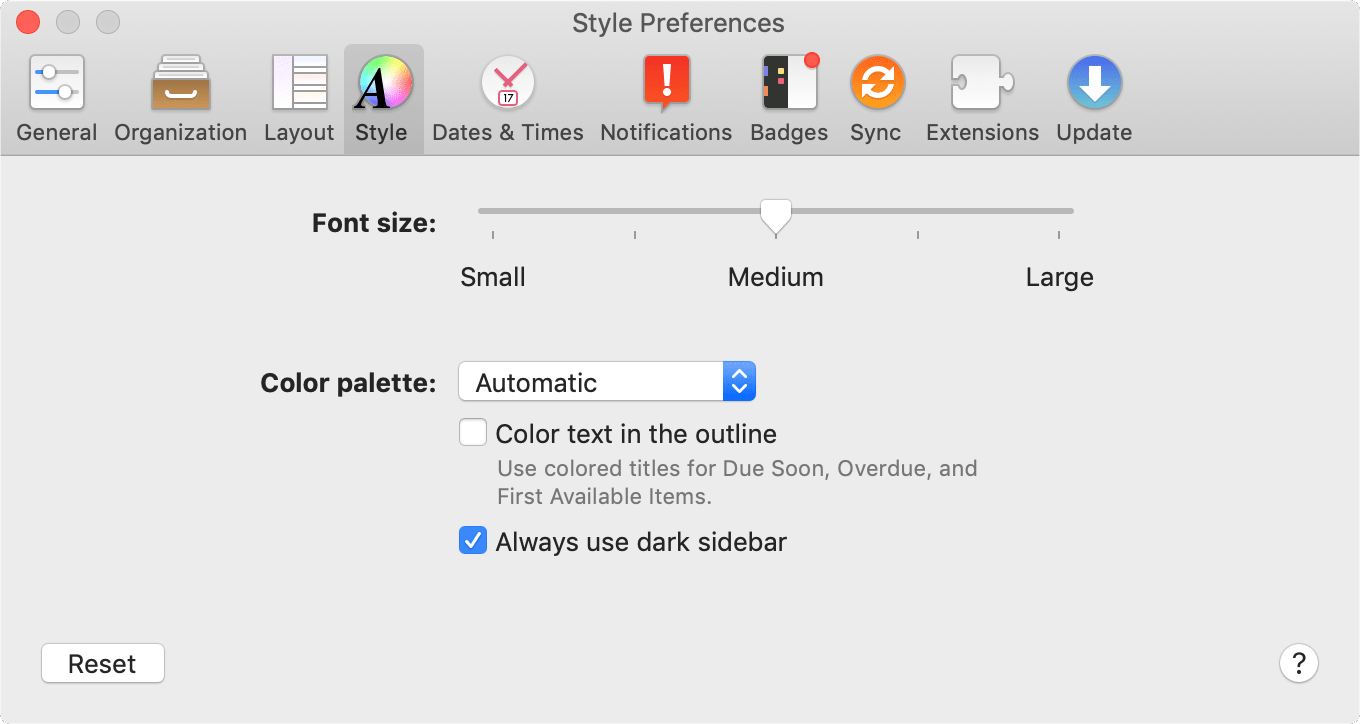
The Style tab controls the fonts and colors used throughout OmniFocus.
Font size
The slider here offers scaling font size for easy readability or higher data density.
Color palette
Choose a themed set of colors to apply to your OmniFocus interface. The following styles are included:
- Automatic—the color scheme conforms to your appearance settings in macOS System Preferences.
- OmniFocus—use the light color scheme regardless of the system settings.
- OmniFocus Dark—use the dark color scheme regardless of the system settings.
The checkboxes below the color palette menu offer the following options:
-
Color text in the outline—choose whether to use color for the title text of Due Soon, Overdue, and First Available items. When this checkbox is selected, these items will be styled in colors appropriate to their status.
-
Always use dark sidebar—When using the OmniFocus (light) color scheme, choose whether the sidebar is dark or light.
Dates and Times
OmniFocus starts with an educated guess at some default parameters for what it means for items to be due, due soon, and deferred, as well as an interval for project reviews. You can change these settings in the Dates & Times tab of Preferences.
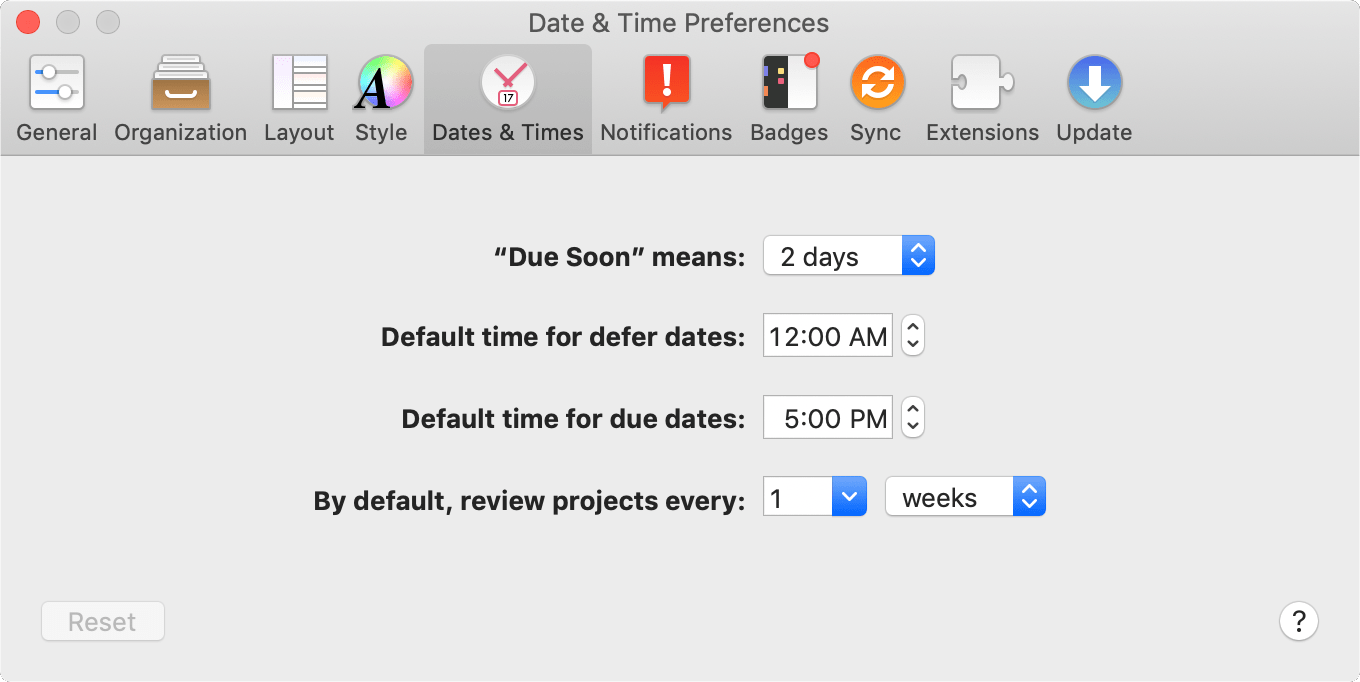
“Due Soon” means
OmniFocus displays actions and projects that are due soon with an amber title and status circle. What “due soon” means is up to you—the default is two days away from the present, but you can pick a different value here.
Default time for defer dates
When you create an action or project with a defer date but no specific time of day, OmniFocus provides one for you. Use this preference to pick a default time for defer dates that most suits your needs.
Default time for due dates
As with the previous preference, you have free reign over the time that your actions and projects come due by default (when only a due date is assigned).
By default, review projects every
This preference governs how often projects will show up in your Review queue by default. (You can set custom review intervals for specific projects using the inspector.)
Notifications
OmniFocus can work with the macOS Notification system to provide alerts relevant to tasks that you set up across a wide variety of parameters. Those that apply to each task in your database are set here in Preferences; notifications can also be set on a per-item basis using the Notifications inspector.
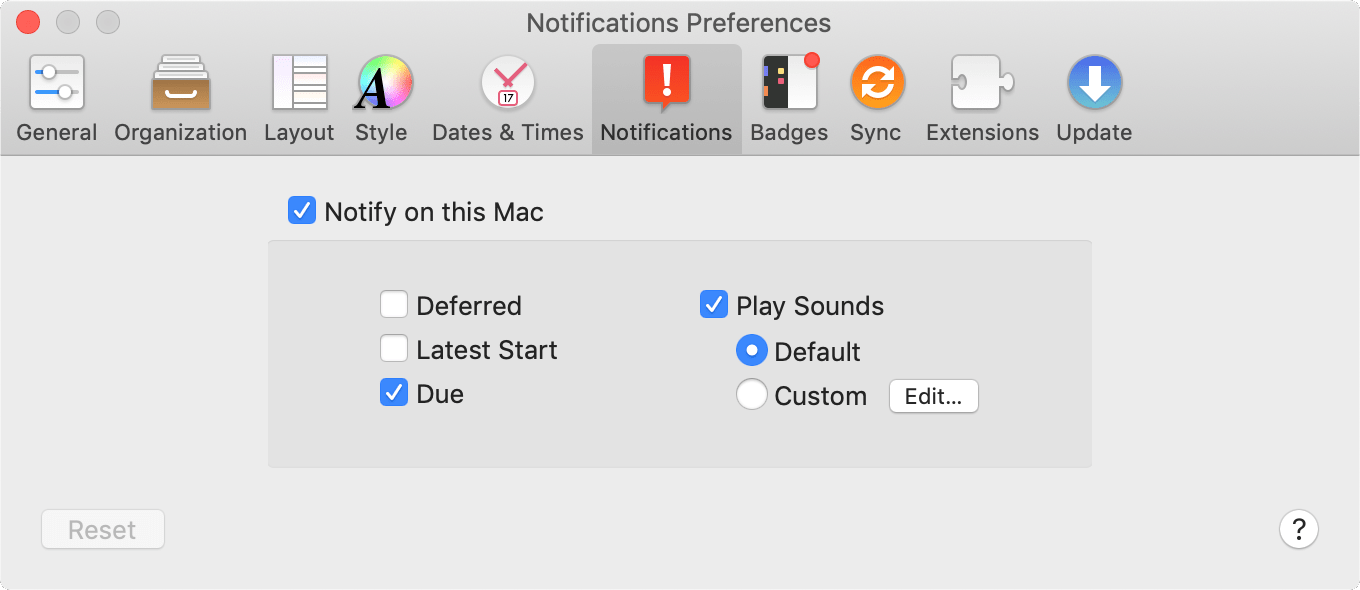
Notify on this Mac
Select Notify on this Mac to have OmniFocus notifications appear in macOS Notification Center. Notifications sync between devices along with the rest of your database, so those you add elsewhere will appear along with any notifications you set up in OmniFocus here on your Mac.
You can add notifications for items automatically when they meet certain criteria by selecting the options below, or set up custom notifications for individual items using the Notifications inspector.
-
Deferred—Automatically add a notification for the date and time of an item's defer date. Changing an item's defer date changes the date of the notification, and removing it deletes the notification.
-
Latest Start—Automatically add a notification for the latest possible time an item could be started if it is to be completed by its due date, based on the item's estimated duration and due date. This notification is only created if an item has both a due date an an estimated duration.
-
Due—Automatically add a notification for the date and time of an item's due date. Changing the due date changes the date of the notification, and removing it deletes the notification.
These settings don't apply to items created prior to the settings being turned on.
Any notifications that are created automatically can be individually removed by clicking XX next to their entries in the Notifications inspector.
- Play Sounds—Turn on sounds that correspond to OmniFocus notifications. Choose either the default system notification sound, or custom sounds (including None) based on the type of notification; click Edit to revisit choices you've made for your custom alerts.
Badges
OmniFocus can operate in complete stealth mode, or it can display visual cues when it's time to focus on your tasks. The Badges tab of Preferences holds settings for fine-grained control over when and how the app tells you what’s up next.

Badge app icon with
How visibly do you want OmniFocus remind about items you’ve decided are relevant? Check the boxes in this section for items you want to include in the badge count number that appears on the OmniFocus app icon in the macOS Dock. (If nothing is checked, the badge won't appear.)
Highlight perspective tabs
When there are items asking for your attention in one of the built-in perspectives, OmniFocus can give you a subtle reminder by adding a colored bar to the left edge of the perspective’s tab. Use this preference to choose which perspectives are highlighted when something relevant comes up.
Show sidebar badges
This preference adds some visual oomph to let you know what’s going on by equipping the OmniFocus sidebar with badges displaying due soon and overdue items in the Projects, Tags, and Review perspectives.
Sync
Establishing a cloud-connected copy of your database is a great way to keep OmniFocus in harmony across all your devices. The Sync tab has the options you need to set up your sync account.
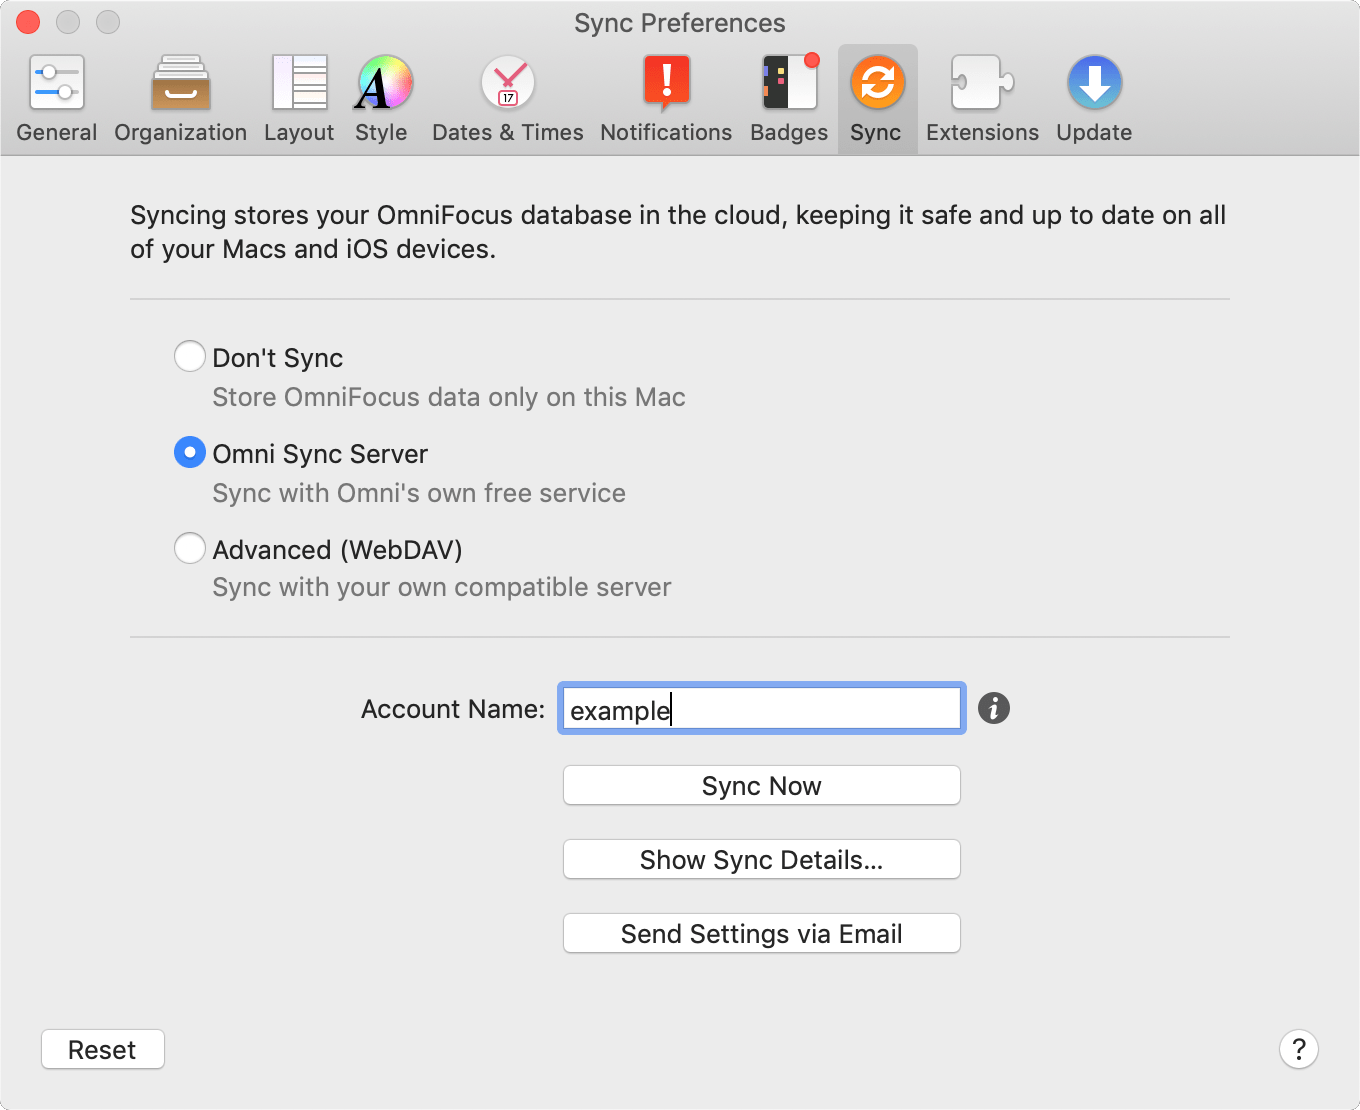
Don’t Sync
This setting isn’t recommended, but if you plan to use OmniFocus exclusively on your Mac and syncing to a remote server is prohibitive, you can choose to disable OmniFocus’s sync features. In all other cases, having a cloud-based copy of your data is a great way to rest at ease that your work won’t be lost in a local catastrophe.
Omni Sync Server
Omni maintains a set of servers designed to interface cleanly with OmniFocus, providing unique features like email capture and support for your needs as an OmniFocus user. We recommend this as the best sync solution for most users, since it’s the one we can provide the most support for; it also happens to be free!
Check out the Getting Synced appendix for details on getting set up and for more information on how sync works.
Advanced (WebDAV)
If you choose to entrust your data with the Omni Sync Server, we’ll treat it with utmost care and responsibility (see our Terms of Service and Privacy Policy). That said, if you have exceptional security needs or other privacy concerns, you may want to use a third party WebDAV server (or set up your own). That’s great! Find out more about syncing to a custom WebDAV server in Other WebDAV Options.
Account Information
When you’ve chosen a sync preference, a field appears beneath the sync choices for entering the server address or account name. You can sync immediately with the Sync Now button and view detailed information about your sync setup with Show Sync Details. Choose Send Settings via Email to create a handy message that’ll help configure sync on your other devices.
Show Sync Details
When you click Show Sync Details a sheet appears with tabs that contain advanced information about your connected sync account, including:
-
A list of Devices currently syncing to the account. Selecting a device shows how recently it synced to your OmniFocus database, and provides the option to unregister it as an approved sync client.
-
Push-triggered sync options, with push enabled by default. Technical details of your push connection are shown here, along with advanced options (primarily used for troubleshooting). The Learn More link connects to a support article with details on how push works, and why even the most data security-conscious users will likely want to leave it enabled.
-
A sync Log with a list of all your recent OmniFocus database sync activity, and the reasons for each sync event along with their durations. If anything seems strange here, you can copy the log for use when contacting Omni support.
-
Details about the Encryption status of your data on the sync server. OmniFocus uses a database format that encrypts your data on the server. Verify the encryption status of your sync data here, and (optionally) set up a separate passphrase for decrypting your database.
Extensions
Use the Extensions tab to control how OmniFocus works with some of the other features of your Mac.
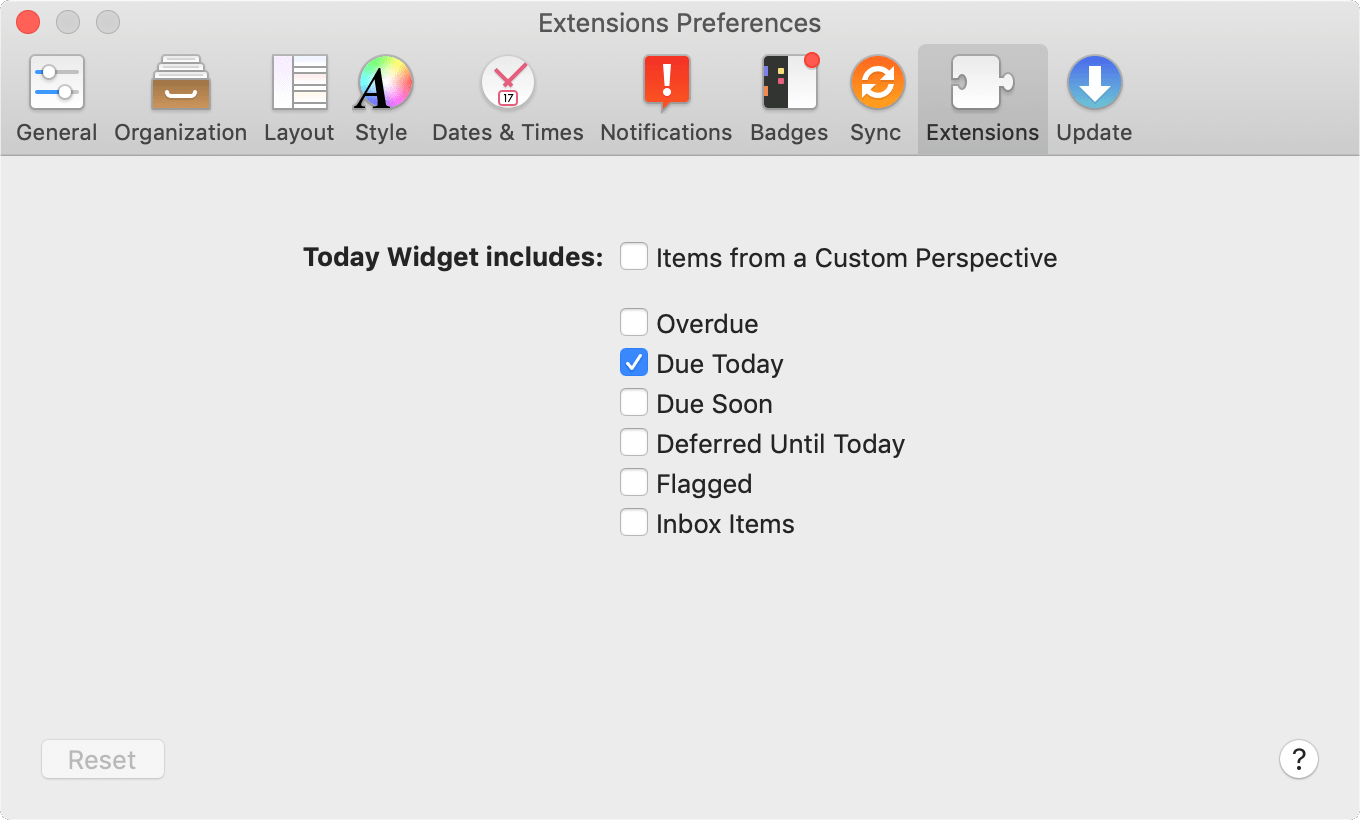
These preferences are available with OmniFocus on versions of macOS prior to macOS 11 (Big Sur). Starting with macOS Big Sur, the Today extension is replaced by OmniFocus widgets and this tab does not appear.
Today Widget includes
With the Today extension turned on, you can fine-tune the list of items you see when you look at Today in macOS Notification Center. Items that can be shown include Overdue, Due Today (the default), Due Soon, Deferred Until Today, Flagged, and Inbox Items.
With OmniFocus Pro ![]() , you also have the option of choosing a custom perspective to display in Notification Center via the Today extension. Choosing Items from a Custom Perspective reveals a dropdown menu from which you can pick the existing custom perspective that you’d like to display.
, you also have the option of choosing a custom perspective to display in Notification Center via the Today extension. Choosing Items from a Custom Perspective reveals a dropdown menu from which you can pick the existing custom perspective that you’d like to display.
Update
The Update tab controls how frequently OmniFocus checks for updates to itself (for non-Mac App Store builds only), and offers the option to help Omni improve future versions of OmniFocus by sending us anonymous data about your Mac.
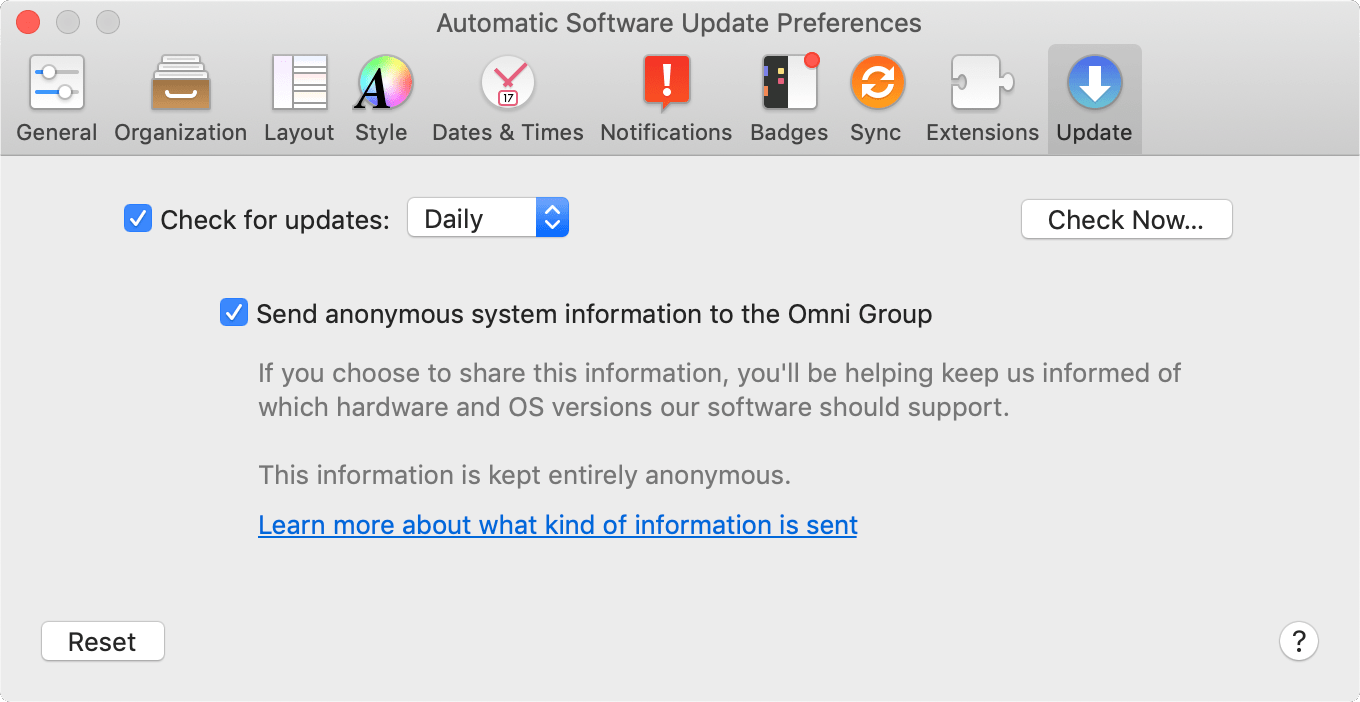
Check for updates (Omni Store Only)
OmniFocus is naturally curious about when updates are available for itself. If you’d prefer for the app not to check for updates automatically, uncheck the box for this preference; otherwise, you can choose an interval that suits you best (it’s not a very intrusive or bandwidth-heavy process). You can check for updates manually using the Check Now button, or with Check for Updates in the OmniFocus menu.
Send anonymous system information to the Omni Group
If you’d like to help us improve future versions of OmniFocus for you and others, you can choose to send us anonymous information about your system when you check for updates to the app. Click Learn more about what kind of information is sent to see a list of exactly what info is collected, and learn how it’s used.
Getting Help
When you’re in need of help—whether you’re trying to figure out how custom perspectives work, how to sync your database with OmniFocus for iOS, or if you’re having some other issue with OmniFocus—it’s good to know that the Support Humans at the Omni Group are always available to lend you a hand.
In addition to contacting Omni support directly, there are several online and in-app resources that exist to help answer your questions about OmniFocus.
Release Notes
For a detailed, comprehensive summary of the latest changes to OmniFocus, choose Release Notes from the Help menu. This is a good place to check if something is behaving in a new way after an update.
Finding Help Online
The OmniFocus Support Site provides a wealth of information (including this reference manual) as well as how-tos and support articles which go into finer detail on working with OmniFocus.
Similarly, the OmniFocus product page is always a good place to find the latest information about features and updates to OmniFocus.
For inspiration on setting up a workflow to suit your needs and deep dives into some of OmniFocus’s extended features, check out Inside OmniFocus.
Videos
In addition to the online help, we also provide a series of online videos for OmniFocus. These videos range in topics from available features in the latest version of OmniFocus to how-to tutorial videos to help you level up in your OmniFocus skills.
Email Support
If you’re stuck, if you have a good idea for the next version of OmniFocus, or if you want to let us know how we’re doing, go ahead and send us an email. Choose Contact Omni from the Help menu to queue up an email message addressed to us, or send us an email with your thoughts. We take support seriously, so you can expect a prompt response actually typed by human hands.
Phone Support
We understand that sometimes you can’t wait for an email response when you’re knee-deep in a project and you’re stuck or something isn’t working quite right. We get that. When this happens, you can call our Support Humans at 800-315-OMNI or 206-523-4152. Our Support Humans are available Monday-Friday, from 10 a.m. to 5 p.m. Pacific Time (-0700 GMT).
Online Forums
Omni maintains online forums for all of our products, which are available to everyone. Come share your questions and ideas with other users, share tips to show off how you’re using OmniFocus for getting stuff done, and seek help from the OmniFocus community.
Troubleshooting
If something is amiss, here are a few tips you can try with OmniFocus’s own built in self-help features:
Finding Misplaced Items
-
Try using the Completed and Changed perspectives to track down errant actions.
-
Check the Attachment List for images or other files that you may have appended to items tucked deep in your database.
-
Open an archive of past OmniFocus work to look for items that may have been lost to time.
-
If all else fails, you can revert to a recent backup for something you know you had access to just a day ago.
Improving Performance
-
Sync all the things regularly! This reduces sync wait times and generally improves speed and performance across the board.
-
Compact your database to remove unneeded edit histories.
-
Archive projects long past. Jettison them now for a nimbler database, and future easy retrieval and reference.
-
Delete unneeded attachments to lessen the sync load and disc space footprint of your database. We recommend curating your attachments using the Attachment List to help easily spot the ones you don’t need.
Appendix A
Menu Commands and Keyboard Shortcuts
This appendix explains the function of each of the items found in OmniFocus’s drop-down menus, and lists default keyboard shortcuts for them where they exist.
OmniFocus Menu
The OmniFocus menu holds commands related specifically to the administration of the OmniFocus application itself. Check for updates, view and modify your preferences, and enter new license information here.
About OmniFocus
Open a window with details about your copy of OmniFocus. This is good for checking exactly which version you’re using.
In-App Purchase (Mac App Store Only)
Open the in-app purchase window to choose the version of OmniFocus you would like to buy: the free 14-day trial, the Standard Edition, or the Pro Edition.
Check for Updates (Omni Store Only)
See if there is a new version of OmniFocus available to download. You can also set up automatic checking in Update preferences. (The Mac App Store version of OmniFocus delivers updates through the App Store.)
Preferences (Command-,)
Open the OmniFocus Preferences window, where you can customize how the application works for you.
Licenses (Omni Store Only)
Show the Licenses dialog, where you can review your OmniFocus software licenses.
Unlock OmniFocus
Sign in to your Omni Account to associate this copy of OmniFocus with it.
Manage Omni Account and Purchases
Open the Omni Account window, where you can manage your Omni Account and your OmniFocus licenses. This command appears after you have signed in for the first time.
Free Trial Mode
If you’re running a trial version of OmniFocus, these commands switch between the Pro and Standard versions of the app so you can compare features.
Learn About Pro
Open a sheet with information about features included in the Pro version of OmniFocus.
Services
Access system-wide macOS services offered by other applications.
Hide OmniFocus (Command-H)
Temporarily hide all of OmniFocus’s windows.
Hide Others (Option-Command-H)
Temporarily hide windows of all other applications so you can concentrate on OmniFocus.
Show All
Show all windows of all applications.
Quit OmniFocus (Command-Q)
Stop using OmniFocus and put it away for now. Your database is automatically saved.
File Menu
The File menu contains commands related to OmniFocus on a database level. Add new items or Quick Open others; importing, exporting, archiving, and restoring your database also happen here.
New Action (Command-N)
Create a new action in the currently selected project, or create a new item in the inbox.
New Project (Shift-Command-N)
Create a new project in Projects or in a custom perspective ![]() that groups by entire project.
that groups by entire project.
New Folder
Create a new folder for organizing projects.
New Single-Action List
Create a new list for keeping track of individual actions that don’t fit into projects.
New Tag (Control-Command-N)
Create a new tag in Tags, Flagged, or in a custom perspective ![]() that groups by individual actions.
that groups by individual actions.
New Window (Option-Command-N)
Open a new window just like the frontmost one.
New Tab (Option-Command-T)
Open a new tab in the current window, displaying the same content as the current tab.
Quick Open (Command-O)
Open the Quick Open dialog to seek out and display a specific perspective, folder, project, or tag in your database.
Close (Command-W)
Close the frontmost window. Even if you close the last remaining OmniFocus window, you can always open a new one.
Import OmniOutliner Document
Import the content of an OmniOutliner document to your OmniFocus database, with its rows converted to OmniFocus items and columns to metadata fields associated with those items.
Export
Export your OmniFocus database in a variety of formats.
Synchronize with Server (Command-S)
If you have set up synchronization in Sync preferences, coordinate with the server database and make sure that both sides have all of the recent changes you’ve made.
Replace Server Database
Replace the version of your database stored on the sync server with the one stored on your Mac. This the tool to use when you encounter a sync conflict and you’re sure that the version of your database you have now is the one you want going forward.
Show Backups in Finder
If you run into trouble with your OmniFocus database, you can always go back to an older, backed up version. With this command you can browse to the backup file you want, then open and inspect it. If it looks good, click Revert to this backup in the focus bar and your entire database is reverted to how it looked at the time you made the backup.
Show OmniFocus Database in Finder
Hold down option to reveal this menu command, which replaces Show Backups in Finder. Instead of showing the Backups folder, the folder containing your main OmniFocus database file (OmniFocus.ofocus by default) opens instead.
This can be useful when troubleshooting with the help of Omni Support. Under normal circumstances you should not interact with your OmniFocus database file directly.
Rebuild Database
Analyze and consolidate all of the entries in your OmniFocus database to make sure they are consistent. This is essentially equivalent to backing up and then restoring your database. If you are having problems with your database, this may help.
Reset Database
Hold down option to reveal this menu command, which replaces Rebuild Database. Instead of rebuilding, this command completely removes your existing database and returns you to the app’s initial setup dialog.
Compact Database
Take the database changes OmniFocus has logged and condense them. If OmniFocus doesn’t feel as fast as it used to, this may help. This command is only available when not syncing; if you have sync set up, compacting happens automatically.
Migrate Database
This item becomes available when a new OmniFocus database format is released. You’ll typically migrate as soon as you install the version of OmniFocus that supports the new format, but if for some reason you don’t (other devices are still using the older format, for example), you can prompt a migration here.
Move Old Data to Archive
Store away some of your completed or dropped items in an archive, thus keeping your database slim and making OmniFocus faster.
Open Archive
See the old data you’ve archived.
Page Setup (Shift-Command-P)
Open the standard macOS Page Setup window, where you can change some settings for printing (or exporting to a PDF file). These settings are saved even if you quit OmniFocus.
Print (Command-P)
Open the standard macOS Print window, with a variety of options for printing (or creating a PDF file).
Edit Menu
The Edit menu holds commands related to modifying the contents of actions, projects, tags, and groups. Cut, Copy, Paste, and Undo are all found here.
Undo (Command-Z)
Reverse the most recent change you made. You can keep stepping backwards like this if there are more changes you want to undo.
Redo (Shift-Command-Z)
Reenact the last change you undid. You can keep stepping forward through however many Undo commands you made.
Cut (Command-X)
Remove the selected text or items, putting them on the clipboard so you can paste them somewhere.
Copy (Command-C)
Put a copy of the selected text or items on the clipboard, so you can paste them somewhere.
Copy As Link
Put a link to the selected items on the clipboard; when you paste it, you get an address for each item.
Copy As TaskPaper
Copy the selected items with the tag syntax used by Hog Bay Software’s TaskPaper to-do list app.
See Copy as TaskPaper for further details on the feature, and this support article for a list of supported tags.
Paste (Command-V)
Take whatever’s on the clipboard and insert it at the current selection. If the clipboard contains only text (not whole items), and you are editing the text of an item, the text is pasted at the insertion point. Otherwise, the contents of the clipboard are pasted as new items.
Paste and Match Style (Option-Shift-Command-V)
Ignore any styles on the text you’re pasting and use the style already there at the place you’re pasting into. This only makes a difference in notes, since that’s the only place where you can have special styles.
Delete
Remove the selected item(s) or text from your database.
Select All (Command-A)
Select everything in the outline, or if you are editing an item’s text, all text in the cell.
Deselect All (Shift-Command-A)
Clear the selection completely so that nothing is selected.
Duplicate (Command-D)
Make another item just like the selected one, immediately after it.
Edit Note (Command-’)
Move from the item text to the note area of an item, or move back from the note area to the item text.
Convert to Project (Command-!)
Convert the selected items from actions to projects.
Status
Choose from this submenu to change the status for the selected item.
- Active
- On Hold
- Completed (Space)
- Dropped (Option-Space)
With one or more items selected in the outline, press Space to mark them complete or switch them back to active. Press Option-Space to mark them dropped or switch them back to active.
Mark Reviewed (Shift-Command-R)
Indicate that you’ve reviewed the selected project, thus resetting its next-review date.
Set/Clear Flag (Shift-Command-L)
Put flags on the selected items, or remove the flags if the selected items already have them.
Attach File
Choose a file to insert in the note area of the selected item.
Add/Edit Link
Create or edit a hyperlink to an item within OmniFocus, or beyond.
Insert Time Stamp
Automatically type the current date or time, as defined by the Short Date, Long Date, and Time formats set up in macOS System Preferences’ Language & Region pane.
- Short Date
- Short Date and Time
- Time
- Long Date
- Long Date and Time
Find
This submenu contains the standard Find commands included in many macOS applications: Find (which opens a window where you can use regular expressions and search-and-replace), Find Next, Find Previous, Use Selection for Find (which enters the selected text as the text to search for), and Jump to Selection.
- Go to Search Field (Option-Command-F)
- Find (Command-F)
- Find Next (Command-G)
- Find Previous (Shift-Command-G)
- Use Selection for Find (Command-E)
- Jump to Selection (Command-J)
Unlike searching using the toolbar (which narrows what you see in the outline), the Find dialog looks through all the fields currently visible in the outline and highlights results instead, providing a theme for them which you can browse through until you find what you need.
The Find dialog supports the use of regular expressions to match more complex text strings and combinations. See the NSRegularExpression developer documentation for technical details on the regex syntax, including a list of supported characters and operators.
Spelling and Grammar
This submenu contains the standard Spelling commands for the macOS spell checking system: Spelling (which opens the Spelling window), Check Spelling (which checks spelling in the document once), and Check Spelling While Typing (which turns the automatic spell checking on or off).
- Show/Hide Spelling and Grammar (Command-:)
- Check Spelling (Command-;)
- Check Spelling While Typing
Substitutions
With text selected, use this submenu to choose which components of macOS text substitution to use in OmniFocus. Learn more at this Apple support article.
Transformations
This submenu contains commands that apply to selected text in the outline, sidebar, and inspector, to convert it to completely upper case, lowercase, or capitalize each selected word, respectively.
- Make Upper Case
- Make Lower Case
- Capitalize
Speech
This submenu contains the Start Speaking and Stop Speaking commands, which you can use to make the macOS text-to-speech system say the selected text out loud.
- Start Speaking
- Stop Speaking
Start Dictation (fn fn)
With dictation enabled in the macOS System Preferences Dictation & Speech pane, select an editable text field and use this command to enter text via the spoken word.
Emoji and Symbols (Control-Command-Space)
Open the macOS Character Palette for assistance inserting emoji or other special characters.
Organize Menu
The Organize menu contains commands that manipulate items in your database based on their hierarchical position. This is primarily useful when working with nested projects and groups.
Clean Up (Command-K)
Make OmniFocus tidy up after itself, so that all items obey your view settings. Also, take any inbox items you’ve assigned projects or tags to and move them to where they belong in your library.
Add Inside (Shift-Command-])
Create a new item belonging to the selected item; for instance if you have a project selected, this adds an action to the project.
Add Outside (Shift-Command-[)
Create a new item at the same level as the selected item’s parent; for instance if you have an action selected at the top level of a project, this creates a new project.
Move
These commands rearrange the currently selected item in the outline hierarchy without affecting deselected items. Move Up and Move Down change an item’s location in relation to its siblings. Move Right and Move Left increase or decrease an item’s indentation level. When items move, their descendants move with them.
- Move Down (Control-Command-Down Arrow)
- Move Right (Control-Command-Right Arrow)
- Move Up (Control-Command-Up Arrow)
- Move Left (Control-Command-Left Arrow)
Indent (Command-])
Move the selected item to the right, turning it into a child of the item before it in the outline.
Outdent (Command-[)
Move the selected item to the left, making it a sibling of what was its parent. This doesn’t change the location of the item’s former siblings; only the selected item’s position in the hierarchy is affected.
Group (Option-Command-G)
In the sidebar, group projects into folders or group tags hierarchically. In the outline, group actions into projects or action groups.
Ungroup (Option-Command-U)
Move all of the child items out of the selected item, and get rid of the selected item completely.
Sort Once
Using one of the parameters in this submenu, perform a one-time sort of the selected items in the sidebar or the outline (as long as you’ve selected something that can be reordered).
- By Name
- By Status
- By Date Added
- By Date Completed
- By Date Due
- By Defer Date
View Menu
The View menu contains options for configuring your database view on the fly. Show and hide various parts of the interface, and expand or collapse the details of items in the outline here.
Expand All (Control-Command-9)
Show all descendants of all currently collapsed items in the sidebar or the outline.
Collapse All (Control-Command-0)
Collapse everything in the sidebar or the outline to the top level only.
Expand Item (Command-9)
Show the children of the selected items.
Collapse Item (Command-0)
Hide the children of the selected items.
Show/Hide All Notes (Control-Command-’)
Show or hide all note areas with content.
Show/Hide Note (Option-Command-’)
Show or hide the note of the selected item.
Show Full Item Title Always/When Selected
Choosing When Selected from the submenu causes items with long titles to end with ellipses (...) rather than wrap to a new line when those items are not selected. Otherwise, the full item title will always be shown.
Focus on Selected Projects/Unfocus (Shift-Command-F)
If you’re using OmniFocus Pro and you want to concentrate for a while on a particular project, folder, or combination of items, the Focus feature can get everything else out of your way.
To focus:
-
Select a project or folder (or any combination of projects and folders) in the sidebar or outline.
-
Click the Focus toolbar button, or choose View > Focus on (Selected Items) (Shift-Command-F).
Everything outside your selection disappears from the sidebar, and a notice bar appears beneath the toolbar to indicate that you’re in a special view of your database.
As you move between perspectives, OmniFocus ignores everything outside of your focus, as if the items you’re focusing on are the only items in your library.
When you’re done focusing, choose View > Unfocus (Shift-Command-F), or click the Unfocus button in the focus bar to restore the full view on your library.
When you find yourself using a certain set of tags, focus, and View options pretty often, you might want to save them as a custom perspective.
Focusing inside a custom perspective that includes a focus as part of its parameters will display the intersection of the two focus areas.
Show in Projects/Tags (Option-Command-R)
Switch to either Projects or Tags and select the same items you have selected in the current perspective.
Show/Hide Sidebar (Option-Command-S)
Show the sidebar complete with perspective tabs, or hide it away.
Show/Hide Inspector (Option-Command-I)
Summon up the inspector, or put it away.
Go to Sidebar (Option-Command-1)
Switch to navigate the sidebar (tab, return, esc, etc. affect items and fields in the sidebar).
Go to Outline (Option-Command-2)
Switch to navigate the outline (tab, return, esc, etc. affect items and fields in the outline).
Go to Inspector (Option-Command-3)
Switch to navigate the inspector (tab, return, esc, and so on affect fields in the inspector).
Show/Hide View Options (Shift-Command-V)
Open the View options for the current perspective.
Show/Hide Tab Bar
Show or hide the macOS tab bar on the current OmniFocus window.
Show All Tabs/Exit Tab Overview
Switch to a view that displays thumbnail contents of each tab as a tile in the OmniFocus window, or return to the standard full view.
Show/Hide Toolbar
Show or hide the toolbar.
Customize Toolbar
Choose which controls appear in the main window’s toolbar.
Enter/Exit Full Screen (Control-Command-F)
View OmniFocus at the glorious full dimensions of your screen, or return it to a modest window.
Perspectives Menu
The Perspectives menu holds commands for quick navigation to all things related to both the default, built-in perspectives and the custom perspectives available in OmniFocus Pro. Keyboard shortcuts assigned to custom perspectives appear in this menu as well.
Show Perspectives (Control-Command-P)
Summon or dismiss the Perspectives window, where you can manage your custom perspectives.
Add Perspective
Open the Perspectives window with a new perspective created in the list, ready to be named and customized to your heart’s content.
Inbox (Command-1)
Open the built-in Inbox perspective in the current OmniFocus window.
Projects (Command-2)
Open the built-in Projects perspective in the current OmniFocus window.
Tags (Command-3)
Open the built-in Tags perspective in the current OmniFocus window.
Forecast (Command-4)
Open the built-in Forecast perspective in the current OmniFocus window.
Flagged (Command-5)
Open the built-in Flagged perspective in the current OmniFocus window.
Review (Command-6)
Open the built-in Review perspective in the current OmniFocus window.
Completed
Open the built-in Completed perspective in the current OmniFocus window to view your completed actions and projects. Unlike other built-in perspectives, Completed doesn’t stick around in your sidebar when you switch away from it; choose this menu item again to reopen it.
Changed
Open the built-in Changed perspective in the current OmniFocus window to view recent changes you’ve made. Unlike other built-in perspectives, Changed doesn’t stick around in your sidebar when you switch away from it; choose this menu item again to reopen it.
With OmniFocus Pro, at the bottom of the Perspectives menu you’ll find a list of all of your custom perspectives; choose one to switch to it in the current window.
Format Menu
Styling of note text in OmniFocus is the domain of the Format menu, with options available for all common text styles you’re familiar with in macOS.
Formatting commands are only applicable in note fields.
Copy Style (Option-Command-C)
Copy the style of the selected text, so that you can apply it elsewhere with the Paste Style command. This uses a special style clipboard, so you don’t lose the data in the normal clipboard.
Paste Style (Option-Command-V)
Apply the style in the style clipboard (obtained using the Copy Style command) to the selected text.
Clear Style (Control-Command-Delete)
Remove all styling from the selected text, thus reverting it to the default style. This is useful for getting rid of weird styles in notes that you pasted from other applications.
Show/Hide Fonts (Command-T)
Show and hide the Fonts window.
Show/Hide Colors (Shift-Command-C)
Show and hide the Colors window.
Bold (Command-B)
Embolden the selected text.
Italic (Command-I)
Italicize the selected text.
Underline (Command-U)
Underline the selected text.
Bigger (Command-+)
Increase the size of the selected text.
Smaller (Command-–)
Decrease the size of the selected text.
Automation Menu
With OmniFocus Pro, use JavaScript plug-ins to automate task management in OmniFocus.
Installed Plug-Ins
Any Omni Automation Plug-Ins that you have installed are displayed in a list at the top of the menu. Choose one of them from the list to run the plug-in.
Show Console
Opens the Automation Console.
Clear Console (Command-K)
Clears the Automation Console of any previous input.
Console Text Size
Choose from Regular, Medium, or Large as the size of the text in the Automation Console.
API Reference
Learn more about what you can do with Omni Automation in OmniFocus by viewing the available classes along with their constructors, functions, and properties.
Plug-Ins
Opens the OmniFocus Plug-Ins window, where you can add, remove, and manage your Omni Automation Plug-Ins.
For information on installing plug-ins, see Installing Omni Automation Plug-Ins.
For sample plug-ins and to learn more about scripting OmniFocus, visit the Omni Automation website.
Window Menu
When you have multiple database windows open in OmniFocus, use the Window menu to choose between them. This menu also accesses Quick Entry and the Attachment List, two of OmniFocus’s specialized window types.
Minimize Window (Command-M)
Shrink the frontmost window down into the Dock.
Zoom
Switch the frontmost window between the biggest size possible and the last size you set.
Show Previous Tab
With OmniFocus open in multiple tabs, navigate to the previous tab in the bar.
Show Next Tab
With OmniFocus open in multiple tabs, navigate to the next tab in the bar.
Move Tab to New Window
With OmniFocus open in multiple tabs, move the current tab to a new OmniFocus window.
Merge All Windows
With OmniFocus open in multiple windows, merge all of them into a single window with multiple tabs.
Show/Hide Quick Entry
Show or hide the Quick Entry window; note that you can customize a keyboard shortcut for this, and use the shortcut from within any application.
Main Window
Foreground the main OmniFocus window (instead of a secondary window like the Attachment List or Preferences). If multiple OmniFocus windows are open, the closest one to the front is considered main for purposes of this command.
Attachment List
Open a list of all attachments in your database.
Bring All to Front
Gather all of your OmniFocus windows up in front of other applications’ windows.
At the bottom of the Window menu is a list of all of your OmniFocus windows; choose one to bring it to the front.
Help Menu
Access a variety of support resources using the Help menu in OmniFocus, including this documentation, release notes, and contact with our friendly Support Humans.
Search
Search OmniFocus Help (this document), and filter commands across all of OmniFocus’s menus to find and select a specific command. Results appear as a list of menu items and help topics respectively.
OmniFocus Help
View the help documentation available in the in-app help viewer.
News
View the latest information from Omni about changes to OmniFocus or macOS that affect your use of the app. (This item only appears when there is news to share.)
Release Notes
Check out what’s new since the last version of OmniFocus.
OmniFocus Product Page
Visit the OmniFocus page on the Omni Group web site.
OmniFocus Forums
Stop by the official OmniFocus forums to view and share insights with other users.
Sign Up for the Omni Newsletter
Visit the Omni website, where you can subscribe to our email newsletter. You’ll get nothing but the latest news and tips for OmniFocus and the other apps in the Omni Group family.
Open Scripts Folder
Open the designated Finder folder for storing AppleScript scripts that you want to access from the toolbar.
Add Tutorial Project
When you first launch OmniFocus a sample project is added to your database to help you get started. If you want it back, choose this command to recreate it (it’ll be added to your existing projects non-destructively).
Anonymize Database
Create a copy of your current database with all identifying text and attachments converted to anonymous entities. This is useful for exchanges with Omni support, or for sharing your database with other OmniFocus users without divulging the details of your private goings-on.
Contact Omni
Compose an email to the OmniFocus support team. We’d be happy to give advice, answer questions, or listen to your feedback.
If you’d like to set up a keyboard shortcut for a menu item that doesn’t have one, open the Keyboard pane of macOS System Preferences and choose the Shortcuts tab. Pick App Shortcuts from the list on the left, then click the plus button beneath.
Choose OmniFocus.app from the Application drop down list that appears, then enter the exact text of the menu command you’d like a shortcut for in the Menu Title field. Put your cursor in the Keyboard Shortcut field, then press the key combination you want for the shortcut. Finally, click Add to save your new custom shortcut.
Return to OmniFocus and give it a try!
Appendix B
Capture Methods
Beyond the New Action menu item and toolbar button, OmniFocus has plenty of other ways to help you get stuff out of your head and into the app. This appendix describes how you can get items into OmniFocus from anywhere on your Mac and beyond.
Copying from Plain Text
If you’ve written a list of tasks elsewhere that you’d like to copy into OmniFocus, OmniFocus can use line breaks to determine where one item ends and the next begins.
Select the text you’d like to add as items and copy it (Command-C). In OmniFocus, select an item without activating any of its text fields, then paste (Command-V) to add the copied text as a list of items below the one you have selected.
The items will be pasted as peers of the one initially selected, so if you’d like to paste text as a list of actions in a project, you’ll want to select an existing action in the project first (selecting the project results in a pasted list of projects rather than actions).
Quick Entry
With an easily configurable keyboard shortcut, you can use Quick Entry from anywhere on your Mac to add items to your database as long as OmniFocus is running. Make sure the shortcut in OmniFocus General preferences is what you want, and it’ll open the Quick Entry window no matter which app you’re viewing in the foreground.
When using Quick Entry, a couple of other keyboard interactions are affected by your Outlining choice in General preferences.
-
If you decide against posting an item with Quick Entry, in Modern mode press Esc to close the window. In Classic mode, use Cancel (Command-.) instead.
-
Press Return in Quick Entry to save the current item and close the window. To add another item before closing the Quick Entry window, hold down Shift and then press Return — twice if in Modern mode, once if in Classic mode.
![]() With OmniFocus Pro, the option to customize your outline layout extends to the Quick Entry window as well.
With OmniFocus Pro, the option to customize your outline layout extends to the Quick Entry window as well.
Open the View options with the button in the lower left of the window to choose whether to use the style set up in Layout preferences, or override it with another layout you want for adding items with Quick Entry.
Clippings
You may come across an email message, a web page, a newsreader article, or some other piece of info that you’d like to turn into an OmniFocus action. In the olden days you might heft your mouse, highlight the text, copy it, summon up the OmniFocus quick entry window, and paste. But no, you’re living in the future. You use the OmniFocus Clippings service.
To clip content from another application:
-
Highlight some text in any application that supports macOS Services.
-
Press the Clippings keyboard shortcut, or open the application menu and then the Services submenu, then choose OmniFocus: Send to Inbox.
-
A new item, with the highlighted content (rich text and embedded images) as its note, lands in the quick entry window for you to revise and save.
Setting Up a Clippings Shortcut
At the bottom of General preferences in OmniFocus you’ll find a setting for the Clippings Shortcut. Click Set Shortcut to open these instructions as well as a window for the Keyboard section of macOS System Preferences.
Due to the macOS sandboxing security protocol, apps aren’t allowed to customize the keyboard shortcuts for their own services—such as the OmniFocus “Send to Inbox” service—which is why you need to do the rest of this on your own.
In that window, you’ll see two panes: on the left is a list of shortcut categories, and on the right is an outline of items within that category. In the left pane, click on Services, and on the right scroll down until you see the group of Text services. In there, you should see an item for the OmniFocus Send to Inbox* service. Click that service, and an add shortcut** button appears which you can use to assign a keyboard shortcut.
Sharing
As an alternative to Clippings or Quick Entry, you can use the Share Menu in apps that support it (such as Safari) to share content with OmniFocus.
To add OmniFocus to the share menu of other apps that support the macOS share extension, visit Extensions in the macOS System Preferences app and select the checkbox next to OmniFocus in the Share Menu extension. To make OmniFocus more visible, drag to rearrange it above other apps in the menu.
OmniFocus supports sharing with other apps, too. With content selected in the outline, click Share in the toolbar to send the desired items to a destination app.
Email Capture (Mail Drop)
Mail Drop is a feature of the Omni Sync Server that lets you send emails directly to your OmniFocus Inbox. You can create multiple private send-to addresses to give access to third parties, and delete those addresses at any time. In order to use Mail Drop, you’ll need to have an Omni Account (they’re free), and OmniFocus must be configured to actively sync with that account on our server.
If you don’t have an Omni Account yet, you can sign up here. The account creation process includes instructions for configuring OmniFocus to use your new account.
If you’re already using Omni Sync Server to sync OmniFocus, you can log in to the Sync Server web interface and create your first Mail Drop address. After logging in, click or tap Add An Address to automatically generate the email address (a combination of your account name and a random string of characters).
When you send an email message to a Mail Drop address, the subject line of that message becomes the name of the new Inbox item. The body of the message becomes the note, which can contain text and simple HTML; attachments to the email (such as images) are added as attachments to the OmniFocus item as well.
See OmniFocus Mail Drop on the Omni support website for more details on this feature.
Importing from OmniOutliner
OmniFocus integrates with OmniOutliner for Mac, so you can outline an agenda in OmniOutliner and then easily bring it into OmniFocus and take action. There are three ways to bring your OmniOutliner data into OmniFocus:
Import a Document
Using the File > Import OmniOutliner Document menu command, OmniFocus imports an OmniOutliner outline of your choice into your OmniFocus database. The outline’s rows become OmniFocus items, and its columns become fields for those items (you can choose what OmniFocus item field corresponds to each outline column as part of the import process).
Drag and Drop
Drag a selection of rows from an OmniOutliner document onto a project or group in OmniFocus, and they’ll become actions within that project or group with hierarchy preserved. As with the Import menu command, when you release the drag OmniFocus will ask how you’d like data in the outline’s columns to be interpreted.
Copy and Paste
Select any number of rows in an Outliner document and copy them (Command-C). Paste them (Command-V) into the Inbox or into another selected OmniFocus item, and the copied rows will appear in place with hierarchy preserved. As with the Import menu command, when you paste in a valid location OmniFocus asks how you’d like data in the outline’s columns to be interpreted.
Appendix C
OmniFocus Extended
OmniFocus as a standalone app is an incredibly powerful tool. Beyond what you can do with OmniFocus alone, the app interacts with other apps and services to help you get stuff done with even greater convenience and efficiency.
This appendix lists ways that OmniFocus can be used in tandem with other software to help you achieve your goals.
Today Extension
This feature is available with OmniFocus on versions of macOS prior to macOS 11 (Big Sur). Starting with macOS Big Sur, the Today extension is replaced by OmniFocus widgets.
OmniFocus brings a status summary to your desktop with the OmniFocus Today extension, which you’ll find listed in the Extensions section of macOS System Preferences.
With the Today extension turned on, you can view items that are due soon and overdue in Notification Center, and when they’re complete, check them off right there — the items’ status updates in the app along with any changes you make.
Choose which items appear in Today with OmniFocus’s Extensions preferences.
To change the position of the OmniFocus widget in Notification Center, click Edit at the bottom of the Today pane.
OmniFocus Widgets
Starting with macOS Big Sur, you can add special OmniFocus widgets to Notification Center on your Mac.
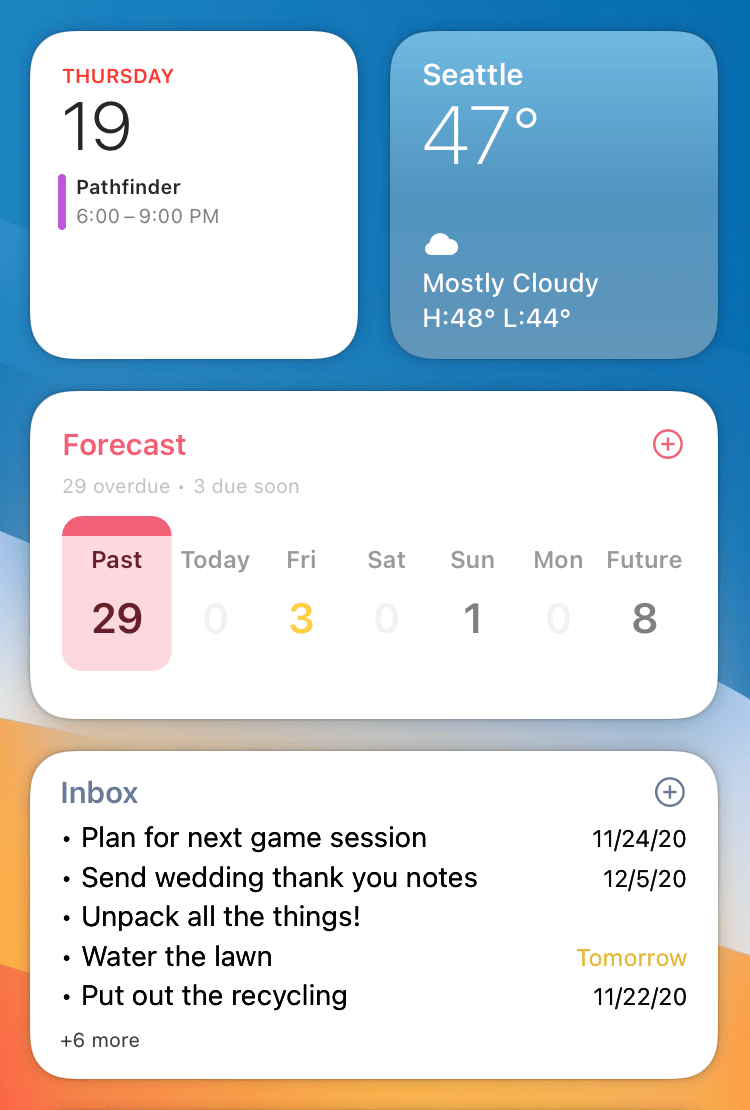
To add a widget to Notification Center:
-
Click the time displayed in the upper right of your Mac's menu bar to open Notification Center.
-
Scroll down past your notifications to your widget collection. At the bottom of your widget list, click Edit Widgets.
-
Choose OmniFocus from the list that appears at the left side of the edit screen.
-
Pick the widget style and size that you would like to add from among the OmniFocus widgets in the center of the screen, and drag it to the right to place it among your existing widgets.
OmniFocus offers the following widgets at small, medium, and large sizes.
Forecast Widget
Get an overview of your past, today, and due soon items.
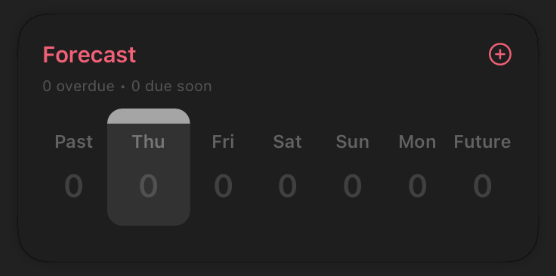
The Forecast widget displays a calendar row of days with the number of items due on each day. Depending on the widget size, it may also display a list of the items due today.
This list corresponds with your view options in the Forecast perspective, so it may also display deferred items and/or items tagged with your Forecast tag.
Perspective Items Widget
See items that are up next for a chosen perspective.
This widget shows a list of items in a chosen perspective, with the number of items shown depending on the size of the widget and its text. The widget shows items in the same order that they appear in the perspective in OmniFocus.
The widget displays the contents of the Inbox perspective by default. To switch to a different perspective, control-click to open the widget's contextual menu and choose Edit Widget.
Customizing Widgets
Control-click a widget to open its contextual menu, where you can choose Edit Widget to customize it.

The following customization options are available:
- Perspective—For the Perspective Items widget, choose the perspective for the widget to display.
- Font Size—Step between available font sizes for text in the widget.
- Lines Per Item—Choose the maximum number of lines that an item's text will span.
- Hide Quick Entry—Choose whether to hide the Quick Entry button (+) next to the widget title.
Interactive Notifications
If you use notifications for OmniFocus on your Mac, you can add a bit more oomph to things that really need your attention by requiring an interaction when they appear.
To set up interactive notifications, first visit Notifications preferences and be sure that Notify on this Mac is checked. Next, open Notifications in macOS System Preferences and choose OmniFocus in the list of apps. Select Alerts as the type of notification you’d like to receive.
From now on, OmniFocus notifications you receive on your Mac will remain on screen until dismissed. You’ll have the following options when dismissing an alert:
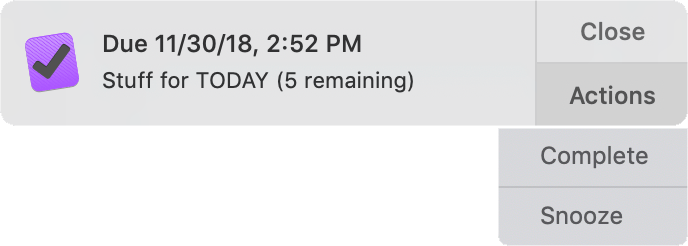
-
Close—Dismiss the notification from your screen without affecting it in any other way.
-
Actions—Open a submenu with the option to either mark the item Complete in OmniFocus, or Snooze the notification for 15 minutes. Postponing the notification in this way doesn't affect dates assigned to the item; it just reschedules the notification to occur again later.
-
Item Title—Click the item title to open OmniFocus and show the item in the Forecast perspective in your currently active window. OmniFocus will launch if it was closed at the time.
Copy as TaskPaper
Most aspects of an OmniFocus item can be represented as tags in the plain text syntax used by Hog Bay Software’s to-do list app TaskPaper. The Edit > Copy as TaskPaper menu item provides an easy way to bring items and their properties (such as due date, tag, or repeat type) from OmniFocus to any other app that supports the TaskPaper tag syntax.
OmniFocus also supports pasting plain text lists formatted in TaskPaper syntax into the open window of an OmniFocus database. So while Copy as TaskPaper can be used to share OmniFocus items with TaskPaper itself, its primary use is as an intermediary between OmniFocus and other apps that support TaskPaper’s tag system.
This can be used to (for example) batch process dozens or hundreds of OmniFocus items at once, round-tripping them out from OmniFocus in the TaskPaper syntax, performing the batch processing actions, and bringing them back to OmniFocus without loss of important metadata.
See this support article for more details on TaskPaper syntax and a list of supported TaskPaper tags.
Archiving and Backup
When your database grows large, unwieldy, or full of obsolete items, or when you need to refer back to versions of your data from days gone by, the archiving and backup features of OmniFocus for Mac here here to lend a hand.
Creating an Archive
After a while of using OmniFocus every day, your database may become quite large, and especially if you synchronize with a mobile device, things could get quite slow. Most of the items are probably completed or dropped items that you rarely or never need to review, so OmniFocus includes a command to archive those old items to a different file, keeping your main database sprightly and nimble.
To archive your old data, choose Move Old Data to Archive from the File menu. A sheet appears with a date field; any items completed before that date, or dropped items that haven’t been changed since that date, will be moved to the archive.
OmniFocus saves your archive file in the same place as your main database. If you ever want to look at your archived data, choose Open Archive from the File menu; your archive opens in its own window.
To retrieve items from an archive you are browsing, drag and drop them into the desired location in your main database (copy and paste works too). In either case, a copy remains behind in the archives; the archived copy can be retained as a record or manually deleted to keep things tidy.
Restoring from a Backup
OmniFocus errs on the side of meticulous data preservation, automatically backing up your database once every two hours.
OmniFocus keeps up to 100 backups of your database at a time, which comes to about two weeks worth if you run OmniFocus continuously (more for most people, since backups do not happen when OmniFocus is closed).
To restore a backed-up version of your database, choose Show Backups in Finder from the File menu, then double-click to choose a backup file to view. It opens in its own separate OmniFocus window so you can browse it and determine if it is the one you want; if so, choose Revert to This Backup in the notice bar and it will replace your current database.
Printing
To print content from OmniFocus to paper (or save it as a PDF), first set up a window that contains exactly the data you want by focusing ![]() , selecting items in the sidebar, or expanding and collapsing rows in the outline. Then choose Print from the File menu. OmniFocus resizes the content to fit horizontally on the paper you’ve chosen.
, selecting items in the sidebar, or expanding and collapsing rows in the outline. Then choose Print from the File menu. OmniFocus resizes the content to fit horizontally on the paper you’ve chosen.
Exporting
Your data belongs to you; if you want to send it to other applications, run scripts on it, publish it on the web, or do other exciting stuff with it that we haven’t even thought of, you’re more than welcome to write it out to the format of your liking.
To export your database, choose File > Export, and then choose a format and a location. The available formats are:
-
OmniFocus Document — This is an ordinary OmniFocus document, like the one that you use as your database. If you open such a file in OmniFocus, it appears in its own window and you can work with it normally, but settings specific to your database (such as custom perspectives and View options) don’t come along with it.
-
Plain Text — This is a lightweight plain-text representation of your data, able to be opened in the text editor of your choice.
OmniFocus’s plain text export is inspired by TaskPaper, the light to-do application from Hog Bay Software. As such the output should be roughly compatible and able to be imported to TaskPaper with a minimum of fuss; see Copy as TaskPaper for more on OmniFocus and TaskPaper compatibility.
-
Simple HTML — This is a single-file HTML representation of your data; the stylesheet and even the icons are embedded in the HTML. If you are proficient with CSS, you should be able to restyle the result however you like.
-
Comma Separated Values (CSV and CSV UTF–16) — CSV is a common syntax for applications old and new on all platforms: all of your data in a plain text file with its columns separated by commas. Once you have your data in CSV format, it’s easy to run scripts on it, convert it to some other format, or open it in applications that understand it (like OmniPlan). If you’re having trouble persuading other applications to read the non-ASCII characters in your CSV file, such as accented letters or non-Roman characters, try exporting with the UTF–16 CSV option.
-
Backup Document (OmniFocus) — This export option creates a file in a format (.ofocus-backup) that is essentially the same as the standard OmniFocus database format, with one key difference.
Unlike a standard OmniFocus database file, when you open a backup in OmniFocus, the option to Revert to This Backup appears in a notice bar beneath the toolbar. Click this button to replace your local default database with the database contained in the backup.
Applescript Support
With OmniFocus Pro you have access to powerful scripting tools using the built-in AppleScript library. To access the dictionary of scripting commands specific to OmniFocus, open AppleScript Editor and choose File > Open Dictionary (Shift-Command-O), then choose OmniFocus.app from the list that appears.
You can add scripts that live in your OmniFocus toolbar by placing them in the directory accessible from the Help > Open Scripts Folder menu item.
Check out the resources below to get started with ideas, tips, and help for adding automation to your OmniFocus workflow:
-
AppleScript discussion on the official OmniFocus Forums.
-
An AppleScript overview, tips, and an extended list of resources can be found at Inside OmniFocus.
Omni Automation
OmniFocus Pro supports automating tasks in OmniFocus using JavaScript. You can create your own plug-ins or use plug-ins created by others; see the Omni Automation website for a set of sample plug-ins that you can use right away, or find documentation resources for creating your own.
Installing Omni Automation Plug-Ins
Once you have a plug-in that you would like to try, you will need to install it in a connected folder that OmniFocus recognizes.
If you are looking for a place to start with plug-ins, head on over to the Omni Automation website and find one you like.
First, download the plug-in and unzip it. The resulting file will have an .omnijs extension (the file format for Omni Automation Plug-Ins).
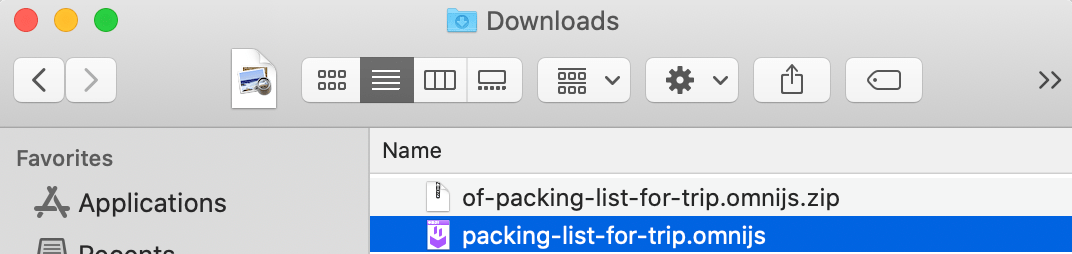
With a plug-in downloaded, you have a couple of options for installing it. You can double-click the plug-in file, which presents an import dialog in OmniFocus:
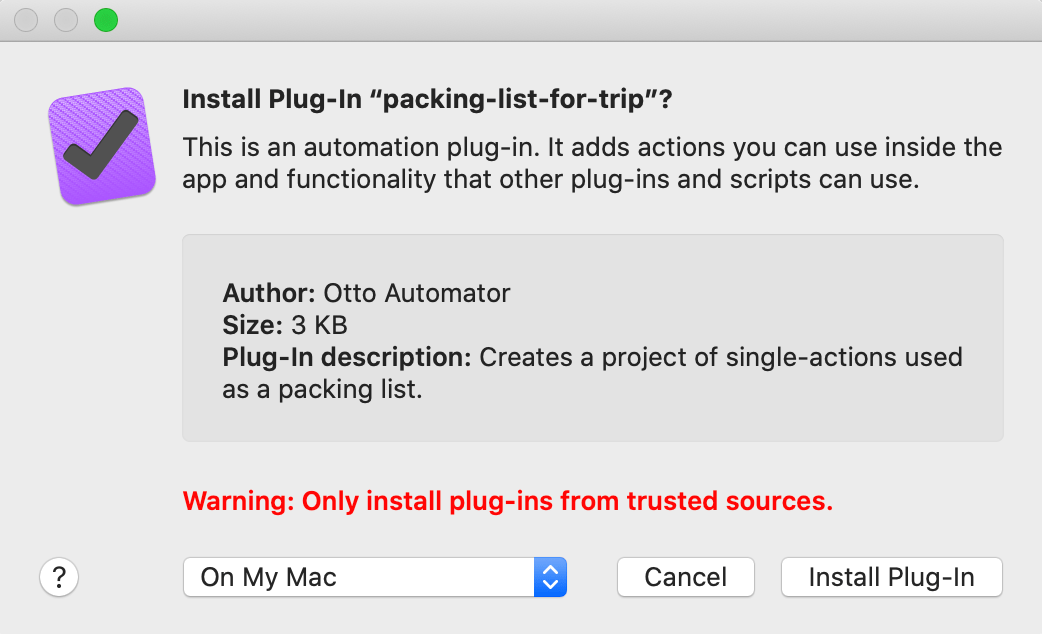
If everything looks in order, choose an install destination from the drop-down menu and click Install Plug-In. The plug-in is copied to that location and appears in the OmniFocus Automation menu, ready to use.
Alternatively, you can choose Automation > Plug-Ins in OmniFocus to open the Plug-Ins window for managing your Omni Automation Plug-Ins. At first it will be empty, looking something like this:
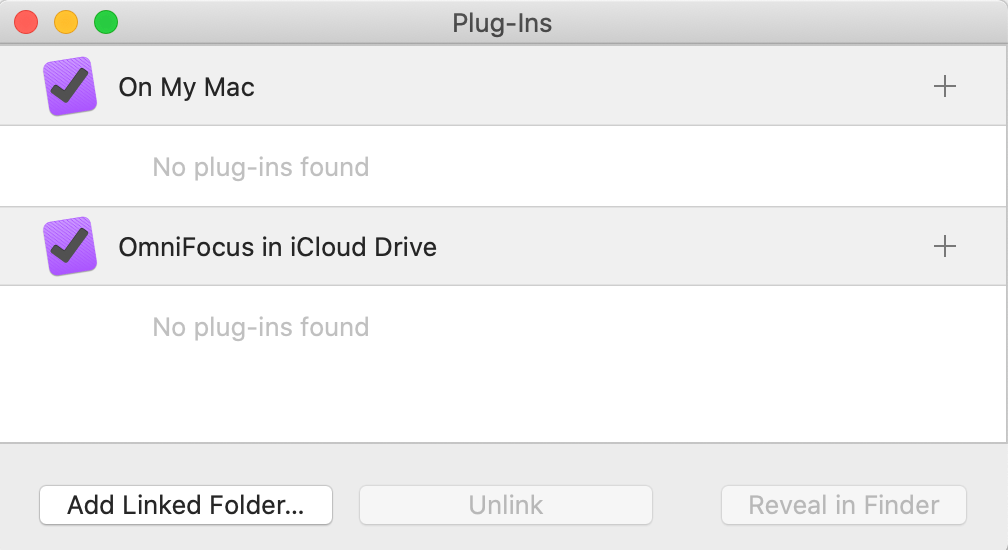
To add a plug-in using this window, drag and drop it from its location in the Finder on top of the destination in the window that you prefer. OmniFocus automatically copies the plug-in to that location.
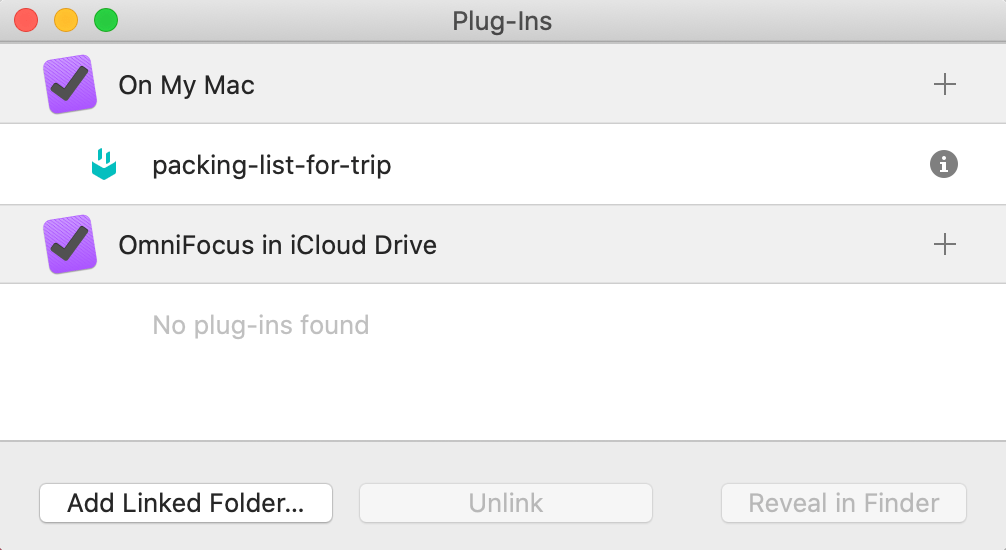
Once you have installed your first plug-in, it appears as an item in the Automation menu. Select it to run the plug-in, and start experimenting with what Omni Automation can do.
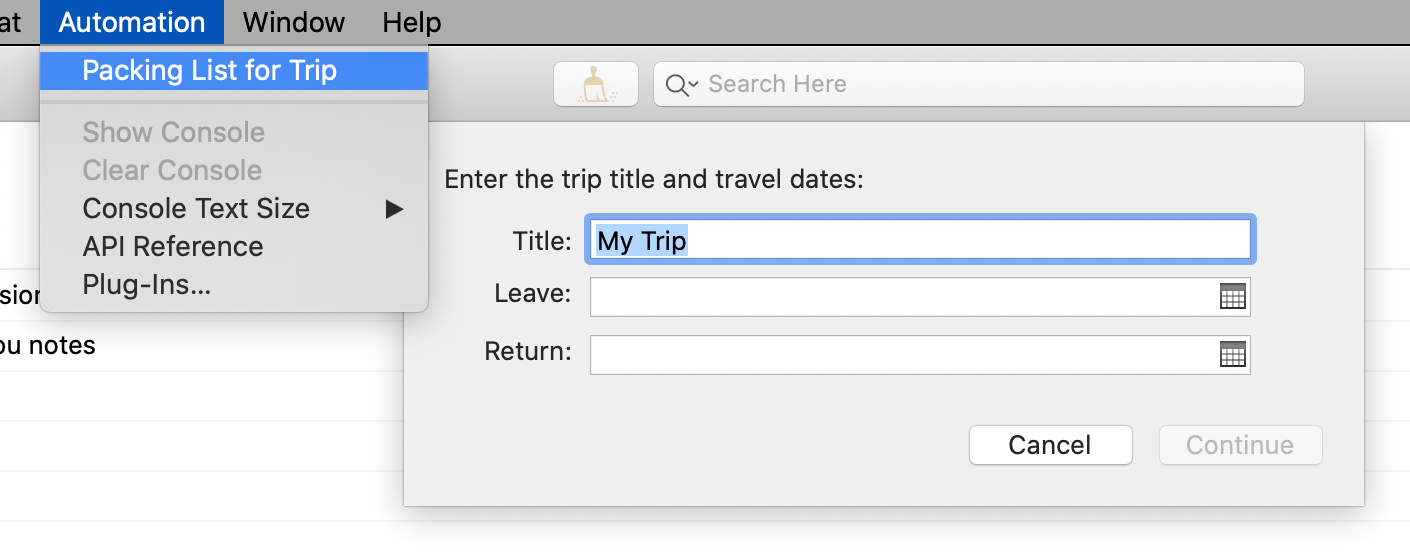
Managing Plug-Ins
Use the Plug-Ins window (Automation > Plug-Ins) to add, remove, and organize your Omni Automation Plug-Ins and connected plug-in locations.
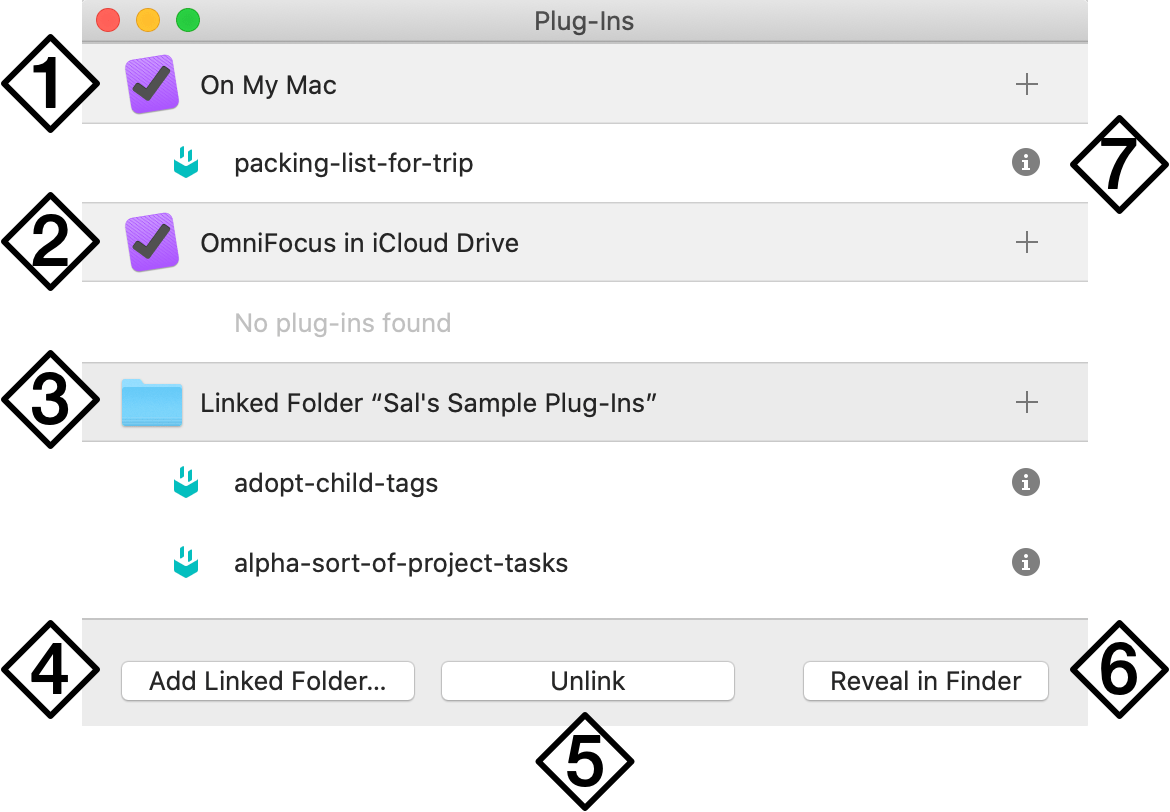
-
On My Mac—This is the default storage location for plug-ins associated with OmniFocus, a folder that lives deep in the Finder's OmniFocus-specific file tree. Drag and drop a plug-in onto this location to copy it into the folder, or click the Plus button to create a new pre-formatted plug-in file ready for customizing to suit your needs.
-
OmniFocus in iCloud Drive—With iCloud Drive set up on your Mac, OmniFocus can use its application folder there to sync plug-ins between your various devices. Note that plug-in files are stored separately from your OmniFocus sync database and they must be managed separately. iCloud Drive is not capable of syncing your OmniFocus database.
-
Custom Locations—Beyond the two default storage locations above, you can link as many additional plug-in folders as you like. These are regular folders on your Mac that contain the plug-in files that you want to use in OmniFocus. Once a folder is linked, its plug-ins become available in the Automation menu.
-
Add Linked Folder—Click to open a file browser for selecting additional plug-in folders that you would like to link to OmniFocus.
-
Unlink—Click to remove a custom location's association with OmniFocus. This removes the folder and its contents from the Plug-In window and Automation menu, but does not move or alter its contents in any way. If you change your mind, you can click Add Linked Folder again to restore it.
-
Reveal in Finder—With a location or plug-in selected, click to open its corresponding folder in Finder.
-
Plug-In Info—Click the Info button on a plug-in's row to show detailed information about the plug-in, including its name, version, author, description, and information about the actions that the plug-in contains.
Some additional tips for managing plug-ins:
- Control-click a plug-in to open its contextual menu, with commands for revealing it in the Finder or moving it directly to the Trash.
- Drag-and-drop a plug-in between locations to move its associated file from one folder to another.
OmniFocus for the Web
OmniFocus for the Web is a browser-based companion app that works in tandem with OmniFocus for Mac and iOS to provide access to the core features of OmniFocus from any modern web browser. The app is provided as an optional subscription-based add-on to your existing OmniFocus purchase, or as part of an OmniFocus subscription package.
Learn more about subscribing to OmniFocus for the Web here.
Appendix D
Getting Synced
When you first launch OmniFocus you’ll be asked to set up Sync. Syncing is important as an additional layer of backup storage for your data, and enables several of the advanced features of the app such as email capture. If you have OmniFocus for iOS, syncing connects you to the latest changes made on any of your devices.
If you’re planning to sync, it’s recommended to do so as part of the app setup process to ensure as smooth a transition as possible between versions, and to provide that added layer of backup right away. If you choose to set up sync later, the same preferences you saw at first launch are available in OmniFocus Sync preferences.
This appendix provides additional information about the sync setup process, and describes some of the underlying technology that helps keep your data safe and secure.
Omni Sync Server
The most straightforward sync option is our very own Omni Sync Server. It’s free, reliable, and supported by Omni’s ace support team. We take care of managing the servers so we are able to provide the best support possible, and help ensure your data is always available when you need it.
To set up sync with Omni Sync Server, get started by creating a new Omni Account here.
Other WebDAV Options
Omni Sync Server is a great solution for most OmniFocus users. If your sync needs require that your data be kept completely within a system you control, you can alternatively configure OmniFocus to sync using another WebDAV server.
Omni is not able to provide support for third party servers, so this option is not recommended unless you have a specific need for control over your own server and you have the technical capability to administrate it.
If you choose to go this route, OmniFocus sync is compatible with any WebDAV standards-compliant server, whether remote (there are many fine providers available) or hosted on your own Mac.
If data privacy is your primary concern when syncing, you may wish to disable the Push feature in OmniFocus preferences (found in the Push tab of Show Sync Details in Sync preferences). Push registrations contain nothing specific to your database, but do represent information exchanged outside your server.
See this support article to help determine whether push sync is right for your needs.
File Sharing Services and OmniFocus Sync
While services such as Dropbox are great for file sharing, they can’t handle OmniFocus data properly for syncing purposes. Using a file sharing service as a place to store your OmniFocus data can corrupt it. Do not use such a service as a means of synchronizing your OmniFocus data.
How Sync Works
With sync turned on in OmniFocus, a server you designate keeps a copy of your database so that it’s always available wherever you are. With each subsequent sync, OmniFocus compares your local database with what’s on the server and applies any differences to the database on the server (or vice versa, bringing the latest changes from the server to your device).
OmniFocus is set up to sync automatically whenever it’s connected to the internet. With sync turned on, OmniFocus sends new changes to the sync server after one minute, or when opening or closing the app. At a bare minimum, OmniFocus checks in with the server every hour if nothing has changed on the device. This helps ensure that your data from OmniFocus is always safe, secure, and most importantly—up to date.
If you’ve made changes you want to view immediately on another device, you can perform a manual sync (choose File > Synchronize with Server (Commmand-S) or click the Sync button in the toolbar) before switching devices. This pushes your latest changes up to the sync server, so that when you launch OmniFocus on the other system, all you have to do is click or tap Sync to ensure that all of your changes are there.
OmniFocus uses push notification-activated sync for even more robust synchronization support. This feature notifies your other devices with OmniFocus to update whenever you make a change, so manual syncing should rarely — if ever — be required. See this support article for more information on how it works.
For options related to push sync, choose Show Sync Details... in the Sync tab of OmniFocus preferences.
Encryption
OmniFocus uses HTTPS to encrypt your data while in transfer to sync servers that support it (including Omni Sync Server). Additionally, all current OmniFocus databases set up to sync with remote servers are also automatically encrypted prior to transit, and live encrypted on the server.
Versions of OmniFocus with the database encryption feature also include an updated database format that may require migration from previous versions for compatibility between all your devices with OmniFocus.
After updating one device to a version that supports encryption, you’ll see guidance on which other devices must be updated before the migration can take place.
Encryption is done by OmniFocus on your Mac or iOS device at the time the data is transmitted to the sync server. This means that regardless of the sync destination (Omni Sync Server or another WebDAV server), encryption-based security is preserved. OmniFocus doesn’t actively encrypt data while in storage on your local device, instead deferring to any system-level encryption you have in place.
Technical details of the encryption scheme for OmniFocus can be found in this forum post.
Setting a Separate Database Passphrase
By default, OmniFocus uses the password you chose when setting up your sync account to encrypt your database on the server. For an extra layer of security, you can use a distinct encryption passphrase by choosing Change Passphrase from the Encryption tab of Show Sync Details in Sync preferences.
This section of Sync Details indicates whether your database is encrypted with your sync password, or a separate one. When you click Change Passphrase, you are prompted to enter your current passphrase (this is the same as your sync password). You can then set and confirm a new passphrase used to encrypt your database on the server.
After setting a new encryption passphrase the Encryption settings indicate that your sync and encryption passwords are distinct. You can unify them again by clicking Link Passwords, or change the encryption passphrase to something new with Change Passphrase.
If you’re syncing with OmniFocus on other Macs or iOS devices, after changing your encryption passphrase you will be prompted to enter the new passphrase on each of those devices before you can receive updates from the server.
Migrating your Database
If you are updating from an earlier version of OmniFocus, you may be prompted to migrate your database to a format capable of supporting the features of the latest version of the app.
When you first launch a version of OmniFocus that’s compatible with the new database format, or choose Migrate Database... from the File menu, you’ll see the Migration window that lists any clients that still need to be updated to the latest version to allow for the database migration to work.
If you’re running a very old version of OmniFocus on a device that syncs with your current database, it may not be eligible for migration to the new database format. If this is the case, it will be indicated in a separate section of the Migration window. You’ll be asked to disconnect any ineligible clients (choose Show Devices and Unregister those that aren’t eligible) before proceeding with the upgrade.
If you prefer to maintain sync compatibility with a very old version of OmniFocus, you can choose not to update to the new database format. However, newer features of OmniFocus that require the updated format will not be available on any devices that sync with that database.
When all of your Macs and iOS devices with OmniFocus are at versions that support the latest database format, the Migration window gives the green light to make the transition to the new, improved format. Choose Migrate Database, and voila! OmniFocus syncs your database in the new format to all of your devices. If you choose Later, you’ll be prompted to migrate again in one day (and you can always use the Migrate Database... menu item to migrate sooner).
On the small chance that something goes missing during the migration process, before changing formats OmniFocus automatically makes a backup of your database that you can revert to if needed. We’ve prepared support articles with more detail on the migration and backup restoration process, and you can always contact us with any additional questions.