Capture Methods
You are viewing the OmniFocus 4 Reference Manual for OmniFocus 4.3.3, the final release for macOS 13, iOS 16, iPadOS 16, and watchOS 9.
The most recent version of the OmniFocus 4 Reference Manual is located here.
This chapter discusses capturing your ideas, action items, and projects in OmniFocus, so you can accomplish more!
Quick Entry
Quick Entry is the fastest way of capturing ideas in OmniFocus, and is available anywhere OmniFocus is available.
On iPhone and iPad,
Quick Entry is available while OmniFocus is open,
by double-tapping the Smart Add and Quick Entry button
 .
It is also available by using
.
It is also available by using
 Share to OmniFocus from other apps.
On Apple Vision Pro,
Quick Entry is available while OmniFocus is open,
by tapping the
Quick Entry button
 .
It is also available by using
Share to OmniFocus from other apps.
.
It is also available by using
Share to OmniFocus from other apps.
On Mac,
Quick Entry is available while OmniFocus is open,
by clicking the
Quick Entry button
in the Toolbar,
or using the Show/Hide Quick Entry command.
It is also available by using
Share to OmniFocus
from other apps.
You can also use the
Quick Entry Shortcut from
anywhere on Mac,
as long as OmniFocus is running.
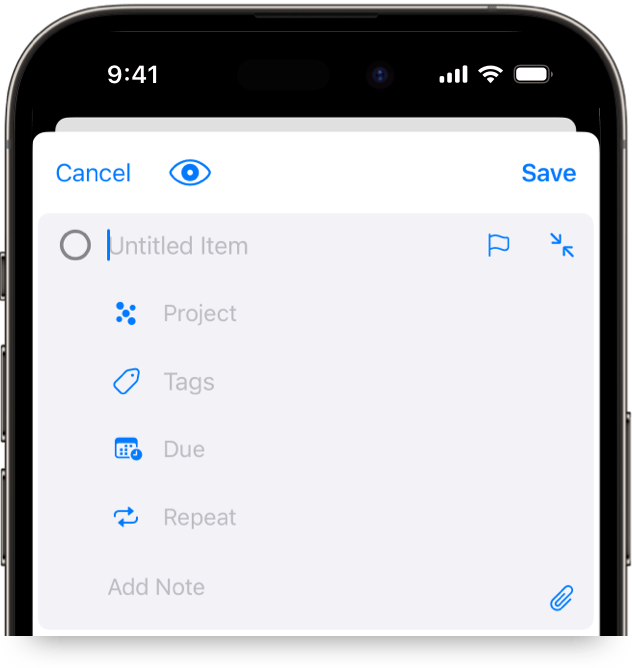
Quick Entry acts like a mini Inbox and can be used to add one or more new items, filling in as much information as you desire. When Quick Entry first opens, there will be a new action row available for editing. Enter a title for your new action, then click or tap into each desired field (or use Bare Key Editing with an external keyboard).
Once you have finished adding your new action,
you can click or tap Save,
or tap the Smart Add button
in the bottom right
(on iPhone, iPad, and Apple Vision Pro)
to add another action.
If you click or tap Cancel,
your newly entered actions will be discarded.
Open
 View Options
to choose between default
Layout settings, or a
custom layout for Quick Entry.
View Options
to choose between default
Layout settings, or a
custom layout for Quick Entry.
Quick Entry on Mac
You can use Quick Entry from anywhere on your Mac, using a Quick Entry Shortcut that you choose, as long as OmniFocus is running in the background.
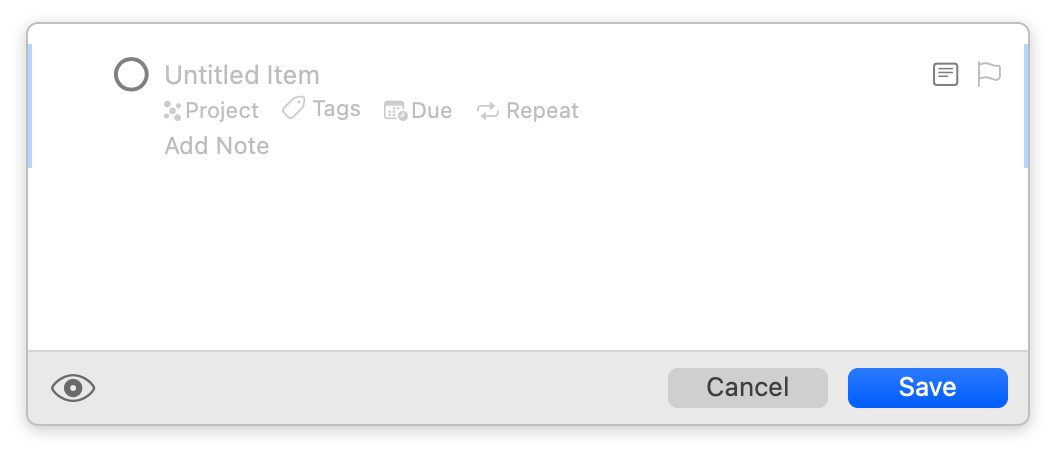
While the Quick Entry window is open, you can use Tab and Shift-Tab to navigate between fields. This is often faster than using Bare Key Editing, which requires ending editing between every change, and may result in closing the window too quickly.
Quick Entry keyboard shortcuts also work a little differently, depending on which Outlining Mode you have selected.
When in Modern Mode:
- Press Escape to cancel editing
- Press Return to confirm editing, and close Quick Entry
- Press Shift-Return twice to create an additional item, before closing Quick Entry
When in Classic Mode:
- Press Command-Period (.) to cancel editing
- Press Escape to confirm editing
- Press Return to confirm editing, and close Quick Entry
- Press Shift-Return once to create an additional item, before closing Quick Entry
Share to OmniFocus
When you are using another app, and there is something that you would like to add to OmniFocus, you can Share to OmniFocus. You may want to capture a webpage in Safari, a picture in Photos (iPhone, iPad, or Apple Vision Pro only) or a file; if the other app supports sharing something, OmniFocus will do its best to either capture it, or link to it.
Depending on the app, you may need to select something first, or a selection may be optional; Safari will send slightly different information depending on whether you have selected anything on a webpage.
Click or tap the
Share button
in the app’s toolbar,
or choose Share from the Shortcut menu of the selected item,
then choose OmniFocus from the list of apps that appear.
If you are on Mac,
select File > Share > OmniFocus
(if the app has included support).
You will see the standard Quick Entry form for Mac, iPhone, iPad, or Apple Vision Pro.
The form may be pre-filled with information relevant to the information you’re sending to OmniFocus (website URLs in the note field and a title already entered, for example). Edit these if you like, add any other properties, and then click or tap Save when you’re ready to send it to your Inbox.
If OmniFocus doesn’t appear in the list of apps, read these Apple User Guide articles to learn how to add OmniFocus to your sharing options:
Share from OmniFocus
OmniFocus supports sending information to other apps, as well.
With content selected in the Outline,
click or tap the
Share button
in the Toolbar,
or select it from the Shortcut menu,
to send the selected items to another app.
Clippings on Mac
OmniFocus on Mac combines
Quick Entry
and
Share to OmniFocus
into a Clippings service that can be used from other Mac apps.
To clip content from another application:
- Select text or images in any application that supports macOS Services (most native Mac apps).
- Press your chosen Clippings shortcut, or choose OmniFocus > Services > OmniFocus 4: Send to Inbox.
- A new action row is created in
Quick Entry,
ready for editing and saving,
with a text-only version of your selection as the title,
and the highlighted content (rich text and embedded images)
included in the note.
If you attempt to clip from Mail, and the email message is not added to or linked from Quick Entry, you may need to grant OmniFocus authorization in System Settings.
If you attempt to clip from Safari, and you see an error such as “Not authorized to send Apple events to Safari.” you may need to grant OmniFocus authorization in System Settings.
Open System Settings, then navigate to Privacy & Security > Automation, and click on the disclosure arrow next to OmniFocus to view additional options. Make sure that Mail and Safari are enabled (along with any other apps that you would like), and then try clipping again.
System authorization can also affect sending email using Contact Omni.
Setting a Clippings Shortcut
You need to visit System Settings to set a keyboard shortcut for the Clippings service.
OmniFocus provides a button to take you to the right area of settings, but due to Apple security restrictions, we can only get you part of the way there. Use these instructions for complete guidance on configuring your shortcut:
-
Choose Settings… from the OmniFocus menu.
-
Click on the Set Shortcut… button
 , which will open the Keyboard Shortcuts pane in Keyboard settings.
 -
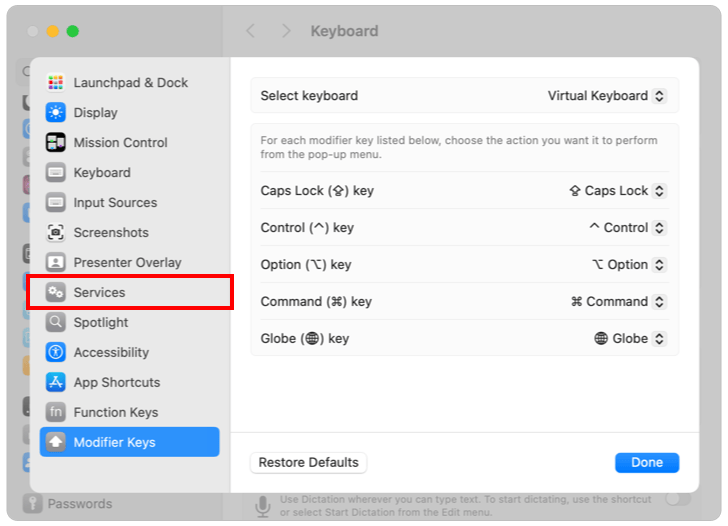
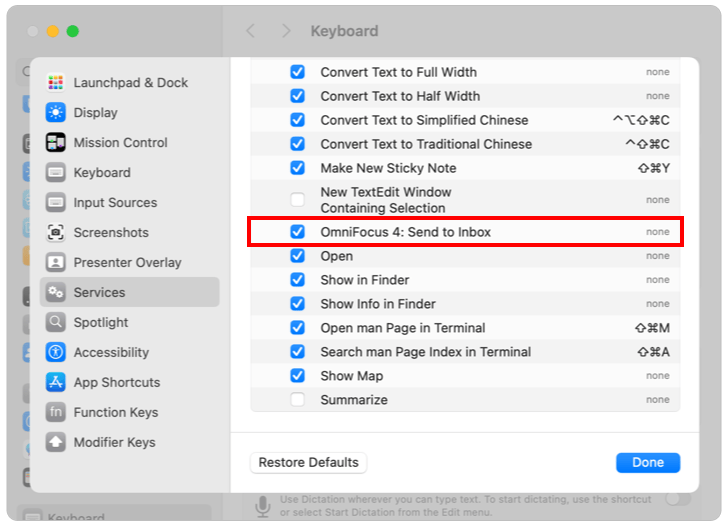
Click Services in the sidebar.
-
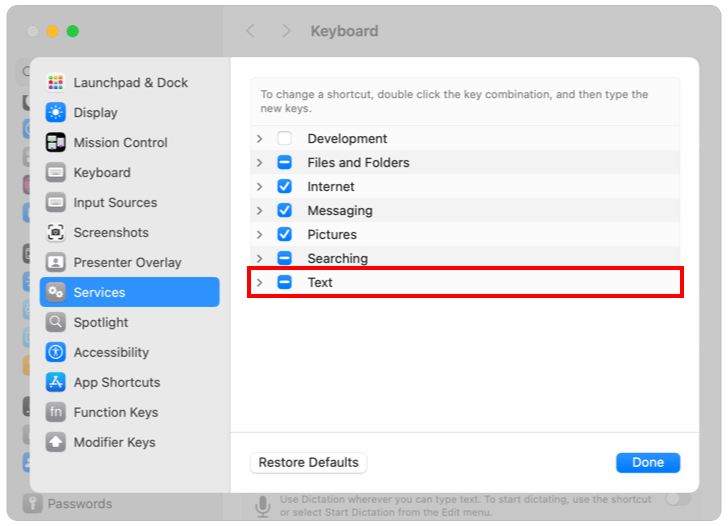
Click the disclosure arrow to reveal the Text section (if not already open).
-
Scroll down to find the OmniFocus 4: Send to Inbox item.
-
Make sure the service is enabled.
-
Double-click on “none” to set a keyboard shortcut.
Mail Drop
Mail Drop is a feature of the
Omni Sync Server,
which lets you send emails directly to your
 Inbox.
In addition to using Mail Drop for your own email, you can create multiple private addresses to give access to third parties, and delete those addresses at any time.
In order to use Mail Drop, you’ll need to have a free Omni Account, and OmniFocus must be actively syncing with that Omni Account.
If you are already using Omni Sync Server, you can log in to the Omni Sync Server site and create your first Mail Drop address by clicking or tapping on Add an Address.
An email address will be automatically generated, combining your Omni Account name with a random string of characters. You can start using that address to send or forward emails.
When you send an email message to a Mail Drop address, the subject line of that message becomes the name of the new Inbox item. The body of the message, which can contain text and simple HTML, becomes the note. Email attachments (such as images) are also added as OmniFocus attachments.
Read the OmniFocus Mail Drop support article for more details about this feature.
Plain Text
If you have a list of actions in another file, OmniFocus can turn those into a set of actions, using line breaks to determine where one item ends and the next begins.
Select the text you would like to add to OmniFocus, and Copy it. In OmniFocus, select an item row (without editing any fields), then Paste to add the copied text as a list of items below the one you have selected.
The items will be pasted at the same level as the row you selected. If you would like to paste text as a list of actions in a project, select an existing action inside the project before pasting (selecting the project results in a pasted list of projects, instead of actions).
OmniOutliner
OmniFocus integrates with OmniOutliner, so you can outline a project or agenda in OmniOutliner, then easily bring it to OmniFocus, to take action.
There are three ways to bring your OmniOutliner data into OmniFocus. One is only available on Mac, and the others are also available on iPhone, iPad, and Apple Vision Pro:
- On Mac, use the Import OmniOutliner Document command. You will be prompted to choose an OmniOutliner document, which will be imported into OmniFocus. The OmniOutliner rows become OmniFocus items, and its columns become fields for those items (you can choose which column imports to each field, as part of the import process).
- Drag a selection of rows from an OmniOutliner document, and drop them into the Inbox, or inside a project or group. The rows will become actions or groups, with hierarchy preserved. (On Mac, you can choose which column imports to each field).
- Select any number of rows in an OmniOutliner document and Copy. Paste them into the Inbox, or inside a project or group. The rows will become actions or groups, with hierarchy preserved. (On Mac, you can choose which column imports to each field).
OmniFocus for the Web
When you aren’t able to use OmniFocus on your Mac, iPhone, iPad, Apple Watch, or Apple Vision Pro, you might want to consider OmniFocus for the Web.
OmniFocus for the Web is our browser-based companion app, that works alongside OmniFocus on all your Apple devices and platforms. Using a Windows device at work? Have your iPhone with you, but want a bigger screen? OmniFocus for the Web can be very handy!
OmniFocus for the Web requires syncing with an Omni Account, using our free Omni Sync Server.
Unlike our native apps, which are available as either traditional licenses or subscriptions, OmniFocus for the Web is only available as a subscription. It is included as part of an OmniFocus subscription, or can be added on to your existing OmniFocus license, on a recurring basis.