Custom Perspectives (Pro)
You are viewing the OmniFocus 4 Reference Manual for OmniFocus 4.3.3, the final release for macOS 13, iOS 16, iPadOS 16, and watchOS 9.
The most recent version of the OmniFocus 4 Reference Manual is located here.
Custom Perspectives are saved views of your OmniFocus data, which allow you to quickly view, edit, and complete actions and projects, for specific situations.
This chapter describes how to create and edit custom perspectives, and details the various perspective rules you can adjust, to get the perfect view of your actions and projects.
Custom perspectives can be created,
edited,
deleted,
and favorited using the
Perspectives List on Mac,
or
 Quick Open
on iPhone, iPad, and Apple Vision Pro.
Quick Open
on iPhone, iPad, and Apple Vision Pro.
Custom perspectives can be viewed by
adding them to your Perspectives Bar
or using
Quick Open
on Mac, iPhone, iPad, and Apple Vision Pro;
or selected from the Perspectives List
or Perspectives menu on Mac.
This chapter describes creating and editing custom perspectives with the latest version of OmniFocus 4. You can still sync and view custom perspectives created in earlier versions of OmniFocus, but you will need to upgrade them in order to edit them in the current version.
Creating Custom Perspectives
To create a new custom perspective on Mac,
select Add Perspective…
from the Perspectives menu,
or click the
Add Perspective button
 in the Perspectives List.
To create a new custom perspective on iPhone, iPad, or Apple Vision Pro,
tap the
Add Perspective button
in the bottom of the
Quick Open.
window.
If the Quick Open search field is active,
tap Cancel to show the button.
A new custom perspective will be created,
with
 View Options
open,
ready for you to begin editing.
View Options
open,
ready for you to begin editing.
Editing Custom Perspectives
To edit an existing custom perspective,
navigate to it using
Quick Open or
the Perspectives Bar;
or select it from the Perspectives menu
or Perspectives List on Mac;
then open
View Options.
You can also select Edit from the Perspective Bar shortcuts menu.
Deleting Custom Perspectives
To delete an existing custom perspective,
select Delete from the
Perspectives List Actions Menu
on Mac,
or touch and hold the perspective in
Quick Open
on iPhone, iPad, and Apple Vision Pro,
and then select Delete.
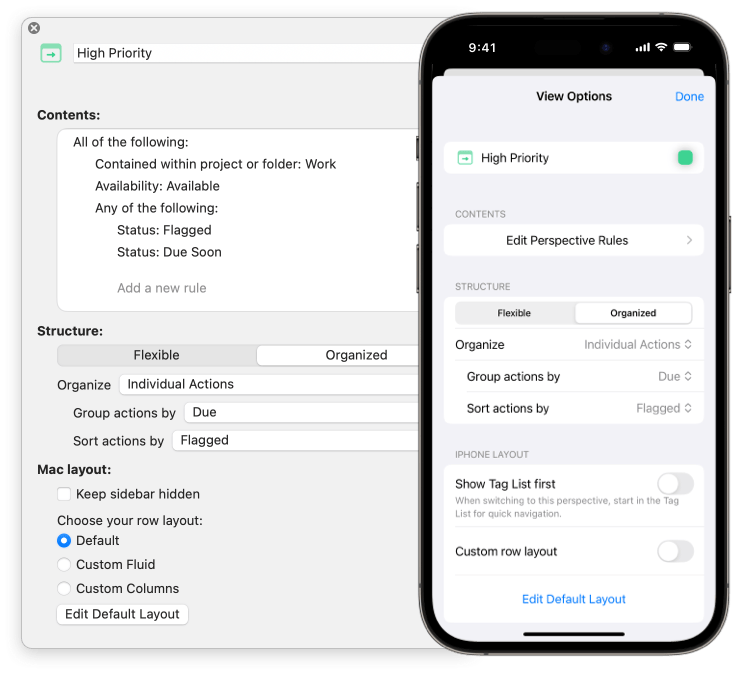
General
The top section of
View Options
contains settings to customize the appearance of
your custom perspective.
These settings have global scope.
Click or tap the name field to enter the title for a new perspective or change an existing title.
Click or tap the
Icon button
 next to the title
to open the icon picker,
where you can choose from the Omni-designed icons
included with OmniFocus.
You can also click or tap Custom (at the bottom of the picker)
to open the system browser
and choose your own icon from any image you have stored locally,
or in most cloud locations.
next to the title
to open the icon picker,
where you can choose from the Omni-designed icons
included with OmniFocus.
You can also click or tap Custom (at the bottom of the picker)
to open the system browser
and choose your own icon from any image you have stored locally,
or in most cloud locations.
Click or tap the color swatch next to the title to open the color picker, where you can choose from the Omni-selected colors. You can also tap Custom… to choose a custom color for your perspective and icon.
Contents
This section of
View Options
determines which items display in the custom perspective.
These settings have global scope.
Items are included or excluded by selecting perspective rules for specific item properties: if an item matches the rule, it is either included in the perspective, or excluded from the perspective.
On Mac, perspectives rules are always visible. On iPhone, iPad, and Apple Vision Pro, the rules are displayed after tapping Edit Perspective Rules.
Perspective rules are set up in a hierarchy, with All of the following, Any of the following, or None of the following at the top of the list. This determines whether all, any, or none of the rules below will apply to items. (The top rule can’t be deleted, but can be set to one of the other options, such as changing from All to Any.)
By default, new custom perspectives include one Availability: Remaining rule as an example. Since it is nested beneath All of the following:, new custom perspectives will only show items with an availability status of Remaining (Completed and Dropped items will not appear).
If you don’t want to include the default rule in your perspective, tap on the three dots in the row, and then select Disable or Delete. You can also modify the existing rule; in this case, Availability: Remaining can be changed to First Available, Available, Completed, or Dropped.
Click or tap Add a new rule to choose from the list of available perspective rules to use in the perspective.
When adding a perspective rule, note that it will apply based on its position in the hierarchy. All rules added beneath the top rule use its logic: All, Any, or None of them must apply for items to be included or excluded from the perspective.
By nesting rules beneath an additional All, Any, or None rule, you can create additional complexity.
- All of the following: — If an item matches all the rules nested below this rule, the item will be included in the perspective, unless excluded by another rule. This corresponds to a Boolean AND operation.
- Any of the following: — If an item matches any of the rules nested below this rule, the item will be included in the perspective, unless excluded by another rule. This corresponds to a Boolean OR operation.
- None of the following: — If an item matches any of the rules nested below this rule, the item will be excluded from the perspective, regardless of any other rules. This corresponds to a Boolean NOT operation.
To reorder a rule in the list, click and drag or touch and hold to lift it, then drag and drop it elsewhere. This is particularly useful in perspectives with multiple levels of hierarchy, since moving a rule to a different position can change which items are included or excluded.
Reordering rules that are peers has no effect on how they are interpreted.
OmniFocus presents a simplified list of rules when adding a new perspective rule. Many of the rules contain additional options, which are described below.
Perspective Rules
Perspective rules are listed in the order they display in the app:
- Status: Due Soon/Flagged
- Availability: First Available/Available/Remaining/Completed/Dropped
- Has an estimated duration
- Has an estimated duration less than: …
- Has a due date
- Has a defer date
- Has date in range: …
- Is repeating
- Is untagged
- Has a tag that…
- Is tagged with any of: …
- Is tagged with all of: …
- Is a project, group, or neither
- Is in the Inbox
- Is in a single actions list
- Has a project that…
- Is contained within project or folder: …
- Matches search terms:
- All of the following:
- Any of the following:
- None of the following:
- Comment
Status
The Status: Due Soon/Flagged rule has two options:
- Status: Due Soon — Includes any item which is Due Soon, and which has not been Completed or Dropped.
- Status: Flagged — Includes any item which is Flagged.
Availability
The Availability rule has five options:
- Availability: First Available — Includes any item which is First Available.
- Availability: Available — Includes any item which is Available.
- Availability: Remaining — Includes any item which is Remaining.
- Availability: Completed — Includes any item which is Completed.
- Availability: Dropped — Includes any item which is Dropped.
Has an Estimated Duration
The Has an estimated duration rule includes any item with an assigned Estimated Duration.
Has an Estimated Duration Less Than
The Has an estimated duration less than rule has four options:
- Has an estimated duration less than: 5 minutes — Includes any item which has an Estimated Duration of less than 5 minutes.
- Has an estimated duration less than: 15 minutes — Includes any item which has an Estimated Duration of less than 15 minutes.
- Has an estimated duration less than: 30 minutes — Includes any item which has an Estimated Duration of less than 30 minutes.
- Has an estimated duration less than: 60 minutes — Includes any item which has an Estimated Duration of less than 60 minutes.
Has a Due Date
The Has a due date rule includes any item with an assigned Due Date.
Has a Defer Date
The Has a defer date rule includes any item with an assigned Defer Until Date.
Has Date in Range
The Has date in range rule includes any item with a specific type of date in a given range.
When first added, the rule is set to Has a due date of: Today.
Click or tap on the left pop-up menu to choose between:
- Date Due — Includes any item with a Due Date that matches…
- Defer Date — Includes any item with a Defer Until Date that matches…
- Date Completed — Includes any item with a Completed Date that matches…
- Date Dropped — Includes any item with a Dropped Date that matches…
- Date Added — Includes any item with an Added Date that matches…
- Date Changed — Includes any item with a Changed Date that matches…
Then click or tap on the right pop-up menu to choose between:
- On — …the day or date that you enter.
- Yesterday — …yesterday.
- Today — …today.
- Tomorrow — …tomorrow.
- In the Past — …the selected number of hours, days, weeks, months, or years before now.
- In the Next — …the selected number of hours, days, weeks, months, or years after now.
- Between — …between two days or dates that you enter.
When entering days or dates for the On or Between options, you can choose to enter a specific date (with or without a time), such as “2028-01-01”; or a descriptive term (such as “january”).
If a specific date is entered, the rule will include any item that matches the selected date or range of dates, and the list will be consistent.
If a descriptive term is entered, the rule will include any item that matches the selected day or range of days, and the list will update each time the perspective is viewed.
This allows flexibility in choosing between viewing any items in a fixed period of time (“before December 31”), or viewing any items in an updating period of time (“in the next month”).
While you are entering a descriptive term, OmniFocus will parse the term as it is entered, and display that result below the field.
Read the Entering Dates and Times section of The Inspector to learn more.
Is Repeating
The Is repeating rule includes any item which is configured to Repeat.
Is Untagged
The Is untagged rule includes any item without assigned Tags.
Has a Tag That
The Has a tag that rule has five options:
- Has a tag that is active or on hold — Includes any item with an assigned Tag that is Active or On Hold.
- Has a tag that is on hold — Includes any item with an assigned Tag that is On Hold.
- Has a tag that is dropped — Includes any item with an assigned Tag that is Dropped.
- Has an active tag that has available actions — Includes any item with an assigned Tag that is Active, and which is also assigned to Available actions.
- Has an active tag that has no available actions — Includes any item with an assigned Tag that is Active, and which is also not assigned to any Available actions.
Is Tagged with Any Of
The Is tagged with any of rule includes any item that has any assigned Tag from your selected list.
Is Tagged with All Of
The Is tagged with all of rule includes any item that has all assigned Tags from your selected list.
Is a Project, Group, or Neither
The Is a project, group, or neither rule has four options:
- Is a project — Includes any item that is a Project.
- Is a group — Includes any item that is an Action Group.
- Is a project or group — Includes any item that is either a Project or an Action Group.
- Is not a project or group — Excludes any item that is either a Project or an Action Group.
Is in the Inbox
The Is in the Inbox rule
includes any item
that is in the
 Inbox.
Is in a Single Actions List
The Is in a single actions list rule includes any item that is part of a Single Actions List.
Has a Project That
The Has a project that rule has seven options:
- Has a project that is active — Includes any item that is part of a Project which is Active.
- Has a project that is active or on hold — Includes any item that is part of a Project which is either Active or On Hold.
- Has a project that is on hold — Includes any item that is part of a Project which is On Hold.
- Has a project that has been completed — Includes any item that is part of a Project which has been Completed.
- Has a project that has been dropped — Includes any item that is part of a Project which has been Dropped.
- Has an active project that has no remaining actions — Includes any item that is part of a Project which is both Active and contains no Remaining actions.
- Has an active project that has a future defer date — Includes any item that is part of a Project which is both Active and has a future Defer Until Date.
Is Contained within Project or Folder
The Is contained within project or folder rule includes any item that is part of a Project, or part of a Project contained by a Folder, from your selected list.
Matches Search Terms
The Matches search terms rule includes any item that matches all the text phrases from your entered list.
All of the Following
The All of the following: rule includes any item which is included by all the rules nested below this rule.
Any of the Following
The Any of the following: rule includes any item which is included by any of the rules nested below this rule.
None of the Following
The None of the following: rule excludes any item which is included by any of the rules nested below this rule.
Comment
The Comment rule allows you to add a note to your rules. It does not affect what is included or excluded.
Structure
This section of
View Options
defines how the perspective’s items
are displayed in the Outline.
You can choose from Flexible or Organized,
with additional options available once you’ve selected your preferred structure.
These settings have global scope.
Flexible
The default structure is Flexible, which presents a single list of all the items included by your perspective rules. The list can be re-ordered using drag and drop, or the Move Down, Right, Up, Left keyboard shortcuts.
As you move items around, you may eventually find that you would like to start over; click or tap Sort Now to reset the list order.
The default Initial order is Projects Order, but you can choose between:
- Due & Flagged — Items are sorted based on their due date and flagged states. Items that are both due and flagged appear first (in the order that they are due), followed by all remaining flagged items, all other due items, and finally items that are neither flagged nor due.
- Projects Order — Items are sorted in Projects order.
- Tag — Items are sorted by tag. Items with multiple tags appear only once, alongside other actions with the same tag combination.
- Flagged — Items are sorted based on their flagged state. Items that are flagged appear first, followed by all other items.
- Name — Items are sorted alphabetically by name.
- Due — Items are sorted by due date. Items with the earliest due (or overdue) dates appear first, followed by actions with later due dates, and finally by actions without due dates.
- Defer Date — Items are sorted by defer until date. Items with the earliest defer dates appear first, followed by actions with later defer dates, and finally actions without defer dates.
- Added — Items are sorted by added date, from newest to oldest.
- Changed — Items are sorted by changed date, from newest to oldest.
- Completed — Items are sorted by completed date, with active items first, followed by completed actions from newest to oldest.
- Dropped — Items are sorted by dropped date, with active items first, followed by dropped actions from newest to oldest.
- Duration — Items are sorted by estimated duration, from shortest to longest. Items without an estimated duration appear at the bottom of the outline.
Once items have been sorted in your chosen order, they may be sorted a second time in Projects order.
As an example, when you sort by Flagged, flagged items are presented in Projects order, then all items without flags are presented in Projects order.
To learn more about the Preserve hierarchy option, please read the Forecast Outline: Flexible section of the Perspectives chapter.
Organized
Once you have selected Organized, several other options become available.
You can choose whether you would like to organize by Individual Actions, which displays a list of actions that can be grouped and sorted, or organize by Entire Projects, which displays a list of projects that can be grouped and sorted.
If your perspective rules exclude items that would be grouped or sorted by one of the criteria listed below, it is possible to choose options that offer no meaningful structure (such as choosing to group by Completed when the perspective is set to display items that are Remaining).
Organized: Individual Actions
When organized by Individual Actions, the Outline contains a list of all actions included by the perspective rules.
The Sidebar shows a filtered list of your tags, including only tags assigned to items in this custom perspective; you can use the same methods of organizing as in the Tags Sidebar.
Actions within the perspective can be grouped by:
- Ungrouped — Actions are not grouped, and are presented as a flat list.
- Tag — Actions are grouped by tag. If an action has more than one tag, it appears within each of its tags.
- Tags (Combined) — Actions are grouped by tag combination. Regardless of the number of tags on an action, it appears only once, in a group named with its tag combination.
- Project — Actions are grouped by project.
- Due — Actions are grouped by due date, from oldest to newest. The granularity of the grouping increases as it nears the present day. Actions with no due date are grouped at the bottom of the outline.
- Defer Date — Actions are grouped by defer until date, from oldest to newest. The granularity of the grouping increases as it nears the present day. Actions with no defer date are grouped at the bottom of the outline.
- Completed — Actions are grouped by completed date, from most recently completed to oldest. The granularity of the grouping increases as it nears the present day. Actions with no completed date are grouped at the bottom of the outline.
- Dropped — Actions are grouped by dropped date, from most recently dropped to oldest. The granularity of the grouping increases as it nears the present day. Actions with no dropped date are grouped at the top of the outline.
- Added — Actions are grouped by added date, from newest to oldest. The granularity of the grouping increases as it nears the present day.
- Changed — Actions are grouped by changed date, from newest to oldest. The granularity of the grouping increases as it nears the present day.
- Flagged — Actions are grouped according to their flagged status, with flagged actions first, followed by unflagged actions.
Actions (ungrouped, or within a group) can be sorted by:
- Due & Flagged — Actions are sorted based on their due date and flagged states. Actions that are both due and flagged appear first (in the order that they are due), followed by all remaining flagged items, all other due items, and finally items that are neither flagged nor due.
- Projects Order — Actions are sorted in Projects order.
- Tag — Actions are sorted by tag. Actions with multiple tags appear only once, alongside other actions in the grouping with the same tag combination.
- Flagged — Actions are sorted by flagged status, following by all other items.
- Name — Actions are sorted alphabetically by name.
- Due — Actions are sorted by due date. Actions with the earliest due (or overdue) dates appear first, followed by actions with later due dates, and finally by actions without due dates.
- Defer Date — Actions are sorted by defer until date. Actions with the earliest defer dates appear first, followed by actions with later defer dates, and finally actions without defer dates.
- Added — Actions are sorted by added date, from newest to oldest.
- Changed — Actions are sorted by changed date, from newest to oldest.
- Completed — Actions are sorted by completed date, with active actions first, followed by completed actions from newest to oldest.
- Dropped — Actions are sorted by dropped date, with active actions first, followed by dropped actions from newest to oldest.
- Duration — Actions are sorted by estimated duration, from shortest to longest. Actions without an estimated duration appear at the bottom of the outline.
To learn more about Preserve hierarchy, please read Forecast Outline: Flexible.
Organized: Entire Projects
When organized by Entire Projects, the Outline contains a list of items included by the perspective rules, inside of the projects that contain them.
Items without a project, that are otherwise included by the perspective rules, are grouped into an Inbox section at the top of the outline.
The Sidebar shows a filtered list of your projects, including only projects which contain items in this custom perspective; you can use the same methods of organizing as in the Projects Sidebar.
Projects within the perspective can be grouped by:
- Ungrouped — Projects are not grouped, and are presented as a flat list.
- Folder — Projects are grouped into the folders that contain them. Projects outside of folders are grouped at the bottom of the outline.
- Due — Projects are grouped by due date of the earliest of either a project, or actions inside a project, from earliest to latest. The granularity of the grouping increases as it nears the present day. Projects that have no due date, nor contain any action due dates, are grouped at the bottom of the outline.
- Defer Date — Projects are grouped by defer until date, from oldest to newest. The granularity of the grouping increases as it nears the present day. Projects with no defer date are grouped at the bottom of the outline.
- Completed — Projects are grouped by completed date, from most to least recently completed. The granularity of the grouping increases as it nears the present day. Projects with no completed date are grouped at the bottom of the outline.
- Dropped — Projects are grouped by dropped date, from most to least recently dropped. The granularity of the grouping increases as it nears the present day. Projects with no dropped date are grouped at the top of the outline.
- Next Review — Projects are grouped by next review date, from earliest to latest. The granularity of the grouping increases as it nears the present day.
- Added — Projects are grouped by added date, from newest to oldest. The granularity of the grouping increases as it nears the present day.
- Changed — Projects are grouped by changed date, from newest to oldest. (This includes changes to actions within the project.) The granularity of the grouping increases as it nears the present day.
Projects (ungrouped, or within a group) can be sorted by:
- Projects Order — Projects are sorted in Projects order.
- Name — Projects are sorted alphabetically by name.
- Flagged — Projects are sorted by flagged status, with flagged projects appearing first. The flagged status of individual actions within projects has no effect on this sorting.
- Due — Projects are sorted by due date of the earliest of either a project, or actions inside a project, from earliest to latest. Projects that have no due date, nor contain any action due dates, appear at the bottom of the outline.
- Defer Date — Projects are sorted by defer until date, from oldest to newest. Projects with no defer date appear at the bottom of the outline.
- Completed — Projects are sorted by completed date, with active projects first, followed by completed projects from newest to oldest.
- Dropped — Projects are sorted by dropped date, with active projects first, followed by dropped projects from newest to oldest.
- Next Review — Projects are sorted by next review date, from earliest to latest.
- Added — Projects are sorted by added date, from newest to oldest.
- Changed — Projects are sorted by changed date, from newest to oldest. (This includes changes to actions within the project.)
- Duration — Projects are sorted by estimated duration, from shortest to longest. Projects without an estimated duration appear at the bottom of the outline.
Layout
Custom perspectives can either use the default Layout settings, or configure a custom layout for each perspective. Layout settings have platform scope.
Click on Custom Fluid or Custom Columns (on Mac), or Custom row layout on iPhone, iPad, or Apple Vision Pro; this will present the same set of options as Layout settings for Mac or iPhone, iPad, and Apple Vision Pro, but will be applied only to the custom perspective you are editing.
Some settings in this section vary with the device that you are using: Keep Sidebar Hidden (Mac or iPad) or Show Project/Tags List first (iPhone).
Upgrading
Custom perspectives you create are synced between all the devices that sync with your OmniFocus database.
Older versions of OmniFocus may not support all the features of perspectives created with the latest versions of OmniFocus. (These perspectives will still sync provided the database version is compatible, but they will be hidden in older versions.)
If you are syncing a perspective created with an older version of OmniFocus, you can choose to upgrade the perspective to take advantage of the features described in this chapter, by clicking or tapping the Upgrade Perspective button in View Options for the custom perspective.
Existing perspective rules and settings will be converted to the newer perspective format. Please be aware that once custom perspectives have been upgraded to the latest version, they cannot be downgraded.