Perspectives
You are viewing the OmniFocus 4 Reference Manual for OmniFocus 4.3.3, the final release for macOS 13, iOS 16, iPadOS 16, and watchOS 9.
The most recent version of the OmniFocus 4 Reference Manual is located here.
Perspectives are different ways of viewing the actions and projects in OmniFocus. Each default perspective has a specific purpose, and when used together they allow you to plan and accomplish your goals.
OmniFocus includes seven default perspectives to help you organize, prioritize, schedule, and review your actions and projects, as well as two default perspectives for viewing completed or changed items.
Need more ways of viewing your actions and projects? Custom Perspectives can be created using OmniFocus Pro.
Default Perspectives
The perspectives for planning and completing items are:
 Inbox —
quickly capture and process actions.
Inbox —
quickly capture and process actions. Projects —
organize actions into projects, and figure out what comes next.
Projects —
organize actions into projects, and figure out what comes next. Tags —
add information about people, places, things, states of mind, energy level, or
anything that affects when or where you work.
Tags —
add information about people, places, things, states of mind, energy level, or
anything that affects when or where you work. Forecast —
view all of your actions and projects that have related
due or
defer until dates, and viewing them
alongside your schedule.
Forecast —
view all of your actions and projects that have related
due or
defer until dates, and viewing them
alongside your schedule. Flagged —
gather all of your flagged actions in one place.
Flagged —
gather all of your flagged actions in one place. Nearby —
see all actions or projects that have a tag with an assigned location,
either in a list or on a map. What can you do where you are, or nearby?
Nearby —
see all actions or projects that have a tag with an assigned location,
either in a list or on a map. What can you do where you are, or nearby? Review —
check on your progress so far,
determine the status of projects, and
figure out what to do next.
Review —
check on your progress so far,
determine the status of projects, and
figure out what to do next.
The perspectives for viewing completed or changed items are:
More information about each perspective is below.
The easiest way to view a perspective is to click or tap it in the
Perspectives Bar,
or navigate to it using
 Quick Open.
Perspectives Bar
The Perspectives Bar is a column of tabs down the left side of the screen on Mac, iPad, or Apple Vision Pro; or a row of tabs across the bottom of the screen on iPhone. By default, it is visible when OmniFocus is first installed, with each tab containing an icon and title; tapping on the tab will visit the related perspective. If you’d like to, you can either hide the Perspectives Bar, or just hide the titles.
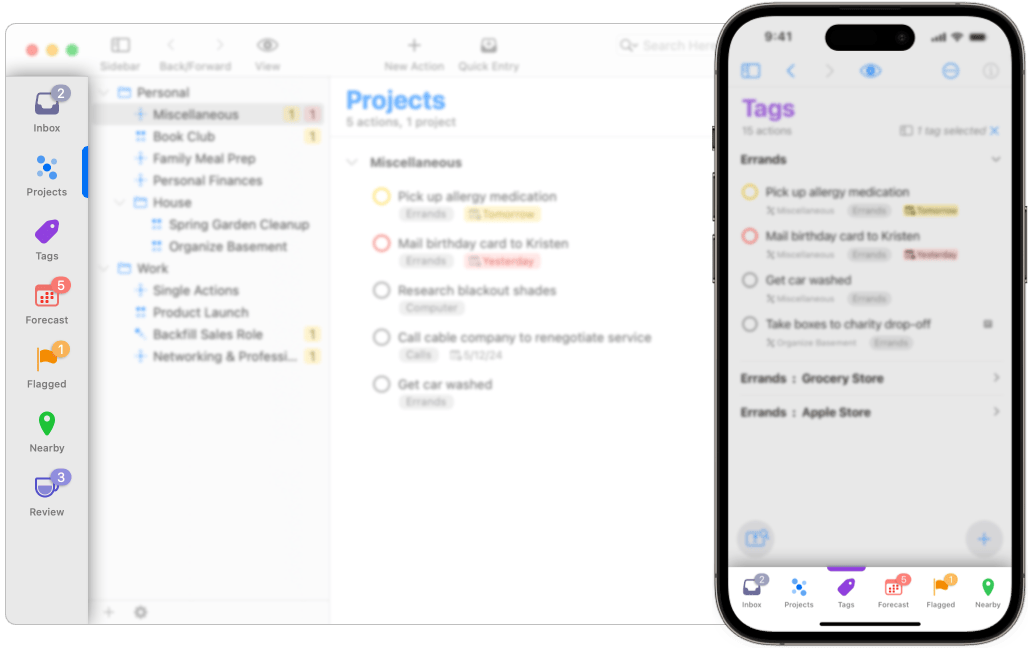
You can also tap the current tab to update the Outline view.
If you are viewing the Outline, and have scrolled down or selected one or more
items, the first tap will clear the selection and return to the top of the
Outline. The second tap will show or hide the
 Sidebar
on Mac, iPad, or Apple Vision Pro, and
switch between the Sidebar and Outline on iPhone.
Sidebar
on Mac, iPad, or Apple Vision Pro, and
switch between the Sidebar and Outline on iPhone.
Editing the Perspectives Bar
By default,
the Perspectives Bar includes all
Default Perspectives,
except for
 Completed and
 Changed.
You can change the order of perspectives,
or add and remove
 favorite perspectives
(including
favorite perspectives
(including
 Custom Perspectives),
using the Perspectives List on Mac,
or
Quick Open
on iPhone, iPad, or Apple Vision Pro.
Custom Perspectives),
using the Perspectives List on Mac,
or
Quick Open
on iPhone, iPad, or Apple Vision Pro.
If you choose to show more perspectives than can fit across the height or width of your screen, you can scroll the bar to reveal additional tabs.
Perspectives Bar Shortcuts Menu
Each tab in the Perspectives Bar is also a button. When you touch and hold on an iPhone, iPad, or Apple Vision Pro, or Control-click on a Mac, a shortcut menu (also called a contextual menu) appears. The shortcut menu may contain some or all of the following menu commands, which apply to the selected perspective:
- Edit — opens
 View Options for the selected perspective, and begins editing.
 - Unfavorite — removes the selected perspective from the Perspectives Bar and favorites list. Quick Open can be used to favorite it again on an iPhone, iPad, or Apple Vision Pro, and the Perspectives List can be used on a Mac.
- Copy Link — copies a link to the perspective in OmniFocus’s app URL format. Tap this link from anywhere on your device to view the perspective in OmniFocus.
- Open in New Window — on a Mac, this opens the selected perspective in a new window, instead of the current window. On an iPad, this will open the selected perspective in a new split screen window. This command is not available on iPhone.
Quick Open
Quick Open is designed to help you quickly navigate wherever you need to go in OmniFocus, whether you are using a Mac, an iPhone, or an iPad.
Quick Open (Mac)
While working anywhere in OmniFocus,
use the Quick Open… command,
or click on the
Quick Open button
in the
Toolbar (if you have
customized the Toolbar).
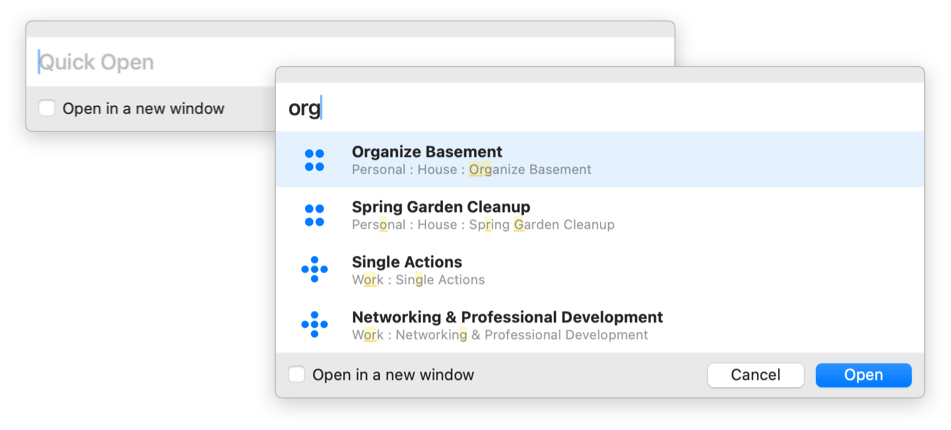
Opening a perspective, folder, project, tag, or plug-in:
- Enter text into the search field at the top of the sheet to quickly find a
perspective, folder, project, tag, or
 Omni Automation Plug-In
(if you are using OmniFocus Pro)
that matches the text you enter.
Omni Automation Plug-In
(if you are using OmniFocus Pro)
that matches the text you enter. - The field matches text from the middle of words as well as between them; entering “ho” will turn up both “Get started with OmniFocus” and “Phone”, for example.
- Click on a result in the list to open it, or use the arrow keys to navigate, and return to select a result.
- If you check the Open in a new window option, the item will be opened in a new window.
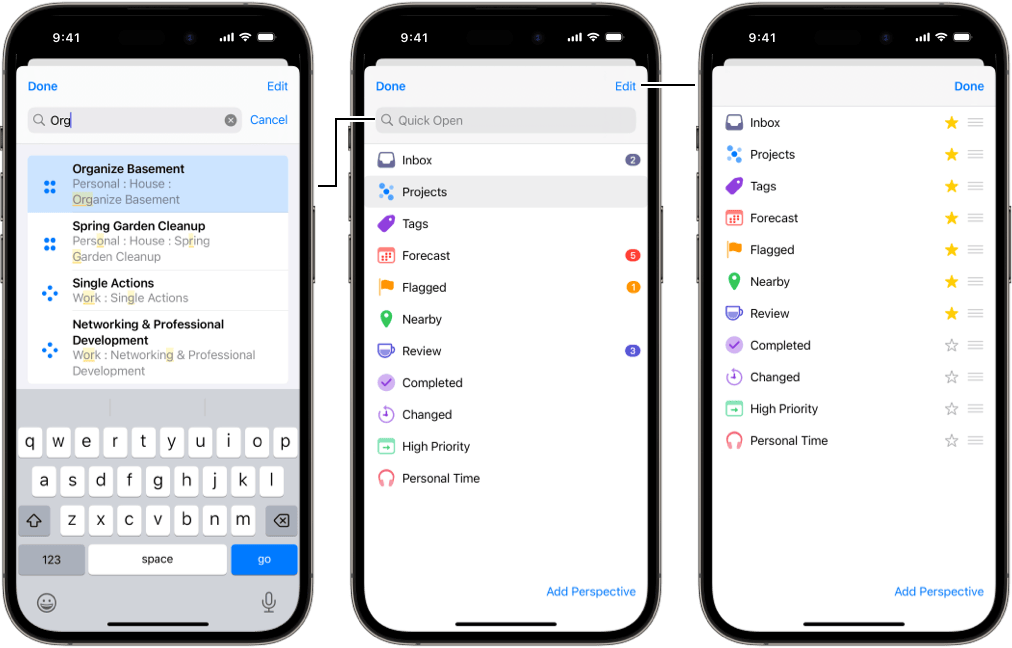
Quick Open (iPhone, iPad, Apple Vision Pro)
On iPhone, iPad, or Apple Vision Pro, Quick Open is also used for selecting favorite perspectives, or reordering the perspectives bar.
On Mac, this functionality is part of the Perspectives List.
With OmniFocus Pro,
Quick Open can also be used to create new
Custom Perspectives.
While working in any perspective’s Sidebar or Outline,
tap
Quick Open.
in the lower left part of the screen (or type
Command-O).
Opening a perspective, folder, project, tag, or plug-in:
- Enter text into the search field at the top of the sheet to quickly find a
perspective, folder, project, tag, or
Omni Automation Plug-In
(if you are using OmniFocus Pro)
that matches the text you enter.
- The field matches text from the middle of words as well as between them; entering “ho” will turn up both “Get started with OmniFocus” and “Phone”, for example.
- Tap on a result in the list to open it. If you are using an attached keyboard, you can also open the selection using the return key.
Setting your favorite perspectives:
- Tap on the empty
Favorite button
 to add a favorite perspective.
 - Tap on the filled
Favorite button
to remove a favorite perspective.
- Favorite perspectives will display in the Perspectives Bar.
Sorting your favorite perspectives:
- Tap Edit
- Use the drag handles to arrange perspectives in the order you prefer.
- Favorite perspectives will display in the order set here.
Creating new custom perspectives:
- With OmniFocus Pro, tap the Add Perspective button in the bottom of the Quick Open window. If the Quick Open search field is active, tap Cancel to show the button.
- A new custom perspective will be created and opened, ready for you to edit.
- Read Creating Custom Perspectives to learn more.
Perspectives List
On Mac, the Perspectives List is used for selecting favorite perspectives, assigning custom keyboard shortcuts, or reordering the Perspectives Bar.
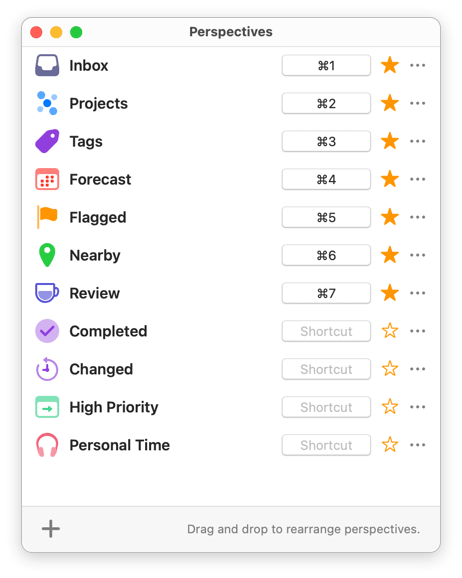
With OmniFocus Pro, the Perspectives List can also be used to create new Custom Perspectives.
On iPhone, iPad, and Apple Vision Pro,
this functionality is in
Quick Open.
The Perspectives List also serves as a way to navigate between perspectives in the main OmniFocus window: double-click a perspective in the list to open it.
To set a keyboard shortcut for a perspective:
- Click on the Shortcut button
 (which may be showing an already assigned
shortcut).
(which may be showing an already assigned
shortcut). - Press the keys for the keyboard shortcut you want to use. Characters appear in the field as you type, and are saved once you enter a valid combination.
You can choose any shortcut which contains one or more of the Control, Option, Shift, or Command keys, along with any other key. An unused Function key (such as F13) can also be used.
Press Esc to cancel recording,
or click the Clear button
 to remove an assigned shortcut.
Setting your favorite perspectives:
- Click on the empty
Favorite button
to add a favorite perspective.
- Click on the filled
Favorite button
to remove a favorite perspective.
- Favorite perspectives will display in the Perspectives Bar.
Sorting your favorite perspectives:
- Click and hold on a row, then drag it into the order you prefer.
- Favorite perspectives will display in the order set here.
Creating new custom perspectives:
- With OmniFocus Pro,
click the
Add Perspective button
 in the bottom toolbar.
 - A new custom perspective will be created and opened, ready for you to edit.
- Read Creating Custom Perspectives to learn more.
Perspectives List Actions Menu
Next to the
Favorite button
,
there is an
Actions menu button
 which contains additional actions or settings for each row:
- Open — opens the selected perspective.
- Open in New Window/Tab — opens the selected perspective in a new view.
- Edit — opens View Options for the selected perspective, and begins editing.
- Copy as Link — copies a link to the selected perspective.
- Duplicate — duplicates the selected perspective.
(Only available for
Completed,
Changed, and
Custom Perspectives.)
- Always Open in a New Window — choose whether to
always open the selected perspective in a new view.
(Only available for
Custom Perspectives.)
- Revert to Default Settings — returns perspectives to their original settings. (Only available for Default Perspectives.)
- Delete — deletes the selected perspective. (Only available for
Custom Perspectives.)
View Options
View Options can be displayed by tapping or clicking the View Options button in the toolbar, selecting Show View Options from the View menu, or using the keyboard shortcut Shift-Command-V.
View Options allow you to customize which actions or projects appear in the Outline for the current perspective, based on their status and availability, in addition to perspective-specific options.
This section provides an overview of the options that are common to most perspectives, with each perspective section discussing options that are specific to that perspective.
View Options is generally divided into several sections:
- Availability —
The first section determines what is visible in the perspective,
based on the Availability of
actions, action groups, and projects.
Read the
View Options section
in the Glossary, to learn more.
This section is not included in
Forecast. Visibility settings
have global scope.
- Structure — The second section determines how the view displays, and
varies between perspectives. This can include settings that impact visibility
(such as whether to display the Inbox in Projects), or the organization of
items (such as whether to display Forecast as a unified list, or separated by
types of information). This section is not included in the
Inbox or
Nearby perspectives.
Structure settings have global scope.
- Layout — The third section contains layout adjustments for the specific kind of device that you are using, including access to Edit Default Layout. Layout settings have platform scope.
Custom Layout
OmniFocus Pro allows you to set a custom layout for each perspective. Click on Custom Fluid or Custom Columns (on Mac), or Custom row layout on iPhone, iPad, or Apple Vision Pro; this will present the same set of options as Layout settings for Mac or iPhone, iPad, and Apple Vision Pro, but will be applied only to the perspective you are editing.
To make capturing and processing new actions as easy as possible, both Inbox and Quick Entry always allow customization, whether licensed for OmniFocus or OmniFocus Pro.
Sidebar
The Sidebar appears between the Perspectives Bar and Outline, on the leading edge of the OmniFocus window if you are using a Mac, iPad, or Apple Vision Pro; on iPhone, the Sidebar will slide in from the leading edge of the screen, and slide back out when dismissed.
You can hide or show the Sidebar using the
Show/Hide Sidebar command,
tapping the
Sidebar button
in the Toolbar,
or clicking on a tab in the
Perspectives Bar
(if you are at the top of the Outline).
By selecting items in the Sidebar, you can quickly navigate to parts of the Outline, while filtering to see only the information that you want to see right now.
The Sidebar is available for all
Default Perspectives and
Custom Perspectives, except the
Inbox. Both navigation and filtering require
information which Inbox items don’t typically have, such as an assigned project
or assigned tags. Adding that information to an item in the Inbox normally
removes the item from the Inbox entirely, depending on your
Clean up inbox items which have
setting.
You can swipe left on a project, folder, or tag to reveal the
Select button
 and
Delete button
and
Delete button
 .
You can swipe right on a project to reveal the
Flag button
.
You can swipe right on a project to reveal the
Flag button
 and
Forecast Tag button
and
Forecast Tag button
 (if you have configured a Forecast Tag in
Forecast View Options).
(if you have configured a Forecast Tag in
Forecast View Options).
There are four different types of Sidebar:
Projects,
Tags,
Forecast, and
Review.
The
Forecast and
Review perspectives
use their specific type,
while all other perspectives use the type found in either Projects or Tags.
Each type is discussed further in the Sidebar section for that perspective.
Sidebar Edit Mode
When using an iPad, iPhone, or Apple Vision Pro,
Sidebar Edit Mode allows rearranging, renaming, and editing items in the Sidebar.
This mode is available in all perspectives except for
Forecast and
Review.
In order to enter Sidebar Edit Mode, tap the Edit button. When you are finished, tap the Done button.
If the Sidebar contains a list of folders and projects, or tag groups and tags, you can drag and drop to reorder them, or change their place in the hierarchy of your database.
While in Sidebar Edit Mode,
you can swipe left on a project, folder, or tag to reveal the
Delete button
,
or swipe right on a project to reveal the
Flag button
and
Forecast Tag button
(if you have configured a Forecast Tag in
Forecast View Options).
You can also tap the Shortcut menu button
in the bottom toolbar
to open a shortcut menu for selected items.
Sidebar Select Mode
When using an iPad, iPhone, or Apple Vision Pro,
Sidebar Select Mode mode allows editing multiple items in the Sidebar.
This mode is available in all perspectives except for
Review.
To enter Sidebar Select Mode
on iPhone,
tap the
More Menu button
 ,
and then the
Select button
.
To enter Sidebar Select Mode
on iPad or Apple Vision Pro,
tap the
List button
,
and then the
Select button
.
To enter Sidebar Select Mode
on iPad or Apple Vision Pro,
tap the
List button
 ,
and then the
Select button
.
When you are finished, tap the Done button.
,
and then the
Select button
.
When you are finished, tap the Done button.
The
More Menu button
on iPhone,
and
List button
on iPad and Apple Vision Pro,
also contain the
Expand All button
 and
Collapse All button
,
which allow expanding and collapsing
folders or tag groups.
and
Collapse All button
,
which allow expanding and collapsing
folders or tag groups.
If the Sidebar contains folders, projects, or tags,
you can tap to select or deselect items,
tap the Select All button
to select all visible items,
tap the Clear button
to deselect all visible items,
or swipe left to reveal the
Select button
,
which also allows you to add or remove items from your current selection.
You can then tap the
Shortcut menu button
in the bottom toolbar
to open a shortcut menu for your selected items,
or tap Done to view
the selected items in the Outline.
If the Sidebar contains a calendar, you can tap to select or deselect days, as well as the Past or Future tiles, tap the Select All button to select all visible items, or tap the Clear button to deselect all visible items, and then tap Done to view the selected days in the Outline.
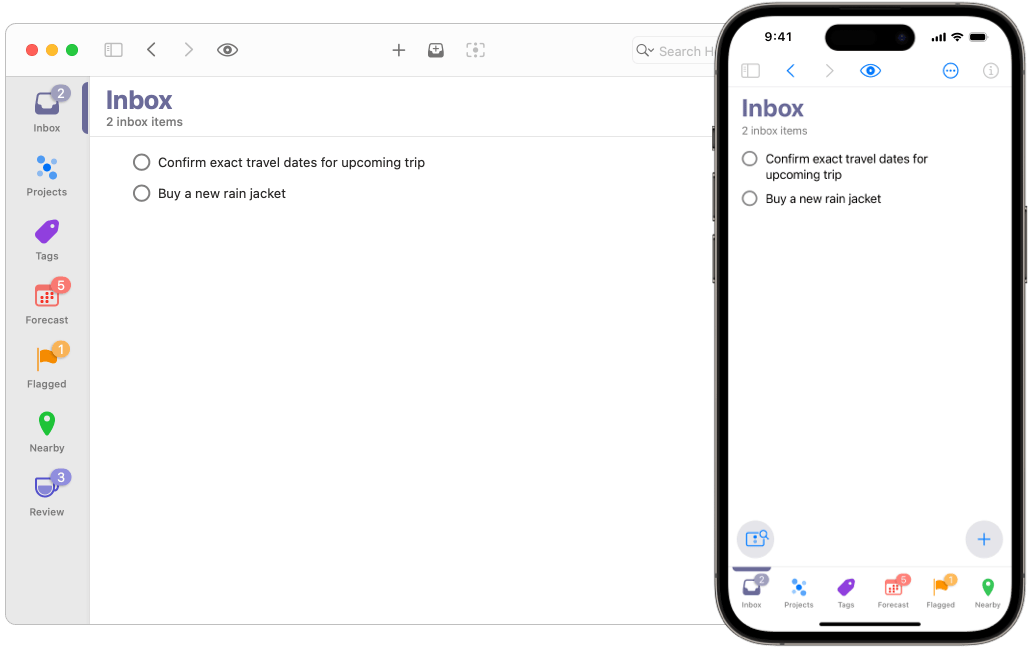
Inbox
The Inbox is your starting place, where you can capture everything that you want to accomplish: all of your hopes, dreams, and goals.
To add an item,
navigate to the Inbox using the
Perspectives Bar or
Quick Open, and choose
New Action (Command-N) from the File
menu, click the
New Action button
in the Mac toolbar,
or tap the
New Action button
in the lower right of your iPhone, iPad, or Apple Vision Pro window.
You can also add items to the Inbox from anywhere in OmniFocus using
 Quick Entry.
Many people use the Inbox as a landing place for new ideas, allowing them to quickly capture all the thoughts in their mind. While it is possible to work out of the Inbox, it’s often a temporary place for those ideas to live. Adding a project or tags to an item turns it into an action, and converting it into a project allows you to add even more actions… all in the interest of moving towards your goals.
Though every workflow is different, many people try to keep their Inbox empty, processing all the contained items on a regular basis. This practice is often referred to as “Inbox Zero”, and is subtly rewarded in OmniFocus by the appearance of a graphic in the background of the Inbox when no items are present.
Inbox View Options
The Inbox perspective
provides the following
View Options:
- In the Inbox, show — this is the Availability section. First Available is not an option in the Inbox, as it requires project structure to determine. Visibility settings have global scope.
- Layout — Layout settings have platform scope. Both OmniFocus and OmniFocus Pro allow you to set a custom layout for the Inbox, to help you process new items more quickly.
Inbox Outline
Once you have an item in your Inbox,
what do you do next?
In the simplest workflow,
you can accomplish the action that you have captured in your Inbox,
and then mark it complete by clicking or tapping the
 Status Circle next to the item.
Do you need to do a little more organizing,
before tackling that first action?
The Inbox Outline contains a list of individual items,
which you can choose to organize into
action groups.
This can be accomplished by dragging one item on top of another
(Mac, iPhone, or iPad),
selecting an item
and using the Add Inside command
(Mac, iPhone, or iPad),
or dragging the
New Action button
from the lower right of your screen to
hover over an action in the Outline (iPhone, iPad, or Apple Vision Pro).
You can also add tags to an item, by clicking or tapping into the Tags fields, and beginning to type; you can either select from existing tags, or create one or more new tags.
Since the Inbox is most often a temporary place for capturing ideas, it only supports very simple organization. If you need more complexity, or are working on a project with many related actions, then it’s time to either add the Inbox item to an existing project, or convert it into a project, and continue planning. Clicking or tapping into the Project field will allow you to either select an existing project, or create a new project.
Once you have added a project or tags to an Inbox item, it will likely disappear from view, depending on your settings for Clean up inbox items which have. Your items are still safe! They’re now filed, and ready for your next steps. Not entirely sure where your Inbox item just went? Please see read about the default Miscellaneous project.
If you convert an Inbox item to a project,
it will immediately reopen in
Projects,
ready for further planning.
Item Status
As you discovered above,
clicking or tapping on the open
Status Circle
for an active action or action group
will mark it
 Completed.
These are two of several Status options that can be applied to actions, groups, projects, folders, and even tags. You can read more about Status options in the Glossary.
Cleaning Up Resolved Items
When you mark an item complete by clicking its status circle, the item may not immediately disappear from the Outline. If you have set items to clean up when changing perspectives, they remain until you navigate elsewhere or clean up manually by using the Clean Up command,
or clicking or tapping the
Clean Up button
 .
You can choose when OmniFocus cleans up by changing the Clean up resolved items setting.
.
You can choose when OmniFocus cleans up by changing the Clean up resolved items setting.
If a completed item doesn’t disappear after you’ve cleaned up your current view,
check
View Options
for the current perspective,
as you have likely selected All.
Change to any of the other Availability options to hide
completed items.
Worried about accidentally deleting hidden items?
If you change the status of an action or project to one that would hide it, given the current View Options setting (such as marking an item Completed, with View Options set to Available) and then later delete the folder, project, or action group which contains it, OmniFocus warns you that you may be about to delete something unintentionally.
To see those hidden items, change View Options to All.
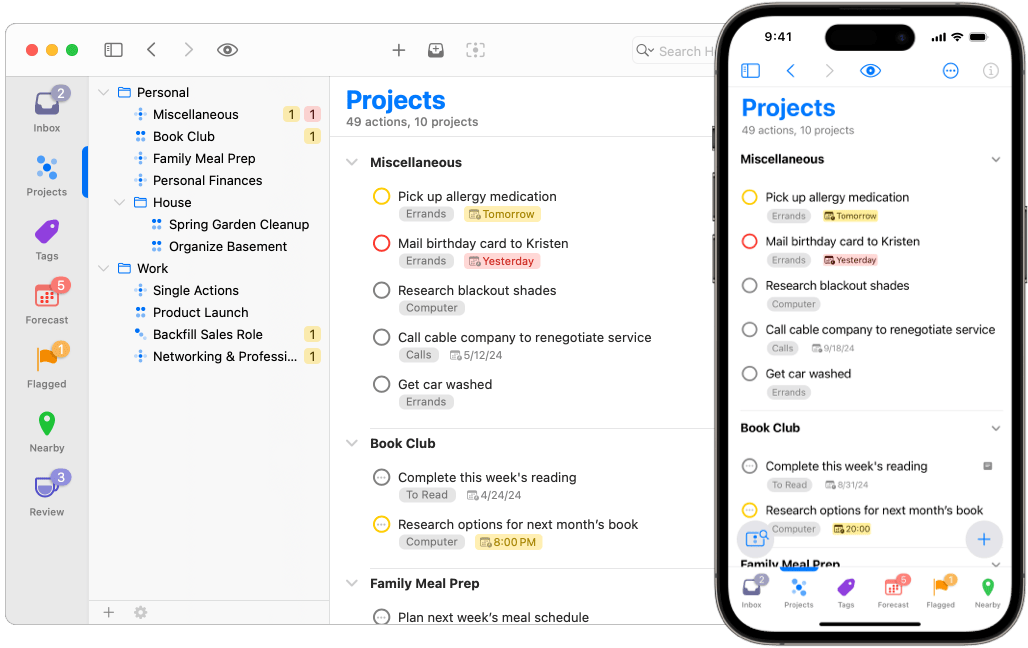
Projects
A project is a collection of related actions and action groups, typically working towards a specific end goal. The Projects perspective displays all of your projects in a list, which can be grouped into folders, such as Personal or Work.
To add a new project, navigate to Projects using the Perspectives Bar or Quick Open, and choose New Project (Shift-Command-N) from the File menu, or use the Add Project at the bottom of the Projects Sidebar.
Projects View Options
The Projects perspective
provides the following
View Options:
- In Projects, show — Choose which items you would like visible in the
Outline (Remaining is the default). Each option describes the items
included; see
View Options,
Project Type, and
Project Status to learn more.
Visibility settings have global scope.
- Structure — Choose whether to show the contents of the Inbox at the top of the Projects Outline and Sidebar (this makes it easier to drag and drop between the Inbox and Projects), and choose whether to include folders in the Outline view (folder rows are hidden if this option isn’t selected). Structure settings have global scope.
- Layout — Settings in this section vary with the device that you are using: Keep Sidebar Hidden (Mac or iPad) or Show Project List first (iPhone). Layout settings have platform scope. OmniFocus Pro allows you to set a custom layout for this perspective.
Projects Outline
The Projects Outline displays a list of your projects,
and the actions they contain,
with visibility determined by your
View Options.
The Outline displays your projects in a list of rows, with each row representing a project, action group, action, or (if enabled in your view options) a folder. The relationships between projects, the actions they contain, and any additional hierarchy in the form of action groups, or folders, are represented in the Outline by levels of indentation. The further indented an item is, the deeper in the project view it is nested.
Read Organizing the Outline to learn more about creating hierarchy with projects and folders.
Projects Sidebar
The Projects Sidebar shows the full OmniFocus project structure, including folders and projects, along with summaries of their contents (if you have enabled Show Sidebar Badges/Sidebar Due Counts).
The leading edge of the row contains an icon which indicates
whether the item is a
 Folder,
 Parallel Project,
 Sequential Project,
or
Sequential Project,
or
 Single Actions List.
(You can learn more about Project Type in the section below.)
The trailing edge of the row will contain an icon which indicates
Project Status or
Folder Status,
if the item is set to
 On Hold,
 Completed, or
 Dropped.
(
Dropped.
(
 Active
is the default state for projects and folders,
so icons are only displayed for non-Active states).
Active
is the default state for projects and folders,
so icons are only displayed for non-Active states).
Click or tap the disclosure arrow to collapse and expand folder rows and show and hide their contents.
Drag and drop can be used to rearrange projects in the Sidebar. If you drop one project on top of a second project, the first project is converted to an action group inside the second project.
You can click or tap a project or folder in the Sidebar to view the selected item and contents in the Outline, or you can select several projects and/or folders to view them together. Tap again or Command-click to remove the selection, and return to the full list in the Outline.
Control-clicking (on a Mac) or long-pressing (on an iPhone, iPad, or Apple Vision Pro) on an item in the Sidebar will show a selection of Commands in a Shortcut menu, which update depending on your selection.
At the bottom of the Projects Sidebar on a Mac,
there are two buttons:
the Add button
,
and the Shortcut menu button
 .
The first button allows you to
Add Parallel Project,
Add Sequential Project,
Add Single Actions List, or
Add Folder.
The Shortcut menu
contains a selection of Commands,
which update depending on your selection.
.
The first button allows you to
Add Parallel Project,
Add Sequential Project,
Add Single Actions List, or
Add Folder.
The Shortcut menu
contains a selection of Commands,
which update depending on your selection.
At the bottom of the Projects Sidebar on an iPhone, iPad, or Apple Vision Pro,
there are two buttons:
the
Add button
,
which is always available,
and the
Shortcut menu button
,
which is available while in
Sidebar Select Mode or
Sidebar Edit Mode.
The
Add button
allows you to
Add Project or
Add Folder.
The
Shortcut menu button
,
contains a selection of Commands,
which update depending on your selection.
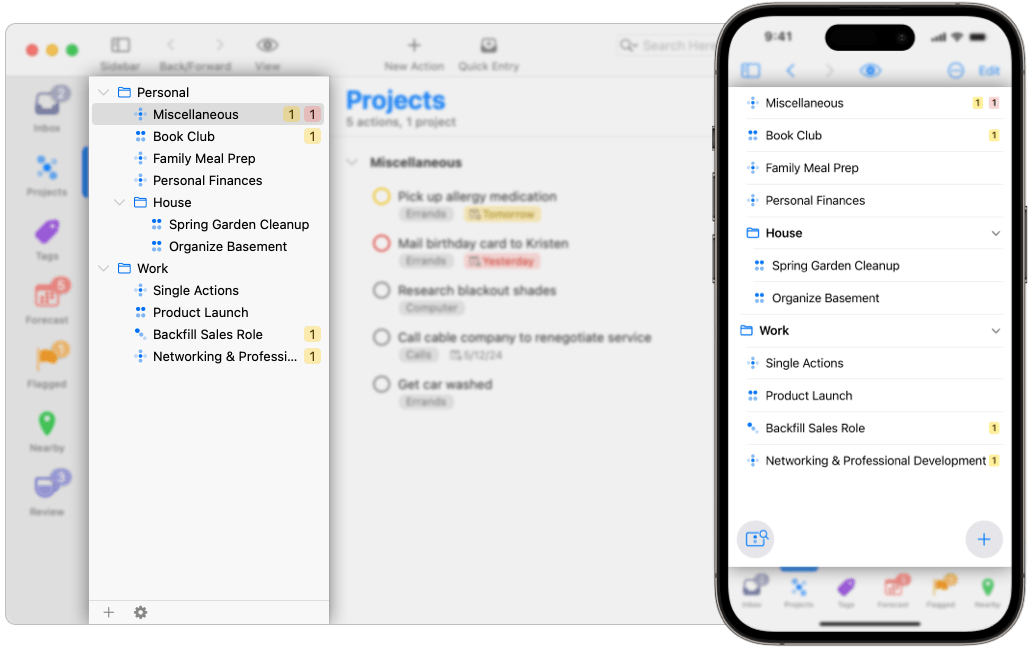
Miscellaneous Project
Before we move on from the Projects Sidebar, let’s consider a special project: the Miscellaneous project, which can appear after cleaning up items from the Inbox.
The Miscellaneous project is a Single Actions List automatically created by OmniFocus when items are cleaned up that don’t yet have an assigned project.
Removing items from the Inbox requires they be assigned to a project. If your Clean up Inbox items which have setting allows cleaning up Inbox items that have an assigned tag, without an assigned project, the Miscellaneous project becomes their new home.
The Miscellaneous project is automatically created when needed, so it can’t be permanently removed. If you’d prefer not to use it, try requiring an assigned project in your Clean up Inbox items which have setting.
The Miscellaneous project can be renamed, and will continue to function in the same way.
Changing the Project Type from single action list to sequential or parallel project will break the default nature of this special project. If that happens, OmniFocus will create another, when next needed.
Project Type
Projects are distinguished by their type, which reflects how actions inside the project must be completed. Project type also affects how actions within the project show up according to the perspective’s View Options.
Projects may be set to Parallel or Sequential, or they may be a Single Actions List. By default, all new projects are created as Parallel, but the Default Project Type can be changed in Settings.
-
Parallel projects contain actions which may be accomplished in
any order. By default, all active actions are
considered available. View Options set to
First Available or
Available will show different results, as
the topmost action in the project is considered first available.
-
Sequential projects contain actions which must be completed
in a specific order, from top to bottom. By default, only the topmost
active action is considered
available, and all actions below that one
are considered blocked. View Options set to
either First Available or
Available should show the same result.
-
Single actions lists contain actions that may (or may
not) be related in some way, but that are not part of an overall goal. Unlike
with parallel or sequential projects, the position of an action in a single
action list does not matter; each action can be thought of as a very small
standalone project. For a single actions list, View Options set to
First Available or
Available will show identical results, as
all actions are considered first available.
Note that Action Groups also have an Action Group Type, which can be set to either Parallel or Sequential.
Project Status
When planning or reviewing a project, it can be useful to assign it a Status to indicate whether work is still progressing, or plans have changed. The statuses for projects are:
-
Active —
The default status for a new or ongoing project. It can be useful
to review active projects regularly to determine what progress you’ve made,
and whether they are still things you want to do.
-
On Hold —
If you’re not sure whether you want to continue a project, you
can change the project’s status to
On Hold.
If you’ve chosen
to show only Available items in
View Options, the project and
its actions are removed from the project list in the Sidebar and Outline.
Projects placed on hold are still available for review if you decide to
prioritize them again in the future. If you’d like to view an on hold project,
change your
View Options to Remaining or
use Search Remaining.
-
Completed —
Eventually you’ll reach the successful end of a project.
Select the project and then choose
Completed
in the Status section of the
inspector (this automatically marks any unfinished actions in the project
complete). If you’d like to view a completed project, change your
View Options to All or use
Search Everything.
-
Dropped —
If you have decided not to work on a project any longer, you can
set it to
Dropped.
It will be hidden from the Projects list, along with its
actions. You can delete the project instead, but then you won’t have any
record of it; keeping it around in a dropped state means you can go back and
check on actions you’ve completed (or not), even if they are part of projects
that are no longer relevant. If you’d like to view a dropped project, change
your
View Options to All or use
Search Everything.
Dropped and completed items can accumulate in your database over time. If you would like to trim your database, please read more about Archiving in OmniFocus.
Folder Status
Folders also have a status to indicate whether contained work is still progressing, or plans have changed. The statuses for folders are:
-
Active —
The default status for a folder.
This status does not affect any contained projects or folders.
-
Dropped —
If you have decided not to work on projects
inside a specific folder any longer,
you can set the folder to
Dropped.
This will result in all contained folders, projects, and actions also being
Dropped. All the contents of the folder will be hidden from the Projects
list. If you’d like to review a dropped folder or contained items, change your
View Options to All or use
Search Everything.
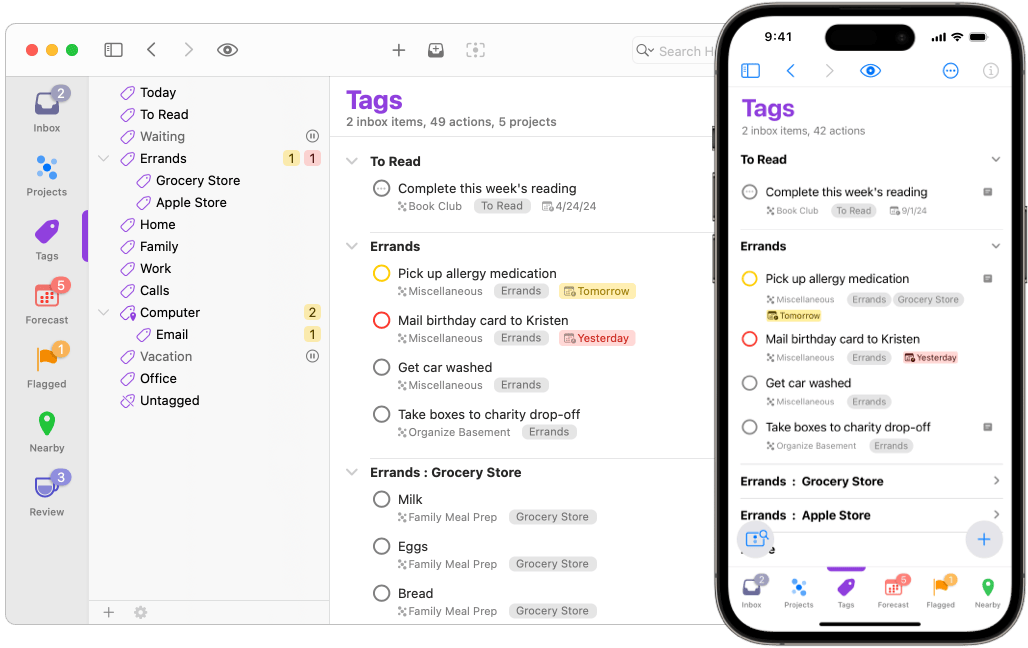
Tags
The Tags perspective displays a list of tags in the Sidebar, and a list of all actions and projects with assigned tags in the Outline, grouped by tag.
In OmniFocus, tags can be used to add context necessary for completion of an action or project. They may represent a person, place, thing, state of mind, energy level, or anything else you find useful. Once multiple items have been assigned the same tag, you can easily view the related (tagged) actions, action groups, and projects in one place.
Your use of tags can be simple, such as showing you all the items related to work; or it can be complex, such as showing you all the items related to work that you need to coordinate with your co-worker, and that must be completed while you have high-energy and are sitting near your computer.
You can assign as many tags to an action, action group, or project as you find useful. Or you may not want to use tags. It’s your choice!
When a tag represents a specific place,
you can assign a tag location.
If you have granted OmniFocus permission to access your device’s location,
items with that tag will appear in the
Nearby perspective
when you’re close to a tag’s location,
and you can receive notifications for those items
based on how close you are to the location.
Tags View Options
The Tags perspective
provides the following
View Options:
- In Tags, show — Choose which items you would like visible in the Outline
(Remaining is the default). Each option describes the items included; see
View Options and
Tag Status to learn more. Visibility
settings have global scope.
- Structure — Choose whether to sort items within tags by their due date and flagged status, or to leave them in their default sort order. Structure settings have global scope.
- Layout — Settings in this section vary with the device that you are using: Keep Sidebar Hidden (Mac or iPad) or Show Tag List first (iPhone). Layout settings have platform scope. OmniFocus Pro allows you to set a custom layout for this perspective.
Tags Outline
By default, the Tags perspective will show projects and action groups, when they
match the selected
View Options filter. To always hide projects
and action groups from Tags, focusing exclusively on actions, enable Hide
projects and action groups in
Organization settings.
The Tags Outline displays each of your tags as a parent row, with the actions or projects assigned that tag immediately below the tag, filtered by your View Options selection.
Tag Groups are presented in the Outline as a flat list, with child tag rows below their parent tag row. Each child tag row is labeled with the parent tag name, a colon, and the child tag name, using an additional colon and name for each level.
If an action or projects has multiple tags assigned, it appears in the Outline under each tag to which it has been assigned.
Tags Sidebar
The Tags Sidebar shows a list of all the tags you’ve added to OmniFocus, along with summaries of their contents (if you have enabled Show Sidebar Badges/Sidebar Due Counts).
The leading edge of the row contains an icon which indicates
whether the presented items are assigned to a
 Tag,
a
Tag,
a
 Tag Location,
or are
Tag Location,
or are
 Untagged.
(You can learn more about Tag Location in the Inspector chapter.)
The trailing edge of the row will contain an icon which indicates
Tag Status,
if the item is set to
On Hold or
Dropped.
(
Active
is the default state for tags,
so icons are only displayed for non-Active states).
Tags can be organized into Tag Groups using drag and drop, Indent/Outdent, or Add Inside and Add Outside.
When dropping one tag on top of a second tag, the first tag becomes a child tag of the second tag. You can click or tap the disclosure arrow for the tag group to hide or show child tags.
You can click or tap a tag in the Sidebar to view the selected tag and assigned actions or projects in the Outline, or you can select several tags and/or tag groups to view them together. Tap again or Command-click to remove the selection, and return to the full list in the Outline.
Control-clicking (on a Mac) or long-pressing (on an iPhone, iPad, or Apple Vision Pro) on an item in the Sidebar will show a selection of Commands in a Shortcut menu, which update depending on your selection.
At the bottom of the Tags Sidebar on a Mac,
there are two buttons:
the Add button
,
and the Shortcut menu button
.
The first button allows you to
Add Tag.
The Shortcut menu
contains a selection of Commands,
which update depending on your selection.
At the bottom of the Tags Sidebar on an iPhone, iPad, or Apple Vision Pro,
there are two buttons:
the
Add button
,
which is always available,
and the
Shortcut menu button
,
which is available while in
Sidebar Select Mode or
Sidebar Edit Mode.
The
Add button
allows you to
Add Tag.
The
Shortcut menu button
contains a selection of Commands,
which update depending on your selection.
Tag Status
Tags have a Status which indicates whether they are currently relevant to your work.
-
Active —
The default status for a tag. When a tag is active, it is
available, and relevant to you in some way.
-
On Hold —
When a tag is not currently available or relevant, but will be
in the future, you can change the tag’s status to
On Hold.
The tag remains visible in the Sidebar
and if you’ve chosen to show only Available items in
View Options,
its assigned actions are hidden in the Outline.
-
Dropped —
If a tag is no longer available or relevant to your work,
you can change the tag’s status to
Dropped.
The tag will disappear from the Sidebar and Outline,
and its actions are also hidden.
You can delete the tag instead,
but then you won’t have any record of it;
keeping it around in a dropped state means
you can go back and check on actions with that assigned tag.
If you’d like to view a dropped tag,
change your
View Options
to Everything or use
Search Everything.
The Completed status doesn’t exist for tags, as tags are a way of adding context to an action or project. A person, place, thing, or state of mind may no longer be relevant to your work, but they cannot be completed.
Tag Sorting
By default, actions that have been assigned a tag will appear in the Tags Outline in same order they appear in their respective projects (Project Order), or in the order they appear in the Inbox if no project is assigned (Inbox Order).
You can use drag and drop to rearrange actions within a tag. The tag saves its new custom order once you make a change, and the previous default rules no longer apply: any items subsequently added to the tag appear at the end of the list, and can be reordered manually from there.
Forecast
The Forecast perspective helps you keep an eye on your progress, check upcoming Due and Defer Until dates, and schedule OmniFocus actions and projects alongside important events in your calendar.
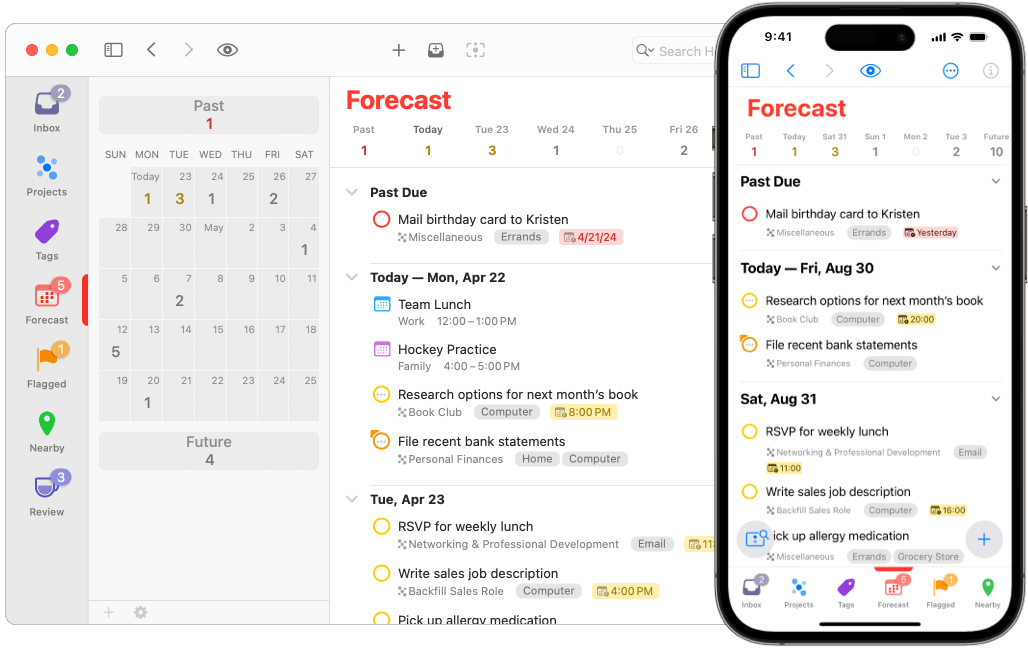
The Forecast tiles across the top of the Outline (we refer to this set of tiles as the “piano keys”) display a range of dates, with a tile for Past (everything prior to Today), a tile for Future (everything after the last day displayed in the piano keys), and a tile for each day in between, with as many days as fit on the device that you are using. This is a quick way to get a sense of what the next several days hold, what should be rescheduled, or where you have capacity to add work.
Each tile also shows the number of items associated with that date. For Due items, the tile is color-coded according to the most urgent item: yellow indicates that an item is due soon, and red indicates an item is due or overdue.
To create a new action that is due on a particular day, tap the appropriate date tile, followed by Smart Add (on iPhone, iPad, or Apple Vision Pro), or use New Action (on any device). New actions created in Past will be Due yesterday, while new actions created in Future will be Due the day after the last date tile.
Forecast View Options
View Options for Forecast
are different from the other Default Perspectives,
as they do not contain an Availability section,
and the Structure section is unique.
The Forecast perspective
provides the following
View Options:
- In Forecast, include —
Enables types of items that will show in Forecast on all days.
Visibility settings have global scope,
except for calendar-related settings.
- Items on defer date — With this setting enabled, actions and projects with a Defer Until date will appear in the Outline for all days, either as part of the Flexible list, or in a separate Organized section for Deferred items.
 Items on notification date —
With this setting enabled,
actions and projects with notifications scheduled
for a date before the Due date or
Defer Until date
will appear in the Outline for all days that have a notification,
either as part of the Flexible list,
or in a separate Organized section
for Scheduled Notifications.
This setting is part of OmniFocus Pro.
Items on notification date —
With this setting enabled,
actions and projects with notifications scheduled
for a date before the Due date or
Defer Until date
will appear in the Outline for all days that have a notification,
either as part of the Flexible list,
or in a separate Organized section
for Scheduled Notifications.
This setting is part of OmniFocus Pro.- Calendar events — With this setting enabled, calendar events will appear in the Outline for all days, either as part of the Flexible list, or in a separate Organized section for Calendar Events. See Calendars to learn more. Calendar settings have local scope.
- Choose Calendars — When Calendar events is enabled, this option will appear, allowing you to select which calendar events show in the Outline. See Calendars to learn more. Calendar settings have local scope.
- Today includes —
Enables types of items that will show in Forecast,
only for Today.
- Flagged items — With this setting enabled, actions and projects that are Flagged will appear in the Outline for Today, either as part of the Flexible list, or in a separate Organized section for Flagged items.
-
Items tagged —
After selecting a Forecast tag in this field,
actions and projects to which you
Apply Forecast tag
will appear in the Outline for Today,
either as part of the Flexible list,
or in a separate Organized section
for Tagged items.
This setting is part of OmniFocus Pro.
- Structure —
Choose how Forecast presents events, projects, actions, and notifications.
See Forecast Outline to learn more.
Structure settings have global scope.
- Flexible — New in OmniFocus 4, Forecast will present a single unified list which combines all the types of items you have selected from In Forecast, include and Today includes, alongside your Due items. There are also settings for See Flexible Outline to learn more. whether you would like to Preserve hierarchy and Keep sorted.
- Organized — Forecast will present sections for each type of item you selected from In Forecast, include and Today includes, as well as one for your Due items. This was the default in earlier versions of OmniFocus. See Organized Outline to learn more.
- Layout — Settings in this section vary with the device that you are using: Keep Sidebar Hidden (Mac or iPad) or Show Calendar first (iPhone). Layout settings have platform scope. OmniFocus Pro allows you to set a custom layout for this perspective.
Forecast Outline
The Forecast Outline can use a Flexible structure (new in OmniFocus 4) or an Organized structure. The same information is presented, regardless of which option you choose, though the difference in appearance may significantly change how you view and interact with your actions and projects.
In each case, the Outline will be filled with actions and projects that have assigned Due Dates, as well as the types of items you’ve enabled in Forecast View Options.
On Hold Projects
Actions that are part of projects that are On Hold, as well as the projects themselves, are hidden in Forecast. This is to ensure that you don’t spend time thinking about projects that you have previously decided to pause.
![]() If you would like these actions and projects to show in Forecast,
OmniFocus Pro
allows you to change this behavior by enabling
Include items from On Hold projects.
If you would like these actions and projects to show in Forecast,
OmniFocus Pro
allows you to change this behavior by enabling
Include items from On Hold projects.
Forecast Outline: Flexible
The new default structure in OmniFocus 4 is Flexible, which will present a single unified list combining all the types of items you have selected in View Options, alongside your Due items. There are also settings for Preserve hierarchy and Keep sorted.
Preserve Hierarchy
In previous versions of OmniFocus, Forecast displayed a flat list of actions, action groups, and projects, in the order that they needed to be completed (top to bottom, children before parents). This presented two challenges: it could be difficult to figure out which project an action belonged to, especially if you re-use project structures (such as for different clients); the order of tasks was logical, but having parent items (action groups and projects) listed after child items (actions) didn’t work for everybody.
OmniFocus 4 addresses both of those challenges by making the presentation of your OmniFocus data more consistent across all perspectives.
Preserve Hierarchy is enabled by default. This setting doesn’t add or remove items from Forecast, but it does change how those items are presented. Actions will display as part of the containing action groups or projects, and those action groups or projects can be collapsed for an overview, or expanded for a detailed view.
As an example, if you have a project due today (“Icon for new version of application”) which has two actions:
- Check with client for design feedback
- Finalize icon design for client
OmniFocus 3 (and earlier versions) would display three separate due items, with the project listed after the actions, as OmniFocus expects you to complete each action before completing the project:
- Check with client for design feedback
- Finalize icon design for client
- Icon for new version of application
OmniFocus 4 displays those same due items with the hierarchy preserved:
- Icon for new version of application
- Check with client for design feedback
- Finalize icon design for client
Which allows you to collapse or expand the project, depending on the level of detail that you would like to see.
Keep Sorted
When first installed, OmniFocus 4 will sort actions and projects in the Forecast Outline by Due date. If you have Calendar events enabled, OmniFocus will do its best to sort the actions, projects, and events into chronological order. By default, Keep sorted is disabled, which allows you to re-order items in the Outline using drag and drop or the Move Down, Right, Up, Left keyboard shortcuts. Once you have begun reordering items manually, new (or previously unseen) items will appear at the bottom of the Outline, and you may move them into your desired location.
With Keep sorted disabled, and Preserve hierarchy enabled, it is possible to use drag and drop to move actions between action groups or projects, if they are in the same Outline view. This can be very powerful, but can also have surprising results, if you aren’t careful where you drop an item.
If you enable Keep sorted,
OmniFocus will return to sorting items for you,
but will also save the manual reordering that you’ve already done;
try toggling the setting in View Options, to see what happens.
Keeping Forecast Sorted
When Keep sorted is enabled, OmniFocus will first sort items in order of the earliest:
Your Forecast view will then be sorted by:
- Items with a Forecast tag, which are also Flagged, sorted in Forecast tag sort order.
- Items with a Forecast tag, sorted in Forecast tag sort order.
- Items that are Flagged, sorted by Due date, and then in either Inbox order or Projects order.
And finally:
- Due date, if Defer Until date and Notification date are the same.
- Inbox order, and then Projects order.
- Added date.
Remember that sorting is based on which Forecast View Options you have enabled, and whether you are using OmniFocus or OmniFocus Pro
Forecast Outline: Organized
Previous versions of OmniFocus used a structure that we now refer to as Organized.
The Outline will contain one or more sections, with each section presenting a specific type of item you selected in View Options, as well as one for your Due items (which always display). The possible sections include Calendar Events, Due, Deferred, Flagged, and (when using OmniFocus Pro) Tagged and Scheduled Notifications.
Items may display in one or more sections, if they match the type for each section. As an example, you may see the same action in Due, Tagged, and Flagged… if it’s due today, has a Forecast tag applied, and has also been flagged.
When using the Organized structure, the Outline displays a flat list of actions, action groups, and projects, in the order that they need to be completed (top to bottom, children before parents). Hierarchy is not presented, nor is manual ordering possible. If you would to see what project an action is part of while using an Organized structure, try enabling Show full project path in the settings for Fluid Layout or Columns Layout (Mac only).
Forecast Outline: Calendars
Forecast can display Calendar events in the same list as your actions and projects when using a Flexible structure, or in a separate section when using an Organized structure.
Calendar events in the Outline are for display purposes,
and can’t be edited in OmniFocus.
Tap or click the
Calendar button
 next to an event to open it in the Calendar app
(or the app chosen in the
Open Calendar Events In setting).
next to an event to open it in the Calendar app
(or the app chosen in the
Open Calendar Events In setting).
To view calendar events in OmniFocus, you need to enable Calendar events in the Forecast View Options, and then tap or click on Choose Calendars to select which calendars to display. OmniFocus will present any calendars that are configured in Apple’s Calendar application on your local device, whether Mac, iPhone, or iPad.
These calendars may be from Apple’s iCloud, Google Calendar, other CalDAV servers to which you have subscribed, or even local calendars. To add to, remove, or modify the calendars available on your device, see Apple’s User Guide articles:
- Add or delete calendar accounts on Mac
- Set up mail, contacts, and calendar accounts on iPhone
- Set up mail, contacts, and calendar accounts on iPad
The first time you launch OmniFocus, you will be asked to grant OmniFocus permission to access your Calendar and Contacts, in order to view calendar events in Forecast, and to assign contact locations to tags. Choose Allow to grant access, or Don’t Allow to deny access. If you choose Don’t Allow, and later change your mind, you can update the setting in the Privacy & Security pane in System Settings on Mac, iPhone, or iPad.
Once you have selected calendars to display in OmniFocus, calendar events will display above and below the actions and projects that have assigned due dates, based on the scheduled time for each, as long as you are using a Flexible structure. If you have Keep sorted enabled, this should work as you expect.
With Keep sorted disabled, OmniFocus will do its best to save the order of everything in the Outline, including calendar events, and sync that information between devices. If you are seeing events sort out of order, please read the following note.
There are two situations in which manual ordering of events may not work as expected.
The first is when the calendar event identifier is changed by the calendar server (this can happen when changing an event from one calendar to another), so OmniFocus doesn’t know that it has previously seen an event, and sorts it to the bottom of the Outline.
The second is when you have sorted your Forecast on one device (such as your iPhone), but a second device (your Mac) has a calendar event the first device can’t access; in this case, the event on the second device will be sorted to the bottom of the Outline.
Forecast Sidebar
The Forecast Sidebar displays a calendar, with a tile for Past (everything prior to Today), a tile for Future (everything after the last date displayed on the calendar), and a tile for each date in the next month. This gives you a higher level overview than the piano keys in the Outline, so you can easily see how many items you have scheduled during the next month, as well as your anticipated workload.
Each tile also shows the number of items associated with that date. For Due items, the tile is color-coded according to the most urgent item: yellow indicates that an item is due soon, and red indicates an item is due or overdue.
To create a new action that is due on a particular day, tap the appropriate date tile, followed by Smart Add (on iPhone, iPad, or Apple Vision Pro), or use New Action (on any device). New actions created in Past will have a due date of yesterday, while new actions created in Future will have a due date of the day after the last date tile.
On Mac, you can:
- Click on a single date to view only that date in the Outline.
- Click and drag on a range of dates to view them all in the Outline; you can also do this using Shift-click (click on one date, and then click on a second date while holding down the Shift key).
- Command-click to select discontiguous dates, such as each weekend day in the coming month, to help plan your weekends.
- Drag and drop an item from the Outline onto a date in the Sidebar to assign it a due date that matches that date.
- If you hold down the Command key while dragging an item, OmniFocus sets the defer until date when you drop it, instead of setting the due date.
- If you hold down Option-Command while dragging, OmniFocus sets both the defer until date and the due date for the item.
On an iPhone, iPad, or Apple Vision Pro, you can:
- Tap on a single date to view only that date in the Outline.
- Tap the
Select button
in the top toolbar,
and tap on a selection of dates to view them all in the Outline,
tap the Select All button
te select all visible dates,
or tap the Clear button
to deselect all visible dates.
On iPhone, tap the
More Menu button
to show the Select button.
- Drag and drop an item from the Outline onto a date in the Sidebar to assign it a due date that matches that date.
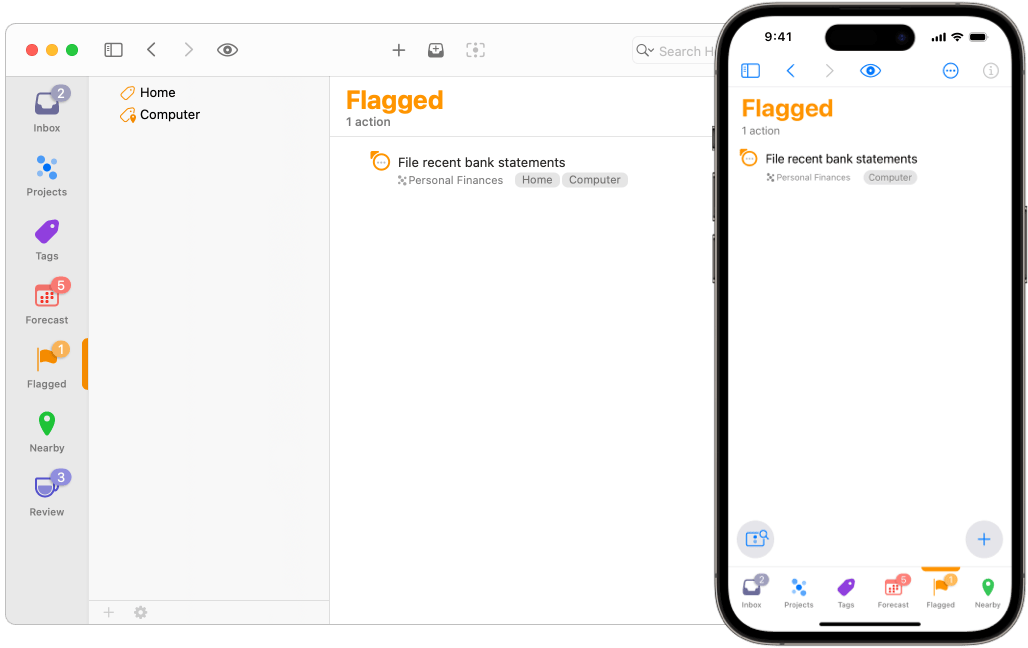
Flagged
The Flagged perspective gathers together all projects, action groups, and actions which have been Flagged, as well as any children of the flagged items.
To flag an item,
tap or click the
Flag button
 on the Outline row,
tap or click the
Flag button
in the Inspector,
swipe from left to right (on iPhone, iPad, or Apple Vision Pro),
or use the Set Flag command
(Shift-Command-L, or F when using Bare Key Editing).
You can remove the flag using the same method.
on the Outline row,
tap or click the
Flag button
in the Inspector,
swipe from left to right (on iPhone, iPad, or Apple Vision Pro),
or use the Set Flag command
(Shift-Command-L, or F when using Bare Key Editing).
You can remove the flag using the same method.
The
 Status Circle
for an action or action group
with a flag
changes to orange,
with a small orange flag added to the upper leading edge of the circle,
to help you see that it is important.
Status Circle
for an action or action group
with a flag
changes to orange,
with a small orange flag added to the upper leading edge of the circle,
to help you see that it is important.
When you flag a project or action group, all the actions within it inherit that flag, along with the sense of importance.
The
 Status Circle
for an action or action group
with an inherited flag
is still orange,
but displays a hollow flag,
rather than a solid flag.
Status Circle
for an action or action group
with an inherited flag
is still orange,
but displays a hollow flag,
rather than a solid flag.
Flags that are inherited can’t be directly removed; the parent item must be unflagged, or the action moved to a different parent. Note that it is possible to flag an item which already has an inherited flag; if this happens, the hollow flags will be filled in to communicate the change.
Have an action or action group that is both important, and has a date that is rapidly approaching, or has passed?
In this situation, the Status Circle will replace the orange circle with either a yellow Due Soon circle, or red Overdue circle, leaving the orange flag to communicate importance.
Flagged View Options
The Flagged perspective
provides the following
View Options:
- In Flagged, show — Choose which items you would like visible in the
Outline (Available is the default). Each option describes the items
included; see
View Options and
Flag to learn more. Visibility settings have
global scope.
- Structure — Choose whether to leave Flagged items as a flat list or group them by another field. Structure settings have global scope.
- Layout — Settings in this section vary with the device that you are using: Keep Sidebar Hidden (Mac or iPad) or Show Tag List first (iPhone). Layout settings have platform scope. OmniFocus Pro allows you to set a custom layout for this perspective.
Flagged Outline
The Flagged Outline will show actions, action groups, and projects, as
long as they match the selected
View Options filter. To always hide projects
and action groups from Flagged, focusing exclusively on actions, enable
Hide projects and action groups in
Organization settings.
By default, items in the Flagged Outline are presented as a flat list, sorted first by due date (from oldest to newest), then by project (for items with the same due date). Sorting isn’t affected by whether a flag is inherited or directly applied.
You can choose to group your items by:
- Ungrouped — Items are not grouped, and are presented as a flat list.
- Tag — Items are grouped by individual tag. If an action has more than one tag, it appears within each of its tags.
- Tags (Combined) — Items are grouped by the combination of all assigned tags. Regardless of the number of tags on an action, it appears only once, in a group named with its tag combination. Only items which have identical tags will be grouped together.
- Project — Items are grouped by project.
- Due — Items are grouped by due date, from oldest to newest. The granularity of the grouping increases as it nears the present day. Items with no due date assigned are grouped at the bottom.
- Defer Date — Items are grouped by defer date, from oldest to newest. The granularity of the grouping increases as it nears the present day. Items with no defer date assigned are grouped at the top.
- Completed — Items are grouped by completion date, from most recently completed to oldest. The granularity of the grouping increases as it nears the present day. Items with no completion date are grouped at the bottom.
- Dropped — Items are grouped by dropped date, from most recently dropped to oldest. The granularity of the grouping increases as it nears the present day. Items with no dropped date are grouped at the bottom.
- Added — Items are grouped by the date they were added to OmniFocus, from newest to oldest. The granularity of the grouping increases as it nears the present day.
- Changed — Items are grouped by the date they were most recently edited, from newest to oldest. The granularity of the grouping increases as it nears the present day.
Flagged Sidebar
The Flagged Sidebar shows a list of your tags, presented in the same order as in the Tags Sidebar, and which can be reorganized using the same methods.
The list is filtered to show only tags which are assigned to items that have been flagged.
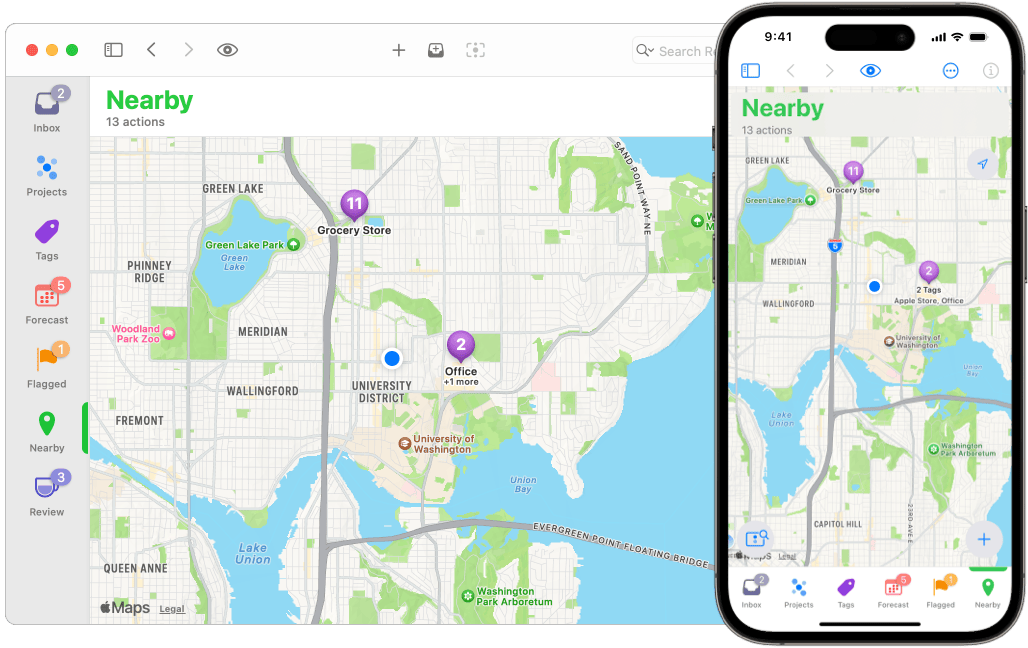
Nearby
The Nearby perspective shows you items with assigned tags which have a tag location. Depending on how you’ve configured each tag, you can see nearby actions that are available for work, whether they are in nearby neighborhoods, at nearby businesses (a specific location, or one of multiple locations), or at a nearby address for someone in your Contacts app.
If you didn’t grant OmniFocus access to your location when you first launched the app, you’ll be asked again the first time you use Nearby, as location access is required for Nearby to function.
An active internet connection is also required for Nearby to work. If you are on a mobile device, turning on Wi-Fi in the Settings app (in addition to cellular service) improves the quality and accuracy of location services, even if your device isn’t connected to any Wi-Fi access points.
Nearby View Options
The Nearby perspective
provides the following
View Options:
- In Nearby, show — Choose which items you would like visible in the Outline
(Available is the default). Each option describes the items included; see
View Options to learn more. Visibility
settings have global scope.
- Structure — The default view is set to Map, and can be changed to List. Structure settings have global scope.
- Layout — Settings in this section vary with the device that you are using: Keep Sidebar Hidden (Mac or iPad) or Show Tag List first (iPhone). Layout settings have platform scope. OmniFocus Pro allows you to set a custom layout for this perspective.
Nearby Outline: Map
When set to Map, the Nearby Outline displays a map view of all items that:
- Are Available (this can be changed in Nearby View Options)
- Have a location-aware tag assigned
- Are within 50 kilometers (about 31 miles) of your current location
The initial map view should show all of these items; if they can display in a smaller area than the default, then the map view will show the smaller area. As you change Nearby View Options, the map view will update to reflect your selection.
Once OmniFocus has presented the map, you can zoom out (to show actions on the other side of the city, or even the other side of the country) or zoom in (to see actions in a specific neighborhood, or near another planned errand). There is no limit to how far out you can zoom, or how far away your items can be; they will all be displayed on the map, as long as they have a tag location.
The map shows a
Pin button
 for each tag location.
The button
includes a count of items with that tag assigned.
Tapping or clicking on the button
will show a popup which includes
the name and assigned location of the tag.
for each tag location.
The button
includes a count of items with that tag assigned.
Tapping or clicking on the button
will show a popup which includes
the name and assigned location of the tag.
There are two additional buttons in the popup:
- A List button
 ,
which opens
Tags
to display a list of all items with that tag assigned.
,
which opens
Tags
to display a list of all items with that tag assigned. - An Arrow button
 ,
which opens the Maps app
to provide directions to the tag location.
,
which opens the Maps app
to provide directions to the tag location.
If multiple tags are too close together on the map to show as individual pins, then they are presented as a pin group; this group is labeled with one tag name, as well as a note that indicates how many additional tags are included.
Zooming in will allow pin groups to separate into individual pins,
while zooming out will group individual pins together.
Tapping or clicking on a pin group
will open
Tags,
and show a list of items which have any of the pin group tags assigned.
Nearby Outline: List
When set to List, the Nearby Outline displays a list view of all items that:
- Are Available (this can be changed in Nearby View Options)
- Have a location-aware tag assigned
- Are within 50 kilometers (about 31 miles) of your current location
Items are grouped by tag, with tags listed from closest to furthest away; within a group, items are sorted in Projects order. On an iPhone, iPad, or Apple Vision Pro, tapping on the distance indicator on the right side of a tag row will open the Maps application, to provide directions to the tag location.
If an item is blocked or unavailable it won’t appear, unless you change view options.
Tags will not appear in the Nearby Outline unless they have a tag location and are assigned to an action or project.
Nearby Sidebar
The Nearby Sidebar shows a list of your tags, presented in the same order as in the Tags Sidebar, and which can be reorganized using the same methods.
The list is filtered to show tags that either have a tag location directly assigned, or that are part of a tag group with a tag location assigned.
When you select a tag with an assigned tag location, the Map view will adjust to show the selected tag. If no tag is selected, the Map will return to showing you the default Map view.
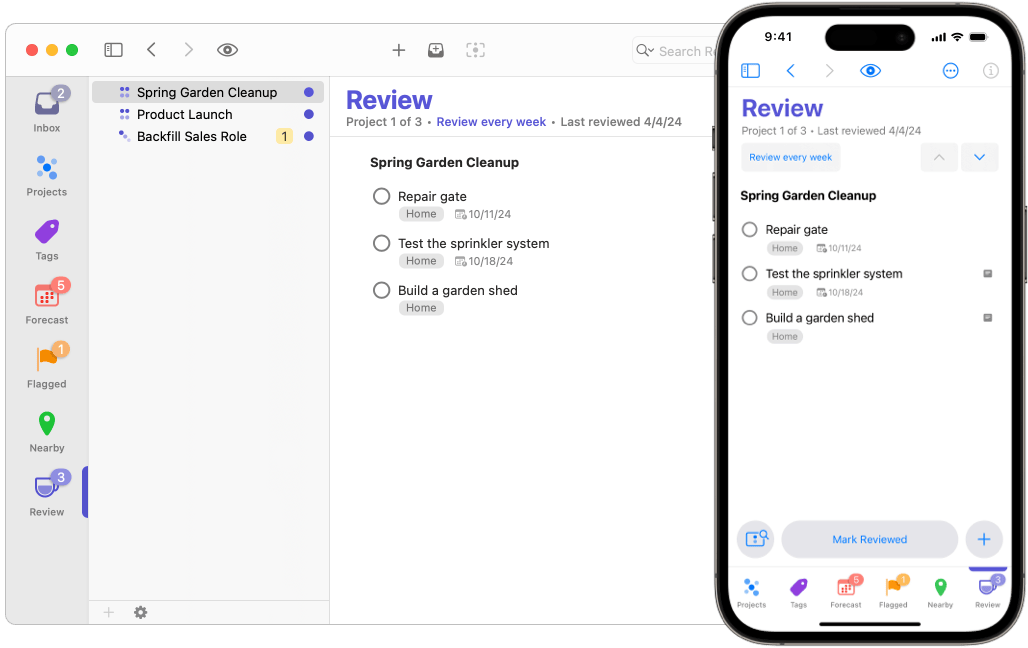
Review
The Review perspective displays a list of projects that are due for review in the Review Sidebar, while allowing you to concentrate on a single project in the Review Outline.
Reviewing your projects helps ensure they are fully captured and planned in OmniFocus, so your actions are ready for work. If you have projects that need actions added, projects that aren’t relevant anymore, or projects you don’t plan to do any time soon, following a regular review process can help keep them from falling through the cracks.
Each project has a Next review date, as well as a setting for Review every, based on how often you intend to review it; both can be viewed and updated using the Review inspector. The default Review every interval for new projects can be changed by adjusting the setting for By default, review projects every in the Dates & Times settings for Mac or iPhone, iPad, and Apple Vision Pro.
Review View Options
The Review perspective
provides the following
View Options:
- In Review, show — Choose which items you would like visible in the Outline
(Remaining is the default). Each option describes the items included; see
View Options to learn more. Visibility
settings have global scope.
- Structure —
Choose to show or Hide blocked projects
(projects that are on hold or deferred);
list projects in Projects order
or Sort by next review;
and to hide or Show folders in outline,
which can provide context for how a project you are reviewing
fits into your overall Projects structure.
Structure settings have global scope.
- Layout — Settings in this section vary with the device that you are using: Keep Sidebar Hidden (Mac or iPad) or Show Project List first (iPhone). Layout settings have platform scope. OmniFocus Pro allows you to set a custom layout for this perspective.
Review Outline
When you open the Review perspective, the Sidebar displays a list of projects that are ready for review.
(Folders are never shown in the Sidebar, but can be shown in the Outline using View Options).
The Review Outline shows one project at a time, allowing you to easily focus on the project you are reviewing. The top project should already be open in the Outline for your review; if not, or if you’d like to start with a different project, select one in the Sidebar to get started.
There are buttons at the top or bottom of the Outline, depending on whether you are using a Mac, iPhone, or iPad:
- Previous — The up arrow will show you the previous project in the list.
- Next — The down arrow will show you the next project in the list.
- Mark Reviewed — Sets Last reviewed date to today, sets the Next review date for the project based on the Review every interval, and then presents the next project in the list.
Reviewing a Project
- Open the Review perspective, and select the project to review.
- The top of the window will display the number of projects ready for review, the last time this project was reviewed, and how often it is scheduled for review. Tap or click on the Review every label to quickly change the Next review date (perhaps today isn’t the best day to review this project?) or Review every interval (if the project should be reviewed more or less frequently).
- Consider whether this project has the proper Project Status. Has it been Completed, or is it still Active? If you’re not currently working on it, should it be put On Hold, or does it need to be Dropped?
- Do you need to update any actions, add new actions, or remove no-longer-relevant actions? Do they need to be organized differently?
- Once your review is complete, click or tap on
Mark Reviewed
in the Outline,
or the
Mark Reviewed button
 in the
Mac toolbar.
in the
Mac toolbar.
If you would like to review a project before its Next review date,
you can either select it and use the Review inspector
to set the Next review date to today,
or drag and drop the project onto the Review perspective tab in the Sidebar,
which also sets Next review date to today.
Either way, the project will appear in
Review,
ready for your consideration.
Review Sidebar
When you open the Review perspective, the Sidebar displays a list of projects that are ready for review.
(Folders are never shown in the Sidebar, but can be shown in the Outline using View Options).
The Review Sidebar presents those projects in a flat list, intentionally ignoring any structure that you have created in the Projects perspective.
By default, those projects are presented in order of their Next review date, from oldest at the top, to newest at the bottom. If you would like them sorted in Projects order, to match the Projects perspective, uncheck Sort by next review in the Nearby View Options.
Completed
The Completed perspective helps you quickly find items that have been completed, whether you are looking for an item that you accidentally tapped, want to look back on your week with satisfaction, or are preparing a report for stakeholders.
Completed can be opened from Quick Open on all devices, or from the Perspectives menu or Perspectives List on Mac.
This perspective is intended to be a temporary view of your OmniFocus data, so switching away from it removes the tab from your Perspectives Bar. If you would like to keep it in your Perspectives Bar for quick reference, you can favorite it using the Perspectives List on Mac, or Quick Open on iPhone, iPad, or Apple Vision Pro.
Completed View Options
The Completed perspective is designed to show only completed items, so provides limited View Options:
- Layout — Settings in this section vary with the device that you are using: Keep Sidebar Hidden (Mac or iPad) or Show Tags List first (iPhone). Layout settings have platform scope. OmniFocus Pro allows you to set a custom layout for this perspective.
Completed Outline
The Completed Outline displays all completed actions, action groups, and projects, grouped and sorted by completion date, from most recently completed to oldest. The granularity of the grouping increases as it nears the present day.
Completed Sidebar
The Completed Sidebar shows a list of your tags, presented in the same order as in the Tags Sidebar, and which can be reorganized using the same methods.
The list is filtered to show only tags which are assigned to items that have been completed.
Changed
The Changed perspective helps you quickly find items that have been changed, and is an excellent way to find items that you have misplaced, or get a sense of where the most movement is happening in your OmniFocus data.
Changed can be opened from Quick Open on all devices, or from the Perspectives menu or Perspectives List on Mac.
This perspective is intended to be a temporary view of your OmniFocus data, so switching away from it removes the tab from your Perspectives Bar. If you would like to keep it in your Perspectives Bar for quick reference, you can favorite it using the Perspectives List on Mac, or Quick Open on iPhone, iPad, or Apple Vision Pro.
Changed View Options
The Changed perspective is designed to show only changed items, so provides limited View Options:
- Layout — Settings in this section vary with the device that you are using: Keep Sidebar Hidden (Mac or iPad) or Show Tags List first (iPhone). Layout settings have platform scope. OmniFocus Pro allows you to set a custom layout for this perspective.
Changed Outline
The Changed Outline displays all changed actions, action groups, and projects, grouped and sorted by changed date, from most recently changed to oldest. The granularity of the grouping increases as it nears the present day.
Changed Sidebar
The Changed Sidebar shows a list of your tags, presented in the same order as in the Tags Sidebar, and which can be reorganized using the same methods.
The list is filtered to show only tags which are assigned to items that have been changed.