Welcome to OmniFocus
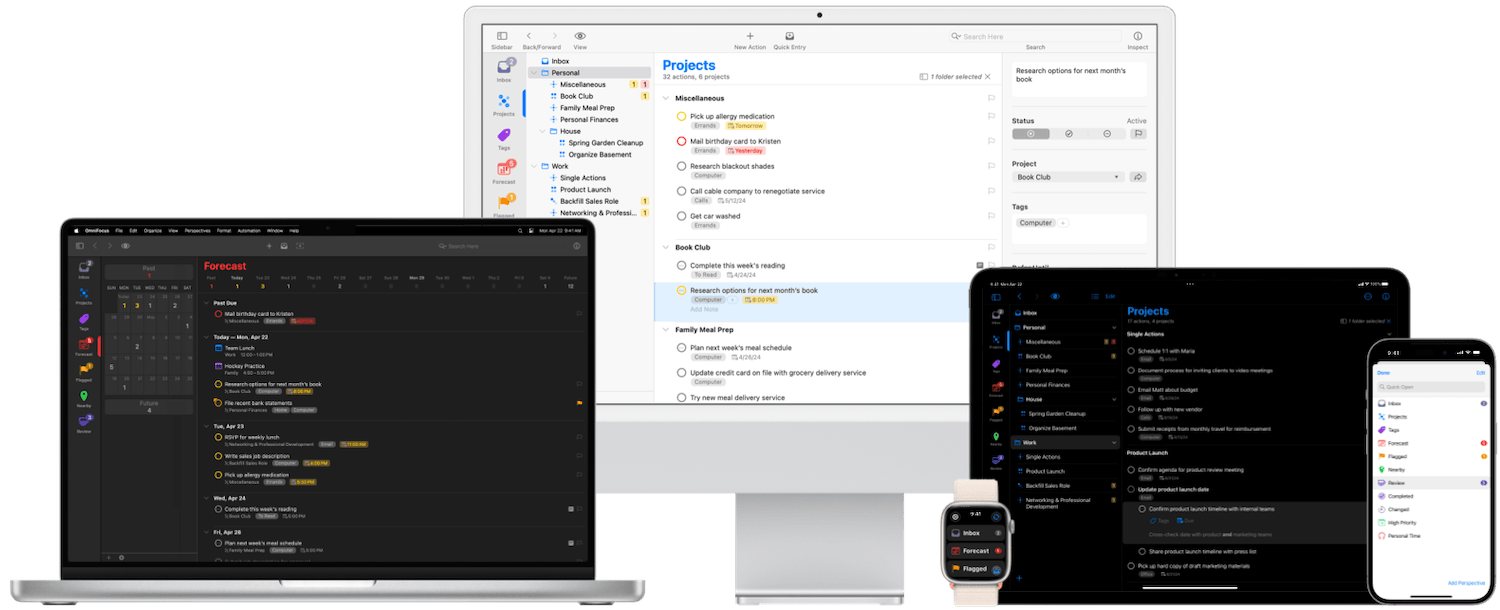
OmniFocus 4 introduces an array of new features and a modernized, unified interface across Mac, iPhone, iPad, Apple Watch, and Apple Vision Pro. Centered around your task outline, OmniFocus 4 brings a consistent experience, optimized for each platform, to all of your Apple devices.
For a quick introduction, we hope you enjoy watching What’s New in OmniFocus 4!
A Message From Ken
If you’re reading this manual, chances are you already know a little bit about OmniFocus. Here’s how we summarize OmniFocus in our latest press release:
OmniFocus is a powerful and highly-customizable personal task manager for busy professionals. OmniFocus helps busy people to tame the chaos, and focus on the right tasks at the right time.
When you strip down OmniFocus to its essence, you’ll find a few simple concepts:
- That big projects can be broken down into smaller tasks to make them easier to tackle.
- That those tasks can be categorized to help you tackle them more efficiently.
- That our computing devices can take some of the load off our overwhelmed minds by tracking when tasks will become available and when they’re due.
- And that this sort of trusted system works best when it can quickly and easily capture whatever is on your mind, while also giving you tools to review your system to regain control and focus.
If you’re familiar with the work of David Allen with his methodology for Getting Things Done®, some of these concepts may sound familiar. That’s no accident! Though knowledge of David Allen’s work is certainly not required to use OmniFocus, GTD® has been an important inspiration for the work we’ve done to develop what David Allen calls a “trusted system.” (And it was personally inspiring to see that many of the speakers at the 2019 GTD Summit in Amsterdam were using OmniFocus!)
OmniFocus 4 strikes a remarkable balance between power and approachability. When we decided to rebuild the app interface with Apple’s new SwiftUI technologies, we took a fresh look at everything and iterated often—based on paying close attention to feedback from thousands of testers. The result is a design which is approachable and easy to use at a light level, while still providing the depth, power, and stunning customizability our customers expect when they need to go deep.
So, welcome! If you’re here because you do need to go deep, we hope this documentation provides you with the information you’re looking for. If not, please don’t hesitate to reach out! We have a team of support humans who are happy to help you out, and by hearing from you we’ll learn where our documentation might have gaps to fill in with future updates.
We’ve been working on OmniFocus for nearly 18 years, and throughout these years I’ve been using it to tame the chaos in my own life — enough years that OmniFocus has reminded me to renew my passport twice, helped me manage several office moves, tracked a multitude of product releases, replace even more lightbulbs and batteries — and help raise two daughters who have now grown into wonderful adults. I hope you’ll find that OmniFocus helps you through the coming years in some of the ways it has helped me.
— Ken Case, CEO
Next Steps
Eager to jump right into using OmniFocus, but aren’t quite sure where to start? Read Getting Started for a quick orientation, and then jump into learning about perspectives.
New to OmniFocus, perhaps using a trial license, and want to learn more about OmniFocus vs. OmniFocus Pro? Keep reading, as that’s right below.
Already familiar with OmniFocus, but want to learn more about all the new features and updates in OmniFocus 4? You can skip directly to the New and Updated in OmniFocus 4 sections.
OmniFocus vs. OmniFocus Pro
Which set of features is right for you? Took a look, and please email us if you have any questions!
OmniFocus
What features are included in OmniFocus?
- Universal App Licensing — Get full access to OmniFocus 4 on your Mac, iPhone, iPad, Apple Watch, and Apple Vision Pro with a single license purchase. Prefer to subscribe to OmniFocus on a monthly or yearly basis? An OmniFocus subscription unlocks OmniFocus Pro on all supported Apple devices, and includes access to OmniFocus for the Web from any web browser.
- Free, Encrypted Syncing — Keep your data the same on all your devices by using Omni’s free sync service — or use your own sync server. Because your data is protected with end-to-end encryption, it’s safe in the cloud. (OmniFocus for the Web requires syncing via Omni’s Sync Server.)
- Quick Entry — Add new actions the instant you think of them, from anywhere.
- Quick Open — Use Quick Open to quickly navigate to a perspective, folder, project, tag, or (when using OmniFocus Pro) Omni Automation plug-in.
- Inbox — Quickly add items to your Inbox — save them when you think of them, then set a due date, assign a project, and add tags whenever you want to.
- Projects — Organize actions into projects, the way you would normally think of them. Then organize related projects into folders, if you like.
- Tags — Create tags for things like location, person, energy level, priority, and so on. Any action can have a project and multiple tags.
- Flags — Flag items of importance, then view those items in the Flagged perspective, or alongside time-sensitive items in Forecast.
- Dates — Assign due dates for items with hard deadlines, set items which are not available yet as deferred until a future date, and schedule additional reminder notifications for items as needed.
- Repeat Schedules — Set up items to repeat on real-world schedules. Every Monday and Thursday. The last weekend day of the month. The first weekday of the month.
- Notes — Add notes — even long notes — to your items, so you have the information you need when completing an action. Format complex notes with rich text styling, and attach relevant files.
- Forecast — Know what’s coming up in your day with the Forecast, which shows your actions and calendar events in a reorder-able list. (Calendar event integration is not available in OmniFocus for Web.)
- Nearby — View items assigned to location-based tags on a map or in a list so that you know what you can get done where you are right now.
- Review — Let the Review feature periodically remind you to go through your projects and actions and make sure everything is on track. Mark projects as reviewed as you go along.
- Customizable Views — Customize OmniFocus to display the information most relevant to you (some customization options require OmniFocus Pro, not all customization options are available in OmniFocus for the Web).
- Batch Editing — Select multiple actions and edit them all at once in the Inspector. Set tags, due dates, defer dates, and more.
- Notifications — Let OmniFocus notify you when an action is coming due, when it becomes available after a defer date, at a scheduled time, or when it’s tagged with your current location.
- Widgets — Configure your device with an array of OmniFocus 4 widgets. Complete items directly from updated interactive widgets on iOS 17, iPadOS 17 and macOS Sonoma. On watchOS 10, view OmniFocus widgets in the brand new Smart Stack.
- Apple Watch — Sync your full OmniFocus debase to the independent OmniFocus for Apple Watch application. Changes made in OmniFocus 4 for Apple Watch sync directly to the server.
OmniFocus Pro
What features are included in OmniFocus Pro?
- Focus Mode — Select what to concentrate on, and make OmniFocus temporarily hide all other items. Concentrate on work when you’re on the job — or forget about work when you’re at home.
- Custom Perspectives — Create new ways to see your data by filtering and grouping projects and tags. Use the intuitive and powerful perspective editor to set up different rules for your personal perspectives. A perspective might show everything tagged with “Grocery Store” and “Birthday” — so you pick up everything needed for the party. Another perspective might show everything in a Work project tagged with “High Energy” in a reorder-able list — for things to do right after that cup of coffee.
- Additional Forecast Features — Optionally display items assigned to a designated Forecast tag, items with scheduled notifications, and items in On Hold projects, alongside your calendar events and due and flagged items in Forecast.
- Automation — Automate OmniFocus with cross-platform Omni Automation Plug-Ins or Mac-only AppleScripts. Enhance your workflows, integrate with other apps and data sources, and create projects from a template. For more information about updates to Omni Automation, be sure to read OmniFocus 4: What’s New in Omni Automation?
- App Icon — Select from a collection of alternate app icons, including the new OmniFocus 4 app icon and the original OmniFocus 1 app icons.
- View Options — Per perspective layout customizations, which sync between devices of the same type.
New in OmniFocus 4
Universal Purchase
Mac, iPhone, iPad, and Apple Watch:
- OmniFocus 4 is a universal cross-platform purchase: get full access to OmniFocus 4 on your Mac, iPhone, iPad, Apple Watch, and Apple Vision Pro with a single license purchase or subscription.
Outline
Mac, iPhone, iPad, and Apple Vision Pro:
- Fluid outline layout has been redesigned to provide quick access to the item details most relevant to you, and is now fully customizable. By default, items display assigned project, tags, due date, and flag status, and selecting a row provides immediate editing access to these fields as well as the item’s note. With OmniFocus Pro, you can customize the displayed fields on an app-wide or per-perspective basis (including re-ordering visible fields, and selecting fields to display only when selecting or editing an item).
Mac:
- Updated Columns layout, including the ability to customize the order of displayed columns.
iPhone, iPad, and Apple Vision Pro:
- Add new items or quickly edit an existing item using inline editing, without ever leaving the task outline.
- Action groups can now be expanded or collapsed in the task outline, allowing you to create and view as much (or as little!) structure within a project as you need.
App Navigation
Mac, iPhone, iPad, and Apple Vision Pro:
- When switching perspectives, you now have the option to go back to the perspective you came from using the new “Back” button in the toolbar. If you change your mind, you can go “Forward” again.
iPhone, iPad, and Apple Vision Pro:
- Opening any perspective in OmniFocus 4 for iPhone brings you directly to your list of tasks, avoiding unnecessary navigation through your database structure.
- The Perspectives Bar is now available on iPhone, iPad, and Apple Vision Pro, so your favorite perspectives are always one tap away.
- The OmniFocus for Mac sidebar, which displays the full hierarchy for the current view in a single interactive list, has been brought to the iPhone, iPad, and Apple Vision Pro. Make a selection in the sidebar to filter the content displayed in the task outline, create a multi-selection via Select mode, or edit your projects or tags list in Edit mode. On iPad, the sidebar can be fully collapsed to maximize screen space. On iPhone, the sidebar stays out of view until it is summoned.
- Use Quick Open, now supported on iPhone, iPad, and Apple Vision Pro, to quickly navigate to a perspective, folder, project, tag, or (when using OmniFocus Pro) Omni Automation plug-in.
App Appearance
Mac, iPhone, and iPad:
 Select from a collection of alternate app icons, including the new OmniFocus 4 app icon and the original OmniFocus 1 app icons,
when using OmniFocus Pro.
Select from a collection of alternate app icons, including the new OmniFocus 4 app icon and the original OmniFocus 1 app icons,
when using OmniFocus Pro.
Mac, iPhone, iPad, and Apple Vision Pro:
- Updated OmniFocus 4 interface to feel fresh, familiar, and right at home on macOS Sonoma, iOS 17, iPadOS 17, watchOS 10, and visionOS 1.
-
Choose from over 100 new custom perspective icons,
when using OmniFocus Pro.
App Customization
Mac, iPhone, iPad, and Apple Vision Pro:
- Customize which fields are included in the re-designed Inspector, as well as the order of those fields.
- View Options now sync across devices. (Layout customizations, available in OmniFocus Pro, sync between devices of the same type)
Forecast Perspective
Mac, iPhone, iPad, and Apple Vision Pro:
- Forecast items can now be structured as a single flexible list, with new support for manually re-ordering items and displaying group hierarchy.
- It is now possible to display flagged items.
-
It is now possible to display items on their notification dates,
when using OmniFocus Pro.
Custom Perspectives
Mac, iPhone, iPad, and Apple Vision Pro:
-
New flexible organization options introduce support for manually re-ordered lists and hierarchy preservation in ungrouped custom perspectives.
Custom Perspectives require OmniFocus Pro.
Apple Watch
- OmniFocus 4 for Apple Watch is an autonomous application that can be installed and run independently of OmniFocus for iPhone. Changes made in OmniFocus 4 for Apple Watch sync directly to the server.
- OmniFocus for Apple Watch now syncs your full OmniFocus database into the watch app, allowing for access to all items and perspectives from your Apple Watch.
- The watch app Home Screen now displays a list of favorite perspectives.
- View additional details associated with an item, like notes and attachments, from the watch app. Items can now also be dropped from the watch app, in addition to completed, flagged, or deleted.
- Watch face complications have been fully re-written, offering improved functionality over previous versions of the watch application, and support has been added for watchOS 10 Smart Stack widgets.
Nearby Perspective
Mac:
- Nearby perspective and tag location Inspector are now available on Mac.
iPhone, iPad, and Apple Vision Pro:
- Location-based tags can once again be viewed on a map in Nearby.
Focus
iPhone, iPad, and Apple Vision Pro:
-
Focus is now supported on iPhone, iPad, and Apple Vision Pro.
Use Focus to temporarily narrow the scope of your OmniFocus database
across all perspectives to just the selected folders or projects,
when using OmniFocus Pro.
Keyboard Support
Mac:
- New bare key keyboard shortcuts are now supported when using OmniFocus on any device with a hardware keyboard.
iPhone, iPad, and Apple Vision Pro:
- Hardware keyboard shortcut and navigation support has been fully rewritten and expanded, with support for native keyboard navigation, organized menus of key commands, and a full set of new bare key keyboard shortcuts.
Widgets
Mac:
- Complete items directly from updated interactive widgets on macOS Sonoma.
iPhone, iPad, and Apple Vision Pro:
- Configure your Lock Screen or iPhone Standby mode with an array of OmniFocus 4 widgets. Complete items directly from updated interactive widgets on iOS 17 and iPadOS 17. On watchOS 10, view OmniFocus widgets in the brand new Smart Stack.
Sharing
Mac, iPhone, iPad, and Apple Vision Pro:
- Quick Entry interface is now presented when sharing items to OmniFocus, allowing for immediate capture of additional details, like dates and flagged status.
Supported Languages
Mac:
- OmniFocus is localized in English, Chinese (Simplified), Dutch, French, German, Korean, Japanese, Italian, Portuguese (Brazilian), Russian, and Spanish. Arabic and Hebrew localization, in addition to full support for right-to-left text, is coming in a future update.
iPhone and iPad:
- OmniFocus is now localized in Arabic and Hebrew in addition to English, Chinese (Simplified), Dutch, French, German, Korean, Japanese, Italian, Portuguese (Brazilian), Russian, and Spanish. OmniFocus for iPhone and iPad interface has been updated to support right-to-left text.
Apple Vision Pro:
- OmniFocus for Apple Vision Pro will be localized in the same languages as Mac, iPhone, and iPad, once supported by visionOS.
Updated in OmniFocus 4
Accessibility
Mac, iPhone, and iPad:
- Improved VoiceOver support and compatibility with native OS Accessibility features.
Attachments
iPhone, iPad, and Apple Vision Pro:
- New “Attach File” attachment option allows for selecting arbitrary files from within OmniFocus, or attaching any type of file via the updated Share extension.
Automation
Mac, iPhone, iPad, and Apple Vision Pro:
- Significant updates to Omni Automation; for more information, please see OmniFocus 4: What’s New in Omni Automation?.
Archive
Mac:
- OmniFocus Archive file can now be saved in any location on your Mac.
Backups
iPhone, iPad, and Apple Vision Pro:
- OmniFocus database backups can now be optionally saved to iCloud Drive.
Menus
iPhone, iPad, and Apple Vision Pro:
- A variety of context-appropriate actions have been added to re-organized shortcut menus (also called contextual menus), offering feature parity with functionality available in OmniFocus for Mac shortcut menus.
Dates
Mac:
- Quickly increment dates via shortcut date buttons in the Inspector, or assign a date via the re-introduced outline calendar popover.
iPhone, iPad, and Apple Vision Pro:
- Entering dates as natural language text (i.e. “tomorrow” or “next Thursday”) is now supported. Completion and dropped dates can now be set prior to completing or dropping an item.
Default Perspectives
Mac, iPhone, iPad, and Apple Vision Pro:
- Tags perspective can now be sorted by flagged and due date.
- Grouping in the Flagged perspective can now be customized.
Notes
iPhone, iPad, and Apple Vision Pro:
- Full rich text note support is now available in OmniFocus on iPhone, iPad, and Apple Vision Pro.
Quick Open
Mac:
-
Omni Automation Plug-Ins are now included in Quick Open results,
when using OmniFocus Pro.
Reference Manual
Mac, iPhone, iPad, Apple Watch, and Apple Vision Pro:
- OmniFocus 4 for Mac, iPhone, iPad, Apple Watch, and Apple Vision Pro functionality is being documented in a single, unified reference manual. This is a work in progress, and your thoughts and feedback are very welcome.
Repeats
Mac, iPhone, iPad, and Apple Vision Pro:
- Updated repeat logic for items which complete every period on a custom schedule after completion.
Settings
iPhone, iPad, and Apple Vision Pro:
- Synced settings previously only configurable in OmniFocus for Mac, like default defer and due times, are now available in a new re-organized Settings interface.
Getting Started
OmniFocus allows you to capture the sometimes endless series of ideas, action items, and projects that come to mind as you wander through the world… and then provides you with the tools to Accomplish more every day — anywhere you go!
If you have used earlier versions of OmniFocus, you may want to watch What’s New in OmniFocus 4, or read the New in OmniFocus 4 section of Welcome to OmniFocus, and then start exploring… for everybody else, let’s get to know OmniFocus!
Before we get started Getting Started, feel free to watch Getting Started in OmniFocus 4, and then come on back.
This documentation can be read from start to finish, but it is also intended to serve as a reference manual, allowing you to learn more about topics that catch your interest, as needed. If you find there’s something you’d like to know more about, that either isn’t covered here or that just isn’t clear, please email us.
A Trusted System
Life is complicated. We each have a mix of plans, commitments, goals, priorities, and ideas jumbled up in our heads, all competing for time and attention. Sometimes these ideas push to the forefront unbidden, or fall out of our mind just when we need them most.
Many of us are pretty good at managing our lives in our heads, most of the time. But what if we didn’t have to?
What if we had a trusted system where we could capture flashes of inspiration, sketch out long term goals, build healthy habits, and house a photographic memory?
OmniFocus is that trusted system: a “second brain” that is as powerful as you choose to make it. It’s designed to rapidly capture ideas on the fly, then help you organize and connect them, whether building multistep projects or grouping common themes using tags.
OmniFocus can let you know when you’re near the grocery store, then remind you of your party plans and all the ingredients that go into that cake. Or prompt you to check the weather and get out the telescope for next month’s full moon viewing. Or if you’re feeling creative, suggest a list of tasks that require your artistic attention.
Whether you’re most comfortable with an unsorted checklist, a complex set of nested steps that are part of a multistep project, or somewhere in the middle, OmniFocus is there to support the way you think. It sticks with the pieces you need to help you get stuff done, revealing new functions along with your changing workflows — all with powerful, end-to-end encrypted data syncing to help you keep trust in the system.
Before we look at the road ahead, it’s sometimes useful to glance behind us, to see where we’ve come from.
OmniFocus started life as a series of OmniOutliner scripts, before becoming a native Mac application, and then making its way to the iPhone, iPad, Apple Watch, Apple Vision Pro, and even the Web. Though the original inspiration was David Allen’s Getting Things Done®, OmniFocus has since evolved into a system with a tremendous amount of flexibility, able to adapt to a wide variety of productivity approaches… while still feeling familiar to long-term customers.
Capturing Ideas
OmniFocus 4 is intentionally built for you to be able to move easily between devices,
so your data is ready for you wherever you are.
When you are
 Syncing OmniFocus
with the Omni Sync Server (or another WebDAV-enabled server),
the latest changes you make are available on all of your devices.
Start capturing a thought on an iPhone,
flesh it out on an iPad,
and really get into the details of organizing on your Mac…
then get reminders on your Apple Watch!
Syncing OmniFocus
with the Omni Sync Server (or another WebDAV-enabled server),
the latest changes you make are available on all of your devices.
Start capturing a thought on an iPhone,
flesh it out on an iPad,
and really get into the details of organizing on your Mac…
then get reminders on your Apple Watch!
For OmniFocus to effectively serve as a trusted system for your plans, first you’ll need to get that knowledge out of your head and into the app. OmniFocus makes this as straightforward as possible by presenting an intuitive interface with just the things you need to get started. Would you like a quick orientation? When you first install OmniFocus, you will be given the option of adding a tutorial project, which will help acquaint you with the current version of OmniFocus. There are slightly different versions for Mac, iPhone, and iPad — we encourage you to install each version, and begin exploring!
Items in OmniFocus represent things that you’d like to do, pieces of larger plans, or really any sort of data that’s actionable in some way. It can be helpful to use a consistent syntax in naming your items, but don’t let that get in your way — for now, the goal is to get as many ideas, plans, and to-dos out of your head and captured in OmniFocus as you can.
You’ll notice as you add items to the
 Inbox
that there are additional details you can set,
such as a
Inbox
that there are additional details you can set,
such as a
 Due Date,
![]() Note,
or
Note,
or
 Flag,
which can each provide more information
about the work that an item represents.
These bits of additional information are purely optional;
don’t feel like you have to fill them all out for every item you add.
(In the future,
you’ll be able to experiment with more data
associated with your tasks,
but for now we’re keeping it simple.)
Flag,
which can each provide more information
about the work that an item represents.
These bits of additional information are purely optional;
don’t feel like you have to fill them all out for every item you add.
(In the future,
you’ll be able to experiment with more data
associated with your tasks,
but for now we’re keeping it simple.)
After you’ve spent some time capturing items in the Inbox,
you’ll probably find yourself coming to a natural pause,
as you run out of quick ideas to capture.
That’s okay!
You can return to the Inbox to add more items,
or add more ideas later, using
 Quick Entry.
Organizing Your Thoughts
You will likely discover that some of the ideas you have captured are quick and
straightforward (“make lunch for tomorrow”), and some are more complex (“budget
for next year”). You can choose to leave some of these in the Inbox and treat
them like a simple checklist, tapping the
 Status Circle
to mark them
Status Circle
to mark them
 Completed when
they’re finished…
or you could venture out of the Inbox,
and see what else OmniFocus holds in store.
Completed when
they’re finished…
or you could venture out of the Inbox,
and see what else OmniFocus holds in store.
- Organize your ideas further in the
 Projects perspective,
and start adding all the related actions and projects.
Projects perspective,
and start adding all the related actions and projects. - Easily see all related actions or projects in the
 Tags perspective,
so that you can see all actions that need to be completed in a specific place,
agenda meeting topics that require a certain person to attend,
or projects you should only tackle when you’re feeling high energy.
Tags perspective,
so that you can see all actions that need to be completed in a specific place,
agenda meeting topics that require a certain person to attend,
or projects you should only tackle when you’re feeling high energy. - Plan the days and weeks ahead using
 Forecast,
so that you’re never surprised,
or forget something on your schedule.
Forecast,
so that you’re never surprised,
or forget something on your schedule. - And so much more… welcome to your new trusted system!
Before You Go
With all of OmniFocus’s features, we recommend giving yourself a chance to get used to this new system. Start simple, use the features that add value to your task management, and feel free to ignore the rest… until more is needed. We wish you the best on your productivity journey, and we’re here whenever you need us — alongside a vibrant community of your fellow OmniFocus users. Good luck, and happy OmniFocusing!
Perspectives
Perspectives are different ways of viewing the actions and projects in OmniFocus. Each default perspective has a specific purpose, and when used together they allow you to plan and accomplish your goals.
OmniFocus includes seven default perspectives to help you organize, prioritize, schedule, and review your actions and projects, as well as two default perspectives for viewing completed or changed items.
Need more ways of viewing your actions and projects? Custom Perspectives can be created using OmniFocus Pro.
Default Perspectives
The perspectives for planning and completing items are:
-
Inbox —
quickly capture and process actions.
-
Projects —
organize actions into projects, and figure out what comes next.
-
Tags —
add information about people, places, things, states of mind, energy level, or
anything that affects when or where you work.
-
Forecast —
view all of your actions and projects that have related
due or
defer until dates, and viewing them
alongside your schedule.
 Flagged —
gather all of your flagged actions in one place.
Flagged —
gather all of your flagged actions in one place. Nearby —
see all actions or projects that have a tag with an assigned location,
either in a list or on a map. What can you do where you are, or nearby?
Nearby —
see all actions or projects that have a tag with an assigned location,
either in a list or on a map. What can you do where you are, or nearby? Review —
check on your progress so far,
determine the status of projects, and
figure out what to do next.
Review —
check on your progress so far,
determine the status of projects, and
figure out what to do next.
The perspectives for viewing completed or changed items are:
More information about each perspective is below.
The easiest way to view a perspective is to click or tap it in the
Perspectives Bar,
or navigate to it using
 Quick Open.
Perspectives Bar
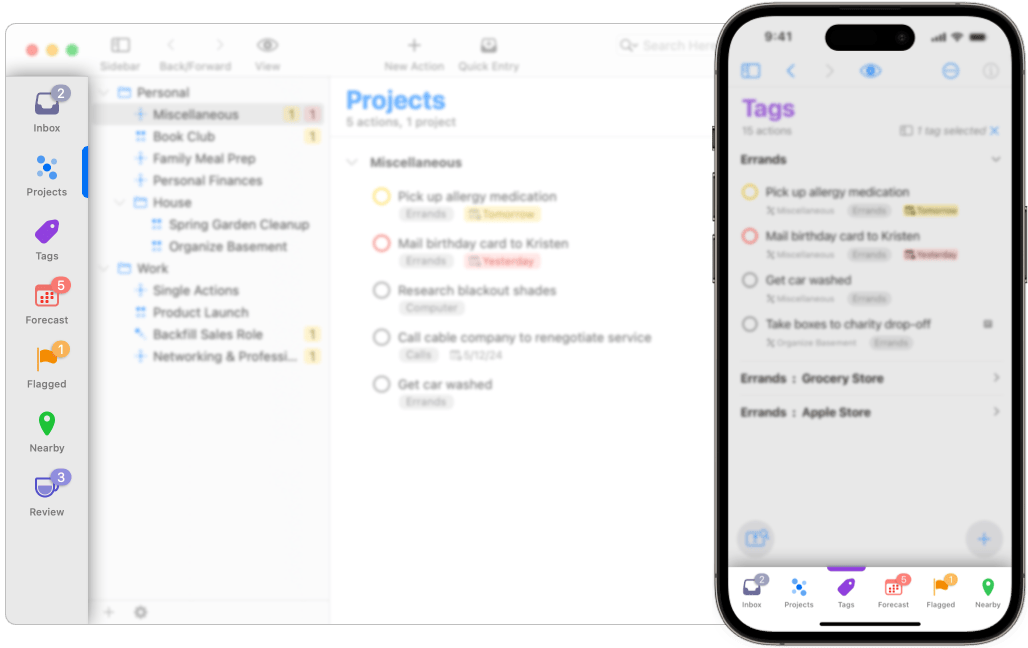
The Perspectives Bar is a column of tabs down the left side of the screen on Mac, iPad, or Apple Vision Pro; or a row of tabs across the bottom of the screen on iPhone. By default, it is visible when OmniFocus is first installed, with each tab containing an icon and title; tapping on the tab will visit the related perspective. If you’d like to, you can either hide the Perspectives Bar, or just hide the titles.
You can also tap the current tab to update the Outline view.
If you are viewing the Outline, and have scrolled down or selected one or more
items, the first tap will clear the selection and return to the top of the
Outline. The second tap will show or hide the
 Sidebar
on Mac, iPad, or Apple Vision Pro, and
switch between the Sidebar and Outline on iPhone.
Sidebar
on Mac, iPad, or Apple Vision Pro, and
switch between the Sidebar and Outline on iPhone.
Editing the Perspectives Bar
By default,
the Perspectives Bar includes all
Default Perspectives,
except for
 Completed and
 Changed.
You can change the order of perspectives,
or add and remove
 favorite perspectives
(including
favorite perspectives
(including
 Custom Perspectives),
using the Perspectives List on Mac,
or
Quick Open
on iPhone, iPad, or Apple Vision Pro.
Custom Perspectives),
using the Perspectives List on Mac,
or
Quick Open
on iPhone, iPad, or Apple Vision Pro.
If you choose to show more perspectives than can fit across the height or width of your screen, you can scroll the bar to reveal additional tabs.
Perspectives Bar Shortcuts Menu
Each tab in the Perspectives Bar is also a button. When you touch and hold on an iPhone, iPad, or Apple Vision Pro, or Control-click on a Mac, a shortcut menu (also called a contextual menu) appears. The shortcut menu may contain some or all of the following menu commands, which apply to the selected perspective:
- Edit — opens
 View Options for the selected perspective, and begins editing.
 - Unfavorite — removes the selected perspective from the Perspectives Bar and favorites list. Quick Open can be used to favorite it again on an iPhone, iPad, or Apple Vision Pro, and the Perspectives List can be used on a Mac.
- Copy Link — copies a link to the perspective in OmniFocus’s app URL format. Tap this link from anywhere on your device to view the perspective in OmniFocus.
- Open in New Window — on a Mac, this opens the selected perspective in a new window, instead of the current window. On an iPad, this will open the selected perspective in a new split screen window. This command is not available on iPhone.
Quick Open
Quick Open is designed to help you quickly navigate wherever you need to go in OmniFocus, whether you are using a Mac, an iPhone, or an iPad.
Quick Open (Mac)
While working anywhere in OmniFocus,
use the Quick Open… command,
or click on the
Quick Open button
in the
Toolbar (if you have
customized the Toolbar).
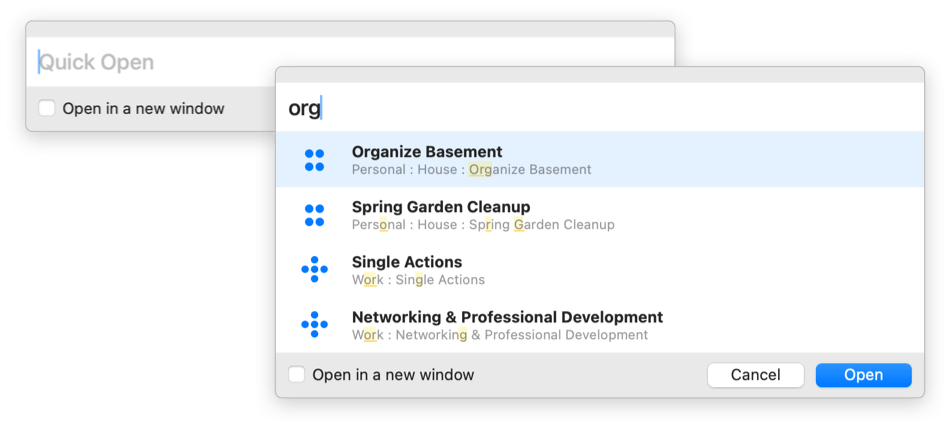
Opening a perspective, folder, project, tag, or plug-in:
- Enter text into the search field at the top of the sheet to quickly find a
perspective, folder, project, tag, or
 Omni Automation Plug-In
(if you are using OmniFocus Pro)
that matches the text you enter.
Omni Automation Plug-In
(if you are using OmniFocus Pro)
that matches the text you enter. - The field matches text from the middle of words as well as between them; entering “ho” will turn up both “Get started with OmniFocus” and “Phone”, for example.
- Click on a result in the list to open it, or use the arrow keys to navigate, and return to select a result.
- If you check the Open in a new window option, the item will be opened in a new window.
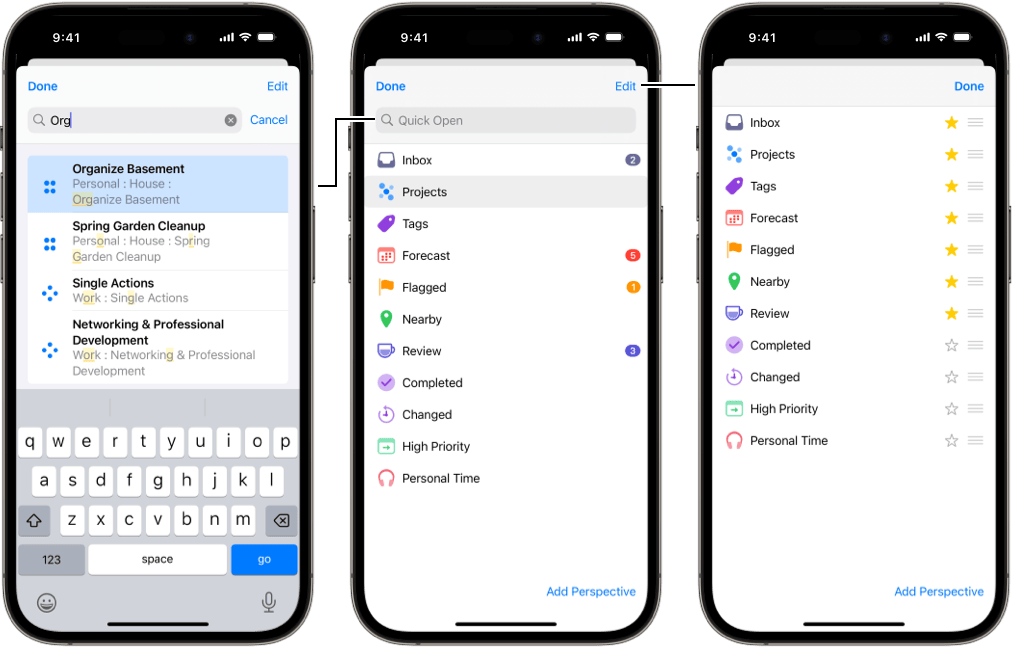
Quick Open (iPhone, iPad, Apple Vision Pro)
On iPhone, iPad, or Apple Vision Pro, Quick Open is also used for selecting favorite perspectives, or reordering the perspectives bar.
On Mac, this functionality is part of the Perspectives List.
With OmniFocus Pro,
Quick Open can also be used to create new
Custom Perspectives.
While working in any perspective’s Sidebar or Outline,
tap
Quick Open.
in the lower left part of the screen (or type
Command-O).
Opening a perspective, folder, project, tag, or plug-in:
- Enter text into the search field at the top of the sheet to quickly find a
perspective, folder, project, tag, or
Omni Automation Plug-In
(if you are using OmniFocus Pro)
that matches the text you enter.
- The field matches text from the middle of words as well as between them; entering “ho” will turn up both “Get started with OmniFocus” and “Phone”, for example.
- Tap on a result in the list to open it. If you are using an attached keyboard, you can also open the selection using the return key.
Setting your favorite perspectives:
- Tap on the empty
Favorite button
 to add a favorite perspective.
 - Tap on the filled
Favorite button
to remove a favorite perspective.
- Favorite perspectives will display in the Perspectives Bar.
Sorting your favorite perspectives:
- Tap Edit
- Use the drag handles to arrange perspectives in the order you prefer.
- Favorite perspectives will display in the order set here.
Creating new custom perspectives:
- With OmniFocus Pro, tap the Add Perspective button in the bottom of the Quick Open window. If the Quick Open search field is active, tap Cancel to show the button.
- A new custom perspective will be created and opened, ready for you to edit.
- Read Creating Custom Perspectives to learn more.
Perspectives List
On Mac, the Perspectives List is used for selecting favorite perspectives, assigning custom keyboard shortcuts, or reordering the Perspectives Bar.
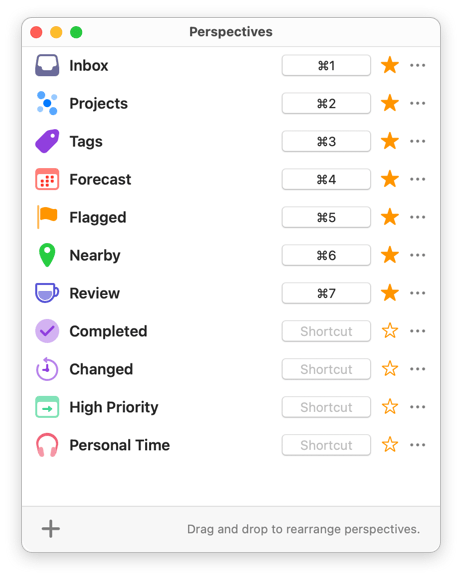
With OmniFocus Pro, the Perspectives List can also be used to create new Custom Perspectives.
On iPhone, iPad, and Apple Vision Pro,
this functionality is in
Quick Open.
The Perspectives List also serves as a way to navigate between perspectives in the main OmniFocus window: double-click a perspective in the list to open it.
To set a keyboard shortcut for a perspective:
- Click on the Shortcut button
 (which may be showing an already assigned
shortcut).
(which may be showing an already assigned
shortcut). - Press the keys for the keyboard shortcut you want to use. Characters appear in the field as you type, and are saved once you enter a valid combination.
You can choose any shortcut which contains one or more of the Control, Option, Shift, or Command keys, along with any other key. An unused Function key (such as F13) can also be used.
Press Esc to cancel recording,
or click the Clear button
 to remove an assigned shortcut.
Setting your favorite perspectives:
- Click on the empty
Favorite button
to add a favorite perspective.
- Click on the filled
Favorite button
to remove a favorite perspective.
- Favorite perspectives will display in the Perspectives Bar.
Sorting your favorite perspectives:
- Click and hold on a row, then drag it into the order you prefer.
- Favorite perspectives will display in the order set here.
Creating new custom perspectives:
- With OmniFocus Pro,
click the
Add Perspective button
 in the bottom toolbar.
 - A new custom perspective will be created and opened, ready for you to edit.
- Read Creating Custom Perspectives to learn more.
Perspectives List Actions Menu
Next to the
Favorite button
,
there is an
Actions menu button
 which contains additional actions or settings for each row:
- Open — opens the selected perspective.
- Open in New Window/Tab — opens the selected perspective in a new view.
- Edit — opens View Options for the selected perspective, and begins editing.
- Copy as Link — copies a link to the selected perspective.
- Duplicate — duplicates the selected perspective.
(Only available for
Completed,
Changed, and
Custom Perspectives.)
- Always Open in a New Window — choose whether to
always open the selected perspective in a new view.
(Only available for
Custom Perspectives.)
- Revert to Default Settings — returns perspectives to their original settings. (Only available for Default Perspectives.)
- Delete — deletes the selected perspective. (Only available for
Custom Perspectives.)
View Options
View Options can be displayed by tapping or clicking the View Options button in the toolbar, selecting Show View Options from the View menu, or using the keyboard shortcut Shift-Command-V.
View Options allow you to customize which actions or projects appear in the Outline for the current perspective, based on their status and availability, in addition to perspective-specific options.
This section provides an overview of the options that are common to most perspectives, with each perspective section discussing options that are specific to that perspective.
View Options is generally divided into several sections:
- Availability —
The first section determines what is visible in the perspective,
based on the Availability of
actions, action groups, and projects.
Read the
View Options section
in the Glossary, to learn more.
This section is not included in
Forecast. Visibility settings
have global scope.
- Structure — The second section determines how the view displays, and
varies between perspectives. This can include settings that impact visibility
(such as whether to display the Inbox in Projects), or the organization of
items (such as whether to display Forecast as a unified list, or separated by
types of information). This section is not included in the
Inbox or
Nearby perspectives.
Structure settings have global scope.
- Layout — The third section contains layout adjustments for the specific kind of device that you are using, including access to Edit Default Layout. Layout settings have platform scope.
Custom Layout
OmniFocus Pro allows you to set a custom layout for each perspective. Click on Custom Fluid or Custom Columns (on Mac), or Custom row layout on iPhone, iPad, or Apple Vision Pro; this will present the same set of options as Layout settings for Mac or iPhone, iPad, and Apple Vision Pro, but will be applied only to the perspective you are editing.
To make capturing and processing new actions as easy as possible, both Inbox and Quick Entry always allow customization, whether licensed for OmniFocus or OmniFocus Pro.
Sidebar
The Sidebar appears between the Perspectives Bar and Outline, on the leading edge of the OmniFocus window if you are using a Mac, iPad, or Apple Vision Pro; on iPhone, the Sidebar will slide in from the leading edge of the screen, and slide back out when dismissed.
You can hide or show the Sidebar using the
Show/Hide Sidebar command,
tapping the
Sidebar button
in the Toolbar,
or clicking on a tab in the
Perspectives Bar
(if you are at the top of the Outline).
By selecting items in the Sidebar, you can quickly navigate to parts of the Outline, while filtering to see only the information that you want to see right now.
The Sidebar is available for all
Default Perspectives and
Custom Perspectives, except the
Inbox. Both navigation and filtering require
information which Inbox items don’t typically have, such as an assigned project
or assigned tags. Adding that information to an item in the Inbox normally
removes the item from the Inbox entirely, depending on your
Clean up inbox items which have
setting.
You can swipe left on a project, folder, or tag to reveal the
Select button
 and
Delete button
and
Delete button
 .
You can swipe right on a project to reveal the
Flag button
.
You can swipe right on a project to reveal the
Flag button
 and
Forecast Tag button
and
Forecast Tag button
 (if you have configured a Forecast Tag in
Forecast View Options).
(if you have configured a Forecast Tag in
Forecast View Options).
There are four different types of Sidebar:
Projects,
Tags,
Forecast, and
Review.
The
Forecast and
Review perspectives
use their specific type,
while all other perspectives use the type found in either Projects or Tags.
Each type is discussed further in the Sidebar section for that perspective.
Sidebar Edit Mode
When using an iPad, iPhone, or Apple Vision Pro,
Sidebar Edit Mode allows rearranging, renaming, and editing items in the Sidebar.
This mode is available in all perspectives except for
Forecast and
Review.
In order to enter Sidebar Edit Mode, tap the Edit button. When you are finished, tap the Done button.
If the Sidebar contains a list of folders and projects, or tag groups and tags, you can drag and drop to reorder them, or change their place in the hierarchy of your database.
While in Sidebar Edit Mode,
you can swipe left on a project, folder, or tag to reveal the
Delete button
,
or swipe right on a project to reveal the
Flag button
and
Forecast Tag button
(if you have configured a Forecast Tag in
Forecast View Options).
You can also tap the Shortcut menu button
in the bottom toolbar
to open a shortcut menu for selected items.
Sidebar Select Mode
When using an iPad, iPhone, or Apple Vision Pro,
Sidebar Select Mode mode allows editing multiple items in the Sidebar.
This mode is available in all perspectives except for
Review.
To enter Sidebar Select Mode
on iPhone,
tap the
More Menu button
 ,
and then the
Select button
.
To enter Sidebar Select Mode
on iPad or Apple Vision Pro,
tap the
List button
,
and then the
Select button
.
To enter Sidebar Select Mode
on iPad or Apple Vision Pro,
tap the
List button
 ,
and then the
Select button
.
When you are finished, tap the Done button.
,
and then the
Select button
.
When you are finished, tap the Done button.
The
More Menu button
on iPhone,
and
List button
on iPad and Apple Vision Pro,
also contain the
Expand All button
 and
Collapse All button
,
which allow expanding and collapsing
folders or tag groups.
and
Collapse All button
,
which allow expanding and collapsing
folders or tag groups.
If the Sidebar contains folders, projects, or tags,
you can tap to select or deselect items,
tap the Select All button
to select all visible items,
tap the Clear button
to deselect all visible items,
or swipe left to reveal the
Select button
,
which also allows you to add or remove items from your current selection.
You can then tap the
Shortcut menu button
in the bottom toolbar
to open a shortcut menu for your selected items,
or tap Done to view
the selected items in the Outline.
If the Sidebar contains a calendar, you can tap to select or deselect days, as well as the Past or Future tiles, tap the Select All button to select all visible items, or tap the Clear button to deselect all visible items, and then tap Done to view the selected days in the Outline.
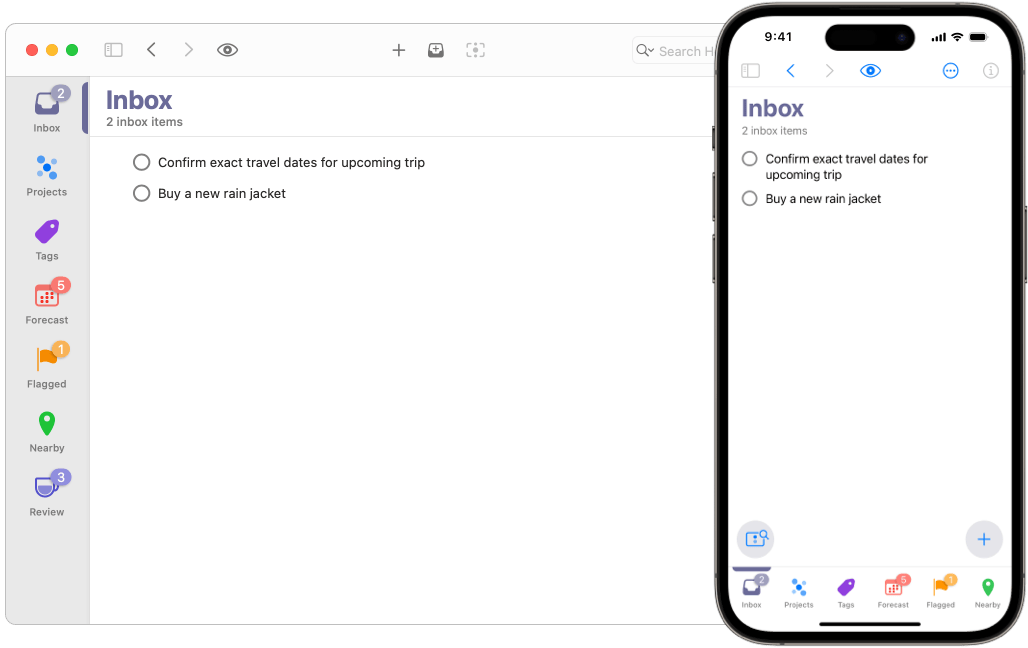
Inbox
The Inbox is your starting place, where you can capture everything that you want to accomplish: all of your hopes, dreams, and goals.
To add an item,
navigate to the Inbox using the
Perspectives Bar or
Quick Open, and choose
New Action (Command-N) from the File
menu, click the
New Action button
in the Mac toolbar,
or tap the
New Action button
in the lower right of your iPhone, iPad, or Apple Vision Pro window.
You can also add items to the Inbox from anywhere in OmniFocus using
Quick Entry.
Many people use the Inbox as a landing place for new ideas, allowing them to quickly capture all the thoughts in their mind. While it is possible to work out of the Inbox, it’s often a temporary place for those ideas to live. Adding a project or tags to an item turns it into an action, and converting it into a project allows you to add even more actions… all in the interest of moving towards your goals.
Though every workflow is different, many people try to keep their Inbox empty, processing all the contained items on a regular basis. This practice is often referred to as “Inbox Zero”, and is subtly rewarded in OmniFocus by the appearance of a graphic in the background of the Inbox when no items are present.
Inbox View Options
The Inbox perspective
provides the following
View Options:
- In the Inbox, show — this is the Availability section. First Available is not an option in the Inbox, as it requires project structure to determine. Visibility settings have global scope.
- Layout — Layout settings have platform scope. Both OmniFocus and OmniFocus Pro allow you to set a custom layout for the Inbox, to help you process new items more quickly.
Inbox Outline
Once you have an item in your Inbox,
what do you do next?
In the simplest workflow,
you can accomplish the action that you have captured in your Inbox,
and then mark it complete by clicking or tapping the
Status Circle next to the item.
Do you need to do a little more organizing,
before tackling that first action?
The Inbox Outline contains a list of individual items,
which you can choose to organize into
action groups.
This can be accomplished by dragging one item on top of another
(Mac, iPhone, or iPad),
selecting an item
and using the Add Inside command
(Mac, iPhone, or iPad),
or dragging the
New Action button
from the lower right of your screen to
hover over an action in the Outline (iPhone, iPad, or Apple Vision Pro).
You can also add tags to an item, by clicking or tapping into the Tags fields, and beginning to type; you can either select from existing tags, or create one or more new tags.
Since the Inbox is most often a temporary place for capturing ideas, it only supports very simple organization. If you need more complexity, or are working on a project with many related actions, then it’s time to either add the Inbox item to an existing project, or convert it into a project, and continue planning. Clicking or tapping into the Project field will allow you to either select an existing project, or create a new project.
Once you have added a project or tags to an Inbox item, it will likely disappear from view, depending on your settings for Clean up inbox items which have. Your items are still safe! They’re now filed, and ready for your next steps. Not entirely sure where your Inbox item just went? Please see read about the default Miscellaneous project.
If you convert an Inbox item to a project,
it will immediately reopen in
Projects,
ready for further planning.
Item Status
As you discovered above,
clicking or tapping on the open
Status Circle
for an active action or action group
will mark it
Completed.
These are two of several Status options that can be applied to actions, groups, projects, folders, and even tags. You can read more about Status options in the Glossary.
Cleaning Up Resolved Items
When you mark an item complete by clicking its status circle, the item may not immediately disappear from the Outline. If you have set items to clean up when changing perspectives, they remain until you navigate elsewhere or clean up manually by using the Clean Up command,
or clicking or tapping the
Clean Up button
 .
You can choose when OmniFocus cleans up by changing the Clean up resolved items setting.
.
You can choose when OmniFocus cleans up by changing the Clean up resolved items setting.
If a completed item doesn’t disappear after you’ve cleaned up your current view,
check
View Options
for the current perspective,
as you have likely selected All.
Change to any of the other Availability options to hide
completed items.
Worried about accidentally deleting hidden items?
If you change the status of an action or project to one that would hide it, given the current View Options setting (such as marking an item Completed, with View Options set to Available) and then later delete the folder, project, or action group which contains it, OmniFocus warns you that you may be about to delete something unintentionally.
To see those hidden items, change View Options to All.
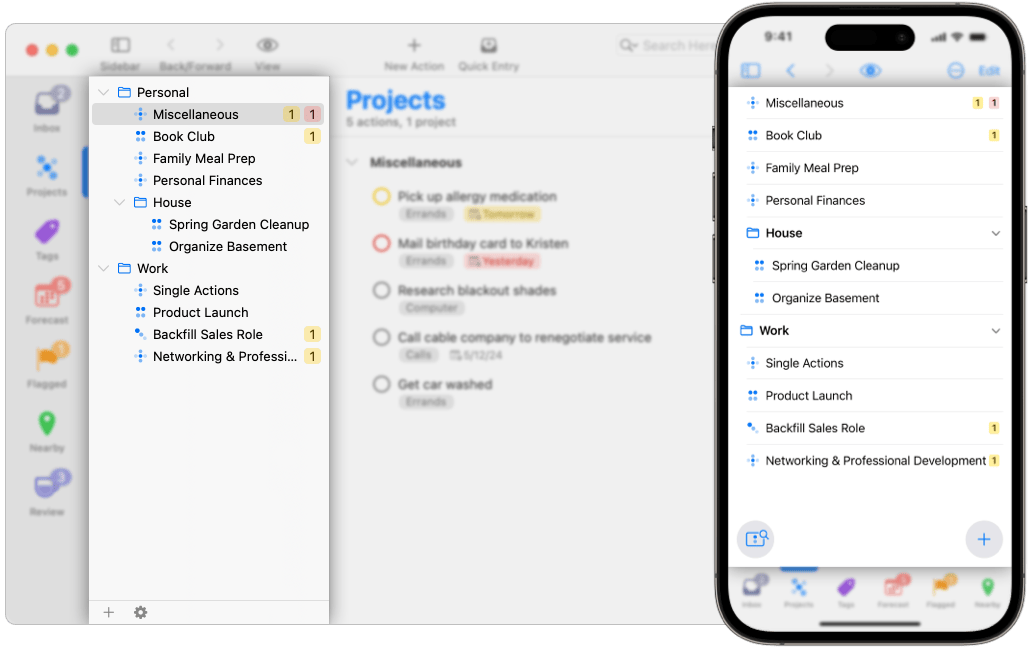
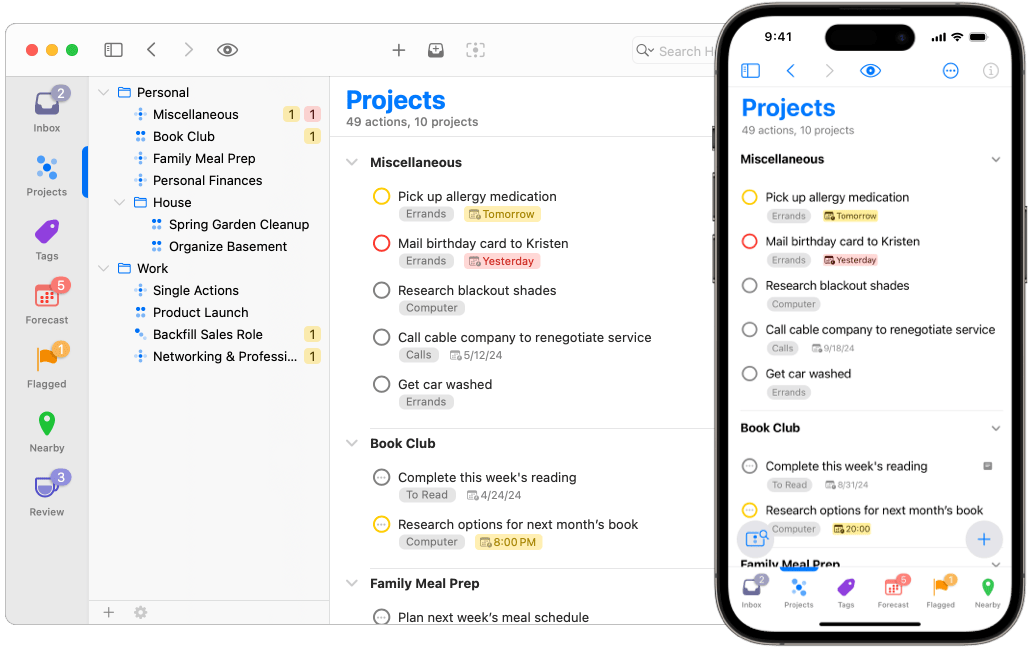
Projects
A project is a collection of related actions and action groups, typically working towards a specific end goal. The Projects perspective displays all of your projects in a list, which can be grouped into folders, such as Personal or Work.
To add a new project, navigate to Projects using the Perspectives Bar or Quick Open, and choose New Project (Shift-Command-N) from the File menu, or use the Add Project at the bottom of the Projects Sidebar.
Projects View Options
The Projects perspective
provides the following
View Options:
- In Projects, show — Choose which items you would like visible in the
Outline (Remaining is the default). Each option describes the items
included; see
View Options,
Project Type, and
Project Status to learn more.
Visibility settings have global scope.
- Structure — Choose whether to show the contents of the Inbox at the top of the Projects Outline and Sidebar (this makes it easier to drag and drop between the Inbox and Projects), and choose whether to include folders in the Outline view (folder rows are hidden if this option isn’t selected). Structure settings have global scope.
- Layout — Settings in this section vary with the device that you are using: Keep Sidebar Hidden (Mac or iPad) or Show Project List first (iPhone). Layout settings have platform scope. OmniFocus Pro allows you to set a custom layout for this perspective.
Projects Outline
The Projects Outline displays a list of your projects,
and the actions they contain,
with visibility determined by your
View Options.
The Outline displays your projects in a list of rows, with each row representing a project, action group, action, or (if enabled in your view options) a folder. The relationships between projects, the actions they contain, and any additional hierarchy in the form of action groups, or folders, are represented in the Outline by levels of indentation. The further indented an item is, the deeper in the project view it is nested.
Read Organizing the Outline to learn more about creating hierarchy with projects and folders.
Projects Sidebar
The Projects Sidebar shows the full OmniFocus project structure, including folders and projects, along with summaries of their contents (if you have enabled Show Sidebar Badges/Sidebar Due Counts).
The leading edge of the row contains an icon which indicates
whether the item is a
 Folder,
 Parallel Project,
 Sequential Project,
or
Sequential Project,
or
 Single Actions List.
(You can learn more about Project Type in the section below.)
The trailing edge of the row will contain an icon which indicates
Project Status or
Folder Status,
if the item is set to
 On Hold,
 Completed, or
 Dropped.
(
Dropped.
(
 Active
is the default state for projects and folders,
so icons are only displayed for non-Active states).
Active
is the default state for projects and folders,
so icons are only displayed for non-Active states).
Click or tap the disclosure arrow to collapse and expand folder rows and show and hide their contents.
Drag and drop can be used to rearrange projects in the Sidebar. If you drop one project on top of a second project, the first project is converted to an action group inside the second project.
You can click or tap a project or folder in the Sidebar to view the selected item and contents in the Outline, or you can select several projects and/or folders to view them together. Tap again or Command-click to remove the selection, and return to the full list in the Outline.
Control-clicking (on a Mac) or long-pressing (on an iPhone, iPad, or Apple Vision Pro) on an item in the Sidebar will show a selection of Commands in a Shortcut menu, which update depending on your selection.
At the bottom of the Projects Sidebar on a Mac,
there are two buttons:
the Add button
,
and the Shortcut menu button
 .
The first button allows you to
Add Parallel Project,
Add Sequential Project,
Add Single Actions List, or
Add Folder.
The Shortcut menu
contains a selection of Commands,
which update depending on your selection.
.
The first button allows you to
Add Parallel Project,
Add Sequential Project,
Add Single Actions List, or
Add Folder.
The Shortcut menu
contains a selection of Commands,
which update depending on your selection.
At the bottom of the Projects Sidebar on an iPhone, iPad, or Apple Vision Pro,
there are two buttons:
the
Add button
,
which is always available,
and the
Shortcut menu button
,
which is available while in
Sidebar Select Mode or
Sidebar Edit Mode.
The
Add button
allows you to
Add Project or
Add Folder.
The
Shortcut menu button
,
contains a selection of Commands,
which update depending on your selection.
Miscellaneous Project
Before we move on from the Projects Sidebar, let’s consider a special project: the Miscellaneous project, which can appear after cleaning up items from the Inbox.
The Miscellaneous project is a Single Actions List automatically created by OmniFocus when items are cleaned up that don’t yet have an assigned project.
Removing items from the Inbox requires they be assigned to a project. If your Clean up Inbox items which have setting allows cleaning up Inbox items that have an assigned tag, without an assigned project, the Miscellaneous project becomes their new home.
The Miscellaneous project is automatically created when needed, so it can’t be permanently removed. If you’d prefer not to use it, try requiring an assigned project in your Clean up Inbox items which have setting.
The Miscellaneous project can be renamed, and will continue to function in the same way.
Changing the Project Type from single action list to sequential or parallel project will break the default nature of this special project. If that happens, OmniFocus will create another, when next needed.
Project Type
Projects are distinguished by their type, which reflects how actions inside the project must be completed. Project type also affects how actions within the project show up according to the perspective’s View Options.
Projects may be set to Parallel or Sequential, or they may be a Single Actions List. By default, all new projects are created as Parallel, but the Default Project Type can be changed in Settings.
-
Parallel projects contain actions which may be accomplished in
any order. By default, all active actions are
considered available. View Options set to
First Available or
Available will show different results, as
the topmost action in the project is considered first available.
-
Sequential projects contain actions which must be completed
in a specific order, from top to bottom. By default, only the topmost
active action is considered
available, and all actions below that one
are considered blocked. View Options set to
either First Available or
Available should show the same result.
-
Single actions lists contain actions that may (or may
not) be related in some way, but that are not part of an overall goal. Unlike
with parallel or sequential projects, the position of an action in a single
action list does not matter; each action can be thought of as a very small
standalone project. For a single actions list, View Options set to
First Available or
Available will show identical results, as
all actions are considered first available.
Note that Action Groups also have an Action Group Type, which can be set to either Parallel or Sequential.
Project Status
When planning or reviewing a project, it can be useful to assign it a Status to indicate whether work is still progressing, or plans have changed. The statuses for projects are:
-
Active —
The default status for a new or ongoing project. It can be useful
to review active projects regularly to determine what progress you’ve made,
and whether they are still things you want to do.
-
On Hold —
If you’re not sure whether you want to continue a project, you
can change the project’s status to
On Hold.
If you’ve chosen
to show only Available items in
View Options, the project and
its actions are removed from the project list in the Sidebar and Outline.
Projects placed on hold are still available for review if you decide to
prioritize them again in the future. If you’d like to view an on hold project,
change your
View Options to Remaining or
use Search Remaining.
-
Completed —
Eventually you’ll reach the successful end of a project.
Select the project and then choose
Completed
in the Status section of the
inspector (this automatically marks any unfinished actions in the project
complete). If you’d like to view a completed project, change your
View Options to All or use
Search Everything.
-
Dropped —
If you have decided not to work on a project any longer, you can
set it to
Dropped.
It will be hidden from the Projects list, along with its
actions. You can delete the project instead, but then you won’t have any
record of it; keeping it around in a dropped state means you can go back and
check on actions you’ve completed (or not), even if they are part of projects
that are no longer relevant. If you’d like to view a dropped project, change
your
View Options to All or use
Search Everything.
Dropped and completed items can accumulate in your database over time. If you would like to trim your database, please read more about Archiving in OmniFocus.
Folder Status
Folders also have a status to indicate whether contained work is still progressing, or plans have changed. The statuses for folders are:
-
Active —
The default status for a folder.
This status does not affect any contained projects or folders.
-
Dropped —
If you have decided not to work on projects
inside a specific folder any longer,
you can set the folder to
Dropped.
This will result in all contained folders, projects, and actions also being
Dropped. All the contents of the folder will be hidden from the Projects
list. If you’d like to review a dropped folder or contained items, change your
View Options to All or use
Search Everything.
Tags
The Tags perspective displays a list of tags in the Sidebar, and a list of all actions and projects with assigned tags in the Outline, grouped by tag.
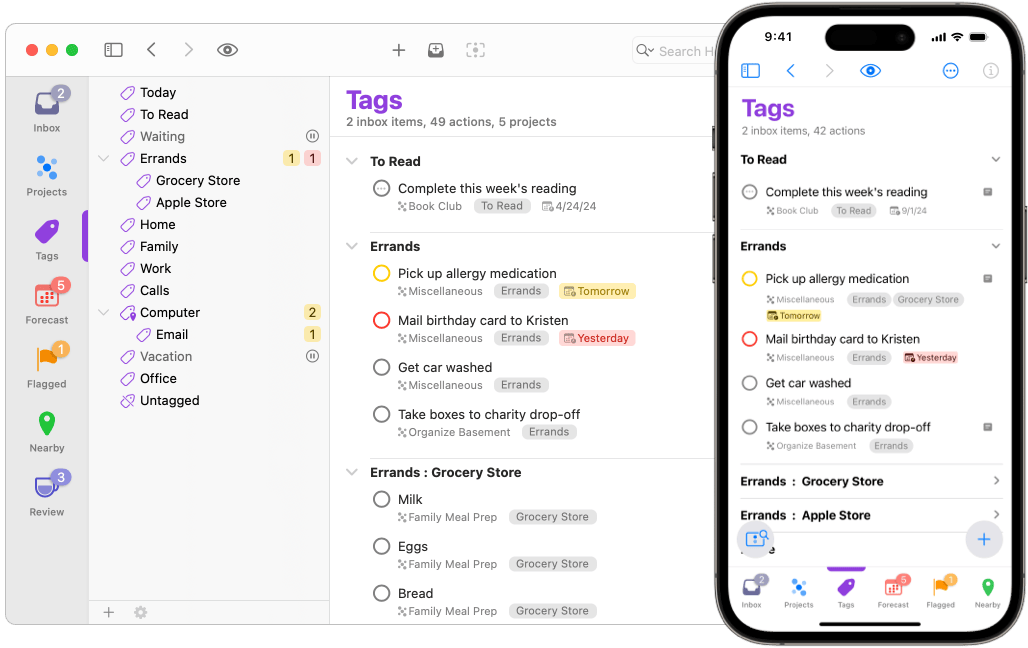
In OmniFocus, tags can be used to add context necessary for completion of an action or project. They may represent a person, place, thing, state of mind, energy level, or anything else you find useful. Once multiple items have been assigned the same tag, you can easily view the related (tagged) actions, action groups, and projects in one place.
Your use of tags can be simple, such as showing you all the items related to work; or it can be complex, such as showing you all the items related to work that you need to coordinate with your co-worker, and that must be completed while you have high-energy and are sitting near your computer.
You can assign as many tags to an action, action group, or project as you find useful. Or you may not want to use tags. It’s your choice!
When a tag represents a specific place,
you can assign a tag location.
If you have granted OmniFocus permission to access your device’s location,
items with that tag will appear in the
Nearby perspective
when you’re close to a tag’s location,
and you can receive notifications for those items
based on how close you are to the location.
Tags View Options
The Tags perspective
provides the following
View Options:
- In Tags, show — Choose which items you would like visible in the Outline
(Remaining is the default). Each option describes the items included; see
View Options and
Tag Status to learn more. Visibility
settings have global scope.
- Structure — Choose whether to sort items within tags by their due date and flagged status, or to leave them in their default sort order. Structure settings have global scope.
- Layout — Settings in this section vary with the device that you are using: Keep Sidebar Hidden (Mac or iPad) or Show Tag List first (iPhone). Layout settings have platform scope. OmniFocus Pro allows you to set a custom layout for this perspective.
Tags Outline
By default, the Tags perspective will show projects and action groups, when they
match the selected
View Options filter. To always hide projects
and action groups from Tags, focusing exclusively on actions, enable Hide
projects and action groups in
Organization settings.
The Tags Outline displays each of your tags as a parent row, with the actions or projects assigned that tag immediately below the tag, filtered by your View Options selection.
Tag Groups are presented in the Outline as a flat list, with child tag rows below their parent tag row. Each child tag row is labeled with the parent tag name, a colon, and the child tag name, using an additional colon and name for each level.
If an action or projects has multiple tags assigned, it appears in the Outline under each tag to which it has been assigned.
Tags Sidebar
The Tags Sidebar shows a list of all the tags you’ve added to OmniFocus, along with summaries of their contents (if you have enabled Show Sidebar Badges/Sidebar Due Counts).
The leading edge of the row contains an icon which indicates
whether the presented items are assigned to a
 Tag,
a
Tag,
a
 Tag Location,
or are
Tag Location,
or are
 Untagged.
(You can learn more about Tag Location in the Inspector chapter.)
The trailing edge of the row will contain an icon which indicates
Tag Status,
if the item is set to
On Hold or
Dropped.
(
Active
is the default state for tags,
so icons are only displayed for non-Active states).
Tags can be organized into Tag Groups using drag and drop, Indent/Outdent, or Add Inside and Add Outside.
When dropping one tag on top of a second tag, the first tag becomes a child tag of the second tag. You can click or tap the disclosure arrow for the tag group to hide or show child tags.
You can click or tap a tag in the Sidebar to view the selected tag and assigned actions or projects in the Outline, or you can select several tags and/or tag groups to view them together. Tap again or Command-click to remove the selection, and return to the full list in the Outline.
Control-clicking (on a Mac) or long-pressing (on an iPhone, iPad, or Apple Vision Pro) on an item in the Sidebar will show a selection of Commands in a Shortcut menu, which update depending on your selection.
At the bottom of the Tags Sidebar on a Mac,
there are two buttons:
the Add button
,
and the Shortcut menu button
.
The first button allows you to
Add Tag.
The Shortcut menu
contains a selection of Commands,
which update depending on your selection.
At the bottom of the Tags Sidebar on an iPhone, iPad, or Apple Vision Pro,
there are two buttons:
the
Add button
,
which is always available,
and the
Shortcut menu button
,
which is available while in
Sidebar Select Mode or
Sidebar Edit Mode.
The
Add button
allows you to
Add Tag.
The
Shortcut menu button
contains a selection of Commands,
which update depending on your selection.
Tag Status
Tags have a Status which indicates whether they are currently relevant to your work.
-
Active —
The default status for a tag. When a tag is active, it is
available, and relevant to you in some way.
-
On Hold —
When a tag is not currently available or relevant, but will be
in the future, you can change the tag’s status to
On Hold.
The tag remains visible in the Sidebar
and if you’ve chosen to show only Available items in
View Options,
its assigned actions are hidden in the Outline.
-
Dropped —
If a tag is no longer available or relevant to your work,
you can change the tag’s status to
Dropped.
The tag will disappear from the Sidebar and Outline,
and its actions are also hidden.
You can delete the tag instead,
but then you won’t have any record of it;
keeping it around in a dropped state means
you can go back and check on actions with that assigned tag.
If you’d like to view a dropped tag,
change your
View Options
to Everything or use
Search Everything.
The Completed status doesn’t exist for tags, as tags are a way of adding context to an action or project. A person, place, thing, or state of mind may no longer be relevant to your work, but they cannot be completed.
Tag Sorting
By default, actions that have been assigned a tag will appear in the Tags Outline in same order they appear in their respective projects (Project Order), or in the order they appear in the Inbox if no project is assigned (Inbox Order).
You can use drag and drop to rearrange actions within a tag. The tag saves its new custom order once you make a change, and the previous default rules no longer apply: any items subsequently added to the tag appear at the end of the list, and can be reordered manually from there.
Forecast
The Forecast perspective helps you keep an eye on your progress, check upcoming Due and Defer Until dates, and schedule OmniFocus actions and projects alongside important events in your calendar.
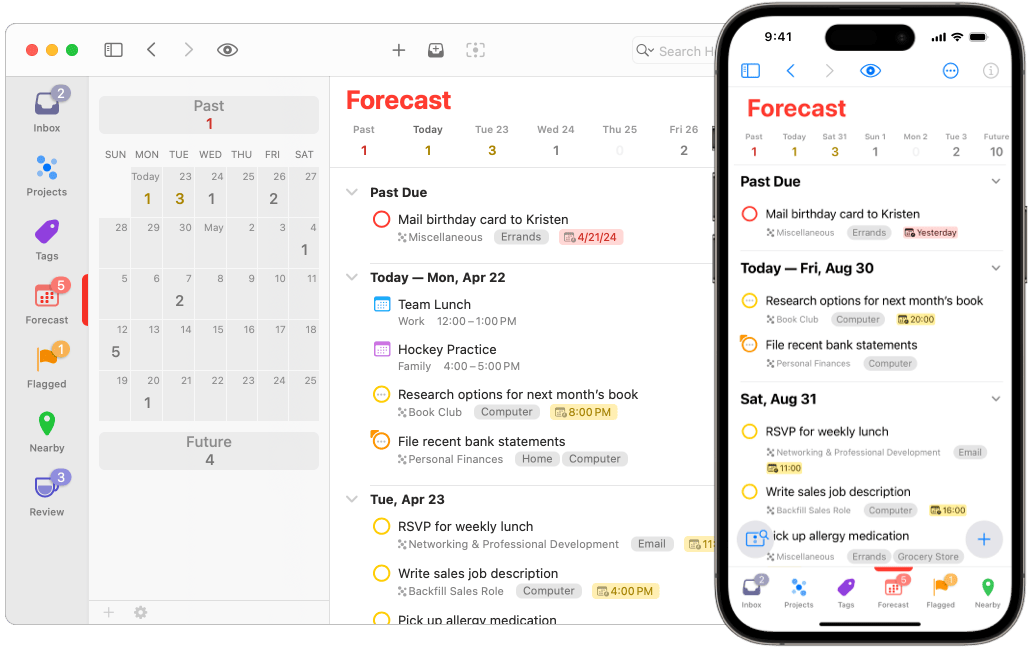
The Forecast tiles across the top of the Outline (we refer to this set of tiles as the “piano keys”) display a range of dates, with a tile for Past (everything prior to Today), a tile for Future (everything after the last day displayed in the piano keys), and a tile for each day in between, with as many days as fit on the device that you are using. This is a quick way to get a sense of what the next several days hold, what should be rescheduled, or where you have capacity to add work.
Each tile also shows the number of items associated with that date. For Due items, the tile is color-coded according to the most urgent item: yellow indicates that an item is due soon, and red indicates an item is due or overdue.
To create a new action that is due on a particular day, tap the appropriate date tile, followed by Smart Add (on iPhone, iPad, or Apple Vision Pro), or use New Action (on any device). New actions created in Past will be Due yesterday, while new actions created in Future will be Due the day after the last date tile.
Forecast View Options
View Options for Forecast
are different from the other Default Perspectives,
as they do not contain an Availability section,
and the Structure section is unique.
The Forecast perspective
provides the following
View Options:
- In Forecast, include —
Enables types of items that will show in Forecast on all days.
Visibility settings have global scope,
except for calendar-related settings.
- Items on defer date — With this setting enabled, actions and projects with a Defer Until date will appear in the Outline for all days, either as part of the Flexible list, or in a separate Organized section for Deferred items.
-
Items on notification date —
With this setting enabled,
actions and projects with notifications scheduled
for a date before the Due date or
Defer Until date
will appear in the Outline for all days that have a notification,
either as part of the Flexible list,
or in a separate Organized section
for Scheduled Notifications.
This setting is part of OmniFocus Pro.
- Calendar events — With this setting enabled, calendar events will appear in the Outline for all days, either as part of the Flexible list, or in a separate Organized section for Calendar Events. See Calendars to learn more. Calendar settings have local scope.
- Choose Calendars — When Calendar events is enabled, this option will appear, allowing you to select which calendar events show in the Outline. See Calendars to learn more. Calendar settings have local scope.
- Today includes —
Enables types of items that will show in Forecast,
only for Today.
- Flagged items — With this setting enabled, actions and projects that are Flagged will appear in the Outline for Today, either as part of the Flexible list, or in a separate Organized section for Flagged items.
-
Items tagged —
After selecting a Forecast tag in this field,
actions and projects to which you
Apply Forecast tag
will appear in the Outline for Today,
either as part of the Flexible list,
or in a separate Organized section
for Tagged items.
This setting is part of OmniFocus Pro.
- Structure —
Choose how Forecast presents events, projects, actions, and notifications.
See Forecast Outline to learn more.
Structure settings have global scope.
- Flexible — New in OmniFocus 4, Forecast will present a single unified list which combines all the types of items you have selected from In Forecast, include and Today includes, alongside your Due items. There are also settings for See Flexible Outline to learn more. whether you would like to Preserve hierarchy and Keep sorted.
- Organized — Forecast will present sections for each type of item you selected from In Forecast, include and Today includes, as well as one for your Due items. This was the default in earlier versions of OmniFocus. See Organized Outline to learn more.
- Layout — Settings in this section vary with the device that you are using: Keep Sidebar Hidden (Mac or iPad) or Show Calendar first (iPhone). Layout settings have platform scope. OmniFocus Pro allows you to set a custom layout for this perspective.
Forecast Outline
The Forecast Outline can use a Flexible structure (new in OmniFocus 4) or an Organized structure. The same information is presented, regardless of which option you choose, though the difference in appearance may significantly change how you view and interact with your actions and projects.
In each case, the Outline will be filled with actions and projects that have assigned Due Dates, as well as the types of items you’ve enabled in Forecast View Options.
On Hold Projects
Actions that are part of projects that are On Hold, as well as the projects themselves, are hidden in Forecast. This is to ensure that you don’t spend time thinking about projects that you have previously decided to pause.
![]() If you would like these actions and projects to show in Forecast,
OmniFocus Pro
allows you to change this behavior by enabling
Include items from On Hold projects.
If you would like these actions and projects to show in Forecast,
OmniFocus Pro
allows you to change this behavior by enabling
Include items from On Hold projects.
Forecast Outline: Flexible
The new default structure in OmniFocus 4 is Flexible, which will present a single unified list combining all the types of items you have selected in View Options, alongside your Due items. There are also settings for Preserve hierarchy and Keep sorted.
Preserve Hierarchy
In previous versions of OmniFocus, Forecast displayed a flat list of actions, action groups, and projects, in the order that they needed to be completed (top to bottom, children before parents). This presented two challenges: it could be difficult to figure out which project an action belonged to, especially if you re-use project structures (such as for different clients); the order of tasks was logical, but having parent items (action groups and projects) listed after child items (actions) didn’t work for everybody.
OmniFocus 4 addresses both of those challenges by making the presentation of your OmniFocus data more consistent across all perspectives.
Preserve Hierarchy is enabled by default. This setting doesn’t add or remove items from Forecast, but it does change how those items are presented. Actions will display as part of the containing action groups or projects, and those action groups or projects can be collapsed for an overview, or expanded for a detailed view.
As an example, if you have a project due today (“Icon for new version of application”) which has two actions:
- Check with client for design feedback
- Finalize icon design for client
OmniFocus 3 (and earlier versions) would display three separate due items, with the project listed after the actions, as OmniFocus expects you to complete each action before completing the project:
- Check with client for design feedback
- Finalize icon design for client
- Icon for new version of application
OmniFocus 4 displays those same due items with the hierarchy preserved:
- Icon for new version of application
- Check with client for design feedback
- Finalize icon design for client
Which allows you to collapse or expand the project, depending on the level of detail that you would like to see.
Keep Sorted
When first installed, OmniFocus 4 will sort actions and projects in the Forecast Outline by Due date. If you have Calendar events enabled, OmniFocus will do its best to sort the actions, projects, and events into chronological order. By default, Keep sorted is disabled, which allows you to re-order items in the Outline using drag and drop or the Move Down, Right, Up, Left keyboard shortcuts. Once you have begun reordering items manually, new (or previously unseen) items will appear at the bottom of the Outline, and you may move them into your desired location.
With Keep sorted disabled, and Preserve hierarchy enabled, it is possible to use drag and drop to move actions between action groups or projects, if they are in the same Outline view. This can be very powerful, but can also have surprising results, if you aren’t careful where you drop an item.
If you enable Keep sorted,
OmniFocus will return to sorting items for you,
but will also save the manual reordering that you’ve already done;
try toggling the setting in View Options, to see what happens.
Keeping Forecast Sorted
When Keep sorted is enabled, OmniFocus will first sort items in order of the earliest:
Your Forecast view will then be sorted by:
- Items with a Forecast tag, which are also Flagged, sorted in Forecast tag sort order.
- Items with a Forecast tag, sorted in Forecast tag sort order.
- Items that are Flagged, sorted by Due date, and then in either Inbox order or Projects order.
And finally:
- Due date, if Defer Until date and Notification date are the same.
- Inbox order, and then Projects order.
- Added date.
Remember that sorting is based on which Forecast View Options you have enabled, and whether you are using OmniFocus or OmniFocus Pro
Forecast Outline: Organized
Previous versions of OmniFocus used a structure that we now refer to as Organized.
The Outline will contain one or more sections, with each section presenting a specific type of item you selected in View Options, as well as one for your Due items (which always display). The possible sections include Calendar Events, Due, Deferred, Flagged, and (when using OmniFocus Pro) Tagged and Scheduled Notifications.
Items may display in one or more sections, if they match the type for each section. As an example, you may see the same action in Due, Tagged, and Flagged… if it’s due today, has a Forecast tag applied, and has also been flagged.
When using the Organized structure, the Outline displays a flat list of actions, action groups, and projects, in the order that they need to be completed (top to bottom, children before parents). Hierarchy is not presented, nor is manual ordering possible. If you would to see what project an action is part of while using an Organized structure, try enabling Show full project path in the settings for Fluid Layout or Columns Layout (Mac only).
Forecast Outline: Calendars
Forecast can display Calendar events in the same list as your actions and projects when using a Flexible structure, or in a separate section when using an Organized structure.
Calendar events in the Outline are for display purposes,
and can’t be edited in OmniFocus.
Tap or click the
Calendar button
 next to an event to open it in the Calendar app
(or the app chosen in the
Open Calendar Events In setting).
next to an event to open it in the Calendar app
(or the app chosen in the
Open Calendar Events In setting).
To view calendar events in OmniFocus, you need to enable Calendar events in the Forecast View Options, and then tap or click on Choose Calendars to select which calendars to display. OmniFocus will present any calendars that are configured in Apple’s Calendar application on your local device, whether Mac, iPhone, or iPad.
These calendars may be from Apple’s iCloud, Google Calendar, other CalDAV servers to which you have subscribed, or even local calendars. To add to, remove, or modify the calendars available on your device, see Apple’s User Guide articles:
- Add or delete calendar accounts on Mac
- Set up mail, contacts, and calendar accounts on iPhone
- Set up mail, contacts, and calendar accounts on iPad
The first time you launch OmniFocus, you will be asked to grant OmniFocus permission to access your Calendar and Contacts, in order to view calendar events in Forecast, and to assign contact locations to tags. Choose Allow to grant access, or Don’t Allow to deny access. If you choose Don’t Allow, and later change your mind, you can update the setting in the Privacy & Security pane in System Settings on Mac, iPhone, or iPad.
Once you have selected calendars to display in OmniFocus, calendar events will display above and below the actions and projects that have assigned due dates, based on the scheduled time for each, as long as you are using a Flexible structure. If you have Keep sorted enabled, this should work as you expect.
With Keep sorted disabled, OmniFocus will do its best to save the order of everything in the Outline, including calendar events, and sync that information between devices. If you are seeing events sort out of order, please read the following note.
There are two situations in which manual ordering of events may not work as expected.
The first is when the calendar event identifier is changed by the calendar server (this can happen when changing an event from one calendar to another), so OmniFocus doesn’t know that it has previously seen an event, and sorts it to the bottom of the Outline.
The second is when you have sorted your Forecast on one device (such as your iPhone), but a second device (your Mac) has a calendar event the first device can’t access; in this case, the event on the second device will be sorted to the bottom of the Outline.
Forecast Sidebar
The Forecast Sidebar displays a calendar, with a tile for Past (everything prior to Today), a tile for Future (everything after the last date displayed on the calendar), and a tile for each date in the next month. This gives you a higher level overview than the piano keys in the Outline, so you can easily see how many items you have scheduled during the next month, as well as your anticipated workload.
Each tile also shows the number of items associated with that date. For Due items, the tile is color-coded according to the most urgent item: yellow indicates that an item is due soon, and red indicates an item is due or overdue.
To create a new action that is due on a particular day, tap the appropriate date tile, followed by Smart Add (on iPhone, iPad, or Apple Vision Pro), or use New Action (on any device). New actions created in Past will have a due date of yesterday, while new actions created in Future will have a due date of the day after the last date tile.
On Mac, you can:
- Click on a single date to view only that date in the Outline.
- Click and drag on a range of dates to view them all in the Outline; you can also do this using Shift-click (click on one date, and then click on a second date while holding down the Shift key).
- Command-click to select discontiguous dates, such as each weekend day in the coming month, to help plan your weekends.
- Drag and drop an item from the Outline onto a date in the Sidebar to assign it a due date that matches that date.
- If you hold down the Command key while dragging an item, OmniFocus sets the defer until date when you drop it, instead of setting the due date.
- If you hold down Option-Command while dragging, OmniFocus sets both the defer until date and the due date for the item.
On an iPhone, iPad, or Apple Vision Pro, you can:
- Tap on a single date to view only that date in the Outline.
- Tap the
Select button
in the top toolbar,
and tap on a selection of dates to view them all in the Outline,
tap the Select All button
te select all visible dates,
or tap the Clear button
to deselect all visible dates.
On iPhone, tap the
More Menu button
to show the Select button.
- Drag and drop an item from the Outline onto a date in the Sidebar to assign it a due date that matches that date.
Flagged
The Flagged perspective gathers together all projects, action groups, and actions which have been Flagged, as well as any children of the flagged items.
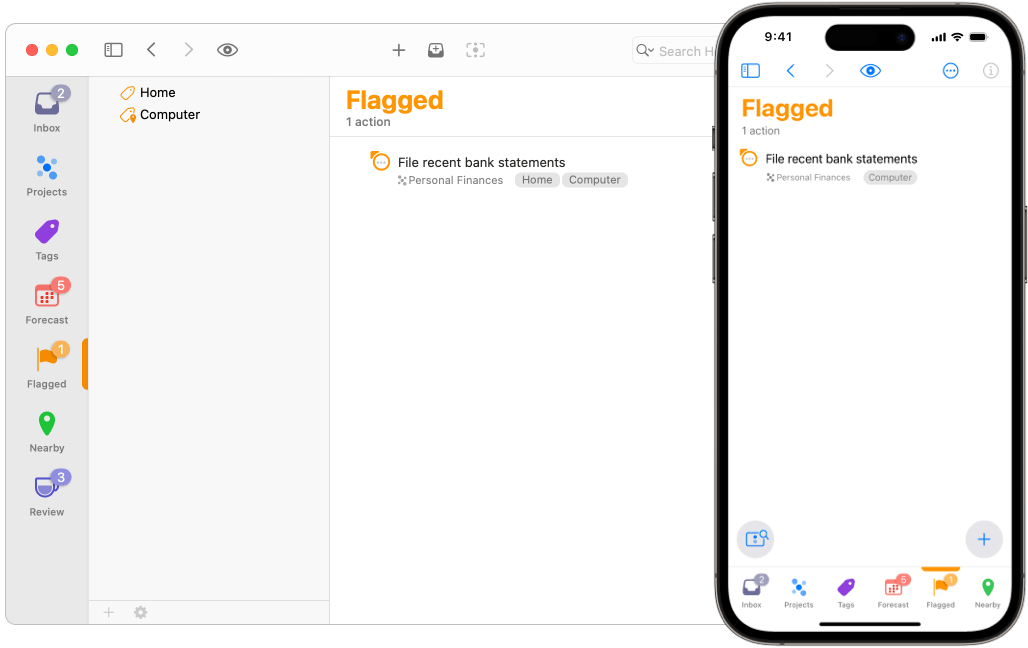
To flag an item,
tap or click the
Flag button
 on the Outline row,
tap or click the
Flag button
in the Inspector,
swipe from left to right (on iPhone, iPad, or Apple Vision Pro),
or use the Set Flag command
(Shift-Command-L, or F when using Bare Key Editing).
You can remove the flag using the same method.
on the Outline row,
tap or click the
Flag button
in the Inspector,
swipe from left to right (on iPhone, iPad, or Apple Vision Pro),
or use the Set Flag command
(Shift-Command-L, or F when using Bare Key Editing).
You can remove the flag using the same method.
The
 Status Circle
for an action or action group
with a flag
changes to orange,
with a small orange flag added to the upper leading edge of the circle,
to help you see that it is important.
Status Circle
for an action or action group
with a flag
changes to orange,
with a small orange flag added to the upper leading edge of the circle,
to help you see that it is important.
When you flag a project or action group, all the actions within it inherit that flag, along with the sense of importance.
The
 Status Circle
for an action or action group
with an inherited flag
is still orange,
but displays a hollow flag,
rather than a solid flag.
Status Circle
for an action or action group
with an inherited flag
is still orange,
but displays a hollow flag,
rather than a solid flag.
Flags that are inherited can’t be directly removed; the parent item must be unflagged, or the action moved to a different parent. Note that it is possible to flag an item which already has an inherited flag; if this happens, the hollow flags will be filled in to communicate the change.
Have an action or action group that is both important, and has a date that is rapidly approaching, or has passed?
In this situation, the Status Circle will replace the orange circle with either a yellow Due Soon circle, or red Overdue circle, leaving the orange flag to communicate importance.
Flagged View Options
The Flagged perspective
provides the following
View Options:
- In Flagged, show — Choose which items you would like visible in the
Outline (Available is the default). Each option describes the items
included; see
View Options and
Flag to learn more. Visibility settings have
global scope.
- Structure — Choose whether to leave Flagged items as a flat list or group them by another field. Structure settings have global scope.
- Layout — Settings in this section vary with the device that you are using: Keep Sidebar Hidden (Mac or iPad) or Show Tag List first (iPhone). Layout settings have platform scope. OmniFocus Pro allows you to set a custom layout for this perspective.
Flagged Outline
The Flagged Outline will show actions, action groups, and projects, as
long as they match the selected
View Options filter. To always hide projects
and action groups from Flagged, focusing exclusively on actions, enable
Hide projects and action groups in
Organization settings.
By default, items in the Flagged Outline are presented as a flat list, sorted first by due date (from oldest to newest), then by project (for items with the same due date). Sorting isn’t affected by whether a flag is inherited or directly applied.
You can choose to group your items by:
- Ungrouped — Items are not grouped, and are presented as a flat list.
- Tag — Items are grouped by individual tag. If an action has more than one tag, it appears within each of its tags.
- Tags (Combined) — Items are grouped by the combination of all assigned tags. Regardless of the number of tags on an action, it appears only once, in a group named with its tag combination. Only items which have identical tags will be grouped together.
- Project — Items are grouped by project.
- Due — Items are grouped by due date, from oldest to newest. The granularity of the grouping increases as it nears the present day. Items with no due date assigned are grouped at the bottom.
- Defer Date — Items are grouped by defer date, from oldest to newest. The granularity of the grouping increases as it nears the present day. Items with no defer date assigned are grouped at the top.
- Completed — Items are grouped by completion date, from most recently completed to oldest. The granularity of the grouping increases as it nears the present day. Items with no completion date are grouped at the bottom.
- Dropped — Items are grouped by dropped date, from most recently dropped to oldest. The granularity of the grouping increases as it nears the present day. Items with no dropped date are grouped at the bottom.
- Added — Items are grouped by the date they were added to OmniFocus, from newest to oldest. The granularity of the grouping increases as it nears the present day.
- Changed — Items are grouped by the date they were most recently edited, from newest to oldest. The granularity of the grouping increases as it nears the present day.
Flagged Sidebar
The Flagged Sidebar shows a list of your tags, presented in the same order as in the Tags Sidebar, and which can be reorganized using the same methods.
The list is filtered to show only tags which are assigned to items that have been flagged.
Nearby
The Nearby perspective shows you items with assigned tags which have a tag location. Depending on how you’ve configured each tag, you can see nearby actions that are available for work, whether they are in nearby neighborhoods, at nearby businesses (a specific location, or one of multiple locations), or at a nearby address for someone in your Contacts app.
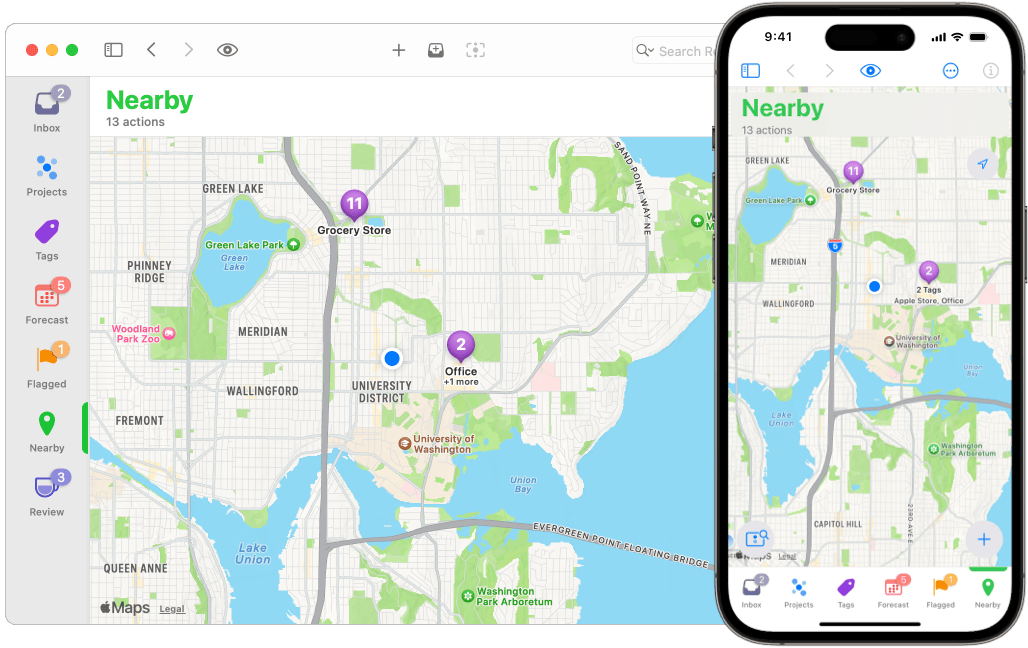
If you didn’t grant OmniFocus access to your location when you first launched the app, you’ll be asked again the first time you use Nearby, as location access is required for Nearby to function.
An active internet connection is also required for Nearby to work. If you are on a mobile device, turning on Wi-Fi in the Settings app (in addition to cellular service) improves the quality and accuracy of location services, even if your device isn’t connected to any Wi-Fi access points.
Nearby View Options
The Nearby perspective
provides the following
View Options:
- In Nearby, show — Choose which items you would like visible in the Outline
(Available is the default). Each option describes the items included; see
View Options to learn more. Visibility
settings have global scope.
- Structure — The default view is set to Map, and can be changed to List. Structure settings have global scope.
- Layout — Settings in this section vary with the device that you are using: Keep Sidebar Hidden (Mac or iPad) or Show Tag List first (iPhone). Layout settings have platform scope. OmniFocus Pro allows you to set a custom layout for this perspective.
Nearby Outline: Map
When set to Map, the Nearby Outline displays a map view of all items that:
- Are Available (this can be changed in Nearby View Options)
- Have a location-aware tag assigned
- Are within 50 kilometers (about 31 miles) of your current location
The initial map view should show all of these items; if they can display in a smaller area than the default, then the map view will show the smaller area. As you change Nearby View Options, the map view will update to reflect your selection.
Once OmniFocus has presented the map, you can zoom out (to show actions on the other side of the city, or even the other side of the country) or zoom in (to see actions in a specific neighborhood, or near another planned errand). There is no limit to how far out you can zoom, or how far away your items can be; they will all be displayed on the map, as long as they have a tag location.
The map shows a
Pin button
 for each tag location.
The button
includes a count of items with that tag assigned.
Tapping or clicking on the button
will show a popup which includes
the name and assigned location of the tag.
for each tag location.
The button
includes a count of items with that tag assigned.
Tapping or clicking on the button
will show a popup which includes
the name and assigned location of the tag.
There are two additional buttons in the popup:
- A List button
 ,
which opens
Tags
to display a list of all items with that tag assigned.
,
which opens
Tags
to display a list of all items with that tag assigned. - An Arrow button
 ,
which opens the Maps app
to provide directions to the tag location.
,
which opens the Maps app
to provide directions to the tag location.
If multiple tags are too close together on the map to show as individual pins, then they are presented as a pin group; this group is labeled with one tag name, as well as a note that indicates how many additional tags are included.
Zooming in will allow pin groups to separate into individual pins,
while zooming out will group individual pins together.
Tapping or clicking on a pin group
will open
Tags,
and show a list of items which have any of the pin group tags assigned.
Nearby Outline: List
When set to List, the Nearby Outline displays a list view of all items that:
- Are Available (this can be changed in Nearby View Options)
- Have a location-aware tag assigned
- Are within 50 kilometers (about 31 miles) of your current location
Items are grouped by tag, with tags listed from closest to furthest away; within a group, items are sorted in Projects order. On an iPhone, iPad, or Apple Vision Pro, tapping on the distance indicator on the right side of a tag row will open the Maps application, to provide directions to the tag location.
If an item is blocked or unavailable it won’t appear, unless you change view options.
Tags will not appear in the Nearby Outline unless they have a tag location and are assigned to an action or project.
Nearby Sidebar
The Nearby Sidebar shows a list of your tags, presented in the same order as in the Tags Sidebar, and which can be reorganized using the same methods.
The list is filtered to show tags that either have a tag location directly assigned, or that are part of a tag group with a tag location assigned.
When you select a tag with an assigned tag location, the Map view will adjust to show the selected tag. If no tag is selected, the Map will return to showing you the default Map view.
Review
The Review perspective displays a list of projects that are due for review in the Review Sidebar, while allowing you to concentrate on a single project in the Review Outline.
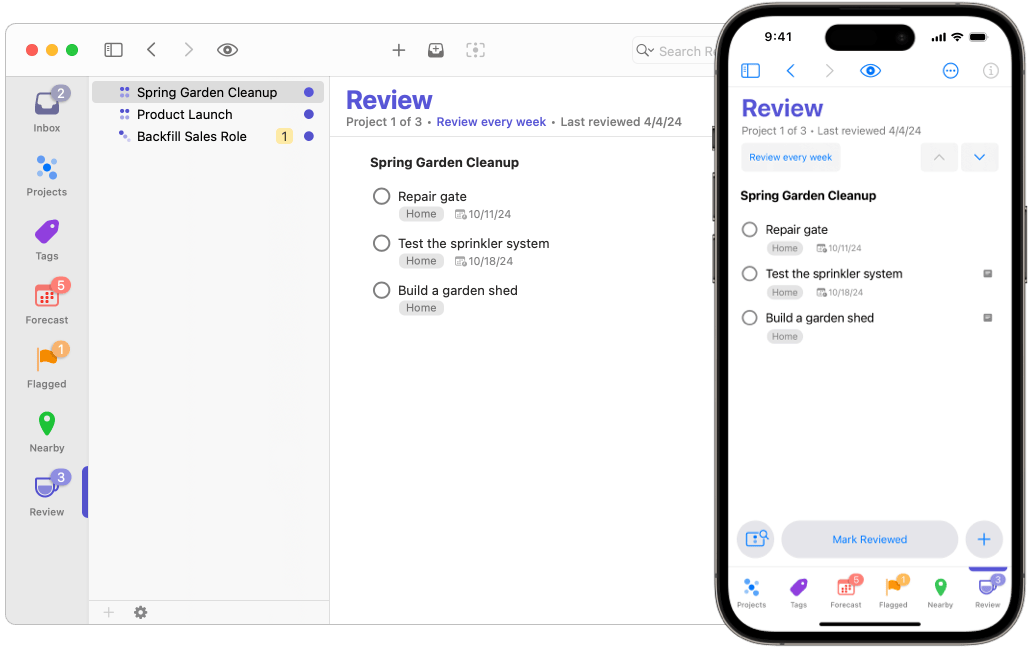
Reviewing your projects helps ensure they are fully captured and planned in OmniFocus, so your actions are ready for work. If you have projects that need actions added, projects that aren’t relevant anymore, or projects you don’t plan to do any time soon, following a regular review process can help keep them from falling through the cracks.
Each project has a Next review date, as well as a setting for Review every, based on how often you intend to review it; both can be viewed and updated using the Review inspector. The default Review every interval for new projects can be changed by adjusting the setting for By default, review projects every in the Dates & Times settings for Mac or iPhone, iPad, and Apple Vision Pro.
Review View Options
The Review perspective
provides the following
View Options:
- In Review, show — Choose which items you would like visible in the Outline
(Remaining is the default). Each option describes the items included; see
View Options to learn more. Visibility
settings have global scope.
- Structure —
Choose to show or Hide blocked projects
(projects that are on hold or deferred);
list projects in Projects order
or Sort by next review;
and to hide or Show folders in outline,
which can provide context for how a project you are reviewing
fits into your overall Projects structure.
Structure settings have global scope.
- Layout — Settings in this section vary with the device that you are using: Keep Sidebar Hidden (Mac or iPad) or Show Project List first (iPhone). Layout settings have platform scope. OmniFocus Pro allows you to set a custom layout for this perspective.
Review Outline
When you open the Review perspective, the Sidebar displays a list of projects that are ready for review.
(Folders are never shown in the Sidebar, but can be shown in the Outline using View Options).
The Review Outline shows one project at a time, allowing you to easily focus on the project you are reviewing. The top project should already be open in the Outline for your review; if not, or if you’d like to start with a different project, select one in the Sidebar to get started.
There are buttons at the top or bottom of the Outline, depending on whether you are using a Mac, iPhone, or iPad:
- Previous — The up arrow will show you the previous project in the list.
- Next — The down arrow will show you the next project in the list.
- Mark Reviewed — Sets Last reviewed date to today, sets the Next review date for the project based on the Review every interval, and then presents the next project in the list.
Reviewing a Project
- Open the Review perspective, and select the project to review.
- The top of the window will display the number of projects ready for review, the last time this project was reviewed, and how often it is scheduled for review. Tap or click on the Review every label to quickly change the Next review date (perhaps today isn’t the best day to review this project?) or Review every interval (if the project should be reviewed more or less frequently).
- Consider whether this project has the proper Project Status. Has it been Completed, or is it still Active? If you’re not currently working on it, should it be put On Hold, or does it need to be Dropped?
- Do you need to update any actions, add new actions, or remove no-longer-relevant actions? Do they need to be organized differently?
- Once your review is complete, click or tap on
Mark Reviewed
in the Outline,
or the
Mark Reviewed button
 in the
Mac toolbar.
in the
Mac toolbar.
If you would like to review a project before its Next review date,
you can either select it and use the Review inspector
to set the Next review date to today,
or drag and drop the project onto the Review perspective tab in the Sidebar,
which also sets Next review date to today.
Either way, the project will appear in
Review,
ready for your consideration.
Review Sidebar
When you open the Review perspective, the Sidebar displays a list of projects that are ready for review.
(Folders are never shown in the Sidebar, but can be shown in the Outline using View Options).
The Review Sidebar presents those projects in a flat list, intentionally ignoring any structure that you have created in the Projects perspective.
By default, those projects are presented in order of their Next review date, from oldest at the top, to newest at the bottom. If you would like them sorted in Projects order, to match the Projects perspective, uncheck Sort by next review in the Nearby View Options.
Completed
The Completed perspective helps you quickly find items that have been completed, whether you are looking for an item that you accidentally tapped, want to look back on your week with satisfaction, or are preparing a report for stakeholders.
Completed can be opened from Quick Open on all devices, or from the Perspectives menu or Perspectives List on Mac.
This perspective is intended to be a temporary view of your OmniFocus data, so switching away from it removes the tab from your Perspectives Bar. If you would like to keep it in your Perspectives Bar for quick reference, you can favorite it using the Perspectives List on Mac, or Quick Open on iPhone, iPad, or Apple Vision Pro.
Completed View Options
The Completed perspective is designed to show only completed items, so provides limited View Options:
- Layout — Settings in this section vary with the device that you are using: Keep Sidebar Hidden (Mac or iPad) or Show Tags List first (iPhone). Layout settings have platform scope. OmniFocus Pro allows you to set a custom layout for this perspective.
Completed Outline
The Completed Outline displays all completed actions, action groups, and projects, grouped and sorted by completion date, from most recently completed to oldest. The granularity of the grouping increases as it nears the present day.
Completed Sidebar
The Completed Sidebar shows a list of your tags, presented in the same order as in the Tags Sidebar, and which can be reorganized using the same methods.
The list is filtered to show only tags which are assigned to items that have been completed.
Changed
The Changed perspective helps you quickly find items that have been changed, and is an excellent way to find items that you have misplaced, or get a sense of where the most movement is happening in your OmniFocus data.
Changed can be opened from Quick Open on all devices, or from the Perspectives menu or Perspectives List on Mac.
This perspective is intended to be a temporary view of your OmniFocus data, so switching away from it removes the tab from your Perspectives Bar. If you would like to keep it in your Perspectives Bar for quick reference, you can favorite it using the Perspectives List on Mac, or Quick Open on iPhone, iPad, or Apple Vision Pro.
Changed View Options
The Changed perspective is designed to show only changed items, so provides limited View Options:
- Layout — Settings in this section vary with the device that you are using: Keep Sidebar Hidden (Mac or iPad) or Show Tags List first (iPhone). Layout settings have platform scope. OmniFocus Pro allows you to set a custom layout for this perspective.
Changed Outline
The Changed Outline displays all changed actions, action groups, and projects, grouped and sorted by changed date, from most recently changed to oldest. The granularity of the grouping increases as it nears the present day.
Changed Sidebar
The Changed Sidebar shows a list of your tags, presented in the same order as in the Tags Sidebar, and which can be reorganized using the same methods.
The list is filtered to show only tags which are assigned to items that have been changed.
Custom Perspectives (Pro)
Custom Perspectives are saved views of your OmniFocus data, which allow you to quickly view, edit, and complete actions and projects, for specific situations.
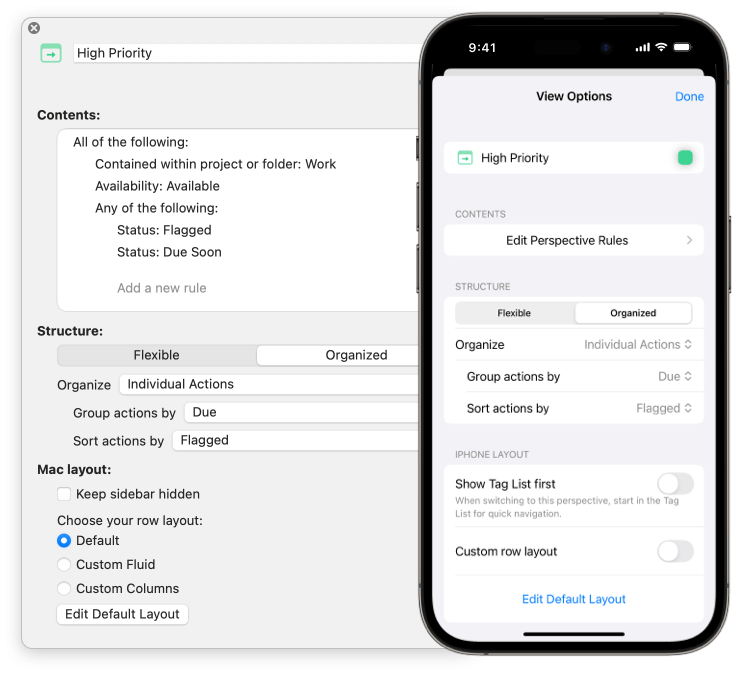
This chapter describes how to create and edit custom perspectives, and details the various perspective rules you can adjust, to get the perfect view of your actions and projects.
Custom perspectives can be created,
edited,
deleted,
and favorited using the
Perspectives List on Mac,
or
Quick Open
on iPhone, iPad, and Apple Vision Pro.
Custom perspectives can be viewed by
adding them to your Perspectives Bar
or using
Quick Open
on Mac, iPhone, iPad, and Apple Vision Pro;
or selected from the Perspectives List
or Perspectives menu on Mac.
This chapter describes creating and editing custom perspectives with the latest version of OmniFocus 4. You can still sync and view custom perspectives created in earlier versions of OmniFocus, but you will need to upgrade them in order to edit them in the current version.
Creating Custom Perspectives
To create a new custom perspective on Mac,
select Add Perspective…
from the Perspectives menu,
or click the
Add Perspective button
in the Perspectives List.
To create a new custom perspective on iPhone, iPad, or Apple Vision Pro,
tap the
Add Perspective button
in the bottom of the
Quick Open.
window.
If the Quick Open search field is active,
tap Cancel to show the button.
A new custom perspective will be created,
with
View Options
open,
ready for you to begin editing.
Editing Custom Perspectives
To edit an existing custom perspective,
navigate to it using
Quick Open or
the Perspectives Bar;
or select it from the Perspectives menu
or Perspectives List on Mac;
then open
View Options.
You can also select Edit from the Perspective Bar shortcuts menu.
Deleting Custom Perspectives
To delete an existing custom perspective,
select Delete from the
Perspectives List Actions Menu
on Mac,
or touch and hold the perspective in
Quick Open
on iPhone, iPad, and Apple Vision Pro,
and then select Delete.
General
The top section of
View Options
contains settings to customize the appearance of
your custom perspective.
These settings have global scope.
Click or tap the name field to enter the title for a new perspective or change an existing title.
Click or tap the
Icon button
next to the title
to open the icon picker,
where you can choose from the Omni-designed icons
included with OmniFocus.
You can also click or tap Custom (at the bottom of the picker)
to open the system browser
and choose your own icon from any image you have stored locally,
or in most cloud locations.
Click or tap the color swatch next to the title to open the color picker, where you can choose from the Omni-selected colors. You can also tap Custom… to choose a custom color for your perspective and icon.
Contents
This section of
View Options
determines which items display in the custom perspective.
These settings have global scope.
Items are included or excluded by selecting perspective rules for specific item properties: if an item matches the rule, it is either included in the perspective, or excluded from the perspective.
On Mac, perspectives rules are always visible. On iPhone, iPad, and Apple Vision Pro, the rules are displayed after tapping Edit Perspective Rules.
Perspective rules are set up in a hierarchy, with All of the following, Any of the following, or None of the following at the top of the list. This determines whether all, any, or none of the rules below will apply to items. (The top rule can’t be deleted, but can be set to one of the other options, such as changing from All to Any.)
By default, new custom perspectives include one Availability: Remaining rule as an example. Since it is nested beneath All of the following:, new custom perspectives will only show items with an availability status of Remaining (Completed and Dropped items will not appear).
If you don’t want to include the default rule in your perspective, tap on the three dots in the row, and then select Disable or Delete. You can also modify the existing rule; in this case, Availability: Remaining can be changed to First Available, Available, Completed, or Dropped.
Click or tap Add a new rule to choose from the list of available perspective rules to use in the perspective.
When adding a perspective rule, note that it will apply based on its position in the hierarchy. All rules added beneath the top rule use its logic: All, Any, or None of them must apply for items to be included or excluded from the perspective.
By nesting rules beneath an additional All, Any, or None rule, you can create additional complexity.
- All of the following: — If an item matches all the rules nested below this rule, the item will be included in the perspective, unless excluded by another rule. This corresponds to a Boolean AND operation.
- Any of the following: — If an item matches any of the rules nested below this rule, the item will be included in the perspective, unless excluded by another rule. This corresponds to a Boolean OR operation.
- None of the following: — If an item matches any of the rules nested below this rule, the item will be excluded from the perspective, regardless of any other rules. This corresponds to a Boolean NOT operation.
To reorder a rule in the list, click and drag or touch and hold to lift it, then drag and drop it elsewhere. This is particularly useful in perspectives with multiple levels of hierarchy, since moving a rule to a different position can change which items are included or excluded.
Reordering rules that are peers has no effect on how they are interpreted.
OmniFocus presents a simplified list of rules when adding a new perspective rule. Many of the rules contain additional options, which are described below.
Perspective Rules
Perspective rules are listed in the order they display in the app:
- Status: Due Soon/Flagged
- Availability: First Available/Available/Remaining/Completed/Dropped
- Has an estimated duration
- Has an estimated duration less than: …
- Has a due date
- Has a defer date
- Has date in range: …
- Is repeating
- Is untagged
- Has a tag that…
- Is tagged with any of: …
- Is tagged with all of: …
- Is a project, group, or neither
- Is in the Inbox
- Is in a single actions list
- Has a project that…
- Is contained within project or folder: …
- Matches search terms:
- All of the following:
- Any of the following:
- None of the following:
- Comment
Status
The Status: Due Soon/Flagged rule has two options:
- Status: Due Soon — Includes any item which is Due Soon, and which has not been Completed or Dropped.
- Status: Flagged — Includes any item which is Flagged.
Availability
The Availability rule has five options:
- Availability: First Available — Includes any item which is First Available.
- Availability: Available — Includes any item which is Available.
- Availability: Remaining — Includes any item which is Remaining.
- Availability: Completed — Includes any item which is Completed.
- Availability: Dropped — Includes any item which is Dropped.
Has an Estimated Duration
The Has an estimated duration rule includes any item with an assigned Estimated Duration.
Has an Estimated Duration Less Than
The Has an estimated duration less than rule has four options:
- Has an estimated duration less than: 5 minutes — Includes any item which has an Estimated Duration of less than 5 minutes.
- Has an estimated duration less than: 15 minutes — Includes any item which has an Estimated Duration of less than 15 minutes.
- Has an estimated duration less than: 30 minutes — Includes any item which has an Estimated Duration of less than 30 minutes.
- Has an estimated duration less than: 60 minutes — Includes any item which has an Estimated Duration of less than 60 minutes.
Has a Due Date
The Has a due date rule includes any item with an assigned Due Date.
Has a Defer Date
The Has a defer date rule includes any item with an assigned Defer Until Date.
Has Date in Range
The Has date in range rule includes any item with a specific type of date in a given range.
When first added, the rule is set to Has a due date of: Today.
Click or tap on the left pop-up menu to choose between:
- Date Due — Includes any item with a Due Date that matches…
- Defer Date — Includes any item with a Defer Until Date that matches…
- Date Completed — Includes any item with a Completed Date that matches…
- Date Dropped — Includes any item with a Dropped Date that matches…
- Date Added — Includes any item with an Added Date that matches…
- Date Changed — Includes any item with a Changed Date that matches…
Then click or tap on the right pop-up menu to choose between:
- On — …the day or date that you enter.
- Yesterday — …yesterday.
- Today — …today.
- Tomorrow — …tomorrow.
- In the Past — …the selected number of hours, days, weeks, months, or years before now.
- In the Next — …the selected number of hours, days, weeks, months, or years after now.
- Between — …between two days or dates that you enter.
When entering days or dates for the On or Between options, you can choose to enter a specific date (with or without a time), such as “2028-01-01”; or a descriptive term (such as “january”).
If a specific date is entered, the rule will include any item that matches the selected date or range of dates, and the list will be consistent.
If a descriptive term is entered, the rule will include any item that matches the selected day or range of days, and the list will update each time the perspective is viewed.
This allows flexibility in choosing between viewing any items in a fixed period of time (“before December 31”), or viewing any items in an updating period of time (“in the next month”).
While you are entering a descriptive term, OmniFocus will parse the term as it is entered, and display that result below the field.
Read the Entering Dates and Times section of The Inspector to learn more.
Is Repeating
The Is repeating rule includes any item which is configured to Repeat.
Is Untagged
The Is untagged rule includes any item without assigned Tags.
Has a Tag That
The Has a tag that rule has five options:
- Has a tag that is active or on hold — Includes any item with an assigned Tag that is Active or On Hold.
- Has a tag that is on hold — Includes any item with an assigned Tag that is On Hold.
- Has a tag that is dropped — Includes any item with an assigned Tag that is Dropped.
- Has an active tag that has available actions — Includes any item with an assigned Tag that is Active, and which is also assigned to Available actions.
- Has an active tag that has no available actions — Includes any item with an assigned Tag that is Active, and which is also not assigned to any Available actions.
Is Tagged with Any Of
The Is tagged with any of rule includes any item that has any assigned Tag from your selected list.
Is Tagged with All Of
The Is tagged with all of rule includes any item that has all assigned Tags from your selected list.
Is a Project, Group, or Neither
The Is a project, group, or neither rule has four options:
- Is a project — Includes any item that is a Project.
- Is a group — Includes any item that is an Action Group.
- Is a project or group — Includes any item that is either a Project or an Action Group.
- Is not a project or group — Excludes any item that is either a Project or an Action Group.
Is in the Inbox
The Is in the Inbox rule
includes any item
that is in the
Inbox.
Is in a Single Actions List
The Is in a single actions list rule includes any item that is part of a Single Actions List.
Has a Project That
The Has a project that rule has seven options:
- Has a project that is active — Includes any item that is part of a Project which is Active.
- Has a project that is active or on hold — Includes any item that is part of a Project which is either Active or On Hold.
- Has a project that is on hold — Includes any item that is part of a Project which is On Hold.
- Has a project that has been completed — Includes any item that is part of a Project which has been Completed.
- Has a project that has been dropped — Includes any item that is part of a Project which has been Dropped.
- Has an active project that has no remaining actions — Includes any item that is part of a Project which is both Active and contains no Remaining actions.
- Has an active project that has a future defer date — Includes any item that is part of a Project which is both Active and has a future Defer Until Date.
Is Contained within Project or Folder
The Is contained within project or folder rule includes any item that is part of a Project, or part of a Project contained by a Folder, from your selected list.
Matches Search Terms
The Matches search terms rule includes any item that matches all the text phrases from your entered list.
All of the Following
The All of the following: rule includes any item which is included by all the rules nested below this rule.
Any of the Following
The Any of the following: rule includes any item which is included by any of the rules nested below this rule.
None of the Following
The None of the following: rule excludes any item which is included by any of the rules nested below this rule.
Comment
The Comment rule allows you to add a note to your rules. It does not affect what is included or excluded.
Structure
This section of
View Options
defines how the perspective’s items
are displayed in the Outline.
You can choose from Flexible or Organized,
with additional options available once you’ve selected your preferred structure.
These settings have global scope.
Flexible
The default structure is Flexible, which presents a single list of all the items included by your perspective rules. The list can be re-ordered using drag and drop, or the Move Down, Right, Up, Left keyboard shortcuts.
As you move items around, you may eventually find that you would like to start over; click or tap Sort Now to reset the list order.
The default Initial order is Projects Order, but you can choose between:
- Due & Flagged — Items are sorted based on their due date and flagged states. Items that are both due and flagged appear first (in the order that they are due), followed by all remaining flagged items, all other due items, and finally items that are neither flagged nor due.
- Projects Order — Items are sorted in Projects order.
- Tag — Items are sorted by tag. Items with multiple tags appear only once, alongside other actions with the same tag combination.
- Flagged — Items are sorted based on their flagged state. Items that are flagged appear first, followed by all other items.
- Name — Items are sorted alphabetically by name.
- Due — Items are sorted by due date. Items with the earliest due (or overdue) dates appear first, followed by actions with later due dates, and finally by actions without due dates.
- Defer Date — Items are sorted by defer until date. Items with the earliest defer dates appear first, followed by actions with later defer dates, and finally actions without defer dates.
- Added — Items are sorted by added date, from newest to oldest.
- Changed — Items are sorted by changed date, from newest to oldest.
- Completed — Items are sorted by completed date, with active items first, followed by completed actions from newest to oldest.
- Dropped — Items are sorted by dropped date, with active items first, followed by dropped actions from newest to oldest.
- Duration — Items are sorted by estimated duration, from shortest to longest. Items without an estimated duration appear at the bottom of the outline.
Once items have been sorted in your chosen order, they may be sorted a second time in Projects order.
As an example, when you sort by Flagged, flagged items are presented in Projects order, then all items without flags are presented in Projects order.
To learn more about the Preserve hierarchy option, please read the Forecast Outline: Flexible section of the Perspectives chapter.
Organized
Once you have selected Organized, several other options become available.
You can choose whether you would like to organize by Individual Actions, which displays a list of actions that can be grouped and sorted, or organize by Entire Projects, which displays a list of projects that can be grouped and sorted.
If your perspective rules exclude items that would be grouped or sorted by one of the criteria listed below, it is possible to choose options that offer no meaningful structure (such as choosing to group by Completed when the perspective is set to display items that are Remaining).
Organized: Individual Actions
When organized by Individual Actions, the Outline contains a list of all actions included by the perspective rules.
The Sidebar shows a filtered list of your tags, including only tags assigned to items in this custom perspective; you can use the same methods of organizing as in the Tags Sidebar.
Actions within the perspective can be grouped by:
- Ungrouped — Actions are not grouped, and are presented as a flat list.
- Tag — Actions are grouped by tag. If an action has more than one tag, it appears within each of its tags.
- Tags (Combined) — Actions are grouped by tag combination. Regardless of the number of tags on an action, it appears only once, in a group named with its tag combination.
- Project — Actions are grouped by project.
- Due — Actions are grouped by due date, from oldest to newest. The granularity of the grouping increases as it nears the present day. Actions with no due date are grouped at the bottom of the outline.
- Defer Date — Actions are grouped by defer until date, from oldest to newest. The granularity of the grouping increases as it nears the present day. Actions with no defer date are grouped at the bottom of the outline.
- Completed — Actions are grouped by completed date, from most recently completed to oldest. The granularity of the grouping increases as it nears the present day. Actions with no completed date are grouped at the bottom of the outline.
- Dropped — Actions are grouped by dropped date, from most recently dropped to oldest. The granularity of the grouping increases as it nears the present day. Actions with no dropped date are grouped at the top of the outline.
- Added — Actions are grouped by added date, from newest to oldest. The granularity of the grouping increases as it nears the present day.
- Changed — Actions are grouped by changed date, from newest to oldest. The granularity of the grouping increases as it nears the present day.
- Flagged — Actions are grouped according to their flagged status, with flagged actions first, followed by unflagged actions.
Actions (ungrouped, or within a group) can be sorted by:
- Due & Flagged — Actions are sorted based on their due date and flagged states. Actions that are both due and flagged appear first (in the order that they are due), followed by all remaining flagged items, all other due items, and finally items that are neither flagged nor due.
- Projects Order — Actions are sorted in Projects order.
- Tag — Actions are sorted by tag. Actions with multiple tags appear only once, alongside other actions in the grouping with the same tag combination.
- Flagged — Actions are sorted by flagged status, following by all other items.
- Name — Actions are sorted alphabetically by name.
- Due — Actions are sorted by due date. Actions with the earliest due (or overdue) dates appear first, followed by actions with later due dates, and finally by actions without due dates.
- Defer Date — Actions are sorted by defer until date. Actions with the earliest defer dates appear first, followed by actions with later defer dates, and finally actions without defer dates.
- Added — Actions are sorted by added date, from newest to oldest.
- Changed — Actions are sorted by changed date, from newest to oldest.
- Completed — Actions are sorted by completed date, with active actions first, followed by completed actions from newest to oldest.
- Dropped — Actions are sorted by dropped date, with active actions first, followed by dropped actions from newest to oldest.
- Duration — Actions are sorted by estimated duration, from shortest to longest. Actions without an estimated duration appear at the bottom of the outline.
To learn more about Preserve hierarchy, please read Forecast Outline: Flexible.
Organized: Entire Projects
When organized by Entire Projects, the Outline contains a list of items included by the perspective rules, inside of the projects that contain them.
Items without a project, that are otherwise included by the perspective rules, are grouped into an Inbox section at the top of the outline.
The Sidebar shows a filtered list of your projects, including only projects which contain items in this custom perspective; you can use the same methods of organizing as in the Projects Sidebar.
Projects within the perspective can be grouped by:
- Ungrouped — Projects are not grouped, and are presented as a flat list.
- Folder — Projects are grouped into the folders that contain them. Projects outside of folders are grouped at the bottom of the outline.
- Due — Projects are grouped by due date of the earliest of either a project, or actions inside a project, from earliest to latest. The granularity of the grouping increases as it nears the present day. Projects that have no due date, nor contain any action due dates, are grouped at the bottom of the outline.
- Defer Date — Projects are grouped by defer until date, from oldest to newest. The granularity of the grouping increases as it nears the present day. Projects with no defer date are grouped at the bottom of the outline.
- Completed — Projects are grouped by completed date, from most to least recently completed. The granularity of the grouping increases as it nears the present day. Projects with no completed date are grouped at the bottom of the outline.
- Dropped — Projects are grouped by dropped date, from most to least recently dropped. The granularity of the grouping increases as it nears the present day. Projects with no dropped date are grouped at the top of the outline.
- Next Review — Projects are grouped by next review date, from earliest to latest. The granularity of the grouping increases as it nears the present day.
- Added — Projects are grouped by added date, from newest to oldest. The granularity of the grouping increases as it nears the present day.
- Changed — Projects are grouped by changed date, from newest to oldest. (This includes changes to actions within the project.) The granularity of the grouping increases as it nears the present day.
Projects (ungrouped, or within a group) can be sorted by:
- Projects Order — Projects are sorted in Projects order.
- Name — Projects are sorted alphabetically by name.
- Flagged — Projects are sorted by flagged status, with flagged projects appearing first. The flagged status of individual actions within projects has no effect on this sorting.
- Due — Projects are sorted by due date of the earliest of either a project, or actions inside a project, from earliest to latest. Projects that have no due date, nor contain any action due dates, appear at the bottom of the outline.
- Defer Date — Projects are sorted by defer until date, from oldest to newest. Projects with no defer date appear at the bottom of the outline.
- Completed — Projects are sorted by completed date, with active projects first, followed by completed projects from newest to oldest.
- Dropped — Projects are sorted by dropped date, with active projects first, followed by dropped projects from newest to oldest.
- Next Review — Projects are sorted by next review date, from earliest to latest.
- Added — Projects are sorted by added date, from newest to oldest.
- Changed — Projects are sorted by changed date, from newest to oldest. (This includes changes to actions within the project.)
- Duration — Projects are sorted by estimated duration, from shortest to longest. Projects without an estimated duration appear at the bottom of the outline.
Layout
Custom perspectives can either use the default Layout settings, or configure a custom layout for each perspective. Layout settings have platform scope.
Click on Custom Fluid or Custom Columns (on Mac), or Custom row layout on iPhone, iPad, or Apple Vision Pro; this will present the same set of options as Layout settings for Mac or iPhone, iPad, and Apple Vision Pro, but will be applied only to the custom perspective you are editing.
Some settings in this section vary with the device that you are using: Keep Sidebar Hidden (Mac or iPad) or Show Project/Tags List first (iPhone).
Upgrading
Custom perspectives you create are synced between all the devices that sync with your OmniFocus database.
Older versions of OmniFocus may not support all the features of perspectives created with the latest versions of OmniFocus. (These perspectives will still sync provided the database version is compatible, but they will be hidden in older versions.)
If you are syncing a perspective created with an older version of OmniFocus, you can choose to upgrade the perspective to take advantage of the features described in this chapter, by clicking or tapping the Upgrade Perspective button in View Options for the custom perspective.
Existing perspective rules and settings will be converted to the newer perspective format. Please be aware that once custom perspectives have been upgraded to the latest version, they cannot be downgraded.
The Outline
The Outline is the primary view in OmniFocus, where you can view, add, remove, or edit actions and projects.
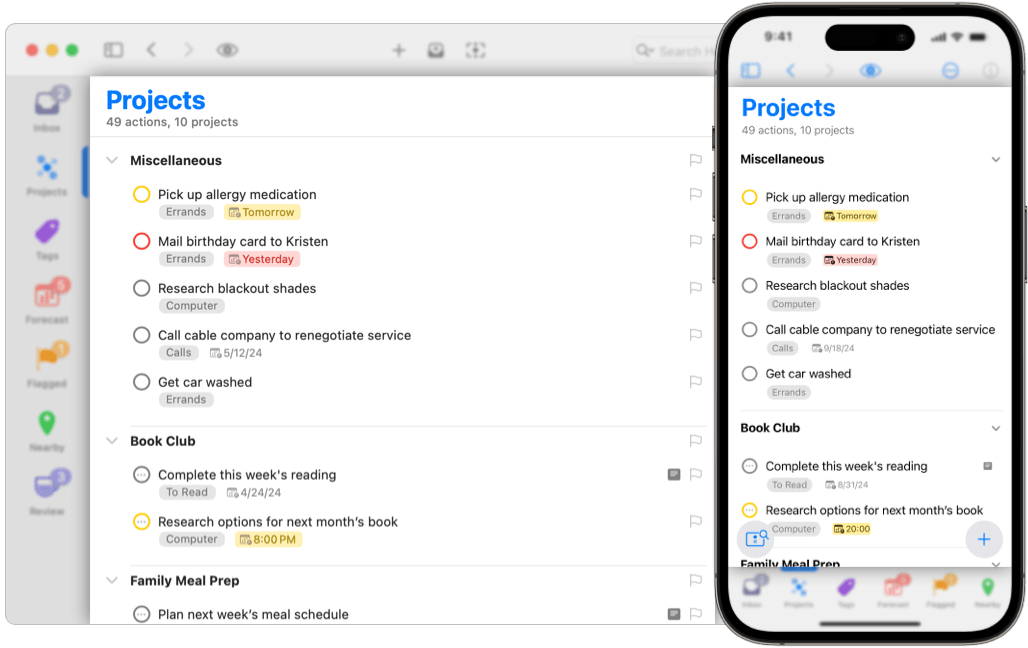
The contents of the Outline depend on which perspective you are viewing:
you can capture actions in the
Inbox,
make plans in
Projects,
narrow in on items only available in a specific location
or with a specific person using
Tags,
focus on the immediate future using
Forecast,
or use other perspectives
for their unique strengths.
When using Mac,
iPad in regular,
or Apple Vision Pro,
the Outline is in the center of the window.
The
Sidebar
can be shown or hidden on the leading edge,
and the
 Inspector
can be shown or hidden on the trailing edge.
When using iPhone or iPad in compact,
the Outline fills the window.
The
Sidebar
will slide in and out from the leading edge,
and the
Inspector
will slide in and out from the trailing edge.
Inspector
can be shown or hidden on the trailing edge.
When using iPhone or iPad in compact,
the Outline fills the window.
The
Sidebar
will slide in and out from the leading edge,
and the
Inspector
will slide in and out from the trailing edge.
Perspective Header
The top of the Outline includes the name of the current perspective, in addition to a count of inbox items, actions, and projects currently visible in the Outline.

This count depends on what you have selected
in the
Sidebar,
as well as which
View Options
you have chosen.
This count is not available in
Forecast
or
Review,
both of which show information specific to those views.
Outline Rows
The Outline is composed of rows that represent inbox items, actions, action groups, projects, folders, or tags.

When you first install OmniFocus, rows will display a default set of fields, each of them containing the assigned properties for a given item.
Fields can be updated in the Outline, or by using the Inspector; whenever possible, the editing experience should be the same.
Links for each of the fields below will show you the related Inspector sections, for more information about their properties.
The default fields include
the assigned
 Project,
any assigned
Project,
any assigned
 Tags,
the
Due Date,
a
Tags,
the
Due Date,
a
 Note and
Attachments
indicator, a
Flag
icon (on Mac), and
Status Circle
(for actions and action groups).
Note and
Attachments
indicator, a
Flag
icon (on Mac), and
Status Circle
(for actions and action groups).
When a row is selected for editing on iPhone,
iPad,
or Apple Vision Pro,
additional controls are displayed,
including the
Flag button
,
End Editing button
 ,
and Attachment button
,
and Attachment button
 (part of the Note field).
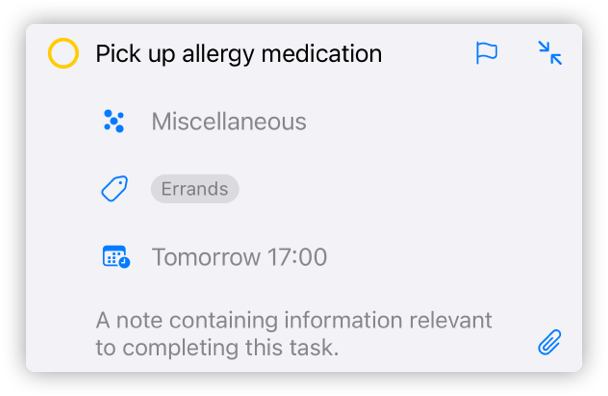
The default layout has been chosen to help you get a feel for the most often used information, but is only a small selection of all the available options.
Status Circle
Actions and action groups have a Status Circle, which is the quickest way to update their status to Completed, Dropped, or Active. Projects do not have a status circle, to prevent unintentional updates.
Clicking or tapping an
Active
status circle
will mark the action or action group
Completed,
displaying a checkmark inside the circle.
Clicking or tapping it again will set it to back to Active.
On Mac, pressing the Option key while clicking an Active status circle
will mark the action or action group
 Dropped,
displaying a dash inside the circle;
Option-clicking it again will set it back to active.
Dropped,
displaying a dash inside the circle;
Option-clicking it again will set it back to active.
Status circles can also communicate other important information:
actions can be
 Due Soon,
indicated by a yellow circle;
Due Soon,
indicated by a yellow circle;
 Overdue,
indicated by a red circle;
Flagged,
indicated by an orange circle and small flag;
or set to
Overdue,
indicated by a red circle;
Flagged,
indicated by an orange circle and small flag;
or set to
 Repeat,
indicated by three dots in the middle.
Repeat,
indicated by three dots in the middle.
It is possible to combine these states:
a
 Flagged,
Overdue,
Repeating action would have a
status circle that is red,
with an orange flag,
and an ellipsis in the middle.
Flagged,
Overdue,
Repeating action would have a
status circle that is red,
with an orange flag,
and an ellipsis in the middle.
Actions, action groups, and projects may be completed by pressing Space bar while they are selected. If the item has a status circle, it will also be updated.
Actions, action groups, projects, folders, and tags may be dropped by pressing Option-Space bar while they are selected. If the item has a status circle, it will also be updated.
Row Layout
When first installed, Outline rows use Fluid Layout, which is available on Mac, iPhone, iPad, and Apple Vision Pro. When using Mac, you may also choose to use Columns Layout.
You can change how OmniFocus displays information for all perspectives, by customizing the Layout settings for Mac, iPhone, iPad, or Apple Vision Pro.
If you are using
OmniFocus Pro,
you can change the Layout for each perspective separately,
using
View Options.
Fluid Layout
Fluid layout is designed to always show the most important information, with the added flexibility of quickly editing other fields. This is accomplished by having two sets of fields: one for display, and another for editing.
By default,
all items display
the assigned
Project,
Tags,
Due Date,
and
Flag
status.
Selecting a row allows you to edit those fields,
as well as the item’s note.
Other fields available for customization include
 Estimated Duration,
 Defer Until Date,
 Completion Date,
 Repeats,
and
Repeats,
and
 Notifications.
In addition to adding fields,
it is also possible to preview notes in the outline
(for iPhone, iPad, and Apple Vision Pro),
choose the number of Tags shown,
select between showing the project name or the full project path,
and decide whether to hide projects when redundant
(such as when viewing Projects).
For more information about customization, please see the Fluid Layout section of the Settings chapter.
Columns Layout
Columns layout is designed to display all information in a single row, which allows for easy scanning of the Outline. It is currently only available on Mac; if you would find it helpful on iPad or Apple Vision Pro, please email us.
By default,
all items display
the assigned
Project,
Tags,
Due Date,
and
Flag
status.
Selecting a row allows you to edit those fields.
Other fields available for customization include
Flag,
Estimated Duration,
Defer Until Date,
Completion Date,
Repeats,
![]() Note, and
Notifications.
Note, and
Notifications.
In addition to customizing which fields are displayed,
it is also possible to choose the number of Tags shown,
select between showing the project name or the full project path,
and decide whether to hide projects when redundant
(such as when viewing Projects).
For more information about customization, please see the Columns Layout section of the Settings chapter.
Organizing the Outline
The Outline
(and
Sidebar)
can be used to organize your actions,
action groups,
projects,
and folders.
You can use drag and drop to rearrange or group actions and projects, as well as use the shortcut menus which are available for every row in the Outline or Sidebar.
Drag and Drop
Items in the Outline can be dragged to:
- other locations in the Outline
- the Sidebar, to assign projects, tags, or dates
- the Perspectives Bar, to assign properties
- other applications
Dragging to Other Applications
When dropping into other applications, the result depends on what that application supports: it may be plain text, rich text, or a link to the item you dragged that will re-open in OmniFocus. Please try it with your favorite applications, see what happens, and email us if you have questions.
To select an item for drag and drop on iPhone, iPad, or Apple Vision Pro, touch and hold its row in the Outline, until the item “lifts off the page” and transforms into a moveable selection under your finger. You can drag and drop a single item (with its children) at a time.
To select an item for drag and drop on Mac, click and hold on one or more rows. If you select multiple items before clicking, all the items will be dragged, and can be dropped at the same time.
Grouping Actions
Inbox items and actions can be organized into action groups, which create a relationship between one top-level parent action, and one or more contained child actions. Each action inside the group should be part of, or necessary for, the top-level action; action groups are sometimes referred to as subprojects.
Action Groups use bold text, making it easy to quickly tell them apart from actions.
Projects may contain as many action groups as you like, and action groups may be placed inside other action groups. This is an excellent way to add more structure to a project, while still keeping all related actions together.
If both parent and child actions exist:
- Drag one item on top of another. On Mac, a line displays to indicate if the drop will be in line with the parent action, or placed as a child action. On iPhone, iPad, or Apple Vision Pro, rows will highlight or move out of the way as you drag the child action, to indicate where it will be dropped.
- If the intended child action is directly below the intended parent action, select the child action, and use the Indent command.
If the parent action exists, but the child action does not:
- Select the parent action, and use the Add Inside command.
- Drag the
Smart Add button
from the lower right of your screen
to hover over an action in the Outline
(iPhone, iPad, or Apple Vision Pro).
If the child action exists, but the parent action does not:
- Select one or more actions, and use the Group command. A new untitled parent action is created to represent the group, and the selected actions are indented to become its child actions.
Once you’ve created a group, you can use the inspector to change the action group type, as well as determine whether the group will complete when the last action within it is marked complete.
Combining different project types and action group types can be incredibly powerful.
Placing a parallel action group inside a sequential project allows a group of actions to become available when a preceding action is completed, and blocks further work until the entire group has been completed.
Placing a sequential action group inside a parallel project allows most actions to be simultaneously available, while ensuring a specific set of actions is still completed in order.
Grouping Projects
Just as actions can be grouped together, using action groups or projects, projects can also be grouped together, using Folders. Folders can also be placed inside other folders, allowing flexibility in creating your structure.
To create a project folder, while grouping existing projects:
- Navigate to the Projects Sidebar.
- Select two or more projects in the Sidebar; if using iPhone, iPad, or Apple Vision Pro, first enter Sidebar Select Mode.
- Use the Group command (Option-Command-G), which places the selected projects in a newly created folder.
- Enter a name for the folder to replace the Untitled Folder text.
- Press Return to accept the new folder name.
To create a project folder, and then group:
- Navigate to the Projects Sidebar.
- Use the New Folder command,
or click or tap the
Add button
in the bottom toolbar.
- Enter a name for the folder to replace the Untitled Folder text.
- Press Return to accept the new folder name.
- Drag related projects into the newly created folder.
Containers and Properties
Folders, projects, and action groups are also referred to as containers. They are items that can contain other items: folders can contain folders or projects, while projects and action groups can contain actions or action groups.
Just as a physical container can affect its contents, OmniFocus containers can also affect their contents. We refer to this as inheritance. Each item inside a container can have a directly assigned value for a given property, such as status, due date, or flag, but if a property does not have a directly assigned value, it may have an indirectly assigned value that it inherits from the container.
Properties that can have inherited values include defer until and due dates, statuses, availability, flag, and tags.
Tags can be assigned to actions and projects, but are not considered containers. If the tag is removed or deleted from OmniFocus, the action or project is left intact.
Tags do have a special type of inheritance, based on their assignment to a project or action group, which is discussed below.
Even though tags do not contain actions or projects, tags can contain other tags; for more information, see tag group in the Glossary.
Inherited Dates
When you add a Defer Until date to an action, action group, or project, you are telling OmniFocus that the item is not available for work until the Defer Until date has passed. When you add a Due date, you are telling OmniFocus that the item must be resolved before the Due date occurs.
If you have assigned a Defer Until and/or Due date to a container, then all the contained items inherit those dates: none of the contained items are available for work before the Defer Until date, and all the contained items must be resolved before the Due Date.
You can still assign a Defer Until and/or Due date to any action group or action in the container, but the container limits the date range: Defer Until can’t be earlier than Defer Until for the container, and Due can’t be later than Due for the container. If you have an action that needs an earlier Defer Until date, or a later Due date, you will need to also change the container dates, to schedule those actions as intended.
The Inspector fields for inherited values of Defer Until and Due will display Defer Until with container or Due with container.
Inherited Status
Newly created actions, projects, folders, and tags have a status of Active (rather than On Hold, Completed, or Dropped).
That status may be directly updated, or may be inherited from the container:
- Actions and action groups can inherit Completed or Dropped status from their containing project or action group.
- Actions, action groups, projects, and folders can inherit Dropped status from their containing folder.
- Tags can inherit Dropped status from their containing tag.
When viewing one of the affected items in the Inspector, the Status will display as Completed with container or Dropped with container. The Inspector field for either Completed or Dropped will display the same status.
For more information about statuses, both directly and indirectly assigned, please see the Status entry in the Glossary.
Inherited Availability
While Availability applies to actions, action groups, and projects which are Active (rather than Completed or Dropped), Inherited Availability only applies to actions and action groups. Projects do not inherit availability, though they can inherit status, as noted above.
Newly created actions and action groups are considered Available (rather than Blocked or Unavailable), until they are updated to add dates, tags, projects, or other properties that may impact their availability. Actions and action groups may then become Blocked or Unavailable, depending on those properties.
An Active action or action group will also inherit the availability of their containing action group or project.
When viewing an action or action group with inherited availability in the Inspector, the Status will display as Blocked with container or Unavailable with container, instead of Active.
For more information about availability, please see the Availability entry in the Glossary.
Inherited Flag
If you flag a project or action group, all actions (and action groups) within it inherit that flag, as well as the sense of importance. Inherited flags display as hollow, rather than solid, which indicates a directly assigned flag.
Inherited flags can’t be directly removed; the container must be unflagged, or the action or action group moved to a different container. Note that it is possible to flag an item which already has an inherited flag; if this happens, the hollow flag will be filled in to communicate the change.
Inherited Tags Assignment
Tags can also be assigned to actions and action groups using inheritance.
Unlike other inherited properties, which will update as the container is modified, tag assignment happens only when first adding an action to a container.
If an action does not have any assigned tags, then adding it to a project or action group will assign the same tags to the action which are assigned to the project or action group. This works whether you are using Quick Entry, Smart Add and Quick Entry, New Action, or Add Inside.
If an action does have assigned tags, then adding it to a project or action group will not change the tags assigned to the action. This allows you to add new actions using Quick Entry, and either add tags (knowing they will be preserved), or not add tags (knowing that the action may inherit tags).
Outline Select Mode
Select mode on iPhone, iPad, and Apple Vision Pro
allows you to select, inspect, and edit as many items as you would like,
all at the same time.
This mode is also available
in the
Sidebar.
To enable Select mode in the Outline
tap the
More Menu button
,
then tap the
Select button
.
You can also swipe two fingers up or down on the Outline, which will enable Select mode while selecting the swiped rows.
Once Select mode has been enabled,
tap rows in the Outline to select them.
You can then use the
Inspector
to simultaneously edit all selected rows.
Any properties where values match for all selected items display those values in the Inspector. When values for properties do not match, the Inspector displays the phrase Multiple Values, where possible. Tags display differently from other properties: all tags assigned to any item are displayed, but tags that are assigned to all items have a stronger appearance.
Changing the value of any property will apply the change to all selected items, overwriting any existing value. This provides an easy way to either update a matching value, or unite non-matching values.
While in Select mode,
the bottom bar displays the
Share button
 ,
Copy button,
Delete button,
and Shortcut menu
.
Selecting most commands in the bottom bar
will automatically disable Select mode.
,
Copy button,
Delete button,
and Shortcut menu
.
Selecting most commands in the bottom bar
will automatically disable Select mode.
You can manually disable Select mode by tapping on the Done button.
Smart Add and Quick Entry
The
Smart Add button
floats in the lower right corner of the Outline
on iPhone and iPad.
The button has three different functions,
allowing you to
Add Items Here,
Add Items with Drag and Drop,
or
Add Items with Quick Entry.
On Apple Vision Pro,
these functions are split between two buttons in the lower toolbar;
one to
Add Items Here
or
Add Items with Drag and Drop,
with a second button to
Add Items with Quick Entry.
Similar functions are available on Mac,
by clicking the
New Action button
in the Toolbar,
using the New Action command,
or opening
Quick Entry.
Add Items Here
Tap the
Smart Add button
to add new items to your current location
in the Outline.
This function is only available
when viewing the contents of a flat list in the Outline.
If the view includes anything else —
a folder, or a nested tag —
then “here” doesn’t have a clear meaning,
so tapping the button opens
Quick Entry.
Add Items with Drag and Drop
Touch and hold the
Smart Add button
to transform it into an item
that you can drag anywhere in the Outline.
As you drag the item over the Outline, rows will move to provide a blank space for dropping. Drop the item to create a new item at that spot in the Outline, pre-filled with any relevant properties based on the perspective you’re viewing.
Add Items with Quick Entry
You can add new actions to any location in OmniFocus
using
Quick Entry.
On iPhone or iPad,
either double-tap the
Smart Add button
or touch and hold the
Smart Add button
then drag it over the
Quick Entry button
that appears.
On Apple Vision Pro,
simply tap the
Quick Entry button
.
Quick Entry acts like a mini Inbox that you can access from anywhere in OmniFocus. Quick Entry can be used to add one or more new items, filling in as much information as you desire.
When Quick Entry first opens, there will be a new action row available for editing. Enter a title for your new action, then tap into each desired field (or use Bare Key Editing, if you are using an external keyboard).
Once you have finished adding your new action,
you can either tap Save,
or tap the Smart Add button
in the bottom right
to add another action.
If you tap Cancel,
your newly entered actions will be discarded.
The Toolbar

The Toolbar at the top of the window contains buttons for commonly used commands and functions, making them accessible with a single click or tap.
This chapter is structured to help you easily find the toolbar information you need, with each section organized for a different purpose.
- Mac — Mac toolbar buttons are listed in the default order found in the app, for quick reference.
- iPhone — iPhone toolbar buttons are listed in the default order found in the app, for quick reference.
- iPad — iPad toolbar buttons are listed in the default order found in the app, for quick reference.
- Apple Vision Pro — Apple Vision Pro toolbar buttons are listed in the default order found in the app, for quick reference.
- Notice Bars — These appear near the toolbar, to alert you to something that affects OmniFocus.
- Toolbar Reference — All toolbar buttons are listed in alphabetical order. This is a good place to start if you would like more information about a button, or want to see where a button is available.
Mac
In this section, toolbar buttons are listed in default order.
When you first install OmniFocus, the toolbar includes these buttons:
Toolbar customization is only available on Mac. If you would like toolbar customization on other devices, please email us.
By Control-clicking on the toolbar, and selecting Customize Toolbar…, (or selecting it from the View menu) you can remove any of the default toolbar buttons, or add additional buttons:
iPhone
In this section, toolbar buttons are listed in default order.
The iPhone toolbar includes these buttons:
The iPhone More Menu may include:
The iPhone Sidebar toolbar includes:
(Which replaces the Inspector button .)
iPad
In this section, toolbar buttons are listed in default order.
The iPad toolbar includes these buttons:
The iPad More Menu may include:
The iPad Sidebar toolbar includes:
When an iPad is using a Compact view, it uses the iPhone Toolbar layout.
Apple Vision Pro
In this section, toolbar buttons are listed in default order.
The Apple Vision Pro toolbar includes these buttons:
The Apple Vision Pro More Menu may include:
The Apple Vision Pro Sidebar toolbar includes:
Notice Bars
Notice Bars indicate that there is something special about the OmniFocus window you are viewing.
Focus Notice Bar (Pro)
![]() When using Focus
to show only part of your OmniFocus data,
the notice bar includes the label Focus:,
with a reminder of what you are focusing on,
and a button to Unfocus.
Focus is part of OmniFocus Pro.
When using Focus
to show only part of your OmniFocus data,
the notice bar includes the label Focus:,
with a reminder of what you are focusing on,
and a button to Unfocus.
Focus is part of OmniFocus Pro.
Archive Notice Bar
When viewing your Archive on Mac, the notice bar includes the label Archive, and the date it was last updated.
Backup Notice Bar
When viewing a Backup on Mac, the notice bar includes the label OmniFocus Backup, the date of the backup, and a Revert to This Backup button.
Document Notice Bar
When viewing external OmniFocus data on Mac, the notice bar includes the label OmniFocus Document and the name of the document, to remind you that this is not your main OmniFocus data.
Free Viewer Notice Bar
When you’re running without a license, or with an expired trial license, the notice bar includes the Free Viewer notice, and provides a button to Unlock OmniFocus.
News Notice Bar
When significant news is available, the notice bar includes Important news about OmniFocus, with a Learn More button. This type of news might include a need for Migrating Your Database; a change in macOS, iOS, iPadOS, watchOS, or visionOS that causes OmniFocus to behave differently; or a major version upgrade (such OmniFocus 3 to OmniFocus 4).
Test Build Notice Bar
When you’re running a test build on Mac, the notice bar includes a notice of when the test build will expire, and buttons to either Hide the bar, or Check for Updates….
Trial Notice Bar
When you’re running a trial license of OmniFocus, the notice bar includes a notice of when the trial will expire, and a button to either Hide the bar, or Unlock OmniFocus.
Toolbar Reference
In this section, toolbar buttons are listed in alphabetical order.
Each entry contains links to the platforms where the button is available.
- Attach
- Back & Forward
- Clean Up
- Collapse All
- Complete
- Drop
- Expand All
- Flag
- Flexible Space
- Focus (Pro)
- Help Menu
- Inspector
- Mark Reviewed
- More Menu
- New Action
- Omni Automation (Pro)
- Omni Automation Plug-Ins (Pro)
- Perspectives (Pro)
- Quick Entry
- Quick Open
- Search Field
- Select
- Settings
- Share
- Show Console (Pro)
- Sidebar
- Sidebar Edit
- Sidebar Menu
- Space
- Sync
- Undo & Redo
- View Options
Attach 
Available on Mac
Use the Attach File command.
Back & Forward 
Available on Mac, iPhone, iPad, Apple Vision Pro
Go Back or Forward in your navigation history. Back will take you through the locations you have recently visited in OmniFocus, from newest to oldest, and Forward will bring you back to the present.
Clean Up
Available on Mac, iPad, Apple Vision Pro
Manually Clean Up any items in the Outline that may belong elsewhere, after changing assigned project, tags, or status. On an iPhone, or in Compact view, pull down on the Outline to prompt a cleanup.
Use Clean up Inbox items which have and Clean up resolved items to determine when items are removed from the Outline automatically.
Collapse All
Available on iPhone, iPad, Apple Vision Pro
Use Collapse All to collapse everything in the Sidebar or Outline to the top level only.
Compare Expand All.
Complete 
Available on Mac
Mark the selected items as Completed.
Drop 
Available on Mac
Mark the selected items as Dropped.
Expand All
Available on iPhone, iPad, Apple Vision Pro
Use Expand All to expand all currently collapsed items in the Sidebar or Outline.
Compare Collapse All.
Flag
Available on Mac
Set or clear a flag on the selected items.
Flexible Space 
Available on Mac
Drag this from the toolbar customization sheet to add an area of space to the toolbar which will expand to fill the available space.
Compare to Space.
Focus (Pro) 
![]() Requires OmniFocus Pro
Requires OmniFocus Pro
Available on
Mac,
iPhone,
iPad,
Apple Vision Pro
Focus on selected folders, projects, or the project which contains the selected actions. If you are already focused, the button changes to Unfocus.
Help Menu 
Available on iPhone, iPad, Apple Vision Pro
Tap to open the Help submenu, which has entries for About OmniFocus, OmniFocus Help, Release Notes, and Contact Omni.
Inspector
Available on Mac, iPhone, iPad, Apple Vision Pro
Show and hide the Inspector for selected items.
Mark Reviewed
Available on Mac
Mark the current project as reviewed. This button is only available when a project is selected.
More Menu
Available on iPhone, iPad, Apple Vision Pro
The More menu contains a list of useful menu items and commands, which update depending on your view and selection.
New Action
Available on Mac
Add an action immediately after the selected row, or at the bottom of the current project.
Omni Automation (Pro) 
![]() Requires OmniFocus Pro
Requires OmniFocus Pro
Available on
iPhone,
iPad,
Apple Vision Pro
Omni Automation menu will only display if Developer Mode has been enabled in Automation settings.
Once enabled, the Omni Automation menu provides access to installed OmniFocus Plug-Ins, as well as links to Manage Plug-Ins, and open the Automation Console or Automation API Reference.
Omni Automation Plug-Ins (Pro)
![]() Requires OmniFocus Pro
Requires OmniFocus Pro
Available on
Mac
With OmniFocus Pro, you can add toolbar buttons for any installed OmniFocus Plug-Ins.
To learn more about scripting OmniFocus, visit the Omni Automation website, and be sure to read OmniFocus 4: What’s New in Omni Automation?.
Perspectives (Pro) 
![]() Requires OmniFocus Pro
Requires OmniFocus Pro
Available on
Mac
With OmniFocus Pro, you can add toolbar buttons for Default Perspectives or Custom Perspectives perspectives.
Quick Entry
Available on Mac, iPhone, iPad, Apple Vision Pro
Quick Entry is only in the toolbar when using a Mac, but is available in the lower right of the screen when using Smart Add & Quick Entry on iPhone, iPad, or Apple Vision Pro.
Quick Open
Available on Mac
Open the Quick Open window.
Quick Open can only be added to the Mac Toolbar, but is available in the lower left of the screen when using Quick Open on iPhone, iPad, or Apple Vision Pro.
Search Field 
Available on Mac, Apple Vision Pro
Search your OmniFocus data.
Search is part of the toolbar on Mac and Apple Vision Pro. When using iPhone or iPad, navigate to the top of the Outline, and pull down to reveal the Search bar.
Select
Available on iPhone, iPad, Apple Vision Pro
Tap Select in the More Menu to enable Outline Select Mode.
Settings 
Available on iPhone, iPad, Apple Vision Pro
Tap Settings in the More Menu to open OmniFocus Settings.
Share
Available on Mac, iPhone, iPad, Apple Vision Pro
Use Share to send selected items from OmniFocus to other applications, or use installed OmniFocus Plug-Ins.
Show Console (Pro)
![]() Requires OmniFocus Pro
Requires OmniFocus Pro
Available on
Mac
Opens the Automation Console.
Sidebar
Available on Mac, iPhone, iPad, Apple Vision Pro
In Regular views, show or hide the Sidebar. In Compact view, tap it to navigate back and forth between the Sidebar and the Outline.
Sidebar Edit 
Available on iPhone, iPad, Apple Vision Pro
Enable Edit Mode in the Sidebar.
Sidebar Menu
Available on iPad, Apple Vision Pro
This menu is available when the Sidebar is open.
In Regular views, tap the Sidebar Menu button to open a menu that allows you to Expand All, Collapse All, or Select items in the Sidebar.
In Compact views, these controls are included in the More Menu.
Space 
Available on Mac
Drag this from the toolbar customization sheet to add a fixed area of space to the toolbar (roughly the size of a toolbar button).
Compare to Flexible Space.
Sync
Available on Mac, iPhone, iPad, Apple Vision Pro
Prompt an immediate Sync.
Syncing occurs automatically, as described in How OmniFocus Syncs, so a manual sync is rarely needed.
Undo & Redo 
Available on iPhone, iPad, Apple Vision Pro
Tap Undo in the More Menu to revert the most recent change you have made. After at least one change has been undone, the Redo button also appears in this area of the menu.
View Options
Available on Mac, iPhone, iPad, Apple Vision Pro
Open View Options to customize which items appear in the Outline, as well as the layout and appearance of Outline Rows.
The Inspector
The Inspector holds tools for editing your actions, action groups, projects, folders, and tags. This chapter describes the fields and related item properties.
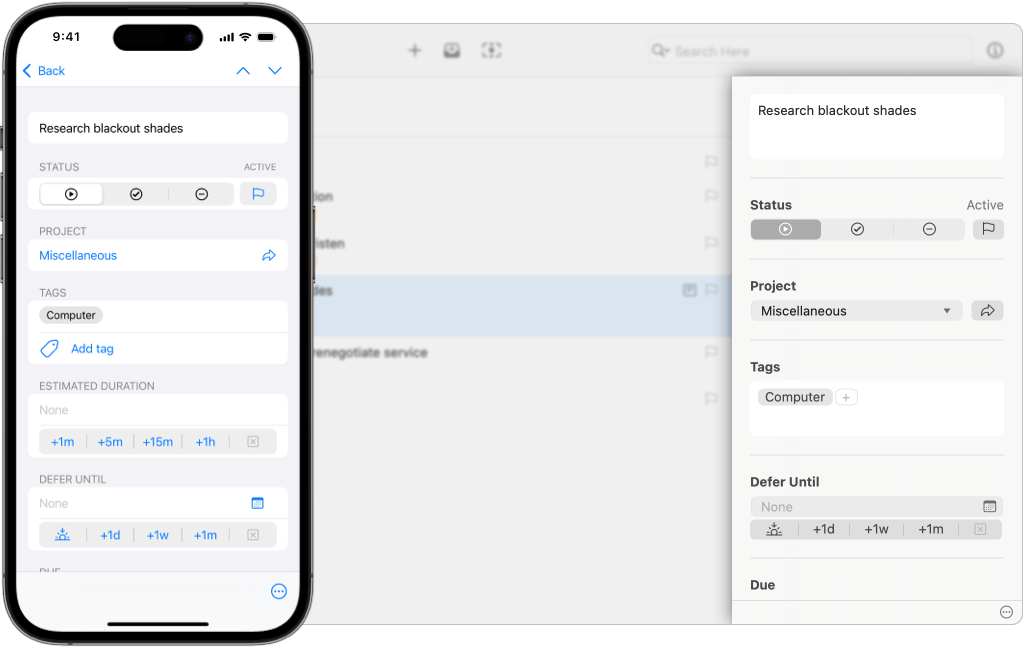
To show the Inspector,
click or tap on an action,
action group,
project,
folder,
or tag
in the Outline
or
Sidebar,
and then:
- Select Show/Hide Inspector from the View menu.
- Tap or click the
Inspector button
in the Toolbar.
- Swipe from the trailing edge of the screen, if you are using an iPhone or any device with a compact view.
You will see inspector fields for your selected action, action group, project, folder, or tag.
Our goal is to have the editing experience for each field match between the Outline and Inspector, allowing you to choose where you’d like to make edits.
Quick edits are usually faster in the Outline, especially when using Bare Key Editing, while editing multiple items or multiple fields is faster in the Inspector.
Fields
By default,
the Inspector shows the
 Title
of any item,
as well as (depending on the type of item):
Title
of any item,
as well as (depending on the type of item):
You can update the Layout Settings for Inspector to add fields for:
Layout Settings for Inspector sync with platform scope.
This allows you to have one set of fields sync between your Mac computers, while a different set of fields is available on your iPhone, and perhaps a third set on another device.
Toolbars
The Inspector contains one or two toolbars, depending on which device you are using.
Compact devices have a top toolbar, containing navigation buttons.
All devices have a bottom toolbar with a
Shortcut menu button
,
containing commands which affect the current selection.
Mac Toolbar


iPhone, iPad, Apple Vision Pro Toolbar


Navigation Buttons
The buttons in the top toolbar are used to navigate in the Outline or Sidebar, depending on your view before opening the Inspector:
 Back —
Returns you to the Outline or Sidebar.
Back —
Returns you to the Outline or Sidebar. Previous —
Navigates to the item
immediately above the current item.
Previous —
Navigates to the item
immediately above the current item. Next —
Navigates to the item
immediately below the current item.
Next —
Navigates to the item
immediately below the current item.
Properties
Each type of OmniFocus item has a different set of properties, and therefore a different set of fields available for editing.
Properties in this section are listed in the default order for Layout Settings for Inspector.
Properties of Actions
These properties and fields apply to Actions:
Properties of Action Groups
These properties and fields apply to Action Groups:
Properties of Projects
These properties and fields apply to Projects:
Properties of Folders
These properties and fields apply to Folders:
Properties of Tags
These properties and fields apply to Tags:
Common Properties
Properties in this section are available for all OmniFocus items: actions, action groups, projects, folders, and tags.
Title Inspector
Available for actions, action groups, projects, folders, tags
Tap or click the title field to add or edit an item title.
OmniFocus gives you flexibility in how and why you name items, but here are a few suggestions that may be useful, while developing your workflow.
- Action and action group titles can be used to clarify a specific action to be completed, often as part of a larger project or single actions list.
- Project titles can be used to clarify the end goal that the collected actions are intended to accomplish.
- Folder titles can be used to indicate an area of your personal or work life, and group projects related to that area.
- Tag titles can be used to represent people, places, things, or situations related to completing your actions and projects.
Status Inspector
Available for actions, action groups, projects, folders, tags
Every item in OmniFocus has a Status or Inherited Status:
- Actions and Action Groups
can be
Active,
Completed, or
Dropped.
- Projects can be
Active,
On Hold,
Completed, or
Dropped.
See Project Status
to learn more.
- Tags can be
Active,
On Hold, or
Dropped.
See Tag Status
to learn more.
- Folders can be
Active or
Dropped.
See Folder Status
to learn more.
The status field for actions, action groups, and projects
also contains a
Flag button
 .
When a flag is set on an item,
it appears in the Flagged perspective,
along with any actions or action groups
that inherit the flag.
.
When a flag is set on an item,
it appears in the Flagged perspective,
along with any actions or action groups
that inherit the flag.
The Flag button will be
empty if the item is not flagged,
 solid orange if the item is flagged,
or
solid orange if the item is flagged,
or
 outlined in orange if the item is inheriting a flag.
You can change the flag state
by tapping or clicking on the Flag button.
outlined in orange if the item is inheriting a flag.
You can change the flag state
by tapping or clicking on the Flag button.
Added/Changed Inspector 
Available for actions, action groups, projects, folders, tags
Added displays the date and time that the action, action group, project, folder, or tag was originally added.
Changed displays the date and time that the action, action group, project, folder, or tag was most recently changed.
This information is read from your OmniFocus data, and can not be edited.
Date and Time Properties
Properties in this section are available for actions, action groups, and projects, in addition to the common properties.
This section includes information on all date and time related properties, which are: Estimated Duration, Defer Until and Due dates, Notifications (which can be automatically added, based on other date properties), Time zone, Completed, and Dropped.
Entering Dates and Times
You can be creative with the way you enter dates, and OmniFocus will do its best to understand what you mean.
- Relative dates — Relative dates and times calculate a new date and time, based on the current date and time, with negative numbers representing dates and times in the past. Examples: 2 days, –3 weeks, 1 hour, 1 year 1 month
- Abbreviations — You can use full names, as in the previous set of examples, or abbreviations. Examples: 2d, –3w, 1h, 1y1m
- Common words — You can refer to relative dates using common words for periods of time. This, next, and last have specific meanings: this Friday always means the Friday in this week, next Friday always means the Friday in the next week, and last Friday always means the Friday in last week, regardless of what day today is. Other periods of time work in the same way. Examples: yesterday, tomorrow, tonight, next Thursday, last month, this Friday, next year
- Specific time period — You can enter a specific time period, which will add a date for the beginning of that time period. Examples: fri, september, 2028
- Short date format — You can use the date format selected in your Language & Region System Settings. Examples: 5/23/08 10a, 9.30.09 2:00 PM
- Mixed formats — Mix the available formats however you like. Examples: 2w sat, 4d @ 5p, mon 6a, aug 6, tue 5p
- Final thoughts — As noted above, OmniFocus makes its best guess at whatever you enter, whether that is bare numbers, times, or word fragments. If you think something might work, give it a try. If it doesn’t work, and you think it should, please get in touch. Examples: now, 9, 14:00, tom
Dates Without Times
If you enter a date without including a time, a default time will be added based on the field being edited, as well as your settings for Default Time For Defer Dates or Default Time For Due Dates.
Shortcut Date Buttons
Several fields have buttons that allow you to quickly set values for the fields, instead of entering values by typing.
The buttons for Estimated Duration are:
- +1m — add one minute
- +5m — add five minutes
- +15m — add fifteen minutes
- +1h — add one hour
 —
clear the current value
—
clear the current value
The buttons for Defer Until and Due are:
 —
set date to today
—
set date to today- +1d — add one day
- +1w — add one week
- +1m — add one month
- —
clear the current value
Changing an existing date and time using the shortcut date buttons changes the date, but does not change the assigned time.
Calendar Popover
The fields for
Defer Until,
Due,
Completed,
and Dropped
all have a popover
Calendar button
 ,
which allow you to quickly select a date and time.
,
which allow you to quickly select a date and time.
On Mac, the popover has arrows that switch between months (the dot between the arrows returns to the current month), and a time field with arrows that increase or decrease the current time field for either hours or minutes. You can also enter time using your keyboard, and use Tab to jump between hours and minutes. If you would like to enter a full date using your keyboard, that can be done from the date field, without opening the calendar popover.
On iPhone, iPad, and Apple Vision Pro, the popover has arrows that switch between months, and tapping on the month label will switch between a monthly view and a month/year picker. Tapping on the time field shows two wheels that allow you to choose hours and minutes. Tap the wheels to enter the time using a keyboard, and tap a second time on either hours or minutes to change only that value. Tap the AM/PM switch (if it is showing) to choose morning or evening time.
This popover is also available in the Outline.
Estimated Duration Inspector
Available for actions, action groups, projects
Enter the amount of time you estimate an action, action group, or project will take to complete. Shortcut Date Buttons allow you to quickly add time, but the text field also supports entering other values in days, months, or years; the value you enter will be converted into hours.
Estimated duration is particularly useful when creating Custom Perspectives with OmniFocus Pro, where you can use this value to create perspectives for actions or projects that require a certain amount of time to complete.
Defer Until Inspector
Available for actions, action groups, projects
Enter or edit a Defer Until date for the selected action, action group, or project.
The Defer Until date determines when an action, action group, or project is available for work. When set for an action group or project, the date may also be inherited by items inside that action group or project.
Read about Inherited Dates to learn more.
Due Inspector
Available for actions, action groups, projects
Enter or edit a Due date for the selected action, action group, or project.
The Due date determines when an action, action group, or project must be completed. When set for an action group or project, the date may also be inherited by items inside that action group or project.
Read about Inherited Dates to learn more.
Due Soon
Adding a Due date also helps OmniFocus determine when to display an action, action group, or project as “Due Soon,” depending on your setting for “Due Soon” Means.
Notifications Inspector
Available for actions, action groups, projects
View existing notifications, add or edit notifications, or remove notifications.
Notifications can be created automatically, based on your Notifications settings, along with the values you’ve entered for Estimated Duration, Defer Until, and Due, or they can be added manually.
You can add as many notifications as you like, and they will be listed from earliest to latest.
The types of automatic notifications are:
- Deferred — With a Defer Until date set, and Deferred checked in Notifications settings, a notification is automatically added for the Defer Until date and time.
- Latest Start — With a Due date and Estimated Duration set, and Latest Start checked in Notifications settings, a notification is automatically added for the latest possible time an action could start, in order for it to be completed by the Due date. This is calculated by subtracting the value of Estimated Duration from the Due date.
- Due — With a Due date set, and Due checked in Notifications settings, a notification is automatically added for the Due date and time.
Any notification,
including automatic notifications,
can be removed
by tapping or clicking on the
Clear button
![]() next to the notification.
If an automatic notification has been removed,
it can be re-added
by tapping or clicking on Add Notification,
and then selecting
Deferred Notification,
Latest Start Notification,
or Due Notification.
next to the notification.
If an automatic notification has been removed,
it can be re-added
by tapping or clicking on Add Notification,
and then selecting
Deferred Notification,
Latest Start Notification,
or Due Notification.
You can also add Before Due notifications, which are based on the Due date. If the Due date changes, the time of the notification automatically updates.
Tap or click on Add Notification, select Before Due, and choose one of the options, which range from 1 minute before to 4 weeks before, based on how far in the future the Due date is set.
Scheduled Notifications (Pro)
If you are using OmniFocus Pro, you can also add notifications for a specific date and time.
Tap or click on Add Notification, select Scheduled Notification, and then select a date and time from the calendar.
Unlike automatic or Before Due notifications, this type of notification will not change when the dates for an item are updated. Items which repeat will keep the same Scheduled Notification as the previous occurrence, so this may not be the best type of notification for a repeating item.
Time Zone Inspector 
Available for actions, action groups, projects
Choose between using Floating (the default) or Fixed times for the currently selected action, action group, or project:
- Floating — Entering date and time values does not save your local time zone. If you have a beginning-of-the-day routine that you always want to complete at 8 AM (08:00), no matter where you are, it will always present at that time: 08:00 in Seattle or 08:00 in New York.
- Fixed — Entering date and time values saves your local time zone. When you change time zones, OmniFocus updates the date and time values to correspond with your current time zone. If you have a meeting scheduled for 11 AM (11:00) in Seattle, it will always present at the correct time for your current time zone: 11:00 in Seattle and 14:00 in New York.
![]() Scheduled Notifications also respect this setting.
Scheduled Notifications also respect this setting.
Completed Inspector
Available for actions, action groups, projects
Enter or edit a Completed date for the selected action, action group, or project.
If the Item Status or Project Status is currently Active, On Hold, or Dropped, entering a date here will update the status to Completed.
If the Item Status or Project Status changes from Completed to any other status, this date will be removed.
When set for an action group or project, the date may also be inherited by items inside that action group or project. Read about Inherited Dates to learn more.
Completing Repeating Items
If an action, action group, or project is configured to repeat, entering a date and time in an empty Completed field will generate the next occurrence based on the date and time you entered.
Completing a repeating item and then adjusting the Completed date will not change the next occurrence, as it has already been created.
Dropped Inspector
Available for actions, action groups, projects
Enter or edit a Dropped date for the selected action, action group, or project.
If the Item Status or Project Status is currently Active, On Hold, or Completed, entering a date here will update the status to Dropped.
If the Item Status or Project Status changes from Dropped to any other status, this date will be removed.
When set for an action group or project, the date may also be inherited by items inside that action group or project. Read about Inherited Dates to learn more.
Dropping Repeating Items
If an action, action group, or project is configured to repeat, entering a date and time in an empty Dropped field will generate the next occurrence based on the date and time you entered, after prompting you to choose between skipping this occurrence or dropping the item completely.
Dropping a repeating item and then adjusting the Dropped date will not change the next occurrence, as it has already been created.
Action and Project Properties
Properties in this section, with a few exceptions, are available for actions, action groups, and projects, in addition to the common properties.
Project or Group Type Inspector 
Available for action groups, projects
Set the project or action group type, which changes how OmniFocus presents the action inside that project or action group.
For more about each type, and how it affects the Availability of items within the project or action group, see Project Type.
Projects can be set to:
Action groups can be set to:
By default, the type will be set to Parallel but can be changed using the Default Project Type setting.
This section also includes the option to complete the project or action group when the last contained action is resolved. This option is not available for Single Actions List projects, as they are not designed to be completed.
The two states for Complete with last action are:
- Unchecked — The project or action group status must be changed to Completed manually, regardless of the status of the contained actions.
- Checked — The project or action group status automatically changes to Completed, when the last action has been resolved.
Dropped or Completed
Complete with last action completes the project or action group when the last action has been either Dropped or Completed.
Project Inspector
Available for actions, action groups
Actions and action groups are either in
the
Inbox,
in which case the Project field is empty,
or are part of a project.
Click or tap the Project field to add, change, or remove a project. On Mac, there is an arrow to display a list of all projects. On iPhone, iPad, and Apple Vision Pro, tapping into the field will present the same list.
Entering text into the field will present a filtered list of projects. You can also create a new project from the project picker. Enter the name of your new project, and then either select the Create “new project” item, or type Command-Return. The project will be created, with the selected action or action group assigned to the new project.
Once a project has been assigned,
the Go To Project button
 next to the project name
is enabled.
Tapping on the arrow
will show the assigned project
in the Projects Outline.
next to the project name
is enabled.
Tapping on the arrow
will show the assigned project
in the Projects Outline.
Assigning a project to an Inbox item typically moves it from the Inbox to the assigned project. This behavior may be different for you, depending on your setting for Clean Up Inbox Items Which Have.
If you’d like to learn more about projects,
please read the
Projects section
of the Perspectives chapter.
Tags Inspector
Available for actions, action groups, projects
Assign tags to items in the current selection, or review any tags already assigned. When multiple items are selected, the list includes all tags assigned to any item, with tags that are assigned to all items having a stronger appearance.
Click or tap into the Tags field
to add tags.
On Mac,
you can click into the Add button
 and start typing,
or click the arrow
and start typing,
or click the arrow
![]() to display a list of all tags.
On iPhone, iPad, and Apple Vision Pro,
tapping the Add tag button will present the same list.
to display a list of all tags.
On iPhone, iPad, and Apple Vision Pro,
tapping the Add tag button will present the same list.
Entering text into the field will present a filtered list of tags. You can also create a new tag from the tag picker. Enter the name of your new tag, and then either select the Create “new tag” item, or type Command-Return. The tag will be created, and assigned to the currently selected action, action group, or project.
Once a tag has been added,
tapping or Control-clicking on the tag
gives you the option to
Go To (or Show) the tag in the
Tags
perspective,
or Remove the tag.
An item can have as many assigned tags as you like. On Mac, you can use drag-and-drop to reorder the tags assigned to an item.
If you’d like to learn more about tags,
please read the
Tags
section of the Perspectives chapter.
Note Inspector 
Available for actions, action groups, projects
Add, view, or edit notes related to the selected action, action group, or project.
Click or tap into the Note field, and type or paste text or images.
In addition to plain text, notes support rich text, including custom fonts (Mac only), colors, and styles, available from the Format menu on Mac, or iPad and Apple Vision Pro. Notes also support hyperlinks: enter a URL in the note field, and it automatically becomes an interactive link.
Note Icon
When the Note Icon is displayed in the Outline, whether in Fluid Layout or Columns Layout, Note contents affect the icon appearance:
-
Note is empty (displays only when row is selected)
 Note contains text
-
Note contains attachment or text
Searching Notes
Adding longer notes is a great way to make searching easier, while keeping titles short and focused.
Attachments Inspector
Available for actions, action groups, projects
In addition to adding images by pasting into the Note field, you can add attachments of various types by clicking or tapping the Add Attachment button.
On Mac, this button opens the file selection dialog, where you can browse to find the file you’d like to attach. By default, the attachment will be embedded in your OmniFocus data, so it can be used on any of your syncing devices. You can choose to create a link to the file instead, which allows you to quickly access it on your local Mac, without syncing it between devices.
On iPhone, iPad, and Apple Vision Pro this button gives you a choice of Attach File, Take Photo, Photo Library, Scan Document, and Record Audio.
The Attach File command works similarly to Mac, but always embeds attachments, without an option for linking.
Syncing Attachments
OmniFocus is not a dedicated file syncing service.
Embedding large attachments, or numerous small attachments, can impact sync performance over time. Large attachments may also impact storage on your mobile devices.
If you use attachments, and begin to notice sync performance issues, consider using the Attachment List to remove large or unneeded attachments.
Repeat Inspector
Available for actions, action groups, parallel or sequential projects
Configure actions, action groups, and projects that repeat on a schedule.
Check or toggle Repeat to indicate that an item repeats.
Items can be set to repeat based on a variety of criteria. As you make changes in the Inspector, additional options will become available.
Select how frequently you would like an item to repeat, by entering a number and unit of time (Minute, Hour, Day, Week, Month, Year). If you select Week or Month, you can enable Customize to show additional options.
- Weekly — Customize allows you to select specific days of the week for an item to repeat, such as every Monday, Wednesday, Friday.
- Monthly: Days in Month — Customize allows you to select specific days of the month for an item to repeat, such as the 5th, 20th, and Last Day.
- Monthly: Days of Week — Customize allows you to select the 1st through 5th (or Last) Monday, Tuesday, Wednesday, Thursday, Friday, Saturday, Sunday, Weekday, or Weekend for an item to repeat, such as the 1st Monday and Last Weekday.
With Defer Until or Due dates assigned, there are additional options for scheduling the next occurrence. If the Defer Until and Due dates are set to the same day, you will only see one of the these options. If the Defer Until and Due dates are set to different days, you will see both of these options.
Choose whether completing the item will Schedule the next occurrence based on:
- Due Date — The item must be completed again by that date.
- Defer Until Date — The item becomes available again on that date.
Choose whether completing the item will Repeat from this item’s:
- Completion — The next occurrence is based on the date and time that this occurrence is completed.
- Assigned Dates — The next occurrence is based on the date and time that this occurrence was scheduled; the next occurrence is displayed in small text at the bottom of the section.
Repeating from Assigned Dates is a very simple experience: when you complete a repeating item, the next occurrence will be created for the next scheduled date.
This is the case whether you complete an item before or after the assigned dates; the next occurrence will always be created based on the schedule.
Repeating from Completion is slightly more complex, but can be quickly learned.
Completing an item early or late works the same as completing it on time, since the next occurrence is always created based on the time of completion. You can see this by completing a repeating item, then immediately completing the second occurrence; it should create a third occurrence identical to the second.
Even when repeating from Completion, OmniFocus attempts to keep your times predictable by rounding based on the selected unit. This is intended to avoid times shifting slightly, each time a completion occurs.
If you configure a repeat in hours, completing an item in the first half of an hour will round down, while completing an item in the second half of an hour will round up.
If you need more precision, you can change to smaller units (hours to minutes, or minutes to seconds) and the rounding will be based on the next smaller unit (minutes will use seconds, seconds will use fractions of a second).
If you use a custom weekly or monthly repeat, where you have chosen specific days or dates for an item to repeat, completing an item will calculate the next occurrence by skipping ahead, and then finding the next chosen day or date.
Some examples:
- An item which repeats every weekday after completion will schedule the next occurrence for the next available weekday.
- An item which repeats four weeks from completion on weekdays will schedule the next occurrence for the first available weekday, at least four weeks from completion.
- An item which repeats the last Friday of every third month will schedule the next occurrence for the first available last Friday, at least three months from completion.
Experimentation is the best way to understand
how this style of repeat works.
Set up a repeating item,
complete it,
view at the result,
and then use
Undo
to make further adjustments.
Repeating Actions in Repeating Projects
Completing a repeating project or action group will update all the action groups or actions that it contains from Completed or Dropped to Active. This provides an easy way to repeat a series of actions: place them inside a repeating project or action group.
If you have a repeating action inside a repeating action group or project, especially one set to Complete with last action, you may see unexpected results.
When you complete a repeating action inside a repeating project, another occurrence of that action is created. When you then complete the repeating project, another occurrence of the project will be created, including all occurrences of the repeating action, which can result in duplicate actions, each of them still set to repeat.
If you see unexpected occurrences when completing items, make sure that every item is only part of one repeat, whether that’s a repeating action, or as part of a repeating action group or project.
Review Inspector 
Available for projects
Select how often you would like to review a project, see the date of last review, or set the date of the next review.
By default, projects are set to be reviewed every week, beginning one week after the project is created. That setting can be adjusted in the Dates and Times settings.
- Next review — The top field contains the next scheduled review for this project. You can update this date, if you would like.
- Review every — Choose how often you would like to review this project.
- Last reviewed — The date the project was last reviewed. This date is read from your OmniFocus data, and can’t be edited.
Please read the Reviewing a Project section of the Perspectives chapter for more information.
Tag Properties
Properties in this section are available for tags, in addition to the common properties.
Tag Location Inspector
Available for tags
Set a location for the selected tag,
which allows you to see assigned actions and projects in
Nearby,
or receive notifications when near the assigned location.
Tap or click on Add Location, and select an option:
- Here — Use Wi-Fi or cellular triangulation to pinpoint where you are right now, and save that as the tag location. This tag is assigned to items you can complete here, and is a fixed location.
- Anywhere — This isn’t a specific location. This tag is assigned to items you can complete anywhere.
- Search — Enter a search term, such as “hardware store”. You can select one of the results to assign that specific location to the tag, or use the search term itself. If you use the search term, the location becomes the nearest search result, updated for your current location. This tag is assigned to items you can complete at a specific location, or at a type or chain of businesses.
- Address — Enter a specific address to add as the location. This tag is assigned to items you can complete at the selected address.
- Contact — Choose an address from an entry in the Contacts app on your device. If this is the first time you’ve set a location this way, you may be asked to grant OmniFocus access to your contacts. This tag is assigned to items you can complete at the address for the selected contact.
- Pin — Touch and hold a spot on the map to drop a pin at a location of your choice. This tag is assigned to items you can complete at the selected pin.
To remove an assigned location, tap the
Clear button
![]() next to it.
next to it.
When a location is assigned to a tag,
it shows up in
Nearby,
on the Map view
or in the List view.
Setting a tag’s location doesn’t automatically enable location-based alerts for that tag. To receive notifications, make sure location alerts are enabled for your device in Notifications settings, and the Notification selection (below) is set to When Arriving or When Leaving.
Location-based alerts can be edited on Mac, but will only provide notifications on mobile devices.
Once a tag has been assigned a location, two additional selections appear in the Location section.
The Notification selection determines when a notification occurs:
- None — You will not be notified when arriving at or leaving from the tag location.
- When Arriving — You will be notified when you arrive at the area of the tag location.
- When Leaving — You will be notified when you leave from the area of the tag location.
The Distance selection determines the location’s area size.
- Small — Roughly 200 meters or 650 feet. This covers about one city block, which is useful for locations such as arriving home or leaving the office.
- Medium — Roughly 500 meters or about 1/4 mile. This covers a small neighborhood or park, which is useful for knowing when you are a few streets over from a certain store.
- Large — About 10 kilometers or 6 1/4 miles. This is useful for turning on tags that are relevant when you visit another city.
Combining Location and Notifications
You can use tag groups to unify a selection of locations and notifications, such as those related to beginning or ending your work day.
If you create a tag group with one parent and two children, you can assign your work location to all three tags, with one child set to When Arriving, and the other child set to When Leaving.
This allows you to have a set of actions to complete when arriving at work, another set to complete when leaving work, and another set that can be completed while you are at work.
Capture Methods
This chapter discusses capturing your ideas, action items, and projects in OmniFocus, so you can accomplish more!
Quick Entry
Quick Entry is the fastest way of capturing ideas in OmniFocus, and is available anywhere OmniFocus is available.
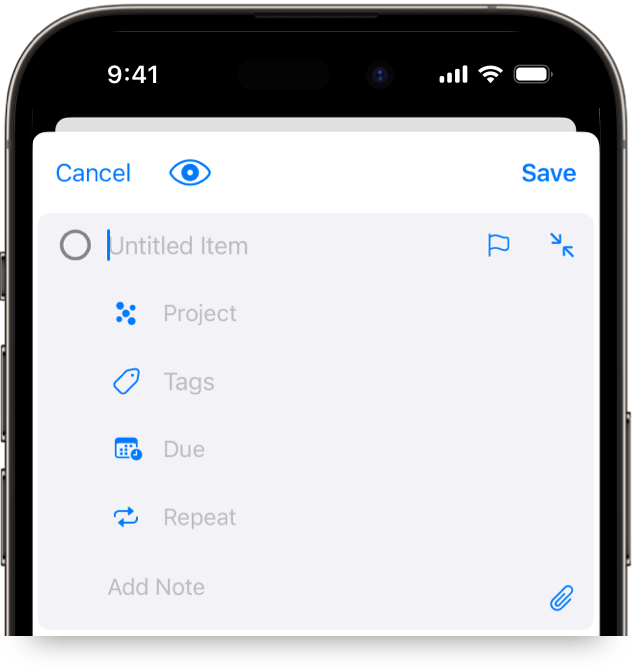
On iPhone and iPad,
Quick Entry is available while OmniFocus is open,
by double-tapping the Smart Add and Quick Entry button
.
It is also available by using
Share to OmniFocus from other apps.
On Apple Vision Pro,
Quick Entry is available while OmniFocus is open,
by tapping the
Quick Entry button
.
It is also available by using
Share to OmniFocus from other apps.
On Mac,
Quick Entry is available while OmniFocus is open,
by clicking the
Quick Entry button
in the Toolbar,
or using the Show/Hide Quick Entry command.
It is also available by using
Share to OmniFocus
from other apps.
You can also use the
Quick Entry Shortcut from
anywhere on Mac,
as long as OmniFocus is running.
Quick Entry acts like a mini Inbox and can be used to add one or more new items, filling in as much information as you desire. When Quick Entry first opens, there will be a new action row available for editing. Enter a title for your new action, then click or tap into each desired field (or use Bare Key Editing with an external keyboard).
Once you have finished adding your new action,
you can click or tap Save,
or tap the Smart Add button
in the bottom right
(on iPhone, iPad, and Apple Vision Pro)
to add another action.
If you click or tap Cancel,
your newly entered actions will be discarded.
Open
View Options
to choose between default
Layout settings, or a
custom layout for Quick Entry.
Quick Entry on Mac
You can use Quick Entry from anywhere on your Mac, using a Quick Entry Shortcut that you choose, as long as OmniFocus is running in the background.
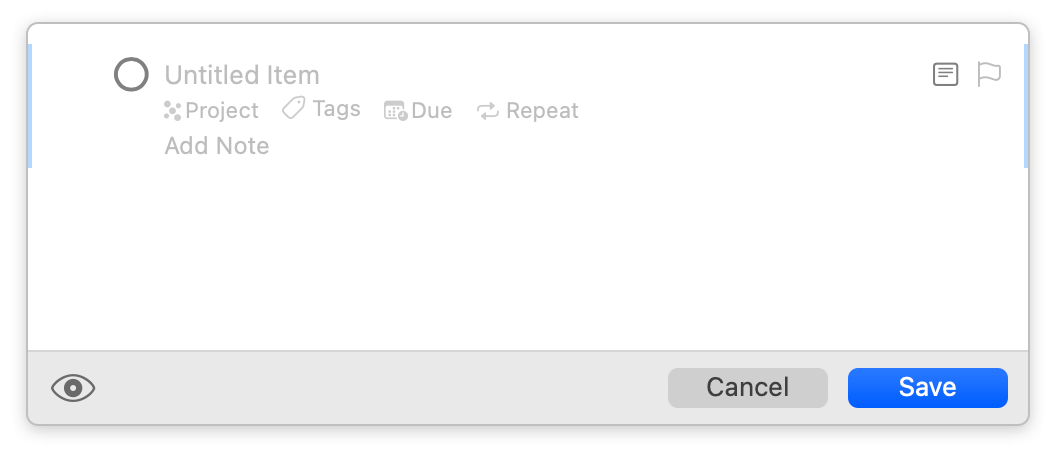
While the Quick Entry window is open, you can use Tab and Shift-Tab to navigate between fields. This is often faster than using Bare Key Editing, which requires ending editing between every change, and may result in closing the window too quickly.
Quick Entry keyboard shortcuts also work a little differently, depending on which Outlining Mode you have selected.
When in Modern Mode:
- Press Escape to cancel editing
- Press Return to confirm editing, and close Quick Entry
- Press Shift-Return twice to create an additional item, before closing Quick Entry
When in Classic Mode:
- Press Command-Period (.) to cancel editing
- Press Escape to confirm editing
- Press Return to confirm editing, and close Quick Entry
- Press Shift-Return once to create an additional item, before closing Quick Entry
Share to OmniFocus
When you are using another app, and there is something that you would like to add to OmniFocus, you can Share to OmniFocus. You may want to capture a webpage in Safari, a picture in Photos (iPhone, iPad, or Apple Vision Pro only) or a file; if the other app supports sharing something, OmniFocus will do its best to either capture it, or link to it.
Depending on the app, you may need to select something first, or a selection may be optional; Safari will send slightly different information depending on whether you have selected anything on a webpage.
Click or tap the
Share button
in the app’s toolbar,
or choose Share from the Shortcut menu of the selected item,
then choose OmniFocus from the list of apps that appear.
If you are on Mac,
select File > Share > OmniFocus
(if the app has included support).
You will see the standard Quick Entry form for Mac, iPhone, iPad, or Apple Vision Pro.
The form may be pre-filled with information relevant to the information you’re sending to OmniFocus (website URLs in the note field and a title already entered, for example). Edit these if you like, add any other properties, and then click or tap Save when you’re ready to send it to your Inbox.
If OmniFocus doesn’t appear in the list of apps, read these Apple User Guide articles to learn how to add OmniFocus to your sharing options:
Share from OmniFocus
OmniFocus supports sending information to other apps, as well.
With content selected in the Outline,
click or tap the
Share button
in the Toolbar,
or select it from the Shortcut menu,
to send the selected items to another app.
Clippings on Mac
OmniFocus on Mac combines
Quick Entry
and
Share to OmniFocus
into a Clippings service that can be used from other Mac apps.
To clip content from another application:
- Select text or images in any application that supports macOS Services (most native Mac apps).
- Press your chosen Clippings shortcut, or choose OmniFocus > Services > OmniFocus 4: Send to Inbox.
- A new action row is created in
Quick Entry,
ready for editing and saving,
with a text-only version of your selection as the title,
and the highlighted content (rich text and embedded images)
included in the note.
If you attempt to clip from Mail, and the email message is not added to or linked from Quick Entry, you may need to grant OmniFocus authorization in System Settings.
If you attempt to clip from Safari, and you see an error such as “Not authorized to send Apple events to Safari.” you may need to grant OmniFocus authorization in System Settings.
Open System Settings, then navigate to Privacy & Security > Automation, and click on the triangle next to OmniFocus to view additional options. Make sure that Mail and Safari are enabled (along with any other apps that you would like), and then try clipping again.
System authorization can also affect sending email using Contact Omni.
Setting a Clippings Shortcut
You need to visit System Settings to set a keyboard shortcut for the Clippings service.
OmniFocus provides a button to take you to the right area of settings, but due to Apple security restrictions, we can only get you part of the way there. Use these instructions for complete guidance on configuring your shortcut:
-
Choose Settings… from the OmniFocus menu.
-
Click on the Set Shortcut… button
 , which will open the Keyboard Shortcuts pane in Keyboard settings.
 -
Click Services in the sidebar.
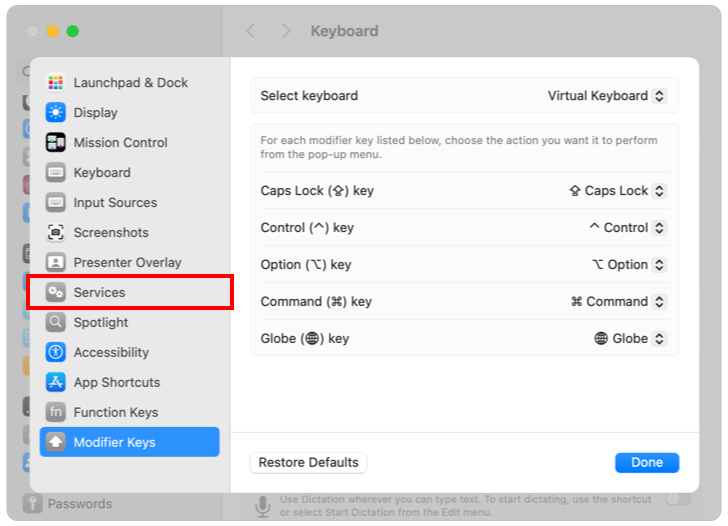
-
Click the disclosure arrow to reveal the Text section (if not already open).
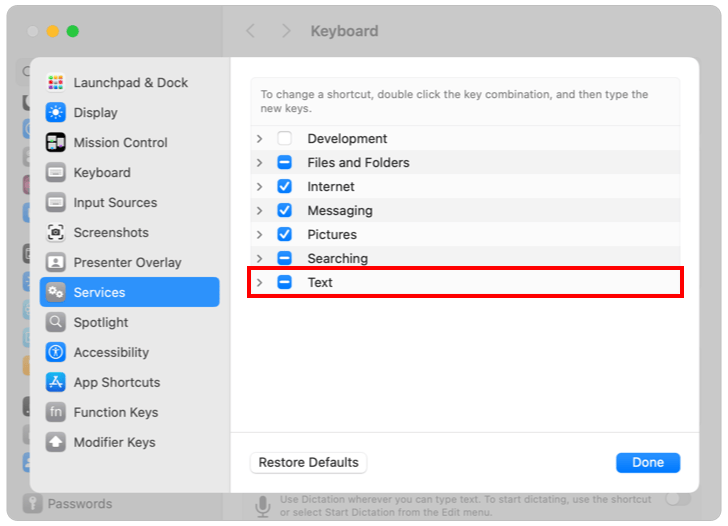
-
Scroll down to find the OmniFocus 4: Send to Inbox item.
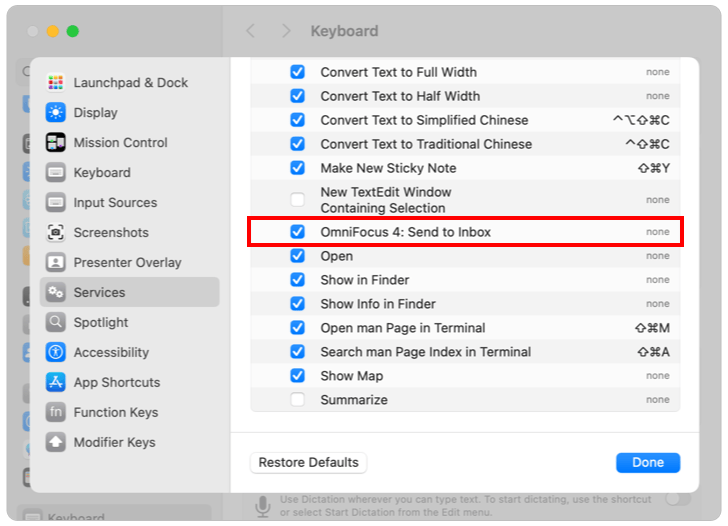
-
Make sure the service is enabled.
-
Double-click on “none” to set a keyboard shortcut.
Mail Drop
Mail Drop is a feature of the
Omni Sync Server,
which lets you send emails directly to your
Inbox.
In addition to using Mail Drop for your own email, you can create multiple private addresses to give access to third parties, and delete those addresses at any time.
In order to use Mail Drop, you’ll need to have a free Omni Account, and OmniFocus must be actively syncing with that Omni Account.
If you are already using Omni Sync Server, you can log in to the Omni Sync Server site and create your first Mail Drop address by clicking or tapping on Add an Address.
An email address will be automatically generated, combining your Omni Account name with a random string of characters. You can start using that address to send or forward emails.
When you send an email message to a Mail Drop address, the subject line of that message becomes the name of the new Inbox item. The body of the message, which can contain text and simple HTML, becomes the note. Email attachments (such as images) are also added as OmniFocus attachments.
Read the OmniFocus Mail Drop support article for more details about this feature.
Plain Text
If you have a list of actions in another file, OmniFocus can turn those into a set of actions, using line breaks to determine where one item ends and the next begins.
Select the text you would like to add to OmniFocus, and Copy it. In OmniFocus, select an item row (without editing any fields), then Paste to add the copied text as a list of items below the one you have selected.
The items will be pasted at the same level as the row you selected. If you would like to paste text as a list of actions in a project, select an existing action inside the project before pasting (selecting the project results in a pasted list of projects, instead of actions).
OmniOutliner
OmniFocus integrates with OmniOutliner, so you can outline a project or agenda in OmniOutliner, then easily bring it to OmniFocus, to take action.
There are three ways to bring your OmniOutliner data into OmniFocus. One is only available on Mac, and the others are also available on iPhone, iPad, and Apple Vision Pro:
- On Mac, use the Import OmniOutliner Document command. You will be prompted to choose an OmniOutliner document, which will be imported into OmniFocus. The OmniOutliner rows become OmniFocus items, and its columns become fields for those items (you can choose which column imports to each field, as part of the import process).
- Drag a selection of rows from an OmniOutliner document, and drop them into the Inbox, or inside a project or group. The rows will become actions or groups, with hierarchy preserved. (On Mac, you can choose which column imports to each field).
- Select any number of rows in an OmniOutliner document and Copy. Paste them into the Inbox, or inside a project or group. The rows will become actions or groups, with hierarchy preserved. (On Mac, you can choose which column imports to each field).
OmniFocus for the Web
When you aren’t able to use OmniFocus on your Mac, iPhone, iPad, Apple Watch, or Apple Vision Pro, you might want to consider OmniFocus for the Web.
OmniFocus for the Web is our browser-based companion app, that works alongside OmniFocus on all your Apple devices and platforms. Using a Windows device at work? Have your iPhone with you, but want a bigger screen? OmniFocus for the Web can be very handy!
OmniFocus for the Web requires syncing with an Omni Account, using our free Omni Sync Server.
Unlike our native apps, which are available as either traditional licenses or subscriptions, OmniFocus for the Web is only available as a subscription. It is included as part of an OmniFocus subscription, or can be added on to your existing OmniFocus license, on a recurring basis.
Settings
Settings can be used to customize the app’s behavior and appearance, so that OmniFocus is fully configured for your needs.
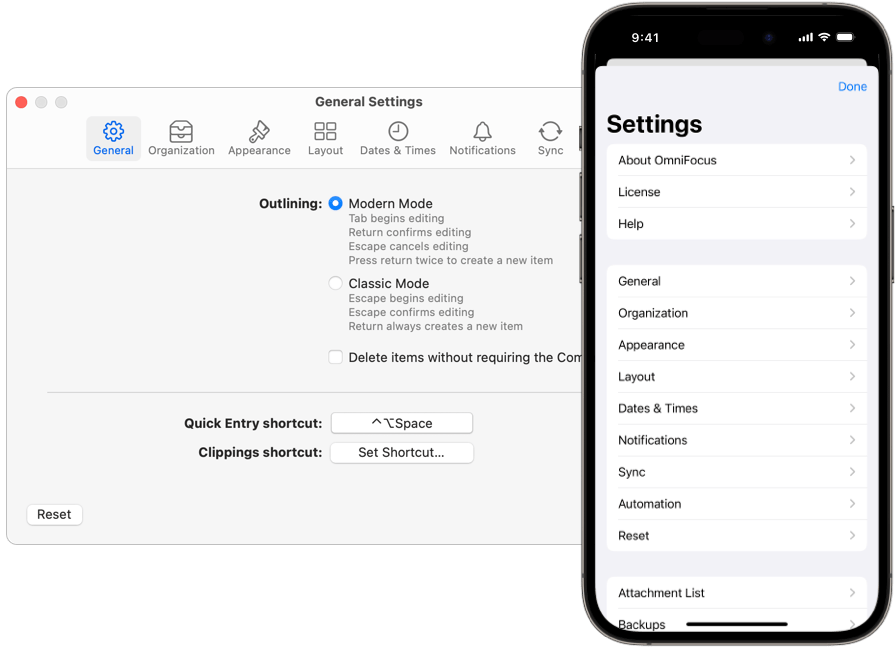
This chapter is structured to help you easily find the information you need, with each section organized for a different purpose.
- Categories — Settings are grouped by category, such as Appearance or Dates & Times. This is a good place to start if you know the category of a setting you would like to change, and want to know more about available options, or need to locate the setting on different platforms.
- Mac — Mac settings are listed in the same order as found in the app. This is a good place to start if you are looking at a settings pane, and want to know more.
- iPhone, iPad, Apple Vision Pro — iPhone, iPad, and Apple Vision Pro settings are listed in the same order as found in the app. This is a good place to start if you are looking at a row or group of settings, and want to know more.
- Settings Reference — All settings are listed in alphabetical order. This is a good place to start if you would like more information about a setting, want to see which platforms support the setting, or need to locate the setting on different platforms.
To open Settings
on Mac, iPad, and Apple Vision Pro,
choose Settings… from the OmniFocus menu,
or use Command-Comma (,).
On iPhone, iPad, and Apple Vision Pro,
you can also
tap the
More Menu button
in the
Toolbar,
then tap the
Settings button
.
On Apple Watch,
tap the
Settings button
on the main OmniFocus screen.
Most items in iPhone, iPad, Apple Vision Pro, and Apple Watch settings are also available on Mac, but are found in Commands, rather than Settings.
Where appropriate, sections of this chapter may link to a related section of the Commands & Shortcuts chapter.
Scope
If you are Syncing OmniFocus, whether using an Omni Account or WebDAV Server, many of your settings will also sync.
We refer to settings as having a Global Scope, Platform Scope, or Local Scope.
- Global Scope settings affect the content or structure of a perspective, and are synced between all devices.
- Platform Scope settings affect the layout, detail, and order of items in a perspective, and are synced between devices that use the same platform. This allows you to display information differently on each platform (and device) you use.
- Local Scope settings affect the appearance of items in a perspective, or rely upon local information (such as calendars available on a specific device), and do not sync.
Categories
This section groups settings into categories, so you can easily find all settings related to a specific topic, such as Layout or Notifications.
Categories are listed in alphabetical order, with each section linking to information for each supported platform. Some settings are available only on specific platforms.
Appearance Settings
Appearance settings vary by platform. Settings may affect font size, colors and styles used by the app, or presentation of information.
Automation Settings
Automation settings vary by platform. Settings may include managing your Omni Automation Plug-Ins, or enabling Developer Mode.
Database Settings
Database settings (the bottom group of settings on iPhone, iPad, and Apple Vision Pro) allow to you to manage attachments, configure backups, export data, or make changes to your database.
On Mac, similar functions are available as Commands rather than Settings, and are linked from specific entries in this chapter, when appropriate.
Dates and Times Settings
Dates & Times settings include how far in advance items are considered “Due Soon”, default times used for new items, and how often new projects should be reviewed.
General Settings
General settings affect app-wide interactions in OmniFocus.
Help Settings
Help topics are found in settings on iPhone, iPad, and Apple Vision Pro, and in the Help menu on Mac.
Help topics may include documentation, release notes, a tutorial project, quick access to resources on our website, or an easy way to email our friendly Support Humans, while including relevant app information.
In-App Purchases
Open In-App Purchases to unlock OmniFocus features by subscribing, purchasing either the Standard or Pro edition of the app, or restoring a previous purchase.
Layout Settings
Layout settings vary by platform. Settings may include choosing between Fluid Layout or Columns Layout, selecting default Outline Rows fields, or selecting default Inspector fields.
When using
OmniFocus Pro,
Layout settings may be customized for each individual perspective,
using
View Options.
License Settings
License settings vary by platform. Settings may include unlocking or licensing OmniFocus, or switching between Standard and Pro feature sets.
Notifications Settings
Notification settings vary by platform, and affect badges and alerts. Alerts may be based on time or location, and can apply to all items in OmniFocus, or specific items.
Organization Settings
Organization settings include choosing when to clean up your Outline, selecting the type of project (or action group) you typically use, and whether to show certain kinds of data when in specific perspectives.
Reset Settings
Reset commands allow you to reset all or part of your OmniFocus data.
On Mac, settings can be reset in each Settings pane, or by using the Reset Database and Settings… command.
Sync Settings
Sync settings empower you to keep OmniFocus updated across all of your devices.
System Information Settings
The System Information setting offers the option to send us anonymous data, to help improve future versions of OmniFocus.
Update Settings
Update settings are only available on Mac, when running a version of OmniFocus downloaded from us, and control how frequently OmniFocus checks for updates.
Mac
Settings panes are listed in the order they are displayed in the app.
On Mac, each settings pane has a Reset button in the bottom corner. If you press the Option key, the button updates to Reset All. Clicking on either option will present a confirmation before making any changes.
- Reset will restore settings in the pane you are viewing to the state they were in when OmniFocus was first installed.
- Reset All will restore all settings to the state they were in when OmniFocus was first installed.
General (Mac)
General settings affect app-wide interactions in OmniFocus.
Organization (Mac)
Organization settings include choosing when to clean up your Outline, selecting the type of project you typically use, and whether to view certain kinds of data in specific perspectives.
Appearance (Mac)
Appearance settings control font size, colors and styles used by the app, as well as how some information is presented.
Layout (Mac)
Layout settings control the appearance of the Outline and Inspector.
When using
OmniFocus Pro,
Layout settings may be customized for each individual perspective,
using
View Options.
Outline
Inspector
Dates and Times (Mac)
Dates & Times settings include how far in advance items are considered “Due Soon”, default times used for new items, and how often new projects should be reviewed.
Due Soon
Default Times
Default Projects Review Schedule
Notifications (Mac)
Notification settings control alerts and badges in OmniFocus.
OmniFocus can provide notifications on Mac, in addition to notifications on iPhone, iPad, and Apple Vision Pro.
OmniFocus notification settings include alerts and sounds:
As well as badges:
Location-based notifications can be edited on Mac, but will only provide notifications on mobile devices.
Read the Apple User Guide articles View app notifications on Mac and Change Notifications settings on Mac to learn more about System Settings for notifications.
Sync (Mac)
- Information about Syncing OmniFocus can be found in the Managing Your Data chapter.
Update (Mac Omni Store)
Update settings control how frequently OmniFocus checks for updates to itself (for non-App Store builds), and offers the option to help Omni improve future versions of OmniFocus by sending us anonymous data about your device.
System Information (Mac App Store)
System Information settings offer the option to help Omni improve future versions of OmniFocus by sending us anonymous data about your device.
iPhone, iPad, Apple Vision Pro
Settings rows and groups are listed in the order they are displayed in the app.
About (iPhone, iPad, Apple Vision Pro)
License (iPhone, iPad, Apple Vision Pro)
License settings control how OmniFocus is unlocked, and allow switching between Standard and Pro feature sets.
If you have not unlocked OmniFocus, tap the Omni Account row to sign in to an existing Omni Account or Site License, or create a new Omni Account. On the next screen, enter the information for your current Omni Account (or tap on Sign Up to create one), or a work email address associated with a Site License, and follow the instructions that present.
If you need to unlock OmniFocus, tap the In-App Purchases row to start a subscription, purchase a Standard or Pro license, or restore an existing purchase.
If you have already unlocked OmniFocus, the first row indicates whether you are licensed using an Omni Account or Site License. If you are using an Omni Account, tap on the Omni Account row for additional options. If you are using a Site License, two additional buttons appear, allowing you to either Renew Session or Remove License.
Help (iPhone, iPad, Apple Vision Pro)
Help topics include resources for learning more about OmniFocus, and getting help from our Support Humans.
General (iPhone, iPad, Apple Vision Pro)
General settings affect app-wide interactions in OmniFocus.
Organization (iPhone, iPad, Apple Vision Pro)
Organization settings include choosing when to clean up your Outline, selecting the type of project you typically use, and whether to view certain kinds of data in specific perspectives.
Appearance (iPhone, iPad, Apple Vision Pro)
Appearance settings control colors and styles used by the app, as well as how some information is presented.
Layout (iPhone, iPad, Apple Vision Pro)
Layout settings control the appearance of the Outline and Inspector.
When using
OmniFocus Pro,
Layout settings may be customized for each individual perspective,
using
View Options.
Outline
Inspector
Dates and Times (iPhone, iPad, Apple Vision Pro)
Dates & Times settings include how far in advance items are considered “Due Soon”, default times used for new items, and how often new projects should be reviewed.
Due Soon
Default Times
Default Projects Review Schedule
Notifications (iPhone, iPad, Apple Vision Pro)
Notification settings control alerts and badges in OmniFocus.
OmniFocus can provide notifications on iPhone, iPad, and Apple Vision Pro, in addition to notifications on Mac.
OmniFocus notification settings include alerts and sounds:
As well as badges:
Read these Apple User Guide articles, to learn more about System Settings for notifications.
iPhone:
iPad:
Apple Vision Pro:
Sync (iPhone, iPad, Apple Vision Pro)
- Information about Syncing OmniFocus can be found in the Managing Your Data chapter.
Automation (iPhone, iPad, Apple Vision Pro)
Automation settings allow you to manage your Omni Automation Plug-Ins, and enable Developer Mode.
Reset Settings (iPhone, iPad, Apple Vision Pro)
Reset some or all of your settings, or reset your OmniFocus database and start again.
Database Settings (iPhone, iPad, Apple Vision Pro)
Database settings (the bottom group of settings on iPhone, iPad, and Apple Vision Pro) allow to you to manage attachments, configure backups, export data, or make changes to your database.
Attachments
Backups
Settings in this section are only available on iPhone, iPad, and Apple Vision Pro, as OmniFocus on these devices handles backups differently than on Mac.
Read Backups of OmniFocus Data to learn more.
Exporting
Database
These items appear only if your database is in a state where it could use the help they provide. If you don’t see them, you’re probably in good shape.
At the very bottom of the Settings screen, there is information about the number of projects and actions in your database, as well as the number of zip files used to contain your data.
If you are syncing, the number of zip files will increase as you make edits in OmniFocus, and decrease as all devices receive those changes. Syncing all of your devices frequently will improve performance, as each device has to track fewer local changes.
Apple Watch
OmniFocus for Apple Watch settings provide a subset of settings found on other devices.
The top row includes:
Perspectives List (Apple Watch)
The second row allows configuration of the main app screen, by selecting which of your synced Perspectives will display on the main screen.
- Tapping a row with an empty
Favorite button
will add it to the main view.
- Tapping a row with a filled
Favorite button
will remove it from the main view.
Appearance (Apple Watch)
The third row contains settings for color and font appearance:
Sync (Apple Watch)
The bottom rows include Sync-related settings:
Settings Reference
This section lists all OmniFocus settings (or commands found in Settings on iPhone, iPad, or Apple Vision Pro) in alphabetical order.
Each entry contains links to where the setting (or command) can be found on each platform. If no platforms are specified, it is available on all devices except for Apple Watch.
- Accent Color
- App Icon (Pro)
- App Icon Badge Counts
- App Lock
- Automatic Backups
- Back Up Now
- Backup Folder
- Backups List
- By Default, Review Projects Every
- Change Email
- Change Password
- Check For Updates
- Clean Up Inbox Items Which Have
- Clean Up Resolved Items
- Clippings Shortcut
- Color Palette
- Color Text For Due Items
- Color Text For First Available Actions
- Columns Layout
- Default Notifications
- Default Project Type
- Default Row Layout
- Default Time For Defer Dates
- Default Time For Due Dates
- Default Time For Scheduled Notifications
- Delete Items Without Requiring the Command Key
- Delete Old Items
- Developer Mode (Pro)
- “Due Soon” Means
- Enable Pro Features
- Export to CSV
- Fluid Layout
- Font Size
- Hide Projects and Action Groups
- How Many Backups Should Be Kept?
- Include Items from on Hold Projects (Pro)
- Keep Sidebar Hidden
- Layout Settings for Inspector
- Location Notifications
- Notification Sounds
- Omni Account
- Open Calendar Events In
- Outlining Mode
- Perspectives Bar Shows Badges
- Perspectives Bar Shows Titles
- Quick Entry Shortcut
- Reminders Capture
- Reset OmniFocus
- Send Anonymous System Information to the Omni Group
- Show Full Item Title
- Show Perspectives Bar
- Show Sidebar Badges
- Show Sidebar First
- Sidebar Due Counts
- Siri Shortcuts
- Strike Resolved Items
- Support Center
Accent Color
Available in Appearance settings
Available on iPhone, iPad, Apple Vision Pro
Setting has local scope
Select the accent color used for buttons and links throughout the app.
Tap the color swatch to open the color picker, where you can choose from Omni-selected colors. You can also tap Custom… to choose a custom color for OmniFocus, or reset to the Default Color.
On Mac, OmniFocus uses the Accent color selected in System Settings > Appearance. To learn more, read the Apple User Guide article Change Appearance settings on Mac.
App Icon (Pro)
![]() Requires OmniFocus Pro
Requires OmniFocus Pro
Available in Appearance settings
Available on Mac, iPhone, iPad
Setting has local scope
Select an alternate app icon, ranging from the original OmniFocus 1 app icons to the updated OmniFocus 4 app icon.
When using the Mac App Store version, this only updates the app icon while OmniFocus is running. When using the Mac version downloaded from Omni, this updates the app icon even when OmniFocus isn’t running.
This feature is not yet supported by Apple Vision Pro.
App Icon Badge Counts
Available in Notifications settings
Setting has local scope
Choose whether you would like to include Overdue, Due Soon, or Flagged items in the number badge that appears in the corner of the OmniFocus app icon.
If nothing is checked, the badge won’t appear.
App Lock
Available in General settings
Available on iPhone, iPad, Apple Vision Pro
Setting has local scope
If you use OmniFocus on a device that you occasionally share (with your children, coworkers, or clients, for example), there may be times you would prefer that your OmniFocus data be hidden. The App Lock feature prevents accidental taps and casual glances by adding a password-locked privacy screen that must be dismissed before accessing any of your OmniFocus data or settings.
App Lock does not encrypt your OmniFocus data, nor does it prevent someone with physical access to your device from connecting it to another device and copying your data file, or deleting OmniFocus from your device outright.
The Files app can also be used to retrieve your OmniFocus data file regardless of whether App Lock is enabled.
App Lock is solely intended as a privacy feature, to prevent accidental exposure or corruption of data when others are using your device. It is not meant to thwart serious attempts to access or compromise your data. Device-level security measures are recommended for those with additional security needs.
App Lock is turned off by default. To turn it on, tap App Lock.
When you turn on App Lock, you will be prompted to choose (and confirm) a new App Lock password, which is distinct from both your OmniFocus sync password and encryption passphrase.
If you use OmniFocus on multiple devices, you need to configure and set an App Lock password on each device where you would like the additional privacy.
Warning
If you forget the App Lock password, OmniFocus can no longer be used on your device.
If you are syncing your OmniFocus data, the easiest way to recover is to delete OmniFocus, then reinstall the app from the App Store, and use your existing sync credentials to restore your database.
If you have chosen not to sync, you can retrieve your OmniFocus data by connecting your device to the Finder or iTunes, and copying your OmniFocus data (the OmniFocus.ofocus file) to a safe location.
You can also use the Files app to retrieve your data file, and share it using email, or another option in the Share menu, to another location.
After saving a backup of your data, delete OmniFocus from your device and reinstall it from the App Store. Once you have reinstalled OmniFocus, you can set a new App Lock password, and use Finder or iTunes to load your OmniFocus.ofocus file back onto your device.
After choosing a password, App Lock is turned on.
App Lock Settings offer the option to turn App Lock off, change your password, or use Touch ID, Face ID, or Optic ID to unlock OmniFocus on supported devices.
To change your App Lock password, Tap Change Password…. You are prompted to enter your old password, and then to choose and confirm a new one.
With App Lock turned on, the next time you open OmniFocus you will see a privacy screen with a field to enter the password you chose. Enter the password, and jump into your action list!
If you choose to use Touch ID, Face ID, or Optic ID, a prompt for your fingerprint, face, or eye will appear instead. You will still have the option to enter a password, or you can tap the icon next to the password field to unlock with Touch ID, Face ID, or Optic ID if you dismissed the prompt initially.
To minimize interruptions while using OmniFocus, App Lock will not engage for 90 seconds after switching away, in case you are quickly switching between apps.
Automatic Backups
Available in Database settings
Available on iPhone, iPad, Apple Vision Pro
Setting has local scope
Choose between having OmniFocus create a new backup every 24 hours, or only making manual backups. Every time OmniFocus creates a new backup, it replaces the oldest backup.
On Mac, backups are always automatic; please read Backups on Mac to learn more.
Back Up Now
See Back Up Now in Commands & Shortcuts.
Backup Folder
Available in Database settings
Available on iPhone, iPad, Apple Vision Pro
Setting has local scope
By default, OmniFocus will save backups locally, on your device. This ensures that only the syncing database, which uses end-to-end encryption, is exposed to a network. When backups are stored locally, deleting OmniFocus will delete your backups.
If you would like to store backups in iCloud Drive, which will keep your backups from being deleted when OmniFocus is deleted, please select that option. Keep in mind that neither local copies of the database nor backups are encrypted.
On Mac, backups are always stored in the same location; please read Backups on Mac to learn more.
Backups List
Available in Database settings
Available on iPhone, iPad, Apple Vision Pro
OmniFocus on iPhone, iPad, and Apple Vision Pro will display a list of backups, up to the number set in How many backups should be kept?. Tapping on one of the backups in the list will show information about the date of the backup, the size of the backup, and whether it was automatically or manually created.
To use this backup, replacing your current OmniFocus data, tap on the Revert to This Backup button.
On Mac, backups can be shown using the Show Backups in Finder command.
By Default, Review Projects Every
Available in Dates & Times settings
Setting has global scope
When a new project is created, this will be the value for how often you would like to review your progress. The review period for a specific project can be adjusted using the Review inspector.
Change Email
Available in the Omni Account screen
Available on iPhone, iPad, Apple Vision Pro
Enter your current Omni Account password, and your new email address. You will receive a code at your new email address that you can enter to verify the change; once you have verified the change, the new email address will be updated across our servers.
This command is available on Mac, by clicking Edit Account… in the Manage Omni Account and Purchases… screen.
Change Password
Available in the Omni Account screen
Available on iPhone, iPad, Apple Vision Pro
Enter your current Omni Account password, then a new password, and verify the new password by entering it a second time. Once you have submitted your change, the new password will be updated across our servers.
This command is available on Mac, by clicking Edit Account… in the Manage Omni Account and Purchases… screen.
Check For Updates (Omni Store Only)
Available on Mac in Update settings
Setting has local scope
OmniFocus will periodically check for updates. You can choose the interval you prefer, or uncheck the box to disable automatic checking.
You can manually check for updates by clicking on the Check Now button, or with the Check for Updates… command.
Clean Up Inbox Items Which Have
Available in Organization settings
Setting has global scope
This setting controls when Inbox items
are moved from the
Inbox
to an assigned project.
The options are:
- A project — Assigning a project will move this item to the assigned project. Without an assigned project, this item will remain in the Inbox.
- A tag — Assigning one or more tags will move this item to the default Miscellaneous project, with the assigned tags. Without at least one tag, this item will remain in the Inbox.
- Both a project and a tag — Assigning both a project and one or more tags will move this to the assigned project, with the assigned tags. Without a project and at least one tag, this item will remain in the Inbox.
- Either a project or a tag — Assigning either a project or one or more tags will move this to the assigned project or the default Miscellaneous project, with the assigned tags. Without a project or at least one tag, this item will remain in the Inbox.
Note that items will not move out of the Inbox
until you either switch to another
Perspective, or
use the
Clean Up command.
Clean Up Resolved Items
Available in Organization settings
Setting has global scope
If you prefer that items be cleaned up,
updating their visibility to match the current
View Options selection,
as soon as they are
Completed
or
Dropped,
choose Immediately.
Otherwise,
Resolved items will be cleaned up
when you either switch to another
Perspective, or
use the
Clean Up command.
Clippings Shortcut
Available on Mac in General settings
Setting has local scope
Click on the Set Shortcut… button
to open System Settings
and set up your system-wide keyboard shortcut
for Clippings.
Please read Setting a Clippings Shortcut to learn more.
Color Palette
Available in Appearance settings
Available on Mac, iPhone, iPad
Setting has local scope
Choose between three color palette options for OmniFocus:
- Automatic — Follows the Appearance (Light, Dark, or Auto) selected in System Settings.
- Light — Uses the Light color palette, regardless of your device’s Appearance settings.
- Dark — Uses the Dark color palette, regardless of your device’s Appearance settings.
Read these Apple User Guide articles to learn more:
This feature is not yet supported by Apple Vision Pro.
Color Text For Due Items
Available in Appearance settings
Setting has local scope
Choose whether to use yellow text for the title of projects, action groups, and actions that are Due Soon, and red text for the title of projects, action groups, and actions that are Overdue.
Color Text For First Available Actions
Available in Appearance settings
Setting has local scope
Choose whether to use purple text for the title of actions that are First Available.
Columns Layout
Available on Mac in Layout settings
Settings have platform scope
Columns layout is designed to display each item in a single row, which allows for easy scanning of the Outline. If you would find this layout helpful on iPad or Apple Vision Pro, please email us.
By default, each row displays the assigned Project, Tags, Due Date, and Flag Status. Selecting a row allows you to edit those fields, as well as the note.
Clicking on Set Columns allows you to choose which columns are displayed, as well as rearrange the order of columns by dragging and dropping.
Available columns:
Additional options include:
- Tags shown — Choose the number of tags to display, or select the ∞ infinite symbol to show all assigned tags.
- Show full project path — By default, project display includes only the name of the project. Enabling this setting will also show any folders above the project in the Hierarchy.
- Hide project when redundant —
By default,
displaying the assigned project is considered redundant
when in
Projects,
or in a
Custom Perspective
which is
Organized by Entire Projects.
Disabling this setting will show the assigned project
in those perspectives, as well.
Default Notifications
Available in Notifications settings
Settings have local scope
Set automatic date-based notifications for all actions, action groups, and projects. These settings affect all items with assigned dates or estimated durations.
Automatic notifications can be removed from individual items
using the
Notifications inspector,
or re-added once they have been removed.
Notifications can also be added to, or removed from, individual items using the Notifications inspector.
- Deferred —
Enable this to automatically schedule a notification
for the
Defer Until Date,
when an item becomes Available.
Changing the Defer Until Date will also change
the date and time of the notification;
removing the Defer Until Date deletes the notification.
- Latest Start —
Enable this to automatically schedule a notification
for the Latest Start Date,
which is calculated by subtracting
Estimated Duration
from the
Due Date,
so you know the latest possible time to begin working on an item,
in order to complete it by the Due Date.
Changing the Due Date or Estimated Duration will also change
the date and time of the notification;
removing the Due Date or Estimated Duration deletes the notification.
- Due —
Enable this to automatically schedule a notification
for the
Due Date,
when an item becomes Overdue.
Changing the Due Date will also change
the date and time of the notification;
removing the Due Date deletes the notification.
Default Row Layout
Available on Mac in Layout settings
Setting has platform scope
Choose between using Fluid or Columns as the default layout for all your perspectives.
When using
OmniFocus Pro,
Row Layout settings can be customized for each perspective using
View Options.
Default Project Type
Available in Organization settings
Setting has global scope
Select the default
Project Type and
Action Group Type,
choosing between
Parallel or
 Sequential.
You can easily switch between types using the Project or Group Type inspector, but if you use one type more often than the other, this can save you a little time.
This setting does not apply when creating a new
 Single Actions List,
or when using
Add Parallel Project or
Add Sequential Project.
It only applies when the type is not specifically chosen,
such as when you use the New Project command,
or created a project using the
Project inspector.
Single Actions List,
or when using
Add Parallel Project or
Add Sequential Project.
It only applies when the type is not specifically chosen,
such as when you use the New Project command,
or created a project using the
Project inspector.
Default Time For Defer Dates
Available in Dates & Times settings
Setting has global scope
When you assign a
Defer Until Date
to an action or project
without choosing a specific time,
this default time will be used.
Default Time For Due Dates
Available in Dates & Times settings
Setting has global scope
When you assign a
Due Date
to an action or project
without choosing a specific time,
this default time will be used.
Default Time For Scheduled Notifications
Available in Dates & Times settings
Setting has global scope
When you create a
Scheduled Notification
for an action or project
without choosing a specific time,
this default time will be used.
Delete Items Without Requiring the Command Key
Available on Mac in General settings
Setting has local scope
By default, the keyboard shortcut for Delete is Command-Delete. Enabling this setting allows you to use Delete without pressing the Command key.
Delete Old Items
Available in Database settings
Available on iPhone, iPad, Apple Vision Pro
This command appears when you have at least 1000 completed items, all of which have been completed for six months or longer. You can use this command to reduce your database size by removing those old items, which often improves performance.
If you have OmniFocus for Mac, we recommend using Archive Old Items… instead of deleting items. Read Archiving in OmniFocus to learn more.
You could also read the Find and reduce the size of your database in OmniFocus 4 support article, for additional help keeping your database size manageable.
Developer Mode (Pro)
![]() Requires OmniFocus Pro
Requires OmniFocus Pro
Available in Automation settings
Available on iPhone, iPad, Apple Vision Pro
Setting has local scope
Enable Developer Mode to add the
Omni Automation (Pro) menu
to the top Toolbar.
This also enables access to the Automation Console (Pro) and Automation Reference (Pro), both of which are tools that you can use to create your own automations.
“Due Soon” Means
Available in Dates & Times settings
Setting has global scope
OmniFocus displays
Actions and
Projects
that are Due Soon
with a yellow
Status Circle
(and optional yellow text).
Choose when you would like OmniFocus to consider items Due Soon:
- Today
- 24 hours
- 2 days (default)
- 3 days
- 4 days
- 5 days
- 1 week
All options are based on full calendar days, except for 24 hours, which includes the rest of today, and the portion of tomorrow that falls within the next 24 hours.
Enable Pro Features
![]() Requires OmniFocus Pro
Requires OmniFocus Pro
Available in License settings
Available on iPhone, iPad, Apple Vision Pro
Setting has local scope
This allows you to choose between the OmniFocus or OmniFocus Pro feature sets, when using a trial license, Pro license, or Site License.
On Mac, a similar function is available in the OmniFocus menu, using the Free Trial Mode sub-menu.
Export to CSV
See Export to CSV in Commands & Shortcuts.
Fluid Layout
Available in Layout settings
Settings have platform scope
Fluid layout is designed to always show information that is most important to you, in a row under the title, with the additional flexibility of quickly editing other fields. This is accomplished by having two sets of fields: one for display, and another for editing.
By default, all items display the assigned Project, Tags, Due Date, Flag Status, and Note Icon. Selecting a row allows you to edit those fields, as well as the item’s note.
Clicking or tapping on Set Display Fields allows you to choose fields that are always displayed for each item, regardless of whether they are selected. Fields can also be rearranged by dragging and dropping into your desired order.
Available fields:
Additional options include:
- Preview notes in Outline — Display all notes. (iPhone, iPad, and Apple Vision Pro only).
- Tags shown — Choose the number of tags to display, or select the ∞ infinite symbol to show all assigned tags.
- Show full project path — By default, project display includes only the name of the project. Enabling this setting will also show any folders above the project in the Hierarchy.
- Hide project when redundant —
By default,
displaying the assigned project is considered redundant
when in
Projects,
or in a
Custom Perspective
which is
Organized by Entire Projects.
Disabling this setting will show the assigned project
in those perspectives, as well.
Clicking or tapping on Set Editing Fields allows you to choose additional fields which are displayed only when an item is selected.
This set automatically includes all fields enabled in Set Display Fields, in the same order. Display Fields are always available, and additional fields can be added by disabling Mirror Display Fields.
Additional options include:
- Show note automatically — When selecting an item, the note will automatically be shown. (Mac only)
- Notes — When selecting an item, the note will automatically be shown. Note that this overrides the Preview notes in Outline setting above, but only for the selected note. (iPhone, iPad, and Apple Vision Pro only)
Font Size
Available on Mac in Appearance settings
Setting has local scope
This slider allows you to adjust the font size used in OmniFocus, in order to find the right balance between comfortable reading and information density.
When using an iPhone, iPad, or Apple Vision Pro, OmniFocus will respect the settings found in Settings > Display & Brightness, as well as related Accessibility settings.
For more information, see the Apple User Guide articles:
Hide Projects and Action Groups
Available in Organization settings
Setting has global scope
By default,
the
Tags
and
Flagged
perspectives will show
projects and action groups,
as long as they match the selected
View Options filter.
Enable this setting to hide projects and action groups from these perspectives, and focus exclusively on actions.
How Many Backups Should Be Kept?
Available in Database settings
Available on iPhone, iPad, Apple Vision Pro
Setting has local scope
Select the number of backups that OmniFocus will store. As each additional automatic or manual backup is made, the oldest existing backup will be replaced.
A higher number of backups may provide additional security, but will also take more storage space.
On Mac, there is a fixed number of backups; please read Backups on Mac to learn more.
Include Items from On Hold Projects (Pro)
![]() Requires OmniFocus Pro
Requires OmniFocus Pro
Available in Organization settings
Setting has global scope
By default, the
Forecast
perspective will hide projects that are
On Hold,
as well as any actions or action groups that are part of that project.
If these items help your planning, enable this setting to show them in Forecast.
Keep Sidebar Hidden
Available in View Options
Available on Mac, iPad, Apple Vision Pro
Setting has platform scope
On a Mac, iPad, or Apple Vision Pro,
navigating to a different perspective by using the
Perspectives Bar or
Quick Open
will show the Sidebar in the most recent state set by using the
Show/Hide Sidebar command.
If during your last visit to a given perspective you left the Sidebar showing (such as showing the Calendar in Forecast), then the next time you visit that perspective, the Sidebar will still be showing; the same is true if the Sidebar was hidden.
Enabling this setting changes that behavior, but only for the perspective where you have enabled it: instead of respecting the most recent state, you will always start with the Sidebar hidden.
When using an iPad or Apple Vision Pro, this setting only impacts Regular view. When using Compact view (iPhone width, displayed on a larger screen) you will always visit the Outline first.
This setting does not affect the use of
Go Back/Forward
navigation, which should always show
you the most recent state of each perspective you visit.
This setting is not available for the
Inbox perspective,
which does not have a Sidebar.
Show Sidebar First is the related setting on an iPhone.
Layout Settings for Inspector
Available in Layout settings
Settings have platform scope
By default, the Inspector displays the
Title,
Status,
Project/Group Type,
Project,
Tags,
Defer Until,
Due,
Repeat,
Review,
![]() Note, and
Tag Location fields,
as appropriate for the selected item.
Note, and
Tag Location fields,
as appropriate for the selected item.
You can enable or disable fields to show by default, as well as rearrange them by dragging and dropping.
Select which of these fields show in the Inspector:
Location Notifications
Available in Notifications settings
Available on iPhone, iPad, Apple Vision Pro
Setting has local scope
Enable this setting to use location-based notifications on your mobile devices.
Notification Sounds
Available in Notifications settings
Settings have local scope
Select the sounds that are played for notifications.
These sounds may be used by Default Notifications, Location Notifications, or notifications set using the Notifications inspector.
On Mac, your options are:
- Off — No sounds are played. Alerts may still display for enabled Default Notifications, depending on your System Settings for Notifications > OmniFocus.
- Default — OmniFocus default sound (Bridge) is played for enabled Default Notifications, depending on your System Settings for Notifications > OmniFocus.
- Custom — Select custom sounds to play for enabled Default Notifications, depending on your System Settings for Notifications > OmniFocus.
On iPhone, iPad, or Apple Vision Pro, tap on the Sounds row to show the Notify with Sound toggle, along with additional settings.
- Off — No sounds are played. Alerts may still display for enabled Default Notifications, depending on your System Settings for Notifications > OmniFocus.
- On — OmniFocus default sounds (Bridge, Arriving Synth, Leaving Synth) are played for Location Notifications and enabled Default Notifications, depending on your System Settings for Notifications > OmniFocus.
The visible Sounds options on iPhone, iPad, and Apple Vision Pro update based on which of the Default Notifications are enabled. If you do not see an option that you expect, make sure that it is enabled on the main Notifications screen.
Custom sounds include None, Bridge, Arriving Synth, Leaving Synth, Ditto, Interval, Laser, Mercury, Projector, Robot, and Sonar.
Custom sounds can be assigned to notifications for
Deferred,
Latest Start,
Due,
Location (When Arriving),
Location (When Leaving), and
![]() Scheduled.
Scheduled.
Omni Account
Available in License settings
Available on iPhone, iPad, Apple Vision Pro
Log in to or sign out of your Omni Account, unlock OmniFocus (if you have a current license or subscription), or update your account information.
Options include:
Creating an Omni Account is free, and is required for syncing with the Omni Sync Server, or using OmniFocus for the Web.
Similar functions are available on Mac, using Unlock OmniFocus… and Manage Omni Account and Purchases….
Open Calendar Events In
Available in General settings
Available on iPhone, iPad, Apple Vision Pro
Setting has local scope
Choose whether tapping the
Calendar button
next to events in
Forecast
opens Apple Calendar or Fantastical.
Please feel free to request support for your favorite calendar application.
On Mac, OmniFocus reads this setting from Apple’s Calendar application. Read Apple’s Calendar User Guide article Change General settings in Calendar on Mac to learn more.
Outlining Mode
Available on Mac in General settings
Setting has local scope
Choose between two different modes of outlining, which change the behavior of common keyboard actions when items in the Outline are selected.
When in Modern Mode:
- Press Tab to begin editing
- Press Return to confirm editing
- Press Escape to cancel editing
- Press Return twice to create a new item
When in Classic Mode:
- Press Escape to begin editing
- Press Escape to confirm editing
- Press Return once to create a new item
This setting only applies when using a Mac.
Read Apple’s Use shortcuts on an Apple external keyboard with iPad to learn more about keyboard navigation on iPad (& iPhone).
Perspectives Bar Shows Badges
Available in Notifications settings
Settings have local scope
Enable or disable Perspectives Bar badges for the Inbox, Forecast, Flagged, or Review perspectives.
The badge count for each perspective is based on the intended purpose of the perspective:
Neither Projects nor Tags have Perspectives Bar badges, but each can Show Sidebar Badges.
Perspectives Bar Shows Titles
Available in Appearance settings
Setting has local scope
Choose to show or hide titles in the Perspectives Bar. Showing titles (the default setting) provides more information, while hiding titles fits more items in the Perspectives Bar.
Quick Entry Shortcut
Available on Mac in General settings
Setting has local scope
Set a custom keyboard shortcut for
Quick Entry here (the default is Control-Option-Space bar).
See also Show Quick Entry
Reminders Capture
Available in Automation settings
Available on iPhone, iPad, Apple Vision Pro
Setting has local scope
Enabling this setting allows you to choose a specific Reminders list to continuously import into the Inbox.
Earlier versions of OmniFocus relied on this for communication with Siri, and the feature is still available for customers that find it useful. Please note that Reminders Capture is no longer the preferred method for OmniFocus to interact with Siri. Instead, use Siri to add items to OmniFocus directly.
Reset OmniFocus
Available in Reset settings
Available on iPhone, iPad, Apple Vision Pro
You can reset OmniFocus settings, using these options:
- Reset iPhone/iPad/Apple Vision Pro Layout Settings — This resets platform scope settings for Layout and Inspector back to defaults, for all perspectives.
- Reset All Settings — This resets global scope, platform scope, and local scope settings back to defaults. This affects any syncing Mac, iPhone, iPad, or Apple Vision Pro, but does not reset platform scope settings for a different platform.
- Reset Database — This removes your local OmniFocus data, and starts OmniFocus back at the First Launch screen. If you are not syncing your database, be aware that this will erase your data. Depending on your Backups settings, you may not be able to recover your data.
On Mac, a similar function is available by using the Reset Database and Settings… command.
Send Anonymous System Information to the Omni Group
Available in General settings
Available on iPhone, iPad, Apple Vision Pro
Available on Mac in Update settings
Available on Mac in System Information settings
Setting has local scope
If you would like to help improve future versions of OmniFocus, you can choose to send us anonymous information about your OmniFocus data and device.
All the information that will be shared is visible in this Settings screen on iPhone, iPad, or Apple Vision Pro.
On Mac, click on Learn more about what kind of information is sent.
Show Full Item Title
Available on Mac in Appearance settings
Setting has local scope
- Always — Titles are always displayed at full length in the Outline, whether or not a row is selected. This is the default setting, and allows you to see all relevant information.
- When Selected — Titles are truncated to the first line in the Outline, unless they are selected. This setting allows you to see more items at the same time.
Show Perspectives Bar
Available in Appearance settings
Available on iPhone, iPad, Apple Vision Pro
Setting has local scope
Show or hide the Perspectives Bar.
This is available as a setting on iPhone, iPad, and Apple Vision Pro, and as the Show/Hide Perspectives Bar command on all devices.
Show Sidebar Badges/Sidebar Due Counts
Available in Notifications settings
Setting has local scope
Show badges in the Projects Sidebar, Tags Sidebar, and Review Sidebar which include the number of Due Soon (yellow badge) or Overdue (red badge) items.
Show Sidebar First
Available in View Options
Available on iPhone
Setting has platform scope
This setting will be displayed as Show Project list first, Show Tag list first, or Show Calendar first, depending on which Perspective you are viewing.
On an iPhone,
navigating to a different perspective by using the
Perspectives Bar or
Quick Open
will always show the Outline first.
Enabling this setting changes that behavior,
but only for the perspective where you have enabled it:
instead of always starting with the Outline,
you will always start with the Sidebar.
This setting does not affect using an iPad or Apple Vision Pro in Compact view (iPhone width, displayed on an iPhone). When using Compact view on an iPad or Apple Vision Pro, you will always visit the Outline first.
This setting does not affect the use of
Go Back/Forward
navigation, which should always show
you the most recent state of each perspective you visit.
This setting is not available for the
Inbox
perspective,
which does not have a Sidebar.
Keep Sidebar Hidden is the related setting on a Mac or iPad.
Siri Shortcuts
Available in Automation settings
Available on iPhone, iPad, Apple Vision Pro
Setting has global scope
Tap to open a list of your OmniFocus perspectives, then tap a perspective to open the Siri Shortcuts recording dialog. Record a custom phrase here that can be used with Siri to open the perspective from anywhere on your device.
Strike Resolved Items
Available in Appearance settings
Setting has local scope
Choose whether to strike through the title text for
Completed
or
Dropped
projects and actions.
Support Center
Available in Help settings
Available on iPhone, iPad, Apple Vision Pro
Tap to open a web view containing the official OmniFocus support page, with a search field for troubleshooting articles and links to the online reference manuals and other resources.
Commands and Shortcuts
This chapter gathers the commands and shortcuts found throughout OmniFocus into a single reference.
This chapter is structured to help you easily find the information you need, with each section organized for a different purpose.
- Bare Key Editing — Introduction to Bare Key Editing, new in OmniFocus 4!
- Keyboard Shortcuts — Quick info about Keyboard Shortcuts.
- Categories — Commands are grouped by category, such as Perspectives or View. This is a good place to start if you know the category of a menu, menu item, or menu command, and want to know more about it, or need to locate the command on different platforms.
- Mac — Mac menu bar items and commands are listed in the same order as found in the app. This is a good place to start if you are looking at a menu, and want to know more.
- iPad, Apple Vision Pro — iPad & Apple Vision Pro menus are listed in the same order as found in the app; menu items and commands are listed in alphabetical order. This is a good place to start if you are looking at a menu, and want to know more.
- Shortcut Menus — Shortcut menu items and commands are listed in alphabetical order, grouped by type. This is a good place to start if you are looking at a shortcut menu, and want to know more.
- Commands Reference — All commands are listed in alphabetical order. This is a good place to start if you would like more information about a command, want to see which platforms support that command, or need to locate the command on different platforms.
Commands are located in Mac, iPad, and Apple Vision Pro menu bars, as well as in Shortcut Menus on Mac, iPhone, iPad, and Apple Vision Pro.
Many commands are also available using either Bare Key Editing or Keyboard Shortcuts.
Bare Key Editing
When using Mac, iPad, or iPhone with a hardware keyboard, it is now possible to jump directly to a specific field, and begin editing.
Please note that there are some differences between devices.
When using Mac with a keyboard, it is possible to tab through the fields on a row. If you’d like to use a bare key editing shortcut to jump to a specific field, you first need to end editing of the current row, which you can do using either Return or Command-Return
In addition, the bare key editing shortcuts will only work on visible fields, as set in Layout Settings.
When using iPad or iPhone with a keyboard, it is not possible to tab through fields, as OmniFocus 4 uses Apple’s native iPad keyboard navigation, to support accessibility features.
Tabbing will move between parts of the screen (such as the Perspectives Bar, Sidebar, and Outline), instead of through fields in a row. Once you have selected a row in the Outline (by tabbing to the Outline, and then using up and down arrow keys to navigate), typing any of these bare key editing shortcuts will begin editing the field.
If field editing presents a pop-up menu, tabbing will navigate to the next part of the menu (such as from the search field to the list of projects or tags), and typing Command-Period (.) (or using the Esc key) will end editing, saving the current information.
Unlike when using Mac, it is possible to edit fields that are not currently visible.
-
Set/Clear Completed Status (Space bar)
-
Set/Clear Dropped Status (Option-Space bar)
-
Mark Flagged/Unflagged (F)
-
Edit Title (E)
-
Edit Note (N)
-
Edit Project (P)
-
Edit Tags (T)
-
Edit Due (D)
-
Edit Defer Until (Shift-D)
-
Edit Repeat (R)
-
Edit Estimated Duration (Shift-T)
-
Edit Notifications (Shift-N)
-
Edit Completion Date (C)
 Delete (Command-Delete)
Keyboard Shortcuts
If you’re using OmniFocus with a keyboard, whether on Mac, iPhone, or iPad, you can take advantage of the app’s built-in keyboard shortcuts for many common tasks.
Each section of the Commands Reference has keyboard shortcut(s) listed, to make them easy to find.
When using iPad, press and hold the Command key on your external keyboard to view a list of available shortcuts. The same keyboard shortcuts will work on an iPhone with external keyboard, but pressing and holding the Command key does not present the same list of available shortcuts.
When using Mac, you can create keyboard shortcuts for menu items that don’t already have one. For more information, please read the Apple User Guide article Create keyboard shortcuts for apps on Mac.
Categories
This section groups menus into categories, so you can easily find all related commands, such as those used to Edit or Organize.
Categories are listed in alphabetical order, with each section linking to information for each supported platform. Some commands are available only on specific platforms.
When there is a Shortcut Menu that matches a category, it is included here.
Automation Menu (Pro)
Edit Menu
File Menu
Format Menu
Help Menu
OmniFocus Menu
Organize Menu
Perspectives Menu
View Menu
Window Menu
Mac
This section includes a list of all Mac menu bar menus, menu items, and menu commands, in the order they appear in the app.
OmniFocus Menu (Mac)
The OmniFocus menu contains commands related to the application itself. Check for updates, view and modify your settings, and license or unlock the application.
- About OmniFocus
- Check for Updates… (Omni downloads)
- Settings…
- In-App Purchases… (App Store downloads)
- Unlock OmniFocus…
- Manage Omni Account and Purchases… (after signing in to Omni Account)
- Site License… (after signing in to Site License)
- Free Trial Mode
- Learn About Pro
- Services
- Hide OmniFocus
- Hide Others
- Show All
- Quit OmniFocus
File Menu (Mac)
The File menu contains commands related to your database. Add new items, or Quick Open others. Importing, exporting, archiving, and restoring your database also happen here.
- New Action
- New Project
- New Folder
- New Single-Action List
- New Tag
- New Window
- New Tab
- Quick Open…
- Close
- Import OmniOutliner Document…
- Export…
- Sync Now
- Show Backups in Finder
- Show “OmniFocus.ofocus” in Finder
- Rebuild Database…
- Reset Database and Settings…
- Compact Database
- Migrate Database…
- Archive Old Items…
- Open Archive…
- Page Setup…
- Print…
Edit Menu (Mac)
The Edit menu contains commands related to editing actions, projects, folders, tags, and groups.
- Undo
- Redo
- Cut
- Copy
- Copy As Link
- Copy As TaskPaper
- Paste
- Paste and Match Style
- Paste with Original Style
- Delete
- Select All
- Deselect All
- Duplicate
- Edit Title/Note
- Convert to Project
- Status
- Mark Reviewed
- Apply/Remove Forecast Tag (Pro)
- Set/Clear Flag
- Attach File…
- Add Link…
- Insert Time Stamp
- Find
- Spelling and Grammar
- Substitutions
- Transformations
- Speech
- AutoFill
- Start Dictation…
- Emoji and Symbols
Organize Menu (Mac)
The Organize menu contains commands that change the hierarchy and structure of your OmniFocus data. This is primarily useful when working with nested projects and action groups.
View Menu (Mac)
The View menu contains commands for quickly changing the view of your OmniFocus data. Show and hide parts of the interface, and expand or collapse the details of items in the Outline.
- Go Back
- Go Forward
- Expand All
- Collapse All
- Expand Item(s)
- Press Option for Expand Item(s) Completely
- Collapse Item(s)
- Press Option for Collapse Item(s) Completely
- Show/Hide All Notes
- Show/Hide Note(s)
- Focus on Selected Projects/Unfocus (Pro)
- Show in Projects/Tags/Inbox
- Show/Hide Perspectives Bar
- Show/Hide Sidebar
- Show/Hide Inspector
- Go to Sidebar
- Go to Outline
- Go to Inspector
- Show/Hide View Options
- Show/Hide Tab Bar
- Show All Tabs/Exit Tab Overview
- Show/Hide Toolbar
- Customize Toolbar…
- Enter/Exit Full Screen
Perspectives Menu (Mac)
The Perspectives menu holds commands for quick navigation to both the default, built-in perspectives and the Custom Perspectives available in OmniFocus Pro.
Keyboard shortcuts assigned to perspectives also appear in this list.
Format Menu (Mac)
Please note that formatting commands only work in note fields
Automation Menu (Pro) (Mac)
With OmniFocus Pro, Omni Automation can be used to automate OmniFocus.
Window Menu (Mac)
When you have multiple database windows open in OmniFocus, use the Window menu to choose between them. This menu also allows you to use Quick Entry and the Attachment List.
- Minimize Window
- Zoom
- Tile Window to Left of Screen
- Tile Window to Right of Screen
- Replace Tiled Window
- Remove Window from Set
- Move to Display
- Show Previous Tab
- Show Next Tab
- Move Tab to New Window
- Merge All Windows
- Show/Hide Quick Entry
- Main Window
- Attachment List
- Bring All to Front
- OmniFocus Windows
Help Menu (Mac)
Access a variety of support resources using the Help menu in OmniFocus, including this documentation, release notes, and contact with our friendly Support Humans.
iPad, Apple Vision Pro
This section includes a list of all possible menu bar menus, menu items, and menu commands on iPad and Apple Vision Pro.
Commands with keyboard shortcuts are also available on iPhone, though menu bars do not display on that platform.
Menu bar items and commands on iPad and Apple Vision Pro only appear when relevant, and their order may change.
They are loosely sorted in alphabetical order, while grouped by affect (such as Group and Ungroup being listed together).
OmniFocus Menu (iPad, Apple Vision Pro)
The OmniFocus menu contains commands related to the application itself, allowing you to view and modify your settings.
File Menu (iPad, Apple Vision Pro)
The File menu contains commands related to your database. Add new items, or Quick Open others.
Edit Menu (iPad, Apple Vision Pro)
The Edit menu contains commands related to editing actions, projects, folders, tags, and groups.
- Apply/Remove Forecast Tag (Pro)
- Begin/End Select Mode
- Convert to Project
- Copy
- Cut
- Delete
- Dictation
- Edit Note
- Edit Title/Note
- Emoji
- Find
- Mark Reviewed
- Paste
- Paste and Match Style
- Search Here
- Search Remaining
- Search Everything
- Select All
- Deselect All
- Set/Clear Completed Status
- Set/Clear Dropped Status
- Set/Clear Flag
- Show Completion Date Editor
- Show Defer Until Editor
- Show Due Editor
- Show Estimated Editor Duration
- Show Notifications Editor
- Show Project Editor
- Show Repeat Editor
- Show Tags Editor
Organize Menu (iPad, Apple Vision Pro)
The Organize menu contains commands that change the hierarchy and structure of your OmniFocus data. This is primarily useful when working with nested projects and action groups.
View Menu (iPad, Apple Vision Pro)
The View menu contains commands for quickly changing the view of your OmniFocus data. Show and hide parts of the interface, and expand or collapse the details of items in the Outline.
- Back
- Forward
- Expand Item(s)
- Expand Item(s) Completely
- Expand All
- Collapse Item(s)
- Collapse Item(s) Completely
- Collapse All
- Focus/Unfocus (Pro)
- Show in Projects/Tags/Inbox
- Show/Hide Inspector
- Show/Hide Perspectives Bar
- Show/Hide Sidebar
- Show/Hide View Options
- Select Previous Day
- Select Today
- Select Next Day
Format Menu (iPad, Apple Vision Pro)
Please note that formatting commands only work in note fields
Automation Menu (Pro) (iPad, Apple Vision Pro)
With OmniFocus Pro, Omni Automation can be used to automate OmniFocus.
Shortcut Menus
Shortcut menu items and commands are listed grouped by type, in the default app order. Items and commands appear as needed, so the menu you are looking at is unlikely to match this listing.
Shortcut menus (previously referred to as
context menus or contextual menus) are found through OmniFocus, and are
available when using Control-click on Mac, or touch and hold on iPhone,
iPad, and Apple Vision Pro. They are also available from the
Shortcut Menu buttons
in
Outline Select Mode,
Sidebar Select Mode, and
Sidebar Edit Mode.
Touch and hold is the same gesture required to lift an item for drag and drop. Release the item after it lifts, instead of moving it, and the shortcut menu will appear.
Shortcut menus are available for folders, projects, and tags in the Sidebar; folders, projects, tags, action groups, and actions in the Outline; and while editing text in the Sidebar, Outline, or Notes.
One major difference between menu bar items and shortcut menu items has to do with how available and unavailable commands are displayed: on Mac, menu bar items are always displayed, whether they are available or unavailable; shortcut menus (as well as iPad and Apple Vision Pro menu bars) update depending on your selection.
This section will include all possible shortcut menu items, though not all will appear in every situation.
General Shortcut Menu
Menu items found at the top level of the shortcut menu:
- Apply/Remove Forecast Tag (Pro) — actions, projects
- Flag/Unflag — actions, projects
- Attach File… — actions, projects (Mac only)
- Complete — actions
- Skip — actions
- Drop — actions
- Drop Completely — actions
- Mark Reviewed — projects
- Rename — projects, folders, tags
- Inspect — actions, projects, folders, tags
- Focus/Unfocus (Pro) — actions, projects, folders
- Show in Inbox — actions
- Show in Projects — actions, projects
- Show in Tags — actions, projects
- Open in New Window — actions (Mac only), projects, folders, tags, perspectives
- Omni Automation (Pro) — actions, projects, folders, tags
- Share — actions, projects, folders, tags
- Delete — actions, projects, folders, tags
- Services — actions, projects, folders, tags (Mac only)
Edit Shortcut Menu
Please note that these are located at the top level of the shortcut menu on Mac.
- Cut — actions, projects, folders, tags
- Copy — actions, projects, folders, tags
- Copy as Link — actions, projects, folders, tags
- Copy as TaskPaper — actions, projects, folders, tags
- Paste — actions, projects, folders
- Duplicate — actions, projects, folders
Status Shortcut Menu
Type Shortcut Menu
- Parallel — actions, projects
- Sequential — actions, projects
- Single Actions — projects
- Complete with Last Action — actions, projects
Organize Shortcut Menu
- Add Inside — actions, projects, folders, tags
- Add Action — actions, projects, tags
- Add Item — actions in Inbox
- Add Folder — projects, folders
- Add Project — projects, folders
- Add Tag — tags
- Group — actions
- Indent — actions, projects, folders, tags
- Outdent — actions, projects, folders, tags
- Convert To Project — actions
- Convert To Action — projects
- Move — actions, projects, folders, tags
Schedule Shortcut Menu
- Due Today — actions, projects
- Due Tomorrow — actions, projects
- Defer until Tomorrow — actions, projects
- Reschedule to Today — actions, projects
- Reschedule to Tomorrow — actions, projects
Sort Shortcut Menu
This menu is only available when using Mac.
See Sort Once.
Commands Reference
These are listed in alphabetical order, and link to where they may be found in OmniFocus. That location may be different on Mac, iPhone, iPad, Apple Watch, or Apple Vision Pro.
Keyboard shortcuts are listed under each command.
If a keyboard shortcut is available only on specific platforms, those platforms are listed. If a keyboard shortcut is available on any device that can use an external keyboard, platform is not specified.
- About OmniFocus
- Add Action
- Add Folder
- Add Inside
- Add Item
- Add Link
- Add Outside
- Add Perspective (Pro)
- Add Project
- Add Parallel Project
- Add Sequential Project
- Add Single-Action List
- Add Tag
- Add Tutorial Items
- Align Text
- Always Open in a New View
- Anonymize Database
- API Reference (Pro)
- Apply/Remove Forecast Tag (Pro)
- Archive Old Items
- Attach File
- Attachment List
- AutoFill
- Automation API Reference
- Automation Console
- Back Up Now
- Baseline
- Begin/End Select Mode
- Bigger
- Bold
- Bring All to Front
- Changed
- Check for Updates
- Clean Up
- Clear Console (Pro)
- Clear Flag
- Clear Style
- Close
- Close Account
- Collapse All
- Collapse Item(s)
- Collapse Item(s) Completely
- Compact Database
- Complete
- Complete with Last Action
- Completed
- Configure (Pro)
- Contact Omni
- Convert to Action
- Convert to Project
- Copy
- Copy as Link
- Copy as Taskpaper
- Copy Style
- Customize Toolbar
- Cut
- Defer until Tomorrow
- Delete
- Deselect All
- Drop
- Drop Completely
- Due Today/Tomorrow
- Duplicate
- Edit Completion Date
- Edit Defer Until
- Edit Due
- Edit Estimated Duration
- Edit Inspector Layout
- Edit Link
- Edit Notifications
- Edit Project
- Edit Repeat
- Edit Tags
- Edit Title/Edit Note
- Emoji and Symbols
- Enter/Exit Full Screen
- Expand All
- Expand Item(s)
- Expand Item(s) Completely
- Export
- Export to CSV
- Favorite/Unfavorite
- Find/Go to Search Field
- Find (iPhone, iPad, Apple Vision Pro)
- Find (Mac)
- Flag
- Flagged
- Focus on Selected Projects/Unfocus (Pro)
- Forecast
- Free Trial Mode
- Go Back
- Go Forward
- Go to Inspector
- Go to Outline
- Go to Sidebar
- Group
- Hide All Notes
- Hide Colors
- Hide Fonts
- Hide Inspector
- Hide Note(s)
- Hide OmniFocus
- Hide Others
- Hide Perspectives Bar
- Hide Perspectives List
- Hide Quick Entry
- Hide Sidebar
- Hide Tab Bar
- Hide Toolbar
- Hide View Options
- Import OmniOutliner Document
- In-App Purchases
- Inbox
- Indent
- Insert Time Stamp
- Installed Plug-Ins (Pro)
- Italic
- Kern
- Learn About Pro
- Ligatures
- Main Window
- Manage Omni Account and Purchases
- Manage Plug-Ins
- Mark Reviewed
- Merge All Windows
- Migrate Database
- Minimize Window
- Move
- Move Down, Right, Up, Left
- Move Tab to New Window
- Move to Display
- Nearby
- New Action
- New Folder
- New Project
- New Single-Action List
- New Tab
- New Tag
- New Window
- News
- Omni Automation (Pro)
- OmniFocus Forums
- OmniFocus Help
- OmniFocus Product Page
- OmniFocus Windows
- Open Archive
- Open in New Tab
- Open in New Window
- Open Link
- Open Scripts Folder (Pro)
- Outdent
- Page Setup
- Parallel
- Paste
- Paste Style
- Paste and Match Style
- Paste with Original Style
- Projects
- Quick Open
- Quit OmniFocus
- Rebuild Database
- Redo
- Release Notes
- Rename
- Replace Tiled Window
- Reschedule to Today/Tomorrow
- Reset Database and Settings…
- Revert to This Backup
- Review
- Select All
- Select Forecast Day
- Sequential
- Services
- Set/Clear Completed Status
- Set/Clear Dropped Status
- Set/Clear Flag
- Settings
- Share
- Show “OmniFocus.ofocus” in Finder
- Show All
- Show All Inspector Fields
- Show All Tabs/Exit Tab Overview
- Show Backups in Finder
- Show Console (Pro)
- Show in Inbox
- Show in Projects
- Show in Tags
- Show Next/Previous Tab
- Show All Notes
- Show Colors
- Show Fonts
- Show Inspector
- Show Note(s)
- Show Perspectives Bar
- Show Perspectives List
- Show Quick Entry
- Show Sidebar
- Show Tab Bar
- Show Toolbar
- Show View Options
- Sign Up for the Omni Newsletter
- Simplify Style
- Single Actions
- Site License
- Skip
- Smaller
- Sort Once
- Speech
- Spelling and Grammar
- Split View (Mac)
- Stage Manager (Mac)
- Start Dictation
- Status
- Strikethrough
- Substitutions
- Sync Now
- System Search
- Tags
- Tile Window to Left of Screen
- Tile Window to Right of Screen
- Transformations
- Underline
- Undo
- Ungroup
- Unlock OmniFocus
- Writing Direction
- Zoom
About OmniFocus
Available on Mac in OmniFocus menu
Available on iPhone, iPad, Apple Vision Pro in Settings
Available on iPhone, iPad, Apple Vision Pro in Help toolbar menu
Available on Apple Watch in About OmniFocus
View details about your copy of OmniFocus. This is good for checking exactly which version you’re using, which can be very helpful when contacting our Support Humans. Some versions of this screen also include a link to write a review on the App Store.
Add Action
Available in the Organize shortcut menu
Creates a new action.
Add Folder
Available on Mac in Project sidebar action menu
Available on iPhone, iPad, Apple Vision Pro in Project sidebar more menu
Available in the Organize shortcut menu
Creates a New Folder at the selected location in the Sidebar.
Add Inside
Available on Mac, iPad, Apple Vision Pro in Organize menu
Available in the Organize shortcut menu
Shift-Command-Right Brace (})
Create a new item belonging to the selected item.
If you have a project selected, this adds an action to the project.
If you have an action selected, it turns that action into the parent of an action group, and adds an action inside.
Compare Add Outside
Add Item
Available on iPhone, iPad, Apple Vision Pro in Organize shortcut menu
Creates a new Inbox item.
Add Link
Available on Mac in Edit menu
Create a hyperlink to an item within OmniFocus, or beyond.
See also Edit Link
Add Outside
Available on Mac, iPad, Apple Vision Pro in Organize menu
Shift-Command-Left Brace ({)
Create a new item at the same level as the selected item’s parent, if possible.
If you have an action selected inside an action group, this creates a new action at the same level as the action group.
If you have an action selected at the top level of a project, this creates a new project.
If you have a project selected, this will either create a project at the same level, or one level higher, depending on the location of the project in your structure.
Compare Add Inside
Add Perspective (Pro)
![]() Requires OmniFocus Pro
Requires OmniFocus Pro
Available on Mac in Perspectives menu
Available on iPhone, iPad, Apple Vision Pro in Quick Open
Creates and begins editing a new Custom Perspective.
Add Project
Available on iPhone, iPad, Apple Vision Pro in Project sidebar more menu
Available in the Organize shortcut menu
Creates a New Project at the selected location in the Sidebar, with the Default Project Type (Parallel or Sequential) that you have chosen.
Once the project has been created, you can change the Project Type.
Add Parallel Project
Available on Mac in Project sidebar action menu
Creates a new Parallel project at the selected location in the Sidebar.
This has the same effect as using New Project, following by setting Project Type to Parallel.
Add Sequential Project
Available on Mac in Project sidebar action menu
Creates a new Sequential project at the selected location in the Sidebar.
This has the same effect as using New Project, following by setting Project Type to Sequential.
Add Single-Action List
Available on Mac in Project sidebar action menu
Creates a new Single Actions List at the selected location in the Sidebar.
This has the same effect as using New Project, following by setting Project Type to Single Actions List.
Add Tag
Available on Mac in Tags sidebar action menu
Available on iPhone, iPad, Apple Vision Pro in Tags sidebar more menu
Available in the Organize shortcut menu
Creates a New Tag at the selected location in the Sidebar.
Add Tutorial Items
Available on Mac in Help menu
When you first launch OmniFocus a sample project is added to your database to help you get started. If you want it back, choose this command to recreate it (it’ll be added to your existing projects non-destructively).
Always Open in a New View
Available on Mac in Perspectives List
On Mac, this command will display as either Always Open in a New Window or Always Open in a New Tab; please see the note in Open in New View about how this interacts with your System Settings.
Enable this setting to always open the perspective in a new view when you navigate to it, whether you are selecting it from the Perspectives menu, or using the Perspectives List.
Align Text
Available on Mac in Format menu
Adjust the alignment of the paragraph containing selected text:
- Align Left — Aligns the paragraph to the left side of the view.
- Center — Aligns the paragraph to the right side of the view.
- Justify — Aligns the paragraph to both the left and ride side of the view, attempting to fill the view.
- Align Right — Aligns the paragraph in the center of the view.
Anonymize Database
Available on Mac in Help menu
Create a copy of your current database with all identifying text and attachments converted to anonymous entities. This is useful for exchanges with Omni support, or for sharing your database with other OmniFocus users without divulging the details of your private goings-on.
API Reference (Pro)
![]() Requires OmniFocus Pro
Requires OmniFocus Pro
May also be named Automation API Reference or Show Automation Reference
Available on Mac in Automation menu
Available on iPhone, iPad, Apple Vision Pro in Omni Automation toolbar menu
Shift-Command-Zero (0) on iPhone, iPad, Apple Vision Pro
Command is labeled Automation API Reference on iPhone, iPad, and Apple Vision Pro
Learn more about what you can do with Omni Automation in OmniFocus by viewing the available classes along with their constructors, functions, and properties.
Apply/Remove Forecast Tag (Pro)
![]() Requires OmniFocus Pro
Requires OmniFocus Pro
Available on Mac, iPad, Apple Vision Pro in Edit menu
Available in the Shortcut menu
Control-Command-L
Apply (or remove) the Forecast tag to the selected action, action group, or project.
Archive Old Items
Available on Mac in File menu
Move some or all of your completed or dropped items into an Archive.
It is not possible to archive from iPhone, iPad, or Apple Vision Pro, but it is possible to Delete Old Items from Settings.
Attach File
Available on Mac in Edit menu
Available on Mac in Shortcut menu
Available on iPhone, iPad, Apple Vision Pro in the Outline
Available in the Inspector
Choose an attachment to add to the selected action or project. When using Mac, you have the choice of either embedding a copy of the attachment, which allows you to access the attachment on Mac, iPhone, iPad, or Apple Vision Pro, or linking the attachment, which leaves it on the Mac.
Attachment List
Available on Mac in Window menu
Available on iPhone, iPad, Apple Vision Pro in Database settings
Open a list of all attachments in your database. This can be useful for finding reference material you have added to your actions and projects.
This list displays all the files in your OmniFocus data, with links to their corresponding project or action. Note that a single attachment can be linked to multiple projects or actions. Sort attachments by file size, date added, or name (on Mac), and delete any unwanted ones here.
On Mac, expand the disclosure arrow to the left of the attachment image to see a list of projects and actions that link to the attachment. Double-clicking on the attachment row, or single clicking on the name of the linked action or project, will open that action or project in a new view. With one or more rows selected, click on the Delete button to remove the attachments, or the Export button to save them outside OmniFocus.
On iPhone, and iPad, tap an individual attachment for a detail view which lists the attachment file size, the number of references to the file in your OmniFocus data, and a list of projects and actions that link to the attachment. Tap one of the linked items to go straight to where the file is attached, or tap Delete in the upper right to remove the file from your database.
Exporting Attachments
You may want to export attachments, perhaps before deleting them.
On Mac, select one or more attachments in the list, and click Export. An export panel appears, where you can choose a location on your Mac to store the attachments. Navigate to the directory you would like to use, and click Export again to save copies of the files.
On iPhone, iPad, or Apple Vision Pro, tap the linked attachment to open the location where it is linked. Press and hold on the attachment, then select Share.
AutoFill
Available on Mac in Edit menu
Available on iPhone, iPad, Apple Vision Pro in Editing menu
This is a system-level command, which allows autofilling either Contacts or Passwords. It is not available on macOS Ventura, but is available on macOS Sonoma, iPadOS 17, and iOS 17.
Automation API Reference
See API Reference
Automation Console
See Show Console
Back Up Now
Available in Database settings
Available on iPhone, iPad, Apple Vision Pro
Tap this button to create a manual backup. Keep in mind that this will replace the oldest backup; on iPhone, iPad, and Apple Vision Pro, the total number of backups is set using How many backups should be kept?.
On Mac, a manual backup can be created using the Export… command.
Baseline
Available on Mac in Format menu
Adjust the baseline of body text:
- Use Default — Places selected text at the same level as body text.
- Superscript — Move selected text above the body text.
- Subscript — Move selected text below the body text.
- Raise — Move selected text up.
- Lower — Move selected text down.
Begin/End Select Mode
Available on iPad, Apple Vision Pro in Edit menu
Shift-Command-E on iPhone, iPad, Apple Vision Pro
Begins or ends Outline Select Mode or Sidebar Select Mode.
Bigger
Available on Mac, iPad, Apple Vision Pro in Format menu
Command-Plus Sign (+)
Increase the size of the selected note text.
Bold
Available on Mac, iPad, Apple Vision Pro in Format menu
Command-B
Apply (or remove) the bold style to the selected note text.
Bring All to Front
Available on Mac in Window menu
Gather all of your OmniFocus windows up in front of other applications’ windows.
Clear Console (Pro)
![]() Requires OmniFocus Pro
Requires OmniFocus Pro
Available on Mac in Automation menu
Clears the Automation Console display.
Clear Style
Available on Mac in Format menu
Available on iPhone, iPad, Apple Vision Pro in editing format menu
Control-Command-Delete on Mac
Applies only to selected text in the note field.
Re-formats selected text in notes.
Removes all styles, such as bold, italic, underline, bulleted lists, custom fonts, text and background colors, and sizes.
Result should be clean text, with no apparent formatting.
Attachments and links are preserved.
Contrast with Simplify Style
Clean Up
Available on Mac, iPad, Apple Vision Pro in Organize menu
Available in the Toolbar
Available on iPhone, iPad, Apple Vision Pro when pulling to sync
Command-K
Force OmniFocus to clean up after itself,
so that all items obey your
View Options settings.
Also moves any Inbox items
with assigned projects or tags
to the appropriate location
in the hierarchy.
This command may not be needed, depending on your settings for Cleaning Up Resolved Items and Clean Up Inbox Items Which Have.
Regardless of those settings, switching perspectives will always clean up the view, as will pulling down to sync on an iPhone, iPad, or Apple Vision Pro.
Changed
Available on Mac in Perspectives menu
Available on iPhone, iPad, Apple Vision Pro in Quick Open
Open the built-in Changed perspective in the current OmniFocus window to view recent changes you’ve made. Unlike other built-in perspectives, Changed doesn’t stay in the Perspectives Bar once closed, unless you favorite it.
Check for Updates
Available on Mac in OmniFocus menu. (Direct Download version only)
See if there is a new version of OmniFocus available to download. You can also configure automatic checking in Update settings. Versions of OmniFocus from the App Store use Apple’s process for updates.
Clear Flag
See Set/Clear Flag
Close
Available on Mac in File menu
Command-W on Mac
Close the front most window. Even if you close the last remaining OmniFocus window, you can always open a new one.
Close Account
Available on Mac in Manage Omni Account and Purchases… menu item
Available on iPhone, iPad, Apple Vision Pro in Omni Account screen
Sends an email requesting to close your Omni Account. You will receive an automatic email response at the registered email address for the Omni Account, which you then need to reply to, in order to actually close your account. Accidentally tapping this button will not close your account.
Collapse Item(s)
Available on Mac, iPad, Apple Vision Pro in View menu
Command-Zero (0)
Hide the children of the selected items.
Compare Expand Item(s)
Collapse Item(s) Completely
Available on Mac, iPad, Apple Vision Pro in View menu
Option-Command-Zero (0)
Hide all descendants of all selected items in the Sidebar or the Outline.
Compare Expand Item(s) Completely
Collapse All
Available on Mac, iPad, Apple Vision Pro in View menu
Control-Command-Zero (0)
Hide all descendants of all items in the Sidebar or the Outline.
Compare Expand All
Compact Database
Available on Mac in File menu
Available on iPhone, iPad, Apple Vision Pro in Database settings
Rewrites your OmniFocus into a simple structure, which can be helpful for increasing performance if OmniFocus appears to be slow or unresponsive. This command is only available when not syncing; if you are syncing, compacting happens automatically when all of your devices are up-to-date.
Complete
Available in the Shortcut menu
Marks the selected action(s) completed.
See also Completed
Complete with Last Action
Available in the Project or Group Type inspector
Available in the Type shortcut menu
With this option enabled, completing the last action inside a project or action group will automatically complete the containing project or action group. With this option disabled, the project or action group will need to be manually marked completed.
Only available for projects or action groups set to Parallel or Sequential.
Completed
Available on Mac in Perspectives menu
Available on iPhone, iPad, Apple Vision Pro in Quick Open
Open the built-in Completed perspective in the current OmniFocus window to view your completed actions and projects. Unlike other built-in perspectives, Completed doesn’t stay in the Perspectives Bar once closed, unless you favorite it.
Configure (Pro)
![]() Requires OmniFocus Pro
Requires OmniFocus Pro
May also be named Manage Plug-Ins
Available on Mac in Automation menu
Available on iPhone, iPad, Apple Vision Pro in Automation settings
Opens Automation Configuration, where you can add, remove, and manage your Omni Automation Plug-Ins, as well as change scripting-related security settings.
For sample Omni Automation Plug-Ins and to learn more about scripting OmniFocus, visit the Omni Automation website.
For information on installing Omni Automation Plug-Ins, see the Omni Automation article Installing Plug-Ins.
Contact Omni
Available on Mac in Help menu
Available on iPhone, iPad, Apple Vision Pro in Help toolbar menu
Available on iPhone, iPad, Apple Vision Pro in Help settings
Compose an email to the OmniFocus support team. We’d be happy to give advice, answer questions, or listen to your feedback. This email will also include information about the version you’re running, which operating system you’re running it on, and what type of license you have; leaving this information in place helps us quickly assist you.
If you see a “The operation couldn’t be completed. Not authorized to send Apple events to Mail.” error when you select Contact Omni, you can grant OmniFocus authorization to send email.
Open System Settings, then navigate to Privacy & Security > Automation, and click on the triangle next to OmniFocus to view additional options. Make sure that Mail is enabled (along with any other apps that you would like), then select Contact Omni again.
System authorization can also affect using Clippings on Mac
Convert to Action
Available in the Inspector toolbar
Available in the Organize shortcut menu
Convert the selected project into an action group (if the project contains actions), or an action (if the project doesn’t contain actions).
The newly created action or action group will be placed
in either the
Inbox,
or the default Miscellaneous project,
depending on your setting for
Clean up Inbox items which have.
Compare Convert to Project
Convert to Project
Available on Mac, iPad, Apple Vision Pro in Edit menu
Available in the Inspector toolbar
Available in the Organize shortcut menu
Command-Exclamation Point (!)
Convert the selected action or action group into a project.
The newly created project will be placed at the bottom of the Projects Sidebar.
Compare Convert to Action
Copy
Available on Mac, iPad, Apple Vision Pro in Edit menu
Available in the Edit shortcut menu
Available on iPhone, iPad, Apple Vision Pro in Editing menu
Command-C
Put a copy of the selected text or item(s) on the clipboard, so you can copy the selection somewhere else.
Copy as Link
Available on Mac in Edit menu
Available on Mac in Perspectives List
Available in the Edit shortcut menu
Put a link to the selected item(s) on the clipboard; when you paste it, you get links for each selected item, to allow easy reference from another location.
Copy as Taskpaper
Available on Mac in Edit menu
Available in the Edit shortcut menu
Copy the selected items with the tag syntax used by Hog Bay Software’s TaskPaper to-do list app.
See our OmniFocus TaskPaper Reference Guide support article for more information.
Copy Style
Available on Mac in Format menu
Option-Command-C on Mac
Copy the style of the selected text, so that you can apply it elsewhere with the Paste Style command. This uses a special style clipboard, so you don’t lose the data on the normal clipboard.
Customize Toolbar
Available on Mac in View menu
Choose which controls appear in the main window’s Toolbar.
Cut
Available on Mac, iPad, Apple Vision Pro in Edit menu
Available in the Edit shortcut menu
Available on iPhone, iPad, Apple Vision Pro in Editing menu
Command-Z
Remove the selected text or item(s), while saving them on the clipboard, so you can move the selection somewhere else.
Defer until Tomorrow
Available on iPhone, iPad, Apple Vision Pro in Schedule shortcut menu
Only available for actions and projects that are not set to repeat.
Sets the Defer Until date for an item to Tomorrow, without changing any assigned time. This option presents if the action or project has a Defer Until date in the past, or no assigned Defer Until date.
See also Due Today/Tomorrow
Delete
Available on Mac, iPad, Apple Vision Pro in Edit menu
Available in the Inspector toolbar
Available in the Shortcut menu
Command-Delete
Remove the selected item(s) or text from your database.
On Mac, you can enable Delete items without requiring the Command Key, which allows you to use Delete.
Deselect All
Available on Mac, iPad, Apple Vision Pro in Edit menu
Shift-Command-A
Clear the selection completely, so that nothing is selected.
Drop
Available in the Shortcut menu
Marks the selected action(s) dropped.
Drop Completely
Available in the Shortcut menu
Only available for actions that are set to repeat.
Drops the selected action(s), but does not create the next repetition; this results in the entire repeating action being dropped.
Compare Skip
Due Today/Tomorrow
Available on iPhone, iPad, Apple Vision Pro in Schedule shortcut menu
Only available for actions and projects that are not set to repeat.
Sets the Due date for an item to either Today or Tomorrow, without changing any assigned time. If the item is already Due either Today or Tomorrow, then only a single choice will be offered.
See also Defer until Tomorrow
Compare Reschedule to Today/Tomorrow
Duplicate
Available on Mac in Edit menu
Available in the Edit shortcut menu
Command-D on Mac
Make a copy of a selected item, placing it immediately below the selected item.
Edit Completion Date
May also be named Show Completion Date Editor
Available on iPad, Apple Vision Pro in Edit menu
C
Assign a completion date to an action, action group, or project, or edit the currently assigned completion date.
Edit Defer Until
May also be named Show Defer Until Editor
Available on iPad, Apple Vision Pro in Edit menu
Shift-D
Assign a Defer Until date to an action, action group, or project, or edit the currently assigned defer until date.
Edit Due
May also be named Show Due Editor
Available on iPad, Apple Vision Pro in Edit menu
D
Assign a due date to an action, action group, or project, or edit the currently assigned due date.
Edit Estimated Duration
May also be named Show Estimated Editor Duration
Available on iPad, Apple Vision Pro in Edit menu
Shift-T
Assign an estimated duration to an action, action group, or project, or edit the currently assigned estimated duration.
Edit Inspector Layout
Available in the Inspector toolbar
Choose this command to open Layout Settings for Inspector.
Edit Link
Available on Mac in Edit shortcut menu
Edit a hyperlink to an item within OmniFocus, or beyond.
See also Add Link
Edit Title/Edit Note
Available on Mac, iPad, Apple Vision Pro in Edit menu
Command-Apostrophe (') to switch between fields
E to begin editing title
N to begin editing note
Using E or N will begin editing, but will not toggle between fields.
Using Command-Apostrophe (') will switch between editing the item title and the item note.
Edit Notifications
May also be named Show Notifications Editor
Available on iPad, Apple Vision Pro in Edit menu
Shift-N
Assign a notification to an action, action group, or project, or edit the currently assigned notifications.
Edit Project
May also be named Show Project Editor
Available on iPad, Apple Vision Pro in Edit menu
P
Assign a project to an action or action group, or edit the currently assigned project.
Edit Repeat
May also be named Show Repeat Editor
Available on iPad, Apple Vision Pro in Edit menu
R
Assign a repeat to an action, action group, or project, or edit the currently assigned repeat.
Edit Tags
May also be named Show Tags Editor
Available on iPad, Apple Vision Pro in Edit menu
T
Assign tags to an action, action group, or project, or edit the currently assigned tags.
Emoji and Symbols
May also be named Emoji
Available on Mac, iPad, Apple Vision Pro in Edit menu
Control-Command-Space bar
Globe key on Mac
Globe-E key on iPhone, iPad, Apple Vision Pro
Open the Character Viewer to insert emoji or other special characters.
More information about the Character Viewer is available in Use emoji and symbols on Mac, part of the Apple User Guides.
Enter/Exit Full Screen
Available on Mac in View menu
Control-Command-F on Mac
Function (Fn)-F on Mac
Globe-F on Mac
View OmniFocus using your full screen, or return it to single window.
Expand Item(s)
Available on Mac, iPad, Apple Vision Pro in View menu
Command-9
Show the children of the selected items.
Compare Collapse Item(s)
Expand Item(s) Completely
Available on Mac, iPad, Apple Vision Pro in View menu
Option-Command-9
Show all descendants of all selected items in the Sidebar or the Outline.
Compare Collapse Item(s) Completely
Expand All
Available on Mac, iPad, Apple Vision Pro in View menu
Control-Command-9
Show all descendants of all items in the Sidebar or the Outline.
Compare Collapse All
Export
Available on Mac in File menu
We believe that your data belongs to you; read Exporting from OmniFocus to learn more.
Multiple formats are available when exporting on your Mac.
On iPhone, iPad, and Apple Vision Pro, you can use the Export to CSV command, available in Database settings.
Export to CSV
Available in Database settings
Available on iPhone, iPad, Apple Vision Pro
We believe that your data belongs to you; read Exporting from OmniFocus to learn more.
CSV (Comma Separated Values) export is available on iPhone, iPad, and Apple Vision Pro.
Additional export formats are available on Mac, using the Export… command.
Favorite/Unfavorite
Available on Mac in Perspectives List
Available on iPhone, iPad, Apple Vision Pro in Quick Open
Set your favorite perspectives, which will display in the Perspectives Bar.
Click or tap on the empty
Favorite button
to add a favorite perspective.
Click or tap on the filled
Favorite button
to remove a favorite perspective.
Find (iPhone, iPad, Apple Vision Pro)
Available on iPad, Apple Vision Pro in Edit menu
Command-F on iPhone, iPad, Apple Vision Pro
This command is named Go to Search Field on Mac, and Find on iPad and Apple Vision Pro.
Find (Mac)
Available on Mac in Edit menu
The Find menu contains the standard Find commands found in many applications: Find (which opens a window where you can use regular expressions and search-and-replace), Find Next, Find Previous, Use Selection for Find (which enters the selected text as the text to search for), and Jump to Selection.
- Go to Search Field (Option-Command-F on Mac)
- Search Here
- Search Remaining
- Search Everything
- Find… (Command-F on Mac)
- Find Next (Command-G on Mac)
- Find Previous (Shift-Command-G on Mac)
- Use Selection for Find (Command-E on Mac)
- Jump to Selection (Command-J on Mac)
Unlike searching using the toolbar (which narrows what you see in the outline), the Find dialog looks through all the fields currently visible in the outline and highlights results instead, providing a theme for them which you can browse through until you find what you need.
The Find dialog supports the use of regular expressions to match more complex text strings and combinations. See the NSRegularExpression developer documentation for technical details on the regex syntax, including a list of supported characters and operators.
Find/Go to Search Field
Available on Mac, iPad, Apple Vision Pro in Edit menu
Option-Command-F on Mac
Command-F on iPhone, iPad, Apple Vision Pro
This command is named Go to Search Field on Mac, and Find on iPad and Apple Vision Pro.
The Toolbar
at the top of the Outline
contains a
Search field
.
On Mac, this field is always visible, unless the toolbar has been customized to hide the field.
On iPhone or iPad, you need to drag down from the top of the Outline, in order to show the field.
On Apple Vision Pro,
you need to tap the
Search button
.
Search Scope
Available on Mac, iPad, Apple Vision Pro in Edit menu
Control-Command-1 for Search Here
Control-Command-2 for Search Remaining
Control-Command-3 for Search Everything
On Mac,
you can change scope by clicking on the arrow next to the
Search field
,
after beginning a search.
On iPhone, iPad, or Apple Vision Pro, you can start a search using a specific scope using these keyboard shortcuts, when using an external keyboard.
Search finds text matching the keywords in item titles, notes, and tags, and displays results in the Outline. Click or tap into the Search field and enter keywords to find in one of the following scopes.
- Search Here — Search includes all items currently visible in the Outline. For many perspectives this includes the entire content of the perspective, but for perspectives grouped by project it may not. If you have selected a specific folder or project in the Sidebar, items in projects outside that selection will not be shown in the results.
- Search Remaining — Search includes items in your OmniFocus data that are Remaining (neither Completed nor Dropped).
- Search Everything — Search includes all items in your OmniFocus data, regardless of status or location.
Flag
See Set/Clear Flag
Flagged
Available on Mac in Perspectives menu
Available on iPhone, iPad, Apple Vision Pro in Quick Open
Command-5
Open the built-in
Flagged
perspective in the current OmniFocus window.
Focus on Selected Projects/Unfocus (Pro)
![]() Requires OmniFocus Pro
Requires OmniFocus Pro
May also be named Focus/Unfocus
Available on Mac, iPad, Apple Vision Pro in View menu
Available in the Shortcut menu
Shift-Command-F
If you’re using OmniFocus Pro and you want to concentrate for a while on a particular project, folder, or combination of items, the Focus feature can get everything else out of your way.
To Focus:
- Select an action, project, or folder (or any combination of those items) in the sidebar or outline; if you select an action, the containing project will also be considered selected.
- Click the
Focus button
,
or choose Focus on (Selected Items) from the View menu.
Everything outside your selected items is hidden, and a Focus notice bar appears at the top of the outline, to indicate that you’re in a special view. OmniFocus will continue to show you only the selected items while you move between perspectives.
When you’re done focusing, choose the Unfocus menu item, or click the x in the Focus notice bar; this will restore the full view of your OmniFocus data.
If you find yourself frequently using the same combinations of tags, Focus, or View Options, you might want to save them as a Custom Perspective.
Using Focus inside a Custom Perspective that includes a Focus as part of its parameters will display the intersection of the two Focus areas.
Forecast
Available on Mac in Perspectives menu
Available on iPhone, iPad, Apple Vision Pro in Quick Open
Command-4
Open the built-in
Forecast perspective
in the current OmniFocus window.
Free Trial Mode
Available on Mac in OmniFocus menu
This allows you to choose between the Standard or Pro feature set when running a trial license, in order to see which edition is best for your needs.
A similar function is available on iPhone, iPad, and Apple Vision Pro in License settings, using the Enable Pro features switch.
Go Back/Forward
May also be named Back/Forward
Available on Mac, iPad, Apple Vision Pro in View menu
Command-Option-Left Bracket ([) for Back
Command-Option-Right Bracket (]) for Forward
Allows you to navigate back and forward through the locations you have recently visited in OmniFocus.
Go Back reviews from newest to oldest, while Go Forward reviews from oldest to newest.
Using Go Back to return to an earlier point in your navigation history, and then making a different choice before using Go Forward, will reset your Go Forward history.
Go to Inspector
Available on Mac in View menu
Option-Command-3 on Mac
Use the keyboard to navigate to the Inspector (Tab, Return, Esc, and other keys affect fields in the inspector).
Go to Outline
Available on Mac in View menu
Option-Command-2 on Mac
Use the keyboard to navigate to the Outline (Tab, Return, Esc, and other keys affect items and fields in the outline).
Go to Sidebar
Available on Mac in View menu
Option-Command-1 on Mac
Use the keyboard to navigate to the Sidebar (Tab, Return, Esc, and other keys affect items and fields in the sidebar).
Group
Available on Mac, iPad, Apple Vision Pro in Organize menu
Available on iPhone, iPad, Apple Vision Pro in Organize shortcut menu
Option-Command-G
In the Sidebar, group projects and folders into newly created folders, or group tags into newly created tag groups.
In the Outline, group actions into action groups. Grouping a project will convert it from a project to an action group, and place it inside a new project.
Compare Ungroup
Hide OmniFocus
Available on Mac in OmniFocus menu
Command-H on Mac
Temporarily hide all of OmniFocus’s windows.
Hide Others
Available on Mac in OmniFocus menu
Option-Command-H on Mac
Temporarily hide windows of all other applications, so you can concentrate on OmniFocus.
Import OmniOutliner Document
Available on Mac in File menu
Import an OmniOutliner document to your OmniFocus database, with its rows converted to OmniFocus items and columns to metadata fields associated with those items.
It is not currently possible to import an OmniOutliner document on iPhone, iPad, or Apple Vision Pro. If you are using iPhone or iPad, parts of an OmniOutliner document may be dragged and dropped into OmniFocus.
Read the OmniOutliner section of Capture Methods, to learn more.
In-App Purchases
Available on Mac in OmniFocus menu (App Store version only)
Available on iPhone, iPad, Apple Vision Pro in License settings
Open the In-App Purchases window to unlock OmniFocus features by subscribing, purchasing either the Standard or Pro edition of the app, or restoring a previous purchase.
Inbox
Available on Mac in Perspectives menu
Available on iPhone, iPad, Apple Vision Pro in Quick Open
Command-1
Open the built-in
Inbox
perspective in the current OmniFocus window.
Indent/Outdent
Available on Mac, iPad, Apple Vision Pro in Organize menu
Available in the Organize shortcut menu
Command-Right Bracket (]) for Indent
Command-Left Bracket ([) for Outdent
See Move Down, Right, Up, Left.
Insert Time Stamp
Available on Mac in Edit menu
Automatically insert the current date, time, or date and time, using the format from the system settings.
- Short Date
- Short Date and Time
- Time
- Long Date
- Long Date and Time
Installed Plug-Ins (Pro)
![]() Requires OmniFocus Pro
Requires OmniFocus Pro
Available on Mac in Automation menu
Available on iPhone, iPad, Apple Vision Pro in Automation settings
Available in the Omni Automation shortcut menu
Any Omni Automation Plug-Ins that you have installed are displayed in a list at the top of the menu. Choose one of them from the list to run the plug-in.
Italic
Available on Mac, iPad, Apple Vision Pro in Format menu
Command-I
Apply (or remove) the italic style to the selected note text.
Kern
Available on Mac in Format menu
Adjust spacing between characters:
- Use Default — Automatically adjust spacing between selected characters.
- Use None — Disable spacing adjustments between selected characters.
- Tighten — Reduce the spacing between selected characters.
- Loosen — Increase the spacing between selected characters.
Learn About Pro
Available on Mac in OmniFocus menu, when using a Standard or Trial license
Opens a feature comparison page for Standard vs. Pro, on the Omni Group’s website.
Ligatures
Available on Mac in Format menu
Adjust the use of ligatures to join two characters, in the selected text:
- Use Default — Use the default ligatures from the font you are using.
- Use None — Use none of the available ligatures from the font you are using.
- Use All — Use all available ligatures from the font you are using.
Main Window
Available on Mac in Window menu
Foreground the main OmniFocus window (instead of a secondary window like the Attachment List or Preferences). If multiple OmniFocus windows are open, the closest one to the front is considered main for purposes of this command.
Manage Omni Account and Purchases
Available on Mac in OmniFocus menu
Available on iPhone, iPad, Apple Vision Pro in License settings
Open the Omni Account window, where you can manage your Omni Account and your OmniFocus licenses. This command appears after you have signed in to your Omni Account using Unlock OmniFocus….
You can also close your Omni Account from this screen.
Manage Plug-Ins
See Configure
Mark Reviewed
Available on Mac, iPad, Apple Vision Pro in Edit menu
Available in the Shortcut menu
Shift-Command-R
Indicate that you’ve reviewed the selected project, and set its next review date.
Merge All Windows
Available on Mac in Window menu
With OmniFocus open in multiple windows, merge all of them into a single window with multiple tabs.
Migrate Database
Available on Mac in File menu
Available on iPhone, iPad, Apple Vision Pro in Database settings
This command is only available when an updated OmniFocus data format is released. You will normally be prompted to migrate your database as soon as all of your synced Mac, iPhone, iPad, Apple Watch, and Apple Vision Pro devices are running versions which support the updated data format. If for some reason you aren’t prompted, you can begin a data format migration here. You will be warned if some syncing OmniFocus versions are not compatible with the new format.
More information about Migrating Your Database is in the Managing Your Data chapter.
Minimize Window
Available on Mac in Window menu
Command-M on Mac
Shrink the front most window down into the Dock.
More information can be found in Move and arrange app windows on Mac, part of the Apple User Guides.
Move
Available in the Inspector toolbar
Available on iPhone, iPad, Apple Vision Pro in Organize shortcut menu
Move the currently selected action, action group, project, folder, or tag to a new location in the OmniFocus structure.
Possible destinations depend on the selected item:
- Action or Action Group — Move the action or action group within the currently assigned project (or Inbox). To move the action or action group to a different project, use the Project field in the Inspector.
- Project — Move the project to a different location within the project hierarchy. To move a project inside another project, first use Convert to Action, then drag the action group inside the destination project, or use the Project field in the Inspector.
- Folder — Move the folder anywhere within the project hierarchy.
- Tag — Move the tag anywhere within the tag hierarchy.
Move Down, Right, Up, Left
Available on Mac, iPad, Apple Vision Pro in Organize menu
Control-Command-Down Arrow for Move Down
Control-Command-Right Arrow for Move Right
Control-Command-Up Arrow for Move Up
Control-Command-Left Arrow for Move Left
These commands rearrange the currently selected item in the Outline structure without affecting deselected items.
Move Up and Move Down change an item’s location relative to its siblings.
Move Right (Indent) and Move Left (Outdent) increase or decrease an item’s level, moving their descendants with them.
Move Tab to New Window
Available on Mac in Window menu
With OmniFocus open in multiple tabs, move the current tab to a new OmniFocus window.
Move to Display
Available on Mac in Window menu
This sends the front most window to the selected display; it only appears if you have an external monitor or iPad connected.
Nearby
Available on Mac in Perspectives menu
Available on iPhone, iPad, Apple Vision Pro in Quick Open
Command-6
Open the built-in
Nearby perspective
in the current OmniFocus window.
New Action
Available on Mac, iPad, Apple Vision Pro in File menu
Available on Mac, iPhone, iPad, Apple Vision Pro in Toolbar
Command-N
Create a new action in the currently selected project or tag, or create a new Inbox item.
Add Action/Item has the same function, and is available in the Organize shortcut menu.
New Folder
Available on Mac, iPad, Apple Vision Pro in File menu
Shift-Option-Command-N on iPad, iPhone
Create a new folder for organizing projects,
in Projects or in a
Custom Perspective
which groups by Entire Project.
See Add Folder for the related Projects Sidebar button.
New Project
Available on Mac, iPad, Apple Vision Pro in File menu
Shift-Command-N
Create a new project,
in Projects or in a
Custom Perspective
which groups by Entire Project,
using the Default Project Type
(Parallel or
Sequential)
that you have chosen.
Once the project has been created, you can change the Project Type.
See Add Project for the related Projects Sidebar button.
New Single-Action List
Available on Mac in File menu
Create a new list,
for keeping track of related actions that don’t fit into projects,
in Projects or in a
Custom Perspective
which groups by Entire Project.
This command is also available by using New Project, and setting project type to Single Actions List, on Mac, iPad, iPhone, and Apple Vision Pro.
See Add Single-Action List for the related Projects Sidebar button.
New Tab
Available on Mac in File menu
Option-Command-T on Mac
Open a new tab in the current window, displaying the same content as the current tab.
New Tag
Available on Mac, iPad, Apple Vision Pro in File menu
Control-Command-N
Create a new tag in Tags,
Flagged,
Nearby,
or in a
Custom Perspective
which groups by Individual Actions.
See Add Tag for the related button in the Tags Sidebar.
New Window
Available on Mac in File menu
Option-Command-N on Mac
Open a new window, displaying the same content as the current window.
Omni Automation (Pro)
![]() Requires OmniFocus Pro
Requires OmniFocus Pro
Available in the Shortcut menu
The Omni Automation menu provides access to installed OmniFocus Plug-Ins.
On iPhone, iPad, or Apple Vision Pro, Omni Automation menu will only display if Developer Mode has been enabled in Automation settings.
News
Available on Mac in Help menu
Available on iPhone, iPad, Apple Vision Pro in Help settings
View the latest information from the Omni Group about changes to OmniFocus or Apple’s operating systems that may affect your use of the app. This item only appears when there is news to share.
OmniFocus Forums
Available on Mac in Help menu
Stop by the official OmniFocus forums to view and share insights with other users.
OmniFocus Help
Available on Mac in Help menu
Available on iPhone, iPad, Apple Vision Pro in Help toolbar menu
Available on iPhone, iPad, Apple Vision Pro in Help settings
View this help documentation.
OmniFocus Product Page
Available on Mac in Help menu
Visit the OmniFocus page on the Omni Group website.
OmniFocus Windows
Available on Mac in Window menu
At the bottom of the Window menu is a list of all of your OmniFocus windows; choose one to bring it to the front.
Open Archive
Available on Mac in File menu
Open your OmniFocus archive for viewing and editing.
Open in New Window/Tab
Available on Mac in Perspectives List
Available in the Perspectives Bar shortcut menu, except for iPhone
Available in the Shortcut menu
On Mac, this command will display as either Open in New Window or Open in New Tab. Please see the note below about how this interacts with your System Settings.
On Mac, this command can also be applied to an action, in which case it affects the containing project.
On Mac or Apple Vision Pro, this opens the selected perspective, folder, or project in a new window, instead of replacing the current window.
On iPad, this will open the selected perspective, folder, or project in a new split screen window.
On iPhone, this command is not available.
This command will either open in a new window or a new tab, depending on how you have configured System Settings. More information about the appropriate setting is available in the Apple User Guide article Use tabs in windows on Mac.
Open Link
Available on Mac in Edit shortcut menu
Available on iPhone, iPad, Apple Vision Pro in Editing menu
Opens the selected link in a web browser.
Open Scripts Folder (Pro)
![]() Requires OmniFocus Pro
Requires OmniFocus Pro
Available on Mac in Help menu
Open the designated Finder folder for storing AppleScript scripts that you want to access from the toolbar.
Parallel
Available in the Type shortcut menu
Sets the Project Type or Action Group Type to Parallel.
See also Complete with Last Action
Page Setup
Available on Mac in File menu
Shift-Command-P on Mac
Open the standard macOS Page Setup window, where you can change some settings for printing, or exporting to a PDF file. These settings are saved even if you quit OmniFocus.
Paste
Available on Mac, iPad, Apple Vision Pro in Edit menu
Available in the Edit shortcut menu
Available on iPhone, iPad, Apple Vision Pro in Editing menu
Command-V
Inserts a copy of whatever is currently on the clipboard. The contents of the clipboard will be pasted as (a) new item(s). If the clipboard contains only text (rather than whole items, such as actions or projects), and you are already editing the text of another item, the clipboard contents are pasted at the insertion point, using a simplified style.
Paste Style
Available on Mac in Format menu
Option-Command-V on Mac
Apply the style on the style clipboard (obtained using Copy Style) to the selected text.
Paste and Match Style
Available on Mac, iPad, Apple Vision Pro in Edit menu
Option-Shift-Command-V
Ignore any styles that have already been applied to text on the clipboard, and match the styles of the location you’re pasting. Styles are only available in notes, so this command is primarily useful there.
Paste with Original Style
Available on Mac in Edit menu
Available on iPhone, iPad, Apple Vision Pro in Editing menu
Control-Option-Shift-Command-V on Mac
Preserve styles from the original source, ignoring the styles of the location you’re pasting. Styles are only available in notes, so this command is primarily useful there.
Available on Mac in File menu
Command-P on Mac
Open the standard macOS Print window, with a variety of options for printing, or creating a PDF file.
Printing is not currently supported on iPhone, iPad, or Apple Vision Pro. Please contact our Support Humans if you would find this useful.
Projects
Available on Mac in Perspectives menu
Available on iPhone, iPad, Apple Vision Pro in Quick Open
Command-2
Open the built-in
Projects
perspective in the current OmniFocus window.
Quick Open
Available on Mac, iPad, Apple Vision Pro in File menu
Available in the Toolbar or Window
Command-O
Please read about Quick Open on Mac and Quick Open on iPhone, iPad, Apple Vision Pro for more information.
Quit OmniFocus
Available on Mac in OmniFocus menu
Command-Q on Mac
Stop using OmniFocus and put it away for now. Your database is automatically saved.
Rebuild Database
Available on Mac in File menu
Check and consolidate all of your OmniFocus data, to make sure it is consistent and valid. This is almost the same as backing up and then restoring your database, and will also rebuild the local cache. If you are having problems with your database, this may help.
Redo
Available on Mac in Edit menu
Shift-Command-Z
Re-create the last change, that you just used Undo to reverse. You can keep redoing edits, allowing you to return to a later point in time.
Release Notes
Available on Mac in Help menu
Available on iPhone, iPad, Apple Vision Pro in Help toolbar menu
Available on iPhone, iPad, Apple Vision Pro in Help settings
Read the release notes for the current version of OmniFocus.
Rename
Available on iPhone, iPad, Apple Vision Pro in Shortcut menu
Rename the selected folder, project, or tag in the Sidebar. This allows in-place renaming, without opening the Inspector.
Replace Tiled Window
See Split View (Mac)
Reschedule to Today/Tomorrow
Available on iPhone, iPad, Apple Vision Pro in Schedule shortcut menu
Only available for actions and projects that are set to repeat.
Sets the Due date for an item to either Today or Tomorrow, maintaining the current difference between the Due date, and any assigned Defer Until date, without changing any assigned times. If the item is already Due either Today or Tomorrow, then only a single choice will be offered.
Compare Due Today/Tomorrow
Reset Database and Settings…
Available on Mac in File menu
Press Option to reveal this menu command, which replaces Rebuild Database. This command completely removes your existing OmniFocus data and settings, and returns you to First Launch for OmniFocus.
If you would like to reset some of your settings, rather than all of your settings, please read the Mac Settings note about Reset and Reset All.
On iPhone, iPad, and Apple Vision Pro you can use Reset Database, which is part of the Reset OmniFocus settings.
Revert to This Backup
Available on iPhone, iPad, Apple Vision Pro when viewing Backup list
Available on Mac when using Show Backups in Finder
After confirming that you want to replace your current OmniFocus data with the backup being viewed, your local OmniFocus data will be replaced. If you are syncing, the server data will also be replaced, which will prompt all of your currently syncing devices to replace their data from the server.
Review
Available on Mac in Perspectives menu
Available on iPhone, iPad, Apple Vision Pro in Quick Open
Command-7
Open the built-in
Review perspective
in the current OmniFocus window.
Select All
Available on Mac, iPad, Apple Vision Pro in Edit menu
Available on iPhone, iPad, Apple Vision Pro in Editing menu
Command-A
Select everything in the outline, or if you are editing an item’s text, all text in the cell.
Select Forecast Day
Available on iPhone, iPad, Apple Vision Pro in View menu
Command-Left Arrow for Select Previous Day
Command-T for Select Today
Command-Right Arrow for Select Next Day
Navigate between days while viewing Forecast.
Sequential
Available in the Type shortcut menu
Sets the Project Type or Action Group Type to Sequential.
See also Complete with Last Action
Services
Available on Mac in OmniFocus menu
Available on Mac in Shortcut menu
Access system-wide macOS services offered by other applications.
This menu is only available in the Outline on Mac.
Set/Clear Completed Status
Available on iPad, Apple Vision Pro in Edit menu
Space bar
With one or more items selected, press Space bar to toggle between Completed and Active.
Set/Clear Dropped Status
Available on iPad, Apple Vision Pro in Edit menu
Option-Space bar
With one or more items selected, Press Option-Space bar to toggle between Dropped and Active.
Set/Clear Flag
Available on Mac, iPad, Apple Vision Pro in Edit menu
Available in the Shortcut menu
Shift-Command-L
F
Flag the selected item(s), adding it to the
Flagged
perspective, or remove an assigned flag.
Settings
Available on Mac, iPad, Apple Vision Pro in OmniFocus menu
Available on iPhone, iPad, Apple Vision Pro in Toolbar
Available on Apple Watch by tapping Settings button
Command-Comma (,)
Open OmniFocus Settings, where you can customize how the application works for you.
Share
Available in the Toolbar
Available in the Inspector toolbar
Available in the Shortcut menu
Send selected items from OmniFocus to another application, using the built-in macOS, iOS, iPadOS, or visionOS dialog. The item is sent in a format based on its destination, with a link back to the original item in OmniFocus.
With OmniFocus Pro for iPhone, iPad, or Apple Vision Pro, any installed OmniFocus Plug-Ins also appear as options in the Share dialog. Tap a scripted action in the list to run it.
Show “OmniFocus.ofocus” in Finder
Available on Mac in File menu
Press Option to reveal this menu command, which replaces Show Backups in Finder. Instead of showing the Backups folder, the folder containing your main OmniFocus document (OmniFocus.ofocus) opens instead.
This can be useful when troubleshooting with the help of Omni Support. Under normal circumstances you should not interact with your primary OmniFocus document directly.
Show All
Available on Mac in OmniFocus menu
Show all windows of all applications.
Show All Inspector Fields
Available in the Inspector toolbar
Enable this command to show all Inspector fields that apply to the current selection, regardless of which fields are enabled in the Layout Settings for Inspector.
Disable this command to show only those fields enabled in Layout Settings for Inspector.
Show All Tabs/Exit Tab Overview
Available on Mac in View menu
Shift-Command-Backslash (\) on Mac
Switch to a view that displays thumbnail views of each tab as a tile in the OmniFocus window, or return to the standard full view.
Show/Hide All Notes
Available on Mac in View menu
Control-Command-Apostrophe (') on Mac
Show or hide all notes with content.
Show Backups in Finder
Available on Mac in File menu
If you have trouble with your OmniFocus database, you can always go back to an older, backed up version. With this command you can browse to the backup file you want, then open and inspect it. If it looks good, click Revert to This Backup, and your entire database is reverted to how it looked at the time you made the backup.
More information about this, as well as iPhone, iPad, and Apple Vision Pro backups, is in the Backups of OmniFocus Data section of Managing Your Data.
Show/Hide Colors
Available on Mac in Format menu
Shift-Command-C on Mac
Show or hide the Colors window.
Show Console (Pro)
![]() Requires OmniFocus Pro
Requires OmniFocus Pro
May also be named Automation Console or Show Automation Console
Available on Mac, iPad, Apple Vision Pro in Automation menu
Available on iPhone, iPad, Apple Vision Pro in Omni Automation toolbar menu
Shift-Command-C on iPhone, iPad, Apple Vision Pro
Opens the Automation Console, for Omni Automation development and testing.
Item is labeled Automation Console on iPhone, iPad, and Apple Vision Pro
Show/Hide Fonts
Available on Mac in Format menu
Command-T on Mac
Show or hide the Fonts window.
Show in Inbox/Projects/Tags
Available on Mac, iPad, Apple Vision Pro in View menu
Available in the Shortcut menu
Option-Command-R
Switch to Projects,
Tags,
or Inbox.
Your current selection of items will be preserved in the new perspective.
Show/Hide Inspector
Available on Mac, iPad, Apple Vision Pro in View menu
Available on iPhone, iPad, Apple Vision Pro in Toolbar
Available on iPhone, iPad, Apple Vision Pro in Shortcut menu
Option-Command-I
Show Inspector for the selected items, or hide it again.
Show Next/Previous Tab
Available on Mac in Window menu
With OmniFocus open in multiple tabs, navigate to the next or previous tab in the bar.
Show/Hide Note(s)
Option-Command-Apostrophe (') on Mac
Show or hide the note of the selected item(s).
Show/Hide Perspectives Bar
Available on Mac, iPad, Apple Vision Pro in View menu
Available on iPhone, iPad, Apple Vision Pro in Appearance settings
Option-Command-P
Show or hide the Perspectives Bar. This is available as a setting on iPhone, iPad, and Apple Vision Pro, as well as a keyboard command.
Show/Hide Perspectives List
Available on Mac in Perspectives menu
Control-Command-P on Mac
Command-O
Show or hide the Perspectives List,
where you can add or modify keyboard shortcuts,
rearrange or favorite perspectives,
and create or edit new
Custom Perspectives.
The same function is available on iPhone, iPad, Apple Vision Pro in Quick Open.
Apple Watch supports selecting favorite perspectives, either to display on the main screen of OmniFocus 4 for Apple Watch or to use on a watch face, in Perspectives List settings.
Show/Hide Quick Entry
Available on Mac in Window menu
Available on iPad, Apple Vision Pro in File menu
Shift-Control-Option-S on Mac
Control-Option-Space bar
Show or hide the Quick Entry window.
Keyboard shortcuts work differently, depending on which device you are using:
- Shift-Control-Option-S works only on Mac, when OmniFocus is the front most application.
- Control-Option-Space bar works on iPhone, iPad, and Apple Vision Pro, when OmniFocus is the front most application. The shortcut can not be customized.
- Control-Option-Space bar works on Mac, even if OmniFocus is not the front most application, as long as it is running. The shortcut can be customized in General settings.
Show/Hide Sidebar
Available on Mac, iPad, Apple Vision Pro in View menu
Available on iPhone, iPad, Apple Vision Pro in Appearance settings
Option-Command-S
Show or hide the Sidebar.
Show/Hide Tab Bar
Available on Mac in View menu
Shift-Command-V on Mac
Show or hide the macOS tab bar on the current OmniFocus window.
Show/Hide Toolbar
Available on Mac in View menu
Show or hide the Toolbar.
Show/Hide View Options
Available on Mac, iPad, Apple Vision Pro in View menu
Shift-Command-V
Open the View Options for the current perspective.
Single Actions
Available in the Type shortcut menu
Sets the Project Type to Single Actions List.
Skip
Available in the Shortcut menu
Only available for actions that are set to repeat.
Drops the selected action(s), while creating the next repetition; this results in the repeating action continuing.
Compare Drop Completely
Smaller
Available on Mac, iPad, Apple Vision Pro in Format menu
Command-Minus Sign (-)
Decrease the size of the selected note text.
Sign Up for the Omni Newsletter
Available on Mac in Help menu
Available on iPhone, iPad, Apple Vision Pro in Help settings
Visit the Omni Newsletter web page, where you can subscribe to our email newsletter. You’ll get nothing but the latest news and tips for OmniFocus and the other apps in the Omni Group family.
Simplify Style
Available on Mac in Format menu
Re-formats selected text in notes or text within selected actions or projects.
Removes custom fonts, text and background colors, text size, and text alignment, while keeping styles such as bold, italic, underline, and bulleted lists.
Result should be clean readable text, that maintains the intent of the original formatting.
Attachments and links are preserved.
Contrast with Clear Style
Site License
Available on Mac in OmniFocus menu
Available on iPhone, iPad, Apple Vision Pro in License settings
Open the Site License window, which allows you to renew or sign out of a site license.
On Mac, this menu command only appears if you are signed in to a site license, and replaces Unlock OmniFocus… and Manage Omni Account and Purchases….
On iPhone, and iPad, this appears as a row within the License settings screen.
Sort Once
Available on Mac in Organize menu
Available on Mac in Sort shortcut menu
Using one of these properties, sort the selected items in the Sidebar or Outline, as long as you’ve selected something that can be reordered.
- By Name
- By Status
- By Date Added
- By Date Completed
- By Date Due
- By Defer Date
- By Date Dropped
Speech
Available on Mac in Edit menu
The Speech submenu contains the Start Speaking and Stop Speaking commands, which you can use to make the macOS text-to-speech system say the selected text out loud.
- Start Speaking
- Stop Speaking
A similar feature can be enabled on iPhone, iPad, and Apple Vision Pro, using Accessibility settings, in the Settings app.
Spelling and Grammar
Available on Mac in Edit menu
The Spelling and Grammar menu contains the standard Spelling commands for the macOS spell checking system: Show Spelling and Grammar (which opens the Spelling and Grammar window), Check Document Now (which checks spelling in the document once), and the ability to turn on or off Check Spelling While Typing, Check Grammar With Spelling, and Correct Spelling Automatically
- Show/Hide Spelling and Grammar (Command-Colon (:) on Mac)
- Check Document Now (Command-Semicolon (;) on Mac)
- Check Spelling While Typing
- Check Grammar With Spelling
- Correct Spelling Automatically
Split View (Mac)
Available on Mac in Window menu
These menu commands are provided by the operating system, and may include:
- Tile Window to Left of Screen
- Tile Window to Right of Screen
- Replace Tiled Window
More information can be found in Use apps in Split View on Mac, part of the Apple User Guides.
Stage Manager (Mac)
Available on Mac in Window menu
This menu command is provided by the operating system:
- Remove Window from Set
More information can be found in Organize your Mac desktop with Stage Manager, part of the Apple User Guides.
Start Dictation
May also be named Dictation
Available on Mac, iPad, Apple Vision Pro in Edit menu
Globe-D key on iPhone, iPad, Apple Vision Pro
With dictation enabled for Mac, iPhone, iPad, or Apple Vision Pro, select an editable text field and use this command to enter text by speaking.
A separate shortcut key can also be set in Keyboard system settings.
Status
Available on Mac in Edit menu
Available in the Status shortcut menu
Choose from this submenu to change the status for the selected item(s):
It is also possible to update between Active, Completed, and Dropped using a keyboard. See Set/Clear Completed Status and Set/Clear Dropped Status for more information.
Strikethrough
Available on Mac in Format menu
Apply (or remove) the strikethrough style to the selected note text.
Substitutions
Available on Mac in Edit menu
The Substitutions submenu allows you to choose which macOS text substitutions will be used in OmniFocus.
More information about substitutions and text editing is available in Replace text and punctuation in documents on Mac, part of the Apple User Guides.
Sync Now
Available on Mac, iPad, Apple Vision Pro in File menu
Available in the Toolbar
Command-S
Compare your local OmniFocus data with the server data, and make sure that both sides have all the recent changes you’ve made.
Only available if you are Syncing OmniFocus.
Available in the
More Menu
on iPhone, iPad, and Apple Vision Pro;
can be added to the
Mac Toolbar
by using customization.
System Search
Available on Mac in Help menu
Shift-Command-Question Mark (?)
On Mac, iPhone, iPad, and Apple Vision Pro, search OmniFocus menu items in order to find a specific command.
On Mac, the same command will also search OmniFocus Help (this document). Results appear as a list of menu items and help topics respectively.
Tags
Available on Mac in Perspectives menu
Available on iPhone, iPad, Apple Vision Pro in Quick Open
Command-3
Open the built-in
Tags
perspective in the current OmniFocus window.
Tile Window to Left of Screen
See Split View (Mac)
Tile Window to Right of Screen
See Split View (Mac)
Transformations
Available on Mac in Edit menu
The Transformations submenu contains commands that apply to selected text in the outline, sidebar, and inspector, to convert it to upper case, lowercase, or capitalize each selected word.
- Make Upper Case
- Make Lower Case
- Capitalize
Underline
Available on Mac, iPad, Apple Vision Pro in Format menu
Command-U
Apply (or remove) the underline style to the selected note text.
Undo
Available on Mac in Edit menu
Available in the Toolbar
Command-Z
Reverse the most recent change that you made. You can keep undoing edits, allowing you to return to an earlier point in time.
Ungroup
Available on Mac, iPad, Apple Vision Pro in Organize menu
Option-Command-U
Move all the child items out of the selected group, and remove the group from OmniFocus.
Compare Group
Unlock OmniFocus
Available on Mac in OmniFocus menu
Available on iPhone, iPad, Apple Vision Pro in License settings
Sign in to your Omni Account to unlock this copy of OmniFocus, or add a license.
On Mac, this menu item will update based on the current licensing state, to either Manage Omni Account and Purchases… or Site License….
Writing Direction
Available on Mac in Format menu
Adjust the writing direction of the selected text, or of the paragraph containing the selected text.
Paragraph:
- Default — Writing direction of paragraph matches the default for the selected language.
- Left to Right — Writing direction of paragraph is left-to-right. May override the selected language.
- Right to Left — Writing direction of paragraph is right-to-left. May override the selected language.
Selection:
- Default — Writing direction of selected text matches the default for the selected language. May override the above setting for Paragraph.
- Left to Right — Writing direction of selected text is left-to-right. May override the above setting for Paragraph.
- Right to Left — Writing direction of selected text is right-to-left. May override the above setting for Paragraph.
Zoom
Available on Mac in Window menu
Switch the front most window between the biggest size possible and the last size you set.
More information can be found in Move and arrange app windows on Mac, part of the Apple User Guides.
Getting Help
When you’re in need of help — whether you’re trying to figure out how custom perspectives work, how to sync your database with OmniFocus on another device, or if you’re having some other issue with OmniFocus — it’s good to know that the Support Humans at the Omni Group are always available to lend you a hand.
In addition to contacting Omni support directly, there are several online and in-app resources that can help answer your questions about OmniFocus.
Reference Manual
OmniFocus 4 for Mac, iPhone, iPad, Apple Watch, and Apple Vision Pro documentation has been combined into this unified reference manual. Most of the work has been completed, but planned changes, work in progress, and published updates are noted below.
If there is anything additional you would like to see, or topics that you would like us to prioritize, please email the Support Humans.
Release Notes
For a detailed, comprehensive summary of the latest changes to OmniFocus, read the Release Notes.
They are available from
the Help menu on Mac,
Help settings
on iPhone, iPad, and Apple Vision Pro,
or the
Help menu button
on iPhone, iPad, and Apple Vision Pro,
located under the
More Menu
in the Toolbar.
Online Support
The OmniFocus Support Site provides a wealth of information (including this reference manual), as well as support articles which cover other topics related to working with OmniFocus.
Similarly, the OmniFocus product page is always a good place to find the latest information about features and updates to OmniFocus.
Email Support
If you’re stuck, if you have a good idea for the next version of OmniFocus, or if you just want to let us know how we’re doing, please send us an email. Contact Omni will create an email message addressed to us, which also includes information about the version you’re running, which operating system you’re running it on, and what type of license you have, which helps us quickly assist you.
Alternatively, you can email Support Humans directly! Either way, we take support seriously, so you can expect a prompt response actually typed by our Support Humans.
If you are contacting support with an issue, it’s very helpful if you can include a screenshot or screen recording of the behavior that you’re experiencing, along with the steps that are causing the issue. This helps us understand the problem and find a solution more quickly and effectively.
Apple provides several useful sets of instructions for capturing screenshots or screen recordings:
Phone Support
We understand that sometimes you just can’t wait for an email response when you’re knee-deep in a project, and you’re stuck, or something isn’t working quite right. When this happens, you can call our Support Humans! Please check our Support site for current hours and telephone numbers.
Community Support
Omni maintains online forums for all of our products, which are available to everyone. Come share your questions and ideas with other users, share tips to show off how you’re using OmniFocus for getting stuff done, and seek help from the OmniFocus community.
Omni also maintains a public Slack Workspace, where you’re welcome to join the community of fellow productivity enthusiasts to hang out and share OmniFocus-related insights.
Note that while Omni Forums and Slack are a great resource for interacting with others in the OmniFocus community, they are not monitored for troubleshooting purposes, and are not considered an official support channel. Please use our email and phone options to get in touch with our support team directly.
Documentation Updates
While documentation is still being actively revised, notes will be added to this section to make it easy to find new and updated content.
Planned Work
Remaining work is planned in this order; feedback is welcome!
- System Integration
- Commands & Shortcuts (minor updates)
- OmniFocus for Apple Watch
- Omni Automation
- Accessibility
Completed Work
- 4.0.0 — Initial release, followed by updates for the Perspectives, Outline, Custom Perspectives, and Settings chapters.
- 4.0.1 — Updated the Managing Your Data chapter.
- 4.0.2 — Updated the Perspectives, Managing Your Data, Settings, Commands & Shortcuts, and Glossary chapters.
- 4.0.3 — Updated the Perspectives, Managing Your Data, Settings, Commands & Shortcuts, and Glossary chapters.
- 4.0.4 — Updated the Welcome, Perspectives, Managing Your Data, Getting Started, Outline, Inspector, Settings, Commands & Shortcuts, and Glossary chapters.
- 4.1.0 — Finalized the Perspectives chapter. Added Apple Vision Pro information, as OmniFocus 4.1 brings OmniFocus to Apple Vision Pro!
- 4.2.1 — Revised the Outline, Toolbar, and Commands & Shortcuts chapters. Updated the Perspectives, Inspector, Settings, Glossary, and Managing Your Data chapters.
- 4.2.2 — Revised the Inspector chapter. Updated the Outline, Settings, Commands & Shortcuts, and Glossary chapters.
- 4.3.0 — Revised the Custom Perspectives chapter. Updated the Perspectives, Inspector, Commands & Shortcuts, Getting Help, and Glossary chapters.
- 4.3.1 — Revised the Capture Methods chapter. Updated the Perspectives, Custom Perspectives, Settings, Commands & Shortcuts, and Glossary chapters.
- 4.3.2 — Finalized the Settings chapter. Updated the Capture Methods, Commands & Shortcuts, Managing Your Data, and Glossary chapters.
- 4.3.3 — Updated the Toolbar, Capture Methods, Settings, Commands & Shortcuts, Managing Your Data, and Glossary chapters. Updated the appearance of the reference manual, and added images and screenshots throughout.
Glossary
Some words and phrases used in OmniFocus have very specific meanings, and though we strive to make those meanings clear, this is a good place to come for further assistance.
Is there is a term missing from this list, or something here that doesn’t quite make sense? Please email us about what would be helpful, and we’ll do our best to clarify or update.
- Action
- Action Group
- Action Group Type
- Active
- Added Date
- Apple User Guides
- Availability
- Available
- Blocked
- Blocked with Container
- Changed Date
- Compact View
- Completed
- Completed with Container
- Completed Date
- Container
- Context Menu
- Contextual Menu
- Database
- Defer Until Date
- Device
- Drag and Drop
- Dropped
- Dropped with Container
- Dropped Date
- Due Date
- Due Soon
- Editing Menu
- Estimated Duration
- Everything
- Favorite
- First Available
- Flagged
- Folder
- Forecast Tag (Pro)
- Group
- Hidden
- Hierarchy
- Inbox
- Inbox Item
- Inbox Order
- Inherited Status
- Inspector
- Item
- Keyboard Shortcut
- Latest Start Date
- Leading Edge
- Omni Account
- Omni Automation
- On Hold
- Outline
- Overdue
- Parallel
- Pending
- Perspective
- Platform
- Plug-In
- Project
- Project Hierarchy
- Project Type
- Projects Order
- Regular View
- Remaining
- Resolved
- Sequential
- Settings
- Shortcut Menu
- Sidebar
- Single Actions List
- Stalled
- Starred
- Status
- Status Circle
- Structure and Hierarchy
- Sub-Project
- Sync
- System Settings
- Tag
- Tag Group
- Tag Hierarchy
- Tags Order
- Task
- Toolbar
- Trailing Edge
- Unavailable
- Unavailable with Container
- Untagged
- View Options
Action
A specific item which can be accomplished, and which you can capture in OmniFocus. Actions can be found in the Inbox, as part of a Project, or part of an Action Group within a project.
In other areas of your life, these are often referred to as tasks or to-dos. In OmniFocus, using the word action reminds you to always be thinking about the next step you can take to move a project towards completion, and attain your goal.
Action Group
A collection of child Actions nested underneath a parent action, which must all be Resolved before the parent action can be considered completed.
Action Groups are normally part of a Project, and can be thought of as subprojects, but may also be part of the Inbox.
Similar to a project, an action group may be Parallel or Sequential.
Action Groups use bold text, making it easy to quickly tell them apart from actions.
Action Group Type
Action Groups may be Parallel or Sequential.
Compare this to Project Types, which also includes Single Actions List.
Active
See Status.
Added Date
The date and time that a given Action, Action Group, Project, Folder, or Tag was Added.
Apple User Guides
Apple provides User Guides for a variety of devices, operating systems, and applications:
- Apple Vision Pro User Guide
- Apple Watch User Guide
- Calendar User Guide
- iPad User Guide
- iPhone User Guide
- macOS User Guide
- Shortcuts User Guide for iPhone and iPad
- Shortcuts User Guide for Mac
Availability
Availability is a state that is derived for actions or action groups, based both upon the assigned Status of the item, and the states of containing Folders, Projects, Action Groups, or assigned Tags; this can include project status, project dates, project type, status of assigned tags, and Additional. Possible availability states include:
- Available — An Active Action, Action Group, or Project that is available for work, as it is not Blocked, Deferred, or On Hold.
- Blocked — An Active Action or Action Group that is not available for work, as another action must be completed first. This is typically found in a Sequential project or action group, if another action is above it in the project outline. Actions can be unblocked by moving them to the top of the project or action group, or by changing the containing project or action group from Sequential to Parallel.
- Blocked with container — An Action or Action Group may also be Blocked based on the availability of the Project or Action Group which Contains it.
- Unavailable — An Active Action or Action Group that is not yet Available for work. This is most often due to the Defer Until Date being in the future.
- Unavailable with container — An Action or Action Group may also be unavailable for work, based on either the Status or availability of the Project or Action Group which Contains it. This is most often the case when the project is On Hold, or the project or action group has a future Defer Until Date.
Available
To learn more about the concept of Availability in OmniFocus, and how it impacts Actions, Action Groups, and Projects, see Availability.
To learn more about the filter option named Available, see View Options.
Blocked
See Availability.
Blocked with Container
See Availability.
Changed Date
The date and time that a given Action, Action Group, Project, Folder, or Tag was Changed.
Compact View
Default view on iPhone, or iPad (when running in some split screen sizes). This view shows each pane of OmniFocus individually, and can be thought of as navigating a series of stacked cards. You can see the Sidebar, Outline, or Inspector.
Compare this with Regular View.
Completed
See Status.
Completed Date
The date and time that a given Action, Action Group, or Project was Completed.
Container
A Folder which contains folders or Projects, or a project or Action Group which contains action groups or Actions. This term is used in the Inspector when viewing items which inherit Availability, Status, or properties such as Flagged or Due Date from their container.
Context Menu
See Shortcut Menu.
Contextual Menu
See Shortcut Menu.
Database
The collection of files, that are bundled together as an OmniFocus.ofocus package, which OmniFocus uses to store all the information that you add to the app. Under normal circumstances, you should rarely need to interact directly with the database folder, and the various perspectives show you all the contained information. There are Database settings that can optimize the performance of OmniFocus, and you can email us if it looks like something isn’t working correctly. When using a Mac or iPad, you can have multiple windows open, in order to see different views of your data at the same time. When using a Mac, you can open multiple database files at once to restore from a backup or archive, or view the contents of an OmniFocus database other than your primary data.
You may also see this referred to as your OmniFocus data, or OmniFocus library.
Defer Until Date
The date and time that an item becomes Available for work. Using Defer Until is an excellent way to get something off of your plate for now, knowing that it will return when it’s ready for work.
This is sometimes referred to as a Defer Date or Start Date.
Projects or actions that have a future Defer Until date are referred to as Deferred projects or actions.
Defer Until dates may also be inherited from their Container. Read about Inherited Dates to learn more.
Compare to Due Date
Device
Hardware that runs each platform supported by OmniFocus.
Supported devices include Mac, iPhone, iPad, Apple Watch, and Apple Vision Pro.
Drag and Drop
A system-level function that allows dragging items into OmniFocus, out of OmniFocus, and between OmniFocus and other apps on Macs, iPads, and iPhones. Try dragging text into OmniFocus from other apps, reordering items in the outline, and dragging rows or selected text from OmniFocus to other apps on your device.
Dropped
See Status.
Dropped Date
The date and time that a given Action, Action Group, or Project was Dropped.
Due Date
The date and time by which a given Action, Action Group, or Project must be completed.
Due dates may also be inherited from their Container. Read about Inherited Dates to learn more.
Compare to Defer Until Date
Due Soon
A designation for Actions, Action Groups, and Projects with assigned due dates that are approaching, and may need additional attention. Items that are due soon have a special style to make them more visible in your outline.
The exact meaning of Due Soon can be changed using the “Due Soon” Means setting.
Editing Menu
A menu available on iPhone, iPad, and Apple Vision Pro, that allows editing of text in text fields; normally accessed by tapping in a text field, while editing text. Most often contains system commands such as cut, copy, paste, and more; may also contain OmniFocus commands, such as Paste with Original Style.
Estimated Duration
The amount of time you think an Action, Action Group, or Project will take to complete.
Estimated Duration can be assigned using the Inspector, or the Outline (depending on your Layout Settings).
Estimated Duration is used when calculating
the Latest Start Date,
and can be used when building
Custom Perspectives.
Everything
See View Options
Favorite
Favorite perspectives can be selected to display in the Perspectives Bar on Mac, iPhone, iPad, and Apple Vision Pro; or on the main screen of OmniFocus for Apple Watch.
Setting your favorite perspectives:
- Click or tap on the empty
Favorite button
to add a favorite perspective.
- Click or tap on the filled
Favorite button
to remove a favorite perspective.
This can be done in the
Perspectives List on Mac,
in
Quick Open
on iPhone, iPad, and Apple Vision Pro,
and in
Settings on Apple Watch.
First Available
Unlike the other availability states, which can also apply to Projects and Action Groups, First Available is a state that can only apply to Actions.
See View Options
Flagged
An indication that an Action, Action Group, or Project is important. Children of flagged items are also considered flagged, making it very easy to prioritize an entire project with a single click.
Items that are flagged
also have a special orange
Status Circle,
with a flag hat.
Use Set/Clear Flag to add or remove Flagged status to an item.
Folder
A way to group together related projects or folders. By default, folders are shown in the Sidebar, and can optionally be shown in the Outline using Projects View Options.
Forecast Tag (Pro)
![]() Requires OmniFocus Pro
Requires OmniFocus Pro
A way of indicating that an Action,
Action Group,
or Project
should be displayed in
Forecast.
Select the Forecast Tag in Forecast View Options, and use Apply/Remove Forecast Tag to apply or remove the Forecast Tag to items.
Group
See Action Group.
Hidden
An item that exists in your OmniFocus data, but that isn’t currently visible, based on your setting for View Options. This can be relevant when OmniFocus alerts you that something might be deleted by mistake.
Hierarchy
Inbox
The built-in
Inbox perspective is designed to hold
Actions and
Action Groups that you have captured in
OmniFocus, prior to processing them… creating new projects, adding them to
existing projects, or assigning tags.
Inbox Item
An Action which has been captured in the Inbox, and which has not yet been processed.
Inbox items can be assigned to a new or existing Project, or may be converted to a project.
Inbox Order
The order in which Action Groups and
Actions
are listed in the
Inbox.
This is a very common order in which to display your OmniFocus data,
even when you are in other Perspectives.
Related: Projects Order, Tags Order
Inspector
A view on the trailing side of the OmniFocus window (in Regular View), or that can be opened by swiping from the trailing side (in Compact View), which allows you to adjust all the details for Actions, Action Groups, Projects, Folders, and Tags. With something selected in the Outline or Sidebar, the Inspector automatically shows relevant fields. Click the
Inspector button
in the Toolbar, or choose Show Inspector from the View menu.
Additional information is available in the Inspector chapter.
Item
Term that may refer to Actions, Action Groups, Projects, Folders, or Tags. This reference manual will typically refer to the specific type of item being discussed, but there are a few topics where referring to an item is either necessary, or sufficiently clear.
Keyboard Shortcut
A single key, or set of keys pressed in combination, that calls a menu command. These are available when using a Mac, or with an external keyboard attached to an iPhone, iPad, or Apple Vision Pro. When using an iPad, pressing and holding the Command key (⌘) will see a list of shortcuts available from your current location in the app.
Latest Start Date
Date and time by which work must begin on a given Action, Action Group, or Project, in order to have work completed by the Due Date.
Latest Start Date is calculated by subtracting the Estimated Duration from the Due Date.
Leading/Trailing Edge
When using OmniFocus with a left to right language, the leading edge is the left side, and the trailing edge is the right side.
When using OmniFocus with a right to left language, the leading edge is the right side, and the trailing edge is the left side.
Omni Account
Your Omni Account can be used to start a free trial of our applications, purchase a license or subscription, upgrade an existing license, and sync our applications using the Omni Sync Server.
Additional information about Omni Accounts can be found in our Using and managing your Omni Account support article.
Omni Automation
A method of scripting OmniFocus with JavaScript. See the Omni Automation website for more information on this feature.
On Hold
See Status.
Outline
The main view of OmniFocus, where you see and interact with your
Actions,
Action Groups,
and Projects,
usually through a
Structured view of your data.
On a Mac or iPad, this is the center area of the OmniFocus window,
with the Sidebar available on the
Leading Edge,
and the Inspector available on the
Trailing Edge. On an iPhone, this is
also the primary area of OmniFocus, with both the Sidebar and Inspector hidden
most of the time, but available for changing your view or data. Some
perspectives, such as
Forecast,
Nearby, and
Review
have specific ways of viewing your data,
that may differ from the typical project structure.
Additional information is available in the Outline chapter.
Overdue
A state for items with a Due Date which has passed. Items that are overdue have red Status Circles for greater visibility.
Parallel
A Project or Action Group that contains actions which may be accomplished in any order. By default, all Active actions are considered Available. For a parallel project or action group, View Options set to First Available or Available will show different results, as the topmost action is considered first available.
Compare Sequential projects or action groups, and Single Actions List projects.
Additional information is available in the Perspectives chapter.
Pending
This Custom Perspective filter rule from earlier versions of OmniFocus is now named Has an active project which has a future defer date.
Perspective
A view of your OmniFocus data,
that can be quickly visited from the
Perspectives Bar,
Perspectives List, or
Quick Open.
OmniFocus comes with nine Default Perspectives. Custom Perspectives can be created using OmniFocus Pro.
Read the Perspectives chapter, to learn more.
Platform
Operating system that runs on each Apple device supported by OmniFocus.
Supported platforms include iOS, iPadOS, macOS, watchOS, and visionOS.
Plug-In
Omni Automation Plug-Ins are written in JavaScript, and can be used for automating various tasks, when using OmniFocus Pro. Visit the Omni Automation in OmniFocus website for more information.
Project
A collection of Actions and Action Groups that are all working towards a common goal (see Parallel or Sequential) or that are united by another common element (see Single Actions List).
Project Type
Projects may be Parallel or Sequential, or they may be a Single Actions List.
Compare this to Action Group Types, which does not include Single Actions List.
Additional information is available in Project Type
Projects Order
The order in which Projects,
Action Groups,
and Actions
are listed in the
Projects
perspective.
This is a very common order in which to display your OmniFocus data,
even when you are in other
Perspectives.
Related: Inbox Order, Tags Order
Regular View
Default view on Mac, iPad (when running in full screen), and Apple Vision Pro. This view can show the Sidebar, Outline, and Inspector at the same time.
Compare this with Compact View.
Remaining
See View Options
Resolved
Projects, action groups, or actions that have either been Completed or Dropped.
Sequential
A Project or Action Group that contains actions which must be completed in a specific order, from top to bottom. By default, only the topmost Active action is considered Available, and all actions below that one are considered Blocked. For a sequential project or action group, View Options set to either First Available or Available should show the same result.
Compare Parallel projects or action groups, and Single Actions List projects.
Additional information is available in the Perspectives chapter.
Shortcut Menu
If you touch and hold on an Item, Outline Row, or selection of text, a menu may appear with relevant commands.
Apple previously referred to this type of menu as a context or contextual menu.
Sidebar
A pane to the left of the Outline, which can display folders, projects, tags, or a calendar, depending on which Perspective you are viewing. When using Regular View, choosing Show/Hide Sidebar will show or hide the Sidebar, next to the Outline. When using Compact View, the Sidebar will slide in from the left, and will slide out to the left when you are finished using it, leaving the Outline visible.
Additional information is available in the Perspectives chapter.
Single Actions List
A Project which contains actions that may (or may not) be related in some way, but that are not part of an overall goal. Unlike with parallel or sequential projects, the position of an action in a single actions list does not matter; each action can be thought of as a very small standalone project. For a single actions list, View Options set to First Available or Available will show identical results, as all actions are considered first available.
Compare Parallel and Sequential projects and action groups.
Additional information is available in the Perspectives chapter.
Stalled
This Custom Perspective filter rule from earlier versions of OmniFocus is now named Has an active project which has no remaining actions.
Status
Status can be directly assigned to an action, action group, project, folder, or tag.
Status can be updated by clicking or tapping on the Status Circle (for actions and action groups), using the Status sub-menu in the Edit menu, using the Status shortcut menu, or using the Inspector:
- Active — Status for an Action, Action Group, Project, or Folder that is planned for work, or a Tag that is currently in use. This is the default status for a newly added Item.
- On Hold — Status for a Project or Tag which is not currently planned for work, but which may be in the future. Actions or action groups which are part of an On Hold project will be considered Unavailable for work; actions or action groups (but not projects) which are assigned to an On Hold tag will be considered Blocked.
- Completed — Status for an Action, Action Group, or Project when you have finished work on the item. You can also complete the item using the Space bar.
- Dropped — Status for an Action, Action Group, Project, Folder, or Tag that is no longer planned for work. You can also drop the item using Option-Space bar.
Inherited Status
Status can also be inherited from the item which contains it: actions can inherit status from action groups and projects, projects can inherit status from folders, and so on.
- Completed with container — Active Actions or Action Groups which are part of a Container which has been Completed will be considered Completed with container.
- Dropped with container — Active Actions, Action Groups, Projects, and Folders which are part of a Container which has been Dropped will be considered Dropped with container. When dropping a Tag Group, any child tags will also be dropped; note that dropping a tag does not drop actions with that tag assigned.
When a status is inherited, the item keeps the original value of any assigned fields, and shows the inherited values through slight modifications of icons and text, in both the Outline and Inspector.
Structure and Hierarchy
OmniFocus data is structured in a specific way, often referred to as the hierarchy of OmniFocus.
The smallest item in OmniFocus is the Action, which can either exist in the Inbox, or as part of a specific Project. While part of the Inbox, an action is just that: a single item which has the potential to be completed, but which may or may not be part of a larger goal (a project).
When switching to the
Projects perspective,
you begin to see where else an action can exist.
Actions, whether or not they are part of an Action Group,
are also part of a project.
Projects may contain many actions or action groups,
but may not contain other projects.
How can you group projects into areas, such as “Work” or “Renovate House”? Look at the Projects Sidebar, where you can create Folders, which can hold projects, or even other folders.
Project Hierarchy
The project hierarchy of OmniFocus is: folders can contain folders or projects, projects can contain action groups or actions, action groups can contain action groups or actions, while at the bottom of the structure lives the most important part: the action.
This hierarchy can most easily be seen in the Projects Sidebar, or in the Projects Outline, after enabling Show folders in outline.
Tag Hierarchy
There is also a tag hierarchy, which is that tags can contain other tags, and any level of tag can be assigned to an action, action group, or project.
This hierarchy can most easily be seen in the Tags Sidebar, as the Tags Outline only displays rows for tags that have been assigned to visible actions, action groups, or projects.
Sub-Project
See Action Group.
Status Circle
The circle next to an
Active Action or Action Group that
can be clicked or tapped to set the item to
Completed, or
Option-clicked to set the item to
Dropped.
The color of the circle also indicates whether it is
Due Soon,
Overdue, or
Flagged; actions and group configured to
Repeat also have a special status circle,
containing 3 dots.
For additional information, see the Status Circle section of the Outline chapter.
Sync
Syncing OmniFocus updates your local OmniFocus data with another copy stored on a server, such as the Omni Sync Server.
This allows you to keep all of your copies of OmniFocus up-to-date, as changes go from one device, to the server, to another device, and back again.
Settings
See OmniFocus Settings or System Settings, depending on whether you want to change something about OmniFocus, or something about the system on which OmniFocus is running.
Starred
See Favorite
System Settings
Apple application that allows you to change options that affect either your entire device, or only OmniFocus.
This application is named Settings on iPad, iPhone, or Apple Watch; it is named System Settings on Mac (it was previously called System Preferences).
Tag
Tags can be assigned to an Action, Action Group, or Project, and provide another way of looking at your OmniFocus database.
They can represent a person, place, thing, state of mind, energy level, or any other factor that you find useful. These allow you to pull together all related actions, action groups, and projects into one place.
Your use of tags can be simple, such as showing you all the items related to work; or it can be complex, such as showing you all the items related to work that you need to coordinate with your co-worker, which must be completed while you have high-energy and are sitting near your computer.
Tag Group
A collection of child Tags nested underneath a parent tag. Selecting a parent tag in the Sidebar will also select child tags. Assigning a child tag to an action or project will also assign the parent tag.
Tags Order
The order in which Projects,
Action Groups,
and Actions
are listed in the
Tags
perspective.
Related: Inbox Order, Project Order
Task
See Action.
Toolbar
An area at either the top or bottom of the OmniFocus window that contains Tools & Commands for modifying the contents of that window, or provides access to additional functionality, such as Settings, Help, or Automation.
For additional information, see the Toolbar chapter.
Unavailable
See Availability.
Unavailable with Container
See Availability.
Untagged
Actions, Action Groups, and Projects without at least one assigned Tag.
Untagged items can be found using an Is untagged perspective rule in a Custom Perspective, and are grouped together in the Tags Sidebar.
View Options
View Options allows for setting many elements that impact how your OmniFocus data displays, and which actions and groups and displayed. Though the details can vary between perspectives, these choices are found in most of the perspectives:
- First Available — The first of the actions which are Active and Available, in a given project; this is a focused view of the Available option (described next), which additionally takes into account the position of actions within a project, as well as the type of project. In Sequential projects, the first available action must be higher in the project list than any other Blocked or Unavailable actions; it is very common for a sequential project to not have a first available action, if there is another action higher in the project, which is itself blocked or unavailable. In Parallel projects, the action may be anywhere in the project, as actions in parallel projects may be completed in any order. For Single Actions Lists, all available actions are considered first available, as a single actions list is a collection of individual actions, rather than actions working towards a specific goal. This list may also be thought of as a list of next actions.
- Available — Actions, action groups, projects, folders, and tags which are both Active and Available; items may not be Blocked, Deferred, or On Hold.
- Remaining — Actions, action groups, projects, folders, and tags which are not Completed or Dropped.
- Everything — All actions, action groups, projects, folders, and tags, including those which have been completed or dropped.
Additional information is available in the Perspectives chapter.
Managing Your Data
All of your OmniFocus data is stored in a collection of files on each device, which OmniFocus uses to build a database of all your actions, projects, tags, and goals.
This chapter discusses ways that you can work with that data, whether upgrading, syncing, archiving, exporting, or backing up.
The collection of files on your system (technically, a folder of files that looks like a single file) is named OmniFocus.ofocus.
On Mac, you can see the data file by using the Show “OmniFocus.ofocus” in Finder command.
On iPhone, iPad, or Apple Vision Pro, you can see the data file by using Files.app, and navigating to On My Device > OmniFocus > OmniFocus.ofocus (though the name will likely display without the .ofocus portion). It is possible to have multiple versions of OmniFocus installed and syncing on the same device. To make it easier to tell OmniFocus folders apart, the OmniFocus 4 folder will also contain a file with the title OmniFocus 4 Documents.
Setting up OmniFocus 4
When you first launch OmniFocus, you will be prompted to configure syncing. Syncing allows you to access your OmniFocus data on all of your Apple devices, while providing an additional layer of backup for your data. If you sync using an Omni Account, that also enables several of the advanced features of the app, such as Mail Drop.
If you are planning to sync, we recommend configuring sync when you first launch OmniFocus, to ensure as smooth a process as possible. If you choose to set up sync later, most of the options you see during first launch are available in Sync Settings.
Please read How OmniFocus Syncs to learn more.
Upgrading to OmniFocus 4
The initial release of OmniFocus 4 does not contain any changes to the OmniFocus data structure and is fully sync compatible with the latest releases of OmniFocus 3.
Future OmniFocus 4 updates may require Migrating Your Database to an updated format.
Upgrading with a Synced Database
If you are currently syncing a recent version of OmniFocus 3, upgrading to OmniFocus 4 is easy:
- Launch OmniFocus 4 on your Mac, iPhone, iPad, or Apple Watch. If this is the first time you have launched OmniFocus 4, complete the setup.
- When you reach the Sync Setup screen, sign into the same sync account you use for OmniFocus 3, whether that is an Omni Account or an Advanced (WebDAV) server account.
- You will be prompted to Add tutorial project. This project helps get you quickly acquainted with OmniFocus 4… so you can enjoy the new and updated features!
- If you are using a Mac, and have an existing Archive, please read Importing an Archive.
Syncing with OmniFocus 2, or an earlier version of OmniFocus 3, will also allow you to upgrade to OmniFocus 4. Upgrading may require Migrating Your Database; you will be prompted, if that is necessary.
Upgrading with a Local Database
If you are not syncing, OmniFocus 4 can import your local database from an earlier version of OmniFocus, that was used on the same device. Importing creates a new copy of your existing OmniFocus database, leaving the older version unchanged.
Import of local databases is only available while you are setting up OmniFocus. If you have already set up OmniFocus, you can start again by using Reset Database and Settings… on Mac, or Reset Database on iPhone or iPad.
- Launch OmniFocus 4 on your Mac, iPhone, or iPad, and click or tap through the Welcome and Licensing screens.
- When you reach the Sync Setup screen, click or tap the Skip button.
- On Mac, OmniFocus will check to see if there is an earlier OmniFocus database on your device.
- On iPhone or iPad, you will need to navigate to find the earlier database; please read the directions on the device.
- If an earlier OmniFocus database is located, OmniFocus 4 will offer to either Import previous data or Create a new database.
- Once the database has been imported or created, you will be prompted to Add tutorial project. This project helps get you quickly acquainted with OmniFocus 4… so you can enjoy the new and updated features!
- If you are using a Mac, and have an existing Archive, please read Importing an Archive.
This option is not available on Apple Vision Pro, as OmniFocus 4 is the first version that supports visionOS.
Manually Upgrading (Mac)
If the automatic import of an earlier database, as discussed in Upgrading with a Local Database doesn’t work, you can use these steps to manually upgrade from OmniFocus 3 to OmniFocus 4. These steps may also be useful if you are migrating between devices while upgrading.
Using these steps requires exporting your existing OmniFocus data from OmniFocus 3, adding it to OmniFocus 4, and then importing any existing Archive file. This will allow you to use OmniFocus 4, while leaving OmniFocus 3 unchanged.
- Launch OmniFocus 3 on your Mac.
- Select Export… from the File menu, choose a location that is easy to find (such as the Desktop), select the file format option for Backup Document (OmniFocus), then click the Save button. This will save an OmniFocus.ofocus-backup file in your chosen location.
- Quit OmniFocus 3, so you’re working with a single version of the app.
- Launch OmniFocus 4 on your Mac. If this is the first time you have launched OmniFocus 4, complete the setup.
- When you reach the Sync Setup screen, tap the Skip button, and confirm that you would like to continue without syncing.
- You will be prompted to Add tutorial project; choose either option (as this data will be replaced), and then tap on Launch OmniFocus. You should be viewing a new data file in OmniFocus 4.
- Drag the OmniFocus.ofocus-backup file on top of the OmniFocus 4 app icon in the Dock or Applications folder, click on the Revert to This Backup button that will present in a bar at the top of the window, and then confirm that you’d like to revert to the backup.
- Your OmniFocus 3 data should now be in OmniFocus 4, and you can close the OmniFocus Backup document.
- The first time you use Archive Old Items… or Open Archive… in OmniFocus 4, it will offer to import a copy of your existing archive from OmniFocus 3 (or OmniFocus 2). Please read the Archiving in OmniFocus section, with special attention to Importing an Archive.
If you need help upgrading, please email us.
Manually Upgrading (iPhone, iPad)
If the automatic import of an earlier database, as discussed in Upgrading with a Local Database doesn’t work, you can use these steps to manually upgrade from OmniFocus 3 to OmniFocus 4. These steps may also be useful if you are migrating between devices while upgrading.
Using these steps requires copying your existing OmniFocus data. This will allow you to use OmniFocus 4, while leaving OmniFocus 3 unchanged.
- Install and launch OmniFocus 4.
- Complete the setup for OmniFocus 4.
- When you reach the Sync Setup screen, tap the Skip button, and confirm that you would like to continue without syncing.
- You will be prompted to Add tutorial project; choose either option (as this data will be replaced), and then tap on Launch OmniFocus. You should be viewing a new data file in OmniFocus 4.
- Force quit OmniFocus 4 (See Quit and reopen an app on iPhone or Quit and reopen an app on iPad).
- We’re now going to find your current OmniFocus 3 data. Let’s start by opening Files.app.
- Navigate to On My iPhone/iPad > OmniFocus. Note that there should be two OmniFocus folders: one will contain your OmniFocus 3 data, and one will contain your OmniFocus 4 data. You are looking for the folder that contains the OmniFocus 3 Documents file.
- There should also be an OmniFocus.ofocus file in this folder (which may display as OmniFocus, depending on your View Options in Files.app). Press and hold on OmniFocus.ofocus, and select Copy.
- Navigate to the other OmniFocus. This one should contain a OmniFocus 4 Documents file.
- Press and hold below the file list, and select Paste. Your iPhone or iPad will prompt you to Replace or Keep Both; select Replace.
- Launch OmniFocus 4, and your OmniFocus 3 data should be ready to go!
If you need help upgrading, please email us.
How OmniFocus Syncs
With sync enabled in OmniFocus, a sync server you choose keeps a copy of your database, so that it’s always available wherever you are. With each sync, OmniFocus compares your local data with what’s on the server and updates each as needed.
OmniFocus automatically syncs whenever it’s connected to the internet. When connected, OmniFocus sends new changes to the sync server after one minute, or when opening or closing the app. At a minimum, OmniFocus checks with the server every hour, even if nothing has changed on the device. This helps ensure that your data from OmniFocus is always safe, secure, and most importantly — up to date.
If you’ve made changes you want to view immediately on another device,
you can perform a manual sync by
using the Sync Now command,
clicking or tapping the
Sync button
in the Toolbar,
or pulling down to sync
(on iPhone, iPad, or Apple Vision Pro),
before switching devices.
This syncs your latest changes up to the server,
so that when you launch OmniFocus on the other devices,
all you have to do is sync to ensure that all of your changes are there…
and remember that sync also normally happens when you open the app,
so using Sync Now on the second device
probably won’t be necessary.
OmniFocus uses push notifications for even more robust synchronization support. This feature notifies OmniFocus on your other devices that a sync is needed, whenever you make a change. With push notifications, manual syncing should rarely be required. See our OmniFocus Push-triggered sync support article for more information on how it works.
For options related to push notification sync, select the Push option in Sync settings.
Encrypted Sync
OmniFocus uses HTTPS to encrypt your data while communicating with sync servers that support it (including the Omni Sync Server). Additionally, all current OmniFocus databases set up to sync with remote servers are also encrypted prior to transit, and remain encrypted on the server.
Encryption was introduced in OmniFocus 2.6 for Mac and OmniFocus 2.15 for iOS. Upgrading from an earlier version of OmniFocus will require Migrating Your Database.
Encryption is done by OmniFocus on your Mac, iPhone, iPad, or Apple Watch at the time the data is transmitted to the sync server. This means that regardless of the sync destination (Omni Sync Server or another Advanced (WebDAV) server), encryption-based security is preserved. Though your database is encrypted while on the server, OmniFocus doesn’t actively encrypt data while it is stored on your local device, instead deferring to any system-level encryption you have in place.
Technical details of the encryption scheme for OmniFocus can be found in this forum post.
Setting a Separate Encryption Passphrase
By default, OmniFocus encrypts your database on the server using the password you chose when setting up your sync account. When selecting the Encryption row of Sync settings, the resulting view will confirm Encryption active and Passwords are linked. For an extra layer of security, you can use a distinct encryption passphrase by clicking or tapping on Change Passphrase.
When you click Change Passphrase, you are prompted to enter a new passphrase, which will be used to encrypt your database on the server. After setting a new encryption passphrase the Encryption settings will update to read Passwords are distinct. You can link them again by clicking Link Passwords, and entering your current encryption passphrase, or change the encryption passphrase to something new using Change Passphrase.
If you change the encryption passphrase on one device, all the other devices that you are syncing will prompt you to enter the new passphrase, before that device can receive further updates from the server. This is to guarantee that your end-to-end encryption remains secure across all devices.
Syncing OmniFocus
Establishing a cloud-connected copy of your database is a great way to keep OmniFocus updated across all your devices. Even if you’re only using OmniFocus on a single device, we recommend syncing, for the automated data backup it provides.
To configure syncing,
or change your current sync settings,
open Settings
from the OmniFocus menu
(or use Command-Comma (,)).
On iPhone, iPad, and Apple Vision Pro,
you can also tap the
More Menu button
in the Toolbar,
then tap the
Settings button
.
On Apple Watch,
tap the
Settings button
on the main OmniFocus screen.
Once you are in Settings, click on the Sync settings pane (on Mac), tap on the Sync settings row (on iPhone, iPad, or Apple Vision Pro), or tap on Sync Setup (on Apple Watch).
Please keep your sync password (and separate encryption passphrase, if you use one) in a safe place. If you lose these, you will lose access to your data. Our Support Humans can help you reset your Omni Account password, but it is not possible to reset your encryption phrase, if you lose it.
Select one of the sync options. Depending on your selection, additional information may show in the right pane (Mac), or on a second screen (iPhone, iPad, or Apple Vision Pro)
Additional options will display, once you have configured a sync account:
The rest of this section provides more detail about each of the settings linked above, beginning with options for syncing.
Sync: Disabled
This setting isn’t recommended, but if you want to exclusively use OmniFocus on your Mac, iPhone, iPad, or Apple Vision Pro, and syncing to a remote server is either not allowed or simply not desired, you can choose to leave sync disabled.
In all other cases, having a cloud-based copy of your data is a great way to know that your work won’t be lost, if anything happens to the device you are using.
Sync: Omni Account
Omni maintains the Omni Sync Server, which is designed to work well with OmniFocus, while providing unique features like Mail Drop. We recommend this as the best sync solution for most users, since it’s the one for which we can provide the most support, and it also happens to be free!
If you choose to entrust your data with the Omni Sync Server, we’ll treat it with utmost care and responsibility. Please see our Terms of Service and Privacy Policy, to learn more.
If you have an Omni Account, you can use our sync service. If you don’t yet have an account, and want to use the Omni Sync Server, get started by creating a new Omni Account.
Sync: Advanced (WebDAV)
Omni Sync Server is a great solution for most OmniFocus users, but if your sync needs require that your data be kept completely within a system you control, you can configure OmniFocus to sync using another WebDAV server.
We are not able to provide support for third party servers, so this option is not recommended unless you have a specific need, and you have the technical knowledge for server configuration and administration. OmniFocus sync is compatible with any WebDAV standards-compliant server, whether remote (there are many fine providers available) or hosted on your own Mac.
If data privacy is your primary concern when syncing, you may also wish to disable Push syncing. Push registrations contain nothing specific to your database, but do represent information exchanged outside your server. Read our OmniFocus Push-triggered sync support article to learn more, and determine whether push sync is right for your needs.
Cloud Storage & File Sharing
Though services such as Dropbox, OneDrive, and Google Drive are great for file sharing, they don’t handle OmniFocus data properly.
Using a file sharing service as a place to store your OmniFocus data can corrupt it. Please do not use file sharing services as a means of synchronizing your OmniFocus data, or non-iCloud Drive services for storing your OmniFocus data.
Account Name & Password
These fields allow you to enter the sync account name and password.
The account name cannot be changed while sync is turned on. To switch sync accounts, tap Turn Sync Off, then enter information for the new account.
Encryption
Check whether your OmniFocus database is encrypted on the server, and optionally choose a separate encryption passphrase, which is distinct from your sync password.
Read the Encrypted Sync section above, as well as our Frequently asked questions about OmniFocus encryption support article, to learn more about encryption and OmniFocus.
Manage Your Omni Account
Opens a link to the Omni Sync Server, where you can change your password, update your email address, enable Mail Drop, and access your sync server data.
Push
Check the status of push-triggered sync on your sync account (it’s set to On by default). This feature offers faster, more frequent syncs.
Read our OmniFocus Push-triggered sync support article, to learn more about push-triggered sync.
Registered Devices
View a list of devices registered to sync with your cloud database, along with some other useful information: the entry for your current device is highlighted in purple, and the day a device last synced is shown next to it (if a device hasn’t synced in over a week, the last sync date is highlighted in yellow).
You can click or tap on a row, and then the Unregister Selected Devices button to remove any devices you no longer want to sync with your account.
Replace Sync Data
Replace the OmniFocus data on the sync server with the data stored on your Mac, iPhone, iPad, or Apple Vision Pro.
This can be used when you encounter a sync conflict, and you are sure that your local data is the correct version.
This may also be a good time to check our online help or talk to our Support Humans.
Reveal Stored Password
View the password for your sync account, which is stored and encrypted on your device.
This requires granting OmniFocus permission using Touch ID, Face ID, or Optic ID, to ensure another person using your device will not be able to see your password.
Sync Log
The sync log lists recent OmniFocus sync activity, the reason for each sync, and the time and duration.
If anything seems unusual here, you can copy the log for use when contacting our Support Humans.
Turn Sync Off
Use OmniFocus with a local database, without syncing to any other location.
If you need to switch sync accounts, click or tap this button to turn off the currently connected account, and then connect to the new one.
Leaving sync disabled is not recommended.
Archiving in OmniFocus
After using OmniFocus for some time, your OmniFocus database may become quite large. This can affect sync times and performance, especially if you are syncing with an iPhone, iPad, or Apple Watch. Most of your data is likely to be completed or dropped items, which you rarely need to reference, so OmniFocus includes an option to move some of that data to an Archive file. This gives you the option to review your older data when needed, while keeping your active data as streamlined as possible.
To archive your old data, choose Archive Old Items… from the File menu. A sheet appears with a date field; any items completed before that date, or dropped items that haven’t been changed since that date, will be moved to the archive.
Creating an Archive
The first time that you use Archive Old Items… or Open Archive… in OmniFocus 4, you will be asked to choose a folder where you would like your OmniFocus archive to be stored. This may be a folder with an existing archive, or it may be a folder in which you would like to create a new archive.
OmniFocus 4 supports storing your OmniFocus archive anywhere on your local system, instead of requiring the archive to be stored in the same location as your primary OmniFocus data. Two places to consider are the OmniFocus folder which is automatically created in iCloud Drive, or in an OmniFocus folder that you create in your Documents folder.
Once you have selected a location for your OmniFocus archive, that location will be used each time you Archive Old Items… or Open Archive…. If you would like to change this location, move your current OmniFocus archive file (Archive.ofocus-archive) out of the selected folder. The next time you use an archive-related command, OmniFocus will prompt you to select a new location.
Importing an Archive
If you would like to import your existing Archive file from OmniFocus 4, OmniFocus 3, or OmniFocus 2, but don’t yet want to archive additional items, select Open Archive… from the File menu. If you would like to import your existing Archive, and also want to archive additional items, select Archive Old Items… from the File menu.
You must then select the location where you want the imported Archive file to be stored (not the location of the Archive file to import). If you have recently installed and configured OmniFocus, you will likely be shown a location in iCloud Drive. You are welcome to choose any location in iCloud Drive, or on your local hard drive, but please read the note about Cloud Storage and File Sharing before selecting another cloud storage location.
As long as the location you have chosen to store your imported Archive file doesn’t already contain an OmniFocus 4 Archive file, OmniFocus 4 will search for an OmniFocus 3 archive; if it can’t find one, it will search for an OmniFocus 2 archive. You won’t be asked where to select an import location, as OmniFocus 4 already knows where to look. If an existing Archive file is found, OmniFocus 4 will offer to import it, specifying which version of OmniFocus last updated the archive; if multiple Archive files are found, OmniFocus 4 will offer to import the most recent.
Depending on which command you selected from the File menu, you will be presented with options to Import Archive, Create New Archive, or Cancel; please read the available options, and select the best choice.
If you have an Archive file that you would like to import, but which is no longer stored in the default location for an earlier version of OmniFocus, you can still import it. Place it in the same folder you are going to select after using either Open Archive… or Archive Old Items…; OmniFocus 4 will detect that it is from an earlier version, and offer to import it.
Restoring from an Archive
If you ever want to look at your archived data, choose Open Archive… from the File menu; your archive opens in its own window. To retrieve items from an archive you are browsing, drag and drop them into the desired location in your main OmniFocus window (copy and paste works, as well). In either case, a copy remains behind in the archives; the archived copy can be retained as a record or manually deleted to keep things tidy.
Backups of OmniFocus Data
Backups are handled differently on a Mac than they are an iPhone, iPad, or Apple Vision Pro, but on every device our goal to ensure that your data is safe, and can easily be restored, if needed.
Backups on Mac
On a Mac, OmniFocus automatically backs up your data once every two hours, and keeps up to 100 backups of your data at a time. This is about two weeks worth if you run OmniFocus continuously, but is more for most people, since backups do not happen unless OmniFocus is running. Backups are also made prior to changing sync accounts, migrating your data, and even before restoring from a backup.
To restore a backed-up version of your database, choose Show Backups in Finder from the File menu, then double-click on the backup that you would like to view. It opens in its own separate OmniFocus window, so you can determine if it is the backup that you want to use. If you’d like to use this backup, click the Revert to This Backup button to replace your primary OmniFocus data with the data contained in the backup. If you are syncing, this will also force all of your other devices to re-sync, bringing them all up to date.
Backups Folder
OmniFocus 4 changes where your backups are stored, to make it easier to find them, or to include them in your Mac backups.
If you are not syncing your Desktop & Documents then you will have a special OmniFocus folder inside your Documents folder, that contains a Backups folder. This folder isn’t actually part of your Documents folder, but is in a special location inside the OmniFocus storage on your system, which allows macOS to show it here.
If you are syncing your Desktop & Documents (see the Store your Desktop and Documents folders in iCloud Drive section of the Apple User Guide’s Store files in iCloud Drive on Mac), then this folder can be found in On My Mac, which you can add to your Finder sidebar in Finder Settings (see the Apple User Guide article Customize the Finder sidebar on Mac).
Backups on iPhone, iPad, and Apple Vision Pro
On an iPhone, iPad, or Apple Vision Pro, OmniFocus automatically backs up your data once per day, and can store backups on your local device, or in iCloud Drive.
More information about Backups on an iPhone, iPad, or Apple Vision Pro can be found in the Database settings section.
Migrating Your Database
When you update from earlier to later versions of OmniFocus, you may be prompted to migrate your database to a format capable of supporting the features of the latest version of the app. As noted above, the initial release of OmniFocus 4 is fully sync compatible with the latest release of OmniFocus 3, but if you have been syncing with older versions of OmniFocus, then a migration may be required.
When you first launch a version of OmniFocus that is compatible with the new database format, or use the Migrate Database… command, you will see a Migration window which lists any clients that need to be updated to a later version, as well as which features will be enabled.
If you’re running a very old version of OmniFocus on a device that syncs with your current database, it may not be eligible for migration to the new database format. If this is the case, it will be indicated in the Migration window, and you’ll be asked to disconnect older versions. Choose Show Devices, then tap or click on Registered Devices, and Unregister those older versions before proceeding with the upgrade by re-selecting Migrate Database….
If you prefer to maintain sync compatibility with a very old version of OmniFocus, you can choose not to update to the new database format. However, newer features of OmniFocus that require the updated format will not be available on any devices that sync with that database.
When all of your devices with OmniFocus have versions that support the latest database format, the Migration window gives the green light to make the transition to the new, improved format. Choose Migrate Database, and OmniFocus will sync your database in the new format to all of your devices. If you choose Later, you’ll be prompted to migrate again in one day (and you can always use the Migrate Database… command to migrate sooner).
In the unlikely chance that something goes wrong during the migration process, OmniFocus automatically makes a backup that you can revert to, if needed.
Exporting from OmniFocus
Your OmniFocus data belongs to you. If you want to send it to other applications, run scripts on it, publish it on the web, or do other exciting stuff with it that we haven’t even thought of, you’re more than welcome to export it to the format of your liking.
Exporting on a Mac offers a variety of formats; exporting on iPhone, iPad, or Apple Vision Pro offers the CSV format. If there is another export format you would find valuable on iPhone, iPad, or Apple Vision Pro, please email us and let us know.
To export your data on iPhone, iPad, or Apple Vision Pro, use Export to CSV in Database settings.
To export your data on a Mac, choose Export… from the File menu, and then choose a format and a location. The available formats are:
- OmniFocus Document — This is an ordinary OmniFocus document, like the one that you use for your primary OmniFocus database. If you open this file in OmniFocus, it will appear in its own window, and you can work with it normally, including moving items into your primary OmniFocus database. Keep in mind that most settings are stored in and read from your primary database, rather than being pulled from the document that you are viewing, which can result in unexpected behavior.
- Plain Text — This is a lightweight plain text version of your data, able to be opened in the text editor of your choice. OmniFocus’s plain text export is inspired by TaskPaper, the to-do list editor from Hog Bay Software. This export should be generally compatible with TaskPaper, and able to be imported with a minimum of fuss. See our OmniFocus TaskPaper Reference Guide support article for more information.
- Simple HTML — This is a single-file HTML version of your data; the stylesheet and even the icons are embedded in the HTML. If you are proficient with CSS, you should be able to restyle the result however you like.
- Comma Separated Values (CSV and CSV UTF-16) — CSV is an open syntax for applications old and new, on all platforms: all of your data in a plain text file with its columns separated by commas. Once you have your data in CSV format, it’s easy to run scripts on it, convert it to some other format, or open it in applications that understand it (like OmniPlan). If you’re having trouble persuading other applications to read the non-ASCII characters in your CSV file, such as accented letters or non-Roman characters, try exporting with the UTF–16 CSV option.
- Backup Document (OmniFocus) — This export option creates a file in a format (.ofocus-backup) that is almost the same as the standard OmniFocus database format, with one key difference: unlike a standard OmniFocus database file, when you open a backup in OmniFocus, the option to Revert to This Backup appears right below the toolbar. Click this button to replace your primary OmniFocus data with the data contained in the backup. If you are syncing, this will also force all of your other devices to re-sync, bringing them all up to date.
Troubleshooting
Here are a few troubleshooting tips you can try, using OmniFocus’s built in self-help features.
Finding Misplaced Items
Have you lost track of something? Try these tips:
- Use the Search Field (with the three options for Here, Remaining, and Everything).
- Try using the Completed or Changed perspectives to track down missing actions or projects.
- Check the Attachment List for images or other files that you may have attached to items tucked deep in your database.
- Open an Archive of past OmniFocus work to look for items that may have been lost to time.
- If all else fails, you can revert to a recent Backup to retrieve something you know you recently had.
Improving Performance
Is OmniFocus a little slower than you’d like? Try these tips:
- Sync all of your devices regularly! This reduces sync wait times and generally improves speed and performance across the board.
- Compact your database to remove unneeded edit histories; if you are syncing, this will happen automatically, once all devices have synced the same information.
- Archive projects that have been completed or dropped. Moving them to the Archive gives you a more streamlined database, while still being able to restore items in the future.
- Delete unneeded attachments using the Attachment List, in order to lessen the sync load and storage space required for your OmniFocus data.
- More information can also be found in our Troubleshooting OmniFocus Performance support article.