The Inspector
The Inspector holds tools for editing your actions, action groups, projects, folders, and tags. This chapter describes the fields and related item properties.
To show the Inspector,
click or tap an action,
action group,
project,
folder,
or tag
in the Outline
or
 Sidebar,
and then:
Sidebar,
and then:
- Select Show/Hide Inspector from the View menu.
- Tap or click
 Inspector
in the Toolbar.
Inspector
in the Toolbar. - Swipe from the trailing edge of the screen, if you are using an iPhone or any device with a Compact View.
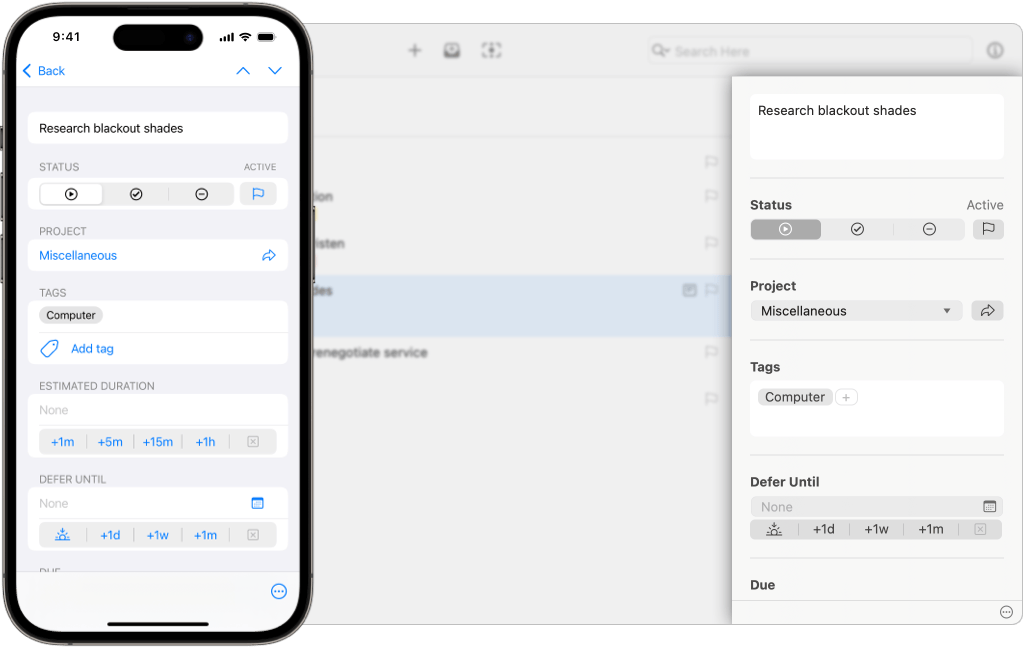
You will see inspector fields for your selected Action, Action Group, Project, Folder, or Tag.
Our goal is to have the editing experience for each field match between the Outline and Inspector, allowing you to choose where you’d like to make edits.
Quick edits are usually faster in the Outline, especially when using Bare Key Editing, while editing multiple items or multiple fields is faster in the Inspector.
Fields
By default, the Inspector displays these fields, based on the selected item:
 Title
Title Status
 Project or Group Type
 Project
 Tags
Tags Defer Date
 Planned Date
 Due Date
 Repeat
 Review
 Note
Note Attachments
 Tag Group Behavior
 Tag Location
You can update Layout Settings for Inspector to add fields for:
Layout Settings for Inspector sync with Platform Scope.
This allows you to have one set of fields sync between your Mac computers, while a different set of fields is available on your iPhone, and perhaps a third set on another device.
Toolbars
The Inspector contains one or two toolbars, depending on which device you are using.
Compact devices have a top toolbar, containing Navigation Buttons.
All devices have a bottom toolbar with a
 Shortcut Menu,
containing commands which affect the current selection.
Shortcut Menu,
containing commands which affect the current selection.
Mac Toolbar
iPhone, iPad, Apple Vision Pro Toolbar
 Share
Share Move
Move Convert to Project
 Convert to Action
 Edit Inspector Layout
 Show All Inspector Fields
 Delete
Navigation Buttons
The buttons in the top toolbar are used to navigate in the Outline or Sidebar, depending on your view before opening the Inspector:
 Back —
Returns you to the Outline or Sidebar.
Back —
Returns you to the Outline or Sidebar. Previous —
Navigates to the item
immediately above the current item.
Previous —
Navigates to the item
immediately above the current item. Next —
Navigates to the item
immediately below the current item.
Next —
Navigates to the item
immediately below the current item.
Properties
Each type of OmniFocus item has a different set of properties, and therefore a different set of fields available for editing.
Properties in this section are listed in the default order for Layout Settings for Inspector.
Properties of Actions
These properties and fields apply to Actions:
-
Title
-
Status
-
Project
-
Tags
 Estimated Duration
-
Defer Date
-
Planned Date
-
Due Date
 Notifications
 Time Zone
 Completed Date
 Dropped Date
-
Repeat
-
Note
-
Attachments
 Added/Changed Dates
Properties of Action Groups
These properties and fields apply to Action Groups:
-
Title
-
Status
-
Group Type
-
Project
-
Tags
-
Estimated Duration
-
Defer Date
-
Planned Date
-
Due Date
-
Notifications
-
Time Zone
-
Completed Date
-
Dropped Date
-
Repeat
-
Note
-
Attachments
-
Added/Changed Dates
Properties of Projects
These properties and fields apply to Projects:
-
Title
-
Status
-
Project Type
-
Tags
-
Estimated Duration
-
Defer Date
-
Planned Date
-
Due Date
-
Notifications
-
Time Zone
-
Completed Date
-
Dropped Date
-
Repeat
-
Review
-
Note
-
Attachments
-
Added/Changed Dates
Properties of Folders
These properties and fields apply to Folders:
Properties of Tags
These properties and fields apply to Tags:
Properties of Tag Groups
These properties and fields apply to Tag Groups:
All Items
Properties in this section are available for all OmniFocus items: actions, action groups, projects, folders, and tags.
Title Inspector
Available for Actions, Action Groups, Projects, Folders, Tags
Tap or click the title field to add or edit an item title.
OmniFocus gives you flexibility in how and why you name items, but here are a few suggestions that may be useful, while developing your workflow.
- Action and action group titles can be used to clarify a specific action to be completed, often as part of a larger project or single actions list.
- Project titles can be used to clarify the end goal that the collected actions are intended to accomplish.
- Folder titles can be used to indicate an area of your personal or work life, and group projects related to that area.
- Tag titles can be used to represent people, places, things, or situations related to completing your actions and projects.
Status Inspector
Available for Actions, Action Groups, Projects, Folders, Tags
Every item in OmniFocus has a Status (or Inherited Status):
- Actions and Action Groups
can be
Active,
 Completed, or
Dropped.
Completed, or
Dropped. - Projects can be
Active,
 On Hold,
Completed, or
Dropped.
See Project Status
to learn more.
On Hold,
Completed, or
Dropped.
See Project Status
to learn more. - Tags can be
Active,
On Hold, or
Dropped.
See Tag Status
to learn more.
- Folders can be
Active or
Dropped.
See Folder Status
to learn more.
The status field for actions, action groups, and projects
also contains a
 Flag
button.
When a flag is set on an item,
it appears in the Flagged perspective,
along with any actions or action groups
which now have an
Inherited Flag.
Flag
button.
When a flag is set on an item,
it appears in the Flagged perspective,
along with any actions or action groups
which now have an
Inherited Flag.
The Flag button will be
 empty if the item is not flagged,
 solid orange if the item is flagged,
or
solid orange if the item is flagged,
or
 outlined in orange if the item is inheriting a flag.
You can change the flag state
by tapping or clicking on the Flag button.
outlined in orange if the item is inheriting a flag.
You can change the flag state
by tapping or clicking on the Flag button.
Added/Changed Inspector
Available for Actions, Action Groups, Projects, Folders, Tags
Added displays the date and time that the action, action group, project, folder, or tag was originally added.
Changed displays the date and time that the action, action group, project, folder, or tag was most recently changed.
This information is read from your OmniFocus data, and can not be edited.
Dates and Times
Properties in this section are available for actions, action groups, and projects, in addition to properties listed under All Items.
This section includes information on all date and time related properties, which are: Estimated Duration, Defer Date, Planned Date, Due Date, Notifications (which can be automatically added, based on other date properties), Time Zone, Completed Date, and Dropped Date.
Entering Dates and Times
You can be creative with the way you enter dates, and OmniFocus will do its best to understand what you mean.
- Relative dates — Relative dates and times calculate a new date and time, based on the current date and time, with negative numbers representing dates and times in the past. Examples: 2 days, –3 weeks, 1 hour, 1 year 1 month
- Abbreviations — You can use full names, as in the previous set of examples, or abbreviations. Examples: 2d, –3w, 1h, 1y1m
- Common words — You can refer to relative dates using common words for periods of time. This, next, and last have specific meanings: this Friday always means the Friday in this week, next Friday always means the Friday in the next week, and last Friday always means the Friday in last week, regardless of what day today is. Other periods of time work in the same way. Examples: yesterday, tomorrow, tonight, next Thursday, last month, this Friday, next year
- Specific time period — You can enter a specific time period, which will add a date for the beginning of that time period. Examples: fri, september, 2028
- Short date format — You can use the date format selected in your Language & Region System Settings. Examples: 5/23/08 10a, 9.30.09 2:00 PM
- Mixed formats — Mix the available formats however you like. Examples: 2w sat, 4d @ 5p, mon 6a, aug 6, tue 5p
- Final thoughts — As noted above, OmniFocus makes its best guess at whatever you enter, whether that is bare numbers, times, or word fragments. If you think something might work, give it a try. If it doesn’t work, and you think it should, please Email Support. Examples: now, 9, 14:00, tom
Dates Without Times
If you enter a date without including a time, a default time will be added based on the field being edited, as well as your settings for Default Time for Defer Dates, Default Time for Planned Dates, or Default Time for Due Dates.
Shortcut Date Buttons
Several fields have buttons that allow you to quickly set values for the fields, instead of entering values by typing.
The buttons for Estimated Duration are:
- +1m — add one minute
- +5m — add five minutes
- +15m — add fifteen minutes
- +1h — add one hour
 —
clear the current value
—
clear the current value
The buttons for Defer Date, Planned Date, and Due Date are:
 —
set date to today
—
set date to today- +1d — add one day
- +1w — add one week
- +1m — add one month
- —
clear the current value
Changing an existing date and time using the shortcut date buttons changes the date, but does not change the assigned time.
Calendar Popover
The fields for
Defer Date,
Planned Date,
Due Date,
Completed Date,
and Dropped Date
all have a popover
Calendar button
 ,
which allow you to quickly select a date and time.
,
which allow you to quickly select a date and time.
On Mac, the popover has arrows that switch between months (the dot between the arrows returns to the current month), and a time field with arrows that increase or decrease the current time field for either hours or minutes. You can also enter time using your keyboard, and use Tab to jump between hours and minutes. If you would like to enter a full date using your keyboard, that can be done from the date field, without opening the calendar popover.
On iPhone, iPad, and Apple Vision Pro, the popover has arrows that switch between months, and tapping the month label will switch between a monthly view and a month/year picker. Tapping the time field shows two wheels that allow you to choose hours and minutes. Tap the wheels to enter the time using a keyboard, and tap a second time on either hours or minutes to change only that value. Tap the AM/PM switch (if it is showing) to choose morning or evening time.
This popover is also available in the Outline.
Duration Inspector
Available for Actions, Action Groups, Projects
Enter the amount of time you estimate an action, action group, or project will take to complete. Shortcut Date Buttons allow you to quickly add time, but the text field also supports entering other values in days, months, or years; the value you enter will be converted into hours.
Estimated Duration is particularly useful when Creating Custom Perspectives with OmniFocus Pro, where you can use this value to create perspectives for actions or projects that require a certain amount of time to complete.
Defer Inspector
Available for Actions, Action Groups, Projects
Enter or edit a Defer Date for the selected action, action group, or project.
The Defer Date determines when an action, action group, or project is available for work. When set for an action group or project, the date may also be inherited by items contained within the action group or project.
Read about Inherited Dates to learn more.
Planned Inspector
Available for Actions, Action Groups, Projects
Enter or edit a Planned Date for the selected action, action group, or project.
The Planned Date determines when an action, action group, or project is scheduled for work. When set for an action group or project, the date may also be inherited by items contained within the action group or project.
Read about Inherited Dates to learn more.
Due Inspector
Available for Actions, Action Groups, Projects
Enter or edit a Due Date for the selected action, action group, or project.
The Due Date determines when an action, action group, or project must be completed. When set for an action group or project, the date may also be inherited by items contained within the action group or project.
Read about Inherited Dates to learn more.
Due Soon
Adding a Due Date also helps OmniFocus determine when to display an action, action group, or project as “Due Soon,” depending on your setting for “Due Soon” Means.
Notifications Inspector
Available for Actions, Action Groups, Projects
View existing notifications, add or edit notifications, or remove notifications.
Notifications can be created automatically, based on your Default Notifications settings, along with the values you’ve entered for Estimated Duration, Defer Date, Planned Date, and Due Date, or they can be added manually.
You can add as many notifications as you like, and they will be listed from earliest to latest.
The types of available Default Notifications are:
- Defer Dates — With a Defer Date set, a notification is automatically added for the Defer Date.
- Planned Dates — With a Planned Date set, a notification is automatically added for the Planned Date.
- Latest Start — With a Due Date and Estimated Duration set, a notification is automatically added for the latest possible time an action could start, in order for it to be completed by the Due Date. This is calculated by subtracting the value of Estimated Duration from the Due Date.
- Due Dates — With a Due Date set, a notification is automatically added for the Due Date.
Any notification,
including
Default Notifications,
can be removed
by tapping or clicking on
![]() Clear
next to the notification.
If a notification has been removed,
it can be re-added
by tapping or clicking Add Notification,
and then selecting
Deferred Notification,
Planned Notification,
Latest Start Notification,
or Due Notification.
Clear
next to the notification.
If a notification has been removed,
it can be re-added
by tapping or clicking Add Notification,
and then selecting
Deferred Notification,
Planned Notification,
Latest Start Notification,
or Due Notification.
Before Due Notifications
and
![]() Custom Notifications (Pro)
are always available.
Custom Notifications (Pro)
are always available.
If one of the settings for Default Notifications has been turned off, it is not possible to add that type of notification to an action or project.
Before Due Notifications
You can also add Before Due notifications, which are based on the Due Date. If the Due Date changes, the time of the notification automatically updates.
Tap or click on Add Notification, select Before Due, and choose one of the options, which range from 1 minute before to 4 weeks before, based on how far in the future the Due Date is set.
Custom Notifications (Pro)
If you are using OmniFocus Pro, you can also add notifications for a specific date and time.
Tap or click on Add Notification, select Custom Notification, and then select a date and time from the calendar.
Unlike Default Notifications or Before Due Notifications, Custom Notifications will not change when the dates for an item are updated.
Items which Repeat will have Custom Notifications removed from the next repetition, allowing you to use them where needed, without needing to remove them from repeating items once no longer useful.
Time Zone Inspector
Available for Actions, Action Groups, Projects
Choose between using Floating (the default) or Fixed times for the currently selected action, action group, or project:
- Floating — Entering date and time values does not save your local time zone. If you have a beginning-of-the-day routine that you always want to complete at 8 AM (08:00), no matter where you are, it will always present at that time: 08:00 in Seattle or 08:00 in New York.
- Fixed — Entering date and time values saves your local time zone. When you change time zones, OmniFocus updates the date and time values to correspond with your current time zone. If you have a meeting scheduled for 11 AM (11:00) in Seattle, it will always present at the correct time for your current time zone: 11:00 in Seattle and 14:00 in New York.
![]() Custom Notifications also respect this setting.
Custom Notifications also respect this setting.
Completed Inspector
Available for Actions, Action Groups, Projects
Enter or edit a Completed Date for the selected action, action group, or project.
If the Item Status or Project Status is currently Active, On Hold, or Dropped, entering a date here will update the status to Completed.
If the Item Status or Project Status changes from Completed to any other status, this date will be removed.
When set for an action group or project, the date may also be inherited by items contained within the action group or project. Read about Inherited Dates to learn more.
Completing Repeating Items
If an action, action group, or project is configured to Repeat, entering a date and time in an empty Completed field will generate the next occurrence based on the date and time you entered.
Completing a repeating item and then adjusting the Completed Date will not change the next occurrence, as it has already been created.
Dropped Inspector
Available for Actions, Action Groups, Projects
Enter or edit a Dropped Date for the selected action, action group, or project.
If the Item Status or Project Status is currently Active, On Hold, or Completed, entering a date here will update the status to Dropped.
If the Item Status or Project Status changes from Dropped to any other status, this date will be removed.
When set for an action group or project, the date may also be inherited by items contained within the action group or project. Read about Inherited Dates to learn more.
Dropping Repeating Items
If an action, action group, or project is configured to Repeat, entering a date and time in an empty Dropped field will generate the next occurrence based on the date and time you entered, after prompting you to choose between skipping this occurrence or dropping the item completely.
Dropping a repeating item and then adjusting the Dropped Date will not change the next occurrence, as it has already been created.
Actions, Action Groups, and Projects
Properties in this section, with a few exceptions, are available for actions, action groups, and projects, in addition to properties listed under All Items.
Project or Group Type Inspector 
Available for Action Groups, Projects
Set the project or action group type, which changes how OmniFocus presents the action inside that project or action group.
For more about each type, and how it affects the Availability of items within the project or action group, see Project Type.
Projects can be set to:


Action groups can be set to:
By default, the type will be set to Parallel but can be changed using the Default Project Type setting.
This section also includes the option to complete the project or action group when the last contained action is resolved. This option is not available for Single Actions List projects, as they are not designed to be completed.
The two states for Complete with last action are:
- Unchecked — The project or action group status must be changed to Completed manually, regardless of the status of the contained actions.
- Checked — The project or action group status automatically changes to Completed, when the last action has been resolved.
Dropped or Completed
Complete with last action completes the project or action group when the last action has been either Dropped or Completed.
Project Inspector
Available for Actions, Action Groups
Actions and action groups are either in
the  Inbox,
in which case the Project field is empty,
or are part of a project.
Inbox,
in which case the Project field is empty,
or are part of a project.
Click or tap the Project field to add, change, or remove a project. On Mac, there is an arrow to display a list of all projects. On iPhone, iPad, and Apple Vision Pro, tapping into the field will present the same list.
Entering text into the field will present a filtered list of projects. You can also create a new project from the project picker. Enter the name of your new project, and then either select the Create “new project” item, or type Command+Return. The project will be created, with the selected action or action group assigned to the new project.
Once a project has been assigned,
the Go To Project button
 next to the project name
is turned on.
Tapping the arrow
will show the assigned project
in the Projects Outline.
next to the project name
is turned on.
Tapping the arrow
will show the assigned project
in the Projects Outline.
Assigning a project to an Inbox item typically moves it from the Inbox to the assigned project. This behavior may be different for you, depending on your setting for Clean Up Inbox Items Which Have.
If you’d like to learn more about projects,
please read the
 Projects section
of the Perspectives chapter.
Projects section
of the Perspectives chapter.
Tags Inspector
Available for Actions, Action Groups, Projects
Assign Tags to items in the current selection, or review any tags already assigned. When multiple items are selected, the list includes all tags assigned to any item, with tags that are assigned to all items having a stronger appearance.
Click or tap into the Tags field
to add tags.
On Mac,
you can click into the Add button
 and start typing,
or click the arrow
and start typing,
or click the arrow
![]() to display a list of all tags.
On iPhone, iPad, and Apple Vision Pro,
tapping the Add tag button will present the same list.
to display a list of all tags.
On iPhone, iPad, and Apple Vision Pro,
tapping the Add tag button will present the same list.
Entering text into the field will present a filtered list of tags. You can also create a new tag from the tag picker. Enter the name of your new tag, and then either select the Create “new tag” item, or type Command+Return. The tag will be created, and assigned to the currently selected action, action group, or project.
Once a tag has been added,
touch and hold or Control + click on the tag
gives you the option to
Go To (or Show) the tag in the
 Tags
perspective,
or Remove the tag.
Tags
perspective,
or Remove the tag.
An item can have as many assigned tags as you like. On Mac, you can use drag-and-drop to reorder the tags assigned to an item.
If you’d like to learn more about tags,
please read the
Tags
section of the Perspectives chapter.
Note Inspector
Available for Actions, Action Groups, Projects
Add, view, or edit notes related to the selected action, action group, or project.
Click or tap into the Note field, and type or paste text or images.
In addition to plain text, notes support rich text, including custom fonts (Mac only), colors, and styles, available from the Format menu on Mac, or iPad and Apple Vision Pro. Notes also support links in notes: enter a URL in the note field, and it automatically becomes an interactive link.
Links in Notes
On Mac, Control + click on a link to show a menu containing a variety of options, including:
- Open Link — Opens link in default application for the type of link;
- Open With… — Opens link in the browser of your selection.
- Copy Link — Copies the link to the system clipboard.
- Edit Link… — Opens a dialog for editing the link title and URL.
- Remove Link — Removes the URL from the link, leaving only the title.
On iPhone, iPad, and Apple Vision Pro, tap a link to show a menu which includes:
- Open — Opens link in default application for the type of link;
- Copy — Copies the link to the system clipboard.
- Share… — Opens the Share dialog that is part of the system.
- Select — Selects the link, for ease of editing.
- Remove Link — Removes the URL from the link, leaving only the title.
Note Icon
When the Note Icon is displayed in the Outline, whether in Fluid Layout or Columns Layout, Note contents affect the icon appearance:
-
Note is empty (displays only when row is selected)
 Note contains text
 Note contains attachment or text
Attachments Inspector 
Available for Actions, Action Groups, Projects
In addition to adding images by pasting into the Note field, you can add attachments of various types by clicking or tapping the Add Attachment button.
On Mac:
- This button opens the file selection dialog, where you can browse to find the file you’d like to attach.
- By default, the attachment will be embedded in your OmniFocus data, so it can be used on any of your syncing devices.
- You can choose to create a link to the file instead, which allows you to quickly access it on your local Mac, without syncing it between devices.
On iPhone, iPad, and Apple Vision Pro:
- This button gives you a choice of Attach File, Take Photo, Photo Library, Scan Document, or Record Audio.
- The Attach File command works similarly to Mac, but always embeds attachments, without an option for linking.
On Web:
- OmniFocus for the Web does not yet support adding attachments, though they can be viewed, downloaded, or deleted.
Working with Attachments
On Mac:
- Click an attachment to select it for further editing.
- Control + click an attachment to display the Attachment Shortcut Menu.
On iPhone, iPad, Apple Vision Pro:
- Tap an image attachment to place the cursor on the side of the image closest to your tap.
- Touch and hold an image attachment to display the Attachment Shortcut Menu.
- Tap a non-image attachment to display a preview of the file, as well as buttons to either Share or Delete the attachment.
- Touch and hold a non-image attachment to display a Shortcut Menu with options to Preview or Select.
On Web:
- Hover over the thumbnail of the attachment, and if it is an image, click on it to view at a larger size
- Click on
 Download
to save the attachment to your local computer
Download
to save the attachment to your local computer - Click on
 Delete
to remove the attachment from OmniFocus
Delete
to remove the attachment from OmniFocus
Syncing Attachments
Embedding large attachments, or numerous small attachments, can impact sync performance over time. Large attachments may also impact storage on your mobile devices.
If you use attachments, and begin to notice sync issues, please read the troubleshooting sections for Improving Performance and Removing Large Attachments.
Repeat Inspector
Available for
Actions,
Action Groups,
Parallel or Sequential Projects
Not available in OmniFocus for the Web
Configure Actions, Action Groups, and Projects which repeat on a schedule:
- Click or tap Add Repetition to create a new repetition, or Edit Repetition to modify an existing repetition.
- Changes are automatically saved as you make updates.
- Click or tap outside the editor to close it, or tap Done.
- Click or tap Remove Repetition to remove an existing repetition.
By default, new repetitions are configured to repeat every One Day, using the Regularly schedule, based on the assigned Due Date.
Configuration options include:
As you make changes in the Inspector, additional options may become available.
Once a repetition has been configured, a summary will be displayed in the Inspector or Outline, depending on your Layout Settings.
Interval and Frequency
Select how often you want the item to repeat, selecting from:
- Minutes
- Hours
- Days
- Weeks
- Months
- Years
Selecting Minutes, Hours, Days, or Years allows you to choose an interval for your repetition.
Selecting Weeks allows you to choose one or more days of the week for an item to repeat, in addition to the interval.
Selecting Months allows you to choose days of the month for an item to repeat, in addition to the interval:
- Days in Month — Select specific dates, with an option to include the last day of the month.
- Days of Week — Select a specific day, based on the position of the day in the month. The first menu allows you to select from the 1st through 5th week (or the Last week), and the second menu allows you to select from a day of the week, Weekday, or Weekend day.
Schedule Regularly or From Completion
Select whether to repeat the item:
- Regularly — The next occurrence is based on the schedule you have chosen, regardless of when this occurrence is completed. Selecting this option will display an option to Catch up automatically.
- From Completion — The next occurrence is based on the date and time this occurrence is completed.
To assist with configuration, the dates for the next occurrence are displayed at the bottom of the Repeat inspector, and will update as you change options.
OmniFocus attempts to keep your times predictable, even when repeating From Completion, to avoid times shifting when an occurrence is completed. This is accomplished by rounding, based on your selected unit of time.
If you configure a repetition in hours, completing an item in the first half of an hour (the 1st to 29th minute) will round earlier; completing an item in the second half of an hour (the 30th to 59th minute) will round later.
If you need more precision, you can change to smaller units (days to hours, or hours to minutes) and the rounding will adjust appropriately (hours will use minutes, minutes will use seconds).
Catch Up Automatically
This option is only available when Schedule is set to Repeat Regularly.
With this setting turned off, completing an item will create the next occurrence following the schedule you have set, even when the next occurrence is in the past.
With this setting turned on, completing an item will create the next occurrence following the schedule you have set, skipping any occurrences in the past.
Catch Up or From Completion?
Items configured to repeat Regularly with Catch up automatically turned on will always create the next occurrence in the future, as will items configured to repeat From Completion, but the two configurations calculate dates differently:
- Regularly with Catch up automatically turned on creates the next occurrence based on the schedule that you have configured, skipping all occurrences that have been missed, so the date of the next occurrence is predictable.
- From Completion creates the next occurrence based on the date and time that you complete the existing occurrence, so the date of the next occurrence is variable.
Based on Date
Select the type of date you would like to use for calculating the next occurrence:
The next occurrence will be based on the date type you have selected, while maintaining the relationship between all dates which have been assigned.
This is a very powerful feature, which benefits from an example.
Given a repeating action:
- Defer Date scheduled for two days before Planned Date
- Planned Date scheduled for three days before Due Date
- Based On Due Date
- Schedule set to repeat every week From Completion
The next occurrence will have:
- Defer Date scheduled for two days from now
- Planned Date scheduled for four days from now
- Due Date scheduled for seven days from now
But if you change:
- Based On from Due Date to Defer Date
The next occurrence will have:
- Defer Date scheduled for seven days from now
- Planned Date scheduled for nine days from now
- Due Date scheduled for twelve days from now
Feel free to experiment!
End On Date or After
Select if you would like your repetition to end:
- Never — Continues until you Delete or Drop the item.
- On Date — Continues until you reach the selected date.
- After — Continues until you Complete or Drop the item for the selected number of times.
You can change the target for On Date or After at any time.
Repetitions that are set to Catch up automatically do not affect the number of remaining repetitions for End After when catching up automatically; that number will only decrease if you Complete or Drop an occurrence.
Repetitions Inside of Repetitions
Completing a repeating Project or Action Group will create another occurrence of the Project or Action Group, while also updating all Action Groups or Actions that it contains from Completed or Dropped to Active.
This provides an easy way to repeat a series of Actions: place them inside of a repeating Project or Action Group. It can also lead to unexpected results if you have nested repetitions:
- Completing a repeating Action creates another occurrence of that Action.
- Completing a repeating Action Group or Project creates another occurrence of the Action Group or Project, which contains both the original repeating Action as well as the next occurrence of the repeating Action.
- The new occurrence of the repeating Action Group or Project now includes all occurrences of the repeating Action, each of them still set to repeat.
If you see duplicate Actions when completing Action Groups or Projects, make sure that every Action is part of only one repetition, whether that’s a repeating Action, or as part of a repeating Action Group or Project.
Review Inspector
Available for Projects
Select how often you plan on Reviewing a Project, see the date of last review, or set the date of the next review.
By default, projects are set to be reviewed every week, beginning one week after the project is created. That setting can be adjusted in the Date & Time Settings.
- Next review — The top field contains the next scheduled review for this project. You can update this date, if you would like.
- Review every — Choose how often you would like to review this project.
- Last reviewed — The date the project was last reviewed. This date is read from your OmniFocus data, and can’t be edited.
Please read the Reviewing a Project section of the Perspectives chapter for more information.
Tags and Tag Groups
Properties in this section are available for tags, in addition to properties listed under All Items.
Group Behavior Inspector
Available for Tag Groups
With Mutually Exclusive turned off, any given action, action group, or project may be assigned as many tags from this tag group as desired. This is the default behavior in OmniFocus 3 and OmniFocus 4.
With Mutually Exclusive turned on, any given action, action group, or project may be assigned only a single tag from this tag group, whether a deeply nested tag, or the top-level tag group itself. This is similar to the default behavior in OmniFocus 2 and earlier, where each item could be assigned only a single Context.
This setting supports workflows where you only ever want one tag of a group, such as energy levels (low, medium, or high), times of day (morning, workday, evening), or stages of a pipeline (inquiry, development, delivery).
You can quickly see which tags and tag groups are affected by this setting in any Perspective which uses the Tags Sidebar. Read Tag Location and Behavior to learn more.
Location Inspector
Available for Tags, Tag Groups
Set a location for the selected tag,
which allows you to see assigned actions and projects in
 Nearby,
or receive notifications when near the assigned location.
Nearby,
or receive notifications when near the assigned location.
Tap or click on Add Location, and select an option:
- Here — Use Wi-Fi or cellular triangulation to pinpoint where you are right now, and save that as the tag location. This tag is assigned to items you can complete here, and is a fixed location.
- Anywhere — This isn’t a specific location. This tag is assigned to items you can complete anywhere.
- Search — Enter a search term, such as “hardware store”. You can select one of the results to assign that specific location to the tag, or use the search term itself. If you use the search term, the location becomes the nearest search result, updated for your current location. This tag is assigned to items you can complete at a specific location, or at a type or chain of businesses.
- Address — Enter a specific address to add as the location. This tag is assigned to items you can complete at the selected address.
- Contact — Choose an address from an entry in the Contacts app on your device. If this is the first time you’ve set a location this way, you may be asked to grant OmniFocus access to your contacts. This tag is assigned to items you can complete at the address for the selected contact.
- Pin — Touch and hold a spot on the map to drop a pin at a location of your choice. This tag is assigned to items you can complete at the selected pin.
To remove an assigned location, tap the
Clear button
![]() next to it.
next to it.
When a location is assigned to a tag,
it shows up in
Nearby,
on the Map view
or in the List view.
Setting a tag’s location doesn’t automatically turn on location-based alerts for that tag. To receive notifications, make sure location alerts are turned on for your device in Notifications Settings, and the Notification selection (below) is set to When Arriving or When Leaving.
Location-based alerts can be edited on Mac, but will only provide notifications on mobile devices.
Once a tag has been assigned a location, two additional selections appear in the Location section.
The Notification selection determines when a notification occurs:
- None — You will not be notified when arriving at or leaving from the tag location.
- When Arriving — You will be notified when you arrive at the area of the tag location.
- When Leaving — You will be notified when you leave from the area of the tag location.
The Distance selection determines the location’s area size.
- Small — Roughly 200 meters or 650 feet. This covers about one city block, which is useful for locations such as arriving home or leaving the office.
- Medium — Roughly 500 meters or about 1/4 mile. This covers a small neighborhood or park, which is useful for knowing when you are a few streets over from a certain store.
- Large — About 10 kilometers or 6 1/4 miles. This is useful for turning on tags that are relevant when you visit another city.
You can quickly see the status of this setting in any Perspective which uses the Tags Sidebar.
Combining Location and Notifications
You can use Tag Groups to unify a selection of locations and notifications, such as those related to beginning or ending your work day.
If you create a tag group with one parent and two children, you can assign your work location to all three tags, with one child set to When Arriving, and the other child set to When Leaving.
This allows you to have a set of actions to complete when arriving at work, another set to complete when leaving work, and another set that can be completed while you are at work.