The Outline
The Outline is the primary view in OmniFocus, where you can view, add, remove, or edit actions and projects.
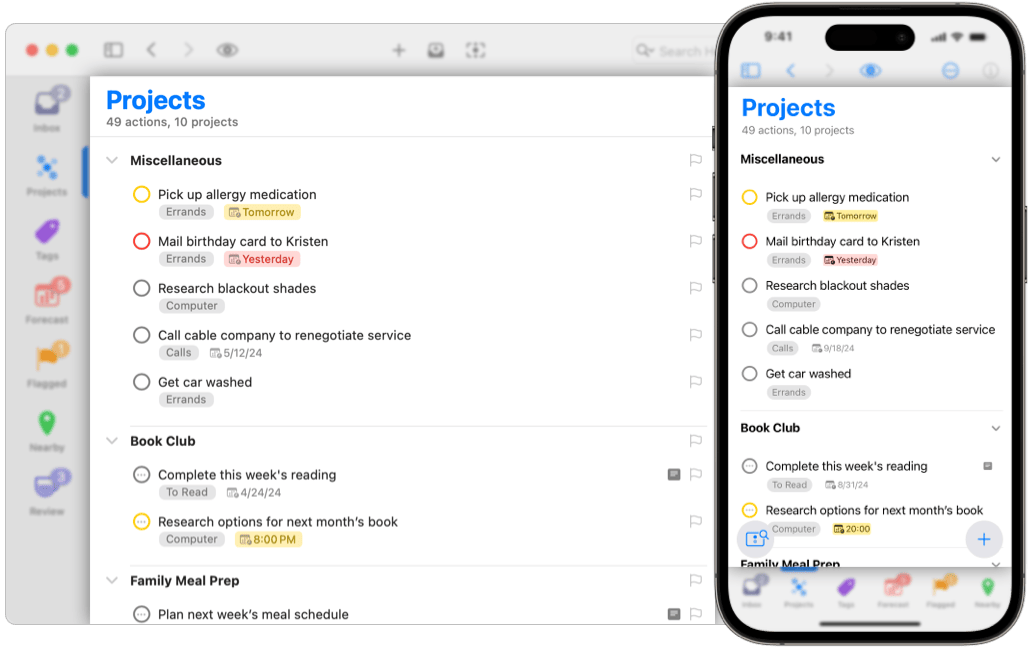
The contents of the Outline depend on which perspective you are viewing:
you can capture actions in the
 Inbox,
make plans in
Inbox,
make plans in
 Projects,
narrow in on items only available in a specific location
or with a specific person using
Projects,
narrow in on items only available in a specific location
or with a specific person using
 Tags,
focus on the immediate future using
Tags,
focus on the immediate future using
 Forecast,
or use other Perspectives
for their unique strengths.
Forecast,
or use other Perspectives
for their unique strengths.
When using Mac,
iPad in Regular View,
or Apple Vision Pro,
the Outline is in the center of the window.
The
 Sidebar
can be shown or hidden on the leading edge,
and the
Sidebar
can be shown or hidden on the leading edge,
and the
 Inspector
can be shown or hidden on the trailing edge.
When using iPhone,
or iPad in a Compact View,
the Outline fills the window.
The
Sidebar
will slide in and out from the leading edge,
and the
Inspector
will slide in and out from the trailing edge.
Inspector
can be shown or hidden on the trailing edge.
When using iPhone,
or iPad in a Compact View,
the Outline fills the window.
The
Sidebar
will slide in and out from the leading edge,
and the
Inspector
will slide in and out from the trailing edge.
Perspective Header
The top of the Outline includes the name of the current Perspective, in addition to a count of Inbox Items, Actions, and Projects currently visible in the Outline.

This count depends on what you have selected
in the
Sidebar,
as well as which
 View Options
you have chosen.
This count is not available in
Forecast
or
View Options
you have chosen.
This count is not available in
Forecast
or
 Review,
both of which show information specific to those views.
Review,
both of which show information specific to those views.
Count is not yet supported in OmniFocus for the Web.
Outline Rows
The Outline is composed of rows that can represent:

When you first install OmniFocus, rows will display a default set of fields, each containing the assigned property for a given item, in addition to a Status Circle for actions and action groups:


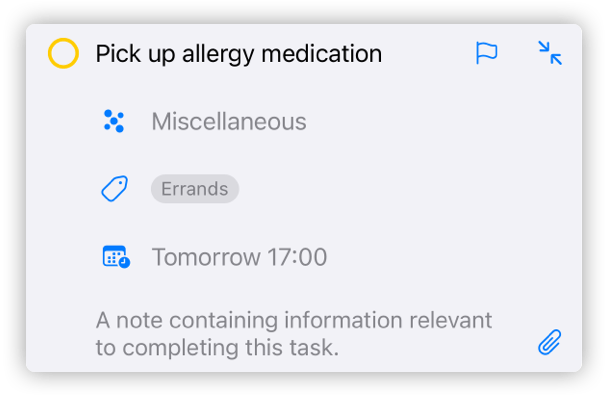
When a row is selected for editing on iPhone, iPad, or Apple Vision Pro, additional controls are displayed, including buttons for:
 Flag
Flag End Editing
 Attachment
(which is part of the Note)
Attachment
(which is part of the Note)
The default layout has been chosen to help you get a feel for the most often used information, but is only a small selection of all the available options. You can read about other options in the Row Layout section below.
Using Dates in OmniFocus
OmniFocus 4.7 introduces support for Planned Dates, providing more robust scheduling options than earlier versions, which supported only Defer Dates and Due Dates. Let’s look at how you might use the different date types.
Using Defer Dates
Defer Dates indicate the date when you want an action or project to become Available for work. Until that date, the action or project won’t display in any Perspective that filters out Unavailable actions or projects.
Using a Defer Date allows you to hide future work, so it doesn’t distract you from today’s work. You’ll start to see Available actions and projects in various perspectives, as soon as they’ve reached their Defer Date.
Changing the Defer Date on a project or action group also affects all contained actions. This is sometimes referred to as a “Start No Earlier Than” constraint; you can read about Inherited Defer Dates to learn more.
Using Due Dates
Due Dates indicate the date by which you need an action or project Completed. As that date approaches, the action or project will become Due Soon, and when the date passes, the action or project will become Overdue.
Changing the Due Date on a project or action group also affects all contained actions. This is sometimes referred to as an “End No Later Than” constraint; you can read about Inherited Due Dates to learn more.
Using Planned Dates
Planned Dates are for scheduling when you actually intend to do the work, which could be far later than the Defer Date, or far earlier than the Due Date.
Unlike
Defer Dates
and
Due Dates,
Planned Dates
do not affect the
Status
of an action or project,
but can be used to make an action or project show up in
Forecast
at the appropriate time,
or to have the app send you a
Notification
to remind you about your plan.
Changing the Planned Date on a project or action group affects the default Planned Date for all contained actions, but does not create a constraint; you can read about Inherited Planned Dates to learn more. This allows you to easily schedule a new Planned Date for earlier or later than the containing project or action group.
If you have been using Due Dates to schedule actions and projects, but find yourself constantly changing dates, and losing track of your important must complete on time items, you may find it easier to work with Planned Dates. They will help you schedule work, without interfering with the actual constraints on that work.
If you have been using Defer Dates to schedule actions and projects, but find yourself missing items as they become Available, you might find it easier to work with Planned Dates. They remain on their assigned dates, whether past or future, making it easy to quickly find them.
Status Circle
Actions and action groups have a Status Circle, which is the quickest way to update their status to Completed, Dropped, or Active. Projects do not have a status circle, to prevent unintentional updates.
Click or tap an
 Active
status circle
to mark the action or action group
Active
status circle
to mark the action or action group
 Completed,
and display a checkmark inside the circle.
Click or tap again to set it to back to Active.
Completed,
and display a checkmark inside the circle.
Click or tap again to set it to back to Active.
On Mac, press the Option key while you click an Active status circle
to mark the action or action group
 Dropped,
and display a dash inside the circle.
Option + click again to set it back to Active.
Dropped,
and display a dash inside the circle.
Option + click again to set it back to Active.
Status circles can also communicate other important information:
actions can be
 Due Soon,
indicated by a yellow circle;
Due Soon,
indicated by a yellow circle;
 Overdue,
indicated by a red circle;
Overdue,
indicated by a red circle;
 Flagged,
indicated by an orange circle and small flag;
or set to
Flagged,
indicated by an orange circle and small flag;
or set to
 Repeat,
indicated by three dots in the middle of the circle.
Repeat,
indicated by three dots in the middle of the circle.
It is possible to combine these states:
a
 Flagged and
Overdue
action, which is also configured to
Repeat,
would have a status circle that is red,
with a small orange flag,
and an ellipsis in the middle.
Flagged and
Overdue
action, which is also configured to
Repeat,
would have a status circle that is red,
with a small orange flag,
and an ellipsis in the middle.
Actions, action groups, and projects may be completed by pressing Space bar while they are selected. If the item has a status circle, it will also be updated.
Actions, action groups, projects, folders, and tags may be dropped by pressing Option+Space bar while they are selected. If the item has a status circle, it will also be updated.
Row Layout
When first installed, Outline Rows use the Fluid Layout, which is available on Mac, iPhone, iPad, and Apple Vision Pro. On Mac, you may also use Columns Layout.
You can change how OmniFocus displays information for all perspectives, by customizing Layout Settings.
If you are using
OmniFocus Pro,
you can change the Layout for each perspective separately,
using
View Options.
Fluid Layout
Fluid Layout is designed to always show the most important information, with the added flexibility of quickly editing additional fields. This is accomplished by having a set of fields that is always displayed, as well as a set that is only displayed while editing.
By default, all items display the assigned:
Selecting a row allows you to edit those fields, as well as the item’s note.
Other fields available in Fluid Layout include:


In addition to adding fields,
it is also possible to Preview notes in the outline
(for iPhone, iPad, and Apple Vision Pro),
choose the number of Tags shown,
select between showing the project name or the Full project path,
and decide whether to Hide projects when redundant
(such as when viewing
Projects).
For more information about customization, please see the Fluid Layout section of the Settings chapter.
Columns Layout
Columns Layout is designed to display all information in a single row, which allows for easy scanning of the Outline. It is currently only available on Mac; if you would find it helpful on iPad or Apple Vision Pro, please Email Support.
By default, all items display the assigned:
Selecting a row allows you to edit those fields.
Other fields available in Columns Layout include:
In addition to customizing which fields are displayed,
it is also possible to choose the number of Tags shown,
select between showing the project name or the Full project path,
and decide whether to Hide projects when redundant
(such as when viewing
Projects).
For more information about customization, please see the Columns Layout section of the Settings chapter.
Organizing the Outline
The Outline
(and
Sidebar)
can be used to organize your actions,
action groups,
projects,
and folders.
You can use Drag And Drop for Grouping Actions and Grouping Projects, as well as use Shortcut Menus which are available for every row in the Outline or Sidebar.
Drag and Drop
Items in the Outline can be dragged to:
- other locations in the Outline
- the Sidebar, to assign projects, tags, or dates
- the Perspectives Bar, to assign properties
- other applications
Dragging to Other Applications
When dropping into other applications, the result depends on what that application supports: it may be plain text, rich text, or a link to the item you dragged that will re-open in OmniFocus. Please try it with your favorite applications, see what happens, and Email Support if you have questions.
To select an item for drag and drop on iPhone, iPad, or Apple Vision Pro, touch and hold its row in the Outline, until the item “lifts off the page” and transforms into a moveable selection under your finger. You can drag and drop a single item (with its children) at a time.
To select an item for drag and drop on Mac, click and hold on one or more rows. If you select multiple items before clicking, all the items will be dragged, and can be dropped at the same time.
Grouping Actions
Inbox items and actions can be organized into Action Groups, which create a relationship between one top-level parent action, and one or more contained child actions. Each action inside the group should be part of, or necessary for, the top-level action; action groups are sometimes referred to as subprojects.
Action Groups use bold text, making it easy to quickly tell them apart from actions.
Projects may contain as many action groups as you like, and action groups may be placed inside other action groups. This is an excellent way to add more structure to a project, while still keeping all related actions together.
If both parent and child actions exist:
- Drag one item on top of another. On Mac, a line displays to indicate if the drop will be in line with the parent action, or placed as a child action. On iPhone, iPad, or Apple Vision Pro, rows will highlight or move out of the way as you drag the child action, to indicate where it will be dropped.
- If the intended child action is directly below the intended parent action, select the child action, and use the Indent command.
If the parent action exists, but the child action does not:
- Select the parent action, and use the Add Inside command.
- Drag
 Smart Add
from the lower right of your screen
to hover over an action in the Outline
(iPhone, iPad, or Apple Vision Pro).
Smart Add
from the lower right of your screen
to hover over an action in the Outline
(iPhone, iPad, or Apple Vision Pro).
If the child action exists, but the parent action does not:
- Select one or more actions, and use the Group command. A new untitled parent action is created to represent the group, and the selected actions are indented to become its child actions.
Once you’ve created a group, you can use the inspector to change the Action Group Type, as well as determine whether the group will Complete with Last Action.
Combining a different Project Type and Action Group Type can be incredibly powerful.
Placing a parallel action group inside a sequential project allows a group of actions to become available when a preceding action is completed, and blocks further work until the entire group has been completed.
Placing a sequential action group inside a parallel project allows most actions to be simultaneously available, while ensuring a specific set of actions is still completed in order.
Grouping Projects
Just as actions can be grouped using action groups or projects, projects can also be grouped together using Folders. Folders can also be grouped using folders, allowing flexibility in creating your OmniFocus Hierarchy.
To create a project folder, while grouping existing projects:
- Navigate to the Projects Sidebar.
- Select two or more projects in the Sidebar; if using iPhone, iPad, or Apple Vision Pro, first enter Sidebar Select Mode.
- Use the Group command, which places the selected projects in a newly created folder.
- Enter a name for the folder to replace the Untitled Folder text.
- Press Return to accept the new folder name.
To create a project folder, and then group:
- Navigate to the Projects Sidebar.
- Use the New Folder command,
or click or tap
Add
in the bottom toolbar.
- Enter a name for the folder to replace the Untitled Folder text.
- Press Return to accept the new folder name.
- Drag related projects into the newly created folder.
Containers, Properties, and Inheritance
Folders, projects, and action groups are also referred to as Containers, as they are items that can contain other items: folders can contain folders or projects, while projects and action groups can contain actions or action groups.
Just as a physical container can affect its contents, OmniFocus containers can also affect their contents. We refer to this as inheritance. Each item inside a container can have a directly assigned value for a given property, such as status, Due Date, or flag, but if a property does not have a directly assigned value, it may have an indirectly assigned value that it inherits from the container.
Properties that can have inherited values include Dates, Statuses, Availability, Flag, and Tags.
Tags can be assigned to actions and projects, but are not considered containers. If the tag is removed or deleted from OmniFocus, the action or project is left intact.
Tags do have a special type of inheritance, based on their assignment to a project or action group;. Read Inherited Tags Assignment to learn more.
Even though tags do not contain actions or projects, tags can contain other tags; for more information, see Tag Group in the Glossary.
Inherited Dates
OmniFocus 4.7 or later supports three inherited date properties:
Earlier versions of OmniFocus support two inherited date properties:
Inherited Defer Date
Assigning a Defer Date to an action tells OmniFocus that the action is not Available for work until the Defer Date has passed. In the field of project management, this is referred to as a “Start No Earlier Than” constraint.
Assigning a Defer Date to an action group or project tells OmniFocus that neither the item nor any contained items are Available for work until the Defer Date has passed.
You can directly assign a Defer Date to any action or action group in the container, but the date cannot be earlier than the date for the container. If you have an action that requires an earlier date, you will need to also change the container date, in order to schedule that action as desired.
Inherited Due Date
Assigning a Due Date to an action tells OmniFocus that the action must be Completed or Dropped before the Due Date occurs. In the field of project management, this is referred to as an “End No Later Than” constraint.
Assigning a Due Date to an action group or project tells OmniFocus that the item and all contained items must be Completed or Dropped before the Due Date occurs.
You can directly assign a Due Date to any action or action group in the container, but the date cannot be later than the date for the container. If you have an action that requires a later date, you will need to also change the container date, in order to schedule that action as desired.
Inherited Planned Date
Assigning a Planned Date to an action tells OmniFocus that the action is scheduled for work on that date. Unlike the Defer Date or Due Date, assigning a Planned Date does not create any limitations or constraints; it is provided for your ease of planning.
Assigning a Planned Date to an action group or project tells OmniFocus that the item and all contained items are scheduled for work on the Planned Date, unless they have directly assigned dates.
You can directly assign a Planned Date to any action or action group in the container; that date may be before or after either the Defer Date or Due Date. This allows you to schedule items for work before the container becomes available, or after the container is due.
Inherited Inspector Fields
Inspector fields which contain inherited values for Defer Date, Due Date, or Planned Date, will display Deferred with container, Planned with container, or Due with container.
Inherited Status
Newly created actions, projects, folders, and tags have a Status of Active (rather than On Hold, Completed, or Dropped).
Status for an item may be assigned, or may be inherited from the container:
- Actions and action groups can inherit Completed or Dropped status from their containing project or action group.
- Actions, action groups, projects, and folders can inherit Dropped status from their containing folder.
- Tags can inherit Dropped status from their containing tag.
When viewing one of the affected items in the Inspector, the Status will display as Completed with container or Dropped with container. The Inspector field for either Completed or Dropped will display the same status.
For more information about statuses, both directly and indirectly assigned, please see the Status entry in the Glossary.
Inherited Availability
While Availability applies to actions, action groups, and projects which are Active (rather than Completed or Dropped), Inherited Availability only applies to actions and action groups. Projects do not inherit availability, though they can have an Inherited Status, as noted above.
Newly created actions and action groups are considered Available (rather than Blocked or Unavailable), until they are updated to add dates, tags, projects, or other properties that may impact their availability. Actions and action groups may then become Blocked or Unavailable, depending on those properties.
An Active action or action group will also inherit the availability of their containing action group or project.
When viewing an action or action group with inherited availability in the Inspector, the Status will display as Blocked with container or Unavailable with container, instead of Active.
For more information about availability, please see the Availability entry in the Glossary.
Inherited Flag
If you Flag a project or action group, all actions (and action groups) within it inherit that flag, as well as the sense of importance. Inherited flags display as hollow, rather than solid, which indicates a directly assigned flag.
Inherited flags can’t be directly removed; the container must be unflagged, or the action or action group moved to a different container. Note that it is possible to flag an item which already has an inherited flag; if this happens, the hollow flag will be filled in to communicate the change.
Inherited Tags Assignment
Tags can also be assigned to actions and action groups using inheritance.
Unlike other inherited properties, which will update as the container is modified, tag assignment happens only when first adding an action to a container.
If an action does not have any assigned tags, then adding it to a project or action group will assign the same tags to the action which are assigned to the project or action group. This works whether you are using Quick Entry, Smart Add, New Action, or Add Inside.
If an action does have assigned tags, then adding it to a project or action group will not change the tags assigned to the action. This allows you to add new actions using Quick Entry, and either add tags (knowing they will be preserved), or not add tags (knowing that the action may inherit tags).
Outline Select Mode
Select Mode on iPhone, iPad, and Apple Vision Pro
allows you to select, inspect, and edit as many items as you would like,
all at the same time.
This mode is also available
in the
Sidebar.
To turn on Select Mode in the Outline
tap
 More Menu,
then tap the
More Menu,
then tap the
 Select.
You can also swipe two fingers up or down on the Outline, which will turn on Select Mode while selecting the swiped rows.
Once Select Mode has been turned on,
tap rows in the Outline to select them.
You can then use the
Inspector
to simultaneously edit all selected rows.
Any properties where values match for all selected items display those values in the Inspector. When values for properties do not match, the Inspector displays the phrase Multiple Values, where possible. Tags display differently from other properties: all tags assigned to any item are displayed, but tags that are assigned to all items have a stronger appearance.
Changing the value of any property will apply the change to all selected items, overwriting any existing value. This provides an easy way to either update a matching value, or unite non-matching values.
While in Select Mode,
the bottom bar displays buttons for
 Share,
Copy,
Share,
Copy,
![]() Delete,
and
Delete,
and
 More.
Selecting most commands in the bottom bar
will automatically turn off Select Mode.
More.
Selecting most commands in the bottom bar
will automatically turn off Select Mode.
You can manually turn off Select Mode by tapping Done.