Getting to Know OmniGraffle
Sure, it’s still the same great chart-drawing, prototyping, wireframing app you’ve grown to love and adore, but we’ve pulled out the stops with OmniGraffle 6.
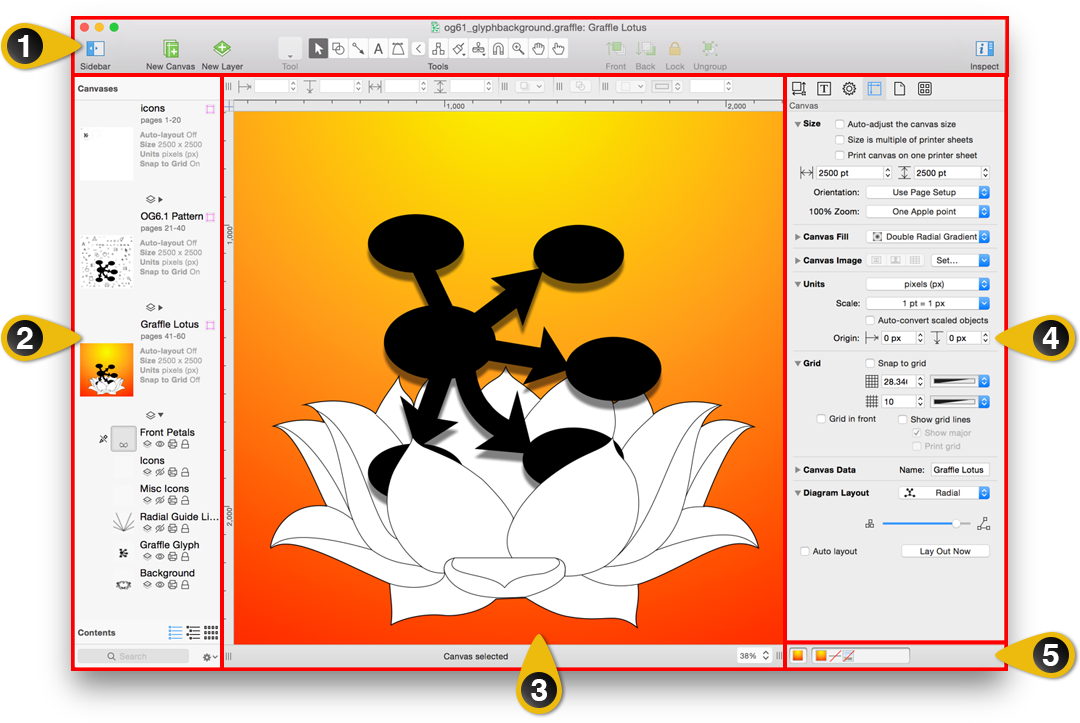
- The Toolbar
The toolbar provides easy access to the controls of your choosing. Choose View ▸ Customize Toolbar (or Control-click) on the toolbar to arrange your favorite tools. Most importantly, the toolbar is home to the Tool Palette which you’ll use to create diagrams and such. To hide or show the toolbar, choose View ▸ Hide Toolbar or View ▸ Show Toolbar, respectively. - The Sidebar
The sidebar combines the Canvases and Outline sidebars from OmniGraffle 5 into a single sidebar with Canvases at the top and the Contents viewer below. You can resize these panes to suit your needs, and the benefit for you is more space within the Canvas so you can focus on your work. - The Canvas
In the middle of the interface is the Canvas, which is where you do all of your drawing. You can use the drawing tools to create shapes, connect them with lines, drag and group objects, create tables, and do way more stuff than we can mention here in this quick list of features. - The Inspectors
Floating inspector palettes are back! We’ve combined the Inspectors and the Stencil Library into an ultra-handy Inspectors sidebar to the right of the canvas, and you can use the new Inspectors menu to choose between an Inspector sidebar, a floating inspector window, or to have individual palettes for each inspector. - The Style Tray
Whenever you apply a style—a fill color, border, shadow, and so on—that information shows up in little swatches in the Style Tray just beneath the Inspectors. Need to apply the style from one object to another? Select the styled object and grab its master swatch (the one on the left) and drag it to the object that needs styling.
Now that you have a better understanding of how OmniGraffle is organized visually, let’s dive in deeper and look at everything OmniGraffle has to offer. If you haven’t launched OmniGraffle yet, now might be a good time to do that.
Rulers, Ruler Units, and Guides
Bordering the Canvas—along the left and top edges—are the Rulers. You can also hide or show the rulers by choosing View ▸ Rulers (Command-R).
The point at which the rulers meet—the upper-left corner—is known as the Ruler Origin Point. This is the point from which all ruler measurements originate; its coordinates are 0,0.
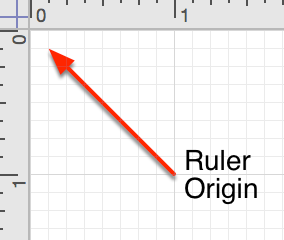
To change the origin, click and drag the origin from the corner where the rulers meet. Alternatively, you can enter Origin values in the Units inspector. To reset the origin to the 0,0 position, click on the origin point between the two rulers. Click the origin point again and the origin point changes to its previous position.
Changing Ruler Units to Suit Your Design Needs
The rulers reflect the units of measure defined in the default template, but you can also change the Ruler Units in the Units inspector (choose Inspectors ▸ Canvas).
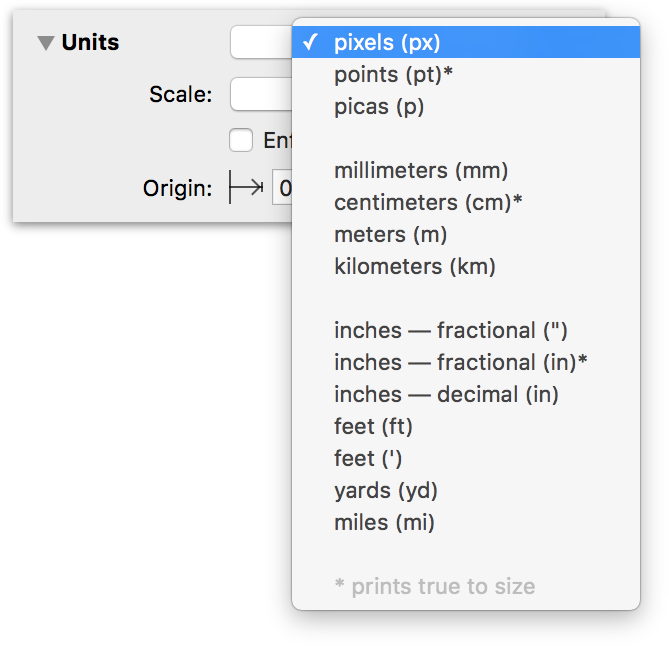
The available units of measurement include:
- Pixels (px)
- Points (pt)*
- Picas (p)
- Millimeters (mm)
- Centimeters (cm)*
- Meters (m)
- Kilometers (km)
- Inches, fractional (" or in*)
- Inches, decimal (in)
- Feet (ft or ')
- Yards (yd)
- Miles (mi)
Ruler units followed by an asterisk (*) in the previous list means that these measurement types will print true to size when selected.
Note
The Units inspector also offers the option for you to set a custom Scale. For example, you could specify that 1 inch on the canvas is the equivalent to 10 feet, or for really long distances, 100 pixels could represent 93 million miles.
You can also change the ruler units by Control- or Right-clicking on the ruler or the Canvas itself. For example, Control-/Right-clicking on the Rulers provides you with options for hiding and showing the Rulers and Guides, as well as the Ruler Units.
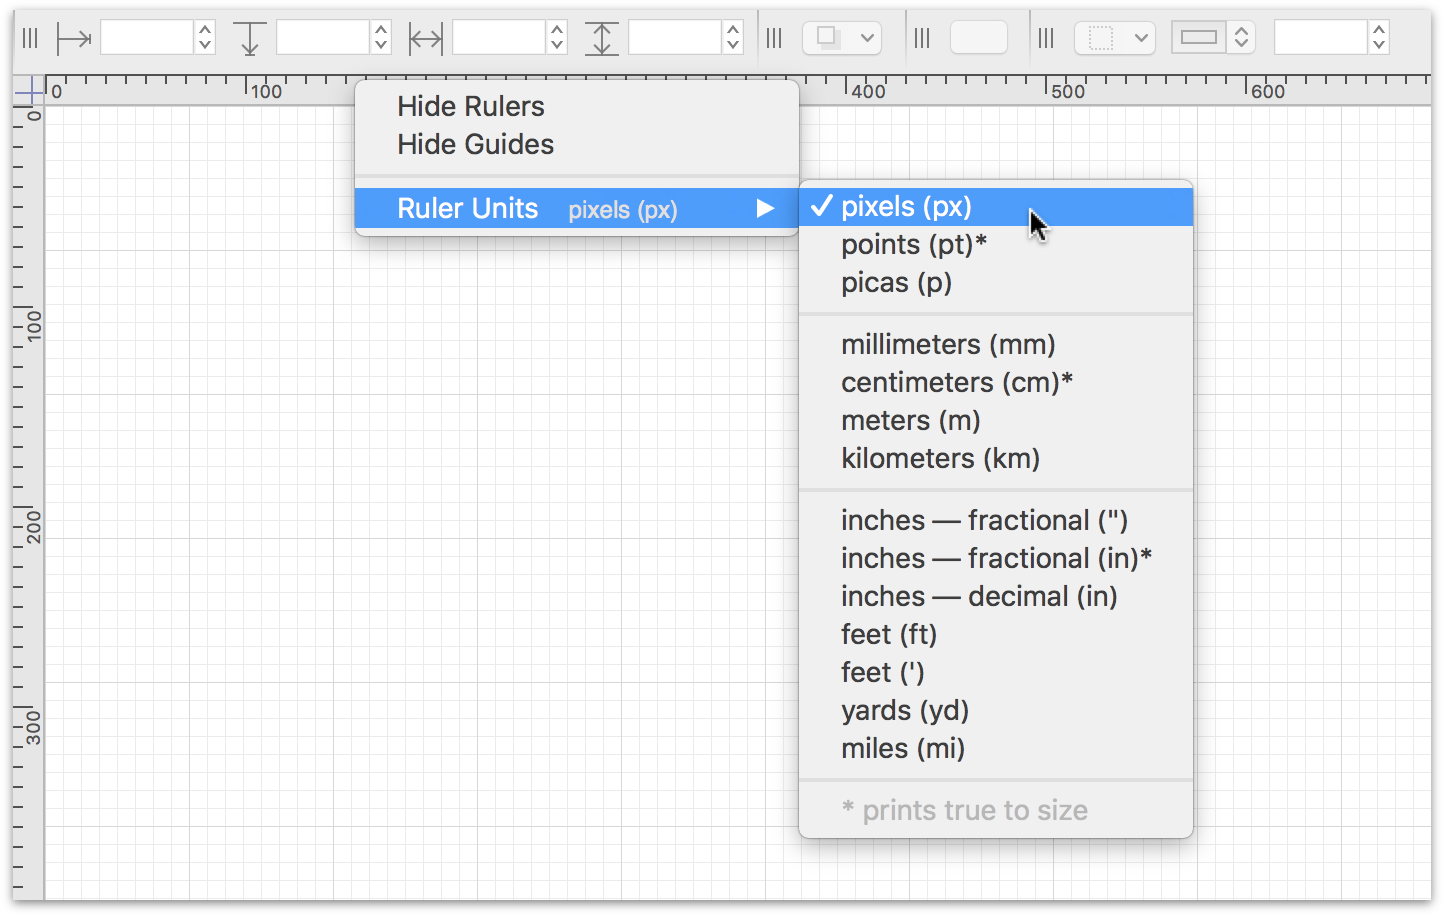
While Control-/Right-clicking on the Canvas gives you quick access to other options, including the ability to add or duplicate Canvases and Layers, and for controlling the Grid and Guides.
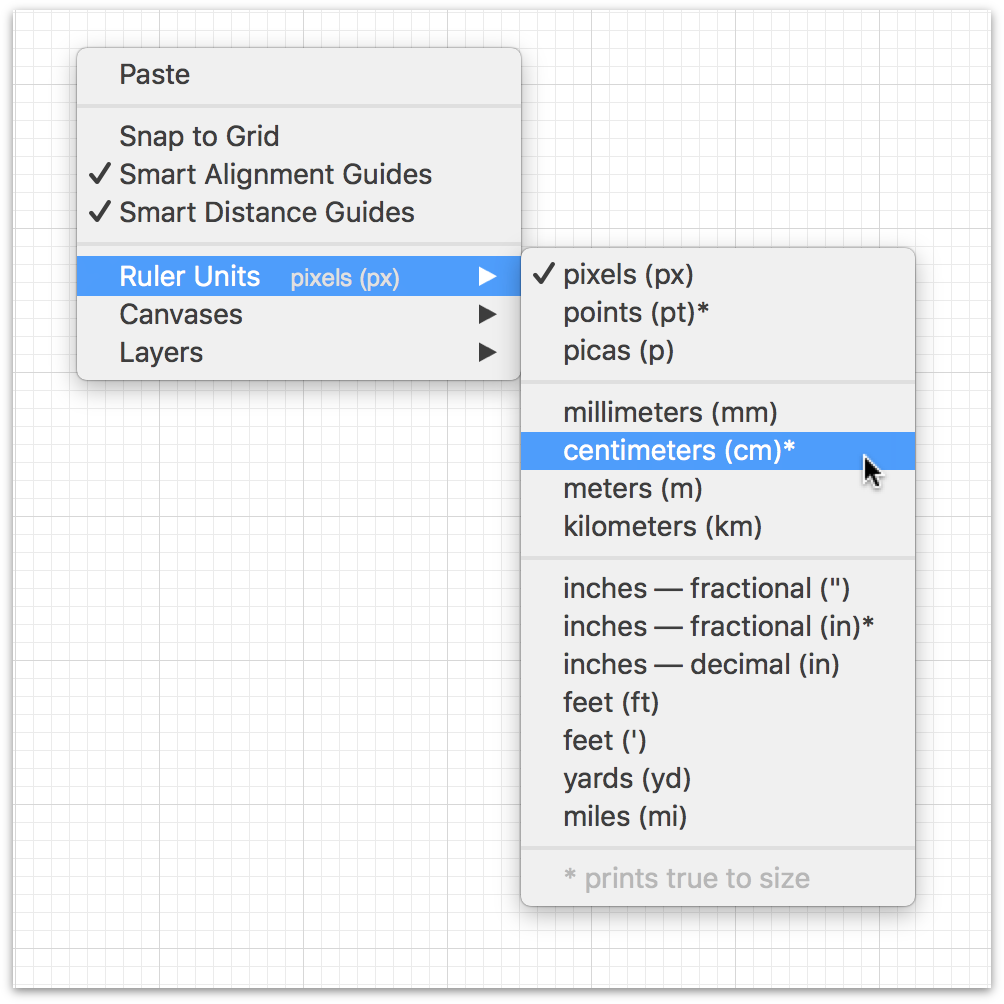
Note that in both cases, the context menu displays the current setting next to the Ruler Units menu item. Also note that the context menu
The unit type specified in the template you choose, or as set in the Units inspector, determine how other inspectors deal with units of measurement. For example, if Ruler Units are set to centimeters (cm), you will see this unit of measurement reflected in the following inspectors:
- Geometry
- Alignment
- Size
- Grid
- Diagram Layout
- Margins
The Stroke, Shadow, Shape, Line, and Font inspectors specify their units in points (pt) regardless of the Ruler Units setting.
Note
See Working With the Inspectors later in this guide for more details about the individual inspectors.
Setting and Using Canvas Guides
You can use a combination of ruler guides and OmniGraffle’s Smart Guides to position and perfectly align objects on the canvas. To add a ruler guide to your canvas, click and hold on either the top or left ruler bar and then drag a guide onto the canvas.
The guides you drag in are bright pink, so they are easy to recognize. If you don’t like the pink guides, you can change the color in the Guides popover by clicking ![]() next to the Canvas title in the sidebar. You can also set the Guide colors independently by clicking the popup menu to the right of each guide in the Guides popover menu.
next to the Canvas title in the sidebar. You can also set the Guide colors independently by clicking the popup menu to the right of each guide in the Guides popover menu.

There’s no limit to the number of guides you can drag onto the canvas, so don’t be shy.
The Object Inspector Bar
When you have selected an object, the area above the ruler—the Inspector Bar—contains mini inspectors—miniature versions of the full inspectors—for editing basic attributes of selected objects:

For example, when you have a shape object selected on the Canvas, the mini inspectors include:
- Horizontal Object Position—the object’s position from the left origin point.
- Vertical Object Position—the object’s position from the top origin point.
- Object Width—the object’s width.
- Object Height—the object’s height.
- Shadow Casting Style—set the shadow style for the object; for additional control over shadows, see the Shadow inspector.
- Shape Style—this pop-up lets you quickly select a shape style for the selected object.
- Stroke—choose a stroke style for the selected object.
- Stroke Color—set a color for the object’s stroke.
- Stroke Thickness—set the width (or thickness) for a stroke.
- Fill Type—choose a fill type for the selected object(s). Use the controls to the right to set the fill color (or colors, if you have selected one of the gradient options).
- Fill Color—fill the selected object with a color.
You can remove the mini inspectors from the Inspector Bar by clicking and dragging it away from the bar. When you let go of the mouse button, the mini inspector disappears. To add a mini inspector, hold down the Option and Command keys while dragging an inspector from the right sidebar to the Inspector Bar. To reset the mini inspectors to the default set, choose Inspectors ▸ Sidebar.
When entering or editing text you’ve placed on the Canvas, tab stops appear in the top ruler and text formatting controls appear in the Inspector Bar. You can style text, change the spacing and alignment, or drag tab stops to and from the ruler.

Using the Style Tray
At the bottom of the Inspector sidebar, you’ll find a tray which contains style “swatches” for the selected object.

The isolated swatch on the left represents all of the styles applied to the selected object, while the rest of the swatches represent each of the styles applied to the object, such as fill, stroke, image, shadow, shape, font, and text position. Drag any of these swatches to another object, to a group in the Selection inspector, or to a tool in the tool palette, to copy the style there.
Note
The absence of a style—such as having no stroke, no fill, or no shadow—also counts as a style. For instance, you can drag a “no fill” swatch to an object to remove its fill.
If you select more than one object, only the styles that those objects have in common appear in the style tray.
Setting OmniGraffle’s Preferences
A standard feature among Mac apps, OmniGraffle’s preferences can be accessed from the menu bar (OmniGraffle ▸ Preferences), or with the Command-, keyboard shortcut.
Two features that all of the preference panes offer are the ability to Reset ( ) any changes you’ve made to the defaults settings, and quick access to Help (
 ) documentation for that pane.
General Preferences
The General preferences give you control over basic OmniGraffle settings, such as what OmniGraffle does at startup, whether new documents open with a blank canvas or you’re taken to the template chooser, and things like text editing and selection behaviors. You can also turn on Multi-Touch for trackpad support, and opt for OmniGraffle to only show you the inspectors you need when you’re working on the canvas.
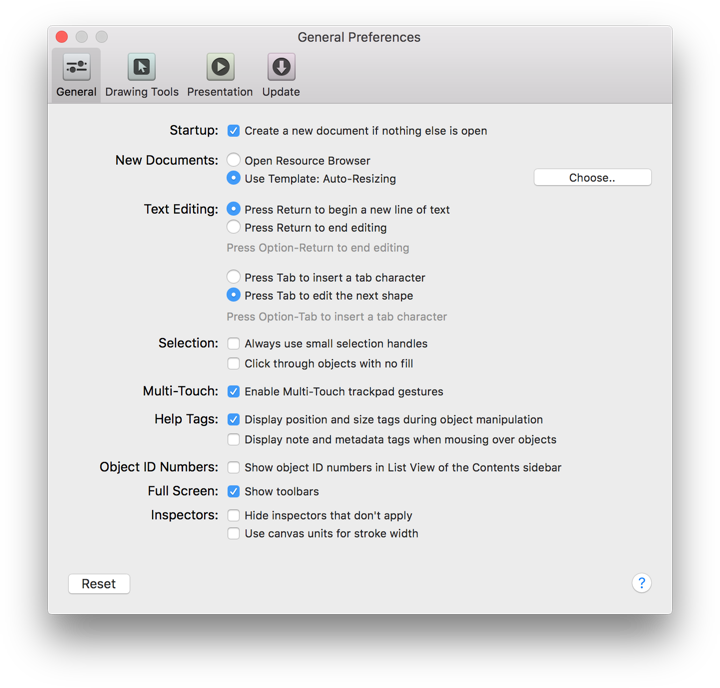
Options include:
- Startup
- Select Create new document if nothing else is open to start with a new document when you aren’t making OmniGraffle remember open documents, or if there were no open documents the last time you quit.
- New Documents
- Select Open Resource Browser to be presented with a window for choosing from a variety of file sources each time you create a new document. Select Use Template, and choose your default template, if you’d rather bypass the browser. Either way, you can always get to the browser with the Resource Browser command in the File menu.
- Text Editing
- Decide how you would like the Return and Tab keys to behave while you are editing an object’s text. Whichever way you choose, you can hold Option while pressing the key to do the reverse instead.
- Selection
- Small objects get smaller versions of the handles that appear when you select them; if you really like the small ones, you can click Always use small selection handles to see them all the time.
-
When you click in the middle of a shape object that isn’t filled with an image or color, you might want to select the object or you might want to select whatever is behind it. Use the Click through objects with no fill checkbox to indicate which you prefer.
- Multi-Touch
- Disabled by default, turn this option on if you’d like to use Multi-Touch gestures with a trackpad on a compatible MacBook Pro, MacBook Air, or other device.
- Help Tags
- When you move or resize an object, a little help tag appears to let you know the object’s new location and size exactly. That is, unless you find it annoying and turn it off here.
- (Pro) If you have OmniGraffle Pro, a second option is available for displaying any notes and metadata you’ve assigned to an object when you mouse over them.
- Object ID Numbers
- (Pro) If you’re accessing OmniGraffle objects with AppleScript, or you’re otherwise endeared to unique IDs, you can select Show object identification numbers to add a column to the list sidebar.
- Full Screen
- Choose whether to display the toolbar when in full screen mode.
- Inspectors
- Choose whether to hide inspectors that don’t apply to the currently selected object.
- Preferences Reset button
- Each preference pane has a Reset button in the lower-left corner. Click this button to return all of the settings on the pane to their defaults. To reset all settings on all preference panes, hold Option while clicking Reset.
Drawing Tools
The Drawing Tools preferences provides you with another way to organize the tools you see in OmniGraffle’s toolbar and set their Hot Keys. You can also define how you interact with the tools, and set the behaviors for line creation and editing.
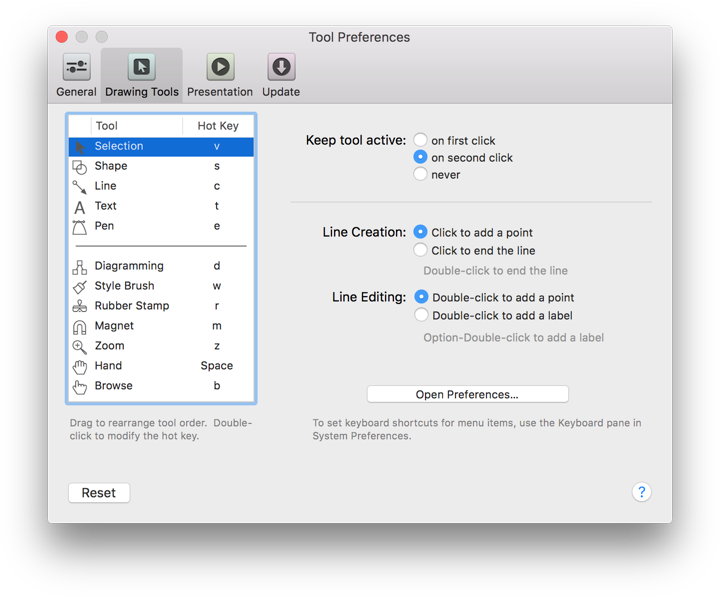
You can drag tools around in the list to reorder them in the palette. Move the separator line to change where the expansion button appears in the toolbar; move it to the end of the list to get rid of the button entirely.
Double-click a tool’s hot key to change it. A hot key activates a tool for only as long as you hold the key down; once you release the key, the previously active tool becomes active again.
- Keep tool active
- By default, it takes one click to temporarily activate a tool, and two clicks to make a tool “stick” in an active state. You can choose to make tools stick after only one click, or make it so that every tool selection is temporary.
- Line Creation
- When you are creating a line, clicking an object will always connect the line to the object and end the line. If you click in an empty area of the canvas, though, you might want to end the line there or you might want just to add a point there and continue creating the line. Use this preference setting to indicate which you prefer.
- Line Editing
- When you double-click a line, you might prefer to add a new point to the line, or you might prefer to add a label. Choose one; Option-double-click performs the opposite action.
Presentation Preferences (Pro)
For those times when you need to make a presentation, say to show off the new user interface for an app you’re developing or when you’re showing a client how you plan to redesign their home, OmniGraffle Pro offers Presentation mode. Available by choosing View ▸ Start Presentation, OmniGraffle takes over your entire screen so you can easily show off your work to everyone in the room.
Use the Presentation preferences to configure your settings for making presentations.
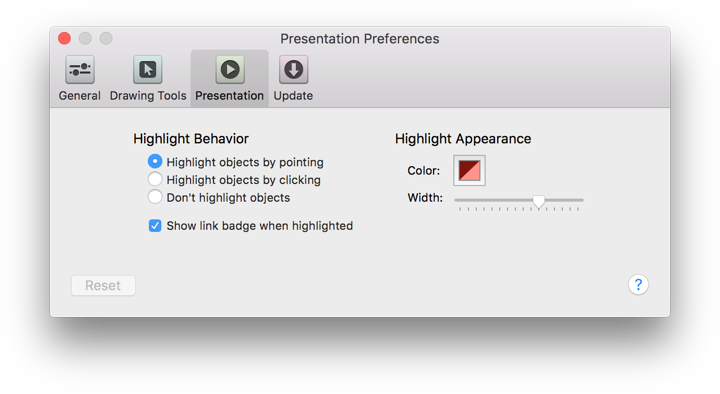
- Highlight Behavior
- Choose whether to have an object become highlighted whenever you put the pointer on it, whenever you click it, or never. You can also choose to display a badge for objects that have actions set up in the Action inspector.
- Highlight Appearance
- Click the color well to choose a color for the highlight. Use the slider to adjust the thickness of the highlight.
Tip
To always match OS X’s highlight color (set in System Preferences ▸ General ▸ Highlight color), open the Colors palette and select the third button, Color Palettes in the window’s toolbar. In the Palette pop-up, choose Developer and then scroll down and choose selectedControlColor from the list of options.
Each canvas acts as a slide; use the arrow keys to move between canvases. You can also press Return or Enter, or click, to move to the next canvas. If your Presentation preferences are set to highlight an object when you click it, doing so won’t advance to the next canvas; you can still click an empty area of the canvas to advance.
While in Presentation mode, you can get to the menu bar by moving your mouse to the top of the screen. The menu bar goes back into hiding when you move the mouse away. If you move the mouse to the bottom of the screen, a navigation interface appears, with buttons for going forward or back, exiting, or moving directly to a particular canvas.
Tip
To turn presentation mode on and off quickly, use Option-Command-P. To leave presentation mode, press Escape or click the × button that appears when you move the mouse pointer to the bottom of the screen.
You can highlight objects to draw attention to them during the presentation. Use the Presentation preferences to control how highlighting happens.
Actions set up in the Action inspector work while in presentation mode. When you click an object that has an action assigned, it performs the action as if you had clicked it with the Browse tool.
Update Preferences
If you’ve purchased your copy of OmniGraffle 6 (Pro or Standard) from The Omni Group’s website, OmniGraffle can automatically use your Internet connection to check for new and updated versions.
Note
The Update Preferences panel doesn’t exist if you have purchased OmniGraffle 6 from the Mac App Store. When there’s a new version of OmniGraffle 6 available, the Mac App Store will alert you to download and install that on your Mac.
You can specify whether OmniGraffle will automatically check for updates Daily, Weekly, or Monthly, or if you’re really impatient, you can click Check for Updates Now to see if we’ve issued a new release. This is particularly helpful if you have Check for updates set to check Monthly and you’ve recently heard that a new update is available.
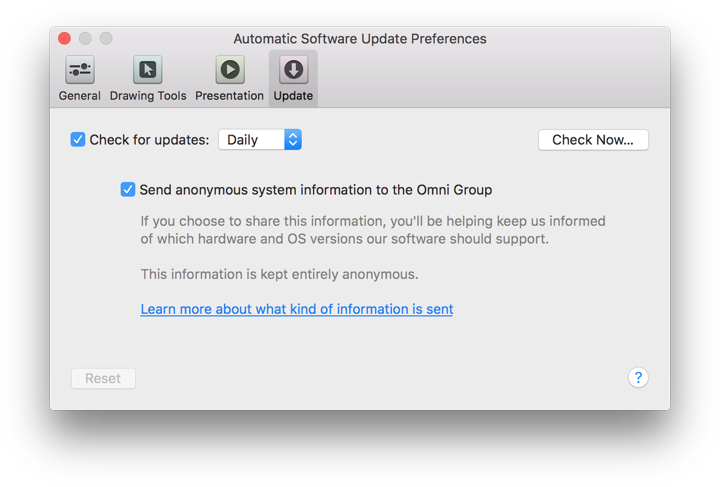
If Check for updates is turned on, you will be notified when there is a new version of OmniGraffle ready for you to download and enjoy. Click Check for Updates Now to look for the newest version manually; you can also choose OmniGraffle ▸ Check for Updates from the menu bar.
Additionally, you can opt in to Include system information when OmniGraffle checks for updates. This sends basic information about your system to us, which we only use to better support various systems with future releases of OmniGraffle. And, as the Update preferences pane says: “This information is kept entirely anonymous,” which means that the information we receive about your system stays with us and is only used by us as we work on future updates of OmniGraffle.