Using Data Variables
In OmniGraffle, a data variable is a string that you can use to insert object and line labels based on other information in your project. These variables look for like-named elements in an OmniGraffle project’s XML source, and displays its corresponding data related to the string provided. For example, you can use the <%Layer%> data variable as a text object on the canvas to display the name of that layer.
Data variables have long been part of OmniGraffle; however, there is a little-known variable, <%UserData%> which gives OmniGraffle Pro users access to project-level details and metadata entered into the Note inspector.
This chapter provides you with a basic overview of the data variables available in OmniGraffle Standard, and shows OmniGraffle Pro users how to go beyond the basics.
Data Variable Basics
You can insert a variable while editing the label of an object or line, or a text object. For example:
- Select the Text tool.
- Click on the canvas to create a text object.
-
Enter the following:
<%Canvas%> -
Press the Escape (Esc) key to accept the variable as the text.
When you press the Escape key, the variable displays the name of the current canvas. If you double-click on the text object, OmniGraffle displays the <%Canvas%> variable.
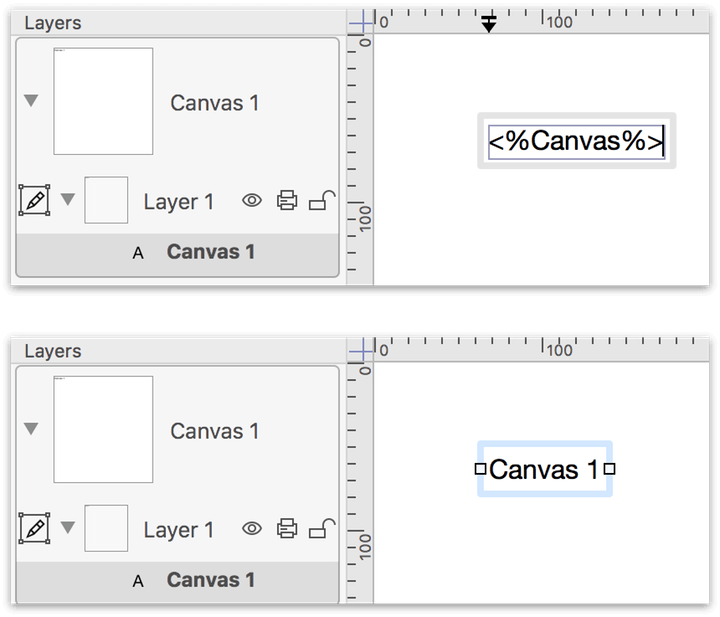
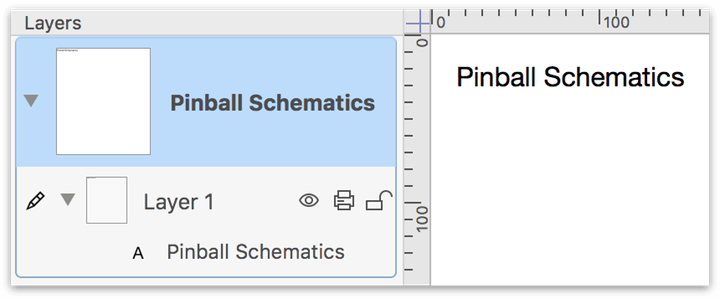
If you change the name of the canvas in the Sidebar (or in the Canvas Data inspector, if you have OmniGraffle Pro), the variable instantly updates to reflect the new canvas name.
The Core Set of Data Variables
OmniGraffle Standard and Pro both have access to a core set of data variables, which you can create without typing by choosing Edit ▸ Insert Variable, and then selecting one of the variable options from the submenu. This places a text object on the current layer, containing the data variable of your choosing.
The core set of data variables include are listed in Table 1.
| Menu Option | Variable | Description |
|---|---|---|
| Canvas and Layer Variables | ||
| Canvas Name | <%Canvas%> |
Displays the canvas name |
| Canvas Number | <%CanvasNumber%> |
Displays a number related to the canvas’s position in the Sidebar |
| Total Canvases | <%TotalCanvases%> |
Displays the total number of canvases in the project |
| Layer Name | <%Layer%> |
Displays the name of the layer |
| Document-specific Variables | ||
| Document Name | <%Document%> |
Displays the filename of the OmniGraffle project |
| Creator | <%Creator%> |
Displays the user name of the person who created the project |
| Modifier | <%Modifier%> |
Displays the user name of the person who last modified the project |
| Page Number | <%#%> |
Displays the current page number, based on the object’s position on the canvas as it relates to how the page is printed |
| Total Pages | <%TotalPages%> |
Displays the total number of pages to be printed from the project |
| Date Variables | ||
| Current Date | <%Date%> |
Displays today’s date |
| Document Creation Date | <%CreationDate%> |
Displays the date the project was created |
| Document Modification Date | <%ModificationDate%> |
Displays the date that the project was last modified |
| Object-specific Variables | ||
| X Position | <%X%> |
Displays the object’s horizontal distance from the origin |
| Y Position | <%Y%> |
Displays the objects vertical distance from the origin |
| Width | <%Width%> |
Displays the object’s width |
| Height | <%Height%> |
Displays the object’s height |
| Line Length | <%LineLength%> |
Displays a line object’s length |
| Graphic Name | <%GraphicName%> |
Displays the name of the object |
Customizing the Date Strings Used by the Date Variables
As noted in Table 1, OmniGraffle has three date-specific variables that make it easy for you to track the status of work on your projects.
-
Current Date (
<%Date%>) — inserts the current date. This particularly handy when you want to “stamp” a document you’re exporting or printing with today’s date. -
Document Creation Date (
<%CreationDate%>) — inserts the date that the document was originally created, according to the document XML. -
Document Modification Date (
<%ModificationDate%>) — inserts the date that the document was last saved, according to the document XML.
The date variables are particularly useful when combined with the <%Creator%> and <%Modifier%> variables, when you need to see who last updated a project file.
If you are using one of the date variables, you can customize the format of the date using the variables listed in Table 2.
| Variable | Description |
|---|---|
y |
Two-digit year, based on the decade; for example, 16 for “2016” |
Y |
Four-digit year; for example, 2016 |
m |
Month, represented as two digits ranging from 01-12; for example, 10 for October |
d |
Day, represented as two digits ranging from 01-31 (as appropriate); for example, 05 is the fifth day of the month |
H |
Hours, represented as two-digits ranging from 00-23; for example, 11 is 11 a.m., whereas 23 is 11 p.m. |
M |
Minutes, represented as two digits ranging from 00-59 |
S |
Seconds, represented as two digits ranging from 00-59 |
z |
Zulu time difference; for example, an output of -0700 represents that the current time is seven hours behind Zulu time |
For example, to get a date such as 2016-10-05 08:37:30 -0700Z, you could use the following variable string:
<%date %Y-%m-%d %H:%M:%S %zZ %>
The logic we have used in creating the date variables is based on Cocoa’s date formatting tokens.
Using the Line Length Variable
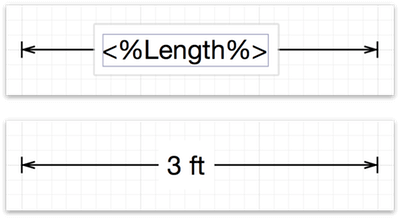
Apply the Line Length variable (<%Length%>) is especially useful when assigned as the label on a line. The Line Length variable relies on the values set in the Units inspector when displaying the line length.
For example, let’s say that you are creating a floorplan of your house or apartment. In the Units inspector, you can set the Ruler Units to feet (ft), and the Scale to something like 1 in = 1 ft to get accurate (to-scale) floorplans, using lines and the Line Length variable to display the dimensions.
Data Variables Bound to Inspectors
Two of OmniGraffle’s inspectors—Document Data (Standard), and Note (PRO)—offer a way for you to provide additional information about the objects in your project, and the project file itself, with ease. And, you can tap into the information you’ve provided in these inspectors with some special, inspector-bound variables.
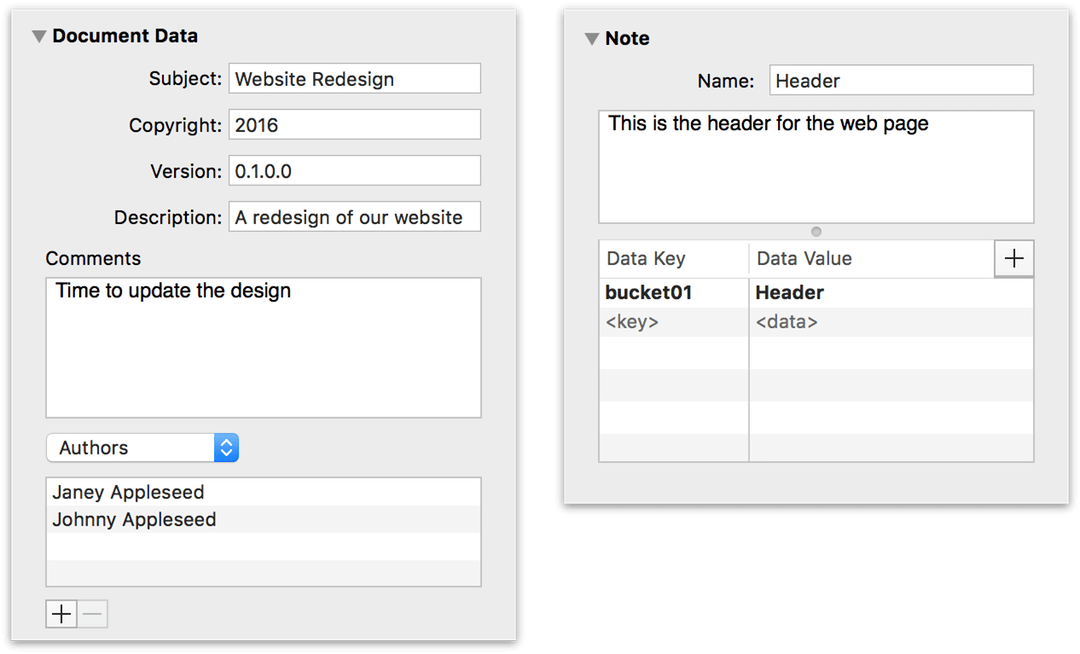
Similar in form to the Note inspector, the only information that you can access from the Canvas Data inspector is the Name field, via the <%Canvas%> variable.
If you choose to add a Note or any key-value data to the Canvas Data inspector, that information is solely referential in nature. At present, OmniGraffle doesn’t offer variables to access those fields.
Variables for the Document Data Inspector
Every field of the Document Data inspector has a like-named variable. This also includes the metadata pop-up menu, which lets you add details about the project, including a list of Authors, Organizations, Languages, Keywords, or Projects. And while the metadata you enter in the rows beneath the pop-up menu can be singular, you can enter as many as you’d like.
The Document Data inspector’s variables are not accessible via the Edit ▸ Insert Variable menu, and are shown and listed here:
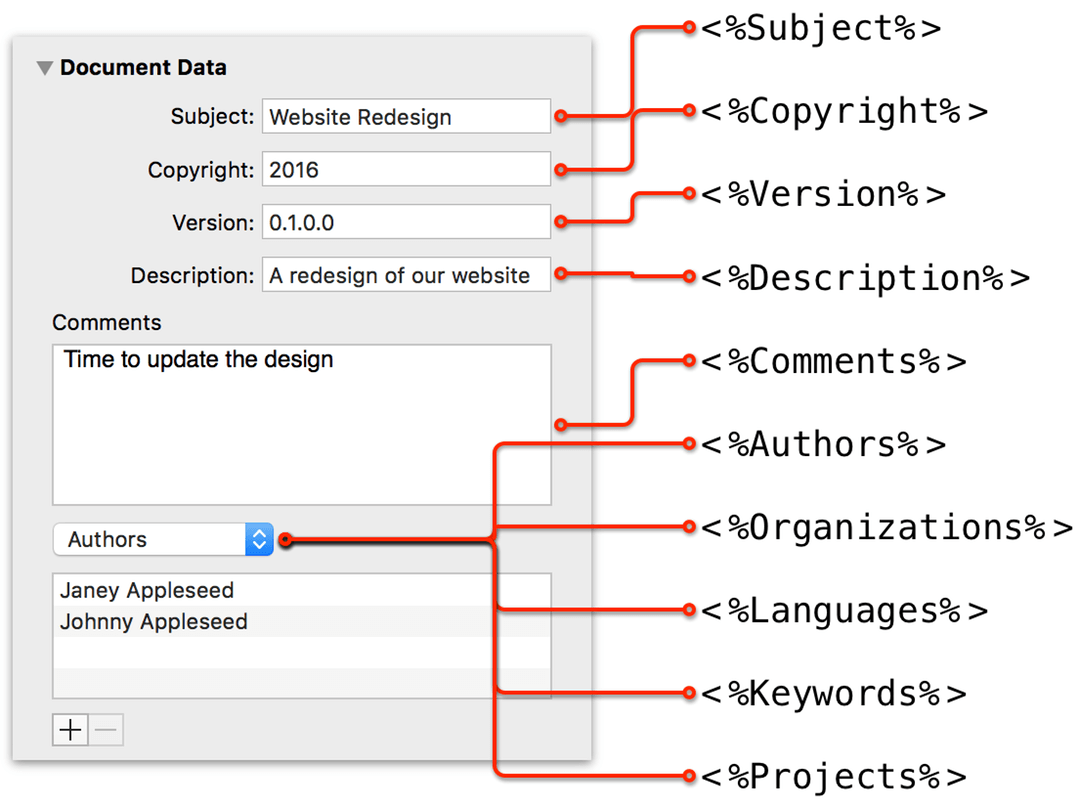
-
<%Subject%>— Displays the Subject of the field. -
<%Copyright%>— Books and software are protected by copyrights, and you can label your projects with a similar copyright statement. -
<%Version%>— If needed, enter a version number for your project. This can be helpful for working on projects that are synced and shared among team members by having them iterate the version string whenever a change is made. -
<%Description%>— Enter a brief description about the project. -
<%Comments%>— Use the Comments field to enter a little more information about the project; more than you would enter in the Description field. -
<%Authors%>— Here, "Authors" is used loosely to define the people associated with the project. The people you list in the rows underneath can be designers, engineers, architects, and so on. -
<%Organizations%>— This could be the name of your company or the name of the client this project is related to. -
<%Languages%>— Here you can specify the languages within the project. For example, if you are prototyping an app that will be localized in other languages, you can list those here. -
<%Keywords%>— You can add metadata to your projects when Keywords is selected in the pop-up menu. There’s no limit to the number of keywords you can assign to your project. When you use<%Keywords%>, each keyword you assign to a project is displayed on its own line. -
<%Projects%>— Used for assigning a name to the project you are working on. You can assign more than one project name in the list; each one is displayed on its own line when the variable is called.
Using the UserData Variable to Access Key-Value Pairs (PRO)
If you have OmniGraffle Pro, you can enter details about specific objects in your projects using the Note inspector, and then—with the use of variables—apply that information to the objects on the canvas.
The Note inspector looks fairly innocuous, there’s the Name field at the top which is bound to the <%GraphicName%> variable. There’s a Note field, where you can enter information about the object. The information you enter here is displayed whenever you hover over that object with the mouse. (There is no variable for accessing the Note field.)
The <%GraphicName%> variable displays the name of the object, and is not dependent on having OmniGraffle Pro. If you have OmniGraffle Standard, you can assign names to objects in the Sidebar instead of in the Note inspector.
To learn more about naming objects in the Sidebar, see Changing Canvas, Layer, and Object Names in the Sidebar, earlier in this guide.
Accessing Key-Value Pairs with the UserData Variable
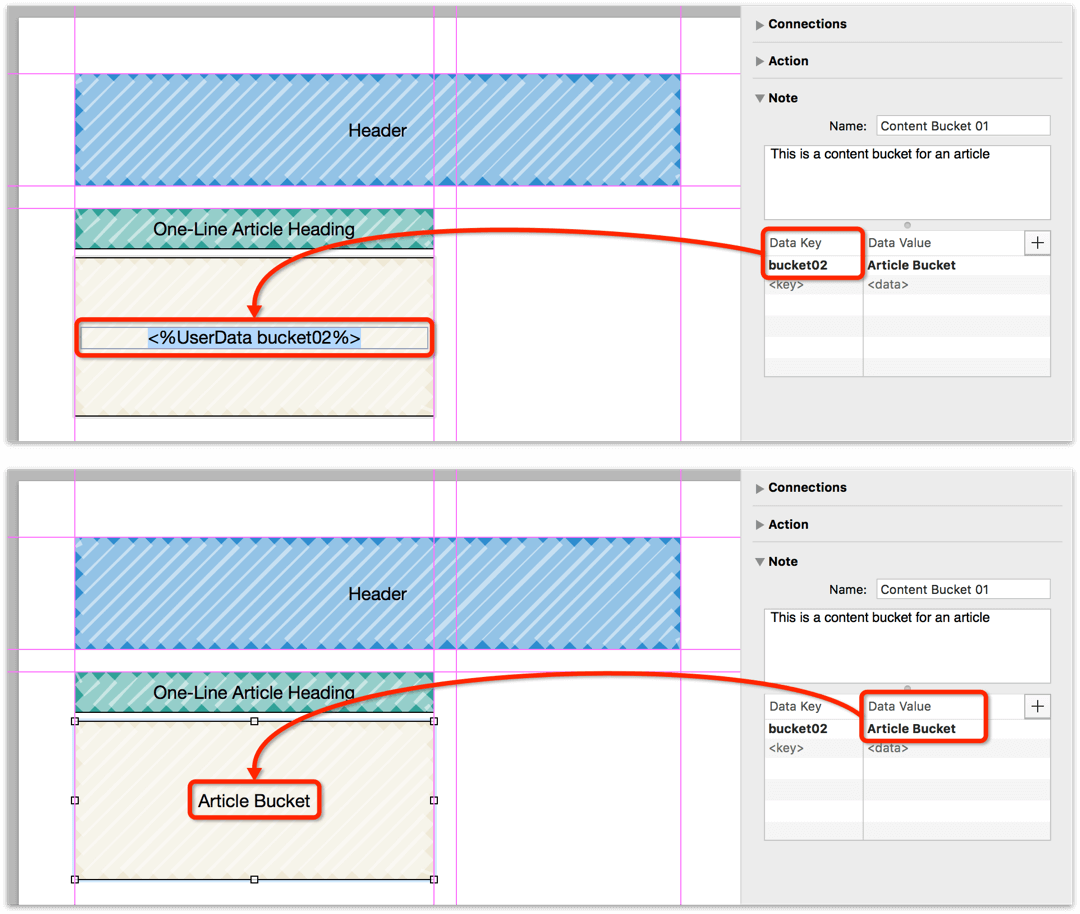
At the bottom of the Note inspector is an area where you can assign key-value pairs to individual objects in your project. A key-value pair is similar to the listings you find in a dictionary, where the word you look up is the key and its definition is the value. You can use the <%UserData%> variable to call upon the key and use its value as the label of an object or line.
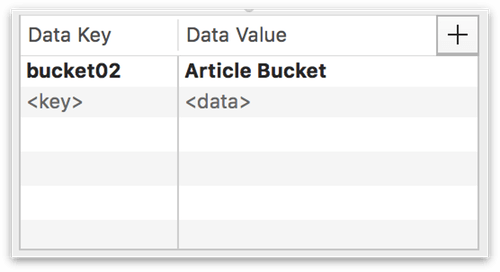
Using the previous image as an example, bucket02 is the key, and Article Bucket is the value. To display the value (Article Bucket) as the label for an object, you would use the following variable:
<%UserData bucket02%>
Using Multiple Key-Value Pairs on the Same Object
You don’t need to limit the number of key-value pairs you assign to an object to just one pair. For example, if you are working on a website design, you might want to devote a canvas in your project to hold detailed color swatches you plan to use on the site. You can then use the keys to identify color spaces, and the values to display the appropriate color value.
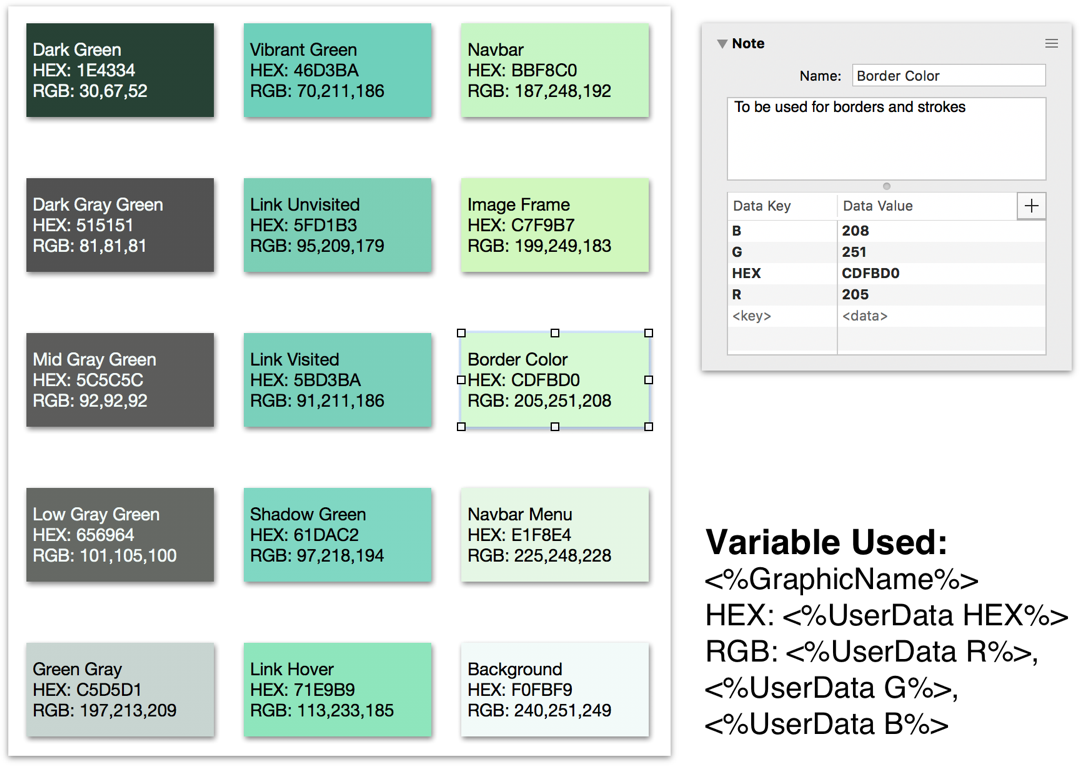
- The variables used as the object labels are as follows:
-
<%GraphicName%> -
HEX:
<%UserData HEX%> -
RGB:
<%UserData R%>,<%UserData G%>,<%UserData B%>
In this example, create a single object on the canvas, add the variables (shown above) as the text label for the object, and then use the Note inspector to assign the hexadecimal and RGB color values as key-value pairs. With those details in place, duplicate the swatch as many times as you need, and align them using the Smart Guides or with the Alignment inspector. Finally, use the Fill inspector to change the fill color for each object, and then apply the color values in the Note inspector.
A similar technique could also be used to create a highly detailed network diagram. For example, you could note the IP addresses for servers, switches, and firewalls, the make and model of each piece of gear, the location of the equipment, and more.
Look for ways to leverage key-value pairs and call upon them using the <%UserData [key]%> variable.
Chaining and Nesting Data Variables
Another way you can use data variables in your projects is to combine them. For example, if you want an object to display its width and height, you can set its label as <%Width%> x <%Height%>, thus chaining those two variables together.
Similarly, some variables allow you to nest them together within a single set of angle brackets. For example, you can combine the Page Number and Total Pages variables together as follows to display the range of pages within your project:
<%# of %TotalPages %>
Not all variables, however, can be nested; for example, <%CanvasNumber of %TotalCanvases %> does not work. Instead, you’ll have to chain those together as follows:
<%CanvasNumber%> of <%TotalCanvases%>
Styling Variables
The text produced by a variable can be styled similar to any other block of text by using the Font and Text Position inspectors. You can change the font, type size, and color in the Font inspector, and you can change the alignment, overflow state, and margins in the Text Position inspector. The style changes you make in the inspectors are reflected in the variable itself if you double- or triple-click on the text block containing the variable.
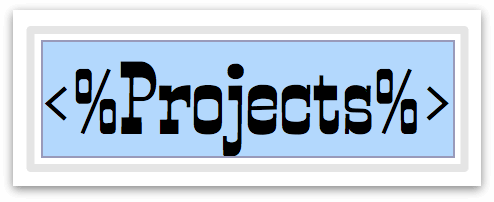
If you have OmniGraffle Pro, you can also convert variable-based text blocks to shapes, by selecting the text object and choosing Edit ▸ Objects ▸ Convert Text to Shapes.
After converting the text block to shapes, the variable goes away, and OmniGraffle renders the text value provided by the variable as shapes.
Using Variables on Shared Layers (PRO)
Some variables, such as <%Canvas%>, <%CanvasNumber%>, <%TotalCanvases%>, <%Layer%>, <%#%> (page number), and <%TotalPages%> are useful for placing on a shared layer and then sharing that layer with every canvas in your project.
For example, if your project has more than one canvas, you can use the following variable on a shared layer to display each canvas’s number:
<%CanvasNumber%>
If you want to display the number of the current canvas in relation to the total number of canvases in your project (resulting in something like Canvas 1 of 3), use the following variable string:
<%CanvasNumber%> of <%TotalCanvases%>
If you wanted to add the canvas name into the mix, you could use the following:
<%Canvas%> (<%CanvasNumber%> of <%TotalCanvases%>)
Which would display something along the lines of Canvas 1 (1 of 3), or whatever name you have assigned to the canvas.
