Working in OmniOutliner
Now that you’ve learned a little bit about what OmniOutliner looks like, and how the sidebar and inspectors work, it’s time to get to work. This tutorial takes you through the process of creating your first OmniOutliner document. Along the way, you’ll learn how to create a custom template (or theme) that you can later use on the documents you create.
You’ll learn some of the basic mechanics of OmniOutliner: how to enter text, move around, and ways to organize your content. Following that, you’ll dive in deeper to take a closer look at OmniOutliner’s layering and style model as you build out the styles for your own template.
By the time you’ve reached the end of the tutorial, you’ll have mastered OmniOutliner and should be able to create templates and styles with, well, style.
Let’s get started!
It All Starts with a Template
When you open OmniOutliner, one of the first things you’ll see is the Resource Browser. This handy window gives you access to the existing templates we’ve included with OmniOutliner, as well as any files you’ve recently worked on. It’s quite handy, actually. If for some reason you don’t see the Resource Browser, go ahead and choose File ▸ Resource Browser (Shift-Command-N).
The Resource Browser makes it easy for you to locate and open files you’ve recently worked on (in the Recents section), or to create new documents using one of the existing Templates. Selecting the main Templates heading in the sidebar shows you all of the available templates.
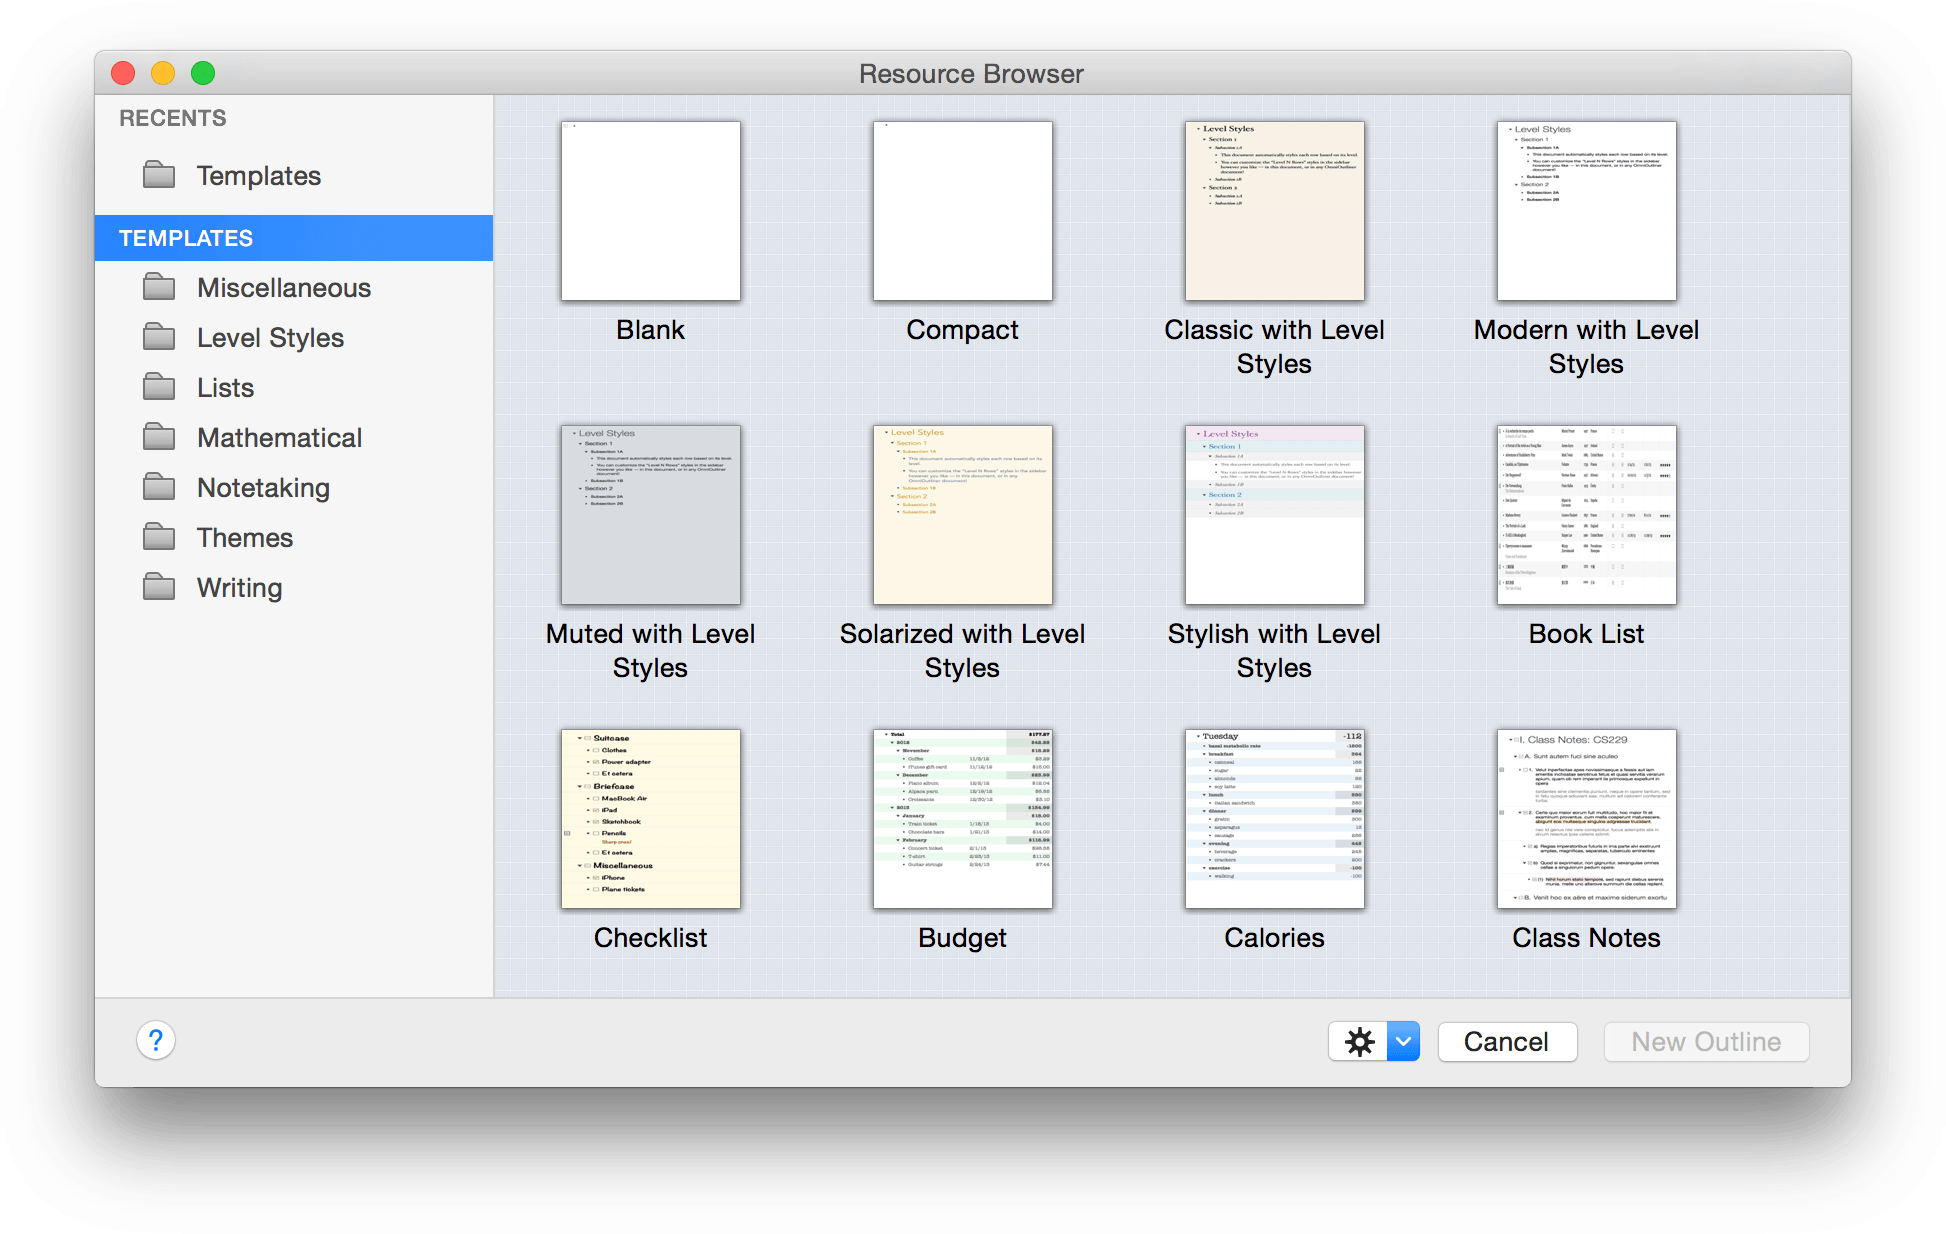
The templates are also categorized based on their style and purpose. For example, you’ll find the Book Draft template in the Writing folder. In the sidebar, select Level Styles folder and then select the Modern with Level Styles template. To get a closer look at the template, press the Spacebar to open a QuickLook view.
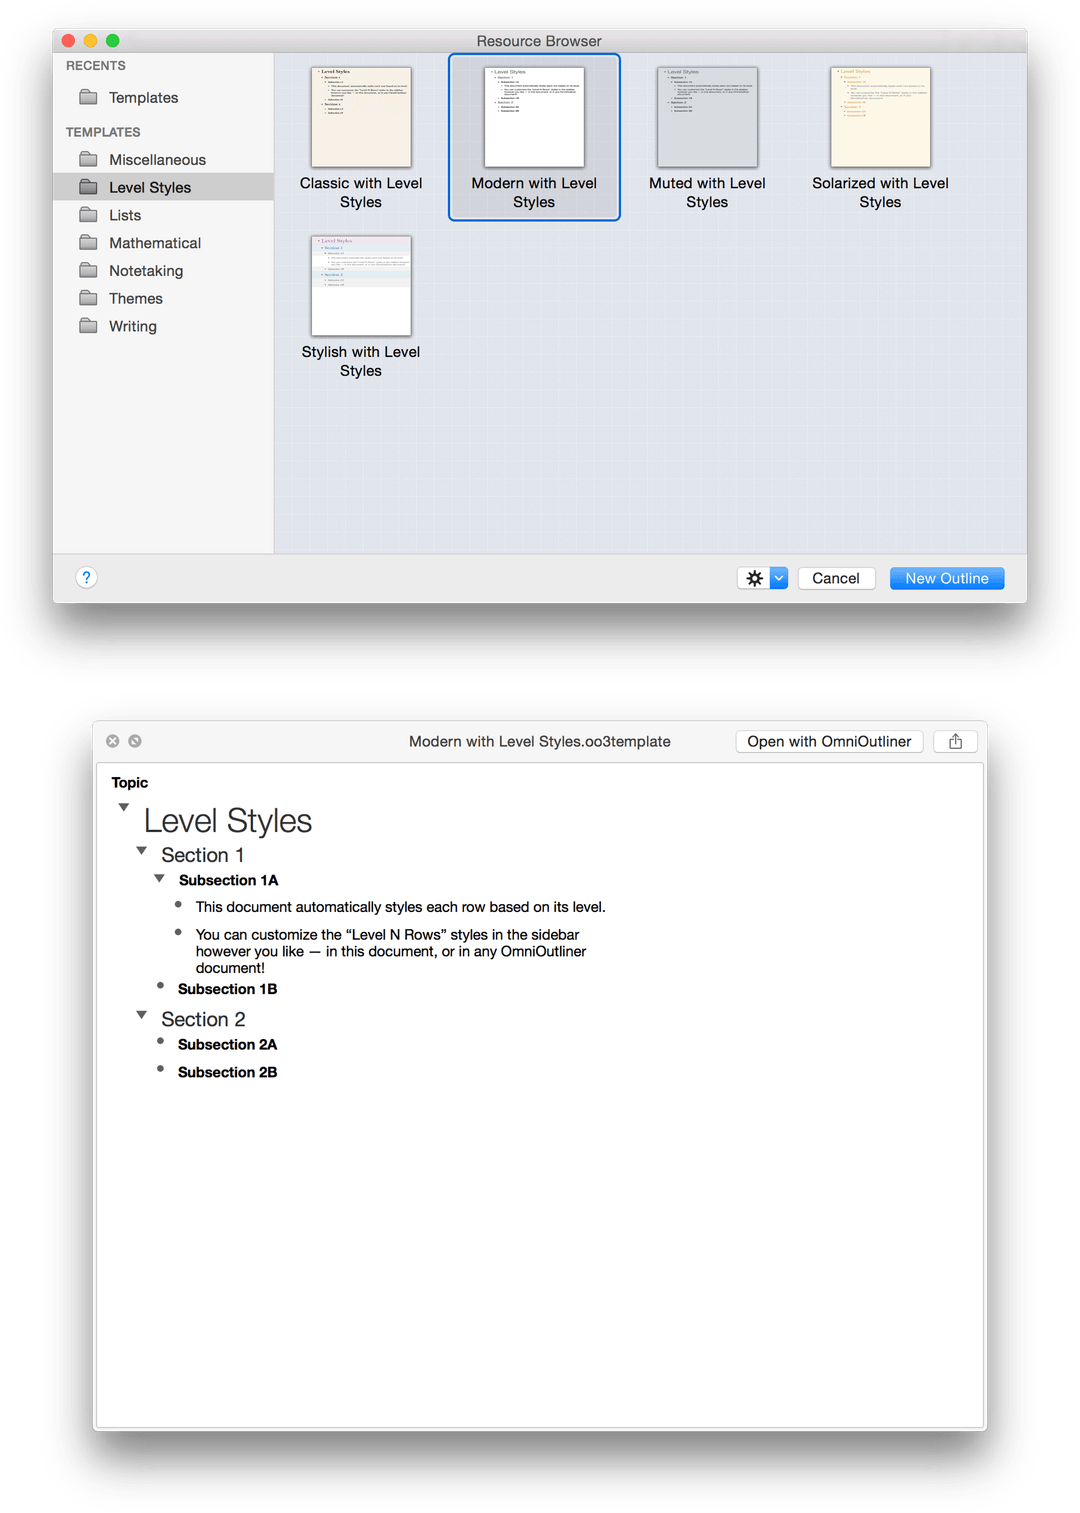
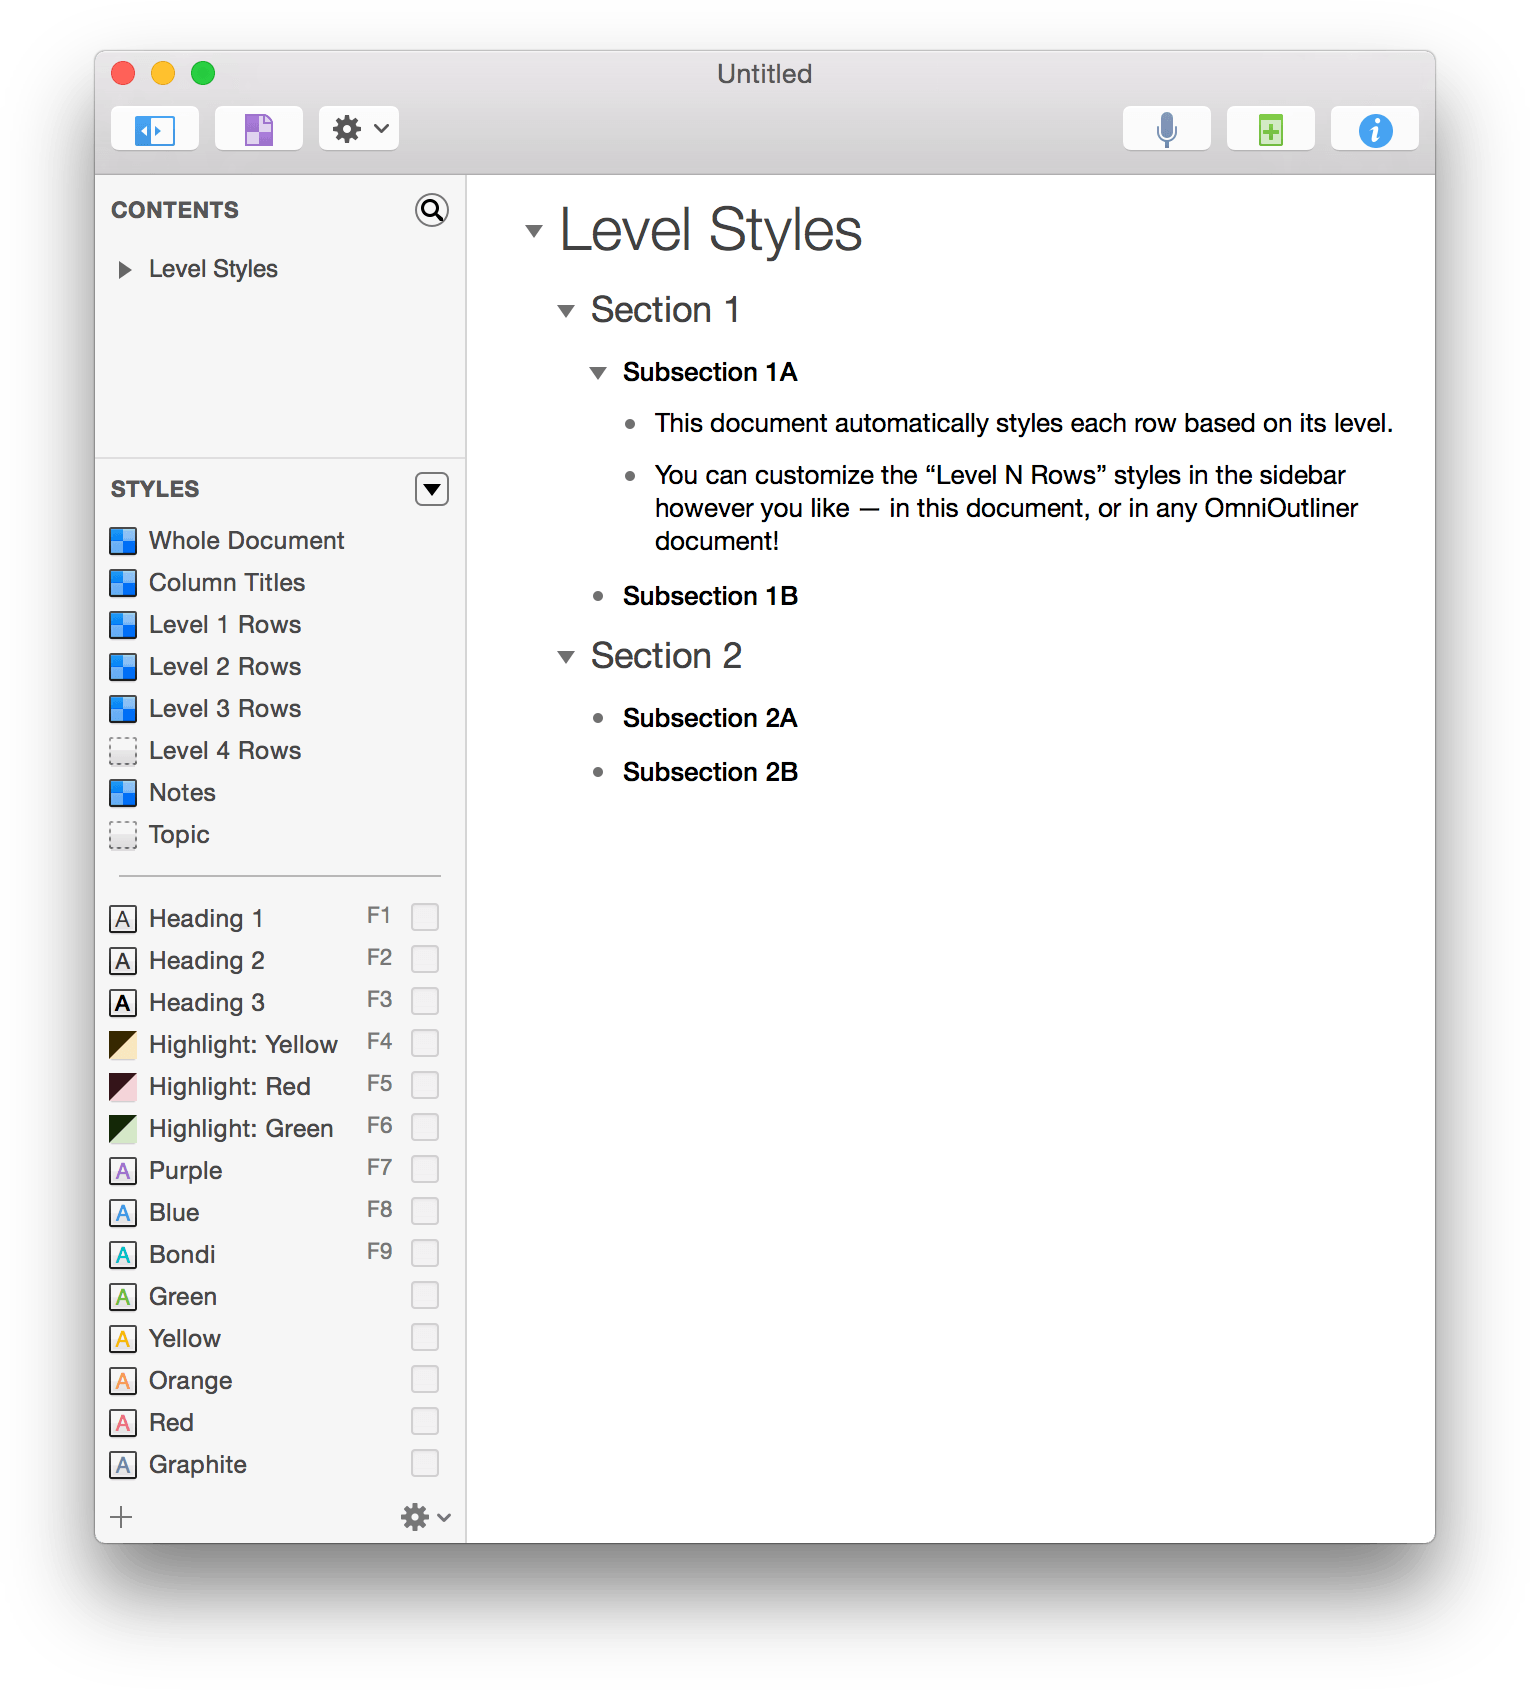
Go ahead and tap the Spacebar again to close the QuickLook popup. As you can see, the Modern with Level Styles template is fairly sparse. It has a white background, and some cleanly styled text for the various levels. You can quickly distinguish which level you’re on based on the text styles: Level 1 rows have larger text, and the styles get progressively smaller and less stylish as you go into the Level 2, 3, and 4 rows. This is perfect, and will be the basis of this tutorial, so go ahead and choose the Modern with Level Styles template and then click New Outline. OmniOutliner creates a new Untitled document based on the style theme in the Modern with Level Styles template.
Document Features and Styles
Before going too much further, it’s important to understand some of the structure of an OmniOutliner document. To help illustrate this, do the following:
- Choose View ▸ Column Headers ▸ Show
- Choose View ▸ Show Status Checkboxes
The Outline area should look like the following:
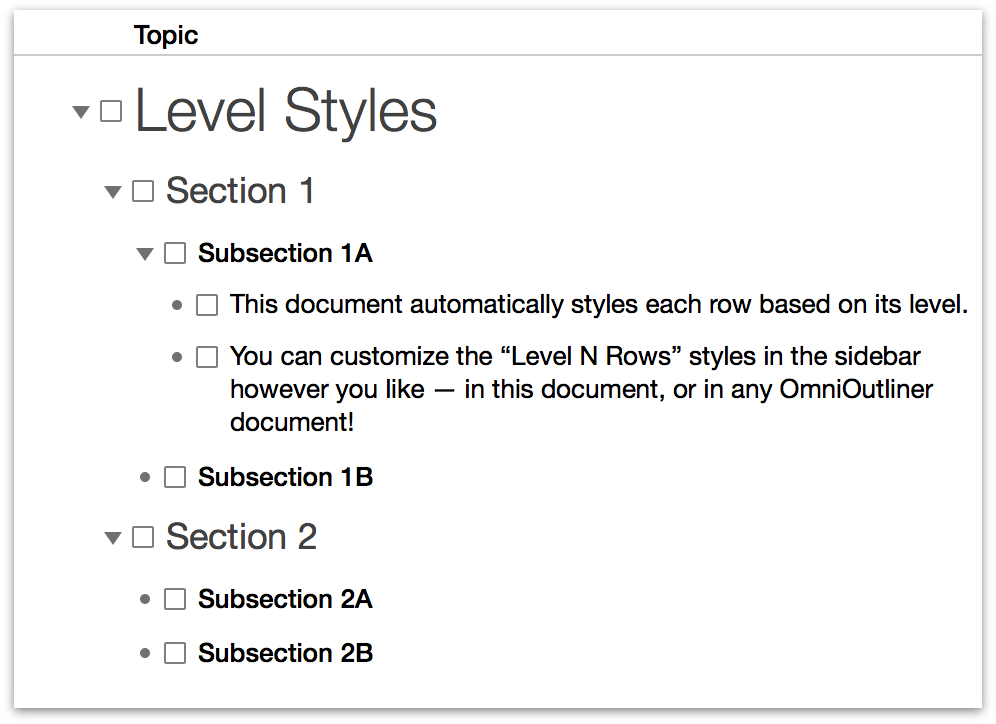
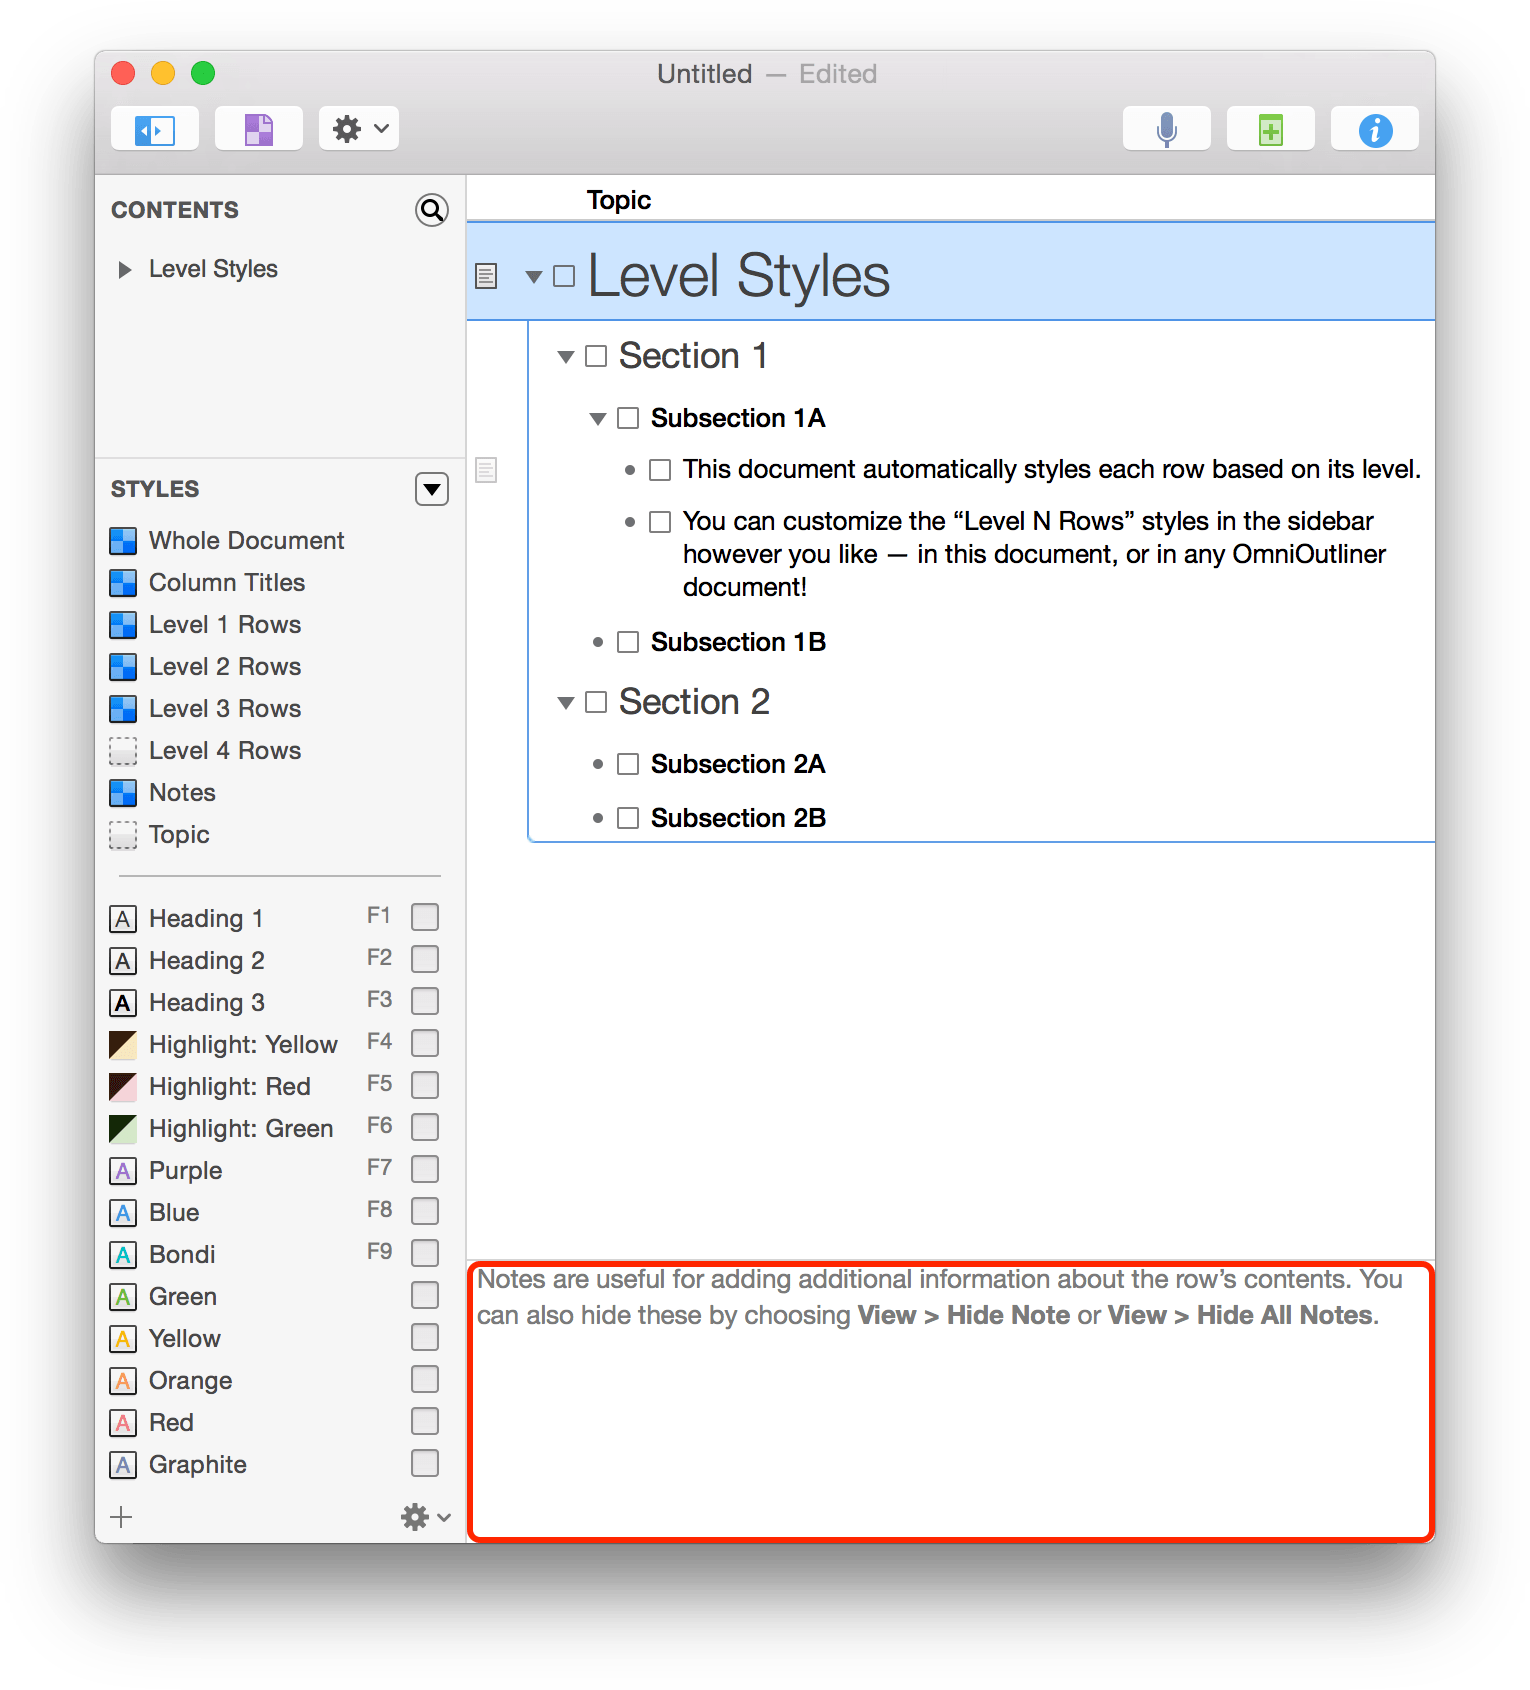
Along the top of the Outline area, you’ll see the Topic column heading, which is the default column heading for the primary (or Topic) column in any OmniOutliner document. You’ll also notice that little checkboxes are placed between each row handle and that row’s content; these are known as Status Checkboxes, and can be used to check things off in a list of things you need to do.
If you move the mouse over the very first row—Level Styles—you’ll notice that a little ![]() icon pops up along the left edge. This is the Notes icon. To add a Note to a row, click this icon and an area opens up along the bottom of the row where you can add some additional text. Go ahead and type something in; yours should look something like the following:
icon pops up along the left edge. This is the Notes icon. To add a Note to a row, click this icon and an area opens up along the bottom of the row where you can add some additional text. Go ahead and type something in; yours should look something like the following:

After you’ve entered a Note, you’ll notice that the ![]() icon is a little darker and is always visible (not just when you move the mouse pointer over a row). This makes it easy for you to see which rows have Notes when you’ve hidden them with View ▸ Hide Note or View ▸ Hide All Notes.
icon is a little darker and is always visible (not just when you move the mouse pointer over a row). This makes it easy for you to see which rows have Notes when you’ve hidden them with View ▸ Hide Note or View ▸ Hide All Notes.
(Pro)
If you have OmniOutliner 4 Pro, you can opt to have Notes appear in a pane along the bottom of the Outline area. To view your Notes in a pane, choose View ▸ Notes ▸ Display in Pane.
Get Your Mind in the Gutter
The point of this exercise—unbeknownst to you—is to highlight all of the things that appear in an outline’s Gutter: the Notes icon, a row handle, and a status checkbox. Depending on how you like to view the content of your outline, you can choose to hide or show all of these independent of one another.
- To hide the Status Checkboxes column, choose View ▸ Hide Status Checkboxes.
- (Pro) If you have OmniOutliner 4.2 Pro and want to hide the Notes column, choose View ▸ Columns ▸ Note.
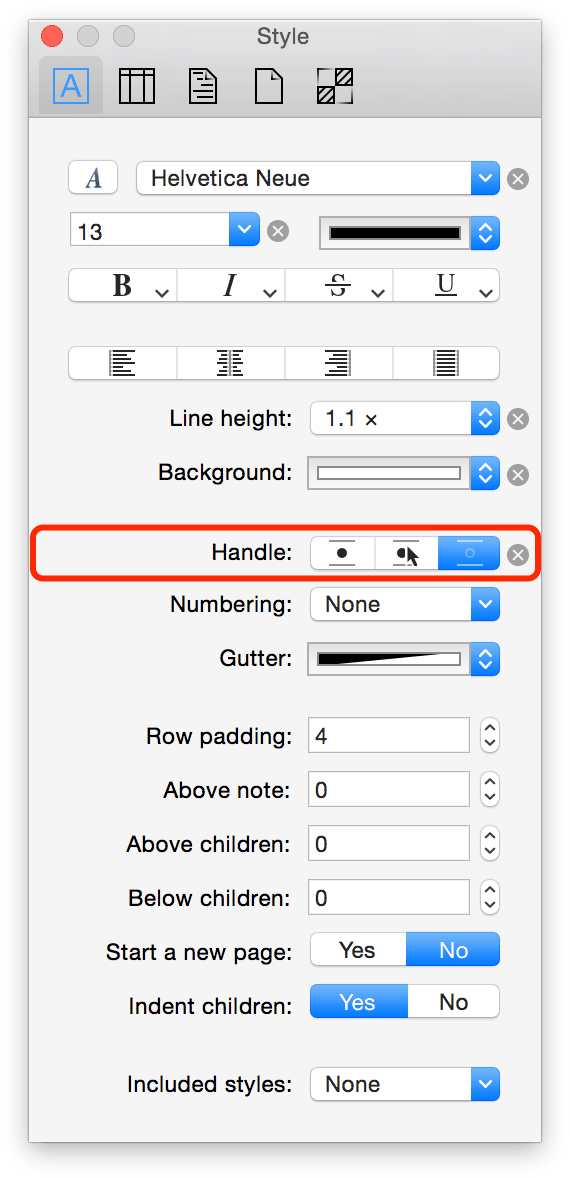
- (Pro) If you have OmniOutliner 4.2 Pro and you want to hide the row handles, open the Style inspector (Window ▸ Inspector ▸ Style). Look for the Handles section in the middle of the Style inspector.
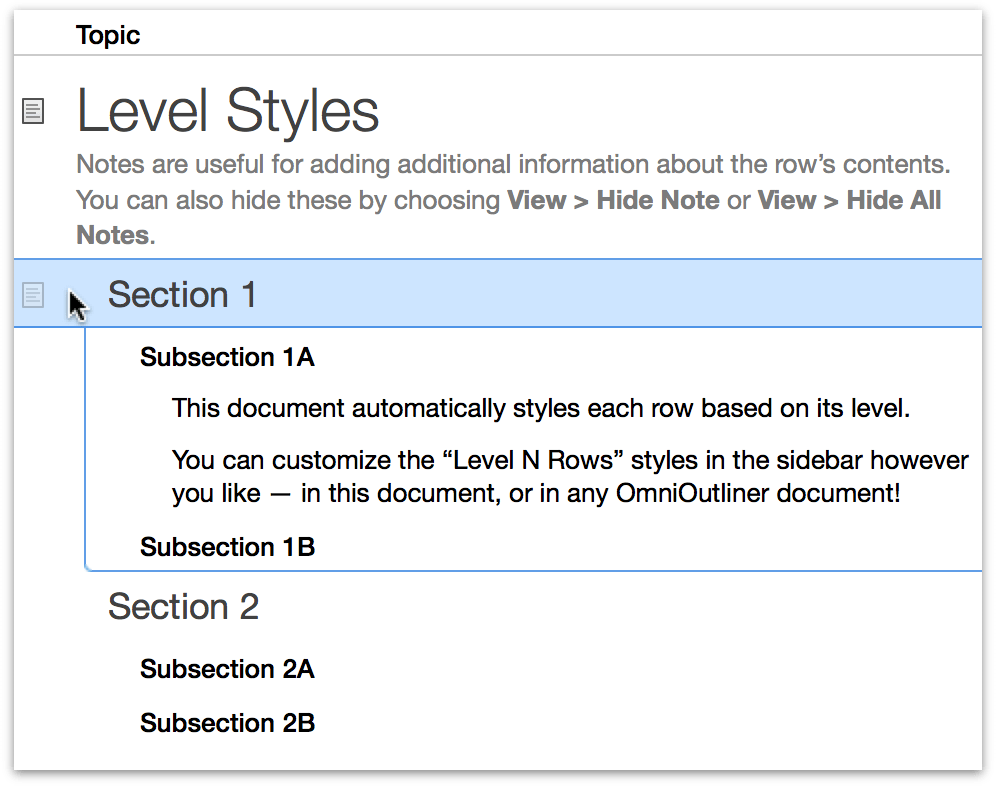
With the Notes, Status Checkboxes, and row handles neatly tucked away, your outline takes on a bit of a cleaner feel. If you click in the Gutter (the space to the left of a row’s content), you’ll see that you can still select individual rows.
Get a Handle On Things
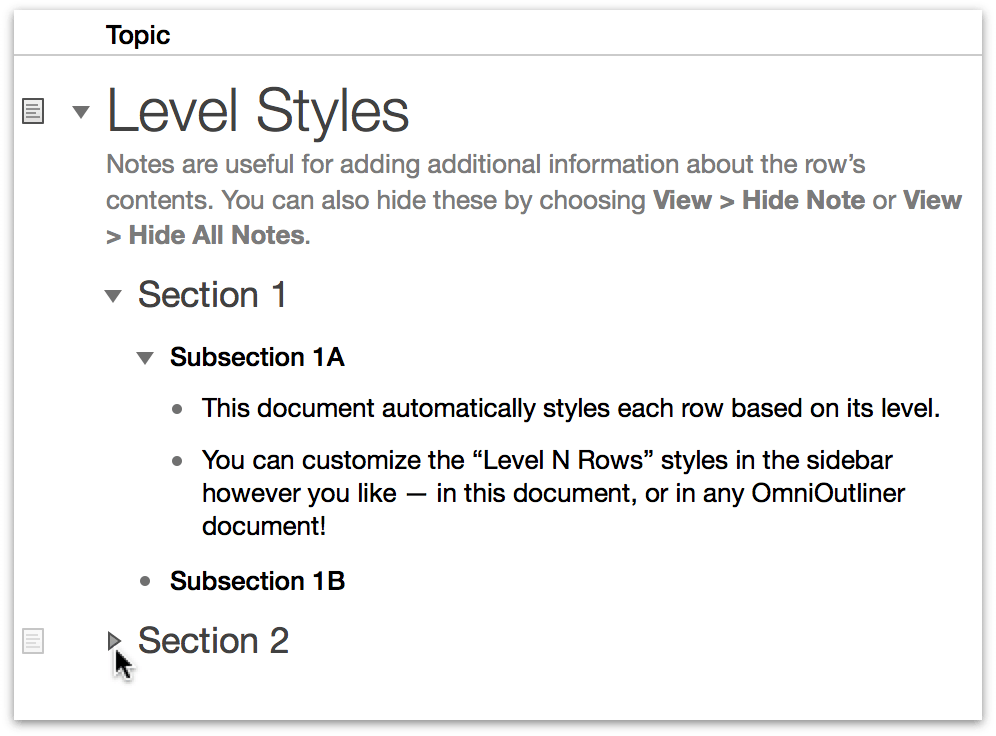
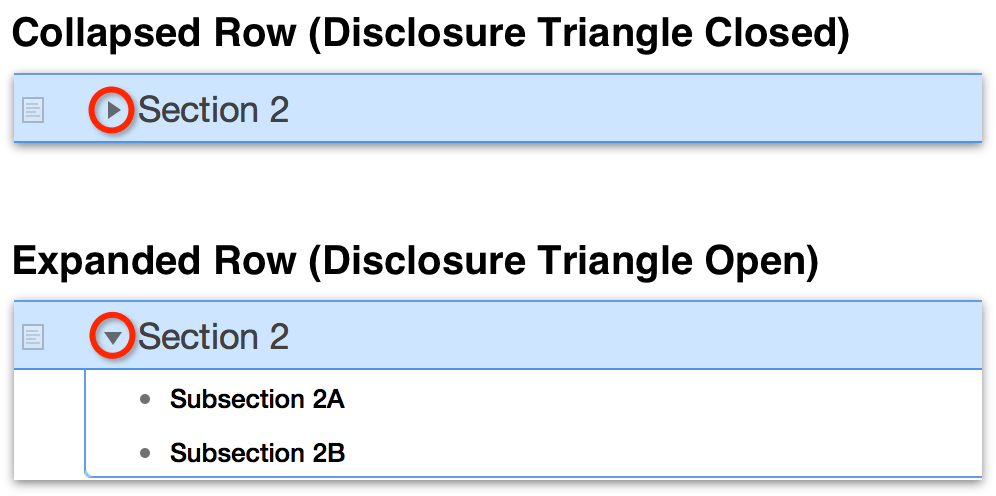
Row handles come in two styles: bullets, which means the row doesn’t have any children, and disclosure triangles, which means that the row has child rows indented underneath.
Row handles are handy because they allow you to expand and collapse rows, and they give you something to grab onto when you want to move sections around in your outline. You can still do this when row handles are hidden; just use the Expand and Collapse options in the View menu, or in the Organize ▸ Move submenu. Don’t worry about these right now; all of this is covered later in Organizing Your Content. Now closely examine the different row handles in the following screenshot:
(Pro) If you have OmniOutliner 4 Pro and you’ve hidden your row handles, go ahead and turn row handles back on again.
Rows with children—indented rows with additional content—have a disclosure triangle as their row handle. When the triangle is pointing downward, the row has been expanded so you can see the content within. If the triangle is pointing to the right, as with the Section 2 row in the previous image, it means the row has been collapsed to hide its contents. Click on the closed disclosure triangle to expand the row, or click in the gutter to select the row and choose View ▸ Expand Row (Command–9).
You can also use the Left and Right Arrow keys to expand and collapse rows as long as the row is selected. To give this a try, click gutter of the Section 1 row to select it, and then press the Right Arrow key to collapse the list, and then press the Left Arrow key to expand it again.
One trick you’ll find that comes in handy is Option-clicking the disclosure triangles. When you Option-click a disclosure triangle, it automatically hides or expands everything at that level. For example, Option-click the disclosure triangle for the Section 1 row to collapse all of its children.
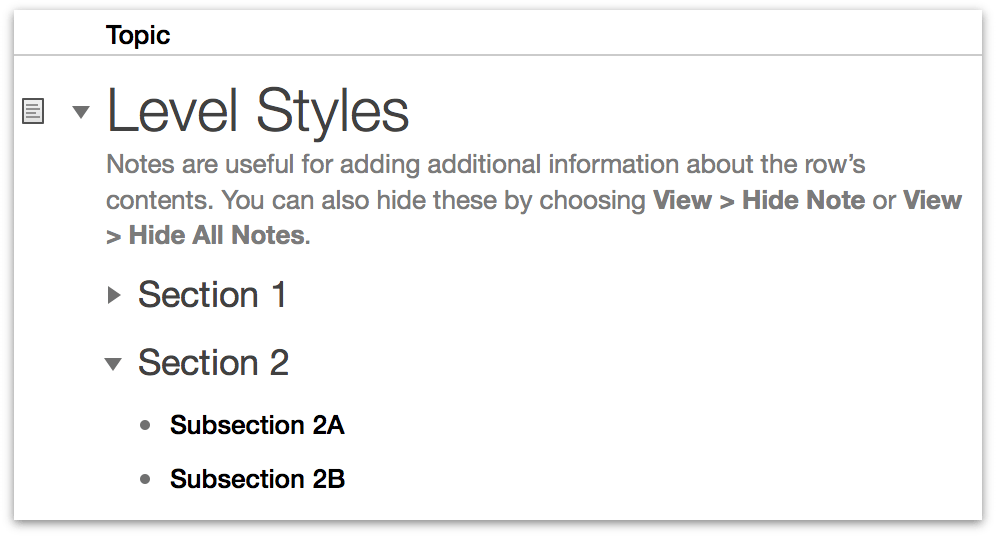
If you just click on the row handle for Section 1 (the right-pointing disclosure triangle), you’ll see the following:
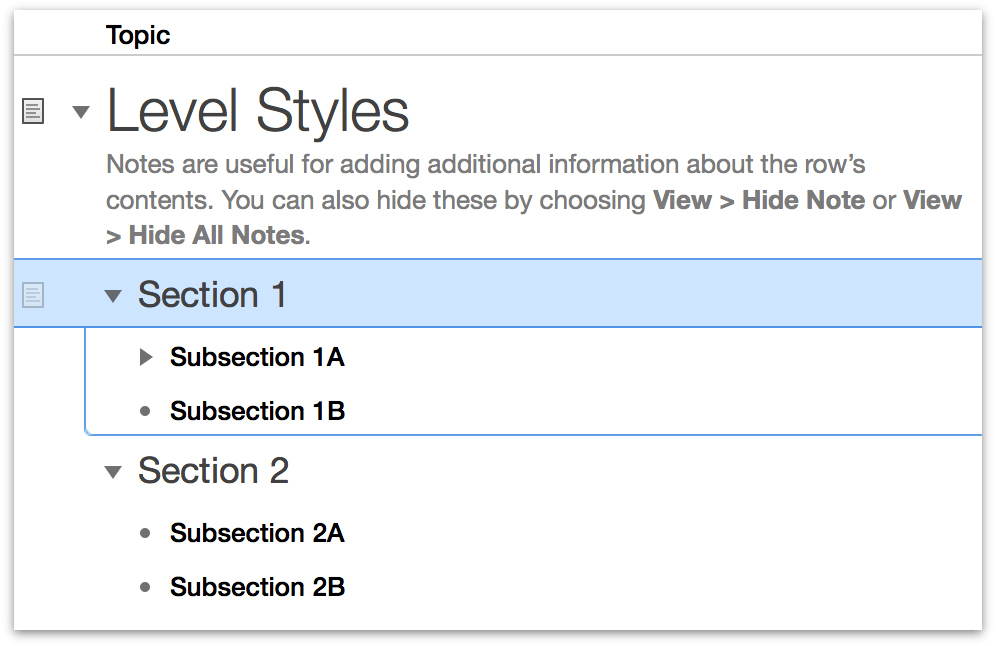
Notice that the contents of Subsection 1A are collapsed and hidden from view. However, if you were to Option-click on the disclosure triangle instead, all of the rows within that have children also expand.
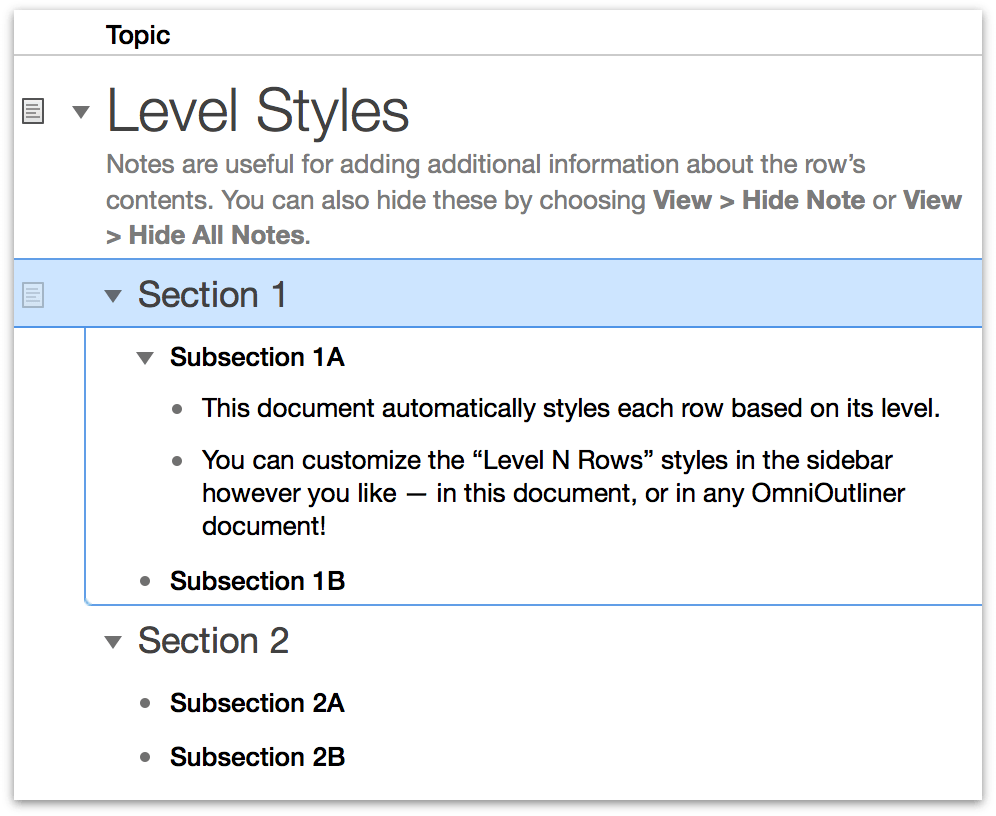
Take some time to play around with the disclosure triangles to collapse and expand the rows, using a mixture of clicking and Option-clicking so you get the hang of how this works.
Styles, the Style Attributes Inspector, and You
One of the many things that makes OmniOutliner such a fantastic outlining tool is the ability to add style to your content. We have included a bunch of templates and themes with OmniOutliner 4 (none of them are exclusive to Pro users) that you can use wholesale or as a starting point for the outlines you create. And that’s exactly what we’re doing here in this tutorial.
If the Inspector window isn’t open, go ahead and choose Window ▸ Show Inspector. You could also click the Inspector button in the toolbar, but since you’re trying to learn everything about OmniOutliner, try using the keyboard shortcut, Shift-Command-I to open the Inspector window.
You can move the Inspector window around, and when you move it alongside the main window, you’ll notice that it kind of snaps into place. This doesn’t mean that the Inspector window moves in concert with the main window, it’s just something cool that we thought you should know. Give it a try.
In the Outline window, click anywhere beneath the content; somewhere in the vast white space at the bottom of the document. This deselects all of the rows, and leads you to the next step: learning about the Style Attributes inspector.
In the Inspector window’s toolbar, double-click the far-right button (it looks like a checkerboard) to open the Style Attributes inspector. This places a little green lock on the inspector so it always remains active.
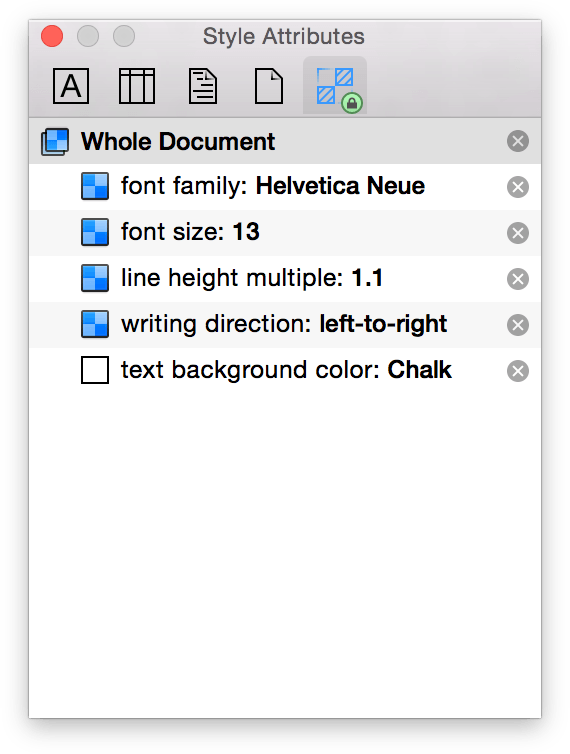
The styles you see for Whole Document are the base styles for this particular template. Let’s quickly run through what you see here:
- The base font family is Helvetica Neue).
- The base font size for the outline is 13 points.
- All rows will have a default line height multiple of 1.1, which adds a little padding between each row.
- The writing direction has been set to left-to-right.
- And finally the text background color has been set to Chalk (white).
In the Styles pane of the sidebar, select Level 1 Rows and watch what happens with the Style Attributes inspector; the inspector changes to show you the styles for Level 1 Rows, in addition to the Whole Document styles.
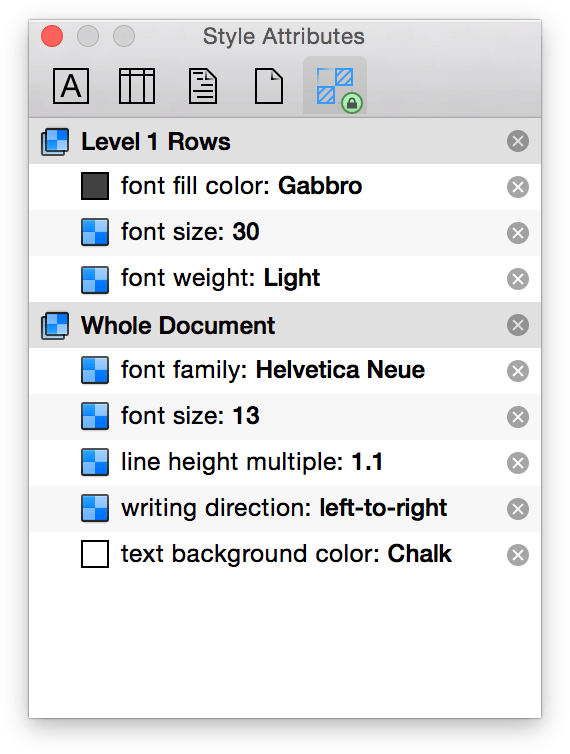
If you look at the Level 1 Rows section of the inspector, you’ll see that defines a font fill color for the text (Gabbro), the font size (30 pt), and the font weight (Light), but no actual font. This is because the font family is defined under the Whole Document styles.
What this means is that Level 1 Rows are styled as dark gray, 30 point Helvetica Neue Light. As you may have guessed, the Whole Document styles set the base “layer” of styles for your document, while the various Level styles can be defined independently so they adopt attributes of the Whole Document style.
The order of the styles in the Style Attributes inspector shows the style hierarchy for the row you’ve selected. To “read” the styles, you start at the bottom of the Style Attributes inspector and work your way up to the top combining properties as you go. For example, if you were to read the Style Attributes inspector to interpret how Level 1 Rows are styled, you could translate that as follows:
Level 1 Rows are dark gray with a white background. Text is left-aligned, 30 point Helvetica Neue Light, with a line height of 1.1.
Click on the Section 1 row in the outline and see how the Style Attributes inspector changes.
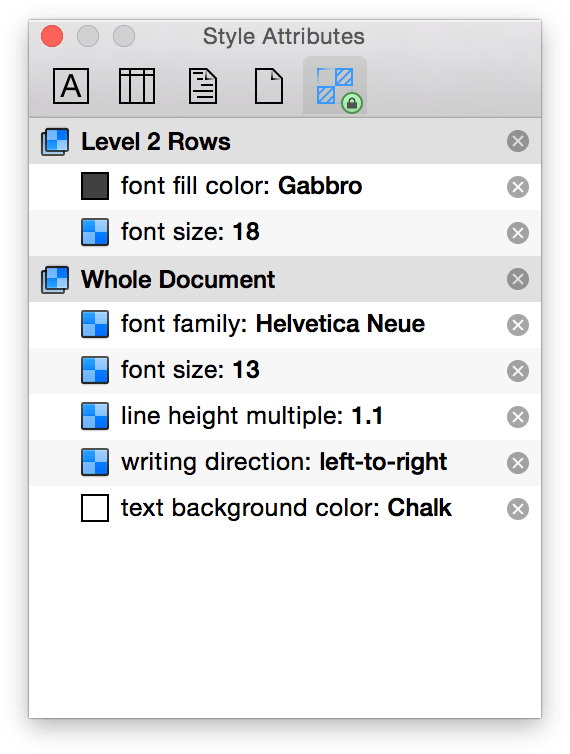
This reads as follows:
Level 2 Rows are dark gray with a white background. The text is left-aligned, 18 point Helvetica Neue.
And let’s do this again by first selecting the Subsection 1A row:
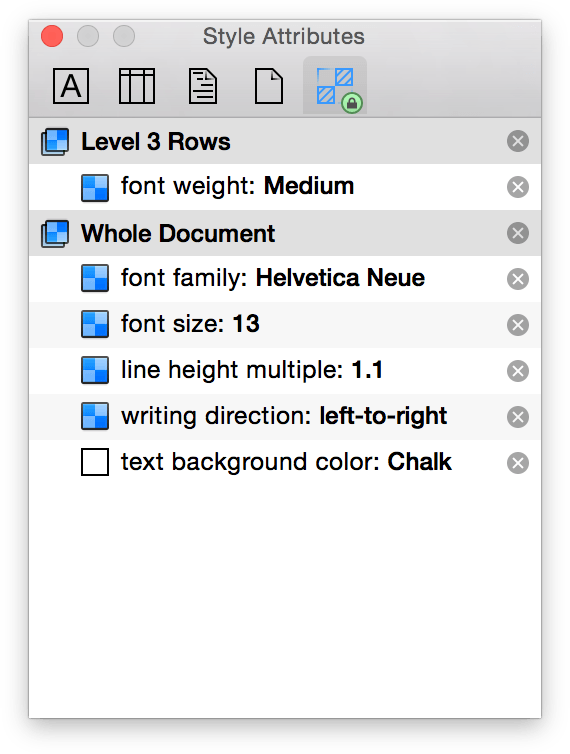
Which reads as follows:
Level 3 Rows have a white background. The text is left-aligned, 13 point Helvetica Neue Medium.
There’s one more thing you should know about the Style Attributes inspector. Click in the lower portion of the outline (in the white space) so you see just the Whole Document styles.
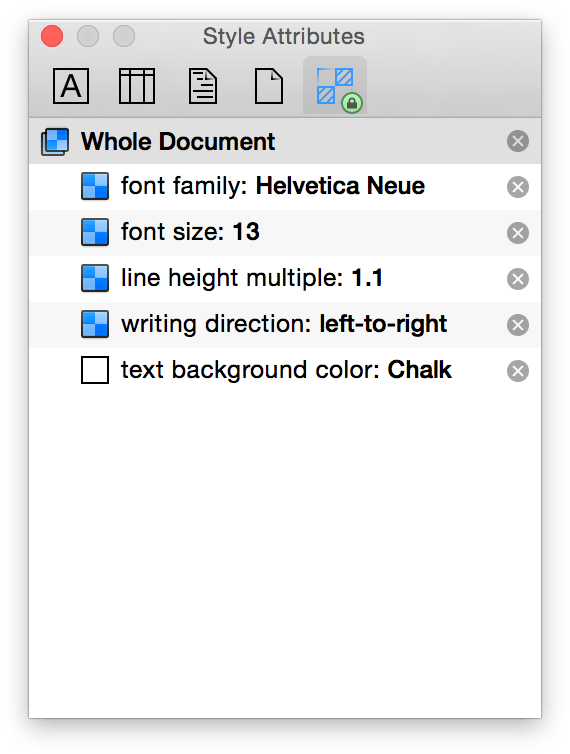
If you look to the right of each of the style attributes, you’ll notice a little ![]() . As you might guess, if you click on that little
. As you might guess, if you click on that little ![]() , it removes that style attribute from the list. Go ahead and click the
, it removes that style attribute from the list. Go ahead and click the ![]() next to text background color. Nothing changes in the main window (because OmniOutliner’s default background color is white), but now that style attribute is no longer defined for the Whole Document style.
next to text background color. Nothing changes in the main window (because OmniOutliner’s default background color is white), but now that style attribute is no longer defined for the Whole Document style.
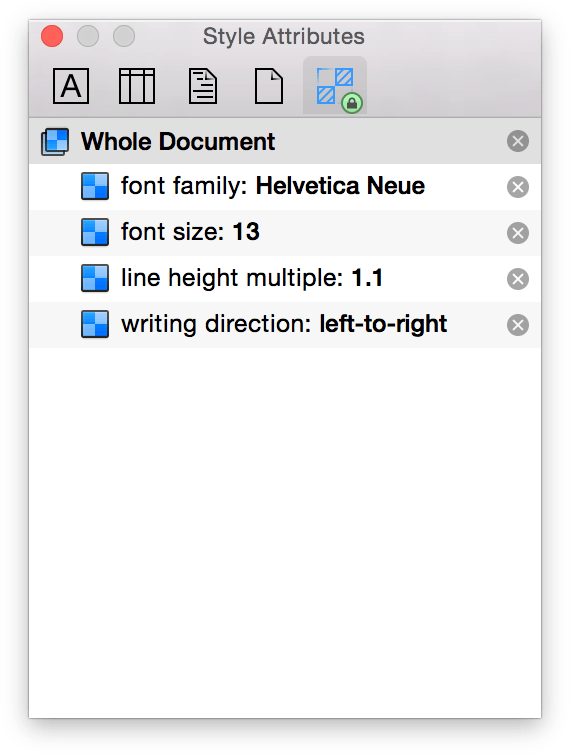
To bring the text background style back, choose Edit ▸ Undo Delete Style Attribute, or use the Command-Z keyboard shortcut.
Removing the Template Styles
Yes, that’s right: the next thing you’re going to do is to clear out all of the styles in the document you’ve been using. In the sidebar, select all of the styles in the top portion of the Styles pane. Then, click the Action menu at the bottom of the sidebar and choose Clear Style from the menu.
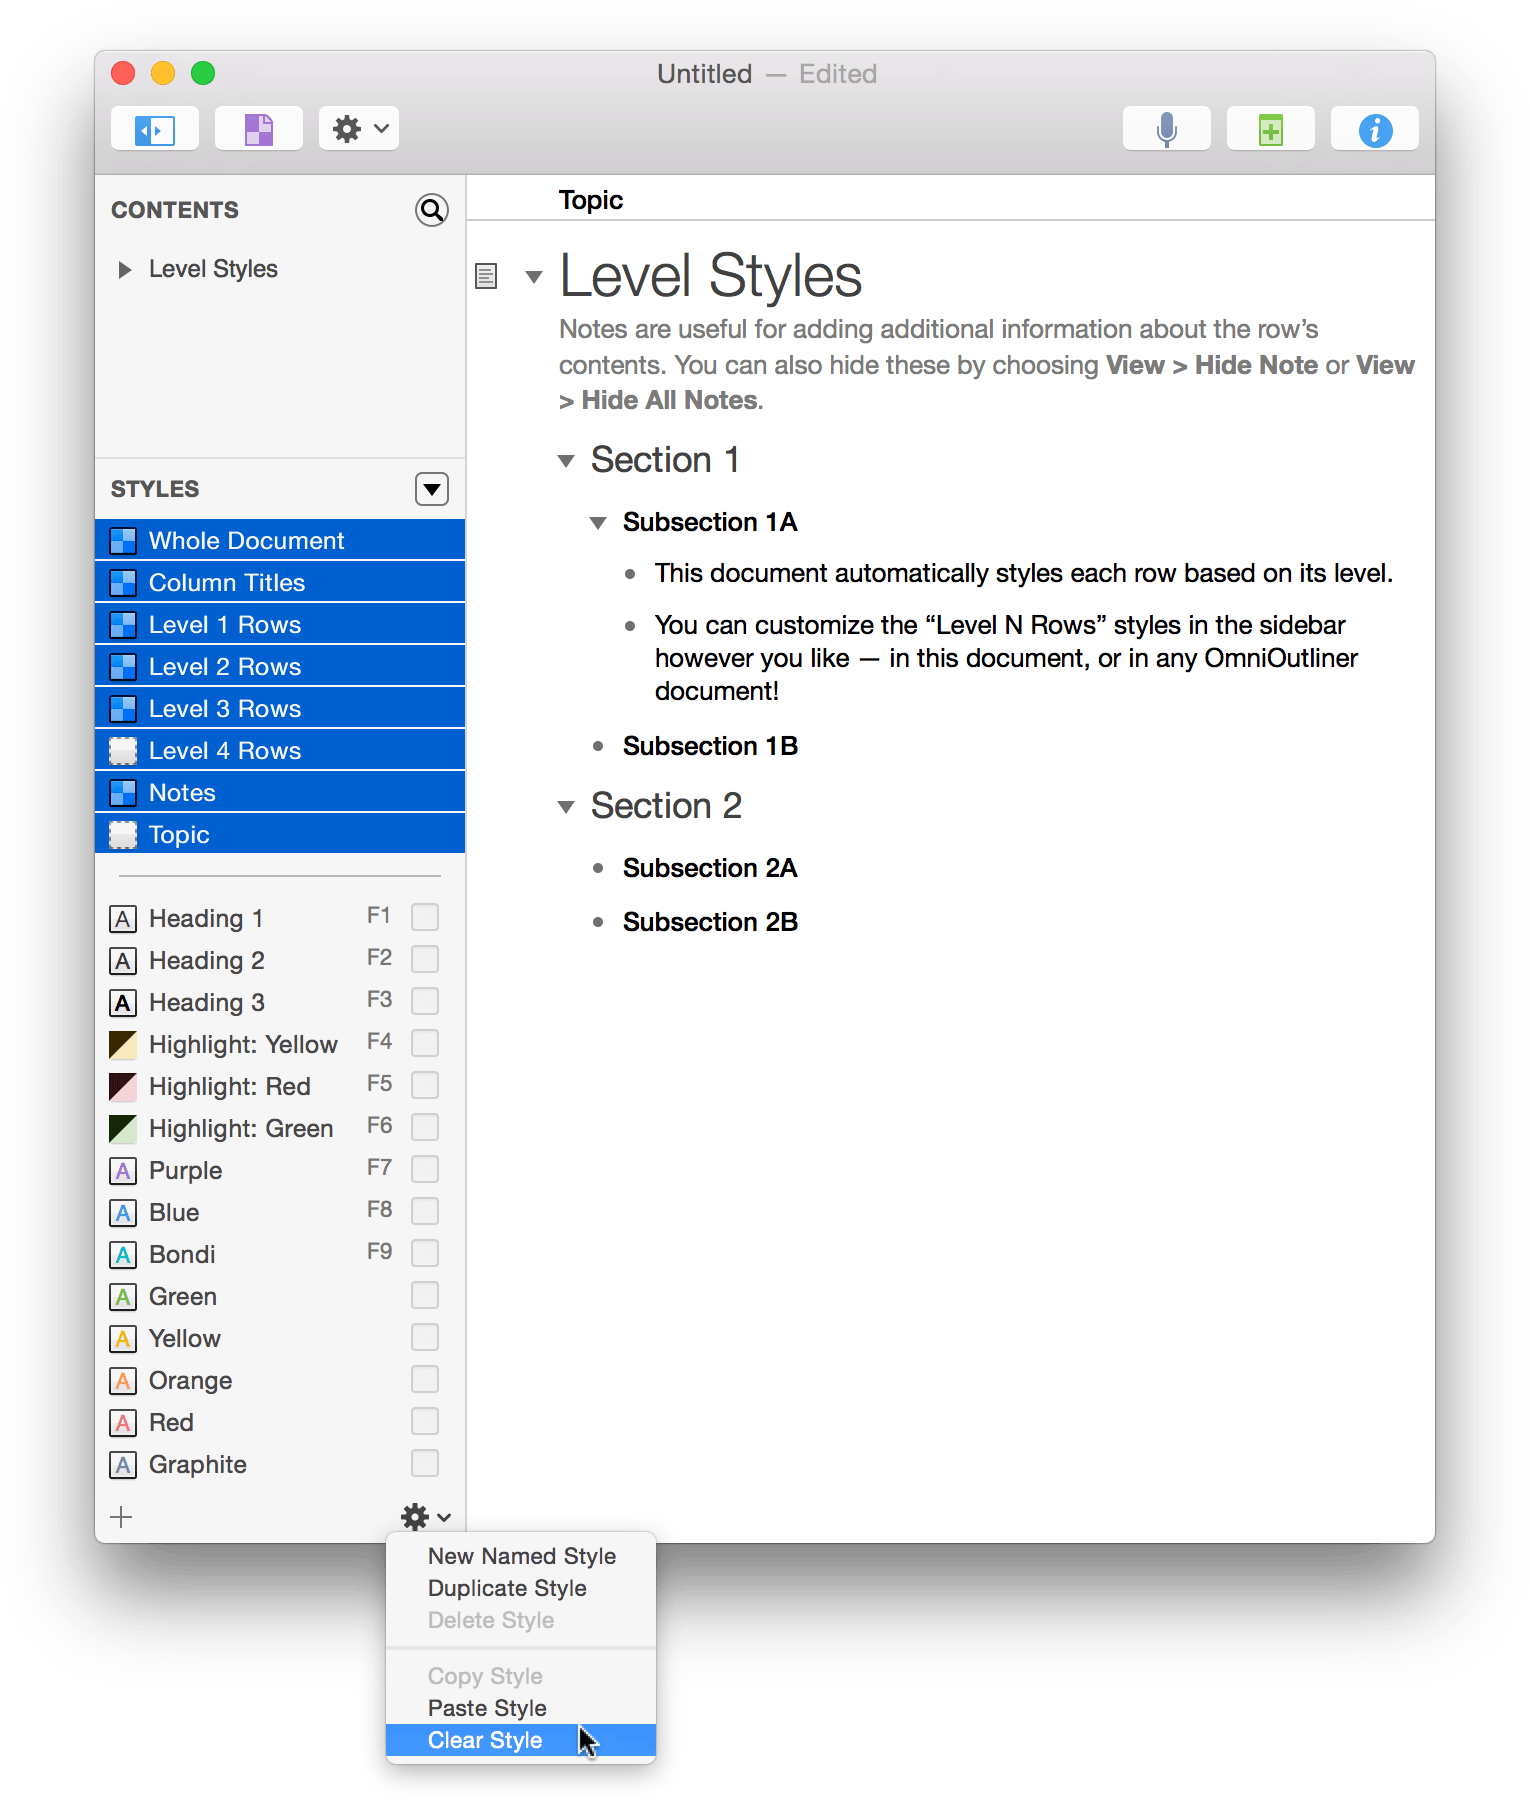
The document looks a lot different, doesn’t it?
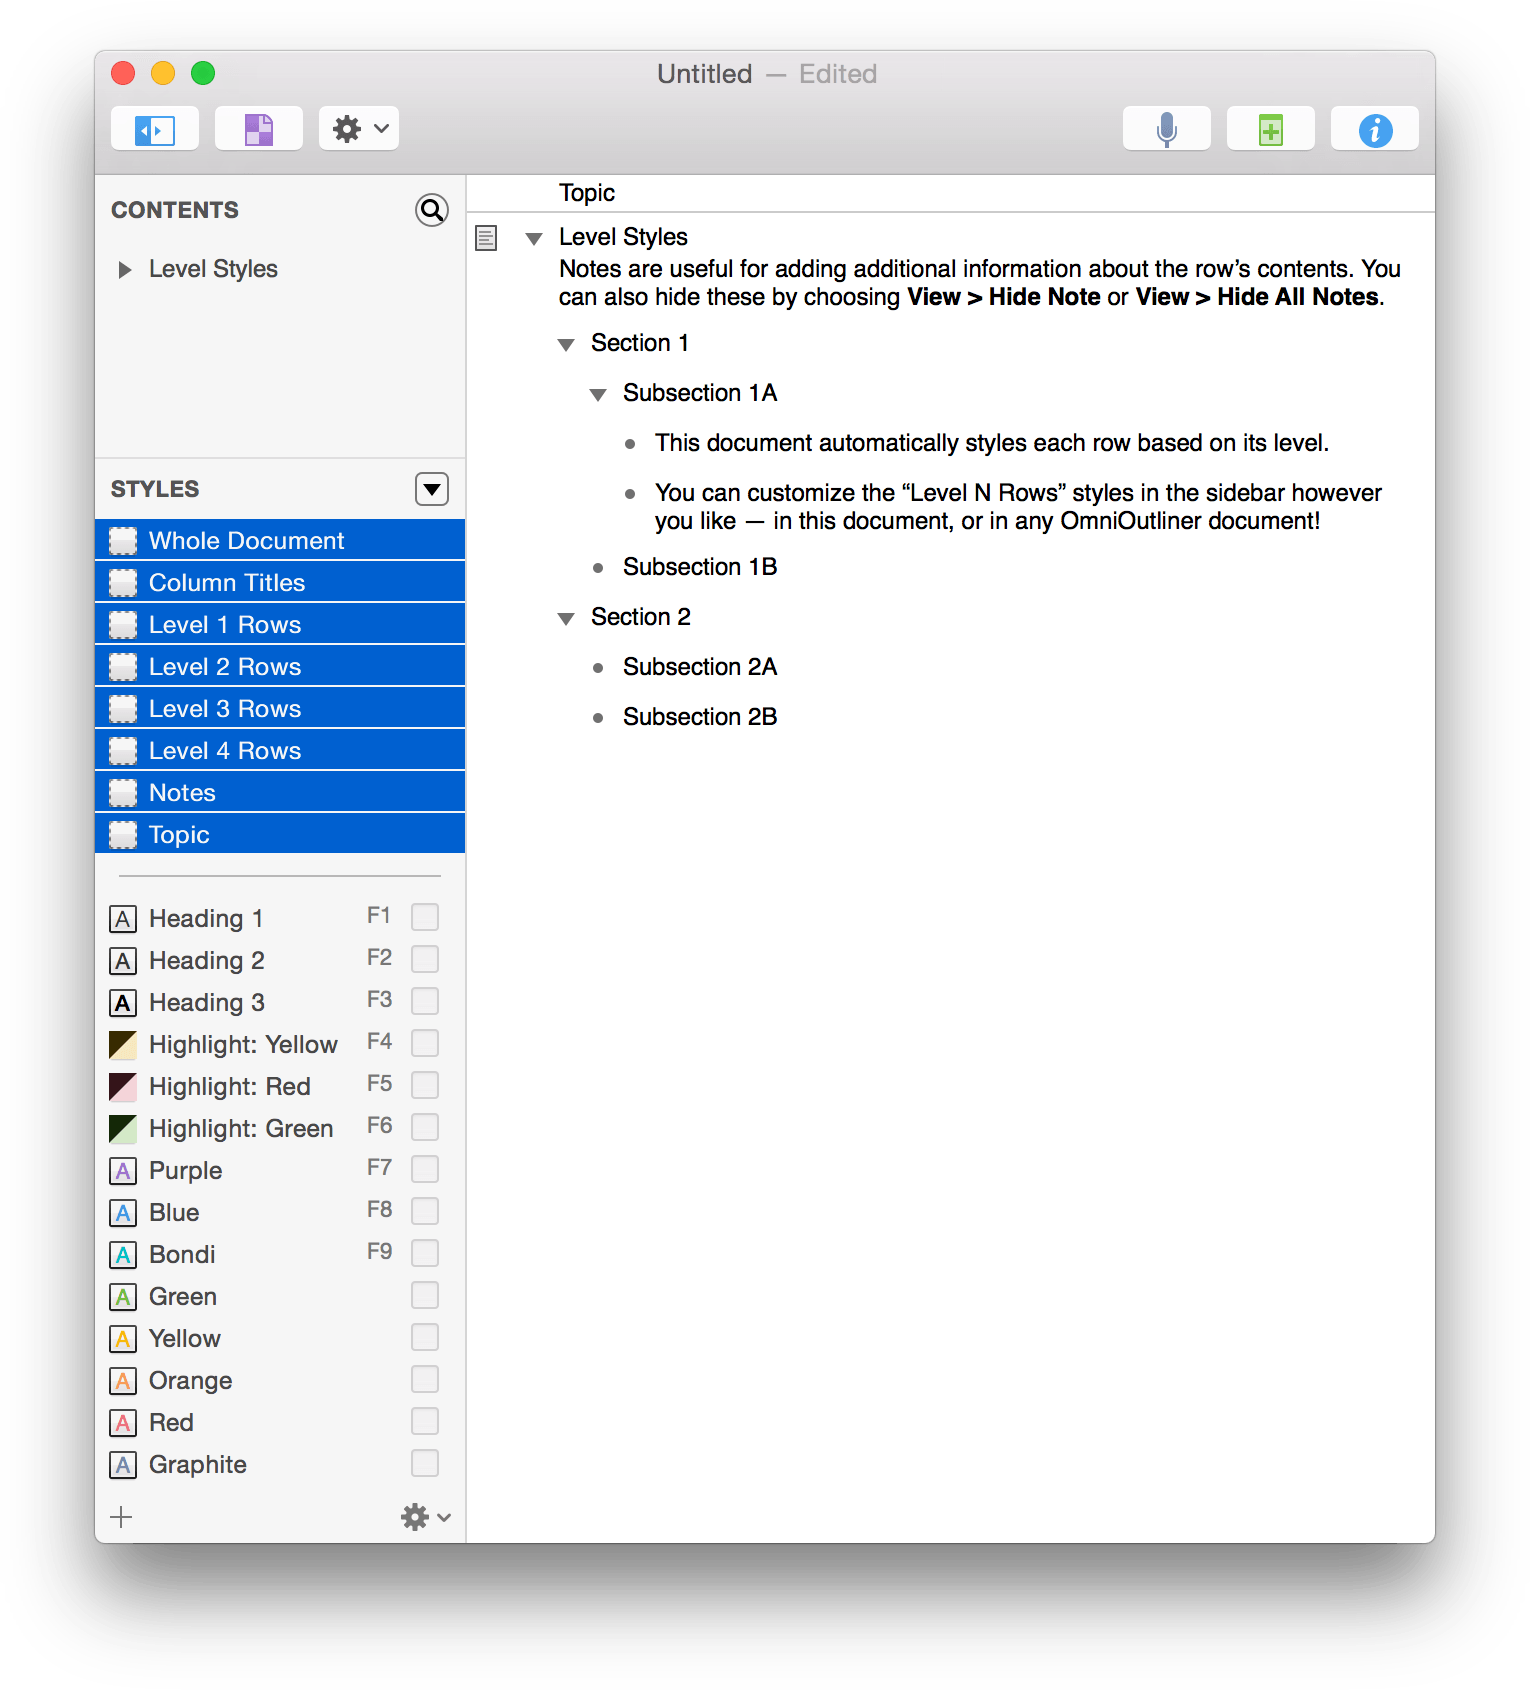
You’ll also notice that all of the Style Swatches in the Styles pane of the sidebar are also empty.
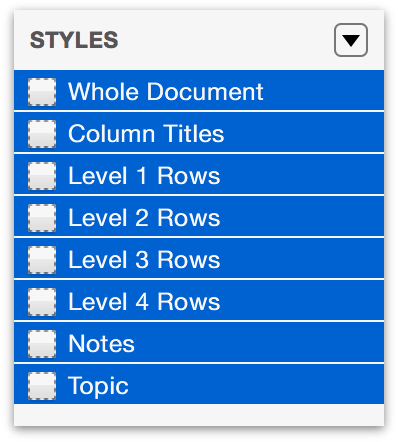
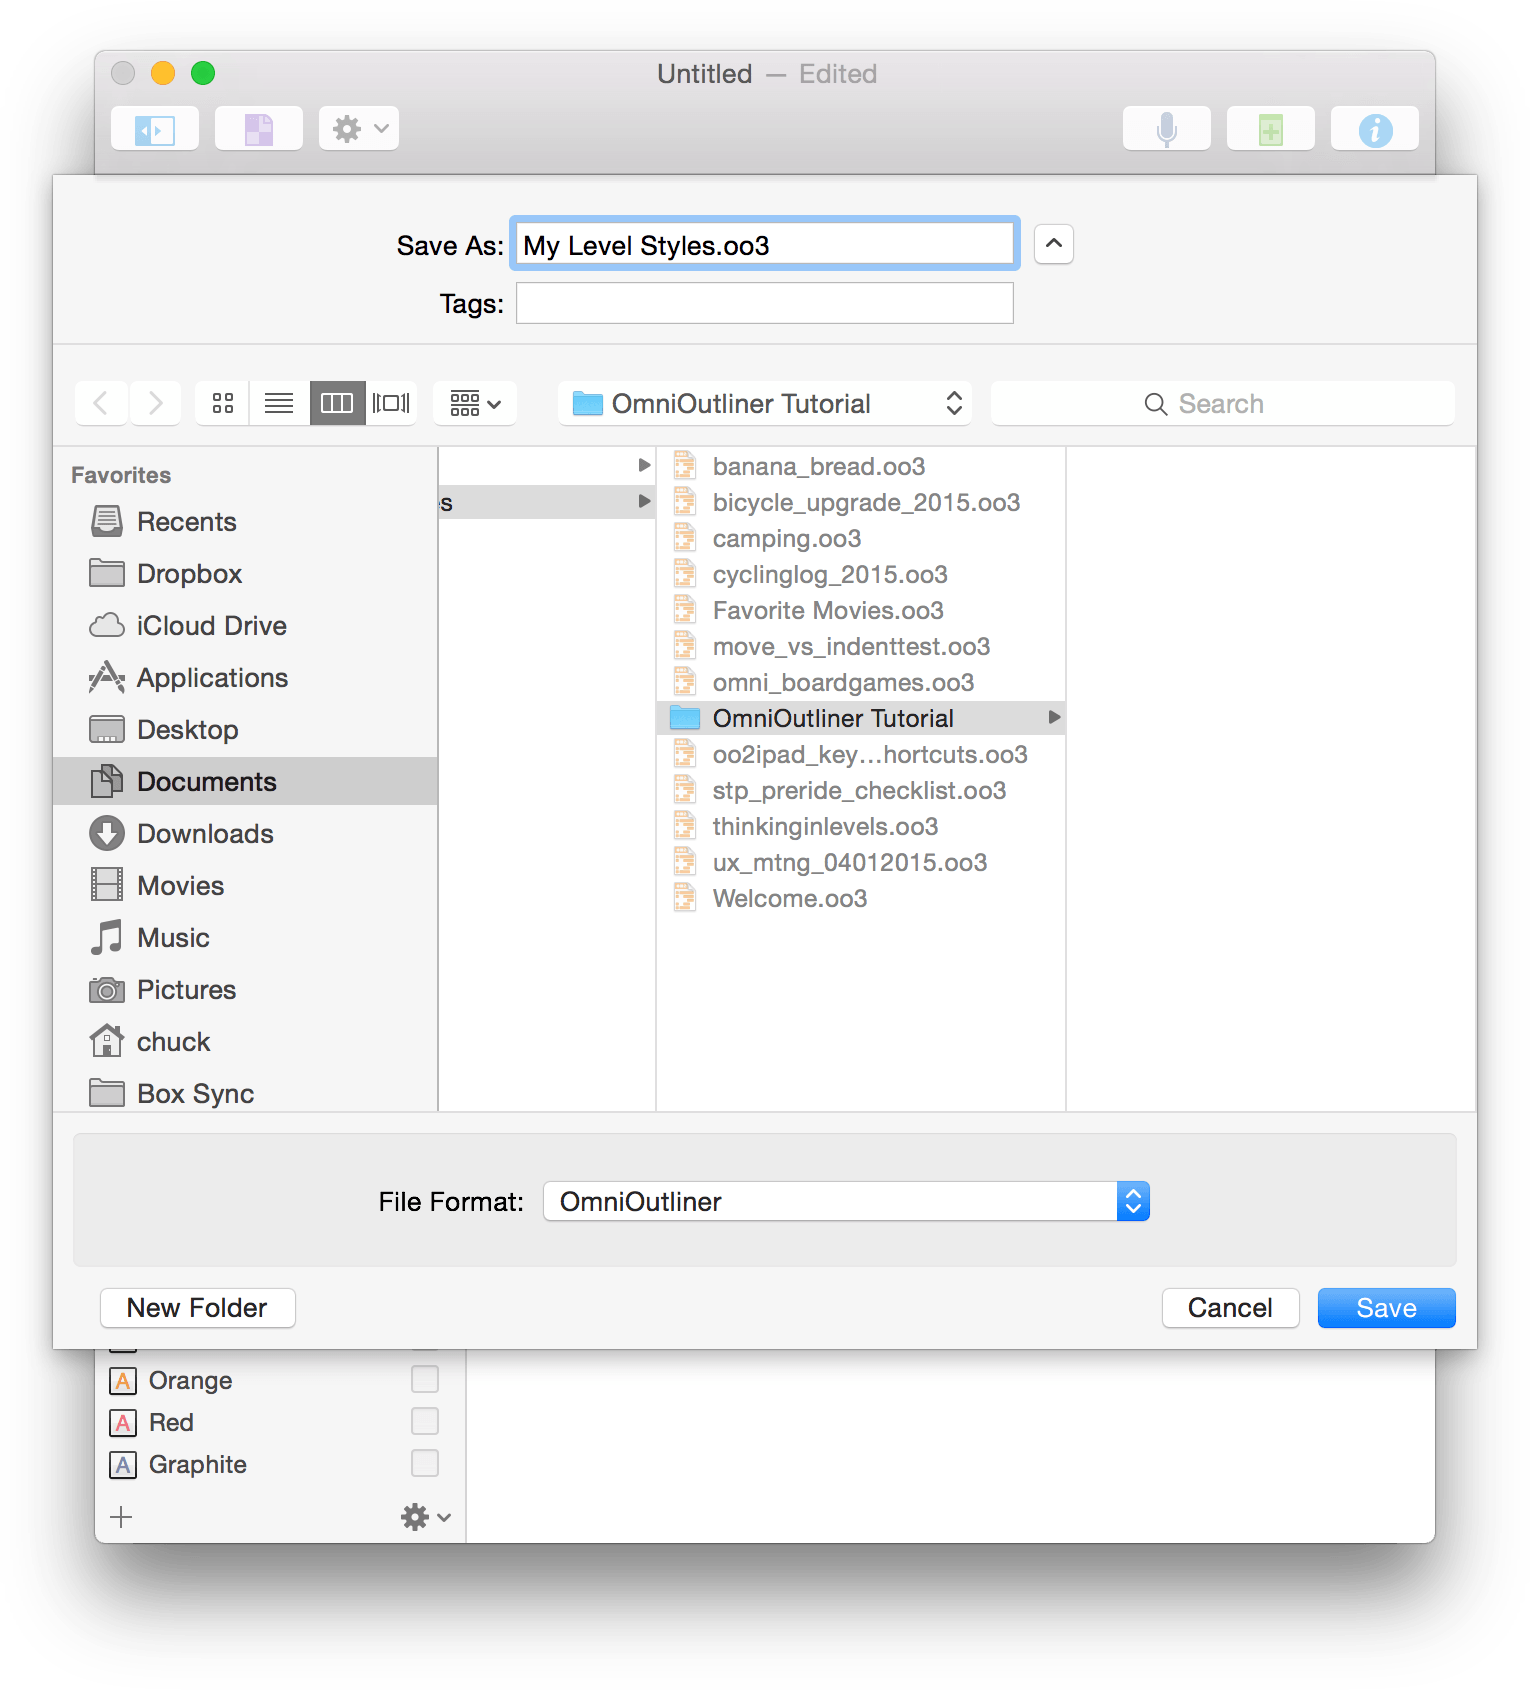
This is exactly what we want, because in the remainder of the tutorial, you’ll learn how to create and style your own template. Before moving on, though, choose File ▸ Save (Command-S) to save this document as My Level Styles.oo3 anywhere on your Mac’s hard drive.
Entering Text and Moving Around in OmniOutliner
The next thing that you’re going to learn about OmniOutliner—and this is a bit of a diversion from styling—is how to enter text, move around, and organize the contents of your outlines. While this might sound trivial, it’s an important part of the learning path.
To get started, click somewhere in the white area beneath the text in the outline, and choose Edit ▸ Select All, or use the standard keyboard shortcut, Command-A. Now press Delete to clear all of the text out of the outline. As you can see, both the document, and the Style Attributes inspector, are clear of any content. The only thing that remains is the Topic heading for the outline; you can leave that alone for right now.
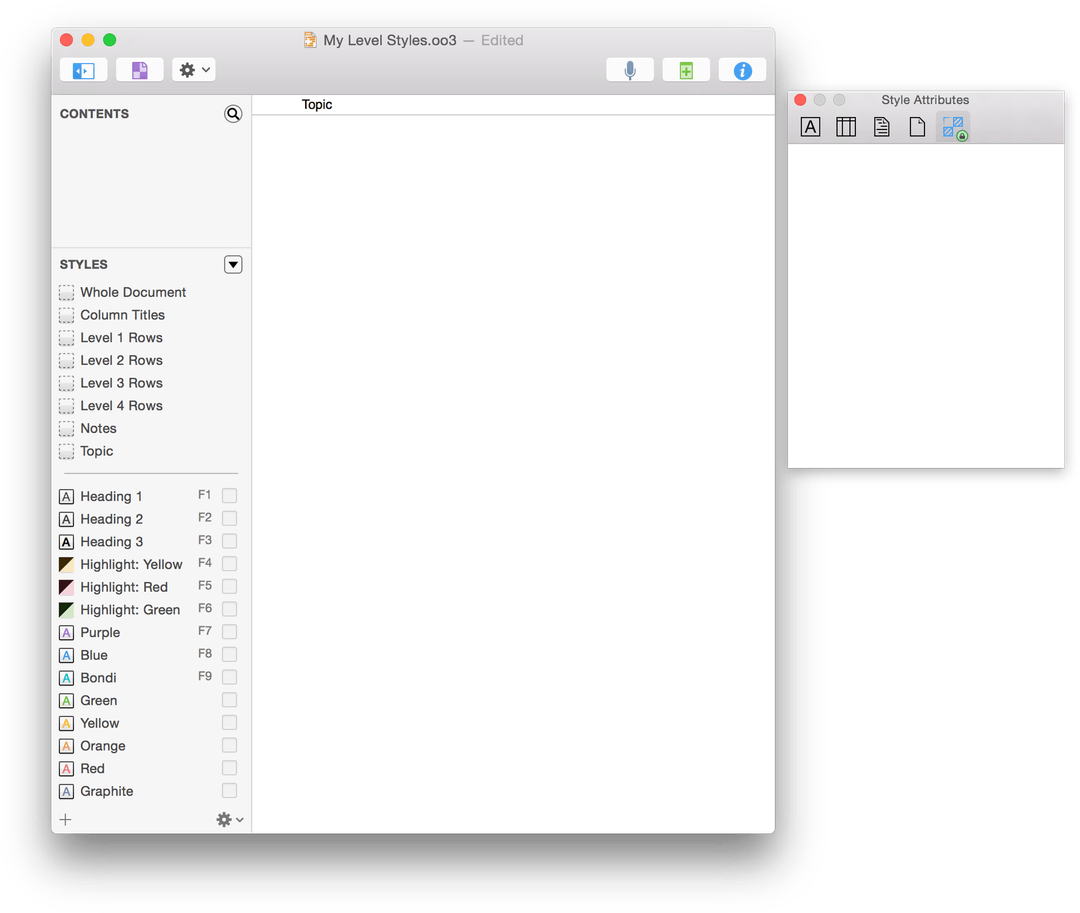
Entering text is simple. Start out by double-clicking on the Topic heading and enter My Level Styles. This will be the new Topic heading for the contents of your outline. To enter text on the rows of your outline, click beneath the My Level Styles heading and enter Level 1 Row. Pressing Return at the end of the first line moves you down to the next row.

A couple things you’ll notice is that the Contents pane of the sidebar recognizes the text you enter as you’re entering it into the outline area. Also, the rows get row handles by default. To add more rows, do the following on the next and subsequent rows:
- Enter Level 2 Row and press Return
- Enter Level 3 Row and press Return
- Enter Level 3 Row and press Return
- Enter Level 2 Row and press Return
- Enter Level 3 Row and press Return
- Enter Level 3 Row and press Return
- Enter Level 1 Row and press Return
- Enter Level 2 Row and press Return
- Enter Level 2 Row and press Return
- Enter Level 1 Row
Your document should look like the following:
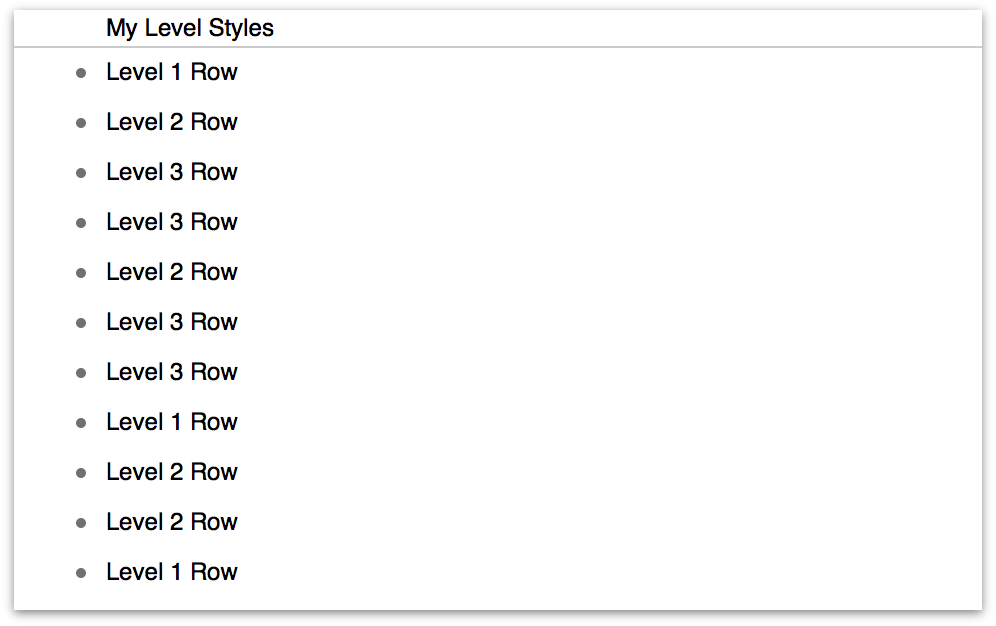
Now let’s add some depth to the outline by indenting the rows. To navigate around in the outline, use the Up and Down arrow keys on your keyboard. You can also just click in a row gutter to select a row. If you want to select multiple rows, Command-click in the row gutters. Go ahead and Command-click on the row handles for all of the rows that say Level 3 Row. Your document should look like this:
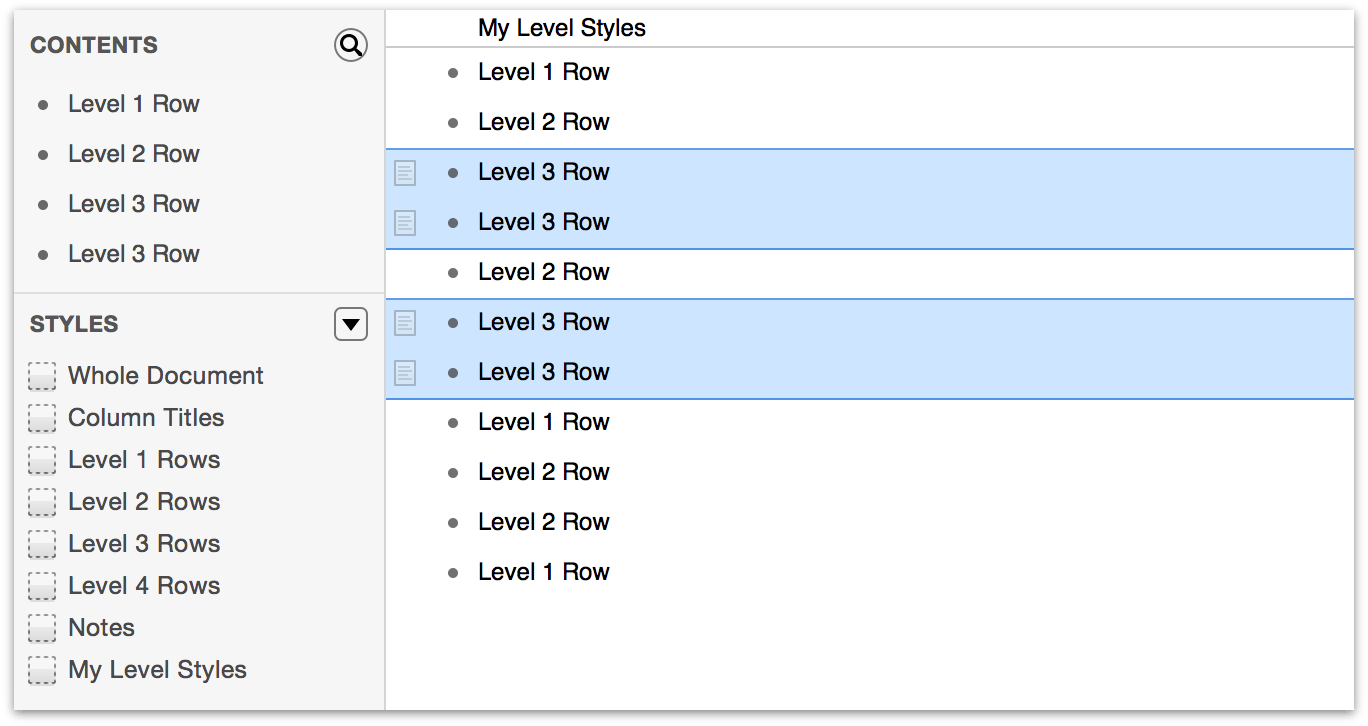
There are a couple of ways that you can indent these Level 3 Rows. The easiest way is to just press the Tab key; the other way is to choose Organize ▸ Indent (Command-]). As you can see, the Level 3 Rows are indented, and the rows that precede them now have a disclosure triangle.
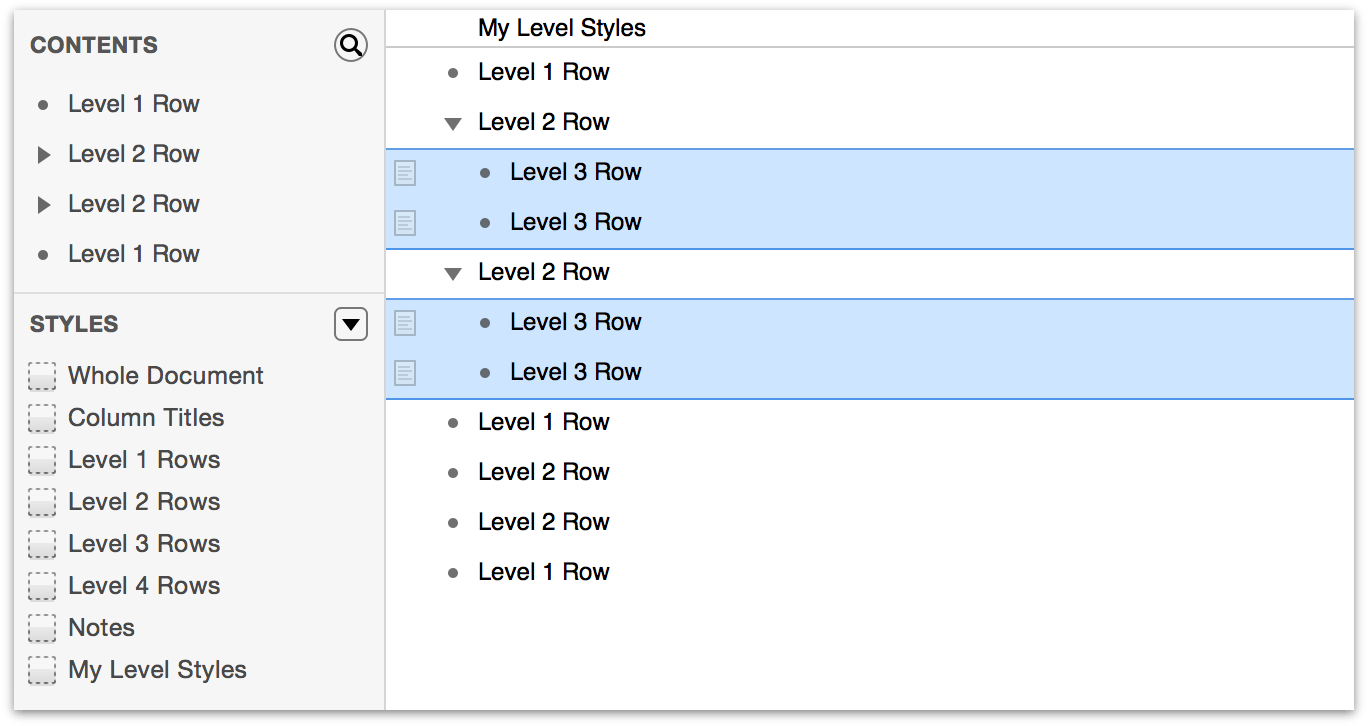
Now do the same with the Level 2 Rows:
- Command-click all of the Level 2 Rows
- Press Tab or use Command-] to indent the selected rows
Your document should look like this:
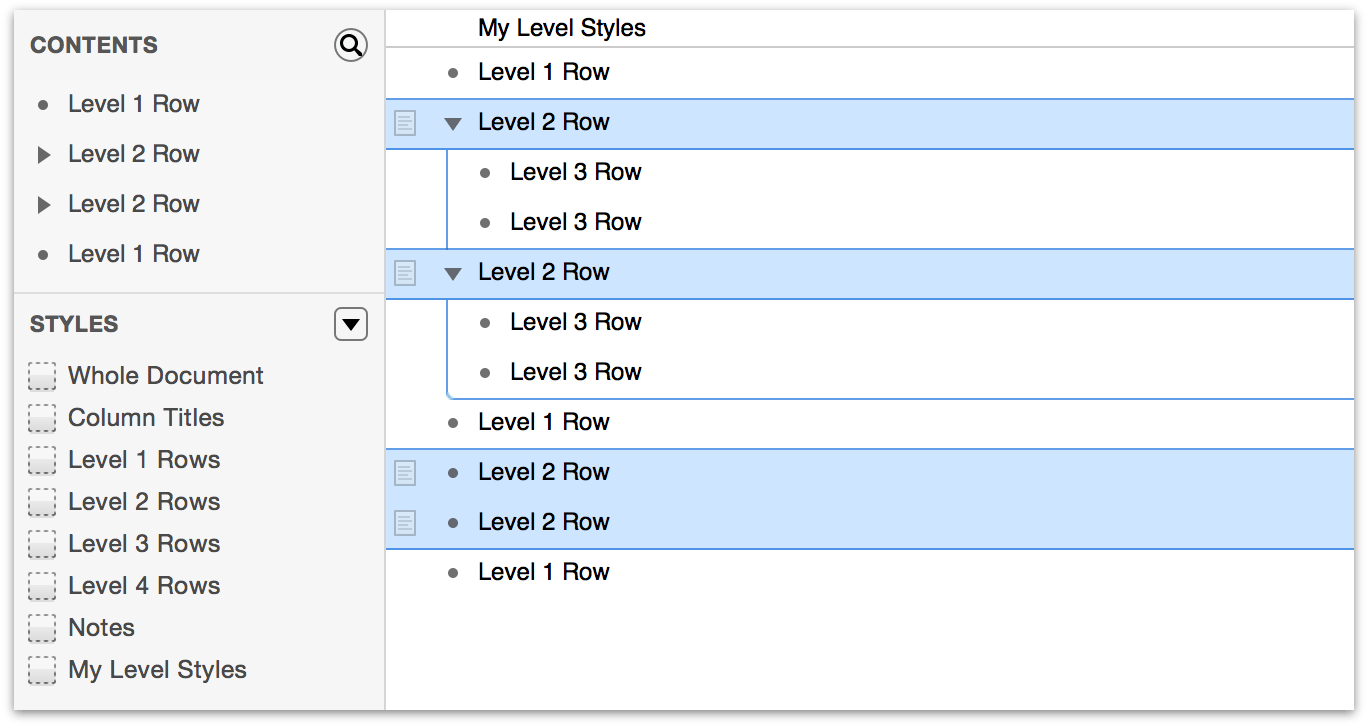
As you can see, the Level 2 Rows are children of the Level 1 Rows, and the Level 3 Rows are children of the Level 2 Rows, making them grandchildren of the Level 1 Rows. Indentation adds hierarchical depth to your outlines, making it easy for you to organize lists of information quickly.
Before moving on to the next section, one final bit of text entry you should do is to add some text to the Notes for the Level 1 Rows. You do this by moving the mouse pointer over row and then click the Notes icon in the gutter.
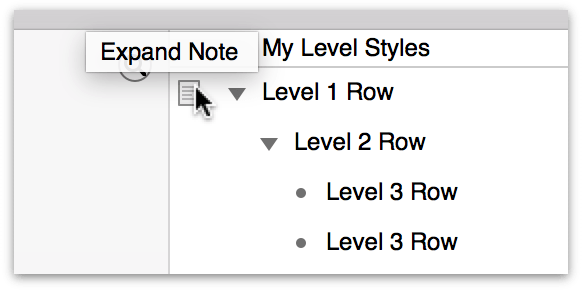
It doesn’t really matter what you enter there—it could be your address, or the name of your favorite Rush album—just as long as you have some text in place that you can style later in this tutorial. When you’ve finished, your document should look something like the following:
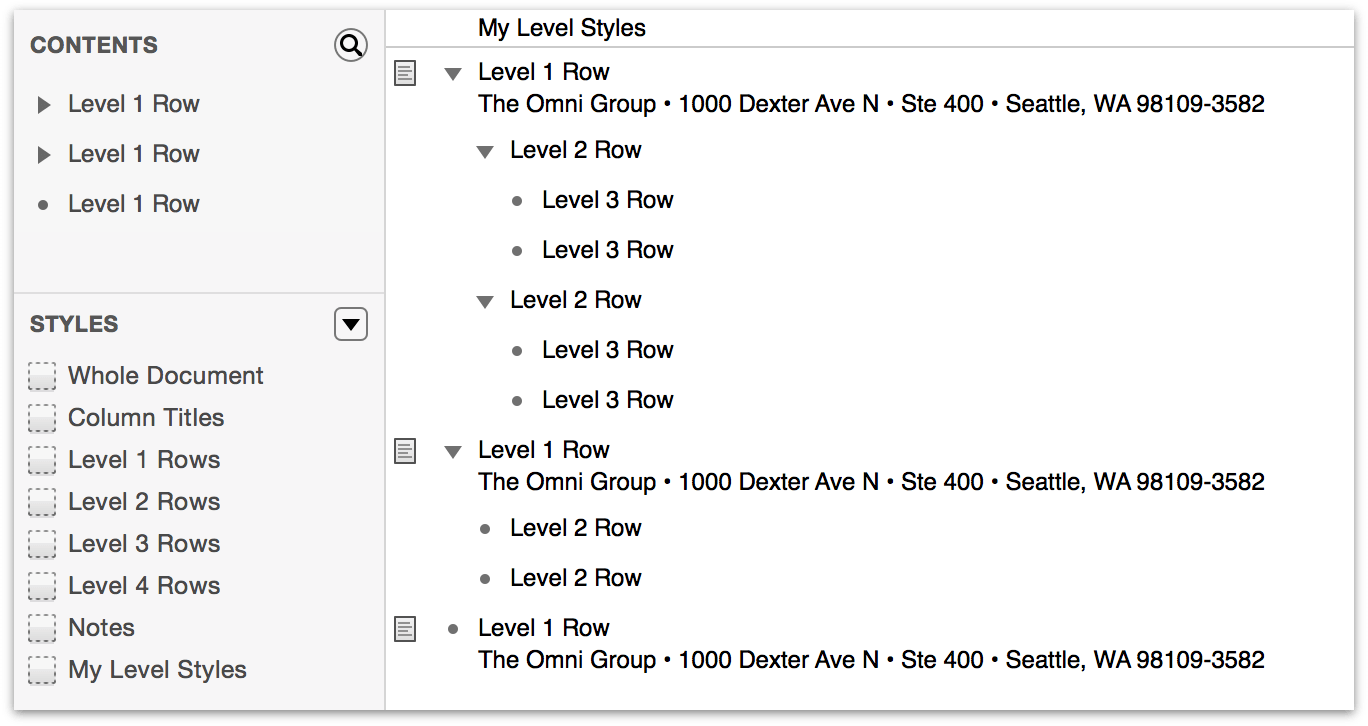
This now gives you enough content to use as placeholder text for the document you’ll eventually turn into a template. Go ahead and choose File ▸ Save (Command-S) to save the document before moving on to the next section.
Organizing Your Content
OmniOutliner helps you create detailed lists, and to go with that, it includes some powerful features for helping you organize the content in your outline. Here we’ll show you how to move whole sections around using the Move menu options and how to create Groups to add depth to your content.
Reorganizing and Moving Content Around
There are a few ways you can reorganize the content in your outline. The most frequent—and often misused—way is with Cut and Paste from the Edit menu. In many cases, you don’t want to Cut the content from your document, you just want to move it around, and for that, look to the options in the Organize ▸ Move menu.
To use these options, you can either click on the text within a row or click in the gutter for the row that you want to move. If you click in the gutter of a row that has children, the parent row and the children are selected. For example, click in the gutter of the second Level 2 Row; you’ll notice that the two Level 3 Rows are also selected.
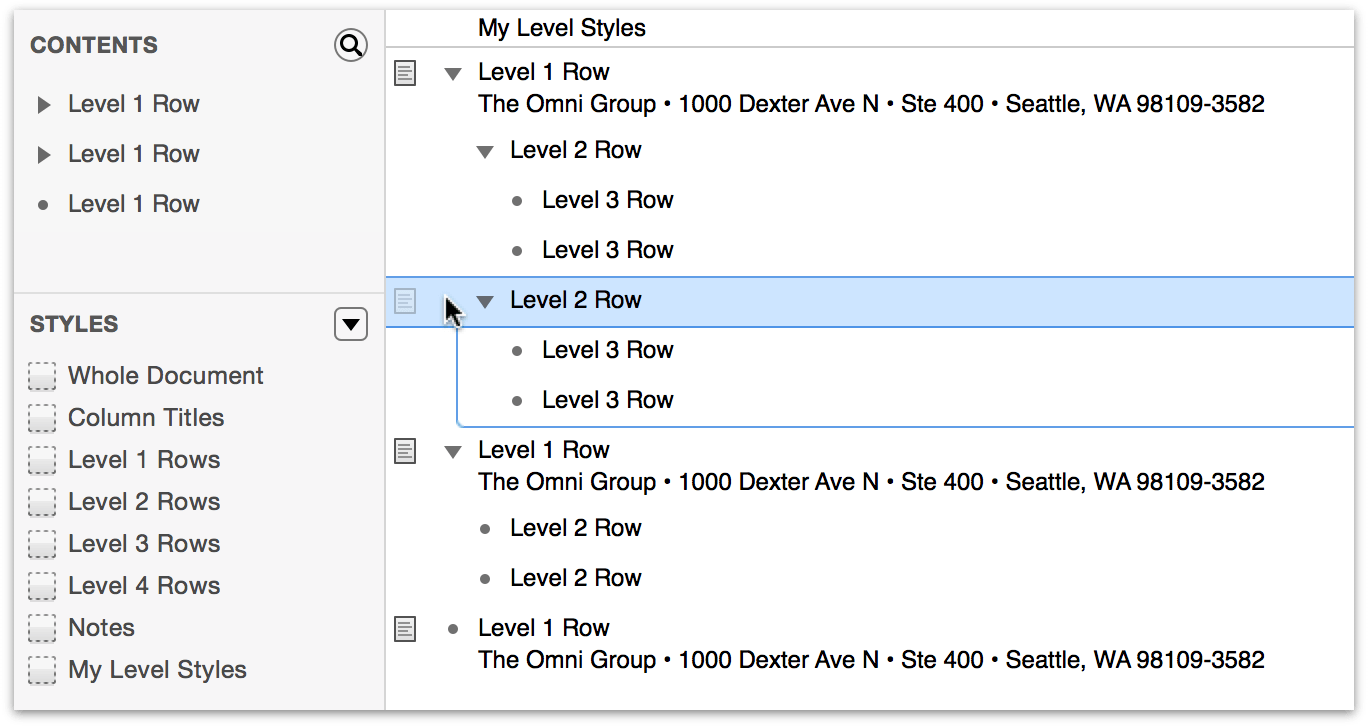
Now let’s say that you wanted to move the second Level 2 Row and its children to the last Level 1 Row so it has some children. You can click on the row handle (in this case, the open disclosure triangle) and drag it downward and drop and insert it within the list. As you start to drag the content down, you’ll notice a couple of things that will help you find the right place to relocate the content.
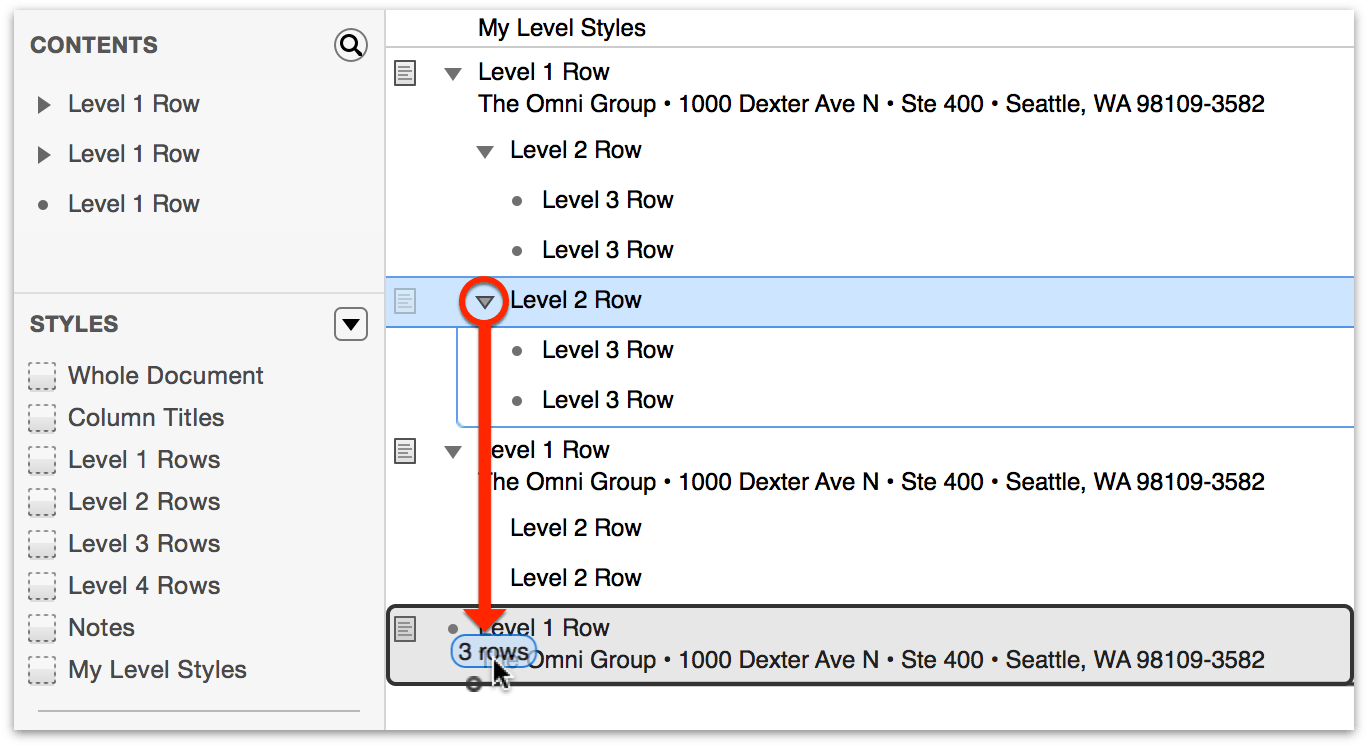
First, you’ll notice a little bubble just above the mouse pointer that tells you how many rows you’re moving (in this case, you’re moving 3 rows).
Next, you’ll see an insertion bar appear in the content list to show you where the content will be placed when you let go of the mouse button. As you drag the Level 2 Row and its children downward, the insertion bar pops in between rows to indicate a possible drop point.
And finally, if you are moving something into another section, the parent row for that section is highlighted temporarily to indicate that you’re moving content to that section.
When you let go of the mouse button, the content you’ve dragged drops into place and takes up residence as new child rows for the parent row.
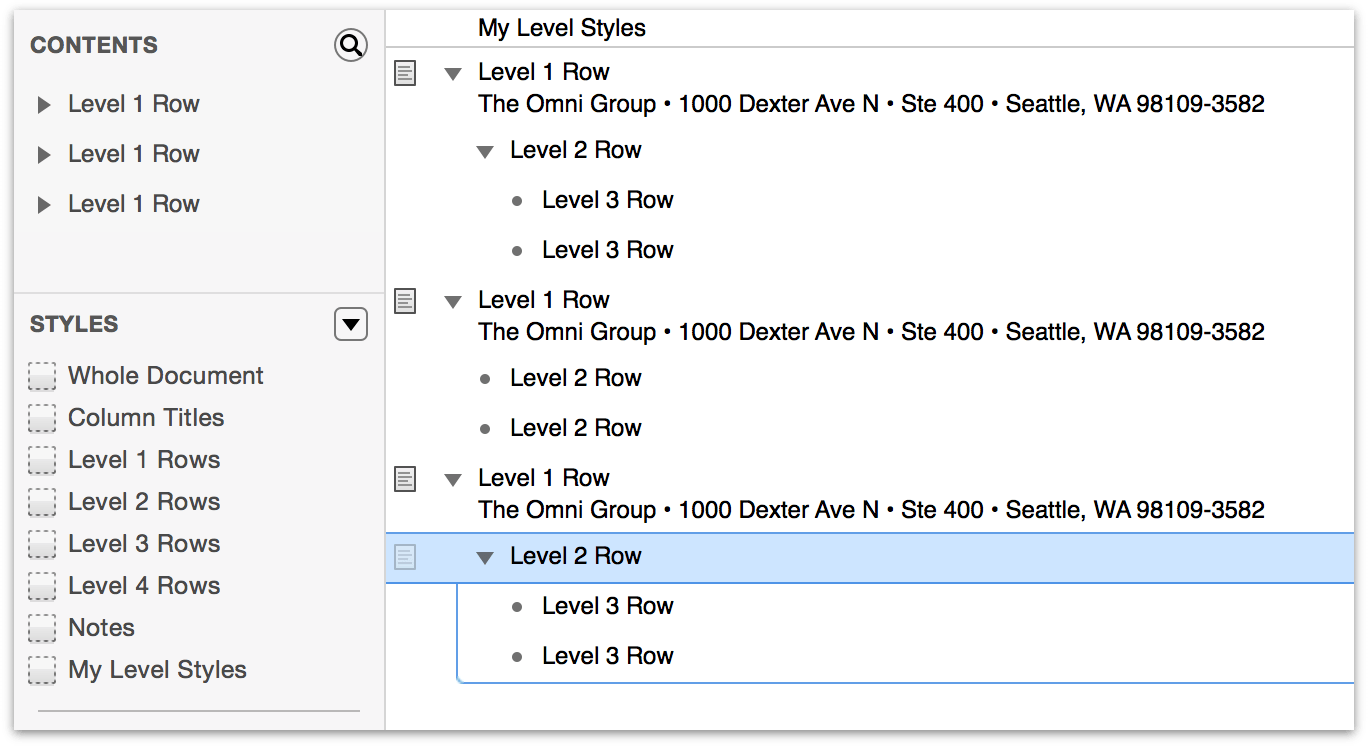
If you click the disclosure triangle on the last Level 1 Row, you’ll notice that the rows you’ve moved there collapse within. Click the disclosure triangle again to open it back up.
Another way you can organize the content is by using the Move options within the Organize menu. Let’s say that you want to move that final Level 1 Row and its children up to the beginning of the document. Start by clicking in the gutter next to the final Level 1 Row to select it and its children:
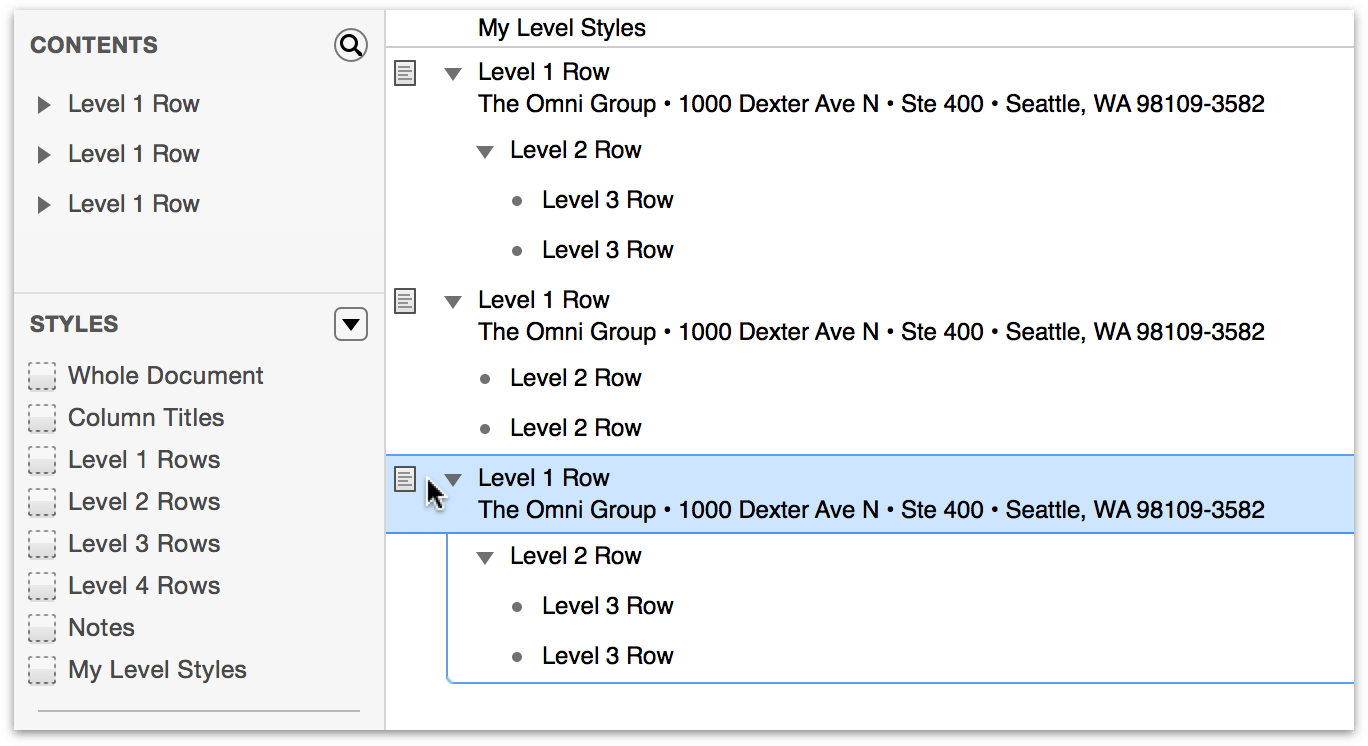
Next, choose Organize ▸ Move ▸ Move Up; you’ll notice that it moves up above the previous Level 1 Row to take the middle position in the document.
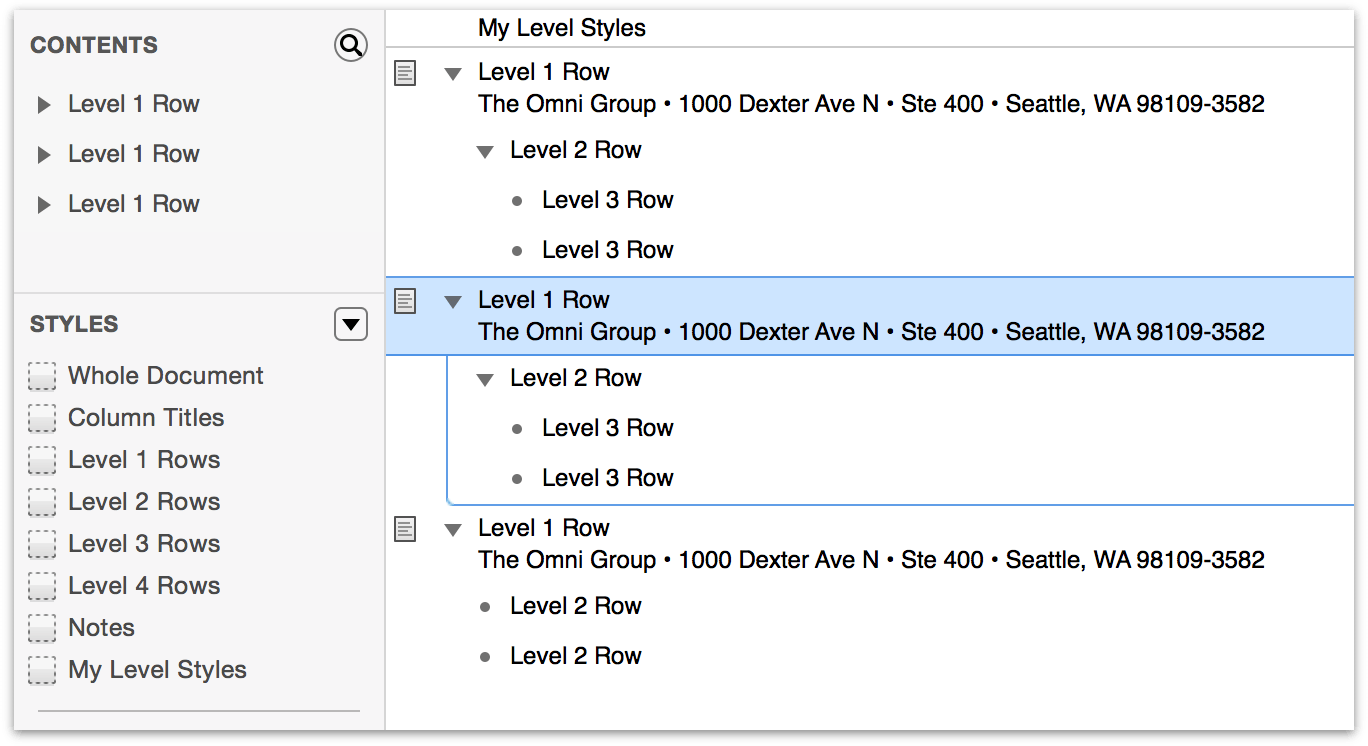
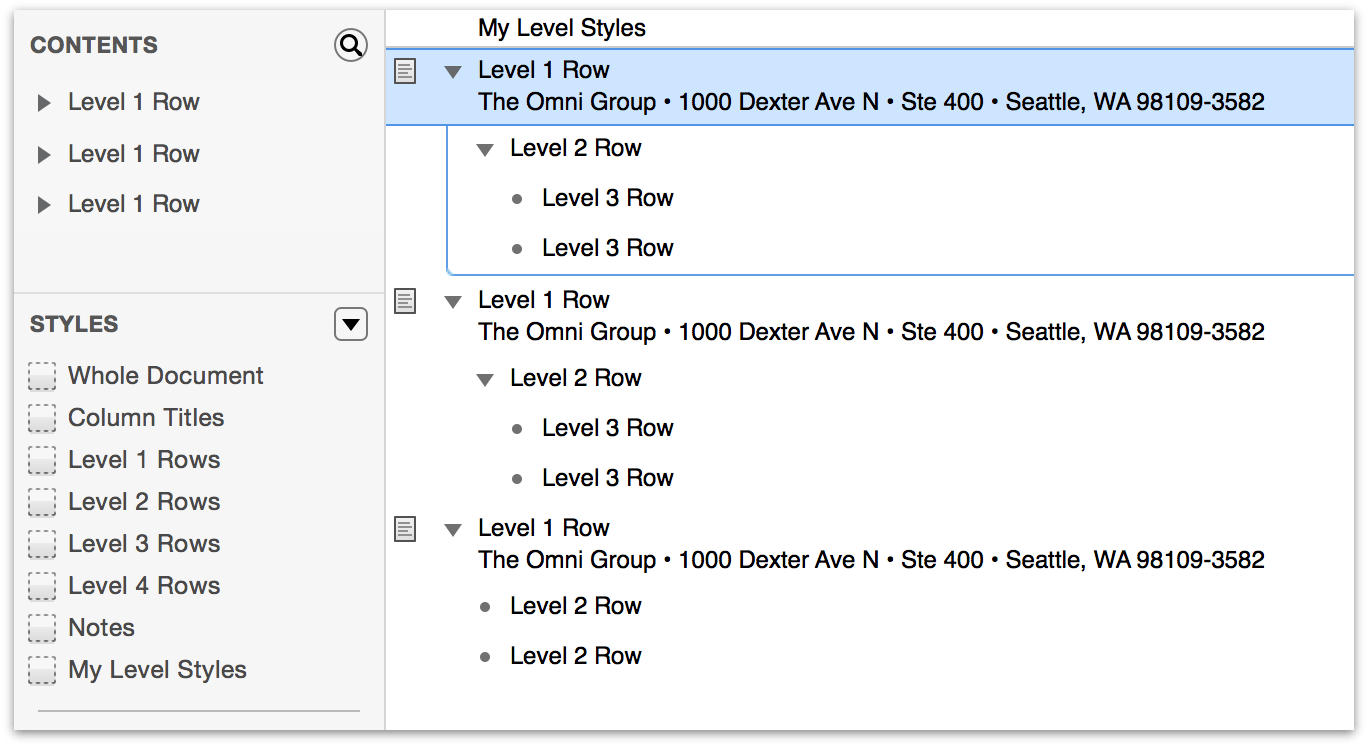
Choose Organize ▸ Move ▸ Move Up again to move the middle section up to the top of the document.
Tip
An easier way to move that final Level 1 Row and its children up to the top would have been to use the Move Up command’s keyboard shortcut. Instead of navigating through the menu hierarchy (twice!) to find the option you wanted, you could have just entered the Control-Command-Up Arrow keyboard shortcut twice.
Also found in the Organize ▸ Move menu, you’ll see options for Move Right and Move Left (with corresponding keyboard shortcuts of Control-Command-Right Arrow and Control-Command-Left Arrow, respectively). These options are analogous to the Organize ▸ Indent and Organize ▸ Outdent menu options. You can use these interchangeably based on whatever’s easier for you to do.
The important thing to keep in mind when you move a row left or right is that you’re changing the row’s level. If you have a Level 1 Row and you move it right, it now becomes a Level 2 Row and it adopts that row level’s style. Conversely, if you move a Level 2 Row left, it becomes a Level 1 Row and it adopts that row level’s style. It’s hard to visualize this right now, because we’ve cleared out all of the template styles from the example document, but you’ll see how this works later on.
Creating Content Groups
Sometimes when you’re working on an OmniOutliner document, you’ll find a bunch of rows that you’d like to group together. These rows can follow one another or be non-contiguous, but all you know is that they belong together. For this, you’ll want to group the rows together using Organize ▸ Group (or Option-Command-G).
To show you how this works, go ahead and click at the end of the last row in the document, after Level 2 Row. You’ll see a flashing insertion point (|). Press Return and then press Shift-Tab to outdent the next line to create a new Level 1 Row.
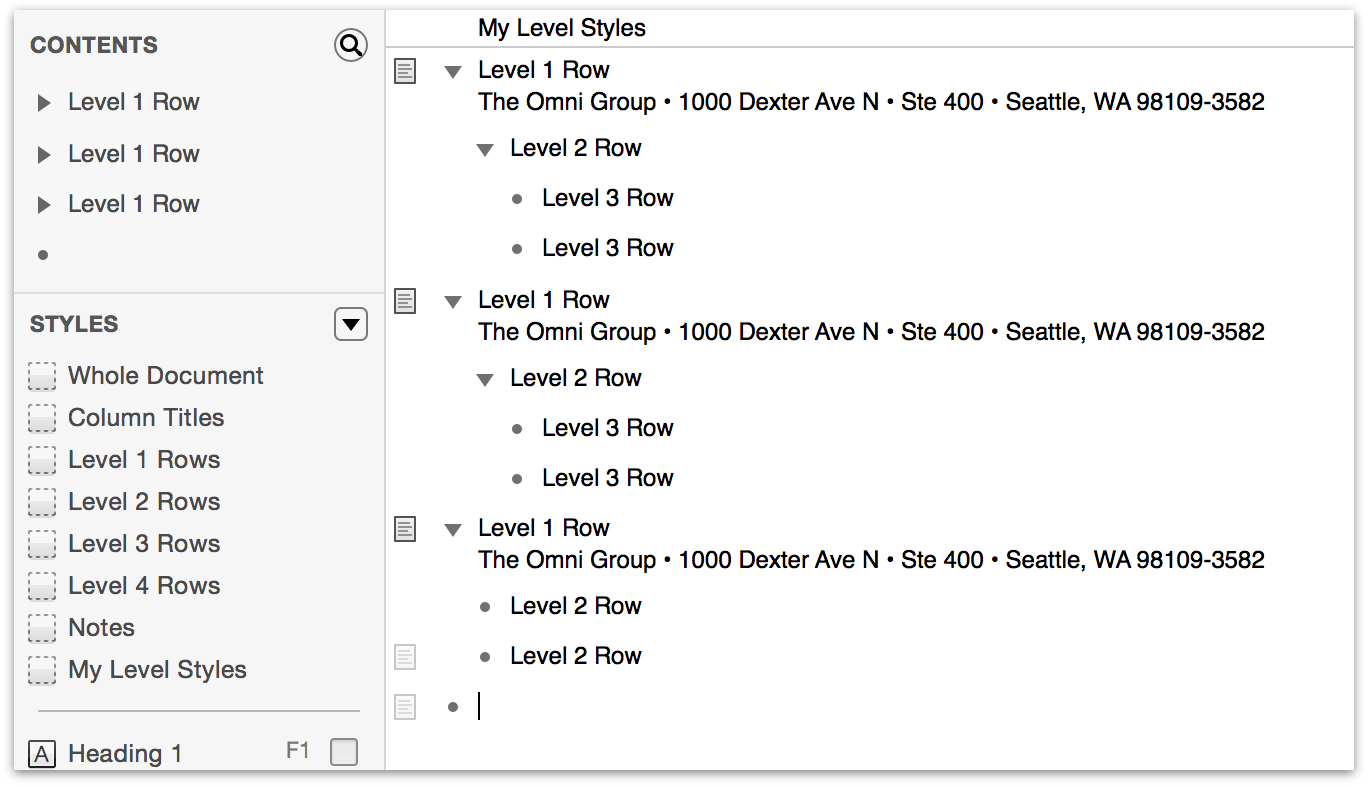
Enter the following:
- Red and press Return
- Green and press Return
- Blue
Your document should look like this:
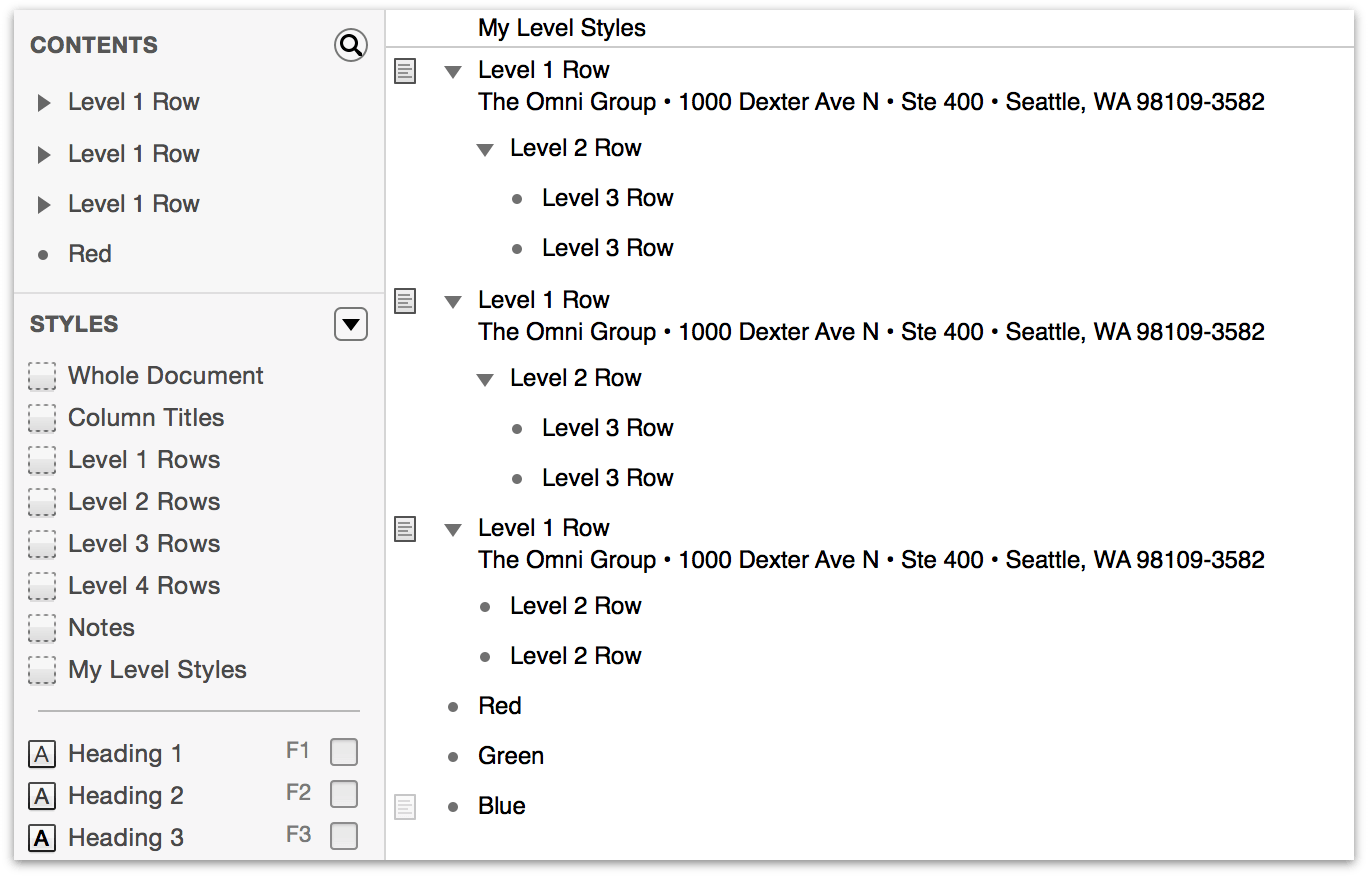
To create a group from these rows, do the following:
Select the Red, Green, and Blue rows by Command-clicking in their gutters.
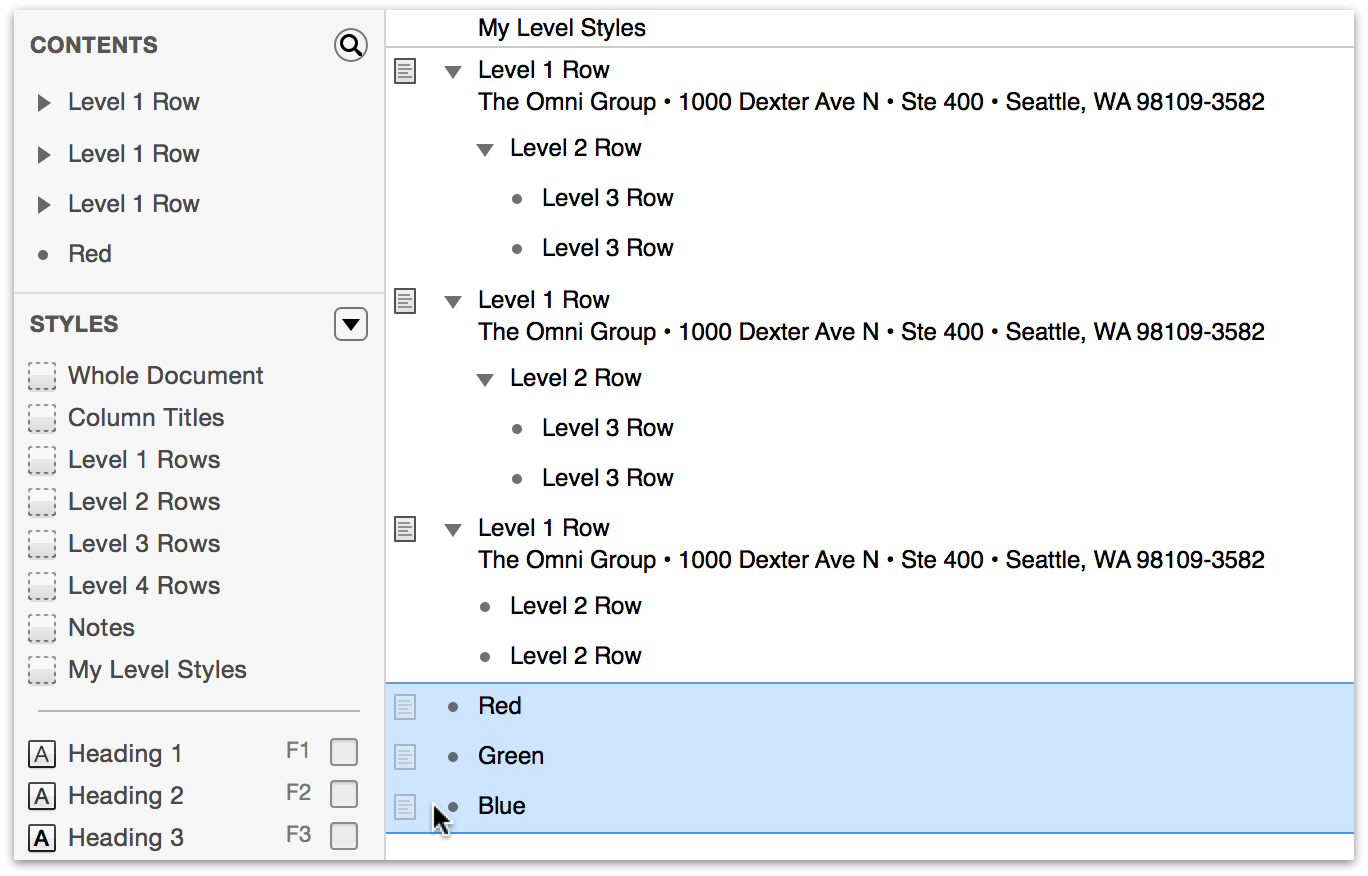
Choose Organize ▸ Group (or Option-Command-G). This indents the Red, Green, and Blue rows (converting them to Level 2 Rows), and inserts a new Level 1 Row above them.
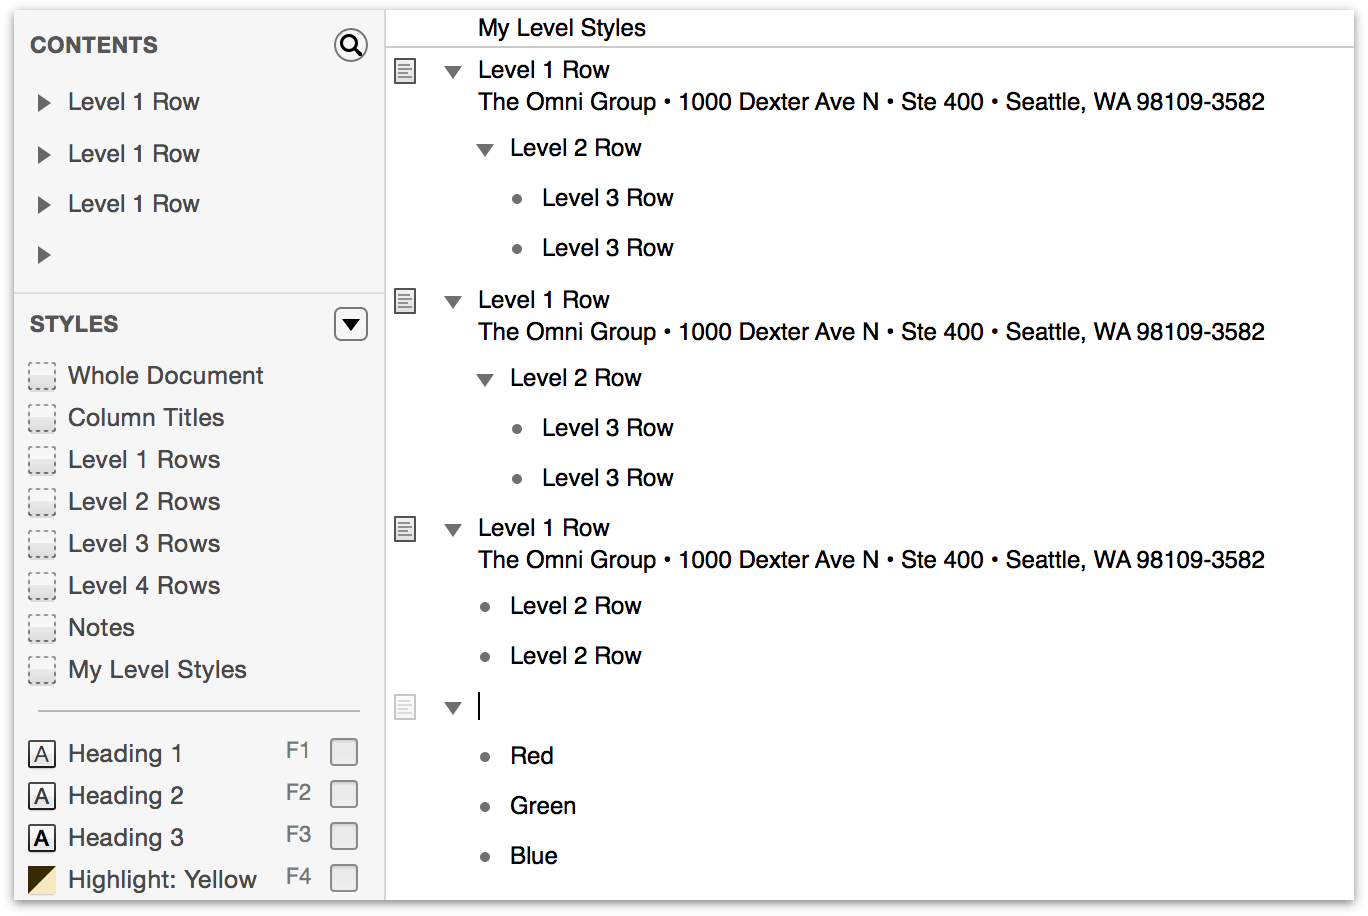
In the empty Level 1 Row, enter Additive Primary Colors. This gives a “title” for the parent row of the newly created child rows.
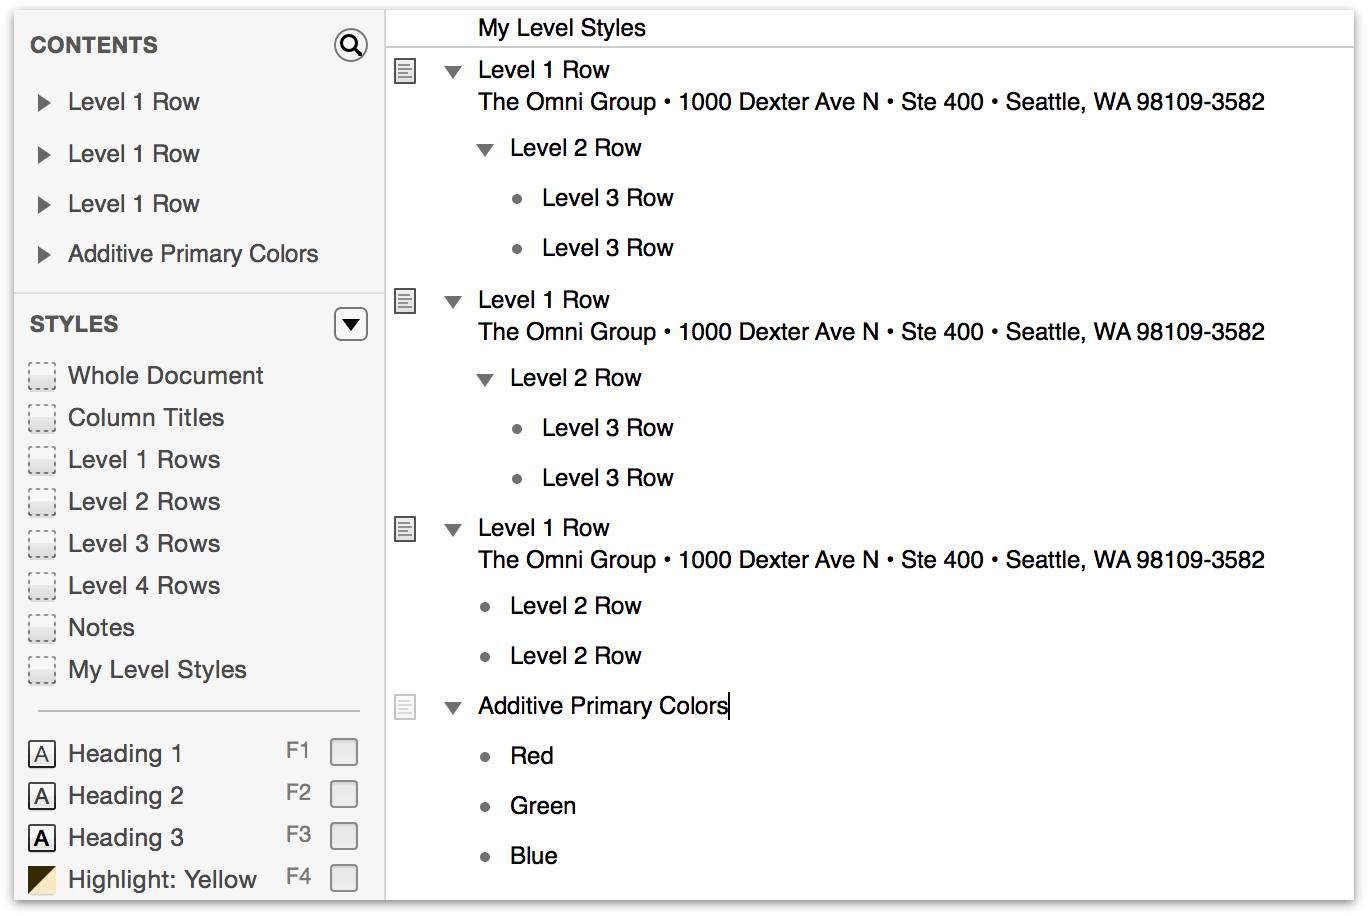
There is also an Ungroup option in the Organize menu which can only be used on rows with children for when you want to dismantle the organization. Click in the gutter next to Additive Primary Colors and choose Organize ▸ Ungroup (or Option-Command-U). You’ll see that the Additive Primary Colors row maintains its Level 1 Row status, and that the Red, Green, and Blue rows are outdented Level 1 Rows, too.
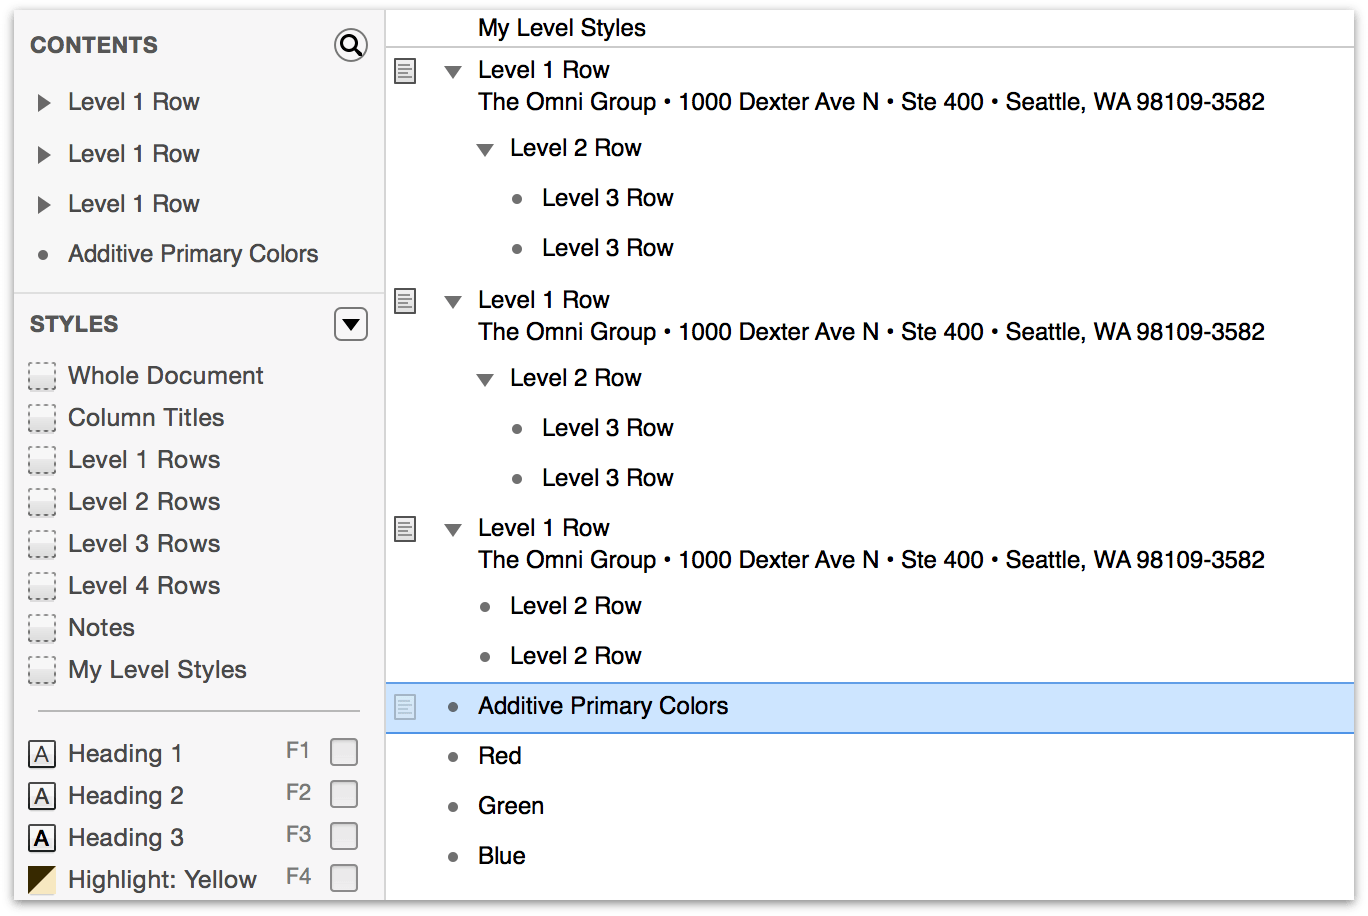
However, since we want that Additive Primary Colors list for a later part of the tutorial, go ahead and press Command-Z to undo the ungrouping. You’ll see that the Additive Primary Colors row now has a closed disclosure triangle as its row handle and that the Red, Green, and Blue lines have disappeared. Don’t worry, though. If you click the disclosure triangle, the row pops open to reveal its child rows.

Choose File ▸ Save to save the changes you’ve made to the document.
Note
If you’re looking for a place to take a break, this might be a good time to do that. The remainder of this tutorial takes you through the process of styling the document before saving a version of it as a template which you can reuse later on. We won’t lie, it gets pretty intense, and you’ll want to pay close attention to the things you’re doing. So go ahead, take a walk around the office, grab a coffee, or go pet your cat, and then come back and be prepared for some fun.
Styling Your Content
Up to now, you’ve learned all kinds of things about OmniOutliner. You’ve created a new document based on a template, and have then stripped out all of the template styles before learning how to enter and create hierarchical lists of information, including moving and grouping content.
Now it’s time to take things to the next level by showing you how to create styles for your content. There’s a lot that’s involved here, but before this goes too far, it’s important to understand OmniOutliner’s style layering model.
Note
If you’d like to see an example of just how versatile OmniOutliner’s styling features can be, choose Help ▸ Welcome from the menu bar. OmniOutliner’s Welcome document was created with OmniOutliner 4.
Understanding OmniOutliner’s Style Model
As mentioned earlier, when showing you how to use the Style Attributes inspector, OmniOutliner’s styles stack upon one another. The base layer of styles for your document is the Whole Document style. This is the foundation of your document, and the various Level styles you set can adopt, amend, and even override the Whole Document styles.
There are two kinds of styles in OmniOutliner: Level Styles and Named Styles:
Level Styles reside in the top portion of the Styles pane of the sidebar, and consist of the Whole Document style, styles for the various numbered Level Rows (Level 1 Row, Level 2 Row, and so on), as well as styles for Column Titles, Notes, and the main Topic column.
Named Styles are found in the lower portion of the Styles pane in the sidebar, and can be applied to anything in your document. When applied, a Named Style amends the existing Level Style with its own properties. For example, you could apply a Heading named style on top of a Level 1 Row style to make the text bigger or change the font. All of the templates come with some pre-defined Named styles, which you can use, delete, or edit to suit the needs of your document.
The styles you set for the various Level Rows, headings, and text all stack on top of the styles you designate for the Whole Document. This is very much like the web’s Cascading Style Sheets (CSS), if you’ve ever used that for web design.
Using the Colors Palette
One thing you may not have noticed is that OmniOutliner’s sidebar (Option-Command–1) is also layered on top of your content. If you change the background color of your OmniOutliner document to something other than white, you’ll notice that the sidebar takes on a slight tint of that color. That’s because the sidebar’s default color uses opacity to let the underlying background color bleed through.
To see how this works, click in the white space beneath the content of the outline, and then do the following:
Open the Inspectors window by clicking the
 button in the toolbar, or with the Shift-Command-I keyboard shortcut.
Make sure you’re in the Style inspector by clicking the left-most icon in the Inspector window’s toolbar. Your Inspector window should look like this:
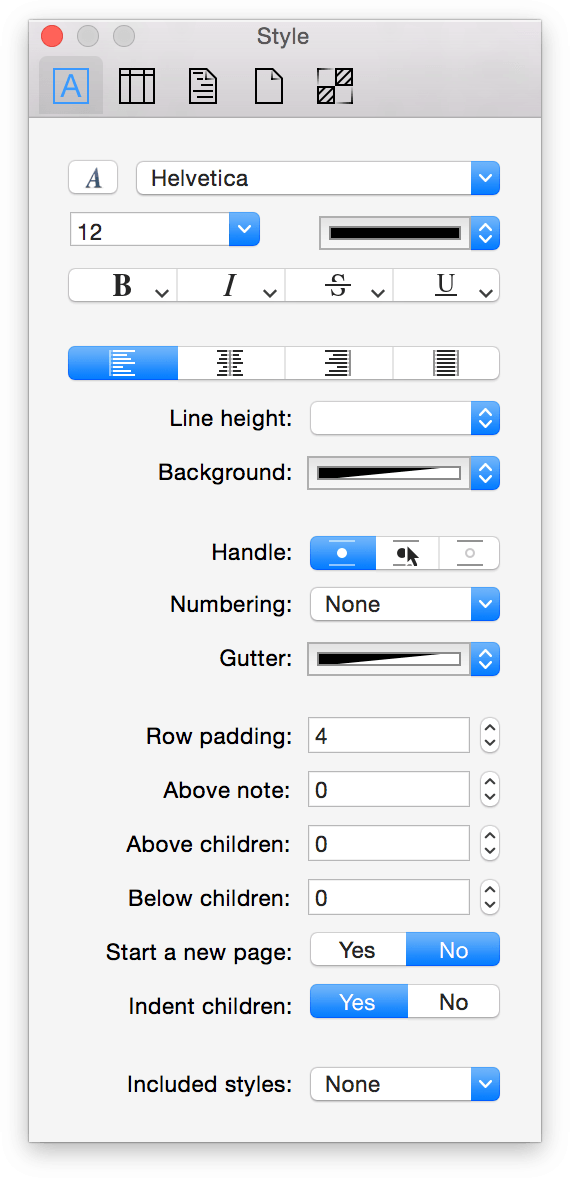
Click on the half-black, half-white color bar next to Background (don’t click on the little arrows on the right edge). This opens the Colors palette.
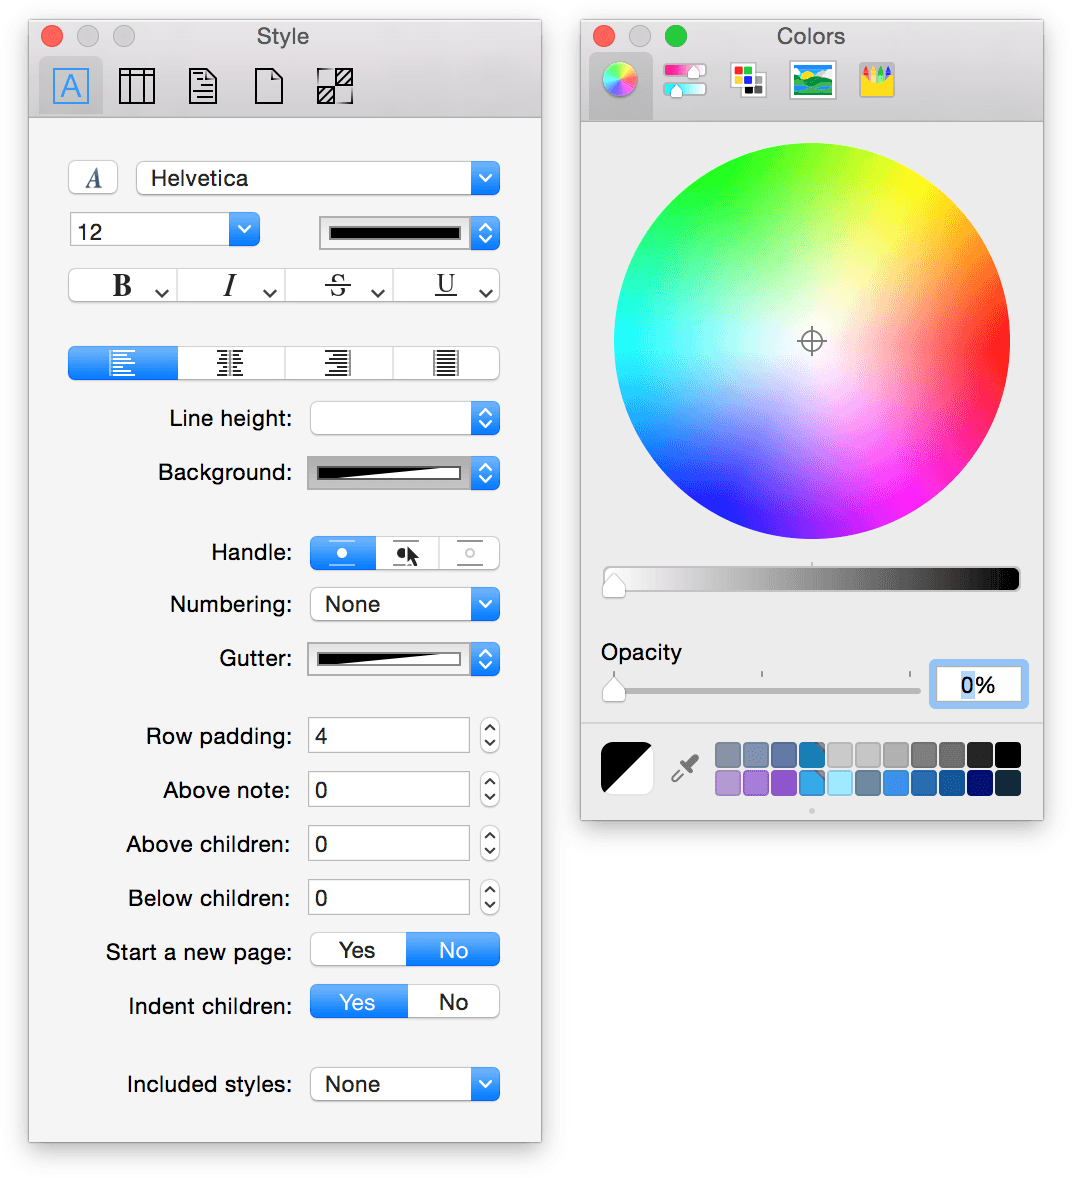
The big disc of color is known as the Color Wheel. To change the color, click within the Color Wheel and drag the Color Picker around.
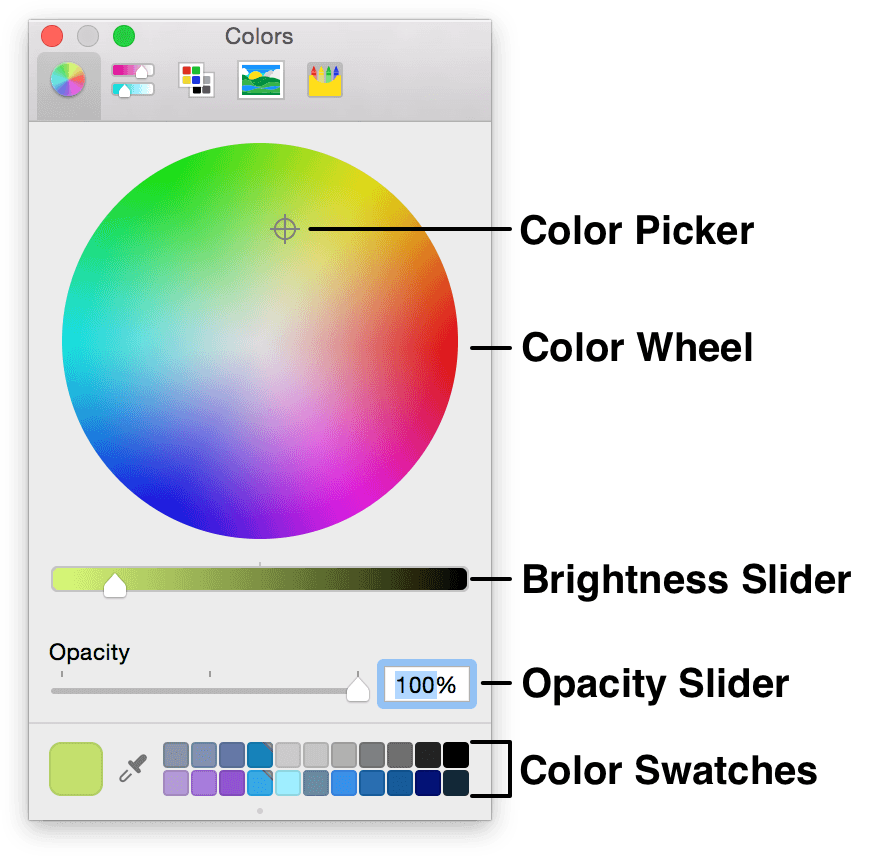
Beneath the Color Wheel you’ll see two sliders. Use the top slider to set the Brightness of the color you’ve selected in the wheel. If you drag the slider all the way to the left, the color is lighter; drag it all the way to the right, and the color you’ll get is black. The bottom slider lets you specify the Opacity (or see-through-ness) of the color, where 0% is totally transparent and 100% is opaque.
Drag the Brightness slider all the way to the left, and then drag the Opacity slider all the way to the right so that the Opacity is set to 100%.
Click anywhere within the Color Wheel and hold down the mouse button. Now drag the mouse pointer around within the Color Wheel until you find a color you like. Notice how the outline’s background color changes as you move the mouse around, and how the sidebar also takes on a slight tint of those colors as well.
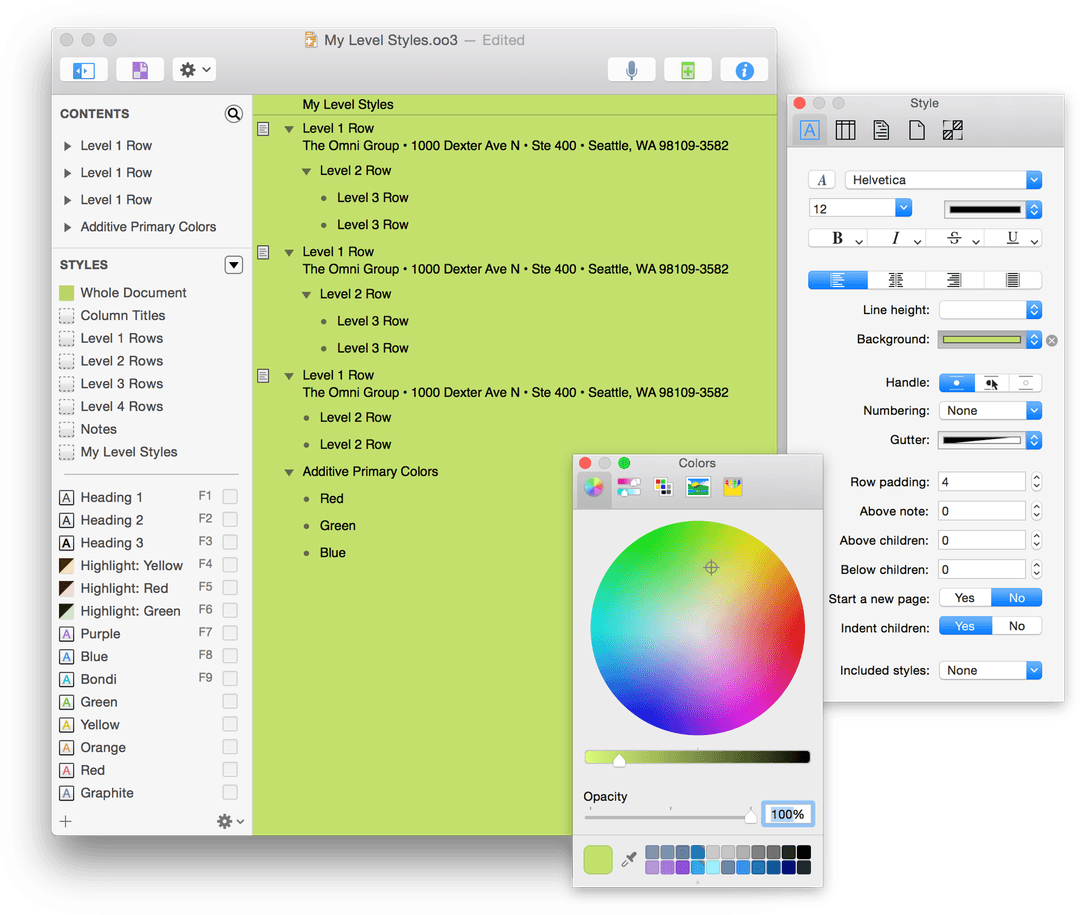
If you haven’t used the Colors palette much in the past, there are some additional things you should know about. For example, you can switch from the Color Wheel to other color-choosing options by clicking the icons along the top of the Colors palette.
To the left of the Color Swatches, you’ll see an eyedropper next to a rounded square that contains the color you’ve selected in the Wheel. This is the Color Inspector. If you find a color you like and would like to save, click and drag the color to one of the empty Color Swatches along the bottom of the window.
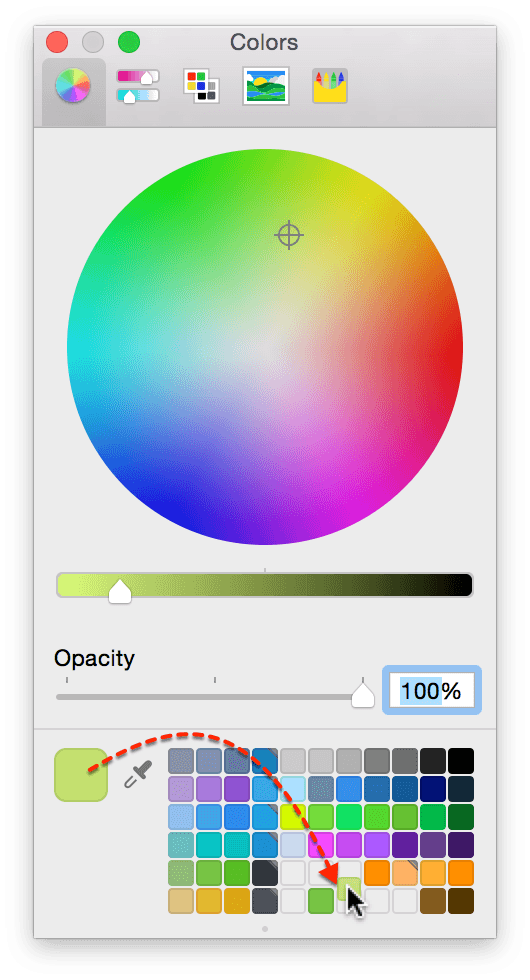
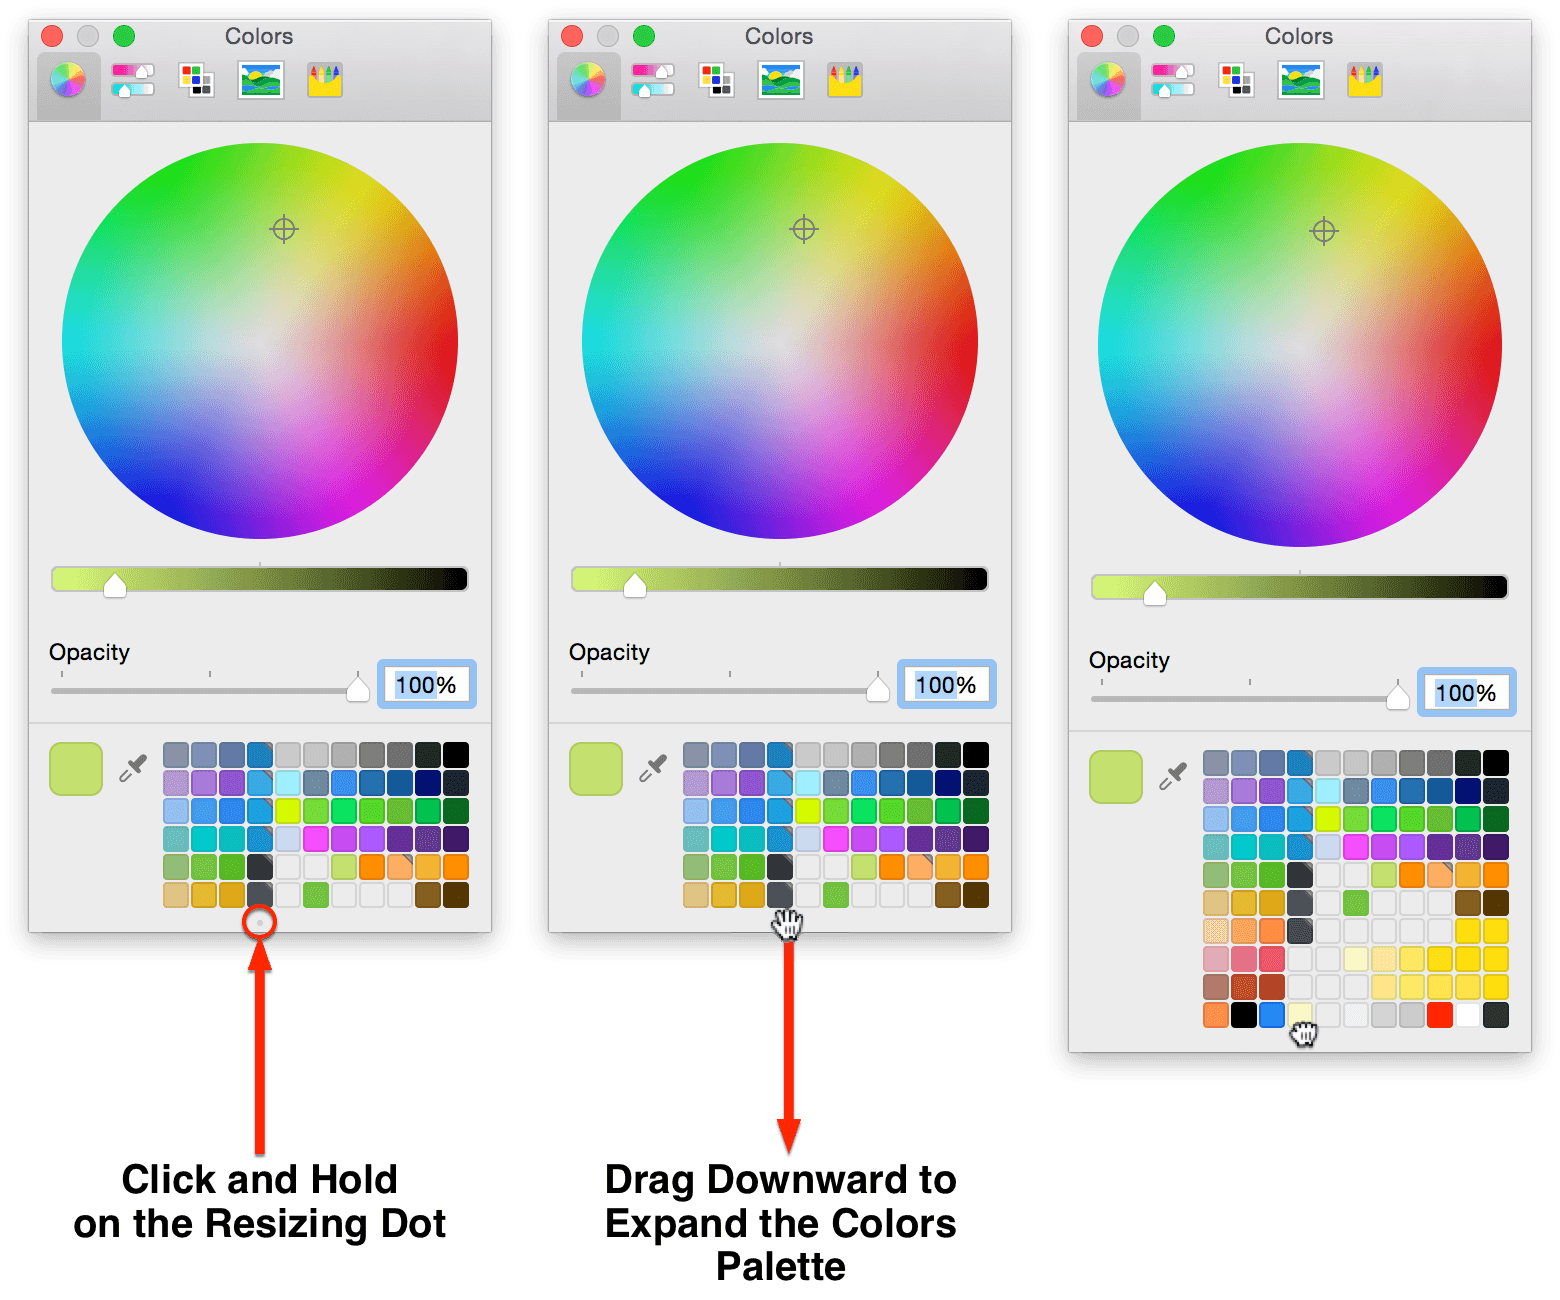
Don’t fret if you run out of color chits at the bottom of the Colors palette. If you click and drag on the little dot handle at the bottom of the window, you can expand the chit collector to reveal more rows. You can drop colors in randomly, and later reorganize them into color groups, if you’d like.
To close the Colors palette, move your mouse over the three window control buttons at the upper-left of the palette and click the red Close Window button at the far left.

Back in OmniOutliner, open the Style Attributes inspector. You’ll notice that the Whole Document style now has a background color property which reflects the color you’ve chosen.
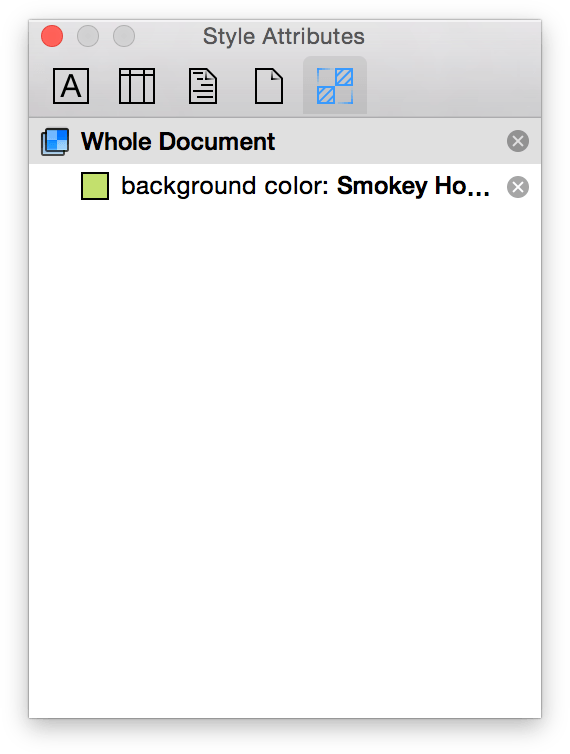
There’s much more to show you about the Colors palette, including how to use the Opacity slider for creating varying shades of the same color. For now, though, click the ![]() to the right of the Whole Document bar in the Style Attributes inspector to remove the background color you’ve set.
to the right of the Whole Document bar in the Style Attributes inspector to remove the background color you’ve set.
Setting the Whole Document Styles
Now it’s time to get to work on building out the styles for what will evolve into a new template you can use in OmniOutliner. Before you get started, take some time to think about how you would like your template to look:
- What colors should it have?
- What fonts and font styles are needed?
- Does it need status checkboxes?
- What about columns and layout?
- (Pro) Are row handles necessary?
All of these—and more—can factor into how you design and create the template. As noted earlier, however, the Whole Document styles set the foundation for the rest of your template, so that’s where we’ll start.
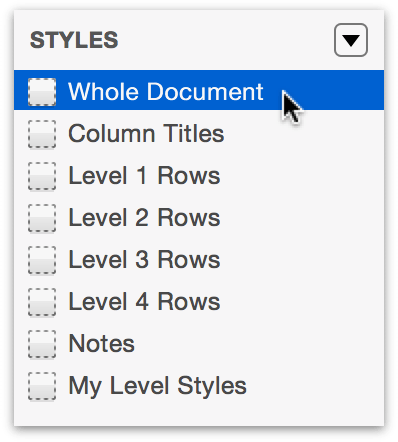
In the Styles pane of the sidebar, select Whole Document.
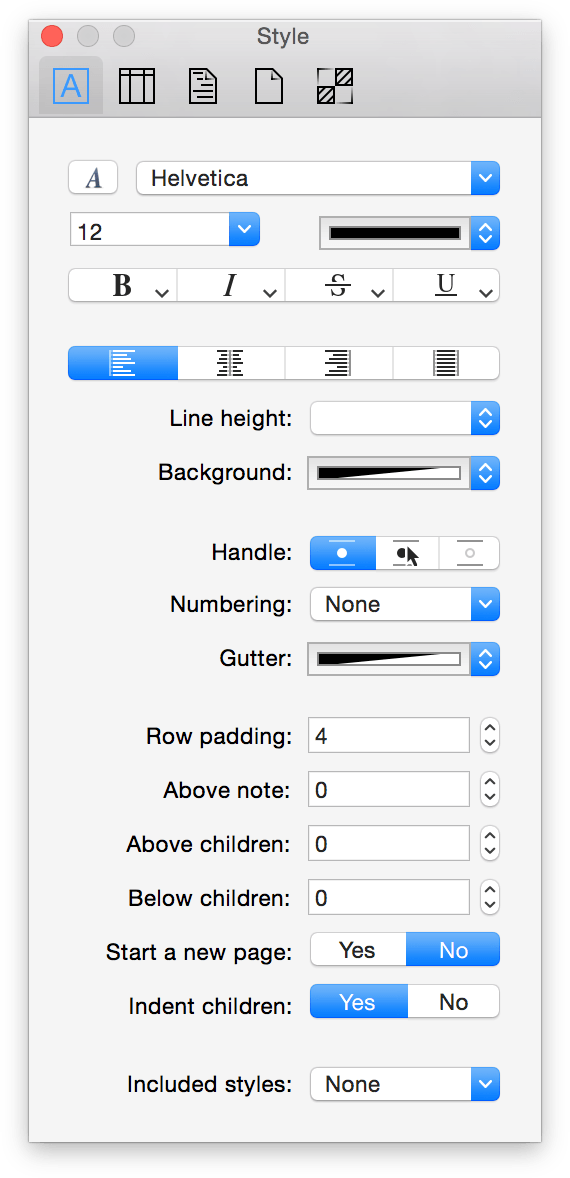
Choose Window ▸ Inspectors ▸ Style to open the Style inspector.
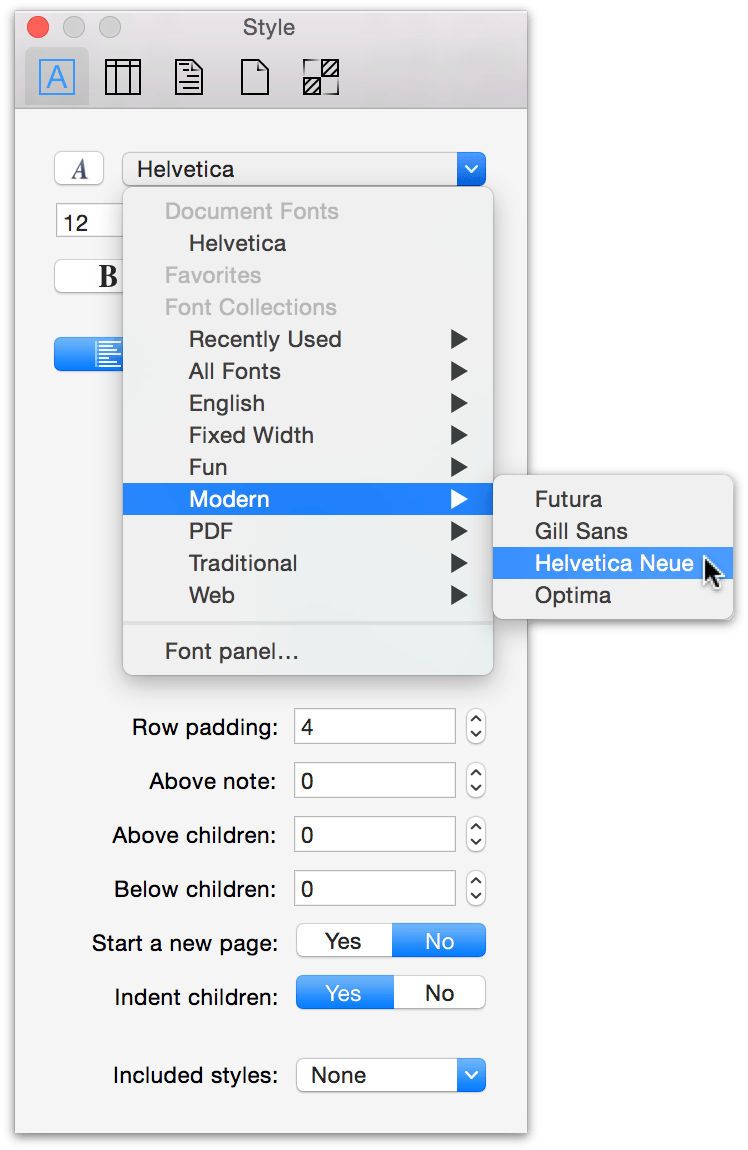
To set a base font for the document, click the font family pop up at the top of the Style inspector, and choose Modern ▸ Helvetica Neue.
In the Font Size selector, choose 13 as the font size (in points).
Click the Align Left button.
Click on the half-black, half-white portion of the Background color chooser to open the Colors palette.
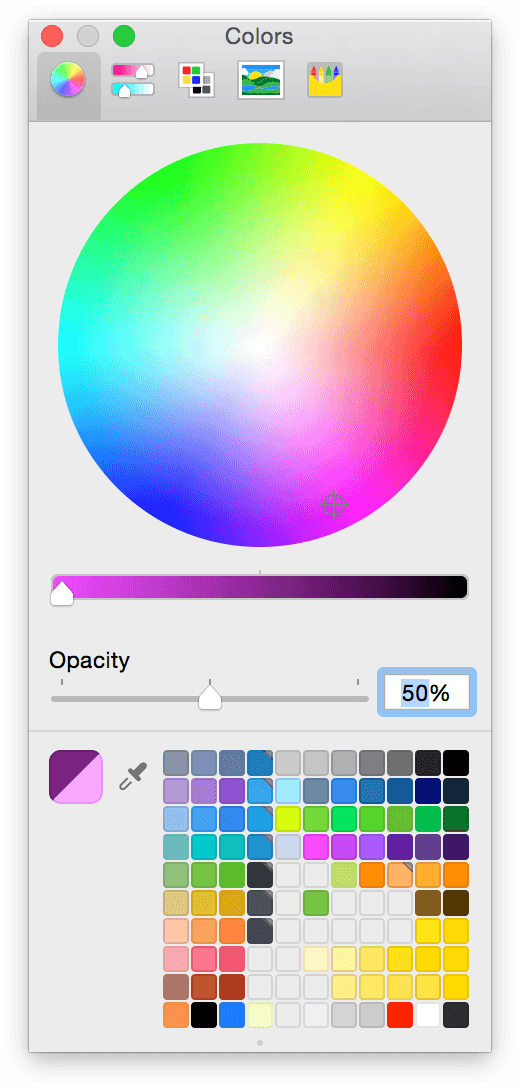
In the Colors palette, slide the Brightness slider to the left and slide the Opacity slider over to the right. If you’d like to follow along, choose a light pink background color, or select your favorite color and go with that. If it turns out that the background color you’ve chosen is too bright, you can always dial down the Opacity to lighten its intensity.
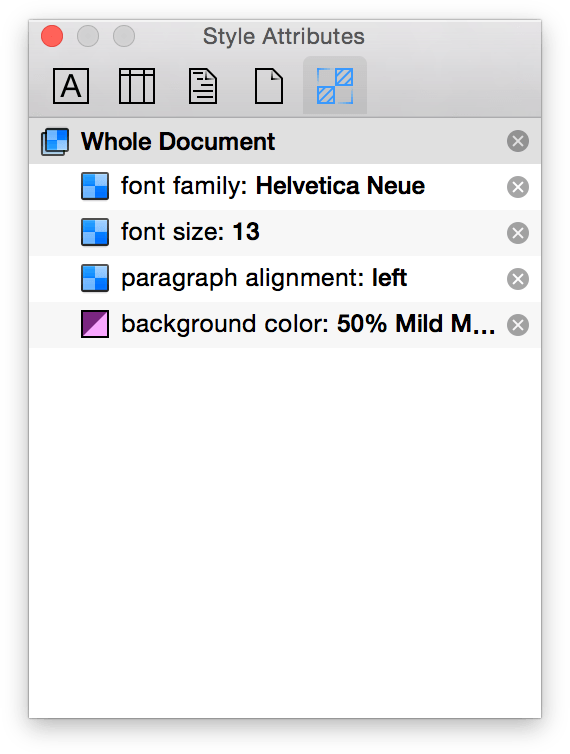
The outline now has a light pink background, and its default font type and size is 13 point Helvetica Neue. You can verify that these styles have been applied to the Whole Document style by switching over to the Style Attributes inspector.
Setting the Column Titles Styles
Now let’s create a title banner across the top of the document.
Go ahead and switch back to the Style inspector and then select Column Titles in the Styles pane of the sidebar.
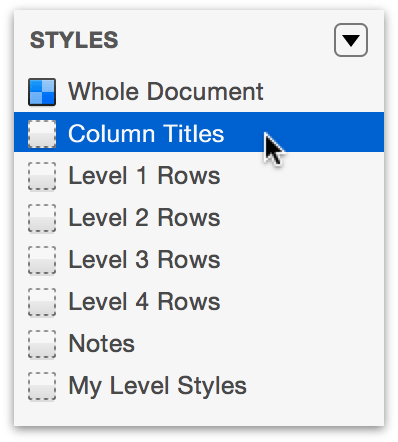
In the Style inspector, do the following:
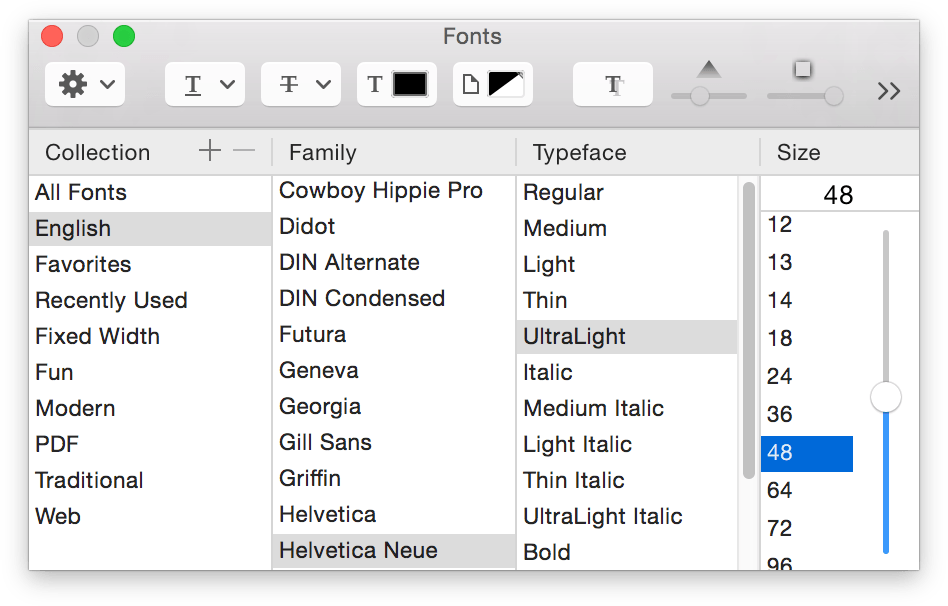
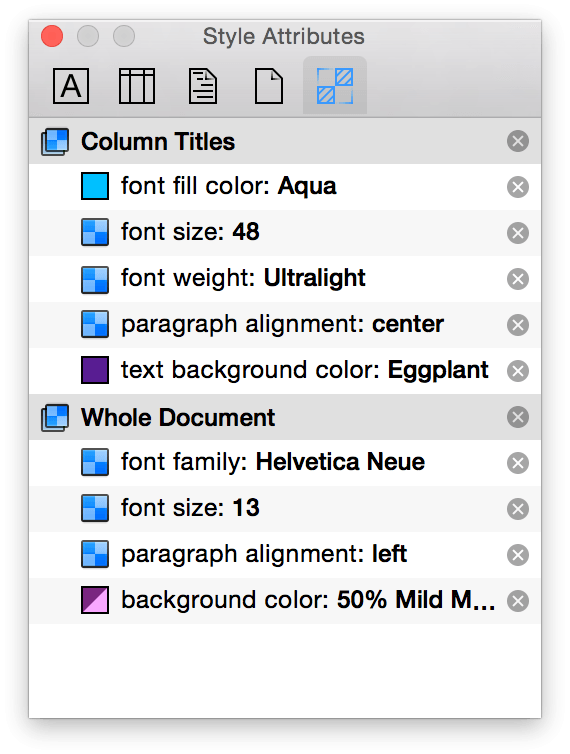
- In the Font Family bar at the top, click the A icon to open the Fonts window. In the Typeface column, choose UltraLight, and then change the Size to 48.
Change the font color to a light blue or Aqua tone. You can do this easily by clicking on the Color Picker and dragging it over to the edge of the blue area in the Color Wheel.
Change the text alignment to Centered.
Change the Background color to a dark (almost black) purple. This helps the light blue text really stand out at the top of the document.
Your document should look similar to the following:
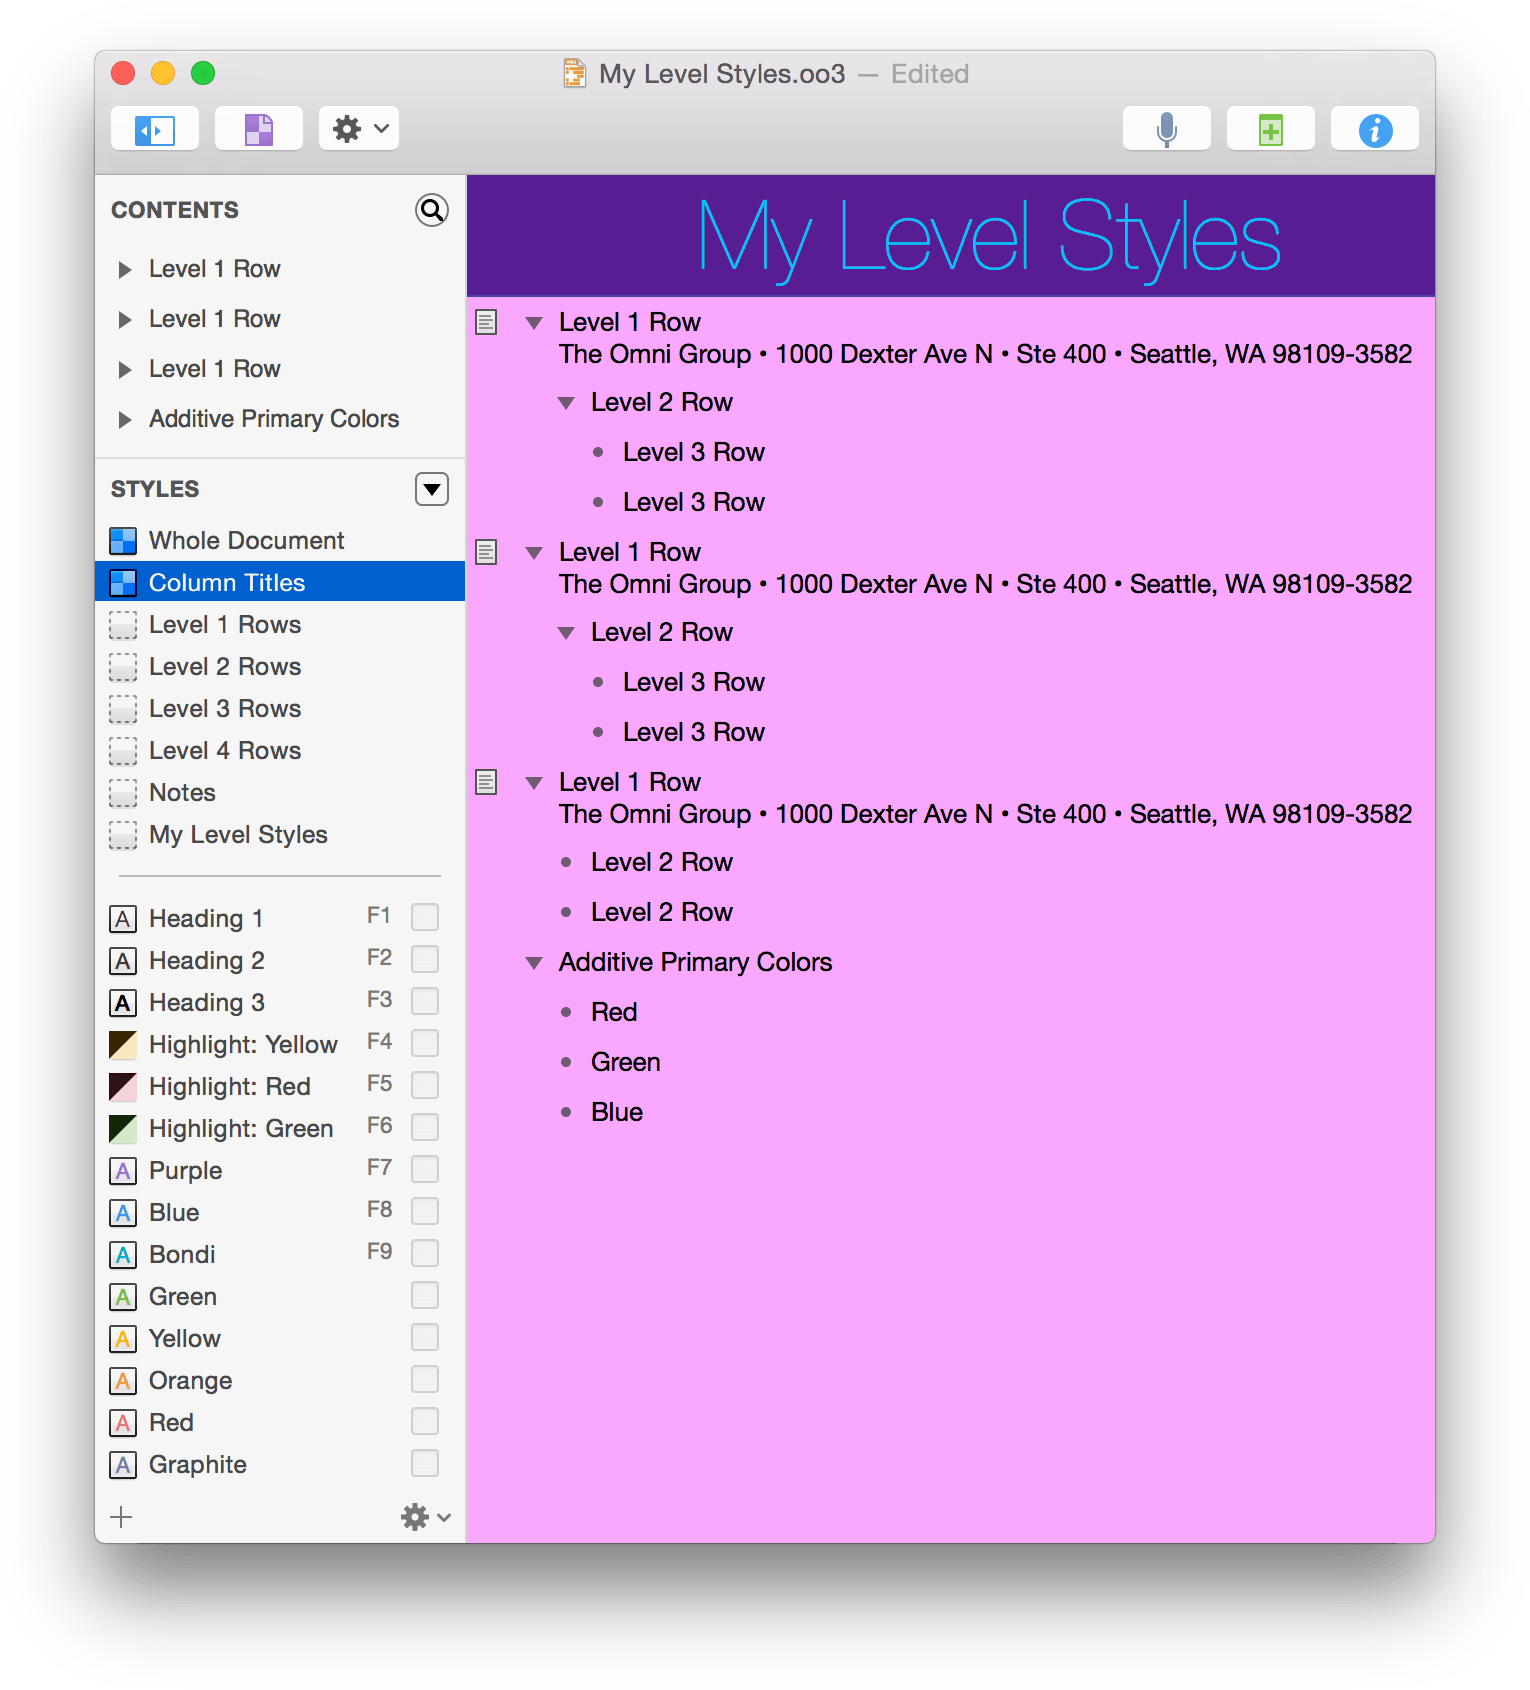
And you can verify the styles in the Style Attributes inspector, too.
Setting the Row Level Styles
Now it’s time to turn our attention to the row levels. As you might recall from earlier in this tutorial, the Level Styles template used variations on the same font for the different row styles. We’ll do something similar here, but we’ll also add a background color to a couple of the rows so you can see how to layer colors on top of the background color specified in the Whole Document style.
Let’s get started!
In the Styles pane of the sidebar, select Level 1 Rows.
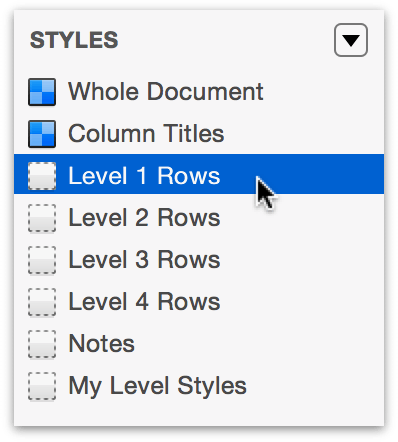
In the Style inspector, do the following:
- Open the Fonts window and change the Typeface to UltraLight.
- Change the font size to 24 points.
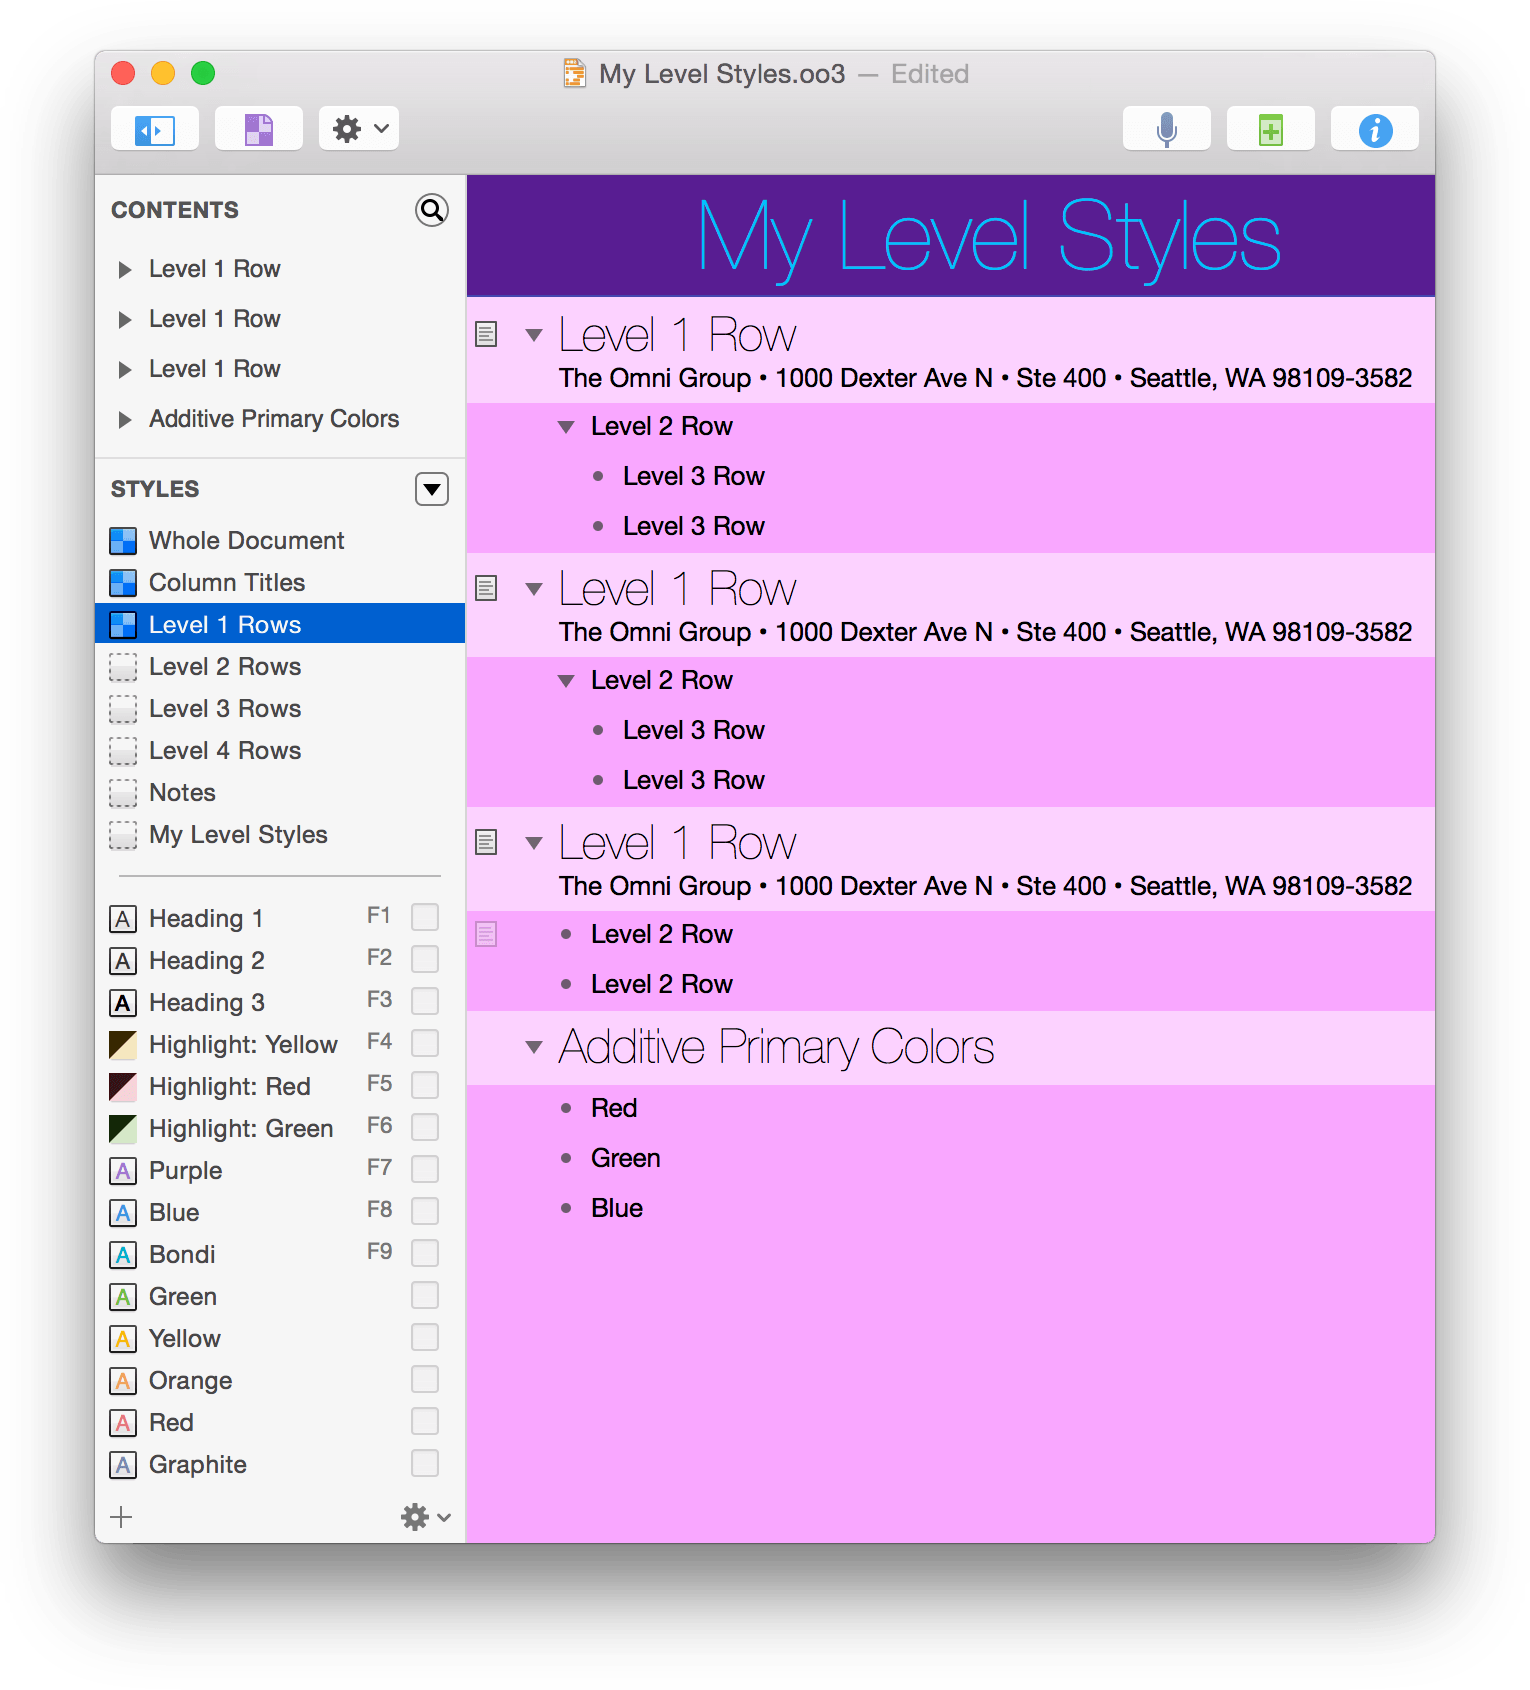
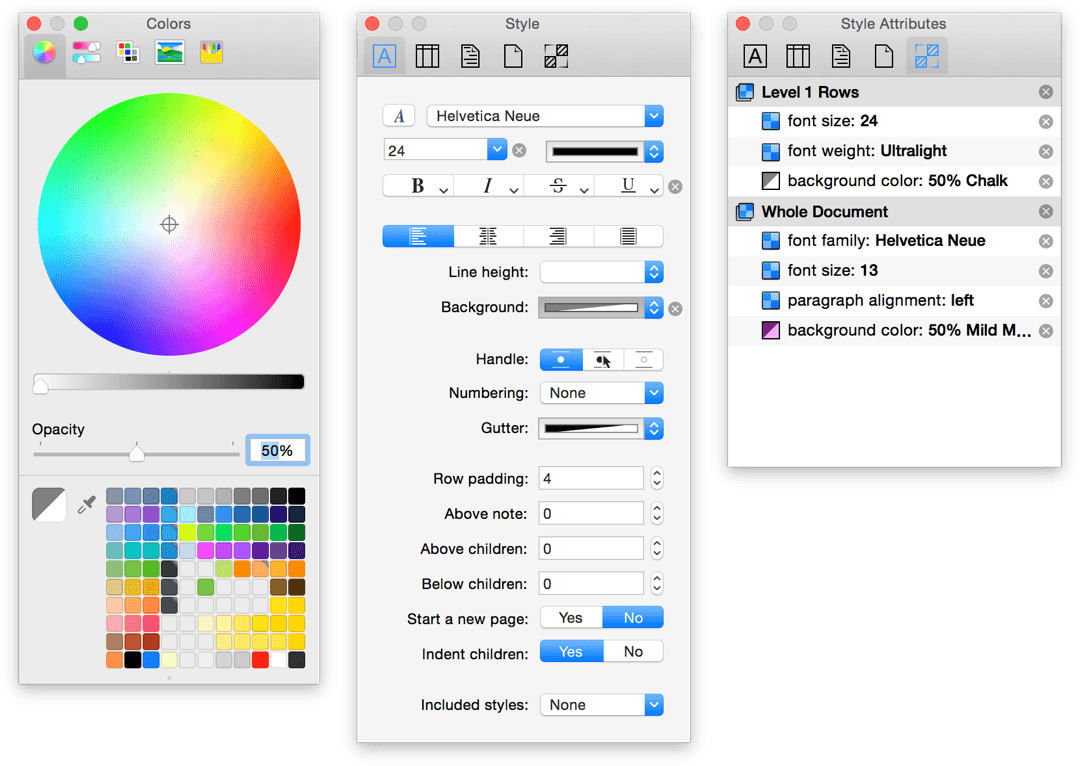
- Change the Background color to White, but set the Opacity in the Colors palette to 50%. This creates a transparent background that lets the light blue background color from the Whole Document style bleed through.
Your document should look similar to the following:
And for reference, the Colors palette, and the Style and Style Attributes inspectors should look like this:
In the Styles pane of the sidebar, select Level 2 Rows.
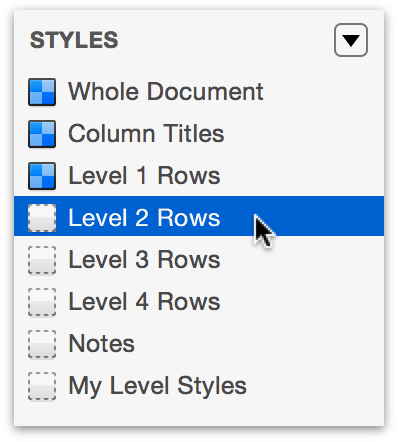
In the Style inspector, do the following:
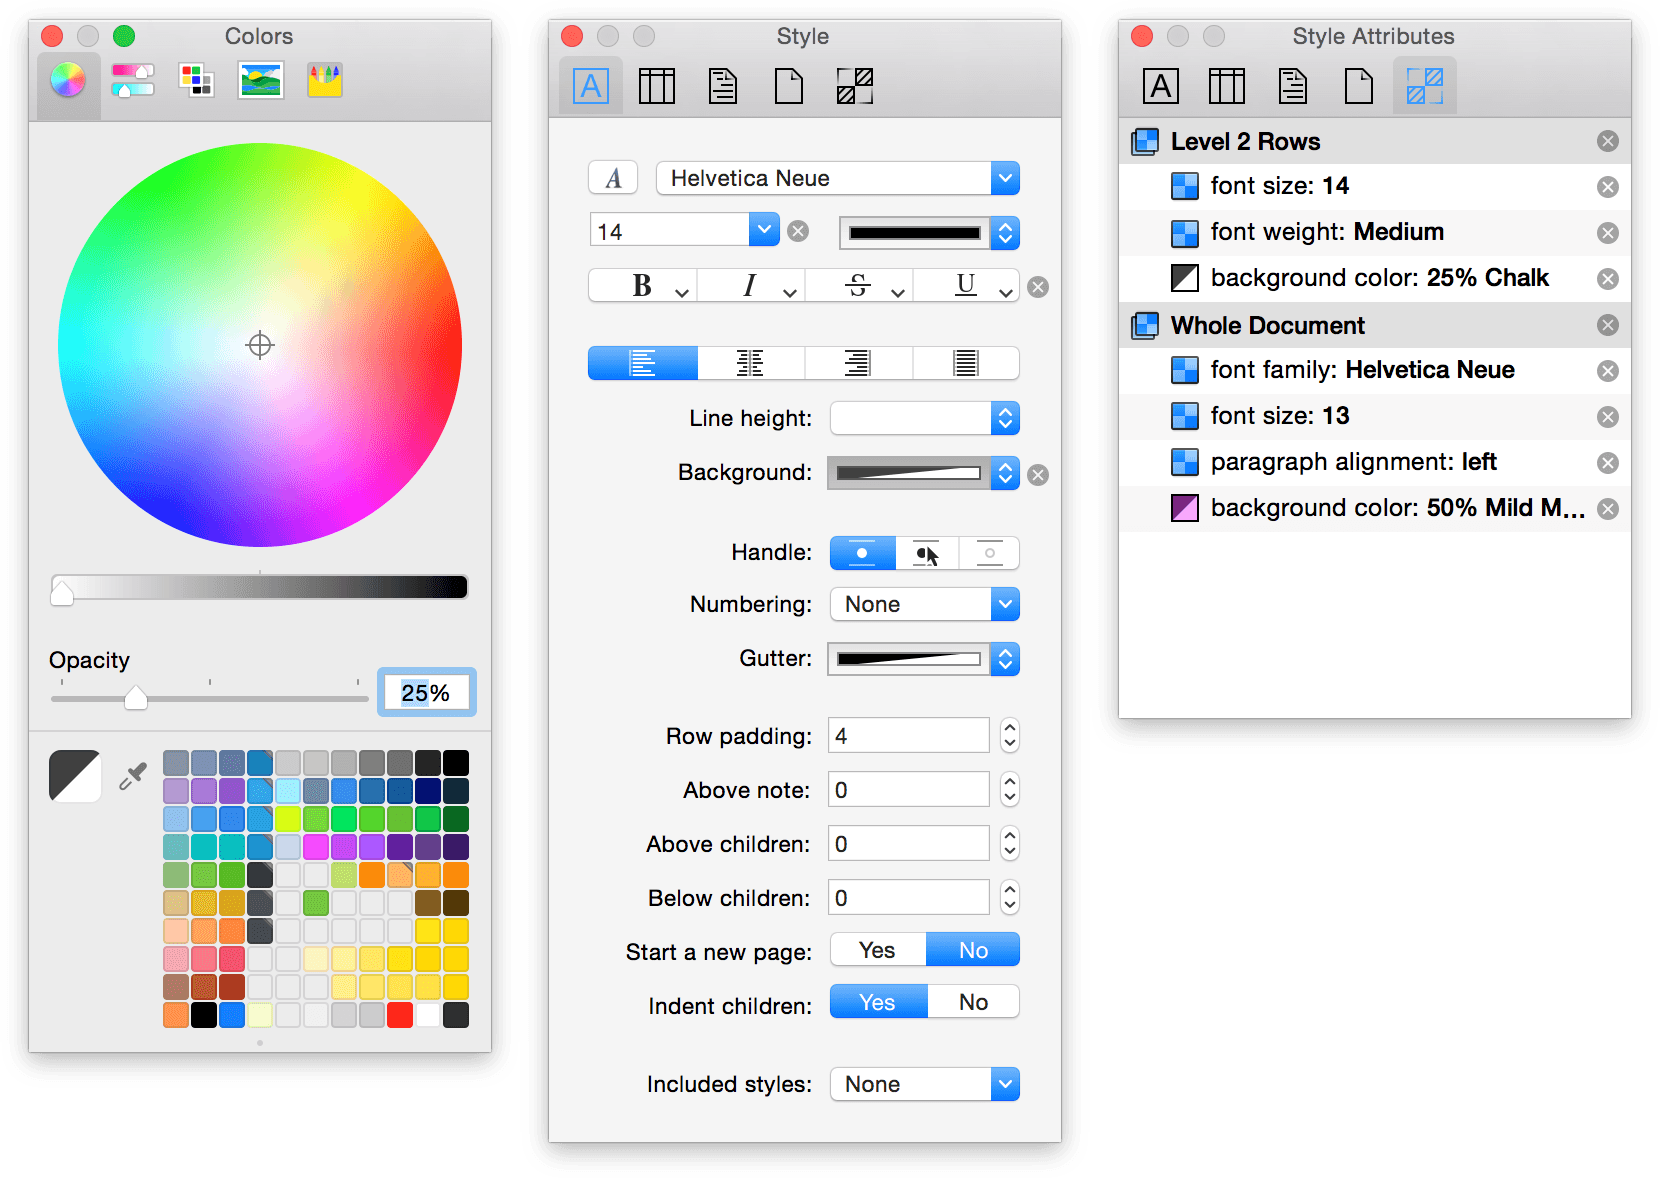
- Open the Fonts window and change the Typeface to Medium.
- Change the font size to 14 points.
- Change the Background color to White, but set the Opacity in the colors palette to 30%. This gives the Level 2 Rows a slightly darker background color than the Level 1 Rows.
Your document should look similar to the following:
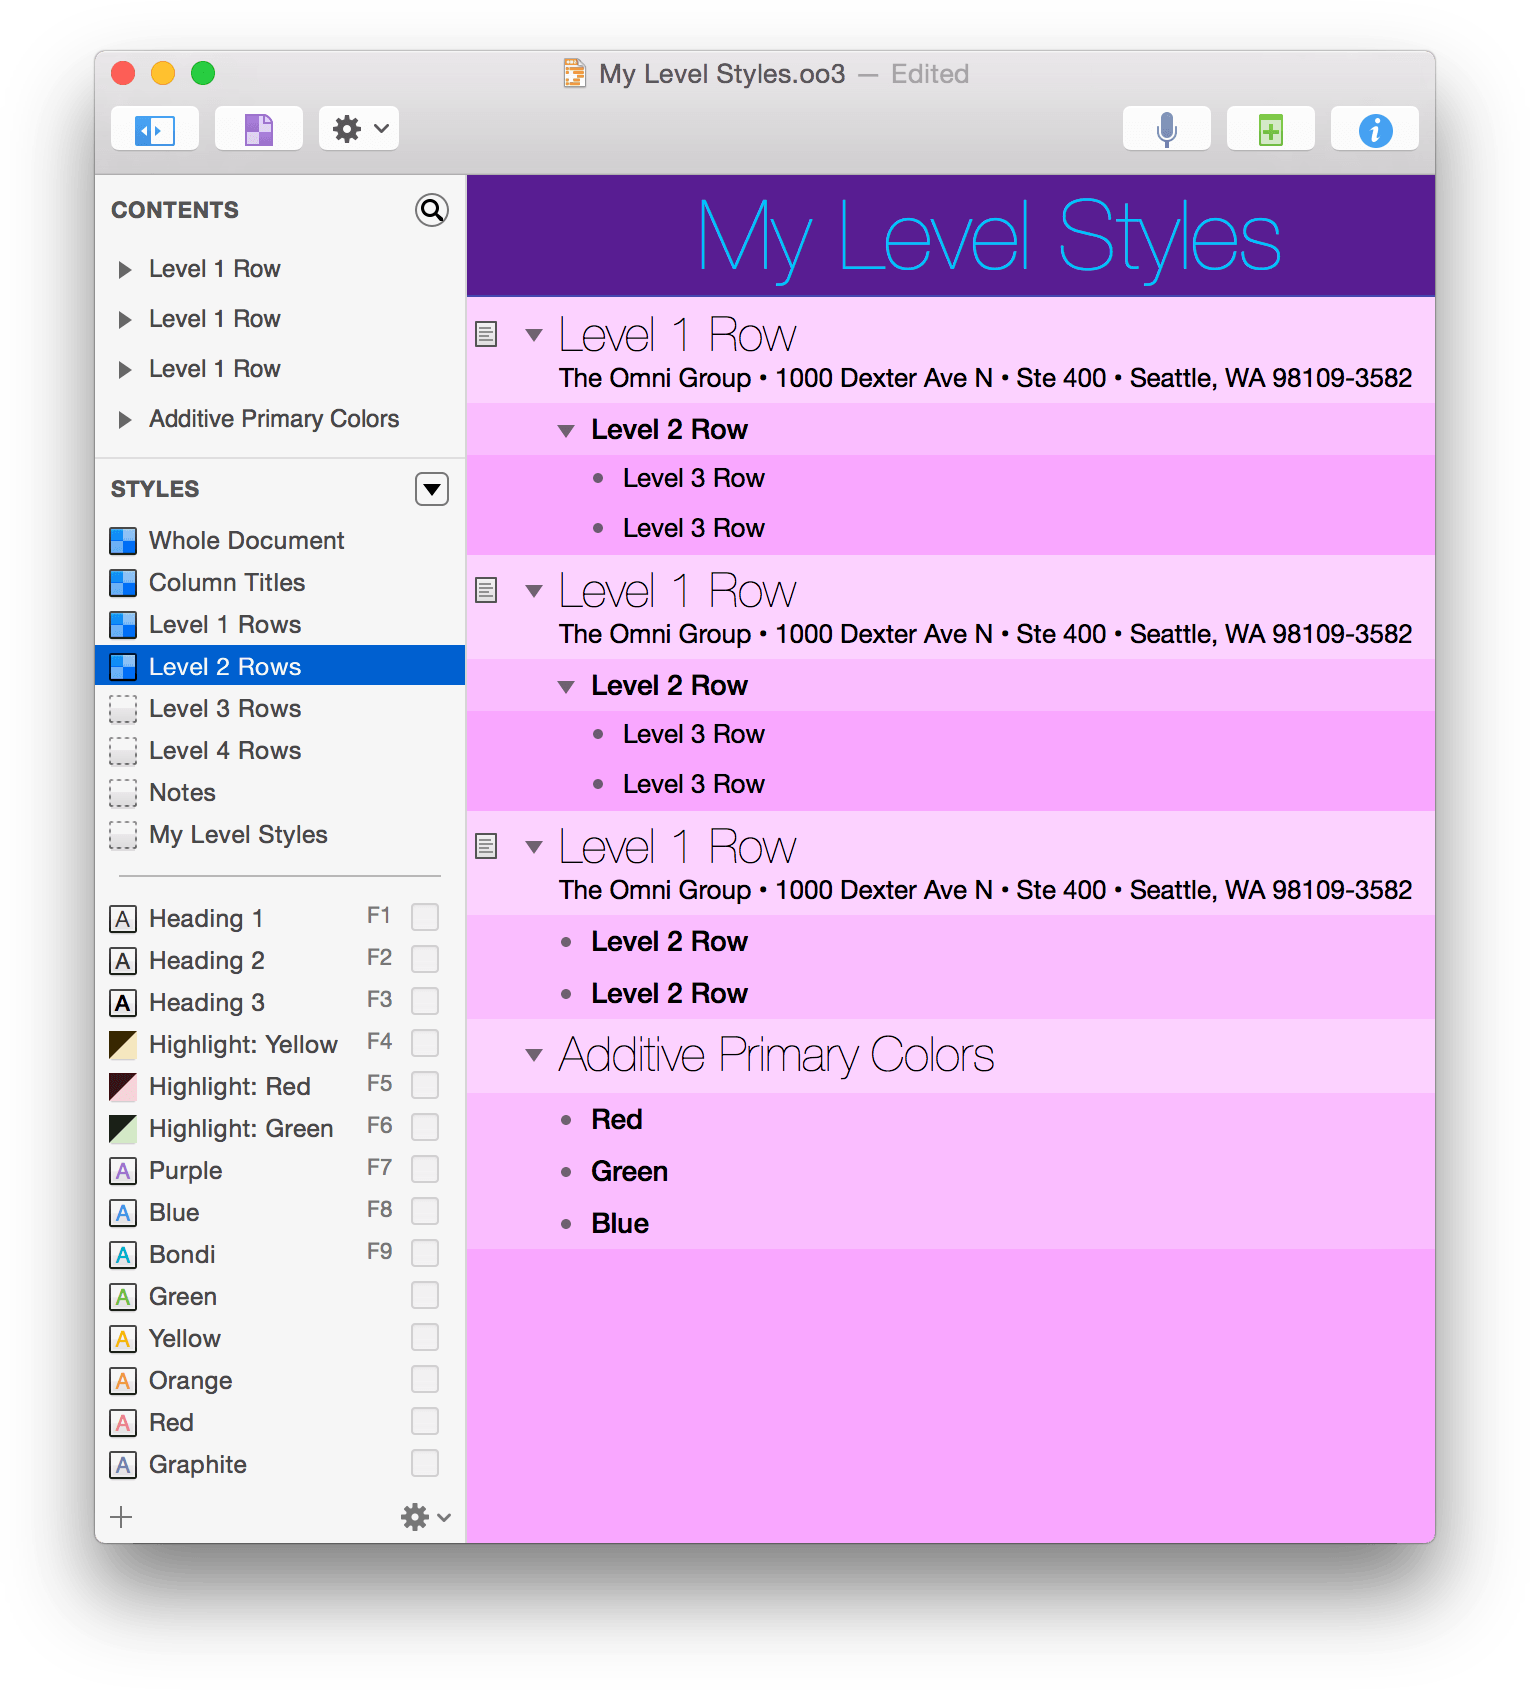
And for reference, the Colors palette, and the Style and Style Attributes inspectors should look like this:
In the Styles pane of the sidebar, select Level 3 Rows.
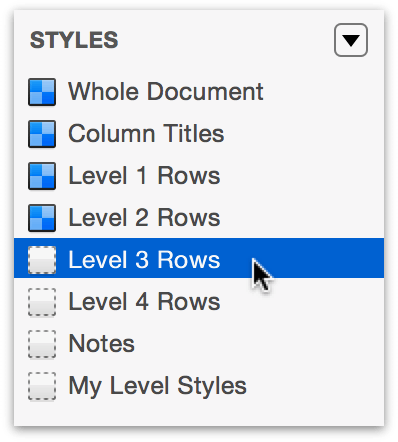
In the Style inspector, do the following:
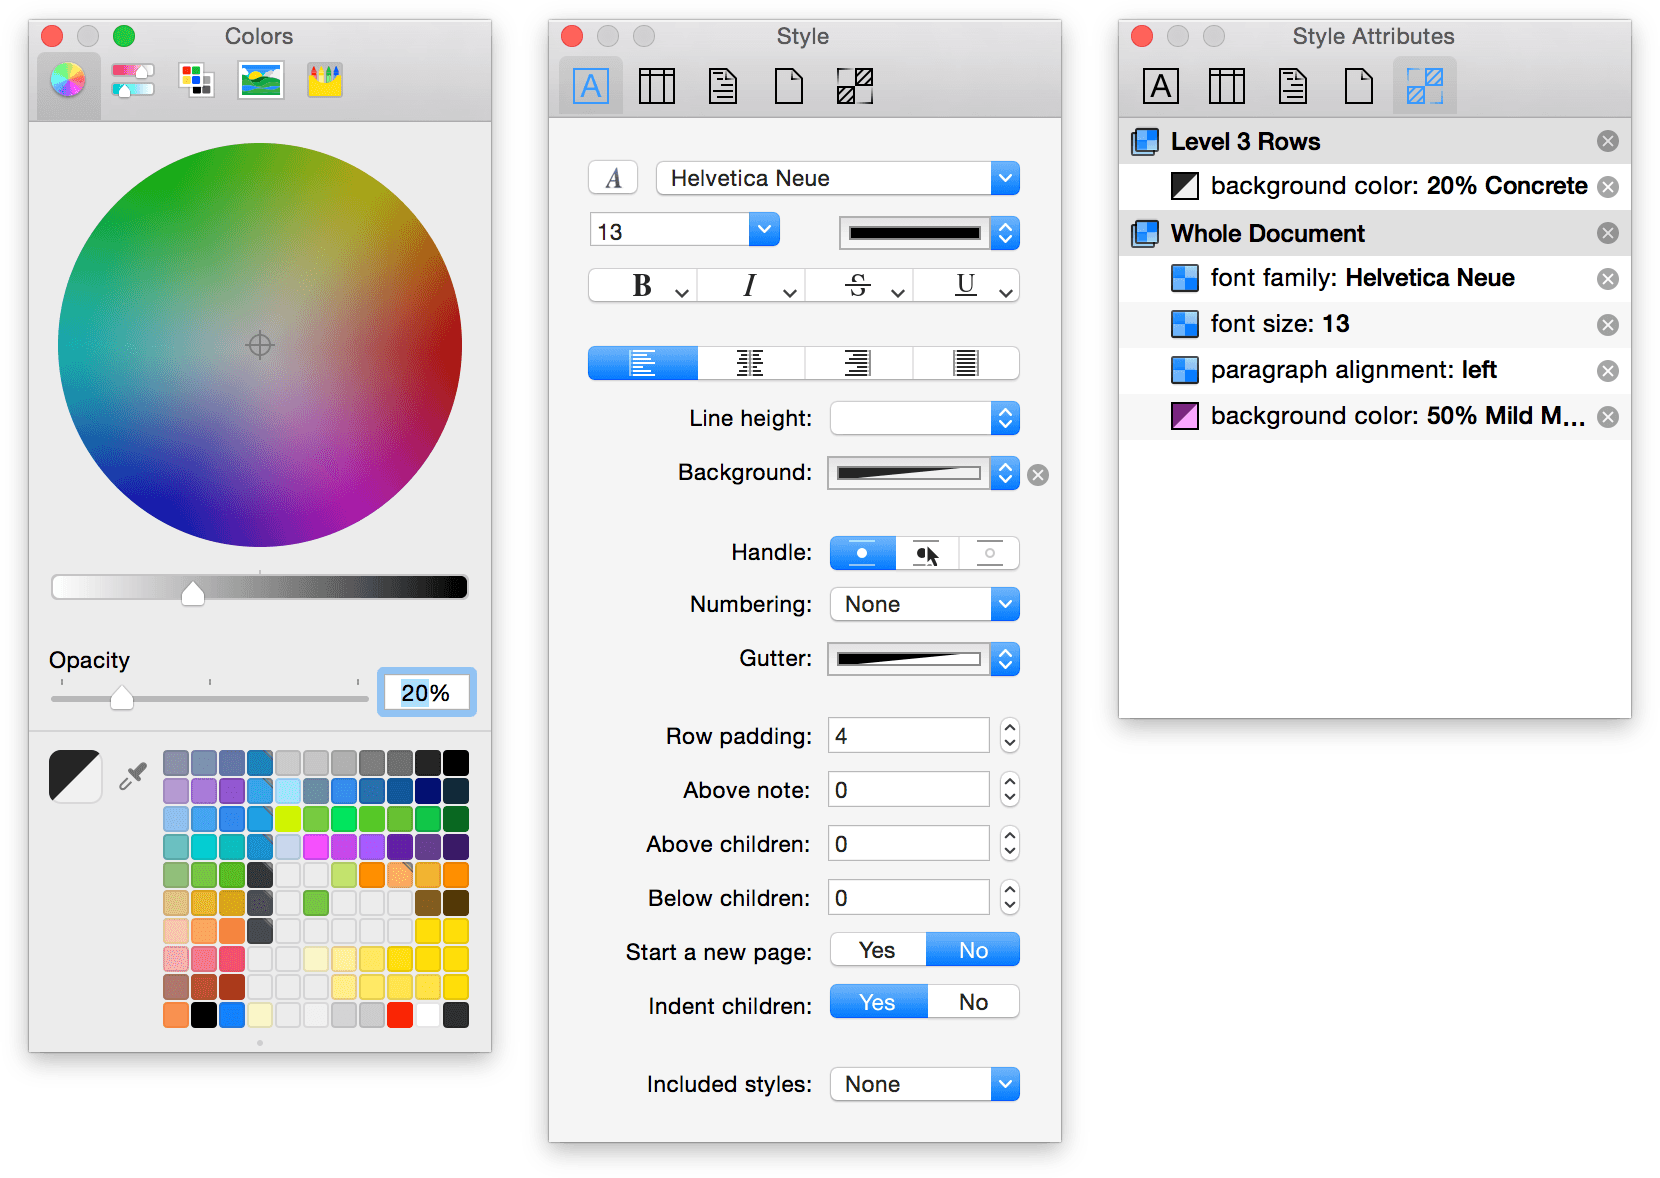
- Change the Background color to Light Gray by clicking on the little arrows on the right side. This background color automatically has a 20% opacity set to it, which makes the row slightly darker than the Level 2 Rows.
Your document should look similar to the following:
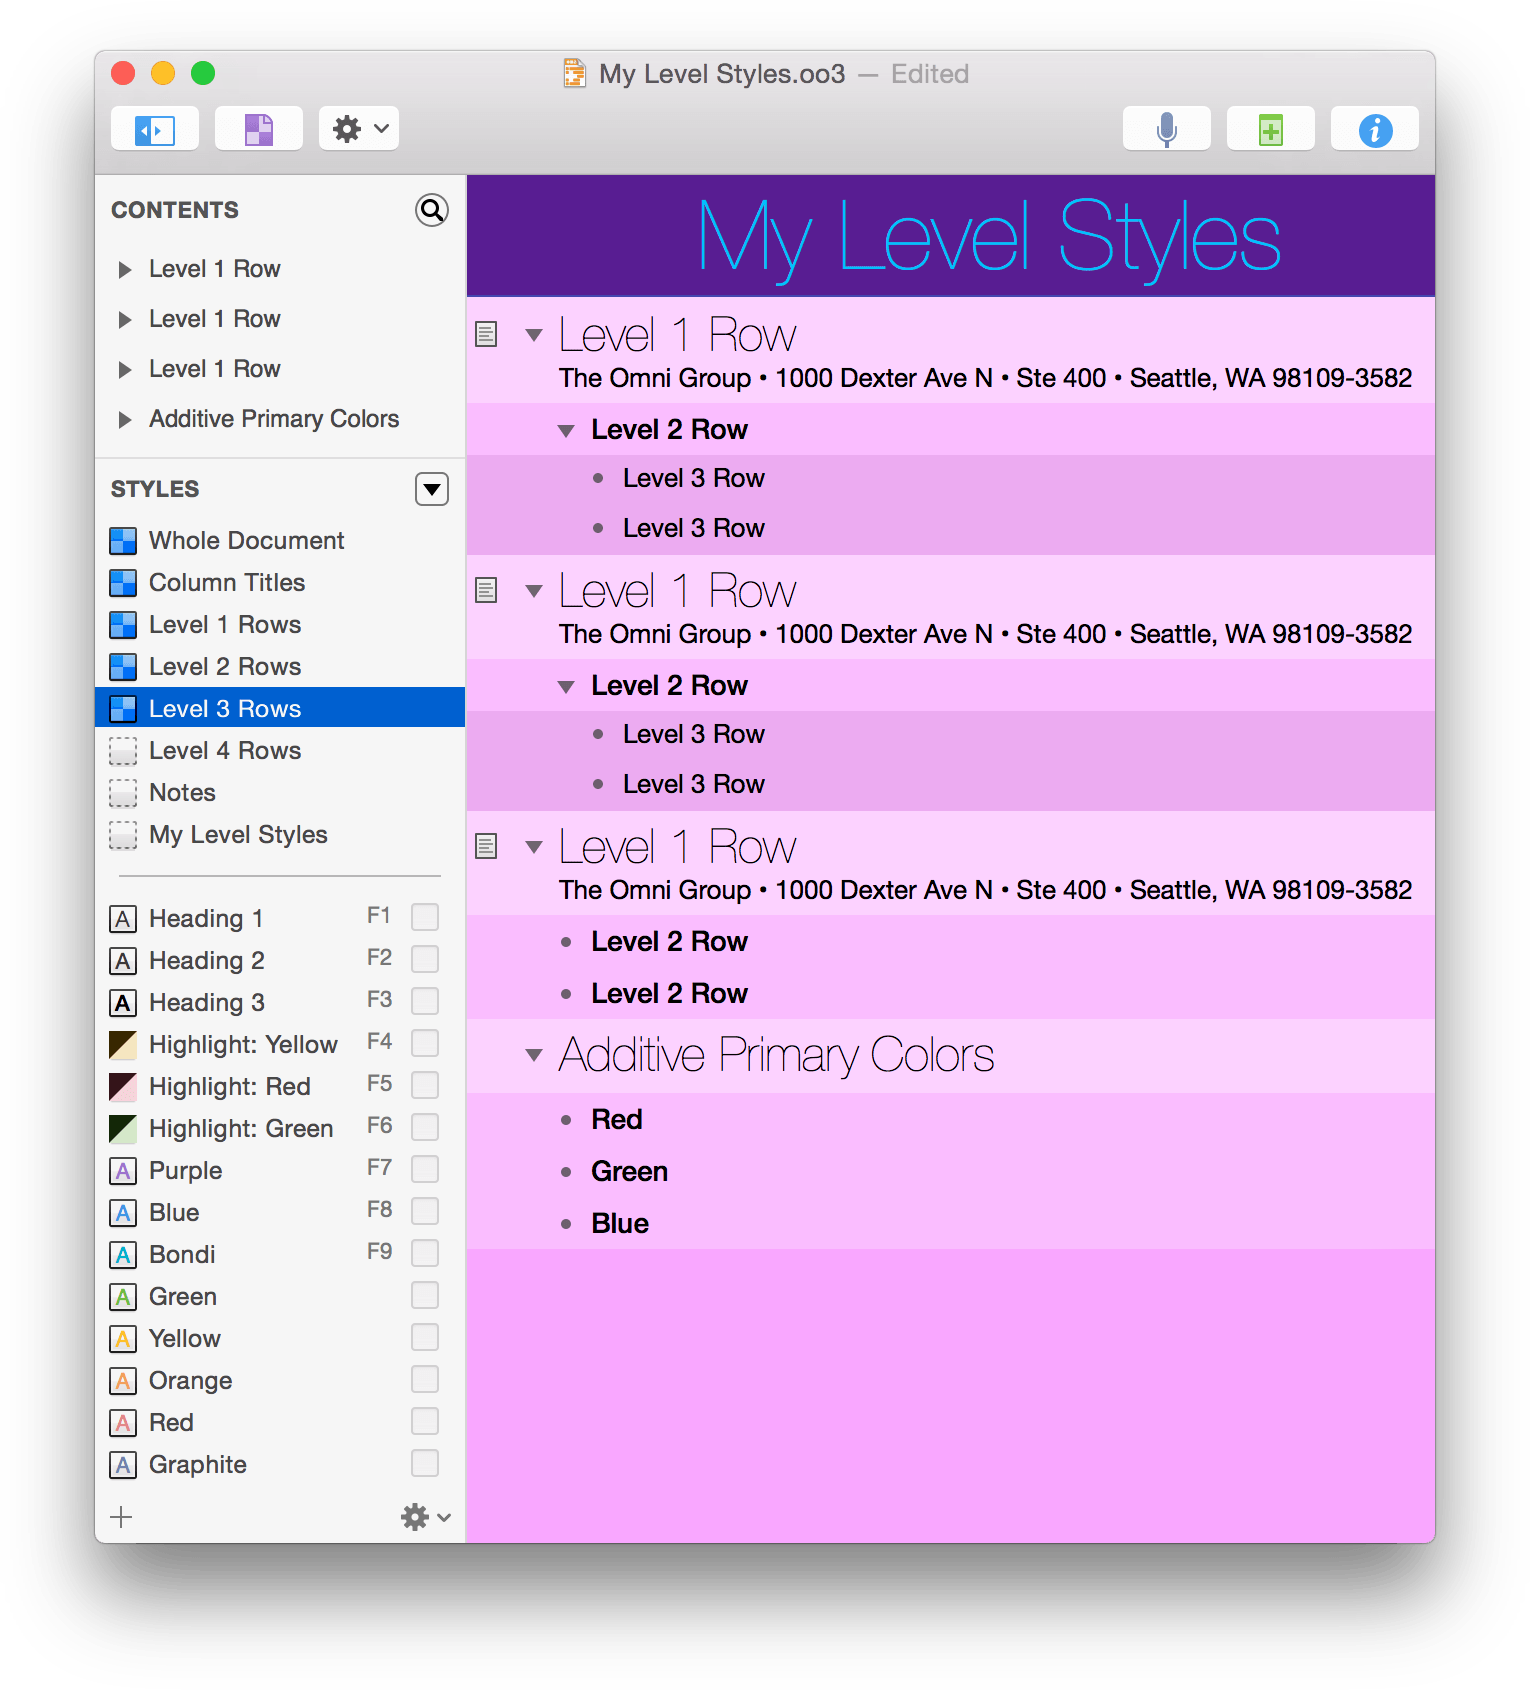
And for reference, the Colors palette, and the Style and Style Attributes inspectors should look like this:
In the Styles pane of the sidebar, select Notes.
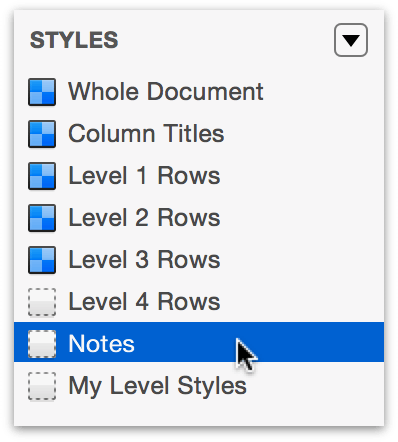
In the Styles inspector, do the following:
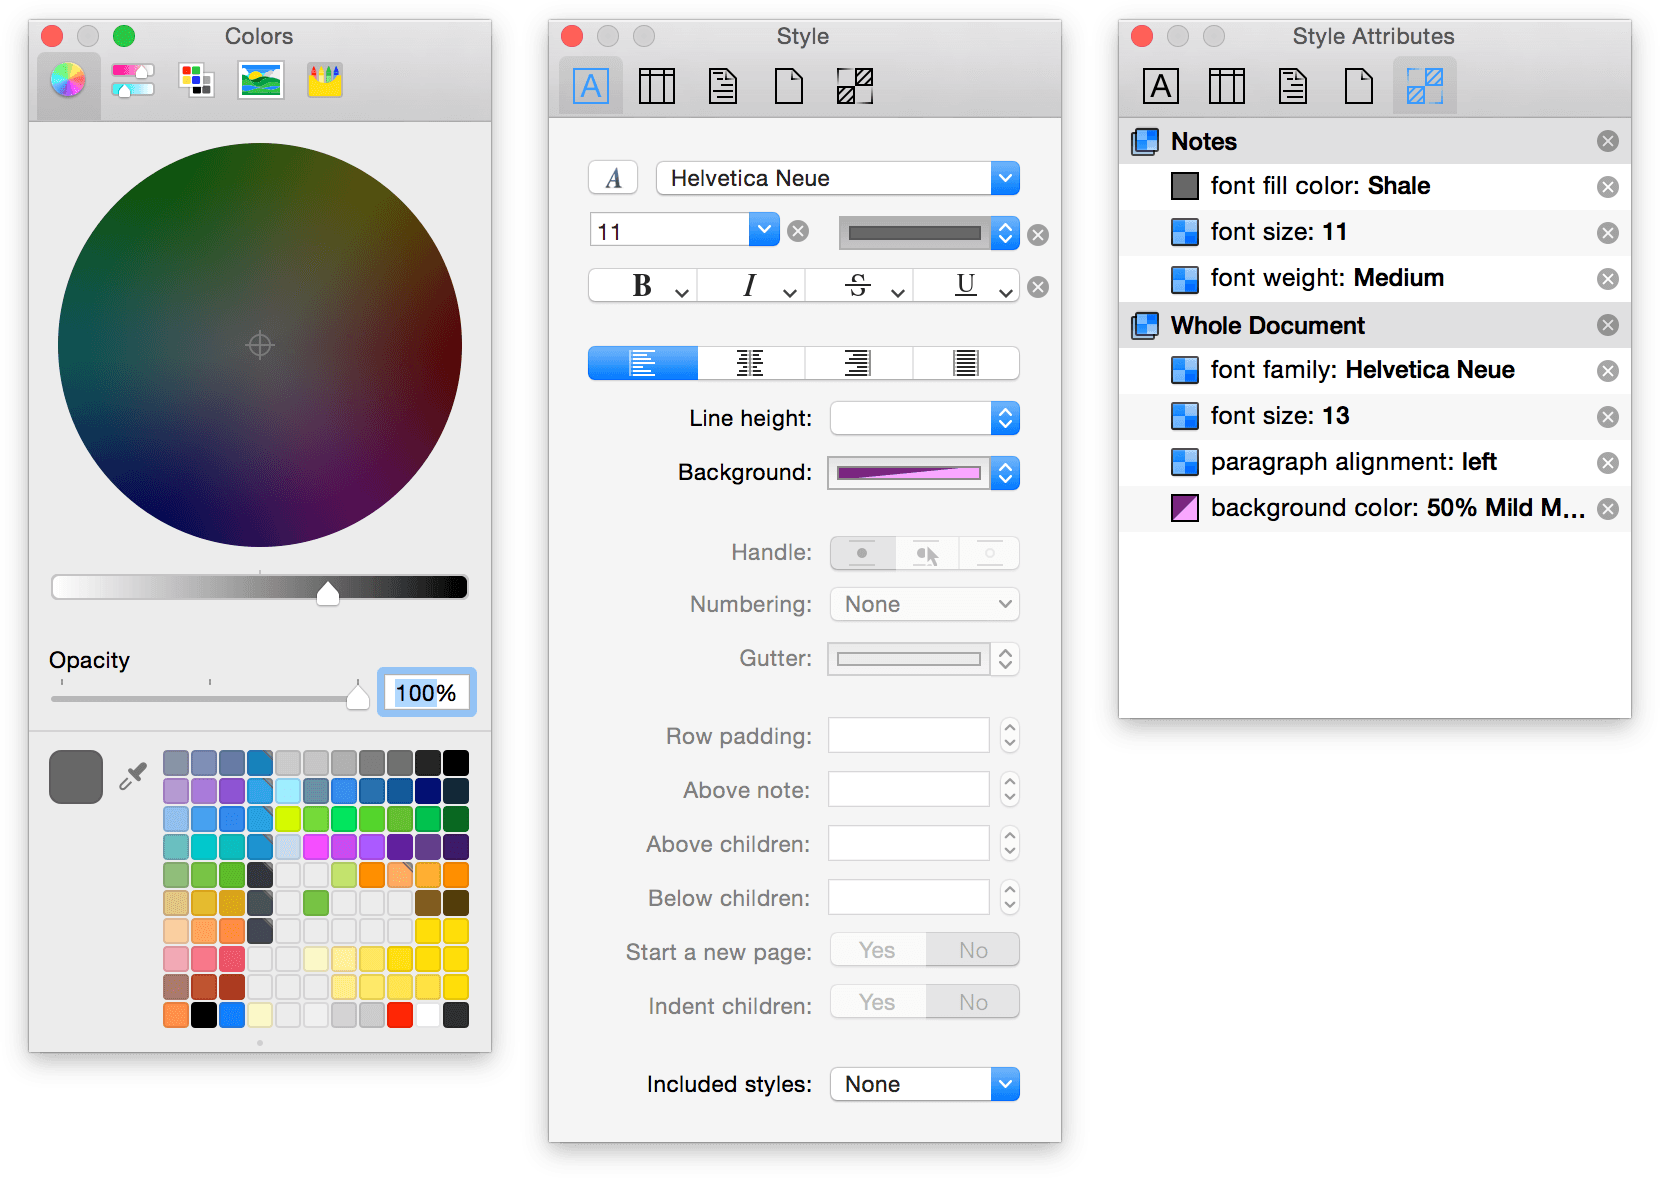
- Open the Fonts window and change the Typeface to Medium.
- Change the font size to 11 points.
- Change the font color to Dark Gray. You can do this easily by clicking on the little arrows to the right of the color bar and selecting Dark Gray from the available options.
Your document should look similar to the following:
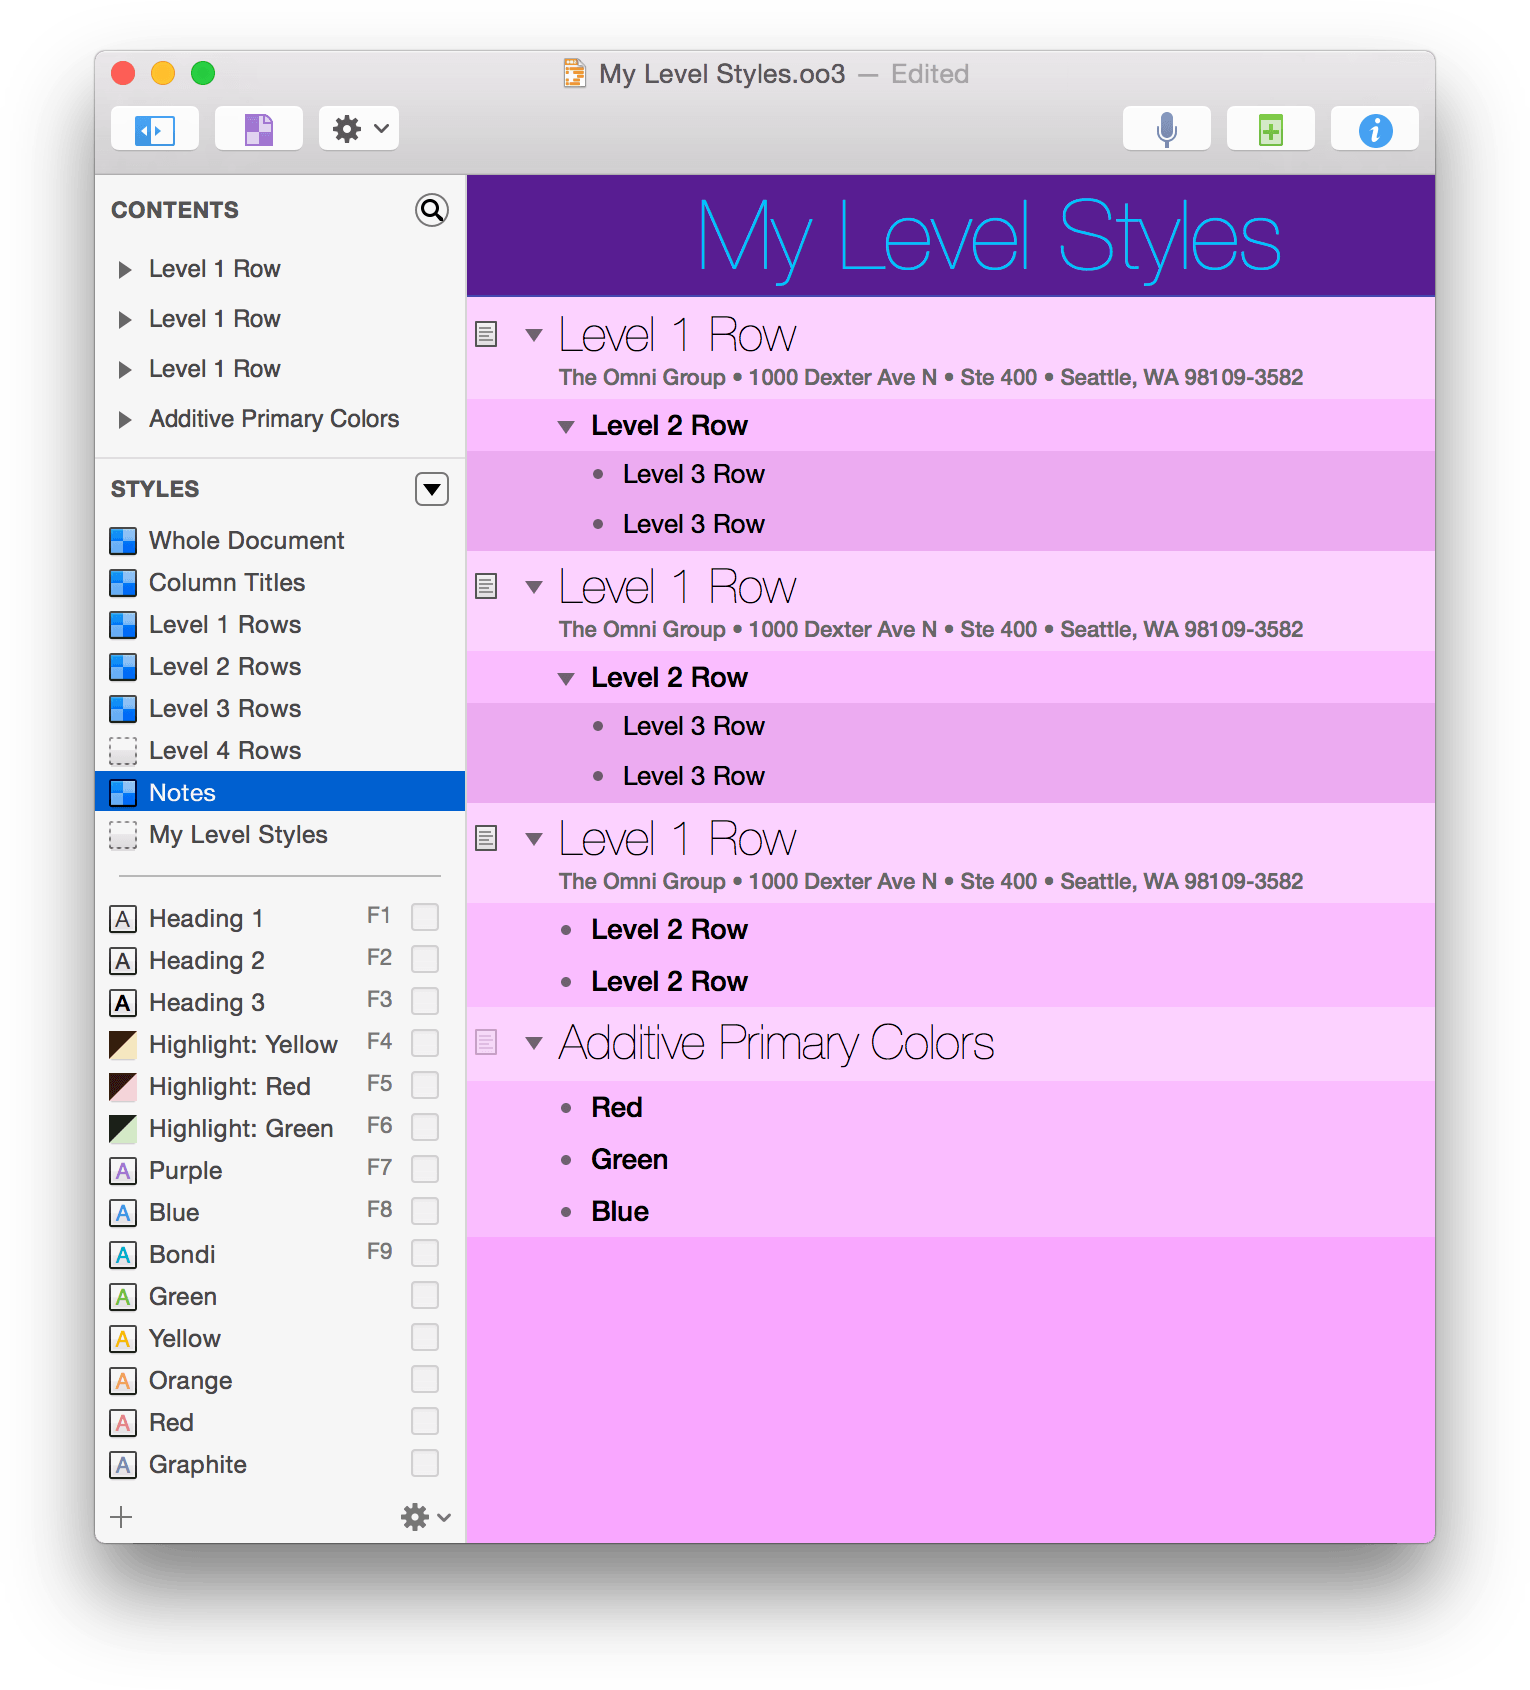
And for reference, the Colors, Style, and Style Attributes inspectors should look like this:
Creating New Named Styles
Finally, let’s create some new Named Styles that we can use on the Red, Green, and Blue text under the Additive Primary Colors row.
Start by deleting the Named Styles that came with the Modern with Level Styles template; follow these steps:
In the Styles pane of the sidebar, click to select the Heading 1 style, hold down the Shift key, and then click to select the Graphite style at the bottom of the pane; this selects those styles and everything in between.
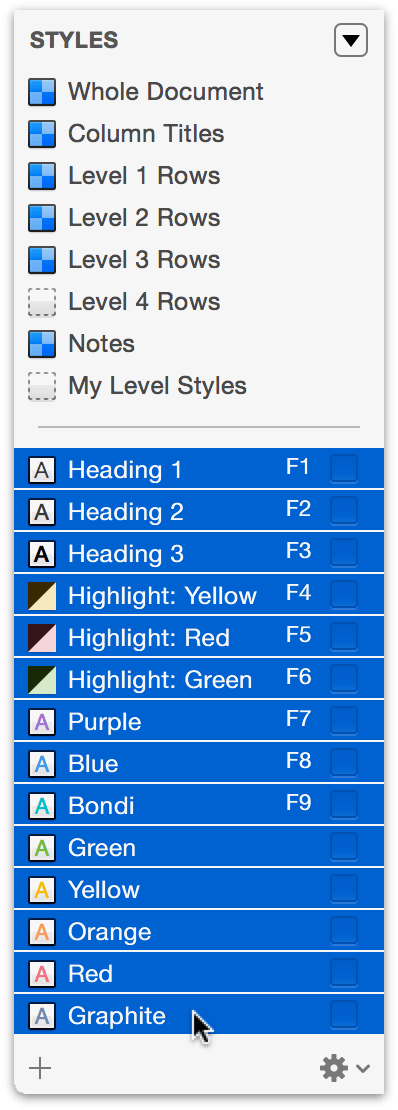
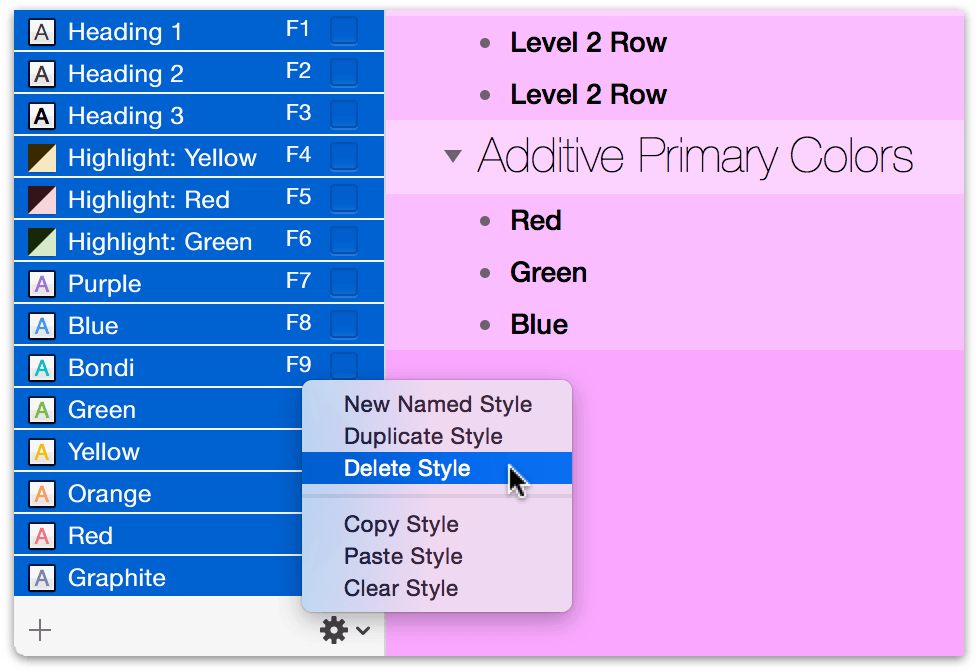
Click the Action menu to the right and underneath the Named Styles, and choose Delete Style from the popup menu.
Click the Action menu again and choose New Named Style from the popup menu.
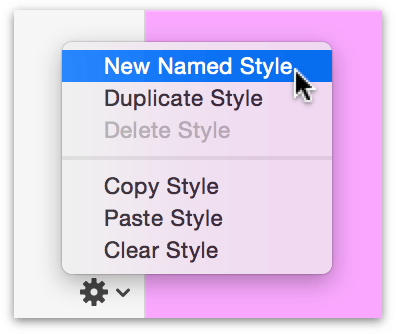
This creates a new named style in the lower portion of the Styles pane, which you can assign a name to. Let’s keep this simple; type in Red and press Return to avoid ambiguity.
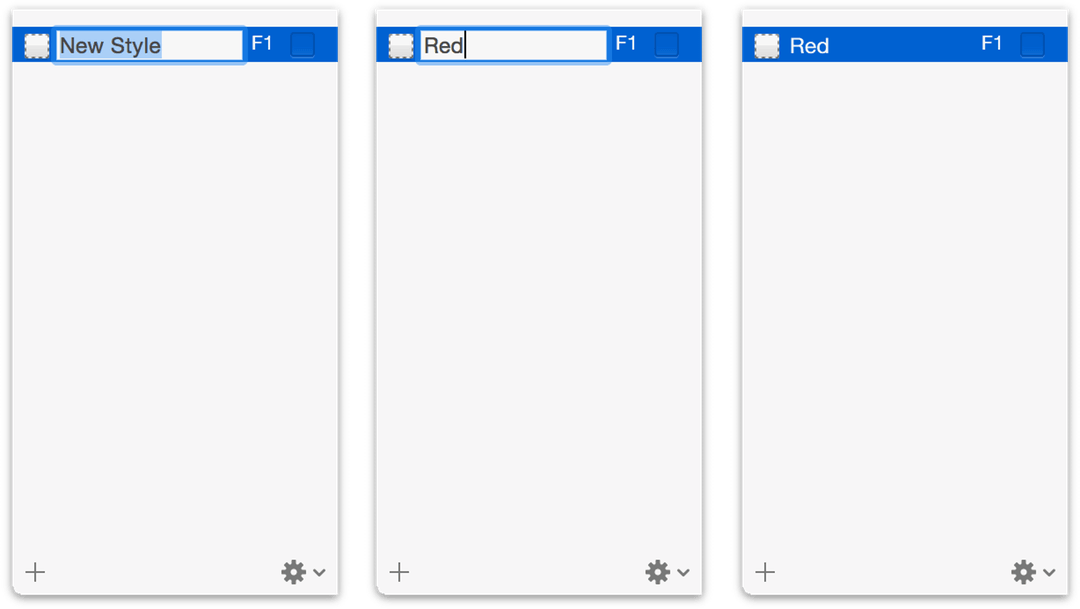
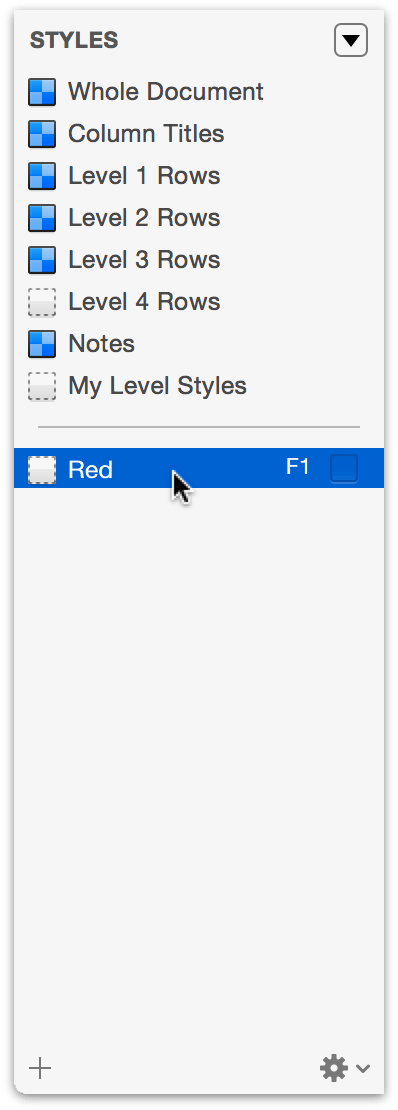
Select the Red named style in the Styles pane.
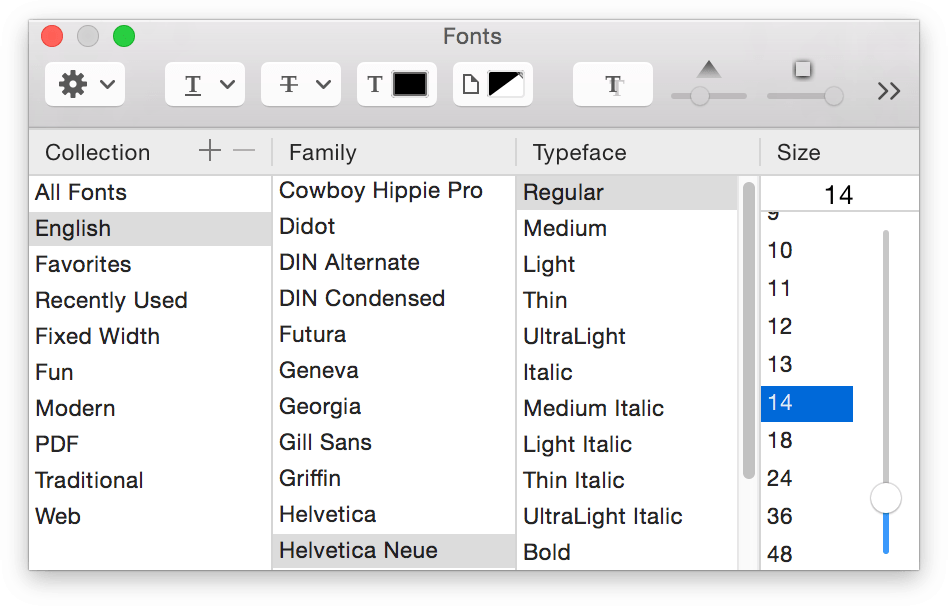
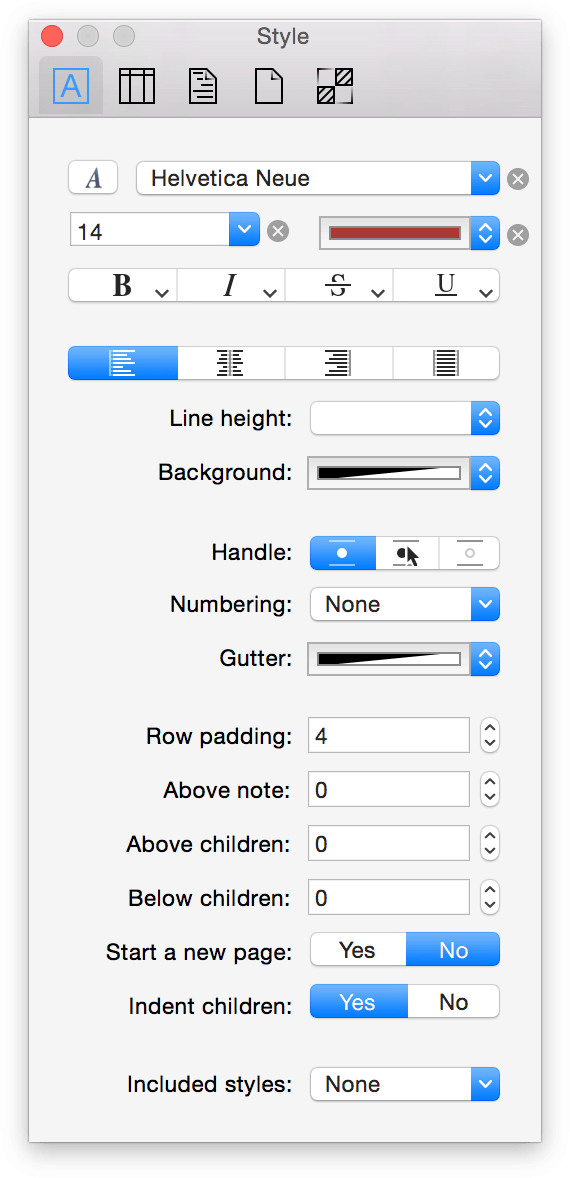
In the Style inspector, do the following:
Open the Fonts window and change the Family to Helvetica Neue, the Typeface to Regular, and set the Size to 14 points.
Click on the little arrows next to the color selector and choose Red.
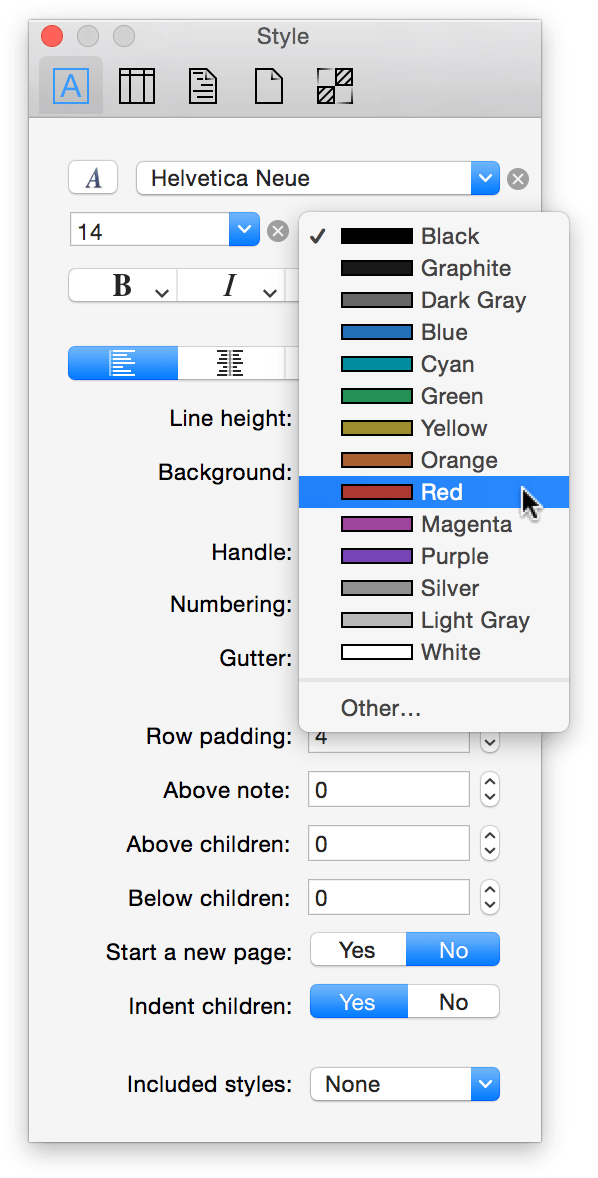
When finished, the Style inspector should look like this:
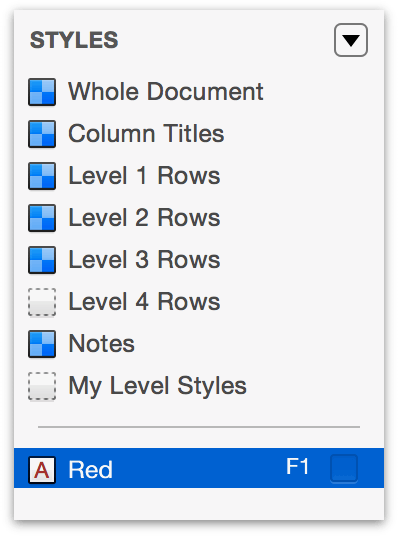
And you’ll see that the Red named style in the Styles pane has a red “A” in its style icon.
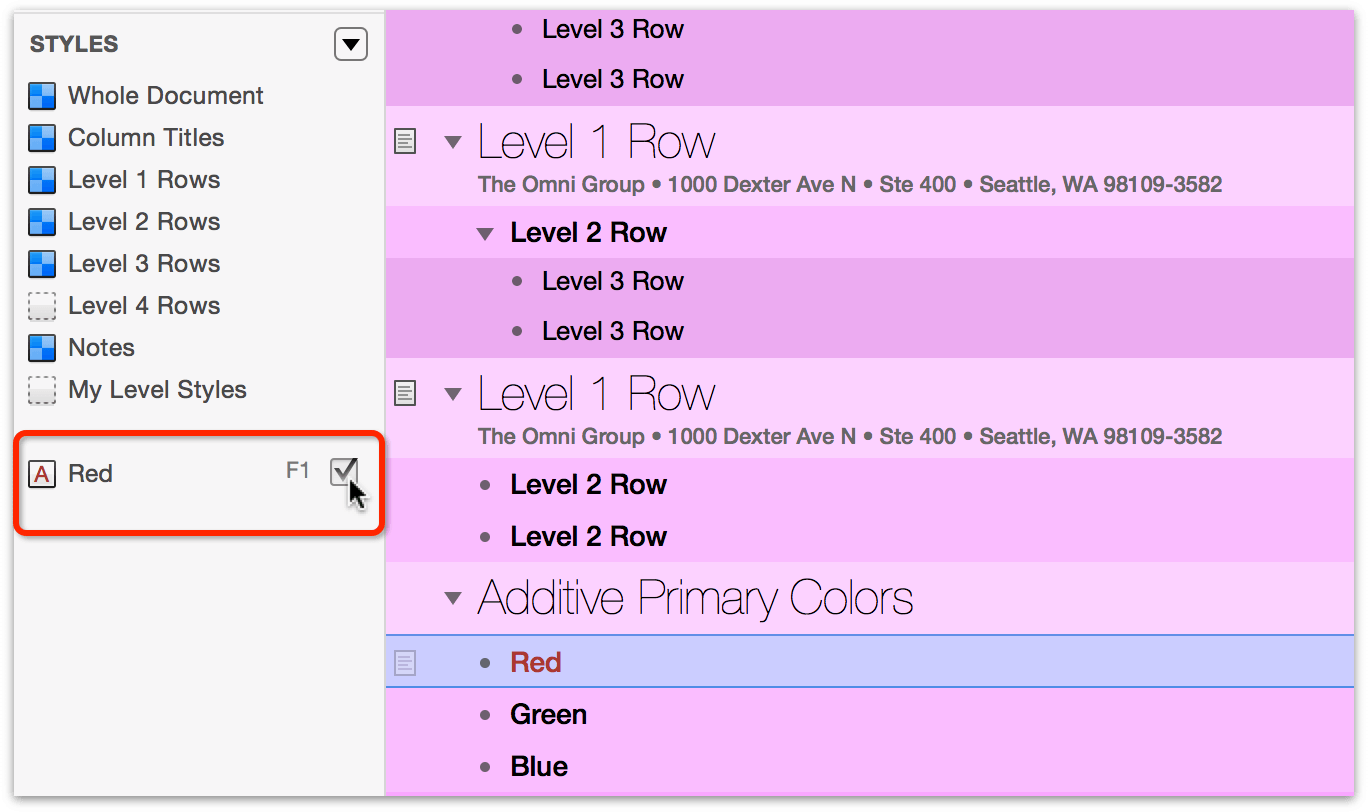
To put this new named style to the test, double-click to select the word Red, and then click the checkbox next to the Red named style to apply it to the text.
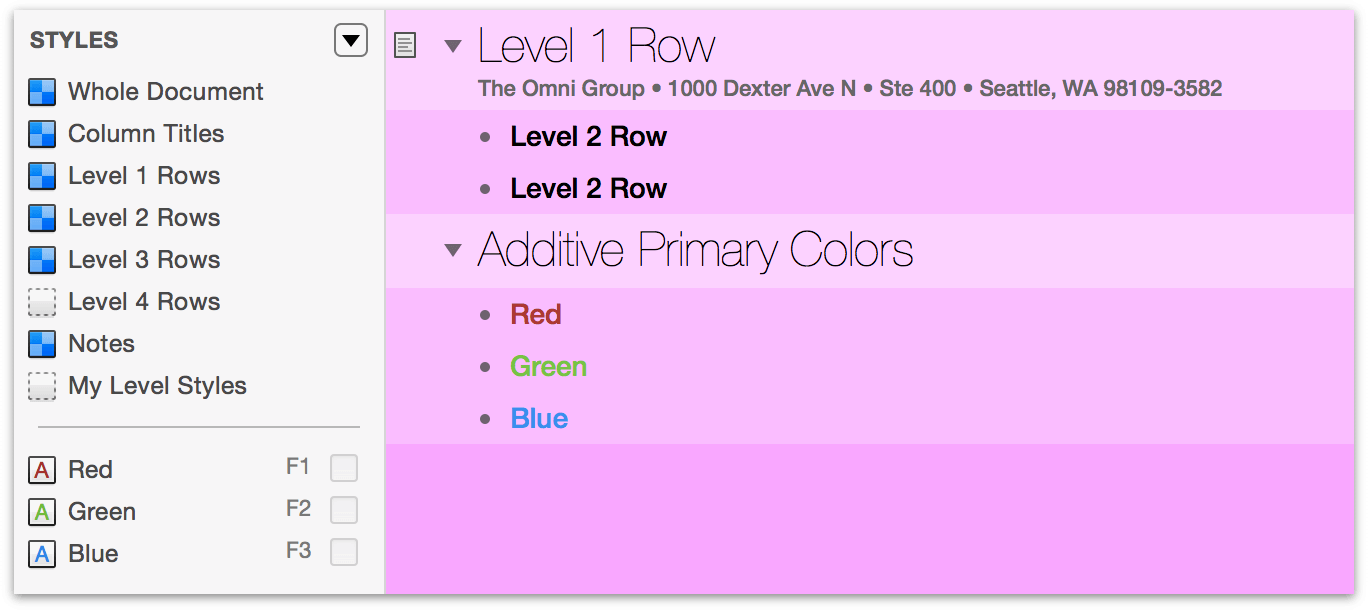
Repeat Steps 1–5 and create new named styles for Green and Blue. With the Blue style, you’ll have to get a little creative (use the Color Wheel) so you can find a shade of blue that stands out against the background colors. When you’re finished, the Additive Primary Colors section should be similar to this:
You can also create named styles that you can apply, such as a transparent highlight color or a strikethrough for editing purposes, to the contents of the outlines. Take some time to explore what’s possible with named styles.
Creating Named Styles from the Level Styles
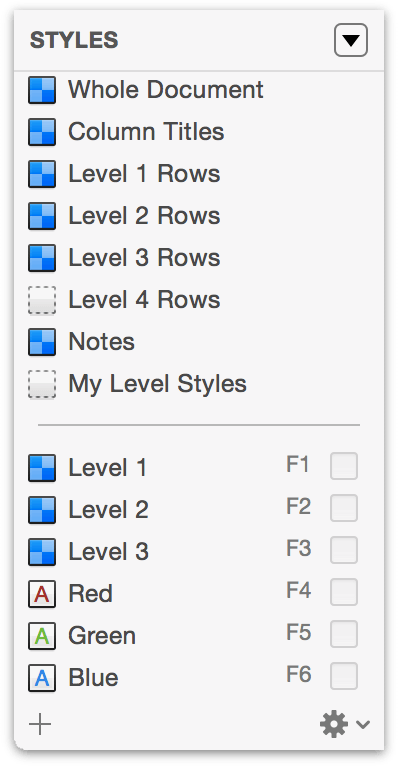
Every now and then, you might find the need to apply one of the Level styles (found in the upper portion of the Styles pane) to a lower-level row. The trick to making this work without changing a row’s indentation level is to make duplicates of the Level styles so they also appear as named styles. Let’s do that.
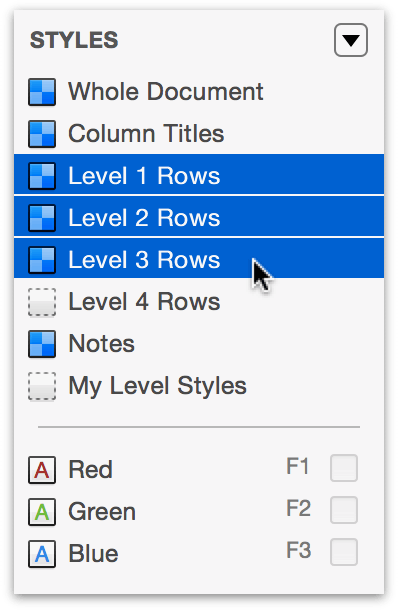
Click on the Level 1 Rows style in the Styles pane, hold down the Shift key, and then click on the Level 3 Rows style. As you can see, this also selects the Level 2 Rows style.
Click the Action menu at the bottom of the sidebar and choose Duplicate Style from the popup menu.
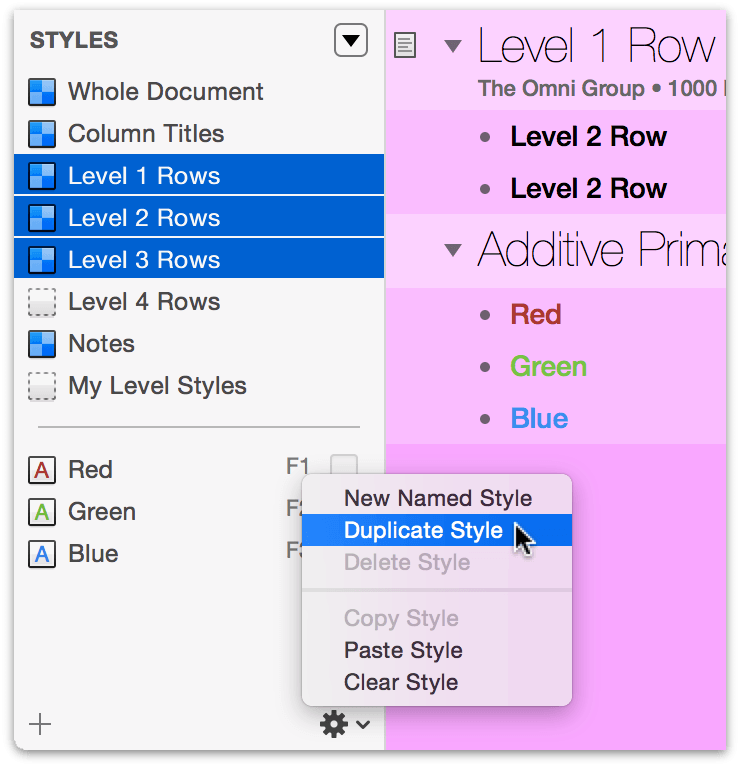
This copies the three styles you’ve selected and places them at the bottom of the named styles list.
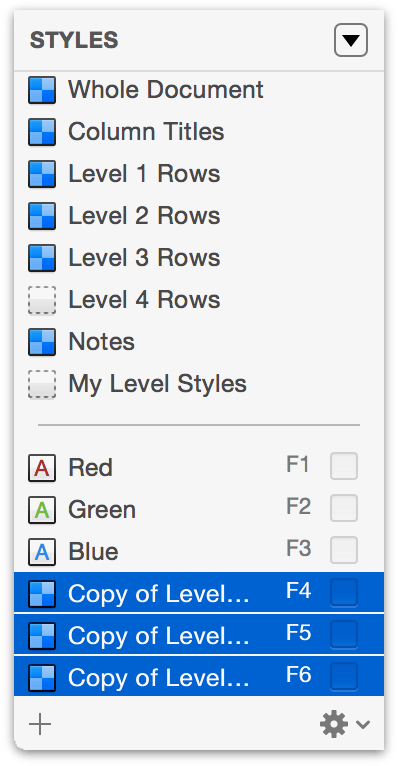
As you can see, the names of the styles are truncated because “Copy of” has been added to the beginning of each style. Let’s fix that. For each of these styles:
- Select the style name and press Return to highlight and make the style name editable.
- Delete the words “Copy of” and “Rows” from each style.
What remains are three named styles—Level 1, Level 2, and Level 3—which carry the same style properties as their corresponding levels.
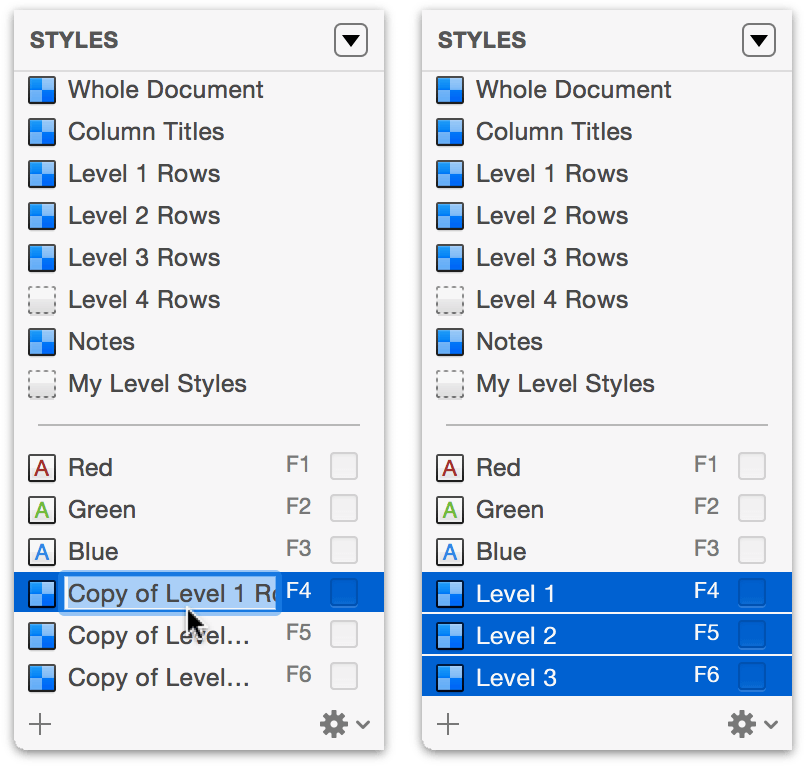
You can either leave the Level 1, Level 2, and Level 3 named styles at the bottom of the list, or you can drag them up to another location in the named styles section.
Creating and Using the My Level Styles Template
Up to now, you’ve done a lot of work on this one OmniOutliner document, and it’d be a shame to have to redo all of that design work again. When you find a design that you really really like, you can save the OmniOutliner file as a template and then later create new documents with that template, or apply its styles as a “theme” to an existing document.
Here’s what you need to do to create the template:
Before creating the template, choose File ▸ Save (Command-S) to save all of the changes you’ve made to the My Level Styles file.
Choose File ▸ Save As Template. A sheet slides down from under the toolbar, giving you the option to change the filename or change the location to where the file will be saved. Go ahead and ignore these and just click Save.
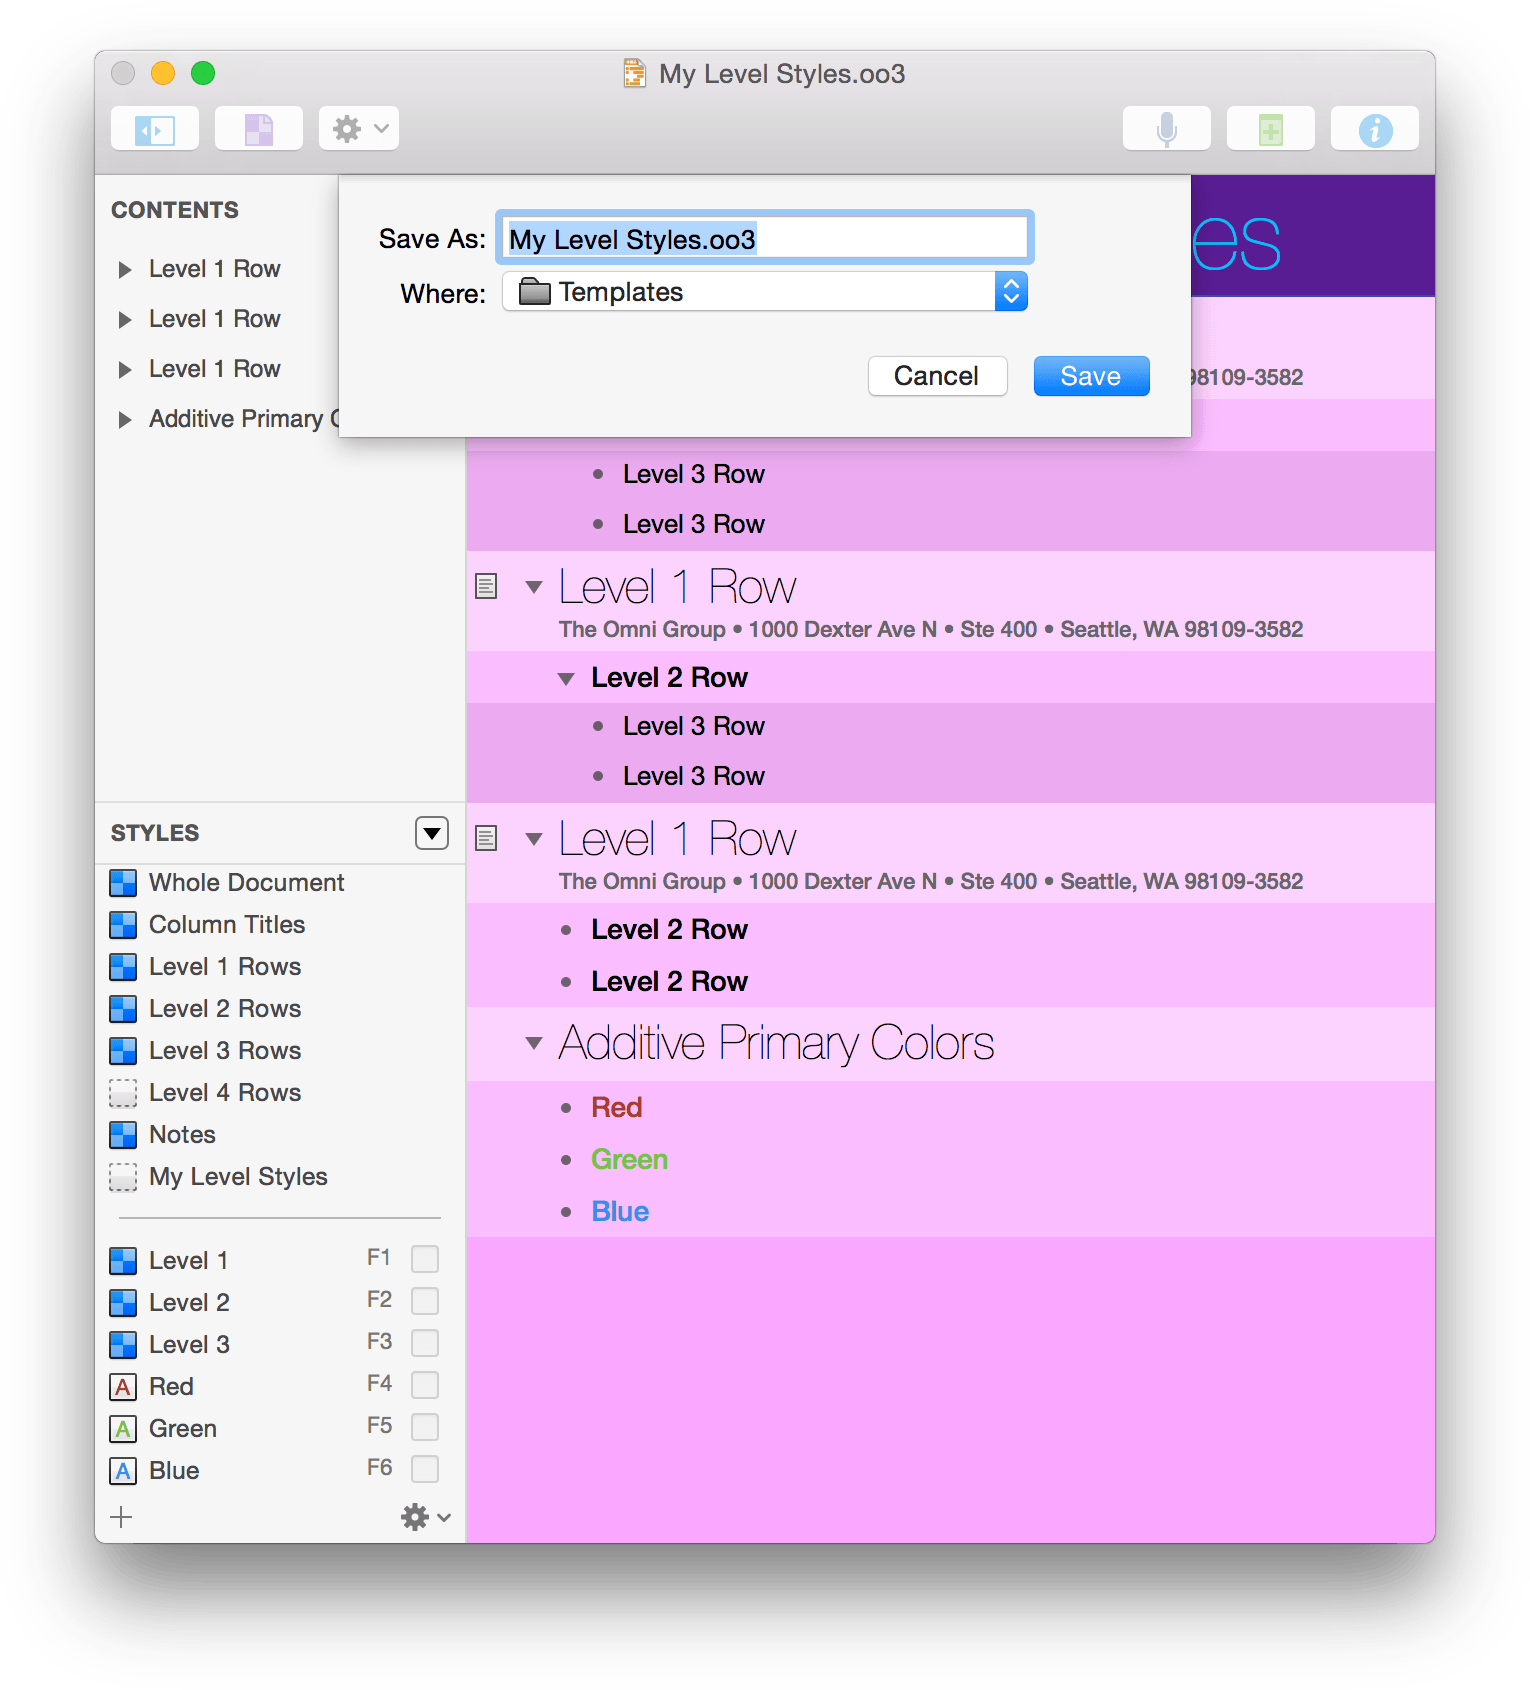
When you save the template, OmniOutliner places a .oo3template file extension onto the file.
Close the OmniOutliner window by choosing Window ▸ Close Window, or with the standard Command-W keyboard shortcut.
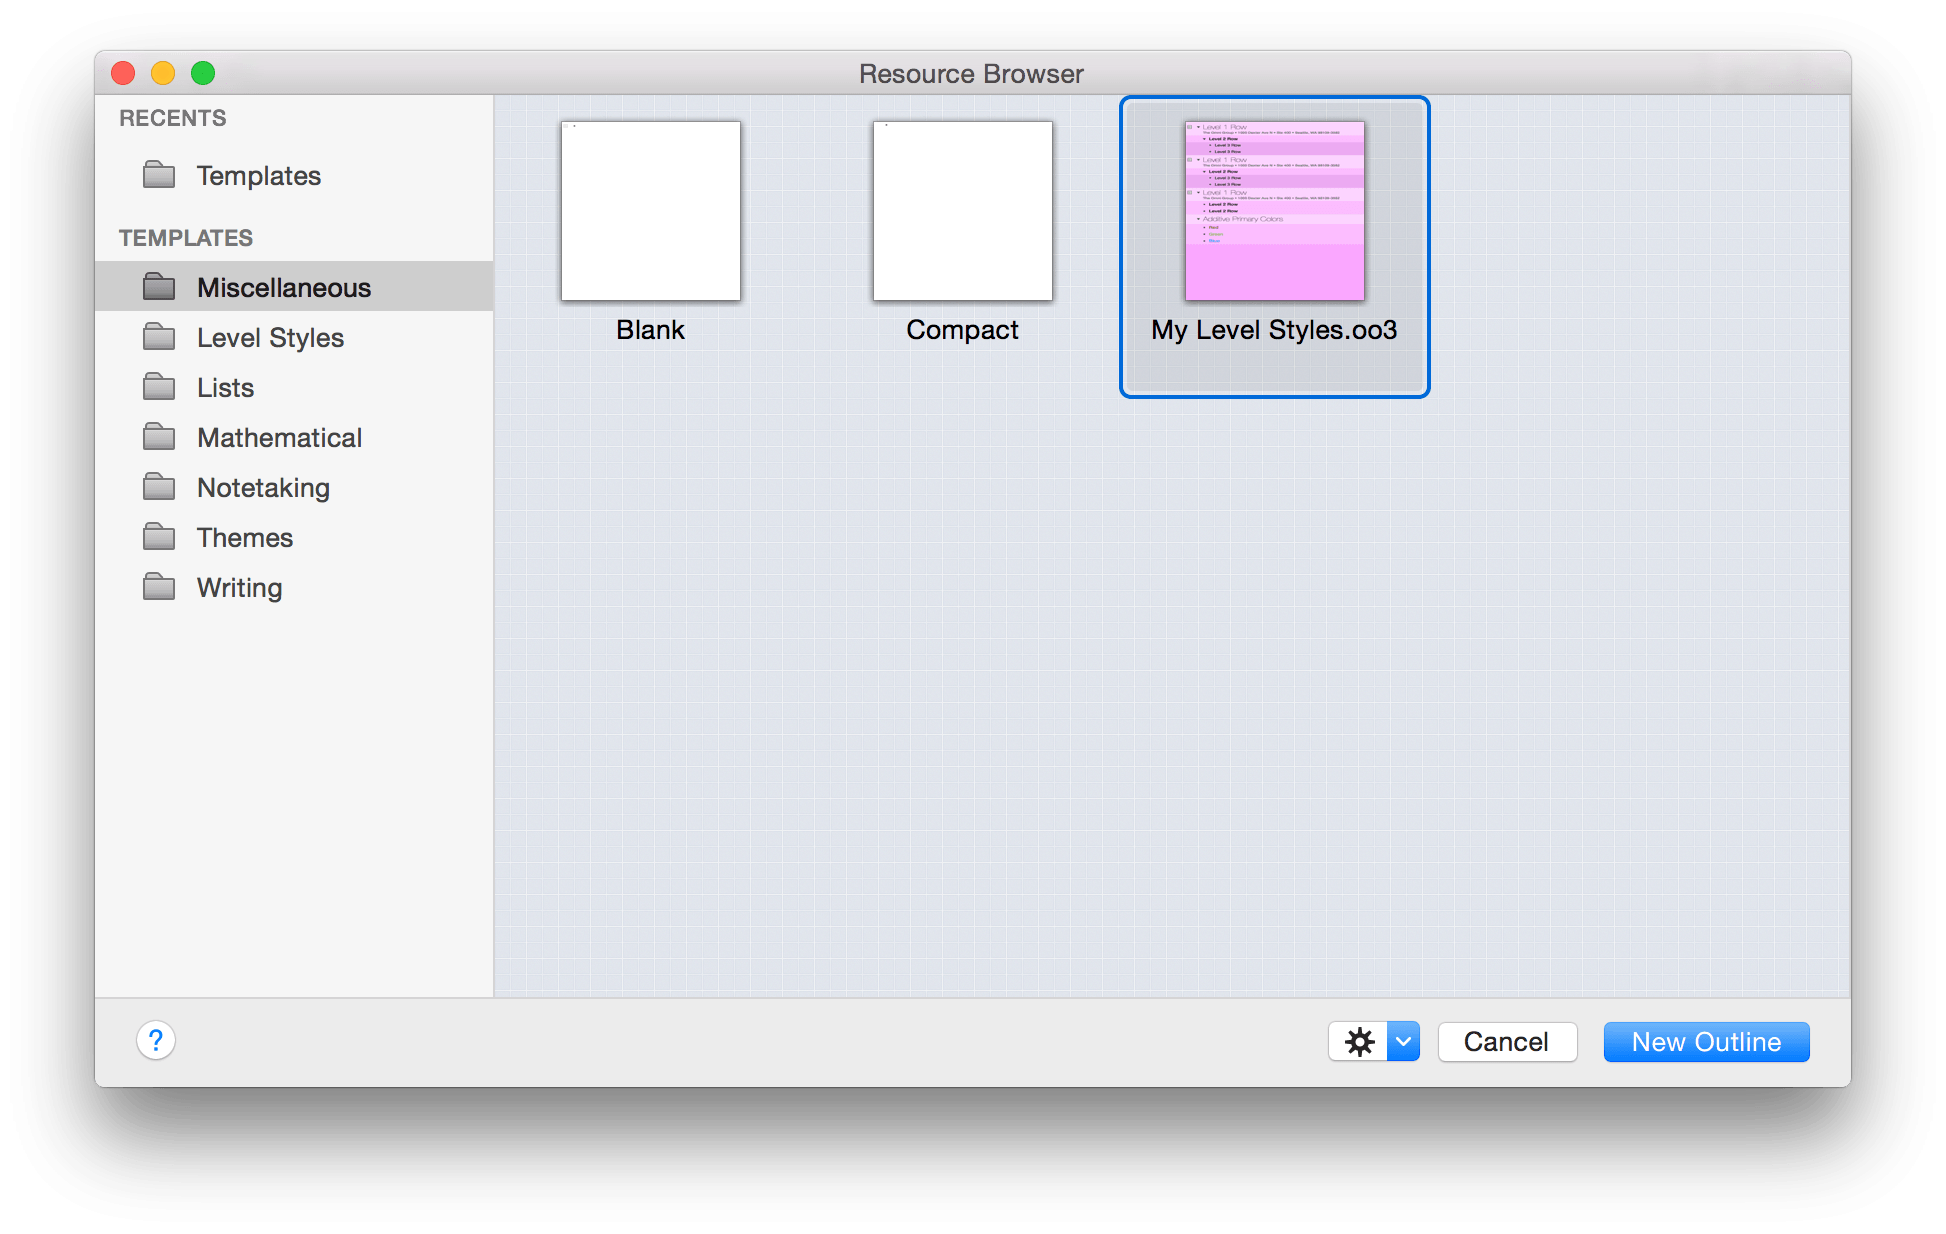
To use the template as the basis for a new document, choose File ▸ New or File ▸ Resource Browser, and look for your template under Templates ▸ Miscellaneous. Select the My Level Styles template and click New Outline.
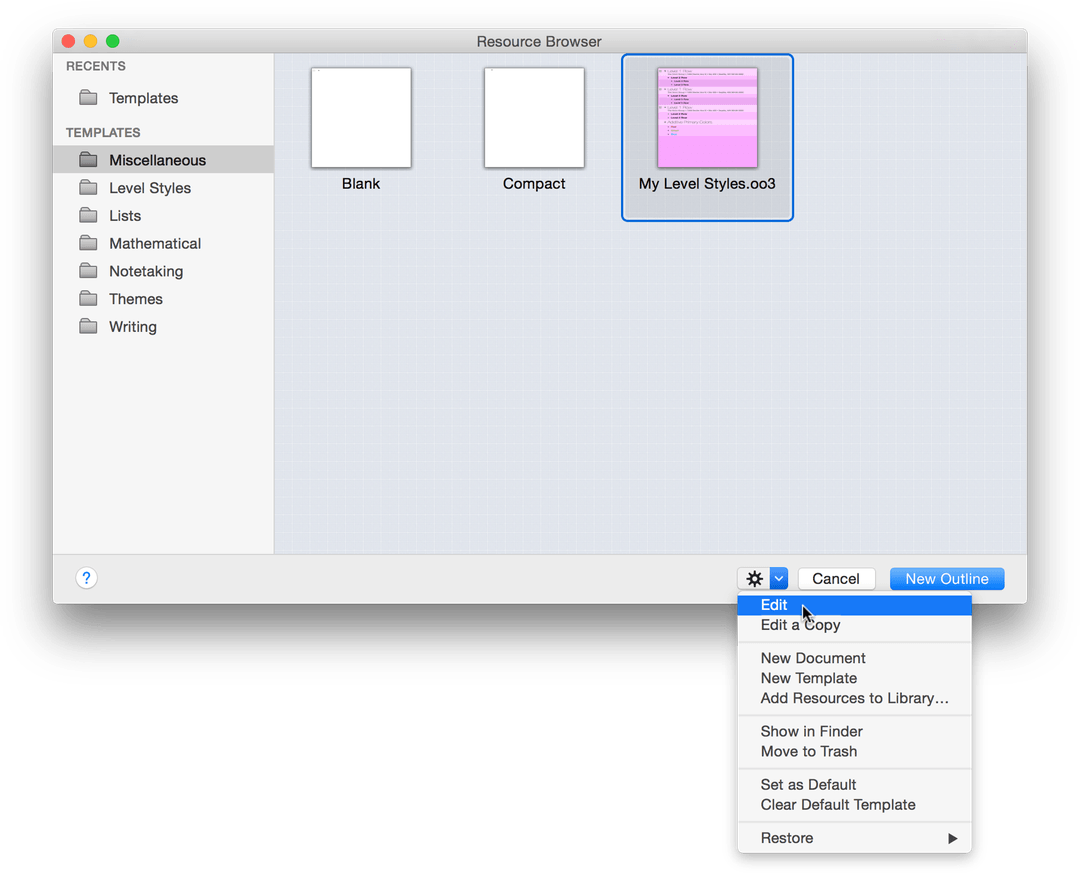
If you ever need to make changes to a template, you can select it in the Resource Browser, and then choose Edit from the Action menu (the gear icon) at the bottom of the window.
You’ll know you’re editing a template file if you look at the top of the window and see [TEMPLATE] next to the filename.

Applying a Template as a Theme
As you might have noticed, when you create a new file using one of the templates, the new Untitled file also includes the contents of the original template file. Not just the styles, but all of the text on the rows and columns, if applicable. However, there is a way for you to apply the styles from a template—its theme—to another document you’re working on.
Start by opening the Resource Browser (File ▸ Resource Browser).
Select Level Styles in the browser’s sidebar, and then double-click the Modern with Level Styles template to open it. Look familiar?
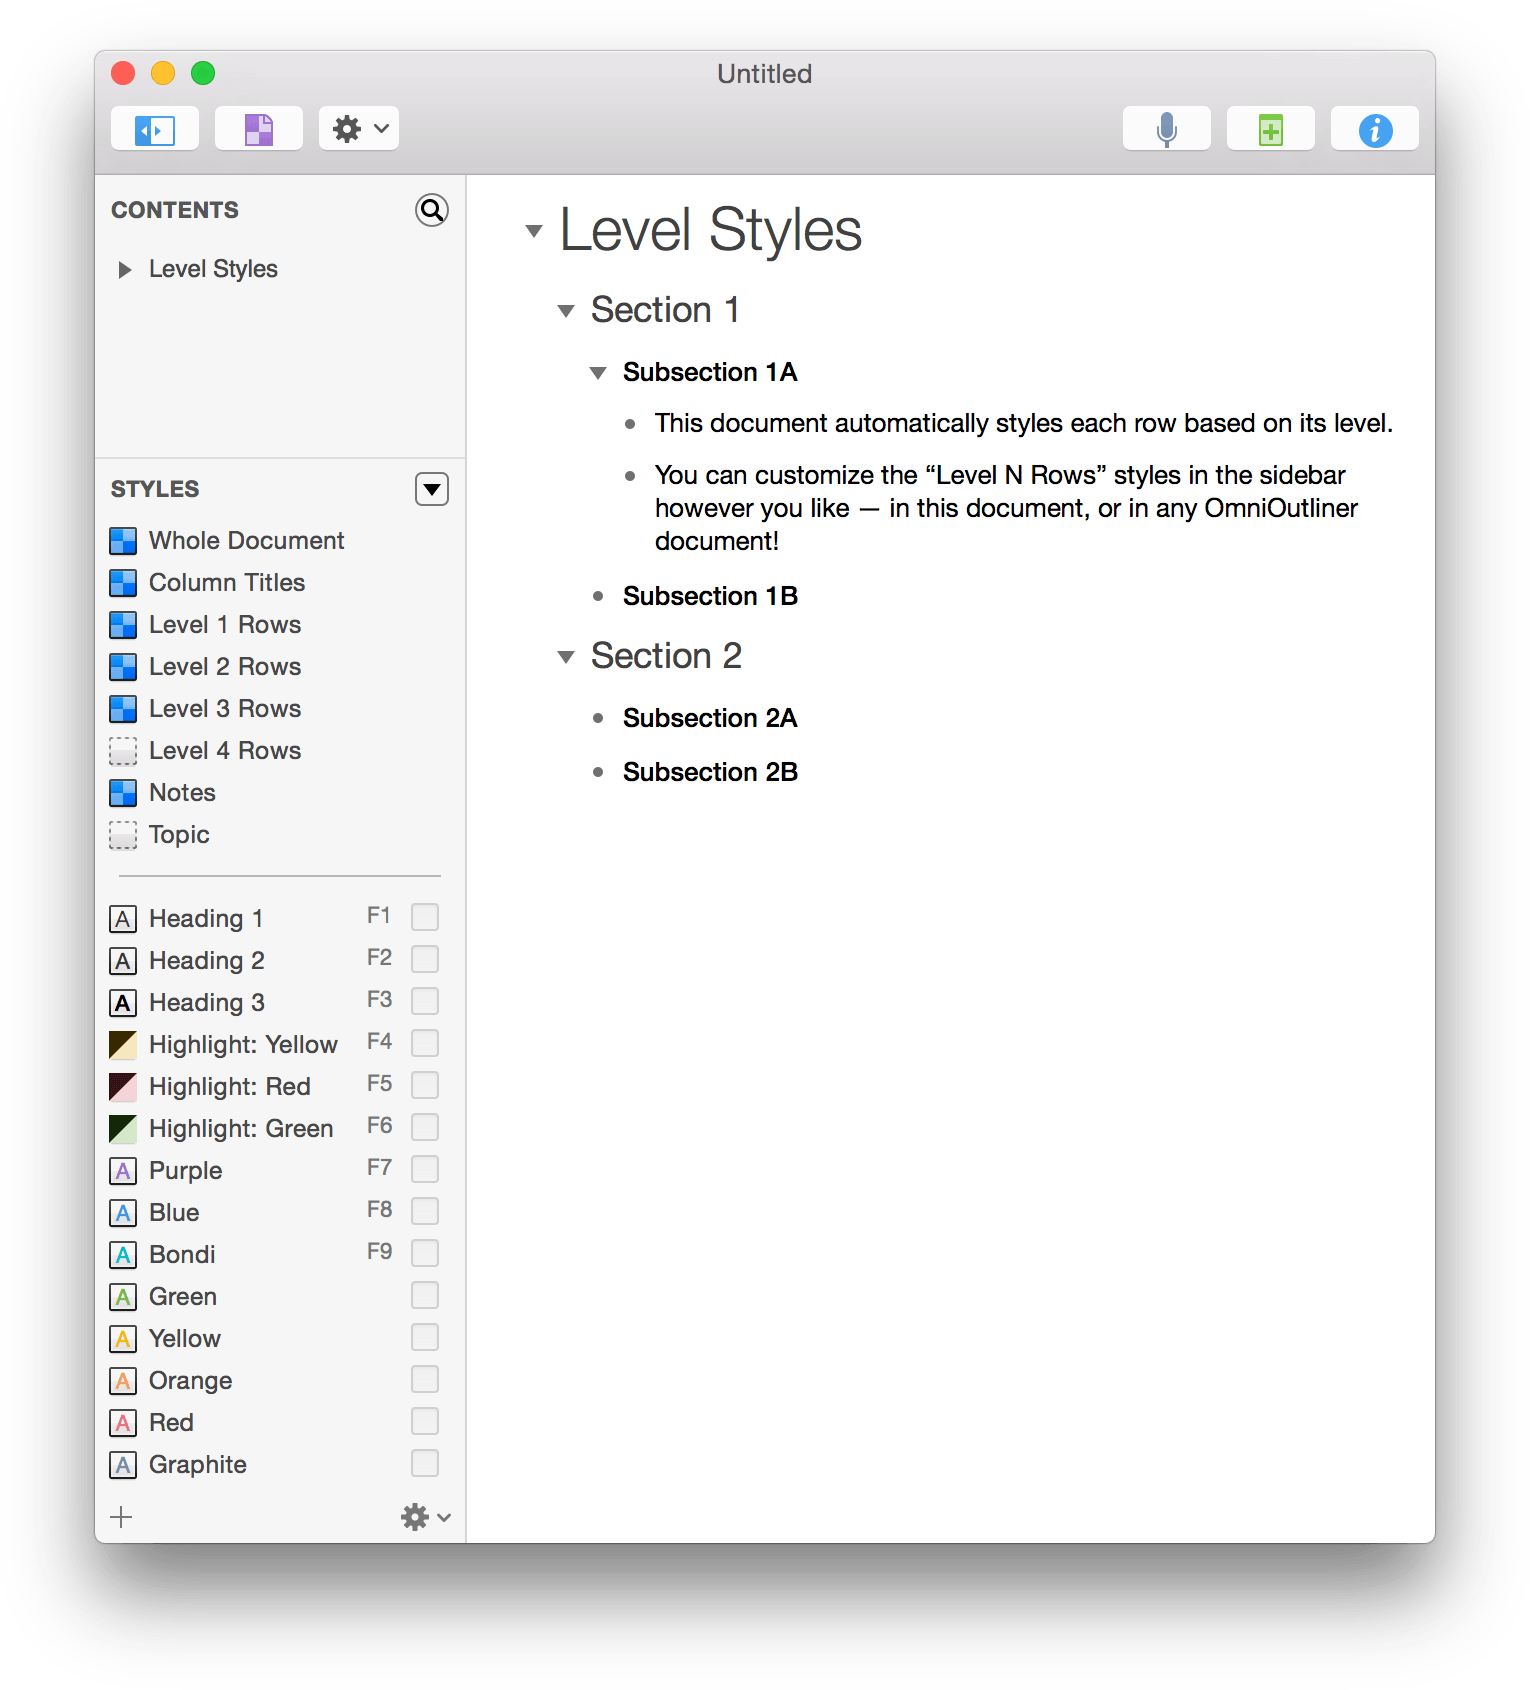
Choose Format ▸ Apply Template Theme; this opens a Resource Browser-like sheet from which you can select a template to apply.
In the sheet’s sidebar, choose Miscellaneous and then select the My Level Styles template.
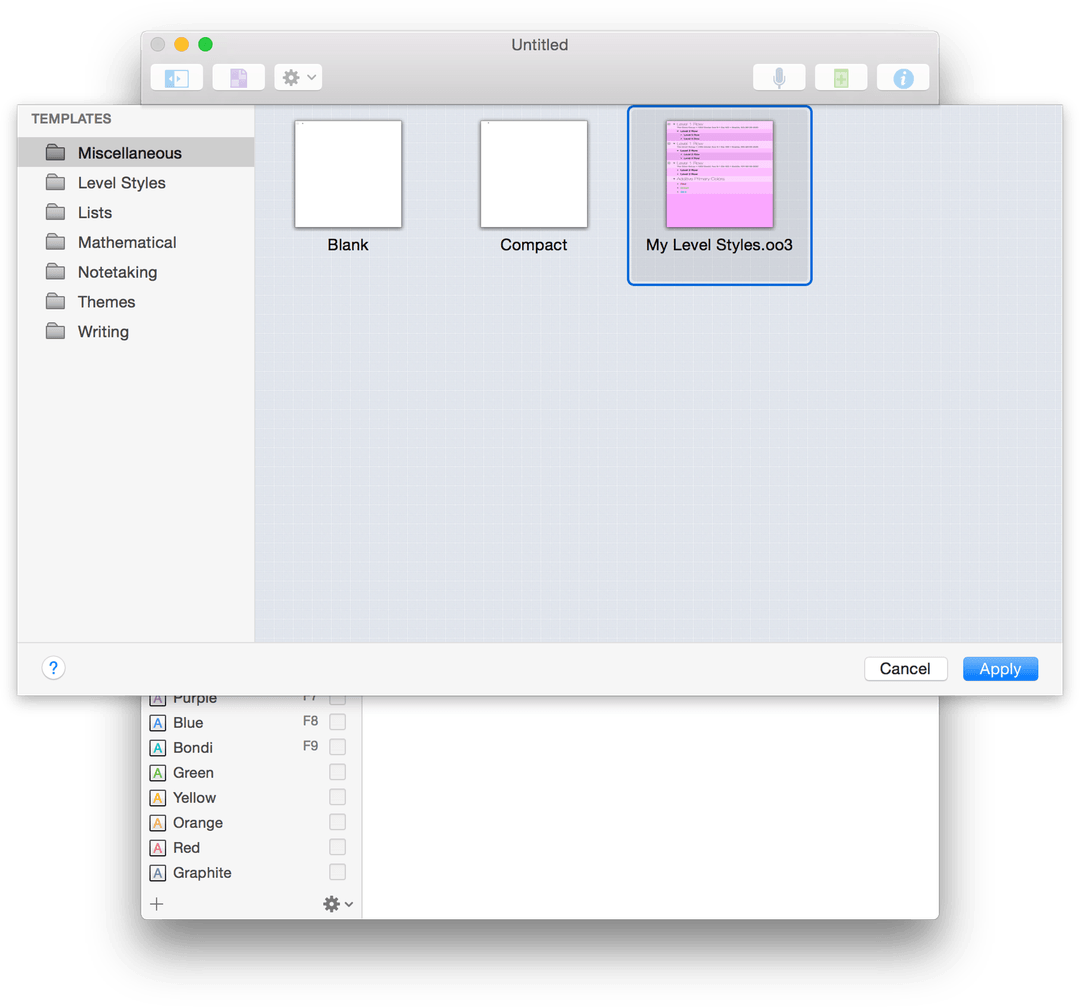
Click Apply.
The document takes on all of the characteristics of the My Level Styles template you created without overwriting all of the content on the rows.
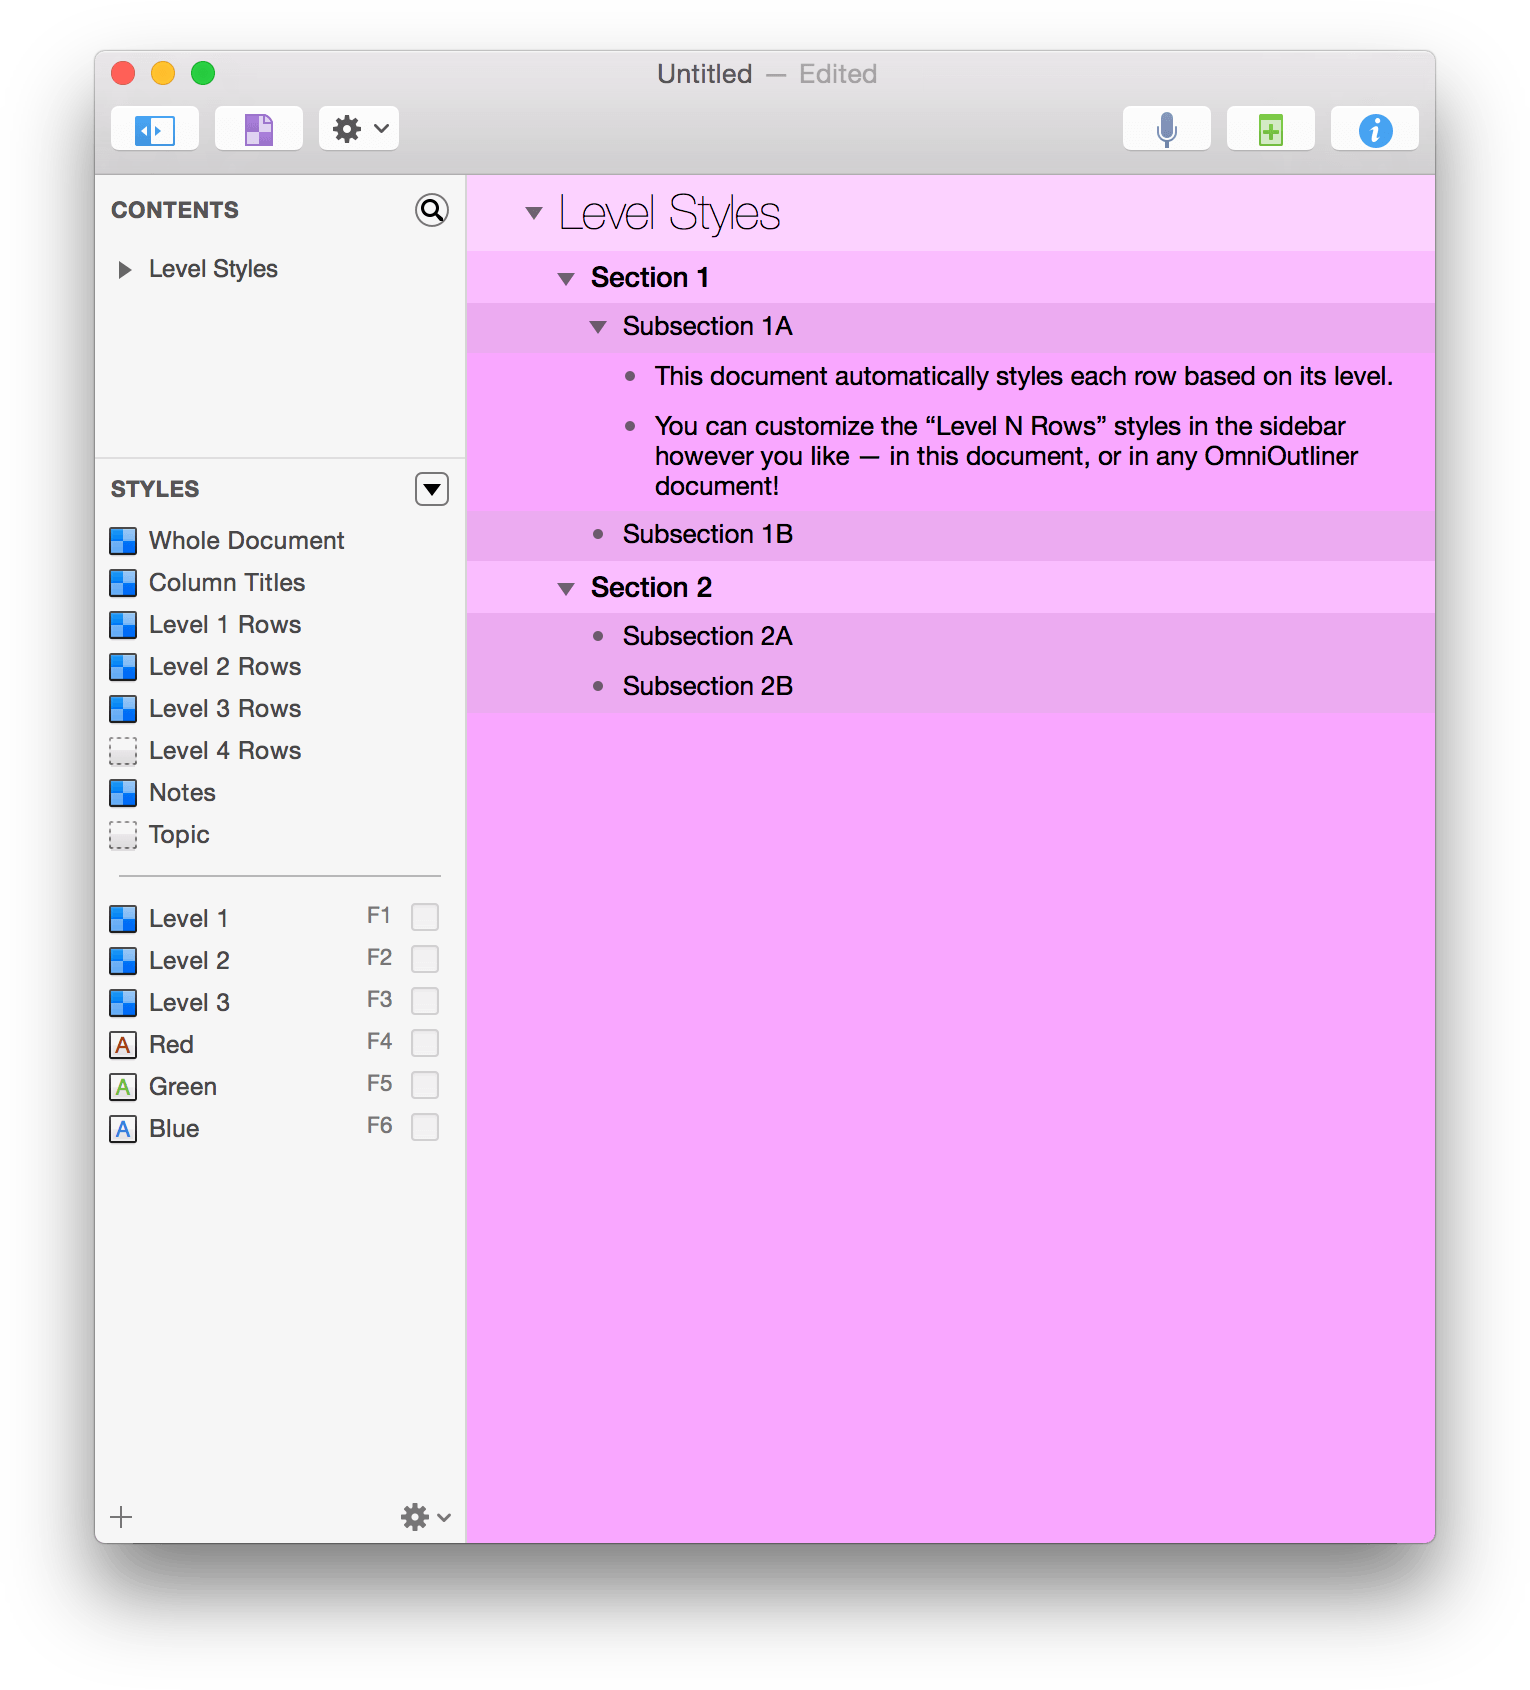
Keep this in mind when you’re working on a document and looking for creative ways to style the content. If you don’t like the way a particular theme looks, you can use Command-Z to undo the theme and revert back to the previous styling.
Where to Go From Here
This tutorial took you through the process of stripping one of OmniOutliner 4’s templates down to the bare metal and then building up a new template from scratch. Along the way, we showed you how to create hierarchical lists of information on different rows, how to move and organize your content, and also how to create groups.
Take some time now to explore everything that OmniOutliner has to offer. If you downloaded a timed trial of OmniOutliner from our website, all of the OmniOutliner 4 Pro features are available to you, so why not put those to the test? Try creating styles that make use of Pro-only features, including:
- Add space above Notes and Children
- Add space below Children
- Force a page break before a particular item when printing
- Decide whether child rows are indented
You can also add multiple columns to an outline and use them for laying out content. Be sure to use the Horizontal and Vertical grid lines (found in the Outline inspector) to apply grid lines to your outline to assist in laying things out.
