Welcome to OmniPlan
OmniPlan is designed to help you visualize, maintain, and simplify your projects. Break down tasks, optimize the required resources, control costs, and monitor your entire plan–all at a glance. Collaborate with your colleagues and share every detail, update a calendar with your days off, or mix and match. Accept and reject changes one-by-one or all in one go. OmniPlan provides features like Gantt charts, schedules, summaries, milestones, and critical path highlighting to let you manage all of your activities. From customizable views to fast data entry, OmniPlan helps you manage projects that are as simple or complex as you need them to be–without the complexity.
Features of OmniPlan for iOS
Here's a look ahead at what you can expect as you begin to explore project management in OmniPlan for iOS.
- Visualize
- The best-looking screen in the business. OmniPlan's Gantt View is beautiful, functional, and customizable.
- Simplify
- Stay focused on the information you need — hide what you don't. Filter out dates you aren't concerned with, or tasks the team doesn't need to worry about yet. OmniPlan can be as simple as you need, and simple can be great.
- Maintain
- Keeping projects up-to-date is incredibly easy with OmniPlan. Everyone stays current with whole-project sharing, change-tracking, and automatic publishing. Always there, always current.
- Track
- Use Change Tracking in OmniPlan for immediate revision notifications you or other teammates are making to the timeline, tasks, or amount of work completed. Accept or reject the changes one by one, or en masse.
- Sync
- Sync your projects with other computers and people using a self-hosted web server. Or sign up for our own, free Omni Sync Server. Publish, subscribe, even accept or reject changes others make.
- Work Across the Aisle
- Import and export Microsoft Project documents effortlessly with the OmniPlan Pro upgrade (in-app purchase required).
A Note About Screenshots
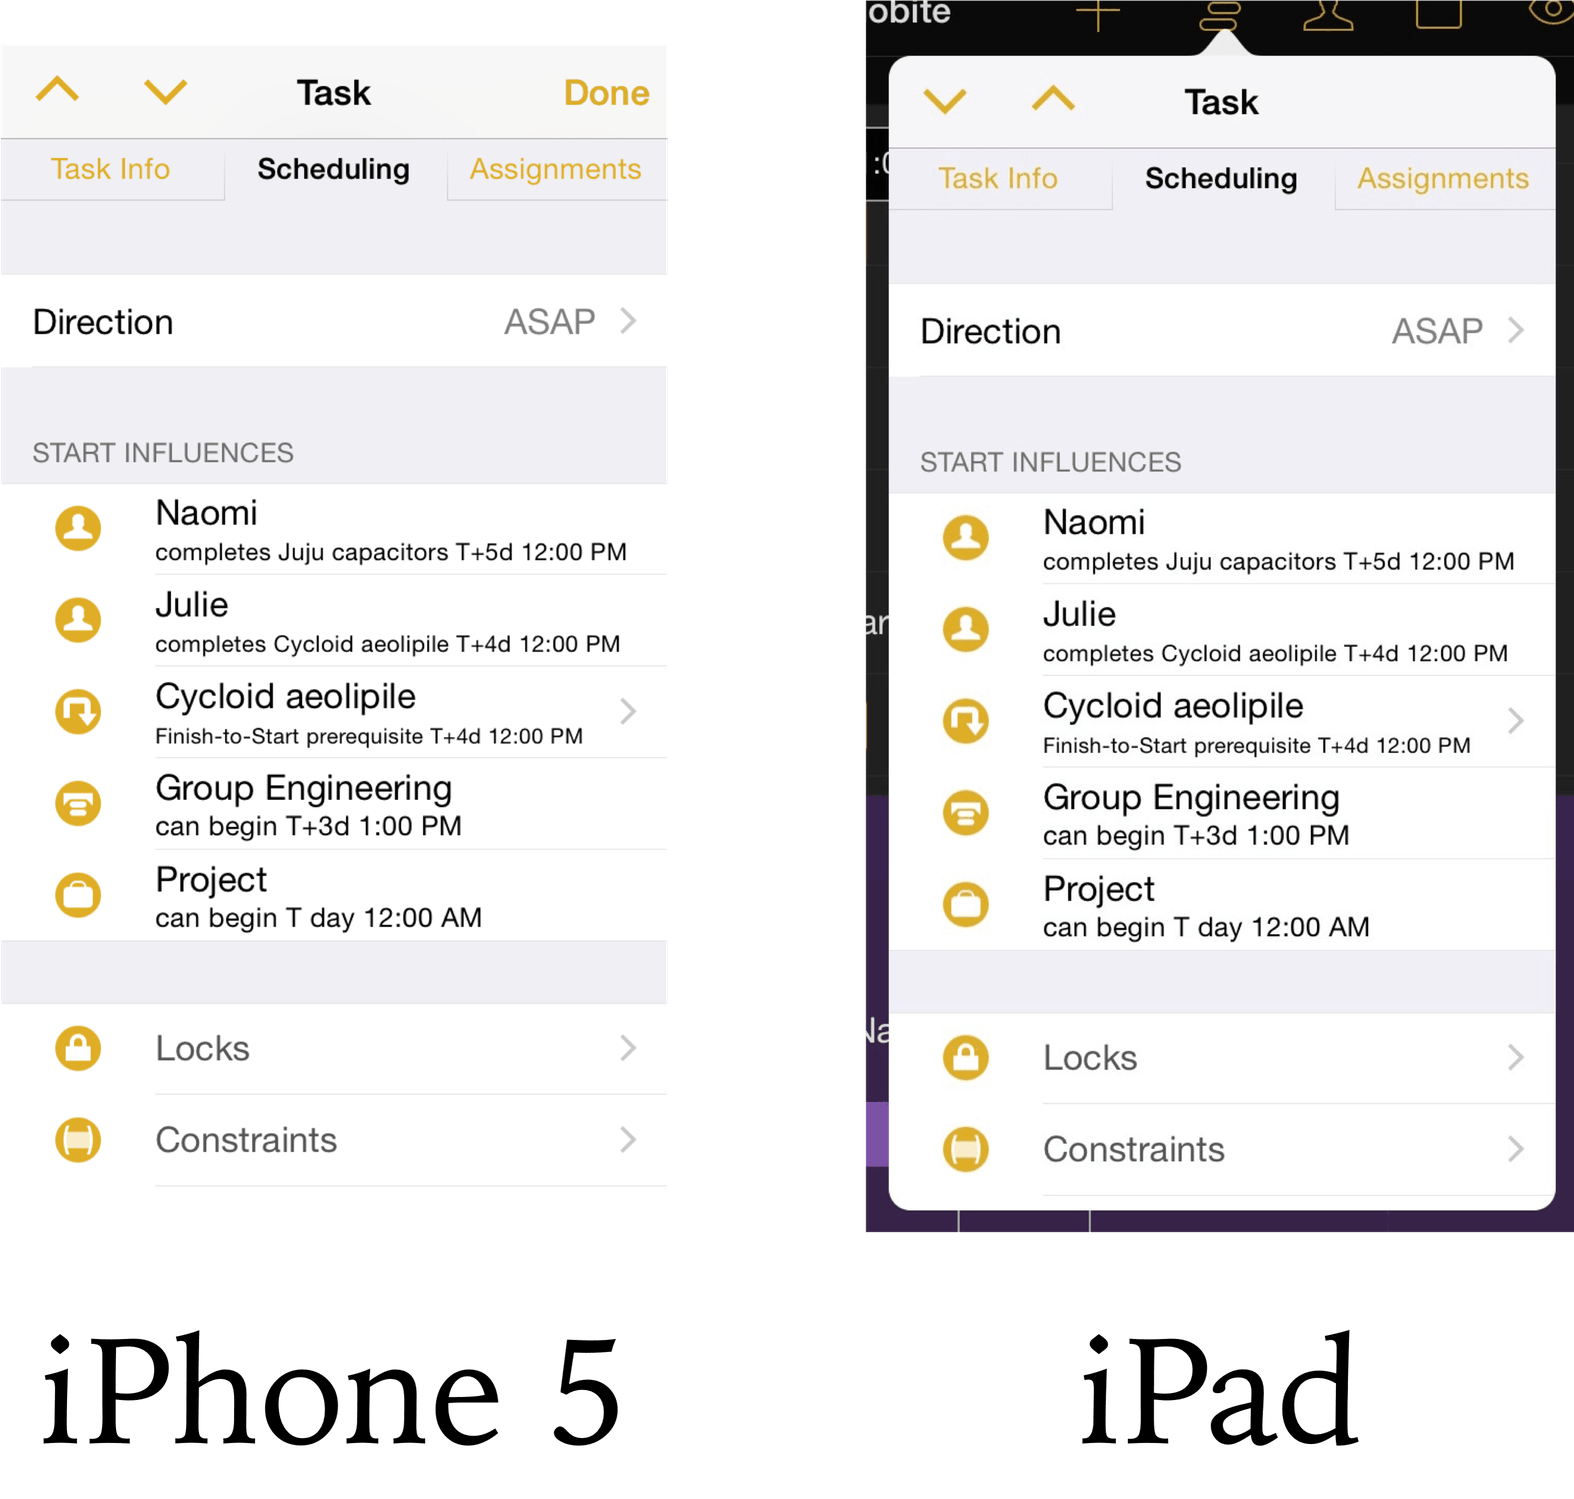
OmniPlan 2 for iOS requires iOS 8, and runs on all Apple devices that support it. Due to the range of screen sizes across devices, for ease of use minor differences in interface layout exist between the iPhone and iPad; functionality is identical between them.
To illustrate this manual we've chosen screenshots primarily from OmniPlan on the iPad, but they should be equally useful to iPhone users. A comparison of the task inspector on iPhone 5 and Retina iPad is typical of the minor difference between versions.
Using the Document Browser
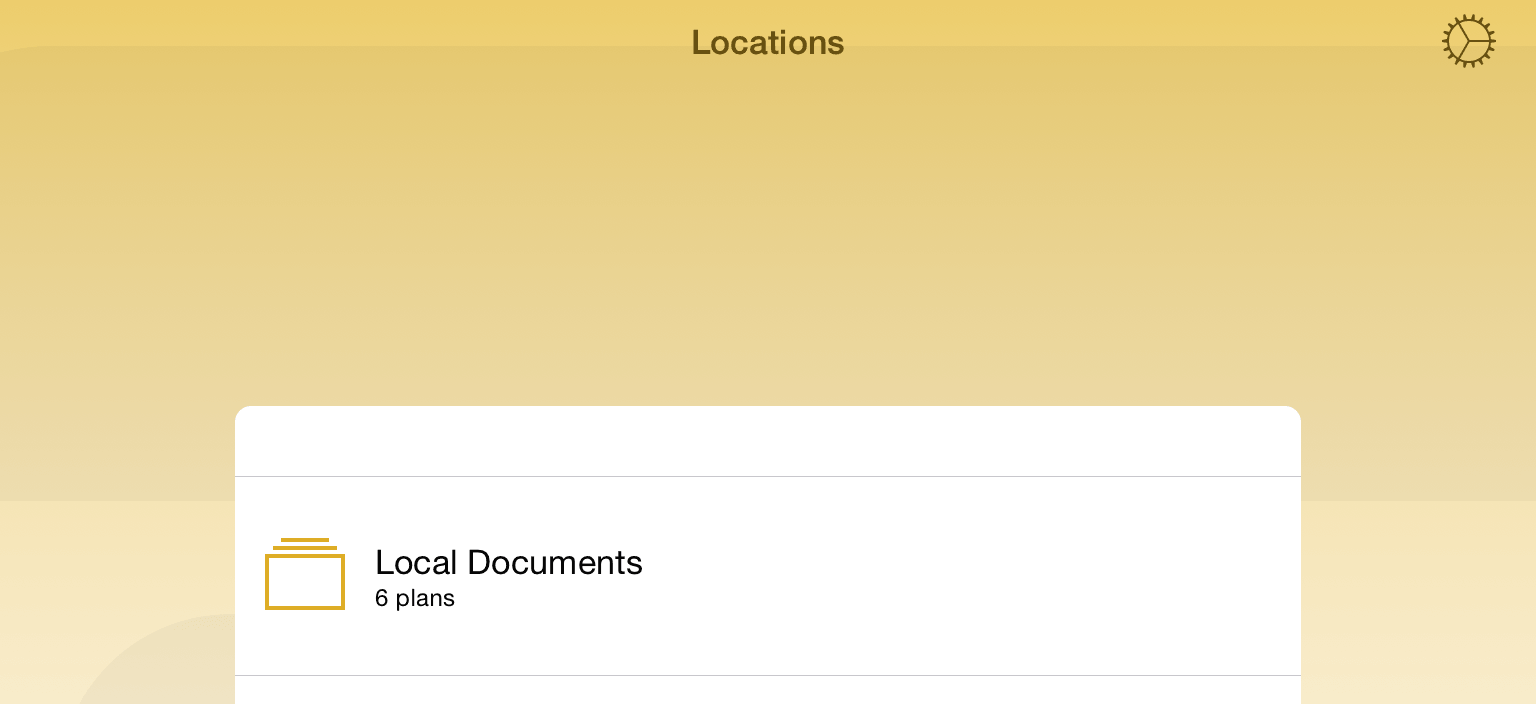
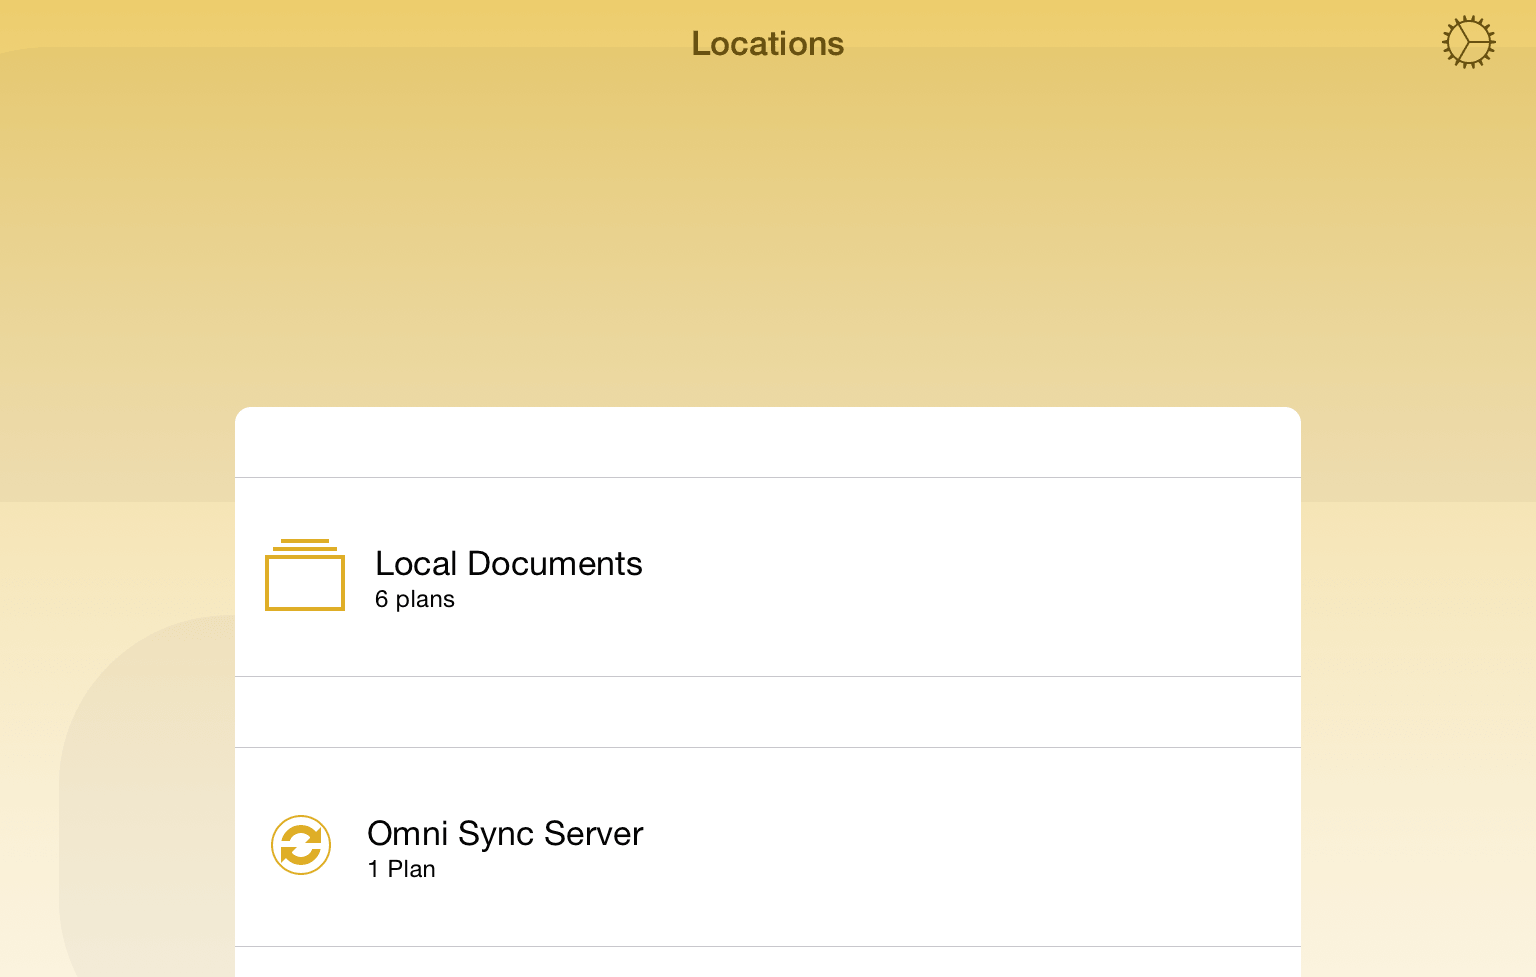
When you first open OmniPlan, you're taken to the Locations screen which is the place you go to access all of your documents. There is a Local Documents folder, which we've preloaded with some sample OmniPlan files that you can use as inspiration for the projects you create.
Tap the Local Documents folder to see what's inside. This opens the Document Browser, which is the place to view, create, and manage your projects.
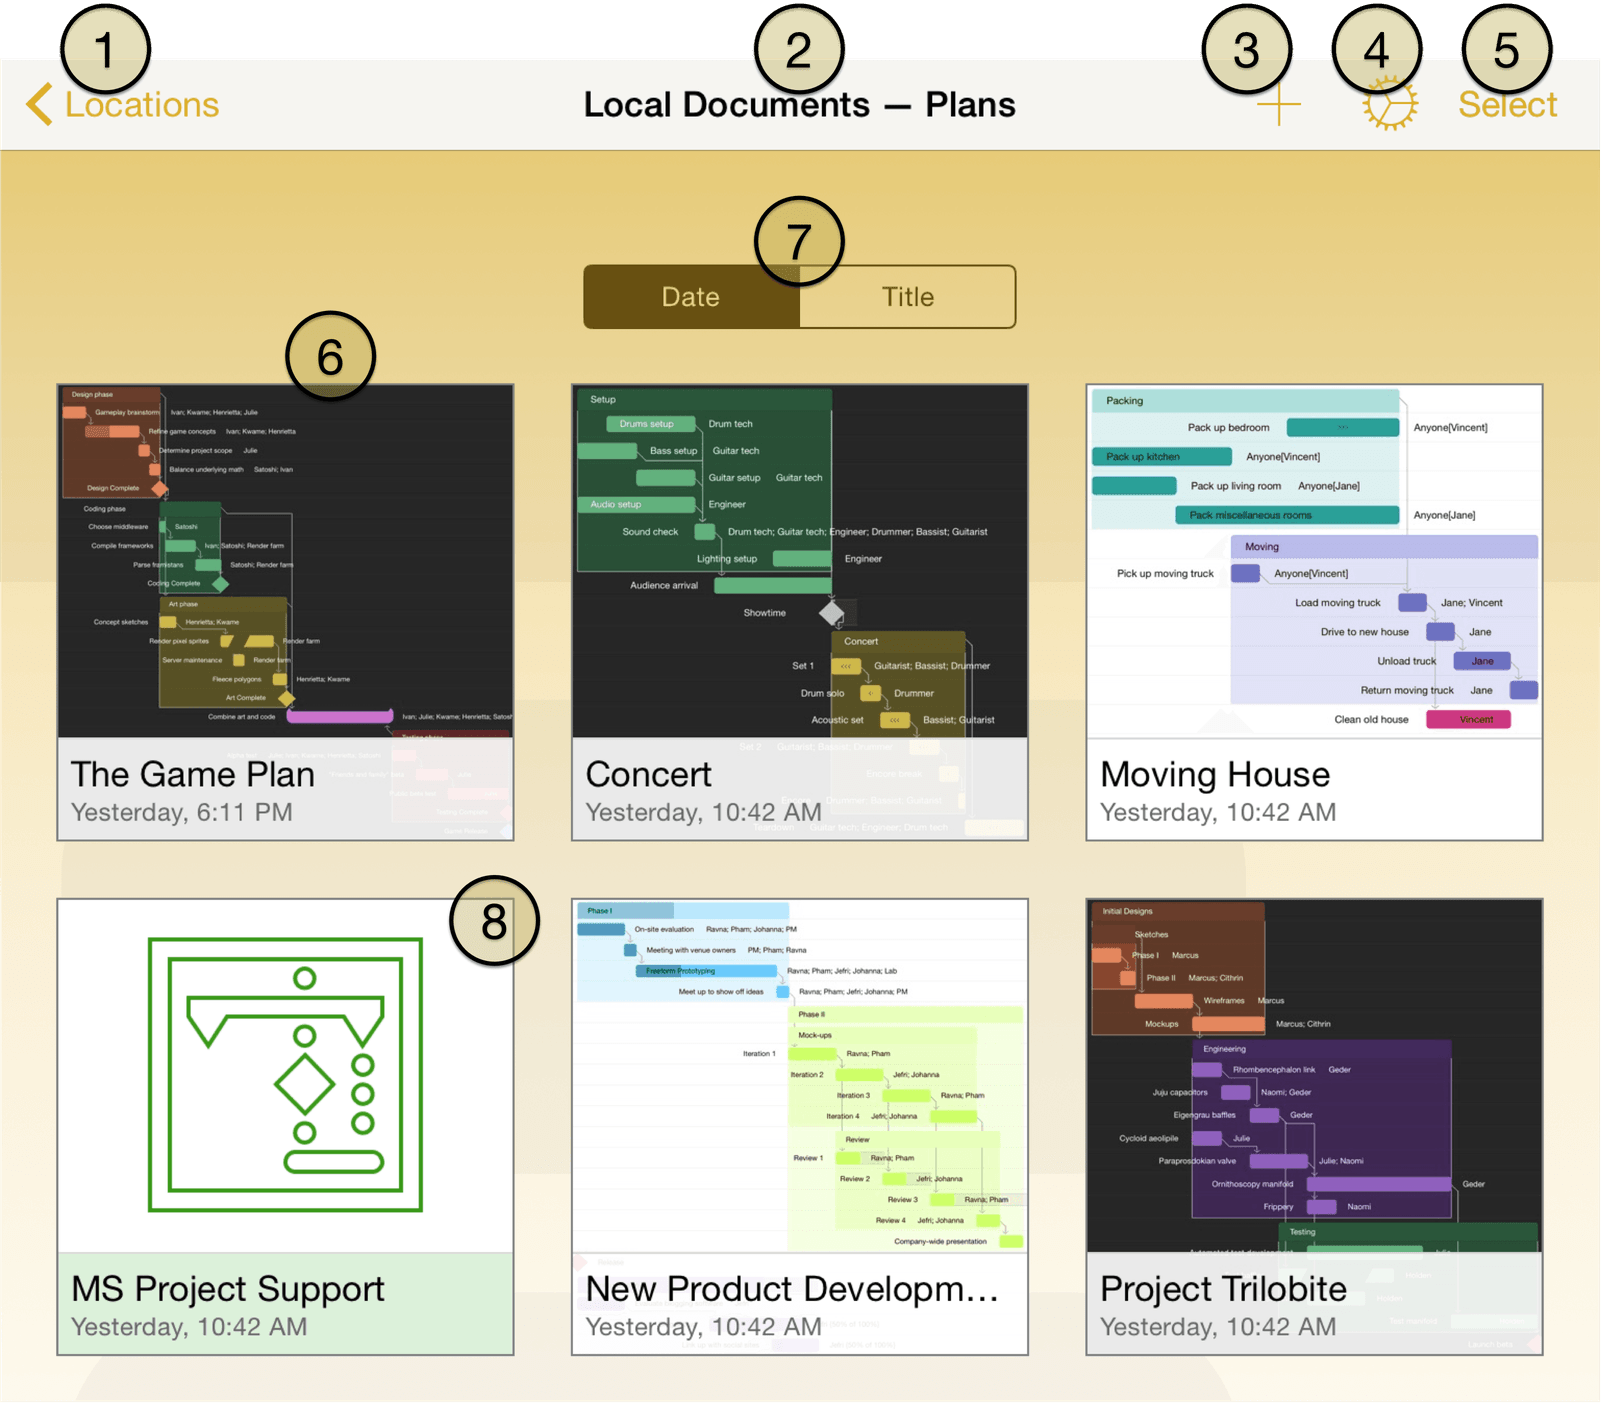
Locations — Tap here to go back to the main screen where you can view the Local Documents folder and any server repositories you're synced with.
Folder Name and Document Type — This is the name of the current folder. Your default folder for storing files locally is titled Local Documents, and the document type is Plans (this is currently the only document type available).
Add/Plus — Creates a new project.
Settings — Tap to reveal a popover menu with the following options:
About OmniPlan — this displays a screen with information about the version of OmniPlan you have installed.
OmniPlan Help — this takes you a screen with links to support resources for OmniPlan, including web-based and eBook versions of this manual.
Contact Omni — this queues up an email message that you can send to the kind and wonderful Support Humans here at Omni. Don't hesitate to ask us a question or send us feedback.
Release Notes — discover what's new in the latest version of OmniPlan.
Restore Sample Documents — if you previously deleted any of the sample documents that came with OmniPlan, tap here to restore them to your device.
Upgrade to Pro — the Pro in-app purchase is an add-on for OmniPlan that provides the ability to import Microsoft Project files as OmniPlan files, and export OmniPlan files in the MPP format readable by Microsoft Project 2013.
Import — if you have files stored (not synced) on a WebDAV server or Omni Sync Server account, you can add those accounts and import OmniPlan files for local use here.
Settings — if you'd like to help Omni improve future versions of OmniPlan, you can choose to share anonymous usage data with us. The full content of the data sent is displayed on this screen.
Select — Tap to edit the contents of a folder. For example, you can select one or more documents and move them to another folder, to the trash, or create a subfolder within the current folder that contains the projects you've selected.
Projects — These are your saved projects and any subfolders you've created in OmniPlan.
Sort — When you pull down on the screen, the super secret Sort bar comes into view. By default, the projects you create are sorted by their creation date, or you can opt to sort them by title.
MS Project Support — A preview document for the Microsoft Project file import feature, available with the OmniPlan Pro in-app purchase.
Note
With OmniPlan Pro, you can import Project 2003, Project 2007, Project 2010, and Project 2013 MPP documents. Once imported, these documents can be managed just liked any other OmniPlan Project.
OmniPlan Pro can also export Project 2013 MPP documents. Once exported, these documents can be used in Microsoft Project 2013.
To create a subfolder, tap Select in the navigation bar, and then tap on and select one or more files in the Document Browser. Next, tap Move to in the upper-left corner and then tap New folder.
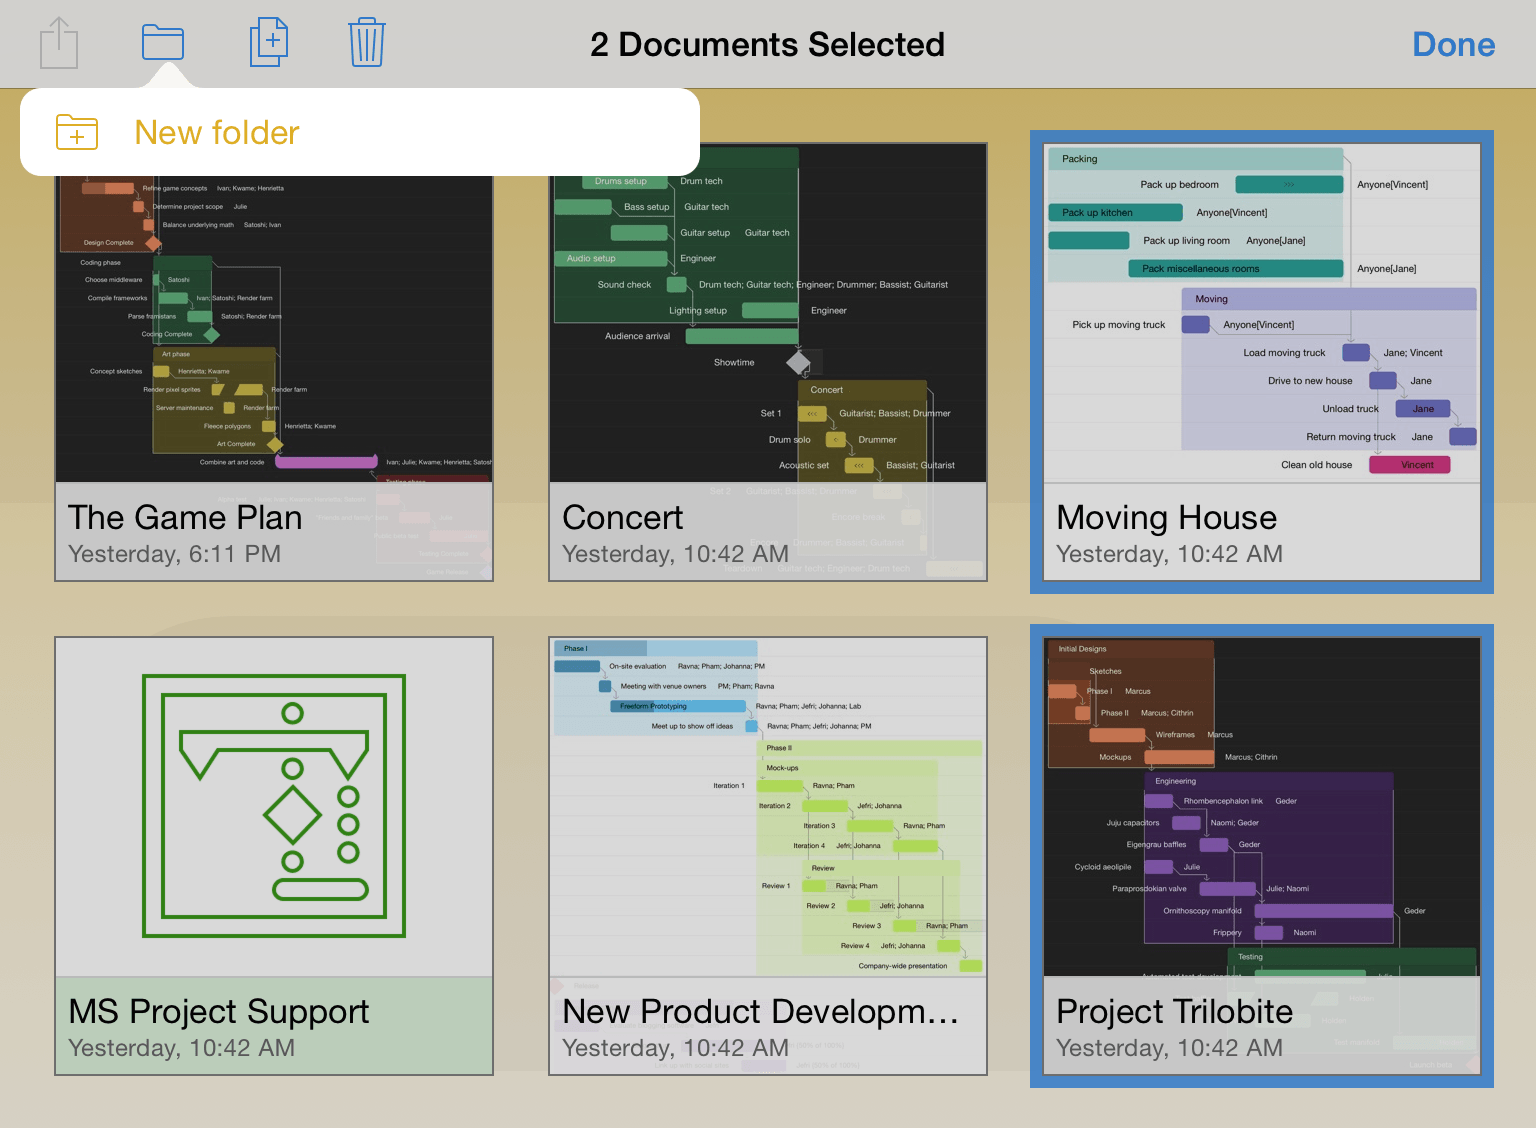
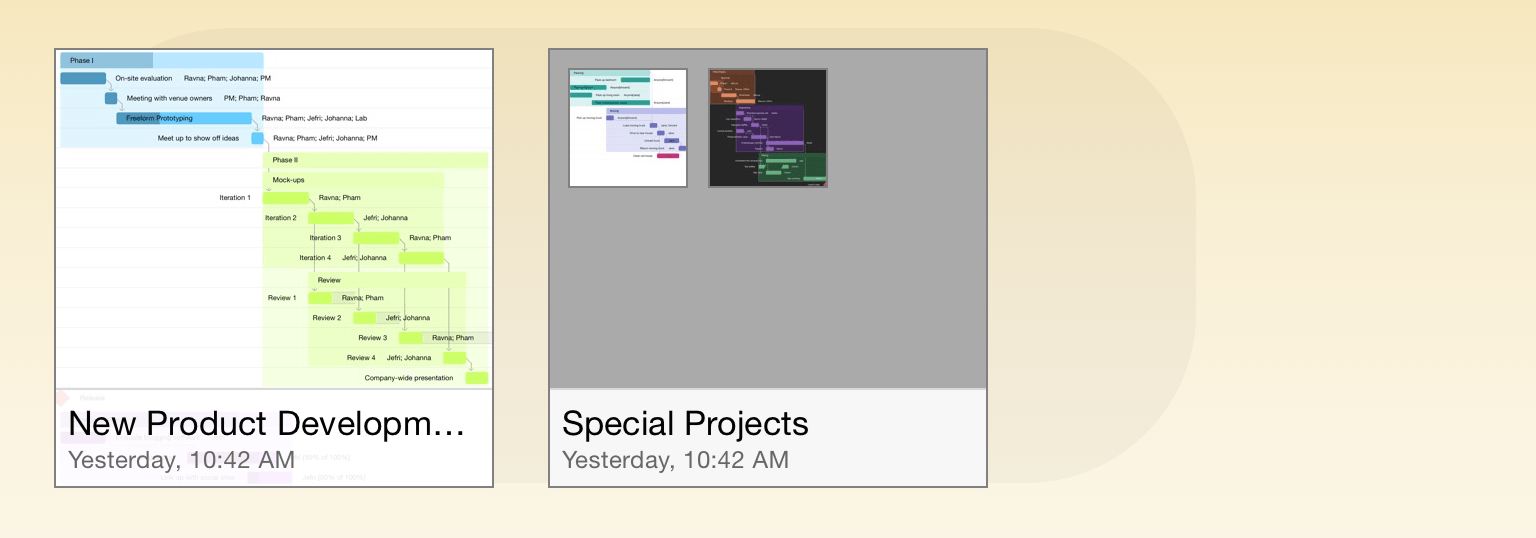
Enter a name for the folder and then tap Done. Subfolders have a dark gray background and display tiny icons for the projects they contain.
When you connect to a server repository, such as a free Omni Sync Server account (or connect to any WebDAV service you're subscribed to), you'll also see a folder on the Locations screen for any compatible file syncing servers to which you've connected OmniPlan.
To create a new project, go to the Locations screen, select the folder in which you'd like to store the new project file, and then tap the Add button (the + sign) in the navigation bar.

See Using the Project Editor for more details the project editor itself, or check out the Tutorial to get started with your own project.
Sending and Sharing Project Files
Every now and then you'll find the need to share some document you've created in OmniPlan with someone else. But all of the files are on your device, how are you going to do this?
When you open a folder, such as your Local Documents folder, tap Select in the navigation bar, and then select the project that you'd like to share. This places a blue highlight around the file to let you know which file you have selected.
Now tap the Action button in the navigation bar and select from one of the following options:
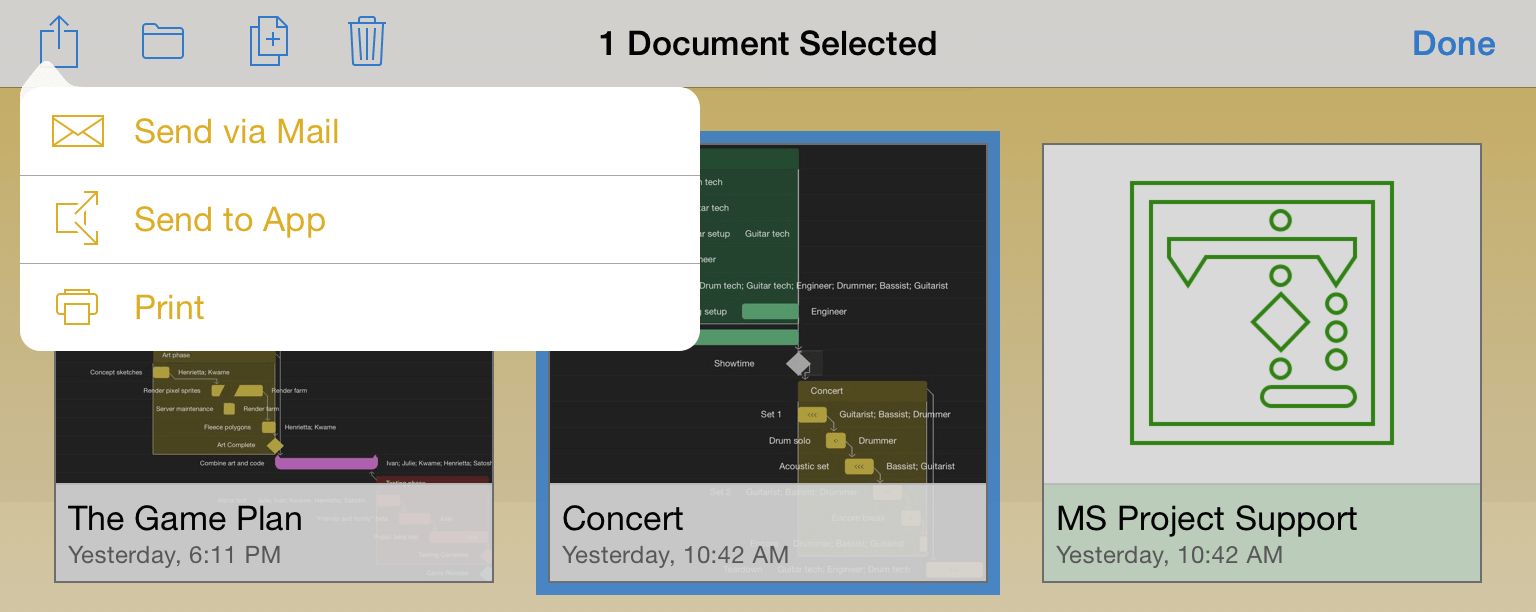
Send via Email — lets you choose a document format for the file you want to email, and then queues up an email message for your to send.
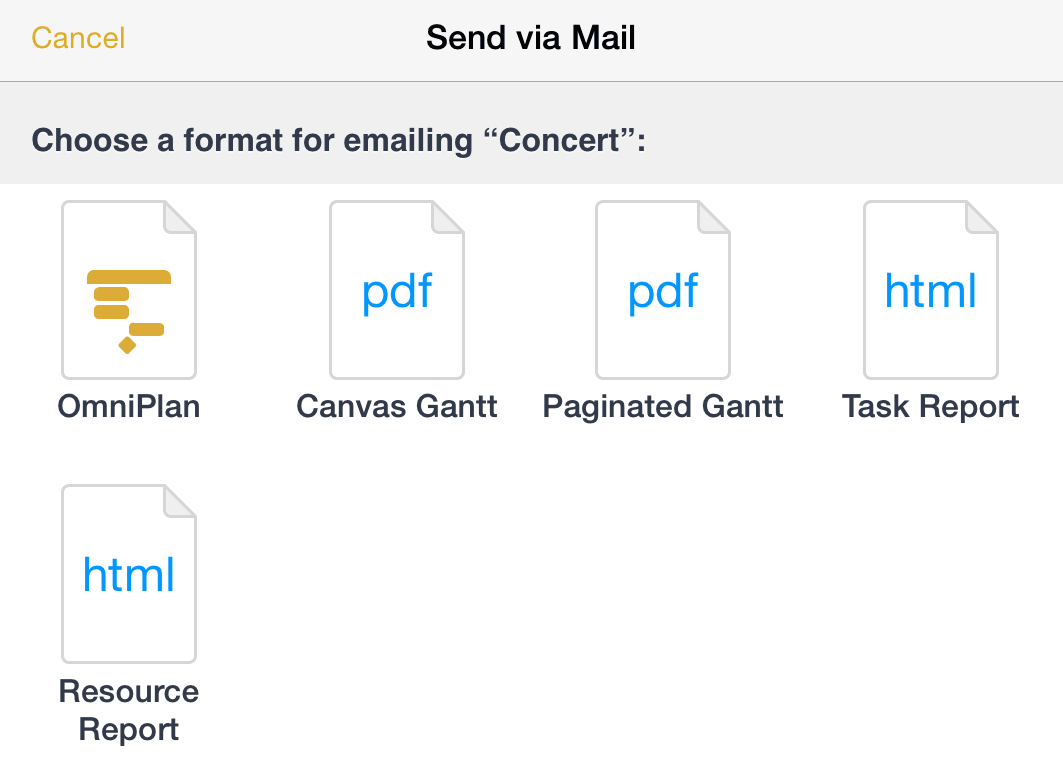
Send to App — lets you open the file in a compatible app on your device, or, if you are on a Wi-Fi network with someone you know, you can share the file with another iOS device using AirDrop. The two PDF options—Canvas Gantt and Paginated Gantt—can also be sent to iBooks or any other iOS app that can render a PDF file.
Print — lets you print the project to an AirPrint-compatible printer.
Taking Out the Trash
Every now and then, you'll find that it's time to do a little housecleaning in OmniPlan. Those projects for renovating the house are no longer relevant, so it's time to dump those documents into the trash and purge them from your device (or from your synced server repository, if you have one of those configured) forever.
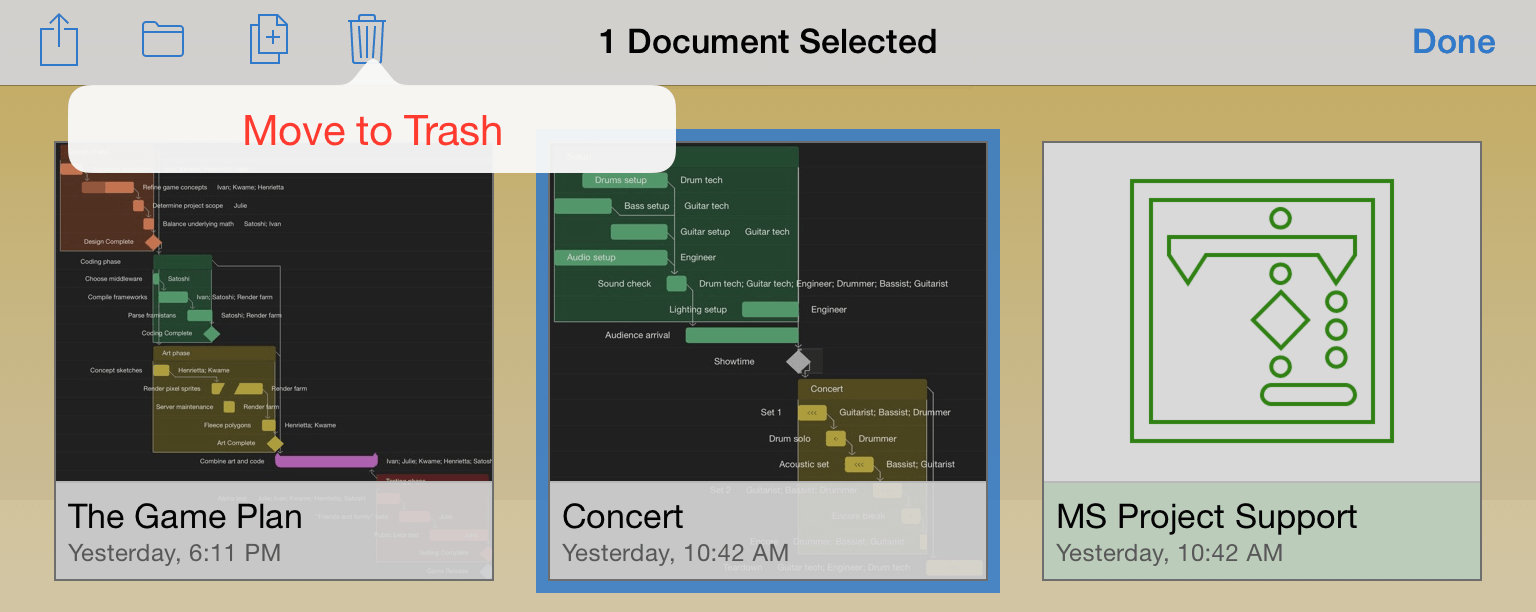
Fortunately, deleting files from OmniPlan is just as easy as finding someone to play Batman. When viewing a folder of documents, tap Select in the navigation bar at the top of the screen. Then tap on the documents you'd like to delete; you'll see that the files now have a blue highlight.
Tap the Trashcan in the navigation bar to move the document to the Trash.
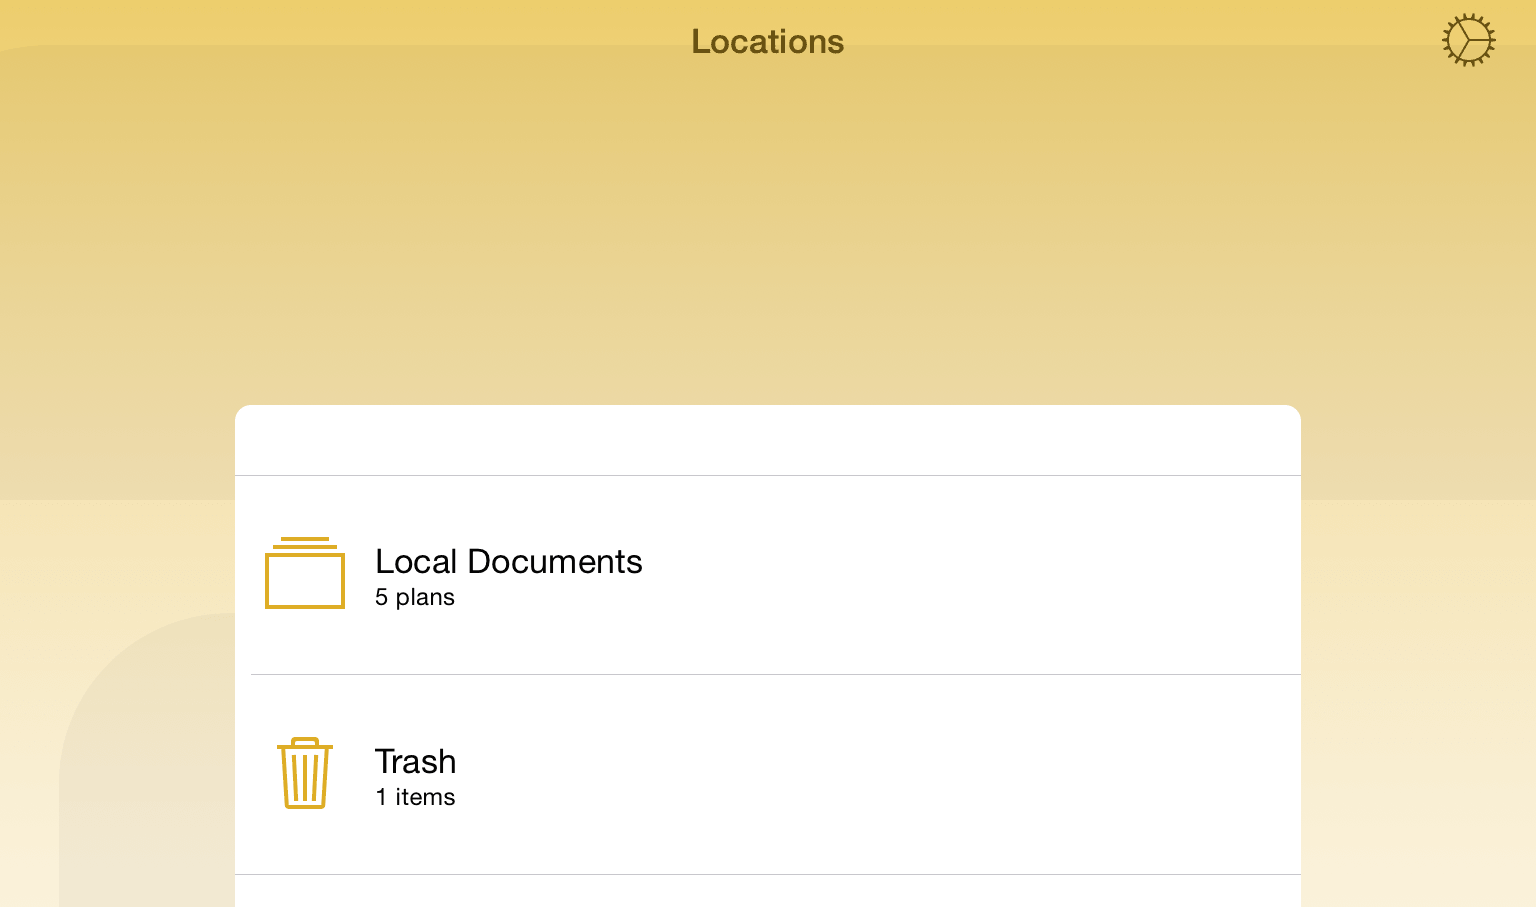
If you tap Locations in the navigation bar, you'll see a Trash folder in your list of OmniPlan folders. Until you empty the trash, the files remain on your device.
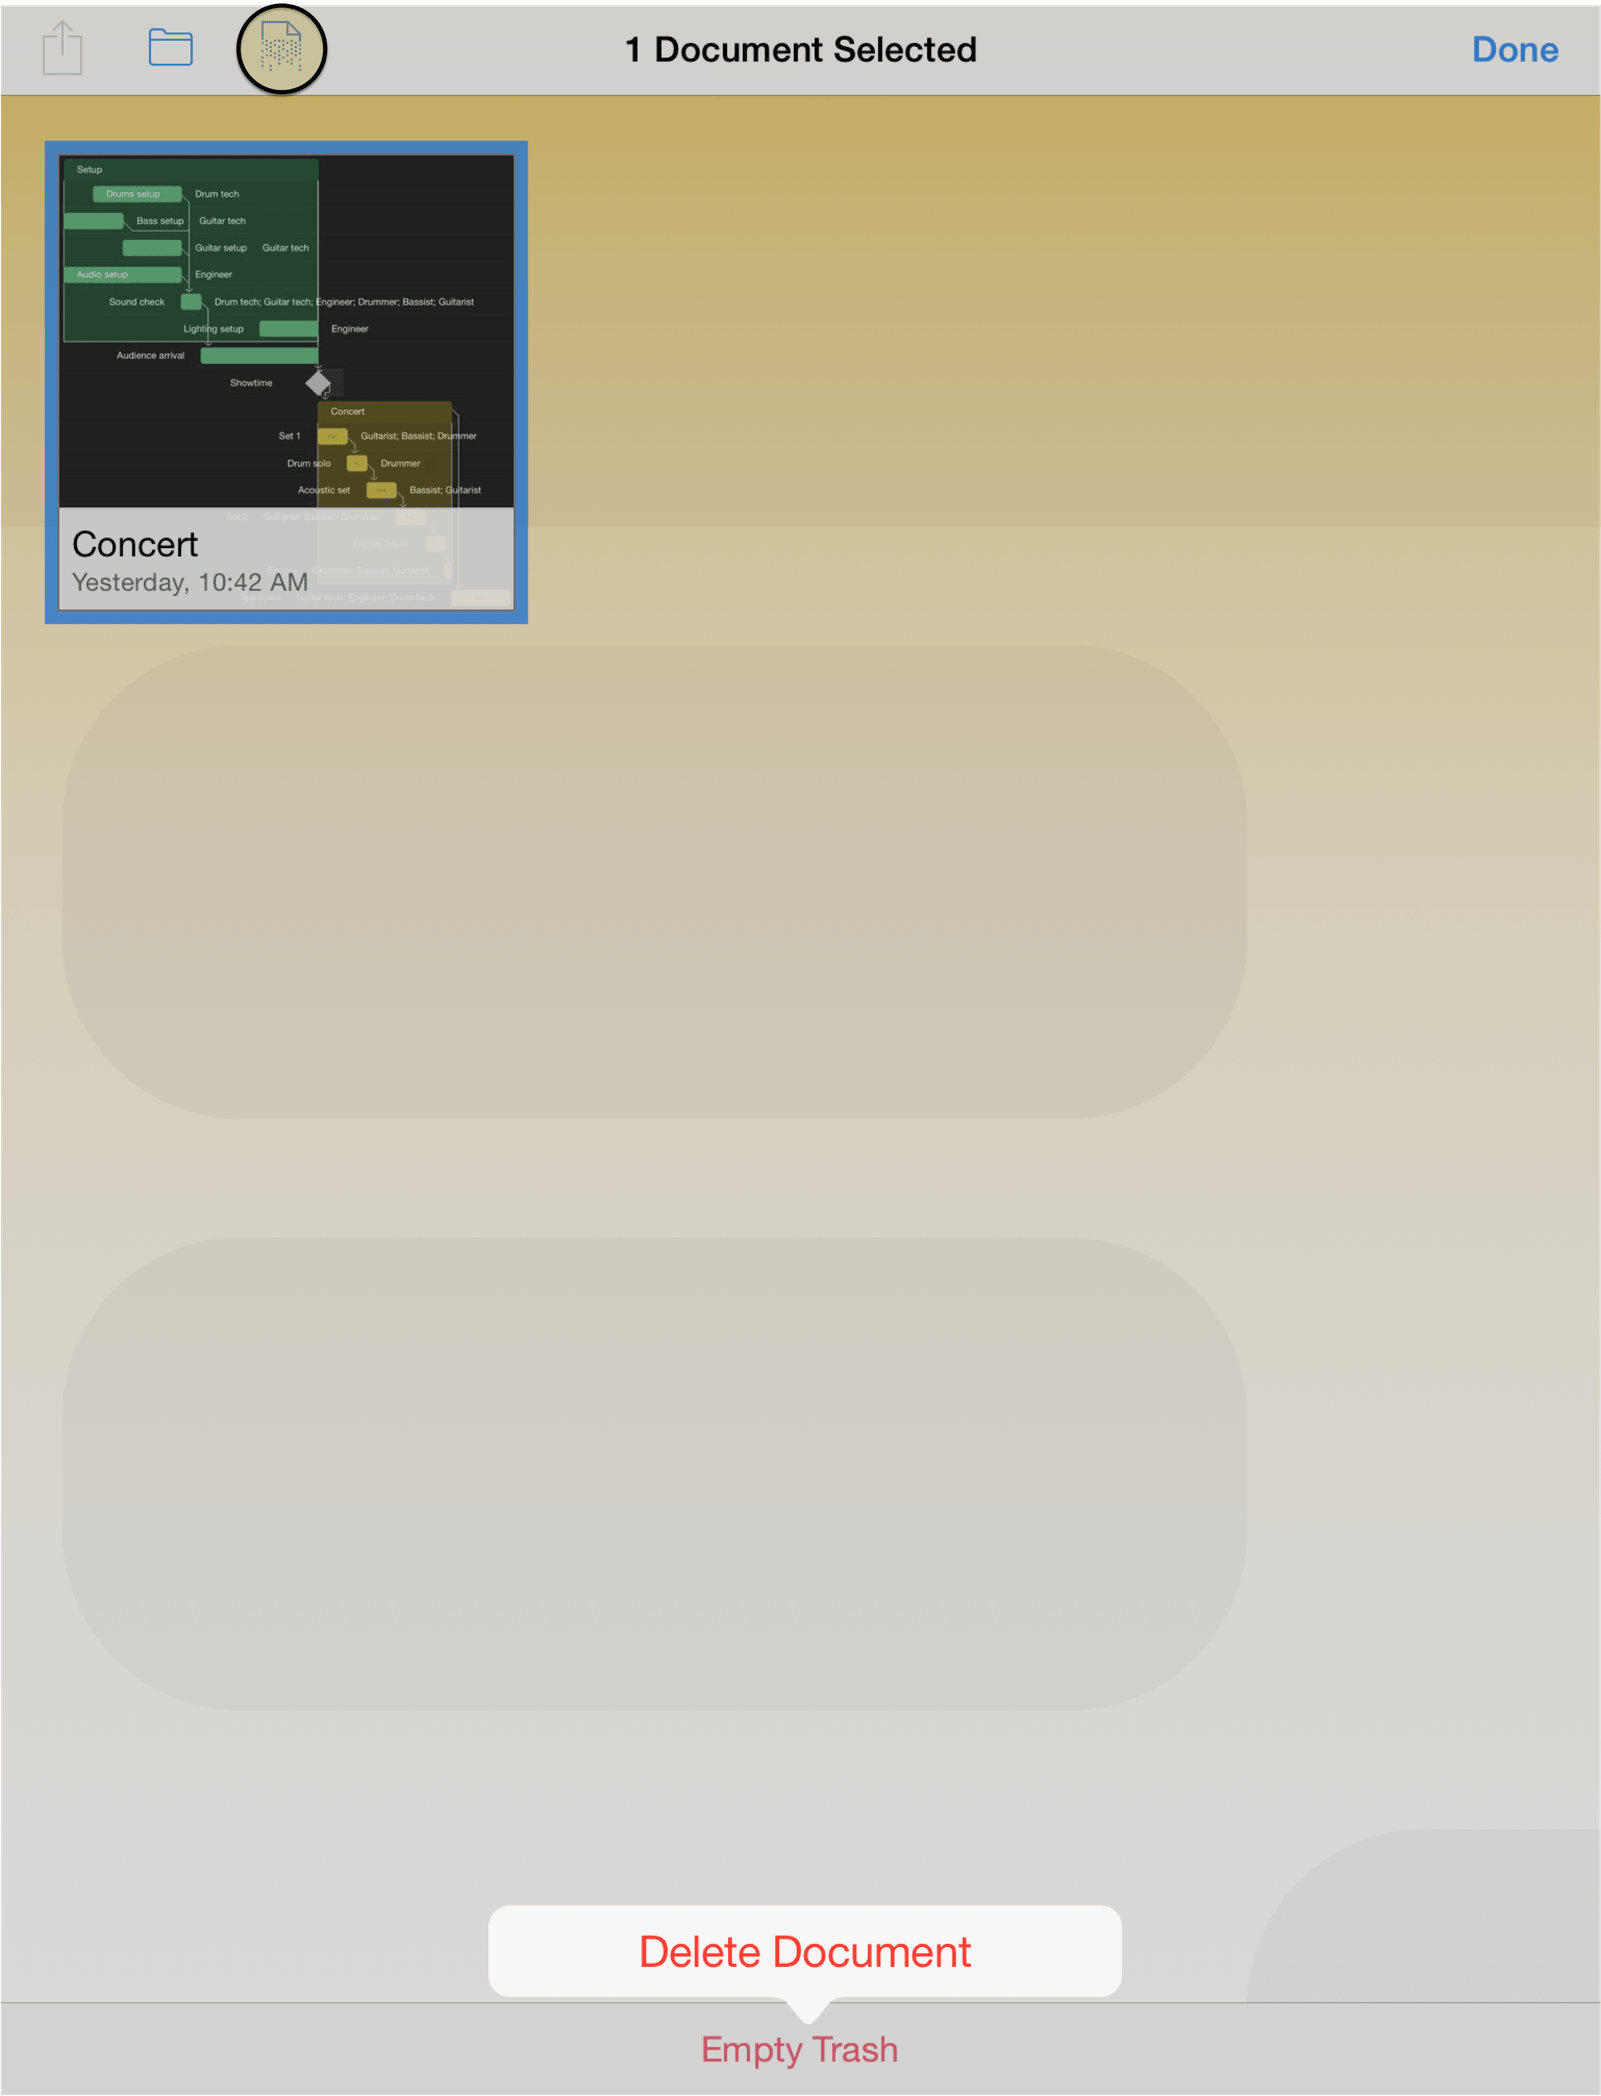
Tap the Trash folder to open it in the Document Browser, and then tap Empty Trash to permanently delete the files from your device. The Delete button (the shredder icon, circled below) will also delete items selected normally.
After all files in the Trash folder are deleted, you're taken back to the Locations screen in OmniPlan.
Getting Synced
To work on a project accessible for editing by multiple OmniPlan users, start by tapping Manage Server Repositories on the Locations screen.

You'll see the OmniPlan Server Repositories screen, from which you can choose either Add Omni Sync Server Account or Add WebDAV Account.

You can create a free Omni Sync Server account online at:
For Omni Sync Server Accounts
On the Server Details screen that appears:
Enter your Username.
Enter the Password for your account.
Set the default Path (or folder) to use. By default, OmniPlan uses the root directory (as denoted by the slash, / ), but you can change this to another folder; for example, using /OmniPlan assumes you have a folder named OmniPlan at the root level of your Omni Sync Server directory.
Optionally, enter a Description that will be used on the Locations screen as the name for your synced folder.
Tap Connect to authenticate with Omni Sync Server.
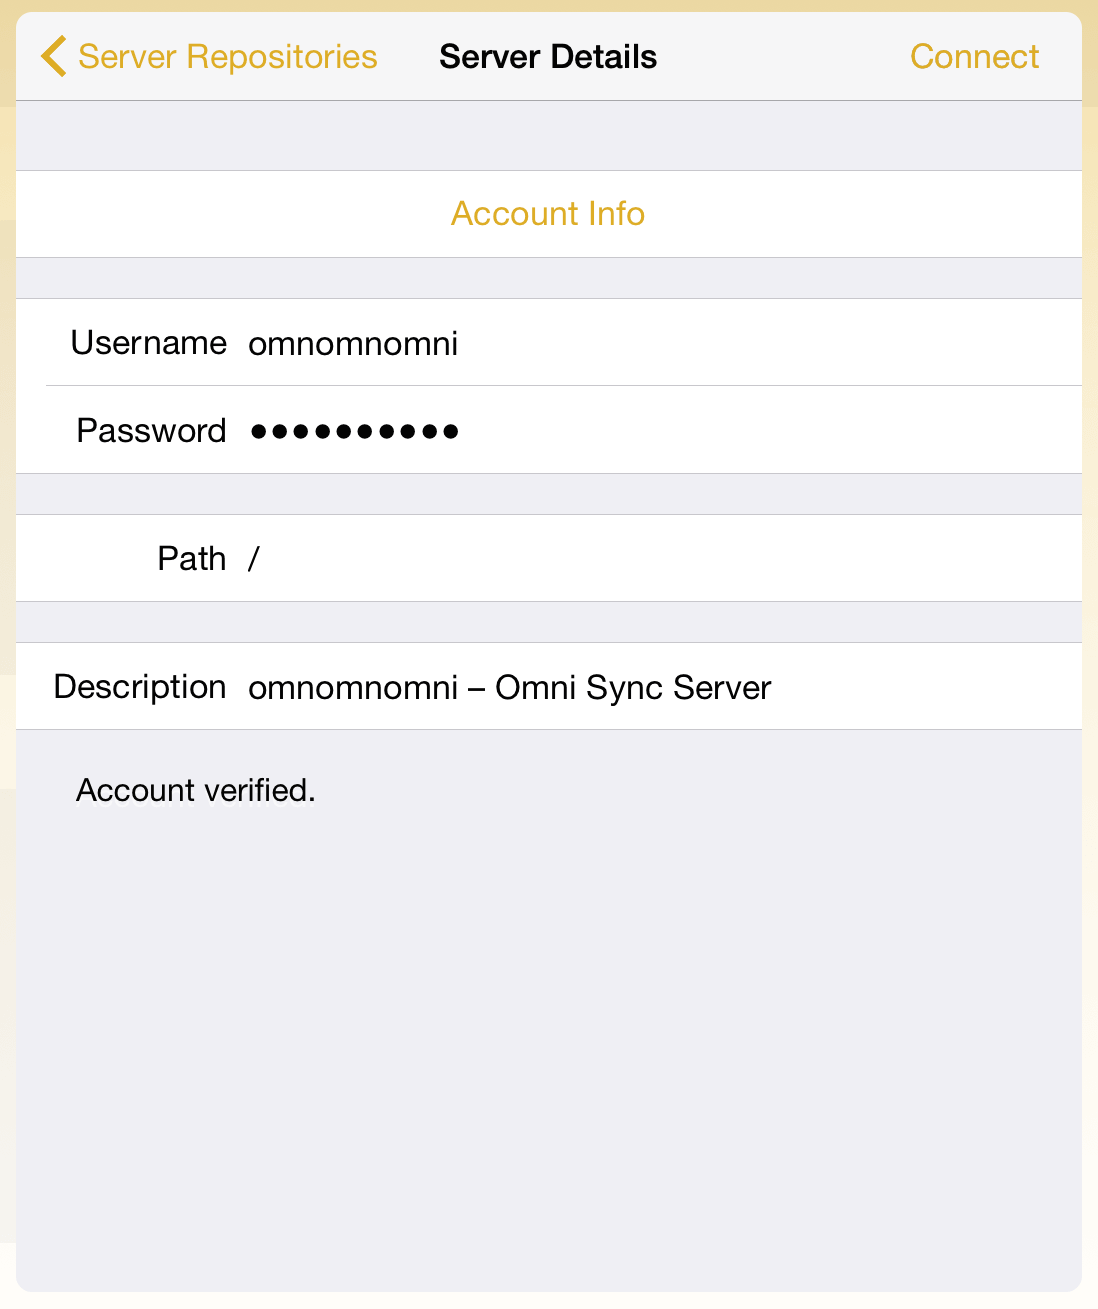
When you tap Connect you'll see Checking account... at the bottom of the window. When your account information has been validated, the text changes to Account verified and the Omni Sync Server folder is added to OmniPlan on your device.
For WebDAV Server Accounts
On the Server Details screen that appears:
Enter the Address (in the form of a URL) for your WebDAV server.
Enter your Username.
Enter the Password for your account.
Optionally, enter a Description that will be used as the name for your synced folder.
Tap Connect to authenticate with your WebDAV server.
When you tap Back, you'll see a list of your available server repositories.
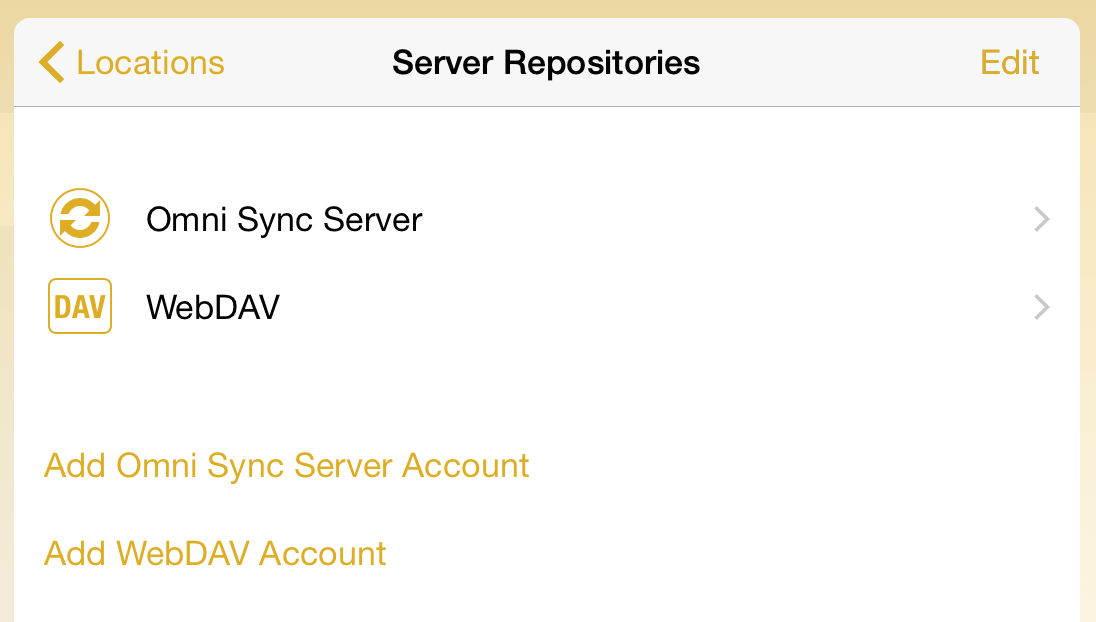
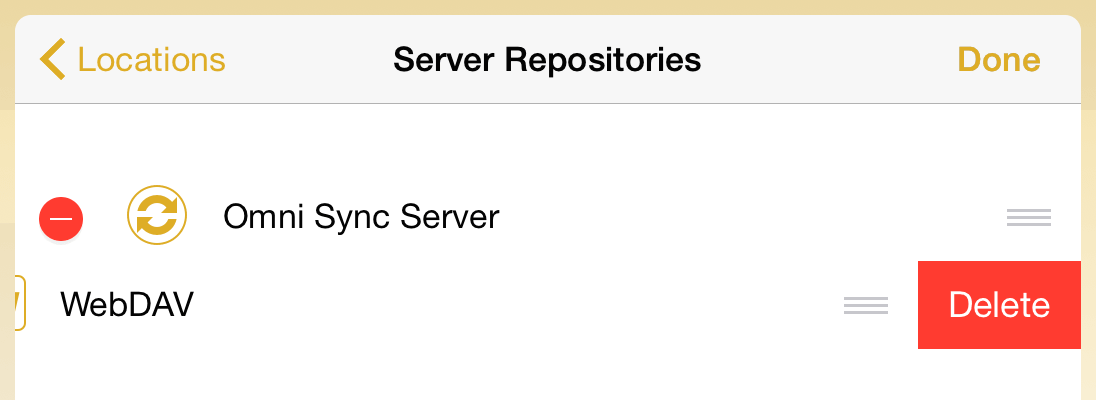
To remove an account, tap Edit; a delete handle appears to the left of the account name. If you tap the delete handle, the account name slides to the left and a Delete button appears on the right edge; tap that to delete the account. A quicker way to do this is to just swipe left across the account name to bring up the Delete button. If you change your mind before deleting the account, tap Done and the Delete button goes away.
Warning
Undo will not restore an account that you delete. If you delete one (or all) of your repository accounts, you will need to set those up all over again.
When you tap Done, you're returned to the Locations screen where you'll see the Local Documents folder along with any synced services you've added to OmniPlan.
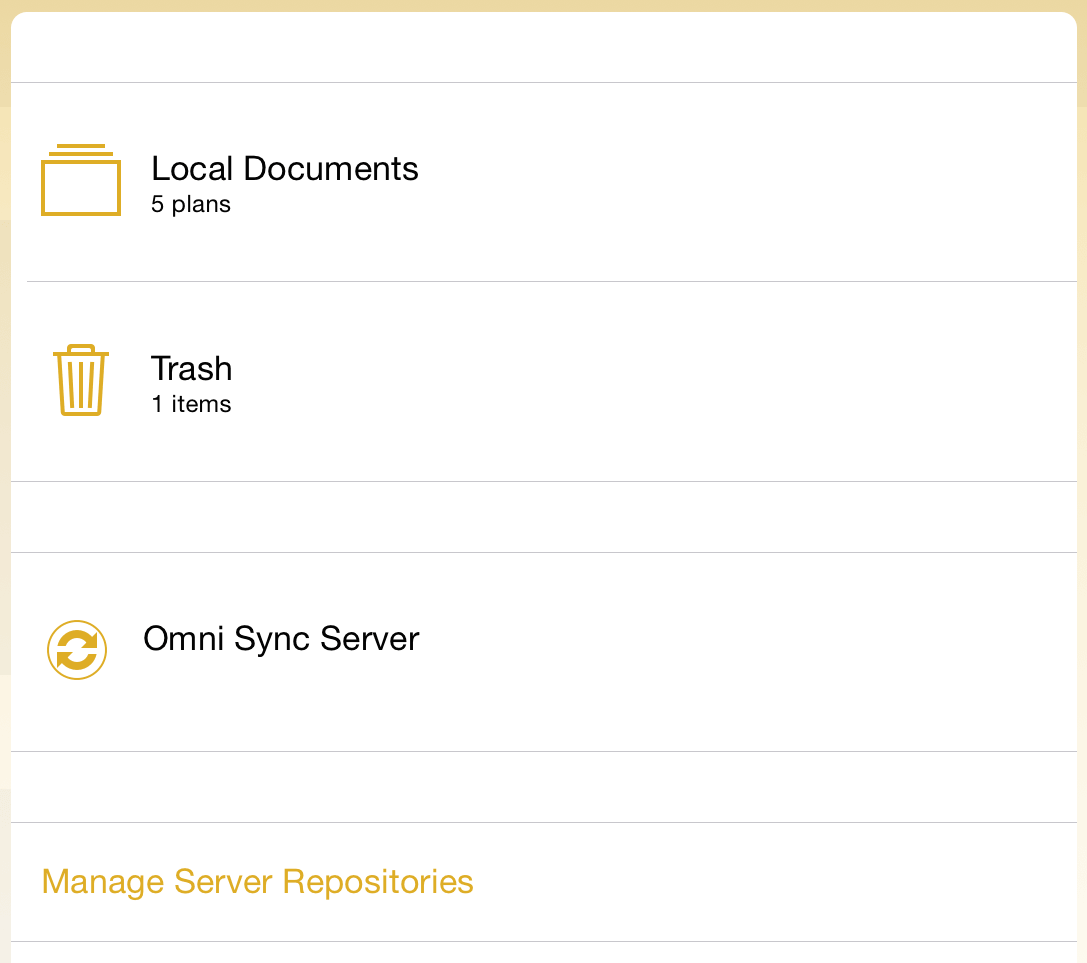
If you tap on a synced folder, such as the Omni Sync Server folder, you'll see a list of files which you can import from the server.
Note
Syncing to a server repository has a special meaning within OmniPlan; it's not just a way to access files from multiple devices. For more on how to collaborate with OmniPlan, see the Collaboration and Sharing section of the tutorial.
Using the Project Editor
After creating a new project, you'll be faced with OmniPlan's Project Editor. However, the best way to get to know the Project Editor is to open one of the sample projects in the Local Documents folder.
Before we get going, there are a couple things that will make any project manager who's working with OmniPlan happy:
Landscape Mode — Don't be afraid to rotate your device to work on your project in Landscape Mode.
Pinch to Zoom — Most projects have many overlapping tasks, so when you need to view your entire project, use the vertical pinch gesture to zoom in or out.
Changing Time Scale — Pinch horizontally to change the view's time scale on the fly, or tap the date header of the Gantt chart to choose a scale from among granular options (including the ever-handy Scale to Fit Project).
AirPlay Mirroring — Need an even bigger screen to work on your project? If you have an Apple TV, you can turn on AirPlay Mirroring by swiping up from the bottom of the screen.
The Project Editor is where you will spend the majority of your time. Whether you're creating a new project or trying to see one to fruition, the Project Editor is where everything comes together in OmniPlan.
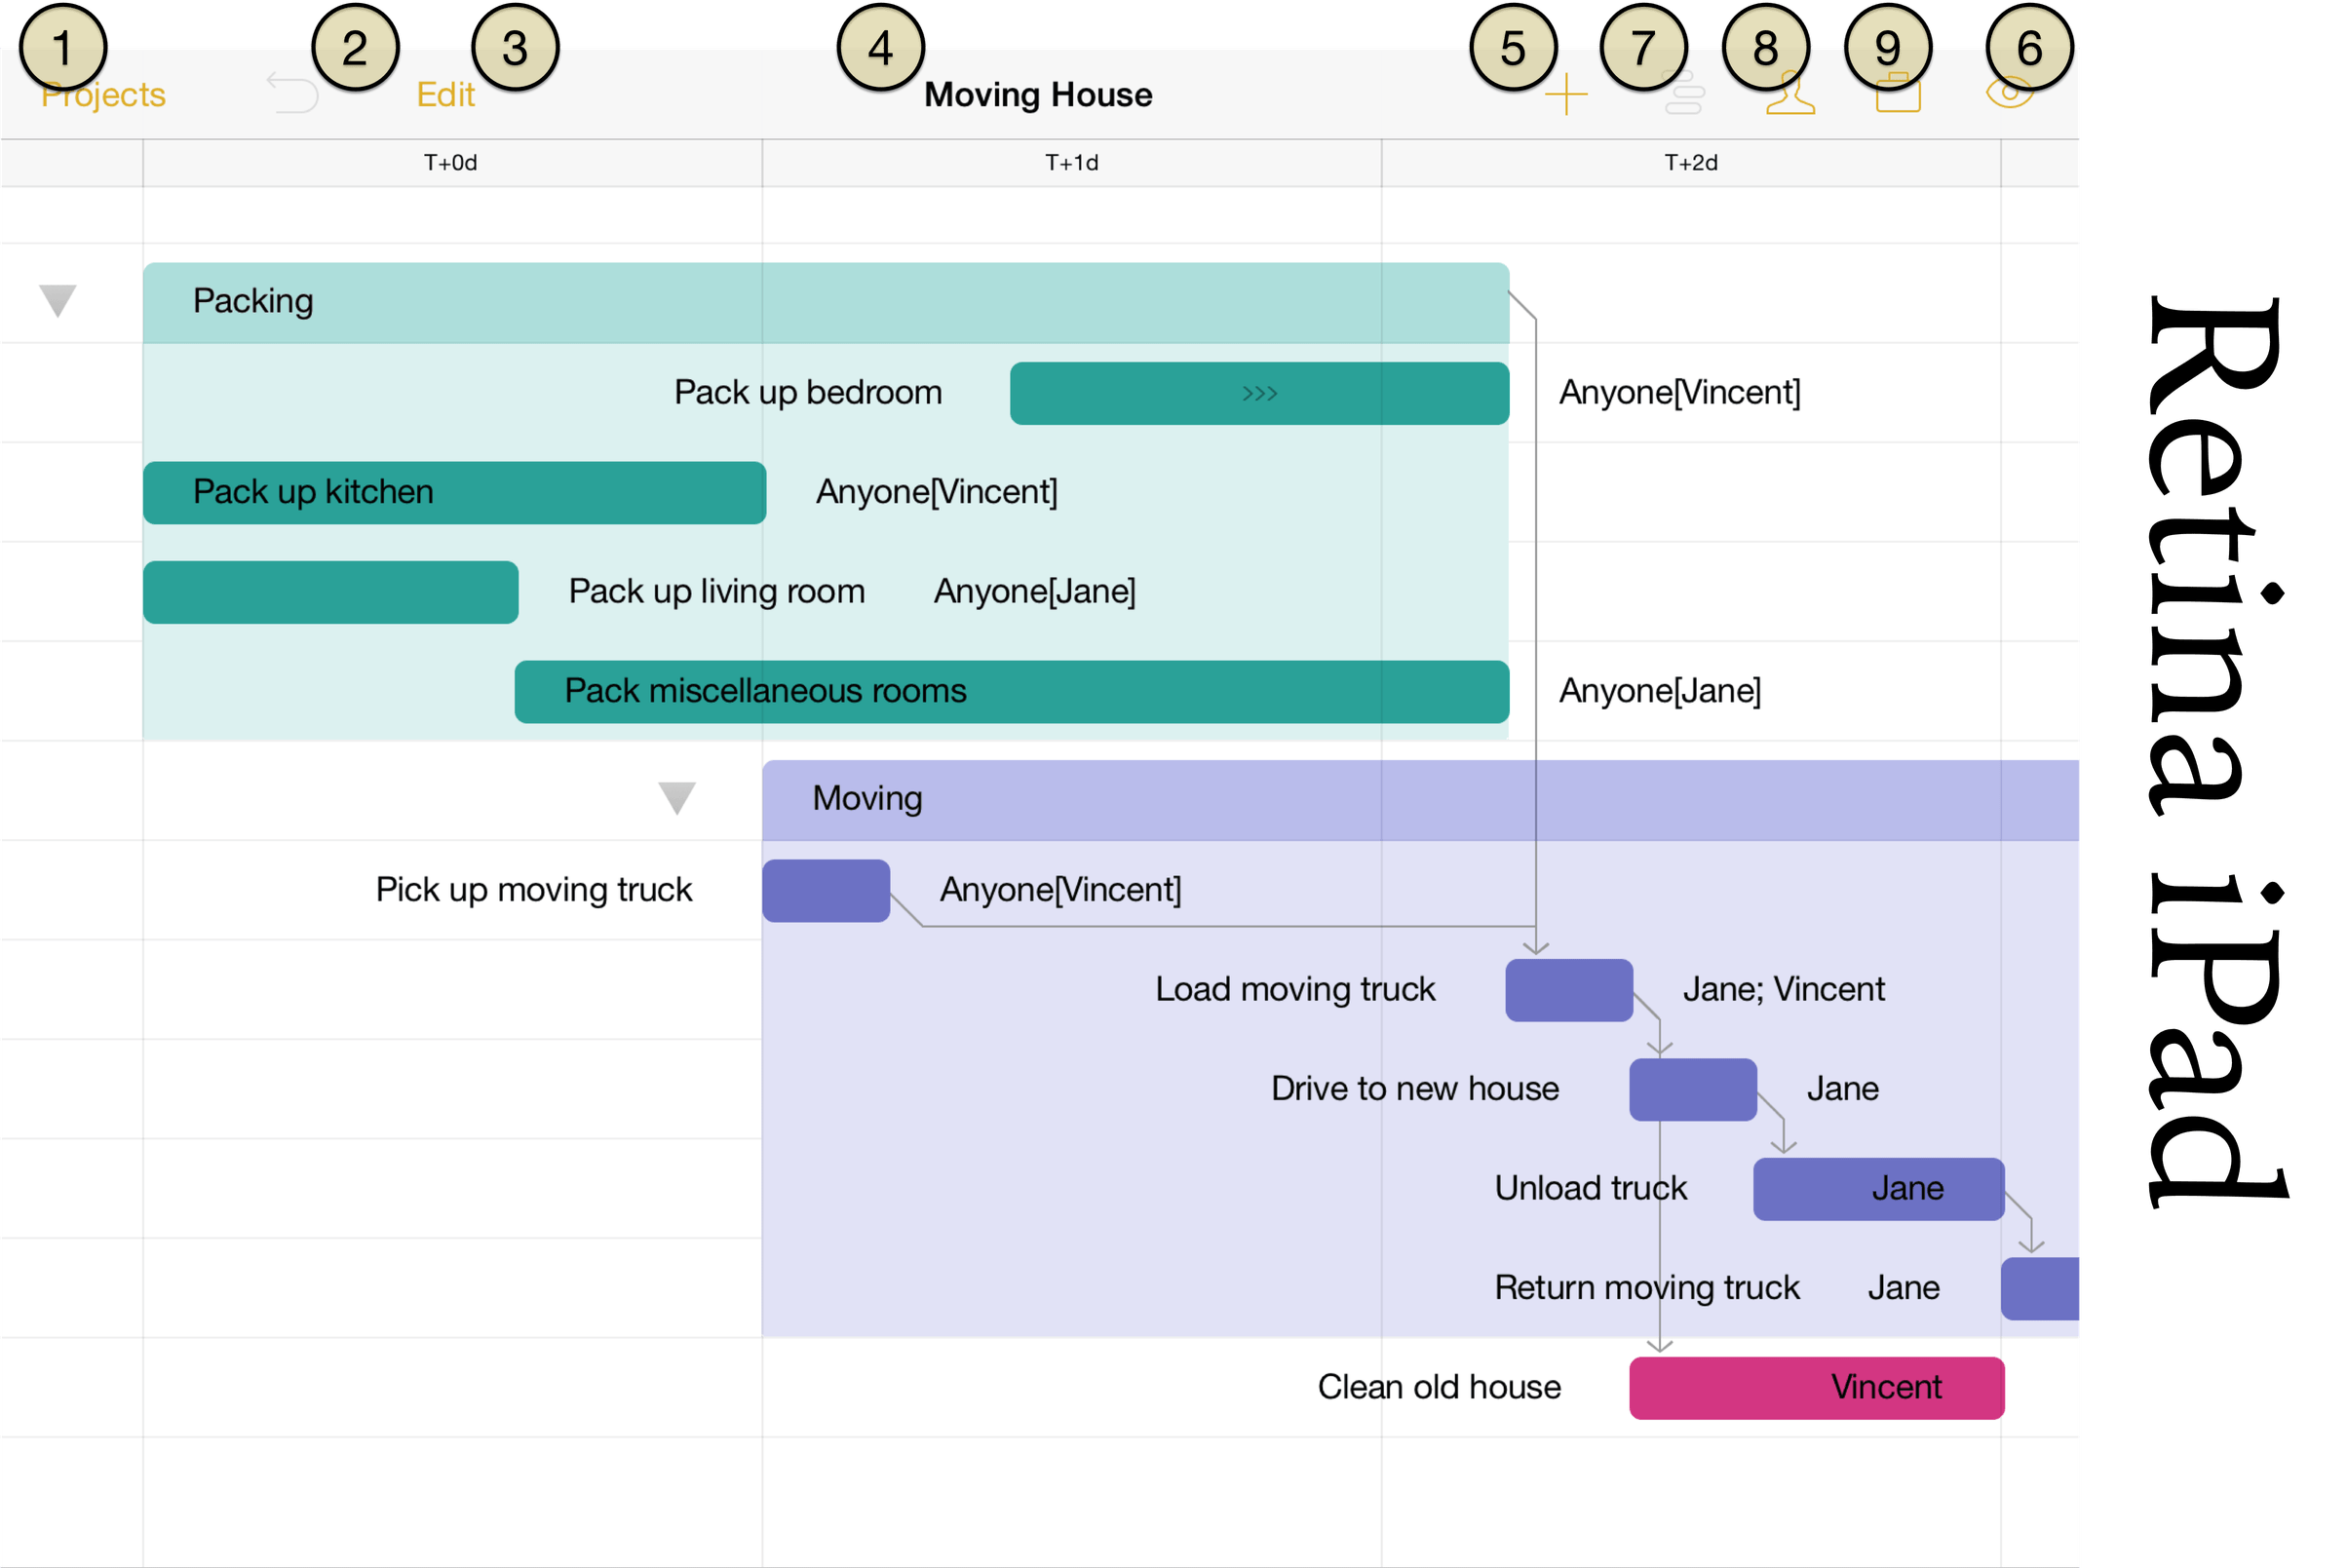
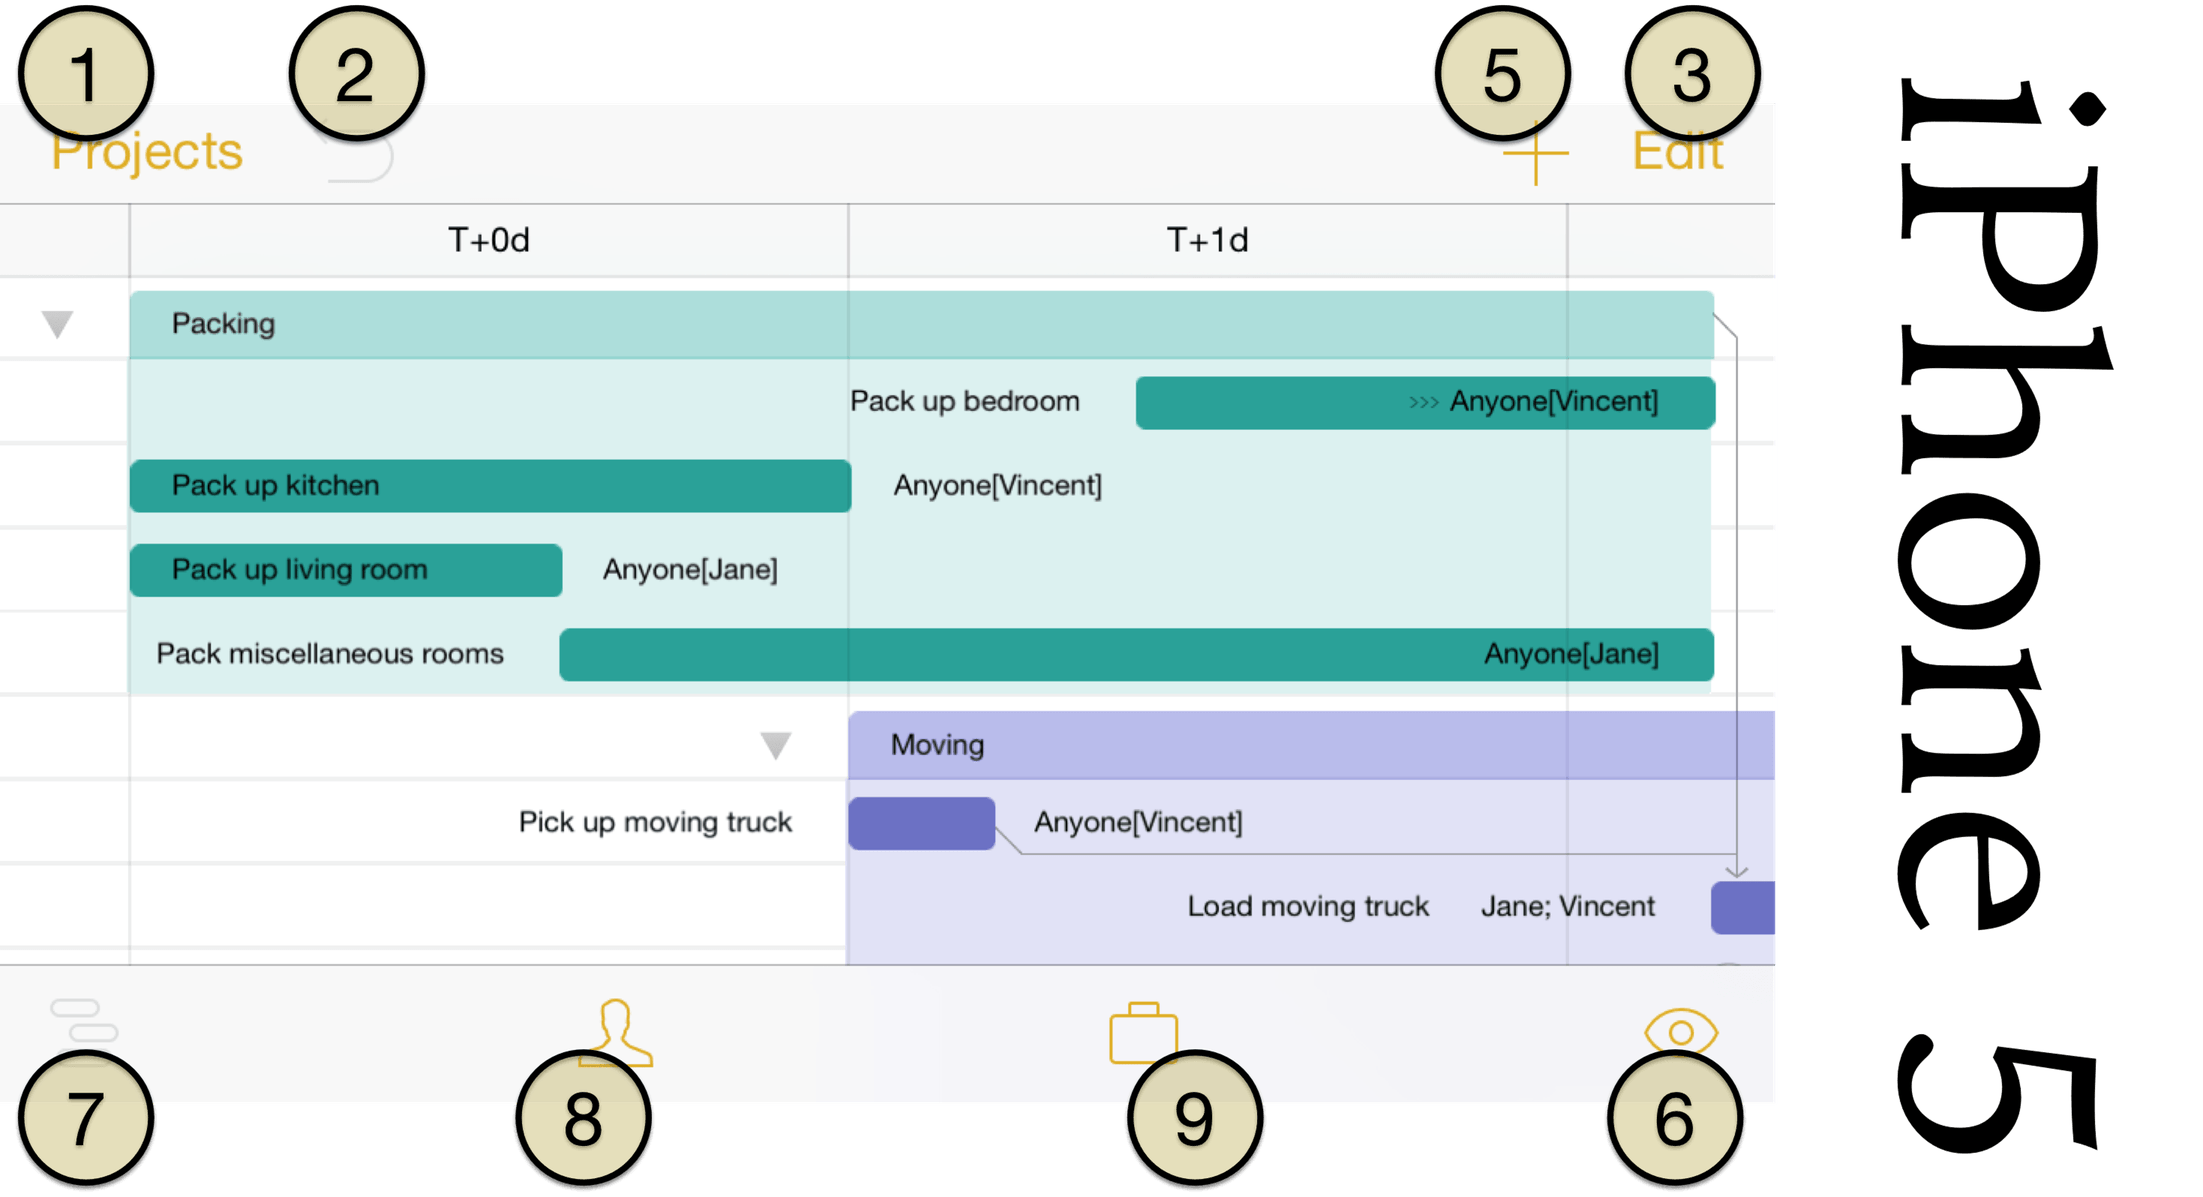
Projects — tap to exit the project you're working on and return to the current project folder.
Undo/Redo — tap to undo or redo the previous change.
Edit — with a task, milestone, or group selected, tap Edit to enter edit mode and reveal the editing controls at the bottom of the screen. In edit mode, multiple items can be selected by tapping them to perform various actions:
Cut — Delete the selected item or items and copy them to be pasted later. Paste by tapping Done to exit edit mode and touching and holding an item on the Gantt chart to reveal the contextual menu. When pasted, the copied items will appear below the one selected.
Copy — Copy the selected item(s) to be pasted later.
Delete — Delete the selected item(s) from the Gantt chart.
Group/Ungroup — With multiple items selected, Group creates a group containing those items. With a group selected, Ungroup removes the grouping container (but not the tasks inside it).
Move — Move the selected item or items elsewhere in the Gantt chart.
To move an item or items in edit mode, tap to select them, then tap Move. To choose their destination, tap another row. A contextual menu appears that provides three location options: Above the chosen row, Below it, and Inside. Choosing Inside converts the chosen row into a group (if it isn't one already) and adds the items to be moved as tasks inside it.
Connect/Disconnect — With multiple items selected, this command connects them with finish → start dependencies (if they're not already connected) or removes dependencies between them (if they're currently connected).
Project Title — the name of the project.
Add — tap to add a new task to the project. If you touch and hold, a popover menu appears giving you the option to add a new Task, Milestone, or Group.
View — this popover lets you set a project filter, turn on change tracking, check for violations, and view baselines and critical paths.
Task Inspector — with a task or group selected, tap to open the Task Inspector. There are three tabs in the inspector: Task Info, Scheduling, and Assignments.
Resources Inspector — lets you assign resources (Staff, Equipment, Materials, or a Group) to a task.
Project Inspector — use the Project inspector to set the parameters for your project.
The Project Inspector
The Project Inspector contains tools for fine-tuning the details of your project's structure and operating parameters.
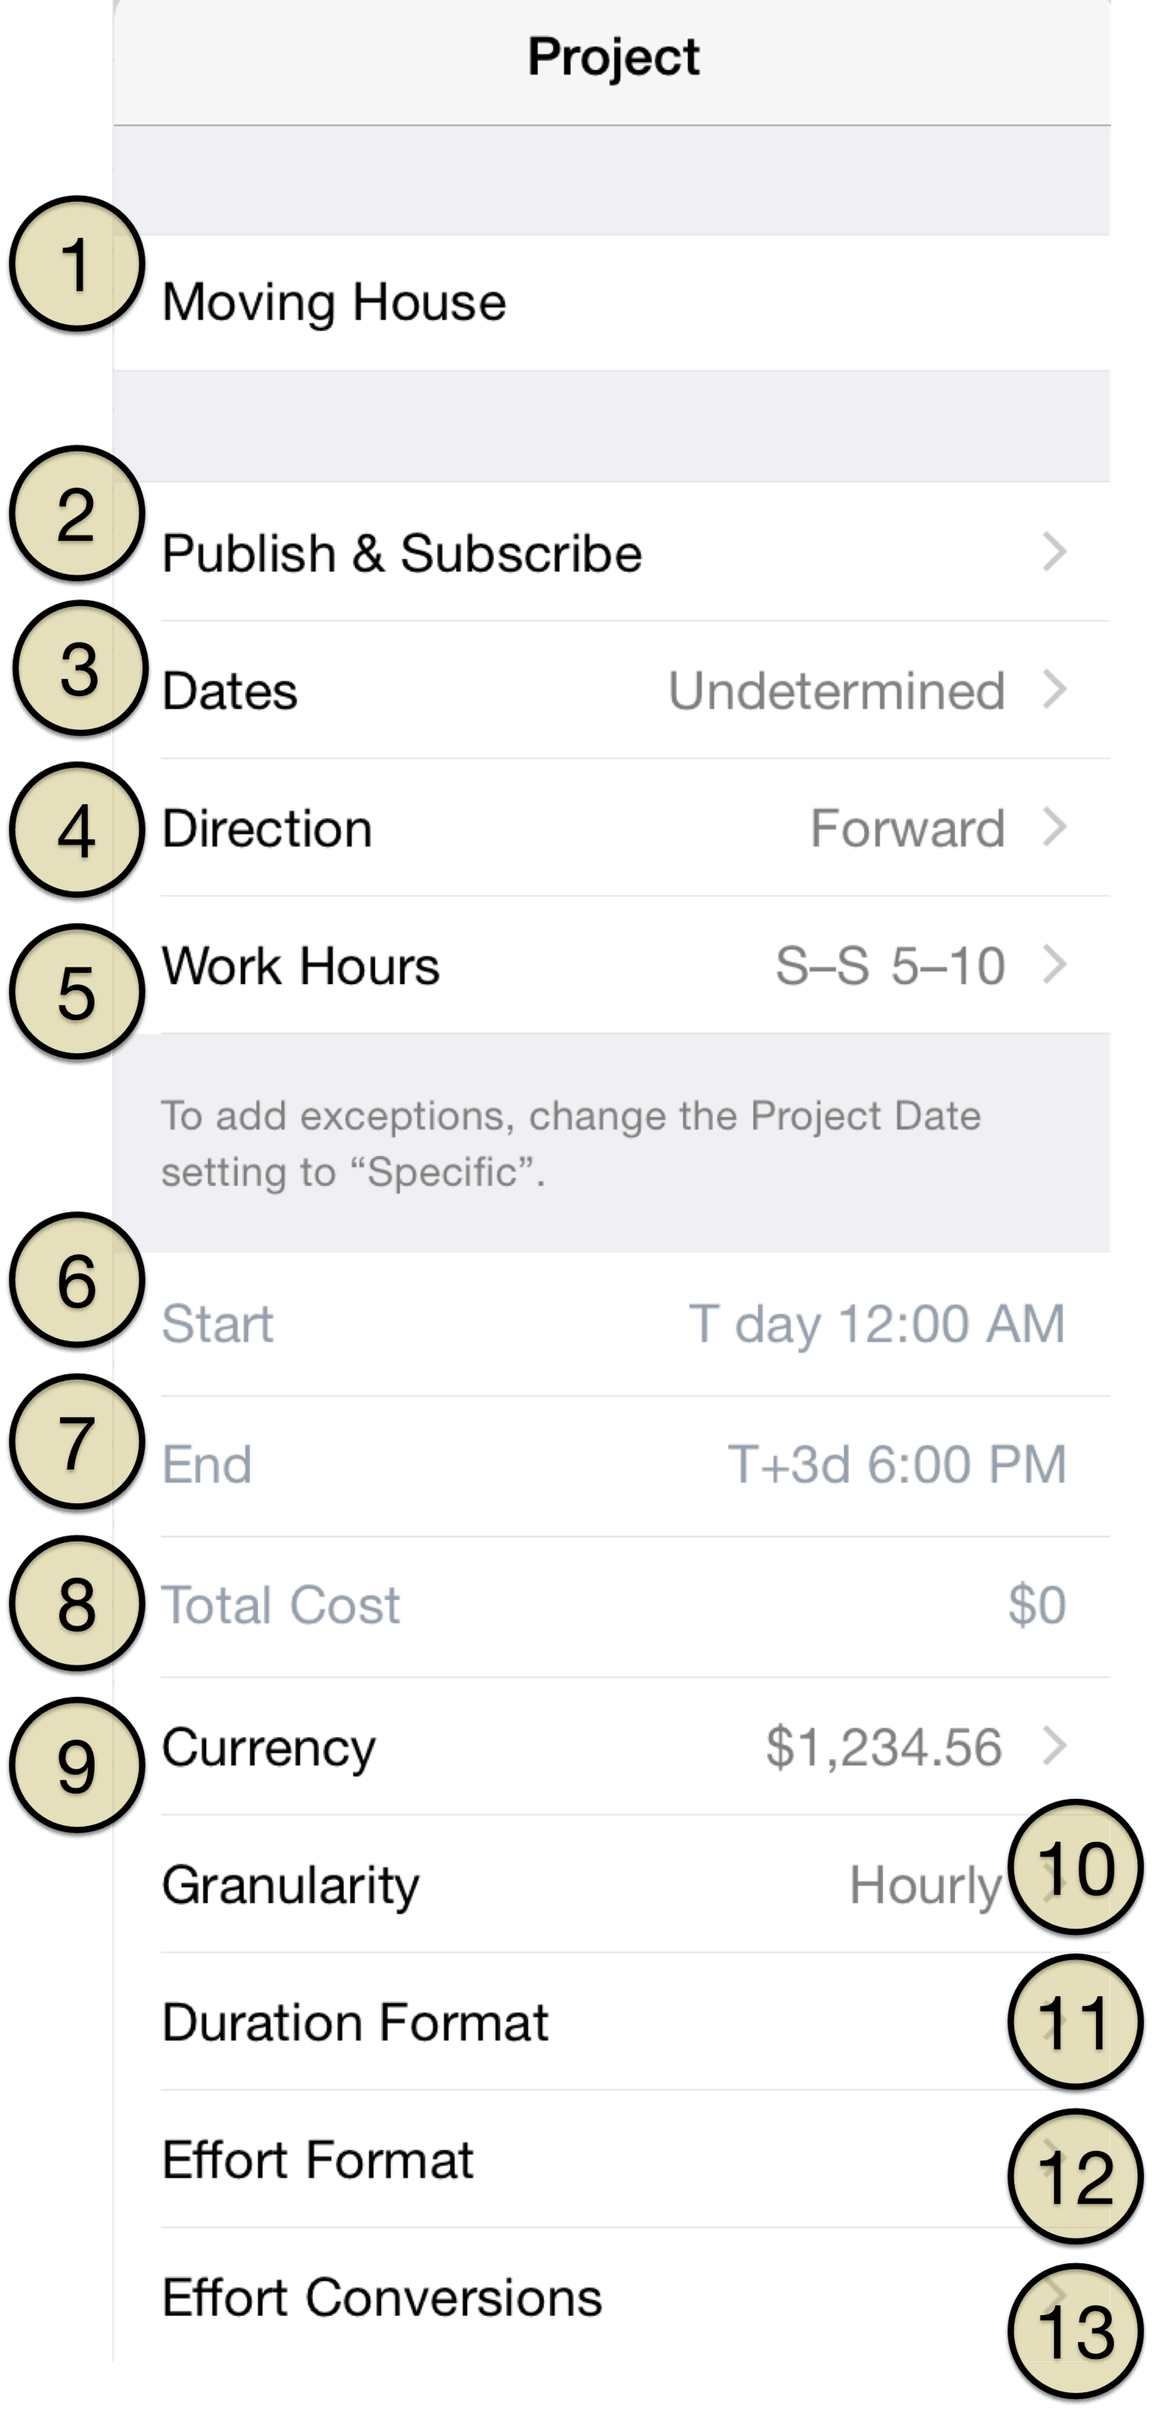
Project Title — as an alternative to tapping the project header, you can edit the project's name here.
Publish and Subscribe — configure the sync settings for this particular project. If you are using Omni Sync Server, you can specify an auto- update interval so that other members of your team can view and edit the project in OmniPlan on their iOS device or Mac.
Dates — choose from Undetermined or Specific, which basically means your project can start or end on a random or specific date, respectively.
Direction — depending on your project type, choose from Forward from Fixed Start or Backward from Fixed End. Projects typically have a definitive start or end date (and sometimes both), so choose whichever is appropriate for your project.
Work Hours — specify the expected working hours.
Start Date — this option is only available if you have set a Specific start date for your project, rather than an Undetermined date.
End Date — this option is only available if you have set a Specific end date for your project, rather than an Undetermined date.
Total Cost — check here to see the total cost for your project.
Currency — set the currency type for your project's expenses and costs.
Granularity — choose from Exact, Hourly, or Daily to specify how precisely to schedule task start and end times.
Duration Format — check here to see how long it will take to work through all of the tasks in your project. This popover contains a set of switches so you can toggle on or off Years, Months, Weeks, Days, Hours, Minutes, and Seconds.
Effort Format — choose which units should be displayed when working with durations. This popover contains a set of switches so you can toggle on or off Years, Months, Weeks, Days, Hours, Minutes, and Seconds.
Effort Conversions — choose how many hours to count as one day, week, month, or year.
With an overview of the Project editor and Project Inspector wrapped up, now let's move on to a tutorial for putting a project together from the very beginning.
OmniPlan 2 for iOS Tutorial
Welcome to the tutorial! Starting with a blank slate, we'll build a project from the ground up to show all of the core features of OmniPlan in practical use.
Step 1: Create a Project
For the purpose of this tutorial we'll be looking at the development process of a game being put together by an independent team of intrepid designers, coders, and testers.
Starting off in the document browser, tap the New Project button.

This opens the project editor, where a first task is waiting to be customized or edited. Before we get to that, let's rename the project to something more interesting.
Tap My Project in the toolbar to edit the project title.

Step 2: Choose a Start or End Date
When setting out to build a project, one of the most important aspects is the timeframe. This, in turn, is dictated by any deadlines or start constraints that exist for the project.
In the case of our game development scheme, we don't have a hard deadline for the project to be finished - we want it to be done when it's ready (but as soon as reasonably possible). To indicate this, we'll go to the project inspector and set the start date as today.
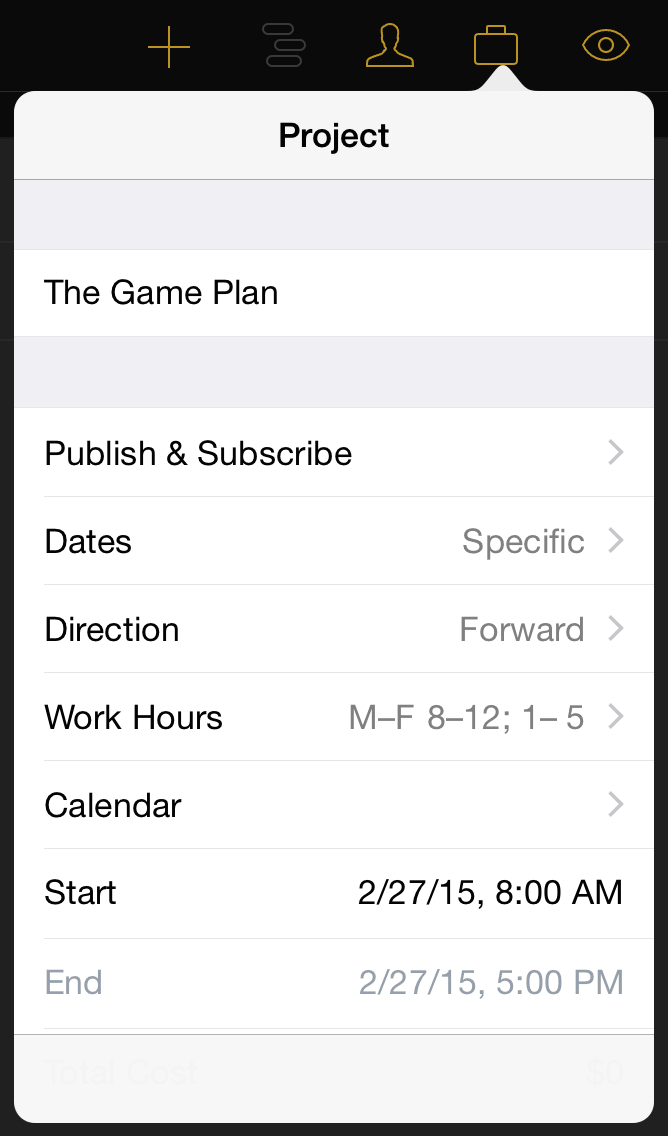
Conveniently, this is the default setting for any new project.
Note
If you're planning a project in the abstract without a fixed start or end date, you can change the dates from Specific to Undetermined until the timeframe is more set in stone. You'll get dates that display as T+1d, T +2d... instead.
If you're planning a project with a specific do-or-die deadline, you'll want to switch the direction from forward to backward and put the deadline date in the End field. Tasks will be scheduled back from this date, filling in the time from project completion to the present.
Step 3: Create Milestones
Milestones are the anchor points in your project that mark important shifts in focus or unlocking a new phase of the project. Clarifying these will help break a dauntingly large project down into more manageable sections, and help dictate the tasks leading up to and following the milestone.
To create a milestone, tap and hold the new task button until the option appears:

Alternatively, tap the currently existing task ("Task 1") to select it, then open the task inspector. You can change the task type from a regular task to a milestone here.
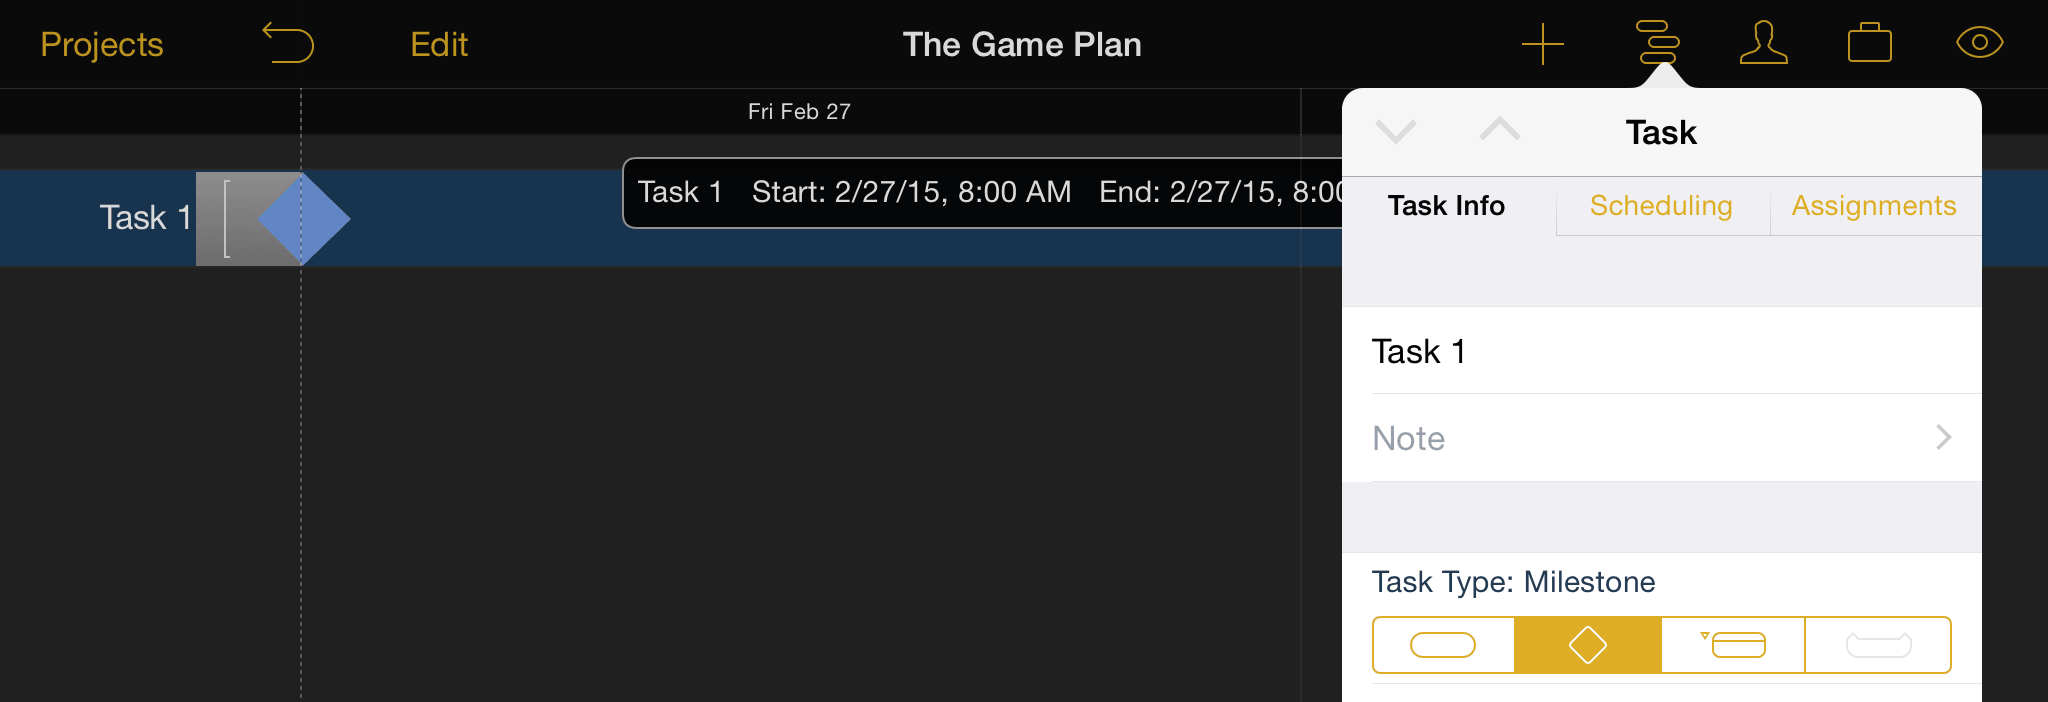
We'll change the name of "Task 1" by double-tapping it or editing the name field in the Task Info tab, create a few more milestones for our game plan, and then go on to reinforce our milestones with tasks.
Step 4: Create Tasks
Create a task by tapping the new task button.
New tasks appear below the currently selected item in the Gantt view, or at the bottom of the list if no tasks, milestones, or groups are selected.
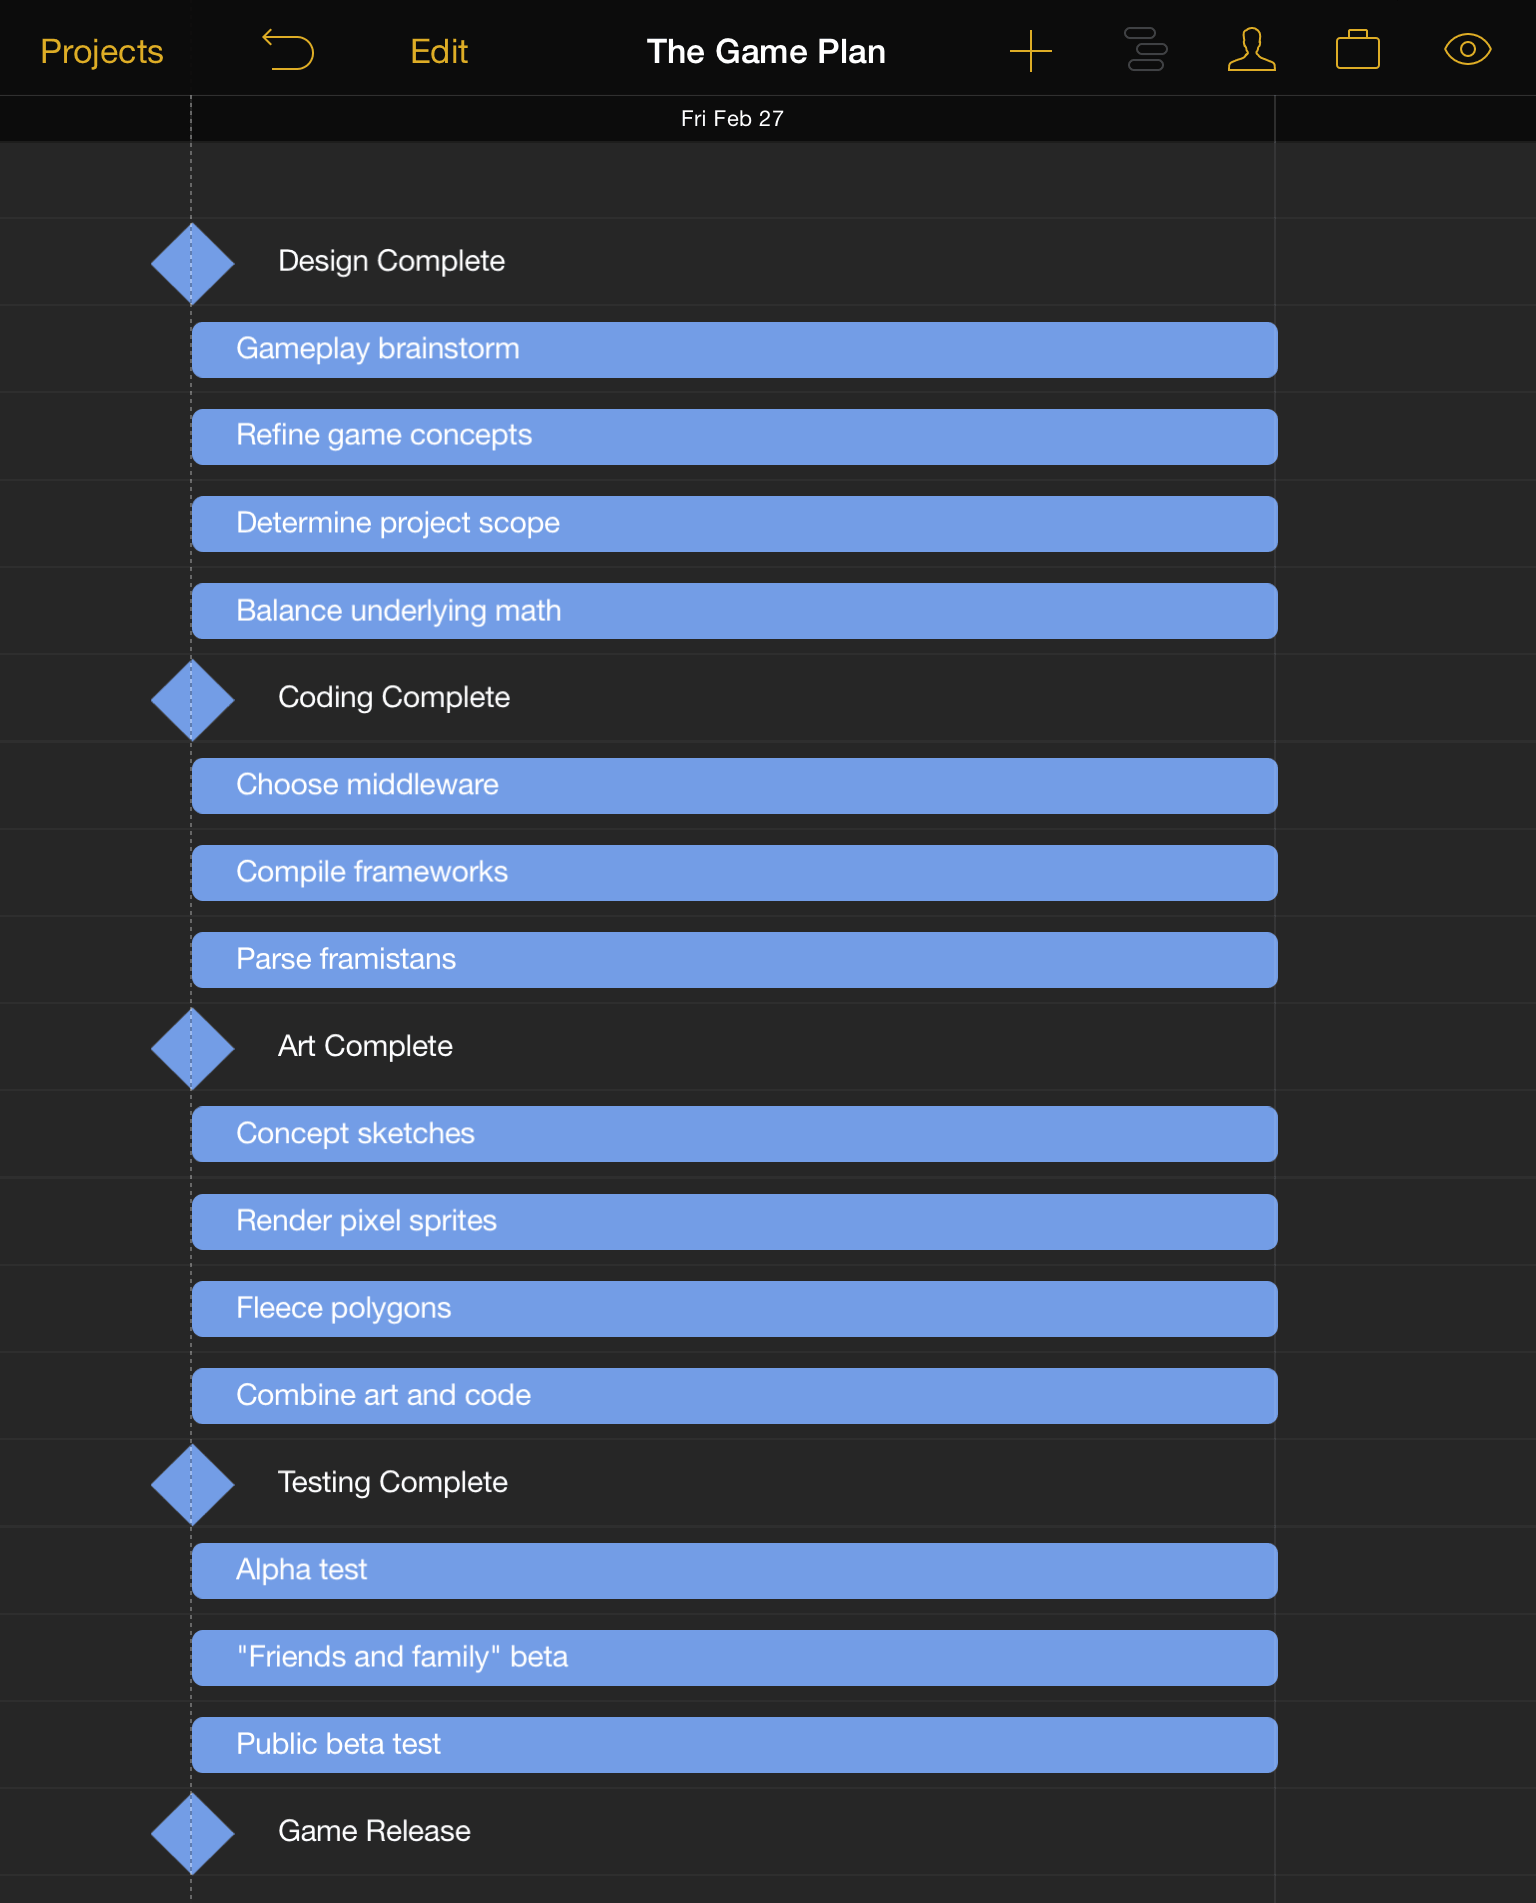
For our project we'll create several tasks beneath each milestone that they're related to. Since we now have more items than will fit on the screen at once, pinch vertically on the Gantt view to change the view scale.
Step 5: Edit the Work Week
Now that we're starting to see the game plan come together, we'll set tasks aside for the moment and start setting up the work schedule for our project.
Tap the project inspector and then Work Hours to access the regular weekly work schedule for the project. By default, working hours are Monday through Friday from 8:00 to 5:00, with an hour-long break for lunch at noon.
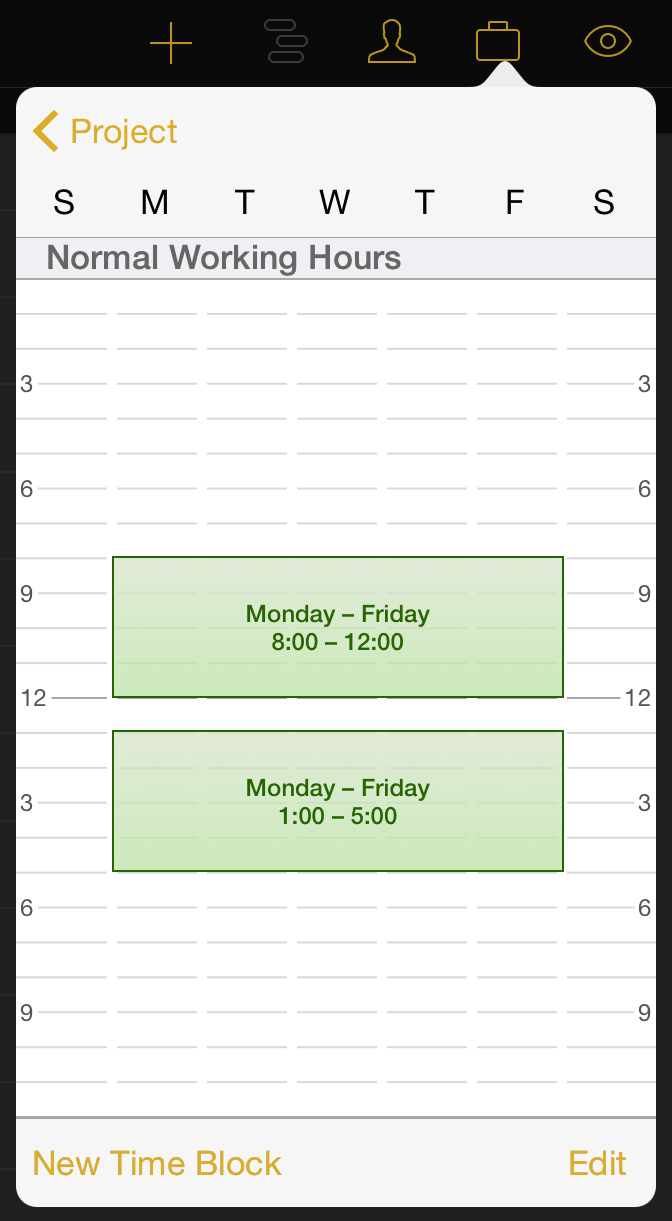
Since we're working with a bunch of more nocturnal folks, let's change the schedule to reflect that. Tap and hold one of the time blocks on the calendar to bring it to a new position, or drag one of the side handles to change the size of the block. We end up with a schedule that fits our needs:
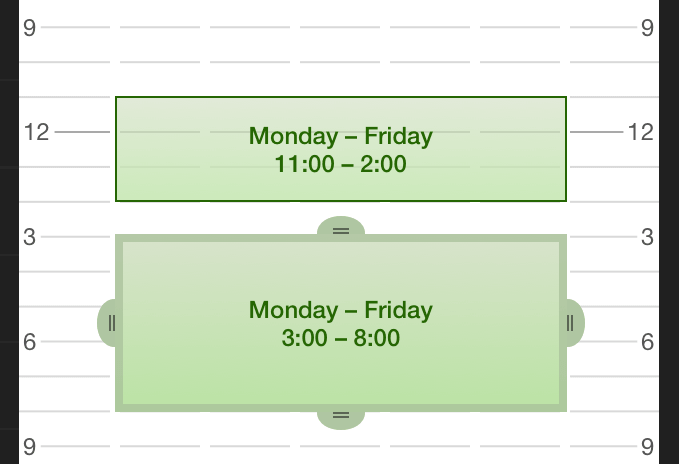
Time blocks can be created for individual days to indicate longer or shorter regular working hours (tap New Time Block), and deleted by tapping Edit.
Step 6: Set Schedule Exceptions
Even the most accommodating work week will occasionally have days that are out of the ordinary. Whether it's a national holiday, a team-wide training seminar, an industry expo or conference, or just a patch of bad weather that keeps folks out of the office, setting exceptions to the regular work schedule can be key to keeping a project on track.
One that we know is in the future for our project is the upcoming Memorial Day. We can add that to our schedule right now by returning to the top level of the project inspector and tapping Calendar.
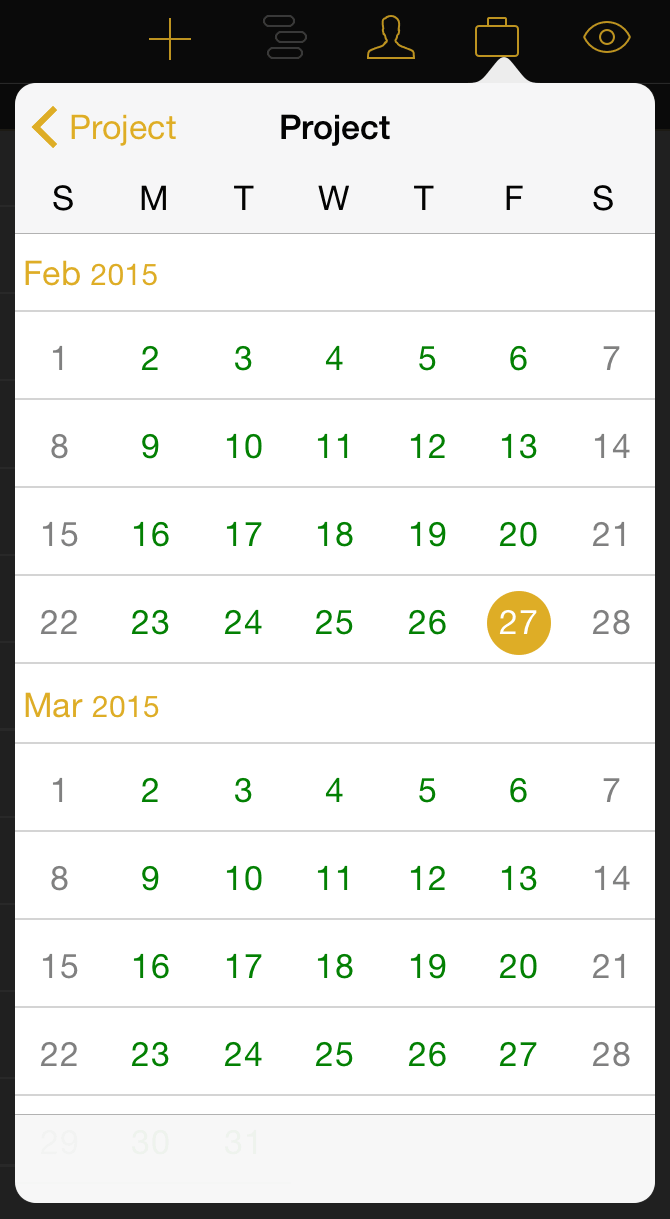
Green days on the exceptions calendar indicate regular work days. Swipe to scroll down to May, then tap on the week of Memorial Day (the 25th) to access the exceptions calendar for that week.
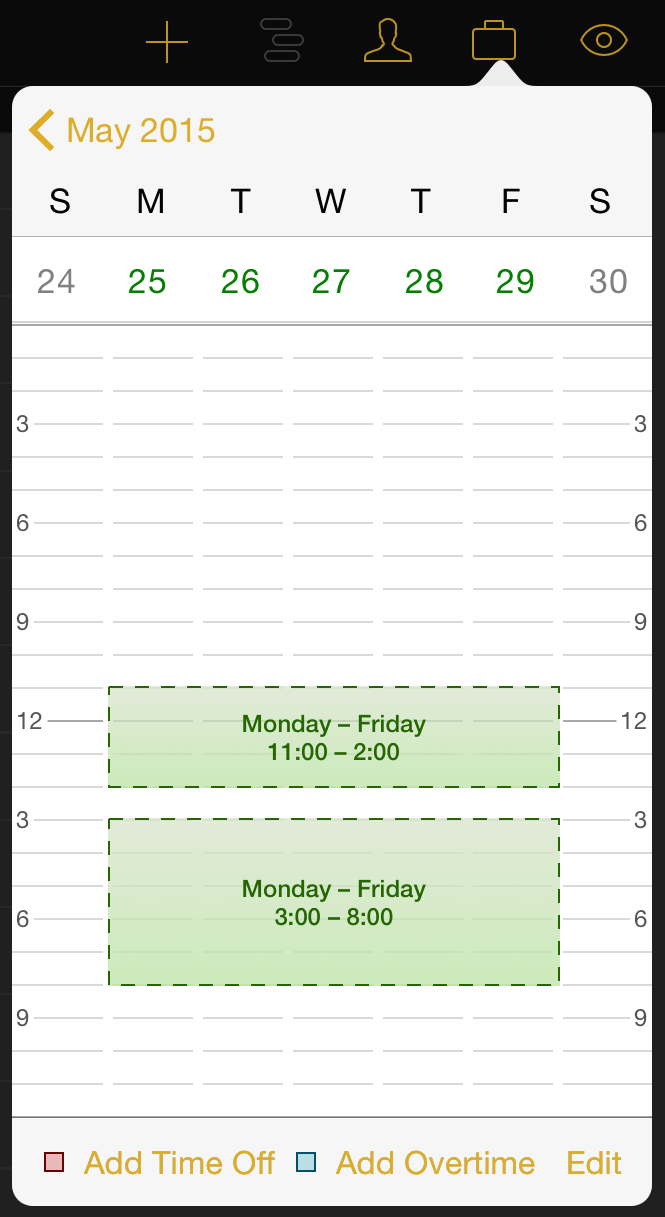
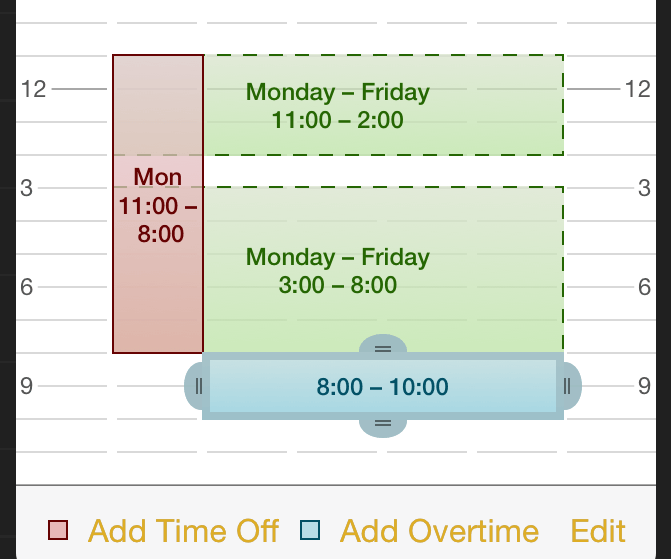
We know we want to take Memorial Day off, but we can also predict that this week will be crunch mode for the team. We use the Add Time Off button to create a block of time that covers the 25th, and then replace that lost time with evening overtime hours through the rest of the week.
Step 7: Set Task Durations
Returning to our tasks in the Gantt view we can begin to scope out how long each task will take. With estimated times for their completion in mind, tap a task and drag the right handle that appears to the appropriate length for the task's duration (in this case, two full workdays).

Task duration can also be set using the task inspector.
Step 8: Group Tasks
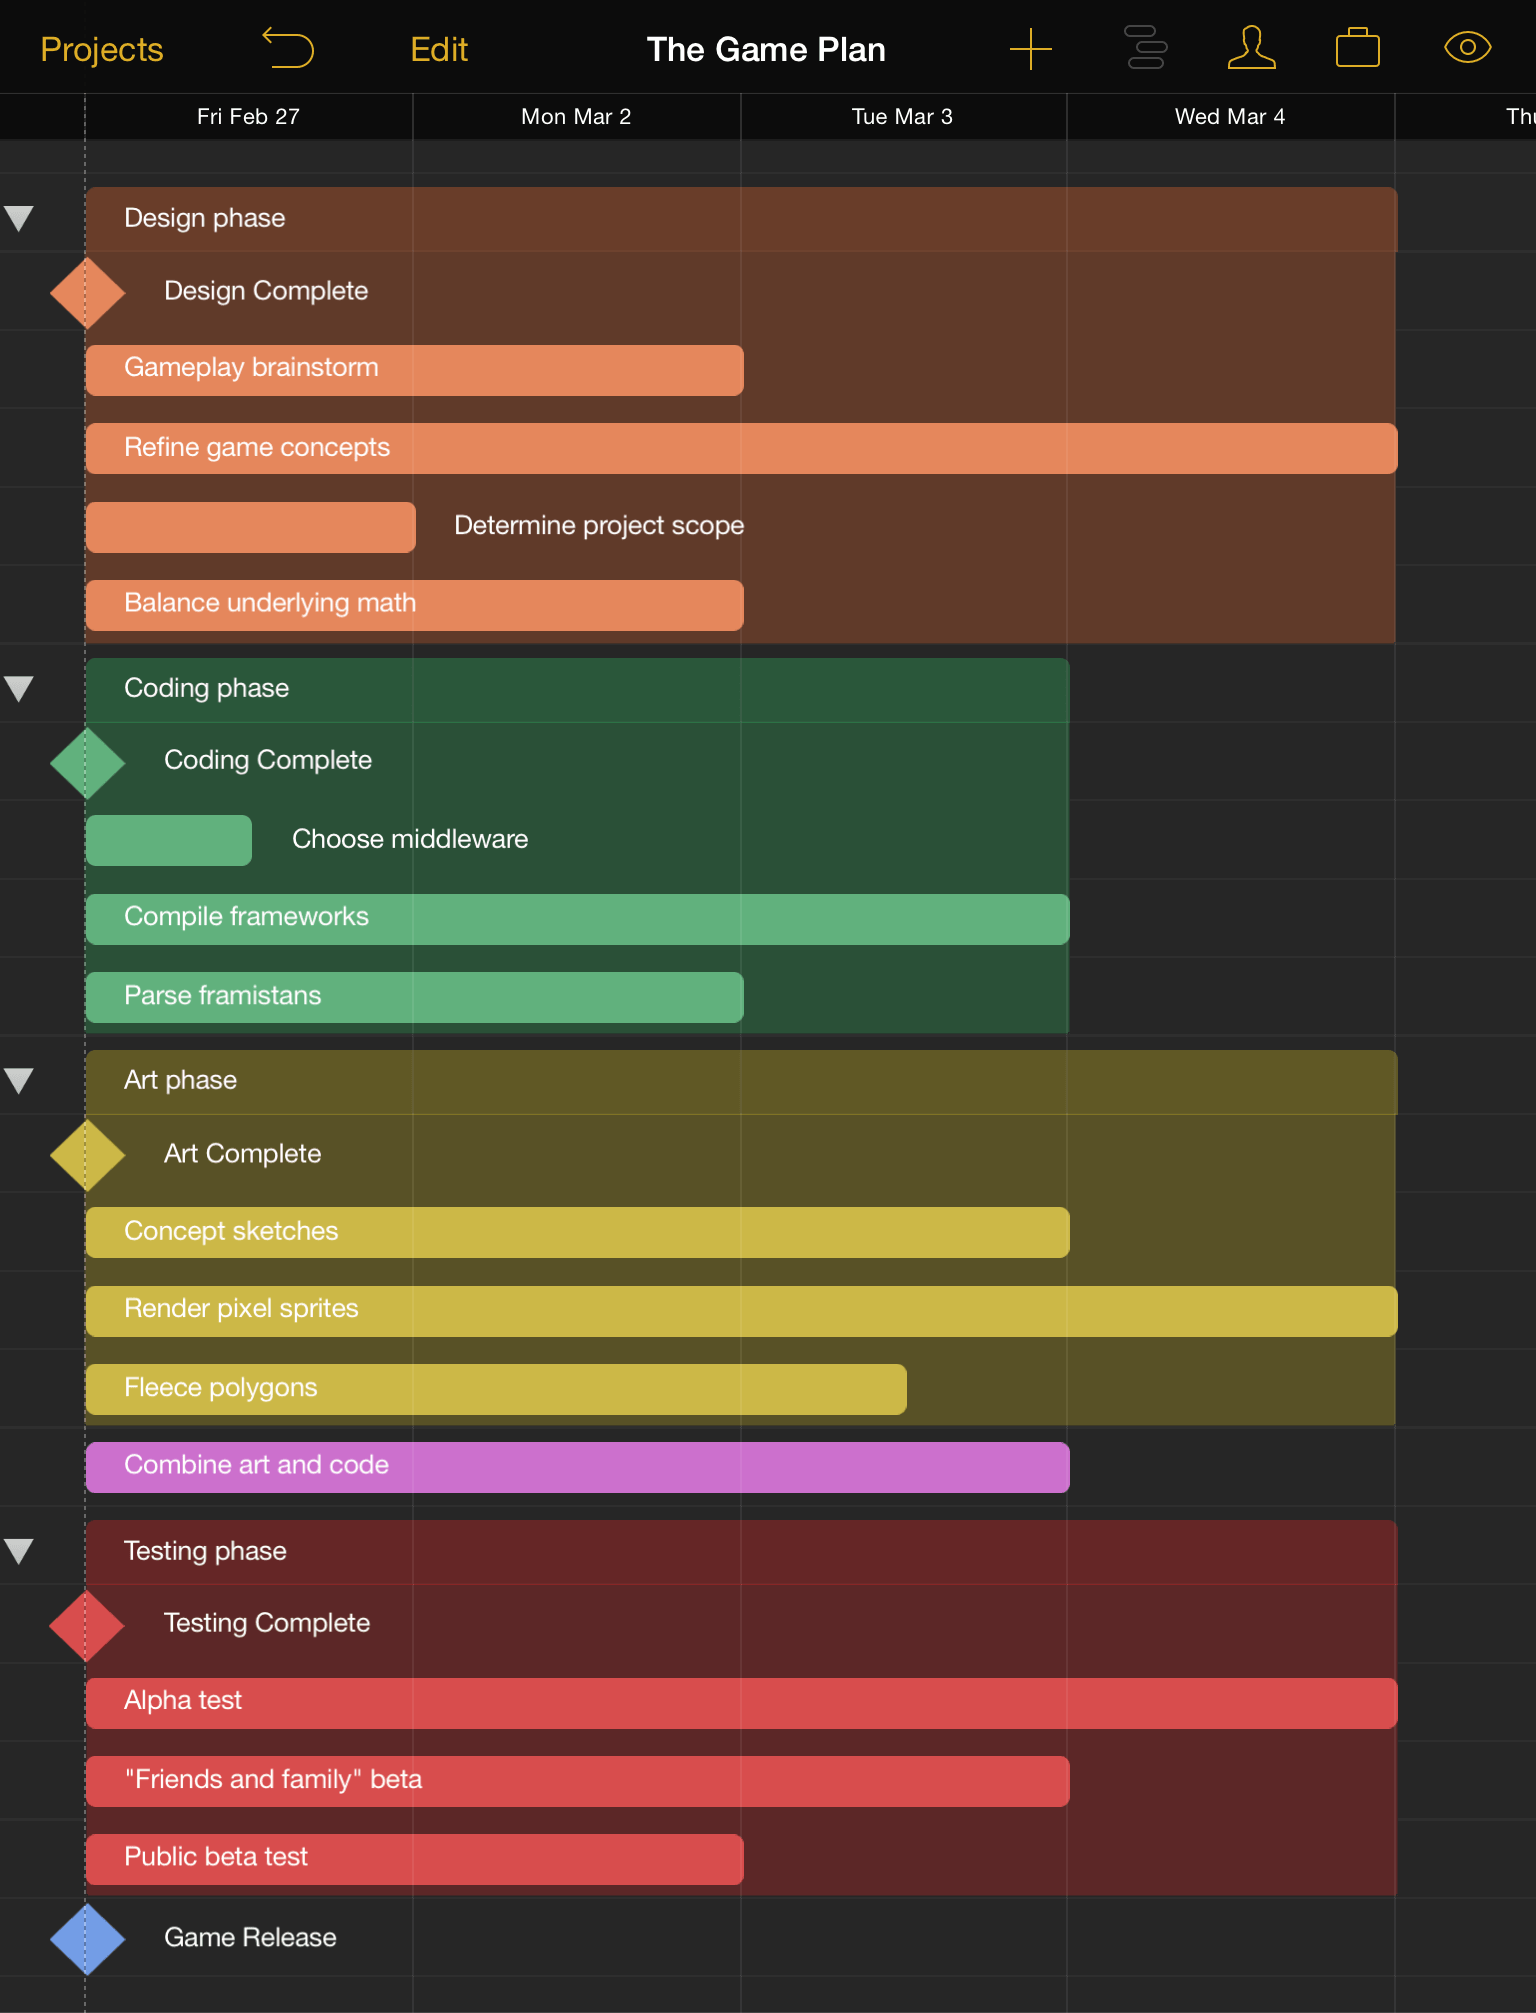
When tasks are closely related or interdependent it can be useful to put them in a group. Groups help organize a project conceptually, and also act as meta-tasks that can be linked via dependencies to other tasks or groups.
The easiest way to gather tasks into a group in edit mode. Tap Edit on the project screen, then tap to select all of the tasks and milestones to be grouped. Finally, tap Group in the bottom toolbar to complete the edit.
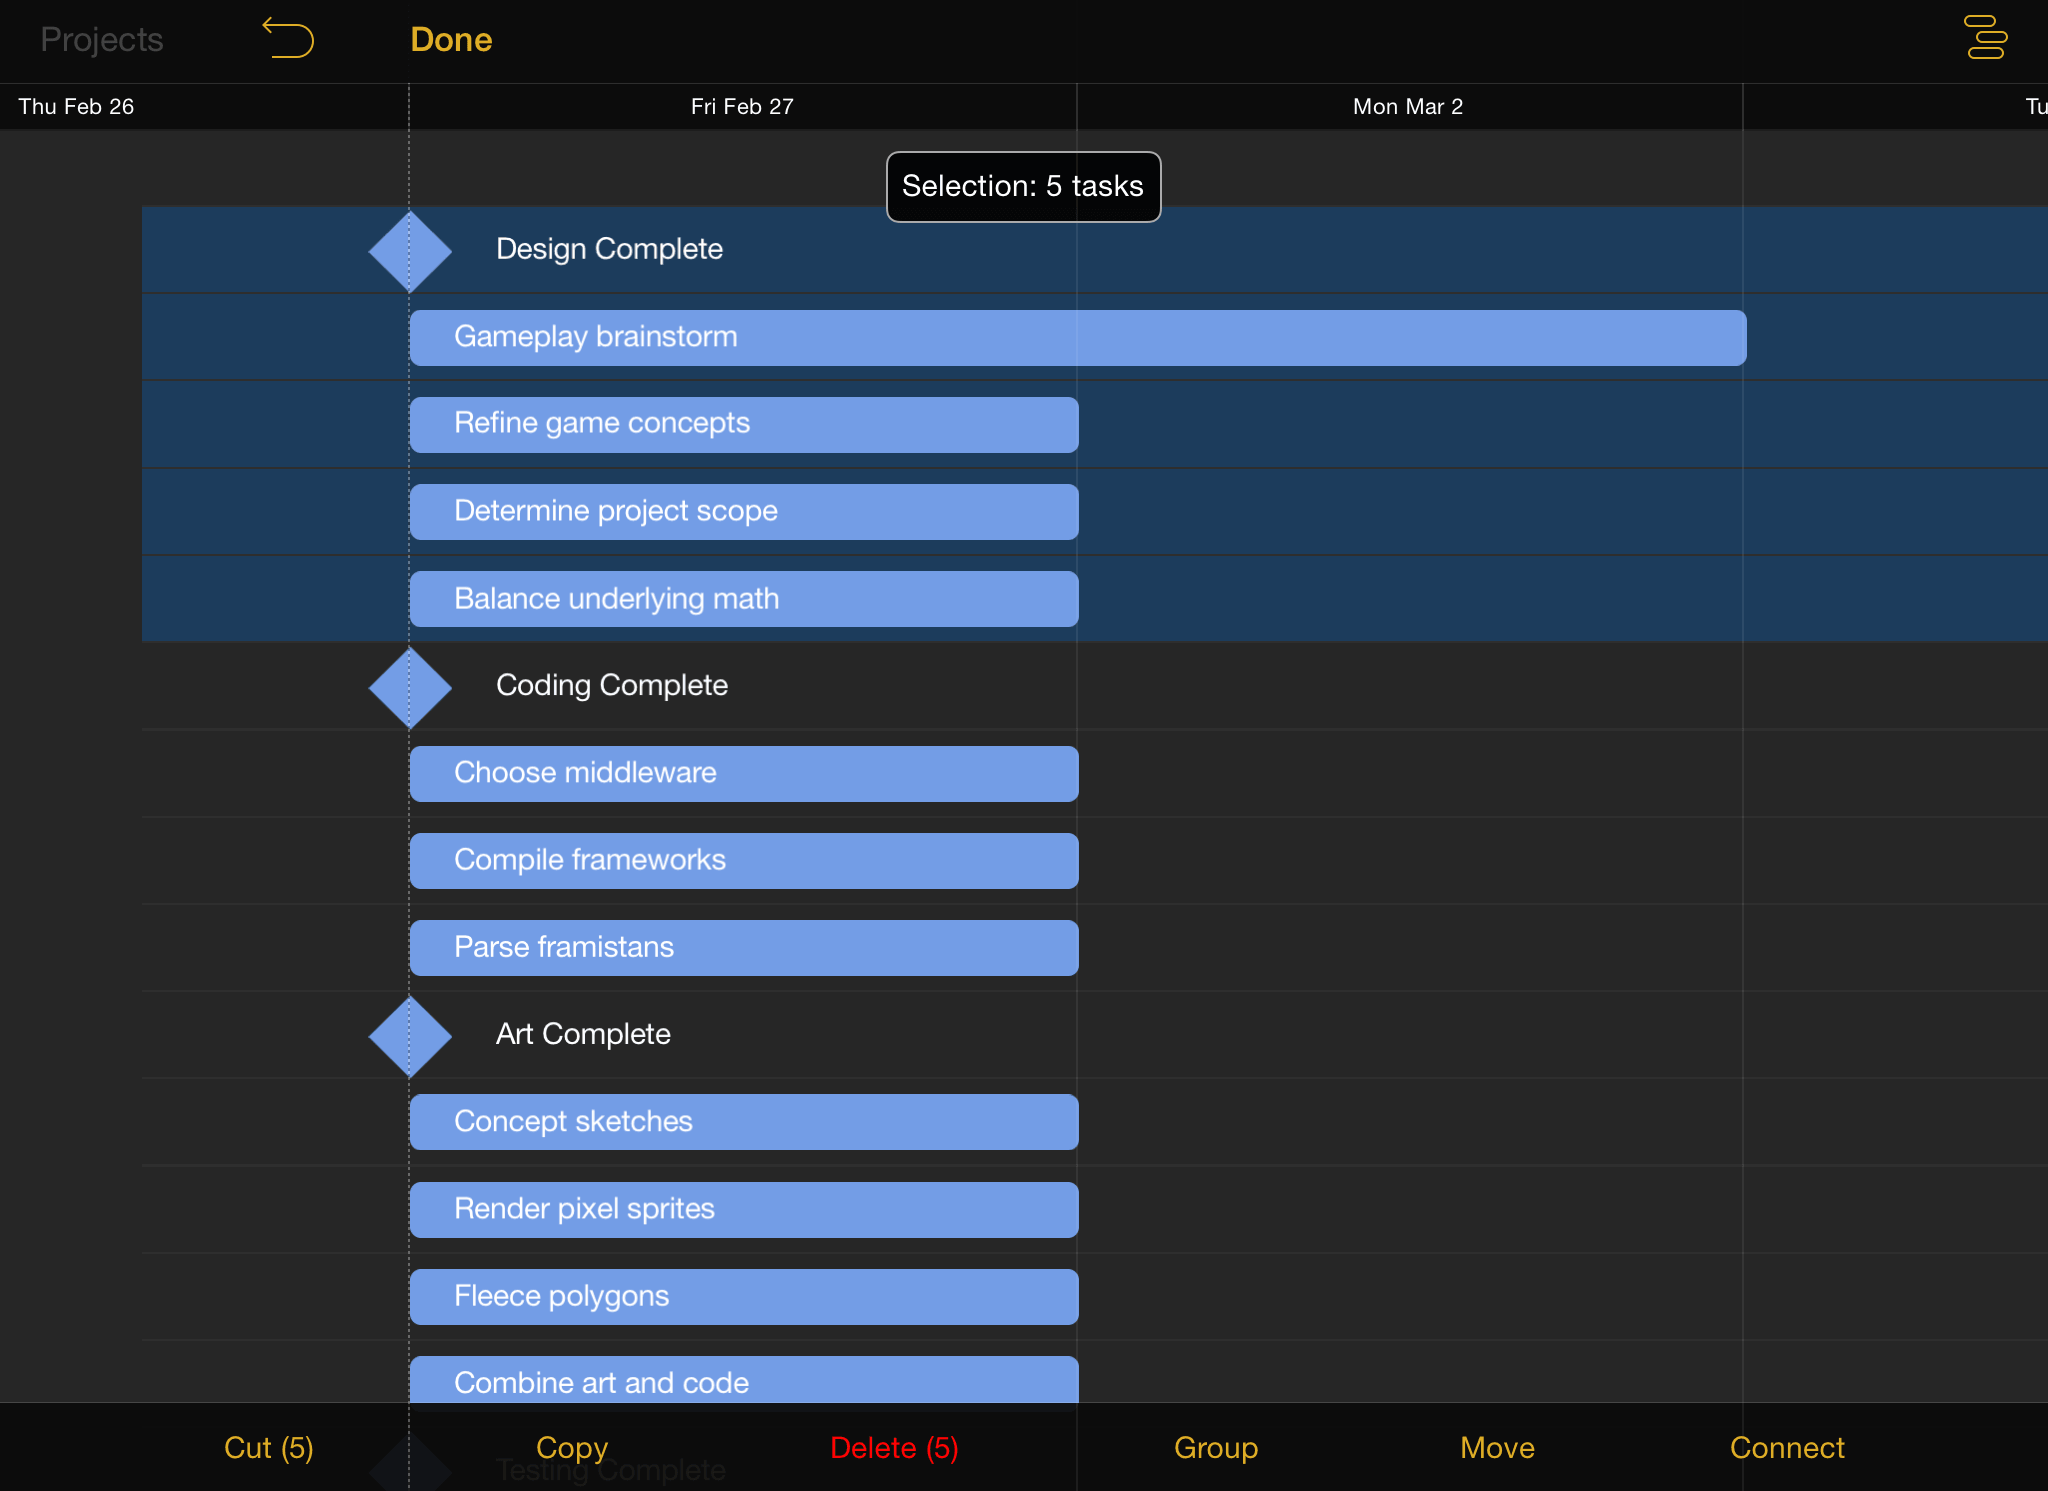
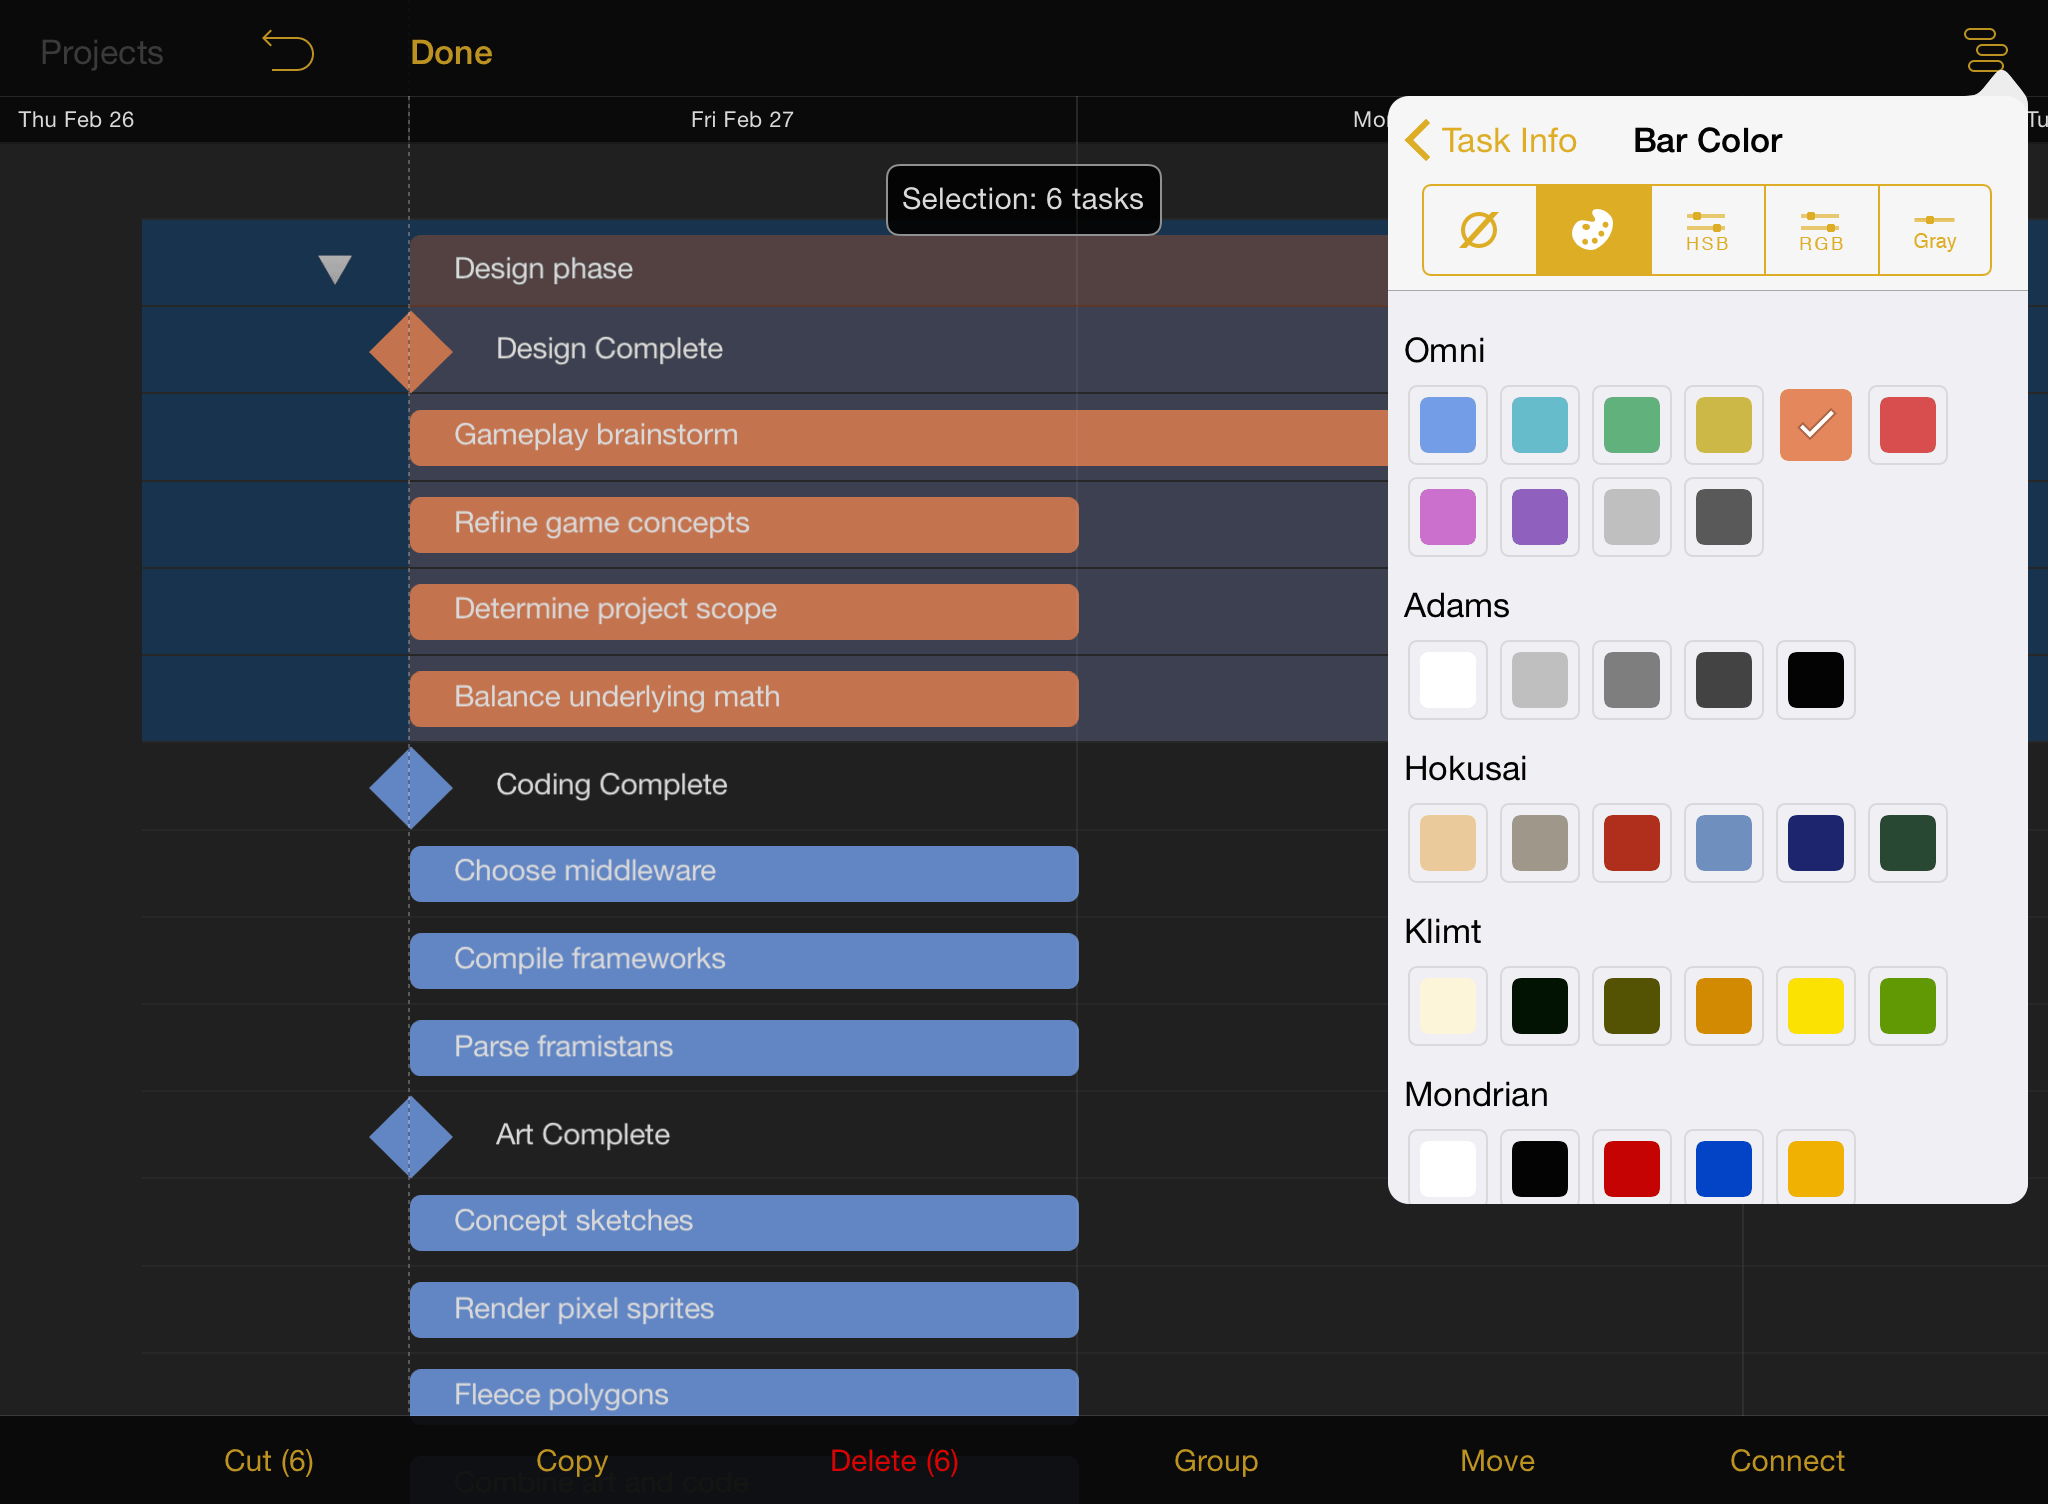
With all of the tasks in the group selected, this would be a good time to add a bit of visual distinction to the group as well. Open the task inspector and tap Bar Color to choose a color that will identify all of the tasks in the group.
After organizing tasks and milestones into groups and estimating the time required to complete them, we're starting to get a better picture of how our project will take shape. At this stage our Gantt chart looks something like this:
Step 9: Connect Tasks with Dependency Lines
We can't complete all of our tasks simultaneously! Even if we had the resources to do so, some parts of the project can't happen until others are finished. Thankfully, the pieces are now in place to establish the ways that those tasks are dependent on the status of others. There are four ways that dependencies can exist:
Finish → Start dependencies are the most common type, indicating that when task A finishes, task B can start.
Start → Finish dependencies indicate that when task A starts, task B can finish.
Start → Start dependencies indicate that when task A starts, task B can also start.
Finish → Finish dependencies indicate that when task A finishes, task B can also finish.
Connecting tasks in the Gantt view is as easy as tapping a selected task again, which puts dependency arrow handles on either side of the task bar.

Drag an arrow from the selected task to another task to create a dependency. The type of dependency is based on the start- and end- points of the arrow: dragging an arrow from the completion of one task to the beginning of another will create a finish → start dependency, and so on.

While in edit mode, you can use the Connect/Disconnect button to add finish → start dependencies or remove dependencies between any number of selected tasks simultaneously.
Step 10: Create Hammock Tasks
A hammock task is one in which the duration is dependent on both when the previous task ends, and the next task starts. This type of task is useful when facing a hard deadline and deciding what can be compressed if the project is running behind schedule, or if external factors influence when parts of the project must happen.
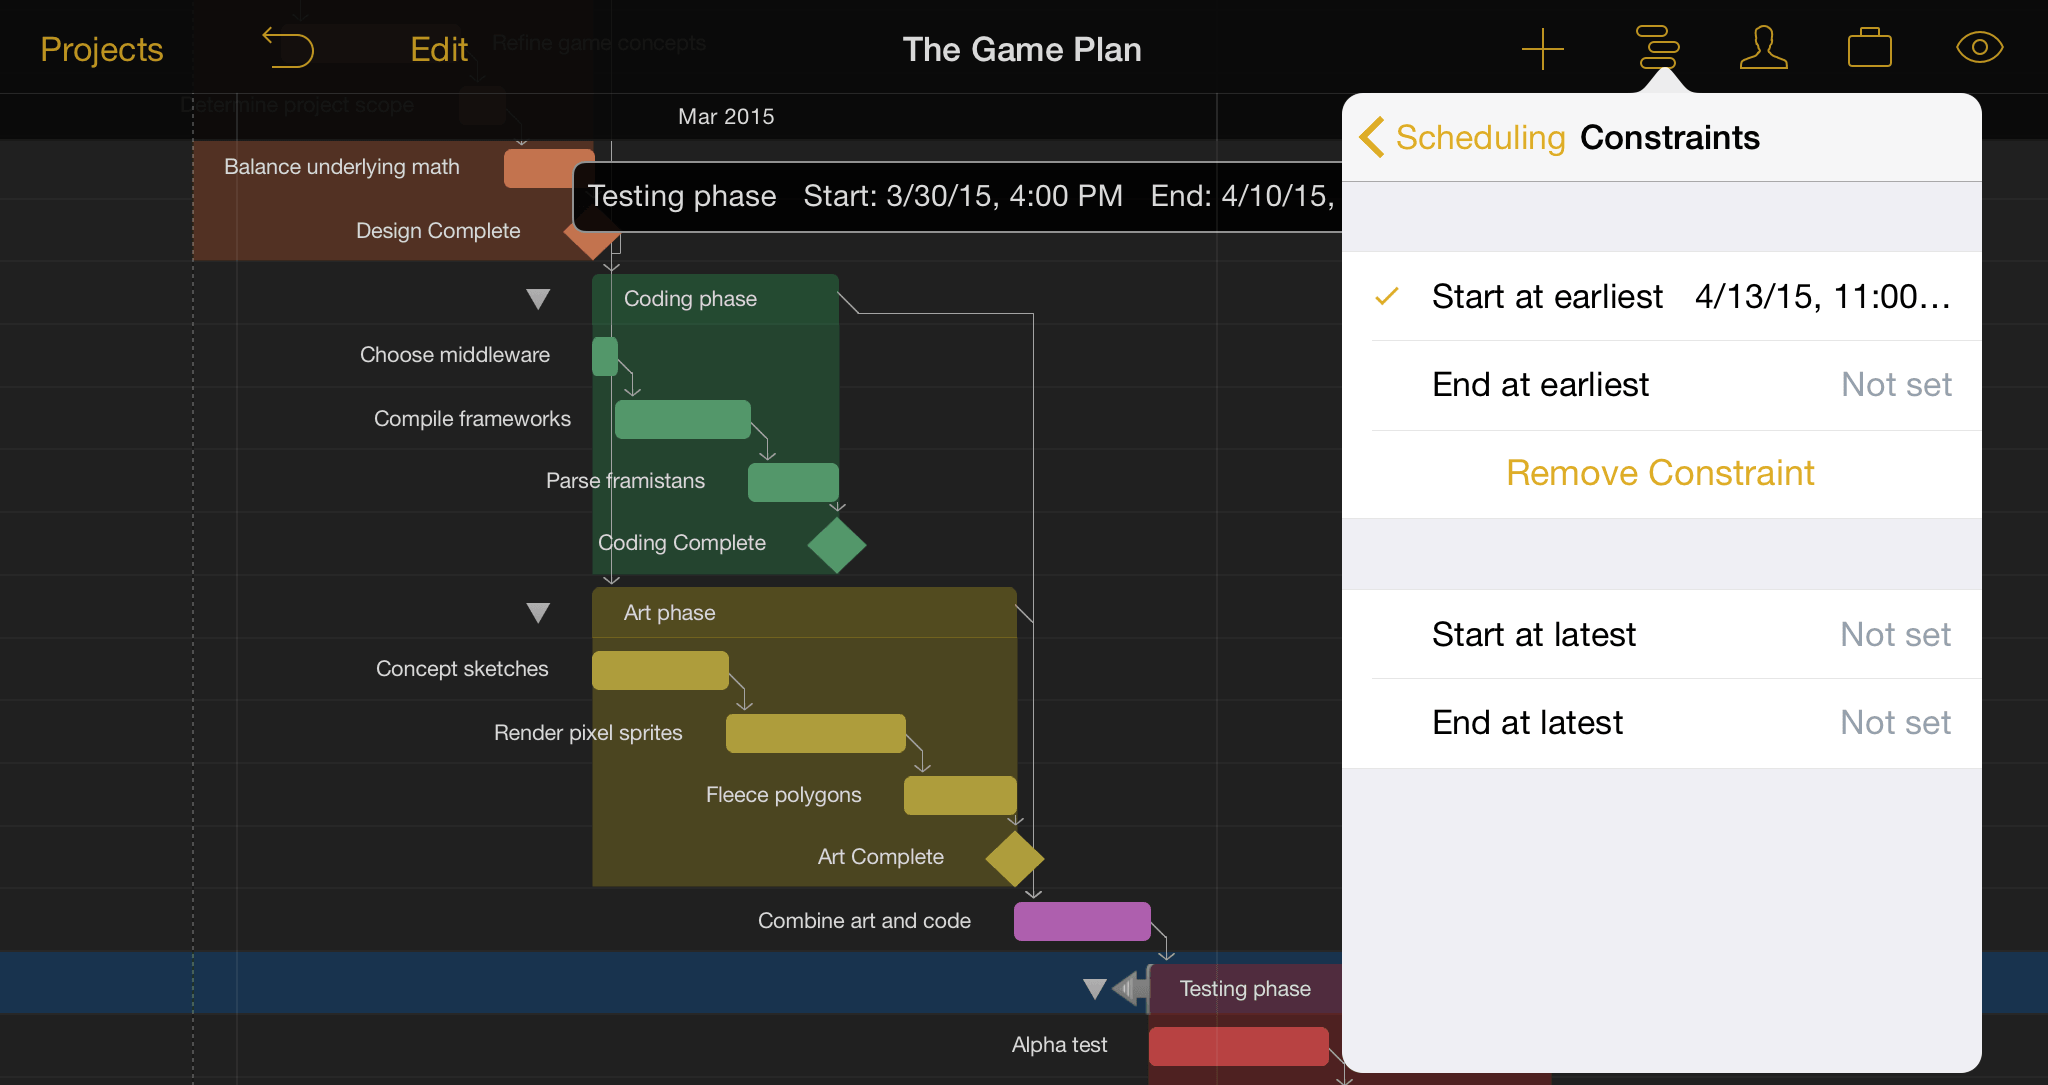
In our example we decide that alpha testing for the game should begin as soon as possible after April 13th, since that's when we receive our prototype testing hardware. We give the "Testing phase" group a start constraint of April 13th by choosing Constraints in the Scheduling pane of the task inspector, and setting Start at earliest to April 13th 11:00 AM.
Note
A Start at earliest constraint can also be set by selecting a task and dragging it along the timeline by the left handle that appears at its edge.
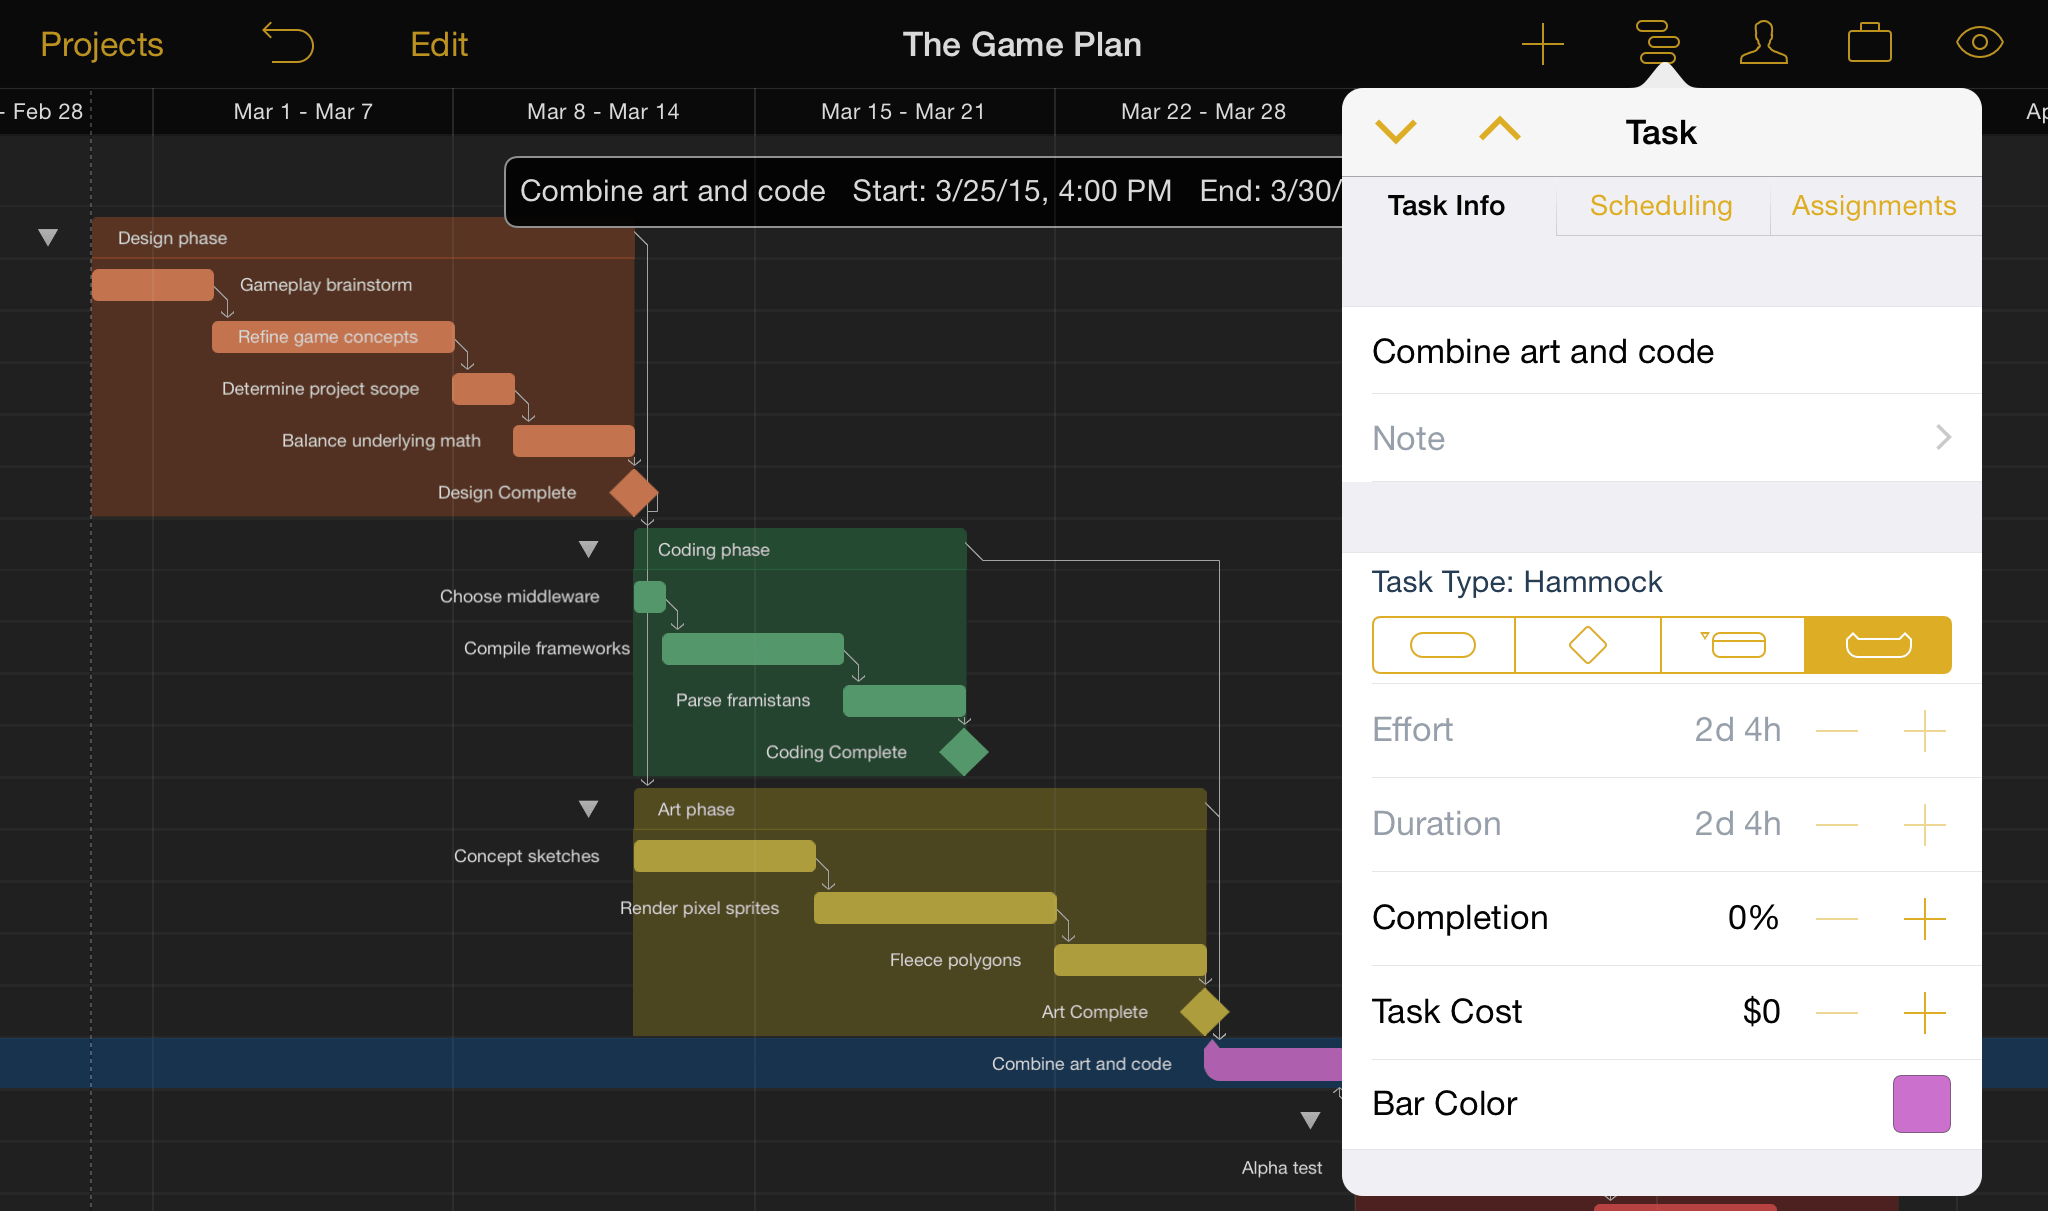
We decide that the "combine art and code" task is the one that's going to give if the going gets rough. To convert it from a task of fixed duration to a hammock task:
- First, make sure both the "coding" group and the "art" group are linked to "combine art and code" with finish → start dependencies.
- Then, create a start → finish dependency originating from the testing phase and linking to "combine art and code."
- Finally, select the "combine art and code" task and open the task inspector. The fourth task type, Hammock, is available for selection.
Step 11: Create Resources
Now it's time to start adding the team members, equipment and materials we'll be using to bring the project to fruition. Every person, piece of infrastructure, and raw ingredient that contributes to reaching the project's goal is counted as a resource, so let's open the resource inspector and get started.
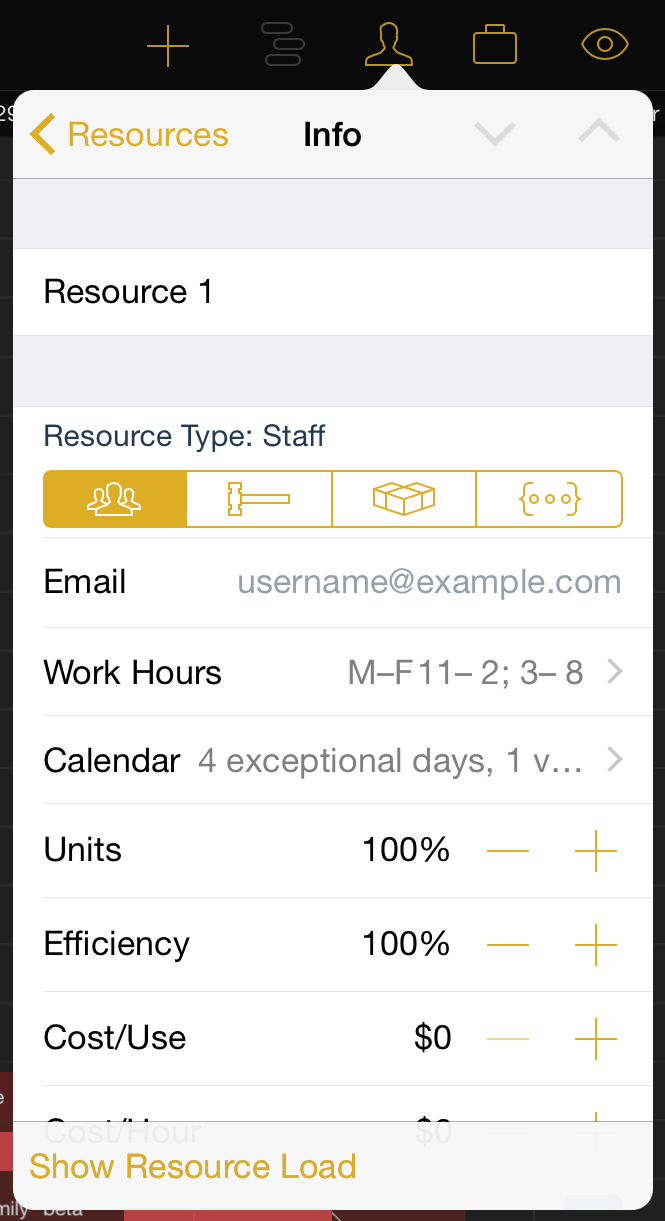
One resource has been created by default for our project – a staff member. Tap it to access and edit their details, including name, resource type, and personal calendar.
When balancing workloads across multiple projects a staff member's email address is used as their unique identifier, so make sure their address is consistent across all the projects they're participating in.
After editing the default resource we'll create a few more to fill out the list of our team members and the technology they're using to bring the game to life. Remove or rearrange resources at any time using the Edit button.
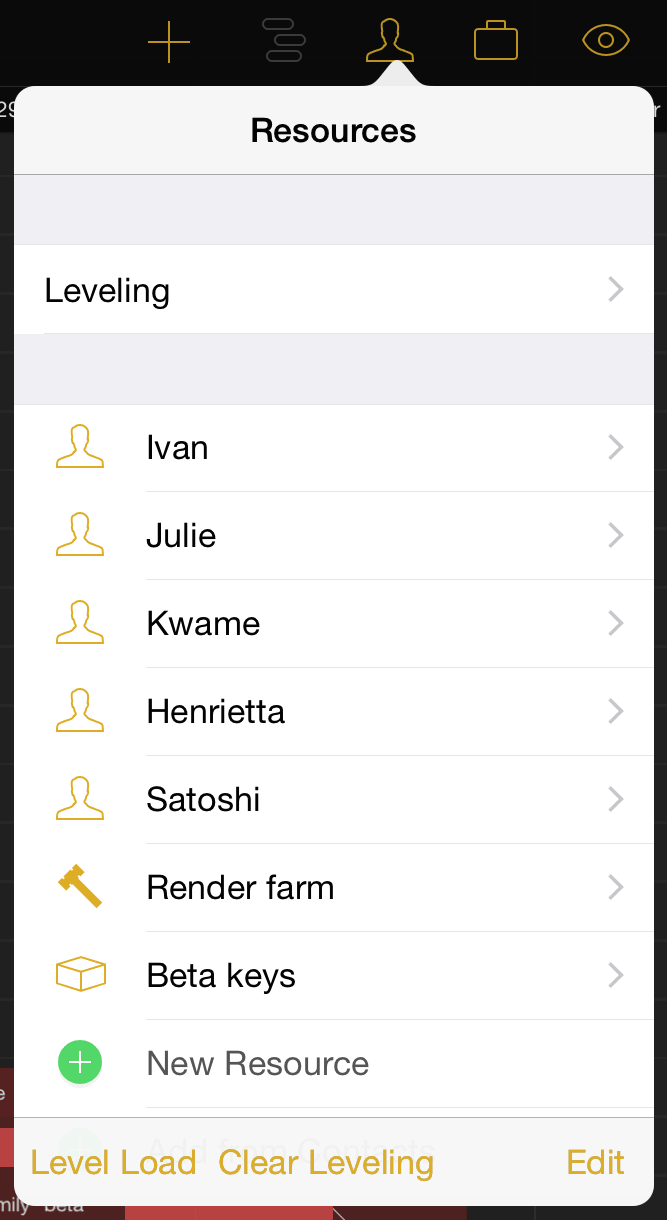
Step 12: Assign Resources
Assign resources to tasks by selecting the desired tasks in the Gantt view (multiple tasks can be selected simultaneously using edit mode), then opening the task inspector and switching to the Assignments tab.
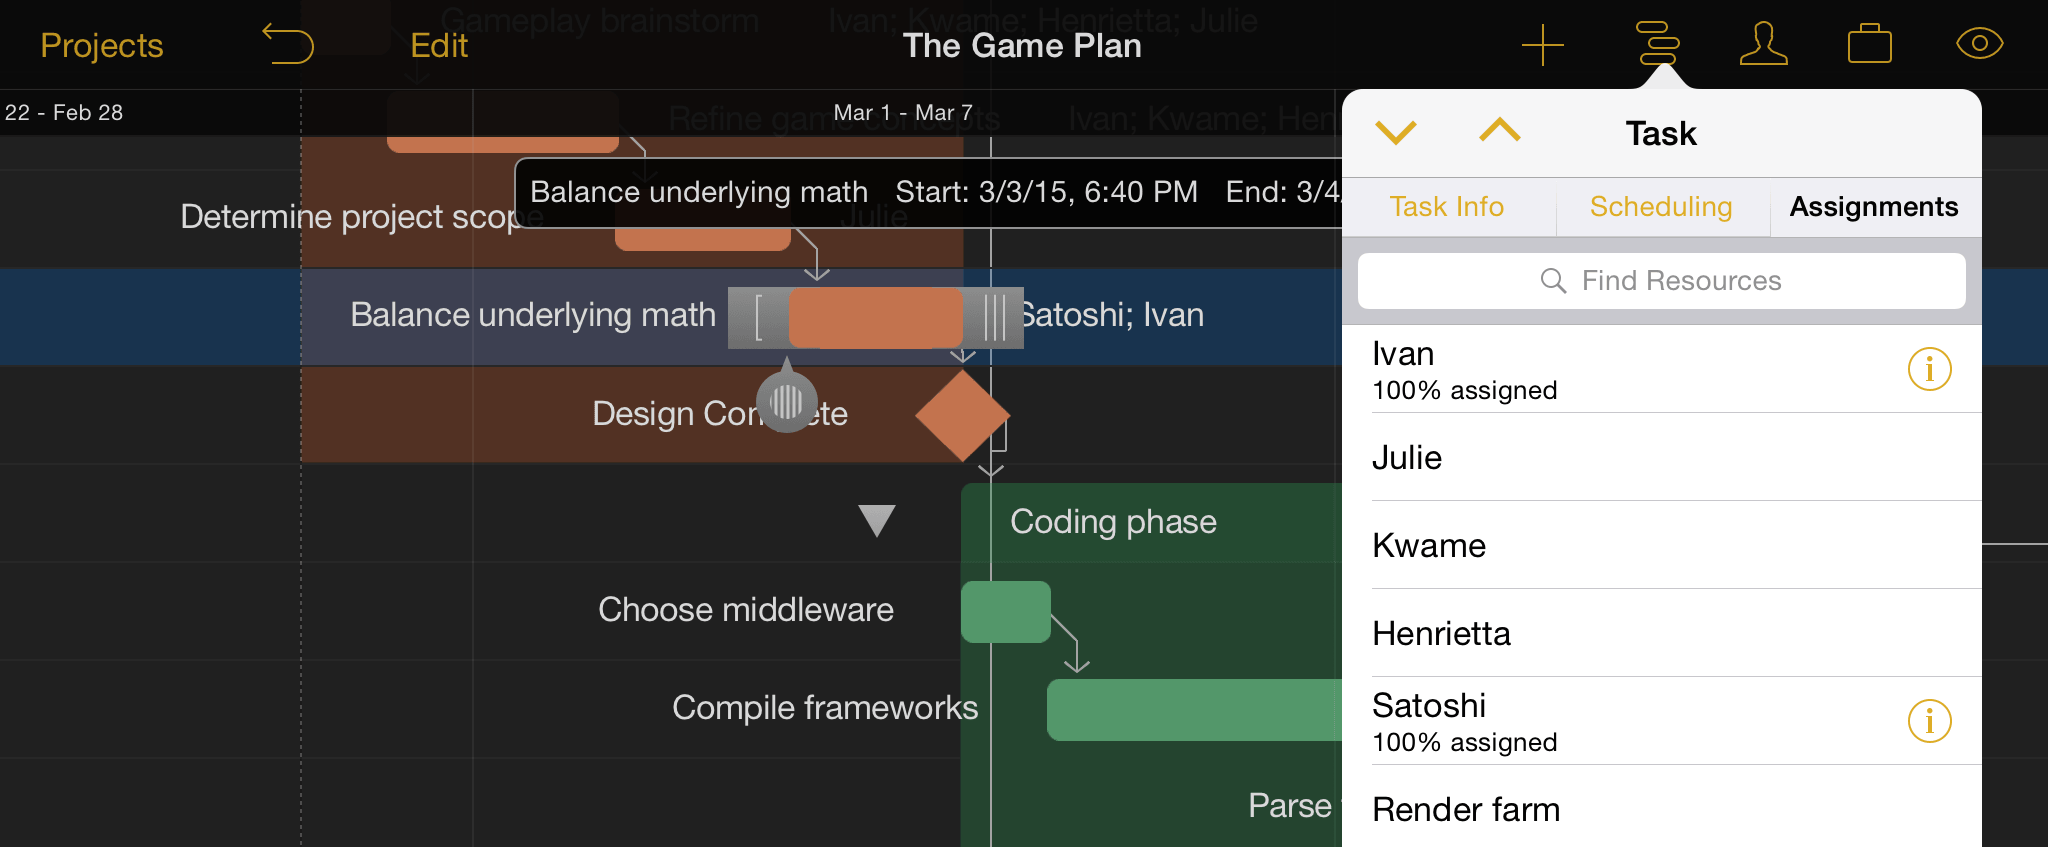
Tap each resource you'd like to assign to the selected task(s) and their names will appear next to each task that they're assigned to.
Step 13: Level Resources
After assigning team members and equipment to the tasks that make up your project, you can ensure the team is at its most productive by leveling the workload across your resources and tasks.
To level the resource workload for your project, open the resource inspector and tap Level Load. Unless your staff is already in the optimal configuration you'll see the tasks in the Gantt view shift to accommodate the most efficient use of your resources' time.

Optionally, choose Leveling from the resource inspector and turn on Automatically Level to have OmniPlan optimize your resource use every time a change is made to your project.

Step 14: Set the Baseline
With tasks set and resources assigned and leveled, the state the project is in now may be a glimpse at its fate in the best of all possible worlds – one where unforeseen hindrances don't bog down progress, and where optimistic estimations rule the day.
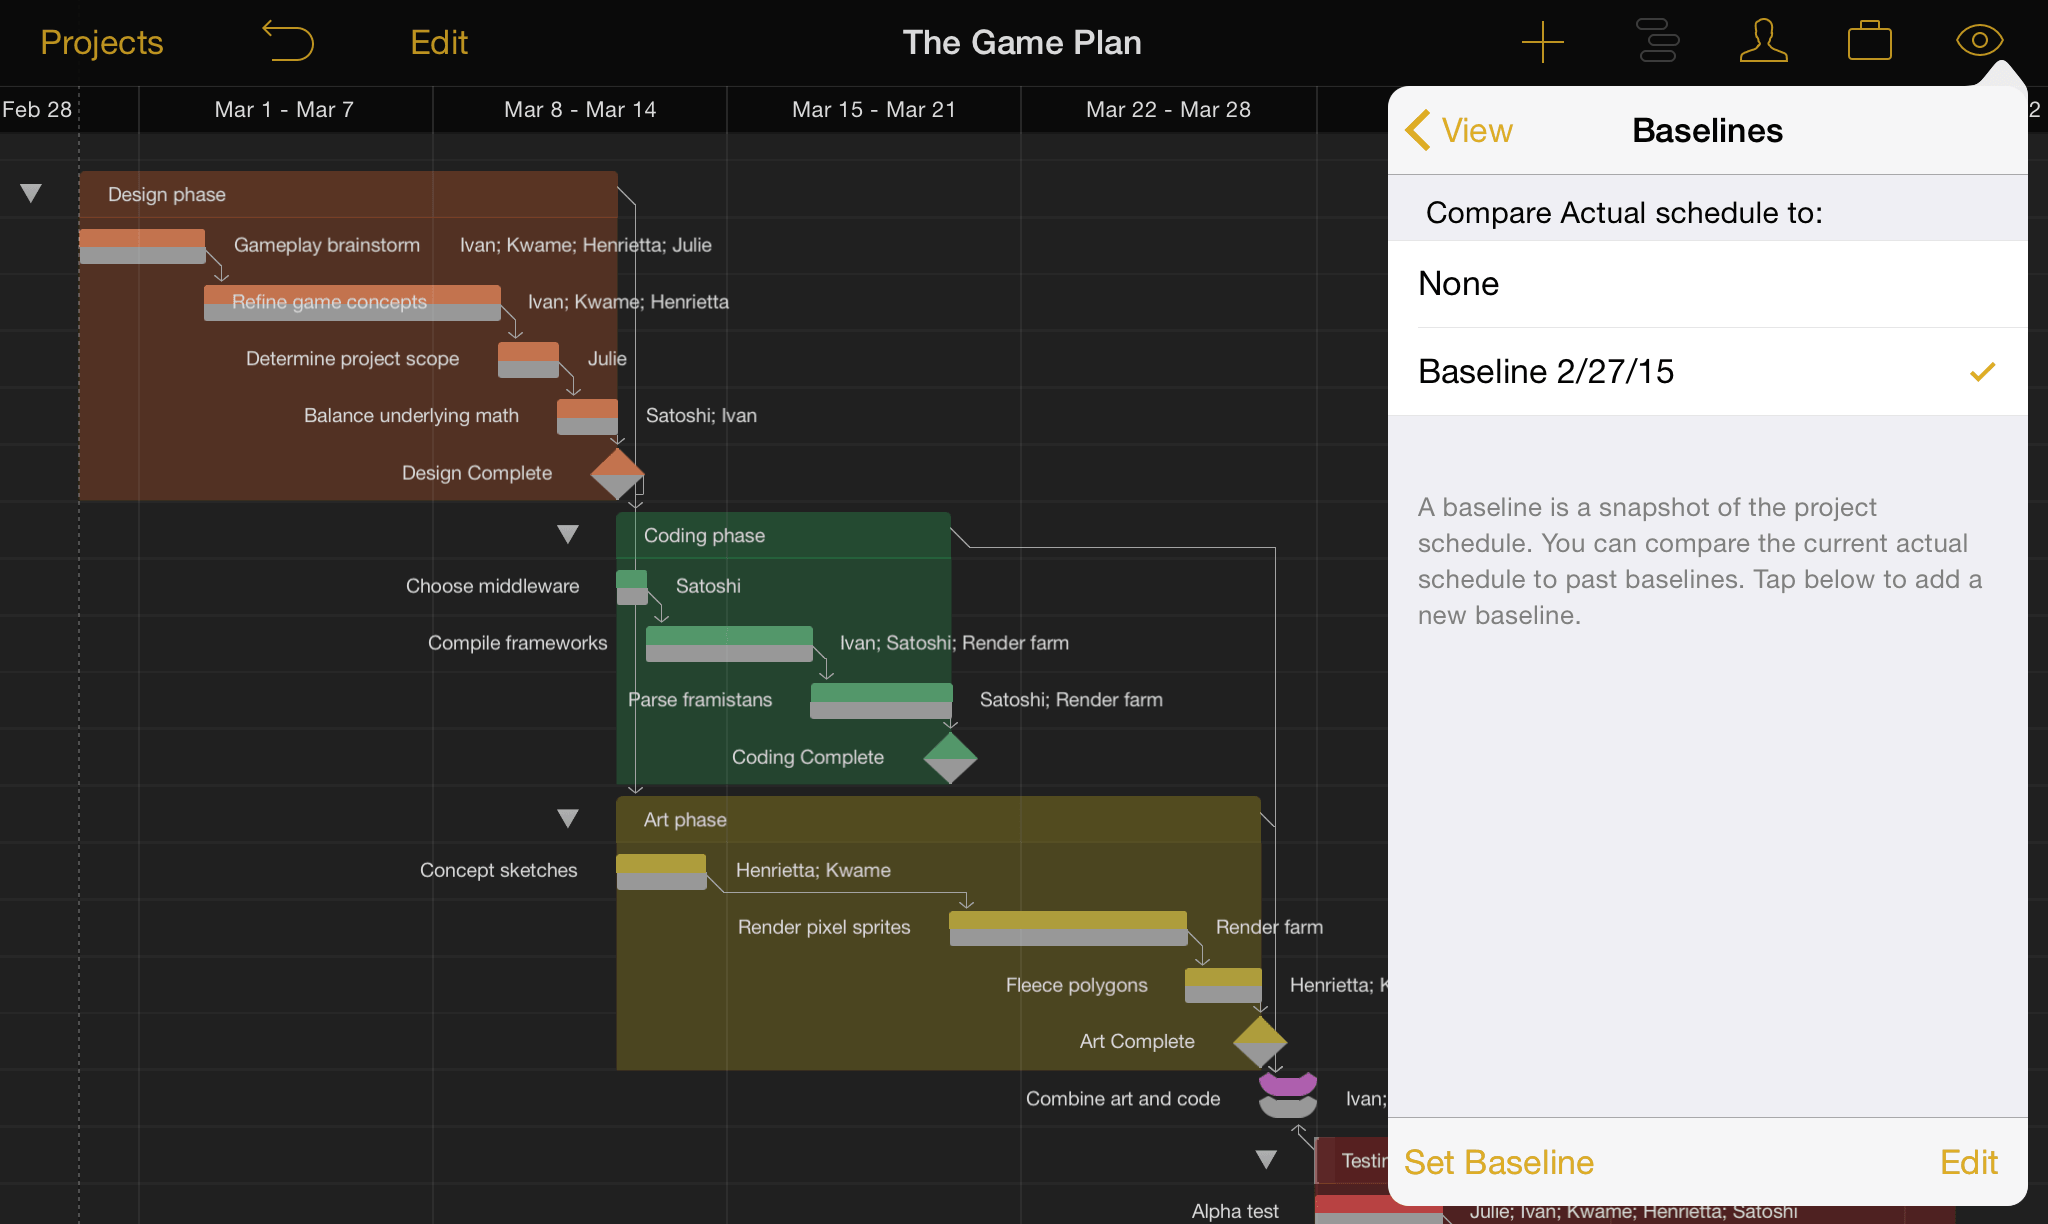
This is the world that is captured when we set a baseline for progress, a feature used to compare how the project is actually doing against initial expectations, so milestones and resource allocation can be adjusted accordingly.
To set a baseline, open the view inspector and tap Baselines. Tap Set Baseline and enter a name (the current date is the default); it's now selected for comparison, and can be compared against subsequently set baselines as the project progresses.
Step 15: Update Task Completion
As work on the project begins, you can track progress against the baseline you've set by tapping a task currently in progress and moving the slider along to the task's completion percentage (this can be edited in the task inspector as well).

If a task is behind schedule, update the expected duration and level resources again to compensate for the additional time needed.
Step 16: Resolve Violations
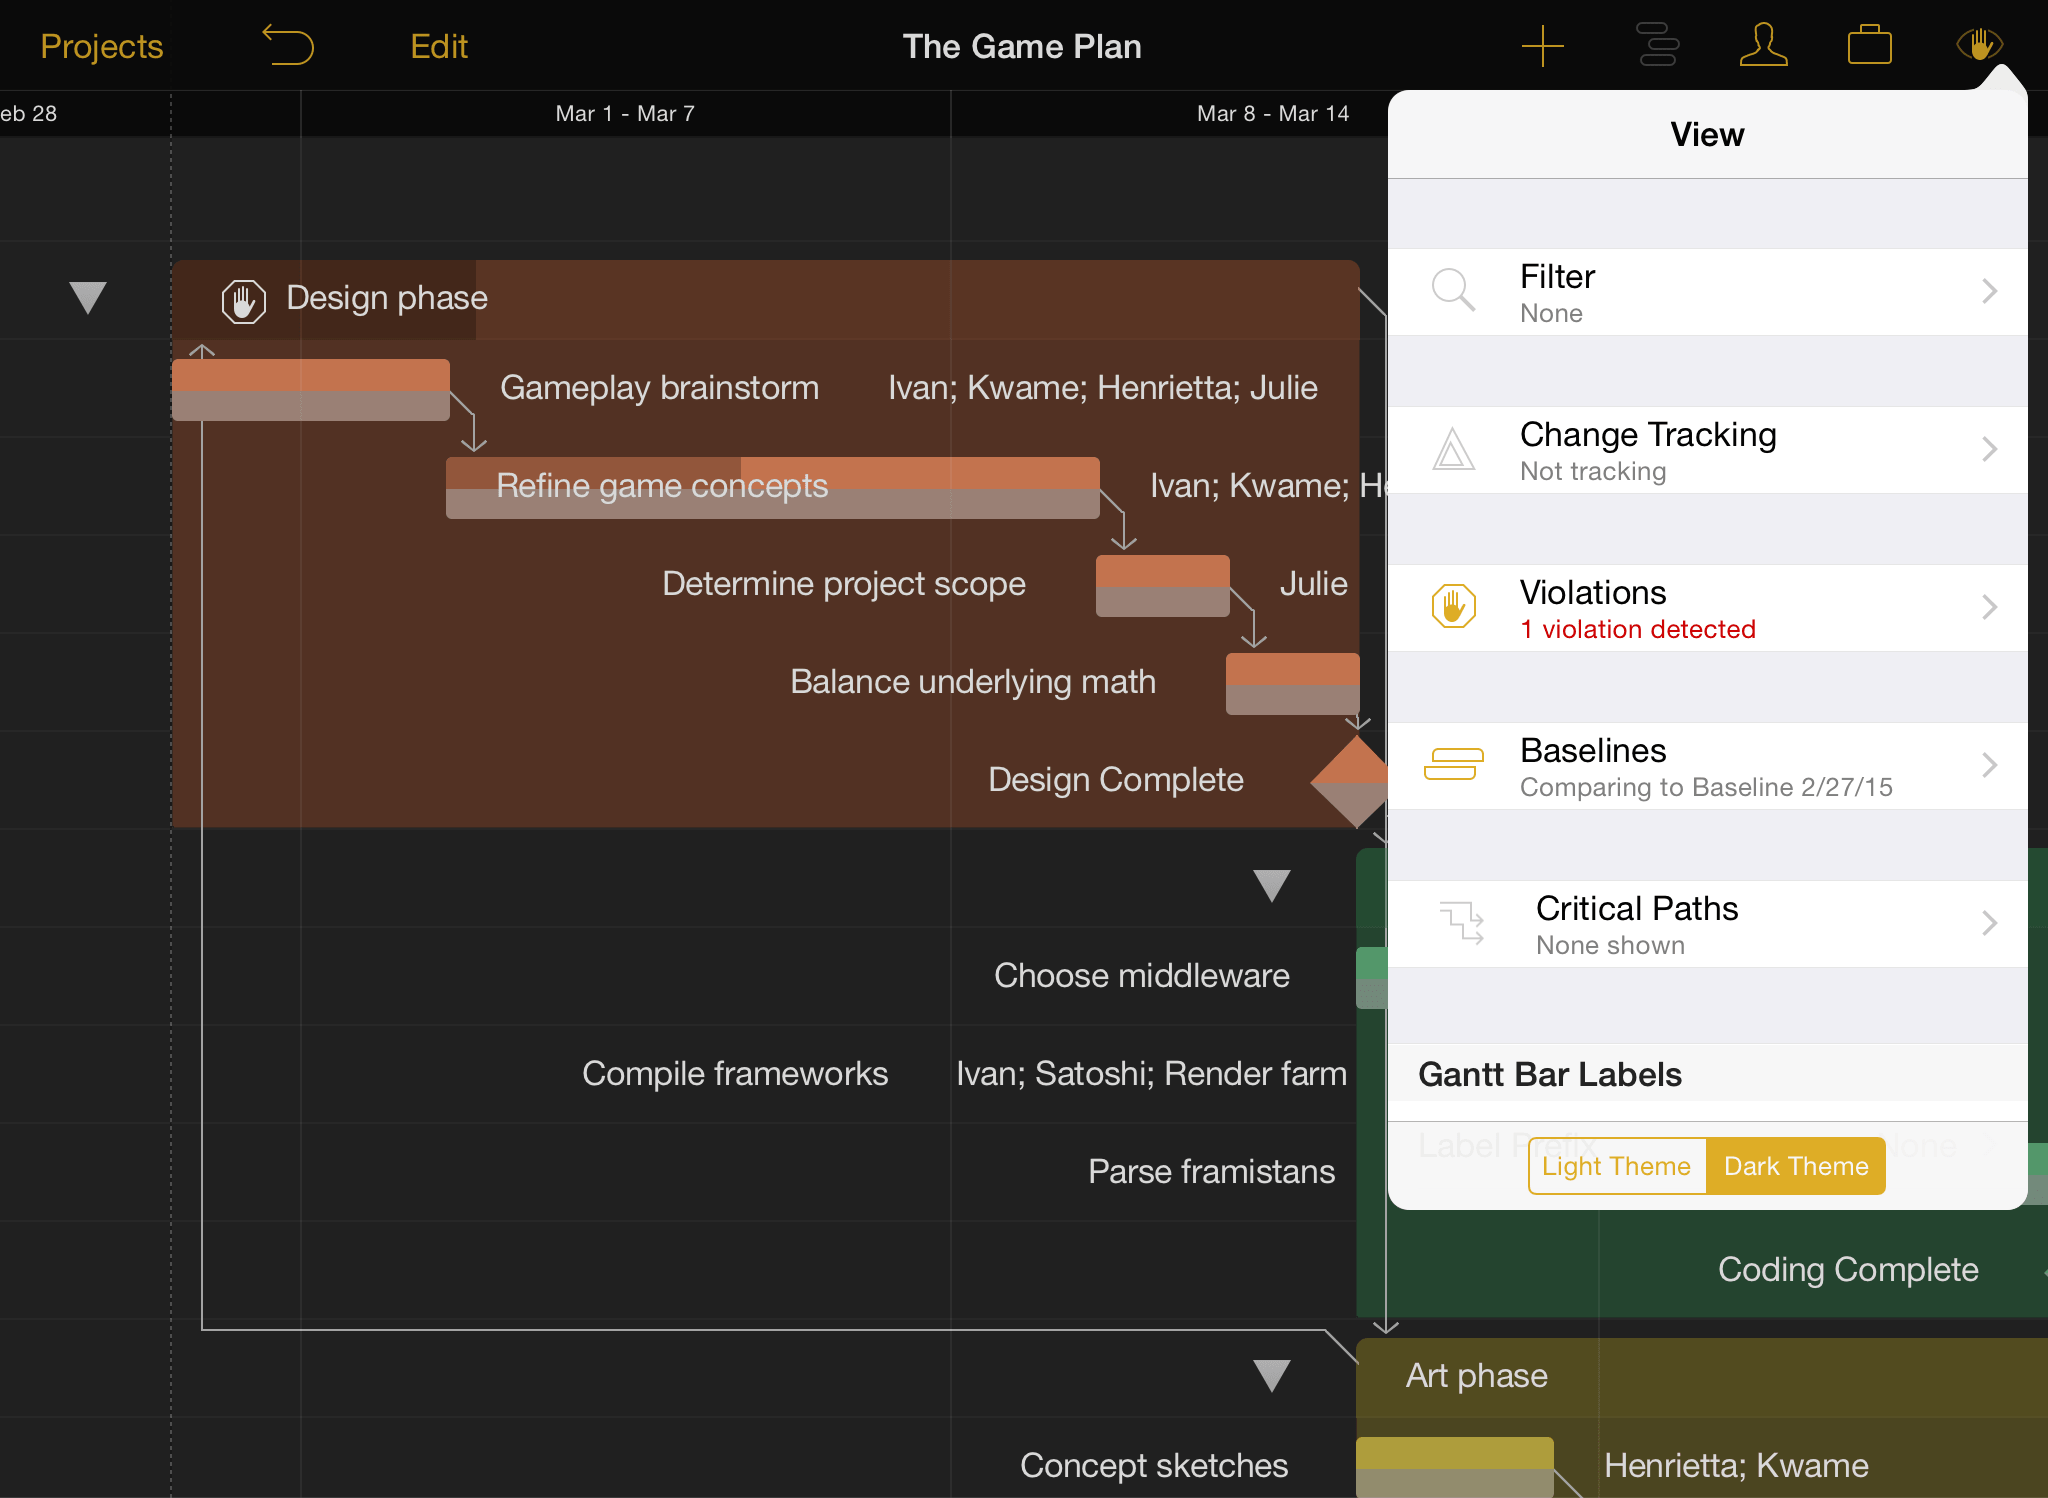
Occasionally situations will emerge that break the rules of logic you've set up for your project. When one of these occurs, OmniPlan will let you know with an indicating a violation related to the adjacent task.
Violations can be fixed by opening the view inspector and tapping Violations. You'll find a description of the problem and a command to tap that should resolve it.
Step 17: Split Tasks
Whether because a key collaborator is on vacation or another part of the project has taken priority, suspending work on a particular task can be very helpful. When you want a resource or team member to devote time to something other than the task they're currently assigned to, splitting the task into parts around the "time out" period is an ideal solution.
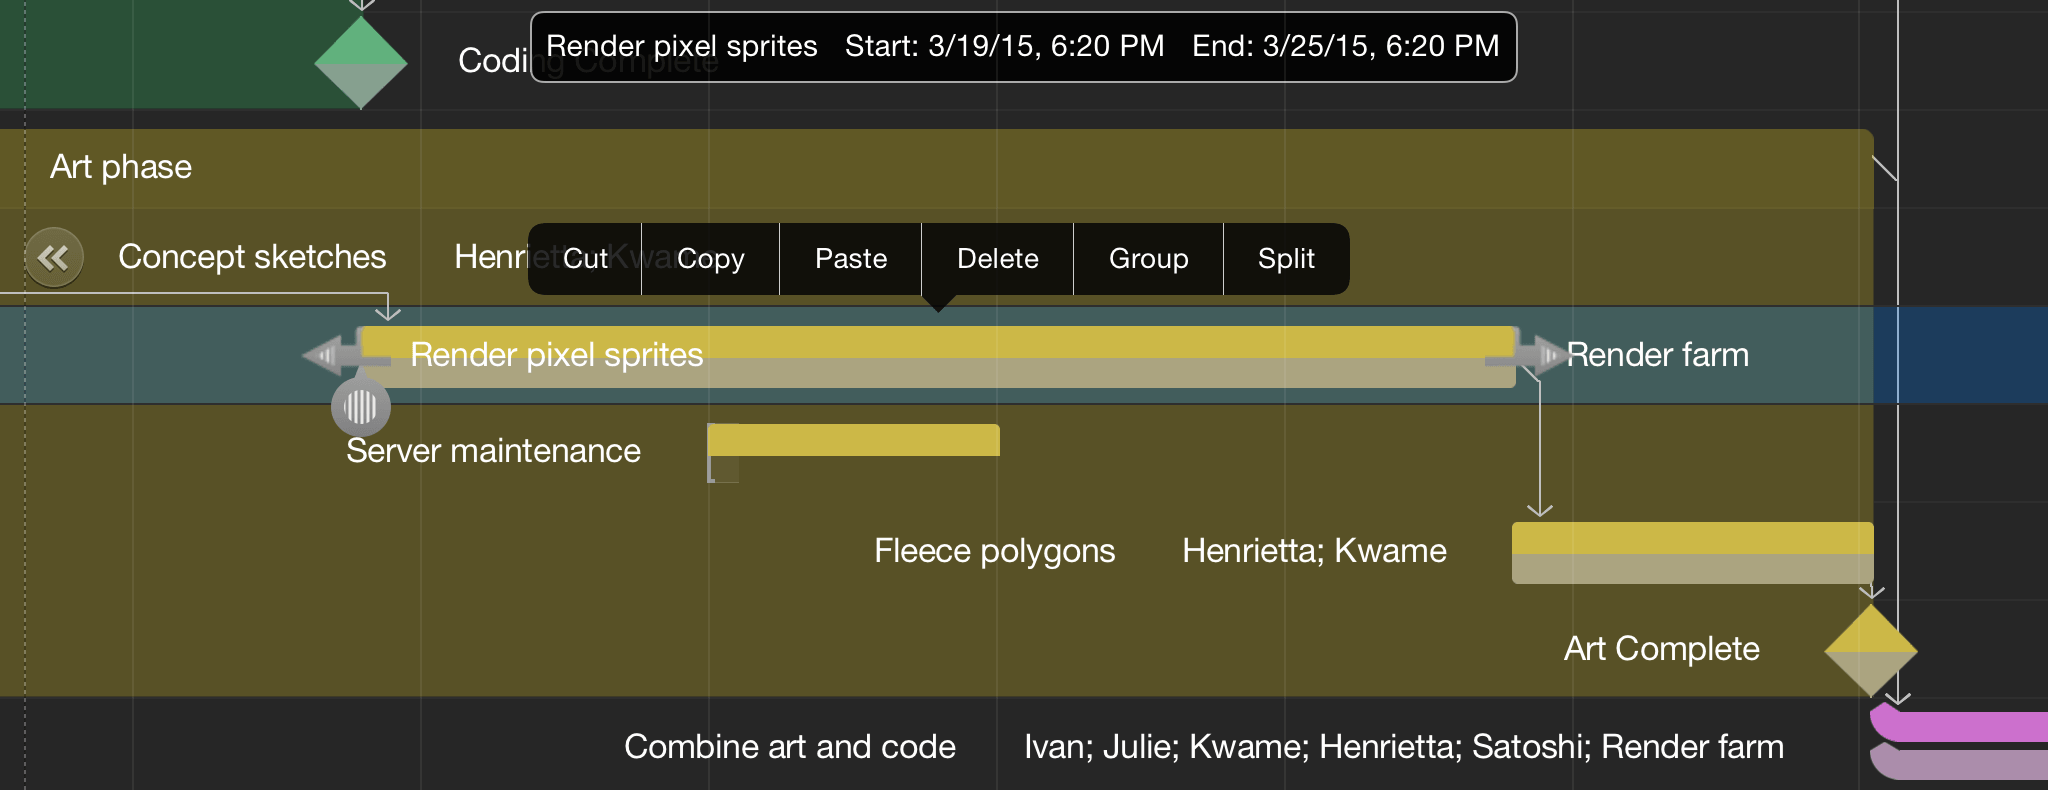
To split a task, press and hold it in the Gantt view until the contextual menu appears, then tap the right arrow and choose Split. You'll be asked to choose the duration of each segment of the task, and the date and time you want the task to resume after the break. If the resource will be absent during the split, remember to indicate this on its schedule in the resource inspector.
Note
The schedules of individual resources (usually workers) can be customized to account for personal vacation or sick days by selecting the resource in the resource inspector and choosing Calendar.

After splitting a task it's always a good idea to level to be sure the split is the most efficient way to manage the task at hand given the project's available resources and time constraints.
Warning
A split task may mysteriously re-merge after leveling. If this isn't what you want, make sure that Allow Splitting is turned on in the resource inspector's Leveling submenu.
Step 18: Collaborate via Server Repository
On a large project, or one where the collaborators are spread across diverse geographic locations, you may want to have multiple teammembers able to update the project status remotely. OmniPlan makes this easy!
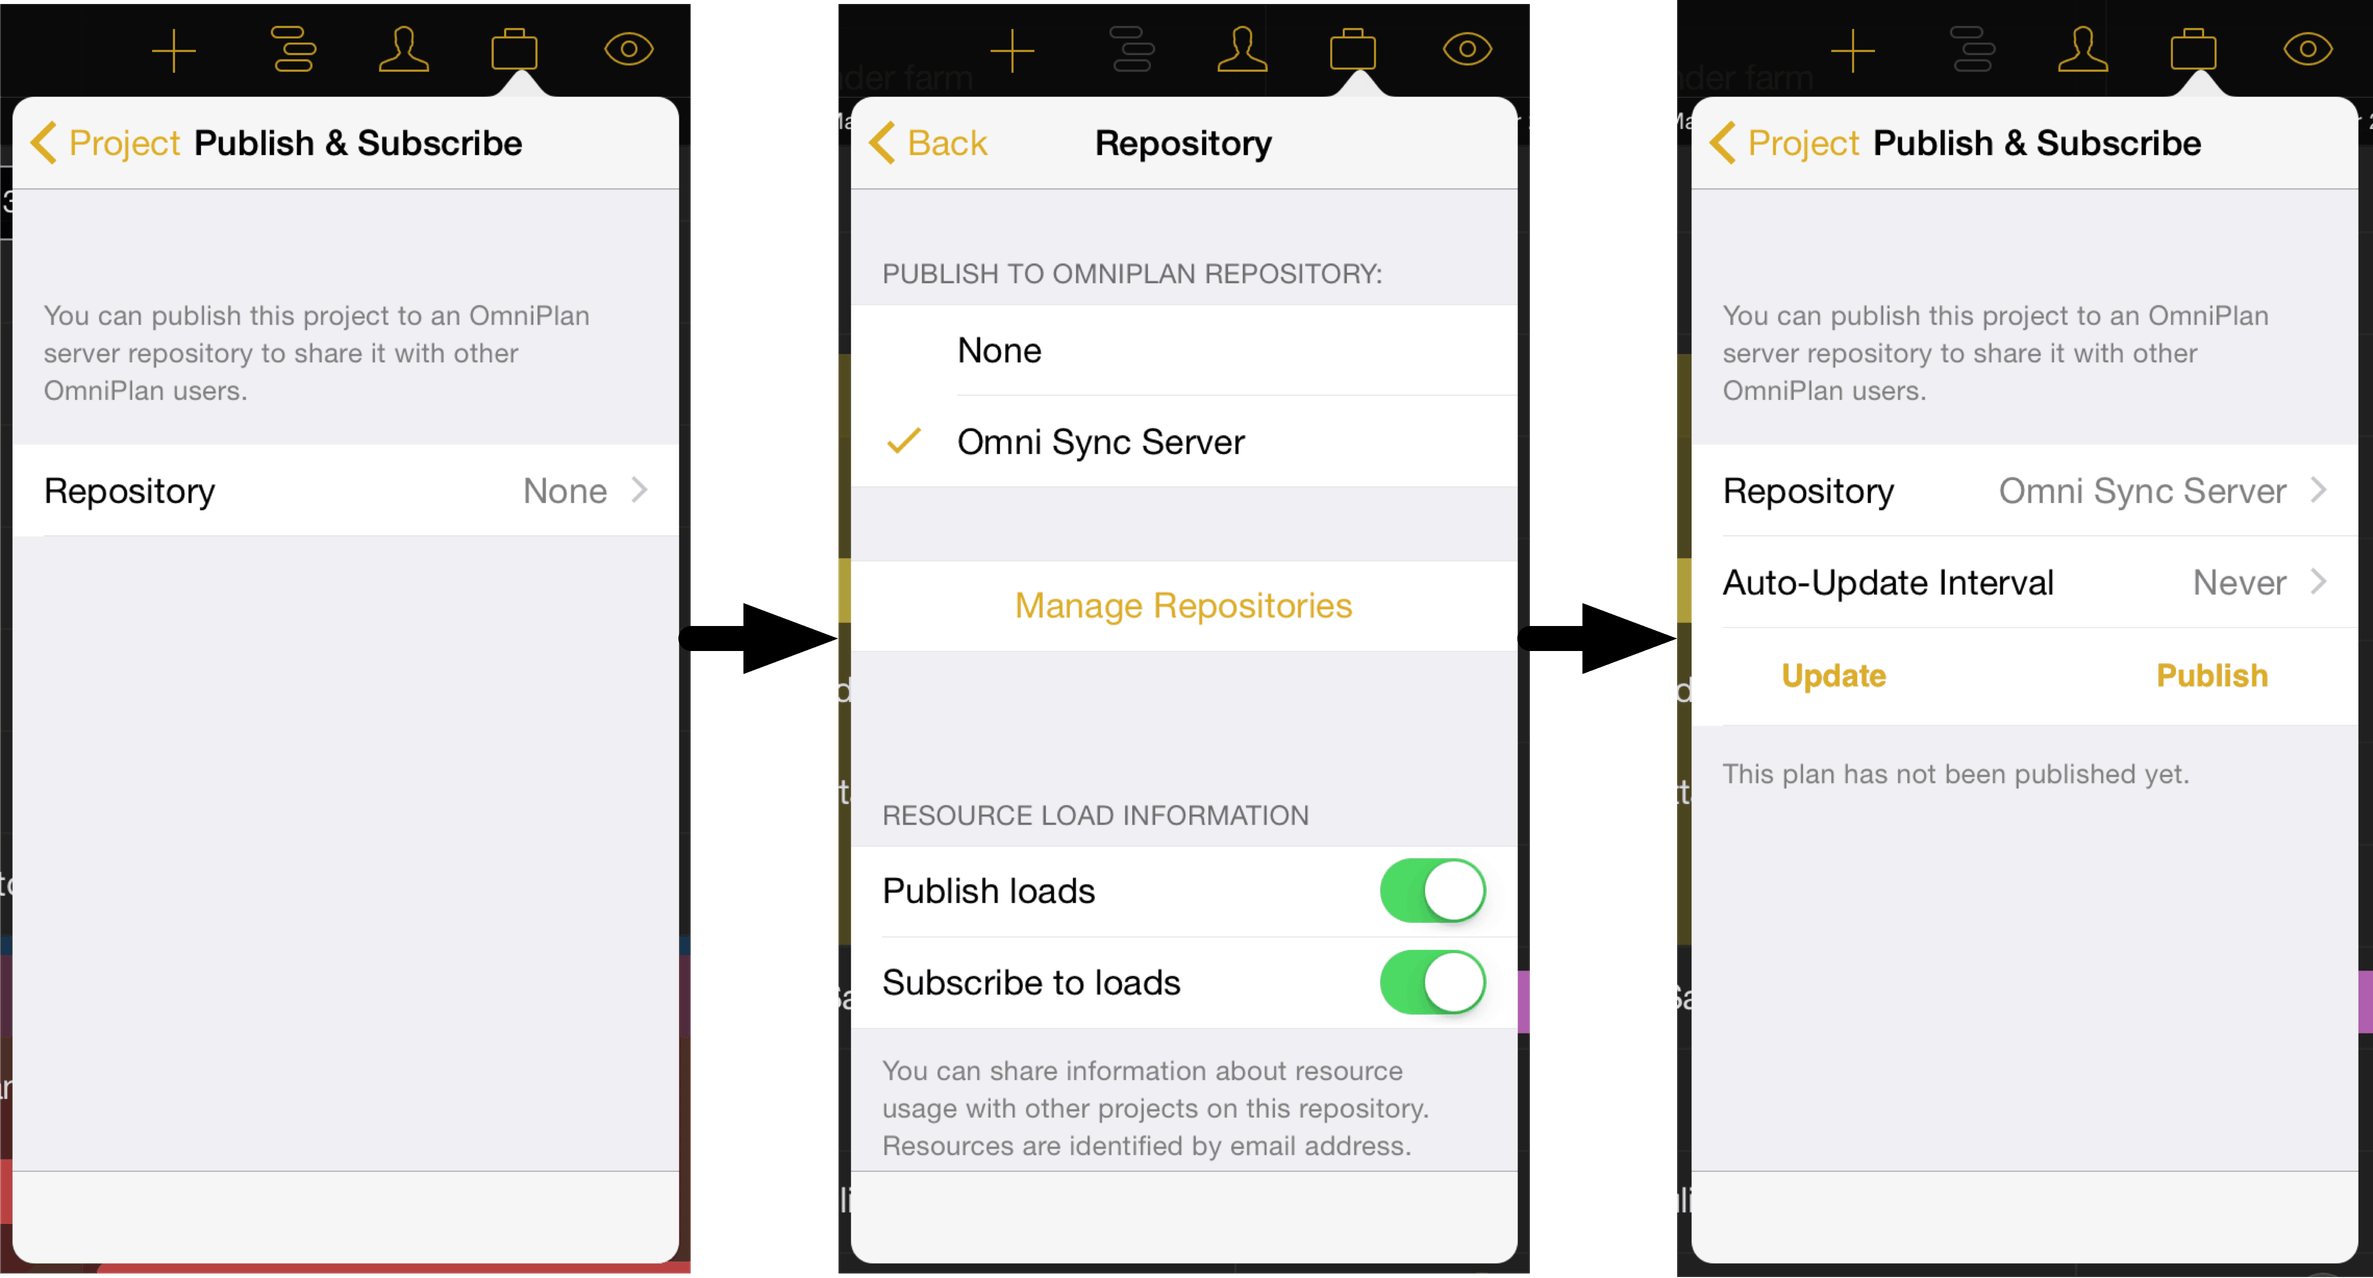
To share the project you're currently working on, open the project inspector and tap Publish and Subscribe, then Repository. You'll be asked to choose a repository to sync to; if you don't have one set up, tap Manage Repositories and see Getting Synced at the beginning of this manual to get started.
After choosing a repository, return to the Sync panel and choose an auto-update interval. This is the frequency with which your project will pull changes from the version stored on the server (you can tap Update to manually cause a sync any time you'd like). When you have the settings the way you want them, tap Publish to bring the project live.
Note
Publication is fully manual to give you complete control over your submissions to the project. Any time you have changes to share, tap Publish to sync them to the server.
Step 19: Balance Multi-Project Resource Loads
If resources (usually human members of your team) are shared between multiple projects in the same repository, you'll want to decide in the repository panel whether you'll publish the current project's resource loads to other projects and whether the current project will subscribe to the resource loads of others.

Choosing to publish a project's resource loads means that other subscribing projects will obey its workload information when leveling; if Julie is working on Project A on Wednesday and its loads are being published to Project B, after leveling Project B won't schedule her to work on Wednesday.
Choosing to subscribe to resource loads means that the project will obey all constraints by projects in the repository that are publishing their loads. By using only the publish or subscribe option a hierarchy of priority can be established between simultaneous projects — a project that only publishes will always have its needs met first, while a project that only subscribes will be assigned resources only when they can be spared.
By both publishing and subscribing, projects are treated as equals — and if a project neither publishes or subscribes, it ignores external factors and syncs only with its own updates.
Note
The key to balancing resource loads across projects is that individual resources be tagged and identified by a unique email address that is shared across all projects. This can be set using the resource inspector.
Glossary
The following is a list of terms specific to OmniPlan or project management that you'll encounter throughout this manual, defined and listed in alphabetical order for easy reference.
- Actual schedule
- The actual schedule, in contrast to the baseline schedule, is the way a project turns out in real life. Before the baseline is set for a project, the baseline and actual schedules are the same. After the baseline is set, further editing changes the actual schedule only.
- Assignment
- Assigning a resource to a task means that the resource is expected to be actively busy with that task throughout its duration. Assignment amounts are expressed as the percentage of the resource’s time being spent on the task.
- Baseline schedule
- The baseline schedule, in contrast to the actual schedule, is the way a project is originally planned. Before the baseline is set for a project, the baseline and actual schedules are the same. After the baseline is set, further editing changes the actual schedule only. You can compare the baseline schedule and the actual schedule using the view inspector.
- Cost
- A task or a resource can have a monetary cost. The total cost of a task is the sum of the task cost and the costs of the resources assigned to it. A resource can have a per-use cost and a per-hour cost.
- Critical path
- The critical path is the series of dependent tasks which, if any of their durations change, will cause the whole project's duration to change. You can check the critical path from the view inspector.
- Dependency
- The relationship by which one task must start or finish before another task can start or finish. For example, the task "Buy paint" must finish before the task "Paint fence" can begin.
- Duration
- Duration, in contrast to effort, is how long a task takes to complete in actual working time (that is, not including off-time). For example, a task which takes 4 hours of effort, and is assigned to 2 resources, has a duration of 2 hours. When you assign resources to a task, the duration or effort may change.
- Efficiency
- The measure of how much work a resource can get done in a certain amount of time. Efficiency can affect duration and effort: 100% efficiency means the resource can contribute 1 hour of effort for every hour of work; 50% efficiency means it can contribute 1 hour of effort for every 2 hours of work; and so on.
- Effort
- Effort, in contrast to duration, is how much work time a task takes to complete, considering all of the resources assigned to it. For example, a task which has a duration of 4 hours, and has 2 resources assigned to it, has an effort of 8 hours. When you assign resources to a task, the duration or effort may change.
- Equipment
Equipment is a type of resource. It represents some kind of reusable asset, such as some special computer hardware. It can also be useful to consider things like meeting rooms to be equipment, if you need to balance their use between different tasks.
For equipment resources, Units represent how many of the resource are available. The number of available units can affect resource leveling.
Equipment can have Efficiency, Cost per Use, and Cost per Hour values.
- Gantt Chart
- The Gantt chart is a chronological representation of the project. Each task is represented by a bar, corresponding to a row in the outline, and possibly connected to other tasks by lines representing dependencies.
- Group
- Items in the task outline or the resource outline can be grouped together. The members, or "children", of the group appear indented from the group itself in the outline. In the Gantt chart, a task group appears as a bracket enclosing its members.
- Level
Leveling the project, or leveling resources, means automatically rearranging the project to make sure the resources are being used as efficiently as possible. This means not allowing a resource to be assigned at more than 100% of its available units at any time, and finding the best order for resources to work on tasks in order to complete them more quickly.
Newly created projects by default require leveling to be manually triggered, but automatic leveling can be enabled in the resource inspector.
When not leveling automatically, you should level your project after making changes like updating task completion or changing resource assignments.
- Material
Material is a type of resource, representing consumable supplies.
For material resources, Units means how many of the resource are being used throughout the project. This value updates as the resource is assigned to more tasks.
Material resources can have Cost per Use and Cost per Hour values.
- Milestone
- A milestone is like a task, except that it has no duration and requires no effort. Its purpose is to mark some important point in time. Based on dependencies and work schedules, a milestone may shift in time.
- Parent
- A group is considered the "parent" of all its members; this is common terminology for outlining software.
- Resource
- Resources are the people and things needed to get a project done. Resources are listed in the resource inspector, and can be assigned to tasks. The three types of resources are Staff, Material, and Equipment.
- Resource load / Resource allocation
- A resource's load is the amount of effort it is assigned to do at various times throughout the project. If a resource is assigned at more than 100% of its availability all at once, it is said to be overloaded or overutilized. Resource leveling tries to alleviate overload of resources.
- Staff
Staff is a type of resource, representing people who work on the project.
Staff units are measured as percentages. A person who is fully available to the project has a units value of 100%; someone who is spending part of their working hours on other projects would have lower available units. Note that this is not the same as having fewer working hours (which can be set in the calendar view), or being less efficient (which can be set in the Resource Information inspector).
Staff can have Address, Efficiency, Cost per Use, and Cost per Hour values.
- T day
- The first day of a project that has an undetermined start date. Until the start date is set, all dates are represented by an amount of time after T day, such as T+2w 1d.
- Task
- Some item of work that needs to be done for the project to progress, represented by a corresponding task bar in the Gantt chart.
- Units
- Units measure amounts of resources in various contexts. For a staff resource, the units value is a percentage representing how much of the person’s time is available to be assigned to tasks. For equipment and material resources, the units value is a number representing a physical quantity.
- Variance
- Variance is the amount of time by which the actual date differs from the baseline date.
- Violation
- A violation is some sort of problem in the project that prevents it from working out properly. Such problems are things like tasks that start before the project start date, tasks that don't have enough time to complete before their dependent tasks need to start, or dependencies that cause a task to be prerequisite to itself.
Getting Help
When you're in need of help—whether you're puzzled by the Gantt chart, having trouble syncing, or experiencing another issue with OmniPlan—it's good to know that the Support Humans at The Omni Group are available to lend you a hand.
The OmniPlan Website
The OmniPlan website is always a good place to find the latest information about OmniPlan, complete with an ever-growing support section.
The Official Forums
The Omni Group maintains online forums for all of our products, and you're invited! Come share your questions and ideas with other users and Omni staff.
Email Support
If you’re stuck, if you have a good idea for the next version of OmniPlan, or if you just want to let us know how we're doing, go ahead and send us an email. Choose Send Feedback from Settings to conjure up a message addressed to us. We take support seriously, so you can expect a prompt response actually typed by human hands.
Release Notes
For detailed information about what has changed in each minor version of OmniPlan, check out the release notes in Settings.

