Collaboration and Multi-Project Review (Pro)
On a large project, or one where the collaborators are spread across diverse geographic locations, you may want to have multiple teammembers able to update the project status remotely. With OmniPlan Pro, working together no matter where you are is made possible by a powerful and intuitive Publication, Subscription, and Change Tracking system.
Likewise, when you’re working on multiple simultaneous projects (perhaps with team members shared between them), the ability to compare those projects side by side and assess their needs as a combined ecosystem is invaluable. The Dashboards feature offers unprecedented visualization of your multi-project workflow.
Note
This chapter describes features present in the OmniPlan Pro upgrade. If you have specific needs that these features address, you can try OmniPlan Pro for free at any time.
Collaborating with Multiple Contributors
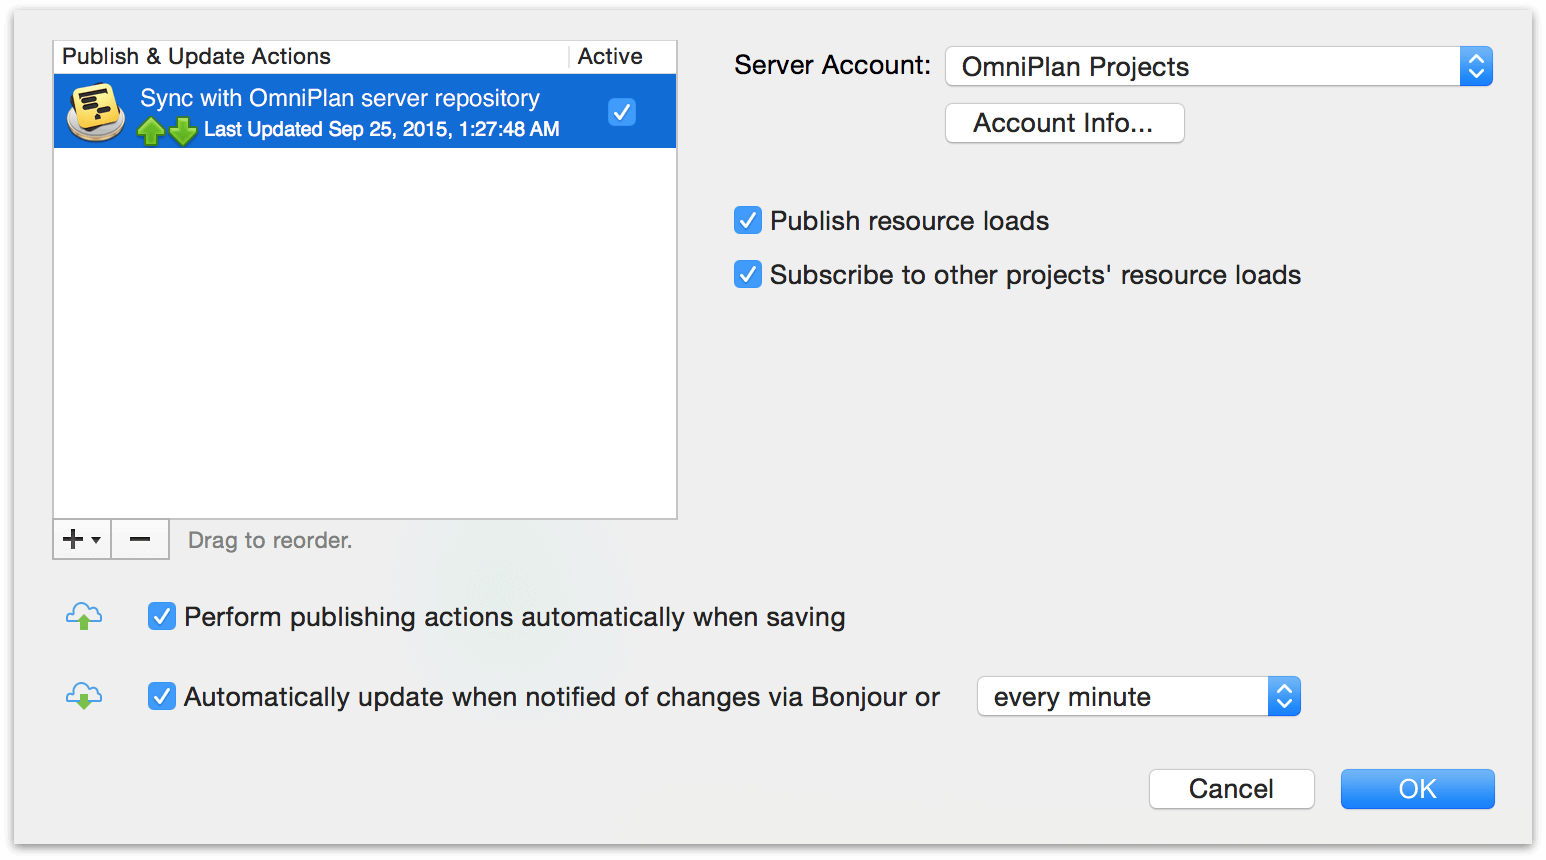
To share the project you’re currently working on, choose Project ▸ Configure Publishing and Subscriptions, then use the plus button below the Publish & Update Actions list to add Sync entire plan with OmniPlan server repository to the list of actions.
You’ll need to choose a server account to sync to; if you don’t have one set up, click Account Info to visit the Accounts pane of Preferences and set one up. See the Creating a Sync Account section below to get started.
Creating a Sync Account
When multiple users will be contributing to and editing an OmniPlan project, you can easily keep everyone on the same page by storing the project in a server repository.
First, set up a server account in the Accounts section of OmniPlan ▸ Preferences.
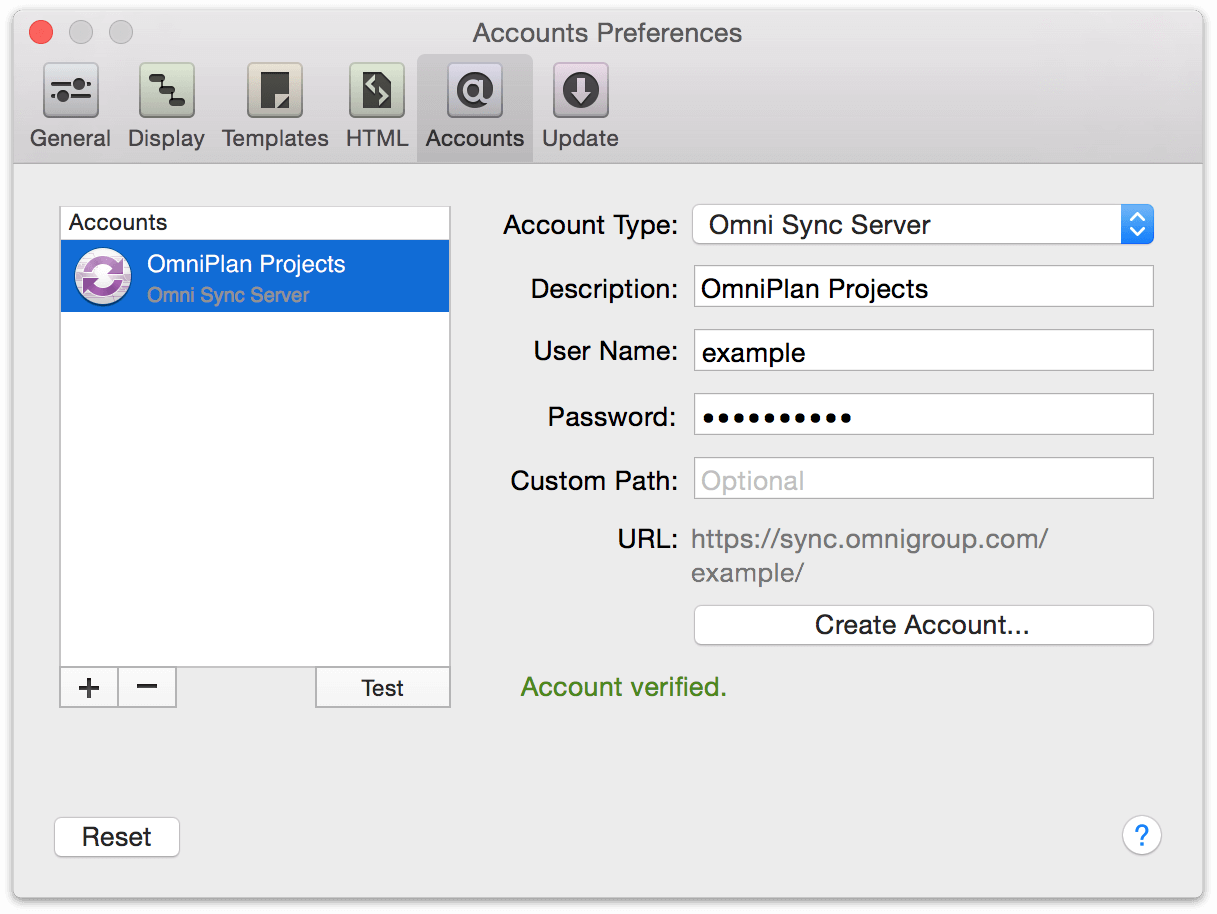
Click the plus sign under the accounts list to create a new account, then choose an account type from the dropdown: CalDAV, Google, Omni Sync Server (the default), and WebDAV. The Omni Sync Server option is recommended for users seeking a free and robust syncing solution, while a self-hosted WebDAV server may be preferred for confidential projects where data privacy is the highest priority.
To sync via Omni Sync Server, enter your account information or click Create Account to create a new account online. You’ll get feedback at every step of the process as your account data is validated.
Note
When adding an Omni Sync Server account in OmniPlan the user name field only requires the part of your email address that precedes the "@" symbol, and the directory field can be left blank.
Publishing, Subscribing, and Change Tracking
To get your first communally accessible project up and running, you’ll want to visit Projects ▸ Configure Publishing & Subscriptions, which opens the Publishing & Subscriptions screen. Click the plus button at the bottom of the Publish & Update Actions list to choose the type of syncing or subscription you’d like to set up for this project from the dropdown menu. Choosing Sync entire plan with OmniPlan server repository will make the project accessible to everyone else with access to the account you’ve just set up in Preferences, and updates to the project file will be synced for all users.
When you have your settings the way you want them, click Publish in the toolbar to bring your project to the cloud with its very first sync.
You can control the amount of automation that is part of the publication and subscription process. The options beneath the Publish & Update Actions list define when and how the project is published to the server and updated from the remote version.
You can publish your local version to the server with Project ▸ Publish (Control-Command-P) or the Publish toolbar button. Or with the option here, you can choose to publish whenever you save changes.
You can update manually from the server at any time by choosing Project ▸ Update (Control-Command-U) or the Update toolbar button, or automate the update process as prompted by Bonjour, or at an interval specified with the dropdown menu.
Warning
Because OmniPlan relies partially on your system time to determine the scheduling of synced project updates, making changes to the Apple system clock when working on a project with publishing or subscription enabled will result in an error and should be avoided.
Beyond simply publishing your project to the shared server repository, Publish actions can take a variety of other forms. Add additional Publish actions to your list of Publish & Update Actions using the plus menu beneath the list. You can:
Execute a custom AppleScript upon publish or update.
Export your document with one of the export options.
Use Subscribe actions to pull in changes from others.
Choose free/busy times from the Calendar Server to see available resource times and be notified of changes for particular resources or all of them.
Choose offtime/overtime from iCal calendar to choose a calendar for the whole project or an individual resource. Specify whether events are extra or off hours.
Choose offtime/overtime from web calendar and specify a URL, along with the schedule for a project or particular resource, and how events behave.
Note
Due to limitations in Calendar sync, OmniPlan is able to fetch data out approximately 11 months from the present when subscribing to free/busy times from a Calendar server.
Use Sync actions to make changes to the project and pull in changes from others.
Choose entire plan with OmniPlan server repository to sync all tasks, resources, and calendars—everything!—on a shared server.
Choose to sync tasks to/from Calendar Server events to make changes and bring in changes from events on a calendar server.
Choose to sync tasks to/from Calendar Server reminders to make changes and bring in changes from to-do items on a calendar server.
Choose to sync tasks to/from iCal events to make changes and bring in changes from events in iCal.
Once you’ve specified the kind or kinds of subscribing you’d like to do, you can use change tracking to see your changes and accept or reject the changes of others.
To enable change tracking, use the Project ▸ Show Changes (Shift-Command-T) menu item. A sidebar appears that logs the changes you make and shows the changes of your teammates, along with a toolbar (beneath OmniPlan’s main toolbar) with controls for accepting and rejecting the changes of others.
To accept or reject all changes, use the Accept All and Reject All buttons in the change tracking bar.
To accept or reject individual changes, select an individual change in the sidebar and use the Accept or Reject buttons.
Note
If you didn’t choose to grant OmniPlan access to Calendar the first time you tried to create a Calendar-related publish or update action, you can grant it after the fact with Apple’s System Preferences ▸ Security & Privacy ▸ Privacy tab.

Balancing Resource Loads Across Projects
If resources (usually human members of your team) are shared between multiple projects in the same repository, you’ll want to decide in the Configure Publishing and Subscriptions panel whether you’ll publish the current project’s resource loads to other projects and whether the current project will subscribe to the resource loads of others.

Choosing to publish a project’s resource loads means that other subscribing projects will obey its workload information when leveling; if Julie is working on Project A on Wednesday and its loads are being published to Project B, after leveling Project B won’t schedule her to work on Wednesday.
Choosing to subscribe to resource loads means that the project will obey all constraints by projects in the repository that are publishing their loads. By using only the publish or subscribe option a hierarchy of priority can be established between simultaneous projects — a project that only publishes will always have its needs met first, while a project that only subscribes will be assigned resources only when they can be spared.
By both publishing and subscribing, projects are treated as equals — and if a project neither publishes or subscribes, it ignores external factors and syncs only with its own updates.
Note
The key to balancing resource loads across projects is that individual resources be tagged and identified by a unique email address that is shared across all projects. This can be set in the Resource Info section of the Resource inspector.
Managing Server Repositories
Once you have an account set up and have begun publishing and subscribing to projects, you can manage your repository accounts and shared projects with the centralized Server Repository screen. Choose OmniPlan ▸ Server Repository to see and manage your shared OmniPlan projects.
Note
The Server Repository window will be empty if you open it before creating an account or publishing your first project.
The Account menu lists your Omni Sync Server and WebDAV accounts by name (as set up in Accounts Preferences); these are the types of account that can operate OmniPlan repositories. Choose an account in the pop-up to see the projects in its repository. To add to or edit your accounts, click the Account Info button.
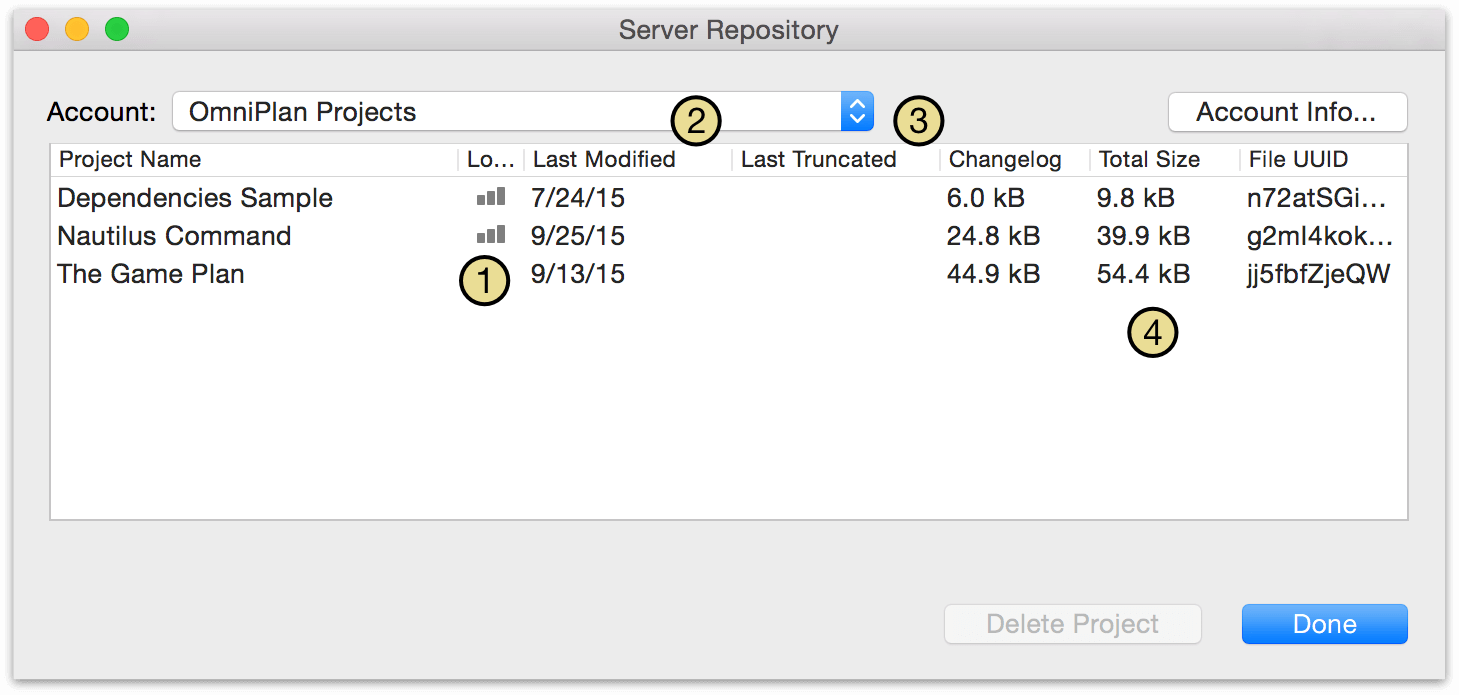
The list shows all projects that have been published to the repository, and the following information about them:
- Load — Indicates, by the presence of a vertical bar graph icon, whether these projects are sharing their resource load information with other projects in the repository for the purposes of leveling resources across projects.
- Last Modified — The date when the project was last modified by any user with shared access to it.
- Last Truncated — To optimize the speed of syncing on currently active projects, once a certain size threshold is exceeded in the sync log OmniPlan sets aside older changes on the server and “truncates” what is synced to only the newest set of changes. If OmniPlan sees that a project hasn’t been updated since the date the changelog was last truncated (shown here), it retrieves older changes from the archived logs on the server.
- Changelog, Total Size, File UUID — The file size of the changelog and total project respectively, and the unique ID assigned to the project on the server.
Cleaning Up Stale Usage
When sharing projects on a server, in some cases resource load sharing information for deleted projects may be left behind on the server. This happens if someone removes a project that is sharing resource loads using a version of OmniPlan older than v2.1, or if someone deletes the file directly from Finder or Terminal.
If OmniPlan finds unused resource load information on the server, it detects the problem and prompts that you clean it up. Until you allow it to clean up, there may be misleading resource load information shared with your active projects.
The clean way to remove a project from a server repository is by opening the Server Repository window in OmniPlan v2.1 or newer and using the Delete Project button.
Using Dashboards to Review Multiple Projects Simultaneously
When you’re working on more than one project at the same time, it can be essential to compare the status of multiple projects to make sure resources are being correctly assigned, and progress is proceeding on all fronts according to plan. The Dashboards feature of OmniPlan Pro is here to assist.
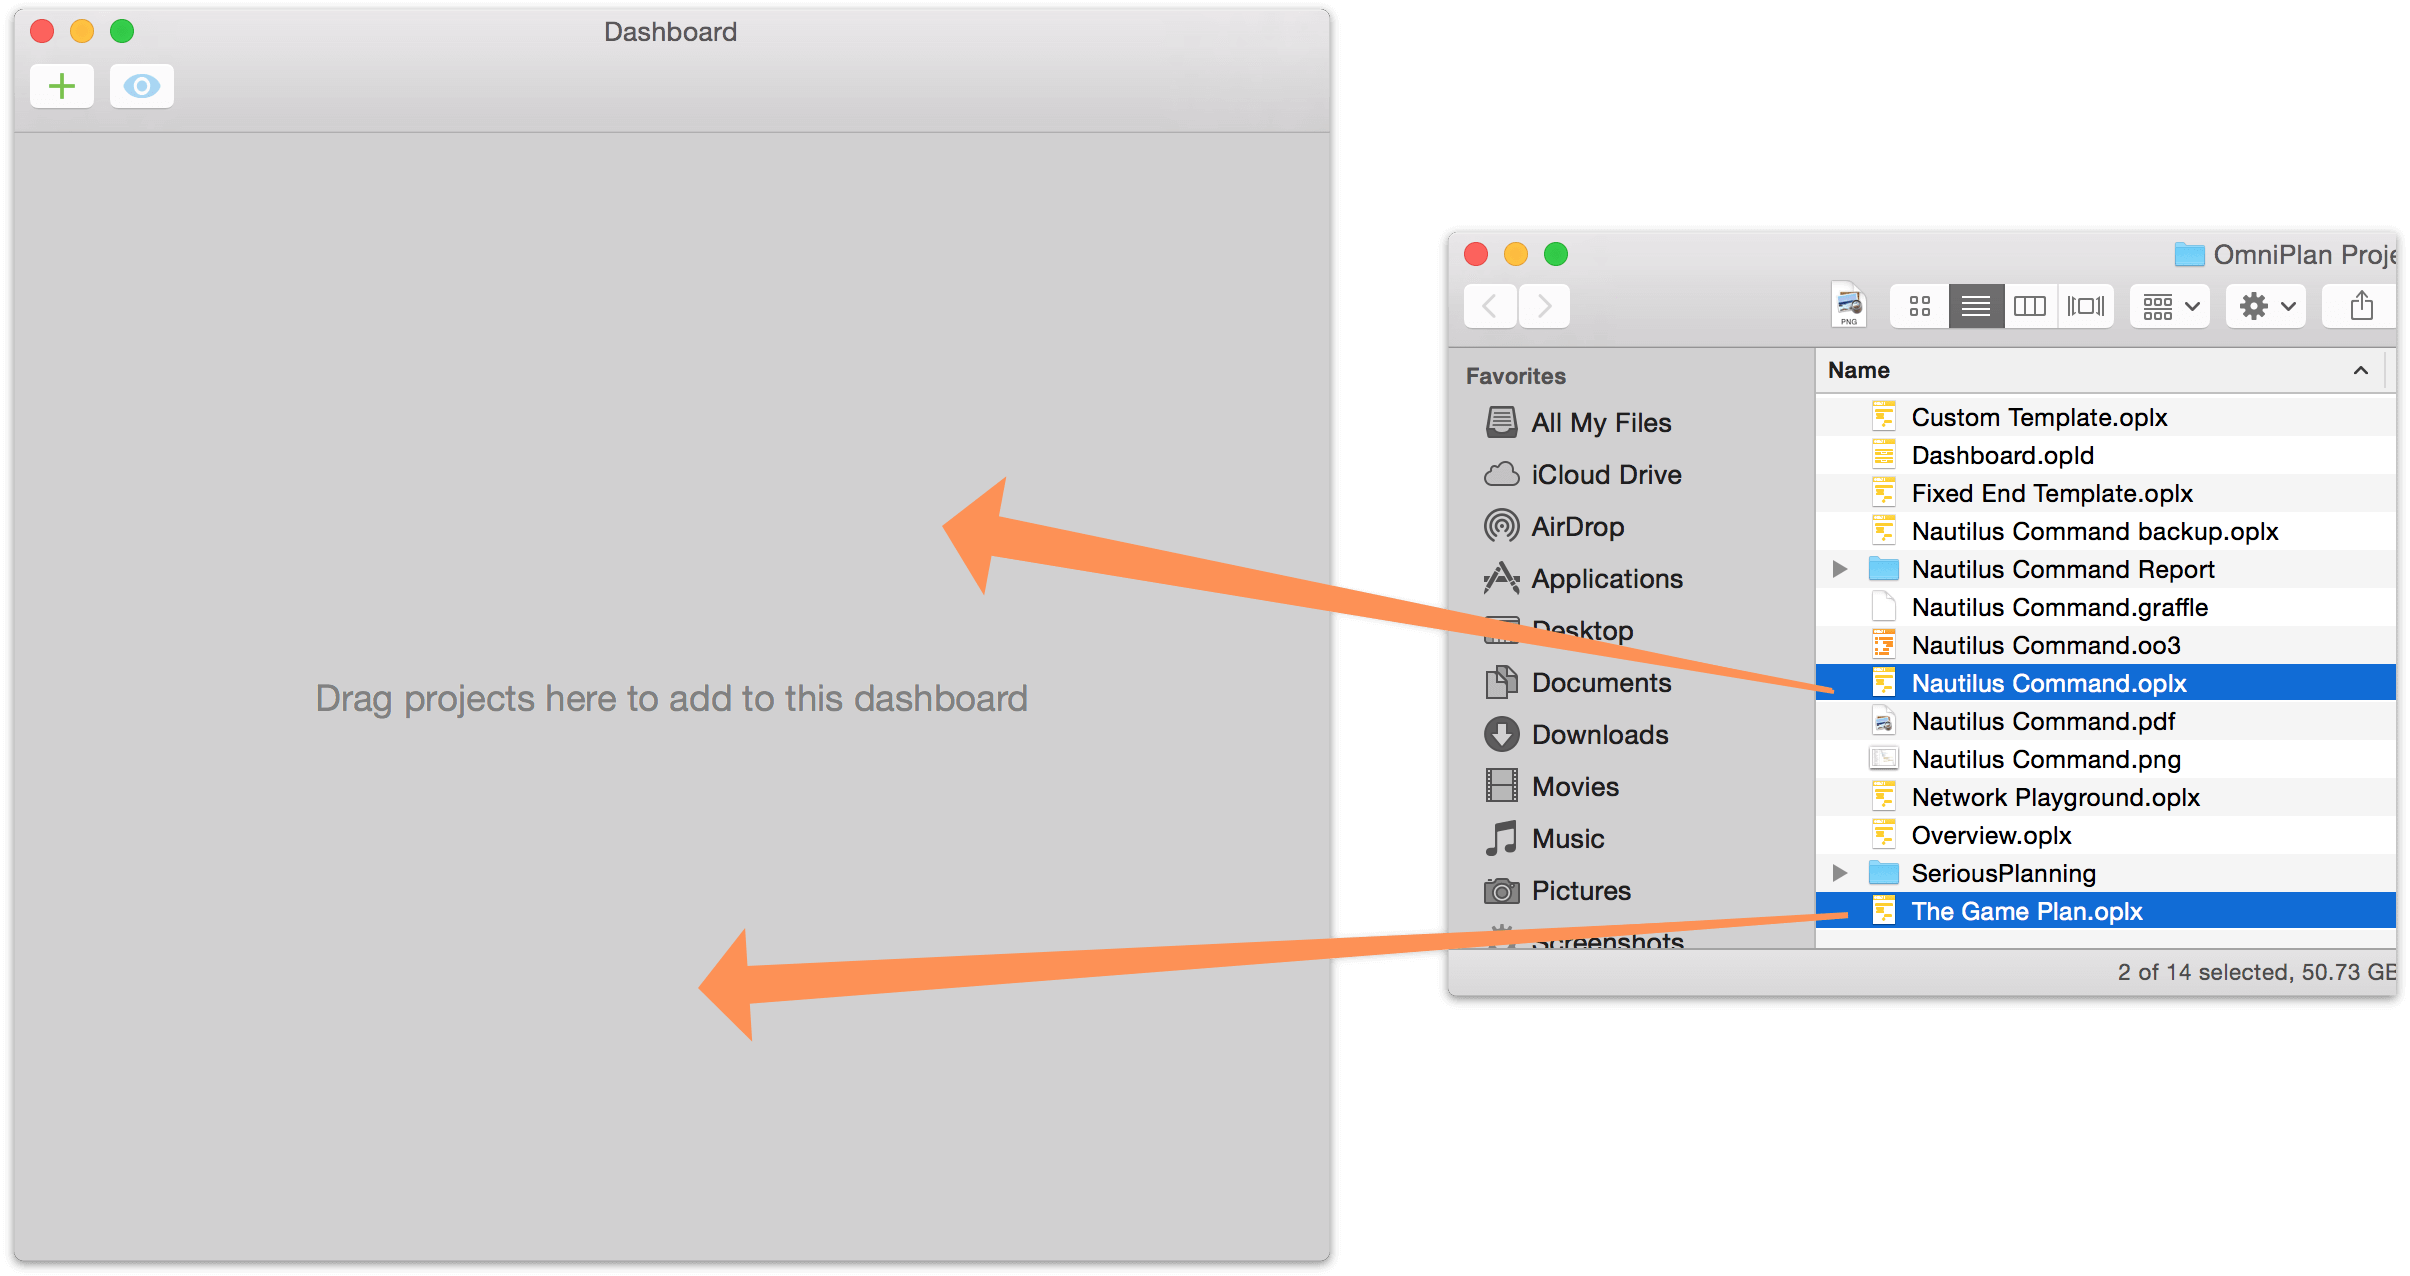
The dashboards feature introduces a new file type to OmniPlan: .opld. An .opld file is a window that’s a specialized viewport on as many projects as you’d care to add to it, and that when saved preserves a particular selection of projects for when you’d like to review them again.
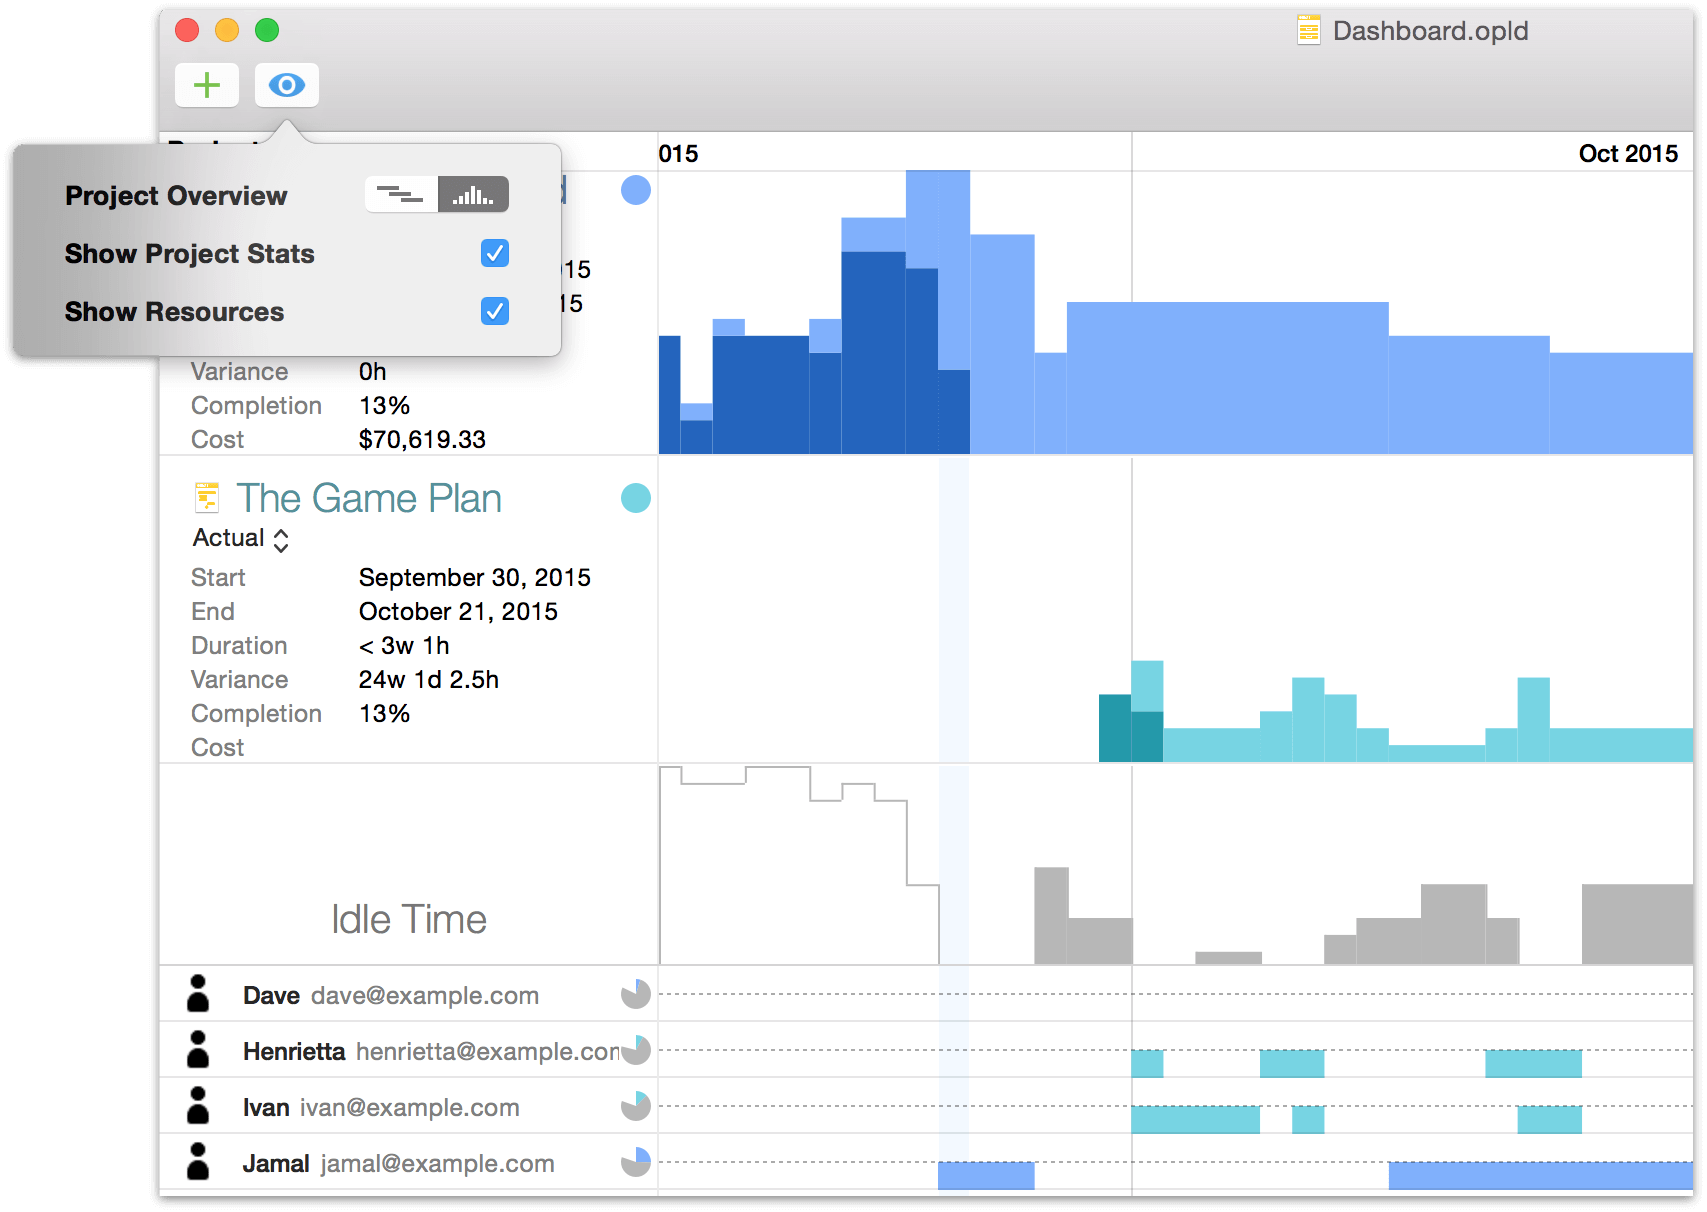
To create a new dashboard, choose File ▸ New Dashboard (Shift-Command-N). An empty dashboard file is created, ready for projects to be added. Add projects by dragging them from the Finder directly onto the Dashboard window, or by clicking the plus button in the upper left.
When you bring projects into your dashboard, you’ll see them laid out as rows that contain summary graphics of the projects’ Gantt charts in two-tone color schemes that reflect the work completed and the work yet to be done (these colors represent their respective projects throughout the dashboard).
In addition to rows representing your project plans, you’ll see an additional automatically generated row as well — a graph of idle time when the projects’ resources aren’t being utilized. White bars of idle time represent unused time in the past, while dark grey bars represent time in the future that can yet be recouped.

If you’ve assigned email addresses to your staff resources you’ll see a list of them as well, along with resource diagram-style bars that illustrate when they’re occupied, and pie chart reference graphs noting the split of their effort between the dashboard’s projects and idle time.
You can use the dashboard’s view menu (the eye button in the upper left) to switch between the Gantt comparison view, and a bar chart view that displays the chronology of projects with task bar heights based on the amount of effort required to complete them. The dashboard’s view menu also offers controls to show or hide resources, and show or hide project details.
Open a project directly from the dashboard by clicking its document icon. Edits made to project files included in the dashboard are reflected there right away, so you can immediately see the effect your changes are having on the project in question — and potentially on others, if you’re sharing resources between projects.
Sharing Resources Between Projects
The power of dashboards is realized to its fullest when you’re also taking advantage of the publication and subscription of resource loads (described earlier in this chapter) of the projects included in your dashboard.
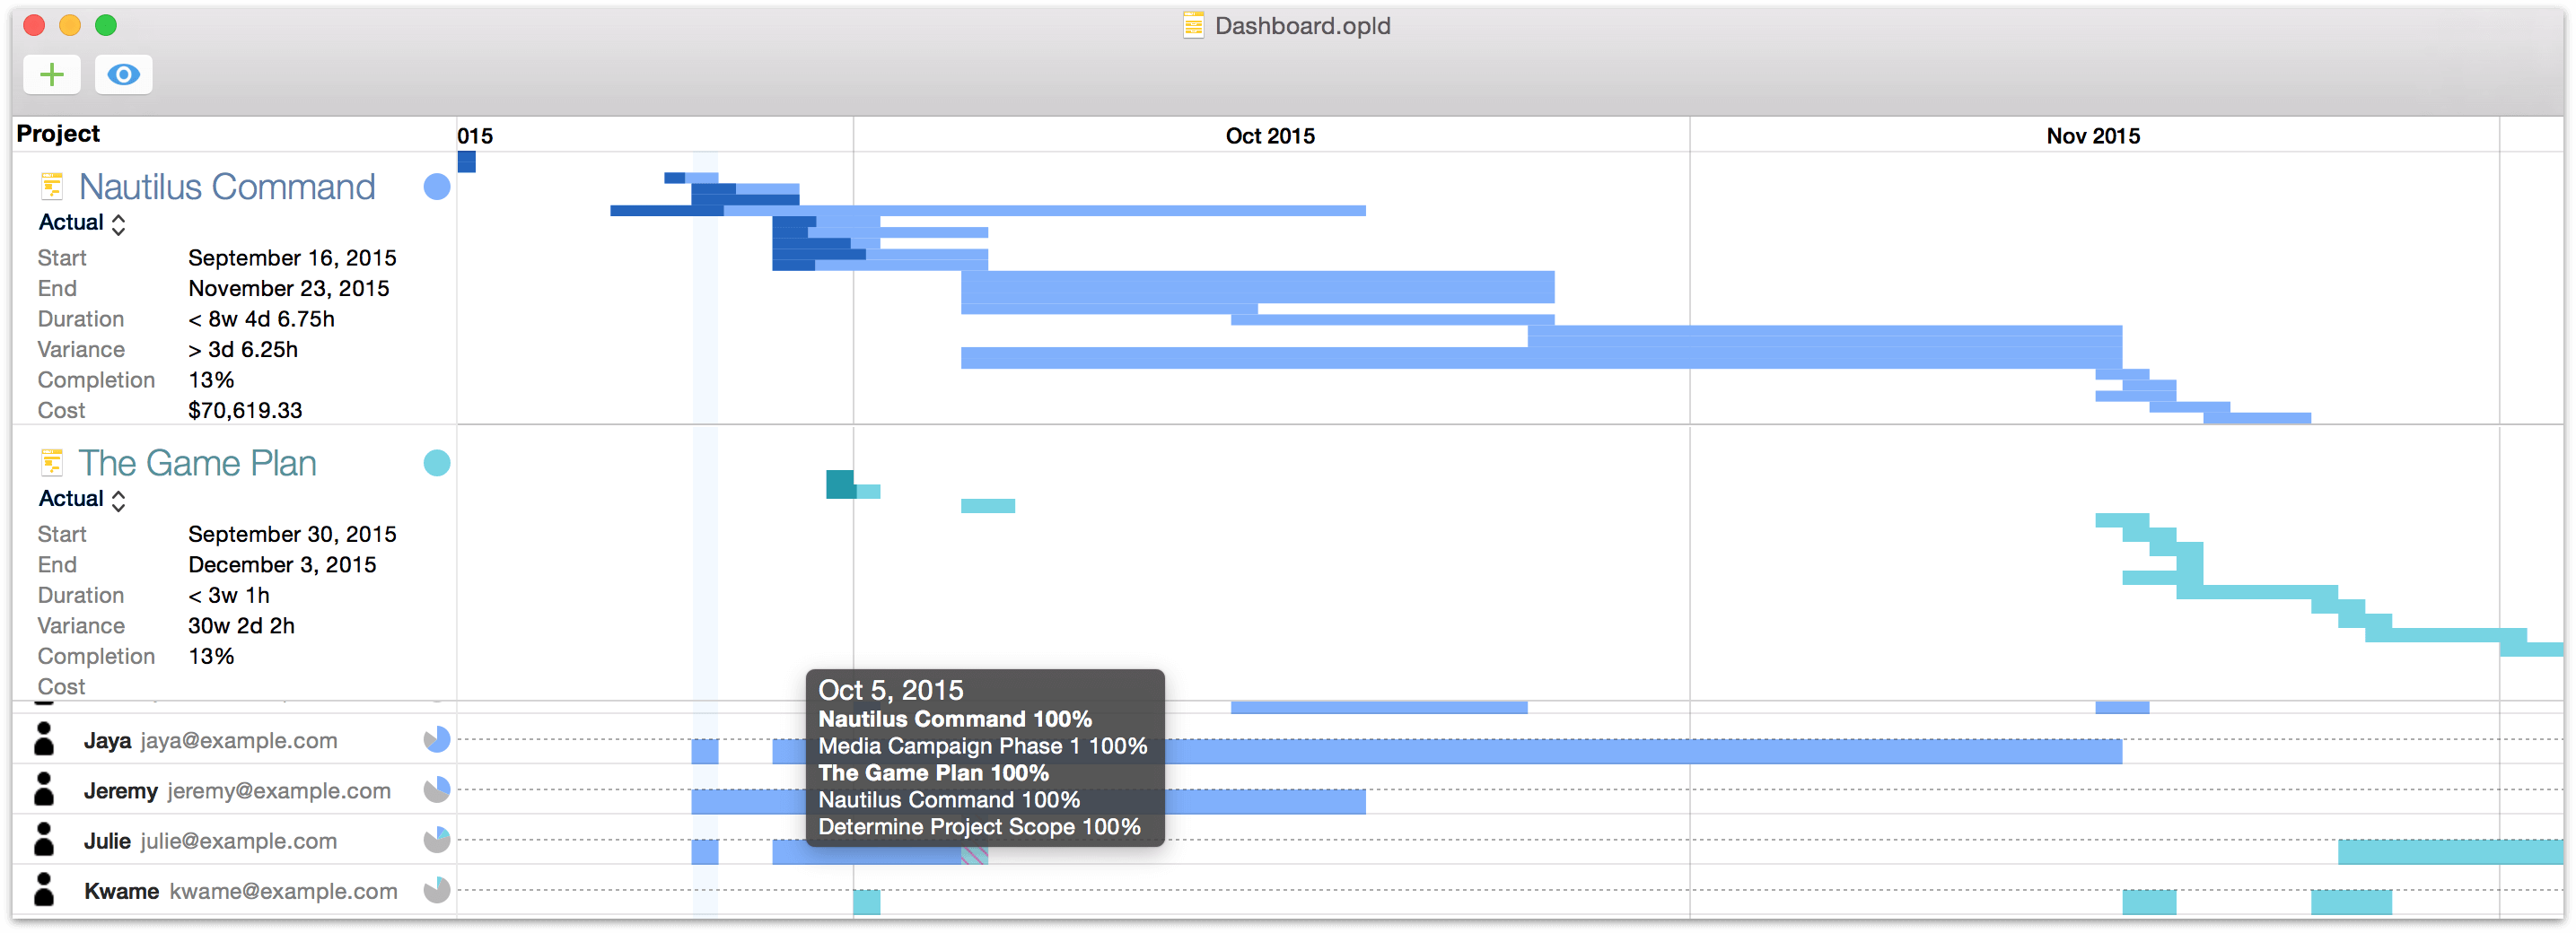
When balancing resource loads across projects in a shared server repository, the dashboard recognizes that resources are being shared and provides a window on the intersection between resources and the projects they’re working on (sometimes simultaneously at 100% effort, as in the example above). You can identify where resources are overloaded (or are standing idle), and make the changes necessary to ensure your projects are running in tandem at peak efficiency.
Printing Dashboards
When you have a dashboard set up just the way you like it and you want to share it with others, you can print it straight from the File menu (Command-P).
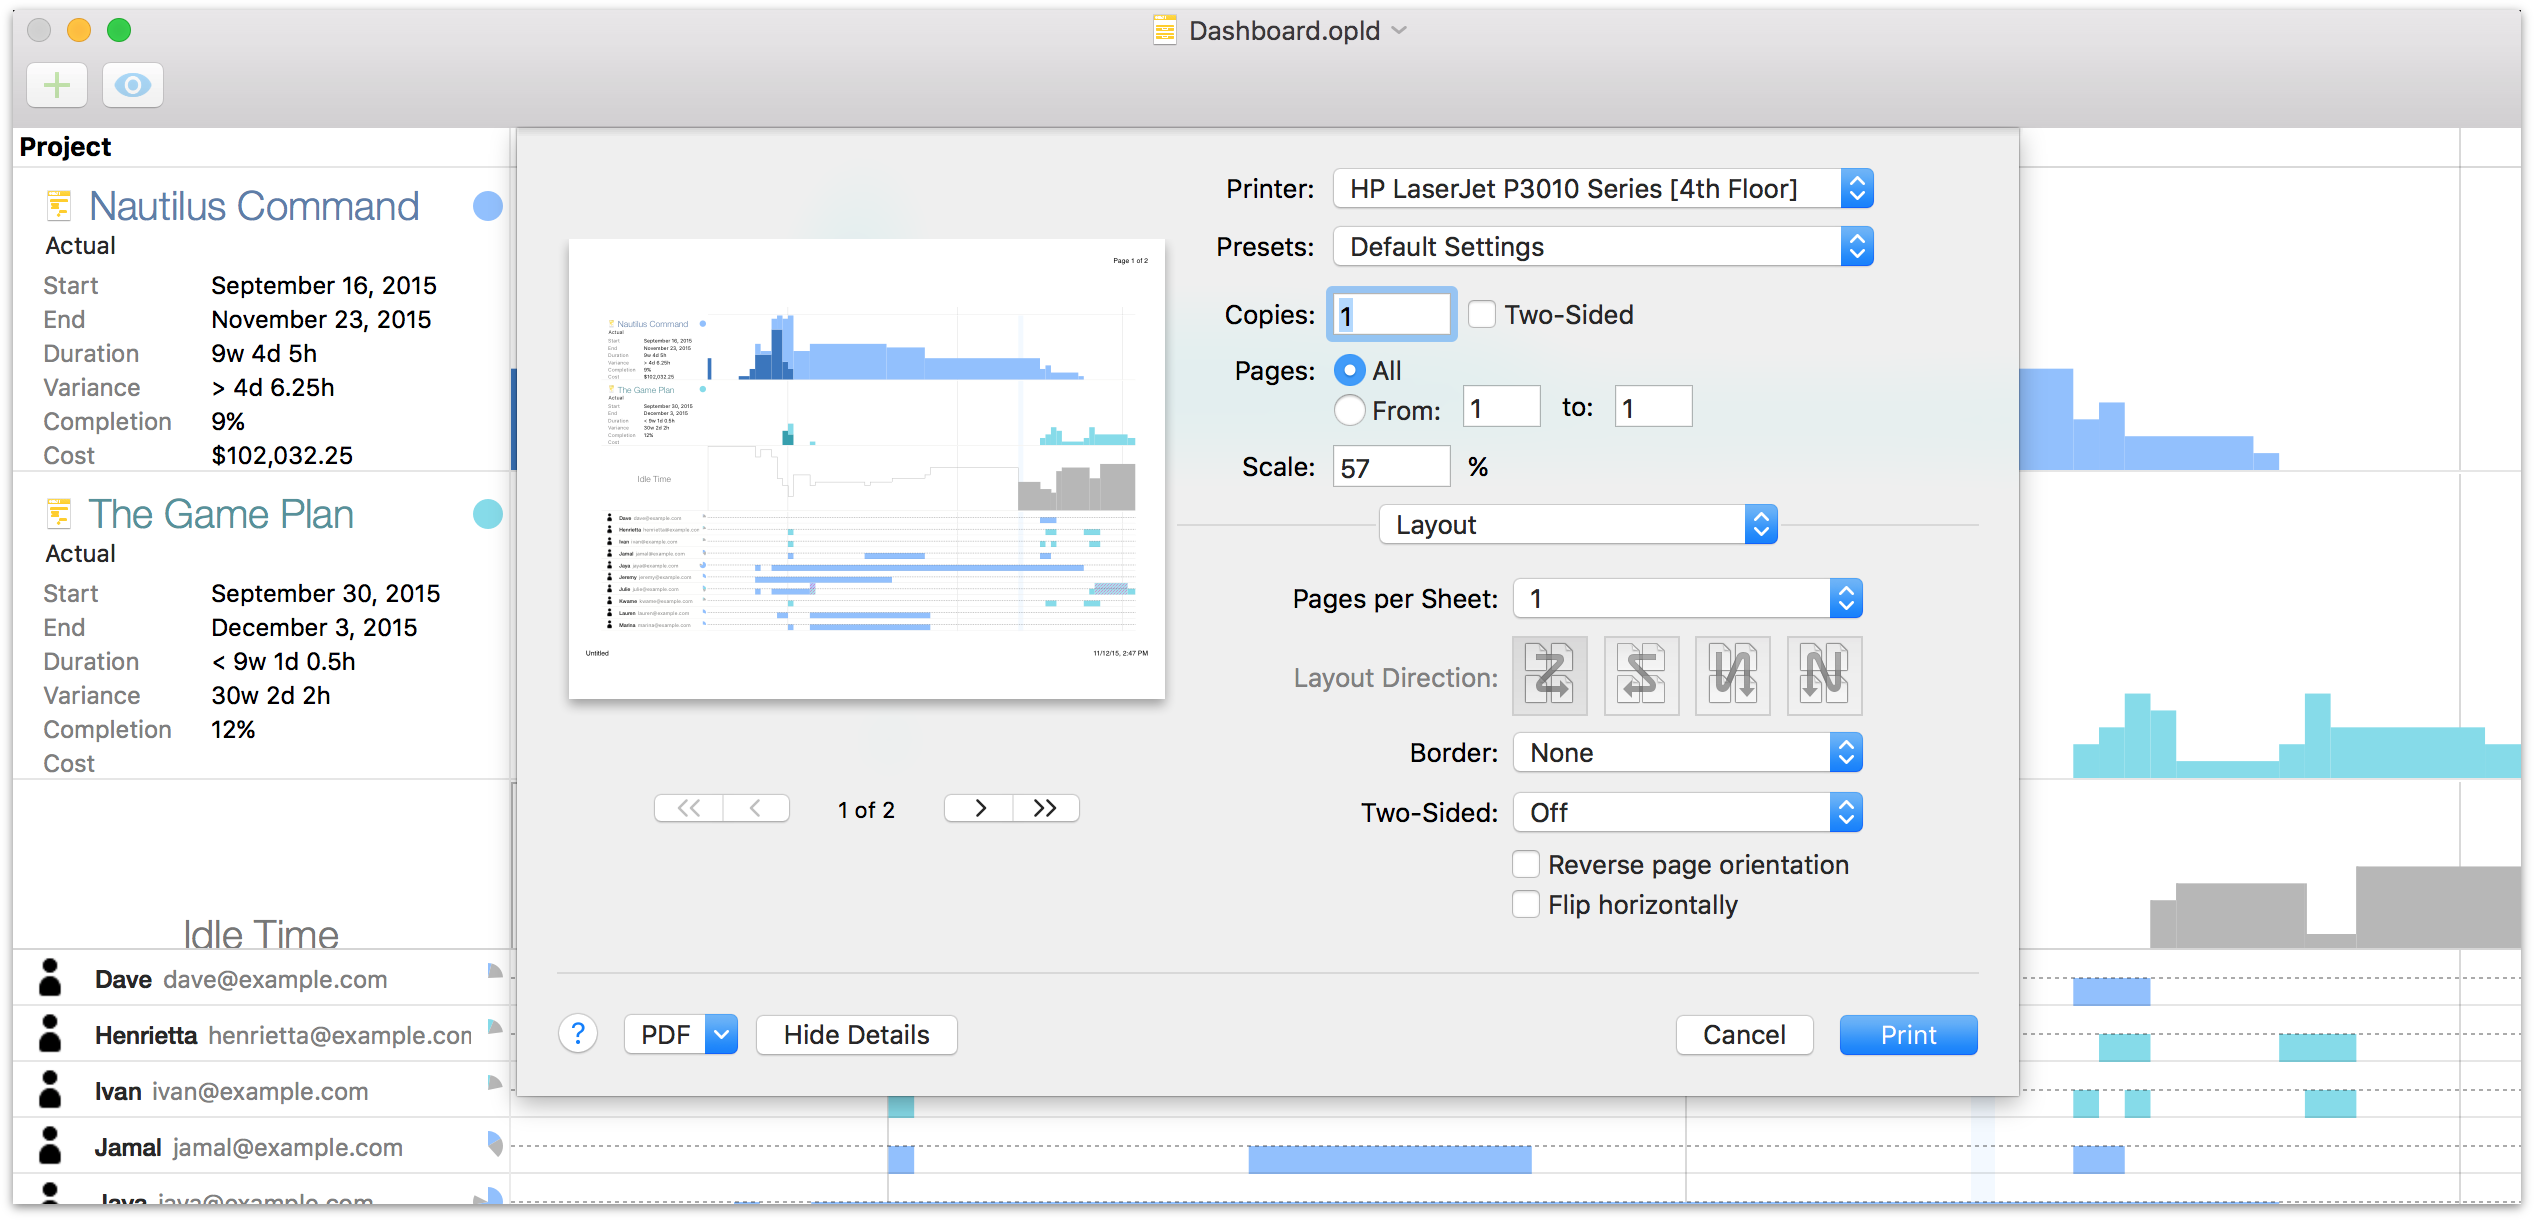
Print-time options for dashboards are pretty straightforward; as with all standard documents in OS X, you can choose to save the dashboard as a PDF rather than send it to a printer. The standard page setup controls are available as well.
The most important thing to note about printing dashboards is that what you see is what you get — the content of the print preview changes based on the dimensions and content of the dashboard's window at the time of printing.
A dashboard's printed page width is dictated by the bounds of the window, and will never exceed one page; excess pages are generated vertically only. If you find that the printed version of your dashboard extends vertically more than you would like, consider turning off display of project stats and resources in the dashboard’s view menu.
Note
See the Reporting and Printing chapter for details on printing the content of a single project.