Working in Resource View
Resources are the lifeblood of any project, without which an idea will never reach fruition. Effective management of personnel, equipment, and raw materials is key to bringing your project to a successful conclusion, and OmniPlan provides the tools you need to do just that.
In OmniPlan, resource management is primarily accomplished in Resource View (the second button in the toolbar’s view switcher). This chapter describes the functions and features of the view; the Task and Resource inspectors also contribute to resource organization.
Creating and Deleting Resources
A key part of building out your project is describing the resources that make up the team you’re working with, and the equipment and materials they’ll be using to get the job done. The resource outline is a quick and efficient way to do this.
There are several ways to create new items in Resource View:
Select an item in the resource outline and press Return (or Command-Return, depending on the Keyboard Options in OmniPlan’s General Preferences).
Click the Add button in the toolbar above the outline.
Drag a Contacts card into the resource outline to create a Staff resource that collects its contact information from the Contacts.
Secondary-click and choose Add ▸ Resource from the contextual menu.
There are a few ways to delete a resource or resource group:
Select a resource or group in the outline, then press the Delete key.
Select the item, then click the Remove button in the toolbar above the outline.
Select the item, then secondary-click to reveal the contextual menu and choose Delete.
Assigning Resources to Tasks
Most tasks require some kind of resources in order to complete. Software development needs programmers, excavation needs heavy machinery, and construction needs lumber. Tracking which resources are assigned to which tasks helps you to see how long the tasks will take to complete, and when your resources are going to be busy or idle.
There are several ways to assign a resource to a task:
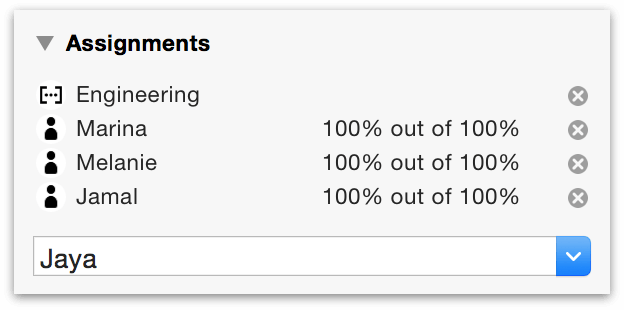
Select the task in task view, open the Assignments section of the Task inspector, and check the resources you’d like to assign. You can then edit the amount to assign, if it’s different from the default amount. You can also see all of a resource’s assignments, and adjust their amounts or clear them, in the Assignments section of the Resource inspector.
Drag tasks around between resources’ lanes and the Unassigned lane in the resource timeline chart. While dragging a task from one resource to another, you can hold the Option key to assign the task to the second resource without unassigning it from the first.
Drag a card from Apple Contacts to a task in the task view. If the project doesn’t yet have a resource associated with that card, a new one is added.
Edit the Assigned column of the task outline or the assigned resources area in the Gantt chart. The following are helpful hints:
Enter resource names in the Assigned column to assign them to the task.
You can also double-click resource lists in the Gantt chart and edit them directly there.
Follow a staff resource with a percentage inside curly braces to assign an amount other than 100%.
Follow a material or equipment resource name with a number in curly braces to assign an amount other than 1 unit.
Separate multiple resource names with semicolons.
Grouping Resources
As with tasks, you can also group resources — and resources can be assigned to groups of tasks, as well.
Assigning Groups
If you assign a resource to a group of tasks, the resource becomes assigned to every task in the group. The group itself can’t have a resource assigned to it.
If you assign a group of resources to a task, OmniPlan provisionally labels the task as having the whole resource assigned. Then, when you level resources, one member of the group is chosen to work on that task. If that member becomes unavailable, leveling again assigns a different member.
Characteristics of Resource Groups
A resource group is just a way to organize several resources together, so it doesn’t have a lot of the same characteristics as an individual resource, like Efficiency and Cost.
Name — Of course, a resource group has its own name.
Email — You can assign an e-mail address to a group, in case you have a mailing list or some address which goes to all of the members in the group.
Type — A resource group can contain resources of any type (Staff, Equipment, or Material), but its own type is always Group.
Cost/Use, Cost/Hour, and Efficiency — These are shown as averages of the values of all members of the group. If you enter a new value, it is applied to all members of the group.
Tracking Assignments with the Timeline
When you want to manage your project from the point of view of the resources available, the timeline in Resource View will help you visualize and control your assets.
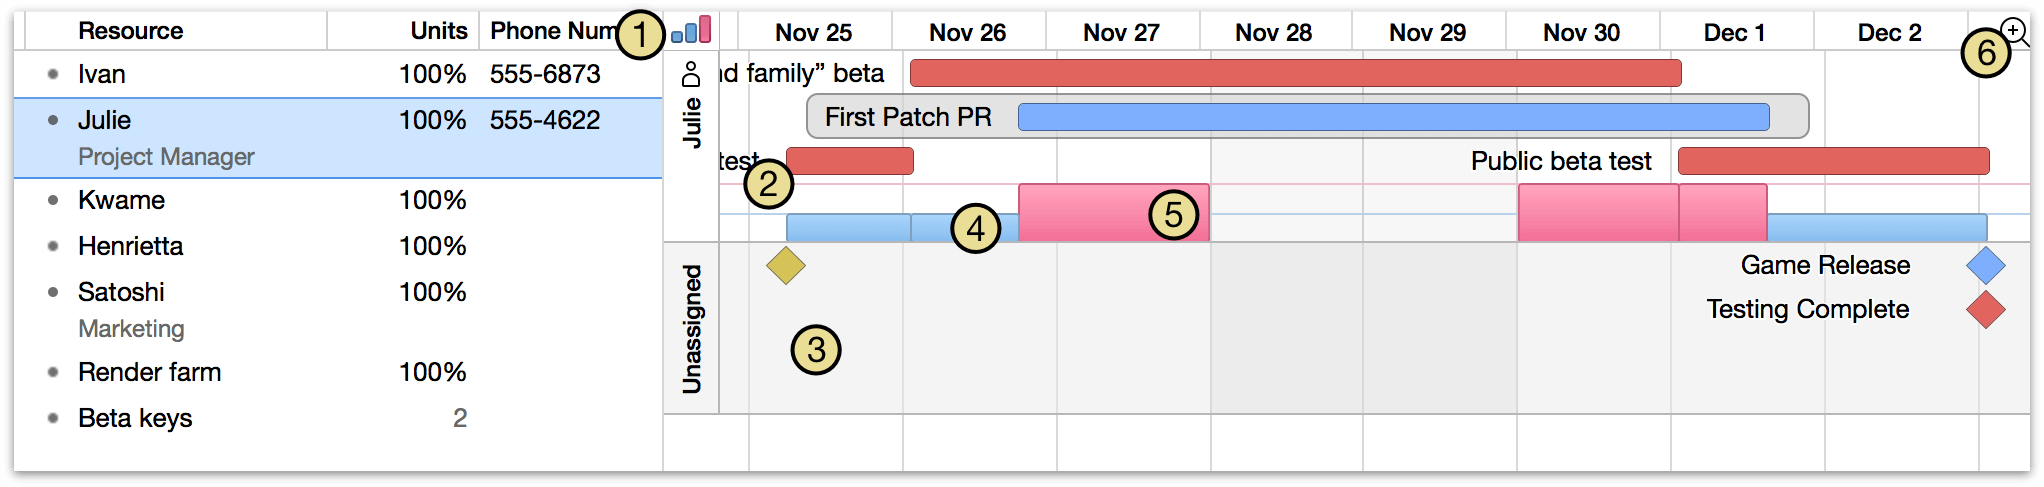
Click the bar graph button to show or hide the resource allocation graph beneath each resource’s timeline.
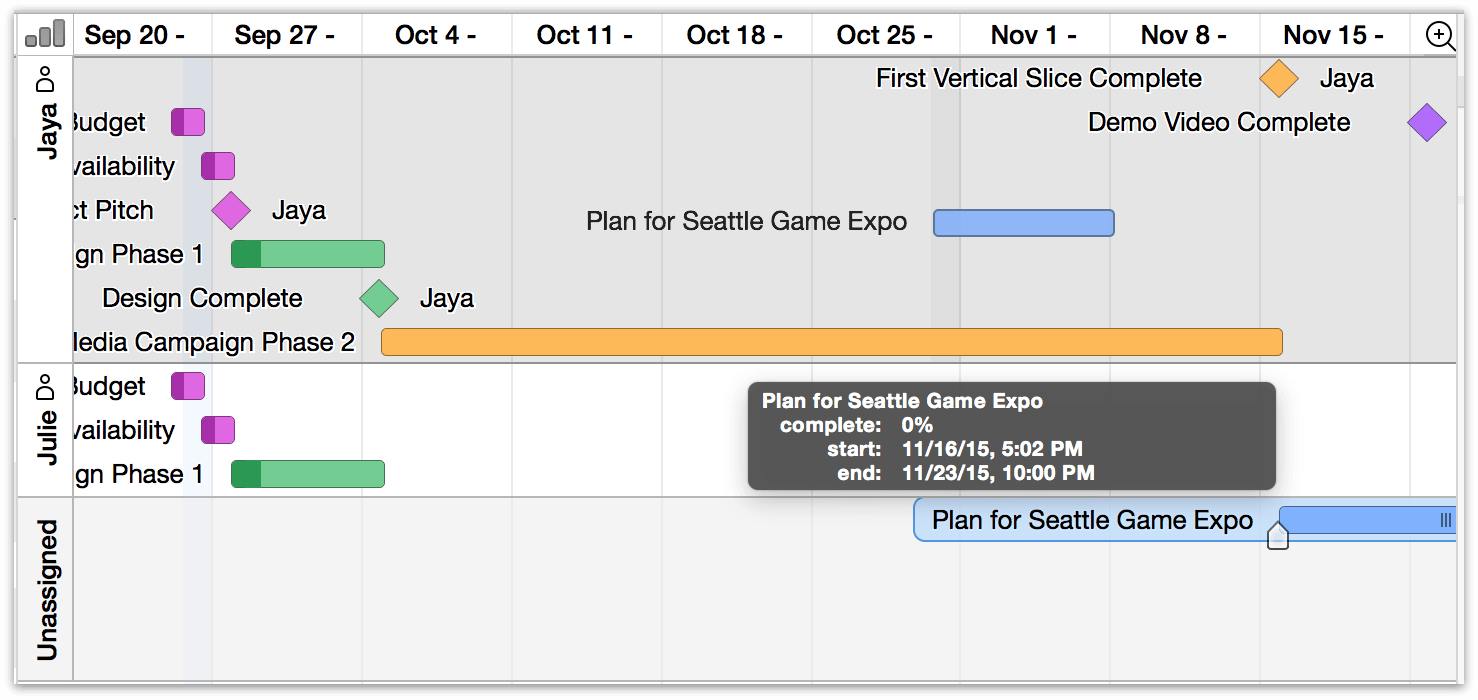
The chart shows a timeline of tasks for each resource you select in the outline. If you select no resources, the chart shows all resources’ timelines. If the resource is unavailable during some normal working hours, because it has customized working hours, the unavailable times have a background of the Off-hours color (gray by default) as it is set in Styles View.
Below the resources’ timelines, an Unassigned timeline shows the tasks which aren’t assigned to any resource. You can drag tasks between timelines to change their assignments.
A blue bar in the load graph represents time when the resource is being used at 100% of its available units.
A pink bar in the load graph represents time when the resource is being used at over 100% of its available units. You can level the project to clear up such problems.
You can zoom the timeline the same way you zoom the Gantt chart. Just choose a scale from this menu or drag in the header area.
View Options in Resource View
As with Task View, the resource outline can be customized to display columns with a wide variety of information about your resources. To show and hide columns, select them in View Options (Command-J) or secondary-click on the column header and toggle them in the contextual menu that appears.
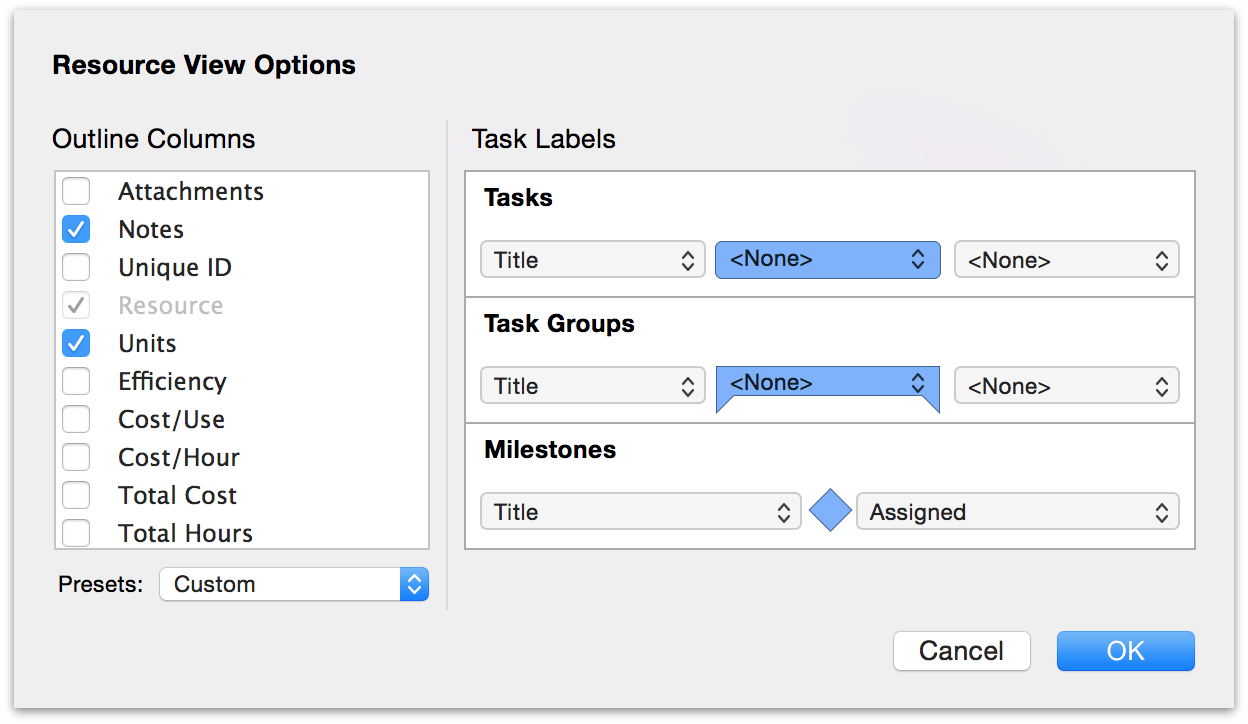
Also as with Task View, the Resource View’s view options offer metadata fields for display next to (or superimposed upon) tasks and groups as displayed in the resource timeline. Each appended field has a dropdown menu that you can choose any of the available custom columns’ values to occupy.
Description of some of the more involved custom Resource View columns follows.
- Attachments
- You can click the paper clip icon Attachment icon in the selected row to see a menu of the item’s attachments, or to link to a file if there isn’t one linked yet. Rows with links to files show a paper clip icon even when they are deselected.
- Notes
- You can click the note icon in the selected row to show or hide the item’s note, or to create a note if there isn’t one yet. Rows with notes show a note icon even when they are deselected.
- Unique ID
- The unique ID is a number assigned to each resource to identify it unambiguously, even if its name or position in the outline changes. A unique ID won’t ever change, and each new task or resource you create gets a new unique ID number. These numbers are useful for matching up items when you are importing and exporting projects between OmniPlan and other applications.
- Custom Work Week
- An icon appears in this column if a resource has a work week that differs from its default work week; the default work week for a resource is defined by its parent (if it’s a member of a group) or the project (if it’s not). You can click the icon to see the resource’s work week, and from there you can always click the X button in the upper right of the week view to revert to the default.
- Schedule Exception
- An icon appears in this column if a resource has a work schedule that differs from its work week, such as when someone goes on vacation. You can click the icon to see the resource’s work schedule, and from there you can check the orange-highlighted dates to see where its exceptions are. You can click the X button in the upper right corner of any week view to clear the resource’s exceptions for that week.