Multi-User Collaboration (Pro)
On a large project, or one where resources are spread across different teams and projects, you may want to provide access to the project document so team members can check their status and update the project remotely. Alternatively, you may want to connect the project to a calendar account—either to publish work hours to it, or subscribe to calendar events representing a resource’s schedule. With the sync and sharing options in OmniPlan Pro, you have the flexibility to administrate your project in the way that best fits the needs of your team.
Choosing a Host Server
Before you begin sharing your OmniPlan projects you’ll want to make sure you have a server ready to act as a centralized repository for your files. Syncing a local copy of your project with the copy on the server—or to a calendar on a calendar server—is what makes sure everyone sharing the file is up to date with all of the latest changes.
If you don’t have a server set up and would like a free, secure option, you can create an Omni Sync Server account to host your shared OmniPlan projects.
Omni Sync Server is a hosting solution that meets the needs of most users. If your project has more stringent data security requirements, you can set up a private WebDAV server that you wholly administrate to act as the host for your shared projects instead.
Once you have a server in place, use the walkthrough in the following section to connect to your first sync account. From there you can either begin collaborating on projects already hosted by the server, or start hosting new projects by configuring their Sync & Sharing Options.
Setting Up A Server Account
There are two things you need to establish in order to collaborate with others on an OmniPlan project: your app-wide server account settings, and the sharing settings for the individual project file. These features are grouped around their respective themes in the OmniPlan-wide Server Accounts window (described here) and in a project’s individual Sync & Sharing Options.
The Server Accounts window (OmniPlan > Server Accounts) is where you’ll associate new server accounts with OmniPlan, manage your existing accounts, and view and retrieve project files from your servers.
When you connect to a server account for the first time, the window presents a guided setup mode for choosing the account type and entering the relevant login information. To add additional accounts after the first, click the Add Account (+) button in the lower left of the window.
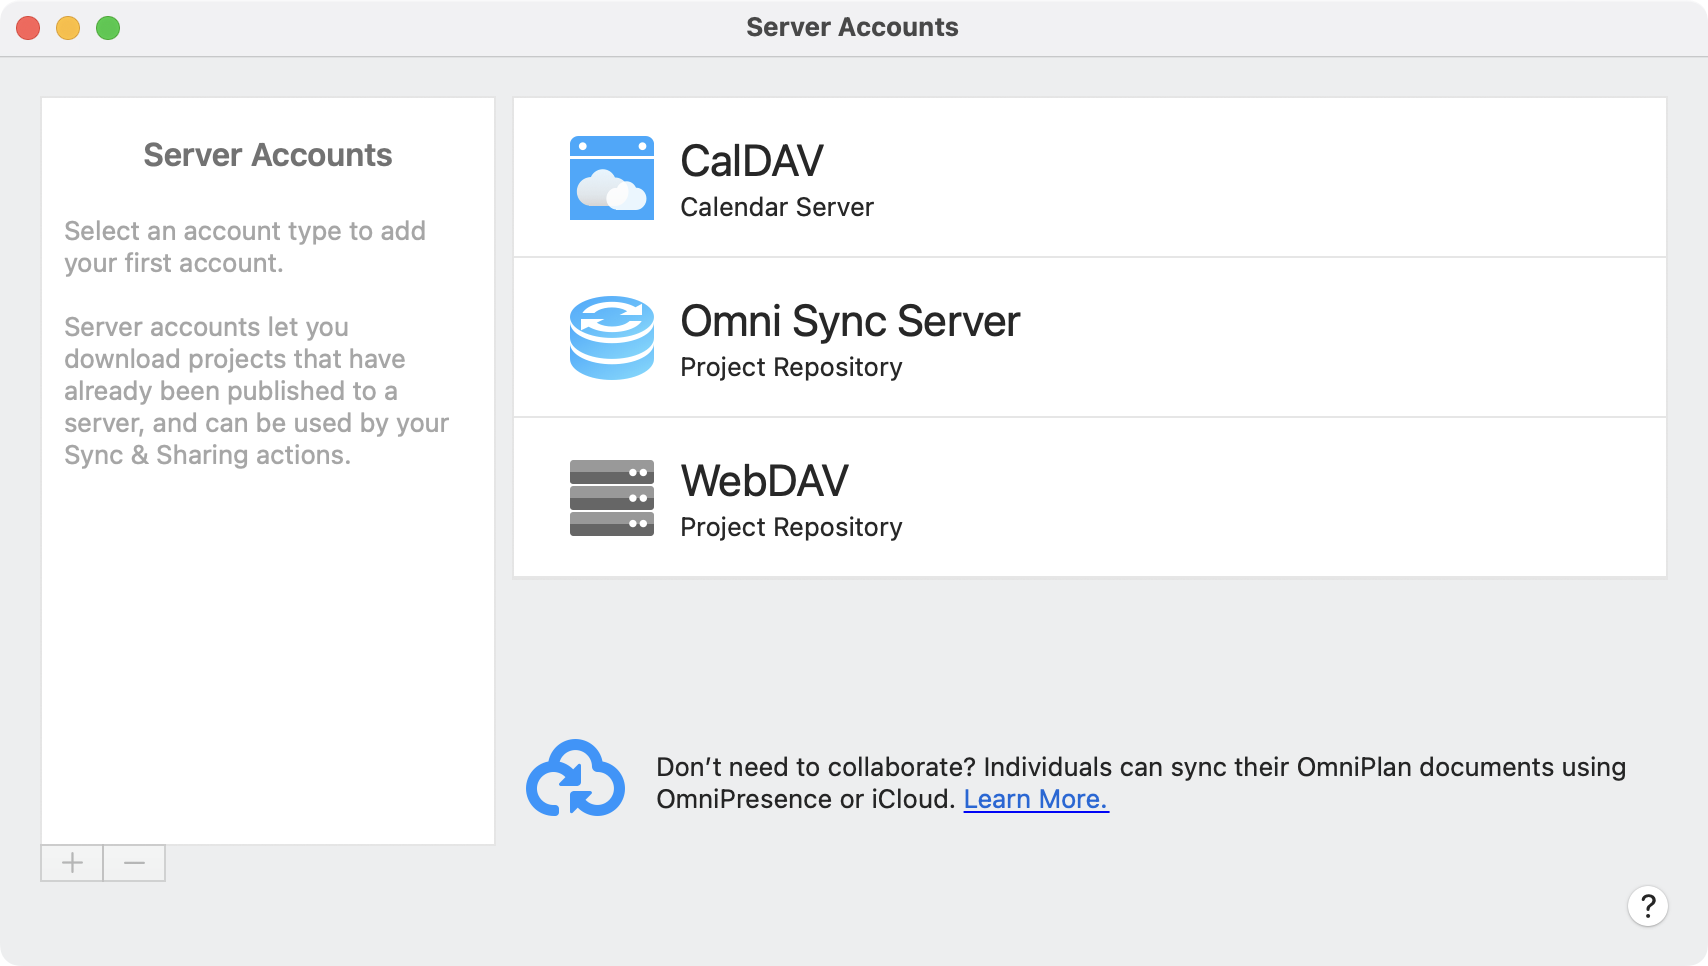
If you are setting up a server account for collaboration, choose either Omni Sync Server or WebDAV. If you are adding or retrieving work hours from a synced calendar account, choose CalDAV.
Once you have an account connected, it appears in the list on the left side of the window.
If you are connecting to a server account that already hosts existing projects, the project files it contains appear in the list on the right. Select a project in the list and click Download Project to make a local copy. The file opens, ready for collaboration—you can now publish changes to the server, and refresh your local copy with any changes made by other contributors.
Once you have downloaded a project file from a shared server repository, that copy of the file is the only one you should use for making updates and tracking changes. Downloading additional copies to the same Mac risks creating conflicts when merging changes back to the server.
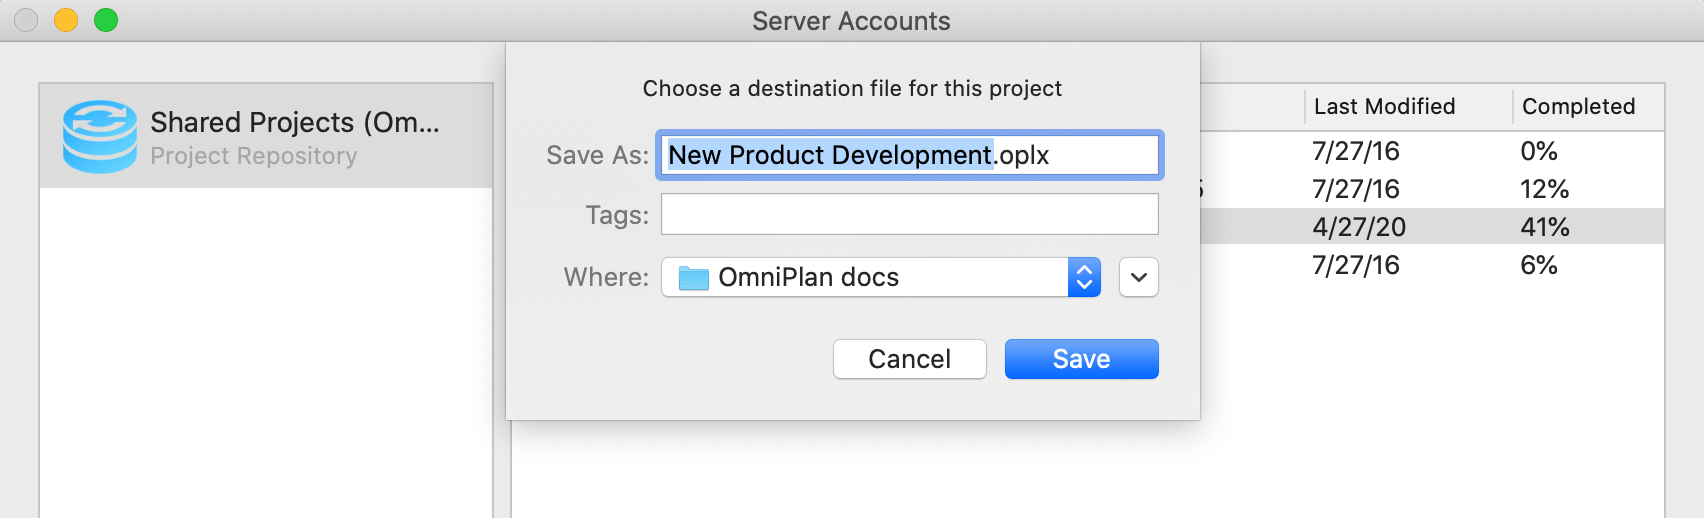
If you are setting up sharing for the first time and don’t have any projects synced remotely, the project list will be empty. The Setting Up Sync and Sharing walkthrough below will guide you through publishing your first project to the server.
With a CalDAV account selected, the list displays the calendars available on the server instead. Publish and refresh actions can be set up to pull scheduling information from these calendars rather than updates to the project’s status.
Managing Server Accounts
Once you have a server account set up and have begun publishing and subscribing to projects or calendars, you can use the Server Accounts window to manage your repository accounts and shared projects. Choose OmniPlan > Server Accounts to see and manage your shared OmniPlan projects.
The Accounts list shows your Omni Sync Server, WebDAV, and CalDAV accounts by name. Choose an account in the list to see the projects or calendars it contains. To add an account, click the Add Account (+) button below the list. To edit an account, select it and click Edit Account.
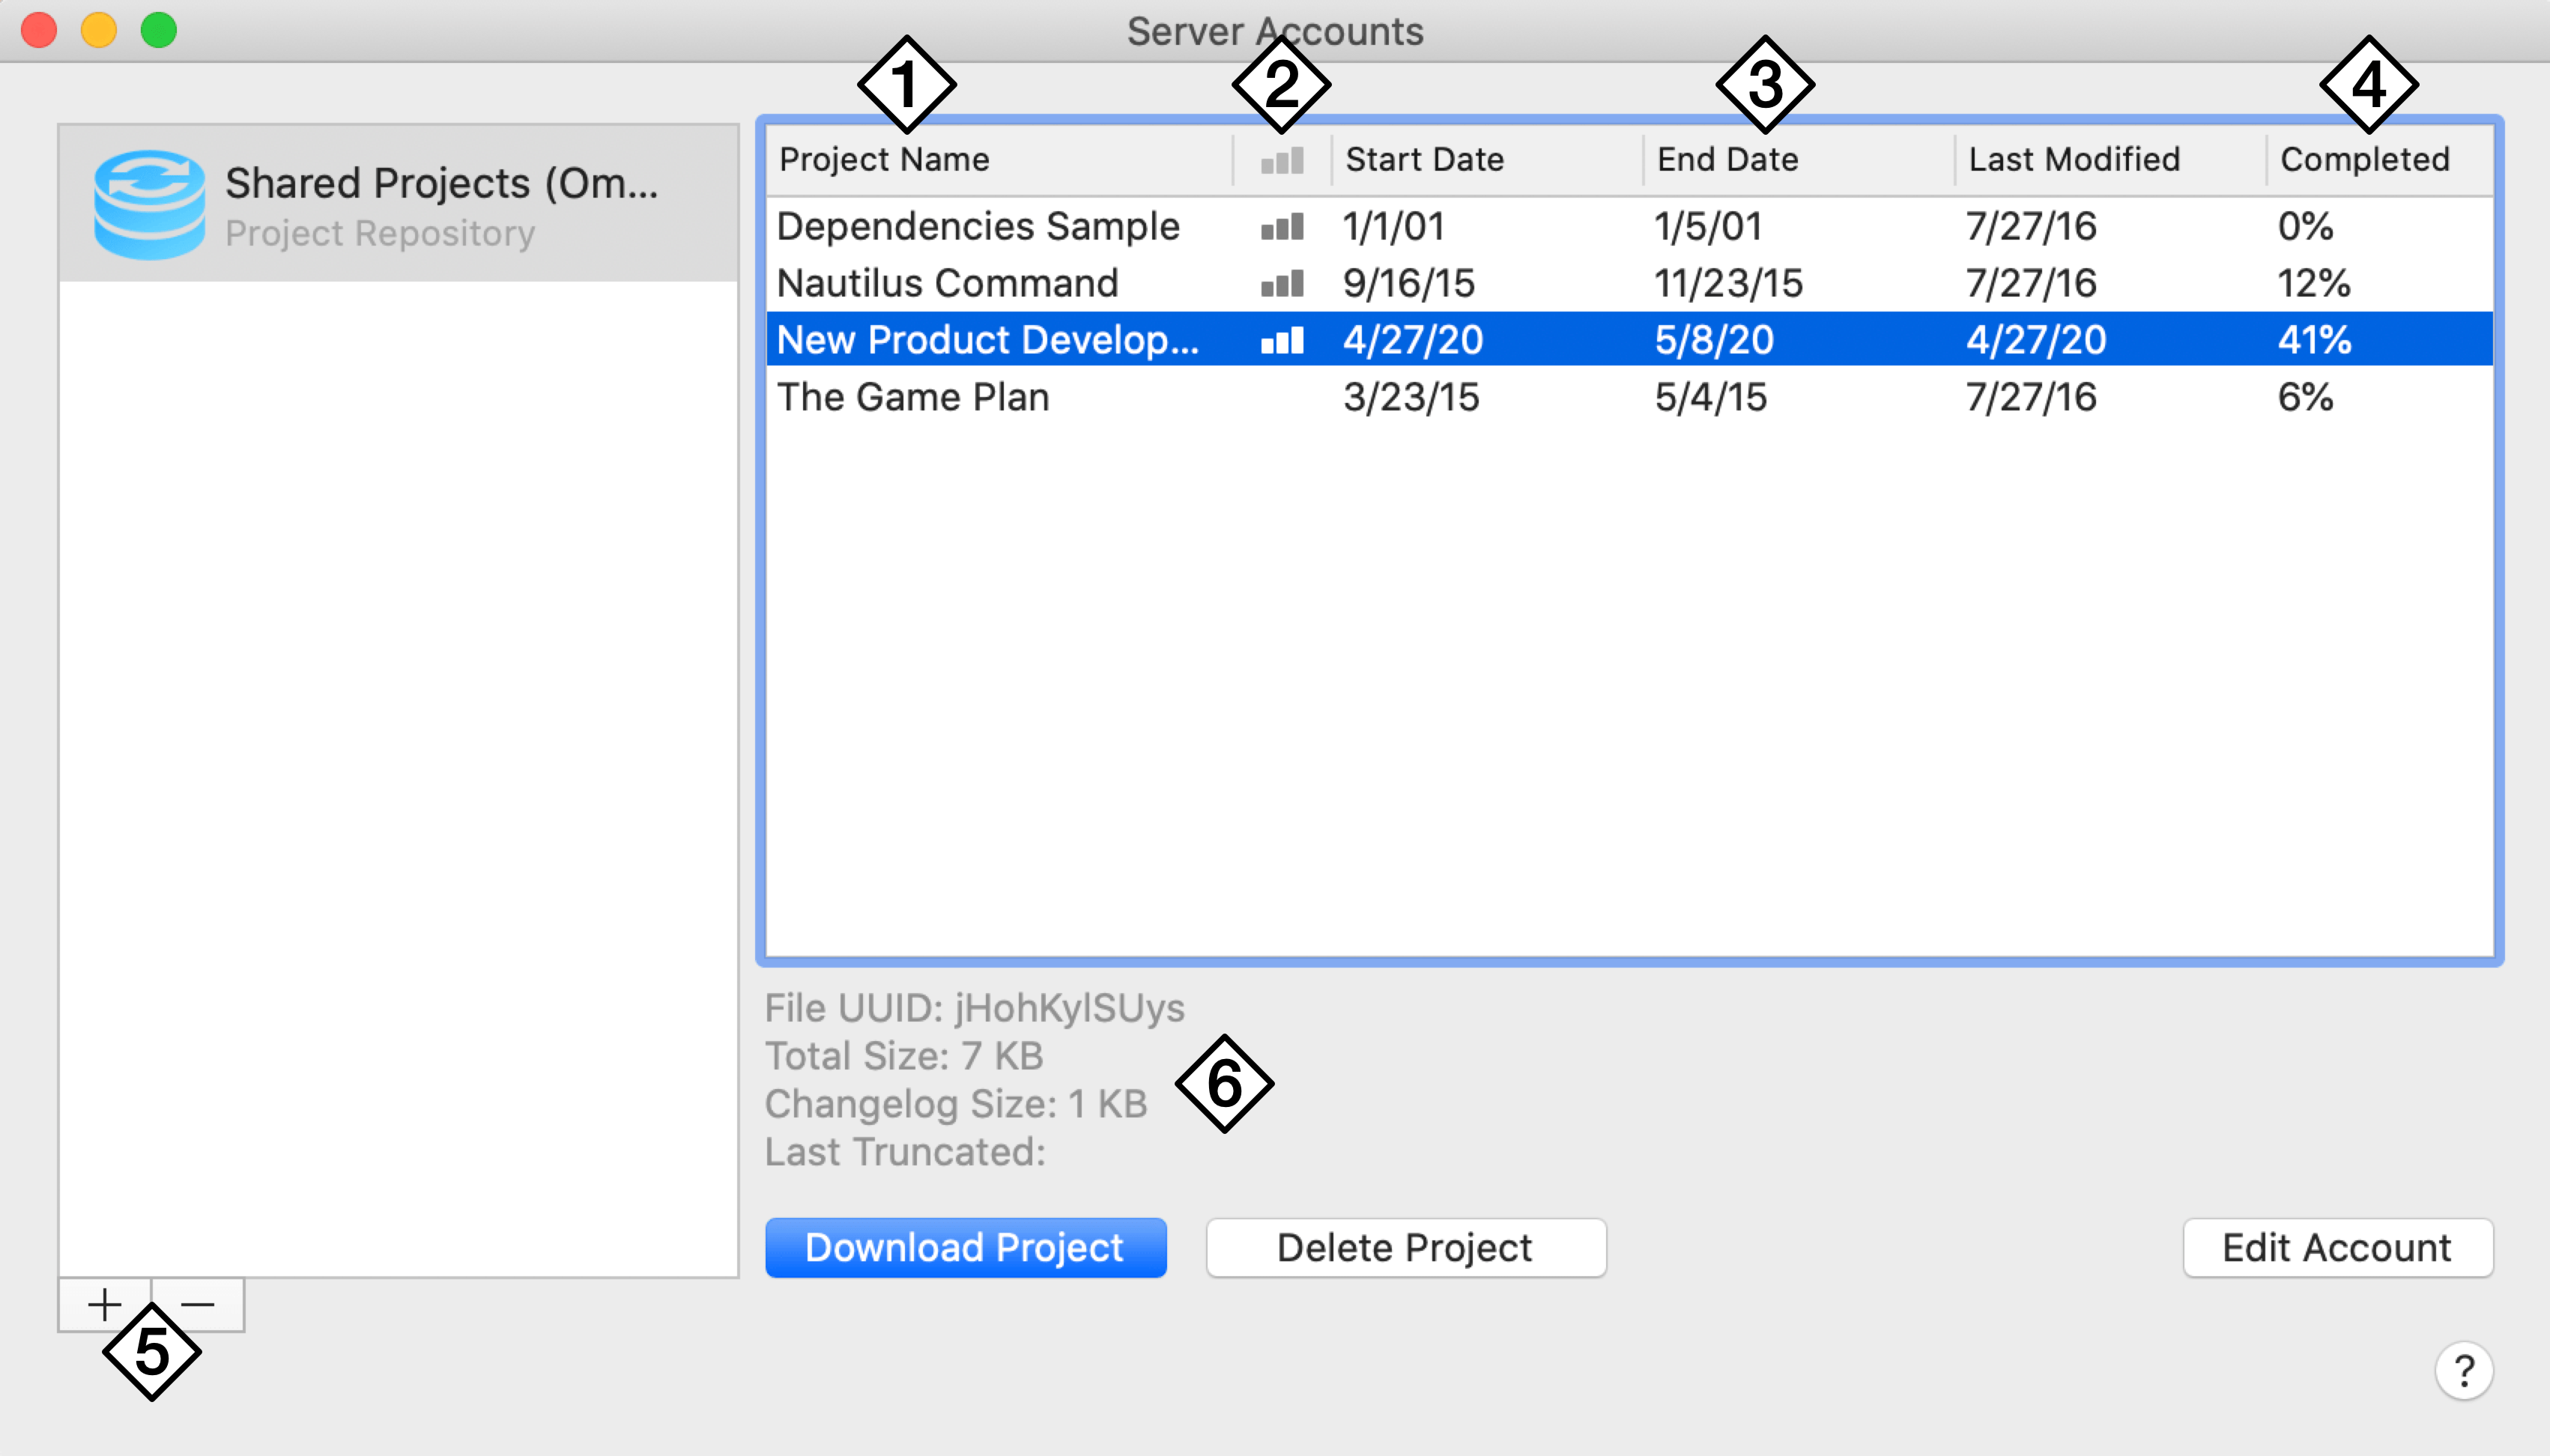
With an Omni Sync Server or WebDAV account selected, the list shows all projects that have been published to the repository, and the following information about them:
-
Project Name—The name of the project file.
-
Load—This column indicates, by the presence of a vertical bar graph icon, whether the project shares its resource load information with other projects in the repository for the purposes of leveling resources across projects.
-
Start Date, End Date, Last Modified—The dates when the project is scheduled to start and end, and the date it was last modified by any user with shared access to it.
-
Completed—The percentage of overall work on the project that has been completed.
-
Add Account, Remove Account—Click the Plus button here to add a repository account, and the Minus button to remove an existing account. Removing an account doesn’t delete its contents on the server; it only deletes it from the list of servers you have connected to OmniPlan.
-
File Metadata—This section displays information about the project file: its unique ID, its size, the size of the associated changelog file (for change tracking), and when the file was last truncated.
With a CalDAV account selected, the list displays the calendars available on the server instead.
Setting Up Sync and Sharing
Once you have a server account set up, you can begin syncing your project files to collaborate with other project contributors. You are able to choose sync actions for each project individually using its Sync & Sharing Options sheet (Project > Sync & Sharing Options).
For this walkthrough we will assume you are starting with a brand new server account (set up in the Server Accounts window above) and a fresh project that you want to work on collaboratively with others. You’ll be publishing changes you make to your shared server, which other editors will subscribe to (and vice versa).
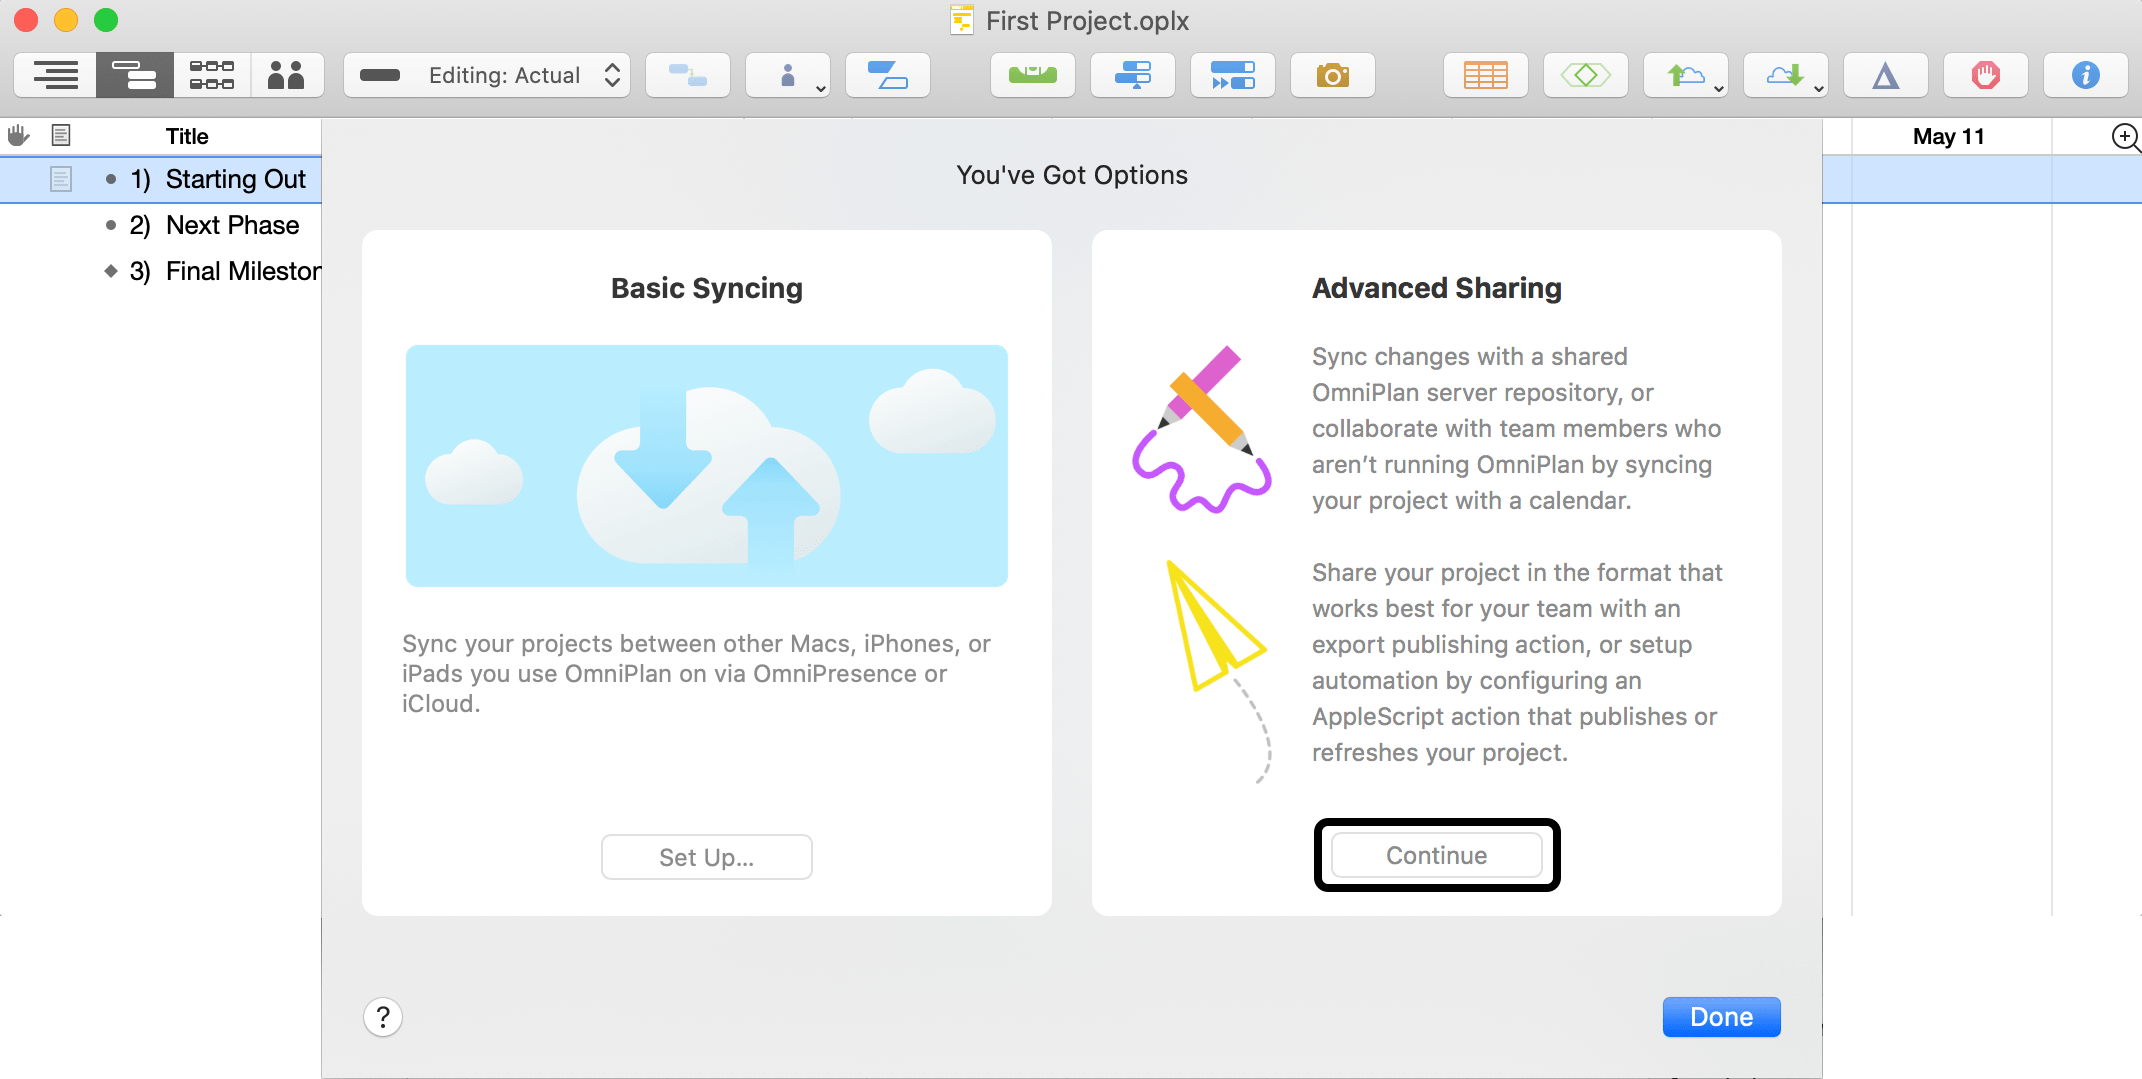
When you first set up sync and sharing for a project, you’ll see two options: Basic Syncing and Advanced Sharing. If you choose Basic Syncing you’ll be directed to the setup process for OmniPresence or iCloud storage—two great options if all you need is a remote place to keep your files.
Since this example has multiple contributors, we’ll choose Advanced Sharing instead. Click Continue to set up sharing for the project.
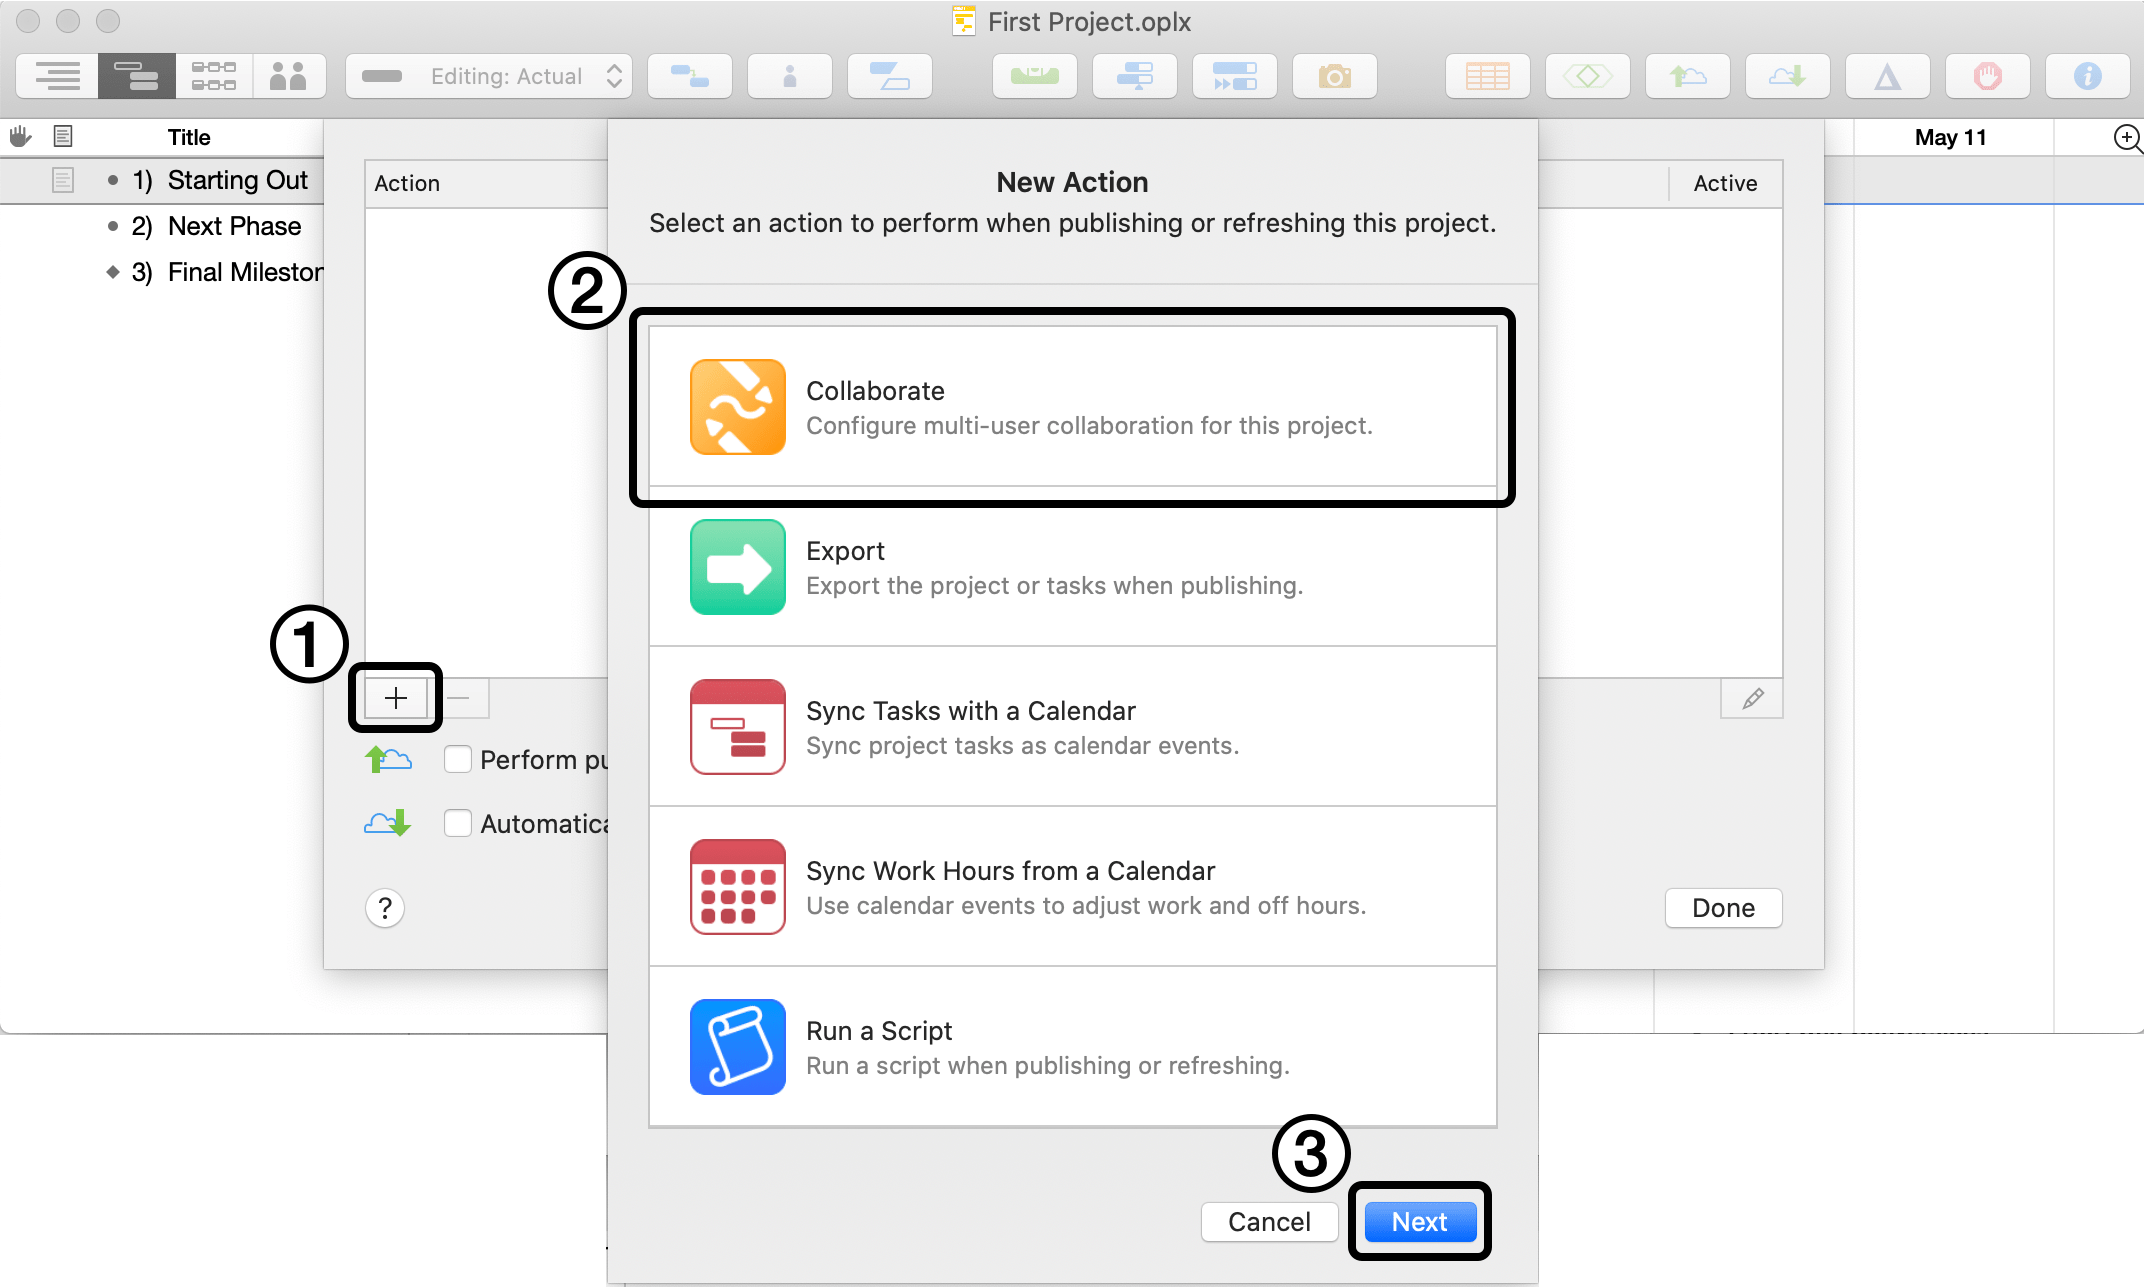
The list of share actions for your project starts out blank. Click the Plus button ① to add a new one and choose from among the available action types. You’ll see that you can perform a variety of automated tasks when sharing (publishing) your project; we’ll focus on collaboration for now. Choose Collaborate ② as the action type, then click Next ③.
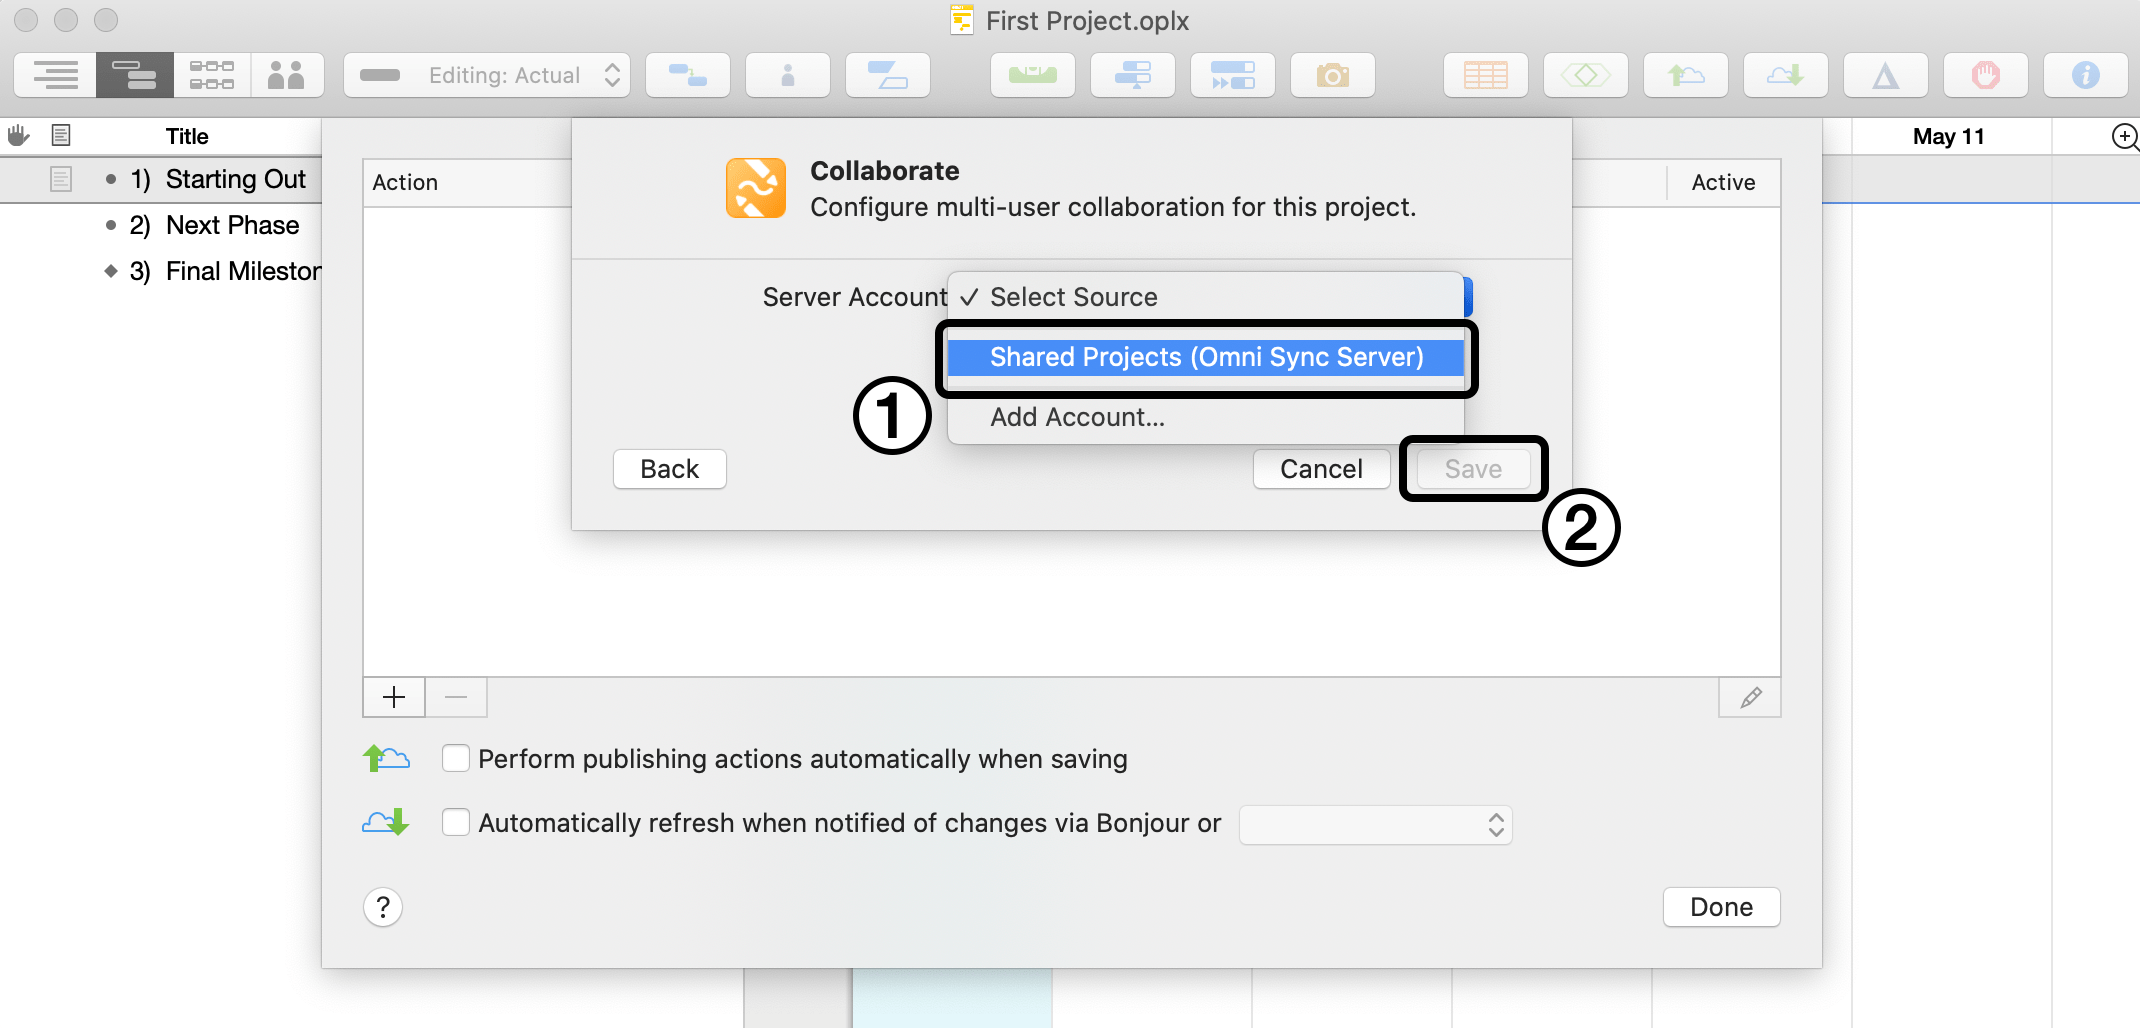
To collaborate on this project it will have to be stored on a server so others can access it. If you set up an account with the Server Accounts window, click Select Source ① and choose it from the list (if not, you’ll want to set one up now and come back to this step). After choosing your account, click Save ②.
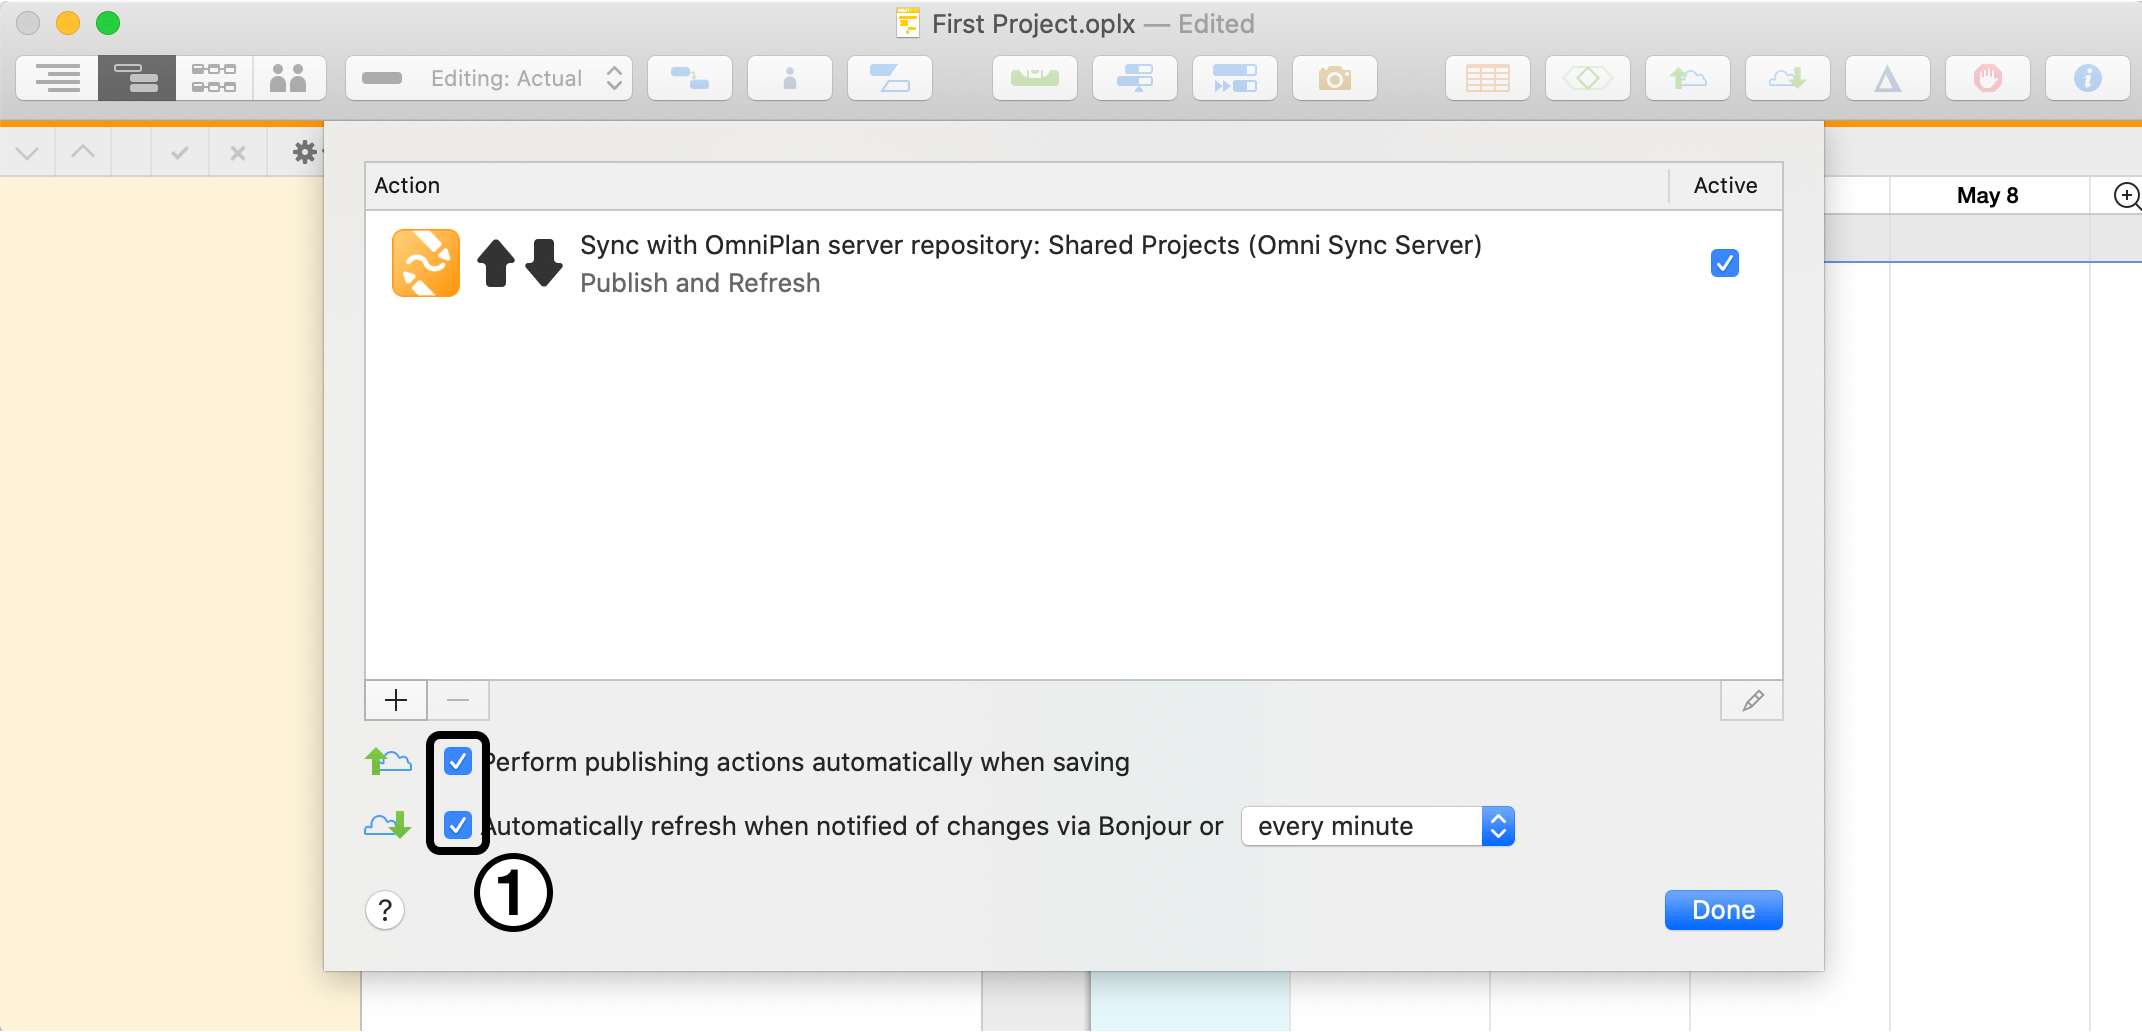
Your Sync & Sharing Options sheet now contains an active action for publishing to, and refreshing from, your shared server repository. To edit details of the action, select it and click the Pencil edit button at the bottom of the actions list. Use the checkboxes below the list ① to choose what prompts the project to publish or refresh its status.
Click Done, then save the project. If you selected Perform publishing actions automatically when saving, the project is published to the server for the first time. Otherwise, choose Project > Publish (Control-Command-P) to publish it manually.
The next time you check the Server Accounts window you’ll see the project listed in your account. Subsequent changes you make are published to the server based on the settings you chose in Sync & Sharing Options, and you can monitor those changes—any incoming from other editors who have similarly connected to your project—using change tracking (Project > Show Changes).
You can publish your local version of the project to the server by choosing Project > Publish (Control-Command-P), or by clicking the Publish button in the toolbar.
You can refresh manually from the server at any time by choosing Project > Refresh (Control-Command-R) or the Refresh toolbar button.
Sync and Sharing Configuration Options
Use the Sync and Sharing Options sheet (Project > Sync & Sharing Options...) for each project you want to share to configure publication and subscription actions to suit the needs of that project. The Setting Up Sync and Sharing section above provides a walkthrough for setting up your first Collaborate action; this section and those following it offer more information on the other Share actions available.
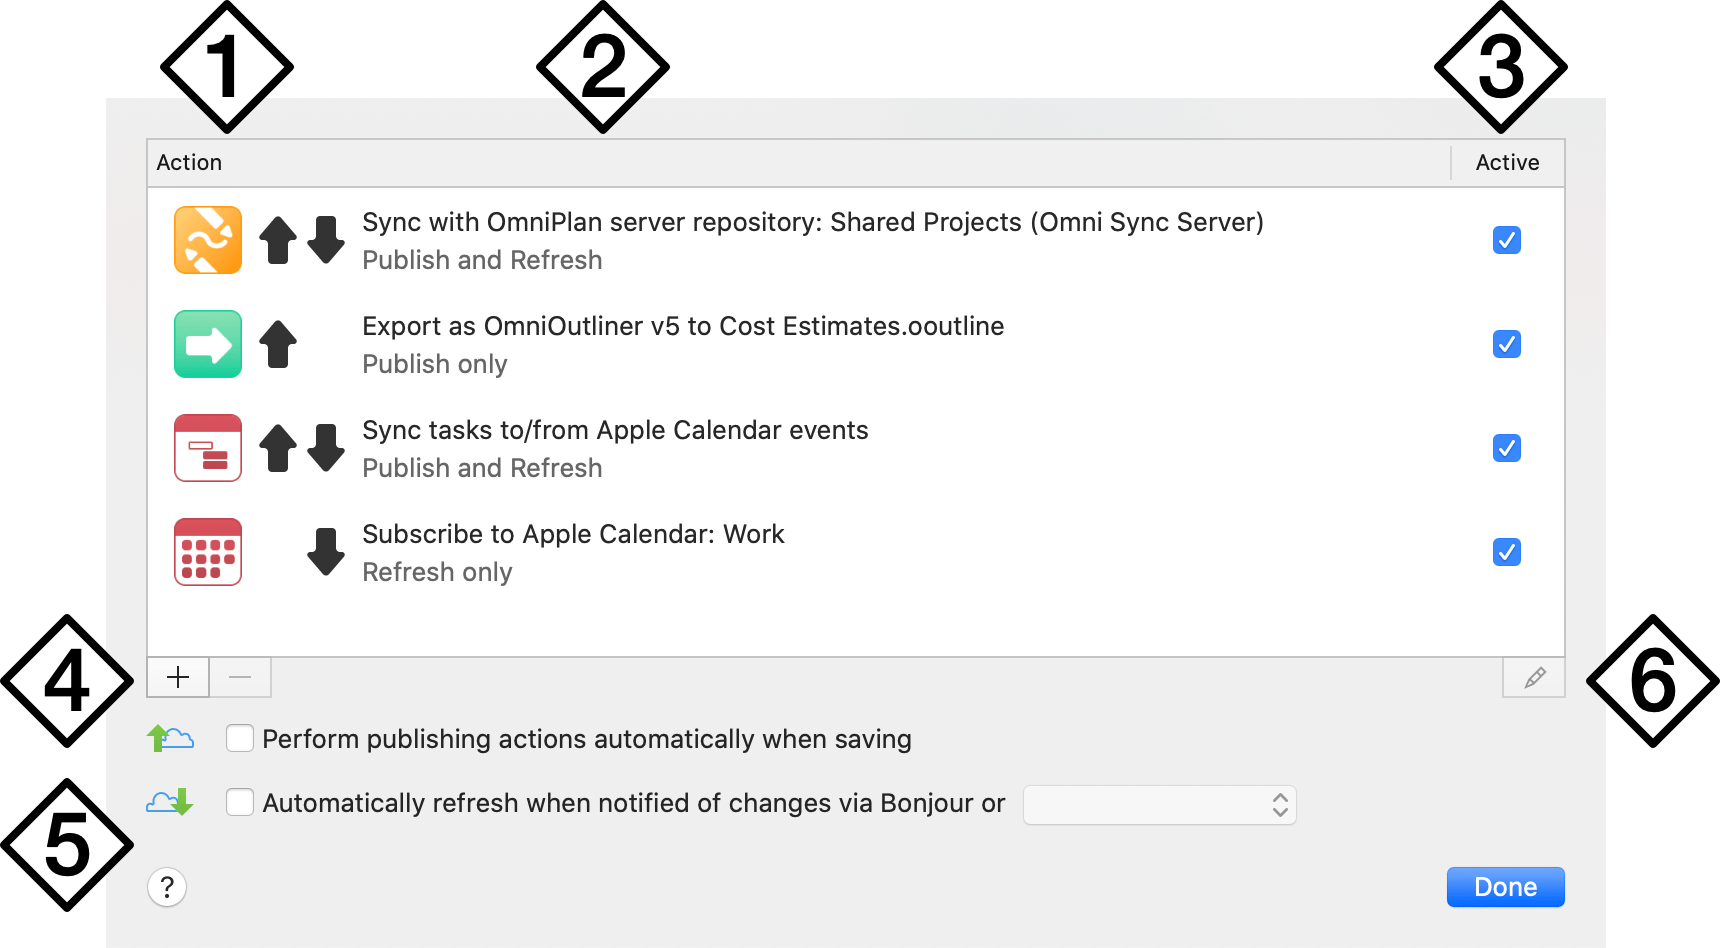
The Sync & Sharing Options sheet provides an overview of the sharing actions you have set up for the current project, and includes tools for adding, removing, and editing those actions.
-
Action Type and Direction—The icon shows the type of action for the row, and the arrows next to it indicate whether the action occurs on Publish (the up arrow), Refresh (the down arrow), or both.
-
Action Description—The text in the center of each action row describes the action, and notes whether the action occurs on Publish, Refresh, or both.
-
Action Active Status—The rightmost column contains a checkbox that indicates whether the action is currently in use. Deselect it to exclude the action from occurring when it normally would.
-
Add and Remove Action—Click the buttons here to add a new action (plus) or delete a selected action (minus). Deleting an action removes it from the project entirely. To temporarily disable it instead, deselect its active status checkbox.
-
Publish and Refresh Options—Choose whether to perform publishing actions automatically when saving the project file, and choose whether to automatically update when notified of changes via Bonjour or a specified timeframe from the pop-up menu to the right. These options apply to all actions set up for the project.
-
Edit Action—Further options for each action are available; choose the action in the list and click this button to open and edit the action details.
Collaborate Action Options
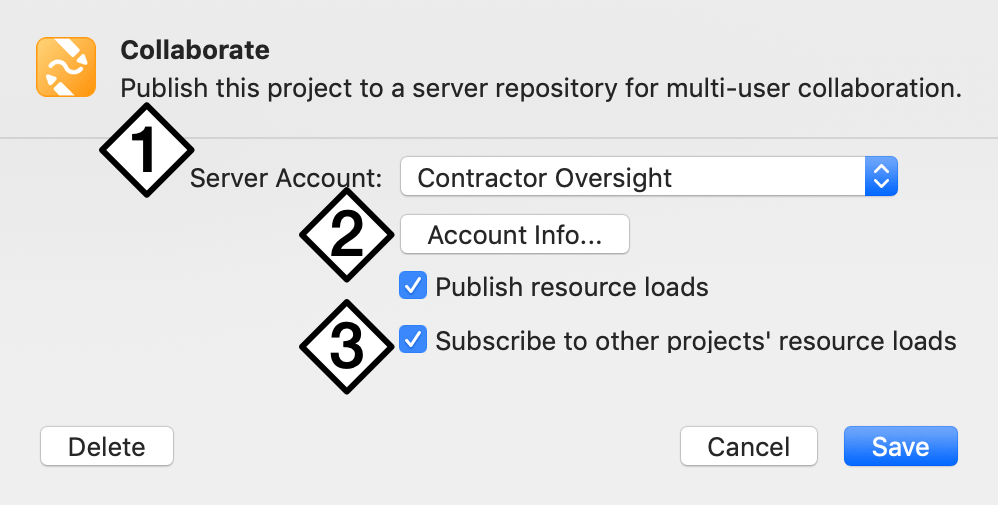
When creating or editing a Collaborate action, the following options are available:
-
Server Account—Choose the server account to publish and subscribe to from this dropdown menu. The menu lists all of the accounts you have set up in the Server Accounts window.
-
Account Info—Open a sheet with login details for the sync account associated with the action.
-
Resource Load Sharing—Choose whether to share the project’s resource loads with other projects on the server, and choose whether to respect the resource loads of other projects on the server when leveling.
A project file can sync with a single server repository at a time, and therefore can only have one collaborate action assigned to it.
Export Action Options
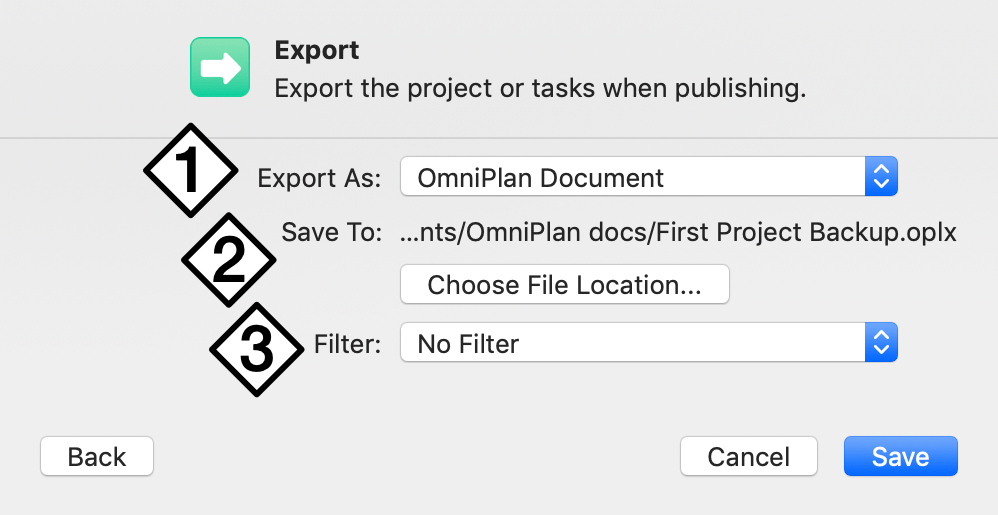
When creating or editing an Export action, the following options are available:
-
Export As—Choose a file format to export from this dropdown menu. The list of formats includes all of those available from File > Export, as well as the default native OmniPlan file format.
-
Save To—Choose a name and location for the exported file.
-
Filter—Set up or choose a custom filter to apply when exporting the project file. Any items excluded by the terms of the filter will not appear in the exported version of the project.
Export actions occur solely on publish.
Sync Tasks With A Calendar Options
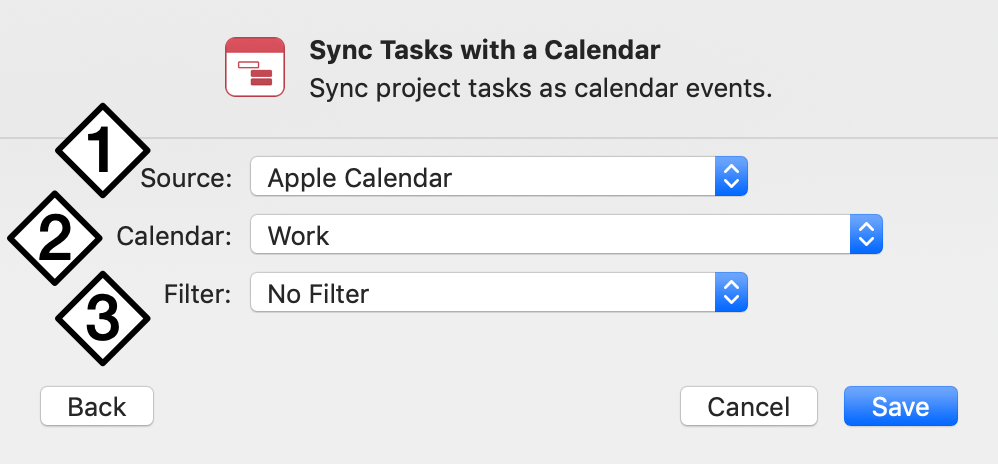
When creating or editing a Sync Tasks with a Calendar action, the following options are available:
-
Source—Choose an existing calendar source from this dropdown menu, or choose Add Account to open a sheet where you can choose a CalDAV server to add as a new calendar source.
-
Calendar—With a source selected, use this dropdown menu to choose the calendar you want to sync with.
-
Filter—Set up or choose a custom filter to apply when syncing tasks from the project file. Any tasks excluded by the terms of the filter will not appear in the synced version of the project.
If you didn’t choose to grant OmniPlan access to Calendar the first time you tried to create a Calendar-related publish or update action, you can grant it after the fact with System Preferences > Security & Privacy > Privacy.
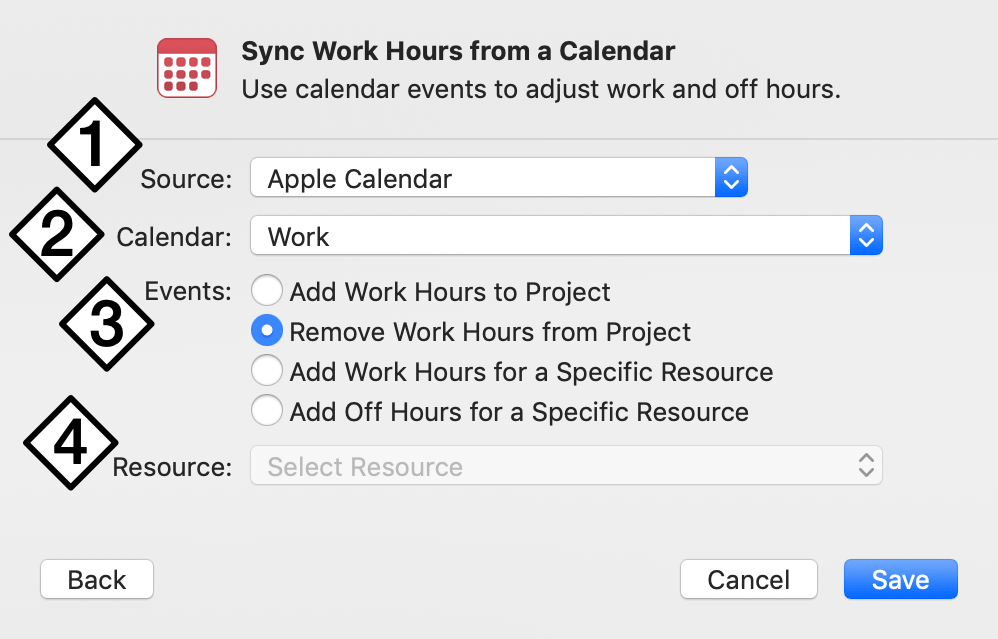
Sync Work Hours From A Calendar Options
When creating or editing a Sync Work Hours from a Calendar action, the following options are available:
-
Source—Choose an existing calendar source from this dropdown menu, or choose Add Account to open a sheet where you can choose a CalDAV account to add as a new calendar source.
-
Calendar—With a source selected, use this dropdown menu to choose the calendar you want to retrieve events from.
-
Events—Choose what happens when events are retrieved from the calendar. Calendar events can either represent new work hours added to the project, work hours subtracted from the project, or additional work or off hours for a specific resource.
-
Resource—If you chose for calendar events to add work or off hours for a specific resource, choose the resource from the dropdown menu here.
Due to limitations in Calendar sync, OmniPlan is able to fetch data out approximately 11 months from the present when subscribing to events from a Calendar server.
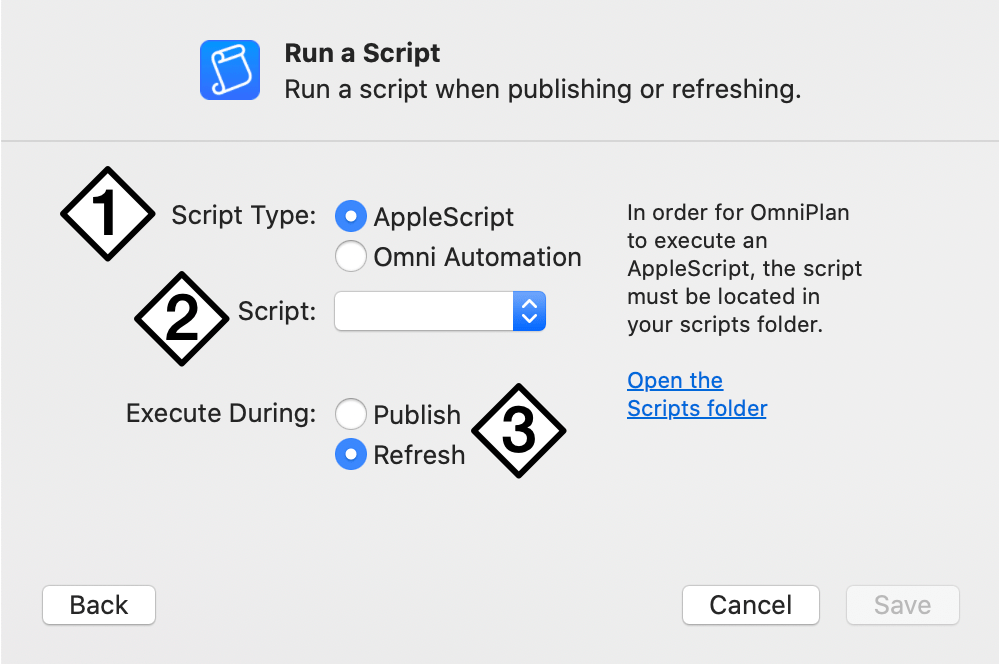
Run A Script Options
When creating or editing a Run a Script action, the following options are available:
-
Script Type—Choose from between AppleScript and Omni Automation.
-
Script—Choose the script to run from this dropdown menu. The menu is empty until you add an AppleScript file to the OmniPlan Scripts folder, which is linked in the text next to this item.
When you choose the Omni Automation script type, this is replaced by two other dropdown menus labeled Plug-In and Action respectively. Choose an Omni Automation Plug-In using the first, and choose one of its actions to run using the second. The Plug-Ins folder is linked in the text to the right.
-
Execute During—Choose whether the script should run when publishing changes to the repository, or when refreshing to receive changes from the server.
Sharing A Project With Others
To connect other team members to your published project, you will need to provide them with the following information:
- Account Type: Either Omni Sync Server or WebDAV.
- The User Name and Password used to access the sync server account.
- The name of the file to which they will subscribe.
Team members will use that information to add an account in OmniPlan > Server Accounts (see the instructions earlier in this chapter). Once they have created the account, the members of your team can subscribe to the project with the following steps:
- Open OmniPlan.
- Choose OmniPlan > Server Accounts.
- On the left side of the window that appears, click to select the Project Repository.
- Click to select the Project Name from the list of available projects in the repository.
- Click Download Project.
- Save a copy of the project file locally on your Mac’s hard drive.
The downloaded file is automatically subscribed to, and linked to the master copy on the server.
Once subscribed, members of the team can edit and review the OmniPlan project using their local copy of the file. Any changes that people make to their local copy (and use change tracking to accept) are saved to the sync server when they publish the project, and when other team members refresh their copy of the project, they receive those changes from the server.
To ensure that your local copy of the project file is always up to date with the latest changes from other team members, we recommend that you follow these steps whenever you open your local copy:
- Open the OmniPlan project file that you have saved locally.
- Get updates to the project; choose Project > Refresh (Control-Command-R).
- Show changes; choose Project > Show Changes (Option-Command-T).
- Make your changes to the project file.
- Accept changes to be published (see Change Tracking).
- Save the file with File > Save (Command-S).
- Publish your changes to make them available to other team members who subscribe to the same project; choose Project > Publish (Control-Command-P).
Change Tracking
Once you have specified the kind of subscribing you would like to do, you can use change tracking to see your changes alongside the changes of others, and accept or reject changes for publication to the copy of the project on the server.
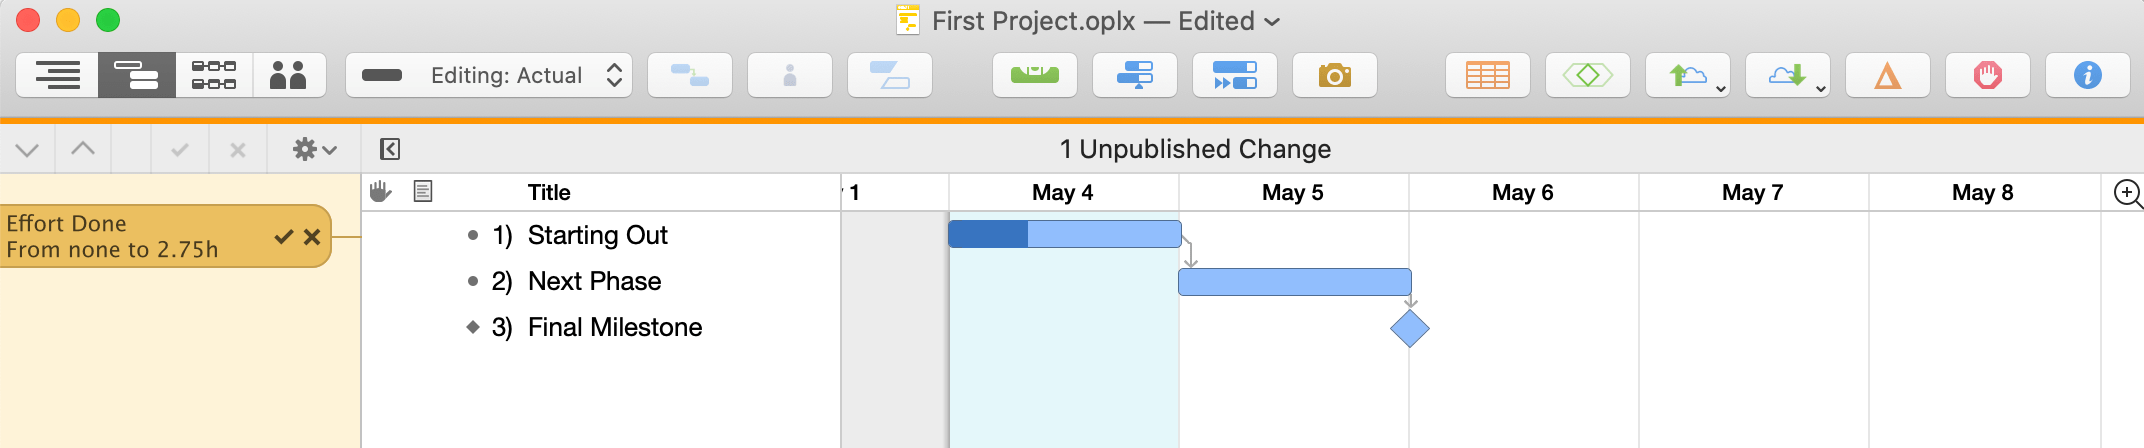
To view all changes made to the project, choose Project > Show Changes (Shift-Command-T). A sidebar appears that shows logs of the changes you have made along with changes from your teammates, with a notice bar (beneath OmniPlan’s main toolbar) with controls for accepting and rejecting the changes.
To accept or reject all changes, use the Accept All and Reject All commands in the Gear menu ![]() in the change tracking bar.
in the change tracking bar.
To accept or reject individual changes, select an individual change in the sidebar and use the Accept ![]() or Reject
or Reject ![]() buttons.
buttons.
When you publish a project after accepting changes, those changes are retained in your local copy and saved to the copy on the server.
When you publish a project after rejecting changes, those changes are removed from your local copy of the project as well as from the server copy.
In either case, the sidebar entry for the change is removed.
Balancing Resource Loads Across Projects
If resources (usually human members of your team) are shared between multiple projects in the same repository, you’ll want to decide in the Collaborate action’s options whether you’ll publish the current project’s resource loads to other projects and whether the current project will subscribe to the resource loads of others.
Choosing to publish a project’s resource loads means that other subscribing projects will obey its workload information when leveling; if Julie is working on Project A on Wednesday and its loads are being published to Project B, after leveling Project B won’t schedule her to work on Wednesday.
Choosing to subscribe to resource loads means that the project will obey all constraints by projects in the repository that are publishing their loads. By using only the publish or subscribe option a hierarchy of priority can be established between simultaneous projects—a project that only publishes will always have its needs met first, while a project that only subscribes will be assigned resources only when they can be spared.
By both publishing and subscribing, projects are treated as equals—and if a project neither publishes or subscribes, it ignores external factors and syncs only with its own updates.
The key to balancing resource loads across projects is that individual resources be tagged and identified by a unique email address that is shared across all projects. This can be set in the Resource Info section of the Resource inspector.
Cleaning Up Stale Usage
If OmniPlan finds unused resource load information on the server, it detects the problem and prompts that you clean it up. This can happen if someone removes a project that is sharing resource loads using a version of OmniPlan older than v2.1, or if someone deletes the file directly from Finder or Terminal. Until you allow it to clean up, there may be misleading resource load information shared with your active projects.
The clean way to remove a project from a server repository is to open the Server Accounts window and use the Delete Project button.