The Styles Inspector
The Styles inspector holds tools for configuring the visual style of individual item selections, item classes (such as groups and milestones), and the project as a whole, and provides a summary of styles applied to any currently selected items.

Selection Styles
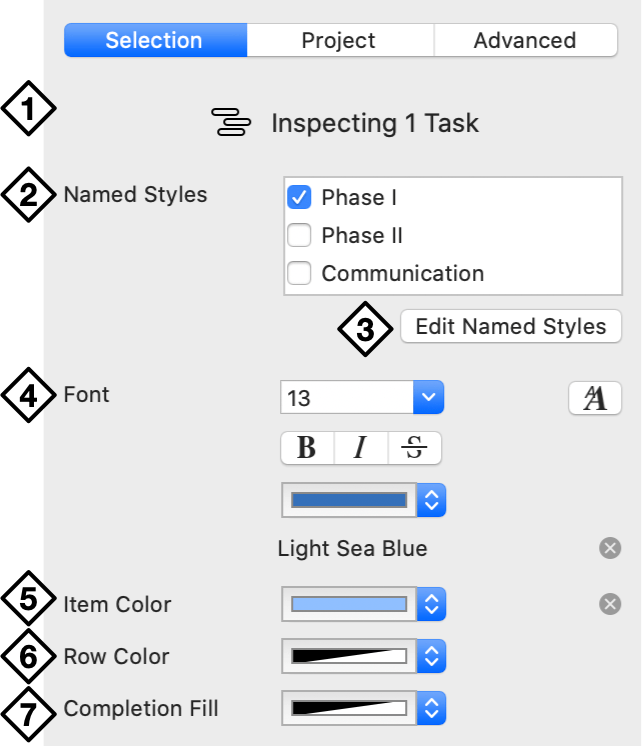
Use the Selection tab to set ad hoc styles for the items that you are currently inspecting.
-
Selection Indicator—The space at the top of the inspector describes the items that you currently have selected. You must have one or more tasks or resources selected to apply selection styles; to edit styles for the entire project, use Project Styles instead.
-
Named Styles—Reusable style templates that can be applied to individual items. Any named styles set up for the project are listed here; select a style’s checkbox to apply it to the inspected items.
This area does not appear if no named styles are set up for the document.
-
Edit Named Styles—Click to open the Named Styles editor in the Project Styles pane.
-
Font—Use the controls in this section to change the size, style, color, and typeface of the inspected item’s row text. Click the X next to a property to remove it.
-
Item Color—Choose a color for the bar that represents the item.
-
Row Color—Choose a color for the item’s row in outlines throughout the app.
-
Completion Fill—Choose a color for the completed portion of the item’s bar. Only available if turned on in the Advanced tab.
Selection styles have higher precedence than any other type of style. If an item has a selection style applied to it, that style wins over any Named Styles editor or Project Styles.
Project Styles
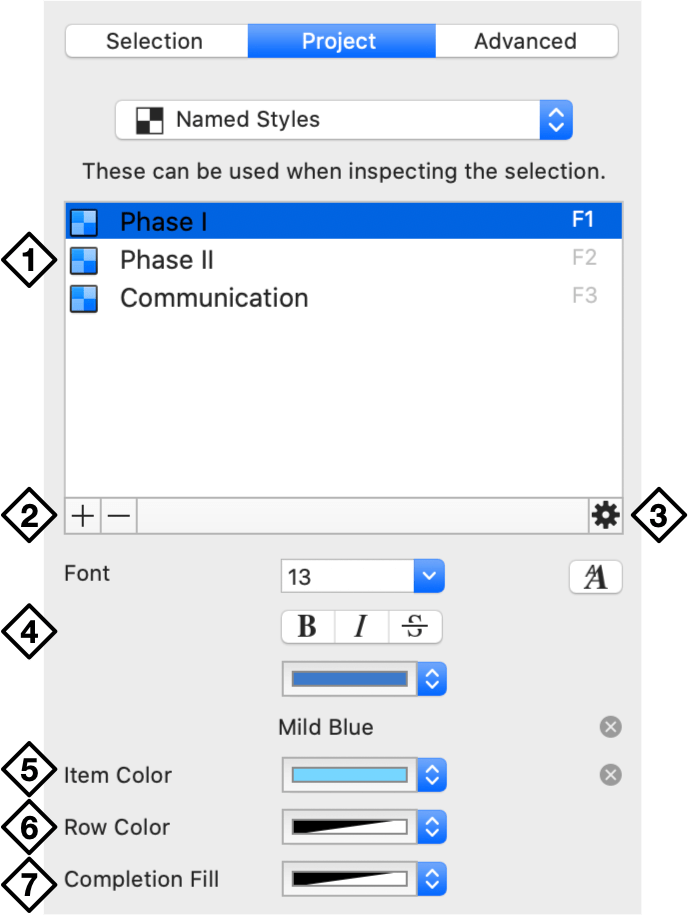
Use the Project tab to edit styles that apply to common classes of items across the project, as well as the to document as a whole.

-
Styles Menu—Choose the project style to edit from this popup menu. Options include:
- Default Style—This is the base style for the document as a whole. Where applicable, other project styles and selection styles are layered above it.
- Normal Tasks—The base style for normal tasks throughout the project.
- Milestone Tasks—The base style for milestones throughout the project.
- Group Tasks—The base style for group tasks throughout the project.
- Hammock Tasks—The base style for hammock tasks throughout the project.
- Resources—The base style for resources throughout the project.
- Overdue Tasks—The base style for overdue tasks throughout the project.
- Completed Tasks—The base style for completed tasks throughout the project.
- Named Styles—Reusable style templates that can be applied to individual items via the Selection tab. Choose this to set up and edit named styles.
-
Font—Use the controls in this section to change the size, style, color, and typeface for the selected project style. Click the X next to a property to remove it.
-
Item Color—Choose a color for the bars of all items with the selected project style.
-
Row Color—Choose a background color for the outline rows of all the items with the selected project style.
-
Completion Fill—Choose a color for the completed portion of item bars with the selected project style. Only available if turned on in the Advanced tab.
Editing Named Styles
Named Styles are saved collections of style attributes that you can apply as ad hoc styles to selected items using the Selection tab. These styles are saved with the document, can be included in templates, and are ideal for frequently used styling of individual items.
-
Named Styles List—Named styles saved with the document are listed here. The first nine styles are assigned keyboard shortcuts shortcuts F1 through F9 by default. Click and drag to reorder styles in the list.
-
Add/Remove—Click the Plus and Minus buttons to add or remove styles from the list. Deleting a style here removes the style from any items in the project that had it applied.
-
Gear Menu—Opens a menu with commands to Copy a selected style, Rename it, Duplicate it, or Reset any of its custom attributes.
-
Font—Use the controls in this section to change the size, style, color, and typeface for the selected named style. Click the X next to a property to remove it.
-
Item Color—Choose a color for the bars of items with the selected named style.
-
Row Color—Choose a background color for the outline rows of items with the selected named style.
-
Completion Fill—Choose a color for the completed portion of item bars with the selected named style. Only available if turned on in the Advanced tab.
Advanced Styles
Use the Advanced tab to edit styles for miscellaneous structural aspects of the project appearance.
-
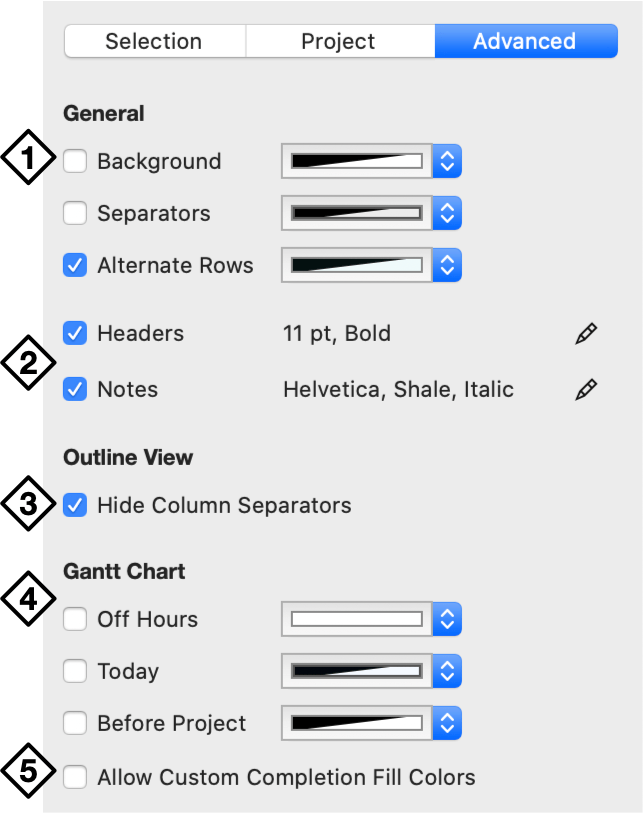
General—Select the checkboxes here to turn on colors for the document background, separators, and alternate outline rows.
-
Fonts—Select the checkboxes here to turn on custom fonts for chart headers and item notes. Click the Pencil button for each to open a popup font editor.
Deselecting the checkbox for a custom font clears it permanently from the document. It must be set up from scratch to be used again.
-
Outline View—Select to hide column separators in the outline.
-
Gantt Chart—Select the checkboxes here to turn on custom colors in the Gantt chart for off hours, the present day, and the time before the project’s scheduled beginning.
-
Allow Custom Completion Fill Colors—Select to allow selection and project styles to include custom colors for the portion of bars representing task completion. If deselected, the Completion Fill attribute is removed from the Selection and Project tabs.
Style Attributes
Use the Style Attributes inspector to view information about the style influences on the currently inspected item.

Any ad hoc styles are listed here, along with base project styles and named styles.
-
Copy a style from the inspector by dragging the style swatch (the square icon next to the style name) from the inspector to an item in the current view. This applies it to the item as an ad hoc selection style.
-
Clear a style from the inspected item by clicking the X on its row.