Support Humans at Omni often get asked how to understand OmniOutliner styling, which can be simple or quite complex. To help you style your OmniOutliner documents, we wrote this article describing different OmniOutliner style elements and listing some tips and tricks for getting started and for understanding the styling. Please use this article in conjunction with the OmniOutliner Pro Edition reference manual section on the style model.
OmniOutliner styles by edition
This article is meant mostly for users of the Pro Edition of OmniOutliner, where people can create new themes and customize row styles. However, the basic style model is the same in the Essentials edition: in the Essentials edition, we’ve limited what people can customize to make it simpler to use.
Table of Contents
Styles Sidebar
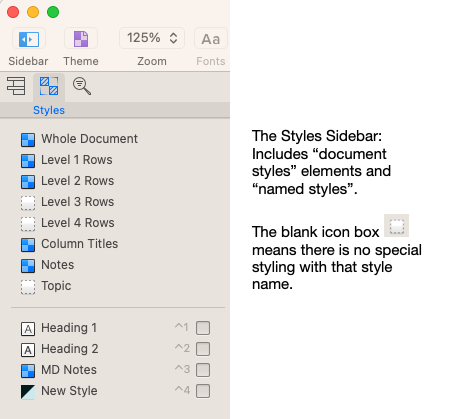
The left styles sidebar (a Pro edition feature) lists all the document elements that have been defined, and other document elements that are available to be defined, but have not had styling applied yet.
Document Styles (Structural Styles)
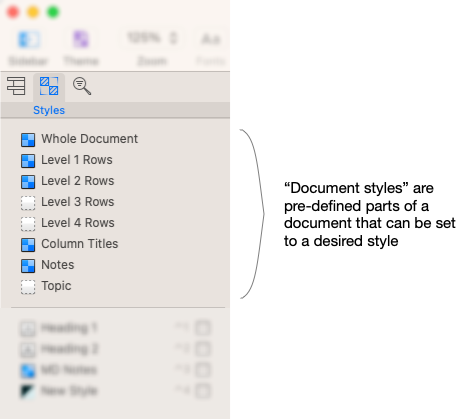
Document styles let you apply styling to pre-defined document parts. The document styles are found in the upper part of the styles sidebar, and are as follows: Whole Document, Level # Rows, Column Titles, Notes and Topic.
Themes
Themes are groups of pre-set styling, and can be applied to any document. Themes use document styles as their basis. In the Essentials edition, themes are the basic method for styling your document, and you can apply character and named styles overrides from the Format menu. In the Pro edition, you can apply character and named styles overrides from the styles sidebar.
Here are descriptions of how each of the document styles are defined:
- Whole Document — The whole document style is the basic unit of your document: the default font family, font size, line height, etc. that any new section of text will use, unless otherwise defined.
- Level # Rows — Level styles are applied by row level (e.g indentation level). There will be as many level styles as you have levels of hierarchy. For example, if there are no indented rows in a document, you will only see “Level 1 Rows” in your Styles guide. If you add 9 indentations — 9 “children” or levels of hierarchy — you will see Level 1 Rows, Level 2 Rows, Level 3 Rows, … Level 10 Rows in the Styles sidebar.
- Column Titles — Column titles style defines the style of all the column headers.
- Notes — Notes style defines the style for all the notes of all your rows.
- Topic — Topic style defines the style for the topic column specifically. If you change the name of the topic column, the style name changes to match the column heading.
- Column # — Each additional column after the topic column can be assigned its own styling. When you change the name of the column header, then the style name changes to match the new column header name.
Named Styles
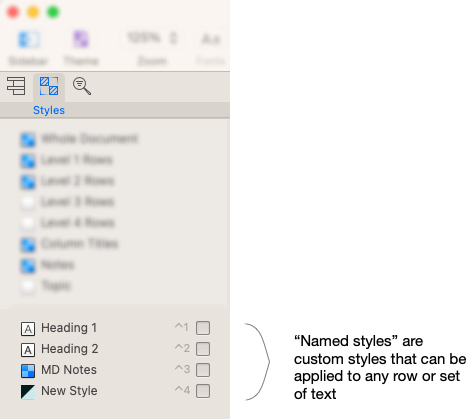
Named styles are custom styles that are saved in the left sidebar. They can be applied to any row, or piece of text. These styles can be re-named, moved, deleted, applied, and unapplied at will.
Once a named style is applied to a piece of text, that text’s style will be updated when the named style is updated. For instance, let’s say you create a named style called emphasis, and the styling is italicized text. You apply it in your document. Later, you decide that emphasis should use bolded text instead, and you apply that change to the named style. Any place that emphasis was applied in the document will now show bolded text instead of italicized.
Named styles will be saved if you create a template from your document, and so can be used in other documents you create.
Style Model Tips
The whole document style and the style hierarchy are useful constructs to help you get started with styling your OmniOutliner document.
Whole Document
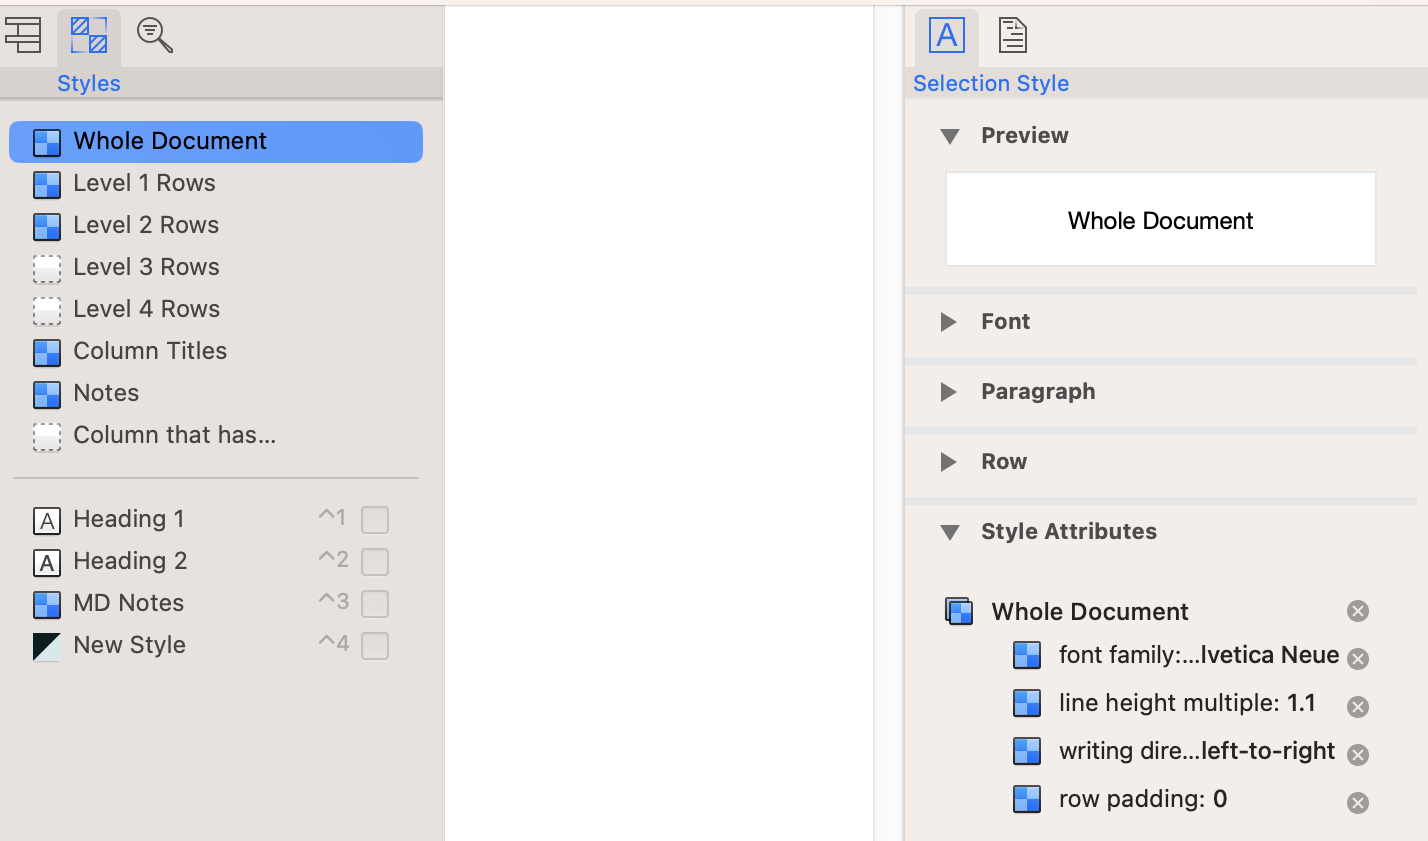
Whole document is part of the document styles styling. The whole document style sets the default styling for the rows, the row notes, the columns, and the column titles.
One approach to style your document is to:
- Apply what you want the document’s base style to be in the whole document style.
- Follow the style hierarchy rules to plan how you will apply other styles to your rows.
For example
- Set Whole Document to font Helvetica Neue, font size 14.
- Set Level 1 rows (a document style) to font size 24, bold.
- Set Level 2 rows to font size 18, bold.
In steps 2 and 3, you are overriding the whole document styling by changing the font sizes and font weight for rows that are not indented (Level 1 rows) or indented once (Level 2 rows).
Style Hierarchy Rules for Row Text
When you have conflicting styles (say two different font sizes in whole document and level 2 style) which one will show up on your screen? Here are some rules to help you figure that out:
- Character styling (font styles applied to selected text or individual characters) overrides all other styles.
- Row styling (styles applied to an entire individual row) overrides all but character styling.
- Level # Rows styling overrides all but character styling and row styling.
- Column styling overrides whole document.
- Whole document styling is at the bottom.
Named styles that are applied at the same level fall within the same hierarchy. For instance, if a named style is applied to a set of characters, that style overrides row styling, level # rows styling, column styling and whole document styling. If a named style is applied to an entire row, it overrides Level # rows styling, column styling, and whole document styling. And so on.
The exception to this named styles rule is when named styles are in conflict with another styling applied at the same level of the hierarchy. For instance, you select a row and apply a named style with red text. The text turns red. Then, you apply blue text from the font inspector. The text turns blue. Both red text and blue text are applied, but the blue text overrides the named style.
Wherever you have placed your cursor, you can view that text’s styling hierarchy in the style attributes inspector.
Style Attributes Inspector
The style attributes inspector is located at the bottom of the right sidebar, and lists out all the styling of the text where the cursor is located. It is a powerful tool. In it, you can modify your pre-set styles, view the document styling and see the hierarchy of style of a row or character.
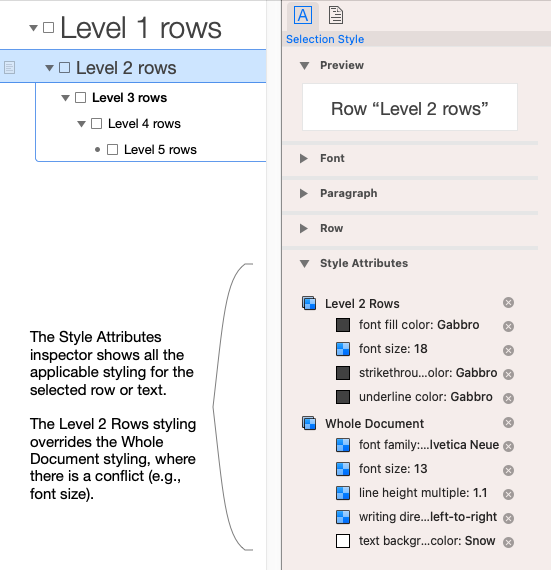
Style Hierarchy in the Style Attributes Inspector
The style attributes inspector shows you the hierarchy of styling where the cursor is. The styles that are listed higher in the style attributes inspector generally override the styles listed lower down in the inspector.
Editing Styles in the Style Attributes Inspector
All the styles in the style attributes inspector can be cleared by clicking on the ‘x’ next to the style. It is a quick way to modify a named or document style across the whole file.
Clearing All Styles
You can clear styles using the Styles Attributes inspector, but these are the steps to clear all the styles from text, named styles and document styles:
To remove named styles and selected text styles:
- Make sure every row is visible: go to View > Expand All.
- Select every row: select a single row and type command-a.
- Go to menu: Format > Clear Style.
- You may need to do the last step twice, to clear all the formatting.
To remove document styles:
- Open the styles tab of the left sidebar.
- Select all the document styles.
- Go to menu: Format > Clear Style.
