Thanks for checking out OmniOutliner! If this is your first time using the app, you’re in the right place—this article is here to help you get up and running from the very beginning.
After installing OmniOutliner and at the end of the intro experience, you’re offered the option to create a new document right away or visit the Document Browser, the place where all of your outlines are stored.
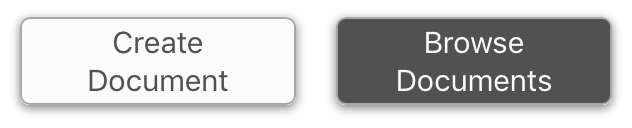
Choose Browse Documents to visit the document browser and get started with your first outline. There’s nothing here yet, but there will be soon!
For this article we’ll be using screenshots from the Essentials edition of OmniOutliner 3, but all of the steps are similar in the Pro edition. There’s a section at the end describing some Pro-specific features you’ll want to try out, too.
For details on every feature and function that you’ll find in OmniOutliner 3, check out the Pro and Essentials reference manuals.
Choosing a Template
The first step in structured writing with OmniOutliner 3 for iOS is choosing a template for your outline. If you chose
to create a new document at the end of the intro experience, you’re taken to the template chooser right away; otherwise,
tap New Document  in the document browser toolbar to pick
the template for your first outline.
in the document browser toolbar to pick
the template for your first outline.

Start by deciding if you need a template that is a completely blank slate, or one that’s pre-populated with sample content and styles.
If you see a template with a color scheme and font styles that you like, that’s the perfect place to start! You can either edit the sample rows or delete everything and work from the ground up–the styles will apply to new content that you add.
Alternatively you can start with a blank template, build out your outline, and pick the template theme that best suits it afterward.
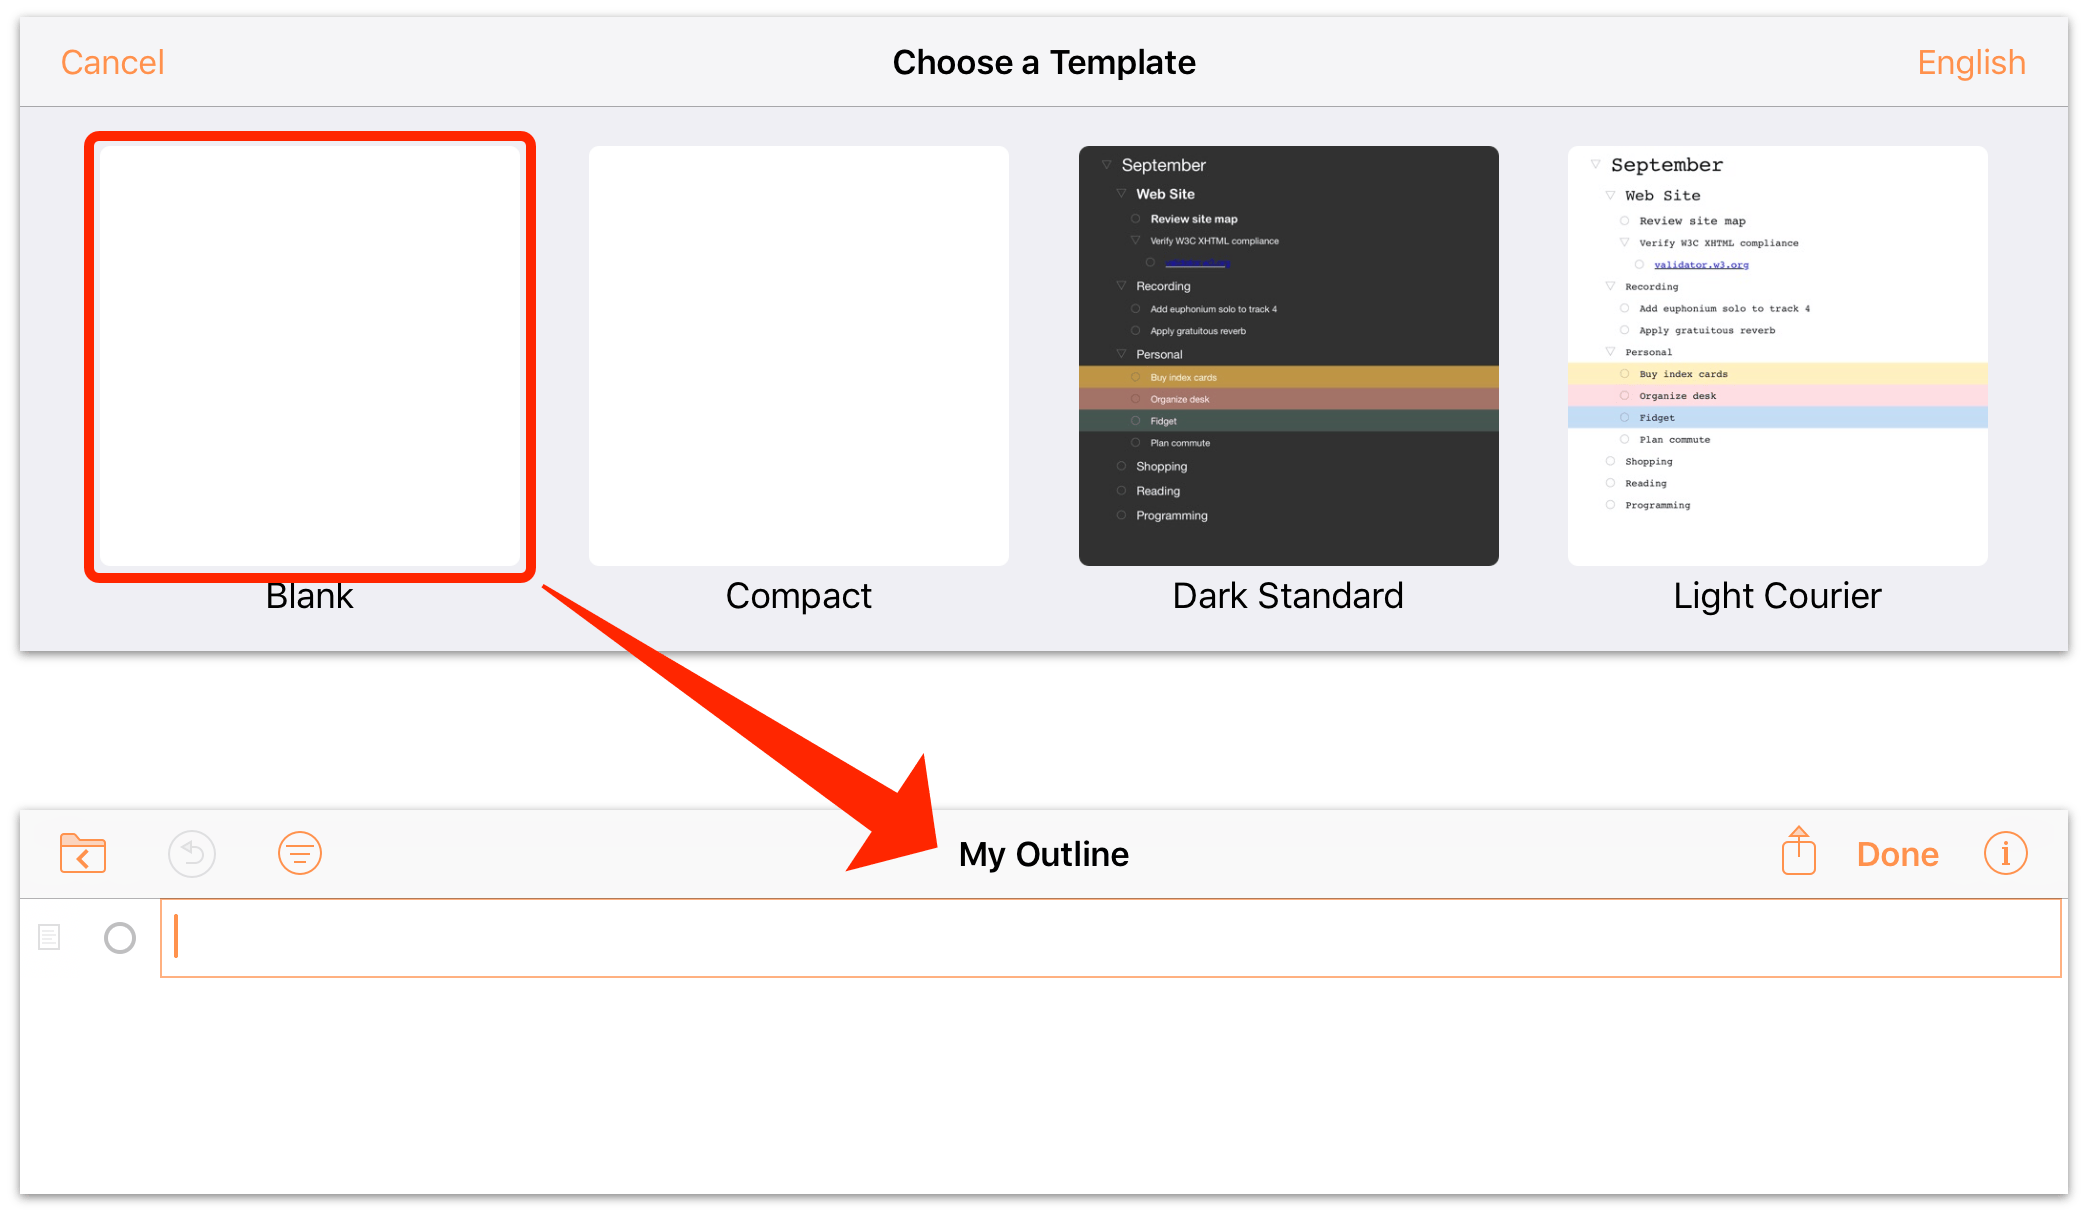
For the sake of this article, we’ll start with a blank template and show you how to add styling to it later.
Adding Rows
When you create a new document from the Blank template it consists of a single row, ready for you to add text and begin building out the content of your outline. Enter some text in the first row, and when you’re ready to move on to the next row tap return.
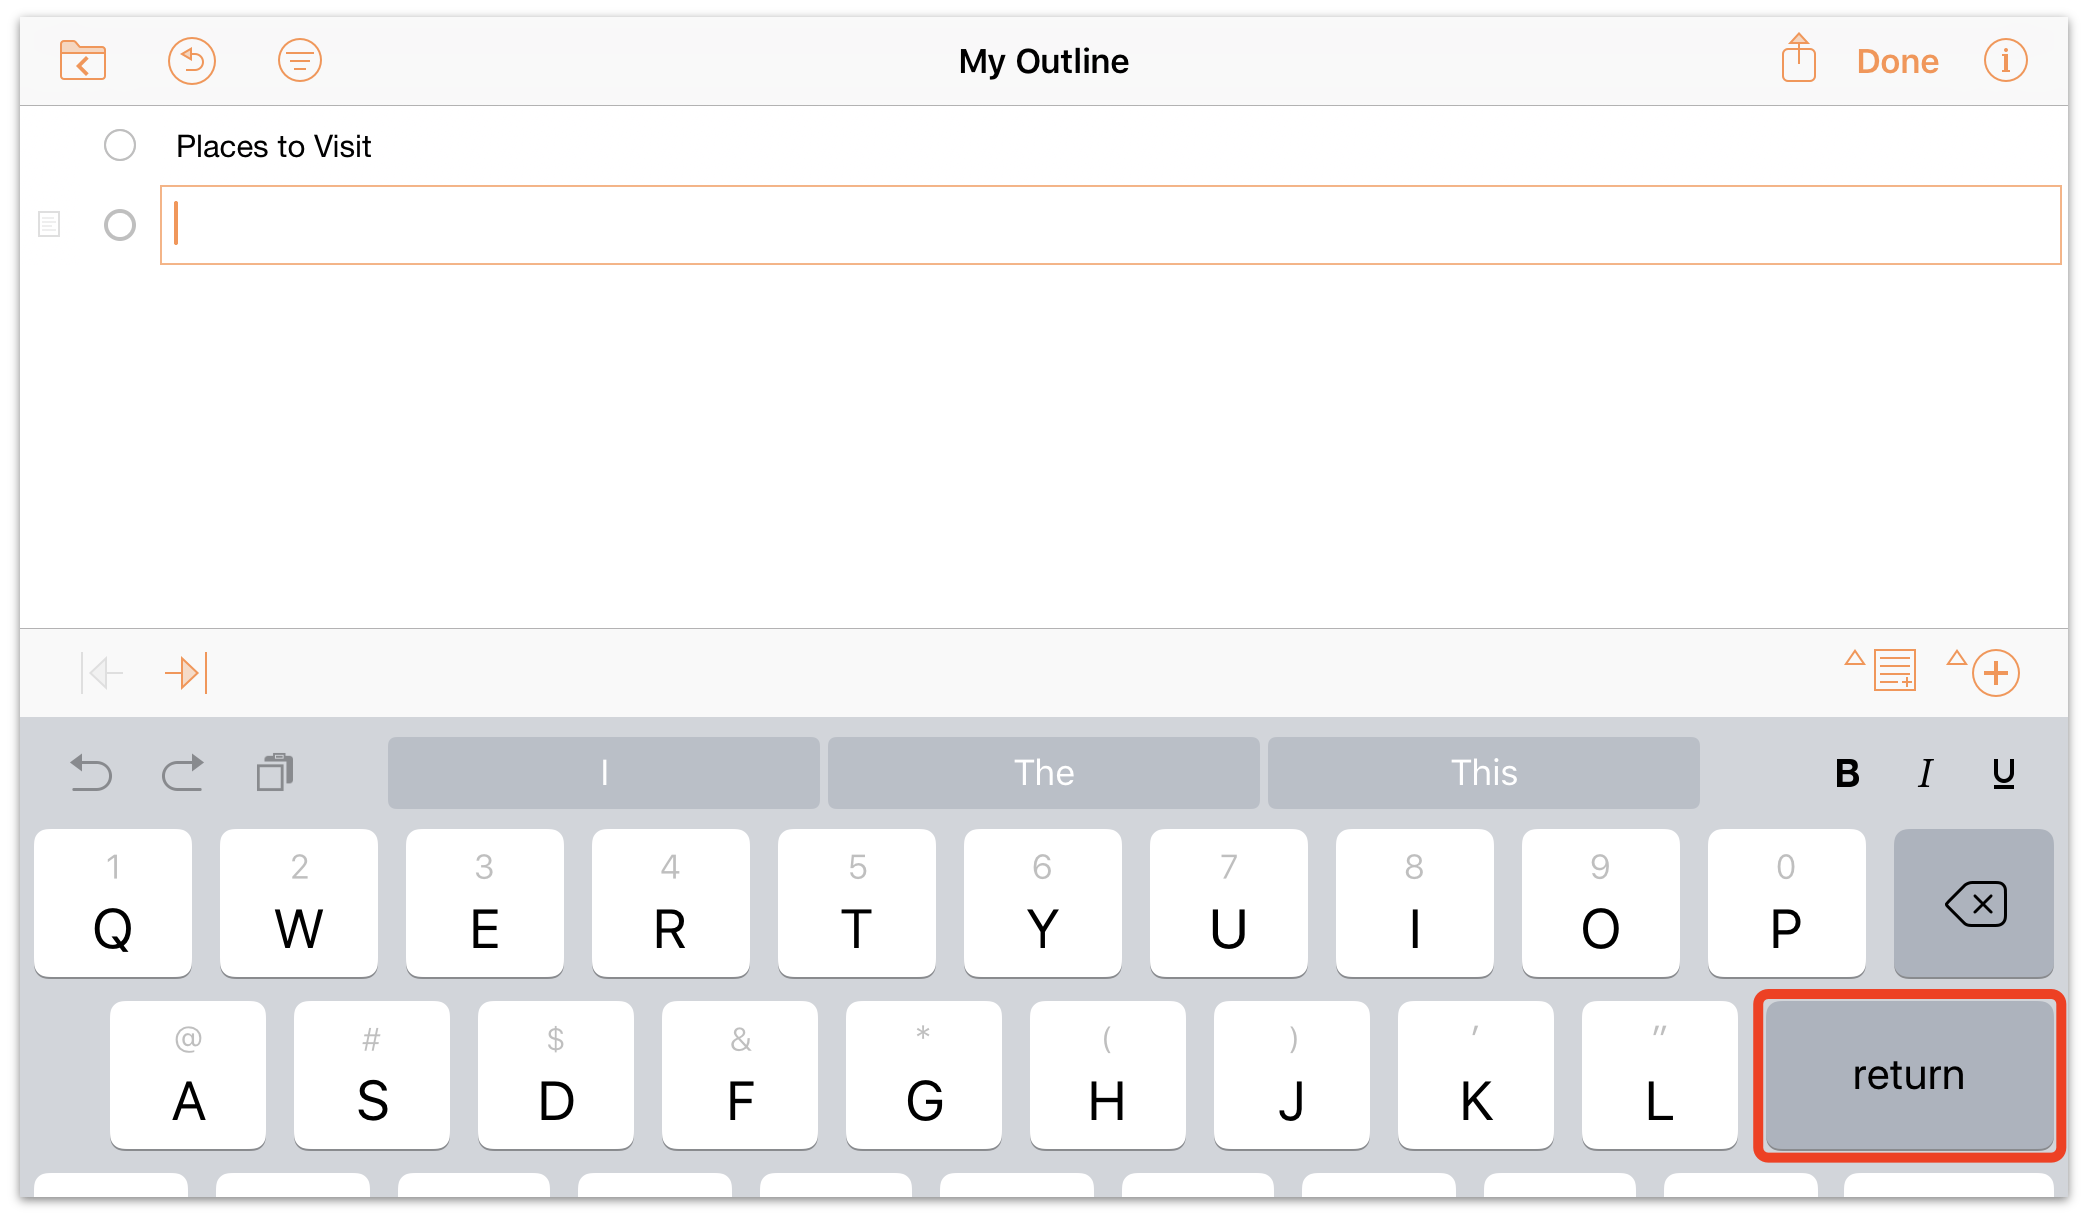
Voila! You’ve added a new row to the document. (If a row isn’t currently selected, you can tap Add Row
 in the edit bar to add a new row instead of tapping return.)
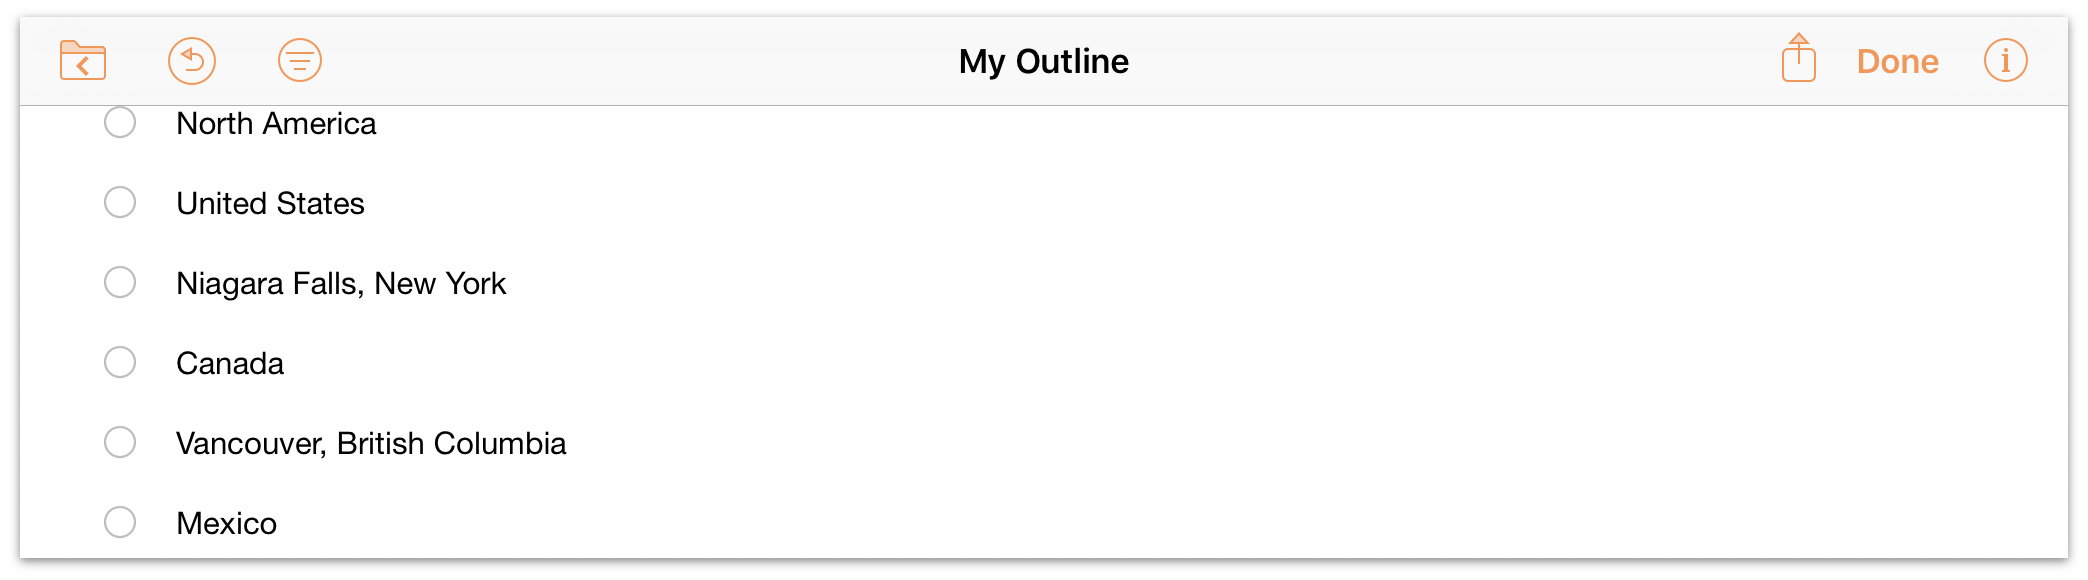
Keep entering text and creating new rows until you have the beginnings of your outline.
If you’d like to create a paragraph break inside a row, tap the row to reveal the contextual menu, then tap Line
Break  .
.
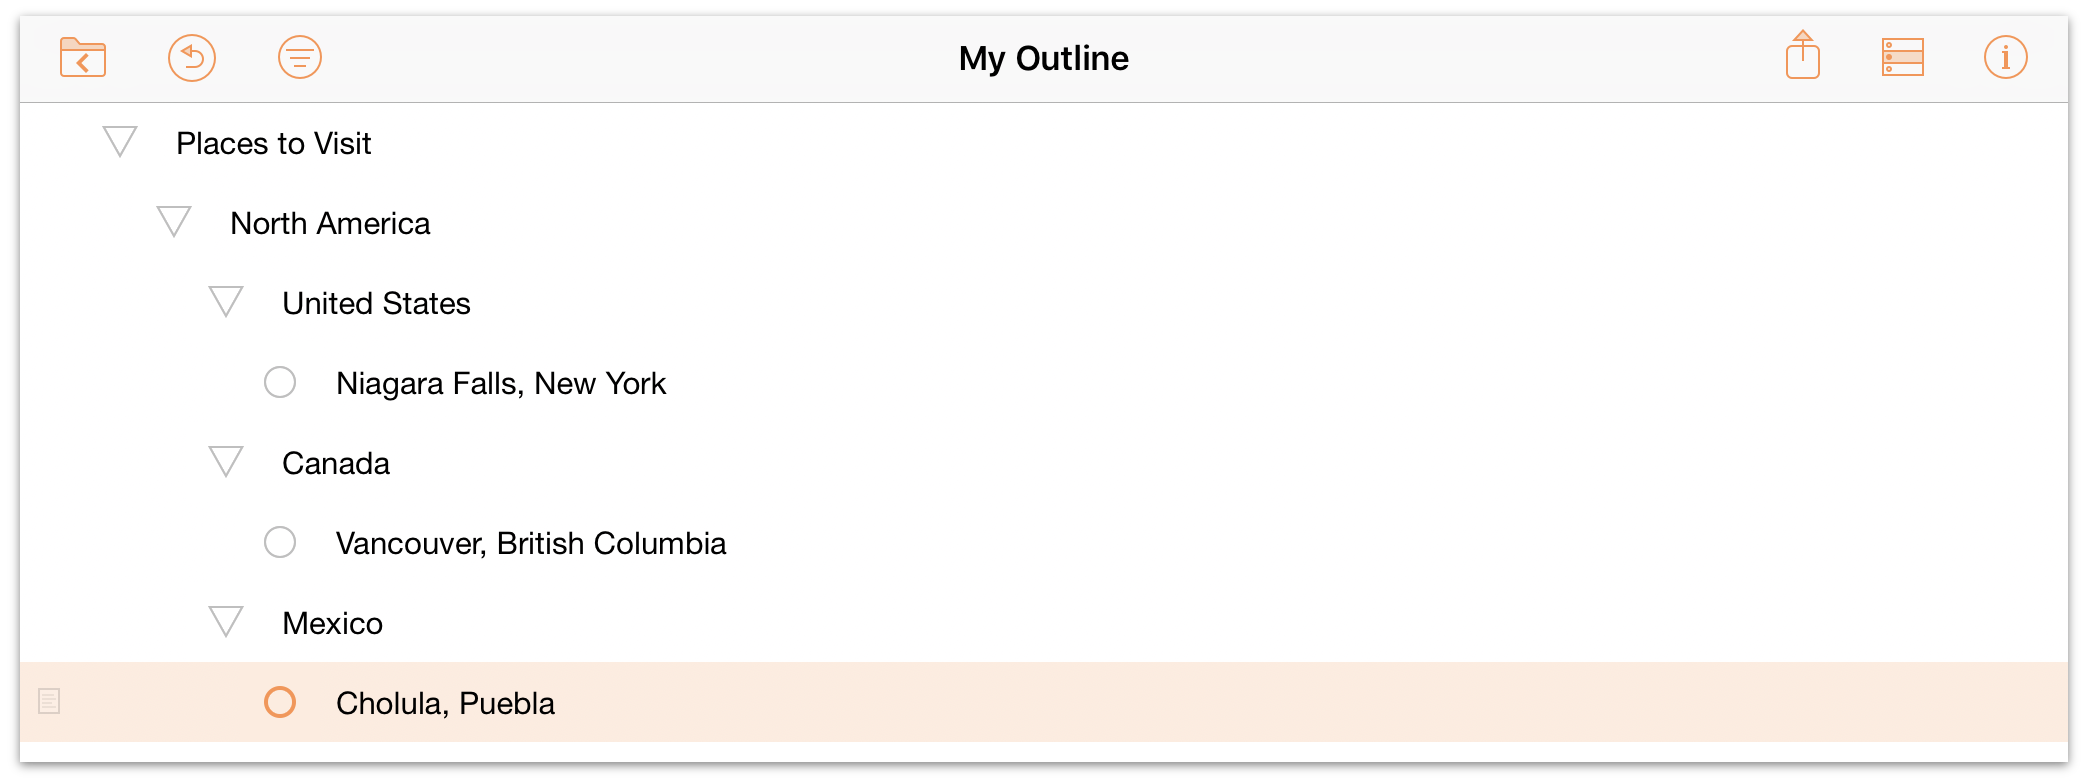
Creating Hierarchy
Sometimes there are sections in your outline that are clearly subsidiary to others (such as topics and subtopics of an essay, or a list of locations within a state or country). It can be helpful to organize these sections hierarchically, and OmniOutliner has just the tools for the job.
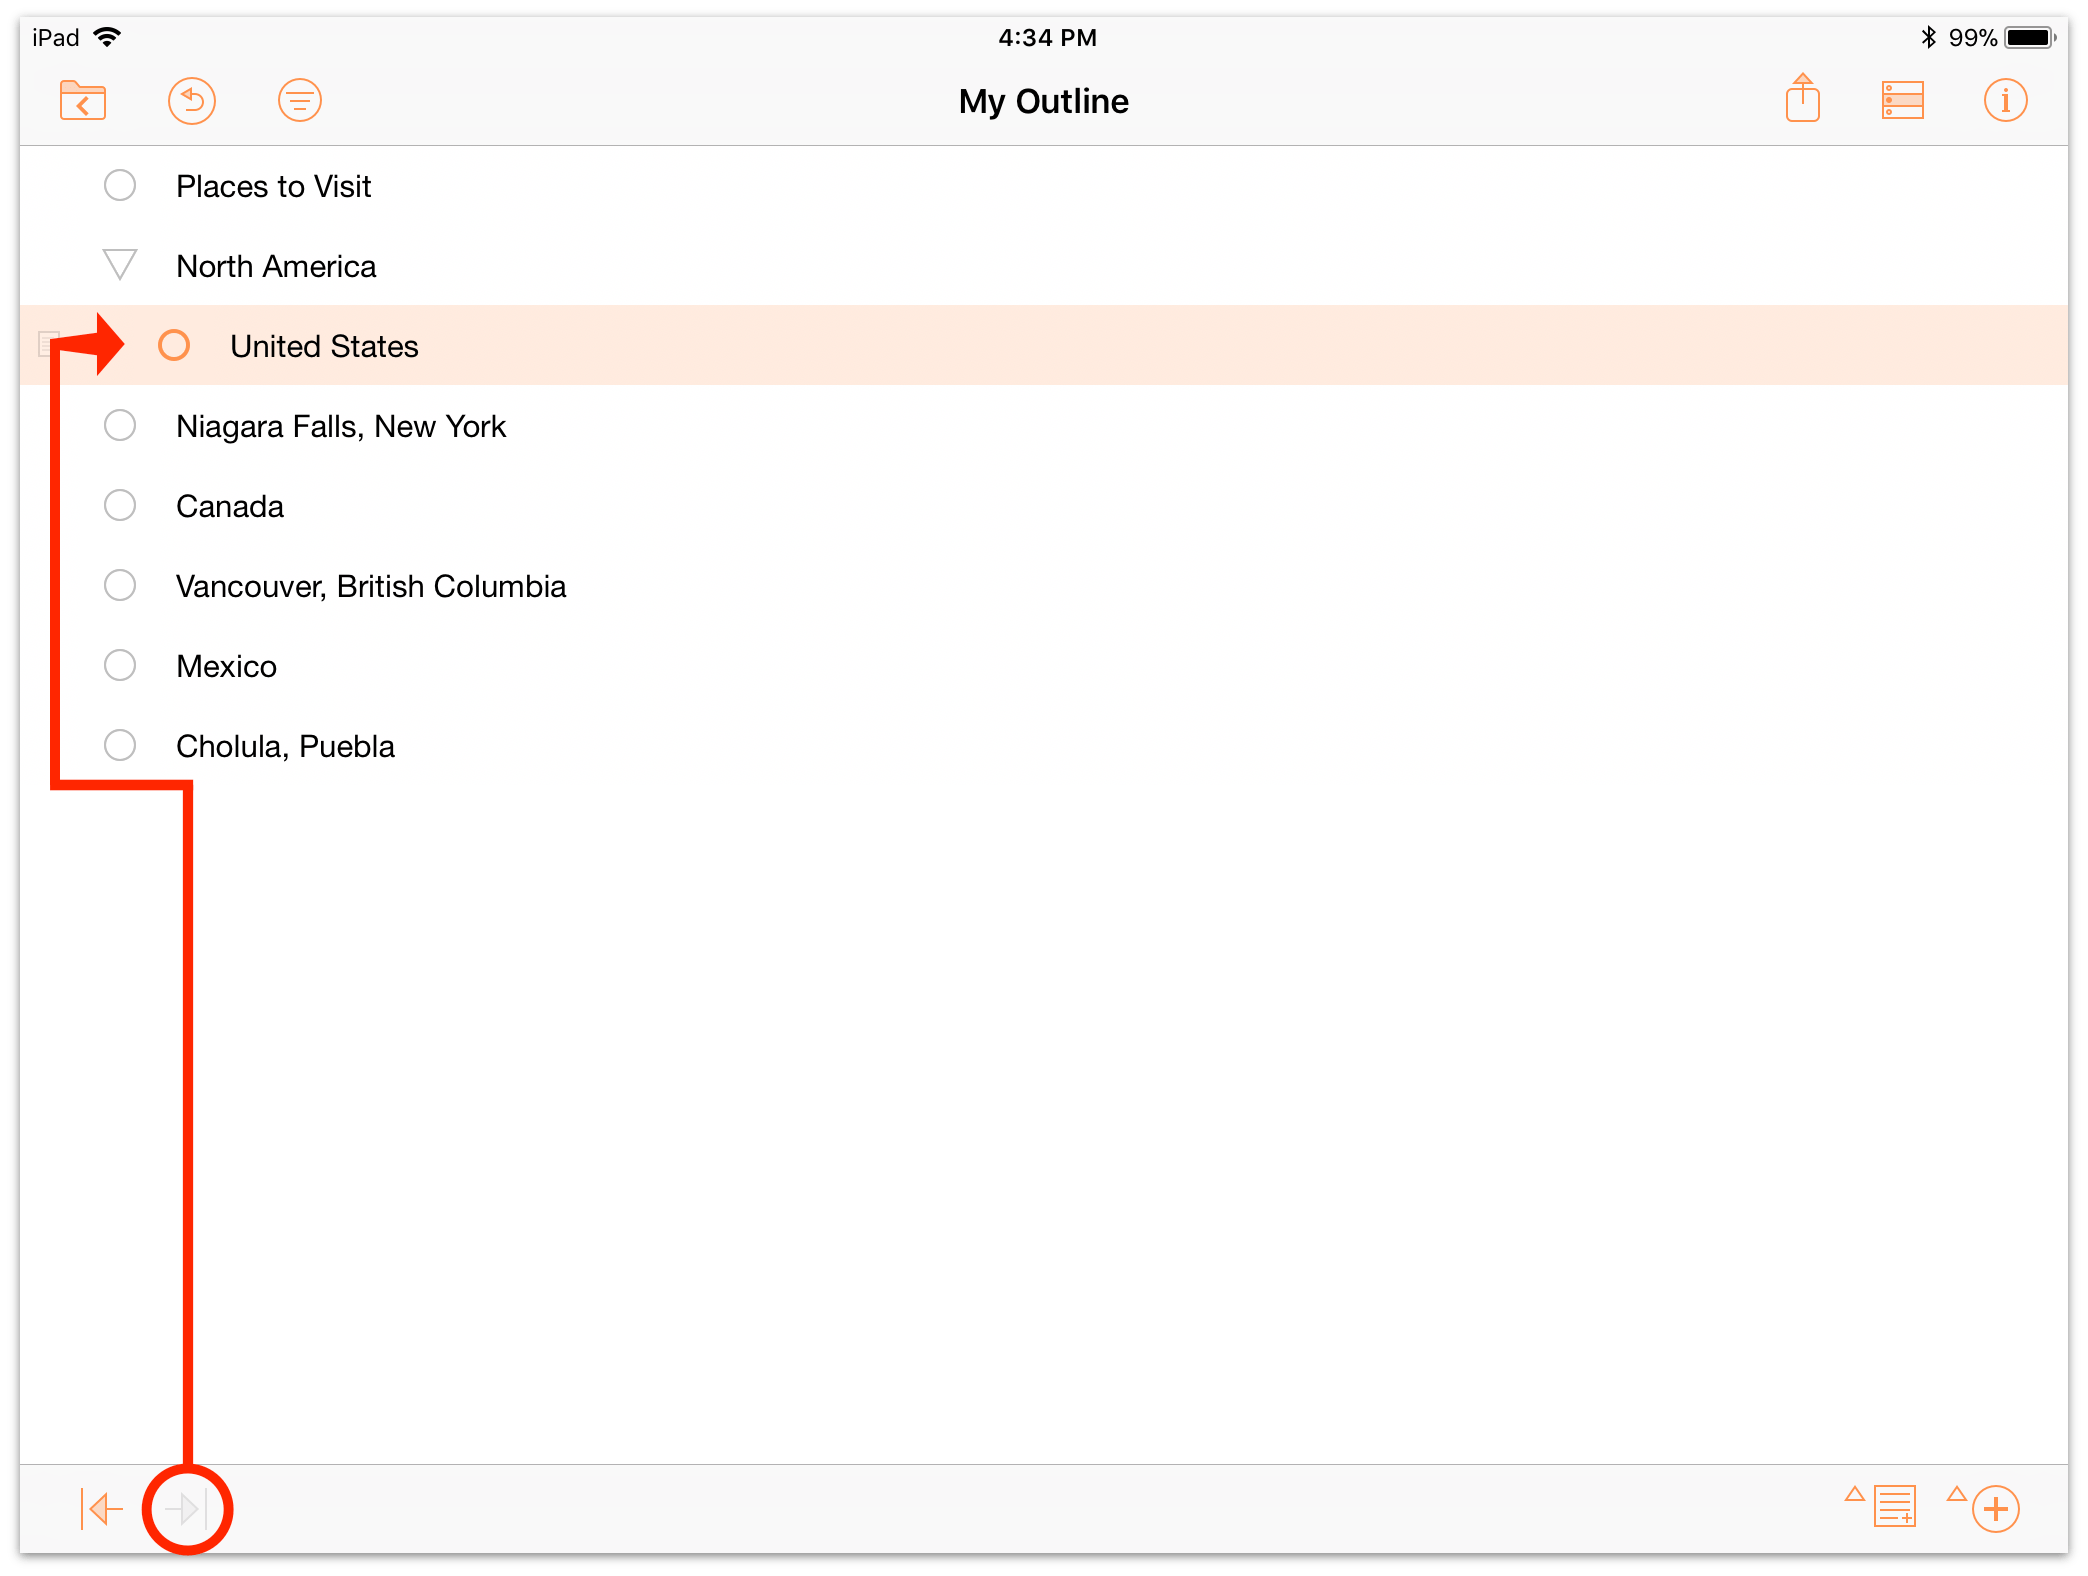
When a row has content that belongs inside the row above it, tap to select it, then tap Indent
 in the edit bar. The selected row becomes a child of the row above it,
living one level lower than its parent row.
in the edit bar. The selected row becomes a child of the row above it,
living one level lower than its parent row.
Using Indent and Outdent
 in the edit bar, you can add hierarchy to rows in your outline with the
amount of depth or complexity that matches the topic you’re covering, whether it’s a term paper, an agenda, a weekly
budget, or a novel.
in the edit bar, you can add hierarchy to rows in your outline with the
amount of depth or complexity that matches the topic you’re covering, whether it’s a term paper, an agenda, a weekly
budget, or a novel.
You can also create structure on the fly (useful when taking notes, for example) by touching and holding Add Row
in the edit bar to reveal the Add Parent
 , Add Above
  , Add Aunt
 , and Add Child
  buttons, which add
hierarchical relationships to every new row you create.
buttons, which add
hierarchical relationships to every new row you create.
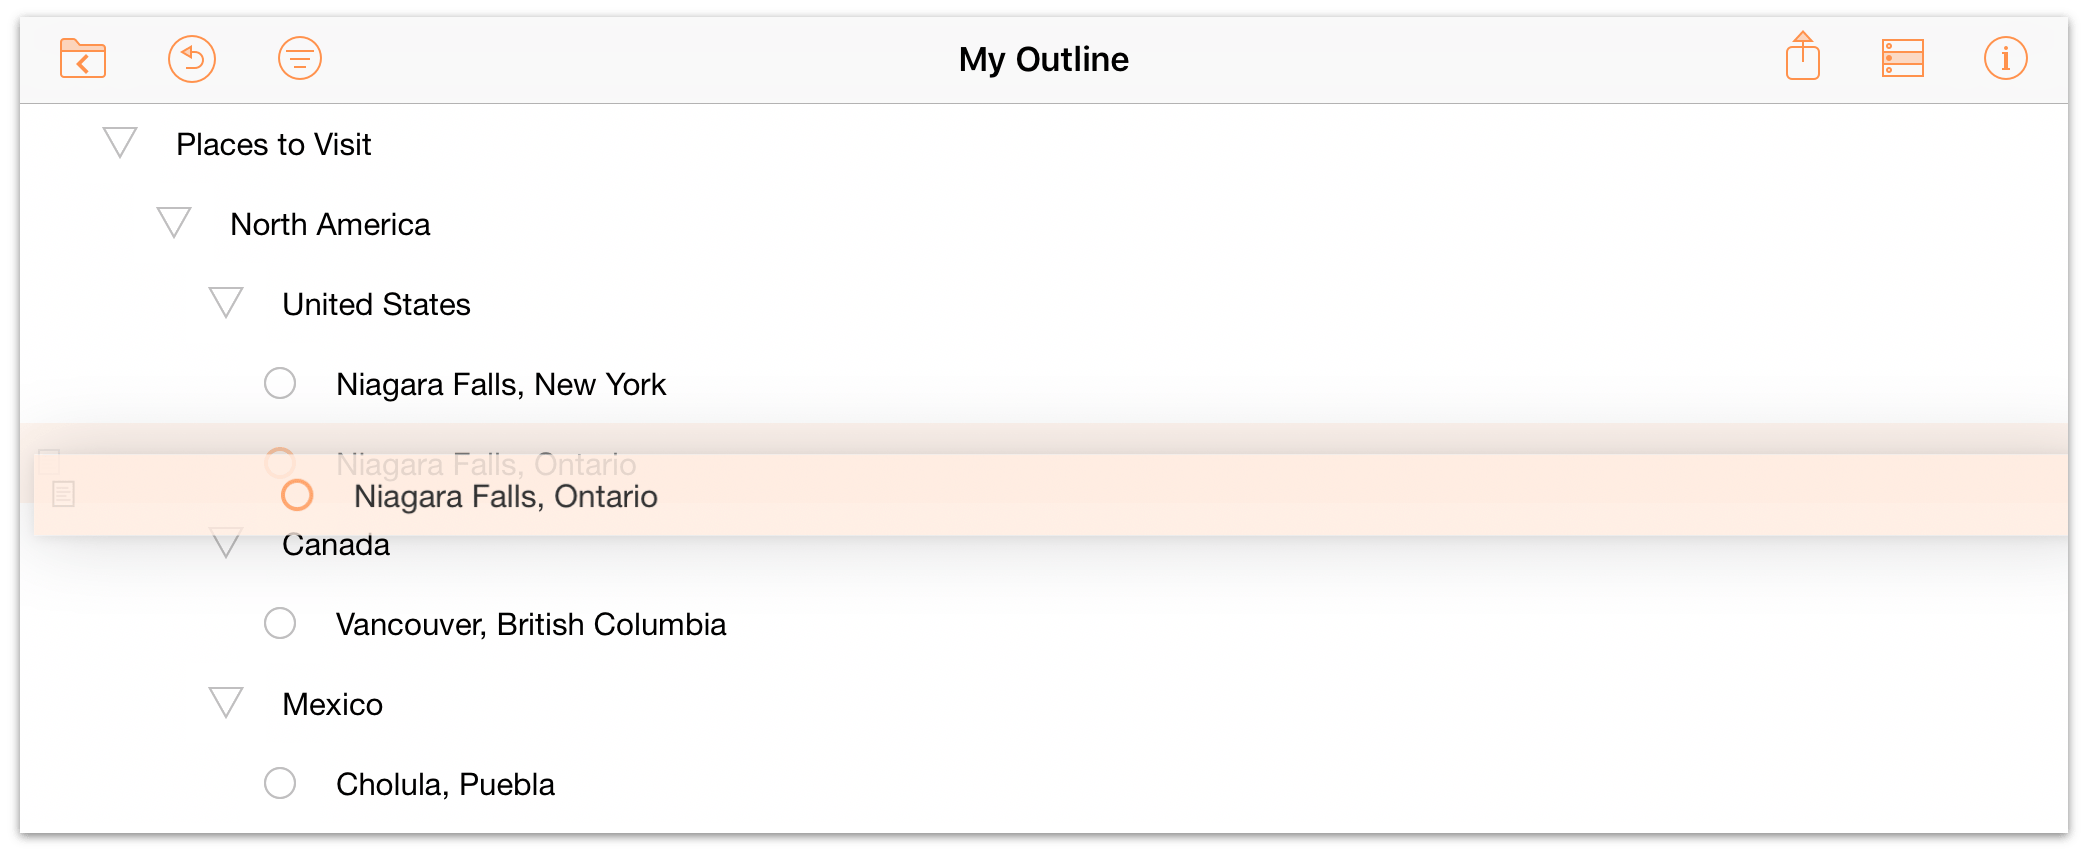
Reorganizing the Outline
When the sequence of rows in your outline doesn’t match the order you have in your head, use row handles
![]() to pick up and move the wayward rows to another location.
to pick up and move the wayward rows to another location.
Touch and hold a row’s handle until the row lifts up from the outline, and then drag to reposition it. The surrounding rows separate to provide space to drop the row.
When moving a parent row (indicated by a triangular row handle ![]() ), all of
its children come along for the ride, along with any hierarchy they contain.
), all of
its children come along for the ride, along with any hierarchy they contain.
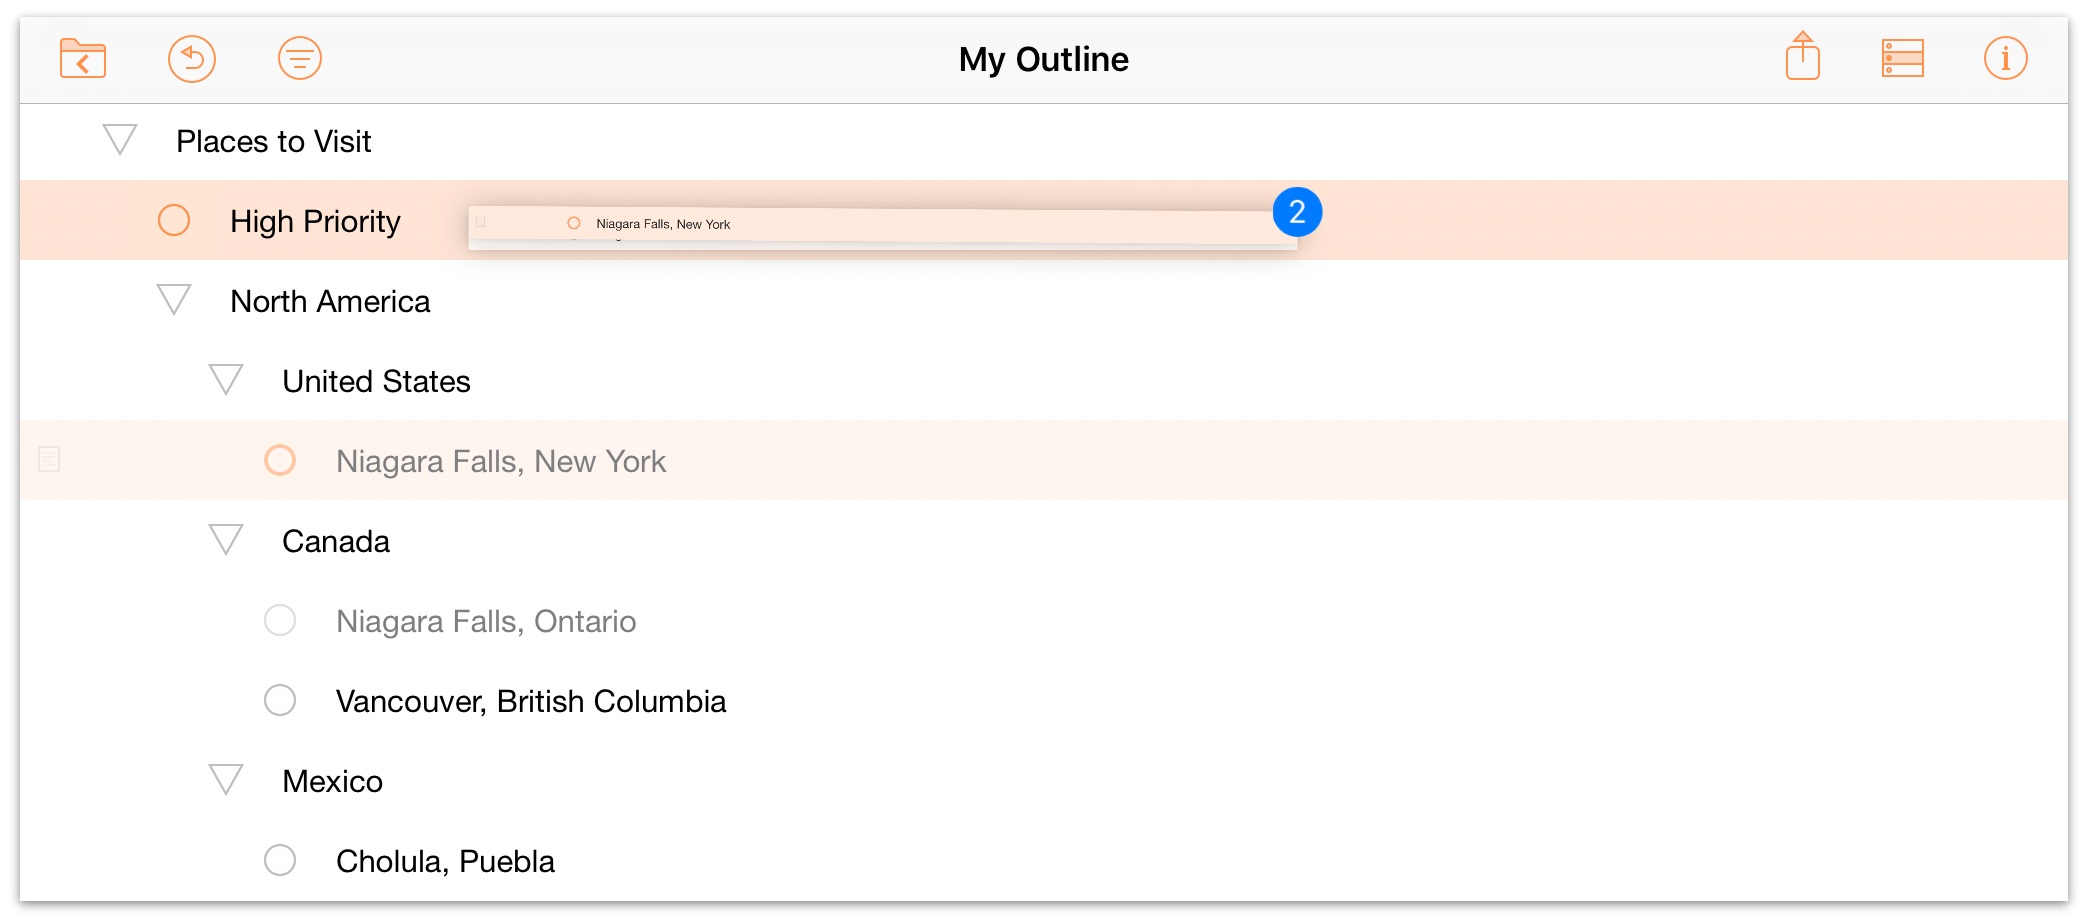
Multiple discontiguous rows can be added to the selection, too. Touch and hold the first row until it lifts up, then use another finger to tap rows elsewhere in the outline and add them to the selection.
Drag and drop is also a great way to adjust row hierarchy: drop a selection directly on top of another row to add it as a child of that row, rather than a peer.
Edit Mode is another tool for reorganizing the outline, with useful tools for editing multiple rows at once such as Cut, Copy, and Delete. See the Edit Mode section of the reference manual for details.
Adding Notes
Individual rows work great as representations of ideas or sections of an outline, but sometimes you need to add some context or detail to flesh out the content of a row.
Enter notes! Each row in your outline can have a note attached to it, which exists as a section of text beneath the row itself.
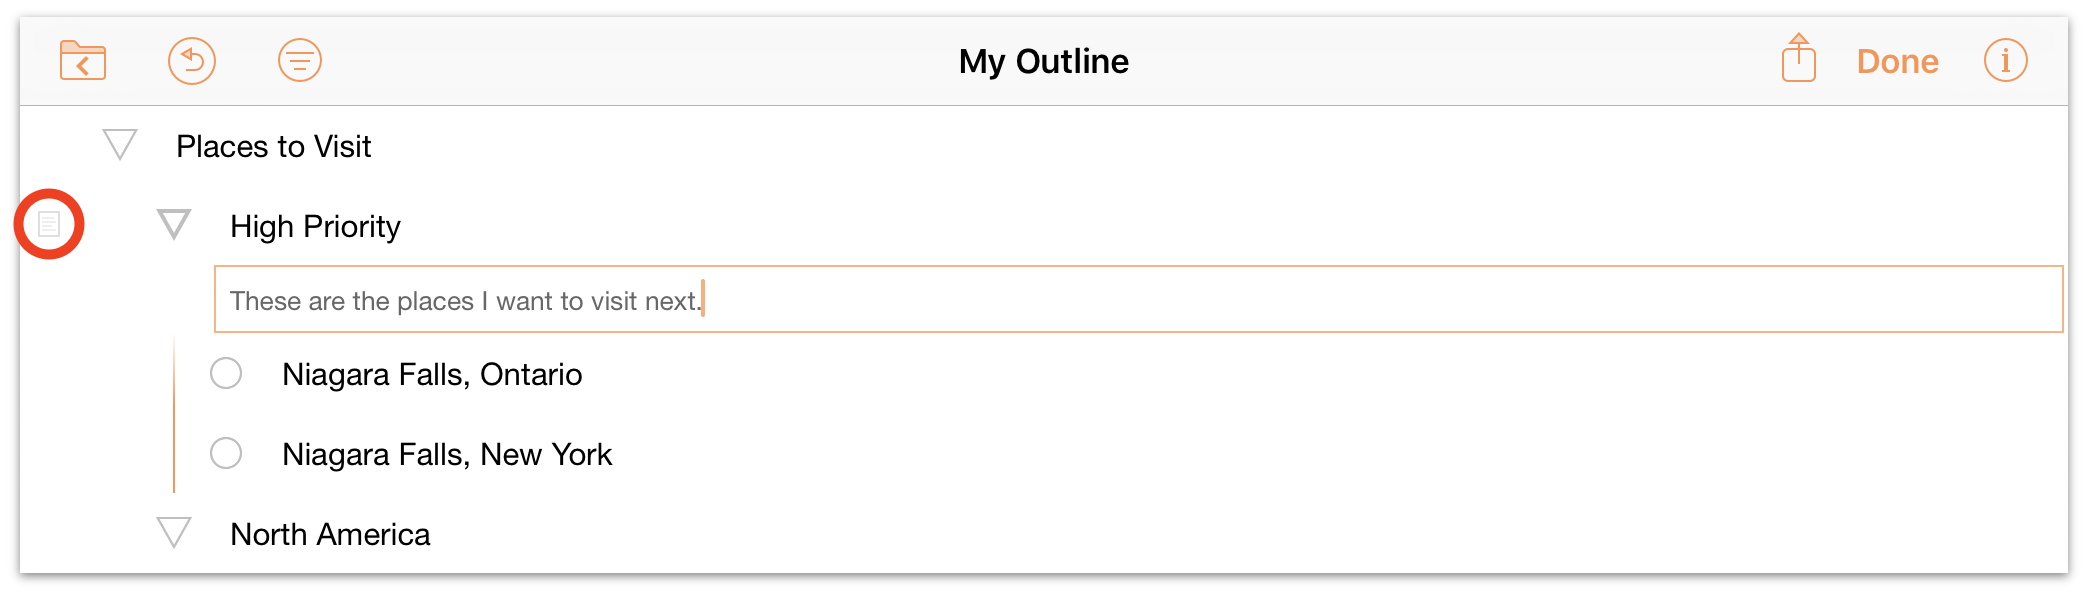
While editing a row, tap the note icon ![]() to the right of the row handle (or the Note button
to the right of the row handle (or the Note button
 in the edit bar) to open the note on the row for editing.
Styling the Outline
If you started with a blank document template, or if the colors and fonts of the template you chose aren’t doing it for you, you may want to change the styles in your outline to better suit your needs.
This is done using the Inspector pane, which holds controls for customizing the appearance of your outline. Tap the
Inspector button  in the document toolbar to show it.
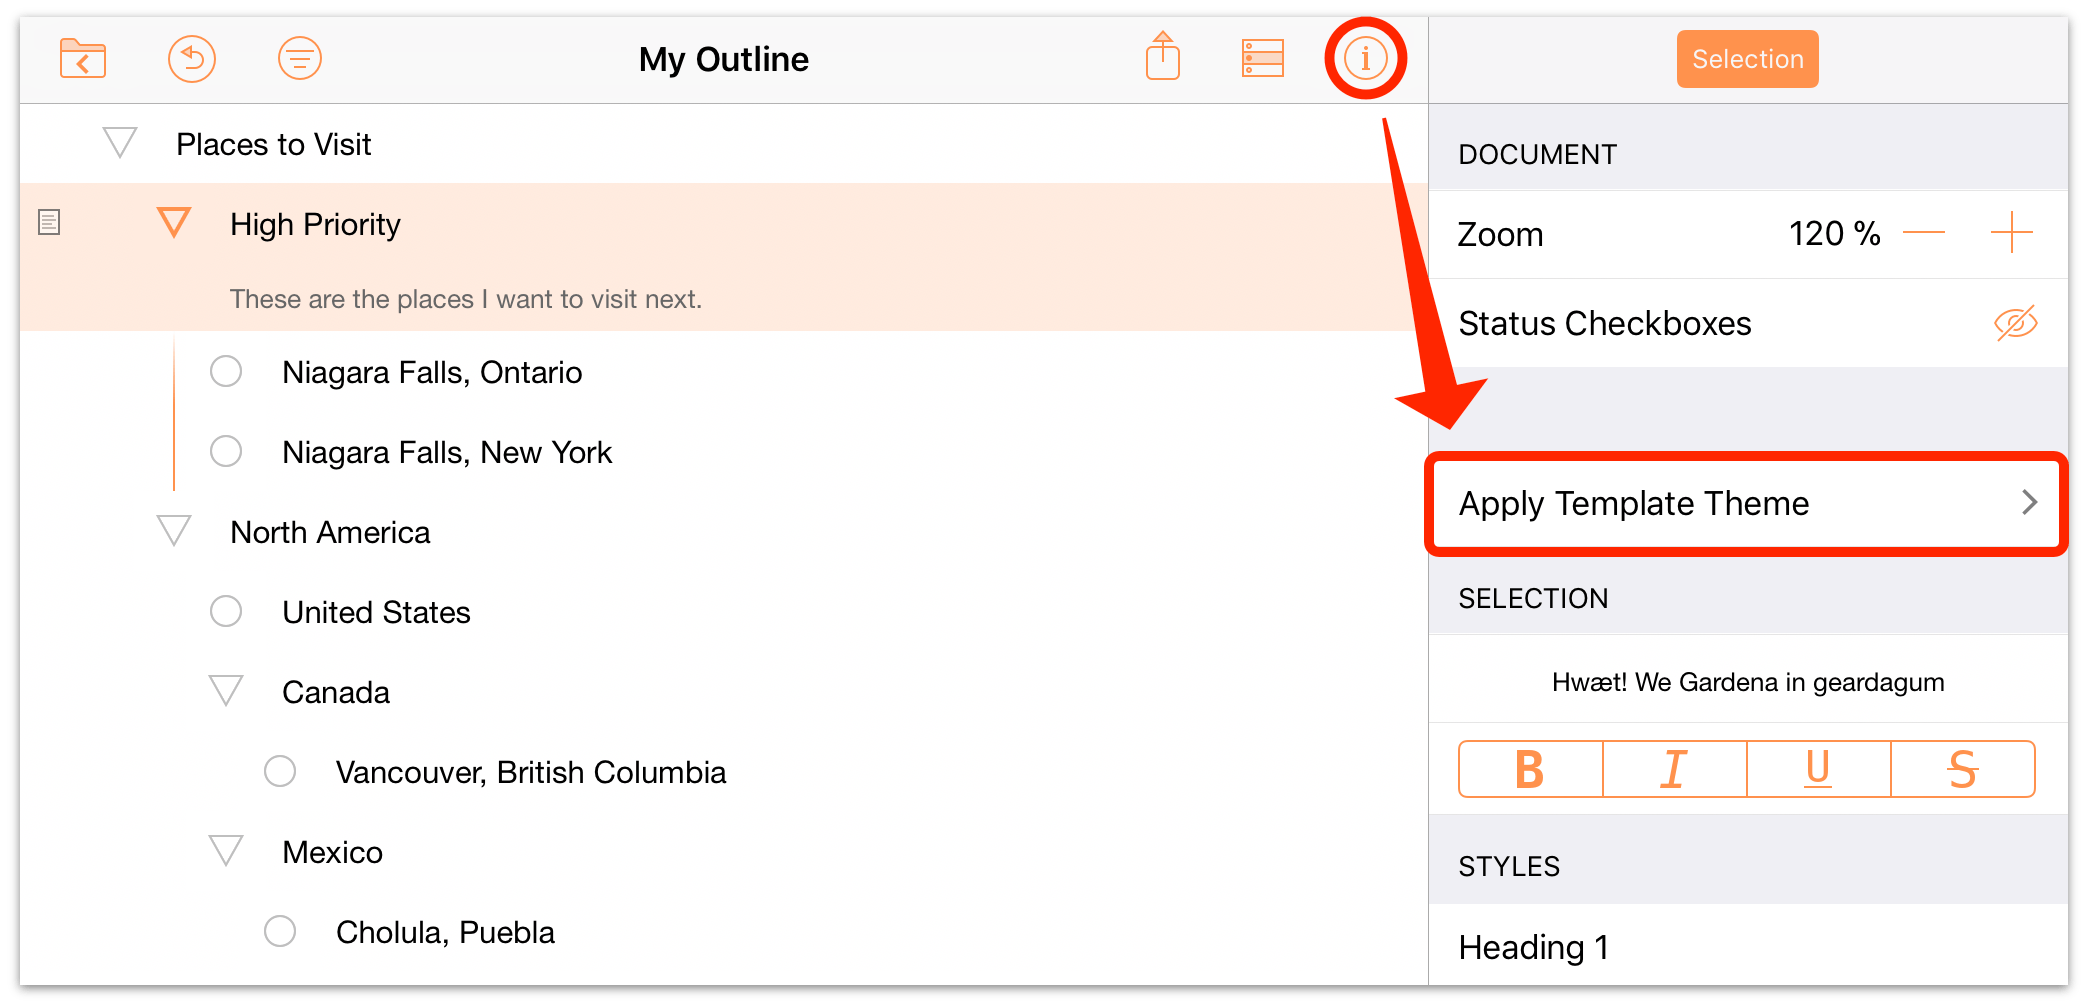
In OmniOutliner Essentials, the styles available depend on the template theme currently applied to the outline. Tap Apply Template Theme in the inspector to choose a new theme.
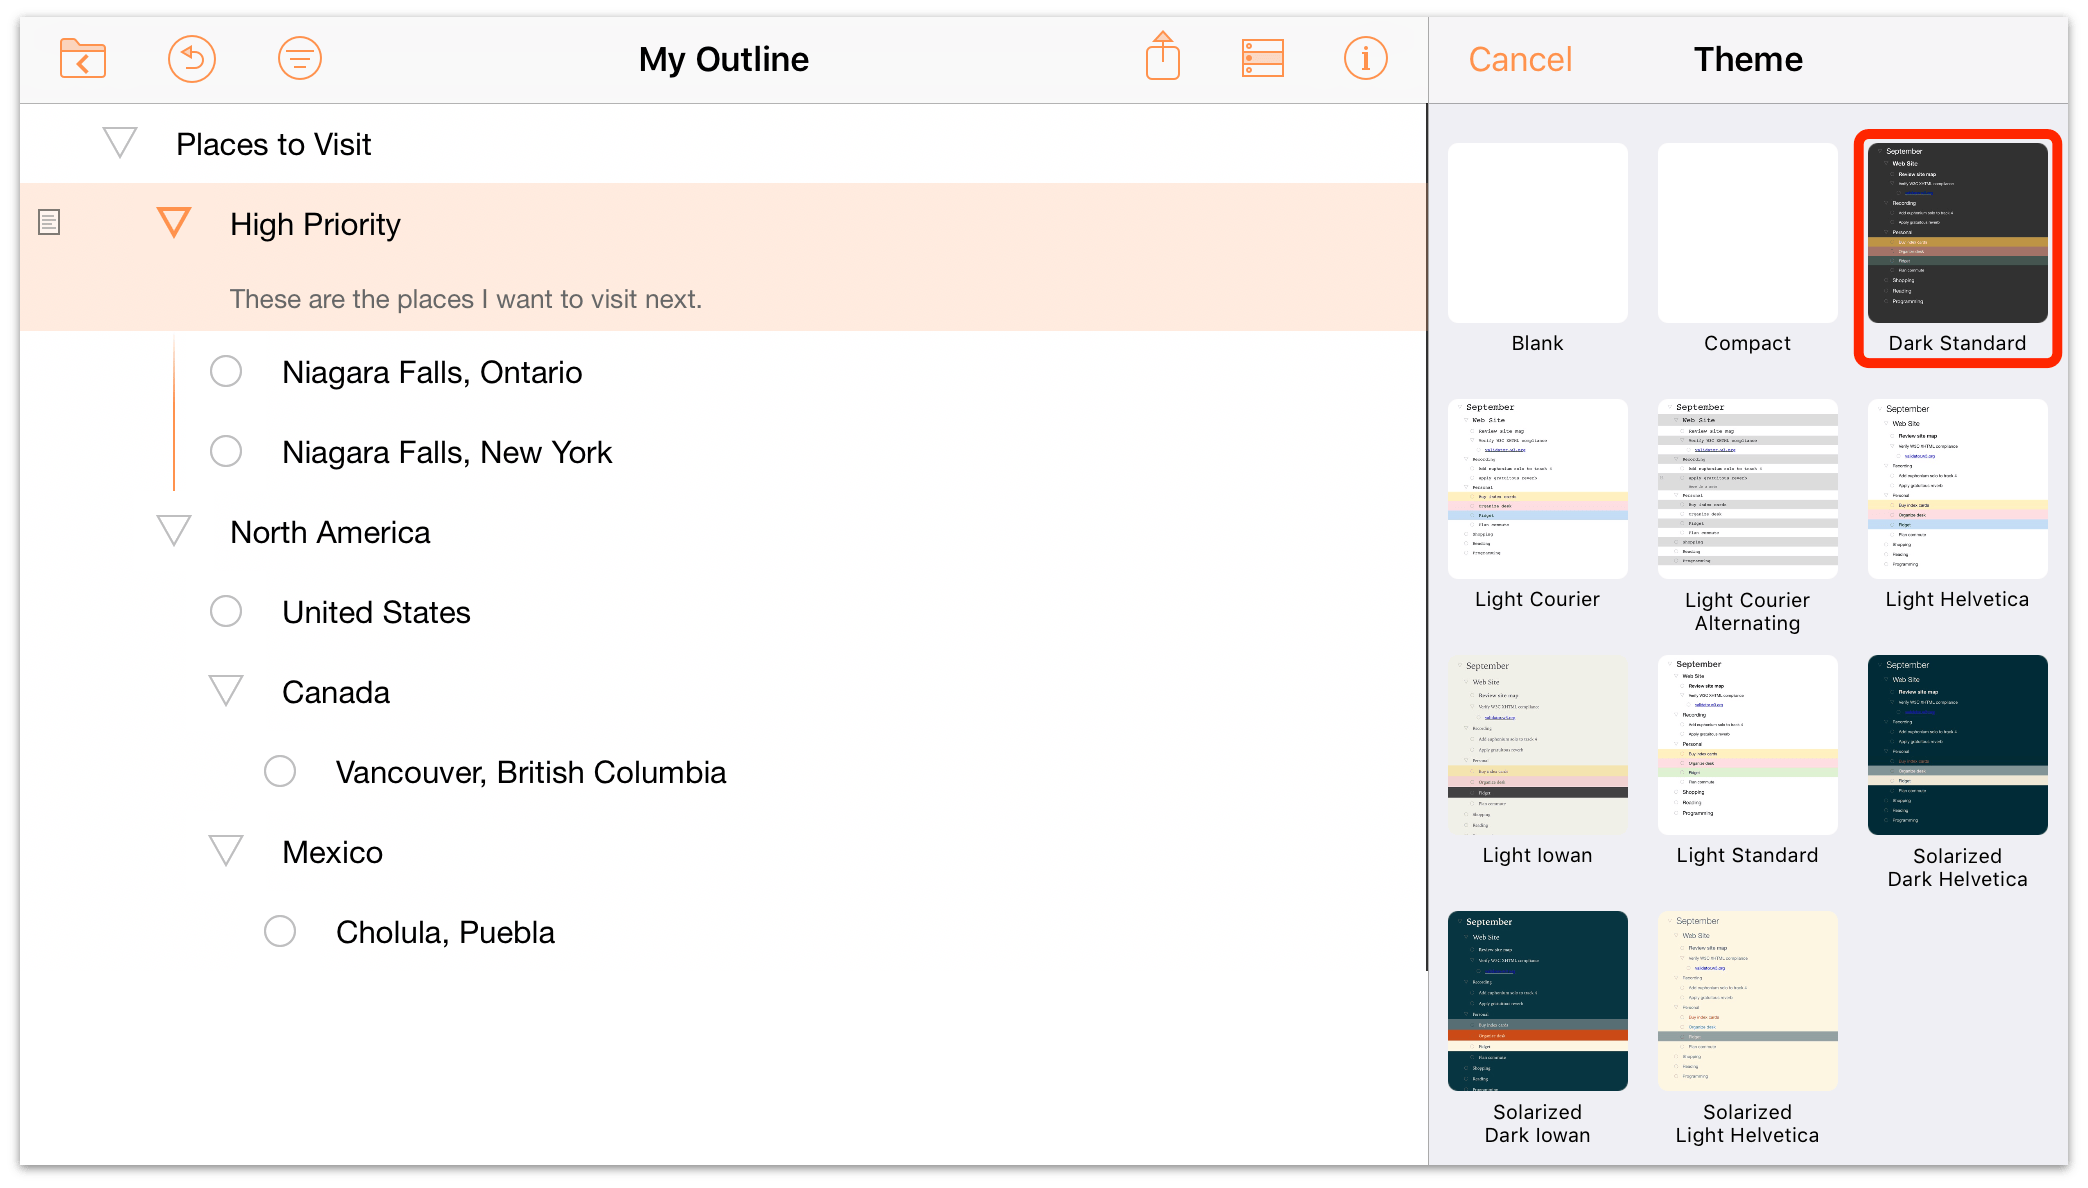
Applying a template theme brings along its style properties, including font, level styles (applied automatically to rows based on their position in the hierarchy), and a set of named styles you can use to apply custom styles to individual rows.
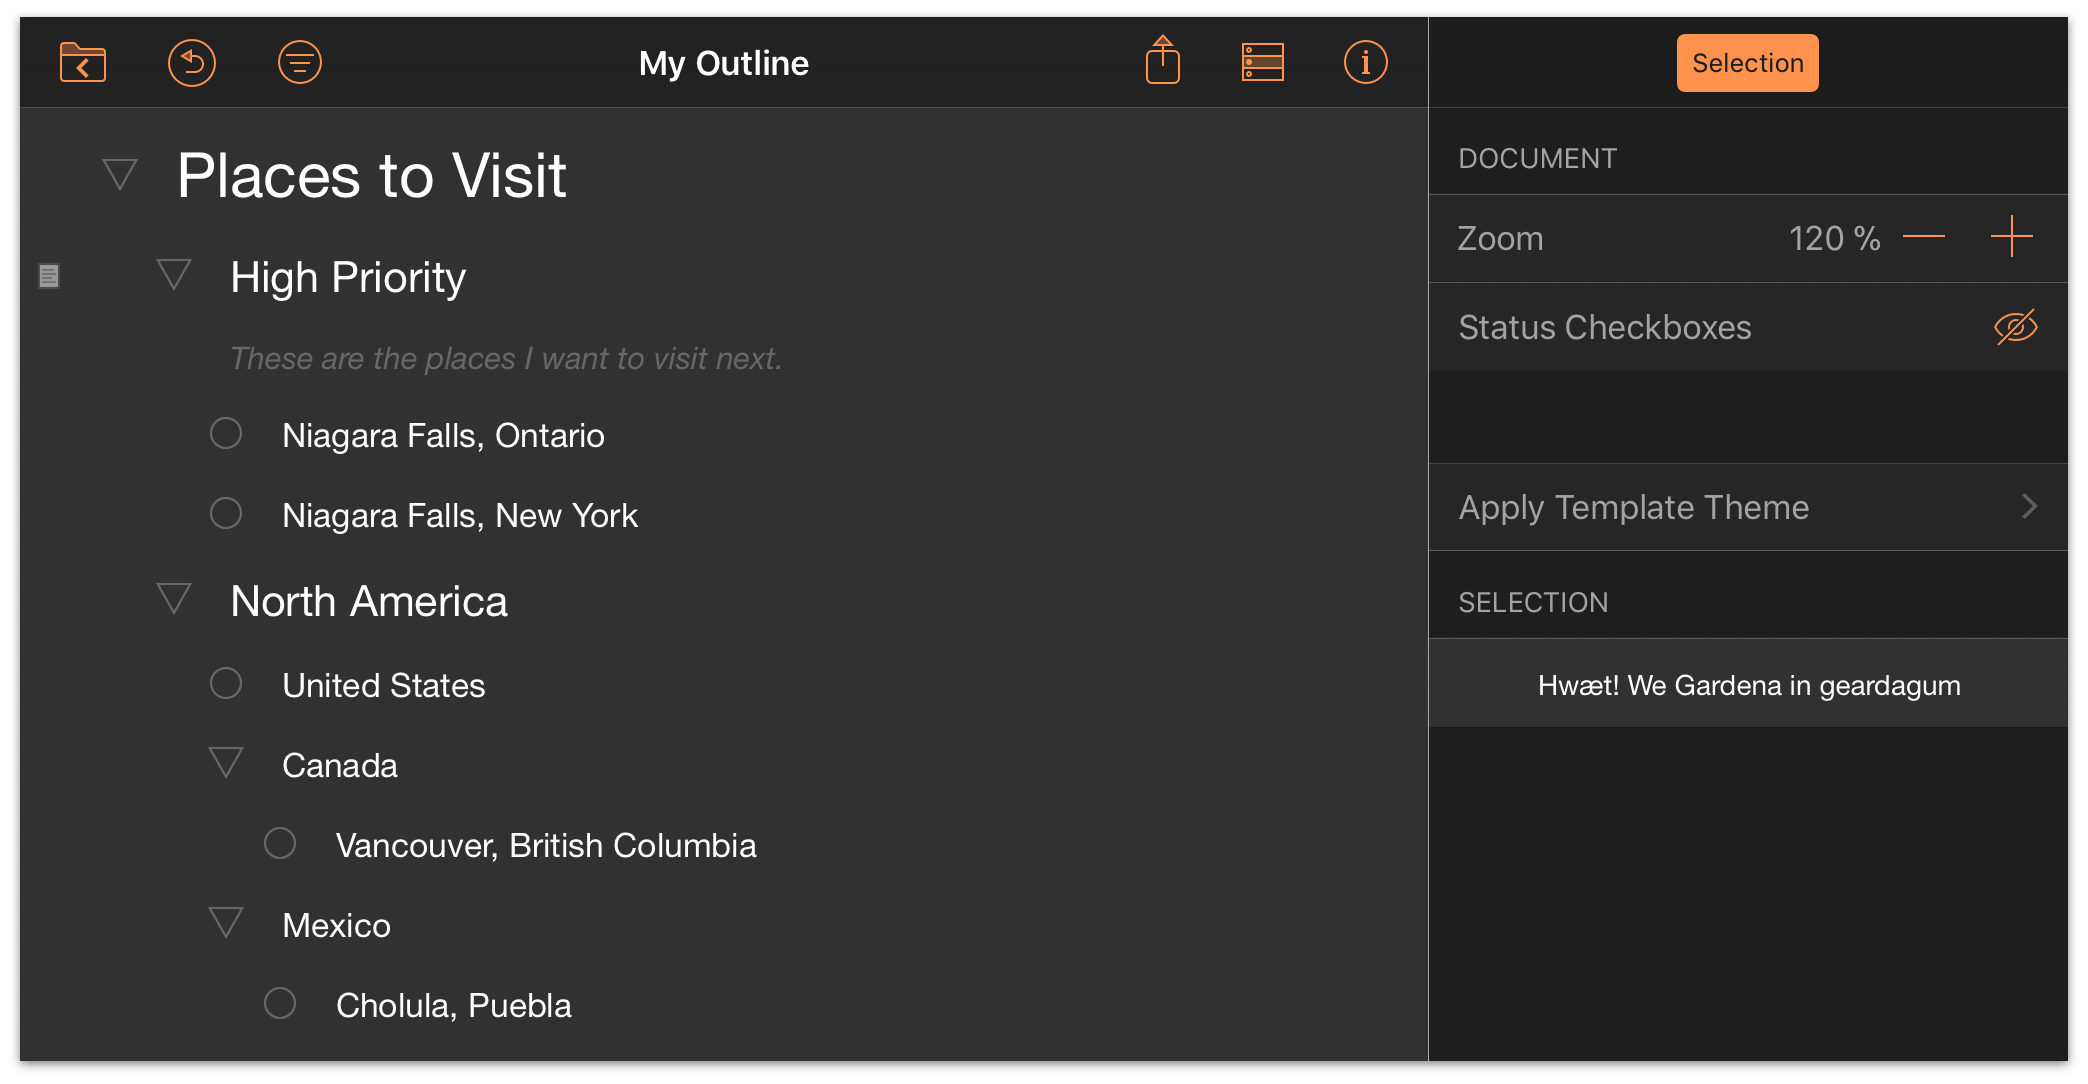
With a row selected, the list of available named styles appears in the Styles section of the inspector. Each template theme includes six Heading styles and three Highlight styles you can apply to any row in your document; tap one of them to apply it to the selected row.
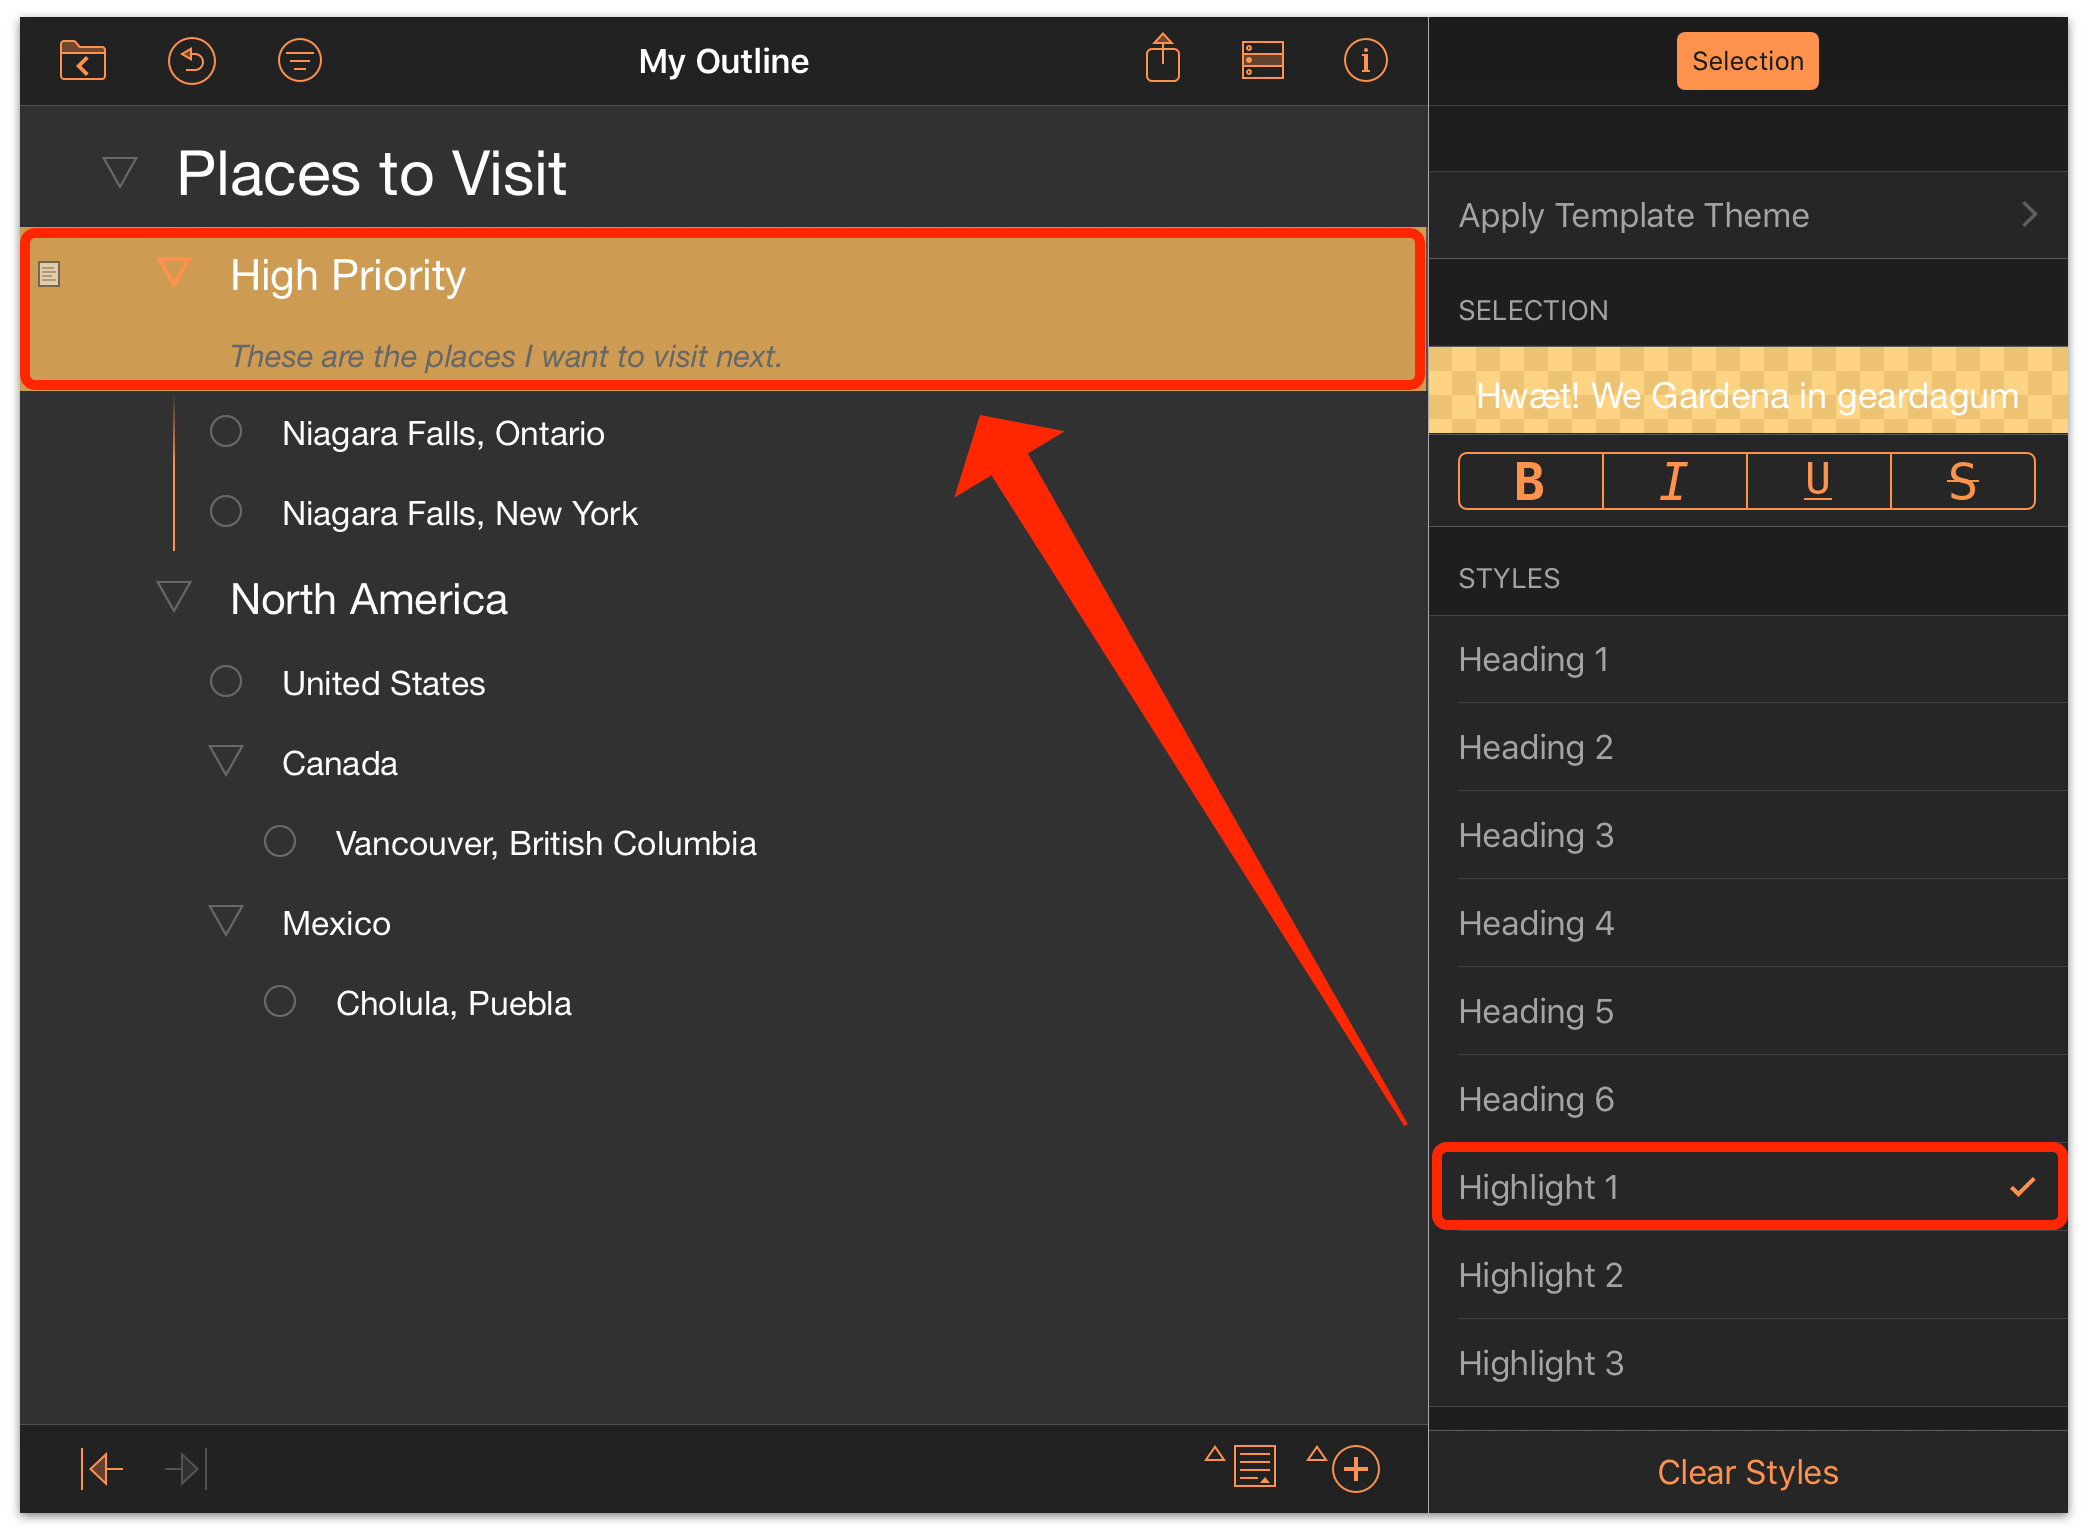
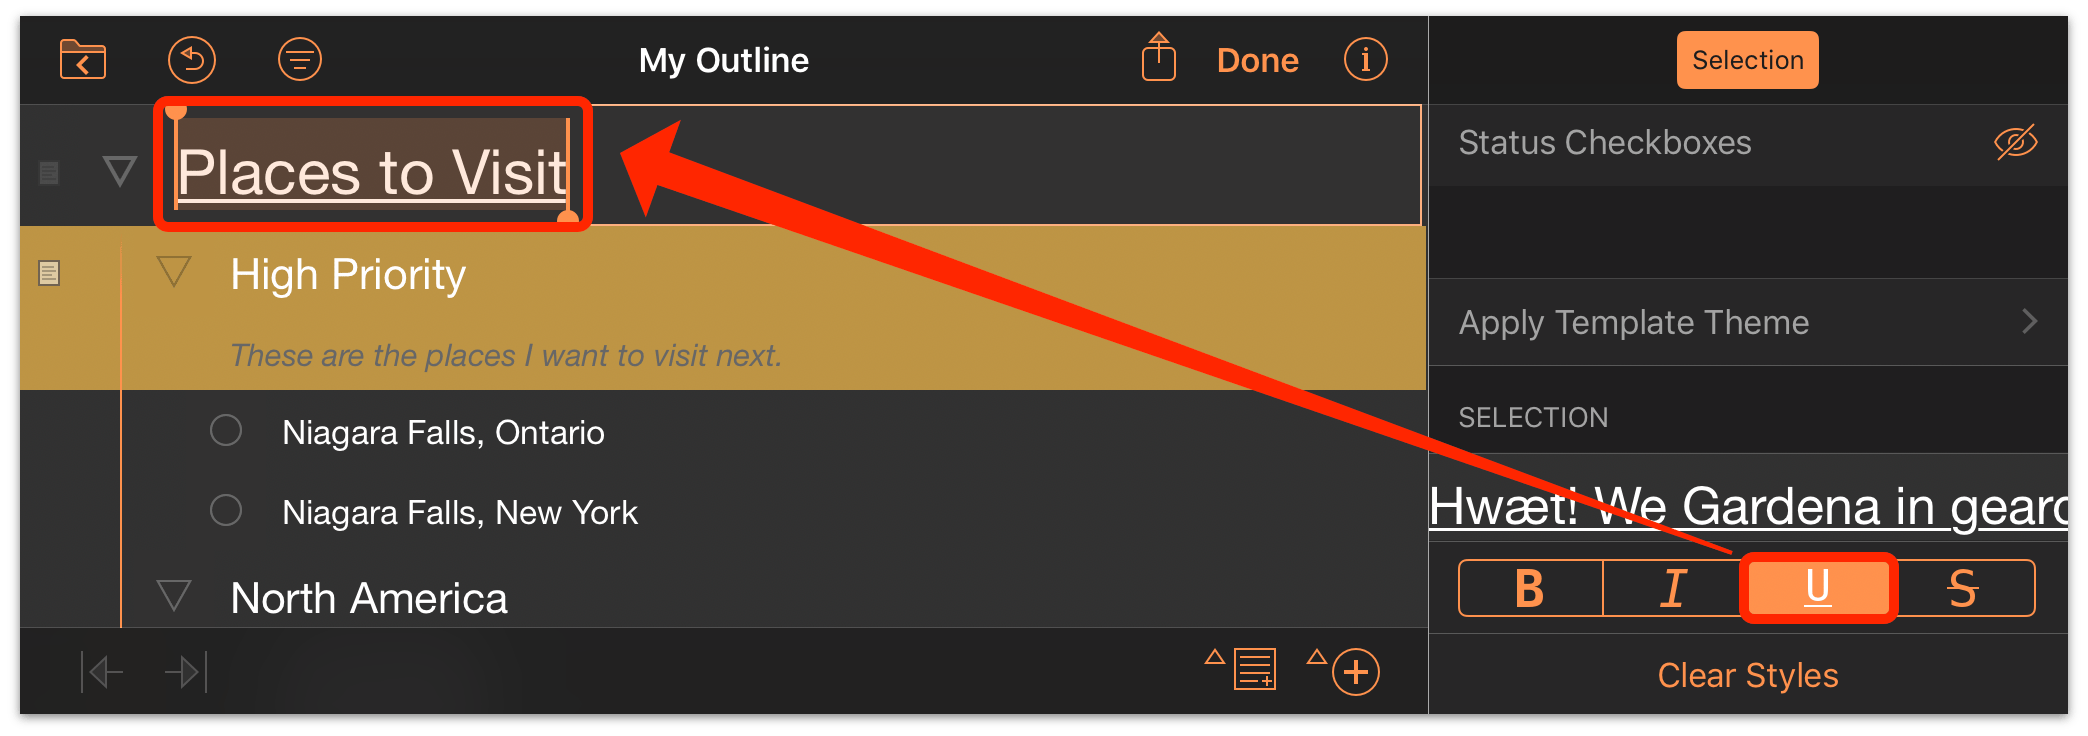
In addition to custom named styles that come along with the theme, you can also apply the Bold, Italic, Underline, and Strikethrough text styles to any selected rows or text within them.
Naming the Outline
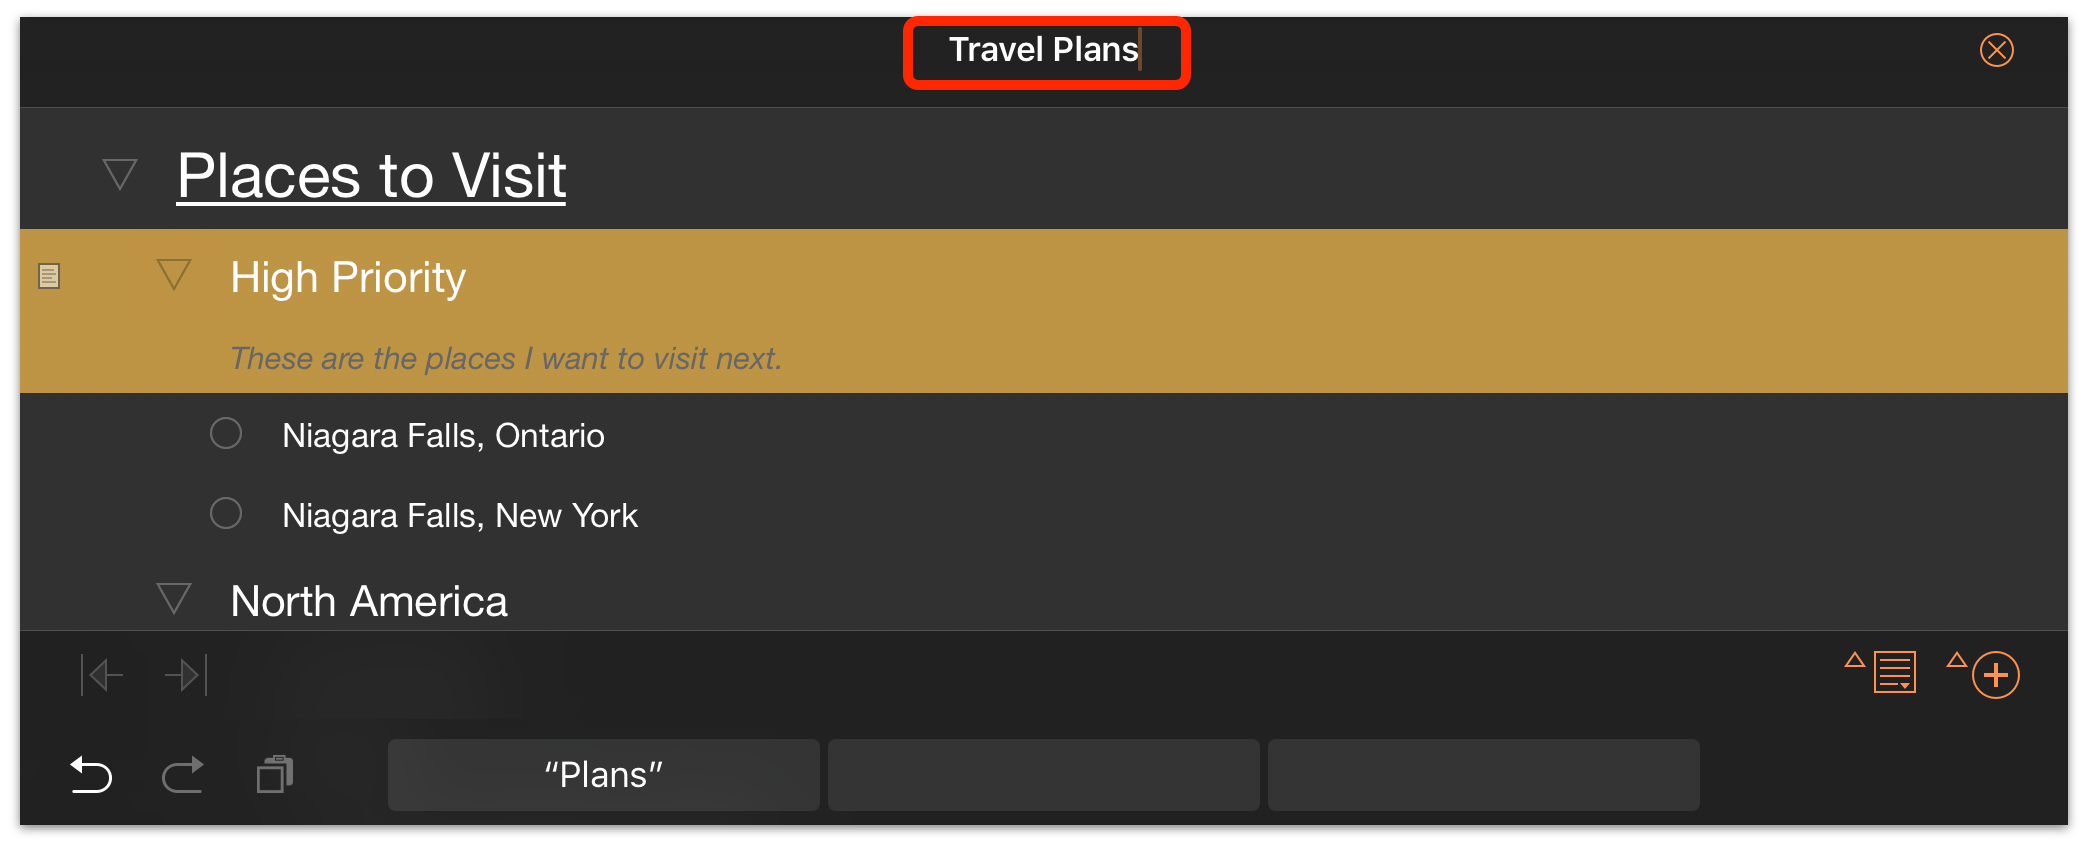
The default document name of any newly created outline is My Outline. To change the name, tap it in the document toolbar and enter whatever name you like.
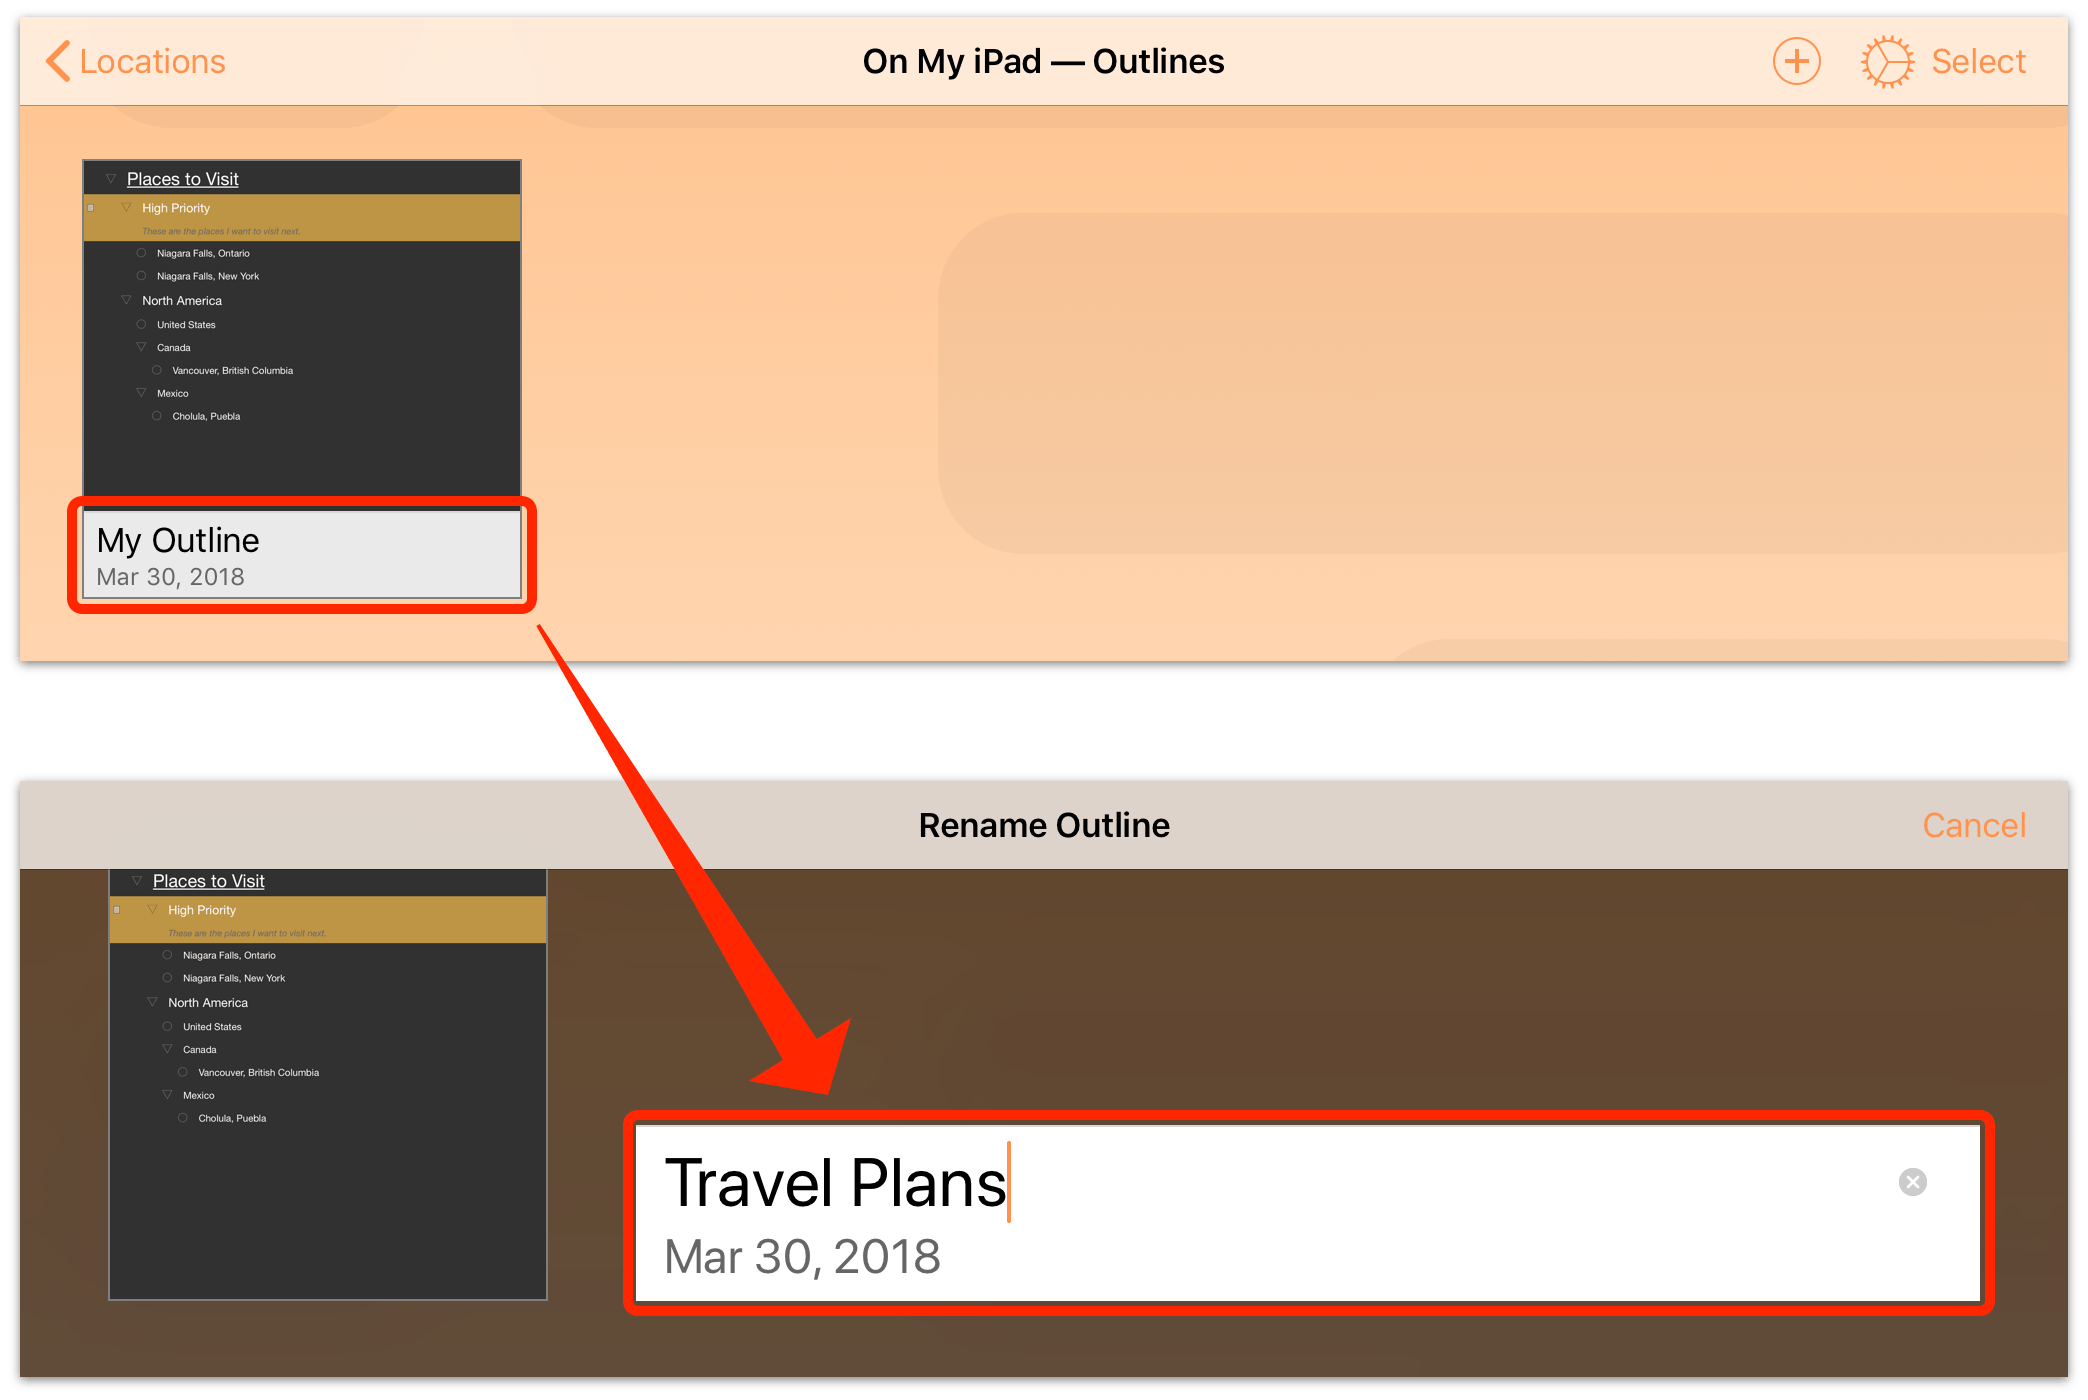
Alternatively, tap Documents  in the document
toolbar to return to the document browser, then tap the document name beneath the preview icon for your outline to open
it for editing.
in the document
toolbar to return to the document browser, then tap the document name beneath the preview icon for your outline to open
it for editing.
When you’re ready to share your document with the world, see Exporting from OmniOutliner 3 for iOS for step by step instructions and a list of the various export formats that OmniOutliner supports.
Getting Started with Pro
Along with the set of structured writing tools and styling options available in OmniOutliner Essentials, OmniOutliner 3 Pro for iOS offers several additional features for enriching your outlines. If you’re just getting started with Pro, it’s a good idea to read the sections above this for the basics and then continue here.
Adding Columns
In the Pro edition of OmniOutliner, the Inspector pane contains two
sections: one for setting the style properties of a selection in the outline, and the other for setting up the
document itself. The Document inspector is where you’ll find the capability to add new columns to the outline.
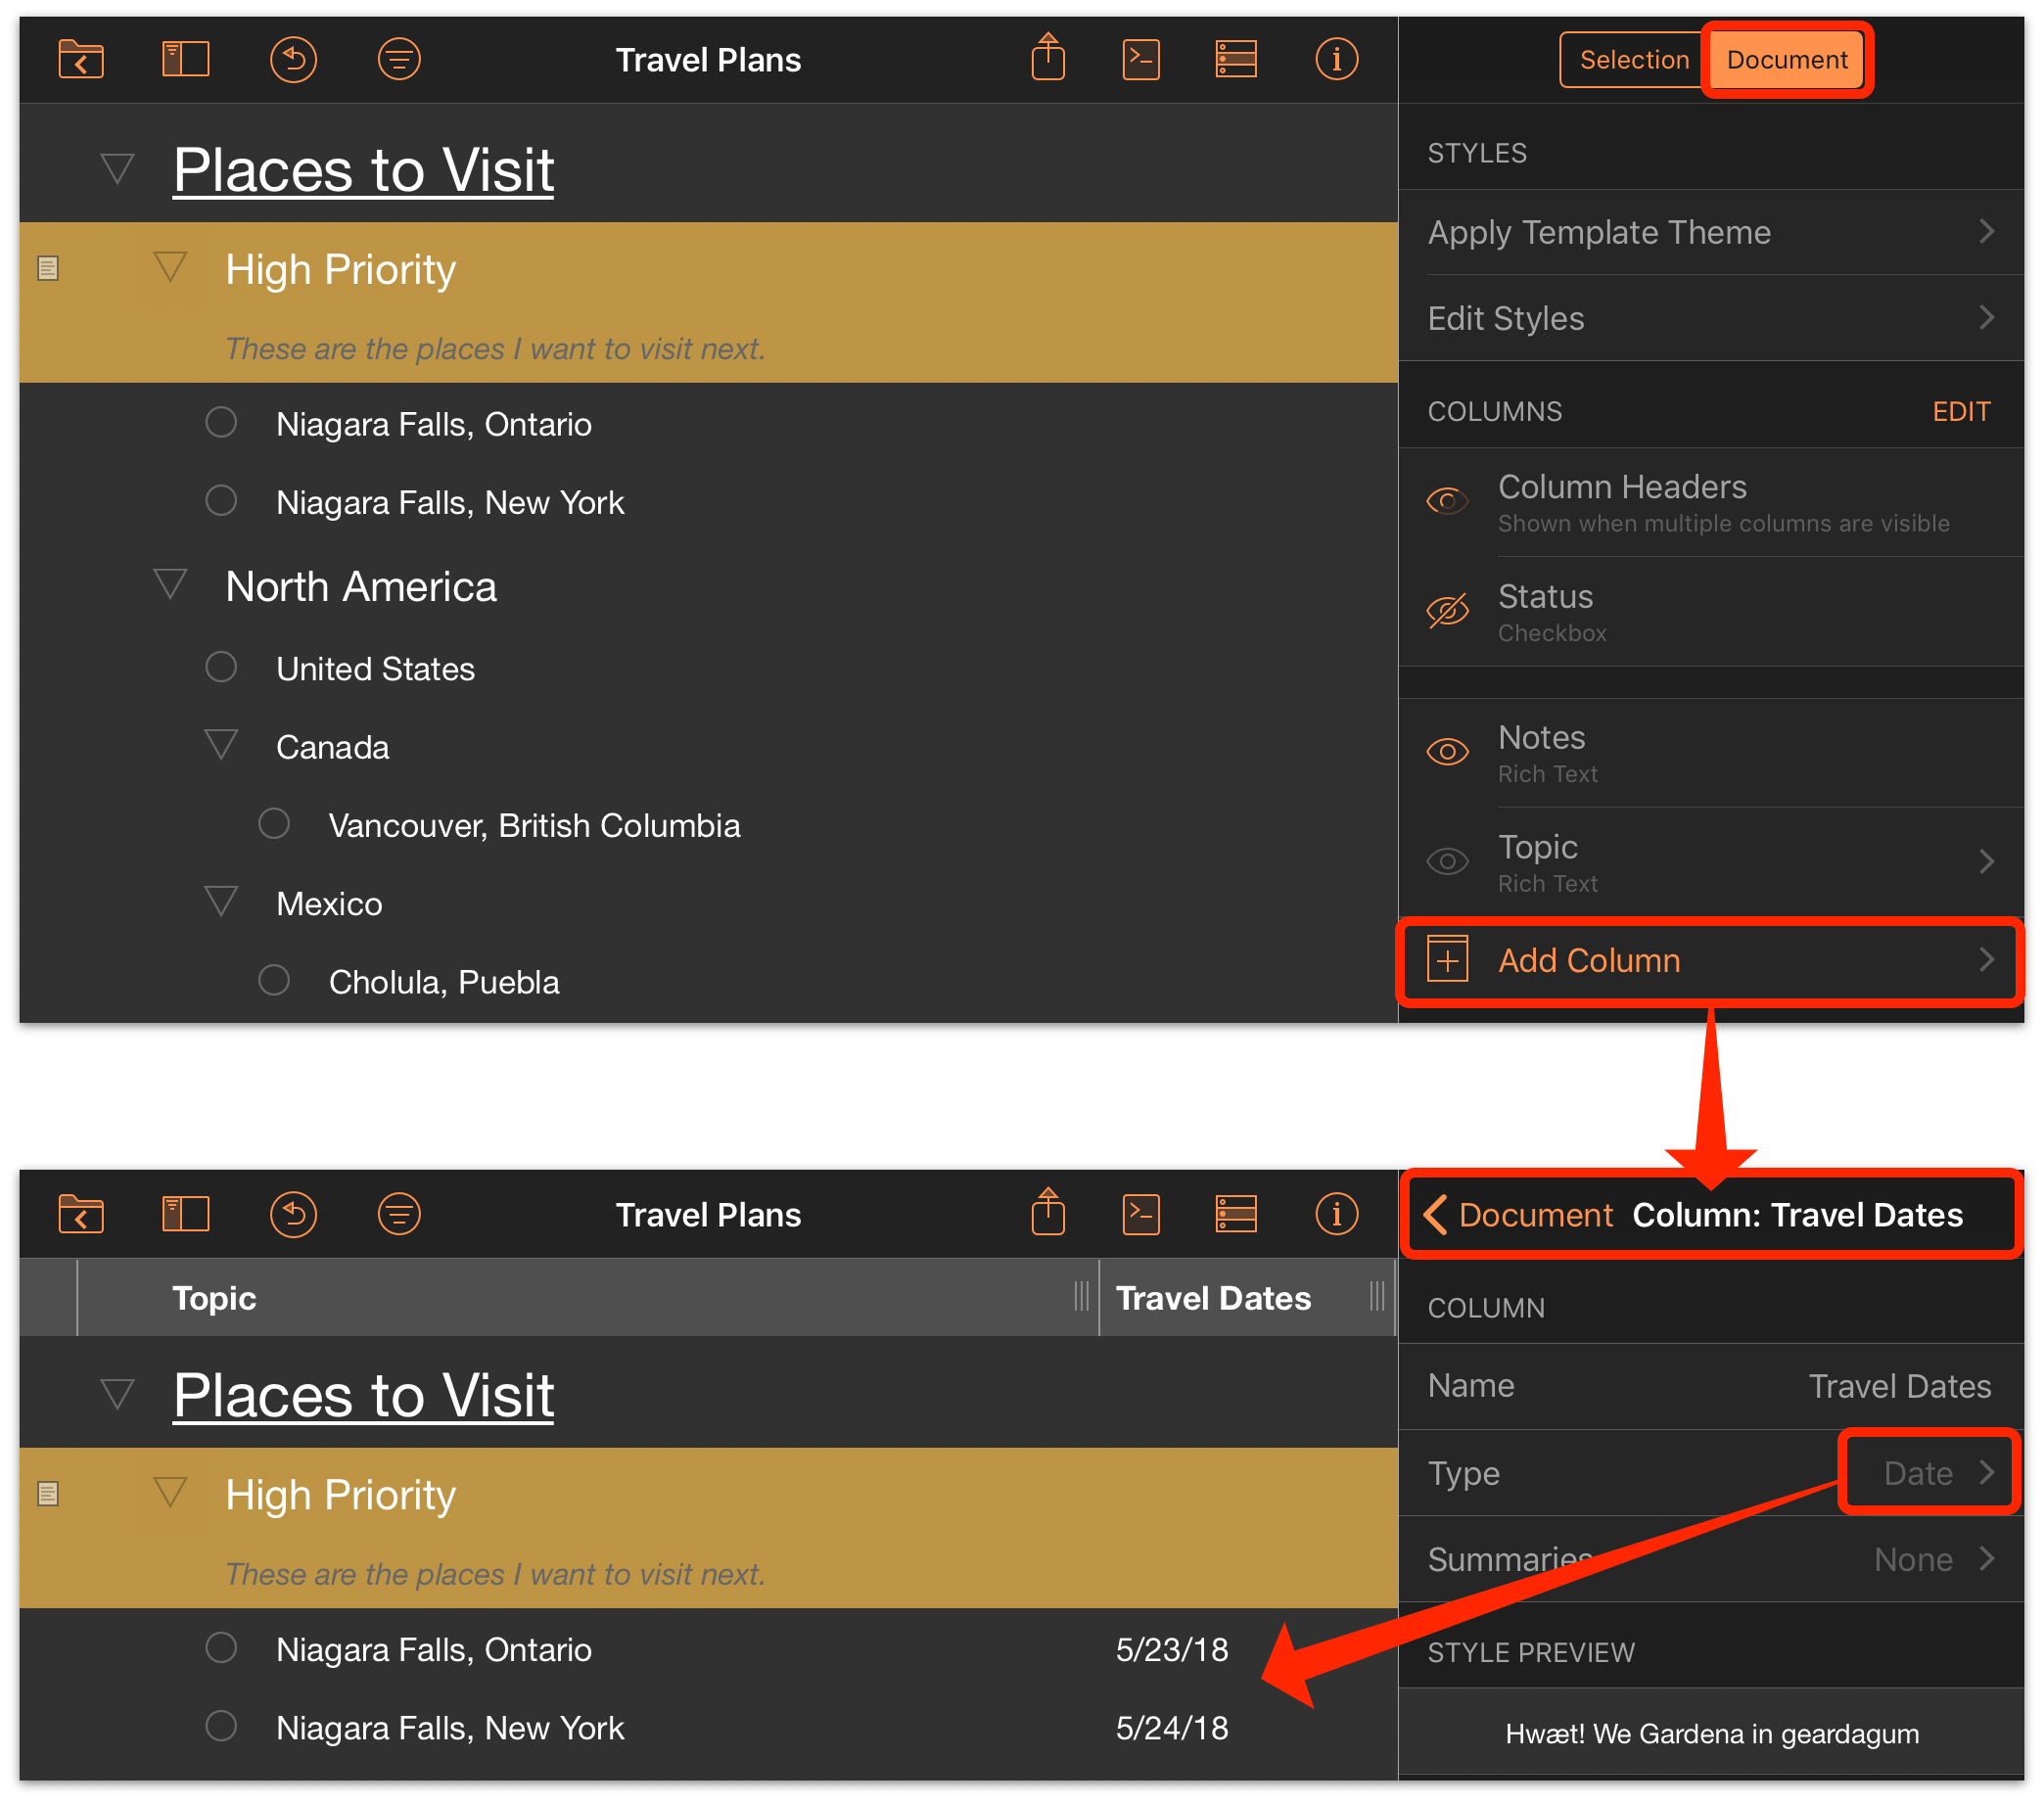
Tap Add Column in the Document inspector to create a second column. The Column sub-inspector is packed with tools for customizing this column to suit your exact needs (if you know the column will only contain dates, for example, you can change the column type to reflect that).
For full details on setting up custom columns in your outline, see the Columns section of the OmniOutliner Pro reference manual.
To quickly set up a multi-column document without using the inspector, try creating a new document using one of the multi-column templates offered with OmniOutliner Pro.
Advanced Styling
OmniOutliner Pro distinguishes itself from the Essentials edition through a suite of highly customizable styling options. Apply styles to any selection of rows or text on the fly, create new named styles to store commonly used sets of style attributes, edit the properties of document-wide structural styles, and save entire document style sets as templates for future use.
This article provides an overview of these styling features to help you get started. The OmniOutliner Pro reference manual contains sections for the Selection inspectors and Document inspectors that cover these features in detail.
Applying Ad Hoc Styles
Ad hoc styles can be applied to any row or selection of text in the outline.
In addition to the Bold, Italic, Underline, and Strikethrough styles present in Essentials, OmniOutliner Pro adds options for styling the selection to change its font, colors, size, paragraph alignment, row numbering, and more.
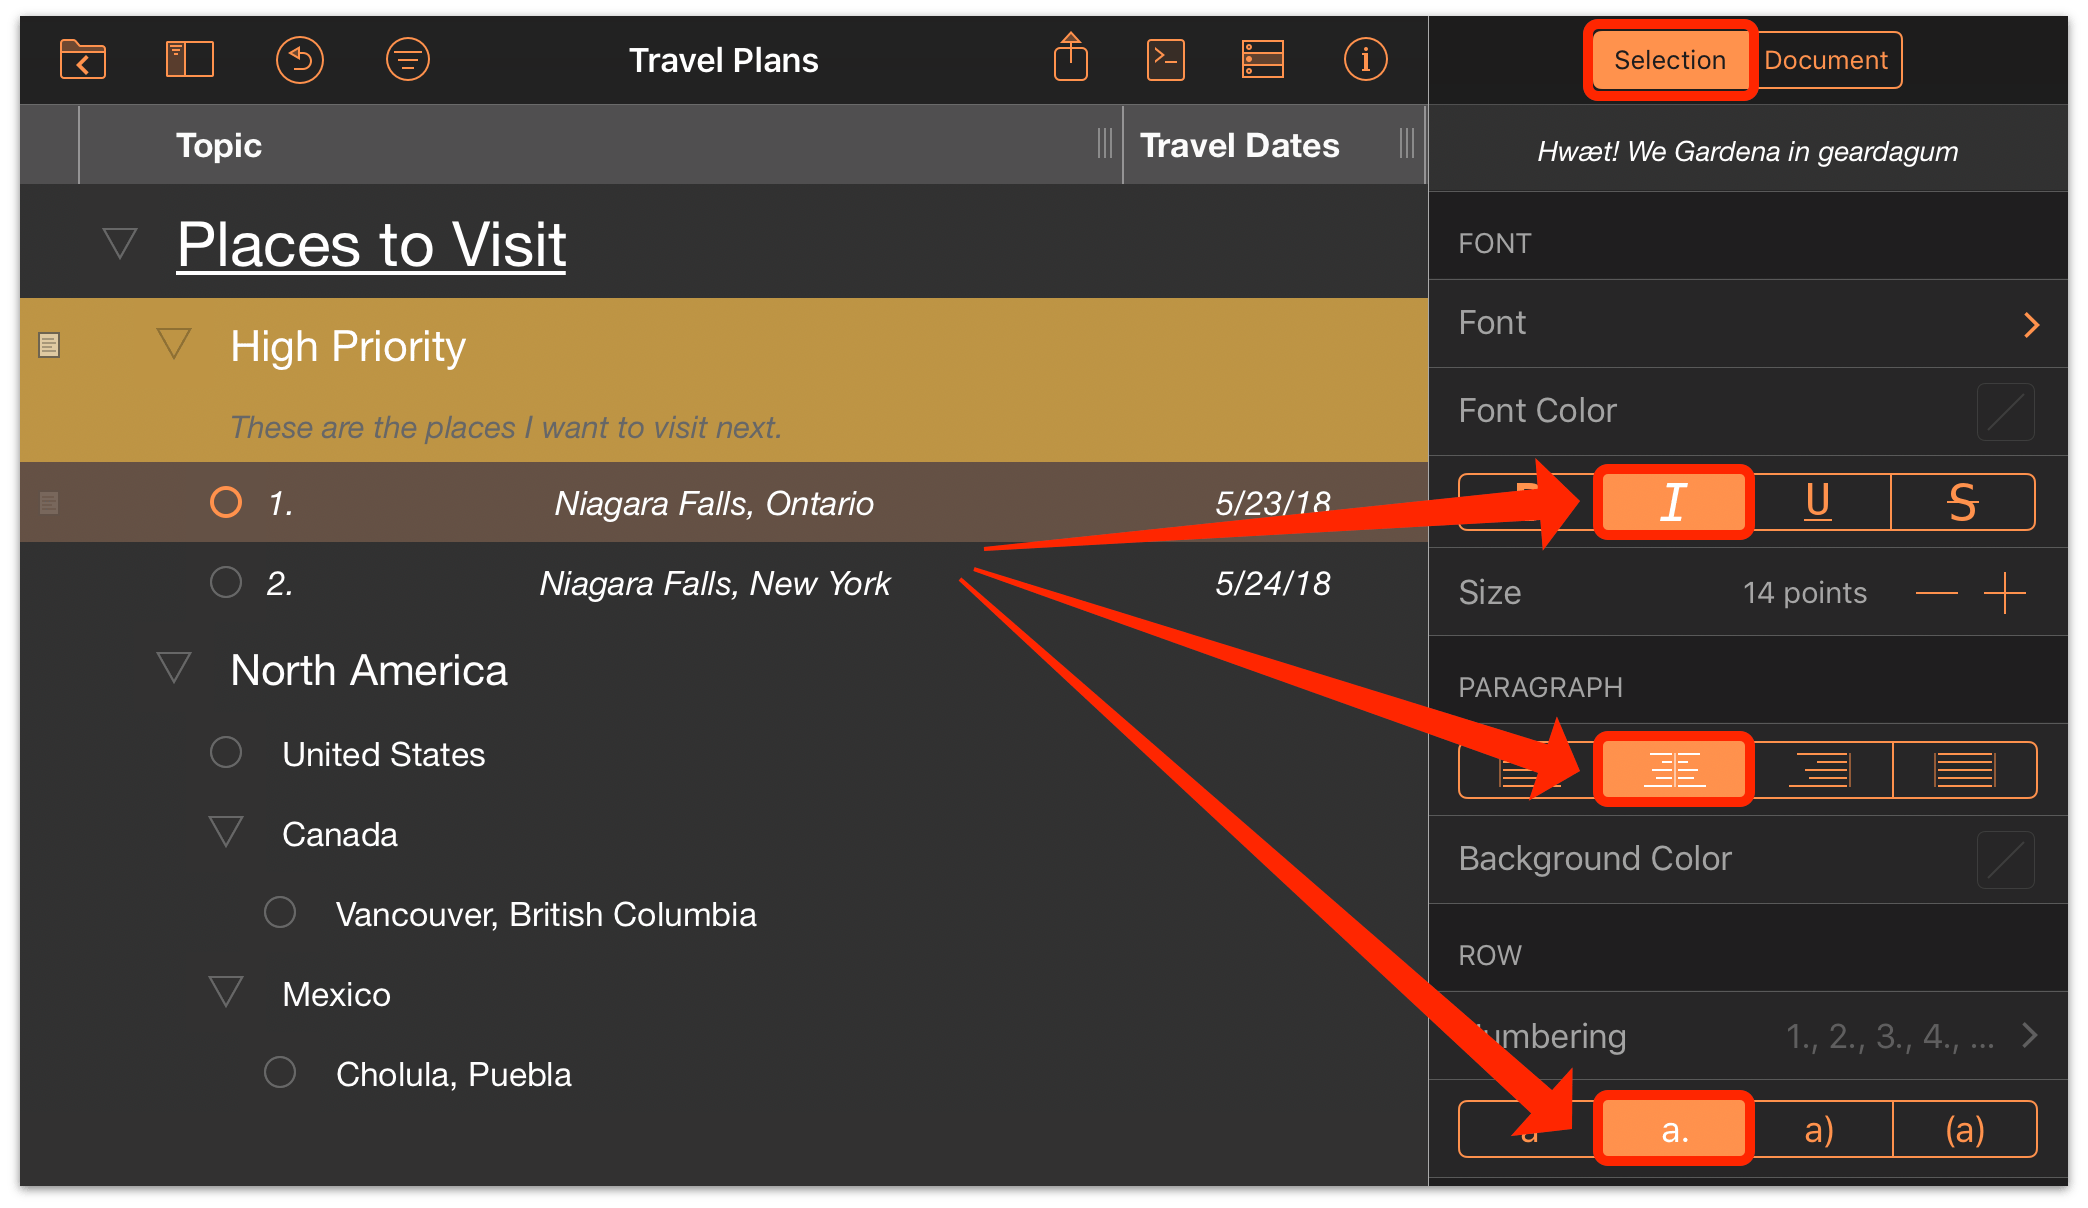
If you find a particular set of styles you like, you can set it up as a named style and save it for future use.
Creating Named Styles
Named styles are saved style presets that include multiple commonly used properties. Like ad hoc styles, they can be applied to any row or selection of text.
OmniOutliner Pro adds the tools to create brand new named styles that you can save with your outline and apply at will.

Open the Selection inspector and scroll to the bottom to find Edit Styles. Tap it to open the Style sub-inspector, where you’ll see the list of existing styles. Scroll to the bottom of the list to find the option to Add Named Style.
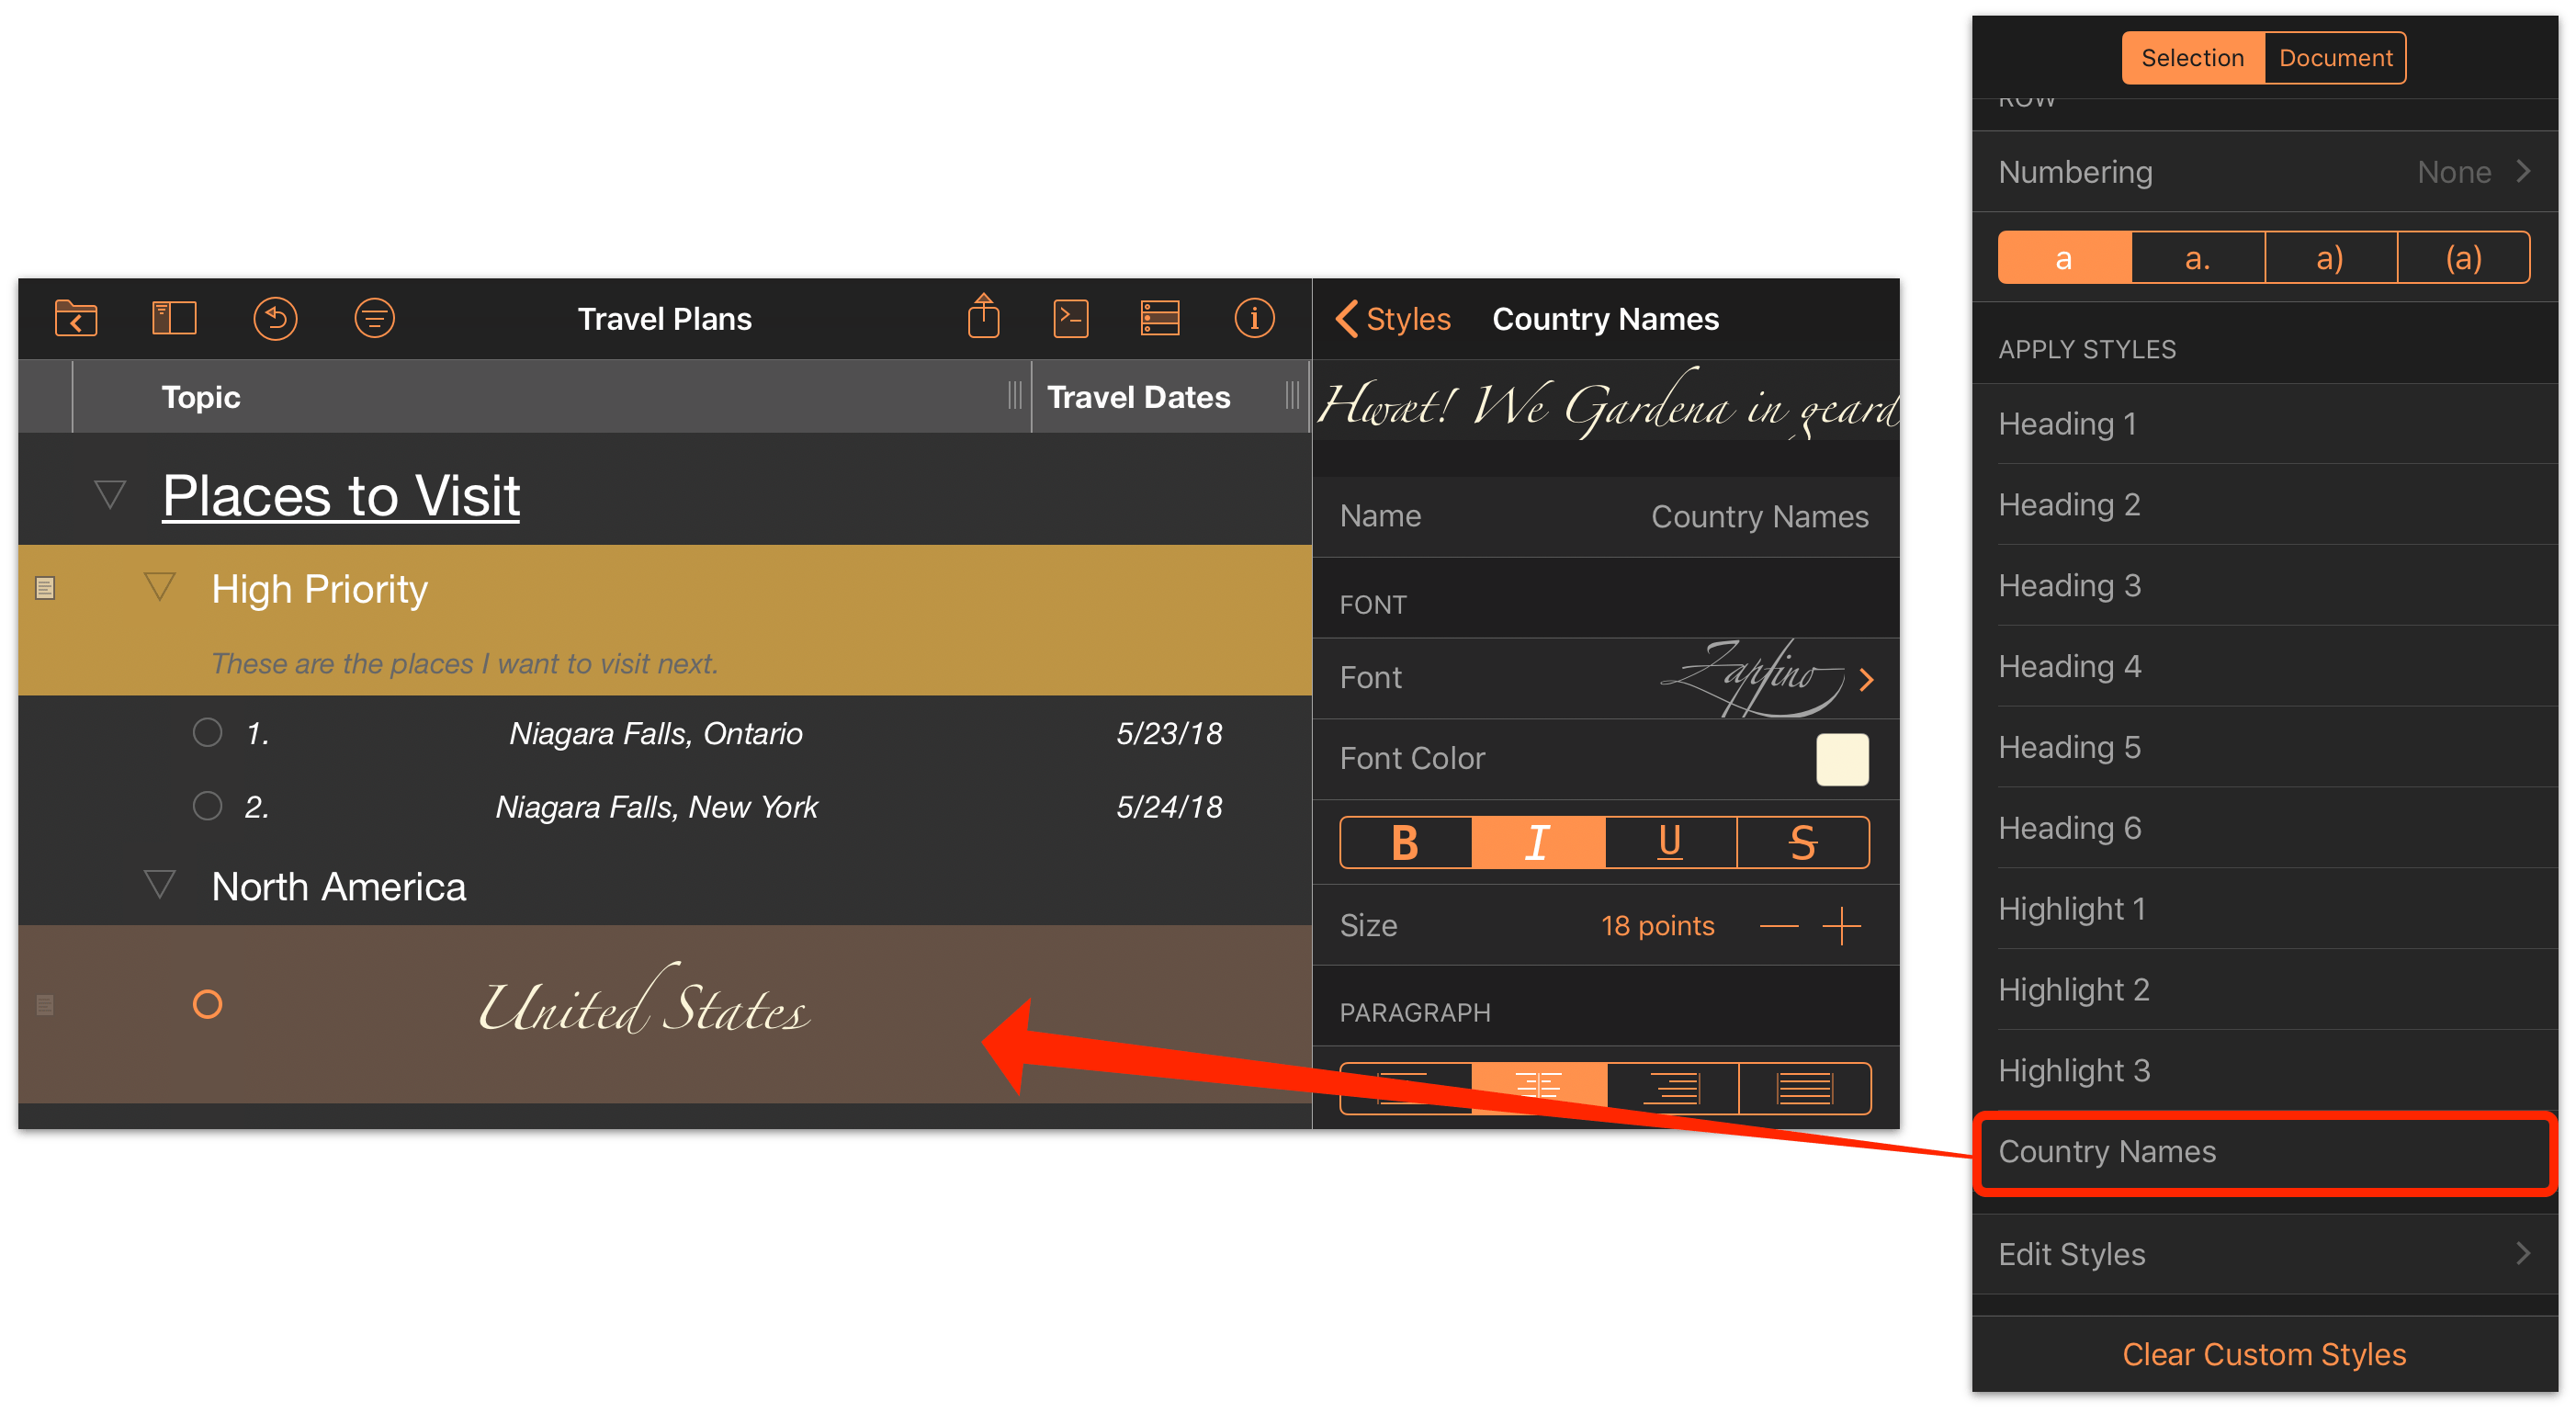
Tap it to create a brand new style preset, which you’ll set up as if assigning a set of ad hoc styles to a selection. In the future, instead of manually assigning these style attributes you can tap the new named style in the styles list and apply them all at once.
Editing Structural Styles
As you create your outline and assign hierarchy to its rows, you create structure that is an intrinsic property of the document. An outline contains as many row levels as it has levels of hierarchical depth, and each of these levels can be assigned its own unique style properties using the Style sub-inspector.
Tap Edit Styles in the Selection inspector to open the Style sub-inspector, where you’ll find the list of structural styles. Tap one of the row level styles (such as Level 1 Rows) to edit its stylistic properties, which you can set up using the full set of style options available.
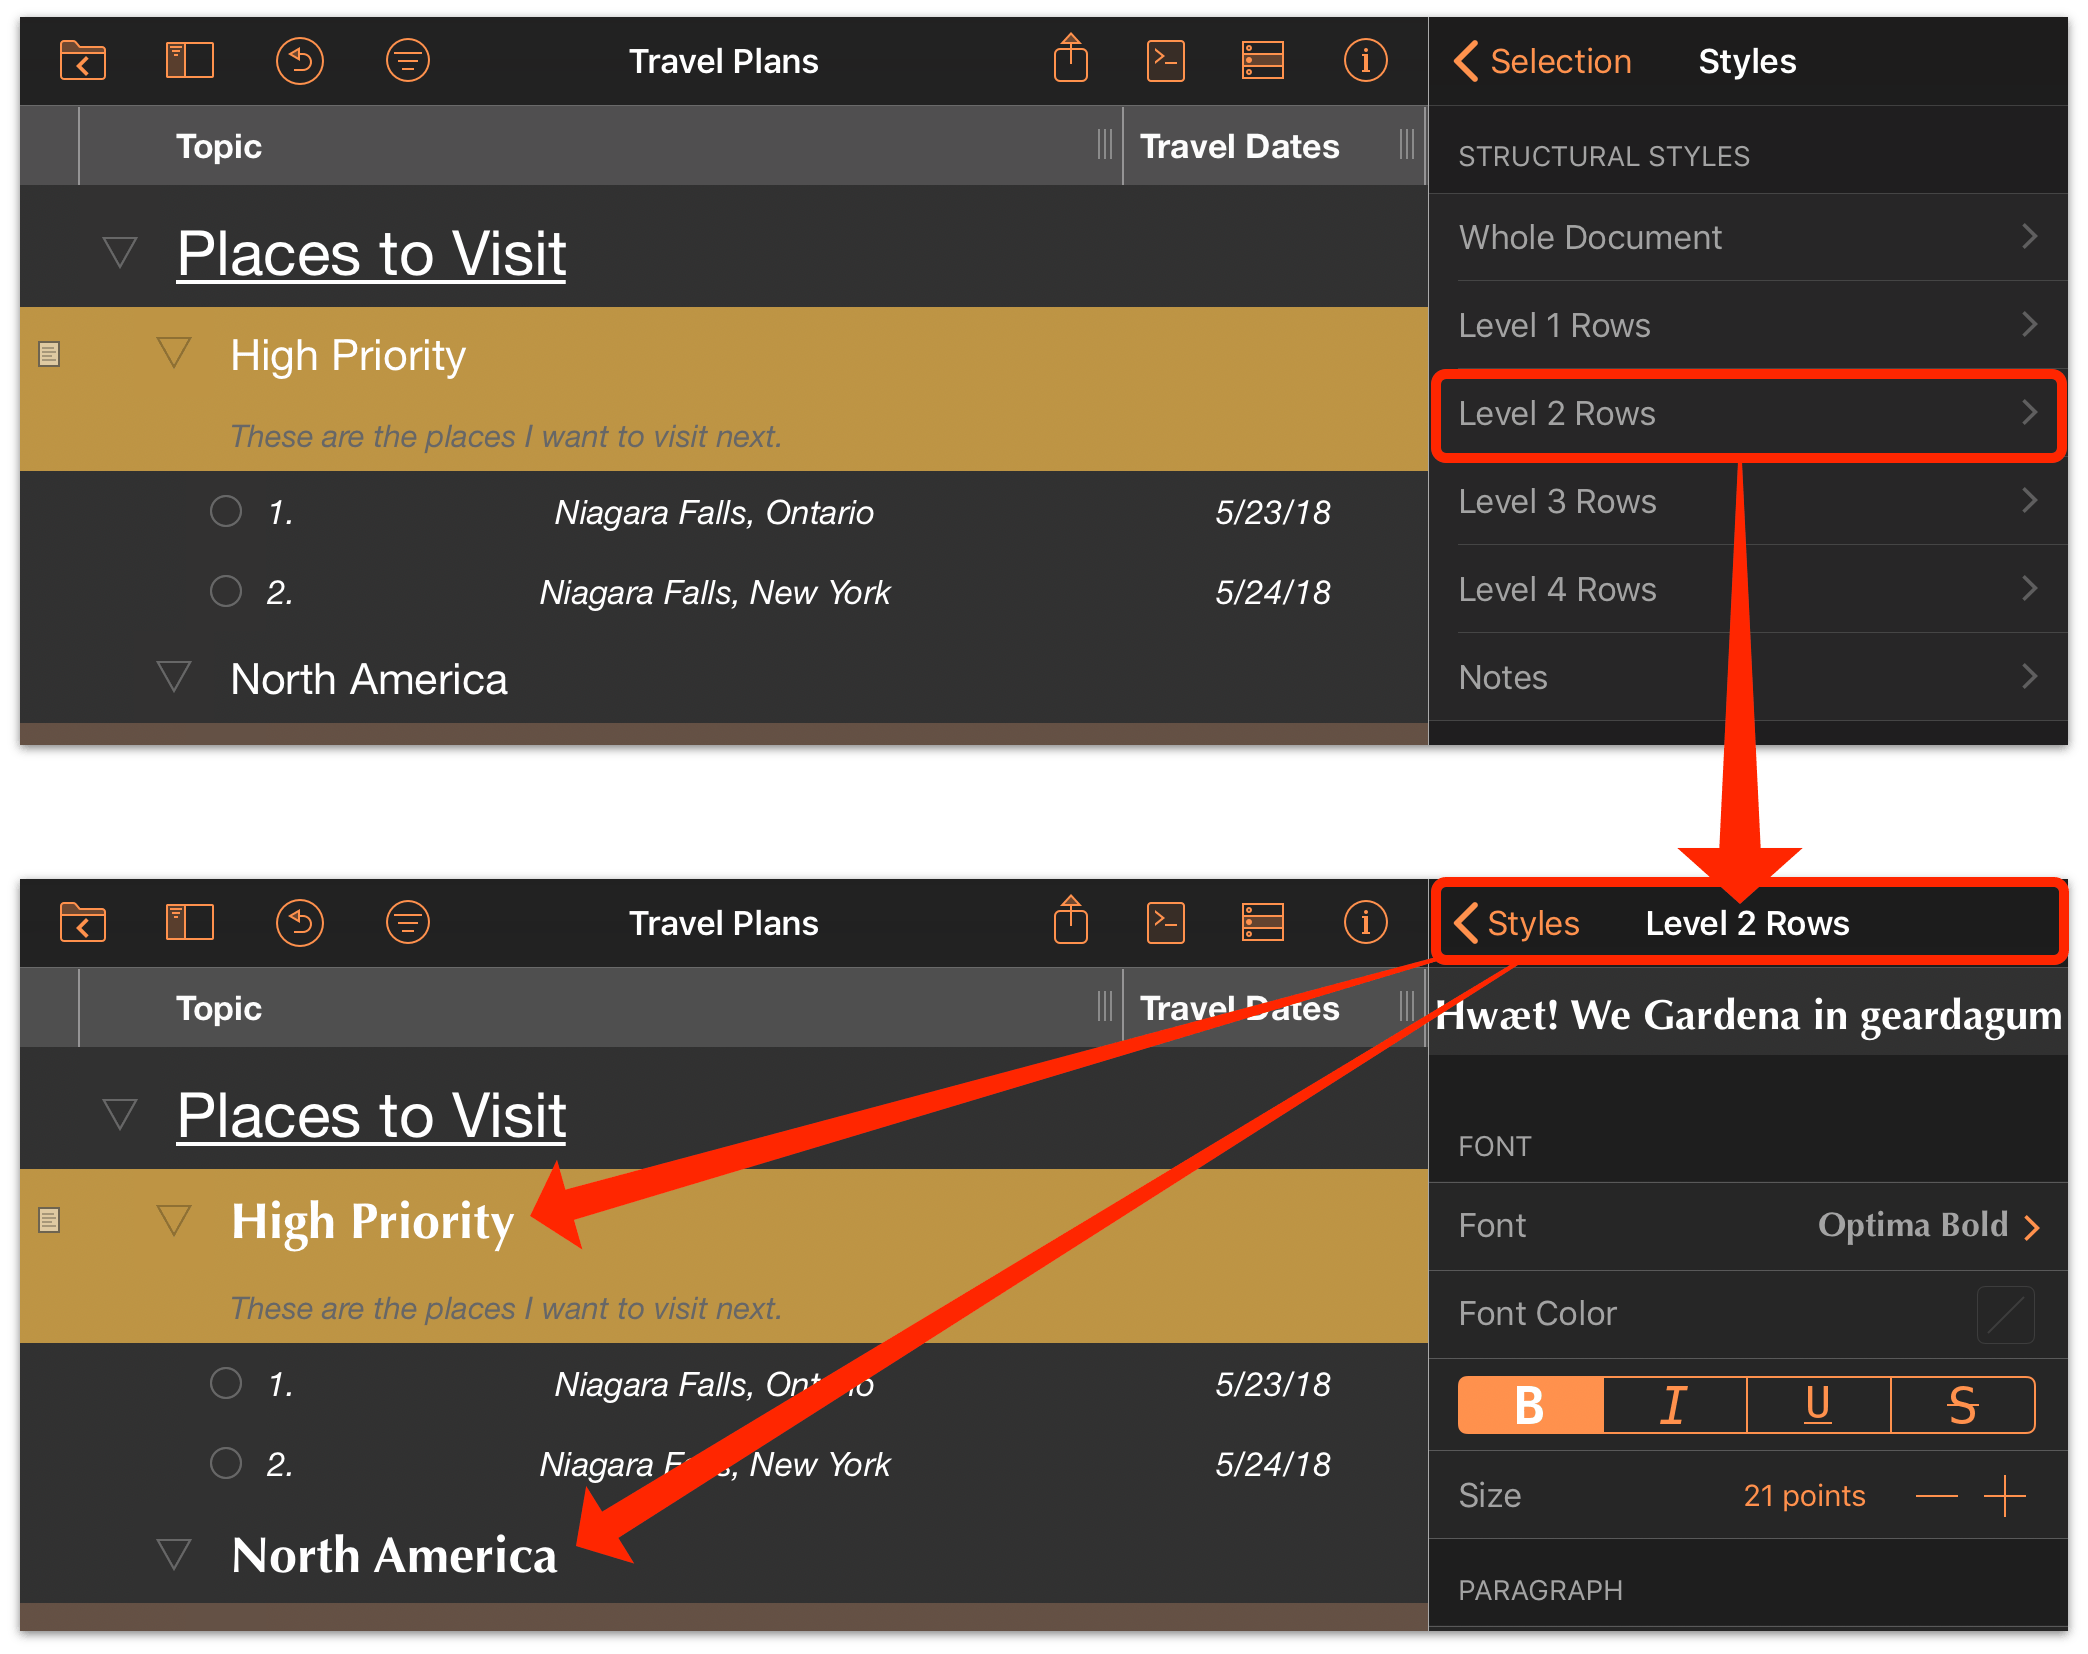
Styles you save here are applied immediately to all rows at that level throughout the document.
To edit the background properties of the entire document, choose the Whole Document structural style. This is the bottom-most style layer atop which all the others are displayed. For more on how certain styles take precedence over others, see the Structural Styles and Style Layers section of the reference manual.
Creating Templates
If you have your outline styles set up the way you like and you want to reuse them in future documents, you can save the entire set of structural and named styles (along with any outline content you like) as a new custom template.
(Templates are used as the starting place for new documents, and can have their style properties applied as themes to existing outlines.)
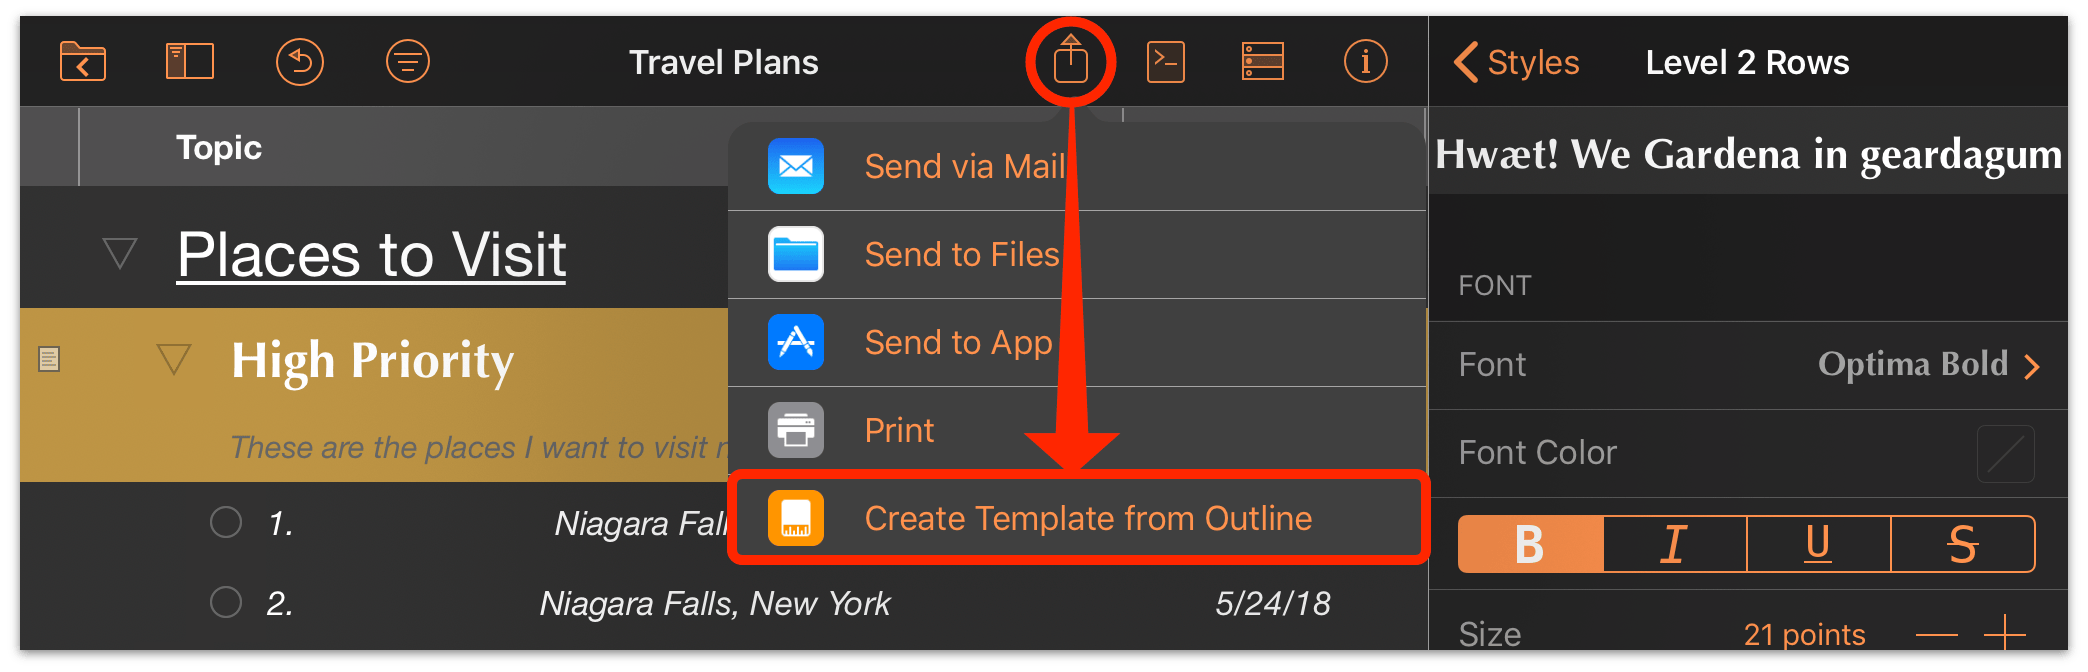
To save an outline as a template, tap Share  in the
document toolbar and choose Create Template from Outline. The template is saved in the document browser’s
Templates section, and appears in the template chooser for future use.
in the
document toolbar and choose Create Template from Outline. The template is saved in the document browser’s
Templates section, and appears in the template chooser for future use.

Focusing and Filtering
Along with the advanced styling features that OmniOutliner Pro provides, it also includes a sidebar with tools for customizing the view on your outline to just the parts that are relevant to you right now. (These don’t change the content of your document—they just provide a view that tucks the other bits away.)
Tap the sidebar button  (or
(or  on compact devices) to open the sidebar, which is split
into two panes: Sections and Filters. Sections holds an abbreviated view of your row hierarchy, acting as a
table of contents for quickly navigating to and focusing on the relevant pieces.
on compact devices) to open the sidebar, which is split
into two panes: Sections and Filters. Sections holds an abbreviated view of your row hierarchy, acting as a
table of contents for quickly navigating to and focusing on the relevant pieces.

Tap one or more sections in the list to focus on them in the outline. While focusing, all rows not contained by the chosen sections are hidden from view. (This is indicated by a notice bar at the top of the outline.) Tap the notice bar and choose Unfocus to restore a full view of the outline, or tap the sections in the list again to remove them from the focused selection.

The Batch Find tool at the top of the sections list is useful for finding text matching specific keywords. Enter terms here and the sections list displays results for cells matching those terms.
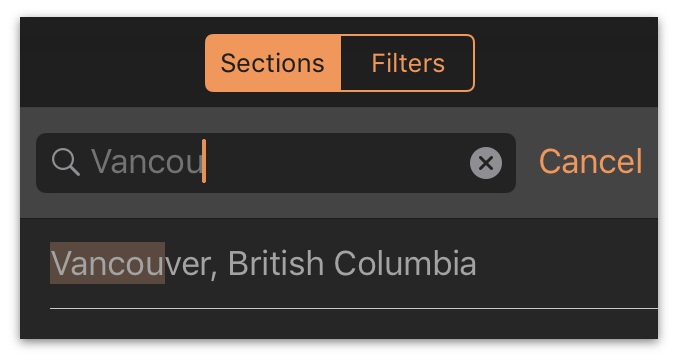
The other pane of the sidebar, Filters, holds saved rules for filtering the content of your outline. To create a new
filter, Tap Search  in the document toolbar and enter
a keyword. The outline displays any rows with text matching that term. When the search view is set the way you want,
tap Save as Filter to save the search as a filter.
in the document toolbar and enter
a keyword. The outline displays any rows with text matching that term. When the search view is set the way you want,
tap Save as Filter to save the search as a filter.
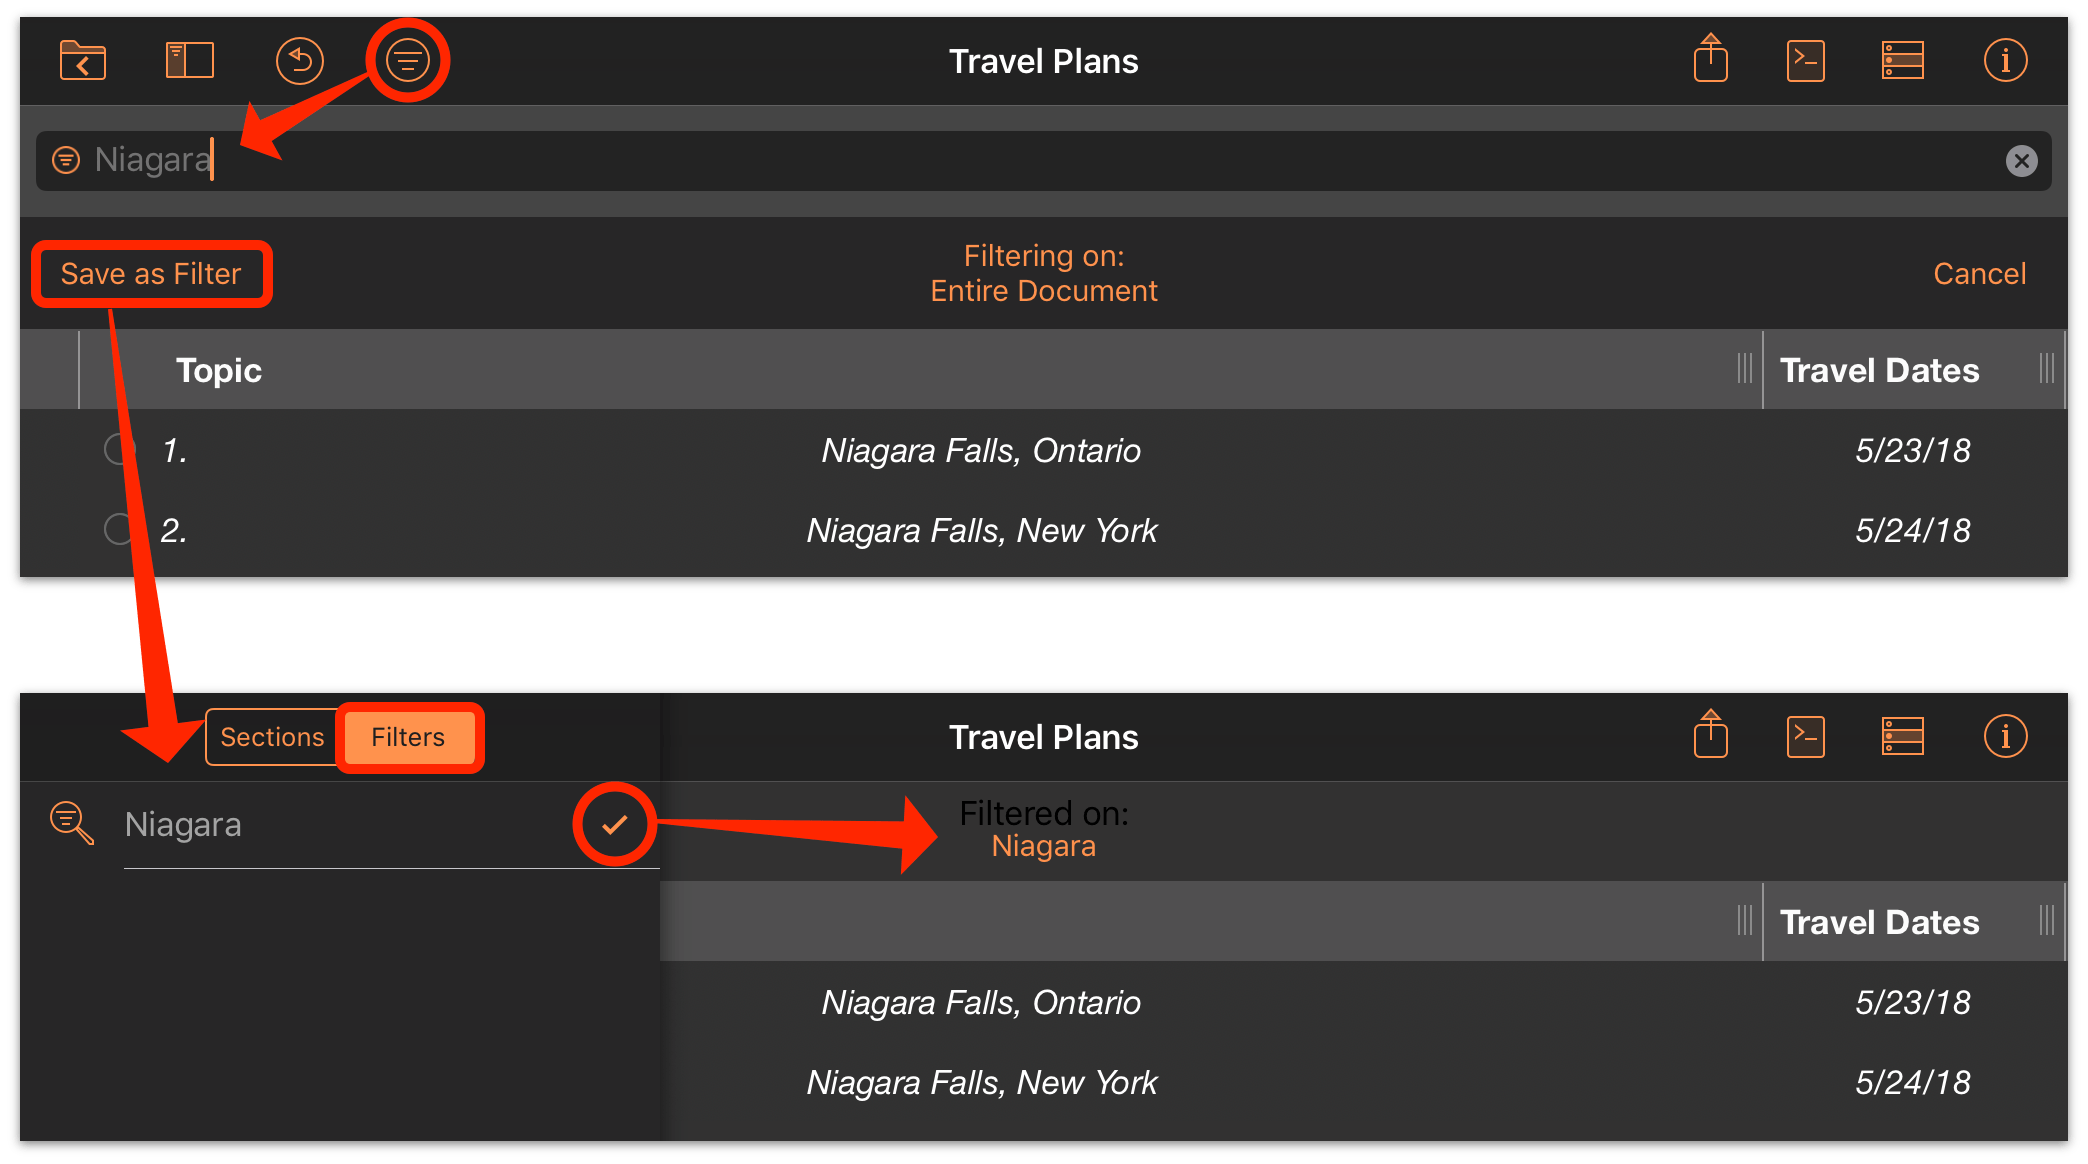
The keyword search now appears as a saved entry in your Filters list. Tap a filter in the list to apply it to the outline view, and tap it again to remove it.
To read up on the features of OmniOutliner 3 for iOS in greater detail, check out the reference manuals: