Getting Synced with OmniPresence and Omni Sync Server
Available on the Mac and iPad, OmniOutliner is an essential tool for all your outlining needs. And when it comes to protecting those documents and sharing them between OmniOutliner on your Mac and OmniOutliner on your iPad, we have something a little extra-special for you: OmniPresence and Omni Sync Server.
-
OmniPresence is a free utility that you install on your Mac for synchronizing files. OmniPresence runs in the background, watching a “connected folder.” It makes sure the files inside are in sync with files in the cloud (a WebDAV server of your choice), and with your OmniPresence-enabled iPad apps.
On iPad, OmniPresence is built into all of our current document-based apps, including OmniOutliner 2 and OmniGraffle 1. You’ll access OmniPresence folders and files from within the app’s respective Resource Browsers. The result is that all of your OmniPresence-enabled devices detect changes wherever you make them, and constantly sync up to keep your files up to date.
To get started, you’ll need to download OmniPresence for Mac from our website.
Note
OmniPresence isn’t a replacement for your current sync solution for OmniFocus or OmniPlan:- OmniFocus uses its own built-in sync code (rather than OmniPresence) to push database changes to a WebDAV server and retrieve them from it; OmniFocus for Mac doesn’t require OmniPresence to be installed for its sync to function to work.
- OmniPlan uses a publish-and-subscribe feature for sharing project files. For example, you can create a project plan in OmniPlan and share it (publish) with people on the team who are responsible for certain tasks. In turn, they subscribe to the project so they can see and report on the tasks they’re assigned.
-
Omni Sync Server is a magical box that lives in a well-air conditioned room with our other servers and a herd of unicorns. Omni Sync Server is our own custom WebDAV server and it functions as a central hub for all your syncing needs; it’s what OmniPresence connects to when shuttling files between your Mac and iOS devices.
With Omni Sync Server, we never ever look at your data without your permission. For example, when our Support Humans are working with you to restore a corrupt file or isolate a particular issue you’re having with our server. Beyond that, you can rest assured that your data is safe and secure on Omni Sync Server.
To use Omni Sync Server, you’ll first need to sign up for an account. Don’t worry, though, it’s free. If you don’t have an account already, head over to our website and sign up for an Omni Sync Server account today. Like, right now.
How Synchronization Works
Before diving in to the nuts and bolts of getting everything set up on your Mac, it’s worth taking a moment to discuss how syncing with OmniPresence works.
With OmniPresence turned on, the WebDAV server you designate (either Omni Sync Server or your own or a third-party WebDAV server) manages synchronization so that your files are always up to date. With each subsequent sync, OmniPresence compares your local files and applies any differences to your files on the server. This ensures that your files are not just up to date, they’re available wherever—and whenever—you need them.
We’ve also built in an automatic sync mechanism. When you save an OmniOutliner file to an OmniPresence-enabled folder (or when an Auto Save occurs), OmniPresence updates the file on the sync server. At a bare minimum, OmniPresence checks in with Omni Sync Server every hour and compares files in your sync folder. If nothing has changed, OmniPresence quietly goes back to watching over your files. This helps ensure that your OmniOutliner files are always safe, secure, and most importantly—up to date.
Installing OmniPresence
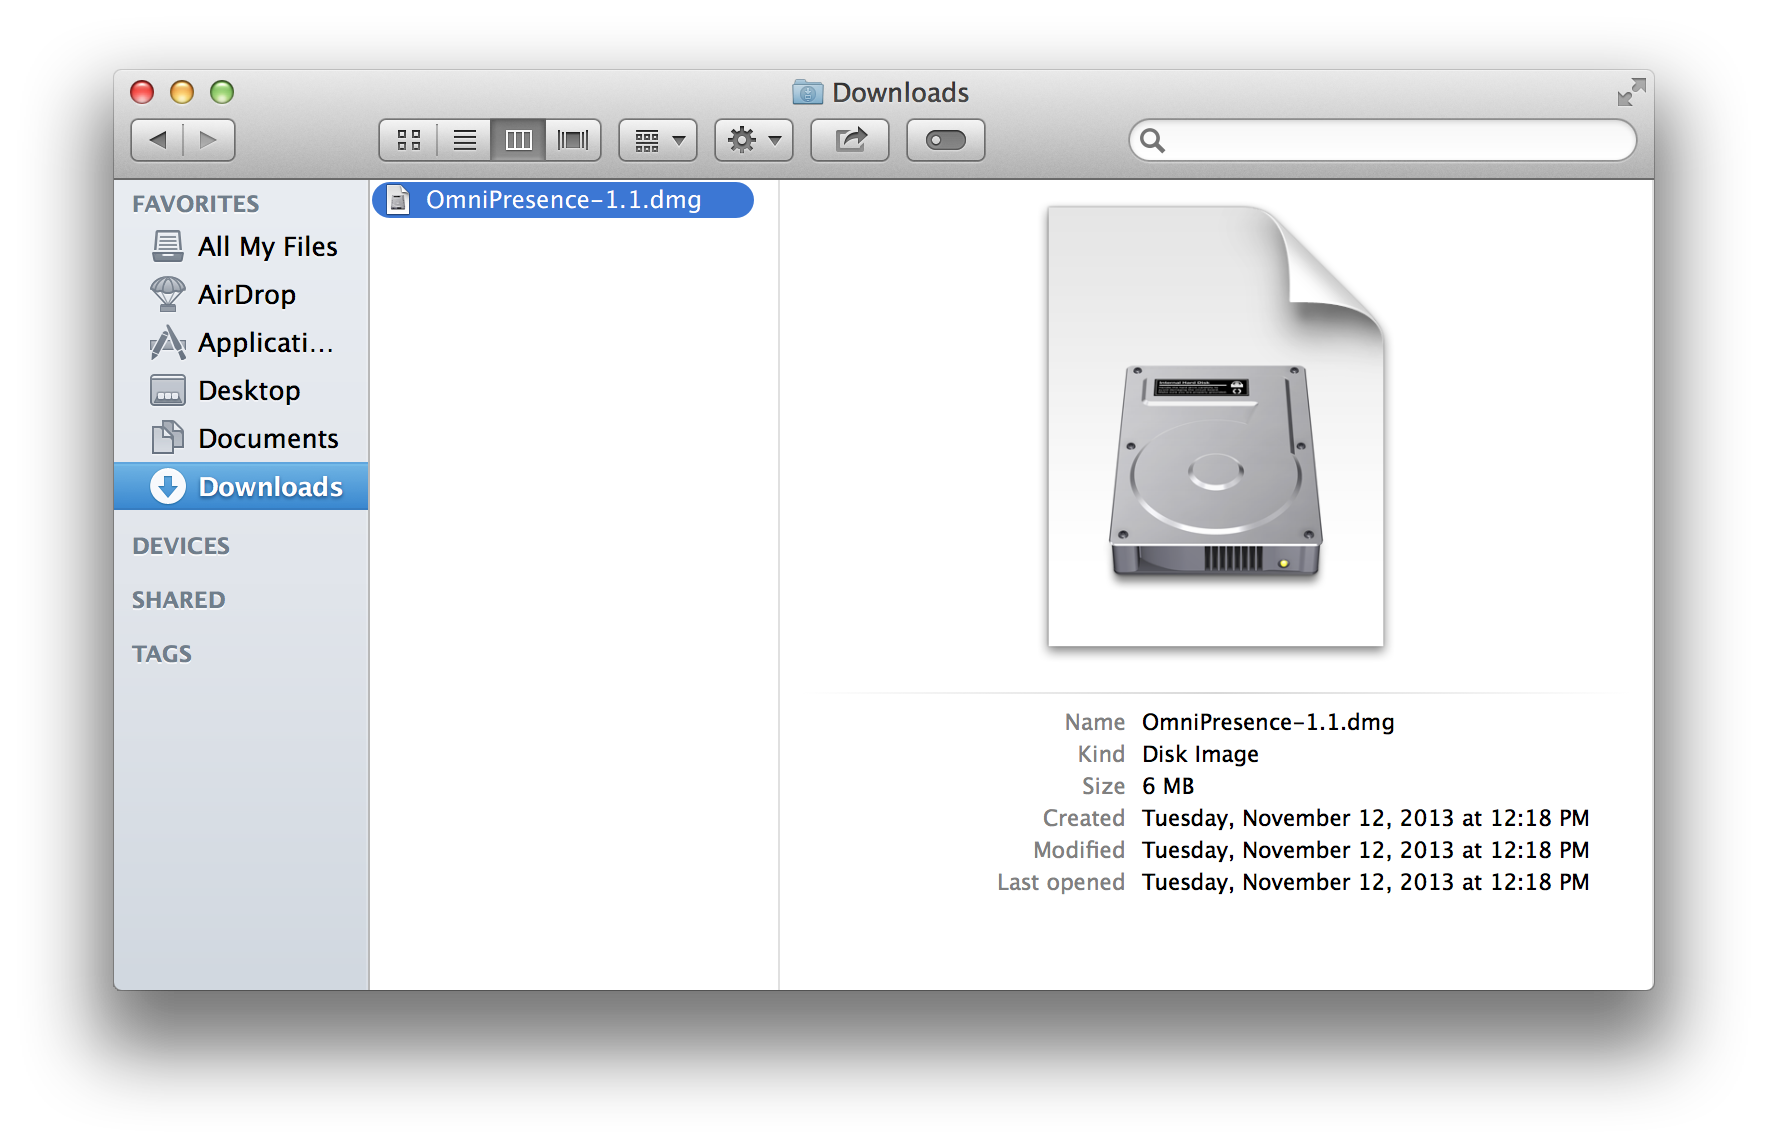
If you clicked the earlier link to download OmniPresence for Mac (or this one right here), you’ll find the installer package in the Downloads folder on your Mac:
To install OmniPresence, follow these steps:
- Open a Finder window and go to the Downloads folder on your Mac.
- Locate and then double-click the file, OmniPresence-1.1.dmg.
Note
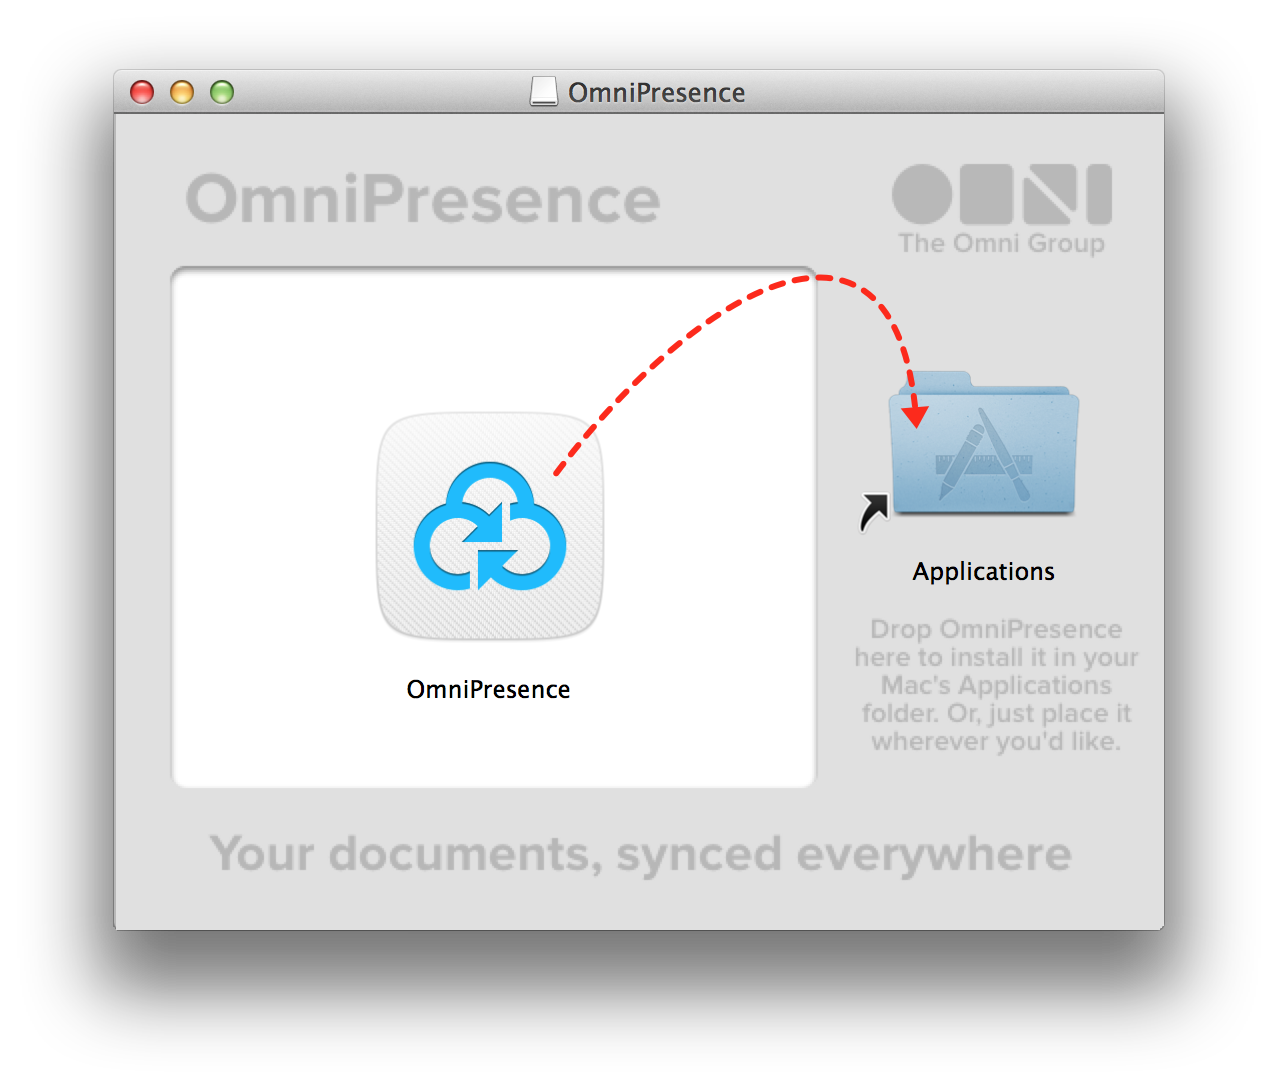
The filename you see might be slightly different. As of this writing, OmniPresence for Mac is at version 1.1 (thus the filename, OmniPresence-1.1.dmg). If you see a different number in the filename, don’t be worried; just go ahead and double-click that one. It just means that our engineering team have been hard at work to improve OmniPresence for Mac. - After agreeing to our license, you’re presented with the following window:

- Drag and drop the OmniPresence.app icon onto the Applications folder to install OmniPresence on your Mac.
- Close that window with Command-W
- In the Finder window, eject the disk image.
- In the Finder window, return to your Downloads folder. Select the file OmniPresence-1.1.dmg and press Command-Delete to move the file to your Trash. The next time you empty the Trash, that disk image will be purged from your system, saving you precious disk space. (You’re welcome!)
Even if you’re only using OmniOutliner on your Mac, syncing is recommended for the automated data backup it provides. Best of all, our Omni Sync Server is free, and we take care of managing the servers so your data is always available when you need it most.
Starting OmniPresence and Connecting to Omni Sync Server
With OmniPresence installed on your Mac, it’s time to get it started and either create or connect to an existing Omni Sync Server account.
Let’s get started! (No pun intended. Okay, maybe.)
- Open a Finder window, and choose Applications in the Finder’s sidebar. (If you don’t see it there, choose Go ▸ Applications, or use Shift-Command-A.)
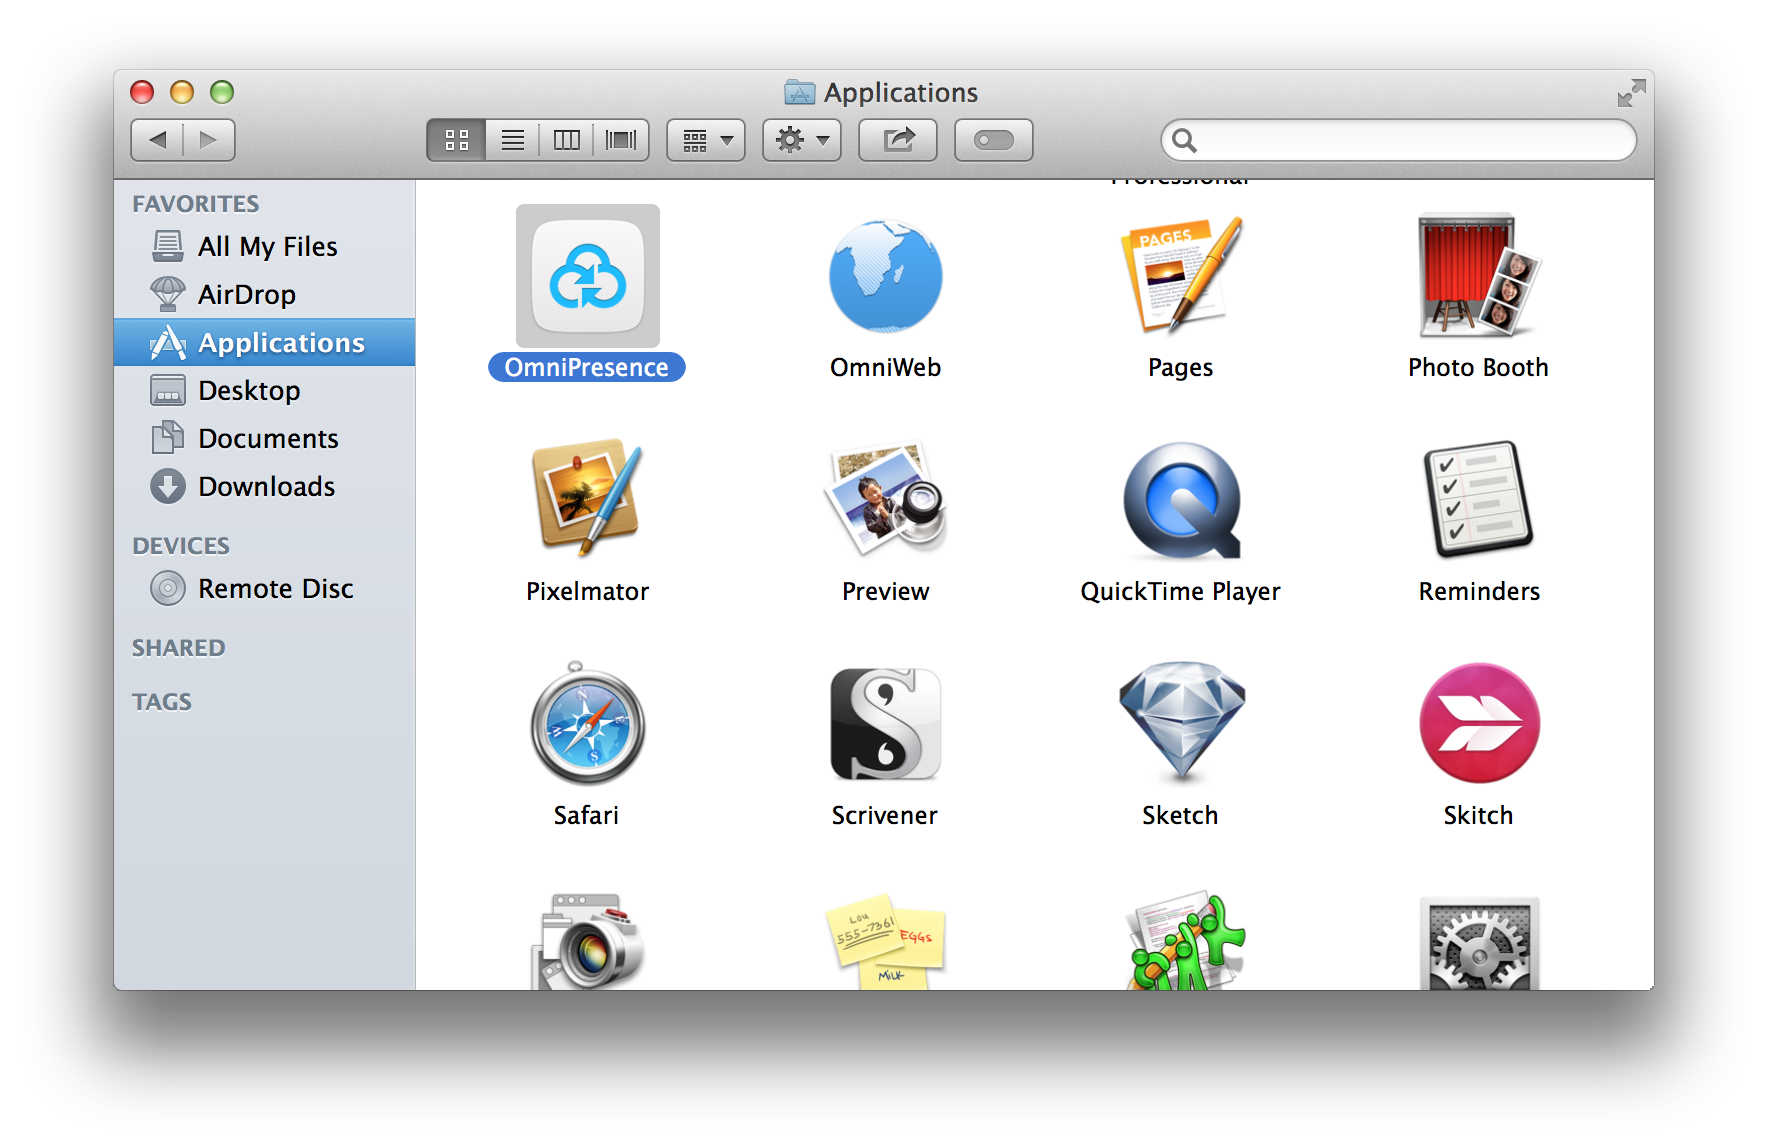
- Scroll down in the list of applications installed on your Mac and locate OmniPresence.app.
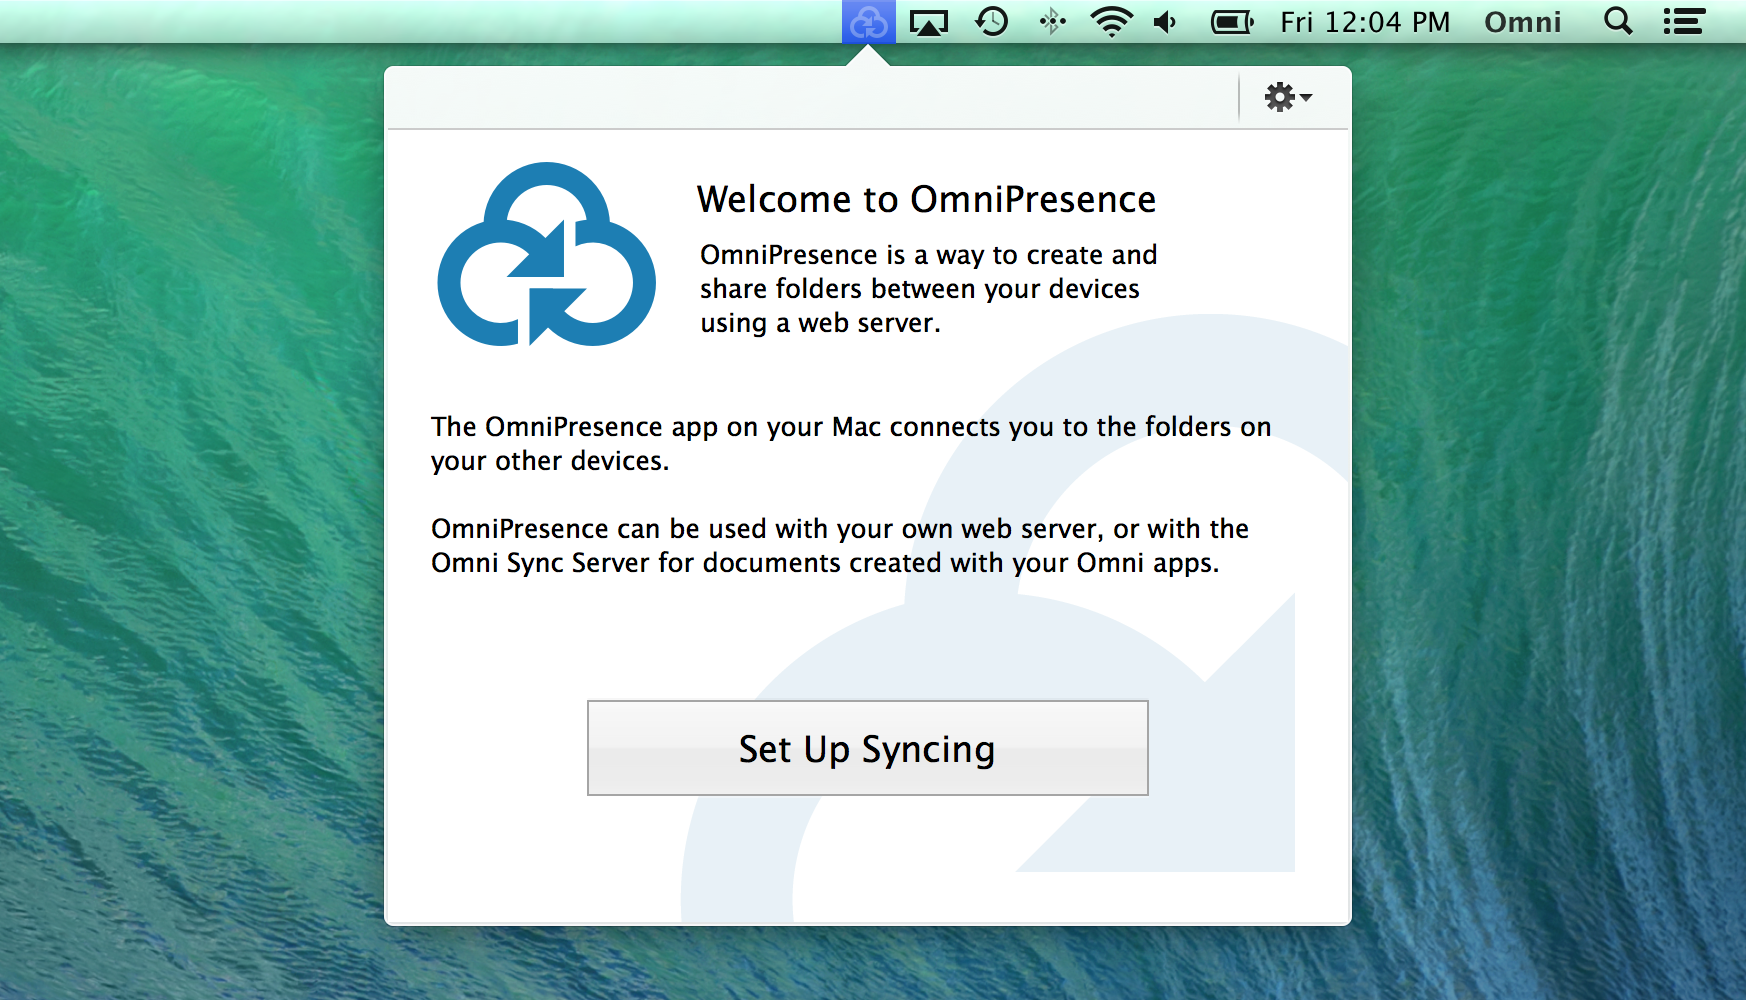
- Double-click the OmniPresence.app icon to open the app. OmniPresence installs and then pops open a menu extra in the menu bar; this is where you’ll configure and control OmniPresence.
- Click Set Up Syncing:
- Click Create a Synced Folder:
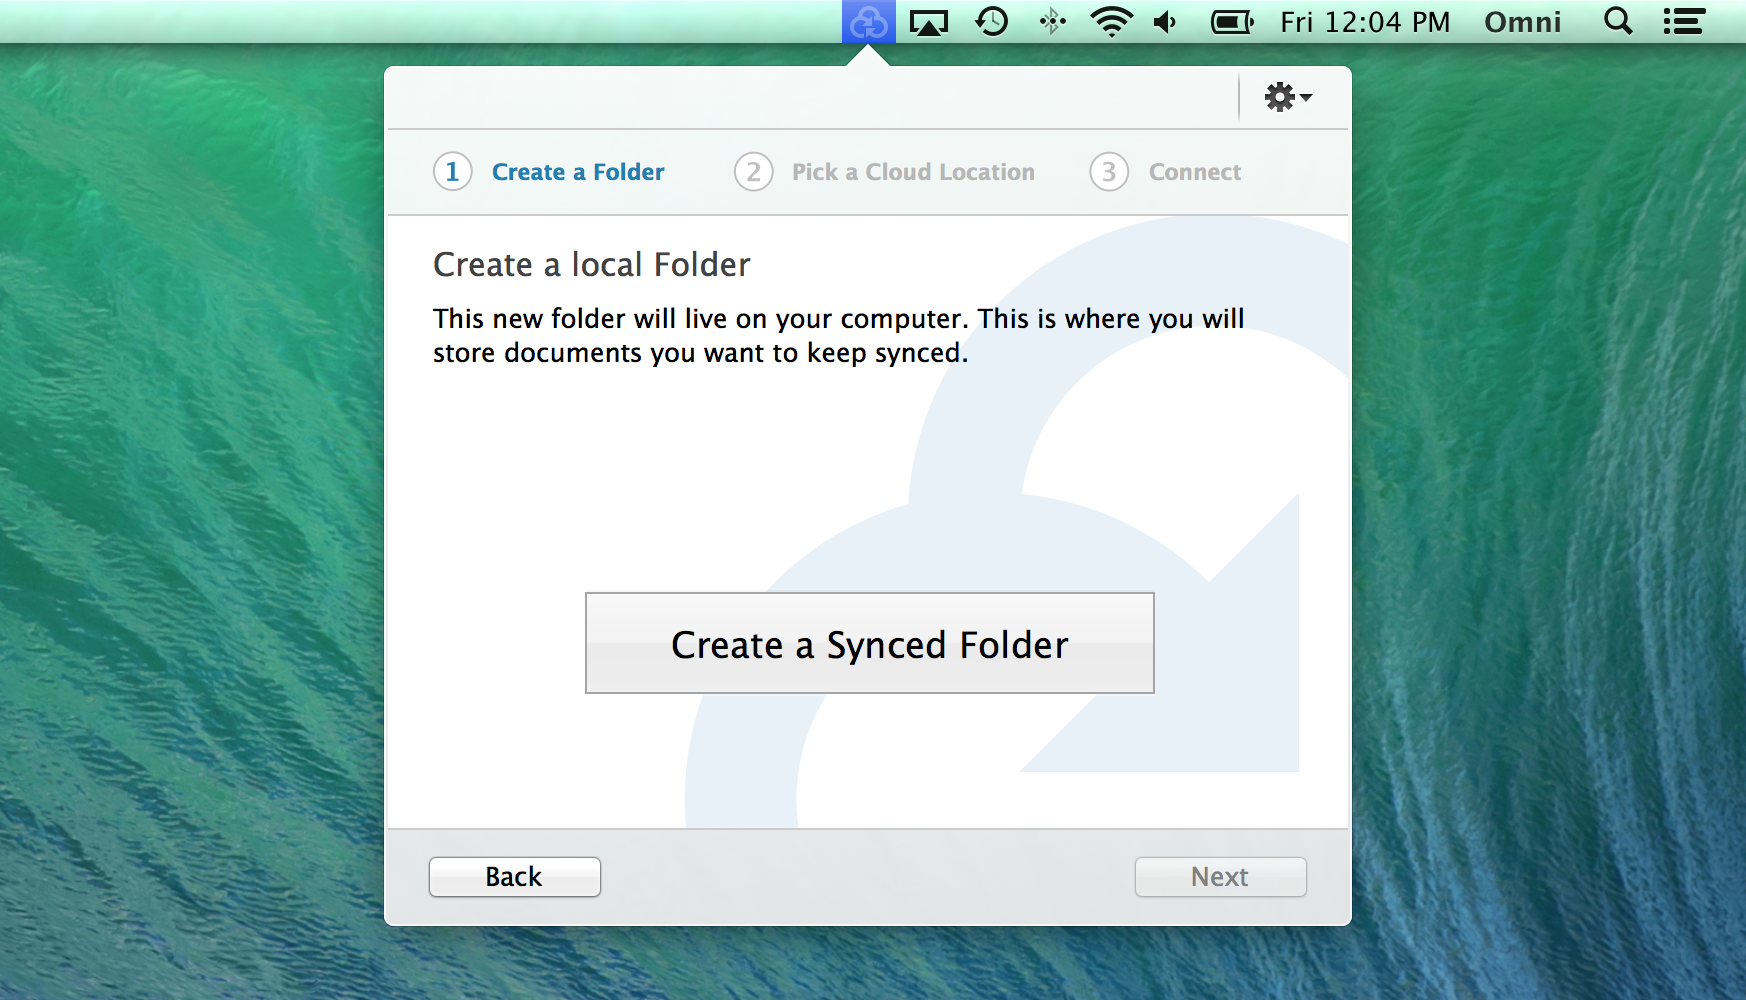
In the sheet that appears, you have the option to name the OmniPresence folder that lives on your Mac. We’ve pre-filled the New Folder with OmniPresence, but you can change this to whatever you’d like.
Also, this folder is created within your Documents folder. You can also change this to something else, if you’d like. For example, you could opt to have your OmniPresence folder reside at the bottom level of your Home folder.
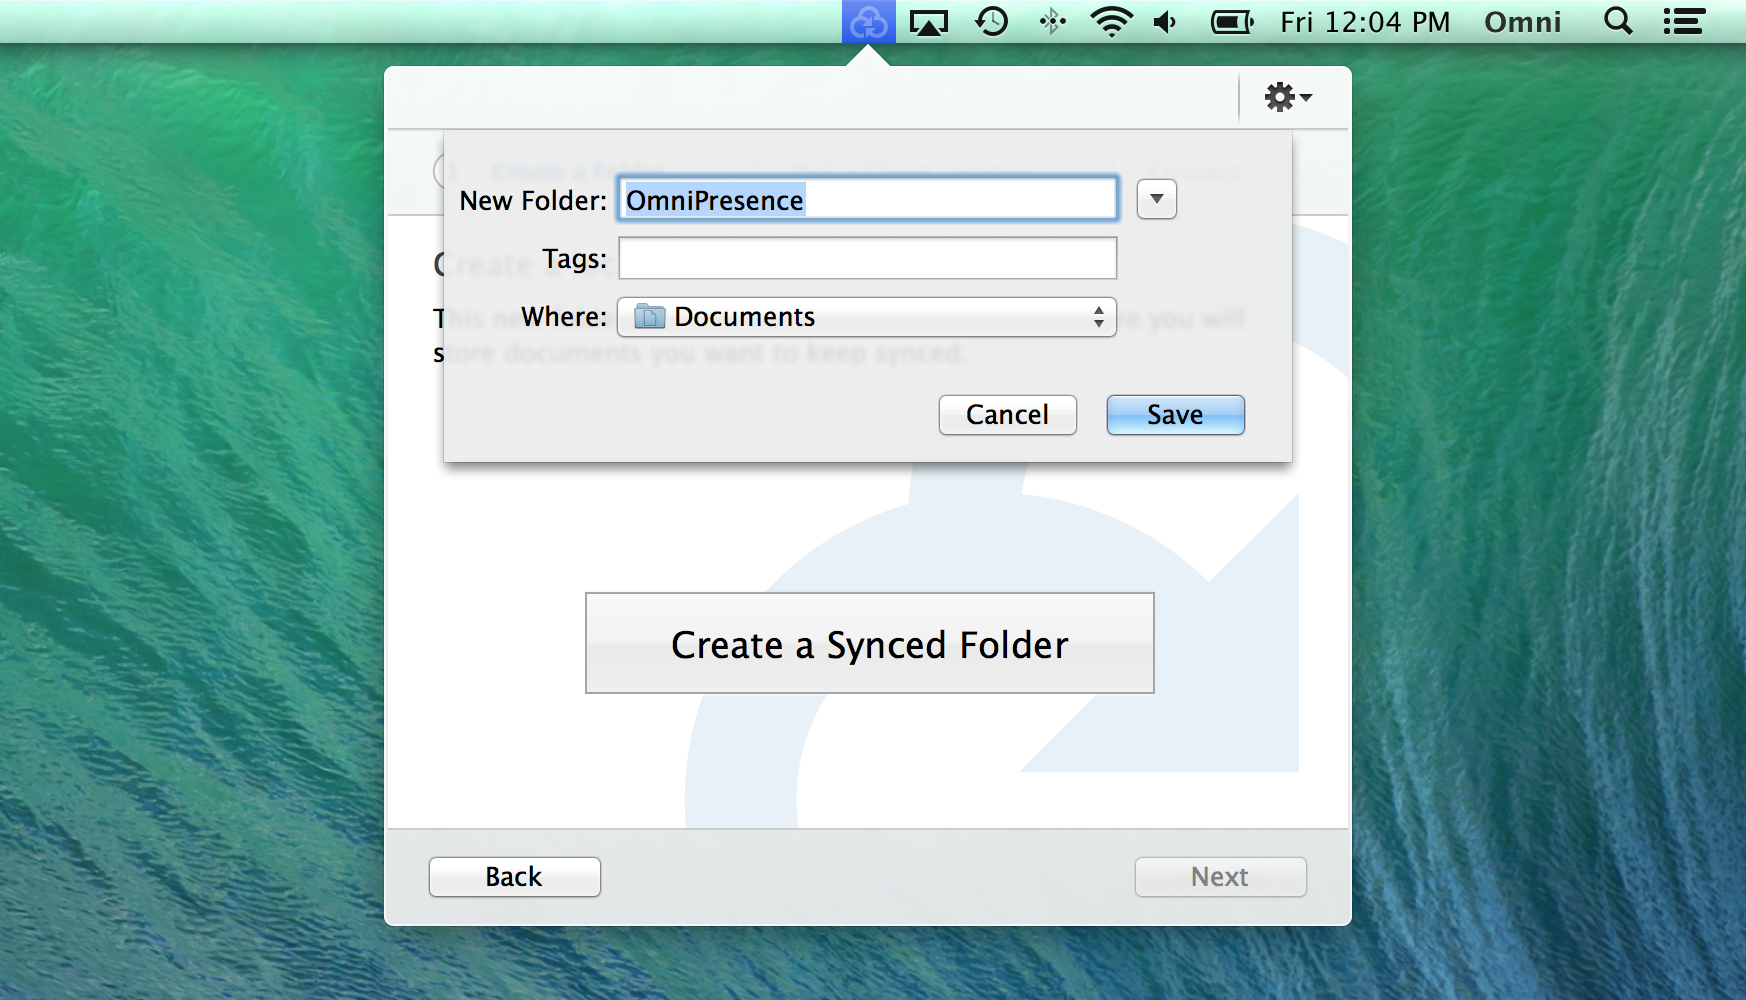
When you’ve settled on a name and location for your OmniPresence folder—or if you’ve decided to go with the default options—click Save. This creates the folder OmniPresence uses to synchronize your files.
After creating the OmniPresence folder, your next task is to choose a server in the cloud where OmniPresence stores your synced files.
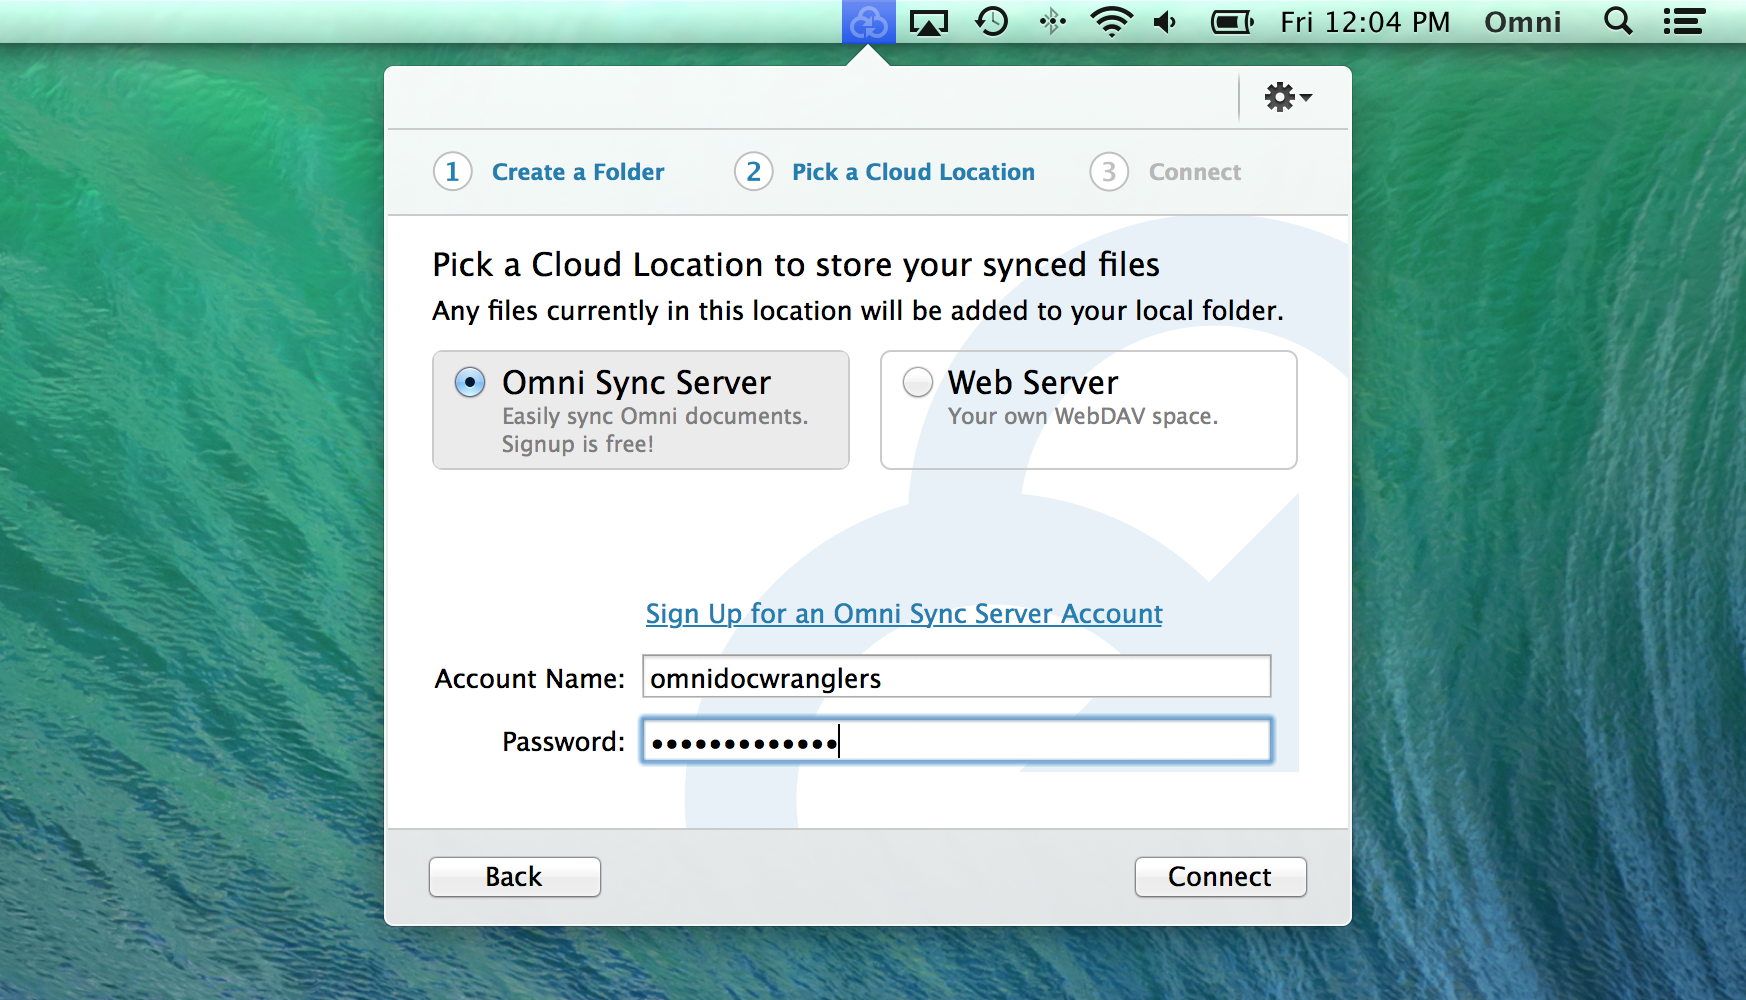
You have two options to choose from:
- Omni Sync Server: This is Omni’s free file server, which has specifically been designed to work in unison with OmniPresence.
- Web Server: This could be your own WebDAV server, or a WebDAV server hosted by a third-party provider.
If you have an Omni Sync Server account, enter your Account Name and Password in the applicable fields and click Connect.
Note
If you haven’t already set up an Omni Sync Server account, click Sign Up for an Omni Sync Server Account. This opens your default web browser and transports you to the Omni Sync Server site where you can sign up for an account and set your password.-
After clicking Connect, OmniPresence connects to the server you’ve chosen and tests for server compatibility. This is more of an issue with third-party WebDAV servers than it is for connecting to Omni Sync Server, which has been designed to work with OmniPresence.
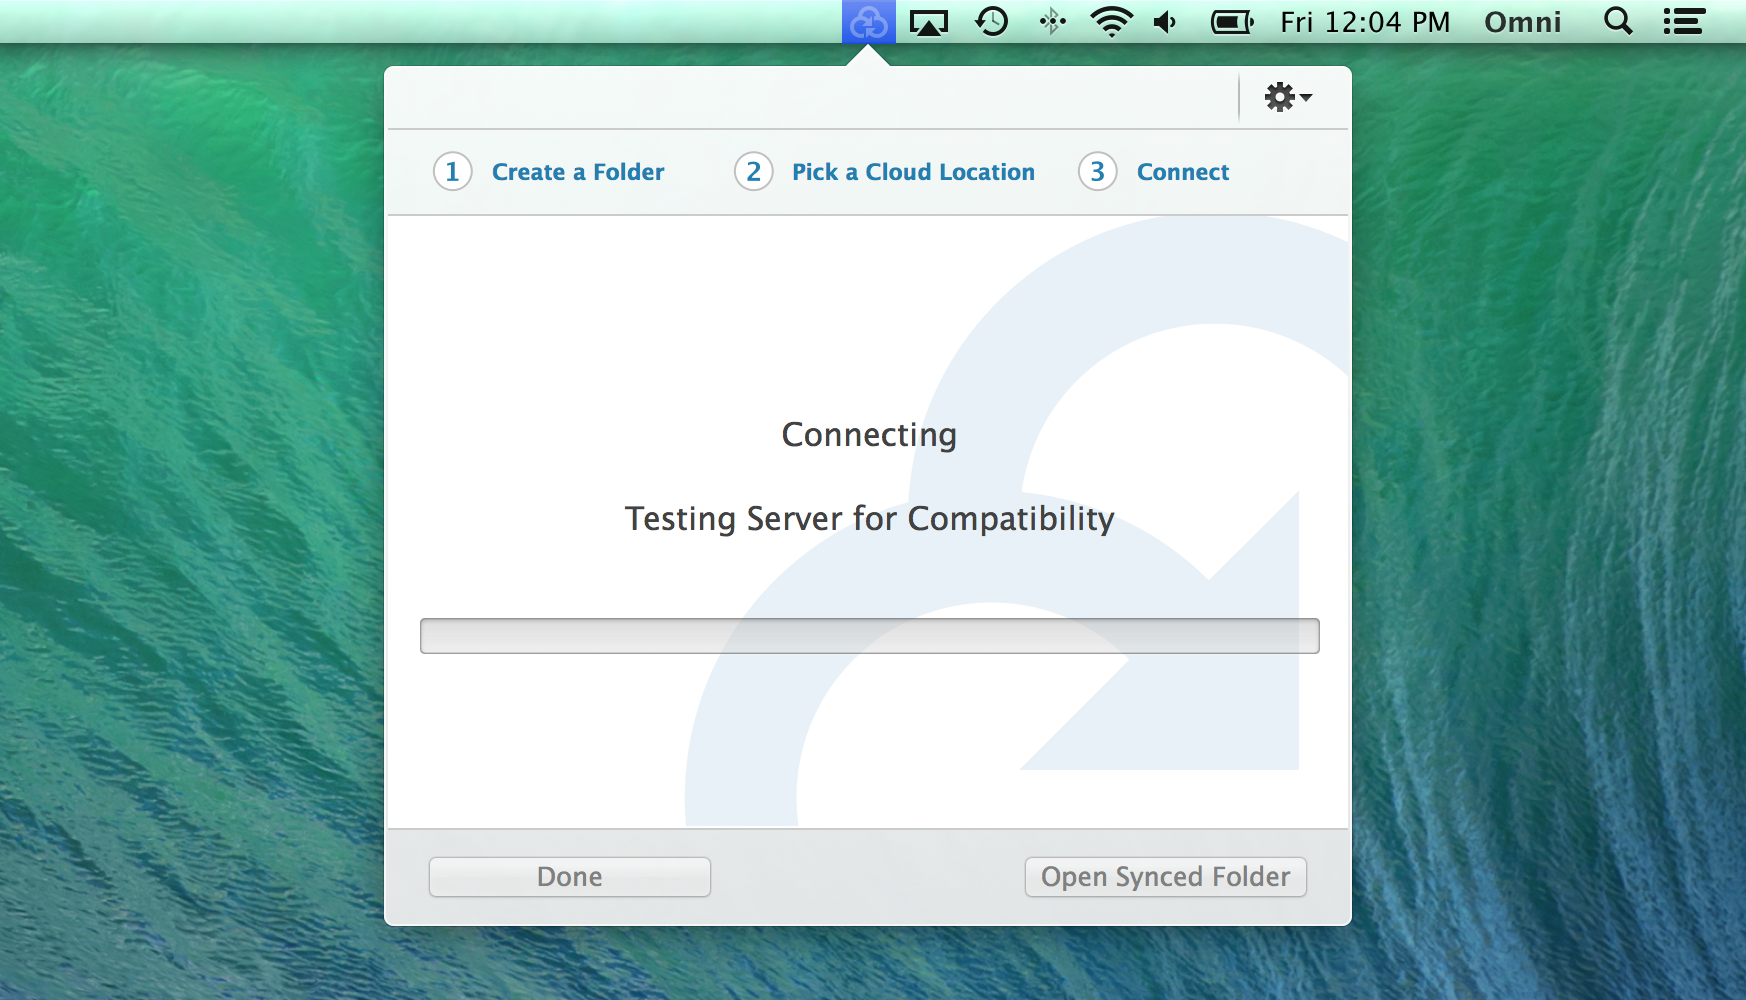
OmniPresence lets you know if it is able to connect to Omni Sync Server (or the WebDAV server you’ve specified).
-
Click the checkbox for Open OmniPresence at Login if you would like OmniPresence to start up whenever your log into your Mac.
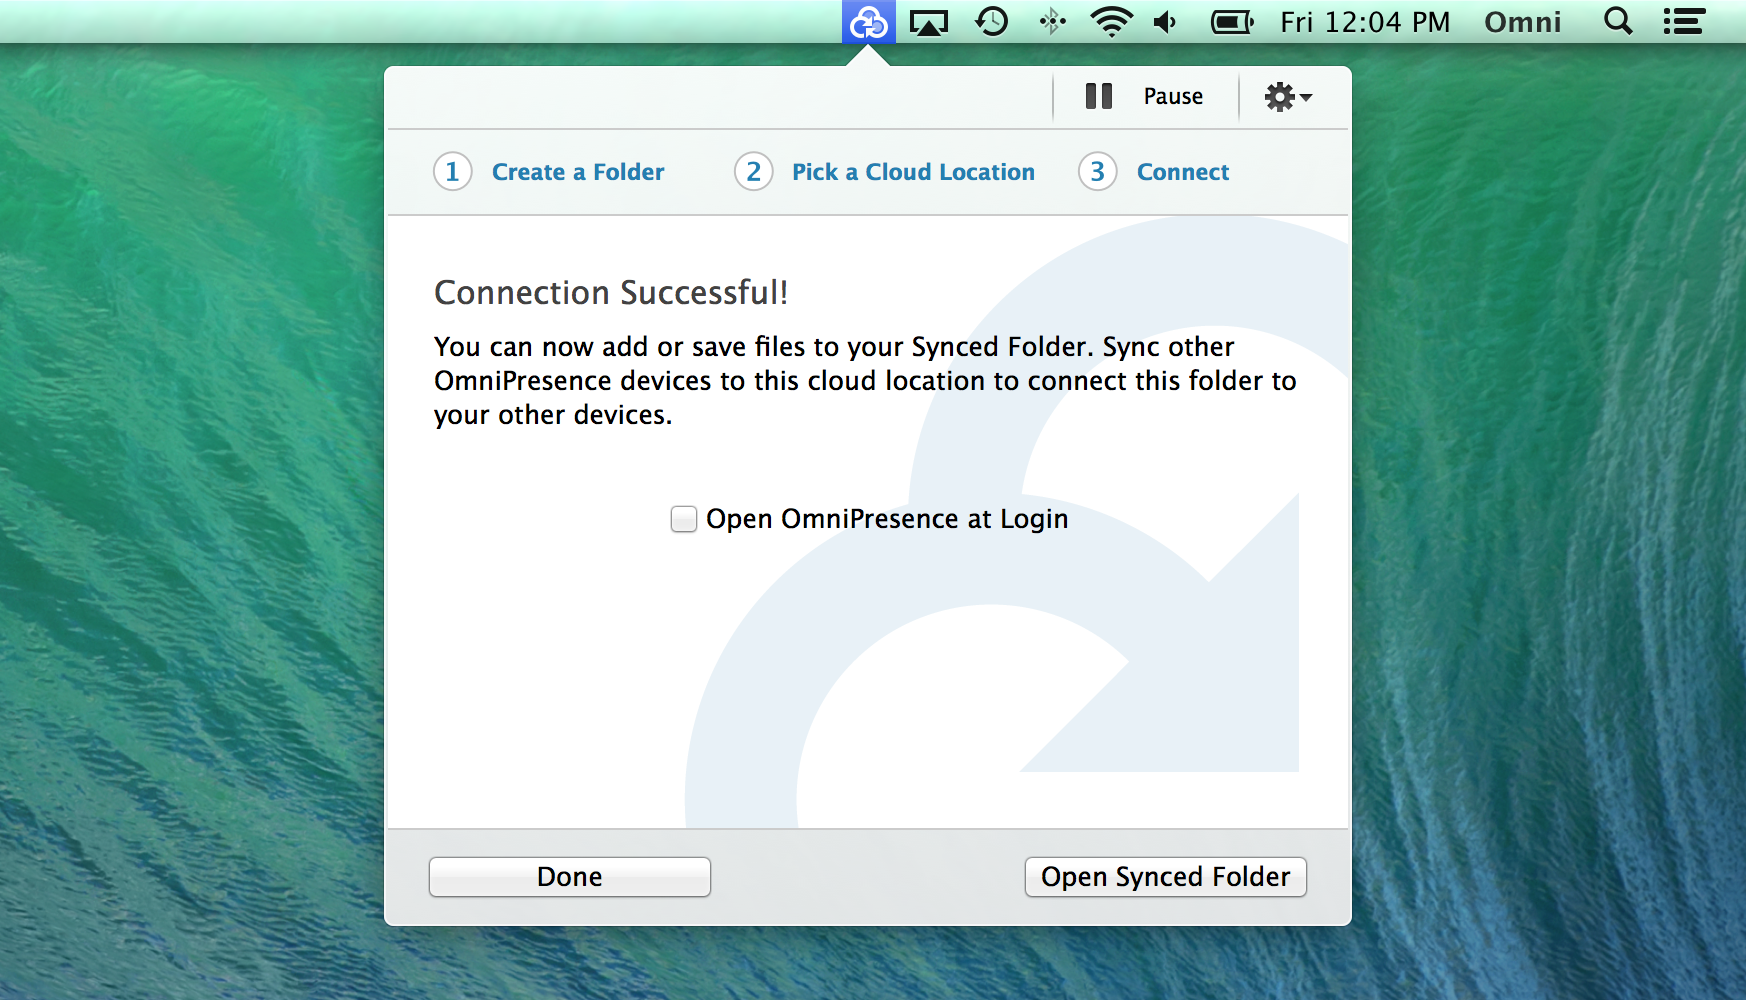
At the bottom of that window, click Open Synced Folder. This syncs your OmniPresence folder with Omni Sync Server (or a WebDAV server). If you already have an Omni Sync Server account, OmniPresence creates new synchronized versions of those files in the folder you’ve specified.
That’s it! Once OmniPresence connects with Omni Sync Server and creates the sync folder on your Mac, you’re ready to go. Whenever you create files with OmniOutliner, be sure to save them to your OmniPresence folder (~/Documents/OmniPresence). OmniPresence syncs the files whenever you save, or when an Auto Save takes place on your Mac.
OmniPresence Tips
Here are some helpful tips for enhancing your OmniPresence experience:
- You can create subfolders within the main OmniPresence folder for the files you sync. For example, you could have subfolders for OmniOutliner, OmniGraffle, OmniPlan, and OmniFocus, as well as other files you want to sync.
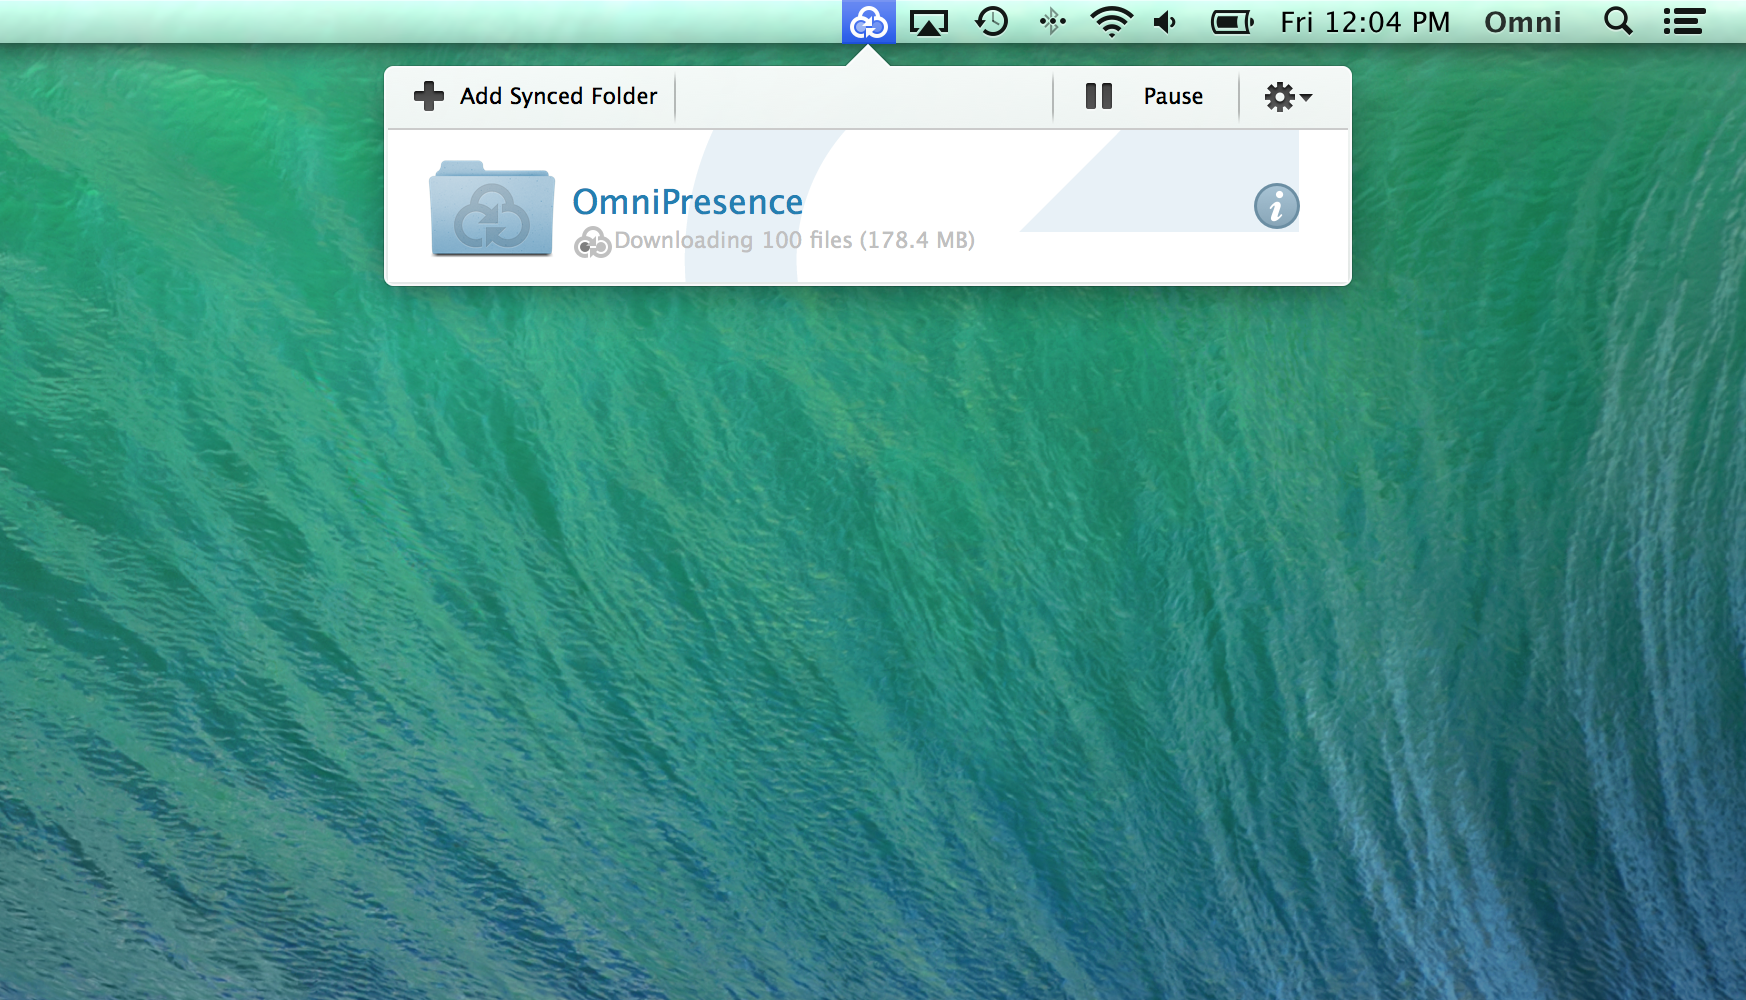
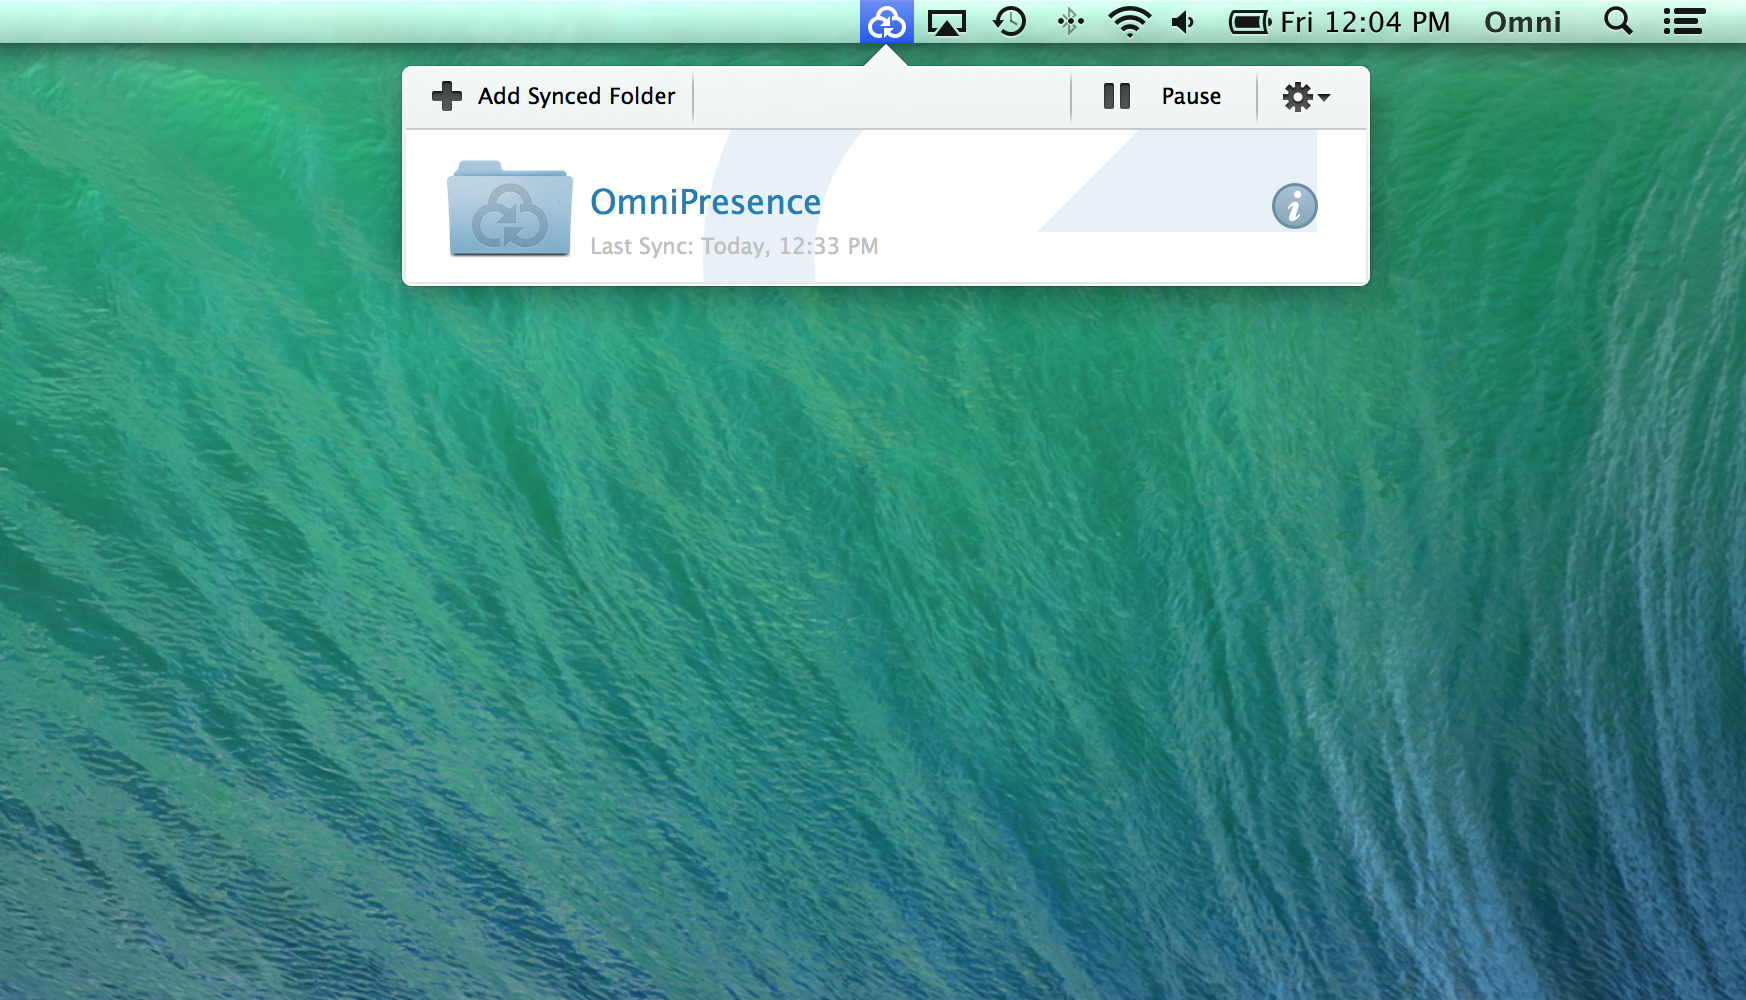
- You can Pause and Resume syncing by clicking the OmniPresence icon in the menu bar.
Click the Action menu (the gear next to the Pause/Resume button) for a host of OmniPresence options, including:
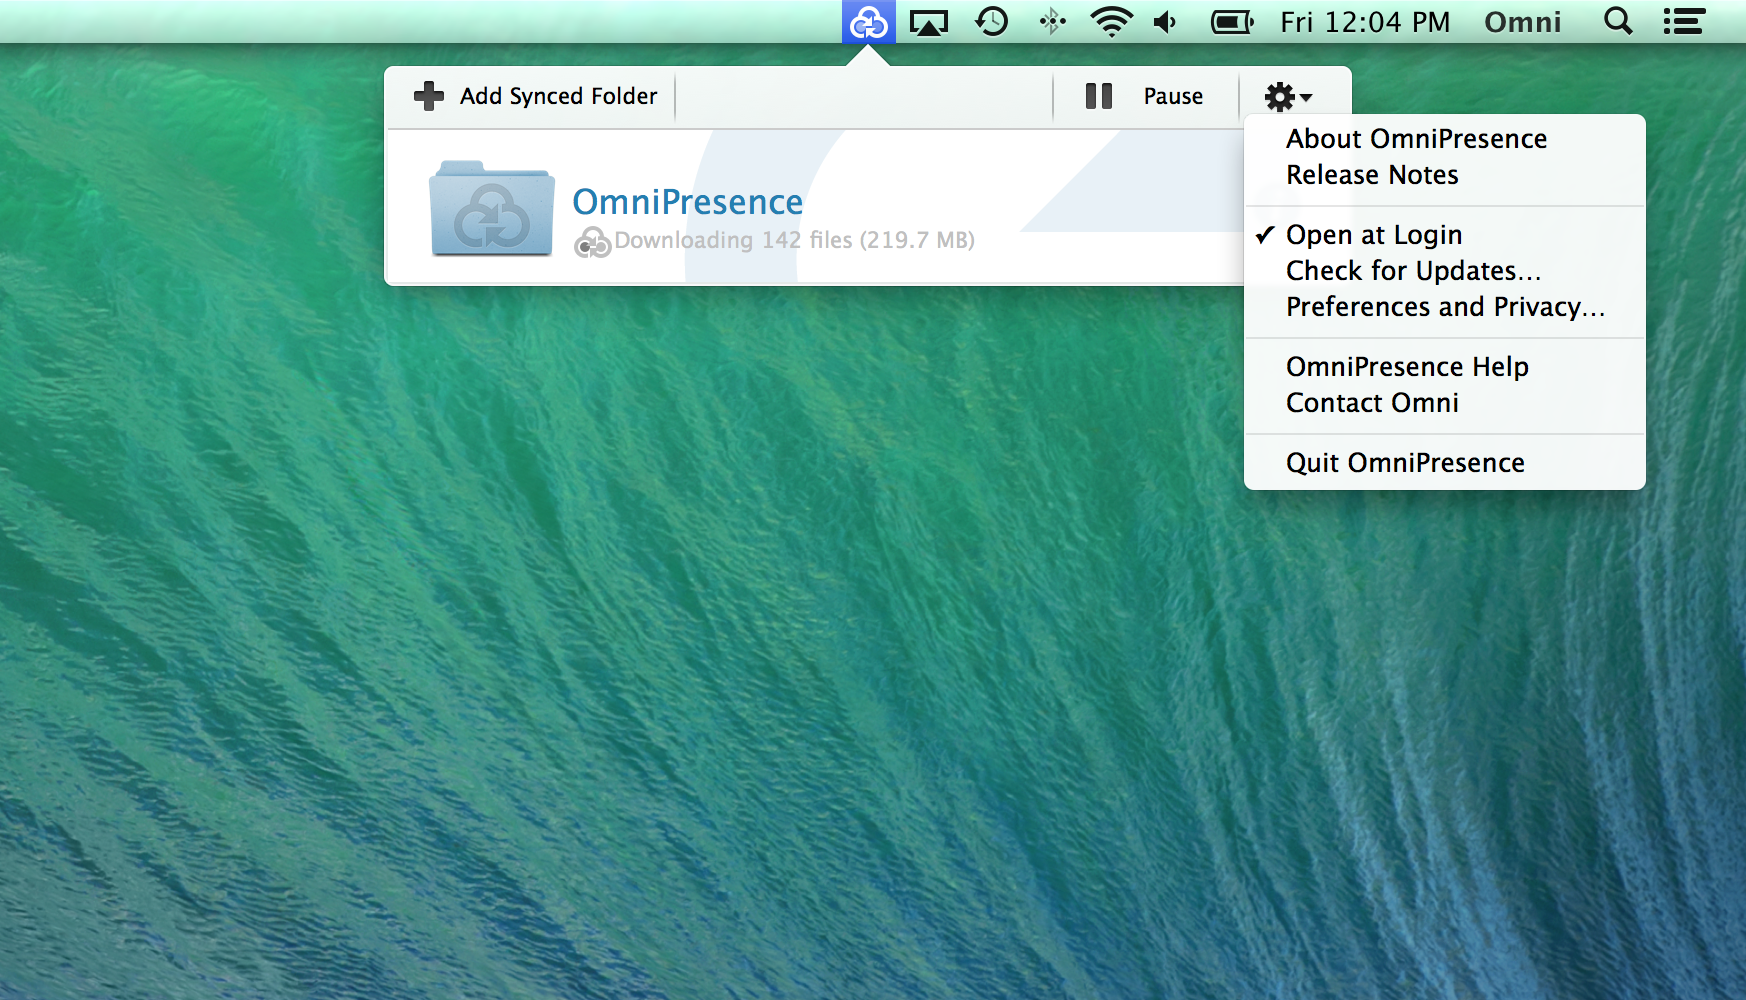
- About OmniPresence
- Release Notes
- Open at Login
- Check for Updates
- Preferences and Privacy
- OmniPresence Help
- Contact Omni
- Quit OmniPresence
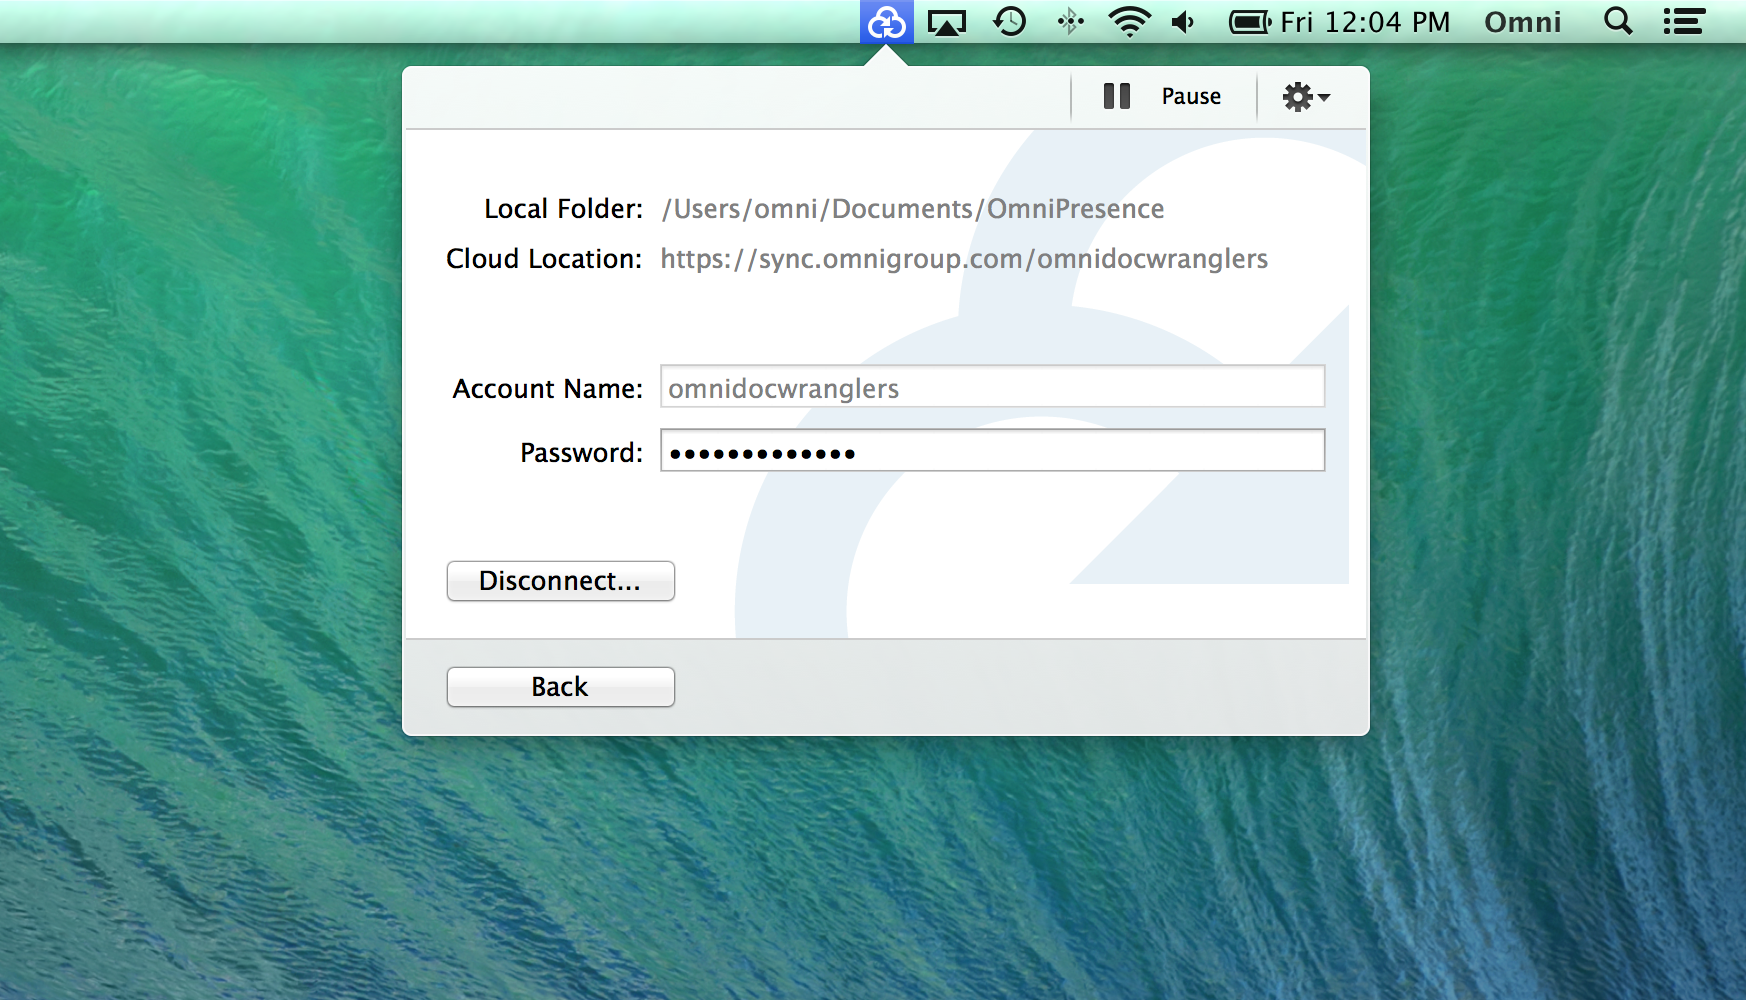
- To stop syncing a folder you’ve connected, click its Info button and choose Disconnect. The folder on your Mac will be moved to the Trash and the files inside will no longer be synced. Any files left in the folder before disconnecting will stay safe and sound at the cloud server location you’ve specified. To reconnect and start syncing with those files again, just create a new folder connected to that cloud location.
Unsure of when OmniPresence last synced? Click the OmniPresence icon in the menubar and then look beneath each folder name to see the date and time that folder last synced.
Note
If you don’t set up sync now, but later decide that you want to, you can always install OmniPresence and set up an Omni Sync Server account when it’s more convenient for you.