The Outline
Tasks that you add to OmniFocus are represented as a list of actionable items in the outline. Interacting with items in the outline—adding new ones, marking them complete, or organizing them into projects and groups—is one of the main ways OmniFocus helps you get stuff done.
This chapter describes the outline in its component parts, and details the purpose of each.
The Perspective Header
The items you see in the outline depend on the perspective you are viewing. You can narrow your concentration on a few things you’d like to accomplish in the near term with Forecast, tackle things contextually with Tags, or get a broad overview of the work ahead across a number of Projects, for example.

The name of your current perspective appears at the top of the outline, along with a count of the items currently visible.
The Anatomy of a Row
The OmniFocus outline is composed of rows that represent items (to-dos that you capture with OmniFocus) or other pieces of your organizational framework like folders or tags.
Rows display all sorts of information about an item, like the project it belongs to, any relevant tags, due dates, and completion status in the form of status circles.
By default, rows in the outline use the Columns layout option for presenting data.
The figure below is a breakdown of an item in the Inbox that’s packed with additional information about the task at hand, using the default Columns presentation.

-
Status Circle—A visual representation of the completion status of the item, along with other important attributes. Click an active item’s status circle to mark it complete.
-
Title—The item’s title. Black title text generally indicates that an item is actionable; items that are completed, blocked, on hold, or parents of groups have grey title text instead (unless they are due soon or overdue).
-
Project—If the item has a project assigned, its location in the project hierarchy appears here. Since this is an Inbox item (and Inbox items with projects are usually cleaned up), this item is listed without a project.
-
Tags—Any tags assigned to the item appear here. An item can have as many tags as you want; if there are more tags than horizontal space in the row, additional tags are indicated by an ellipsis.
-
Dates—If the item has due or defer dates assigned, they will appear here when relevant (once a defer date has passed it is no longer displayed).
-
Notes and Attachments, Flag—These icons indicate whether or not the item includes notes or attachments (the
 icon is filled when a note or attachment is present), and whether the item is flagged.
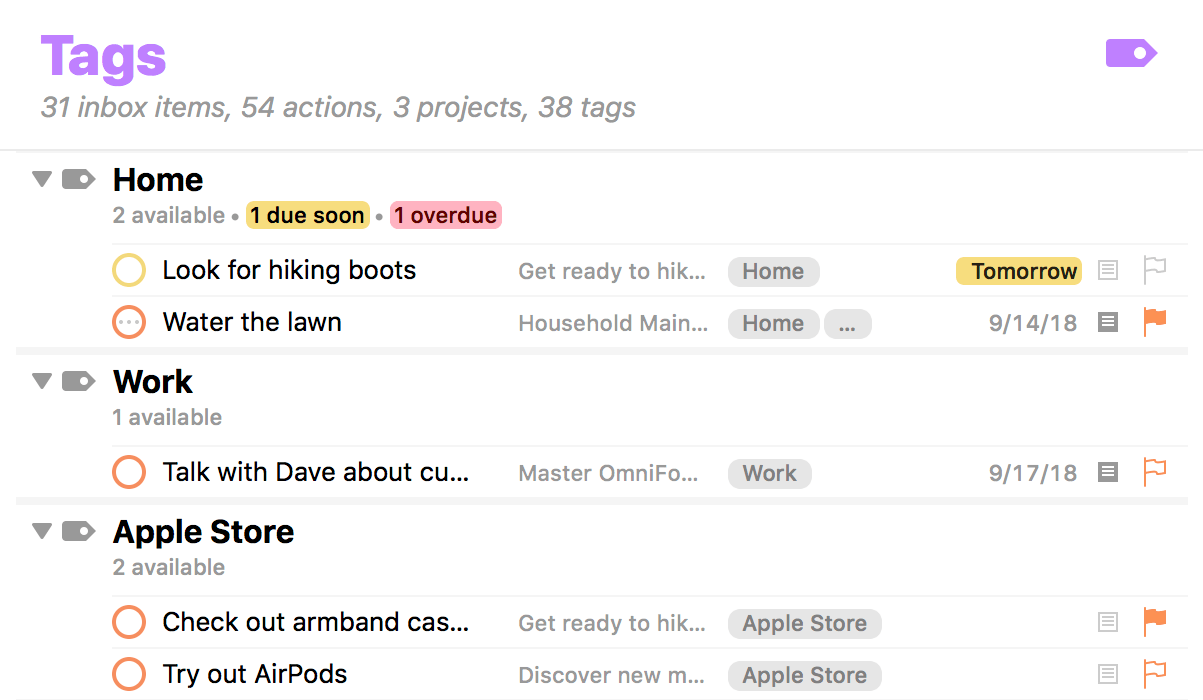
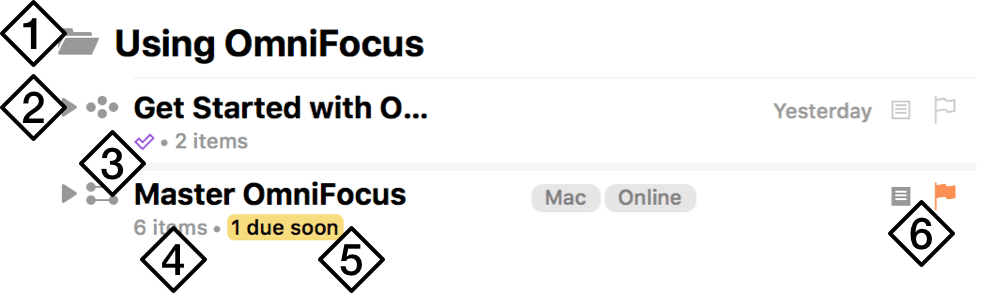
Project, Folder, and Tag Rows
In addition to the common attributes of Inbox items, rows for projects, folders, and tags can have a variety of other useful information.
-
Row Type Icon—Projects, folders, and tags have icons next to them to help remind you of your current perspective and the row’s relation to those around it. Projects are further broken down by type: Sequential, Parallel, and Single Actions.
-
Disclosure Triangle—Click to collapse or expand the folder, project, or tag to hide or reveal its contents.
-
Row Status—Projects and tags with a status other than Active display it here. In addition to Active (no icon), Projects can be On Hold, Completed, or Dropped, while tags can be Active, On Hold, or Dropped.
-
Item Count—The total number of items in the project or tag.
-
Due Summary—When there is enough room in the row, this line shows a breakdown of the due states (due soon and overdue) of items in the project, folder, or tag.
-
Notes and Attachments, Flag—These icons indicate whether there are notes or attachments associated with the project itself (as opposed to the items within it), and whether the project is flagged. Notes, attachments, and flagged status can’t be assigned to folders or tags.
Status Circles
An item’s status circle  is the target for checking it off when it is done. Click the circle to mark the item complete
  ; option-click to drop the item instead
  .
.
Status circles also convey important information about an item: items can be due soon  (amber), overdue
  (red), or flagged
  (orange). Repeating items are also distinguished by the ellipsis
  in their center.
If you have an item with more than one status, the circle will take on multiple colors simultaneously to communicate each relevant attribute.
Cleaning Up
When you mark an item complete by clicking its status circle , the item may not immediately disappear from the outline. If you’ve set items to clean up when changing perspectives, they remain until you navigate elsewhere or clean up manually by clicking Clean Up in the toolbar, or choosing Organize > Clean Up (Command-K).
You can choose what causes OmniFocus to clean up automatically in Organization preferences.
If a completed item doesn’t disappear even after you’ve cleaned up your current view, check your View options for the perspective. It’s likely that the view is set to All. Try setting the View options to Remaining or Available to hide those completed items.
If you change an action’s status to one that would hide it from the current view settings (marking an item Complete in a perspective with View options set to Available, for example) and later delete the project or tag that contains it, OmniFocus warns you that you may be about to delete something unintentionally. To see those hidden items, change the current perspective’s View options to All.
Sometimes after cleaning up, a project named Miscellaneous will appear in your Projects perspective.
The Miscellaneous project is a single action list that OmniFocus automatically creates whenever items are cleaned up that don’t have a project assigned. Since removing items from the Inbox requires that they be assigned a project, if your Clean Up preferences are tag-based the Miscellaneous project becomes their home until you assign them another.
Since the Miscellaneous project is automatically created by the app based on how you’ve chosen for clean up to work, it can’t be permanently removed; if you’d prefer not to use it, try cleaning up based on project assignment instead.
Grouping Items
Groups can be used to create nested lists of items in the outline: either groups of items in the inbox, or action groups within a project (also sometimes called sub-projects).

When you create an action group you’re creating a parent-child hierarchical relationship between an action and the actions within it. If the desired parent and children are actions that already exist, this can be done by selecting the soon-to-be child actions and:
-
Dragging them on top of the parent action so the parent action is selected and shows a vertical insertion line indented beneath it, then dropping them inside, or
-
Positioning them immediately below the intended parent action in the outline and choosing Organize > Indent (Command-]).
If either the group’s parent action or its child actions have yet to be created, there are two other ways to create groups.
To create a group from an existing action intended as its parent:
- Create child actions from scratch by choosing Organize > Add Inside (Shift-Command-]) with the intended parent action selected. A new action is created with the selected action as its parent.
To create a group from existing actions with no existing parent action:
- Select the items you’d like to group and choose Organize > Group (Option-Command-G). A new untitled action is created to represent the group, and the selected items are indented to become its children.
Once you’ve created a group, you can use the inspector to change its type and determine whether the group auto-completes when the last action within it is marked complete.
Grouping Projects with Folders
In addition to grouping action items within other items, when using the Projects perspective you can group related projects together using folders.
To create a project folder, follow these steps:
-
Select two or more projects in the sidebar.
-
Choose Organize > Group (Option-Command-G). This places the selected projects within a newly created folder.
-
Enter a name for the folder to replace the New Folder text.
-
Press Return to accept the new folder name.
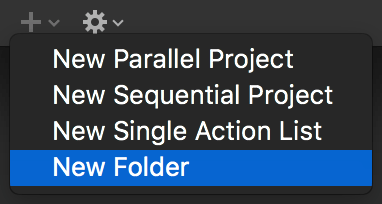
Alternatively, while in the Projects perspective choose New Folder from the Plus menu beneath the sidebar, or choose File > New Folder.
Folders can be created or moved inside other folders, to create a nesting hierarchy of projects that’s as deep or wide as you need it to be.
Layout Options
The overall appearance of items in the outline is determined by your Layout preferences.
The primary choice is between two layout types:
- A Columns layout, where the title appears next to item details of your choice on a single line. This is the default setting.

- A Fluid layout, where the title extends the width of the outline and has its details listed below the title.

The default layout includes columns for the item’s project, tags, due date, note icon, and flag icon next to the title. Changes you make in Layout preferences affect the outline view throughout the app.
If you make changes and later decide you prefer the original default layout, you can revert to it by clicking Reset.
The default column layout is designed to help you get a feel for the most commonly used item attributes, and is a subset of all the options available. As you become more familiar with OmniFocus you may want to experiment with changing this default based on the attributes you find most useful.
To further customize the appearance of items in the outline, you can use the View > Show Full Item Title submenu to choose whether item titles are truncated to a single line when they’re not selected, or always extend to multiple lines when necessary.
Custom Perspective Layouts 
With OmniFocus Pro, you can customize the outline layout for individual perspectives to fit your needs using each perspective’s View options.
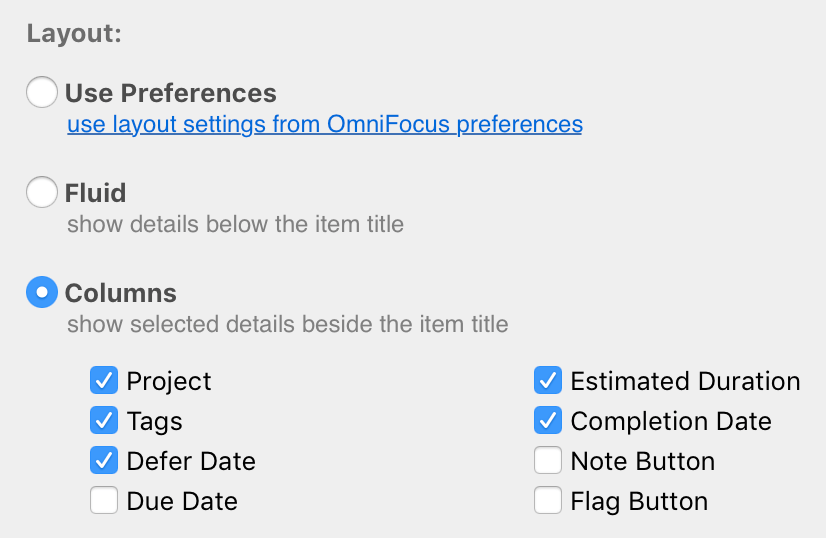
In an individual perspective’s View options, choose a layout other than Use Preferences to overwrite the default for that perspective, either with the Fluid layout or a set of columns that you choose.