Perspectives and the Sidebar
All of your to-dos in OmniFocus live in a database behind the scenes, and perspectives are how you look at and interact with the contents of that database. OmniFocus 3 for Mac comes with six built-in perspectives that represent specialized, commonly-used view states specifically designed to help you organize, prioritize, schedule, and review your tasks.

The sidebar appears on left side of the OmniFocus window, and controls what is displayed in the outline.
The Sidebar
Nestled on the left side of the OmniFocus window, next to the outline, lives the sidebar. The sidebar consists of perspective tabs for quick navigation between your perspectives, and (for perspective other than the Inbox) provides a high-level means for surveying what’s on your plate. The function of the sidebar for each built-in perspective is discussed in the section for that perspective.
Perspective Tabs
You can switch between perspectives using the tabs on the left side of the OmniFocus window. By default this includes the following built-in perspectives:
-
The Inbox, where you’ll stash all the tasks and to-dos that come to mind for later processing.
-
Projects, where related tasks are grouped together into overarching plans and hierarchies.
-
Tags, the places, people, things, and states of mind most relevant or conducive to accomplishing your tasks.
-
Forecast, where you can view your tasks chronologically and integrate them into your schedule.
-
Flagged, where tasks designated with the most important priority or visibility are gathered.
-
Review, the place to regularly check up on your progress and determine the status of projects.
Completed and Changed are two additional perspectives, available from the Perspectives menu, that can help you recover misplaced items or review progress and recent changes to your database. These are designed as temporary views on your database, so switching away from them to another tab removes the tab from your sidebar (you can open them from the Perspectives menu again at any time).
![]() With OmniFocus Pro you can hide or rearrange perspectives in the list to bring them to prominence, and you can create custom perspectives that you can set to appear as perspective tabs as well.
With OmniFocus Pro you can hide or rearrange perspectives in the list to bring them to prominence, and you can create custom perspectives that you can set to appear as perspective tabs as well.
Sidebar Bottom Buttons
The bottom of the sidebar contains buttons for quick access to commands based on your current perspective and sidebar selection.
-
When in the Projects or Tags perspectives, use the Add button
 to create new projects or tags, respectively. This button is unavailable in other perspectives.
 -
The Action menu
 provides a host of tools contextually relevant to your current perspective and sidebar selection. These are a subset of the commands available from the contextual menu that appears when you control-click an item in the sidebar.
Inbox 
The Inbox is the catch-all perspective for depositing everything that you’d like to do. To add an item to the Inbox, navigate to the Inbox and choose File > New Action. Alternatively, use Quick Entry (Window > Quick Entry) to add items to the Inbox from anywhere in OmniFocus.
Many workflows use the Inbox as an initial point of entry, a transient receptacle for ideas big and small. Once you’ve processed an Inbox item (added a project or tag, converted it to a project, or assigned it some other fate), it will likely disappear off to its new location (this depends on your Organization preferences).
While it’s not required, many workflows encourage regularly processing items out of the inbox in a practice known as "Inbox Zero". This is subtly rewarded in the app by the appearance of a graphic in the background of the Inbox when no items are present.
Inbox Outline
The Inbox contains a list of individual items that can be organized hierarchically into item groups. Since the Inbox primarily serves as a temporary resting place for new tasks, it doesn’t support complexity beyond simple grouping; to add hierarchical nuance to a task with many parts, consider assigning it to an existing project with the inspector or converting it to a project with Edit > Convert to Project.
If you convert an Inbox item to a project it will immediately reopen in the Projects perspective.
Inbox View Options
-
In Inbox, show:—Choose the setting for items that you would like to be visible in the outline (Available is the default). Each option describes the requirements for items that it includes or excludes; see the Glossary for further details on each view state.
-
 Layout—OmniFocus Pro adds a Layout section to Inbox View options where you can customize the outline to show a set of attributes specific to this perspective. See Layout Options for details.
Item Status
The states described here apply both to items in the inbox and actions within projects. Items can have additional states described by their status circles; the ones here are common to all and appear in the inspector.
-
 Active—The default status for a newly added item, indicating an item that is currently planned for work.
 -
 Completed—The status for an item that has been successfully completed. Click the item's status circle, press Space with the item selected, use the inspector, or Edit > Status > Completed to mark an item complete.
When completing an item group, items within the group inherit the completed status and are represented with an inherited completion status circle
 in the outline.
 -
 Dropped—The status for an item no longer planned for work. Option-click the item's status circle, press Option-Space with the item selected, use the inspector, or Edit > Status > Dropped to mark an item dropped.
When dropping an item group, items within the group inherit the dropped status and are represented with an inherited dropped status circle
 in the outline.
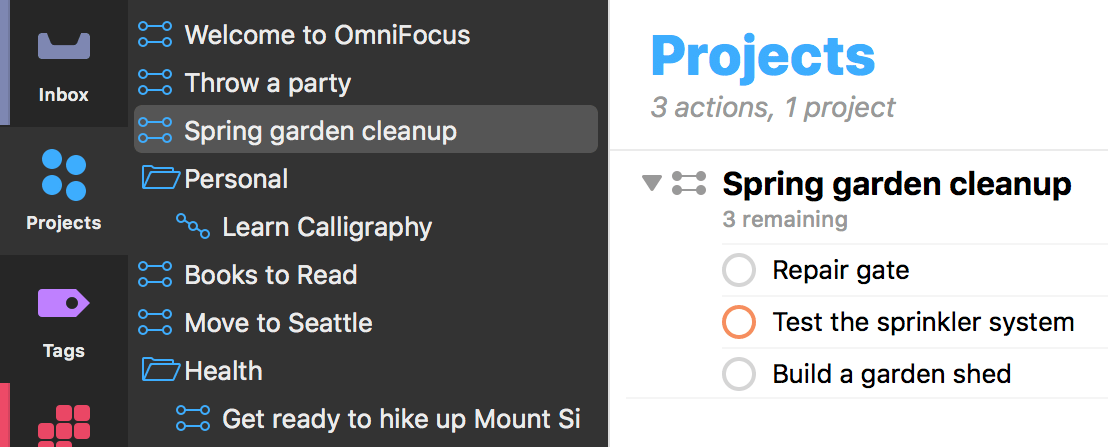
Projects 
A project is a task made up of multiple items, referred to in OmniFocus as actions. Projects are typically more complex than individual action items, and can include several related actions. The Projects perspective displays all of your projects in a list, which can be grouped into folders to create hierarchy.
Projects Outline
The Projects outline displays a list of your projects and the actions they contain, with visibility determined by your View options.
Projects Sidebar
The Projects sidebar displays a list of your projects grouped hierarchically into folders. Click a project in the sidebar to view it alone; click the Projects tab or an empty space in the sidebar to view the full list in the outline.
Drag and drop to rearrange projects in the sidebar. If you drop a project on top of another, the project is converted to an action group inside its destination.
Projects View Options
-
In Projects, show:—Choose the setting for items that you would like to be visible in the outline (Remaining is the default). Each option describes the requirements for items that it includes or excludes; see the Glossary and the Project Type and Project Status sections for further details.
-
Show folders in the outline—When this checkbox is selected, the outline includes rows for folders as well as the projects within them.
-
Layout—OmniFocus Pro adds a Layout section to Projects View options where you can customize the outline to show a set of attributes specific to this perspective. See Layout Options for details.
Project Type
Projects are distinguished by their type, which varies based on how actions inside the project must be completed. Project type also affects how actions within the project show up according to the perspective’s View options.
-
 Sequential—Sequential projects have actions that need to be completed in a predetermined order; the first item must be finished before you can move on to the next. In a sequential project, there is only ever one action available at a time. (this is also, by definition, the project’s first available action).
 -
 Parallel—Parallel projects consist of actions that can be completed in any order. In a parallel project, all incomplete actions are available, and the first available is the first one in the list.
 -
 Single Actions—A single action list isn’t a project in the traditional sense; it’s a list of loosely-related items that aren’t interdependent (a shopping list is an example of this). In a single action list, all actions are considered both available and first available.
The difference between parallel and sequential projects is most visible when Projects View options are set to show only Available actions. (Actions beyond the first available action in a sequential project are blocked, and therefore hidden.)
Project Status
When planning and subsequently reviewing a project, it can be useful to give it a status to indicate whether work is progressing or plans have changed.
-
 Active—The default status for a new or ongoing project. It can be useful to review active projects regularly to determine what progress you’ve made, and whether they are still things you want to do.
 -
 On Hold—If you’re not sure whether you want to continue a project, you can change the project’s status from Active to On Hold. If you’ve chosen to show only Available items in View options, the project and its actions are removed from the project list in the sidebar and outline.
Projects placed on hold are still available for review and reconsideration if you decide to prioritize them again in the future.
-
 Completed—Eventually you’ll reach the successful end of a project. Select the project and then choose Completed in the Status section of the inspector (this automatically marks any unfinished actions in the project complete). If you’d like to revisit a completed project, change your View options to All or search for the project with the Everything filter.
 -
 Dropped—If you’ve decided not to work on a project any further, you can Drop it completely. It disappears from the Projects list, and its actions are likewise hidden. You could delete the project instead, but then you wouldn’t have any record of it; keeping it around in a dropped state means you can go back and check on actions you’ve completed regardless of whether they’re from still-relevant projects, and so on.
To find a dropped project in your database, choose All in View options or search for it with the Everything filter.
Dropped and completed items accumulate in your database over time. If you find that things are becoming unwieldy, archiving can help lighten the load.
Tags 
In OmniFocus, a tag represents an association that a task has to the world around it. A tag could be a person, place, or thing most relevant to completion of a project, or it could represent a mindset most applicable to execution of an action item.
An item can have as many tags as you find useful, and there is no specific purpose assigned to them; use tags to assign priority, group items by energy level or required equipment, or don’t use them at all.
The Tags perspective displays a list of your tags in the sidebar, and a list of all your actions grouped by the tags they belong to in the outline.
Tags Outline
The Tags outline displays all of your Inbox items and actions, grouped by the tags they have assigned.
While tags can be assigned to projects, projects themselves do not appear in the Tags perspective. Actions added to the project after it is tagged inherit the tag, and those actions appear in the Tags outline where appropriate.
If an item has multiple tags, it appears in the list under each tag assigned to it.
Tags Sidebar
The Tags sidebar shows a list of your tags in the order they were created (by default). You can drag to rearrange them in the list, and to create hierarchical tag arrangements: Home : Yard or Errands : Hardware Store, for example.
Click a tag in the sidebar to view it alone; click the Tags tab to view the full list in the outline.
Tags View Options
-
In Tags, Show:—Choose the setting for items that you would like to be visible in the outline (Available is the default). Each option describes the requirements for items that it includes or excludes; see the Glossary for further details on each view state.
-
Layout—OmniFocus Pro adds a Layout section to Tags View options where you can customize the outline to show a set of attributes specific to this perspective. See Layout Options for details.
Tag Status
Like projects, tags have a status that indicates whether they are currently relevant to your work. View options that depend on status apply similarly between projects and tags; however, the implications of tag status vary.
-
Active—The default status for a tag. When a tag is active, it exists and is relevant to you in some way.
-
On Hold—When a tag is temporarily irrelevant or unavailable for some reason (a required tool is loaned out, a colleague is on sabbatical, or the public library is closed for remodeling), you can change the tag’s status from Active to On Hold. The tag remains in the sidebar, but when viewing Available items its actions are removed from the outline.
-
Dropped—If a tag becomes permanently irrelevant or unavailable, you can drop it completely. It disappears from the Tags list, and its actions are likewise hidden. You could delete the tag instead, but then you wouldn’t have any record of it; keeping it around in a dropped state means you can go back and check on actions you’ve completed regardless of whether they’re from still-relevant tags, and so on.
To find a dropped tag in your database, choose All in View options or search for it with the Everything filter.
The Completed status doesn’t exist for tags, because tags aren’t actionable for completion themselves: they are things or conditions that exist in the world.
Tag Sorting
By default, items inside a tag are sorted in the order they appear in their respective projects (project order), or in the order they appear in the Inbox if no project is assigned (inbox order).
You can drag to rearrange items within a tag. The tag saves its new custom order once you make a change, and the previous default rules no longer apply: any items subsequently added to the tag appear at the end of the list, and can be reordered manually from there.
Forecast 
Forecast helps you keep an eye on the progress of your projects, check upcoming due dates, and schedule OmniFocus to-dos alongside important events in your calendar.
To create a new action that is due on a day that you are viewing, click the date in the sidebar and choose File > New Action (Command-N).
Forecast Outline
The Forecast outline displays a chronological list of items due each day (across a selection of days, if you have multiple selected in the sidebar), interleaved with events from any calendars you’ve chosen to display in OmniFocus.
Calendar events in the outline are for display purposes and can’t be interacted with from inside OmniFocus. Click the calendar icon ![]() next to an event to open it in macOS Calendar.
next to an event to open it in macOS Calendar.
If you have designated a Forecast tag ![]() in View options, items with that tag appear in a separate section of the outline when browsing items due Today.
in View options, items with that tag appear in a separate section of the outline when browsing items due Today.
Forecast Sidebar
A range of dates spanning the next month is displayed in a grid in the forecast sidebar, letting you know at a glance what’s on your plate in the coming weeks.
Each date button displays the number of actions associated with that date. For due items, the count is color-coded according to the most urgent item: amber indicates that an item is due soon, and red indicates an item is due or past due. To create a new action that is due on a particular day, click the appropriate date button and choose File > New Action.
The Forecast sidebar has several other useful interactions:
-
Click and drag on a range of dates to select them, bringing items due on those dates to view in the outline.
-
Command-click to select discontiguous dates—Each Saturday in the coming month, for example, to see whether your next few weekends are clear.
-
Drag and drop an item from the outline onto a date in the sidebar to make it due that day.
-
If you hold down the Command key while dragging an item, OmniFocus sets the defer date rather than the due date when you drop it. Similarly, if you hold down Option-Command while dragging, OmniFocus sets both the defer date and the due for the item.
Forecast View Options
-
Show only one week in sidebar—With this setting turned on, the calendar in the Forecast sidebar will display a single row of dates (the past, the future, and a span of five days in between) rather than the full month default.
-
Show deferred items—With this setting turned on, deferred items scheduled to begin on a given day will appear in a separate Deferred section on the dates when they become available. With this turned off, deferred items do not appear in the outline until they are due.
-
Today shows items with this tag:—With OmniFocus Pro, choose a tag here to have its items appear in the Today view of Forecast in their own section of the outline. Once set, this Forecast tag can be applied to items from anywhere in the outline by choosing Edit > Add Tag "tagname".
-
Show calendar events—With this setting turned on, events from calendars you’ve chosen to display in Forecast will appear alongside OmniFocus items on the dates when they occur. With this turned off, calendar events do not appear in the outline.
-
Calendars—When Show calendar events is turned on, use this submenu to pick the calendars that you would like to appear in OmniFocus. Events from the selected calendars appear interspersed chronologically with your OmniFocus items in the Forecast outline.
Calendars works with the macOS Calendar app to find calendars you own or have subscribed to across services and devices, including iCloud, Google Calendar, and more. Use Internet Accounts settings in macOS System Preferences to connect to your shared calendars.
-
Layout—OmniFocus Pro adds a Layout section to Forecast View options where you can customize the outline to show a set of attributes specific to this perspective. See Layout Options for details.
Adding your Calendars to OmniFocus
OmniFocus plays well with your calendars, including those you might sync through Apple’s iCloud from Calendar on macOS or iOS, Google Calendar, or any CalDAV servers to which you have subscribed. The calendars which you can view in OmniFocus are based upon the calendars that the Calendar app on your Mac can see; to add to, remove, or modify the calendars available on your Mac, use the Calendar app’s Accounts preferences or File menu commands.
The first time you launch OmniFocus, you’ll receive a prompt informing you that the app would like to access your calendar. Choose OK to connect the app with your calendars. If you previously chose Don’t Allow, your Forecast calendars will come up blank. If that’s happened, no need to fear — you can always go back and change this setting.
Head to System Preferences > Security & Privacy > Privacy > Calendars, then click the lock to make changes and allow OmniFocus to access your calendars.
Events on your calendar show up interspersed with the daily events you’ve scheduled in OmniFocus. To view additional details of an event in the Calendar app, click the calendar icon ![]() next to the event.
next to the event.
While OmniFocus is great at talking with Apple’s Calendar, we can’t guarantee compatibility with other calendar apps that may be on your Mac. Calendar is considered the default go-to resource when OmniFocus seeks out calendar information to display alongside your OmniFocus items in Forecast view.
To modify what you see in the list or to adjust the time shown for the Calendar events, choose View > Show View Options or click View in the toolbar. Forecast View options include a Calendars section that lets you customize which external calendars are shown, including those stored in iCloud and more.
Flagged 
The Flagged perspective contains a collection of all items you have assigned the Flagged status.
To flag an item, click the flag icon ![]() on its row in the outline (or in Fluid layout, click on the upper-right corner of its status circle), click the flag in the inspector, or choose Edit > Set Flag (Shift-Command-L). You can also use this to remove the flag from an item.
on its row in the outline (or in Fluid layout, click on the upper-right corner of its status circle), click the flag in the inspector, or choose Edit > Set Flag (Shift-Command-L). You can also use this to remove the flag from an item.
When you flag an item, its status circle changes color to orange  to help catch your eye and let you know that something important is going on.
If you flag a project or an action group all of the actions within it inherit that flag, and the sense of urgency it imparts. Flags on items that are inherited rather than directly applied are noted with a hollow flag icon ![]() on the row, in the inspector, or attached to their status circles.
on the row, in the inspector, or attached to their status circles.
Inherited flags can’t be directly removed; the parent item must be unflagged, or the action moved elsewhere, to lose the inherited property.
Flagged Outline
Items in the Flagged outline are sorted first by due date (from oldest to most recent), then by project (for items with the same due date). Sorting isn’t affected by whether a flag is inherited or directly applied, and the only items that appear in Flagged are those that are directly actionable (flagged projects don’t appear).
Flagged Sidebar
The Flagged sidebar shows a list of your tags, presented identically to their appearance in the Tags perspective. They appear in the order they were created, and (as with Tags) you can drag to rearrange them in the list, and to create hierarchical tag arrangements.
Flagged View Options
-
In Flagged, Show:—Choose the setting for items that you would like to be visible in the outline (Available is the default). Each option describes the requirements for items that it includes or excludes; see the Glossary for further details on each view state.
-
Layout—OmniFocus Pro adds a Layout section to Flagged View options where you can customize the outline to show a set of attributes specific to this perspective. See Layout Options for details.
Review 
The Review perspective contains a flat list of projects that are due for review.
Reviewing helps make sure your projects are accurately portrayed in OmniFocus, leaving them in good shape and ready for action. If you have projects that need items added, projects that aren’t relevant anymore, or projects you don’t mean to do any time soon, following a regular review process can help you keep them from falling through the cracks.
Each project has an interval for how often you intend to review it and a date when the next review is planned. You can change the default review interval in Date & Time preferences, and you can change the review interval and next review date of individual projects with the inspector.
To review your remaining projects:
-
Choose the Review perspective in the sidebar (there’s also a corresponding button you can add to your toolbar). In this view, your remaining projects are grouped in order of their next-scheduled review date.
-
For each project, check whether it has the proper status. Do you need to revise its actions, or add new ones? Should you put the project on hold, drop it, or mark it completed? Or is everything moving along just fine?
-
Once you’re satisfied with the state of the project, select it. You’ll see that some review-specific handy controls appear at the top of the outline—click Mark Reviewed, choose Edit > Mark Reviewed, or Control-click and choose Mark Reviewed from the shortcut menu. The project’s next review date moves forward and you can go on to review another project.
If you would like to look a project over again before its next scheduled review, select it and use the Review section of the inspector to change its next review date to today. The project appears in the Review perspective ready for your perusal.
Alternatively, you can drag and drop the project onto the Review perspective icon in the sidebar. This sets the project’s next scheduled review date to today, and adds it to the queue for review.
Drag and drop works similarly for other items in ways that you might find useful—try moving items between perspectives or from the sidebar to the outline (and vice versa) for more flexible editing shortcuts.
Review Outline
When you enter the Review perspective the sidebar displays a flat list of your review-ready projects (folders are not included). The project with the earliest review date will be open in the outline for your inspection.
In Review, the outline only shows a single project at a time to facilitate inspection of its contents. Use the arrow buttons in the outline header to navigate between projects, or click Mark Reviewed when you’re ready to move on to the next one.
Review View Options
-
In Review, Show:—Choose the setting for items that you would like to be visible in the outline (Remaining is the default). Each option describes the requirements for items that it includes or excludes; see the Glossary for further details on each view state.
-
Layout—OmniFocus Pro adds a Layout section to Review View options where you can customize the outline to show a set of attributes specific to this perspective. See Layout Options for details.
Completed and Changed
The final two built-in perspectives—Completed ![]() and Changed
and Changed ![]() —are available from the Perspectives menu. These are a great way to find items in your database that may have been filed away by mistake or otherwise disappeared under mysterious circumstances.
—are available from the Perspectives menu. These are a great way to find items in your database that may have been filed away by mistake or otherwise disappeared under mysterious circumstances.
Completed and Changed are designed to track movement of items in your database, but have no other specific purpose for helping to get stuff done.