Preferences
Preferences in OmniFocus govern ways the app behaves and how you interact with it, with settings that can be customized to suit your needs. Choose OmniFocus > Preferences (Command-,) to open the Preferences window.
General
The General tab includes settings for common interactions you’ll have with OmniFocus.
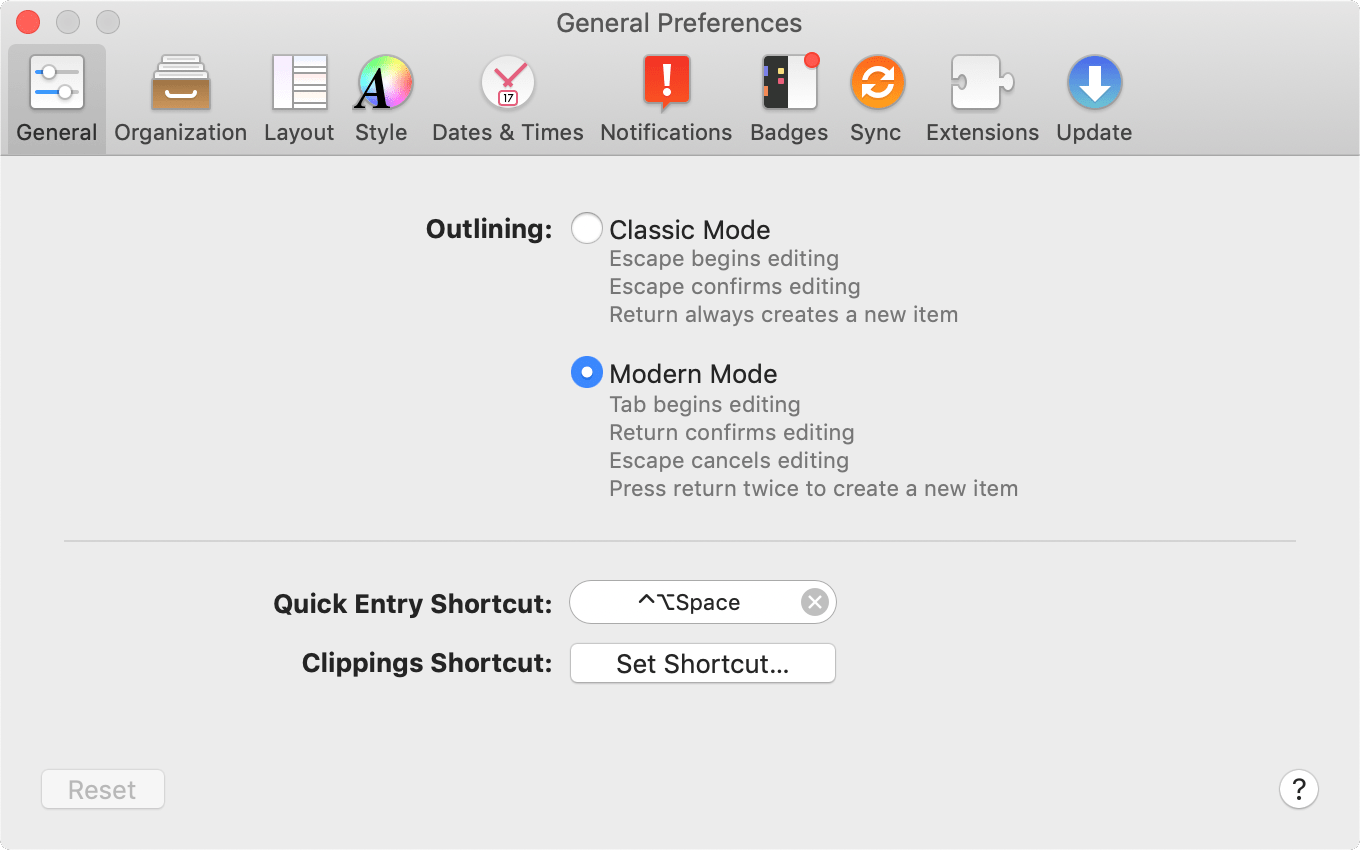
Outlining
Choose between Classic Mode and Modern Mode outlining, governing the behavior of common keyboard actions when items in the outline are selected.
Quick Entry Shortcut
Set a custom keyboard shortcut for Quick Entry here (the default is Control-Option-Space).
Clippings Shortcut
Use the Clippings Shortcut button to open System Preferences and set up your system-wide keyboard shortcut for Clippings.
Organization
The Organization tab includes settings for keeping your database views tidy and determining how projects and perspectives are organized.
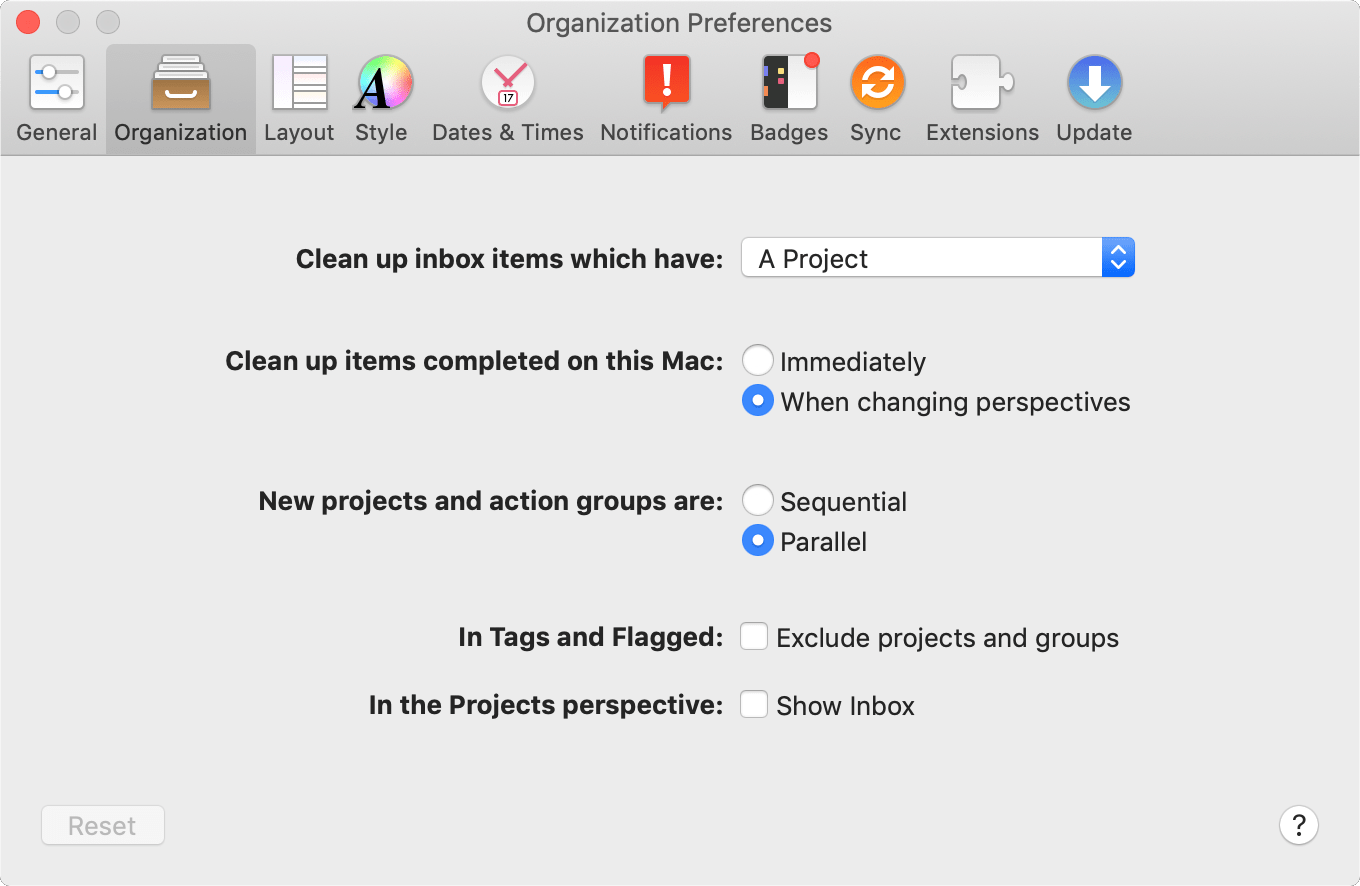
Clean up inbox items which have
You can choose Organize > Clean Up (Command-K) to help keep your Inbox tidy by moving items with changed status or metadata to their correct locations. This preference governs which changes cause an item to be swept up in the cleanup process.
Clean up items completed on this Mac
If you’d prefer that items be cleaned up as soon as they are marked complete, choose Immediately. Otherwise, completed items will be cleaned up when you switch between perspectives or when you invoke a cleanup manually.
New projects and action groups are
Choose Sequential if you tend to create projects whose actions must be completed in a specific order, or choose Parallel if your projects and groups are often closer to unordered lists.
In Tags and Flagged
If you’d prefer to display items completely detached from the projects or groups they belong to when you’re looking at the Tags or Flagged perspectives, uncheck the box for this preference.
In the Projects perspective
Choose Show Inbox to display the Inbox as the first item in your Projects list (unlike other items, this one cannot be reordered in the list). This option is available for convenience of interaction between your Inbox and Projects perspectives, and does not otherwise change the behavior of the Inbox.
Layout
The Layout tab controls how data is displayed in OmniFocus’s outline.
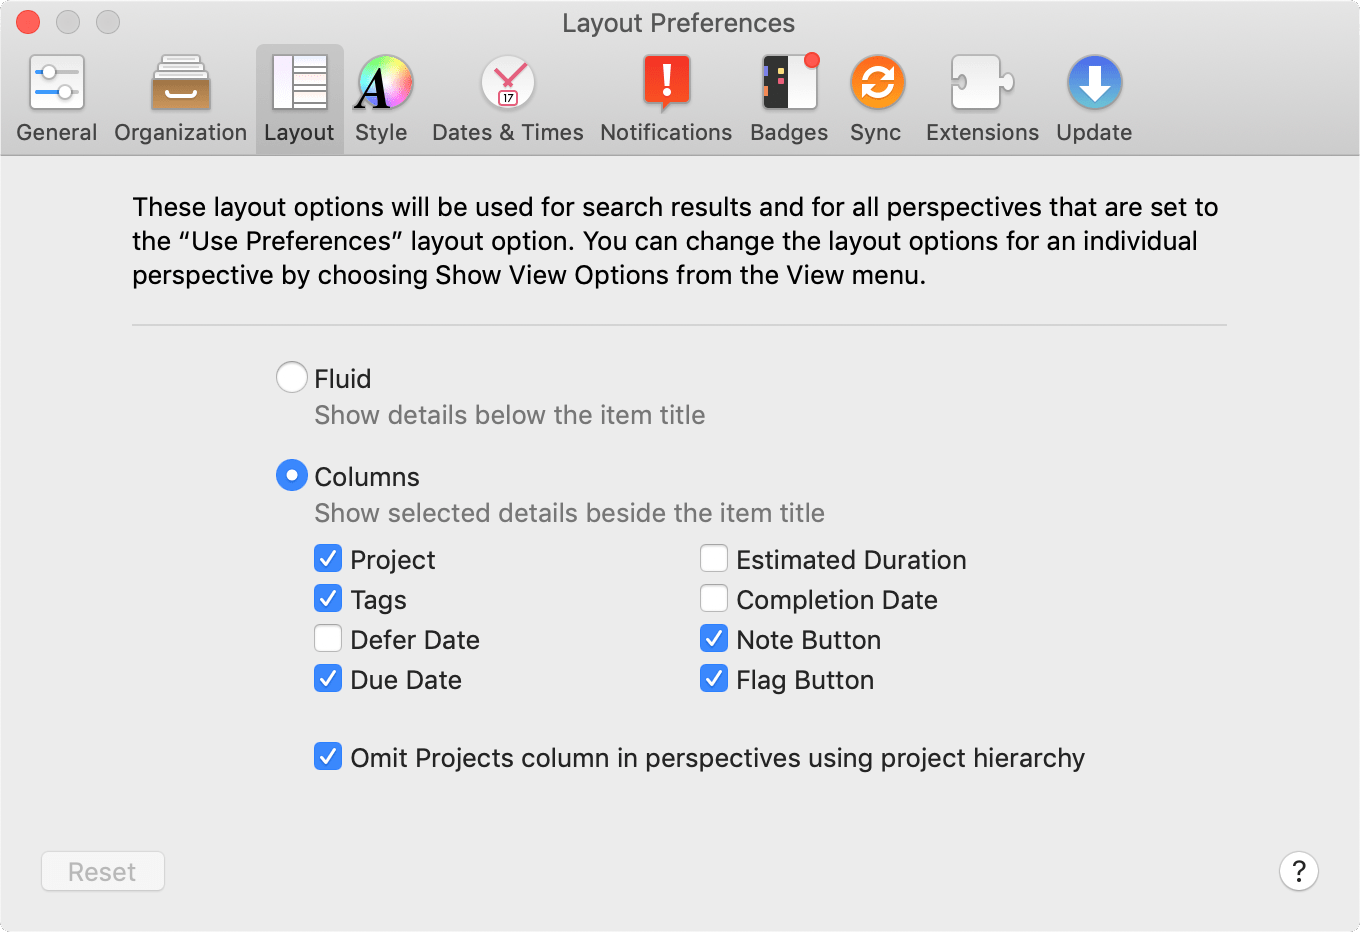
Fluid
This option displays information related to items in the outline in a row beneath each item’s title.
Columns
This option provides a configurable set of columns for each item. Your data appears in columns on the same row as each item’s title, and these columns can be selectively shown or hidden with the checkboxes in this section.
With OmniFocus Pro, you can use individual perspectives’ View options to choose whether Layout preferences apply to that particular perspective. If you use a variant layout, you can further customize it by choosing columns that show only the data most relevant to the perspective.
Style
The Style tab controls the fonts and colors used throughout OmniFocus.
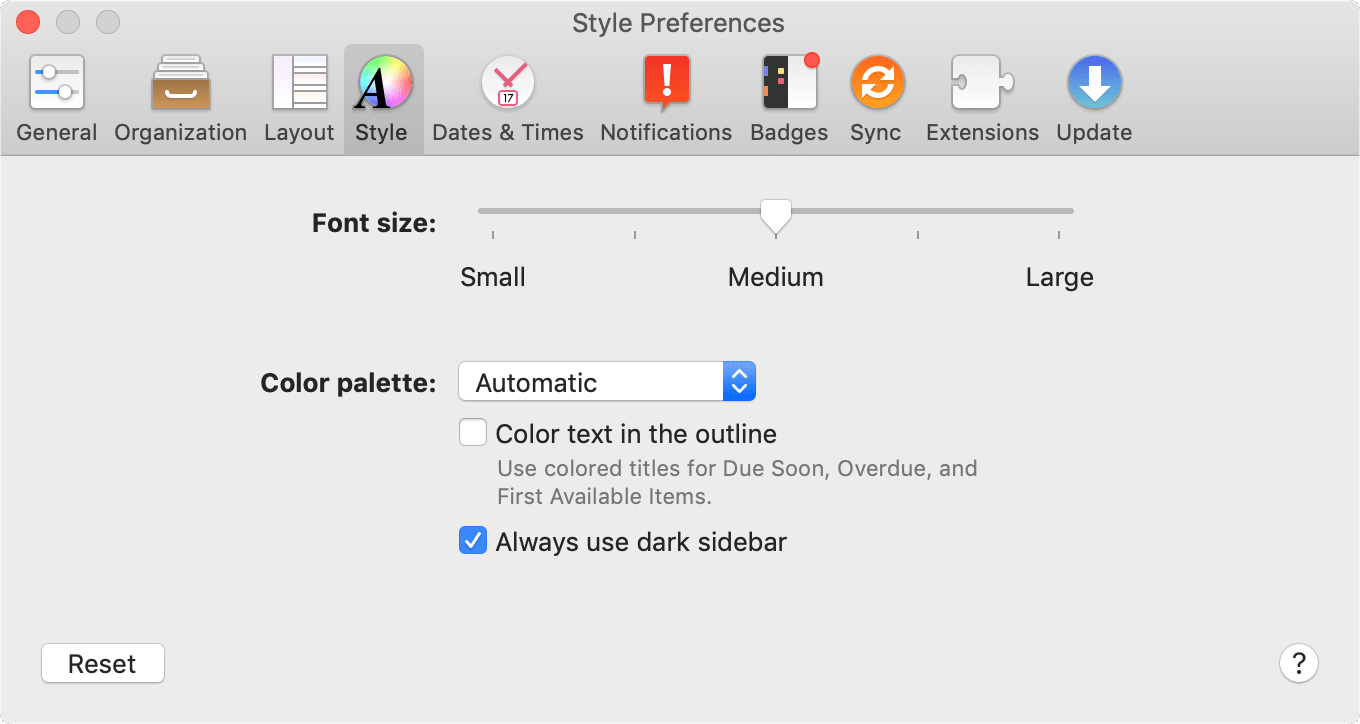
Font size
The slider here offers scaling font size for easy readability or higher data density.
Color palette
Choose a themed set of colors to apply to your OmniFocus interface. The following styles are included:
- Automatic—the color scheme conforms to your appearance settings in macOS System Preferences.
- OmniFocus—use the light color scheme regardless of the system settings.
- OmniFocus Dark—use the dark color scheme regardless of the system settings.
The checkboxes below the color palette menu offer the following options:
-
Color text in the outline—choose whether to use color for the title text of Due Soon, Overdue, and First Available items. When this checkbox is selected, these items will be styled in colors appropriate to their status.
-
Always use dark sidebar—When using the OmniFocus (light) color scheme, choose whether the sidebar is dark or light.
Dates and Times
OmniFocus starts with an educated guess at some default parameters for what it means for items to be due, due soon, and deferred, as well as an interval for project reviews. You can change these settings in the Dates & Times tab of Preferences.
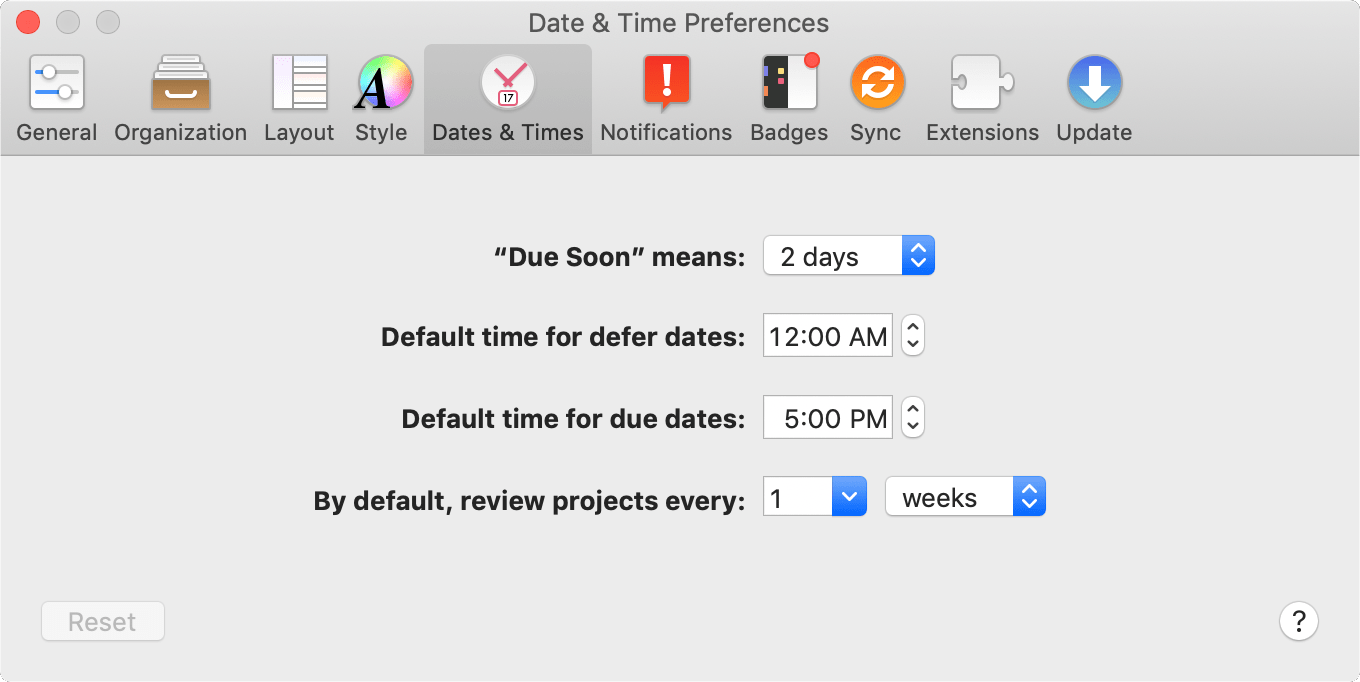
“Due Soon” means
OmniFocus displays actions and projects that are due soon with an amber title and status circle. What “due soon” means is up to you—the default is two days away from the present, but you can pick a different value here.
Default time for defer dates
When you create an action or project with a defer date but no specific time of day, OmniFocus provides one for you. Use this preference to pick a default time for defer dates that most suits your needs.
Default time for due dates
As with the previous preference, you have free reign over the time that your actions and projects come due by default (when only a due date is assigned).
By default, review projects every
This preference governs how often projects will show up in your Review queue by default. (You can set custom review intervals for specific projects using the inspector.)
Notifications
OmniFocus can work with the macOS Notification system to provide alerts relevant to tasks that you set up across a wide variety of parameters. Those that apply to each task in your database are set here in Preferences; notifications can also be set on a per-item basis using the Notifications inspector.
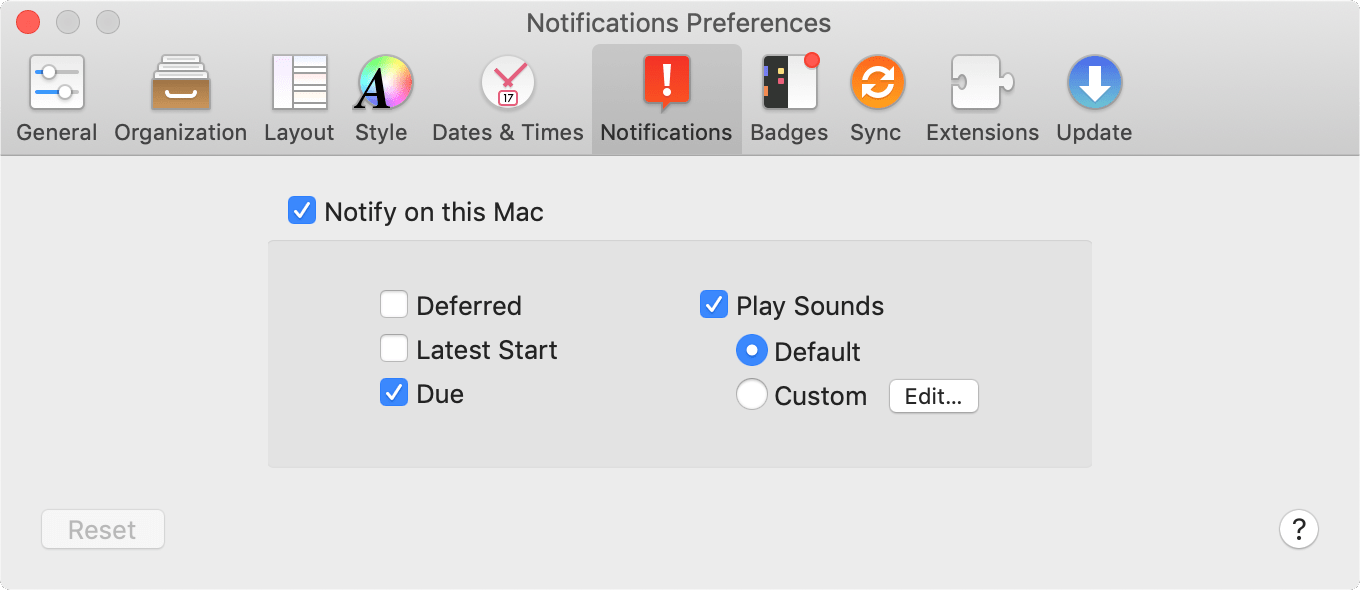
Notify on this Mac
Select Notify on this Mac to have OmniFocus notifications appear in macOS Notification Center. Notifications sync between devices along with the rest of your database, so those you add elsewhere will appear along with any notifications you set up in OmniFocus here on your Mac.
You can add notifications for items automatically when they meet certain criteria by selecting the options below, or set up custom notifications for individual items using the Notifications inspector.
-
Deferred—Automatically add a notification for the date and time of an item's defer date. Changing an item's defer date changes the date of the notification, and removing it deletes the notification.
-
Latest Start—Automatically add a notification for the latest possible time an item could be started if it is to be completed by its due date, based on the item's estimated duration and due date. This notification is only created if an item has both a due date an an estimated duration.
-
Due—Automatically add a notification for the date and time of an item's due date. Changing the due date changes the date of the notification, and removing it deletes the notification.
These settings don't apply to items created prior to the settings being turned on.
Any notifications that are created automatically can be individually removed by clicking XX next to their entries in the Notifications inspector.
- Play Sounds—Turn on sounds that correspond to OmniFocus notifications. Choose either the default system notification sound, or custom sounds (including None) based on the type of notification; click Edit to revisit choices you've made for your custom alerts.
Badges
OmniFocus can operate in complete stealth mode, or it can display visual cues when it's time to focus on your tasks. The Badges tab of Preferences holds settings for fine-grained control over when and how the app tells you what’s up next.
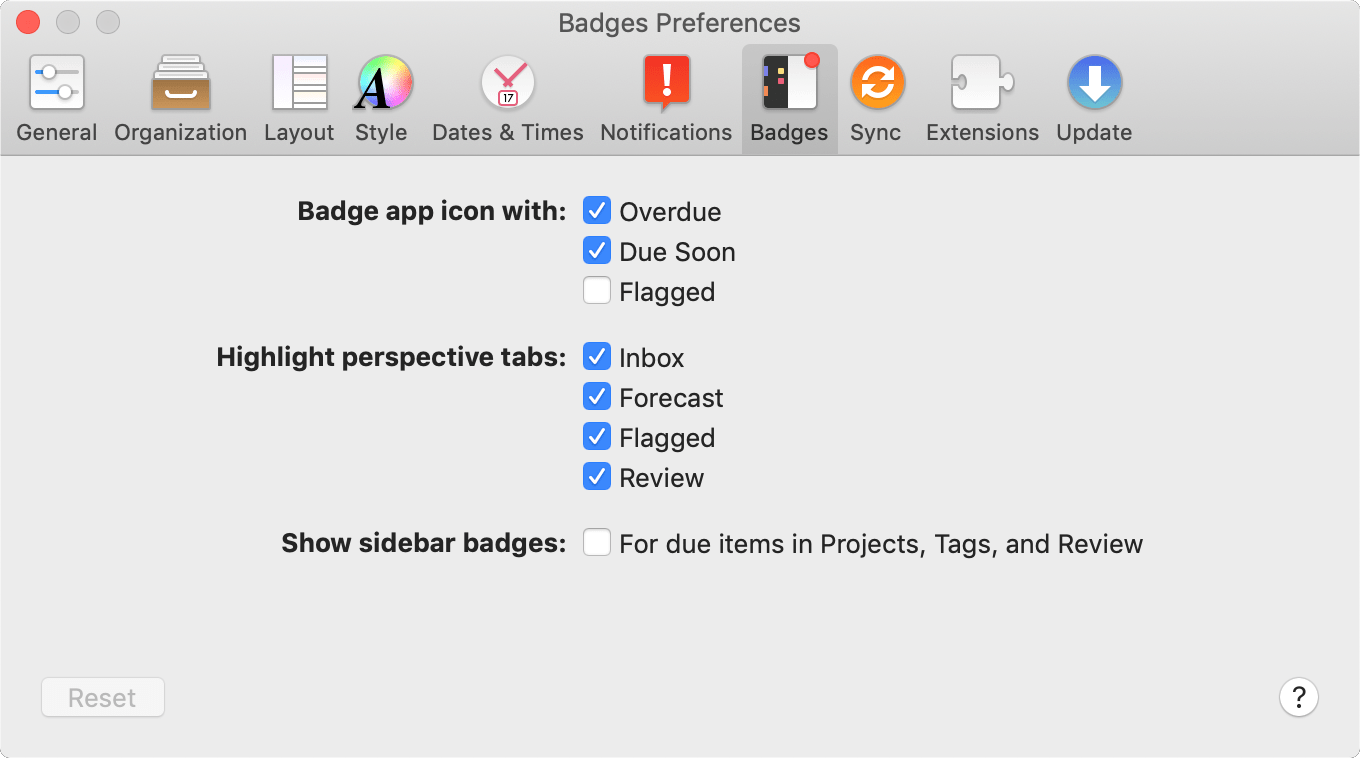
Badge app icon with
How visibly do you want OmniFocus remind about items you’ve decided are relevant? Check the boxes in this section for items you want to include in the badge count number that appears on the OmniFocus app icon in the macOS Dock. (If nothing is checked, the badge won't appear.)
Highlight perspective tabs
When there are items asking for your attention in one of the built-in perspectives, OmniFocus can give you a subtle reminder by adding a colored bar to the left edge of the perspective’s tab. Use this preference to choose which perspectives are highlighted when something relevant comes up.
Show sidebar badges
This preference adds some visual oomph to let you know what’s going on by equipping the OmniFocus sidebar with badges displaying due soon and overdue items in the Projects, Tags, and Review perspectives.
Sync
Establishing a cloud-connected copy of your database is a great way to keep OmniFocus in harmony across all your devices. The Sync tab has the options you need to set up your sync account.
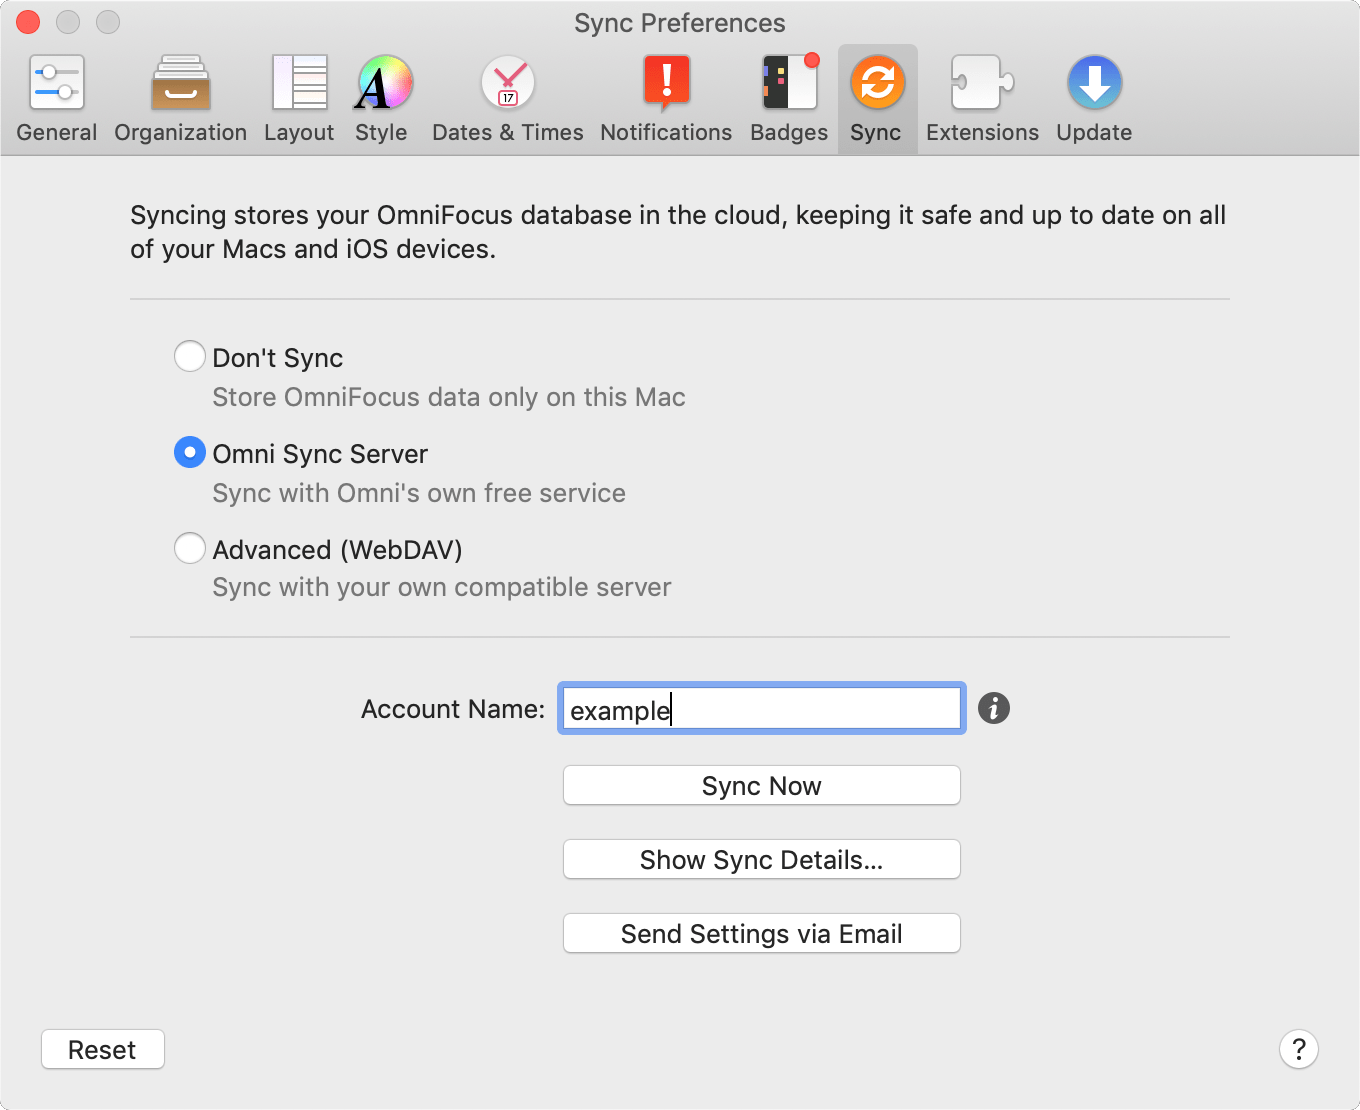
Don’t Sync
This setting isn’t recommended, but if you plan to use OmniFocus exclusively on your Mac and syncing to a remote server is prohibitive, you can choose to disable OmniFocus’s sync features. In all other cases, having a cloud-based copy of your data is a great way to rest at ease that your work won’t be lost in a local catastrophe.
Omni Sync Server
Omni maintains a set of servers designed to interface cleanly with OmniFocus, providing unique features like email capture and support for your needs as an OmniFocus user. We recommend this as the best sync solution for most users, since it’s the one we can provide the most support for; it also happens to be free!
Check out the Getting Synced appendix for details on getting set up and for more information on how sync works.
Advanced (WebDAV)
If you choose to entrust your data with the Omni Sync Server, we’ll treat it with utmost care and responsibility (see our Terms of Service and Privacy Policy). That said, if you have exceptional security needs or other privacy concerns, you may want to use a third party WebDAV server (or set up your own). That’s great! Find out more about syncing to a custom WebDAV server in Other WebDAV Options.
Account Information
When you’ve chosen a sync preference, a field appears beneath the sync choices for entering the server address or account name. You can sync immediately with the Sync Now button and view detailed information about your sync setup with Show Sync Details. Choose Send Settings via Email to create a handy message that’ll help configure sync on your other devices.
Show Sync Details
When you click Show Sync Details a sheet appears with tabs that contain advanced information about your connected sync account, including:
-
A list of Devices currently syncing to the account. Selecting a device shows how recently it synced to your OmniFocus database, and provides the option to unregister it as an approved sync client.
-
Push-triggered sync options, with push enabled by default. Technical details of your push connection are shown here, along with advanced options (primarily used for troubleshooting). The Learn More link connects to a support article with details on how push works, and why even the most data security-conscious users will likely want to leave it enabled.
-
A sync Log with a list of all your recent OmniFocus database sync activity, and the reasons for each sync event along with their durations. If anything seems strange here, you can copy the log for use when contacting Omni support.
-
Details about the Encryption status of your data on the sync server. OmniFocus uses a database format that encrypts your data on the server. Verify the encryption status of your sync data here, and (optionally) set up a separate passphrase for decrypting your database.
Extensions
Use the Extensions tab to control how OmniFocus works with some of the other features of your Mac.
These preferences are available with OmniFocus on versions of macOS prior to macOS 11 (Big Sur). Starting with macOS Big Sur, the Today extension is replaced by OmniFocus widgets and this tab does not appear.
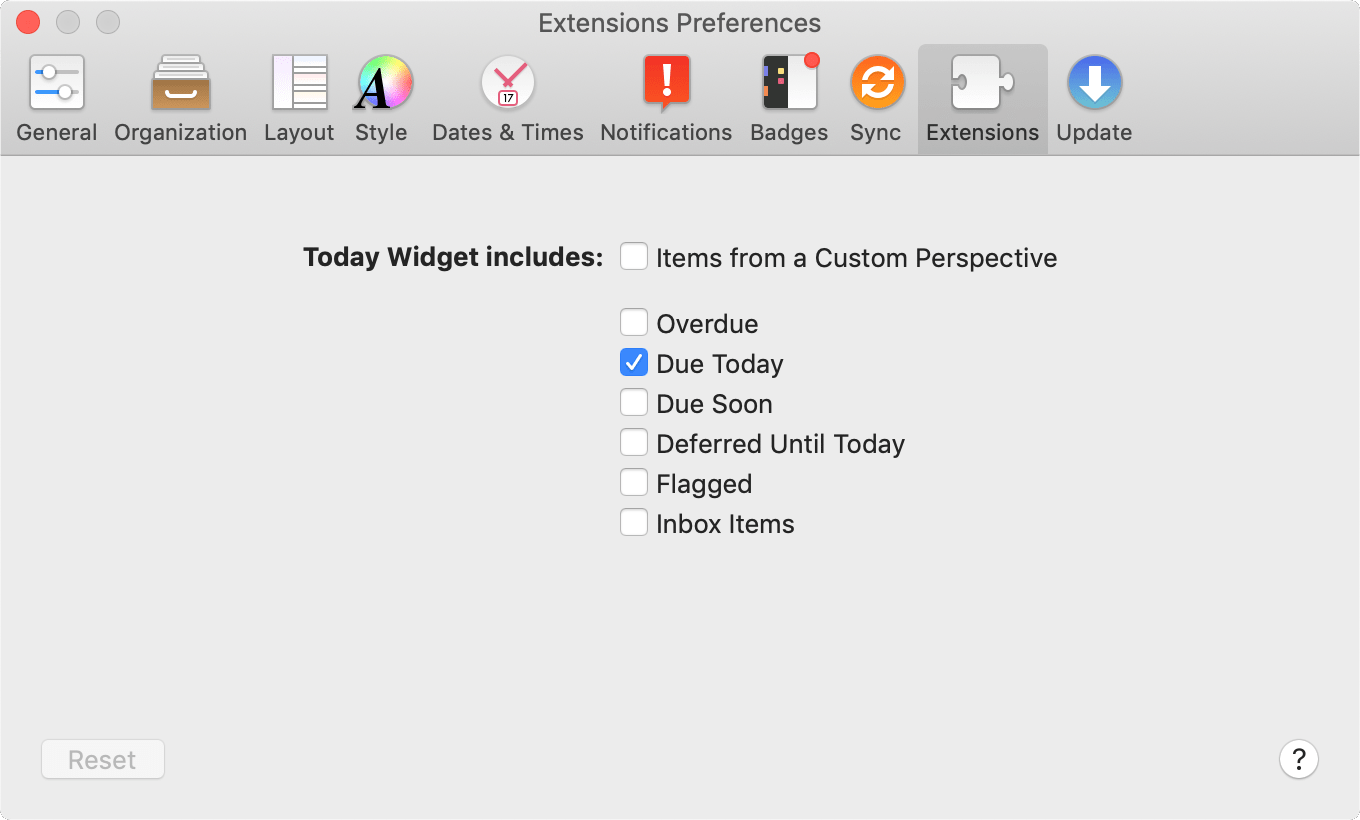
Today Widget includes
With the Today extension turned on, you can fine-tune the list of items you see when you look at Today in macOS Notification Center. Items that can be shown include Overdue, Due Today (the default), Due Soon, Deferred Until Today, Flagged, and Inbox Items.
With OmniFocus Pro ![]() , you also have the option of choosing a custom perspective to display in Notification Center via the Today extension. Choosing Items from a Custom Perspective reveals a dropdown menu from which you can pick the existing custom perspective that you’d like to display.
, you also have the option of choosing a custom perspective to display in Notification Center via the Today extension. Choosing Items from a Custom Perspective reveals a dropdown menu from which you can pick the existing custom perspective that you’d like to display.
Update
The Update tab controls how frequently OmniFocus checks for updates to itself (for non-Mac App Store builds only), and offers the option to help Omni improve future versions of OmniFocus by sending us anonymous data about your Mac.
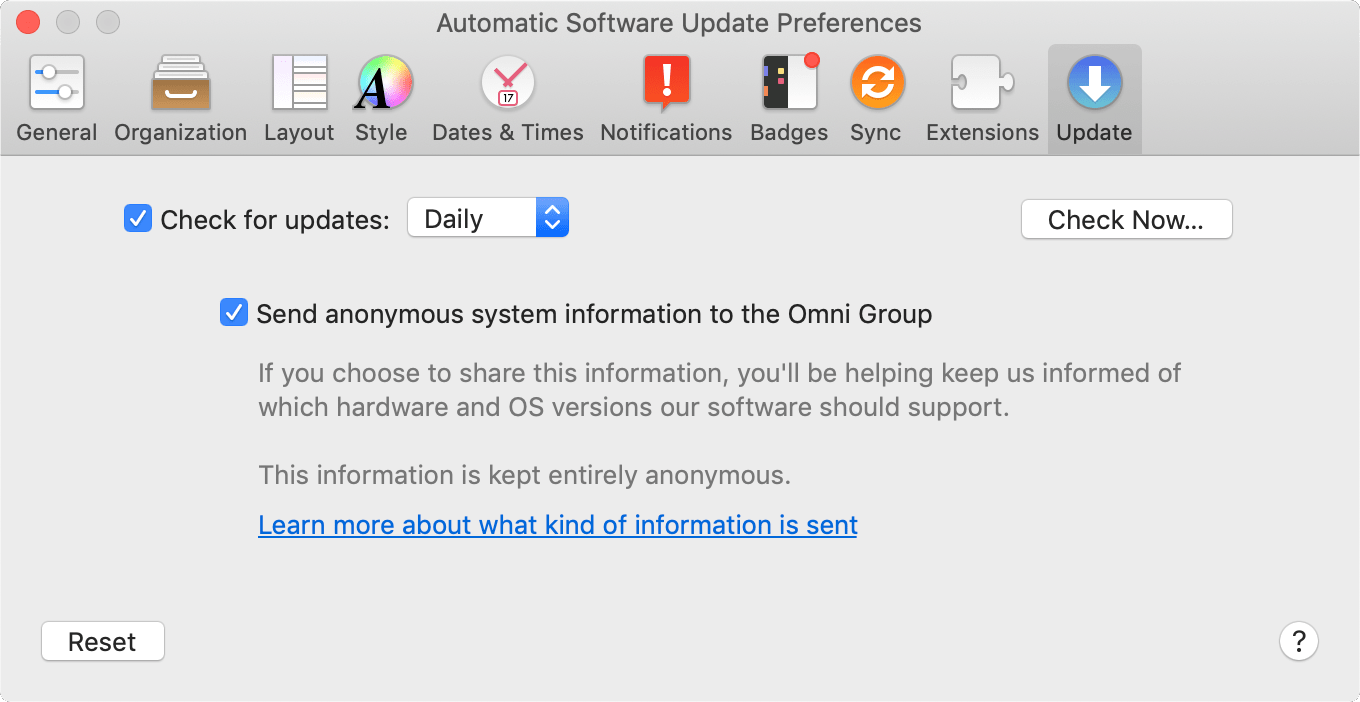
Check for updates (Omni Store Only)
OmniFocus is naturally curious about when updates are available for itself. If you’d prefer for the app not to check for updates automatically, uncheck the box for this preference; otherwise, you can choose an interval that suits you best (it’s not a very intrusive or bandwidth-heavy process). You can check for updates manually using the Check Now button, or with Check for Updates in the OmniFocus menu.
Send anonymous system information to the Omni Group
If you’d like to help us improve future versions of OmniFocus for you and others, you can choose to send us anonymous information about your system when you check for updates to the app. Click Learn more about what kind of information is sent to see a list of exactly what info is collected, and learn how it’s used.