Contents
Overview
What is OmniFocus for the Web?
OmniFocus for the Web is a companion to OmniFocus, the professional-grade task management app for Mac, iPhone, iPad, Apple Watch, and Apple Vision Pro. OmniFocus for the Web is designed to work in tandem with your other versions of OmniFocus, providing access to your OmniFocus database from any desktop computer with a modern internet browser.
Supported Features
OmniFocus for the Web supports the core features of task management in OmniFocus:
- Task Creation—Add Inbox items, projects, and actions
- Task Editing—Modify item details including title, flagged status, project type, tags, due and defer dates, and notes
- Task Organization—Group items into projects or action groups
- Built-In Perspectives—Browse and organize the Inbox, Projects, Tags, Flagged, and Forecast perspectives
- Custom Perspectives—Browse and organize custom perspectives created with OmniFocus for Mac, iPhone, iPad, or Apple Vision Pro
- Attachments—View, download, and delete attachments added with OmniFocus for Mac, iPhone, iPad, or Apple Vision Pro
The following OmniFocus features are not currently supported by OmniFocus for the Web:
- Review Perspective
- Notifications
- Repeat Editing
All of the attributes that you add using OmniFocus for Mac, iPhone, iPad, Apple Watch, or Apple Vision Pro are preserved in your database, but may not be completely accessible in OmniFocus for the Web.
New features are constantly being added to OmniFocus for the Web, and the client is updated to include them as soon as they are ready.
Accessing OmniFocus for the Web
Access to OmniFocus for the Web requires an OmniFocus subscription. Once you are subscribed, visit https://web.omnifocus.com/ and use your Omni Account credentials to log in.
OmniFocus Glossary
- Action
- An item that’s part of a project, or part of a group within a project.
- Action Group
- Also referred to as a sub-project, an action group is a set of actions nested hierarchically within a parent action (which itself can be part of a project).
- Active
- The status for an item that’s planned for completion, or a tag that’s currently in use. Active status can be set on projects and tags using the inspector.
- Available
- An item state and view option that includes items that aren’t blocked, deferred, or on hold. Availablilty is derived from an item’s defer date, project type, and project or tag status.
- Blocked
- The state of an action in a sequential project that comes after the first available action. The blocked state is derived from an action’s position in its project; to unblock an action, either change the project to another type or move the action to the top of the project list.
- Complete
- The status assigned to an item when you’ve finished it, or finished all the actions that comprise it (in the case of a project or group). Click an item’s status circle to mark it complete.
- Database
- The file that OmniFocus uses to hold all of the information that you add to the app. OmniFocus and its various perspectives act as windows onto your database, interpreting the data there in ways that help you get stuff done.
- Defer Date
- A date and time assigned to an item that you don’t want to (or can’t) consider for completion until later. When the defer date is reached, the item becomes available for work. Also referred to as the Defer Until date.
- Dropped
- The status for a project, folder, action, or tag that is no longer being considered for completion. Use the inspector to set one of these as dropped.
- Due Date
- A date and time assigned to an item by which the item must be completed.
- Due Soon
- A designation for items whose due dates are approaching. Items that are due soon are styled in amber for greater visibility.
- First Available
- An item state and view option that represents a project’s first action as the only one available. First Available status is derived from an action’s position within a project and the project’s type: for sequential and parallel projects, the first available action is the first action in the project list. For single action lists, all actions are equally available.
- Flag
- A mark of privileged, eye-catching status bestowed on an item. What this special designation means is completely up to you, but it’s a great way to keep important things from falling through the cracks. Items that are flagged are styled in orange for greater visibility.
- Group
- A collection of items nested hierarchically within another item. Groups created from inbox items are item groups, while groups created within projects are action groups (also sometimes called sub-projects).
- An item that exists in your database but isn’t exposed by the view options of your current perspective. Relevant when the app gives notice that you might be deleting something by mistake.
- Inbox
- The built-in perspective designed to hold tasks and to-dos that you’ve entered into OmniFocus as items, prior to processing them into projects, actions, and groups.
- Inspector
- A pane on the right side of the OmniFocus window that holds the suite of tools for adding and changing the details of an action, project, or tag. With something selected in the outline or sidebar, the inspector automatically shows fields relevant to the details of the selection. Click the Inspector button in the toolbar to show or hide it.
- Item
- Items are representations of tasks and to-dos in an OmniFocus database. Types of items include: inbox items, actions, projects, and groups.
- On Hold
- A status for projects and tags that aren’t relevant to your plans right now, but may be in the foreseeable future. Use the inspector to set projects and tags on hold.
- Outline
- The place where you see and interact with your items in OmniFocus, usually through a hierarchical view of your database. Specific perspectives (such as Tags and Flagged) have specialized ways of showing your data that eschew or modify the typical project hierarchy.
- Overdue
- A state for items whose due dates are past. Items that are overdue are styled in red for greater visibility.
- Parallel
- A project or group that doesn’t place particular emphasis on the order in which its actions are completed. All actions are considered available, though the topmost action is still considered the first available action for the purposes of view options.
- Perspective
- A view on your OmniFocus database that appears in the perspective list and is detailed in the outline. OmniFocus for the Web comes with five built-in perspectives; custom perspectives can be created in OmniFocus Pro for Mac or iOS, and accessed in OmniFocus for the Web using the Perspectives menu.
- Project
- A to-do item that’s larger in scope or permanence than a simple action, potentially containing several actions and groups within it that must be completed before the project can be marked complete.
- Quick Open
- Press O when not editing the contents of a cell to reveal the Quick Open dialog, where you can enter keyword text and navigate to a matching perspective, folder, project, or tag. Any items matching the keyword you enter appear in a list as you type.
- Remaining
- An item state and view option that represents all items that haven’t been completed or dropped. Remaining is derived from an item’s attributes and not set directly.
- Resolved
- An item state that includes all items that have either been completed or dropped.
- Sequential
- A project or group whose actions must be completed in a specific order. The first action in the list is the only one available for completion; all later actions are considered blocked.
- A pane that holds the vertical column of perspective tabs, and displays additional levels of hierarchy for perspectives that support them. The sidebar appears to the left of the outline; click the Sidebar button in the toolbar to show or hide it.
- Single Action List
- A project whose actions are equally available regardless of sequence. Unlike other project types where completion is the goal, single action lists persist regardless of whether they contain available actions.
- Status Circle
- A graphical depiction of an item’s status (due soon, overdue, flagged, or repeating), as well as a target to click to mark an item completed.
- Sub-Project
- A term synonymous with action group; a group of actions nested hierarchically within a project.
- Tag
- A person, place, thing, state of mind, or other factor relevant to the completion of a given action or project. These exist outside the project hierarchy and represent another axis from which to view the items you’ve accumulated in your database. An item can have as many tags as you find to be useful.
- Task
- In the context of this manual, a task is something you’d like to accomplish in the real world that you’d capture with OmniFocus (where it would then become an item). To-do is another word with the same meaning.
- Toolbar
- A region along the top of the OmniFocus window that contains controls for modifying the contents of that window.
The Outline
Tasks that you add to OmniFocus are represented as a list of actionable items in the outline. Interacting with items in the outline—adding new ones, marking them complete, or organizing them into projects and groups—is one of the main ways OmniFocus helps you get stuff done.
This chapter describes the outline in its component parts, and details the purpose of each.

The Perspective Header
The items you see in the outline depend on the perspective you are viewing. You can tackle things contextually with Tags, get a broad overview of the work ahead across a number of Projects, or focus on notable items with Flagged, for example.
The name of your current perspective appears at the top of the outline.
The Anatomy of a Row
The OmniFocus outline is composed of rows that represent items (to-dos that you capture with OmniFocus) or other pieces of your organizational framework (such as tags).
Rows display all sorts of information about an item, like the project it belongs to, any relevant tags, due dates, and completion status in the form of status circles.
The figure below is a breakdown of an item in the Inbox that’s packed with additional information about the task at hand.

-
Status Circle—A visual representation of the completion status of the item, along with other important attributes. Click an active item’s status circle to mark it complete.
-
Title—The item’s title. Black title text generally indicates that an item is actionable; items that are completed, blocked, on hold, or parents of groups have grey title text instead (unless they are due soon or overdue).
-
Project—If the item has a project assigned, its location in the project hierarchy appears here.
-
Tags—Any tags assigned to the item appear here. An item can have as many tags as you want; if there are more tags than horizontal space in the row, the row shows as many tags as fit (when the row is selected, it expands to display every tag on the item).
-
Dates—If the item has a due date assigned, it appears here.
-
Notes, Flag—These icons indicate whether or not the item includes a note or attachments (the
 icon is filled when either is present), and whether the item is flagged. Click the note icon to open the item’s note, and click the flag icon to add or remove its flag.
 -
Contextual Menu—With an item selected, click the elipsis next to the Note icon to open a menu with commands relevant to the selection.
Project Rows
In addition to the rows of actions and and Inbox items, rows for projects have a variety of useful information as well.

-
Disclosure Triangle—Click to collapse or expand the project to hide or reveal its contents.
-
Row Type Icon—Projects have icons next to them to help remind you of your current perspective and the row’s relation to those around it. Projects are further broken down by type: Sequential, Parallel, and Single Actions.
-
Project Title—The project title appears here.
-
Project Tags—Tags for the project, if any, appear here. A project can have as many tags as you want; if there are more tags than horizontal space in the row, the row shows as many tags as fit (when the row is selected, it expands to display every tag on the item).
-
Project Dates—If the project has a due date assigned, it appears here.
-
Notes, Flag—These icons indicate whether there are notes associated with the project itself (as opposed to the items within it), and whether the project is flagged.
-
Contextual Menu—With a project selected, click the elipsis next to the Flag icon to open a menu with commands relevant to the selection.
You can choose to show or hide folders in the hierarchy of the project outline using the Projects perspective’s View options.
Status Circles
An item’s status circle  is the target for checking it off when it is done. Click the circle, and the item is complete
  .
.
Status circles also convey important information about an item: items can be due soon  (amber), overdue
  (red), or flagged
  (orange). Repeating items are also distinguished by the ellipsis
  in their center, and items that are dropped receive a grey cross bar
  .
.
If you have an item with more than one status, the circle will take on multiple colors simultaneously to communicate each relevant attribute.
Cleaning Up
When you mark an item complete by clicking its status circle , the item may not immediately disappear from the outline. If you’ve set items to clean up when changing perspectives, they remain until you navigate elsewhere or clean up manually by clicking Clean Up in the toolbar.
If a completed item doesn’t disappear even after you’ve cleaned up your current view, check your View options for the perspective. It’s likely that the view is set to All. Try setting the View options to Remaining or Available to hide those completed items.
Grouping Items
Groups can be used to create nested lists of items in the outline: either groups of items in the inbox, or action groups within a project (also sometimes called sub-projects).

When you create an action group you’re creating a parent-child hierarchical relationship between an action and the actions within it.
To create a group, select and drag each child item on top and slightly to the right of the item you want to be the parent.
Grouping Projects with Folders
In addition to grouping action items within other items, when using the Projects perspective you can group related projects together using folders.
To create a project folder, while in the Projects perspective choose New Folder from the Plus menu beneath the sidebar.
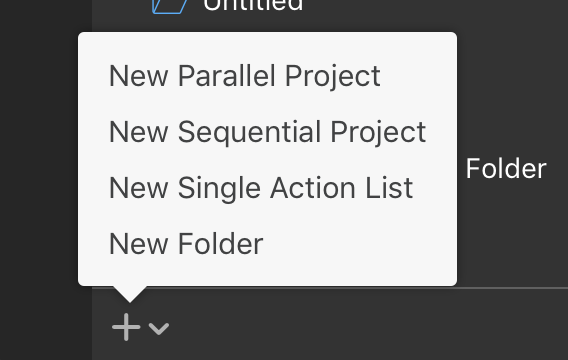
After creating a folder, select it in the sidebar and use the Plus menu again to add new projects or folders inside the selected folder.
Folders can be dragged an dropped inside other folders in the sidebar, to create a nesting hierarchy of projects that’s as deep or wide as you need it to be.
Folders can be displayed in the project outline using the Project perspective’s View options.
The Toolbar
The toolbar at the top of your OmniFocus window contains a set of buttons for commonly used app functions that are accessible at a single click. This chapter describes the controls available in the toolbar.
Toolbar Tools
App Menu 
Shows a menu with information about OmniFocus for the Web and commands for customizing your OmniFocus experience. See The App Menu below for information about individual menu commands.
Sync 
Prompts your OmniFocus database to sync with its counterpart in the cloud. (This happens automatically at regular intervals, so you shouldn’t need to manually sync often.)
Sidebar 
Opens and closes the sidebar on the left side of OmniFocus.
View 
Customizes which items appear in the current perspective’s outline based on their completion status, project order, and other perspective-specific features. See View Options for details.
Perspectives 
Opens the Perspectives menu, where you can navigate to any of the built-in perspectives as well as any custom perspectives you have created with OmniFocus for Mac, iPhone, iPad, or Apple Vision Pro.
Select the star ![]() next to a perspective to include it in the sidebar, or deselect it to remove it from the sidebar. If you visit an unstarred perspective its icon appears in the sidebar until you navigate to another perspective.
next to a perspective to include it in the sidebar, or deselect it to remove it from the sidebar. If you visit an unstarred perspective its icon appears in the sidebar until you navigate to another perspective.
Clean Up 
Tidies any items in the outline that may belong elsewhere after a change of project, tag, or status.
Undo 
Undoes the latest change you made.
Redo 
Restores the most recently undone change.
New Action 
Adds an action item at the current location (inside the topmost level of whatever hierarchy is visible in the outline).
Add Items 
Opens the Add Items dialog for speedily adding new items from anywhere in OmniFocus.
Inspect 
Opens and closes the inspector on the right side of OmniFocus.
The App Menu
Click the OmniFocus icon in the toolbar to open the App Menu, which contains useful information and commands for working with OmniFocus for the Web.
About OmniFocus for the Web 
Opens an overlay with information about your current OmniFocus for the Web session.
Reference Manual 
Opens a browser window with the OmniFocus for the Web Reference Manual (the very thing you are reading now!).
Contact Omni 
Opens a browser window with a form for contacting Omni support, with options to include diagnostic information about your session and add any relevant attachments.
Release Notes 
Opens a browser window with the release notes for recent versions of OmniFocus for the Web.
Preferences 
Navigates to the OmniFocus for the Web Preferences screen, where you can customize your OmniFocus experience in the following ways:
-
Language preference—Choose the language for the OmniFocus user interface.
-
Date format—Choose how dates are displayed: month/day/year, day/month/year, or year/month/day.
-
Start of week—Choose the weekday that OmniFocus considers to be the start of the week for purposes of the Forecast perspective.
-
Time format—Choose whether times should be displayed on a 12 hour clock or a 24 hour clock.
Beneath these options is a button to Restore Defaults, which returns all preferences to their original settings.
After making any changes, click Back to apply them to your session (this may cause OmniFocus to reload in your browser).
Manage Account 
Opens a browser window to the Omni Accounts website, where you can log in to manage the Omni Account associated with your OmniFocus for the Web subscription.
Sign Out 
Sign out from OmniFocus for the Web, ending the current session.
Perspectives and the Sidebar
All of your to-dos in OmniFocus live in a database behind the scenes, and perspectives are how you look at and interact with the contents of that database. OmniFocus for the Web comes with five built-in perspectives that represent specialized, commonly-used view states specifically designed to help you organize, prioritize, and add context to your tasks.
The sidebar appears on left side of the OmniFocus window, and controls what is displayed in the outline.
The Sidebar
Nestled on the left side of the OmniFocus window, next to the outline, lives the sidebar (click to show or hide it).
The sidebar consists of perspective tabs for quick navigation between your perspectives, and (for perspective other than the Inbox) provides a high-level means for surveying what’s on your plate. The function of the sidebar for each built-in perspective is discussed in the section for that perspective.
When viewing a perspective with a list of projects or tags in its sidebar, drag and drop an item there to rearrange it in the list.
Perspective Tabs
You can switch between perspectives using the tabs on the left side of the OmniFocus window. By default this includes the following built-in perspectives:
-
The Inbox, where you’ll stash all the tasks and to-dos that come to mind for later processing.
-
Projects, where related tasks are grouped together into overarching plans and hierarchies.
-
Tags, the places, people, things, and states of mind most relevant or conducive to accomplishing your tasks.
-
Flagged, where tasks designated with the most important priority or visibility are gathered.
-
Forecast, where you can view your tasks chronologically and integrate them into your schedule.
You can choose which perspective tabs appear in the sidebar, including any custom perspectives created in OmniFocus for Mac, iPhone, iPad, or Apple Vision Pro, using the Perspectives menu.
Sidebar Action Menu
When in the Projects or Tags perspective, the bottom of the sidebar contains an Action Menu button  for quick access to commands based on your current perspective.
Inbox 
The Inbox is the catch-all perspective for depositing everything that you’d like to do. To add an item to the Inbox from anywhere, click New Inbox Item in the toolbar.
Many workflows use the Inbox as an initial point of entry, a transient receptacle for ideas big and small. Once you’ve processed an Inbox item (added a project or tag, converted it to a project, or assigned it some other fate), it will likely disappear off to its new location.
Inbox Outline
The Inbox contains a list of individual items that can be organized hierarchically into item groups. Since the Inbox primarily serves as a temporary resting place for new tasks, it doesn’t support complexity beyond simple grouping; to add hierarchical nuance to a task with many parts, consider assigning it to an existing project with the inspector.
Item Status
The states described here apply both to items in the inbox and actions within projects. Items can have additional states described by their status circles; the ones here are common to all and appear in the inspector.
-
Active—The default status for a newly added item, indicating an item that is currently planned for work.
-
Completed—The status for an item that has been successfully completed.
When completing an item group, items within the group inherit the completed status and are represented with an inherited completion status circle
 in the outline.
 -
Dropped—The status for an item no longer planned for work.
When dropping an item group, items within the group inherit the dropped status and are represented with an inherited dropped status circle
 in the outline.
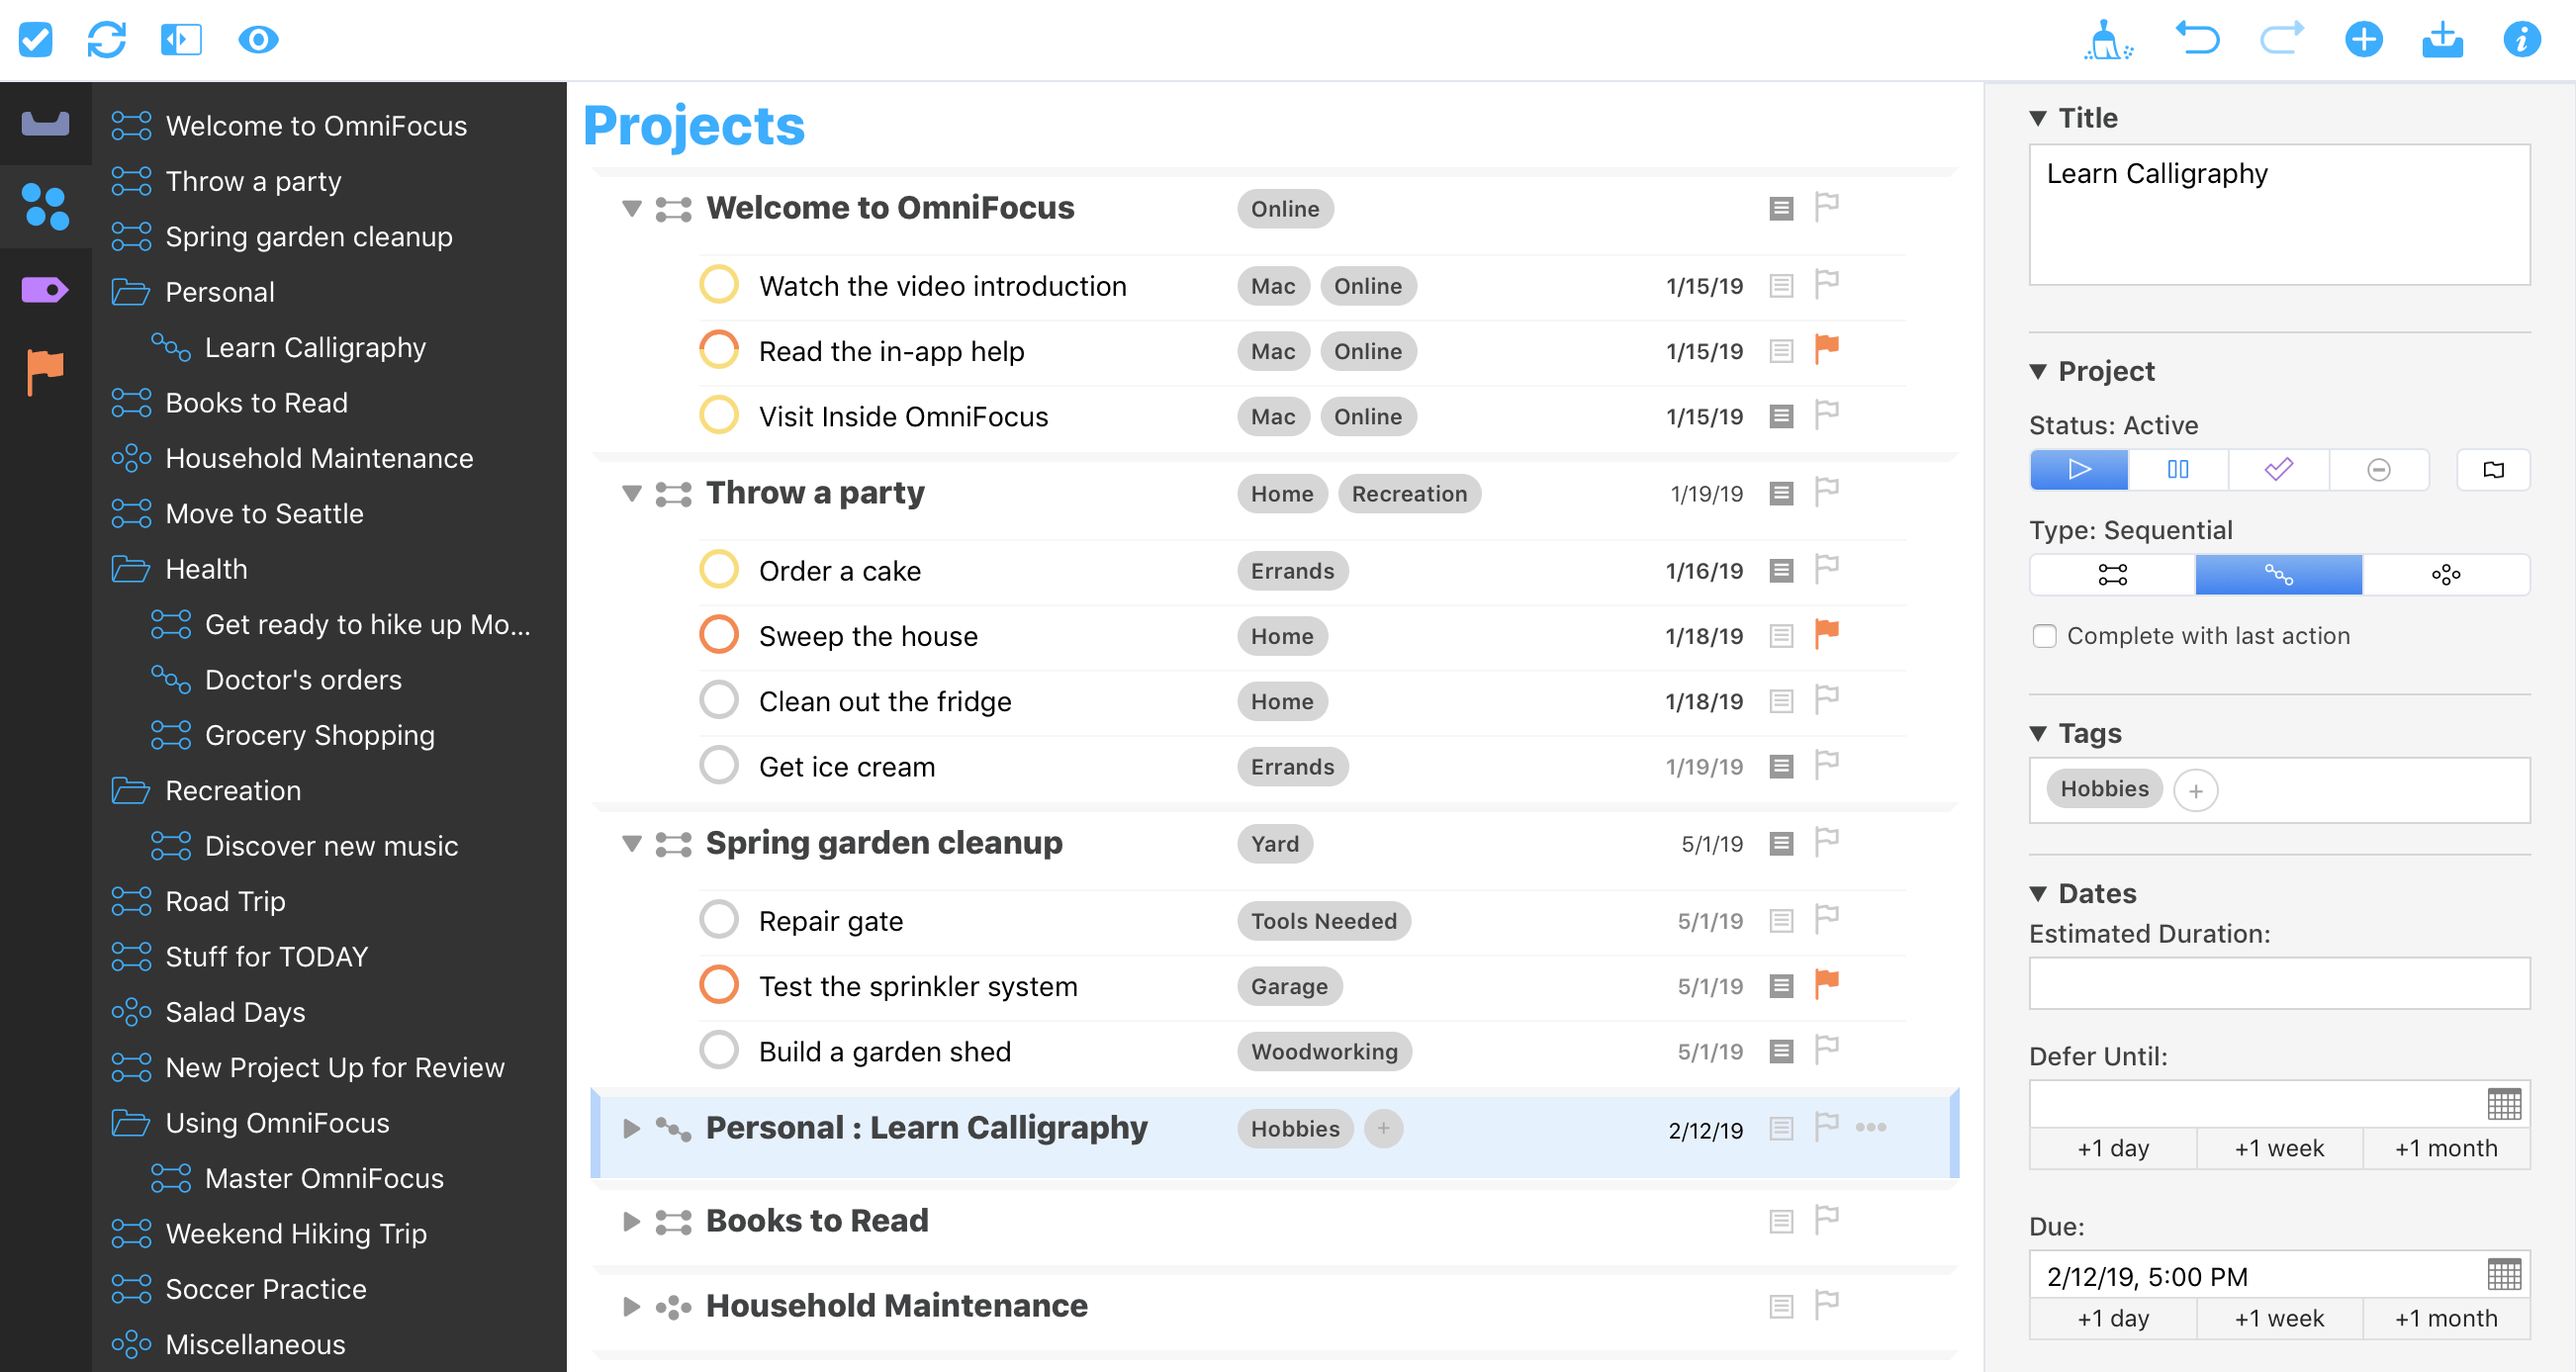
Projects 
A project is a task made up of multiple items. Projects are typically more complex than individual action items, and can include several related actions. The Projects perspective displays all of your projects in a list, which can be grouped into folders to create hierarchy.
Projects Outline
The Projects outline displays a list of your projects and the actions they contain.
Projects Sidebar
The Projects sidebar displays a list of your projects grouped hierarchically into folders. Click a project in the sidebar to view it alone; click the Projects tab or an empty space in the sidebar to view the full list in the outline.
Project Type
Projects are distinguished by their type, which varies based on how actions inside the project must be completed. Project type also affects how actions within the project show up according to the perspective’s View options.
-
 Sequential—Sequential projects have actions that need to be completed in a predetermined order; the first item must be finished before you can move on to the next. In a sequential project, there is only ever one action available at a time. (this is also, by definition, the project’s first available action).
 -
 Parallel—Parallel projects consist of actions that can be completed in any order. In a parallel project, all incomplete actions are available, and the first available is the first one in the list.
 -
 Single Actions—A single action list isn’t a project in the traditional sense; it’s a list of loosely-related items that aren’t interdependent (a shopping list is an example of this). In a single action list, all actions are considered both available and first available.
The difference between parallel and sequential projects is most visible when Projects View options are set to show only Available actions. (Actions beyond the first available action in a sequential project are blocked, and therefore hidden.)
Project Status
When planning and subsequently reviewing a project, it can be useful to give it a status to indicate whether work is progressing or plans have changed.
-
 Active—The default status for a new or ongoing project. It can be useful to review active projects regularly to determine what progress you’ve made, and whether they are still things you want to do.
 -
 On Hold—If you’re not sure whether you want to continue a project, you can change the project’s status from Active to On Hold. If you’ve chosen to show only Available items in View options, the project and its actions are removed from the project list in the sidebar and outline.
Projects placed on hold are still available for review and reconsideration if you decide to prioritize them again in the future.
-
 Completed—Eventually you’ll reach the successful end of a project. Select the project and then choose Completed in the Status section of the inspector (this automatically marks any unfinished actions in the project complete). If you’d like to revisit a completed project, change your View options to All.
 -
 Dropped—If you’ve decided not to work on a project any further, you can Drop it completely. It disappears from the Projects list, and its actions are likewise hidden. You could delete the project instead, but then you wouldn’t have any record of it; keeping it around in a dropped state means you can go back and check on actions you’ve completed regardless of whether they’re from still-relevant projects, and so on.
Tags 
In OmniFocus, a tag represents an association that a task has to the world around it. A tag could be a person, place, or thing most relevant to completion of a project, or it could represent a mindset most applicable to execution of an action item.
An item can have as many tags as you find useful, and there is no specific purpose assigned to them; use tags to assign priority, group items by energy level or required equipment, or don’t use them at all.
The Tags perspective displays a list of your tags in the sidebar, and a list of all your actions grouped by the tags they belong to in the outline.
Tags Outline
The Tags outline displays all of your Inbox items and actions, grouped by the tags they have assigned.
While tags can be assigned to projects, projects themselves do not appear in the Tags perspective. Actions added to the project after it is tagged inherit the tag, and those actions appear in the Tags outline where appropriate.
If an item has multiple tags, it appears in the list under each tag assigned to it.
Tags Sidebar
The Tags sidebar shows a list of your tags in the order they were created (by default), or the order you arranged them in OmniFocus for Mac, iPhone, iPad, or Apple Vision Pro.
Click a tag in the sidebar to view it alone; click the Tags tab to view the full list in the outline.
Tag Status
Like projects, tags have a status that indicates whether they are currently relevant to your work. View options that depend on status apply similarly between projects and tags; however, the implications of tag status vary.
-
Active—The default status for a tag. When a tag is active, it exists and is relevant to you in some way.
-
On Hold—When a tag is temporarily irrelevant or unavailable for some reason (a required tool is loaned out, a colleague is on sabbatical, or the public library is closed for remodeling), you can change the tag’s status from Active to On Hold. The tag remains in the sidebar, but when viewing Available items its actions are removed from the outline.
-
Dropped—If a tag becomes permanently irrelevant or unavailable, you can drop it completely. It disappears from the Tags list, and its actions are likewise hidden. You could delete the tag instead, but then you wouldn’t have any record of it; keeping it around in a dropped state means you can go back and check on actions you’ve completed regardless of whether they’re from still-relevant tags, and so on.
The Completed status doesn’t exist for tags, because tags aren’t actionable for completion themselves: they are things or conditions that exist in the world.
Tag Sorting
By default, items inside a tag are sorted in the order they appear in their respective projects (project order), or in the order they appear in the Inbox if no project is assigned (inbox order).
Flagged 
The Flagged perspective contains a collection of all items you have assigned the Flagged status.
To flag an item, click the flag icon ![]() on its row in the outline or click the flag in the inspector. You can also use this to remove the flag from an item.
on its row in the outline or click the flag in the inspector. You can also use this to remove the flag from an item.
When you flag an item, its status circle changes color to orange to help catch your eye and let you know that something important is going on.
If you flag a project or an action group all of the actions within it inherit that flag, and the sense of urgency it imparts. Flags on items that are inherited rather than directly applied are noted with a hollow flag icon ![]() on the row, in the inspector, or attached to their status circles.
on the row, in the inspector, or attached to their status circles.
Inherited flags can’t be directly removed; the parent item must be unflagged, or the action moved elsewhere, to lose the inherited property.
Flagged Outline
Items in the Flagged outline are sorted first by due date (from oldest to most recent), then by project (for items with the same due date). Sorting isn’t affected by whether a flag is inherited or directly applied, and the only items that appear in Flagged are those that are directly actionable (flagged projects don’t appear).
Flagged Sidebar
The Flagged sidebar shows a list of your tags, presented identically to their appearance in the Tags perspective.
Forecast 
Forecast helps you keep an eye on the progress of your projects, check upcoming due dates, and conveniently schedule OmniFocus tasks on a day you have selected.
The Forecast outline displays a chronological list of items due each day. To create a new action that is due on a given day, select the date in the sidebar and choose New Action (N)  .
.
Forecast Sidebar
A range of dates spanning the next month is displayed in a grid in the Forecast sidebar, letting you know at a glance what’s on your plate in the coming weeks.
Each date button displays the number of actions associated with that date, and each is color-coded according to its urgency: amber indicates that a date contains items that are due soon, and red indicates a date with items that are due or past due.
What counts as due soon is determined by the date range you’ve chosen in Settings in OmniFocus for Mac, iPhone, iPad, or Apple Vision Pro.
Forecast View Options
The Forecast perspective has its own set of View options that modify how many dates are displayed in the sidebar, and allow for additional items to be included in the outline beyond those with due dates close to the present.
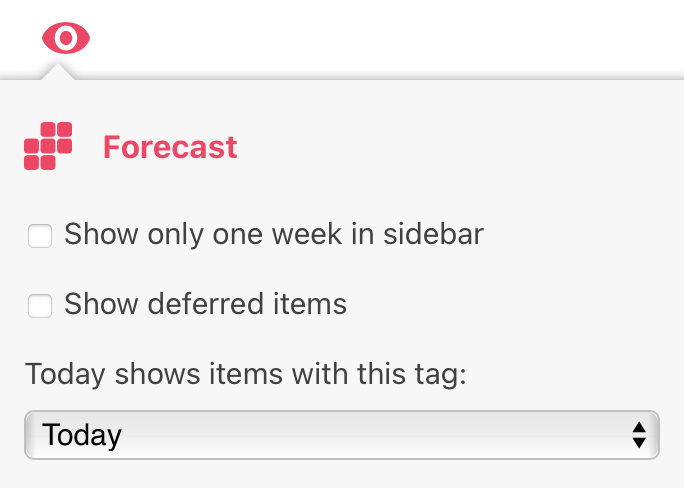
-
Show only one week in sidebar—With this option selected, the calendar in the Forecast sidebar displays a single row of dates (the past, the future, and a span of five days in between) rather than the full month default.
-
Show deferred items—With this option selected, deferred items scheduled to begin on a given day will appear in a separate Deferred section on the dates when they become available. Otherwise, deferred items do not appear in the outline until they are due.
-
Today shows items with this tag:—Choose a tag here to have its items appear on today’s forecast date, in their own Today section of the outline.
View Options
For each perspective, you can customize the scope of what appears in the outline using that perspective’s View options (the Forecast perspective is a special case). Click View to choose the parameters that apply to the current perspective.
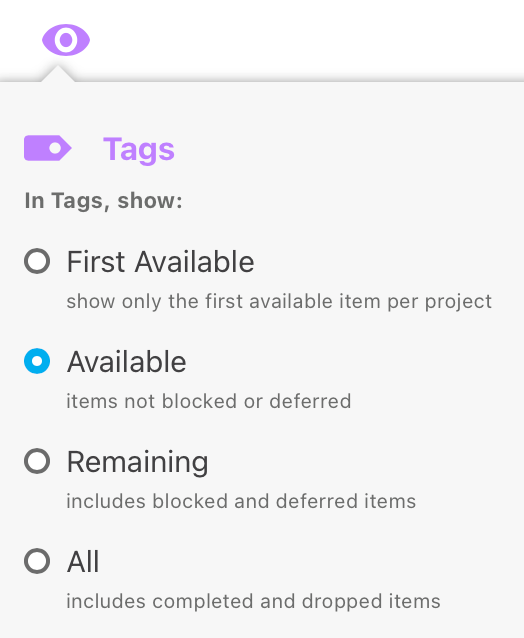
First Available
This view option represents a project’s first available action as the only one visible. The first available state is derived from an action’s position within a project and the project’s type: for sequential and parallel projects, the first available action is the first action as listed in the project outline. For single action lists, all actions are equally available.
Available
This view option displays items that aren’t blocked, deferred, or on hold. Availablilty is derived from an item’s defer date, project type, and project or tag status.
Remaining
This view option includes all items that haven’t been completed or dropped. Remaining is derived from an item’s attributes and not set directly.
All
This view option shows all items contained in the perspective, including completed or dropped ones.
Show folders in outline
The Projects perspective’s View options also include the option to Show folders in outline.
When this checkbox is selected, the project outline includes rows for folders as well as the projects within them.
The Inspector
The Inspector holds tools for editing your actions, projects, and tags.
With something selected in the outline or sidebar, the inspector automatically shows fields relevant to the selection. Click the Inspect button in the toolbar to show or hide it.
This chapter explains the purpose and function of the inspector’s various sections and the options they contain for editing your OmniFocus items.
Each section of the inspector has a disclosure triangle  next to its name. Click it to collapse or expand the section.
Title
Every item or tag you add to OmniFocus has a title, which you can edit with this section of the inspector.
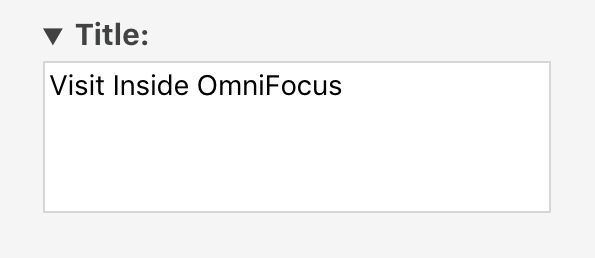
Select the title text in the inspector to edit it.
Most workflows use an item’s title to represent an actionable task—either a standalone action item, a step in a project, or the project goal itself.
By contrast, titles for tags typically represent people, places, things, or situations relevant to completion of the tasks at hand.
Type and Status
Use this section of the inspector to set attributes specific to the type and status of an item selected in the outline.
The name of this section changes depending on what you select.
Inbox Item
The Inbox Item section appears when you select an Inbox item or item group.
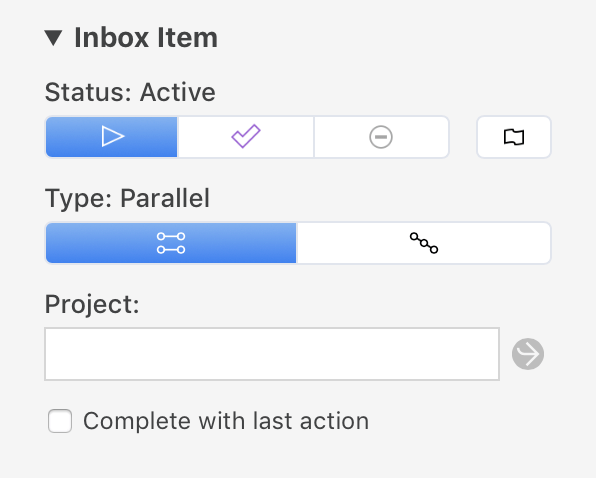
This section includes the following attributes:
-
Status—A switch for setting the status of the selection. Inbox items and groups can be Active, Completed, or Dropped.
Inbox items have the Active status by default. For more on the meaning of each status, see Item Status.
-
Flag—A flag that is either empty (unflagged), filled orange (flagged), or with an orange outline (inherited flag). Click it to set or remove flagged status on the selection.
When a flag is set on an inbox item, it appears in the Flagged perspective. If a flag is set on an item group, the items within it inherit the flag.
-
Type (item groups only)—A switch for setting the type of the group. Item groups can be either Parallel or Sequential.
-
Project—A field for setting the item’s project. For Inbox items and groups, this field is empty; assigning a project to an Inbox item typically causes it to leave the Inbox.
Assign a project to the selection by entering its name in the field, or click the down arrow for a list. To create a new project for the selection, enter it in the field and choose Create new project name.
-
Complete with last action (item groups only)—A checkbox that determines whether the group status automatically changes to Completed when the last item is completed. (If deselected, the group status must be changed to Completed manually.)
Action
The Action section appears when you select an action or action group.
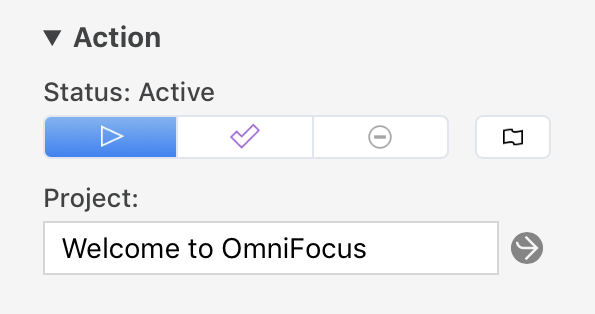
This section includes the following attributes:
-
Status—A switch for setting the status of the selection. Action items and groups can be Active, Completed, or Dropped.
Actions have the Active status by default. For more on the meaning of each status, see Item Status.
-
Flag—A flag that is either empty (unflagged), filled orange (flagged), or with an orange outline (inherited flag). Click it to set or remove flagged status on the selection.
When a flag is set on an action, it appears in the Flagged perspective. If a flag is set on an action group, the actions within it inherit the flag.
-
Type (action groups only)—A switch for setting the type of the group. Action groups can be either Parallel or Sequential.
-
Project—A field for setting the action’s project.
Change the action’s project by entering a different project name in the field. To create a new project for the selection, enter it in the field and choose Create new project name. Click Go to Project
 to open the assigned project in the Projects perspective.
 -
Complete with last action (action groups only)—A checkbox that determines whether the group status automatically changes to Completed when the last item is completed. (If deselected, the group status must be changed to Completed manually.)
Project
The Project section appears when you select a project.

This section includes the following attributes:
-
Status—A switch for setting the status of the selection. Project status can be Active, On Hold, Completed, or Dropped.
Projects have the Active status by default. For more on the meaning of each status and how it affects availability of items within the project, see Project Status.
-
Flag—A flag that is either empty (unflagged), filled orange (flagged), or with an orange outline (inherited flag). Click it to set or remove flagged status on the selection.
When a project is flagged, the actions inside it inherit the flag and appear in the Flagged perspective.
-
Type—A switch for setting the type of the selection. Projects can be Sequential, Parallel, or Single Actions.
Projects have the Parallel type by default. For more on the meaning of each type and how it affects availability of items within the project, see Project Type.
-
Complete with last action—A checkbox that determines whether the project status automatically changes to Completed when its last action is completed. (If deselected, the project status must be changed to Completed manually.)
Projects of the Single Actions type do not display this attribute, since they have no last action and are not conventionally considered complete.
Tag
The Tag section appears when you select a tag in a view that lists tags in the outline or sidebar.
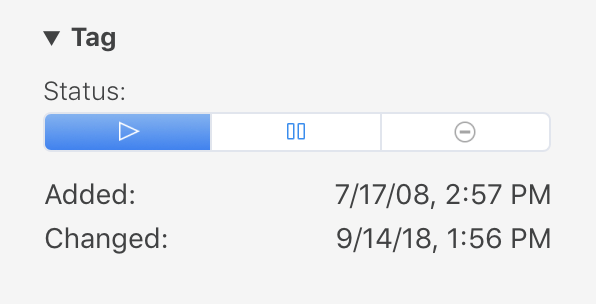
This section includes the following attributes:
-
Status—A switch for setting the status of the selection. Tag status can be Active, On Hold, or Dropped.
Tags have the Active status by default. For more on the meaning of each status and how it affects availability of items the tag is assigned to, see Tag Status.
-
Added—Lists the date that the tag was added to your OmniFocus database. This value is set when the tag is created and cannot be edited.
-
Changed—Lists the date when the tag was last changed. This value is updated automatically when you edit the tag and cannot be directly edited.
Tags
Use the Tags section of the inspector to add tags to a selected item, or review any tags it already has.
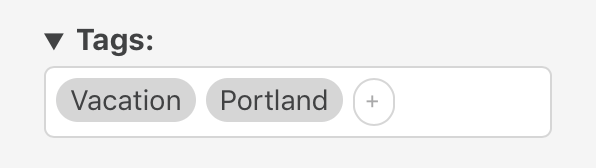
Tags represent associations that tasks have to you and the surrounding world. Click the field in the inspector and start typing to add a tag to an item; existing tags are available to autocomplete. To create a new tag for the selection, enter it in the field and choose Create new tag name (or press Command-Return).
Items can have as many tags as you like.
Dates
Use the Dates section of the inspector to set time-related attributes for items that have requirements for when they should start, end, or both. This section also displays times related to an item’s creation, modification, and completion.
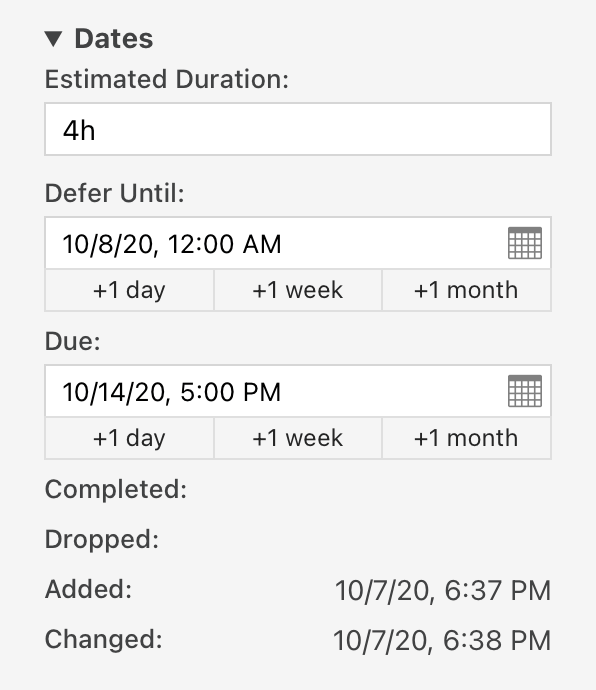
Estimated Duration
Use the Estimated Duration field for the amount of time (in minutes or hours) that you think it will take to complete a task.
Defer Until
Use the Defer Until field to set or change the selection’s defer date. Use the +1 day, +1 week, and +1 month buttons beneath the field to add a new defer date at the default time plus the button’s value, or augment the existing date by the value of the button.
When a defer date is set on an item, it is not considered available for action until that date is reached.
If a defer date is set on a project or group, items within it inherit that date. (A defer date set directly on the item will override the inherited date, if it is later.)
Due
Use the Due field to set or change the selection’s due date. Use the +1 day, +1 week, and +1 month buttons beneath the field to add a new due date at the present time plus the button’s value, or augment the existing date by the value of the button.
When a due date is set on an item, it is considered due at that date.
If a due date is set on a project or group, items within it inherit that date. (A due date set directly on the item will override the inherited date, if it is sooner.)
Completed and Dropped
The Completed and Dropped dates of the selection are shown here, if any. These dates are created when their respective statuses are applied. These values can’t be edited here, but can be changed using OmniFocus for Mac, iPhone, iPad, or Apple Vision Pro.
Added and Changed
The date the selection was added to OmniFocus and the date it was last edited. These values are derived from your editing history, and can’t be changed directly.
Supported Date Formats
You can be creative with the way you enter dates; OmniFocus is good at guessing what you mean. For example:
-
2d, –3w, 1h, 1y1m, and so on — Relative dates and times put the date at a certain amount of time from right now. Negative numbers represent times in the past.
-
2 days, –3 weeks, 1 hour, 1 year 1 month, and so on — You can use the full names of units too.
-
yesterday, tomorrow, tonight, next thursday, last month, this friday, and so on — You can refer to relative dates using common words. “This”, “next”, and “last” have specific meanings: this friday always means the Friday in this week, next friday always means the Friday in the next week, and last friday always means the Friday in last week, regardless of what day today is. Other units work in the same way.
-
september, fri, 2019, and so on — If you enter the name of a specific time period, the date will be at its beginning. So september means September first.
-
5/23/08 10a, 9.30.09 2:00 PM,* and so on — You can use the short date format as defined in your Language & Region system preferences.
-
2w sat, 4d @ 5p, mon 6a, aug 6 tue 5p, and so on — Mix the available formats however you like.
-
now, 9, 14:00, tom, and so on — OmniFocus makes its best guess at things like bare numbers, times, and word fragments. If you think something might work, give it a try.
Note
Use the Note section of the inspector to add, view, and edit the note associated with the selection.
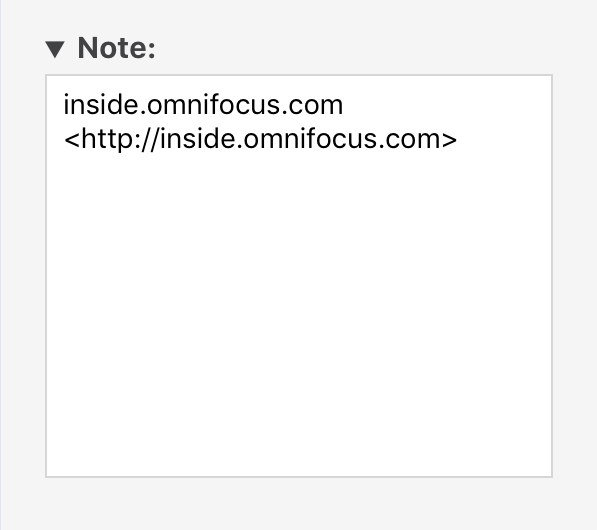
To add a note to an item, click the note icon ![]() in the outline near the item’s title, edit the note field in the inspector, or choose Edit > Edit Note (Command-’).
in the outline near the item’s title, edit the note field in the inspector, or choose Edit > Edit Note (Command-’).
Text styles added in other versions of OmniFocus sync with OmniFocus for the Web, but are not displayed and cannot be interacted with directly using OmniFocus for the Web.
Attachments
Attachments you add to items using OmniFocus for Mac, iPhone, iPad, or Apple Vision Pro appear in the outline when you expand an item’s note, as well as in the Note section at the bottom of the inspector.
OmniFocus for the Web does not support adding attachments at this time.
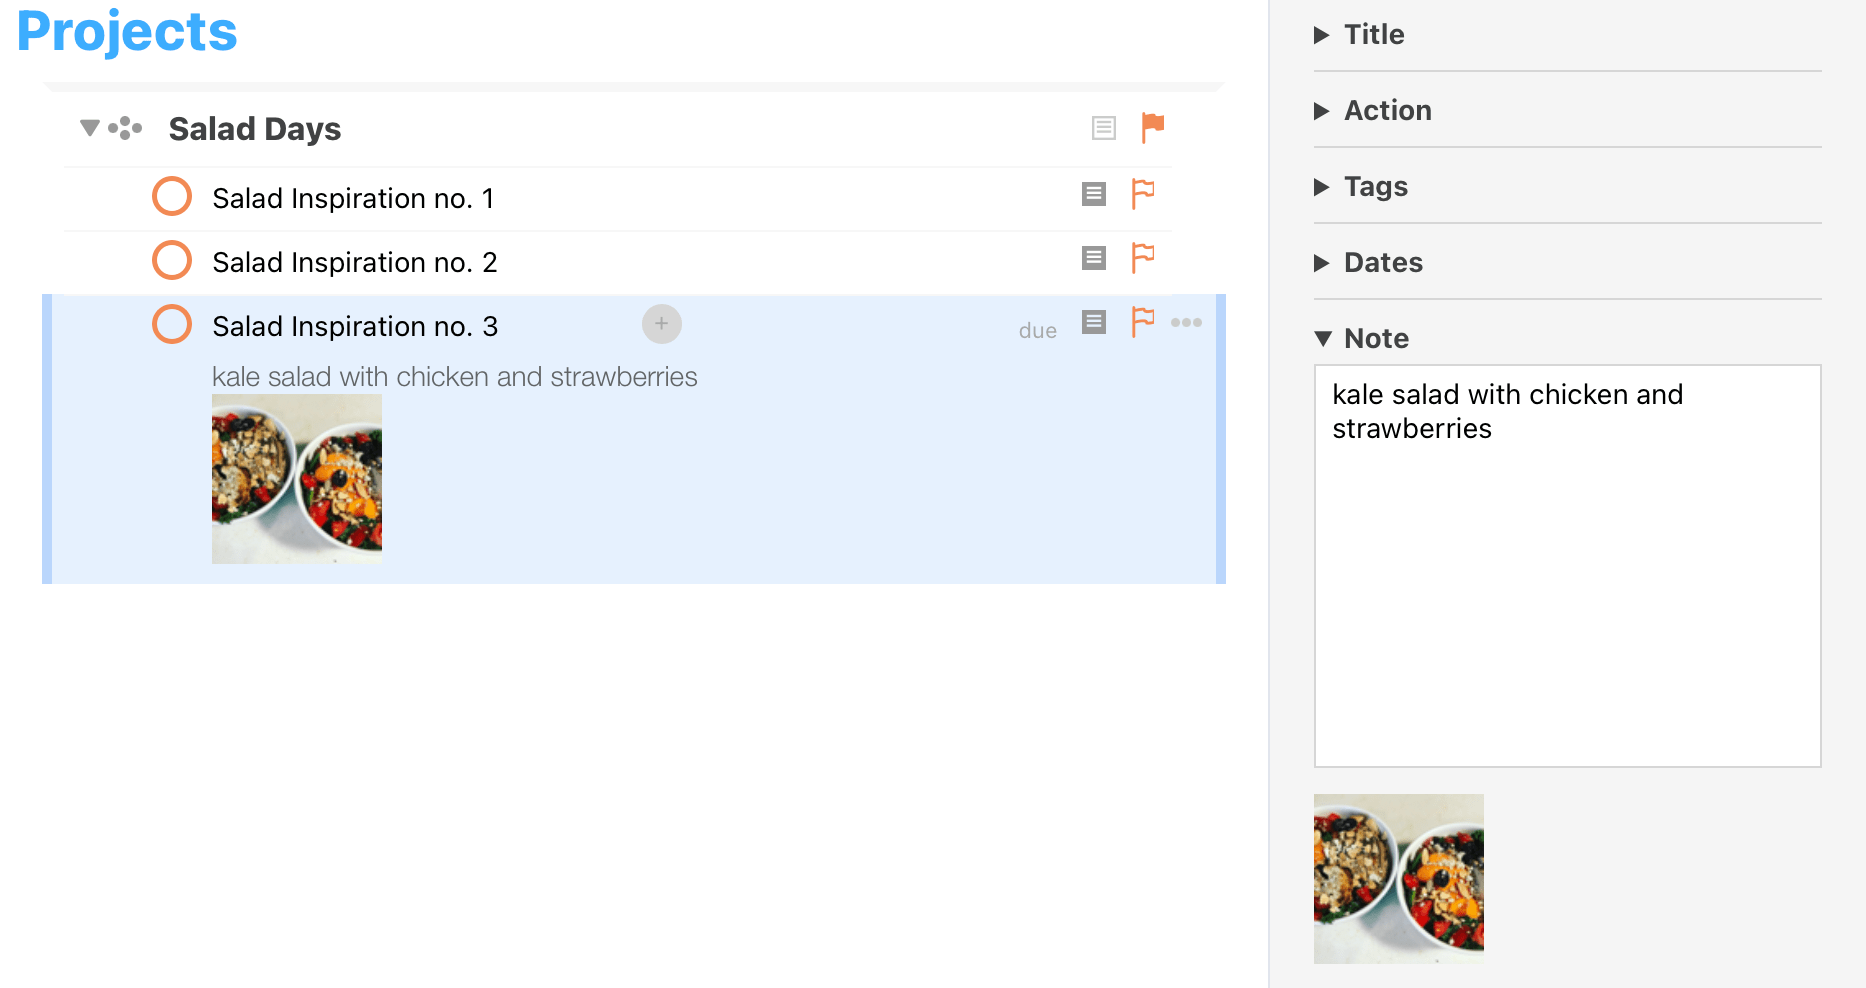
Each attachment is represented by an accompanying thumbnail image. Hover over the image to display controls for the attachment:
-
Click the cloud icon
 to download the attachment to your computer.
 -
Click the delete icon
 to remove the attachment from OmniFocus.
 -
For image attachments, click the magnifying glass icon
 to view the attachment in your browser.
Getting Help
When you’re in need of help, it’s good to know that the Support Humans at The Omni Group are always available to lend you a hand.
In addition to contacting Omni support directly, there are several online and in-app resources that exist to help answer your questions about OmniFocus.
Release Notes
For a detailed, comprehensive summary of the latest changes to OmniFocus, see the release notes on the Omni website. Since OmniFocus for the Web always offers you the latest version of the app, this is a good place to check if something is behaving in a new way after an update.
Finding Help Online
The OmniFocus Support Site provides a wealth of information (including this reference manual) as well as how-tos and support articles which go into finer detail on working with OmniFocus.
Similarly, the OmniFocus product page is always a good place to find the latest information about features and updates to OmniFocus.
For inspiration on setting up a workflow to suit your needs and deep dives into some of OmniFocus’s extended features, check out Inside OmniFocus.
Videos
In addition to the online help, we also provide a series of online videos for OmniFocus. These videos range in topics from available features in the latest version of OmniFocus to how-to tutorial videos to help you level up in your OmniFocus skills.
Email Support
If you’re stuck, if you have a good idea for the next version of OmniFocus, or if you want to let us know how we’re doing, go ahead and send us an email. Choose Contact Omni from the Help menu to queue up an email message addressed to us, or send us an email with your thoughts. We take support seriously, so you can expect a prompt response actually typed by human hands.
Phone Support
We understand that sometimes you can’t wait for an email response when you’re knee-deep in a project and you’re stuck or something isn’t working quite right. We get that. When this happens, you can call our Support Humans at 800-315-OMNI or 206-523-4152. Our Support Humans are available Monday-Friday, from 10 a.m. to 5 p.m. Pacific Time (-0700 GMT).
Online Forums
Omni maintains online forums for all of our products, which are available to everyone. Come share your questions and ideas with other users, share tips to show off how you’re using OmniFocus for getting stuff done, and seek help from the OmniFocus community.
Troubleshooting
Finding Missing Items
Most settings sync to OmniFocus for the Web from OmniFocus for Mac, iPhone, iPad, or Apple Vision Pro. If something is appearing out of place (or isn’t appearing at all), check your View Options, preferences, and other settings in the corresponding app.
Keyboard Shortcuts
This appendix lists the keyboard shortcuts available in OmniFocus for the Web.
| Universal Shortcuts (available anywhere in the app) | ||
| Tab | Focus on the next editable element | |
| O | Quick Open | |
| Toolbar Shortcuts (reproducing toolbar button functions) | ||
| S | Sync | |
| ShiftS | Show or hide the sidebar | |
| V | Open or close view options | |
| K | Clean up | |
| Z or ControlZ or CommandZ | Undo | |
| ShiftZ or ShiftControlZ or ShiftCommandZ | Redo | |
| N | Add new item at the current location | |
| C | Add items from anywhere (quick entry) | |
| ShiftI | Show or hide the inspector | |
| P | Show or hide the Perspectives menu | |
| Outline Shortcuts (when working in the main outline) | ||
| Return | End editing or add a new item below the current selection | |
| ShiftReturn | Add a new item above the current selection | |
| CommandReturn or ControlEnter or E | Start editing the current selection | |
| Delete or Backspace | Delete the selection and select the previous row | |
| Forward Delete | Delete the selection and select the next row | |
| Up Arrow | Select the previous row | |
| Down Arrow | Select the next row | |
| Right Arrow | Expand the selection to show child items | |
| Left Arrow | Collapse the selection to hide child items | |
| ShiftRight Arrow | Move the selection to the right | |
| ShiftLeft Arrow | Move the selection to the left | |
| ] | Indent | |
| [ | Outdent | |
| Shift] | Add inside | |
| Shift[ | Add outside | |
| G | Group | |
| U | Ungroup | |
| ShiftUp Arrow | Move up | |
| ShiftDown Arrow | Move down | |
| ‘ | Edit note | |