Getting Started with OmniGraffle
If you’ve never used OmniGraffle on your iPad, this section’s for you. Heck, even if you have used OmniGraffle before, you might want to read through this, too. This chapter quickly runs through all of the UI thingamabobs you’ll find in OmniGraffle, including the Sidebar, Inspectors, and even some of the more fringy things that you might otherwise not pay much attention to.
Using the Document Browser
The Document Browser is a place to view, create, and manage your OmniGraffle files. Use the Document Browser to create a new document, preview existing documents, and share, duplicate, delete, or otherwise manage them.
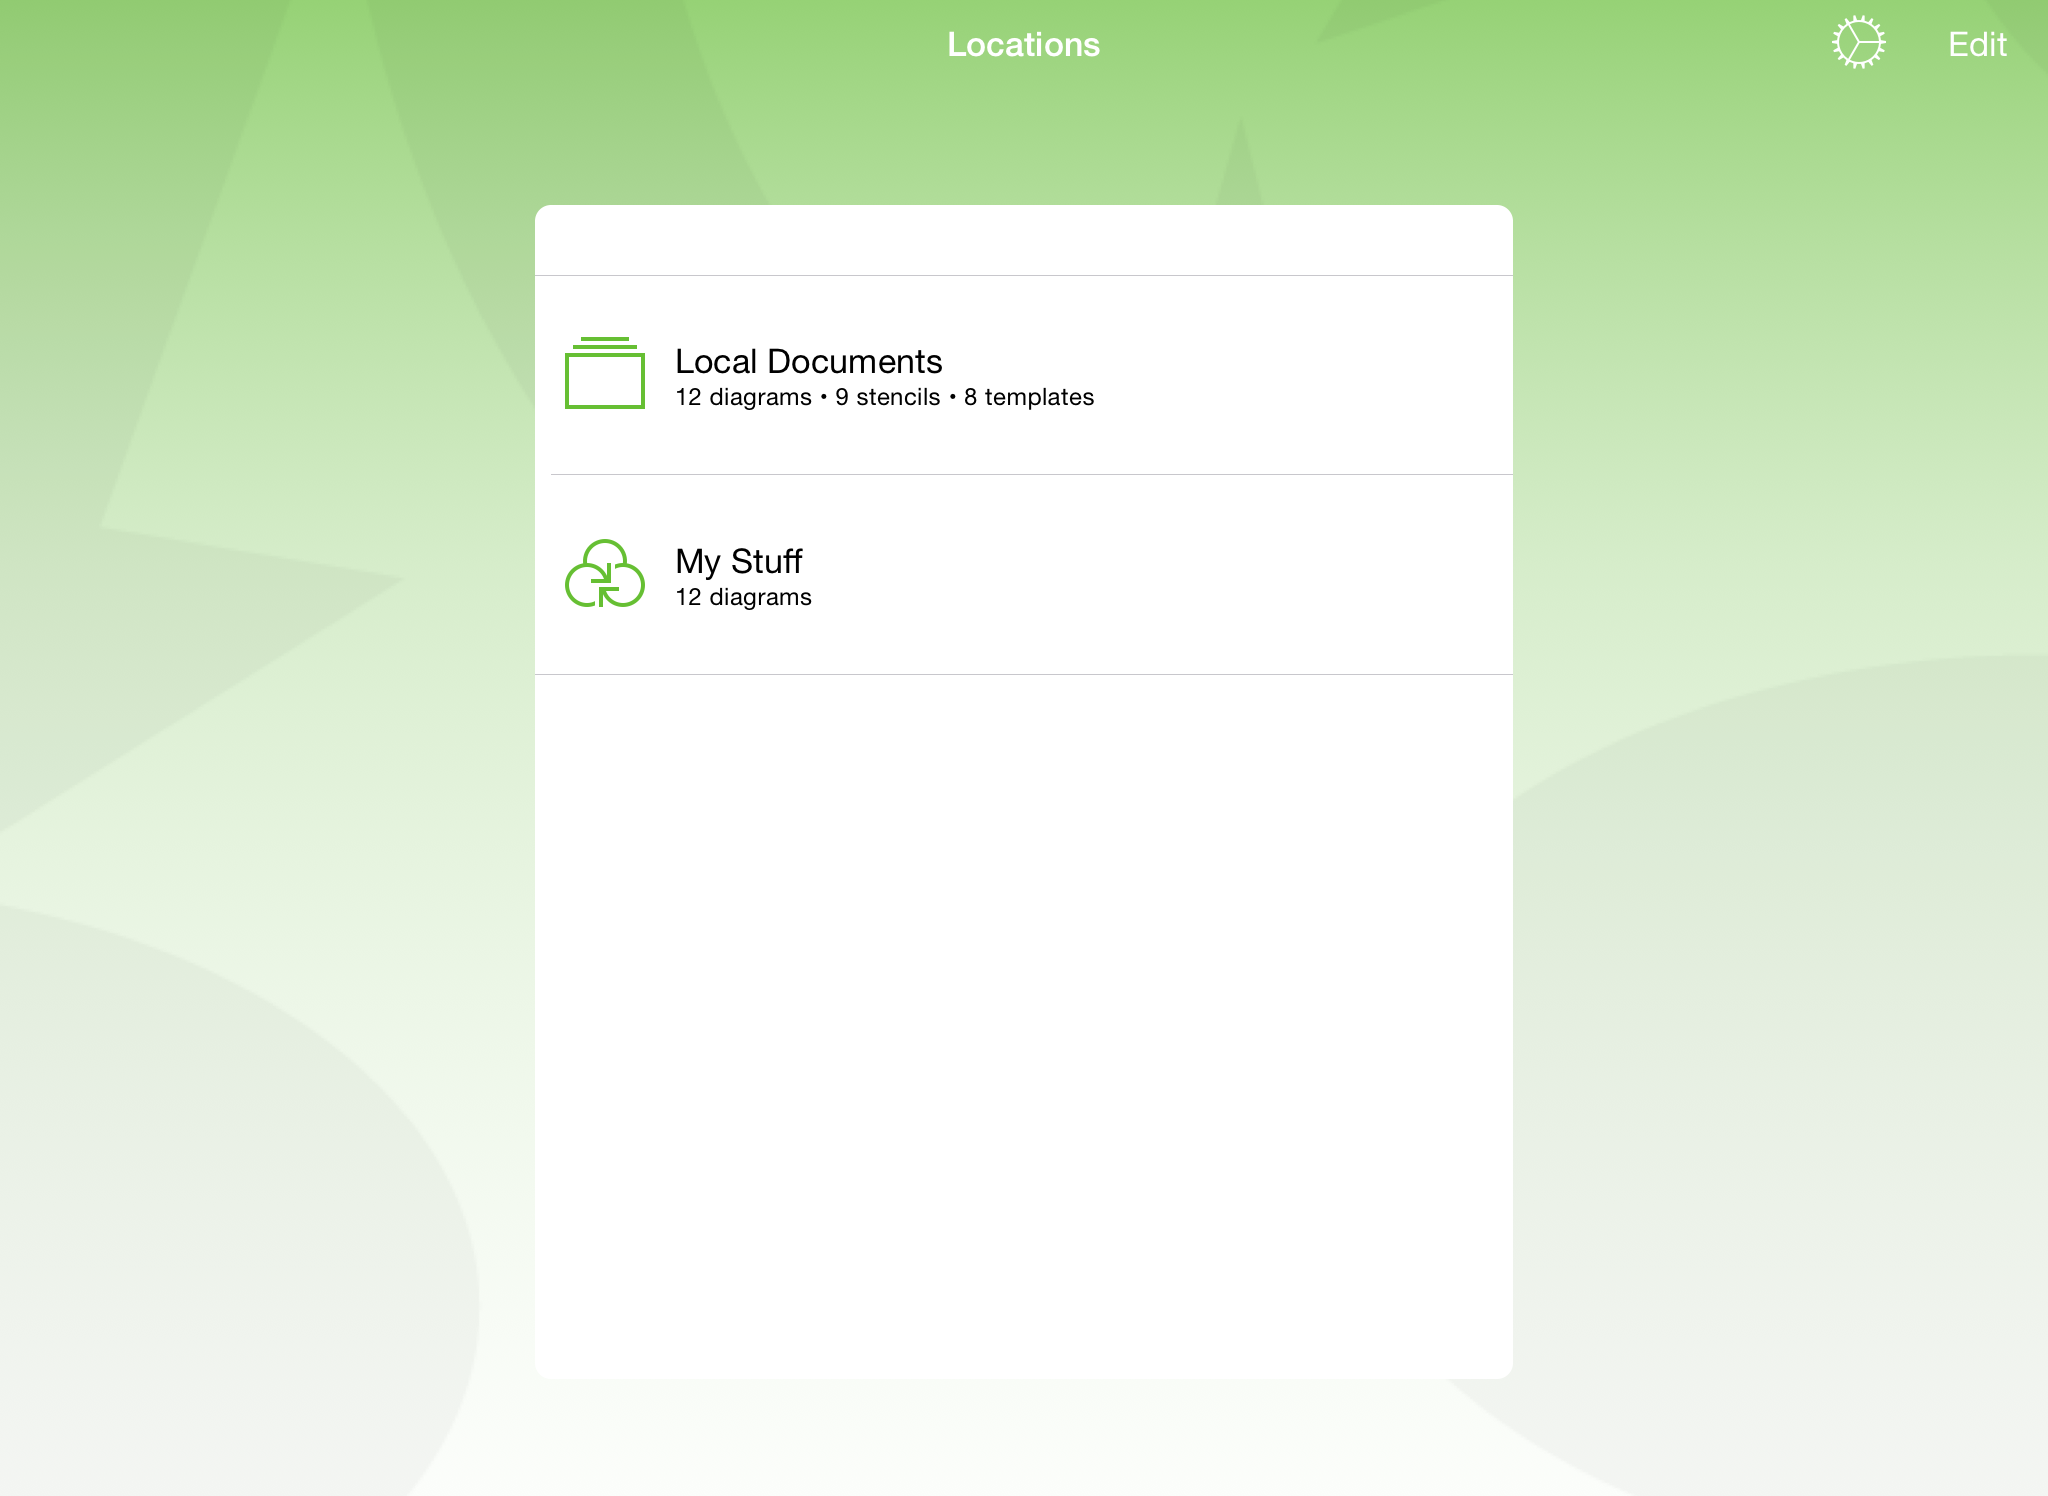
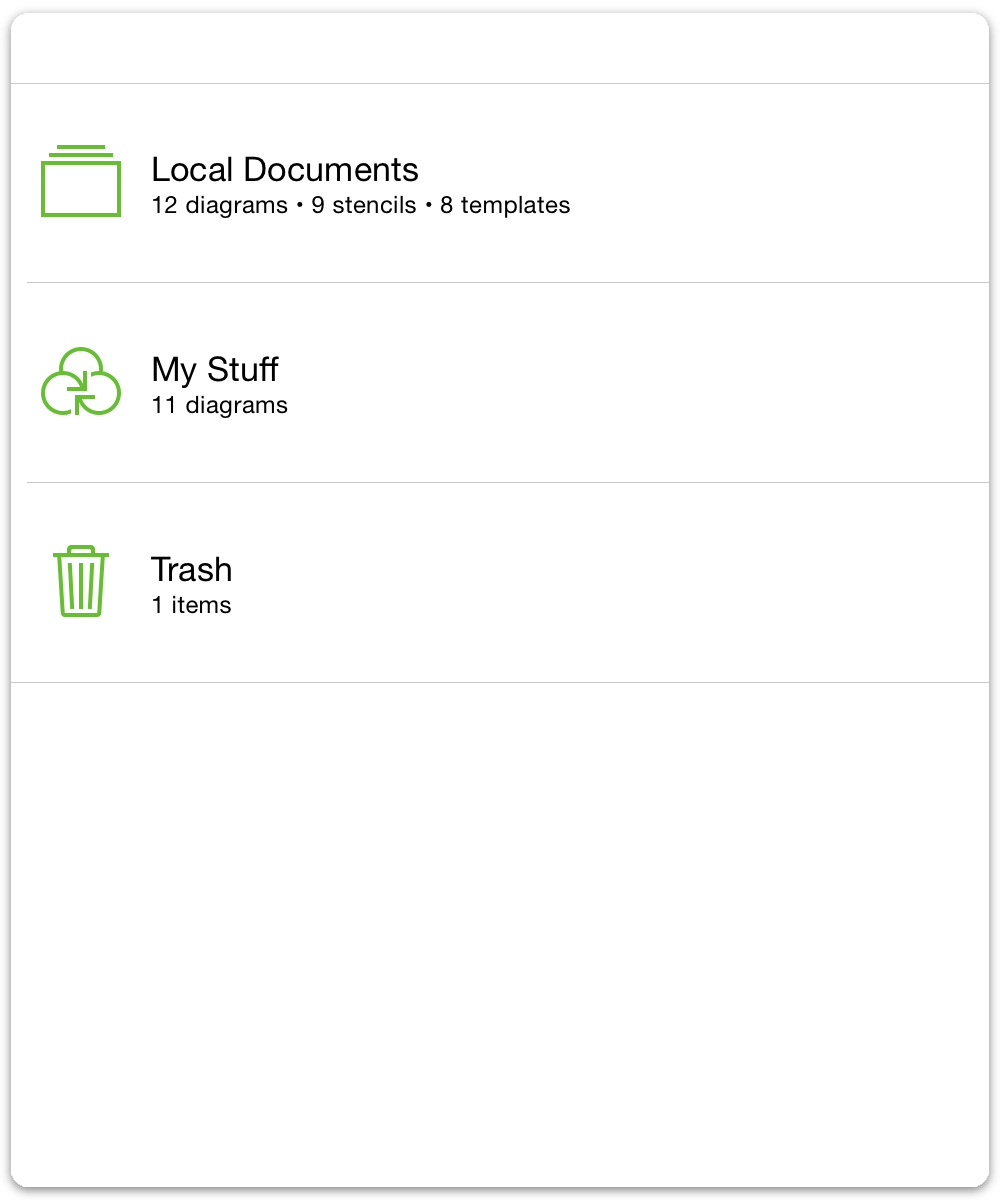
When you first open OmniGraffle, you’re taken to the Locations screen which is the place you go to access all of your documents. There is a Local Documents folder, which we’ve preloaded with some sample Graffle files (diagrams, stencils, and templates) that you can use as inspiration for the things you’ll create.
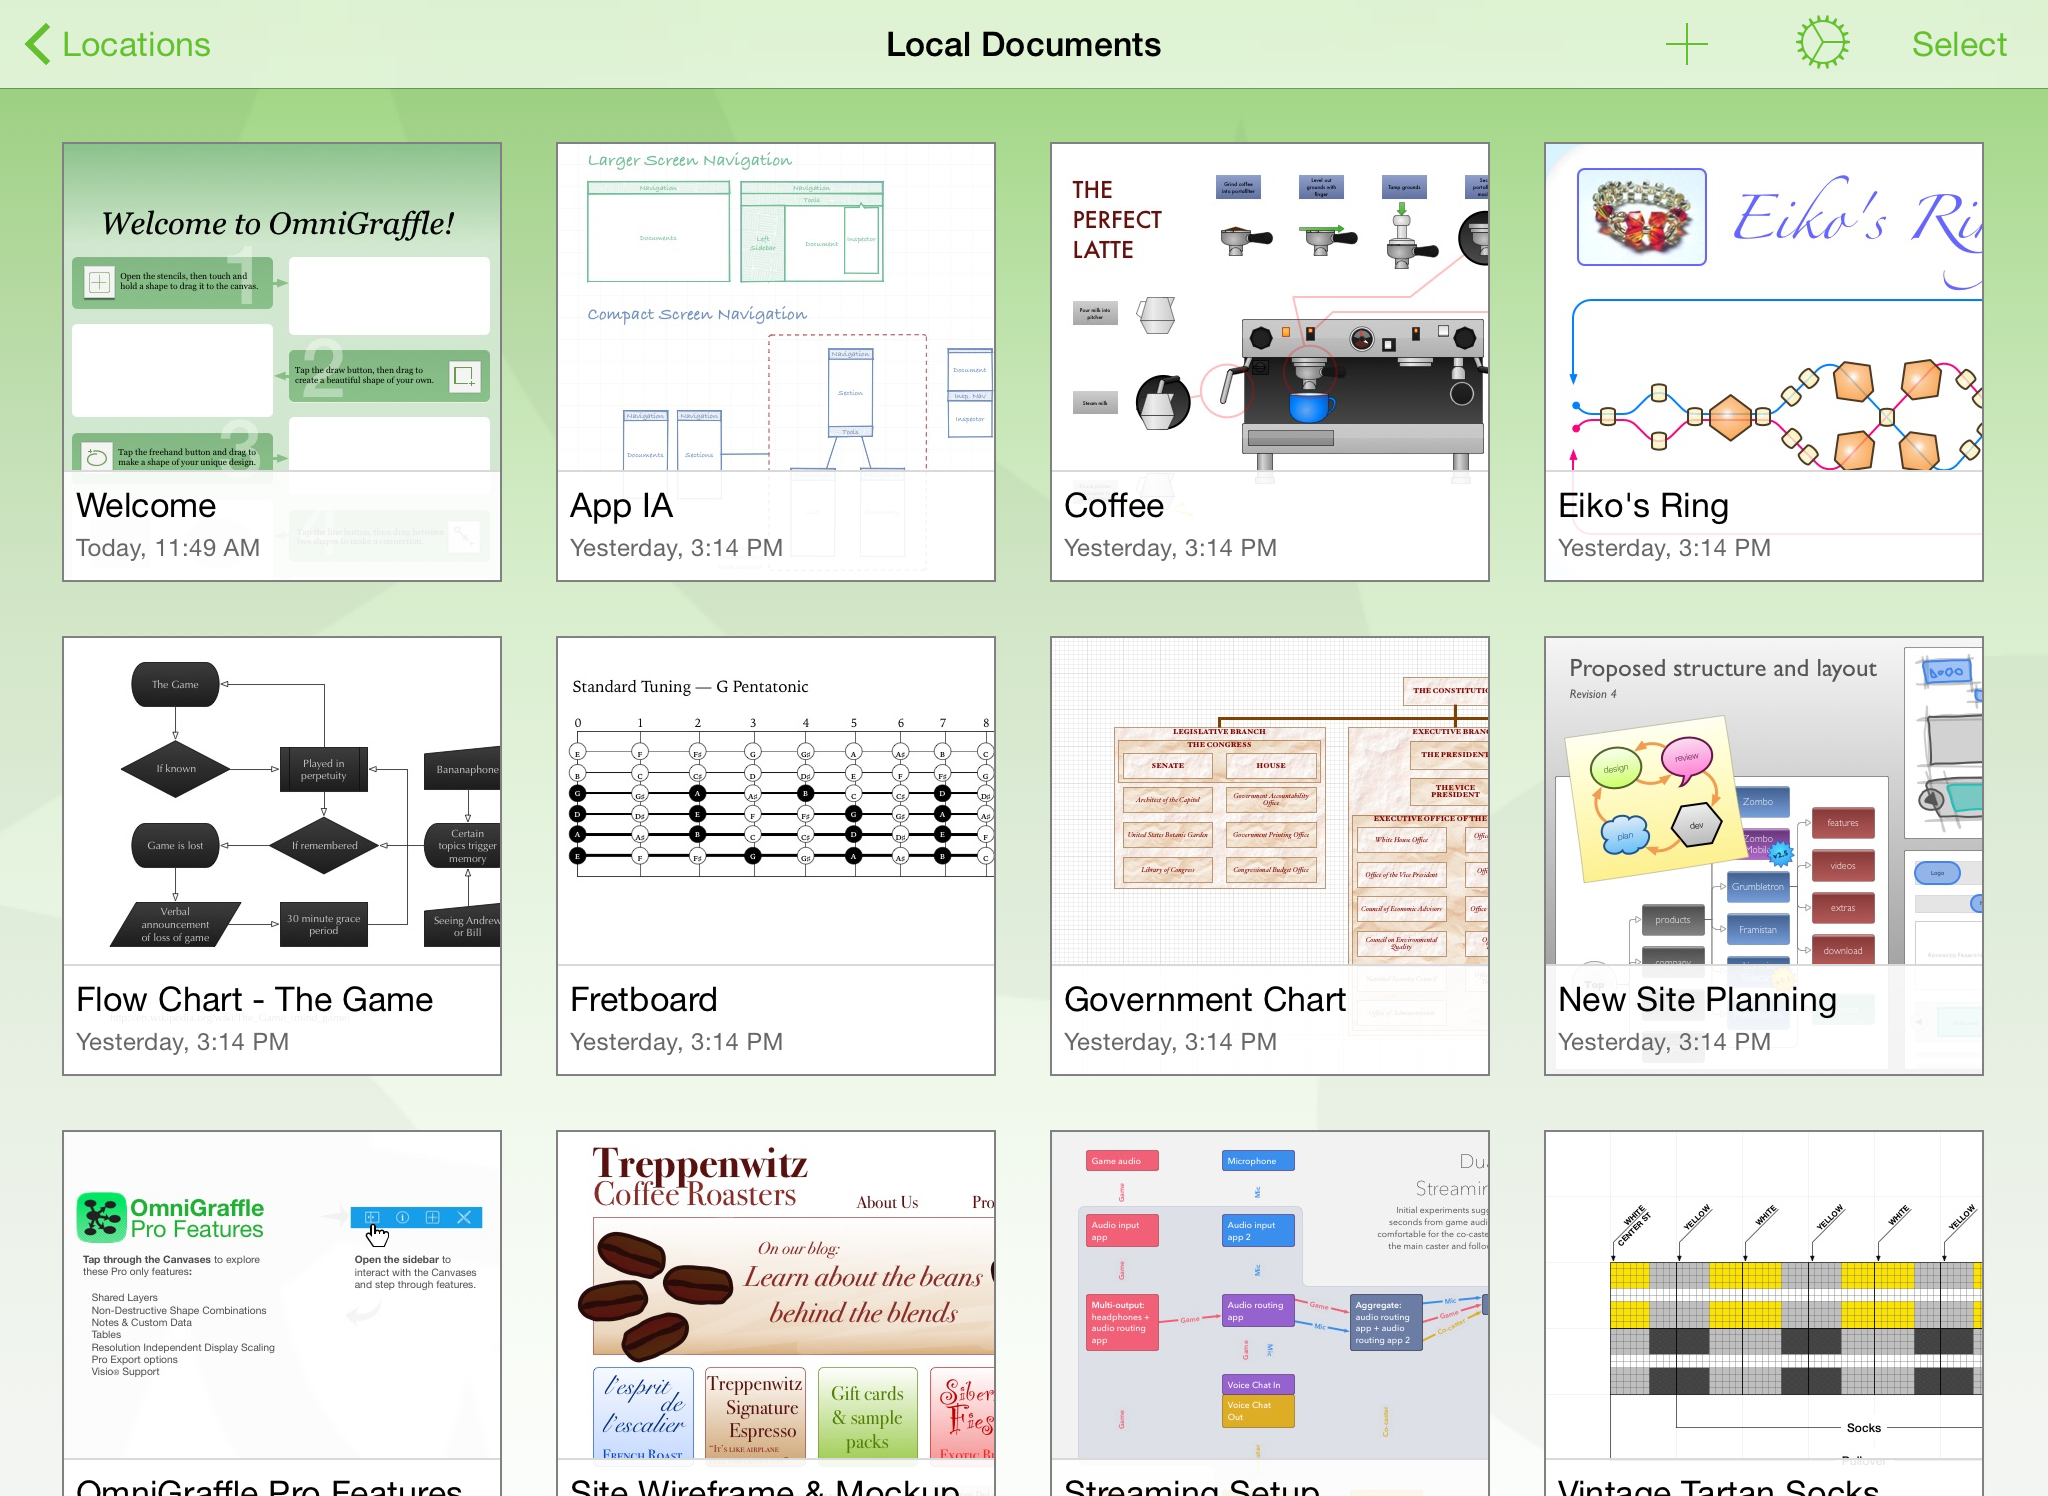
Tap the Local Documents folder to see what’s inside:
If you swipe down while viewing the contents of a folder, you’ll discover the super secret Document Organizer. By default, OmniGraffle sorts your files by the date created and displays any documents in that folder.

You can choose to sort items in the document browser by the date or by title:
- Choose Sort by date to sort items by the last date the file was opened.
- Choose Sort by title to sort items alphabetically by the document’s title.
The three buttons on the right let you choose which documents are displayed in the Document Browser: diagrams, stencils, or templates.
Along the top of the window, you’ll find OmniGraffle’s navigation bar.

Use the button in the upper-left to navigate between folders.
The title of the current folder is displayed in the middle of the toolbar. If your files are being synced with OmniPresence, you can tap
 to the left of the folder name to force a sync. OmniPresence checks for updates and new files on the server and then downloads them to your iPad.
Tap
 to create a new document. After tapping this button, you are taken to a screen where you can choose a template to use.
Tap
 to reveal a pop-up menu that contains options for finding details about your current version of OmniGraffle, how to access the very help document you are reading, how to Contact Omni, and more.
Tap Select to organize files to organize, share, delete, and print files.
Using the Document Toolbar
The Document toolbar is found above the Canvas and contains most everything you need to use OmniGraffle:

The buttons and doo-dads in the toolbar include:
Tap Documents to close the file you’re working on and return to the Document Browser. (If you are editing a stencil, this button reads Stencils.)
Tap Undo to undo the last change; touch and hold to Redo.
Tap Sync to synchronize files with a cloud account. (See Getting Synced.)
Double-tap the Document Title to change the name of the file you’re working on.
Tap Sidebar to show and hide the Contents Sidebar.
Tap Info to make style and property adjustments to the current selection or Canvas.
Tap Stencils to browse and add stencils or images to the Canvas.
Tap Draw to show and hide the Drawing Toolbar, and quickly add objects to your canvas or create custom shapes.
Using the Drawing Toolbar
The Drawing toolbar is a great way to quickly add a lot of stuff to your Canvas. You can enter draw mode and show the draw toolbar by tapping ![]() in the Documents toolbar.
in the Documents toolbar.

The buttons and doo-dads in the toolbar include:
The x position shows an object’s distance from the left edge of the Canvas.
The y position shows an object’s distance from the top edge of the Canvas.
The w dimension shows the width of the selected object.
The y dimension shows the height of the selected object.
The angle indicator shows an object’s degree of rotation.
The Selection tool is used to select, move, and resize objects on the Canvas.
The Shape tool is used to draw shapes (circles, squares, and so on) on the Canvas.
The Freehand tool is used to draw freely on the Canvas. Tap anywhere on the Canvas and drag your finger around to create your own shapes. If the end of the drawing nears the beginning, OmniGraffle will close the shape.
The Line tool is used to either connect two objects together with a line, or to draw a free-standing line on the Canvas. If you begin or end your line on a shape, the line automatically attaches to that shape.
The Text tool is used to add a text label to objects and lines, or anywhere on the Canvas. Tap an existing label to edit; double-tap to select a word.
Tap any draw tool twice to keep it selected. Otherwise, after creating an object it will return to the default selection mode. To leave draw mode, tap the draw button to close the toolbar.
Using the Drawing Tools
To access the Drawing Tools, just tap ![]() . There are five basic buttons in the Drawing Tools bar:
. There are five basic buttons in the Drawing Tools bar:

The tool buttons take on a different look, depending on whether the tool is inactive, selected, highlighted, or sticky:
A tool is inactive when it has a white background:


A tool is selected (or in-use) when it has a light green background:


A tool is highlighted—although only for a short period of time—when you switch from one tool to the next; these have a medium-green background:


A tool is sticky when it has a dark green background:


Tools become sticky, or persistent, when you double-tap its button in the Drawing Tools bar.
Note
The Selection tool is always persistent when it is active (). This makes it easy for you to move and style objects without having to double-tap its button to make it stick.
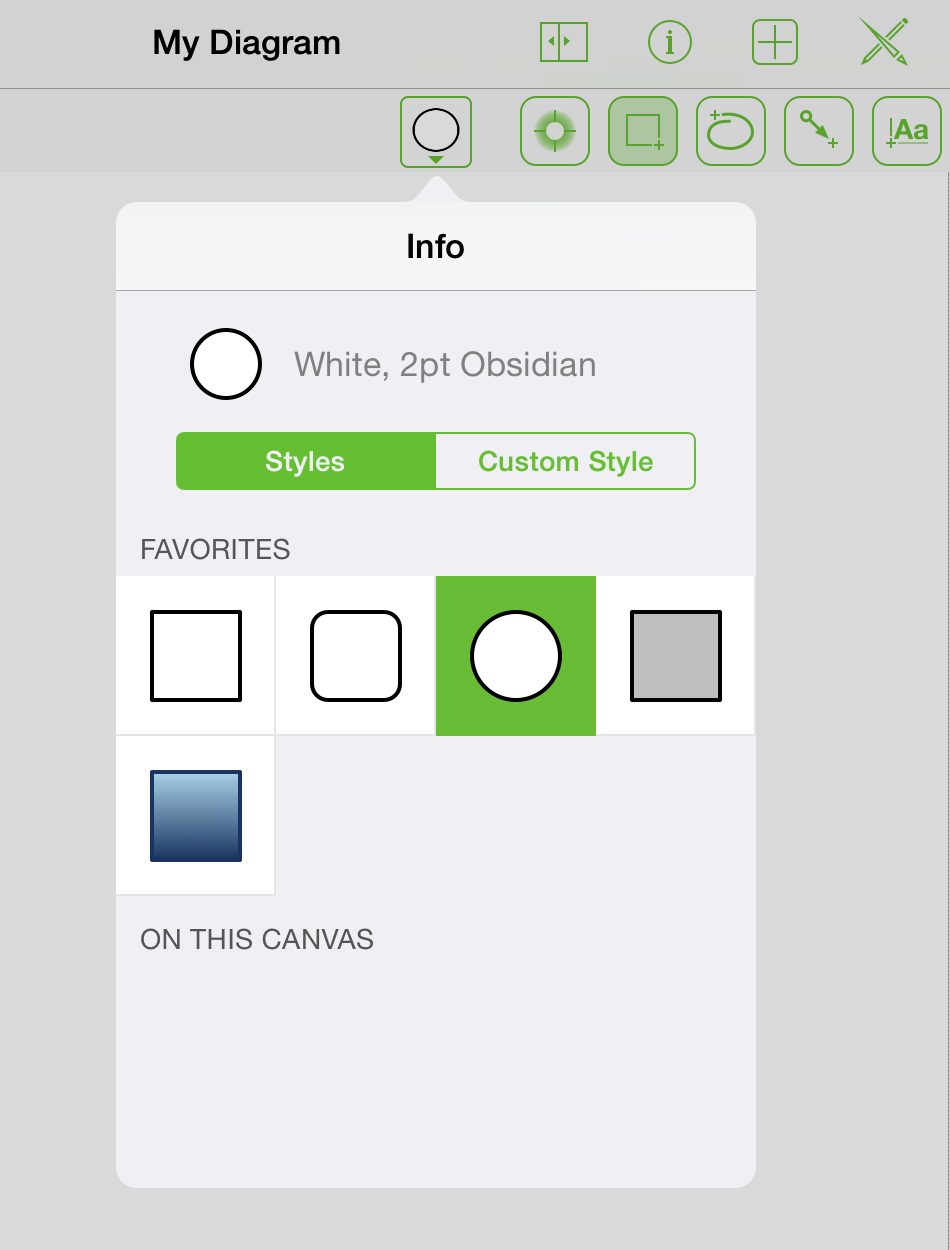
When you select the Shape, Freehand, Line, or Text tool, you’ll notice that another button appears to the left of the button. This is known as the tool preview button, because it shows you exactly the type of thing you’re about to draw.
Pressing a tool’s preview button pops open an Info window which reveals details about that tool’s preset options, shows a list of Favorites which you can choose from, and also shows things of that type On This Canvas. You can also create a Custom Style from this window.
Go ahead and try this out:
Tap
; your toolbar should appear as follows:
Tap the tool preview button to examine the styles, choose another shape, or create a custom style for the shape.

Tap the circle object under Favorites. You’ll notice that the tool preview button changes to display the circle.
Take some time to try out the rest of the tools to see which options are available in their respective Info windows.
The Contents Sidebar
The Contents sidebar contains information about your canvases, their layers, the objects that exist on those layers, and the objects themselves.
To open and close the Contents sidebar, tap ![]() in the Document toolbar. If you have used OmniGraffle 6 for Mac, you’ll notice that the sidebars look quite similar.
in the Document toolbar. If you have used OmniGraffle 6 for Mac, you’ll notice that the sidebars look quite similar.
View and manage your Canvases in the canvas section:
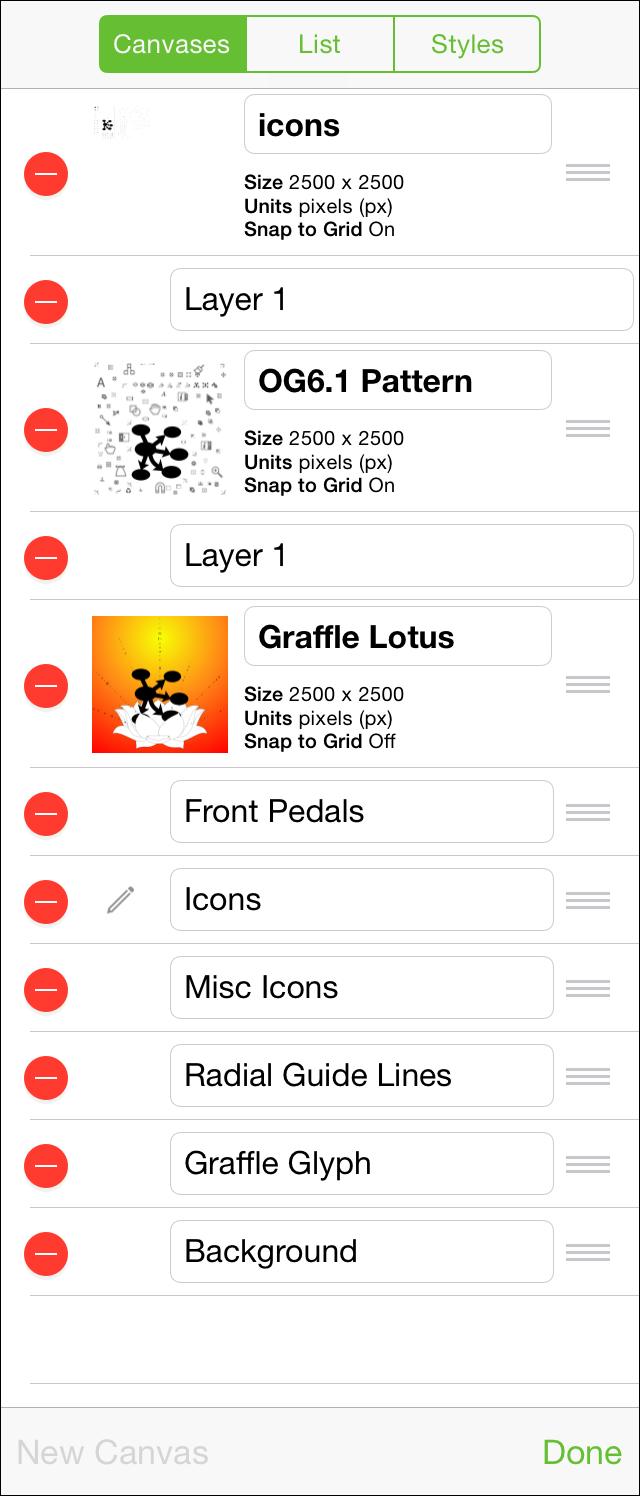
Tap Canvases at the top of the sidebar to view your Canvas list.
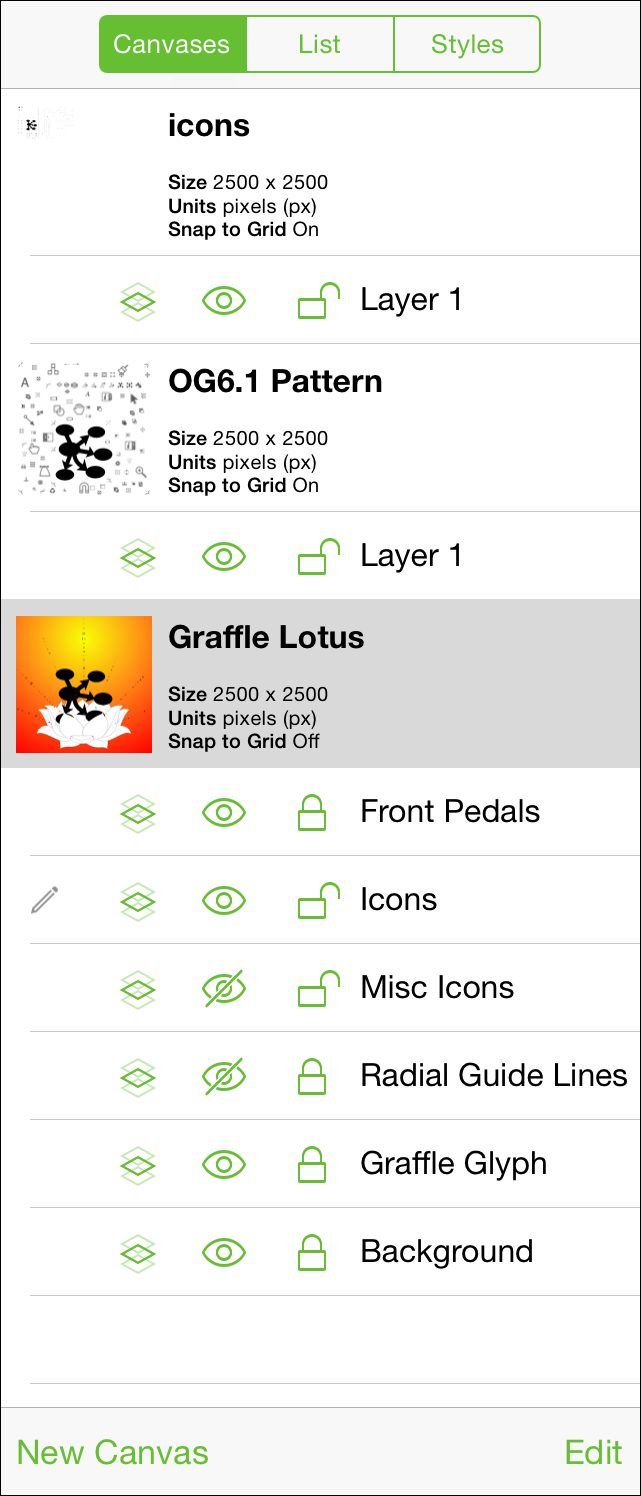
To start working on a canvas, select the canvas in the list with a tap.
To create a new canvas, tap New Canvas at the bottom of the sidebar.
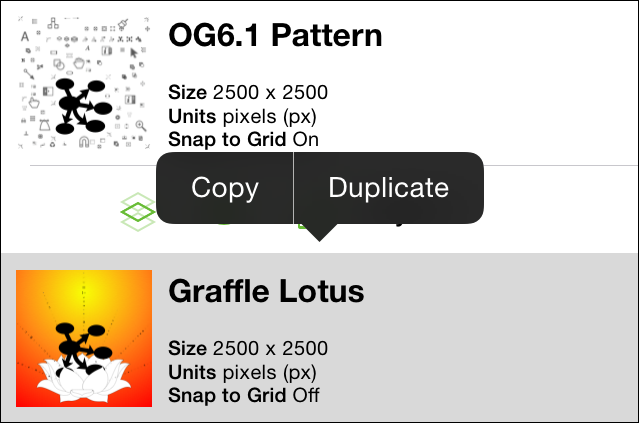
To duplicate the selected canvas, touch and hold on the Canvas name, and then tap Duplicate in the contextual menu.
To rearrange, delete, or rename the Canvases and layers, tap Edit. Tap the red circles on the left to delete a Canvas or Layer, and use the handles on the right to rearrange them. To edit a Canvas or Layer’s name, double-tap in the name field to select all of the text, and then enter something new. Tap Done when you’ve finished making changes.
Working with Layers
Each Canvas starts out with one layer. To add new layers, first select a Canvas’s layer and then tap New Layer at the bottom-left of the sidebar. To work on a particular layer, tap to select the layer you’d like to work on.
To work on a specific layer, tap the layer name in the list. You’ll notice a series of icons to the left of each layer name; let’s run through these:
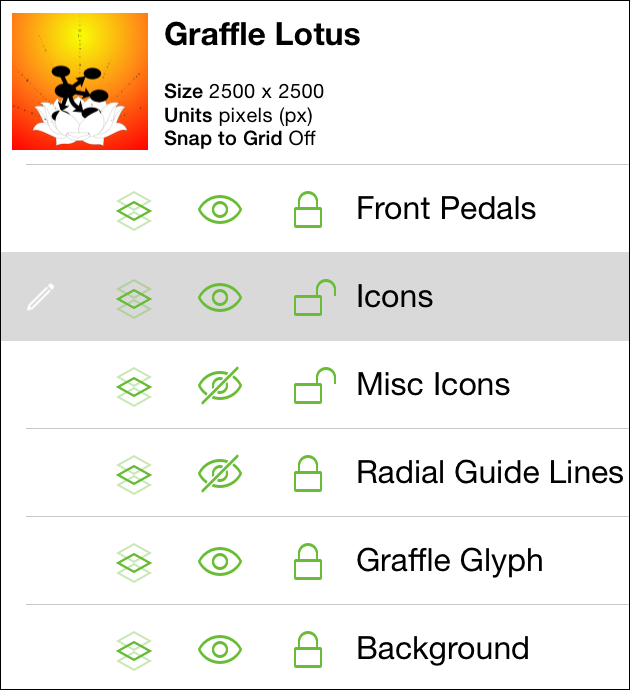
A pencil indicates that the selected layer is editable. If the pencil has a slash through it, that layer is not editable, either because it is locked or its visibility is turned off.
To share a layer across multiple canvases, tap the shared layer button; tap again to turn off sharing.
To show or hide a layer, tap the layer visibility button. If the eye has a slash through it, that means the layer isn’t visible.
Tap the lock to lock or unlock a layer. Locked layers cannot be edited or changed, whereas anything goes with an unlocked layer.
If you need to rearrange or delete layers, tap Edit at the bottom-right of the sidebar. Layers are stacked upon one another on the Canvas—if two layers have overlapping objects, the layer at the top of the list obscures the objects on layers below it in the list.
As with the Canvas, each layer contains its own set of objects. To see everything that’s on a particular layer, first select the layer and then tap List at the top of the sidebar to view and manage its objects:
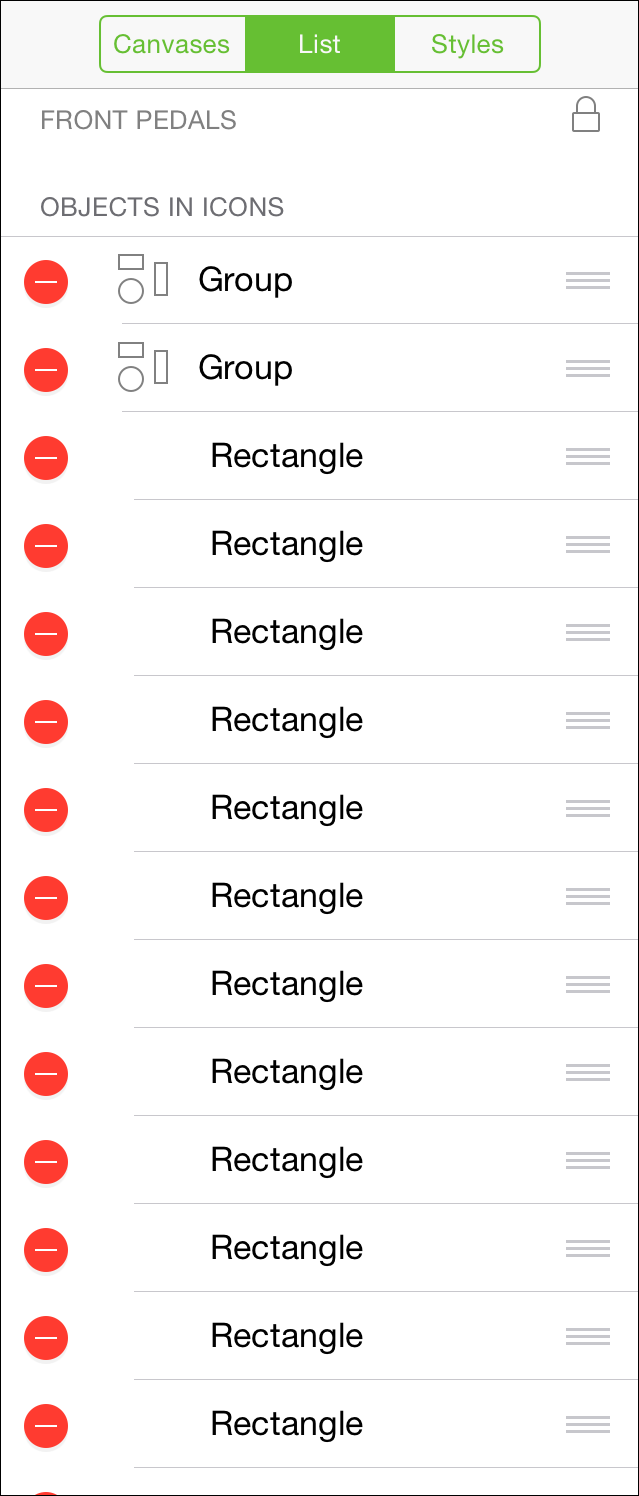
To select an object on that layer, tap the object in the list.
To delete layer elements, tap the red circle on the left and then tap Delete. If you accidentally tap the red circle but don’t want to delete that object, tap anywhere else in the sidebar.
To rearrange layer objects, tap the handle on the right and drag up or down in the list.
Tap Styles at the top of the sidebar to filter and select objects by style on the selected layer.
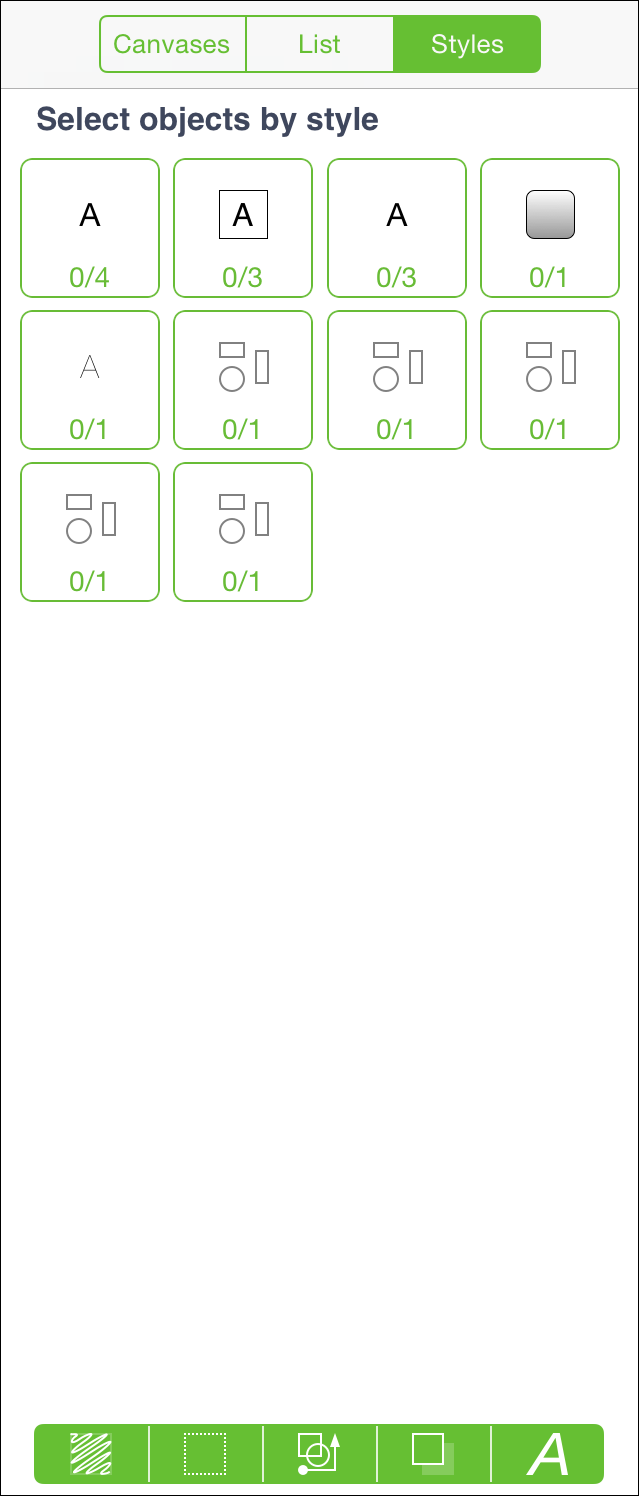
Each style of object has a representation of the object and a pair of numbers. The first number is how many objects you have selected which match that style; the second number is how many objects of that style exist on the canvas.
Along the bottom of the Styles list, you’ll see a grouping of filter buttons. Use these buttons to control which object styles/types are displayed in the list above. Tap a filter to select all objects that match it. You can then tap
 to select and modify that grouping of layer objects.
A white filter button indicates that objects related to that filter are not included; green buttons indicate inclusion. Compounding filters returns objects matching all filters:
Tap the fill button to include or exclude objects on the selected layer with with a fill.
Tap the stroke button to include or exclude objects on the selected layer with a stroke.
Tap the shape button to include or exclude objects on the selected layer of a specified shape.
Tap the shadow button to include or exclude objects on the selected layer with a shadow.
Tap text button to include or exclude text objects on the selected layer.
Keep these filters in mind for when you need to apply changes to a certain grouping of objects. For example, changing all of the text from Helvetica to Gill Sans, or changing the fill color for all round objects on the layer.
Importing Documents
To import a document from a remote location, tap Local Documents and choose Cloud Setup. From here you can create a new account or access an existing account for remote storage or syncing (see the next page for more on OmniPresence sync). To create or access existing Omni Sync Server or WebDAV storage, choose the Import/Export option when setting up your account.
Organizing Files with Folders
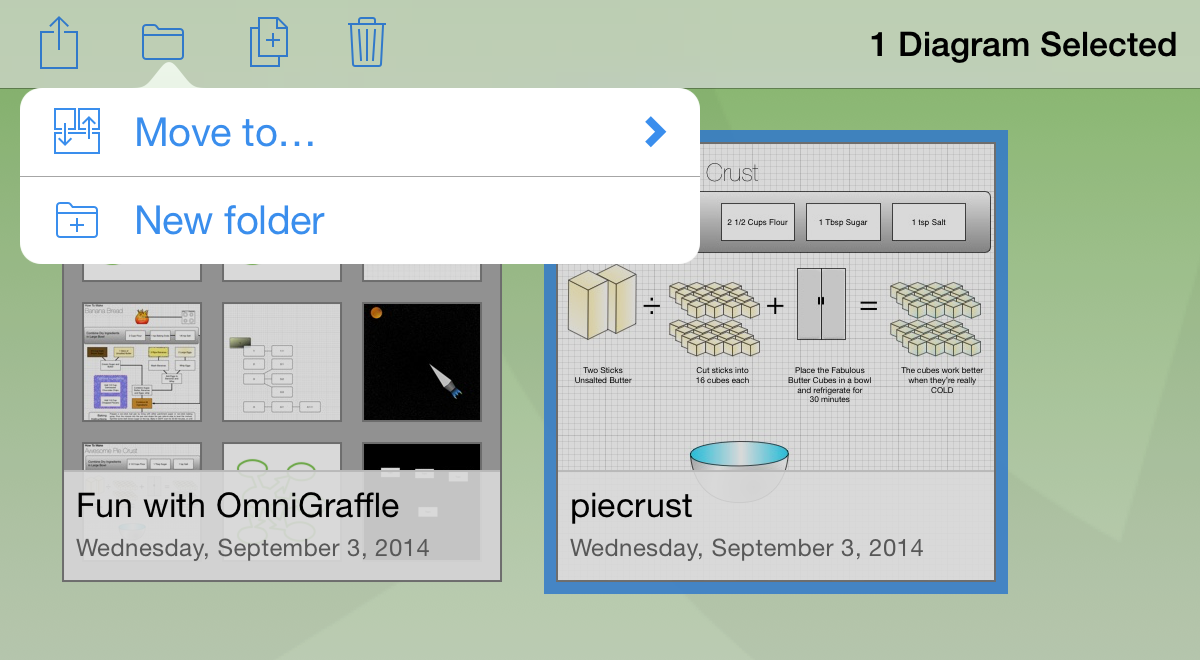
Of course, part of the reason you’re using OmniGraffle on your iPad is so you can draw and design things from wherever you are. And with that flexibility comes the occasional need to shuffle files around when you need to. To move, share, and print files in and from OmniGraffle on your iPad, start by tapping Select in the Document Browser’s toolbar.
After tapping Select in the toolbar, tap to select the files you want to move. When you do, the file(s) you selected gets a blue border around it, like so:
Tip
If you select the wrong file, just tap it again to deselect the file and then choose something else.
With the file selected, tap the folder icon in the toolbar to open the File menu. From here, you can chose Move to to move the file to an existing folder, or tap New folder to create a new folder containing the file you’ve selected.

This is particularly handy for when you want to transfer a file you have stored in the cloud to the Local Documents folder on your iPad; or in the reverse, to a shared folder on another Omni Sync Server account that you have access to.
Note
It’s worth noting that the files you’re storing in the cloud using Omni Sync Server cannot be edited by multiple people simultaneously.
Let’s use that shared folder as an example. If you and the rest of your design team have access to an Omni Sync Server account for sharing documents, you might want to create separate subfolders for each team member, and then have another Shared folder that your group uses to share files with one another. This way, you could each work in your own “sandbox,” and then save a duplicate copy of the file to the Shared folder when you’re finished working on it.
To help you better organize your files, can also move files to other folders or create subfolders that contain similar documents:
Tap Select, and then choose the file (or files) you would like to move.
Tap the folder icon (Move) in the navigation bar to move a file to another folder, or to create a new subfolder containing the selected files.
Tap New Folder to create a new folder containing the selected file. The file is moved out of the current folder into a new Untitled subfolder. Enter a new name for the folder and tap Return.
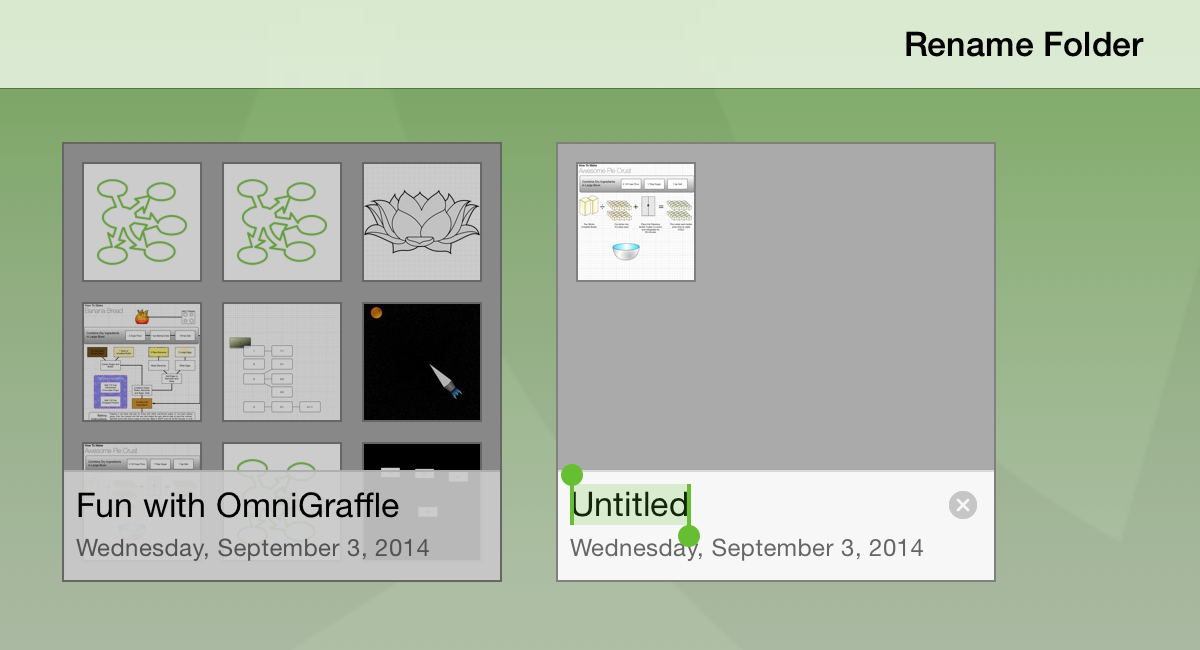
Subfolders have a dark gray background and show mini icons for the files contained within. To open a file within a subfolder, tap the folder to open it, and then tap the file.
Sharing and Printing Graffle Files
Every now and then you’ll find the need to share some document you’ve created in OmniOutliner with someone else. But all of the files are on your iPad, how are you going to do this?
When you open a folder, such as your Local Documents folder, tap Select in the navigation bar, and then select the file (or files) that you want to share. This places a blue highlight around the file to let you know which files you’ve selected to do something with.
After tapping Select in the toolbar, select the files you want to share and then tap the Share button on the far left of the toolbar.
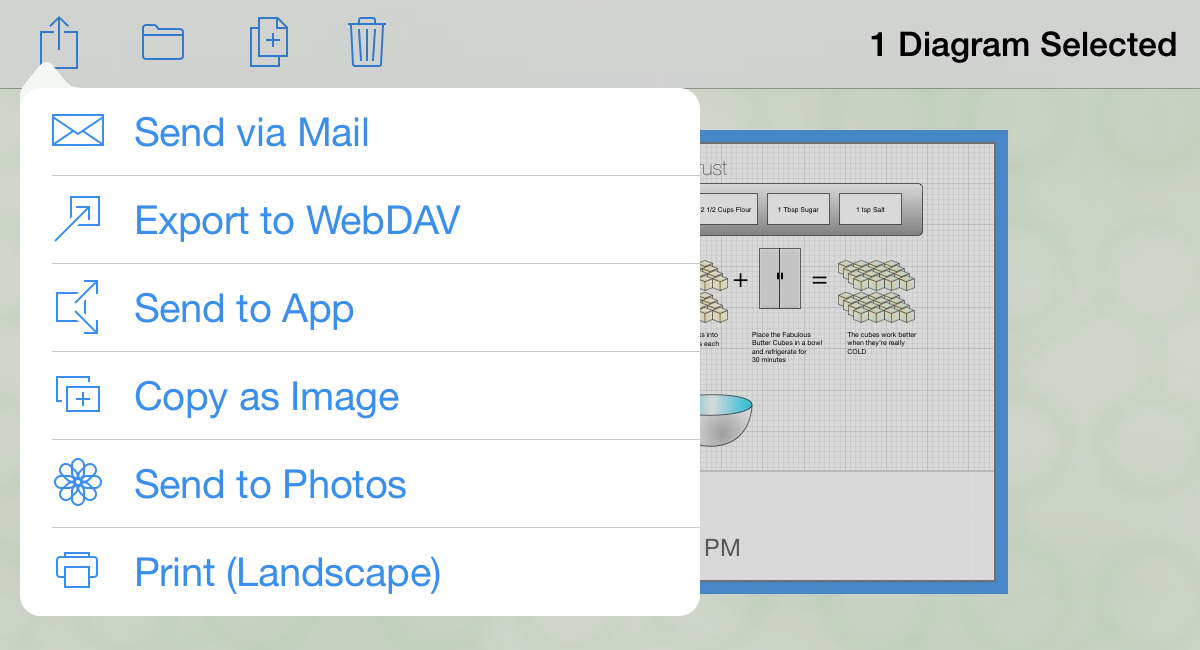
As you can see, there are plenty of options you can choose from, so let’s quickly run through these:
Send via Mail—After tapping Send via Mail, you’re taken to a screen from which you can chose the file format: OmniGraffle, PDF, PNG, or OmniOutliner. Choose the format you’d like to send, and that file gets attached to a new email message. If all you want to do is send a quick snapshot of something you’re working on to a colleague, choose the PNG option.
Export to WebDAV—Choose this option to upload the file to a WebDAV folder. To do this, though, you need to have previously connected to a WebDAV server from OmniGraffle. See Getting Synced, earlier in this book.
Send to App—Choose this option to open this file in another app on your iPad. You’ll first choose the format (either OmniGraffle, PDF, PNG, or OmniOutliner) to send to that app, and then select app to open the file.
Copy as Image—This copies the canvas of the selected document to the clipboard so you can paste it into another app.
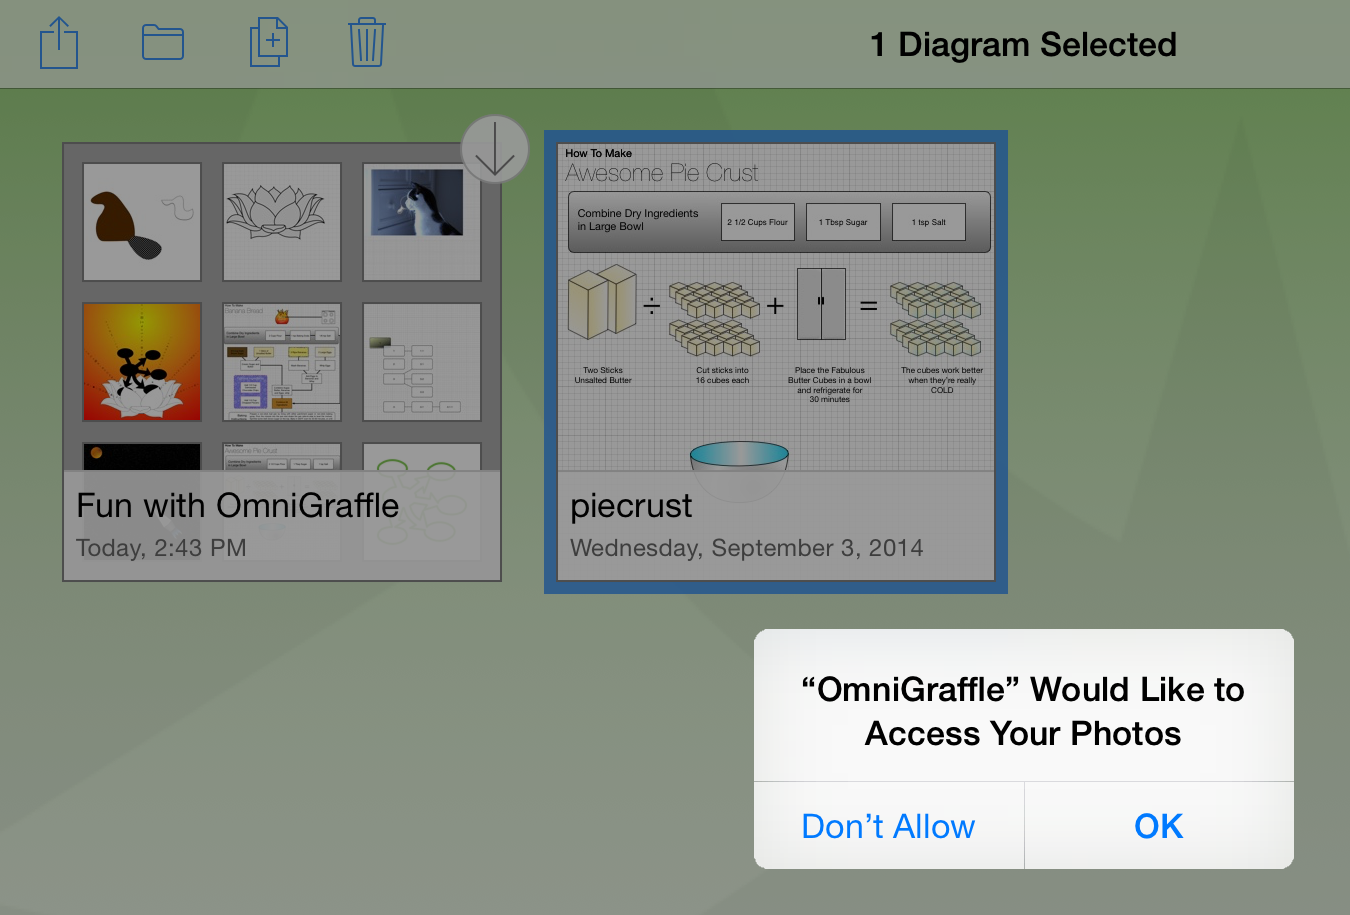
Send to Photos—Choose this option to create a PNG image of the selected file’s canvas and send that to the Photos app on your iPad. If this is the first time you choose this option, iOS prompts you to allow OmniGraffle access to the Photos app on your device.
Print (Portrait or Landscape)—Choose this option to print the selected document. How the document is printed depends on the orientation of your iPad. To print, however, you must have an AirPrint-compatible printer on your wireless network.
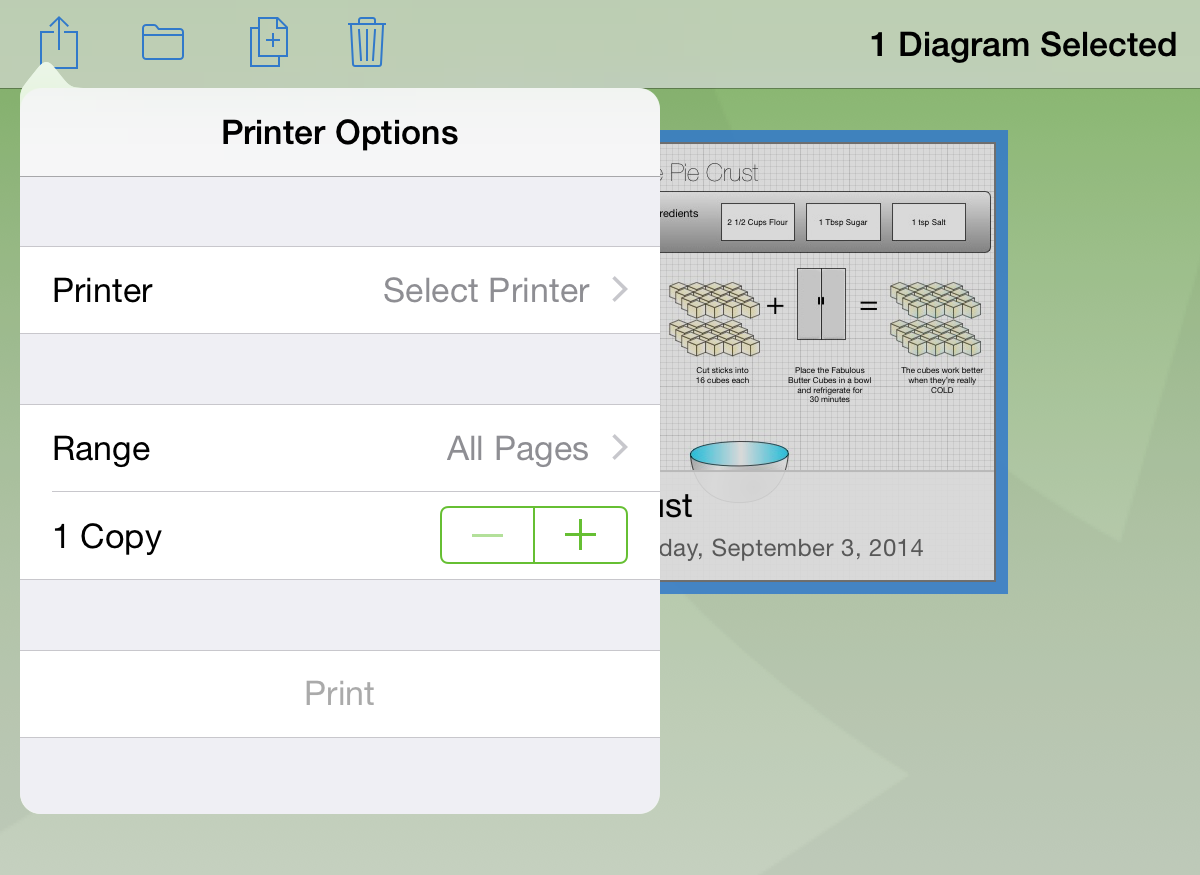
After choosing Print from the Share menu, you have several options: tap Printer to select the printer from which you’d like to print; tap Range to select which pages you’d like to print; and tap the plus and minus buttons to change the number of copies you’d like to print.
Taking Out the Trash
Every now and then, you’ll find that it’s time to do a little housecleaning in OmniGraffle. That organizational chart you created for your previous employer is something you really don’t need to remember, so it’s time to dump that document into the trash and purge it from your iPad (or from your synced Cloud Account, if you have one of those configured) forever.
Fortunately, deleting files from OmniGraffle is just as easy as it is to create a new org chart if you need to. When viewing a folder of documents, tap Select in the navigation bar at the top of the screen. Then tap on the document you’d like to delete; you’ll see that the file now has a blue highlight around it.
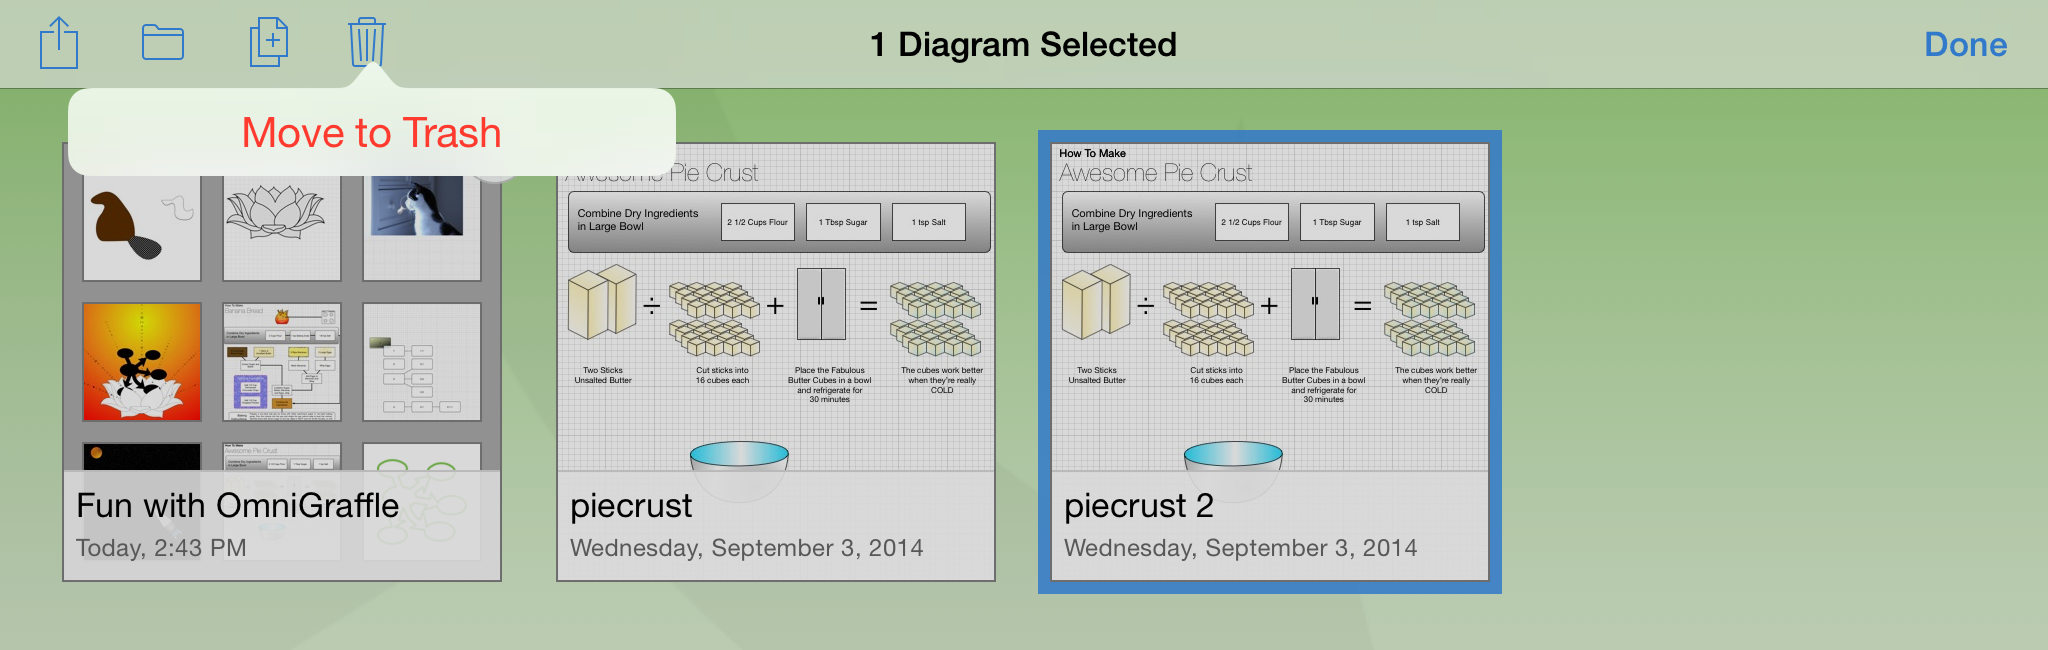
Tap the trashcan (![]() ) in the navigation bar, and then tap Move to Trash to move the document to the Trash folder.
) in the navigation bar, and then tap Move to Trash to move the document to the Trash folder.
If you tap Locations in the navigation bar, you’ll see Trash in your list of folders. Remember, all you’ve done so far is move the file to the trash. This means that the file is still on your iPad.
Tap to open the Trash folder to see its contents. To move the file out of the Trash folder, tap Select, tap to select the file, and then tap the Folder icon (![]() ) in the navigation bar to move the file to another folder on your iPad.
) in the navigation bar to move the file to another folder on your iPad.
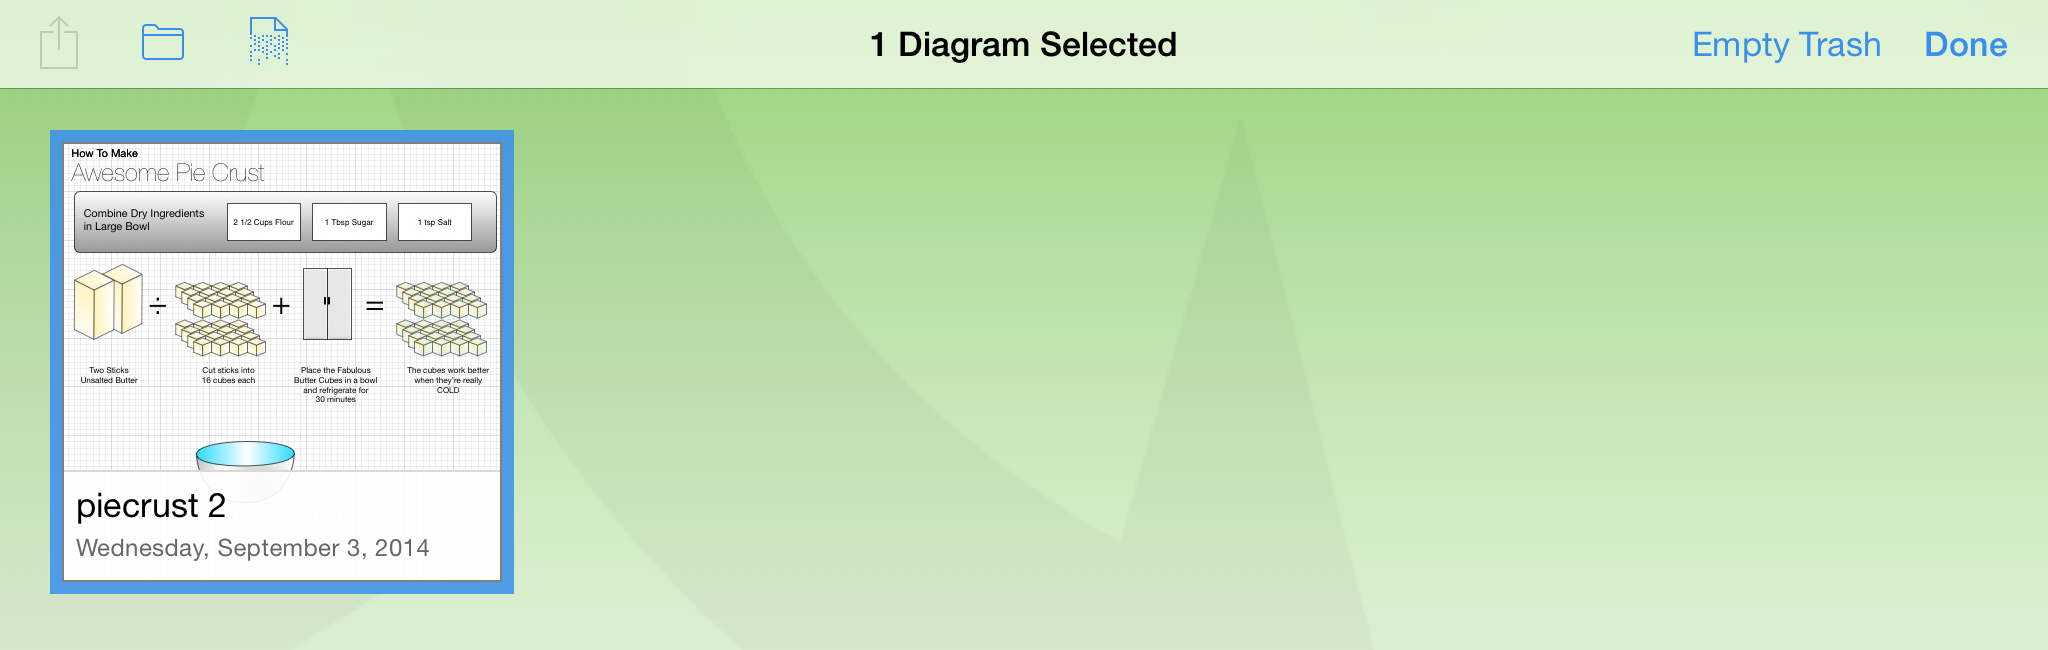
Finally, if you really are sure that you no longer need this file, you can either tap the Shredder icon (![]() ), or tap Empty Trash to delete the file.
), or tap Empty Trash to delete the file.
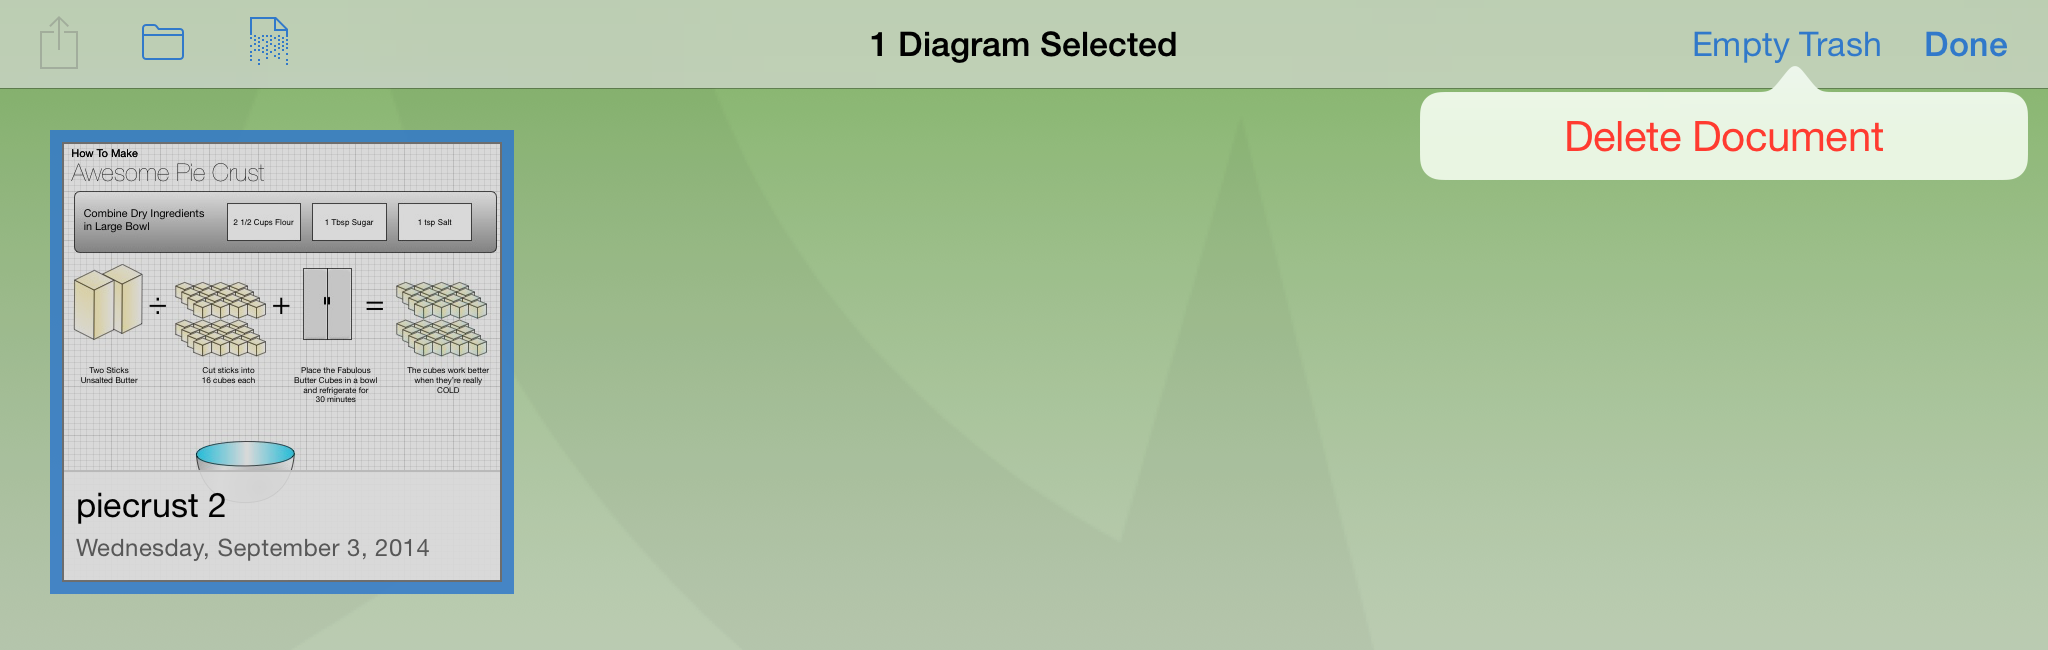
The difference between choosing the Shredder or Empty Trash is that tapping the Shredder icon only deletes any files you’ve selected in the Trash folder, whereas tapping Empty Trash deletes everything in the Trash folder, regardless of whether any files have been selected.
Note
The Trash folder is only available on the Locations screen when it contains something. If you’ve emptied everything from the Trash, that folder disappears until you delete something else. This same principle works for all folders; an empty folder just disappears. The difference is that you don’t have to create and name the Trash folder.