Using and Creating Stencils
A stencil can be anything—from your corporate logo to placeholder widgets for designing an app or website—that you intend to reuse. 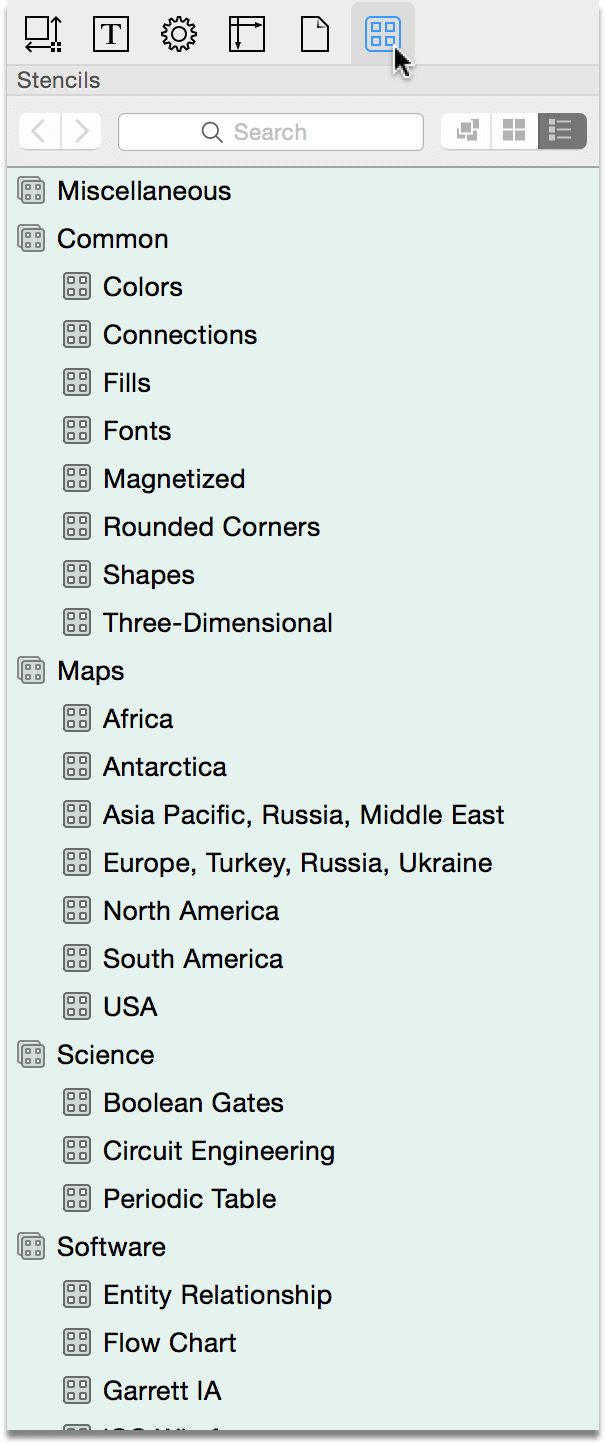 Rather than having to draw the same thing over and over again—and worrying about each thing’s preciseness—you can just draw that thing once, make some minor tweaks in OmniGraffle’s inspectors, and then save and close the stencil file.
A stencil is a reusable “shape” that can be as simple as a square or triangle, or as complex as a multilayered and meticulously designed illustration of your cat. Once you create the thing and export a version as an OmniGraffle stencil file, you’ll never have to redraw that thing again. All you’ll need to do is locate the stencil in the Stencils Library and drag it to the Canvas.
And with the newest member of the OmniGraffle family, Stenciltown, you can locate and share stencils with other OmniGraffle users.
This chapter shows you how to use the Stencils Library to your advantage, how to create a new stencil and save that to your Mac, and how to properly set up your stencil in OmniGraffle.
Using the Stencils Library
To use a Stencil, open the Stencil Library by clicking ![]() above the inspectors, or choose Inspectors ▸ Stencils. You can also switch to the Stencils Library quickly by using one of the following keyboard shortcuts:
above the inspectors, or choose Inspectors ▸ Stencils. You can also switch to the Stencils Library quickly by using one of the following keyboard shortcuts:
- Command–6 if your Inspectors are in the Sidebar or as individual Palettes
- Command–7 if your Inspectors are in a Floating combined inspectors window
To add a stencil object, all you need to do is select the object you’d like to use, and then drag that object to the Canvas. Once on the Canvas, you can interact with the stencil object just as you would with any other object you draw. For example, you can edit a shape’s path to transform an ordinary triangle into a leaf—or pretty much anything else by adding more control points or combining shapes.
Searching for Stencils
At the top of the Stencils Library is a search field that you can use to search through the existing stencils in OmniGraffle and—as an added bonus—Omni’s own online user-supported stencil repository, Stenciltown.
Stencils that already exist in OmniGraffle appear at the top of the search results, followed by anything new that’s been posted to Stenciltown.
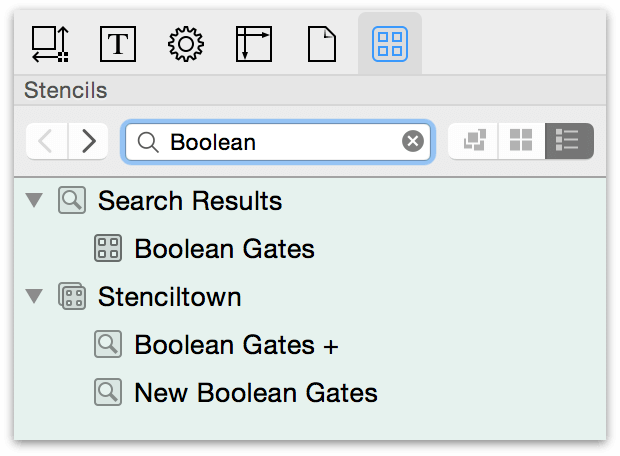
How you use a stencil you’ve searched for depends on how it pops up in the results. Let’s say that you’re working on a techy diagram and you need some Boolean Gates. You click in the search field and start entering Boolean. As you type, OmniGraffle starts pruning what you see below. You’ll notice there are two categories of results:
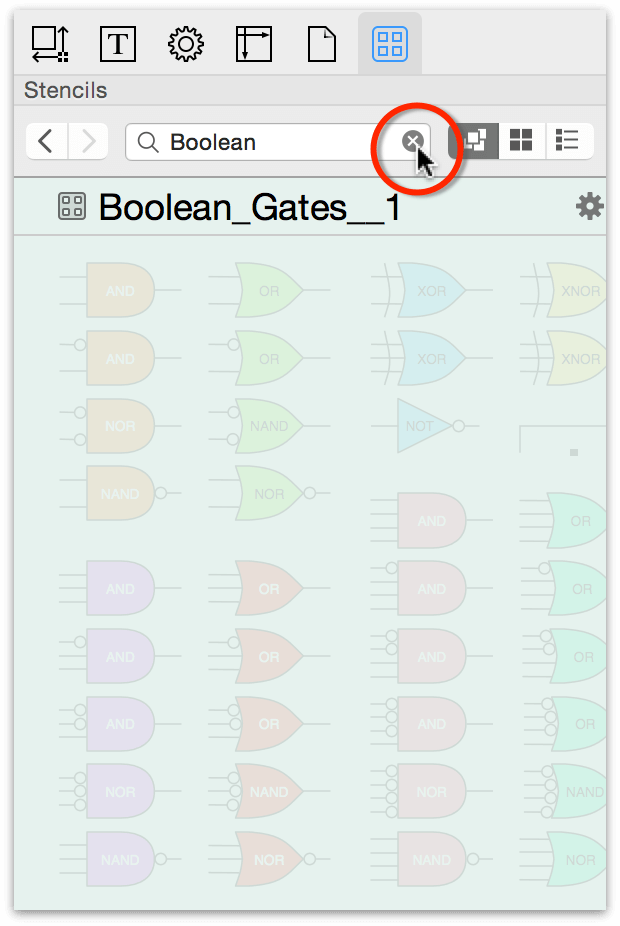
Search Results displays stencils already available to you on your Mac. First click the search result. The Stencils pane shifts to show you grayed-out versions of the available stencils. To use one of the stencils, clear the search field and then drag the stencil to the canvas.
Stenciltown displays applicably-named stencils which you can download from Stenciltown to your Mac. Start by clicking the Download button.
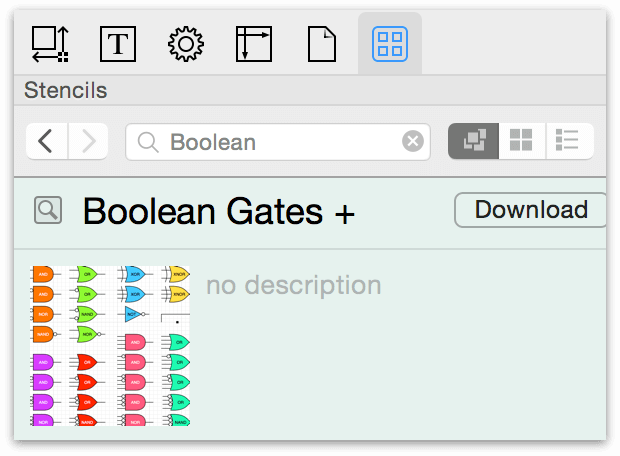
This downloads the stencil from Stenciltown and makes it available with all of the other OmniGraffle stencils on your Mac. Once downloaded, drag the stencil to the canvas.
Note
OmniGraffle only searches for stencils on Stenciltown if your Mac is connected to the Internet.
If you can’t find the stencil you’re looking for, either in OmniGraffle or on Stenciltown, you could always draw your own stencil set in OmniGraffle. And, if you’re inclined, you could share that with other OmniGraffle users on Stenciltown.
Editing an Existing Stencil
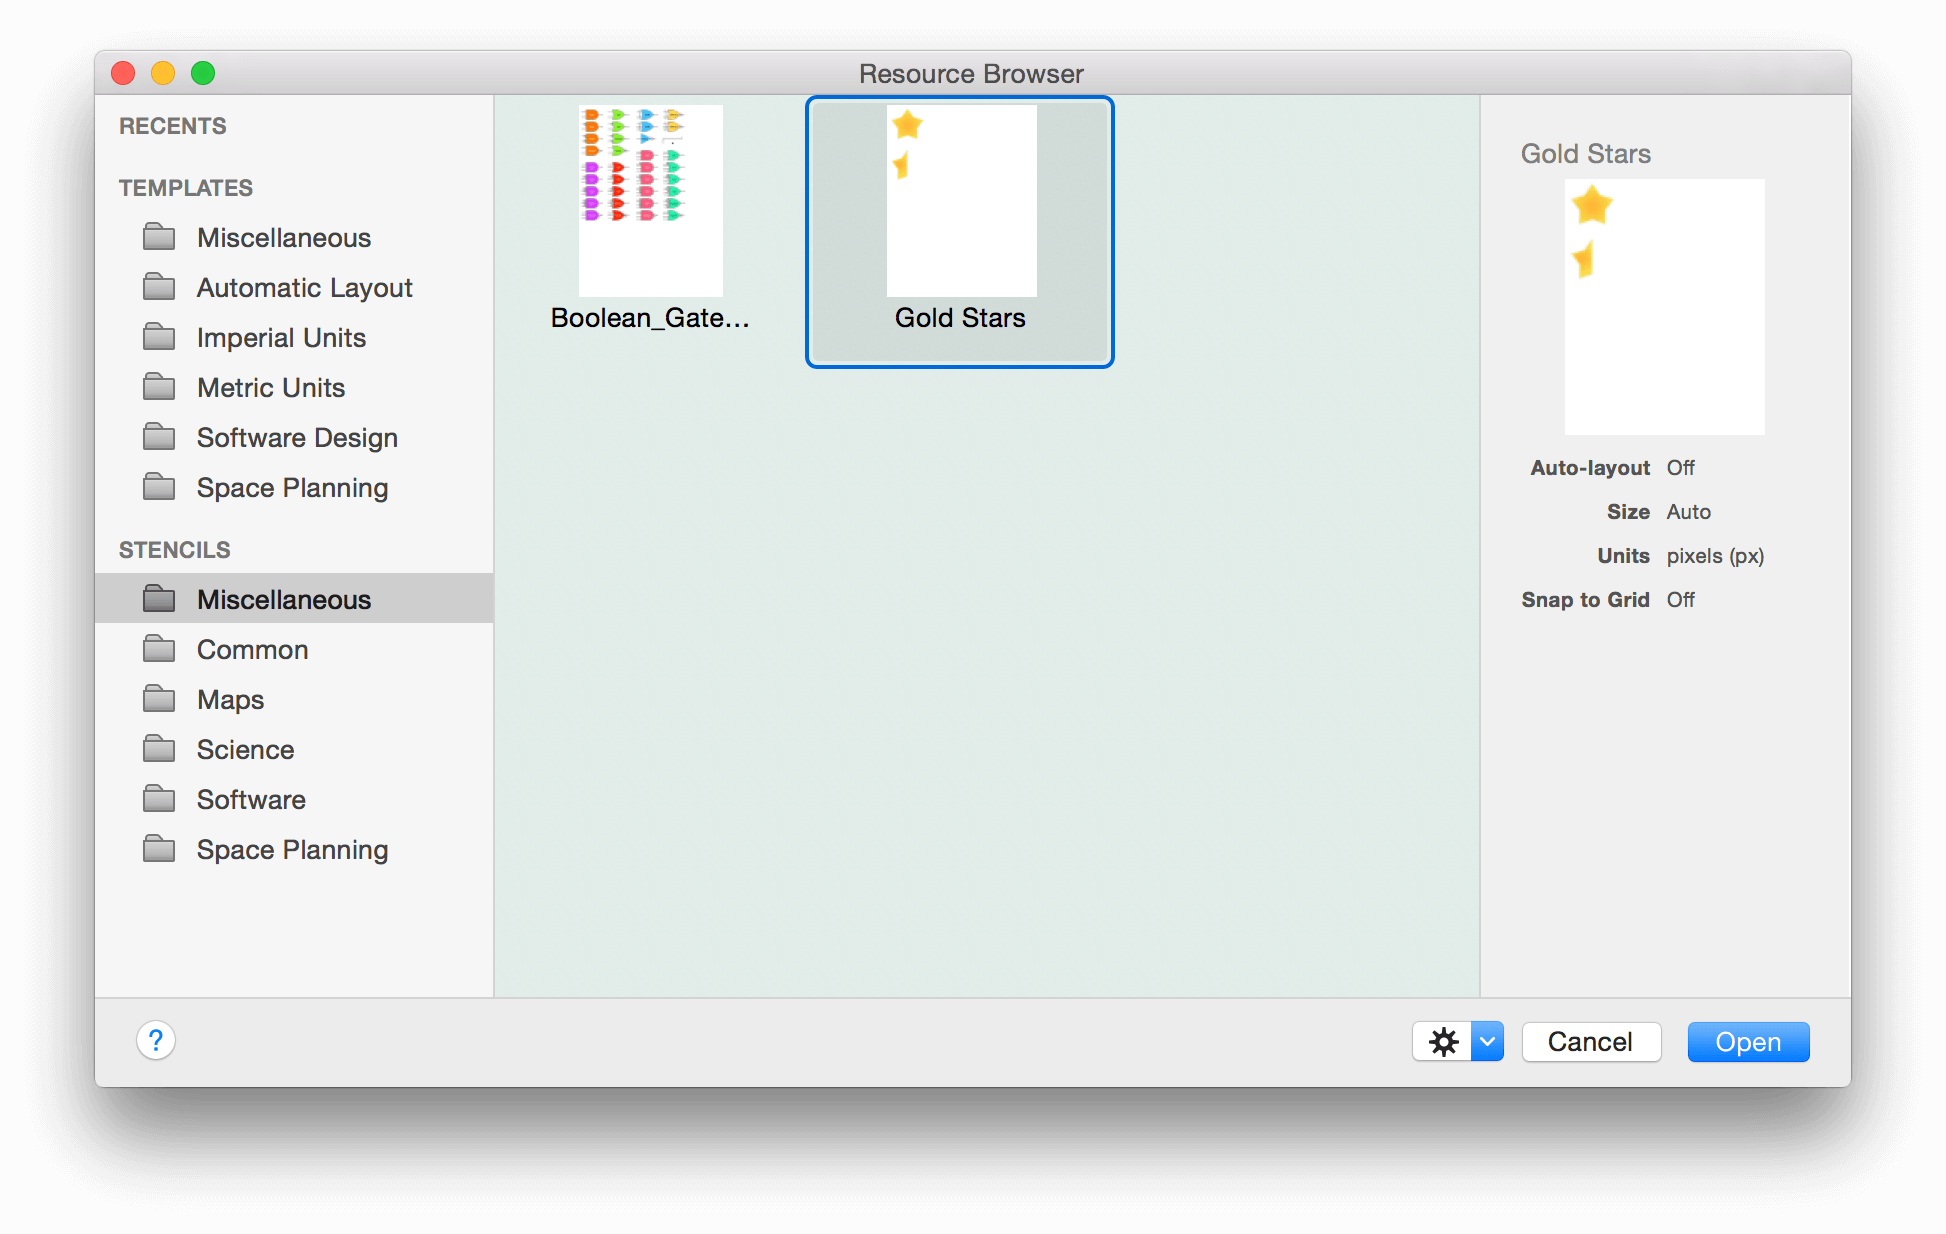
If you ever need to edit a stencil—say, to change an object’s color or size—OmniGraffle makes it super easy for you to do that. Start by opening the Resource Browser (File ▸ Resource Browser, or Shift-Command-N), choose the stencil you need to edit using the Stencils section in the left sidebar, and then click Open.
Once the stencil is open in OmniGraffle, you can work on it just like you would with any diagram or drawing you’ve made. For example, to assign proper names and descriptions to each of the stencils in the Gold Stars example, do the following:
- Select one of the objects on the Canvas.
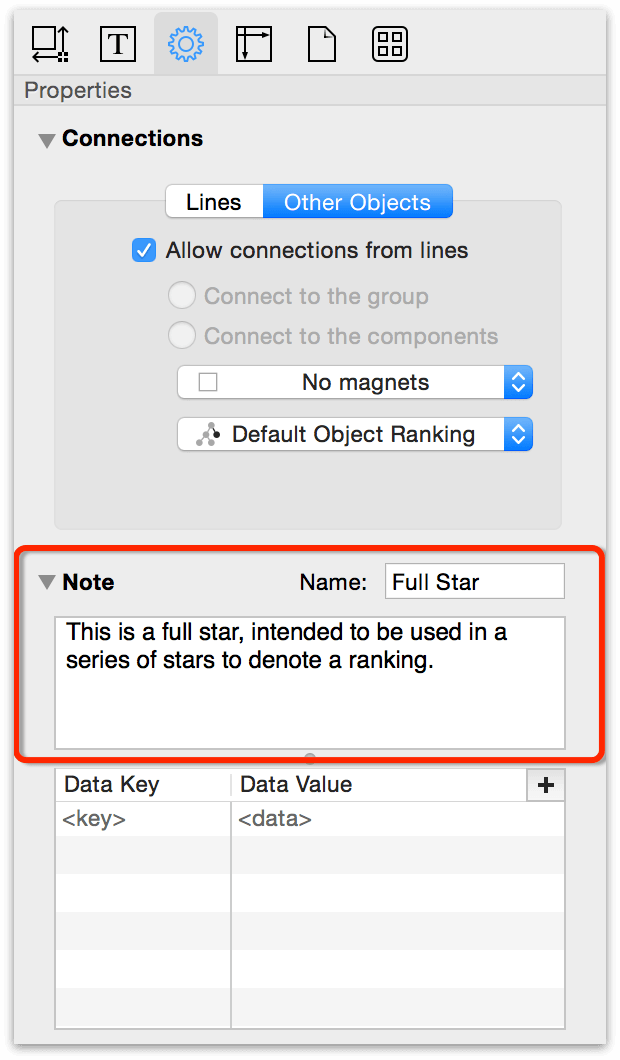
- Switch to the Properties inspector (Inspectors ▸ Properties).
- In the Note pane, enter a Name and a description of the object in the space beneath.
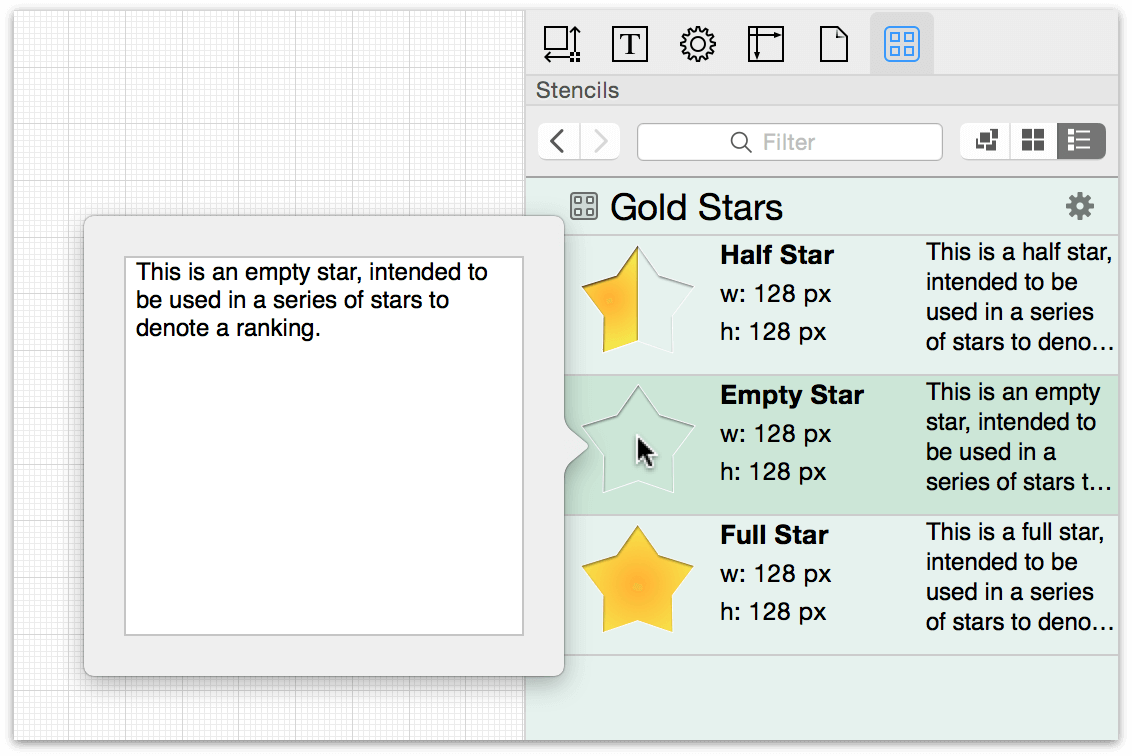
You can check your handiwork by switching to the Stencils Library (Inspectors ▸ Stencils) and finding the stencil that you’re working on. This makes it easy for you to check your work before saving and closing the stencil.
Creating a Shortcut to the Stencils Folder
If you plan to convert the things you’ve been drawing in OmniGraffle into stencils, you need the ability to Export those files to the Stencils folder. Unfortunately—and because of Apple’s security restrictions—the Stencils folder is buried deep within OmniGraffle’s container.
To assist you with exporting OmniGraffle files as stencils to the Stencils folder, let’s set up a shortcut in the Finder’s sidebar to that folder. After creating this shortcut, you will be able to quickly access the Stencils folder from the Finder, or from any Open, Save, or Export sheet that pops up on your Mac.
Follow these steps to create a Finder shortcut to the Stencils folder:
Open a Finder window by clicking the Finder icon in the Dock.
Hold down the Option key and then choose Go ▸ Library.
Press Shift-Command–3 to change the Finder window to View as Columns; this makes the next step much more tolerable.
- In the Finder window, traverse through the following directories:
- Containers
- com.omnigroup.OmniGraffle6
- Data
- Library
- Application Support
- The Omni Group (don’t select the Omni Group folder as that one is used for housing your OmniGraffle license, if you have one).
- OmniGraffle
- Stencils
- Click to select the Stencils folder (but don’t click anything inside that folder).
- Choose File ▸ Add to Sidebar (or use the keyboard shortcut, Control-Command-T).
As you can imagine, having to follow that path every time you want to create a stencil is going to get old fast.
Tip
For you command-line junkies out there, the ultimate file path is:
~/Library/Containers/com.omnigroup.
OmniGraffle6/Data/Library/Application\ Support/The\ Omni\ Group/
OmniGraffle/Stencils
Now whenever you need to add a stencil to the Stencils folder, you can just choose the Stencils folder in the Favorites list on the left side of the save sheet.
Creating Stencils
Now that you know how to find and use a stencil, it’s time to learn how to create one. After all, part of the reason why you’re using OmniGraffle is to draw things, and there’s a good chance that you’ll want to reuse that thing again later. That’s where stencils come in!
What goes into making a great stencil, however, goes far beyond the artistic quality of the thing you create. There are some things you can do in OmniGraffle—from how you name the stencil file, naming canvases and objects, even adding descriptions for individual stencils—to help make your stencil usable and accessible to everyone who uses OmniGraffle.
The remainder of this chapter is devoted to showing you the ins and outs of creating a really great stencil file. So, let’s start at the beginning—creating the stencil file.
Creating a New Stencil from Scratch
If you intend to create a stencil, you can choose File ▸ New Resource ▸ New Stencil to create a new stencil file. And when you save that file, OmniGraffle automatically saves it to the Stencils folder (more on that later), which makes it immediately available in the Stencil Library.
An OmniGraffle stencil file looks just like any other OmniGraffle file. You have the same canvas. The same inspectors. Even the same toolbar. Under the hood, though, OmniGraffle specifies and recognizes this file as a reusable stencil.
Exporting an OmniGraffle Document as a Stencil
Rather than having to open the preexisting OmniGraffle document so you can copy and paste the thing into a new document, why not create a stencil from that object and add it to your Library?
It’s actually quite simple:
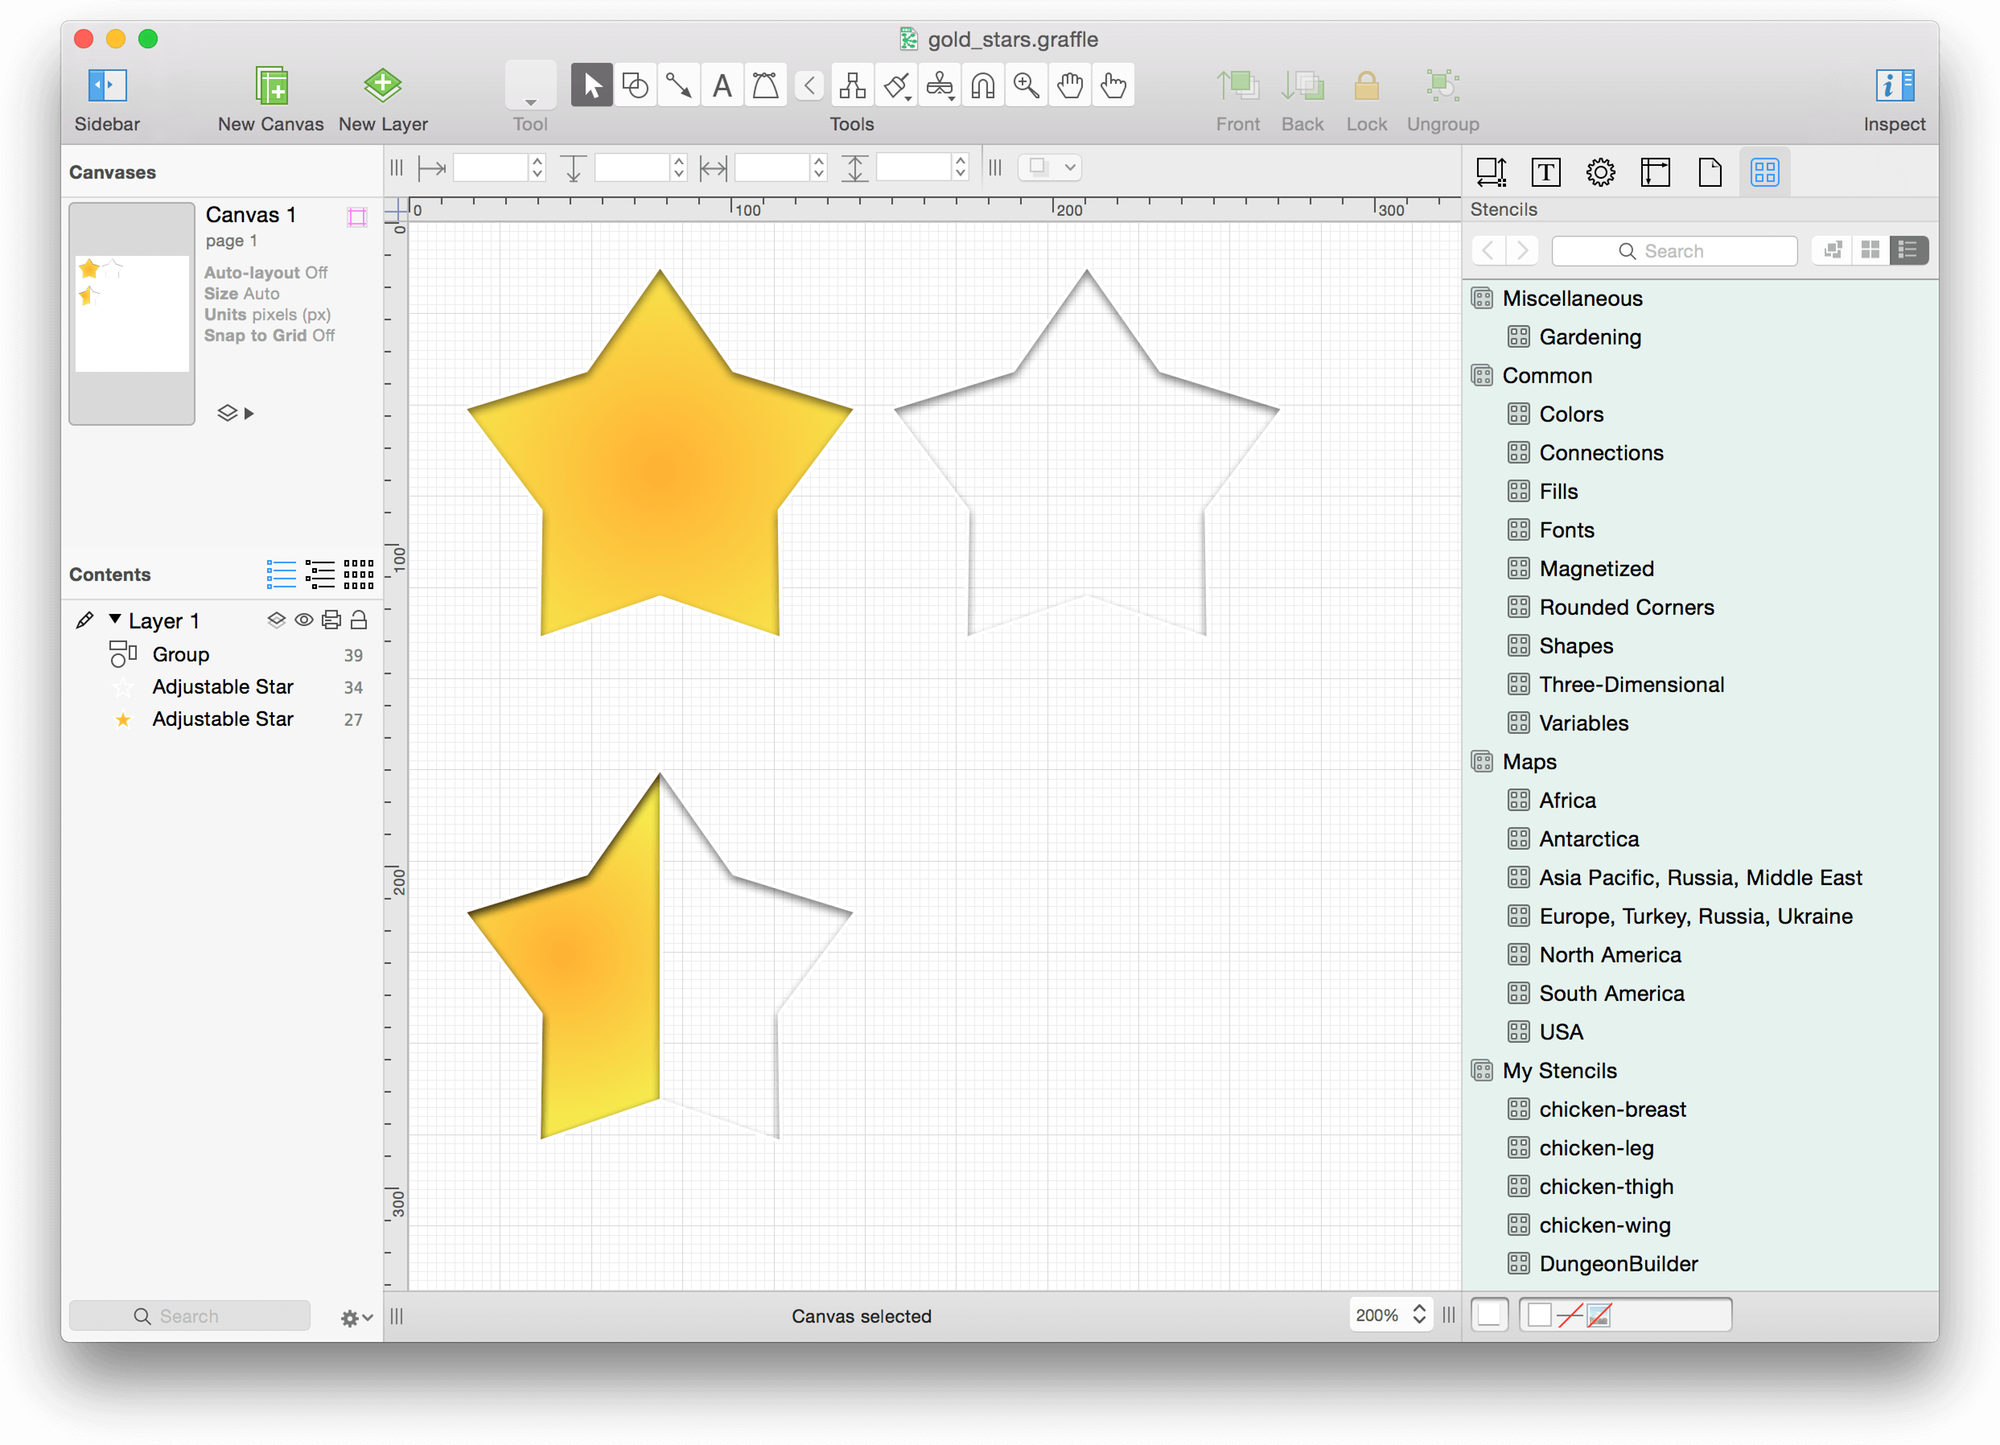
Open the document that contains the thing that you want to save as a stencil. If the OmniGraffle file contains multiple things, as with the following image, each “thing” gets recognized as an individual stencil. (Cool, huh?)
Choose File ▸ Export (Option-Command-E).
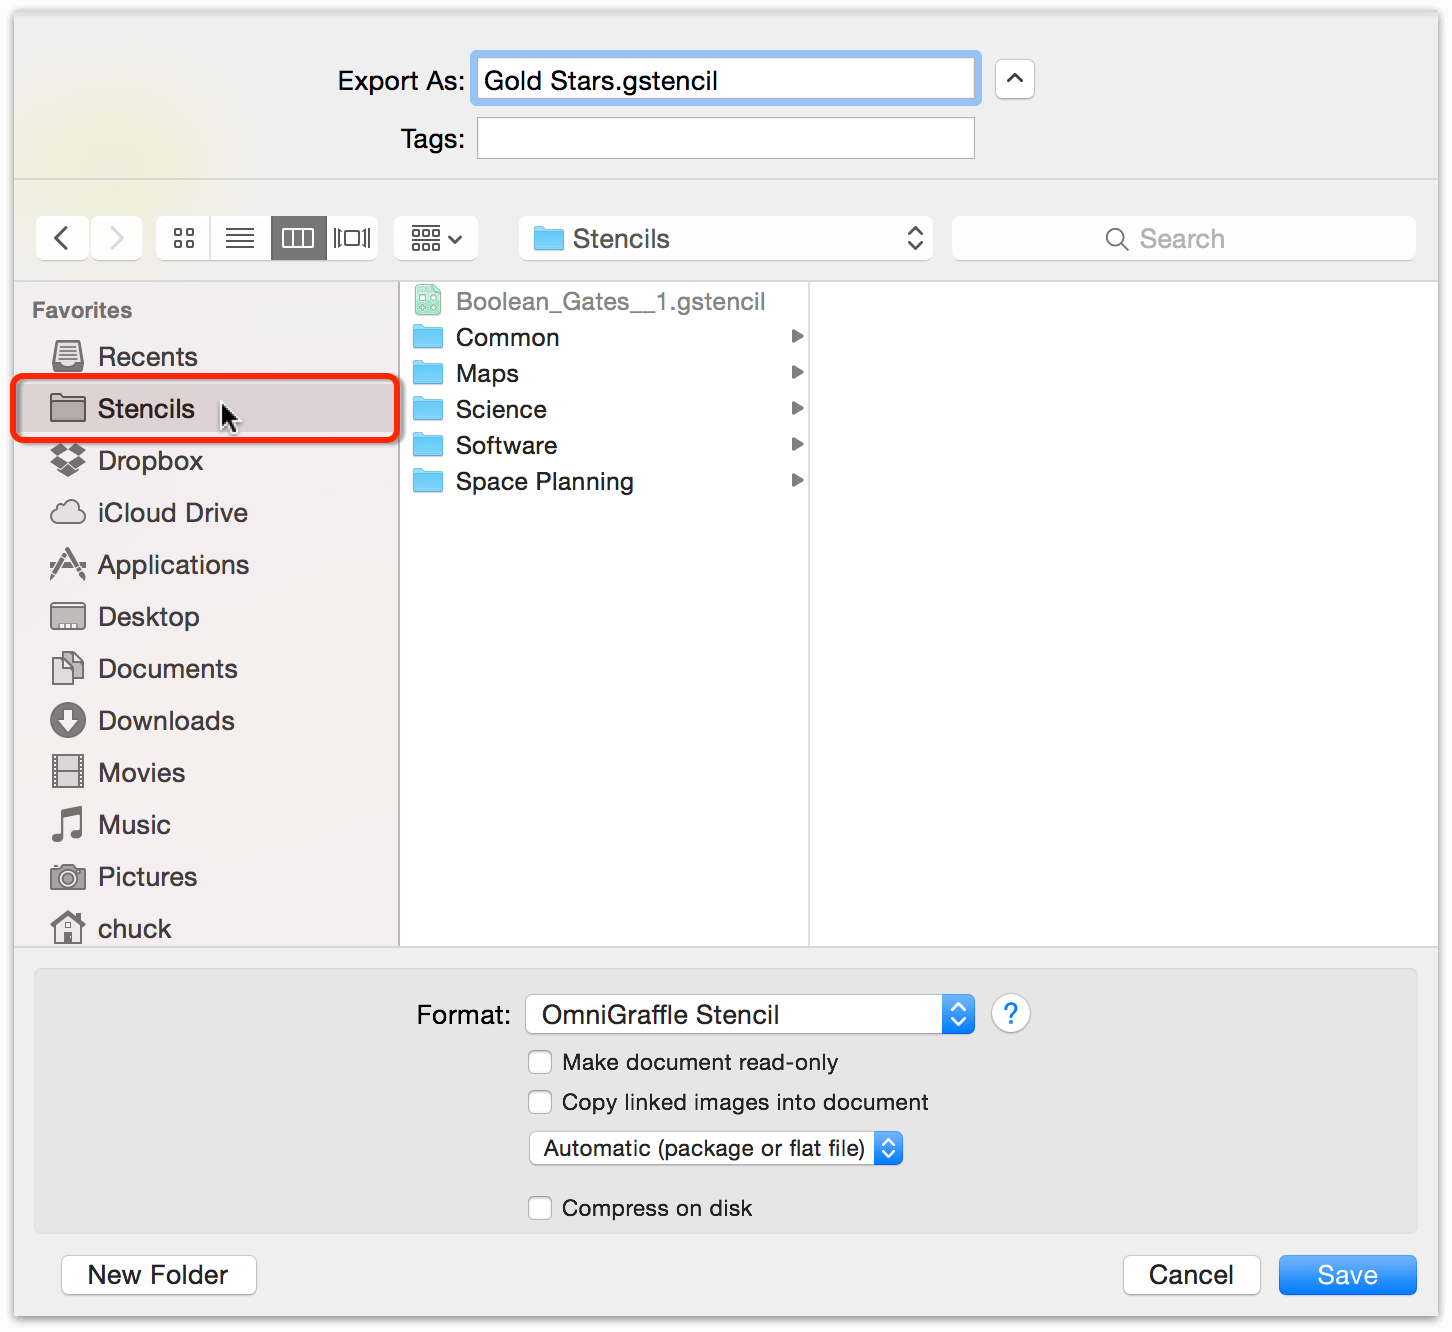
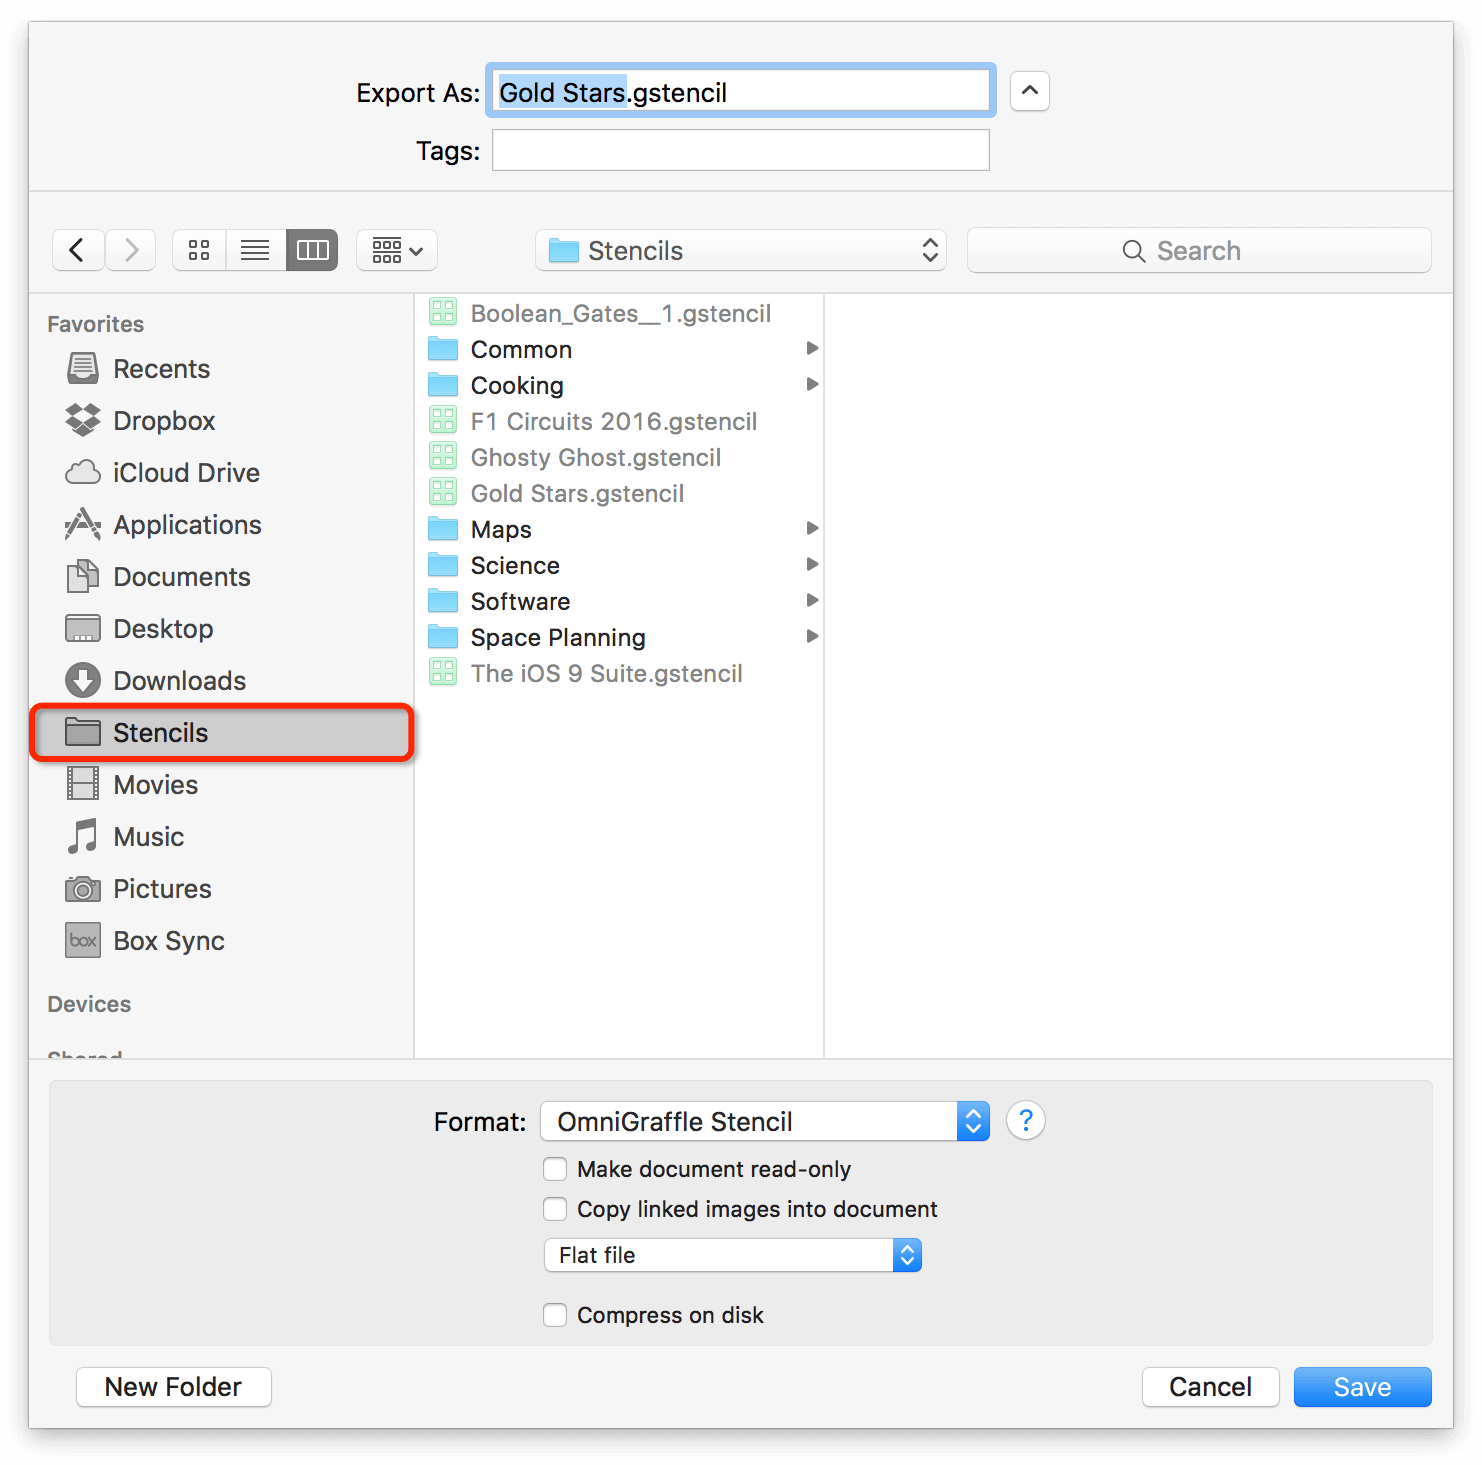
- In the Export sheet:
- If you followed the directions in Creating a Shortcut to the Stencils Folder earlier in the chapter, choose the Stencils folder in the Export sheet’s sidebar.
- In the Export as field, enter a name for the Stencil, but don’t change the .gstencil file extension.
- In the Format popup menu, choose OmniGraffle Stencil.
- Click Save.
Tips for Creating a Great Stencil
Beyond the design aspect of creating a great stencil, there is plenty more that you can do to your stencils to make them more useful for other users, particularly if you intend to share them on Stenciltown. For example, how you name the actual stencil file can make a huge difference in how users see your stencil in the Stencil Library.
Here you’ll find a series of tips for things you can do with your stencils in OmniGraffle to help make them stand out in the Stencil Library. To get started, though, let’s look at The Anatomy of a Stencil...
The Anatomy of a Stencil
A Stencil is a single object (or a single thing consisting of a group of objects), whereas a Stencil Set consists of two or more stencils of similar meaning. For example, Stencil Set could contain all of the icons for your website, or the ingredients you need for various baking projects you’re trying to illustrate.
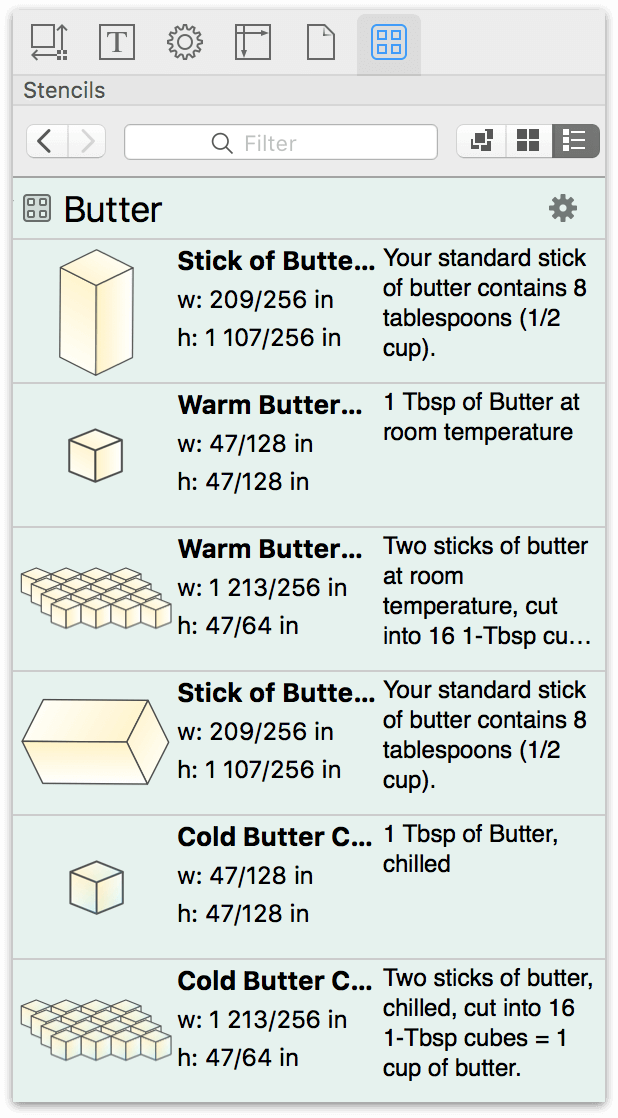
When you look at a stencil in OmniGraffle for Mac’s Stencil Library, you can see all kinds of information about that stencil, such as its name, size, whether it’s part of a Stencil Set—even whether a particular stencil is on its own canvas in the original stencil file. If you’re creating stencils, here’s where all of that information comes from:
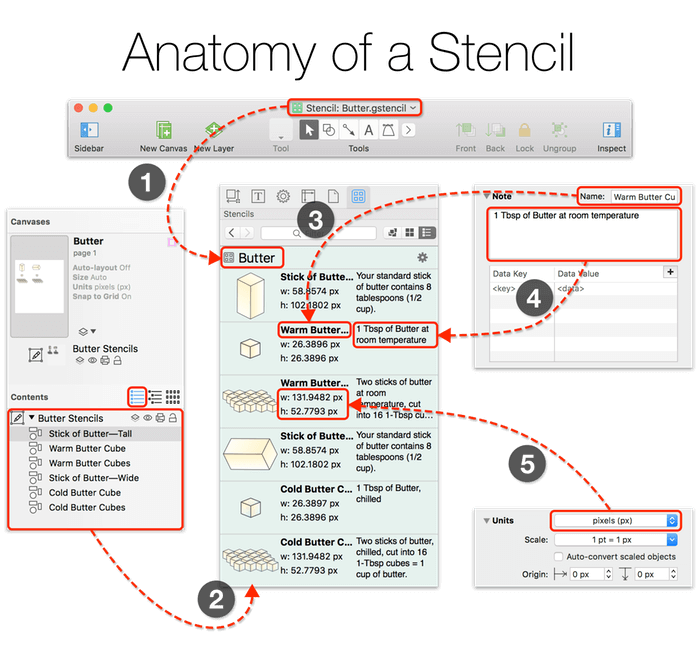
- Stencil Filename: The name of your stencil comes directly from the filename you’ve chosen when you save or export the stencil file. Don’t use underscores or hyphens in the filename, and for the love of peanut butter, please don’t be cryptic when naming your stencil file. While a cryptic filename might work for your own use, that sort of thing doesn’t translate very well for the potential thousands of OmniGraffle users who are trying to find your cool—but seemingly misnamed—stencil.
- Stencil Ordering: If you create a Stencil Set, the order in which your stencils appear on the canvas matters. Use the Contents pane in the Sidebar to see how the objects are ordered on the canvas.
- Stencil Name: Yep, that’s right; there’s another way to name your stencils. If you have a Stencil Set, you can assign names to the individual stencils in that collection by placing them on separate canvases and then naming each canvas accordingly.
If you have OmniGraffle Pro, you can name stencils in the Note inspector’s Name field. If you have OmniGraffle Pro, you can find the Note inspector by choosing Inspectors ▸ Properties.
- Description: Also in the Note inspector (requires OmniGraffle Pro), use the big open text field to enter a short description for the thing you’ve created.
- Dimensions: A stencil’s dimensions are based on your settings in the Units inspector. You can get to the Units inspector by choosing Inspectors ▸ Canvas, and then scroll through the inspectors to open up the Units inspector.
One or Many Objects Per Canvas?
There is no restriction on the number of objects you can have on the canvas. Every object, or group of objects, is its own stencil. For example, if you have three objects on the canvas—two standalone objects and a group of multiple objects—then your stencil file contains three different stencils.
Group Objects That Make Up The Thing
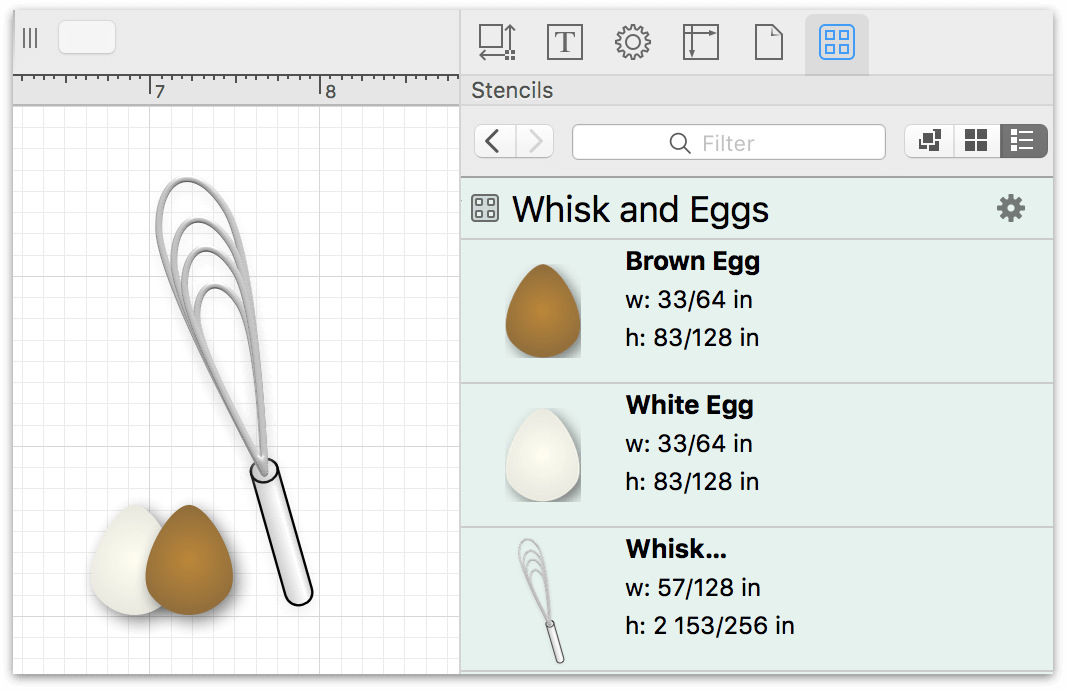
Let’s say that you’re creating a bunch of stencils for standard kitchen utensils, such as whisks, spatulas, slotted spoons, and so on. Each thing you draw probably consists of multiple objects. If you don’t group together all of the objects for a particular item (for example, that whisk), each of those objects are exported as separate stencils.
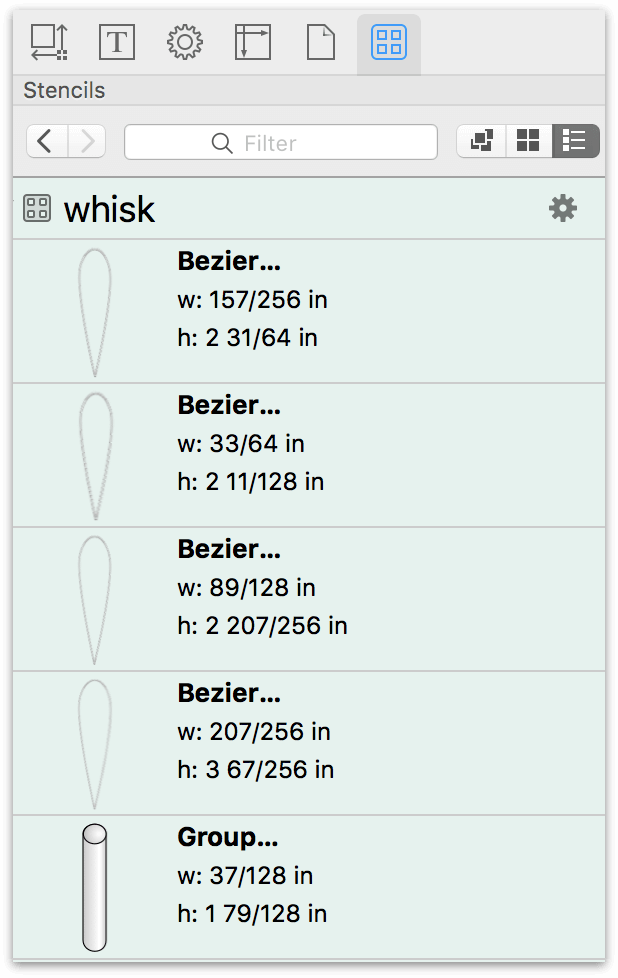
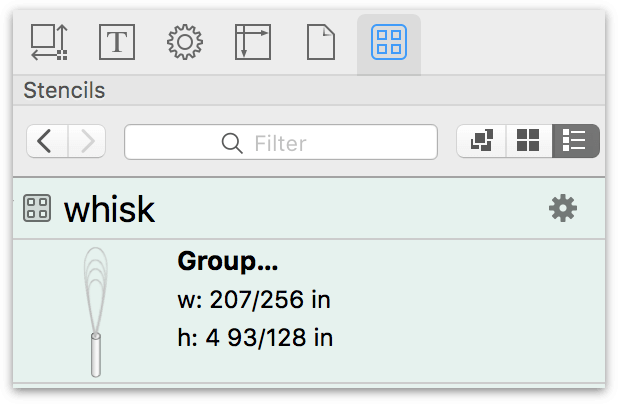
As you can see, rather than being a single stencil of a whisk, the stencil contains five objects: one for the handle, and four wire loops that make up the flat head of the whisk. However, if you group the objects together, you’ll get a single stencil object of the whisk:
Naming Canvases
Even if your OmniGraffle document only has one canvas, don’t just leave it named “Canvas 1”. Instead, enter a short name to the stencil, such as “Espresso Machine” or “Website Prototype”. This is particularly essential when you have a stencil file with items spread across multiple canvases.
The way to identify a stencil that’s on a separate canvas is to look at the Stencil Filename. If the filename is followed by a colon (:) and another name, that second name is the Canvas Name. In the following example, the Stencil Name was added using OmniGraffle Pro’s Note inspector.

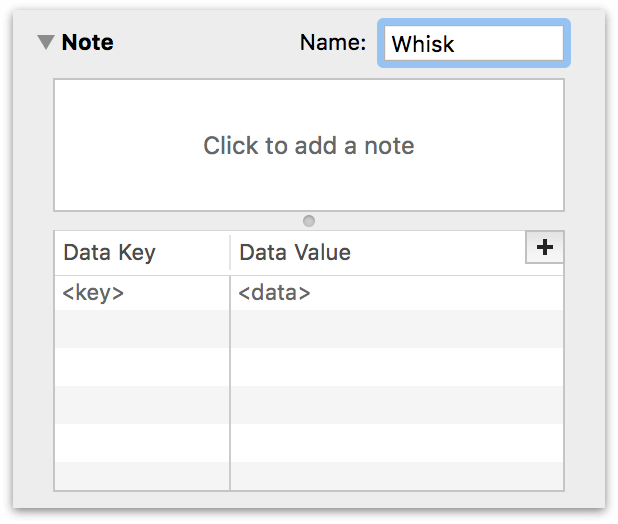
Naming Object Groups in the Note Inspector (Pro)
If you created a stencil that consists of a group of objects, you might notice that the object carries the name of “Group” in the previous image. However, if you have OmniGraffle Pro, you can assign a Name to the grouped object in the Note inspector.
Adding Stencil Descriptions in the Note Inspector (Pro)
If you have OmniGraffle Pro, you can also add a short description to your stencils. Stencil descriptions not only make it easy for other users to understand how to use that particular stencil, but they can also serve as useful reminders to yourself when you go back to use a stencil months from now.
Neatly Organizing Stencil Sets
Another way you can better present the stencils in a Stencil Set is to organize them in the sidebar’s Contents section. Choose View ▸ Show Contents ▸ List View, and open any collapsed layers. To reorder the objects in the List View, click and drag them up or down in the list:
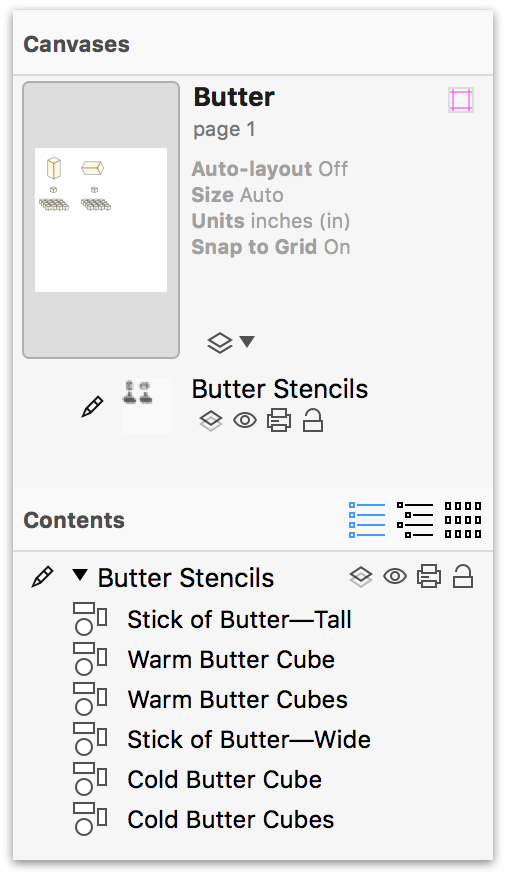
This sets the order in which your stencils appear in the Stencils Library; for example:
There is no right or wrong way to organize your stencils; just use your best judgment.
Naming Canvas Layers
While this might not necessarily apply to a stencil, you should get in the habit of naming the layers in the things you create.
How to Properly Name a Stencil File
Don’t be cryptic when naming your stencil file. Use something that aids in findability. For example, you could use something like F1 Circuits 2016 for a stencil set that contains outlines of the circuits for the upcoming Formula One season.
Don’t use underscores or hyphens in filenames. If you have a stencil, such as F1 Circuits 2016 that normally has spaces in it, don’t resort to using hyphens or underscores in the filename if that’s normally how you roll. Leave the spaces in there; they make the stencil name easier to read.
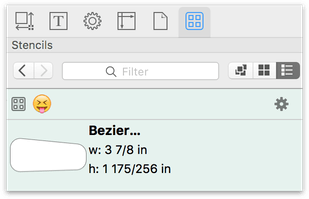
Finally, don’t use an emoji as the filename of your stencil. Since the point of sharing stencils on Stenciltown is to help other OmniGraffle users find the things they need, using an emoji as the filename hinders that process.
To Scale or Not to Scale?
One of the great things about stencils, is that you can take whatever the shape or thing might be, and resize it to the size you need. To aid in this behavior, use the Geometry inspector and turn on the Maintain Aspect Ratio option.
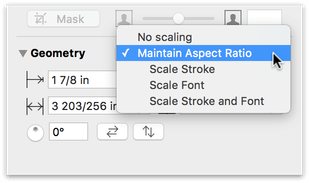
Once Maintain Aspect Ratio has been enabled, you can also choose to scale the stencil’s contents, including the stroke and text. And, if the person using your stencil decides they want to resize it without scaling, they can always turn off Maintain Aspect Ratio.
Stenciltown
After you have created your own stencil in OmniGraffle, why not share it with other users? No, silly, not just the folks in your office or at the coffee bar you’re working at: the whole world of folks!
Stenciltown is kind of like Green Acres—it’s the place to be. Stenciltown is where you can share the awesome things you create in OmniGraffle with other users. We’ve even gone as far as building Stenciltown connectivity—and searchability—into OmniGraffle on Mac and iOS.
To get started, you’ll need to create an account on Stenciltown. Your Omni ID consists of a username, your email address, and a password. That’s all of the information we require; just make sure that your password is a mixture of upper- and lowercase letters, numbers, and then toss in the occasional symbol. We don’t need your mailing address, names of your children or pets, or anything like that. Your Omni ID is, at the moment, your way of signing into and sharing stencils on Stenciltown.
Once you have created your Omni ID for Stenciltown, you can log into Stenciltown directly from OmniGraffle on your Mac. Just follow these steps:
- Open the Resource Browser by choosing File ▸ Resource Browser (Shift-Command-N).
- Select the stencil file you would like to submit to Stenciltown.
- Click the Gear menu, and choose Submit to Stenciltown from the list of options.
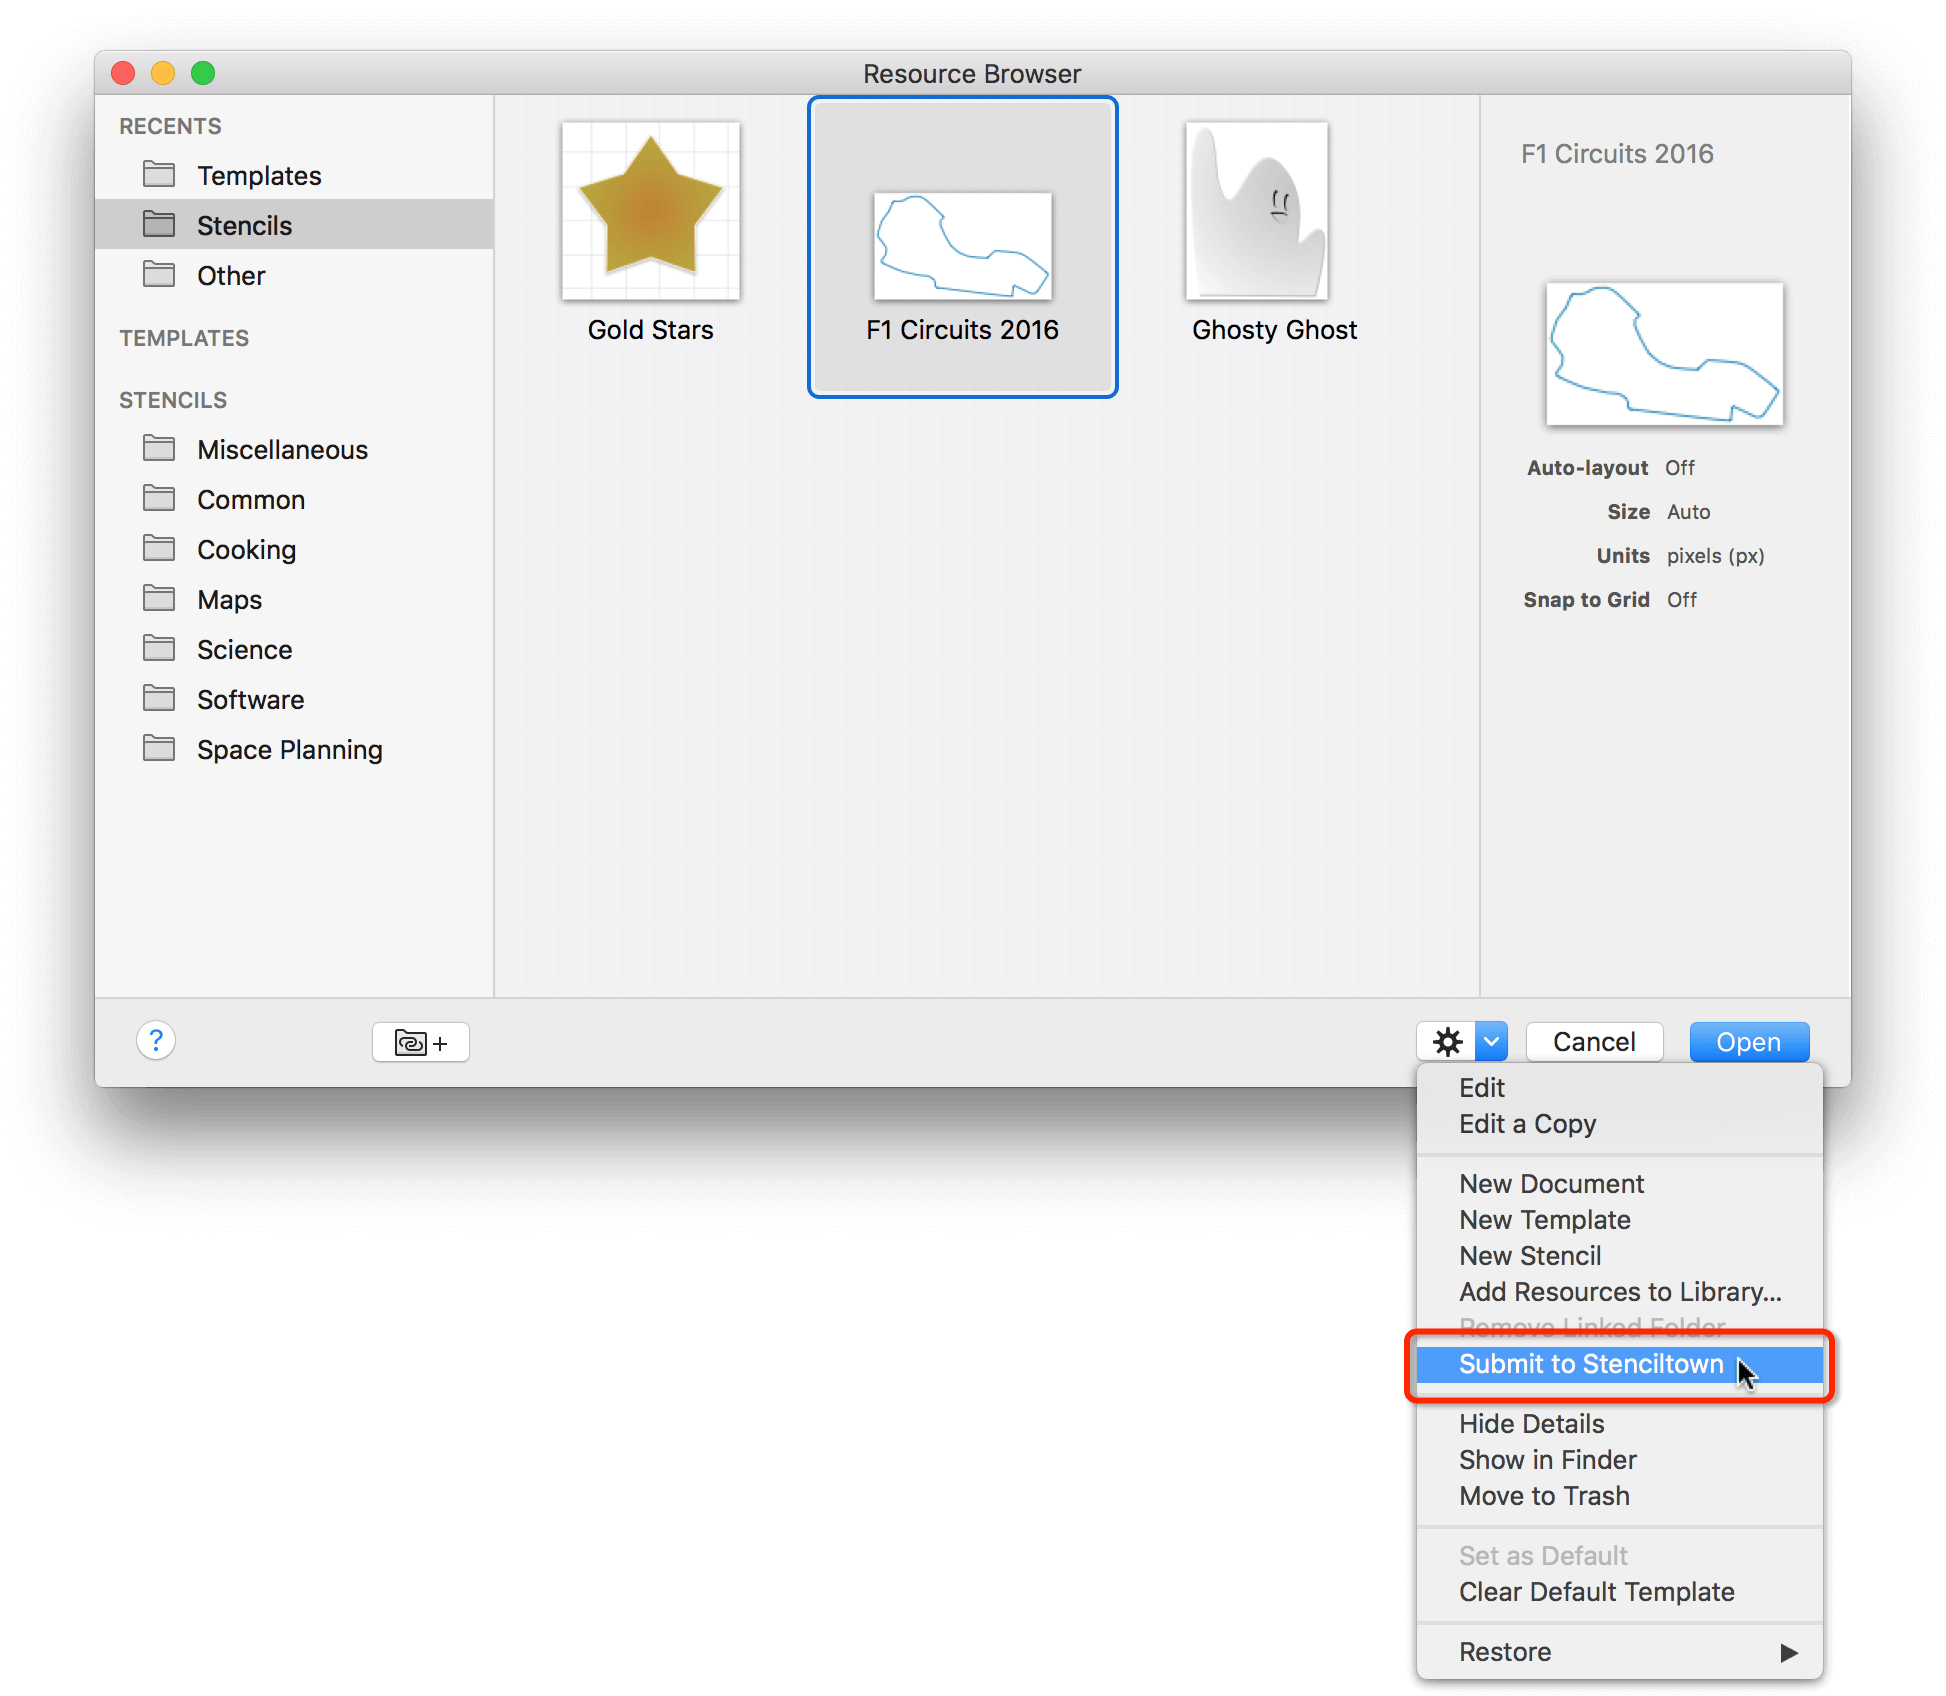
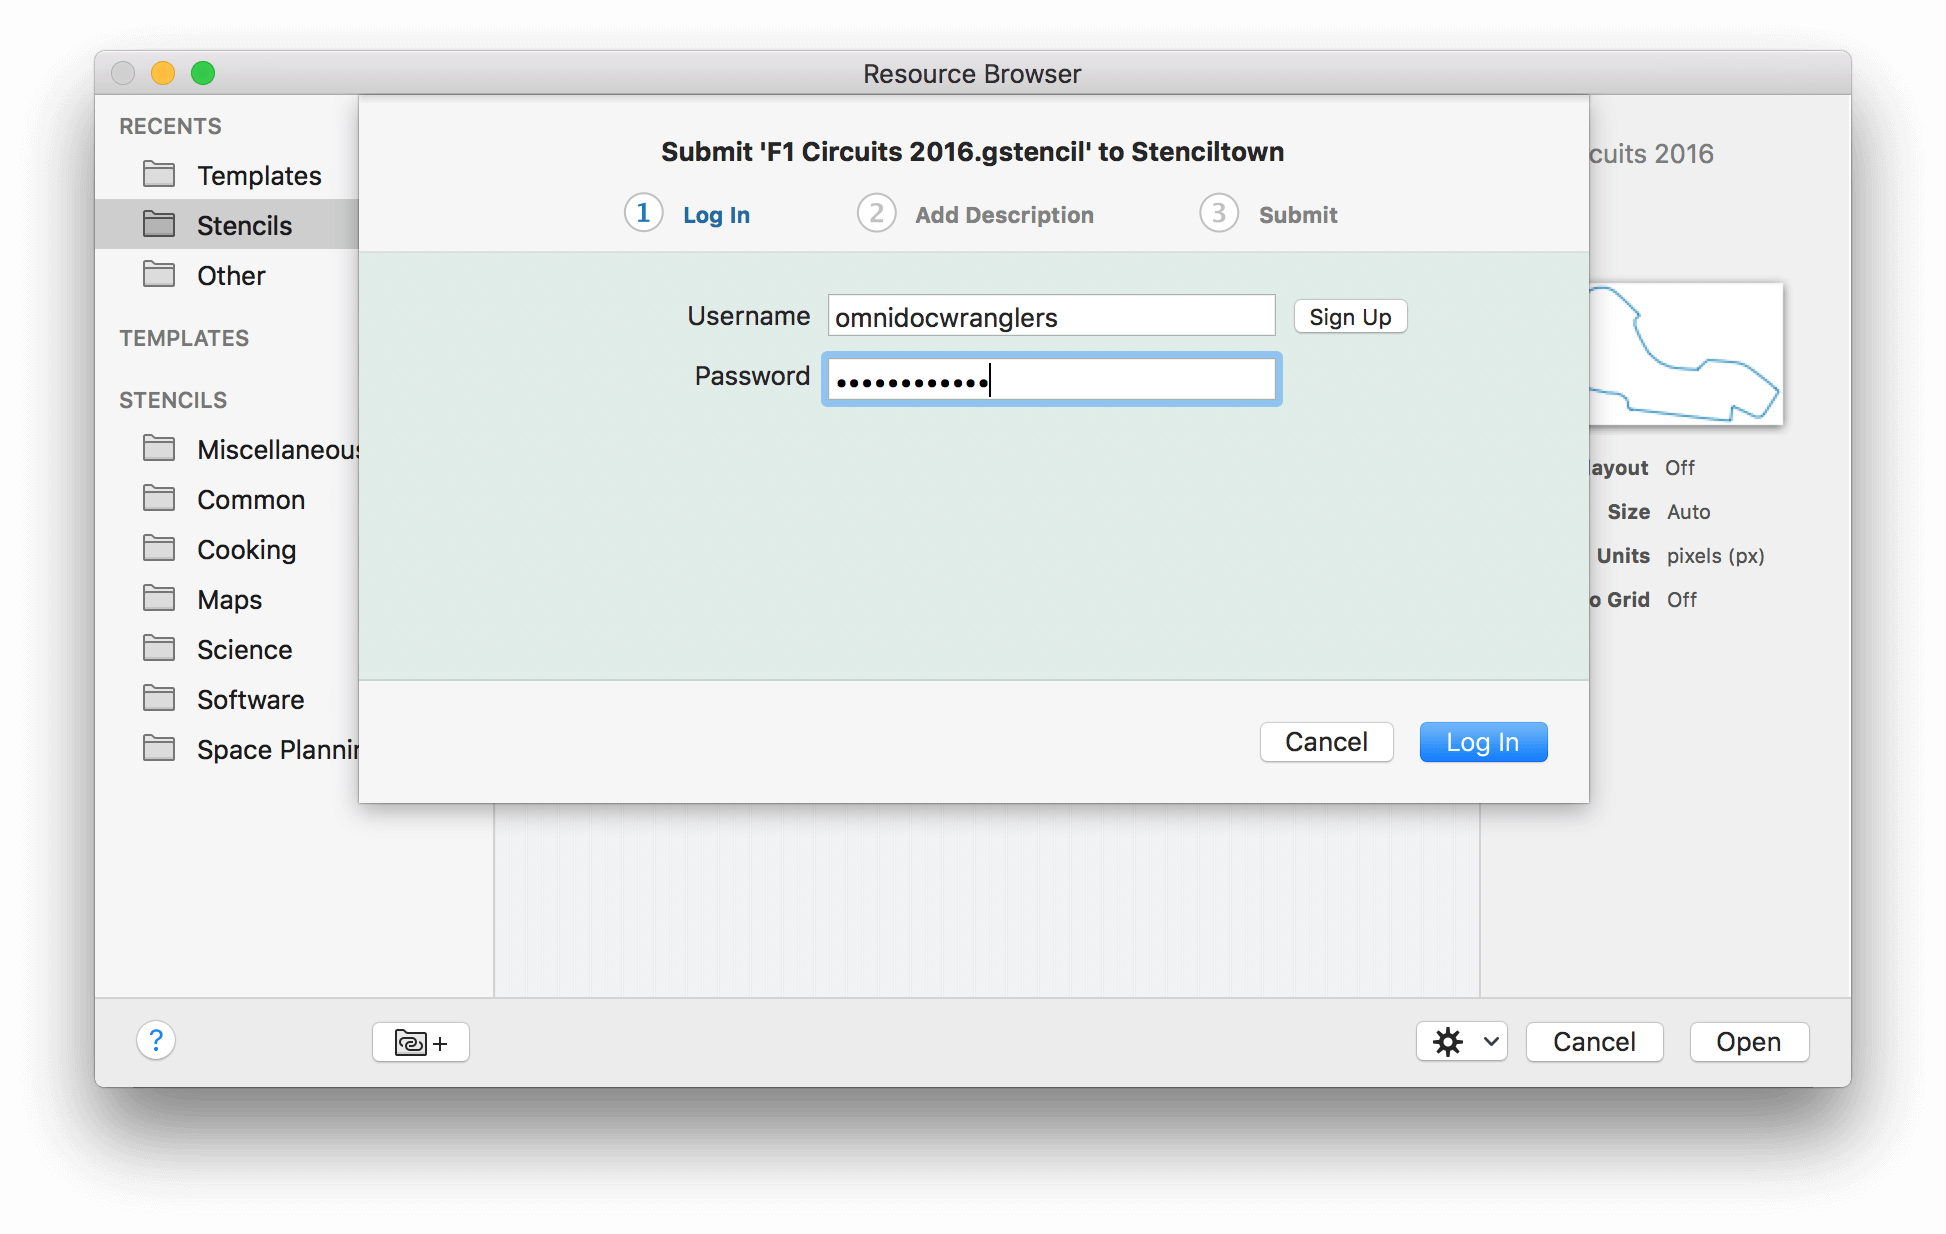
- If you haven’t logged in to Stenciltown from within OmniGraffle before, enter your Omni ID and Password, and then click Log In to authenticate with Stenciltown’s server.
- Enter a Name and Description for the stencil (OmniGraffle automatically uses the first canvas in the file for the preview image).
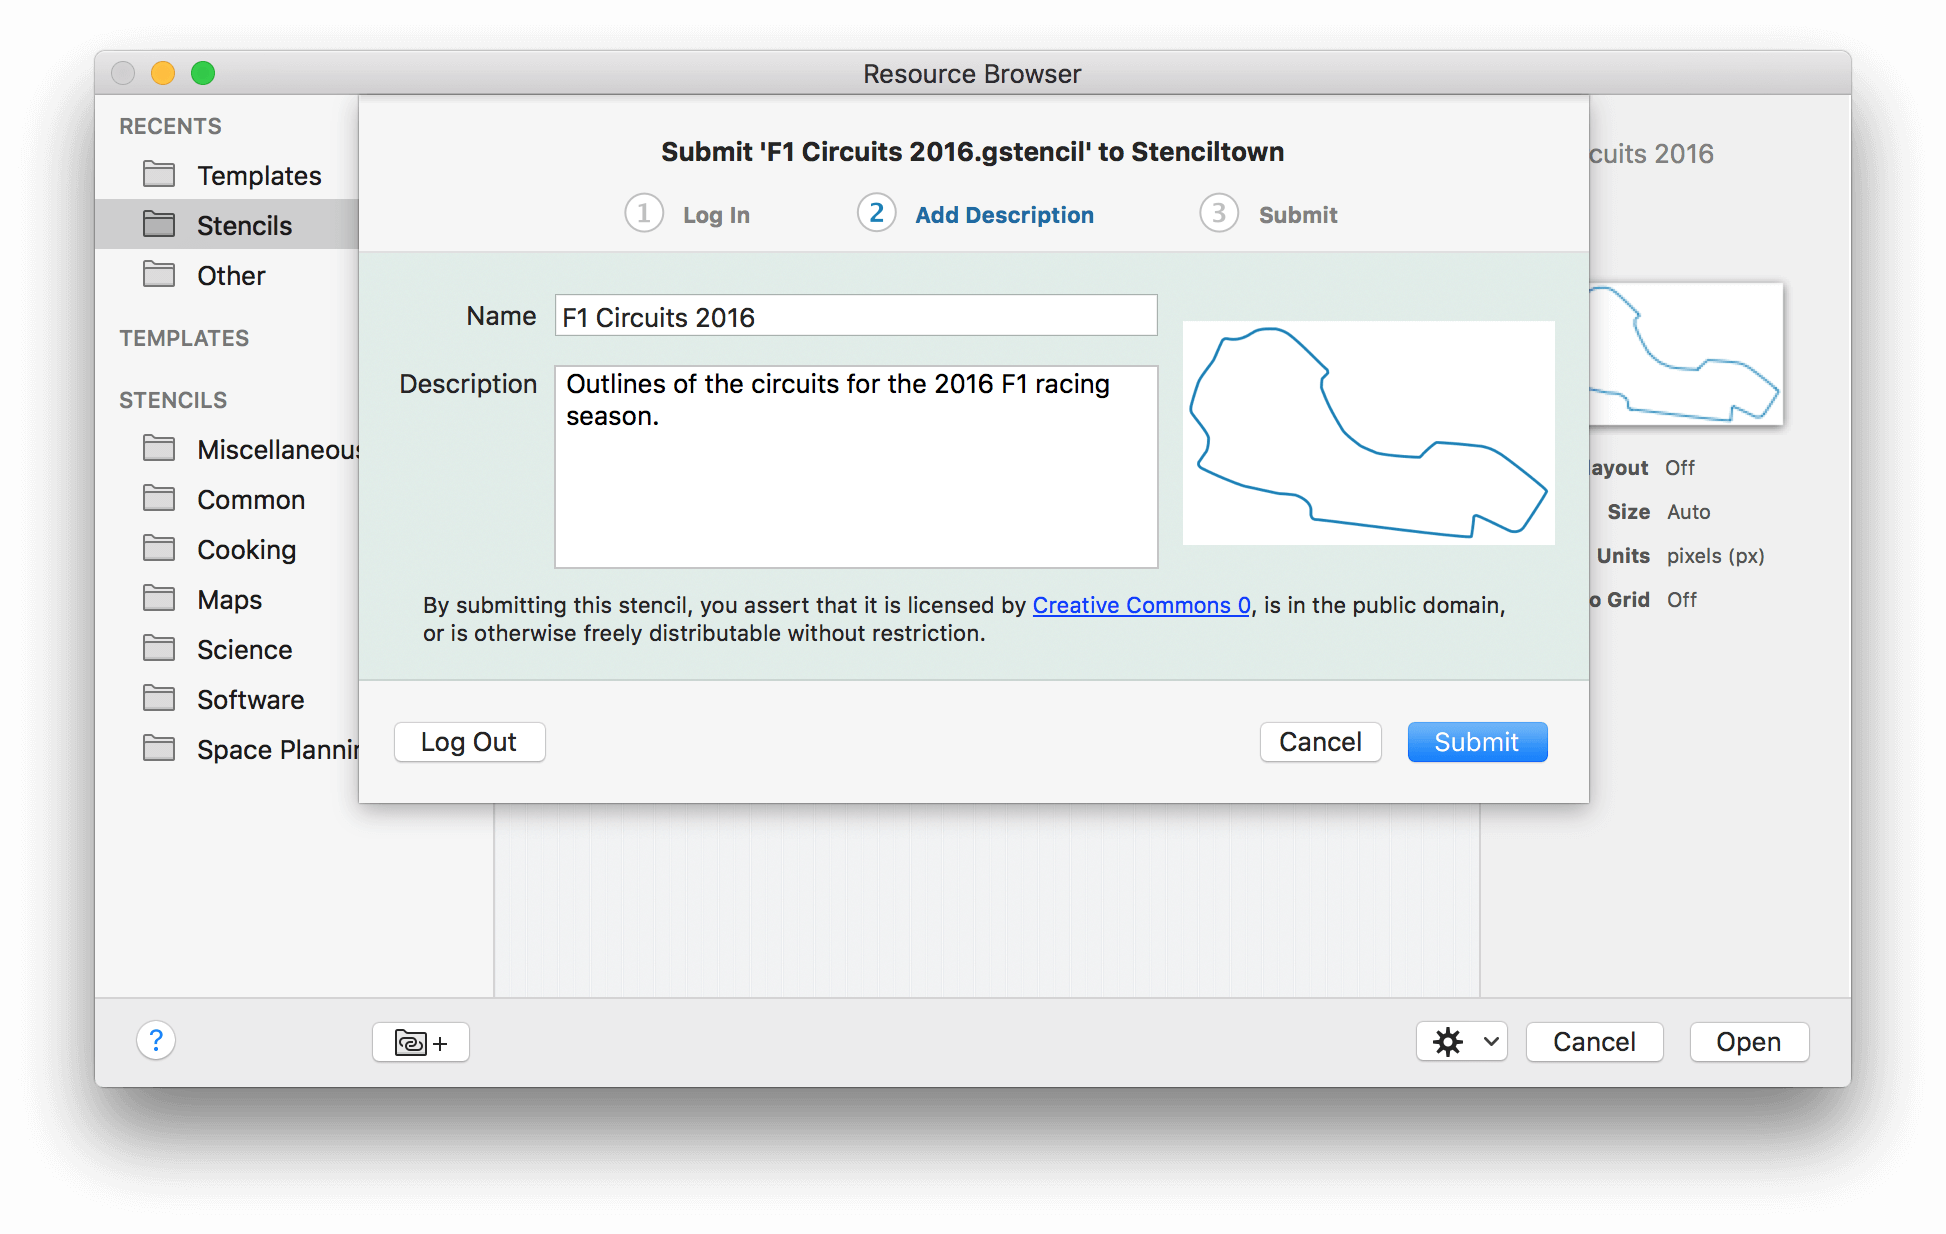
- Click Submit
After you click Submit, OmniGraffle submits the stencil to Stenciltown and ties it to your account.
If you want to make changes to the stencil name or description, or to remove the stencil from Stenciltown:
- Log in on the Stenciltown website.
- Click the icon next to your Omni ID in the upper-right:
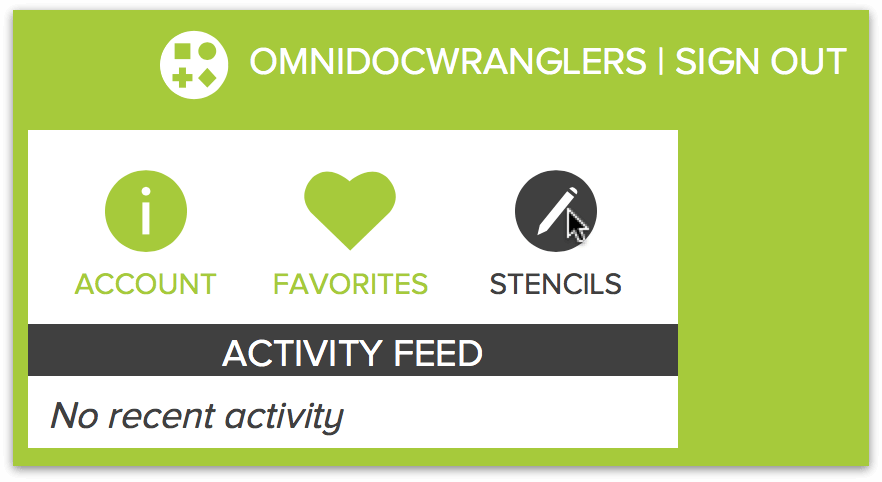
- Click Stencils to see the stencils you have submitted to Stenciltown, and then choose the stencil you would like to update or delete.