Using, Curating, and Creating Stencils
Stencils are reusable shapes that can be as simple as a square or triangle, or as complex as a multilayered and meticulously designed illustration of your cat. Once you create something and export a version as an OmniGraffle stencil file, you’ll never have to repeatedly redraw it again. All you’ll need to do is locate the stencil in the Stencil Browser and drag it to the canvas.
This chapter not only shows you how to use stencils, but you’ll also see how to curate and create them, too.
Getting to Know the Stencil Browser
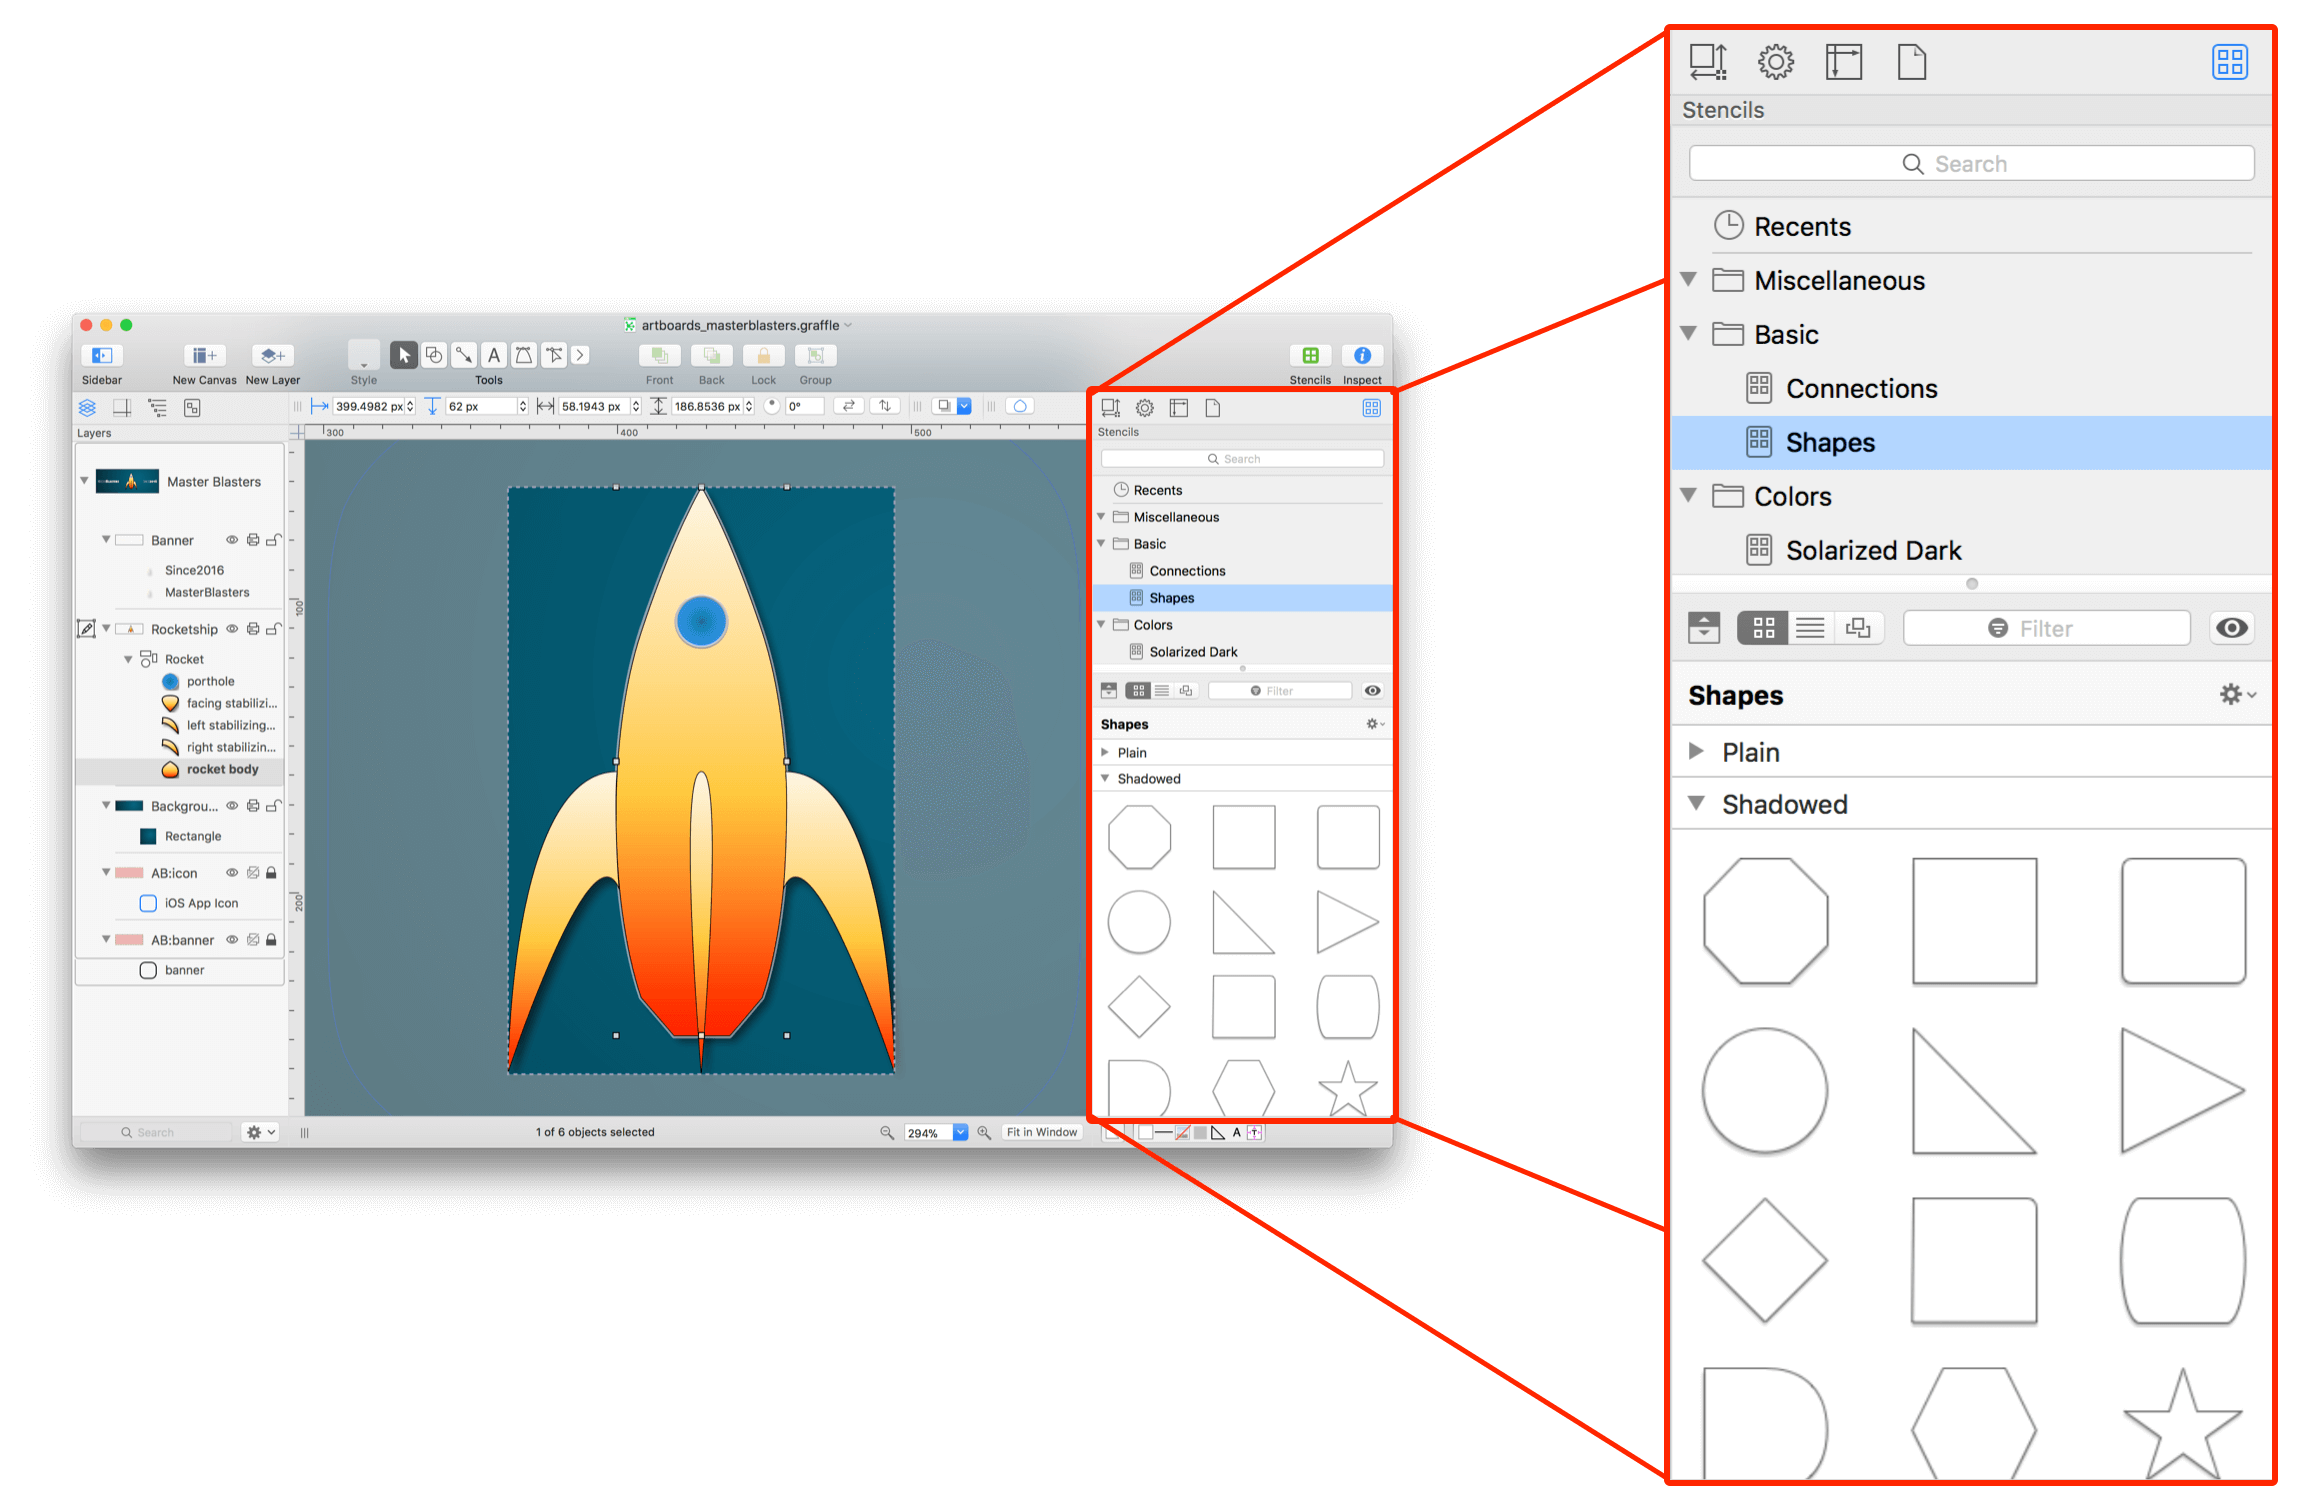
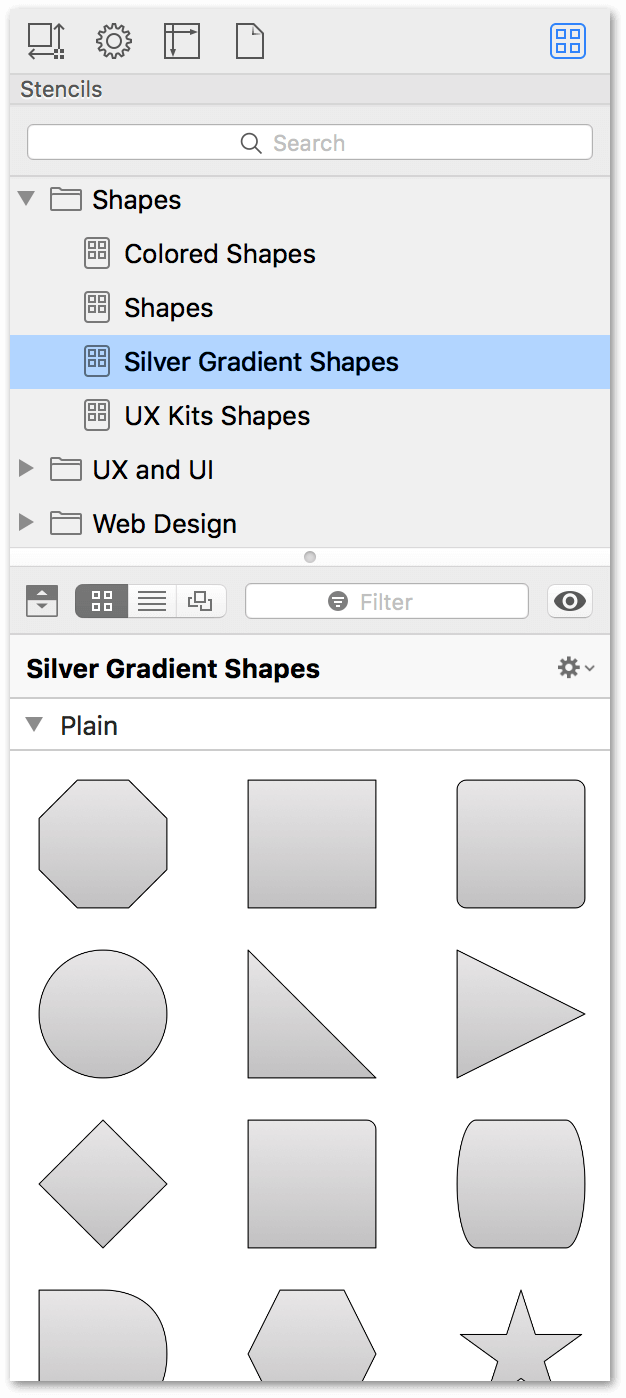
By default, the Stencil Browser is available in the right sidebar along with the inspectors:
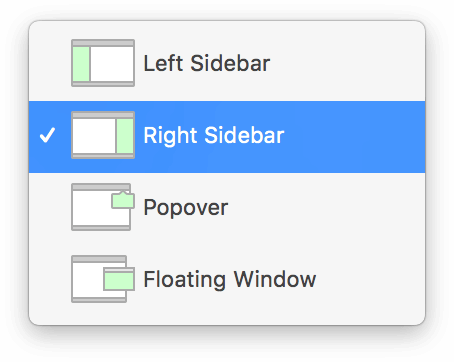
However, you can you can configure OmniGraffle (via the General preferences pane) to make the Stencil Browser available in the following locations:
-
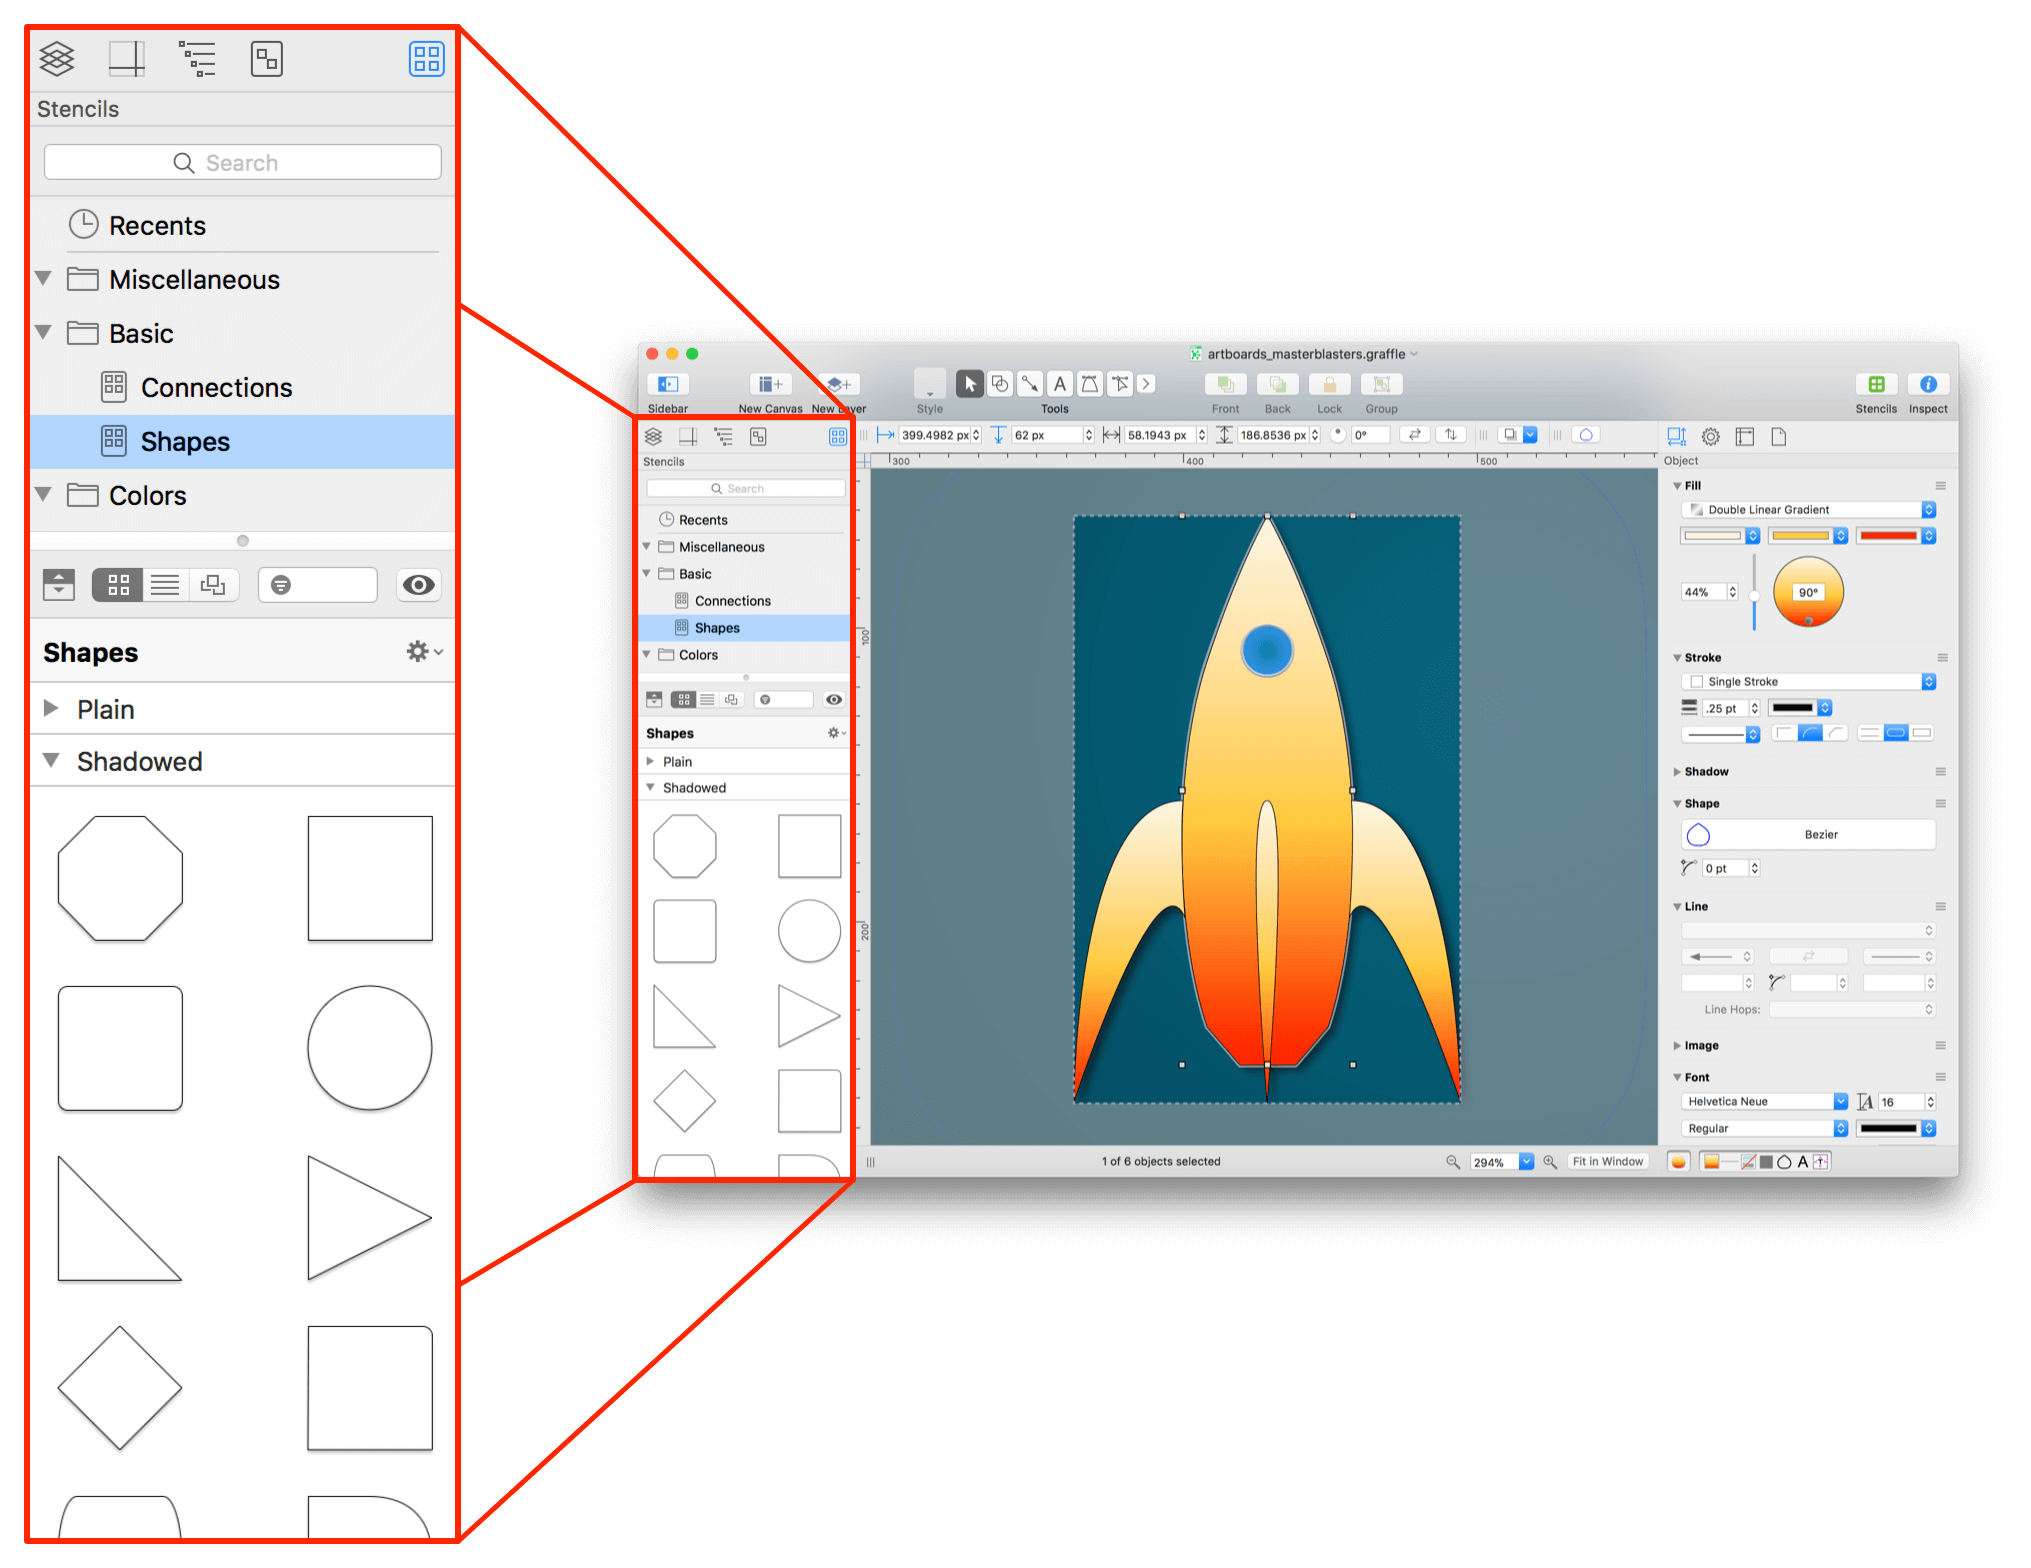
Left Sidebar: For those times when you need to work with stencils and various inspectors at the same time, you can move the Stencil Browser to the left sidebar:
-
Popover: Only occasionally use stencils? You can opt to display the Stencil Browser in a Popover Menu, available by clicking the Stencils button in the toolbar:
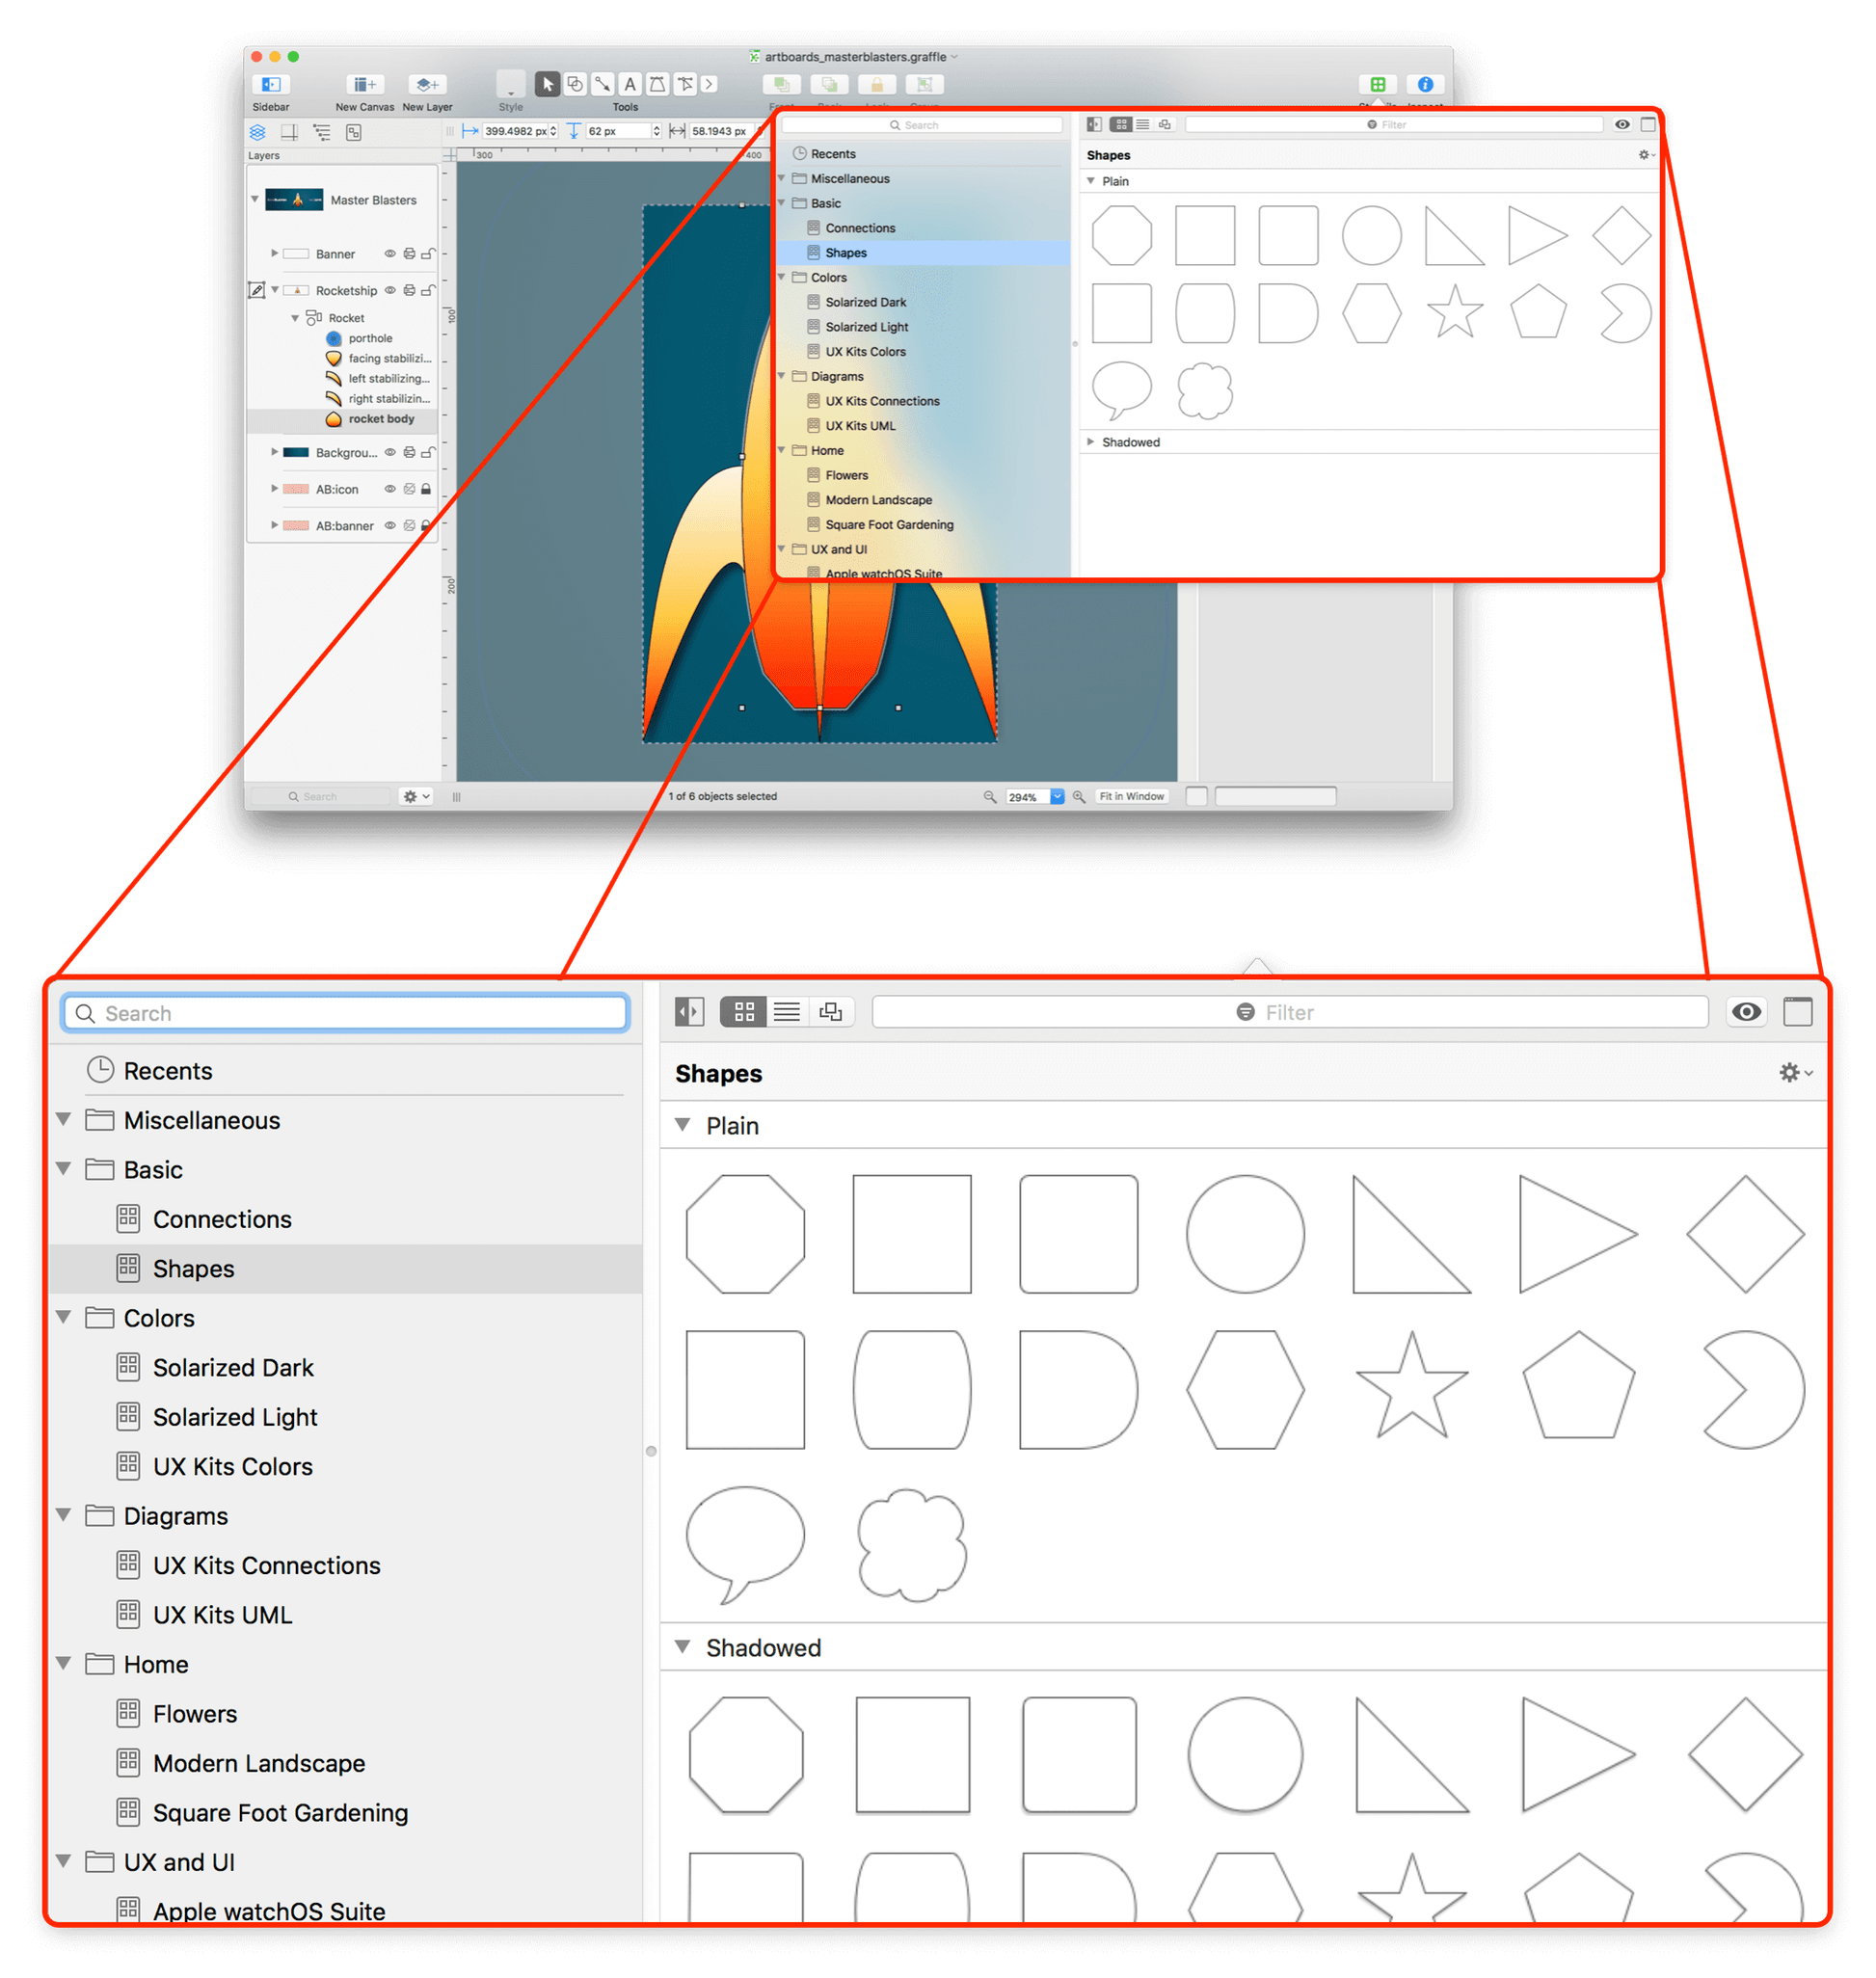
-
Floating Window: If you have a larger display and tend to use stencils more frequently, you can choose to have the Stencil Browser available as a free-floating window that you can move around your display:
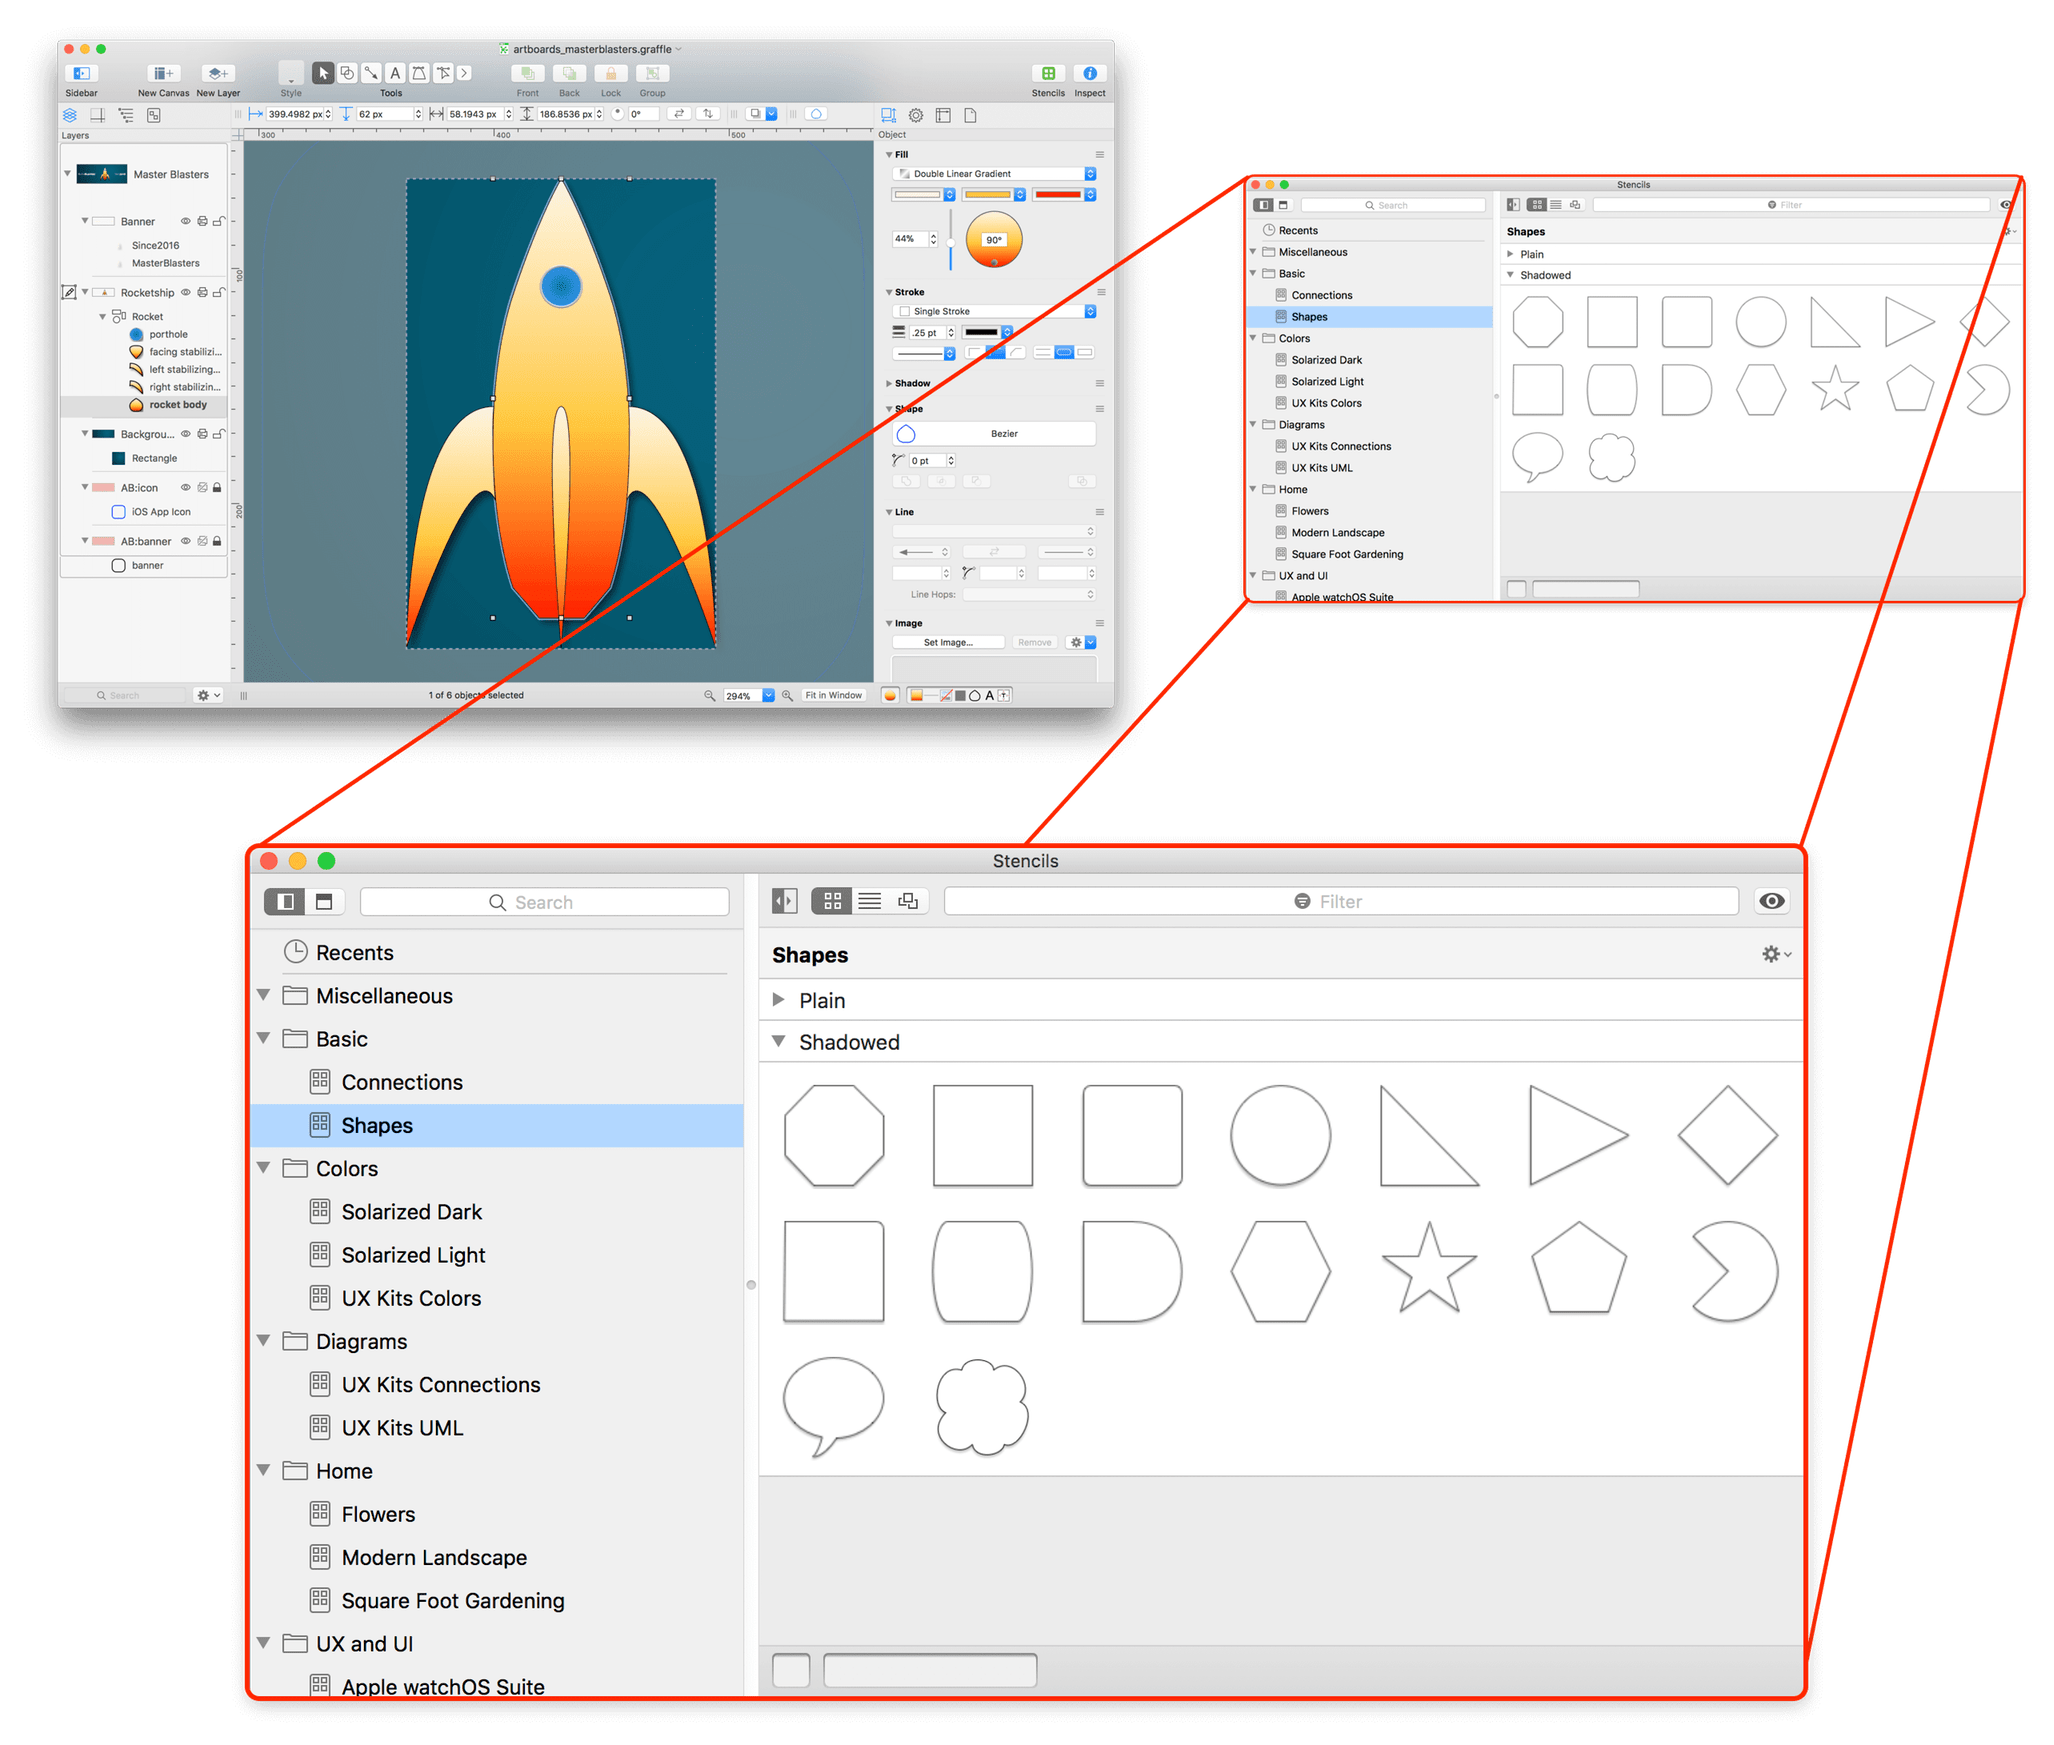
To open the Stencil Browser, click  in the toolbar or choose Window ▸ Stencils.
You can use the Keyboard Shortcuts window to specify a keyboard shortcut for opening the Stencil Browser.
Using the Stencil Browser
When using the Stencil Browser in the Right or Left Sidebar, the Stencil Browser is limited to a vertical display. At the center of the Stencil Browser a bar that you can slide up or down to reveal more of the Stencil List (at top) or the stencils for the selected set (at bottom). Click  to hide and show the Stencil List.
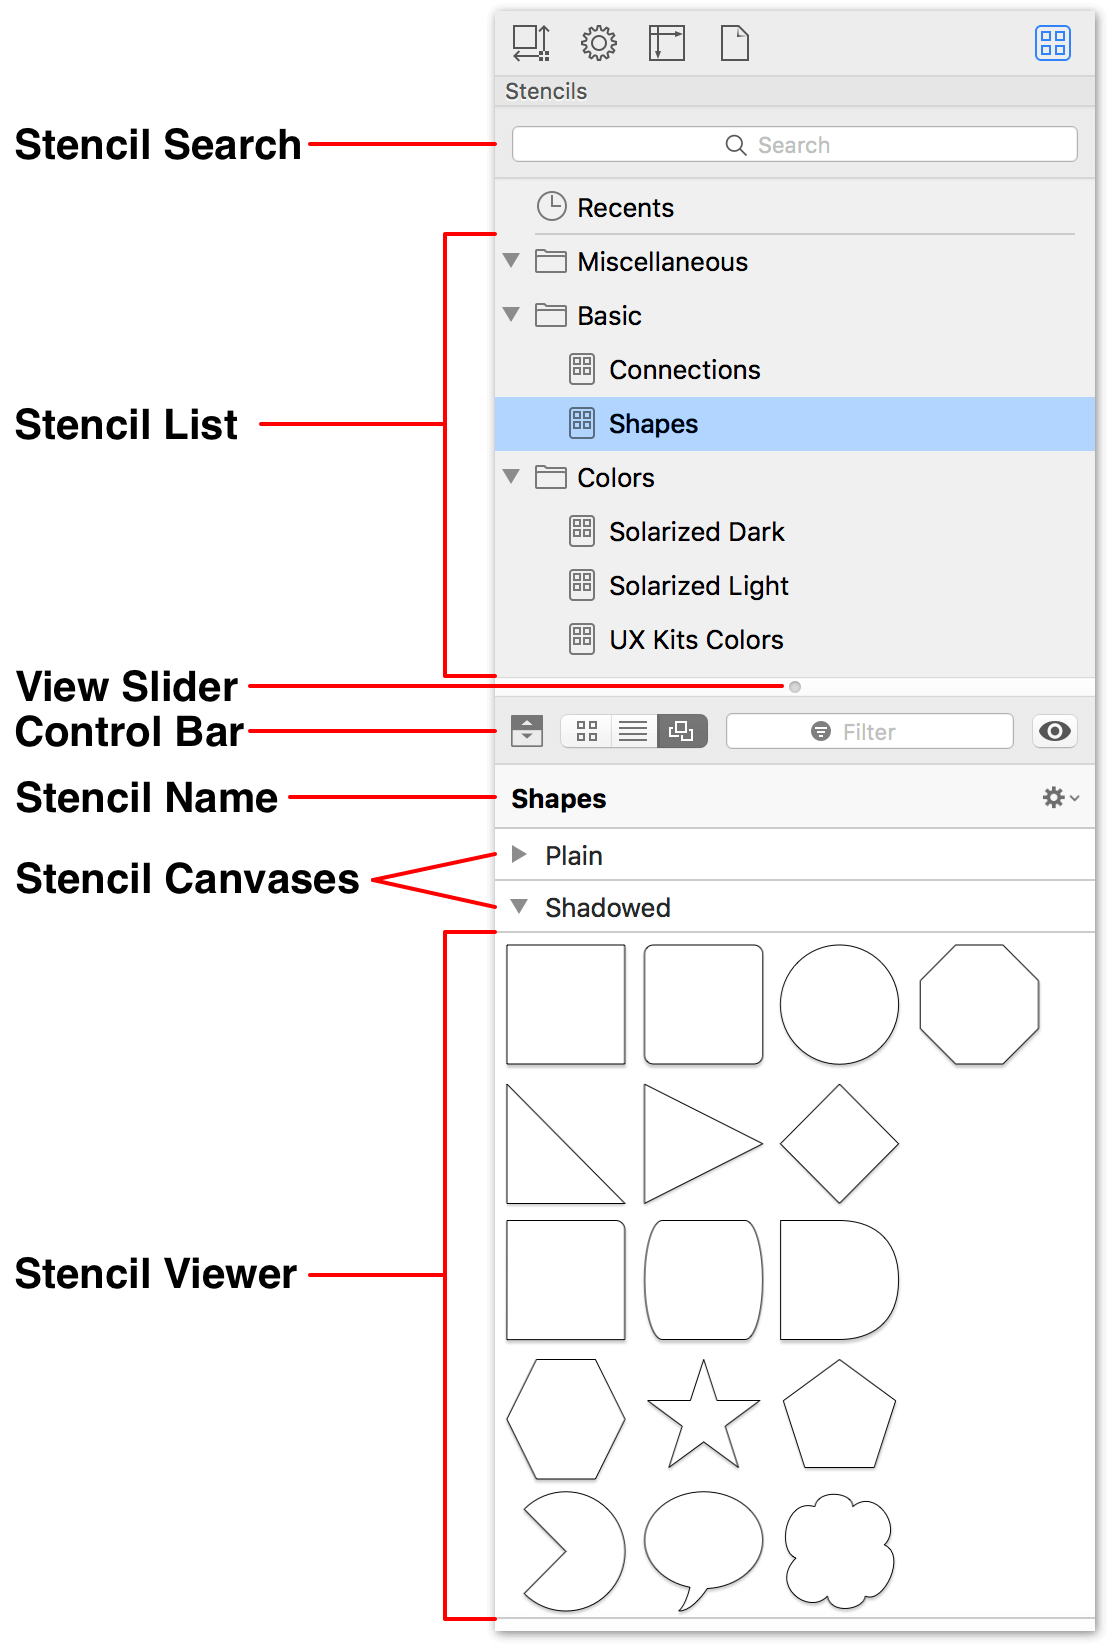
When using the Stencil Browser as a Popover or Floating Window, the Stencil Browser shifts its layout sideways, affording you more room to view and work with your stencils.
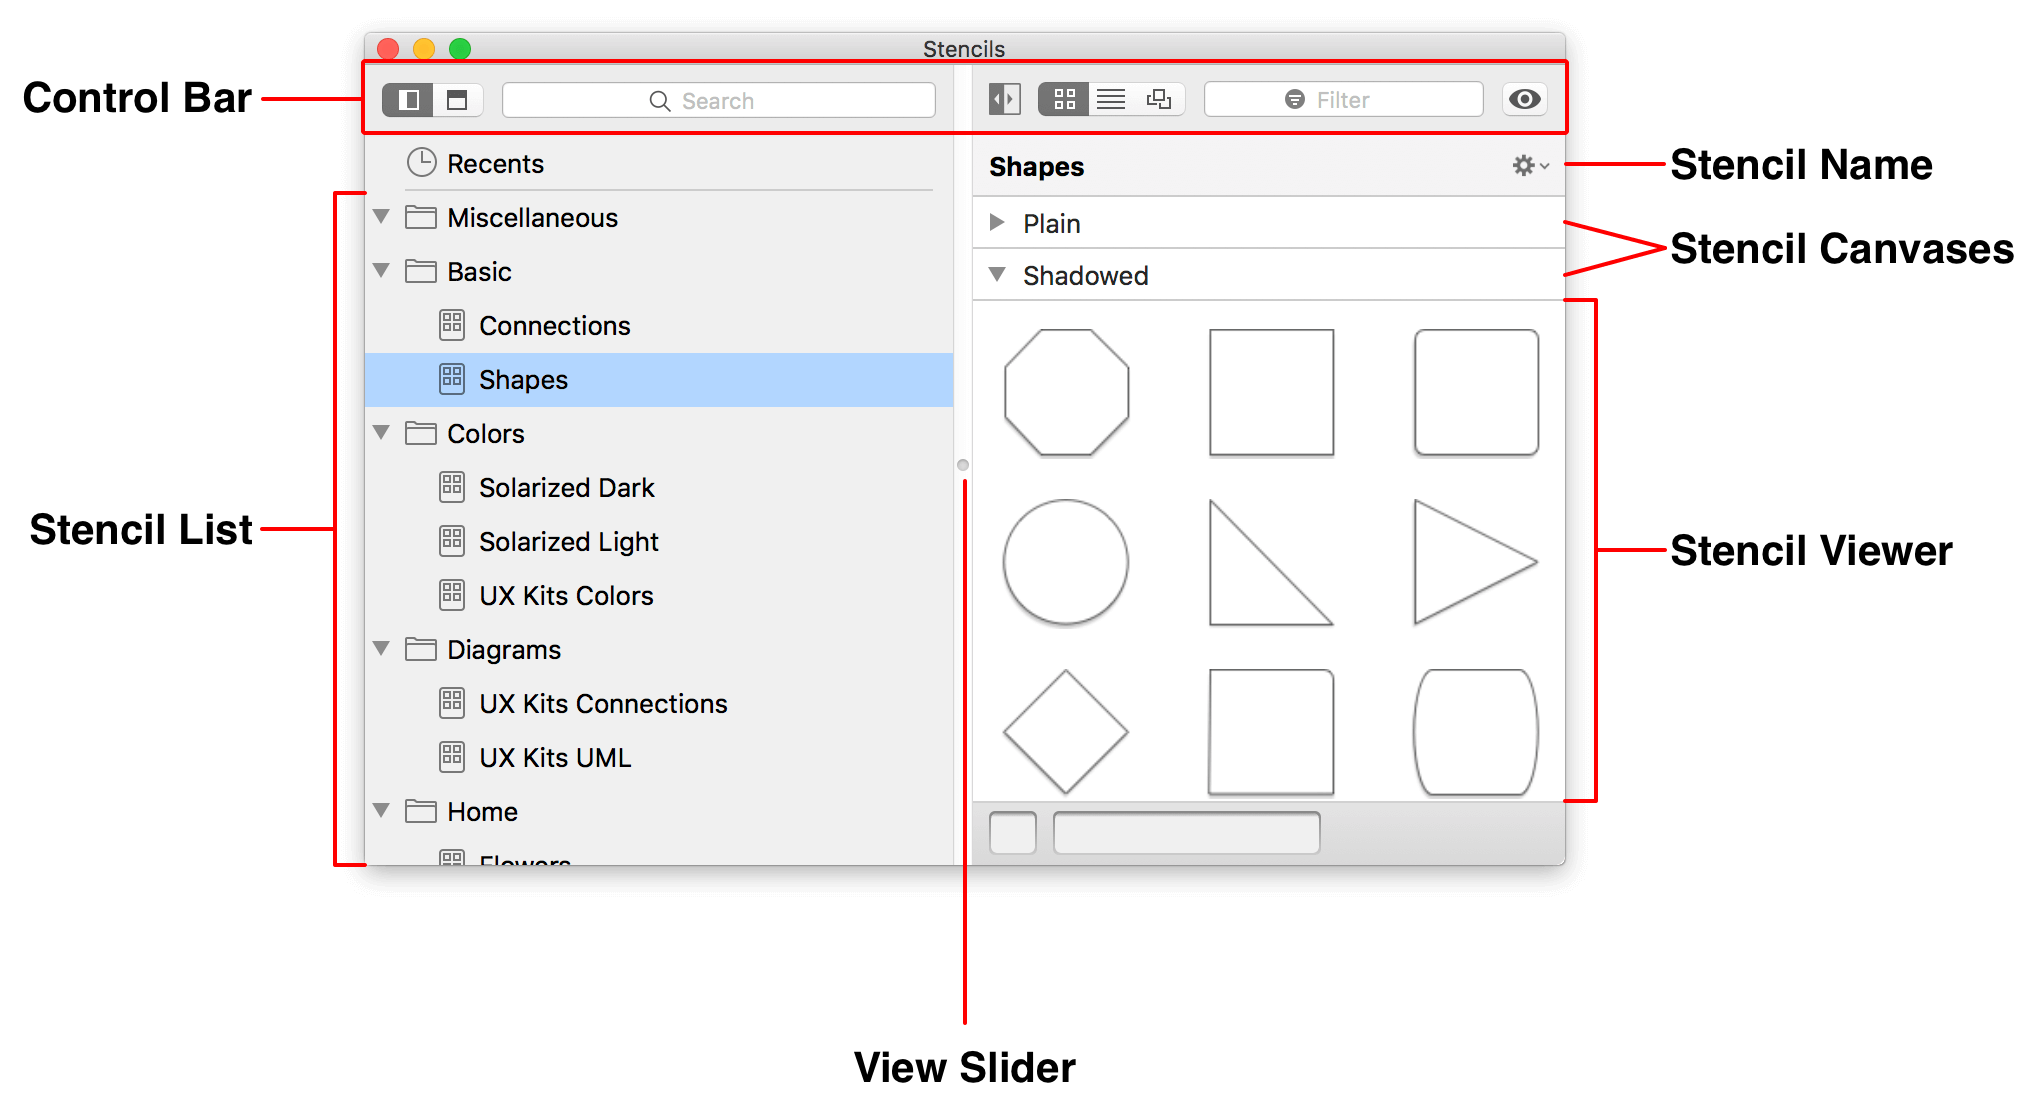
However, if you click  in the Stencil Browser’s control bar, you can switch the orientation to place the stencil list on top:
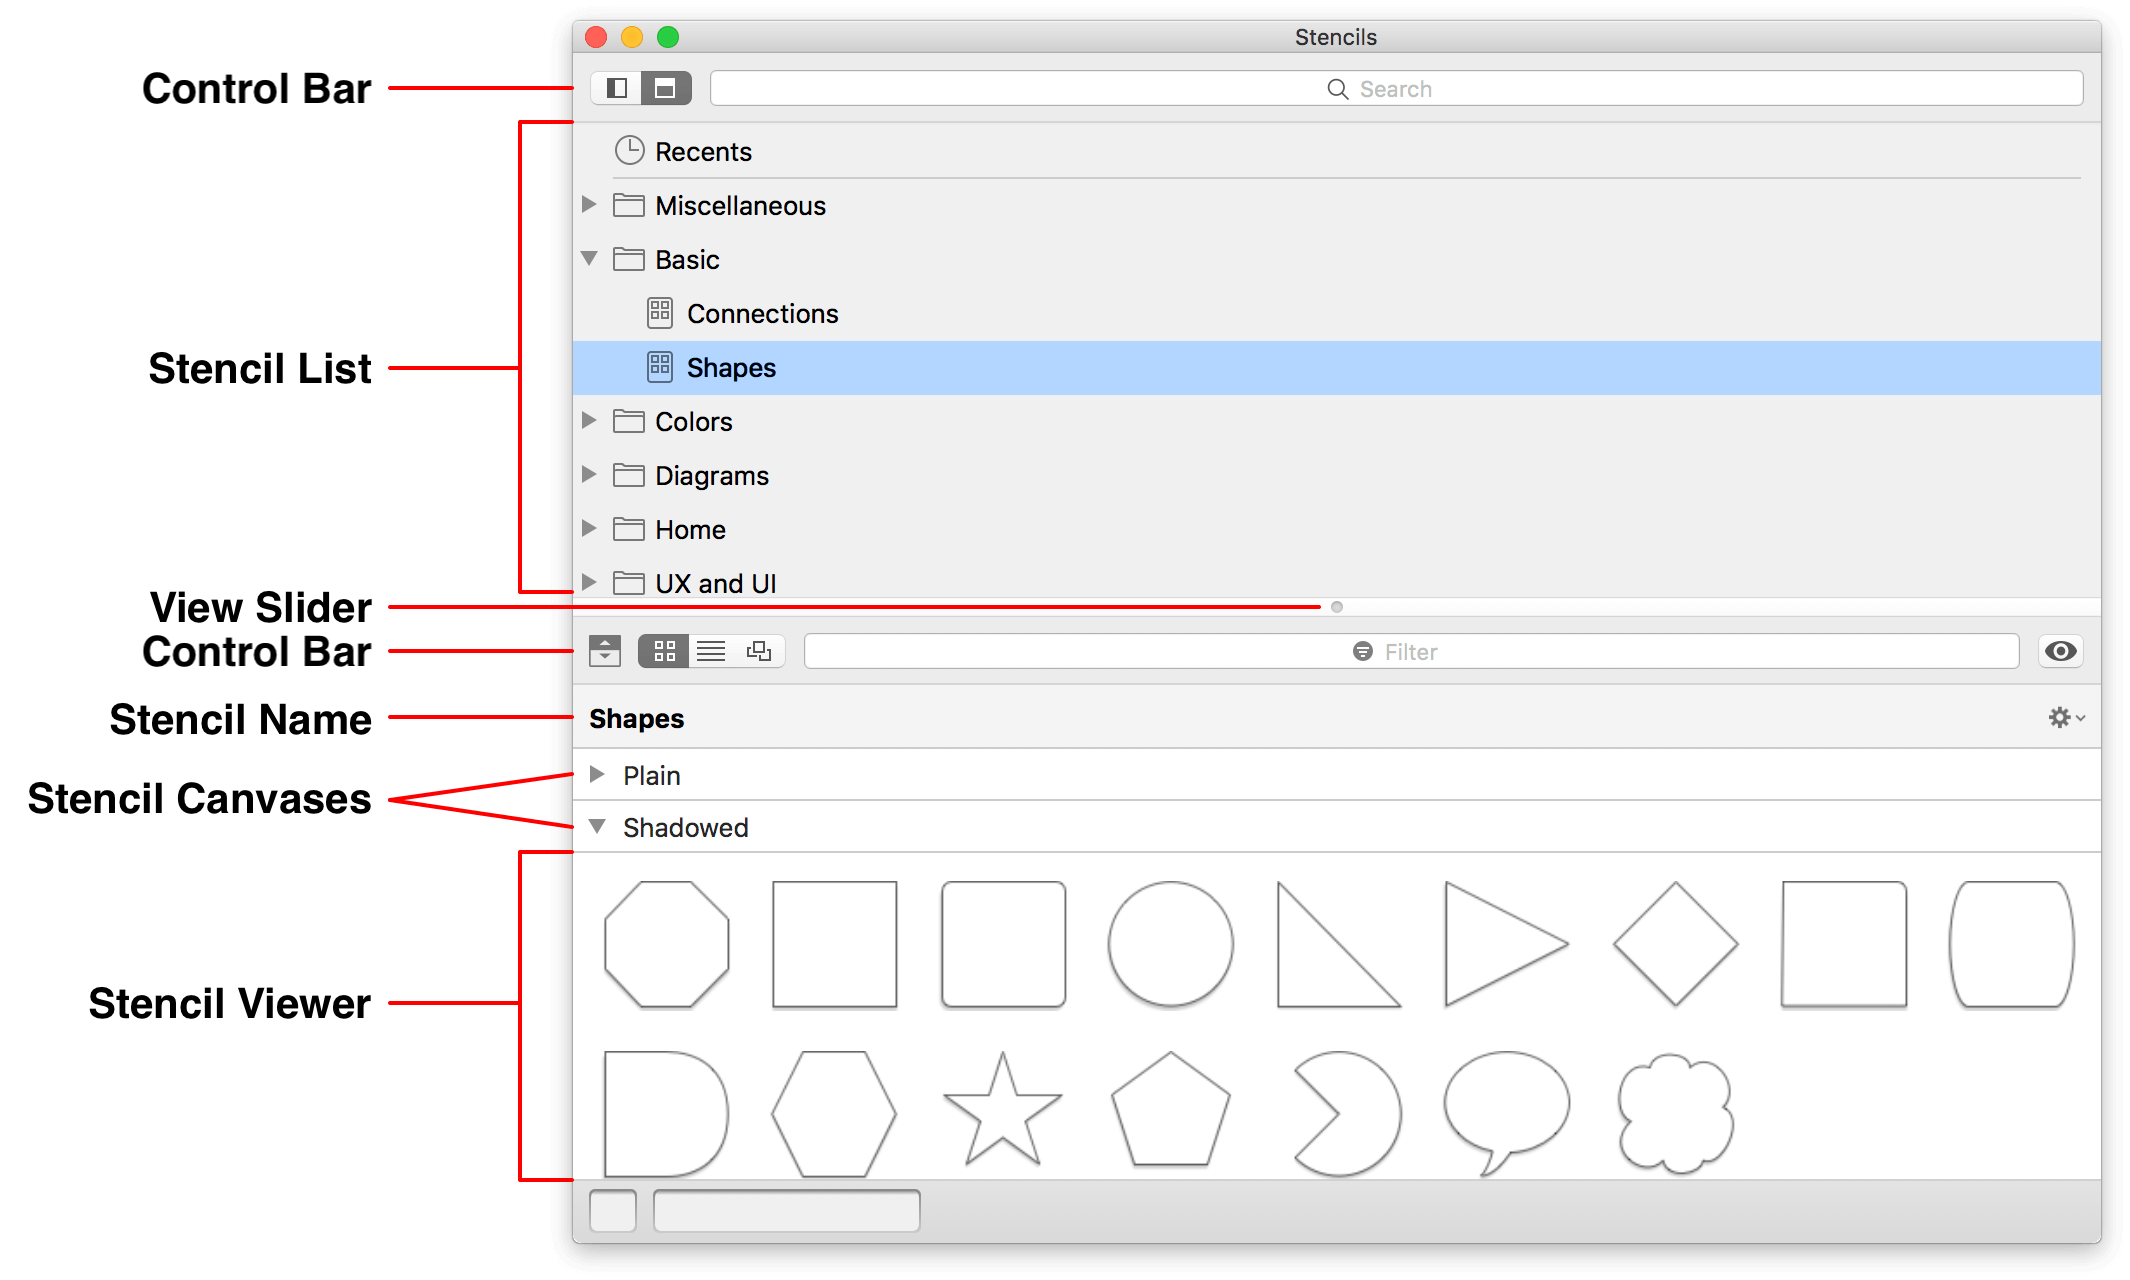
Stencil Browser Controls
The following lists the various interface elements you’ll find in the Stencil Browser’s control bar:
Stencil Layout

- Grid View: Displays the stencils in the stencil set as a grid.

- List View: Displays a list of each stencil in the stencil set, along with its name and any associated metadata.

- Canvas View: Displays the stencil set as they appear on the canvas of the stencil file.
Hide/Show Stencil List

- Click to hide or show the Stencil List at the top of the Stencil Browser.

- Click to hide or show the Stencil List on the left side of the Stencil Browser.
Stencil List Location

- When viewing the Stencil Browser in the Popover or Floating Window, click to show the Stencil List on the left side of the Stencil Browser.

- When viewing the Stencil Browser in the Popover or Floating Window, click to show the Stencil List at the top of the Stencil Browser.
Stencil View Options

-
Click to open a pop-up menu to display different view options for the Stencil Browser based on the view type (Grid, List, or Canvas) you have selected.
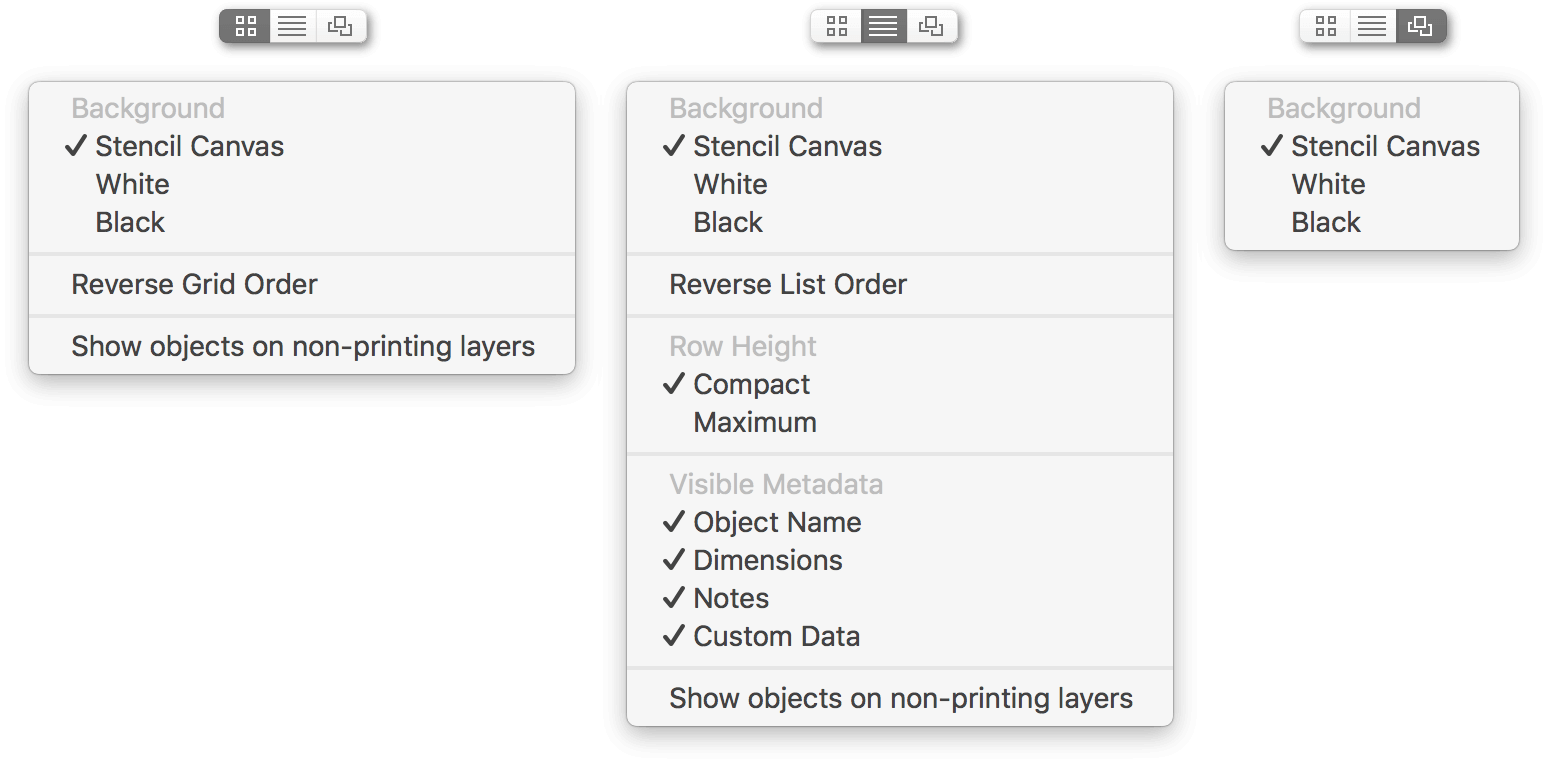
All three view types offer the ability to set a Background color for the stencil view, as follows:
- Stencil Canvas: Use the canvas background from the stencil file.
- White: Sets the background color of the Stencil Browser to white.
- Black: Sets the background color of the Stencil Browser to black.
Grid view offers these additional options:
- Reverse Grid Order: Reverses the display order of items in the grid based on the hierarchy of objects on the canvas.
- Show objects on non-printing layers: Choose to show non-printing layers found in the stencil file, such as artboard layers.
List view offers these additional options:
-
Reverse List Order: Reverses the display order of items in the list based on the hierarchy of objects on the canvas.
-
Row Height:
- Compact: Reduces the height of rows in the list view.
- Maximum: Adds space to rows in the list view.
-
Visible Metadata:
- Object Name: Choose whether to display the object name in the Stencil List.
- Dimensions: Choose whether to display the object dimensions in the Stencil List.
- Notes: Choose whether to display any notes in the Stencil List.
- Custom Data: Choose whether to display custom data in the Stencil List, such as key-value data entered in the Object Data inspector (requires OmniGraffle Pro).
-
Show objects on non-printing layers: Choose to show non-printing layers found in the stencil file, such as artboard layers.
- Search

- Use to search for stencils on your Mac and on Stenciltown.
- Filter

- Use to filter stencils in a selected set (or sets), or to further refine a search.
- Action Menu

-
Clicking the Action menu reveals the following options:
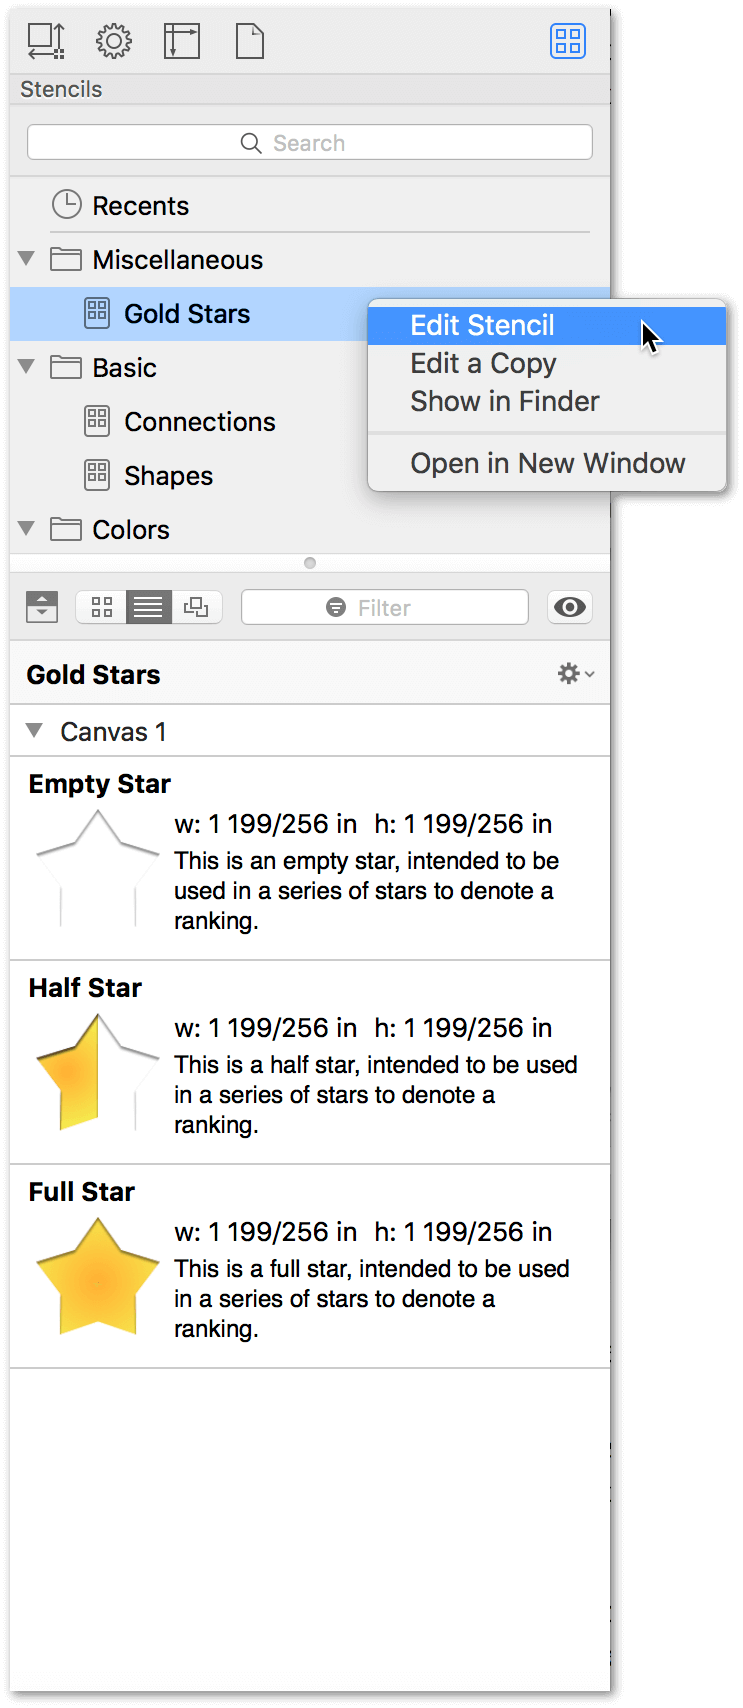
- Edit Stencil: Choosing this option opens the stencil file so you can edit and and save it in place.
- Edit a Copy: Choosing this option opens a copy of the stencil file so you can edit and then save the stencil file with a different name or to another location.
- Show in Finder: Choosing this option opens a Finder window, showing where the selected stencil file is located on your Mac’s hard drive.
- Open in New Window: Choosing this option after selecting a stencil set opens a floating window that isolates that stencil set from other stencils on your Mac.
Searching for Stencils and Filtering Results
At the top of the Stencil Browser is a search field that you can use to search through the existing stencils in OmniGraffle and—as an added bonus—Omni’s own online user-supported stencil repository, Stenciltown.
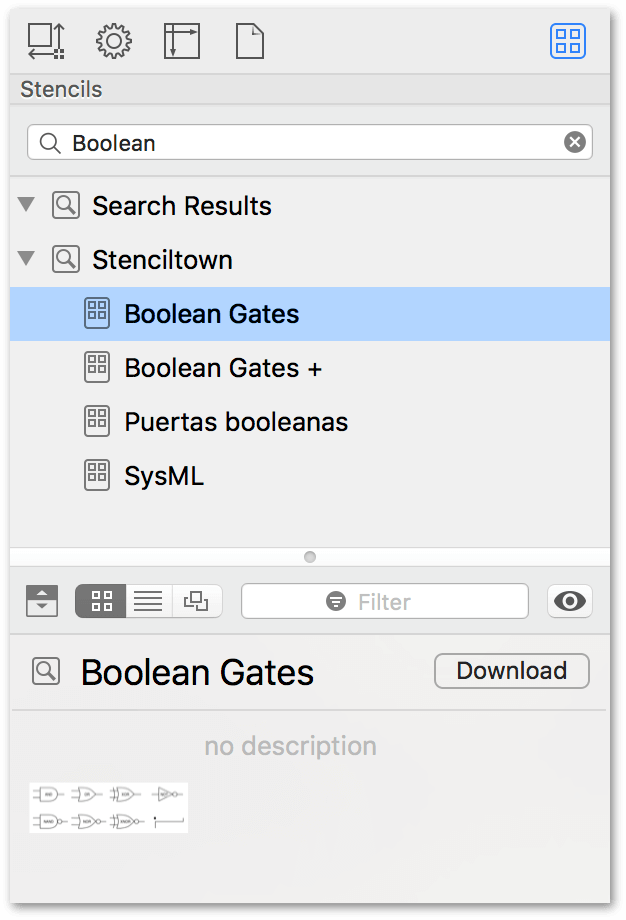
Stencils that already exist in OmniGraffle appear at the top of the search results, followed by anything new that’s been posted to Stenciltown.
How you use a stencil you’ve searched for depends on how it pops up in the results. Let’s say that you’re working on a techy diagram and you need some Boolean Gates. You click in the search field and start entering Boolean. As you type, OmniGraffle starts pruning what you see below. You’ll notice there are two categories of results:
-
Search Results displays stencils already available to you on your Mac.
-
Stenciltown displays applicably-named stencils which you can download from Stenciltown to your Mac. Start by clicking the Download button.
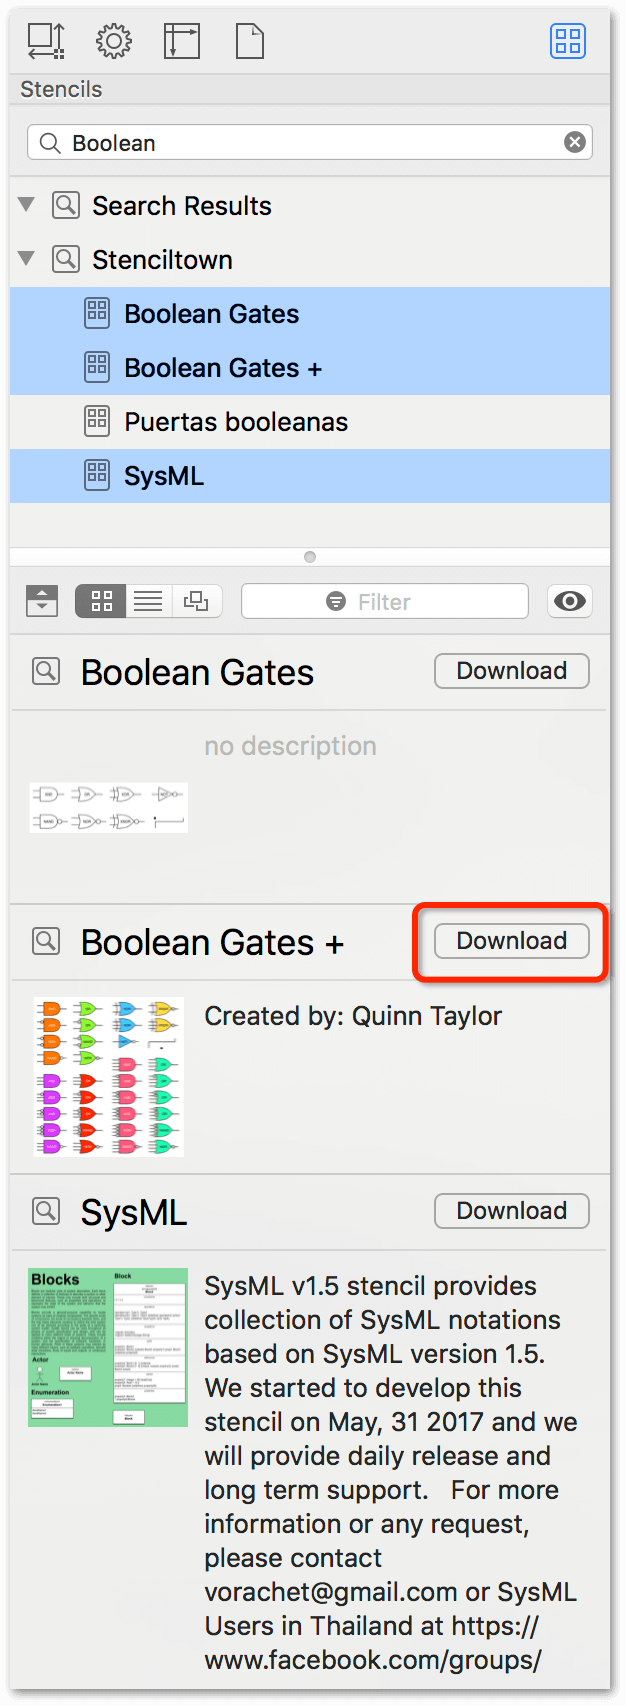
This downloads the stencil from Stenciltown and makes it available with all of the other OmniGraffle stencils on your Mac. Once downloaded, drag the stencil to the canvas.
OmniGraffle only searches for stencils on Stenciltown if your Mac is connected to the Internet.
After downloading the Boolean-related stencils from Stenciltown, you can use the Filter field to isolate specific stencils within each selected set.
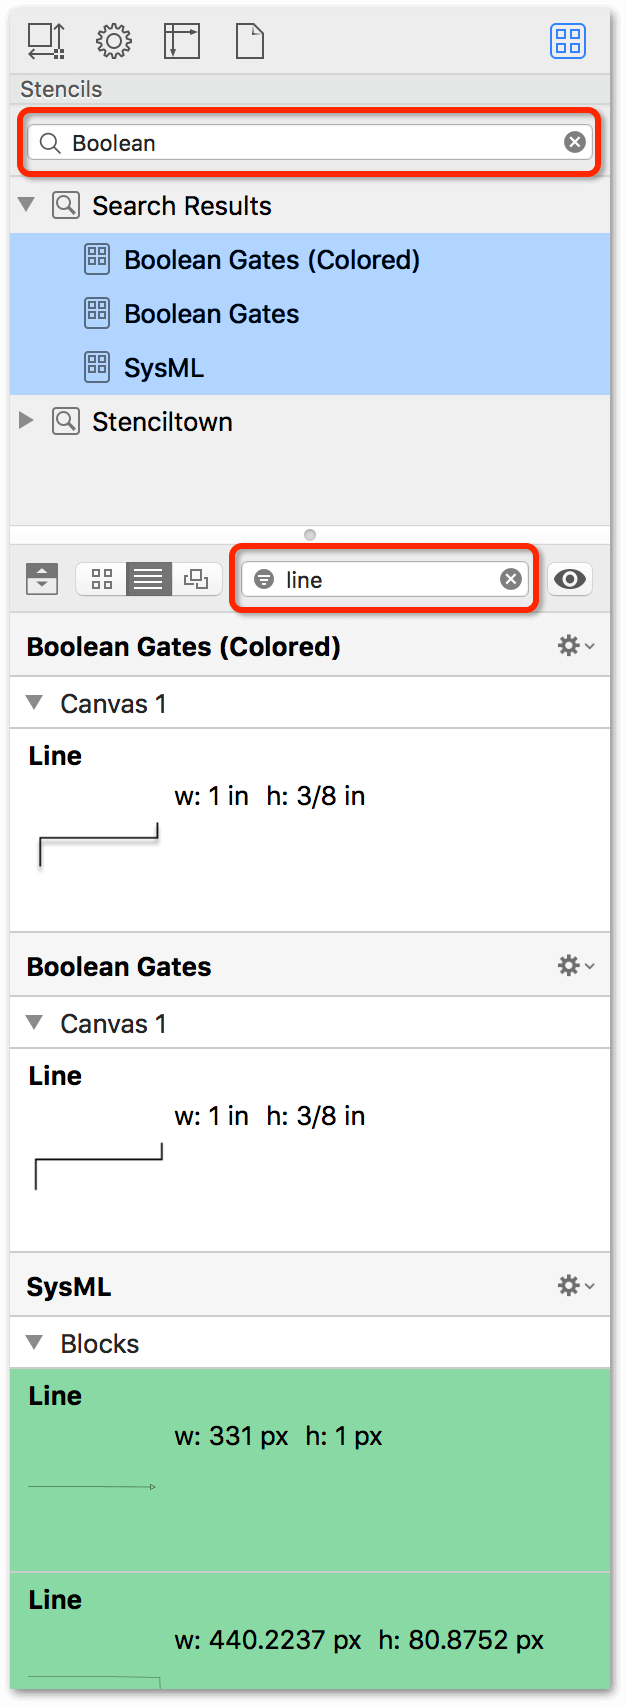
Filtering relies on names and metadata provided in the Stencil Set. For more information about properly naming stencils to optimize them for use in OmniGraffle, see Tips for Creating a Great Stencil.
If you can’t find the stencil you’re looking for, either in OmniGraffle or on Stenciltown, you could always create your own stencil set in OmniGraffle. And, if you’re inclined, you could share that with other OmniGraffle users on Stenciltown.
Adding Stencils to the Canvas
To add a stencil shape to your project, select the object you’d like to use, and then drag that object to the canvas.
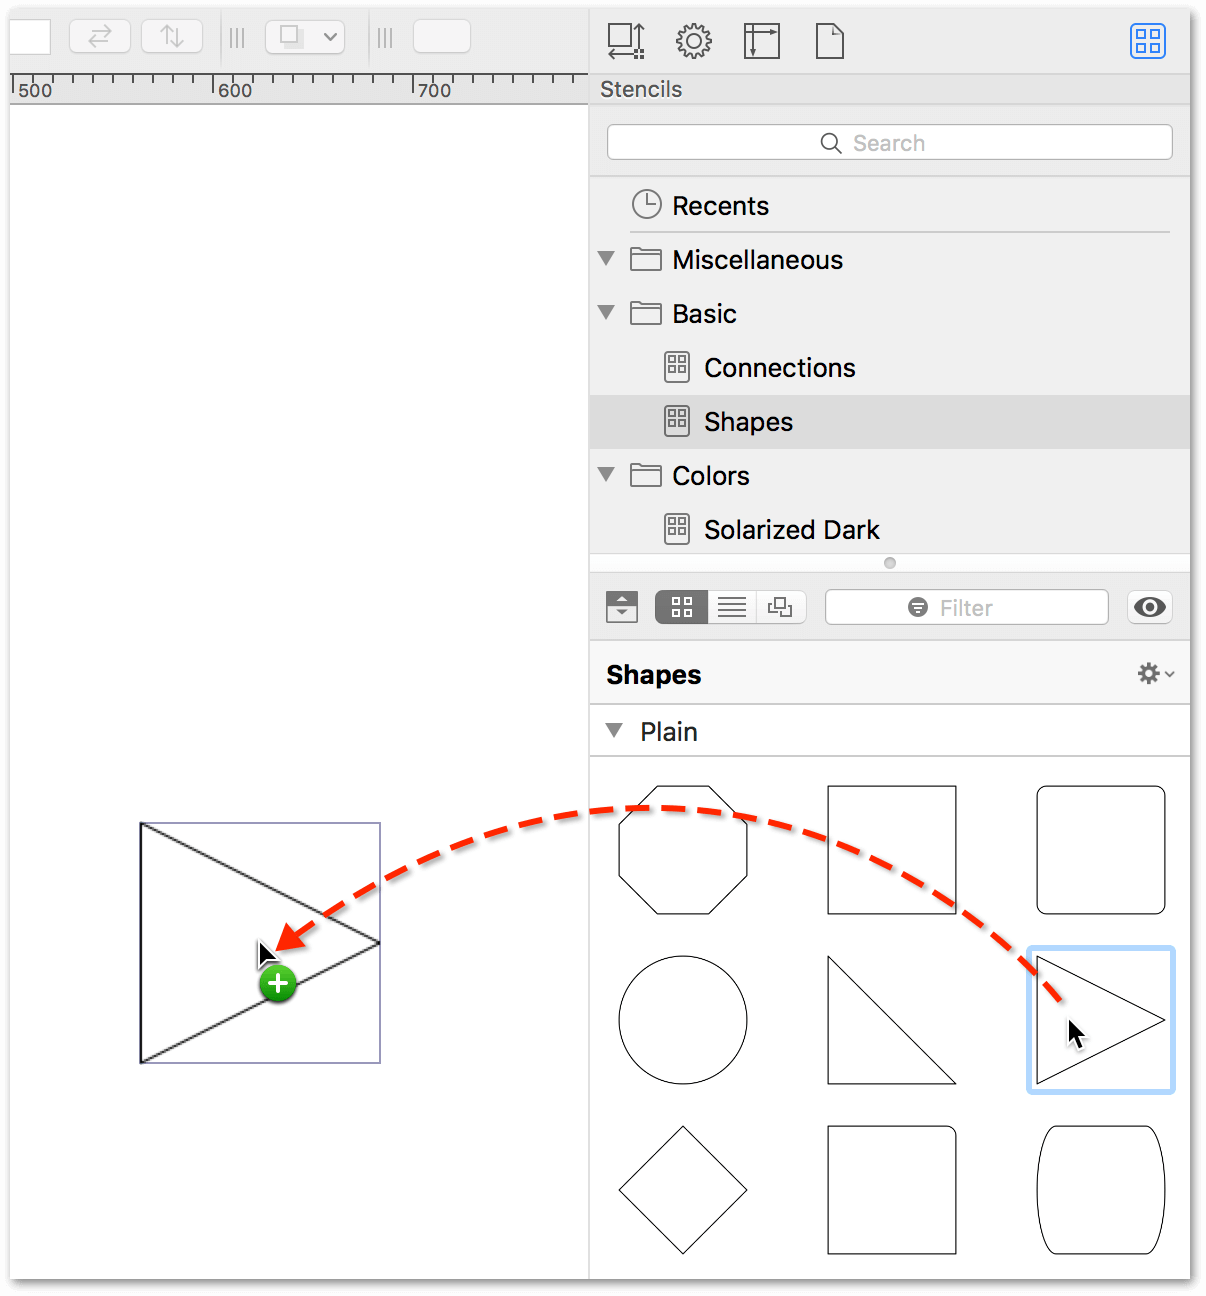
Once on the canvas, you can interact with the shape just as you would with any other object you draw. For example, you can rotate the object, edit the path with the Point Editor tool (requires OmniGraffle Pro), or use the shape to rapidly prototype a new web design.
Editing an Existing Stencil
If you ever need to edit a stencil—say, to change an object’s color or size—OmniGraffle makes it easy:
- In the toolbar, click
 to open the Stencil Browser.
 - Locate the stencil that you want to edit.
-
Control-click the stencil name, and then choose Edit Stencil if you want to edit and save the stencil file, or choose Edit a Copy from the menu:
-
If you chose Edit Stencil, the stencil file opens for you to work on. When you have finished making your changes, saving the file overwrites the original file in the Stencils folder.
-
If you chose Edit a Copy, the contents of the stencil file are placed in a new, Untitled stencil file. When you’ve finished making your changes, be sure to give this stencil file a different name than its predecessor so you don’t overwrite the original.
-
Once the stencil is open in OmniGraffle, you can work on it just like you would with any other project. When you have finished making your changes, save the stencil file and close its window. The results show up immediately in the Stencil Browser.
Dragging Objects Into a Stencil Set
If all you want to do is add an object to a stencil set, you don't have to open and edit the entire file. Instead, you can select the object on the canvas and drag that into a stencil set in the Stencil Browser.
Here's how to do this:
- In the toolbar, click
 to open the Stencil Browser.
 - In the Stencil Browser, select the Stencil Set to which you'd like to add an object.
- Press and hold the Option key.
-
From the canvas, select and drag the object into the Stencil Set.
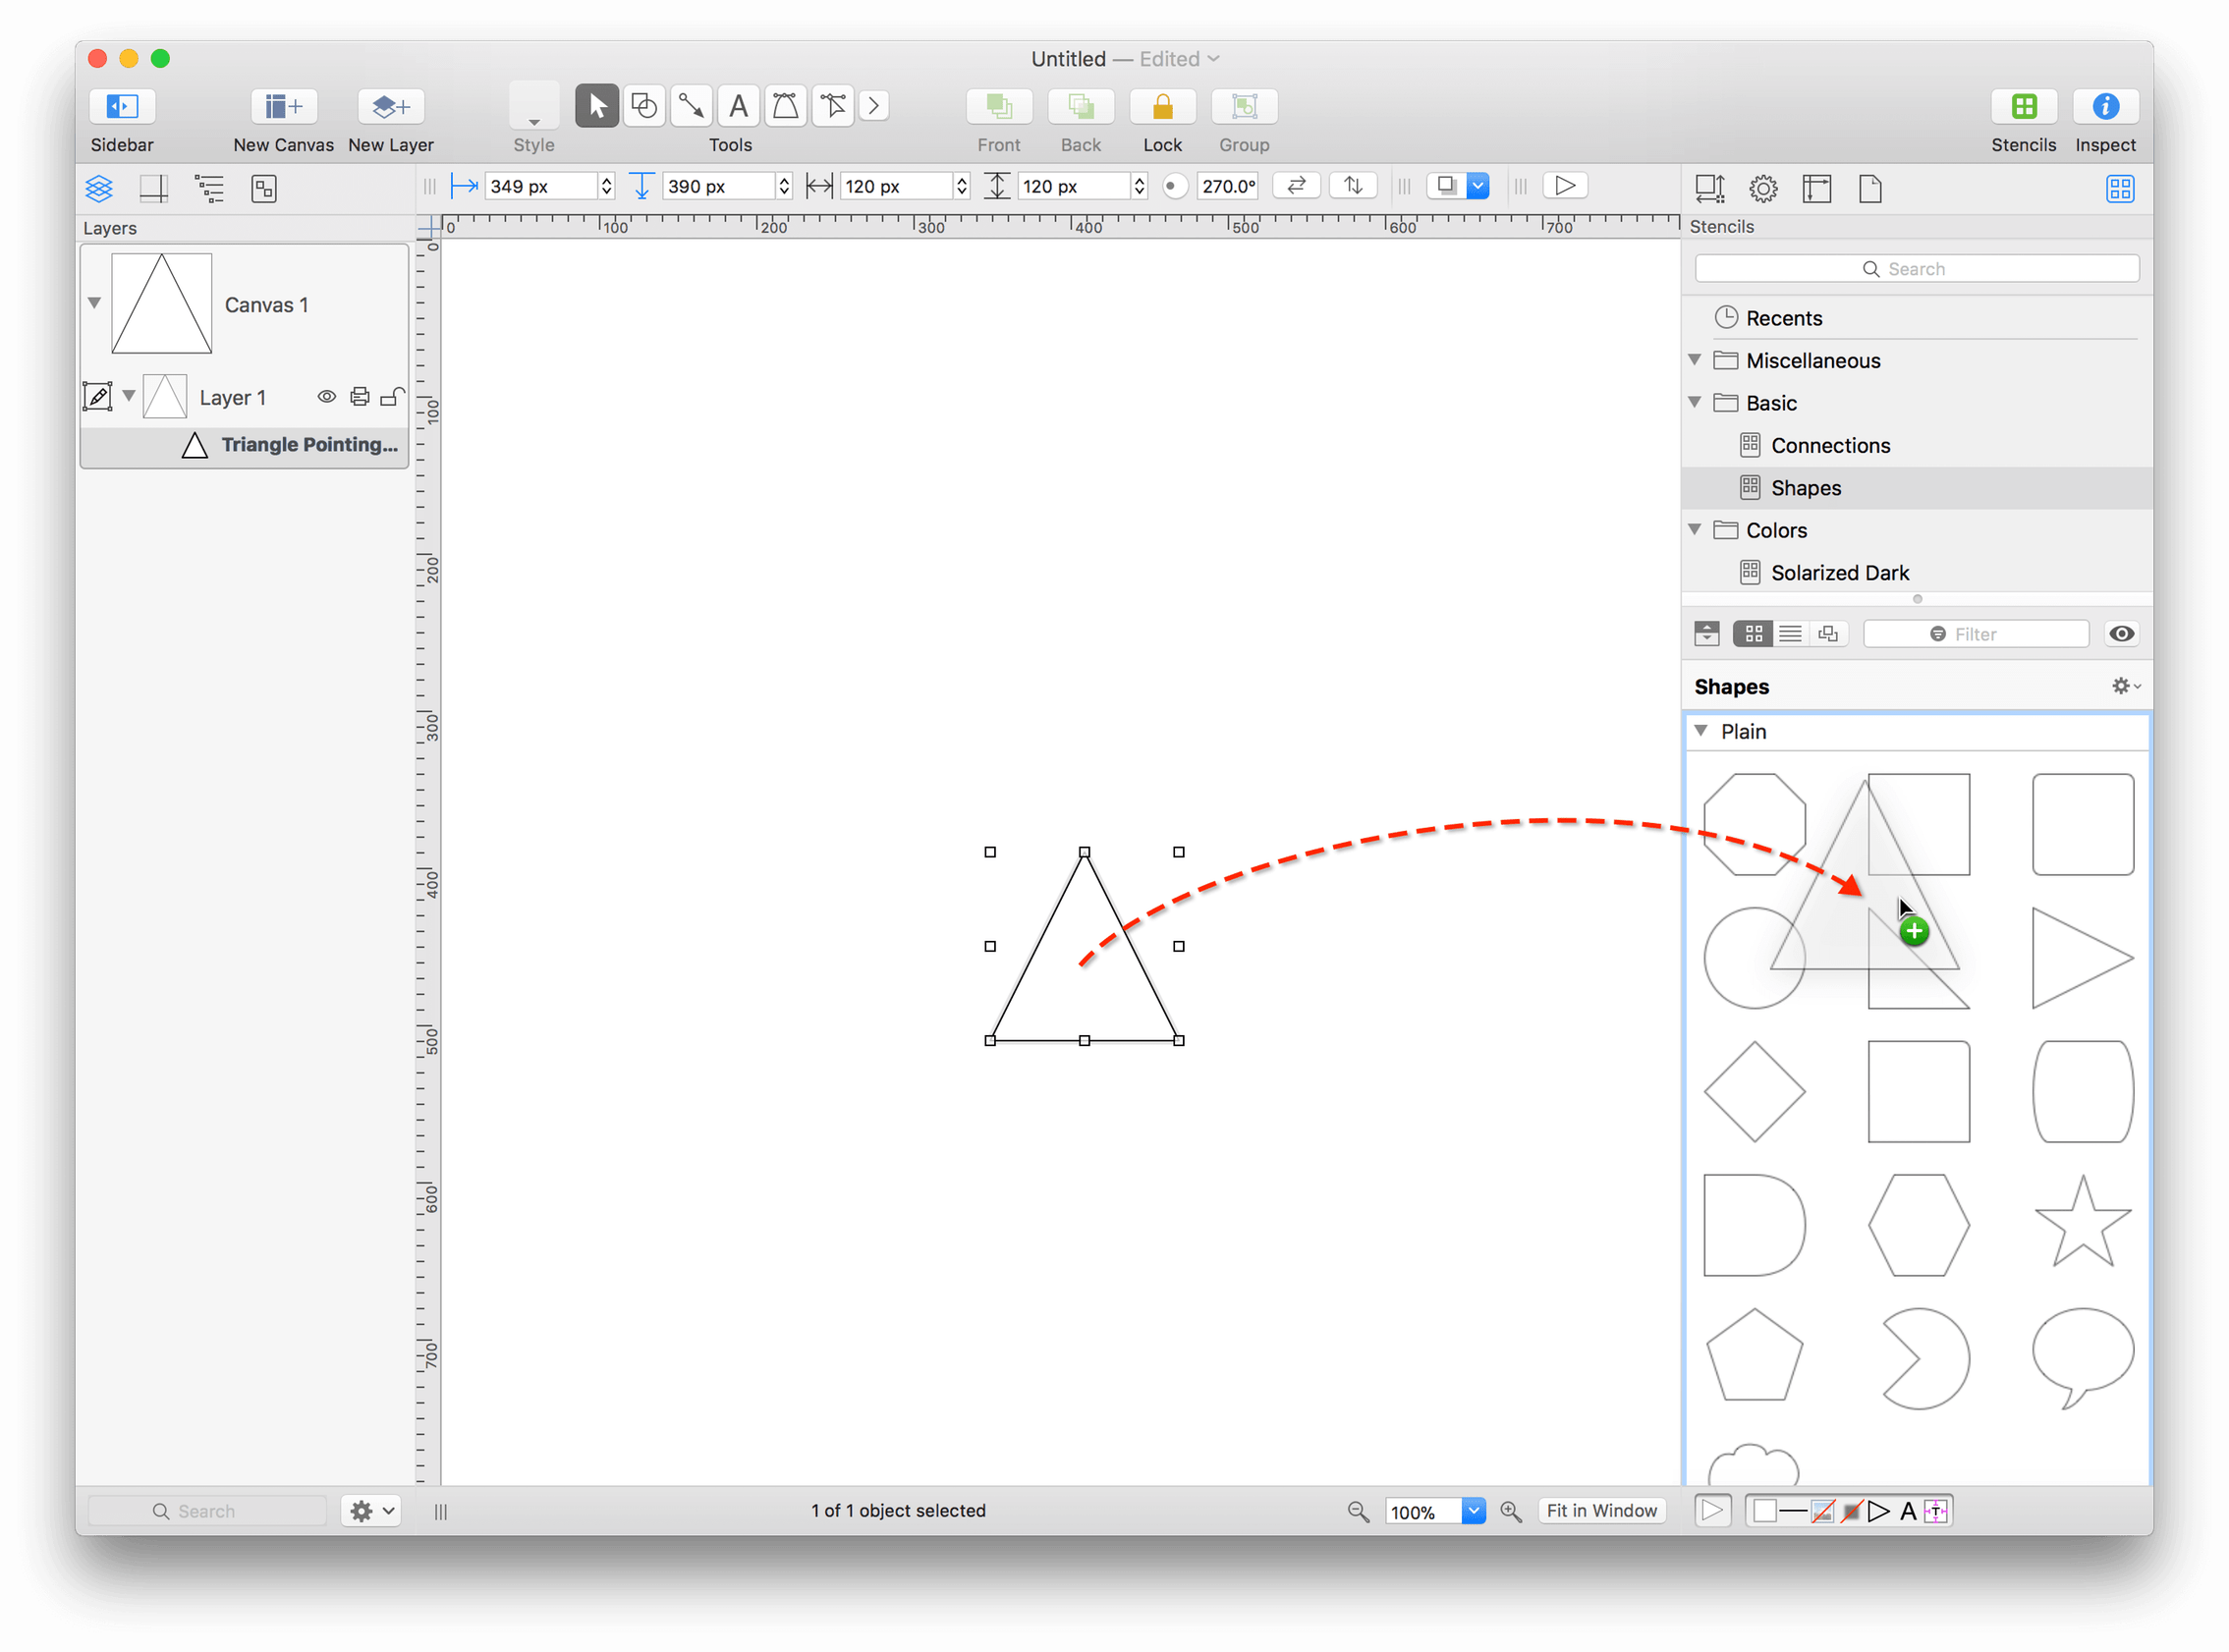
When you let go of the mouse, the object you dragged shows up in the Stencil Set that you have open in the Stencil Browser:
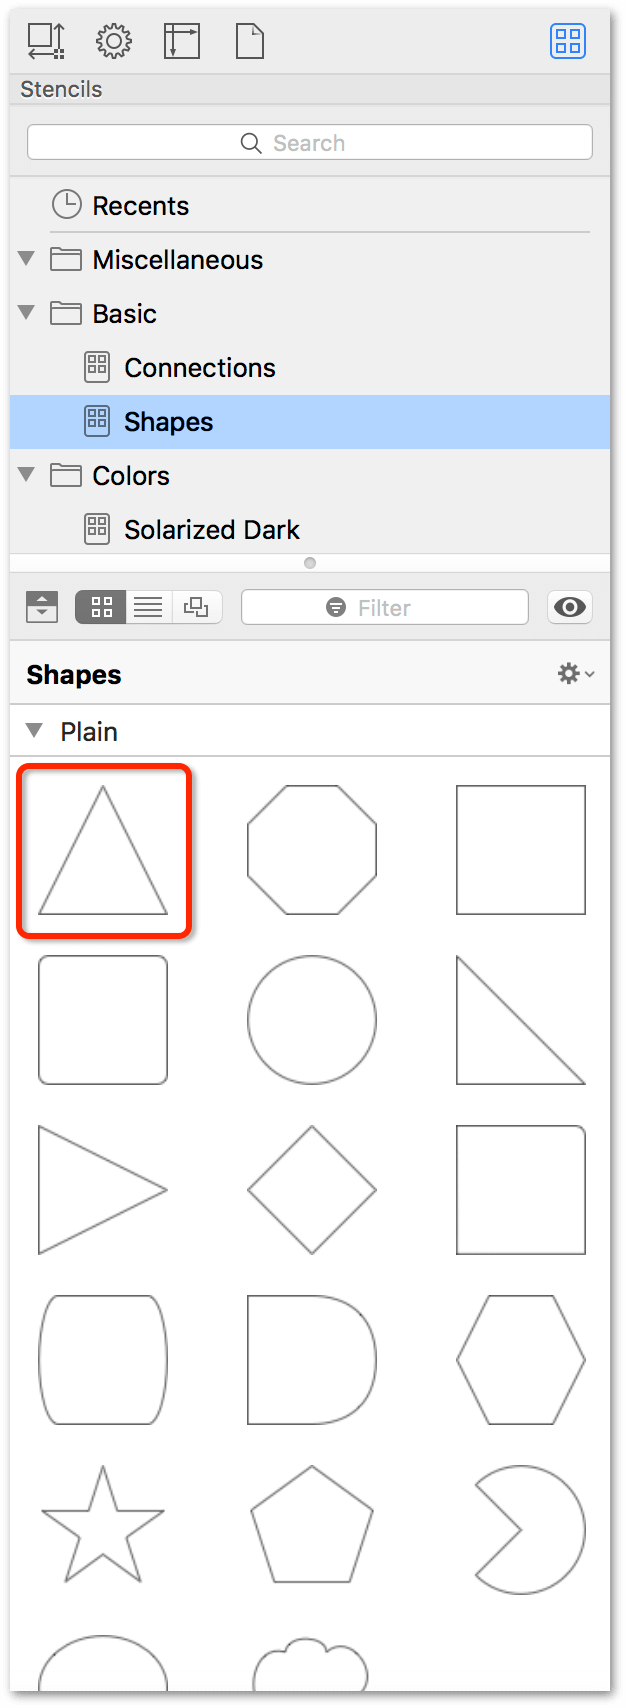
This is particularly helpful if you are prototyping an app, and are creating buttons and other user interface elements on the fly. As you create a new object, you can drag it into your base Stencil Set with the knowledge that your stencils will always be up to date.
Working with Multiple Stencil Browsers
While it may seem that there's only one place to access the Stencil Browser, you can actually have multiple Stencil Browser windows open at the same time.
In the Stencil Browser, double-click on a stencil in the Stencil List; this makes that stencil available in a floating Stencil Browser window. Need to use more than two or three stencils at the same time? Keep double-clicking stencils until you have the windows you need.
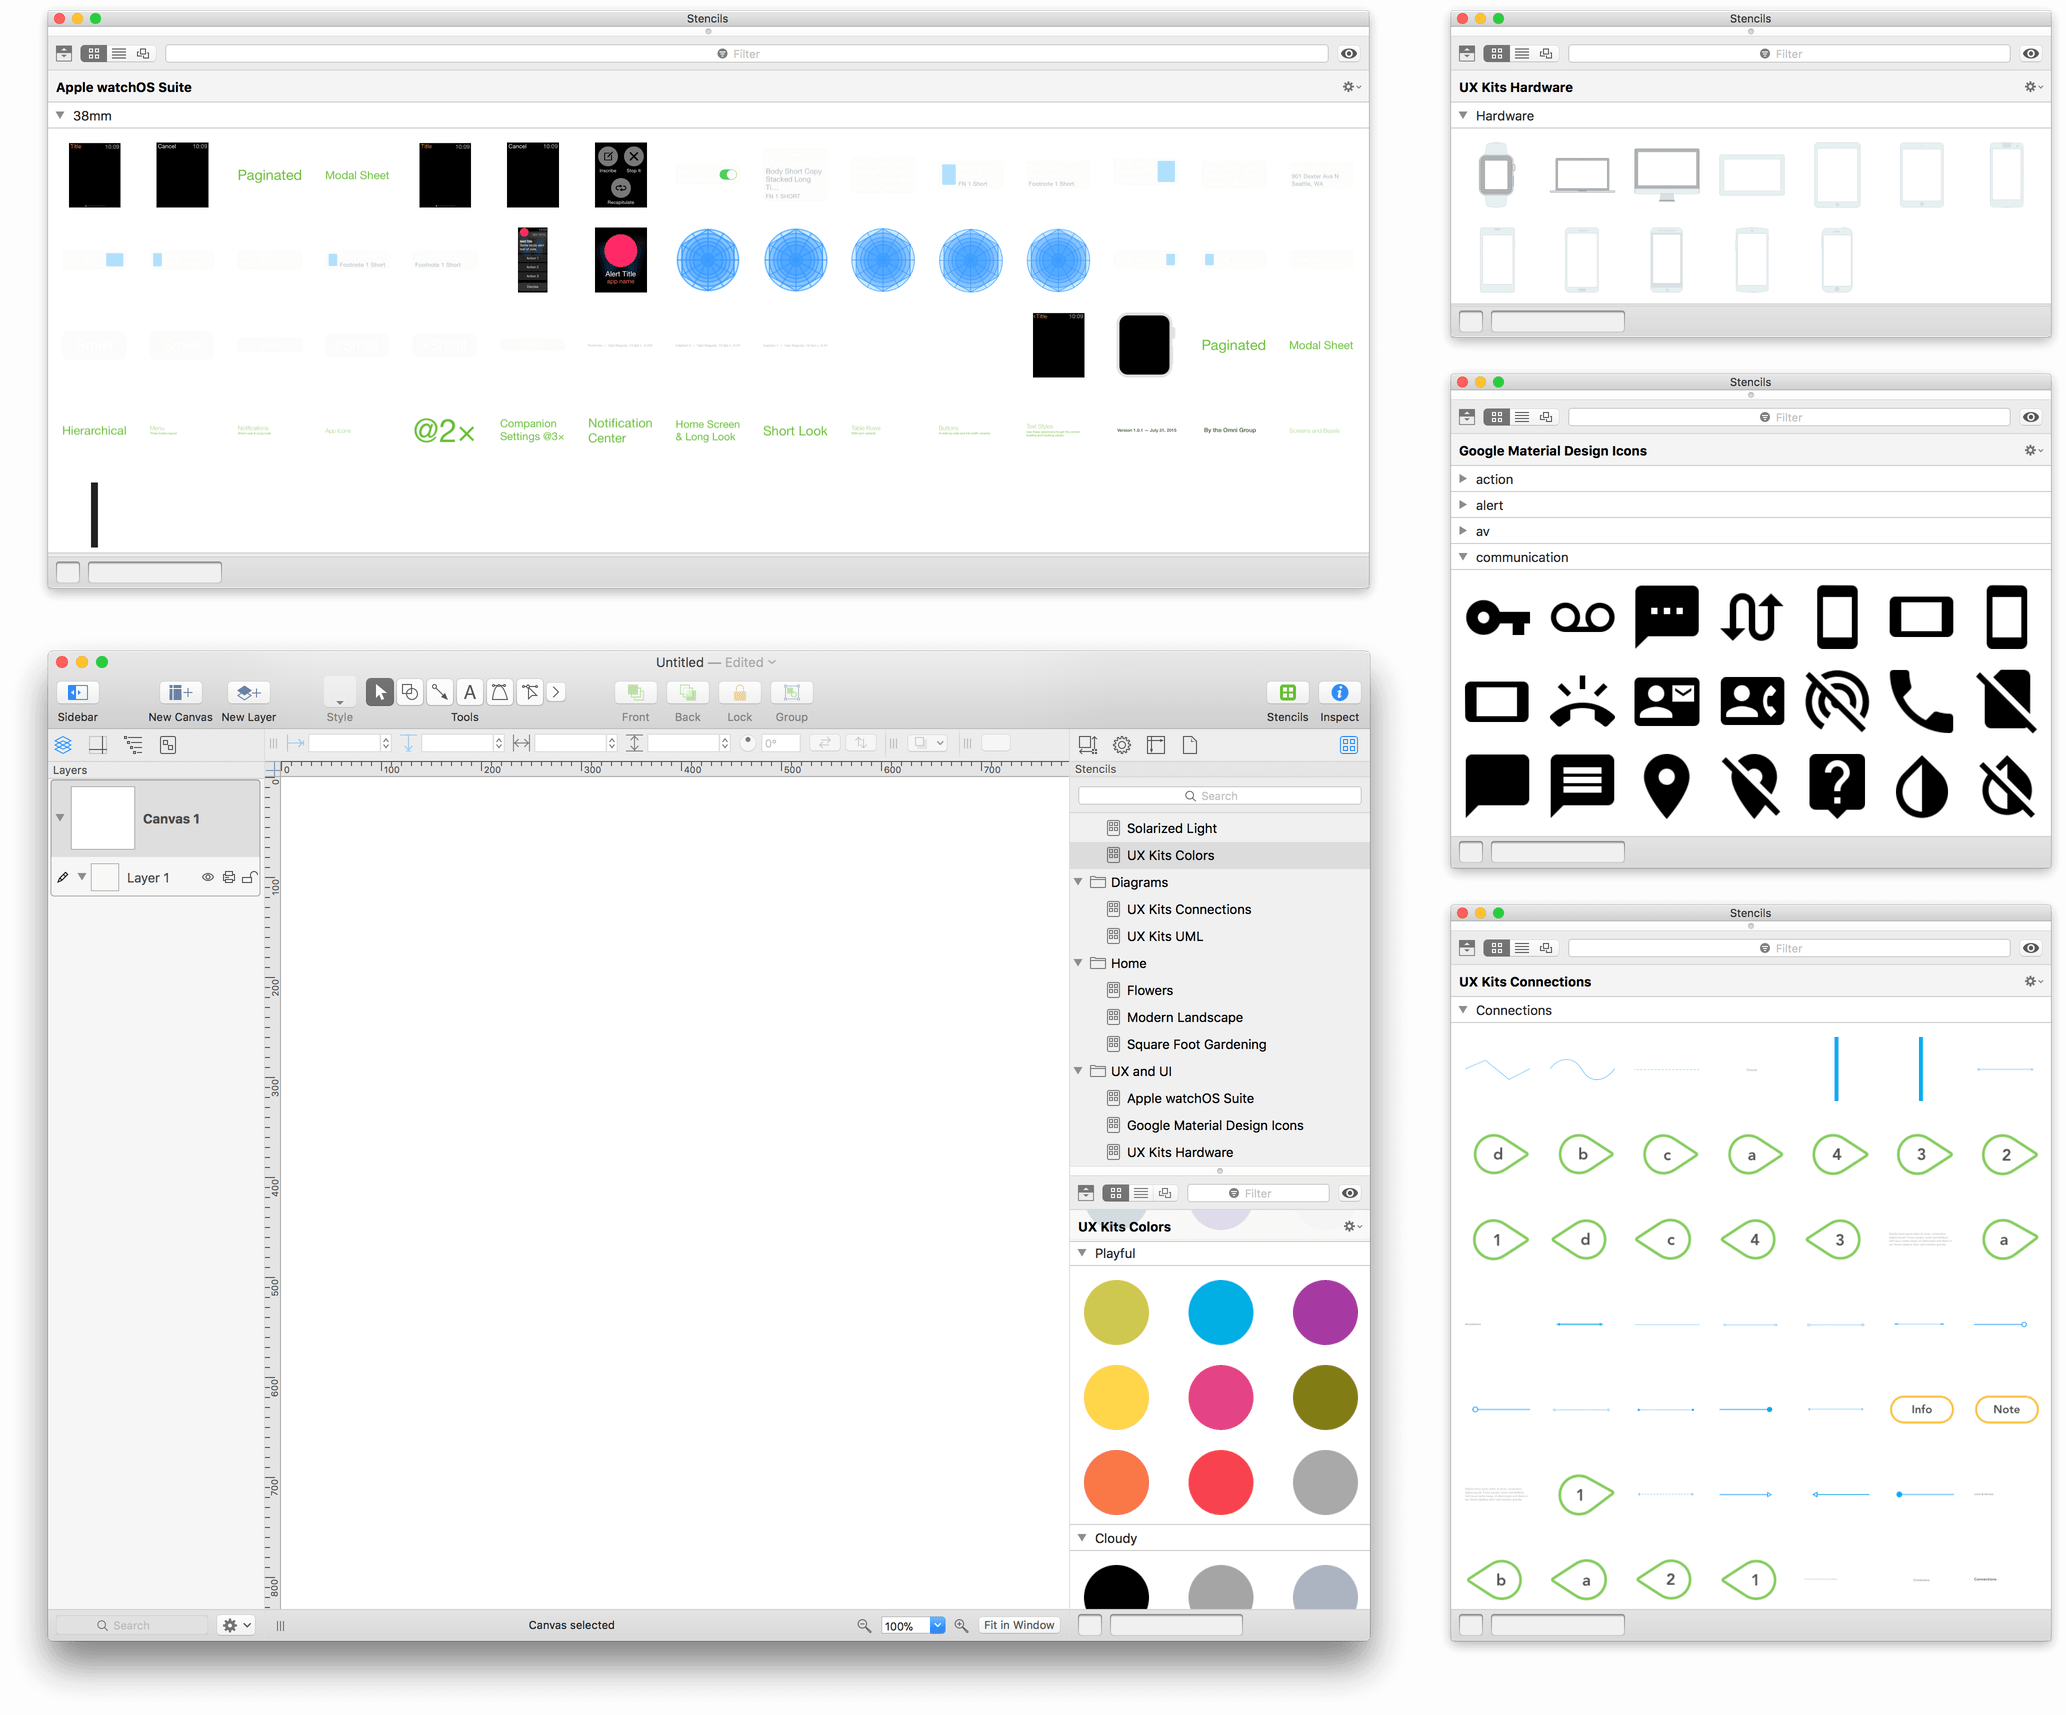
The only limit to the number of Stencil Browser windows you can have open is the amount of screen space you have to make them readily available.
Showing the Stencils Folder in the Finder
The most important part of organizing your stencil files is knowing where they are saved on your Mac. For example, here’s how to use the Resource Browser to quickly get to the Stencils folder:
- Open the Resource Browser (Shift-Command-N).
-
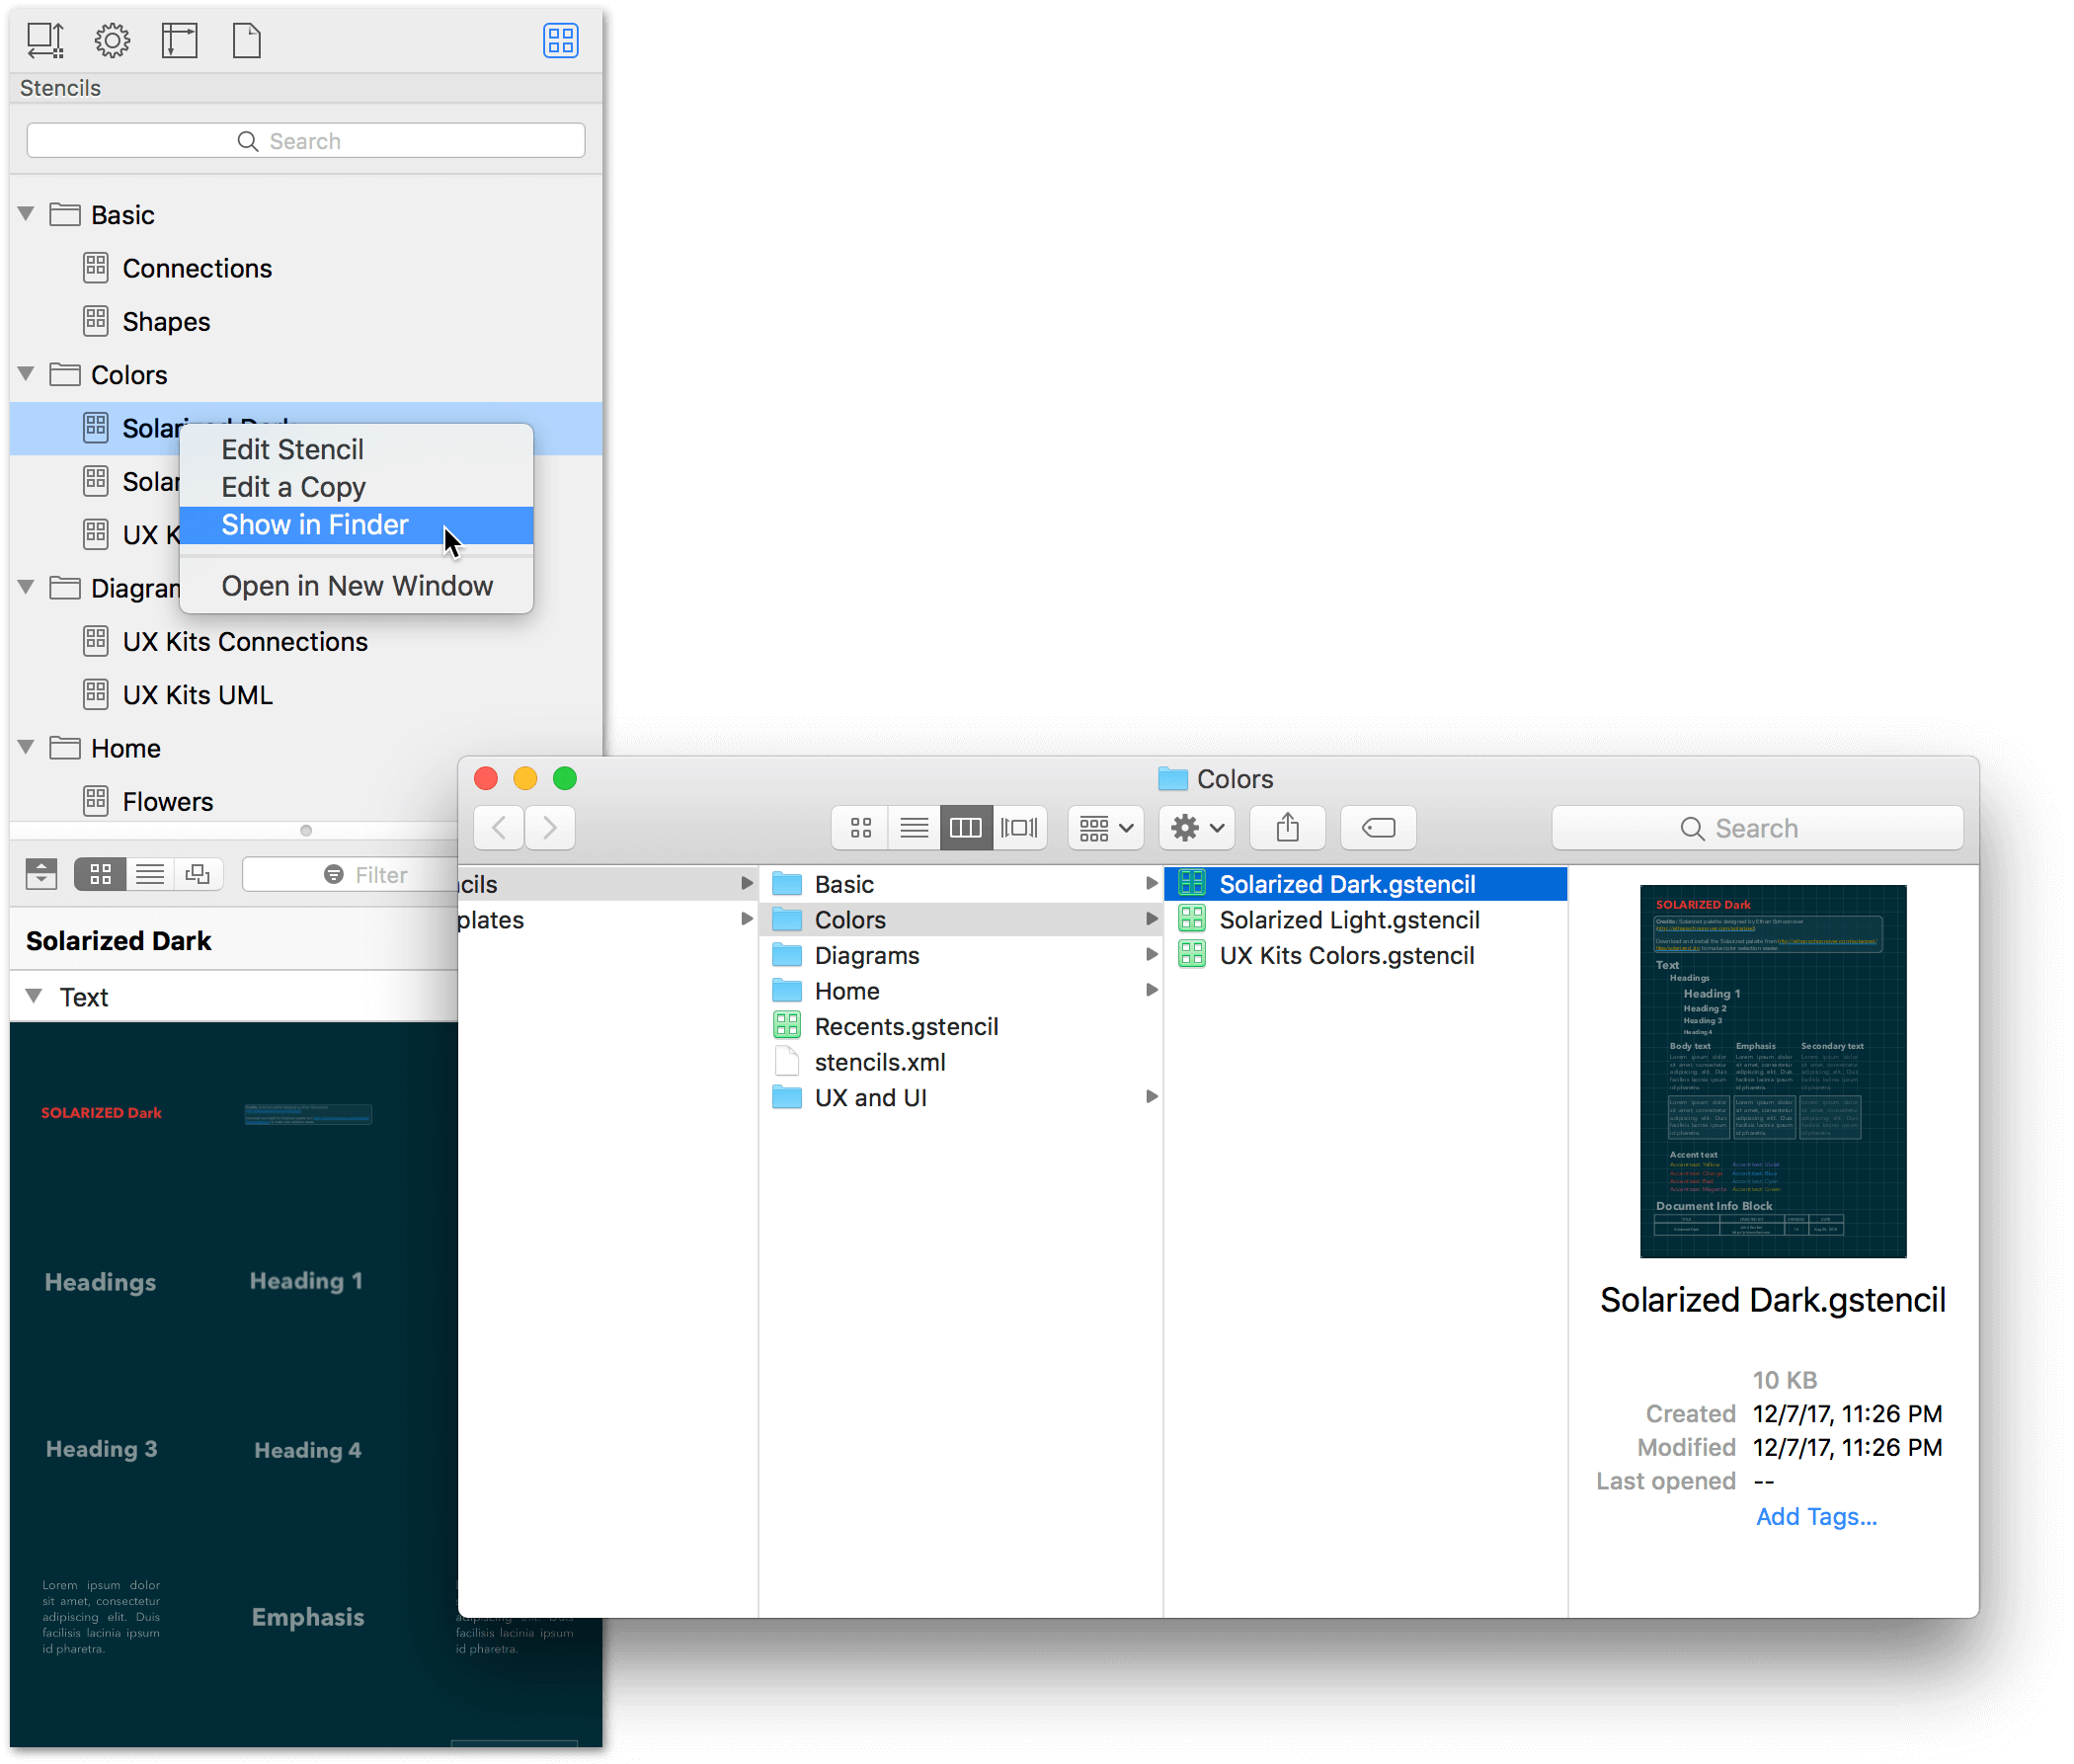
Control-click on a stencil in the left sidebar and choose Show in Finder:
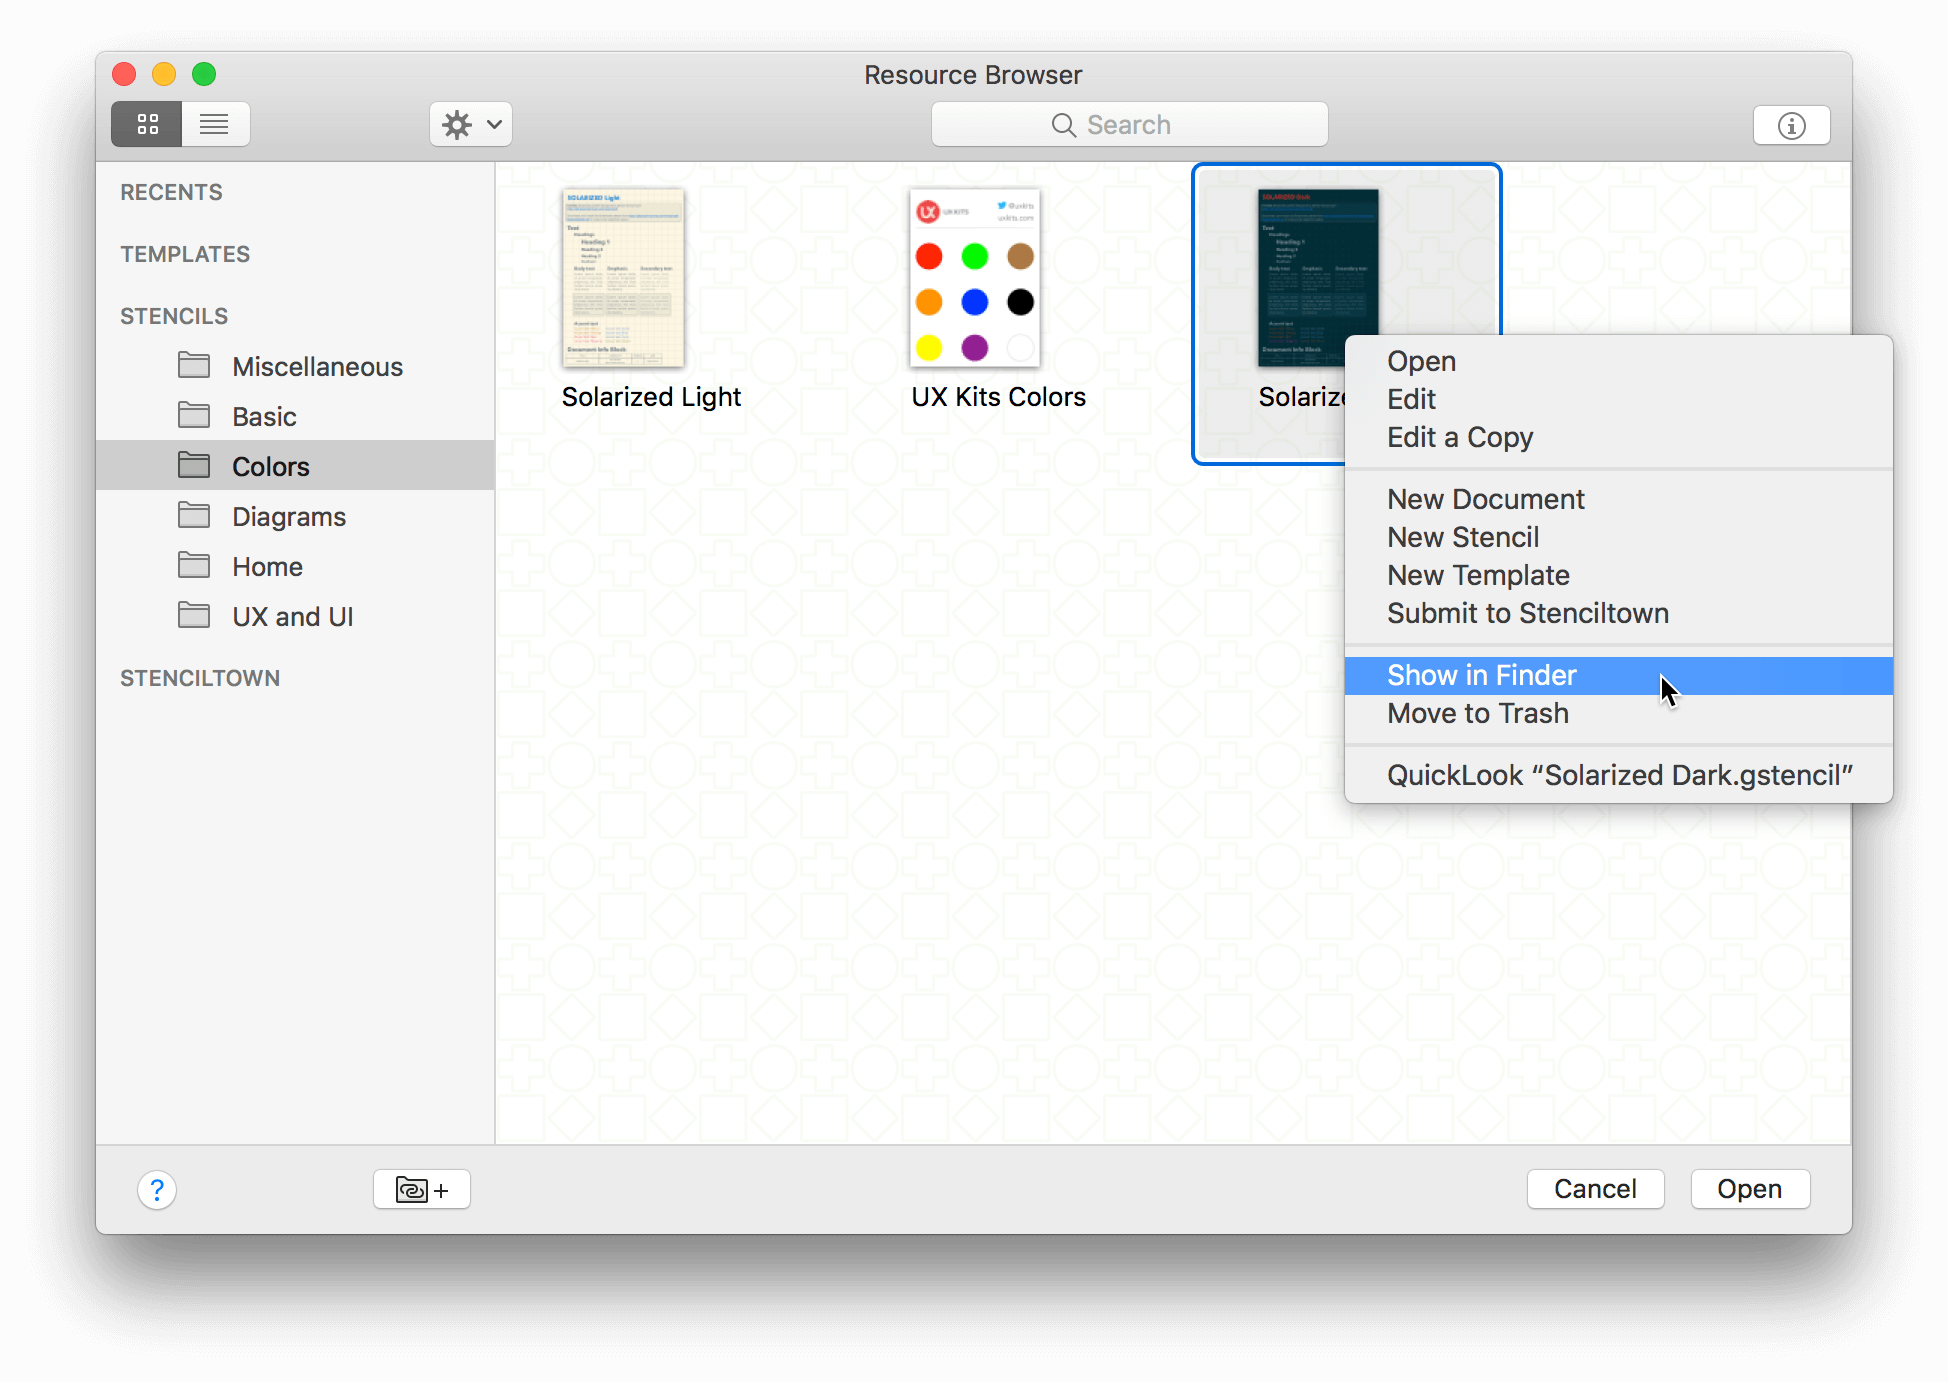
A Finder window opens and takes you directly to the folder that contains the selected stencil file:
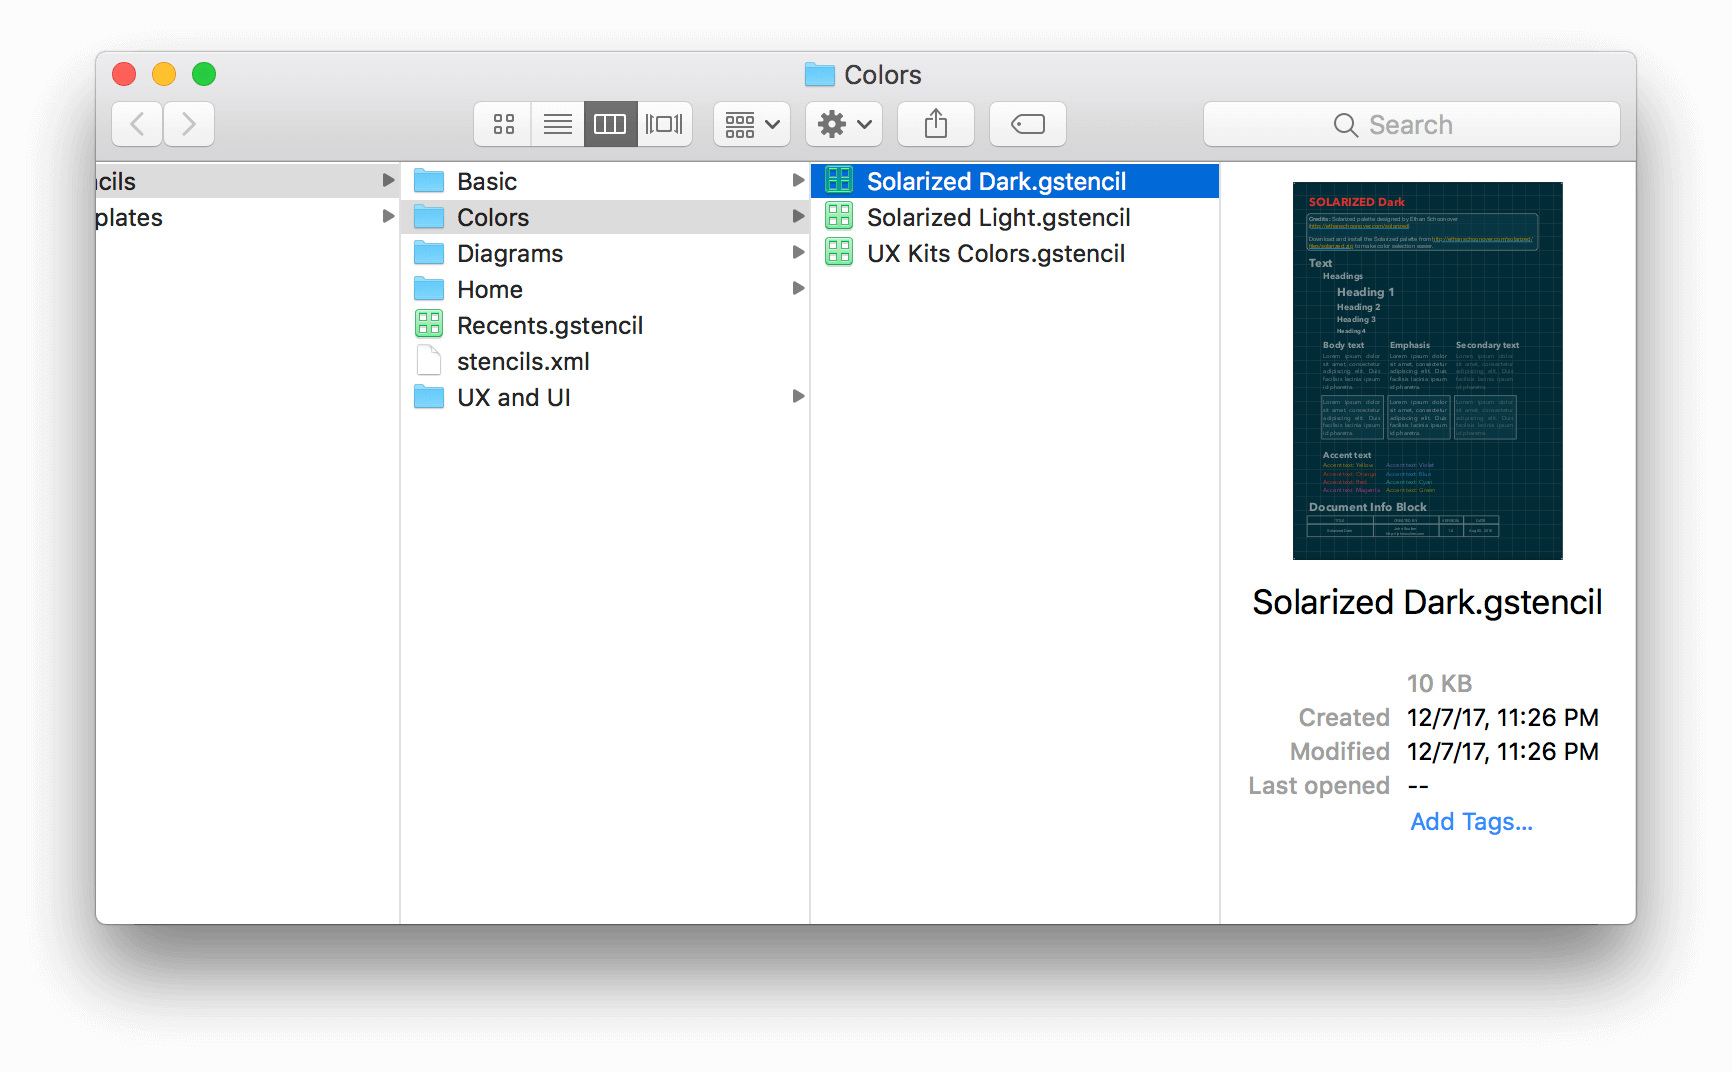
You can use a similar approach to revealing a stencil file in the Finder by Control-clicking a stencil file in the Stencil Browser:
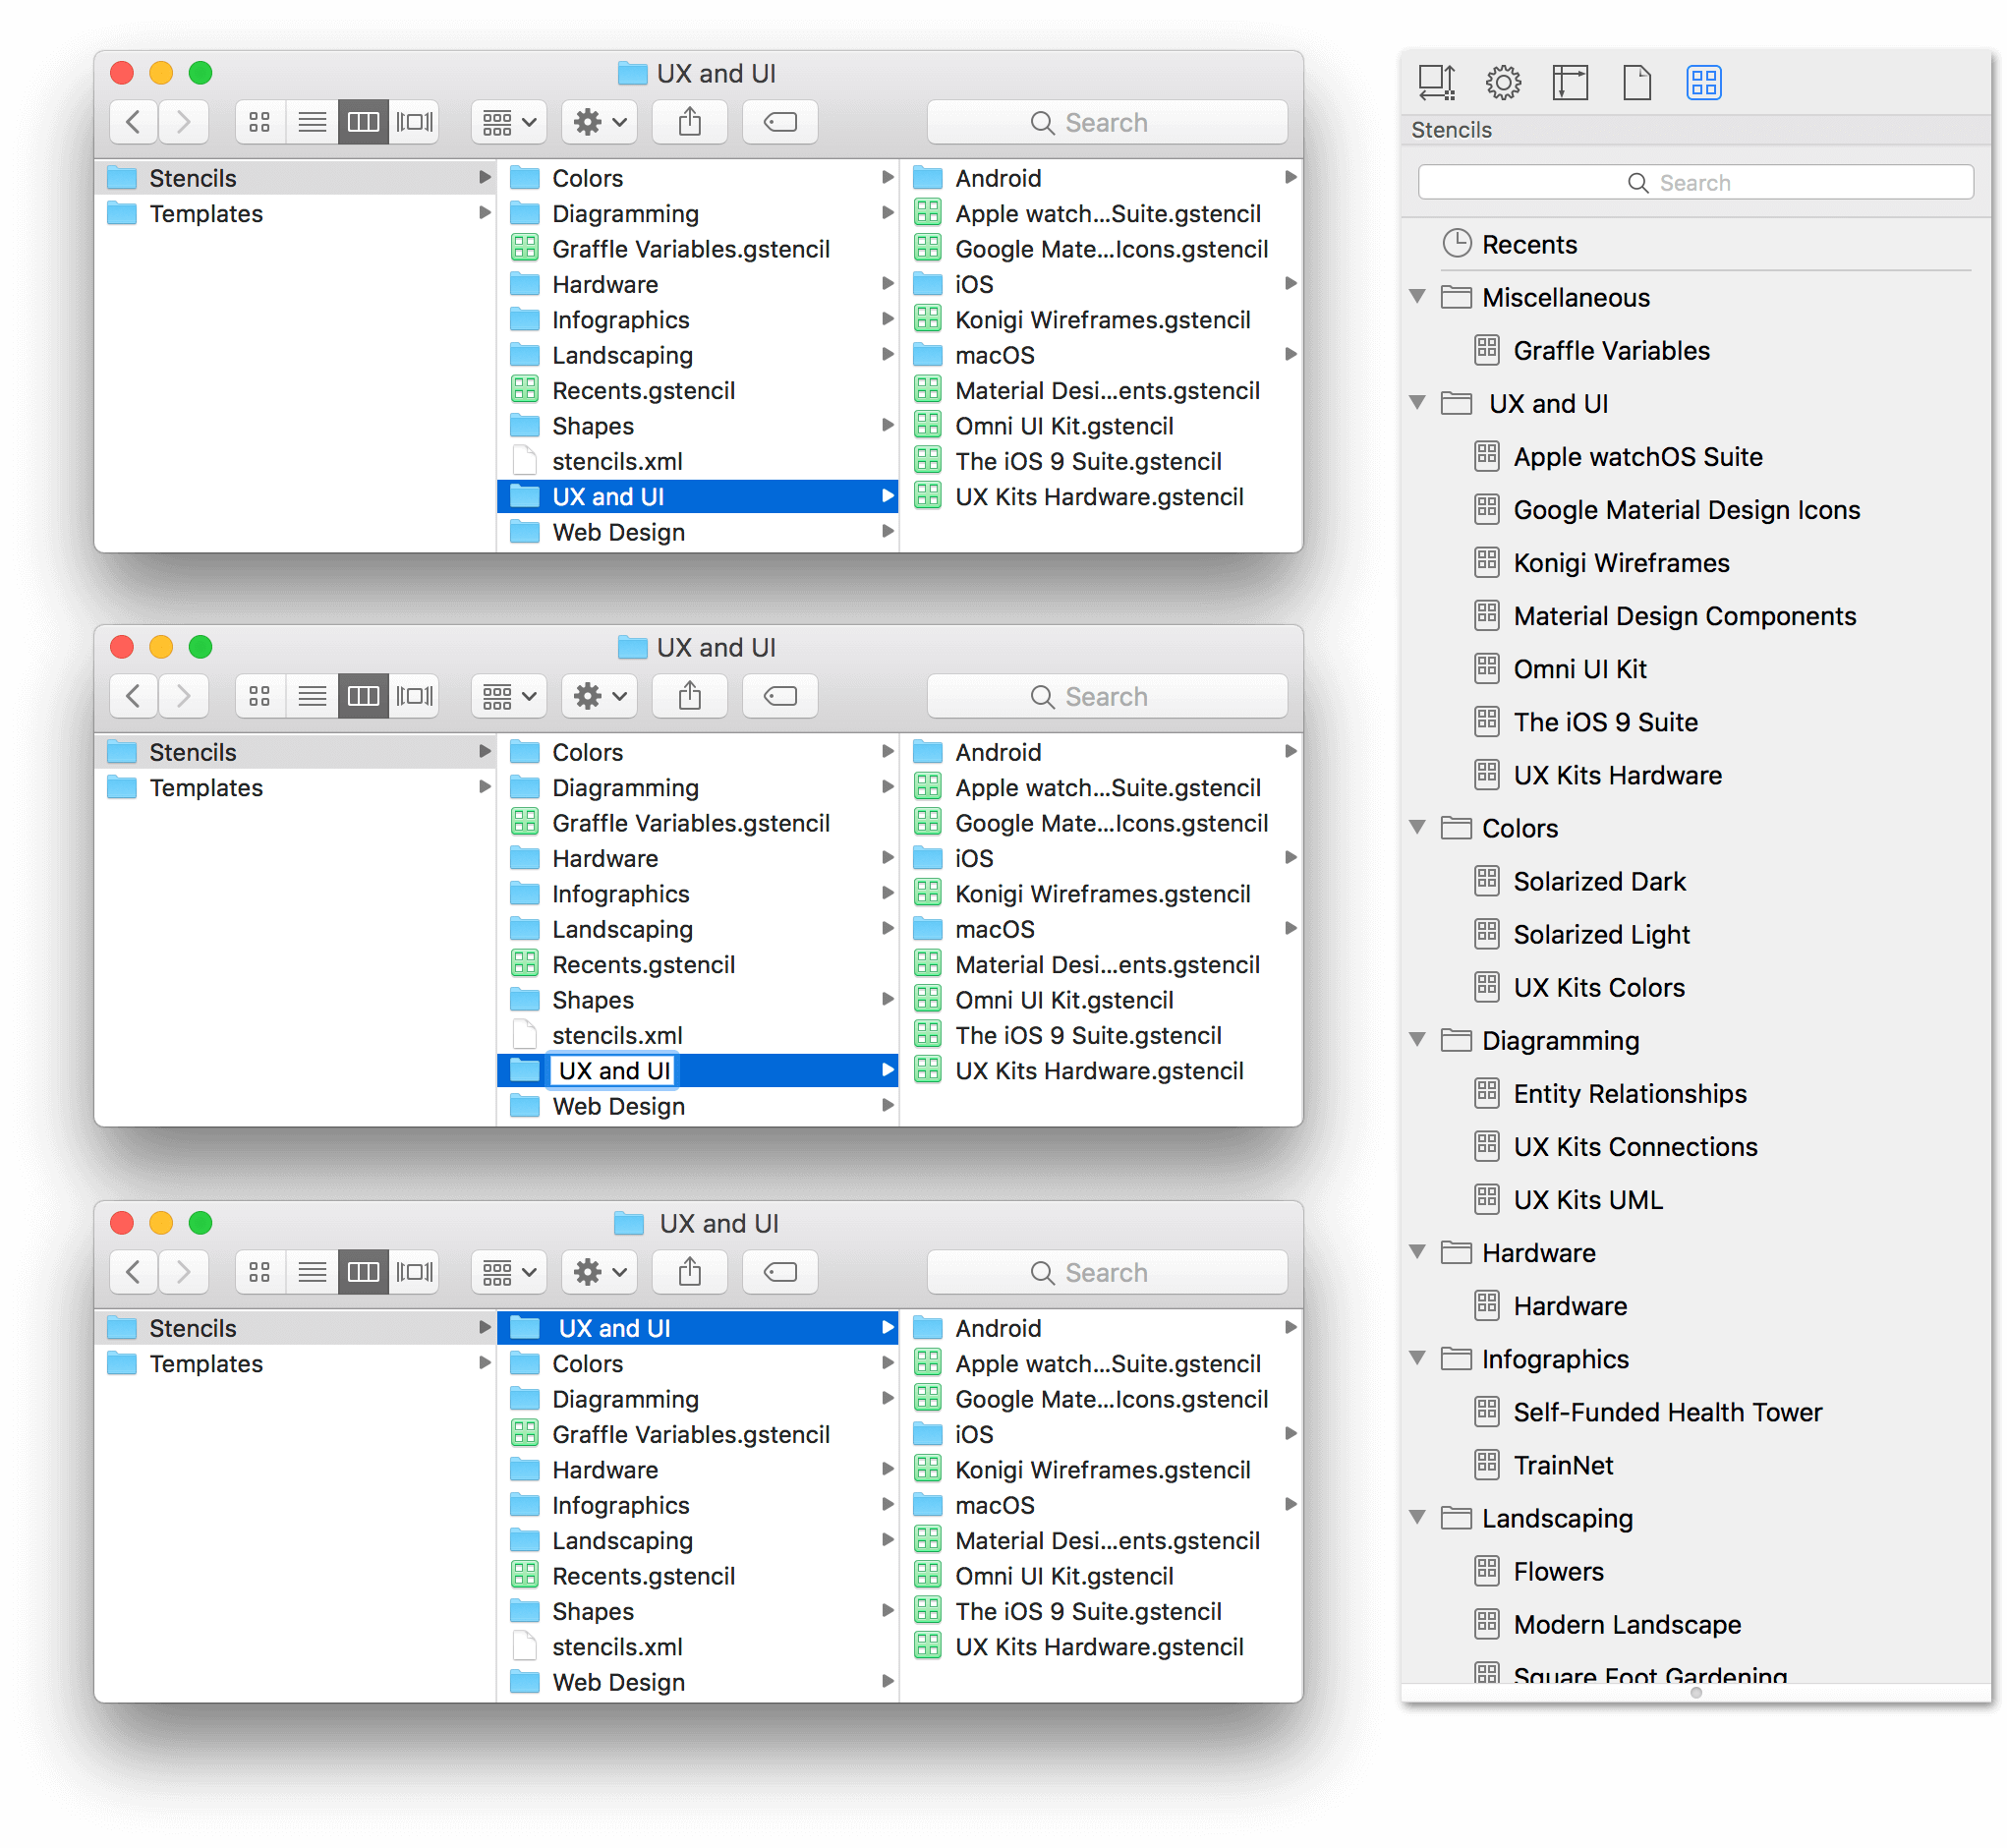
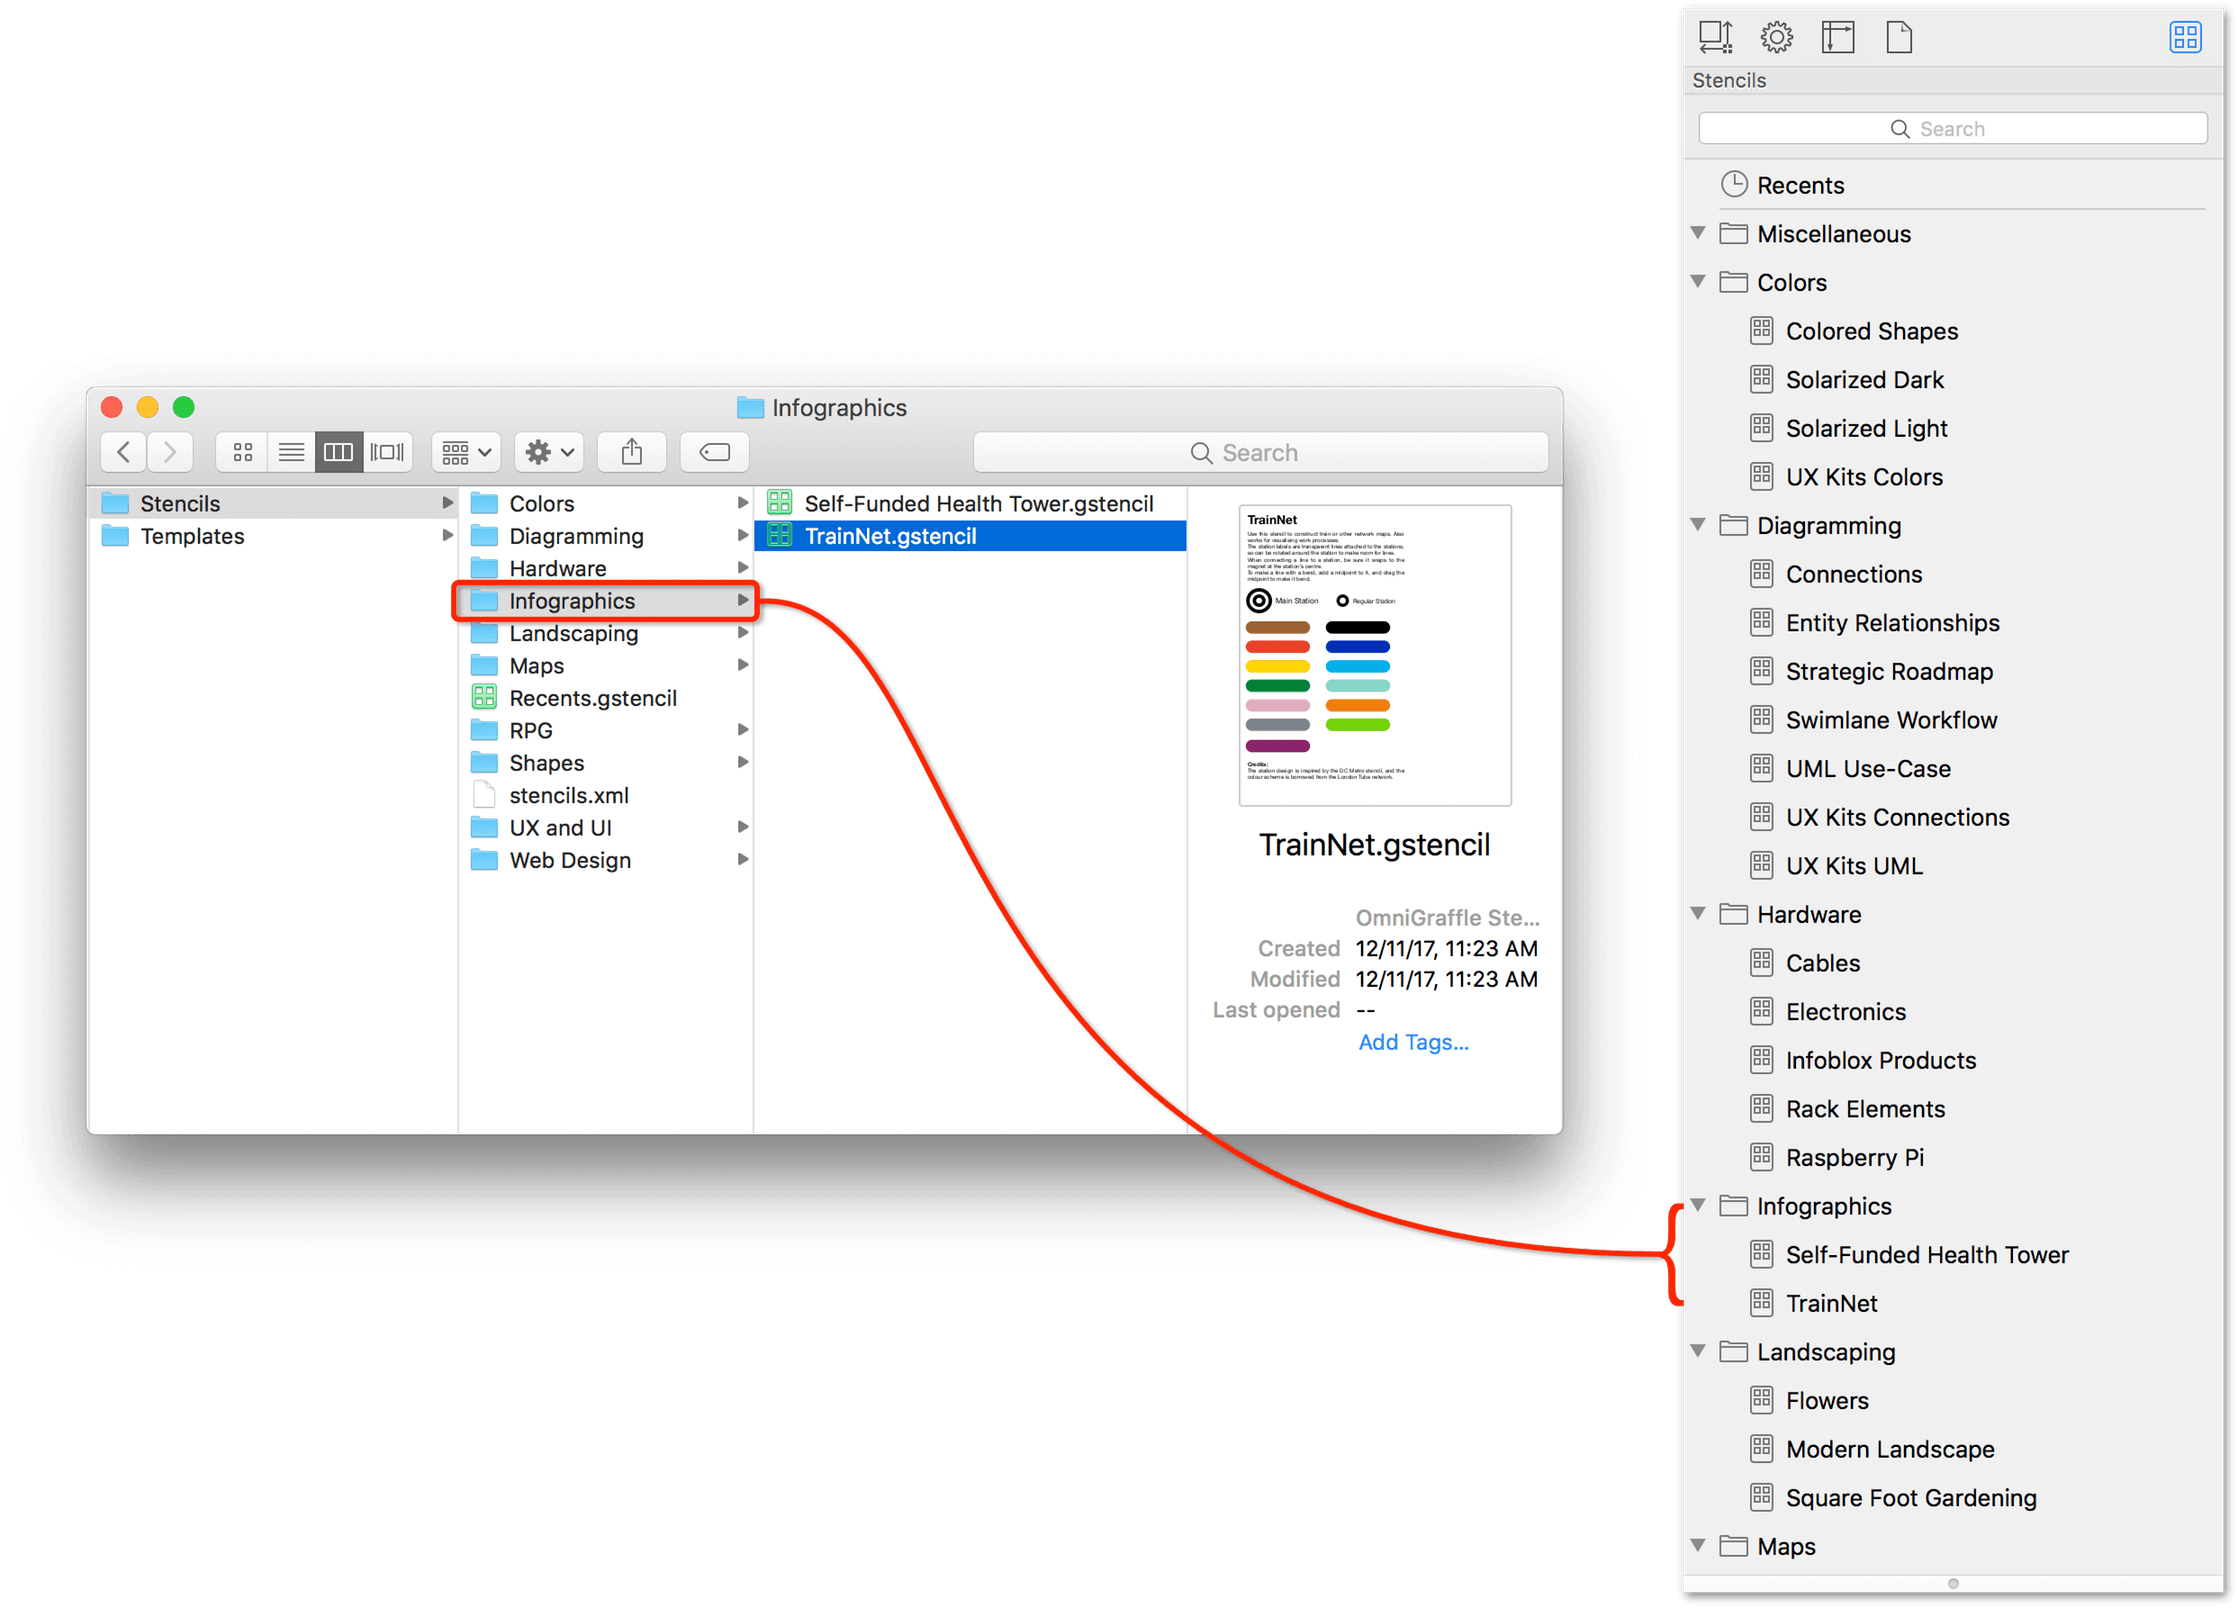
The stencil files reside within a series of pre-curated folders, as shown here:
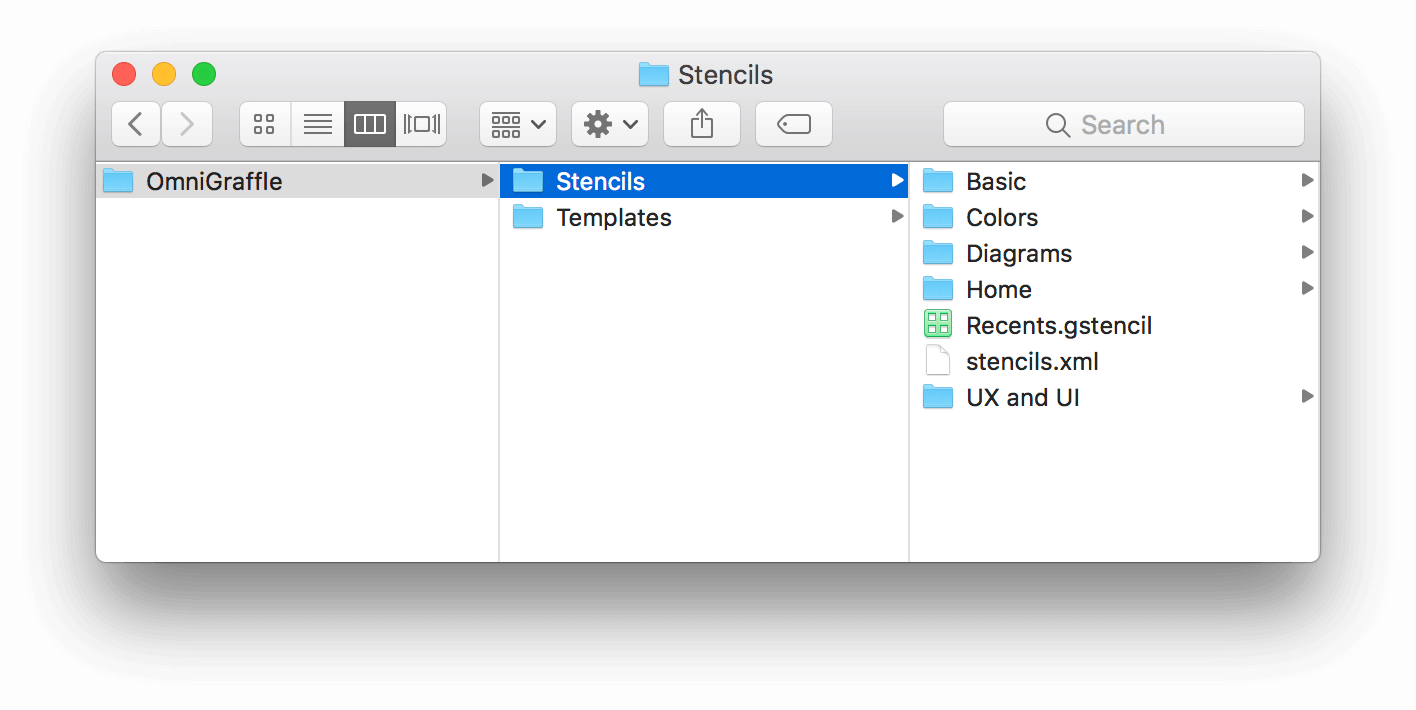
Alongside the folders, you'll see two additional files:
- Recents.gstencil: This file is used by OmniGraffle to remember the stencils you've recently placed in your documents.
- stencils.xml: This is an XML file that OmniGraffle uses to identify the Shapes.gstencil file within the app bundle.
When it comes to curation, you won't need to do anything with these files; please leave them where they are. Moving or deleting these files won't affect how OmniGraffle behaves, but why run the risk?
After finding your way to the Stencils folder, you can now look for ways to better organize the stencil files to suit your needs.
Creating a Shortcut to the Stencils Folder
To make the process of Exporting an OmniGraffle Document as a Stencil to the Stencils folder a little easier, you’ll need to create a shortcut to the Stencils folder in the Finder’s sidebar.
Here’s how to do that:
- In OmniGraffle, choose Window ▸ Stencils to open the Stencil Browser.
-
Control-click on any stencil folder and choose Show in Finder:
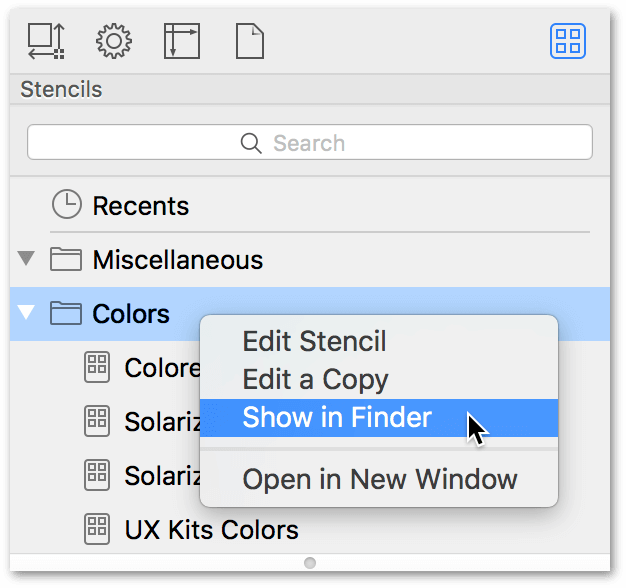
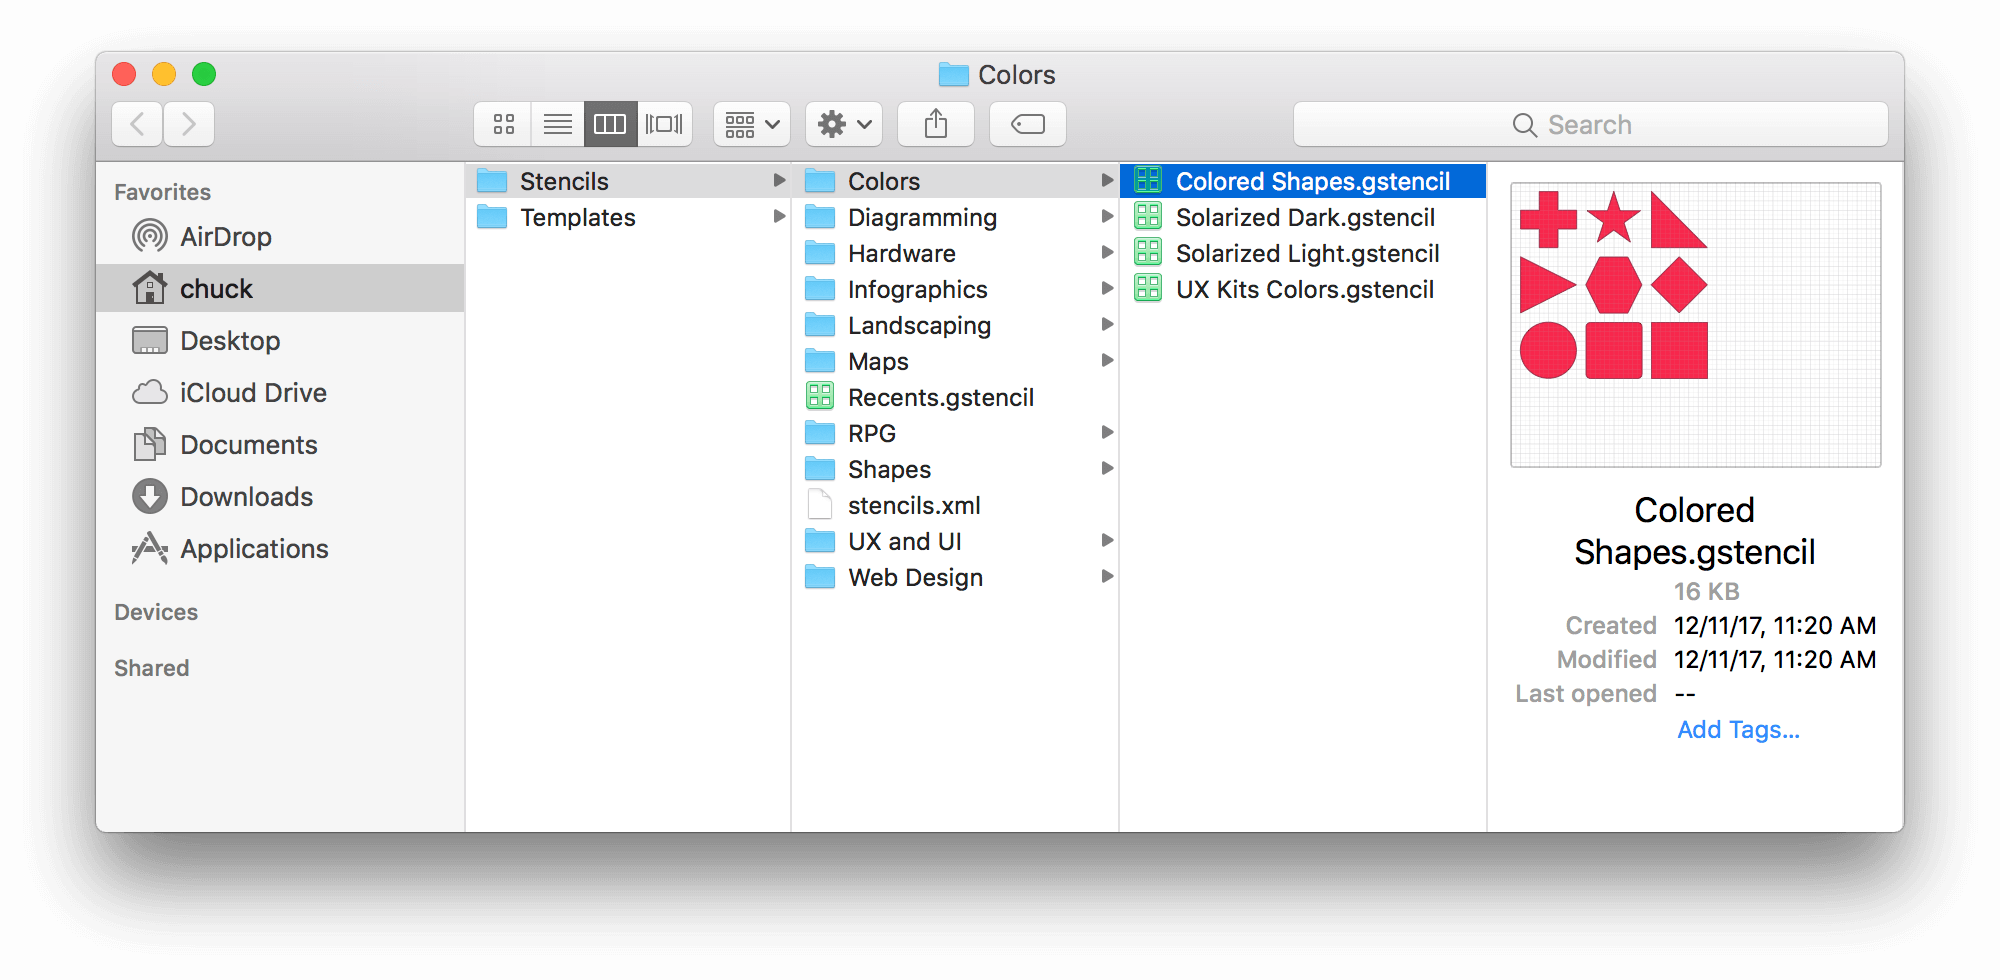
This opens a Finder window, displaying the contents of the stencil folder you Control-clicked:
-
With the Finder window selected, choose View ▸ as Columns (Command-3).
-
Scroll the Finder backward until you see the Stencils folder. Click to select the Stencils folder.
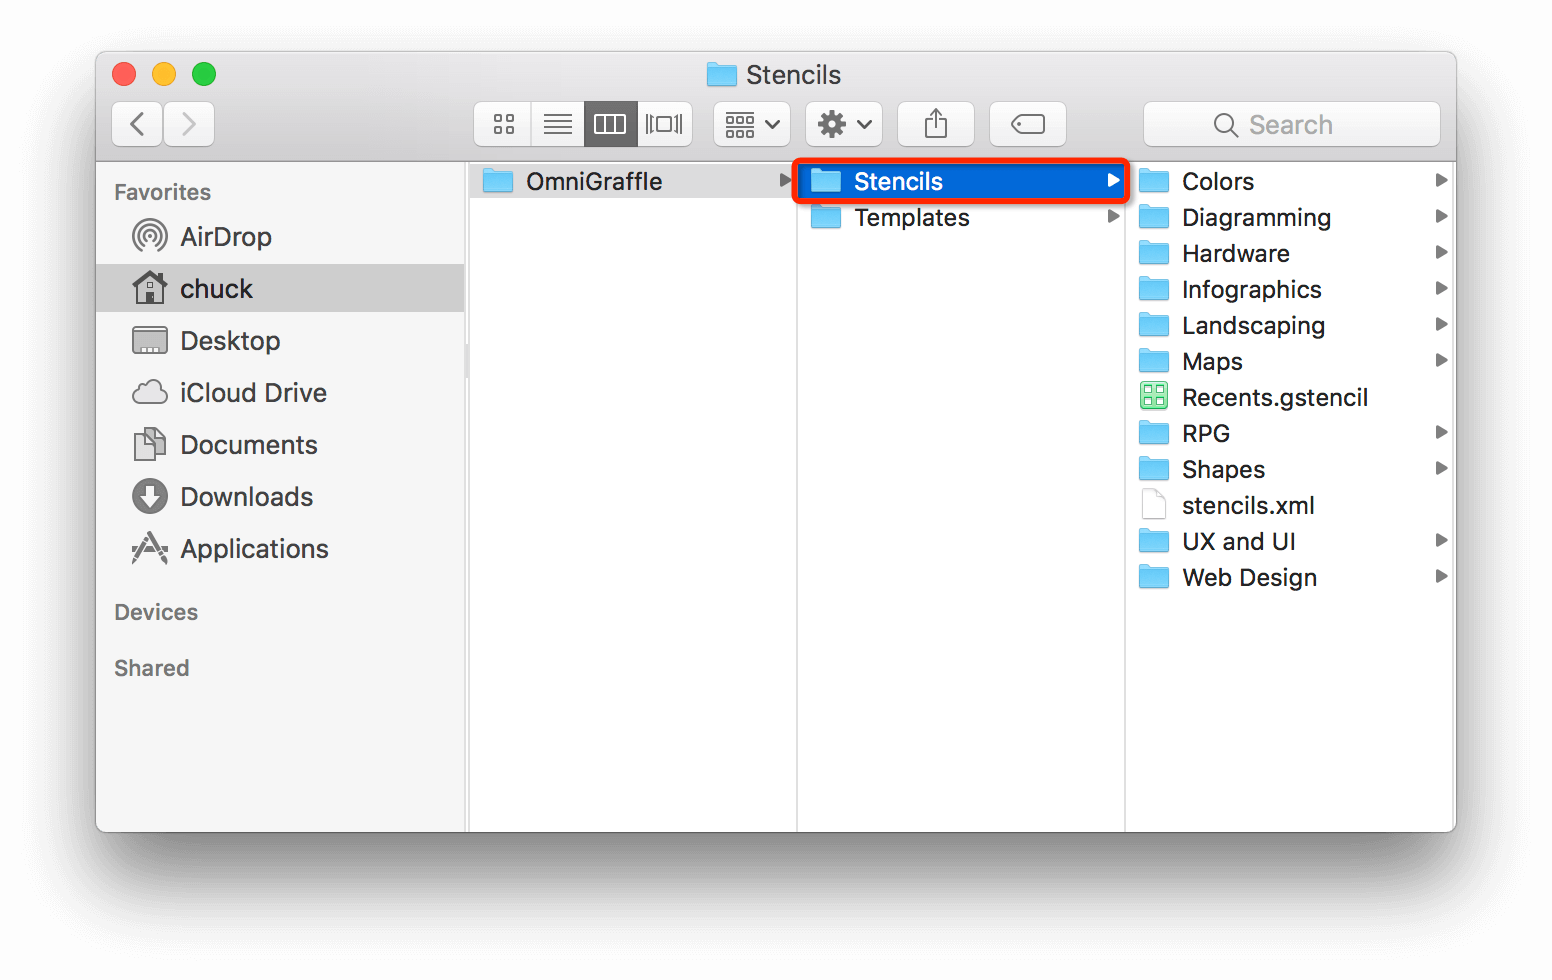
-
With the Stencils folder selected, choose File ▸ Add to Sidebar (Control-Command-T). This adds a shortcut to the Stencils folder in the Favorites section of the Finder’s sidebar:
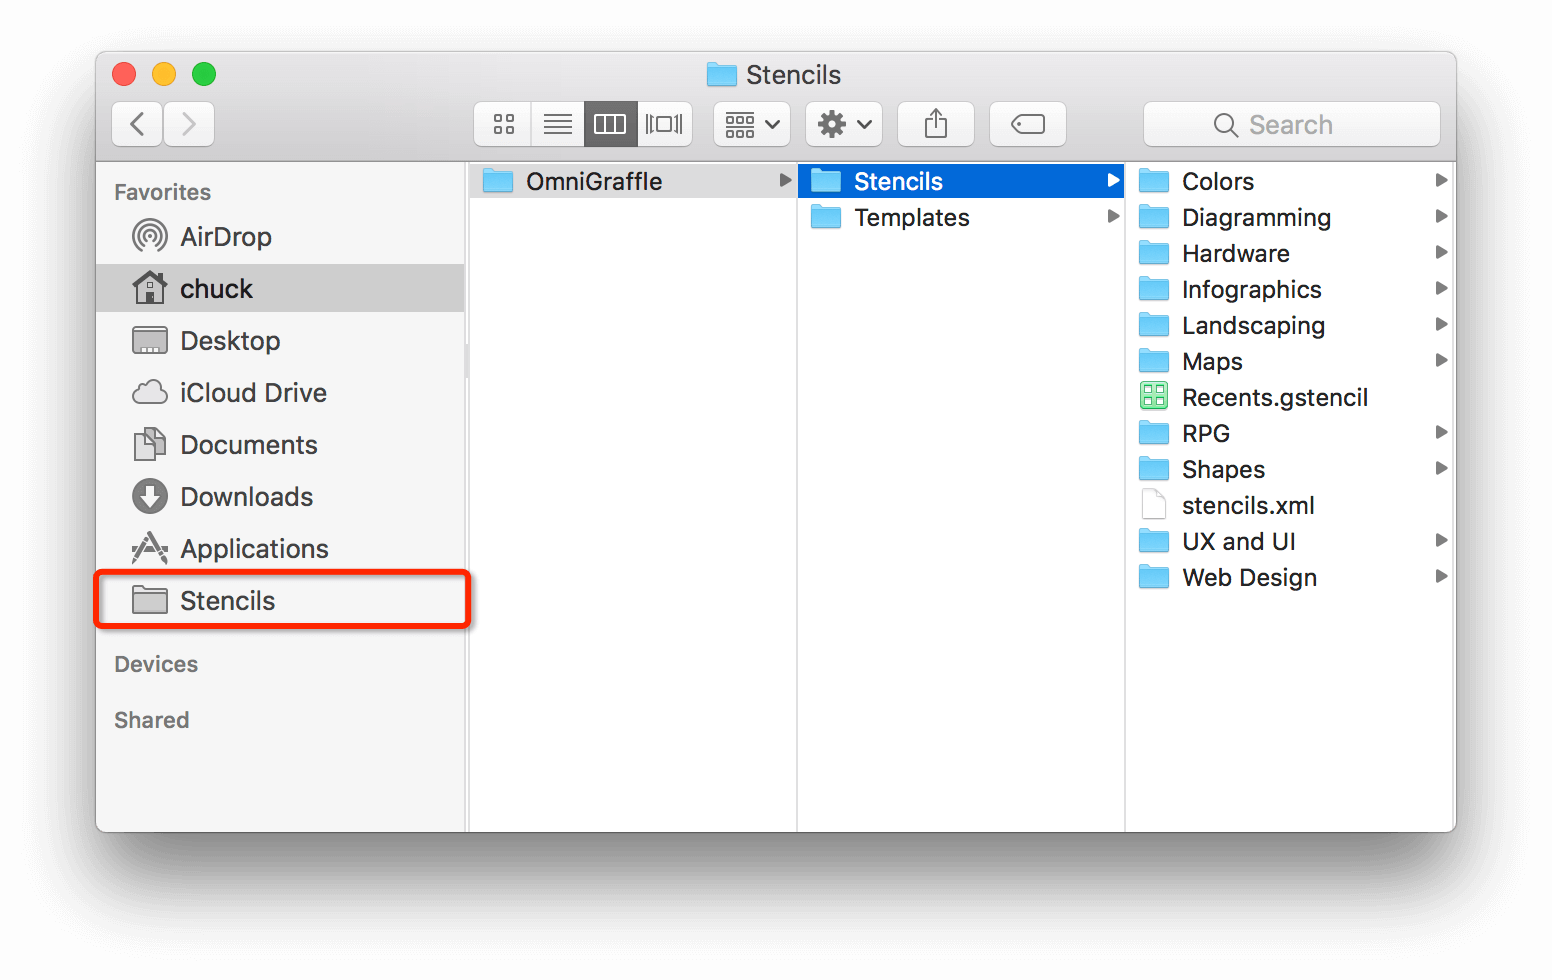
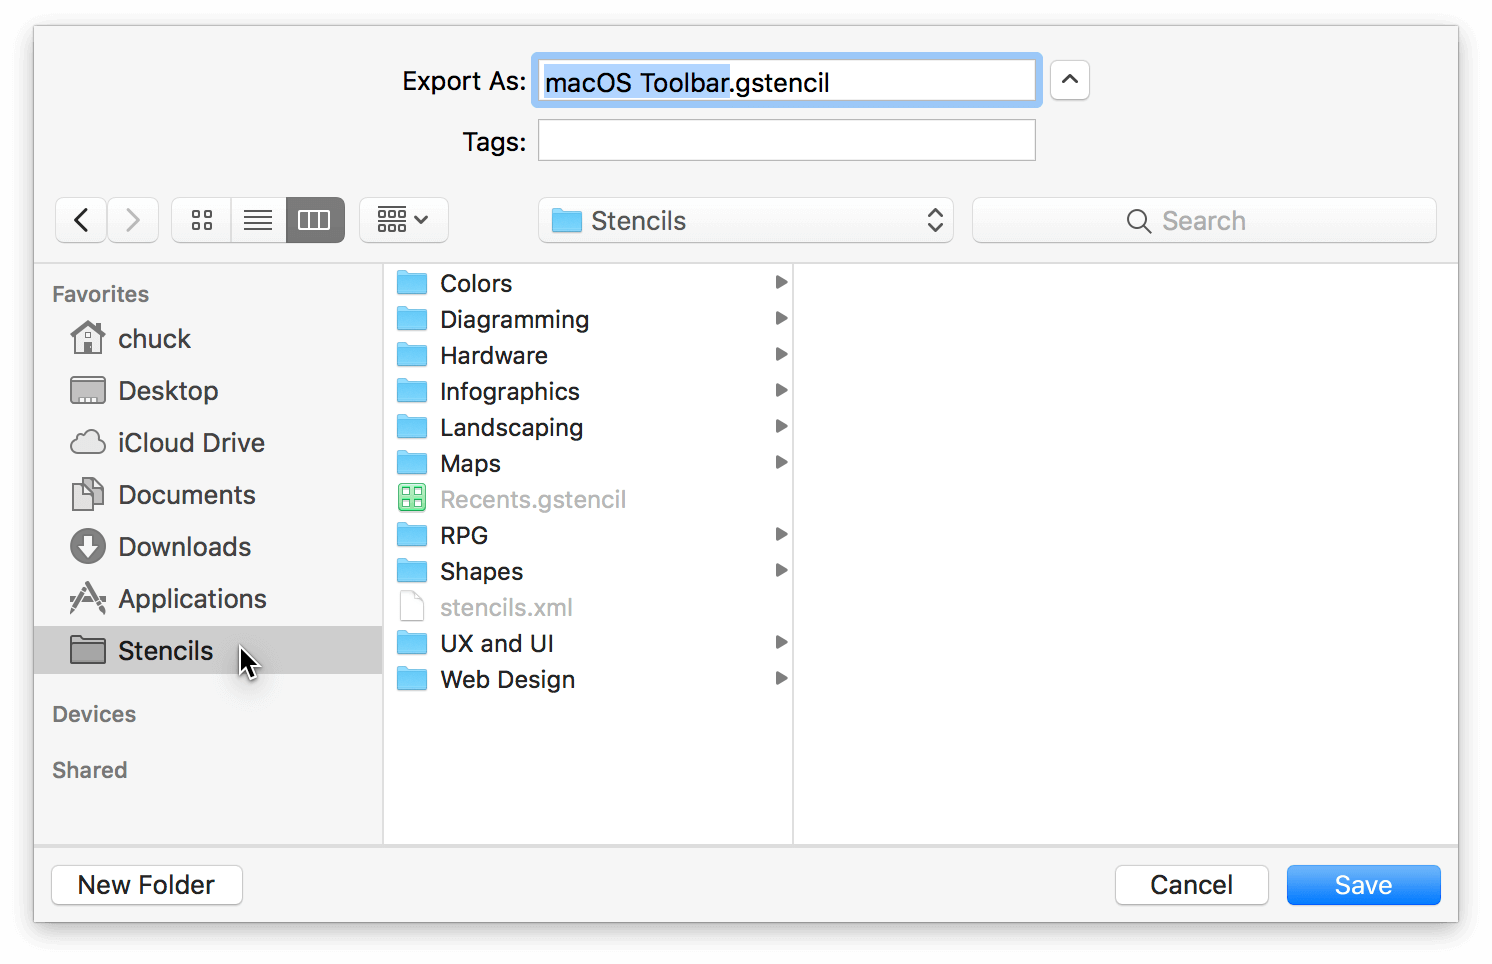
Now when you need to add a stencil to the Stencils folder, you can use the Finder or choose the Stencils folder in the Favorites list on the left side of a save sheet.
Curating Stencils
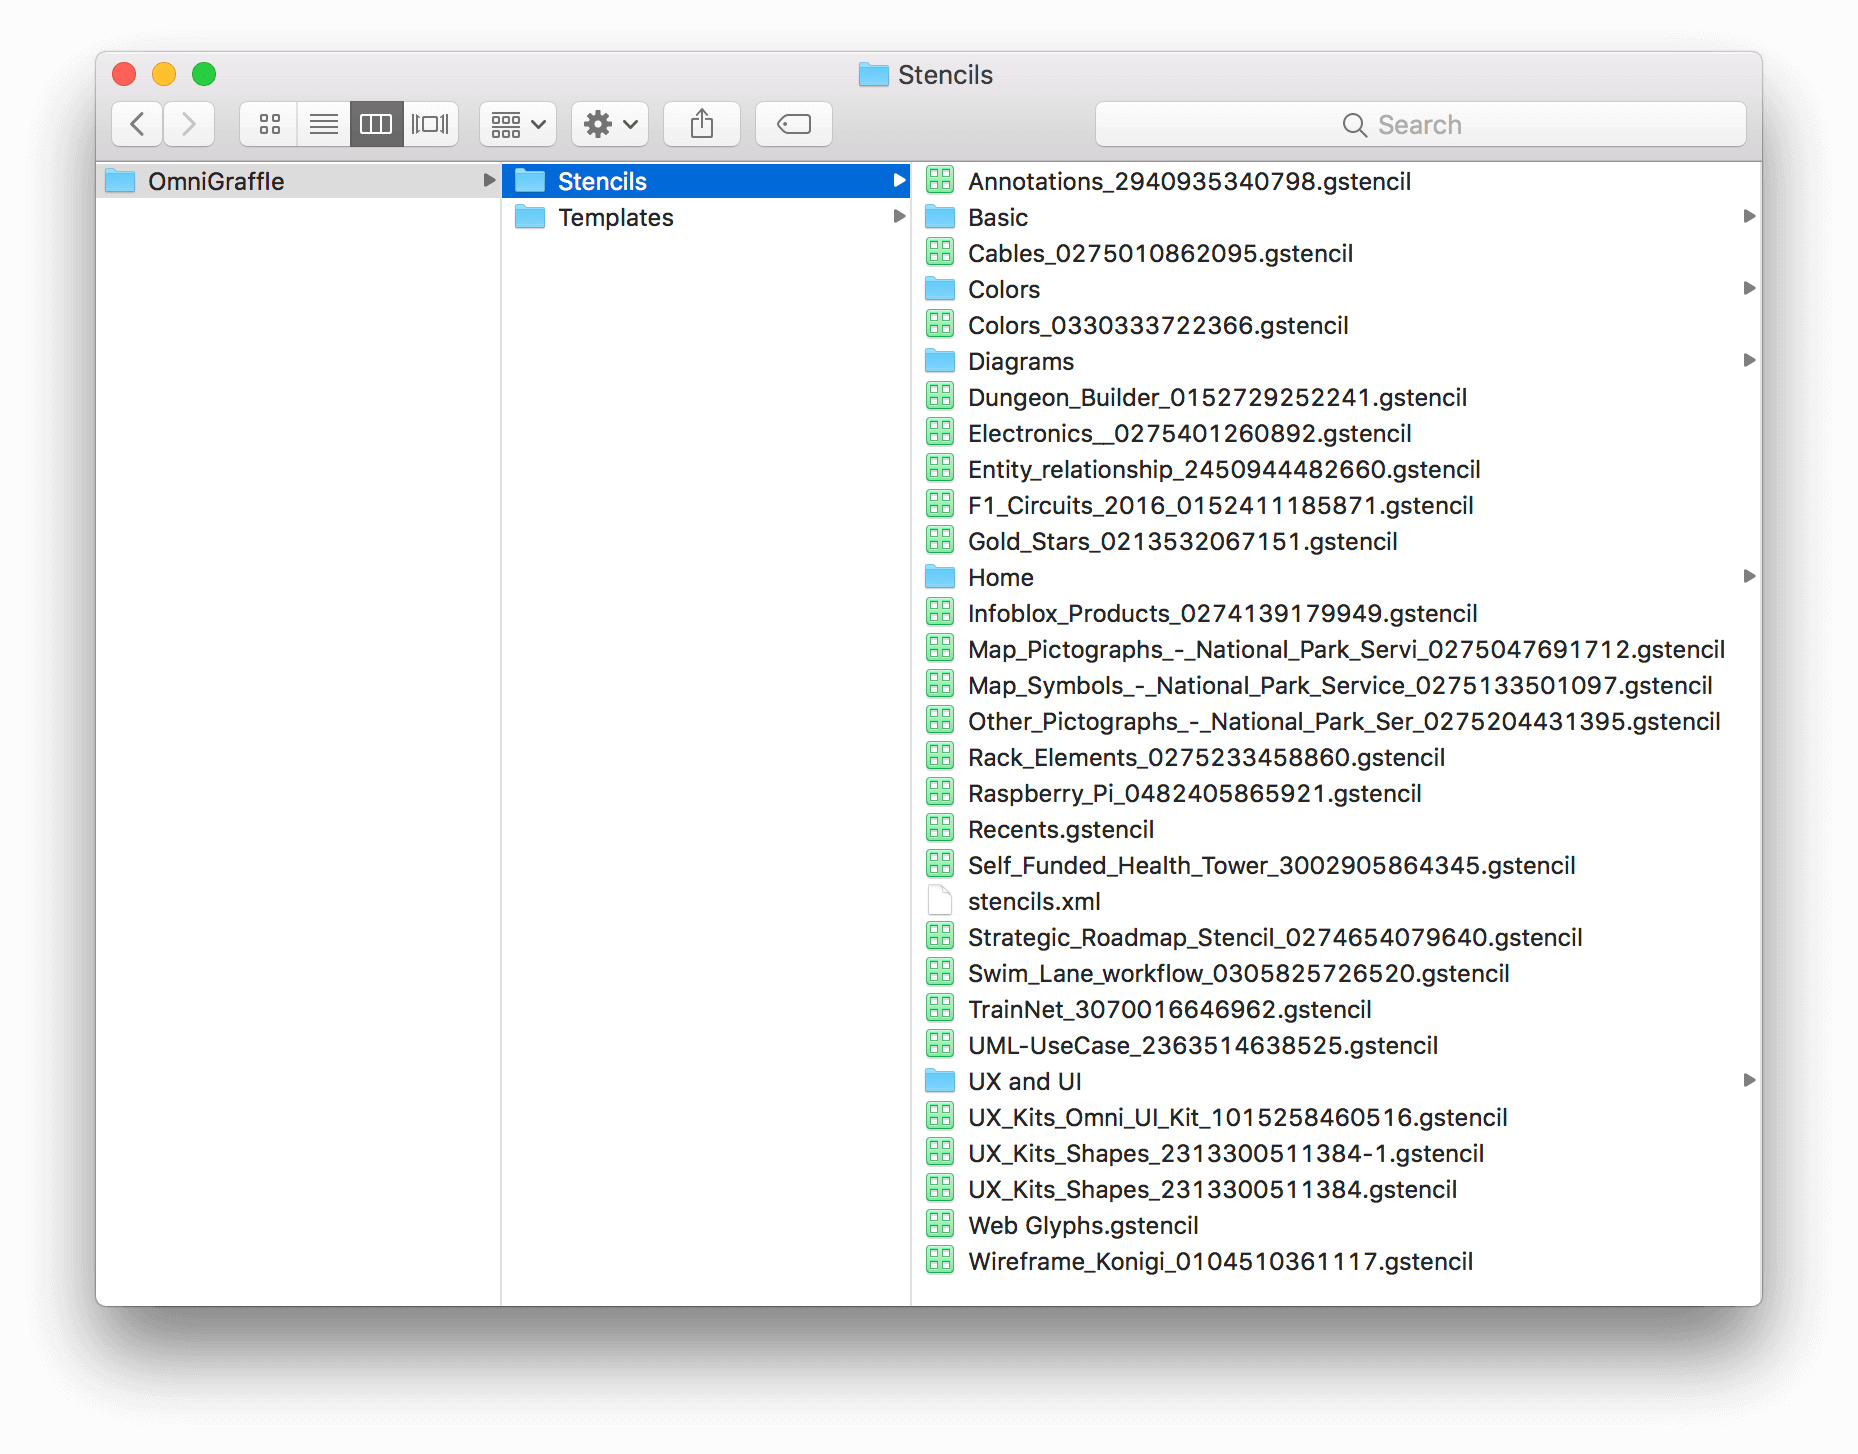
Let's say that you've taken a pass through Stenciltown in the Resource Browser, and you've combed the Interwebs for various stencils you'd like to use. The stencils you download from Stenciltown are automatically placed in the Stencils folder, and you've pulled the stencil files out of your Downloads folder and have placed those in the Stencils folder, too. The folder could end up looking something like this:
And when you look at the stencils in the inspector sidebar, they look something like this:
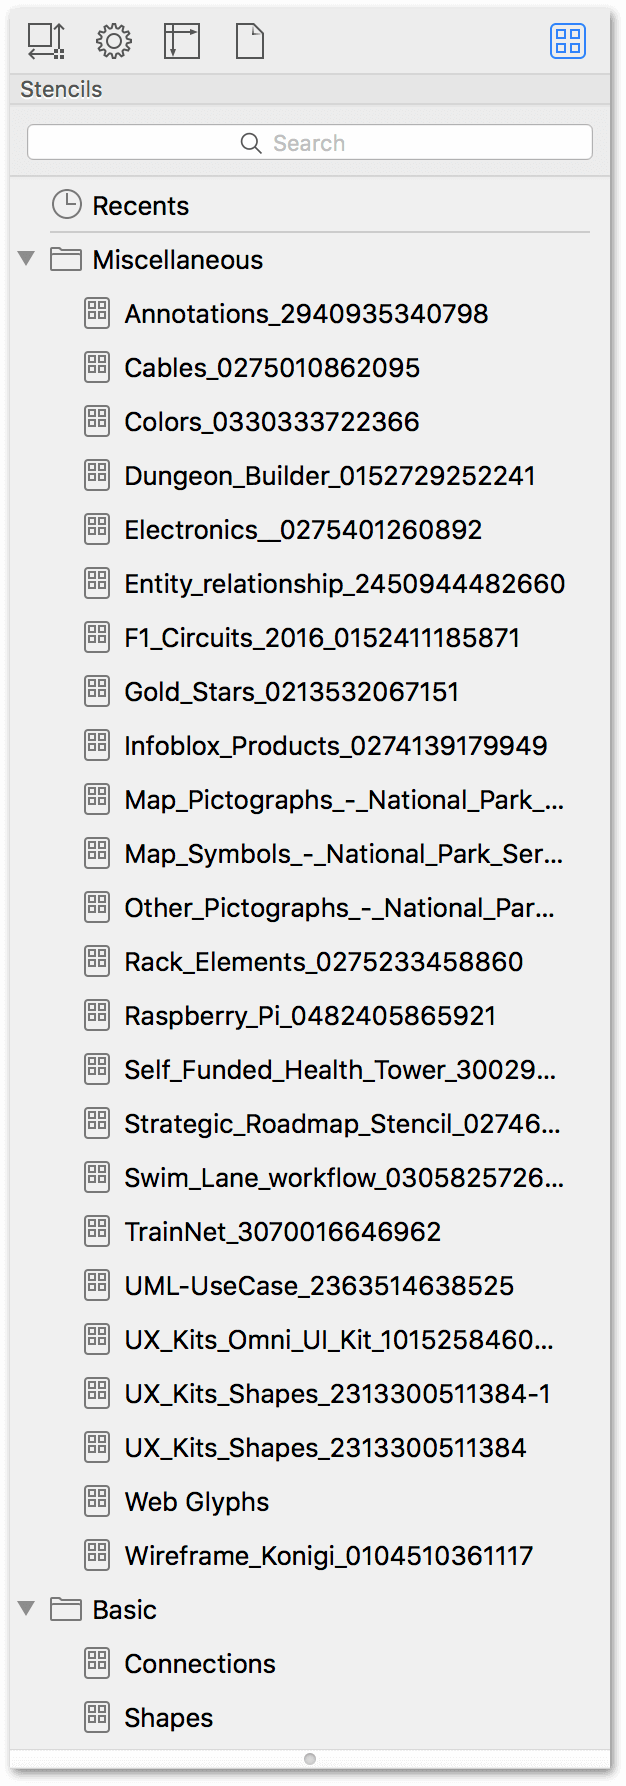
The stencil files you've added to the Stencils folder appear in the Stencil Browser's Miscellaneous folder by default. (There is no actual Miscellaneous folder in the Stencils folder; this is just where OmniGraffle places "unfiled" stencils it finds.) A couple more things you may notice include:
- The stencil files you downloaded from Stenciltown also include a 13-digit number as part of the filename; you don't need that.
- Some of the stencils use underscores for spaces, and their names might not reflect your intended use.
Clearly, these stencil files can be better organized on your system.
To edit the name of the stencil file, do the following:
- Select the stencil file and press Return. This makes the filename editable.
- Make the changes you'd like to the filename. For example, removing the 13-digit number string, replacing underscores with spaces, or changing the stencil name entirely.
- When you are finished making those changes, press Return to accept the filename.
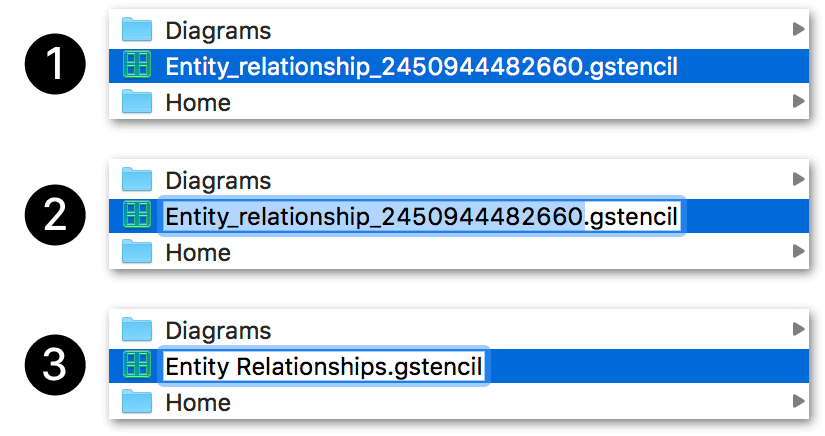
When renaming the stencil files on your system, don't change the file extension (.gstencil); that needs to remain the same. Anything to the left of the period is fair game, though.
With the files renamed, the next step is to create some new folders inside the Stencils folder:
- With the Stencils folder selected in the Finder, choose File ▸ New Folder, or press Shift-Command-N.
- Enter a name for the newly-created Untitled folder and press Return.
When naming the stencil folders, use something more specific to the kind of stencils within, such as Landscaping or Infographics or Web Design.
After you have reorganized the stencils, the folders are listed in alphabetical order in the Stencil Browser, as shown here:
You can use a similar technique for organizing template files, too. Just be sure not to delete your default template as that could cause some problems for OmniGraffle.
Creating Stencils
Now that you know how to find and use a stencil, it’s time to learn how to create one. After all, part of the reason why you’re using OmniGraffle is to draw things, and there’s a good chance that you’ll want to reuse that thing again later. That’s where stencils come in!
What goes into making a great stencil, however, goes far beyond the artistic quality of the thing you create. There are some things you can do in OmniGraffle—from how you name the stencil file, naming canvases and objects, even adding descriptions for individual stencils—to help make your stencil usable and accessible to everyone who uses OmniGraffle.
The remainder of this chapter is devoted to showing you the ins and outs of creating a really great stencil file. So, let’s start at the beginning—creating the stencil file.
Creating a New Stencil from Scratch
To create a new stencil, choose File ▸ New Resource ▸ New Stencil. An OmniGraffle stencil file looks just like any other OmniGraffle file. You have the same canvas. The same inspectors. Even the same toolbar. Under the hood, though, OmniGraffle specifies and recognizes this file as a reusable stencil.
However, when you save the stencil file, OmniGraffle’s save sheet opens to the Stencils folder on your Mac:
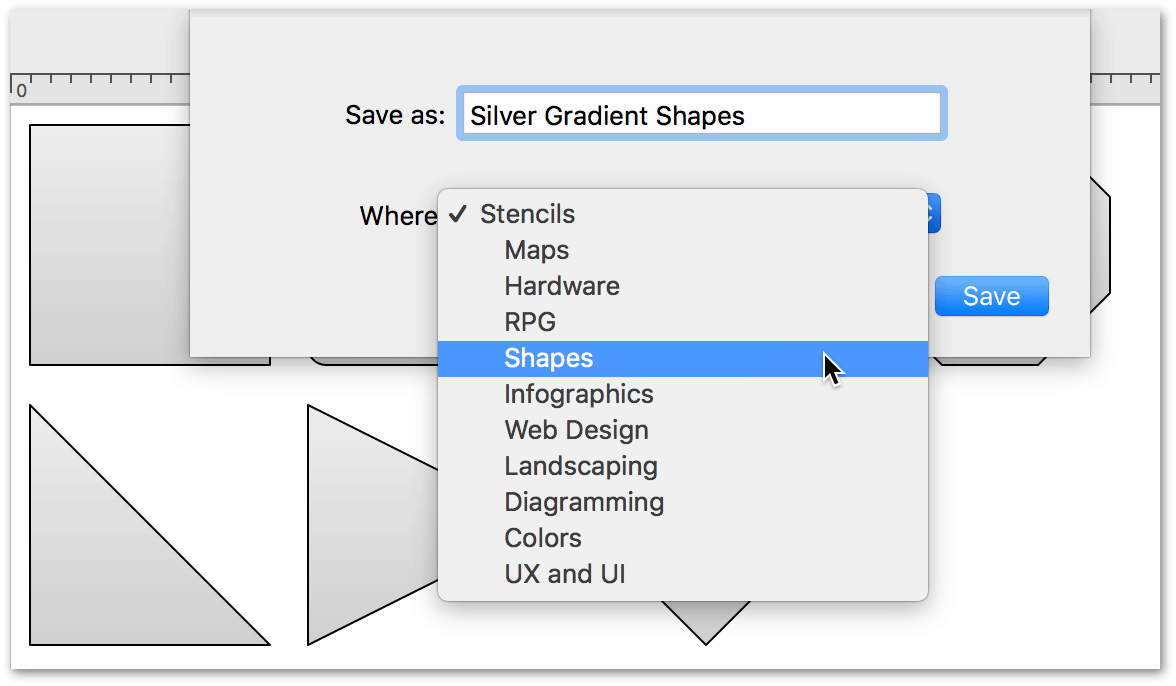
Using the Where menu, you can choose to save your stencil in the Stencils folder, or to any subfolder within that directory. After you click Save, your stencil is immediately available for use from the Stencil Browser.
Exporting an OmniGraffle Document as a Stencil
If you have an existing design in OmniGraffle that you would like to also use as a stencil, do the following:
-
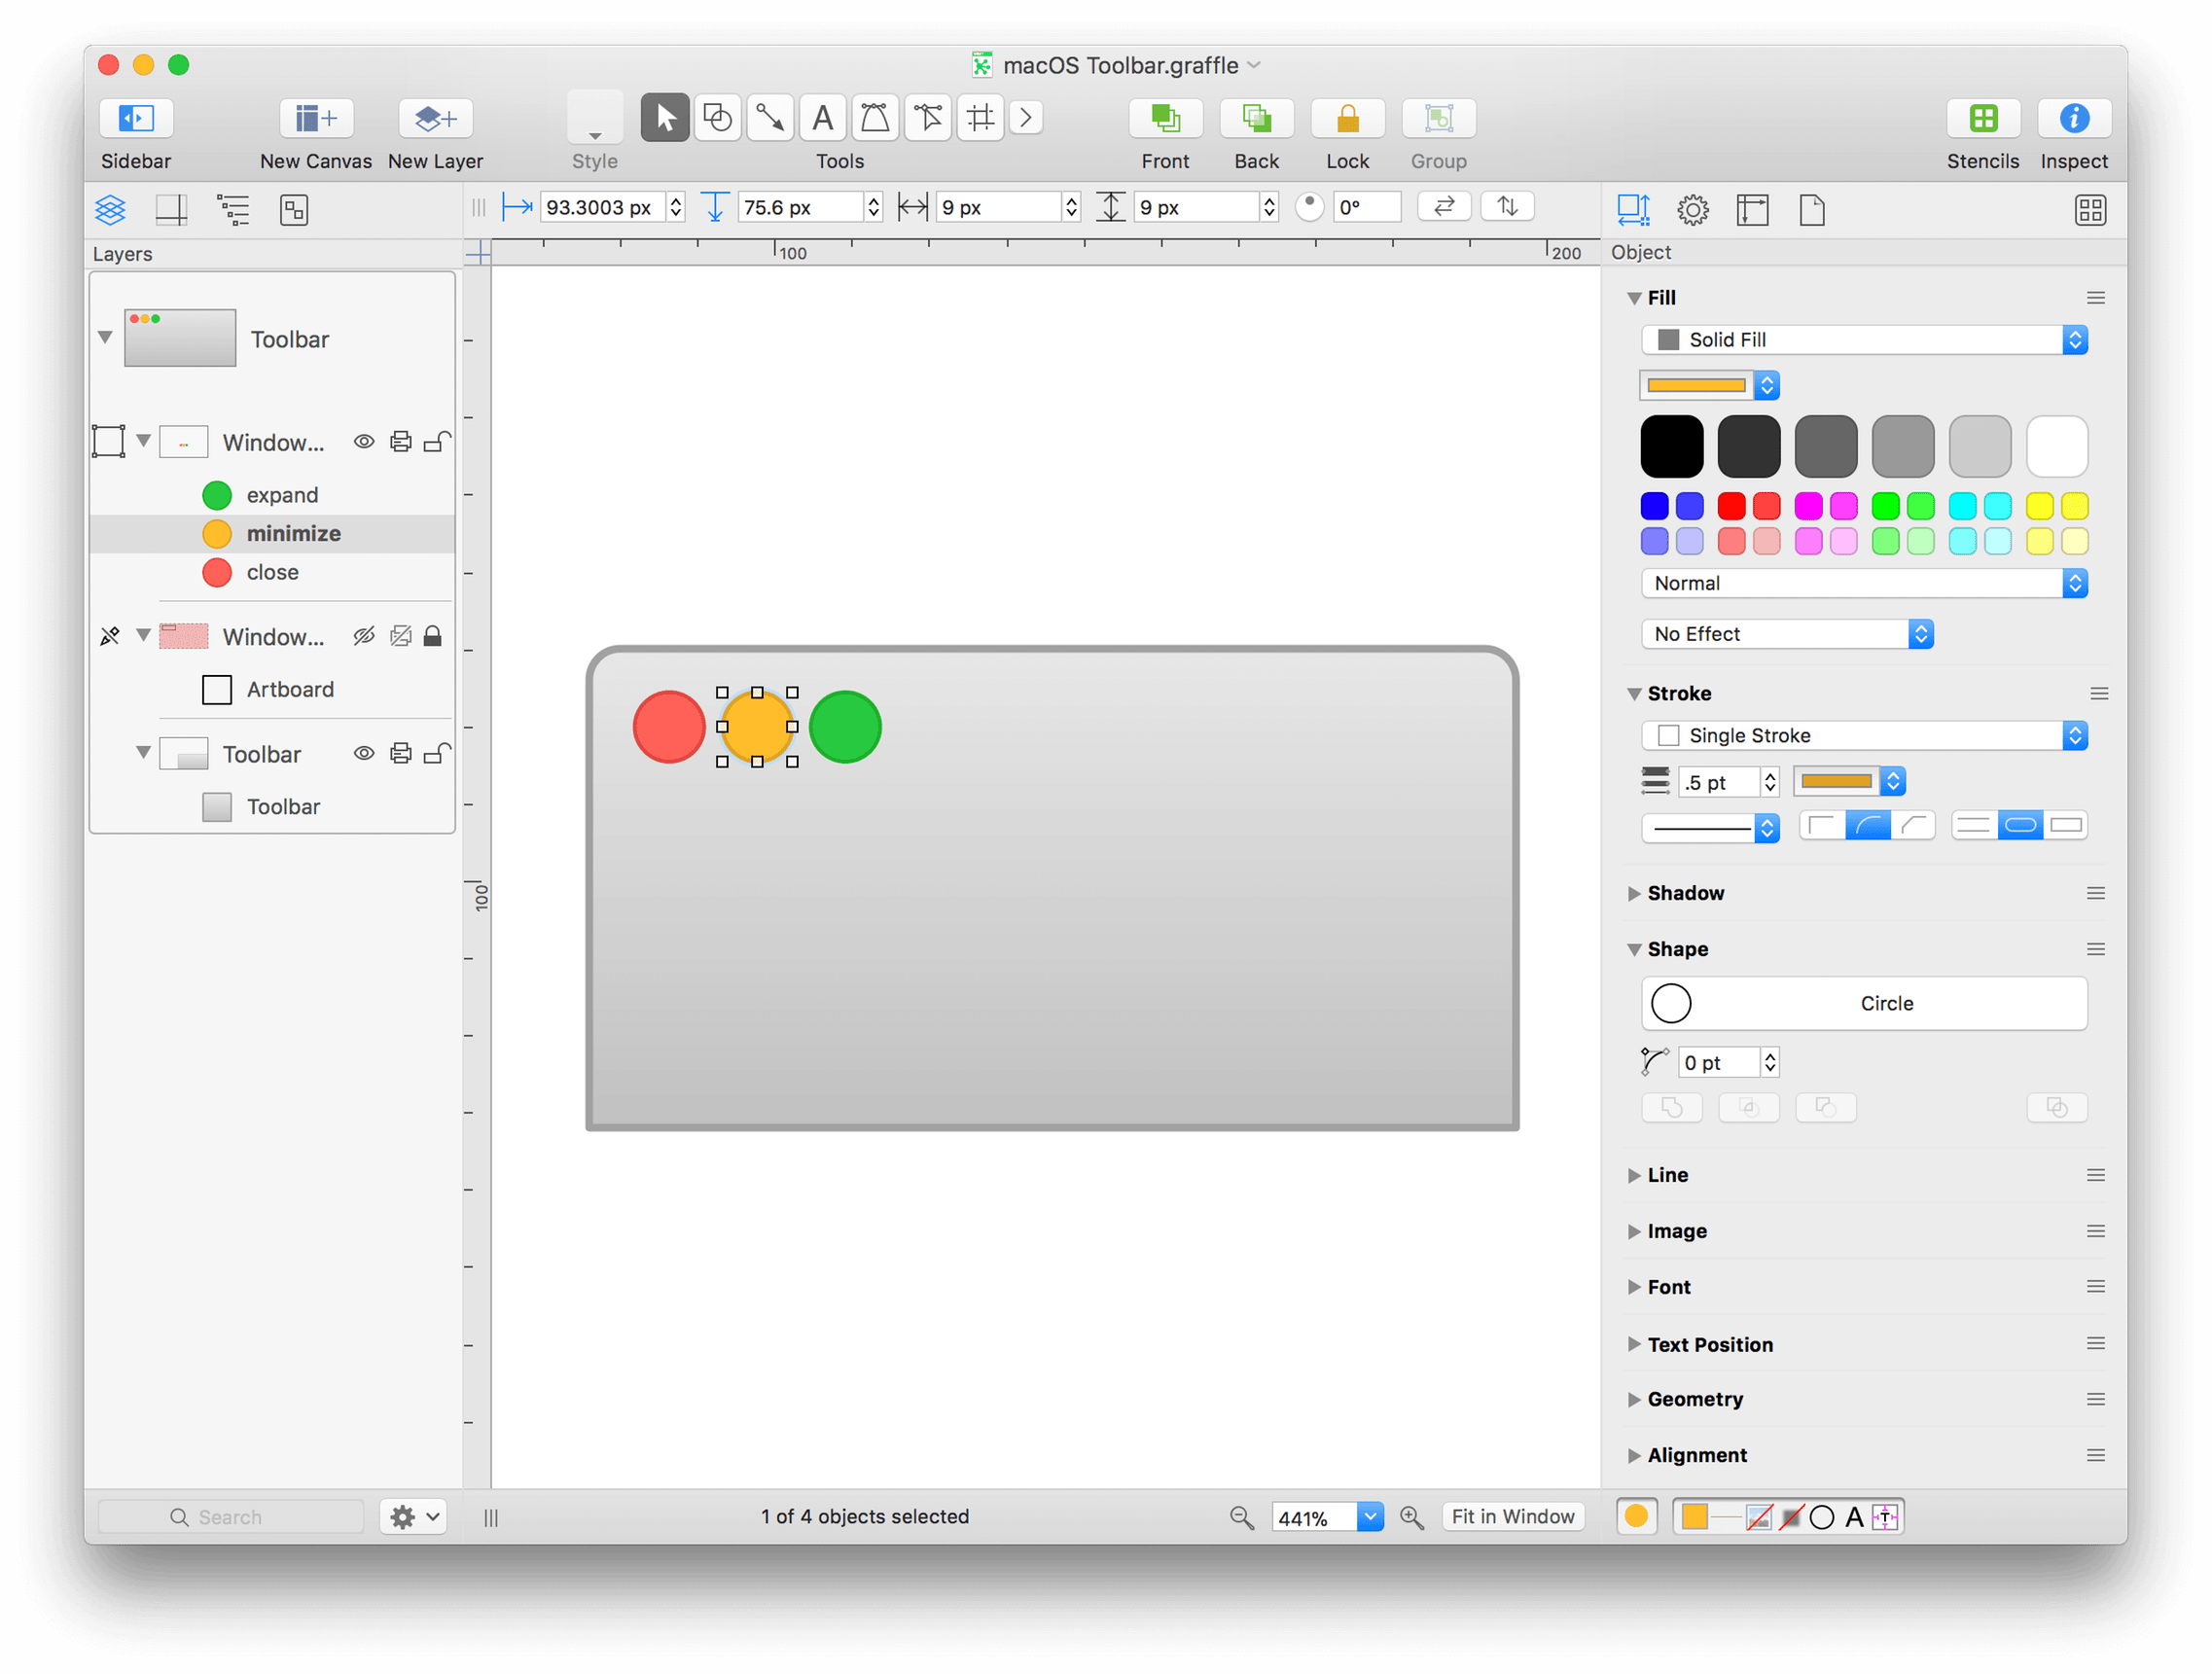
Open your OmniGraffle file. If the file contains multiple objects, each object on the canvas is recognized as an individual stencil:
-
Choose File ▸ Export (Option-Command-E).
-
In the Export sheet:
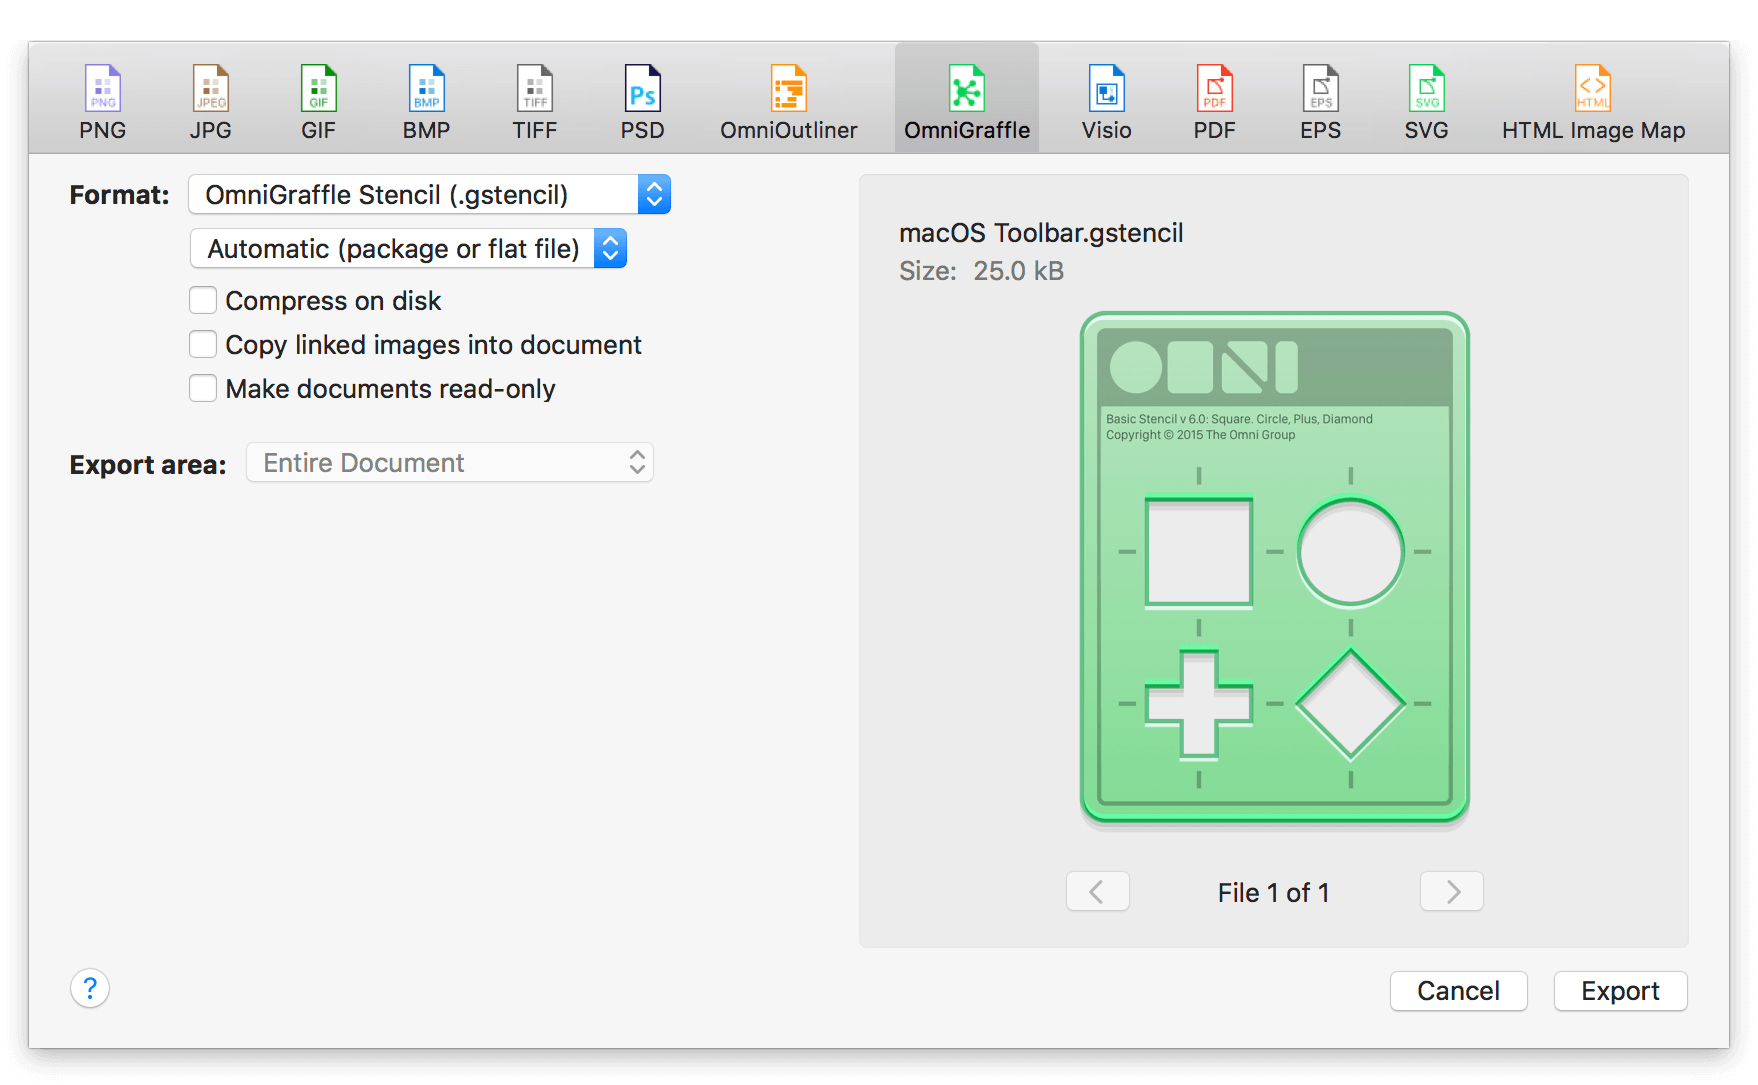
- Choose OmniGraffle in the row at the top of the Export panel.
- In the Format pop-up menu, choose OmniGraffle Stencil (.gstencil).
- In the next pop-up menu, choose whether to save the stencil file as a Package File, a Flat File, or Automatic.
- Select any of the following options, depending on your needs:
- Compress on disk
- Copy linked images into document
- Make documents read-only
-
Click Export; this opens a Save sheet on top of the Export panel:
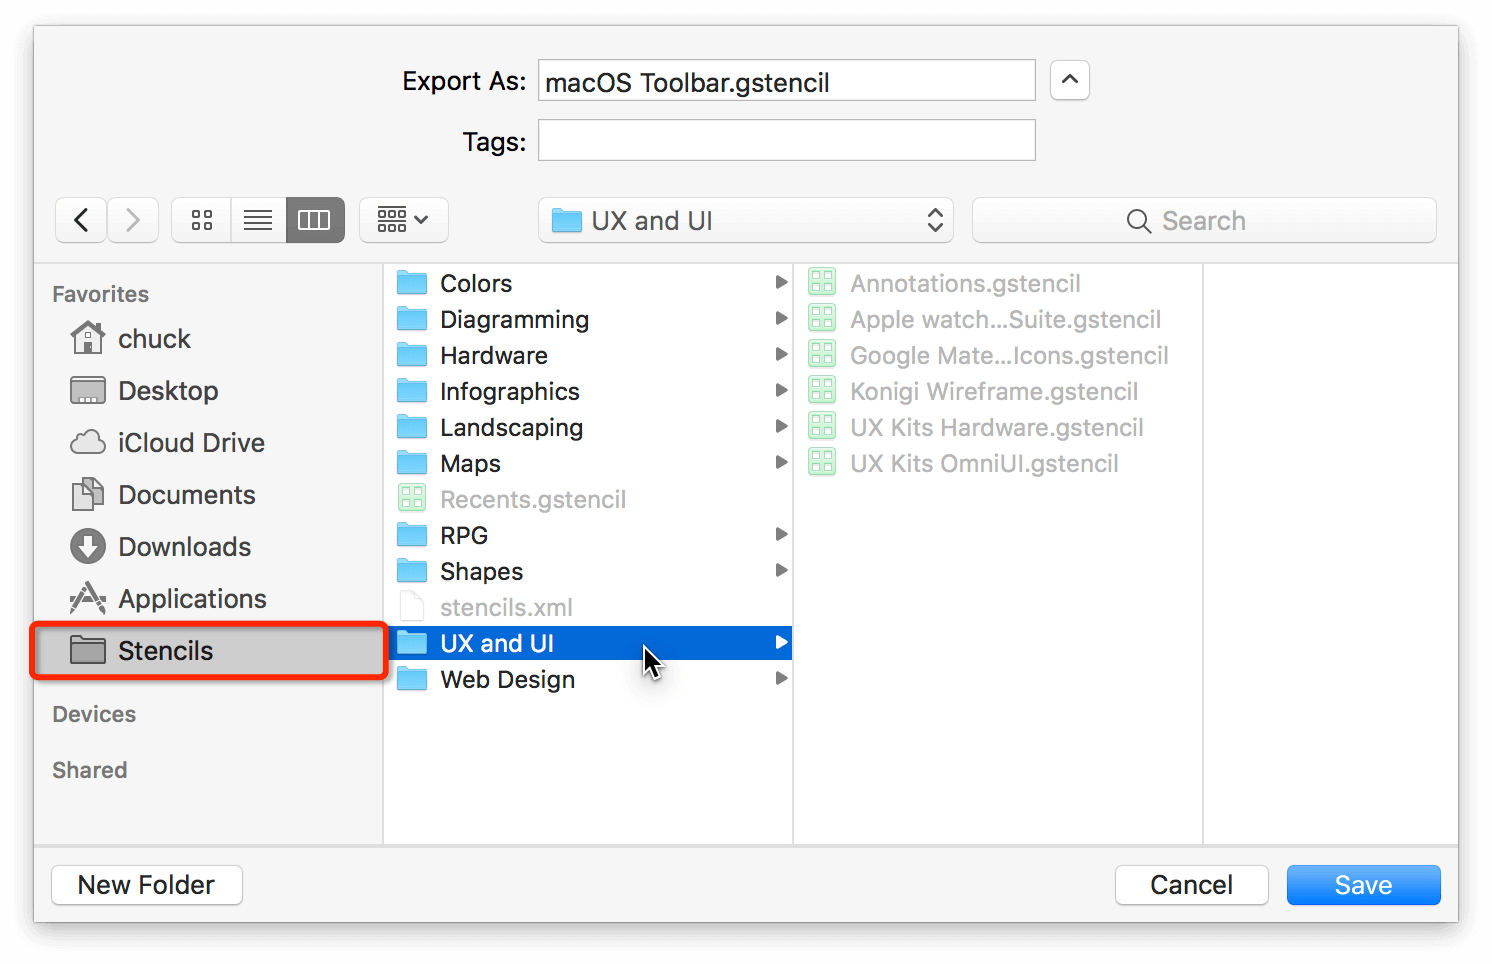
If you added the Stencils folder to the sidebar (see Creating a Shortcut to the Stencils Folder), choose the Stencils folder and then choose a folder in which to save the stencil file.
-
Click Save.
The stencils are ready and waiting for you in the Stencil Browser after exporting.
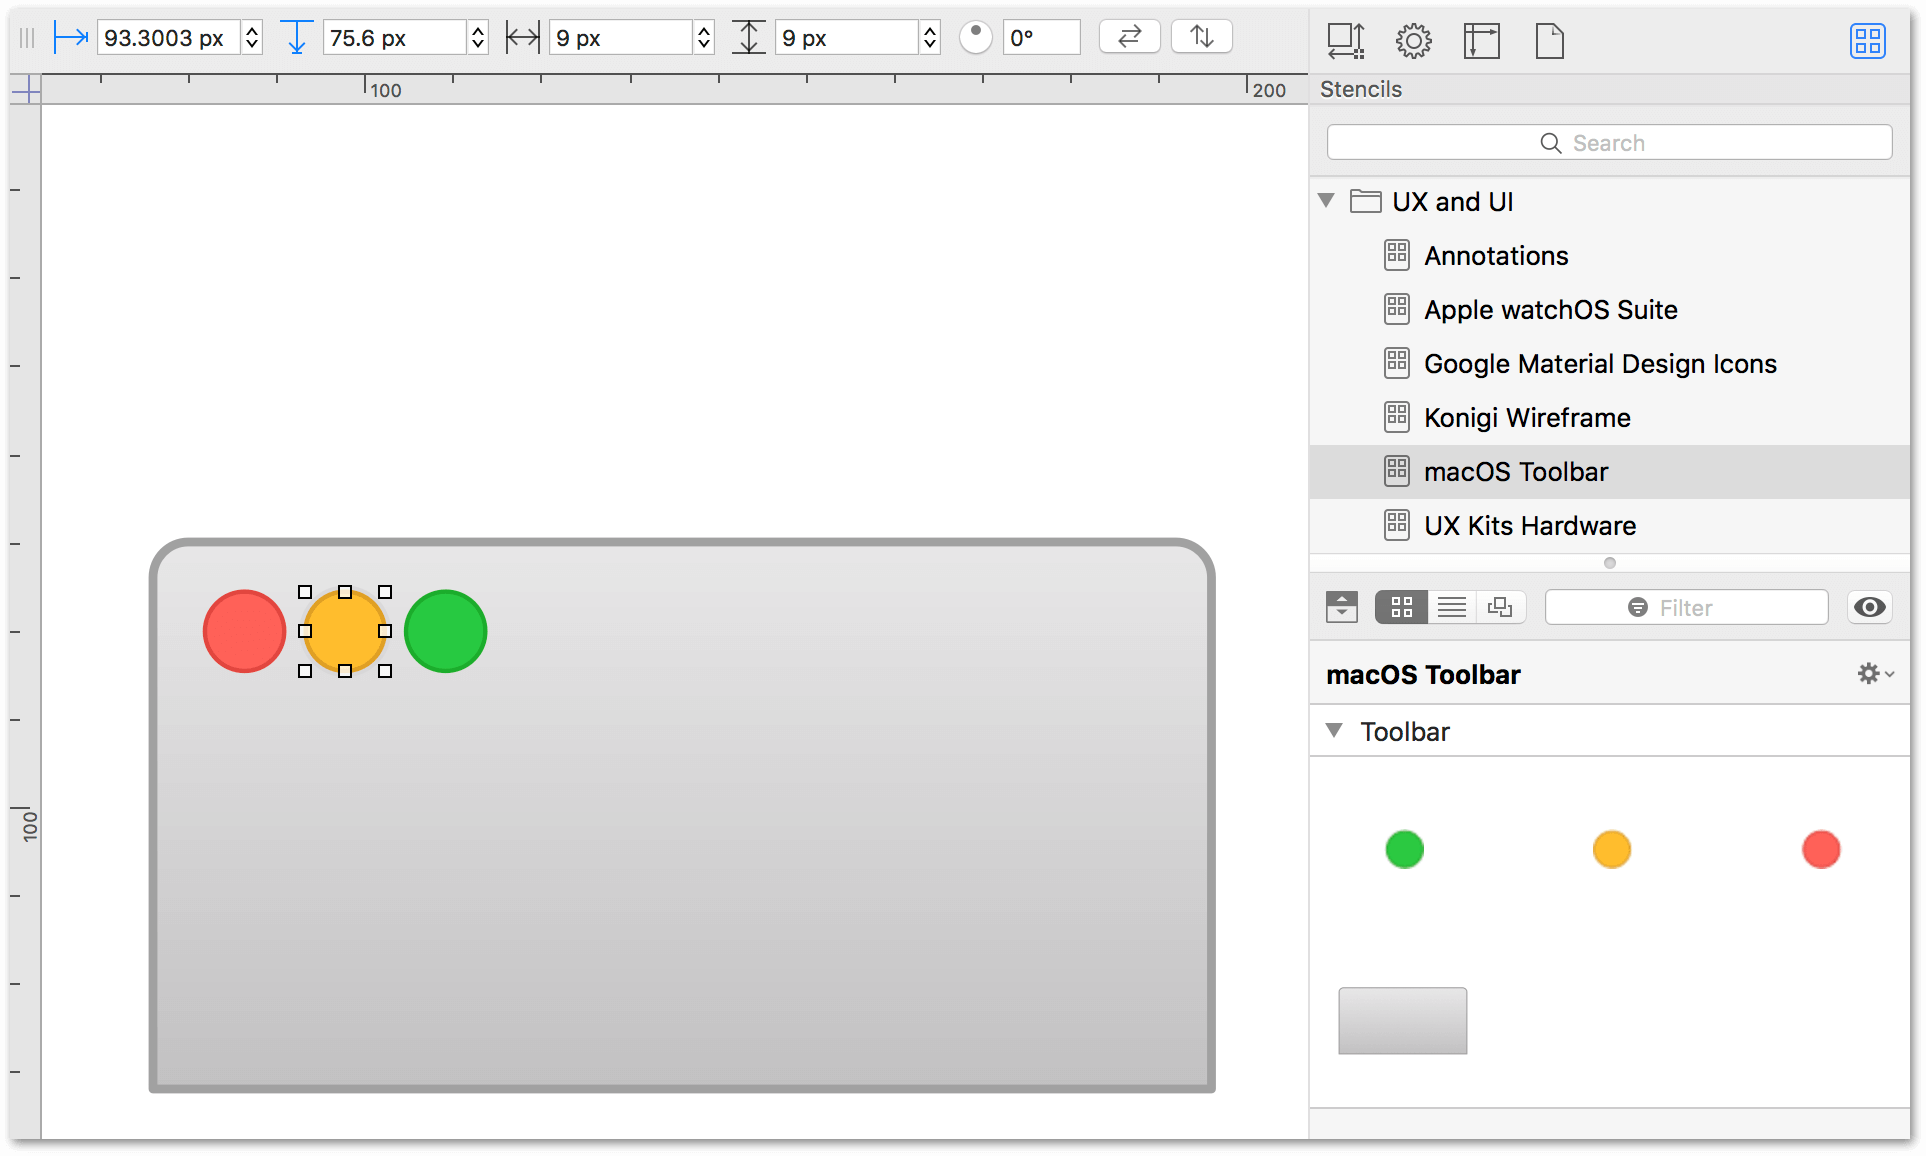
For more information on how to export files from OmniGraffle, see Exporting Image and Graphics Files from OmniGraffle, later in this guide.
Tips for Creating a Great Stencil
Beyond the design aspect of creating a great stencil, there is plenty more that you can do to your stencils to make them more useful for other users, particularly if you intend to share them on Stenciltown. For example, how you name the actual stencil file can make a huge difference in how users see your stencil in the Stencil Browser.
Here you’ll find a series of tips for things you can do with your stencils in OmniGraffle to help make them stand out in the Stencil Browser. To get started, though, let’s look at The Anatomy of a Stencil...
The Anatomy of a Stencil
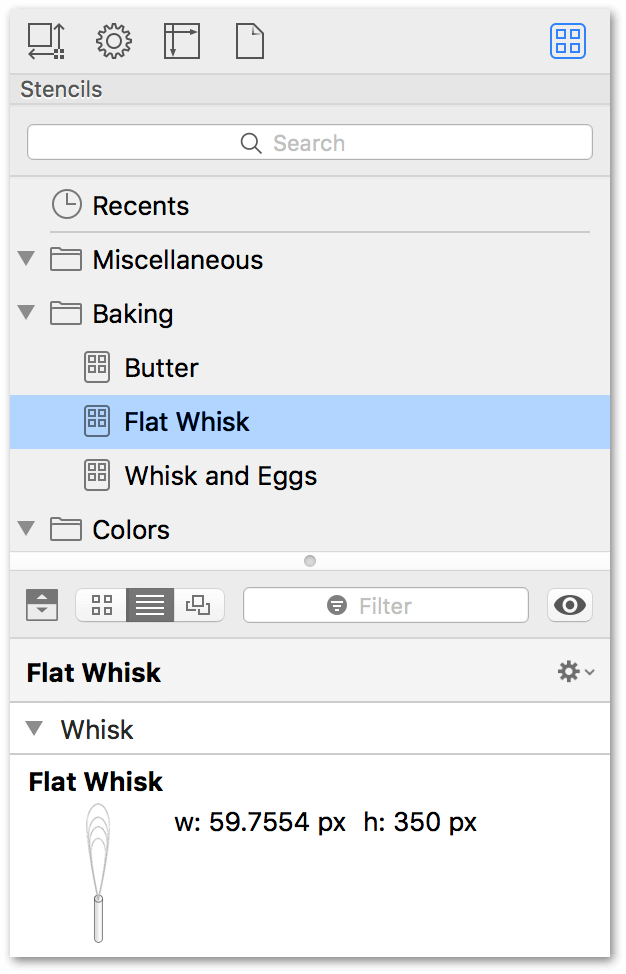
A Stencil is a single object (or a single thing consisting of a group of objects), whereas a Stencil Set consists of two or more stencils of similar meaning. For example, a Stencil Set could contain all of the icons for your website, or the ingredients you need for various baking projects you’re trying to illustrate.
When you look at a stencil in the Stencil Browser, you can see all kinds of information about that stencil, such as its name, size, whether it’s part of a Stencil Set—even whether a particular stencil is on its own canvas in the original stencil file. If you’re creating stencils, here’s where all of that information comes from:
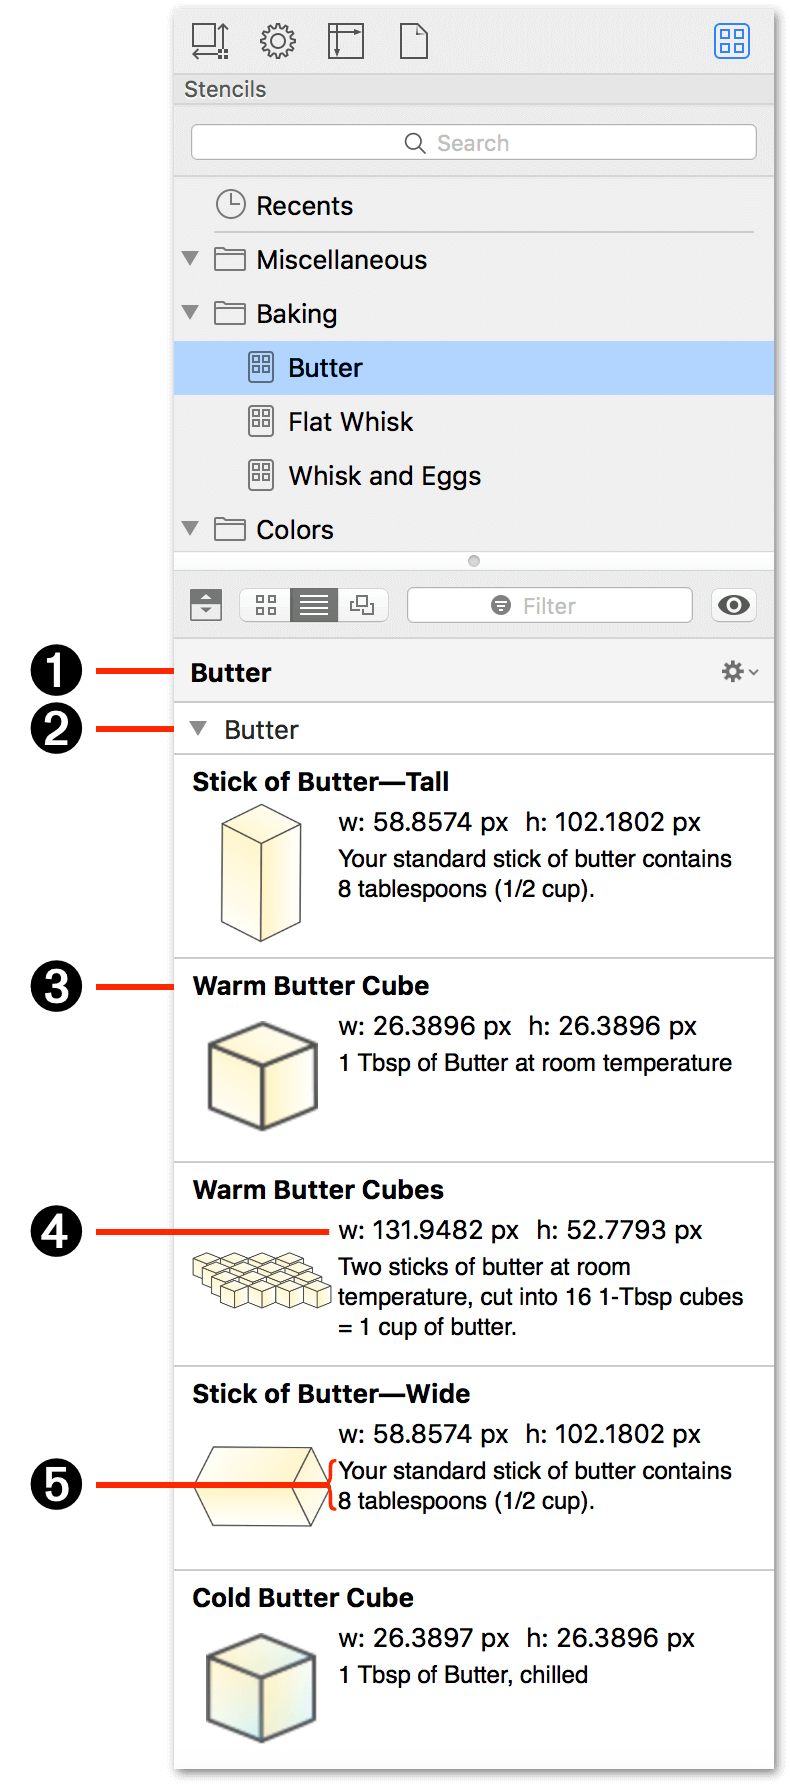
-
Stencil Filename: The name of your stencil comes directly from the filename you’ve chosen when you save or export the stencil file. Don’t use underscores or hyphens in the filename, and if you intend to share your stencil on Stenciltown, please don’t be cryptic when naming your stencil file. While a cryptic filename might work for your own use, that sort of thing doesn’t translate very well for the potential thousands of OmniGraffle users who are trying to find your stencil.
-
Stencil Canvas: Each canvas of the stencil file is shown as a collapsible field in the Stencil Browser. Click the disclosure triangle at left to open or close the view that contains the stencils on a given canvas.
-
Stencil Name: If you have a Stencil Set, you can assign names to the individual stencils in that collection by placing them on separate canvases and then naming each canvas accordingly.
If you have OmniGraffle Pro, you can name stencils in the Object Data inspector’s Name field. For more information about the Object Data inspector, see Assigning Metadata to Objects With the Object Data Inspector (PRO), earlier in this guide.
-
Dimensions: A stencil’s dimensions are based on your settings in the Units inspector. You can get to the Units inspector by choosing Inspectors ▸ Canvas, and then scroll through the inspectors to open up the Units inspector.
-
Description: Also in the Object Data inspector (requires OmniGraffle Pro), use the big open text field to enter a short description for the thing you’ve created.
One or Many Objects Per canvas?
There is no restriction on the number of objects you can have on the canvas. Every object, or group of objects, is its own stencil. For example, if you have three objects on the canvas—two standalone objects and a group of multiple objects—then your stencil file contains three different stencils.
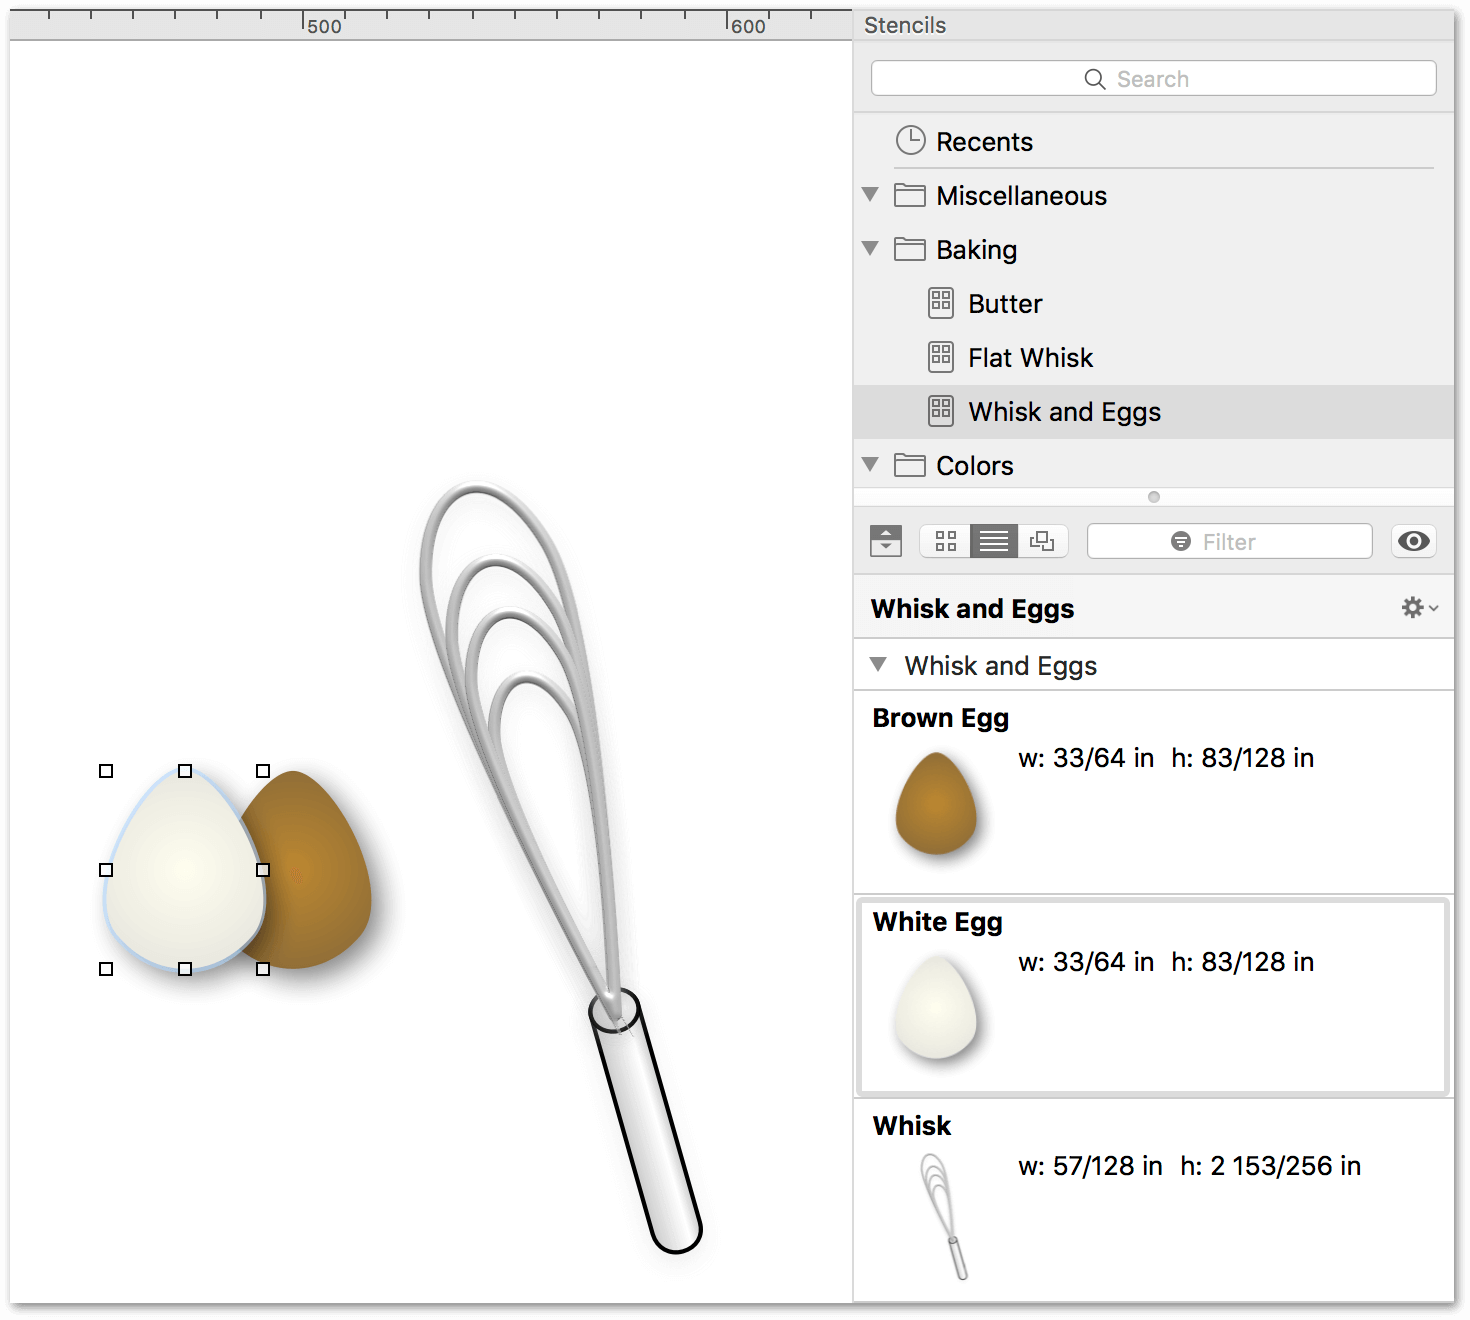
Group Objects That Make Up The Thing
Let’s say that you’re creating a bunch of stencils for standard kitchen utensils, such as whisks, spatulas, slotted spoons, and so on. Each thing you draw probably consists of multiple objects. If you don’t group together all of the objects for a particular item (for example, that whisk), each of those objects are exported as separate stencils.
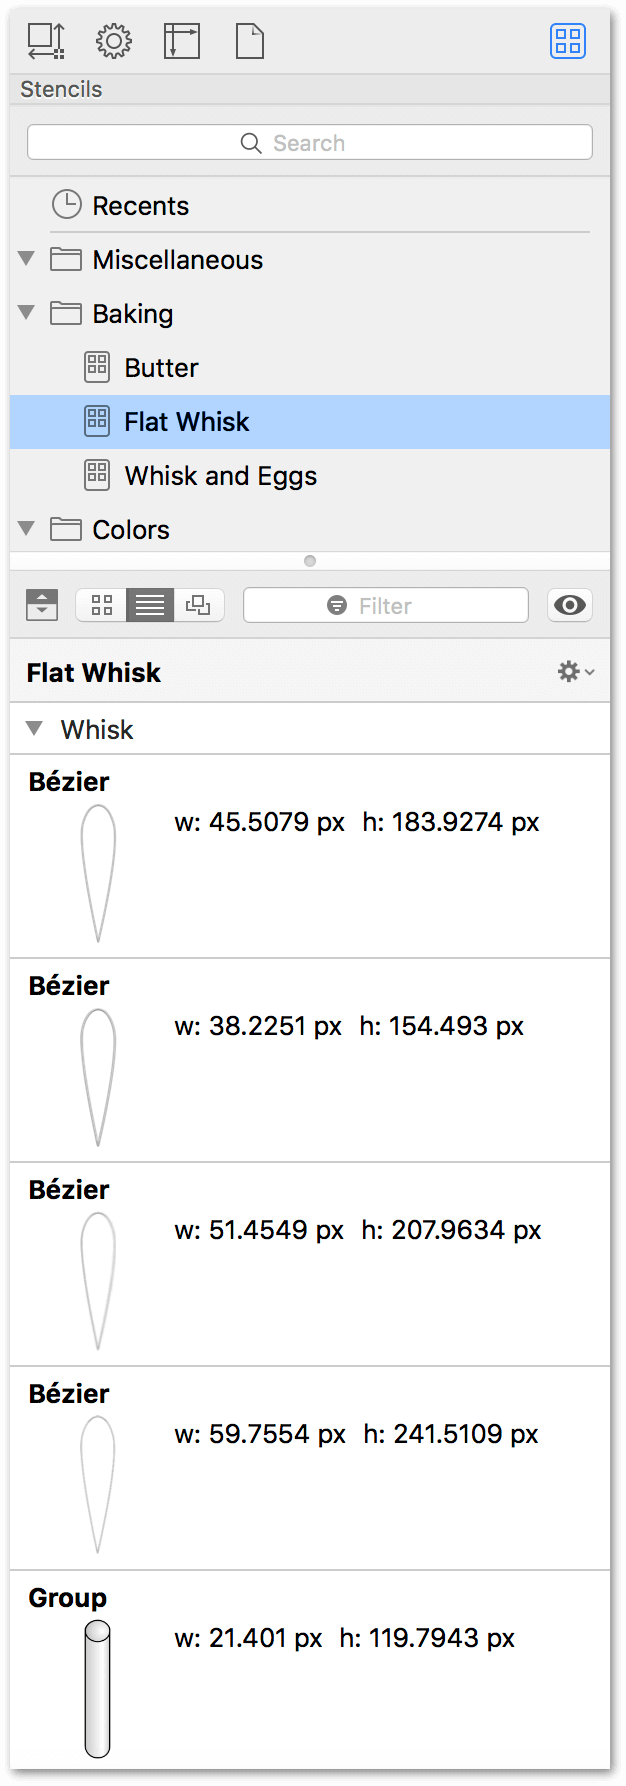
As you can see, rather than being a single stencil of a whisk, the stencil contains five objects: one for the handle, and four wire loops that make up the flat head of the whisk. However, if you group the objects together, you’ll get a single stencil object of the whisk:
Neatly Organizing Stencil Sets
Another way you can better present the stencils in a Stencil Set is to organize them in the Sidebar. To reorder the objects in the Sidebar, click and drag them up or down in the list:
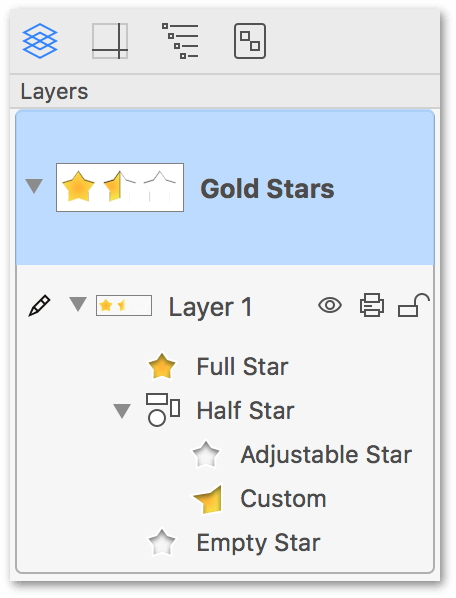
This sets the order in which your stencils appear in the Stencil Browser; for example:
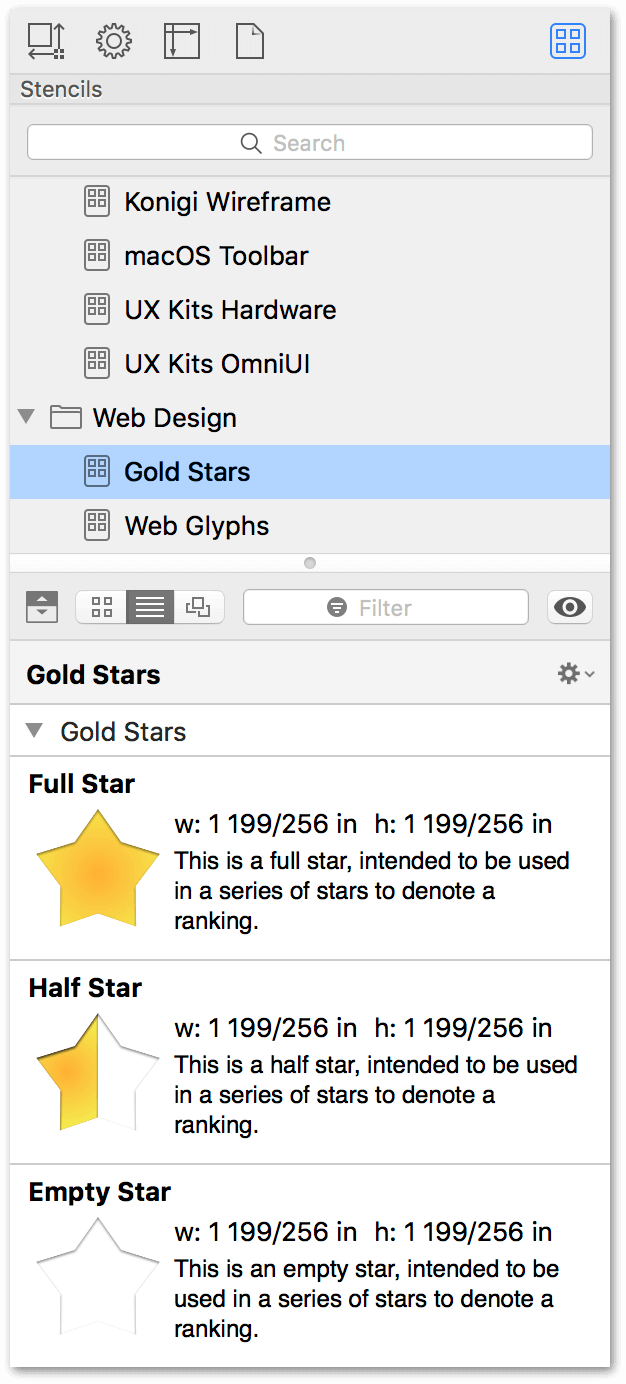
There is no right or wrong way to organize your stencils; just use your best judgment.
To Scale or Not to Scale?
One of the great things about stencils, is that you can take whatever the shape or thing might be, and resize it to the size you need. To aid in this behavior, use the Geometry inspector and turn on the Maintain Aspect Ratio option.
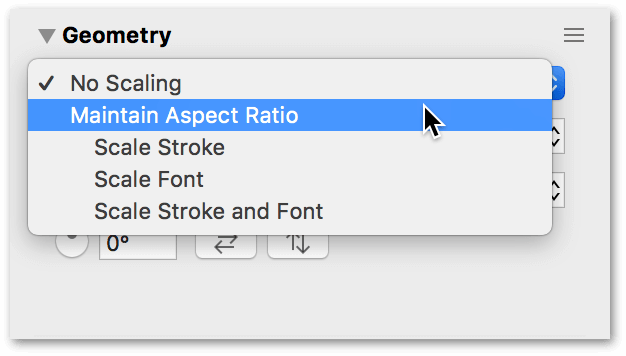
Once Maintain Aspect Ratio has been enabled, you can also choose to scale the stencil’s contents, including the stroke and text. And, if the person using your stencil decides they want to resize it without scaling, they can always turn off Maintain Aspect Ratio.
Sharing Stencils on Stenciltown
Stenciltown is an online community for sharing OmniGraffle stencils. When you use the Stencil Browser to search for new stencils, OmniGraffle also reaches out to Stenciltown and displays any results that match your search criteria. And, if you are working on a stencils file, you can also choose File ▸ Submit to Stenciltown to upload your stencils to Stenciltown, directly from within OmniGraffle.
To get started, you’ll need to create an account on Stenciltown. Your Omni ID consists of a username, your email address, and a password. That’s all of the information we require; just make sure that your password is a mixture of upper- and lowercase letters, numbers, and then toss in the occasional symbol. We don’t need your mailing address, names of your children or pets, or anything like that. Your Omni ID is, at the moment, your way of signing into and sharing stencils on Stenciltown.
How to Properly Name a Stencil File to be Shared on Stenciltown
Don’t be cryptic when naming your stencil file. Use something that aids in findability. For example, you could use something like F1 Circuits 2016 for a stencil set that contains outlines of the circuits for the upcoming Formula One season.
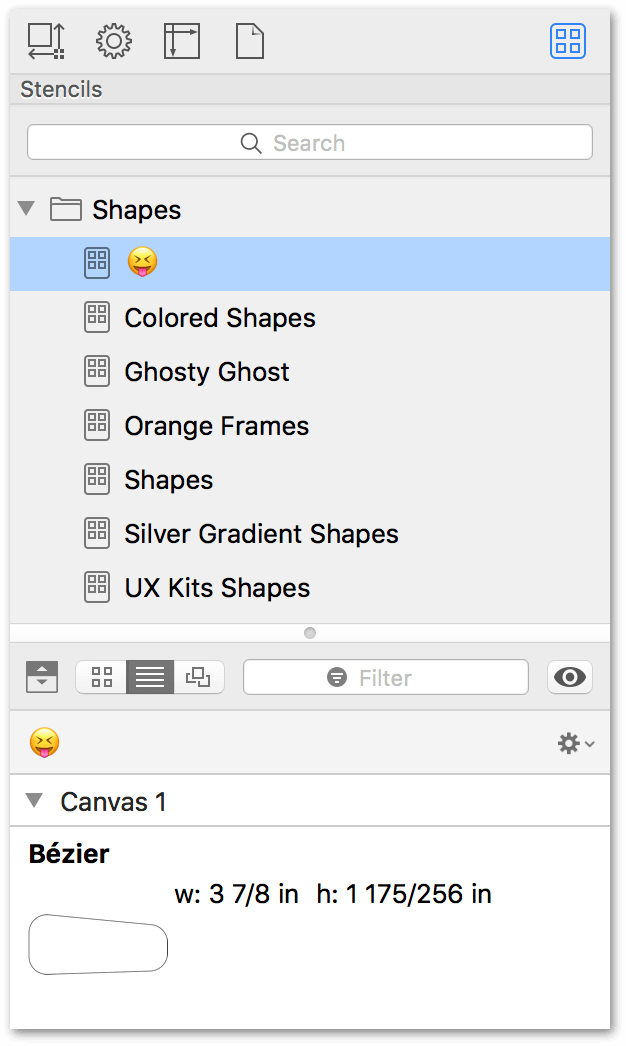
Don’t use underscores or hyphens in filenames. If you have a stencil, such as F1 Circuits 2016 that normally has spaces in it, don’t resort to using hyphens or underscores in the filename if that’s normally how you roll. Leave the spaces in there; they make the stencil name easier to read.
Finally, don’t use an emoji as the filename of your stencil. Since the point of sharing stencils on Stenciltown is to help other OmniGraffle users find the things they need, using an emoji as the filename hinders that process.
Submitting Stencils to Stenciltown
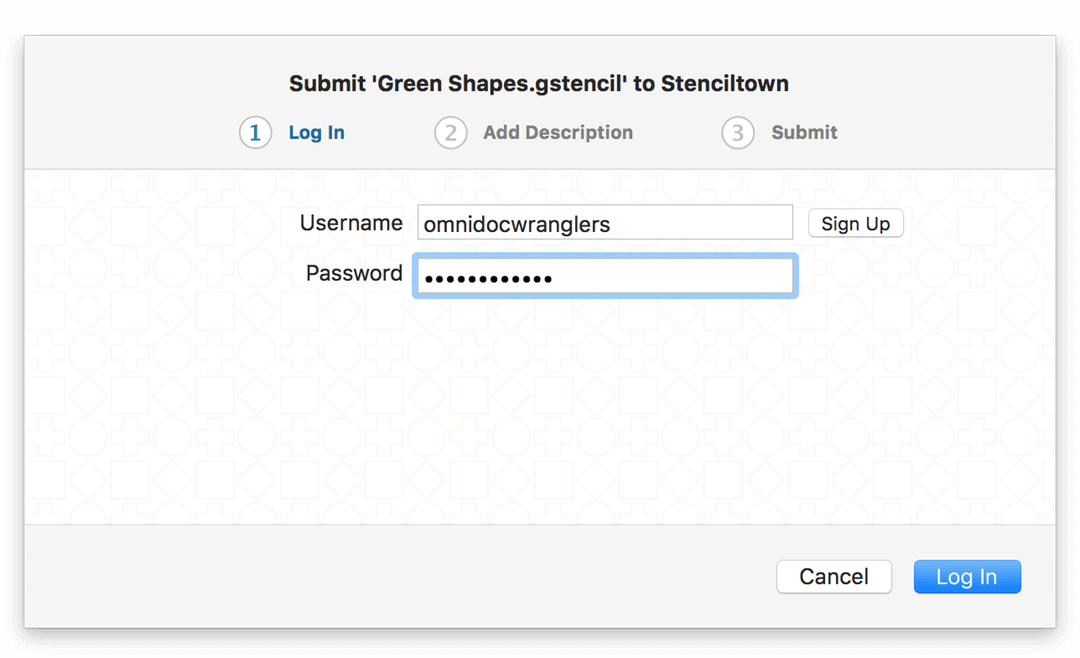
Once you have created your Omni ID for Stenciltown, you can log into Stenciltown directly from OmniGraffle on your Mac. Just follow these steps:
- With a stencils file open in OmniGraffle, choose File ▸ Submit to Stenciltown.
-
In the sheet that appears, enter your Username and Password, and then click Log In:
-
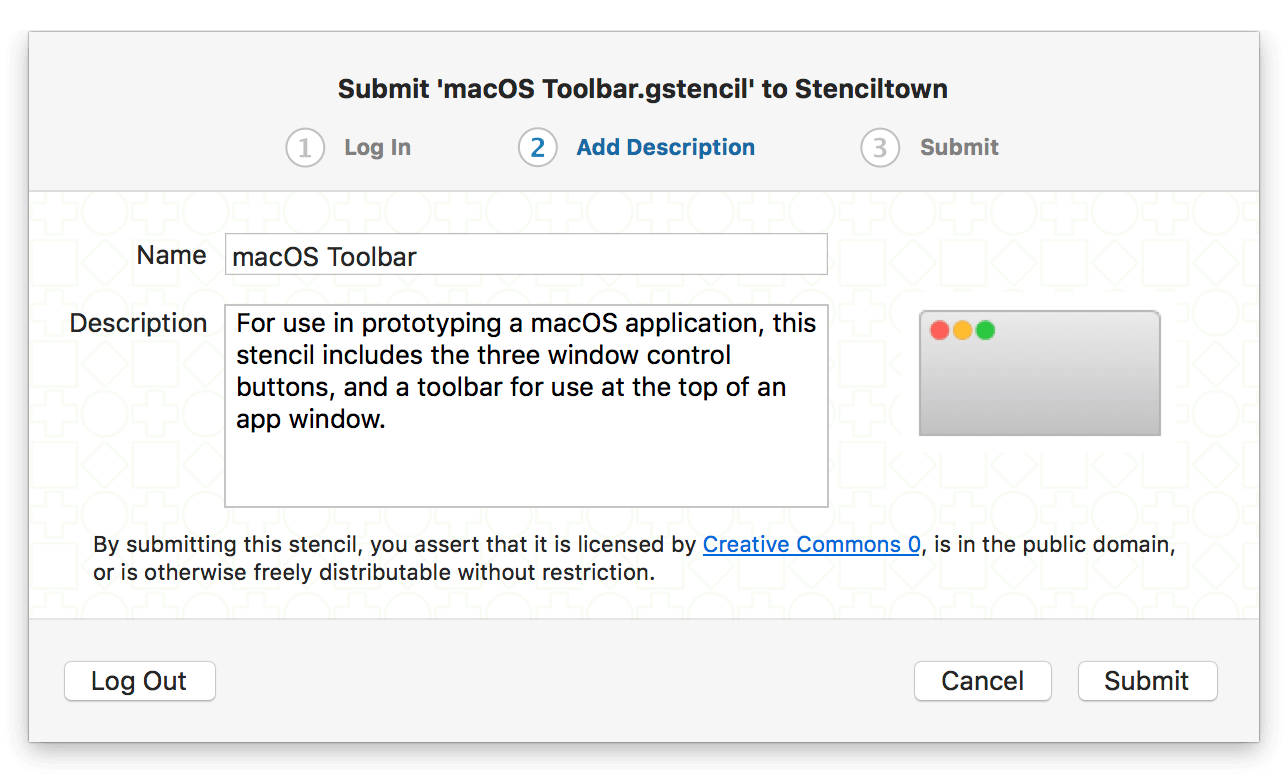
Enter a Name and Description for the stencil (OmniGraffle automatically uses the first canvas in the file for the preview image).
-
Click Submit.
After you click Submit, OmniGraffle submits the stencil to Stenciltown and links it to your account.
If you want to make changes to the stencil name or description, or to remove the stencil from Stenciltown:
- Log in on the Stenciltown website.
- Click the icon next to your Omni ID in the upper-right.
- Click Stencils to see the stencils you have submitted to Stenciltown, and then choose the stencil you would like to update or delete.
For more information about Stenciltown, or to create your account, see the Stenciltown FAQ.
