OmniOutliner Preferences
Now that you’ve had a chance to get cozy with OmniOutliner 4’s interface, let’s take some time to examine the app’s preferences. To open OmniOutliner’s preference pane, choose OmniOutliner ▸ Preferences, or use the ultra-handy keyboard shortcut, Command-Comma (⌘-,). There are six preference panes that you can use to further customize OmniOutliner 4 to suit your needs, and your work style.
Each preference pane includes a Reset ( ) and Help (
 ) button so you can revert back to the default settings, or get to this Help page quickly from within the app.
General Preferences
Use the General preferences pane to make changes that apply across the board for everything you do in OmniOutliner.
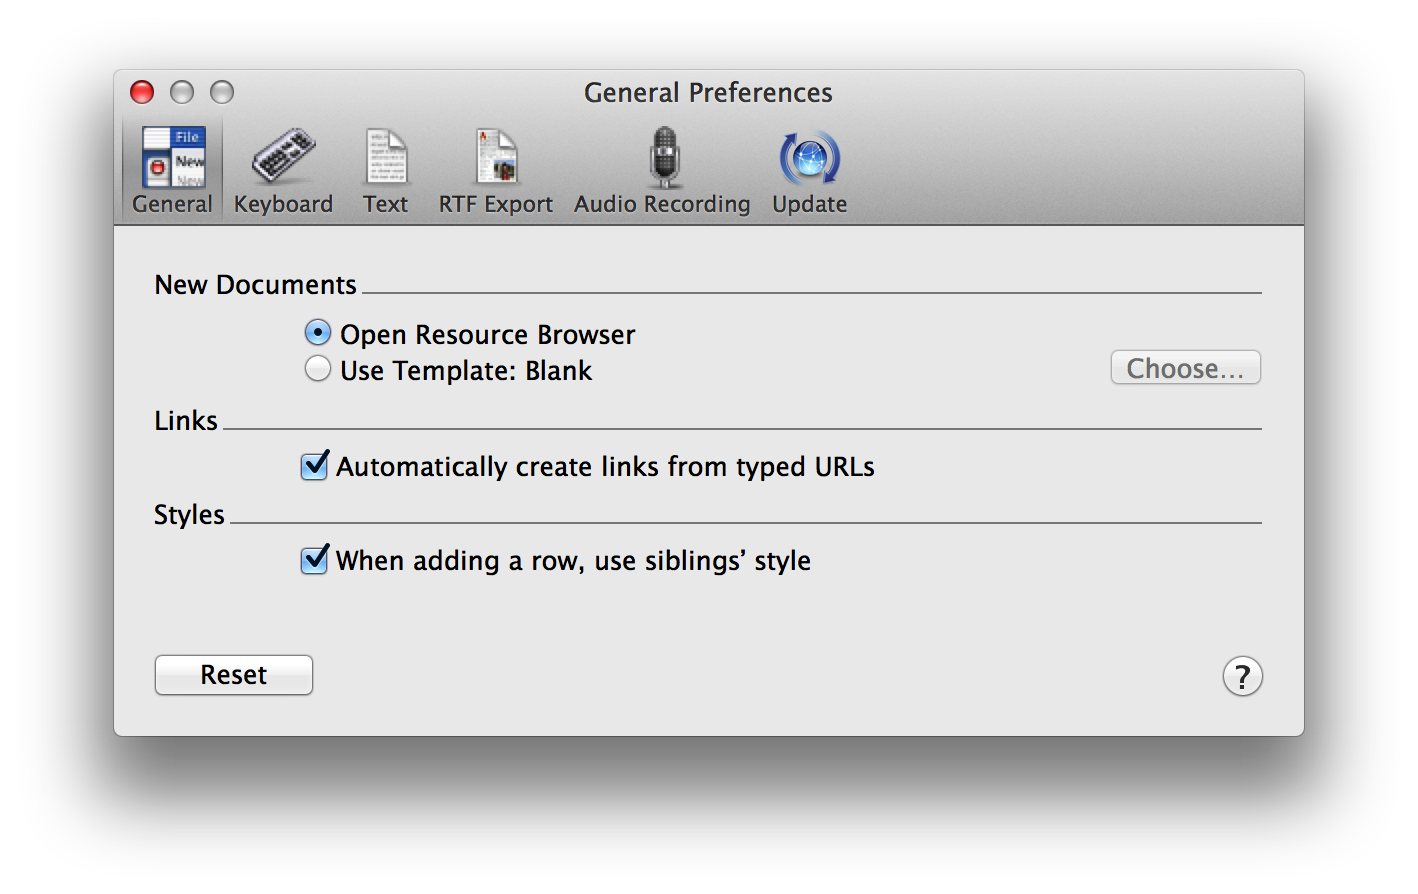
Options in General preferences include:
- New Documents
- Choose what happens when you create a new document, by either choosing File ▸ New or using the Command-N keyboard shortcut. You can choose between opening the new Resource Browser, or creating a new document based on the default template. If you want to change the default template, click Choose and then select one of the OmniOutliner template files on your Mac.
- Links
- Turn on or off the ability to make Internet URLs (such as http://www.omnigroup.com) clickable. If you uncheck this option, the URLs you enter are rendered as Rich Text and clicking them will not open the URL in your default web browser.
-
If you want to change the text label of a URL, right-click (or Control-click) on the link and choose Edit Link from the contextual menu that appears. Change the Display title to whatever you would like, and then click Done.
- Styles
- Turn on or off the setting for a new row to adopt the style from that row’s sibling. When this is checked and you add a new row (by pressing Return or Shift-Return), that new row adopts the styles of the row you were previously in. When unchecked, any new styles you create revert to the default styles from the template you’ve chosen.
-
For example, let’s assume that you have a new document that uses the Blank template and you’ve unchecked this option. In your first row, you click the row handle and assign an orange background to the row. You then enter some text and press Return. The next row doesn’t pick up the orange background color; instead, it has a white background (which is the default for the Blank template). Now, if the Styles option were checked, the next row you created from the orange row would pick up the same orange background color.
Keyboard Preferences
Use the Keyboard Preferences to adjust how OmniOutliner reacts when you press certain keys.
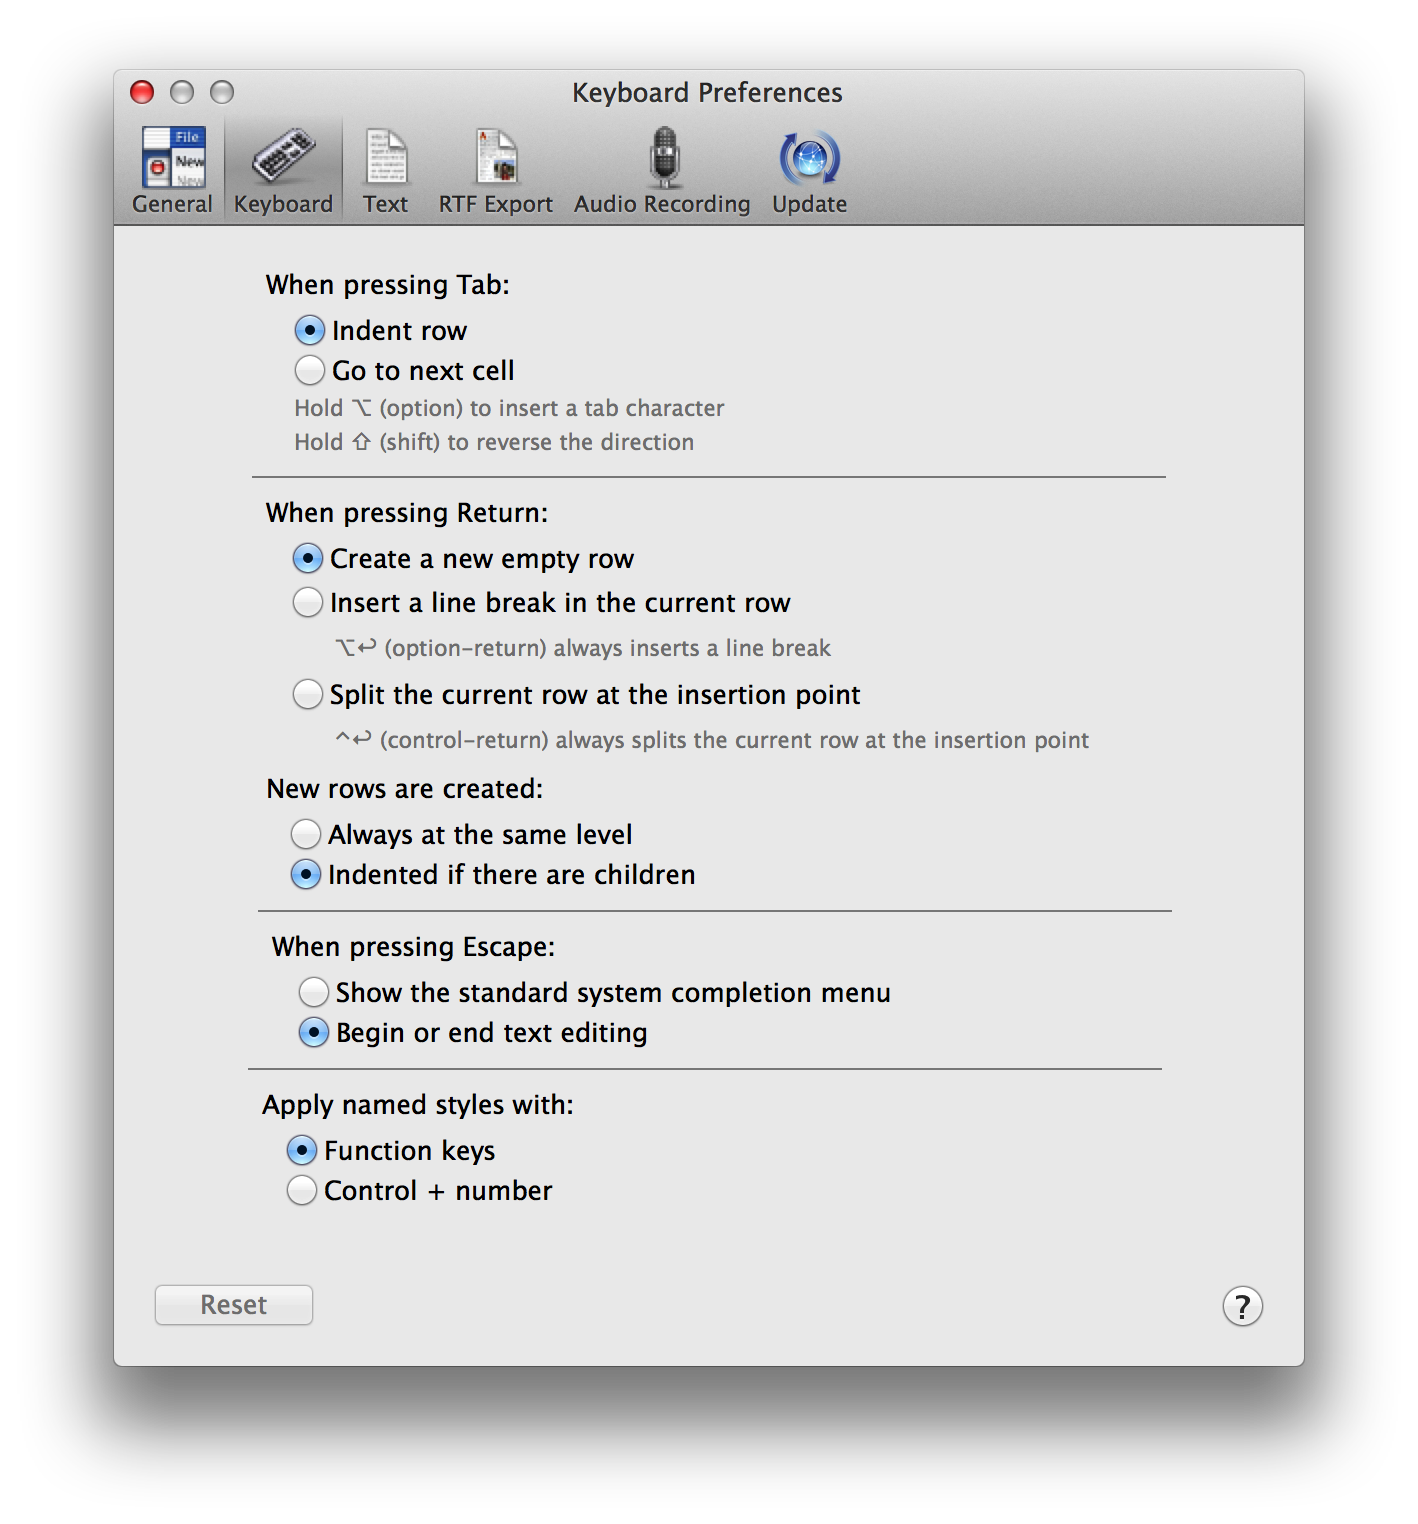
These options are as follows:
- When pressing Tab
- By default, pressing Tab will indent a row. You can change this to Go to next cell by switching the radio buttons. Holding the Option key will insert an actual Tab character, while pressing Shift-Tab will outdent the current row.
- When pressing Return
- By default, pressing Return creates a new empty row. You can change this to Insert a new line in the current row by switching the radio buttons; however, pressing Option-Return always inserts a new line in the current row.
-
Similarly, with Split the current row at the insertion point set, you can split the current row into two rows at the cursors position by pressing Return. Even when this option is turned off, you can press Control-Return to split a row in two.
- New rows are created
- By default, new rows are Indented if there are children when you press Return. If you switch the radio button to Always at the same level, new rows are created at the same level as the line your cursor is on when you press Return.
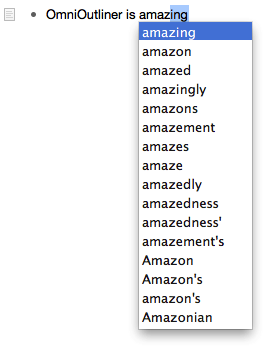
- When pressing Escape
- There are two options for what happens when you press the Escape key. By default, pressing the Escape key opens the system-wide completion menu. This comes in particularly handy when you aren’t quite sure how to spell something. You can just type in the first few characters of the word, press Escape, and a popup menu appears with a list of possible options. To accept one of the options, you can click it with your mouse, or use the Down Arrow key to move the highlight to the word you need and then either press Tab or Return to accept that option.
-
-
Use the other option, Begin or end text editing, for times when you’re doing quick entry and need to move around in your Outline, editing rows and column cells more efficiently. Pressing Escape after entering some text in a row will highlight that row. Press Escape again places the cursor at the end of the line so you can continue typing.
- Apply named styles with
- By default, you can use one of the Function keys to apply one of the Named styles to the current row. (Named styles are found in the lower portion of the Styles section of the Sidebar.) To use the function keys (F1 through F9), you’ll need to press and hold the fn key and then press a numbered function key to apply the style. For example, to apply the Heading 1 named style, use fn-F1.
-
You can change this to Control + number by switching the radio buttons in the preference pane. This can make it easier for you to apply named styles since using the fn key along with the various function keys can be a little awkward.
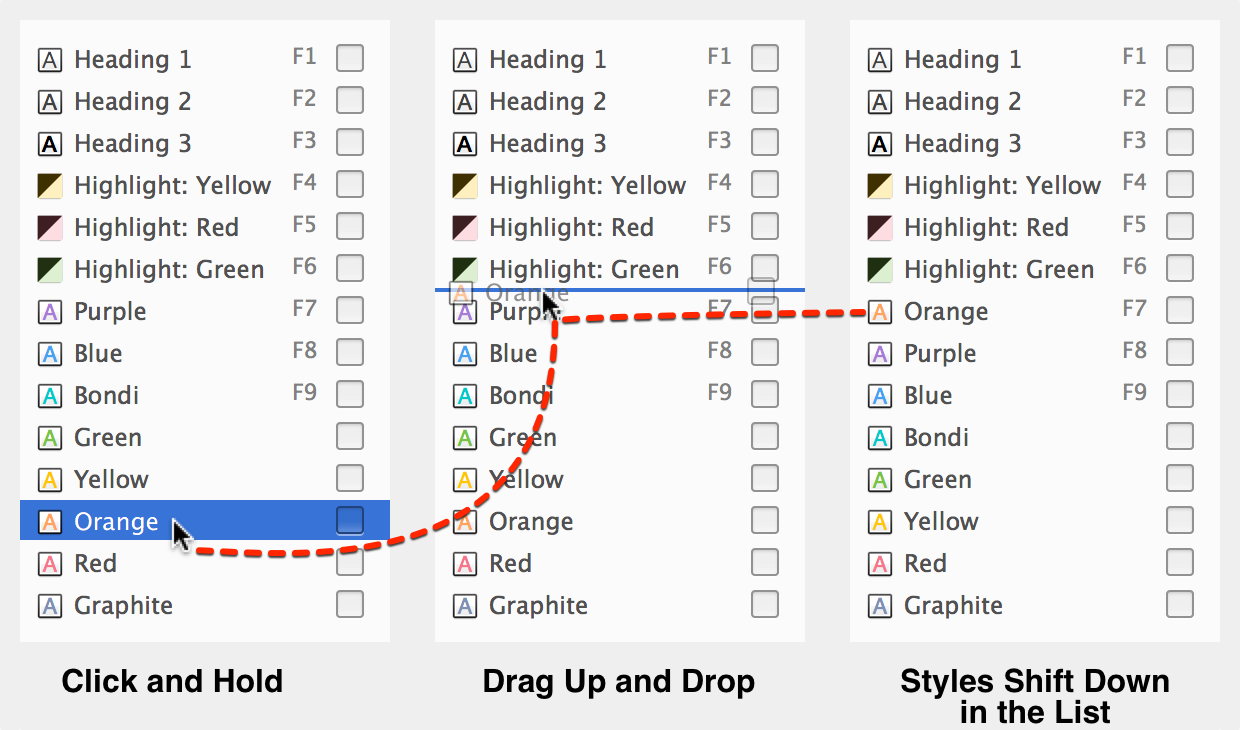
Rearrange the Named Styles for Different Keyboard Shortcuts
As you may have noticed, not all of the Named styles in the Sidebar have a keyboard shortcut equivalent. Additionally, you cannot directly assign (or reassign) these keyboard shortcuts in System Preferences ▸ Keyboard ▸ Shortcuts since these aren’t tied to a menu item.
However, you can rearrange the Named styles by dragging and dropping them into different positions in the list. For example, if you find that you’re using the Orange text style very often, you can drag that up in the list and drop it into a position where it will have a keyboard shortcut.
Text Import & Export Preferences
OmniOutliner also offers the ability to import or export raw text files. To assist with this, the Text Import and Export Preferences lets you view (or change) the characters used to represent elements in an OmniOutliner document.
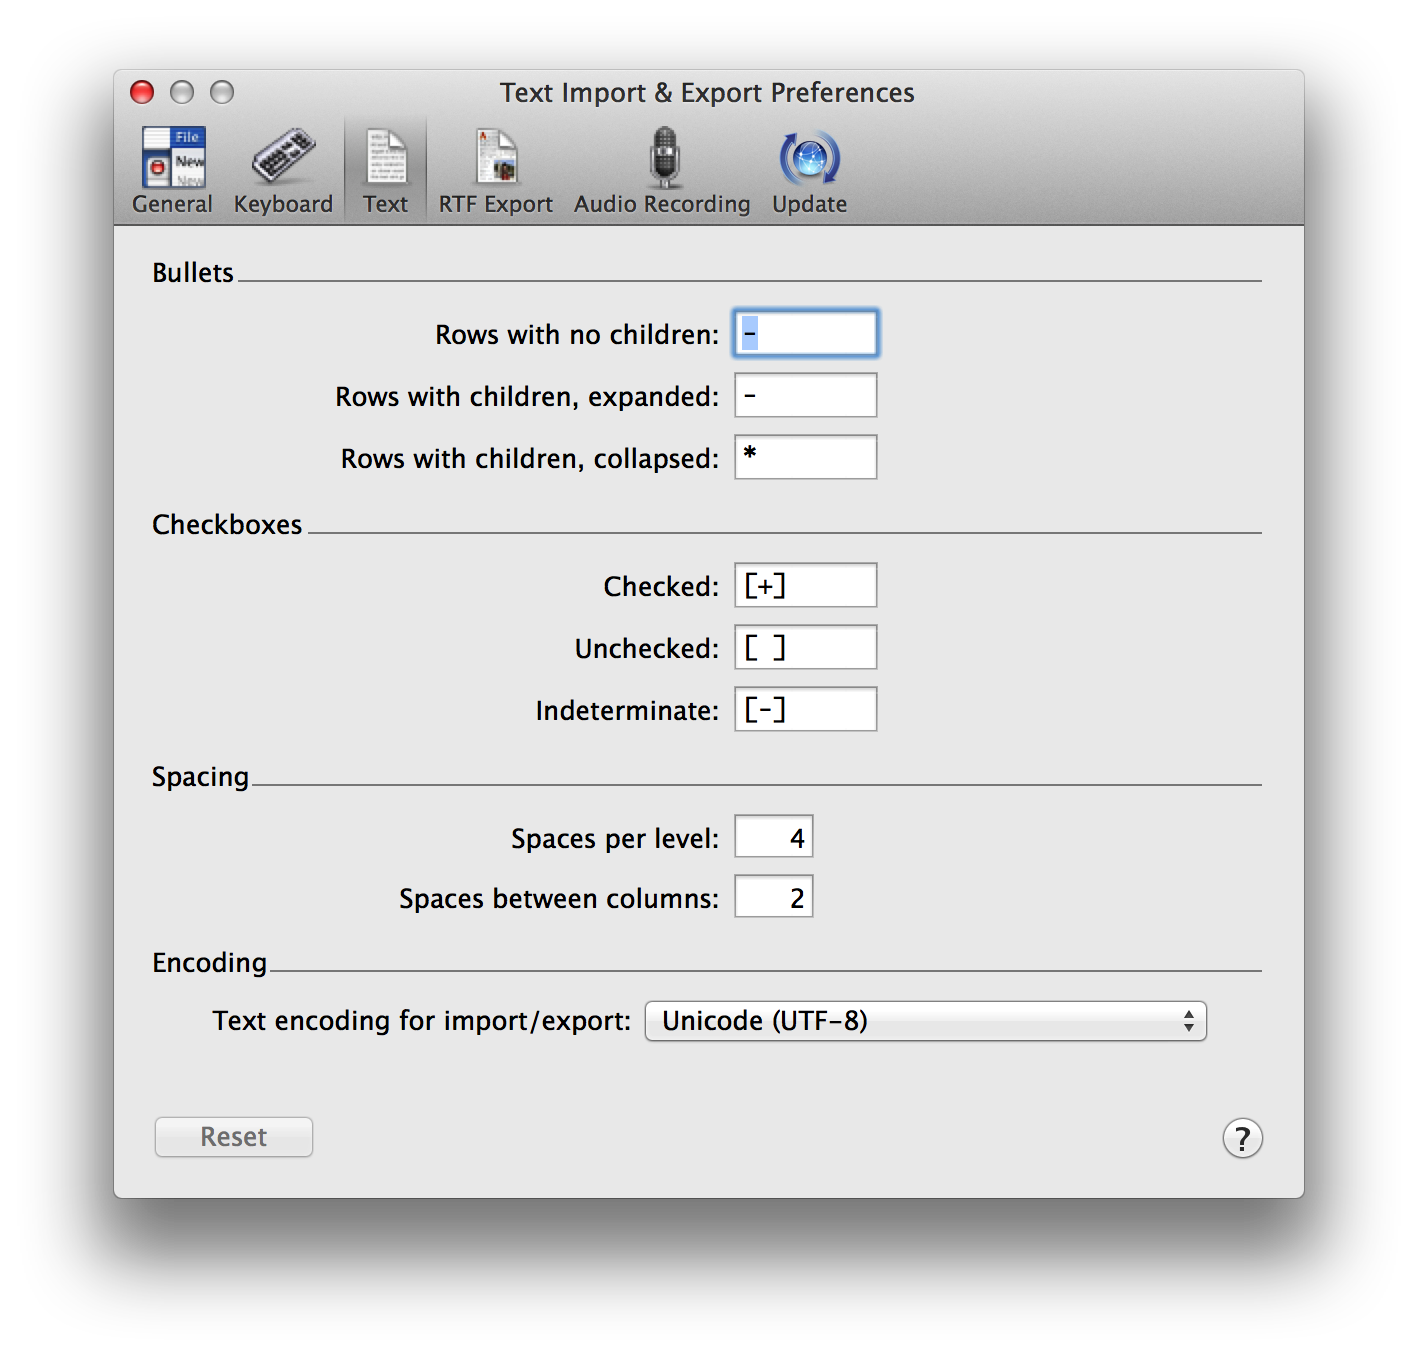
The document elements you have control over include Bullets, Checkboxes, and Spacing, and there’s also a popup menu that lets you select the text encoding type for importing and exporting operations.
RTF Export Preferences
Similar to the Text Import and Export Preferences, OmniOutliner can also export documents to Rich Text Format (RTF). As such, we’ve preset some characters and sizes based on the object types for Bullets and Checkboxes, and have set Spacing for indents and the distance between columns.
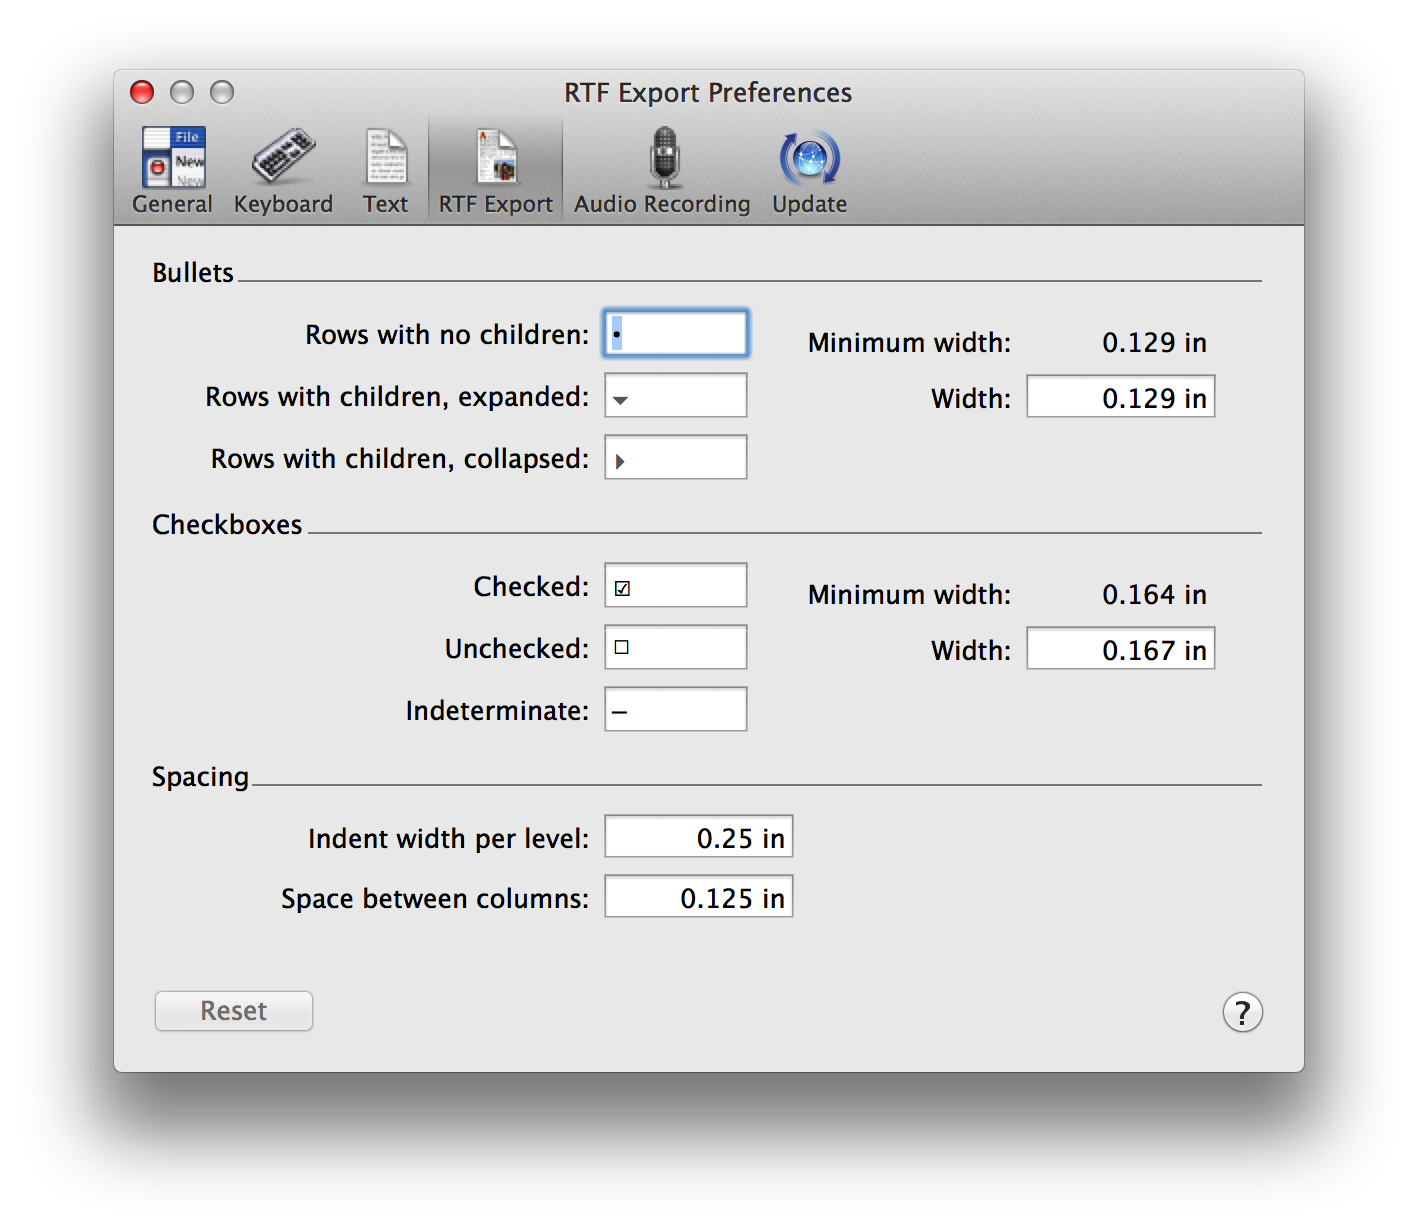
You can use the defaults, or change these up however you see fit, and based on your own document needs.
Audio Recording Preferences
Use the Audio Recording preferences to see which microphone you’re using for recording, change the compression level, or to access the temporary recording folder.
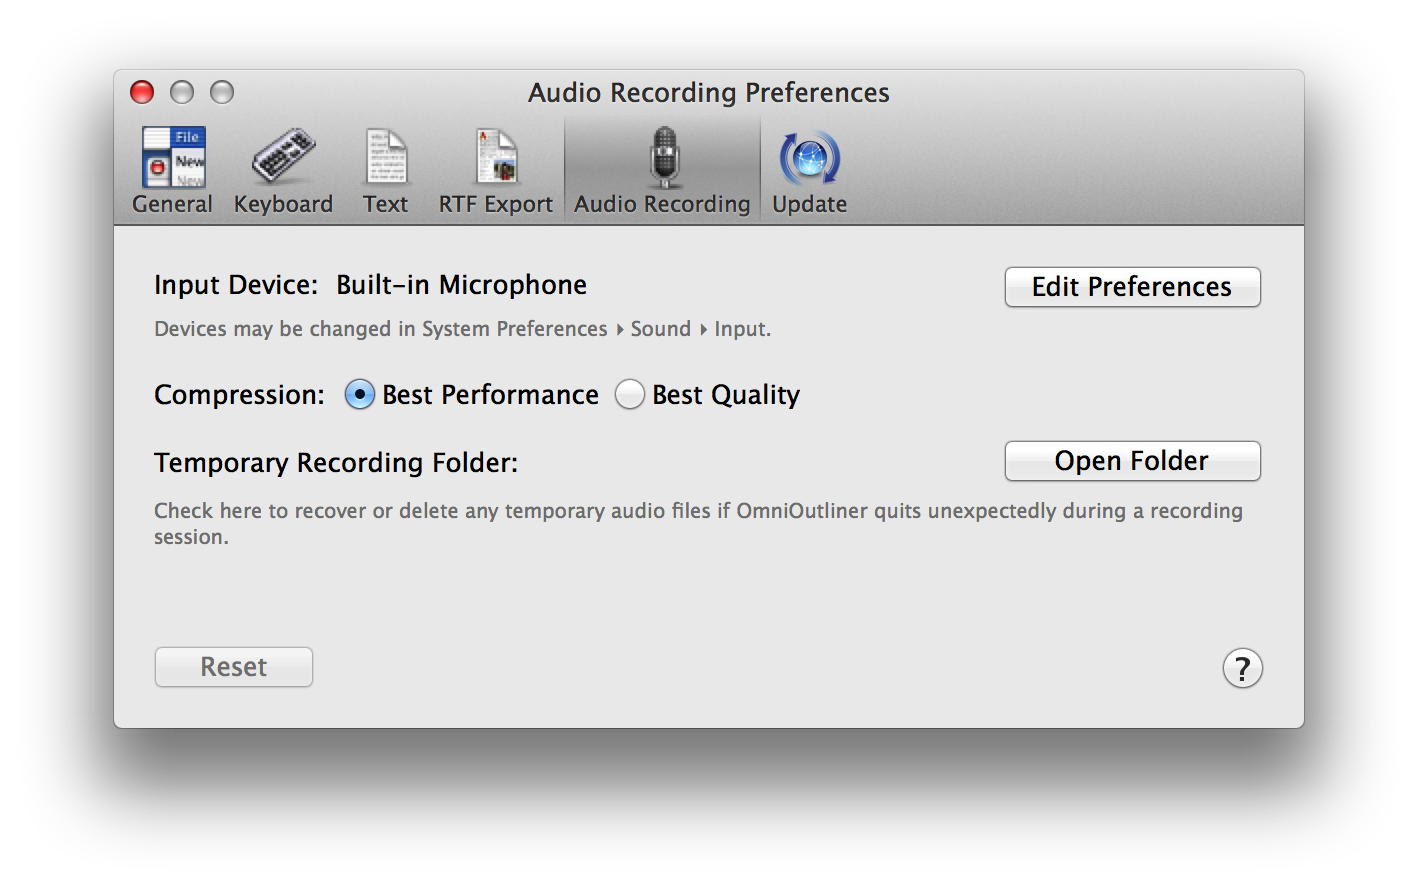
As you record audio, OmniOutliner creates a temporary file in which to dump the audio bits you’re recording. When you’ve finished recording, that temporary file goes away and moves into your OmniOutliner document. However, if OmniOutliner quits unexpectedly while you are recording, all hope is not lost. The temporary recording is still there, and the easiest way to get to it is from this Audio Recording preference panel. Just click the Open Folder button, and you’ll be whisked away to a new Finder window that’s open to the where the temporary file is stored. You can then drag that into OmniOutliner, or dump it in the trash if you want to start over from scratch.
Automatic Software Update Preferences
There’s nothing worse than out-of-date software, and one way to ensure that you’re always using the latest and greatest version of OmniOutliner is with the Automatic Software Update Preferences.
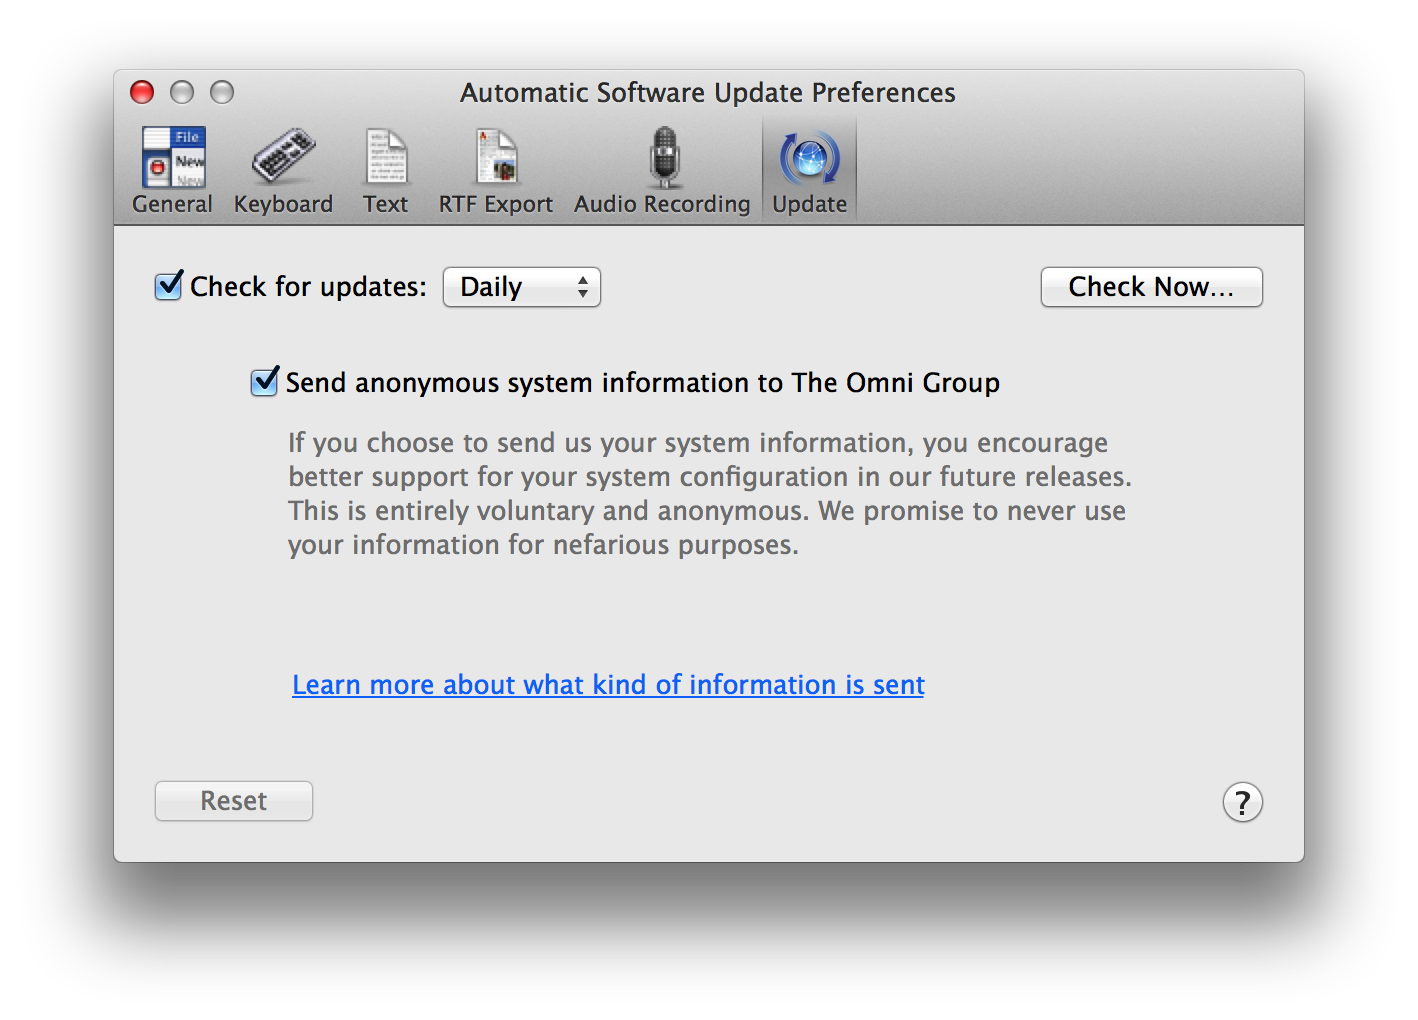
You can choose to check for updates either Daily (the default), Weekly, or Monthly, or if you’re really impatient you can click Check for Updates Now.
There is also a checkbox to Send anonymous system information to The Omni Group when you check for an update. This is totally optional, so feel free to uncheck that box to turn this off. However, if you do choose to send information about your system (no personal information is ever sent), we promise to never ever share that information with anyone. The Omni Group only uses this information so we know which hardware and operating system types we need to target for future software updates.
Note
If you’ve purchased your copy of OmniOutliner through the Mac App Store, you can disregard this preference pane as you will be notified in the App Store app when a new update is available. However, we still offer Mac App Store customers the option to send us anonymous system information when updating.