Importing, Exporting, and Printing
When it’s time to share your outlines with the world—or bring other writing in from the cold—OmniOutliner has you covered with a set of flexible import formats, export options, and a stylish printing template.
Importing to OmniOutliner
OmniOutliner recognizes the following file formats, which can be imported through the File ▸ Open (Command-O) dialog:
- .opml—A valid OPML file.
- .ooutline—Files created with OmniOutliner 5.
- .oo3—Files created with OmniOutliner 3 or 4.
- .txt—Plain text and tab-delimited files.
- .rtf—All text styles and colors are preserved when importing an RTF file.
OmniOutliner cannot open files created or exported as .csv (Comma-Separated Values). Instead, use a tab-delimited file and save it with a .txt file extension.
Exporting from OmniOutliner
For those times when you need to send an OmniOutliner file to someone who doesn’t have OmniOutliner, we’ve included a bunch of export file formats that you can choose from. To export an open file, choose File ▸ Export (Option-Command-E), and then choose one of the following options from the File Format pop-up menu:
- CSV
- When exporting a multi-column outline as CSV, OmniOutliner saves the .csv file using standard comma-separated values (CSV) conventions (i.e., each column is separated by a comma, and text with spaces is placed within quotations).
- HTML
- Creates a like-named folder that contains an index.html file along with the necessary images and attachments that make up your OmniOutliner file. All of the styles you’ve used in OmniOutliner are converted to CSS and included in the index.html file.
- HTML (Dynamic)
- This option gives you everything that comes with the basic HTML export, plus an added outliner.js file. This JavaScript file is what makes the file dynamic; you can open and close the sections of your document just as you would in OmniOutliner.
- Microsoft Word (indented)
- Creates a .docx file that opens in the default page layout view and retains the outline structure via indentation. This option is primarily useful for transitioning from an outline to a word processor (rather than duplicating OmniOutliner’s functionality in Word). Row level styles are converted to heading styles, and other styles are flattened and applied directly to text (Microsoft Word does not support OmniOutliner’s style model).
- Microsoft Word (outline)
- Creates a .docx file that opens by default in Microsoft Word’s Outline view. Choose this option to export an outline that can be readily expanded upon in Word.
- OmniOutliner Document
- Exports a .ooutline file, the current default OmniOutliner file format (for OmniOutliner 5 and later).
- OmniOutliner 3
- Exports a .oo3 file which can be opened in either OmniOutliner 3 or 4 for Mac, and in OmniOutliner 1 for iPad and OmniOutliner 2 for iOS. These files are not compatible with OmniOutliner 2 for Mac and earlier. They can be opened in OmniOutliner 5, but must be updated to the newer .ooutline format before all editing features are available.
- OPML (Outline Processor Markup Language)
- Exports a .opml file, which retains the hierarchical structure of your outline. However, OPML files do not retain any of the styles you may have applied in OmniOutliner.
- Plain Text (with tabs)
- Exports a raw .txt file without any styles. Child rows and columns are aligned using tabs rather than spaces, making this type of export useful for importing into spreadsheet apps such as Numbers or Excel.
- PowerPoint 2012 Format (pptx)
- OmniOutliner exports the contents of your outline in an XML format that PowerPoint 2012 can interpret and render. After exporting your outline as .pptx, you can then import the PowerPoint file into Apple’s Keynote app.
- Each Level 1 row becomes a separate slide in the PowerPoint presentation, with its children listed on that slide, and notes become presenter notes. Very little styling is carried over from OmniOutliner (styles don’t match well between the two formats, so we err on the side of removing them).
- RTF (Rich Text Format)
- Exports a .rtf file, which retains all of the styles you’ve applied in OmniOutliner. RTF is a standard document format that most word processors, such as Word and OS X’s TextEdit app can open. Export to RTF if your Outliner document contains only text and numbers.
Using The Share Button
For another way to send content straight from OmniOutliner to other apps on your Mac, add the Share button to your Toolbar (View ▸ Customize Toolbar and drag the Share button up into the Toolbar).
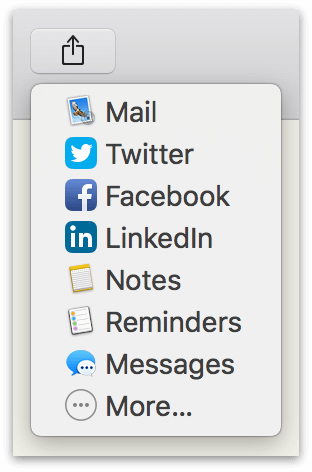
Click the Share button to choose from among a list of available destination applications, or click More to customize the list in macOS Settings. When you choose a destination, any rows you have currently selected in the outline, along with their children, will be sent to the destination app.
A new document is created in the file format of the destination app, with the selected row content pasted in the body of the document as plain text (styles are not preserved).
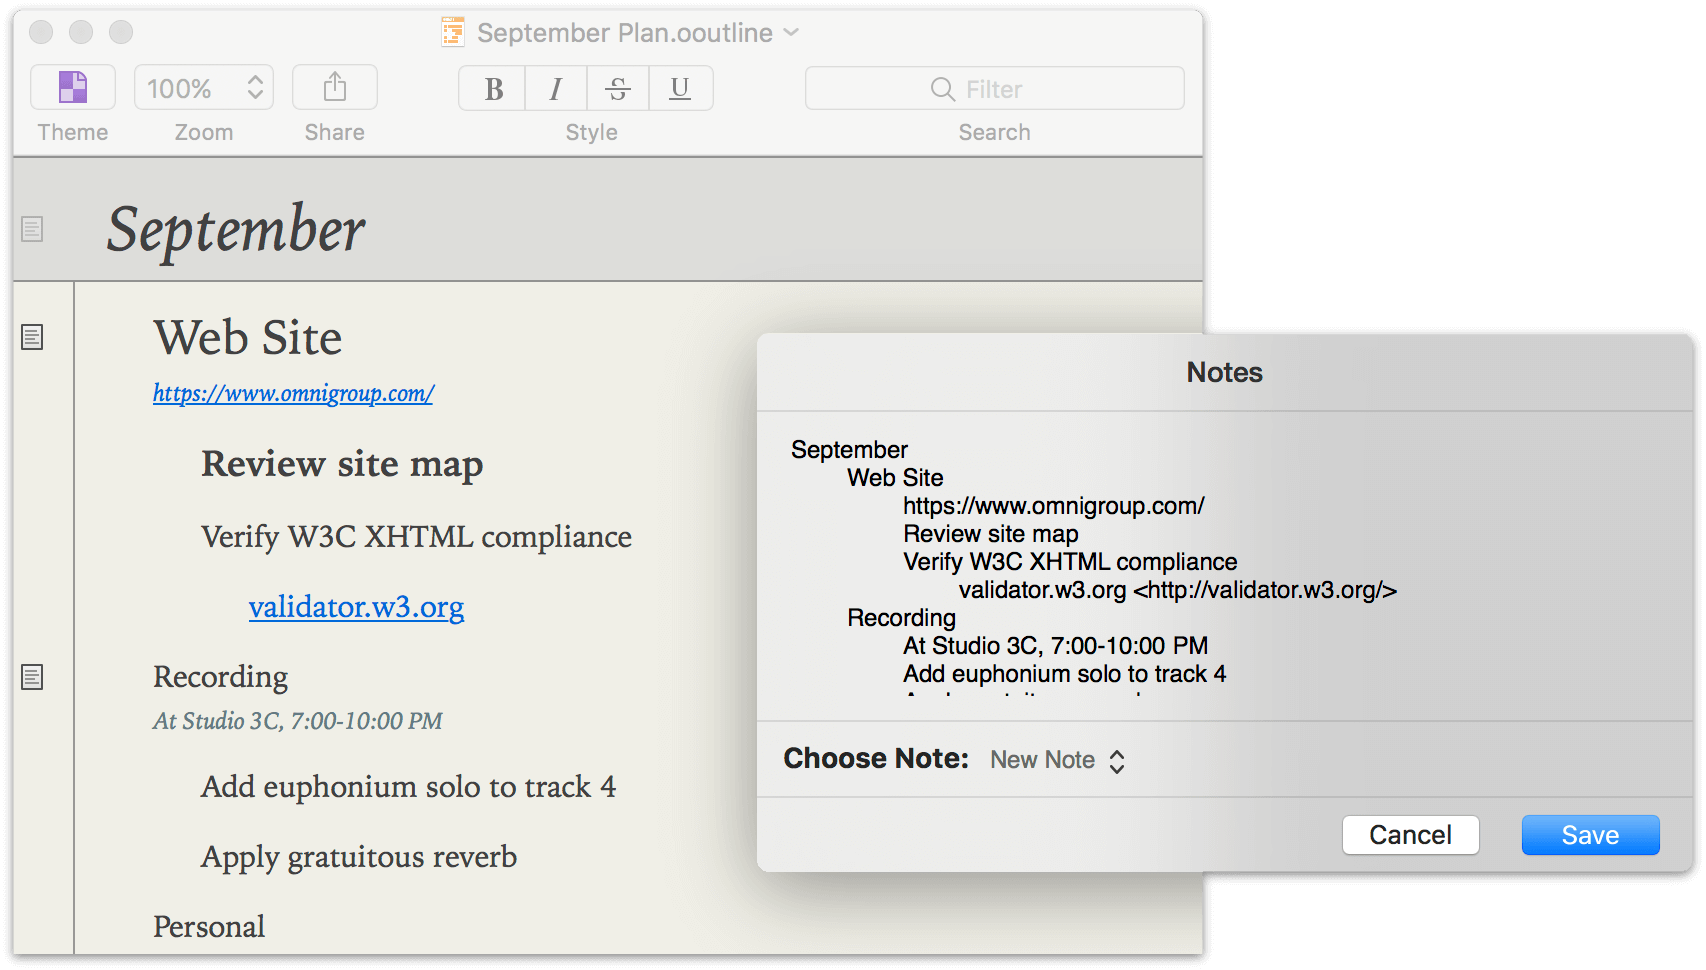
Hierarchy is shown by children being tab-indented beneath their parent rows, and if you are using status checkboxes (View ▸ Show Status Checkboxes) their state will be indicated before each row as well.
Sharing OmniOutliner Files with OmniGraffle
If you use OmniGraffle (the Omni Group’s powerful design application), you can share OmniOutliner files with it and create visual representations of your outline hierarchy from your original styled text layout.
- Open OmniGraffle and choose File ▸ Open.
- In the Open dialog, choose any file whose extension is .ooutline.
- Click Open.
- OmniGraffle presents you with the Import Outline dialog. At the top, be sure to select one of the themed templates, such as Circles or Lines.
You can use OmniGraffle’s powerful Outline Editor (in OmniGraffle, choose View ▸ Show Contents ▸ Outline Editor) to add depth to the diagram you’ve created.
Printing in OmniOutliner
Choose File ▸ Print (Command-P) to print your OmniOutliner document.
You can stick with the default printing options, which deliver a page that’s close to what you see on screen. Or you can click Show Details on the print screen to set up a custom presentation for your printed outline.
OmniOutliner’s Printing Options
With details shown, a customized Print sheet appears with a bunch of options specific to OmniOutliner.
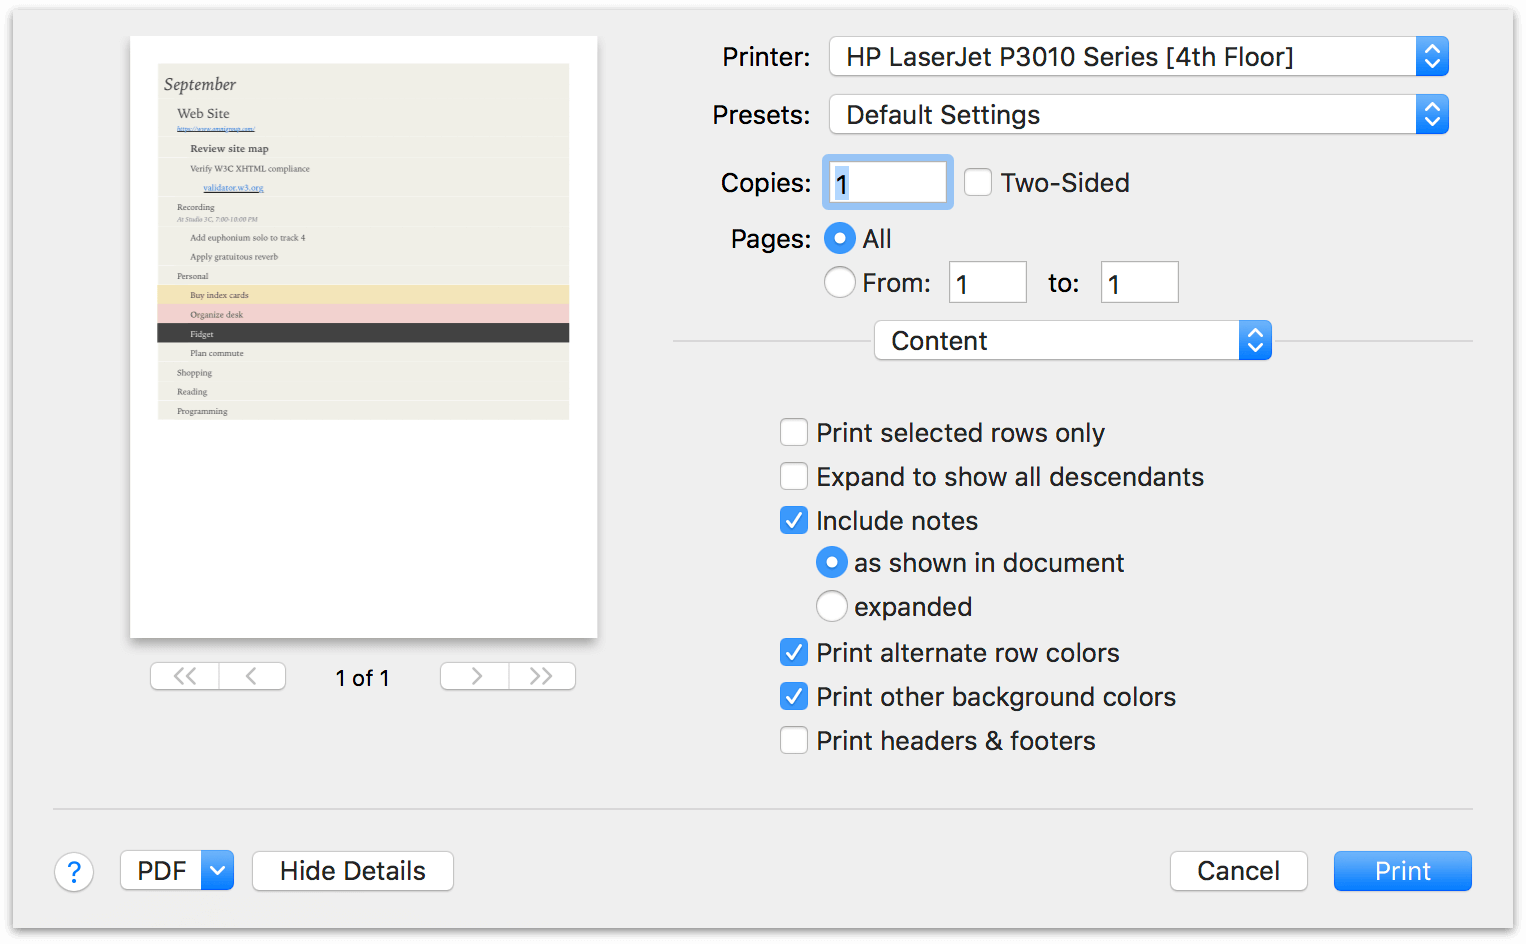
On the left side of the printing panel you’ll see a preview of your OmniOutliner document that shows how it will look when printed. You can use the arrow buttons beneath the preview to page through your document so you can verify that everything is in order.
As you toggle the various options on or off, the Print Preview changes accordingly. OmniOutliner Essentials custom print options include the following:
-
Print selected rows only—Only the rows currently selected in the outline are included in the print output.
-
Expand to show all descendants—Automatically expand all collapsed rows so that their children are visible for printing.
-
Include notes—As shown in document includes notes that are visible at the time of printing. Expanded automatically opens all notes at print time so they are included in the print output.
-
Print alternate row colors—If your document theme includes alternating row colors (such as the Light Courier Alternating theme included with OmniOutliner Essentials), they will be visible in the print output.
-
Print other background colors—Other background colors, such as those applied by the Format menu’s Highlight styles, will be preserved for print.
-
Print headers & footers—Add a simple default set of header and footer data to each printed page, including the document title, print date, and page number.
When you have finished setting all of the Printing Options for your document, click Print to print the file. To generate a PDF based on your print layout (creating a .pdf file rather than printing the document to paper), click PDF and choose Save as PDF from the dropdown menu.