Managing Your Project Files
When you first launch OmniPlan you arrive at the document browser, where you can open an existing file or create a new one from scratch.
The document browser provides access to the same file storage locations as the iOS Files app, including the OmniPlan folder on your device (where files are kept locally), your cloud storage locations (such as iCloud Drive), and any OmniPresence folders you have connected.
OmniPlan files use the .oplx extension, a bit of text appended to the filename that tells the operating system what app the files belong to. This extension is hidden when browsing files in OmniPlan for iOS, but is retained when syncing back and forth with OmniPlan for Mac to make sure everything stays in order.
Recents View
Tap the clock icon  to switch to the Recents view of the document browser, which shows a collection of files that you have worked with recently. This list is drawn from every location available on your device, and includes files stored locally as well as those in the cloud.
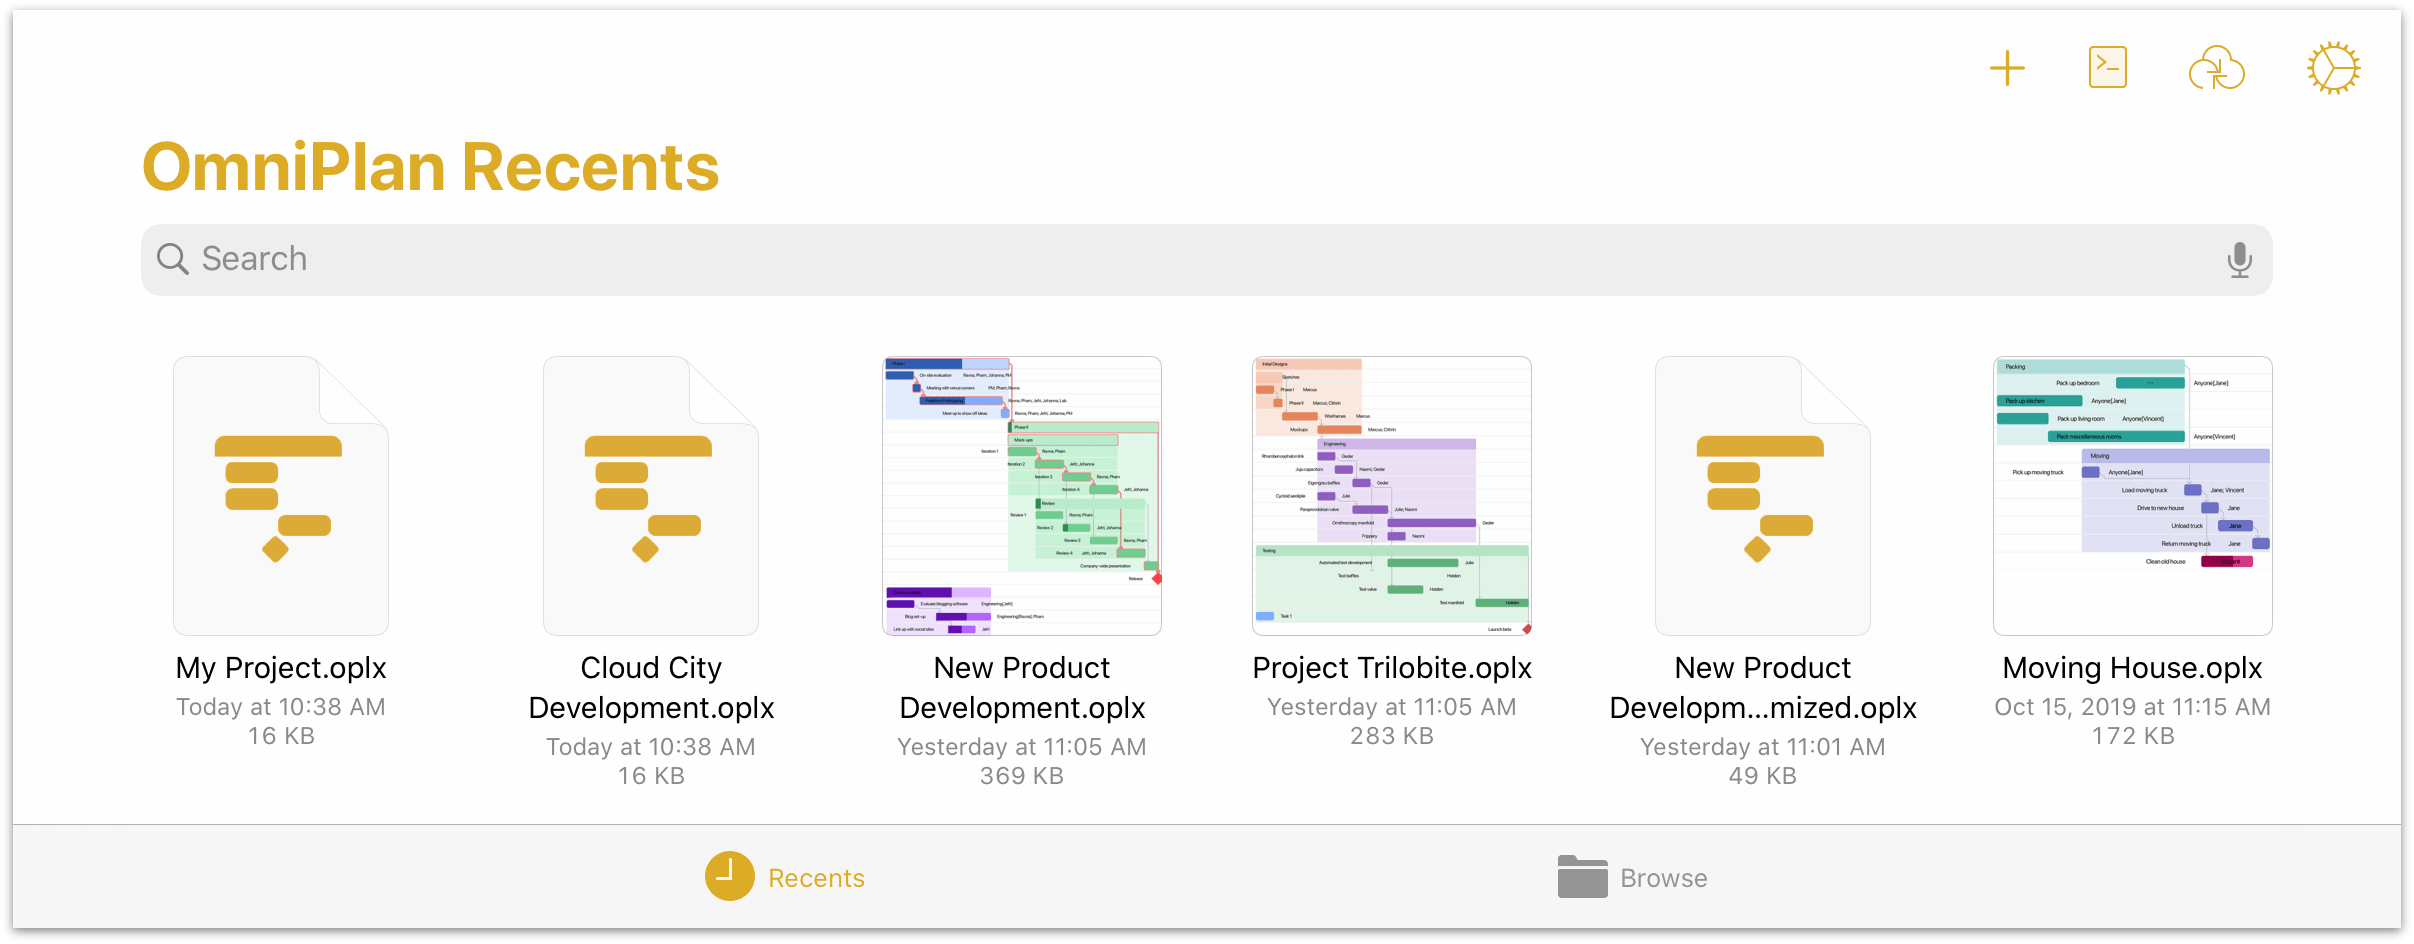
The Recents view is a flat list of files sorted by date from most recently accessed to oldest. If you don't see a file here that you expect, you can use the Search dialog to look through all the files available, or switch to the Browse view to look through the hierarchy of files on your device along with any connected cloud locations.
Browse View
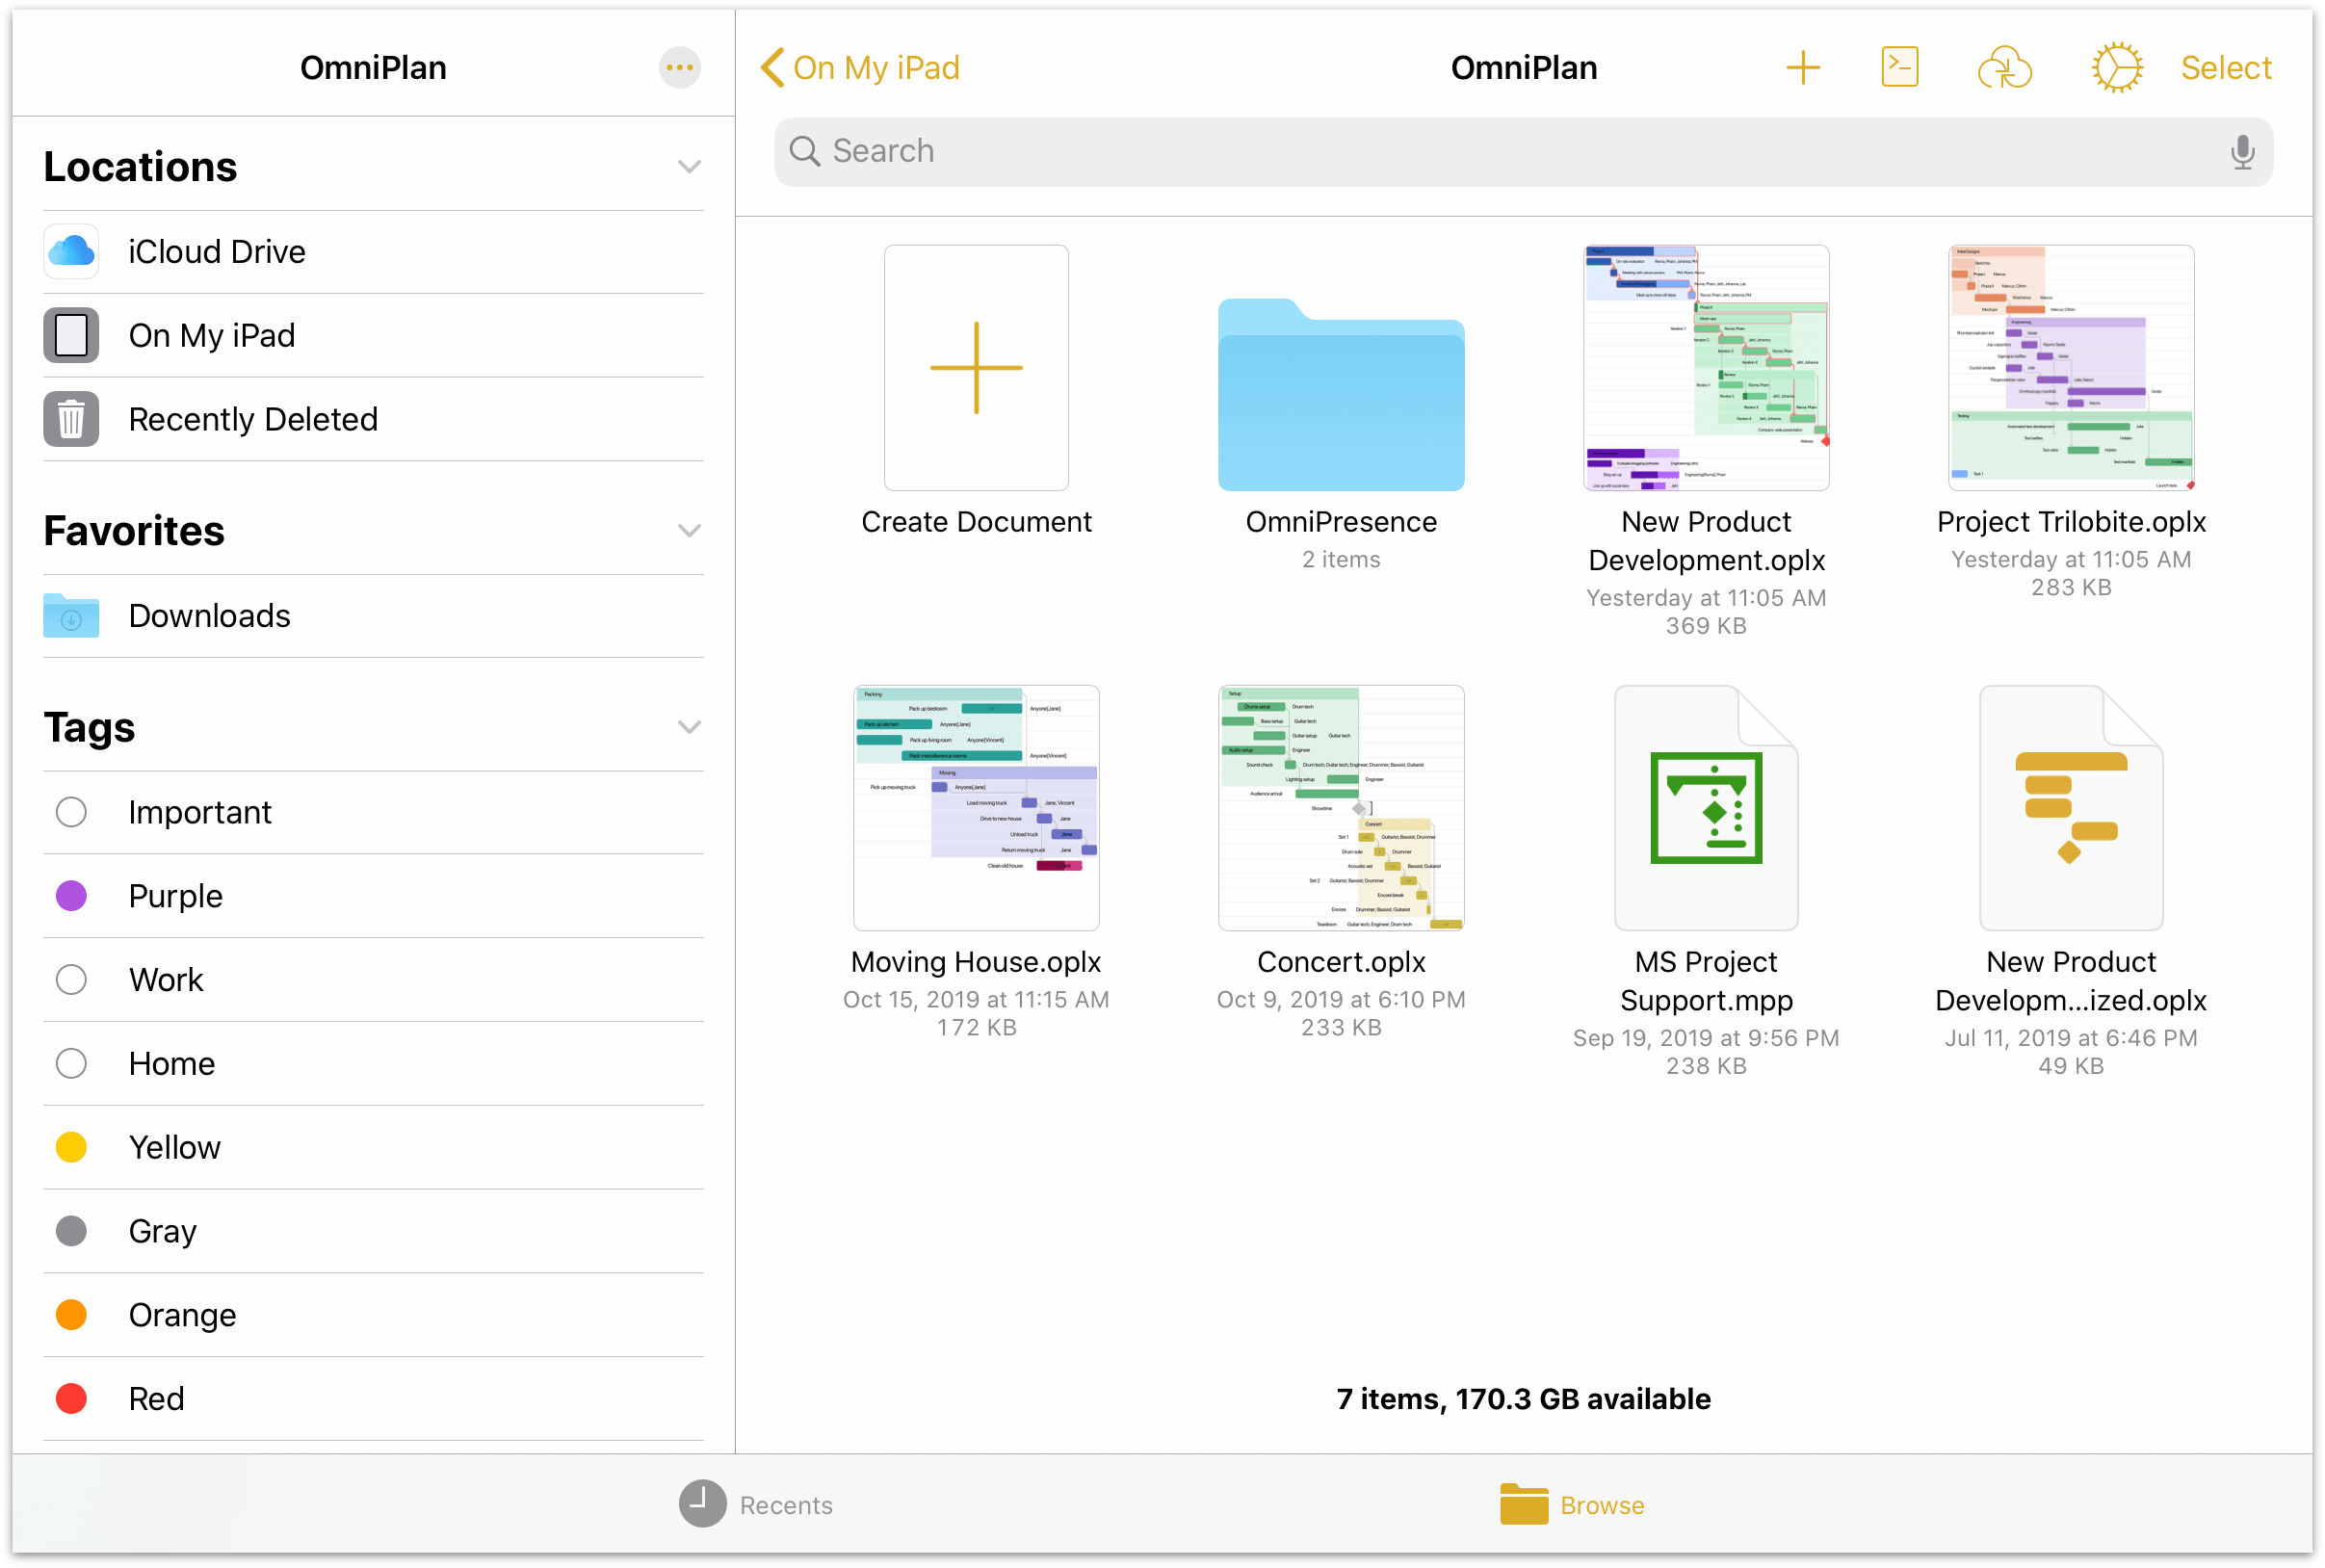
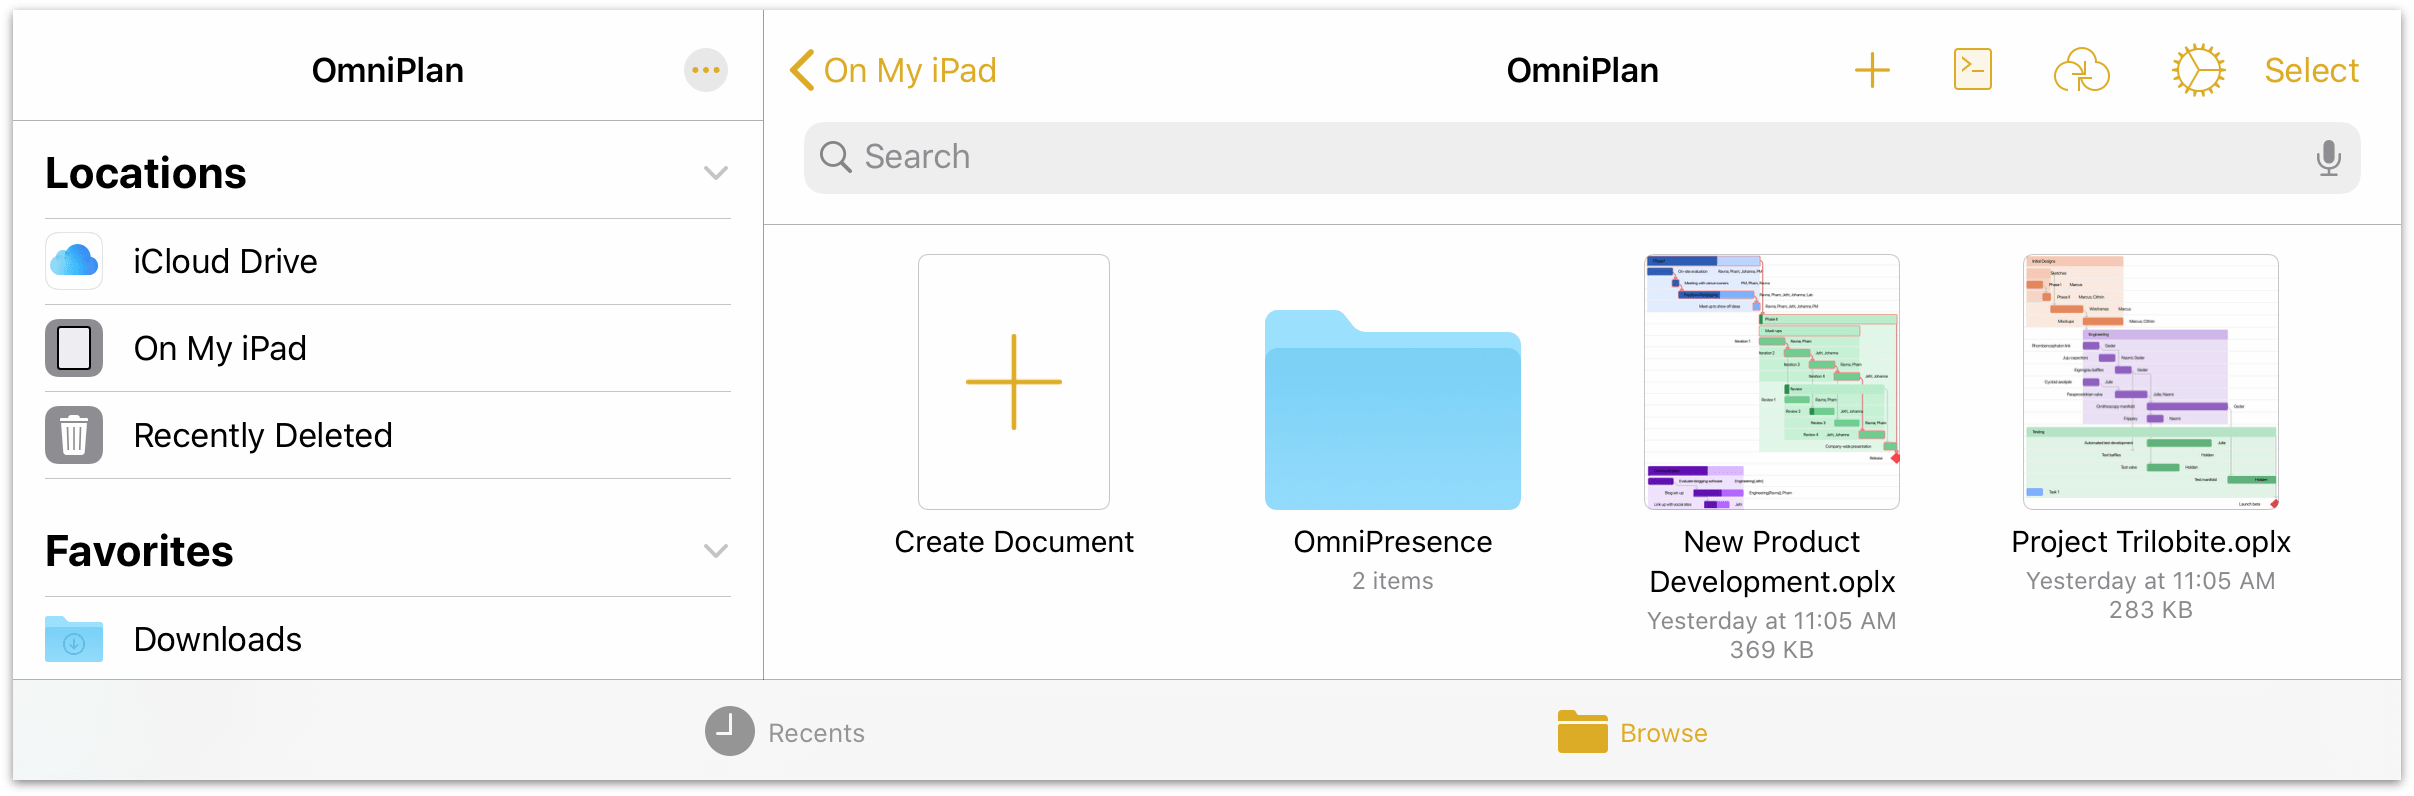
Tap the folder icon  to switch to the Browse view of the document browser, which displays the hierarchy of locations and folders you have stored on your device, as well as any connected cloud service providers.
In wide device views, the Locations list offers high level navigation on the left side of the screen, with the contents of a selected location shown on the right; in compact views, Locations sits at the top of the navigation hierarchy with specific locations and their contents nested beneath.
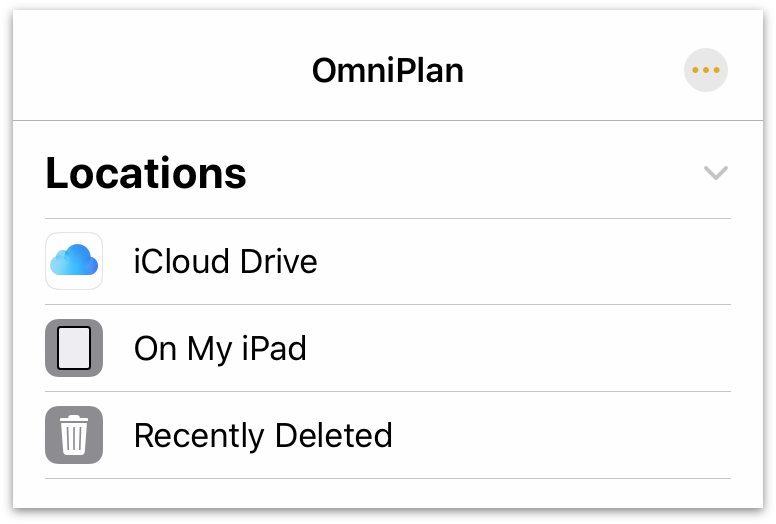
The Locations List
When browsing your files, the Locations list displays the storage destinations that are available on your device. This always includes On My [device], which contains all of your files stored locally. If you have an Apple ID connected, iCloud Drive also appears as an available cloud storage location.
If you have any additional cloud storage providers installed on your device they will appear in this list as well.
Note that OmniPresence, the cloud sync solution operated by The Omni Group, does not appear in the list of service providers here because it doesn't run as a separate application. Instead, you can sync with a dedicated OmniPresence folder inside your On My [Device] > OmniPlan folder, as described here.
Not all cloud storage providers work equally well with all file formats. We recommend using iCloud Drive or a connected OmniPresence folder to sync your OmniPlan files; other providers may have trouble depending on the technologies they use.
The final item in the Locations list is Recently Deleted, where iOS temporarily stores files after you have deleted them in case you want them back.
Managing Deleted Files
If you delete an OmniPlan file, that file is moved to the Recently Deleted folder in the Locations list.
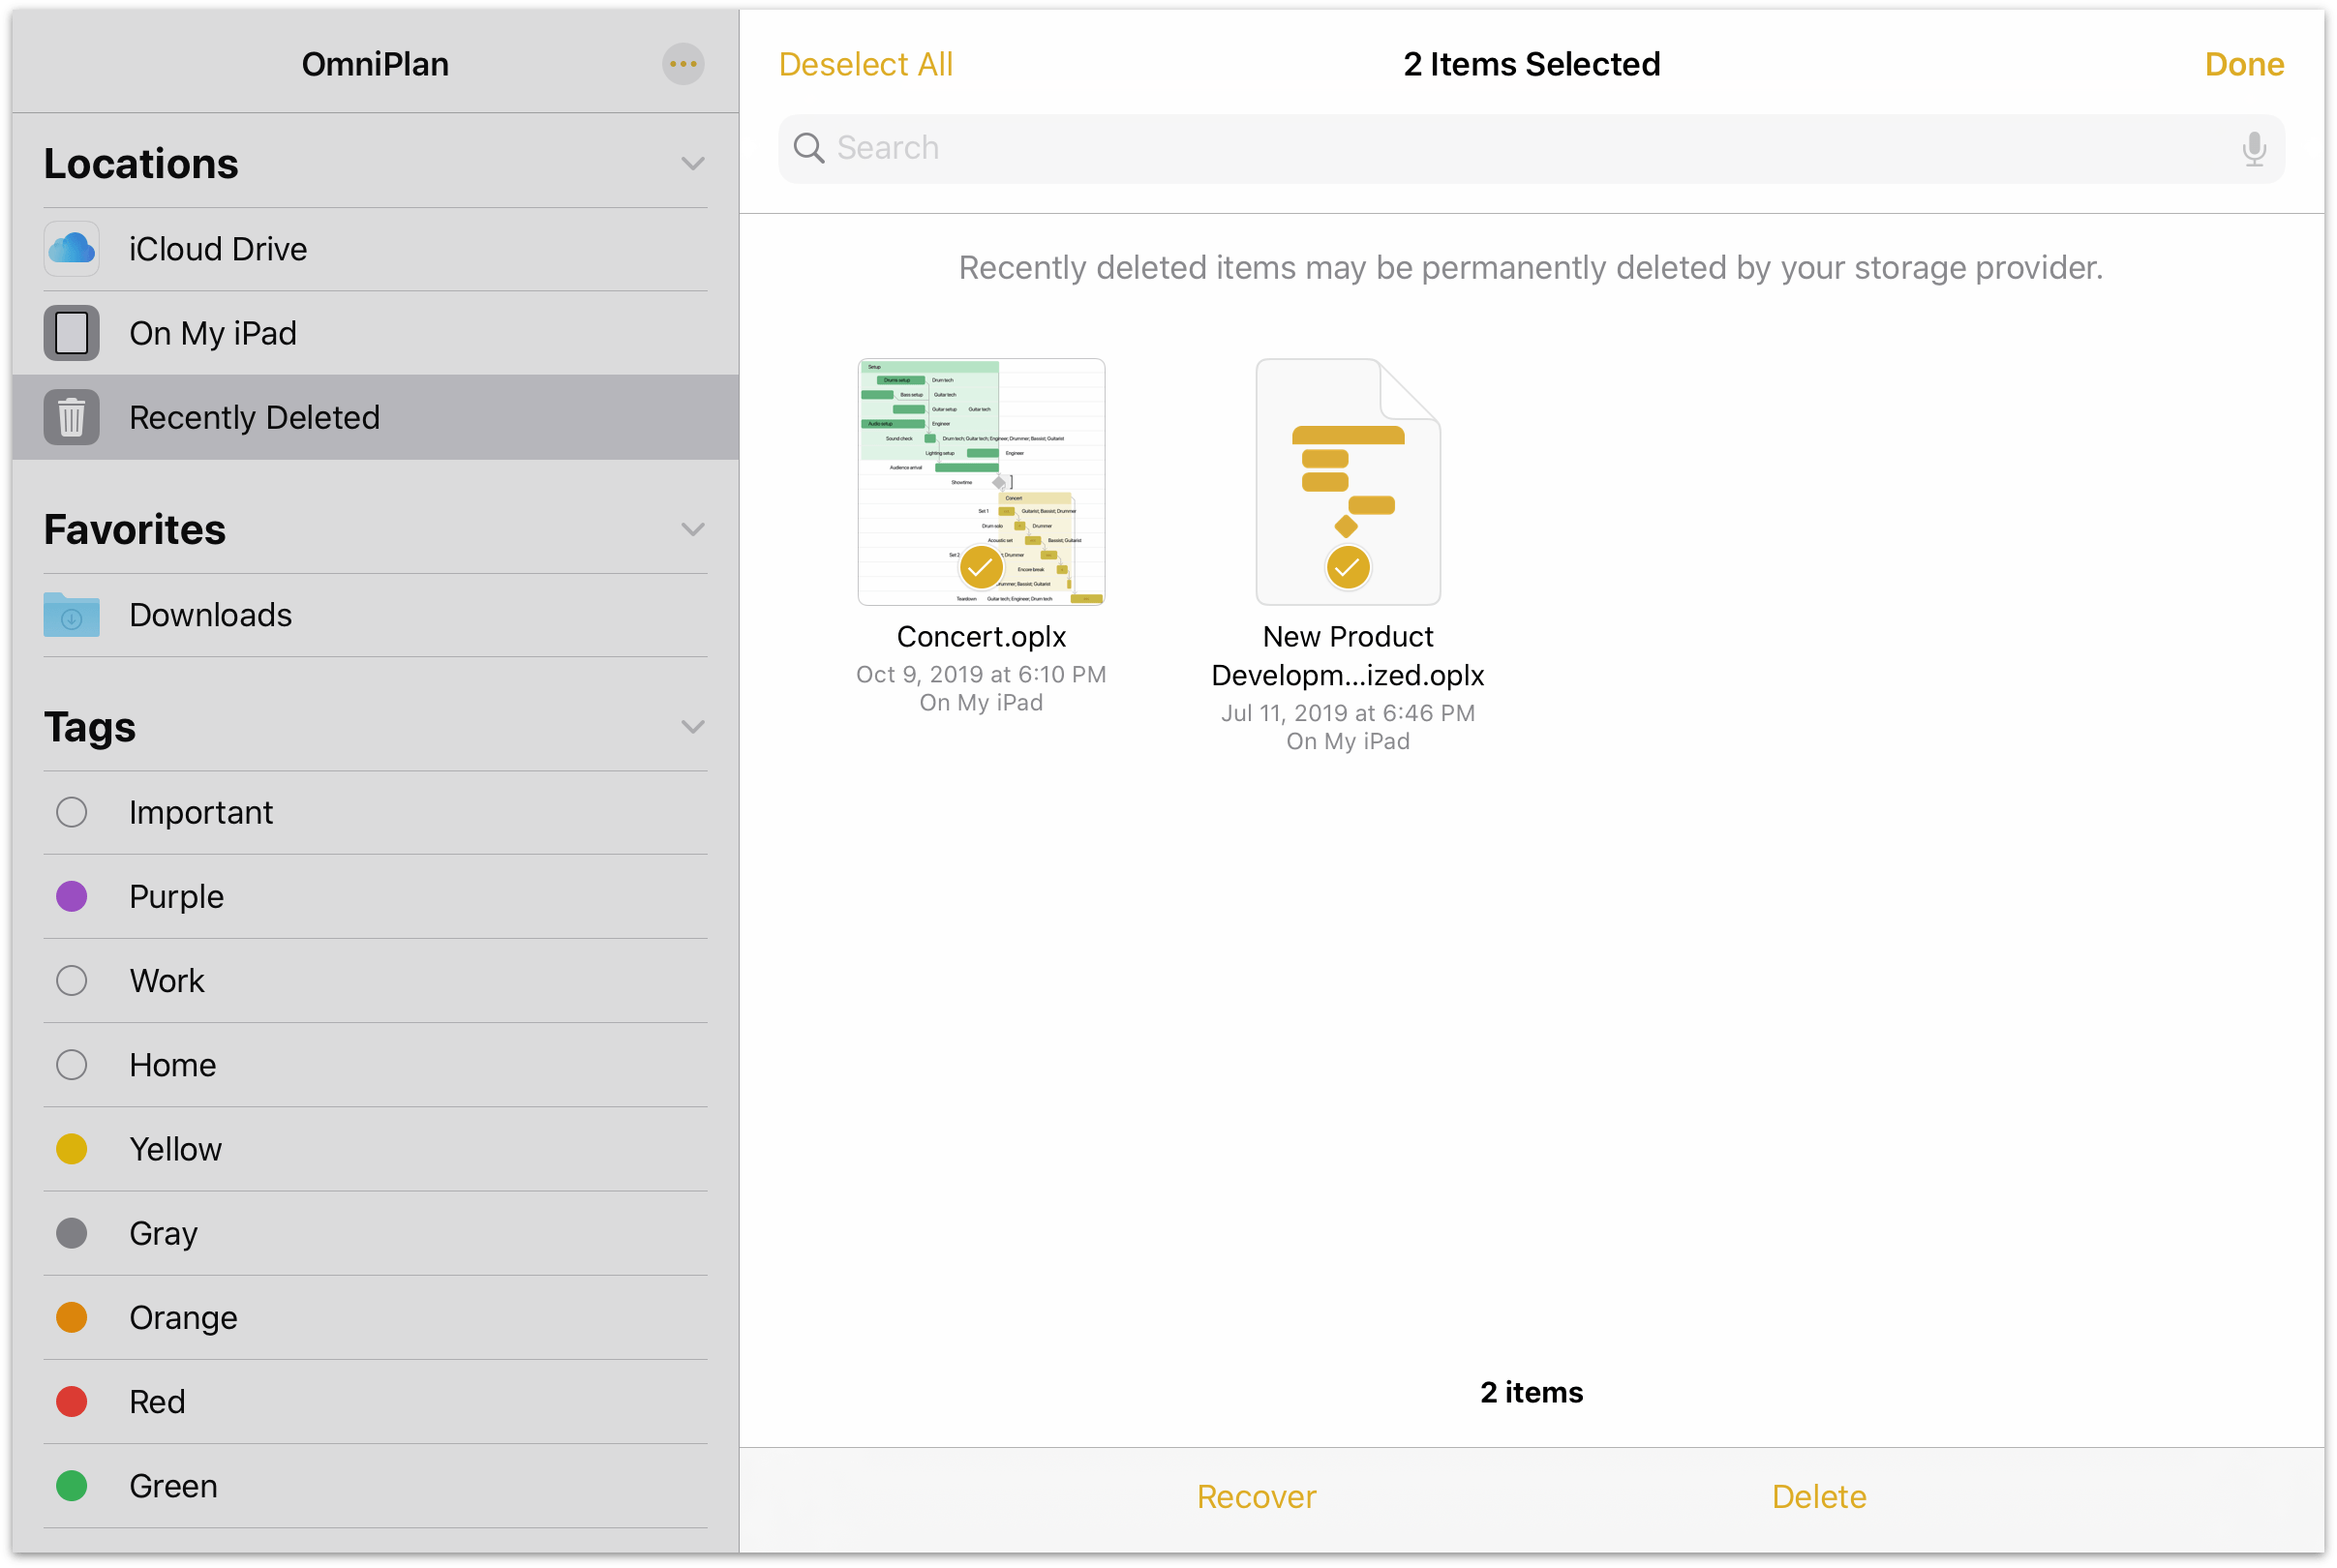
To manage files in the Recently Deleted folder, tap Select in the upper right and tap the thumbnails for each file you would like to manage. Options appear at the bottom of the screen to either Recover the files, returning them to their previous location, or Delete the selected files permanently.
Note that files stored with some cloud storage providers may be permanently deleted immediately instead of moving to Recently Deleted first. Because these recovery standards differ, it's a good idea to always take care when deleting files.
Beneath the list of available locations is a list of Tags. Tap a tag in the list to view all of the items with that tag applied; you can apply tags to individual files using their contextual menu (see File Details below).
Finally, the More button  at the top of the Locations list provides additional functions for modifying the contents of the list.
-
Connect to Server—Choose a server to connect to via SMB, adding it as a location in a separate Shared section of the Locations list.
-
Edit—Switch the list to Edit mode, where you can rearrange locations and tags, and choose which locations you want to be visible in the list. Note that changes made here apply to the Locations list everywhere it appears, including the Files app and other apps that use the iOS document browser.
Browsing a Location
Upon selecting a location in the Locations list, its contents appear in a pane to the right (this pane appears on top of the Locations list when in compact views).
A search field at the top of the pane offers options to search recently opened files, the entire current location, or just the current folder for filenames that match the search terms.

Drag down on the browsing pane to access more controls for the location, choose how files are sorted, and switch between thumbnail and list views.
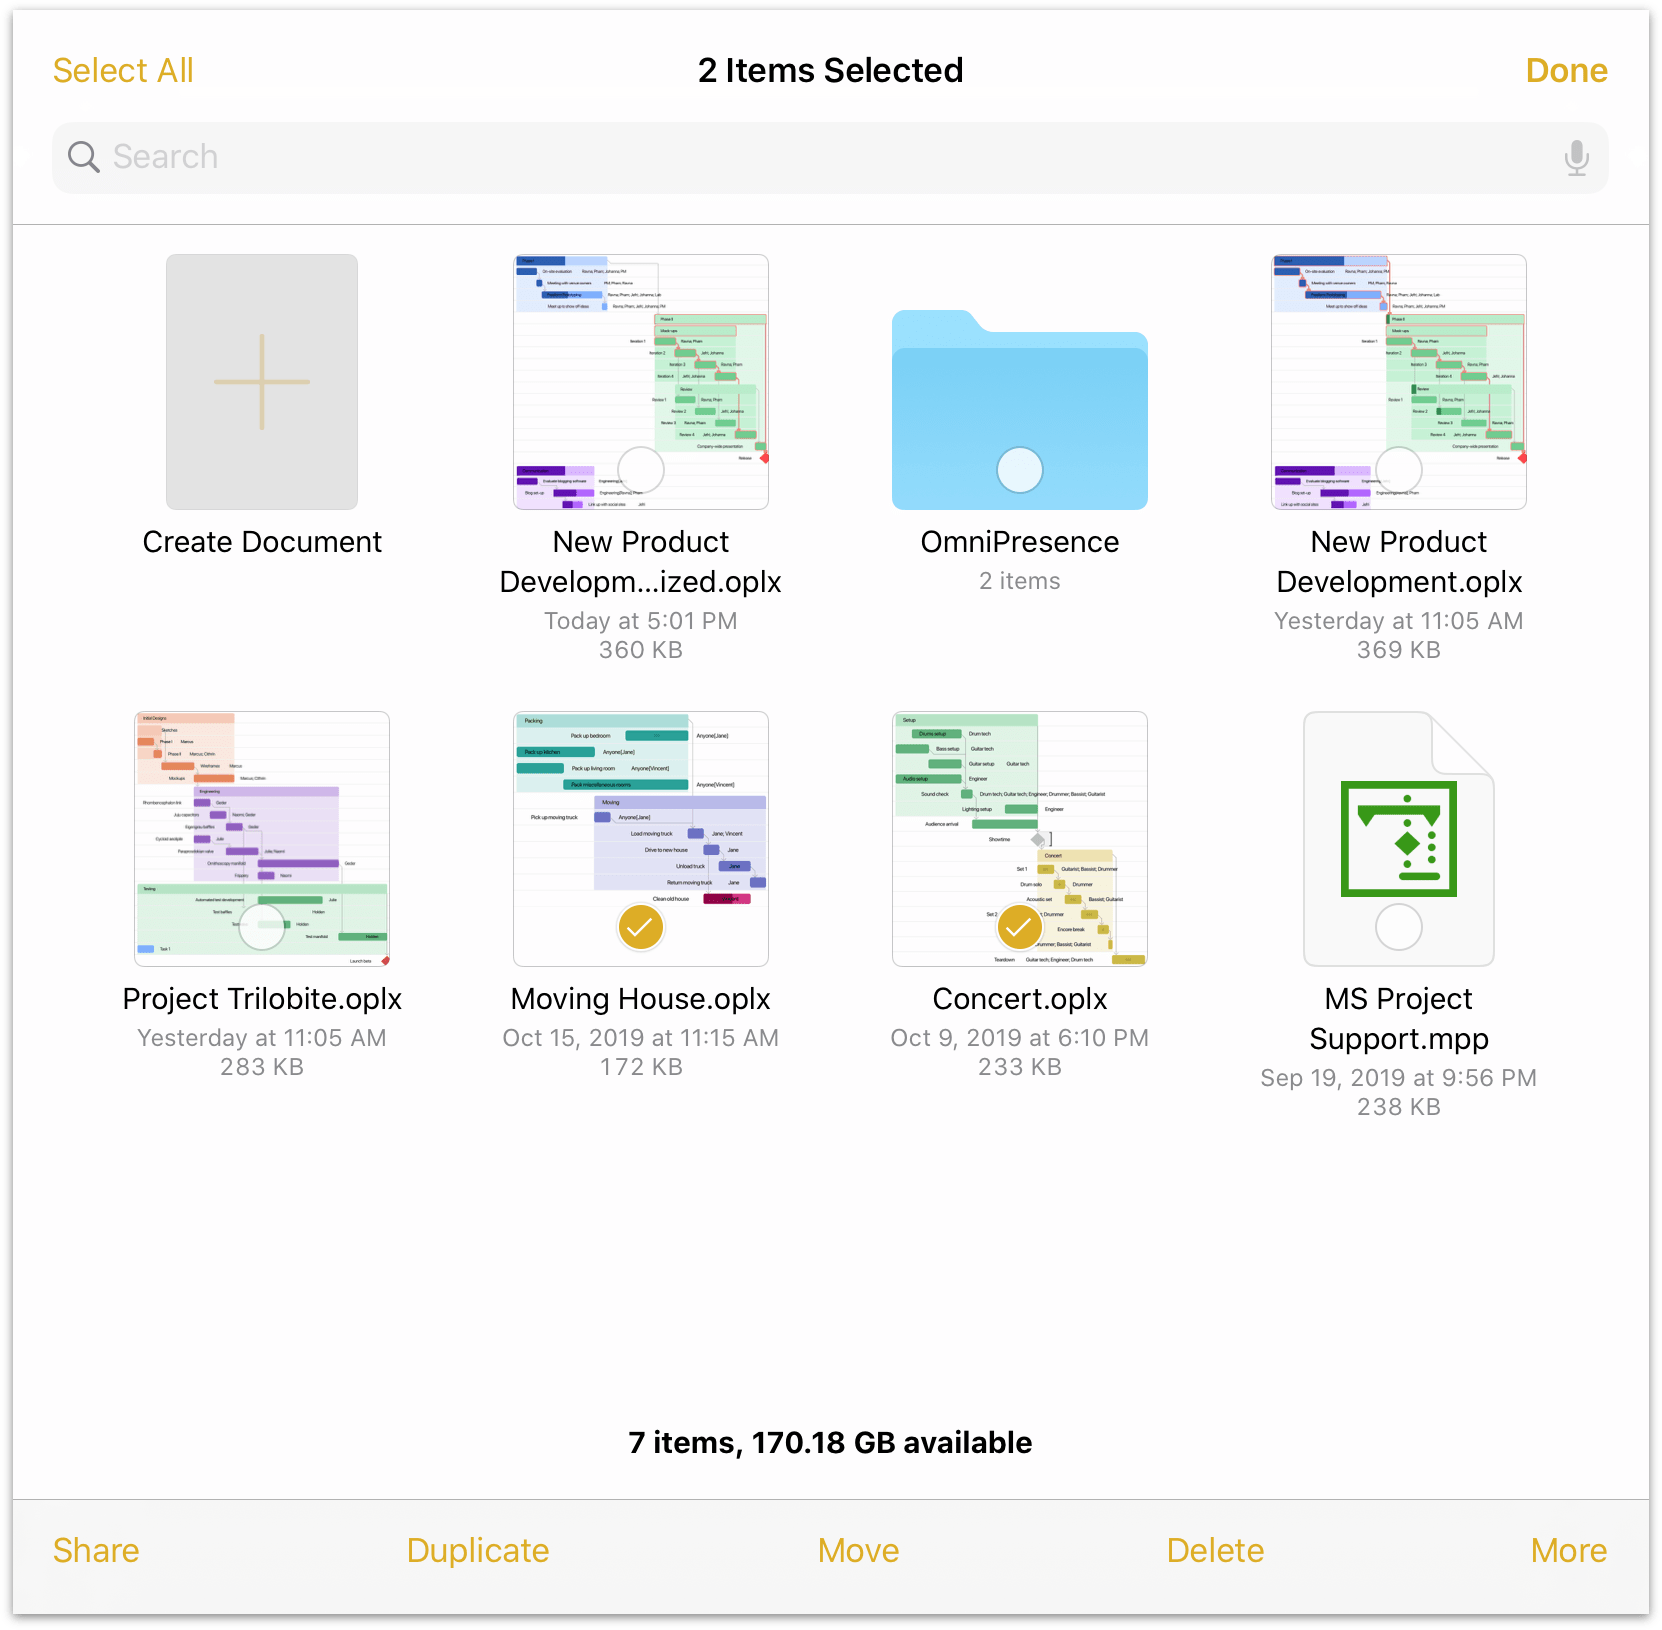
File Details
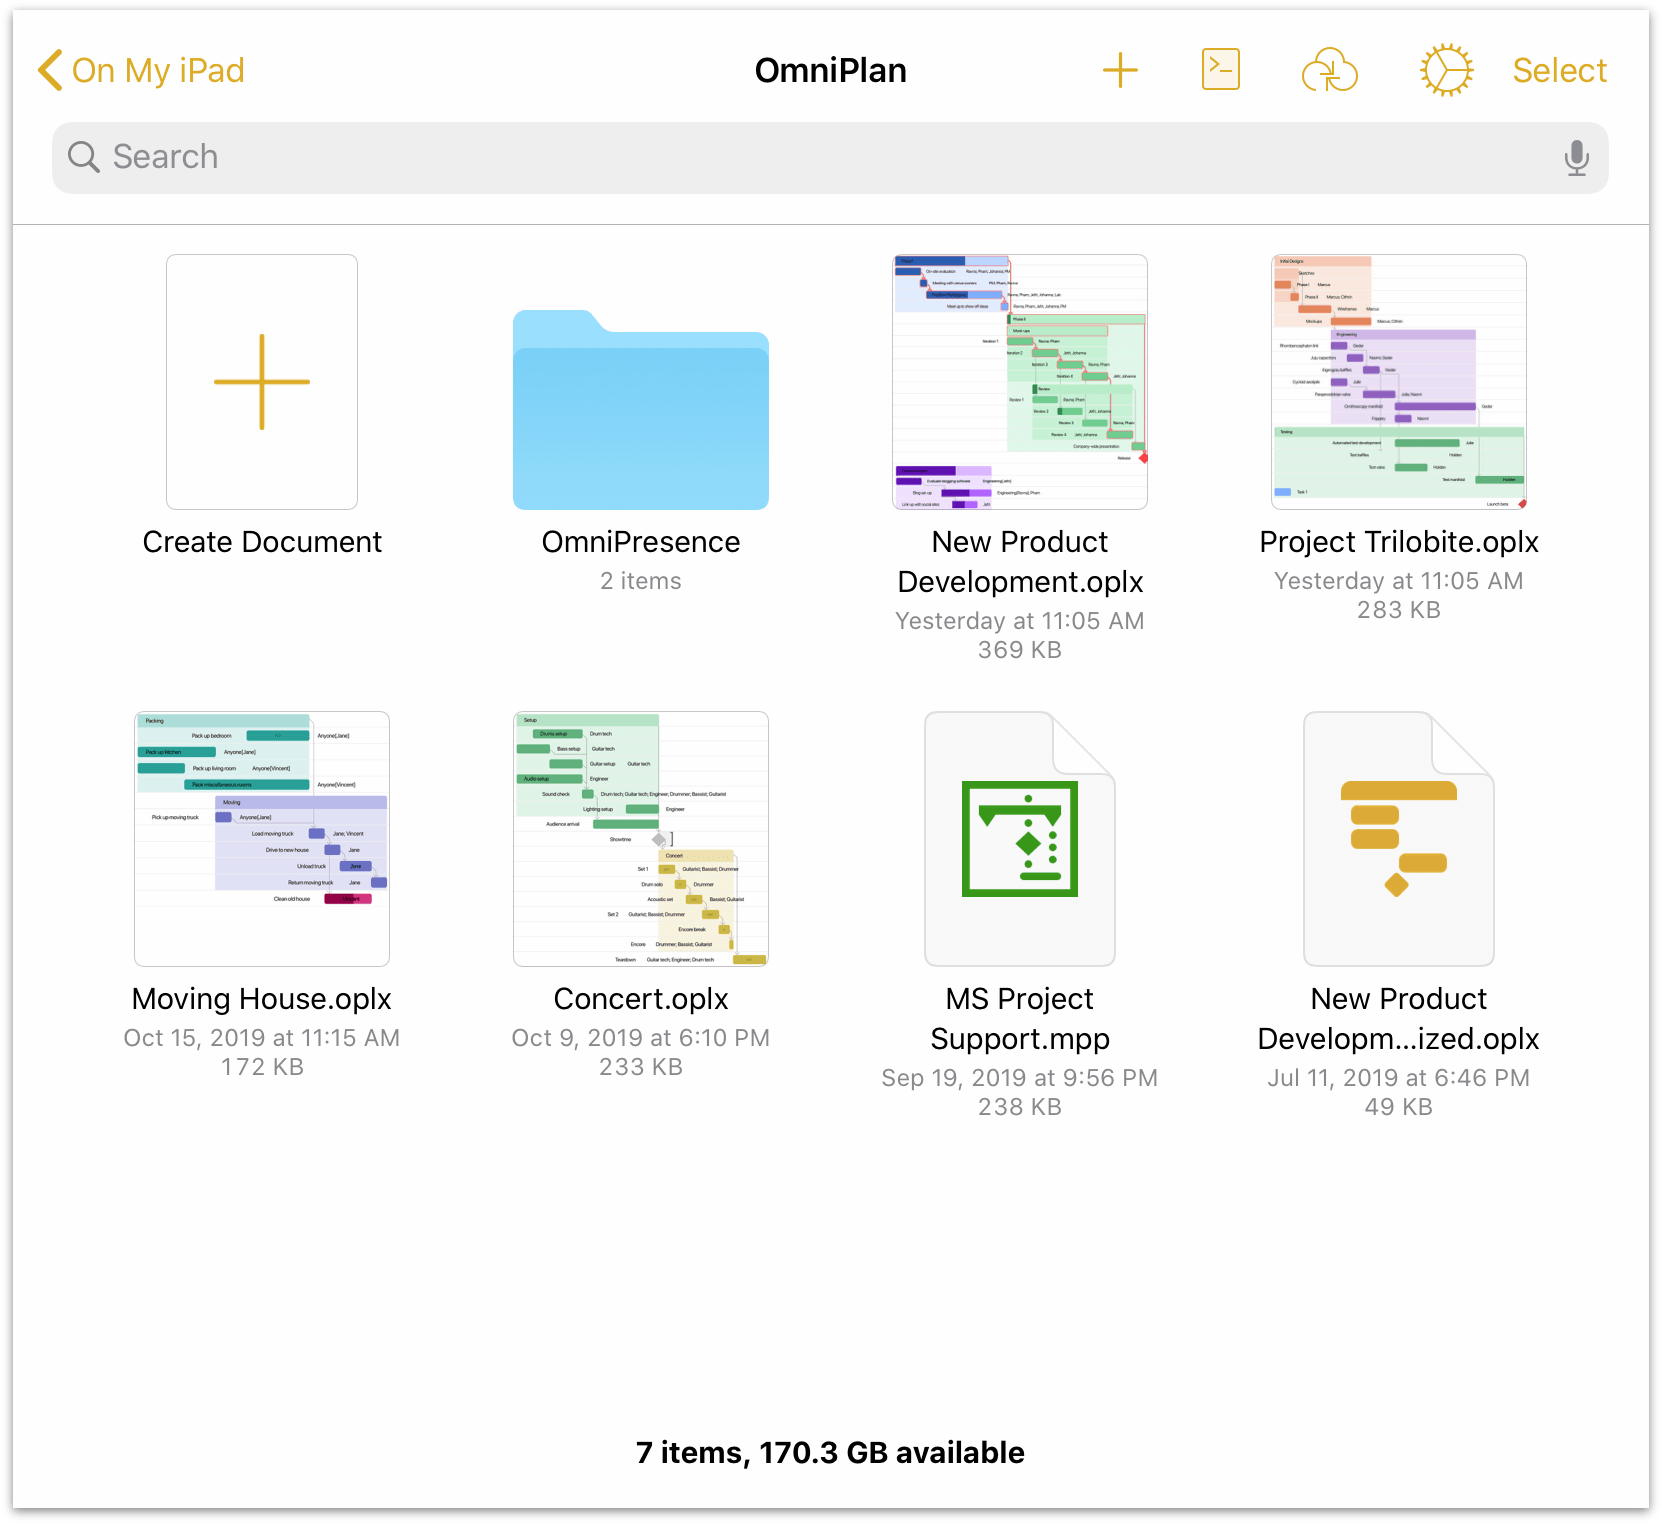
Each file is represented by a thumbnail image. Once modified, OmniPlan generates a preview based on the contents of the file; otherwise, the file is represented by a generic document icon.
Along with the thumbnail, each file displays its name, the date it was last modified, and its location on your device.
-
Tap a document preview to open the associated file.
-
To change the name of a file or folder, tap the name and then enter a new title.
Contextual Menu
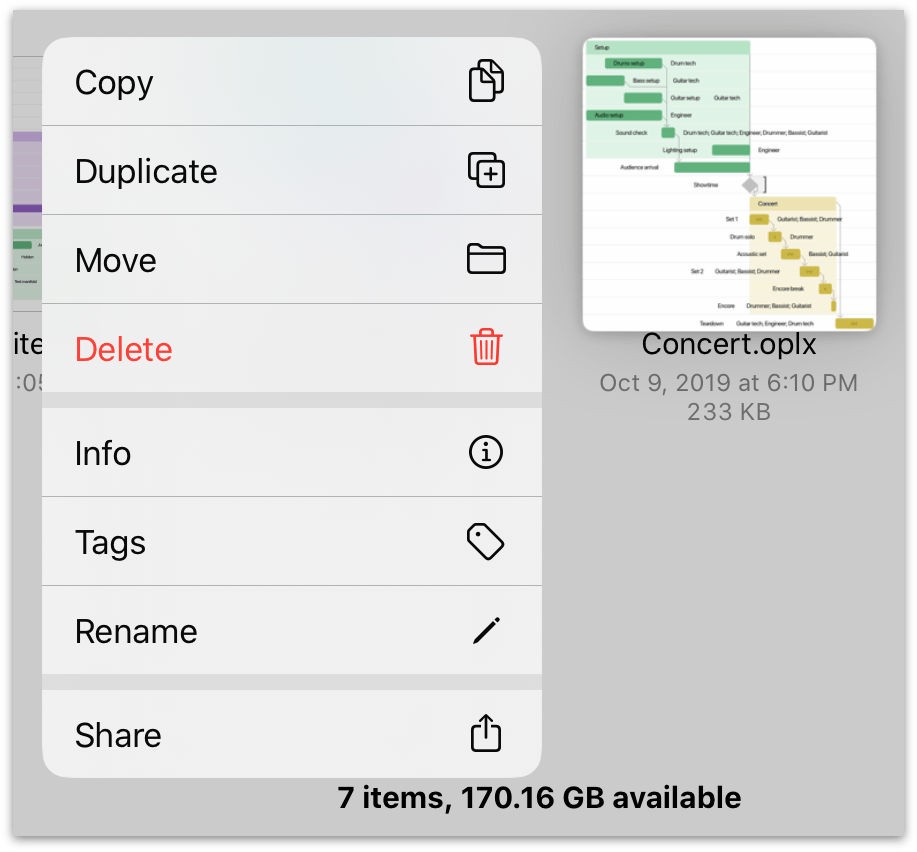
Tap and hold a file's thumbnail to open a contextual menu for the file, with the following commands:
-
Copy—Copies the selected file and makes it available on the clipboard for pasting.
-
Duplicate—Copies and instantly pastes a copy of the selected file at the current location.
-
Move—Opens a hierarchical view of your locations where you can choose a new destination for the file.
-
Delete—Deletes the selected file (it can still be recovered if necessary).
-
Info—Presents a popup with detailed information on the file, including a larger document preview, metadata related to the file's creation and modification, location on your device, and any tags you have assigned.
-
Tags—Presents the list of available tags along with the option to create a new one. Tap a tag in the list to assign it to or remove it from the file.
-
Rename—Opens the file rename dialog, just as if you had tapped its name in the document browser.
-
Share—Opens the iOS share sheet, where you can choose from among the standard array of iOS share destinations as well as additional OmniPlan-specific share options, as described below.
Sharing and Exporting
From a file's contextual menu or with a file selected, tap the Share button  and then choose one of the following actions to perform on the file.
Share As... 
Choose a format for sharing the file, and then choose a destination from the standard set of iOS share destinations.
When sharing an OmniPlan file, the following file formats are available:
- OmniPlan — sends a copy of the selected OmniPlan file.
- Canvas Gantt — sends a PDF of the entire Gantt chart as a single page.
- Paginated Gantt — sends a PDF of the Gantt chart, but split over multiple printable pages.
- Task Report — sends an HTML page that lists all of the tasks in the project, which you can then print, save as PDF, or post to an internal website for the project.
- Resource Report — sends an HTML page that lists all of the tasks in the project by resource, which you can then print, save as PDF, or post to an internal website for the project.
- Microsoft Project MPP
 — sends a Microsoft Project (.mpp) file of the selected OmniPlan file via email or to another app. The Microsoft Project export option requires OmniPlan Pro.
Print 
Prints the selected file to an AirPrint printer of your choosing.
Copy 
Copies the selected file to the clipboard.
Importing to OmniPlan
If you receive OmniPlan files from elsewhere and would like to open them in OmniPlan for iOS, there are two primary ways to import files from other locations into OmniPlan on your iOS device.
When using OmniPlan on multiple devices you own, syncing is preferable to other methods of file transfer. It’s faster, simpler (once set up), provides a layer of backup for your documents, and helps avoid a mess of contradictory file copies.
iCloud Drive and OmniPresence are the two recommended sync services for OmniPlan files. See this support article for details on syncing with OmniPresence in iOS 13 and later.
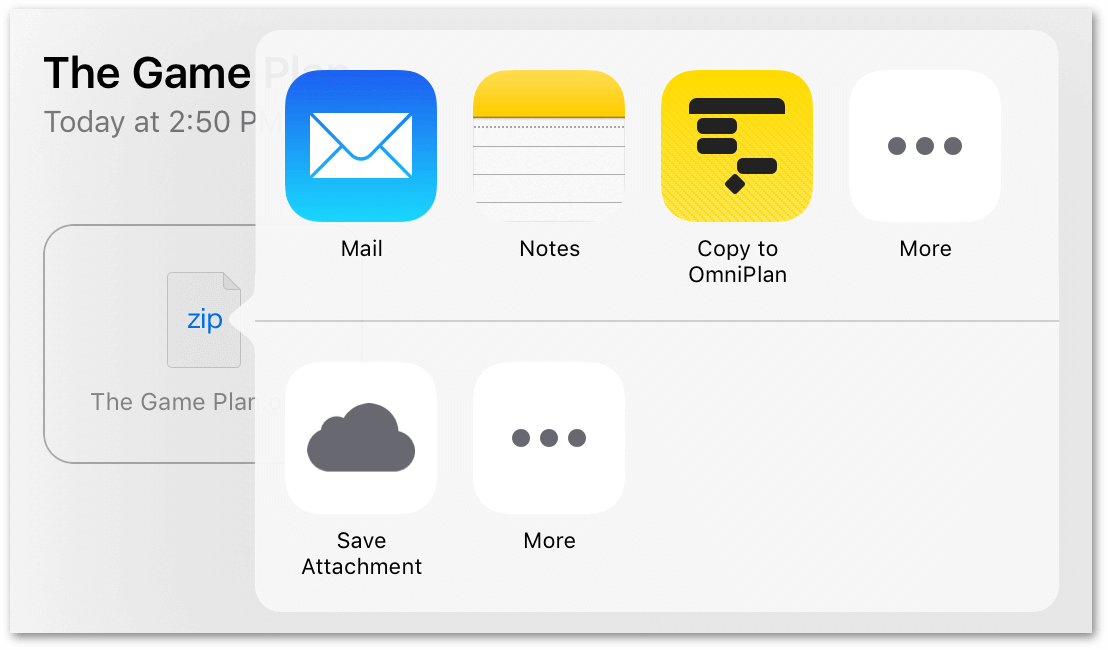
The first way to bring OmniPlan documents from the outside into OmniPlan for iOS is to copy them from another app. This works particularly well with Apple’s built in Mail app for iOS—you can email an OmniPlan file to yourself from anywhere, then tap the attachment and choose Copy to OmniPlan from the Send dialog that appears.
If you have a Mac or a PC with iTunes installed, a second way to transfer OmniPlan files to your iOS device is with iTunes file transfer.
- Make sure your iOS device with OmniPlan is connected to iTunes.
- Choose your device from the device list.
- Choose Apps in the device’s Settings sidebar and scroll down to the File Sharing section of the apps list
- Select OmniPlan in the list of file transfer-capable apps, and drag and drop your files into the list of OmniPlan documents.

Microsoft Project Import and Export (PRO)
OmniPlan Pro enables you to import and export Microsoft Project (.mpp) files. When you import a Microsoft Project file, the file is left in place (either on Omni Sync Server, iCloud Drive, or as an email attachment), and the file is converted to OmniPlan’s format (.oplx) and placed in the On My [device] folder in OmniPlan. Once in OmniPlan, you can edit the project, and then export the file back into Microsoft Project format as needed.
With OmniPlan Pro, the option to export documents as Microsoft Project .mpp files is displayed alongside the other options by tapping the Share button and choosing Share As....
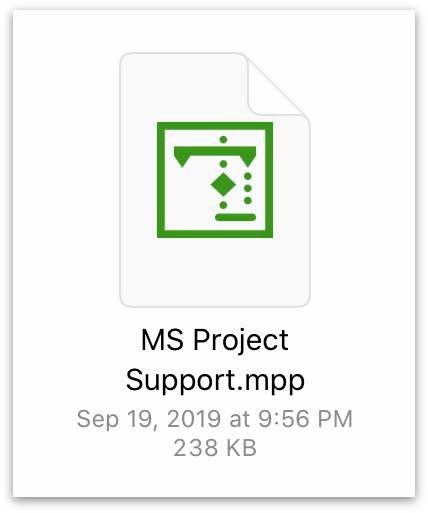
Microsoft Project .mpp files that haven’t yet been converted to OmniPlan’s .oplx file format are shown in the Document Browser with the following icon:
Once converted and saved, a Microsoft Project file appears and behaves just like any other OmniPlan document, and must be exported in the .mpp format again to be read by Microsoft Project.
The Location Toolbar
When viewing the contents of a location in the document browser, the toolbar along the top of the screen includes the following buttons:

Back 
On the far left of the toolbar is the Back button, followed by the name of the folder that contains the files being viewed. Tap to go backward in the folder hierarchy or return to the Locations list.
Folder Title 
At the center of the folder toolbar is the name of the current folder (such as On My iPad).
Add New 
Tap to create a new OmniPlan document.
Automation Menu 
Tap to open a menu with controls related to Omni's JavaScript automation.
-
Automation Console—Opens the automation window to the console pane.
-
Automation API Reference—Opens the automation window to the API reference pane.
-
Configure Plug-Ins—Opens a pane that contains a list of automation Plug-Ins on your device, and controls for linking to a folder that contains Plug-Ins stored elsewhere (such as a cloud storage location).
If any Plug-Ins are installed, they appear in a list titled Actions beneath the Configure Plug-Ins menu item.
![]() Omni Automation Plug-Ins require OmniPlan Pro. For instructions on adding Omni Automation Plug-Ins to OmniPlan, see this article on the Omni Automation website.
Omni Automation Plug-Ins require OmniPlan Pro. For instructions on adding Omni Automation Plug-Ins to OmniPlan, see this article on the Omni Automation website.
Learn more about automating OmniPlan at the official Omni Automation website.
OmniPresence Menu 
With an OmniPresence folder connected, the OmniPresence menu button appears in the toolbar. Tap it to open the OmniPresence menu, where you can download files to a connected OmniPresence folder or navigate directly to them by tapping files in the list.
See this support article for details on using OmniPresence with iOS 13 and later.
App Menu 
Tap to open a menu with tools and settings related to OmniPlan itself. See The App Menu below for details.
Select
At the far right edge of a folder’s toolbar is the Select button. When tapped, Select makes it possible for you to tap to select documents within a folder. Once a document is selected, use the buttons in the bottom toolbar to share or duplicate the file, move it to another folder, delete it, or copy it.
The App Menu
When viewing the contents of a location in the document browser, tap  at the top of the screen to open the App Menu:
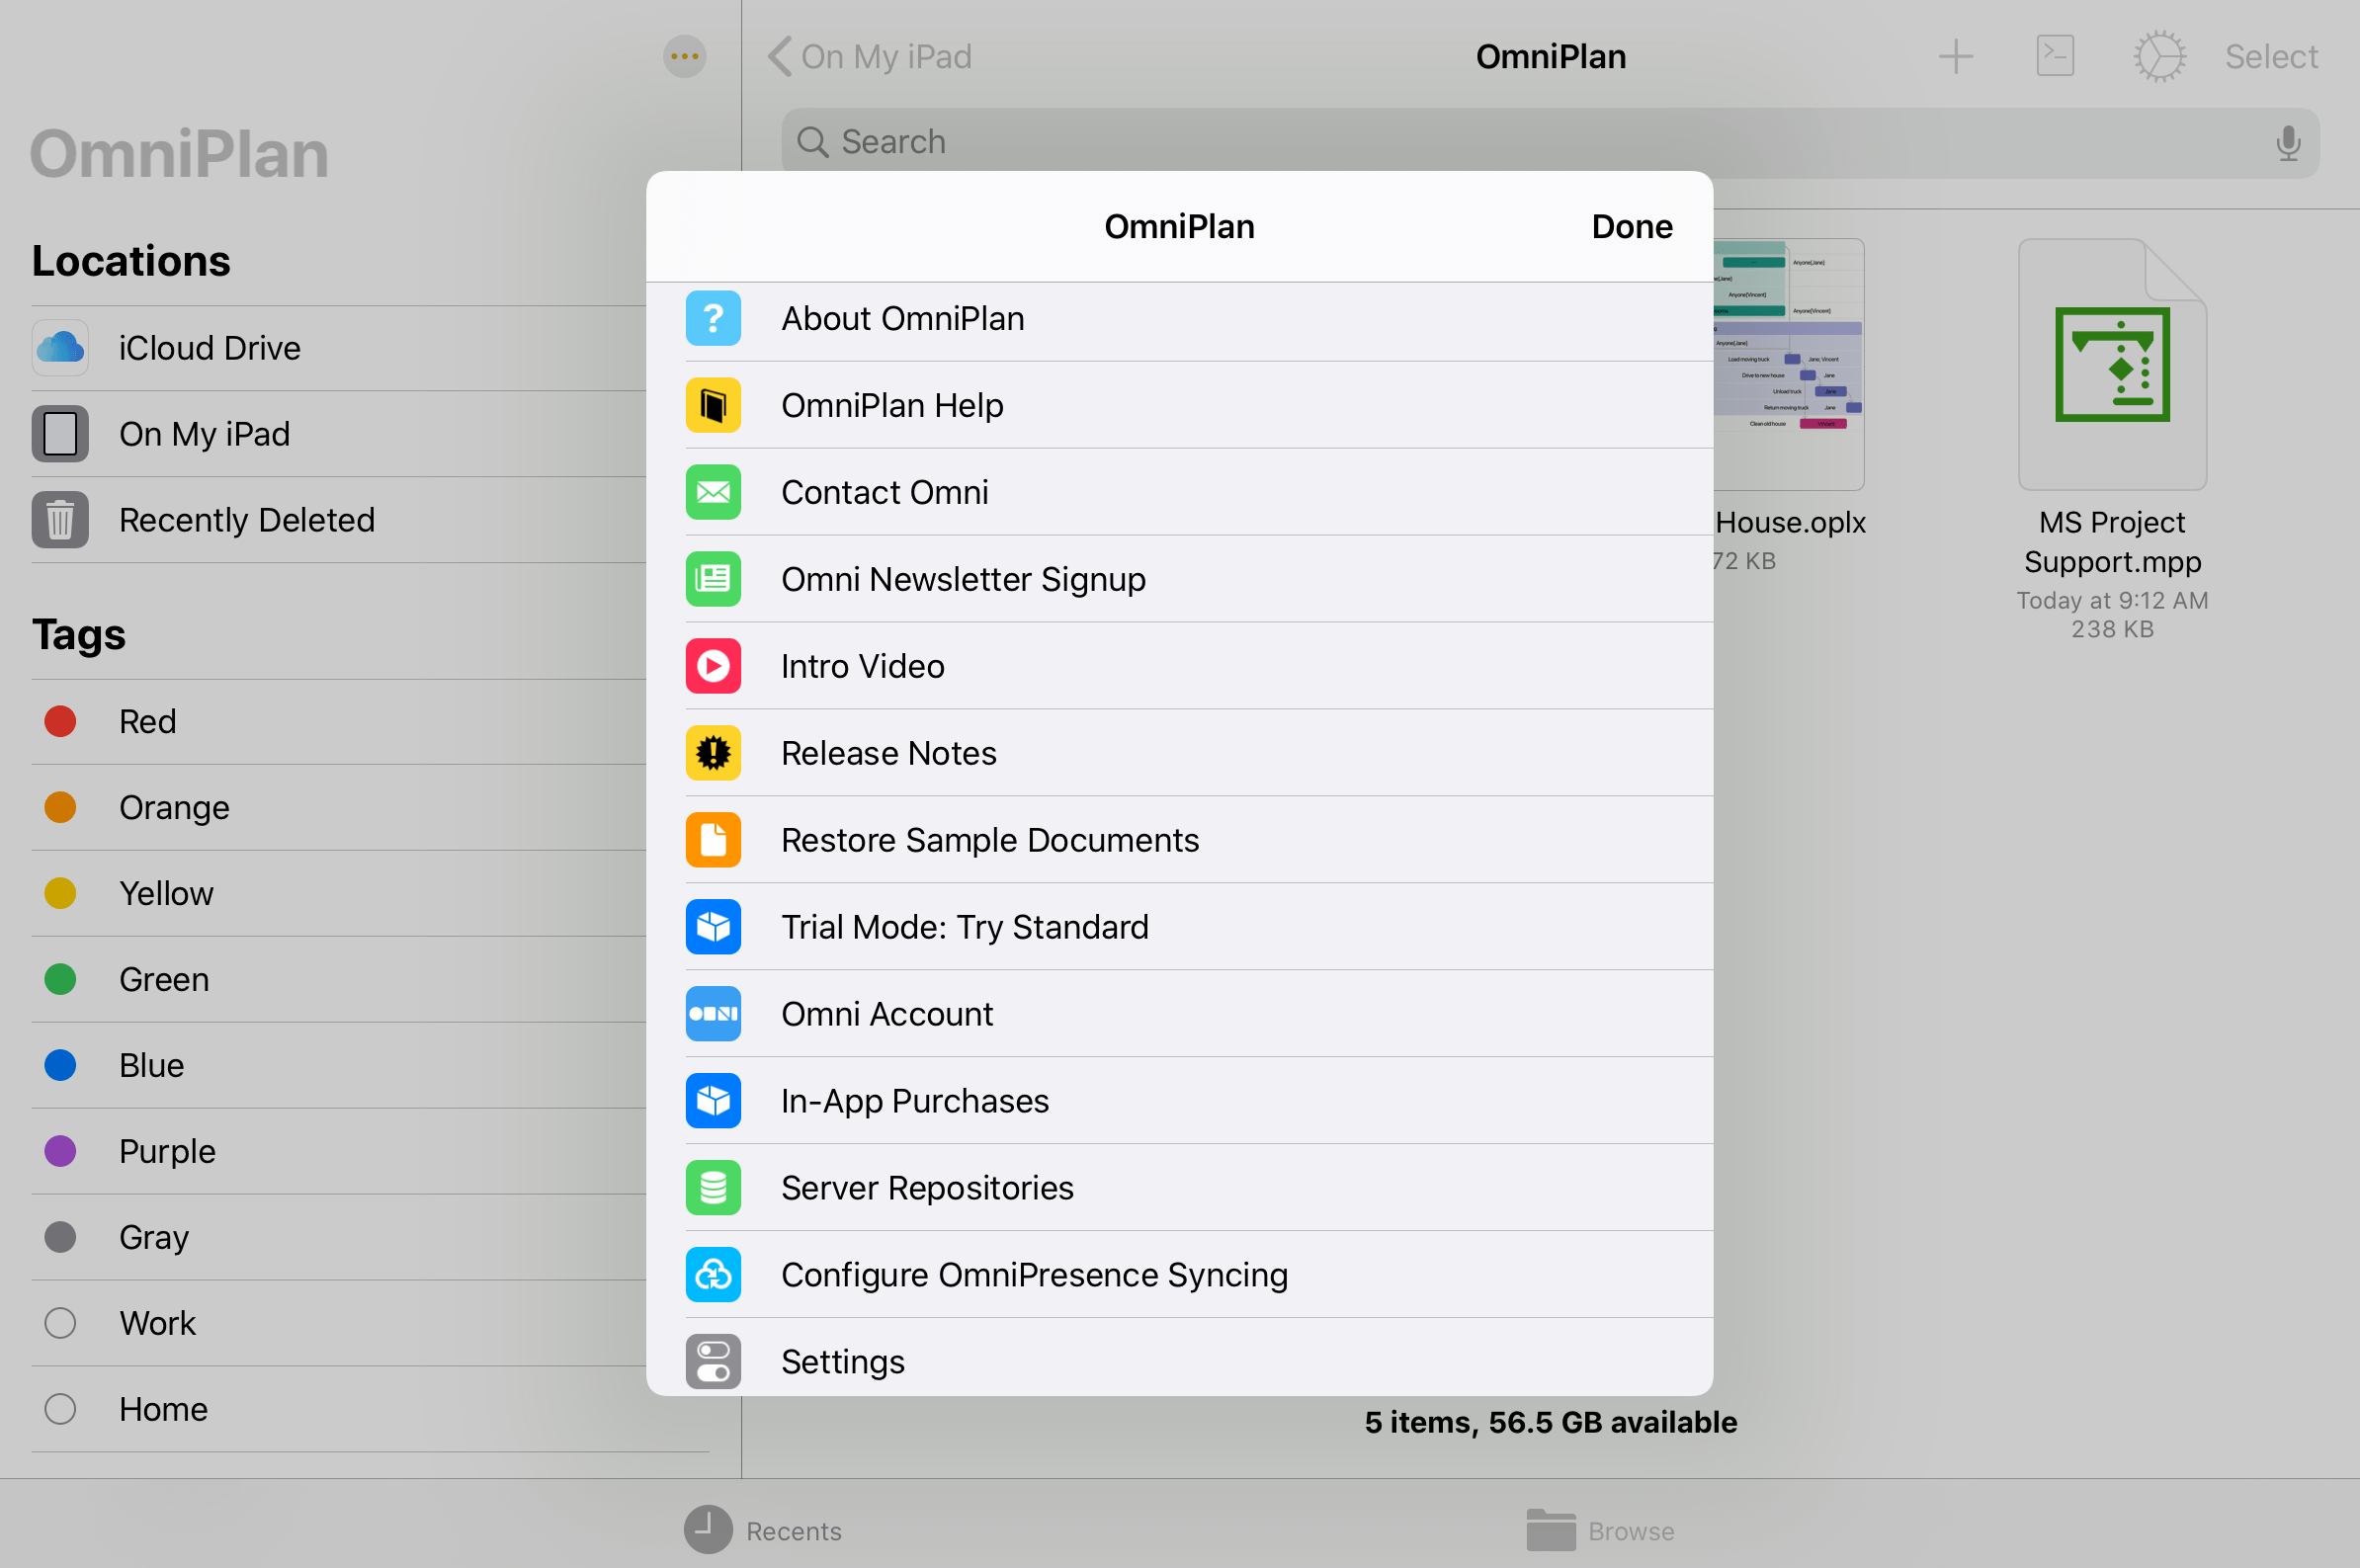
The App Menu has the following options:
About OmniPlan 
Tap to see which version of OmniPlan is installed on your device, and to find Omni’s contact information.
Reference Manual 
Tap to view the in-app reference manual.
Contact Omni 
Tap to send us an email.
Omni Newsletter Signup 
Tap to subscribe to Omni’s quarterly newsletter via email. When tapped, you are taken to the Omni website where you can enter your email address to subscribe.
Replay Intro 
Tap to revisit the introductory experience and tutorial presented the first time you opened OmniPlan.
Release Notes 
Tap to see what’s new in the current release. The release notes are also available on Omni’s website.
Trial Mode 
Trial Mode is only available prior to purchasing the upgrade to OmniPlan Standard or Pro. Tap to switch between Standard and Pro to see which version is right for you.
Omni Account 
Tap to open the Omni Account sign in sheet. If you are an OmniPlan subscriber, use this window to sign in to your Omni Account and unlock the full OmniPlan feature set.
In-App Purchases 
Tap to purchase the upgrade from Trial Mode to either OmniPlan Standard or Pro. This is also where you can restore purchases, if you ever need to reinstall OmniPlan on a device.
Server Repositories 
![]() Tap to open the sheet for setting up a shared server repository, useful when collaborating with multiple project contributors. Learn more about collaboration via server repository here: Collaborating on Projects with Publish Subscribe (PRO).
Tap to open the sheet for setting up a shared server repository, useful when collaborating with multiple project contributors. Learn more about collaboration via server repository here: Collaborating on Projects with Publish Subscribe (PRO).
Configure OmniPresence Syncing 
Tap to connect an OmniPresence cloud synced folder to your device. Documents in this folder are automatically synced to the cloud whenever a change is made. You can sync with a free Omni Sync Server account, or an OmniPresence-capable WebDAV server of your choice.
See this support article for details on using OmniPresence with iOS 13 and later.
Settings 
Set preferences for working in OmniPlan. See OmniPlan Settings for more details.
OmniPlan Settings
Tap ![]() in the document browser toolbar to open the app menu and access OmniPlan settings.
in the document browser toolbar to open the app menu and access OmniPlan settings.
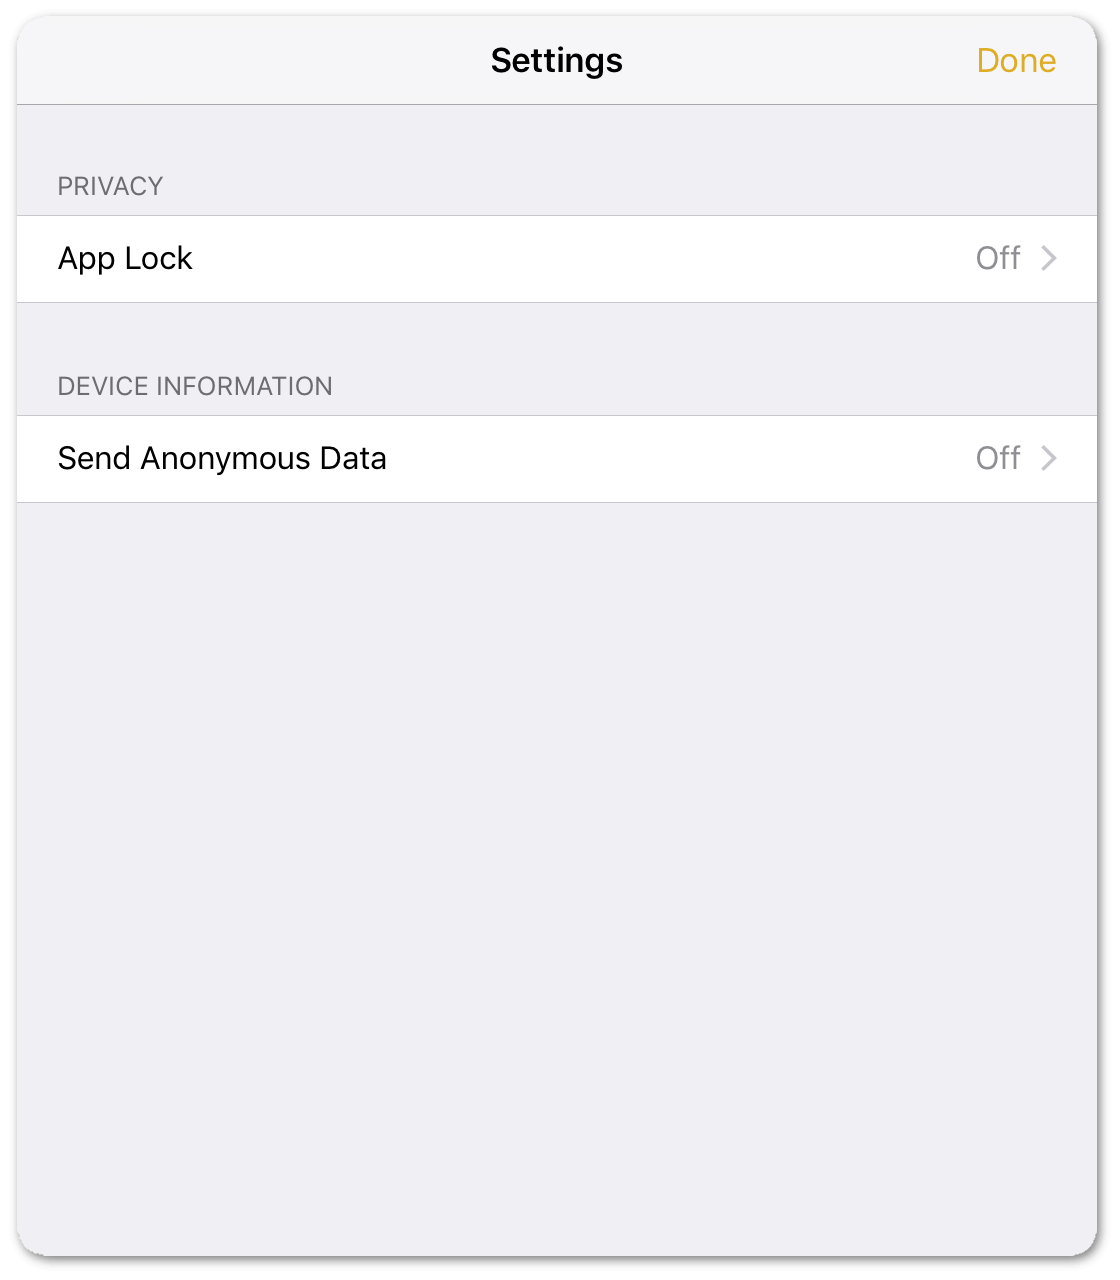
- App Lock—to keep others from accidentally viewing or modifying your OmniPlan data, add a password (or use Touch ID) to unlock the app. See Keeping Your Work Private with App Lock for details on this feature.
- Send Anonymous Data—if you’d like to help Omni improve future versions of OmniPlan, you can choose to share anonymous usage data with us. The full content of the data sent is displayed when you tap here.
Keeping Your Work Private with App Lock
If you use OmniPlan on a device that you occasionally share (with your children, coworkers, or clients, for example), there may be times when you would prefer that your OmniPlan data be out of reach.
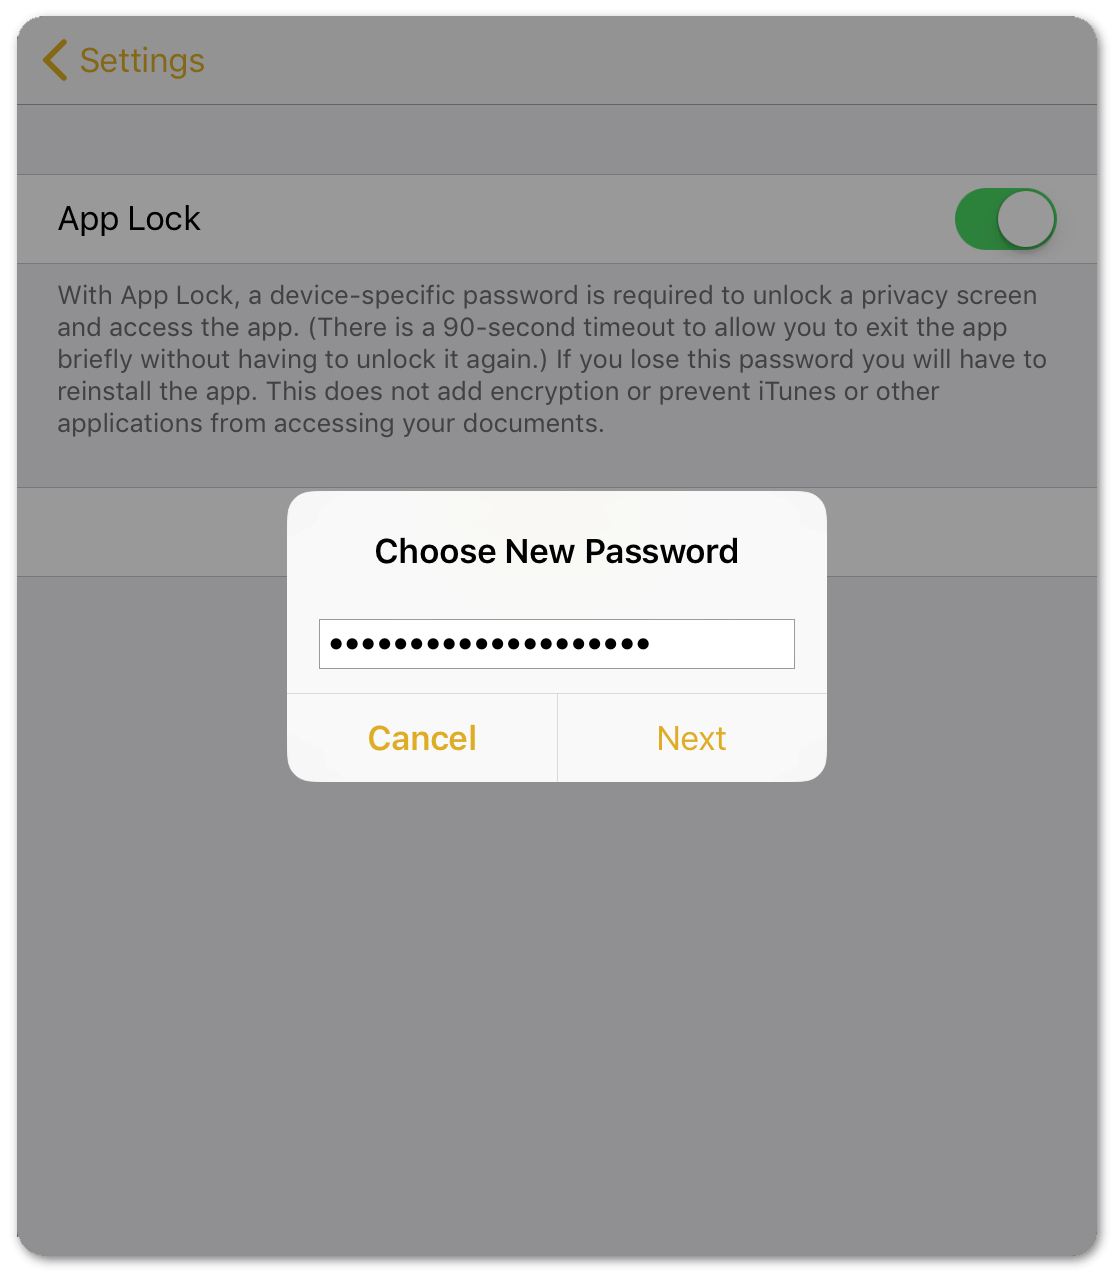
The App Lock feature prevents accidental taps and casual glances by adding a password-locked privacy screen that must be dismissed before any of your documents or settings can be accessed.
To use App Lock, tap the gear icon ![]() in the Document Browser toolbar and choose Settings. App Lock appears in the Privacy section of Settings, and is turned off by default.
in the Document Browser toolbar and choose Settings. App Lock appears in the Privacy section of Settings, and is turned off by default.
When you turn on App Lock, you are prompted to choose and confirm a new password. If you use OmniPlan on multiple iOS devices, you need to configure and set an App Lock password on each device. App Lock passwords are device-specific and do not sync across devices.
If you forget the App Lock password, OmniPlan can no longer be used on your device. However, you can retrieve your OmniPlan data by connecting your device to a computer with iTunes and copying your files to a safe location.
After saving a backup of your data, delete and then reinstall OmniPlan on your device. When you delete OmniPlan, your files—and your App Lock password—are deleted from the device. After reinstalling OmniPlan, you can set a new App Lock password and use iTunes again to load your OmniPlan files back onto your device.
If, however, you have your files stored in the cloud—either on Omni Sync Server via OmniPresence or some other cloud storage system—you can skip the whole iTunes file backup/restore process.
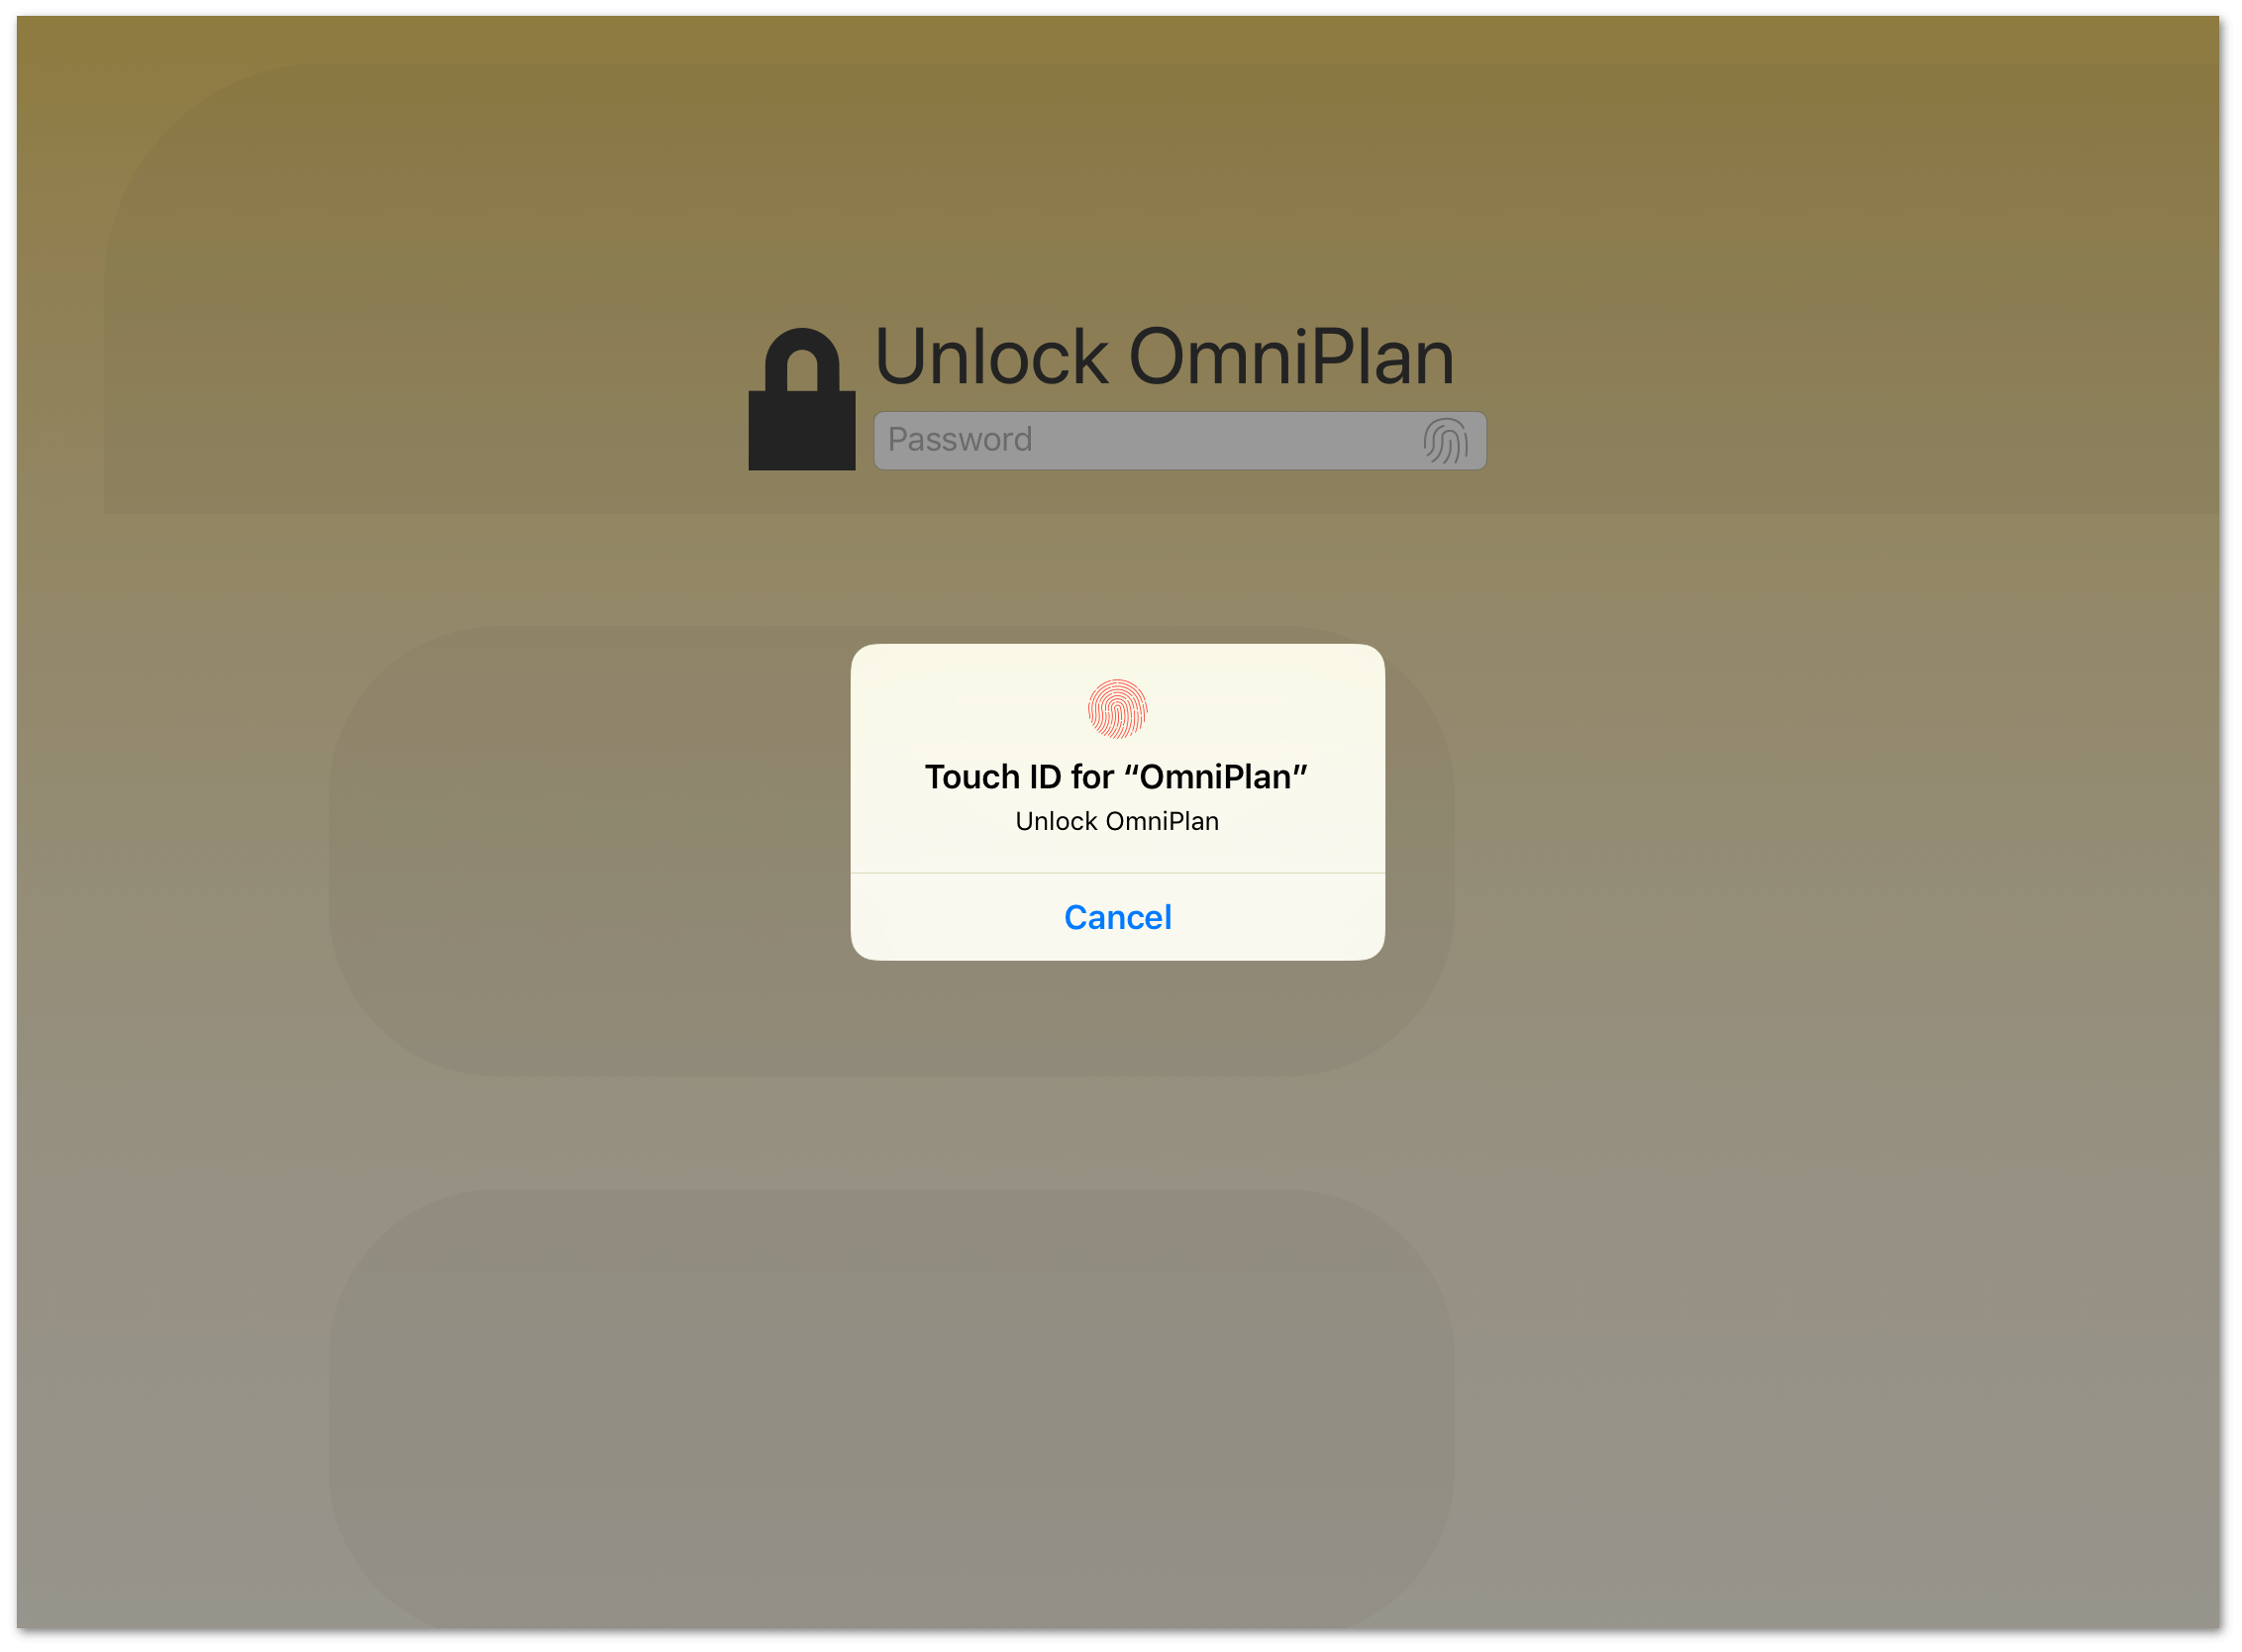
After choosing a password, App Lock is turned on. The App Lock Settings screen offers the option to turn App Lock back off, change your password, or enable Touch ID as an alternative means of unlocking OmniPlan on devices that support it.
To change your password, Tap Change Password. You are prompted to enter your old password, and then to choose and confirm a new one.

With App Lock turned on, the next time you open OmniPlan you will see a privacy screen with a field to enter the password you chose. Enter the password, and work resumes unimpeded.

If you choose to use Touch ID, a prompt for your fingerprint will appear instead. You will still have the option to enter your password, or you can tap the fingerprint icon next to the password field to unlock with Touch ID if you dismissed the prompt initially.