This article is written for OmniPlan 3.10 for Mac and later. Please refer to Setting up and using OmniPlan Multiuser Project Sync (Pro) or the OmniPlan 3.9 for Mac documentation for details on sync and sharing in earlier versions.
The Pro edition of OmniPlan 3.10 for Mac brings a new and improved experience for syncing and sharing your OmniPlan projects. It streamlines and consolidates the interface and account setup process, so it’s easier than ever to collaborate with multiple contributors on a shared project.
The improvements in OmniPlan 3.10 are focused on streamlining OmniPlan’s existing publication and subscription model. The underlying technology, and purpose for collaboration, remain the same. If your project doesn’t require multiple editors, consider using OmniPresence sync for remote access to your files instead.
When collaborating with OmniPlan, there are two areas that you’ll want to think about: app-wide accounts management, and the sharing configuration for each individual project file. OmniPlan 3.10 gathers the important settings for each of these into two new interface elements: the Server Accounts Window and Sync & Sharing Options.
The Server Accounts Window
Before you begin sharing your OmniPlan projects you’ll want to make sure you have a server ready to act as a centralized repository for your files. Syncing a local copy of your project with the copy on the server is what makes sure everyone sharing the file is up-to-date with all of the latest changes.
OmniPlan 3.10 gathers formerly separate UI elements into a single window that makes it easier to set up and keep track of the important functions of your app-wide server accounts, all in one place.
The Server Accounts window (OmniPlan > Accounts) is where you’ll add new server accounts, manage your existing accounts, and view and retrieve project files from your servers.
If you’re setting up your first server account (or connecting to an existing account for the first time), the window presents a guided setup mode for choosing the account type and entering the relevant login information.
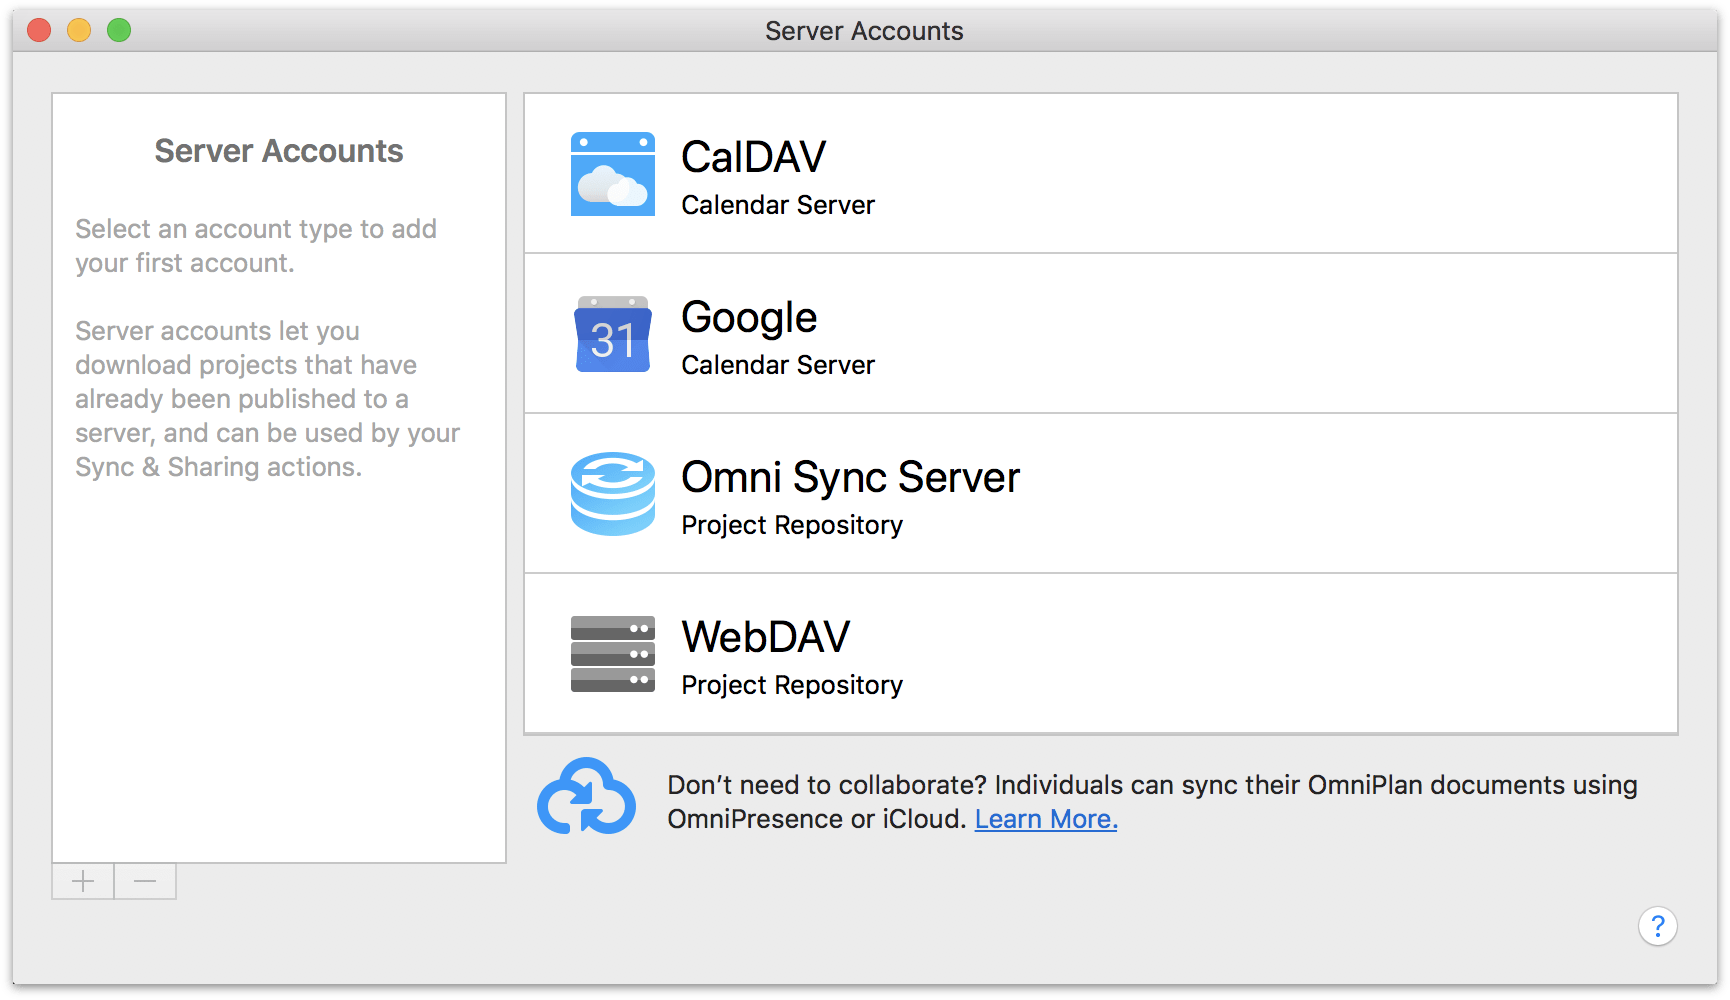
If you don’t know where to start, we recommend collaboration via a free Omni Sync Server account, which you can create here.
Once you have an account connected, it appears in the list on the left side of the window. Add more accounts by clicking the Plus button at the bottom of the list.
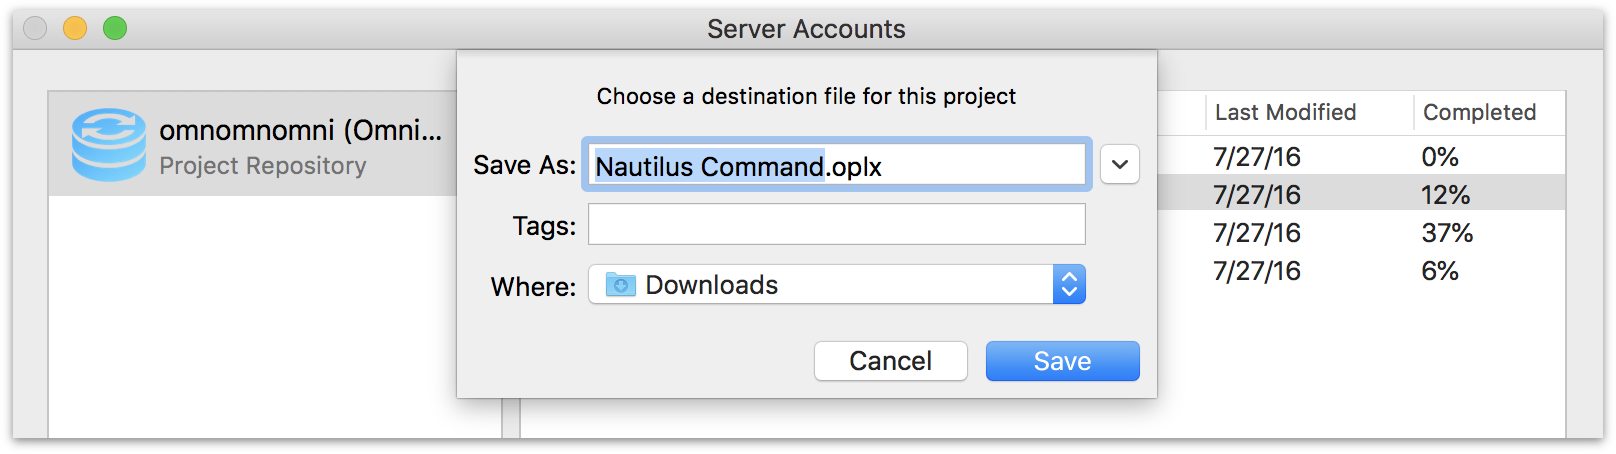
With an account selected, the project files it contains appear in the list on the right. Select a project in the list and click Download Project to make a local copy. The file opens, ready for collaboration.
If you are setting up sharing for the first time and don’t have any projects synced remotely, choose a project you are working on and set it up to sync with your server using the Sync & Sharing Options walkthrough below.
Sync & Sharing Options
Once you have a server account set up, you can begin syncing your project files with it to collaborate with other editors on your project.
With OmniPlan 3.10, set up the sync actions for your project using the new Sync & Sharing sheet (Project > Sync & Sharing Options).
For this walkthrough we will assume you are starting with a brand new server account (set up in the Server Accounts window above) and a fresh project that you want to work on collaboratively with others. You’ll be publishing changes you make to your shared server, which other editors will subscribe to (and vice versa).
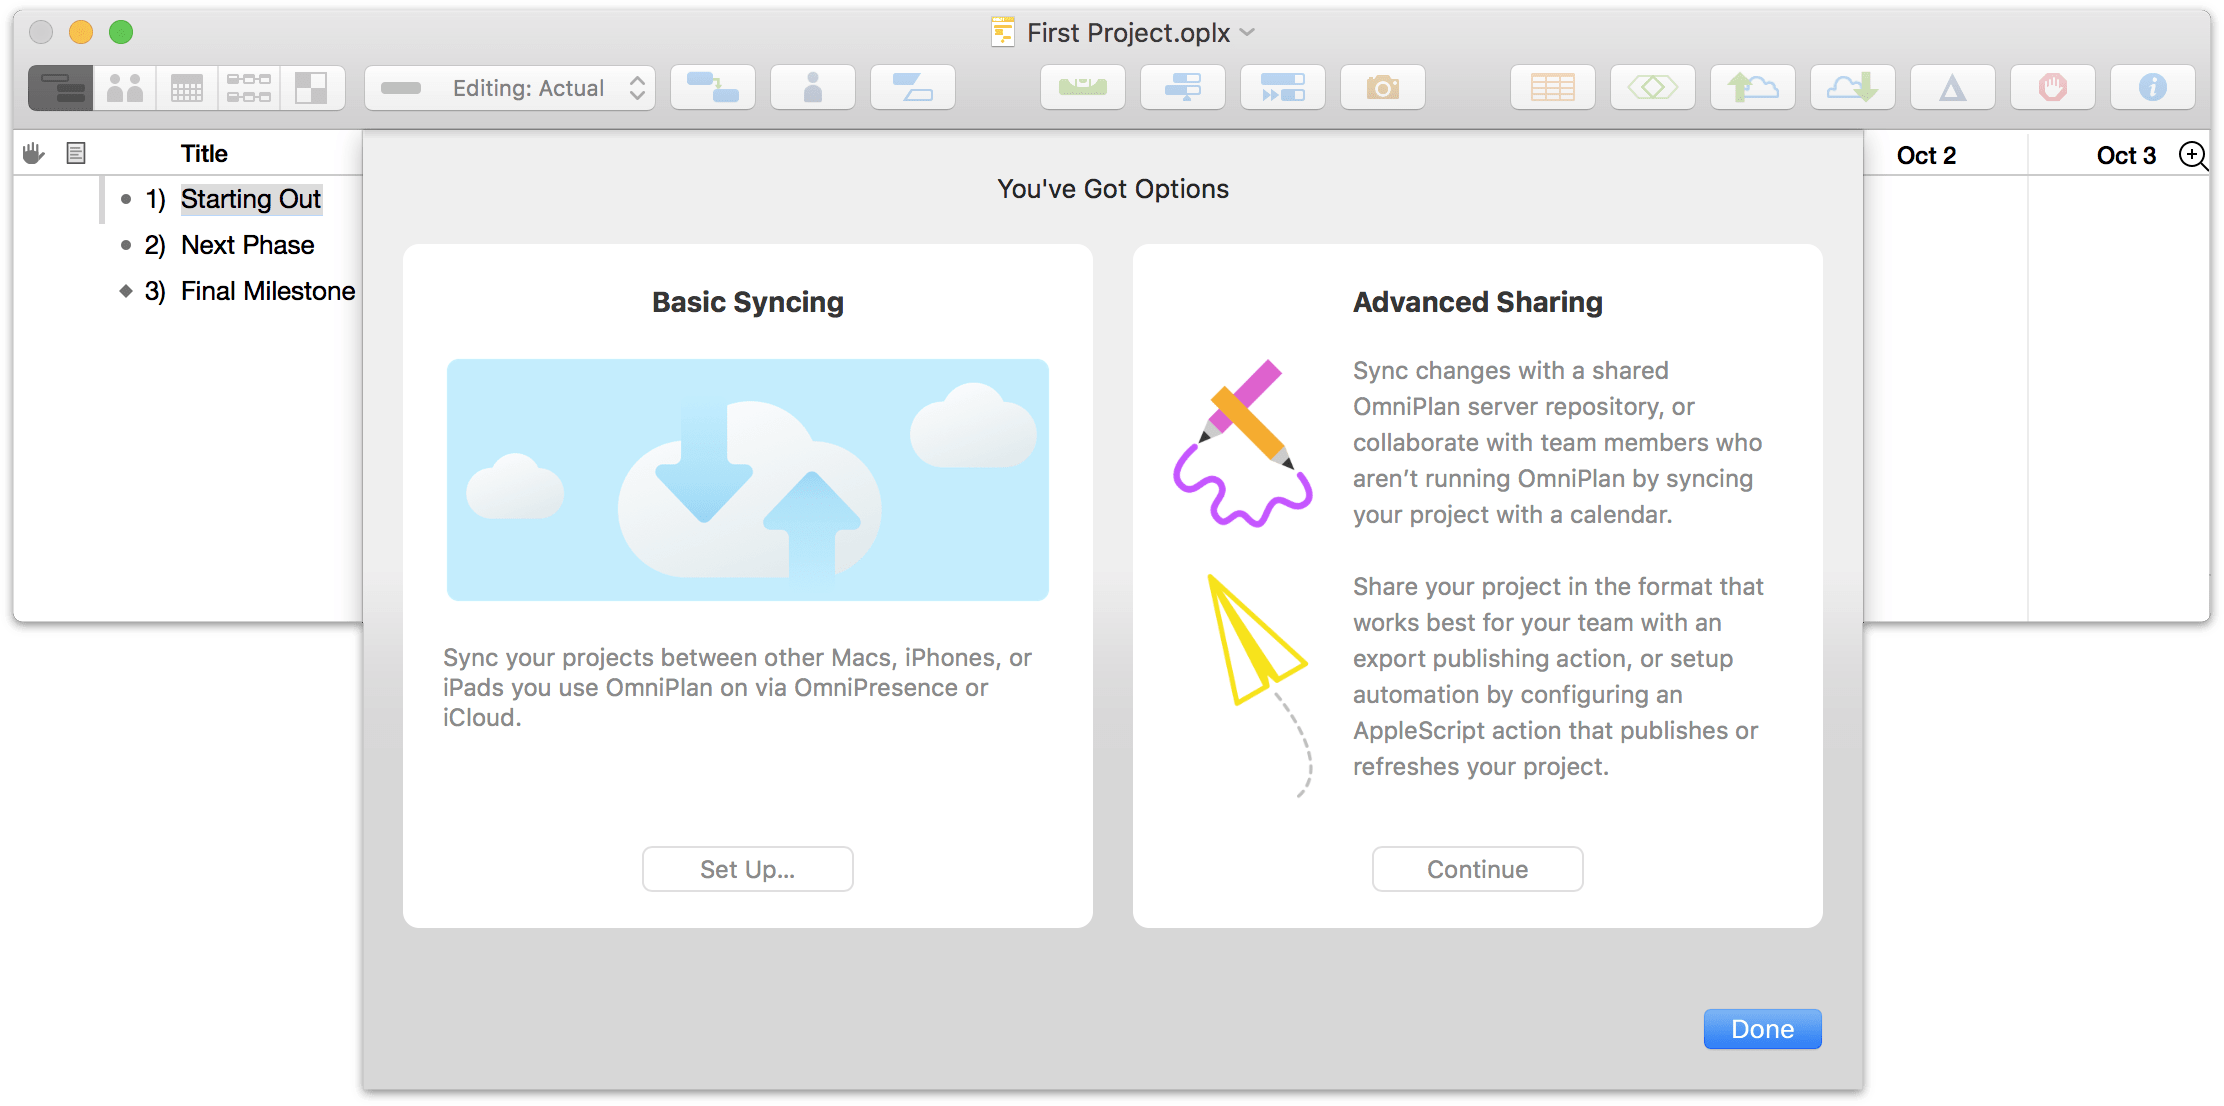
When you first set up sync and sharing for a project, you’ll see two options: Basic Syncing and Advanced Sharing. If you choose Basic Syncing you’ll be directed to the setup process for OmniPresence or iCloud storage—two great options if all you need is a remote place to keep your files.
Since this example has multiple contributors, we’ll choose Advanced Sharing instead. Click Continue to set up sharing for the project.
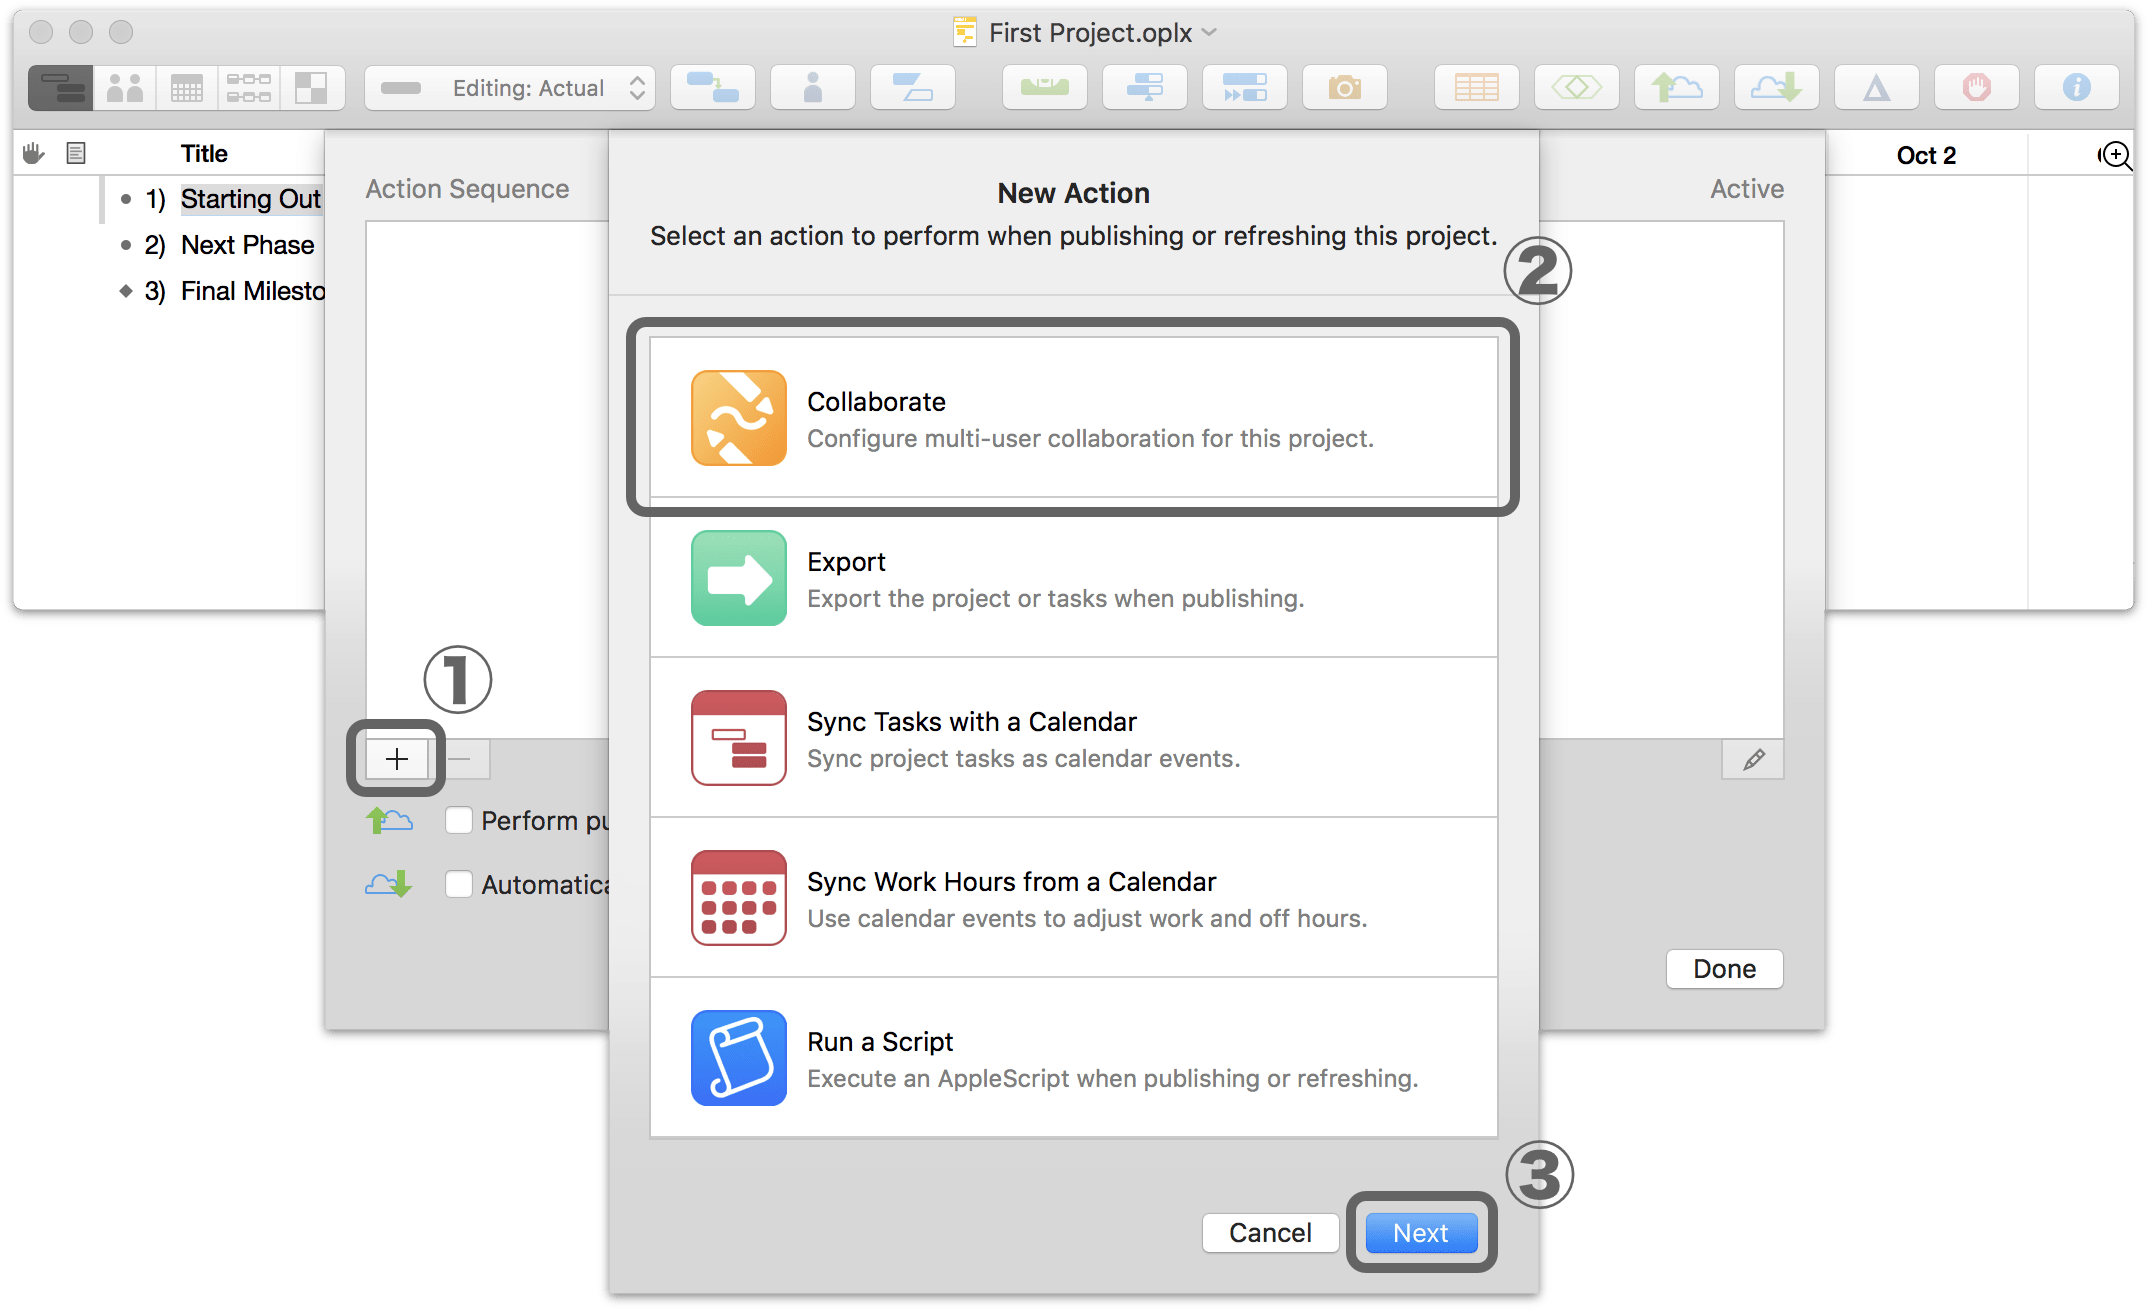
The list of share actions for your project starts out blank. Click the Plus button to add a new one and choose from among the available action types. You’ll see that you can perform a variety of automated tasks when sharing (publishing) your project; we’ll focus on collaboration for now. Choose Collaborate as the action type, then click Next.
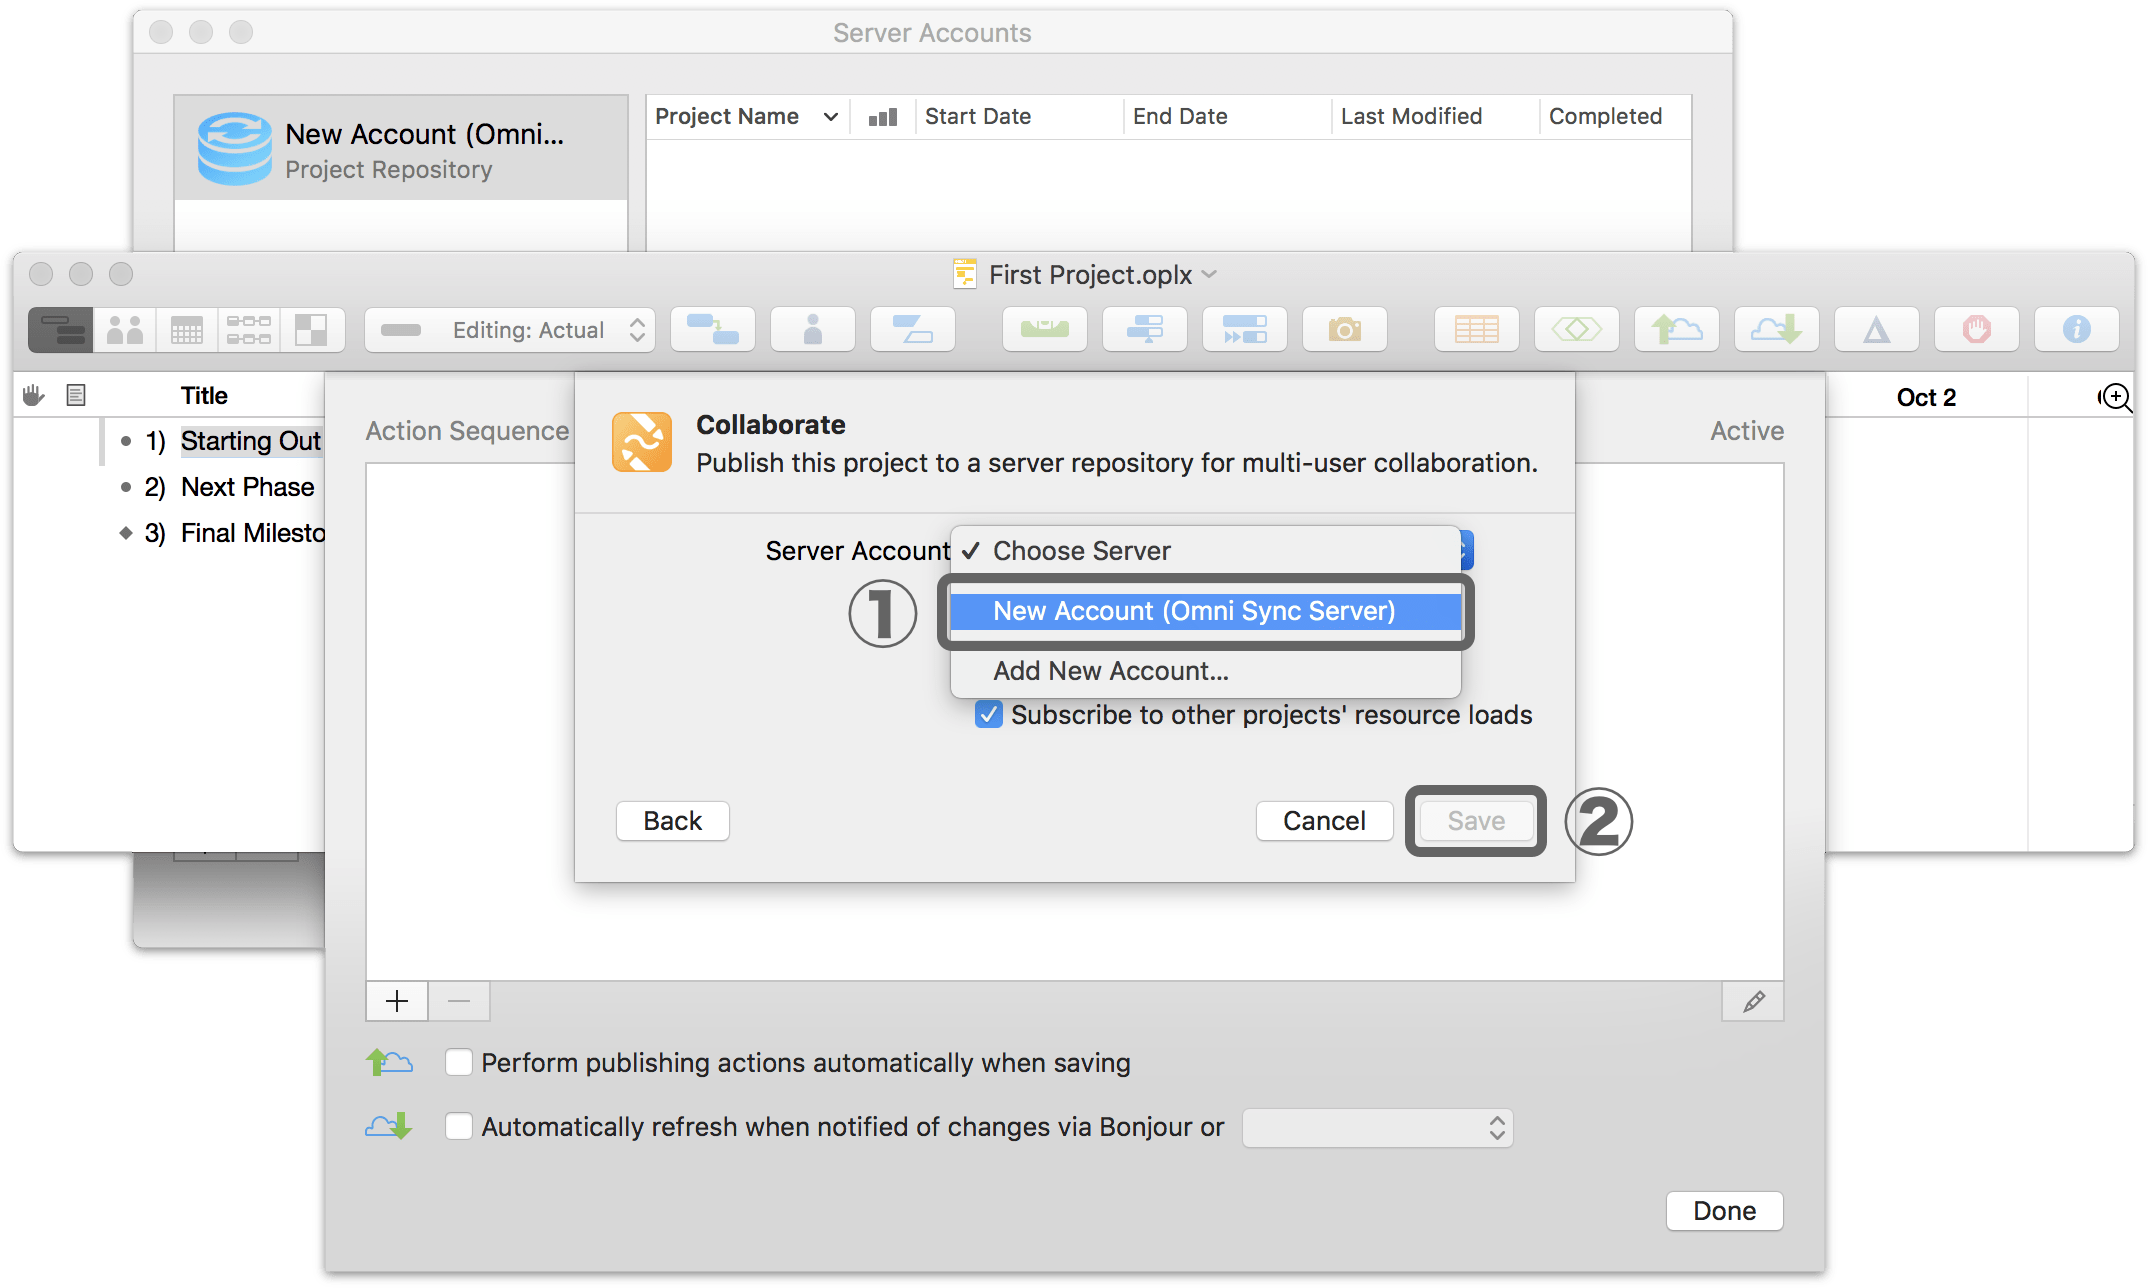
To collaborate on this project it will have to be stored on a server so others can access it. If you set up an account with the Server Accounts window, click Choose Server and choose it from the list (if not, you’ll want to set one up now and come back to this step). After choosing your account, click Save.
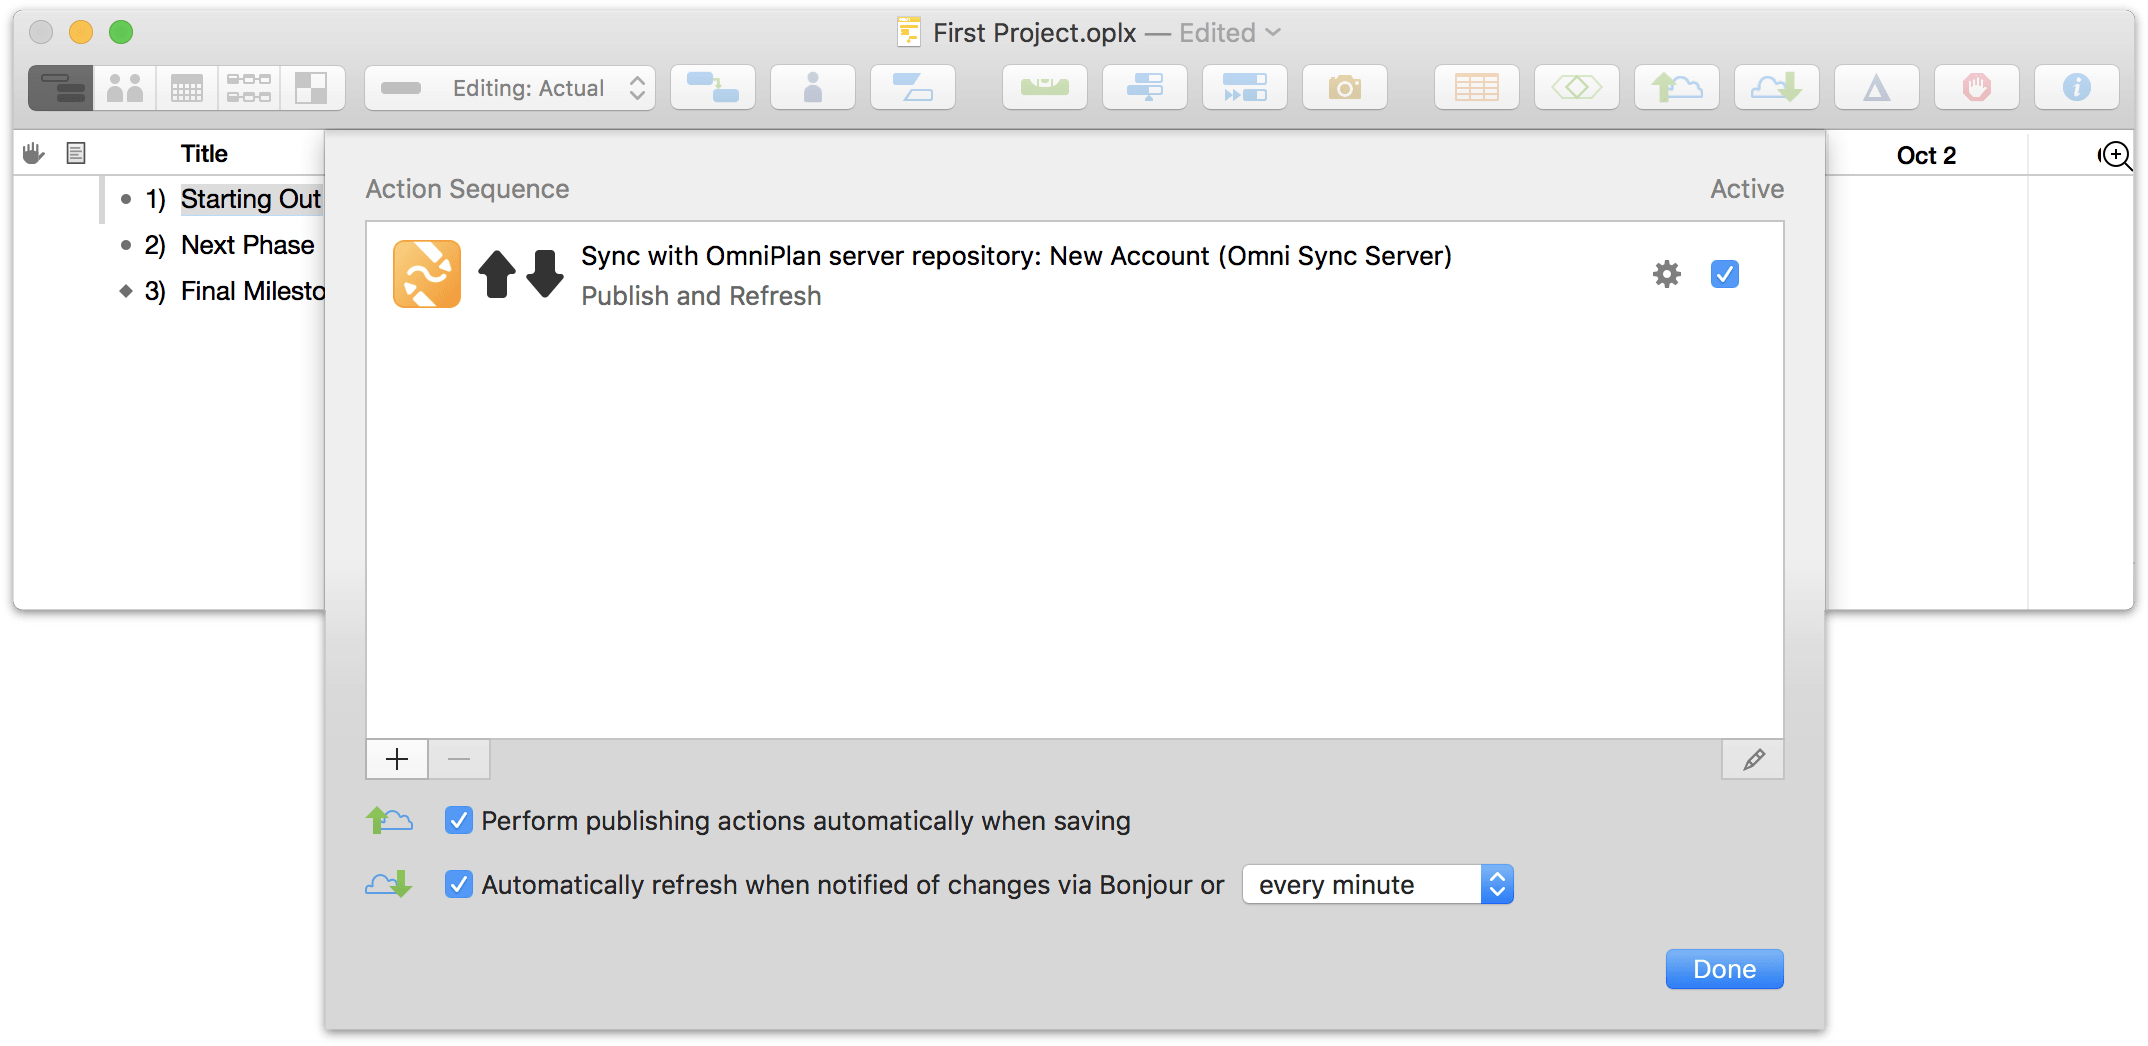
Your Sync & Sharing Options sheet now contains an active action for publishing to, and refreshing from, your shared server repository. Click the Gear button to edit details of the action, and choose what prompts the project to publish or refresh its status using the checkboxes below the list.
Click Done, then save the project to publish it to the server for the first time.

The next time you check the Server Accounts window you’ll see the project listed in your account. Subsequent changes you make are published to the server based on the settings you chose in Sync & Sharing Options, and you can monitor those changes—any any incoming from other editors who have similarly connected to your project—using change tracking (Project > Show Changes).
Last Modified: Jul 15, 2020