OmniPlan Extended
OmniPlan works great as a standalone app, but its capabilities don’t end there. OmniPlan interacts with other apps and services in a wide variety of ways.
Importing from Other Formats
OmniPlan understands several other applications’ file formats. You can open files of these types in OmniPlan the same way you would open an OmniPlan document. The file is imported into a brand new OmniPlan document, which you can then edit, save, or export.

- Microsoft Project (.xml, .mpx, .mpp, and .mpt)
- Documents created in Microsoft Project XML, MPX, or MPP formats can be opened by OmniPlan, with a few limitations. See the Microsoft Project support section for more information on Microsoft Project compatibility.
- Comma-Separated Values (.csv) and Tab-delimited text files (.txt)
- OmniPlan can read comma-separated or tab-delimited values from a plain-text file. To see how the data in a CSV file should be formatted, export an OmniPlan document as a CSV file and open the result in any text editor. Tab-delimited files are formatted like CSV files, except that tab characters are used instead of commas to separate fields.
- OmniOutliner 3 (.oo3 and .ooutline)
- Task lists can be imported from OmniOutliner files. A column mapping dialog appears, where you can choose which outline column should correspond to which field of task information. If the outline has multiple levels of hierarchy, task groups are created.
- OmniGraffle (.graffle)
- Task lists can be imported from OmniGraffle diagrams. The title of an object becomes the task title, and the hierarchy of connection lines determines the hierarchy of task groups.
Exporting to Other Formats
OmniPlan can write files in several formats, for use with other applications. To export an OmniPlan file, choose Export (⌥⌘E) from the File menu. When you export, a new file is created, leaving your original document as it is on the screen. Of course, not all aspects of an OmniPlan document can be represented in all file formats. (If you’re working in tandem with others, consider Publishing and Subcribing.)
If you export a project while a filter is on, only the visible tasks are included in the exported file.
- OmniPlan 2
- Of course, OmniPlan can export to its own format. This is useful when you want to use the filtering feature to make a new OmniPlan file of tasks matching certain criteria.
- OmniPlan 1
- OmniPlan 2 can export either the document as a whole or just the filtered contients to a format OmniPlan 1 can work with.
- iCalendar
- This is the calendar format used by Apple iCal, Apple Calendar, and many other calendar applications. You can choose to export the tasks as calendar events or as items on a to-do list. If you export calendar events, you can also choose whether each task should become to a single event, regardless of how long it may be (One event per task), or whether tasks should be broken into chunks when they span working and non-working hours (One event per work period).
- Comma Separated Values (CSV or CSV UTF–16)
- CSV is a common, plain-text format that can be read by many different applications.
- If you’re having trouble persuading other applications to read the non-ASCII characters in your CSV file, such as accented letters or non-Roman characters, try exporting with the UTF–16 CSV option, and importing that into the other application. This makes it easier for some applications to detect the correct encoding and interpret your characters properly.
- Microsoft Project Exchange (MPX)
- MPX is an older compatibility format that can be read by Microsoft Project 2002 and earlier, and written by Microsoft Project 98 and earlier. This format doesn’t support the Unicode character encoding standard at all, and is in general less reliable than the Microsoft Project XML format. See the Microsoft Project Support section for more information.
- Extensible Markup Language (XML) and Microsoft Project Plan (MPP)
- Microsoft Project 2002 and newer can read and write these formats. See the Microsoft Project Support section for more information.
- PNG Bitmap Image, PDF Vector Image, TIFF Bitmap Image, JPEG Bitmap Image
- You can export a picture of the task view or the resource view, whichever one is open in the main window. In the Export panel, you can choose whether the image should include the outline, the chart, or both.
- OmniOutliner 3
- The task outline is exported as an OmniOutliner file, with a column corresponding to each column in the OmniPlan document.
- OmniGraffle
- There are several ways to export to an OmniGraffle diagram.
Work Breakdown Structure
Tasks and groups are represented by a tree of objects. The connection lines in this diagram type represent the hierarchy of the task outline; dependency lines are not represented.
Activity-on-Node PERT Chart
Tasks are represented by objects, connected by dependency lines. While a Gantt chart emphasizes durations, this type of chart emphasizes the path of dependencies.
Activity-on-Line PERT Chart
Tasks are represented as lines between objects, with the title and duration of the task as a label on each line. Like the Activity-on-Node PERT Chart, this diagram type emphasizes dependencies.
AOL OmniGraffle export
When exporting to a Work Breakdown Structure or an Activity-on-Node PERT Chart, you can choose whether to represent tasks with basic objects (which just show the task name) or with tables (which show the task name, assigned resources, start date and end date).
- If you own an OmniGraffle license, you can style and edit exported diagrams. But even if you don’t own it, you can use an unlicensed copy of OmniGraffle (available at OmniGroup.com) to view, print, or export the diagrams.
- HTML Full Report
- A folder is created containing a full report of the project, including:
An overview index page
A task list
A resource list
A Gantt chart
A resource timeline
An iCalendar file of the project milestones
iCalendar files with each resource’s tasks as events
iCalendar files for each staff or equipment resource’s tasks as to-do list items
- If you know HTML and CSS, you can also make your own HTML templates.
- HTML Task List
- This is just the task list part from the HTML Full Report; it exports as a single HTML page.
- HTML Resource List
- This is just the resource list part from the HTML Full Report; it exports as a single HTML page.
Printing
OmniPlan supports the standard Mac OS X Page Setup dialog; choose Page Setup from the File menu to see it. You can set the paper size, orientation, and scale; this information is saved with the document.
Print-Time Options
Choose Print from the File menu to see the standard Mac OS X print dialog.
Select Show Details from the pop-up menu to see OmniPlan’s print options.
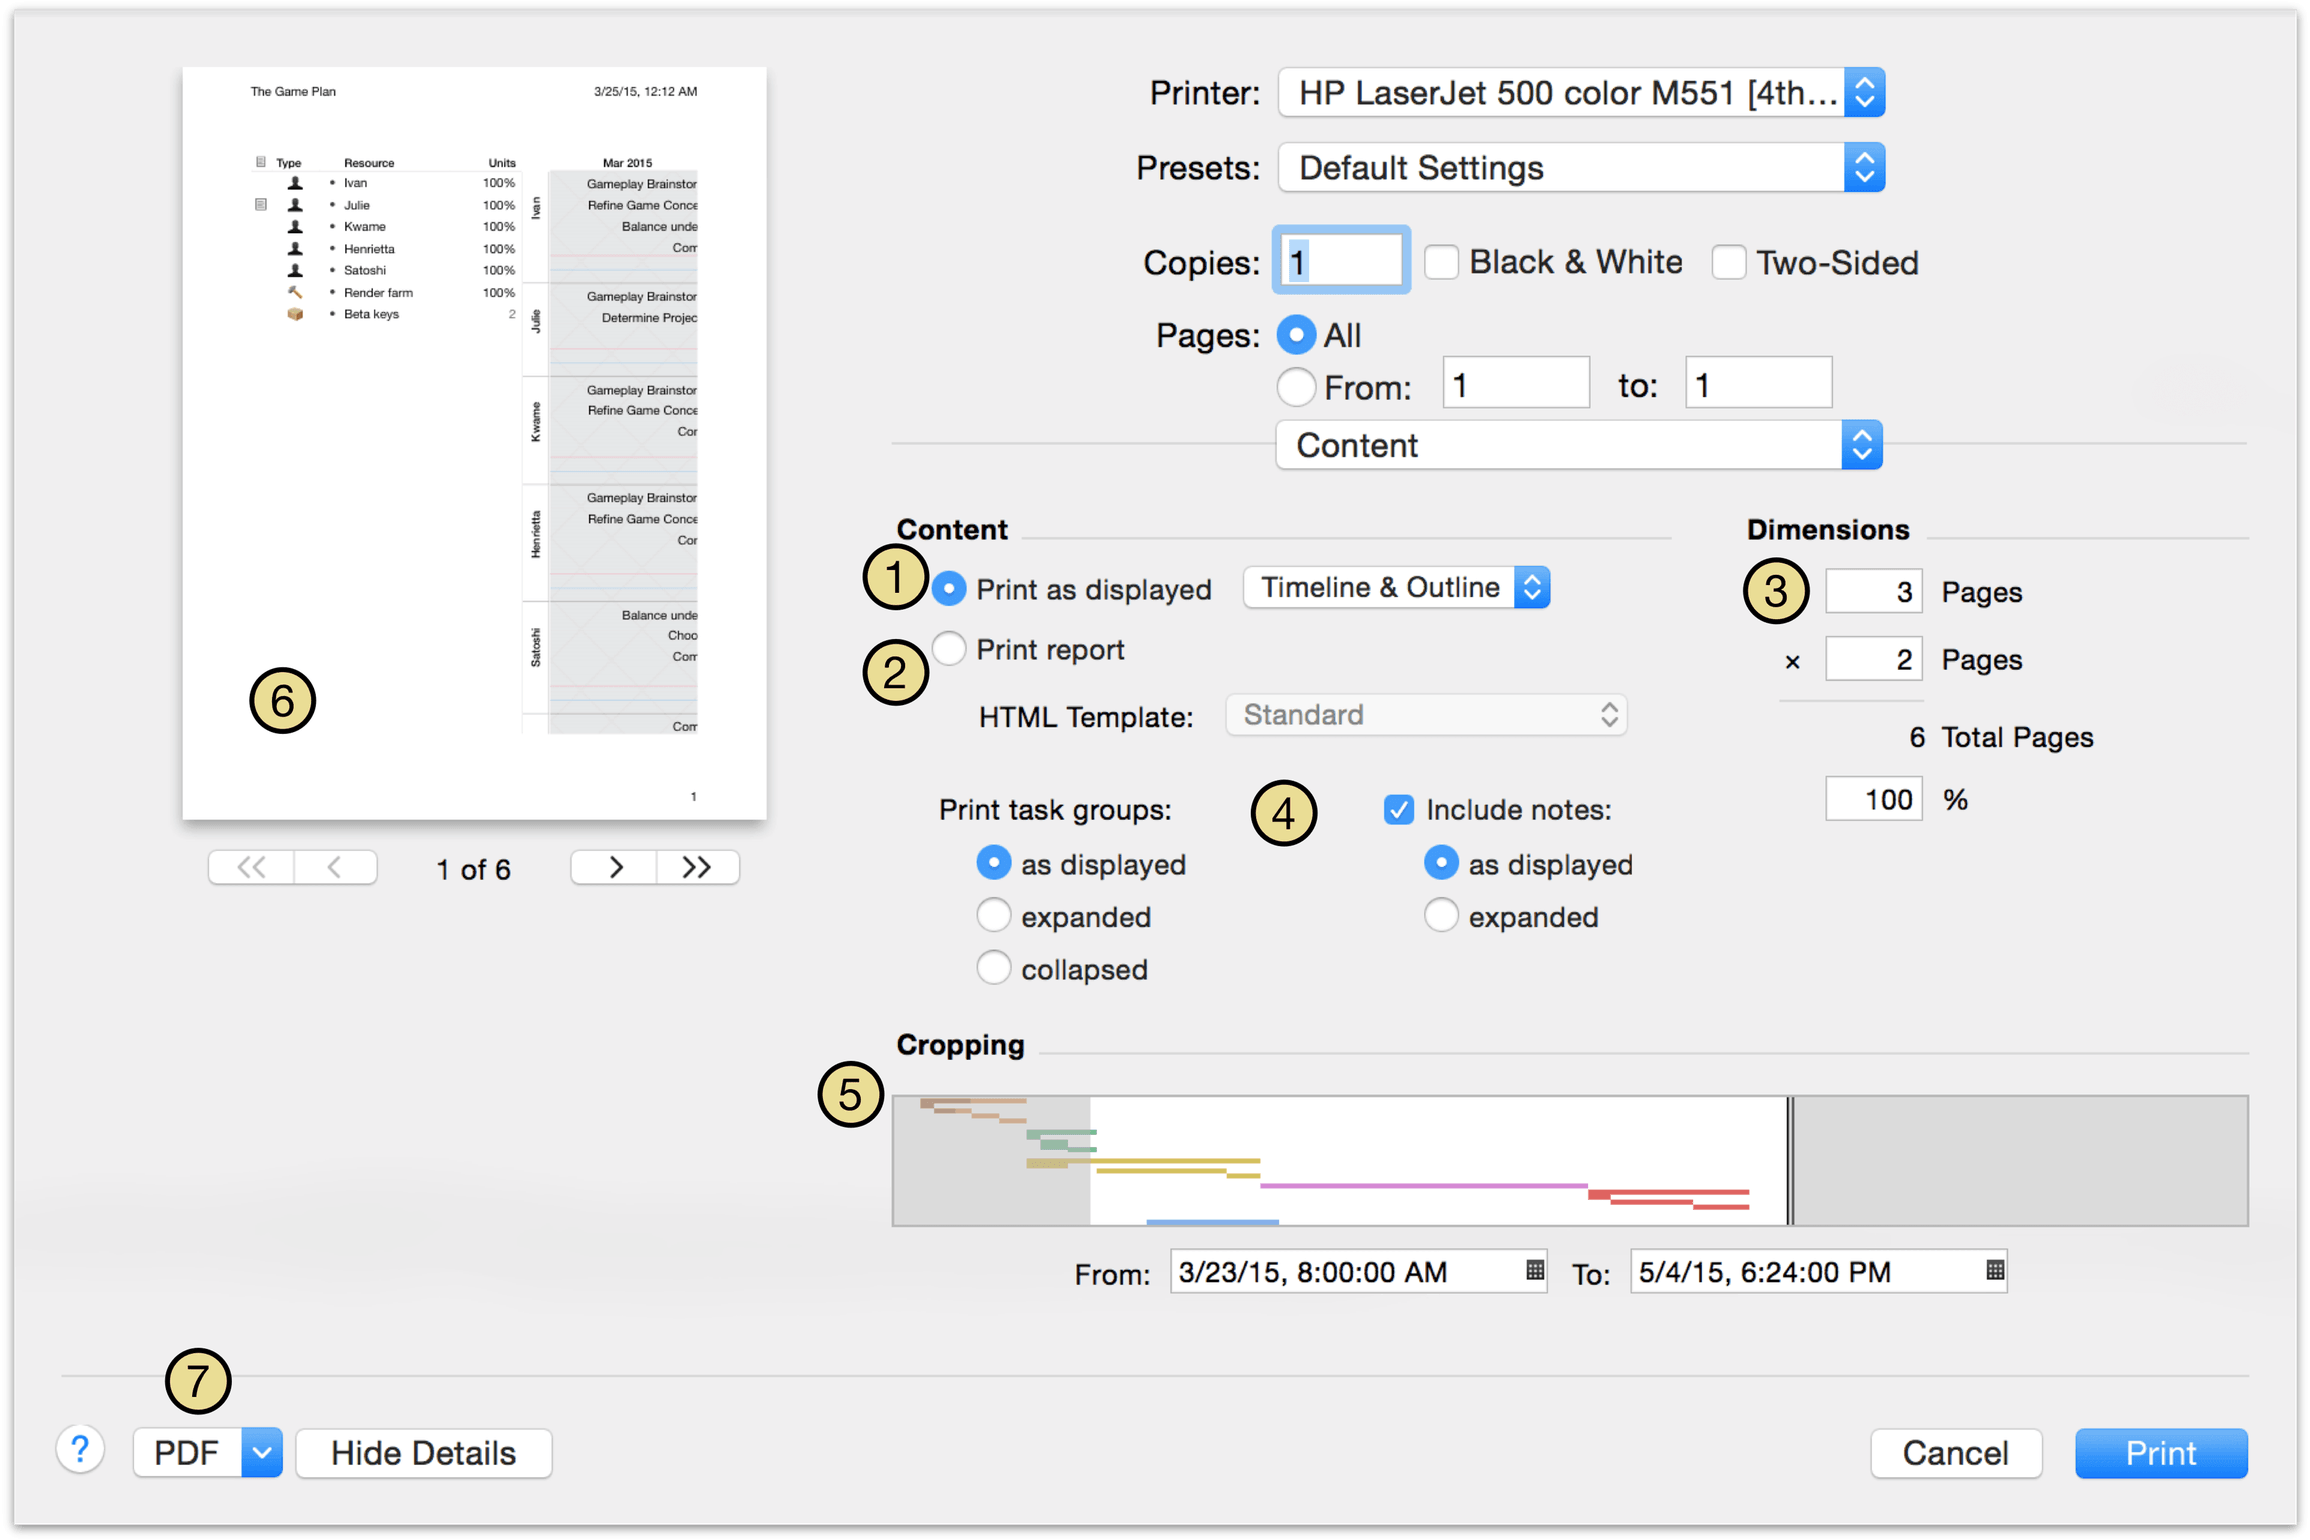
You can print the task view or the resource view, whichever one is open in the main window. You can then choose whether to print the outline, the chart, or both.
Or, you can choose to print an HTML report of the project. This works just like exporting to a web page, and uses the same HTML templates.
The dimensions are calculated based on the size of the project and the scale set in the Page Setup dialog. When you change the width or height, the other one changes accordingly. Note that this overrides the Scale setting in the Page Setup dialog.
Notes and groups can also be printed expanded or collapsed, and task and resource groups can be printed as displayed in the project, or all expanded or collapsed.
You can use the Cropping settings to chop off any part of the project you don’t need. An overview of your project is here. To define the area to print, resize the cropping box by draging its left or right edge, or move the box by draging its center. If you enter dates in the From and To fields, the cropping box updates to match.
The preview shows what your project will look like on paper. Use the buttons to step through the pages and get an idea of the scale and layout.
Note that like in any application that uses the Mac OS X printing system, you can “print” to a PDF file instead of to real paper.
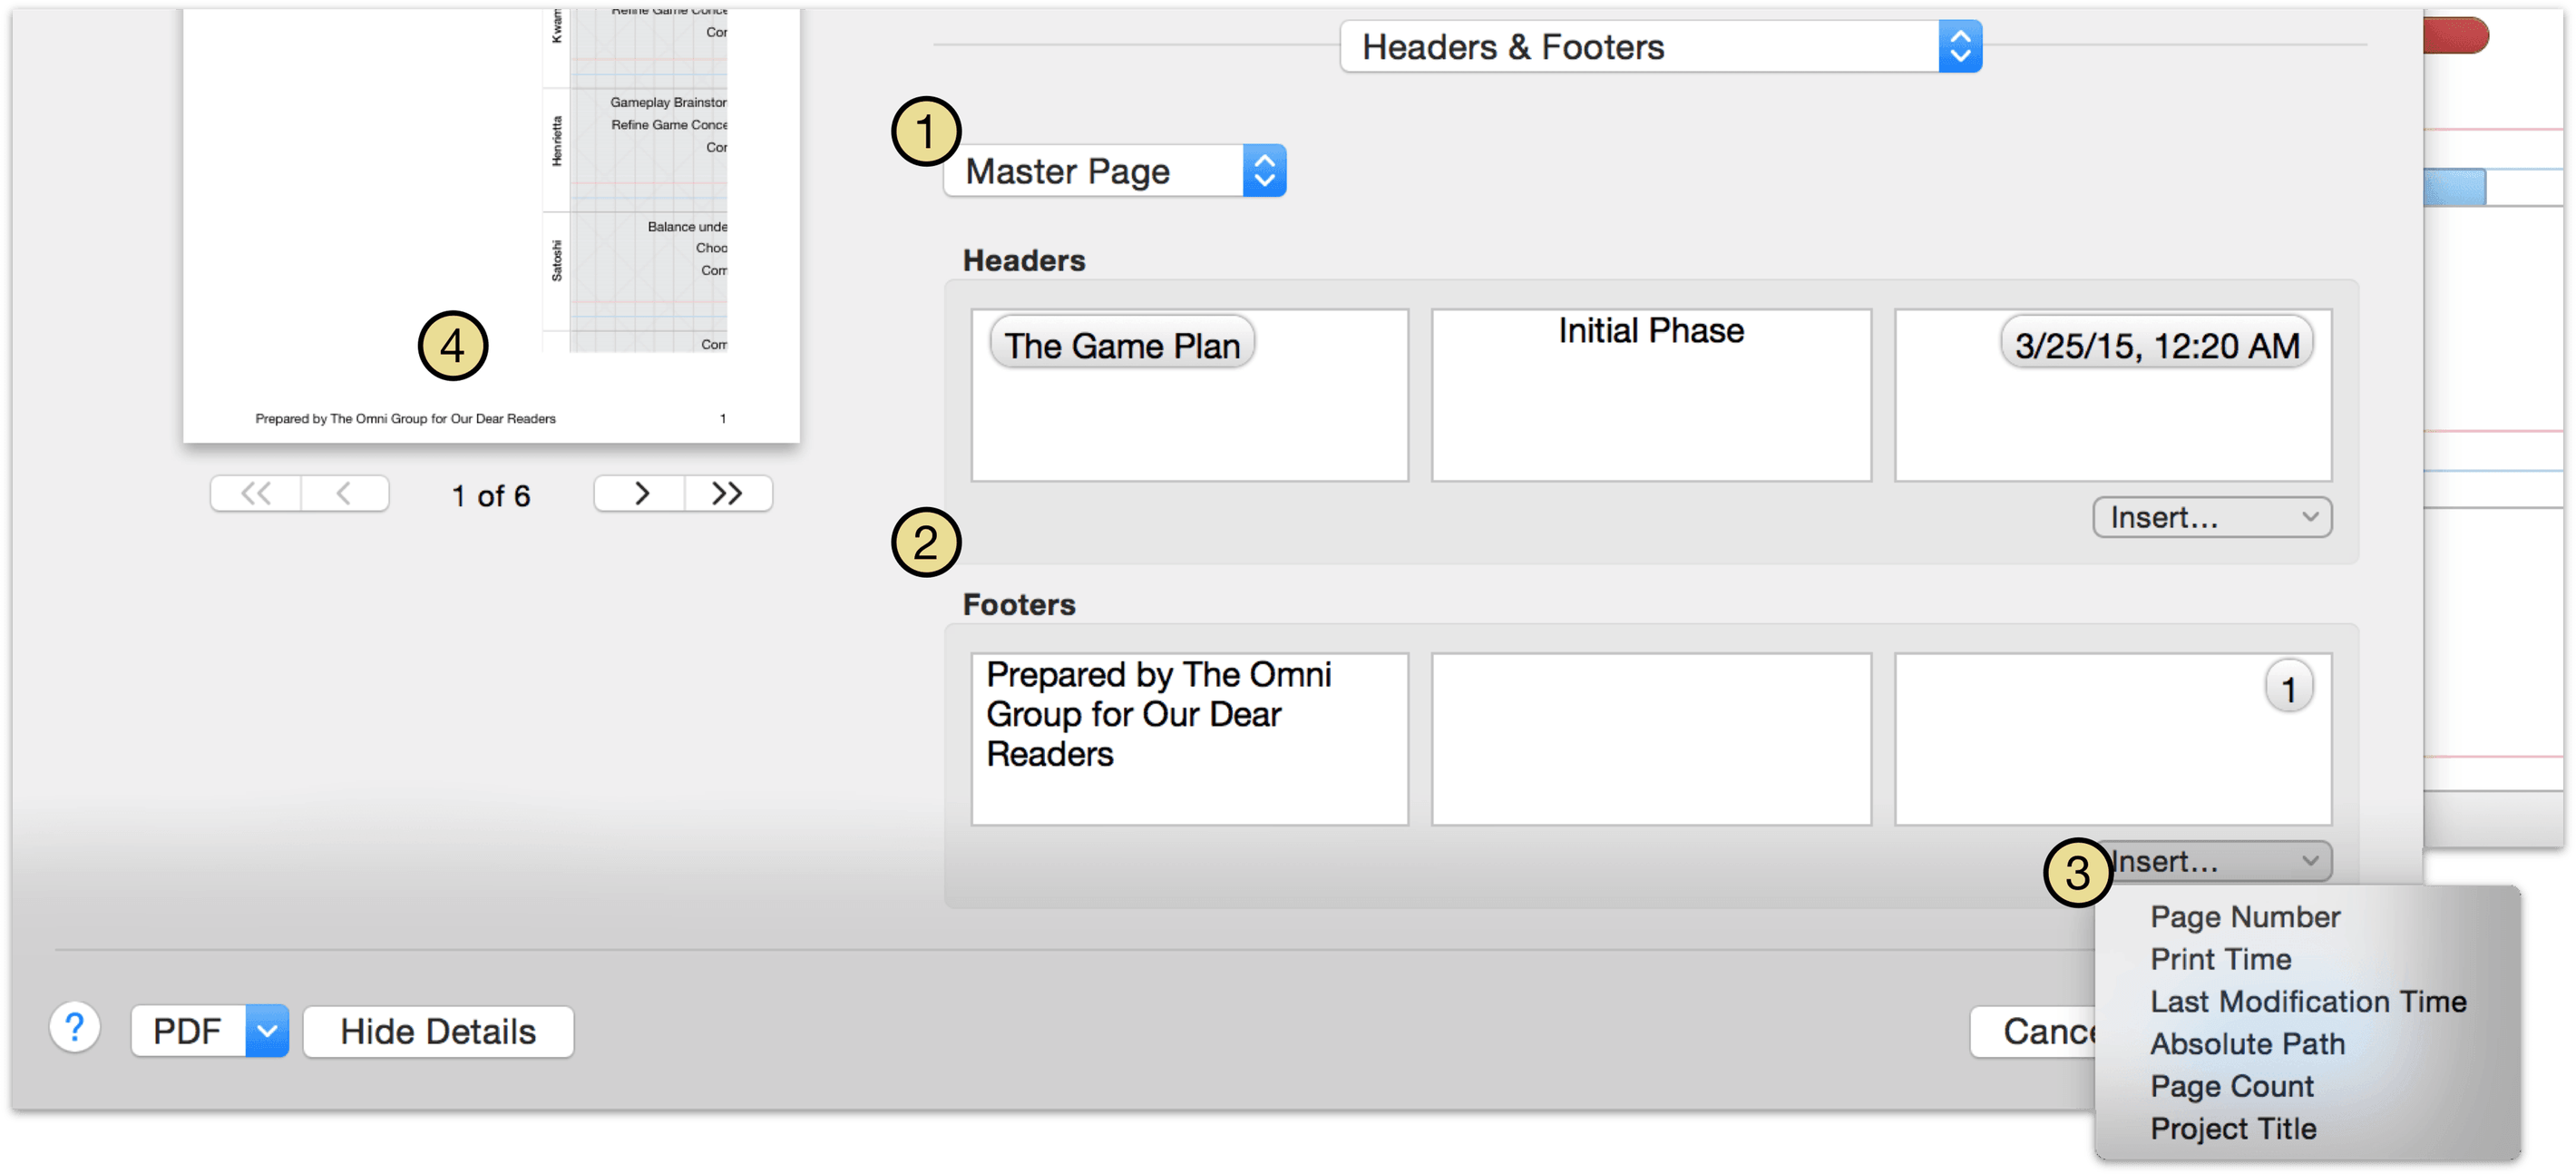
Headers and footers can be customized extensively for printing by choosing Headers & Footers from the dropdown menu in the Print dialog's detail view.
Use this menu to choose where custom headers and footers will appear in your printed document. Options include the Master Page (applied to every page printed, unless overridden by another page style), the First Page, Odd Pages, and Even Pages.
The header and footer sections each have three fields that can be customized: left, right, and center-justified. You can enter custom text here, or:
Use the Insert menu to add information automatically derived from your document to a header or footer field. These automatically generated attributes include:
- Page Number — The current page as scheduled to be printed based on other configuration choices.
- Print Time — The computer clock-derived time when the document goes to press.
- Last Modified — The date and time when the document was last modified.
- Absolute Path — The location of the document in your computer's file system.
- Page Count — The total number of pages in the printed document.
- Project Title — The name of the project file.
As you update your custom headers and footers, changes are reflected in the print preview to give you an idea of how your document will look on paper.
Note
If you print the project while a filter is on, only the visible tasks are included in the printed copy.
Microsoft Project Support
OmniPlan is pretty good at working with Microsoft Project documents — up to and including the Microsoft Project 2013 .MPP format — and we’re always working to make it even better. There are a few things to take note of as you start working with Microsoft Project documents in OmniPlan:
- Assignments to task groups
- In Microsoft Project, a resource can be assigned to a group of tasks. In OmniPlan, this just assigns the resource to all tasks in the group, not to the group itself. When you import a Microsoft Project document with an assignment to a task group, a warning appears in the violations column to let you know that the assignment was not imported.
- Efficiency
- Microsoft Project doesn’t support the OmniPlan efficiency attribute for resources.
- Unequal assignments
- In Microsoft Project, if you assign more than one resource to a task you can specify how many hours of effort each assigned resource should contribute. If you don’t specify, it assigns however much work to each that will complete the task earliest (taking schedule and resource assigned units into account). OmniPlan always uses that same automatic method. So, a task with effort hours specified for its resources may take a different amount of time in OmniPlan than it did in Microsoft Project.
- Unicode characters
- The Microsoft Project MPX format doesn’t support the Unicode character encoding standard. If your project contains Unicode characters (say, some Chinese text for instance), you should use the more modern Microsoft Project XML or MPP format instead.
Customizing HTML Templates
If you know HTML and CSS, you can make your own HTML templates for exporting.
Choose Preferences from the OmniPlan menu, then click the HTML icon at the top of the preferences window.
To create a new template, select the Standard template (or another existing template) and choose Edit a Copy from the action menu below the list.
Enter a name for the template and save it in a convenient location.
The new template opens in Finder; it is a folder of HTML and CSS files that you can customize to your liking.
Due to security changes in OS X, HTML templates created in versions prior to OmniPlan 2.3 are automatically relocated and not available for direct editing. To change the contents of a migrated template, select it and choose Edit a Copy from the action menu.
The HTML templates use a special syntax for inserting data from the project. Open one of the HTML files in the text editor of your choice, and you’ll find standard XHTML interspersed with OmniPlan tokens that look like this:
{@Token Name@}
These tokens are placeholders for data about the project as a whole. When the template is used to export an OmniPlan file, each token is replaced by the data corresponding to the token name.
Project Tokens
{@Date@} — The date of the export.
{@Version@} — The version of OmniPlan that exported the report.
{@Project Title@} — The title of the project, as set in the Project Information inspector.
{@StartDate@}, {@EndDate@} — The start or end date of the project.
{@StartTime@}, {@EndTime@} — The start or end time of the project.
{@Duration@} — The duration of the whole project.
{@Completion@} — The completion percentage of the whole project, as calculated from all tasks.
{@Cost@} — The cost of the whole project.
{@ResourceData@} — Place this at the tr level of a table; for each resource it creates a row of three cells, containing the resource name, a link to an iCalendar file of the resource’s assignments as events, and a link to an iCalendar file of the resource’s assignments as to-do items.
{@ProjectCalendarLink@} — A link to the Project Milestones calendar, if there are any milestones.
Stylesheet Token
- {@ApplyStyleSheet include/style.css@} — This token applies a CSS stylesheet to the page, by specifying the path to the stylesheet. When the export happens, this token is replaced by one of two things:
If exporting a full HTML report, a link to the stylesheet as an external file. This lets all of the exported HTML files link to the same stylesheet.
<link rel="stylesheet" href="include/style.css"type="text/css" />
If exporting just one HTML page (a task list or resource list), an embedded copy of the stylesheet. This keeps everything in one HTML file.
<style type="text/css"> [...] </style>
Loop Tokens
These work like open/close HTML or XML tags. When the export happens, OmniPlan cycles through everything between the opening and closing tokens, inserting data about each task or resource. The Assignments loop has to happen inside the Resources loop, as it lists tasks that are assigned to a particular resource. Make sure that you include the closing token, and that your task-specific or resource-specific tokens are between the appropriate loop tokens.
{@Tasks@} and {@/Tasks@} — Lists all tasks in the export; inside this loop you can use task-specific tokens.
{@Resources@} and {@/Resources@} — Lists all resources in the project; inside this loop you can use resource-specific tokens and Assignments loops.
{@Assignments@} and {@/Assignments@} — Lists all assigned tasks for a resource; this can only be used inside the Resources loop. Inside this loop you can use task-specific tokens.
Tokens for Tasks
These tokens can be used inside the Tasks loop or the Assignments loop of a resource.
{@ID@} — The task’s number in the outline.
{@Title@} — The task name.
{@Start@}, {@End@} — Actual start or end time of the task.
{@Time@} — Duration of the task.
{@Effort@} — Effort value for the task.
{@%Done@} — Completion percentage for the task.
{@Dependencies@} — A list of the task’s dependencies, in the same format as the Dependencies column in the task outline.
{@Cost@} — Cost of the task itself.
{@Resources Cost@} — Cost of the assigned resources.
{@Total Cost@} — Cost of the task and the assigned resources.
{@Assigned@} — A list of assigned resources.
{@Planned Start@}, {@Planned End@} — Baseline start or end time of the task.
{@Start Variance@}, {@End Variance@} — Difference between the baseline and actual times for the start or end of the task.
{@Constraint Start@}, {@Constraint End@} — Constraint on the task’s start or end time, if any.
{@Notes@} — Text of the task’s note, if any.
{@Priority@} — Task priority, just like the column in the task outline.
{@Status@} — Some words to describe the task’s due or overdue state, like the Status icons in the task outline.
{@Violations@} — Number of violations that involve this task.
*Custom data keys — If you include a token that exactly matches the name of one of your custom data keys, it is converted to the value of that key for the given task. For example, if you have a “Location” key for your tasks, you can use a {@Location@} token in your template.
Tokens for Resources
These tokens can be used inside the Resources loop.
{@Resource@} — The resource name.
{@Start@}, {@End@} — Actual start time of the resource’s earliest assignment, or end time of the resource’s latest assignment.
{@Time@} — Total duration of all tasks assigned to the resource.
{@%Done@} — Completion percentage of all tasks assigned to the resource.
{@Resources Cost@} — Total cost of assigning this resource to its assigned tasks.
{@Resource Type@} — The type of resource (Staff, Equipment, or Material).
{@#@} — Total units value of the resource.
{@Notes@} — Text of the resource’s note, if any.
{@Efficiency@} — Resource’s efficiency value.
{@Cost/Use@}, {@Cost/Hour@} — Cost per use and cost per hour values as defined in the Resource Information inspector.
{@Total Uses@}, {@Total Hours@} — Total number of assignments, or total amount of effort assigned, for the resource.
{@ResourceCalendarLink@} — A link to the resource’s assigned tasks as an iCalendar file of events, if it has any tasks assigned.
{@ResourceToDoLink@} — A link to the resource’s assigned tasks as an iCalendar file of to-do items, if it has any tasks assigned.
Custom data keys — If you include a token that exactly matches the name of one of your custom data keys, it is converted to the value of that key for the given resource. For example, if you have a “Phone Number” key for your resources, you can use a {@Phone Number@} token in your template.
Path Tokens
These provide the path to a particular page in the HTML export. You can use these to create links between pages; for example:
<a href="file:{@TaskReportPath@}">
{@TaskReportPath@} — The file path to this HTML export’s Task Report page.
{@ResourceReportPath@} — The file path to this HTML export’s Resource Report page.
{@ResourceTimelinePath@} — The file path to this HTML export’s Resource Timeline image.
{@GanttChartPath@} — The file path to this HTML export’s Gantt Chart image.
{@ProjectCalendarPath@} — The file path to this HTML export’s Project Milestones calendar.
Accessing Items by URL
OmniPlan supports URLs (links) beginning with omniplan://. When you open such an URL, OmniPlan opens and highlights the specified item.
For example:
omniplan:/Volumes/Local/Users/someone/Desktop/Coffee%20Plan.omniplan opens the Coffee Plan project on the user’s desktop.
omniplan:/Volumes/Local/Users/someone/Desktop/Coffee%20Plan.omniplan/task/14 opens the project and highlights the task that has the unique ID of 14.
omniplan:/Volumes/Local/Users/someone/Desktop/Coffee%20Plan.omniplan/task/14,22,67 opens the project and highlights the tasks that have the unique IDs of 14, 22, and 67.
omniplan:/Volumes/Local/Users/someone/Desktop/Coffee%20Plan.omniplan/resource/2 opens the project and highlights the resource that has the unique ID of 2.
You can also make URLs which query for certain values other than ID:
omniplan:/Volumes/Local/Users/someone/Desktop/Coffee%20Plan.omniplan/task?title=Clean%20Up opens the Coffee Plan project on the user’s desktop and highlights any task titled “Clean Up”.
omniplan:/Volumes/Local/Users/someone/Desktop/Coffee%20Plan.omniplan/task?name=Clean%20Up also opens the project and highlights any task titled “Clean Up”.
omniplan:/Volumes/Local/Users/someone/Desktop/Coffee%20Plan.omniplan/task?position=1.9.1 opens the project and highlights the task at outline position 1.9.1. Note that the URLs use hierarchical numbering regardless of whether you have hierarchical or flat numbering turned on in the View menu.
omniplan:/Volumes/Local/Users/someone/Desktop/Coffee%20Plan.omniplan/resource?name=Coffee%20Beans opens the project and highlights the resource named “Coffee Beans”.