Glossary
Action
- An item that’s part of a project, or part of a group within a project.
Action Group
- Also referred to as a sub-project, an action group is a set of actions nested hierarchically within a parent action (which itself can be part of a project).
Active
- The status for an item that’s planned for completion, or a tag that’s currently in use. Active status can be set on projects and tags using the inspector.
Available
- An item state (and view option) that includes items that aren’t blocked, deferred, or on hold. The available state is derived from an item’s defer date, project type, and project or tag status.
Blocked
- The state of an action in a sequential project that comes after the first available action. Blocked isn’t set directly; to unblock an action, either change the project to another type or move the action to the top of the project.
Compact
- A view width that requires OmniFocus’s multi-pane design to run in a layered stack rather than with the panes side by side (contrast with wide view). iPhone in portrait orientation and iPad in 1/3 split screen are examples of compact views.
Complete
- The status assigned to an item when you’ve finished it, or finished all the actions that comprise it (in the case of a project or group). Tap an item’s status circle to mark it complete.
Contextual Menu
- Since iOS doesn’t have a menu structure similar to macOS, OmniFocus uses contextual menus to provide a method of interacting with the user interface. Where available, contextual menus appear when you tap and hold a row or block of text and then release your finger. Contextual menus appear as a black bar—with menu options specific to the object or interface element you have tapped.
Database
- The file that OmniFocus uses to hold all of the information that you add to the app. OmniFocus and its various perspectives act as windows onto your database, interpreting the data there in ways that help you get stuff done. There’s typically no need to interact with your database file directly; there are Settings that can optimize its performance, and you can contact support if it looks like things may be amiss.
Defer Date
- A date and time assigned to an item that you don’t want to (or can’t) consider for completion until later. When the defer date is reached, the item becomes available for work. Also referred to as the Defer Until date.
Drag & Drop
- Introduced with iOS 11, Drag & Drop is a system-level function that is integrated with OmniFocus and other apps on iOS. You can drag text into OmniFocus from the other apps, reorder items in the outline, and drag rows or selected text from OmniFocus to other apps on your device.
Dropped
- The status for a project, folder, action, or tag that is no longer being considered for completion. Use the inspector to set one of these as dropped.
Due Date
- A date and time assigned to an item by which the item must be completed.
Due Soon
- A status for items whose due dates are approaching. Items that are due soon are styled in amber for greater visibility. The exact meaning of Due Soon is configurable in OmniFocus Settings.
First Available
- A status (and view option) designating a project’s first action as the only one available. First Available status is derived from an action’s position within a project and the project’s type: for sequential and parallel projects, the first available action is the first action in the project list. For single action lists, all actions are equally available.
Flag
- A mark of privileged, eye-catching status bestowed on an item. What this special status denotes is completely up to you, but it’s a great way to keep important things from falling through the cracks. Items that are flagged are styled in orange for greater visibility.
Group
- A collection of items nested hierarchically within another item. Groups created from inbox items are item groups, while groups created within projects are action groups (also sometimes called sub-projects).
Hidden
- An item that exists in your database but isn’t exposed by the view options of your current perspective. Relevant when the app gives notice that you might be deleting something by mistake.
Home
- The top level of hierarchy in the sidebar and central navigation hub to all other perspectives in the app. To return Home from another view, tap the chevron in the upper left (or touch and hold it to return home immediately, without passing through each level of the view hierarchy).
Inbox
- The built-in perspective designed to hold tasks and to-dos that you’ve entered into OmniFocus as items, prior to processing them into projects, actions, and groups.
Inspector
- A pane that holds the suite of tools for adding and changing the details of an action, project, or tag. The inspector opens automatically when you tap an item in the outline; in wide views or in Edit mode, tap
 to show or hide it.
Item
- Items are representations of tasks and to-dos in an OmniFocus database. Types of items include: inbox items, actions, projects, and groups.
Keyboard Shortcut
- A set of keys pressed to invoke a menu command, available when a Bluetooth keyboard is paired with your device. Press and hold command (⌘) to see a list of shortcuts available from your current location in the app.
On Hold
- A status for projects and tags that aren’t relevant to your plans right now, but may be in the foreseeable future. Use the inspector to set projects and tags on hold.
Outline
- The place where you see and interact with your items in OmniFocus, usually through a hierarchical view of your database. Specific perspectives (such as Tags and Forecast) have specialized ways of showing your data that eschew or modify the typical project hierarchy.
Overdue
- A status for items whose due dates are past. Items that are overdue are styled in red for greater visibility.
Parallel
- A project or group that doesn’t place particular emphasis on the order in which its actions are completed. All actions are considered available, though the topmost action is still considered the first available action for the purposes of view options.
Perspective
- A view on your OmniFocus database that appears in the sidebar’s perspective list and is detailed in the outline. OmniFocus comes with seven built-in perspectives and two transient reference perspectives (Completed and Changed). Custom perspectives can be created in OmniFocus Pro.
Perspective Editor 
- With OmniFocus Pro, the editor used to create new perspectives or edit existing custom perspectives. To open the Perspective Editor, tap the New Perspectives button in Home bottom bar, or tap View Options in an existing custom perspective.
Project
- A to-do item that’s larger in scope or permanence than a simple action, potentially containing several actions and groups within it that must be completed before the project can be marked complete.
Remaining
- An item state and view option that shows all items that haven’t been completed or dropped. This state is derived from an item’s attributes and not set directly.
Resolved
- An item state that includes all items that have either been completed or dropped.
Sequential
- A project or group whose actions must be completed in a specific order. The first action in the list is the only one available for completion; all later actions are considered blocked.
Sidebar
- A pane that holds the Home view and perspective list, and displays additional levels of hierarchy when navigating deeper into Projects, Tags, and Review. The sidebar appears on the left of the outline in wide views; tap
 to show or hide it.
Single Action List
- A project whose actions are equally available regardless of sequence. Unlike other project types where completion is the goal, single action lists persist regardless of whether they contain available actions.
Sub-Project
- A term synonymous with action group; a group of actions nested hierarchically within a project.
Status Circle
- A graphical depiction of an item’s status (due soon, overdue, flagged, or repeating), as well as a target to tap to mark an item completed.
Summary Dots
- A row of colored dots shown beneath sidebar entries in the Projects and Tags perspectives, used for an at-a-glance view of the number and urgency of items remaining to be completed within them.
Tag
- A person, place, thing, state of mind, or other factor relevant to the completion of a given action or project. These exist outside the project hierarchy and represent another axis from which to view the items you’ve accumulated in your database. An item can have as many tags as you find to be useful.
Task
- In the context of this manual, a task is something you’d like to accomplish in the real world that you’d capture with OmniFocus (where it would then become an item). To-do is another word with the same meaning.
Toolbar
- A region along the top or bottom of the OmniFocus view that contains controls for modifying the contents of that view.
Wide
- A view width that allows OmniFocus’s multi-pane design to run with the panes side by side rather than in a layered stack (contrast with compact view). Full-width iPad and the largest iPhones in landscape orientation are examples of wide views.
Home and the Sidebar
Home is your headquarters in OmniFocus, the top level of navigation in the app where links to perspectives on your database reside.
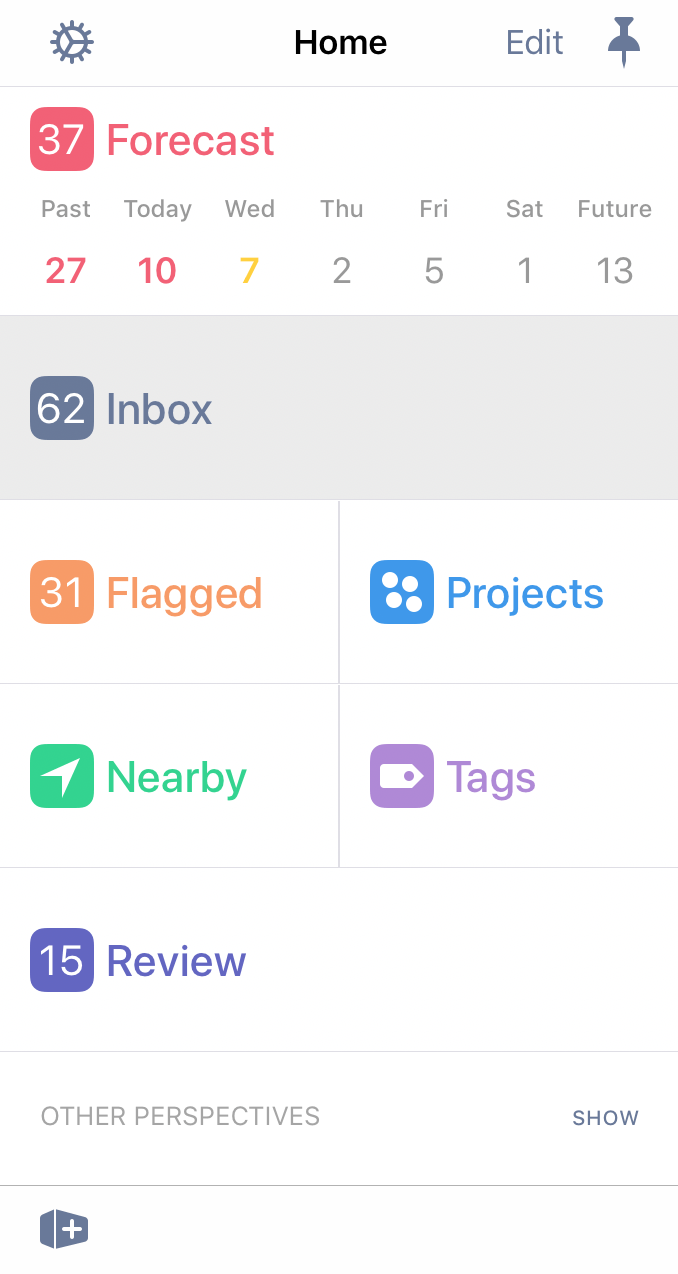
In wide views, Home lives in the sidebar on the left side of the app. In compact views, Home is at the top of the navigation tree when moving through perspectives. Tap and hold  Back to return Home from wherever you are in your database.
OmniFocus is designed to flexibly fit on the screen of your iOS device regardless of size, from the smallest iPhone to the biggest iPad (and every size and split-screen orientation in between).
In compact views, OmniFocus displays one pane (the sidebar, the outline, or the inspector) at a time. In wide views, you can display one, two, or all three. See Multi-Pane Navigation for details.
The Perspectives List
The primary feature of the Home view is the perspectives list: a directory of views on your database that organize your tasks according to specific sets of criteria useful for getting stuff done.
By default, the perspectives list includes OmniFocus’s built-in perspectives along with two Other Perspectives, Completed and Changed, which help track items you’ve been working on that might be harder to find. Tap Show in the Other Perspectives header to display them in the Home view.
With OmniFocus Pro, you can create custom perspectives that, once saved, show up by default in the Other Perspectives section as well.
Perspective Tile Badges
The Forecast, Inbox, Flagged, and Review perspective tiles are badged with a number corresponding to attributes of the items they contain.
-
Forecast
 —Counts the number of items past due. Items due today or due soon are not counted. (The full-width Forecast tile also includes a calendar row with days badged with the number of due items they contain.)
 -
Inbox
 —Counts the total number of available items in the Inbox. The parent tasks of action groups are not counted.
 -
Flagged
 —Counts the total number of available flagged tasks. Items with inherited flags are included in the count.
 -
Review
 —Counts the number of projects with pending reviews.
Rearranging Perspectives
With OmniFocus Pro, you can hide default perspectives that you don’t use and rearrange the Home tiles to bring others to prominence.
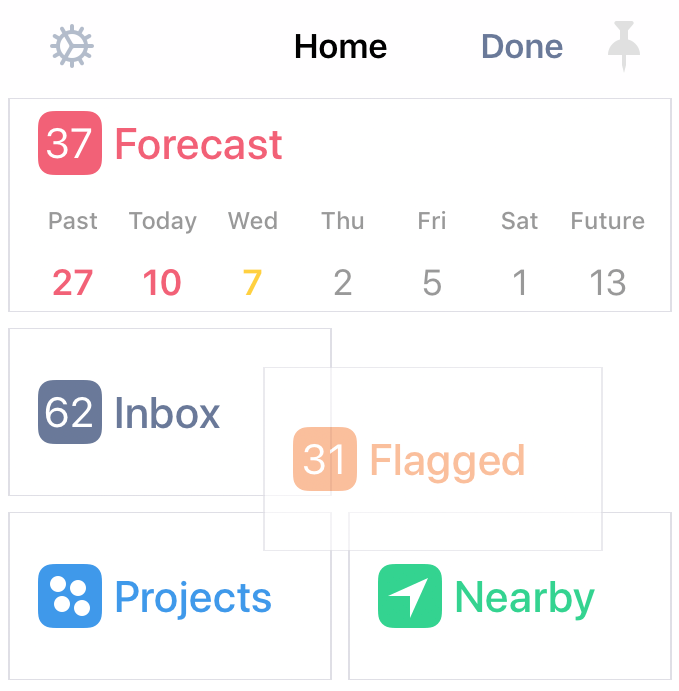
Tap Edit in the toolbar, or tap and hold a perspective tile until Tile Editing mode is engaged, to rearrange perspectives as you like. Perspectives in the Other Perspectives section are always available by tapping Show in the Other Perspectives header at the bottom of Home.
Home Tools
The following buttons appear in the toolbar and bottom bar of the Home view.
Settings 
Tap Settings to open OmniFocus Settings, a menu with controls for customizing many aspects of your OmniFocus experience. See the Settings chapter for details.
Edit 
With OmniFocus Pro installed, Tap Edit to switch Home to Tile Editing mode for rearranging your perspective tiles.
New Perspective 
With OmniFocus Pro installed, Tap New Perspective to open the Perspective Editor and create a new custom perspective. See the Perspective Editor chapter for details.
Search 
The Search button appears in the Home toolbar in compact views. Tap it to open a search on items in your database; you can choose to search from among Remaining items (those not completed or dropped), or Everything—all items that exist in your database.
Other search options exist for individual perspectives; drag down on a perspective’s outline to reveal the search field there.
Undo 
The Undo button appears in the Home bottom bar in compact views. Tap it to revert the most recent change to your database. After a change has been undone, this button changes to Undo/Redo  and provides the option to restore the undone change.
New Inbox Item 
The New Inbox Item button appears in the Home bottom bar in compact views. Tap it to open a new Inbox item for editing. (In wide views, this button appears in the outline’s bottom bar.)
Pin 
The Pin button appears in the Home toolbar in wide views. Tap it to pin the sidebar to the left side of the OmniFocus view (if the sidebar isn’t pinned, it will be dismissed when you begin navigating the outline).
Sidebar Navigation
When you tap a perspective tile in the Home view it usually navigates straight to the outline, showing the list of action items associated with that perspective. (In wide views the outline appears in the center of the screen, while in compact views it replaces Home.)
The Projects, Tags, and Review perspectives are a bit different. These perspectives contain items that don’t represent directly actionable tasks: folders with projects inside them in the case of Projects, and nested tags in the case of Tags. (Review contains a flat list of your projects that are due for review.)

When you tap one of these perspectives, the sidebar switches to a top-level view of that perspective’s library, which you can use to navigate deeper into folders or nested tags until you find the project or tag with content that you want to edit.
In wide views, this content appears as rows in the outline alongside the sidebar; in compact views, the outline appears after navigating through the library.
Sidebar Editing
While you’re looking at a list of projects or tags in the sidebar, you can drag and drop to reorder them. You can also swipe left or right on a row in the sidebar to reveal additional controls:
-
Swipe left to delete a project or tag, or tap More to reschedule a project’s due, defer, or review date.
-
Swipe right to flag a project, or add the Forecast tag
if one is set.
In wide views, use the sidebar in tandem with the outline to narrow in on specific sets of tasks. Tap a row in the sidebar and the outline switches to show only that project, folder, or tag, along with anything it contains. Tap the row in the sidebar again, and the outline returns to show everything.
Sidebar Summary
When viewing a list of projects or tags in the sidebar, each row is accompanied by a series of summary dots beneath its title. These represent the number and relative urgency of the tasks within the project or tag, and use the same color coding as status circles.

The summary row beneath a project or tag also displays an icon representing its status: Flagged ![]() , On Hold
, On Hold ![]() , Completed
, Completed ![]() , Dropped
, Dropped ![]() , or Active (no icon; the default state).
, or Active (no icon; the default state).
Multi-Pane Navigation
OmniFocus 3 for iOS is built on multiple panes with content that can be revealed, hidden, and pinned to create a custom view that best suits whatever you’re working on.
While OmniFocus app content is identical across all iOS devices, only wide views display multiple panes simultaneously. Compact views navigate between the panes in a layered stack instead.

The three panes consist of:
Wide Views
In wide views, the outline is the only pane that is permanently visible. Tap the Sidebar button to show the sidebar, and tap the Inspector button to show the inspector.
Tap Pin to pin the sidebar and/or the inspector in place. Without pinning, these panes hide themselves away when you start working in the outline.
Compact Views
In compact views, Home and the perspectives list are the top level of navigation, replaced by a more specific view when you tap a perspective. When navigating in compact, tap an item to open its detail view, switching panes automatically when necessary.
Tap Back to return to the previous view, or tap and hold it to return Home in an instant.
The Outline
The outline is where you view, add, and manipulate tasks in OmniFocus. The items you see in the outline depend on the perspective you are viewing: you can narrow your concentration on just a few things you’d like to accomplish in the near term using Forecast, tackle things contextually with Tags, or get a broad overview of the work ahead across a number of Projects.
In wide views, the Outline is the center pane and backdrop of all your activity in OmniFocus.
In compact views, the outline sits at a level beneath Home and the sidebar; you’ll tap through the hierarchy in a chosen perspective to reach it.
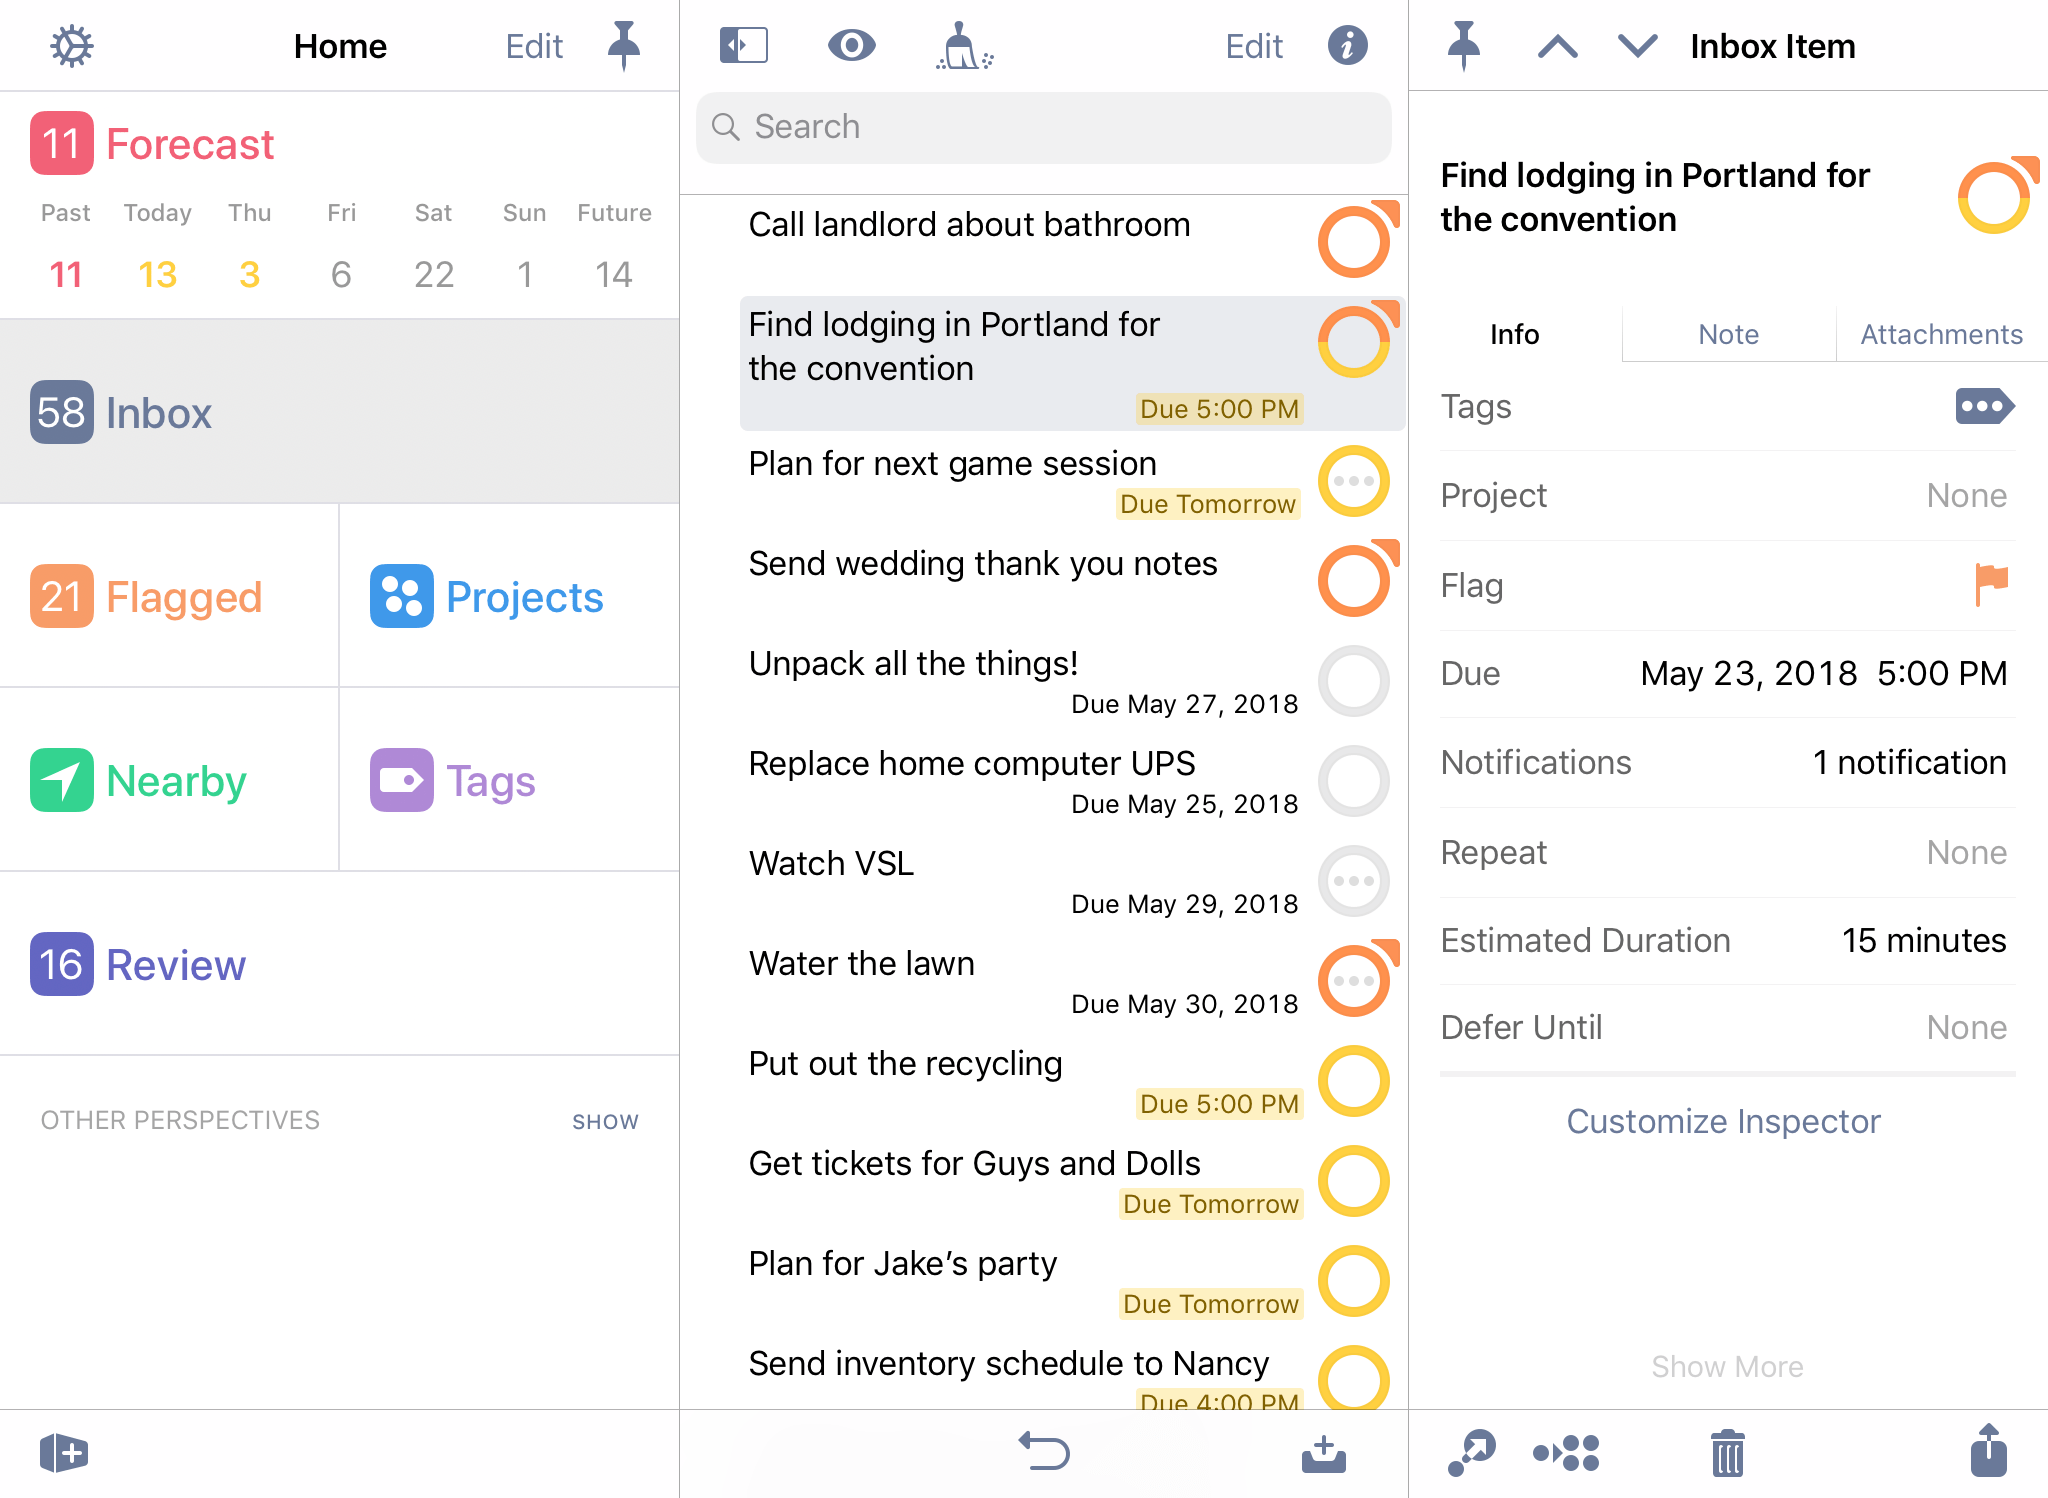
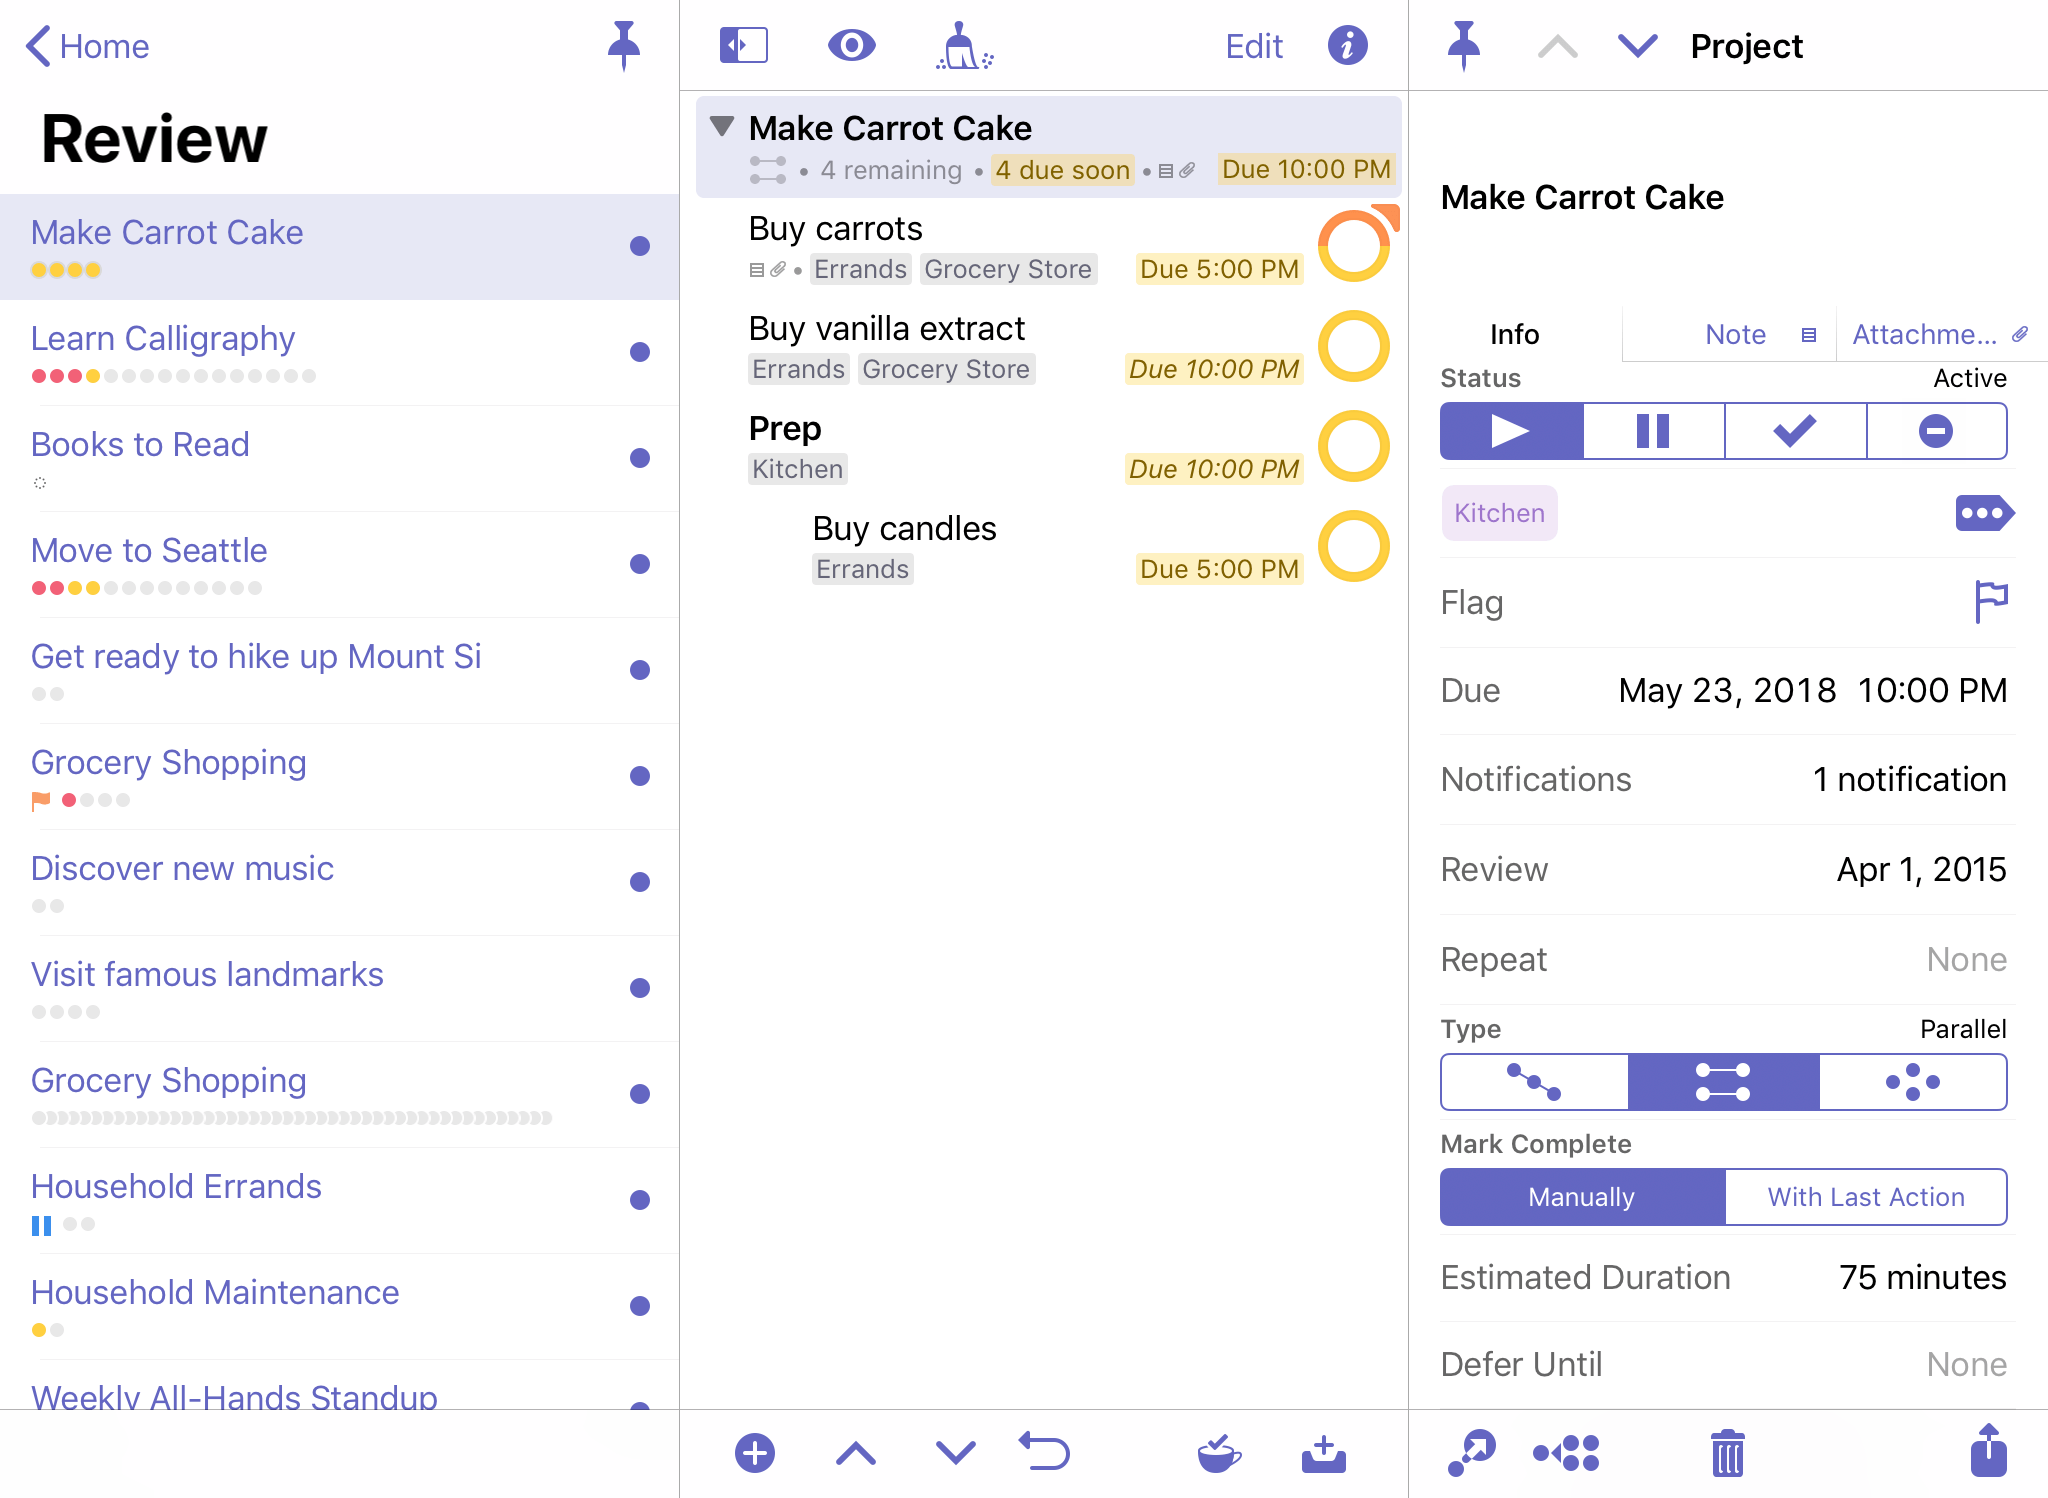
The Anatomy of a Row
A row in the OmniFocus outline represents an item—a to-do that you captured with OmniFocus—or a piece of your organizational framework like a project, folder, or tag.
Rows display all sorts of information about an item, like the project it belongs to, any relevant tags, due dates, and completion status in the form of the status circle.
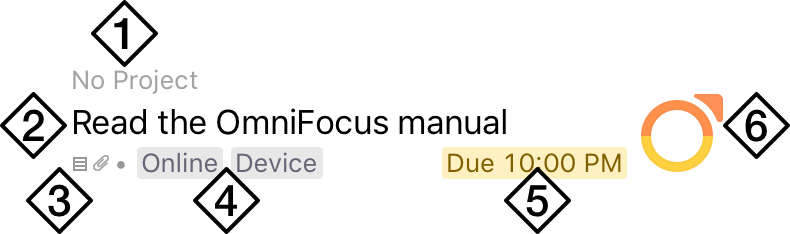
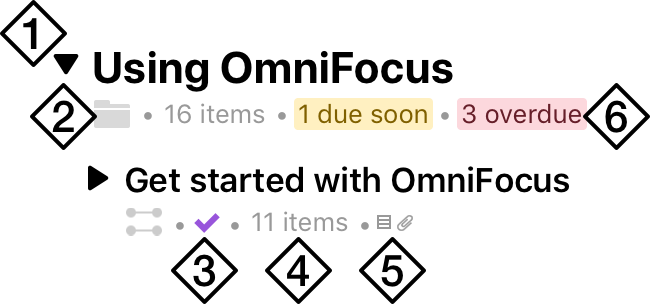
The figure below is a breakdown of an item in the Inbox that’s packed with additional information about the task at hand.
-
Project—If the item has a project assigned, its location in the project hierarchy appears here. Since this is an Inbox item (and Inbox items with projects are usually cleaned up), this item is listed with No Project. This row does not appear on items in the Projects perspective or custom perspectives that display project hierarchy, and can be hidden in
 View Options to increase the number of items on screen at once.
 -
Title—The item’s title. Black title text generally indicates that an item is actionable; items that are completed, blocked, on hold, or parents of groups have grey title text instead (unless they are due soon or overdue).
-
Notes and Attachments—These icons indicate whether the item includes notes
 or attachments
  .
. -
Tags—Any tags assigned to the item appear here. An item can have as many tags as you want; if there are more tags than horizontal space in the row, additional tags are indicated by an ellipsis.
-
Dates—If the item has due or defer dates assigned, they will appear here when relevant (once a defer date has passed it is no longer displayed). The defer date may be hidden if there isn’t enough room in the row.
-
Status Circle—A visual representation of the completion status of the item, along with other important attributes. Tap an active item’s status circle to mark it complete.
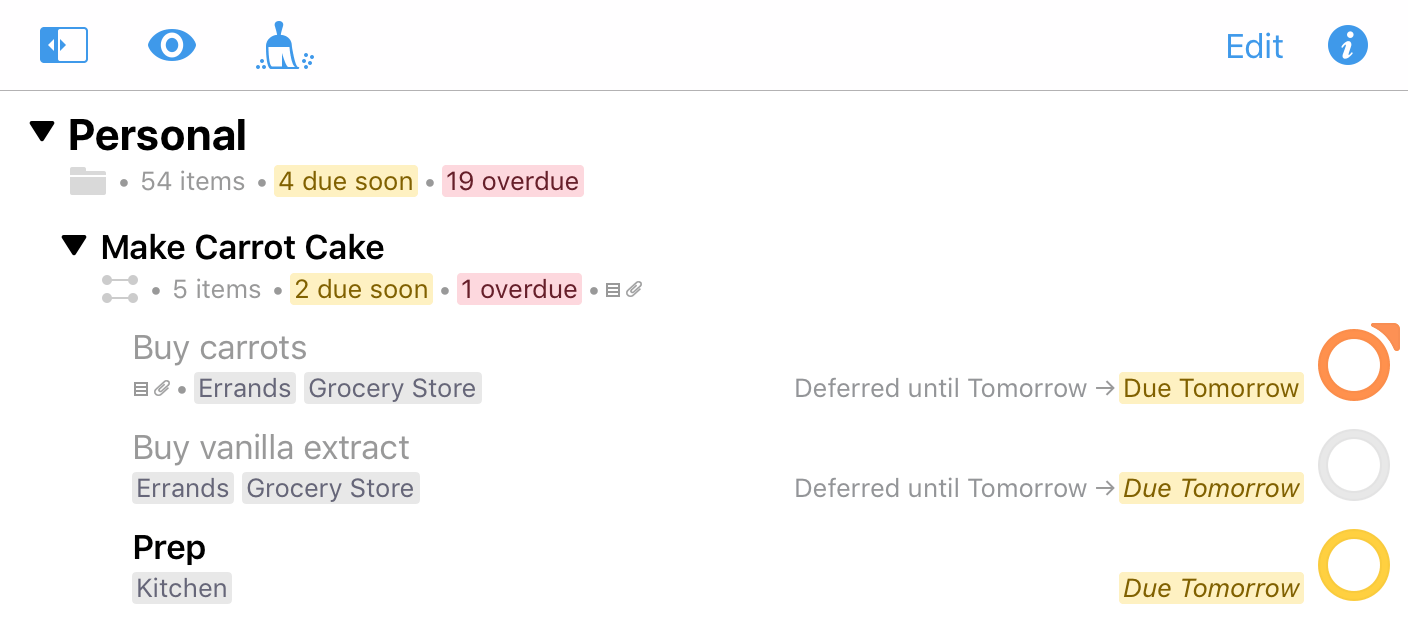
Project, Folder, and Tag Rows
In addition to the common attributes of Inbox items, rows for projects, folders, and tags can have a variety of other useful information.
Note that hierarchy (projects nested within folders and tags within other tags) appears by default in the outline on wide devices; on compact, tap Show Projects Contents or Show Tags Contents to browse the full perspective hierarchy. Otherwise, each level of hierarchy is represented sequentially as you navigate through it.
-
Disclosure Triangle—Tap to collapse or expand the folder, project, or tag to hide or reveal its contents.
-
Row Type Icon—Projects,
 folders, and
  tags have icons next to them to help remind you of your current perspective and the row’s relation to those around it. Projects are further broken down by type:
  Sequential,
  Parallel, and
  Single Actions.
 -
Row Status—Projects and tags with a status other than Active display it here. In addition to Active (no icon), Projects can be On Hold
 , Completed
  , or Dropped
  , while tags can be Active, On Hold, or Dropped.
 -
Item Count—The total number of items in the project, folder, or tag.
-
Notes and Attachments—Indicates whether there are notes or attachments associated with the project itself (as opposed to the items within it). Notes and attachments can’t be assigned to folders or tags.
-
Due Summary—When there is enough room in the row, this line shows a breakdown of the due states (due soon and overdue) of items in the project, folder, or tag.
Status Circle
An item’s status circle is the target for checking it off when it is done. Tap the circle  , and the item is complete
  . (What happens next depends on your Clean Up setting.)
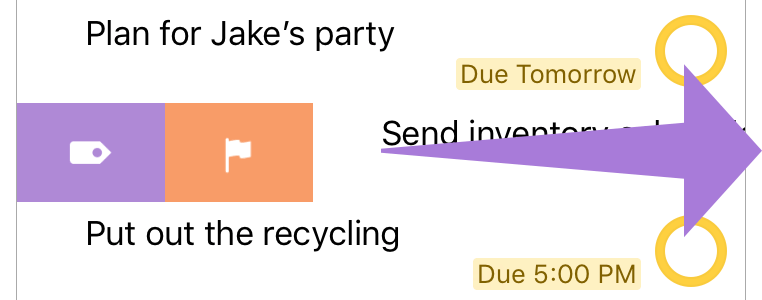
Status circles also convey important information about an item: items can be due soon  (amber), overdue
  (red), or flagged
  (orange). Repeating items are distinguished by the ellipsis
  in their center, and items that are dropped receive a grey cross bar
  .
.
If you have an item with more than one status, the circle will take on multiple colors simultaneously to communicate each relevant attribute.
Outline Tools
The outline toolbar and bottom bar contain a variety of tools for determining what gets displayed in the outline, editing multiple items at once, adding new items to the outline, reverting unwanted changes, and managing projects in the Review perspective.
View Options
Tap View Options to customize which items appear in the current perspective’s outline view based on their completion status, project order, and other perspective-specific features.
Edit
Tap Edit to enter Edit mode, where you can adjust the properties of multiple items at once.
Back
In compact views, tap Back to return to the previous level in your OmniFocus directory. (The button’s label changes to Home when at the top level of another perspective, or to the perspective’s name when a level below that.)
Instead of tapping Back repeatedly, you can tap and hold it to return Home in an instant.
Inspector
In wide views, tap Inspector to open and close the inspector on the right side of OmniFocus. In compact views, the Inspector button appears in the toolbar while in Edit mode. (Both views can use the inspector to batch edit items while in Edit mode.)
Clean Up 
In wide views, tap Clean Up to tidy any items in the outline that may belong elsewhere after a change of project, tag, or status. In compact views, drag down on the outline to prompt a clean up.
Use Clean Up Settings to determine when items are removed from the outline automatically.
Sidebar
In wide views, tap Sidebar to open and close the sidebar on the left side of OmniFocus. In compact views, tap Back to return to the sidebar and Home.
New Inbox Item
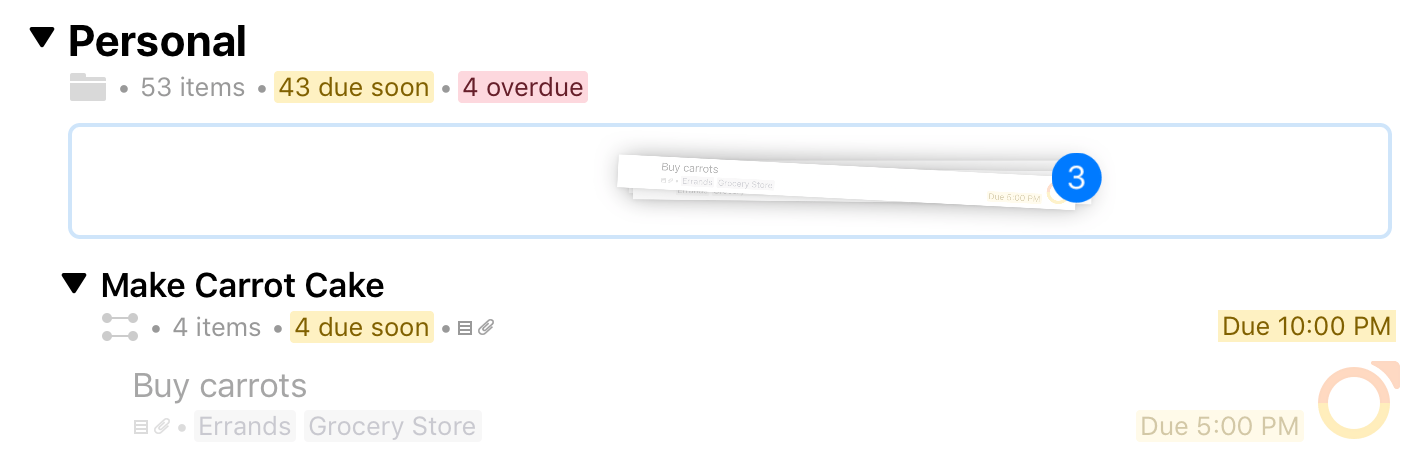
Tap New Inbox Item to quickly add items to the Inbox, or tap and hold the button’s icon to drag it anywhere in the outline. As you drag the button over the outline, rows around it separate to provide a blank space to drop it. Drop the button to create a new item at that spot in the outline hierarchy, pre-filled with any relevant attributes based on the perspective you’re in.
The editor that appears when you tap New Inbox Item is functionally identical to the inspector for Inbox items, and contains the same attributes and controls.
Create New...
The Create New buttons are available when viewing a relevant perspective in the outline. Tap to add an item of the chosen type (Project  , Folder
  , or Tag
  ) at the top level of on-screen hierarchy. (If you’re looking at the contents of a folder and tap Create New Folder, for instance, the folder will be created inside the current folder.)
Add Here 
The Add Here button is available when viewing the contents of a single project, tag, or other flat list (such as the Flagged perspective or a date in Forecast). Tap it to add an action item at the current location.
Add Here only appears when viewing the contents of a flat list in the outline. If the view includes anything else—a folder, a nested tag—it isn’t specific enough to know what “here” means, so the button won’t appear.
Undo
Undo is available wherever you are in the outline. Tap it to revert the most recent change to your database. After a change has been undone, this button changes to Undo/Redo and provides the option to restore the undone change.
Review Buttons
These buttons are available in the bottom bar of the Review perspective, and have specific uses pertaining to the review process.
 Previous—Return to the previous project in the list for review.
 Next—Advance to the next project in the list for review.
 Mark Reviewed—Mark the current project as reviewed, and advance to the next project in the list. The project’s next review date is updated to the present plus its review interval.
Contextual Menus
Contextual menus appear when you tap and hold a row in the outline, and contain commands contextually relevant to your selection.

Tap and hold is the same gesture required to lift an item for drag and drop. Instead of moving the item elsewhere in the outline, release it after it lifts and the contextual menu will appear.
On Actions
Contextual menus on actions and Inbox items offer the following commands:
- Cut
- Copy
- Paste
On Projects
Contextual menus on projects offer the following commands:
- Go to Project
- Paste
- Review
- New Action
On Folders
Contextual menus on folders offer the following commands:
- Go to Folder
- New Folder
- New Project
On Tags
Contextual menus on tags offer the following commands:
- Go to Tag
- Paste
- New Tag
- New Action
On Disclosure Triangles
Contextual menus on disclosure triangles (regardless of item type) offer the following commands:
- Expand All
- Collapse All
Search
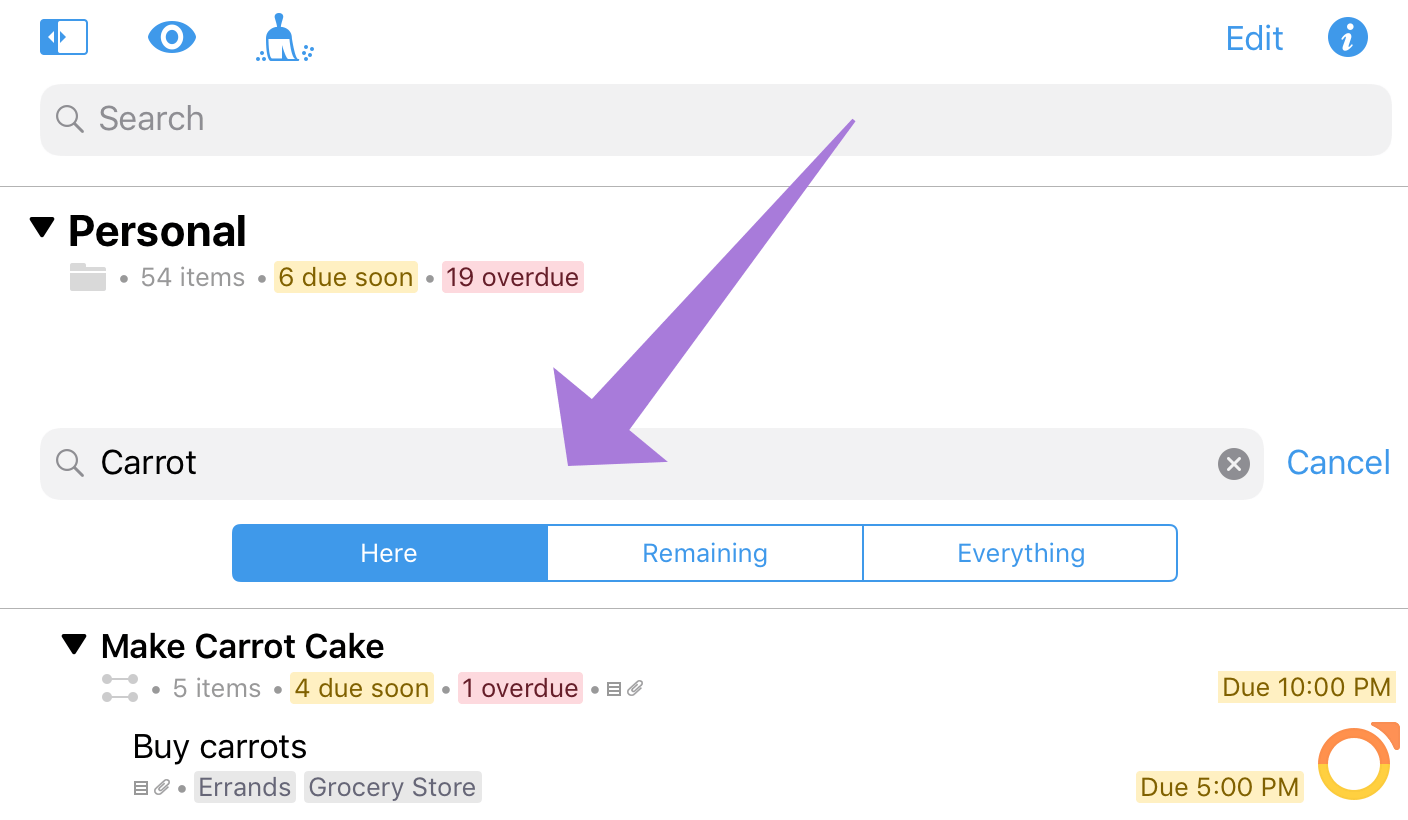
Navigate to the top of the outline and drag down to reveal the Search bar. Tap Search and enter keywords to find matching items from among three different possible scopes on your database.
-
Here—The search is limited to the content currently visible in the outline. For many perspectives this includes the entire content of the perspective, but for those with hierarchy it may not—if you’re viewing the contents of a specific project or folder, items in projects outside that scope will not be shown in the results.
-
Remaining—The search includes everything in your database with an implicit status of Remaining: all items except those marked Completed or Dropped.
-
Everything—The search includes every item in your database, regardless of status or location.
Search looks for text matching the keywords in item titles, notes, and tags, and displays results as a list of items in the outline.
Edit Mode
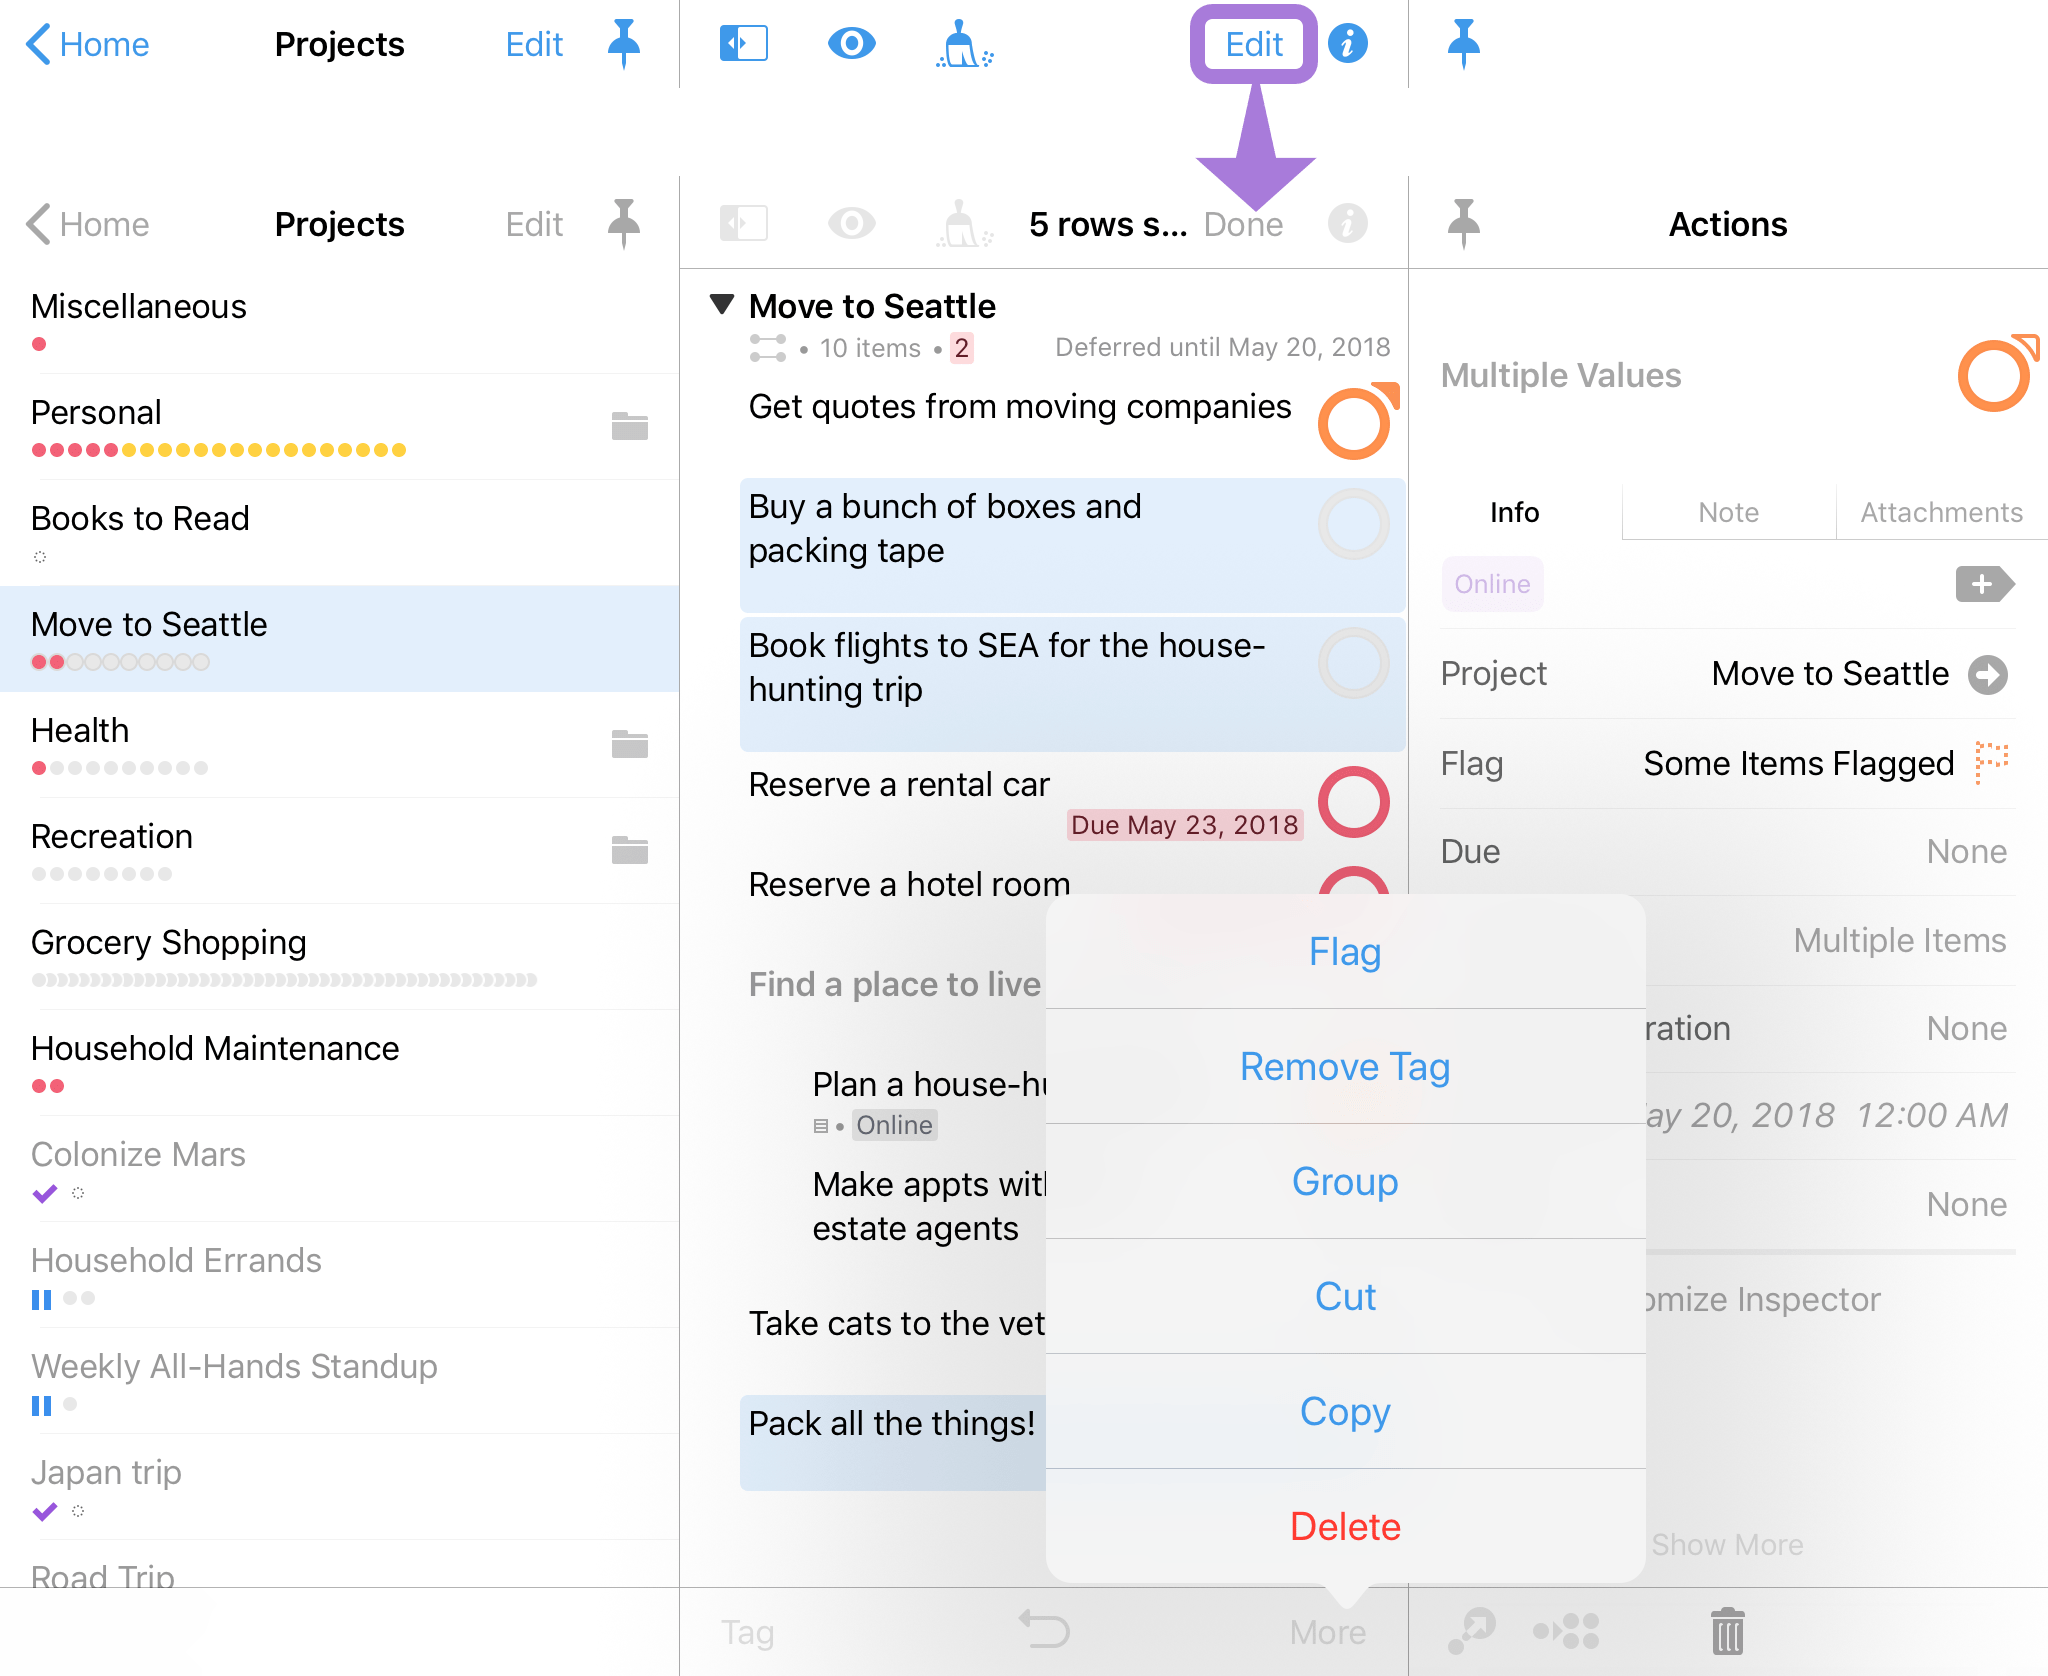
Tap Edit in the outline toolbar to enter Edit mode. In Edit mode, you can select, inspect, and edit as many items simultaneously as you would like. (Tap rows in the outline to select them.)
Any attributes shared by the selected items are displayed in the inspector. When attributes differ, the inspector indicates this as well (items selected across projects display as Mixed, a collection of flagged and unflagged items displays Some Items Flagged, and so on).
Editing an attribute of the selection applies the edit to all items in the selection, overwriting any existing information (in the case of Some Items Flagged, for example, tapping to flag the selection applies a flag directly to all items in the selection).
Any property shared by items in the selection can be edited using the inspector, or tap Delete  to delete the selection from your database entirely.
In addition to the inspector’s editing controls, tap More in the outline’s bottom bar for several other batch editing tools (in the widest outline view these appear in the bottom bar side by side).
-
Flag—Add Flagged status to the items in the selection.
-
Tag—Add a tag to the items in the selection. A sheet appears with a list of existing tags and the option to create a new one from text in the Search dialog.
-
Remove Tag—Remove a tag from items in the selection. A sheet appears with a list of tags shared by one or more of the selected items.
-
Group—Create a group consisting of the selected items and a new parent item. The group appears in the hierarchy on a peer row of the first item in the selection, directly above it.
-
Cut—Cut the items from the database and copy them to the pasteboard. Leave Edit mode and tap and hold a row to open the contextual menu and paste the copied items beneath it.
-
Copy—Copy the items to the pasteboard. Leave Edit mode and tap and hold a row to open the contextual menu and paste the copied items beneath it.
-
Delete—Delete the items from the database entirely.
When you are finished editing, tap Done in the toolbar to leave Edit mode.
Drag and Drop
Items in the outline can be repositioned within the outline hierarchy, dragged to other projects or tags in the sidebar, and dragged from OmniFocus to other applications (where they are added in plain text TaskPaper format).
To select an item for drag and drop, tap and hold its row in the outline until the item “lifts off the page” and transforms into a mobile selection under your finger.
Once lifted, you can add additional items to the selection by tapping their rows. Additional items animate to join the selection, and the badge count increments to indicate the total number of items being dragged. When you drag a project or tag, the selection includes all of the items inside it.
If you would like to add items to the selection that are off screen, swipe to scroll the outline with a second finger while holding the selection with the first.
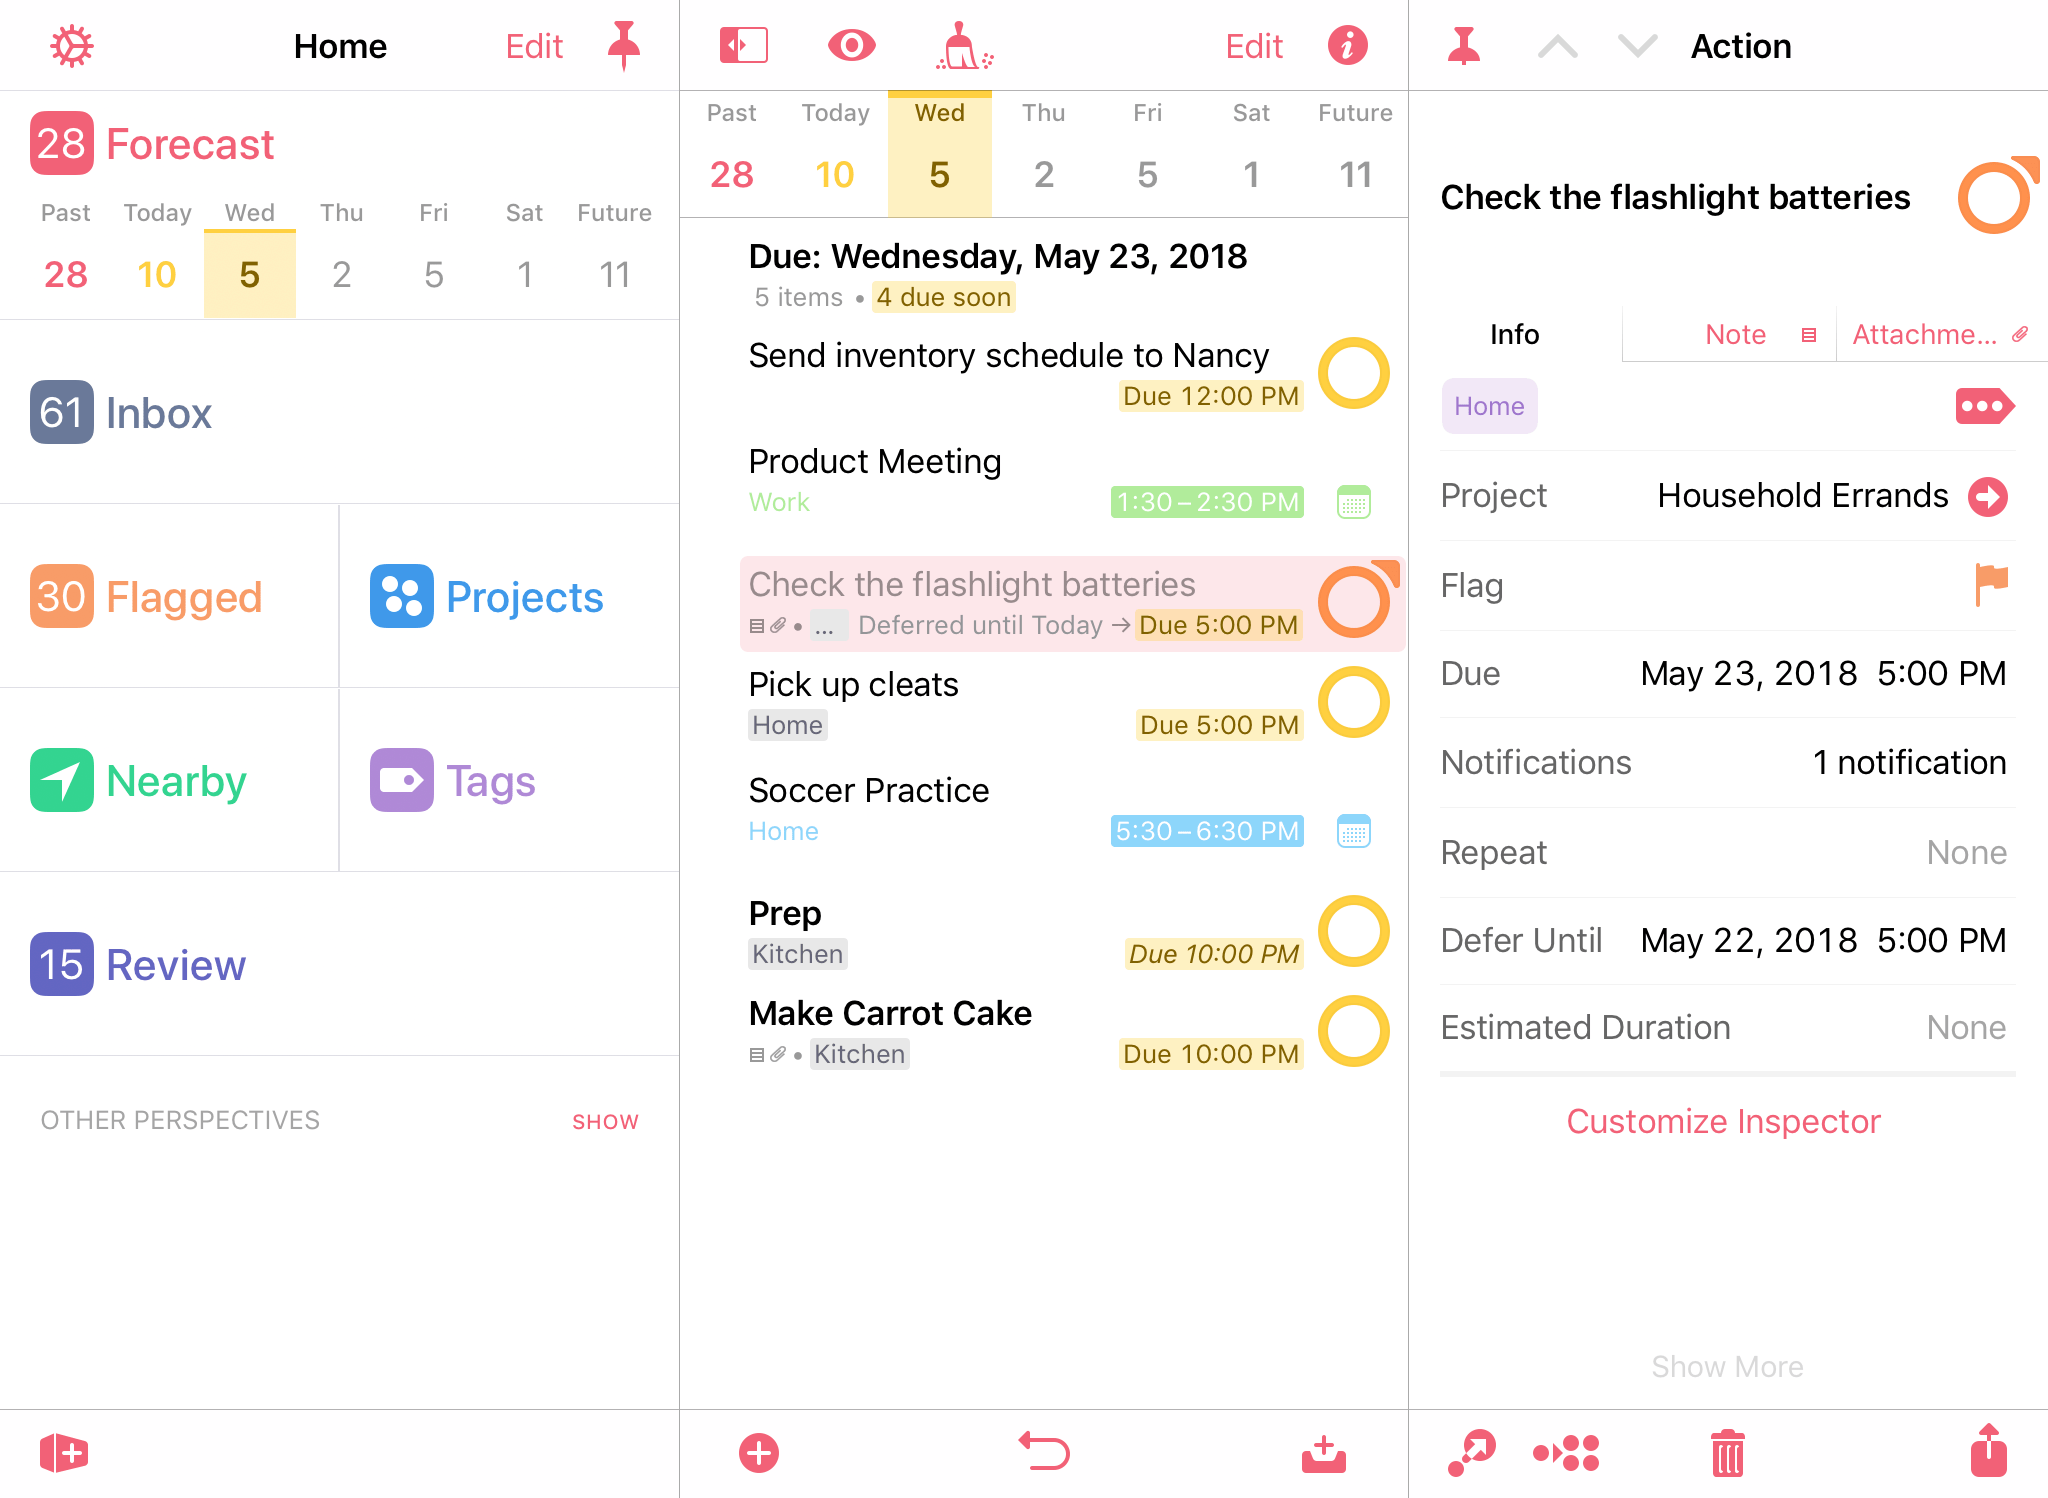
The Inspector
The inspector holds tools for editing your actions, projects, and tags.
The inspector automatically opens to edit the details of an item when you tap it in the outline. On wide devices or in Edit mode, you can also tap the Inspector button in the outline toolbar to open the inspector.
This chapter explains the purpose and function of the inspector’s various fields and options for editing your OmniFocus items.
Inspector Tools
Several tools for manipulating the current item are available in the inspector’s toolbar and bottom bar.
Pin
The Pin button appears in the inspector toolbar in wide views. Tap it to pin the inspector to the right side of the OmniFocus view. If the inspector isn’t pinned, it will be dismissed when you navigate between perspectives or anywhere that doesn’t involve an item selection.
Previous 
Tap Previous to return to the item above the currently selected item in the outline.
Next 
Tap Next to advance to the item below the currently selected item in the outline.
Done
The Done button appears in the inspector toolbar in compact views. Tap it to dismiss the inspector and return to the outline.
Move 
Tap Move to open the Move dialog and reposition the currently selected tag, project, action, or folder. The Move dialog provides destinations for moving the selection to another position within its hierarchy.
-
With a tag selected—Move the tag anywhere within the tag hierarchy.
-
With a project selected—Move the project anywhere within the project hierarchy (created by nesting folders). Projects live within folders but have no intrinsic hierarchical properties themselves; to move a project inside another project, first use Convert to change it to an action group, then drag the action group inside the destination project.
-
With an action or parent action selected—Move the action within its project or the Inbox, repositioning it within the action group hierarchy. To move an action to another project, use the Project row in the inspector.
-
With a folder selected—Move the folder anywhere within the project hierarchy.
Convert 
Tap Convert to open the Convert dialog, where you can convert an action to a top level project, or convert it to a project inside an existing folder. If the selected item is a project, Convert functions in reverse to change it to an action group. (The project becomes the parent action of the group, and its actions are nested inside it.)
Delete
Tap Delete to remove the selected item or items from your database entirely.
Share 
Tap Share to send a selected item outside of OmniFocus using the iOS Share dialog. The item is added in a format relevant to its destination, with a link back to the original item in OmniFocus (or to add the item in OmniFocus, if sent via Mail).
Title and Status Circle
Beneath the inspector’s toolbar are two of the more important components of tasks you capture with OmniFocus: the title and the status circle.

Every item or tag you add to OmniFocus has a title. Tap the title text in the inspector to edit it.
Directly actionable items (Inbox items, actions, and groups) have a status circle opposite their title, useful for getting an at-a-glance summary of the status of the item and serving as a tap target to mark it complete.
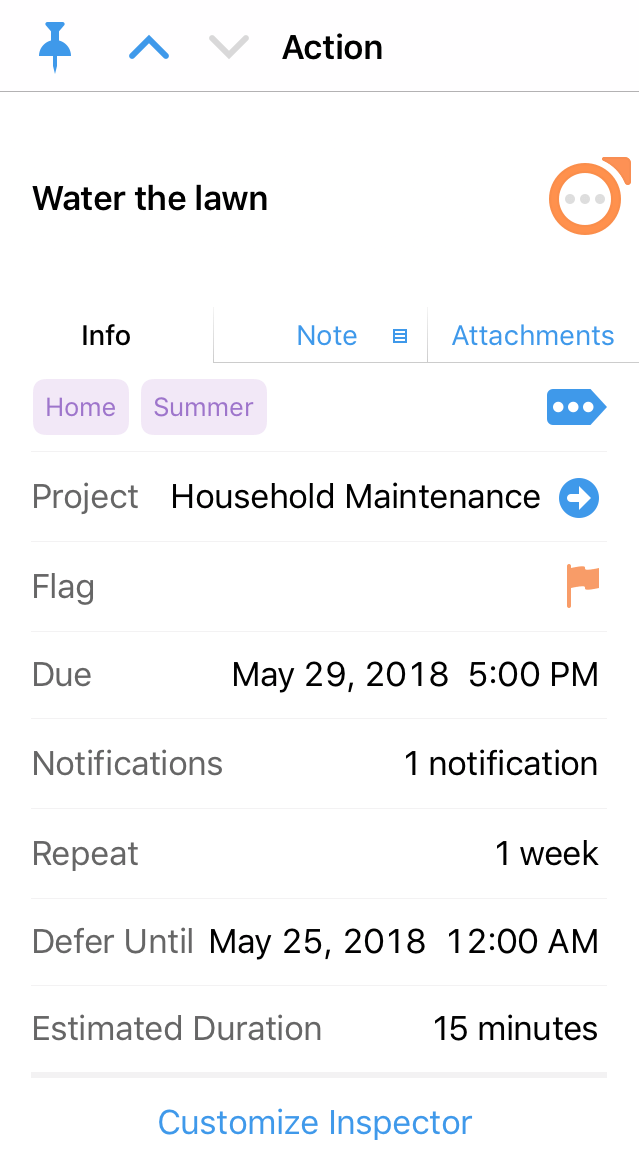
Info, Note, and Attachments
Inbox items, projects, actions, and groups can be further enriched by adding information across three tabs in the inspector: Info, Note, and Attachments.
-
The Info tab includes a list of configurable item attributes, described in detail in Project and Action Attributes. The Info tab can be customized to feature the attributes you use most frequently.
-
The Note tab offers a blank canvas to add as much information about the item as you like. URLs added here become interactive once the note is saved, making it possible to refer back to websites or other apps that use URL syntax.
-
The Attachments tab lists any attachments included with the item, and offers controls for adding image attachments (either from Photos or using the device camera) and recording audio attachments right within OmniFocus.
Use the Attachments list in Database settings to keep an eye on how much space your attachments are taking up in OmniFocus. You can select multiple attachments at once and batch edit to remove those you no longer need.
Customizing The Inspector
You can customize the inspector for items you edit. The inspector starts by showing a default set of commonly used attributes; tap Show More to view all of the attributes available for that item type.
If there are attributes you rely on more frequently, tap Customize Inspector and use the reordering handles on the right to promote those attributes to the Always Show category above the separator bar. Likewise, if there are attributes that you don’t use, you can drag them to the Hide By Default category here.
Changes you make to the inspector are shared between item types (Inbox items, projects, actions, and groups), but not all attributes are relevant to each item. Those that don’t apply to a given item do not appear in that item’s inspector.
Project and Action Attributes
Because rows in the inspector can have their default order changed, the following attributes are listed alphabetically for ease of reference.
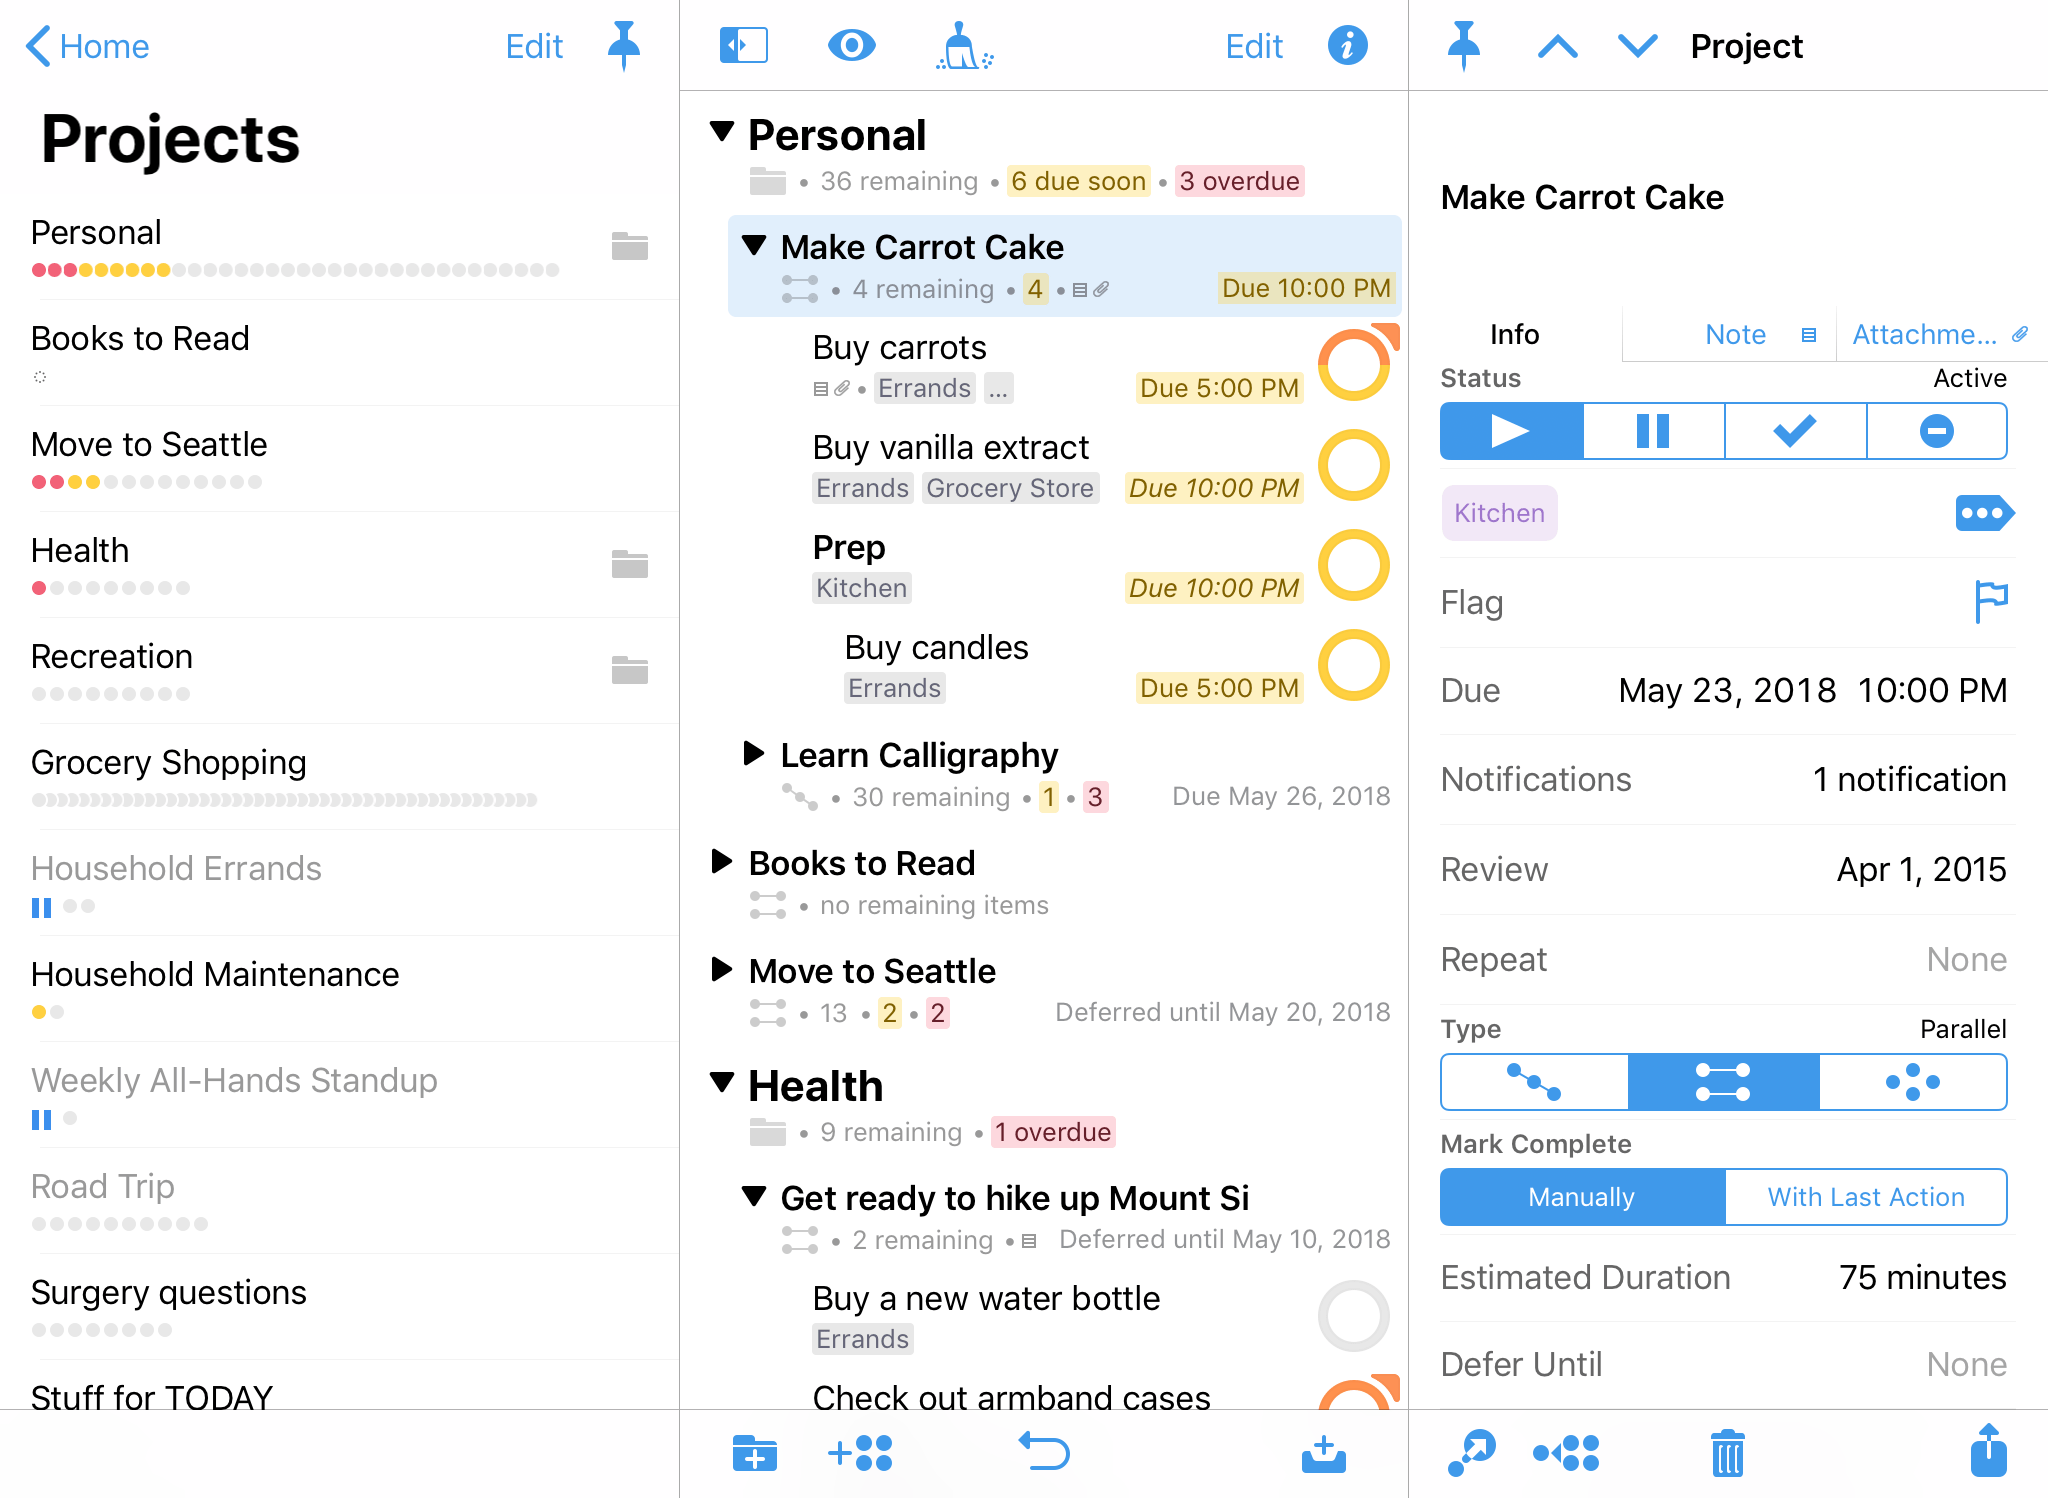
Complete with Last Action
Appears For: Sequential and Parallel Projects, and Groups

A row labeled Mark Complete with a switch to choose between two options:
-
Manually—The project or group status must be changed to Completed manually, regardless of the completion status of actions within it.
-
With Last Action—The project or group status automatically changes to Completed when its last action is completed.
Projects of the Single Actions type do not display this attribute, since they have no last action and are not conventionally considered complete.
Defer Until
Appears For: All Items

A row labeled Defer Until followed by a date and time (or None, if no defer date is set). Tap to set or change the item’s defer date.
When a defer date is set on an item, it is not considered available for action until that date is reached.
If a defer date is set on a project or group, items within it inherit that date. (A defer date set directly on the item will override the inherited date, if it is later.)
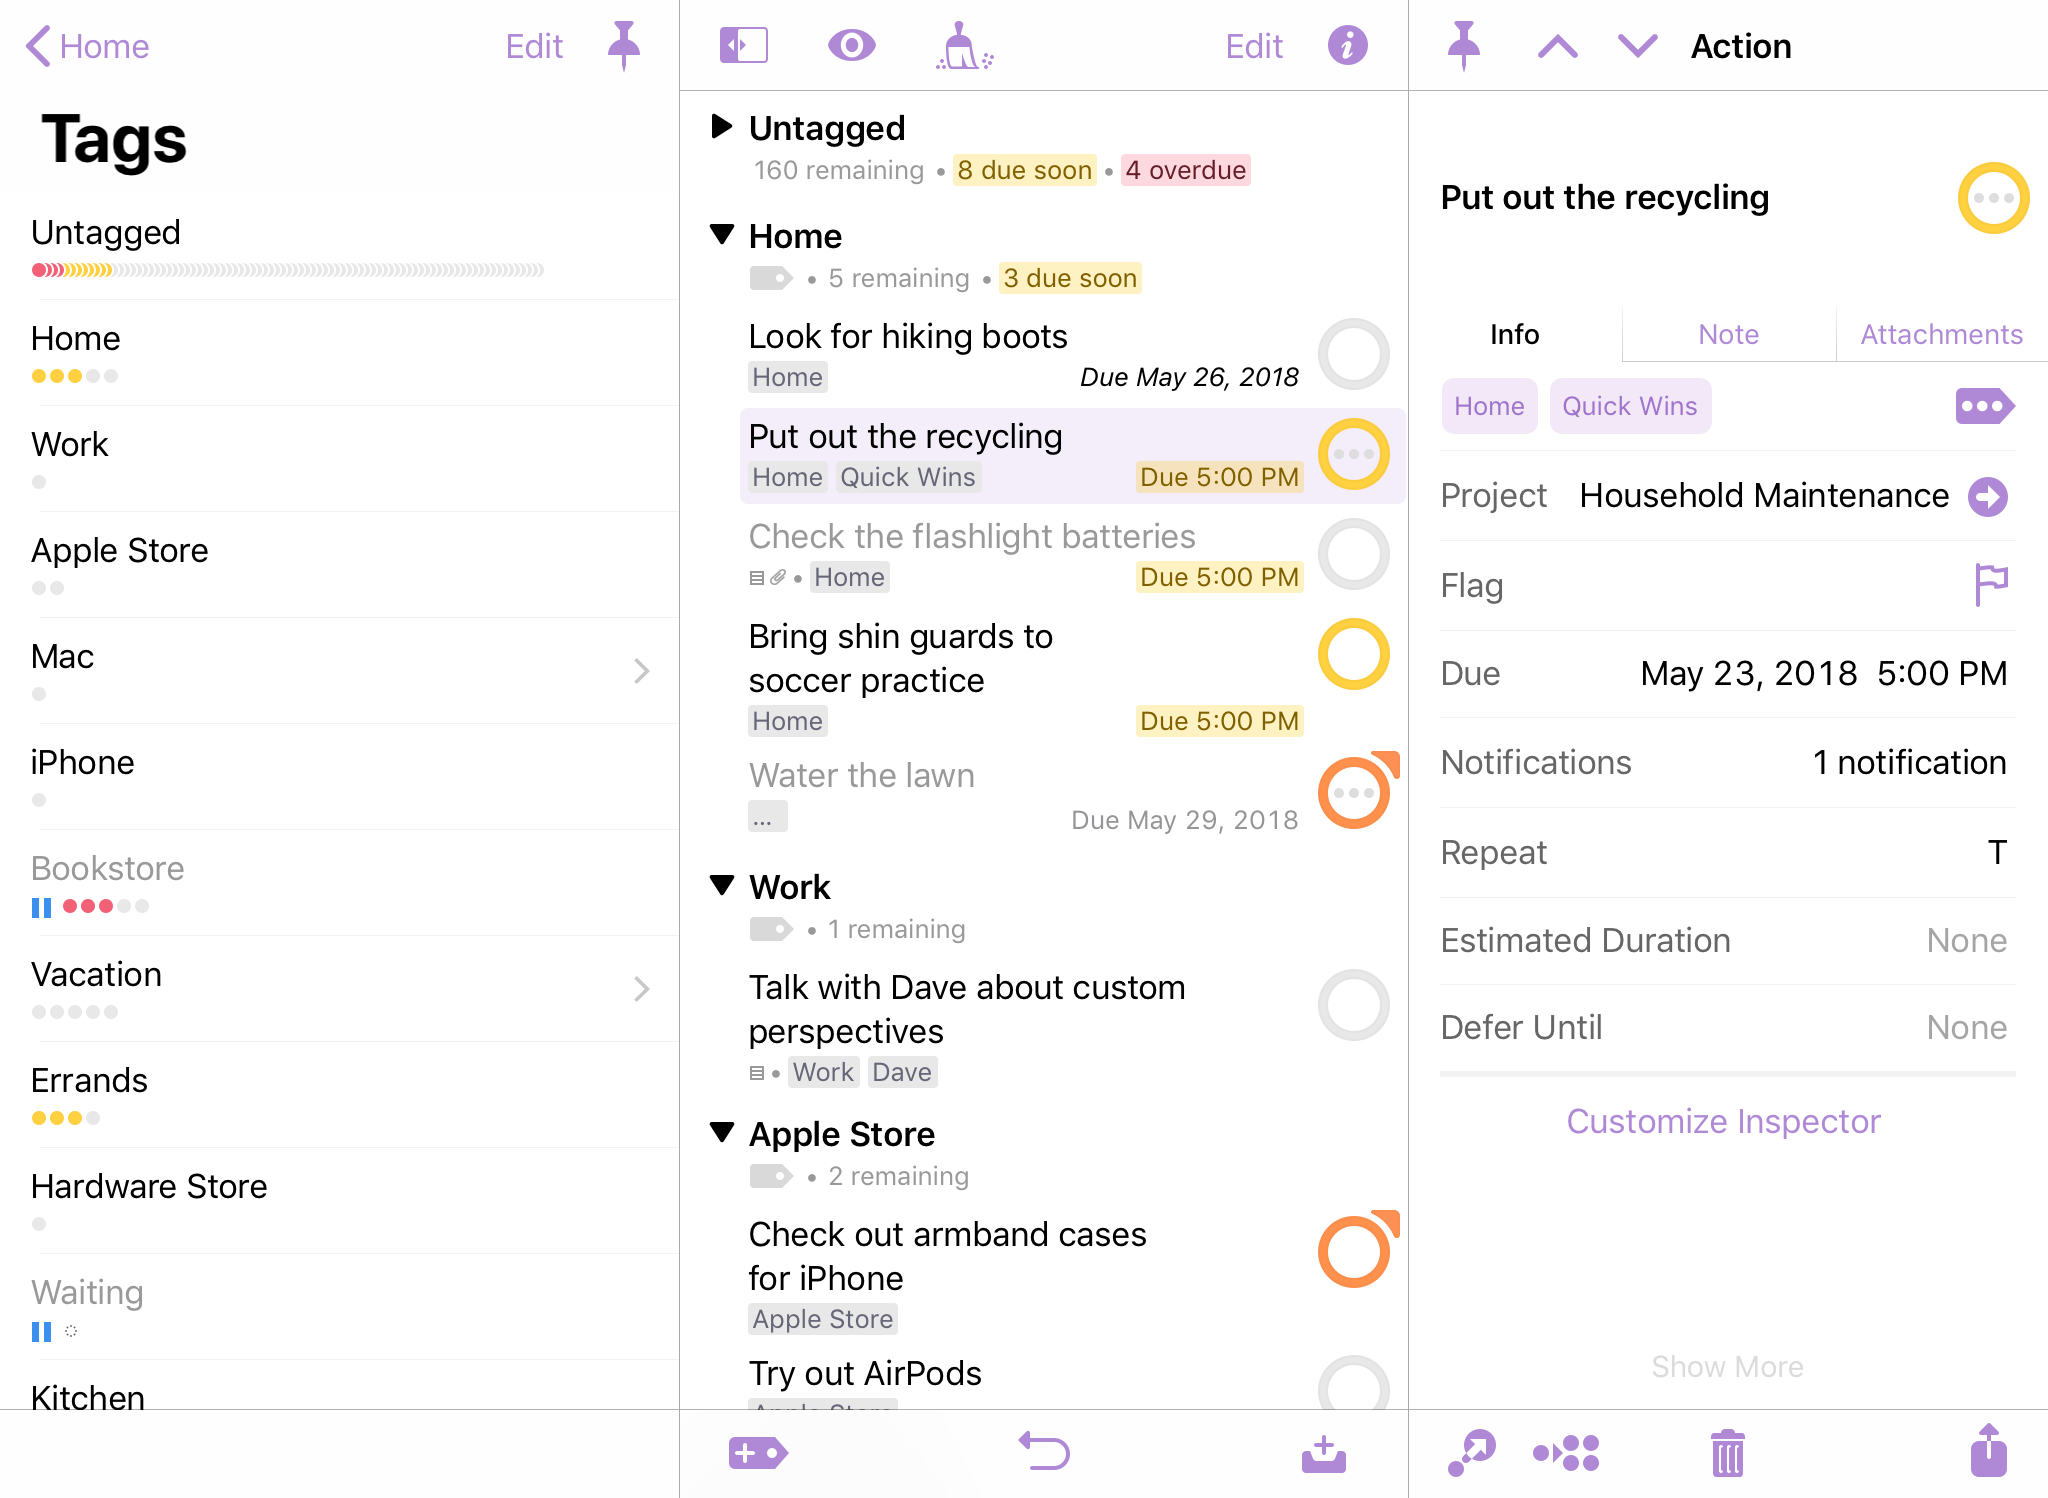
Due
Appears For: All Items

A row labeled Due followed by a date and time (or None, if no due date is set). Tap to set or change the item’s due date.
When a due date is set on an item, it is considered due at that date (and due soon based on the Due Dates settings).
If a due date is set on a project or group, items within it inherit that date. (A due date set directly on the item will override the inherited date, if it is sooner.)
Estimated Duration
Appears For: All Items

A row labeled Estimated Duration followed by an amount of time (in minutes or hours). Tap to set or change the item’s time estimate for completion.
Estimated duration is particularly useful when setting up custom perspectives with OmniFocus Pro, where you can use this value to create perspectives for tasks that require a certain amount of time to complete.
Flag
Appears For: All Items

A row labeled Flag followed by a flag icon: either empty (unflagged), filled orange (flagged), or with an orange dotted outline (inherited flag). Tap to set or remove flagged status on the item.
When a flag is set on an item, it appears in the Flagged perspective. If a flag is set on a project or group, the items within it inherit the flag.
Notifications
Appears For: All Items

A row labeled Notifications followed by a count of the notifications on the item (or None, if no notifications are set). Tap to view a list of notifications on the item and create new custom notifications.
If any notifications were created automatically for the item based based on your preferences in Sounds and Alerts settings, these appear in the list here.
Tap +Custom Notification (or +Before Due Notification, if the item is due in the future) to add a notification. To delete a notification, swipe its row in the inspector from right to left and tap Delete.
You can set as many notifications on an item as you like; when multiple notifications are set, they are listed from earliest to latest.
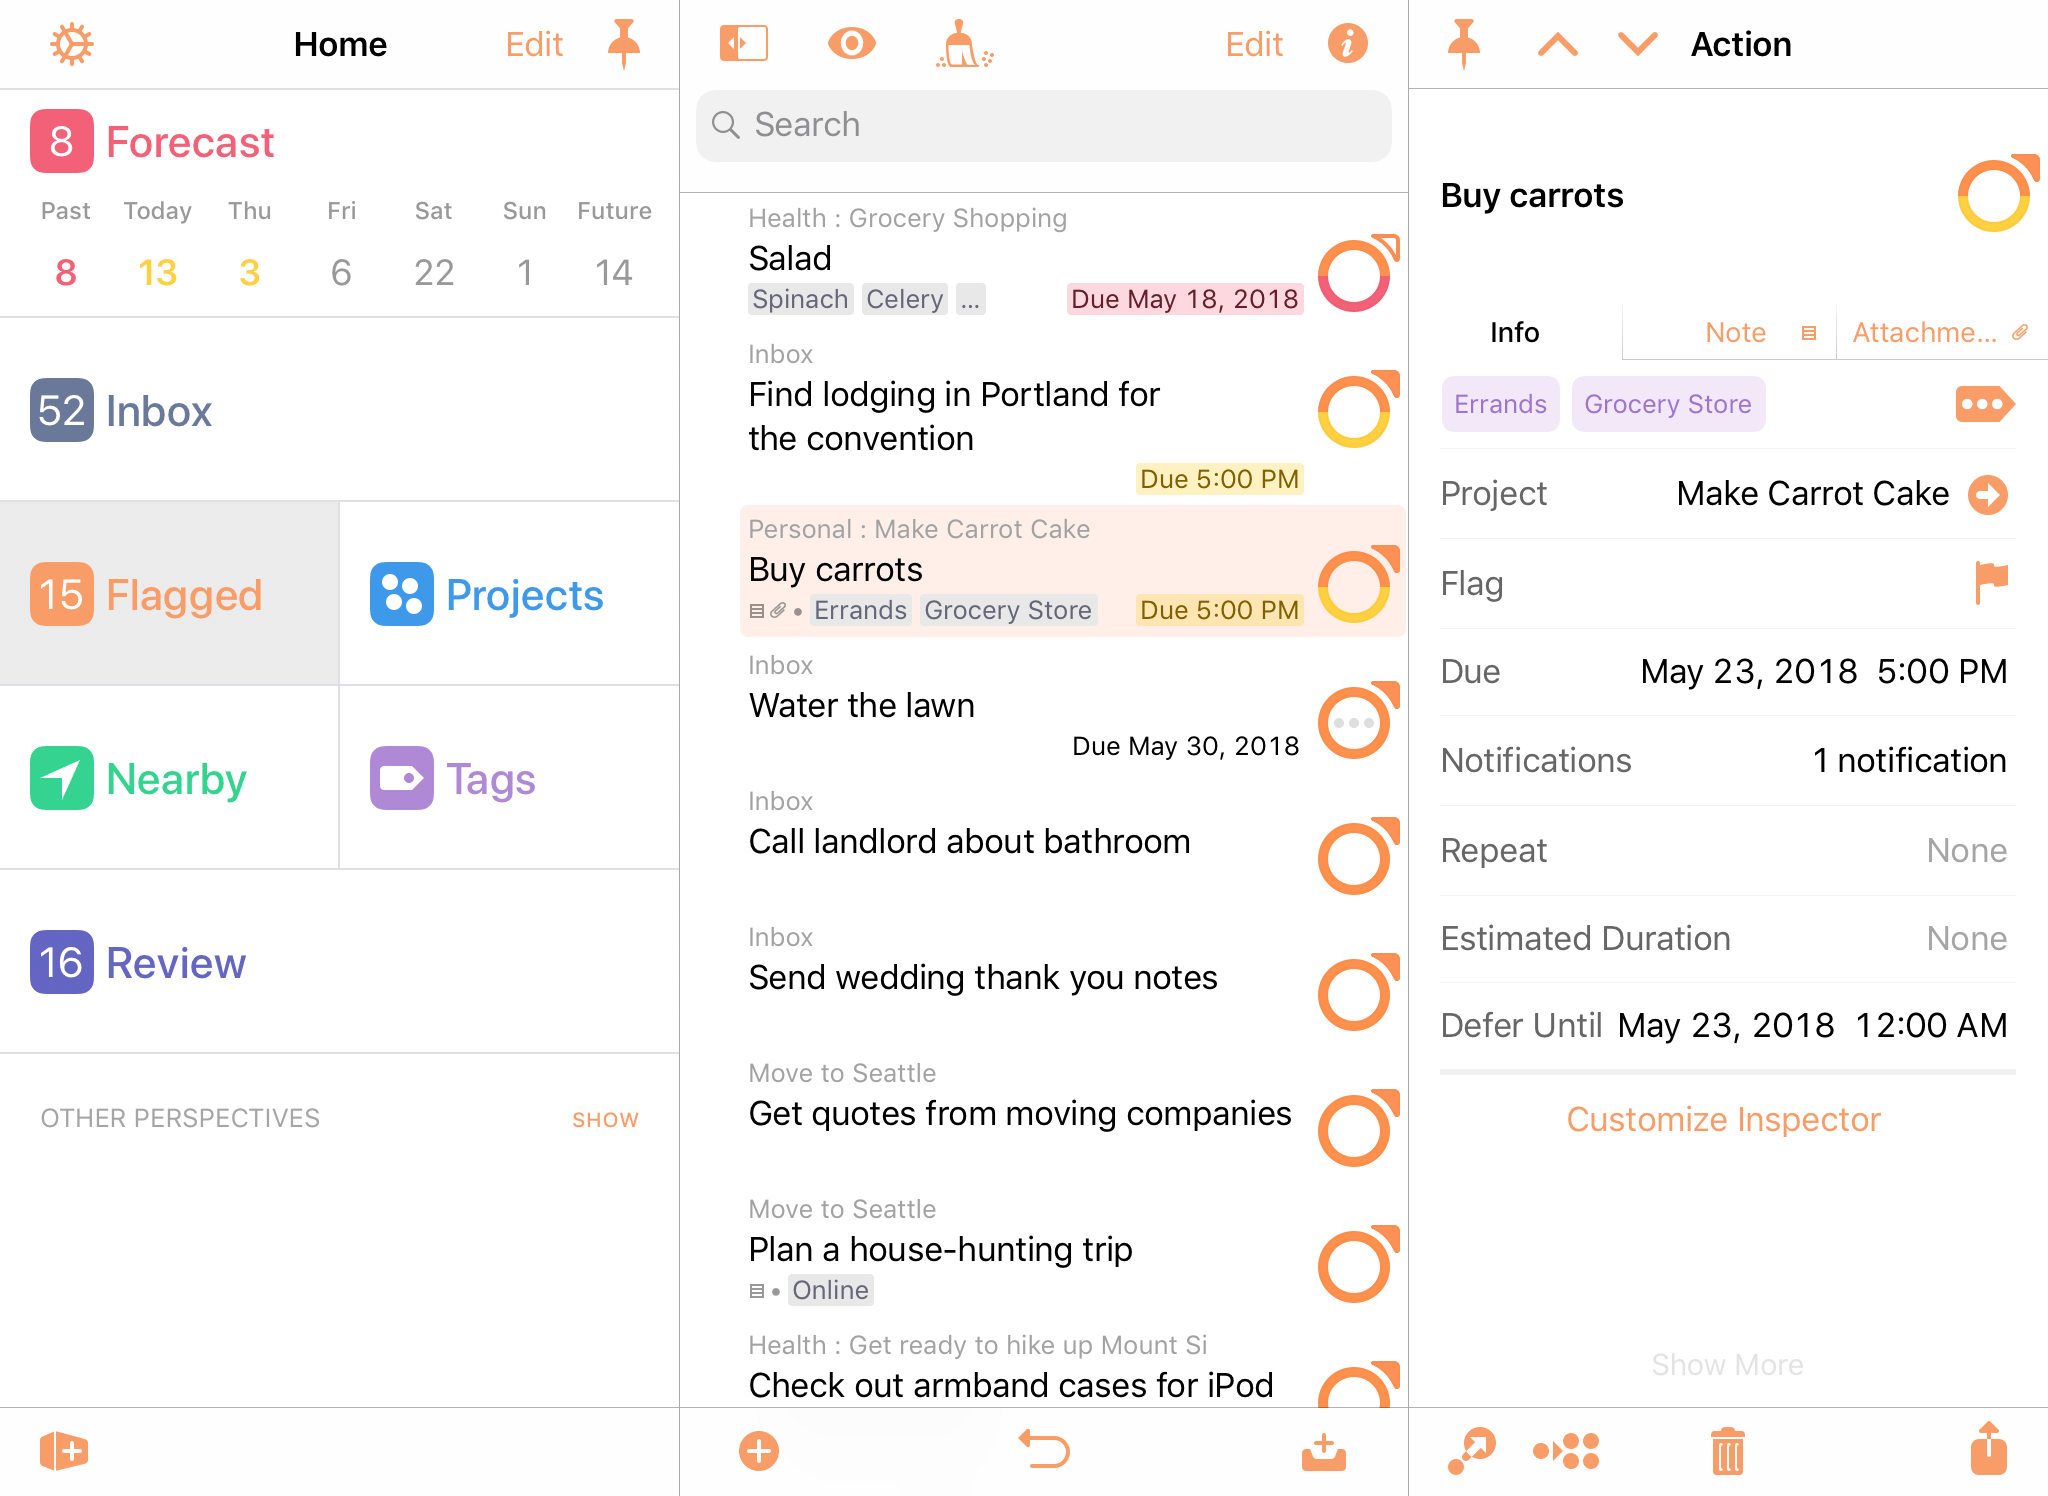
Project
Appears For: Inbox Items, Actions, and Groups

A row labeled Project followed by the project name and the Go To Project button (or None, if no project is set). Tap to assign or change the item’s project, or tap Go To Project to open the project in the outline.
The project picker can also be used to create new projects: enter an unused project title and tap Create “New Project”, and the new project will be assigned to the item.
Projects are tasks composed of the action items required to complete them. Unlike tags, an item can only be assigned to a single project at a time.
Project Status
Appears For: Projects

A row labeled Status with buttons for choosing the project status: Active, On Hold, Completed, or Dropped.
Projects have the Active status by default. For more on the meaning of each status and how it affects availability of items within the project, see Project Status.
Project Type
Appears For: Projects and Groups

A row labeled Type with buttons for choosing the project type: Sequential, Parallel, or Single Actions.
Projects have the Parallel type by default. For more on the meaning of each status and how it affects availability of items within the project, see Project Type.
Groups can also have a project type. In this case, type selection in the inspector is limited to Sequential and Parallel (groups cannot have the Single Actions type).
Repeat
Appears For: Items other than Single Action Lists

A row labeled Repeat followed by a summary of the repeat interval (or None, if the item doesn’t repeat). Tap to set or change an item’s repeat interval.
Tap the Repeat switch to indicate that an item repeats. Items can be set to repeat based on a variety of criteria that are progressively disclosed as you make changes in the repeat editor:
-
Interval—Choose a number hours, days, weeks, or months which elapse for every repeat cycle. When weeks or months are chosen, additional custom options become available.
-
Custom: Days of Week—With an interval of weeks, the option becomes available to repeat every weekday chosen here (Monday, Wednesday, and Friday, for example). With an interval of months, the option becomes available to repeat every first through fifth (or last) weekday of the month.
-
Custom: Days in Month—With an interval of months, the option becomes available to repeat on the chosen calendar dates of the month (or the last day of the month).
-
Schedule the Next—Choose whether completing the item will schedule the next occurrence as a:
- Due Date—The item must be completed again by that date. Or;
- Defer Until Date—The item becomes available again on that date.
-
Repeat From This Item’s—Choose whether completing the item will schedule the next occurrence from:
- Completion—The repeat interval begins when the item is completed. Or;
- Assigned Dates—The repeat interval begins at the originally assigned date.
Review
Appears For: Projects

A row labeled Review followed by the date of the project’s next scheduled review. Tap to edit a project’s review details.
Use the Review editor to change the frequency with which the project comes up for review (the default is every week, beginning a week from the project’s creation), and edit the date of the next scheduled review.
A project’s review interval and next review date are among the few attributes that all projects possess. If project review isn’t part of your workflow, feel free to ignore them.
Tags
Appears For: All Items

A row labeled Tags, containing the Add Tag button as well as any tags assigned to the item.
Tags represent associations that tasks have to you and the world around them. Tap Add Tag to add an existing tag to an item, or create a new one to add: enter an unused tag name and tap Create “New Tag”, and the new tag is created and assigned.
Unlike projects, an item can be assigned as many tags as you like. When tags are assigned to an item, tap one in the inspector row to either go to or remove it.
If you have more tags on an item than fit in the row, swipe left or right to find the tag you want.
Task Status
Appears For: Inbox Items, Actions, and Groups

A row labeled Status with buttons for choosing the item status: Active, Completed, or Dropped.
New Inbox items and actions have the Active status by default. For more on the meaning of each status and how it affects availability of items within the project, see Item Status.
Tag Attributes
Because rows in the inspector can have their default order changed, the following attributes are listed alphabetically for ease of reference.
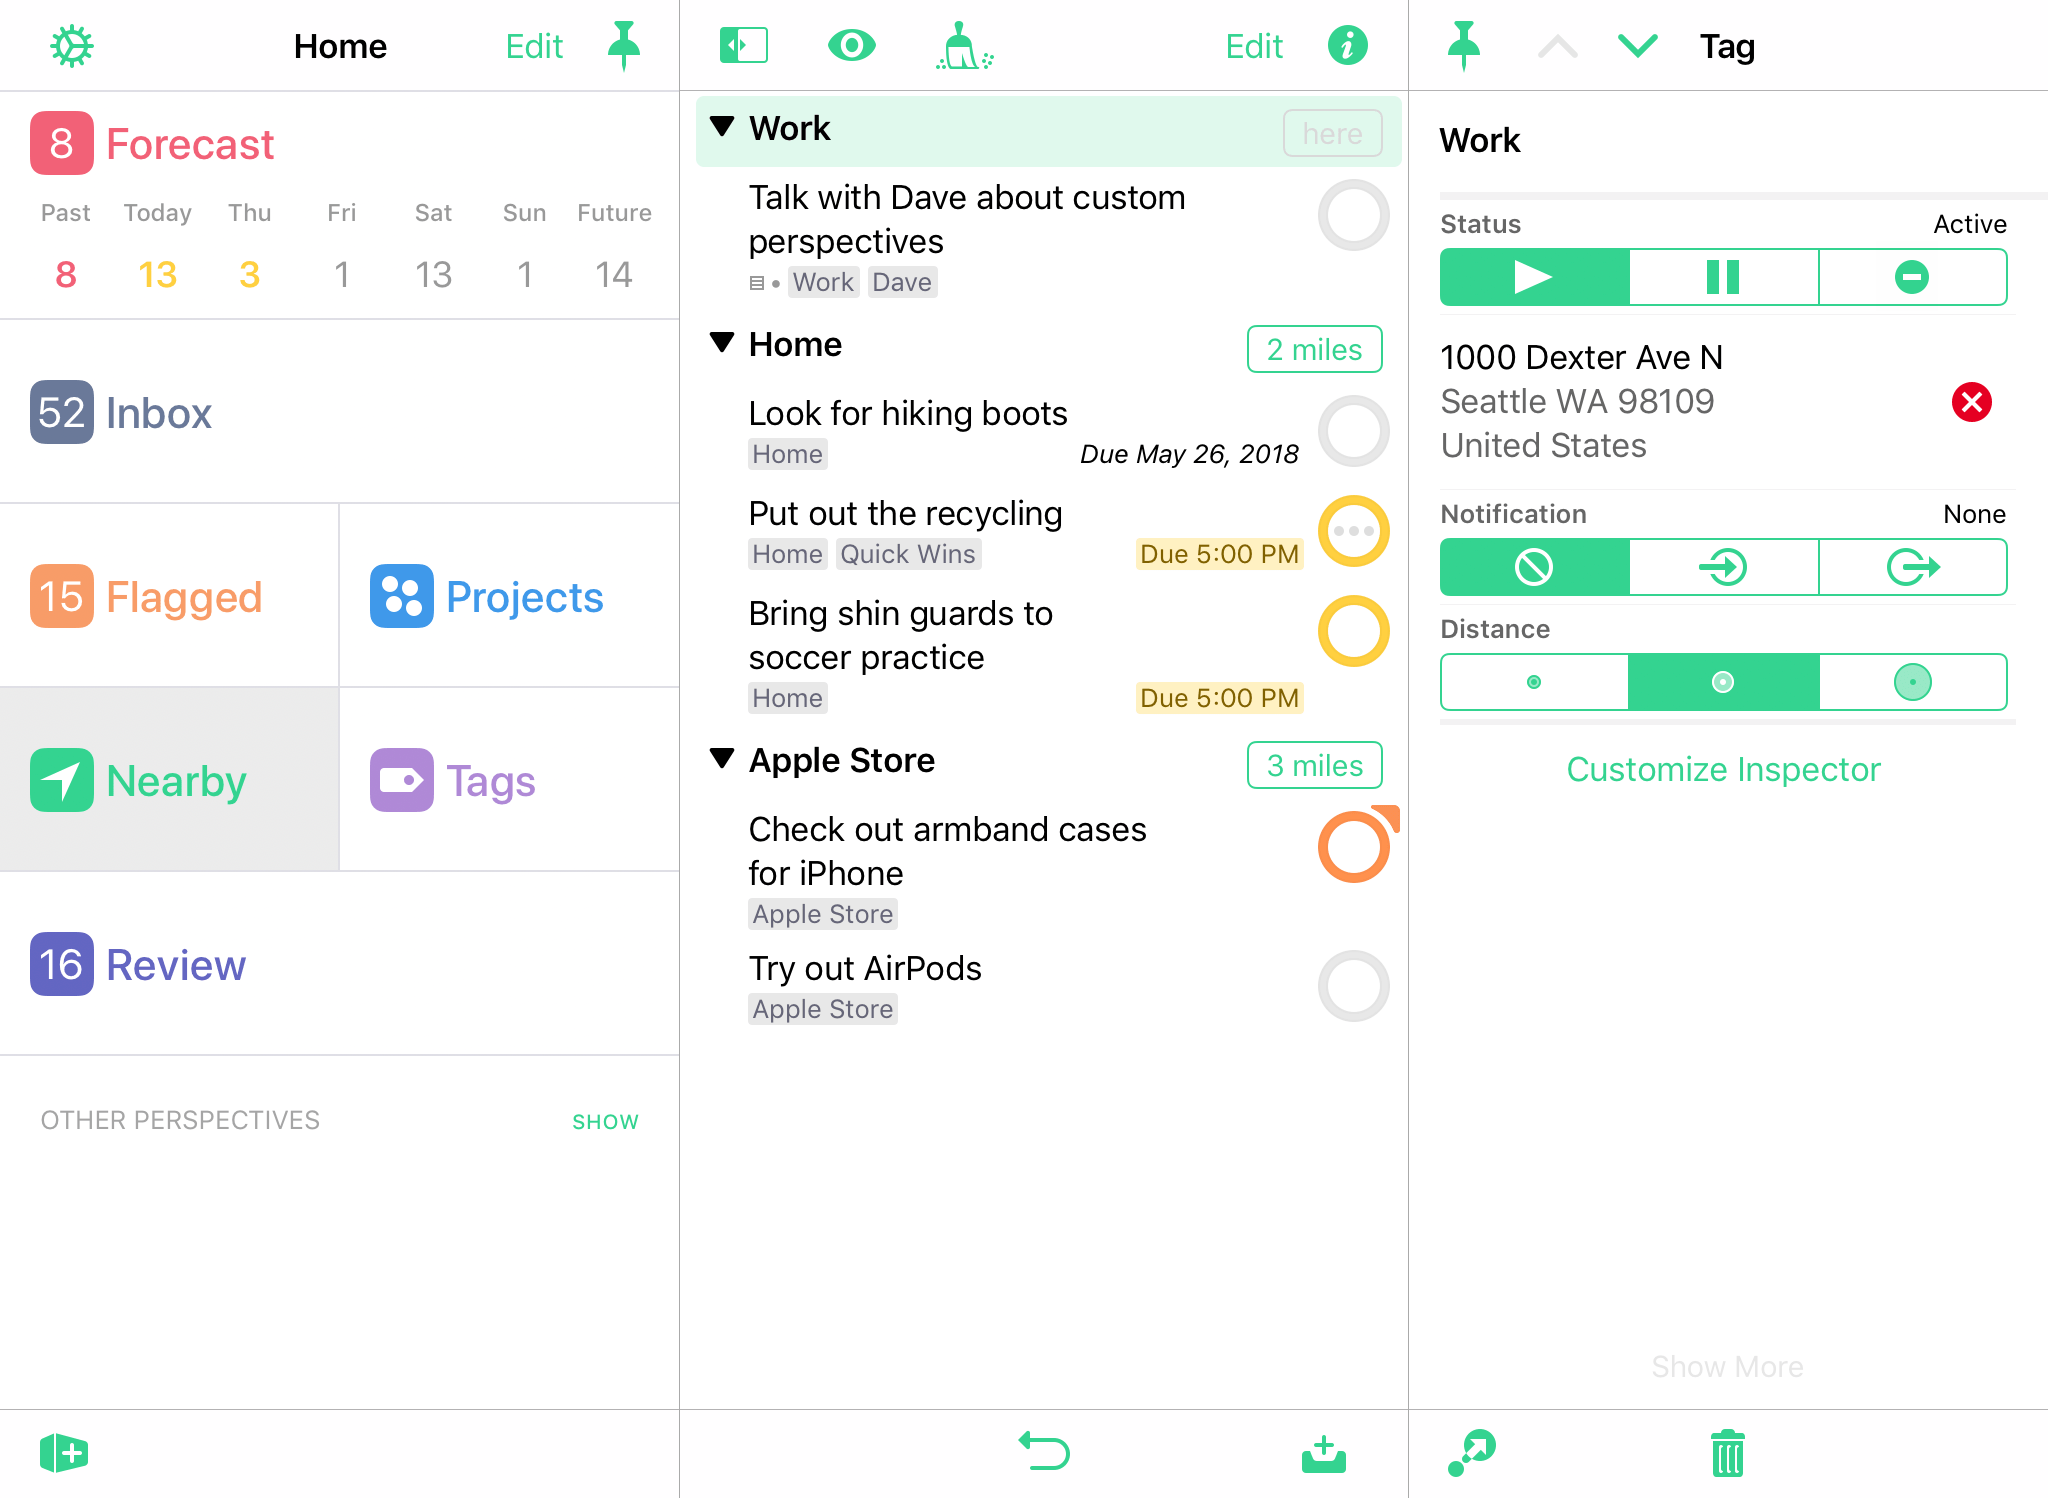
Location
Appears For: All Tags

A row labeled Location followed by the location set on the tag (or None, if no location is set). Tap to set a tag’s location. The following options appear:
-
Here—Use Wi-Fi or cellular triangulation to pinpoint where you are right now, and add that as the tag location.
-
Anywhere—This isn’t really a location; instead, it means that this tag contains work you can do no matter where you are.
-
Search—Enter a search keyword (“hardware store”, for example). You can either assign the tag a location that appears as a result of the search, or use the search itself: if you use the search, the tag location becomes the location of the nearest search result at any given time.
-
Address—Enter a specific address to add as the location.
-
Contact—Choose an address from an entry in iOS Contacts. If this is the first time you’ve opted to set a location this way, an alert will pop up asking you to authorize OmniFocus access to your contacts.
-
Pin—Touch and hold a spot on the map to drop a pin at a location of your choice.
To removed an assigned location, tap the X next to it in the row.
When a location is assigned to a tag, it shows up in Nearby when you’re close to that location.
Setting a tag’s location doesn’t automatically mean you will receive proximity-based alerts for that tag. To receive notifications, make sure location alerts are turned on for your device in Sounds and Alerts settings, and make sure that Tag Notification Kind is set to When Arriving or When Leaving.
Tag Notification Distance
Appears For: Tags with Locations

A row labeled Distance with buttons for choosing the location’s area size.
-
Small—Roughly 200 meters or 650 feet. This covers about one city block, and is useful for things such as coming home or leaving the office.
-
Medium—Roughly 500 meters or about a quarter mile. This covers something like a small neighborhood or park, and is useful for knowing when you are a few streets over from a certain store.
-
Large—About 10 kilometers or 6.2 miles. This is useful for turning on tags that are relevant when you visit a distant city.
Tag Notification Kind
Appears For: Tags with Locations

A row labeled Notification with buttons for choosing the location’s notification type.
-
None—You will not be notified when arriving at or leaving from the tag location.
-
When Arriving—You will be notified when you arrive at the area of the tag location.
-
When Leaving—You will be notified when you depart from the area of the tag location.
Tag Status
Appears For: All Tags

A row labeled Status with buttons for choosing the tag status: Active, On Hold, or Dropped.
Tags have the Active status by default. For more on the meaning of each status and how it affects availability of items the tag is assigned to, see Tag Status.
Built-In Perspectives
Perspectives are views on the work that you capture in OmniFocus, each with its own purpose to help you organize and get stuff done. OmniFocus includes seven built-in perspectives, and this chapter describes their purpose and features in detail.
Access OmniFocus’s built-in perspectives by tapping them in the Home view.
Forecast
Forecast helps you keep an eye on the progress of your projects, check upcoming due dates, and schedule OmniFocus to-dos alongside important events in your calendar.
The Forecast tile in the Home view shows a range of dates spanning today, the next four days, the past, and the future, letting you know at a glance what’s on your plate.
Each date doubles as a button that shows the number of actions associated with that date. For due items, the count is color-coded according to the most urgent item: amber indicates that an item is due soon, and red indicates an item is due or past due.
To create a new action that is due on a particular day, tap the appropriate date button, followed by Add Here  .
.
Forecast Outline
The Forecast outline displays a chronological list of items due each day, interleaved with events from any calendars you’ve chosen to display in OmniFocus.
Calendar events in the outline are for display purposes and can’t be interacted with from inside OmniFocus. Tap the calendar icon next to an event to open it in iOS Calendar.
A row of dates at the top of the outline mirrors that in the Home perspective tile. Tap a day to view that day’s due items and calendar events.
If you have designated a Forecast tag ![]() in view options, items with that tag appear in a separate section of the outline when browsing items due Today.
in view options, items with that tag appear in a separate section of the outline when browsing items due Today.
Forecast View Options 
-
All Days Show: Calendar Events—With this setting turned on, events from calendars you’ve chosen to display in Forecast will appear alongside OmniFocus items on the dates when they occur. With this turned off, calendar events do not appear in the outline.
-
All Days Show: Deferred Items—With this setting turned on, deferred items scheduled to begin on a given day will appear in a separate Deferred section on the dates when they become available. With this turned off, deferred items do not appear in the outline until they are due.
-
Calendars—When All Days Show: Calendar Events is turned on, use this submenu to pick the calendars that you would like to appear in OmniFocus. Events from the selected calendars appear interspersed chronologically with your OmniFocus items in the Forecast outline.
Calendars works with the iOS Calendar app to find calendars you own or have subscribed to across services and devices, including iCloud, Google Calendar, and more. Use Accounts & Passwords settings in the iOS Settings app to connect to your shared calendars.
-
Today Includes: Tag—With OmniFocus Pro, choose a tag here to have its items appear in the Today view of Forecast in their own section of the outline. Once set, this Forecast tag can be applied to items from anywhere in the outline: swipe an item row from left to right and tap the Tag button to do so.
-
Show Project Paths—With this setting turned on, rows in the outline include their project information above the item title as described in The Anatomy of a Row. Turn this off to reduce the amount of space taken by each row in the outline.
Inbox
The Inbox is the catch-all perspective for depositing everything that you’d like to do. To add an item to the Inbox, tap Add Inbox Item in the toolbar. (You can use this button wherever it appears to add Inbox items from all over OmniFocus.)
Many workflows use the Inbox as an initial point of entry, a transient receptacle for ideas big and small. Once you’ve processed an Inbox item (added a project or tag, converted it to a project, or assigned it some other fate), it will likely disappear off to its new location (this depends on your Clean Up settings).
Inbox Outline
The Inbox contains a list of individual items. If you convert an Inbox item to a project it will immediately disappear (you’ll have the option to see it in its new location in Projects).
Inbox View Options
-
In The Inbox, Show:—Choose the setting for items that you would like to be visible in the outline (Available is the default). Each option describes the requirements for items that it includes or excludes; see the Glossary for further details on each status.
-
Show Project Paths—With this setting turned on, rows in the outline include their project information above the item title as described in The Anatomy of a Row. Turn this off to reduce the amount of space taken by each row in the outline.
Item Status
The states described here apply both to items in the inbox and actions within projects. Items can have additional states described by their status circles; the ones here are common to all and appear in the inspector.
-
Active
—The default status for a newly added item, indicating an item that is currently planned for work. -
Completed
—The status for an item that has been successfully completed. Tap the item's status circle, press Space with a connected keyboard, or use the inspector to mark an item complete.When completing an item group, items within the group inherit the completed status and are represented with an inherited completion status circle
 in the outline.
 -
Dropped
—The status for an item no longer planned for work. Use the inspector or press Option-Space with a connected keyboard to mark an item dropped.When dropping an item group, items within the group inherit the dropped status and are represented with an inherited dropped status circle
 in the outline.
Flagged
The Flagged perspective contains a collection of all items you have assigned the Flagged status.
To flag an item, open it for editing and tap the flag icon. Another quick way to flag (or unflag) an item is to swipe it from left to right, revealing the Flag button.
![]() If you've set a Forecast tag with OmniFocus Pro, the Flag button appears alongside the Forecast tag button when you swipe an item row.
If you've set a Forecast tag with OmniFocus Pro, the Flag button appears alongside the Forecast tag button when you swipe an item row.
When you flag an item, its status circle changes color to orange to help catch your eye and let you know that something important is going on. If you flag a project or an action group all of the actions within it inherit that flag, and the sense of urgency it imparts. Flags on items that are inherited rather than directly applied are noted with a hollow flag icon attached to their status circles.
Flagged Outline
Items in the Flagged outline are sorted first by due date (from oldest to most recent), then by project (for items with the same due date). Sorting isn’t affected by whether a flag is inherited or directly applied, and the only items that appear in Flagged are those that are directly actionable (flagged projects don’t appear).
Flagged View Options 
-
In Flagged, Show:—Choose the setting for items that you would like to be visible in the outline (Available is the default). Each option describes the requirements for items that it includes or excludes; see the Glossary for further details on each status.
-
Show Project Paths—With this setting turned on, rows in the outline include their project information above the item title as described in The Anatomy of a Row. Turn this off to reduce the amount of space taken by each row in the outline.
Projects 
A project is a task made up of multiple items. Projects are typically more complex than individual action items, and can include several related actions. The Projects perspective displays all of your projects in a list, which can be grouped into folders to create hierarchy.
Project Type
Projects are distinguished by their type, which varies based on how actions inside the project must be completed. Project type also affects how actions within the project show up according to the perspective’s view options.
-
Sequential
 —Sequential projects have actions that need to be completed in a predetermined order; the first item must be finished before you can move on to the next. In a sequential project, there is only ever one action available at a time. (this is also, by definition, the project’s first available action).
 -
Parallel
 —Parallel projects consist of actions that can be completed in any order. In a parallel project, all incomplete actions are available, and the first available is just the first one in the list.
 -
Single Actions
 —A single action list isn’t a project in the traditional sense; it’s a list of loosely-related items that aren’t interdependent (a shopping list is an example of this). In a single action list, all actions are considered both available and first available.
The difference between parallel and sequential projects is most visible when Projects view options are set to show only Available actions. (Actions beyond the first available action in a sequential project are blocked, and therefore hidden.)
Project Status
When planning and subsequently reviewing a project, it can be useful to give it a status to indicate whether work is progressing or plans have changed.
-
Active
 —The default status for a new or ongoing project. It can be useful to review active projects regularly to determine what progress you’ve made, and whether they are still things you want to do.
 -
On Hold
 —If you’re not sure whether you want to continue a project, you can change the project’s status from Active to On Hold. If you’ve chosen to show only Available items in view options, the project and its actions are removed from the project list in the sidebar and outline.
Projects placed on hold are still available for review and reconsideration if you decide to prioritize them again in the future.
-
Completed
 —Eventually you’ll reach the successful end of a project. Select the project and then choose Completed in the Status section of the inspector (this automatically marks any unfinished actions in the project complete). If you’d like to revisit a completed project, change your view options to All or search for the project with the Everything filter.
 -
Dropped
 —If you’ve decided not to work on a project any further, you can Drop it completely. It disappears from the Projects list, and its actions are likewise hidden. You could delete the project instead, but then you wouldn’t have any record of it; keeping it around in a dropped state means you can go back and check on actions you’ve completed regardless of whether they’re from still-relevant projects, and so on.
To find a dropped project in your database, choose All in view options or search for it with the Everything filter.
Dropped and completed items accumulate in your database over time. If you find that things are becoming unwieldy, Database settings can help lighten the load.
OmniFocus for Mac can also archive these items according to time parameters that you control.
Projects Outline
The Projects outline displays your projects in a layout based on your view width. On wide views, the outline shows the full hierarchy of projects and folders. Tap a project in the sidebar to view it alone; tap it again to return to the full outline. Drag and drop to rearrange projects in the list.
On compact views, the Projects perspective shows each level of hierarchy in an individual pane, starting with the sidebar and diving deeper into folders and the projects within them. However, you can also view the full hierarchy by scrolling to the bottom of Projects and tapping Show Projects Contents.
Projects View Options 
- In Projects, Show:—Choose the setting for items that you would like to be visible in the outline (Remaining is the default). Each option describes the requirements for items that it includes or excludes; see the Glossary and the Project Type and Project Status sections for further details.
Nearby 
When you’re out and about, the Nearby perspective shows you items you’ve assigned to tags that are location aware. Depending on how you’ve set up your tags, you can see actions to complete somewhere nearby that matches a business search (for example), or at a specific address associated with someone on your iOS Contacts list.
The first time you use Nearby, if you didn’t agree to let OmniFocus access your location when you launched the app for the first time, you’ll be asked again. Location access is required for the Nearby feature to work.
Like other location services on your device, an active internet connection is required for Nearby to work. Also, turning on Wi-Fi in the Settings app improves the quality and accuracy of location services (regardless of whether your device is connected to an active hotspot).
Nearby Outline
The Nearby outline displays displays all items that are:
-
Available;
-
With a location-aware tag assigned;
-
Within a reasonable distance of your current location.
Items are displayed in order, grouped by tag, from closest to furthest away. If an item isn’t available (perhaps because it’s deep within a sequential project, or has another tag that is on hold), it won’t appear; likewise, tags will not appear in the Nearby outline unless they have a location assigned using the inspector.
Tags 
In OmniFocus, a tag represents an association that a task has to the world around it. A tag could be a person, place, or thing most relevant to completion of a project, or it could represent a mindset most applicable to execution of an action item.
An item can have as many tags as you find useful, and there is no specific purpose assigned to them; use tags to assign priority, group items by energy level or required equipment, or don’t use them at all.
When a tag represents a specific place, you can assign a location to it. If you’ve allowed OmniFocus access to your device’s location data, items with that tag will appear in the Nearby perspective when you’re close to that spot, and you can receive notifications for those items based on your proximity to the tagged location.
Tag Status
Like projects, tags have a status that indicates whether they are currently relevant to your work. View options that depend on status apply similarly between projects and tags; however, the implications of tag status vary.
-
Active
 —The default status for a tag. When a tag is active, it exists and is relevant to you in some way.
 -
On Hold
 —When a tag is temporarily irrelevant or unavailable for some reason (a required tool is loaned out, a colleague is on sabbatical, or the public library is closed for remodeling), you can change the tag’s status from Active to On Hold. The tag remains in the sidebar, but when viewing Available items its actions are removed from the outline.
 -
Dropped
 —If a tag becomes permanently irrelevant or unavailable, you can drop it completely. It disappears from the Tags list, and its actions are likewise hidden. You could delete the tag instead, but then you wouldn’t have any record of it; keeping it around in a dropped state means you can go back and check on actions you’ve completed regardless of whether they’re from still-relevant tags, and so on.
To find a dropped tag in your database, choose All in view options or search for it with the Everything filter.
The Completed status doesn’t exist for tags, because tags aren’t actionable for completion themselves: they are things or conditions that exist in the world.
Tags Outline
The Tags outline displays your tags in a layout based on your view width. On wide views, the outline shows the full tags list (nested tags are listed in a flat view, with child tags listed after the parent). Tap a tag in the sidebar to view it alone; tap it again to return to the full outline. Drag and drop to rearrange tags in the list.
On compact views, the Tags perspective shows each level of hierarchy in an individual pane, starting with the sidebar and diving deeper into nested tag levels. However, you can also view the full tag list by scrolling to the bottom of Tags and tapping Show Tags Contents.
If an item has multiple tags, it appears in the list under each tag assigned to it.
Tags View Options 
-
In Tags, Show:—Choose the setting for items that you would like to be visible in the outline (Available is the default). Each option describes the requirements for items that it includes or excludes; see the Glossary for further details on each status.
-
Show Project Paths—With this setting turned on, rows in the outline include their project information above the item title as described in The Anatomy of a Row. Turn this off to reduce the amount of space taken by each row in the outline.
Tag Sorting
By default, items inside a tag are sorted in the order they appear in their respective projects (project order), or in the order they appear in the Inbox if no project is assigned (inbox order).
You can use drag and drop to rearrange items within a tag. The tag saves its new custom order once you make a change, and the previous default rules no longer apply: any items subsequently added to the tag appear at the end of the list, and can be reordered manually from there.
Review
The Review perspective contains a flat list of projects that are due for review.
Reviewing helps make sure your projects are accurately portrayed in OmniFocus, leaving them in good shape and ready for action. If you have projects that need items added, projects that aren’t relevant anymore, or projects you don’t mean to do any time soon, following a regular review process can help you keep them from falling through the cracks.
Each project has an interval for how often you intend to review it and a date when the next review is planned. You can change the next review date for a project, as well as its review interval, using the inspector.
To review your remaining projects:
-
Open the Review perspective from Home. Your remaining unreviewed projects are listed in in the sidebar in the same order they appear in the Projects perspective.
-
For each project, check whether it is in the proper state (Active, On Hold, Completed, or Dropped). Do you need to revise its actions, or add new ones? Should you put the project on hold, drop it, or mark it Completed? Or is everything moving along just fine?
-
Once you’re satisfied with the state of the project, make sure it’s selected and tap Mark Reviewed
in the lower right. The project’s next review date moves forward and you can go on to review another project.
If you would like to look a project over again before its next scheduled review, swipe it from right to left in the sidebar and tap More to reveal quick commands associated with the project. Tap Review, and the project opens in the Review perspective ready for perusal.
Review Outline
When you enter the Review perspective the sidebar displays a flat list of your review-ready projects (folders are not included). The first one may already be open in the outline for your inspection; if not, tap a project in the list to get started.
In Review, the outline only shows a single project at a time to facilitate inspection of its contents. Use the arrow buttons in the bottom bar to navigate between projects, or tap Mark Reviewed when you’re ready to move on to the next one.
Review View Options 
- In Review, Show:—Choose the setting for items that you would like to be visible in the outline (Remaining is the default). Each option describes the requirements for items that it includes or excludes; see the Glossary for further details on each status.
Completed and Changed
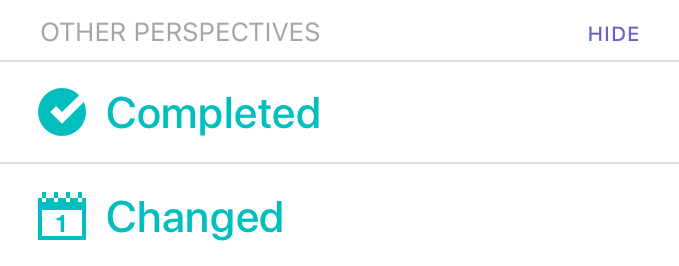
The final two built-in perspectives—Completed and Changed—are listed in the Home view when you toggle to show Other Perspectives. These are a great way to find items in your database that may have been filed away by mistake or otherwise disappeared under mysterious circumstances.
Completed and Changed are designed to track movement of items in your database, but have no other specific purpose for helping to get stuff done.
The Perspective Editor (Pro)
With OmniFocus Pro, you can create custom perspectives that reflect views on your OmniFocus data that you want to come back to again and again.
To make a new custom perspective, tap New Perspective in the Home bottom bar. To edit an existing custom perspective, navigate to it in the sidebar and open the editor by tapping View Options  in the outline toolbar.
To delete a custom perspective, scroll to the bottom of its editor and choose Delete Perspective.
When creating or editing a custom perspective, the Perspective Editor provides tools to customize your view settings in nigh-countless ways. The options in the Perspective Editor are identical whether setting up a new perspective or editing an existing one.
Perspectives created in OmniFocus 3 for iOS use the editor described in this chapter. You can still sync perspectives created in OmniFocus 2, which will open in the old version of the editor if you choose not to upgrade them.
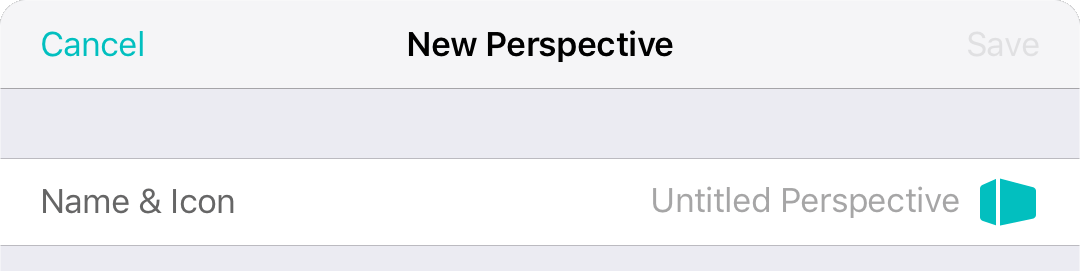
Name and Icon
Tap the name field to enter a name for a new perspective or change an existing one (the default is Untitled Perspective).
Tap the icon to open the icon picker, where you can choose from among a set of Omni-designed icons included with OmniFocus, or tap Custom to choose your own icon from the photos stored on your device.
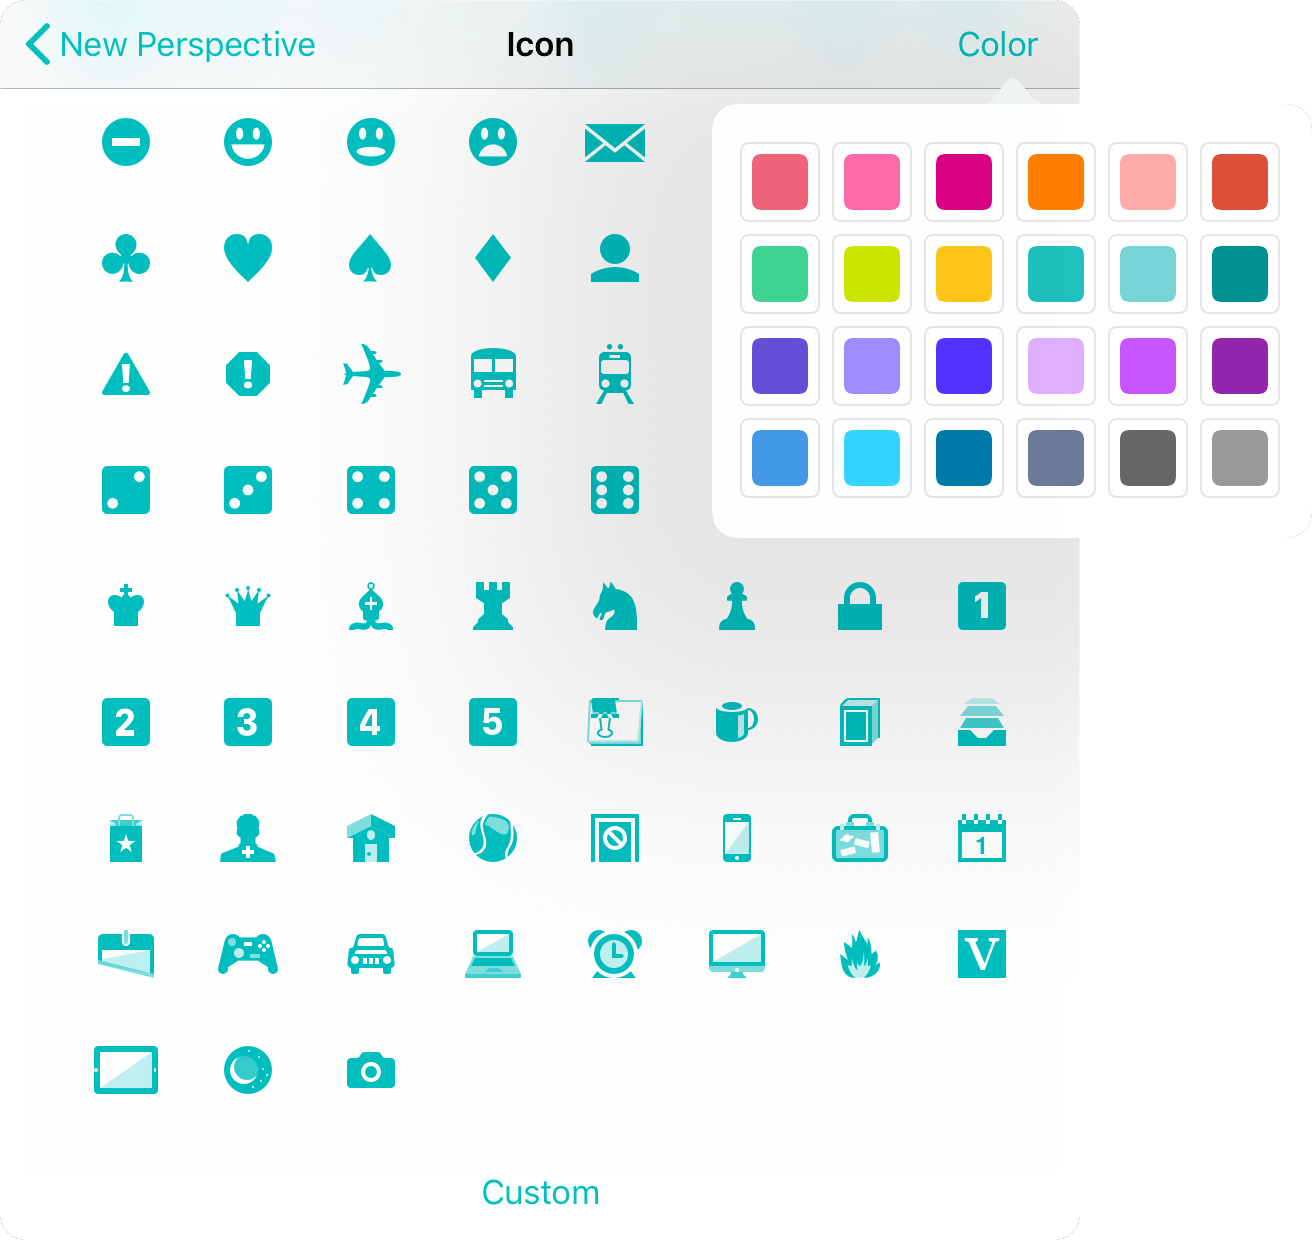
Tap Color in the icon picker’s title bar to choose a custom color for your perspective and its iconography throughout the app.
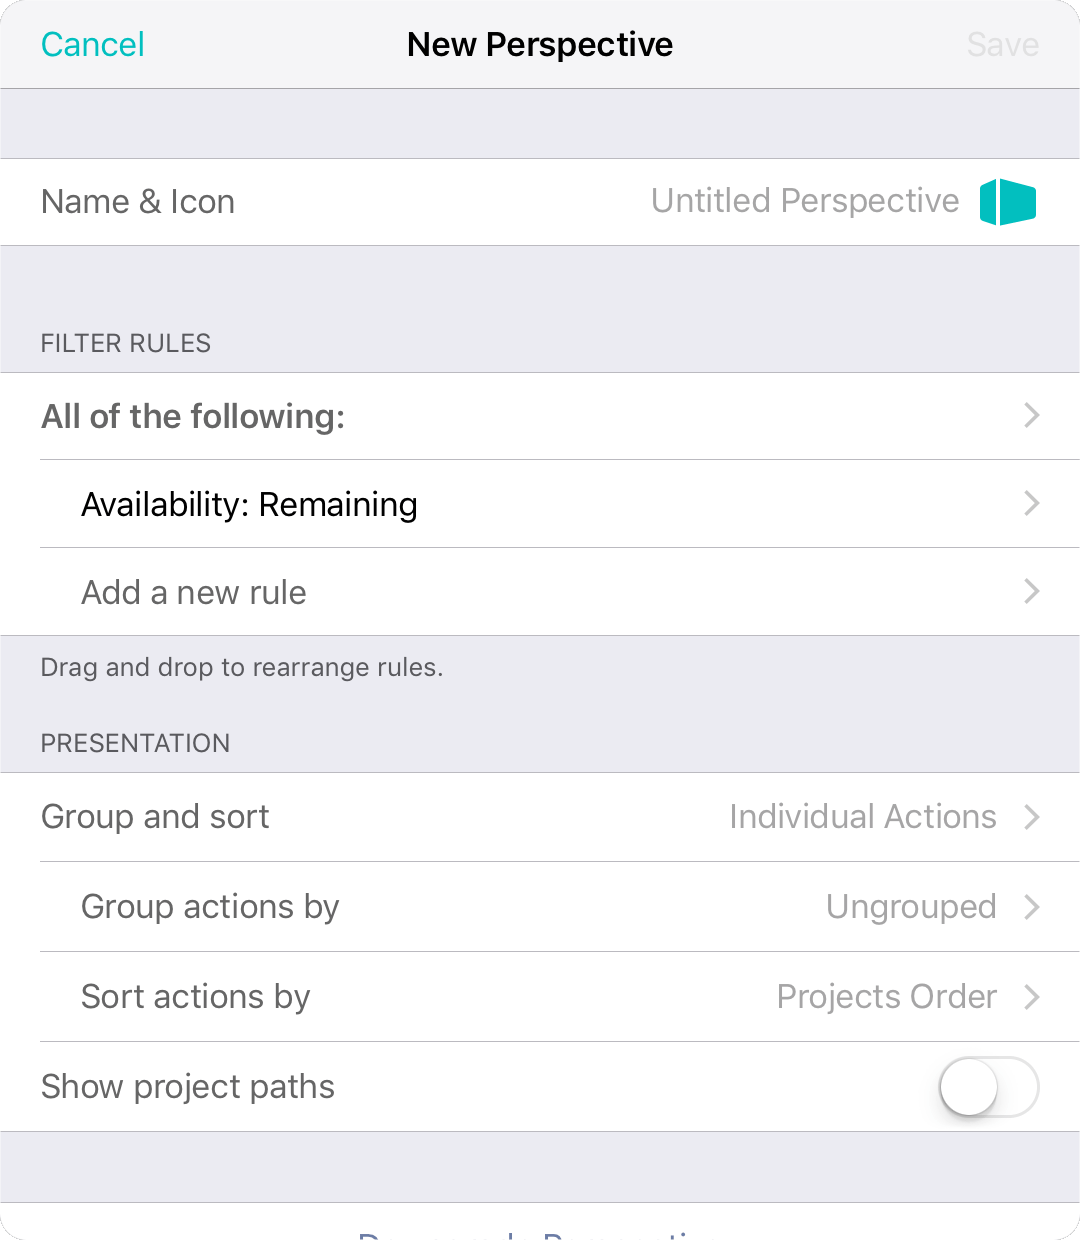
Filter Rules
This section of the editor determines which items the perspective includes. Items are included by setting filters with the parameters for specific item attributes: if an item matches the filter rules, it is included in the perspective. If an item doesn’t match the rules, it won’t appear.
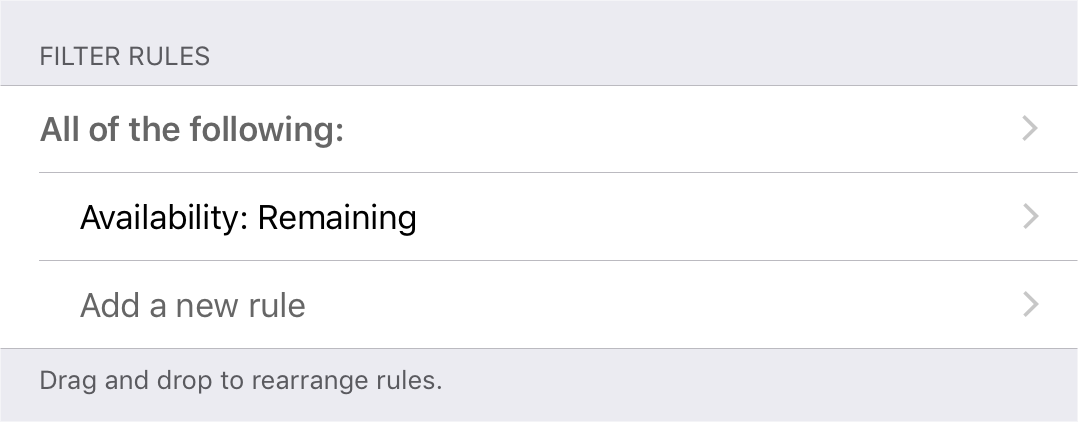
Filter rules are set up in hierarchy, with an All, Any, or None of the following operation at the top of the tree. This indicates that all, any, or none of the rules inside it must apply to items for them to be included in the perspective. (This forms the root of the hierarchy, and therefore can’t be deleted.)
By default a new custom perspective includes one Availability: Remaining rule as an example. Since it is nested beneath All of the following:, this rule means that the perspective will only show items with an availability status of Remaining (completed and dropped items will not appear).
If you don’t want to include the default rule in your perspective, swipe left on its row to either Disable or Delete it.
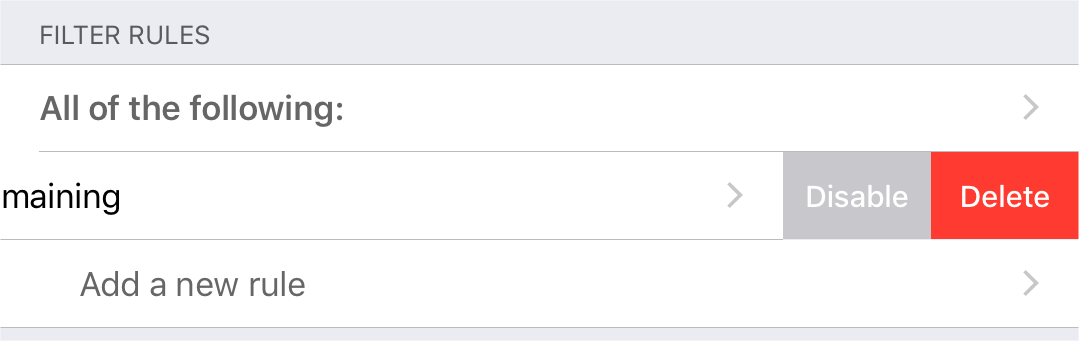
Tap Add a new rule to choose from among the list of available rules to apply to items in the perspective.
When adding a filter rule, note that it will apply based on its position in the hierarchy. All rules added beneath the root use its logic: either Any, All, or None of them must apply for items meeting those criteria to appear in the perspective.
The bottom of the filter rule list contains options for further refining the hierarchy by nesting additional operations. As with the root operation, you can choose the condition that applies to rules in the group:
-
All of the following: Each of the rules in the group must be true for an item to appear in the perspective (or for it to be considered by the rules above it in the hierarchy). This corresponds to a Boolean AND operation.
-
Any of the following: If an item meets even one of the rules nested below Any of the following, it will be included in the perspective (provided it also meets conditions described elsewhere in the tree). This corresponds to a Boolean OR operation.
-
None of the following: If an item meets one of the rules nested below it, it will be excluded from the perspective regardless of any other rules applied. This corresponds to a Boolean NOT operation.
If your filter rules have several levels of hierarchy, you can tap and hold a row to drag and drop it elsewhere in the rule structure to change its effect on item visibility in the perspective.
If your filter rules have several levels of hierarchy, you can tap and hold a row to drag and drop it elsewhere in the rule structure and see how changes to the structure impact the rule’s effect on item visibility in the perspective.
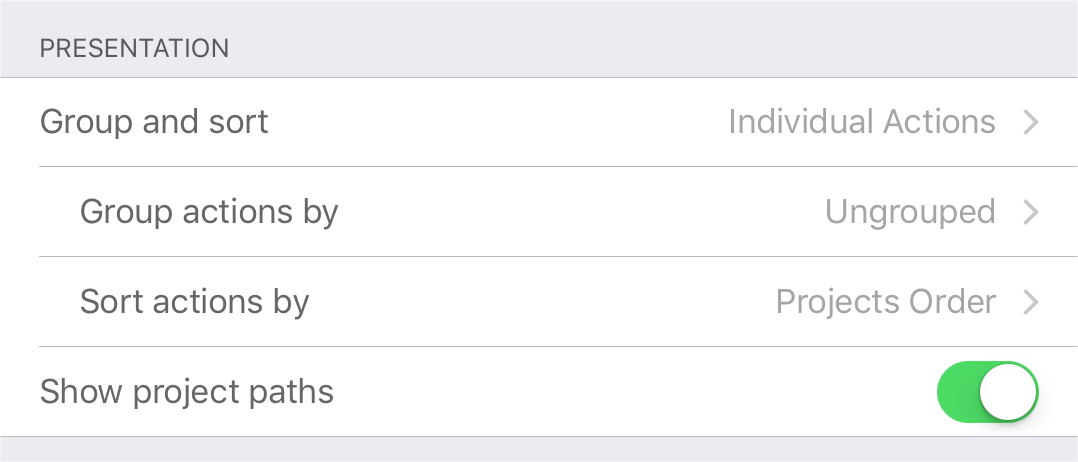
Presentation
This section of the editor defines how the perspective’s items are displayed in the outline. You can choose from two main modes using the Group and sort setting: to view items as a list of Individual Actions, or as items hierarchically grouped within Entire Projects.
If your perspective’s filter rules exclude items of a type that would be grouped or sorted by one of the criteria listed below, it is possible to choose an option that offers no meaningful structure (such as choosing to group by Completed when the perspective is set to display only items that are Remaining).
Grouping and Sorting by Individual Actions
When displayed as individual actions, the outline contains a flat list of all items that meet the filter rule criteria. Further refinement of grouping and sorting within the perspective offers additional options, and the option to Show project paths can be turned on or off to show or hide the project row above each item.
When grouped by individual actions, actions can additionally be grouped by:
-
Ungrouped—Actions are not grouped and presented as a flat list.
-
Tag—Actions are grouped by individual tag. If an action has more than one tag, it appears within each of its tags.
-
Tags (Combined)—Actions are grouped by tag combination. Regardless of the number of tags on an action, it appears only once (in a group named with its tag combination).
-
Project—Actions are grouped by project.
-
Due—Actions are grouped by due date, from oldest to newest. The granularity of the grouping increases as it nears the present day. Actions with no due date assigned are grouped at the bottom of the outline.
-
Defer Date—Actions are grouped by defer date, from oldest to newest. The granularity of the grouping increases as it nears the present day. Actions with no defer date assigned are grouped at the bottom of the outline.
-
Completed—Actions are grouped by completion date, from most recently completed to oldest. The granularity of the grouping increases as it nears the present day. Actions with no completion date are grouped at the bottom of the outline.
-
Dropped—Actions are grouped by dropped date, from most recently dropped to oldest. The granularity of the grouping increases as it nears the present day. Active actions are grouped at the top of the outline.
-
Added—Actions are grouped by the date they were added to OmniFocus, from newest to oldest. The granularity of the grouping increases as it nears the present day.
-
Changed—Actions are grouped by the date they were most recently edited, from newest to oldest. The granularity of the grouping increases as it nears the present day.
-
Flagged—Actions are grouped according to their flagged status, with flagged actions first, followed by unflagged actions.
When grouped by individual actions, actions can additionally be sorted by:
-
Projects Order / Tags Order—Actions are sorted within their grouping in the order they appear in the Projects perspective (or the Tags perspective, if the grouping is based on tags.)
-
Tag—Actions are sorted by tag. Actions with multiple tags appear only once, alongside other actions in the grouping with the same tag combination.
-
Flagged—Actions are sorted by flagged status, with flagged actions appearing first within their grouping.
-
Name—Actions are sorted alphabetically by name.
-
Due—Actions are sorted by due date. Actions with the earliest due (or overdue) dates appear first, followed in descending order by actions with the latest due dates, and finally by actions without due dates.
-
Defer Date—Actions are sorted by defer date. Actions with the soonest defer dates appear first, followed by more remote actions and finally actions without defer dates.
-
Added—Actions are sorted by the date they were added to OmniFocus, from newest to oldest.
-
Changed—Actions are sorted by the date they were most recently edited, from newest to oldest.
-
Completed—Actions are sorted by the date they were completed, with uncompleted actions first, followed by completed actions from newest to oldest.
-
Dropped—Actions are sorted by the date they were dropped, with active actions first, followed by dropped actions from newest to oldest.
-
Duration—Actions are sorted by estimated duration, from shortest to longest. Actions without an estimated duration appear at the bottom of the outline.
Grouping and Sorting by Entire Projects
When displayed as entire projects, the outline contains a list of projects with items that meet the filter rules organized hierarchically inside them. Further refinement of grouping and sorting offers additional options. The Show project paths option is not available for this setting because actions are already displayed within their corresponding projects.
Items without a project that otherwise meet the filter rules are grouped into an Inbox section at the top of the outline.
When grouped by entire project, the projects within the perspective can additionally be grouped by:
-
Ungrouped—Projects are not grouped and presented as a flat list.
-
Folder—Projects are grouped into the folders that contain them. Projects outside of folders are grouped in a No Folder section at the bottom of the outline.
-
Due—Projects are grouped by due date, from oldest to newest. The granularity of the grouping increases as it nears the present day. Projects with no due date are grouped in a No Due Date section at the bottom of the outline.
-
Defer Date—Projects are grouped by defer date, from oldest to newest. The granularity of the grouping increases as it nears the present day. Projects with no defer date are grouped in a No Defer Date section at the bottom of the outline.
-
Completed—Projects are grouped by the date they were completed, from most recently completed to oldest. The granularity of the grouping increases as it nears the present day. Projects with no completion date are grouped in a No Completion Date section at the bottom of the outline.
-
Dropped—Projects are grouped by the date they were dropped, from most recently dropped to oldest. The granularity of the grouping increases as it nears the present day. Projects with no drop date are grouped in a Not Dropped section at the top of the outline.
-
Next Review—Projects are grouped by the date of their next scheduled review, from newest to oldest. The granularity of the grouping increases as it nears the present day.
-
Added—Projects are grouped by the date they were added to OmniFocus, from newest to oldest. The granularity of the grouping increases as it nears the present day.
-
Changed—Projects are grouped by the date of their most recent edit, from newest to oldest. (This includes changes to actions within the project.) The granularity of the grouping increases as it nears the present day.
When grouped by entire project, the projects within the perspective can additionally be sorted by:
-
Projects Order—Projects are sorted within their grouping by the order they appear in the Projects perspective.
-
Name—Projects are sorted alphabetically by name.
-
Flagged—Projects are sorted by flagged status, with flagged projects appearing first. The flagged status of individual actions within projects has no effect on this sorting.
-
Due—Projects are sorted by due dates of actions within the project, from oldest to newest. (Projects containing actions with the oldest due dates appear first.) This sorting applies regardless of whether the project itself has a due date. Projects containing no due dates appear at the bottom of the outline.
-
Defer Date—Projects are sorted by defer date, from oldest to newest. Projects with no defer date appear at the bottom of the outline.
-
Completed—Projects are sorted by the date they were completed, with uncompleted projects first, followed by completed projects from newest to oldest.
-
Dropped—Projects are sorted by the date they were dropped, with active projects first, followed by dropped projects from newest to oldest.
-
Next Review—Projects are sorted by the date of their next scheduled review, from oldest to newest.
-
Added—Projects are sorted by the date they were added to OmniFocus, from newest to oldest.
-
Changed—Projects are sorted by the date they were most recently edited, from newest to oldest. (This includes changes to actions within the project.)
-
Duration—Projects are sorted by estimated duration, from shortest to longest. Projects without an estimated duration appear at the bottom of the outline.
Upgrade or Downgrade Perspective
Custom perspectives you create, as well as names, icons, and colors assigned to them, are synced between all of your devices that sync with your OmniFocus database.
Older versions of OmniFocus do not support all the features of perspectives created with OmniFocus 3. (These perspectives will still sync provided the database version is compatible, however they will be hidden.)
To make a perspective created with OmniFocus 3 visible in earlier versions of OmniFocus, choose Downgrade Perspective. Choosing to downgrade a perspective may remove some advanced filter rules or other features of the perspective.
Alternatively, if you are syncing a perspective created with an older version of OmniFocus to OmniFocus 3, you can choose to Upgrade the perspective to take advantage of the features described in this chapter. Existing perspective rules and presentation settings will be converted to the newer perspective format.
Delete Perspective
Choose this to remove the perspective from your database entirely. Deleting a perspective also removes it from any other synced OmniFocus devices. Since a perspective is simply a view on your data, removing one doesn’t affect the tasks in your OmniFocus database in any way.
Settings
The OmniFocus Settings screen contains a variety of controls for customizing your OmniFocus experience.
To open Settings in OmniFocus for iOS, navigate Home, then tap Settings in the toolbar.
Account
The first section of Settings holds controls for managing your Omni Account and unlocking the various features of OmniFocus.
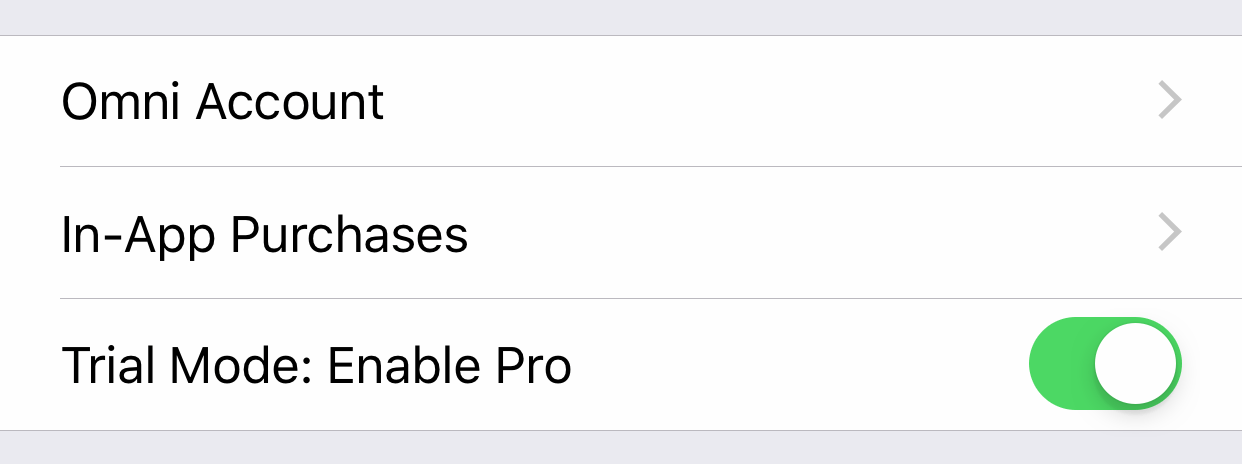
Omni Account
Tap to open a page where you can log in and manage details of your Omni Account, or create an Omni Account if you don't have one yet.
Creating an Omni Account is free, and is required for subscribing to OmniFocus for the Web or syncing with the Omni Sync Server.
In-App Purchases
Tap to unlock OmniFocus features by subscribing, purchasing either the Standard or Pro edition of the app, or restoring a previous purchase. Learn more about OmniFocus subscriptions here.
Trial Mode
Tap the switch in this section to enable or disable Pro features while using the Free Trial edition of OmniFocus (this edition is available for 14 days when you choose the Free Trial Mode in-app purchase option).
General
This section contains information about the version of OmniFocus that you’re using, and links to additional resources that can enrich your OmniFocus experience.
About OmniFocus
Tap to see details about your version of OmniFocus for iOS, including the version number, Omni contact information, and any in-app purchases you have unlocked.
Help
Tap to open the in-app version of this reference manual.
News
Tap to view the latest information from Omni about changes to OmniFocus or iOS that affect your use of the app. (This item only appears when there is news to share.)
Release Notes
Tap to read the release notes for the current version of OmniFocus.
Contact Omni
Tap to send us feedback about OmniFocus or request assistance.
Sign Up for the Omni Newsletter
Tap to visit the Omni website, where you can subscribe to our email newsletter. You’ll get nothing but the latest news and tips for OmniFocus and the other apps in the Omni Group family.
Database
This section contains settings that help maintain your OmniFocus database: choose a sync server, manage your attachments, create or restore backups, and export your data to CSV here.
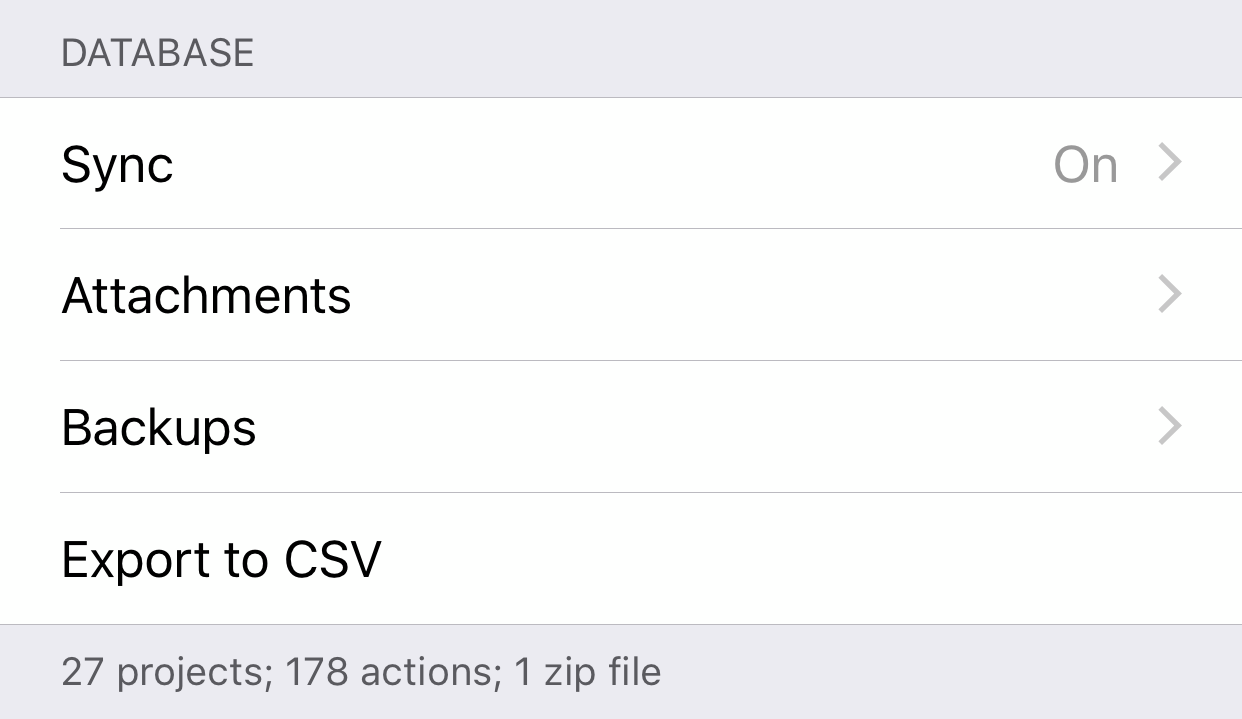
The Clean Database, Migrate Database, and Compact tools in this section only appear if your database is in a condition where it could use the help they provide. If you don’t see them here, you’re probably in good shape.
Sync
Tap to open Sync settings, with information about your current sync server (if you have chosen to sync your data remotely). If you are not currently syncing, this page prompts you to set up an account.
Even if you’re only using OmniFocus on a single device, we recommend setting up sync for the automated data backup it provides.
If you choose to sync, keep your sync password (and separate encryption passphrase, if you use one) in a safe place. If you lose these, you’ll lose access to your data.
Once you set up sync, the Sync page has several settings that describe the features and details of your sync account and connection.
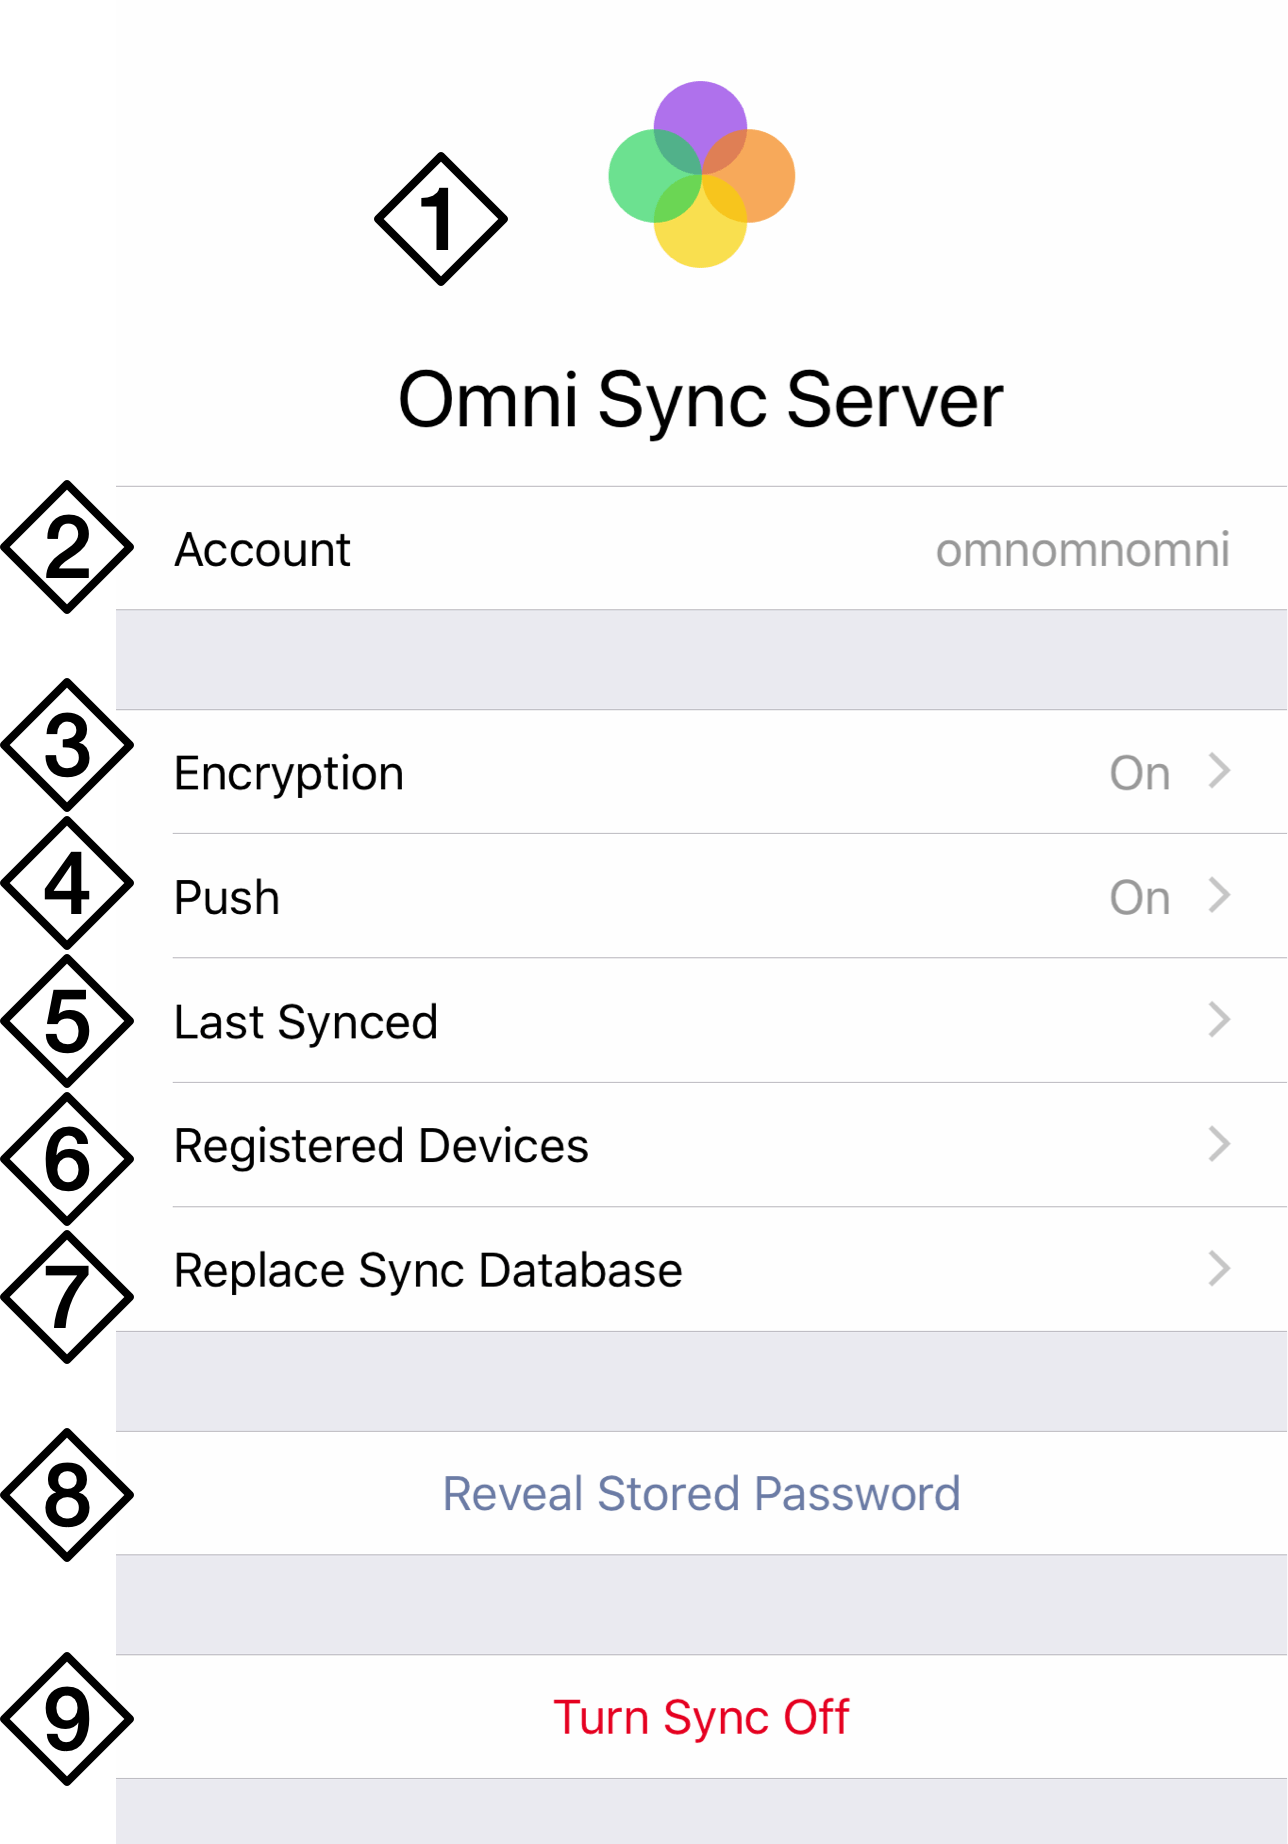
-
Account Type—The top portion of Sync settings displays the type of account that your database is currently synced with. This can be either an Omni Sync Server account, or a WebDAV account that you manage independently.
-
Account Name—This field displays the name of the sync account that you are using.
The account name cannot be changed while sync is turned on. To switch sync accounts, tap Turn Sync Off at the bottom of the Sync settings page, then proceed through the sync setup dialog and enter the information of the new account.
-
Encryption—Check whether your OmniFocus database is encrypted on the server, and optionally choose a separate passphrase (distinct from your sync password) for decrypting it. Learn more about OmniFocus encryption here.
-
Push—Check the status of push-triggered sync on your sync account (it’s set to On by default). This feature offers faster, more frequent syncs; for more information, see this support article and this blog post.
-
Last Synced—View the timestamp for your last database sync at a glance here, or tap to view the log of all recent syncs and the reasons for them.
-
Registered Devices—View a list of devices registered to sync with your cloud database, along with some other useful information: the entry for your current device is highlighted in purple, and the day a device last synced is shown adjacent to it (if a device hasn’t synced in over a week, its last sync date is highlighted in yellow).
From the Registered Devices screen, you can also Edit the list to remove any devices you no longer want to sync with.
-
Replace Sync Database—If your data is in conflict with another version stored on your sync server and you are confident that the version on your device is the one you prefer to keep, choose this item and tap Replace Database to overwrite your remote database with the local one.
-
Reveal Stored Password—View the password for your sync account as it is locally stored and encrypted on your device. This requires giving OmniFocus permission to reveal your secure data using Face ID or Touch ID, so another person accessing your device will not be able to see your password.
-
Turn Sync Off—Turn off sync and use OmniFocus with a local database only. Leaving sync turned off is not recommended. If you need to switch sync accounts, tap this to turn off the currently connected account and use the setup dialog to connect to the new one.
Attachments
Tap to open the Attachments List, a view that displays all of the files attached to your OmniFocus database and links to their corresponding tasks. Sort attachments by file size or date added and delete any unwanted ones here.
Tap an individual attachment for a detail view which lists the attachment file size, the number of references to the file in your database, and a list of associated database items. Tap one of those items to go straight to where the file is attached, or tap Delete in the upper right to remove the file from your database.
To remove multiple attachments at once, tap Select in the main Attachments List view and tap all of the files you would like to delete. Use the controls above the attachment thumbnails to sort the files by size or date added (largest and most recent files are shown first by default; tap Sort to switch the ordering).
With the unwanted files selected, tap Delete in the upper left to remove them from the database.
Backups
OmniFocus for iOS can create and store a backup of your database locally on your device. With Automatic Backups turned on, the backup is replaced every 24 hours with a new copy; otherwise, you can back up manually at any time by tapping Back Up Now.
Restore from your most recent backup by tapping it and choosing Revert to This Backup. Unlike a remotely synced database that’s kept identical to the one on your device, this backup database is only available on the specific iPhone or iPad with OmniFocus installed. If you remove OmniFocus from your device the backup is deleted as well.
Clean Database
This tool appears when you have over 1000 items that have been completed for six months or longer. Use this to lighten the load on your database by removing those old items.
If you have OmniFocus for Mac, we recommend using its Archive feature to prune old items instead; see this support article for help on keeping your database size manageable.
Migrate Database
This tool appears if you’re syncing to an older database version that doesn’t support some of the newer features of OmniFocus. See this support article for instructions on getting your database up to date.
Compact
This tool appears if your database is particularly complex, and can be useful in reducing performance issues if OmniFocus appears to be slow or unresponsive. Choosing to compact your database makes it more streamlined by removing redundant transactions; your OmniFocus tasks are unaffected.
Export to CSV
As part of our commitment to your complete ownership of your data, we offer the ability to export your OmniFocus database in the open CSV format. Your data is available this way whenever you need it, presented in a tabular format viewable in just about any text editor.
Database Info
The text beneath this section has statistics about your OmniFocus library: the number of items in your database, and the number of zip files used to contain your data. If you are syncing, you should try to sync all of your OmniFocus databases regularly to keep the number of files down.
Accessibility
This section provides additional options for navigating OmniFocus using iOS VoiceOver, and only appears when VoiceOver is turned on.

VoiceOver
Choose Hide Status Circles from this submenu to instead use a custom action to mark items complete (swipe down with a row selected to access custom actions). This can improve efficiency in workflows that rely on VoiceOver navigation.
Colors
This section controls the palette of colors used throughout the app, including the option to switch to the Dark Mode color scheme.
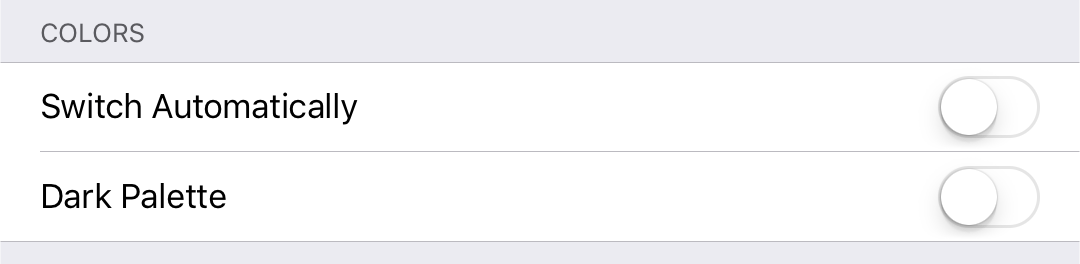
Switch Automatically
If you’d like OmniFocus to switch color schemes automatically, this sets a threshold of screen brightness that the app uses as a tipoff to make the change. When the screen dims below the threshold—either automatically because your screen is set to adjust dynamically based on ambient light, or by manually changing the screen brightness—OmniFocus will switch to Dark Palette on its own. Likewise, when the screen brightens above the set threshold, OmniFocus reverts to the lighter default palette.
Dark Palette
Choose to use the Dark Palette color scheme throughout the app persistently, regardless of your device’s brightness setting.
Organization
This section controls how items are treated after they have been edited in a way that would cause them to move elsewhere in your database. (This is referred to in OmniFocus as “cleaning up”.)

Clean Up
This setting controls the conditions that cause items to leave your Inbox, and dictates whether completed items should be cleaned up (have their status applied to the view) immediately upon completion, or when changing away from the current view.
You can choose to clean up Inbox items which have:
- A Project
- A Tag
- Both a Project and a Tag
- Either a Project or a Tag
You can choose to clean up completed items:
- Immediately
- When Changing Views
If you choose to clean up when changing views, you can still clean up manually by tapping Clean Up in the toolbar (in compact views, drag down on the outline instead).
Due Dates
This section includes options for when items should appear as due soon. Items that are due soon have their status circles styled in amber wherever they appear.

“Due Soon” Means
Tap to set the timeframe for how you would like OmniFocus to define items that are due soon. Options include 24 hours, 2 days (the default), 3 days, 4 days, 5 days, and 1 week.
Notifications
This section holds options for customizing the alerts OmniFocus displays on your iOS device, and what you’d like to see in the Today screen of Notifications Center.
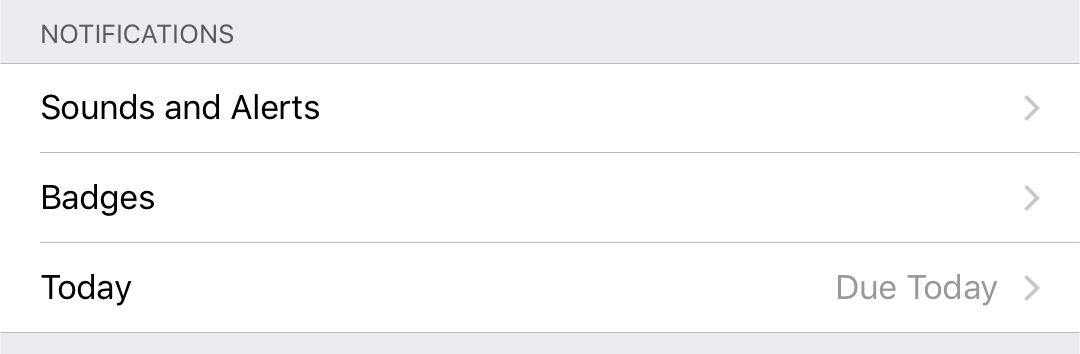
Sounds and Alerts
Tap to set alerts and sounds for due and location-based notifications.
-
Sounds—This includes controls for setting sound notifications for items based on due date, custom notifications, and location-based notifications.
-
Date and Time: Notify on this Device—Turn this on to have date and time-based notifications appear on this device. With this turned off, the following three settings do not appear.
-
Deferred—Turn this on to automatically schedule a notification for when a deferred item becomes available.
-
Latest Start—Turn this on to automatically schedule a notification for an item’s latest possible start time (its due date minus its estimated duration).
-
Due—Turn this on to automatically schedule a notification for when an item becomes due.
-
Location: Notify on this Device—Turn this on to have location-based notifications appear on this device.
Badges
Tap to choose the items that are counted in the badge attached to the OmniFocus app icon (the little red circle laid over the icon’s upper right corner).
This section also offers the option to show a summary breakdown of items included OmniFocus’s badge count in the Today widget. With Show Explanation in Today Widget turned on, the badge count appears in the Today widget and contains a summary of the item types that comprise it.
Today
Customize the items you’d like to see in the Today view of iOS Notification Center via OmniFocus’s Today widget. With the OmniFocus Pro upgrade, you can also choose a custom perspective in Today.
If you have an Apple Watch paired with your device, the option you choose here governs what the app considers most important today for display in the OmniFocus for Apple Watch home screen and Complications.
Siri
Use the settings in this section to have OmniFocus capture items from a chosen list in the iOS Reminders app, or set up shortcuts that work with Siri to navigate directly to your OmniFocus perspectives.
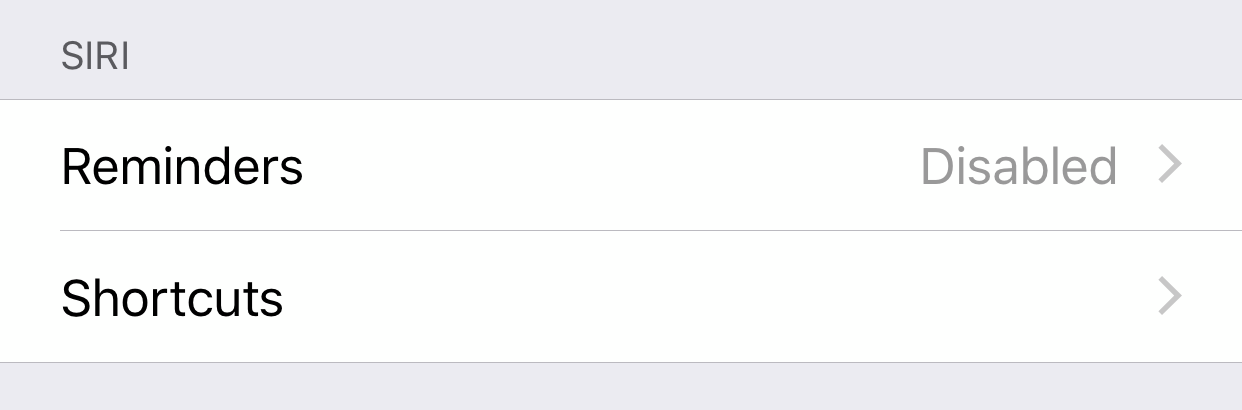
Reminders
This setting offers the ability for OmniFocus to capture items sent to a list in the iOS Reminders app. Earlier versions of OmniFocus relied on this for communication with Siri, and the feature is still available for workflows that require it.
Note that Reminders Capture is no longer the preferred method for OmniFocus to interact with Siri. Instead, use Siri terminology to add items to OmniFocus directly.
Shortcuts
Tap to open a list of your OmniFocus perspectives, then tap a perspective to open the Siri Shortcuts recording dialog. Record a custom phrase here that can be used with Siri to open the perspective directly from anywhere on your device.
Learn more about Siri Shortcuts in the Interacting With Siri appendix.
TextExpander
OmniFocus supports TextExpander snippets. With TextExpander from Smile Software installed on your device, you’ll see a button labeled Update Snippets in this section of OmniFocus settings. Tap it to refresh the snippets that OmniFocus recognizes based on your latest changes in TextExpander.
This section only appears if you have TextExpander installed.
Privacy
This section contains controls for App Lock, a way to keep your work shielded from casual inspection or alteration by someone with temporary access to your device.

App Lock
If you use OmniFocus on a device that you occasionally share (with your children, coworkers, or clients, for example), there may be times when you would prefer that your OmniFocus data be out of reach.
The App Lock feature prevents accidental taps and casual glances by adding a password-locked privacy screen that must be dismissed before any of your data or settings can be accessed.
A Note on Security
App Lock does not encrypt your OmniFocus data, nor does it prevent someone with physical access to your device from connecting it to iTunes and copying your database file or deleting OmniFocus from your device outright.
The iOS Files app can also be used to retrieve your OmniFocus database file regardless of whether App Lock is enabled.
App Lock is intended as a privacy feature to prevent accidental exposure or corruption of data when others are using your device. It is not meant to thwart serious attempts to access or compromise your data.
Device-level security measures are recommended for those with additional security needs.
App Lock is turned off by default. To turn it on, tap App Lock.
When you turn on App Lock, you will be prompted to choose and confirm a new App Lock password (this is distinct from and unrelated to your OmniFocus sync password). If you use OmniFocus on multiple iOS devices, you need to configure and set an App Lock password on each device. App Lock passwords are device-specific and do not sync across devices.
Warning
If you forget the App Lock password, OmniFocus can no longer be used on your device. If you are syncing your OmniFocus data with a cloud server (such as the Omni Sync Server), the easiest way to get running again is to delete OmniFocus and then reinstall the app from the App Store, log in using your existing sync credentials, and restore your database from the sync server.
If you have chosen not to sync, you can retrieve your OmniFocus data by connecting your device to a computer with iTunes and copying your OmniFocus data (the OmniFocus.ofocus file) to a safe location.
You can also use the iOS Files app to retrieve your database file and share it (via email or other means) to another location.
After saving a backup of your data, delete OmniFocus from your device and reinstall it from the App Store. After reinstalling OmniFocus, you can set a new App Lock password and use iTunes to load your OmniFocus.ofocus file back onto your device.
After choosing a password, App Lock is turned on. The App Lock Settings screen offers the option to turn App Lock back off, change your password, or enable Touch ID or Face ID as an alternative means of unlocking OmniFocus on devices that support it.
To change your password, Tap Change Password.... You are prompted to enter your old password, and then to choose and confirm a new one.
With App Lock turned on, the next time you open OmniFocus you will see a privacy screen with a field to enter the password you chose. Enter the password, and work resumes unimpeded.
To minimize interruption when switching between apps, App Lock will not engage for a 90 second “grace period” after switching away from OmniFocus (in case you decide to switch back).
If you choose to use Touch ID or Face ID, a prompt for your fingerprint or face will appear instead. You will still have the option to enter your password, or you can tap the fingerprint icon next to the password field to unlock with Touch ID or Face ID if you dismissed the prompt initially.
Device Information
Use this section to contribute to future OmniFocus development efforts by sending us your anonymous usage data.

Send Anonymous Data
If you’d like to help us improve future versions of OmniFocus, you can choose to send general data about your device and OmniFocus app usage by turning this on. Before choosing whether to share your data anonymously, you’ll get a preview of exactly what we’ll receive (it’s technical information that helps us reproduce and fix bugs). We’d love it if you’d like to help us out!
Reset

If you want to revert to the default OmniFocus experience, you can reset various parts of the app using the tools here. Tap Reset to choose from among the following options.
-
Reset Feature Tips—Reset the display of Feature Tips sheets (shown the first time you visit a new perspective).
-
Reset Home Screen—Revert the home screen or sidebar tiles to their original positions (no other settings are affected).
-
Reset All Settings—Restore all the preferences here in Settings, as well as view options and other visual customization throughout the app.
-
Reset Database—To start over from scratch (are you sure you really want to delete everything?!), tap Reset Database to delete your entire database of OmniFocus projects, actions, and perspectives.
OmniFocus Version—Finally, the text at the bottom of the Settings screen shows the version and build of OmniFocus installed on your device (useful when contacting Support).
Getting Help
When you’re in need of help—whether you’re trying to figure out how custom perspectives work, how to sync your database with OmniFocus for macOS, or if you’re having some other issue with OmniFocus—it’s good to know that the Support Humans at The Omni Group are always available to lend you a hand.
Release Notes
For a detailed, comprehensive summary of the latest changes to OmniFocus, tap Settings in the Home toolbar and choose Release Notes. This is a good place to check if something is behaving in a new way after an update.
Finding Help Online
The OmniFocus Support Site provides a wealth of information (including this reference manual) as well as how-tos and support articles which go into finer detail on working with OmniFocus.
Browsing the reference manual online in split screen with OmniFocus is a great way to familiarize yourself with the app on iPad.
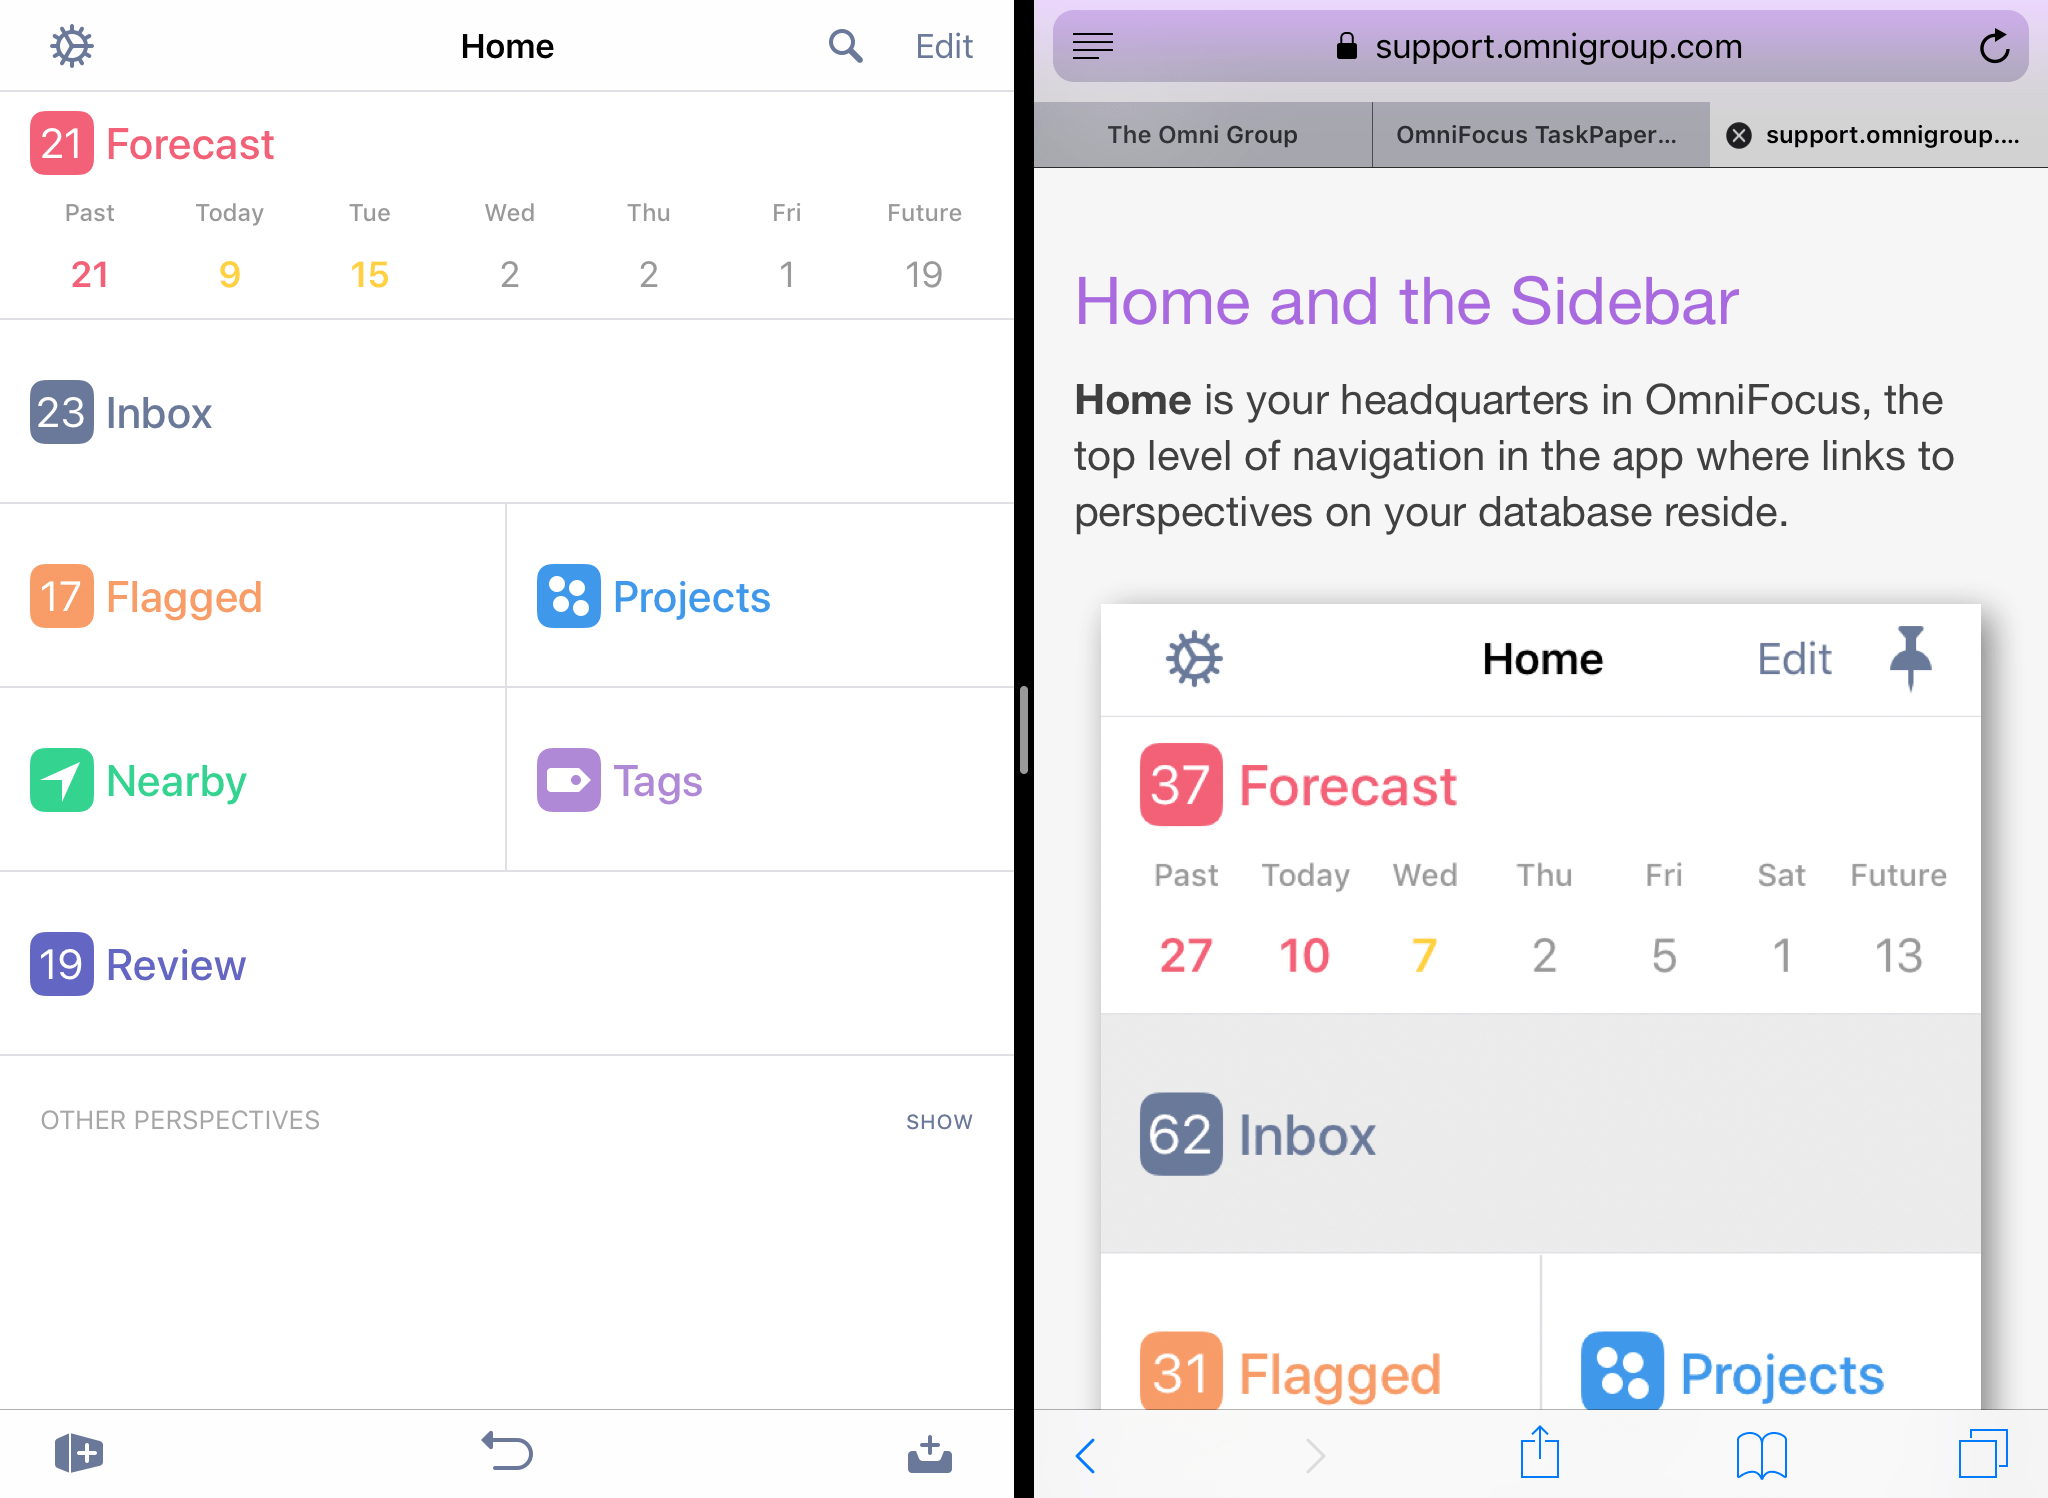
Similarly, the OmniFocus product page is always a good place to find the latest information about features and updates to OmniFocus.
For inspiration on setting up a workflow to suit your needs and deep dives into some of OmniFocus’s extended features, check out Inside OmniFocus.
Videos
In addition to the online help, we also provide a series of online videos for OmniFocus. These videos range in topics from available features in the latest version of OmniFocus to how-to tutorial videos to help you level up in your OmniFocus skills.
Email Support
If you’re stuck, if you have a good idea for the next version of OmniFocus, or if you just want to let us know how we’re doing, go ahead and send us an email. From Home, tap Settings and choose Contact Omni to queue up an email message addressed to us, or just send us an email with your thoughts. We take support pretty seriously, so you can expect a prompt response actually typed by human hands.
Phone Support
We understand that sometimes you just can’t wait for an email response when you’re knee-deep in a project and you’re stuck or something isn’t working quite right. We get that. When this happens, you can call our Support Humans at 800-315-OMNI or 206-523-4152. Our Support Humans are available Monday-Friday, from 10 a.m. to 5 p.m. Pacific Time (-0700 GMT).
Online Forums
Omni maintains online forums for all of our products, which are available to everyone. Come share your questions and ideas with other users, share tips to show off how you’re using OmniFocus for getting stuff done, and seek help from the OmniFocus community.
Troubleshooting
Here are a few tips you can try with OmniFocus’s own built in self-help features:
Finding Misplaced Items
-
Try using the Completed and Changed perspectives to track down errant actions. You can find them by tapping Show in the Other Perspectives section at the bottom of the Home view.
-
Drag down on the outline to search for text in the missing items, and use the Here, Remaining, and Everything filters to narrow your results.
Improving Performance
-
Sync all the things regularly! This reduces sync wait times and generally improves speed and performance across the board.
-
Delete unneeded attachments to lessen the sync load and disc space footprint of your database. We recommend curating your attachments using the Attachments List to help easily spot the ones you don’t need.
Appendix A
Gestures and Keyboard Shortcuts
This appendix collects the useful gestures found throughout OmniFocus in one convenient place for reference, and helps you make the most of working with a connected keyboard by listing the keyboard shortcuts that are available based on your current place in the app.
Useful Gestures
Most of the interactions in OmniFocus are evident based on what you see on screen, but there are some time-saving shortcuts that aren’t always as easy to find. This section lists gesture-based interactions available throughout the app that make common actions even more convenient.
Pull to Clean Up
-
In compact views, pull down from the top of the outline to clean up the current view.
-
In wide views, this is replaced by the Clean Up
button.
Pull to Sync
- Pull down from the top of the screen (in the sidebar on wide views, anywhere on compact views) to prompt OmniFocus to sync.
Swipe in the Outline
- Swipe an action or Inbox item row from right to left to delete it. Tap More to add a due or defer date, or reschedule.
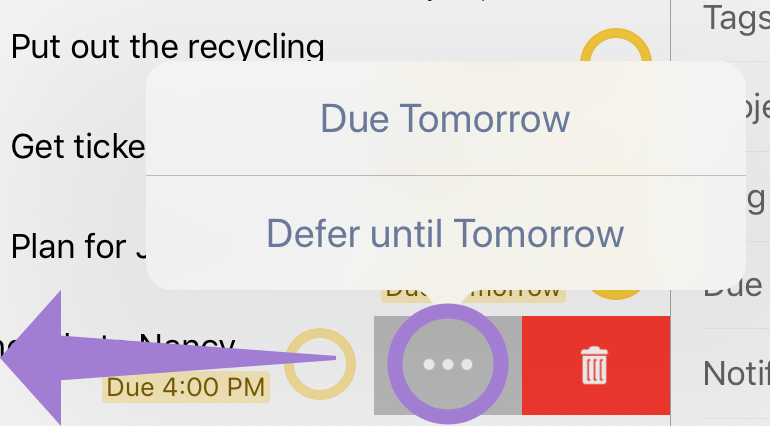
- Swipe an action or Inbox item row from left to right to flag or unflag it, or to tag or untag it with the Forecast tag .
Swipe in the Sidebar
- Swipe a project from right to left to delete it. Tap More to review it, add a due or defer date, or reschedule.
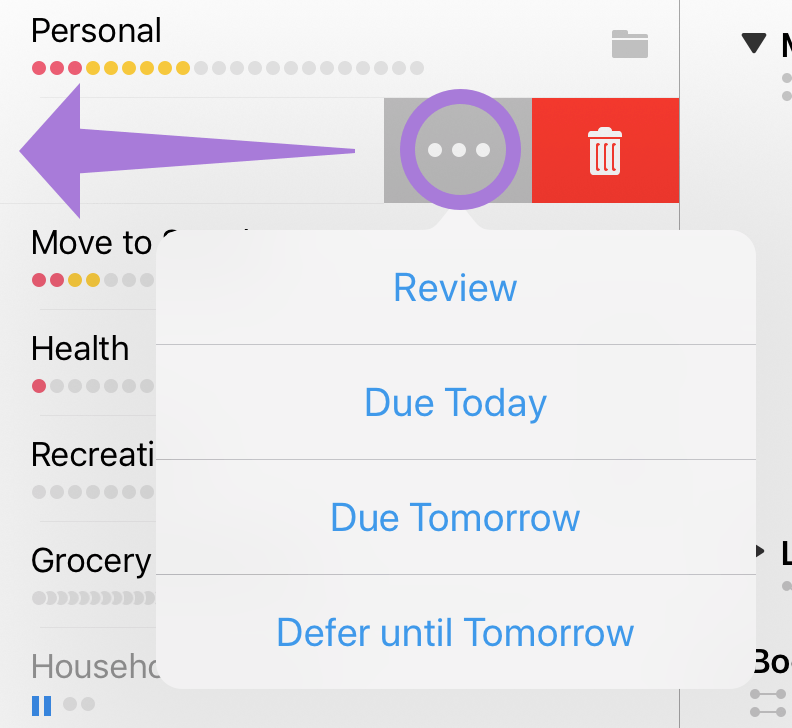
-
Swipe a project from left to right to flag or unflag it, or to tag or untag it with the Forecast tag
. -
Swipe a tag from right to left to delete it.
Drag and Drop From the Outline
-
Drag and drop items within the outline to reposition them, or create groups by dropping items on top of other items.
-
Drag items from the outline to a project or tag in the sidebar to add them to that project or tag.
-
Drag items from the outline to a date in the Forecast date row (either in the Home tile or the Forecast perspective outline) to assign that due date to them.
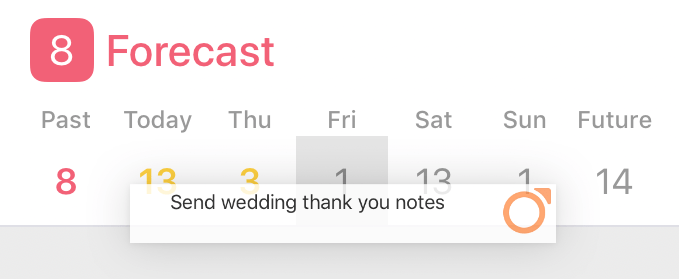
- Drag items from the outline to other iOS apps to add them in plain text TaskPaper format.
Drag and Drop To the Outline
-
From outside OmniFocus, drag text rows to add each row as an item.
-
Drag rows from OmniOutliner, OmniPlan, and OmniGraffle’s outline view to add them as OmniFocus items.
-
Drag images from Photos or Safari to add them as items with the image file attached.
-
Drag messages from Mail to add them as items with links to the original messages in the notes field.
-
Drag files of any type from the Files app (or elsewhere) to create new items and add the files as corresponding attachments.
Drag and drop between apps is currently supported on iPad only.
Drag and Drop in Home
- With OmniFocus Pro, tap and hold a tile in the Home view to enter Tile Editing mode. Drag perspective tiles to rearrange them.
Drag and Drop in the Sidebar
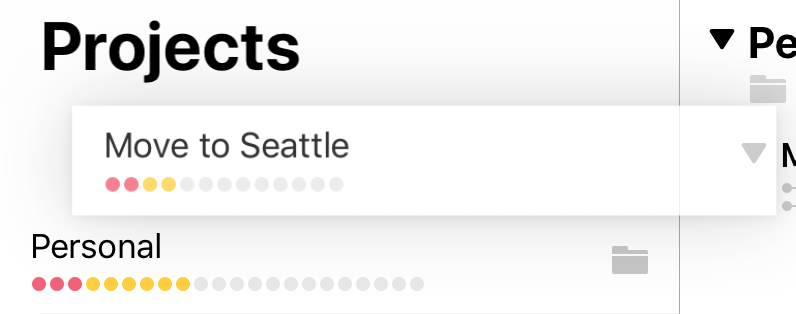
- In the sidebar for Projects and Tags, drag and drop rows to rearrange them within the current level of hierarchy.
Drag New Inbox Item
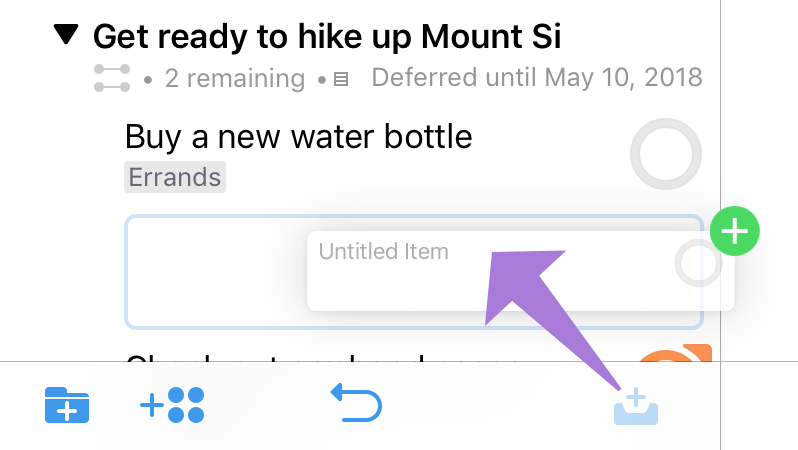
- Drag the New Inbox Item button anywhere in the outline to add an item there, pre-filled with attributes corresponding to the current perspective and item location.
Tap and Hold...
-
Items in the outline to open their contextual menus.
-
Back to instantly go Home.
Shake to Undo
- On iPhone, shake the device to mimic the effect of tapping Undo .
Keyboard Shortcuts
If you’re using OmniFocus for iOS with an external keyboard, you can take advantage of the app’s built in keyboard shortcuts for many common tasks.
Anywhere in the app, press and hold the Command key on your connected keyboard to view a list of available shortcuts. There are some common shortcuts that work no matter where you are; others are specific to your current view.
| Action | Shortcut |
|---|---|
| Universal Shortcuts (available anywhere in the app) | |
| Cut | Command-X |
| Copy | Command-C |
| Paste | Command-V |
| Undo | Command-Z |
| Redo | Shift-Command-Z |
| Outline Shortcuts (with an item selected in the outline) | |
| Complete/Uncomplete | Space |
| Drop/Undrop | Option-Space |
| Inspector Shortcuts (when editing item details) | |
| Edit Note | Command-’ |
| Set/Remove Flag | Shift-Command-L |
| Info | Control-1 |
| Note | Control-2 |
| Attachments | Control-3 |
| Save (when adding a new item only) | Command-S |
| Save Plus (when adding a new item only) | Option-Command-S |
| Cancel | Command-. |
| Delete | Command-Delete |
| Previous Item | Command-↑ |
| Next Item | Command-↓ |
| Projects Perspective Shortcuts | |
| New Project | Shift-Command-N |
| New Folder | Option-Shift-Command-N |
| Tags Perspective Shortcuts | |
| New Tag | Control-Command-N |
| Review Perspective Shortcuts | |
| Mark Reviewed | Shift-Command-R |
| Navigation Shortcuts (outside the new item editor) | |
| OmniFocus Settings | Command-, |
| New Inbox Item | Control-Option-Space |
| New Action | Command-N |
| Sync | Shift-Command-S |
| Search | Command-F |
| Favorite Perspectives | Command-0 through Command-9 |
| Collapse All | Control-Command-0 |
| Expand All | Control-Command-9 |
| Home | Shift-Command-H |
| OmniFocus Help | Command-? |
Other Keyboard Tips
In perspectives other than Forecast, if you have a hardware keyboard attached you can press the down arrow key to select the first item in the outline (even if nothing is selected), then use the arrow keys to keep moving through your items.
Appendix B
OmniFocus for Apple Watch
Apple Watch offers great opportunities for making OmniFocus even more useful. OmniFocus 3 for iOS includes a Watch app designed to work seamlessly with your OmniFocus experience on iPhone and beyond.
To start using OmniFocus on Apple Watch, configure it like you would any other Apple Watch app.
Apple Watch Series 3 owners: Apple Watch Series 3 can make calls, send texts, and receive notifications from your iPhone over LTE, even when your phone isn’t with you. However, due to technical limitations, OmniFocus for Apple watch still syncs with your phone directly. We hope that future models of Apple Watch will allow untethered access to your OmniFocus database.
For more general information on using your Apple Watch, see Apple’s User Guide and video tutorials.
The OmniFocus for Apple Watch Home Screen
When you open OmniFocus from the Apple Watch Home Screen, the Dock, or a complication, you’ll see the OmniFocus for Apple Watch Home Screen: a succinct overview of your OmniFocus database divided into several sections.

The top row is a condensed version of Forecast, which counts items by due date. The second row counts the items you’ve marked with a flag and the unprocessed items in your inbox.
Tap any count on the home screen to open the list it represents. Each action shows a color-coded status circle—just like on OmniFocus for Mac and iOS—so you can immediately see which items are due, flagged, repeating, or completed.
Turning the Digital Crown (or swiping vertically on the screen) while viewing the OmniFocus for Apple Watch Home Screen changes what is displayed in the Continuity Slot at the bottom of the screen. Up to three views are available, depending on how you have set your Today & Watch settings in OmniFocus for iOS (and whether OmniFocus Pro is installed).
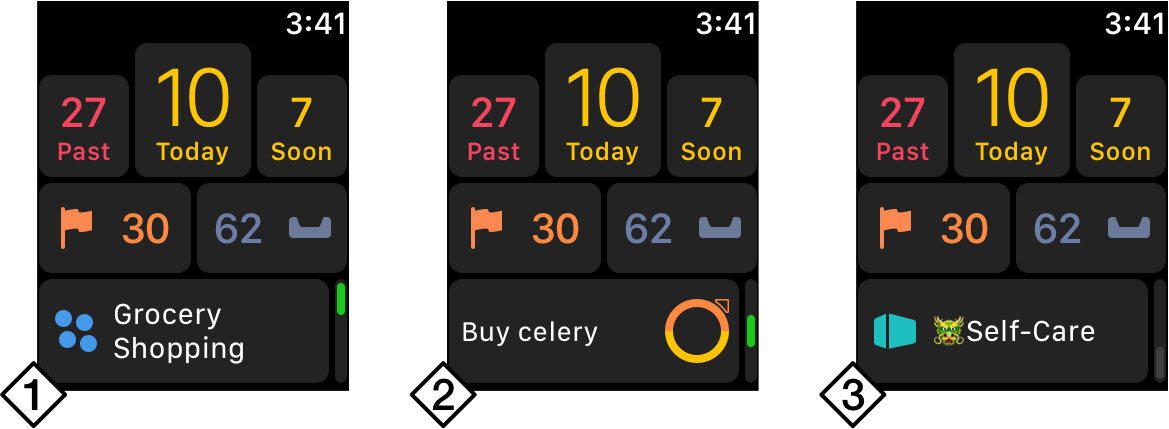
-
Continuity—this view shows the same thing that you’re looking at in OmniFocus on your iPhone. (This mode is blank if you are viewing a screen on the iPhone that is otherwise already represented on the OmniFocus for Apple Watch home screen.)
-
Next Up—this view shows the next item of relevance to you. This is generally the soonest due item (or oldest overdue item, if nothing is due today) in the perspective(s) chosen in OmniFocus for iOS’s Today & Watch settings.
-
Custom Perspective—with the OmniFocus for iOS Pro upgrade installed, this view shows the custom perspective you’ve chosen in OmniFocus for iOS’s Today & Watch settings. If you haven’t chosen one (or if you’re not using OmniFocus Pro), this slot isn’t available.
Adding Inbox Items
Since the Apple Watch doesn’t have a keyboard, you can use your voice to record the titles of new actions. Force Touch anywhere within the app to reveal the menu, then tap New Item and start speaking.
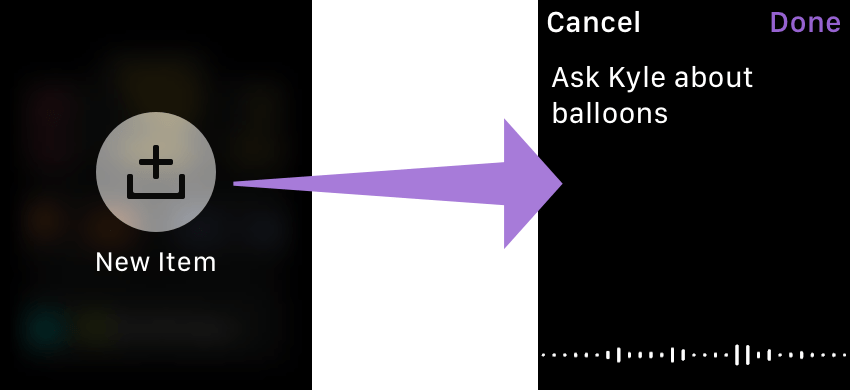
Items added to OmniFocus in this way appear in your inbox, just as if you’d tapped the New Inbox Item button and created a task in OmniFocus for iOS. They’re transferred to your iPhone and tucked away until you have time to review them.
Viewing and Editing Tasks
Just like the rest of OmniFocus for Apple Watch, task views have a scope designed for the customizable display on your wrist.
Viewing Item Details
The greatest amount of detail in OmniFocus for Apple Watch can be found by tapping the title of an action in any of the app’s list views.
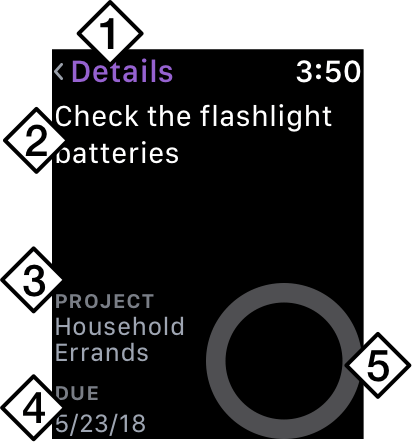
-
Screen Title—When navigating deeper in the app, the colored text at the top of the screen—the screen title—tells you which screen you’re viewing.
-
Action Title—When viewing an action in detail, its title is prominently displayed here.
-
Project—If the action is assigned to a project, the related project is shown here.
-
Due Date—Likewise, if the action has a due date, you’ll see it here.
-
Status Circle—Finally, the large status circle provides an easy target for tapping to complete it.
Completing Items
Wherever you see a status circle, tap it to complete the associated item. This is useful for checking off lists viewed from the home screen, or completing items in the individual action view.
Note: Actions are the only items that can be marked complete in OmniFocus for Apple Watch. Use the iOS and Mac apps for making other, more complex changes to the state of items in your database.
Flagging Items
When you’re pressed for time to devote to OmniFocus on your iPhone, flagging important actions on your Apple Watch is a good way to remember that they’ll need some attention soon.
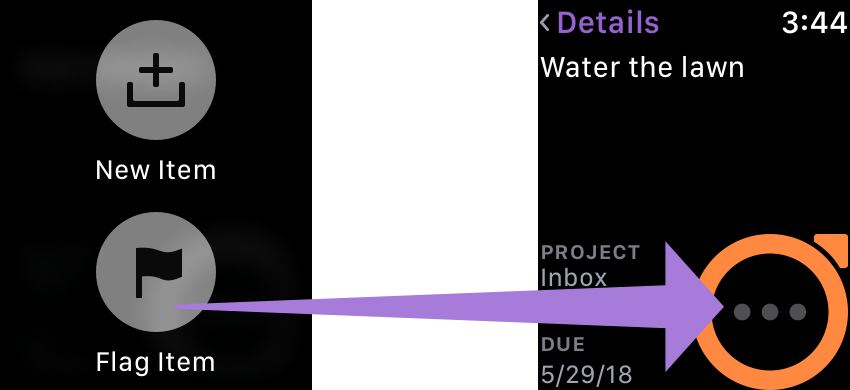
To flag an item, view its details, Force Touch to show the menu, and tap Flag Item.
OmniFocus on your Watch Face
OmniFocus offers several complications so that you can see important data directly on your watch face, no matter which face you’ve chosen. Follow the instructions in Apple’s guide to customizing your watch face to add an OmniFocus complication.
Customizing Today
OmniFocus has a Today & Watch setting to its settings screen that offers the ability to customize what today means to you. On Apple Watch, the setting you choose here governs the items that are displayed in the Next Up view of the continuity slot as well as the OmniFocus Complication on your watch face (if you choose to use it).
The options for this setting include a variety of high priority categories that you can choose to represent items most important to you and your workflow. Due Today is the default selection; however you can choose one or more of the following:
- Overdue
- Due Today
- Due Soon
- Deferred Until Today
- Flagged
- Inbox Items
With the OmniFocus for iOS Pro upgrade, you also have the option of choosing a custom perspective instead of the above presets. The custom perspective count appears in your Complication instead, and can be selected as one of the views in the continuity slot on the home screen of OmniFocus on your Apple Watch.
OmniFocus and the Siri Watch Face
With watchOS 5, OmniFocus can use Siri Shortcuts to suggest relevant activities that appear on the Siri face of your Apple Watch.
As with shortcuts on iOS, these suggestions occur automatically based on how you use the app and your watch. No special configuration is required.
If watchOS decides that other activities are taking precedence over OmniFocus, those will be presented on the Siri face instead. OmniFocus has no direct control over what appears on the Siri watch face.
To set up the Siri watch face and make sure OmniFocus data is being collected for it:
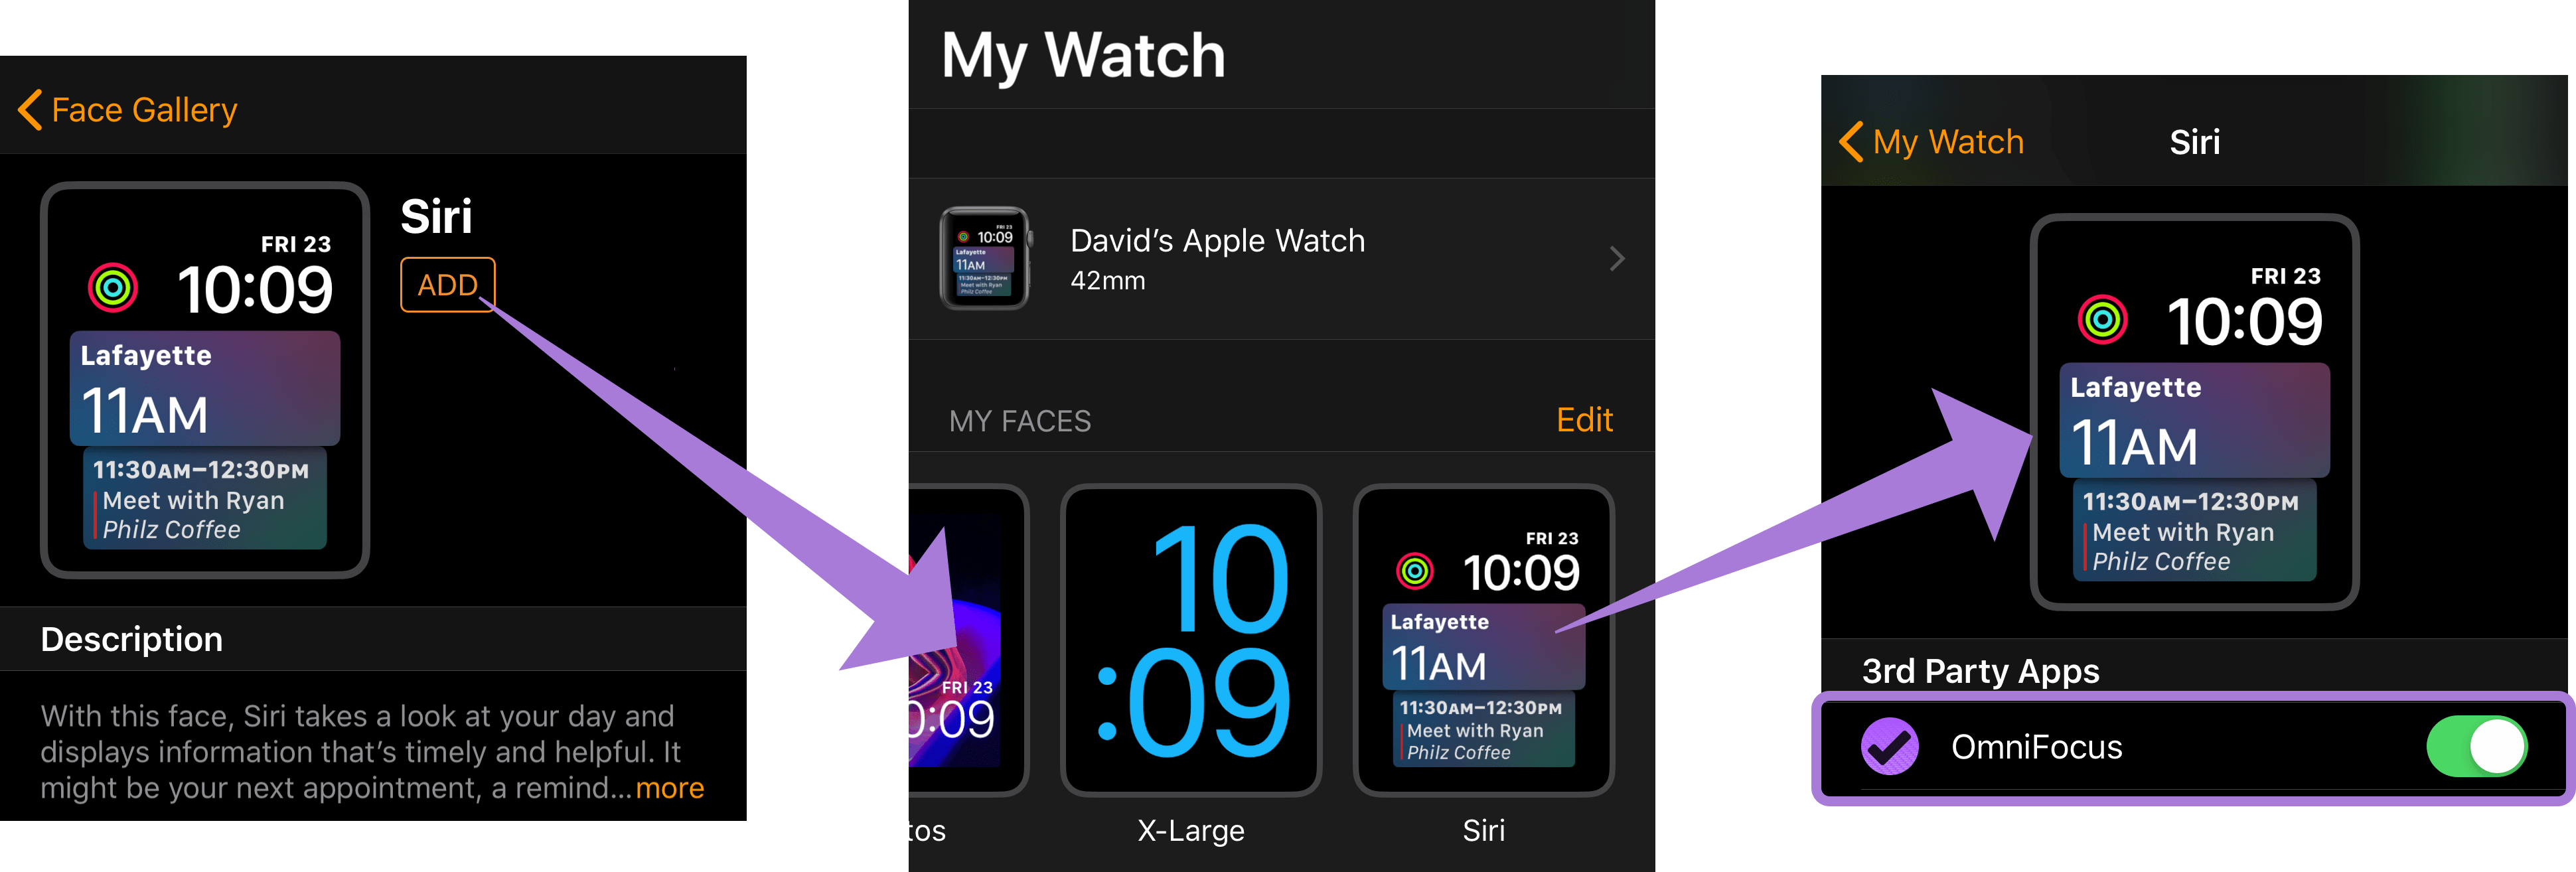
-
Add Siri to My Faces from the Face Gallery in the bottom bar of iOS Watch app.
-
In the Watch app, tap to open the Siri watch face in My Watch. Scroll down to 3rd Party Apps.
-
Check to see that OmniFocus is listed and turned on.
If OmniFocus doesn’t appear in the list of 3rd Party Apps, check to make sure you have OmniFocus 3.1 or later and your device is running iOS 12. If the list of 3rd Party Apps doesn’t appear at all, check to make sure your Apple Watch is running watchOS 5 or later.
As long as OmniFocus is turned on as a data source for your Siri watch face, Siri will suggest relevant shortcuts based on how you use OmniFocus and your Apple Watch. watchOS controls what it considers relevant behind the scenes, so it may take a little while to display your first OmniFocus-related suggestion.
Appendix C
Interacting With Siri
OmniFocus 3 supports interacting with Siri directly. Working with specific inputs that Siri recognizes, you can use voice commands to add and manage items in OmniFocus in many different ways.
When it comes to describing actions and projects, Siri uses words that are a little different from those used by OmniFocus internally. Siri recognizes action items as tasks, while projects and tags are understood as lists. Depending on the structure of your request, Siri and OmniFocus work together to provide the most logical output.
For guidance on using Siri with OmniFocus in languages other than English, see this support article on the Omni website.
Adding Actions
One of the most common needs that Siri can address is adding new actions and inbox items to OmniFocus. Siri listens for you to describe these as tasks that you’ll add in OmniFocus—key components of the example phrases you’ll find below.
It’s important to include the phrase “...in OmniFocus” in requests you give to Siri. Otherwise, Siri might whisk your change off to an unrelated app.
-
“Add a task named ~ in OmniFocus”
Adds an item named ~ to your OmniFocus inbox.
-
“Remind me to ~ at 5:00 PM (on Thursday) in OmniFocus”
Adds an item named ~ to your OmniFocus inbox with a due date set for today at 5:00 PM. Including additional parameters for the due date (such as on Thursday) can further define the set date.
-
“Remind me to ~ when I get home in OmniFocus”
Adds an item named ~ to your OmniFocus inbox with the location-aware tag Home. If a tag with matching name and location data is not found, a new tag is created with the specified name and location.
For example, “Remind me to stop at Voodoo Doughnut when I get to Portland, Oregon in OmniFocus” creates a new location-aware Portland (from Siri) tag (assuming one doesn’t exist) and adds the Stop at Voodoo Doughnut task to it.
Siri can’t directly access location information stored in OmniFocus. When you specify a location as part of a command, Siri searches other available information for a location with a name matching the command.
The most reliable matches are individual addresses associated with locations like your work and home that you’ve set up in your Contacts card in the iOS Phone app. Beyond that, Siri does its best to figure out what you mean by searching other Contacts or location data from the Maps app.
As with other location services on your device, this isn’t always the most reliable way to associate virtual places with reality. If you’ve set up location aware tags in OmniFocus already, the easiest way to make sure new items are assigned to them is to use the “Add ~ to my * list in OmniFocus” syntax described below, where * is a uniquely named tag with the desired location.
For location-aware tags to work properly, make sure that OmniFocus is allowed to access your location (in the iOS Settings app under OmniFocus).
-
Remind me to ~ when I get home at 5:00 PM in OmniFocus”
Adds an item named ~ to your OmniFocus inbox with the location-aware tag Home and a due date of 5:00 PM today (this example is a combination of the previous two).
-
“Add ~ to my * list in OmniFocus”
Adds an item named ~ to a project or tag named * (“add eggs to my grocery list in OmniFocus”, for example).
Since Siri’s notion of lists doesn’t distinguish between projects and tags, you’ll be prompted to confirm the destination for this item (or to choose between available options, if you have more than one project or tag with the same name).
-
“Remind me to ~ when I get home in my * list in OmniFocus”
Adds an item named ~ with the location-aware tag Home. If * is a project, the item is added to that project.
-
“Remind me to ~ every Thursday at 9:00 PM in OmniFocus”
Adds an item named ~ set to repeat every Thursday at 9:00 PM to your OmniFocus inbox. Siri understands OmniFocus’s repeat rules pretty well, so feel free to try any repeating items you can think of.
Adding Projects
When OmniFocus listens to instructions you give to Siri, it interprets a command to create a list as a command to create a new OmniFocus project. (Siri sees both projects and tags as lists. Because of this ambiguity, OmniFocus chooses the relatively more common project as the list type to create.)
Some example phrases:
-
“Create a list called ~ in OmniFocus”
Adds a project named ~ to OmniFocus.
-
“Create a shopping list with bananas in OmniFocus”
Adds a project named Shopping and adds the action Bananas to that project in OmniFocus.
Marking Items Complete
Siri can be used to mark OmniFocus items (both actions and projects) as complete using the following example sentence structure.
-
“Mark ~ as complete in OmniFocus”
Marks an action or project named ~ as complete in OmniFocus. (Projects of the single action list type can’t be marked complete in this way.)
Due to limitations imposed by iOS, Siri can’t mark items complete in OmniFocus while your device is locked.
Searching
Beyond adding and changing items in OmniFocus, you can also ask Siri about the content of your OmniFocus actions, projects, and tags (what Siri understands as tasks and lists respectively).
Some example searches that you can do on your OmniFocus data are as follows (these don’t make any changes to your actual content):
-
“What lists do I have in OmniFocus?”
Shows a list of all the projects and tags you have in OmniFocus.
-
“Show me the ~ list in OmniFocus”
Searches your OmniFocus projects and tags and shows those with names that match ~. If multiple projects or tags match the name, all are shown.
-
“Read me my lists in OmniFocus”
Shows all of your OmniFocus projects and tags with their included actions, and reads them aloud, 25 at a time.
-
“What reminders called ~ do I have in OmniFocus?”
Shows a list of all items matching ~ that you have in OmniFocus.
-
“Read me my ~ task in OmniFocus”
Shows and reads items matching ~ aloud. (If a due date is set, that is read along with the item’s title.)
Siri Shortcuts
Starting with iOS 12, the Siri Shortcuts feature helps you be more productive by analyzing the way you use certain apps on your device. OmniFocus 3.1 for iOS brings support for Siri Shortcuts to your iOS device and Apple Watch.
OmniFocus with Siri Shortcuts requires iOS 12 or later and OmniFocus 3.1 for iOS or later. Siri Shortcuts on the Siri watch face for Apple Watch requires watchOS 5 or later.
With Siri Shortcuts, as you use OmniFocus in various ways (create new items, complete repeating tasks, or browse to different perspectives, for example), Siri keeps track of your actions and starts suggesting activities based on your common use patterns.
You don’t have to manually configure anything to use Siri Shortcuts. By using OmniFocus as you normally would, suggestions for these activities can appear in Spotlight, on the lock screen, and in Siri & Search settings all by themselves.
Voice Activated Shortcuts
To make your most frequently used shortcuts even easier to use, you can set up Siri voice commands for them using Siri & Search settings in the iOS Settings app.
First, open Siri & Search settings. You may see some suggested shortcuts at the top.
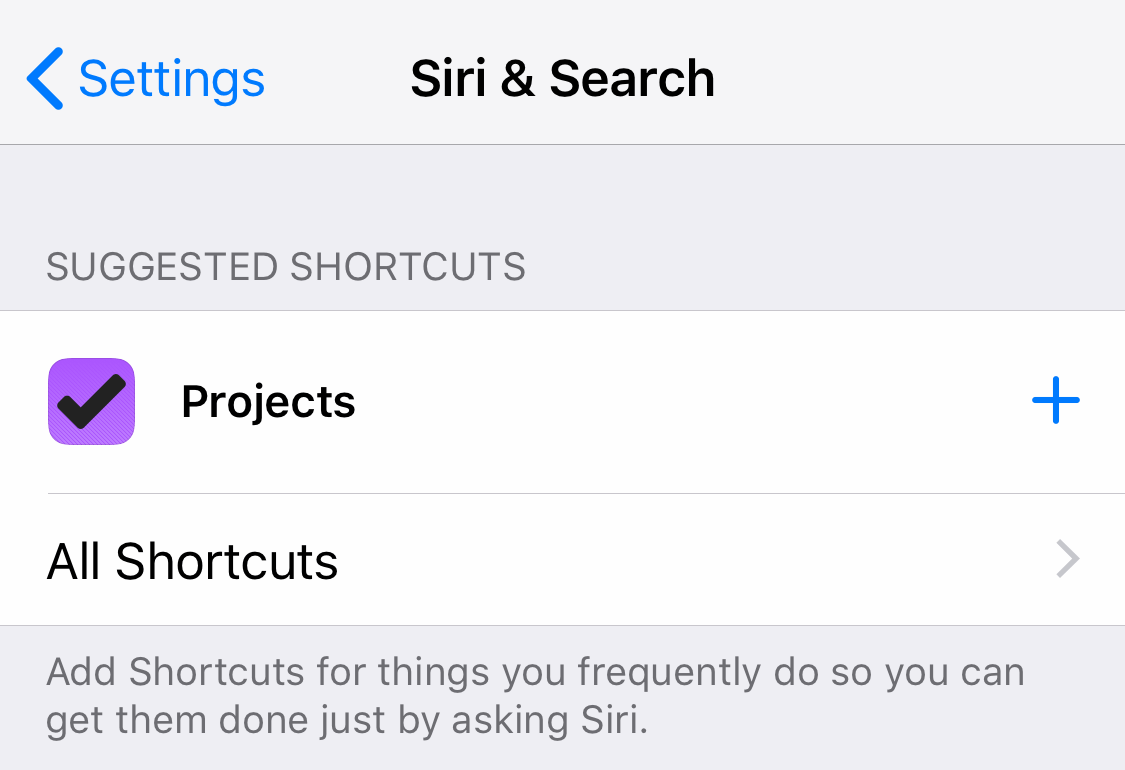
If you don’t see any shortcuts, don’t worry—after using OmniFocus for a little while, suggested shortcuts will start to appear. You can also tap All Shortcuts for a list of those you use less frequently, or scroll down to OmniFocus in the app list of Siri & Search settings to view a full list of recent shortcuts to choose from.
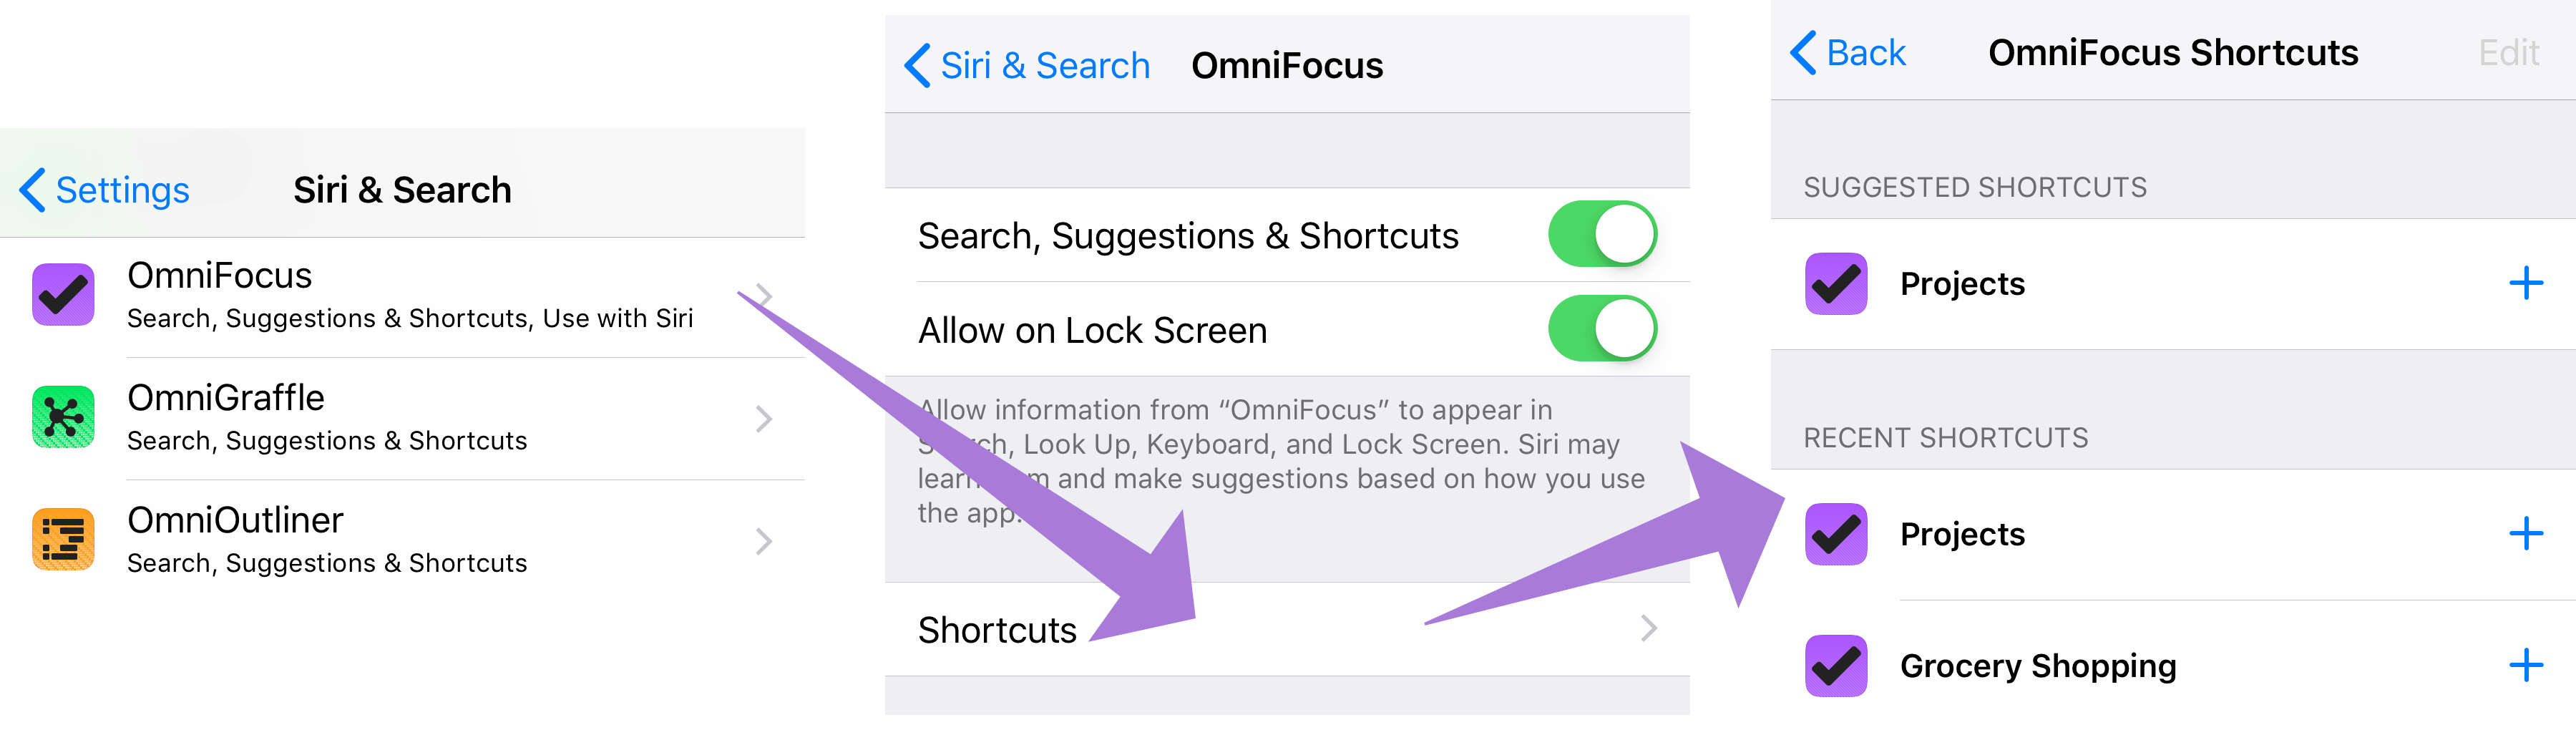
When you see a shortcut you’d like to set up with Siri, tap it to open the Add to Siri voice recorder. Record a phrase, and it appears in the My Shortcuts section at the top of Siri & Search settings.
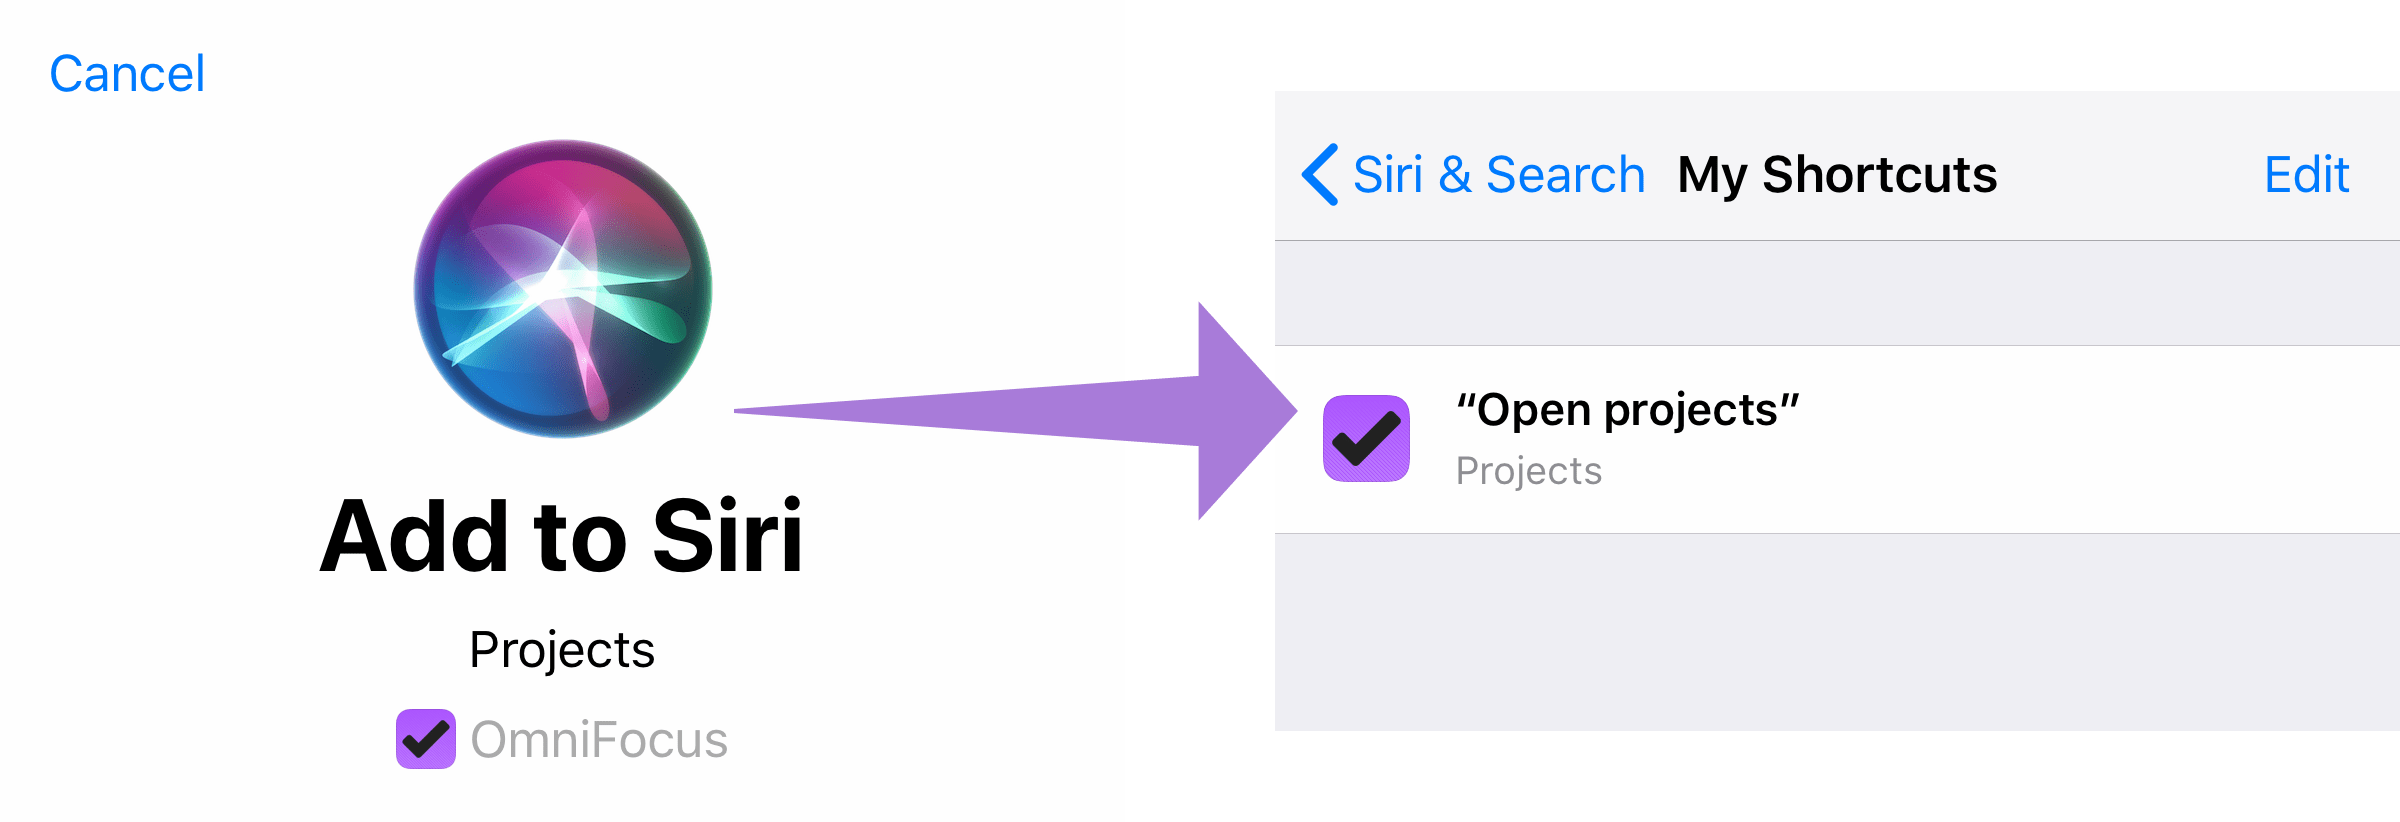
Now, whenever you talk to Siri you can use the phrase you recorded to perform the shortcut in OmniFocus.
Appendix D
iOS Integration
In addition to interacting with Siri, OmniFocus takes advantage of other iOS features to offer convenient access no matter where you are on your device. This appendix describes how OmniFocus works with other native iOS features to deliver the most productive experience possible.
Send to OmniFocus
When you’re in another app and you’re inspired to add something to OmniFocus—whether it be a webpage in Safari, a picture in Photos, or a file from another app that supports sharing—you can send it to OmniFocus.
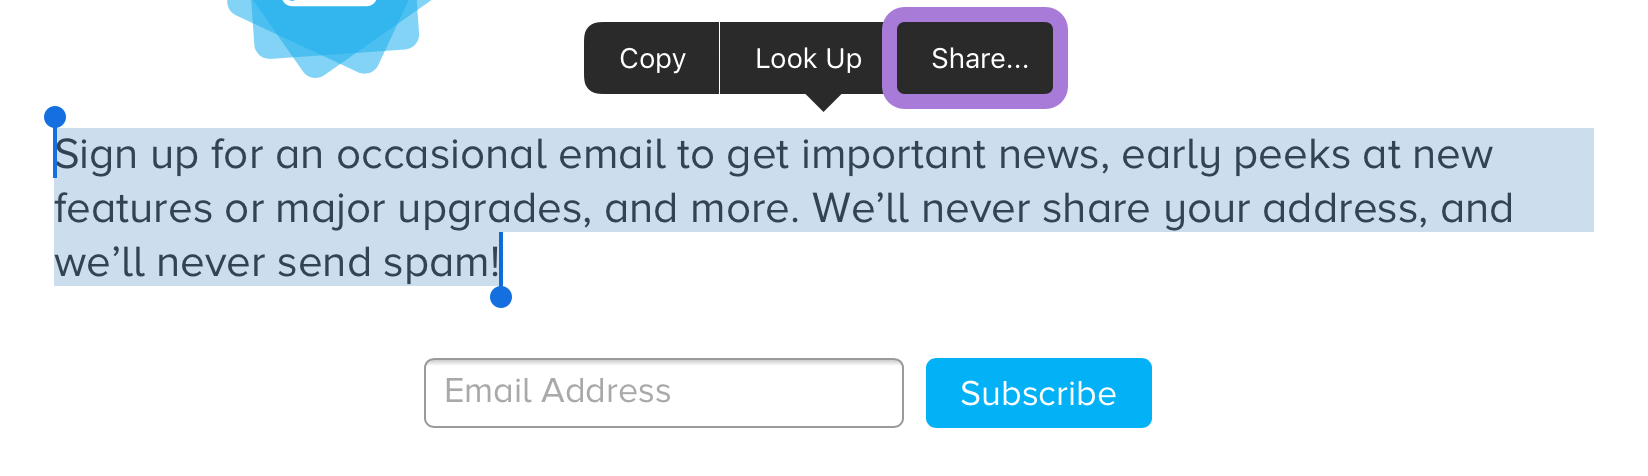
Tap Share ![]() , or choose Share from the contextual menu of a selection, and choose OmniFocus from the list of apps that appears. If it’s not there, swipe left on the list and tap More to add it.
, or choose Share from the contextual menu of a selection, and choose OmniFocus from the list of apps that appears. If it’s not there, swipe left on the list and tap More to add it.
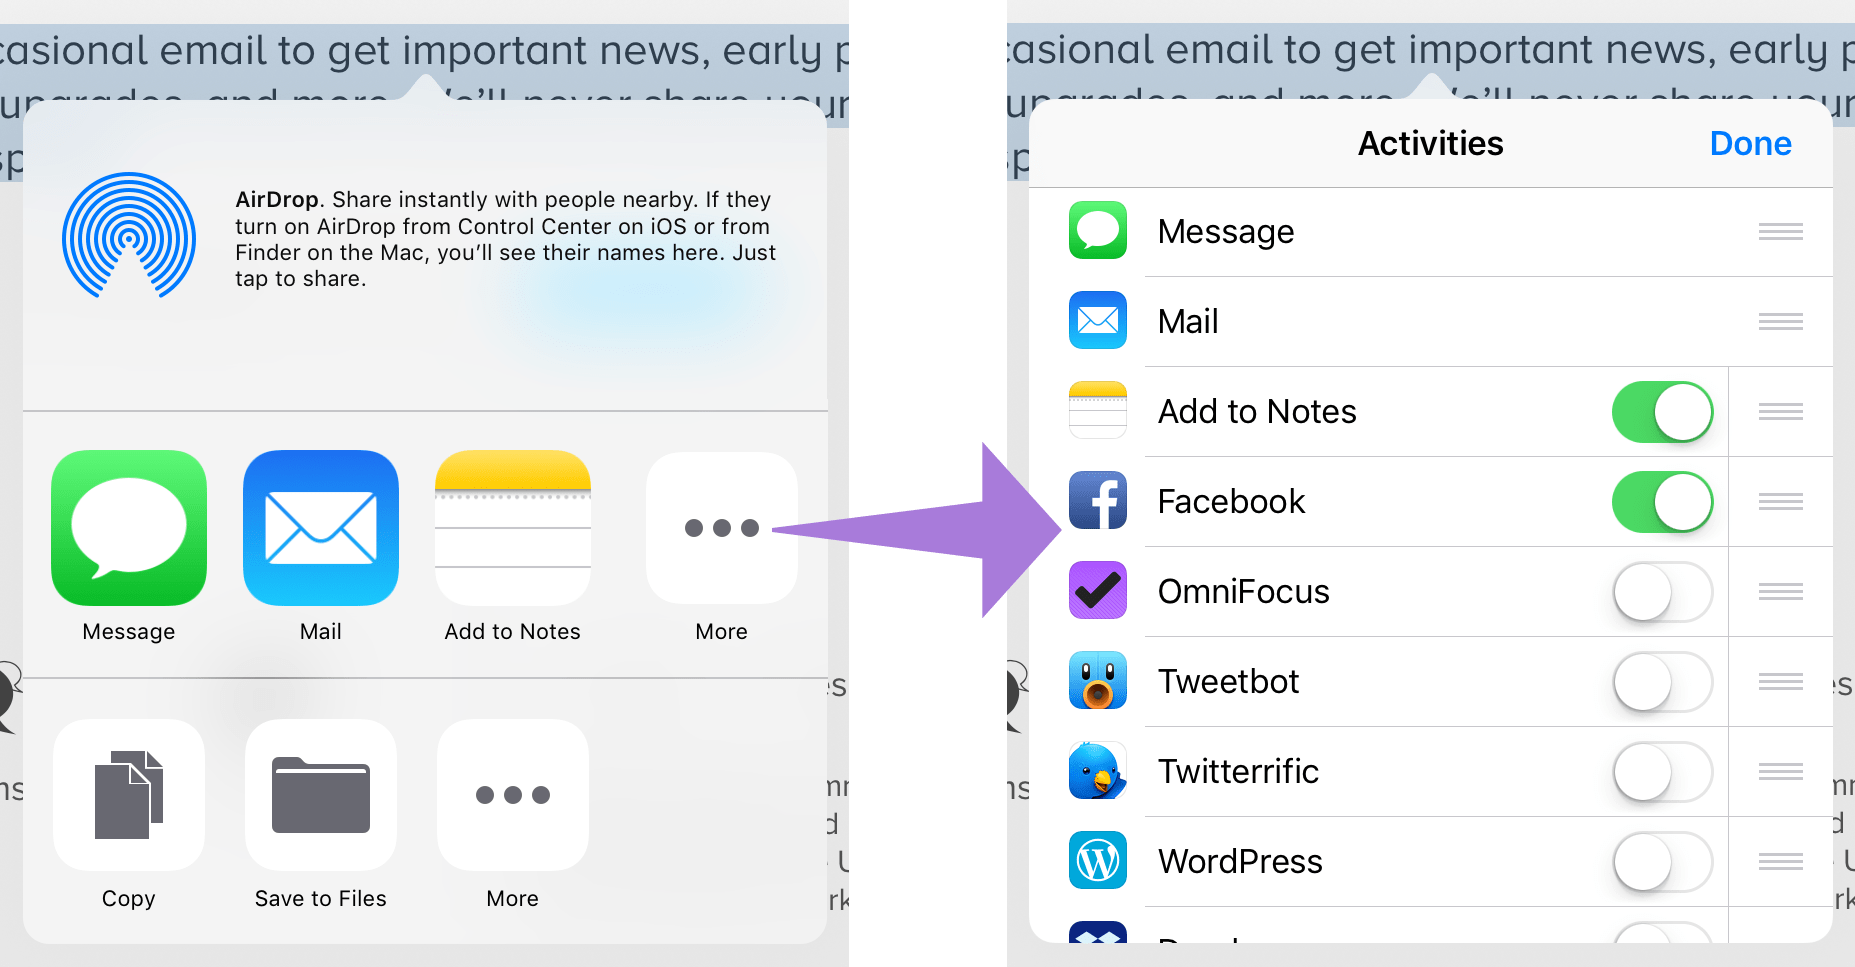
You’ll get a simple “quick entry”-style form to create a new item, with a field for its title, notes, project, and tag. The item is populated with some information relevant to the data you’re sharing back to OmniFocus (website URLs in the note field and title pre-filled in the title field, for example). Edit these if you want, and then tap Save when you’re ready to send it to your Inbox.
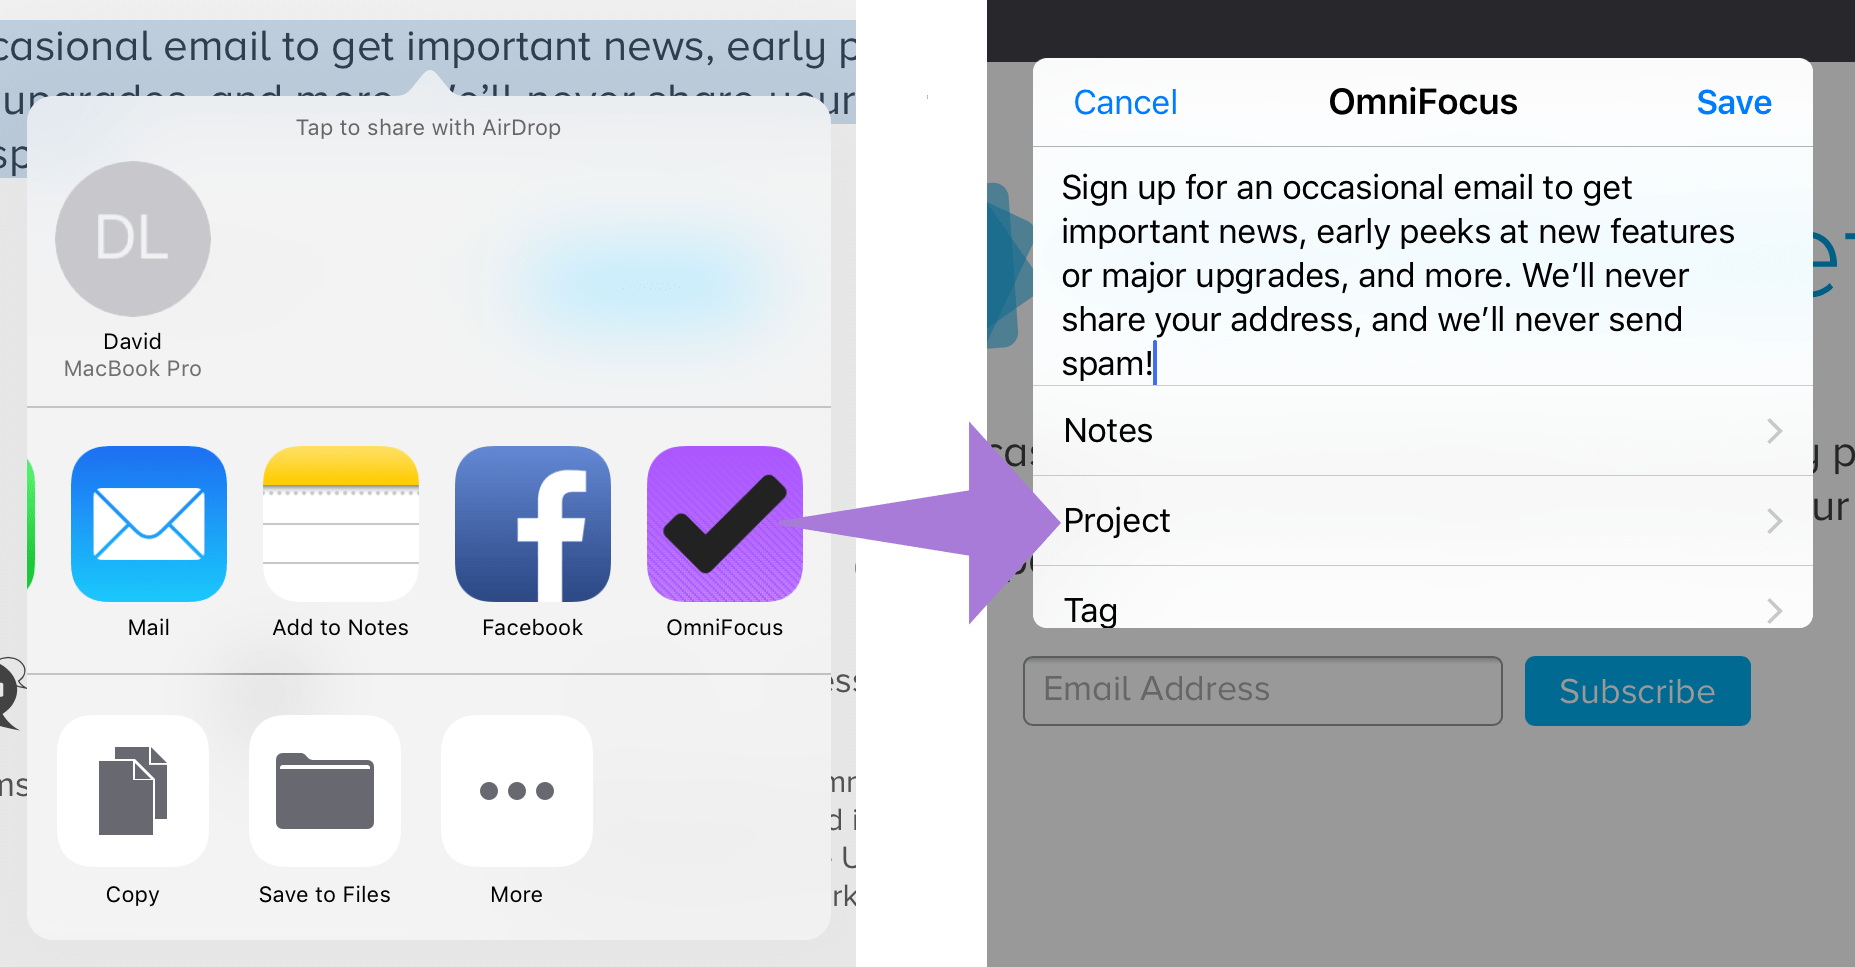
Today Widget
Swipe down from the top of the screen anywhere on your device, then swipe to the right (or swipe right from the first pane of the iOS Home screen), and you’ll see what’s going on today: a collection of widgets that iOS presents as a curated set of data relevant to your current place and time.
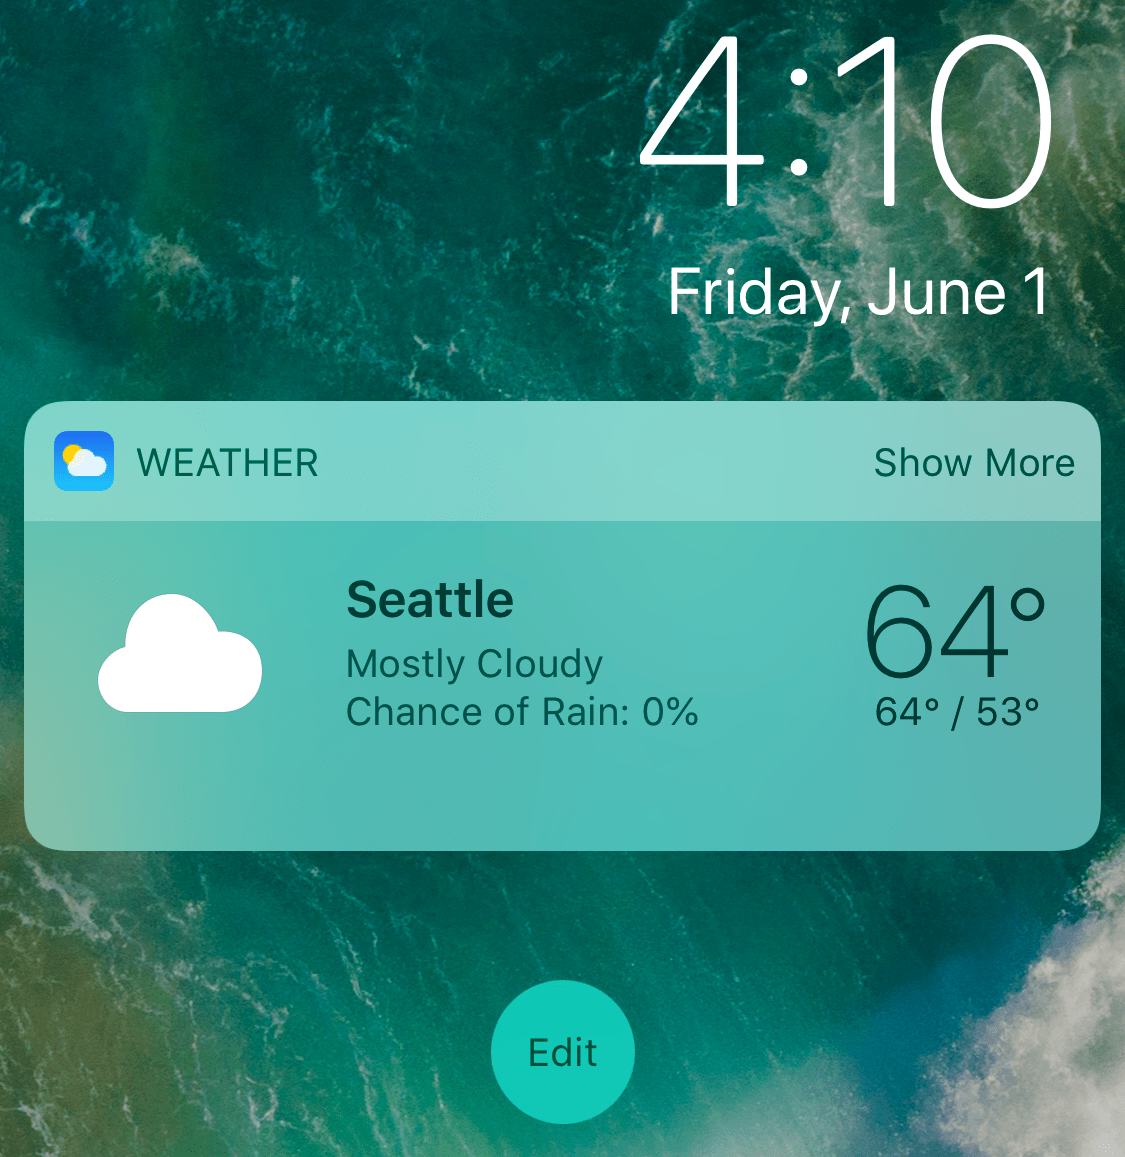
You may see some Calendar entries, perhaps a Reminder or two, and you’ll notice a button at the bottom of the screen labeled Edit. Tap it and you’ll be brought to the edit screen, where you can add other custom widgets to your Today screen—OmniFocus among them.
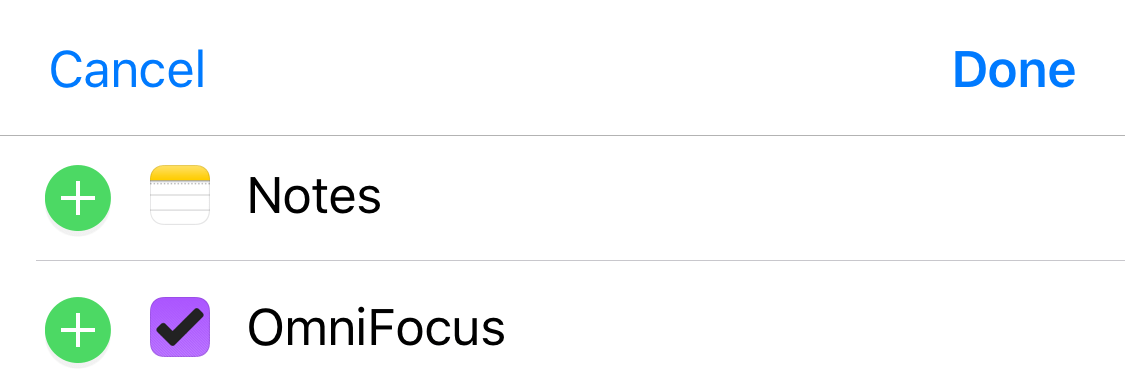
Tap the green plus icon next to OmniFocus and it’ll be added to the list of extensions shown on the Today screen. Use the reordering handles on the right to change their order, and when you’re set, tap Done.
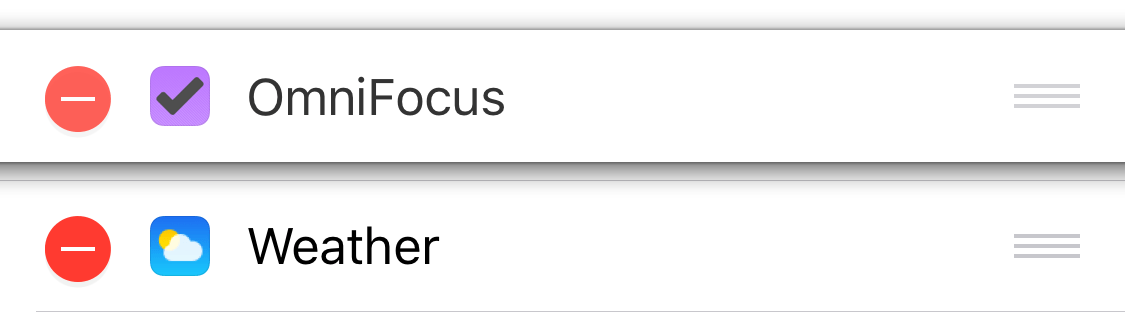
From now on you’ll see OmniFocus items that are relevant today alongside events of current interest from other apps, and you can check on their status (or check them off as complete) from anywhere on your device.
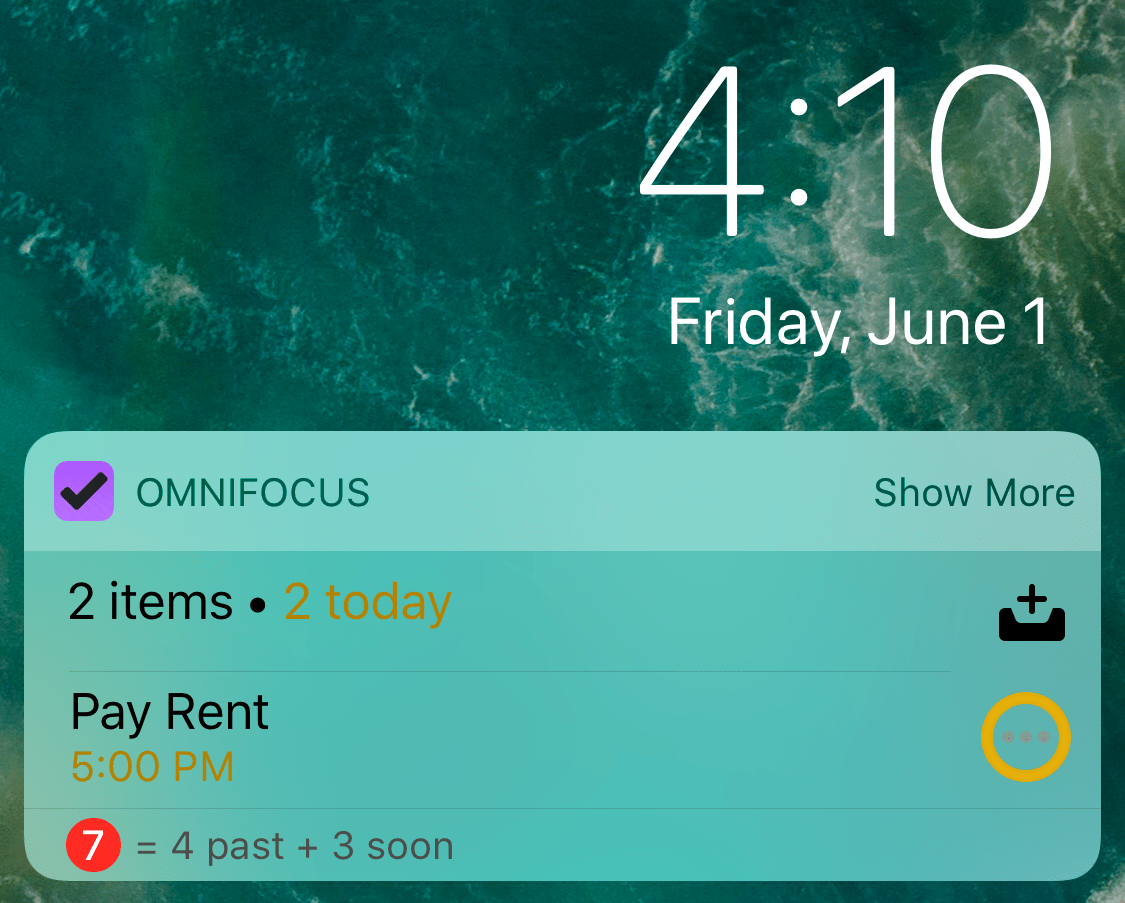
On a device with 3D Touch, press the OmniFocus app icon on the iOS Home screen to access OmniFocus Today widget and other quick actions. This also offers another way to add OmniFocus to the Today screen; tap Add Widget for a convenient setup short cut.
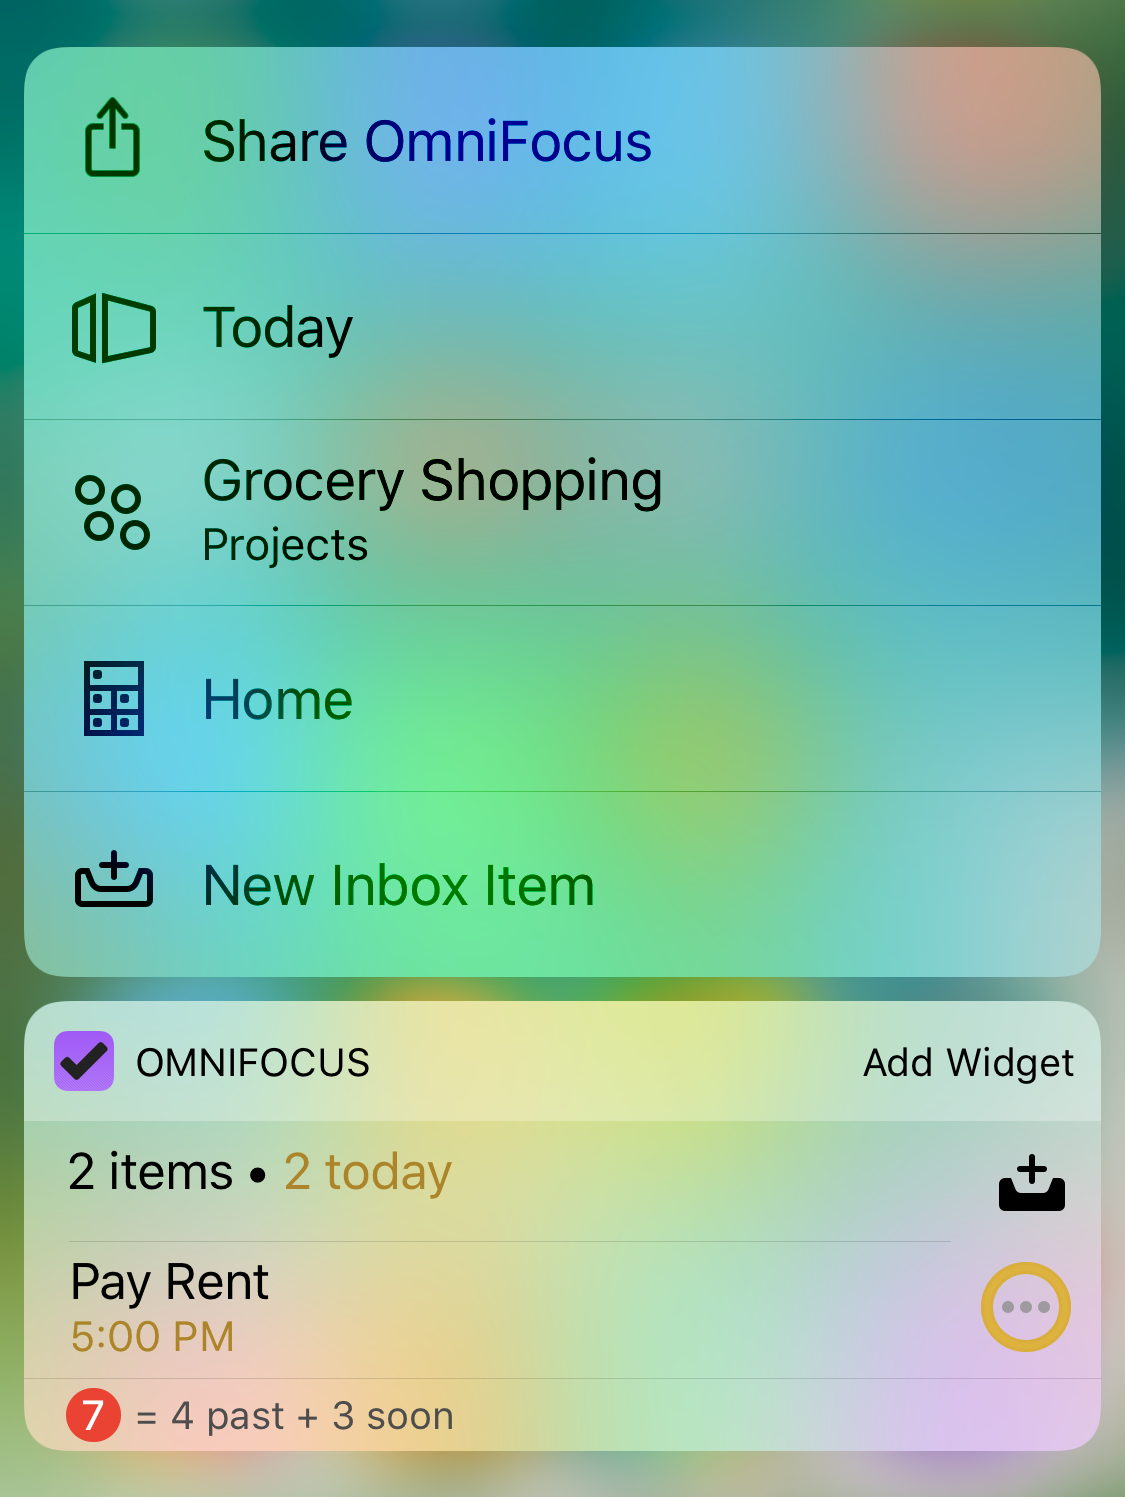
The OmniFocus widget shows a single item by default (the one it deems most relevant based on your settings). Tap Show More to see an extended list of upcoming actions as they appear in chronological order.
Just beneath Show More (or Show Less) in the OmniFocus widget you’ll find the New Inbox Item  button, which makes it even easier to add a task to your OmniFocus Inbox from anywhere on your device. Tap it to open OmniFocus with a new Inbox item ready for entry.
OmniFocus uses the Today settings to determine which items are displayed in your Today widget. Due Today is the default, but you can choose another (or multiple other) task attributes to suit how you personally describe priority in OmniFocus and put the most important things front and center.
With OmniFocus Pro, if you’d prefer to display an entirely different custom perspective in the Today widget you can choose to do so in OmniFocus Today settings.
In the Badges section of Notifications settings, you can choose to have a summary of the OmniFocus icon badge count (a badge that displays the number of OmniFocus items deemed important based on your settings) as part of the Today widget. This adds a row beneath your actions that contains the badge count and its breakdown by item type.
If you have an Apple Watch with OmniFocus installed, the display settings you choose for the Today widget apply to the OmniFocus for Apple Watch home screen and Complications as well. See OmniFocus for Apple Watch to get started with OmniFocus on your Apple Watch.
Spotlight Search
Swipe down from the center of of the iOS Home screen to open Search. When you enter a search term, iOS includes results from your OmniFocus database so you can jog your memory about a task that needs doing, or check to make sure you noted that book you wanted to read (at the same time as you look for it online).
Tap a search result from OmniFocus and it opens directly to that item in the app.
If you would rather not include OmniFocus items with your iOS search results, visit iOS Settings > Siri & Search and scroll to the OmniFocus entry there for controls to turn it off.
Notifications
With the iOS Interactive Notifications feature, you can take action on alerts from OmniFocus regardless of where you are and what you’re doing on your device.
To take advantage of interactive notifications, you’ll need OmniFocus notifications to be set up as banners. Check Notifications > OmniFocus in iOS Settings to make sure this is the case.
Use OmniFocus Sounds and Alerts settings to choose which events associated with OmniFocus items you want to cause notifications, and use the inspector to set up notifications for individual items.
Now, when you see a notification for an OmniFocus item you’ll have a couple of options:
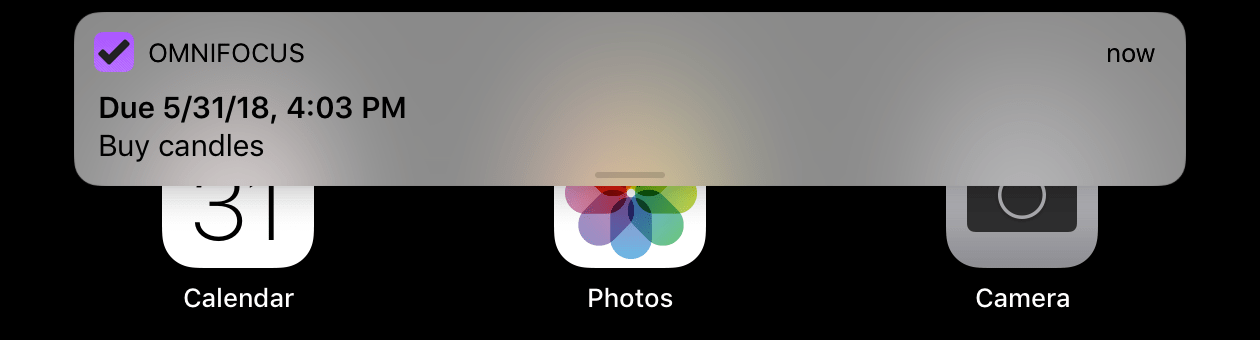
-
Tap to open the item in OmniFocus.
-
Tap and hold or drag down to open its notification details.
Notification Details
The detail view for an OmniFocus notification alert offers the following options for interaction:
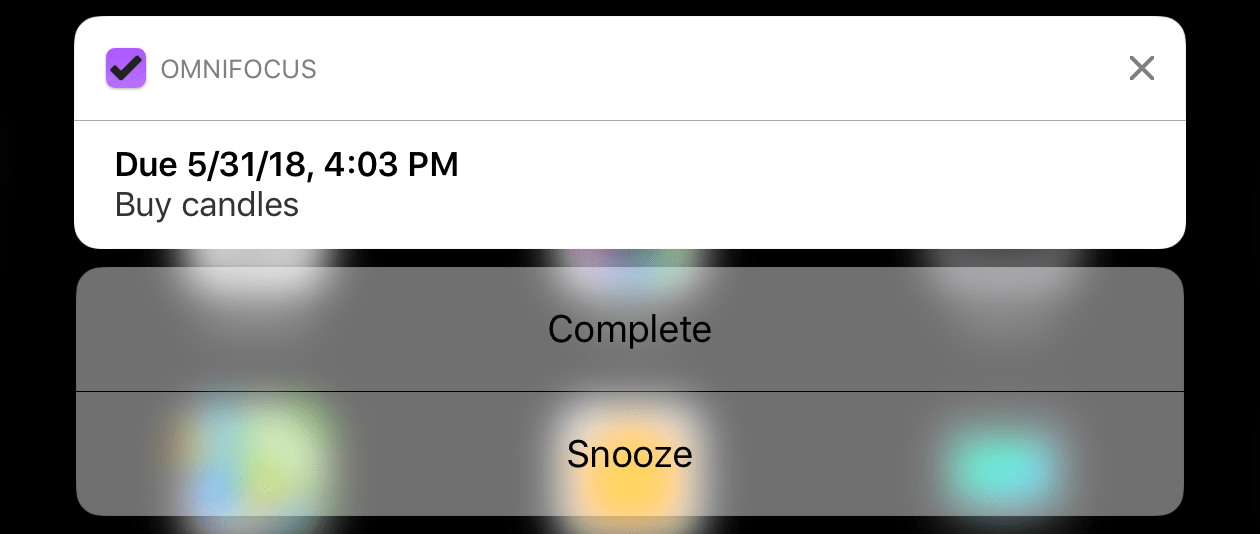
-
Complete—Mark the item complete, checking it off in your OmniFocus database.
-
Snooze—Delay consideration of the item for another 15 minutes. This doesn’t change its due date or defer date; it just reminds your device to check in with you again later.
For project or action group notifications, the detail view also includes a list of actions within the group, and their relevant due dates (if they differ from that of the project or group).
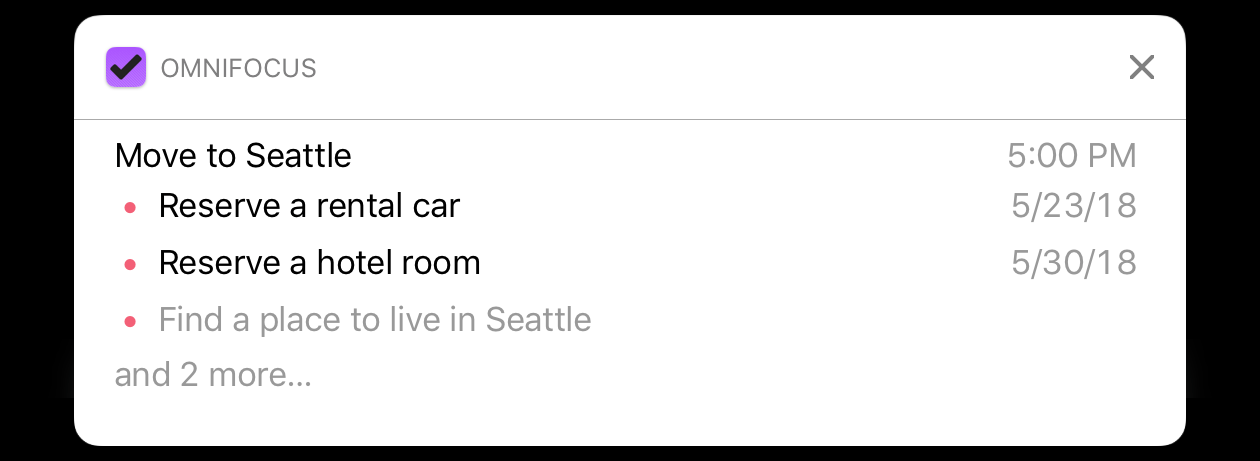
For location-based notifications, the detail view is a bit different: it doesn't offer Complete or Snooze, and instead displays a map with the tag location and a list of available items assigned to the tag. Tap the notification to view the tag and its items in the Nearby perspective.
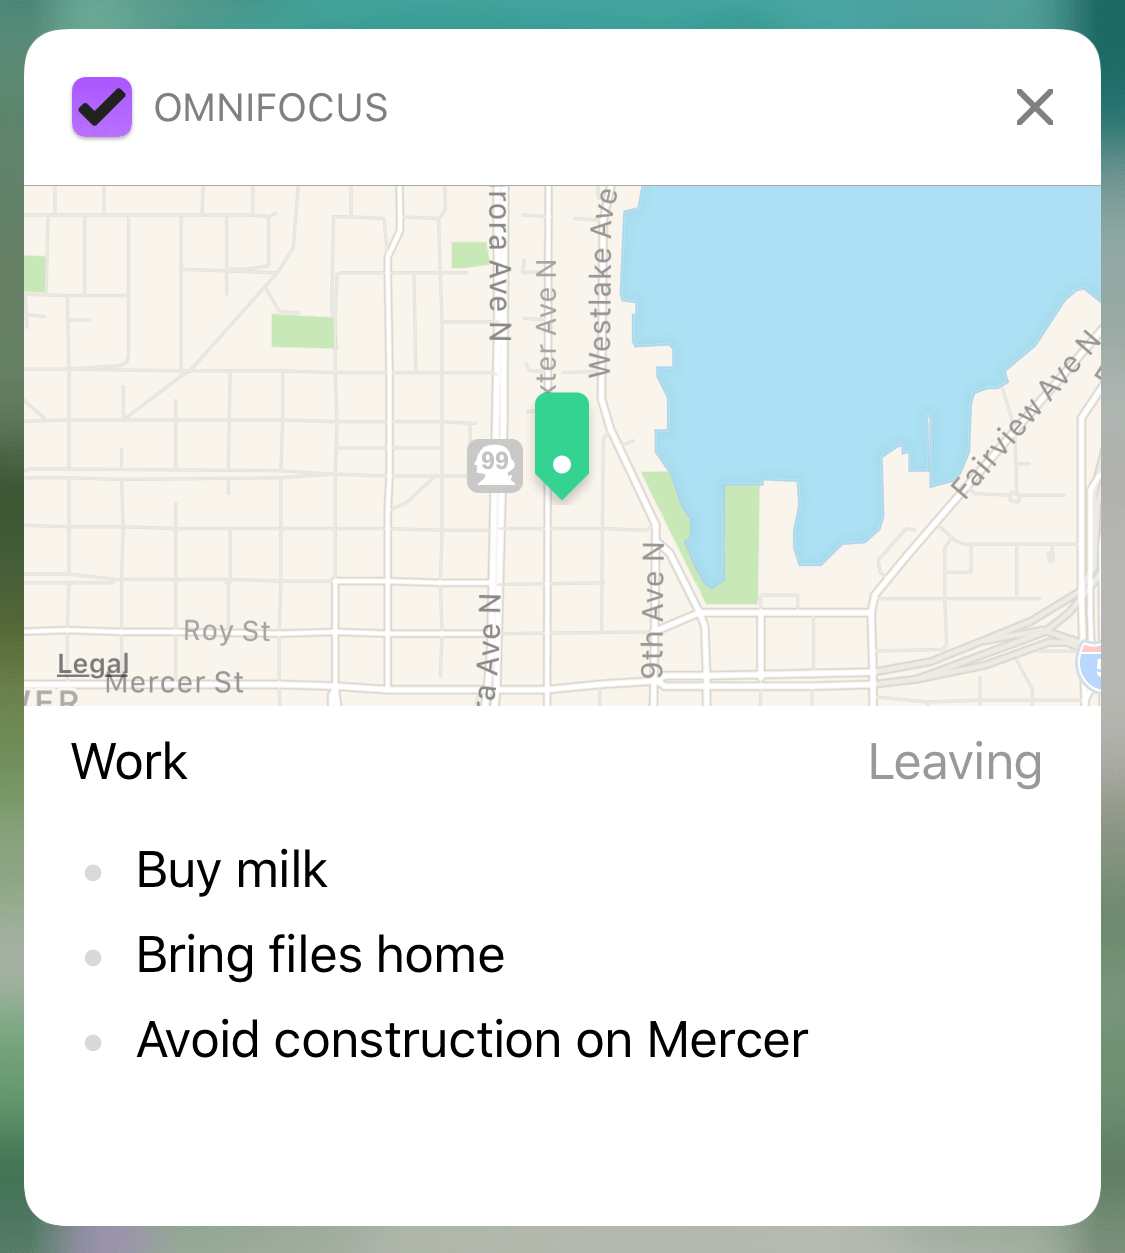
Notification Center
If you have OmniFocus notifications set as temporary in iOS Notifications settings, they'll still be just a gesture away. Swipe down from the top of the screen to open Notification Center, with a list of all your recent alerts.
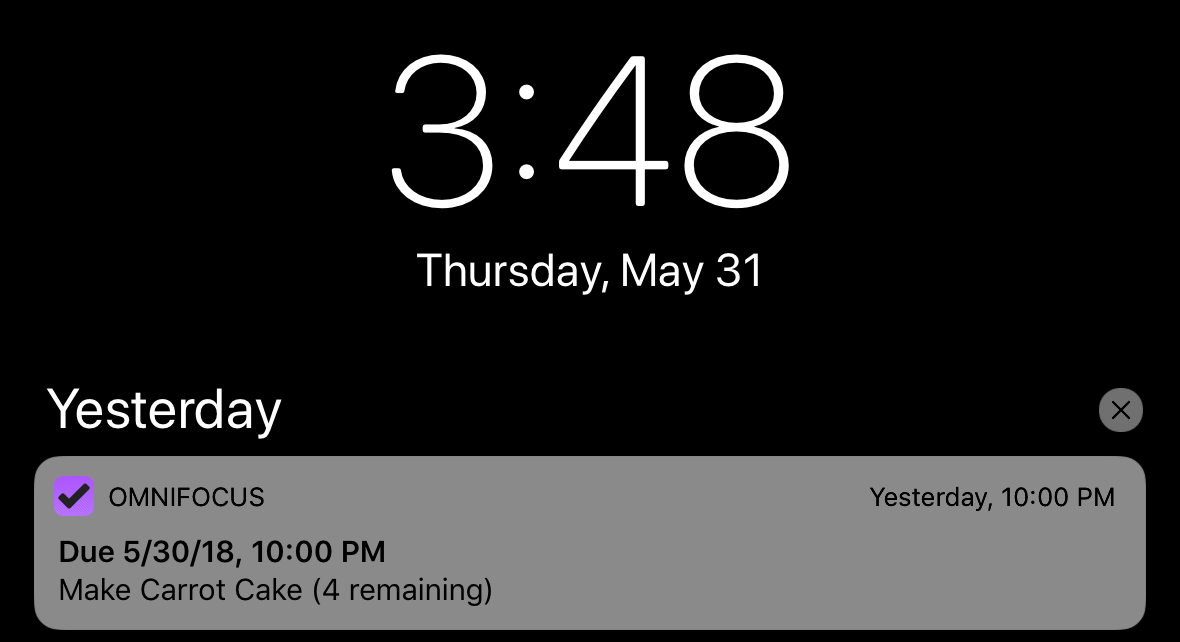
Interact with OmniFocus items in Notification Center in a few ways:
-
Swipe right on an item to Open it. This opens OmniFocus directly to the item in question where you can take further action on it.
-
Swipe left on an item to either View it, opening its notification details, or Clear it, removing the alert from Notification Center.
-
Tap and hold an item to open its notification details.
Appendix E
OmniFocus Extended
OmniFocus as a standalone app is an incredibly powerful tool. Beyond what you can do with OmniFocus alone, the app interacts with other apps and services to help you get stuff done with even greater convenience and efficiency.
This appendix lists ways that OmniFocus can be used in tandem with other software to achieve your goals.
Email Capture (Mail Drop)
Mail Drop is a feature of the Omni Sync Server that lets you send emails directly to your OmniFocus Inbox. You can create multiple private send-to addresses to give access to third parties, and delete those addresses at any time. In order to use Mail Drop, you’ll need to have an Omni Account (they’re free), and OmniFocus must be configured to actively sync with that account on our server.
If you’re already using Omni Sync Server to sync OmniFocus, you can log in to the Omni Sync Server web interface and create your first Mail Drop address. After logging in, click or tap Add An Address to automatically generate the email address (a combination of your account name and a random string of characters).
If you don’t have a Omni Account yet, you can sign up in OmniFocus Settings under Omni Account. The account creation process includes instructions for configuring OmniFocus to use your new account.
When you send an email message to a Mail Drop address, the subject line of that message becomes the name of the new Inbox item. The body of the message becomes the note, which can contain text and simple HTML; attachments to the email (such as images) are added as attachments to the OmniFocus item as well.
See OmniFocus Mail Drop on the Omni support website for more details on this feature.
Workflow Automation
With some knowledge of programming, you can use callback URLs to automate conversations between OmniFocus and other apps on your iOS device. This offers the ability to set up project templates with custom data fields, for example, along with many other powerful automation possibilities.
This is an advanced feature that requires some tinkering under the hood; for help getting started integrating OmniFocus with the workflow app of your choice, see URL Schemes in OmniFocus on the Inside OmniFocus website.
OmniFocus for the Web
OmniFocus for the Web is a browser-based companion app that works in tandem with OmniFocus for Mac and iOS to provide access to the core features of OmniFocus from any modern web browser. The app is provided as an optional subscription-based add-on to your existing OmniFocus purchase, or as part of an OmniFocus subscription package.
Learn more about subscribing to OmniFocus for the Web here.