The Toolbar
Along the top of OmniGraffle’s window is the Toolbar. Packed with buttons and a customizable Tool Palette featuring Expando-Collapso Technology, the toolbar is where you’ll go for all your drawing needs.
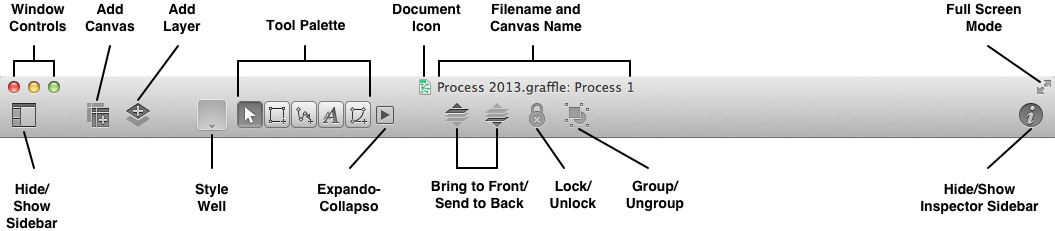
As you can see, the toolbar is packed with the controls you need to help you get your job done. From buttons to add new layers to a canvas—or an entirely new canvas—to the tools you need for drawing and connecting objects together.
On opposing ends of the toolbar you’ll find controls for hiding and showing the left and right sidebars. On the left is the Canvases and Contents sidebar, while on the right is the Inspectors sidebar which also includes the Stencils Library. Above those, you’ll find the standard OS X window controls for Closing, Hiding, and Expanding the window, and for popping into Full Screen mode.
At the center of the toolbar along the top, you’ll see a Document Icon which you might assume does nothing other than tell you what type of file this is. But if you hold down the Command key (⌘) and click that icon, you’ll get a contextual menu that shows you where the file is stored on your Mac. This is sometimes handy for when you’re working on duplicated files and you can’t remember where you saved the last revision. Next to that is the filename, and if your OmniGraffle file has more than one Canvas, the filename is appended by a colon (:) followed by the name of the canvas you’re presently working on.
Beneath the Document icon and filename are buttons that let you interact and control the behavior of the objects on the canvas. You can flip objects to the back or bring them to the front, lock them in place (which is really, really handy), and for grouping and ungrouping objects.
But the big tools are coming up next: the Style Well and the Tool Palette.
The Style Well
With the Shape, Line, Text, or Pen tool selected, a style menu for the applicable tool becomes available from the button to the left of the Selection tool. It contains various styles that you can apply to the tool itself.
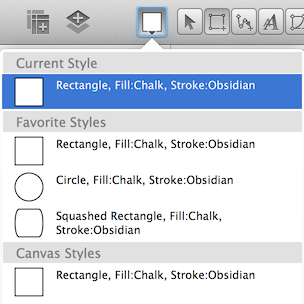
The very top item in the menu, Current Style, is the last style you set. Other sections you may see include:
Canvas Styles, which is dependent upon the tool you have selected in the Tool Palette, shows related styles for that object type for everything on the canvas. For example, if you have selected the Line tool in the Tool Palette, the Canvas Styles section shows you the different styles for all of the lines you’ve drawn on your canvas.
To use one of the Canvas Styles — First select one of the tools in the Tool Palette, and then click the Style Well and choose one of the available styles in the Canvas Styles section. The style you have selected now becomes the default style for that drawing tool.
Favorite Styles, available with the upgrade to OmniGraffle Pro, is your personalized list of styles you intend to reuse from one project to another.
To create a Favorite Style, Control-click an object on the canvas and select Add to Favorite Shape Styles from the contextual menu. To remove a style from the Favorite Styles list, select any object on the canvas, click on the Style Well icon in the toolbar, and then Control-click on the style you would like to remove and select Remove from Favorites from the contextual menu.
The Tool Palette
The Tool Palette contains all of the tools that you need to draw and interact with objects on the Canvas. In its default state, the Tool Palette contains the following tools:
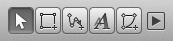
- Selection Tool (Arrow)
- Used for selecting objects on the Canvas.
- Shape Tool
- Used for drawing shapes, such as squares, rectangles, and circles.
- Line Tool
- Used for drawing lines between objects on the Canvas.
- Text Tool
- Used for entering text labels to a Line or for adding a random blob of text on the Canvas.
- Pen Tool
- Used for creating custom shapes.
- Expando-Collapso
- Click this button to expand the Tool Palette to reveal even more awesome tools…

- Diagram
- Used to rapidly create new objects on the canvas.
- Style Brush
- Used for copying the style of an object (including its shape, stroke, text style, and so on) so you can “paint” the style on other objects.
- Rubber Stamp
- Used for rapidly copying and pasting objects on the Canvas. To select a different object when the Rubber Stamp is in Persistent Tool mode, hold down the Option key and then click another object on the Canvas.
- Magnet
- Used to relocate the magnets that connect lines to objects.
- Zoom Tool
- Used to zoom in on the Canvas. When the Zoom Tool is in Persistent Tool mode, hold down the Option key and click on the canvas to zoom out.
- Hand
- Used to drag the canvas around.
- Action Browse Tool (Pro)
- Used to interact with an object if an Action has been set in the Properties inspector.
See Using the Tools for in-depth coverage on each of the tools in the Tool Palette.
Persistent Tool Activation
 By default, clicking a tool once activates it for a single use; after that one use the Selection tool becomes active again. When you select a tool in the toolbar, the button takes on a light gray background to indicate that the tool is active.
 However, if you double-click on a tool, it becomes the permanently active tool until you switch to another tool. The tool button takes on a dark gray background to indicate that the tool is persistent.
You can change this behavior in the Drawing Tools preferences, so that tools are always (or never) activated persistently.
Quick Access to Tools
With the mouse pointer hovering over the Canvas, you can quickly activate any tool in the Tool Palette using a Hot Key. For example, if you press and hold t, the mouse pointer changes to a text insertion tool; just click on the Canvas and start entering some text. When you let go of the Hot Key, the mouse pointer changes back to the Selection tool.
Similarly, you can press the number keys to activate tools. Each key from 1 to 0 corresponds to a tool in the palette, from left to right. (The only exceptions are the Hand and Action Browse Tool, which don’t have a number assigned; instead, use the Space Bar or b key, respectively.) Pressing a number key twice makes that particular tool persistent.
You can configure each tool’s Hot Key in the Drawing Tools preferences.
Customizing the Toolbar
As noted earlier, the Toolbar comes packed with a variety of tools by default. However, you can customize the toolbar by adding additional buttons or rearranging their order, to suit your needs.
To customize the toolbar, choose View ▸ Customize Toolbar or Control-click on the toolbar and select Customize Toolbar. When you do, a sheet slides down from under the toolbar, revealing a slew of function-related buttons that you can drag up to the toolbar. For example, you could add the Make Table or Start Presentation buttons to the toolbar if you’ve purchased OmniGraffle 6 Professional.
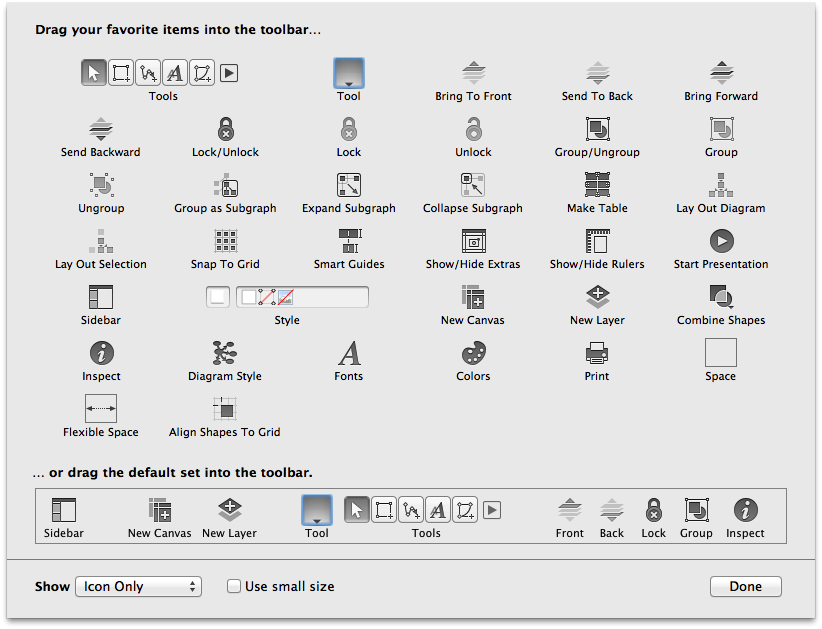
If you don’t like the changes you’ve made, or if you ever want to reset the toolbar to it’s default state, all you need to do is drag the bottom row up to the toolbar. When you’ve finished making changes to the toolbar, click Done.