Building Your First Project
Broadly considered, OmniPlan’s project management tools serve two distinct but connected purposes. The first is similar to tools used in drafting the design of a model airplane kit: describing, as accurately as possible, the intended shape of an ideal plan, executed in miniature at an acceptable level of abstraction and mathematical precision.
The second use of OmniPlan’s tools comes after the first, once the plan has been made and the project is in motion: adding a motor to that model airplane, refueling it and repairing any leaks, and recovering from bumps along the way. The “management” side of project management is covered in the Managing a Project chapter.
This chapter’s tutorial begins at the beginning, tracing the first step toward successful execution of a plan: building the model of the project itself.
Step 1: Creating a Project
For the purpose of this tutorial we’ll be looking at the development process of a game being put together by an independent team of intrepid designers, coders, and testers. The project design described as we proceed is loosely based on a software development cycle, but applies just as well to any complex work consisting of interdependent and occasionally concurrent phases.
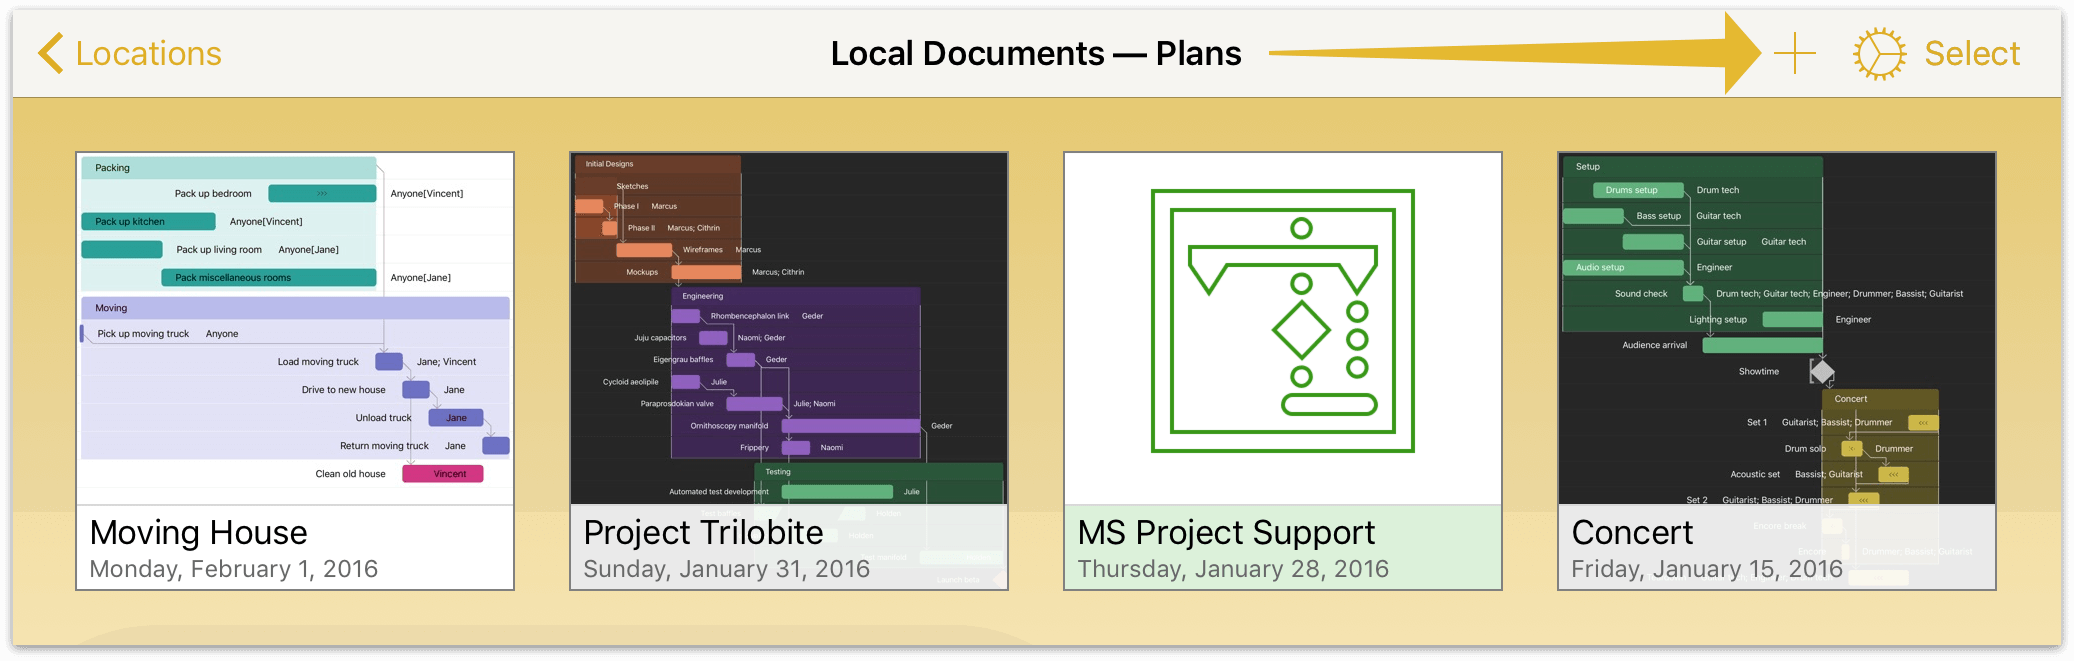
Starting off in Local Documents, tap the New Project button.
This opens the Project Editor’s Gantt chart view, where a first task is waiting to be customized or edited. Before we get to that, let’s rename the project to something more interesting.
Open the Project inspector in the toolbar to edit the project title.
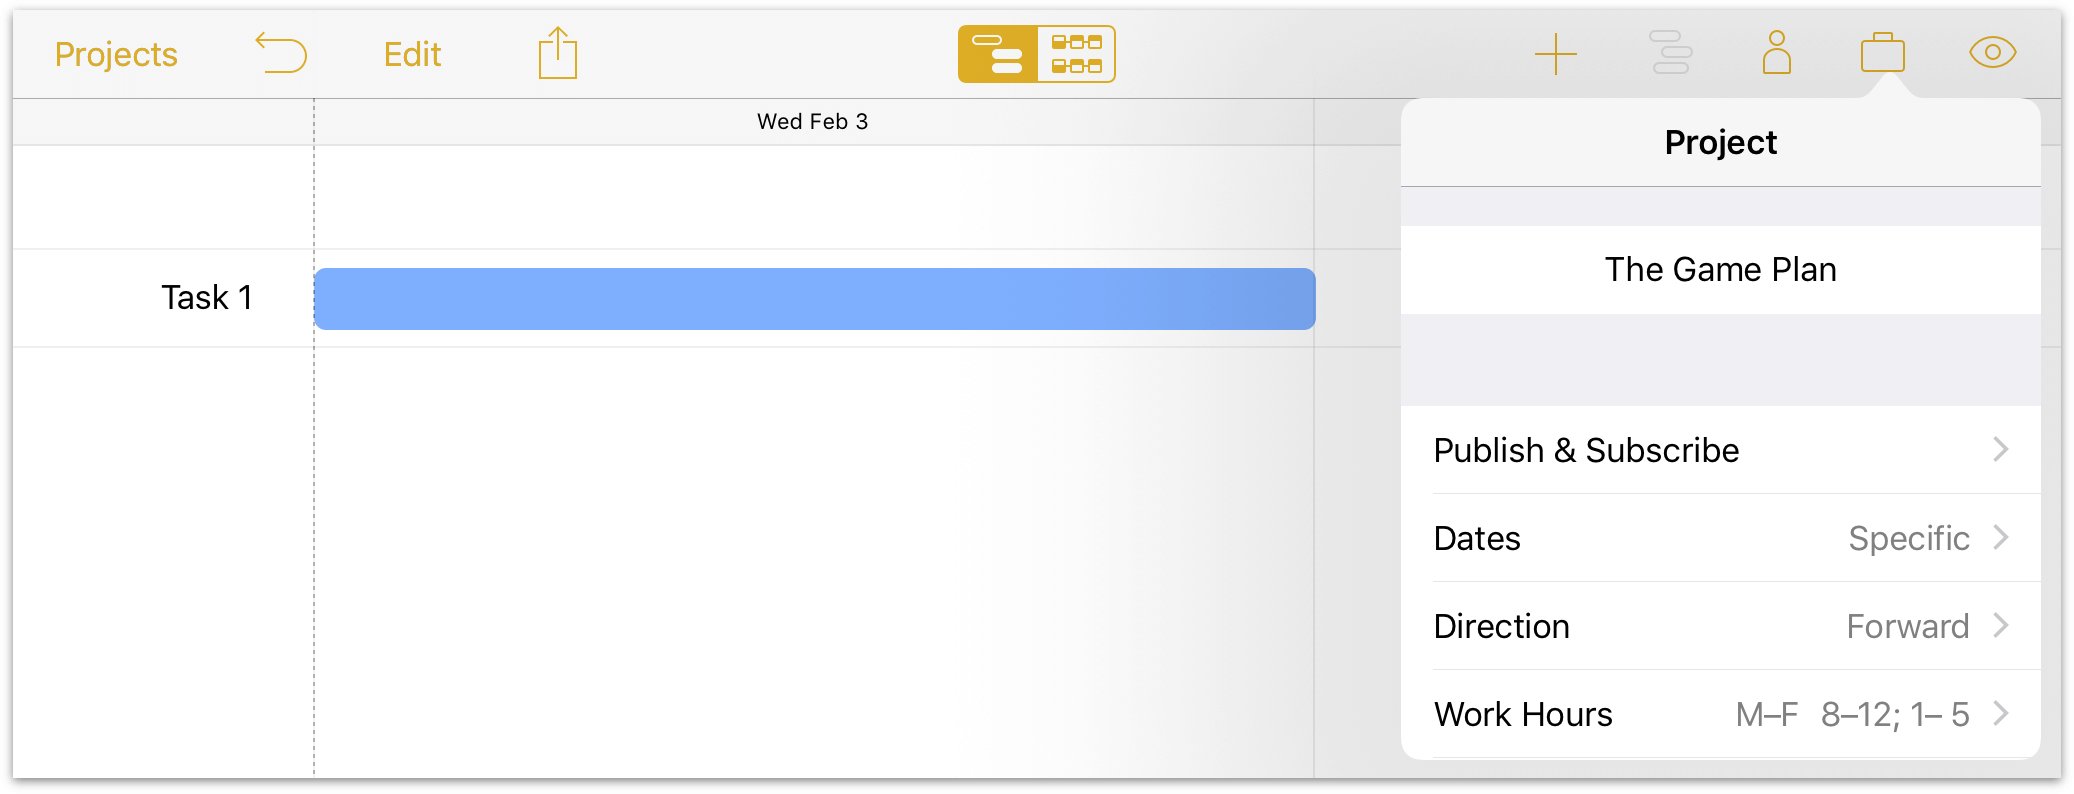
Step 2: Choosing a Start or End Date
When setting out to build a project, one of the most important aspects is the timeframe. This, in turn, is dictated by any deadlines or start constraints that exist for the project.
In the case of our game development scheme, we don’t have a hard deadline for the project to be finished - we want it to be done when it’s ready (but as soon as reasonably possible). To indicate this, we’ll go to the Project inspector and set the start date as today.

Conveniently, this is the default setting for any new project.
You’ll notice when setting the Start date that the End date field is greyed out. This is because for a project scheduled for task completion as soon as possible (also referred to as ASAP), an end date cannot be specified—by definition, the project ends as soon as all of its constituent tasks are complete.
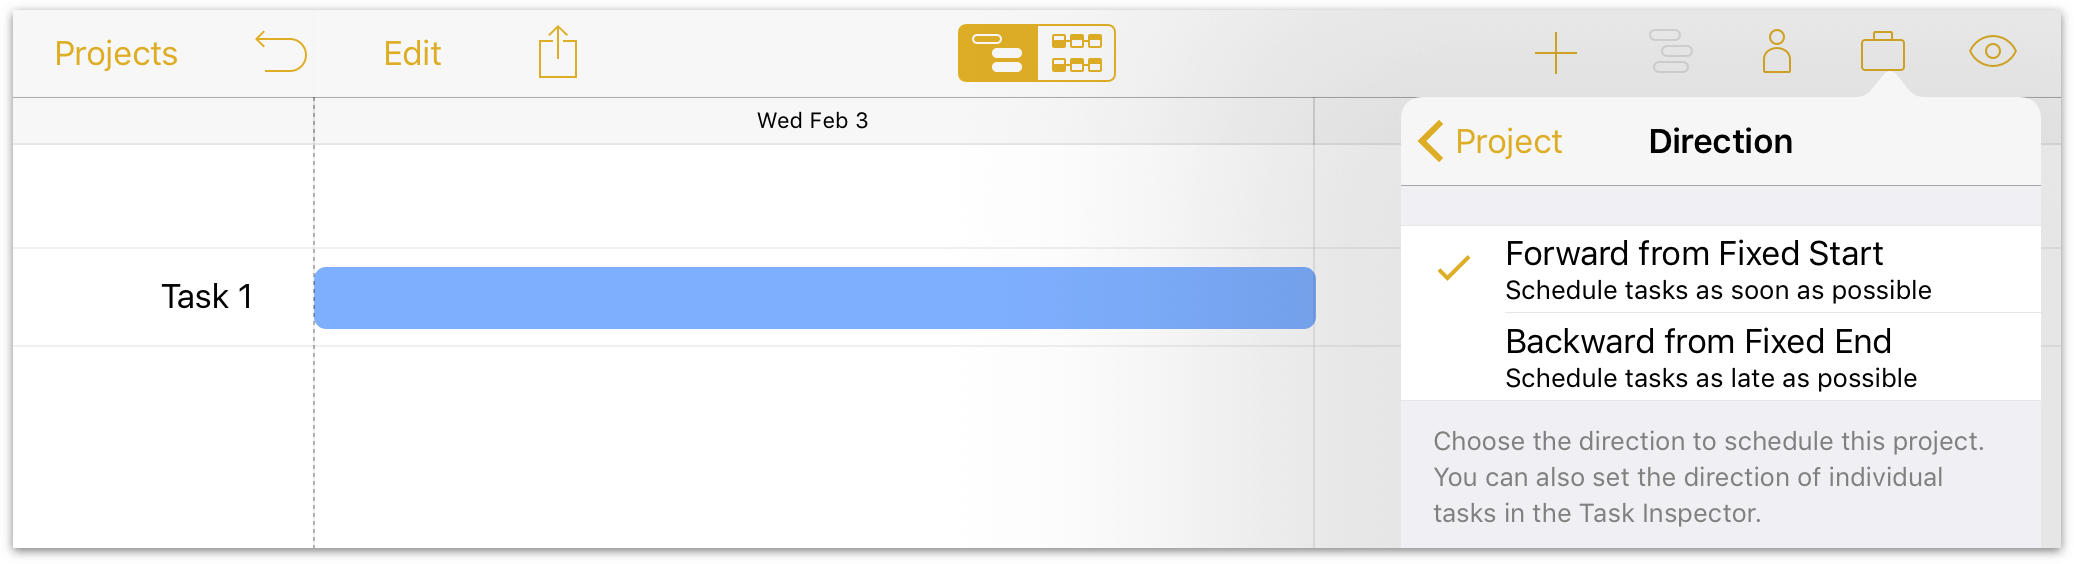
If you’re planning a project with a specific do-or-die deadline, you’ll want to switch the project’s Direction from forward to backward and put the deadline date in the End field. Tasks will be scheduled back from this date (“as late as possible”, or ALAP), filling in the time from project completion to the present.
Note
If you’re planning a project in the abstract without a fixed start or end date, you can change the dates format Specific to Undetermined until the timeframe is more set in stone. You’ll get dates that display as T+1d, T +2d... instead.
Step 3: Creating Tasks
Now let’s turn our attention to the Gantt chart, where a first default task awaits us.
Tasks in OmniPlan represent discrete pieces of work that require substantial effort to complete, usually across a duration expressed in hours or days rather than minutes. Prepare morning coffee, for example, is a task that’s typically not within the scope of OmniPlan, while Install espresso machine very well could be — maybe even a group of tasks, if you need external help getting pipes or electricity connected.
Note
The notion of “task” in OmniPlan is in contrast with action item-based productivity apps such as OmniPlan’s counterpart OmniFocus, where anything you can conceive of as something you’d like to accomplish can—and should—be included in thinking about your project plans.
OmniFocus is built around personal task execution; the granularity of OmniPlan’s tasks is intended for work that must be considered by (or requires input from) a group of stakeholders, often as a team.
The process of project building starts with a brainstorm session for all the tasks you think the project will include. As noted, these are typically things that you think will take the effort of multiple people to complete, or have some impact on other work that the project requires. Don’t worry too much about whether a task fits the project’s scope at this point—it’s more important to get the ideas flowing. You can always come back and edit these later.
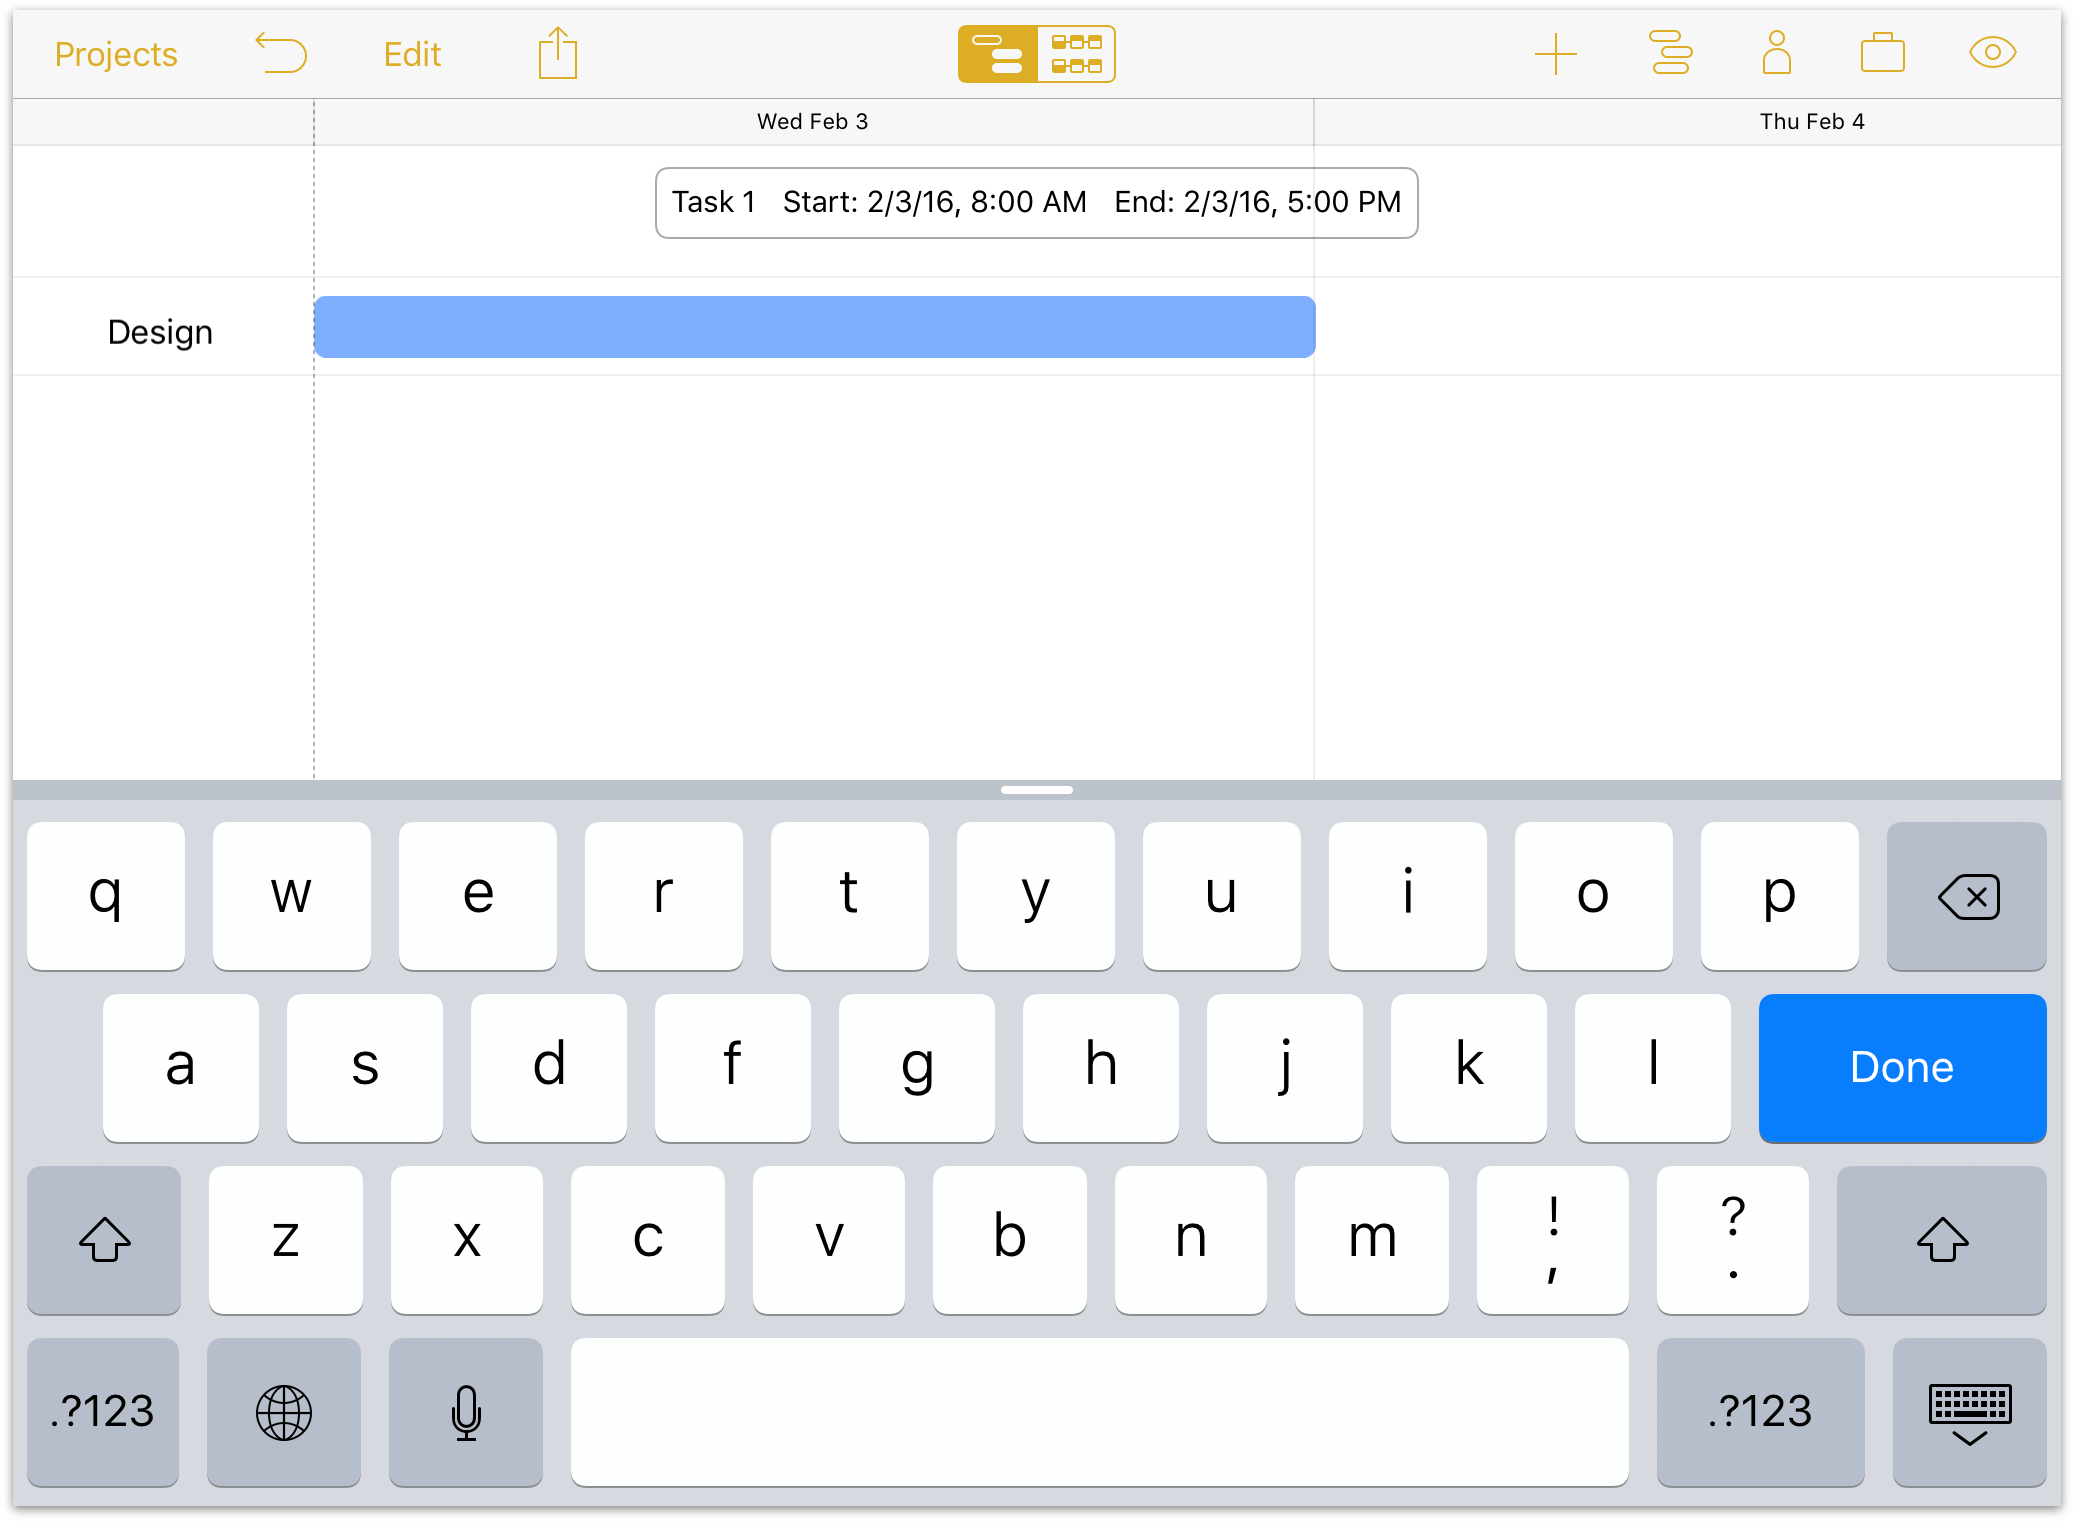
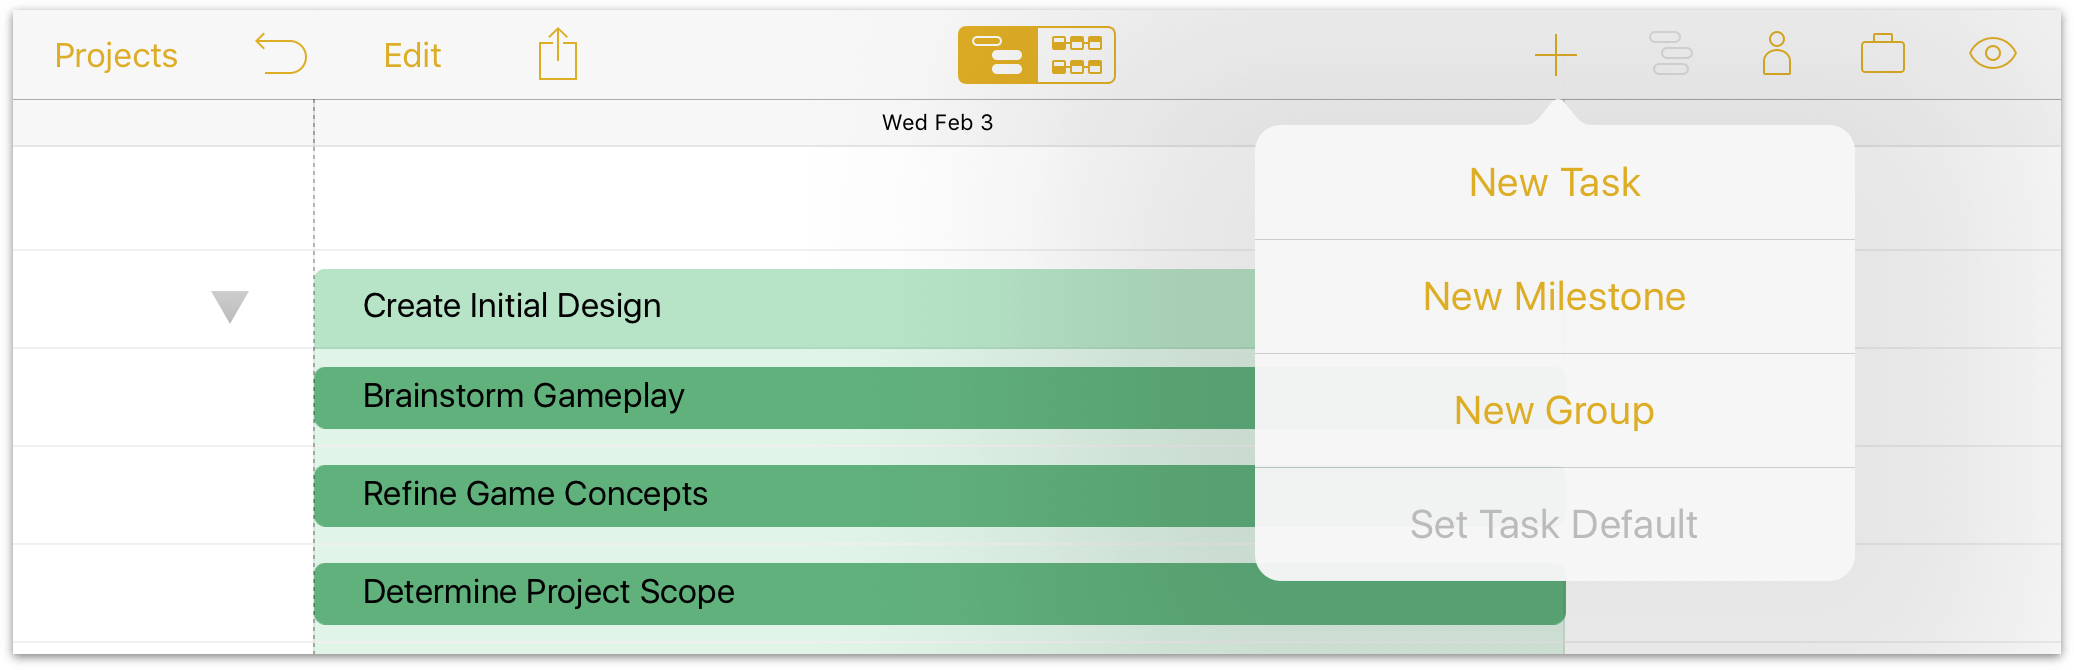
We’ll change the name of the default “Task 1” by double-tapping it or editing the name field in the Task inspector, and then tap the Add button to create new ones.
New tasks appear below the currently selected item in the Gantt chart, or at the bottom of the list if no tasks, milestones, or groups are selected.
Tip
As you create a list of tasks, try Network Diagram view! Tap the view switcher in the toolbar to see your tasks as a set of nodes—they’re currently not connected to one another, but that will change.
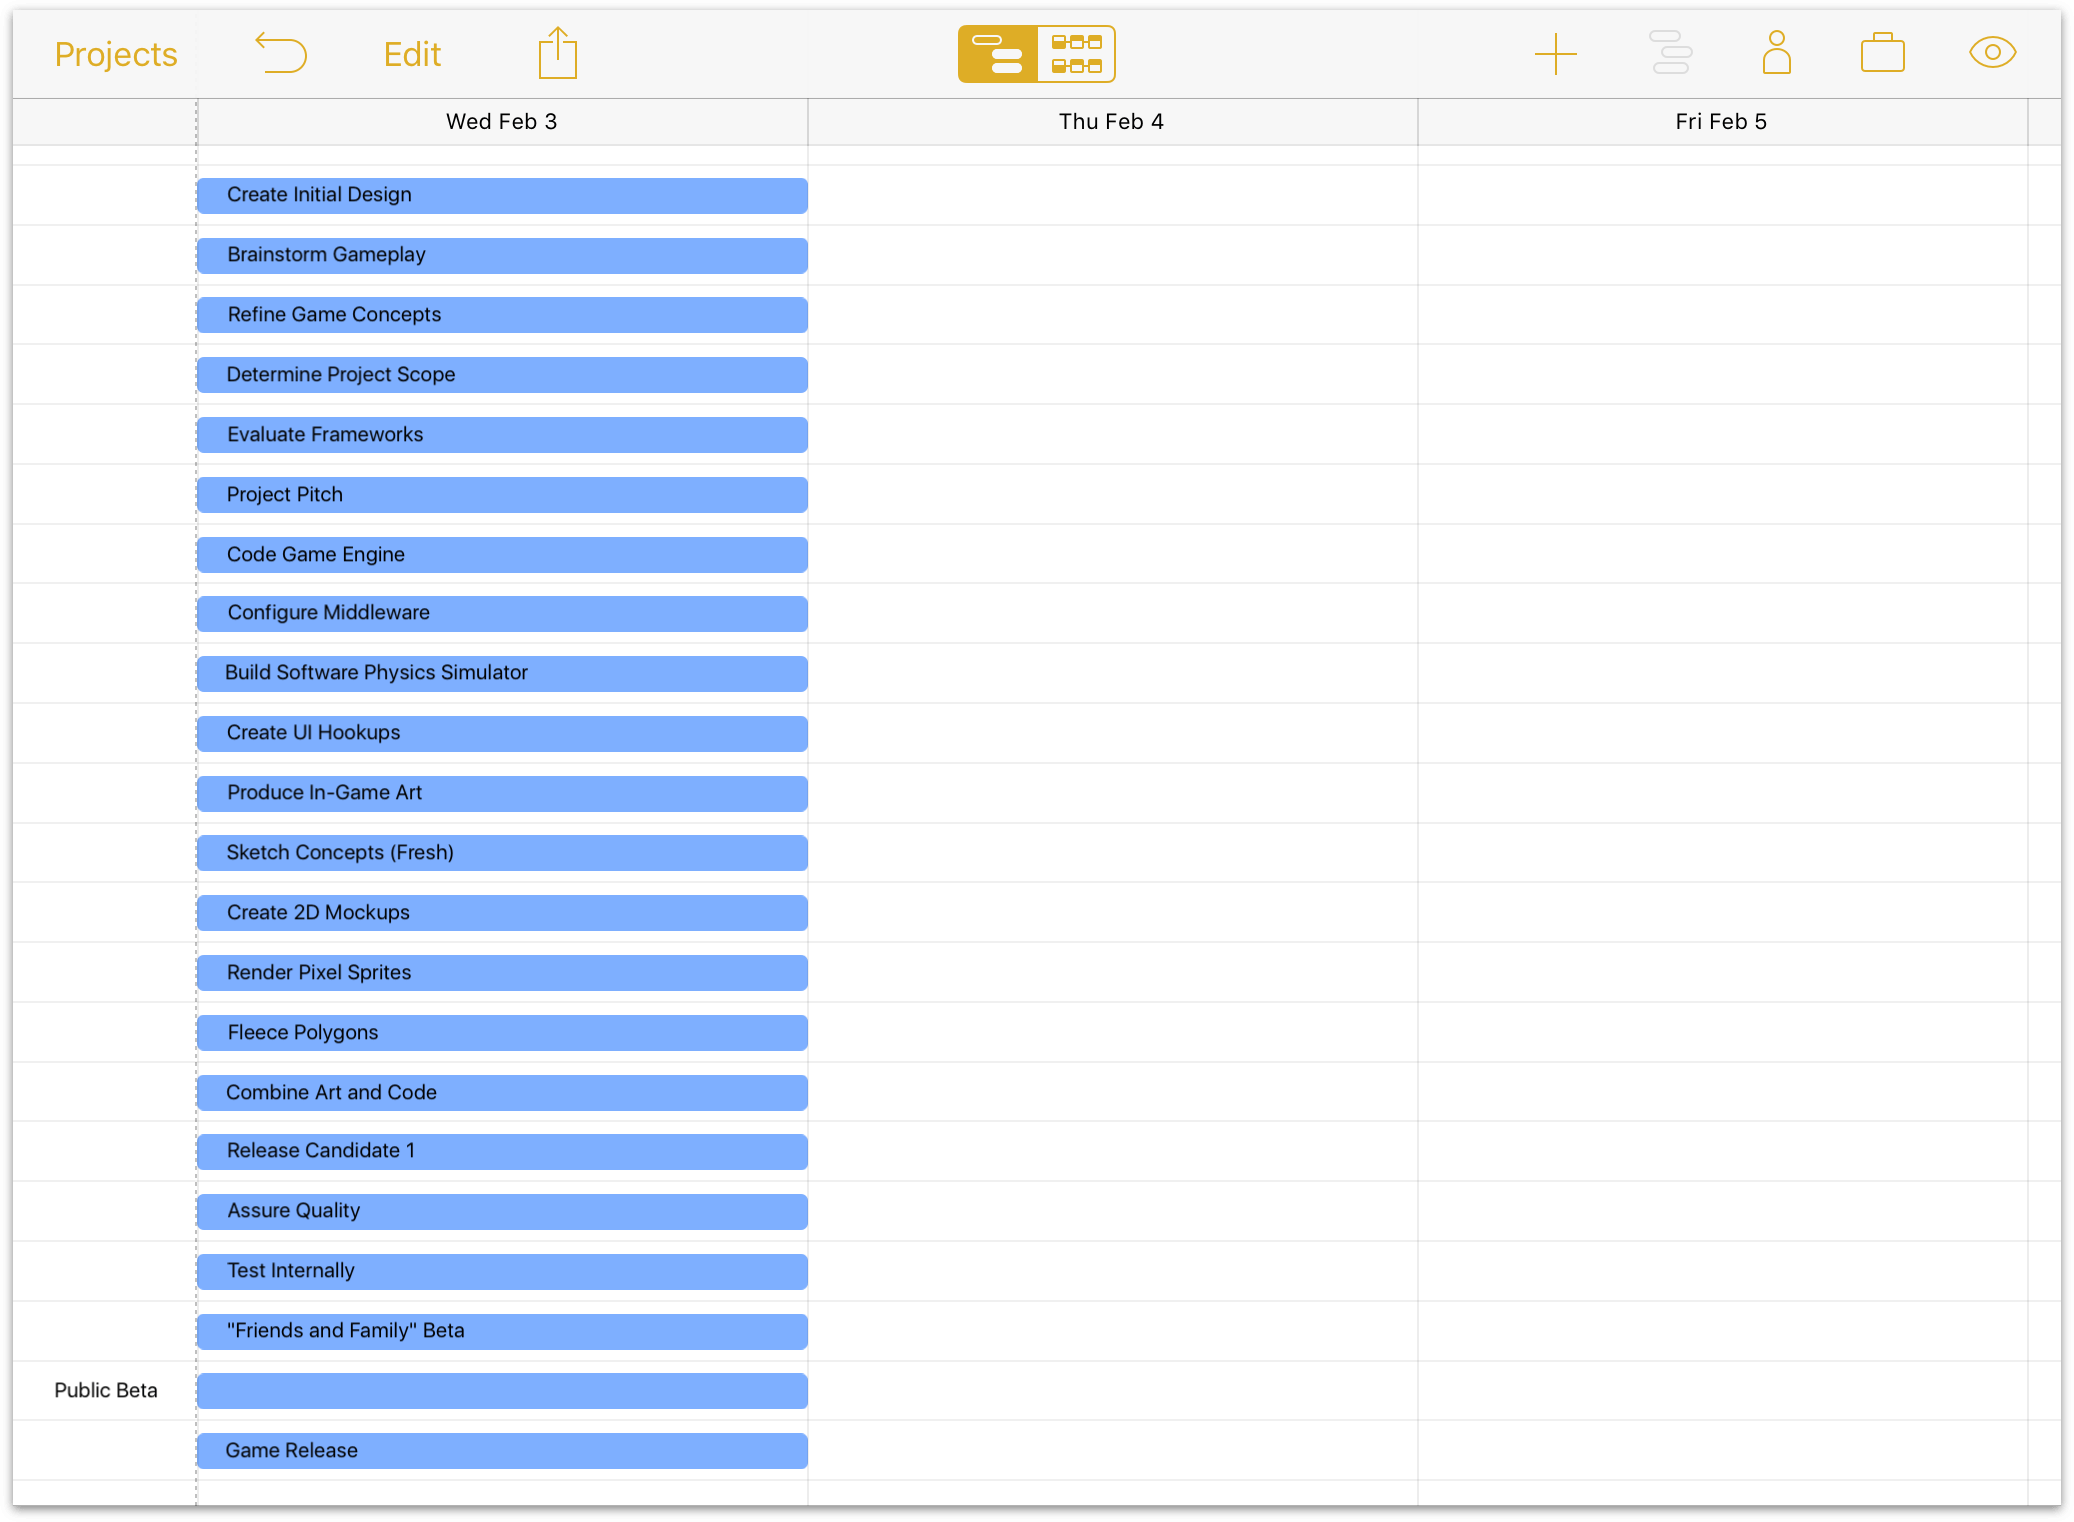
For our project we’ve created several tasks that we think we’ll need to accomplish on the road to a final product. Since we now have more items than will fit on the screen at once, pinch vertically on the Gantt chart to change the view scale.
Step 4: Grouping Tasks
When tasks are closely related or interdependent it can be useful to put them in a group. Groups help organize a project conceptually, and also act as meta-tasks that can be linked via dependencies to other tasks or groups.
Note
A task group is just a container—it has no duration or effort of its own. The amount of time and energy needed to complete the group is equal to the sum of the requirements of the group’s individual tasks.
An easy way to gather tasks into a group is in Edit Mode. Tap Edit on the project screen, then tap to select all of the tasks and milestones to be grouped. Finally, tap Group in the bottom toolbar to complete the edit.
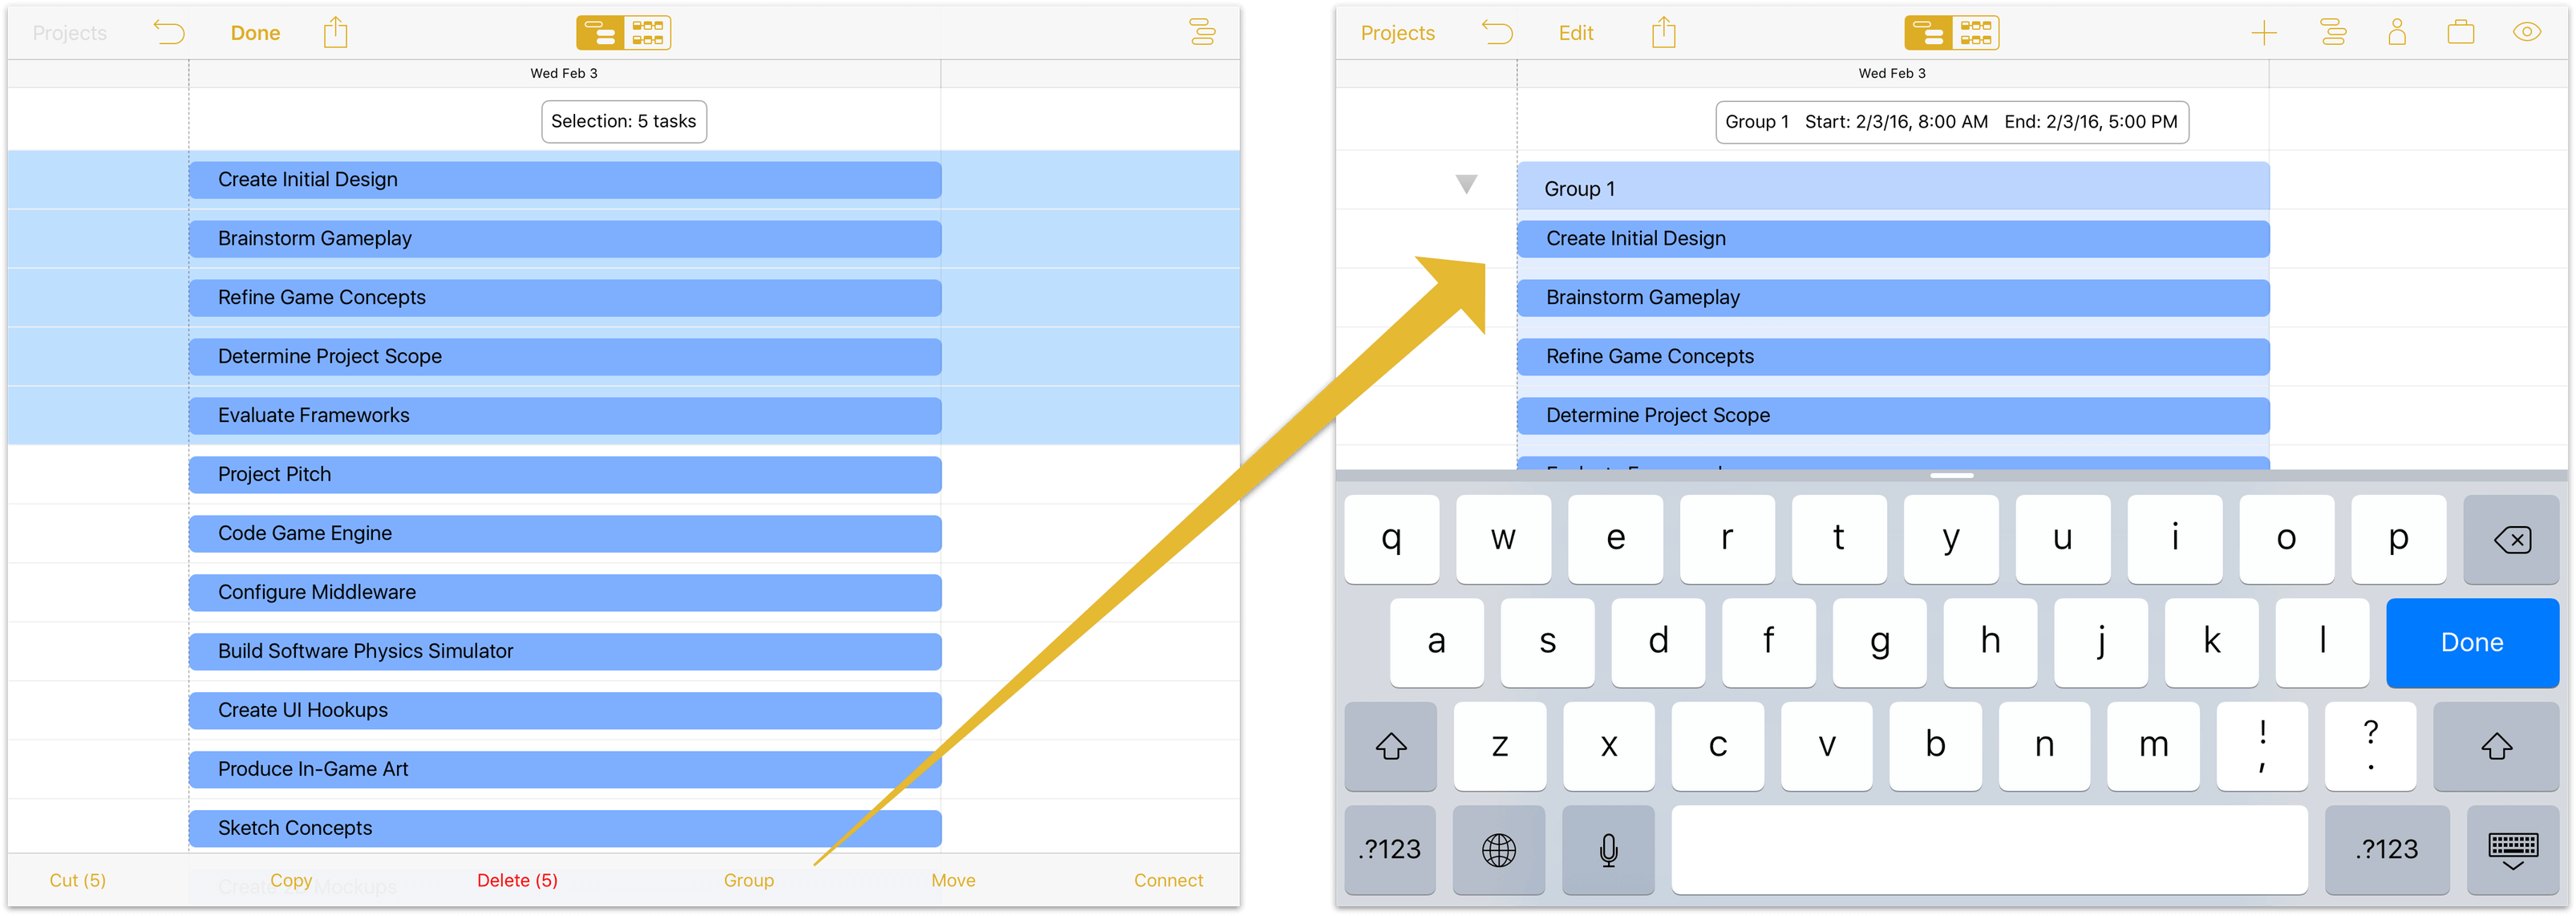
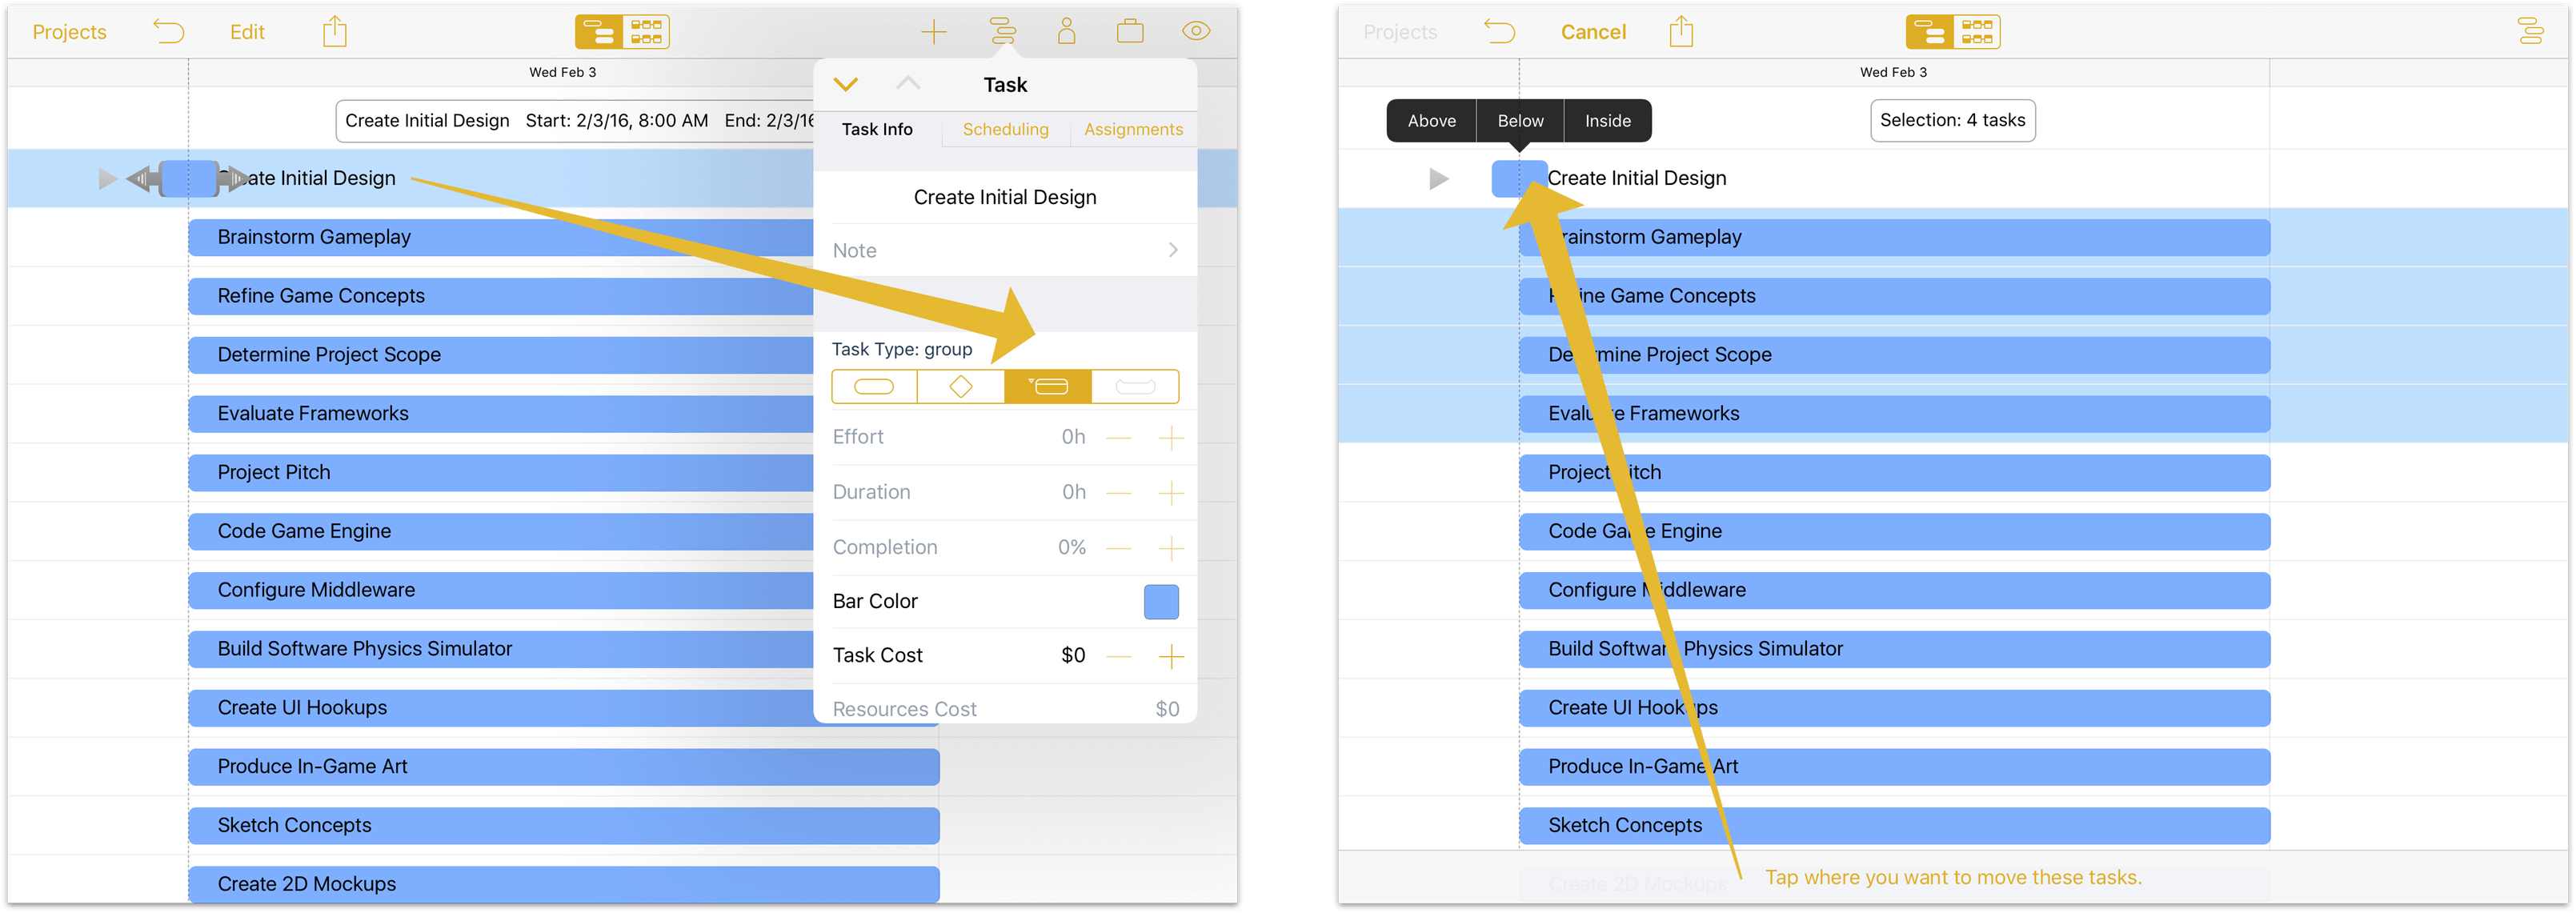
An existing task in your list may make a good candidate for a group already. Tap to select it and then open the Task inspector, where you can change its task type to Group. Assign other tasks to the new group in Edit mode by selecting the tasks (but not the group itself) and choosing Move, then tap the group and choose Inside from the contextual menu.
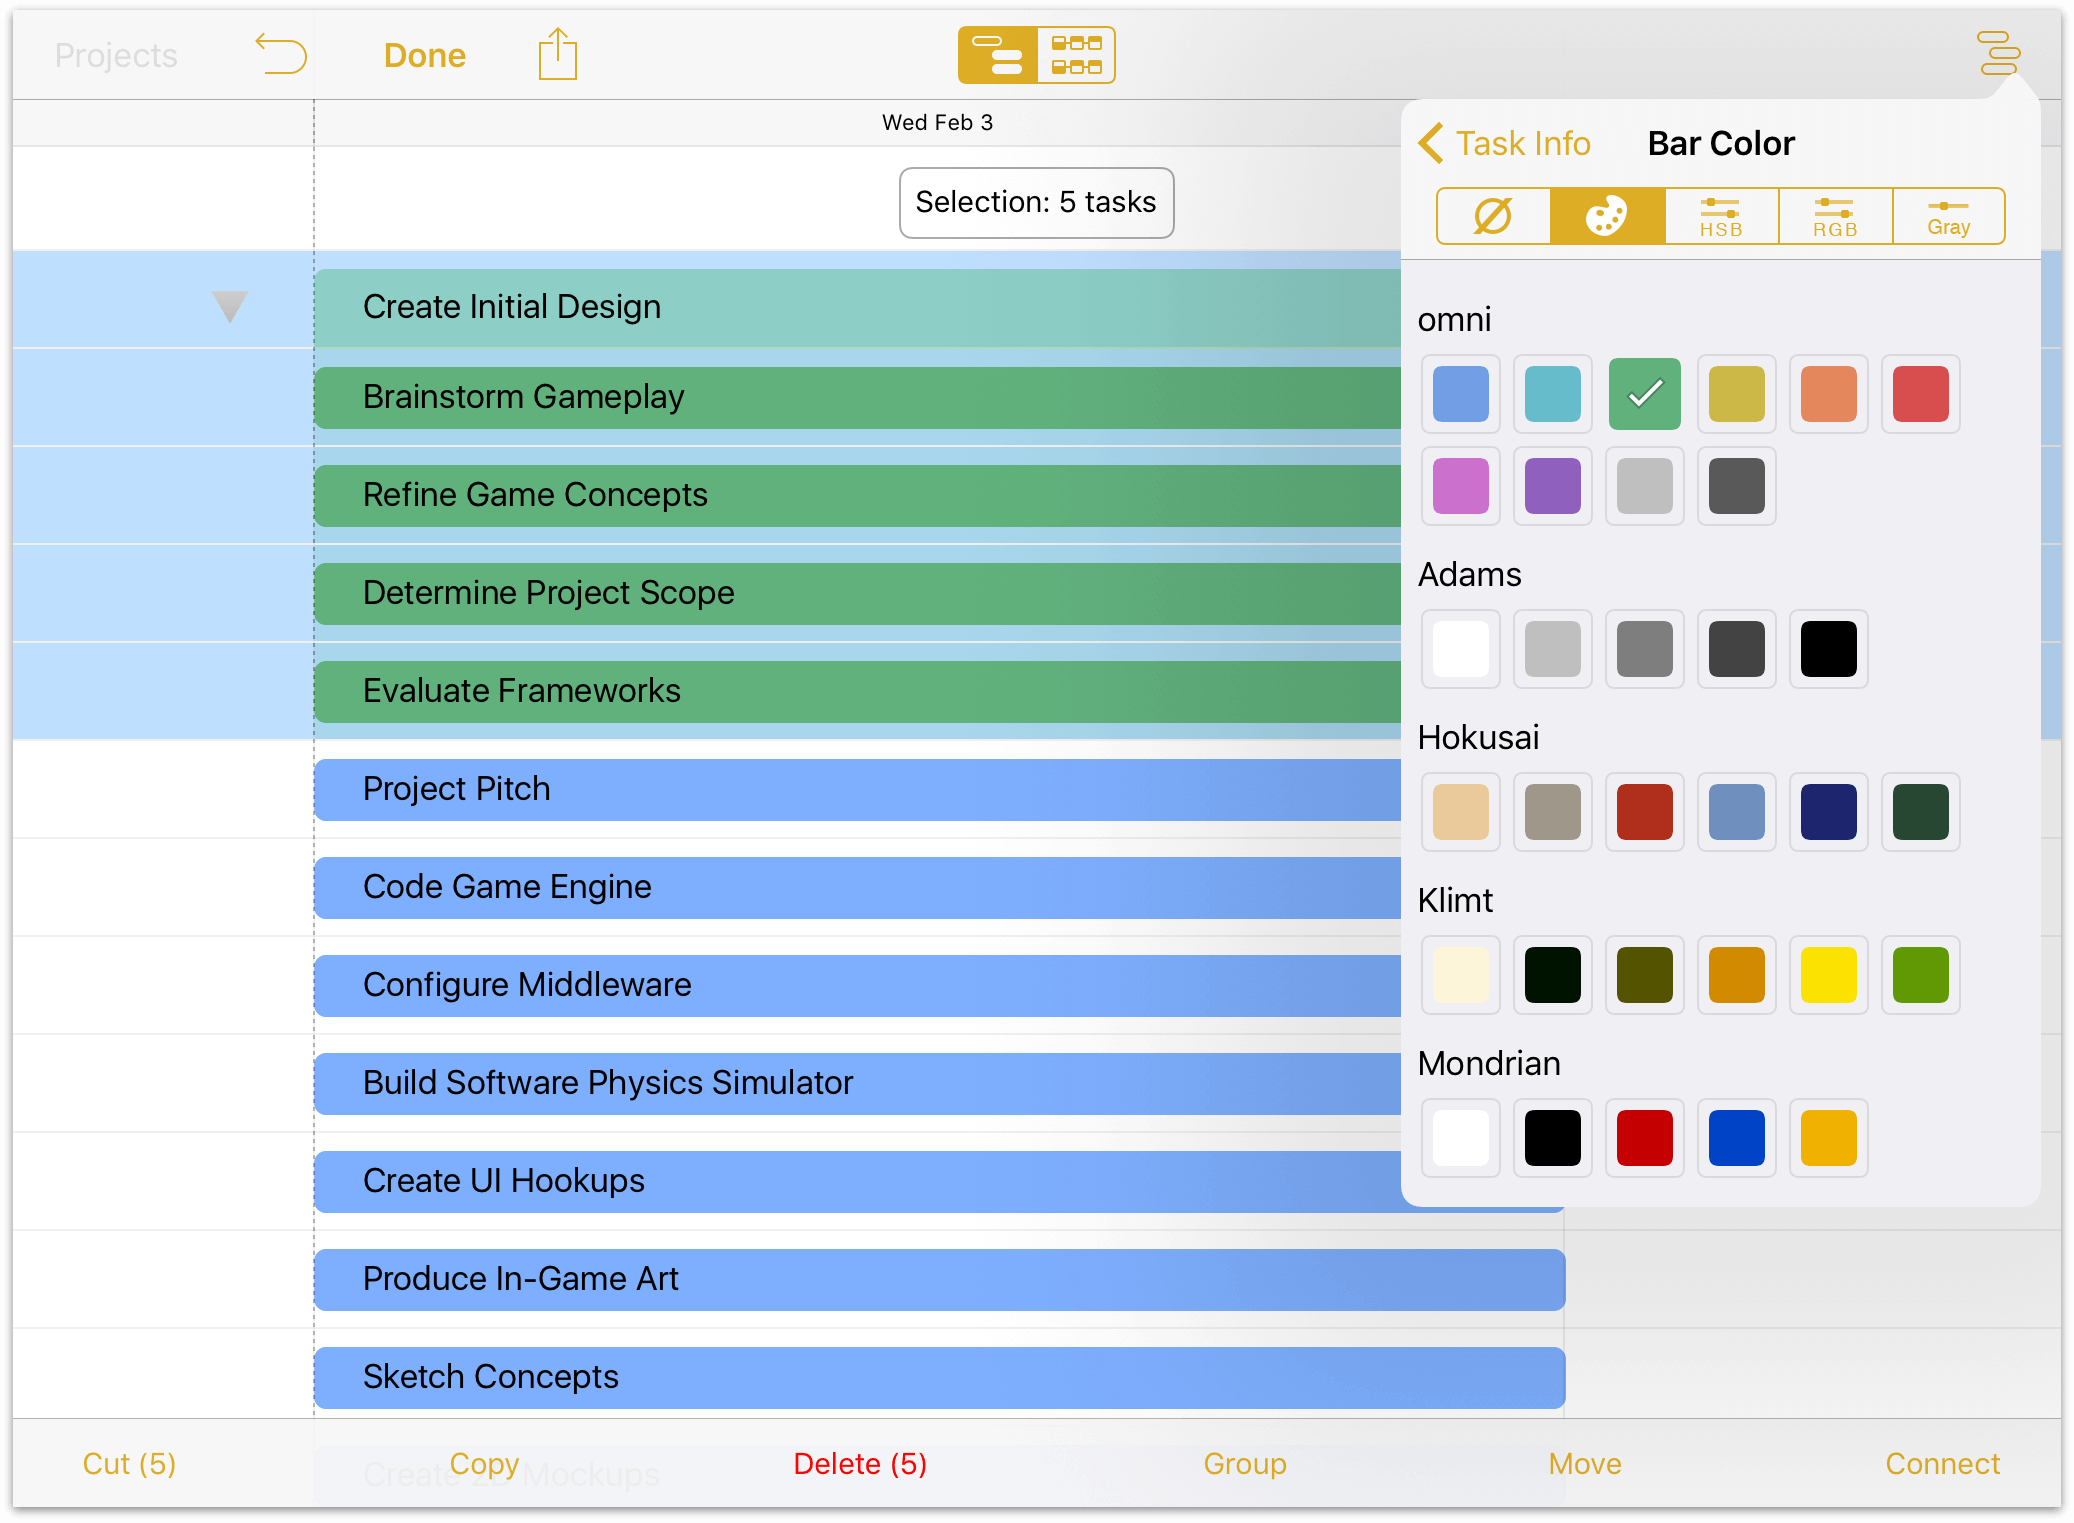
While you’re in Edit mode with the group and all of its tasks selected, this would be a good time to add a bit of visual distinction to the group as well. Open the Task inspector and tap Bar Color to choose a color that will identify all of the tasks in the group.
Step 5: Creating Milestones
Milestones are the anchor points in your project that mark important shifts in focus or unlocking a new phase of the project. Clarifying these will help break a dauntingly large project down into more manageable sections, and help dictate the tasks leading up to and following the milestone.
To create a milestone, tap and hold the new task button until the option appears:
Alternatively, tap a currently existing task to select it, then open the Task inspector. You can change the task type from a regular task to a milestone here.
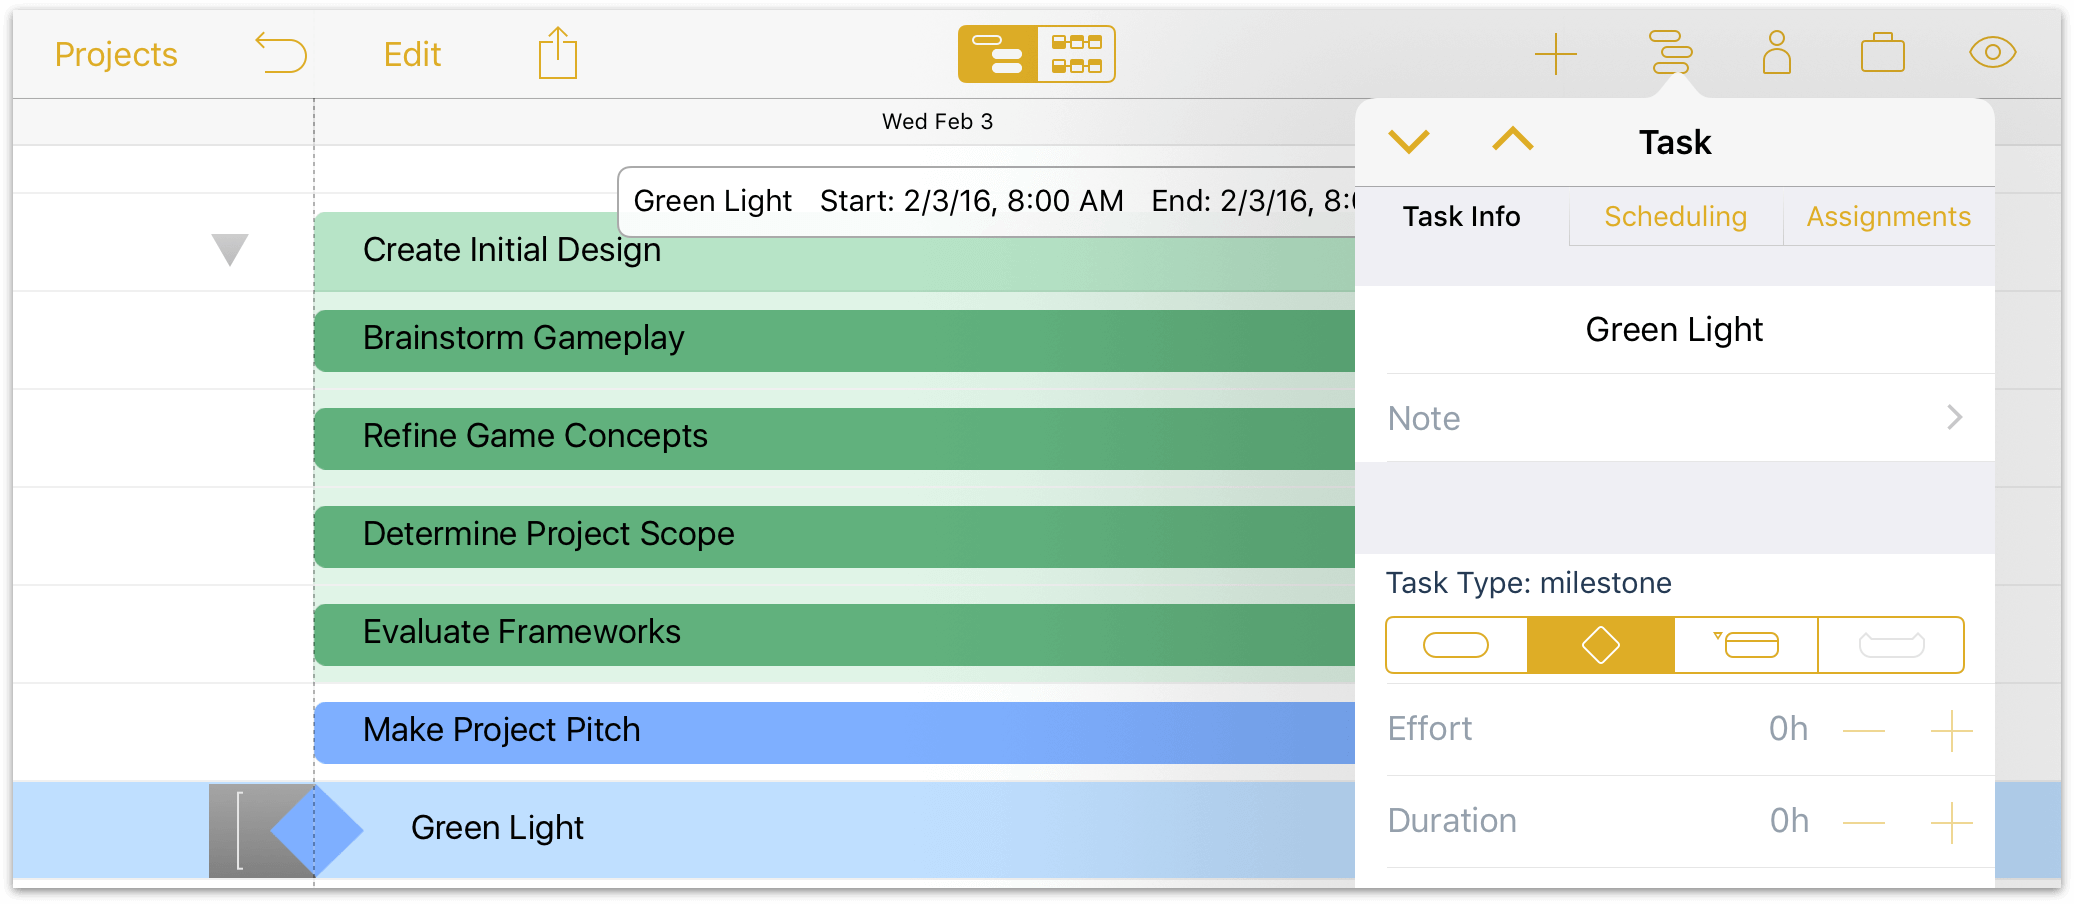
Note
When you convert a task to a milestone, you’ll see that its Effort and Duration fields in the Task inspector are greyed out. This is because milestones aren’t actionable items; they serve as important indicators of progress, but have no “mass” in and of themselves. If you find yourself wanting to apply effort to a milestone, odds are it’s actually a regular task—some piece of work that precedes an actual milestone.
Step 6: Setting Task Durations
Returning to our tasks in the Gantt chart we can begin to scope out how long each task will take. With estimated times for their completion in mind, tap a task and drag the right handle that appears to the appropriate length for the task’s duration (in this case, two full workdays).
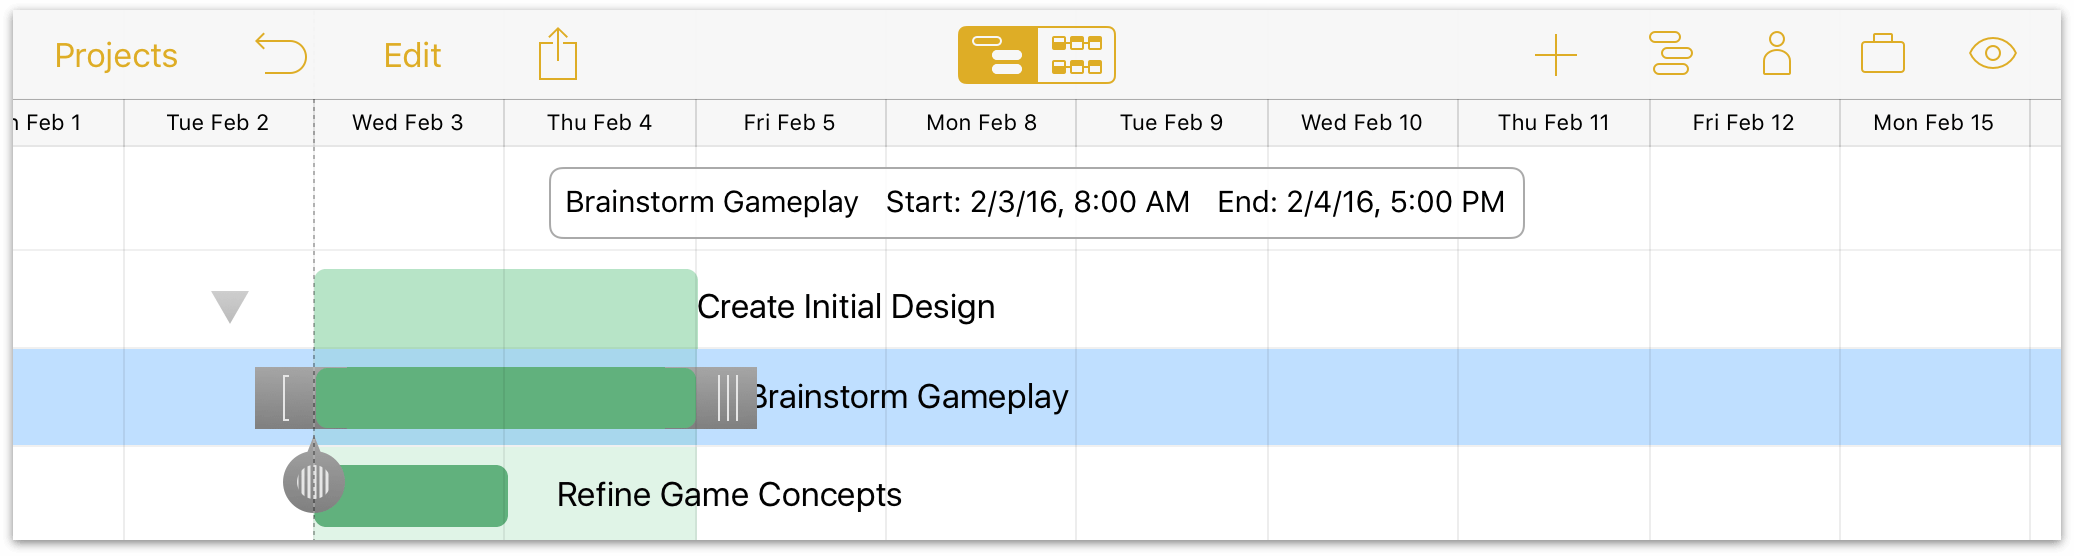
Task duration can also be set using the Task inspector.
Note
The task duration you set in this step isn’t set in stone. By default it represents the number of work hours required to complete the task—not the absolute time that the task will take to complete. This becomes clear when you begin assigning resources to tasks; when more than one staff member puts their full effort into a piece of work, the amount of time it takes to complete is reduced.
If you take a detour to the Assignments pane of the Task inspector you’ll find options for how OmniPlan handles a selected task when resources are assigned to it.
- Adjust Task Duration—Adding new resources increases the effort available to complete them, and this option uses that effort to shorten the amount of time the task will take to complete. The opposite is also true, as removing a resource from the task will increase its duration.
- Adjust Task Effort—Adding new resources keeps the duration the same, and adds the effort they contribute to the total required to complete the task — this represents pouring work into a fixed timeframe. Removing resources indicates that less effort is needed to complete the task in the same amount of time as originally planned.
- Adjust Assigned Amounts—With this option the duration and effort stay the same regardless of resource assignments. Instead, when new resources are added, the amount of effort asked of each resource is reduced evenly across the board (one resource contributes 100 percent, two resources contribute 50 percent each, and so on).
After organizing tasks into groups and estimating the time required to complete them, we’re starting to get a better picture of how our project will take shape. At this stage our Gantt chart looks something like this:

Step 7: Connecting Tasks with Dependency Lines
We can’t complete all of our tasks simultaneously! Even if we had the resources to do so, some parts of the project can’t happen until others are finished. Thankfully, the pieces are now in place to establish the ways that those tasks are dependent on the status of others. There are four ways that dependencies can exist:
Finish ▸ Start dependencies are the most common type, indicating that when task A finishes, task B can start.
Start ▸ Finish dependencies indicate that when task A starts, task B can finish.
Start ▸ Start dependencies indicate that when task A starts, task B can also start.
Finish ▸ Finish dependencies indicate that when task A finishes, task B can also finish.
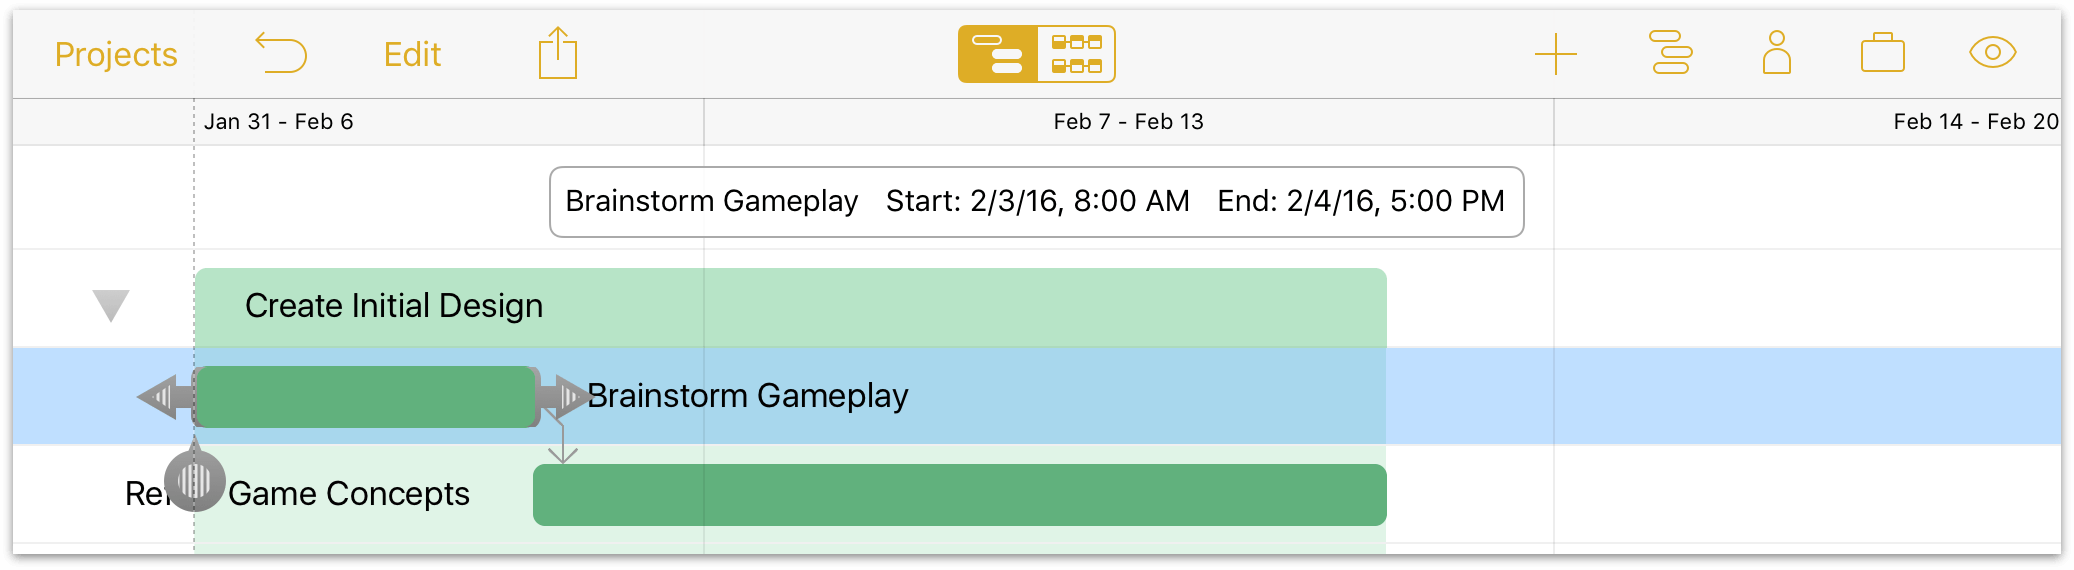
Connecting tasks in the Gantt view is as easy as tapping a selected task again, which puts dependency arrow handles on either side of the task bar.
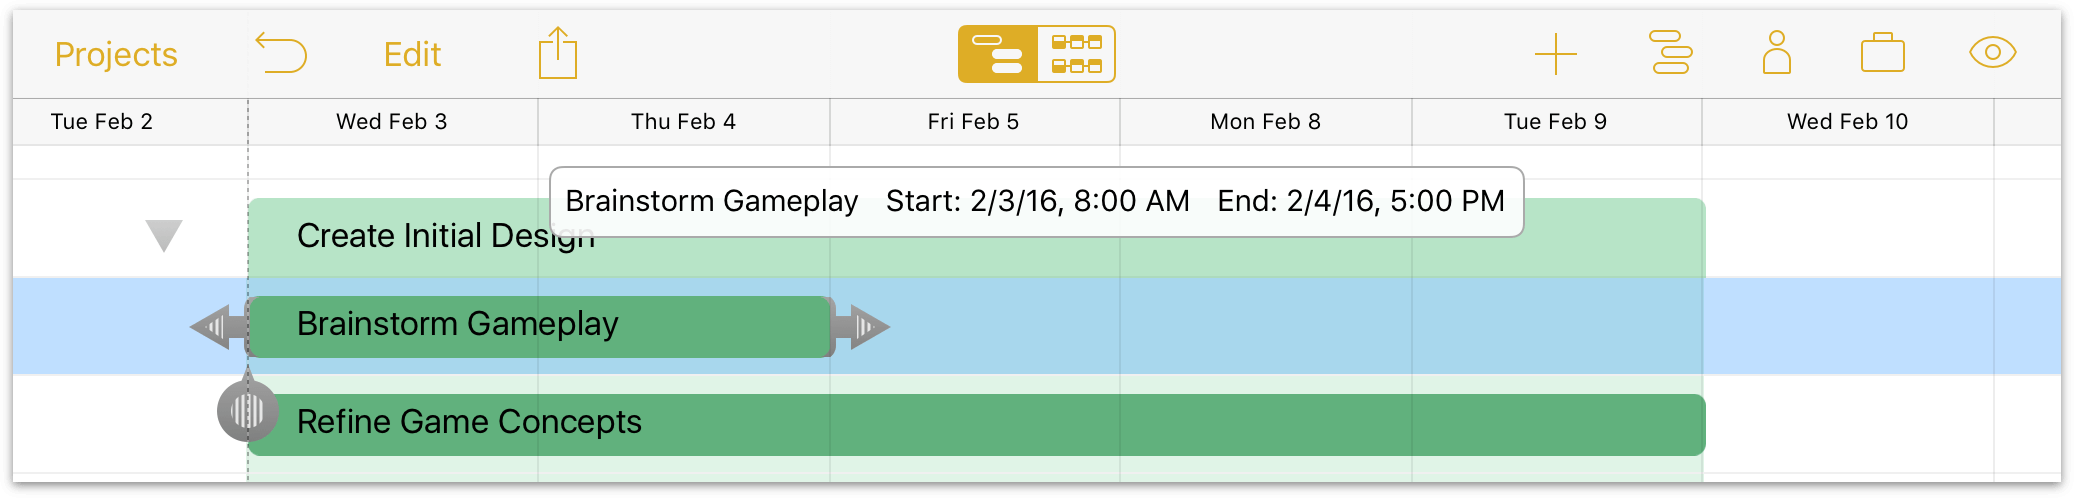
Drag an arrow from the selected task to another task to create a dependency. The type of dependency is based on the start- and end- points of the arrow: dragging an arrow from the completion of one task to the beginning of another will create a Finish ▸ Start dependency, and so on.
While in Edit mode, you can use the Connect/Disconnect button to add Finish ▸ Start dependencies or remove dependencies between any number of selected tasks simultaneously.
Tip
Having created your first dependency, now is a great time to check in with the Network Diagram view again. This is where the view really begins to shine, with clear illustrations of how tasks are connected. Experiment with connecting tasks in this view for awhile—you may find it preferable to the Gantt chart’s organizational aesthetic.

Step 8: Creating Hammock Tasks
A hammock task is one in which the duration is dependent on both when the previous task ends, and the next task starts. This type of task is useful when facing a hard deadline and deciding what can be compressed if the project is running behind schedule, or if external factors influence when parts of the project must happen.
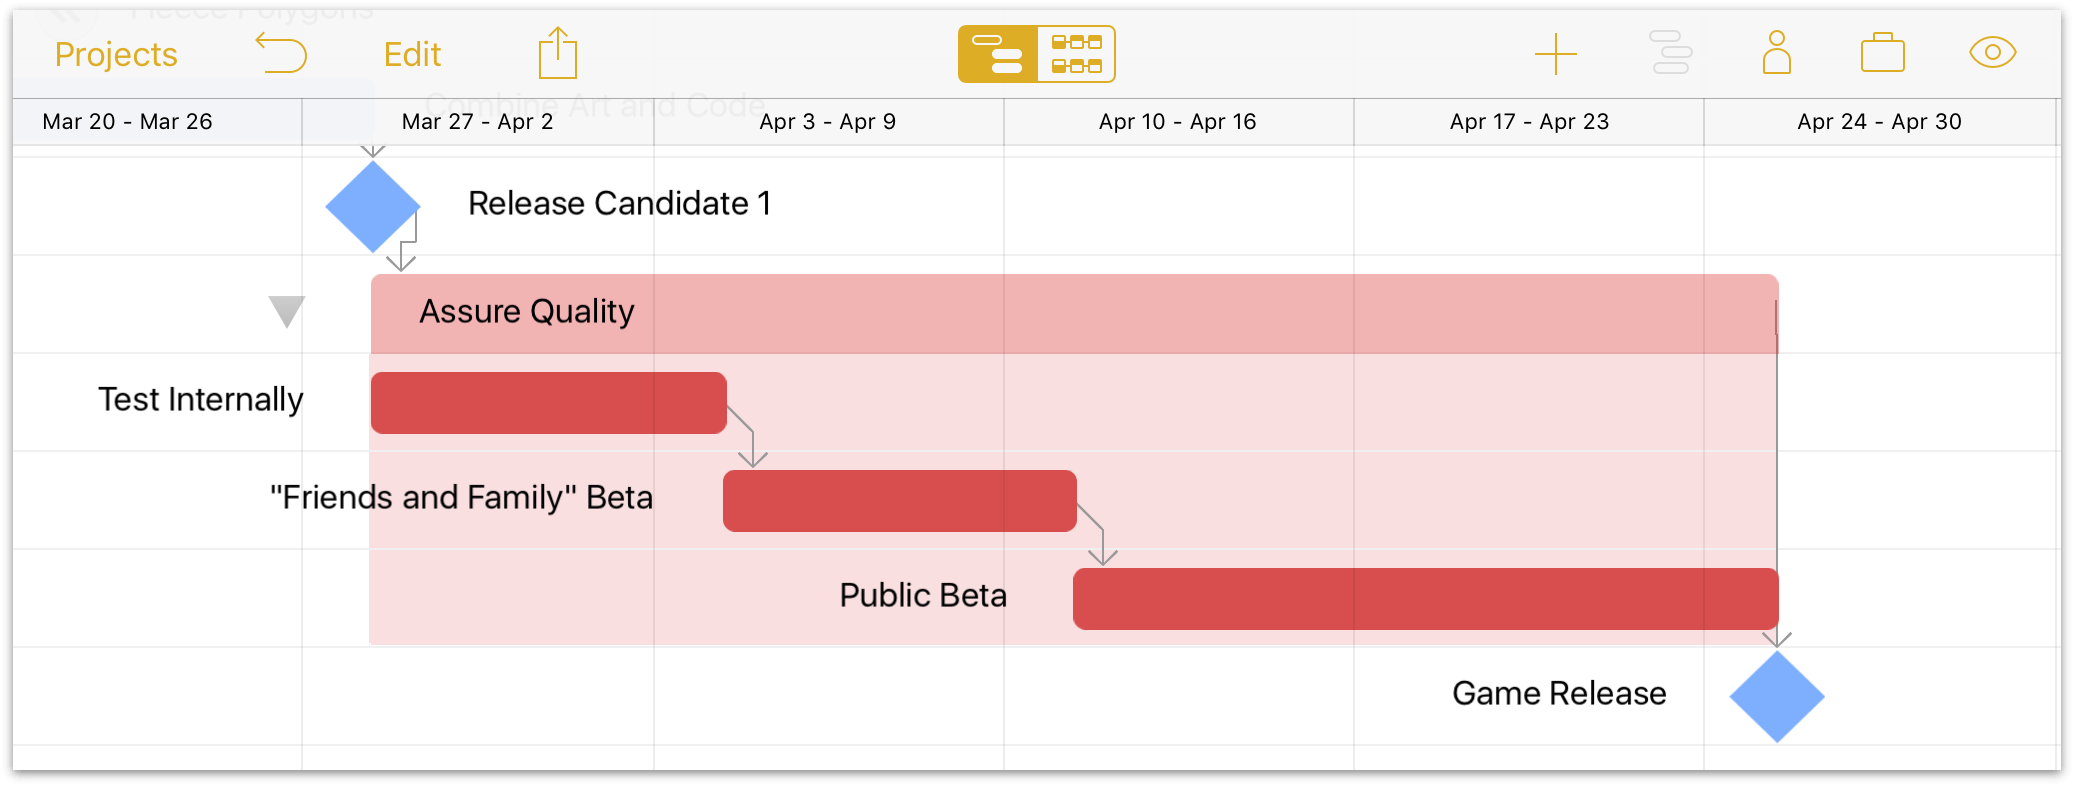
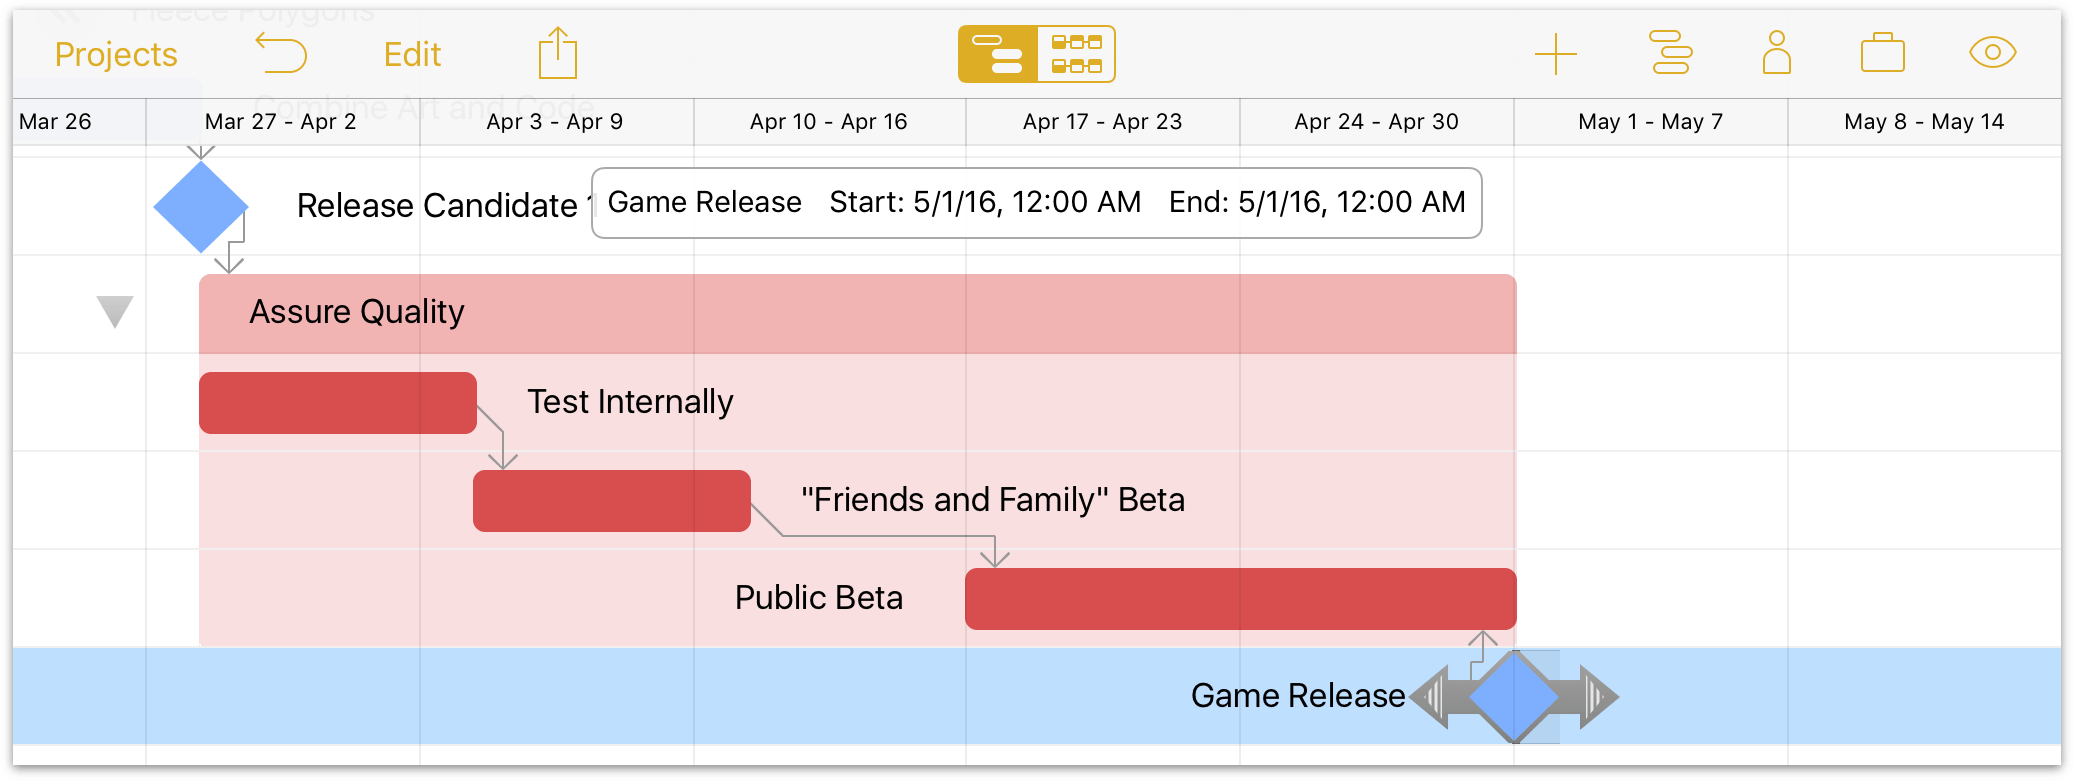
In the case of our example project, now that we’ve established most of its dependencies we have a clearer idea of how long it’s likely to take. With that knowledge, we can anchor the final milestone to a point in time: we set Game Release for May 1st.
We decide that the public beta test period is the task that can give the most if we end up short on time toward the end, so that’s the one we want to convert to a hammock task. We start with a set of two tasks connected to each other with a Finish ▸ Start dependency in the Assure Quality group (“Friends and Family” Beta, Public Beta) with the group connected to the Game Release milestone by another Finish ▸ Start dependency.
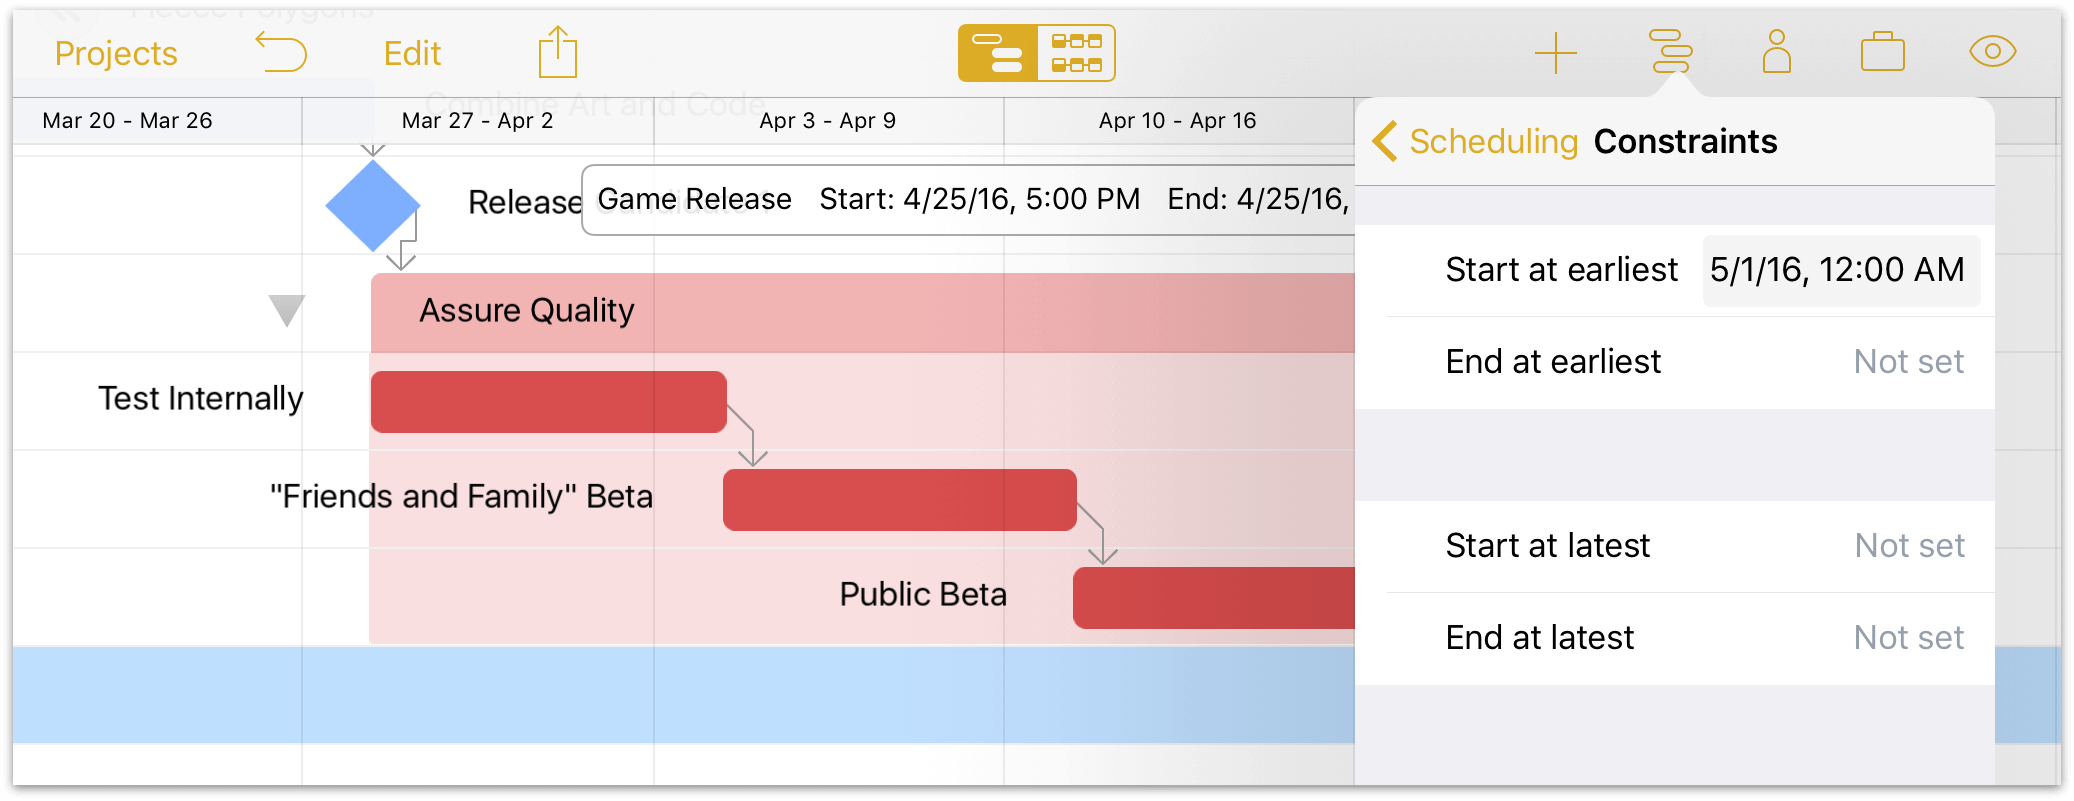
We want to release the game on May 1st, so we set the milestone’s Start at earliest date (in the Task inspector’s Scheduling pane) to reflect that.
Note
This next step is only necessary because the task we want to convert to a hammock is part of a group with an expressed relationship to the milestone that follows. Creating contradictory dependencies between a group and the final task in that group results in a violation, and we don’t want that! To resolve the issue before it happens, remove the dependency between the Assure Quality group and the Game Release milestone. Don’t worry—we’ll replace it with something better soon.
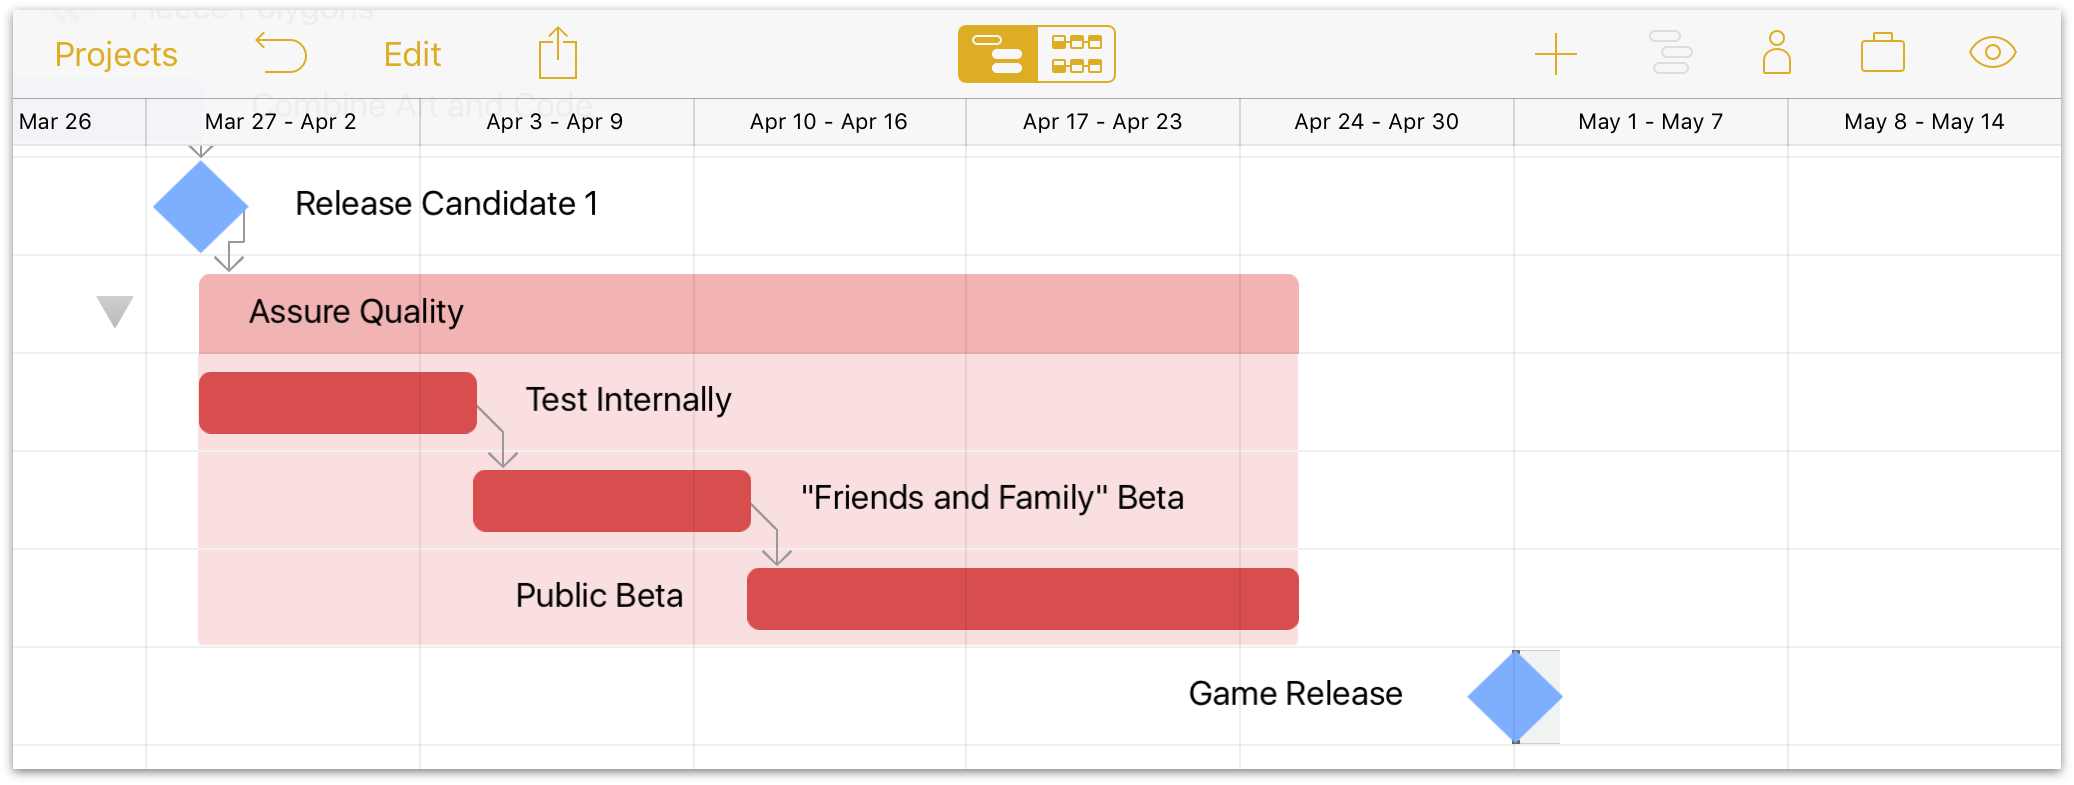
For a task to become a hammock task, it needs dependency relationships with the tasks preceding and following it. In our example the Public Beta task doesn’t have an explicit relationship with the Game Release milestone yet, so our next step is to create one. But what kind?
Our goal is to indicate that when Game Release starts, the Public Beta finishes. To do this, select the Game Release milestone and drag the left dependency arrow handle from the “start” of the milestone to the end of the Public Beta task, creating a Start ▸ Finish dependency between them.
Public Beta is now in the proper state to be converted to a hammock task: It’s connected to the task preceding it with a Finish ▸ Start dependency, and the task following it (a milestone, in this case) with a Start ▸ Finish dependency. For the final step, select Public Beta and choose the Hammock task type for it from the Task inspector.
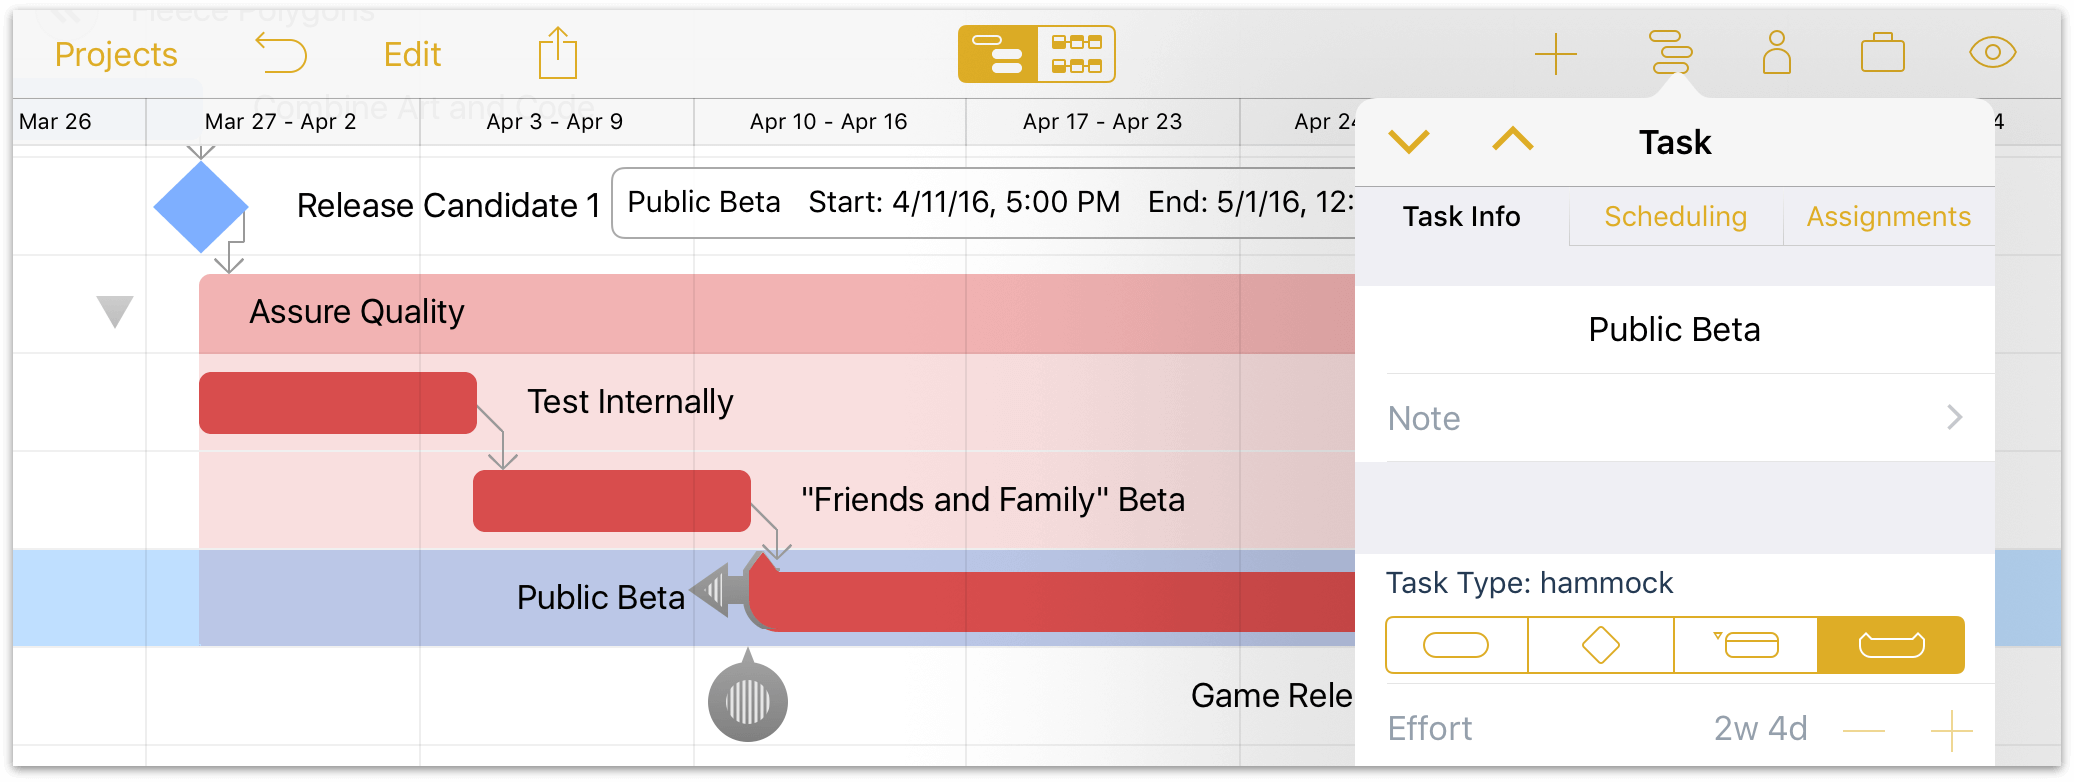
The duration of the hammock task extends automatically to fill the available space, in this case adding an extra week to the Public Beta test period. If the project is running ahead of schedule this period lengthens automatically, or if it’s running behind, it shortens right up until the scheduled release date.
Step 9: Editing the Work Week
Now that we’re starting to see the plan come together, we’ll set tasks aside for the moment and start setting up the work schedule for our project.
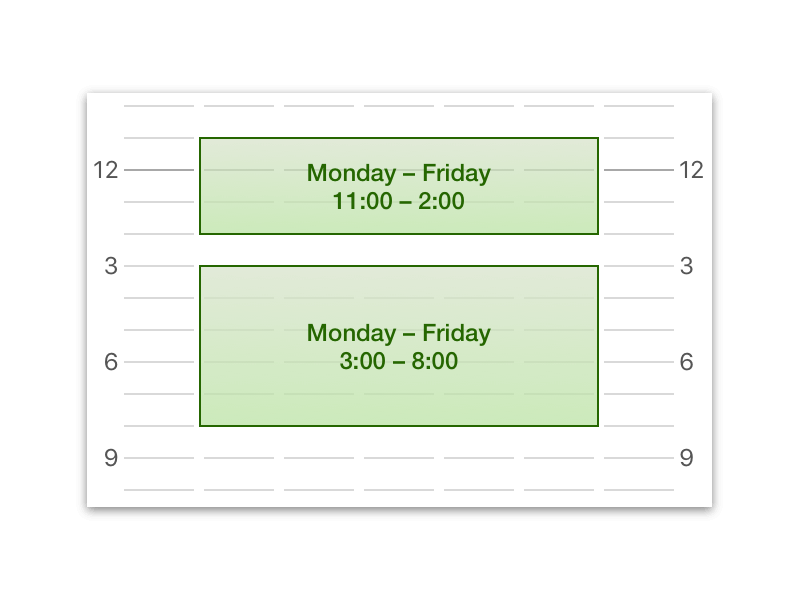
Open the Project inspector and tap Work Hours to access the regular weekly work schedule for the project. By default, working hours are Monday through Friday from 8:00 to 5:00, with an hour-long break for lunch at noon.
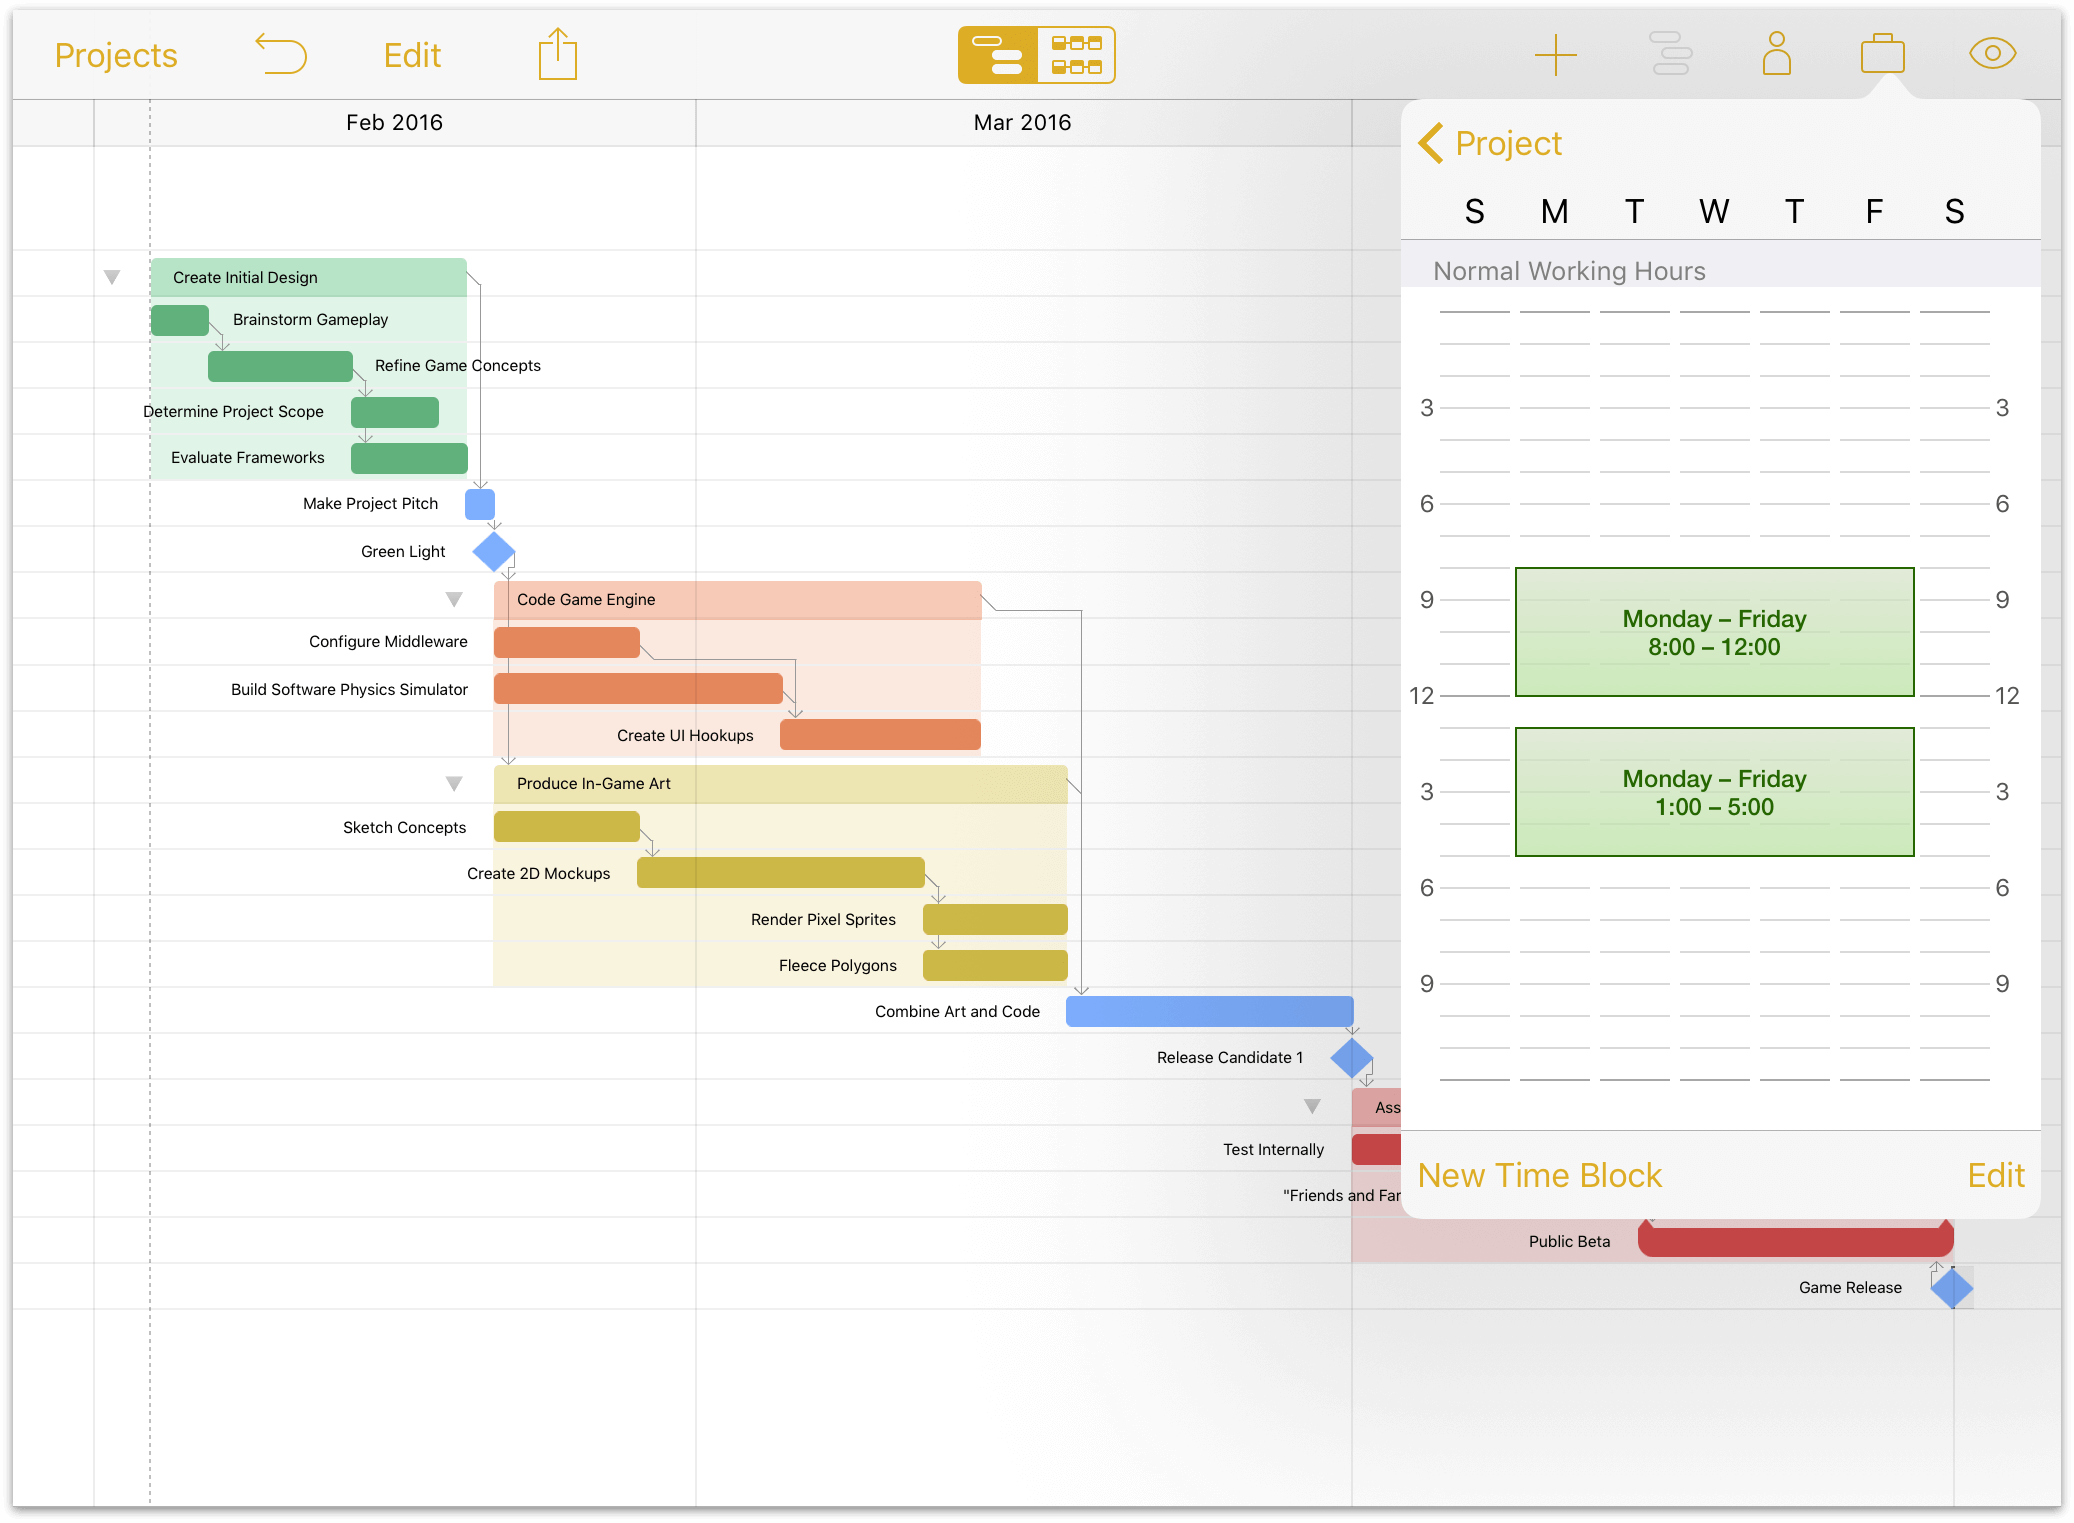
Since we’re working with a bunch of more nocturnal folks, let’s change the schedule to reflect that. Tap and hold one of the time blocks on the calendar to bring it to a new position, or drag one of the side handles to change the size of the block. We end up with a schedule that fits our needs:
Time blocks can be created for individual days to indicate longer or shorter regular working hours (tap New Time Block), and deleted by tapping Edit.
Step 10: Setting Project Schedule Exceptions
Even the most accommodating work week will occasionally have days that are out of the ordinary. Whether it’s a national holiday, a team-wide training seminar, an industry expo or conference, or just a patch of bad weather that keeps folks out of the office, setting exceptions to the regular work schedule can be key to keeping a project on track.
One holiday we know is in the future for our project is a company tradition: Pi Day (3/14, or March 14th). We can add that to our schedule right now by returning to the top level of the Project inspector and tapping Calendar.
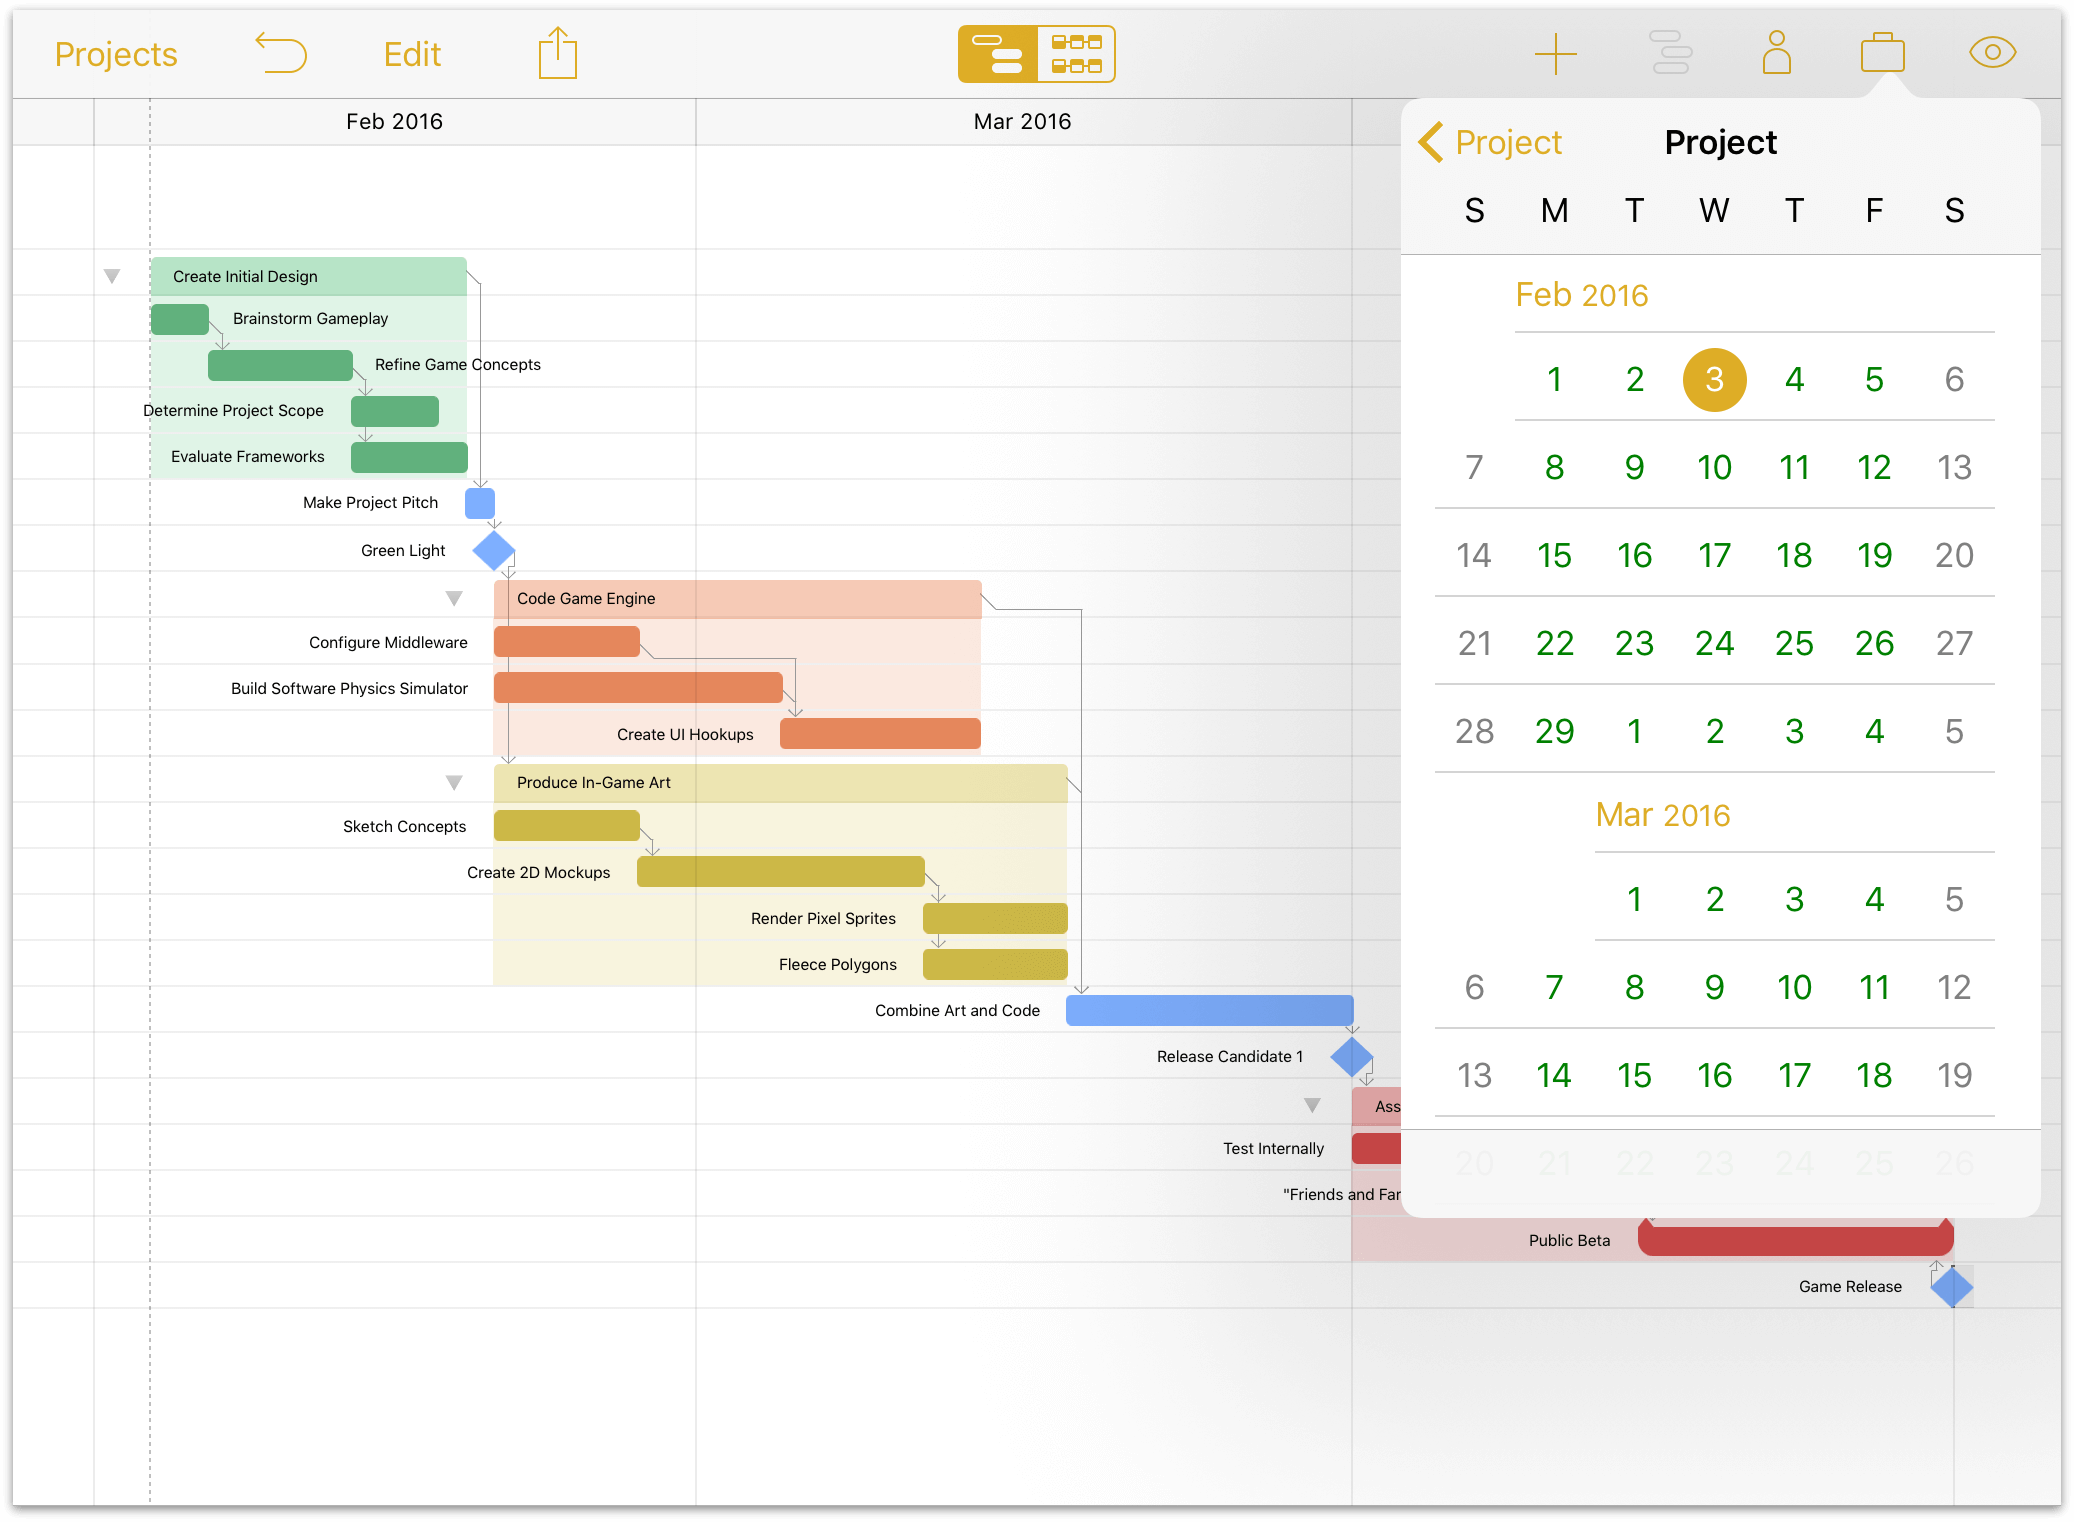
Green days on the exceptions calendar indicate regular work days. Swipe to scroll down to March, then tap the week of the 14th to access the exceptions calendar for that week.
Tip
For quick navigation between individual weeks of the exceptions calendar, swipe left or right on the numerical date headers. It’s a secret tiny productivity boost, and every little bit helps!
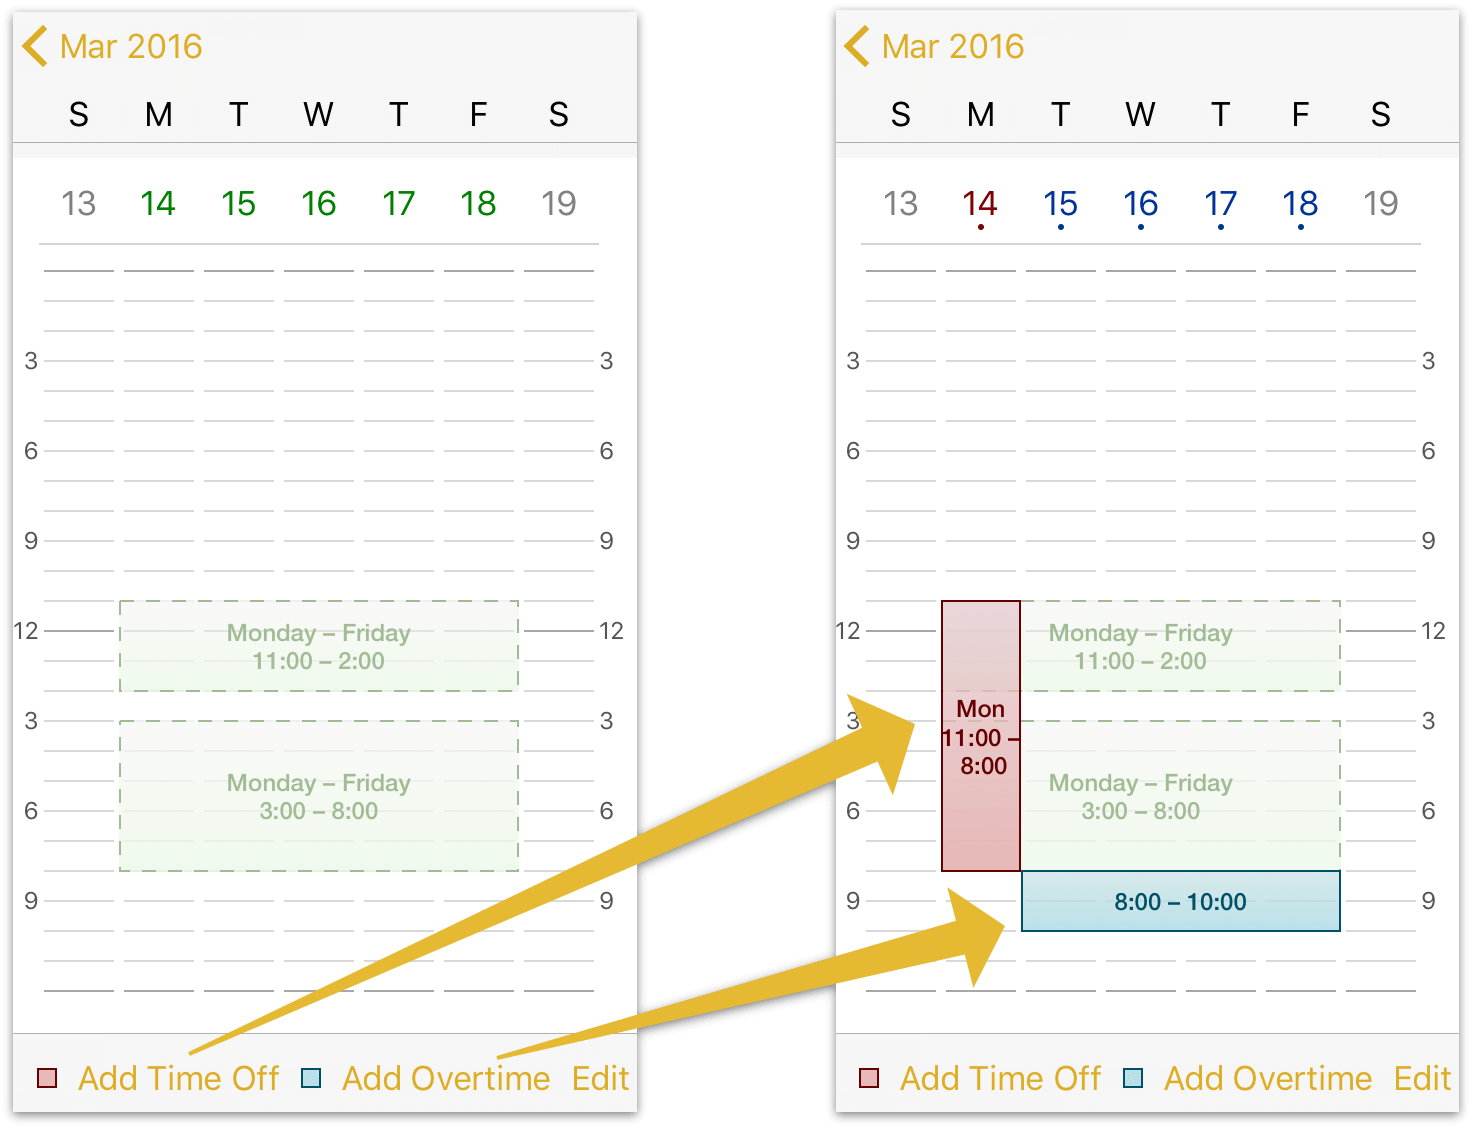
We know we want to take Pi Day off, but we can also predict that this week will be crunch mode for the team. We use the Add Time Off button to create a block of time that covers the 25th, and then replace that lost time with evening overtime hours through the rest of the week.
Tip
For an overview of holiday and weekend time in the context of your project, choose Non-Working Time from the View menu. You can opt to show holidays, holidays and weekends, or all days with work currently unassigned as shaded vertical bars in the Gantt chart.
Step 11: Creating Resources
Now it’s time to start adding the team members, equipment and materials we’ll be using to bring the project to fruition. Every person, piece of infrastructure, and raw ingredient that contributes to reaching the project’s goal is counted as a resource, so let’s open the Resources inspector and get started.
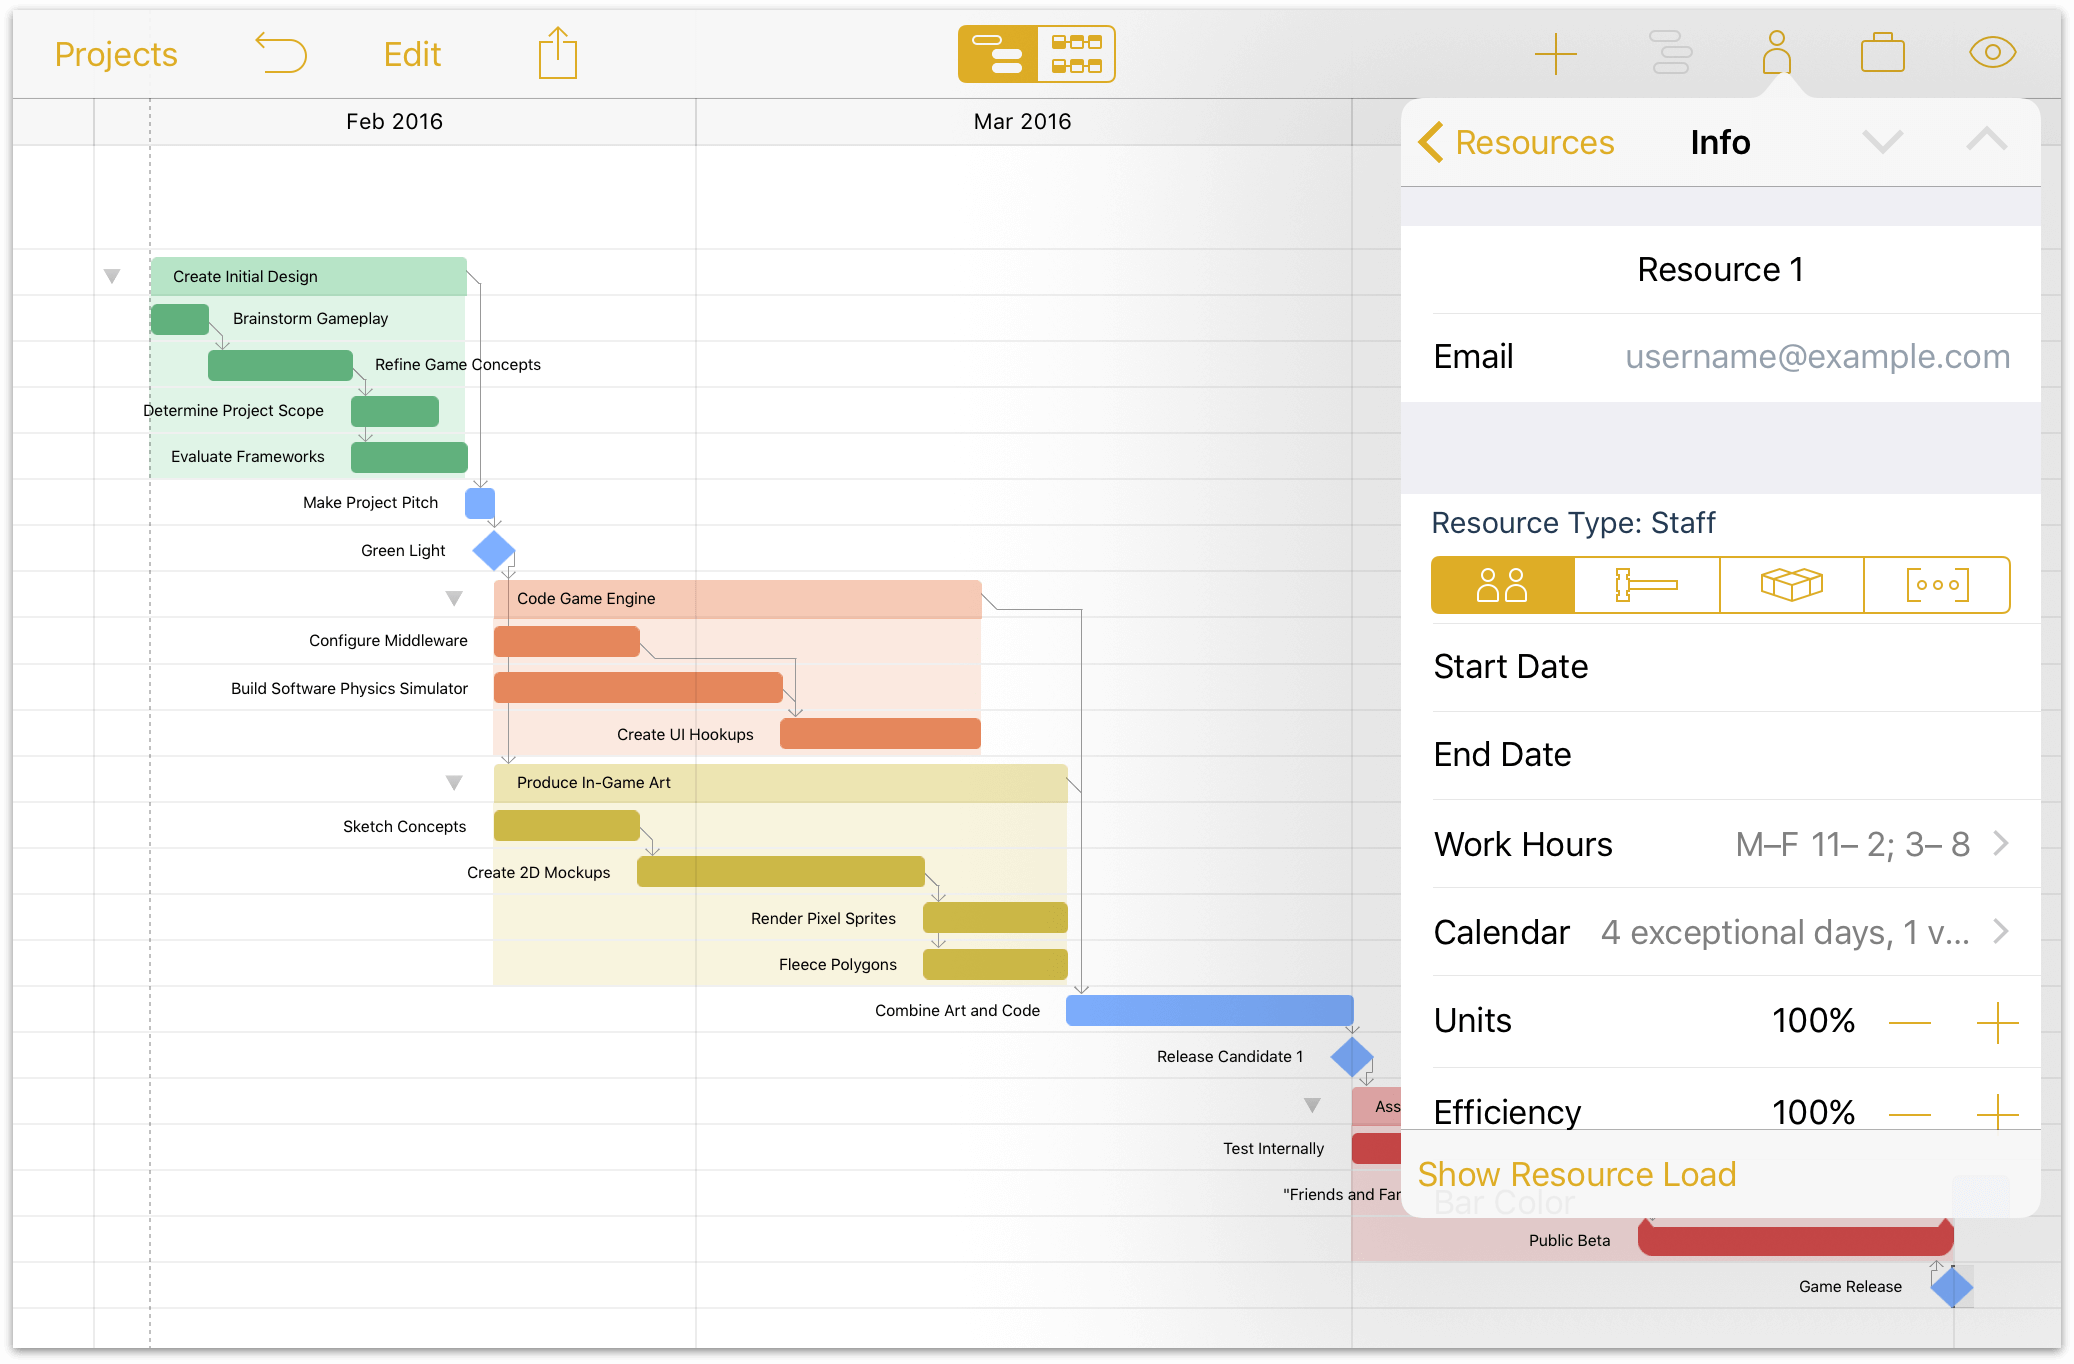
One resource has been created by default for our project – a staff member. Tap it to access and edit their details, including name, resource type, and personal calendar.
Note
When balancing workloads across multiple projects with OmniPlan Pro, a staff member’s email address is used as their unique identifier—so make sure their address is consistent across all the projects they’re participating in.
After editing the default resource we’ll create a few more to fill out the list of our team members and the technology they’re using to bring the game to life. Remove or rearrange resources at any time using the Edit button at the top level of the Resources inspector.

Step 12: Assigning Resources to Tasks
Assign resources to tasks by selecting the desired tasks in the Gantt chart (multiple tasks can be selected simultaneously using Edit mode), then opening the Task inspector and switching to the Assignments tab.
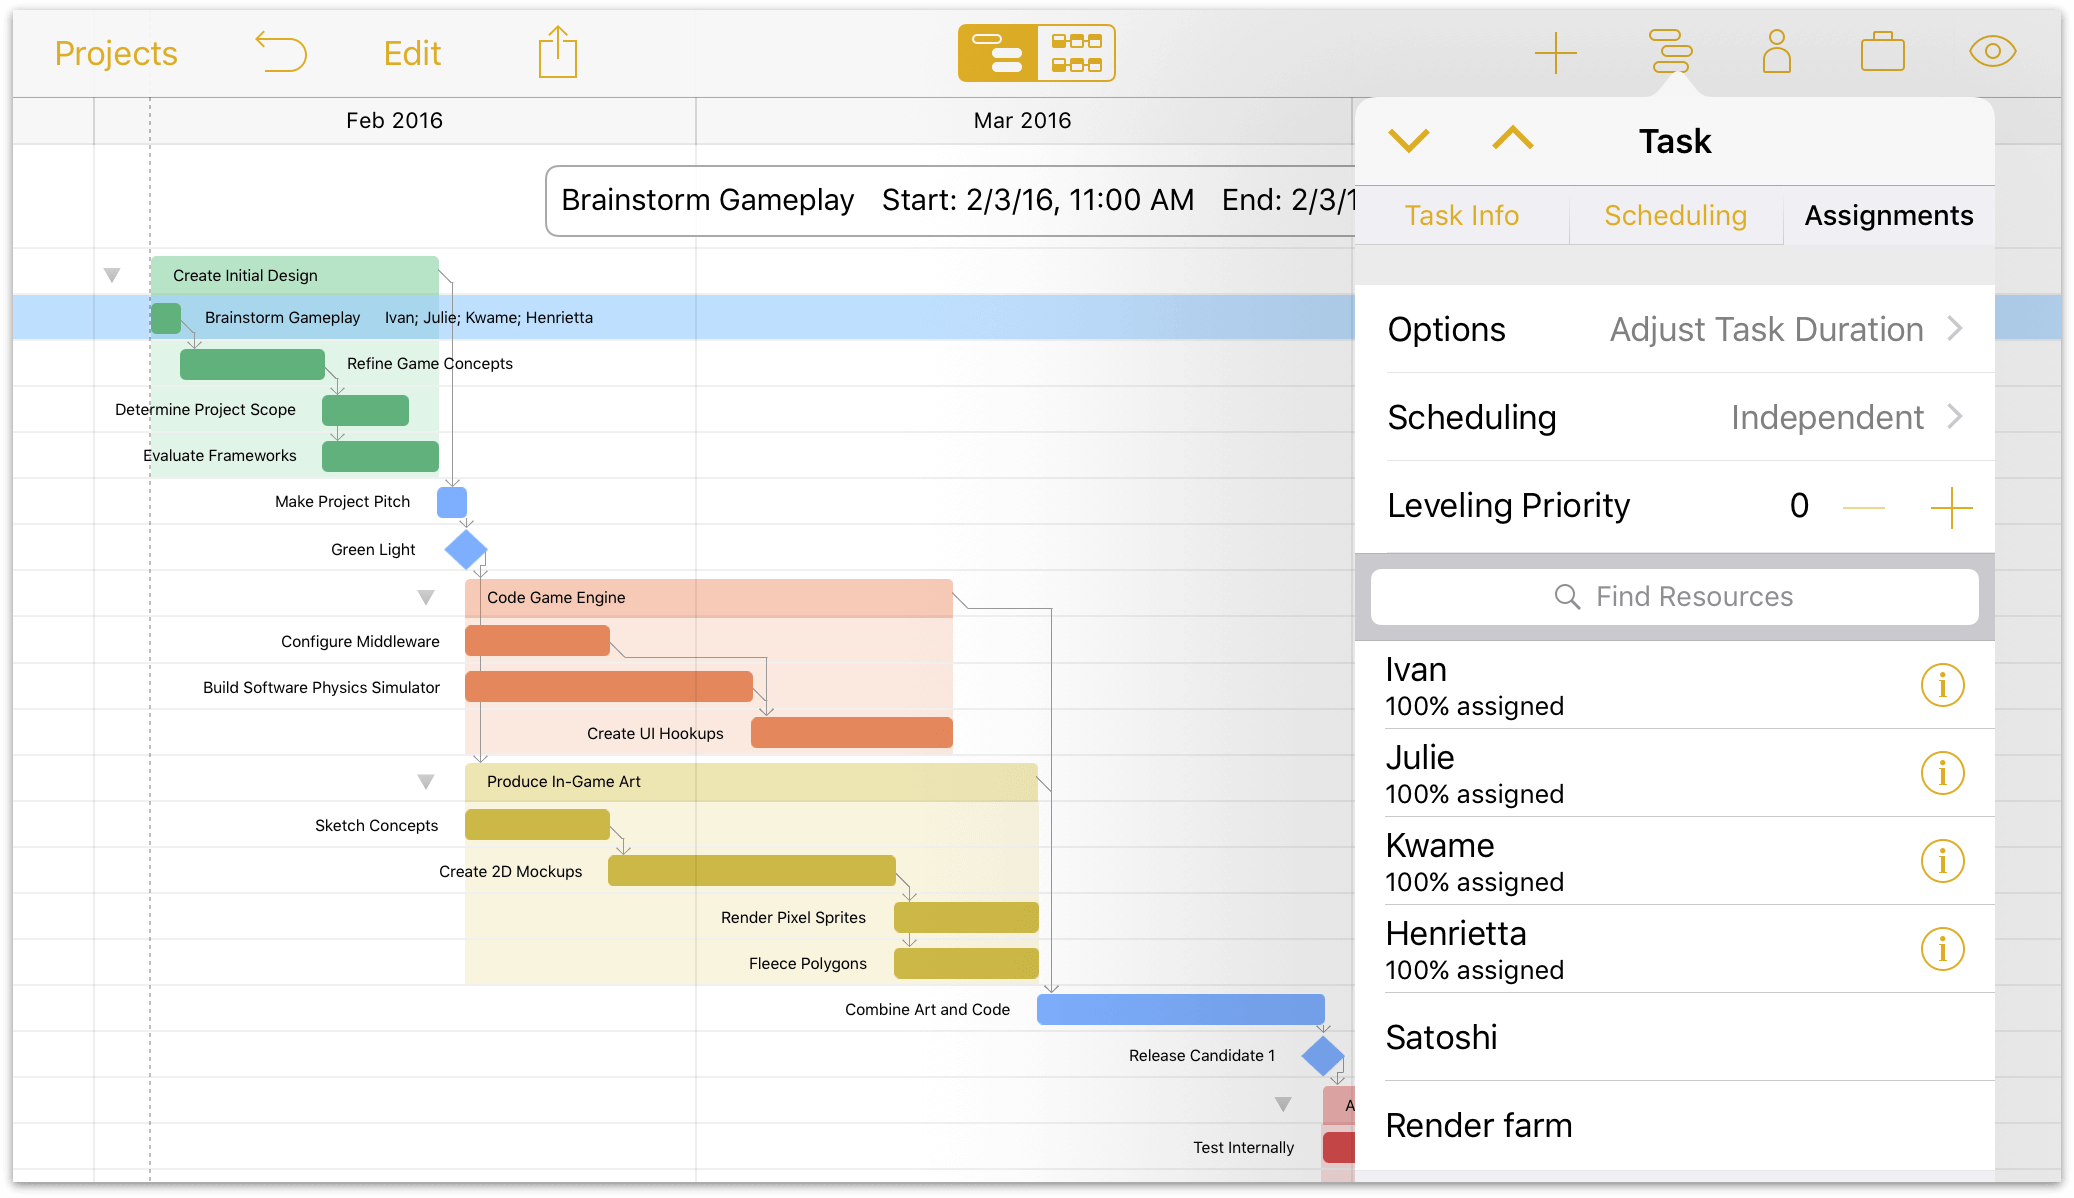
Tap each resource you’d like to assign to the selected task(s) and their names will appear next to each task that they’re assigned to.
By default, resources assigned to tasks commit 100% of their effort to those tasks. This can be affected in a few ways:
- The amount of effort a resource contributes to a given task can be manually set in the Assignments tab of the Task inspector. Assigning less than 100% of a resource’s effort to the task means the work will be completed more slowly, but frees time for that resource to be devoted to other simultaneous tasks.
- If a task’s assignment options are set to Adjust Assigned Amounts, the percentage of effort contributed by each resource will be reduced uniformly when new resources are added. This keeps both the task’s scheduled duration and required effort at constant set amounts.
- The amount of a staff member’s time dedicated to the project (relative to their full time schedule) is expressed by the resource’s Units value in the Resources inspector. If Ivan’s time is split between two projects that he spends equal time on, his Units value for this project should be set to 50%, and 100% of his effort value applied to a task in this project equates to 50% of his total time on the clock.
- A new trainee’s work might not be as productive as that of an experienced employee. In that case, the resource representing them should have its Efficiency value reduced while they are in training. This represents the amount of effort-per-time the team member contributes to tasks to which they are assigned; 100% of their effort accomplishes less than 100% of the effort of a fully trained worker.
Step 13: Setting Individual Schedule Exceptions
Individual staff members may have personalized work schedules, and they’ll almost certainly have individual needs for time off. In the Resource inspector, choose a resource and tap Work Hours to display their normal schedule.
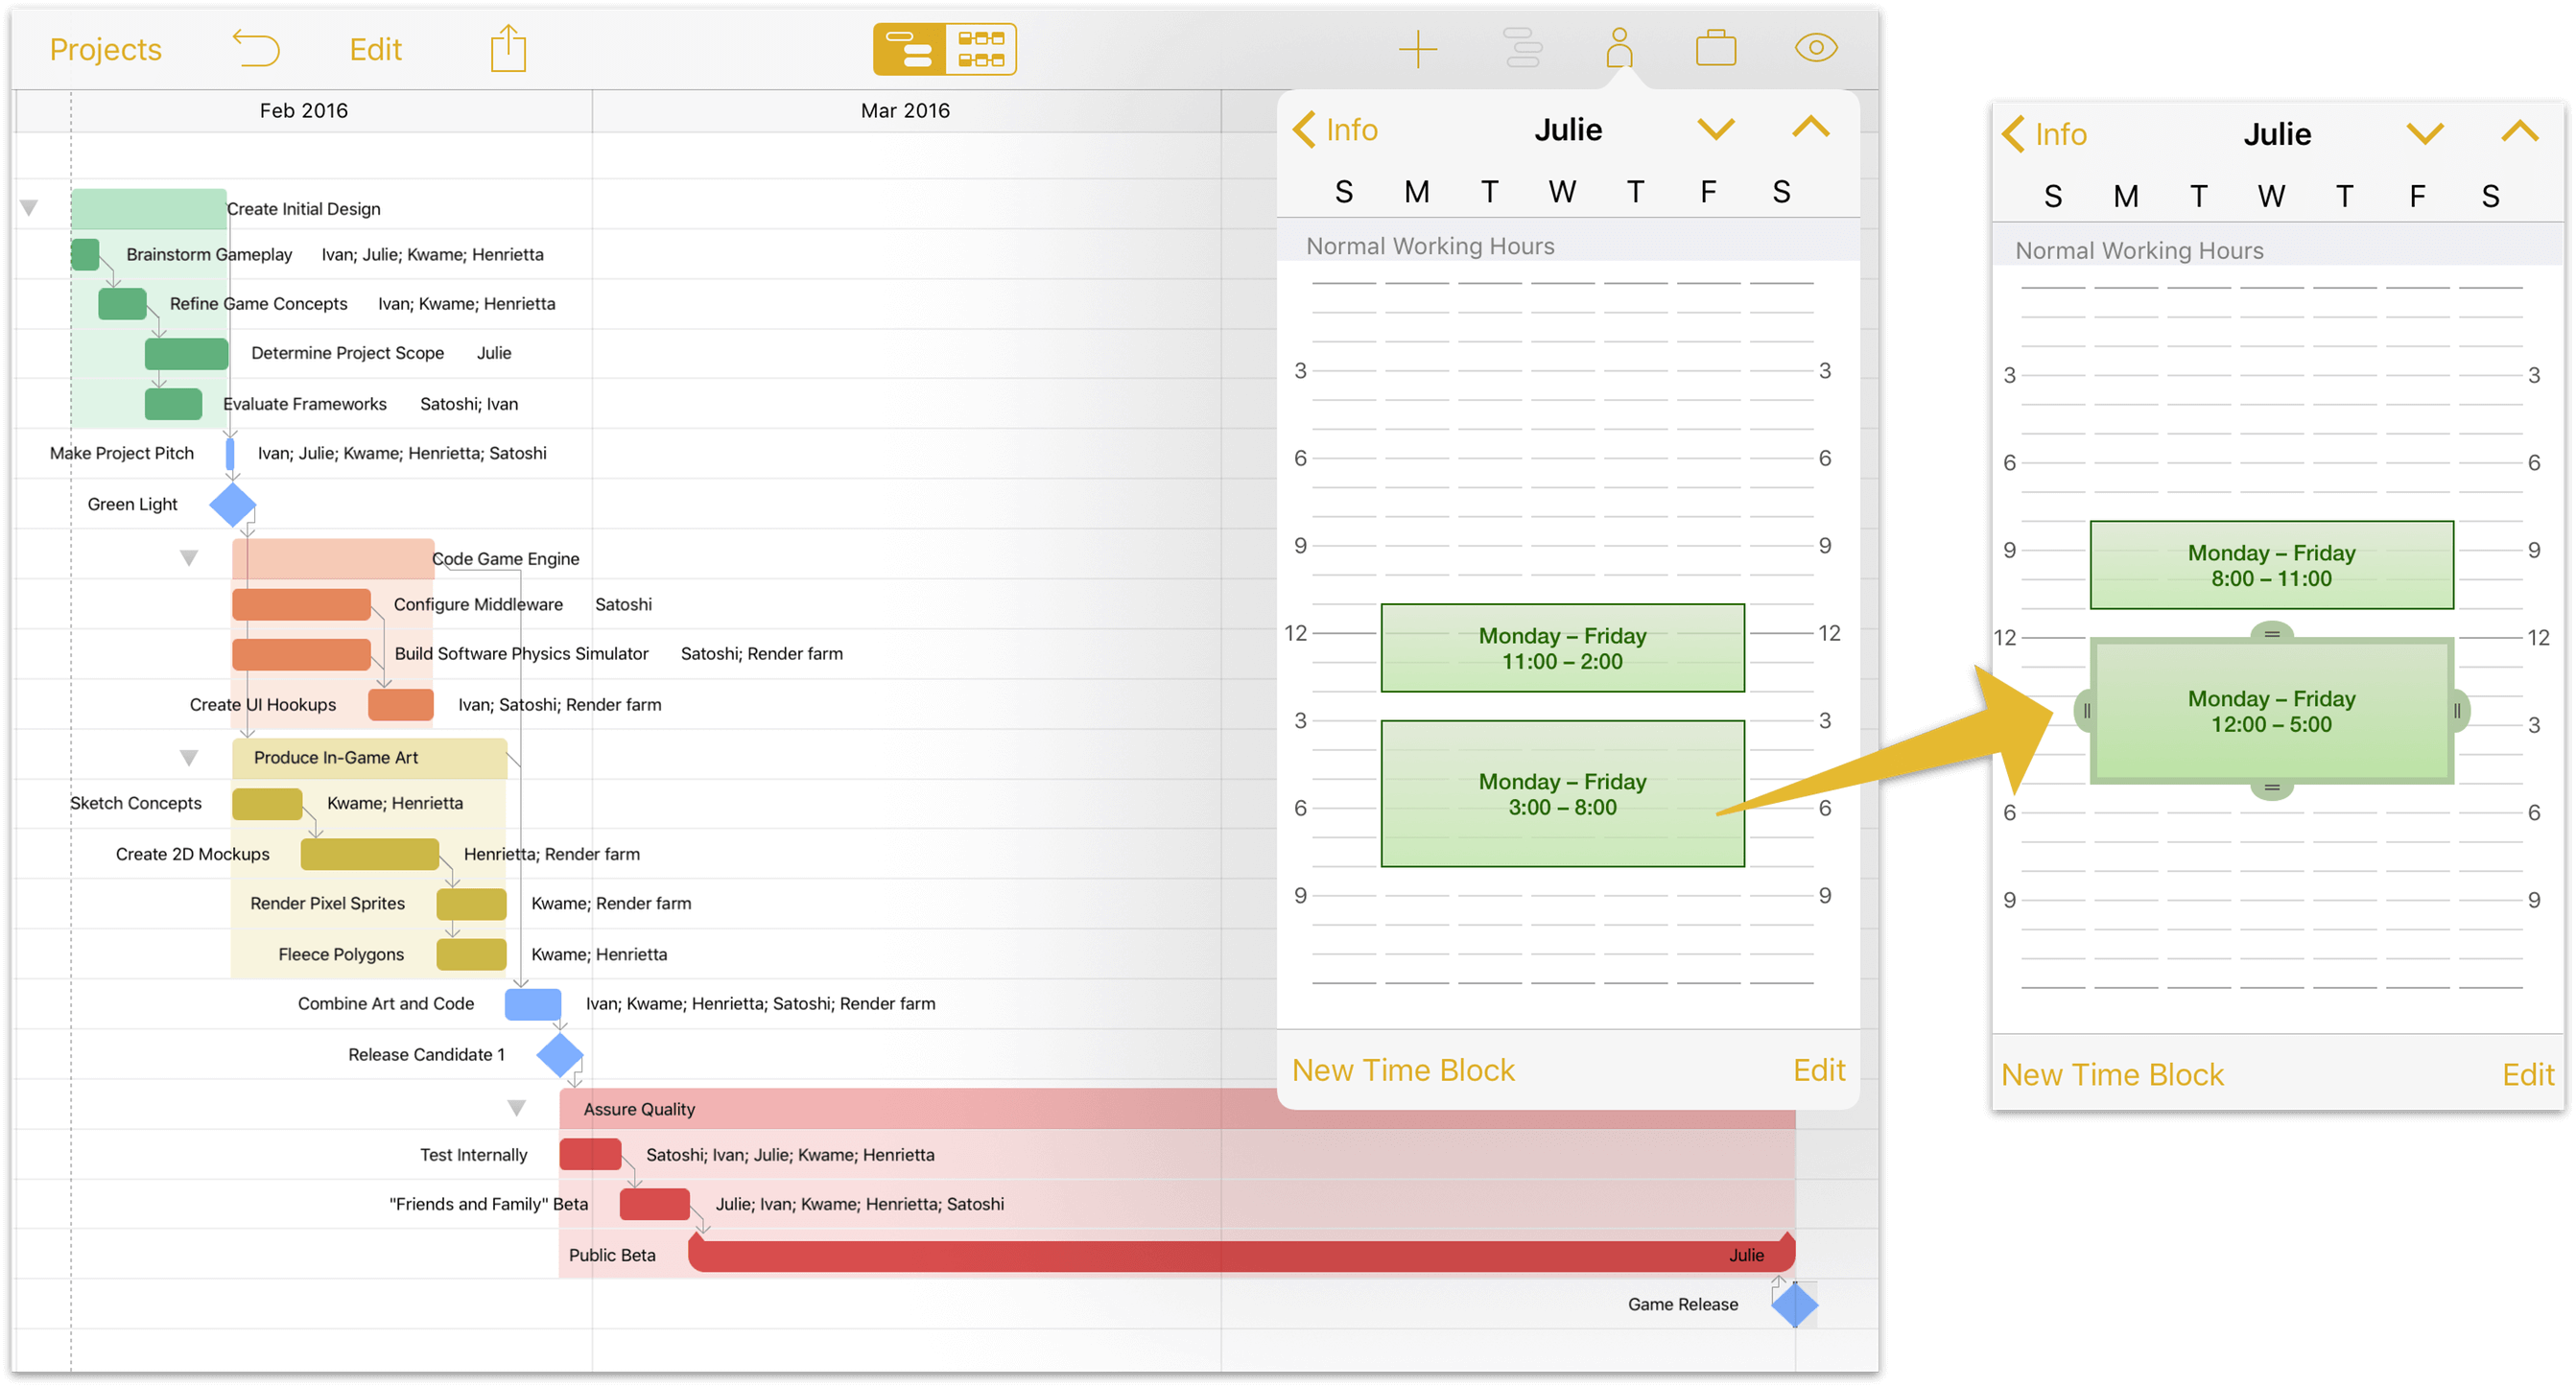
By default, Julie’s normal working hours mirror those we set for the project earlier. However, Julie is an early riser and works best in the morning, and we’re pretty flexible with hours as long as people are around through the afternoon, so we’ll shift her normal working hours forward a bit here.
Next, let’s look at Julie’s off hours. Tap Calendar to view a resource’s personal schedule exceptions for the project. As with normal work hours this schedule mirrors that of the overall project by default, with any project schedule exceptions included. To add schedule exceptions for the chosen resource only, tap the week where the schedule varies and use the Add Time Off and Add Overtime controls to edit the week’s schedule as needed.
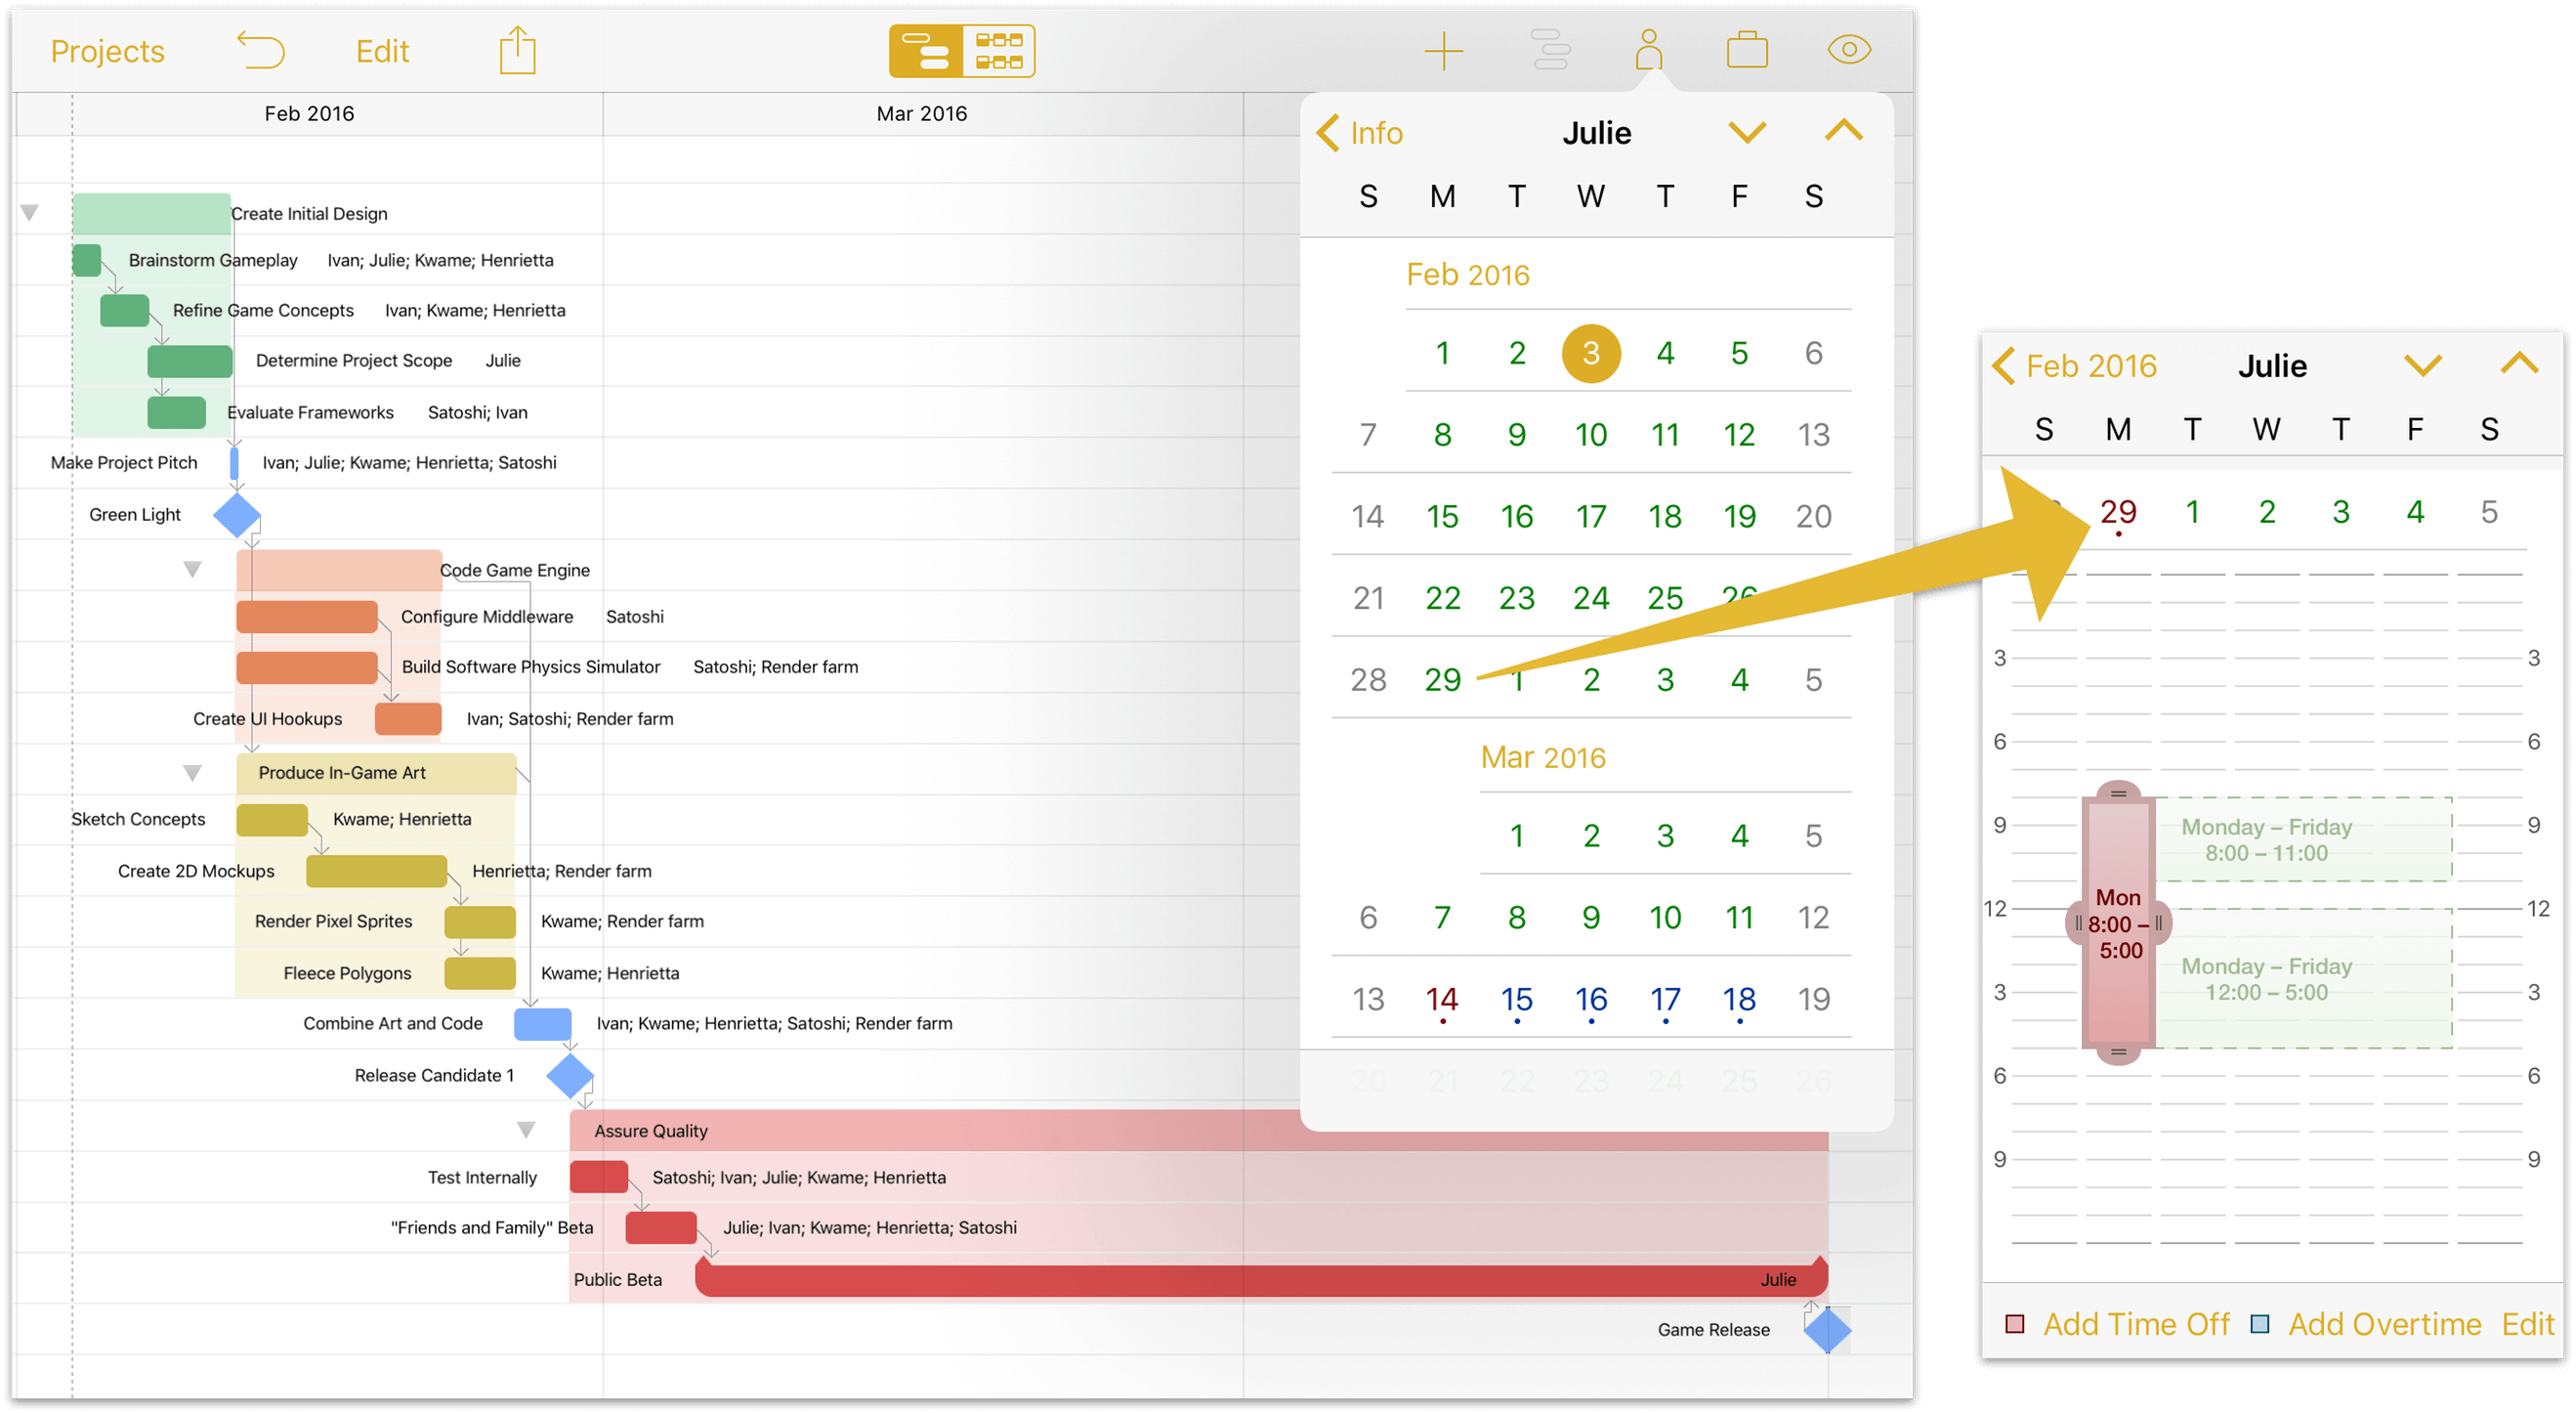
Julie’s birthday is February 29th, and she requested the time off four years ago. It would be criminal not to let her have it, really.
Step 14: Assigning Costs to Tasks and Resources
Once a project gets started, keeping track of expenses is a critical part of leading it to a successful conclusion. It’s just as important to plan those costs in advance, and at this stage in building the project we can get a pretty good feel for the budget by assigning costs to the tasks and resources we’ve added.
Where costs land the heaviest in your project depends what goes into accomplishing its constituent tasks. In the case of software development, much of the budget goes to employee salaries, with some going toward licensing middleware, outsourcing art and music production, facilities and equipment rental, and marketing (among others). Other projects, such as those in manufacturing and construction, have much higher costs in materials—lumber, bricks, silicon—or equipment rental.
Most project costs can be attributed in one way or another to a type of resource (Staff, Equipment, or Material), and resources can be assigned both Cost per Hour and Cost per Use values in the Resources inspector. Miscellaneous costs not associated with a specific resource can instead be added to the task itself, as Task Cost in the Task inspector.
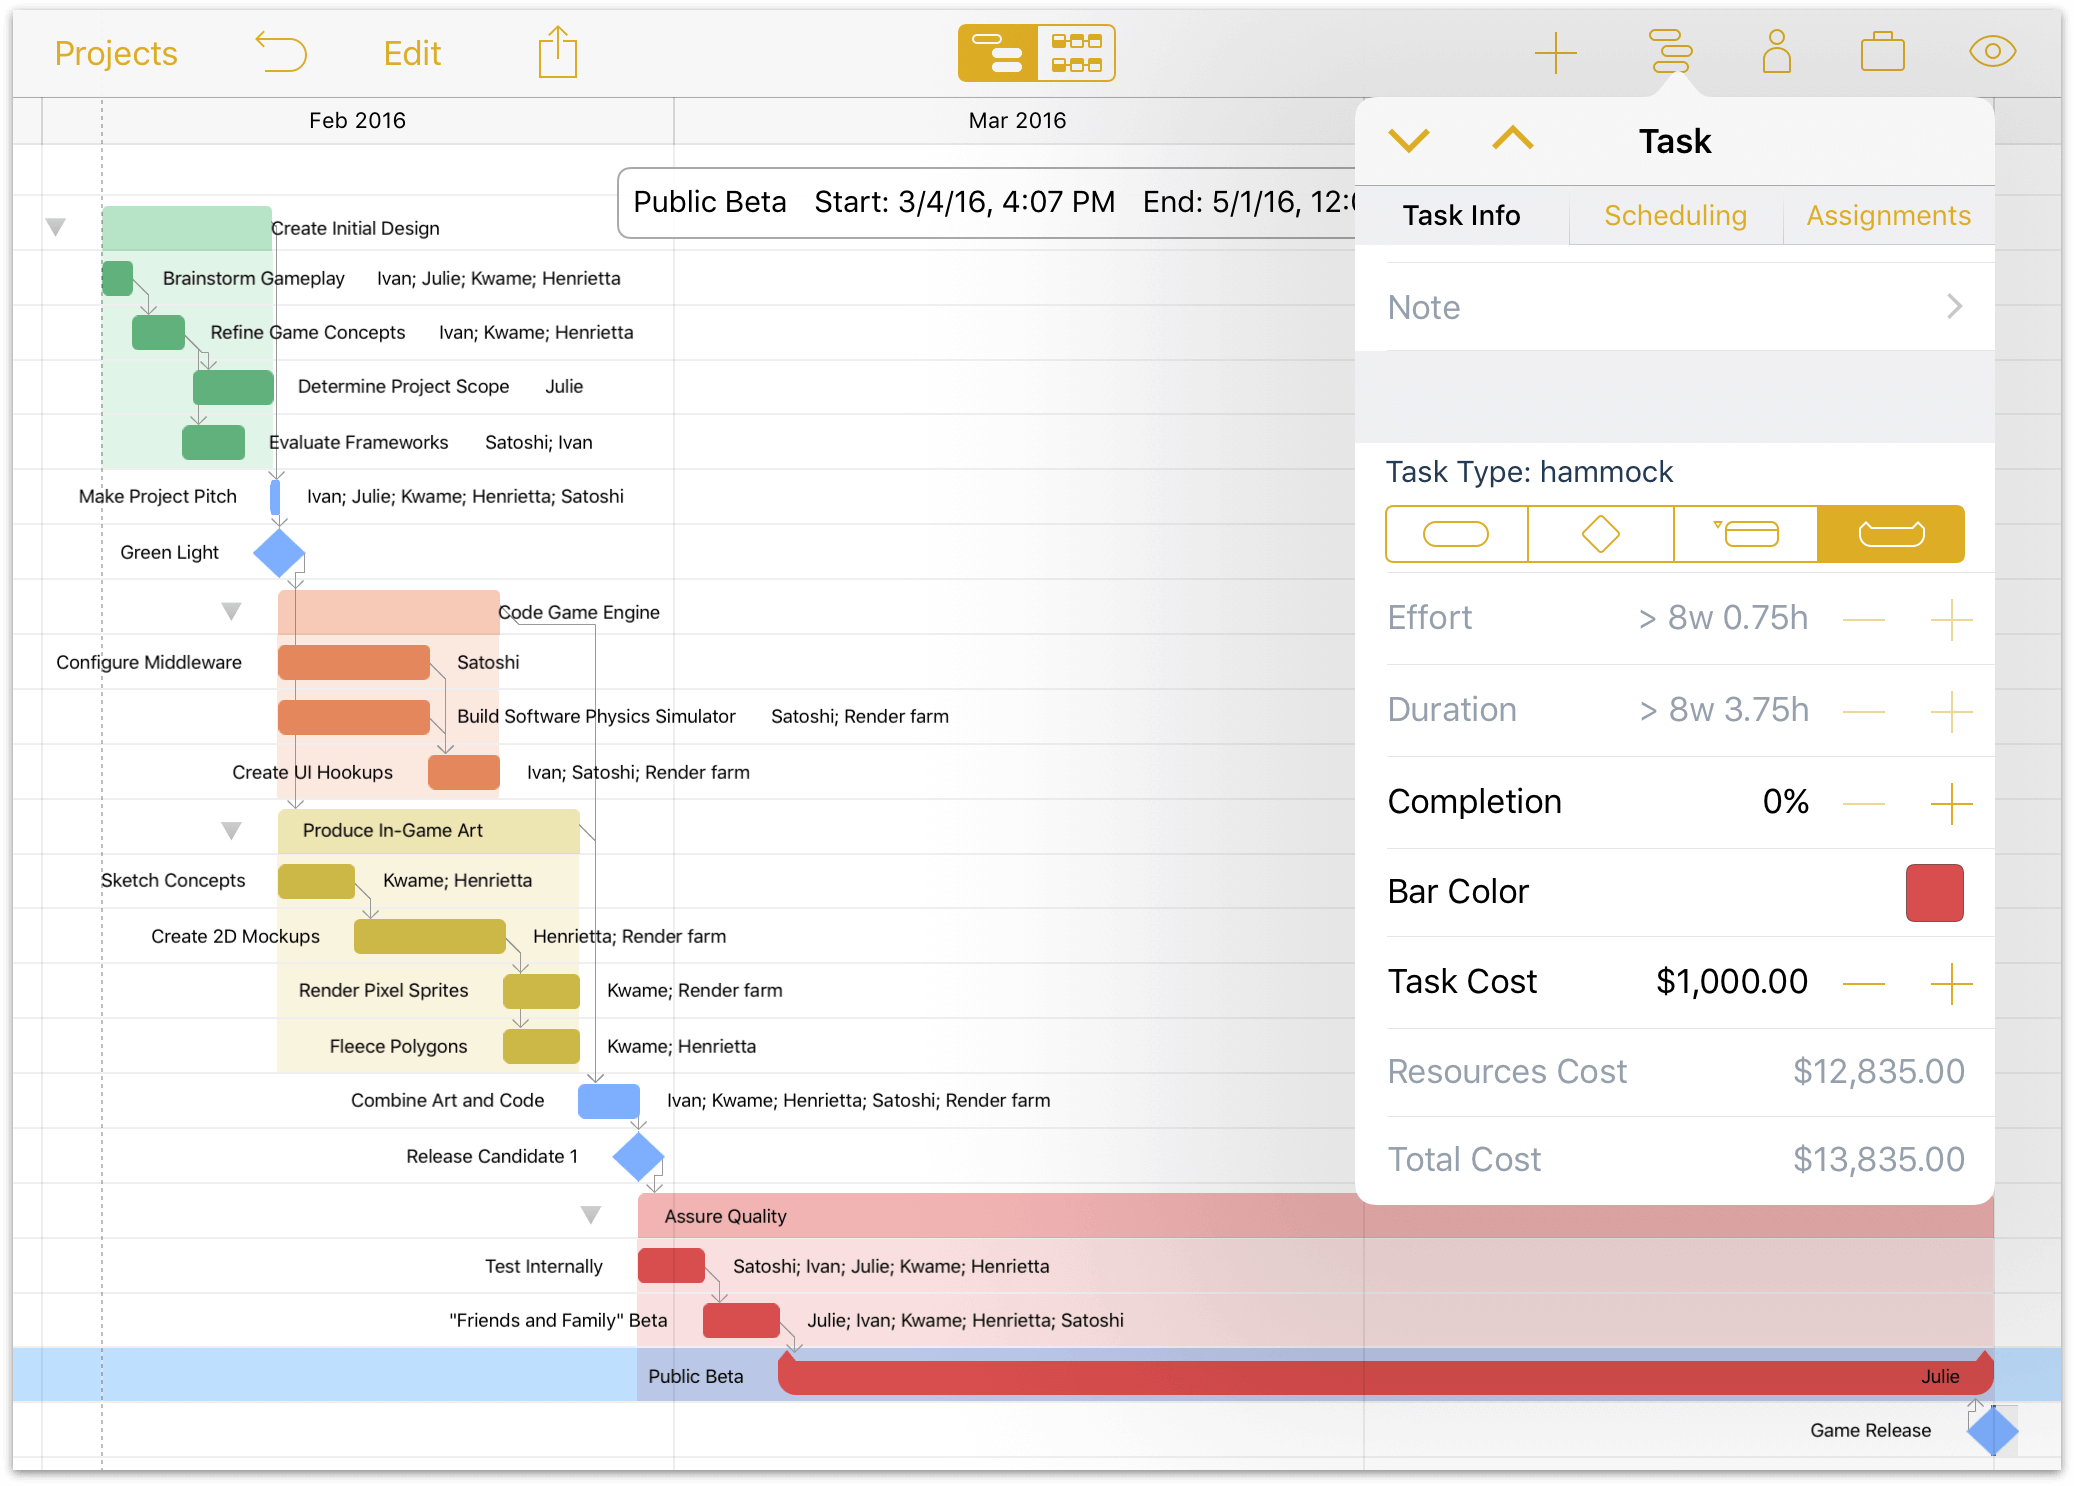
In this example, we see that the Public Beta task is currently scheduled to cost a total of $13,835. Most of this comes as the resource cost of paying Julie to take point throughout the public beta; the rest is a flat fee added to the task that we plan to use for marketing during this period.
Because we set the public beta up as a hammock task and we haven’t leveled or adjusted the project yet, it’s almost two months long. This isn’t an accurate reflection of what we anticipate once the project actually gets rolling, so we’ll want to keep a close eye on this number (it will almost certainly go down, as the duration of the hammock task shortens to allow for delays earlier in the project).
For the highest level view of expenses planned for the entire project, the Total Cost value listed in the Project inspector displays the sum of all resource and task costs currently calculated based on the cost values entered for the project’s individual tasks and resources.
Step 15: Leveling the Project
After assigning team members and equipment to the tasks that make up your project, you can ensure the team is at its most productive by leveling the workload across your resources and tasks.
It’s hard to overstate the power of leveling in OmniPlan. When you first level a project, you cross the line between human and machine—making the statement that you’ve added everything you know about the project to your document, and now it’s time to see what OmniPlan can do to help get all those things done optimally. Automation happens, and everything moves to its most efficient place based on the model of the project you’ve described.
To level the resource workload for your project, open the Resources inspector and tap Level Load. Unless your staff is already in the optimal configuration you’ll see the tasks in the Gantt view shift to accommodate the most efficient use of your resources’ time.
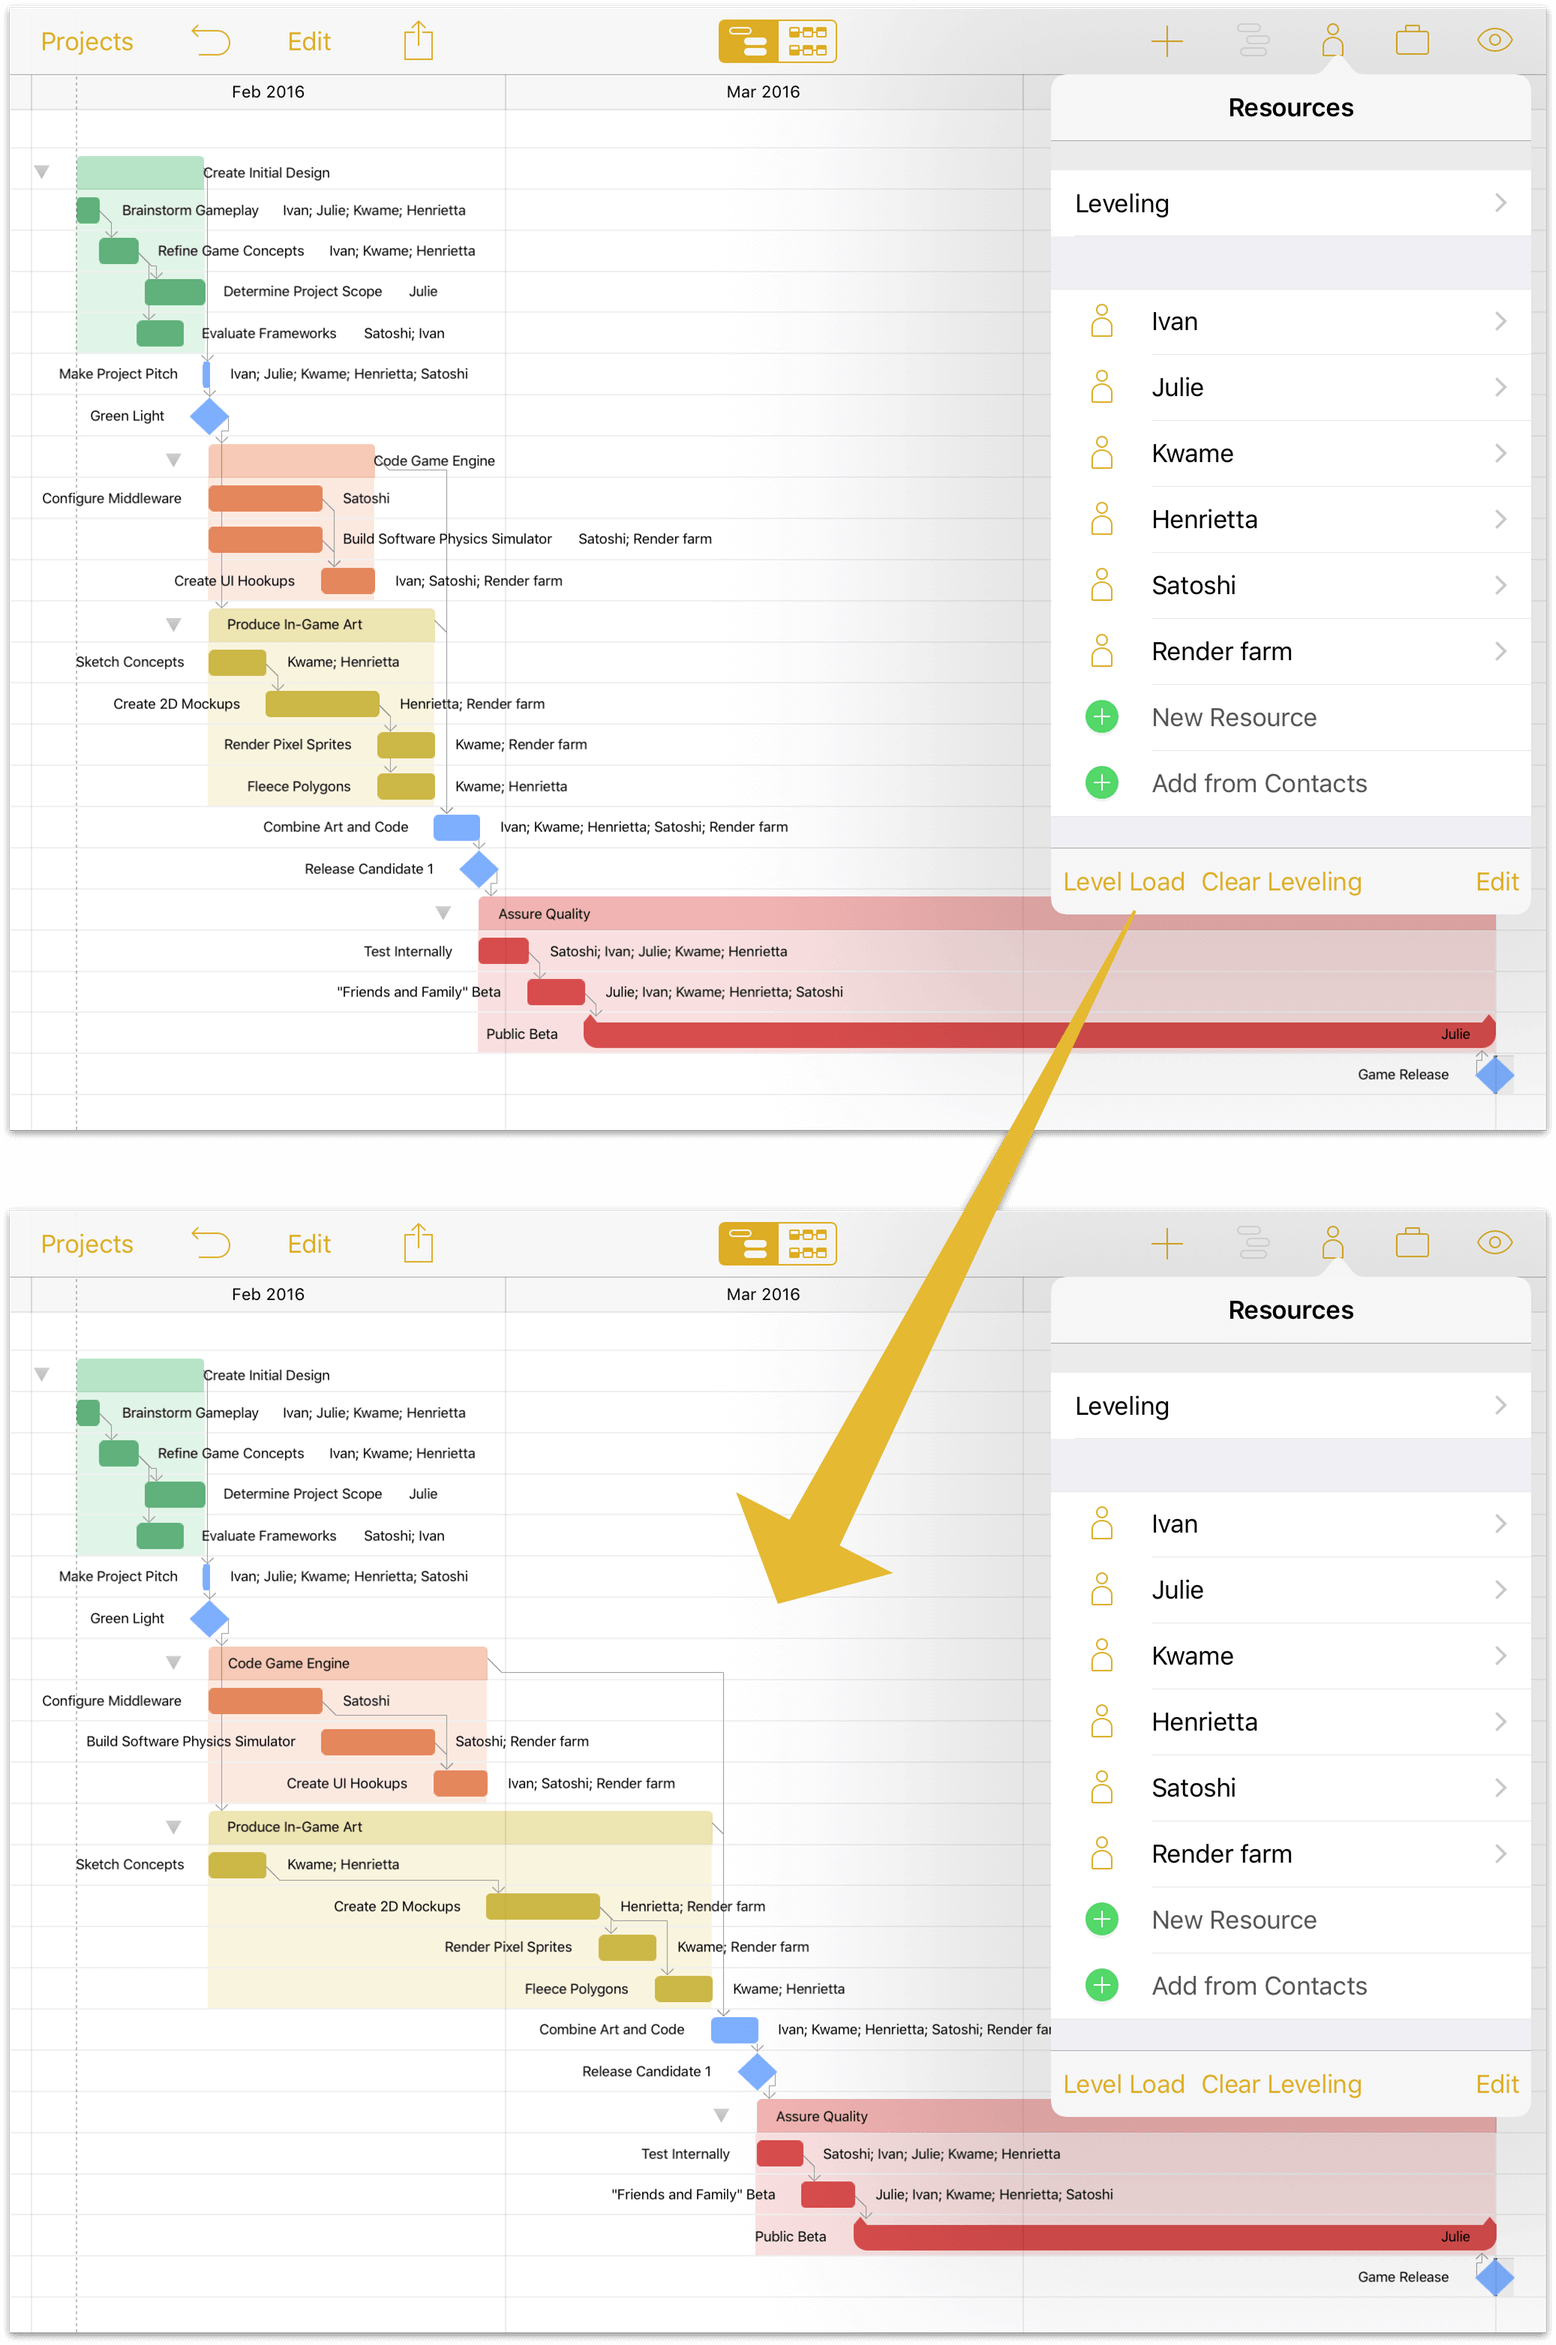
Optionally, choose Leveling from the Resources inspector and turn on Automatically Level to have OmniPlan optimize your resource use every time a change is made to your project.
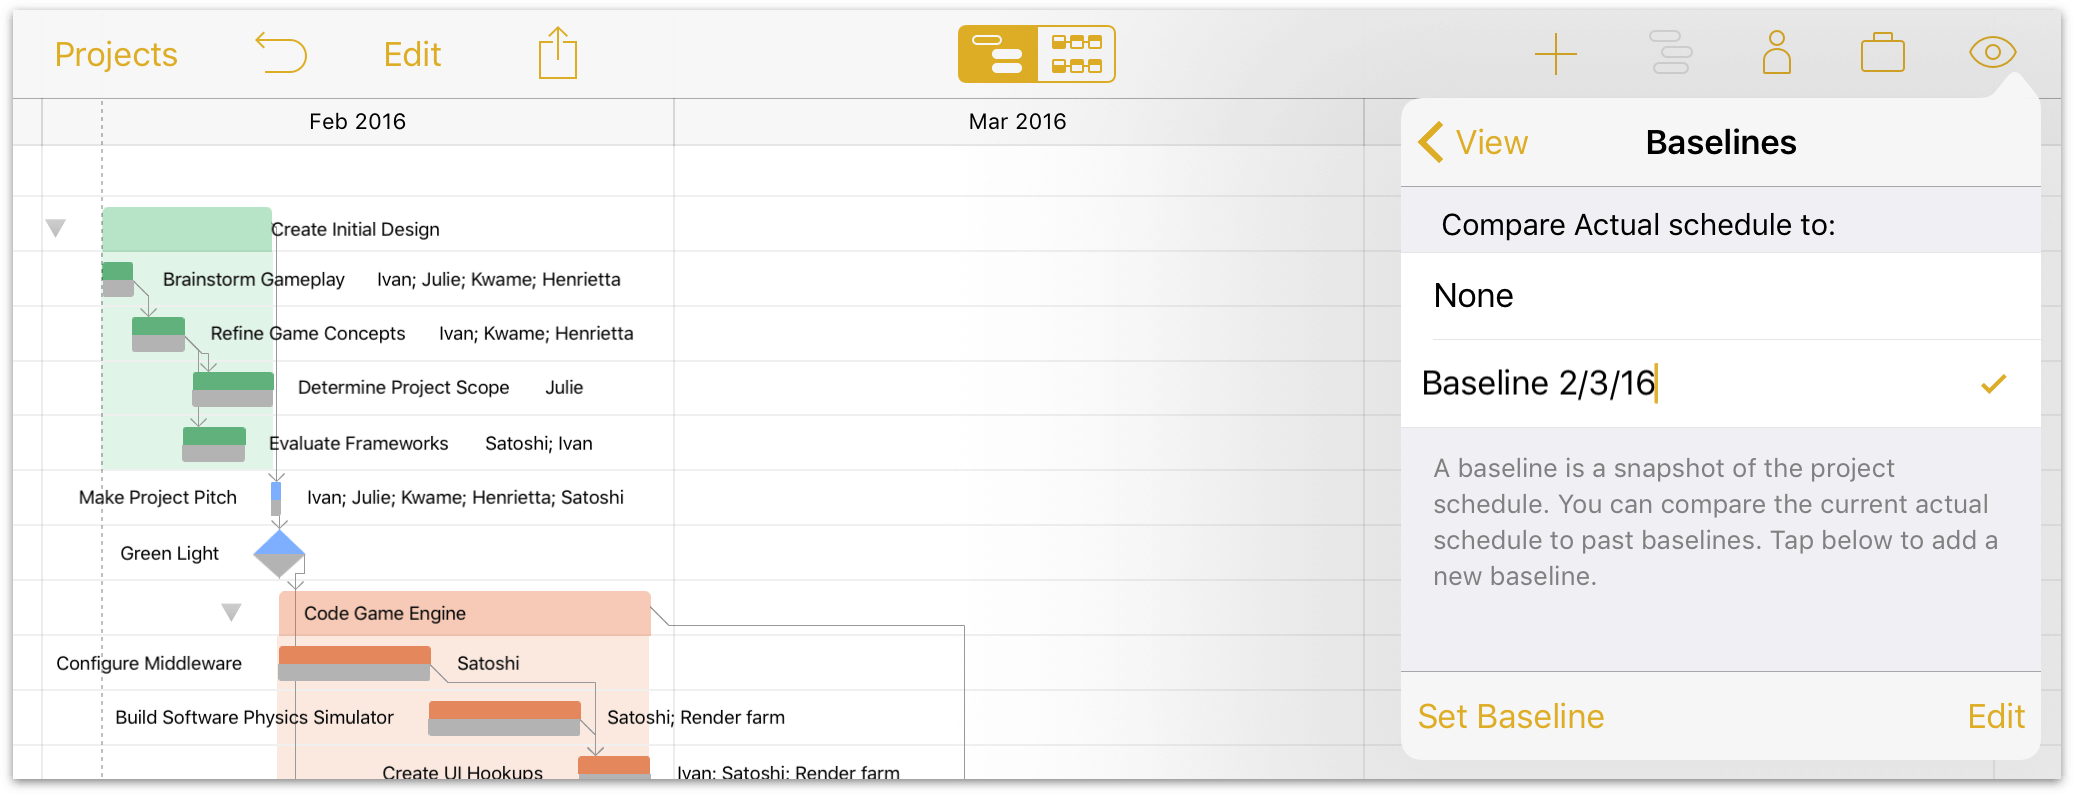
Step 16: Setting a Baseline
With tasks set and resources assigned and leveled, the state the project is in now may be a glimpse at its fate in the best of all possible worlds – one where unforeseen hindrances don’t bog down progress, and where optimistic estimations rule the day.
This is the world that is captured when we set a baseline for progress, a feature used to compare how the project is actually doing against initial expectations, so milestones and resource allocation can be adjusted accordingly.
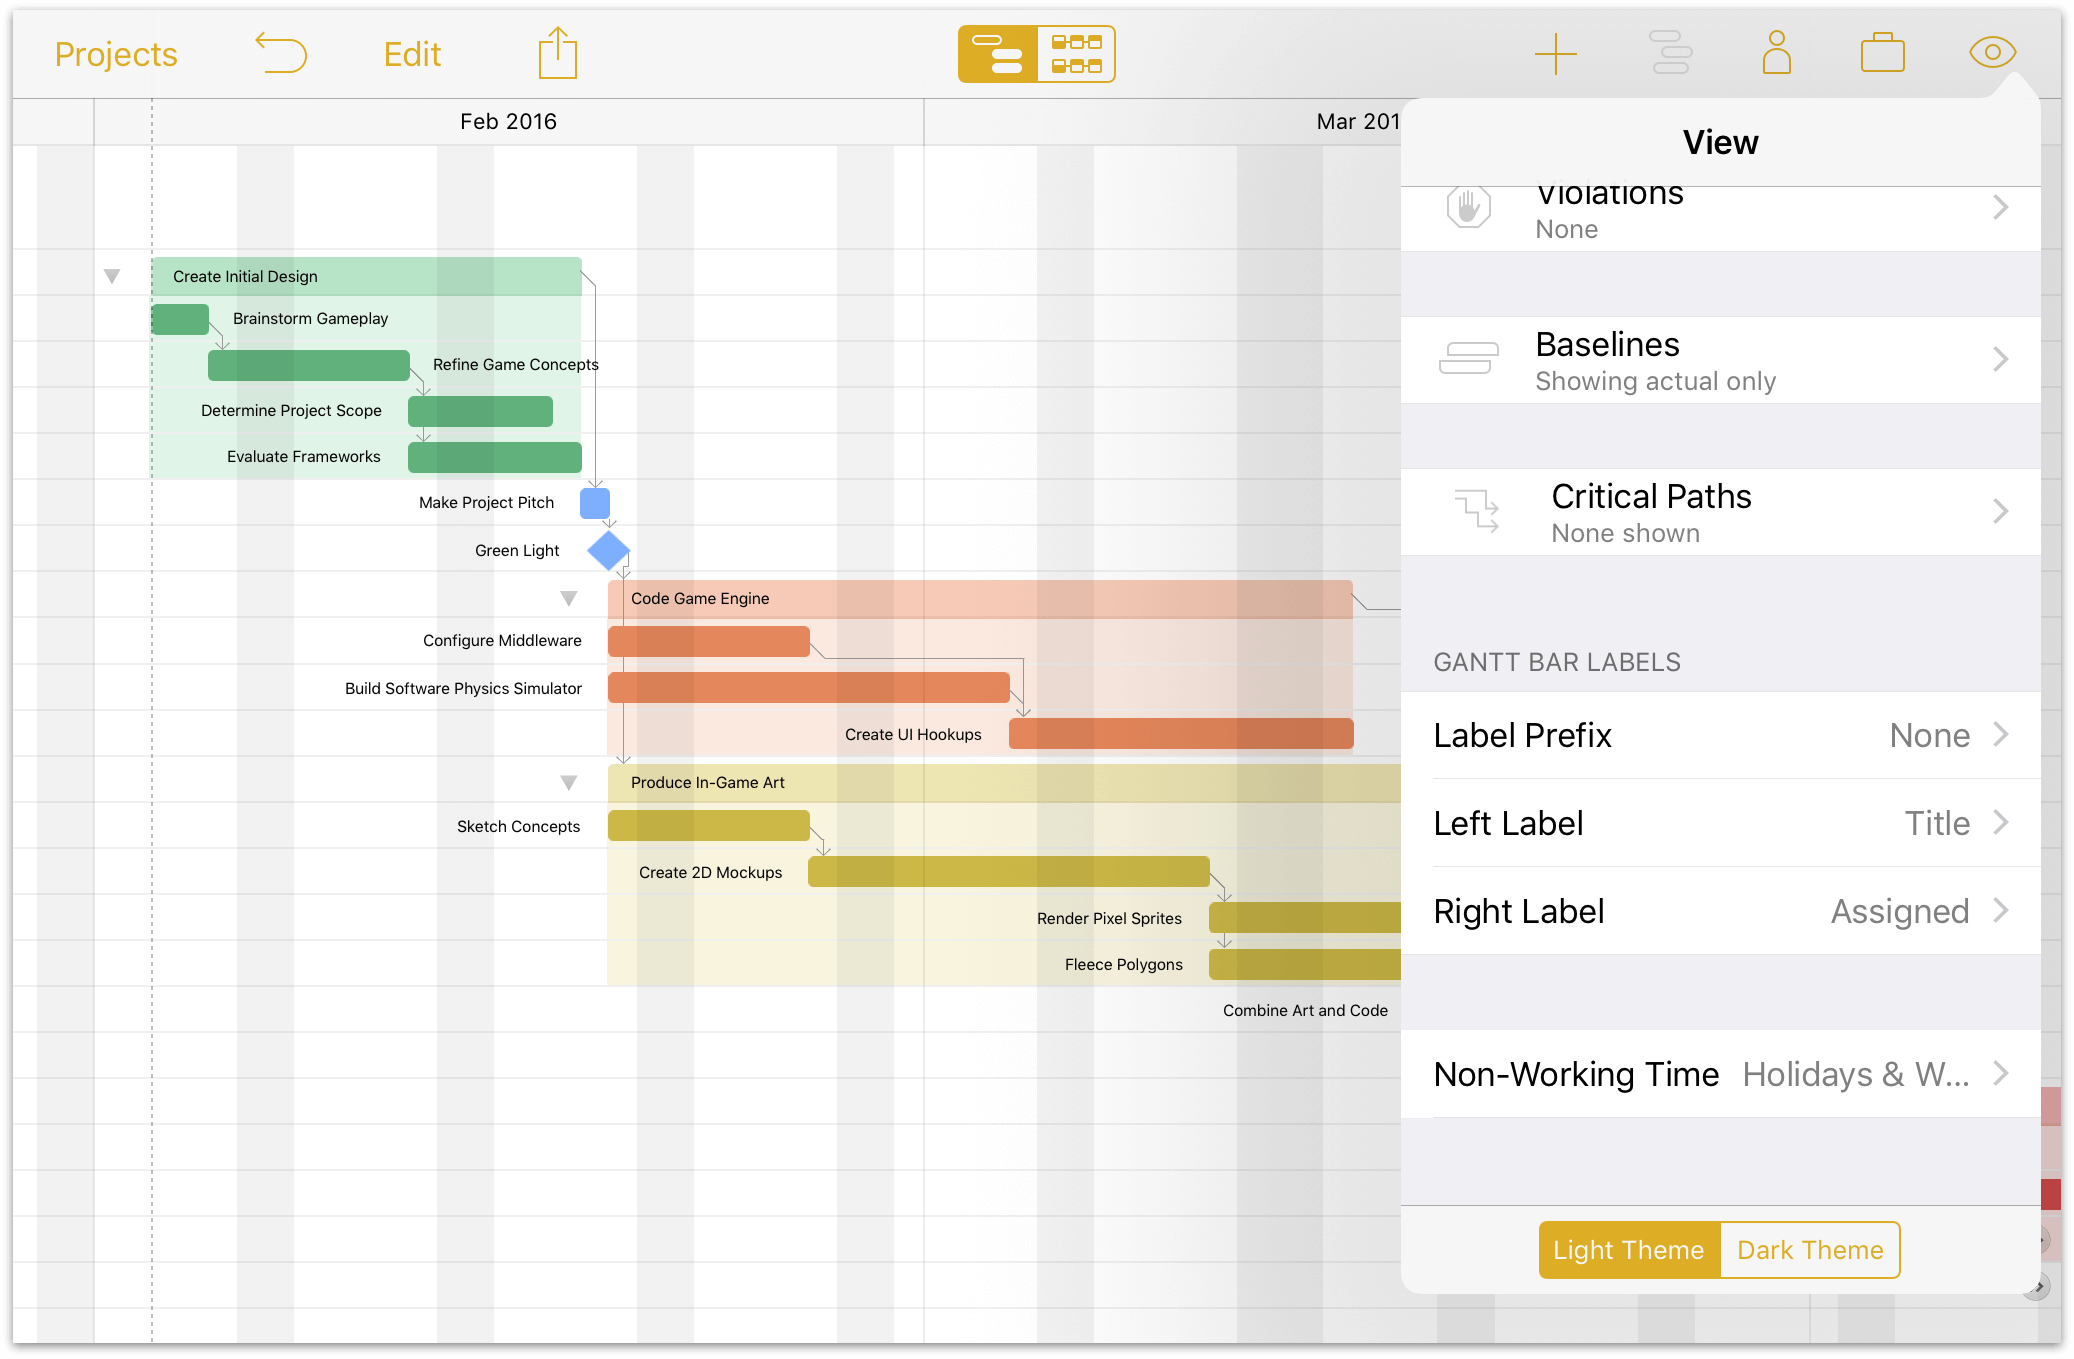
To set a baseline, open the View inspector and tap Baselines. Tap Set Baseline and enter a name (the current date is the default); it’s now selected for comparison, and can be compared against subsequently set baselines as the project progresses.
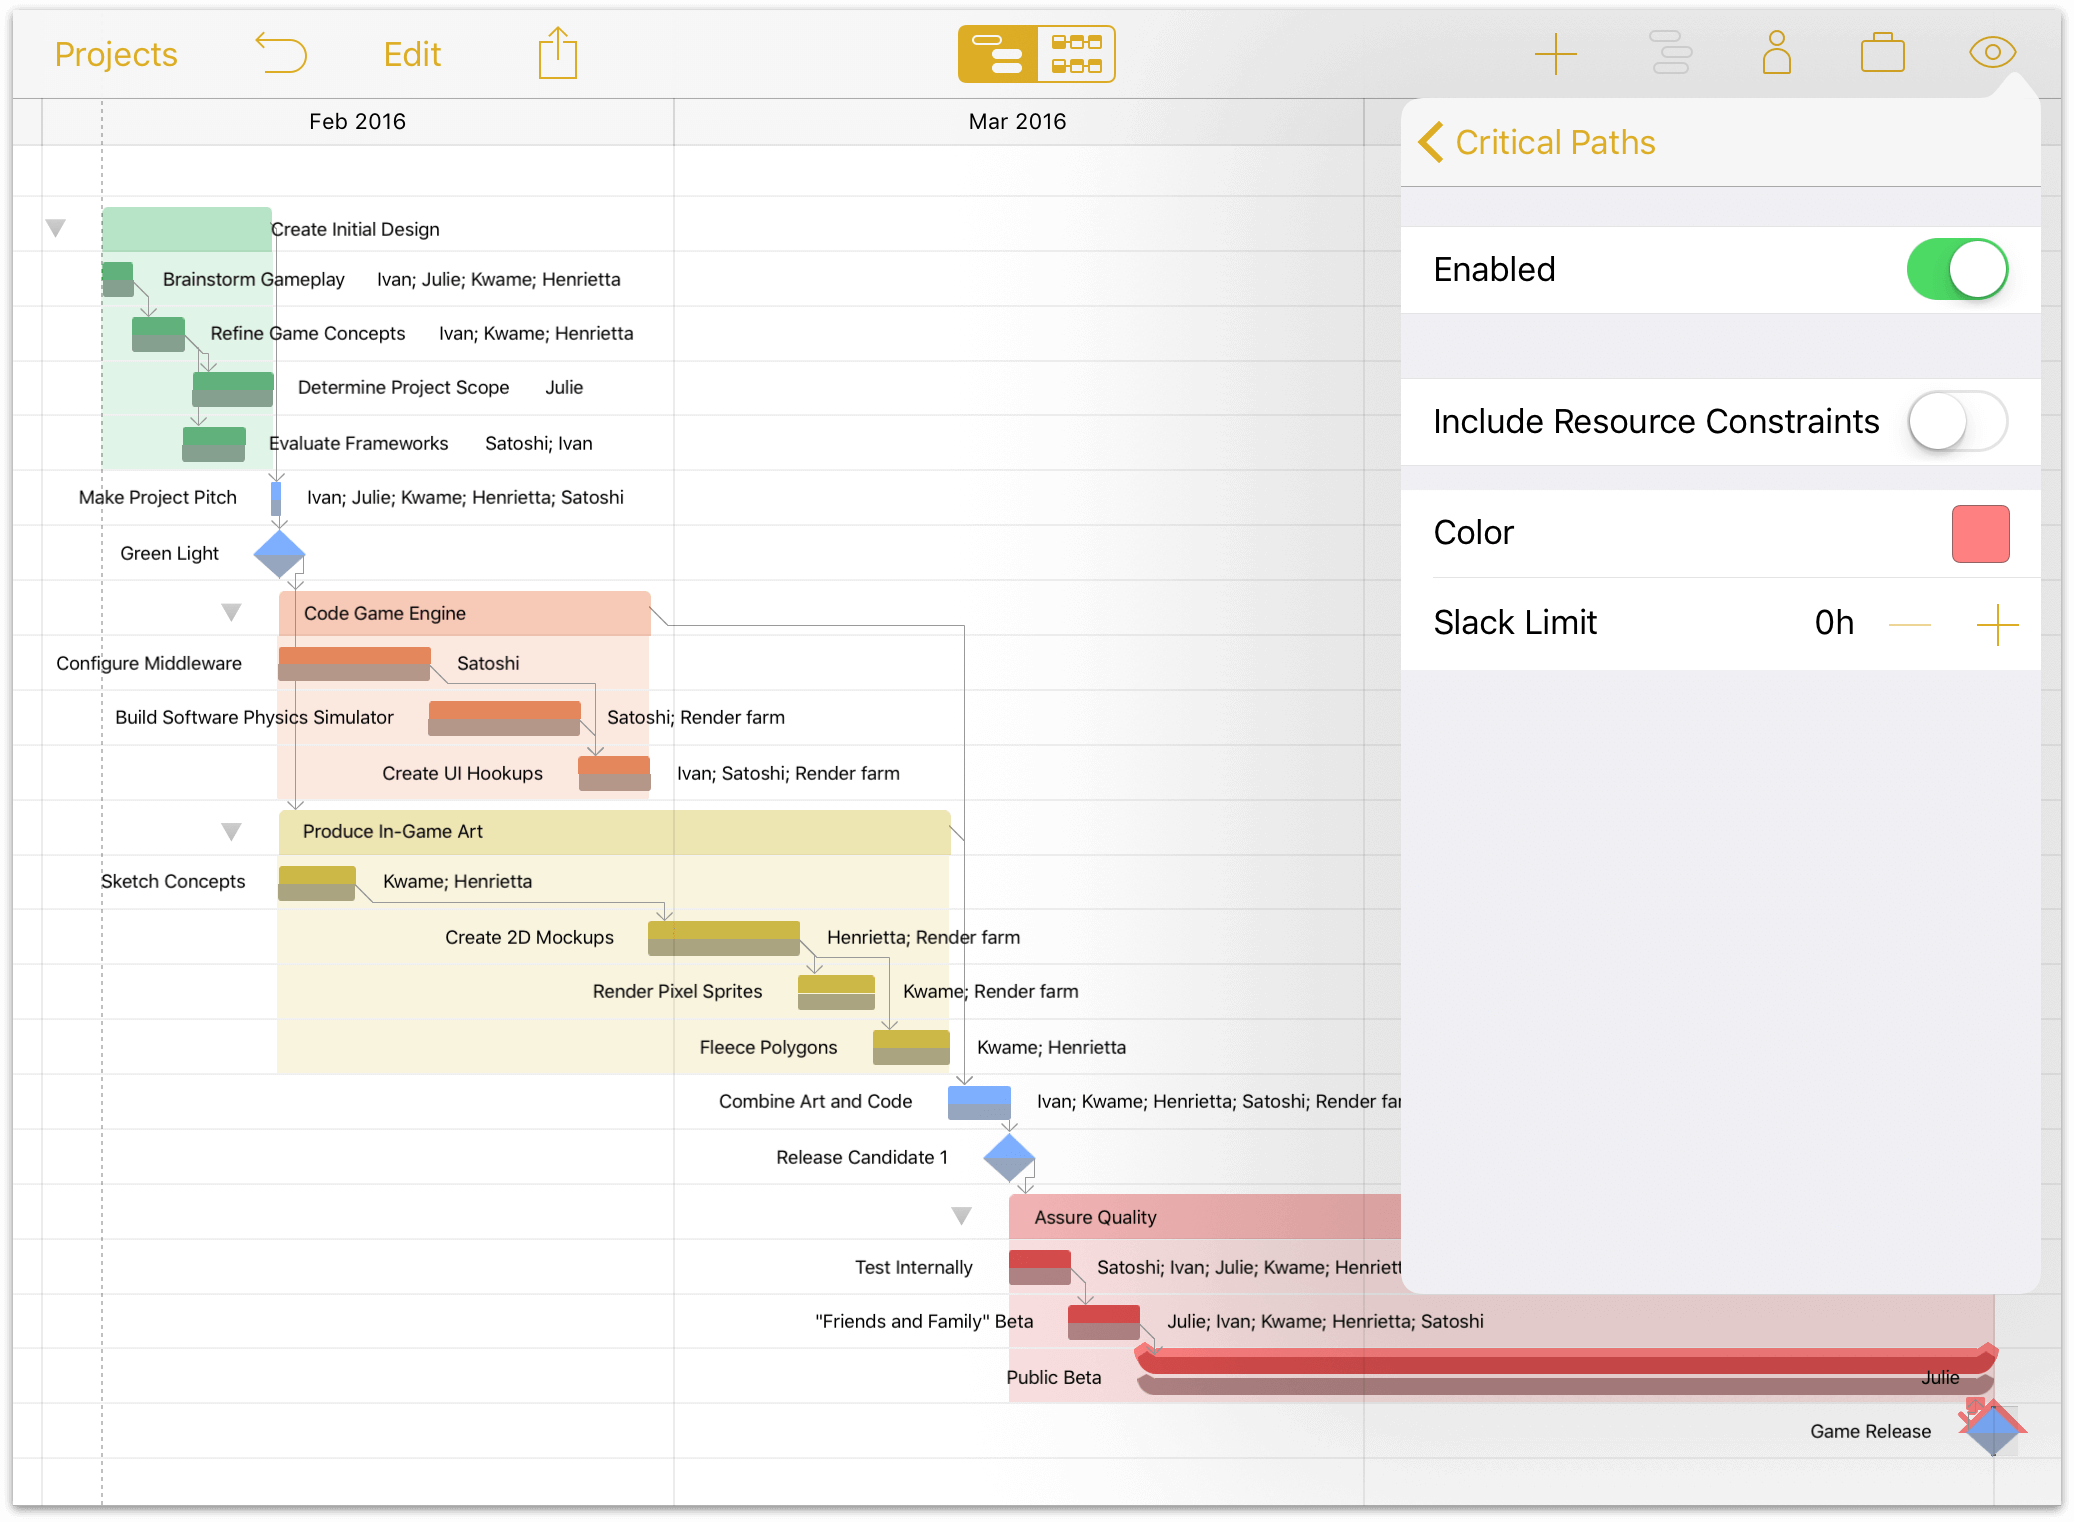
While you’re in the View inspector, now is a good time to check your project’s Critical Path (tap Critical Paths, then Overall Project, then Enabled). The critical path highlights the series of tasks and dependencies which determine the project’s duration. If any of the tasks on a critical path ends up taking more or less time than planned, then the duration of the project as a whole will change as well.
In the case of our example project, the hammock task at the end is designed as a “shock absorber” for earlier phases of the project, so it alone lies on the critical path—if it becomes delayed, its start date moves beyond the date we plan to ship the product.
Here before us is our project in its ideal form, right before the real work begins. We have a good picture of what to expect if our estimates are accurate and everything goes well—and fortunately, we also have the tools to adjust along the way if things don’t go exactly according to plan. In the next chapter, we’ll use these tools to begin managing a project.