
Chapter 3
Introduction
Welcome to OmniOutliner 5 Pro!
OmniOutliner is a flexible program for creating, collecting, and organizing information. Whether you’re keeping track of tasks for a project or putting together an outline for a book or research paper, OmniOutliner has everything you need to get the details just right. The Professional Edition adds a full suite of styling, customization, and management tools to get your outlines looking just the way you want.
Read on to learn more about the features of OmniOutliner 5 Pro and how this documentation can help you make the most of them.
How This Documentation is Organized
This manual is designed to provide you with a complete tour of OmniOutliner Pro.
It is divided into the following sections that correspond to areas of OmniOutliner’s interface, and reference for further customizing your OmniOutliner experience with the array of powerful tools, modes, and preferences included with the app.
Part 1: Interface
- Chapter 1, Using the Resource Browser
- The Resource Browser makes it easy for you to open a recently-saved file, or to create awesome looking documents by starting out with one of the available templates.
- Chapter 2, Navigating the Outline
- The outline is where you’ll do most of your work in OmniOutliner, adding the building blocks of rows and organizing them hierarchically. This chapter describes tools for efficiently navigating the outline to get your content in the structure you want.
- Chapter 3, Using the Toolbar
- Located at the top of OmniOutliner’s window you’ll find the Toolbar. The Toolbar gives you easy access to commonly-used OmniOutliner functions. You can customize the buttons in the Toolbar on both an app-wide and per-document basis.
- Chapter 4, Using the Sidebar
- The Sidebar, located along the left edge of OmniOutliner’s window, helps you focus on and style the contents of your outline.
- Chapter 5, Using the Inspectors
- Use the Inspectors to examine the contents of your outlines and modify their style properties.
Part 2: Reference
- Chapter 6, Importing, Exporting, and Printing
- OmniOutliner makes it easy to both import text files and export your outlines in a variety of formats. This chapter also covers the app’s printing options for when you need to produce a hard copy of your outline.
- Chapter 7, Working in the Cloud
- This chapter explains how to use the OmniPresence cloud syncing software to store your files and sync them between each of your Macs and iOS devices with OmniOutliner installed.
- Chapter 8, OmniOutliner Preferences
- This chapter describes the six preference panes that you can use to further customize OmniOutliner to suit your needs and your work style.
- Chapter 9, Menu Commands and Keyboard Shortcuts
- Here you’ll find a detailed list of each menu item in OmniOutliner 5. Where applicable, the descriptions include the menu option’s keyboard shortcut so you can work even faster in OmniOutliner.
- Chapter 10, Managing Your Omni Licenses
- This chapter describes how to add, remove, and transfer Omni licenses from one Mac to another. (This applies to OmniOutliner licenses bought from the Omni Group website; OmniOutliner on the Mac App Store uses a different licensing system.)
- Chapter 11, Getting Help
- If you ever get stuck when working on something in OmniOutliner, or if you have a problem with the app’s license, or you just want to tell our Support Humans and the DocWranglers how they’re doing, feel free to get in touch. This chapter points you to all of the resources we have available: Support Humans, Support Articles, Videos, and Documentation.
Chapter 4
Using the Resource Browser
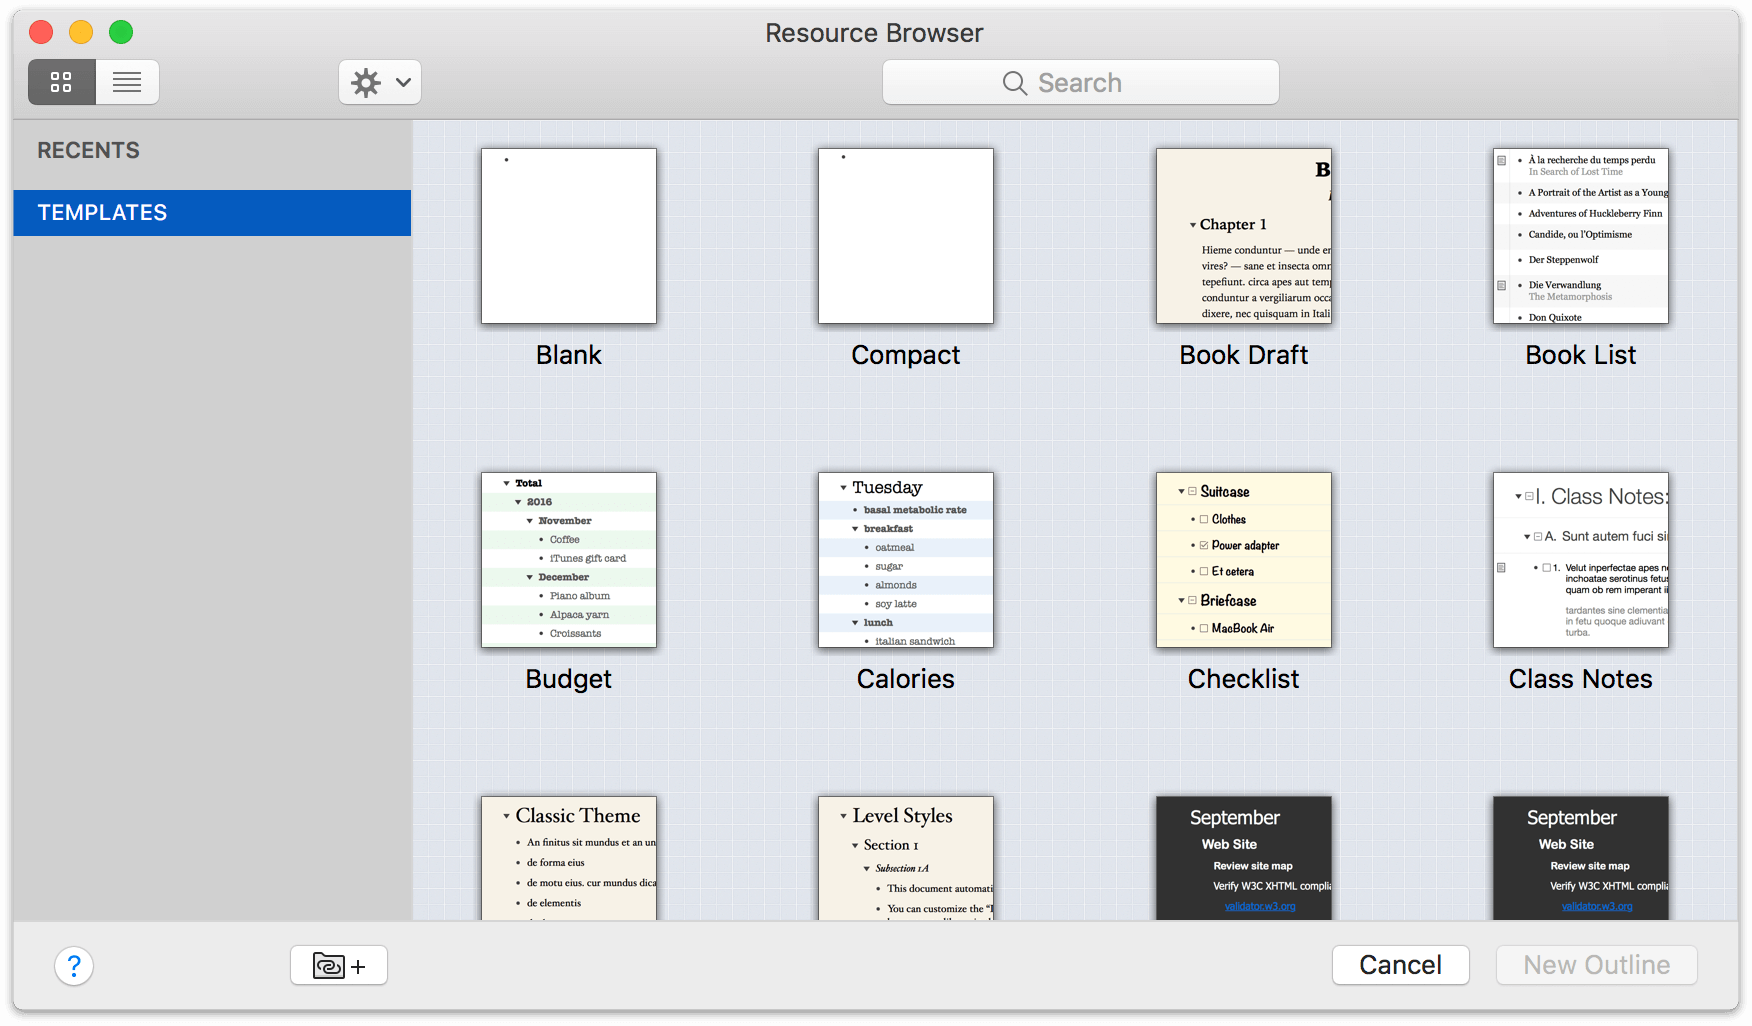
The Resource Browser is your headquarters for creating and accessing documents in OmniOutliner. It provides an interface for easily finding your recent work, or getting a jump start on a new outline by starting out with a Template.
By default the Resource Browser is what you see when you go to create a new document. If you’ve set it otherwise in Preferences, you can still open the Resource Browser with File ▸ Resource Browser (Shift-Command-N).
The sidebar on the left of the browser contains two sections:
-
The Recents section is similar to choosing File ▸ Open Recent from the menu bar. You’ll find a list of recently-opened files which you can select and open quickly. Mouse over Recents in the sidebar to reveal a control for showing or hiding subfolders for recent Documents and Templates, respectively.
Click a recently opened file and then click Open to view and resume editing the file.
-
The Templates section offers an easy way to create a new document from one of the pre-styled templates included with OmniOutliner. Mouse over Templates in the sidebar to reveal a control for showing or hiding subfolders grouped by template style.
To create a new document from a template, select it in the Resource Browser and then click New Outline. A new file is created, pre-populated with styles (and often some placeholder row content).
For a detailed preview of a recently opened document or template, choose it in the browser and tap the Spacebar to open a QuickLook view. (To close the QuickLook view, just tap the Spacebar again and the preview window goes away.)
The Resource Browser Toolbar
The Resource Browser’s toolbar has several useful controls:

-
On the left is a toggle that switches between a Thumbnail view and a List view of the browser window contents (either Recents or Templates). The list view holds an alphabetized summary of the available documents, including Name, Date Last Modified, and Date Created.
-
The Resource Browser’s Action menu
 sits above the sidebar, and contains several useful items for interacting with the browser.
 Here you can open or create new templates, reveal where a particular resource lives on your Mac, move an object to Trash, or set a particular template that you’re fond of as the default.
If you would like to import templates you’ve saved elsewhere, choose Add Resources to Library to select a file or template you’d like to add to OmniOutliner’s locally stored collection (see Managing and Working with Templates for details).
Use the Restore option in the Action menu to restore any of the default templates that you might have discarded earlier.
-
Finally, a Search field quickly filters the available templates or recent documents to find a favorite among a long list of options.
Managing and Working with Templates
If you have a document styled just so and would like to preserve its style setup for future use, you can save it as a template (File ▸ Save As Template). This creates an .otemplate file version of the document, and makes it available as a template from the Resource Browser in the Templates section.
By default, templates live in a folder nestled deep in OmniOutliner’s app directory on your Mac. This doesn’t mean you can’t use Finder to get at them, though.
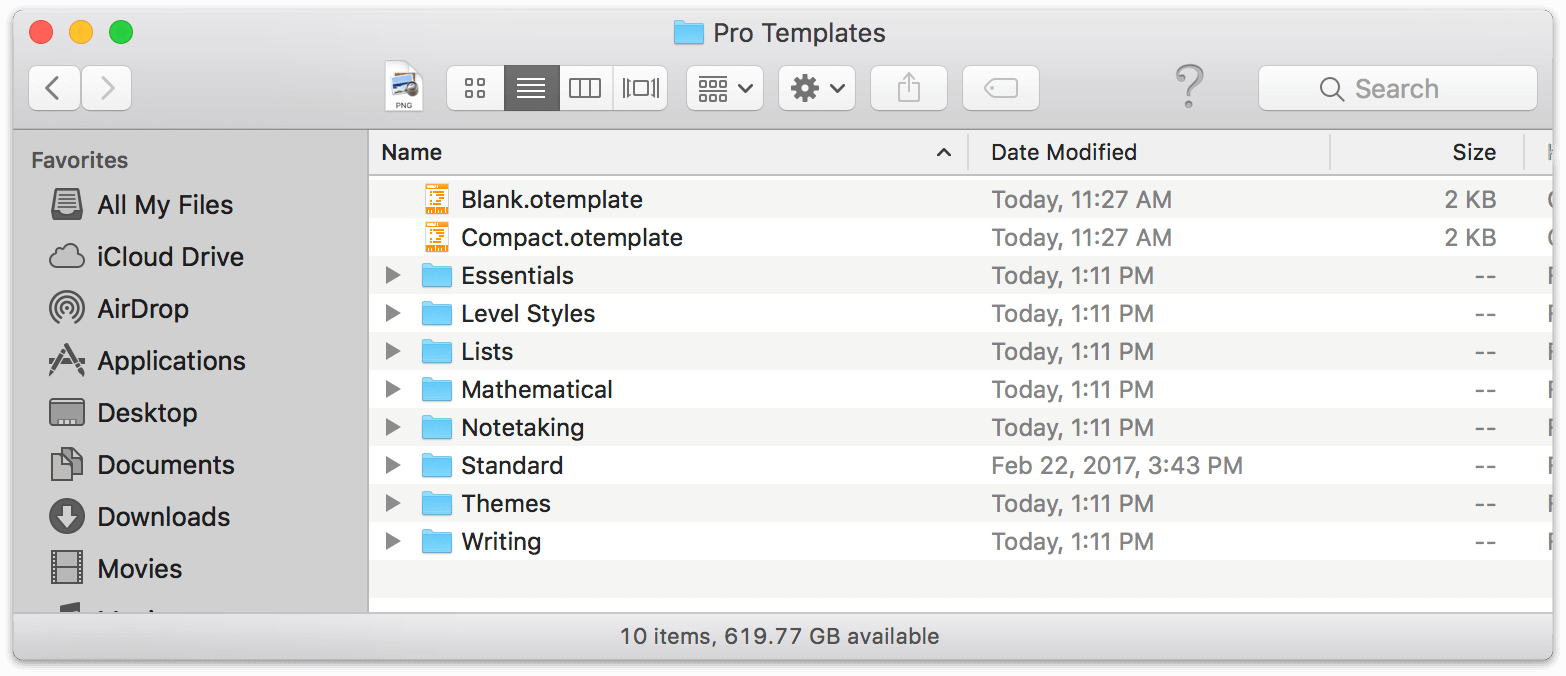
To access your templates in Finder, select one, click the Action menu  and choose Show in Finder. A new Finder window pops open and places you inside the template’s folder. Once here, you can perform any action you’d normally use Finder for. Change template names, move the ones you don’t want to the trash, or add subfolders so you can categorize themes for certain tasks.
If you have a template saved somewhere outside OmniOutliner’s internal Template folder that you would like add, use the Action menu’s Add Resources to Library command to bring them in from the cold. Select a .otemplate file and it is added to your local collection. (If you would like to add that template straight to a specific subfolder, select it in the Resource Browser’s sidebar first—otherwise it will be added to the Miscellaneous subfolder. You can always choose Show in Finder and reorganize your templates later, of course.)
Linking Template Folders on your Mac to OmniOutliner
If you would prefer to keep your templates stored outside of OmniOutliner’s internal folder, you can do it by adding a Linked Folder to the Templates section of the Resource Browser sidebar. Start by clicking the Linked Folder button ![]() . Next, choose a folder in the sheet that appears and click Open to add the folder to the Resource Browser’s sidebar.
. Next, choose a folder in the sheet that appears and click Open to add the folder to the Resource Browser’s sidebar.
Any .otemplate files in the folder will automatically be displayed in the Resource Browser when the folder is selected in the sidebar.
To remove a Linked Folder from the Resource Browser’s sidebar, select the folder in question, click  , and then choose Remove Linked Folder.
One reason to use a linked folder rather than relying on OmniOutliner’s internal Templates folder is that you can use OmniPresence to sync that folder between your Macs and iOS devices with OmniOutliner installed. That way, your custom templates are accessible anywhere!
Chapter 5
Navigating the Outline
The Outline lies at the heart of everything you do in OmniOutliner. It’s where you compose and arrange content, it reflects the styles you choose with the Sidebar and Inspectors, and it is built on a hierarchy of rows that gives exactly the structure you want for your data.
The Anatomy of a Row
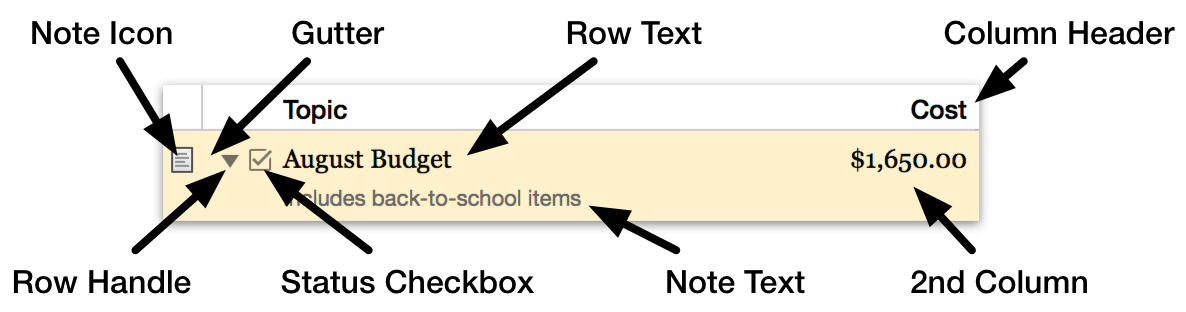
When working in the outline, the building blocks of your content are referred to as rows.
Rows can appear as simple as a line of text, but many outline styles also display other common components to the row such as handles, notes, and status checkboxes. Rows can also span multiple columns (if your document has more than one).
You can choose to hide or show all of these components independently of one another (other than the text of the row itself—which can be collapsed if the row is hierarchically nested beneath another).
Click the space to the left of the row handle, known as the gutter, to select a row.
Shift-click to select multiple contiguous rows, or Command-click to select multiple discontiguous rows in the outline.
Use Text Folding (View ▸ Show Full Row Text ▸ When Editing) to truncate the contents of a row to a single line when not editing the row.
Row Handles
Row Handles are used to get a grip on the contents of a row and any of its children in the hierarchy. Click and drag a row handle to move the row (and any beneath it) elsewhere in the outline.
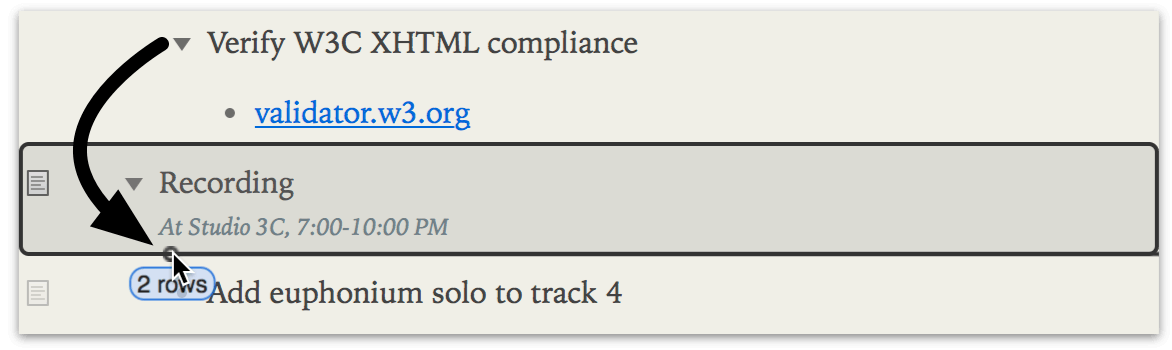
Row handles come in two styles: bullets, which indicate the row has no children, and disclosure triangles, which mean the row has child rows indented underneath. Click a row’s disclosure triangle to show or hide its children. (You can also do this when row handles are hidden; just use the Expand and Collapse options in the View menu.)
Option-click a disclosure triangle to open or close all of the rows within.
To hide row handles throughout your document, use the Row Inspector’s Handle controls. Row handles can be shown at all times, only on mouseover, or hidden completely.
Status Checkboxes
If your outline contains items with a binary status that would be useful to have indicated on a row (a list of tasks to be completed, for example), you can choose to show or hide interactive checkboxes adjacent to each row. Choose View ▸ Show/Hide Status Checkboxes to change their visibility.

The state of a status checkbox is saved along with the document, so a checked item will retain its state regardless of whether checkboxes are currently being shown.
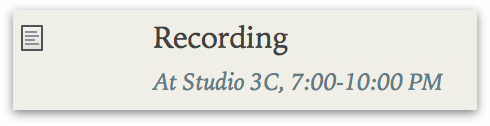
Notes
OmniOutliner supports adding notes to individual rows in the outline. These notes are attached to the rows they annotate, living at the same position as the row in your outline’s hierarchy.
On the left side of the outline is a hidden Note column. This narrow column may appear empty, but hover the mouse cursor over it and a note icon ![]() appears next to the adjacent row.
appears next to the adjacent row.
Click this icon to add note text to the row. A row with note text gains a permanent version of the note icon ![]() , which is used to collapse or expand visibility of the note for that row.
, which is used to collapse or expand visibility of the note for that row.
By default notes are displayed individually beneath the rows they are attached to. If you prefer, you can opt to have them appear in a pane along the bottom of the Outline area instead. To view your Notes in a pane, choose View ▸ Notes ▸ Display in Pane.
To hide the column where the Notes icons appear, choose View ▸ Columns ▸ Note.
Columns
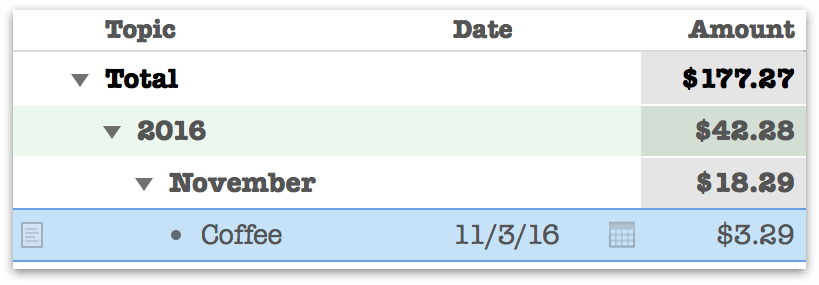
Just as rows describe how your content is oriented horizontally in the outline, Columns describe how it is grouped vertically.
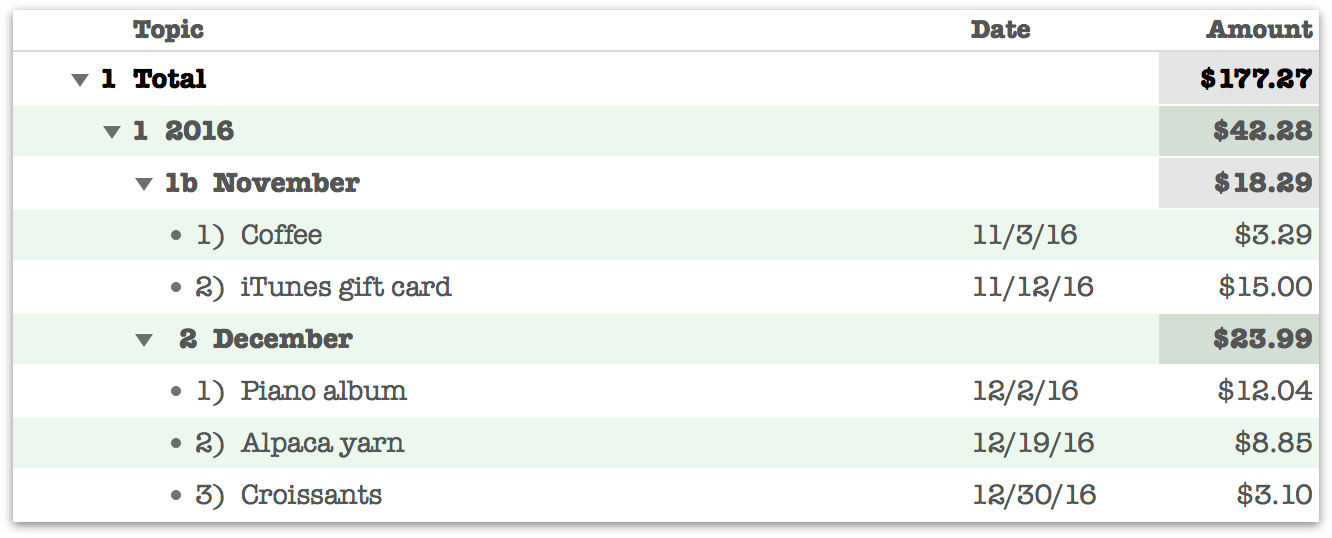
All OmniOutliner documents must have at least one column. The default column created for a new document is the Topic column, which contains content in rich text format by default. The Topic column has some special properties:
-
The Topic column is the only column in the outline that can organize its rows hierarchically; when organization in the Topic column changes, content in additional columns comes along for the ride.
-
The Topic column can have a fixed width, or can adjust automatically to fit the width of the window or other columns. Choose Autosize from the Topic header contextual menu, Auto from the Column Type inspector, or View > Columns > Autosize Topic to switch between modes.
Outlines with a single column do not display the column header (since there’s no need to distinguish between multiple columns). Once a second column is added, the headers are shown above each column. This is the Automatic behavior, which can be changed by choosing from the View ▸ Column Headers submenu.
Add columns to your document with the Add Column button in the Toolbar, or the Organize ▸ Add Column menu item. Delete columns by selecting them (click the column header) and pressing Delete, or editing a cell in the column and choosing Organize ▸ Remove Column. Double-click on a column’s header to change the column title.
As shown in the illustration above, columns can have specialized types other than rich text. Choose an alternate type for your column data with the Column Type Inspector.
Chapter 6
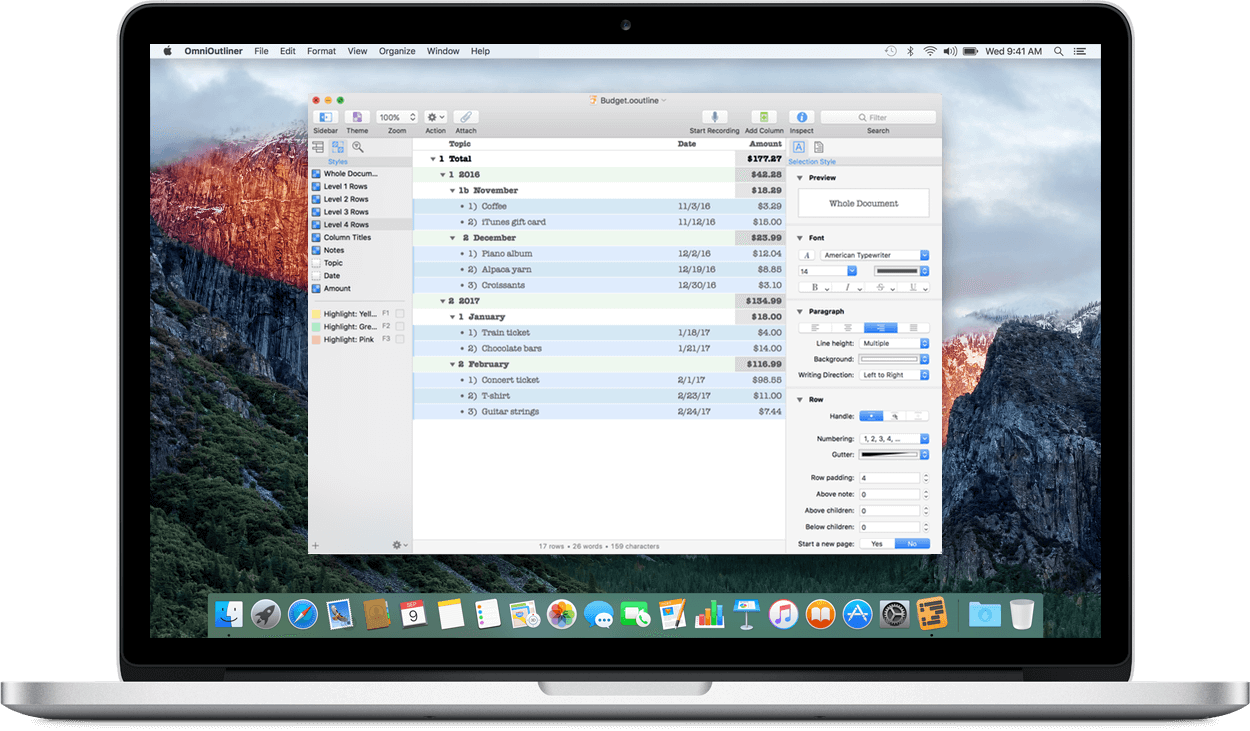
Using the Toolbar
Along the top of OmniOutliner’s window is the Toolbar. Packed with buttons and fully customizable, the Toolbar puts many useful controls just a click away.

Above you’ll see the Toolbar in its default layout. At opposing ends you’ll find buttons for hiding and showing the Sidebar (on the left) and the Inspectors (on the right, next to the Search field). Above those, you’ll find the standard macOS window controls for Closing or Hiding the window or zooming to Full Screen mode.
At the center of the Toolbar along the top, you’ll see a Document Icon. If you hold down the Command key (⌘) and click that icon, you’ll get a menu that shows you where the file is stored on your Mac.
Next to the Document Icon is the Filename, with a small chevron to its right. Clicking this chevron opens a popup window in which you can change the name of the file, add keyword/metadata tags to help make the file easier to find using Spotlight, or move the file to another location on your Mac.
Below the filename, a variety of controls are laid out as buttons you can click to add to or modify the contents of your outline. The default set is designed to be useful for many common applications, but there are many more options available depending on your needs.
Customizing the Toolbar
You can customize the Toolbar by adding additional buttons or rearranging their order to suit your needs.
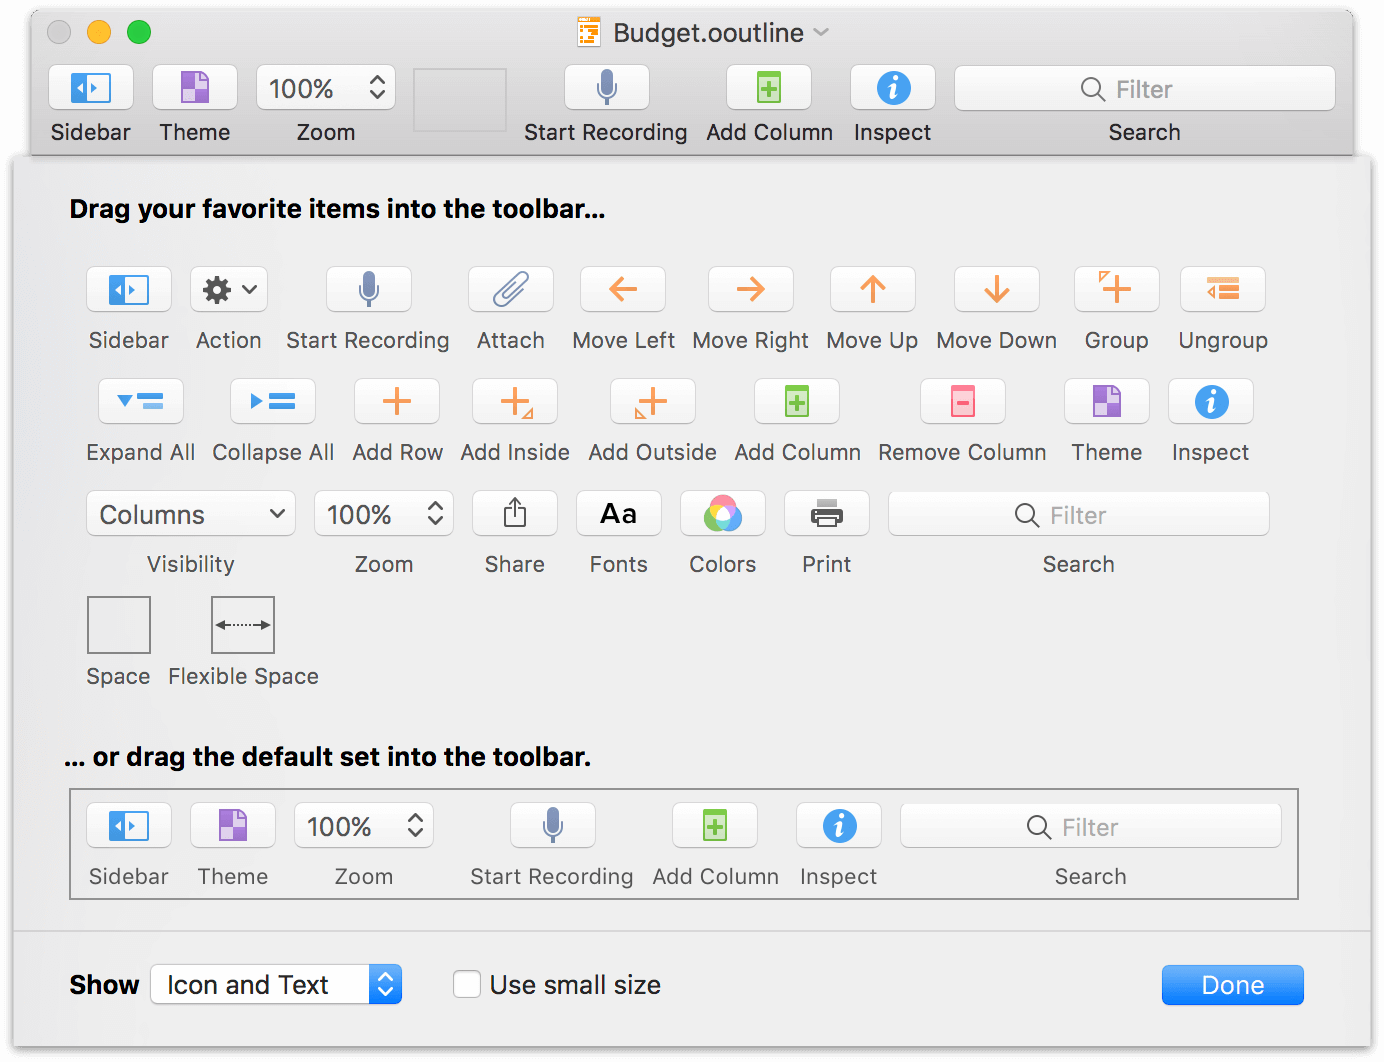
To customize the Toolbar, choose View ▸ Customize Toolbar or Control-click on the Toolbar and select Customize Toolbar. When you do, a sheet slides down from under the Toolbar, revealing a slew of function-related buttons that you can drag up to the Toolbar. When you’ve finished making changes to the Toolbar, click Done.
The changes you’ve made to the Toolbar are saved along with OmniOutliner’s preferences, so that you’ll see the same Toolbar options with every document you create.
To reset the Toolbar to its default set, drag the bottom row of buttons up to the Toolbar and then click Done.
Any changes you make to the Toolbar’s tools and buttons apply to the Toolbar for all of your OmniOutliner documents. If there’s a different, unique set of tools that you use frequently with a certain outline, you can create document-specific toolbars by choosing View ▸ Create Document-Specific Toolbar.
If you decide later that you no longer want that custom Toolbar, choose View ▸ Remove Document-Specific Toolbar and the Toolbar reverts back to the default button set.
Toolbar Button Details
When customizing the Toolbar, many of the available buttons have effects that are obvious or identical to the menu commands of the same name. Some of them warrant further explanation, which follows in the sections below.
Using the Action Menu
The Toolbar’s Action menu  includes many of the commonly used options that you’ll find in the Edit, Format, View, and Organize menus. Rather than spreading these out over four different menus, we’ve placed the ones we feel you’ll use most in this compact Action menu for every document you’re working on.
The contents of the action menu change based on your selection. With nothing selected, the only item in the menu may be Paste; with one or more items selected in the outline, the menu grows contextually.
Using the Share Button
The Share button  offers a way to send content straight from OmniOutliner to other apps on your Mac.
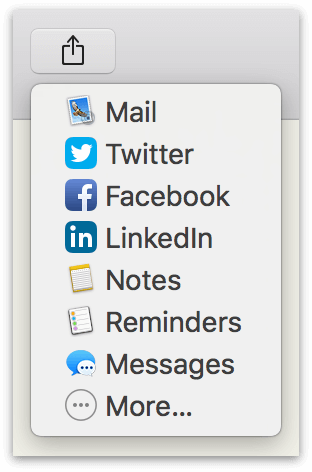
Click the button to choose from among a list of available destination applications, or click More to customize the list in macOS Settings. When you choose a destination, any rows you have currently selected in the outline, along with their children, will be sent to the destination app as plain text (styles are not preserved).
Hierarchy is shown by children being tab-indented beneath their parent rows, and if you are using status checkboxes (View ▸ Show Status Checkboxes) their state will be indicated before each row as well.
Applying Themes
Click the Theme button  in the toolbar or choose Format ▸ Apply Template Theme to open the theme picker and choose a theme to apply to your document.
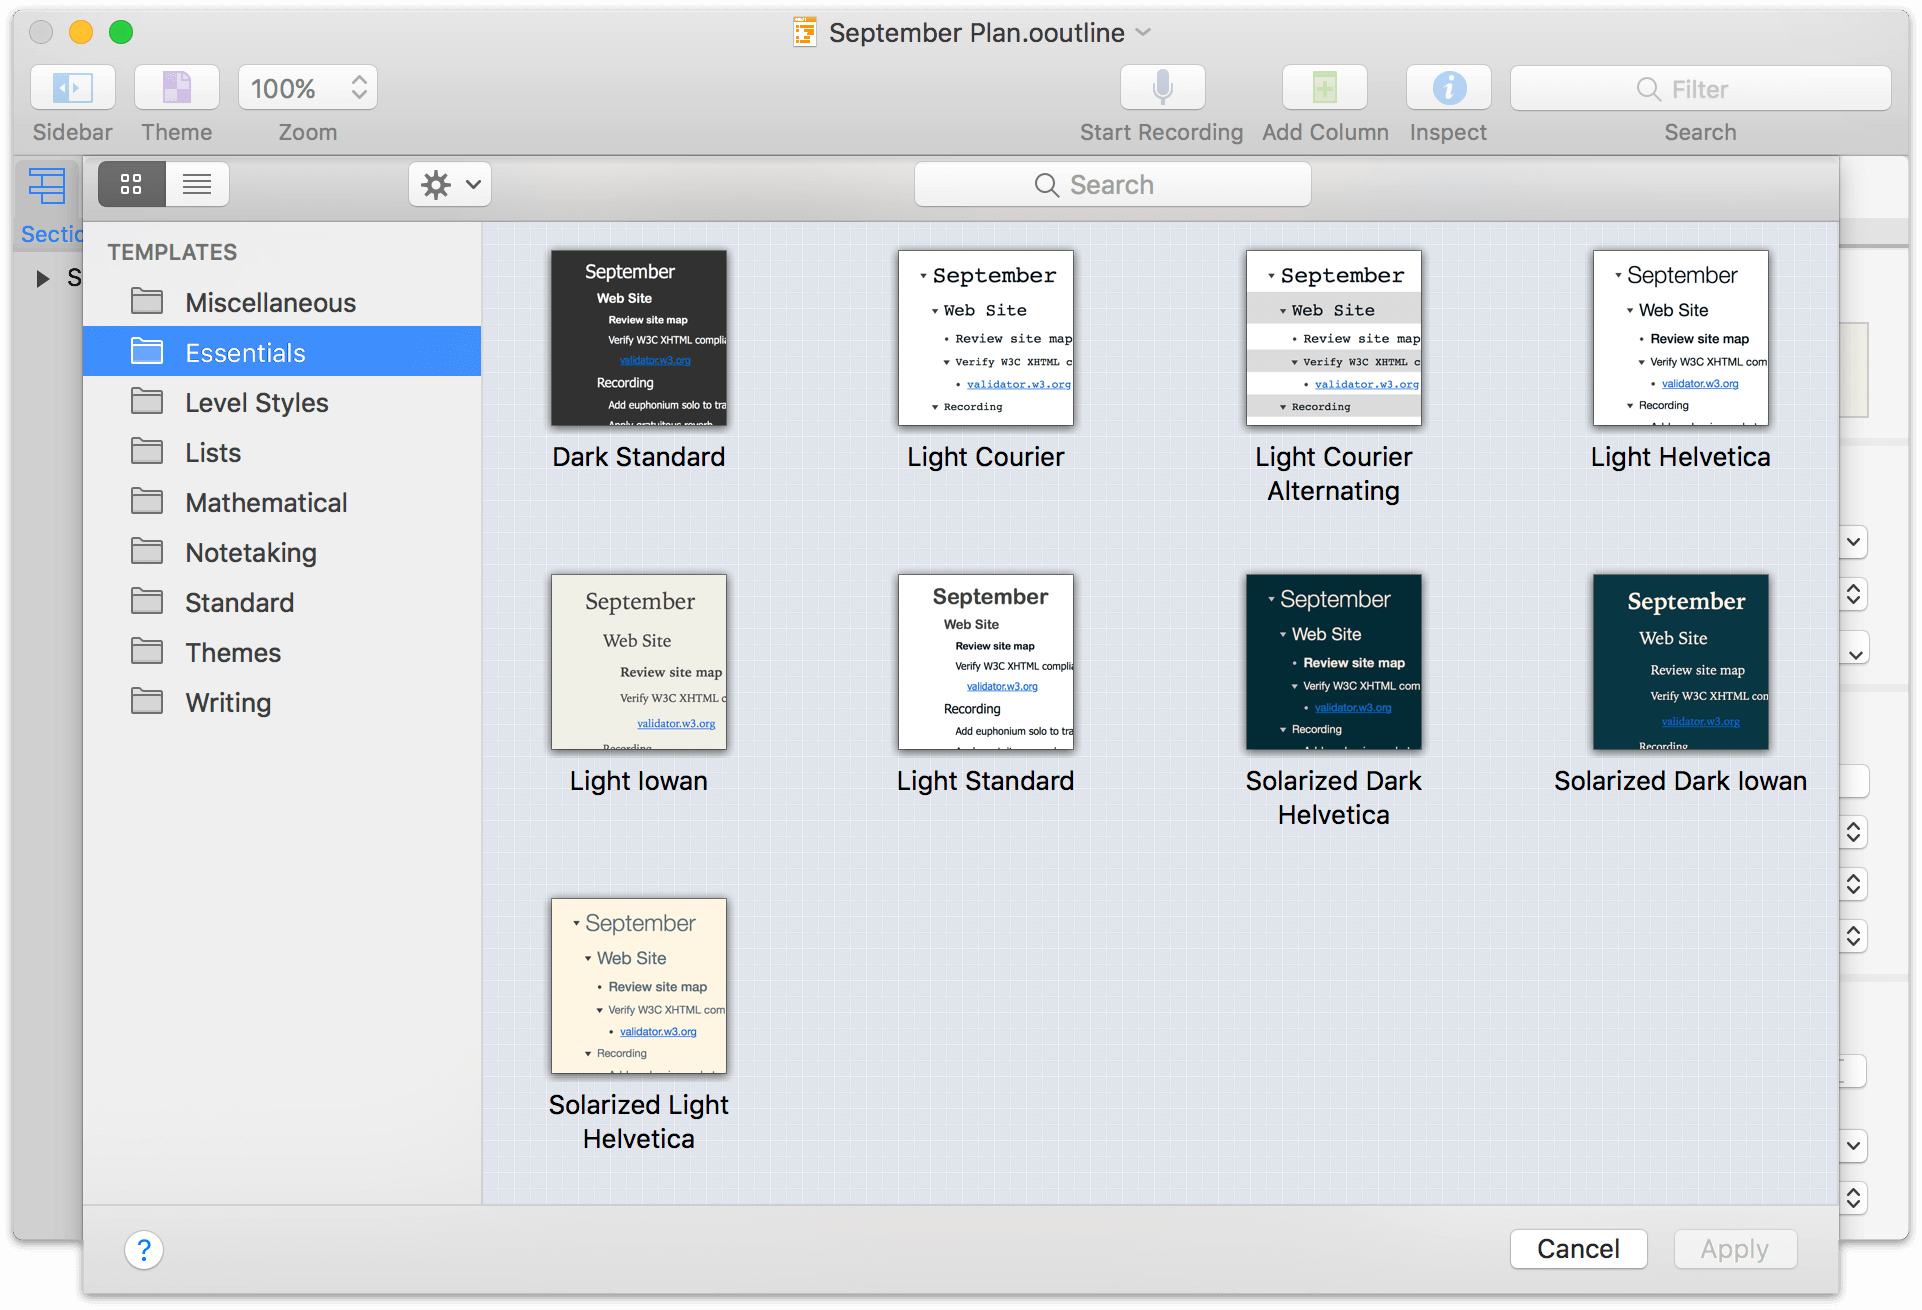
To theme an outline is to take the set of styles stored in an OmniOutliner .otemplate file and apply them to the current document. This overwrites any existing saved styles in the document’s Styles Sidebar tab (but leaves styles directly applied to text intact).
To access additional themes beyond those included with OmniOutliner by default, you must import the template files that contain those themes into the the app’s Resource Browser. See Managing and Working with Templates for an explanation of this process.
If you would prefer to use a particular template’s theme as the default for future documents, you can choose it in the General pane of OmniOutliner ▸ Preferences (Command-,).
Attaching Files
While OmniOutliner outlines are primarily focused on text, if you have a file that’s relevant to your document (such as an image, a video clip, a PDF file, or even another OmniOutliner document) you can attach it with the Attach button  in the Toolbar.
You can also attach files in other ways:
- Drag anything in from anywhere, including files from a Finder window or images from a webpage. Alternatively, press Control while dragging to add a link to the file instead.
- Choose Edit ▸ Attach File.
- Click the Toolbar’s Action menu and choose Attach File.
When attaching files by any method other than dragging and dropping things into OmniOutliner, you are presented with a file chooser that looks very much like a Finder window. Use the file chooser to navigate through your Mac’s hard drive until you locate the file you’d like to attach.
In the chooser, you’ll notice two options that affect how the file is attached to your OmniOutliner document:
- Embed the file in the document—The default. A copy of the file you’ve attached is embedded within the OmniOutliner file you’re presently working on.
- Create a link to the file—Rather than embedding an exact duplicate of the file, as with the previous option, this copies the file’s location on your Mac’s hard drive into the OmniOutliner document.
The difference between the two options is relevant when sharing or syncing the document beyond your current Mac. For that, you’ll want to go with the default option (Embed the file in the document) so the destination will also receive the attachment. If you choose the other option, all that appears is the icon and the filename of the file you linked from your Mac.
When you attach an image or PDF file, a preview automatically scales to the width of the column in which it appears. Other types of files appear as an icon with their filename.
If you click an image or PDF file you’ve attached, the following popover menu appears:
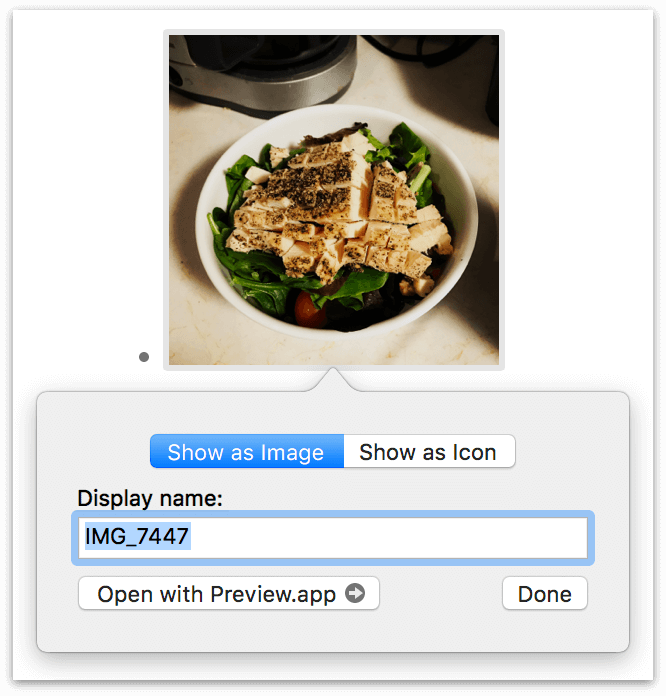
You can choose to have the attachment Show as Image or Show as Icon, and you can change the Display name for the attached file from its filename (the default) to something more descriptive. (Non-image files won’t have the Show as Image and Show as Icon buttons along the top.) To open the file, click the Open with button, which recommends an app to use based on the kind of file you’ve attached.
Recording Audio
You can add recorded audio file attachments to your OmniOutliner document right from within the app. To record something, click the Start Recording button  in the Toolbar; it’s the one that looks like an old-timey microphone. OmniOutliner starts recording the instant you click that button. When you press that button, you’ll also notice a couple changes in the user interface.
First, the text for the microphone button in the Toolbar changes from Start Recording to End Recording. The button also has a small Stop button applied to it. The other change you’ll notice is a red Recording bar appears just beneath the Toolbar.

In the center of the Recording bar, you’ll see a button to Pause recording, which changes the Recording bar’s color to gray, and a checkmark button (Save) to stop recording. In the gray bar, you’ll notice that Recording has changed to Paused, and the Pause button has been replaced with a Resume button.
Click the Resume button to continue recording where you left off, or click the checkmark (Save) button to stop recording. When you stop recording, an audio player clip shows up in your Outline.
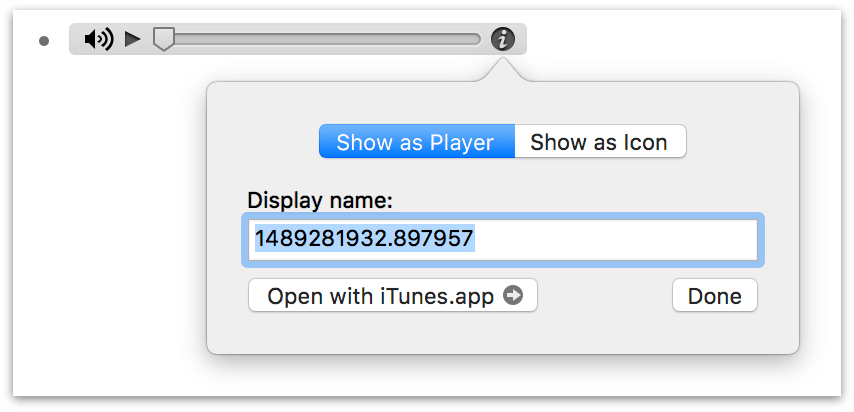
Much like attachments, if you click an audio clip’s Info button (the little i icon at its right edge), a display options popover appears. Here you can opt to have the audio clip show up as a player (the default) or as an icon. More importantly, you can change the audio clip’s Display name from a random number string to something more descriptive. This is particularly important if you choose Show as Icon at the top of the popover.
Check out the Audio Recording Preferences section later in this guide for more information about audio recording options in OmniOutliner.
Using the Search Field
If you have a long document, OmniOutliner’s integrated search field can save the day when you need to find something that’s buried many levels deep in your outline.
By default, the search field is set to filter your document based on what you enter. Rows in the document that contain matching text are displayed in the outline, while all others are hidden. Click the downward-facing arrow next to the magnifying glass icon to access other options:
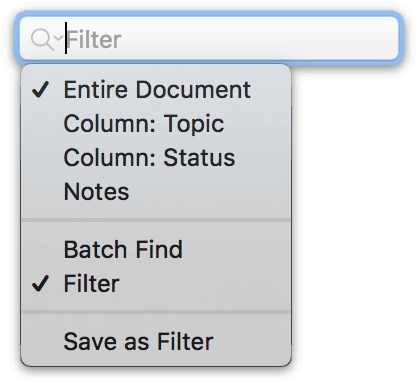
-
The first section of the dropdown menu defines the area of the search, from the widest scope (the entire document) to individual columns and notes.
-
The second section toggles between using the search field for filtering or batch finding in the document. Choose Batch Find to display a list of rows matching the search criteria in the Sections tab of the Sidebar. Unlike filtering, the entire outline remains visible when batch finding.
-
Save as Filter, the last option in the menu, creates a new saved filter based on the term entered in the search field. Saved filters can subsequently be re-applied via the View ▸ Row Filters submenu or the Sidebar’s Filters tab, and can be enriched with sophisticated filtering criteria.
Learn more about setting up saved filters in the Filters tab section.
To clear the search field, press Escape or click the icon  at its right edge. If you were previously focused on a particular row or section of your document, OmniOutliner restores the outline to where you were when you cancelled the search.
Customizing the Touch Bar
If your Mac supports it, OmniOutliner uses the Touch Bar to bring the most useful tools and controls to your fingertips.

The Touch Bar adapts based on what is selected in the outline, displaying different controls if you have:
- A row or rows selected
- Text selected
- A column selected
In each instance, a separate palette of contextually relevant controls appears in the Touch Bar. You can further customize each palette by choosing View ▸ Customize Touch Bar and dragging controls to and from the Touch Bar interface.
Any changes you make are saved separately along with each palette, so you’ll always have the most relevant controls available.
Chapter 7
Using the Sidebar
Along the left edge of OmniOutliner’s window is the Sidebar. The Sidebar lists the Sections of your outline along with the Styles you’ve used, as well as any Filters you’ve saved. These are listed in their respective Sidebar tabs.
Hide or show the Sidebar by choosing View ▸ Hide/Show Sidebar (Option-Command–1), or by clicking the Sidebar button in the Toolbar.
The Sections Tab
The first tab of the Sidebar displays the Sections of your outline in a scrollable pane, representing a compact summary of the document hierarchy.
As with rows in the outline, sections in the Sidebar have handles that can be dragged to reposition them, and sections with children have disclosure triangles that can be clicked to expand or collapse their contents.
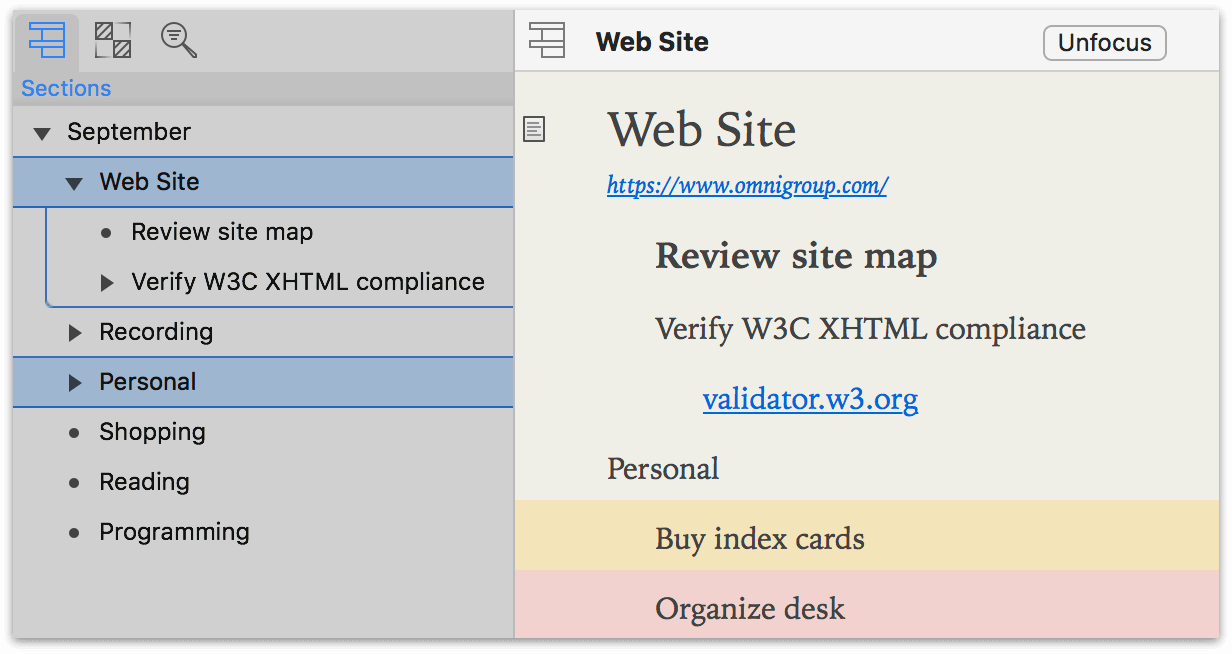
If you select one or more sections in the Sections list, OmniOutliner focuses on those sections—making those sections and their subsections the only thing you’ll see in the outline to the right. Command-click on multiple sections in the sections list to select them, thereby adding them to the set of items focused in the outline.
Focusing on selected content can also be done with View ▸ Focus (Shift-Command-F) and reverted with View ▸ Unfocus (Option-Shift-Command-F), or by Control-clicking to reveal the contextual menu and choosing Focus or Unfocus as desired.
When sections of the outline are focused, that narrowed scope is reflected in the document stats displayed at the bottom of the outline. If the outline is focused when printing, only the focused sections will be printed.
Adding Sections With the Sections List
With sections selected in the Sidebar, new sections (rows) can be added just as they would appear in the outline, using the same set of controls.
Press Return to add a section beneath the selected one(s) that’s a peer of the lowest section selected. The cursor is placed in the outline so you can enter some text for that section.
Similarly, if you wanted to add another section at the same level but above the currently selected section, press Shift-Return.
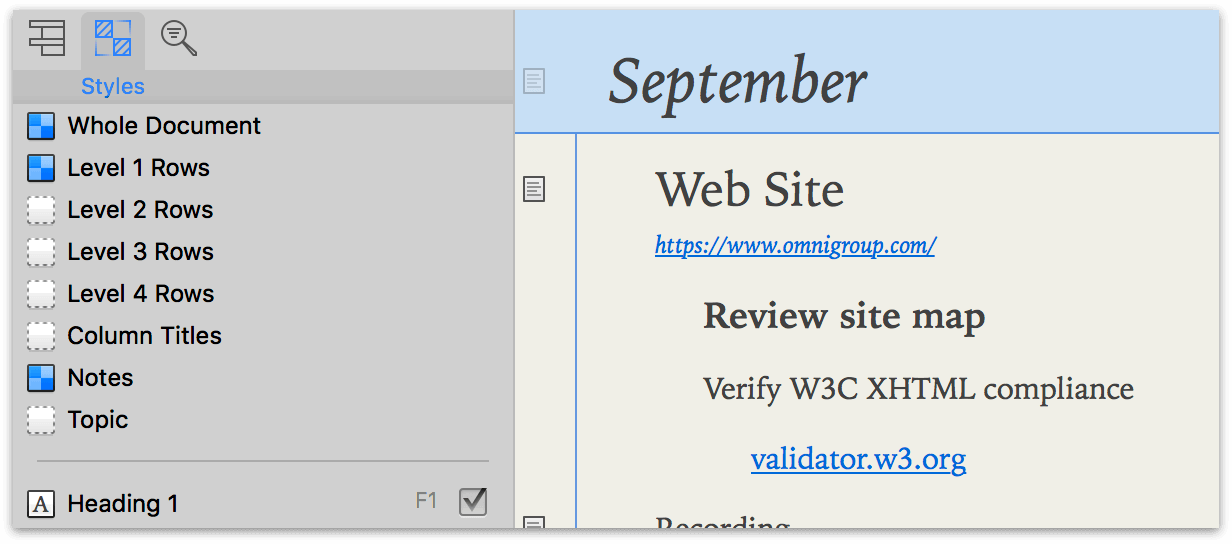
The Styles Tab
The second tab of the Sidebar is the Styles tab. This is the home for all of the styles that describe the look of various parts of your document.
Understanding OmniOutliner’s Style Model
Styling in OmniOutliner can be quite sophisticated, composed of styles that affect the entire document, certain types of content, or individually selected rows or blocks of text.
These are broken down across two kinds of styles: Document Styles (which affect classes of objects) and Named Styles (which can be applied as desired atop document styles).
-
Document styles reside in the top portion of the Styles tab of the Sidebar, and consist of the Whole Document style, styles for the various row levels that are created as hierarchy is added to the document (Level 1 Rows, Level 2 Rows, and so on), as well as styles for Column Titles, Notes, and the main Topic column. Together, these describe the default foundational appearance of content in the document—they are applied passively to all items they represent.
-
Named styles are found in the lower portion of the Styles tab in the Sidebar, and can be applied to any selection in your document. When applied, a Named style amends the existing Document style with its own properties. For example, you could apply a Heading style on top of a Level 1 Row style to make the text bigger or change the font.
Each template theme comes with some pre-defined Named styles, which you can use, delete, or edit to suit the needs of your document.
The styles you set for the various row levels, headings, and text all stack on top of the styles you designate for the whole document—and Named styles stack on top of those. If you’re curious why a certain section looks the way it does, select it and see the Style Attributes Inspector for a list of styles affecting the selection in order of precedence.
Configuring and Applying Styles
In general, styles are configured by selecting them in the Sidebar and tweaking their characteristics using the Inspectors on the right side of the document window. However, styles are applied differently depending on whether they are Document or Named styles.
-
Document styles aren’t applied directly to selections. Rather, their effects are visible on all items they describe. (The Notes style, for example, applies automatically to all notes throughout the document.) To change the appearance of a document style, select it in the Sidebar and use the Inspectors (including the Document Inspectors, especially relevant for the Whole Document style) to adjust the appearance of the content they affect.
-
Named styles are located beneath the style separator line. Unlike Document styles, Named styles are saved sets of style traits that can be applied individually to anything with style attributes (rows, columns, blocks of text, or even other styles). Click the checkbox next to a Named style to apply it to a selection in the outline, or to apply its traits to another style, drag and drop it on top of the style you’d like to modify.
Like Document styles, Named styles can be edited by selecting the style in the Sidebar and using the Inspectors to adjust the style attributes. Also like Document styles, editing a Named style automatically updates the styles of objects everywhere it is applied.
To create a new Named style, click the Add button (+) at the lower-left corner of the Styles tab. Delete Named Styles by first selecting the style in the Styles tab, and then choosing Delete Style from the Action menu at the bottom of the Sidebar.
Click the Action button to open a mini-menu for creating new Named styles, duplicating or deleting a style, copying and pasting style properties, and for clearing custom style data from a selected style.
Style Swatches
In both the Style Sidebar tab and the Style Attributes Inspector, Style Swatches provide an at-a-glance visual summary of a style’s properties.

- Swatches with a two-toned blue checkerboard pattern means that there are a multitude of style properties for that element.

- An empty swatch with a dashed border means there are no styles for that particular row or column. These elements automatically adopt the Whole Document style for the template you’ve chosen.

- A swatch that’s split diagonally with a darker shade on the upper half means that the style applies a transparent background color to the selection.
 and
and 
- Solid squares with a letter A inside are text-specific styles, such as the font and its color.
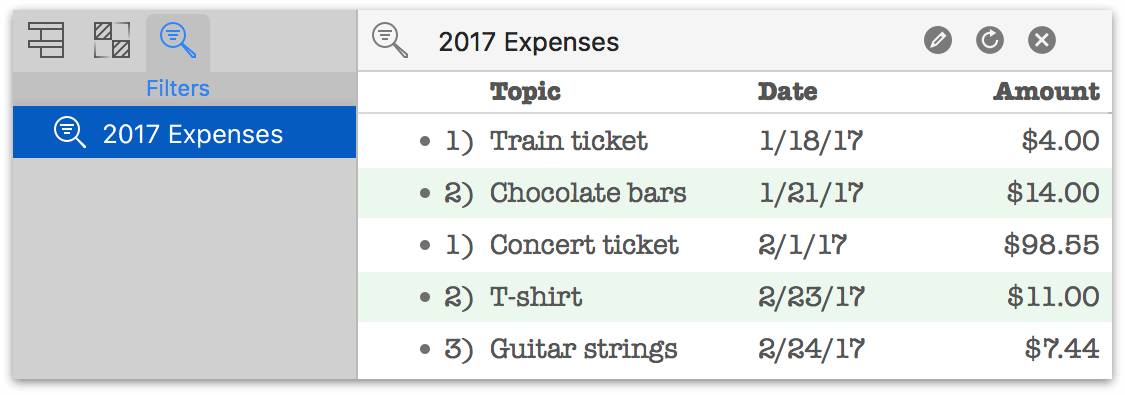
The Filters Tab
OmniOutliner’s filtering feature adds tools to create and save your own rules for customizing the visibility of content in your outlines. Saved filters are listed in the Filters tab of the Sidebar.
To create a filter, choose View ▸ Row Filters ▸ New Filter, or click the + button at the bottom of the Filters Sidebar tab. The filter editor appears in a sheet below the Toolbar, where you can set the rules for rows that are visible when the filter is applied.
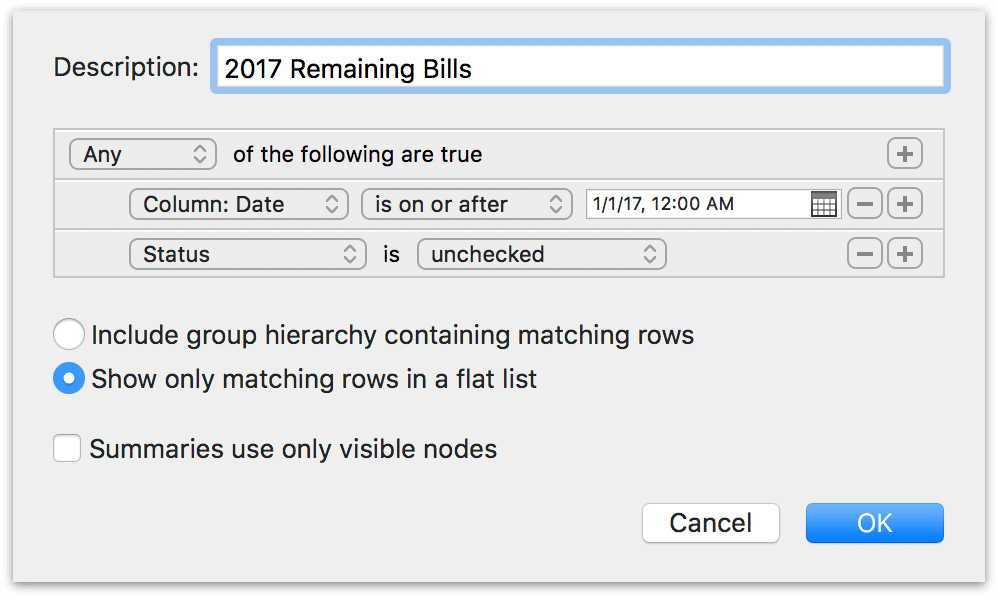
You can set as many rules as you want, using the + and - buttons next to each line to add and remove them.
With the filter set up the way you want, give it a description and click OK. The filter is added to the list in the Filters tab and the View ▸ Row Filters submenu; choose the filter in either of them to apply it to your outline.

For as long as your outline is filtered, the filter bar appears just beneath the Toolbar. It holds the filter description along with buttons to edit, refresh, and dismiss the filter (new rows created while the filter is applied aren’t subject to its rules until you refresh).
When a filter is dismissed, your outline returns to its original view state with all content visible.
One filter option that merits more detail is the is like condition, which matches the input string plus any wildcard characters to text in the chosen scope for the filter.
The is like condition works on any scope that contains rich text or is represented as a string. On these scopes, is like works like is (strict matching), but with wildcard characters available for optional use.
The two wildcard characters are *, which represents any number of characters (including zero), and ?, which represents exactly one character.
For example, Any note is like a*e matches any note with the first character a and the last character e, while Any note is like a?e only matches notes with three characters where a and e are the first and last character.
Chapter 8
Using the Inspectors
OmniOutliner’s Inspectors are tool palettes grouped by theme that control the stylistic aspects of everything in your document: from individually applied text styles and row appearance traits, to column styles, to whole document styles that apply universally.
The Inspectors reside in a sidebar on the right side of the outline which you can open by clicking the Inspect button  in the Toolbar. Other ways you can open the Inspector are by choosing View ▸ Show/Hide Inspectors, or by using the Shift-Command-I keyboard shortcut.
The Inspectors are divided into two groups based on how their tools apply to the document: the Selection Style Inspectors, used to modify the style of a selection in the outline or Sidebar, and the Document Inspectors, used to modify the global traits of the document.
The Inspectors are pretty good at switching to what’s relevant based on your current selection. You can always switch between the Selection Style and Document Inspectors by clicking one of the buttons in the Inspector’s Toolbar along the top, or choosing from the View ▸ Inspectors submenu.
Selection Style Inspectors
Use the Selection Style Inspectors when you want to change the appearance of rows, columns, text selections or styles in your document.
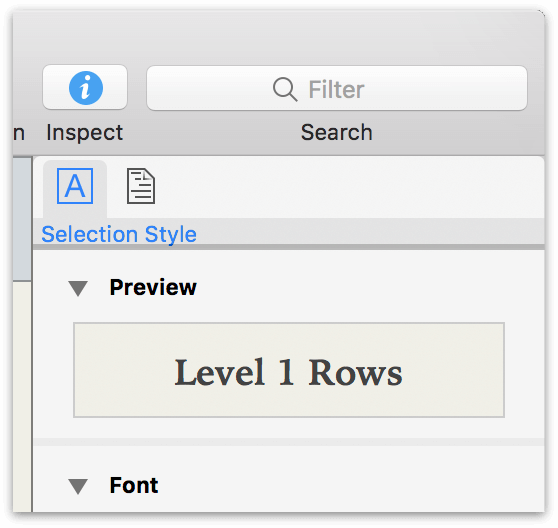
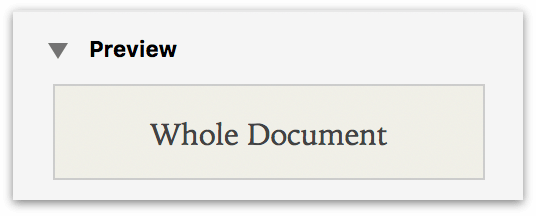
Preview
This Inspector provides a preview of the style applied to your current selection, as well as an indication of what that selection is (with nothing selected, for example, Whole Document is displayed).
Font
This Inspector provides a variety of controls for changing the appearance of the text in your document.
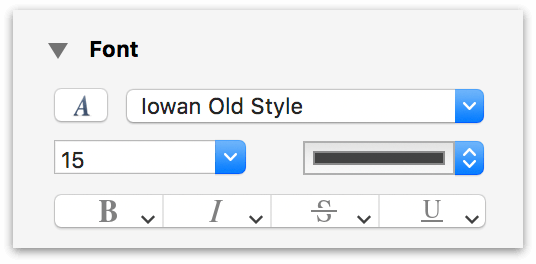
- Typeface, Size, and Color
- Choose the font, size, and color for the selected text or row.
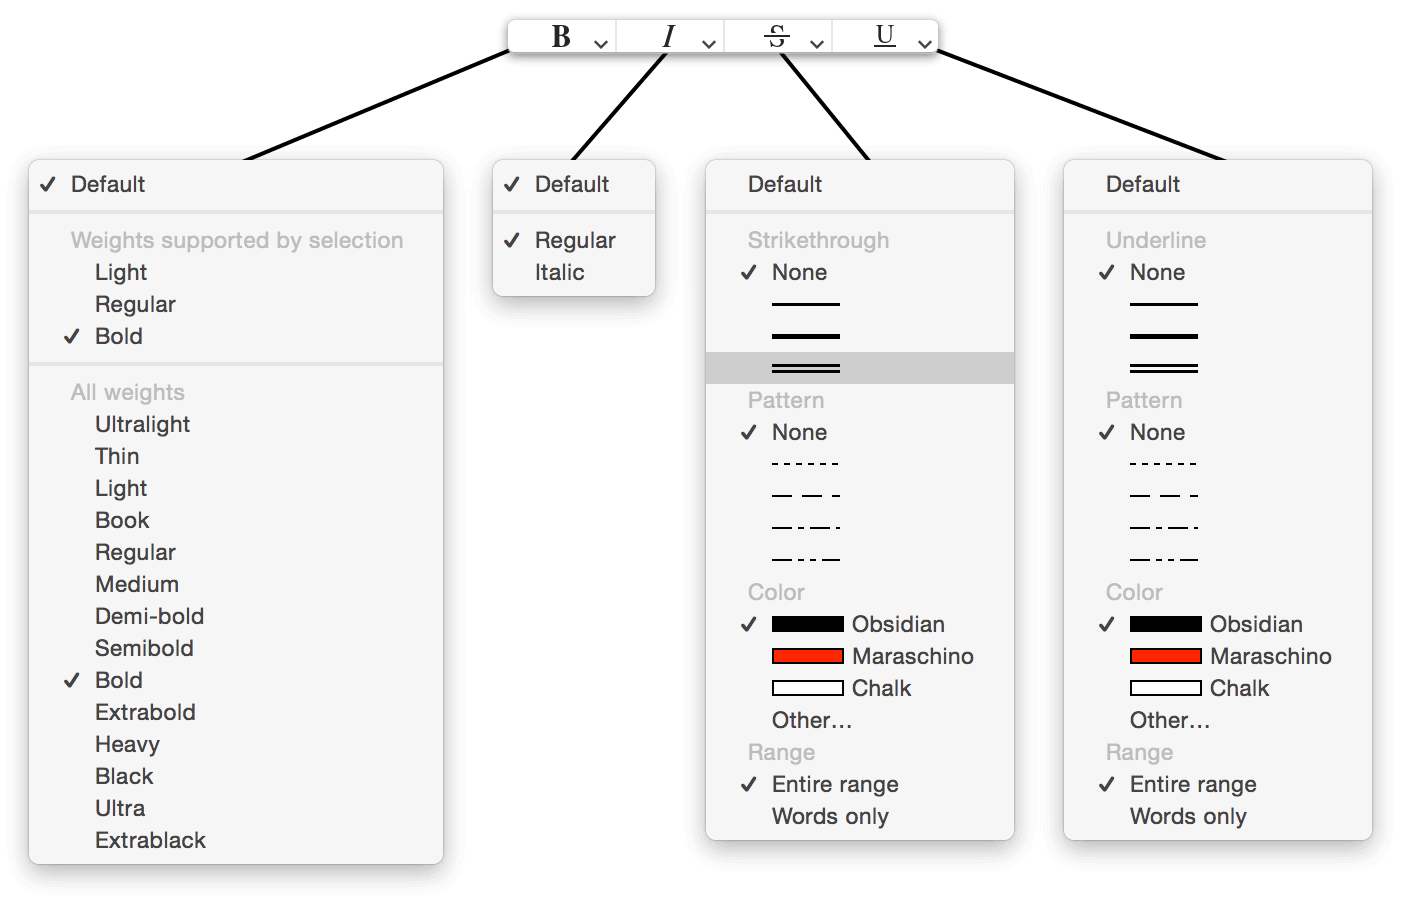
- Bold, Italic, Strikethrough, and Underline
- Click to apply the default Bold, Italic, Strikethrough, or Underline styles to the selected text or row. At the lower right of these buttons you’ll see an arrow pointing downward. This lets you know that there are additional options from which you can select. You can either click on the arrows, or click and hold to reveal the optional attributes menus.
Using the Colors Palette
Whenever you click on a color picker to choose a color for an element in an Inspector (such as the font color mentioned above), the Colors Palette appears—a special window for selecting, manipulating, and saving colors perfect for use throughout OmniOutliner.
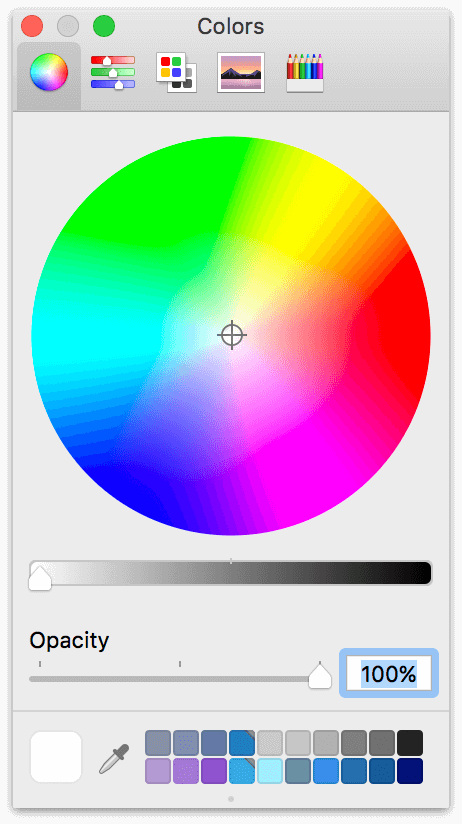
The big disc of color is known as the Color Wheel. To select a color, click within the color wheel and drag the handle to find the value you want. Beneath the color wheel you’ll see a slider for Opacity (or see-through-ness) of the color, where 0% is totally transparent and 100% is opaque.
You can switch from the color wheel to other color-choosing options by clicking the icons along the top of the colors palette, including the Color Sliders, Color Palettes, Image Palettes, and Pencils.
The lower left of the colors palette holds an eyedropper (click it to sample a color anywhere on your screen), and a rounded square that contains the color you’ve selected. This is the Color Inspector. Click and drag a color from the Inspector to one of the empty color swatches along the bottom of the window to save it.
If you run out of space in the color swatches area, click and drag the little dot handle at the bottom of the window to reveal more empty rows for saving your custom color selections.
Paragraph
Use the Paragraph Inspector to choose the layout and background attributes for the current selection.
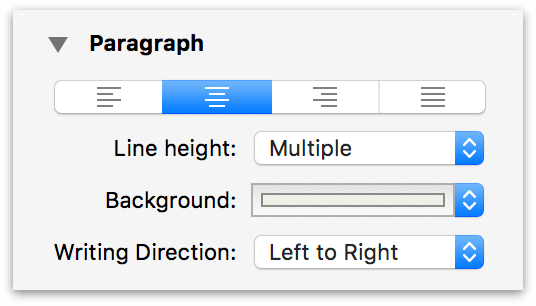
- Text Alignment
- This row of buttons are used to left-, center-, right-align, or justify text in the selection.
- Line Height
- Choose from a range of single to double spacing for your document. Line height adds spacing above the text within a row, where Padding adds spacing between rows.
- Background
- Set the background color for the selected row or style. Click the arrows on the right edge to choose from one of the presets we’ve offered, or click the color bar to open the Colors palette where you can choose a custom color.
- Writing Direction
- Set the writing direction to Natural (based on the system language), Left to Right, or Right to Left.
Row
Use these controls to set row features on the current selection.
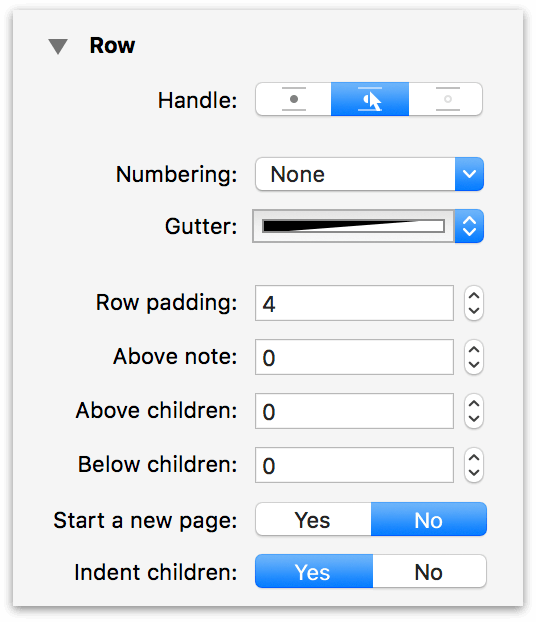
- Handle
- Determines whether the row handle is always visible, only visible when you hover over the row, or never visible.
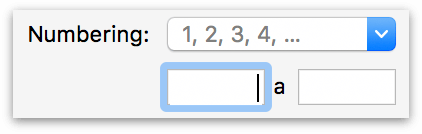
- Numbering
- Choose a numbering style to use for the rows in your document. The dropdown menu offers a variety of prefix and suffix choices that mirror those in the Format ▸ Row Numbering submenu.
-
It also offers the Other numbering option, which reveals two fields that define custom prefix and suffix characters for the row number. Values entered here statically flank any existing row numbering scheme.
- Gutter
- Set a color to use for the gutter (the area where the row handle and status checkbox appear). Click the arrows on the right edge to choose from one of the presets we’ve offered, or choose Other to open the Colors palette.
- Row Padding
- Set the amount of space (in pixels) above and below the text within the row.
- Above Note
- Set the amount of space above an inline note.
- Above Children
- Set the amount of space between a parent row and its children.
- Below Children
- Set the amount of space below the last child row.
- Start a New Page
- Determines whether the currently selected row forces the start of a new page. When you select this option, a red dashed line appears above the row, as if you were going to cut the document with a pair of scissors. This is specifically for the purposes of printing or exporting to PDF.
- Indent Children
- Choose whether to indent a row’s children. If you choose to not indent children, it might be hard to determine which is the parent and which is the child row. As such, you might want to style child rows differently, perhaps giving them a different background color or shade, reducing the font size, and so on.
Style Attributes
The Style Attributes Inspector shows a detailed list of all of the styles currently applied to the selection, organized by source. It also provides controls for removing styles on the selection, or bringing them (via drag and drop) to other items or styles in the outline.
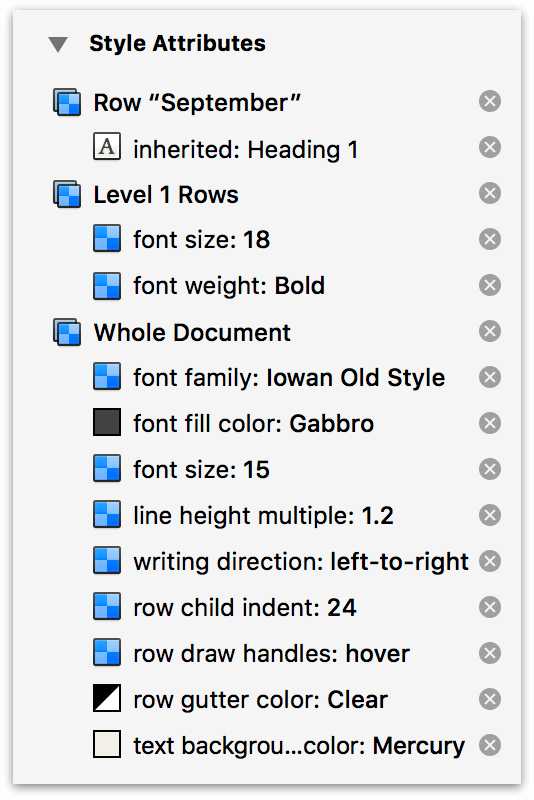
The order of styles shown matches the priority with which they are applied to the selection, providing insight on how the item’s style is calculated (where styles conflict, the topmost style overwrites those beneath it).
Click the  button at the right of each style to remove unwanted styles from the selection.
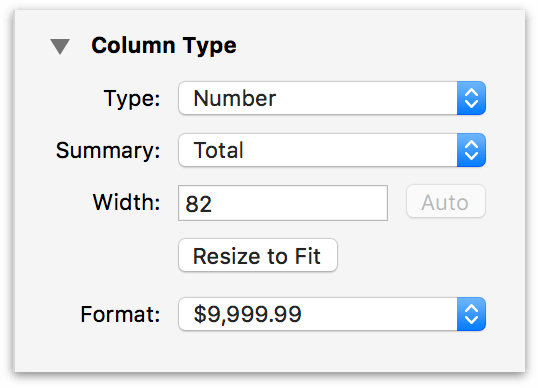
Column Type
The Column Type Inspector has two popup menus for setting column attributes (Type and Summary), and controls for determining column width. Some column types require additional formatting specific to them; additional menus appear to govern that formatting as required.
This Inspector appears while editing text in a column’s row, or when a column is selected (by clicking its header). If column headers are hidden, use View ▸ Column Headers ▸ Show to expose them for selection.
New columns always start out with the Rich Text type. However, you can change this to one of the following to suit the needs of your outline:
If you add custom content specific to a chosen column type, switching the column type to one that doesn’t support that specialized content will cause it to be lost.
If you unintentionally switch column types, Edit ▸ Undo (Command-Z) will switch back to the previous type and revert any data loss.
- Checkbox
-
Checkbox columns can be used for anything from giving you another checkbox to tick off, to monitoring the state of something, and even for ratings. You can add as many Checkbox columns as you’d like, and you can show or hide them as needed with the options in View ▸ Columns.
When used in combination with OmniOutliner’s sorting features (Organize ▸ Keep Sorted or Organize ▸ Sort Outline), checkboxes can be used to denote a Yes or No (binary) state for almost anything.
- Date
-
Choose a date and optional time format to use in the column.
When entering dates into columns, OmniOutliner uses date parsing logic that lets you type things like now, yesterday, 2d, september, thu, or –5w in a date column and have it know what you mean.
With the Date column type chosen, use the Locale dropdown menu to switch between regions used to calculate the time. Use the Format dropdown menu to choose how dates and times are displayed in the column.
If you choose Custom Format from the Format menu, the Date Format Editor appears.
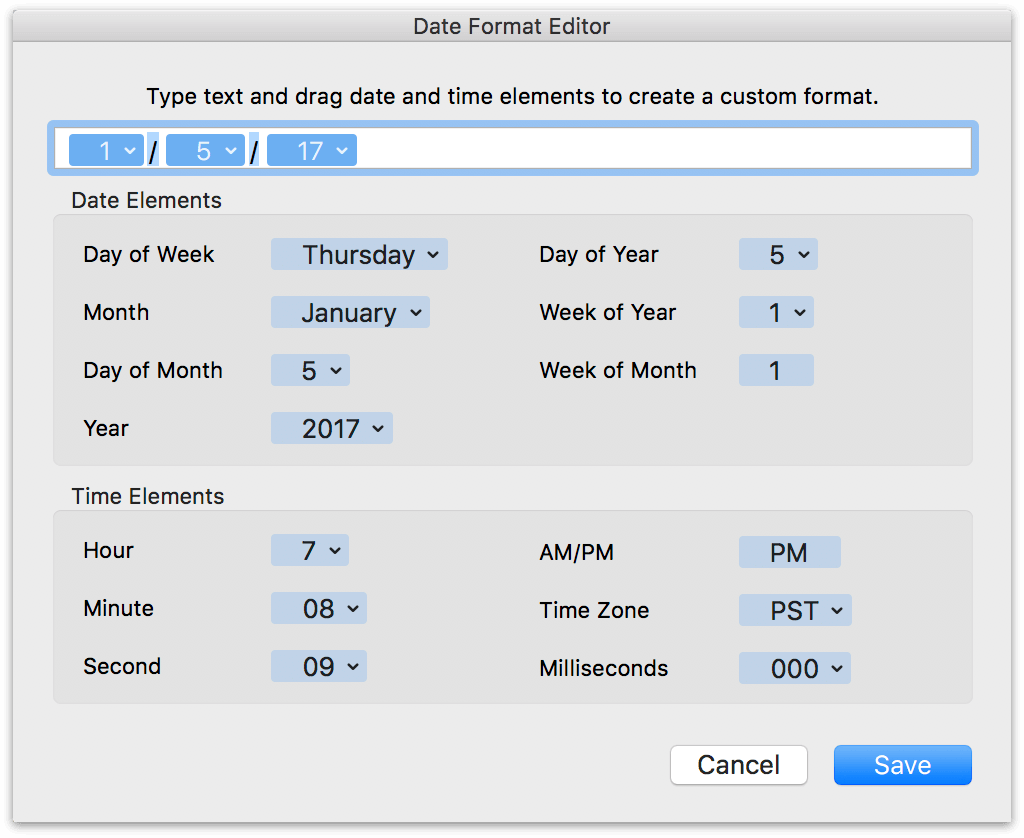
To use the Date Format Editor, drag the items you’d like as part of the date/time string up to the field at the top of the dialog window. Items, such as Day of the Week or Month, have additional formats which you can choose by clicking the downward-pointing arrow. By default, the custom format uses slashes ( / ) for the delimiter, but you can enter another character (or different characters) or remove them entirely, if you’d like.
- Duration
-
Use a Duration column for estimating or tracking the amount of time a task or project takes.
Use the Settings popup menu to select from Work Time, Calendar Time, or to use a Custom time of your choosing. OmniOutliner formats the duration time based on the Setting you’ve chosen; for example, 12h in Calendar Time is equivalent to 1d 4h in Work Time (assuming an 8 hour workday). If you turn on Long format, OmniOutliner spells out the time durations; for example, 1d 4h gets expanded to 1 day 4 hours.
Use the hours per day, hours per week, and hours per month fields to adjust or fine-tune the Duration settings to suit your needs.
- Number
- Choose Number as as the column Type when you have a numbered value that you’d like to monitor. When you choose this column type, an additional Format popup menu appears in the Column Type Inspector with options for number formatting:
- 9,999.99—Numbers with a two-digit decimal at the end. Large numbers will use a comma to separate thousands.
- 9999.99—Numbers with a two-digit decimal.
- 10000—Whole numbers; decimal numbers are rounded up or down to the nearest whole number. For example, 2.67 is rounded up to 3, while 3.14 is rounded down to 3.
- 10000%—A whole number percentage; a decimal number that gets entered is rounded up or down to the nearest whole number. For example, 2.67% is rounded up to 3%, while 3.14% is rounded down to 3%.
- 99.99%—Percentages with a two-digit decimal value, if needed. For example, 99% appears as that and not 99.00%, while 3.14159% is rounded to 3.14%.
- $9,999.99—Use this option for representing currency values based on the localized values you’ve set in System Preferences ▸ Language & Region ▸ Region. For example, if your Region is set to Asia ▸ Japan, the currency value would show up with the Yen symbol (¥).
- Pop-up List
-
Choose the Pop-up List column type when you have a set of repeating options that you need to choose from.
A table in the Column Type Inspector contains the list of values (pop-up options) that you can customize using the + and - buttons below it.
After creating the list, start entering one of the terms in a pop-up list column cell and you’ll have the option automatically enter it from the selection that appears.
If you enter a term in a pop-up list column cell that isn’t already part of the list, you can press Command-Return to add it to the list.
- Rich Text
- Choose Rich Text for regular text; this is the default column type for new columns.
The second popup menu in the Column Type Inspector provides options for converting the column into a Summary.
The most important thing to know about Summary columns is that they only appear on the parent row for a group. In that parent row, the summary appears in the column calculated based on the values of its children, but with a gray background to the cell. The gray background is a transparent layer of black, which slightly darkens any background color you’ve assigned to the row style.
The options in the Summary popup menu change depending on what you’ve selected in the Type popup menu:
Checkbox Summary options include:
-
None—There is no summary; the summary cell displays a checkbox that acts completely independent of its children.
-
State—Displays an empty checkbox if no items have been checked off, a checkbox with a dash inside if some items have been checked, or a filled checkbox if all of the items have been checked.
-
Hidden—The summary cell is empty, regardless of the state of the other checkboxes in the column.
Date Summary options include:
-
None—There is no summary.
-
Minimum—The summary cell displays the earliest date (or time) in the column from among the child rows.
-
Maximum—The summary cell displays the latest date (or time) in the column from among the child rows.
-
Hidden—The summary cell is empty.
Duration Summary options include:
-
None—There is no summary.
-
Total—The summary cell displays the total of all cells in the column.
-
Minimum—The summary cell displays the lowest duration in the column.
-
Maximum—The summary cell displays the highest duration in the column.
-
Average Leaves—The summary cell displays the weighted average of durations among children of branches of the parent row (also known as leaves). If one branch has two leaves and another has one, for example, the first branch is weighted at 2/3 of the average displayed in the parent cell, while the second is weighted at 1/3.
-
Hidden—The summary cell is empty.
Number Summary options include:
-
None—There is no summary.
-
Total—The summary cell displays the total of all cells in the column.
-
Minimum—The summary cell displays the lowest number in the column.
-
Maximum—The summary cell displays the highest number in the column.
-
Average Leaves—The summary cell displays the weighted average of numerical values among children of branches of the parent row (also known as leaves). If one branch has two leaves and another has one, for example, the first branch is weighted at 2/3 of the average displayed in the parent cell, while the second is weighted at 1/3.
-
Hidden—The summary cell is empty.
Pop-up List Summary options include:
-
Minimum—If the Pop-up List contains numbers, the summary cell displays the lowest number used in that column. If the Pop-up List contains text, the summary cell displays uses the first entry in the Column Type Inspector.
-
Maximum—If the Pop-up List contains numbers, the summary cell displays the highest number used in that column. If the Pop-up List contains text, the summary cell displays the last entry in the Column Type Inspector.
-
Hidden—The summary cell is empty.
Rich Text Summary options include:
-
None—There is no summary.
-
Hidden—The summary cell is empty.
- Column Width
-
Enter a value in the Width field to set the width of the selected column. If the Topic column is selected, the Auto button can be used to have the Topic column resize automatically based on the changing widths of the window or the other columns in the outline. (This is referred to in the Topic header contextual menu as Autosize, and in the View > Columns submenu as Autosize Topic.)
Click the Resize to Fit button to have the column width automatically adjust to fit the longest single line of text. (This is a one-time operation. Subsequent changes to the text do not cause the column to resize again.)
Document Inspectors
Use the Document Inspectors to adjust the styles or attributes of the outline as a whole, rather than styles that can be applied to a certain part of the outline.
Document
The Document Inspector controls the appearance of how elements (rows, columns, margins, and more) are laid out within the outline.

- Alternate rows
- Use the Alternate rows option to set a background color to alternating rows in your document. You can choose from one of the preset color options, or click the color bar to choose a custom color or background pattern from the Colors palette.
- Horizontal grid
- Use the Horizontal grid option to add a thin line of color between the rows in your document. You can choose from one of the preset color options, or click the color bar to choose a custom color from the Colors palette.
- Vertical grid
- Use the Vertical grid option to add a thin line of color between the columns in your document. You can choose from one of the preset color options, or click the color bar to choose a custom color from the Colors palette.
- Margin
- Choose a color for the document margin—the space outside the bounds of the outline’s canvas. This appears when in full screen mode, or when the width of all visible columns is less than the width of the outline in the window. You can choose from one of the preset color options, or click the color bar to choose a custom color from the Colors palette.
- Column headers
- Choose whether to Show or Hide column headers. The Automatic option shows any text you’ve entered for a header, but hides the generic Topic header if you have only one column in your document. You can also do this by choosing View ▸ Column Headers ▸ Show/Automatic/Hide.
- Show row status
- Choose this option if you want to display the status checkboxes along the left side of every row. These are different from the checkbox option you can set on a column, in that status checkboxes are always located on the left edge of and follow the indentation level of your rows.
- Inline notes
- Choose whether inline notes will wrap based on the first column of the document, or if they’ll span the width of all columns. (Inline notes, which are styled using the Notes style, appear beneath the text you’ve entered in a row.)
- Indent child rows
- This pop-up menu lets you choose how far child rows will be indented. You can choose from one of the options we’ve provided, or enter a value of your liking and press Return.
Format and Metadata
Use the Format and Metadata Inspector to provide additional information (metadata) about the document you’re working on. The information you provide here stays with the document and makes it easier to find on your Mac using Spotlight.
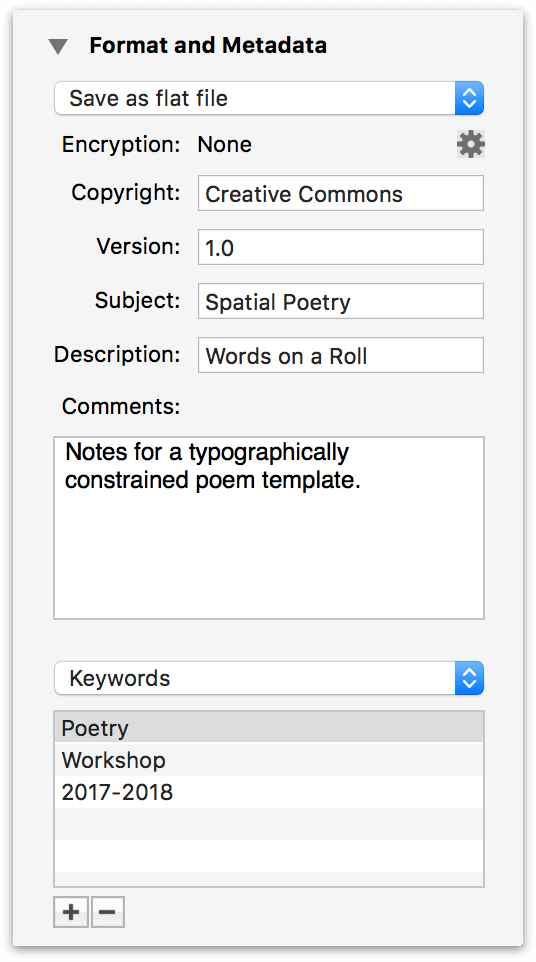
- Save File As
-
The first option in the Document Inspector is a popup menu with options for how your Outliner document is saved: either as a flat file or as a file package. (This option is document-specific.)
If you choose to save as a flat file (the default), OmniOutliner compresses your files down to the smallest practical size. Compressed files don’t just take up less space on your hard drive; they’re also easier to share, and to sync between devices.
Choosing to save as a file package means your files won’t be compressed. This generally isn’t recommended, but can be useful if you are saving your OmniOutliner files in a version control or document management system, or if you run scripts (Python, Ruby, and so on) on the XML inside your document.
- Encryption
- Click the Gear button to add or modify Encryption on your document (detailed at the end of this chapter).
The rest of this Inspector is composed of metadata fields for contextually enriching your document, and have no direct effect on the contents of your outline. The metadata fields in the Format and Metadata Inspector include:
- Copyright
- Copyright statements typically declare who owns the legal rights to something. (Usually you, your company, or some other entity.)
- Version
- Version numbers are used to indicate a certain “state” of a project. For example, 0.1 might be a beta release while 1.0 might be an initial release.
- Subject
- Something similar to what you would enter as the subject line for an email; for example, Staff project assignments for OmniOutliner 5, or Fried Chicken Recipe.
- Description
- A description of the contents of your OmniOutliner file. For example, A list of bike parts, or Actors who’ve portrayed Batman.
- Comments
- Use the Comments field to enter more information about the file you’re working on. For example, you could provide additional detail about a project this file is associated with, or notes to yourself about other things that you’d like to add to the file.
Beneath the Comments field is a popup menu that’s set to Authors. This menu works in conjunction with the combo box below it for creating metadata attribute and value pairs.
To create a metadata attribute and value pair using the popup menu and the combo box:
- Select one of the options in the popup menu (Authors, Organizations, Languages, Keywords, or Projects).
- Click the Add button (the + sign) at the bottom of the Document Inspector. When you click Add, the focus changes to the box in the middle so you can enter information about the item you’ve selected in the popup menu.
- When you’ve finished entering some text, either press Tab or Return to save the metadata information to the file.
If you decide later that you want to remove an item, select it with the mouse and then click Remove (the − button, next to the Add button). To edit an existing item, double-click to highlight the text, and then enter your changes and press Tab or Return to save the changes.
Options in the popup menu include (all of these options can have multiple entries):
- Authors
- The name(s) of the person or people who created the document.
- Organizations
- The name of your company or the organization the document has been created for.
- Languages
- Enter the language, such as English or Japanese, or use one of the ISO 639 language codes, such as en or jp.
- Keywords
- Keywords increase the find-ability of your files more than anything else. Add as many keywords as you like; they help make each document unique when it comes to finding files with Spotlight.
- Projects
- If you’ve created an Outliner file for a specific project, enter the project name here.
If you are using other Omni apps, such as OmniGraffle or OmniPlan, you can enter similar metadata in the Document Inspectors for those apps. macOS Spotlight indexes these attributes, making it particularly easy to find files that share metadata in common.
Encryption
Use the gear button in the Format and Metadata Inspector (or the File ▸ Encrypt Document command) to add password protection to outlines containing private or sensitive material.
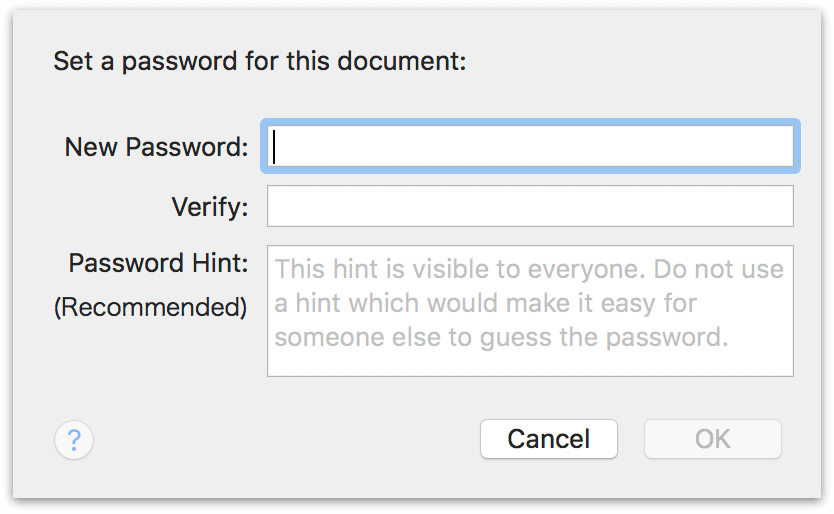
You are prompted to enter and confirm a password. With the New Password and Verify fields matching (and an optional password hint added), click OK to finish the encryption process. The next time you open the document, you’ll see the following prompt:
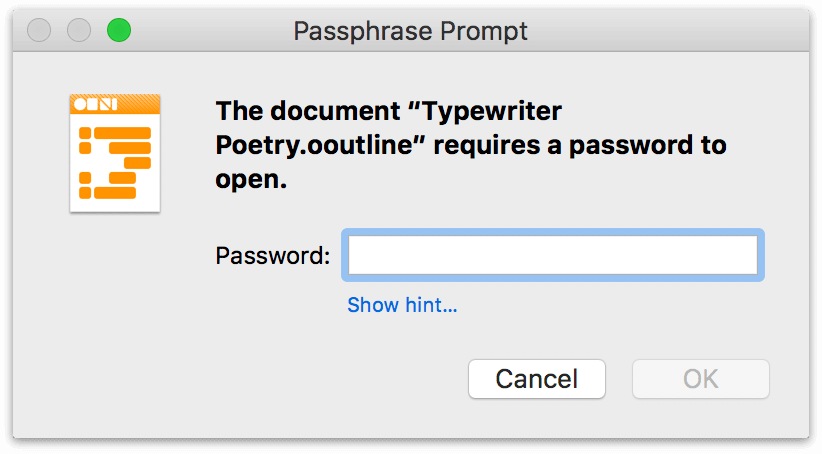
Your document is now encrypted and cannot be opened—or have its contents otherwise read—without entering the password. This is true both of the original document and any copies of it that are subsequently created, so if you send a copy to a coworker they’ll need the password to open it.
To remove encryption from a password-protected document (and remove the requirement for a password), choose File ▸ Encrypt Document, enter the existing password, and click Remove Password.
OmniOutliner uses AES-256 in CCM mode for encryption when password protecting an OmniOutliner file.
Chapter 9
Importing, Exporting, and Printing
When it’s time to share your outlines with the world—or bring other writing in from the cold—OmniOutliner has you covered with a set of flexible import formats, export options, and a highly customizable printing template.
Importing to OmniOutliner
OmniOutliner recognizes the following file formats, which can be imported through the File ▸ Open (Command-O) dialog:
- .opml—A valid OPML file.
- .ooutline—Files created with OmniOutliner 5 for Mac or OmniOutliner 3 for iOS.
- .otemplate—Template files created with OmniOutliner 5 for Mac or OmniOutliner 3 for iOS.
- .oo3—Files created with OmniOutliner 3 or 4 for Mac, or OmniOutliner 1 for iPad or 2 for iOS.
- .oo3template—Template files created with OmniOutliner 3 or 4 for Mac, or OmniOutliner 1 for iPad or 2 for iOS.
- .txt—Plain text and tab-delimited files.
- .rtf—All text styles and colors are preserved when importing an RTF file.
- .rtfd—As with RTF files, all text styles and colors are preserved, and any images are also brought along for the ride.
OmniOutliner cannot open files created or exported as .csv (Comma-Separated Values). Instead, use a tab-delimited file and save it with a .txt file extension.
Exporting from OmniOutliner
For those times when you need to send a file to someone who doesn’t have OmniOutliner (or to continue work on your outline in another application), we’ve included a bunch of export file formats that you can choose from. To export an open file, choose File ▸ Export (Option-Command-E), and then choose one of the following options from the File Format pop-up menu:
- CSV
- When exporting a multi-column outline as CSV, OmniOutliner saves the .csv file using standard comma-separated values (CSV) conventions (i.e., each column is separated by a comma, and text with spaces is placed within quotations).
- Excel 2010 Format
- Creates a .xlsx spreadsheet document capable of being read in Microsoft Excel 2010 (and other versions of Excel that support the format). This export option maps most closely to multi-column data outside OmniOutliner, and does its best to replicate styles between the two (within the limits of Excel).
Microsoft Excel allows hyperlinks to be set on a cell. OmniOutliner export supports this: when an OmniOutliner cell contains nothing but a single hyperlink, it exports as a link on the Excel cell.
Having multiple links in an OmniOutliner cell will result in none of them being set, and unlinked text plus a link results in the link not being set.
That said, any hyperlink present is still converted to text in the destination cell, so no content is lost. Link text exported in this way can be converted back to hyperlinks within Excel itself.
- HTML
- Creates a like-named folder that contains an index.html file along with the necessary images and attachments that make up your OmniOutliner file. All of the styles you’ve used in OmniOutliner are converted to CSS and included in the index.html file.
- HTML (Dynamic)
- This option gives you everything that comes with the basic HTML export, plus an added outliner.js file. This JavaScript file is what makes the file dynamic; you can open and close the sections of your document just as you would in OmniOutliner.
- Microsoft Word (indented)
- Creates a .docx file that opens in the default page layout view and retains the outline structure via indentation. This export option only includes the topic column, and is primarily useful for transitioning from an outline to a word processor (rather than duplicating OmniOutliner’s functionality in Word). Row level styles are converted to heading styles, and other styles are flattened and applied directly to text (Microsoft Word does not support OmniOutliner’s style model).
- Microsoft Word (outline)
- Creates a .docx file that opens by default in Microsoft Word’s Outline view. Choose this option to export an outline that can be readily expanded upon in Word. This export option only includes the topic column.
- OmniOutliner Document
- Exports a .ooutline file, the current default OmniOutliner file format (for OmniOutliner 5 for Mac and later, and OmniOutliner 3 for iOS and later).
- OmniOutliner Template
- Exports a .otemplate file which can be used as the base theme for other OmniOutliner outlines. This template format is not compatible with versions earlier than OmniOutliner 5 for Mac or OmniOutliner 3 for iOS.
- OmniOutliner 3
- Exports a .oo3 file which can be opened in OmniOutliner 3 and 4 for Mac, and in OmniOutliner 1 for iPad and 2 for iOS. These files are not compatible with OmniOutliner 2 for Mac and earlier. They can be opened in OmniOutliner 5, but must be updated to the newer .ooutline format before all editing features are available.
- OmniOutliner 3 Template
- Exports a .oo3template file which can be opened in OmniOutliner 3 and 4 for Mac, and in OmniOutliner 1 for iPad and 2 for iOS. These files are not compatible with OmniOutliner 2 or earlier. They can be opened in OmniOutliner 5, but must be updated to the newer .otemplate format before they can be edited.
- OPML (Outline Processor Markup Language)
- Exports a .opml file, which retains the hierarchical structure of your outline. However, OPML files do not retain any of the styles or attachments you may have applied in OmniOutliner.
- Plain Text (with tabs)
- Exports a raw .txt file without any styles. Child rows and columns are aligned using tabs rather than spaces, making this type of export useful for importing into spreadsheet apps such as Numbers or Excel.
- PowerPoint 2012 Format (pptx)
-
OmniOutliner exports the contents of your outline in an XML format that PowerPoint 2012 can interpret and render. After exporting your outline as .pptx, you can then import the PowerPoint file into Apple’s Keynote app.
Each Level 1 row becomes a separate slide in the PowerPoint presentation, with its children listed on that slide, and notes become presenter notes. Very little styling is carried over from OmniOutliner (styles don’t match well between the two formats, so we err on the side of removing them).
Image attachments are placed on slides corresponding to their level in the hierarchy, but must be manually repositioned to the desired location on the slide.
- RTF (Rich Text Format)
- Exports a .rtf file, which retains all of the styles you’ve applied in OmniOutliner. RTF is a standard document format that most word processors, such as Word and macOS’s TextEdit app can open. Export to RTF if your Outliner document contains only text and numbers.
- RTFD (Rich Text Format with Attachments)
- Exports a .rtfd file, which retains all of the styles you’ve applied in OmniOutliner. What sets RTFD apart from RTF is that an RTFD file can contain attachments, such as any images, audio clips, or anything else you attach to your OmniOutliner file. Most word processors, such as Word, Pages, and macOS’s TextEdit can open .rtfd files.
The popular PDF file format is not included as an export option because OmniOutliner supports the macOS standard Save as PDF option available from the print panel. See Printing in OmniOutliner for details on configuring the appearance of your document for both print and PDF export.
Sharing OmniOutliner Files with OmniGraffle
If you use OmniGraffle (the Omni Group’s powerful design application), you can share OmniOutliner files with it and create visual representations of your outline hierarchy from your original styled text layout.
- Open OmniGraffle and choose File ▸ Open.
- In the Open dialog, choose any file whose extension is .ooutline.
- Click Open.
- OmniGraffle presents you with the Import Outline dialog. At the top, be sure to select one of the themed templates, such as Circles or Lines.
You can use OmniGraffle’s Outline Editor (in OmniGraffle, choose View ▸ Show Contents ▸ Outline) to add depth to the diagram you’ve created.
Printing in OmniOutliner
Choose File ▸ Print (Command-P) to print your OmniOutliner document.
You can stick with the default printing options, which deliver a page that’s close to what you see on screen. Or you can click Show Details on the print panel to set up a custom presentation for your printed outline.
With details shown, a customized version of the print panel appears with a bunch of options specific to OmniOutliner.
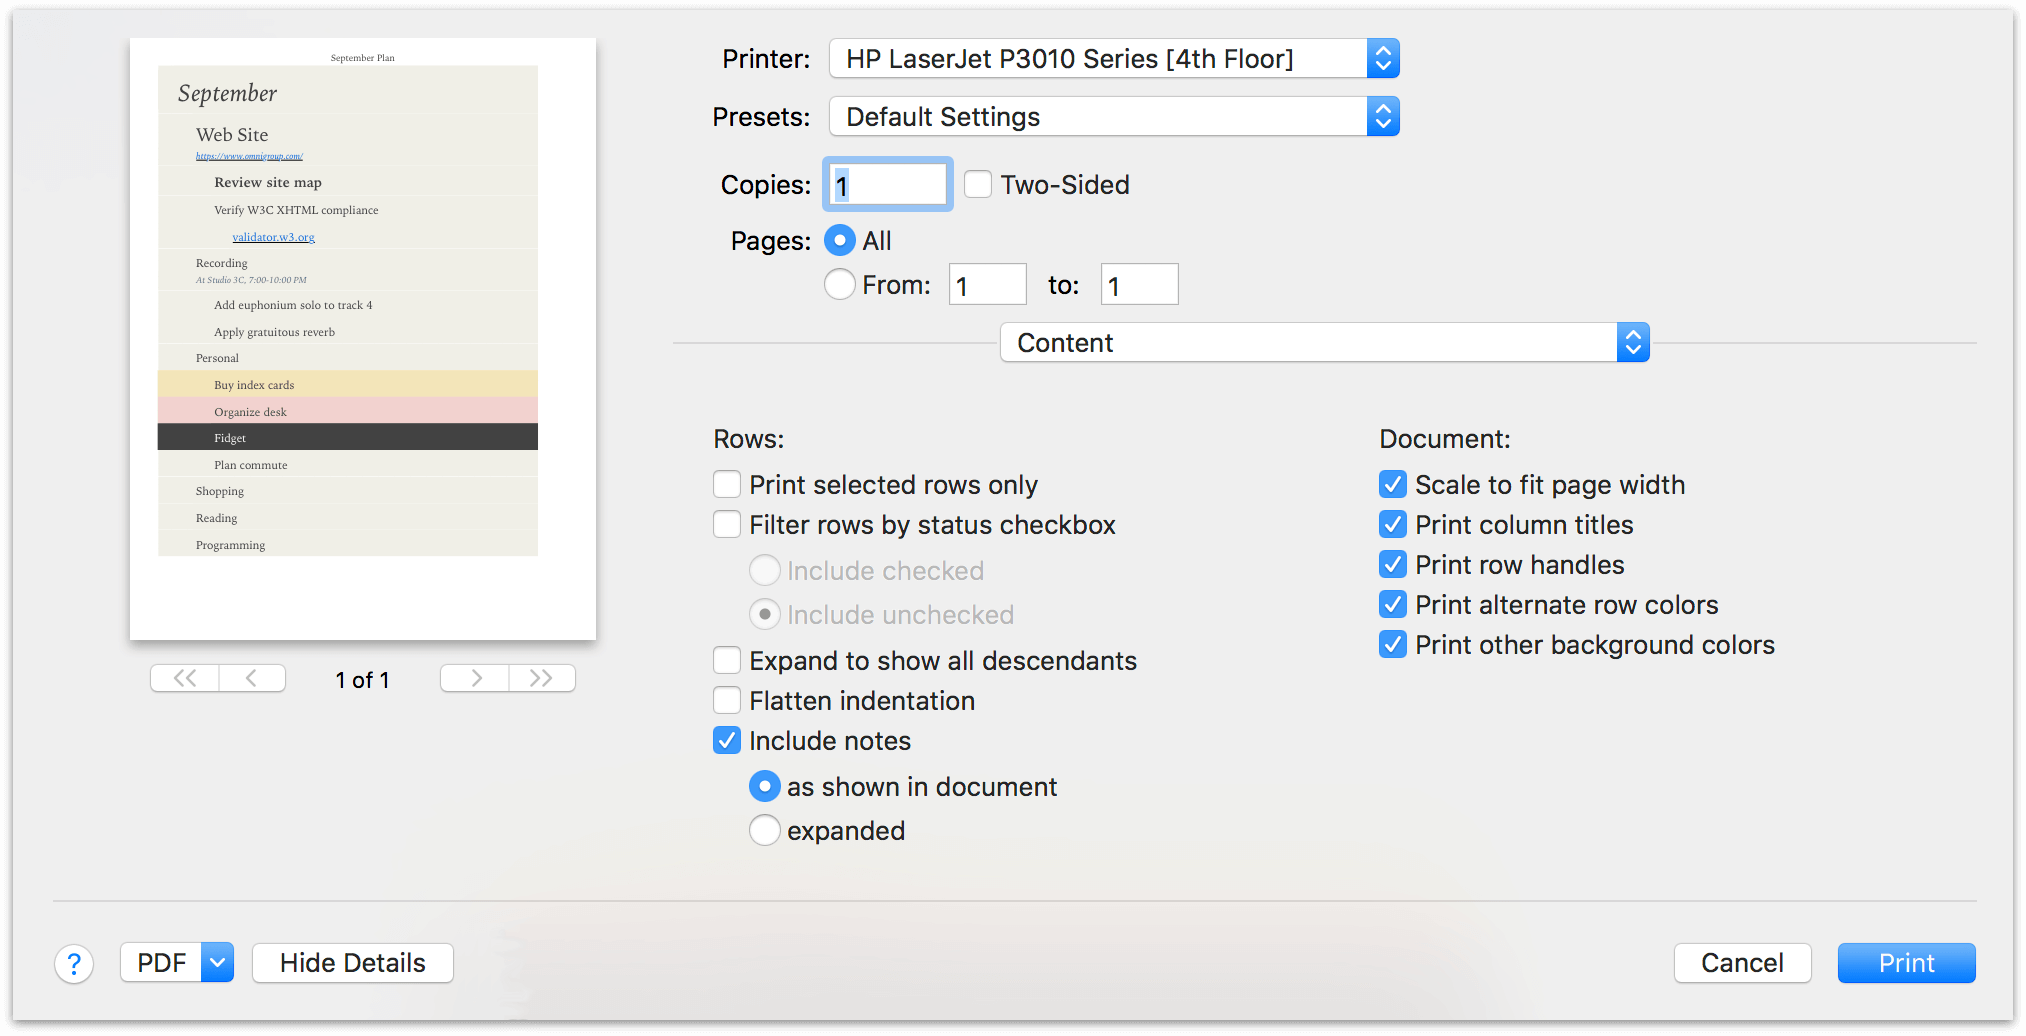
On the left side of the print panel you’ll see a preview of your OmniOutliner document that shows how it will look when printed. You can use the arrow buttons beneath the preview to page through your document so you can verify that everything is in order.
To print your outline to a PDF file rather than a physical printer, choose Save as PDF from the dropdown PDF menu in the lower left of the print panel.
On the right, a popup menu appears with several sets of printing options. The area below the menu changes based on the option you have selected.
By default, this menu is set to Content, which contains document-specific printing options (Headers & Footers and Margins options are also available, described below). As you toggle the various options on or off, the print preview changes accordingly.
Content Printing Options
OmniOutliner Content print options include the following.
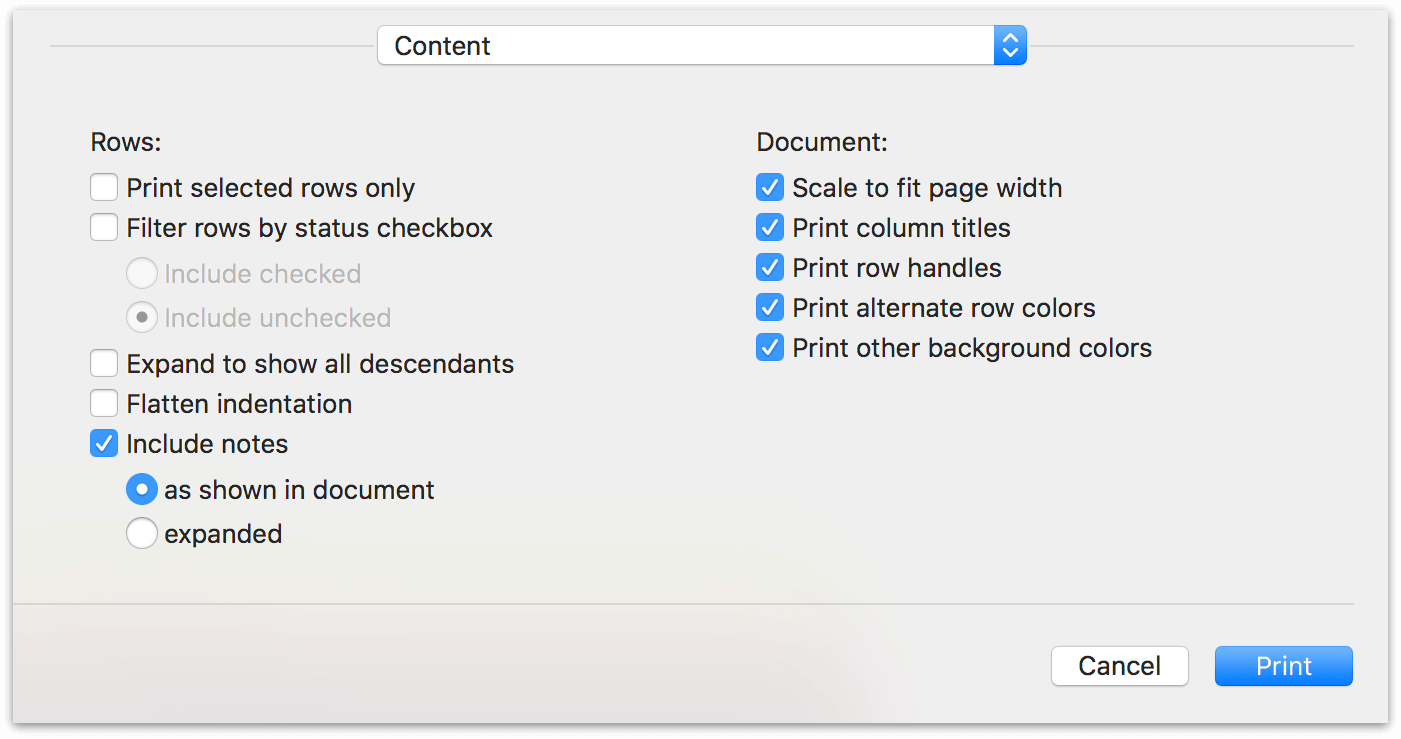
For rows:
-
Print selected rows only—Only the rows currently selected in the outline are included in the print output.
-
Filter rows by status checkbox—Print only rows with their status checkbox checked (or unchecked).
-
Expand to show all descendants—Automatically expand all collapsed rows so that their children are visible for printing.
-
Flatten indentation—Print the outline without visual indication of hierarchy (all rows are depicted with the same starting alignment).
-
Include notes—As shown in document includes notes that are visible at the time of printing. Expanded automatically opens all notes at print time so they are included in the print output.
For the entire document:
- Scale to fit page width—If the outline’s column(s) exceed the width of the printed page, scale the document to fit the entire width onto a page. Uncheck this if you want the print output to strictly mirror the document’s scale in OmniOutliner.
If Scale to fit page width is unchecked, outlines with multiple columns must have their column widths manually adjusted to control what page they appear on.
When resizing a column by dragging on its right edge, the column will snap to the width of a printed page when it nears the vertical dashed line that appears.
-
Print column titles—If the document has visible column titles, include them when printing.
-
Print row handles—If the document is styled to display row handles, set their print visibility here (an outline with row handles hidden will not include them when printed regardless of this setting).
-
Print alternate row colors—If your document style includes alternating row colors, they will be visible in the print output.
-
Print other background colors—Other background colors, such as those applied by the Highlight styles, will be preserved for print.
Printing Headers and Footers
The Headers & Footers print settings gives you the ability to add details about your OmniOutliner document to the top and bottom of the printed page. The six boxes (three each for Headers and Footers) represent the left, center, and right positions on the page. Use the popup just above the Headers section to apply the headers and footers to the Master Page, First Page, Odd Pages, or Even Pages.
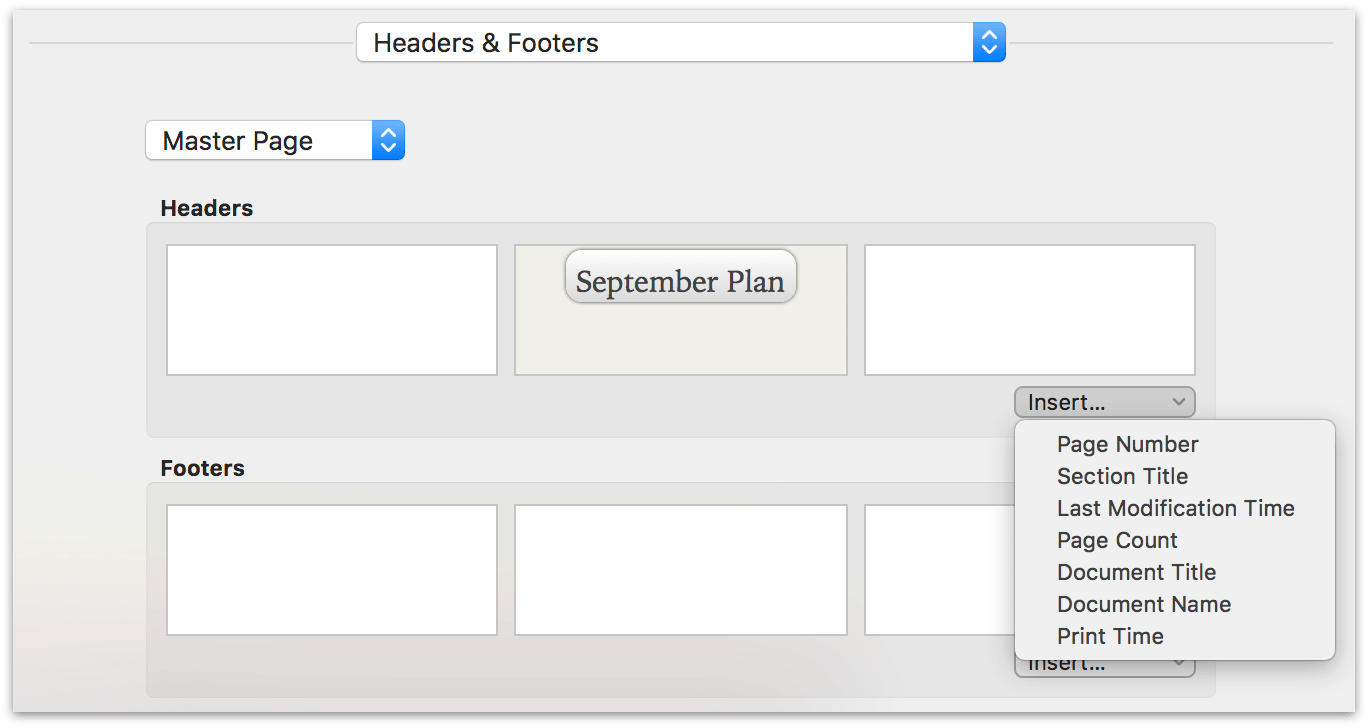
Use the Insert popup just below the right-most box to insert one or more of the following:
- Page Number—the current page of the document.
- Section Title—either the document name (if no section is focused), or the contents of the row at the highest level of focus hierarchy (if printing a focused selection of the outline).
- Last Modification Time—the date and time the document was last updated.
- Page Count—the total number of pages in the document.
- Document Name—the name assigned to the file when it is first saved (or subsequently changed), and that appears in the center of the document Toolbar.
- Document Title—by default, the same as the document name.
- Print Time—the date and time the document is printed.
Just click inside one of the six boxes and choose the option from the Insert menu.
If you would like to style the text of headers and footers independently of the outline’s document style, the recommended method is to open the Font and Color windows (Format ▸ Font ▸ Show Fonts and Format ▸ Font ▸ Show Colors respectively) before opening the print screen. Using these tools (instead of the Selection Style Inspectors) avoids accidentally re-styling the document itself.
Adjusting Printing Margins
Use the Margins print options to control how the contents of your document appears within the bounds of a printed page. The Top and Bottom controls let you set the distance from the edge of the page to any Headers or Footers you’ve applied, and from the Headers and Footers to the actual content. To adjust any of the margin values, you can either click in the box and enter something different, or use the little arrows off to the right to increase or decrease the value.

Chapter 10
Working in the Cloud
OmniOutliner files are perfectly at home alone on your Mac, but there’s no need for them to stay there. Using the Omni Group’s cloud syncing service (or other cloud storage providers) you can store your documents remotely, and sync them between OmniOutliner for Mac and OmniOutliner for iOS on any of your devices.
We created a pair of technologies to make sure you have the latest versions of your outlines with you wherever you go.
The first is OmniPresence, a free utility that you install on your Mac for synchronizing files. OmniPresence runs in the background, watching a “connected folder”. It makes sure the files inside are in sync with files in the cloud, and with your OmniPresence-enabled iOS apps.
On iOS, OmniPresence is built into OmniOutliner. You’ll access OmniPresence folders and files from within the app’s Resource Browser. The result is that all of your OmniPresence-enabled devices detect changes wherever you make them, and constantly sync up to keep your files up to date.
To get started, you’ll need to download OmniPresence for Mac from our website and install it. The instructions in the OmniPresence Help (OmniPresence Gear Menu ▸ OmniPresence Help) will take it from there.
As part of the setup process you’ll need to choose where to store your files in the cloud. The second component to our sync solution is just such a place: Omni Sync Server.
Using OmniPresence With Omni Sync Server
Omni Sync Server is our own custom cloud server that functions as a central hub for all your syncing needs, and it’s one option for OmniPresence to connect to when shuttling files between your Mac and iOS devices. Unlike other compatible cloud servers, since we control the server hardware and software we are able to provide better advice should you run into trouble when syncing.
With Omni Sync Server, we never ever look at your data without your permission (if our Support Humans are working with you to restore a corrupt file, for example). Beyond that, you can rest assured that your data is private and secure on Omni Sync Server. Read more about our privacy policy here.
Omni Sync Server accounts are free. If you don’t have one already, head over to our website and sign up for an Omni Sync Server account if you would like to use it as your OmniOutliner cloud sync location.
Using OmniPresence Without Omni Sync Server
We understand that sometimes you want to keep your data on your own server. This could be due to company policy, for legal reasons, or just your desire to be in charge of backing up everything that’s important to you. We get it!
If you don’t want to use Omni Sync Server, OmniPresence is capable of connecting to any WebDAV server you choose. This could be one that you run on your own server, or a third-party service that you rely on.
If you choose to run your own WebDAV server, step-by-step instructions for setting up WebDAV on macOS Server are available in this support article on our website.
Other Cloud Services
By default, OmniOutliner .ooutline files are flat files, which are compatible with common cloud storage services (such as Dropbox, Google Drive, OneDrive, and Box).
While the .ooutline file format can be changed from the default flat file to a file package via the option in the Format and Metadata Inspector, we recommend always saving your .ooutline files as flat files if you intend to sync with a cloud service. Syncing package files via a cloud service other than OmniPresence may result in data loss.
Chapter 11
OmniOutliner Preferences
To open OmniOutliner’s Preferences window, choose OmniOutliner ▸ Preferences, or Command-Comma (⌘-,). There are six preference panes that you can use to further customize OmniOutliner 5 to suit your needs, and your work style.
Each preference pane includes a Reset  and Help
  button so you can revert back to the default settings, or get to this Help page quickly from within the app.
General Preferences
Use the General Preferences pane to make changes that apply across the board for everything you do in OmniOutliner.
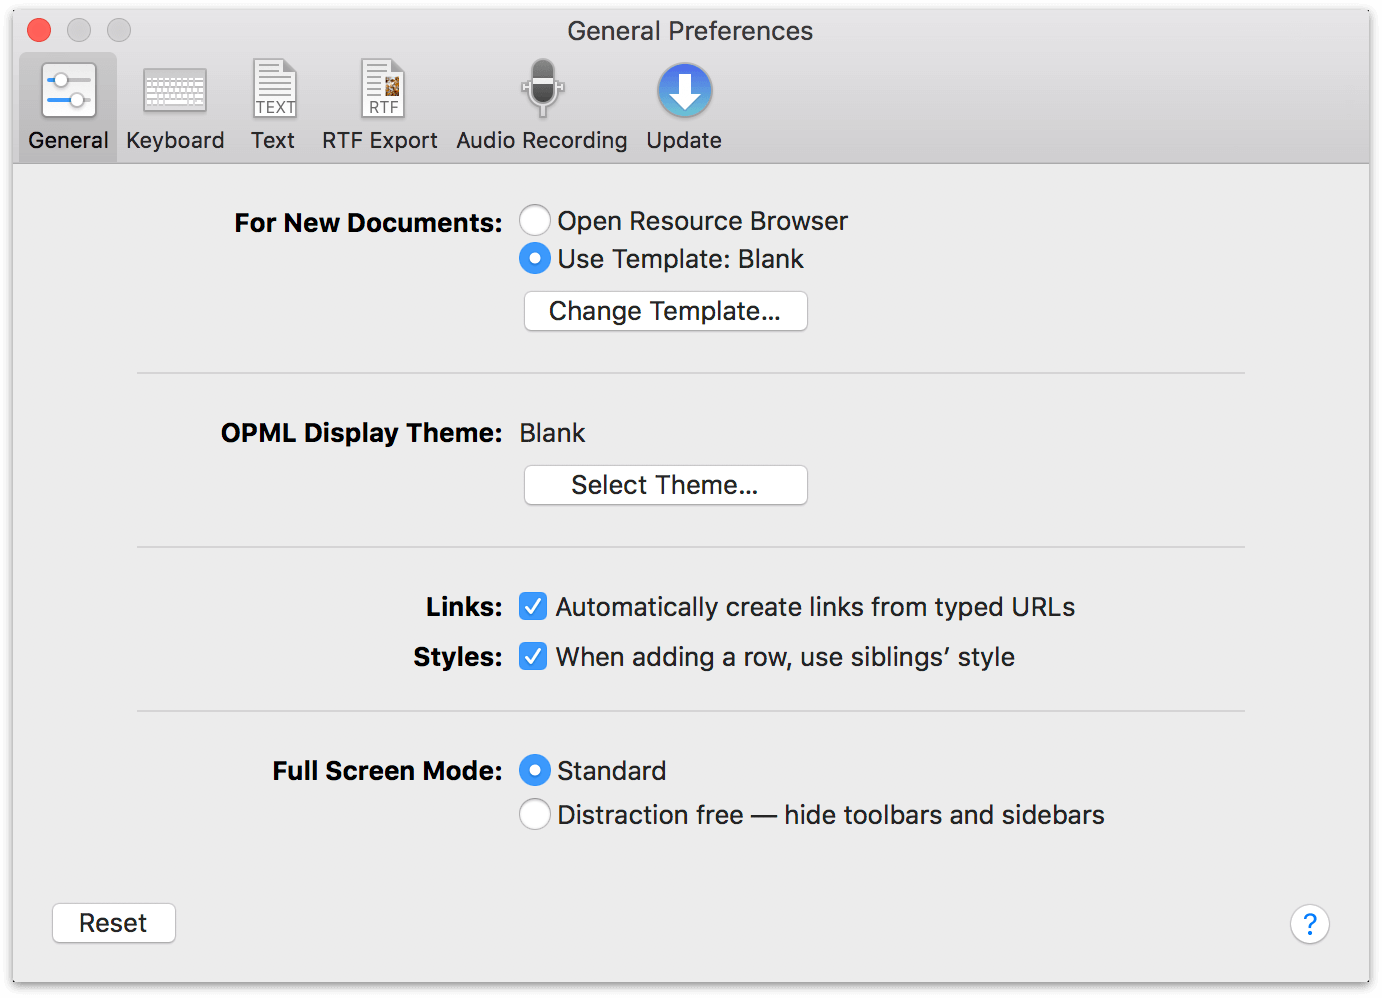
Options in General Preferences include:
- For New Documents
-
Choose what happens when you create a new document, by either choosing File ▸ New or using the Command-N keyboard shortcut. You can choose between opening the Resource Browser (where you can choose a template for a new document, or open a recently edited document or template), or creating a new document based on the default template.
If you want to change the default template, click Change Template and select a different template from the browser.
- OPML Display Theme
- Choose the theme that applies to .opml files when opened in OmniOutliner. Unlike theming for OmniOutliner files (where text and row styles are applied and saved), this preference is purely visual. Style settings are not retained within .opml files.
- Links
- Turn on or off the ability to make hyperlinks (a URL such as https://www.omnigroup.com) clickable. If you uncheck this option, the URLs you enter are rendered as Rich Text and clicking them will not open the URL in your default web browser.
- Styles
- Turn on or off the setting for a new row to adopt the style from that row’s sibling. When this is checked and you add a new row (by pressing Return or Shift-Return), that new row adopts the styles of the row you were previously in. When unchecked, any new rows you create revert to the default styles from the theme you’ve chosen.
- Full Screen Mode
- This preference switches between the Standard full screen mode, with the Toolbar and Sidebars visible at all times, and Distraction Free mode, which hides the Toolbar and Sidebars unless you move the mouse cursor to the edges of the screen.
Use View ▸ Enter Full Screen (Control-Command-F) to make the current window occupy your entire screen (use the same command to leave full screen mode when you’re finished).
Alternatively, click the green Zoom button  in the upper left of the window to enter or leave full screen mode.
Keyboard Preferences
Use the Keyboard Preferences to adjust how OmniOutliner reacts when you press certain keys.
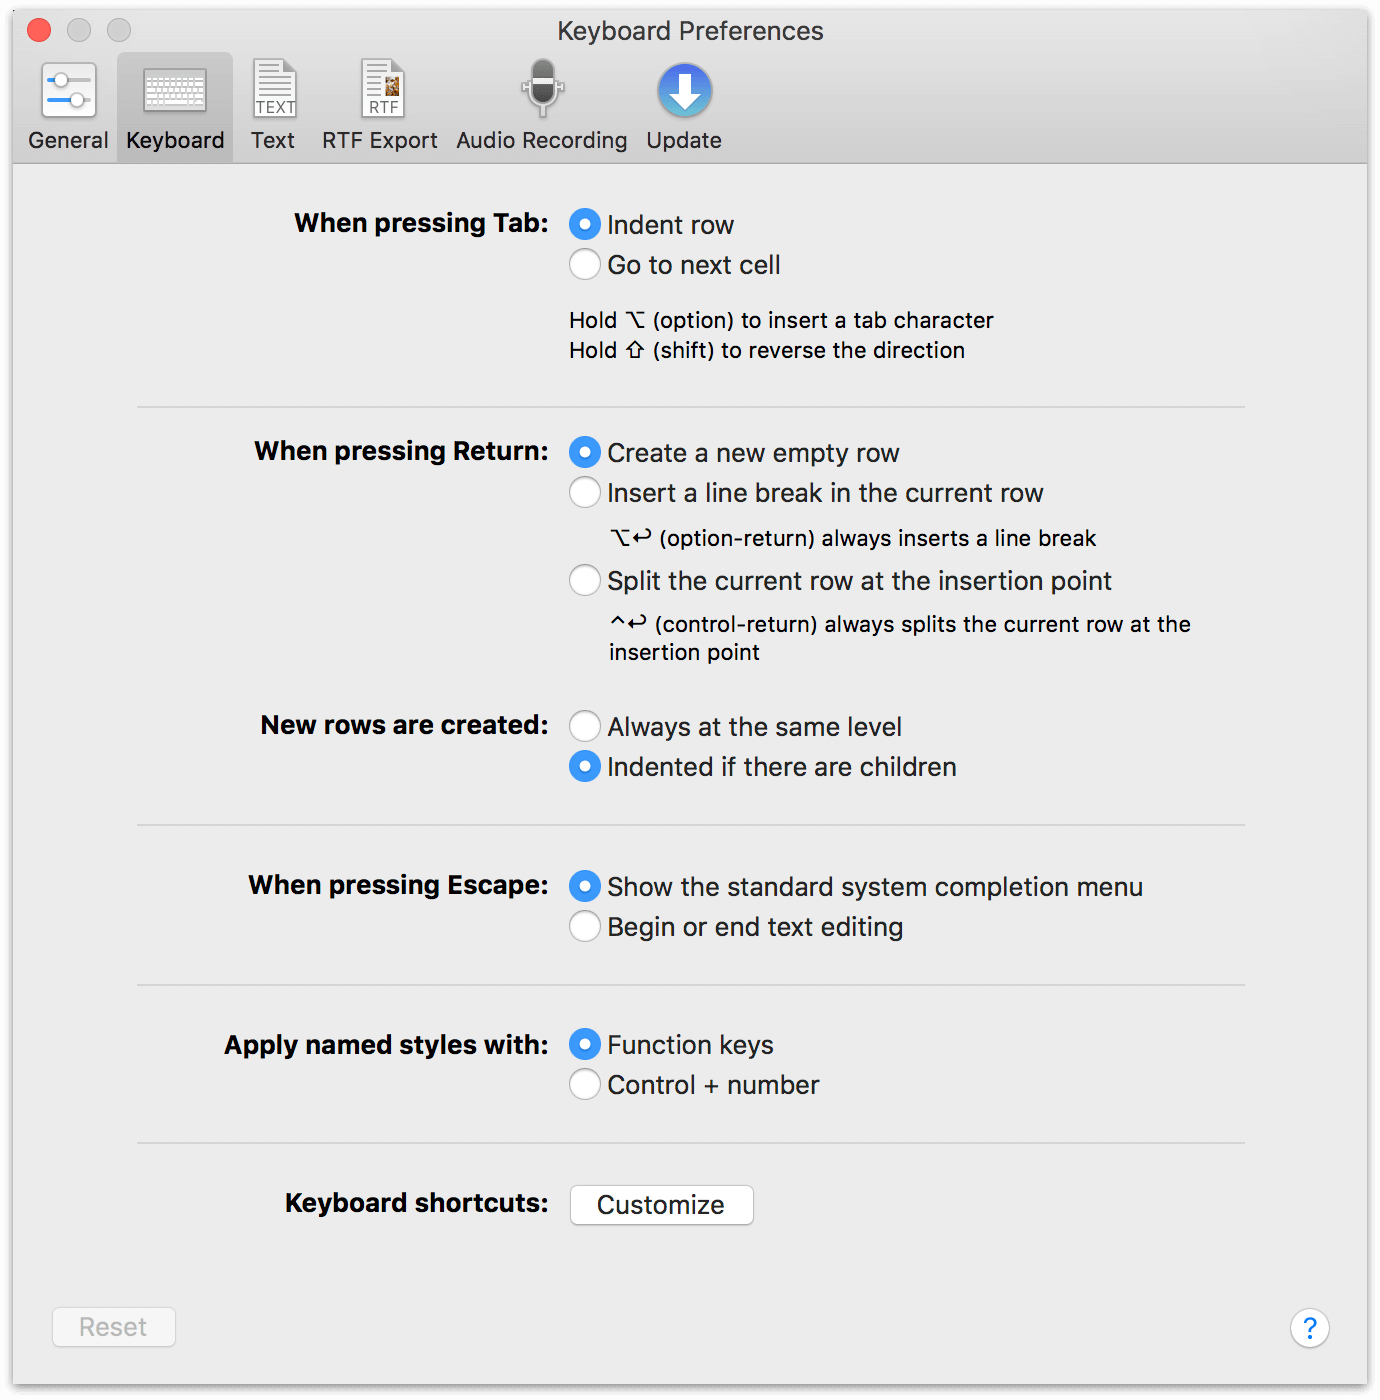
These options are as follows:
- When pressing Tab
- By default, pressing Tab indents a row. You can change this to Go to next cell by switching the radio buttons. Holding the Option key inserts an actual Tab character, while pressing Shift-Tab outdents the current row.
- When pressing Return
-
By default, pressing Return creates a new empty row. You can change this to Insert a line break in the current row by switching the radio buttons; however, pressing Option-Return always inserts a new line in the current row.
Similarly, with Split the current row at the insertion point set, you can split the current row into two rows at the cursors position by pressing Return. Even when this option is turned off, you can press Control-Return to split a row in two.
- New rows are created
- By default, new rows are Indented if there are children when you press Return. If you switch the radio button to Always at the same level, new rows are created at the same level as the line your cursor is on when you press Return.
- When pressing Escape
-
There are two options for what happens when you press the Escape key. By default, pressing the Escape key opens the system-wide completion menu. This comes in particularly handy when you aren’t quite sure how to spell something. You can just type in the first few characters of the word, press Escape, and a popup menu appears with a list of possible options. To accept one of the options, you can click it with your mouse, or use the Down Arrow key to move the highlight to the word you need and then either press Tab or Return to accept that option.
Use the other option, Begin or end text editing, for times when you’re doing quick entry and need to move around in your outline, editing rows and column cells more efficiently. Pressing Escape after entering some text in a row will highlight that row. Press Escape again places the cursor at the end of the line so you can continue typing.
- Apply named styles with
-
By default, you can use one of the Function keys to apply one of the Named styles to the current row. (Named styles are found in the lower portion of the Styles section of the Sidebar.) To use the function keys (F1 through F9), you’ll need to press and hold the fn key and then press a numbered function key to apply the style. For example, to apply the Heading 1 named style in the default Blank template, use fn-F1.
You can change this to Control + number by switching the radio buttons in the preference pane. This can make it easier for you to apply named styles since using the fn key along with the various function keys can be a little awkward.
- Keyboard shortcuts
- Click Customize to open the Keyboard Shortcuts window, where you can set up custom keyboard shortcut sets for the OmniOutliner controls you use most frequently, or assign shortcuts that map more closely to familiar workflows.
The Keyboard Shortcuts Window
Keyboard shortcuts make it easy for you to quickly access menu options without having to use a mouse. Click the Customize button in Keyboard preferences or choose OmniOutliner ▸ Keyboard Shortcuts to open the Keyboard Shortcuts window, where you can create, import, and export sets of keyboard shortcuts customized for your needs.
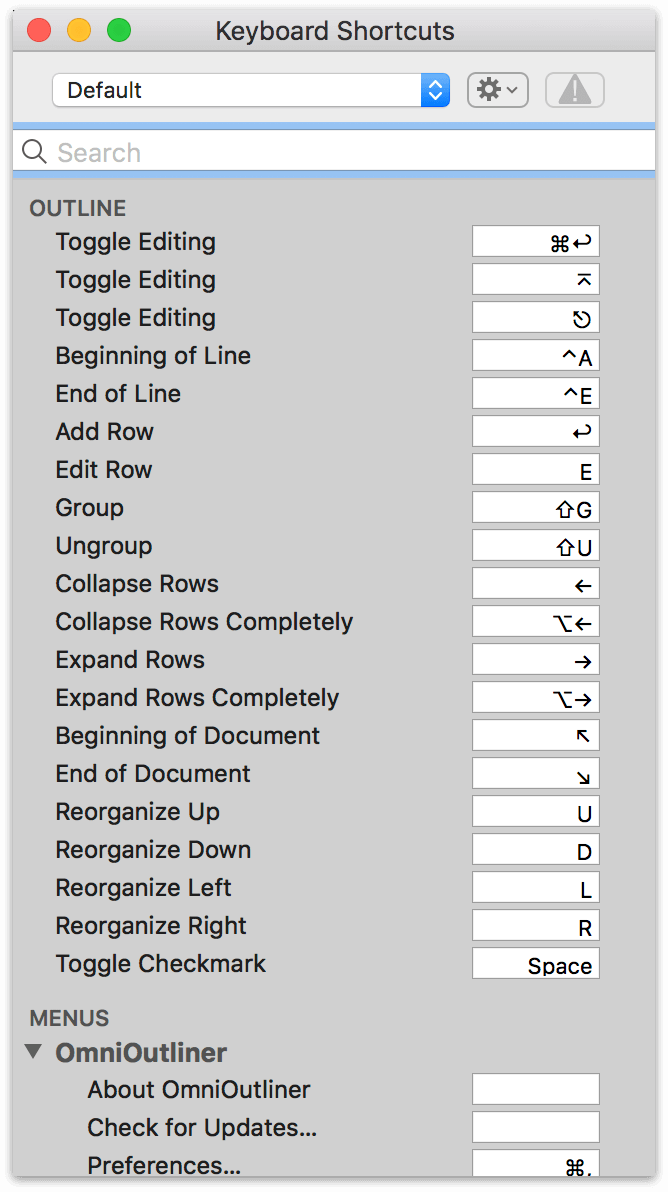
The Keyboard Shortcuts window is divided into two sections:
- Outline — lists commands used when navigating and manipulating the outline in OmniOutliner.
- Menus — lists the menus found at the top of the screen, along with each menu item found in that menu or submenu.
You can hide and show each section by clicking to the right of those sections (the Hide button text appears on mouseover). You can also expand and collapse the menu subsections by clicking the disclosure triangles to the left of each section.
Keyboard shortcuts for Outline commands can be a single letter or number without the use of special key combinations (such as the Control, Option, Shift, or Command keys).
Use the Search field to search for a command or Menu option. This makes it easy for you to see how the assigned keyboard shortcuts relate to each other, and to reassign or set keys, if desired.
Editing OmniOutliner's Keyboard Shortcuts
To change a keyboard shortcut, just click the field to the right of a command or Menu item and enter a new shortcut. The changes are automatically available for use, without requiring you to quit and restart OmniOutliner.
If you enter a shortcut that is used by another command or Menu item, the Keyboard Shortcuts window displays a warning symbol within both shortcut fields, and the normally-grayed out warning button at the top of the window becomes available. This makes it easy for you to identify, and correct, the conflict.
Pressing the Warning button at the top of the Keyboard Shortcuts window focuses on the conflicting items, and a revert arrow is placed to the right of the item that’s causing the conflict. Clicking the revert arrow changes that particular item back to its default keyboard shortcut, or no shortcut if none was previously assigned.
To remove a keyboard shortcut for an item, click the field to the right of a Tool or Menu item and press the Delete key. This removes the keyboard shortcut for that item, which can be useful if the revert arrow sets the key binding to a conflicting value.
The moment you make a change to the Default keyboard set, the name of the current keyboard set used in the drop-down menu becomes editable. By default, OmniOutliner places your user account name in the field, but you can change this to whatever you’d like.
If you later decide that you want to change the name of a keyboard set, click the Action menu next to the drop-down menu and choose the Rename option from the menu. Enter a new name, and press Return to apply it.
Sharing Keyboard Sets
After changing some keys and setting the name for your new keyboard set, you can export your keyboard set by clicking the Action menu and choosing Export Shortcuts. When you export a keyboard set, OmniOutliner uses the name of the set by default, paired with a .outliner-shortcuts file extension.
Similarly, you can also import a keyboard set, using one of the following methods:
-
Click the Action menu and choose Import Shortcuts. In the sheet that slides down, locate and select the .outliner-shortcuts file you’d like to import, and then click Open to add that keyboard set to the Keyboard Shortcuts drop-down menu.
-
Use the Finder to locate and then double-click the .outliner-shortcuts file. The Keyboard Shortcuts window will open with that shortcuts file already selected in the popup menu.
Text Import and Export Preferences
OmniOutliner offers the ability to import or export raw text files. To assist with this, the Text Import and Export Preferences lets you view (or change) the characters used to represent elements when exporting an OmniOutliner document.
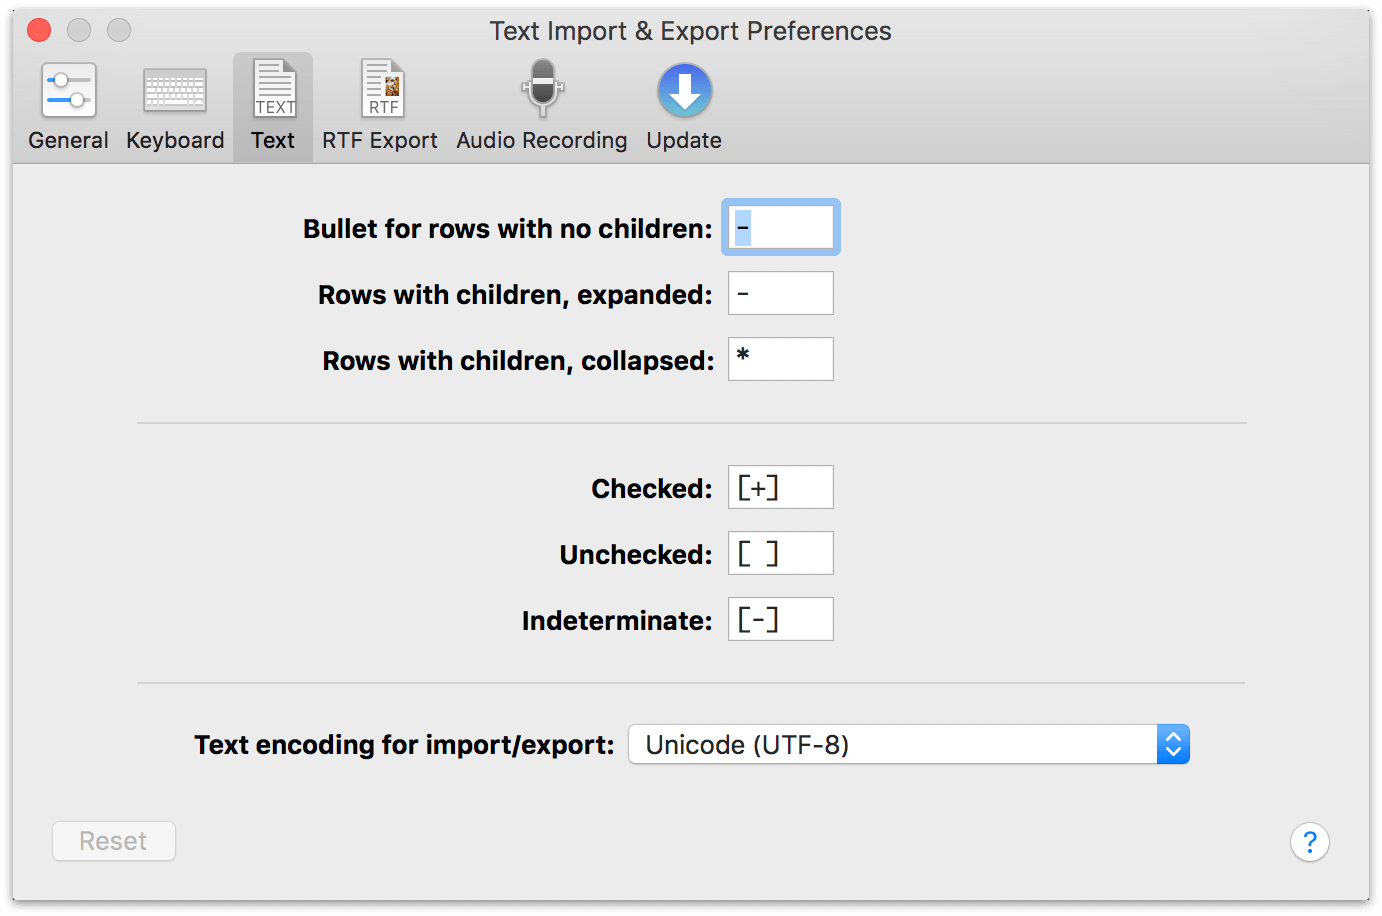
The document elements you have control over include Bullets, Checkboxes, and Spacing, and there’s also a popup menu that lets you select the text encoding type for importing and exporting operations.
RTF Export Preferences
Similar to the Text Import and Export Preferences, OmniOutliner can also export documents to Rich Text Format (RTF). As such, we’ve preset some characters and sizes based on the object types for Bullets and Checkboxes, and have set Spacing for indents and the distance between columns.
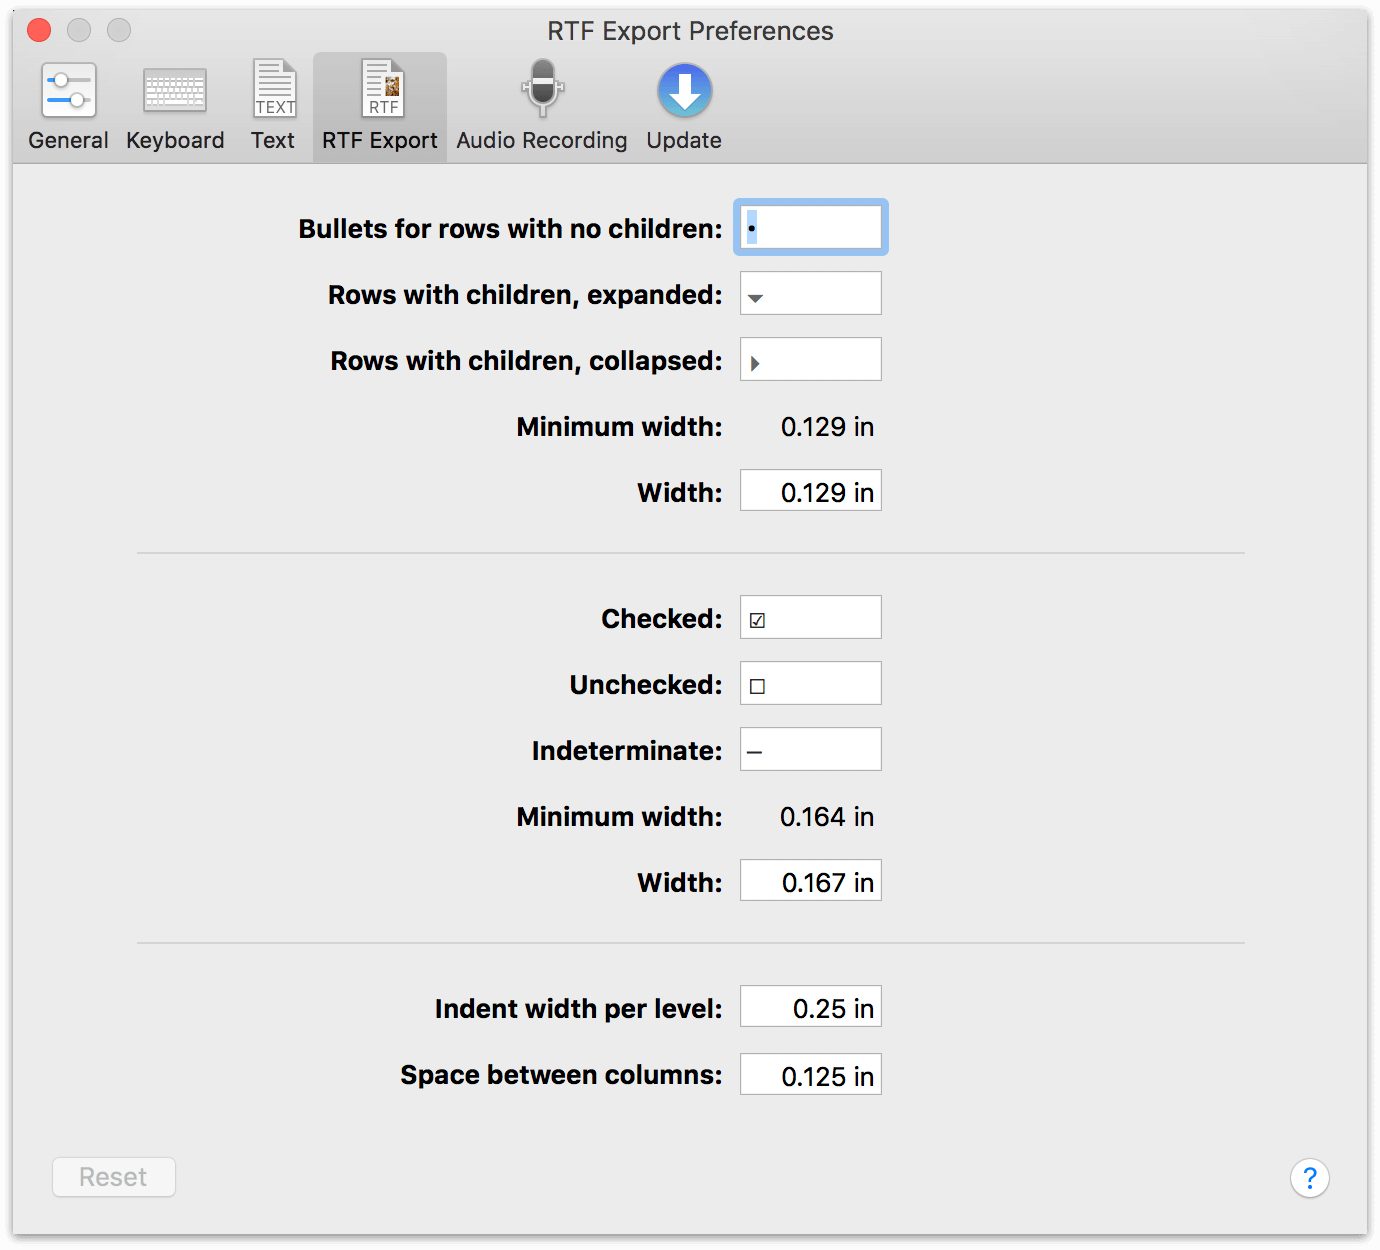
You can use the defaults or change these up however you see fit, based on your own document export needs.
Audio Recording Preferences
Use the Audio Recording Preferences to see which microphone you’re using for recording, change the compression level, or to access the temporary recording folder.
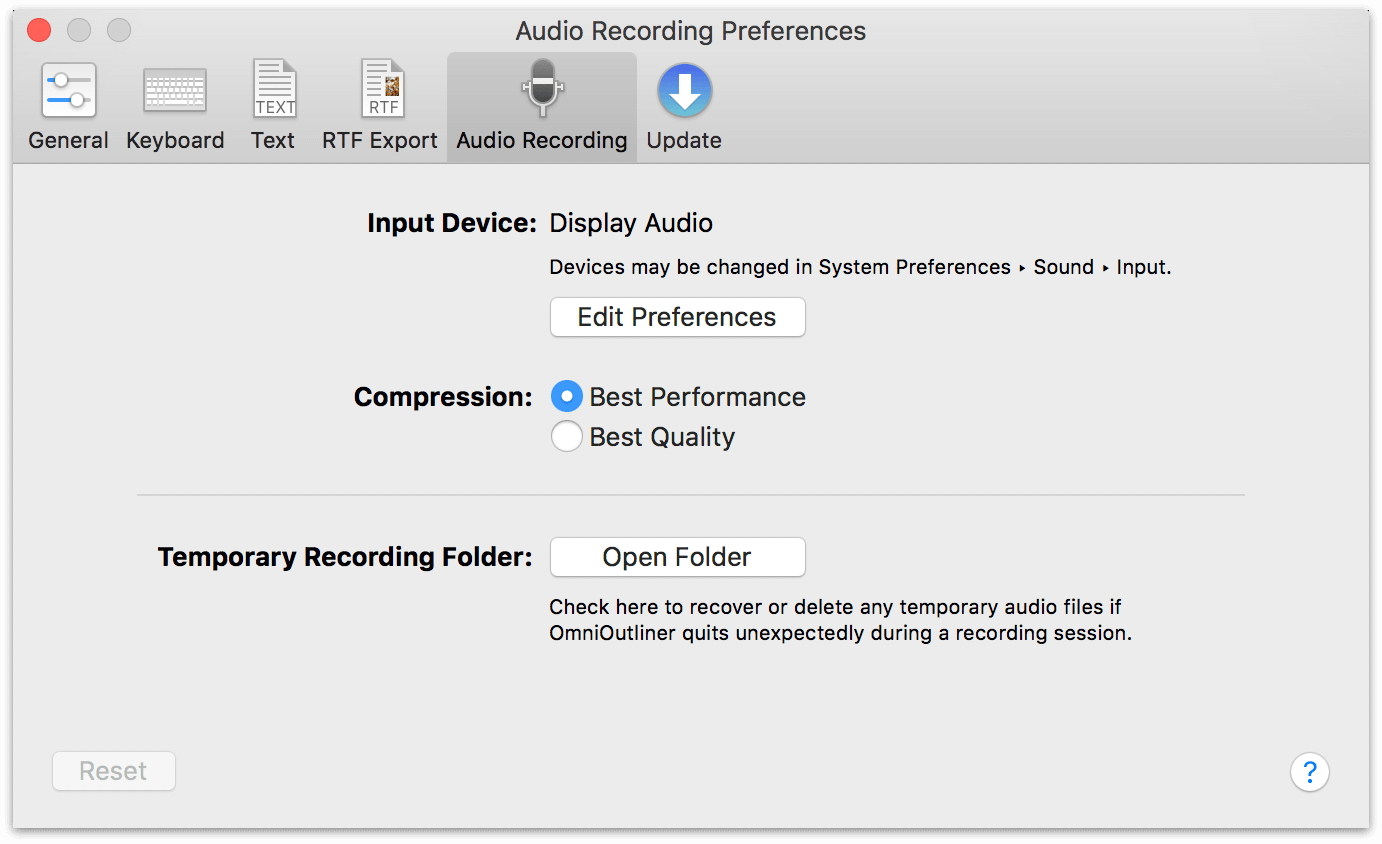
As you record audio, OmniOutliner creates a temporary file in which to dump the audio bits you’re recording. When you’ve finished recording, that temporary file goes away and moves into your OmniOutliner document. However, if OmniOutliner quits unexpectedly while you are recording, all hope is not lost. The temporary recording is still there, and the easiest way to get to it is from this Audio Recording preference pane. Just click the Open Folder button, and you’ll be whisked away to a new Finder window that’s open to the where the temporary file is stored. You can then drag that into OmniOutliner, or dump it in the trash if you want to start over from scratch.
Automatic Software Update Preferences
There’s nothing worse than out-of-date software, and one way to ensure that you’re always using the latest and greatest version of OmniOutliner is with the Automatic Software Update Preferences.
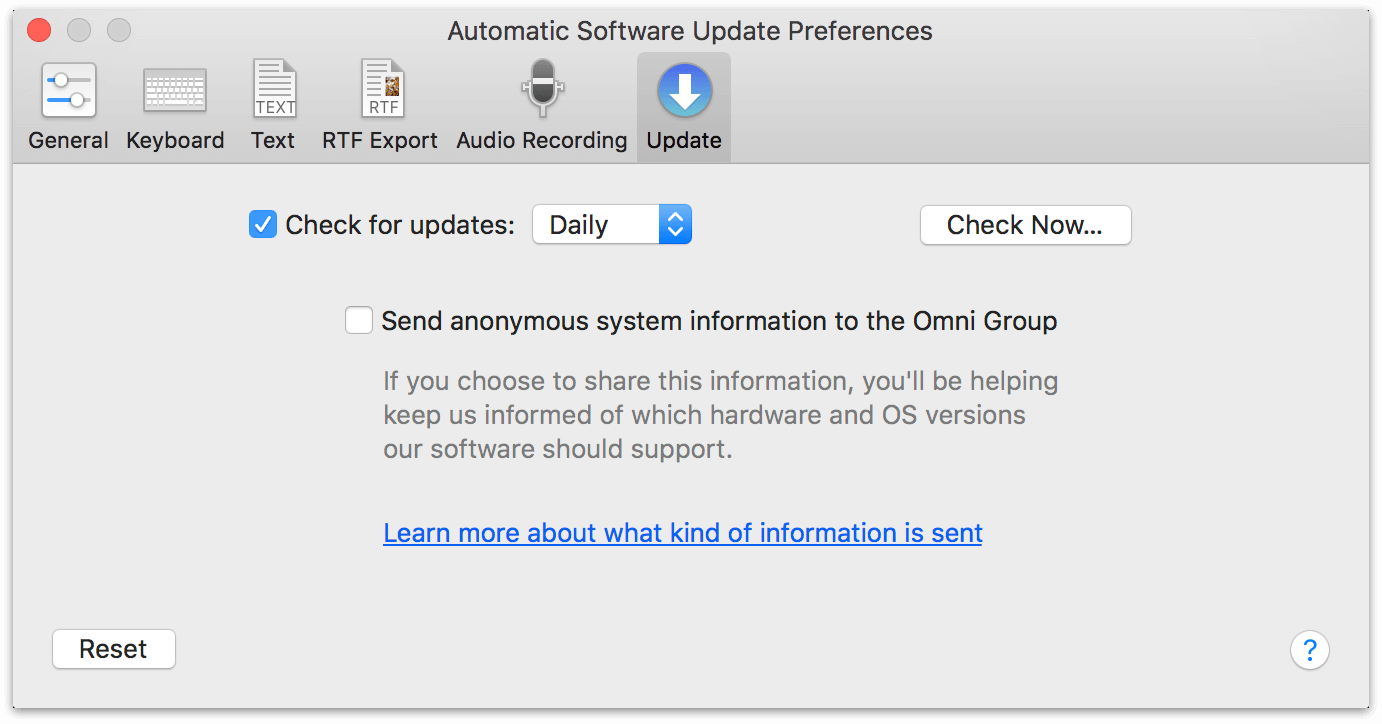
You can choose to check for updates either Daily (the default), Weekly, or Monthly, or if you’re really impatient you can click Check Now....
If you’d like to help us improve future versions of OmniOutliner for you and others, you can choose to send us anonymous information about your system when you check for updates to the app. Click Learn more about what kind of information is sent to see a list of exactly what info is collected, and learn how it’s used.
If you’ve purchased your copy of OmniOutliner through the Mac App Store, you can disregard this preference pane as you will be notified in the App Store app when a new update is available. However, we still offer Mac App Store customers the option to send us anonymous system information when updating.
Chapter 12
Chapter 13
Managing Your Omni Licenses
From the menu bar, choose OmniOutliner ▸ Licenses to see the Licenses dialog. From here you can review and edit your OmniOutliner licenses, which verify that you’ve actually paid for the software. (Thanks!)
You can disregard this chapter if you’ve purchased your copy of OmniOutliner (Essentials or Pro) from the Mac App Store, where licensing is done automatically at the time of purchase. This chapter applies only to licenses purchased from the Omni Store, and the Licenses menu item only appears for those purchases.
To check the status of your Mac App Store purchase, choose OmniOutliner ▸ In-App Purchase... instead.
To purchase a license:
- Click Buy Licenses and you will find yourself magically transported to the Omni Store, where you can purchase a license for the Mac versions of our software. (Naturally, this only works if you have an Internet connection.)
To add a new license:
- From the menu bar, choose OmniOutliner ▸ Licenses to see the Licenses dialog.
- Click Add License.
- If you have a license key in an email message, copy and paste both the Owner name and the License Key into the appropriate fields. If you can’t copy and paste the information, you’ll have to type it in; make sure you enter everything exactly as it appears in your license message, including the dashes. Also, double-check that the license you’re entering really is a license for OmniOutliner 5; licenses for other Omni products or earlier versions of OmniOutliner won’t work.
- The Type drop-down menu is grayed out by default, which limits the license type to Personal for the current user account on your Mac. OmniOutliner has two different types of licenses:
- Personal: This license is for your personal use, and will only be available on this computer when you are logged in as the user who installed the license. You can install this license on more than one computer, but only for your personal use. You should not use the software on two different computers at the same time with this kind of license. If a personal license is available, the application will always use it.
- Computer: You can use this license on this computer, and so can any other user of this computer. However, you should not install this license on more computers than it has license seats for.
If there is more than one user account on your Mac, and you’d like everyone on your Mac to discover the awesomeness that is OmniOutliner, you’ll need to jump through a couple of hoops. To set up a Computer license, follow these steps:
- Quit OmniOutliner 5.
- Open a new Finder window.
- Switch the Finder’s view settings to Column, by choosing View ▸ as Columns (or use Command–3. This will make it easier for you to traverse the folder hierarchy on your Mac.
- Choose Go ▸ Computer.
- Choose your Mac’s hard drive (if you haven’t renamed it, it should be named Macintosh HD), and then traverse through the following folders:
- Library
- Application Support
- In the Application Support folder, create a new folder (choose File ▸ New Folder, or use Shift-Command-N) and name it Omni Group. You will need to enter your admin password to create a new folder at this level.
- In the Omni Group folder, create a new folder and name it Software Licenses.
- Open OmniOutliner 5 again, and then choose OmniOutliner ▸ Licenses.
- Click Add License.
When you click Add License, you’ll notice that the Type drop-down menu is no longer grayed out, and the Computer option is available for selection. Now just enter the Owner and License Key information you received from us, click Save, and you should be set.
To remove a license:
- Select the license you want to remove.
- Click Delete License.
To move a license from one Mac to another:
- First, find the license file on the old computer. Choose Go ▸ Go to Folder in Finder, and enter
~/Library/Application Support/Omni Group/Software Licenses. The file you are looking for has a name such as OmniOutliner–123456.omnilicense. Move this file to the new computer. - On the new computer, choose OmniOutliner ▸ Licenses from the menu bar and then click Add License.
- On the sheet that appears, click Import License File.
- Locate and select the license file that you want to import.
- Click Open. If the license file is compatible—meaning, it is for the same version of OmniOutliner—the license will be added to OmniOutliner on your other system.
Again, the thing to remember here is that license keys are version-specific; the license key you have for OmniOutliner 4 is not compatible with OmniOutliner 5 (and vice versa).
Chapter 14
Getting Help
When you’re in need of help—whether you’re trying to figure out how columns work, or if you’re having some other issue with OmniOutliner—it’s good to know that the Support Humans at the Omni Group are always available to lend you a hand.
Release Notes
For a detailed, comprehensive summary of the latest changes to OmniOutliner, check out Help ▸ Release Notes from the menu bar. This is a good first place to check if something is behaving in a way you didn’t expect.
Finding Help Online
The OmniOutliner Support Site provides a wealth of information, including support articles for answering some of the more technical issues you might discover, access to OmniOutliner’s documentation online, as well as download links for the latest version of OmniOutliner.
Similarly, the OmniOutliner product page is always a good place to find the latest information about features and updates to OmniOutliner.
Videos
Our marketing and product team has developed a series of online videos for OmniOutliner. These videos range in topics from available features in the latest version of OmniOutliner to how-to tutorial videos to help you level up in your OmniOutliner skills.
Email Support
If you’re stuck, if you have a good idea for the next version of OmniOutliner, or if you just want to let us know how we’re doing, go ahead and send us an email. Choose Help ▸ Contact Omni from the menu bar to conjure up a message addressed to us, or just send us an email with your thoughts. We take support pretty seriously, so you can expect a prompt response actually typed by human hands.
Phone Support
We understand that sometimes you just can’t wait for an email response when you’re knee-deep in a project and you’re stuck or something isn’t working quite right. We get that. When this happens, you can call our Support Humans at 800-315-OMNI or 206-523-4152. Our Support Humans are available Monday-Friday, from 10 a.m. to 5 p.m. Pacific Time (-0700 GMT).
Online Forums
The Omni Group maintains online forums for all of our products, which are available to everyone. Come share your questions and ideas with other users, share OmniOutliner files to show off how you’re using OmniOutliner for a particular project, and seek help from the OmniOutliner community.