Collaboration and Multi-Project Review (PRO)
On a large project, or one where team members are spread across different teams and projects, you may need the ability to provide access to a project plan so that team members can check their status and update the project remotely. With OmniPlan Pro, working together no matter where you are is made possible by a powerful and intuitive Publication, Subscription, and Change Tracking system.
And, to make it easier for you to manage multiple projects with shared resources, OmniPlan Pro’s Dashboard makes it easy for you to review projects side by side.
This chapter describes features present in the OmniPlan Pro upgrade. If you have specific needs that these features address, you can try OmniPlan Pro for free at any time.
Publishing and Subscribing to an OmniPlan Project
As the project manager, you will need to publish the OmniPlan project to a sync server location to enable team members to subscribe to that project.
Because OmniPlan relies partially on your system time to determine the scheduling of synced project updates, making changes to the Apple system clock when working on a project with publishing or subscription enabled will result in an error and should be avoided.
Creating a Sync Account
Before you can share an OmniPlan project with its team members, you first need to sync it to a server that team members can also access. To setup a server account, follow these steps:
- Choose OmniPlan ▸ Preferences (Command-,) to open OmniPlan’s preferences window.
- Choose the Accounts preference panel.
-
Click the + button under the Accounts list to the left.
-
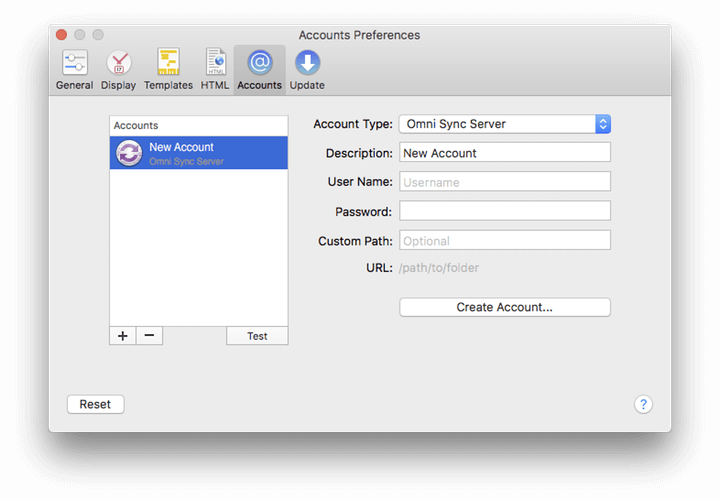
Select an Account Type from the dropdown menu. Use of Omni Sync Server is recommended; however, OmniPlan does support syncing project files to a self-hosted CalDAV or WebDAV server, or to Google.
If you have a personal account on Omni Sync Server (or one of the other services), it is recommended that you create another account specifically for syncing your projects. This helps protect your personal credentials—and data—from unauthorized access.
-
Choose Omni Sync Server. If you don’t already have an Omni Sync Server account, click Create Account to create one. You will be taken to a webpage where you can create an account; afterward, return to OmniPlan and continue setting up the Account preferences.
- Enter a Description for the entire account; something that other team members will recognize, such as your company or department name.
- Enter the User Name and Password for your account.
- The Custom Path must be to a folder or directory that already exists on the server. If you are setting up an Omni Sync Server account, you will most likely need to leave this field blank.
After entering the credentials for your Omni Sync Server account (or other Account Type, if you chose one of the other options), OmniPlan makes a handshake connection to that server to verify your identity. If you entered everything correctly, you’ll see an Account verified message beneath the Create Account button. Optionally, you can click the Test button to the left to check the account.
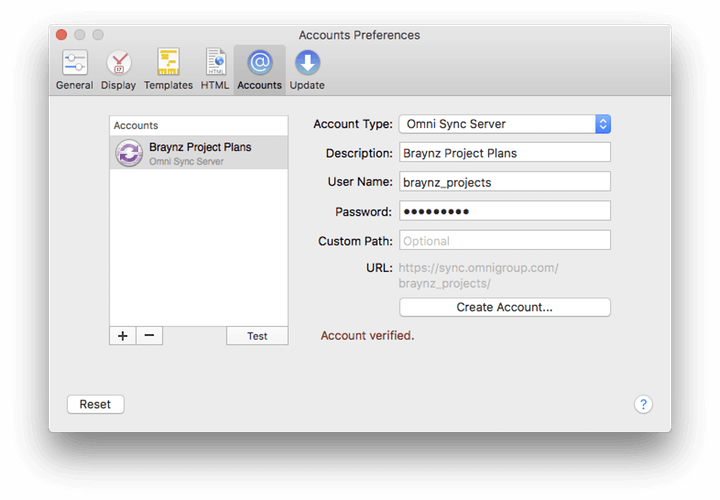
With the account verfied, close the preferences window.
Next up: publishing your project.
Publishing an OmniPlan Project
To share the project you’re currently working on, follow these steps:
- Choose Project ▸ Configure Publishing and Subscriptions.
- Click the plus button (+) below the Publish & Update Actions list.
- Select Sync entire plan with OmniPlan server repository to add the project to the list of actions.
- Select a Server Account from the pop-up menu (top-right); choose the option for the sync Account Type you established in the previous section.
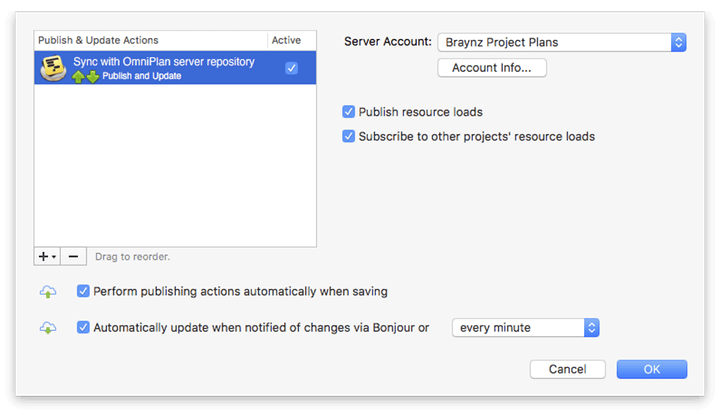
The remaining options on the Publish and Subscribe sheet are enabled by default to provide all team members with the best experience while working on a shared project. These include:
- Perform publishing actions automatically when saving.
- Automatically update when notified of changes via Bonjour; or you can choose a specified timeframe from the pop-up menu to the right.
- Publish resource loads.
- Subscribe to other projects’ resource loads.
To turn off any of those options, simply click the checkbox.
Click OK when you have configured the Publish and Subscribe options for the project.
-
You can publish your local version to the server by choosing Project ▸ Publish (Control-Command-P), or by clicking the Publish button in the toolbar. Or with the option here, you can choose to publish whenever you save changes.
-
You can update manually from the server at any time by choosing Project ▸ Update (Control-Command-U) or the Update toolbar button, or automate the update process as prompted by Bonjour, or at an interval specified with the dropdown menu.
Additional Options for Published Projects
Beyond simply publishing your project to the shared server repository, Publish actions can take a variety of other forms. Add additional Publish actions to your list of Publish & Update Actions when you click the + (Add) button, mentioned earlier. You can:
- Execute a custom AppleScript upon publish or update.
- Export your document with one of the export options.
Use Subscribe actions to pull in changes from others.
- Choose free/busy times from the Calendar Server to see available resource times and be notified of changes for particular resources or all of them.
- Choose offtime/overtime from iCal calendar to choose a calendar for the whole project or an individual resource. Specify whether events are extra or off hours.
- Choose offtime/overtime from web calendar and specify a URL, along with the schedule for a project or particular resource, and how events behave.
Due to limitations in Calendar sync, OmniPlan is able to fetch data out approximately 11 months from the present when subscribing to free/busy times from a Calendar server.
Use Sync actions to make changes to the project and pull in changes from others.
- Choose entire plan with OmniPlan server repository to sync all tasks, resources, and calendars—everything!—on a shared server.
- Choose to sync tasks to/from Calendar Server events to make changes and bring in changes from events on a calendar server.
- Choose to sync tasks to/from Calendar Server reminders to make changes and bring in changes from to-do items on a calendar server.
- Choose to sync tasks to/from iCal events to make changes and bring in changes from events in iCal.
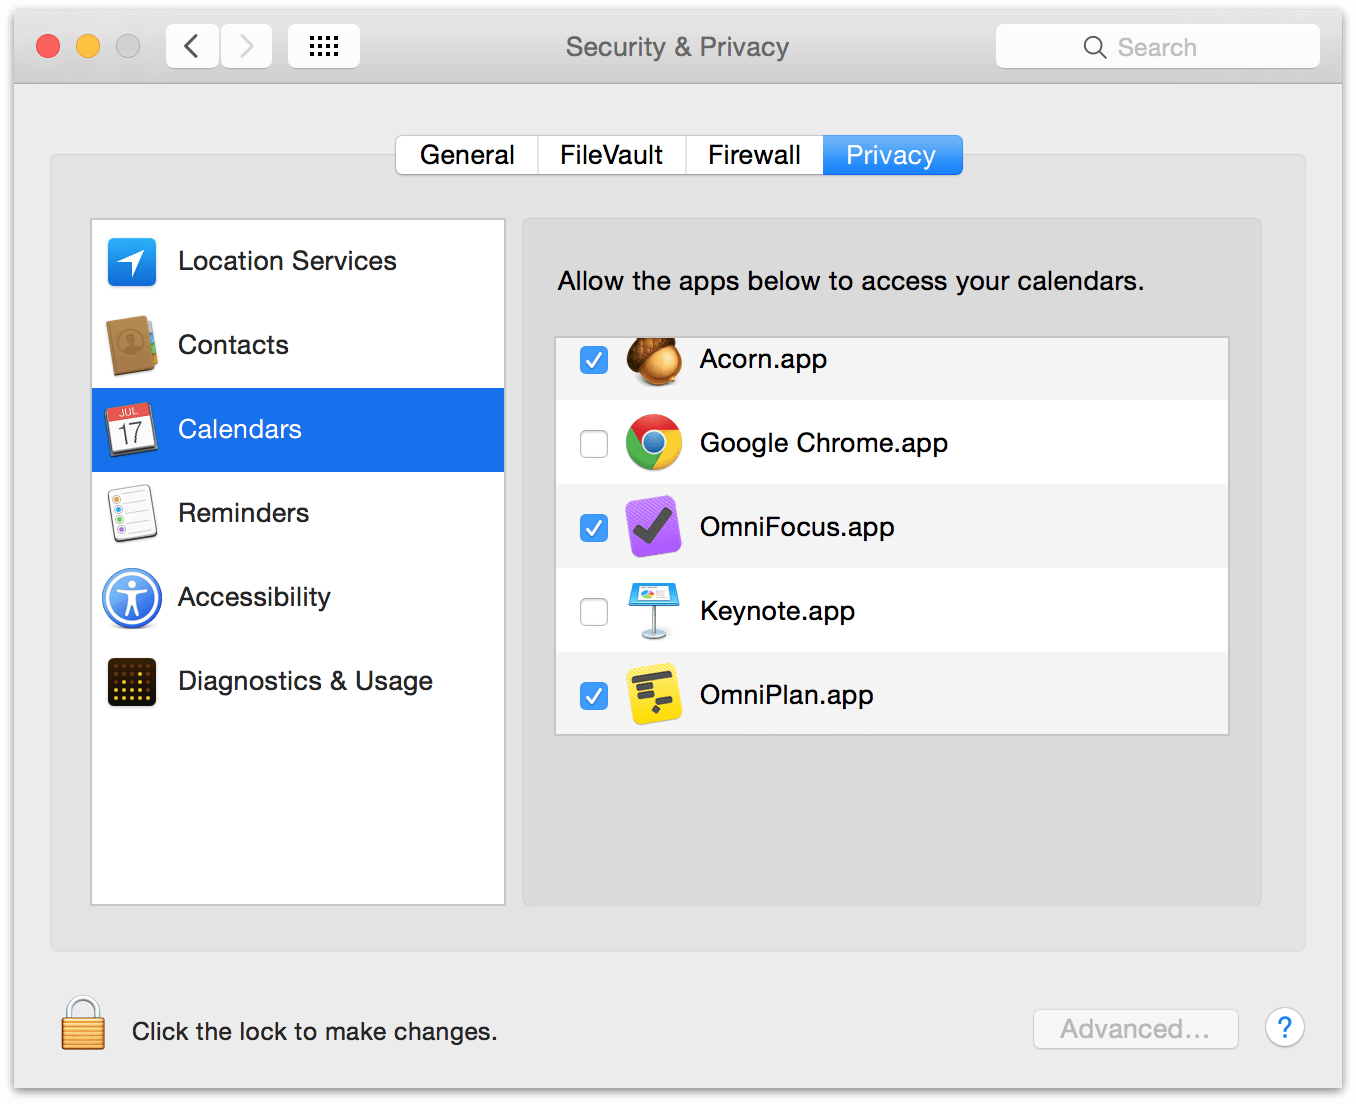
If you didn’t choose to grant OmniPlan access to Calendar the first time you tried to create a Calendar-related publish or update action, you can grant it after the fact with System Preferences ▸ Security & Privacy ▸ Privacy.
Subscribing to an OmniPlan Project
As the project manager, your next task is to inform team members how they can subscribe to the published project. You will need to provide your team with the following information:
- Account Type: Either Omni Sync Server, CalDAV, WebDAV, or Google.
- The User Name and Password used to access the sync server account.
- The name of the file to which they will subscribe.
Team members will use that information to add an account in the Accounts preference panel (see the instructions earlier in this chapter). Once they have created the account, the members of your team can subscribe to the project with the following steps:
- Open OmniPlan.
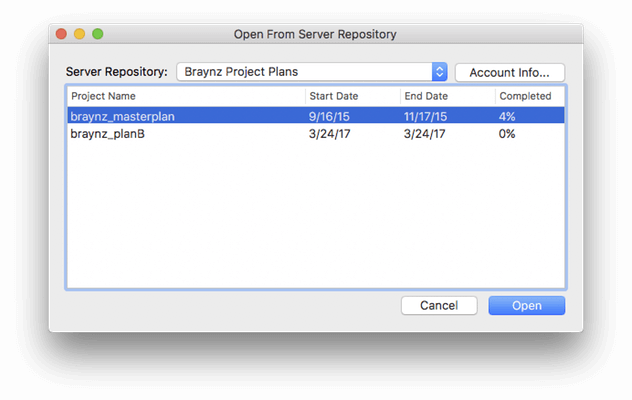
- Choose File ▸ Open From Server Repository.
- At the top of the window that appears, use the pop-up menu to select the Server Repository.
-
Click to select the Project Name from the list of available projects in that Server Repository.
-
Click Open.
- Save a copy of the project file locally on your Mac’s hard drive.
Once subscribed, members of the team can edit and review the OmniPlan project using their local file. Any changes made to the project file are saved to the sync server. If another team member has the project open and is reviewing the project, the changes you save are synced with the other person’s open project file.
To ensure that your local copy of the project file is always up to date with the latest changes from other team members, we recommend that you follow these steps whenever you open your local copy:
- Open the OmniPlan project file that you have saved locally.
- Get updates to the project; choose Project ▸ Update (Control-Command-U).
- Accept or reject changes; choose Project ▸ Show Changes (Option-Command-T).
- Make your changes to the project file, and then choose File ▸ Save (Command-S).
- Publish your changes to make them available to other team members who subscribe to the same project; choose Project ▸ Publish (Control-Command-P).
Tracking Changes in Published/Subscribed Projects
Once you’ve specified the kind or kinds of subscribing you’d like to do, you can use change tracking to see your changes and accept or reject the changes of others.
To enable change tracking, choose Project ▸ Show Changes (Shift-Command-T). A sidebar appears that logs the changes you make and shows the changes of your teammates, along with a toolbar (beneath OmniPlan’s main toolbar) with controls for accepting and rejecting the changes of others.
To accept or reject all changes, use the Accept All and Reject All buttons in the change tracking bar.
To accept or reject individual changes, select an individual change in the sidebar and use the Accept or Reject buttons.
Balancing Resource Loads Across Projects
If resources (usually human members of your team) are shared between multiple projects in the same repository, you’ll want to decide in the Configure Publishing and Subscriptions panel whether you’ll publish the current project’s resource loads to other projects and whether the current project will subscribe to the resource loads of others.

Choosing to publish a project’s resource loads means that other subscribing projects will obey its workload information when leveling; if Julie is working on Project A on Wednesday and its loads are being published to Project B, after leveling Project B won’t schedule her to work on Wednesday.
Choosing to subscribe to resource loads means that the project will obey all constraints by projects in the repository that are publishing their loads. By using only the publish or subscribe option a hierarchy of priority can be established between simultaneous projects — a project that only publishes will always have its needs met first, while a project that only subscribes will be assigned resources only when they can be spared.
By both publishing and subscribing, projects are treated as equals — and if a project neither publishes or subscribes, it ignores external factors and syncs only with its own updates.
The key to balancing resource loads across projects is that individual resources be tagged and identified by a unique email address that is shared across all projects. This can be set in the Resource Info section of the Resource inspector.
Managing Server Repositories
Once you have an account set up and have begun publishing and subscribing to projects, you can manage your repository accounts and shared projects with the centralized Server Repository screen. Choose OmniPlan ▸ Server Repository to see and manage your shared OmniPlan projects.
The Server Repository window is empty if you open it before creating an account, or while publishing your first project.
The Account menu lists your Omni Sync Server and WebDAV accounts by name (as set up in Accounts Preferences); these account types can operate OmniPlan repositories. Choose an account in the pop-up to see the projects in its repository. To add to or edit your accounts, click the Account Info button.
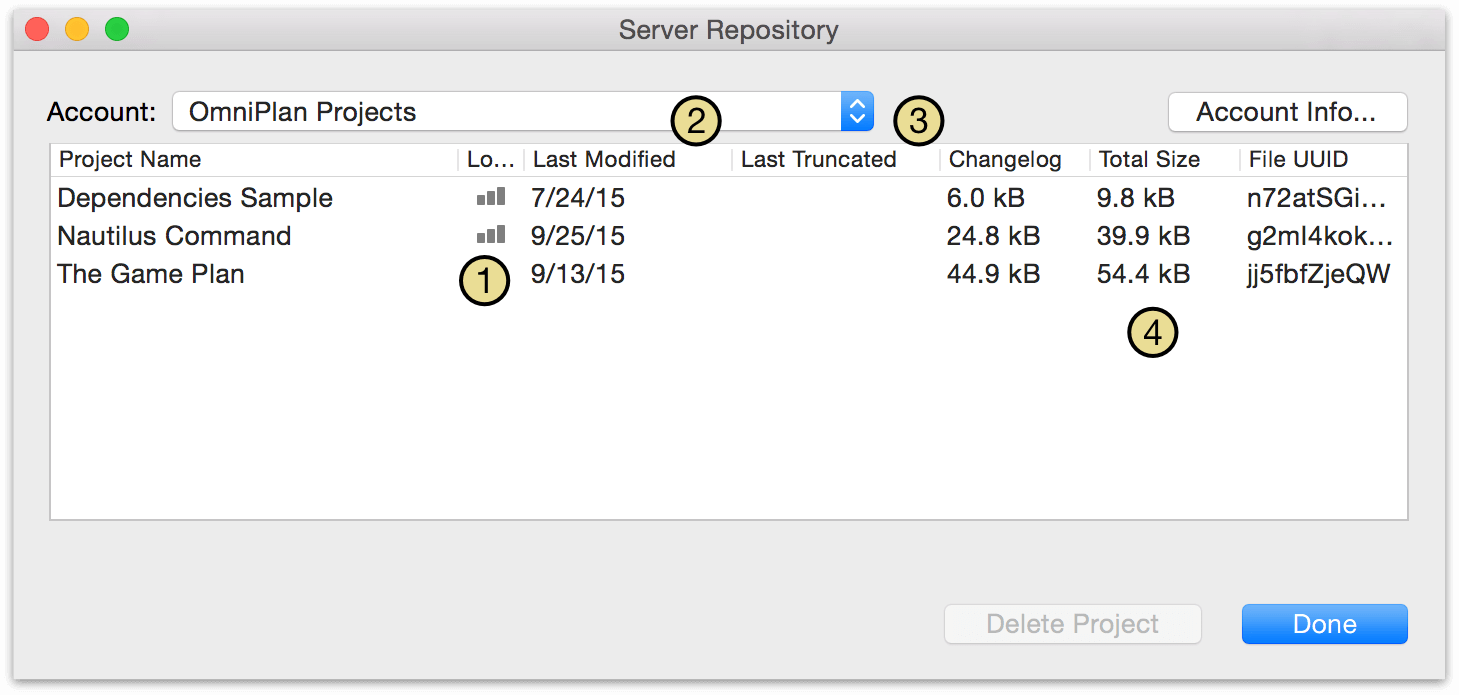
The list shows all projects that have been published to the repository, and the following information about them:
-
Load — Indicates, by the presence of a vertical bar graph icon, whether these projects are sharing their resource load information with other projects in the repository for the purposes of leveling resources across projects.
-
Last Modified — The date when the project was last modified by any user with shared access to it.
-
Last Truncated — To optimize the speed of syncing on currently active projects, once a certain size threshold is exceeded in the sync log OmniPlan sets aside older changes on the server and “truncates” what is synced to only the newest set of changes. If OmniPlan sees that a project hasn’t been updated since the date the changelog was last truncated (shown here), it retrieves older changes from the archived logs on the server.
-
Changelog, Total Size, File UUID — The file size of the changelog and total project respectively, and the unique ID assigned to the project on the server.
Cleaning Up Stale Usage
When sharing projects on a server, in some cases resource load sharing information for deleted projects may be left behind on the server. This happens if someone removes a project that is sharing resource loads using a version of OmniPlan older than v2.1, or if someone deletes the file directly from Finder or Terminal.
If OmniPlan finds unused resource load information on the server, it detects the problem and prompts that you clean it up. Until you allow it to clean up, there may be misleading resource load information shared with your active projects.
The clean way to remove a project from a server repository is by opening the Server Repository window in OmniPlan v2.1 or newer and using the Delete Project button.
Using Dashboards for Simultaneous Project Review
When you’re managing or working on multiple projects, it is essential to ensure that the projects are on track and that any shared resources are correctly assigned. To help facilitate management of and participation in multiple projects, you can use Dashboards OmniPlan Pro.
Dashboards introduce a new file type to OmniPlan Pro: the OmniPlan Dashboard file format (.opld). An OmniPlan Dashboard file is a window that you can customize by adding as few or as many projects to it to manage your projects. When saved, the Dashboard file preserves the projects you have added to it, enabling you to quickly review your projects by opening the Dashboard file in OmniPlan Pro.
Creating a New Dashboard
To create a new Dashboard, follow these steps:
- Choose File ▸ New Dashboard (Shift-Command-N).
-
Click
 to add a project to the Dashboard. This opens a sheet from which you can locate and choose OmniPlan projects to add to the Dashboard. Alternately, you can also drag OmniPlan project files into the window from the Finder.
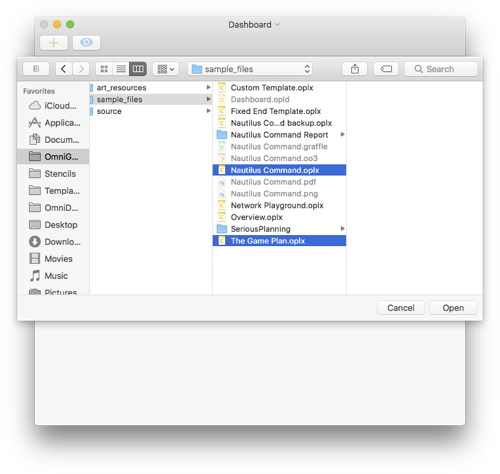
Reviewing Projects in the Dashboard
As you add projects to the Dashboard, you’ll see them laid out as rows with summary graphics of the projects’ Gantt charts in two-tone color schemes that reflect the work completed and the work yet to be done (these colors represent their respective projects throughout the Dashboard).
In addition to rows representing your projects, you’ll see an additional, automatically generated row — a graph of Idle Time to indicate when the projects’ resources are available for other tasks. White bars of idle time represent unused time in the past, while dark gray bars represent available time in the future.
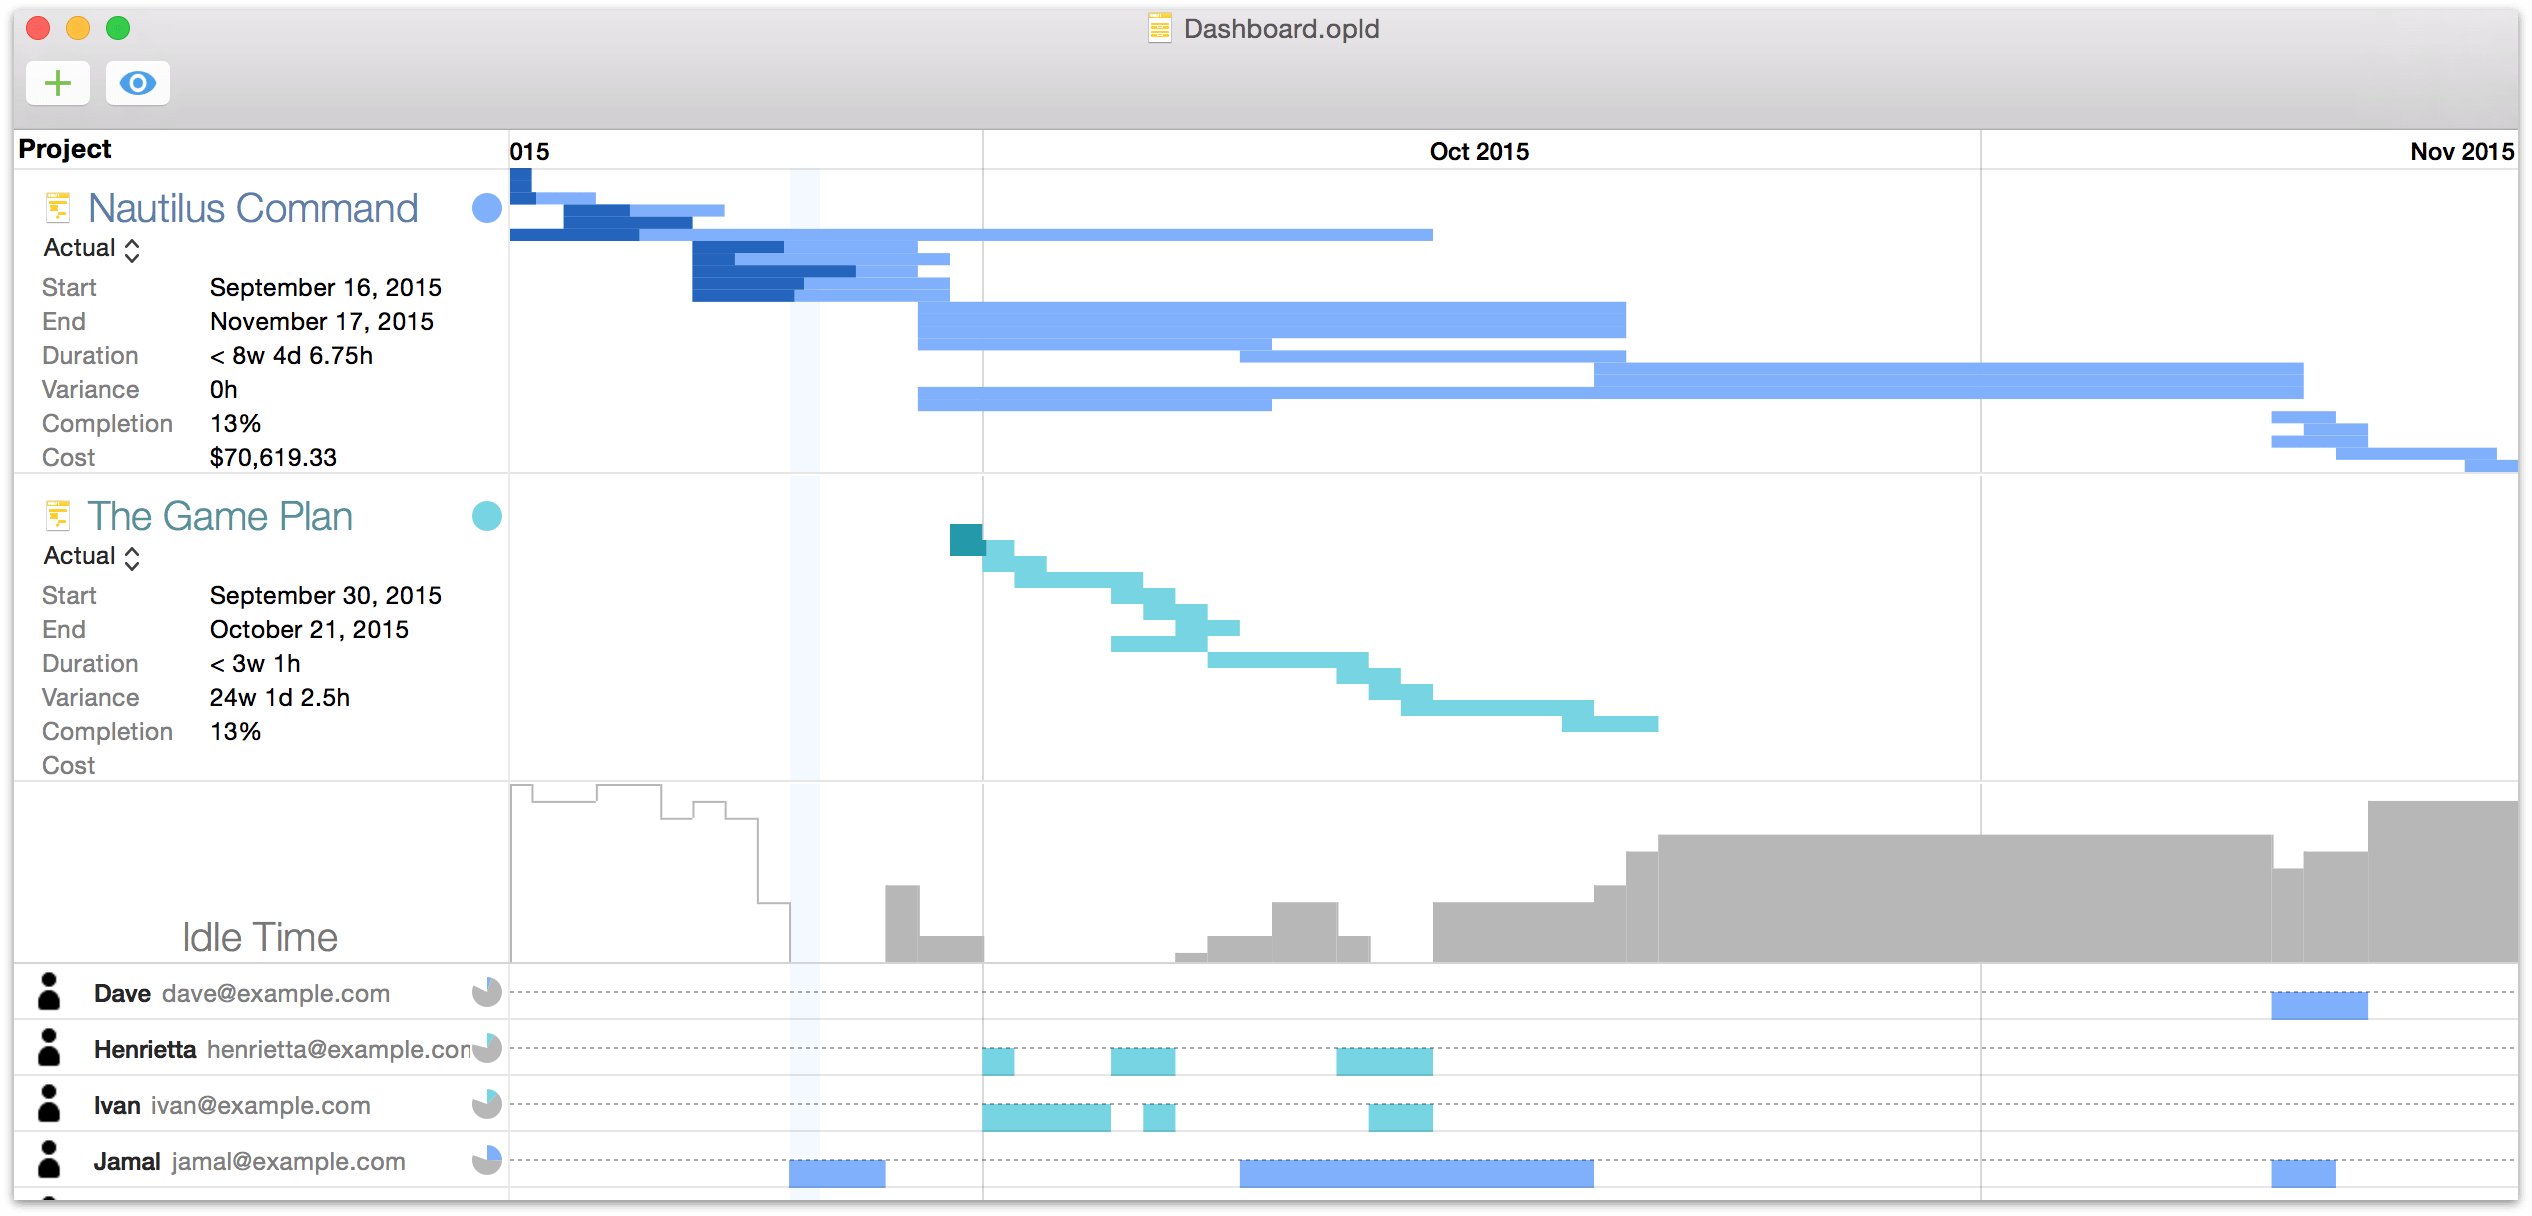
Along the bottom of the Dashboard window, you’ll find a list of any resources to which an email address is assigned. Next to each person, you'll see diagram-style bars that illustrate when each person is busy or available, along with pie chart reference graphs noting the split of their effort between the projects in the Dashboard and their Idle Time.
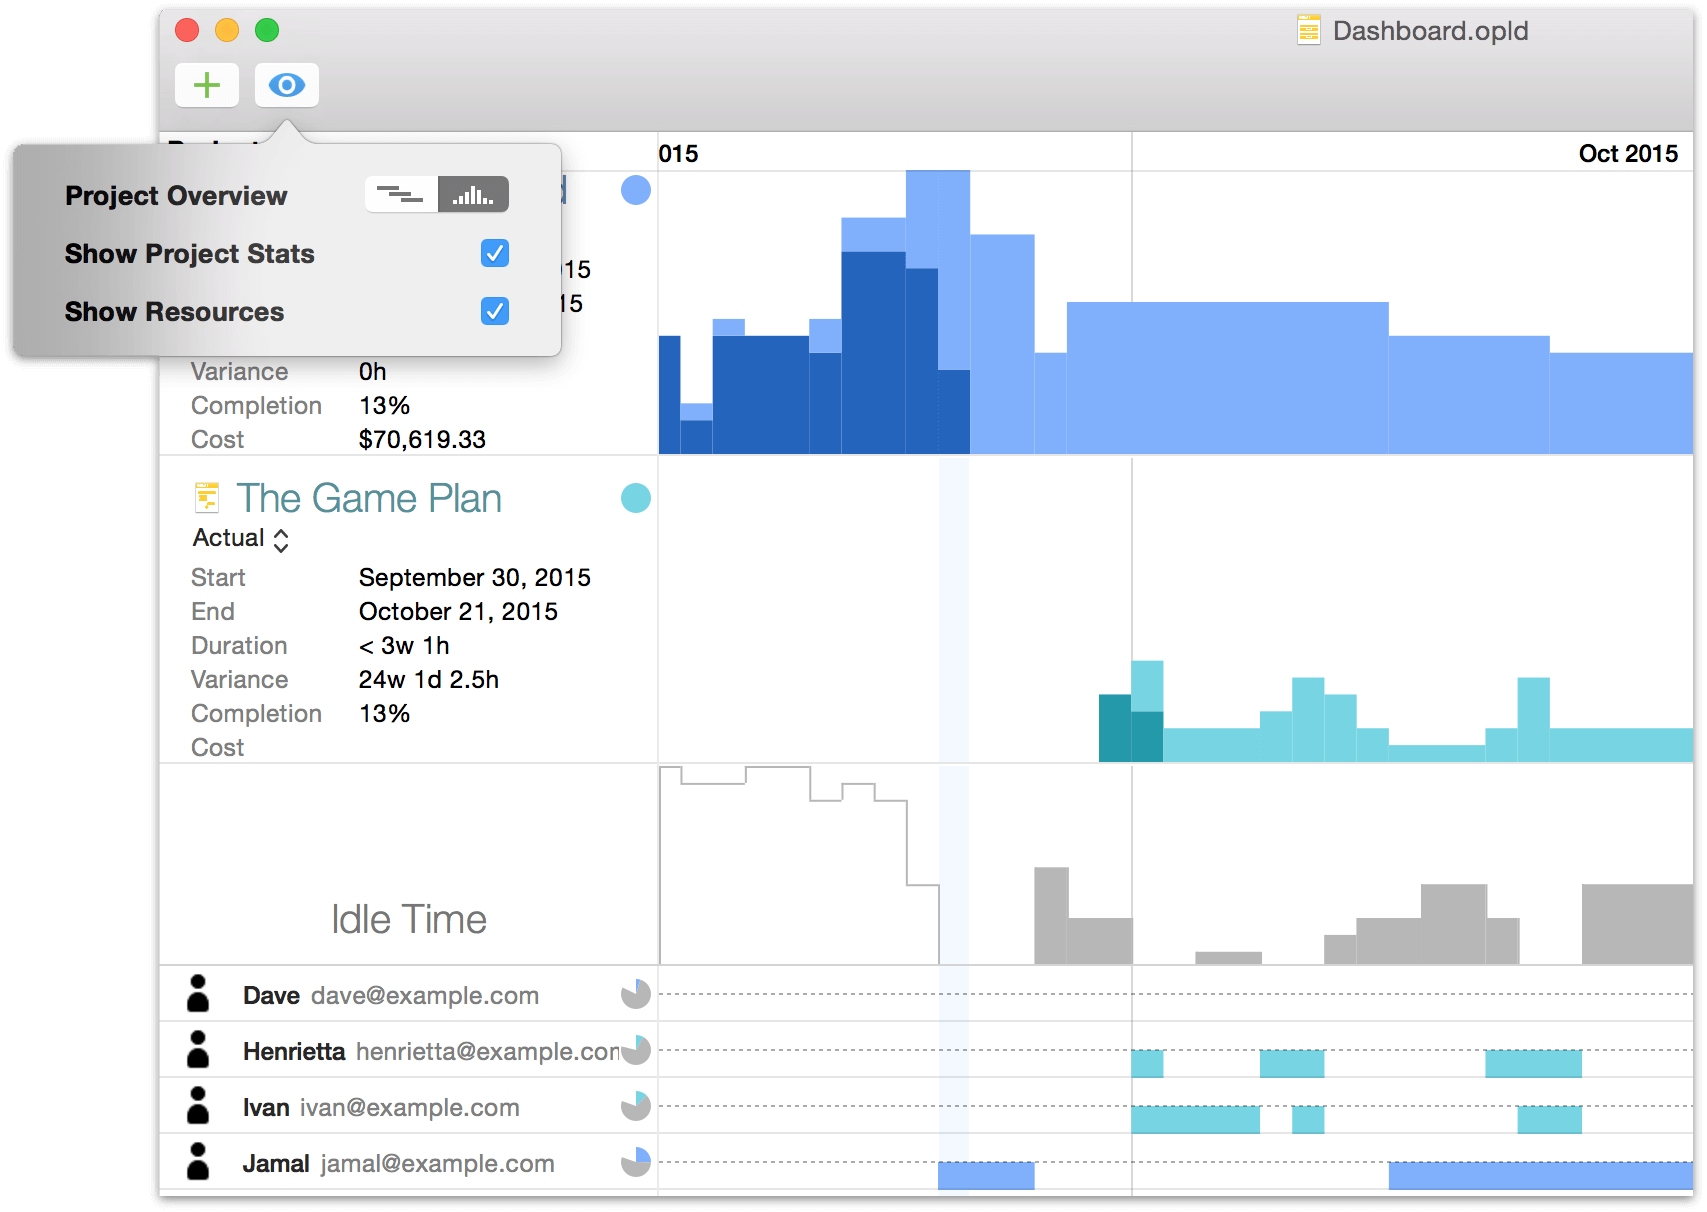
Click  to open the Dashboard window’s View menu, which offers the following options:
- Project Overview — Choose between the Gantt comparison view or a bar chart view for displaying the chronology of projects with task bar heights based on the amount of effort required for completion.
- Show Project Stats — Shows or hides details about the project(s) on the Dashboard, including start and end dates, duration, variance, completion, and cost.
- Show Resources — Shows or hides the list of project resources along the bottom of the Dashboard window.
You can open a project directly from the Dashboard by clicking its document icon. Edits made to project files included in the Dashboard are reflected there right away, so you can immediately see the effect your changes have on the project in question—and potentially on others, if you’re sharing resources between projects.
Sharing Resources Between Projects
The power of dashboards is realized to its fullest when you’re also taking advantage of the publication and subscription of resource loads (described earlier in this chapter) of the projects included in your dashboard.
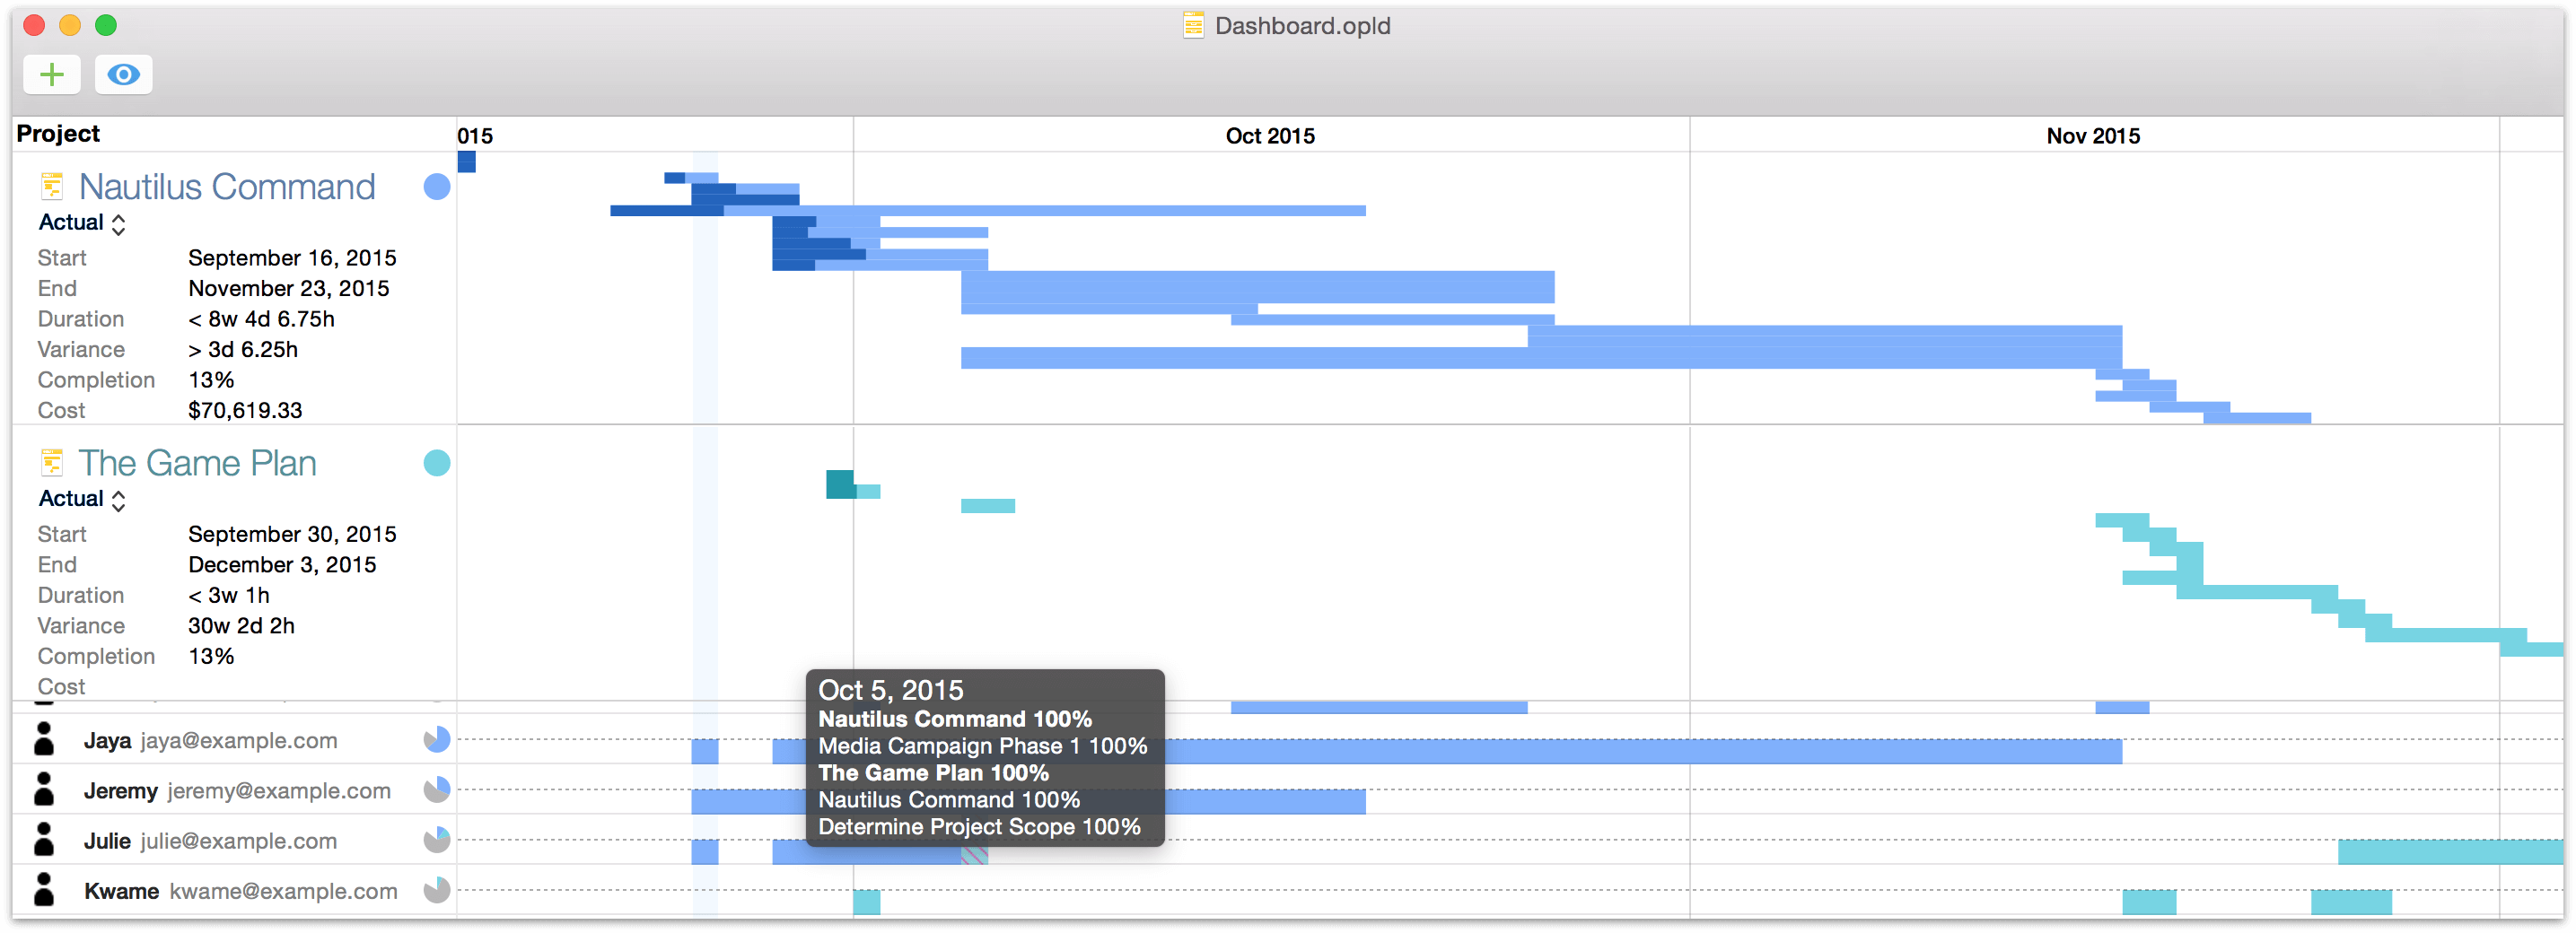
When balancing resource loads across projects in a shared server repository, the dashboard recognizes that resources are being shared and provides a window on the intersection between resources and the projects they’re working on (sometimes simultaneously at 100% effort, as in the example above). You can identify where resources are overloaded (or are standing idle), and make the changes necessary to ensure your projects are running in tandem at peak efficiency.
Printing Dashboards
When you have a dashboard set up just the way you like it and you want to share it with others, you can print it straight from the File menu (Command-P).
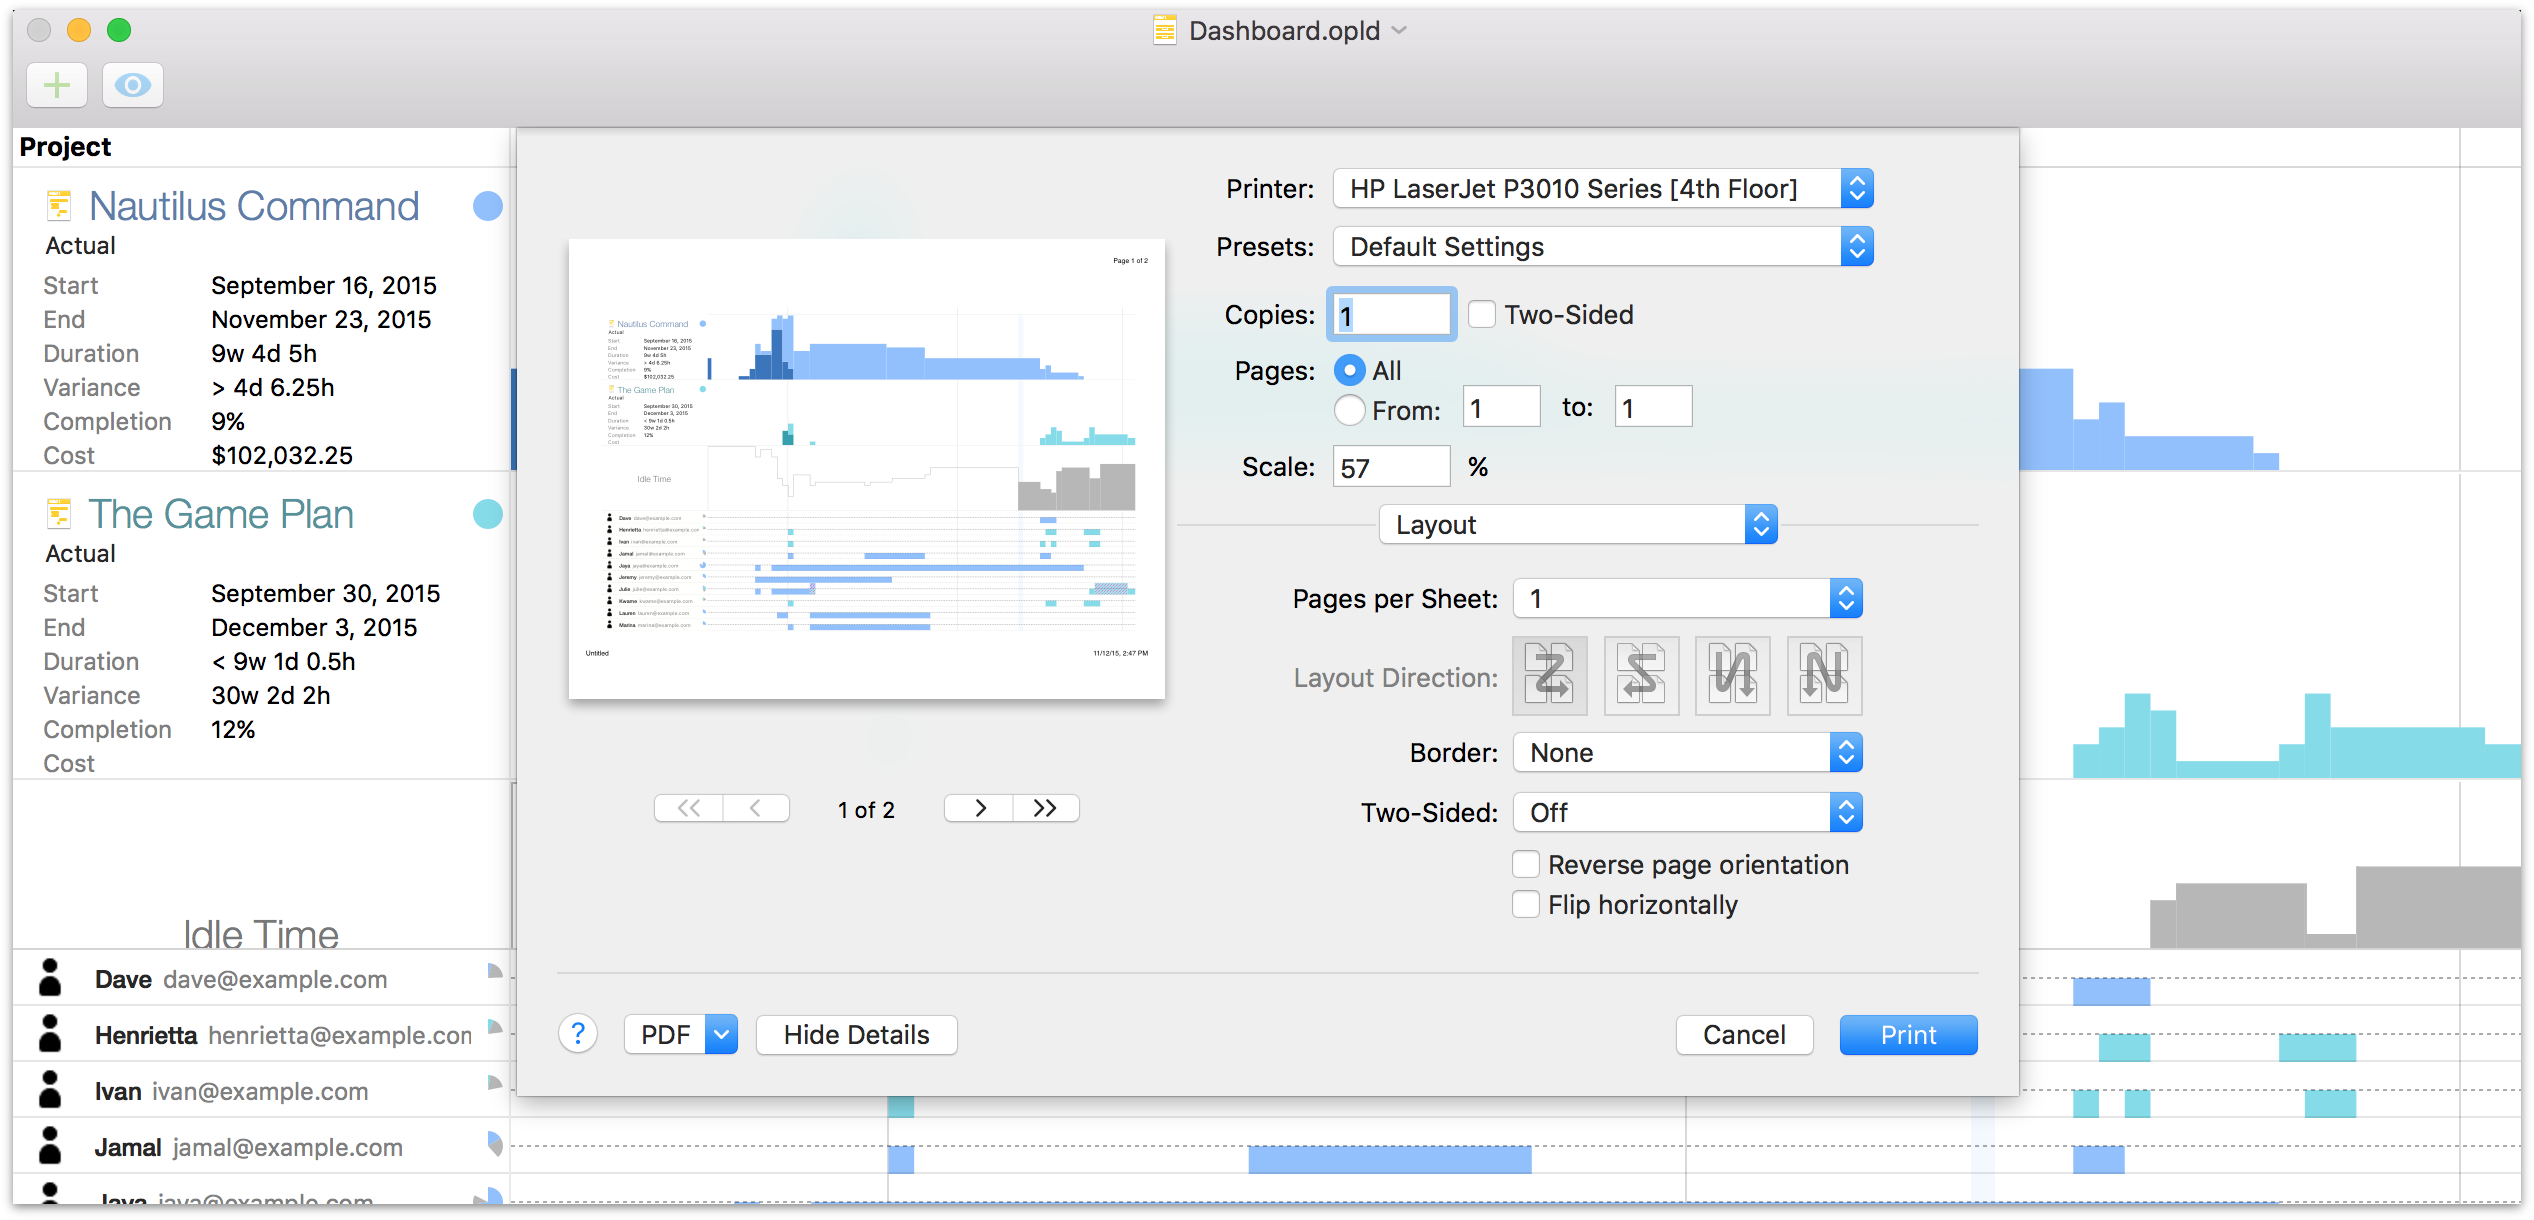
Print-time options for dashboards are pretty straightforward; as with all standard documents in macOS, you can choose to save the dashboard as a PDF rather than send it to a printer. The standard page setup controls are available as well.
The most important thing to note about printing dashboards is that what you see is what you get — the content of the print preview changes based on the dimensions and content of the dashboard’s window at the time of printing.
A dashboard’s printed page width is dictated by the bounds of the window, and will never exceed one page; excess pages are generated vertically only. If you find that the printed version of your dashboard extends vertically more than you would like, consider turning off display of project stats and resources in the dashboard’s view menu.
See the Reporting and Printing chapter for details on printing the content of a single project.