Maintaining Your Project
The moment you’re ready to begin your project in earnest is the moment the real world starts to intrude on the ideal version of your plan. When variables begin to shift, adjusting aspects of the project to suit new circumstances is key to keeping things on track.
Resolving Violations
Occasionally situations will emerge that break the rules of logic you’ve set up for your project. When one of these occurs, OmniPlan will let you know by indicating a violation related to the adjacent task. A red icon appears in the Violations column of your task outline, and the Violations Window appears.

To see this in action, try creating a circular dependency in which two tasks both depend on each other. Because this is logically impossible, a violation will occur.
The Violations Window
If a violation has appeared in your project, the Violations Window will appear to let you know what’s wrong. You can also access it by clicking on the icon in the Violations column of Task View, the Violations button in the toolbar, or with the keyboard shortcut Shift-Command-V.
This window lists all of the violations in the project, along with explanations of why they have occurred. Most violation explanations include links you can click to immediately resolve the problem.

If the automated resolution provided by the Violations Window isn’t what you want, tips at the bottom of the window will help determine the source of the problem so you can fix it based on your scheduling needs.
Scheduling and Leveling
The Task inspector’s Scheduling method indicates how OmniPlan should determine when a task is to occur in the project.

By default and prior to leveling, new tasks are scheduled as early as constraints allow (“As Soon As Possible”, or ASAP). This means the task is placed at the very earliest time possible, taking into consideration start and end constraints, and dependencies on other tasks. Resource availability is not taken into consideration, so resources may end up overutilized (this is why leveling is an important additional step).
A task can also be scheduled As Late As Possible (ALAP), which defers it until the latest possible time based on other constraints.
A task’s Start and End dates can be defined as temporally immovable by locking them (with the lock icons above the Start and End date fields in the Schedule section of the Task inspector, or by holding Command and clicking either end of the task’s bar in the Gantt chart). A locked date (Start, End, or both) will not be affected by leveling.
To schedule a task that has (or should have) already happened, choose Project ▸ Set Current Editing Date and enter the date when work on the task began. This changes the contextual “insertion point” for the project to that date—newly created tasks originate there by default. When finished adding tasks relative to that date, set the editing date back to the present.
When you level the project (or whenever a change is made, if Project ▸ Automatically Level Resources is selected), OmniPlan rearranges tasks which have resources assigned to make sure no resource is being used at more than 100% of its availability. Tasks moved back by resource leveling are scheduled by resource availability.
During leveling, OmniPlan has to make an educated decision about which task should get access to a resource first, and which tasks should be pushed back by a resource dependency. In judging which task to put first, the following criteria matter, in this order:
- Requirements to end by a certain time, such as locked end dates, constraints, or being a prerequisite to a task with such a requirement.
- Task Priority, as set in the Priority column of the task outline.
- Position in the task outline; tasks that are higher in the outline are scheduled earlier.
Duration and Effort
Duration and effort are two key concepts intimately involved with the process of scheduling tasks and leveling your project for optimal efficiency.
Duration is how long a task takes in actual working hours in the schedule. If the task begins at 8:00 and ends at 12:00, that’s a duration of 4 hours. Note that non-working times don’t count; if a task starts one afternoon and doesn’t complete until the next morning, or spans a lunch break, only the working hours are counted. Also note that the resources assigned to a task may have different working hours than the project as a whole, and thus the displayed duration of a task may not match up exactly with the amount of effort it takes.
Effort is the total amount of working time put into a task by all assigned resources. A task with a duration of 4 hours, with 2 resources assigned at 100%, has an effort value of 8 hours. Note that Material resources don’t contribute to effort, only Staff and Equipment resources do.
The duration and the effort of a task can change depending on the resources you assign.
Each task has a setting in the Resource Allocation section of the Task inspector which controls whether to keep the duration fixed, the effort fixed, or both.
When you assign or unassign staff and equipment resources, the value that isn’t fixed re-calculates its value; the other field stays the same. Regardless of which value is calculated, you can always edit either value manually.
If both values are fixed, then assigning resources changes the assigned percentage.
What Makes Duration and Effort Change
Multiple factors influence both duration and effort. The most common variables are described below; adjusting them can help bring a project in line with the desired timeline for completion.
- Number of Assigned Resources
- Assigning more resources to a task generally causes the task to take less time, because the required effort gets completed sooner.
- Efficiency of Assigned Resources
- Assigning less-efficient resources to a task causes the duration to be longer than the effort, because the resource takes more time to achieve the same amount of effort.
- Assigned Amount and Available Units
- Assigning fewer units of a resource to a task causes the duration to be longer than the effort, because less of the resource’s time and energy is being spent on that task. This situation is common when a resource is split between multiple tasks at one time. The amount of a resource you can assign to tasks depends on the resource’s available Units (set in the Resource Info section of the Resource inspector or the Units column of the Resource outline). Assigning more of a resource than is available causes a violation and shows up as overutilization in the Resource timeline.
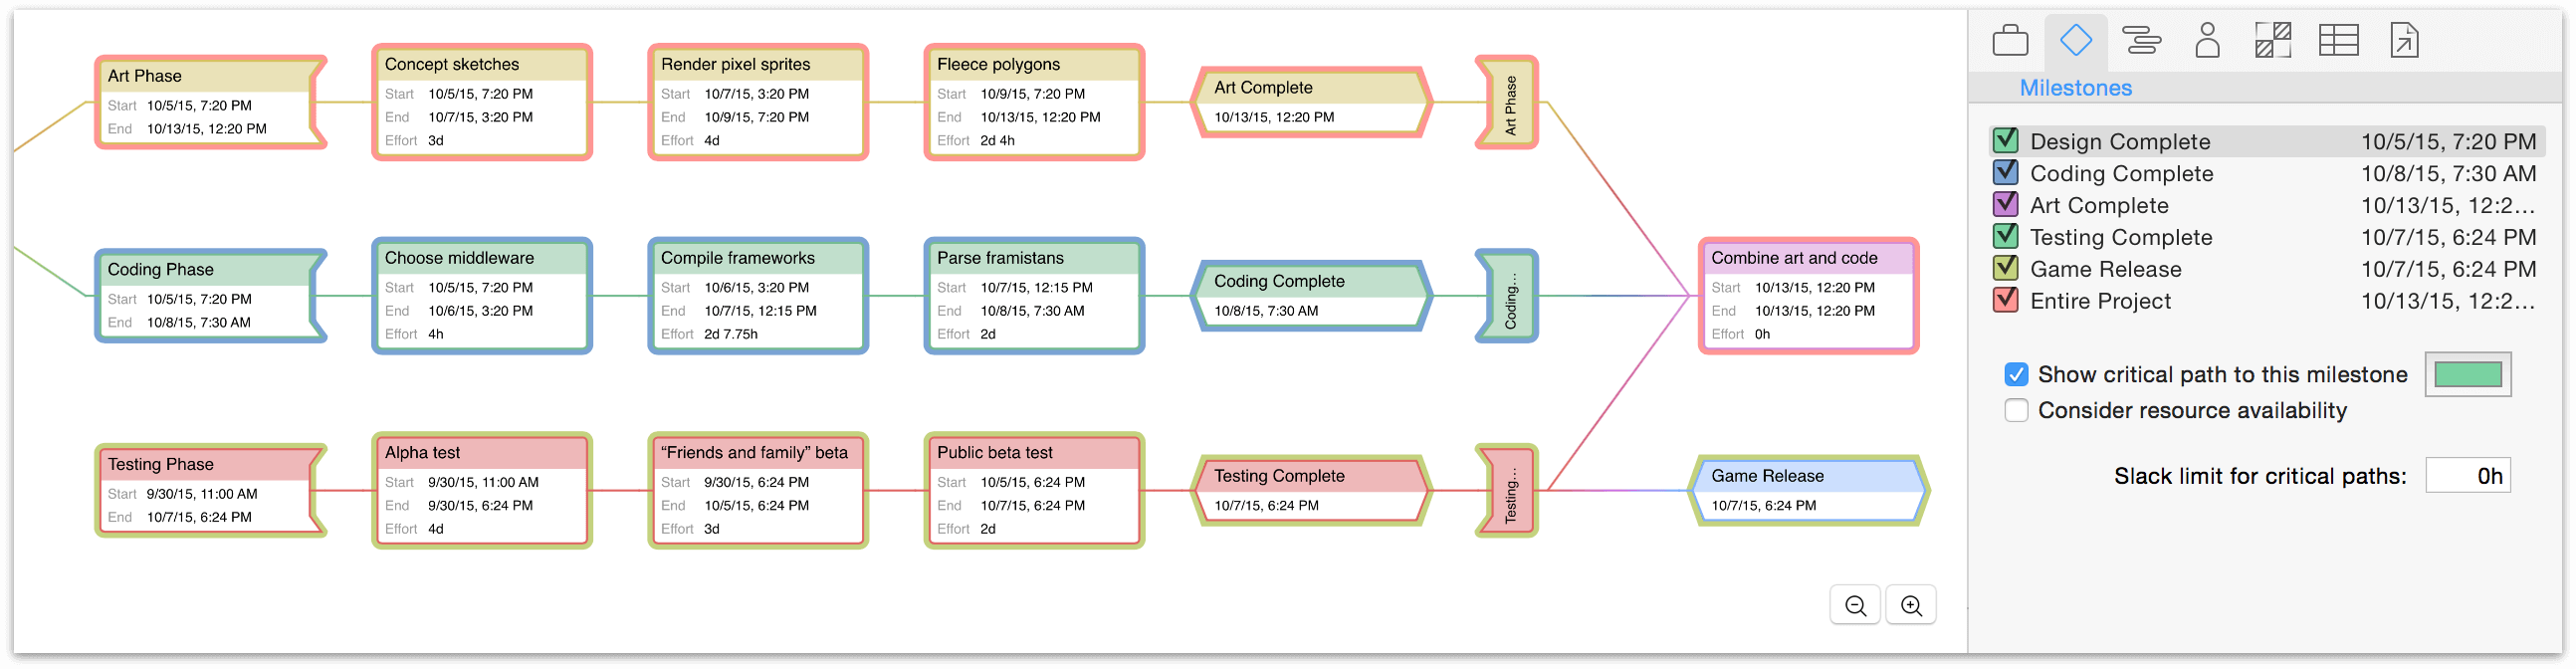
Using Critical Paths
Looking at a project or milestone’s Critical Path in the Gantt chart or Network View is a great way to get a feel for the tasks involved that are most important to on-time completion of the goal. Identifying tasks that are part of the critical path (and vice versa) helps prioritize work to ensure that deadlines are met.
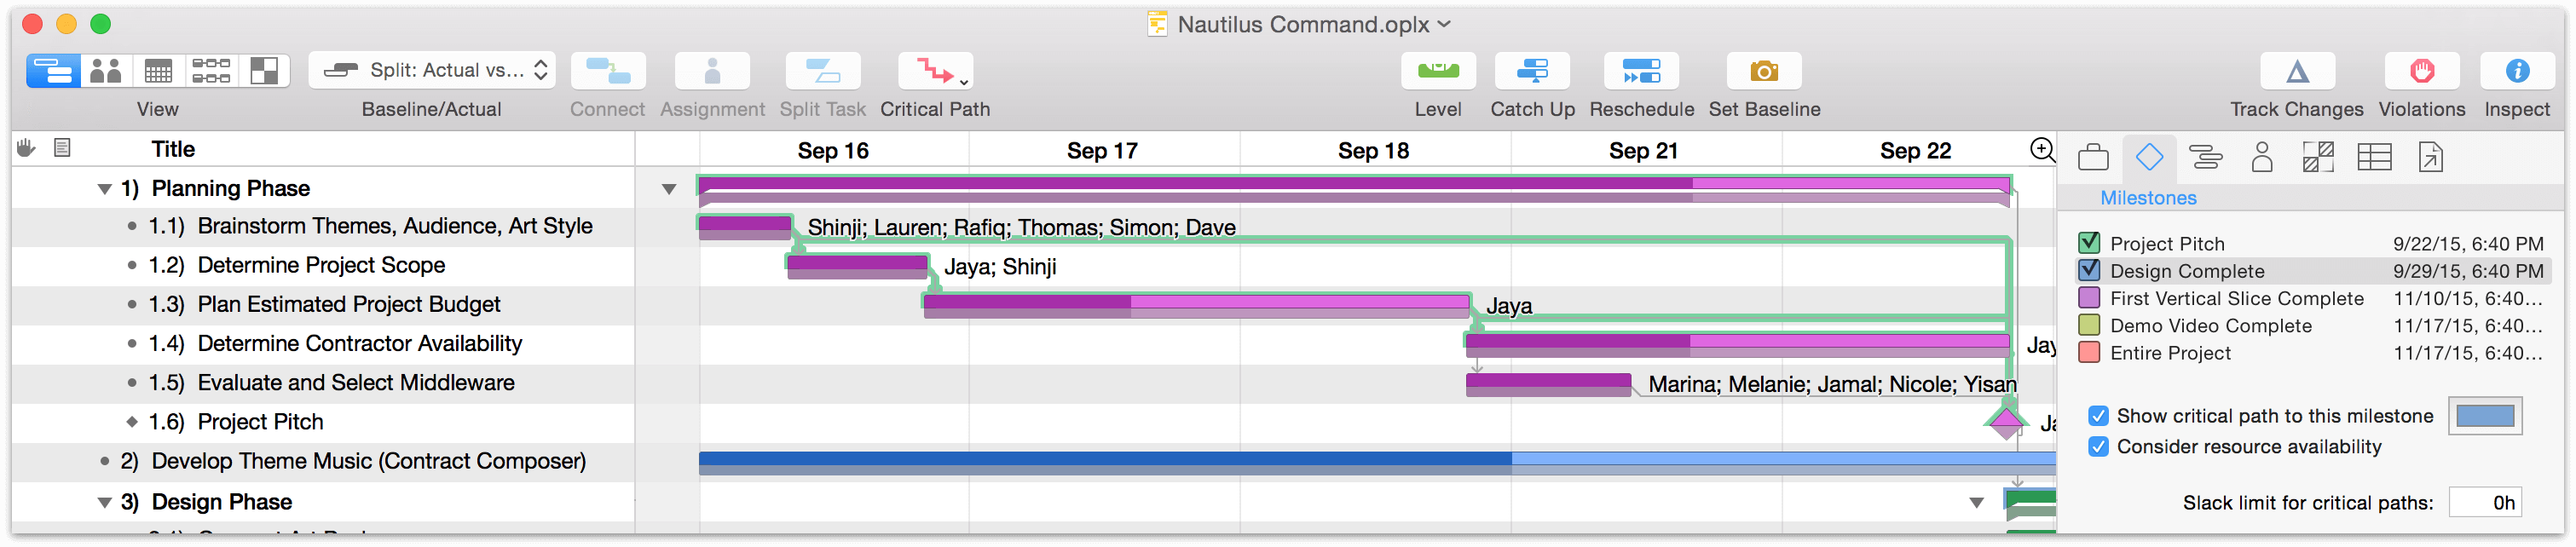
By default, OmniPlan determines the critical path by taking into account the dependency relationships between tasks, and the amount of free (slack) time there is between them.
-
On the dependency side, an unbroken chain of tasks with Finish ▸ Start dependencies represents a simple critical path to project completion. Tasks that are independent won’t be on the path at all, since they can occur at any time during the project.
-
On the slack side, hammock tasks or tasks with a set start date before which other work has been completed can lead to periods in the project where nothing is happening. The length of these periods that determine whether the critical path is affected is set in the Milestones inspector.
One other potential factor affecting critical paths is resource availability. You can choose whether or not to consider it in the display of your critical paths using the Milestones Inspector; that section also contains information on the impact of resource availablility on your critical paths, as does the Scheduling and Leveling section, earlier in this guide.
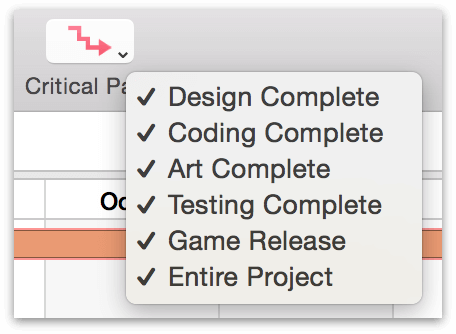
OmniPlan can display critical paths both for the entire project, and for individual milestones. To turn on critical paths, click the Critical Path button in the toolbar; to choose which critical paths to display, click the arrow in the corner of the button and choose the milestones you want, or choose them in Milestones Inspector.
Updating Task Completion
If everything is going according to plan, just click the Catch Up button in the toolbar.
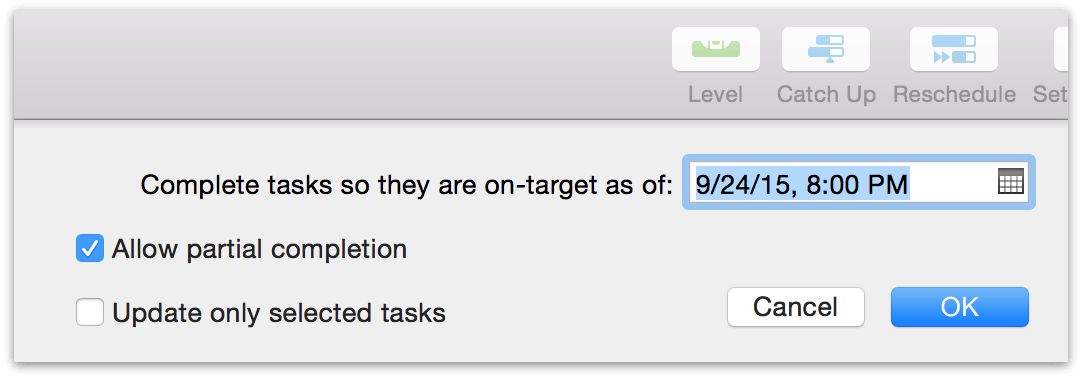
Choose a date and time (today by default), whether to allow tasks to be marked partially complete, and whether to update all tasks or just the selected ones.
When you click OK, the tasks’ completion percentages are updated to the specified date and time.
To mark a task 100% complete, you can use Shift-Option-=. Conversely, Shift-Option-– can be used to mark a task as 0% complete.
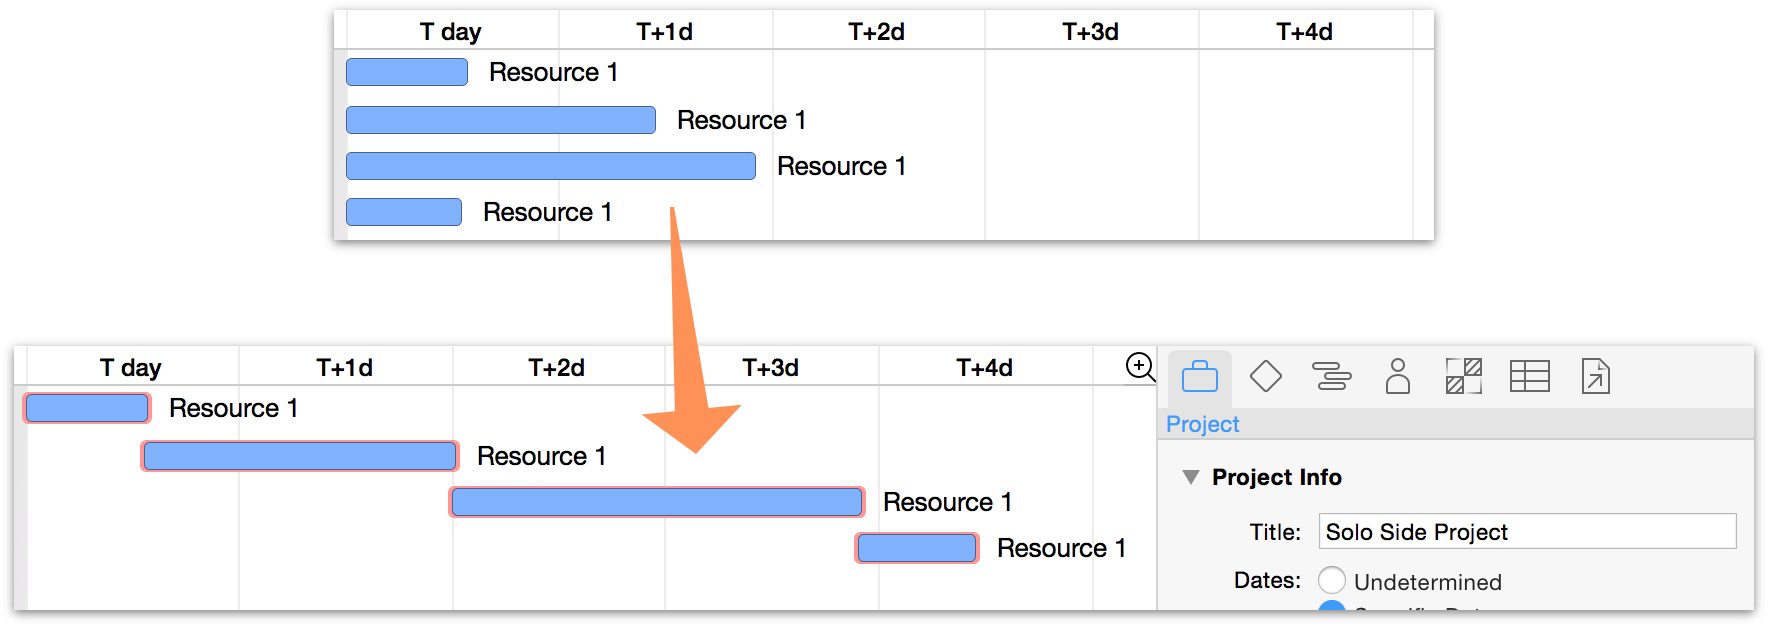
Rescheduling Incomplete Tasks
When a task isn’t as complete as it was scheduled to be, you can use the Reschedule toolbar button to quickly determine the best place for it in the current situation.
Clicking the Reschedule button brings up the following dialog.
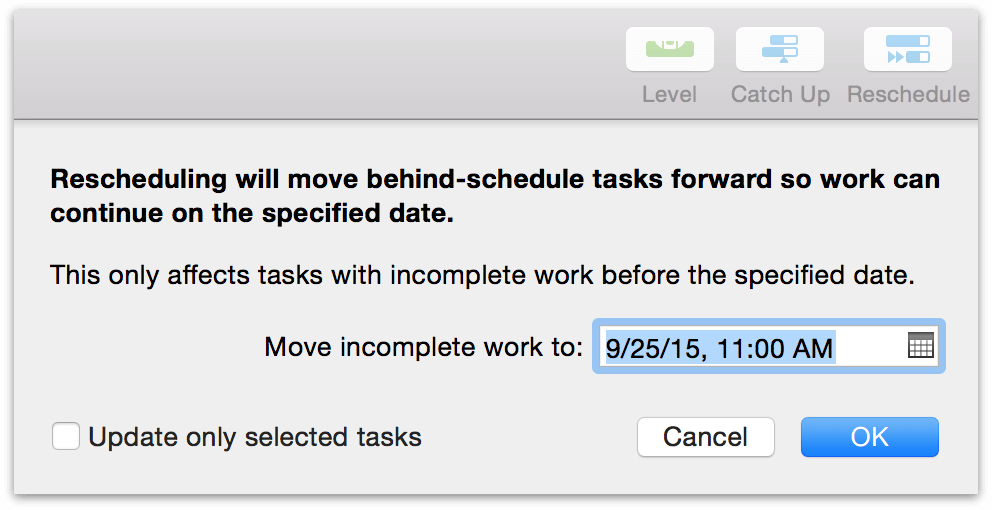
Choose a date and time to reschedule the incomplete tasks, and whether to update all tasks or just the selected ones.
When you click OK the incomplete tasks move — and the whole schedule updates — so that work can continue from here.
Note that this only moves tasks with incomplete work that was scheduled for before the date you specify; tasks in the future aren’t affected.
Gauging Progress with Baselines
Once you have finished setting up a project and you’re ready to start implementing it, you can set a baseline schedule. The baseline represents the original intentions of the project, for comparison with the actual schedule. The actual schedule, by contrast, is the way a project turns out in real life. Before the baseline is set for a project, the baseline and actual schedules are the same. After the baseline is set, further changes affect the actual schedule only.
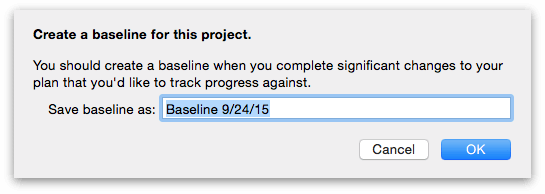
To set a baseline, click the Set Baseline button in the toolbar. You’ll be prompted with a field to name the baseline; the default name is today’s date.
When you click OK, the baseline schedule is set and any further changes are applied to the actual schedule instead.
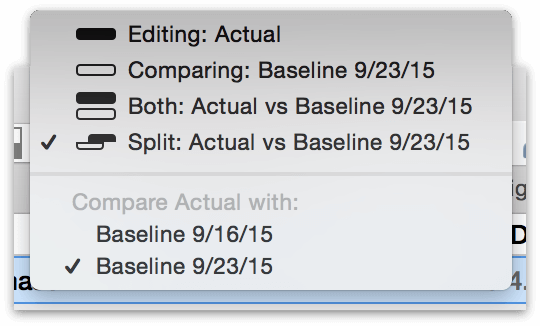
Choose Split Schedule or Both Schedules to see the baseline and actual schedules together, so you can compare them.
OmniPlan 3 supports not just a single baseline, but as many as you want — so at any given point in the project, you can take a snapshot that sets a new standard from which the actual project can proceed. You can compare a given baseline with the current actual schedule using the Baseline/Actual menu in the toolbar.
Using Simulations to Estimate Milestone Completion (PRO)
OmniPlan 3 Pro includes tools for calculating the degree of certainty that a milestone will be complete by a given deadline, using Monte Carlo simulations based on estimations of the effort required to reach the goal. The results of these simulations can help identify where things might fall behind (or even be ahead of schedule).
To run a simulation, switch to Task View and choose the Simulations button in the toolbar. The settings you choose here (and the simulation itself) will affect all tasks and milestones in the project.
The level of certainty the simulation provides is determined by the amount of effort estimated as required for completion of the tasks within each milestone. If you haven’t manually set effort estimates for tasks, you’ll want to either do that, or use the handy Auto-Estimate Effort feature (also found in the Monte Carlo popup menu).
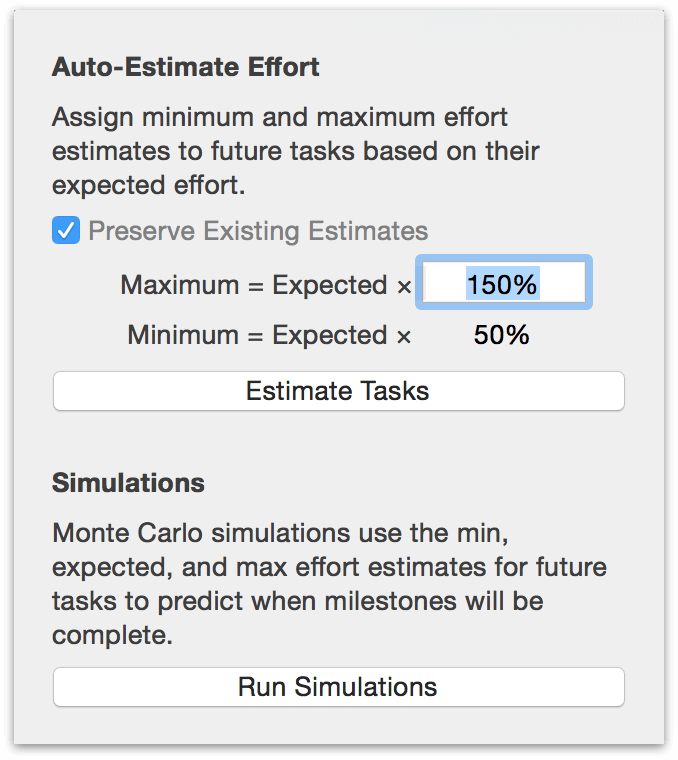
Running a simulation without setting minimum and maximum effort estimates (either manually or automatically) results in a prediction that your milestones will be completed exactly as they’re scheduled, 100% of the time. Not very useful, right? For best results, be sure to have a spread of possible efforts included (auto-estimating effort makes this easy).
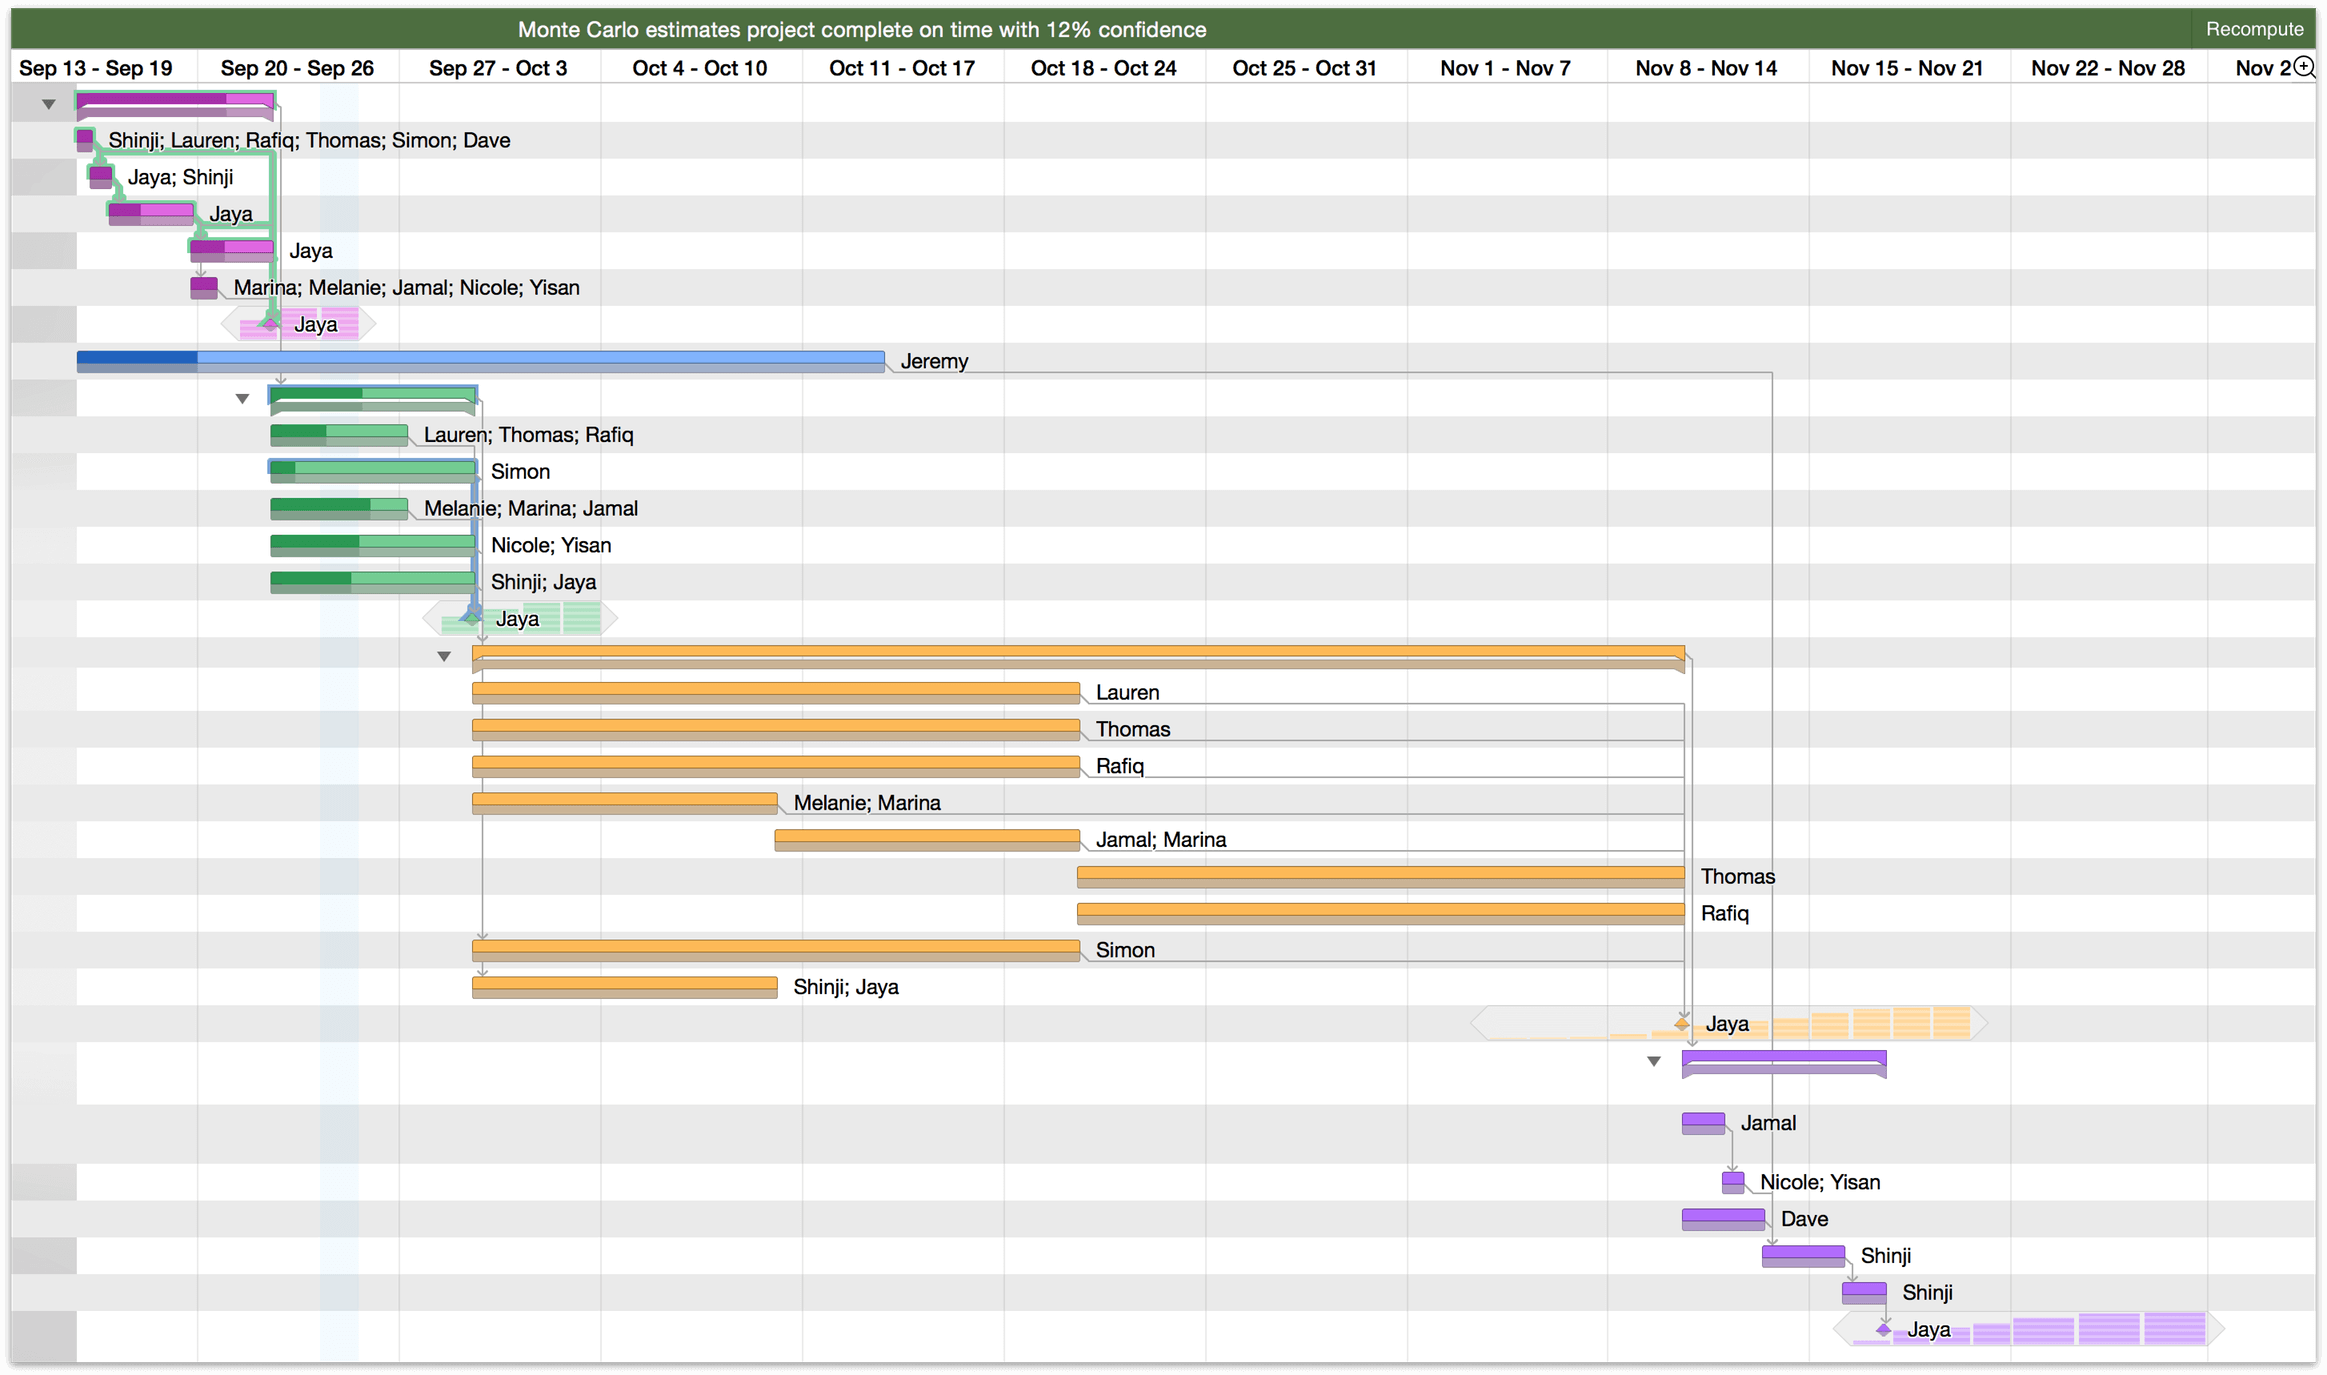
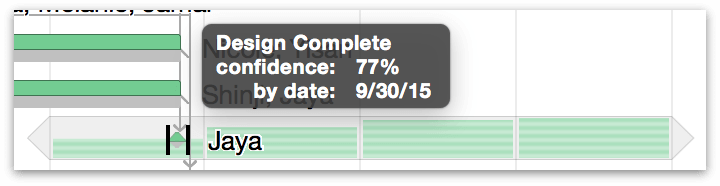
Once the simulation is complete, a set of horizontal bars appears on days surrounding each milestone (represented as a small diamond); one bar equals 20 percent confidence that the milestone will be complete on that day (5 bars on a day means that according to the simulation, a milestone is 100% likely to be completed on that day). Hover over the bars on each day for greater detail.
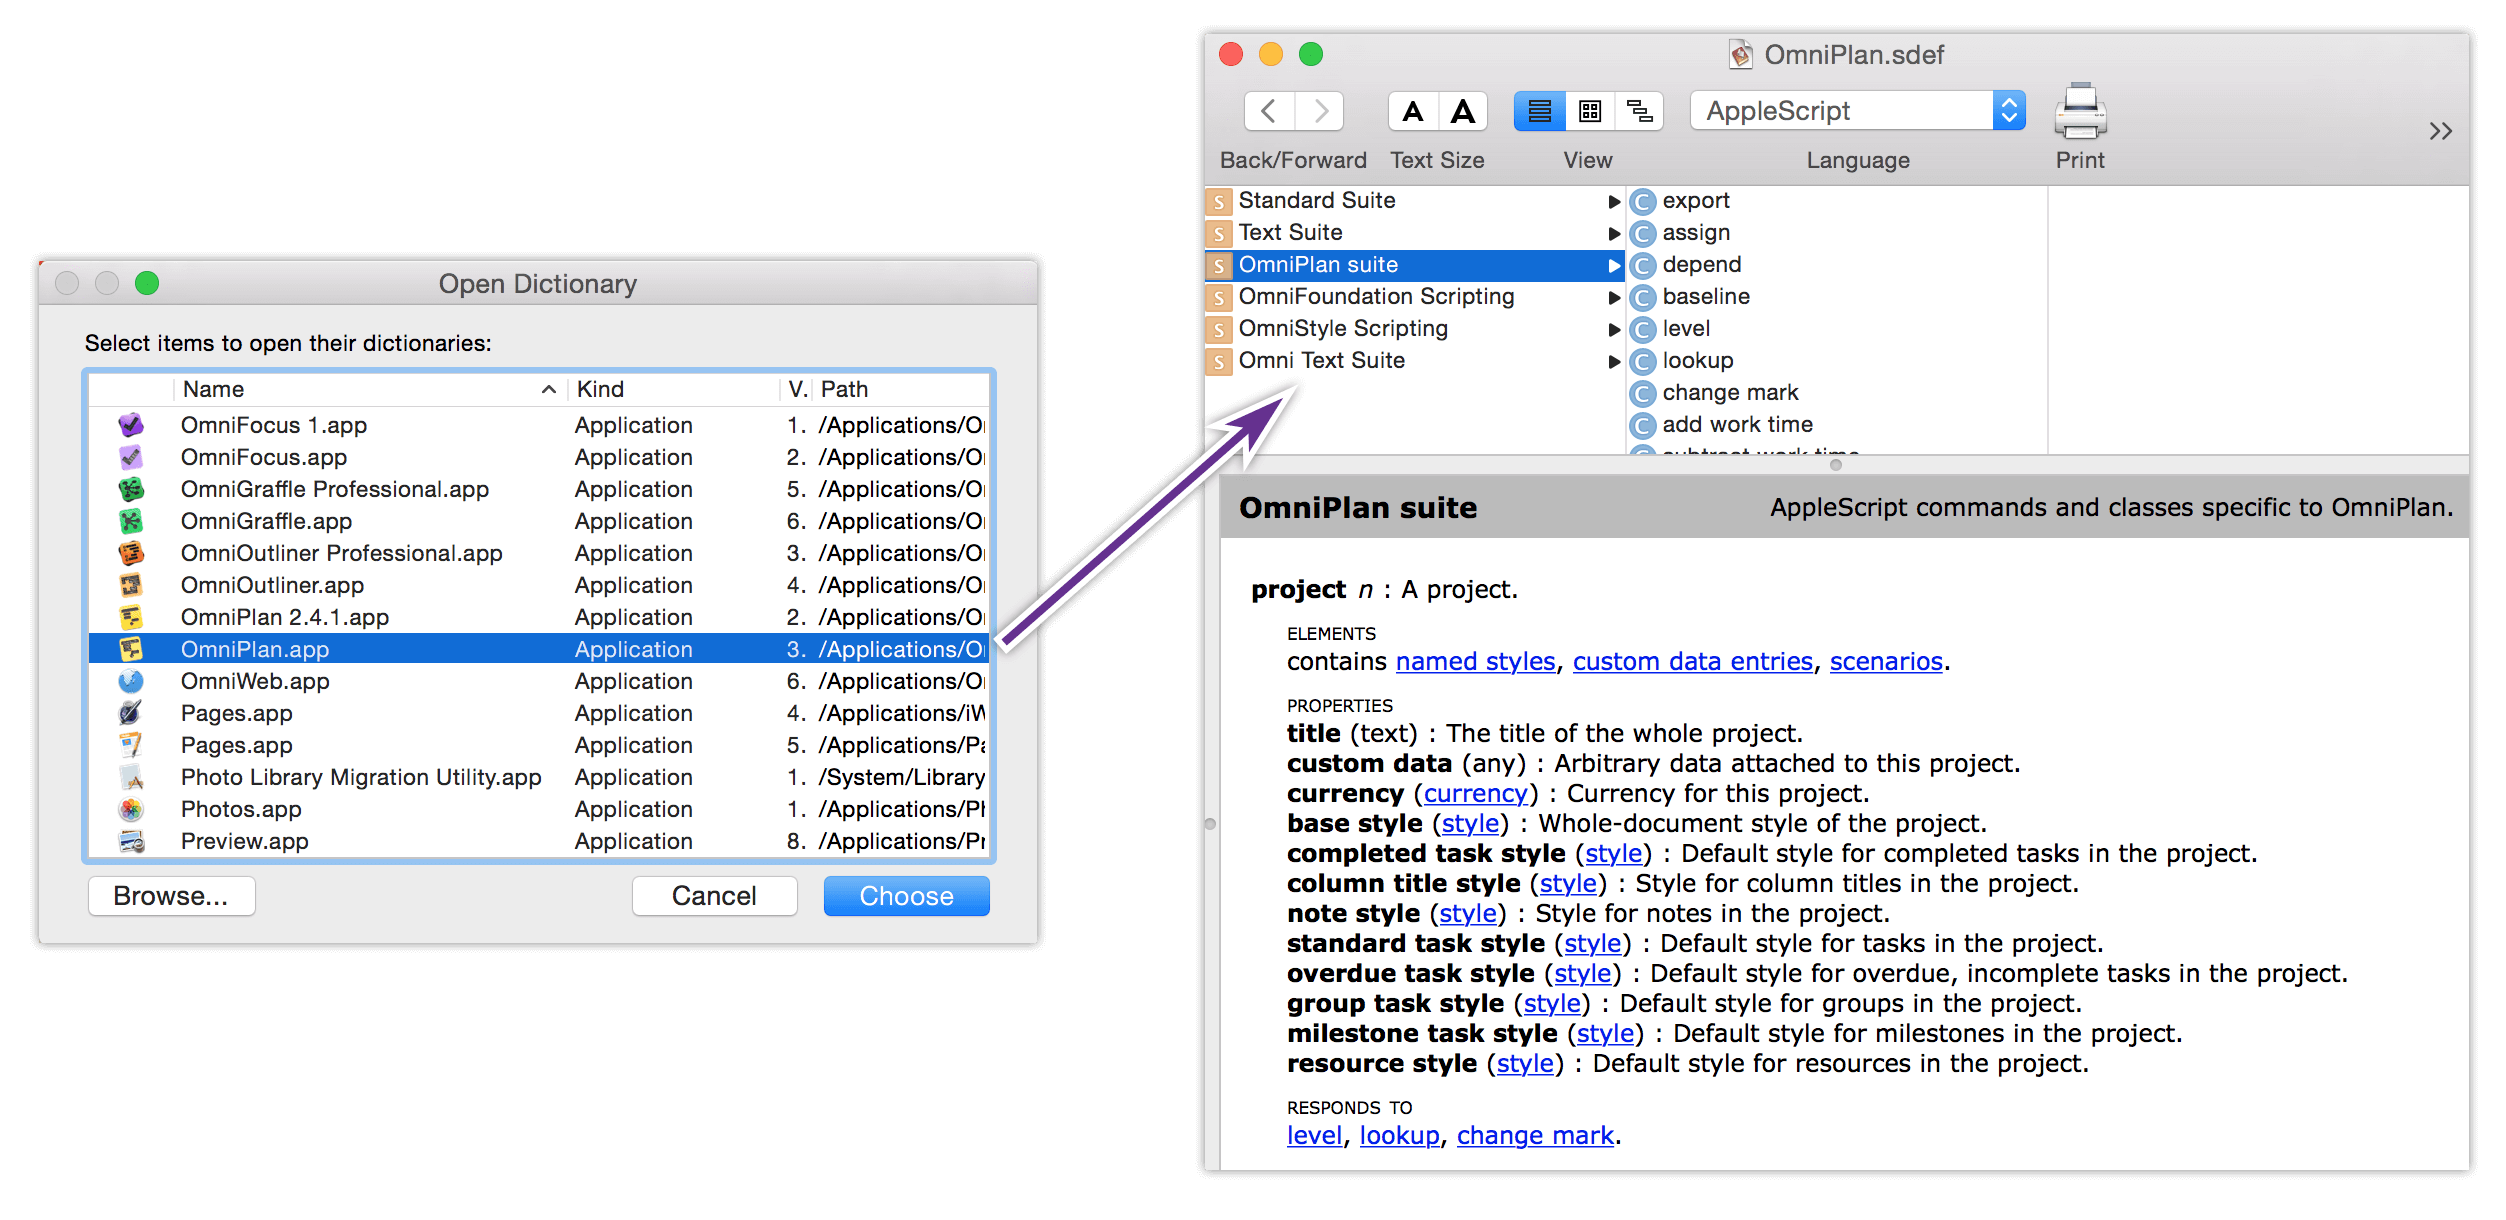
Using AppleScript (PRO)
With OmniPlan Pro you have access to powerful scripting tools using the built-in AppleScript library. To access the dictionary of scripting commands specific to OmniPlan, open AppleScript Editor and choose File ▸ Open Dictionary (Shift-Command-O), then choose OmniPlan.app from the list that appears.
Single-User File Sync with OmniPresence
If you’re solely responsible for managing projects that you would like to keep up-to-date between multiple devices, you can take advantage of cloud-based storage services to keep your OmniPlan files in sync across both Mac and iOS.
While there are many such services available, Omni offers a fully supported solution that is designed to meet the needs of most users: OmniPresence paired with Omni Sync Server.
-
OmniPresence is a free utility that you install on your Mac for synchronizing files. OmniPresence runs in the background, watching a “connected folder.” It makes sure the files inside are in sync with files in the cloud (a WebDAV server of your choice), and with your OmniPresence-enabled iOS apps.
On iOS, OmniPresence is built into all of our current document-based apps, including OmniPlan 2. You’ll access OmniPresence folders and files from within the app’s respective Resource Browsers. The result is that all of your OmniPresence-enabled devices detect changes wherever you make them, and constantly sync up to keep your files up to date.
To learn more about connecting with OmniPresence in OmniPlan for iOS, see the OmniPlan 2 for iOS User Manual.
To get started with OmniPresence for Mac, you’ll need to download OmniPresence for Mac from our website.
OmniPresence sync isn’t a replacement for the multi-user collaboration features of publication and subscription to a server repository in OmniPlan Pro. OmniPresence exists as a cloud storage space to keep files up-to-date between devices; it doesn’t track changes to those files, doesn’t support publishing actions, and is not intended for multiple users to access simultaneously.
If your project requires editing by multiple contributors, consider the collaborative features offered in the Pro upgrade.
-
Omni Sync Server is a set of cloud storage servers maintained by The Omni Group. It is essentially a custom WebDAV server that functions as a central hub for all your syncing needs; it’s what OmniPresence connects to when shuttling files between your Mac and iOS devices.
With Omni Sync Server, we never ever look at your data without your permission. For example, when our Support Humans are working with you to restore a corrupt file or isolate a particular issue you’re having with our server. Beyond that, you can rest assured that your data is safe and secure on Omni Sync Server.
To use Omni Sync Server, you’ll first need to sign up for a free account. If you don’t have an account already, head over to our website and sign up for an Omni Sync Server account.
How Synchronization Works
Before diving in to the nuts and bolts of getting everything set up on your Mac, it’s worth taking a moment to discuss how syncing with OmniPresence works.
With OmniPresence turned on, the WebDAV server you designate (either Omni Sync Server or your own or a third-party WebDAV server) manages synchronization so that your files are always up to date. With each subsequent sync, OmniPresence compares your local files and applies any differences to your files on the server. This ensures that your files are not just up to date, they’re available wherever—and whenever—you need them.
We’ve also built in an automatic sync mechanism. When you save an OmniPlan file to an OmniPresence-enabled folder (or when an Auto Save occurs), OmniPresence updates the file on the sync server. At a bare minimum, OmniPresence checks in with Omni Sync Server every hour and compares files in your sync folder. If nothing has changed, OmniPresence quietly goes back to watching over your files. This helps ensure that your OmniPlan files are always safe, secure, and most importantly—up to date.
Installing OmniPresence
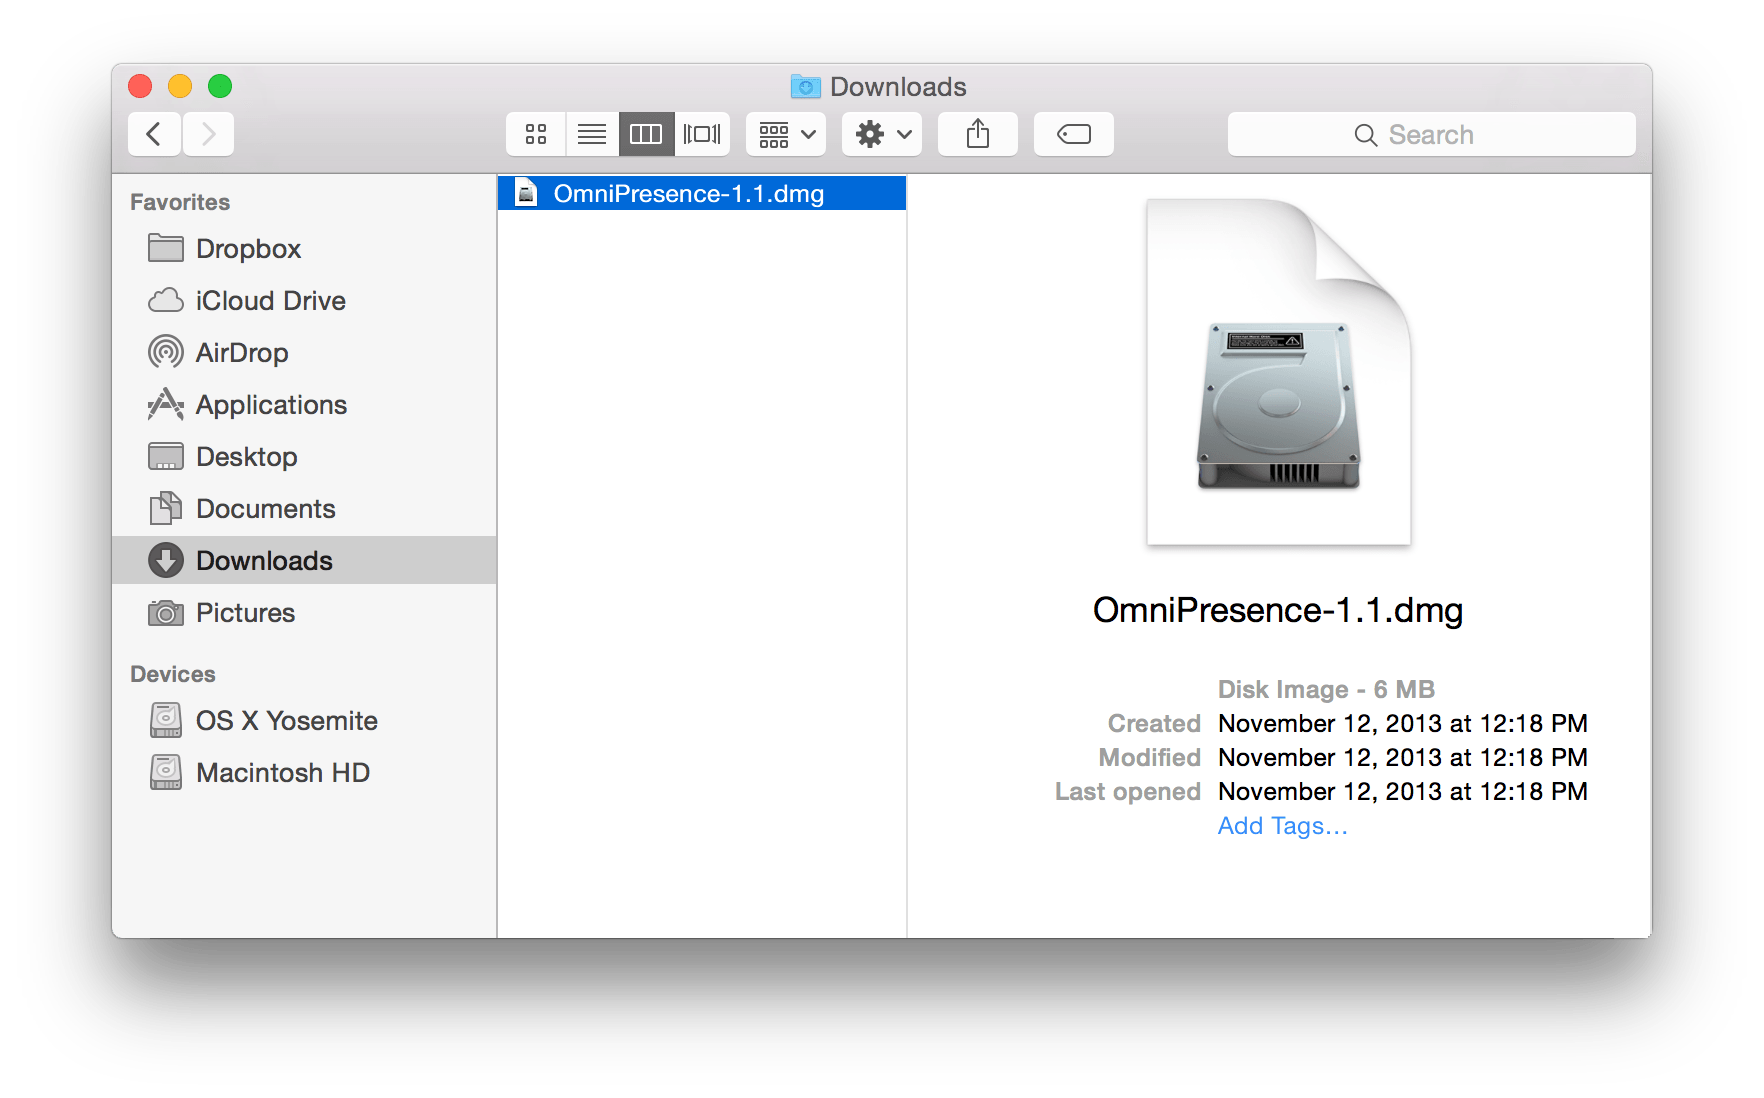
If you clicked the earlier link to download OmniPresence for Mac (or this one right here), you’ll find the installer package in the Downloads folder on your Mac.
To install OmniPresence, follow these steps:
- Open a Finder window and go to the Downloads folder on your Mac.
-
Locate and then double-click the file, OmniPresence-1.4.dmg.
The filename you see might be slightly different. As of this writing, OmniPresence for Mac is at version 1.4 (thus the filename, OmniPresence-1.4.dmg). If you see a different number in the filename, don’t be worried; just go ahead and double-click that one. It just means that our engineering team have been hard at work to improve OmniPresence for Mac.
-
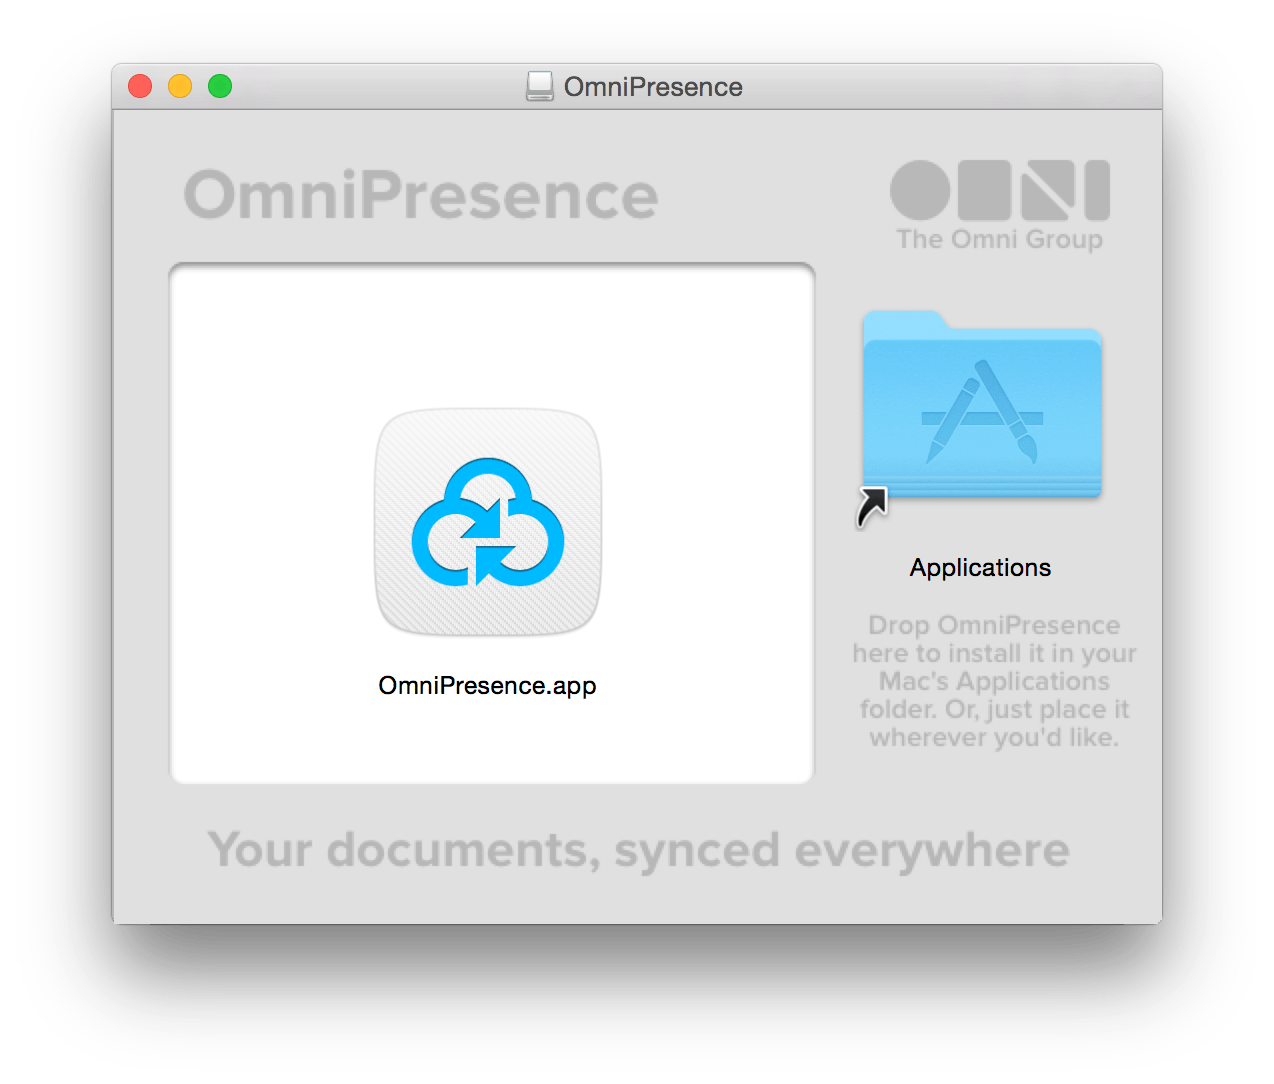
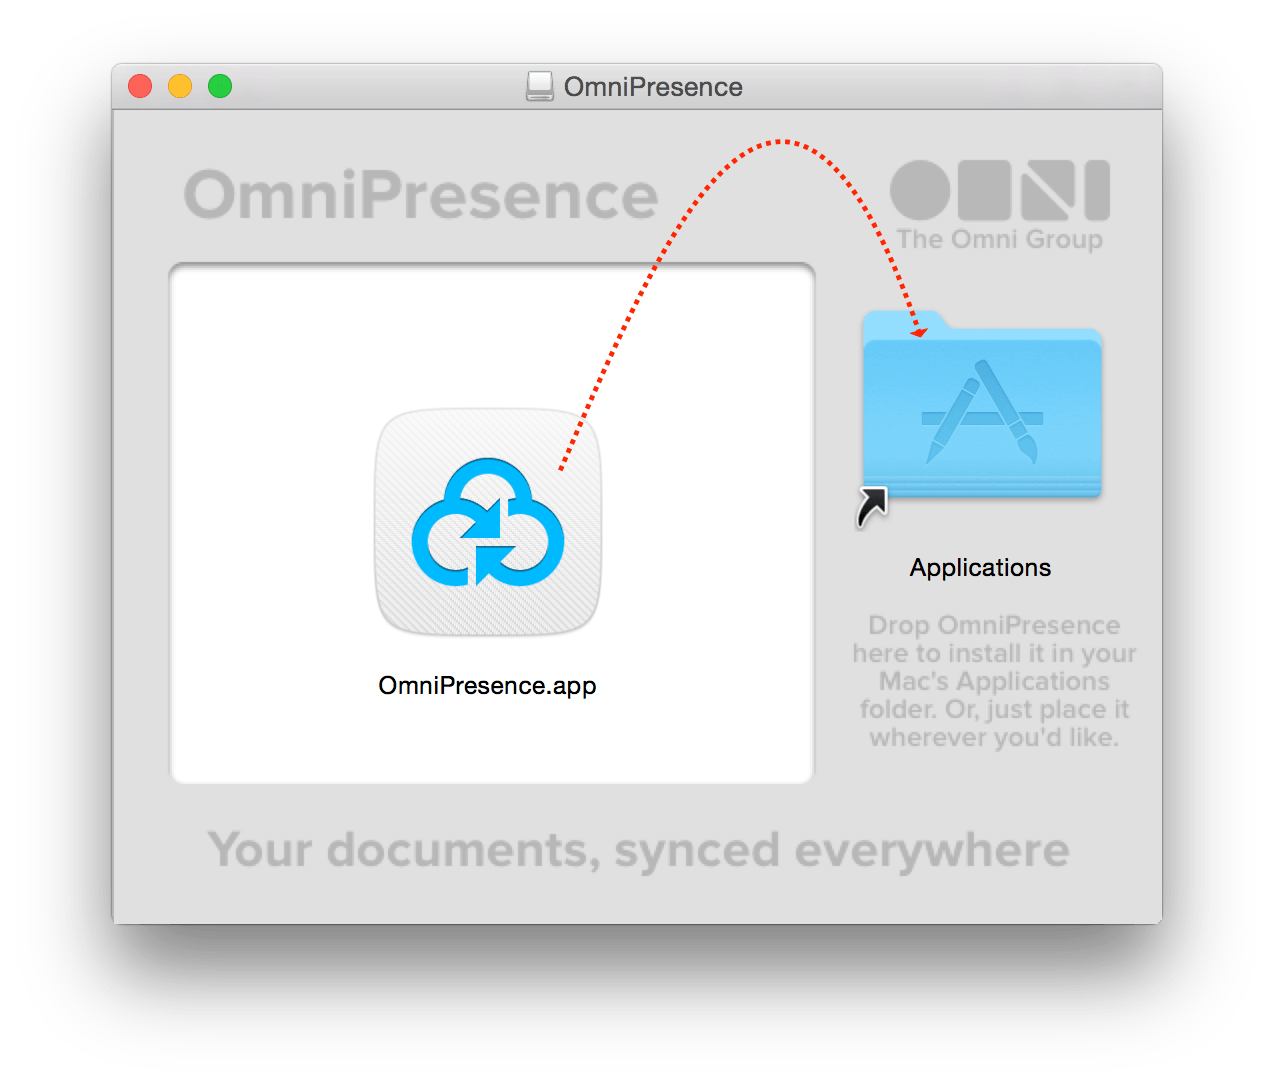
After agreeing to our license, you’re presented with the following window:
-
Drag and drop the OmniPresence.app icon onto the Applications folder to install OmniPresence on your Mac.
-
Close that window with Command-W
- In the Finder window, eject the disk image.
- In the Finder window, return to your Downloads folder. Select the file OmniPresence-1.4.dmg and press Command-Delete to move the file to your Trash. The next time you empty the Trash, that disk image will be purged from your system, saving you precious disk space. (You’re welcome!)
Even if you’re only using OmniPlan on your Mac, syncing is recommended for the automated data backup it provides. Best of all, our Omni Sync Server is free, and we take care of managing the servers so your data is always available when you need it most.
Starting OmniPresence and Connecting to Omni Sync Server
With OmniPresence installed on your Mac, it’s time to get it started and either create or connect to an existing Omni Sync Server account.
Let’s get started!
- Open a Finder window, and choose Applications in the Finder’s sidebar. (If you don’t see it there, choose Go ▸ Applications, or use Shift-Command-A.)
- Scroll down in the list of applications installed on your Mac and locate OmniPresence.app.
- Double-click the OmniPresence.app icon to open the app. OmniPresence installs and then pops open a menu extra in the menu bar; this is where you’ll configure and control OmniPresence.
-
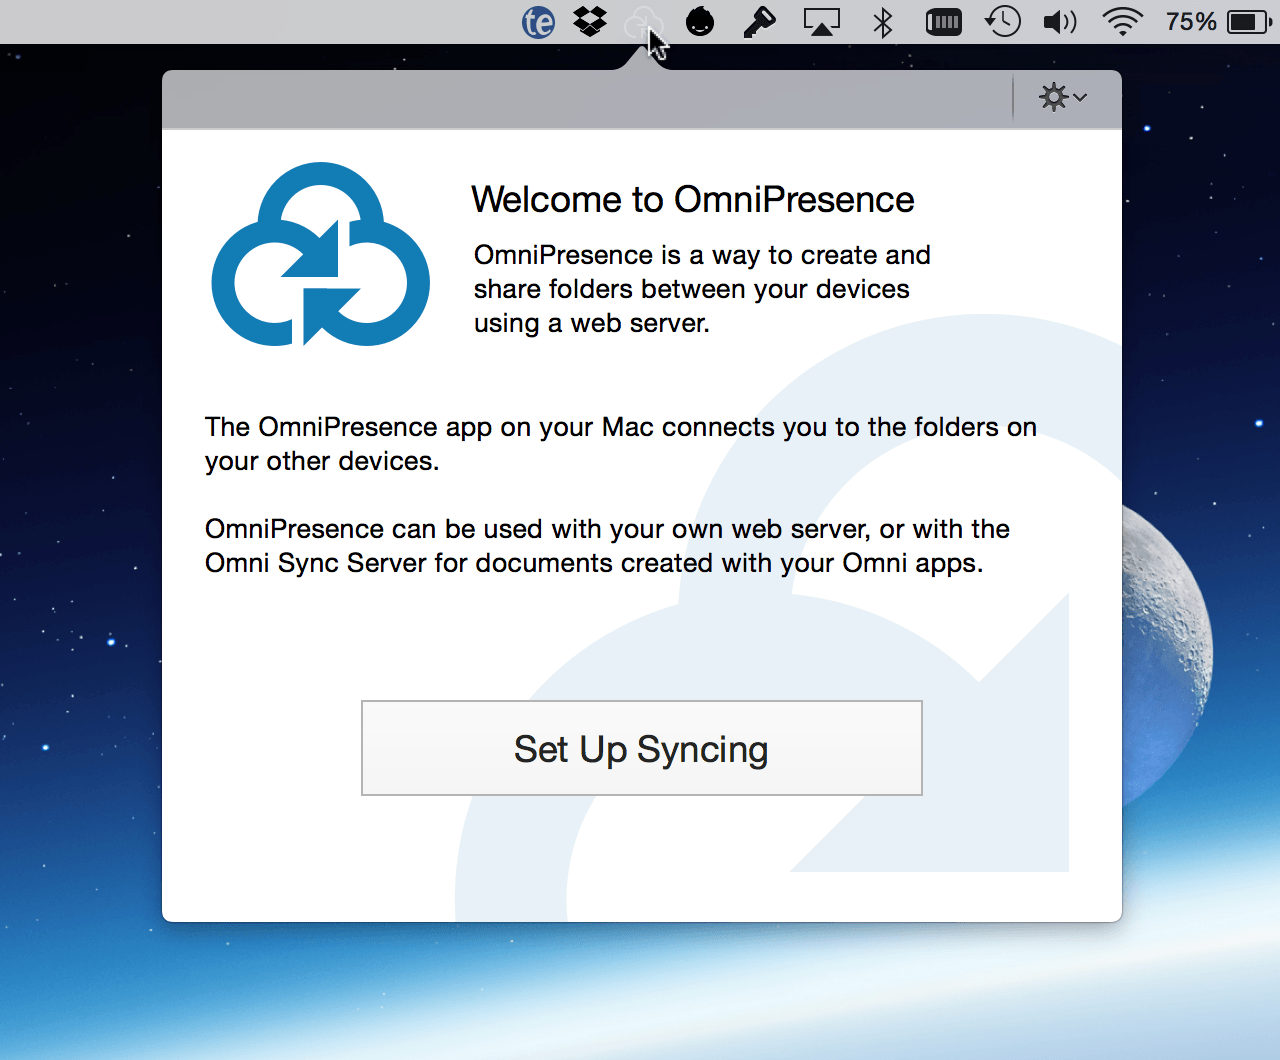
Click Set Up Syncing:
-
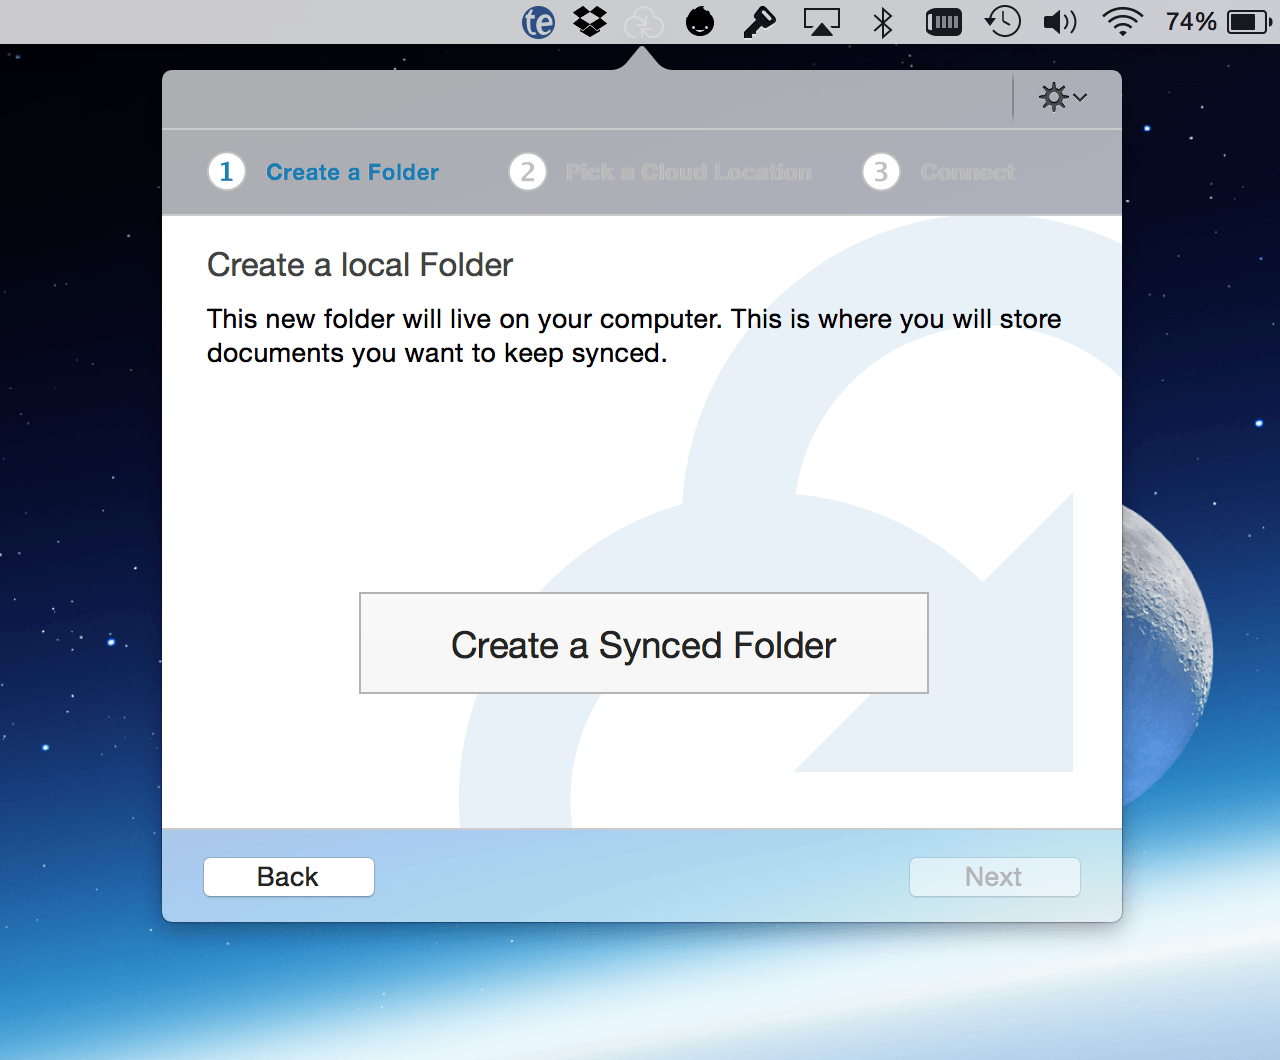
Click Create a Synced Folder:
-
In the sheet that appears, you have the option to name the OmniPresence folder that lives on your Mac. We’ve pre-filled the New Folder with OmniPresence, but you can change this to whatever you’d like.
Also, this folder is created within your Documents folder. You can also change this to something else, if you’d like. For example, you could opt to have your OmniPresence folder reside at the bottom level of your Home folder.
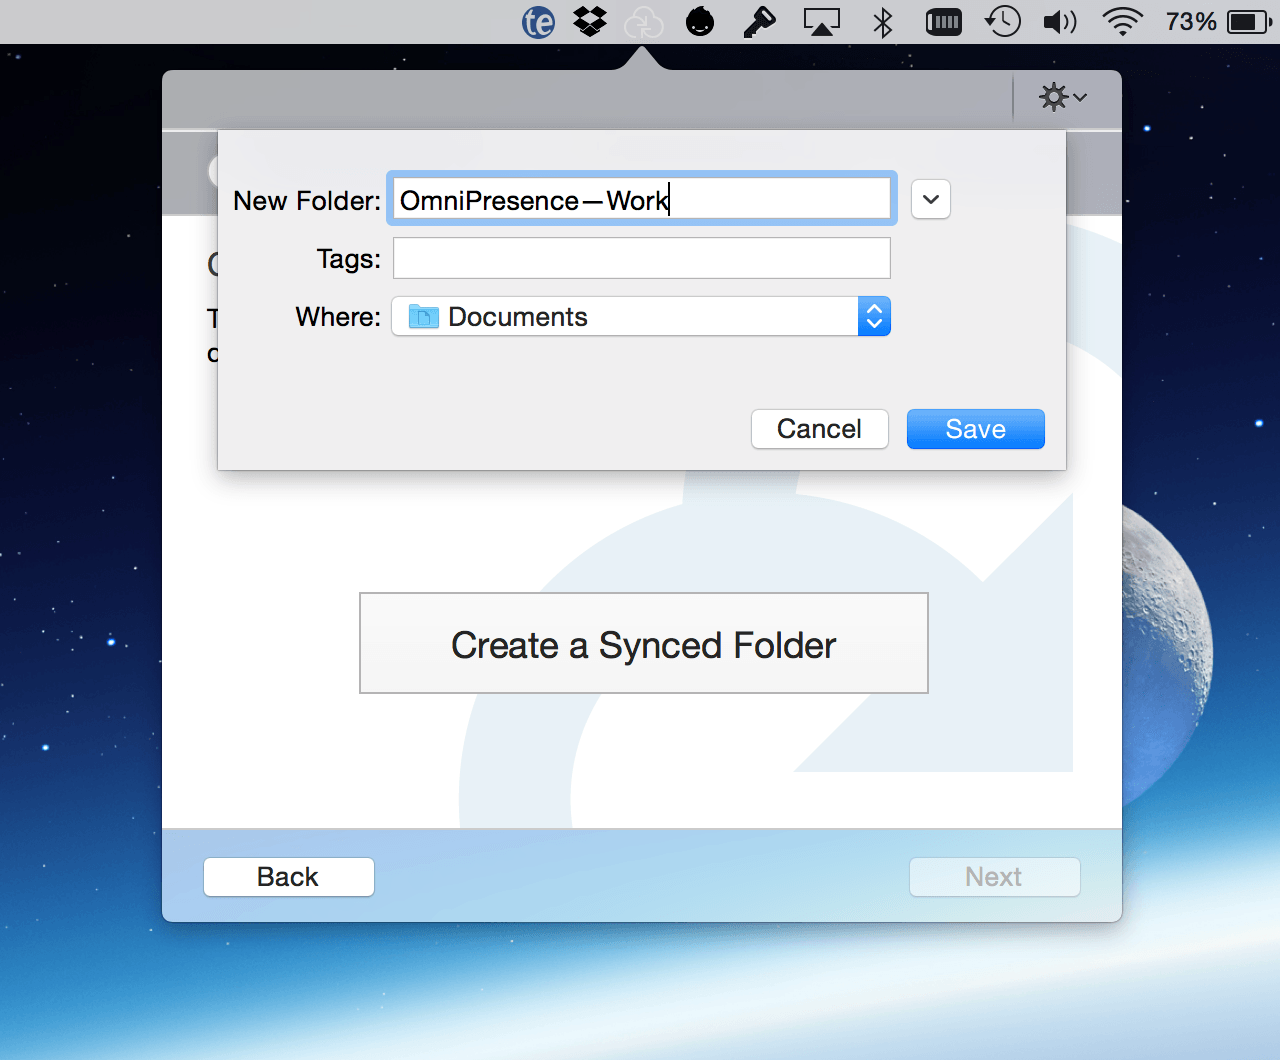
When you’ve settled on a name and location for your OmniPresence folder—or if you’ve decided to go with the default options—click Save. This creates the folder OmniPresence uses to synchronize your files.
-
After creating the OmniPresence folder, your next task is to choose a server in the cloud where OmniPresence stores your synced files.
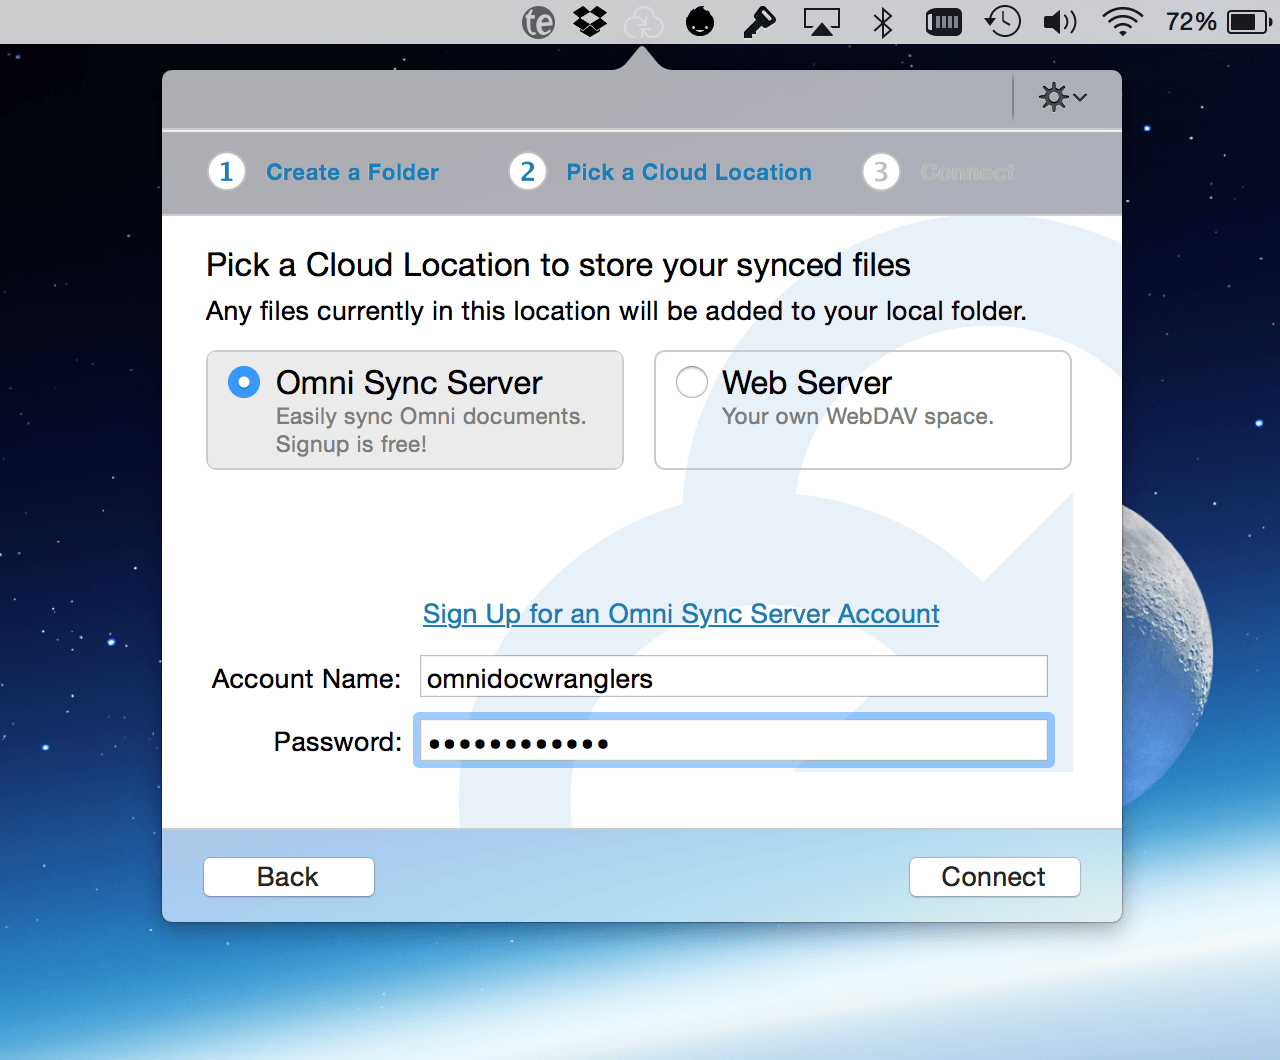
You have two options to choose from:
- Omni Sync Server: This is Omni’s free file server, which has specifically been designed to work in unison with OmniPresence.
- Web Server: This could be your own WebDAV server, or a WebDAV server hosted by a third-party provider.
If you have an Omni Sync Server account, enter your Account Name and Password in the applicable fields and click Connect.
If you haven’t already set up an Omni Sync Server account, click Sign Up for an Omni Sync Server Account. This opens your default web browser and transports you to the Omni Sync Server site where you can sign up for an account and set your password.
-
After clicking Connect, OmniPresence connects to the server you’ve chosen and tests for server compatibility. This is more of an issue with third-party WebDAV servers than it is for connecting to Omni Sync Server, which has been designed to work with OmniPresence.
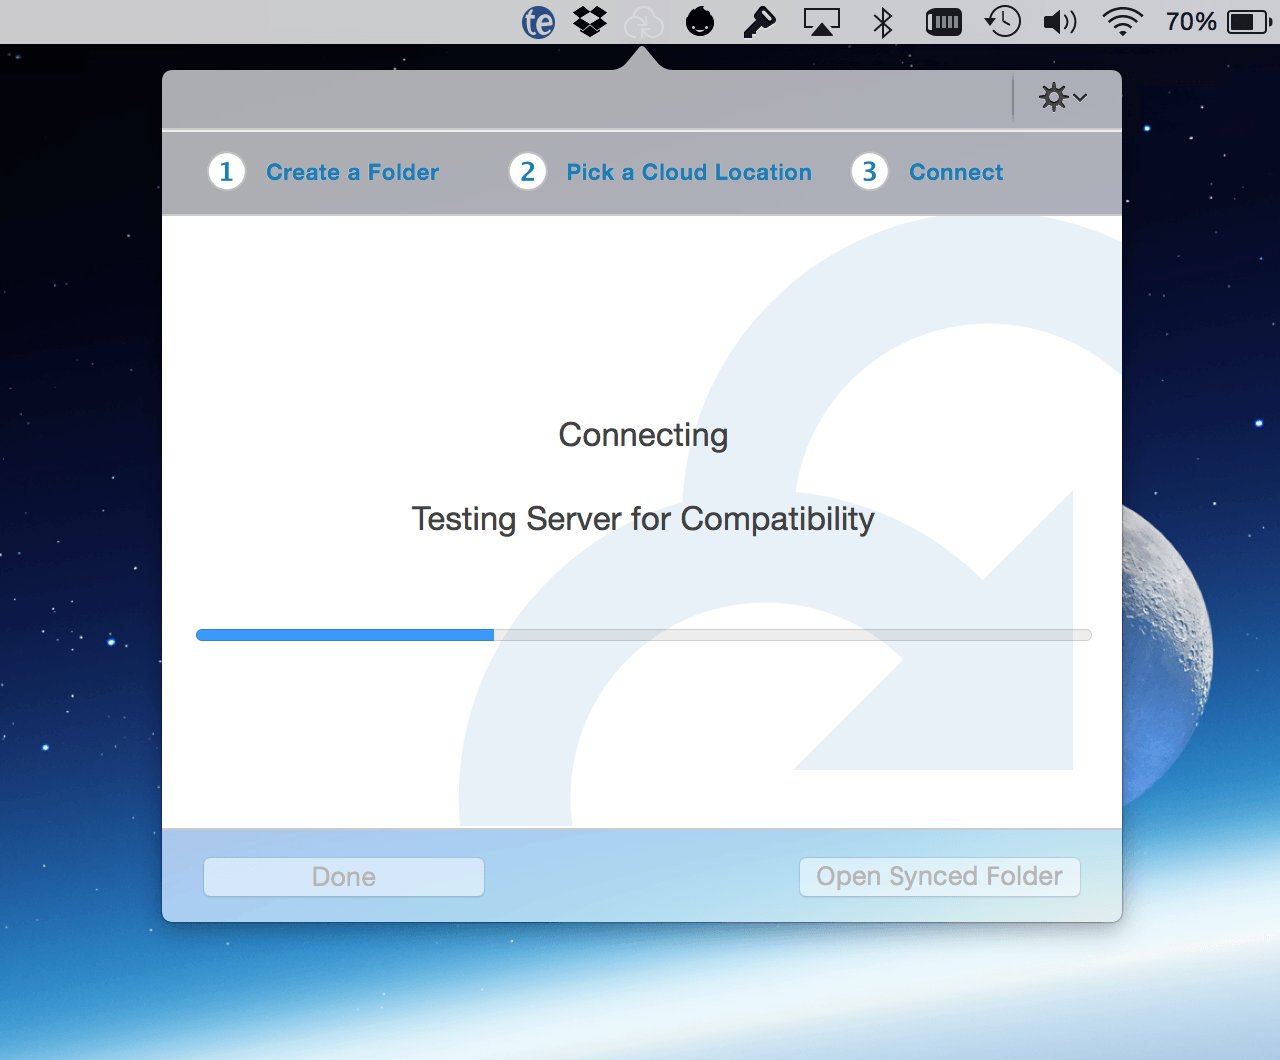
OmniPresence lets you know if it is able to connect to Omni Sync Server (or the WebDAV server you’ve specified).
-
Click the checkbox for Open OmniPresence at Login if you would like OmniPresence to start up whenever your log into your Mac.
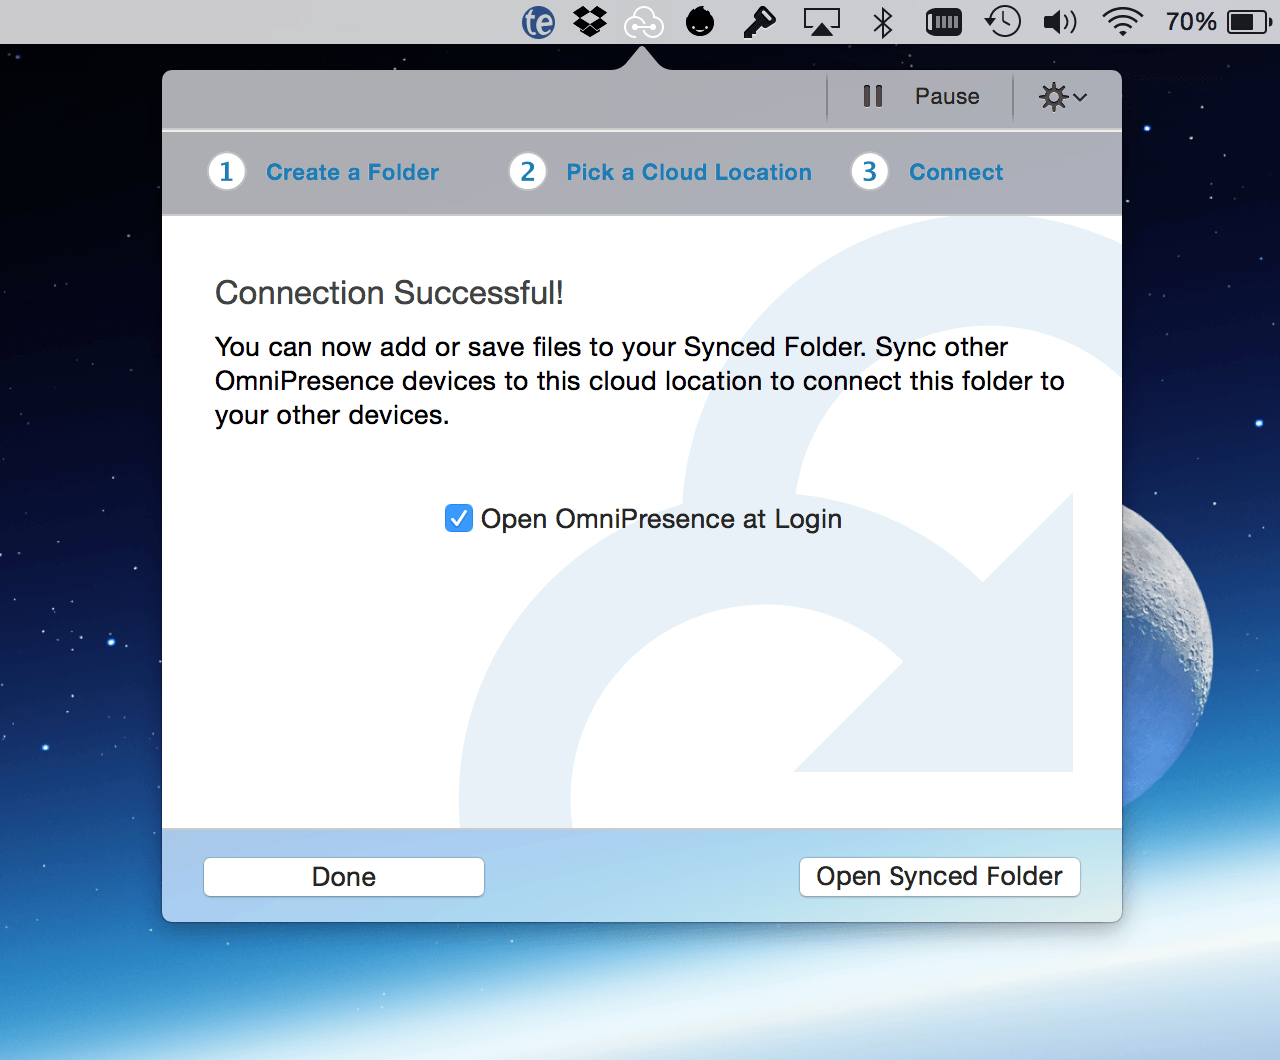
At the bottom of that window, click Open Synced Folder. This syncs your OmniPresence folder with Omni Sync Server (or a WebDAV server). If you already have an Omni Sync Server account, OmniPresence creates new synchronized versions of those files in the folder you’ve specified.
That’s it! Once OmniPresence connects with Omni Sync Server and creates the sync folder on your Mac, you’re ready to go. Whenever you create files with OmniPlan, be sure to save them to your OmniPresence folder (~/Documents/OmniPresence). OmniPresence syncs the files whenever you save, or when an Auto Save takes place on your Mac.
OmniPresence Tips
Here are some helpful tips for enhancing your OmniPresence experience:
- You can create subfolders within the main OmniPresence folder for the files you sync. For example, you could have subfolders for OmniOutliner, OmniGraffle, and OmniPlan, as well as other files you want to sync.
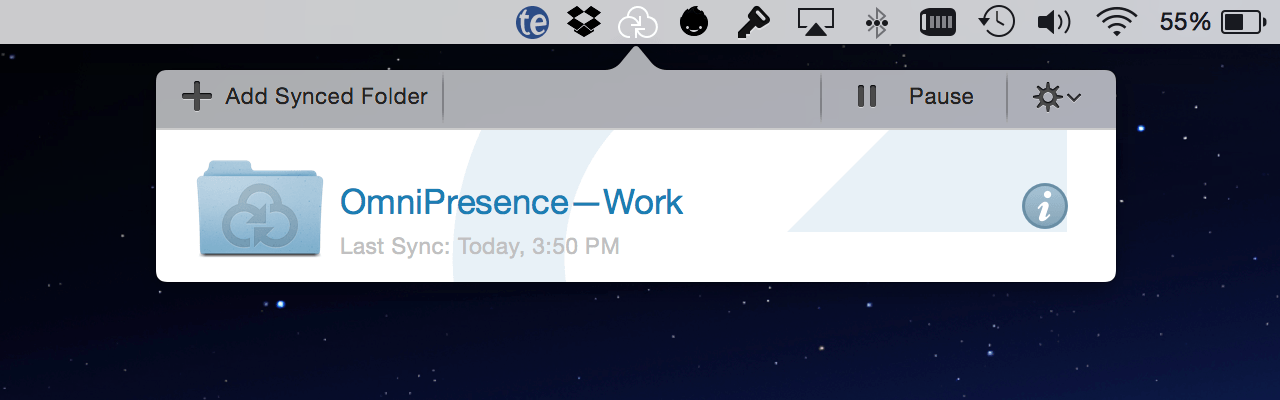
- You can Pause and Resume syncing by clicking the OmniPresence icon in the menu bar.
-
Click the Action menu (the gear next to the Pause/Resume button) for a host of OmniPresence options, including:
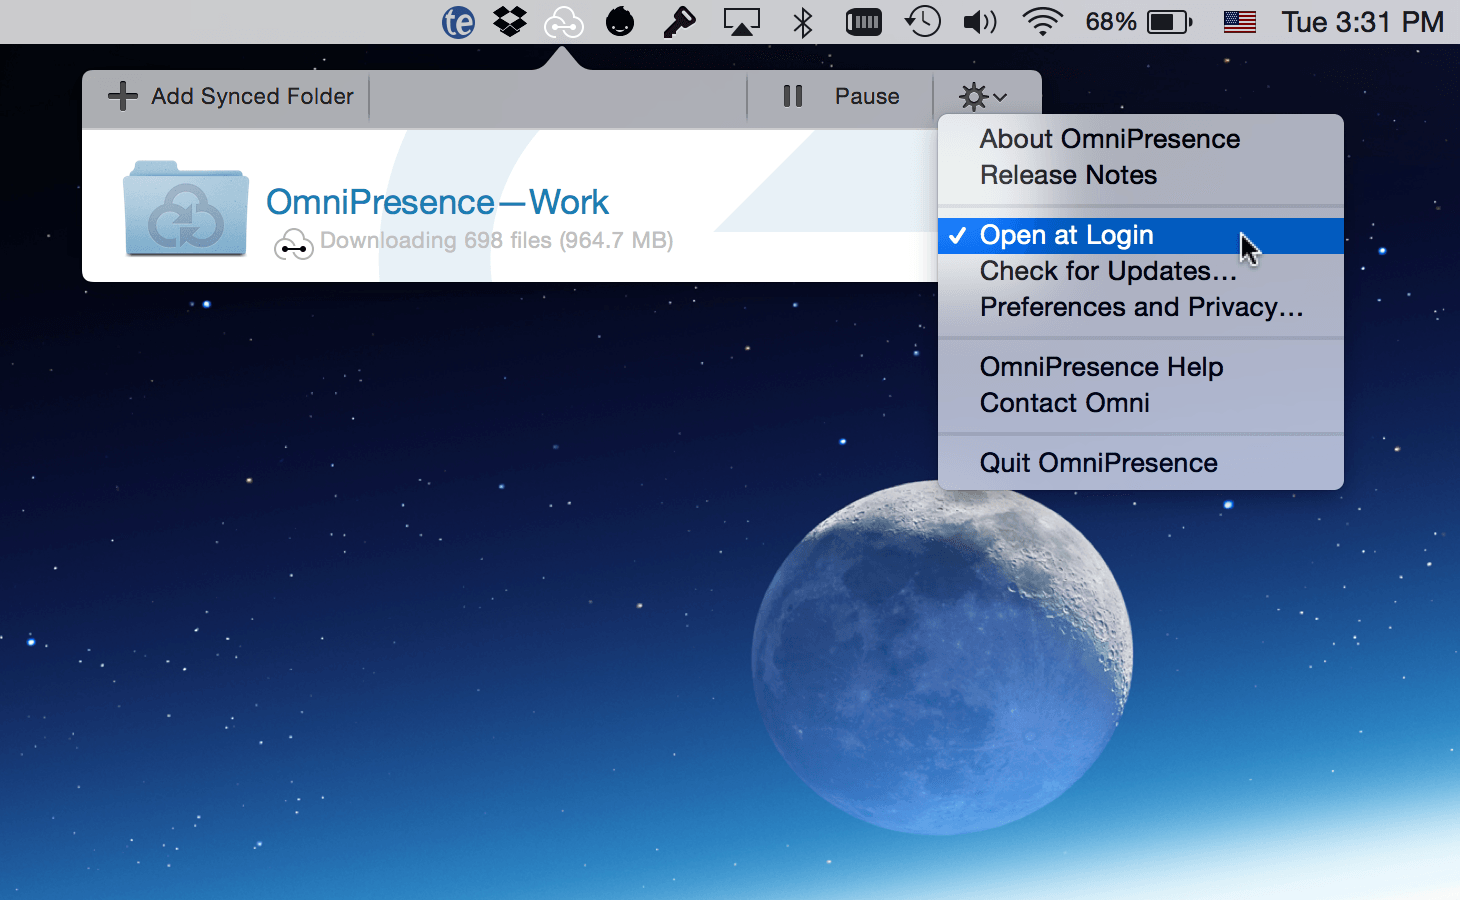
- About OmniPresence
- Release Notes
- Open at Login
- Check for Updates
- Preferences and Privacy
- OmniPresence Help
- Contact Omni
- Quit OmniPresence
-
To stop syncing a folder you’ve connected, click its Info button and choose Disconnect. The folder on your Mac will be moved to the Trash and the files inside will no longer be synced. Any files left in the folder before disconnecting will stay safe and sound at the cloud server location you’ve specified. To reconnect and start syncing with those files again, just create a new folder connected to that cloud location.
-
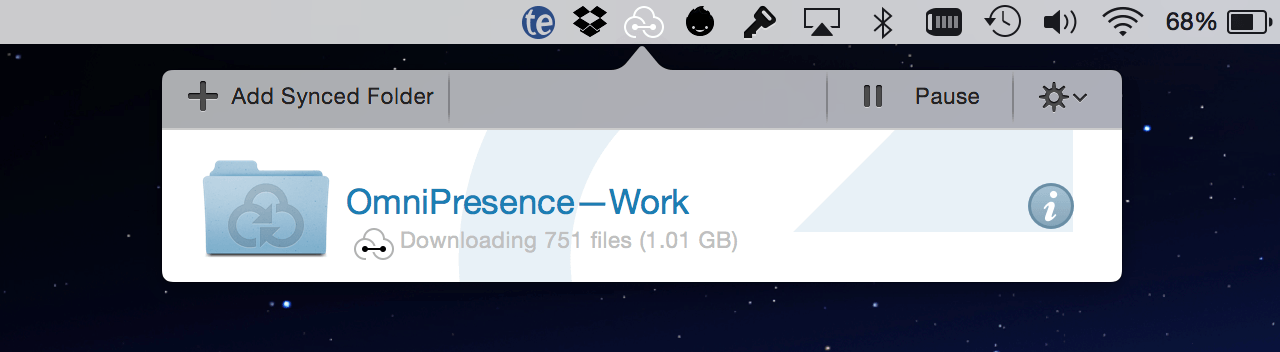
Unsure of when OmniPresence last synced? Click the OmniPresence icon in the menubar and then look beneath each folder name to see the date and time that folder last synced.

If you don’t set up sync now, but later decide that you want to, you can always install OmniPresence and set up an Omni Sync Server account when it’s more convenient for you.