Creating Projects
When you first launch OmniPlan you are presented with the New Project Assistant, a tool that offers choices for the most commonly used settings when creating a new project.
After choosing the settings you want, a new OmniPlan document appears, ready to develop for the specific needs of your project. This chapter describes creating a project using the New Project Assistant, as well as creating templates for kickstarting future projects with frequently used attributes.
Using The New Project Assistant
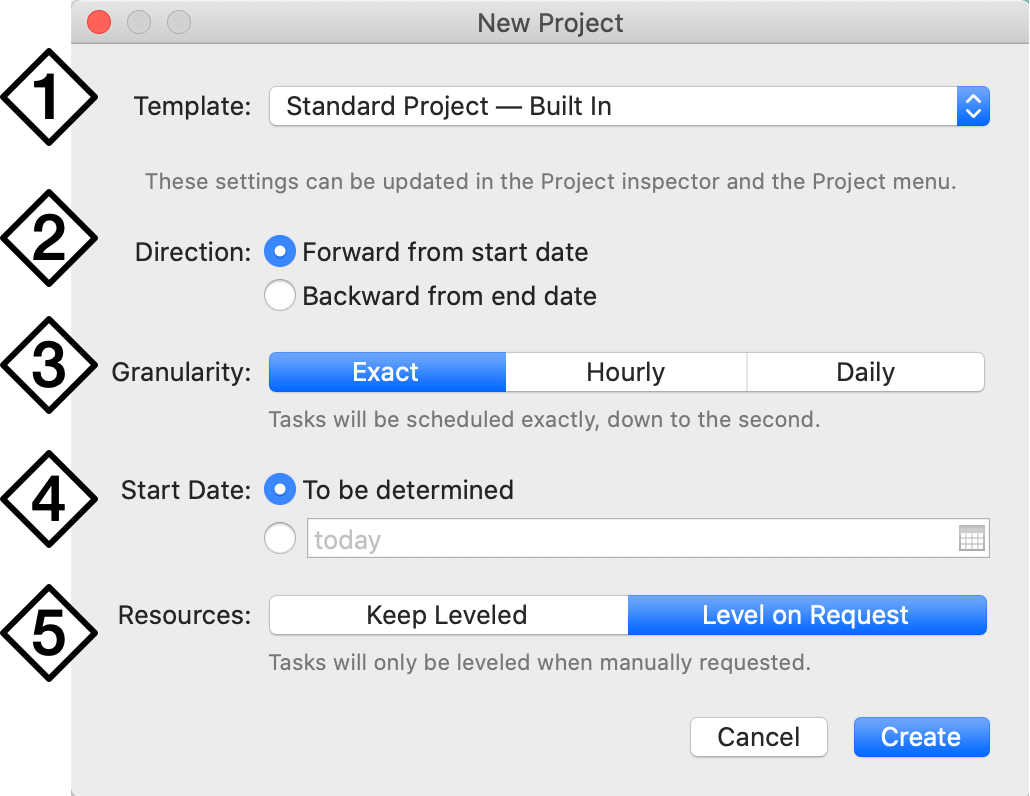
To create a new project, choose File > New Project (Command-N). This opens the New Project Assistant: a window with a set of initial options that form the foundation of a new project.
-
Template—Choose a template file with a set of predetermined characteristics for your project. Three are built-in with OmniPlan; you can create your own if you find that there are specific attributes you use frequently.
-
Direction—Choose whether the project is scheduled forward from a fixed start date or backward from a fixed end date. This corresponds to the Direction setting in the Project inspector.
-
Granularity—Choose whether tasks are scheduled exactly (down to the second), or with some degree of rounding. This corresponds to the Granularity setting in the Project inspector.
-
Start Date/End Date—If the project has a known start date (for a project with Forward direction) or end date (for a project with Backward direction), enter it here. These correspond to the Dates set in the Project inspector.
-
Resources—Choose whether the project levels resources automatically, or only upon request. This corresponds to the Automatically Level Resources setting in the Project menu.
Built-In Templates
The three templates included with OmniPlan offer a sample of useful configurations for getting a quick start on your project.
- Simple Project—This barebones template features minimal styling and includes a single task and a single resource, a good starting point for creating your own project from scratch.
- Standard Project—This template is also styled minimally, but includes an additional pre-configured Conference Room resource (useful when scheduling meetings).
- Standard Project (Styled)—This template is identical to the Standard Project template, but with additional styling for visual presentation.
After a project is created from one of these templates, any existing properties can be changed or removed to suit your project’s specific needs and workflow.
Click Create once you have the project set up to your liking, and a new document appears with your chosen settings.
When you’re ready, choose File > Save (Command-S) to save the file to a convenient location.
Choosing a Save Location
Due to macOS sandboxing restrictions, files saved outside of locations that OmniPlan’s application sandbox can reach cannot be reached by OmniPlan URLs created with Edit > Copy Link To Task/Resource.
The choice of where to save your project files may also be informed by cloud storage considerations, or your multi-user collaboration setup (with OmniPlan Pro).
Creating Templates
A template is a file set up to be a starting point for a new project. For example, there might be certain resources you use for every project, a common task structure, certain named styles you like to use, or a standard set of working hours for your company. You can configure all of these things once in a template file, then create new documents from that template.
To create a new template:
-
Start by creating a new project normally with File > New Project.
-
Set up the project however you like. Everything about a project, including its contents, its styles, the state of the inspectors, the columns displayed, and so on, can be saved in a template.
-
Once the document is ready, choose File > Save As Template.
-
Enter a name for the template and confirm it.
To edit or delete existing templates, or set a default template for new projects, use the Templates pane of OmniPlan Preferences.
OmniPlan Documents in macOS Dark Mode
Previous versions of OmniPlan relied on specific templates to create documents compatible with macOS Dark Mode. Starting with OmniPlan 4, new documents created with the default templates automatically switch color themes based on your appearance settings in macOS System Preferences > General Preferences.