Resource View
Enter Resource View by clicking the fourth button in the view switcher in the toolbar, or choosing View > Resource View (Option-Command-4).

Use this view to add and manage staff, equipment, and materials. As with Gantt View, Resource View is split into two parts: the resource list for adding, grouping, and managing resources, and a timeline that shows the same tasks as Gantt View—divided here by resource assignment instead of chronology or dependency structure, with drag-and-drop control to quickly assign resources to tasks (and vice versa).

This view also includes a calendar for editing working hours, broken down into two modes: editing for Normal Hours, and Custom Hours. In Normal Hours you’ll edit the regular working hours for both the whole project and individual staff members. Use the Custom Hours to add isolated changes to the schedule such as vacations and planned time off.
The Resource List
The outline in Resource View contains a list of the resources available to the project. As with the task outline in Project Outline View, the list is organized into rows and columns, with each row representing a resource (or group) and each column containing a certain type of information related to that resource.
Creating and Deleting Resources
A key part of building out your project is describing the resources that make up the team you are working with, and the equipment and materials they’ll be using to get the job done. The resource list is a quick and efficient way to do this.
There are several ways to create new items in Resource View:
- Select an item in the resource list and press Return (or Command-Return, depending on the Keyboard Options in OmniPlan’s General Preferences).
- Click the Add button in the toolbar above the outline.
- Drag a macOS Contacts card into the resource list to create a Staff resource with that contact information.
- Control-click and choose Add > Resource from the contextual menu.
There are a few ways to delete a resource or resource group:
- Select a resource or group in the outline, then press the Delete key.
- Select the item, then click the Remove button in the toolbar above the outline.
- Select the item, then Control-click to reveal the contextual menu and choose Delete.
Resource Types
An understanding of the various resource types available in OminPlan is useful when working in Resource View.
Staff 
The most important resources on a project are likely the people responsible for its execution. These are represented by Staff resources in OmniPlan. As unique humans, each staff member is represented by an email address that identifies them across all projects they may be a part of.
Equipment 
Tools, machinery, computers, and other hardware used to complete a project are represented as Equipment resources in OmniPlan. Equipment are similar to staff in many respects, but lack a notion of unique identity.
Material 
Ingredients, building supplies, food, or other components expended in the process of executing the project are represented as Material resources in OmniPlan. Unlike staff and equipment resources, materials dedicated to tasks are consumed upon use and are therefore represented by a number of units required.
Group 
A Group is not a resource itself. Instead, it’s a way to gather other resources under the same umbrella, indicating that (for example) a number of staff are part of the same team.
Grouping resources is accomplished similarly to grouping tasks.
Assigning Groups
If you assign a resource to a group of tasks, the resource is assigned to every task in the group. The group task itself cannot have a resource assigned to it.
If you assign a group of resources to a task, OmniPlan provisionally labels the task as having the whole resource group assigned. Then, when you level resources, one member of the group is chosen to work on that task. If that member becomes unavailable, leveling again assigns a different member.
Characteristics of Resource Groups
A resource group is a container to organize several resources together, so it doesn’t have a lot of the same characteristics as an individual resource, like Efficiency and Cost.
-
Name—Of course, a resource group has its own name.
-
Email—You can assign an e-mail address to a group, in case you have a mailing list or some address which goes to all of the members in the group.
-
Type—A resource group can contain resources of any type (Staff, Equipment, or Material), but its own type is always Group.
-
Cost/Use, Cost/Hour, and Efficiency—These are shown as averages of the values of all members of the group. If you enter a new value, it is applied to all members of the group.
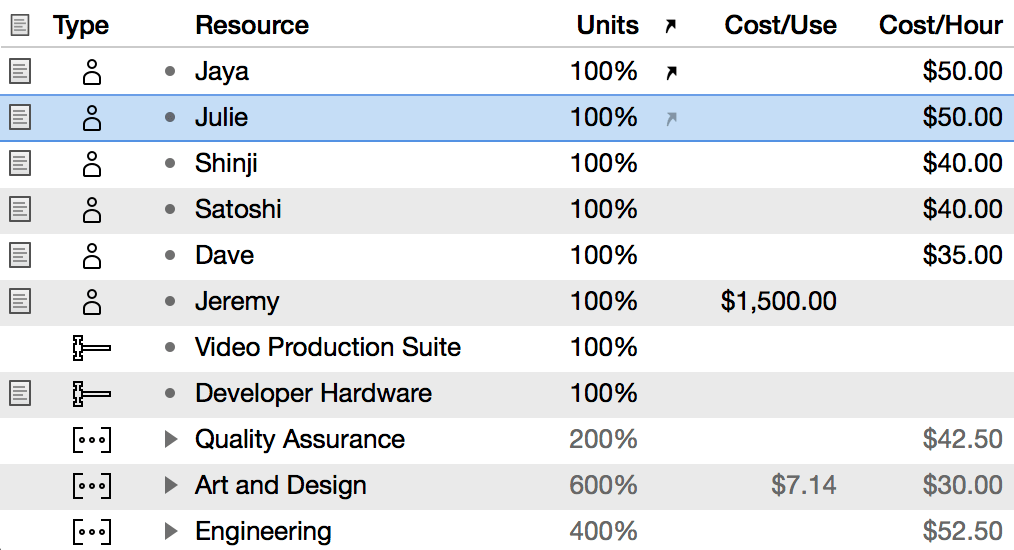
Resource List Columns
As with the task outlines in Project Outline View and Gantt View, you can customize the outline in Resource View to display a set of columns with data specifically relevant to your project. Control-click the outline header or choose View > Resource List > Customize Columns to choose which columns to display.
If you would like to add columns to the resource list that aren’t part of the built-in metadata set (or if you are seeing unexpected entries there), note that key/value pairs you set up for resources using the Custom Data inspector are added to the list as custom column types.
The following columns represent properties of resources that can be included for display in the outline.
Attachments
Click the arrow icon in the selected row to see a menu of the item’s linked files, or to link to a file if there is not one linked yet. Rows with links to files show an icon even when they are deselected.
Notes
Click the note icon in the selected row to show or hide the item’s note, or to create a note if there is not one yet. Rows with notes show a note icon even when they are deselected.
Unique ID
The unique ID is a number assigned to each resource to identify it unambiguously, even if its name or position in the outline changes. A unique ID won’t ever change, and each new task or resource you create gets a new unique ID number. These numbers are useful for matching up items when you are importing and exporting projects between OmniPlan and other applications.
Resource
The resource name, which can be edited here or in the Resource Info inspector.
Units
The Units column has different attributes depending on the type of resource:
-
Staff, Equipment—The amount of a resource’s effort available to the project, expressed as a percentage. This can be edited here or in the Resource Info inspector.
-
Material—The number of times a resource is used throughout the project. This is equal to the sum of the units assigned to tasks in the project, and cannot be edited directly here.
A material resource is assigned to a task with one unit used by default. To edit the number of units used by the task, select the task in the Resource Assignments inspector or the resource in the Task Assigned Resources inspector and double-click on the Units field. Changes made here are reflected in the total units count in the Units column and the Resource Info inspector.
Efficiency
The amount of effort-per-time that a staff or equipment resource can produce, expressed as a percentage. A resource that operates at 50% efficiency (a new employee in training, for example) takes two hours to complete an hour’s worth of effort.
Cost/Use
The flat monetary cost incurred each time a resource is assigned to a task in the project, or (in the case of material resources) for each unit of the resource expended.
Cost/Hour
The monetary cost per hour of effort that the resource spends working on the project.
Total Cost
The sum of the resource’s use costs and hourly costs. This value cannot be edited directly.
Total Hours
The sum of the hours of effort that the resource is assigned throughout the project. This value cannot be edited directly.
Total Uses
The number of times the resource is assigned to a task throughout the project, or (in the case of material resources) the total number of units used by the project.
Type
The resource type. Click the type icon and choose the type from among Staff, Equipment, Material, or Group.
Custom Work Week
An icon appears in this column if a resource has a work week that differs from its default work week; the default work week for a resource is defined by its parent (if it’s a member of a group) or the project (if it’s not). You can click the icon to see the resource’s work week.
Schedule Exception
An icon appears in this column if a resource has a work schedule that differs from its work week, such as when someone goes on vacation. You can click the icon to see the resource’s work schedule, and from there you can check the orange-highlighted dates to see where its exceptions are.
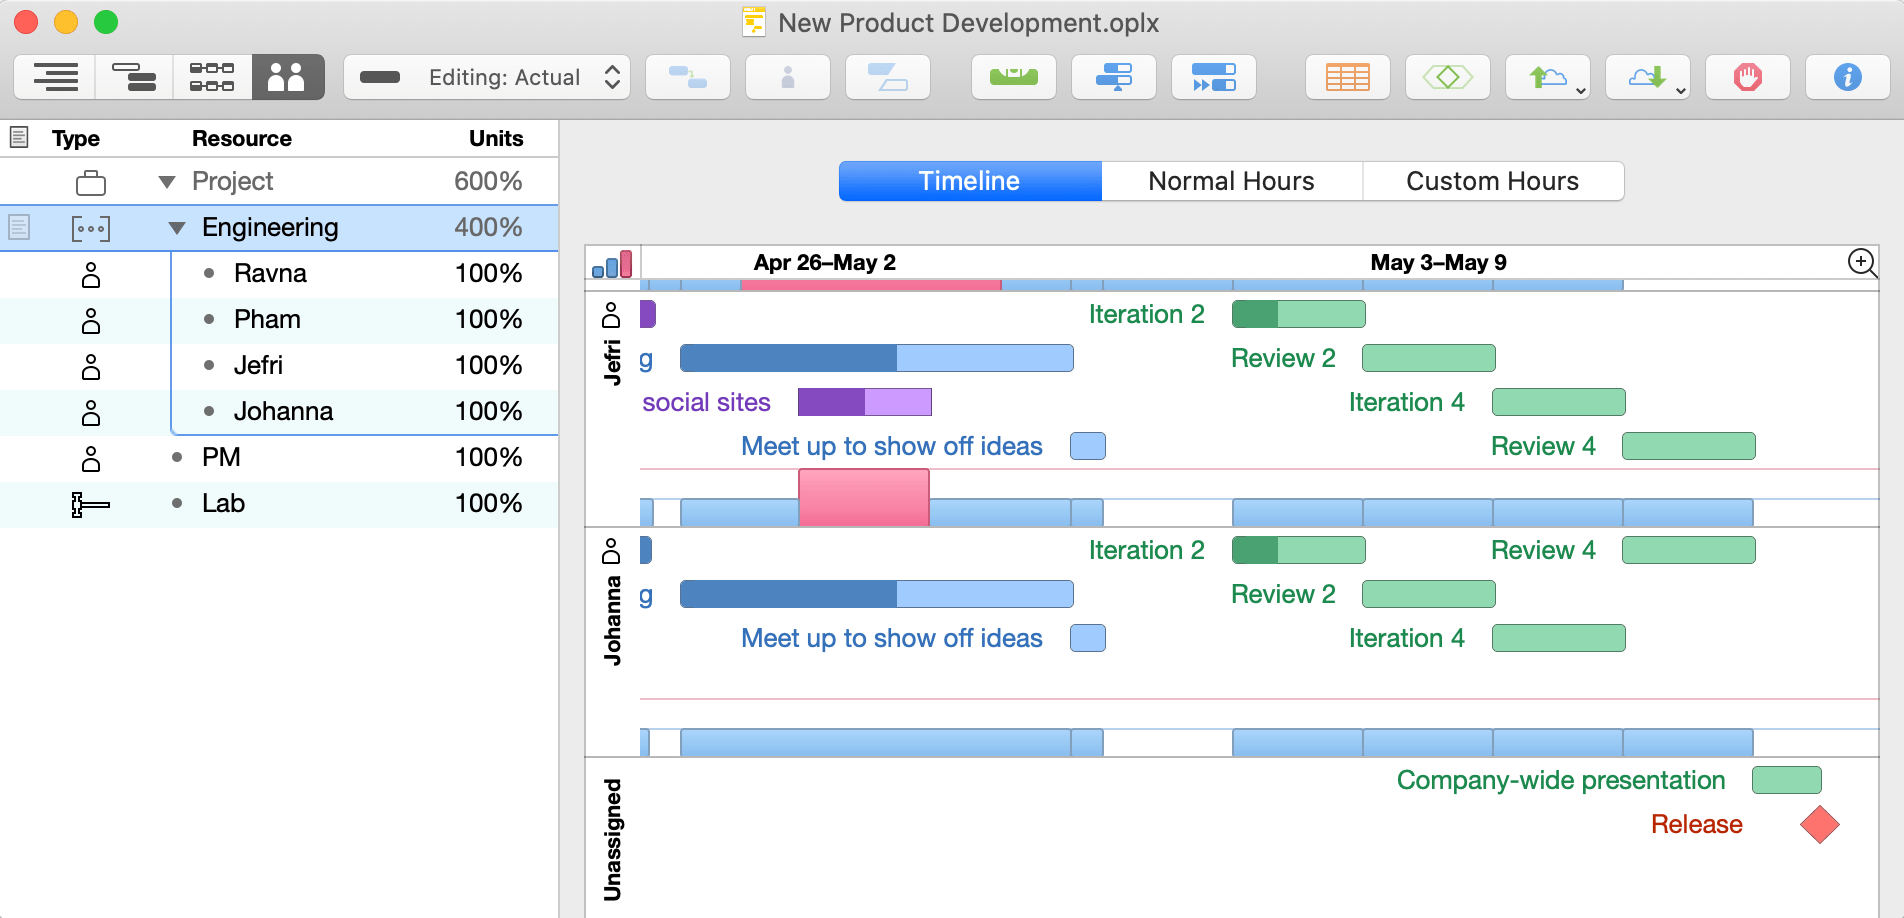
The Resource Timeline
When you want to manage your project from the point of view of the resources available, the timeline in Resource View will help you visualize and control your assets.

-
Click the bar graph button to show or hide the load graph beneath each resource’s timeline.
-
The chart shows a timeline of tasks for each resource you select in the outline. If you select no resources, the chart shows all resources’ timelines. If the resource is unavailable during normal working hours (because it has customized time off), the unavailable times have a background of the off-hours color as it is set in the Styles inspector.
-
Below the resources’ timelines, an Unassigned timeline shows the tasks which aren’t assigned to any resource. You can drag tasks between timelines to change their assignments.
-
A blue bar in the load graph represents time when the resource is being used at 100% of its available units.
-
A pink bar in the load graph represents time when the resource is being used at over 100% of its available units. You can level the project to alleviate this.
-
You can change the visible date range and date headers in the timeline the same way you do in the Gantt chart. Choose a scale from the magnifying glass menu here, or click and drag in the date header area.
Customizing Timeline Task Labels
As with the Gantt chart, you can track intervalic and cumulative information and and display labels on tasks in the Resource View’s timeline with the column data of your choosing. Choose View > Timeline > Customize Task Labels to open the task label editor specific to the resource timeline.
Scheduling Normal Hours
Setting up the calendar for a project involves two components: the Normal Hours for the project and individual resources, which represent the standard work week, and Custom Hours, which represent exceptions to the normal schedule.
In Normal Hours mode you can edit the working calendar for the whole project (when no resources are selected), as well as the regular working hours for individual staff members (by selecting them in the outline). Normal working hours are represented by green blocks in the calendar.
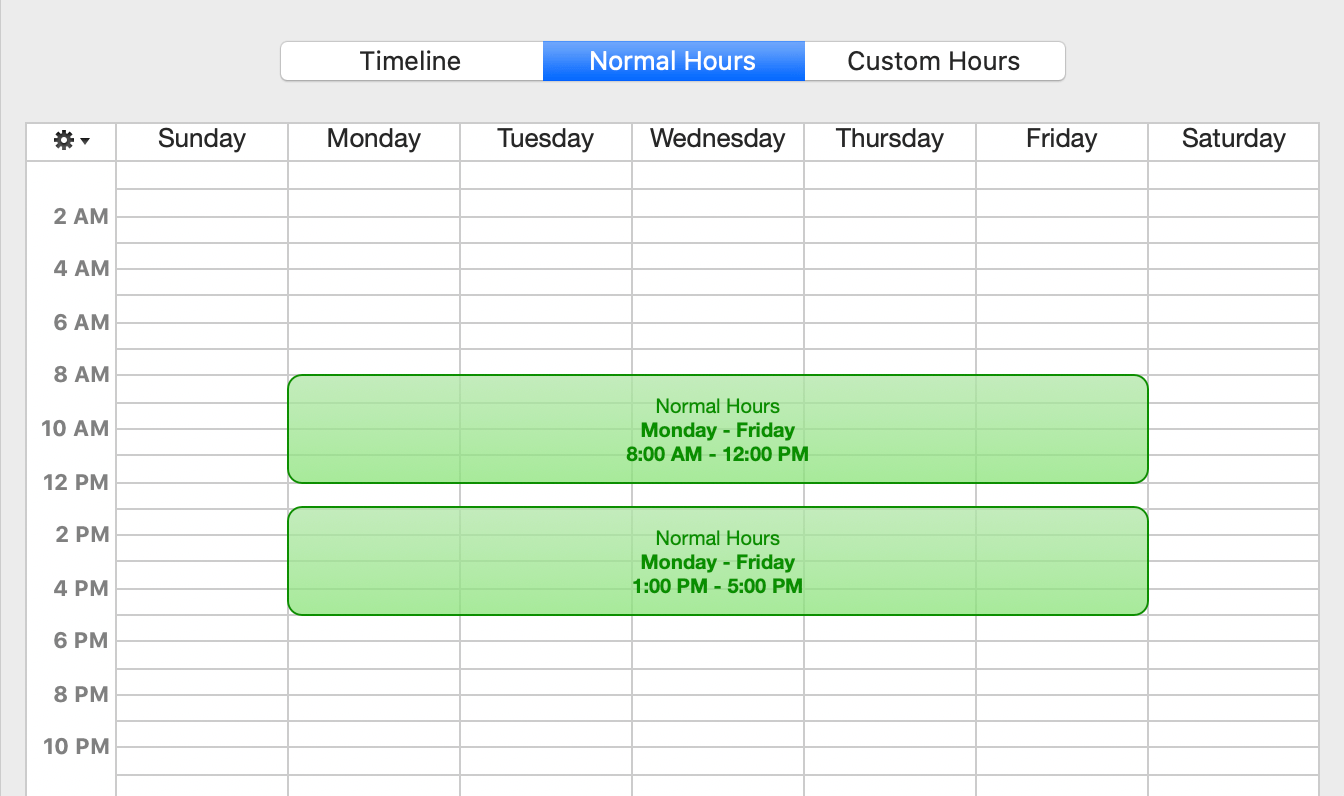
The Normal Hours are a general set of working hours to be followed in a typical week. This set of hours is applied to every week in the project, thus determining how many hours of effort can be completed in each day.

The green blocks represent segments of working time. You can drag the edges of a block to set a day and time range. Click a block to select it; you can then press the arrow keys to move it, or press Delete to remove it.
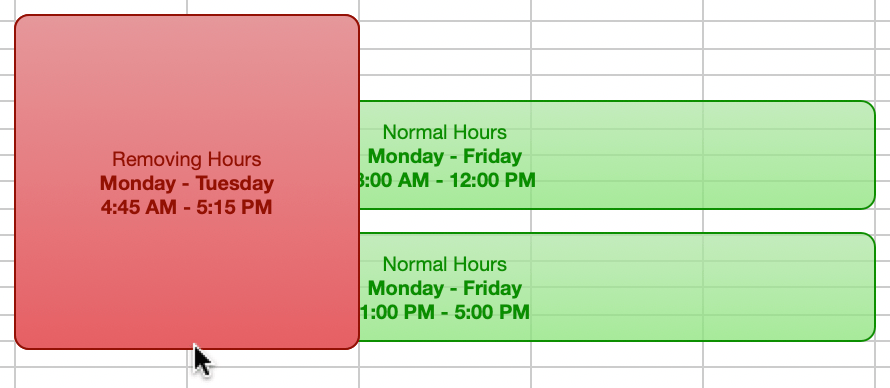
Drag or double-click in an empty area to create a new time block, and Shift-drag anywhere to draw a red block that erases working hours. These techniques are useful for breaking up blocks that span several days, so that you can adjust them individually.
When you create normal working hours for a project, you are describing the calendar of work time that happens in a typical week for purposes of resource assignment.
However, when times are displayed throughout OmniPlan (the amount of effort remaining on a task, for example), they are calculated based on the the week length established in the Effort Unit Conversions section of the Project inspector.
For example, if your work week is six days of seven hours each, tasks displayed in the Gantt chart will appear to register inaccurate times unless you change the value of a work day to 7 hours and a work week to 42 hours.
Setting Up Normal Hours for a Resource
Resources inherit their work week schedules from the project, but you can customize them individually by selecting them in the outline. (If nothing is selected, you will edit the working hours for the whole project instead.)
As with the project as a whole, the working hours for an individual resource are represented by green blocks in the calendar, and can be edited with the same tools used to edit the normal project hours.
If a resource’s work week is customized from the whole project’s normal work week, the Custom Work Week icon ![]() appears in the Custom Work Week column; click it to view the customized work week of the selected resource.
appears in the Custom Work Week column; click it to view the customized work week of the selected resource.
Scheduling Custom Hours
The Custom Hours are a calendar of the working hours for specific days. You can set up holidays, half-days, overtime, and other such exceptions to the normal work week. Like the normal work week, there is a custom schedule for the whole project which resources inherit by default, but you can also customize resource schedules individually.
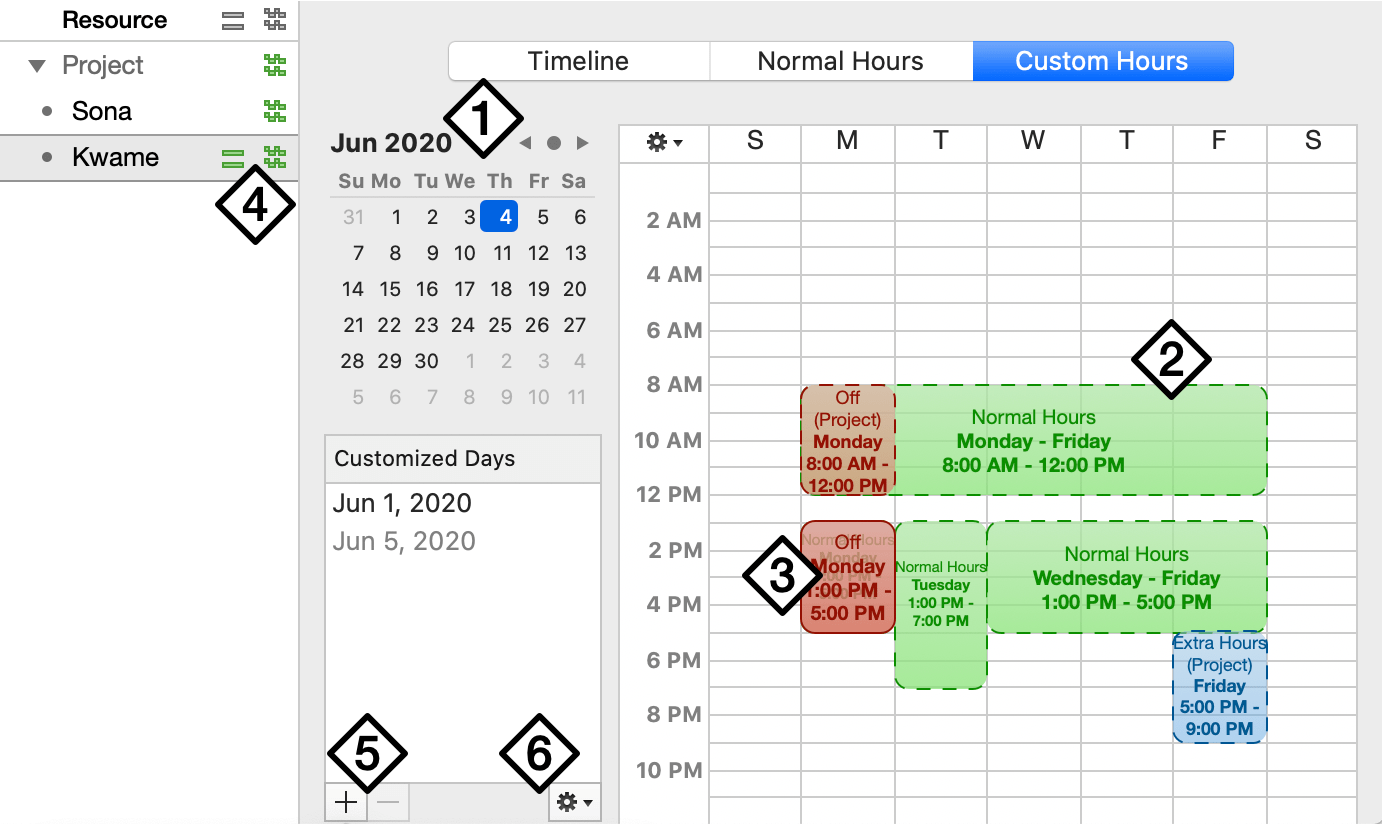
-
Navigate through upcoming weeks and months using the mini calendar. Click the arrows to move between months; Option-click to move a year at a time.
-
The normal work week appears with a green dotted border, so you can see how this week’s schedule differs as you begin to make changes.
-
As when editing the normal hours for the project, drag or double-click in an empty area to create a new block of working time. Shift-drag anywhere to draw a red block that represents time that is unavailable for work.
-
A resource with upcoming custom hours is flagged with
 in the Schedule Exception column; clicking the icon brings you to the schedule change in question.
 -
You can add custom calendar exceptions to either the project or a selected resource by clicking the Plus button beneath the Customized Days list, which opens a menu for designating extra work hours, off hours, or entire off days.
-
When viewing the custom hours for an individual resource, use the Gear menu beneath the Customized Days list to show or hide inherited custom dates (dates that are a part of the project’s custom hours schedule). Inherited dates appear as grey entries in the list.
With OmniPlan Pro, if the project is subscribing to a calendar, hours imported from the calendar are represented by blocks in the custom hours calendar that are outlined with dotted borders, indicating that they cannot be directly edited here.