The Task Inspector
The Task inspector holds tools for configuring selected tasks, including descriptive details and information about their scheduling, dependencies, and assigned resources.

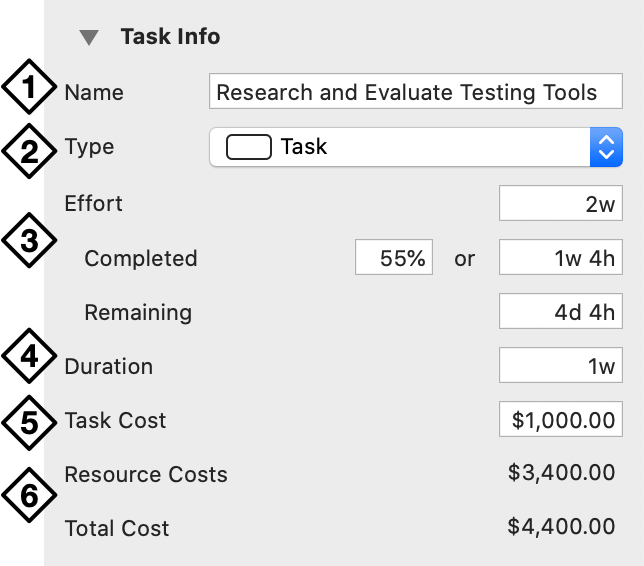
Task Info
Use the Task Info inspector to set key attributes that define the type and scope of a task.
-
Name—The name of the task as it appears in the task outline.
-
Type—Choose from among the available types for the task, including:
- Task—The standard representation of a piece of work to be accomplished as part of the project.
- Milestone—A zero-length event which represents an important moment in the project’s life.
- Group—A parent task used for creating hierarchy with child tasks within it.
- Hammock—A task whose duration varies based on the completion of the preceding task and the start of the task that follows.
Additionally, the following options are available:
- Make This Task Recur—Convert an existing task or milestone to a recurring task.
- Edit Recurrence Rules—Open the recurrence dialog to change the rules for an existing recurring task.
- Stop Recurring—Convert a recurring task back to its original type and cancels any future occurrences.
- When Closed, Show Task Bar—Show a group task as a task bar representing the cumulative attributes of the group when the task is closed.
- When Closed, Roll Up Children—Show a group task as an overlaid collection of the group’s child task bars when the task is closed.
-
Effort—The amount of effort required to complete the task. Completed represents the amount of finished work on the task, while Remaining is the total effort required minus the completed effort.
-
Duration—The amount of time required to complete work on the task. See duration.
-
Task Cost—Any costs associated with the task that are not reflected in the costs of the resources assigned to the task.
-
Resource, Total Costs—The cost of the resources assigned to the task (derived from the resources’ Cost Per Use and Cost Per Hour values), and the total cost of the task (the resource costs plus the task cost). These values cannot be edited directly.
Creating Tasks with an Elapsed Duration
By default, OmniPlan calculates task duration and lead/lag time from the project’s work hours. Entering an “e” before the value for Duration converts it to an elapsed time value instead.
For example, if you need to wait for the paint to dry before you can take the next step in your project, enter 48eh in the “Let paint dry” task’s duration field to tell OmniPlan that the next dependent task can begin Monday morning if the paint has started to dry by the end of the day on Friday.
Tasks with an elapsed time most likely won’t require a resource, since you wouldn’t need to assign someone to stand around and watch the paint dry.
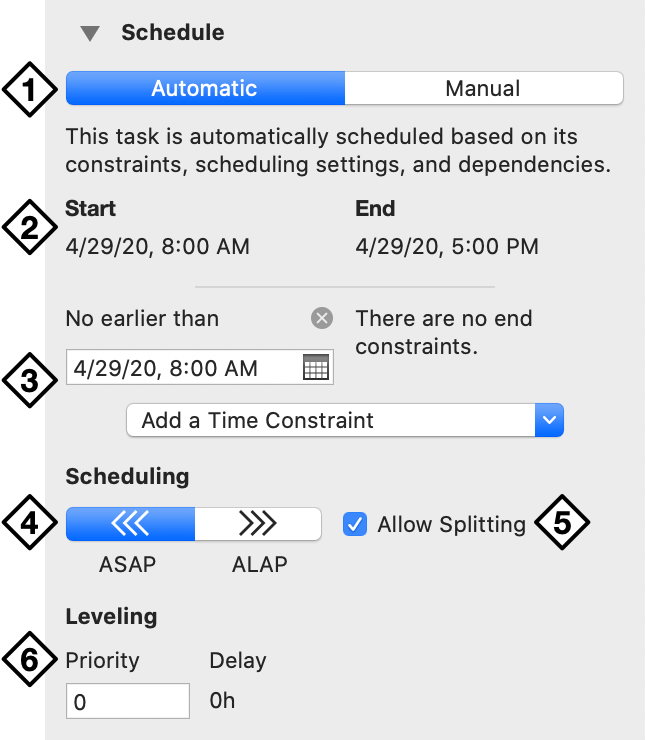
Schedule
Use the Schedule inspector to describe where the task is positioned in time—both actually, and relative to the baseline—along with other time constraints and scheduling priorities.
-
Automatic/Manual—Choose whether the task shifts automatically to the most efficient place in the schedule based on leveling, or whether the task’s position in the schedule is set manually.
-
Start/End—If the task uses automatic scheduling these values are determined by other factors and cannot be directly edited. If you are scheduling the task manually, use the calendar pickers or enter the desired start and end dates here.
-
Constraints—Use the drop-down menu to add timing constraints to the task from among: Start No Earlier Than, End No Earlier Than, Start No Later Than, and End No Later Than. Each task can have a single start constraint and a single end constraint; any constraints appear in this section above the drop-down menu. Use the X button next to a constraint to remove it.
-
ASAP/ALAP—Choose whether the task is scheduled As Soon As Possible or As Late As Possible (given other scheduling influences). This setting overrides the project direction for the individual task when they differ.
-
Allow Splitting—Select to allow the task to be split manually or by leveling. Deselect and the task will not be split for any reason.
-
Priority—Sets a numerical priority for the task. This determines the order in which tasks are assigned resources when leveling, with the highest positive integer receiving first priority. Delay is a value set automatically in the leveling process that notes how long a task has been postponed to wait for resource availability.
To schedule a task that has (or should have) already happened, choose Project > Set Current Editing Date and enter the date when work on the task began. This changes the contextual “insertion point” for the project to that date—newly created tasks originate there by default. When finished adding tasks relative to that date, set the editing date back to the present.
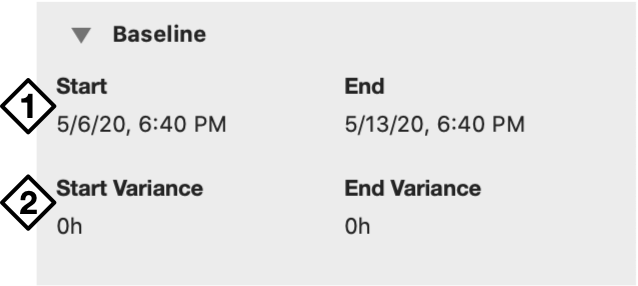
Baseline
Use the Baseline inspector to view information about the task’s relationship to the current baseline schedule and how it differs from the actual schedule of the project.
The content of this inspector cannot be edited directly.
-
Start, End—These dates indicate when the task was expected to start and end according to the baseline plan. They appear once you use the Set Baseline command on a project, and may change depending on which baseline you select for comparison.
-
Variance—The amount of time that the start and end dates diverge from the plan established in the baseline.
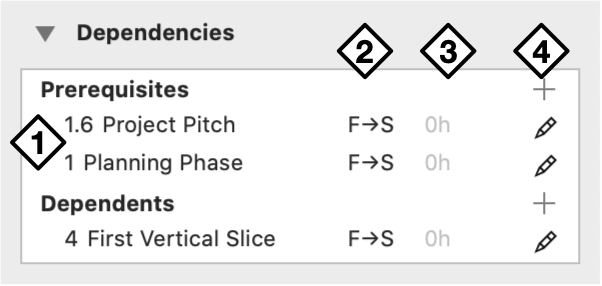
Dependencies
Use the Dependencies inspector to get an at-a-glance view of the inspected task’s relationship with other tasks in the project, alter or remove dependencies on the fly, and add lead or lag time to related tasks.
-
Dependencies List— A list of the tasks connected to the inspected task with dependency relationships.
The Prerequisites section lists tasks that the inspected task relies on, while the Dependents section lists tasks that rely on the inspected task. The nature of these relationships is described by their dependency types.
-
Type—The dependency type.
-
Lead Time—The related task’s lead time, if any.
-
Dependency Editor—Use the Plus buttons to add prerequisite or dependent tasks. Use the Pencil button to open the dependency editor for a related task.
The Dependency Editor
Click the Pencil button next to a task in the Dependencies inspector to open its dependency editor, where you can customize its relationship with the inspected task.
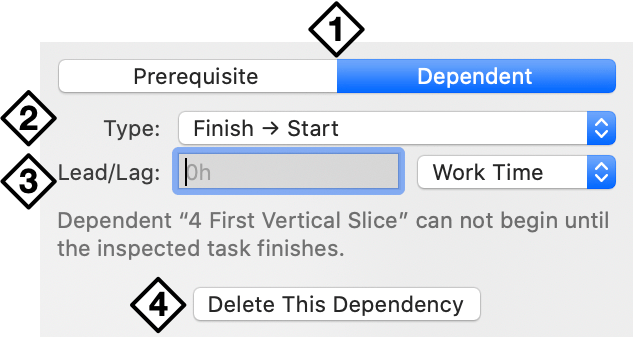
-
Prerequisite, Dependent—Choose whether the task is a prerequisite (the inspected task relies on it for something) or a dependent (it relies on the inspected task for something).
-
Type—Choose the dependency type.
-
Lead/Lag—Enter an amount of lead or lag time, and use the popup menu to designate wether it is Work Time, Elapsed Time, or a Percentage.
-
Delete This Dependency—Click to remove the dependency relationship between this and the inspected task.
Types of Dependencies
OmniPlan supports four types of dependencies that describe the ways in which tasks relate to one another.
- Finish to Start
- The first task must end before the second task can start; the tasks must not overlap except at the instant the first one ends. This is the most common type of dependency, and the kind that you get when you connect two selected tasks by clicking the Connect Tasks button in the toolbar.
- Finish to Finish
- When the first task ends, then the second one can end; the tasks may overlap.
- Start to Start
- Once the first task has started, the second one can start; the tasks may overlap.
- Start to Finish
- Once the first task starts, the second one can finish; the tasks must overlap at least at the instant the first one starts.
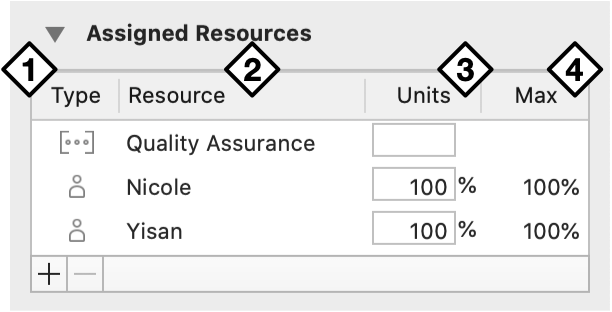
Assigned Resources
Use the Assigned Resources section of the Task inspector to see which resources are assigned to the task, change the amount of effort a resource is contributing, remove existing resources from the task, and add new ones.
-
Type—The resource type.
-
Resource—The name of the resource.
-
Units—The units of the resource assigned to the task, expressed as a percentage of the resource’s total effort. This value cannot exceed the maximum available.
For material resources, Units instead represents the quantity of the resource devoted to the task.
-
Max—The total amount of the resource’s effort that is devoted to the project, expressed as a percent, and set in the Resource Info inspector.
Use the Plus and Minus buttons below the list to add and remove resources assigned to the task.
If a resource that is part of a resource group is assigned to a task, its group will be as well, but only as an informational marker; groups don’t have effort attributes, and can’t have their assignment directly removed. Resource groups shown in this way will disappear when all members’ assignments are removed from a given task.
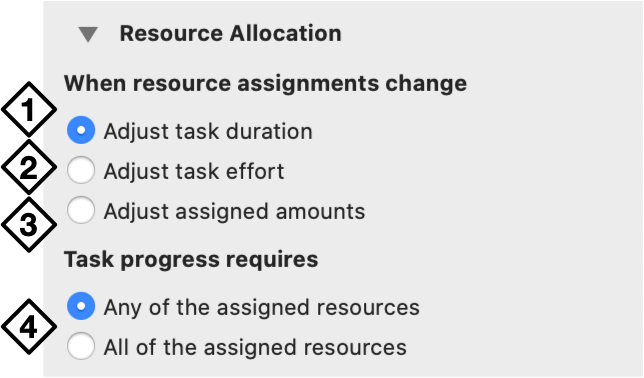
Resource Allocation
Use the Resource Allocation inspector to determine how tasks are scheduled when resources are added to—or removed from—work on the task.
-
Adjust task duration—Adding new resources increases the effort available to complete them, and this option uses that effort to shorten the amount of time the task will take to complete. The opposite is also true, as removing a resource from the task will increase its duration.
-
Adjust task effort—Adding new resources keeps the duration the same, and adds the effort they contribute to the total required to complete the task—this represents pouring work into a fixed timeframe. Removing resources indicates that less effort is needed to complete the task in the same amount of time as originally planned.
-
Adjust assigned amounts—With this option the duration and effort stay the same regardless of resource assignments. Instead, when new resources are added, the amount of effort asked of each resource is reduced evenly across the board (one resource contributes 100 percent, two resources contribute 50 percent each, and so on).
-
Task progress requires—Choose Any of the assigned resources to allow anyone available to be assigned to the task in order to complete it most efficiently. Choose All of the assigned resources to require that every resource assigned to the task be available in order for the task to proceed.
Scheduling Meetings
The Task progress requires control merits special note as the way to model a task in OmniPlan that represents a staff meeting.
When task progress is set to require All of the assigned resources, it will not be scheduled until all of the resources assigned to it are available. (Or conversely, if the task has a fixed start and end time, other tasks will be scheduled around it to allow the required staff to attend.) This is particularly useful for meetings, or any other task that requires the simultaneous attention of the team.
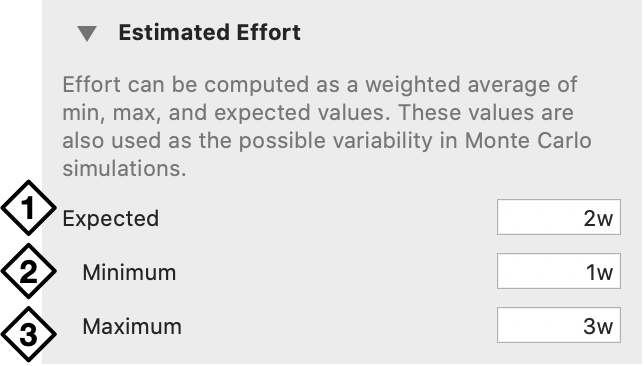
Estimated Effort (Pro)
Use the Estimated Effort inspector in OmniPlan Pro to set predicted values for Monte Carlo simulations and forecast the timeliness of milestone completion.
-
Expected—The best guess at the actual amount of effort the task will require to complete.
-
Minimum—The smallest amount of effort that the task could reasonably take to complete.
-
Maximum—The largest amount of effort that the task could reasonably take to complete.
You can use the Simulations button in the toolbar to auto-estimate the effort required to complete any number of selected tasks. However, if you would prefer fine-grained control over the range of effort used in completion scenarios, this section of the Task inspector provides fields for using any values you would like.
The weighted average formula used to calculate effort is:
[(minimum effort) + 4x(expected effort) + (maximum effort)] / 6
Values for effort throughout OmniPlan (including the Effort column in the task outline, the Effort field in the Task Info inspector, and others) are calculated based on the average of the three values in the estimated effort fields above.
As long as the average of the three remains equal to existing values elsewhere, you won’t see them change (the Simulations automatic effort estimation feature is built to ensure this). However, manually changing the values here (or in the associated custom columns) will cause other effort values to change.
Scheduling Influences
Use the Scheduling Influences inspector to view and edit the factors that come into play when automatically scheduling the task.

This inspector holds a list of all of the factors that currently influence the task’s scheduling. This includes resource availability, dependencies, and the start and end constraints of tasks and the project as a whole.
-
Double-click an item in the list to navigate directly to the relevant field in the item’s inspector.
-
Click an item’s Gear button to open a menu with commands related to the item—typically, options to either inspect the item or edit it directly.