Introduction
Welcome to OmniFocus 2 for iOS!
OmniFocus is the personal task management tool that helps you keep track of all the goals, plans, errands, and aspirations that come up in your life. Whether the task at hand is something small, like setting a reminder to swing by the bike shop after work, or part of a bigger goal, like making plans for that long overdue vacation, OmniFocus helps to keep you on track of everything you need to do throughout your day.
Available on your iPad, iPhone, Mac, and Apple Watch, OmniFocus is packed full of tools to help you prioritize steps within complex projects or simply jot a quick to-do list for a weekly meeting. OmniFocus works great as a standalone productivity aid or in conjunction with whatever time and task-management scheme suits your personal style.
Note
- OmniFocus for iOS (the subject of this manual) is available on the App Store, and works on all of your iOS devices as well as your Apple Watch.
- OmniFocus for iPhone, also available on the App Store, is iPhone-only.
- Both versions require iOS 8.
- OmniFocus for Mac is available both on the Mac App Store and directly from The Omni Group.
OmniFocus for iOS is the mobile counterpart to OmniFocus for Mac, bringing all the power and versatility of the OmniFocus system to your fingertips. It uses the newest iOS and Apple hardware updates to help you get things done when it’s most sensible, convenient, and efficient to do them.
For a video tour of the features of OmniFocus, check out:
https://www.omnigroup.com/video/omnifocus
What’s New in OmniFocus 2.5 for iOS
The main new feature of OmniFocus 2.5 is the OmniFocus for Apple Watch app, a free addition to OmniFocus for iOS (the only requirement is that you have OmniFocus 2.5 for iOS installed on the iPhone you pair with your Apple Watch).
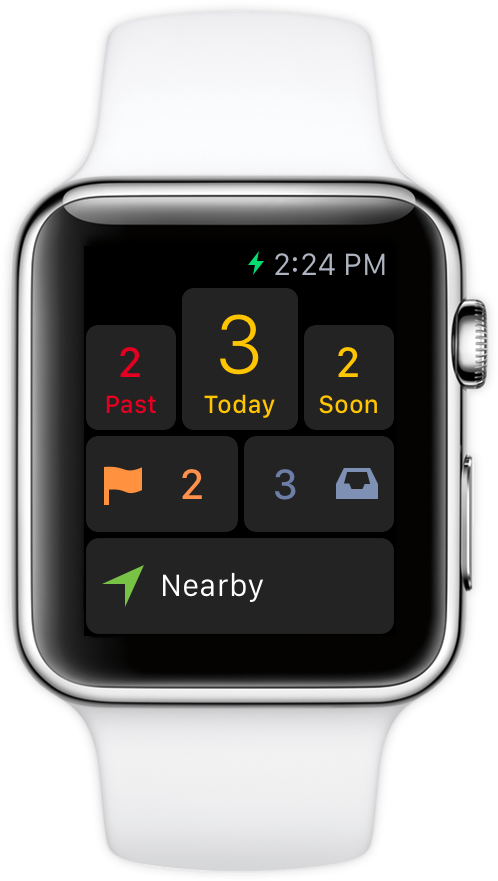
We've prepared a support article that walks you through the setup process, shows the ins and outs of the app, and provides insight on having OmniFocus by your side in the most personal and present way yet.
OmniFocus 2.5 comes hot on the heels of OmniFocus 2.1 for iOS, which was our biggest mid-version release in years. If you're coming to OmniFocus on your iPhone or iPad from an earlier version, you'll find it's packed with tons of great new features:
OmniFocus is now Universal on iOS. It will run on any iPhone or iPad with iOS 8 installed.
The Today extension is even more powerful and flexible, with the ability to display deferred items or a custom perspective of your choice in Notification Center (Pro).
Organize the home screen and sidebar to better suit the way you work with the new tiled home screen (Pro). Add, hide, and rearrange perspectives to completely personalize your OmniFocus experience.
We've implemented platform parity throughout the app — all of the features of OmniFocus for iPad are now available on iPhone (if you can't find something, let us know!). This means that the following features are new on iPhone:
- Landscape mode — OmniFocus looks great no matter how you're holding your iPhone, with the app screen adjusting dynamically to the size and orientation of your device.
- Review — Use the Review perspective to catch up and sign off on the status of your projects, for the first time on iPhone.
- Perspective creation (Pro) — Build and edit new custom perspectives to suit your unique workflow.
- Project Perspectives — Perspectives which use project hierarchy are now supported across all versions of OmniFocus.
- Flexible Flags — Grouping and sorting are now available in the Flagged perspective.
Making the Transition
If you’ve been using an earlier version of OmniFocus or have OmniFocus on another device, getting up to speed with OmniFocus for iOS is a breeze.
Migrating your Database
Syncing OmniFocus 2 for iOS to your existing OmniFocus database in the cloud is the recommended method for migrating from other versions, including earlier versions of OmniFocus for iOS. It provides a straightforward pathway for keeping your data up to date, and keeps all versions of OmniFocus playing nicely together if you’re running the app on multiple devices.
Tip
Confused about the sync setup process? Check out Getting Synced for a refresher.
While it’s not recommended, if you choose not to sync the first time you launch the app you’ll have the option set up sync later from the in-app Settings; remember that any changes you make locally can’t be merged with your remote database, so setting up sync when you first open OmniFocus is the best way to be sure your data is preserved.
Interface Improvements in OmniFocus 2
If you're completely new to OmniFocus 2, you might want to take a few minutes to get up to speed with recent improvements to the interface that we've adopted across the OmniFocus family to make the apps even more powerful and easy to use.
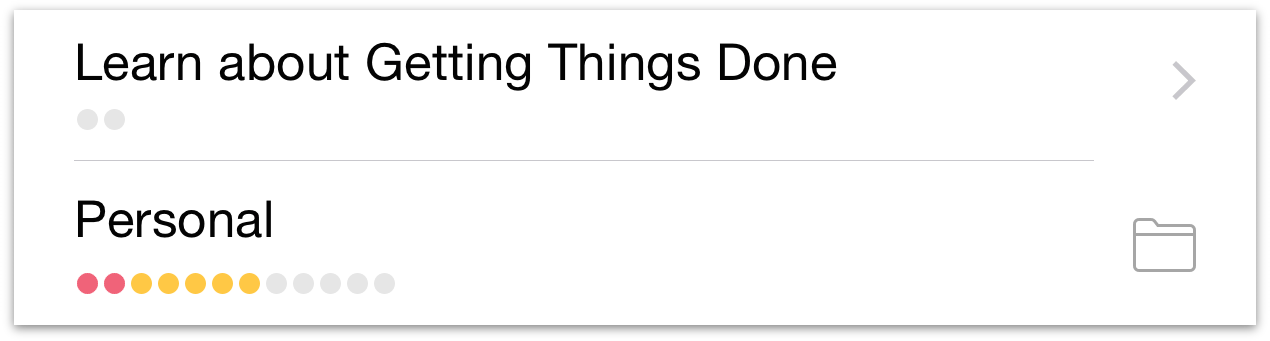
Summary Dots — These handy bits represent an overview of the amount and priority of items within a project or context, giving you an at-a-glance estimate of the size and urgency of things relative to other things.
Status Circles — Checkboxes for marking items complete have been replaced by status circles. Still great for checking things off when they’re finished, status circles also convey the status of an item at a glance: whether it’s due soon (amber), overdue (red), or flagged (orange). Repeating items are also distinct by virtue of the elipses in their center – when you see them, you know they’ll keep coming back for more.
Got an action that’s more than one status, like flagged and overdue? The circle will take on multiple status colors simultaneously–half orange on top, half red on bottom–to communicate everything that’s going on.

Secret Bar — Drag down on the sidebar or home screen to reveal the secret bar, where the Sync, Settings, and Search buttons are safely tucked away.
Toggle between lists of all available perspectives and just your favorite ones (and with the Pro upgrade installed, you'll create new perspectives and edit the tiled layout of your home screen here, too).
Changing Terminology
To help better represent their function, a few things have changed about how OmniFocus 2 describes certain features of the app.
Start dates are now defer dates. This is to more accurately capture the intent that an item shouldn’t be considered until a later time—it’s been deferred.
Next actions are now first available actions. This helps explain view options more clearly, and helps further disambiguate sequential projects, parallel projects, and single action lists.
Project and Context-based perspectives have become Use Project Hierarchy and Don’t Use Project Hierarchy, respectively. This is to better reflect the role this choice plays in affecting other aspects of a custom perspective’s view settings.
Since the act of “focusing” has such a specific meaning in OmniFocus, the Focus command in contextual menus has been replaced with the more accurate Go To Project and Go to Context. Its functionality remains the same.
Note
If you've delved in to view a subset of your items in the Project or Context perspectives (perhaps via Go to Project or Go to Context), you can quickly ascend to the perspective's top level by tapping its name in the sidebar header.
Getting Synced
When you first launch OmniFocus for iOS you’ll be asked to set up your sync settings. OmniFocus synchronizes your actions with a server so that all your iPhone, iPad, and Mac tasks and projects are always up to date.
Even if you’re only using OmniFocus on a single device, syncing is recommended for the automated data backup it provides. Best of all, our Omni Sync Server is free, and we take care of managing the servers so your data is always available when you need it most.
Note
Different OmniFocus databases can't be merged, so if you use the app on multiple devices (for example, on your iPhone and iPad) and want them to communicate, you should set up sync the first time you use OmniFocus on the device to avoid any conflicts.
Omni Sync Server
Because we feel that synchronization is such a crucial part of being productive, we’ve made it part of the launch experience when you first open OmniFocus for iOS.
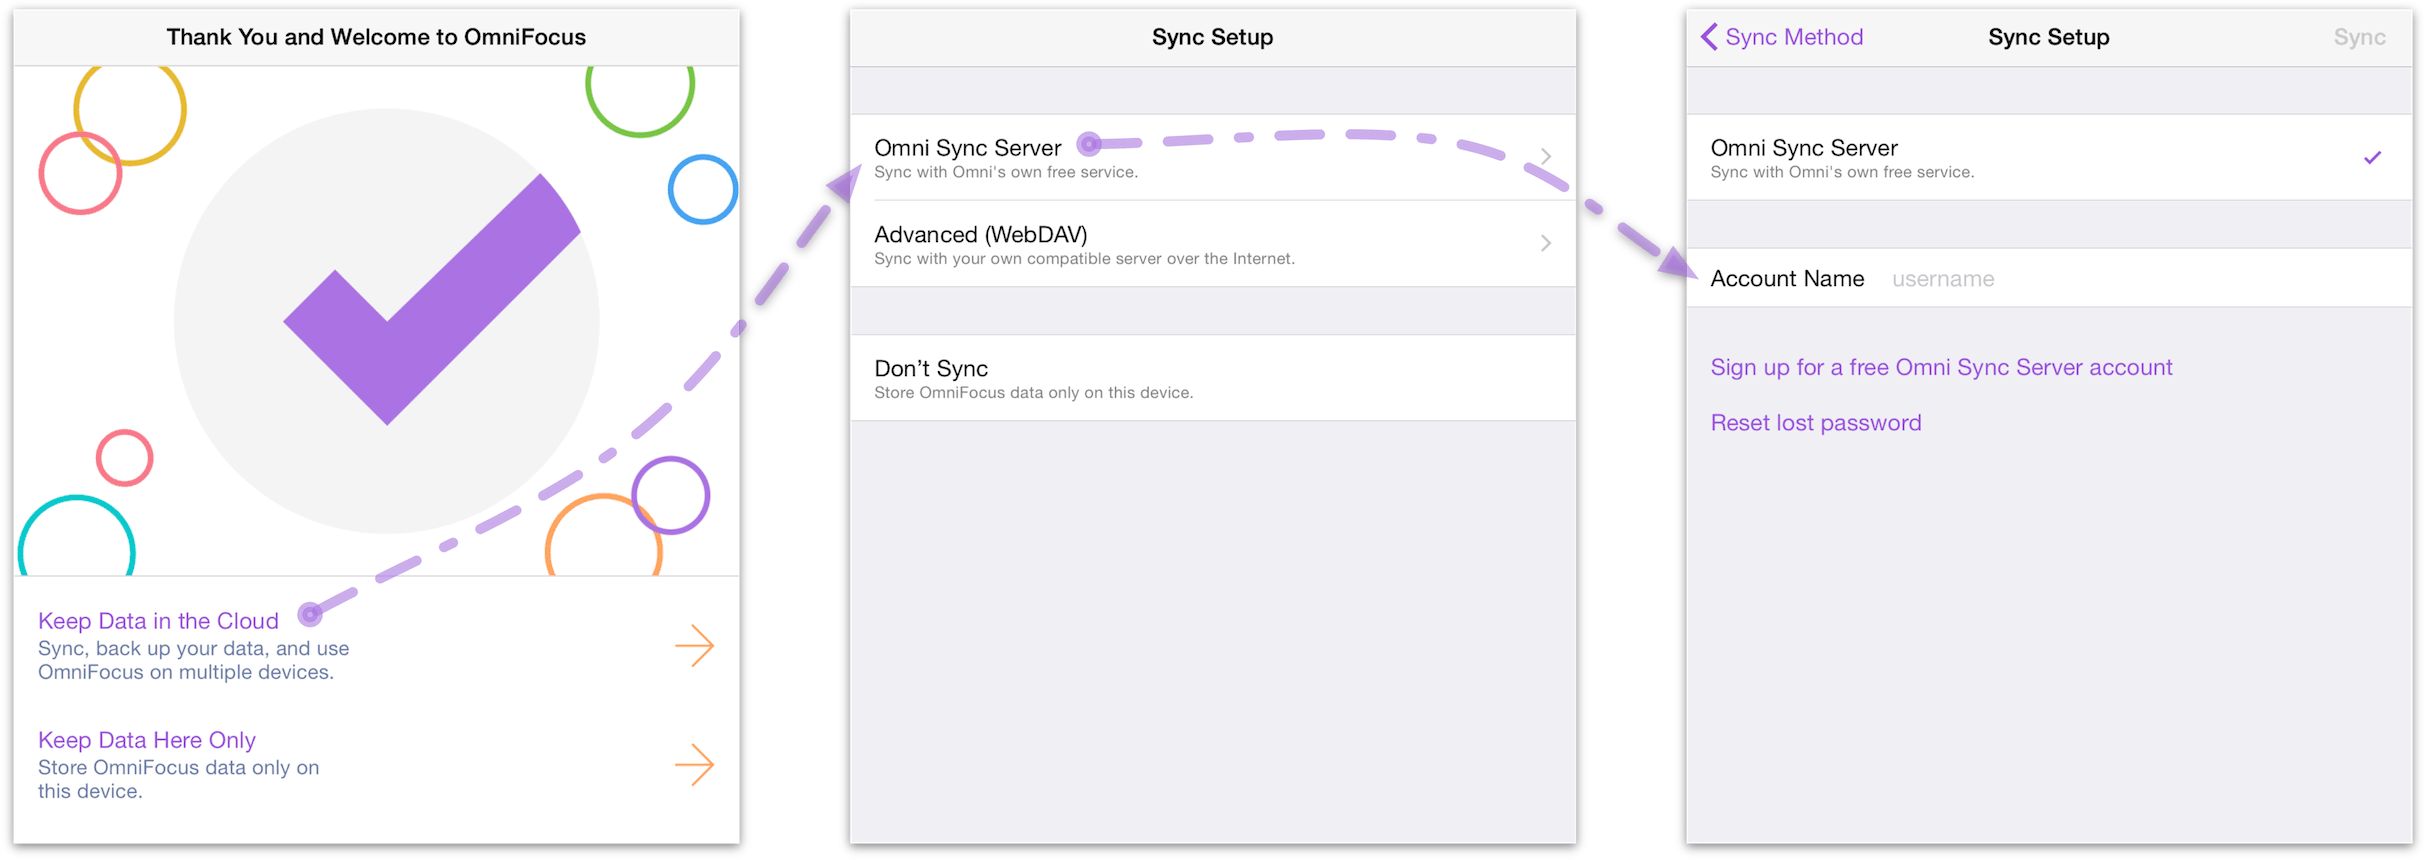
After choosing Keep Data in the Cloud, you will see that you have two methods to choose from:
Omni Sync Server
Advanced (WebDAV)
Our own Omni Sync Server is recommended for ease of use and reliability of support. Get started by creating a new Omni Sync account here:
https://manage.sync.omnigroup.com
If you don’t set up sync now, but later decide that you want to, you can always choose Sync Setup from the Settings menu (found by dragging down on the sidebar).
Other WebDAV Options
Omni Sync Server is a great syncing solution for most OmniFocus users. If your sync needs require that your data be kept completely within a system you control, you can configure a private WebDAV server to sync your OmniFocus data. This can be a third party server (there are many fine providers out there) or one that lives on your own Mac.
While we’re not able to provide comprehensive support for WebDAV servers we don’t administrate (since it isn’t our software), we’re glad to help you get started with some pointers.
See this support article for a tutorial on setting up your own OmniFocus sync server using Server.app (included with Mac OS X Server).
Warning
When you expose files and folders on your computer to the internet (even with password protection), you assume some risk. Make sure you understand this risk before setting up a server, and be sure to keep your Mac up to date with the latest security patches. If you'd prefer not to host your own server, you can sign up for an Omni Sync Server account or use another standards-compliant WebDAV host to sync OmniFocus.
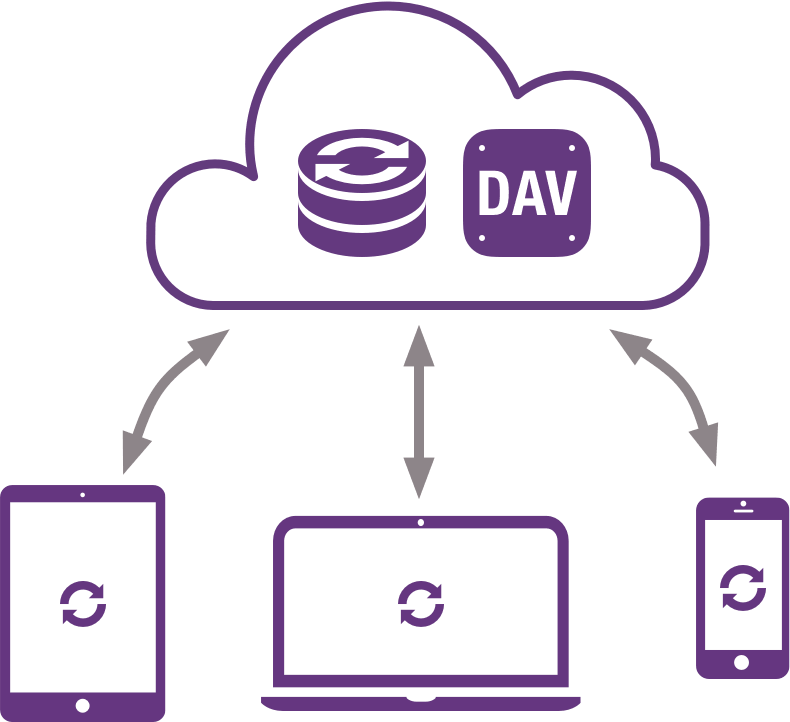
How Synchronization Works
With sync turned on in OmniFocus, a server you designate keeps a copy of your database so that it’s always available wherever you are. With each subsequent sync, OmniFocus compares your local database with what’s on the server and applies any differences to the dataset on the server (or vice versa, bringing the latest changes from the server to your device).
We’ve also built in an automatic sync mechanism. With sync turned on, OmniFocus sends new changes to the sync server after one minute, or whenever you switch to another app. At a bare minimum, OmniFocus checks in with sync server every hour if nothing has changed on the device. This helps ensure that your data from OmniFocus is always safe, secure, and most importantly—up to date.
OmniFocus for iOS uses Apple’s built-in background fetch to keep your database up to date even while not using the app. However, if you’ve made changes you want to view immediately on other devices, you’ll want to perform a manual sync (by tapping the Sync button in OmniFocus) before switching to OmniFocus on another iOS device or your Mac. This pushes your latest changes up to the sync server, so that when you launch OmniFocus on the other system, all you have to do is tap or click Sync to ensure that all of your changes are there.
Warning
Services such as Dropbox are great for file sharing, but they can't handle OmniFocus data properly. Using Dropbox as a place to sync your data can corrupt your OmniFocus data. Do not use Dropbox as a means of synchronizing your OmniFocus data.
Guided Tour
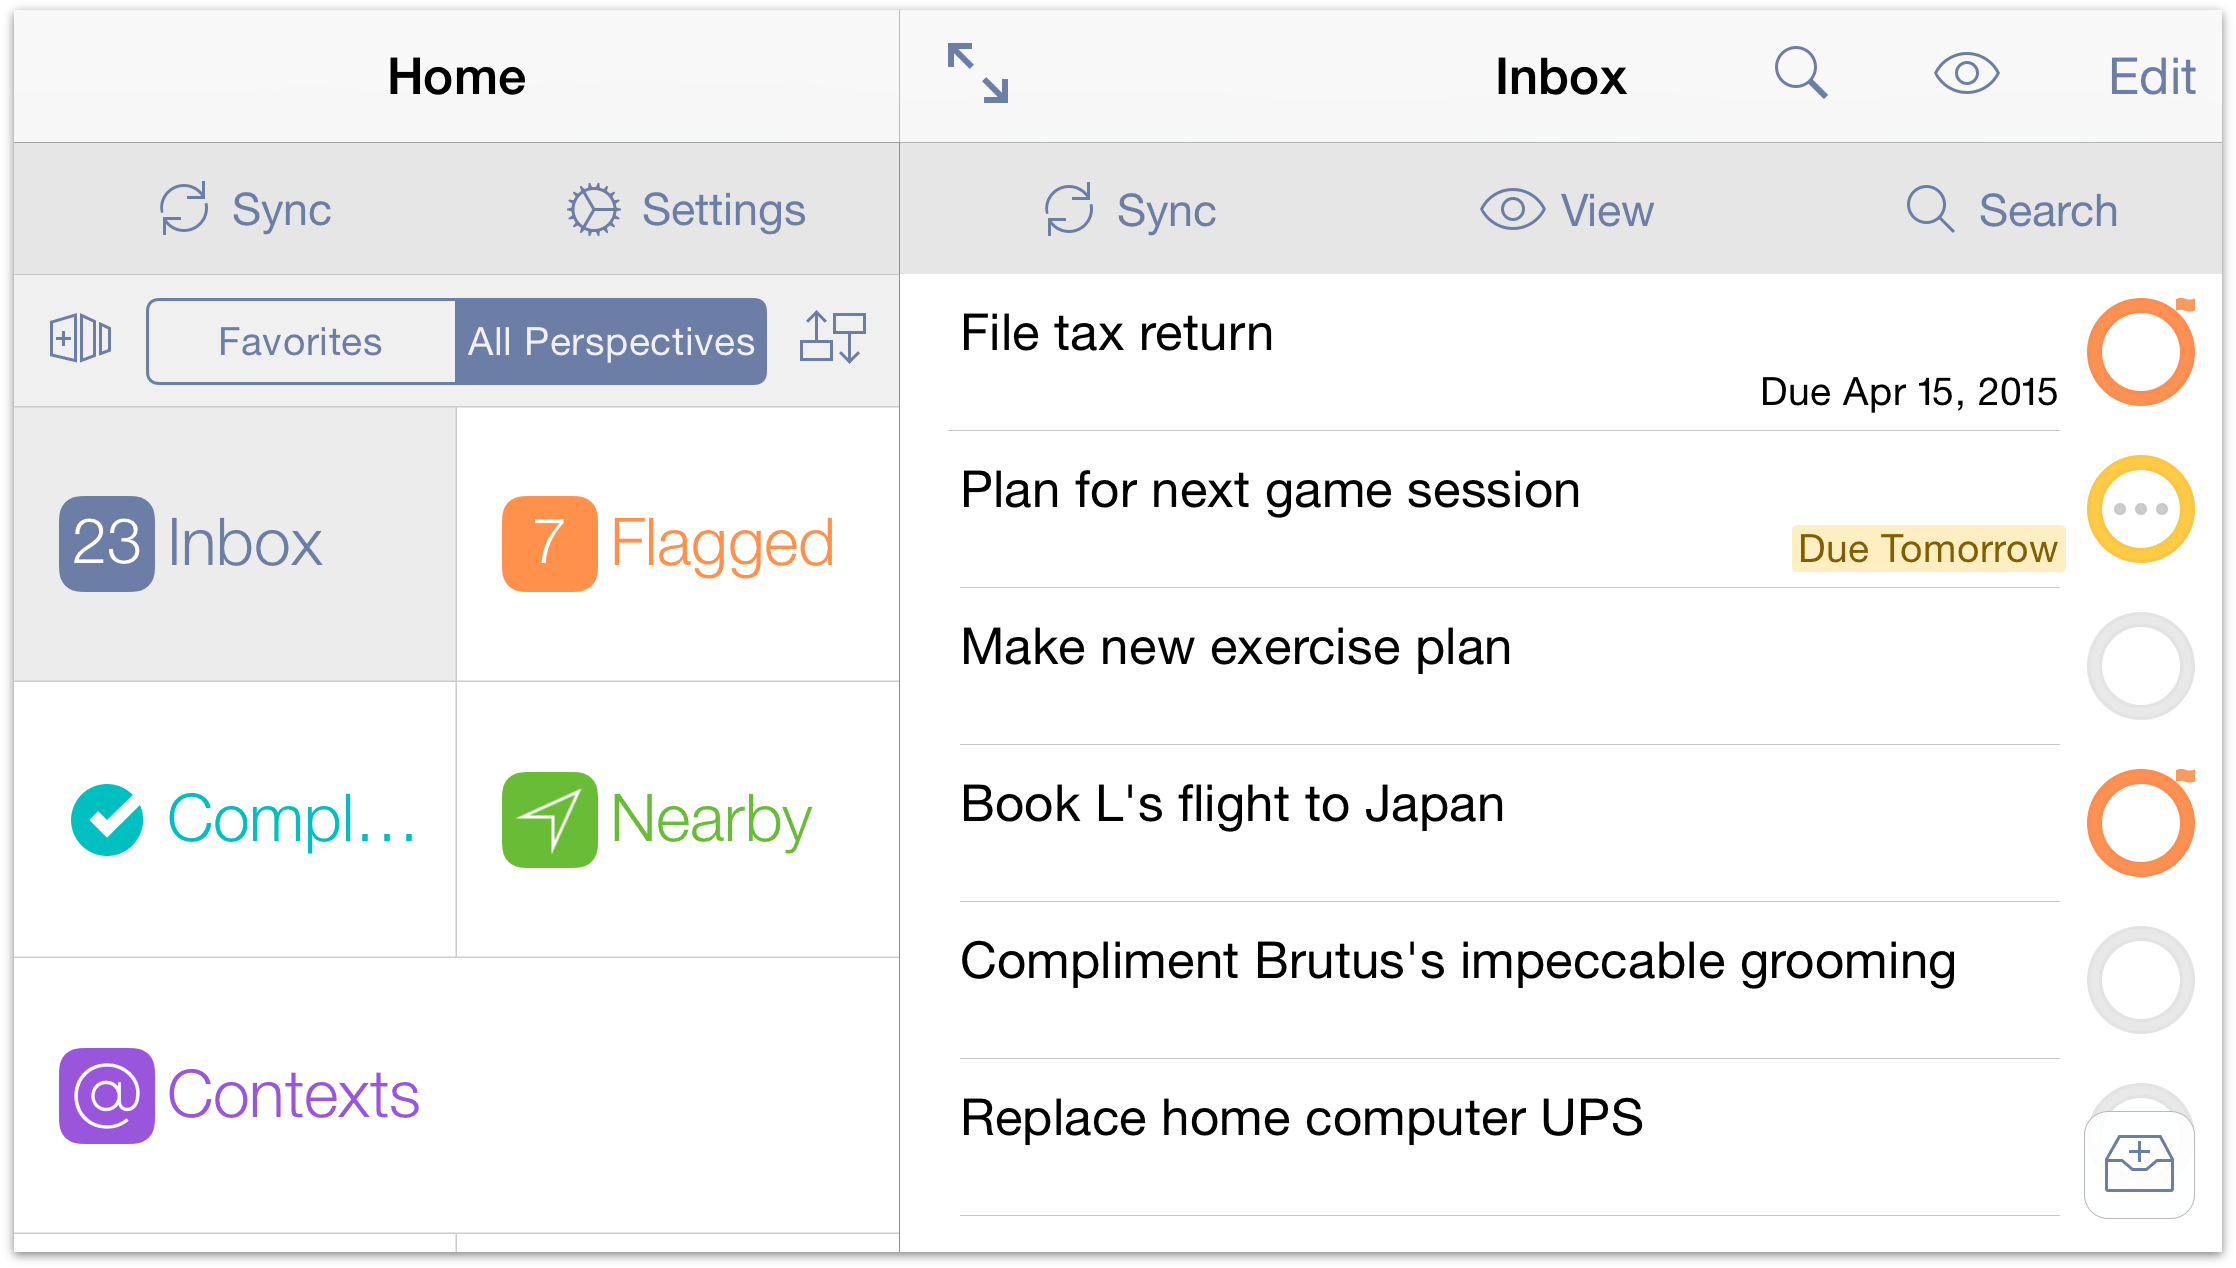
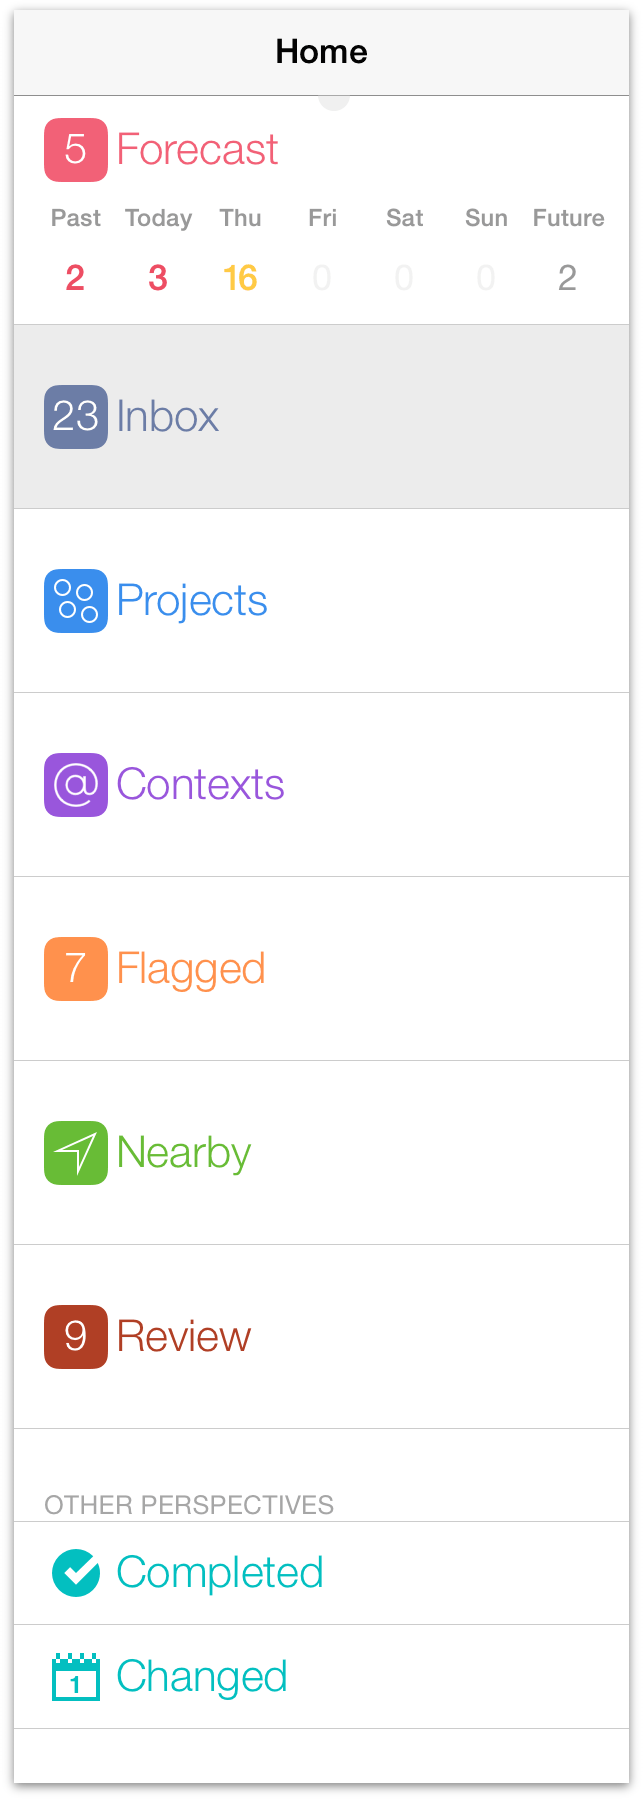
Getting to know OmniFocus by navigating through its various bits and pieces is a great way to start working with the app. The following overview will help you get things going.Sidebar (Home Screen)
The sidebar (or home screen, on iPhone) acts as the central hub of the hive of your OmniFocus activity. With badge icons displaying a count of your most important actions, you’ll see what’s on your plate for the day and week ahead.
Use the sidebar to navigate between perspectives in the main outline. When in landscape mode on iPad the sidebar is always shown; when in portrait, show the sidebar by swiping in from the left (swipe to the right to hide it), or use the chevron ![]() in the upper left of the toolbar.
in the upper left of the toolbar.
On iPhone, navigate to the home screen by following the chevron ![]() back from whatever view you're in (or press and hold it to return home in an instant). On iPhone 6 Plus, landscape mode displays the sidebar by default; tap Expand
back from whatever view you're in (or press and hold it to return home in an instant). On iPhone 6 Plus, landscape mode displays the sidebar by default; tap Expand ![]() to dismiss it, and the chevron to bring it back.
to dismiss it, and the chevron to bring it back.
Note
With the OmniFocus Pro in-app purchase installed, tapping the edit button ![]() in the secret bar brings you to the tile editor, where you can rearrange, add, and remove perspectives from your favorites. Learn more about perspectives in the Perspectives chapter.
in the secret bar brings you to the tile editor, where you can rearrange, add, and remove perspectives from your favorites. Learn more about perspectives in the Perspectives chapter.
 Forecast
Tap Forecast to enter forecast view, where tasks for the day are shown alongside any calendars you’ve chosen to display. The badge icon in the sidebar or home screen counts the number of tasks currently overdue.
 Inbox
Inbox
Tap Inbox to view and process items collected in your inbox.
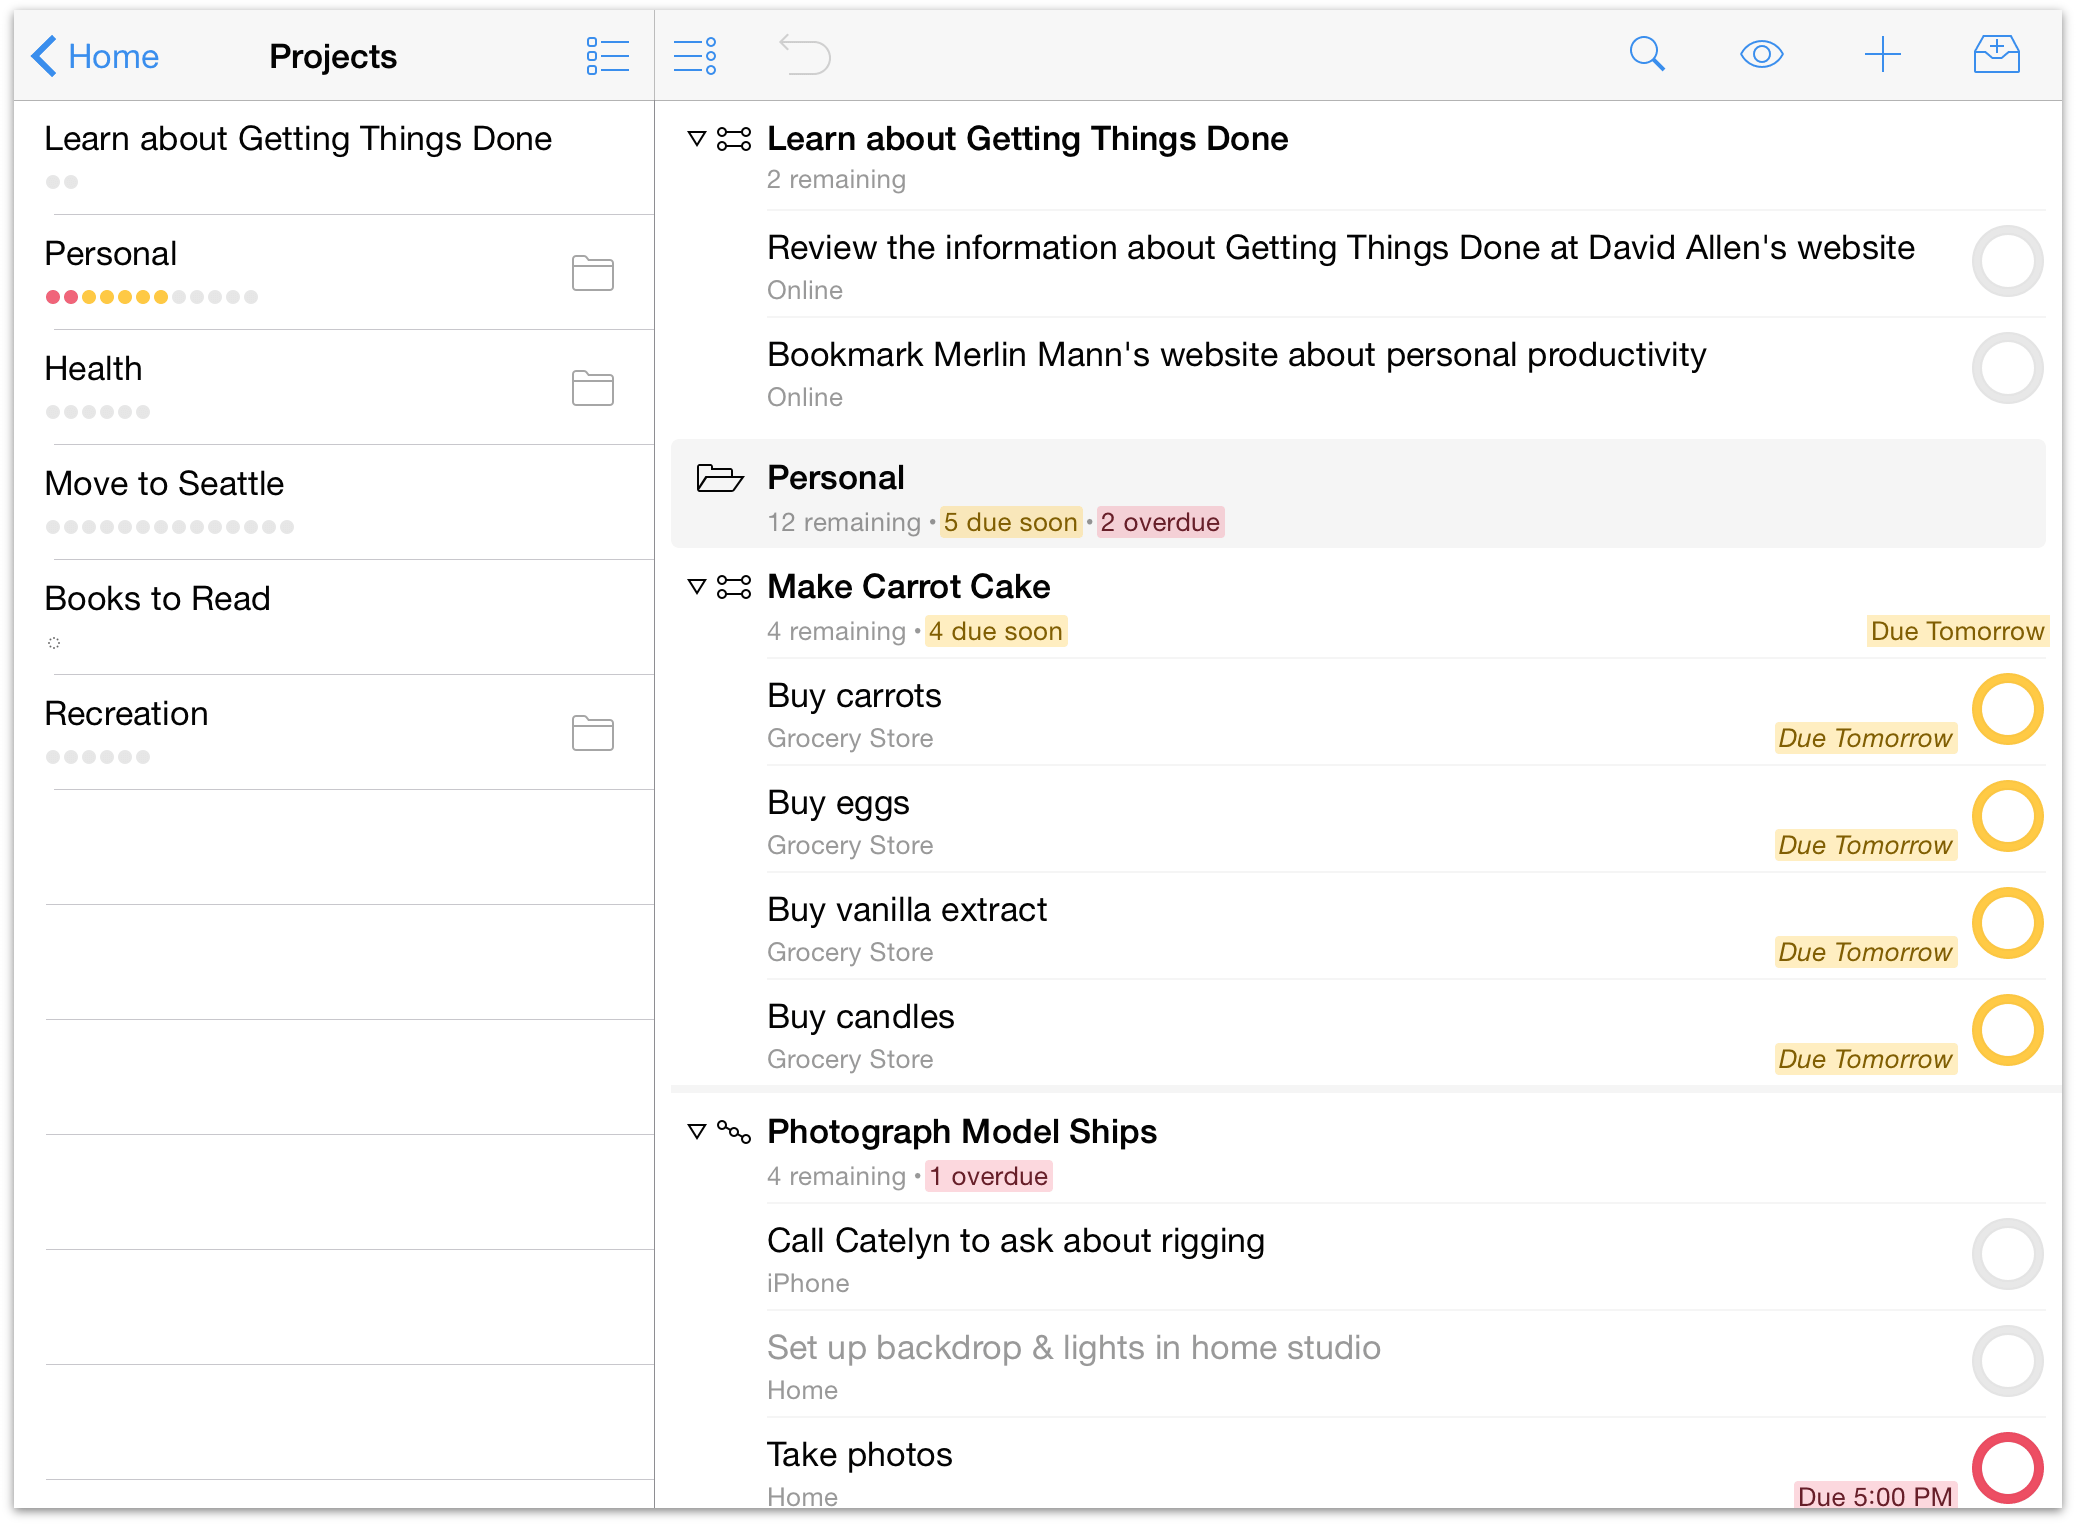
 Projects
Tap Projects to view a list of your projects, and estimate their urgency using the handy summary dots beneath each project title.
 Contexts
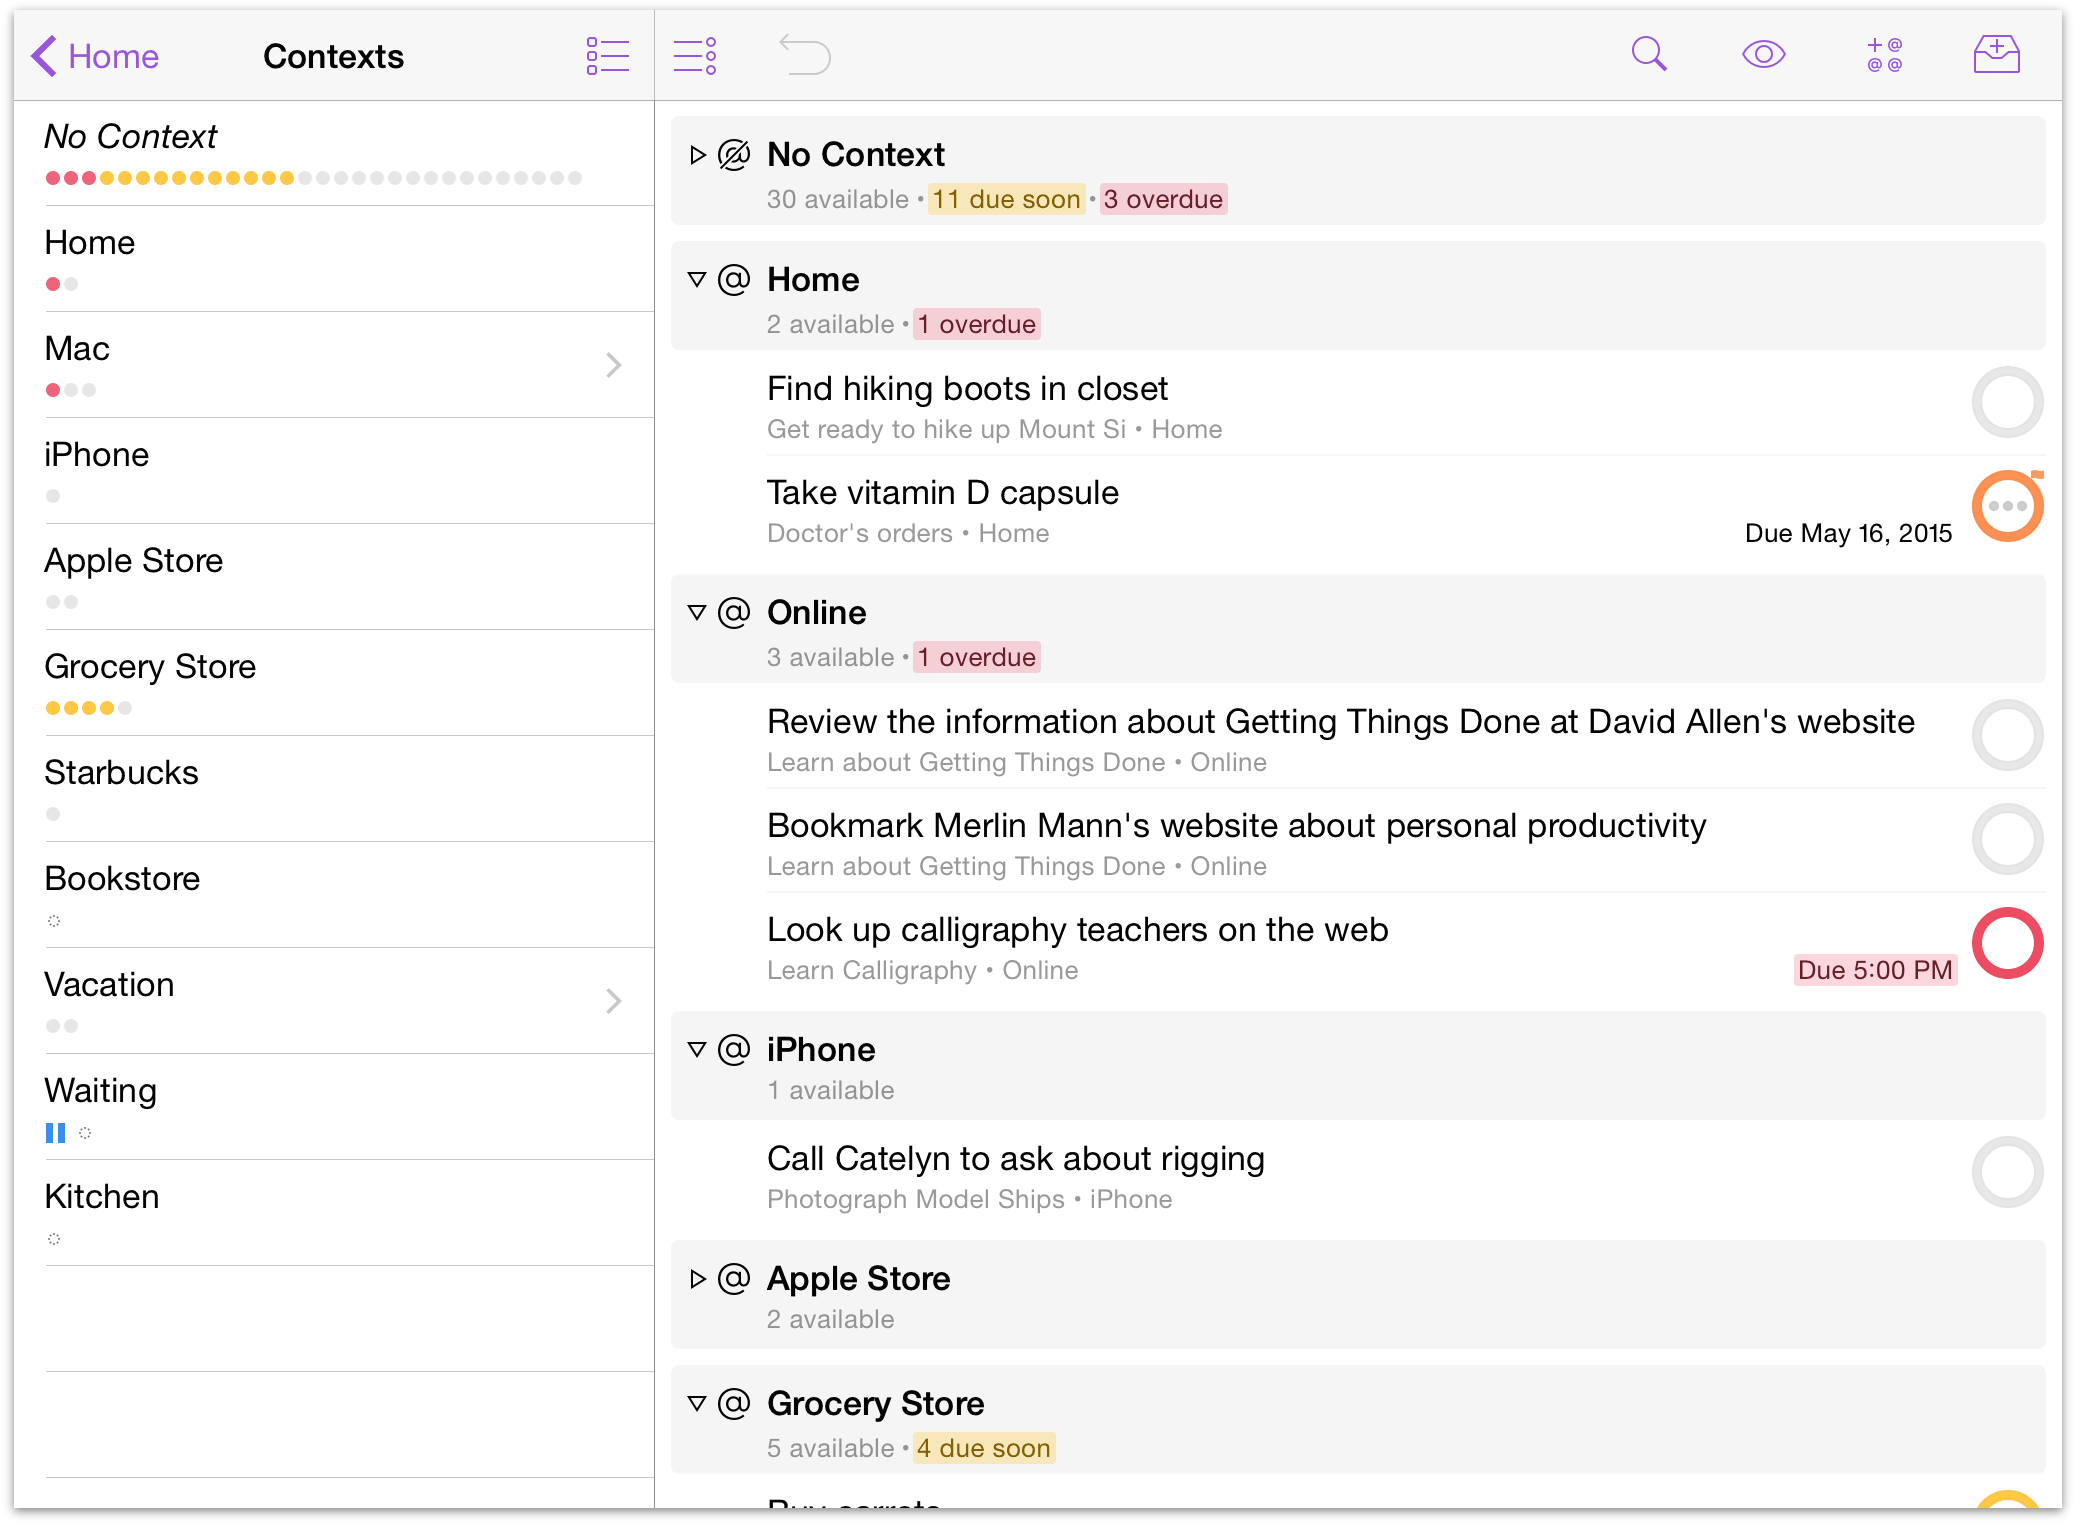
Tap Contexts to view a list of your contexts, and likewise get an at-a-glance appraisal of each from the summary dots.
 Flagged
Tap Flagged to see a list of items you’ve flagged for visibility. The number of flagged items is shown in the badge icon in the sidebar.
 Nearby
If you’ve assigned locations to your contexts, tap Nearby to view the available actions near your location.
 Review
Tap Review for a periodic organized check up on the progress of your projects – easily assess the status of projects one at a time, mark items complete or on hold, and adjust them as circumstances change.
Secret Bar
Whenever you're "home" — viewing the list of perspectives in the OmniFocus sidebar or home screen — drag down on the list to reveal the secret bar. The secret bar holds tools of great power, but relatively infrequent use; that’s why they’re safely kept out of the way for just when you need them.
 Sync
Sync
Tap Sync to trigger a sync manually. This is useful any time you want to update OmniFocus on your other devices, or make sure your device is up to date with your remote database.
Note
OmniFocus syncs automatically whenever changes are made, so you shouldn't have to do this very often (if ever).
 Settings
Tap Settings to customize your OmniFocus experience, contact Omni Support, access the help, and more. Read about the available options in detail in the Settings chapter.
 Search (iPhone)
Tap Search to filter your OmniFocus database (titles and notes) using terms you select. You can choose to receive results from your current location only (when browsing away from the home screen), to search in remaining items only (everything that isn't completed or dropped), or search your entire database.
On iPad, Search is found in the toolbar.
 New Perspective (Pro)
With the OmniFocus Pro upgrade installed, tap New Perspective to create a new custom perspective. To change the view settings of a currently existing perspective, go to the perspective and drag down to reveal its secret bar, then tap View ![]() . The icon changes to
. The icon changes to ![]() when editing a custom perspective.
when editing a custom perspective.
- Default and All Perspectives
Use this switch to choose the set of perspectives that appear in the sidebar. Default displays the seven built-in perspectives, while All Perspectives reveals Completed and Changed as well. With the Pro upgrade installed Default becomes Favorites, a space that's fully customizable using the Tile Editor.
 Tile Editor (Pro)
In OmniFocus Pro, tap this button to enter tile editing mode. Completely customize the appearance of your sidebar or home screen by touching and dragging perspective tiles into the desired full- and half-width rows (existing perspectives will kindly get out of your way), or drag them down to the Other Perspectives section to indicate that they aren't part of your favorites.
Tap Done — or anywhere else on the screen — to confirm your layout change, or tap Cancel to exit tile editing without saving your changes.
Toolbar
When viewing the main outline with your device in landscape orientation, or in portrait with the sidebar hidden, the toolbar at the top of the screen is fully visible. Here you’ll access several important functions, described below:
 Edit
Edit
Tap Edit to delete and rearrange items in the main outline using the deletion switch ![]() and reordering handles
and reordering handles ![]() that appear. On iPad, edit mode is a particularly good way to move items between projects – just drag an action’s reordering handle until it’s within the desired project, group, or folder.
that appear. On iPad, edit mode is a particularly good way to move items between projects – just drag an action’s reordering handle until it’s within the desired project, group, or folder.
 Undo (iPad)
Tap Undo to revert the latest change made to your database. This is the easiest way to restore an accidentally completed or deleted item, or revert a change made while editing. To redo an undid change, just tap and hold Undo.
On iPhone, shake your device to undo an unwanted change.
 Search (iPad)
Filter title text and note field contents for search terms across three useful scopes: Here, which includes everything visible in the main outline; Remaining, which includes all items not completed or dropped; or Everything, which accesses your entire database.
On iPhone, Search is found in the Secret Bar.
 View
View
Choose your view options for the current perspective here, setting the parameters for items to be displayed based on the status you’ve given them.
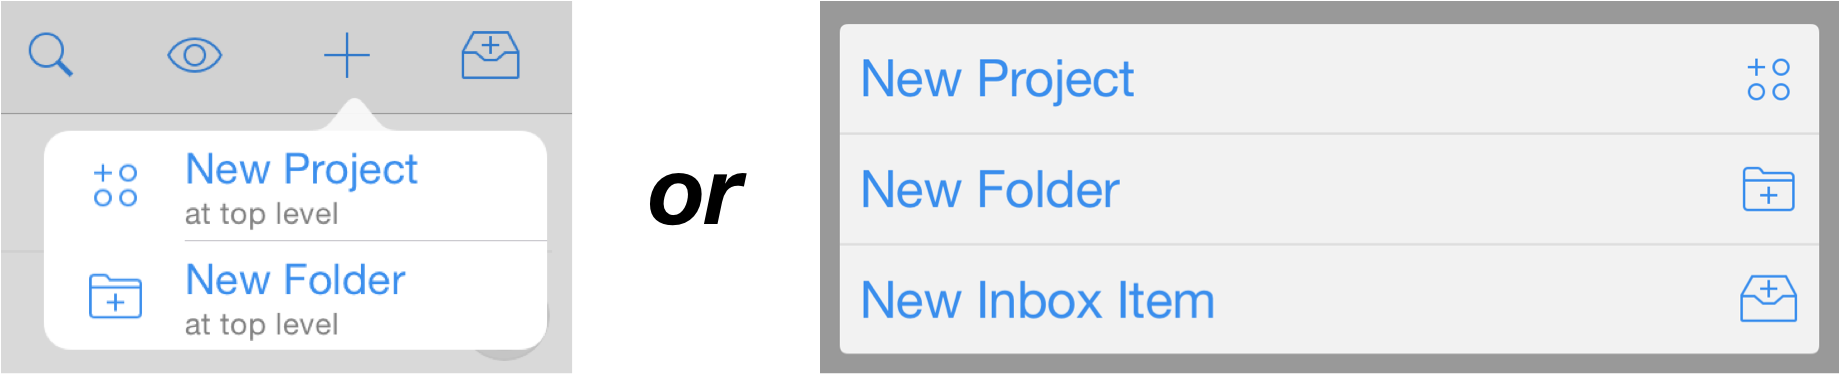
 Add New…
Based on your current view in the main outline, you’ll see options for adding new items. When you’re at the top level of a perspective, typically this will give you the broadest option possible (a new project or a new context at the top level), otherwise the options presented will be more granular.
 New Inbox Item (iPad)
Formerly known as Quick Entry, this button lets you add a new task to your inbox from virtually anywhere in the app.
On iPhone, the New Inbox Item button is found in the lower right of the Home and perspectives screens.
Main Outline
This is where you’ll view, add, and manipulate the tasks you’re working on at a given moment. What you see here is based on which perspective you’re viewing, what you have selected in the sidebar (or where you've navigated from the home screen), and more—you can narrow your concentration on just a few things you’d like to accomplish in the near term, or get a broad overview of the tasks ahead across a number of projects.
The main outline displays a list of items—inbox items, projects, actions, or groups—that fit the criteria you’ve established with your other view parameters. Each item displays associated information that’s the most relevant info you’ve entered about it.
To delete an item in the main outline, touch and drag from right to left until the Delete button appears. This removes the item from your database entirely; to mark it complete instead, just tap its status circle.
How Items Are Ordered
Actions, projects, and other items in the main outline are ordered based on the sequence in which you entered them, or how you’ve manually arranged them in edit mode, with a couple of exceptions: when you’re in a context-based view with a different sort priority set, or in Forecast, where items are sorted by due date and time.
Other sorting parameters can also be applied with custom perspectives when the Pro upgrade is installed.
Editor
To delve deeper into the details of a task, just tap its name. The main outline makes way for the editor, where you can flesh out the task at hand with additional bits of info like when it’s due for completion, whether it’s part of a larger project, how long it’ll take, whether (and how) it repeats, and more. Enrich an item further with a text note and add audio and image attachments, all from tabs within the editor.
Note
The editors for inbox items, actions, and projects are pretty similar, since these all represent tasks that can be accomplished. The editor for contexts is special because it represents a person, place, or thing that you need to help accomplish a goal; importantly, the context editor is where you give a context a location so it can be tracked from the Nearby screen.
Ways that inbox items, actions, projects, and contexts can be enriched using the editor are explored in their individual chapters.
Editor Tools
When using the editor on iPad, a new set of commands becomes available at the top of the screen (replacing the toolbar that’s visible when you’re viewing the main outline). On iPhone, these same tools appear in rows at the bottom of the editor's Info pane.
 Move
Move
Tap to create nesting hierarchy of items within the inbox; actions within projects; or contexts within other contexts.
 Convert
When editing an inbox item or an action, tap to convert it to a project. When editing a project, tap to convert it to an action (the action will appear in the “Miscellaneous” project).
 Share
Share
Tap to send the current selection as a message, an email, or via any other service that shares with OmniFocus.
 Delete
Tap to remove the edited item from your OmniFocus database entirely.
Contextual Menus
A long press on many of the items in OmniFocus reveals the contextual menu with commands relevant to that item. These commands work in ways that are specific to OmniFocus, and might not be completely obvious at first glance.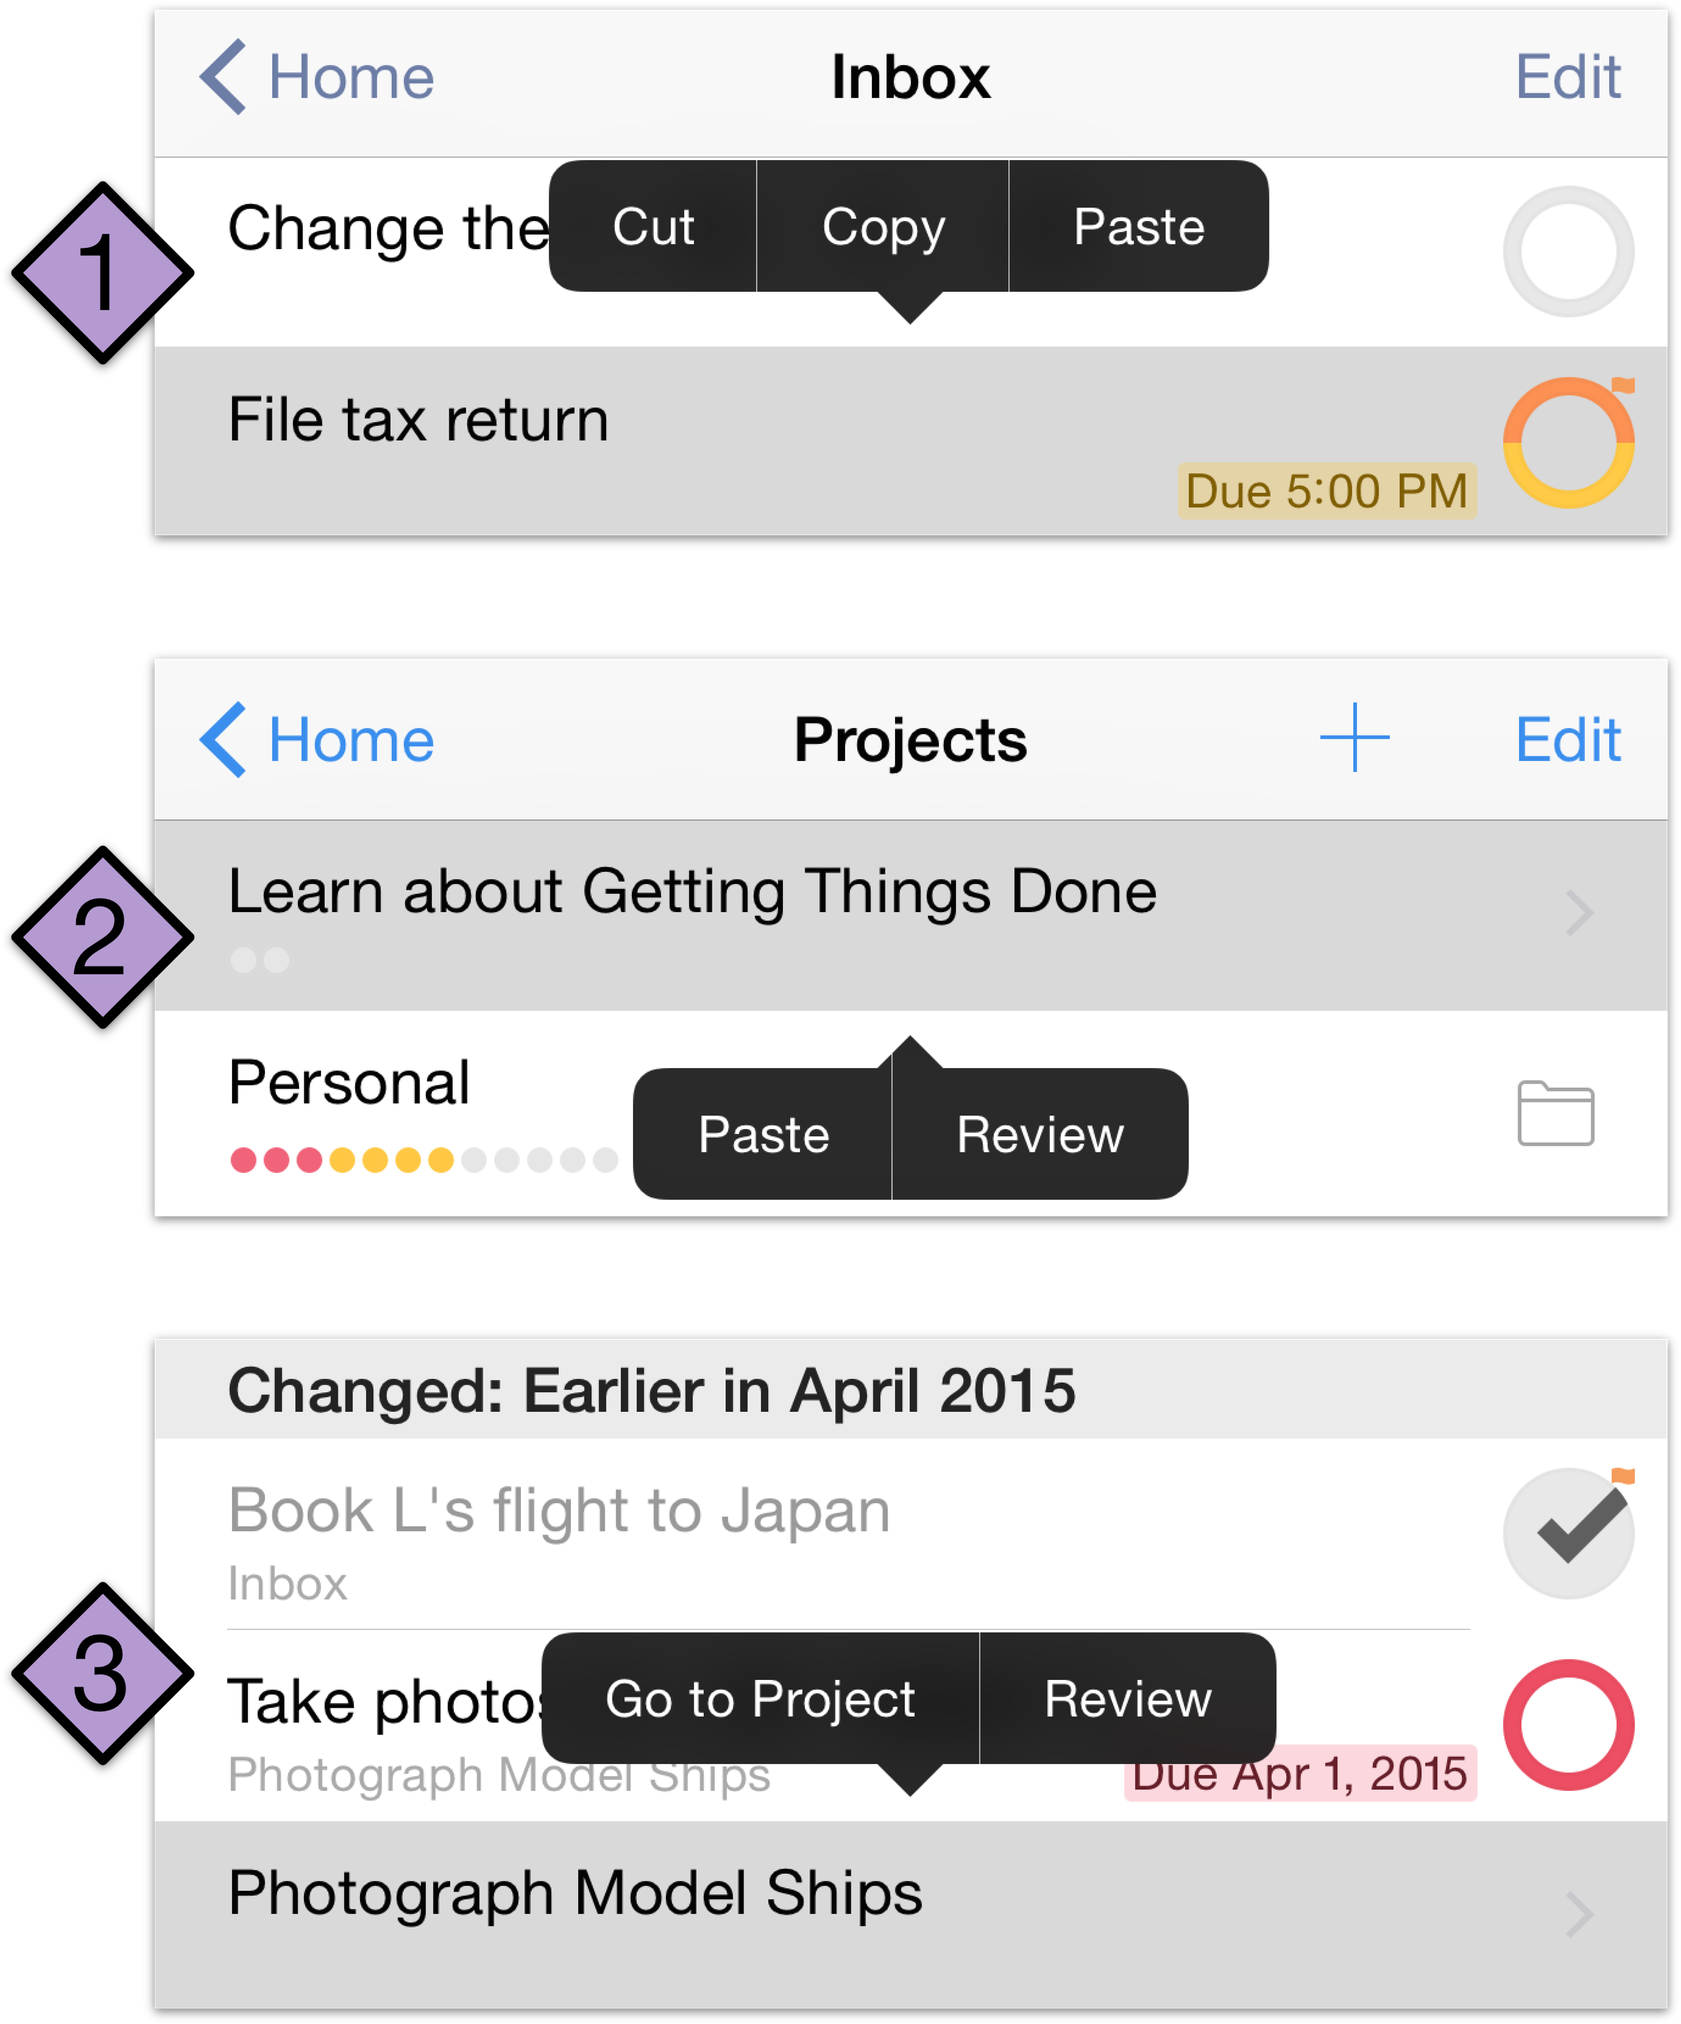
The Cut and Copy commands appear only in the contextual menus of inbox items and actions. They act as you'd expect: the selected item is either removed and copied, or simply copied.
When Pasted via the contextual menu, a copied action will appear either inside the selected item (if it's a project) or as a peer to it (if it's another action). Text copied from other sources can also be pasted into OmniFocus from the contextual menu; in this case, choosing Paste creates a new action with the copied text as its title.
- With a project selected, choosing Paste from the contextual menu adds the copied action (or text as an action) inside the project. Choosing Review opens the project in the Review perspective, ready for perusal. This is the best way to access and edit the review settings of a project.
- Finally, when selecting a project outside the normal project hierarchy (as seen here in the Changed perspective), the contextual menu offers the Go to Project command to leave the current custom perspective and view details of the project in the Projects perspective.
Inbox, Items, and Actions
When you first start using OmniFocus, you might be thinking “Where do I start?”. The best place to go is your Inbox, since this is the place where you’ll do most of your initial work in OmniFocus.
The Inbox is the hub of all activity, and is the catch-all space for depositing just about everything that’s on your mind, no matter how big or small. The things that you’d like to do—tasks, to-dos, aspirations, plans, chores, life goals—all have a home in OmniFocus. You can throw any stray thought into your Inbox.
One of the best ways to get familiar with OmniFocus is to sit down and do a brain dump into your Inbox. Let OmniFocus be your brain away from brain for when you can’t remember that really important thing you need to do by next Monday.
To add an item to the inbox, tap the Add Inbox Item ![]() button in the toolbar (or on iPhone, in the bottom right corner of the screen).
button in the toolbar (or on iPhone, in the bottom right corner of the screen).
Tip
When adding a new item to your Inbox you can quickly create subsequent inbox items using Save Plus in the editor, and when you create a new action from within a project you can use it to rapidly file additional actions in the same project.
Inbox Items
The things you create are placed in your Inbox, and are known as Inbox items. Some of these Inbox items are so simple that you can knock them off while they still reside in your Inbox. For example, let’s say you create an Inbox item to remind you to change the lightbulb in your workshop. That’s a simple enough task that you can do it at any time.
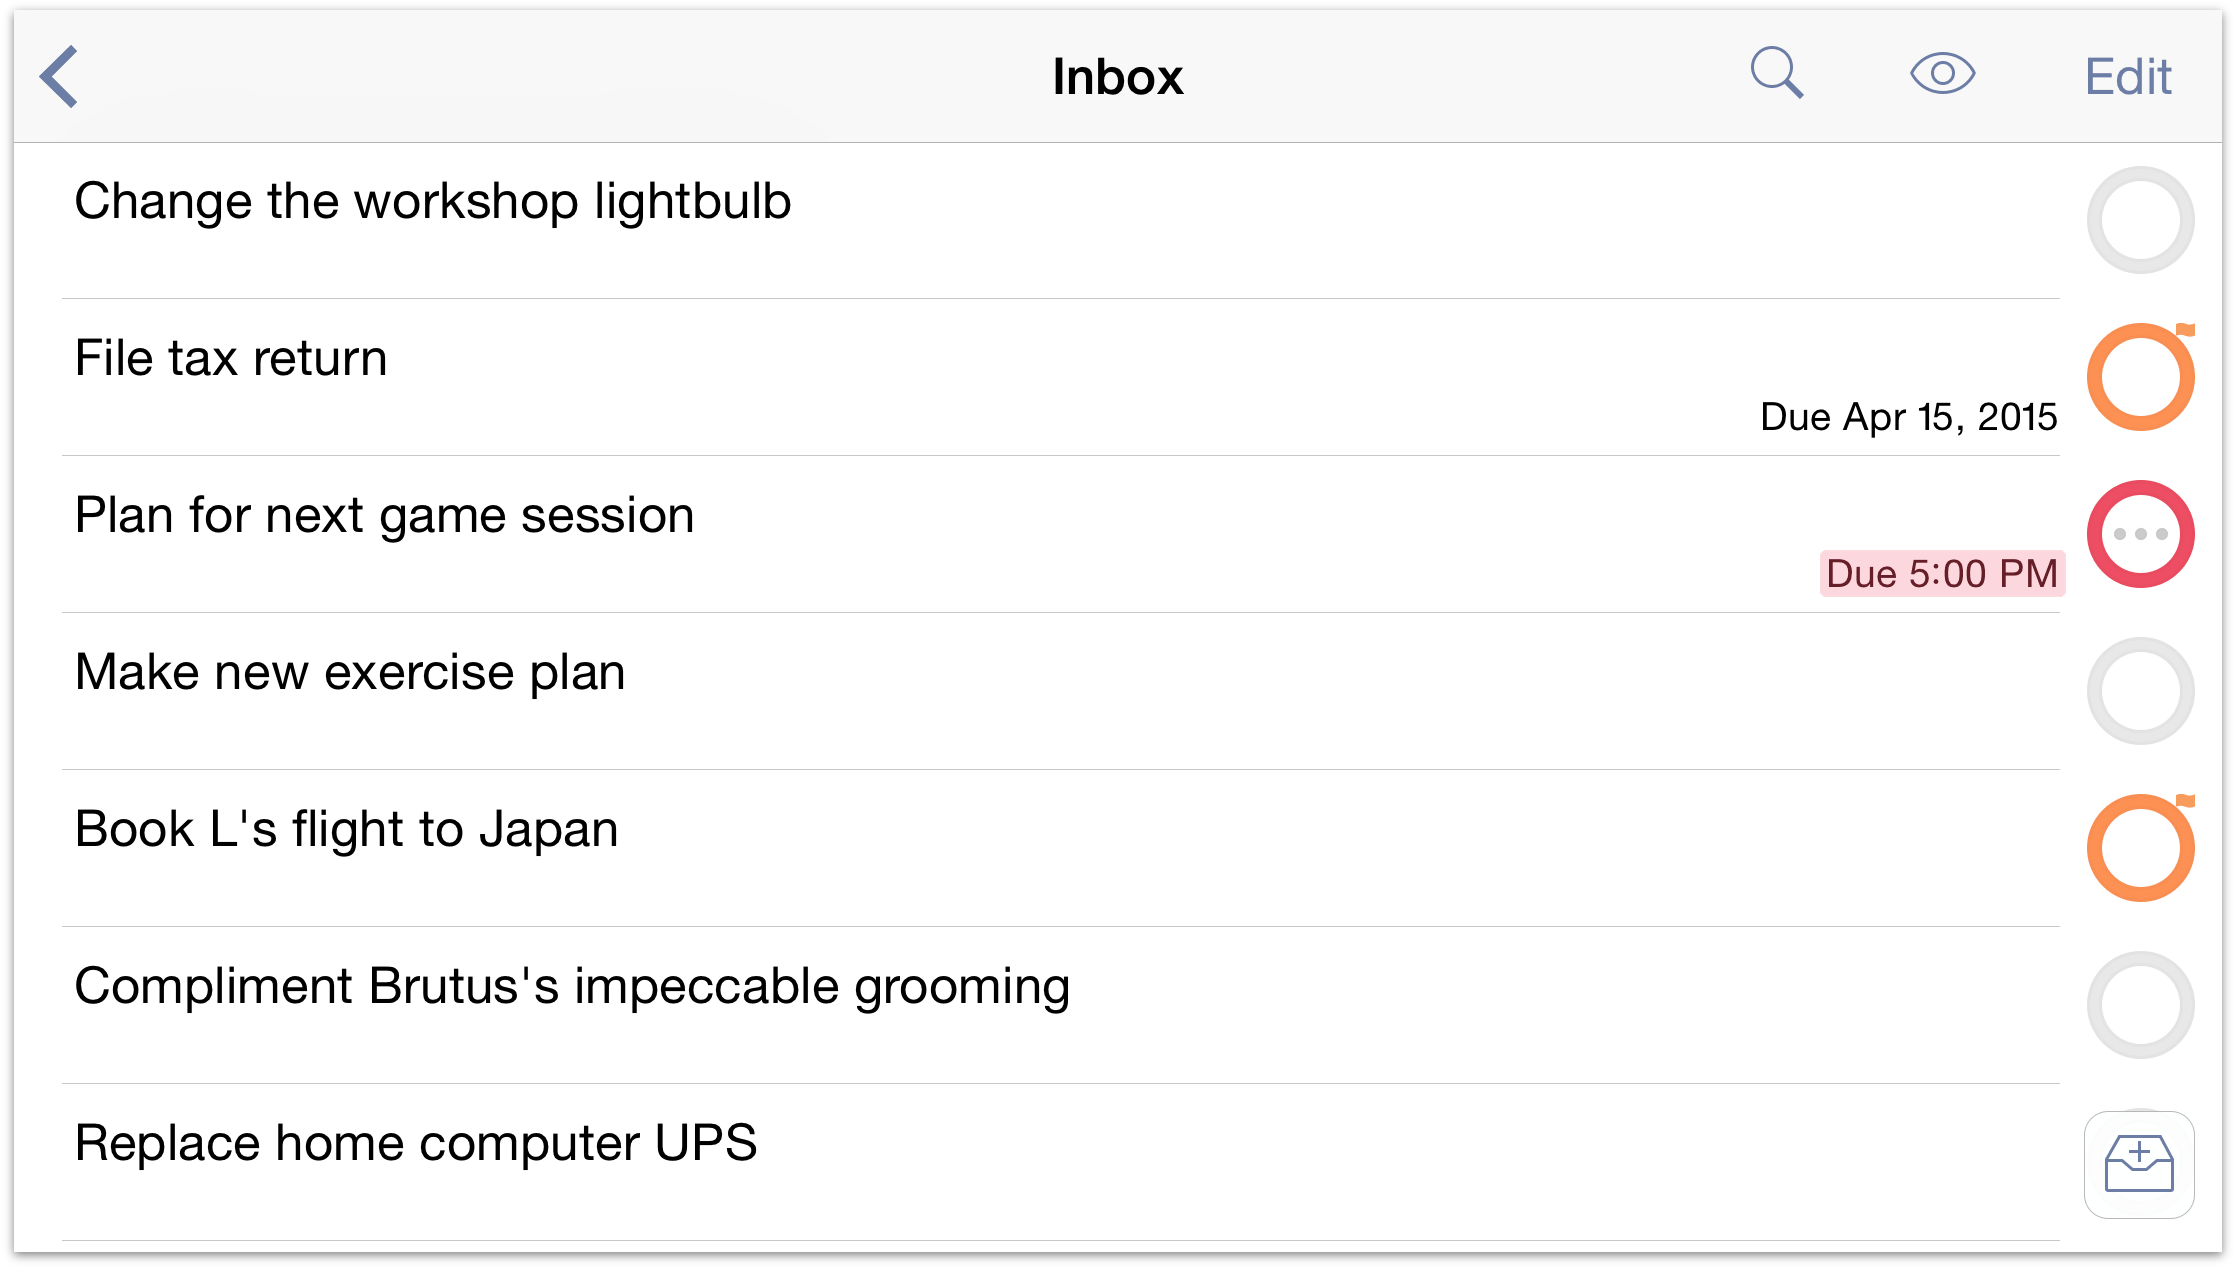
This Inbox item doesn’t need to be part of a larger project, and adding a context seems like overkill. Instead, you just leave this item in your Inbox as a constant reminder to yourself that you need to change the lightbulb in your workshop, especially before you plan to use any power tools.
Some items, though, are worth categorizing and providing fine details so that you have all the information you need at hand when you’re in a particular place or focusing on completing a complex project.
Actions
Most of the Inbox items you create ultimately end up as actions. This happens when you decide that an item is part of a larger goal—a Project—and you file it away with similar to-dos (more on this in the Projects and Contexts sections).
Each action has a Status Circle on its right edge for marking it complete. When you check an item as completed, it’s moved from the list of available items to the list of Completed items and becomes invisible under the default View options.
Once you’ve assigned an Inbox item to a project, it becomes an action that you can see in the Projects or Contexts perspectives, or in any custom perspective you’ve assigned it to.
To edit the details of an action, tap it to open the action editor. You can enrich the information you include with an action by adding notes and attachments, such as images and audio recordings. You’ll find more information about these in Notes and Attachments. You can also set due dates, defer dates, and repeat intervals for actions—for the details, see Dates and Times.
Completing Items
When you’ve finished a task, tap on its status circle to mark it complete. The task disappears from view, but not from your database: you can change your view settings to All to view completed items in your current perspective.
If you mistakenly complete an item, tap Undo to revert the change.
Note
For a reverse chronological list of your completed items, check out the Completed perspective. If it's not currently displayed in the sidebar, drag down and choose to view All Perspectives from the secret bar.
Projects
As you work through your Inbox, some of the items will stand out as larger in scope than a simple action. Planning a vacation or move, for example, are the sort of things that could benefit from being broken down into more manageable parts. Projects to the rescue!
A Project is an item that’s made up of multiple actions. Projects are typically more complex than actions, and can include several related actions.
Understanding Project Types
Projects can be as elaborate as necessary, and you can specify the project type to be either Sequential, Parallel, or as a logical grouping of Single Actions.
 Sequential Projects
Some projects, such as building a papier-mâché pterodactyl, require one action to be completed before the next action starts. These are sequential projects.
Sequential projects have actions that need to be completed in a predetermined order; the first item needs to be completed before you can move on to the next. Another example of a sequential project could be a checklist that an astronaut goes through during the launch sequence. Each item in the list is dependent on the previous item’s completion.
 Parallel Projects
Parallel projects consist of actions that can be completed in any order, such as picking up items at a few different locations. In a parallel project, all incomplete actions are available, and the First Available is just the first one in the list.
Note
The difference between parallel and sequential projects is most visible when the View option is set to show only Available actions. (Actions beyond the first available action in a sequential project are blocked, and therefore hidden.) In other View settings the distinction is there, but more subtle: future actions in a sequential project have their titles in gray text instead of black.
When viewing the Projects perspective on iPad, each project has an icon to its left that indicates the project type. These icons allow you to quickly scan a list of projects and tell which project is which type. On iPhone, tap the project name until the editor appears. The project type is shown in the Info tab.
Tip
For added flexibility in creating just the right dependencies for your project, consider making an action group parallel within a sequential project, or vice versa.
 Single Action Lists
A single action list isn’t really a project in the traditional sense; it’s a list of loosely-related actions that aren’t interdependent. A Shopping List project is a good example of a single action list because it contains a list of things that you need to pick up at the grocery store. You can gather these items and check them off as completed (or acquired) as you make your way through the store. The order in which you collect them is irrelevant—it doesn’t matter if you pick some of them up today or tomorrow; they’re just things you know that you need to grab.
A Single Action list is often more about a state you want to generally sustain (spoiled cat, non-spoiled food, functional household), rather than a state you want to achieve (ship an app, take a vacation, find a new apartment). Another way of looking at this is that Single Action lists rarely have due dates, and they rarely get checked off as completed. The items within the Single Actions list may get checked off, but the project itself is ongoing.
Creating Action Groups
Groups can also be used to create a project within a project—an action group (also sometimes called a sub-project). If you find that you have an action that requires many steps of its own, you could split that action off as a separate project. However, a better solution could be to leave the action in its current project, and then move the related tasks underneath.
For example, when planning your move to Seattle, you realize that you need to make a house-hunting trip to find a place to live. You need to book your flights, rent a car, reserve a hotel room, and make appointments with real estate agents to find an apartment or that dream house in Alki Beach. You can create these actions within the Move to Seattle project, and then move them into the Plan a house-hunting trip action to create an action group.
Let’s break it down. Here’s how to add an action group to a project in OmniFocus for iOS:
Tap Projects
in the sidebar or home screen, then open the project you want to modify.Tap the plus button
 in the toolbar at the upper right to create a new action.
Give the new item you’re creating a name that will describe all the steps it will end up containing.
Tap the Save + button in the toolbar.
Give this next item a name that represents the first action in the group, but tap the “Save” button this time.
Locate the item you just created and tap it to bring up the editor.
Next, use the Move
button in the toolbar (on iPhone, at the bottom of the editor's Info pane) to embed the item inside the item you created in step 3.Tap the Done button in the upper right to see the action group you’ve created. You can now use the plus button to create the remaining items that need to be added, and move them individually into the group.
Once you’ve created that action group, you can change the type from Parallel to Sequential so that the next task only becomes available when you tick off the previous task. And when you’ve completed the final action for that subproject, the parent action can be checked off, too.
Tip
An alternative way to create an action group is to initially create it as a project, populate it with actions, then convert the project to an action and move it inside the project intended to be its final home.
Grouping Projects with Folders
Occasionally, you’ll find that some of your projects are similar enough that you want to keep them together so you can look at everything in one place. These projects might have different goals, timelines, or objectives, but they contribute to the greater whole. For projects such as this, you can use Folders in OmniFocus to group multiple projects together.
From the Projects perspective (tap Projects in the sidebar or home screen), you can create a project folder by tapping the plus button in the toolbar and choosing New Folder from the popup. To move a project into a folder, tap on the project (not its actions) to bring up the project’s details, and then tap the Move button. Then all you need to do is select the folder that you want the project to be in, and the project will be moved to its new location.
You’ll also notice that folders look a little different than a regular project — they’re tagged with a folder icon ![]() in your project list. To open a folder and view the projects it contains, just tap it.
in your project list. To open a folder and view the projects it contains, just tap it.
Marking a Project Complete
Eventually you’re going to reach the successful end of a project. When you’re sure that you’ve really accomplished Move in to new house, Carve Halloween pumpkins, or Write pterodactyl novel, you can mark the project complete.
Select the project and then choose Completed ![]() in the Status section of the editor. If you’d like to revisit a completed project, change your view options to All or search for the project with the Everything filter.
in the Status section of the editor. If you’d like to revisit a completed project, change your view options to All or search for the project with the Everything filter.
Placing a Project On Hold
If you’re not quite sure whether you want to start (or continue) a project, you can change the project’s status from Active to On Hold ![]() . When you place a project on hold, the project and its actions are removed from the project list in the sidebar or home screen and main outline (if you’ve chosen to show Active projects in view options).
. When you place a project on hold, the project and its actions are removed from the project list in the sidebar or home screen and main outline (if you’ve chosen to show Active projects in view options).
You can switch the Project perspective’s view options to Remaining so you can review on hold projects for any you’d like to make active, drop, or mark completed.
Tip
If you don't want On Hold projects cluttering your Projects list, you can leave the Projects view options set to Available, but then change the view options for the Review perspective to Remaining. This way, anything that is On Hold, Deferred, or Blocked shows up in the sidebar whenever you review all of your projects, and you can decide then whether to reactivate a project or action. See the Review chapter for details.
Dropping a Project
If you’ve decided not to work on a project any further, you can drop ![]() it completely. It disappears from the list in the sidebar, and its actions likewise stay hidden. Of course, you could just delete the project, but then you wouldn’t have any record of it or its actions ever having existed. Keeping them around in a dropped state means you can go back and check on how often you give up on projects, check which actions you’ve completed regardless of whether they’re from still-relevant projects, and so on.
it completely. It disappears from the list in the sidebar, and its actions likewise stay hidden. Of course, you could just delete the project, but then you wouldn’t have any record of it or its actions ever having existed. Keeping them around in a dropped state means you can go back and check on how often you give up on projects, check which actions you’ve completed regardless of whether they’re from still-relevant projects, and so on.
To find a dropped project in your database, choose All in view options or search for it with the Everything filter.
Note
Dropped and completed items accumulate in your database over time. If you find the load of data excessive, OmniFocus for Mac offers automated archiving of these items according to time parameters that you control.
Contexts
In addition to the hierarchical ways of organizing your actions, you can also assign a Context to each action, project, or group. A Context can be anything you want, such as a place (the hardware store or work), a person (you, your boss, or a coworker), or a thing (your trusty MacBook Pro or a torque wrench). Contexts indicate where you need to be or what you need to have available to complete the item.
For example, let’s say you’re tweaking the rocket engine you’ve been building in the backyard, and you’re stuck because you need a specific wrench. To make matters worse, the light in your workshop went out when you went searching for that wrench. You’ve added the wrench as an action in your Colonize Mars project, and you just added the lightbulb to your Household Errands project. But what’s to keep you from forgetting one or the other the next time you go to the hardware store? The answer is that while they’re part of different projects, you can associate these items with a Context.
Note
By default, if you only assign a context to an Inbox item, it remains in the inbox with your other tasks until you assign it a project.
Contexts can be created in two ways:
From the Contexts perspective:
Tap Contexts in the sidebar or home screen, then tap the New Context button
 in the toolbar. The context editor appears, where you can assign a name to your new context, set its status (Active, On Hold, or Dropped), and choose a location (see Location Reminders below) for where you need to do that ultra-important thing.
While editing an item:
While editing an Inbox item or action in one of your projects, you can choose a context for it or create a new context by entering a unique name in the text field. After entering the name for the new context, don’t forget to tap Create (context name) below the text field to add this context to your list.
As you can see, contexts give you an amazing amount of control over the depth of information you can add to action items and projects. We have preloaded OmniFocus with a bunch of contexts that we think you’ll most likely need, and the new contexts you create show up at the bottom of the list. But let’s say that you don’t need some of the preset contexts, or that you want to move your new contexts to the top of the list. Alrighty, let’s do that next.
Managing Your Contexts
The contexts screen shows a list of contexts with summary dots indicating the at-a-glance status of the actions and projects within them. Actions without a context show up at the top in a No Context group. When you’re ready to get some work done, this is a good place to see only the things that are relevant to a particular context.
To delete or move contexts around, tap Edit (![]() on iPad) in the toolbar. To the left of the contexts, you’ll see a deletion switch
on iPad) in the toolbar. To the left of the contexts, you’ll see a deletion switch ![]() ; and on the right, you’ll see a reordering handle
; and on the right, you’ll see a reordering handle ![]() . If you tap the deletion switch, you won’t delete the item right away. Instead, a Delete button appears to the right where the reordering handle was. Tap Delete to remove the context from your list.
. If you tap the deletion switch, you won’t delete the item right away. Instead, a Delete button appears to the right where the reordering handle was. Tap Delete to remove the context from your list.
To change the order of the contexts in your sidebar, just press on the reordering handle and drag the context up or down in the list. As you move that context around, you’ll notice that the other contexts move out of the way so you can drop the context where you would like it to be.
When you’ve finished making changes to your contexts list, tap Done in the upper-right corner of the sidebar to save your changes.
By default, actions in context lists appear in the same order they are listed in their projects. Tap View Options to sort by flagged items and due dates, with flagged items shown first and then items by due date from soonest to latest.
Note
Copied items can't be pasted into contexts directly. To add a context to a copied item, first paste it into an perspective that uses the project hierarchy (such as the Inbox or Projects perspectives), then tap it to edit its details.
Nesting Contexts
By default, any new contexts you create are added at the top level of the context list. However, if you tap Move ![]() when creating or viewing a context, you can create nested contexts.
when creating or viewing a context, you can create nested contexts.
For example, when you have important people who are associated with important places, you could assign contexts to them independently – or, you could group them together by their common location. So if you have a Work context, you can move your boss, coworkers, and even work-related tools like your computer or drafting table into it to keep things clearly organized.
There’s no limit to the amount of context nesting you can do, which means you have the ability to give your actions fine-grained detail about where or how you need to do something.
Location Reminders
When you’re on the go with your device, context-based location reminders are handy for getting a little nudge when you are in the right area to complete an action.
Note
The underlying technology for location reminders on iOS is quirky; you can't quite count on them to occur perfectly every time you enter the specified area. (These location alerts use a less accurate and somewhat unreliable low power location monitoring, rather than the battery draining GPS services available in iOS, although accuracy is improved in all cases when both a cellular network and GPS are available.)
The range of distances at which you might get an alert is pretty wide. If you leave an area and then enter it again within a short span of time, you might not get a second alert. And if you pass through an area quickly (such as while driving on the highway), you might not get an alert at all. So for now it is best to use this feature as an extra layer of occasional helpfulness, not a crucial part of your trusted system.
Turning on Notifications
Before you can use location reminders, the first thing you’ll need to do is to turn them on in OmniFocus’s settings. Tap Settings in the secret bar to access the settings. Under Notifications, tap Sounds, Alerts, and Badges, and then tap the switch under Location Reminders to make sure Show Alerts is turned on.

With notifications turned on, you can now set up locations for the contexts you use in OmniFocus.
Note
If you don't turn on notifications in OmniFocus Settings, you won't be able to assign a notification to a context.
You'll also want to make sure that OmniFocus has permission to receive alerts on your device. You'll have been asked about this at launch, but if you refused at that time, you can open the iOS Settings app and then select Notifications to be sure that alerts are enabled (choose OmniFocus from the list of apps on the right).
If you follow the instructions in this chapter and notifications still aren't appearing, it's possible that location-based alerts have been disabled globally on your device. To check on this, take the following steps:
- Open Settings.app.
- Tap Privacy.
- Tap Location Services.
- Scroll down to the very bottom of the screen and tap System Services.
- Ensure that Location-Based Alerts is set to On.
Giving a Context a Location
Your next order of business is to assign locations to your contexts. This makes it even easier for you to accomplish your goals when you’re out running errands, or to remind yourself of where something needs to be done. With location alerts turned on, OmniFocus will ping you when you’re near that location and bring that particular action item to the front so you can check it off your list.
To set up location info on a context:
In the Contexts list, tap on a context (then tap on its bolded title again to edit it), and then tap Location. None is the default; tap it to specify a place. When specifying a location:
Here uses Wi-Fi or cellular triangulation to pinpoint where you are. Neither method is 100 percent accurate, but they can get pretty darn close.
Anywhere designates the context as always available, no matter where you are. It isn’t really a location—it just means that any context with this location are things that you can do anywhere, such as practicing your banjo (although, don’t try this on the bus during the morning commute).
Search lets you enter a keyword to search for. This option is particularly handy, for example, when you need to pick up something from a hardware store, but aren’t quite sure which one is closest to you. You can just type Hardware and then tap Search on the keyboard to choose a business near you. You can either assign the context an exact location that appears as a result of the search, or you can use the search itself.
Address gives you the option to enter a specific address (if known).
Contact gives you the option to choose the address for a person or place that you’ve added to your contacts. If this is the first time you’ve opted to set a location from the Contacts app, an alert will pop up asking you to authorize OmniFocus to access your contacts.
Pin lets you press and hold on the map to drop a pin at a location of your choice.
Note
If you've set up context locations on your device and you switch to OmniFocus on your Mac, the context location data won't be displayed, but don't worry—it's safely preserved when you sync your OmniFocus data between devices.
Setting Notifications for a Location
After you’ve set the location, you can finally set up a notification, and provide a distance alert for the context as well.
The notification dialog appears below the location you’ve chosen on the editing screen. You can choose to be notified when arriving or when leaving your specified location.
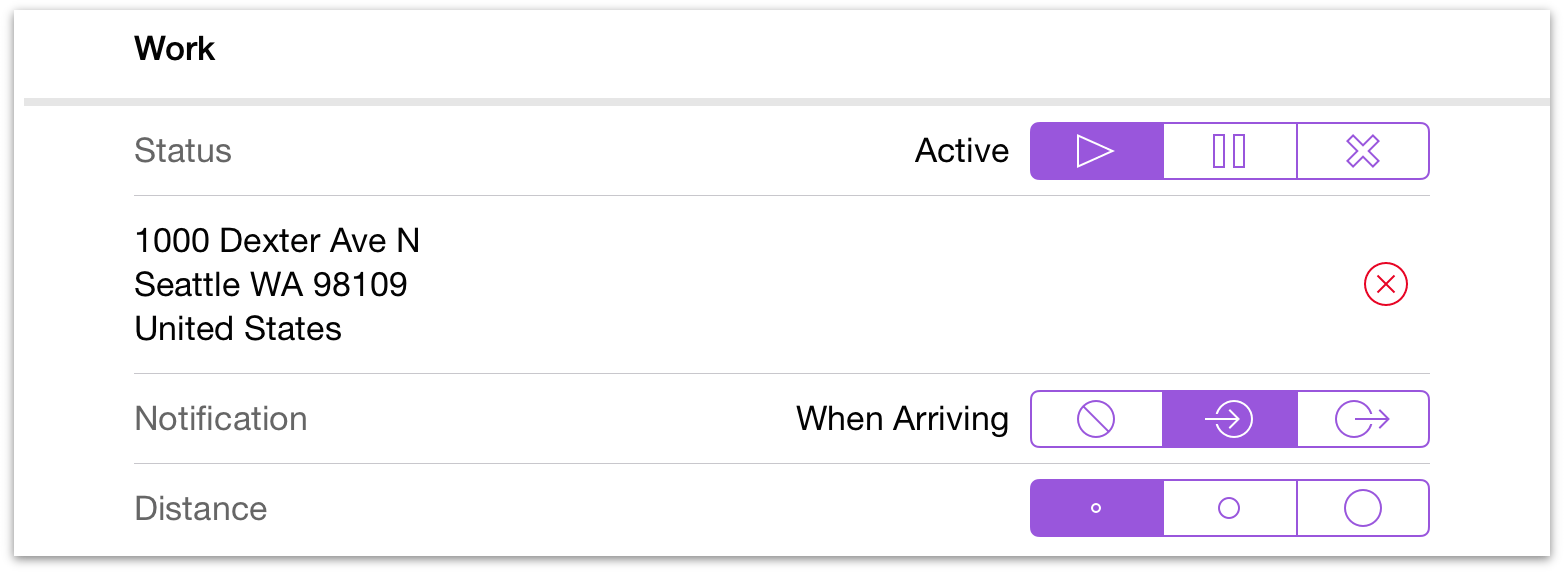
After setting your notification option, you’ll be able to choose a distance. The three distance options are very approximate. The small dot is about 200 meters or 650 feet; it covers about one city block and is useful for things such as coming home or leaving the office. The middle-sized circle is about 500 meters or about a quarter mile; it covers something such as a small neighborhood or park, and is useful for knowing when you are a few streets over from a certain store. The big circle is about 10 kilometers or 6.2 miles; it’s useful for things such as a city you occasionally visit. But remember, the actual distance where you get your notification could be quite a bit different from these rough numbers.
Putting Contexts, Locations, and Notifications to Work
Contexts with search-based locations do not display notifications; instead, choosing Nearby from the sidebar displays the results of searches you’ve defined that are close to your current location. This is useful when the most convenient way to accomplish a task could change based on your current location and timeframe.
However, if you have set a location that’s far away, you can pinch on the map until you’re zoomed out enough to see a red location pin; tap the pin to see the available tasks associated with that context. Tap Info on the popover to view and edit the context and its associated tasks directly, or tap Get Directions to get directions to the location based on your current location.
When you tap Get Directions, the Maps app comes to the front and plots a course to the destination from your current location. To return to OmniFocus, double-tap your device’s home button and select OmniFocus from the app switcher.
Forecast
Forecast helps you keep an eye on the progress of your projects, check upcoming due dates, and schedule OmniFocus actions alongside important events in your Mac or iOS Calendar. With the ability to check for past due tasks and look ahead to the future, you’ll never miss a beat. In OmniFocus for iOS a range of dates spanning today, the next four days, the past, and the future is displayed in a convenient row in the sidebar, letting you know at a glance what’s on your plate in the coming weeks.
One way to think of OmniFocus’s Forecast perspective is to think of the weather (which is something we do often here in Seattle)—you want to know what it’s going to be like outside so you can plan ahead.
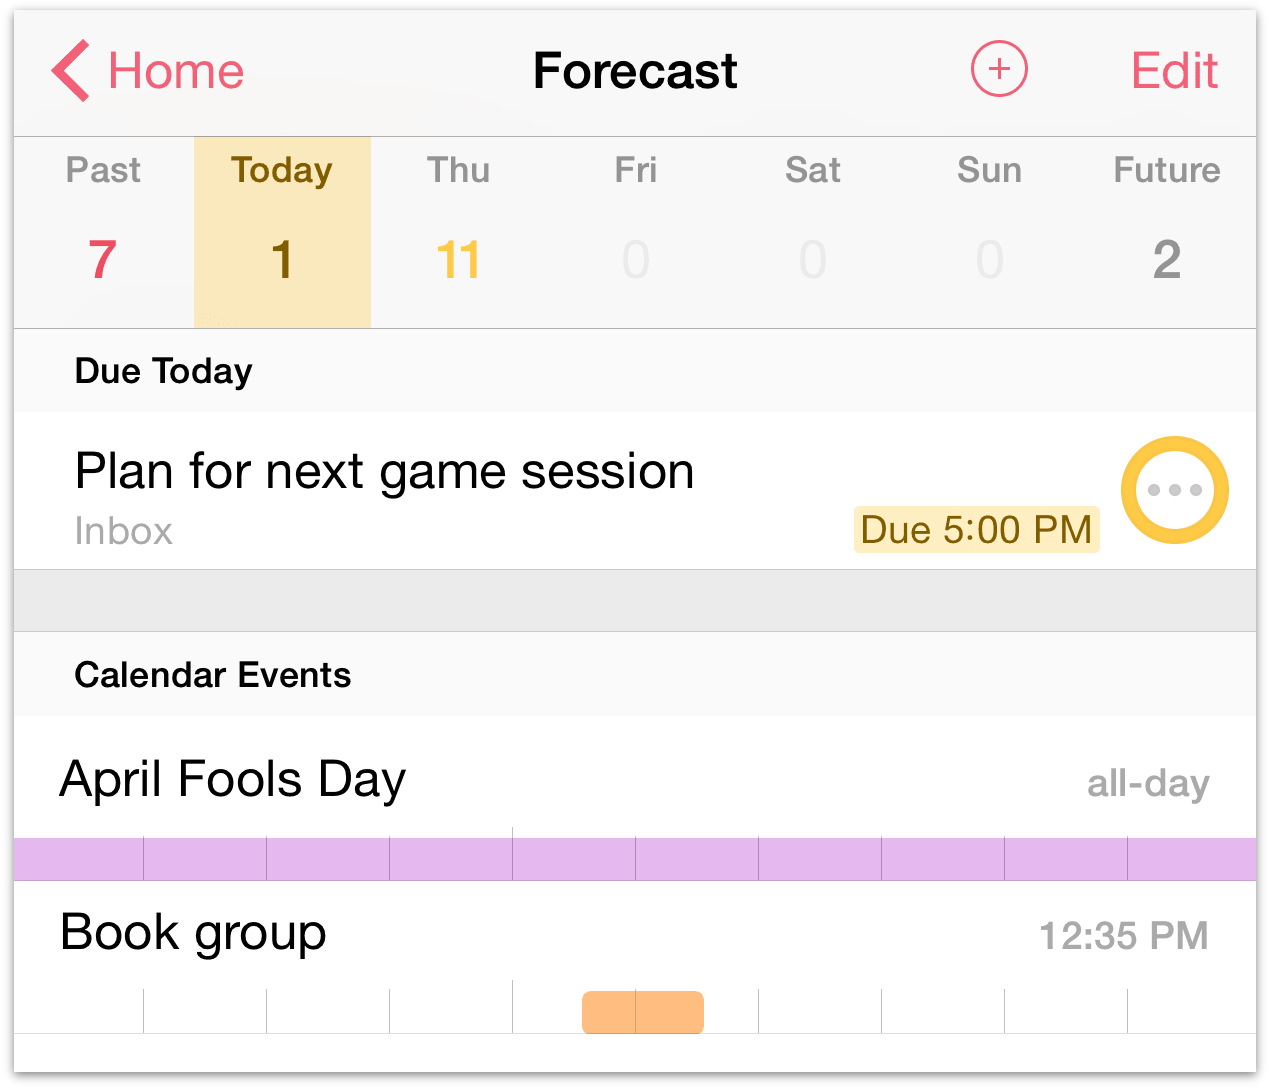
Each date button displays the number of actions associated with that date. For due items, the count is color-coded according to the most urgent item: amber indicates that an item is due soon, and red indicates an item is due or past due. To create a new action that is due on a particular day, go to the appropriate date button, followed by the new item button.
Adding your Calendars to OmniFocus
OmniFocus also plays well with your calendars, including those you might sync through Apple’s iCloud from Calendar on OS X or iOS, Google Calendar, or any CalDAV servers to which you have subscribed. The calendars which you can view in OmniFocus are based upon the calendars that the Calendar app on your device can see; to add to, remove, or modify the calendars available on your device, use the Calendar app.
Note
If you didn't allow calendar access when you first set up OmniFocus, the first time you open the Forecast perspective you'll receive a prompt informing you that the app would like to access your calendar. Choose OK to connect the app with your calendars (if you choose not to, your Forecast calendars will come up blank).
To check whether Calendar access is enabled for OmniFocus, go to the iOS Settings app, scroll down until you find OmniFocus, then tap Privacy.
Events on your calendar show up interspersed with the daily events you’ve scheduled in OmniFocus. To view an event on your calendar, just tap it for a popover that contains the details of that event. In that popover, you can also tap Calendar to open the Calendar app on your device and go directly to that event.
Note
While OmniFocus is great at talking with Apple's Calendar, we can't guarantee compatibility with other calendar apps that may be on your device. Calendar is considered the default go-to resource when OmniFocus seeks out calendar information to display alongside your OmniFocus items in Forecast view.
To modify what you see in the list or to adjust the time shown for the Calendar events, tap View in the toolbar. Forecast view options also include a Calendars section that lets you customize which external calendars are shown, including those stored in iCloud and more.
Flagged
Another great way that OmniFocus helps you accomplish things is with the option to flag important actions and projects. For example, you can use flags to highlight all of the actions you’d like to complete today, or assemble a quick set of talking points for a meeting.
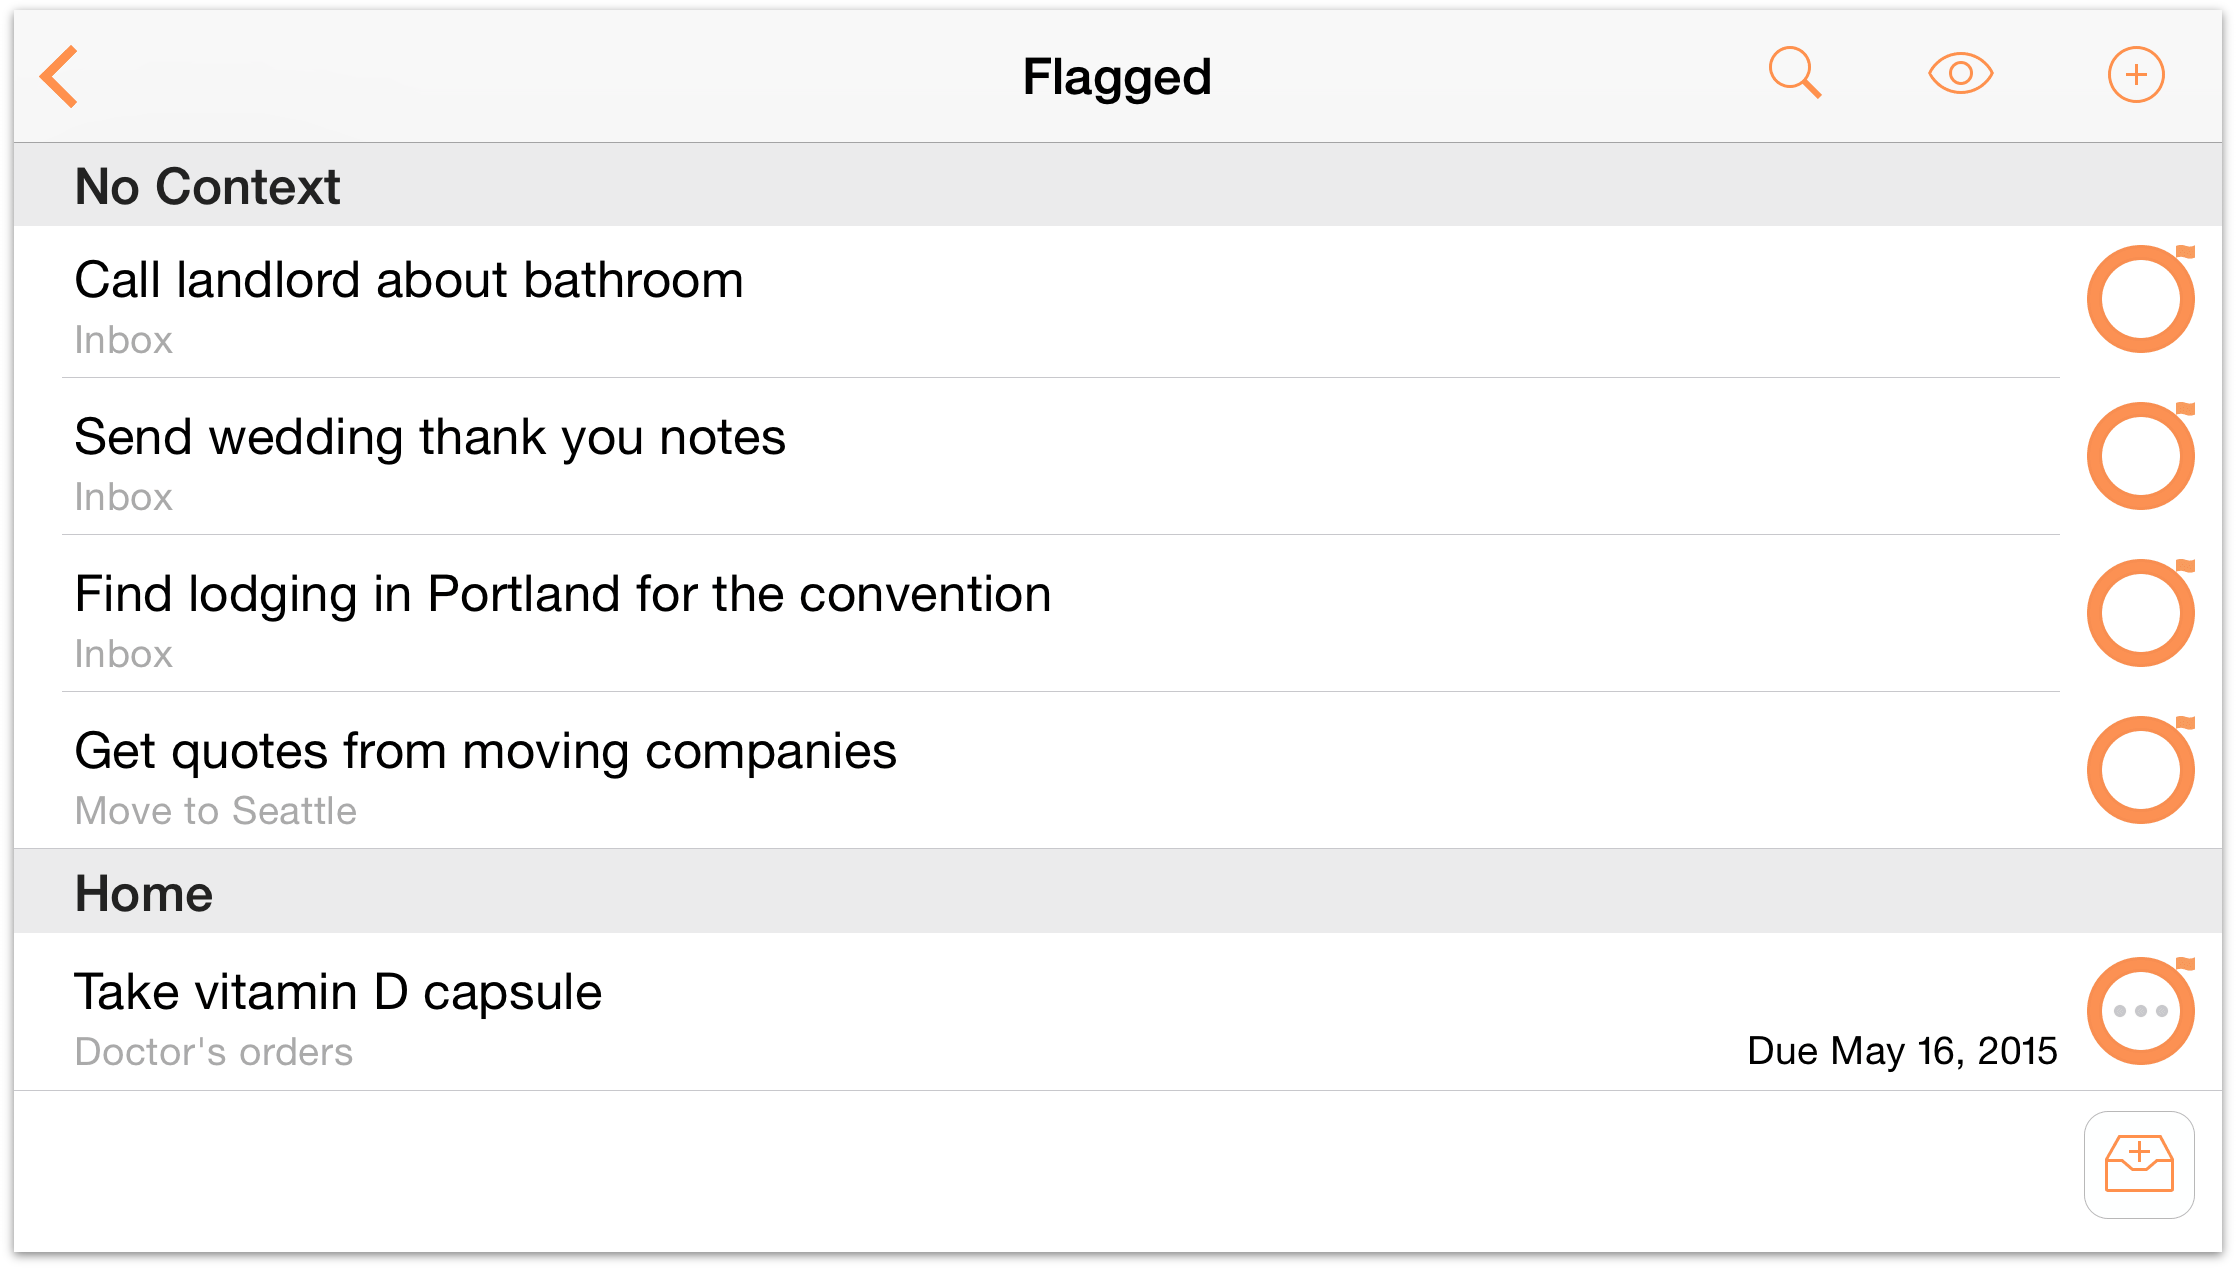
To flag a selected item, open it for editing and tap the flag icon. When you flag an item, its status circle changes from gray to orange to help catch your eye and let you know that something important is going on.
To view all of the items you’ve flagged, visit the Flagged perspective. OmniFocus conveniently brings all of your flagged items together in a nice little bundle so you can tick them off as you go.
Nearby
When you’re out and about, the Nearby view shows you items you’ve assigned to contexts that are location aware. It’s an incredibly flexible tool – depending on how you’ve set up your contexts, you can see actions to complete somewhere nearby that matches a business search (for example), or at a specific address associated with someone on your iOS Contacts list.
Note
The Contexts chapter explains setting up locations for your contexts.
The Nearby view has two modes: Map and List. The map displays a rich visual reference of actions at nearby contexts, while the list shows the same available actions in order of their distance from your current location.

On the map, tap a pin to view a list of the actions associated with its context location. Tap Info ![]() in the popover that appears for details on the action(s), or tap Directions
in the popover that appears for details on the action(s), or tap Directions ![]() to open the location in the iOS Maps app.
to open the location in the iOS Maps app.
The list view shows actions organized by contexts in order of their proximity to your current location. This is useful to see a more comprehensive list of nearby tasks all at once, without the need to tap on individual context locations.
Note
The first time you use Nearby, if you didn't agree to let OmniFocus access your location when you launched the app for the first time, you'll be asked again. Location access is required for the Nearby feature to work.
Like other location services on your device, an active internet connection is required for Nearby to work. Also, turning on wifi in the Settings app improves the quality and accuracy of location services (regardless of whether your device is connected to an active hot spot).
Review
Reviewing is a good way to make sure all of the projects in your library are in good shape and are ready for you to take action. If you have projects that need more actions added to them, or projects that aren’t relevant anymore, or projects you don’t mean to do any time soon, following a regular review process can help you keep them from falling through the cracks.
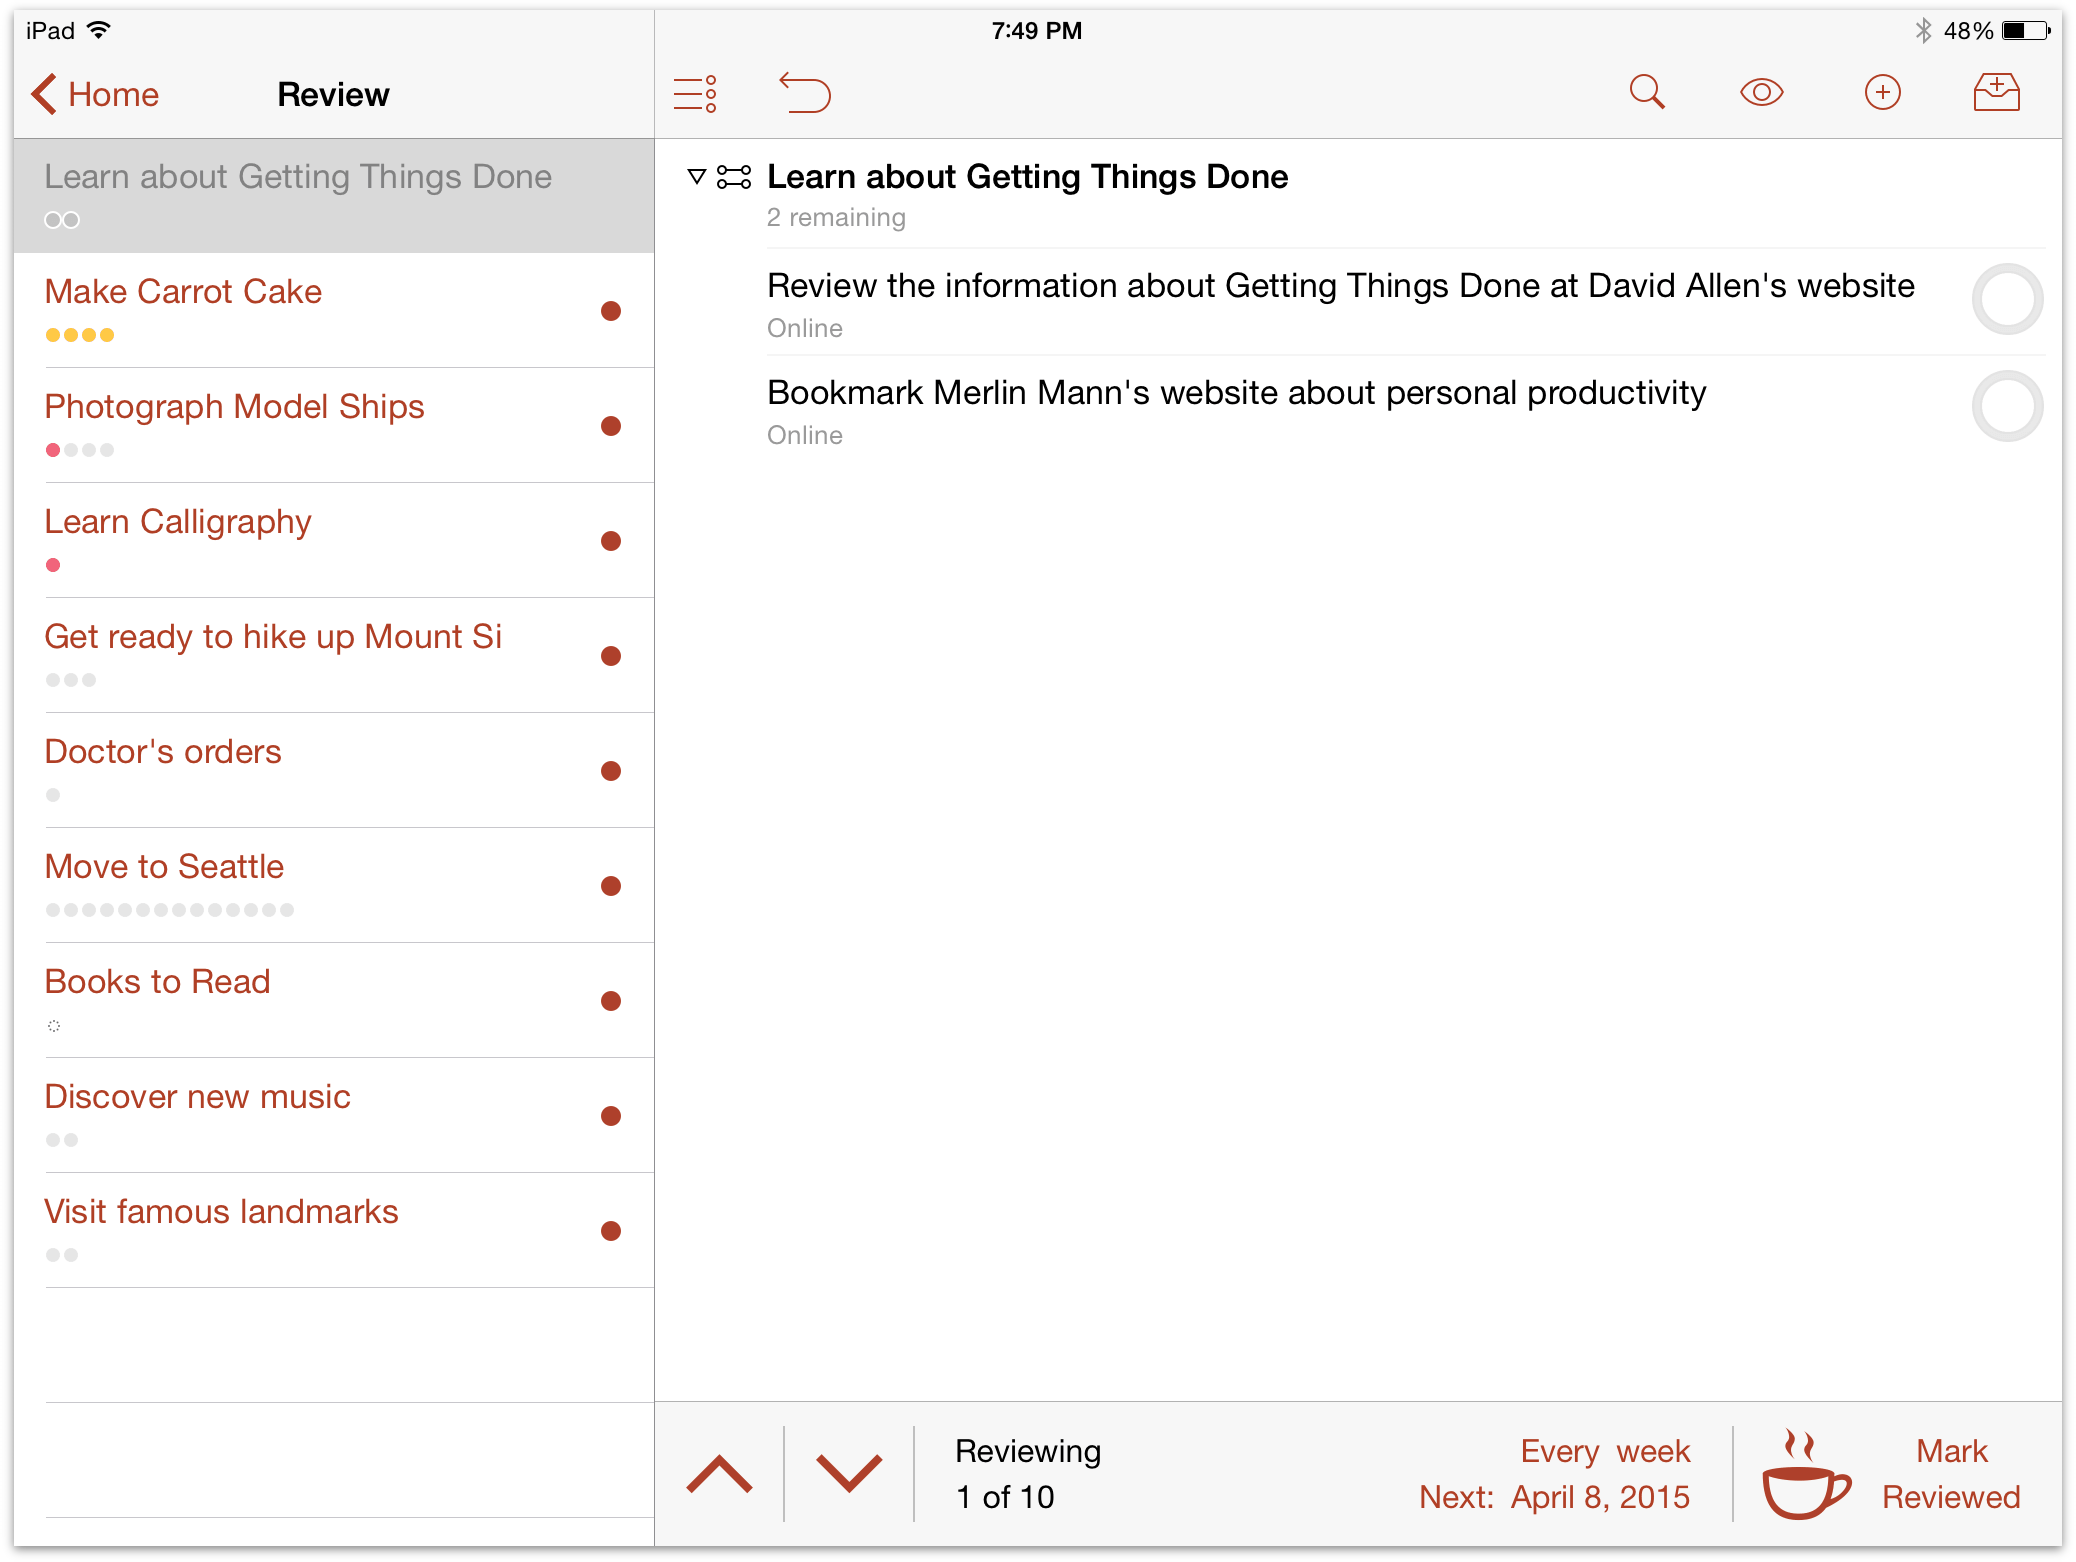
Each project has an interval for how often you intend to review it and a date when the next review is planned. You can change the review interval on a per-project basis by tapping the interval text at the bottom of the screen for iPad, and the top of the screen for iPhone (the default review interval is every week).
To review your remaining projects:
Choose the Review perspective in the sidebar or home screen. In this view, your remaining projects are grouped in order of their next-scheduled review date.
For each project, check whether it is in the proper state (Active, On Hold, Completed, or Dropped). Do you need to revise its actions, or add new ones? Should you put the project On Hold, drop it, or mark it as Completed? Or is everything moving along just fine?
Once you’re satisfied with the state of the project, make sure it’s selected and tap Mark Reviewed in the lower right of the outline. The project’s next review date moves forward and you can go on to review another project.
Common results after reviewing your projects include:
Determining that it’s on course with no changes required; or,
Adding, removing, rearranging or completing actions within the project to adapt to changes in circumstance since the last review.
You may also find you’re able to mark a project as Completed (huzzah!), decide that now’s not the time to be working on it and put it On Hold, or realize that it’s something you won’t be acting on for the foreseeable future and mark it as Dropped. For more on changing a project’s status, see the Projects chapter.
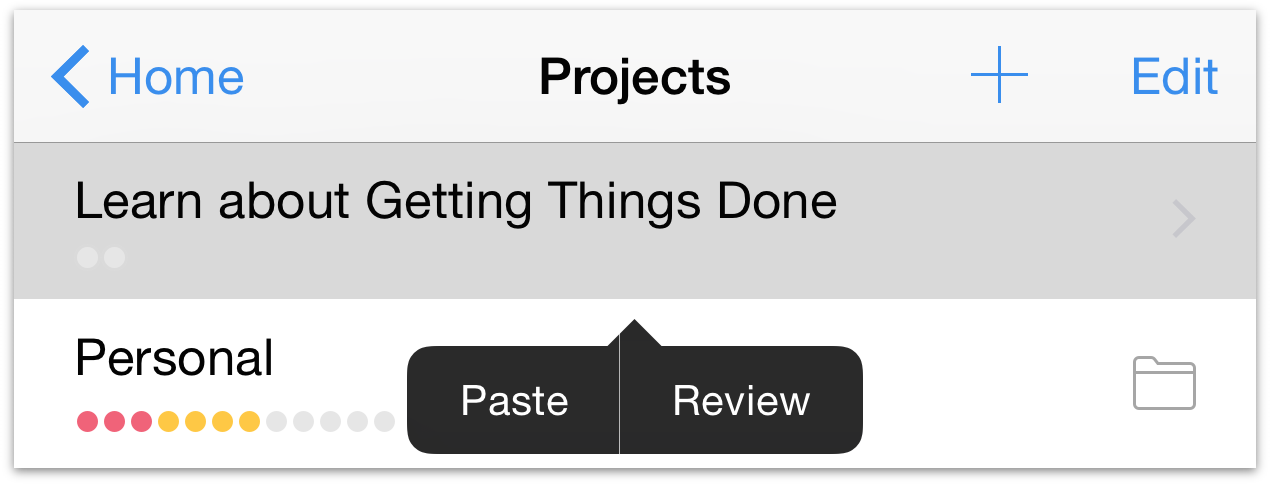
If you recently marked a project reviewed and you would like to look it over again before its next scheduled review (or you'd like to change the review interval to something else), the contextual menu comes to the rescue! Press and hold the project's title and choose Review from the menu that appears, and the project will open in the review perspective ready for perusal.
Perspectives
When you look at a representation of your collected items in the main outline, you’re looking at a perspective on your data. OmniFocus comes with a bunch of built-in perspectives that have been painstakingly designed to help you get the most out of your OmniFocus experience. These include Forecast, Inbox, Projects, Contexts, Flagged, Nearby, Review, Completed, and Changed.
The first seven of these form the foundation of interacting with OmniFocus, and offer tons of power and flexibility for accomplishing things in ways that suit your needs.
The final two standard perspectives—Completed and Changed—are views that appear in your sidebar or home screen when you toggle to show All Perspectives from the secret bar and are a great way to find items in your database that may have been filed away by mistake or otherwise disappeared under mysterious circumstances.
Once you’ve been exploring OmniFocus for a while you may find there are even more specialized ways that you’d like to view your tasks, whether through a specific search term, a group of projects in your sidebar, or a special sort criteria you’d like to apply to actions in a single action list. Or maybe there’s a specific productivity method you’d like to try that the default perspectives don’t fully support.
Favoriting and Reordering Perspectives
With the OmniFocus Pro upgrade installed, you can hide default perspectives that you don’t use, and rearrange the sidebar list to bring others to prominence. Tap the tile editor button ![]() in the secret bar to rearrange and promote perspectives to Favorites. Perspectives listed in the Other Perspectives section are still available when choosing to view All Perspectives from the secret bar.
in the secret bar to rearrange and promote perspectives to Favorites. Perspectives listed in the Other Perspectives section are still available when choosing to view All Perspectives from the secret bar.

Note
If you choose to "favorite" all of your available perspectives by moving them out of the Other Perspectives section, the switch to toggle between Favorites and All Perspectives becomes greyed out in the secret bar (because at that point there's no difference between the two lists). The switch will likewise disappear if no perspectives are promoted, since the sidebar and home screen aren't allowed to show you a completely blank space.
Creating and Editing Perspectives
Along with the ability to customize your sidebar’s appearance, the OmniFocus Pro upgrade lets you create custom perspectives that reflect views on your OmniFocus data that you want to come back to again and again.
To create a new custom perspective, tap New Perspective ![]() in the secret bar. To edit an existing custom perspective, navigate to it in the outline and access the Editor via View Options
in the secret bar. To edit an existing custom perspective, navigate to it in the outline and access the Editor via View Options ![]() in the secret bar (iPhone) or toolbar (iPad). To delete a custom perspective, scroll to the bottom of the Perspective Editor and choose Delete Perspective.
in the secret bar (iPhone) or toolbar (iPad). To delete a custom perspective, scroll to the bottom of the Perspective Editor and choose Delete Perspective.
When creating or editing a custom perspective, the Perspective Editor lets you customize your perspectives’ view settings in nigh-countless ways (these are the same settings available from View Options ![]() when viewing the perspective in the main outline).
when viewing the perspective in the main outline).
Here is a rundown of the perspective editor’s features:
- Name & Icon—Tap a custom perspective’s name to edit it, and tap the icon to choose from among a selection of custom icons to represent your perspective.
Note
The built-in perspective names—Inbox, Projects, Contexts, Forecast, Flagged, Review, Completed, and Changed—cannot be edited. You can, however, choose another icon for the Completed and Changed perspectives.
Project Hierarchy—There are two fundamental types of perspectives: those that rely on the project structure to display your database hierarchically, and those that eschew hierarchy in favor of grouping by other parameters. The grouping and sorting functions in Presentation will govern projects in the former case, and actions in the latter.
Presentation—If you’d like to group or sort projects or actions based on specific criteria, select them here.
Filtering—Granular options for filtering what appears in the perspective are available here, including filtering based on flagged status, availability, duration, or project or context status (based on the mode chosen in Project Hierarchy).
Find Text—To add a text filter to the perspective, enter the text here. The filter applies to text in both item titles and notes.
Focus—To save a focus on a project or folder as part of the perspective, tap to find it using the search dialog.
Context Selection/Project Selection—Select contexts or projects (depending on whether the perspective uses project hierarchy or not) you’d like to add to the perspective by tapping Add Context or Add Folder or Project. You can add as many as you’d like!
Note
Custom perspectives that don't use project hierarchy (formerly known as "context-based" perspectives) and custom perspectives that do use project hierarchy (formerly known as "project-based" perspectives) are both supported by all current versions of OmniFocus, and will sync between them.
Note that older versions of OmniFocus may not support the latter type (project hierarchy-based perspectives). If syncing these custom perspectives is important to you, updating to the current versions of OmniFocus on all of your devices is recommended.
Notes and Attachments
Notes are a great way to enrich the actions and projects you’re working on. Instead of cluttering an action title with a list of instructions for completing it, try adding them in the note field instead—note text is fully searchable, so there’s no worry about the minutiae getting lost in a hidden field.
To add a note to an action or a project, tap it and choose the Note tab in the editor.
When a picture is worth a thousand words, try adding an attachment! Images and audio can be added to an action or project as attachments, which are located in the Attachment tab of the action or project editor.
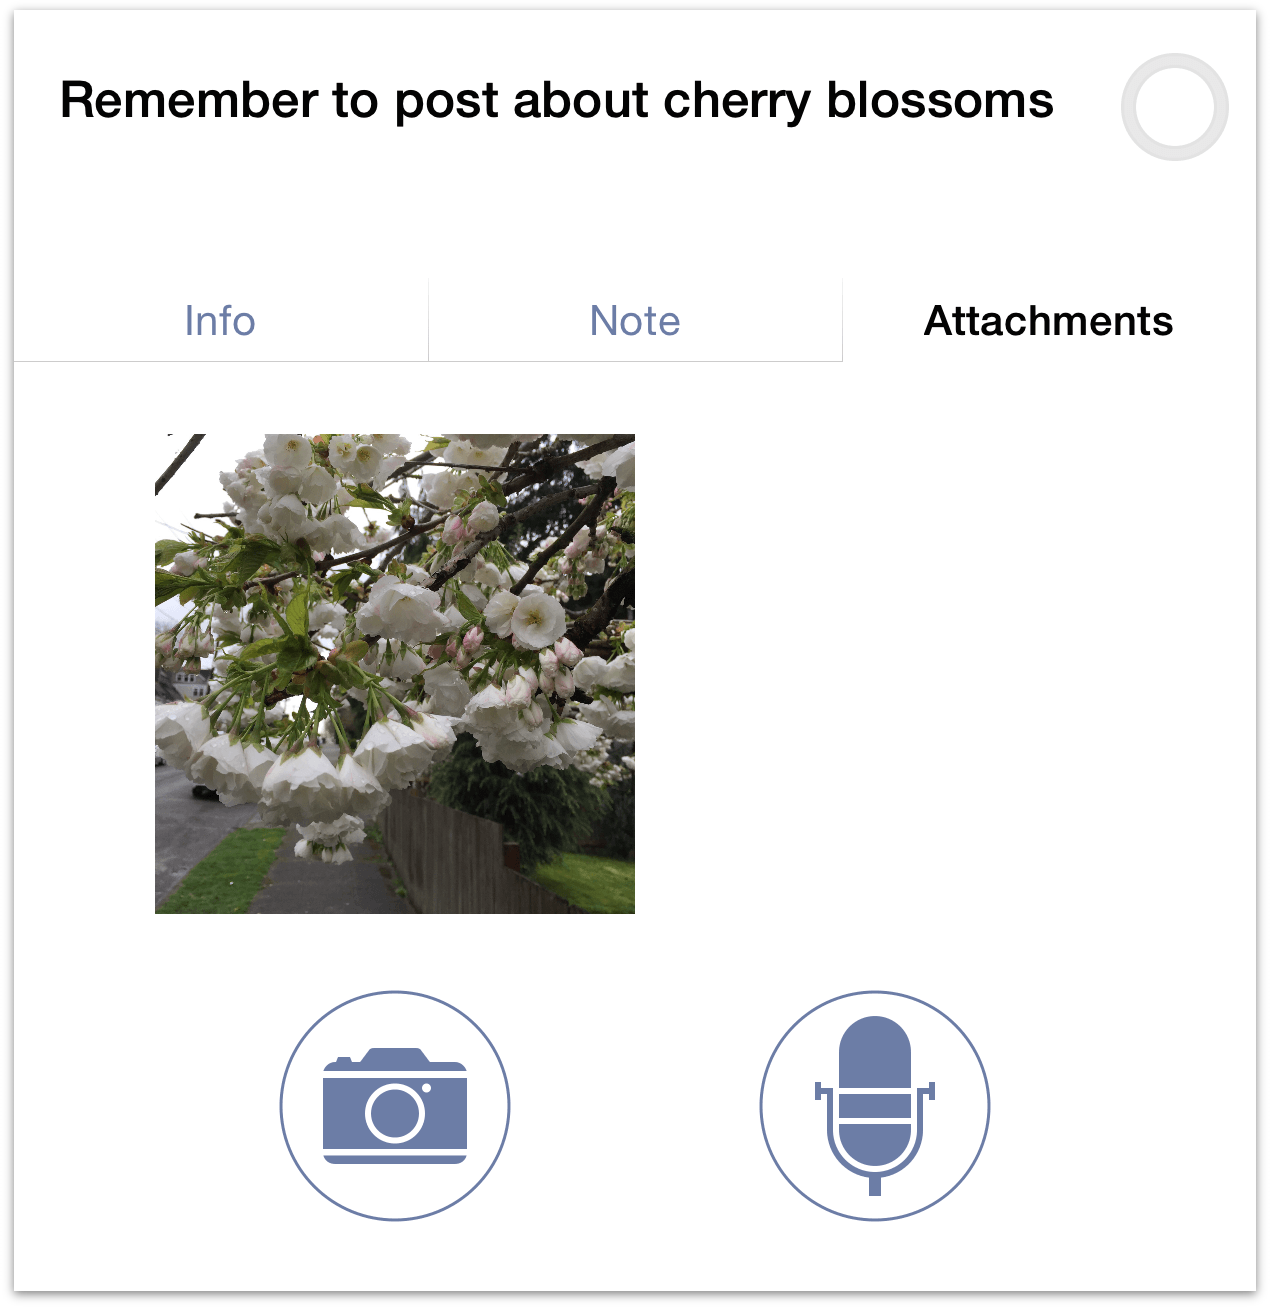
You can attach images to a project or action by tapping the camera button, which gives you the option to either take a picture or to choose an image from one of your photo albums. Audio attachments are added by tapping the microphone button. The segmented bar displays the volume level of the audio being recorded.
Attachments can be viewed (or listened to) by tapping the thumbnail associated with the audio clip or image. To delete an attachment, select it and tap Delete.
Warning
Large attachments will dramatically slow down sync times, especially if you are on a slow — or cellular — network (this might cost a lot of money, too!).
Syncing Attachments with OmniFocus for Mac
When adding attachments in OmniFocus for Mac, there are two ways to ensure the attachments make it across to your iPad or iPhone (or your other Macs with OmniFocus installed). The important theme here is to embed the attachments, as simply linking to them won’t work. Due to the file formats supported on iOS, not all attachments added in OmniFocus for Mac are viewable in OmniFocus for iOS or iPhone.
Note
The reason why linking to attached files won't work is because filesystem links on OS X are just that—they are links to files on that system. When you sync OmniFocus for Mac, those filesystem links no longer work because iOS filesystems are different from the one on your Mac.
However, when you embed an attachment and sync OmniFocus, that file is copied into your OmniFocus database and is stored on the sync server where it can easily be pulled down on either platform.
Attaching Files from the Edit Menu
With OmniFocus open on your Mac, select the item to which you’d like to attach something, and then select Edit ▸ Attach File in the menu bar. In the Open sheet that slides down, select the file you would like to attach, and then make sure you select the Embed the file in the document radio button before you click Select.
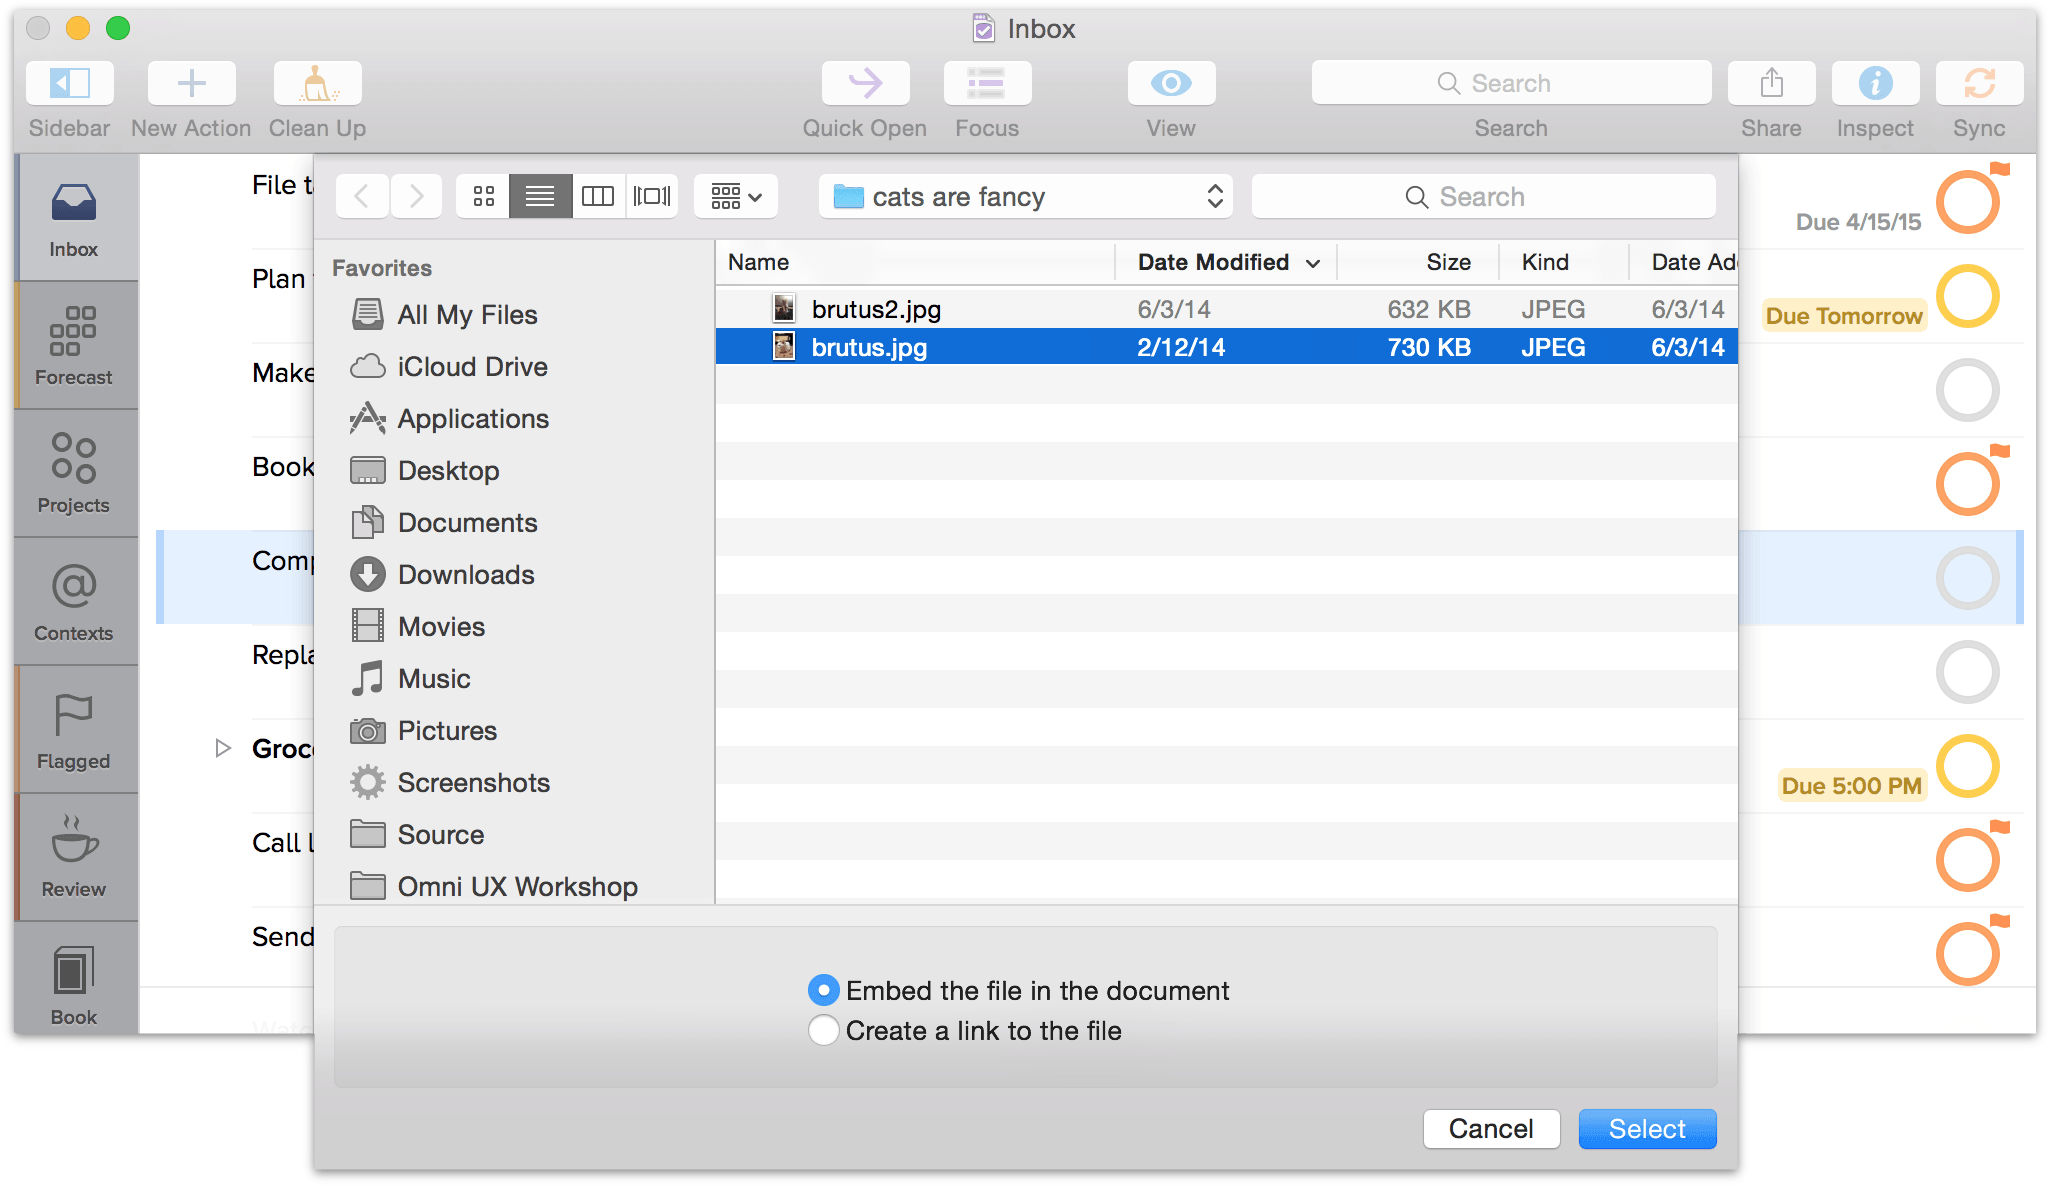
Note
The Embed the file in the document option is selected by default. This makes syncing your attachments the default state of affairs; if you'd prefer not to sync an attachment (for bandwidth or database efficiency reasons), choose Create a link to the file instead.
Attaching Files from the Finder
To attach a file from the Finder (it’s the blue smiley-faced icon on the far left edge of the Dock on your Mac) you will need to Option-drag the file from the Finder to the note field of your item in OmniFocus. Make sure the note field is open and selected, then place the Finder window next to the OmniFocus window and select the file you want to attach by clicking on it. Hold down the Option key while pressing the mouse button. You’ll notice that when you press the Option key, the mouse pointer changes to a green circle with a plus sign inside. This is exactly what you want! Now drag that file onto your OmniFocus item, let go of the mouse button, and the file is attached.
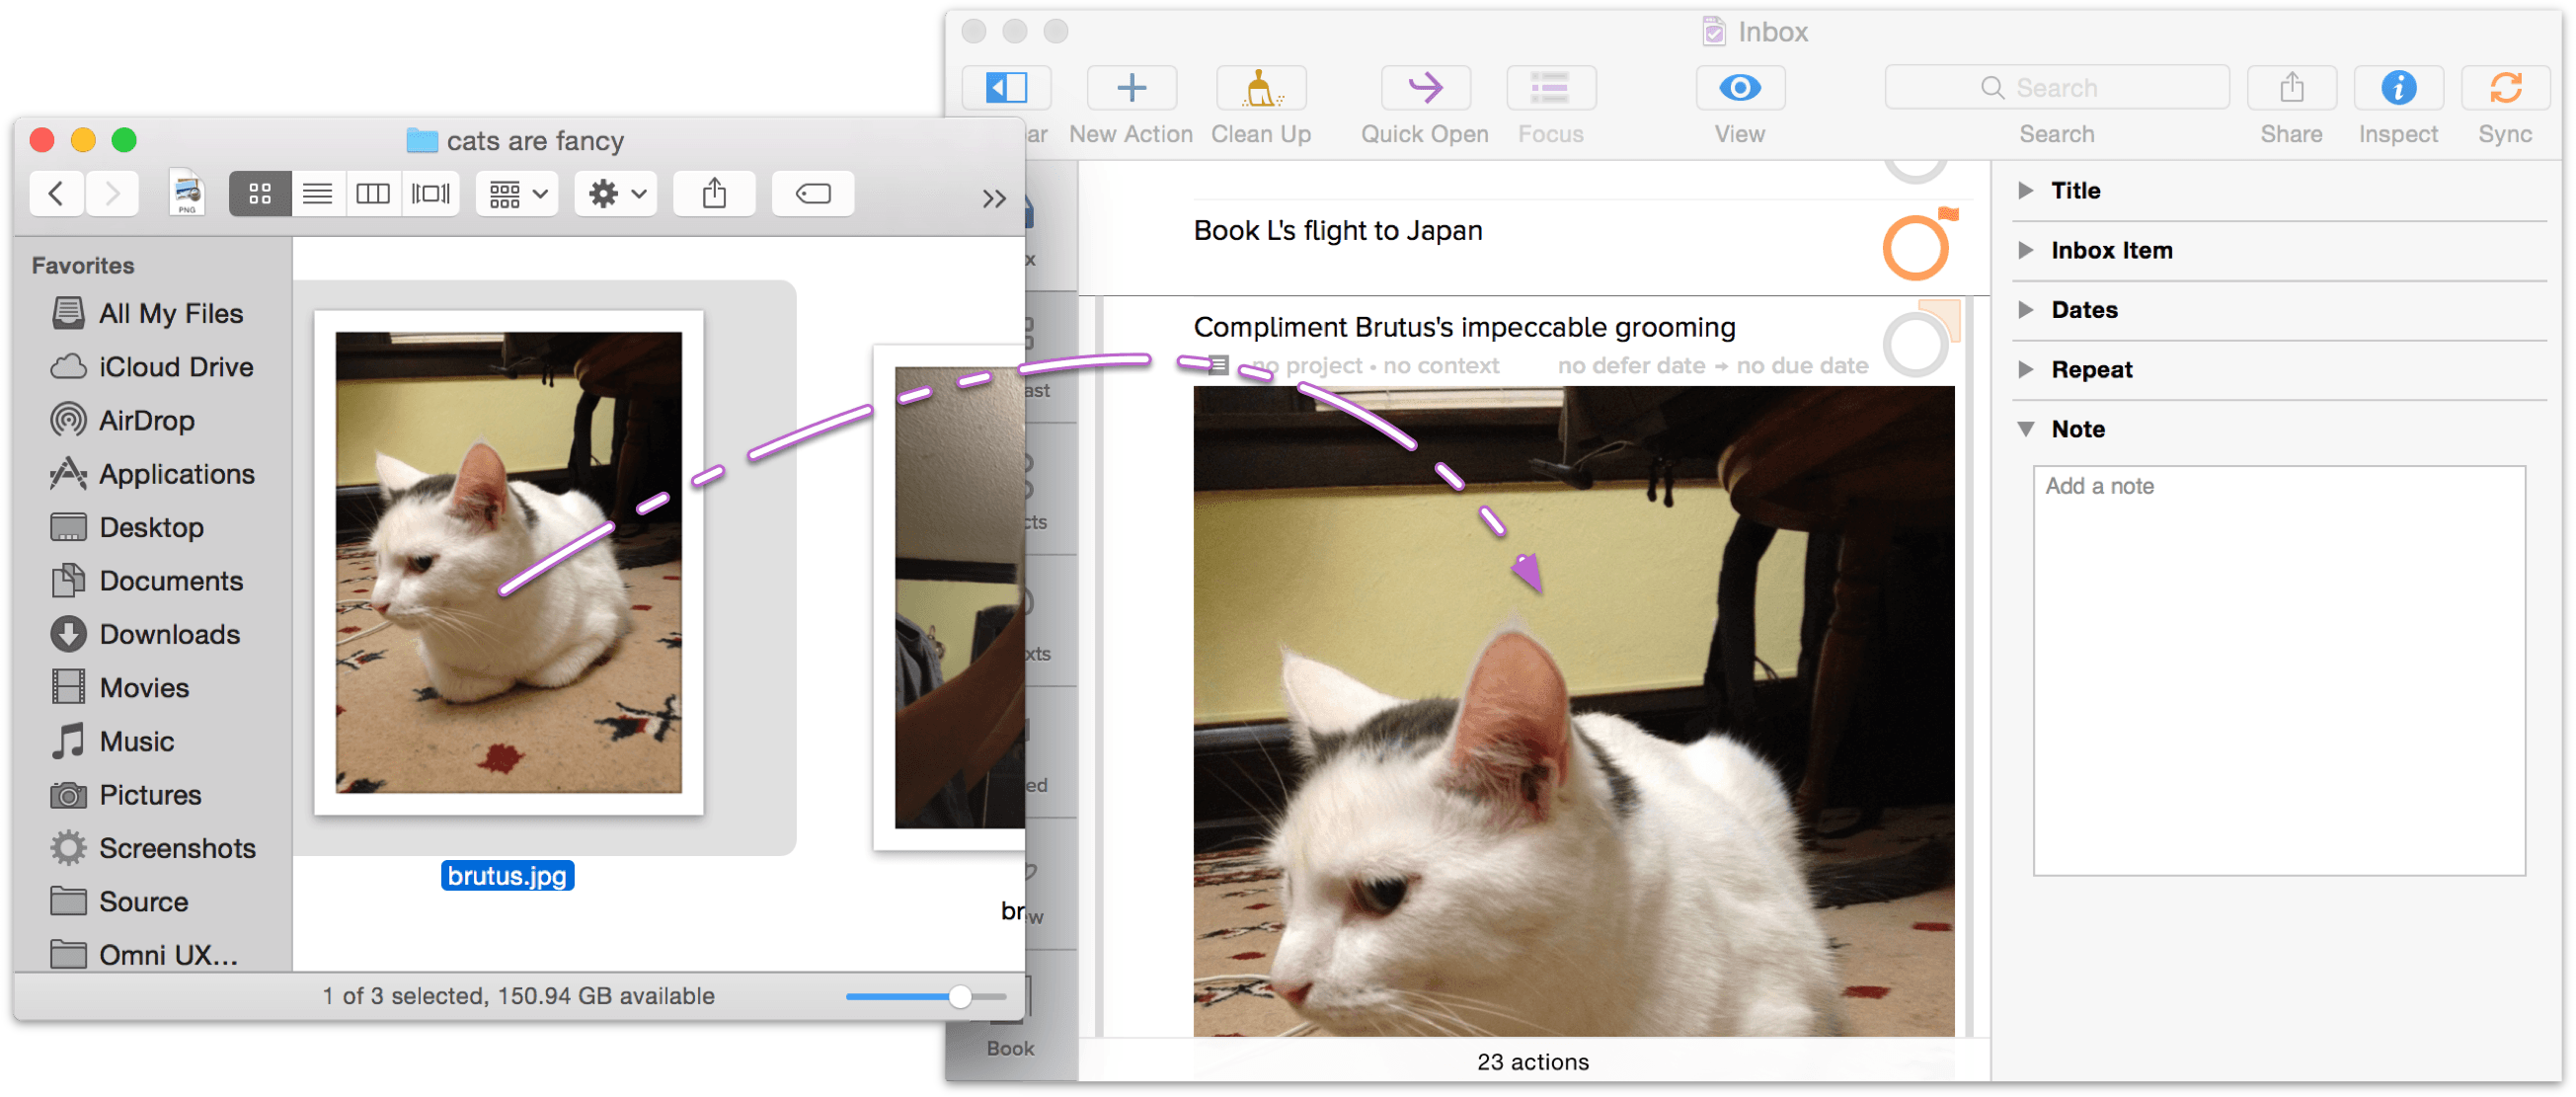
After you have attached the file in OmniFocus on your Mac, be sure to click Sync in the toolbar. Then, when you switch to OmniFocus for iOS or iPhone, tap Sync to bring the attachments over to your other device.
Note
Your Mac supports all kinds of different file types, mainly because of the wide variety of apps that can run on OS X. Conversely, iOS doesn't support nearly as many file types by default. The rule of thumb to keep in mind is that in most cases, if you have compatible versions of an app on your Mac and iOS device, you should be able to open those attachments in OmniFocus on either platform.
Dates and Times
When you have tasks to complete by a deadline, OmniFocus can help weave actions and projects into your day.
By design, the items you collect in OmniFocus aren’t the same sort of thing as events or agenda items you’d list on a calendar. You’d generally use a calendar for anything that takes place at a specific time: meetings, dentist appointments, and dinner reservations would do best in your calendar because you can’t act on them until that moment.
Setting Defer and Due Dates
Actions and projects can have due dates and defer until dates with a less specific notion of time constraint than items in your calendar. The defer until date is the date when an action or project becomes available; until that date arrives, the item remains grayed out. The due date is the date when an action or project needs to be completed.
For example, to make progress on your Colonize Mars project, you need to know when Mars is in opposition so you can schedule a date during the launch window. A quick online search shows that the next window is from January 2016 to April 2016, so you decide to launch your spacecraft on January 6 to commemorate your birthday. To keep track of this, you might create a Launch Window action with a defer until date of January 1, 2016 and a due date of April 30, 2016.
While you’re at it, you also create a Launch Spacecraft action with a defer until date of January 6, 2016 and a due date of April 30, 2016. So why not just a due date for Launch Mission? Well, because weather conditions for a launch could be bad that day, or there could be some sort of mechanical failure that delays the launch. Regardless, that is the day you know you’d like to launch the rocket, and if that date passes, OmniFocus reminds you until you’re past the due date and off to explore the Red Planet.
Items that have not reached their defer until date are not considered available so they won’t clutter your view until you can work on them. To see all of the actions in your Colonize Mars project, choose Remaining in view options (All includes completed and dropped items). Actions with a future defer date are in gray. When the defer date arrives, the action’s text appears in black to let you know it is available and the clock is ticking.
When due dates are approaching, OmniFocus considers actions and projects to be Due Soon and represents them as such by changing their color from black to amber and adding them to the Forecast. By default, actions become due soon two days before the specified due date. To change this, go to Settings and choose a different value for Due Soon.
Defer and due dates can be entered by tapping an item in the main outline.
Actions that have reached their due date are styled in red. This serves as a warning to you that you should either get that task done, or reschedule its due date. In the case of the Mars mission, if you miss the launch window, you’ll have to wait another 24 months for your next opportunity.
Tip
When you have a task you want off your plate for now but would like to have on the horizon again at some point, try deferring it until Later. OmniFocus will choose a random defer date within the next few weeks and make the task available to you then—or keep tapping to defer it out a few weeks more.
Repeating Items
Some tasks occur on a regular basis. Instead of creating a new item every time you need to take out the recycling, you can set that task up so that you’re reminded every Thursday night to put the recycling bins by the road for pickup Friday morning.
Repeating actions can occur regularly—every few hours, days, weeks, or months—based on when the item was first scheduled, or rescheduled to be deferred until (or be due again) based on a set time after you mark it completed.
To set an item up to repeat:
Select the item you want to repeat.
Tap Repeat and choose a repeat type.
Repeat Regularly—With the initial due date as its starting point, the item will come due again at the lapsing of each repeat interval, like clockwork. This is useful for repeating items that are locked to the calendar, like paying the rent. This is the repeat type for most common uses.
Defer Again After Completion—When the item is completed, it’s deferred for another instance of the repeat interval. This is useful for repeating items that can’t be considered again until a specific amount of time has passed—when your scheduling has to be flexible because it’s regulated by some external constraint. If your insurance covers dentist check-ups every six months, for example, you’ll want to make an appointment later in the year based on the date of your previous one.
Due Again After Completion—When the item is completed, it’s due again after the repeat interval has elapsed. This is most useful for items with internally set constraints based on the time they take (or require) to complete. Refilling a 30-dose medical prescription every 30 days is an example of this type of repeat.
Enter a repeat interval. This can be any number of minutes, hours, days, or months.
To schedule an action on specific weekdays, enter a Repeat Every interval in weekly increments and then select the days on which you’d like to repeat the item from the buttons below.
For example:
Defer until Tuesday 5:00 PM; due Tuesday 10:00 PM; repeat every 1 week: take out the trash. This repeats on a fixed schedule because it is necessary to do it at the same time every week, regardless of when you last did it.
Defer until today 12:00 AM; due today 6:00 PM; defer another 5 days: clean the kitchen. This is deferred from the completion date because the next time you need to do it depends on the last time you did it.
Defer until 4:00 PM; due 6:00 PM; repeat every 1 week on Monday, Tuesday, and Thursday: bring Sarah to soccer practice. This repeats on certain weekdays, available toward the end of the workday so you aren’t distracted by it until you need the reminder.
Defer until today 7:00 AM; due today 7:00 PM; due again in 10 days: water the cactus. This prickly fellow risks drowning if watered too frequently, and using due again ensures this won’t happen even if the action becomes overdue before you complete it (repeat every, by contrast, would prompt you to do it again sooner than would be safe).
When you mark a repeating item as complete, the next instance of it is created with its defer and due dates pushed forward as indicated by the repeat interval. If you want an item to stop repeating, just change the repeat type to None.
OmniFocus Extended
OmniFocus for iOS is enormously useful both as a standalone app on your iPhone and iPad and in conjunction with OmniFocus for Mac, but its power doesn’t stop there. Used along with other apps and features of your device, OmniFocus can work for you in even more exciting ways.
Email Capture (Mail Drop)
Mail Drop is a feature of Omni Sync Server which lets you send emails directly into your OmniFocus Inbox. You can create multiple private send-to addresses to give friends, family, coworkers, or classmates the ability to create actions that land in your OmniFocus Inbox. And, best of all, you can revoke those addresses at any time.
Some possible ways to use Mail Drop include:
Forwarding actionable emails from your PC at work
Processing emails on your iPhone or iPad
Using if this then that to automate all kinds of Internet-y things
Allowing a partner to delegate actions directly into your OmniFocus system
If you’re already using the Omni Sync Server to sync OmniFocus, you can log in to the Sync Server web interface and create your first Mail Drop address. After logging in, just click or tap the Create Address button to automatically generate the email address (a combination of your account name and a random string of characters, for example).
If you don’t have a Sync Server account yet, you can sign up here. The account creation process includes instructions for configuring OmniFocus to use your new account (it’s as simple as tapping or clicking a link in an email).
When you send an email message to Mail Drop, the subject line of that message becomes the name of the new Inbox item. The body of the message becomes the Note, which can contain text, attachments (such as images and files), and simple HTML (more complex formatting is removed).
Note
For Mail Drop to work, you should be syncing your OmniFocus database to the same Omni Sync Server account that you've used to set up Mail Drop.
Reminders Capture (Siri)
If you’re using OmniFocus on a device with Siri, and you would like it to keep track of the reminders you give to Siri, all you need to do is check a few settings on your device and you can start adding spoken items to your Inbox in no time.
To set up OmniFocus so it captures your reminders from Siri:
Tap Settings in the secret bar.
In the Capture section, tap Reminders.
Warning
You should only configure Reminders Capture on a single iOS device. If you rely on iCloud to sync your reminders across devices and you have OmniFocus on iPad and iPhone, you could end up with duplicate entries in your Inbox.
- Finally, you'll see the Reminders screen, where you can turn on the capture option (an alert pops up asking you to give OmniFocus access to your Reminders; tap OK) and, if you have multiple Reminders lists set up, choose the list you want OmniFocus to capture from. (If you only have one reminders list, OmniFocus assumes that's the one you want).
To record a new Inbox item with Siri, try these phrases:
Siri, remember to… records a task to the system default Reminders list. OmniFocus grabs it from that list if it’s the one you have chosen to capture.
Siri, remind me to… records a task to the default list, and Siri asks for a due date.
Siri, remind me when I get to (or leave)… records a task to the default list with a contact location attached. If you choose a specific location, make sure it matches an OmniFocus context location.
Note
Use the small dot distance (200 meters/650 feet) if you would like OmniFocus to capture Siri-transcribed actions associated with that location.
- Add … to my OmniFocus list records a task to a list named OmniFocus if you have one set up in Reminders. OmniFocus captures the task if that’s the list you’ve chosen.
Replace OmniFocus with the name of whatever list you’d prefer!
To keep your data safe, there are some Reminders items that OmniFocus will not claim. (Reminders will retain ownership of the data and it will not be lost.) These are items that have data beyond what OmniFocus can track, such as contact locations outside the set of small-size OmniFocus context radii you have established.
For this reason, the location-based aspects of capture are most effective when you tailor the locations of your OmniFocus contexts as closely as possible to your location-based Reminders contacts.
Calendar Alarms
A task’s due date is approaching! By combining the powers of OmniFocus with Calendar on your device, you can set up reminders to let you know about upcoming deadlines automatically. Hooking up OmniFocus with Calendar is a slightly complex setup process. Since iOS now supports time-based notifications from OmniFocus it’s also one that is only useful in a few cases—when you want an alert before an item is due, or if you want an alert on a device that can subscribe to your calendar but doesn’t have OmniFocus.
If you decide to set up calendar export, you’ll first want to enable sync either via Omni Sync Server or another WebDAV server (see Getting Synced at the beginning of this manual for instructions).
Once sync is up and running, tap Settings in the secret bar, and then tap Calendar Alarms. You’ll see the option to view some important security information about the link to the Calendar app before proceeding. If you store potentially sensitive information in your OmniFocus database you’ll want to check this out.
When you’re ready, turn on Calendar Alarms. You’ll have several options for when you’d like to be reminded of your upcoming tasks. Pick the one that works best for you, and then tap Synchronize Now.
Since you're setting up the link to the Calendar app for the first time, you'll need to enter your login information next by tapping the Subscribe in Calendar button which appears in the place of Synchronize Now.
After you’ve authorized the new calendar subscription, due date reminders will appear in Calendar for all the upcoming actions and and projects you’ve scheduled.
Warning
When choosing a location to store a subscribed calendar, you may see iCloud as an available location (this is the default location in the Calendar app, for example). Storing a calendar in iCloud that syncs with your OmniFocus database can lead to some annoying and repetitive password prompts, so we recommend storing it locally on the device where you'd like to receive the alerts instead.
If you have opted to receive push notifications from Calendar on your device, these too will pop up when your to-dos are due. To see what your Calendar settings are, open the iOS Settings app, tap Notifications and then find Calendar in the Include section. You’ll want to turn on Show in Notification Center, select an Alert Style, and then set up how you would like to receive alerts using any combination of an alert badge on Calendar’s app icon, a calendar sound, or on your device’s lock screen.
Today Extension
Drag down from the top of the screen anywhere on your device and you’ll see what’s going on today: a collection of default widgets that iOS presents as a curated set of data relevant to your current place and time.
You may see some Calendar entries, perhaps a Reminder or two, and you’ll notice that at the bottom of the screen there’s a button labeled Edit. Tap it and you’ll be brought to the edit screen, where you’ll find you can add other custom widgets to your Today display – OmniFocus among them!
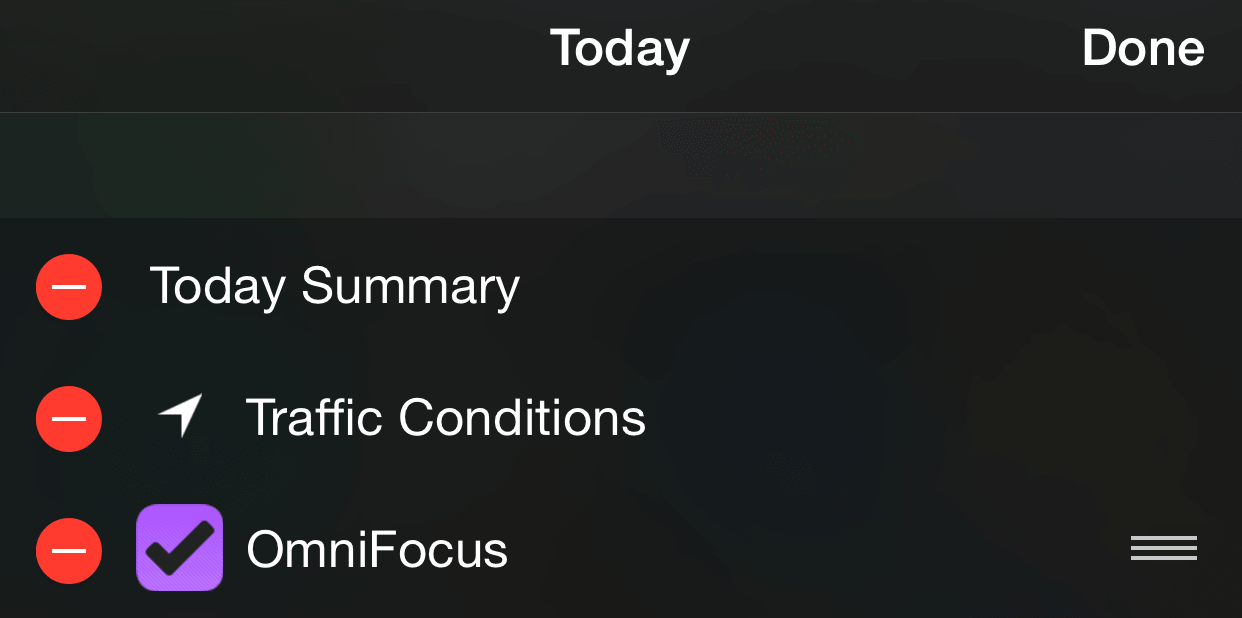
Tap the green plus icon next to OmniFocus and it’ll be added to the list of extensions displayed on the Today screen. Use the reordering handles on the right to change the order of things, and when you’re happy with it, tap Done. From now on you’ll see OmniFocus items that are due today displayed alongside events of current interest from other apps, and you can check on their status from anywhere on your device.
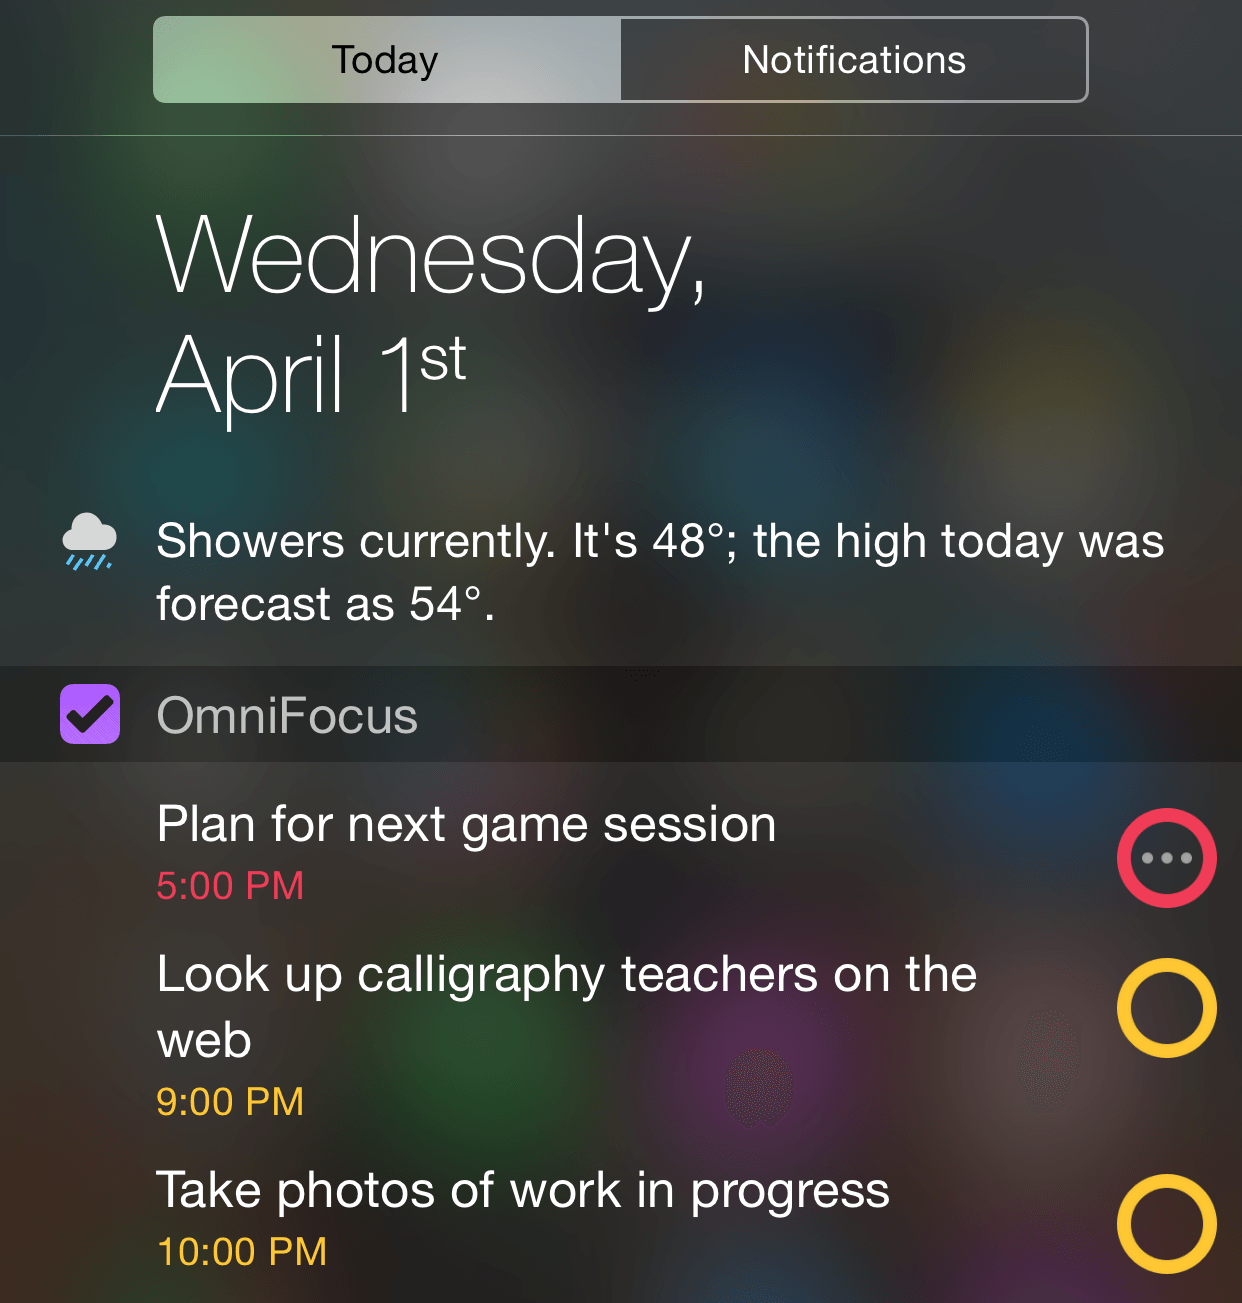
When you check the Today screen you’ll see a handy list of items due today, complete with status circles, and you’ll be able to check them off at your leisure — and with OmniFocus Pro, if you'd prefer to see deferred items as well as due items (or an entirely different custom perspective) you can choose it in OmniFocus Settings.
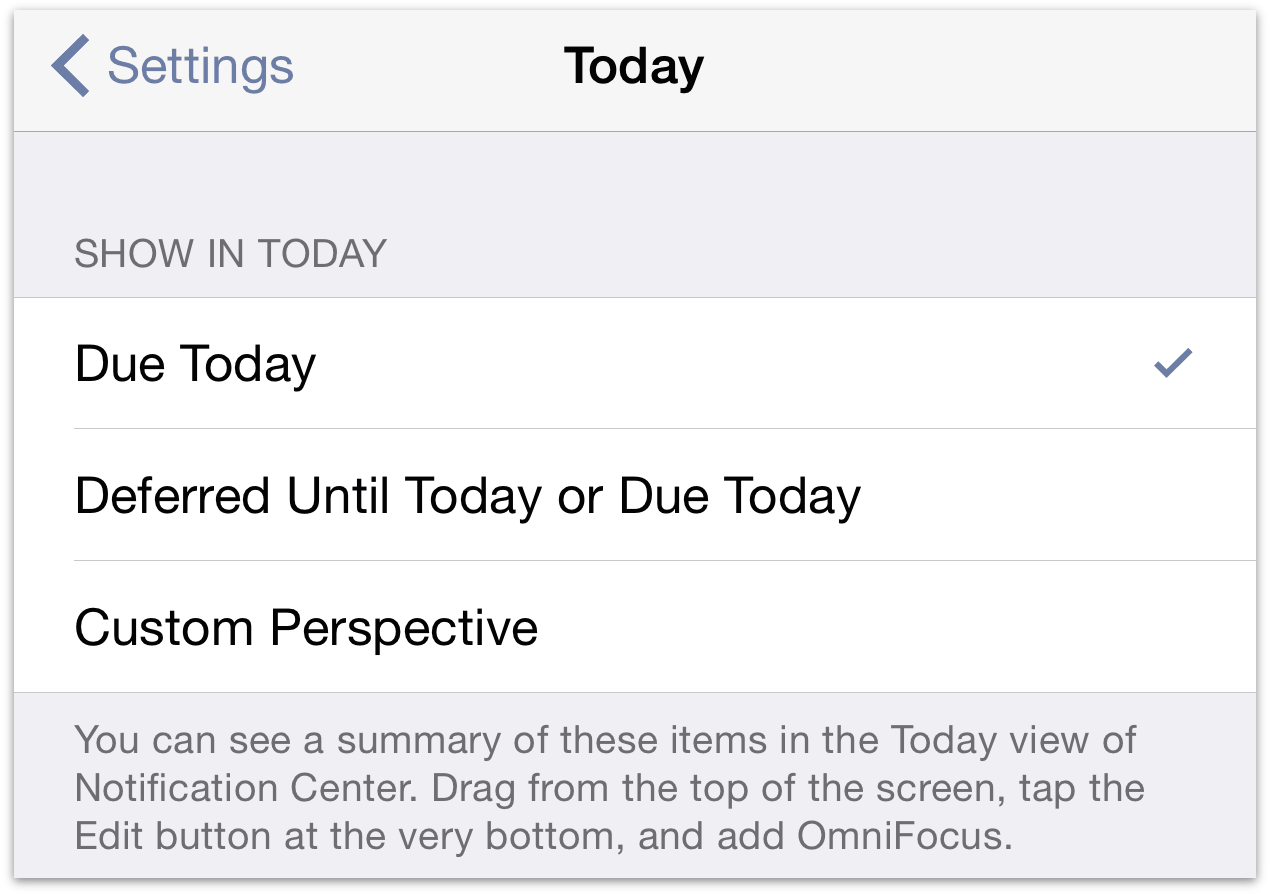
Selecting Custom Perspective will show a list of your available custom perspectives to choose from (learn more about setting up custom perspectives).
Interactive Notifications
New with iOS 8, you can interact with notifications from OmniFocus regardless of where you are and what you’re doing on your device. Previous versions would just show you a notification, but now the notifications you see will be actionable items.
Note
To take advantage of interactive notifications, you'll need OmniFocus notifications to be set up as alerts. Check Notifications > OmniFocus in the iOS Settings app to make sure the alert style is set to Alerts or Banners.
Now, when you see a banner or an alert for an OmniFocus item you’ll have some options. For alert-style notifications, you’ll have several options:
Open
Open OmniFocus directly to the item in question to take further action on it.
Complete
Mark the item complete, effectively checking it off in your OmniFocus database. Done and done!
Note
If you receive multiple notifications from OmniFocus at the same time, the option to complete them won't be available (we don't want to trick you into completing things you can't see!). You can still "snooze" the group of actions to receive a notification again later.
Snooze
Delay consideration of the item for another 15 minutes. This doesn’t change its due date or defer date; it just reminds your device to check in with you again later.
Close
Dismiss the alert for good.
When a banner-style notification appears, swipe down on it to reveal the Complete and Snooze options.
Tip
You can also visit the Notification Center to interact with notifications from OmniFocus. Swipe an item from right to left to snooze, complete, or dismiss it.
Send to OmniFocus
When you’re in another app on your device and you’re inspired to add something to OmniFocus – whether it be a webpage in Safari, a picture in Photos, or a bit of text, image, or audio file from another app that supports sharing – all you have to do is tap Share ![]() , and choose OmniFocus from the list of apps that appears (if it's not there, swipe from right to left and tap More to add it).
, and choose OmniFocus from the list of apps that appears (if it's not there, swipe from right to left and tap More to add it).
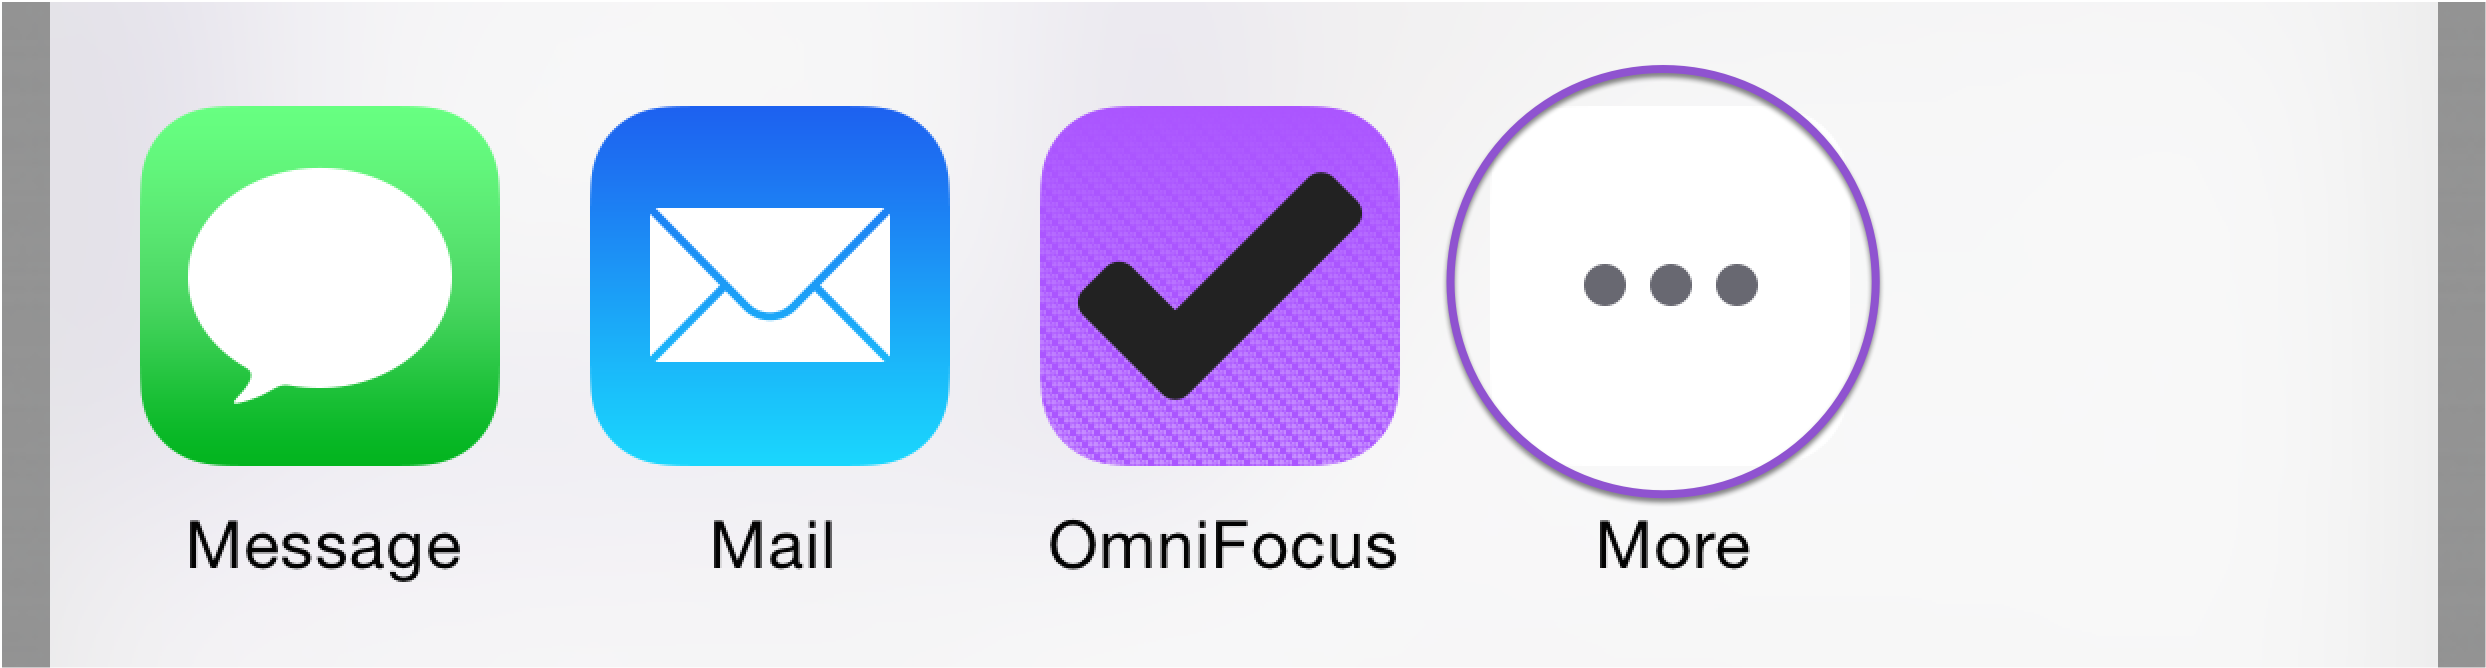
You’ll get a simple “quick entry”-style form to create a new item, with a field for its title, notes, project, and context; it’ll be populated with some information relevant to the data you’re sharing back to OmniFocus (website URLs in the note field and title pre-filled in the title field, for example), which you can edit to your heart’s content and then hit Save when you’re ready to send it to your inbox.
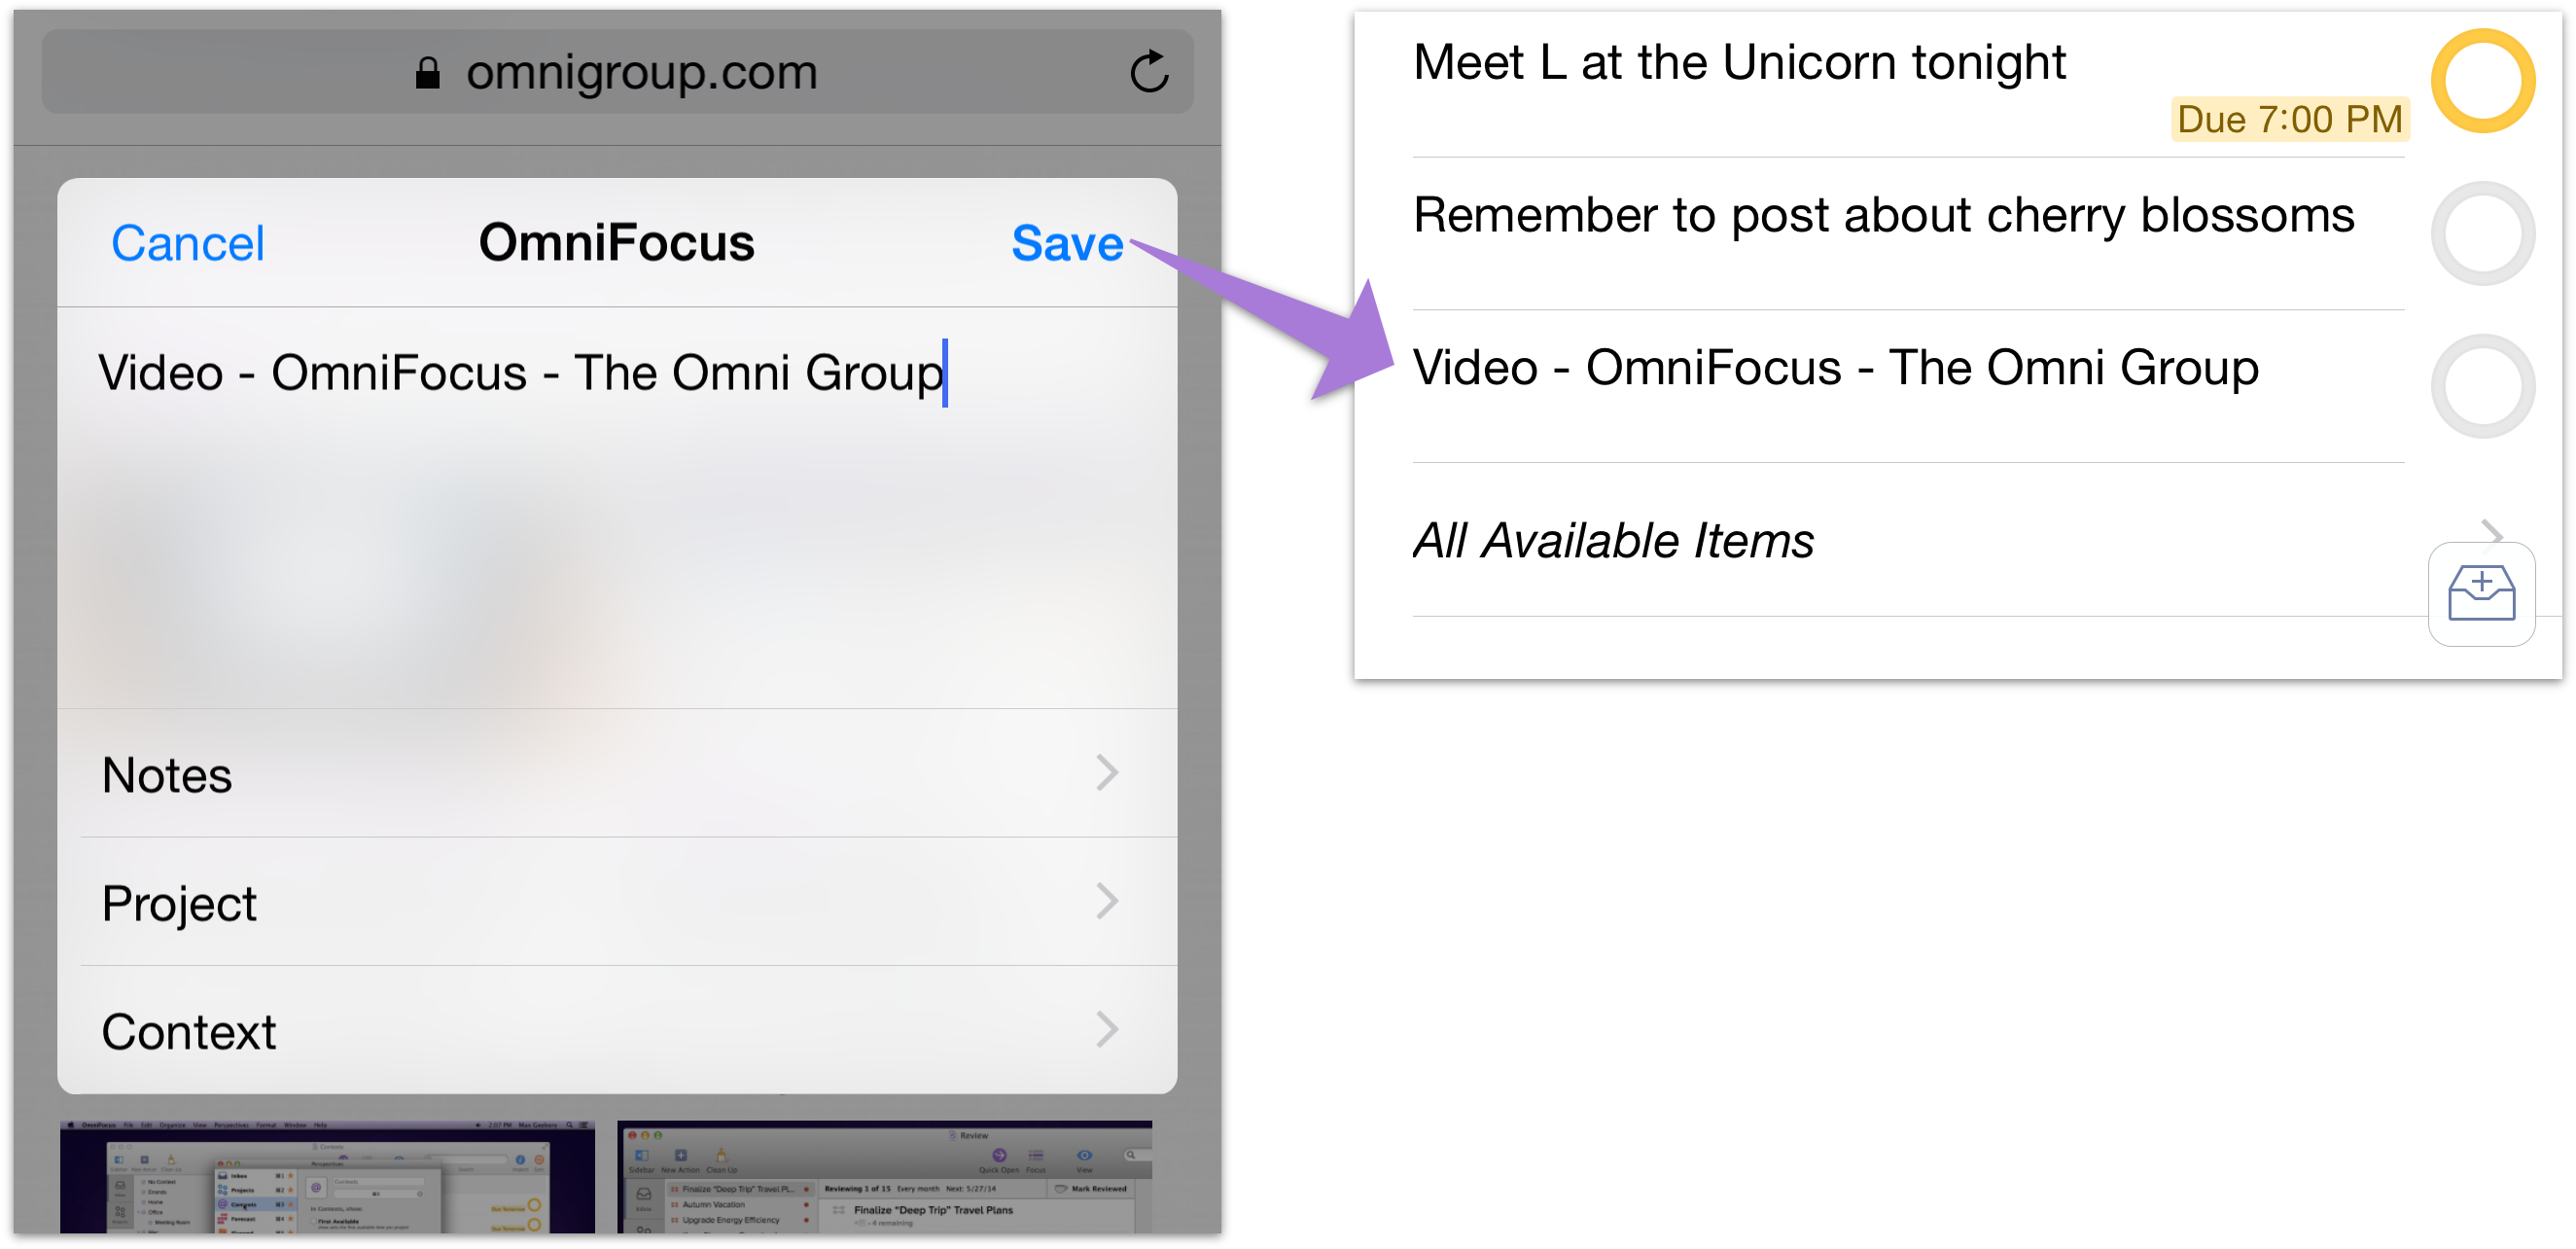
Settings
To access settings in OmniFocus for iOS, drag down on the sidebar or home screen to reveal the secret bar, then tap Settings.
About OmniFocus—See details about your version of OmniFocus for iOS, including version number and any in-app purchases you have unlocked.
Upgrade to Pro—Purchase and upgrade to the Pro version of OmniFocus for iOS, or restore a previously purchased upgrade.
Contact Omni—Send us feedback about OmniFocus or request assistance.
Help—Access the online hep documentation and other support resources.
Release Notes—Read the release notes for the current version of the app.
Sync
- Sync Method—Choose a Sync Method and configure the sync settings for OmniFocus. For a refresher on what to do if you haven’t already set up sync, see Getting Synced.
Due Dates
- “Due Soon” Means—Set the timeframe for how you would like OmniFocus to define items that are due soon.
Notifications
- Sounds, Alerts, and Badges—Choose what items are counted in the badge displayed on the OmniFocus app icon (the little red circle laid over the icon's upper right corner), and set notification alerts and sounds for due and location reminders.
- Today (Pro)—Customize the items you'd like to display with OmniFocus's Today extension.
Calendar Integration
- Calendar Alarms—Turn on alarms associated with events you’ve added to the Calendar app (learn more at Calendar Alarms).
Capture
- Reminders—Turn on Reminders Capture so you can use your personal assistant, Siri, to add items to OmniFocus.
Device Information
Send Anonymous Data—If you’d like to help us improve future versions of OmniFocus, you can choose to send general data about your device and OmniFocus app usage by enabling this setting. Before choosing whether to allow your data to be shared anonymously, you’ll get a preview of exactly what we’ll receive (it’s technical information that helps us reproduce and fix bugs). We’d love it if you’d like to help us out!
Other Settings
TextExpander—If you have TextExpander from Smile Software installed on your device, you’re in luck - OmniFocus supports TextExpander snippets! With TextExpander installed you’ll see an additional entry in OmniFocus Settings with a button for updating the snippets that OmniFocus recognizes based on your latest changes in TextExpander.
Reset Options—If you want to revert to the default OmniFocus experience, you can reset various parts of the app.
- All Settings—Tap Reset to restore all the preferences here in Settings, as well as view options and other visual customization throughout the app.
- Home Screen (Pro)—Revert the home screen tiles to their original positions using this reset option (no other settings are affected).
- Database—To start over from scratch (are you sure you really want to delete everything?!), tap Reset to delete your entire database of OmniFocus projects.
Export—As part of our commitment to your complete ownership of your data, we offer the ability to export your OmniFocus database in the open CSV format. You’ll have access to your data this way whenever you need it, presented in a tabular format viewable in just about any text editor.
Database Info—The text section at the bottom of the Settings screen has statistics about your OmniFocus library, specifically how many items you have and the number of zip files used to contain the data. If you are syncing, you should try to sync all of your OmniFocus databases regularly to keep the number of files down. This also displays the version and build of OmniFocus installed on your device (useful when contacting Support).
Glossary
The following is an alphabetical list of terms you’ll encounter throughout this manual, some of which may be unfamiliar or have special uses particular to OmniFocus.
Action—An item that’s part of a project, or part of a group within a project.
Active—The status for an item that’s planned for completion, or a context that’s currently in use.
Available—A view setting that displays items that aren’t blocked, deferred, or on hold.
Blocked—The status of an action in a sequential project that is ordered to come after the first available action.
Complete—The status assigned to an item when you’ve finished it, or finished all the actions that comprise it (in the case of a project or group).
Context—The person, place, thing, state of mind, or other factor most relevant to the completion of a given action or project. These exist outside the project hierarchy and represent another axis from which to view the items you’ve accumulated in your database.
Defer Date—A date and time assigned to an item that you don’t want to (or can’t) consider for completion until later. When the defer date is reached, the item becomes available for further execution.
Dropped—The status for a project or context that is no longer being considered for completion.
Due Date—A date and time assigned to an item by which the item must be completed.
Due Soon—A status for items whose due dates are approaching. Items that are due soon are styled in amber for greater visibility. The exact meaning of Due Soon is configurable in Settings.
Editor—The suite of tools accessed when an action, project, or context is tapped in the main outline that allow its details to be edited.
First Available—A view setting that affects how actions in projects are displayed. A sequential project has one available action and one first available action. A parallel project has one first available action and many available actions. A single action list potentially has many first available actions.
Flag—A mark of privileged, eye-catching status bestowed on an item. What this special status denotes is completely up to you, but it’s a great way to keep important things from falling through the cracks. Items that are flagged are styled in orange for greater visibility.
Focus—A contextual menu item in OmniFocus 1 for iPad, accessed with a long press on the title of a project or context, that has been replaced by the identical but more accurately named Go to Project and Go to Context commands. Unlike focusing in OmniFocus for Mac, Go to Project and Go to Context don’t retain a narrowed data selection when you switch perspectives: they simply display the chosen project or context alone in the main outline.
Group—A collection items nested hierarchically within another item. Groups created from inbox items are item groups, while groups created within projects are action groups (also sometimes called sub-projects).
Hidden—An Item that exists in your database but isn’t exposed by the view options of your current perspective. Relevant when the app gives notice that you might be deleting something by mistake.
Home—The top level of hierarchy in the sidebar or home screen, from where you can navigate to all other perspectives and views in the app. Home displays the list of favorite perspectives you’ve specified using the tile editor (with OmniFocus Pro), or by toggling between Default and All Perspectives. To return home, tap the chevron in the upper left of the sidebar (multiple times, if necessary).
Home Screen—On iPhone, the landing screen that provides a summary of all your OmniFocus activity. The home screen is analogous to the Sidebar on iPad and iPhone 6 Plus: a navigable list of the default perspectives that (with OmniFocus Pro) can be customized to show, hide, and rearrange perspectives.
Inbox—The built-in perspective designed to hold tasks and to-dos that you’ve entered into OmniFocus as items, prior to processing them into projects, actions, and groups. Once an item becomes a project or an action it’s moved out of the inbox at the next clean up.
Item—Items are representations of tasks and to-dos in an OmniFocus database. Types of items include: Inbox Items, Actions, Projects, and Groups.
Main Outline—The place where you see and interact with your items in OmniFocus, usually through a hierarchical view of your database. Specific perspectives (such as Contexts and Forecast) have specialized ways of displaying your data that eschew or modify the typical project hierarchy.
On Hold—A status for projects and contexts that aren’t relevant to your plans right now, but may be in the foreseeable future.
Overdue—A status for items whose due dates are past. Items that are overdue are styled in red for greater visibility.
Parallel—A project or group that doesn’t place particular emphasis on the order in which its actions are completed. All actions are considered available, though the topmost action is still considered the first available action for the purposes of view settings.
Perspective—A view on your OmniFocus database, displayed in the main outline. OmniFocus 2 comes with seven built-in perspectives and two transient reference perspectives (Completed and Changed), and custom perspectives can be added in OmniFocus Pro.
Perspectives Editor—The screen used to create new perspectives or edit existing custom perspectives when OmniFocus Pro is installed. Creating a new perspective from the secret bar or editing an existing one with View Options will reveal the Perspectives Editor.
Project—A to-do item that’s larger in scope or permanence than a simple action, potentially containing several actions and groups within it that must be completed before the project can be marked complete.
Remaining—A view setting that displays all items that haven’t been completed or dropped.
Secret Bar—A menu bar accessed by dragging down on the sidebar or home screen that contains buttons to prompt an on-demand database sync and access the OmniFocus settings, and a switch to toggle between Default (or Favorites, customizable with OmniFocus Pro) and All Perspectives displayed in the sidebar. The secret bar in OmniFocus Pro also provides tools for creating new perspectives and the tile editor for customizing the home screen or sidebar.
Sequential—A project or group whose actions must be completed in a specific order. The first action in the list is the only one available for completion.
Sidebar—On iPad and iPhone 6 Plus, a vertical pane to the left of the main outline that’s displayed by default (in landscape orientation) or by tapping the chevron in the upper left (in portrait orientation on iPad only). It displays content identical to the Home Screen on iPhone: a navigable list of the default perspectives that (with OmniFocus Pro) can be customized to show, hide, and rearrange perspectives.
Single Action List—A project whose actions are unrelated to a sequence of any sort, or one that’s maintenance-oriented as opposed to completion-oriented. All actions in a single action list are considered equally available.
Stalled—A project with no remaining actions (all of its actions have been completed). This status is used primarily as a filter for custom perspectives (Pro).
Sub-Project—A term synonymous with action group; a group of actions nested hierarchically within a project.
Status Circle—A graphical display of an item’s status (due soon, overdue, flagged, or repeating), as well as a target to tap to mark an item completed (hooray!).
Summary Dots— A row of colored dots displayed beneath sidebar entries in the Projects and Contexts perspectives, used for an at-a-glance view of the number and urgency of items remaining to be completed within them.
Task—In the context of this manual, a task is something you’d like to accomplish in the real world that you’d capture with OmniFocus (where it would then become an item). To-do is another word with the same meaning.
Getting Help
When you’re in need of help—whether you’re puzzled by perspectives, having trouble syncing, or experiencing another issue with OmniFocus—it’s good to know that the Support Humans at The Omni Group are available to lend you a hand.
The OmniFocus Website
The OmniFocus website is always a good place to find the latest information about OmniFocus, complete with an ever-growing support section.
The Official Forums
The Omni Group maintains online forums for all of our products, and you’re invited! Come share your questions and ideas with other users and Omni staff.
Email Support
If you’re stuck, if you have a good idea for the next version of OmniFocus, or if you just want to let us know how we’re doing, go ahead and send us an email. Choose Send Feedback from Settings (accessed from the secret bar above the sidebar) to conjure up a message addressed to us. We take support pretty seriously, so you can expect a prompt response actually typed by human hands.
Release Notes
For detailed information about what has changed in each minor version of OmniFocus, check out the release notes in Settings.
Troubleshooting
Here are a few tips you can try with OmniFocus’s own built in self-help features:
Finding Misplaced Items
Try using the Completed and Changed perspectives to track down errant actions. You can find them by toggling to view All Perspectives in the secret bar (drag down in the sidebar or home screen to reveal it).
Search for text in the missing items using the Here, Remaining, and Everything filters to narrow your results.
Improving Performance
Sync all the things regularly! This reduces sync wait times and generally improves speed and performance across the board.
Delete unneeded attachments to lessen the sync load and disc space footprint of your database. If you have OmniFocus for Mac, we recommend curating your attachments using the Attachment List to help easily spot the ones you don’t need.
Resolving Sync Conflicts
If you’re sure what you have locally is what you want, you can Replace the Server Database when prompted (usually when you're switching server locations or you've spent a long time offline) to get everything back in sync.
If you’re unsure (about this, or anything else OmniFocus-related), please contact Omni support! We’re here to help—it’s what we do.