Building Your First Project
There are two phases to project management with OmniPlan. The first is setting up your project; adding tasks, assigning resources, setting due dates, and such. That part of project management is covered in this chapter’s tutorial. The second phase is Managing a Project with OmniPlan’s tools.
Topics covered in the tutorial include:
- Step 1: Creating a Project
- Step 2: Choosing a Start or End Date
- Step 3: Creating Tasks
- Step 4: Grouping Tasks
- Step 5: Creating Milestones
- Step 6: Setting Task Durations
- Step 7: Connecting Tasks with Dependency Lines
- Step 8: Creating Hammock Tasks
- Step 9: Editing the Work Week
- Step 10: Setting Project Schedule Exceptions
- Step 11: Creating Resources
- Step 12: Assigning Resources to Tasks
- Step 13: Setting Individual Schedule Exceptions
- Step 14: Assigning Costs to Tasks and Resources
- Step 15: Leveling the Project
- Step 16: Setting a Baseline
This tutorial takes you through the process of laying out an entire project—from start to finish—in OmniPlan. Along the way, you’ll use the inspectors and various tools to quickly create a project plan. Even if you have used previous versions of OmniPlan, we encourage you to work through the tutorial as a way of familiarizing yourself with OmniPlan’s interface.
Step 1: Creating a Project
For the purpose of this tutorial we’ll be looking at the development process of a game being put together by an independent team of intrepid designers, coders, and testers. The project design described as we proceed is loosely based on a software development cycle, but applies just as well to any complex work consisting of interdependent and occasionally concurrent phases.
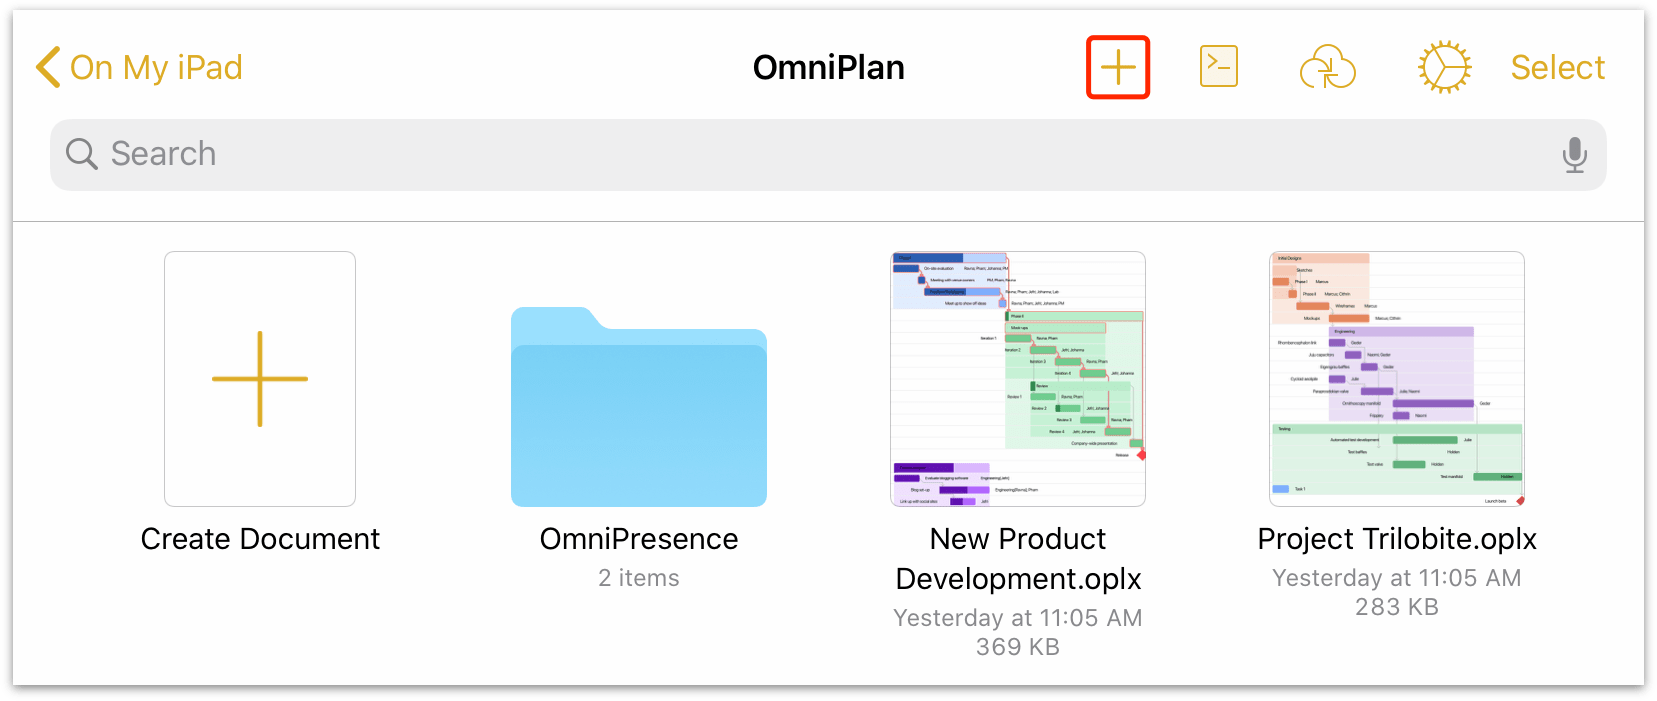
Starting off in the document browser, tap  in the toolbar to create a New Project:
The Project Editor displays the Gantt Chart by default; you can switch over to the Network View by tapping  in the toolbar. To switch back to the Gantt Chart, tap
  .
.
As you can see, your first task awaits editing. Before you get to that, though, the next order of business is to give your project a proper name; something that better reflects the project at hand.
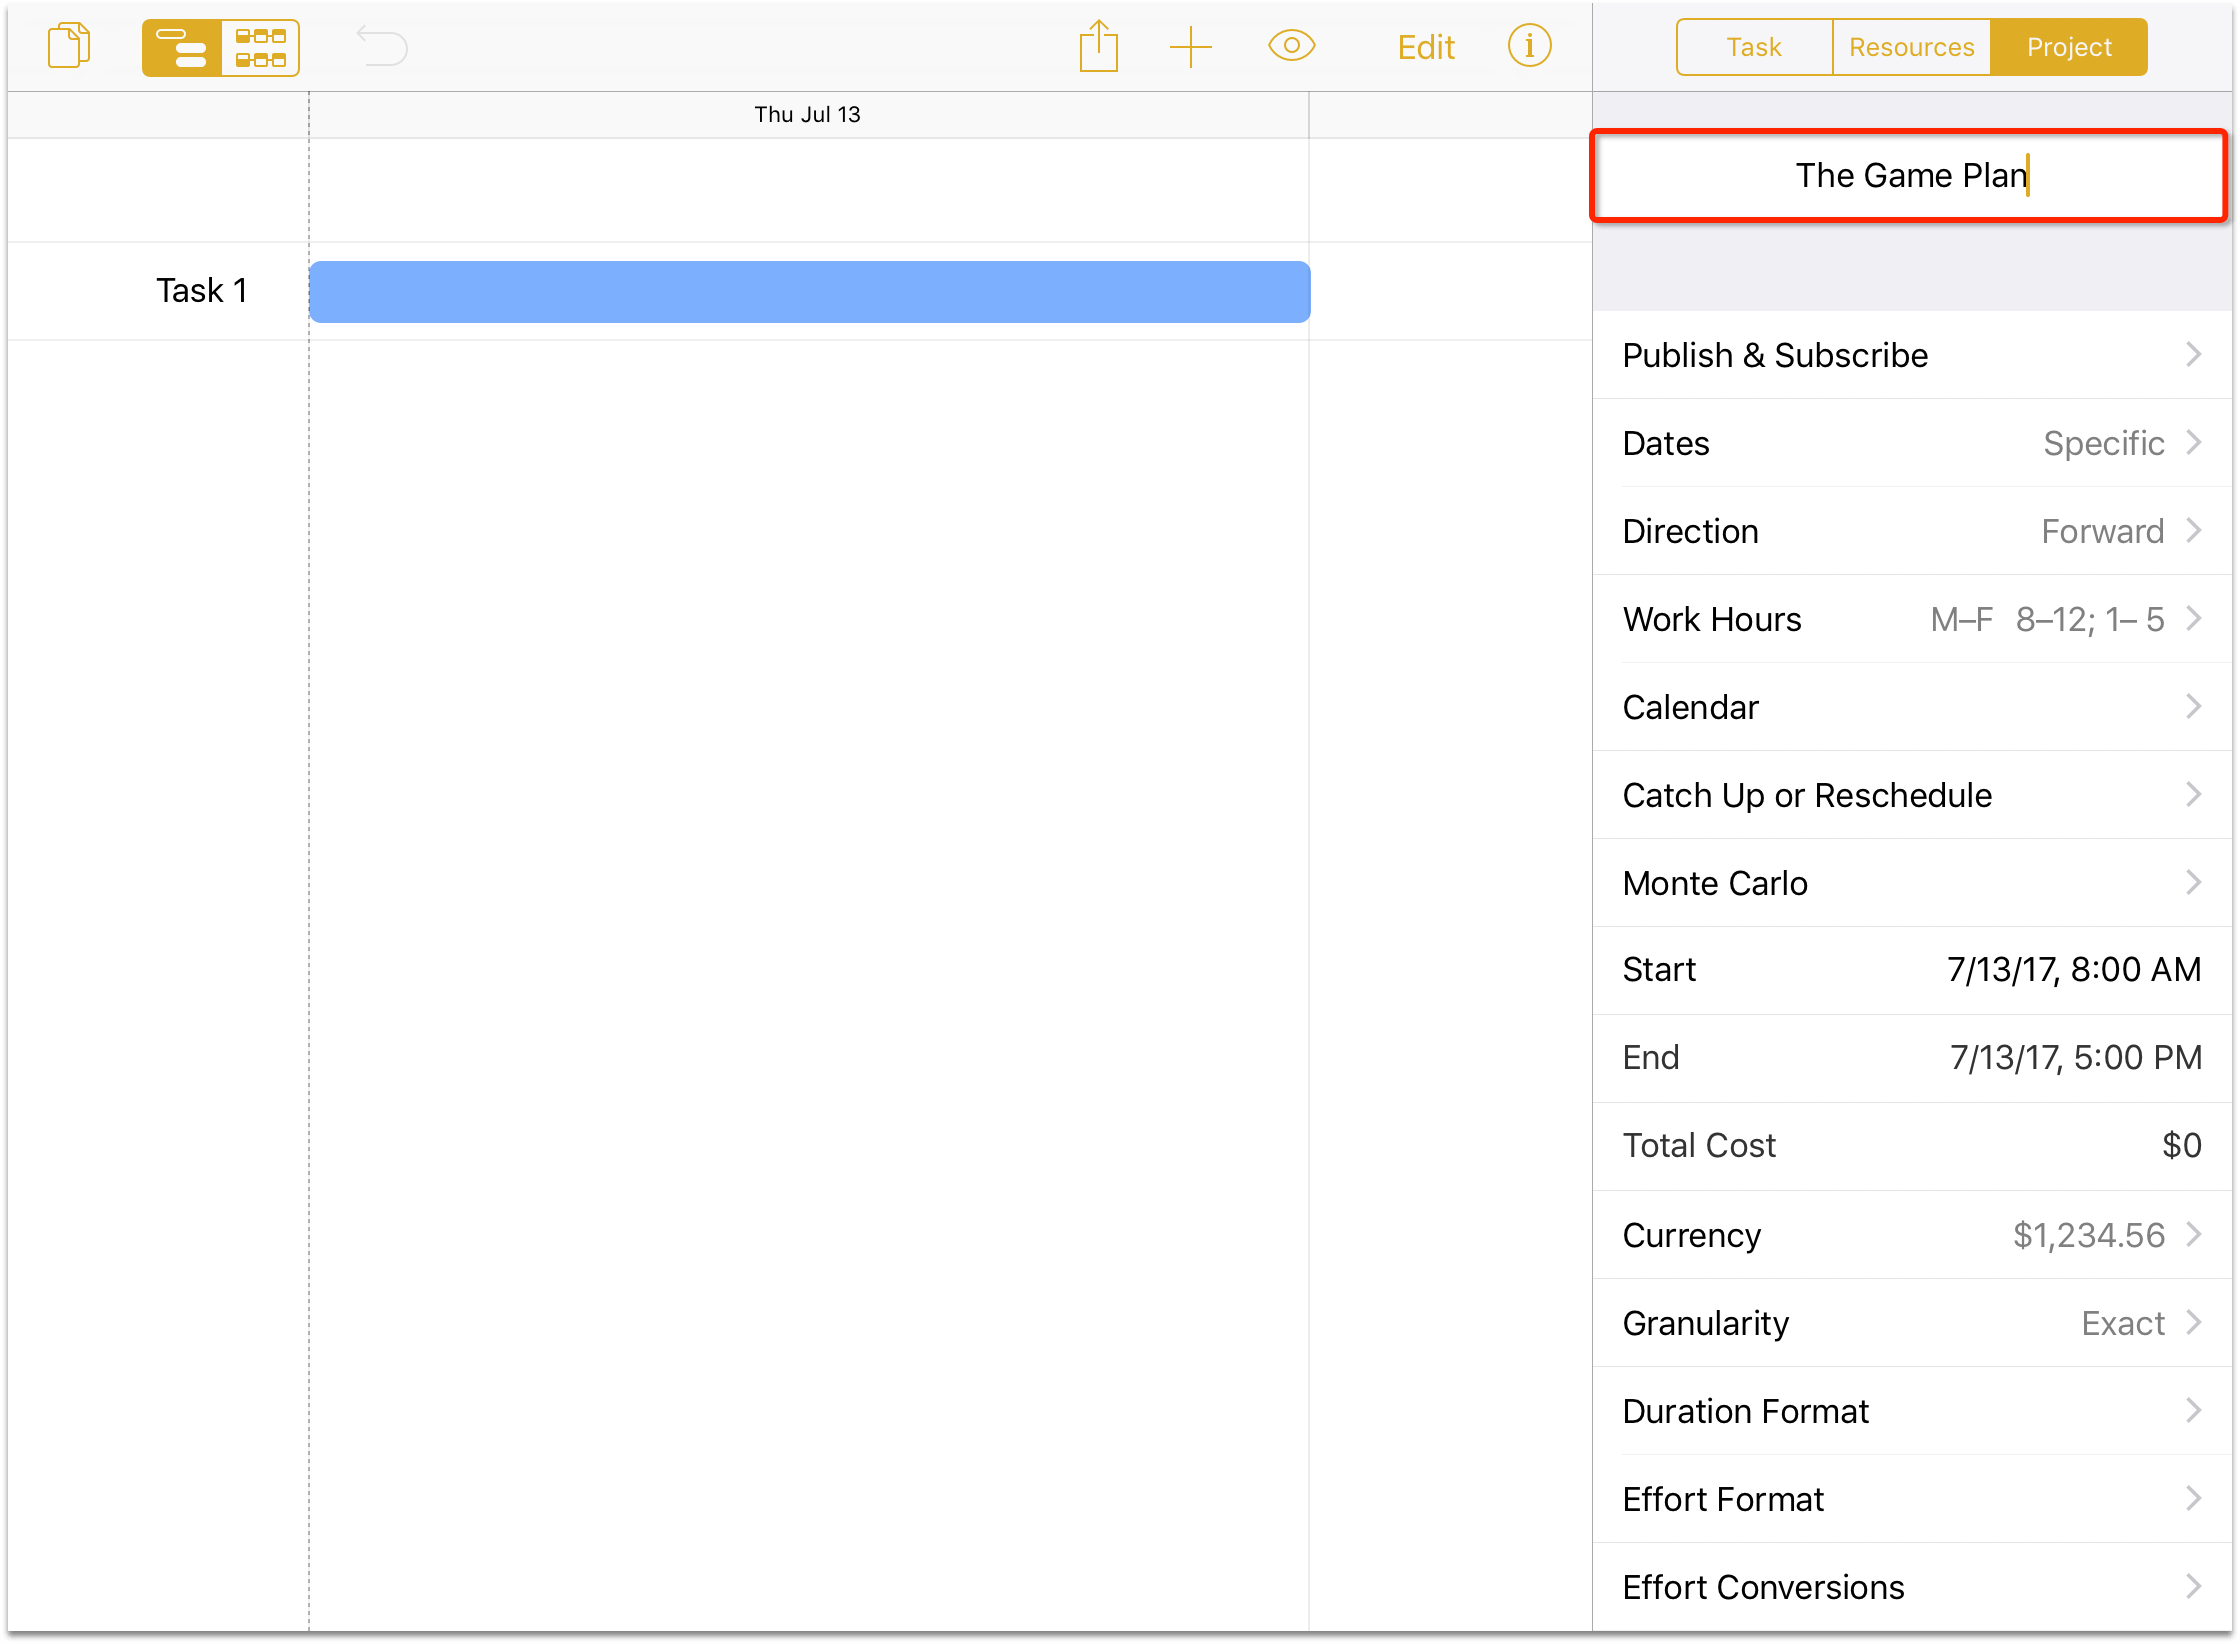
Tap  in the toolbar, and then tap the Project tab to open the Project inspector so you can edit the project title. Tap where it says My Project, press the backspace key to erase that title, and then enter The Game Plan as the new project name for this tutorial.
Step 2: Choosing a Start or End Date
When setting out to build a project, one of the most important aspects is the timeframe. This, in turn, is dictated by any deadlines or start constraints that exist for the project.
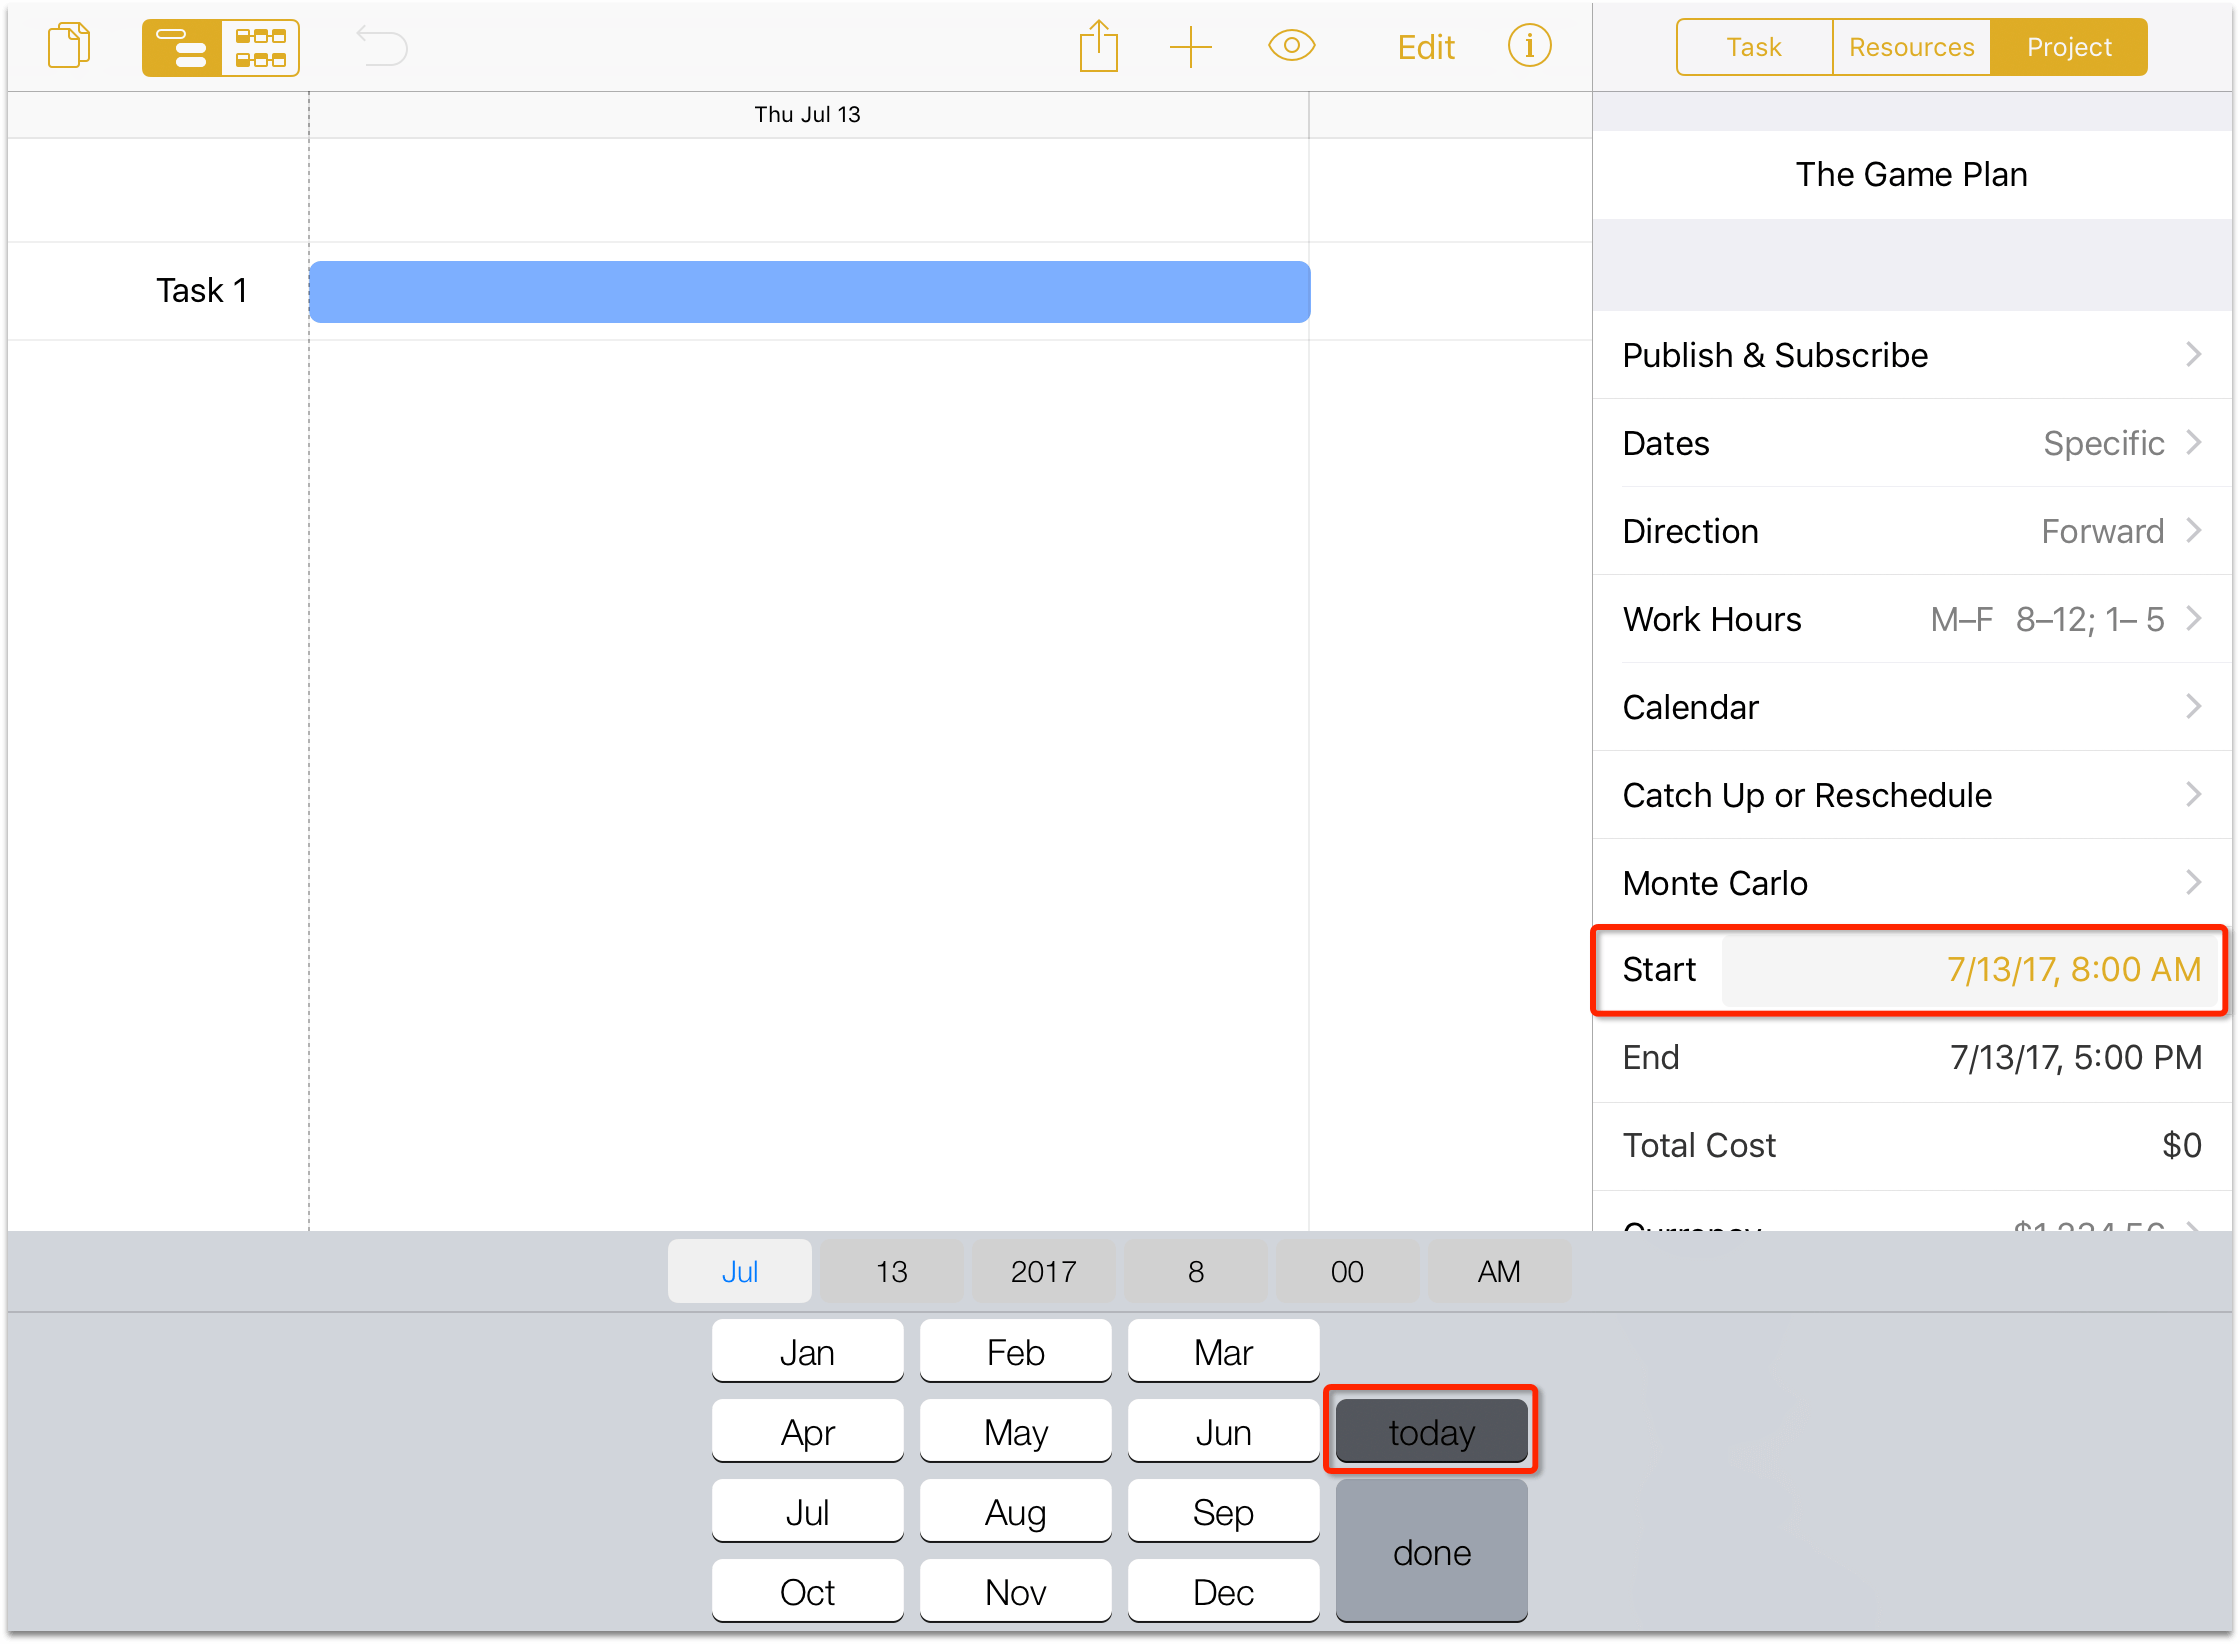
Design and building the game project doesn’t have a hard deadline for completion; it just needs to be done when it’s ready. To indicate this, go to the Project inspector, tap the Start field, and then tap the today button to use today’s date as the start date.
If you are working through this tutorial, your project’s start date will obviously be different from the dates reflected in the text and screenshots that follow.
When planning a project, all of your dates will be in the future. As a suggestion, perhaps pick a date a few weeks in the future as your project’s start date for the tutorial.
Conveniently, the day you initially create a new project is used as the default setting for starting the project. If you need to set the Start date to something else, you can certainly do that.
After setting the Start date, you’ll notice a couple things:
- The project’s End date is initially set to 5:00 PM of the same day as the Start date. This date will change as you add more tasks to the project and assign schedules and dependencies, but let’s not get ahead of ourselves.
- The project’s Direction is set to Forward, which means that all tasks are will be scheduled to complete as soon as possible (or ASAP) based on their duration.
Projects with a Known Deadline
If you are planning a project with a specific due date, you’ll want to switch the project’s Direction from Forward to Backward, and then enter the project’s due date in the End field.
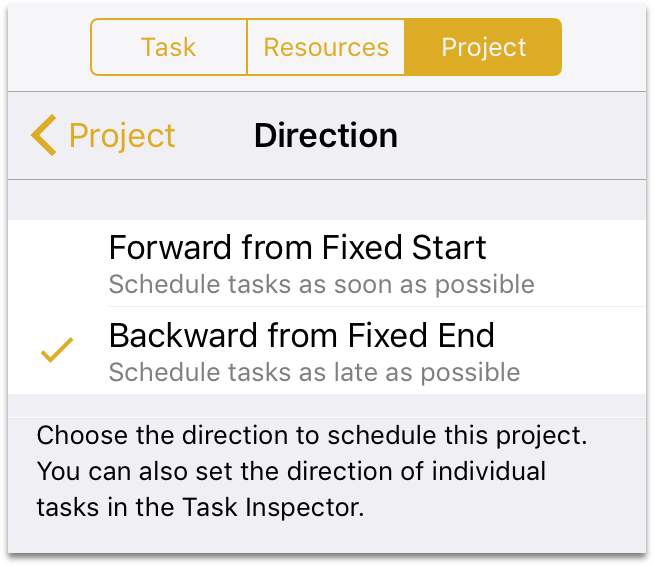
With the project Direction set to Backward, the tasks in the project are scheduled backward from the End date. Task completion dates are computed based on the time from project End date to the present.
Similarly, if you are planning a project without a fixed Start or End date, change the Dates field of the Project inspector from Specific to Undetermined.
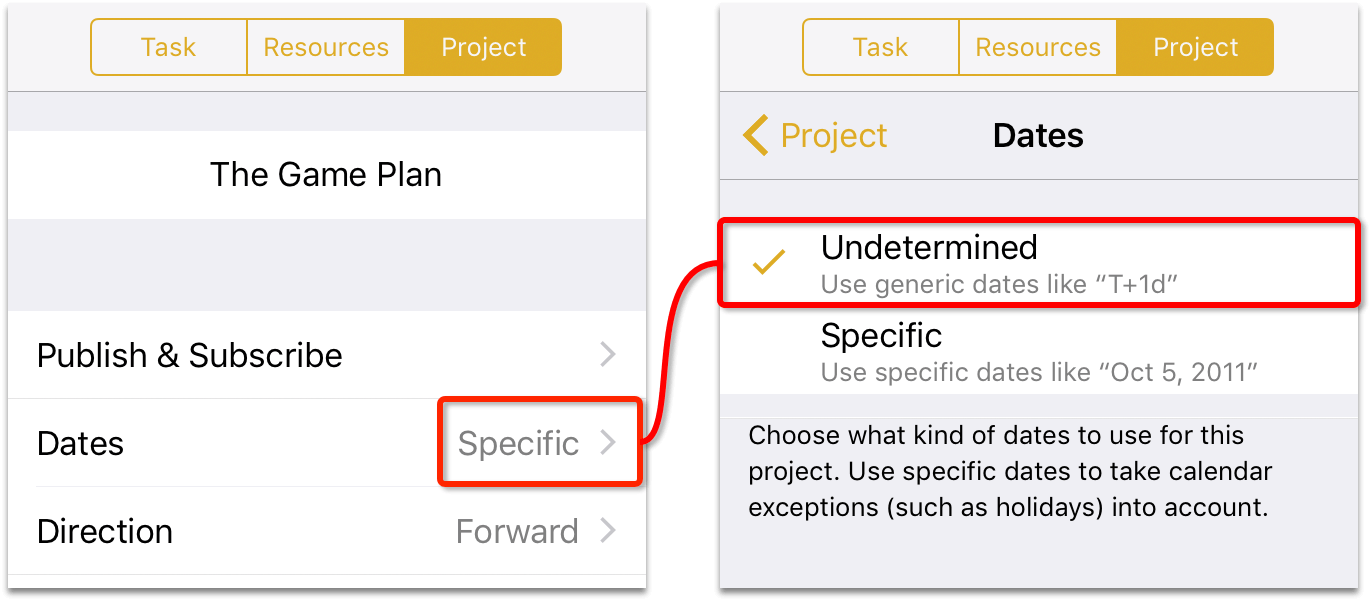
This allows you to create a project with dates that appear as T+1d, T+2d, and so on. This type of project planning gives you the ability to set up the tasks and assign resources and dependencies to see how much time is needed and, once known, you can change the Dates field back to Specific and enter a Start or End date to get your project rolling.
Step 3: Creating Tasks
With the Start date for the project set, it’s time to return to the Gantt chart, where the first default task awaits details.
Tasks in OmniPlan represent discrete pieces of work that require substantial effort to complete, usually across a duration expressed in hours or days, rather than minutes. Prepare morning coffee, for example, is a task that’s typically not within the scope of OmniPlan, while Install espresso machine very well could be—maybe even a group of tasks, if you need external help getting pipes or electricity connected.
The notion of “task” in OmniPlan is in contrast with action item-based productivity apps such as OmniPlan’s counterpart OmniFocus, where anything you can conceive of as something you’d like to accomplish can—and should—be included in thinking about your project plans.
OmniFocus is built around personal task execution; the granularity of OmniPlan’s tasks is intended for work that must be considered by (or requires input from) a group of stakeholders, often as a team.
The process of project building starts with a brainstorm session for all the tasks that the project should include. As noted, these are typically things that take the effort of multiple people to complete, or have some impact on other work that the project requires. Don’t worry too much about whether a task fits the project’s scope at this point—it’s more important to get the ideas flowing. You can always come back and edit these later.
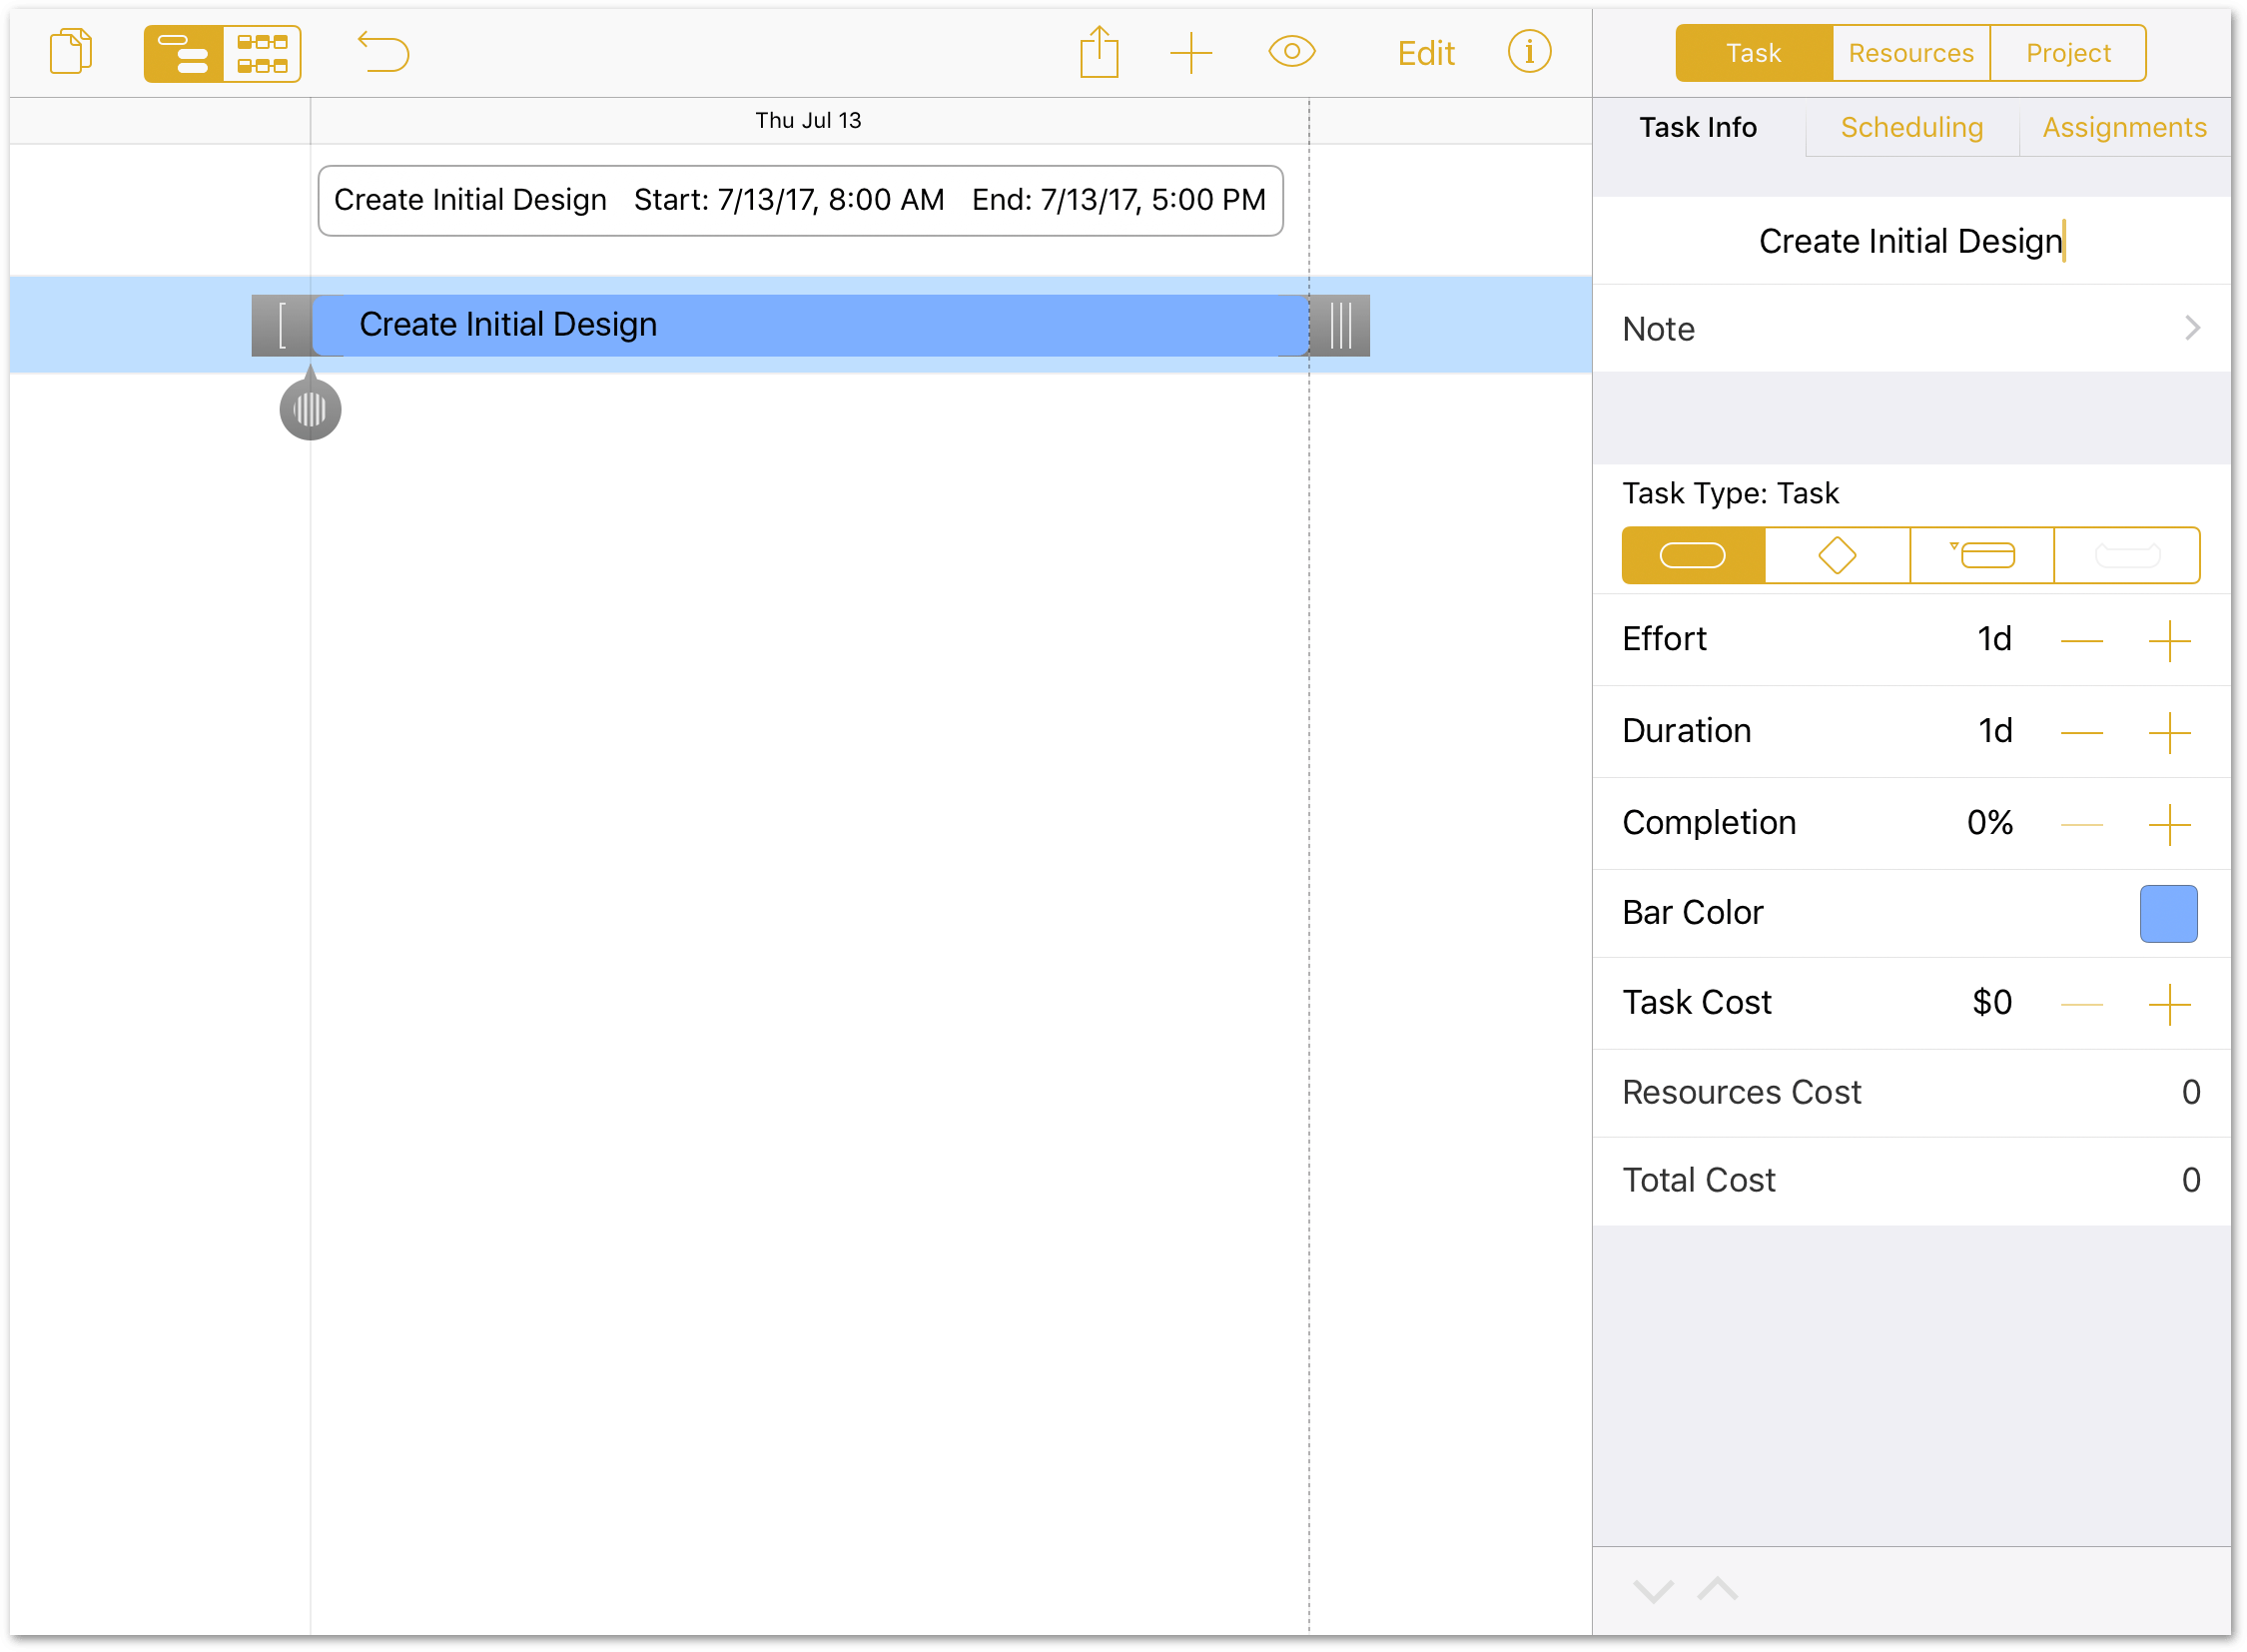
Start by changing the name of the default task:
- To the left of the Gantt bar, double-tap Task 1 to make the task name editable.
- Enter Create Initial Design as the new name for the task and then press Return.

You could also edit the Name field in the Task inspector:
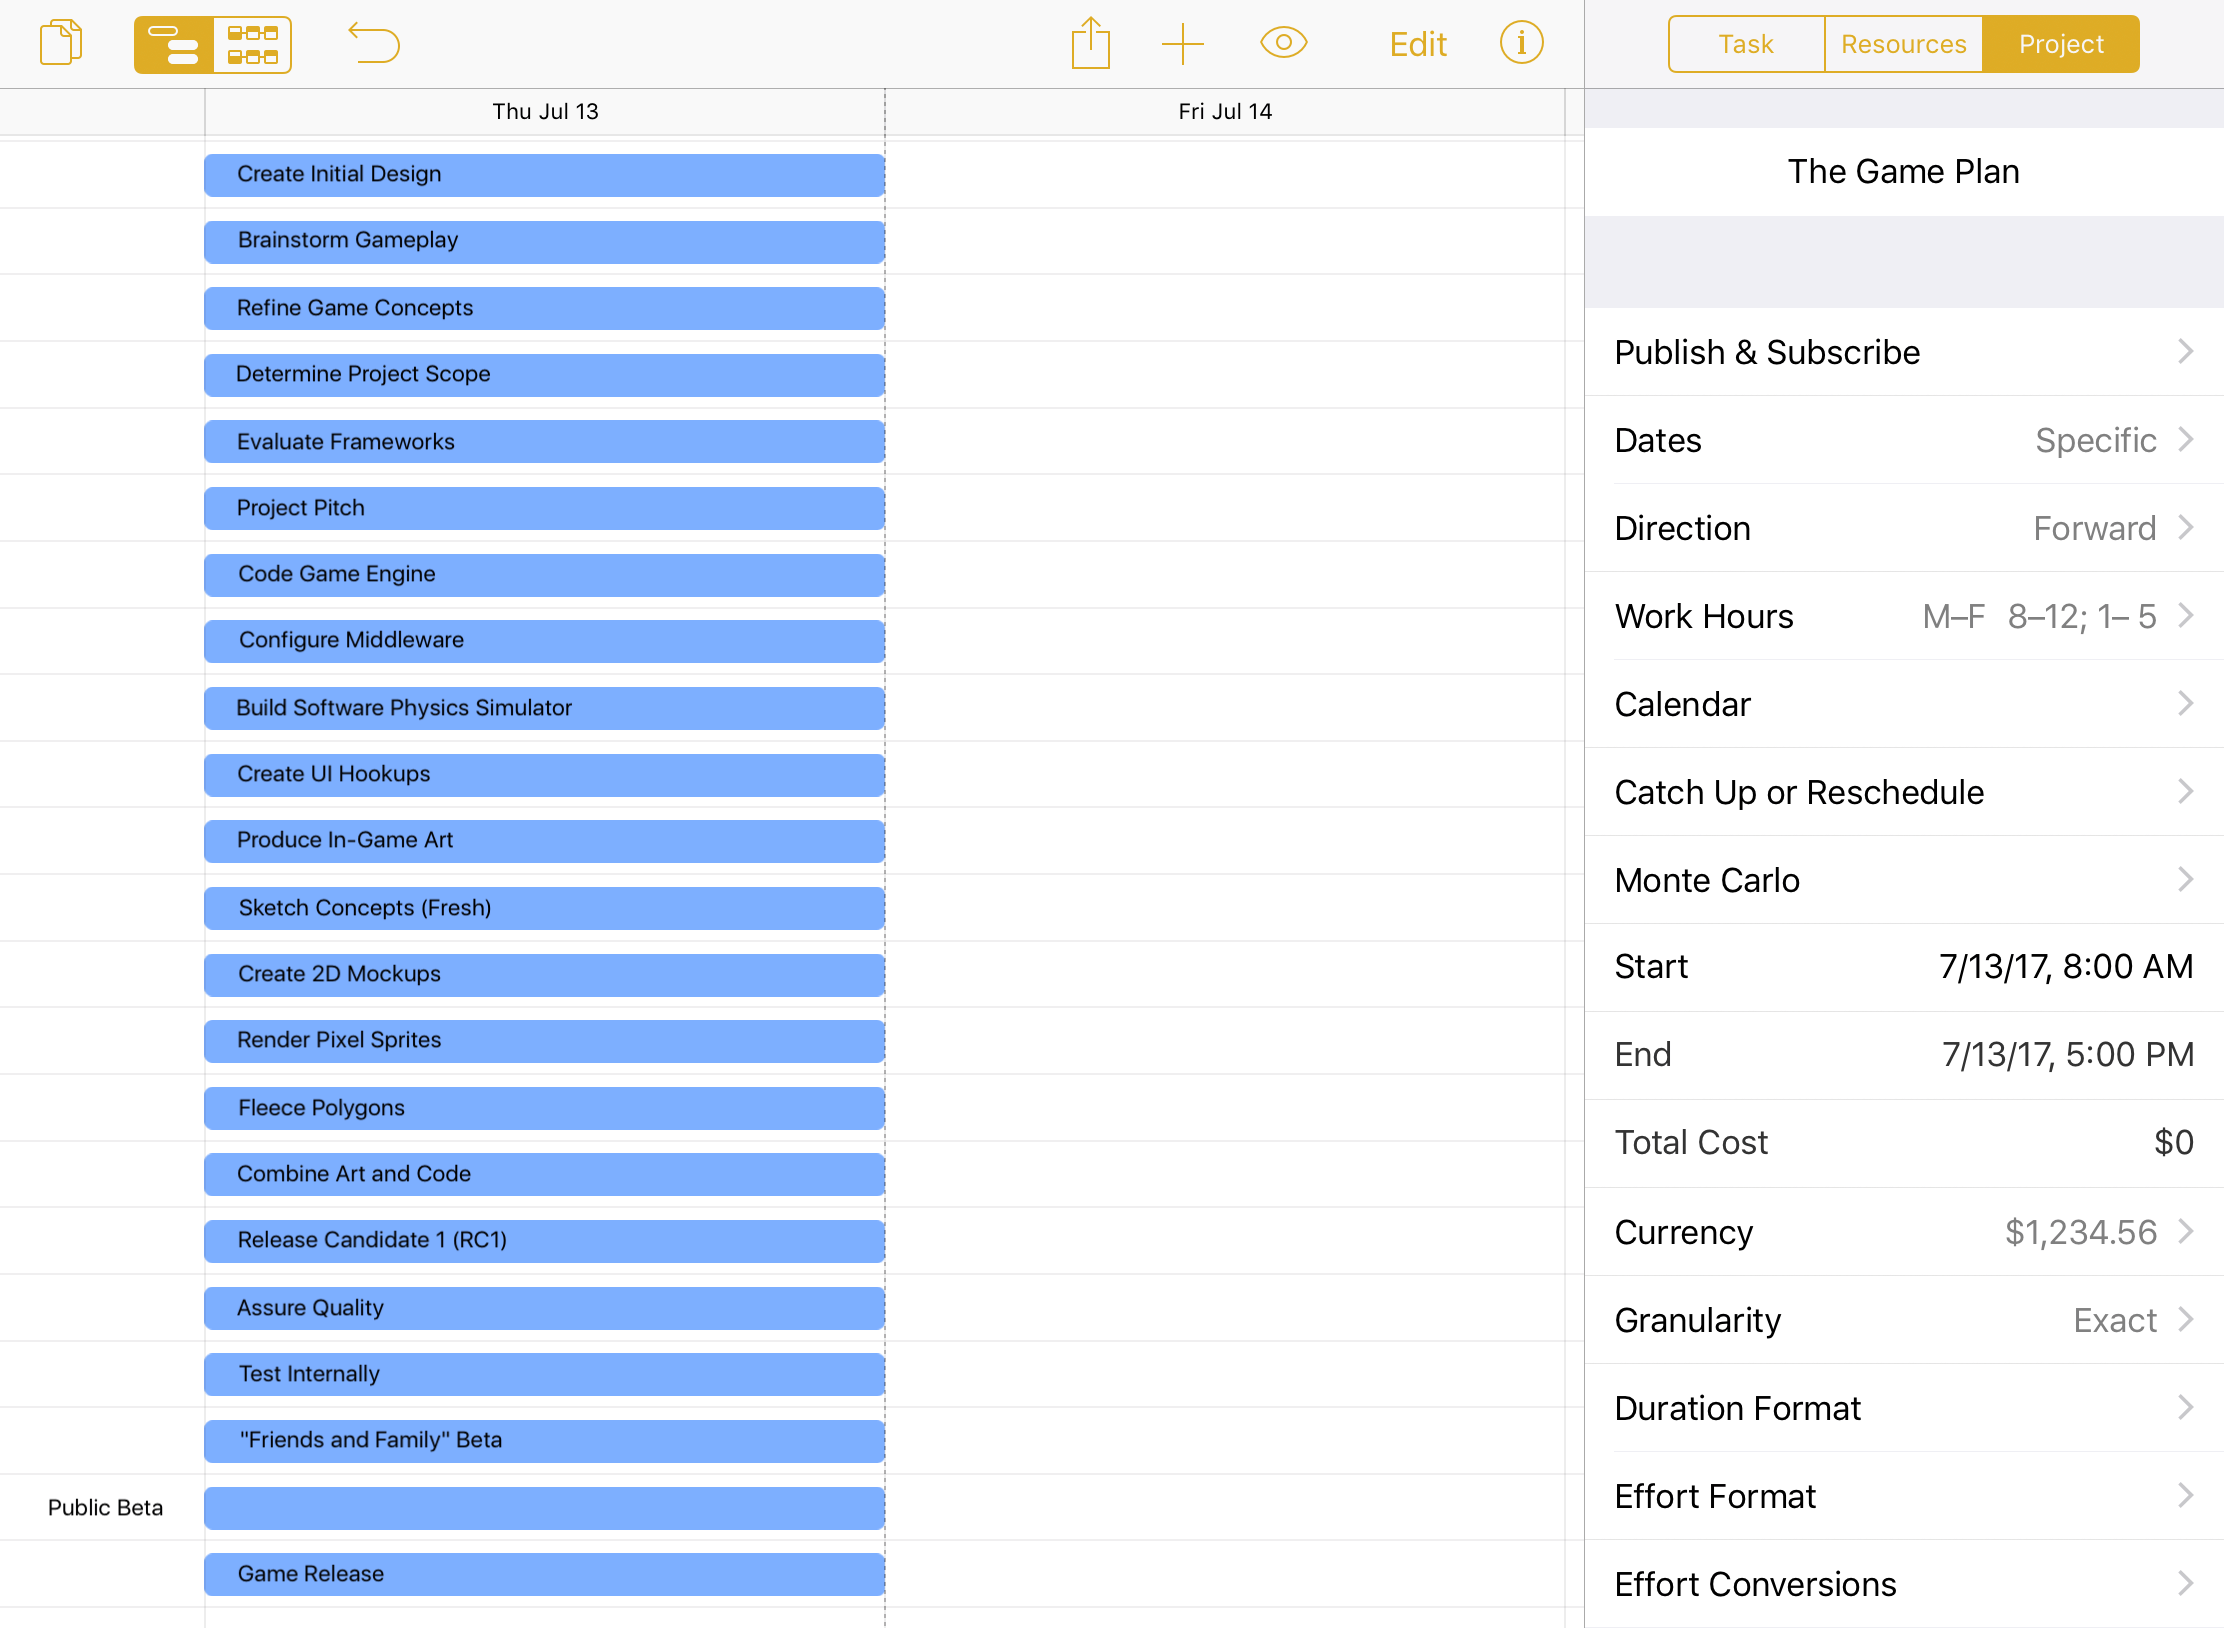
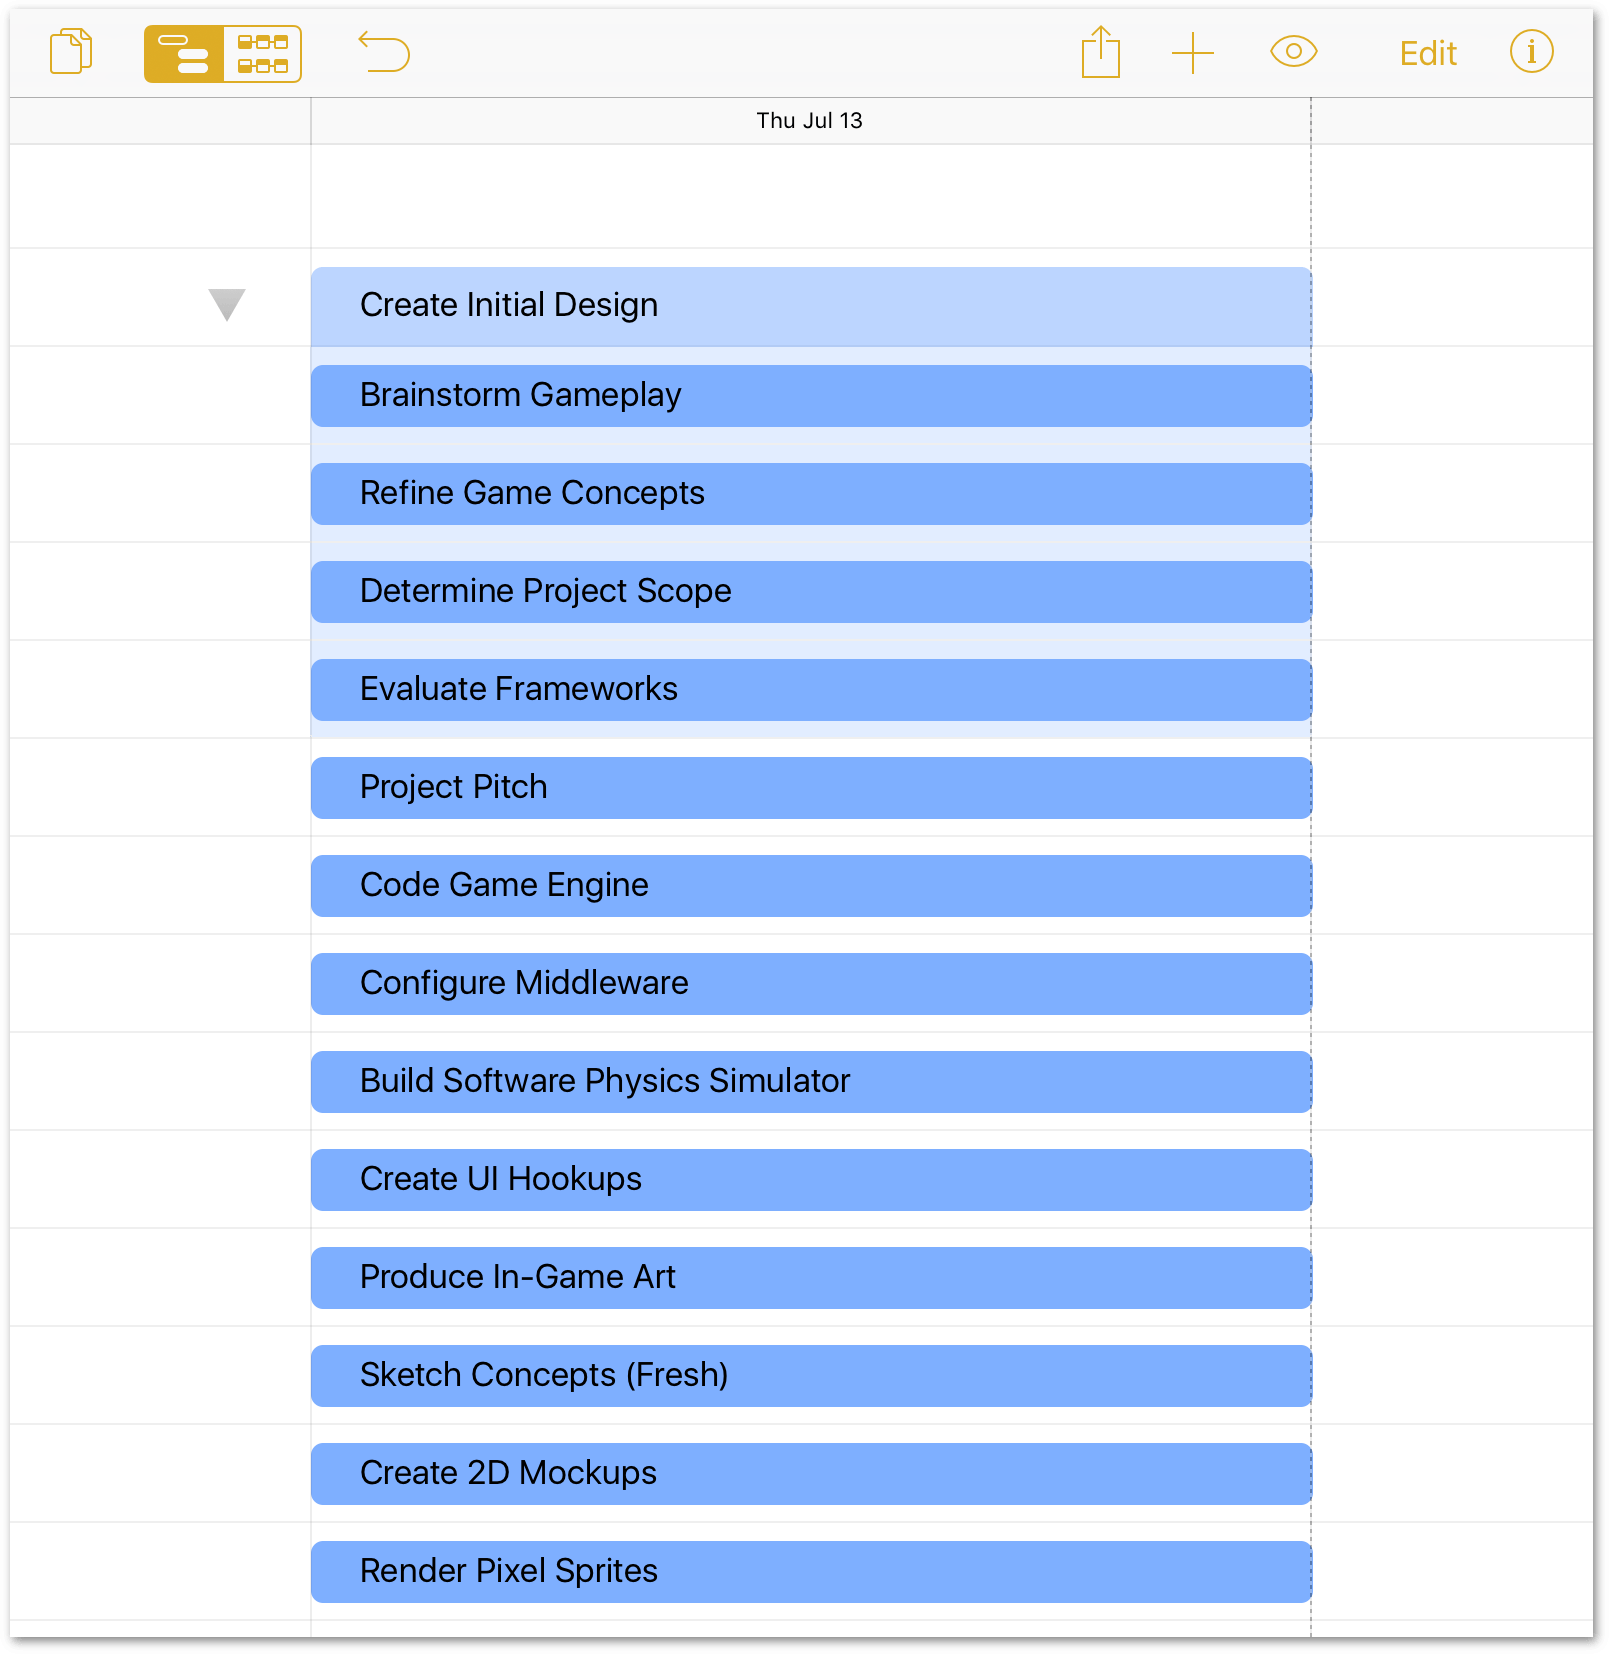
To add more tasks to the project, tap in the toolbar. Create the following tasks:
- Brainstorm Gameplay
- Refine Game Concepts
- Determine Project Scope
- Evaluate Frameworks
- Project Pitch
- Code Game Engine
- Configure Middleware
- Build Software Physics Simulator
- Create UI Hookups
- Produce In-Game Art
- Sketch Concepts (Fresh)
- Create 2D Mockups
- Render Pixel Sprites
- Fleece Polygons
- Combine Art and Code
- Release Candidate 1 (RC1)
- Assure Quality
- Test Internally
- “Friends and Family” Beta
- Public Beta
- Game Release
New tasks appear beneath the currently selected item in the Gantt chart, or at the bottom of the list if no tasks, milestones, or groups are selected.
As you may notice while entering the tasks, the project now has more tasks than can comfortably fit in a single screen. However, you can use the pinch gesture to zoom out on the Gantt chart so everything fits within the window.
Initial task entry can be greatly sped up with the aid of a connected or paired keyboard. After entering the name for a task, pressing Return twice accepts the name of the task and creates the next one.
Creating Tasks in the Network Diagram View
As you create a list of tasks, try Network Diagram view! Tap in the toolbar to see your tasks as a set of nodes:
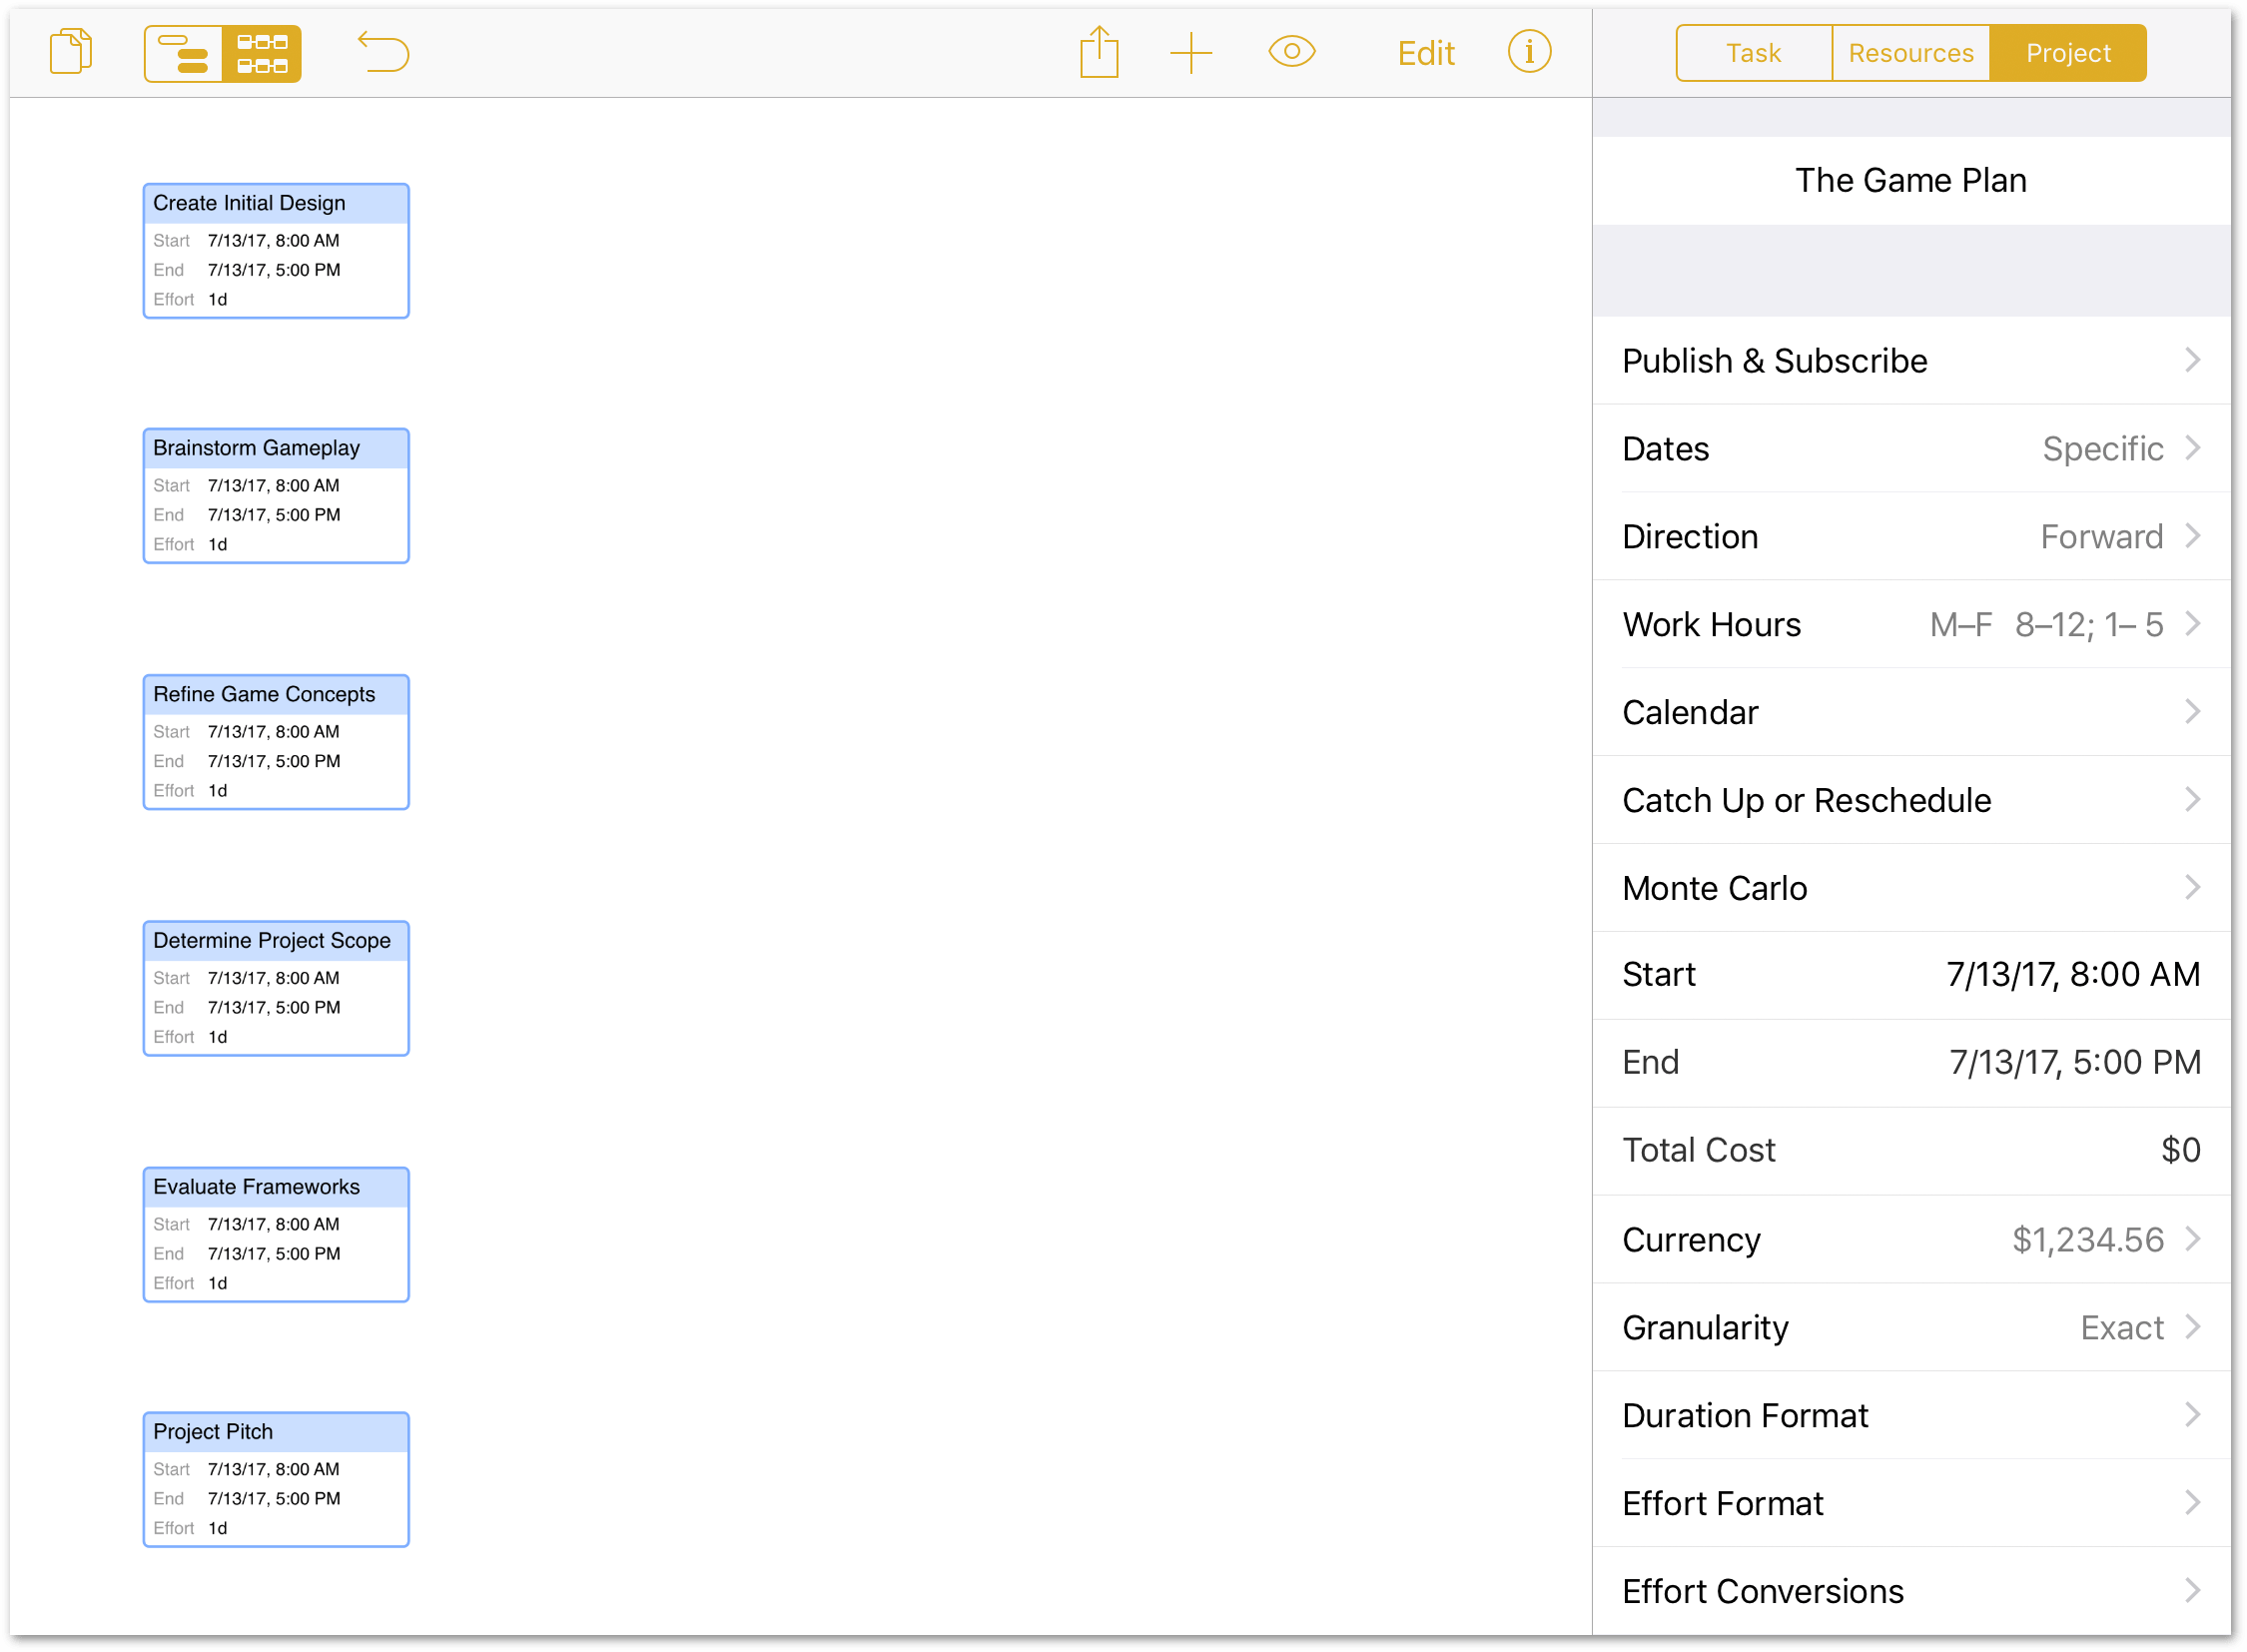
At this stage, the nodes aren’t connected to one another, but that will change as you progress through the tutorial.
Step 4: Grouping Tasks
When tasks are closely related or interdependent it can be useful to put them in a group. Groups help organize a project conceptually, and also act as meta-tasks that can be linked via dependencies to other tasks or groups.
A task group is just a container—it has no duration or effort of its own. The amount of time and energy needed to complete the group is equal to the sum of the requirements of the group’s individual tasks.
An easy way to gather tasks into a group is in Edit Mode. Tap Edit in the toolbar, and then tap to select all of the tasks and milestones that you want to group together:
- Tap Edit in the toolbar.
-
Tap to select the following tasks in the project:
- Create Initial Design
- Brainstorm Gameplay
- Refine Game Concepts
- Determine Project Scope
- Evaluate Frameworks

-
At the bottom of the screen, tap Group to place those five tasks in Group 1 and ends Edit Mode.
-
Press Return to accept Group 1 as the group name for now.
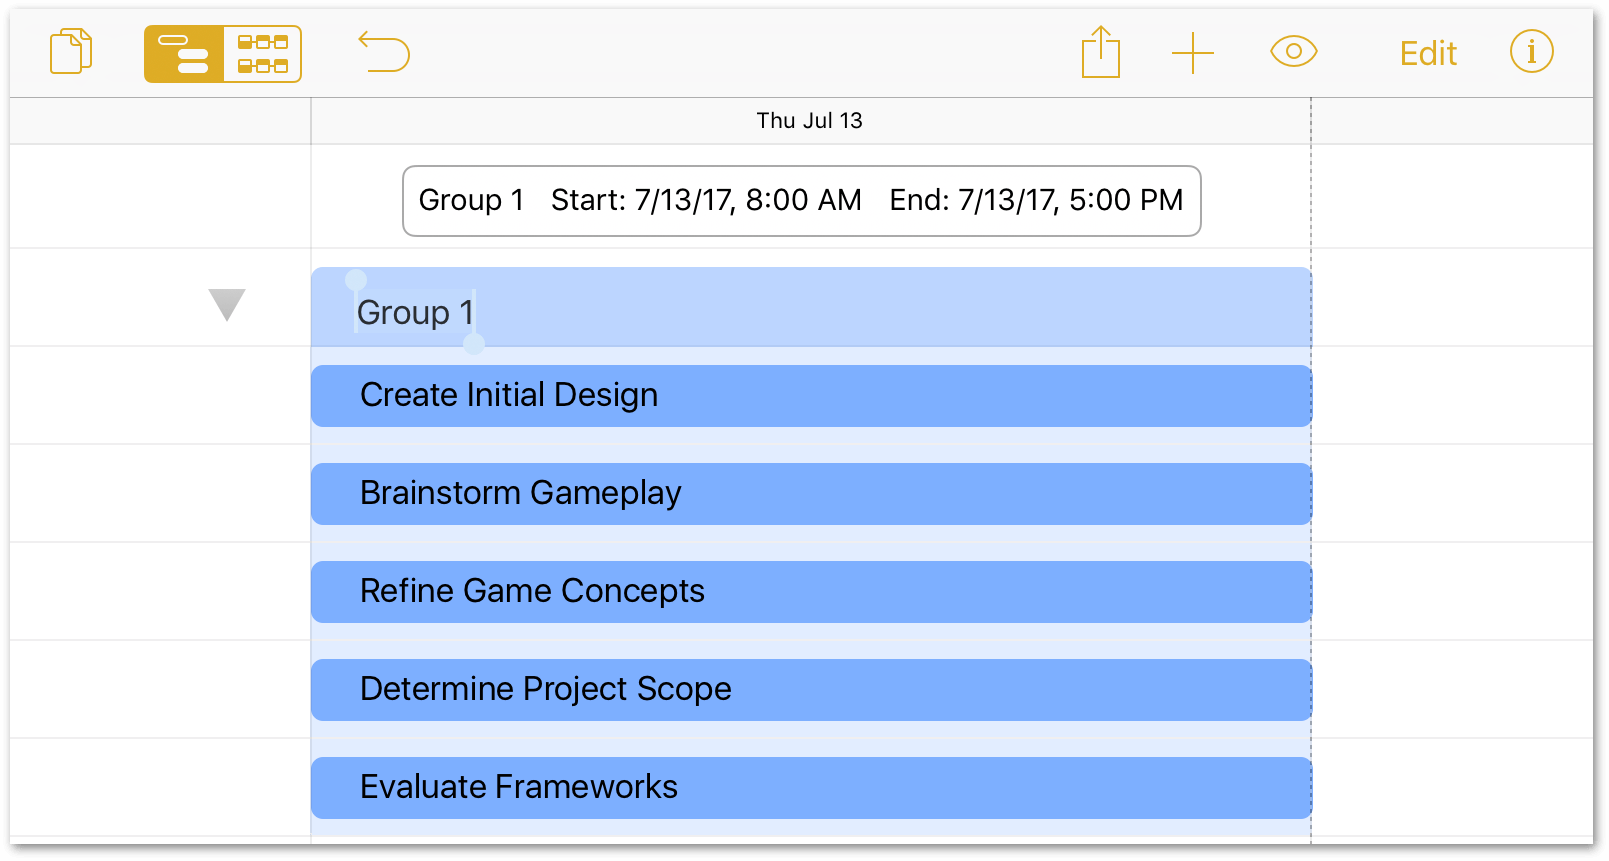
Admittedly, Group 1 is a boring name for a group. And while you could name it anything you’d like, a suitable choice may already be there. In looking at the list of grouped tasks, the first one—Create Initial Design—appears as the front-runner as group leader, so let’s make that change:
-
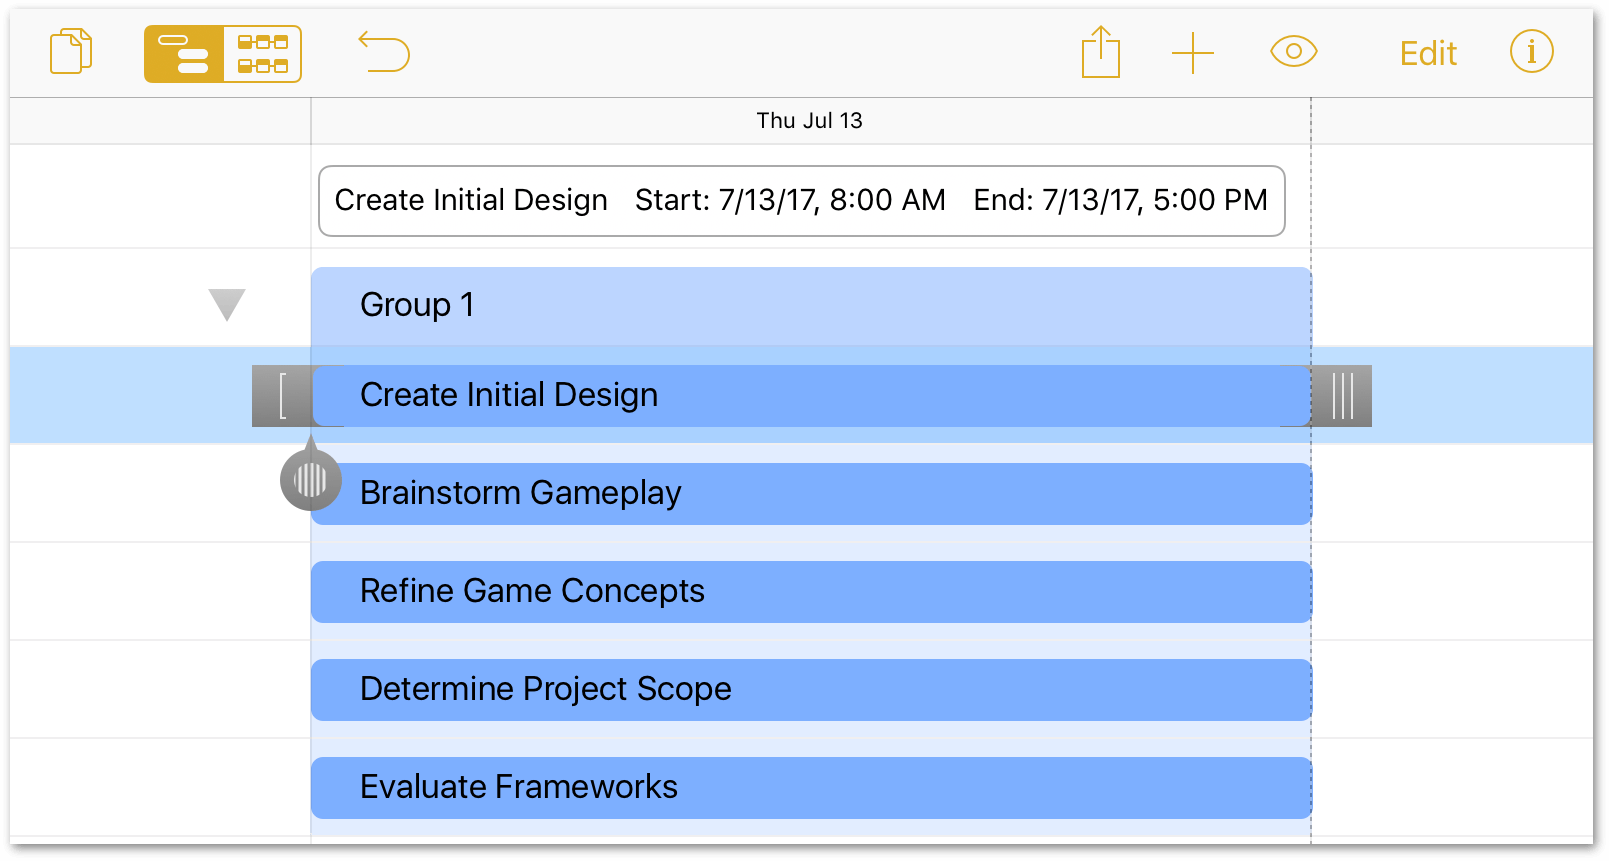
Tap to select the Create Initial Design task:
-
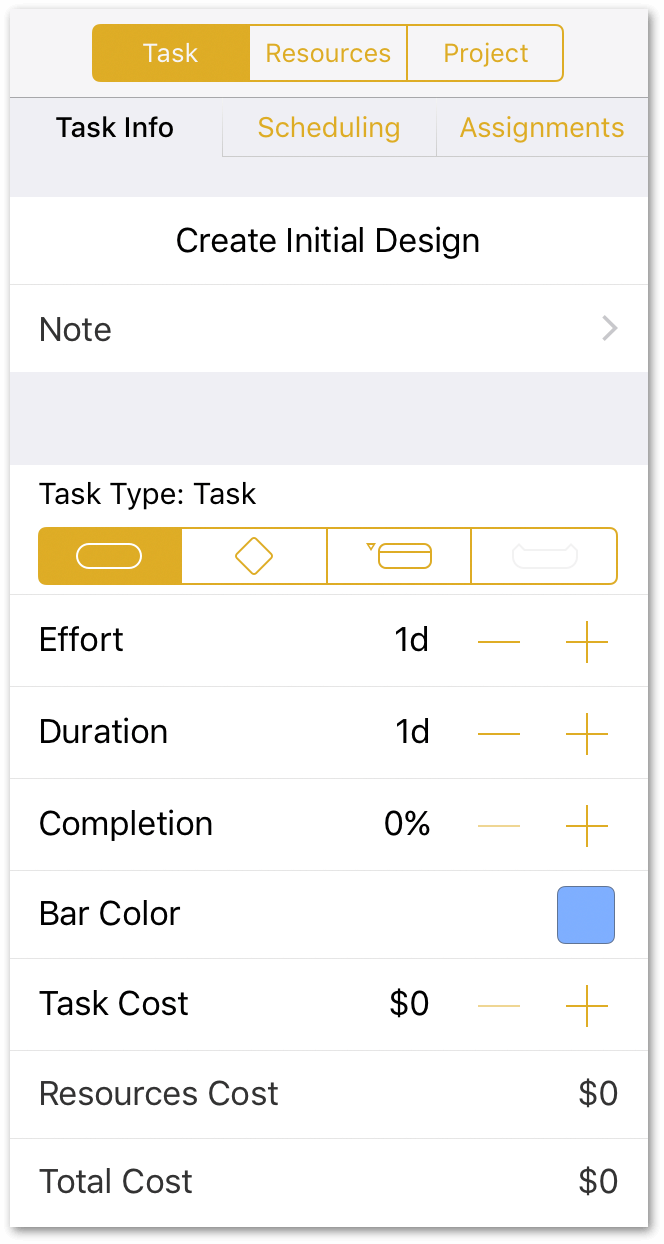
Tap the Task inspector, and then tap Task Info.
-
In the Task Type selectors, tap
 to change its task type to Group.
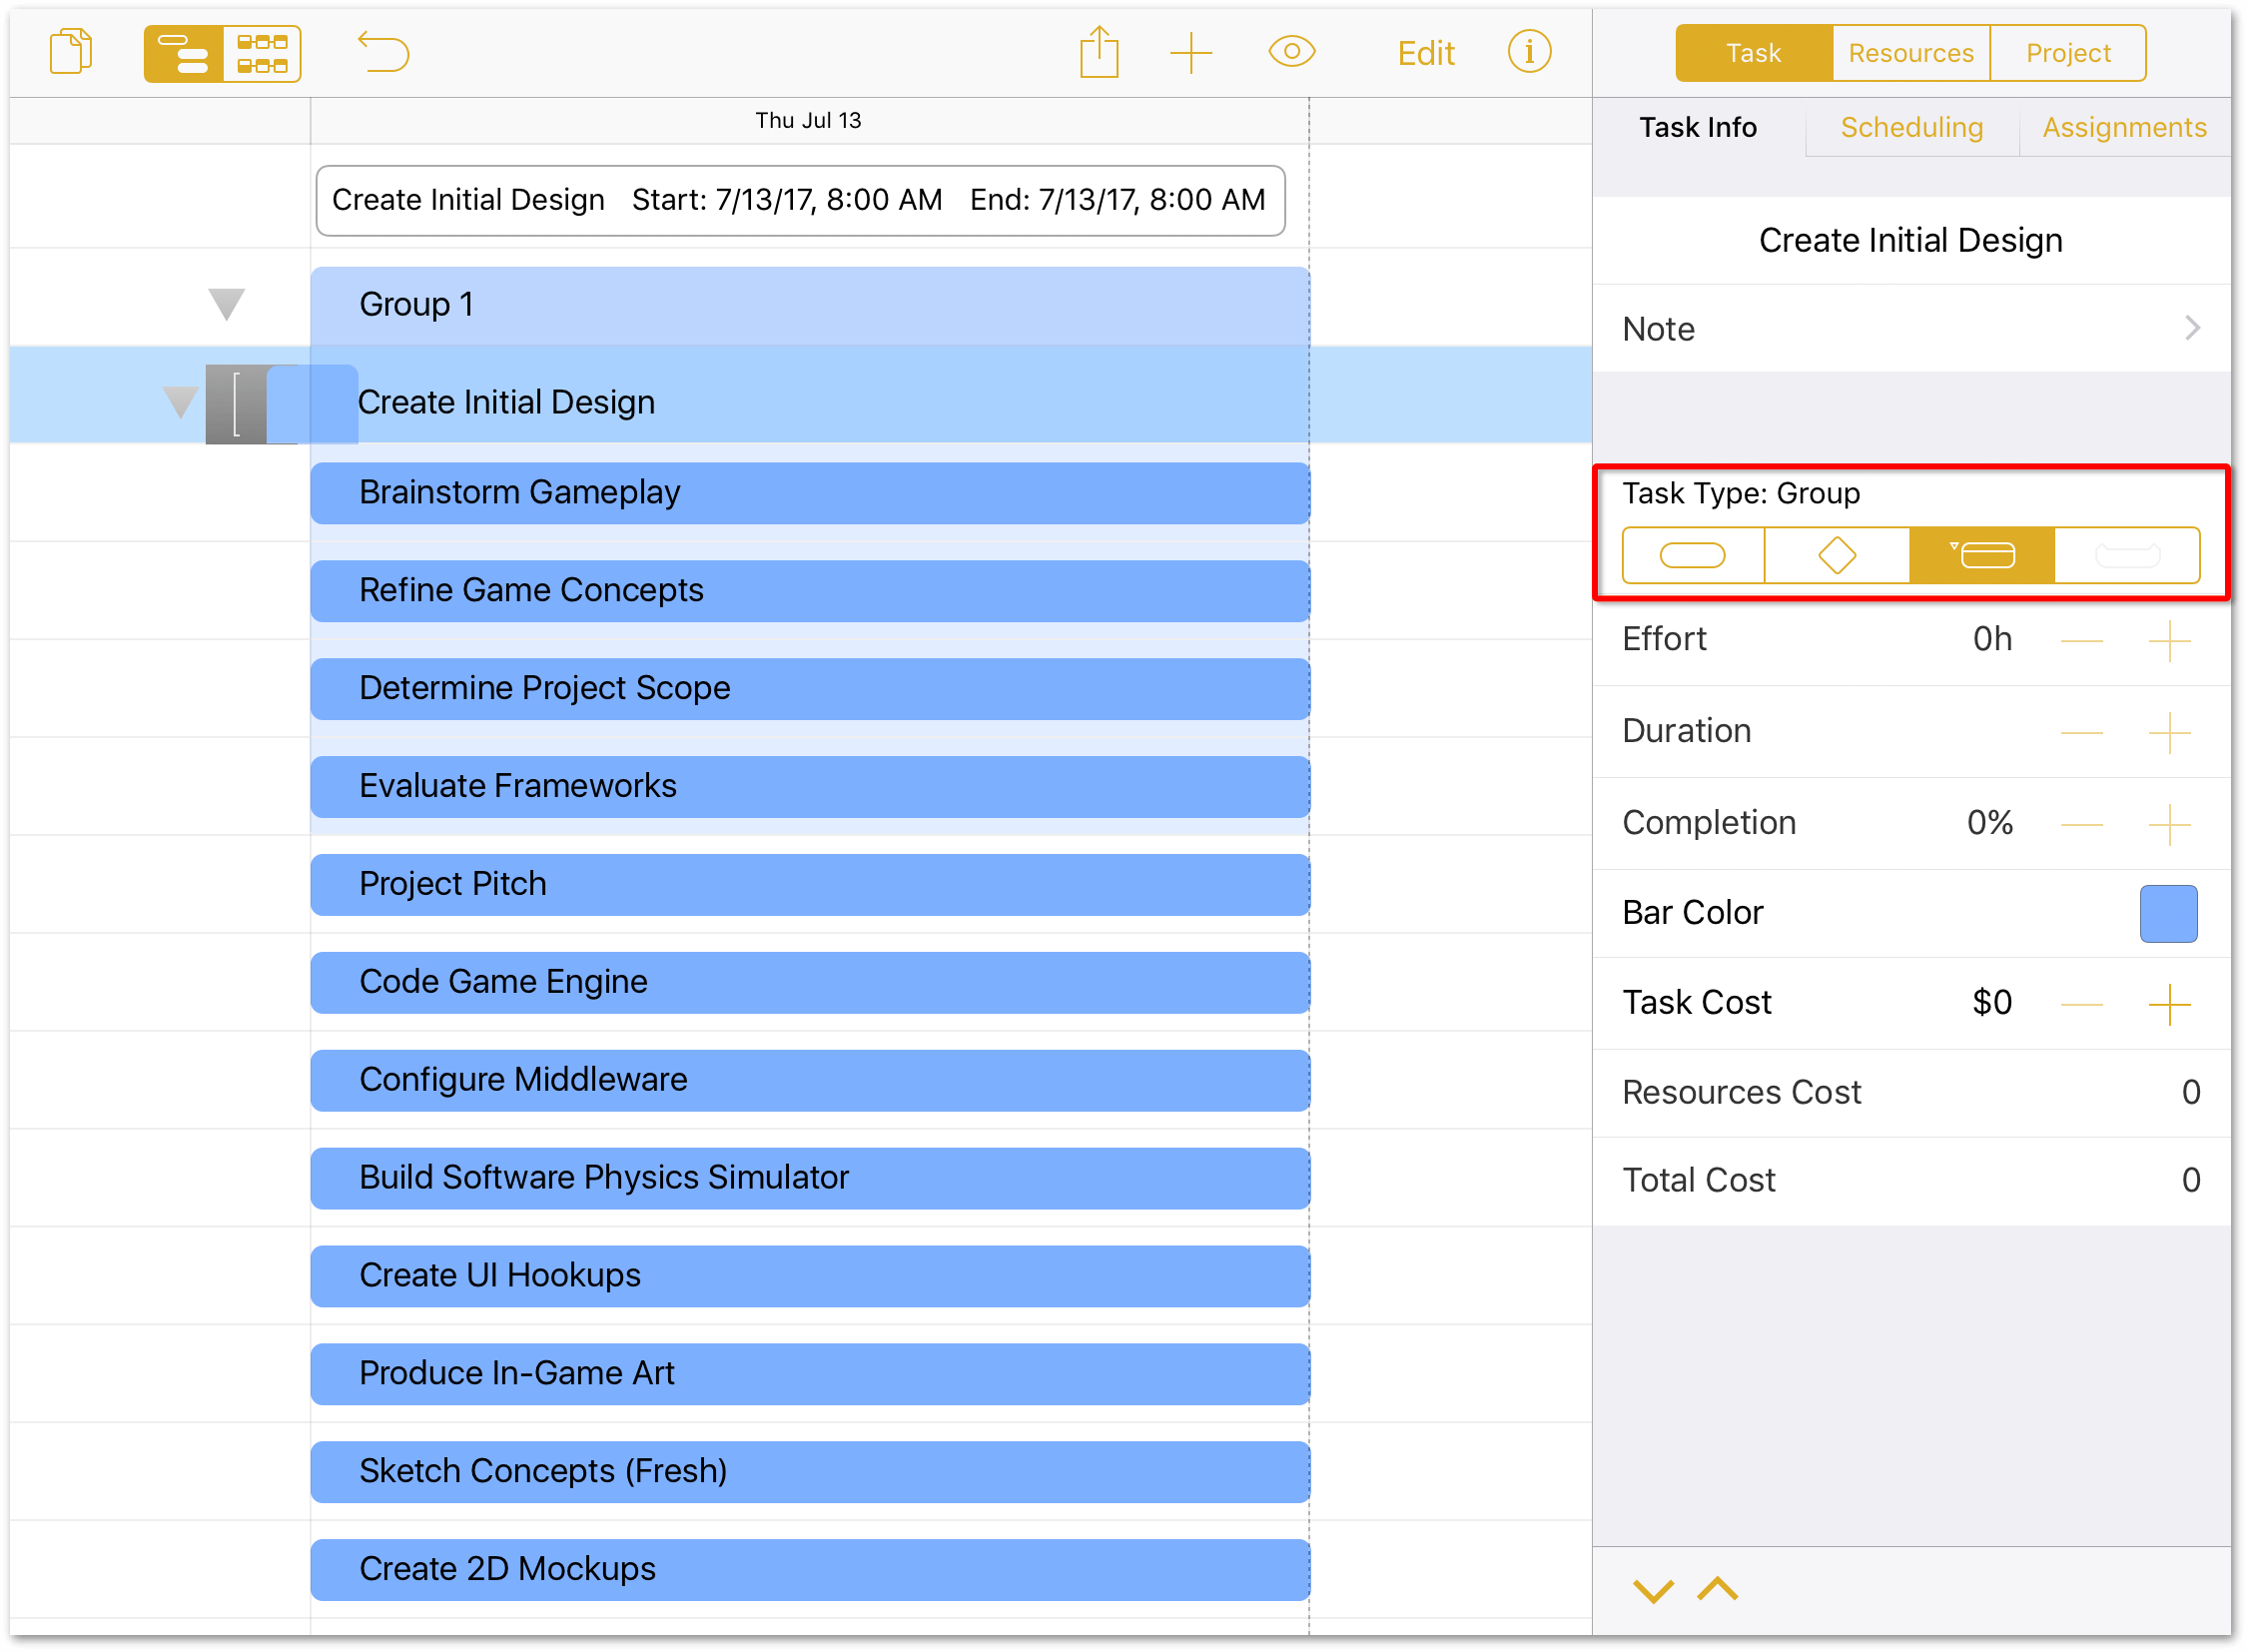
-
In the toolbar, tap Edit.
-
Tap to select the following tasks:
- Brainstorm Gameplay
- Refine Game Concepts
- Determine Project Scope
- Evaluate Frameworks
At this point, do not select Create Initial Design.
-
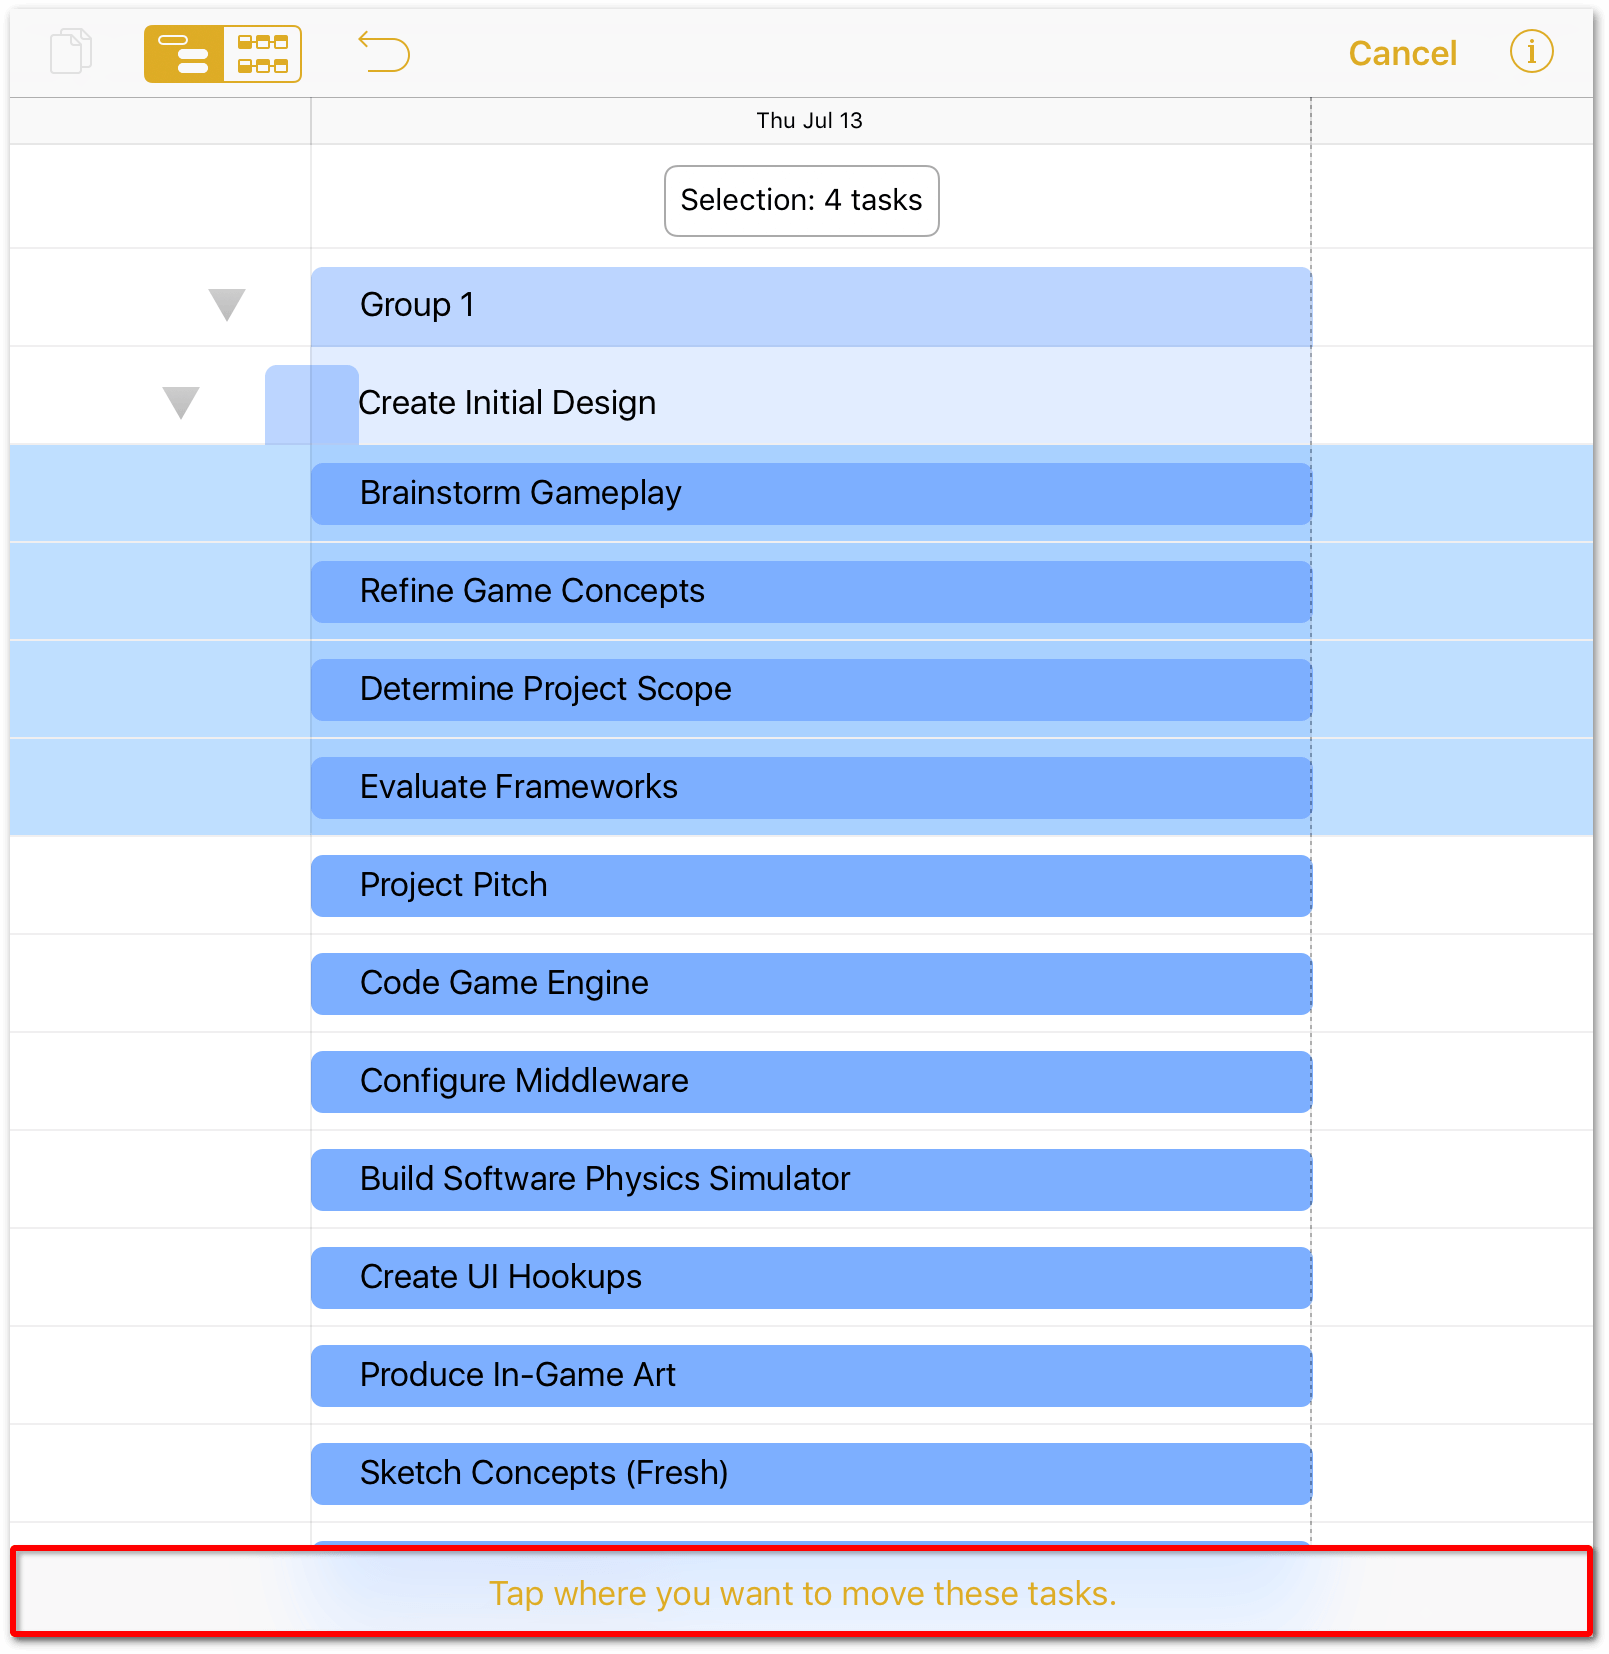
This time, instead of tapping Group, tap Move so you can move the four selected tasks into the Create Initial Design task group.

-
After tapping Move, a message appears at the bottom of the Project Editor, directing you to Tap where you want to move these tasks; tap to select Create Initial Design.
-
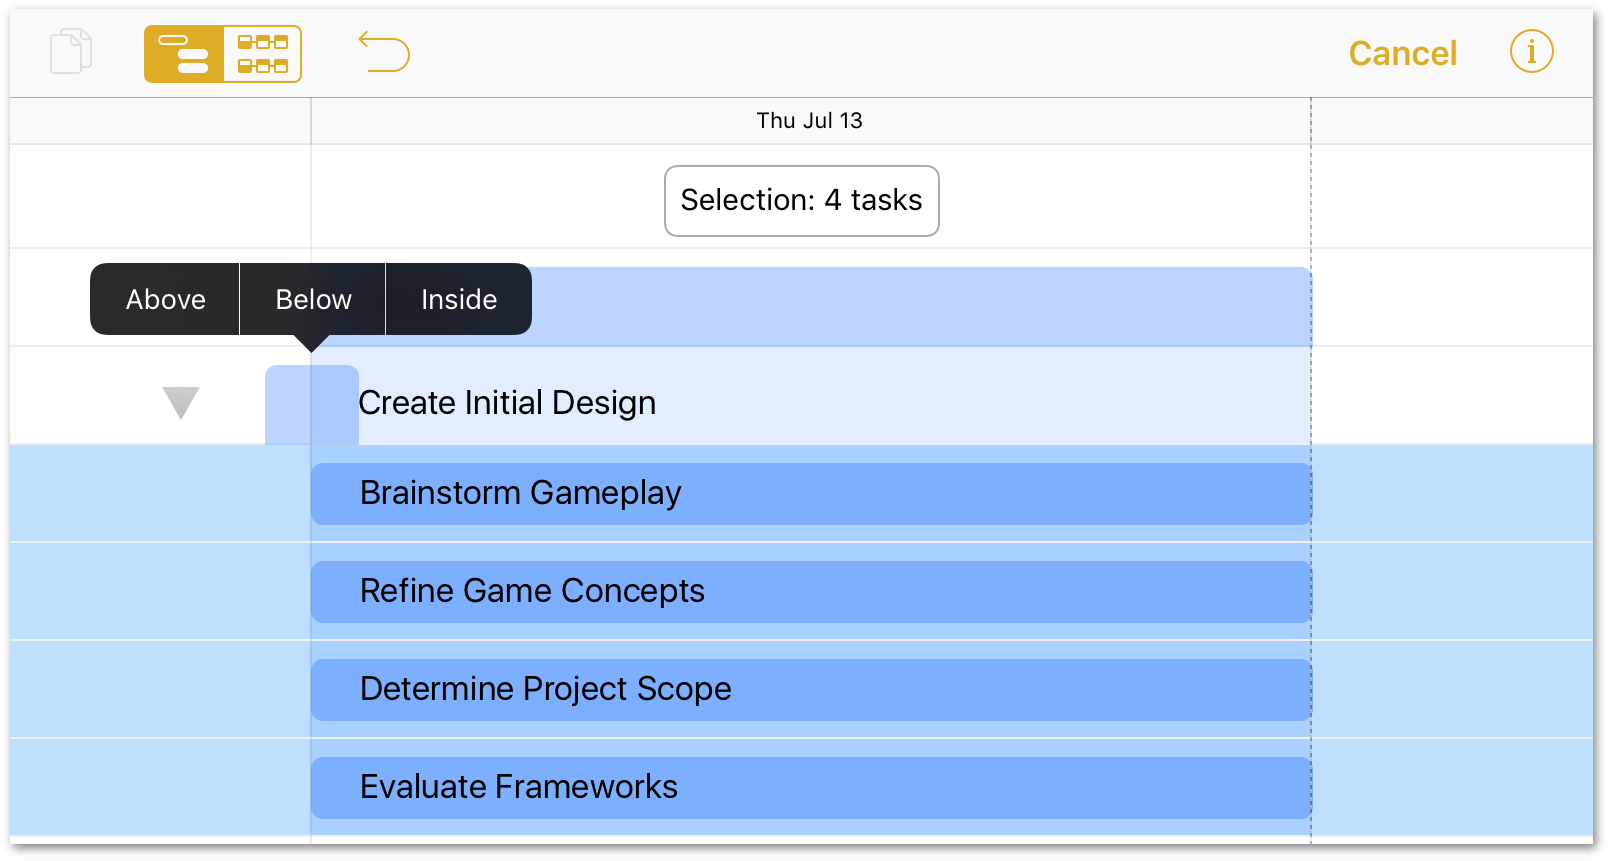
A contextual menu appears over Create Initial Design, giving you the option to place the moved tasks Above, Below, or Inside. Tap Inside to make the tasks part of the Create Initial Design group.
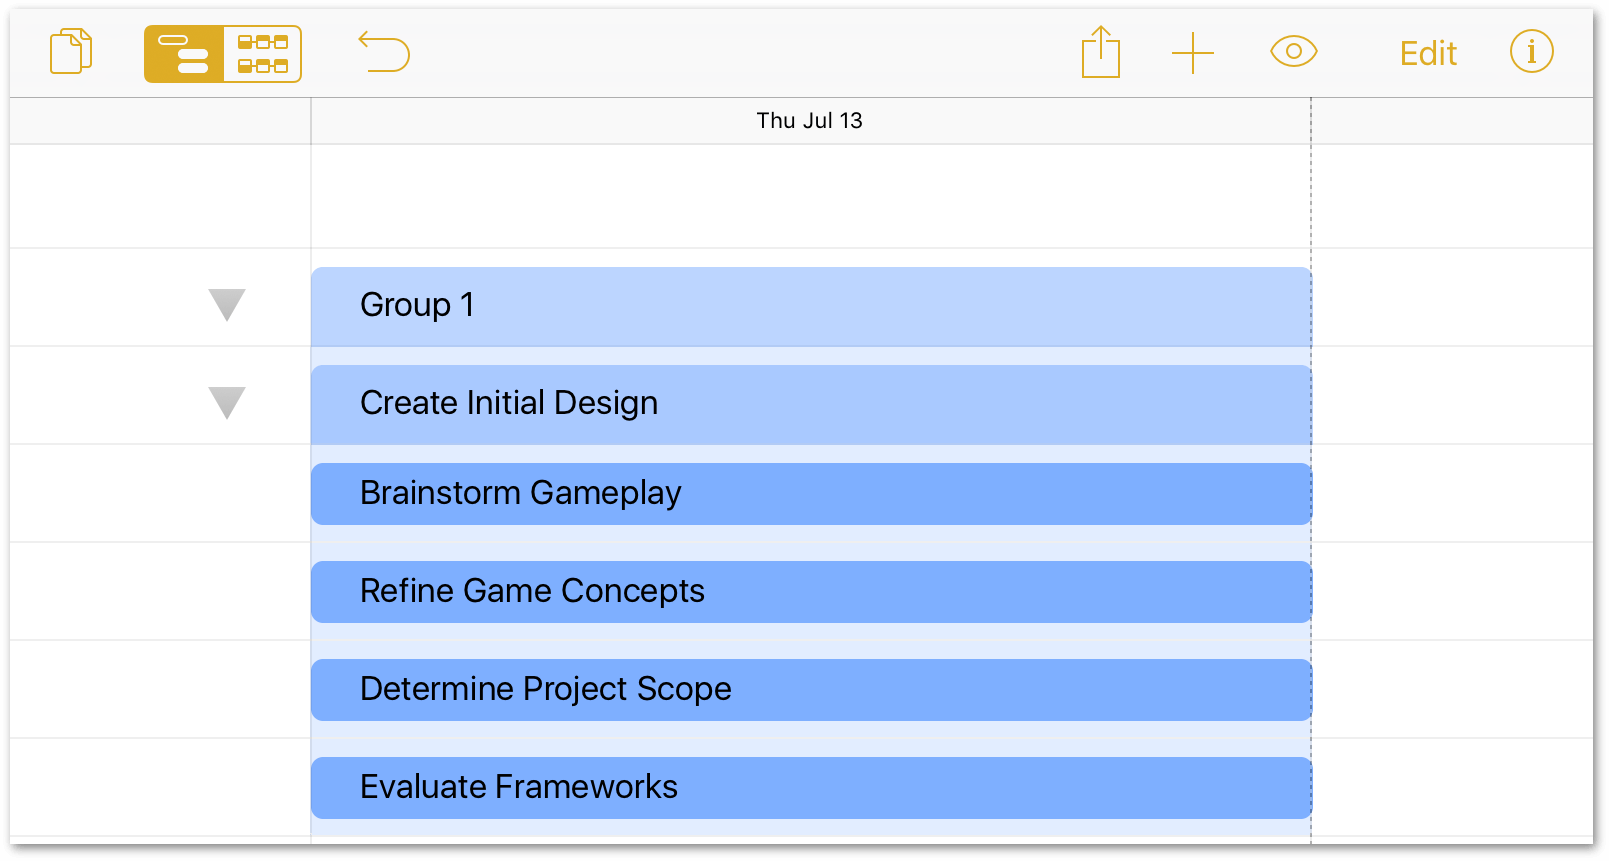
As you may have noticed, the Create Initial Design group is actually a subgroup of Group 1. Since there’s no need for this to be a subgroup, let’s remove Group 1 so that Create Initial Design stands on its own:
- In the toolbar, tap Edit.
-
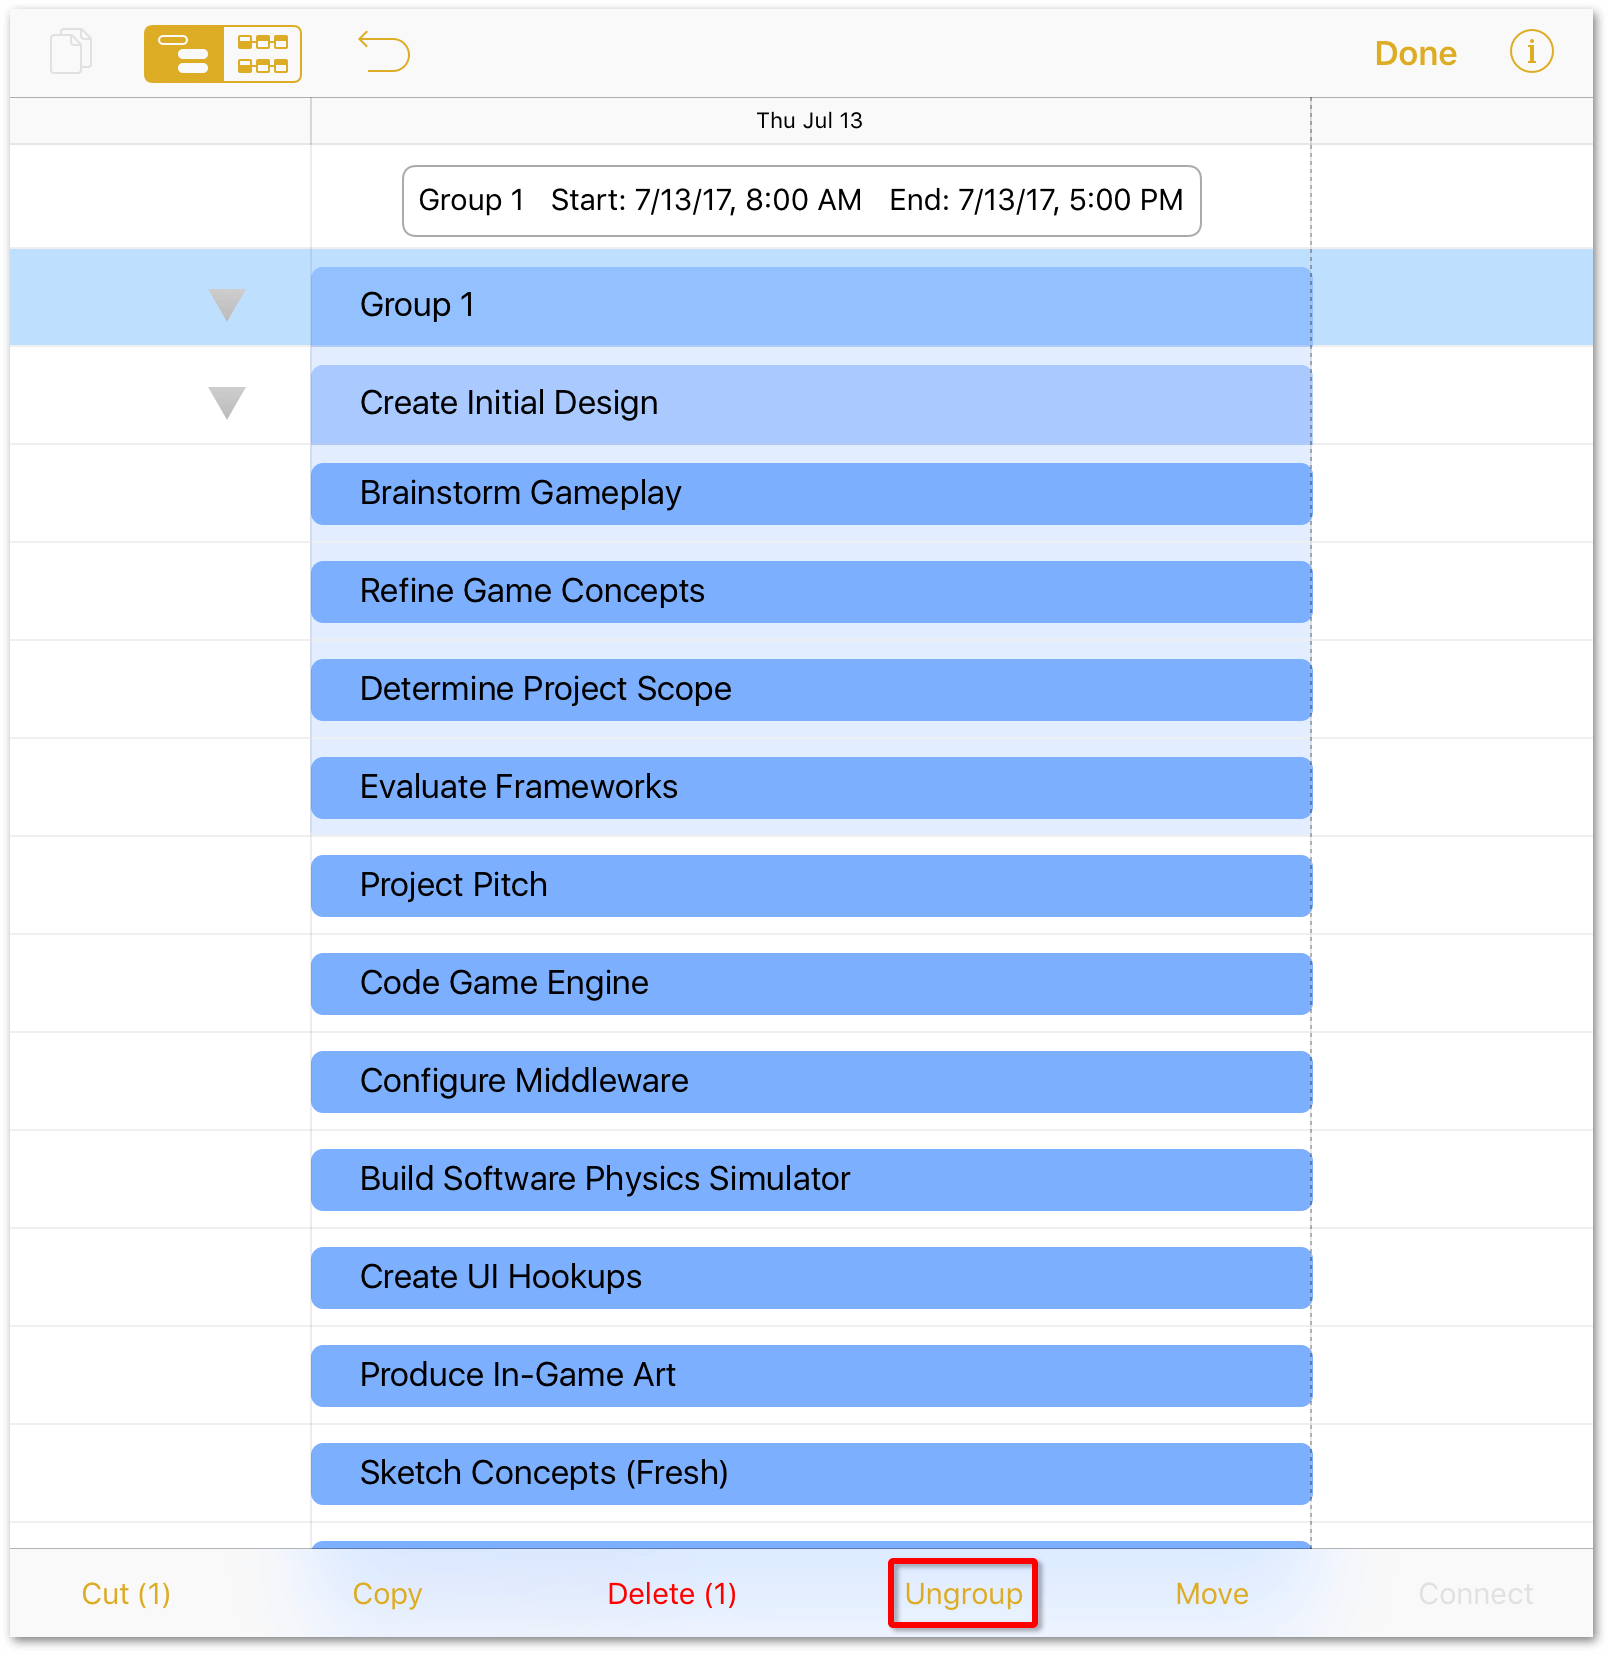
Tap to select Group 1:
-
At the bottom of the Project Editor window, tap Ungroup; this removes Group 1 from the project, but leaves the Create Initial Design group alone.
With the initial group established, let’s set these tasks apart from the others by changing their bar color:
- Tap Edit in the toolbar.
-
Tap to select the following tasks:
- Create Initial Design
- Brainstorm Gameplay
- Refine Game Concepts
- Determine Project Scope
- Evaluate Frameworks
-
In the Task Info tab of the Task inspector, tap the color swatch next to Bar Color and then choose a color:
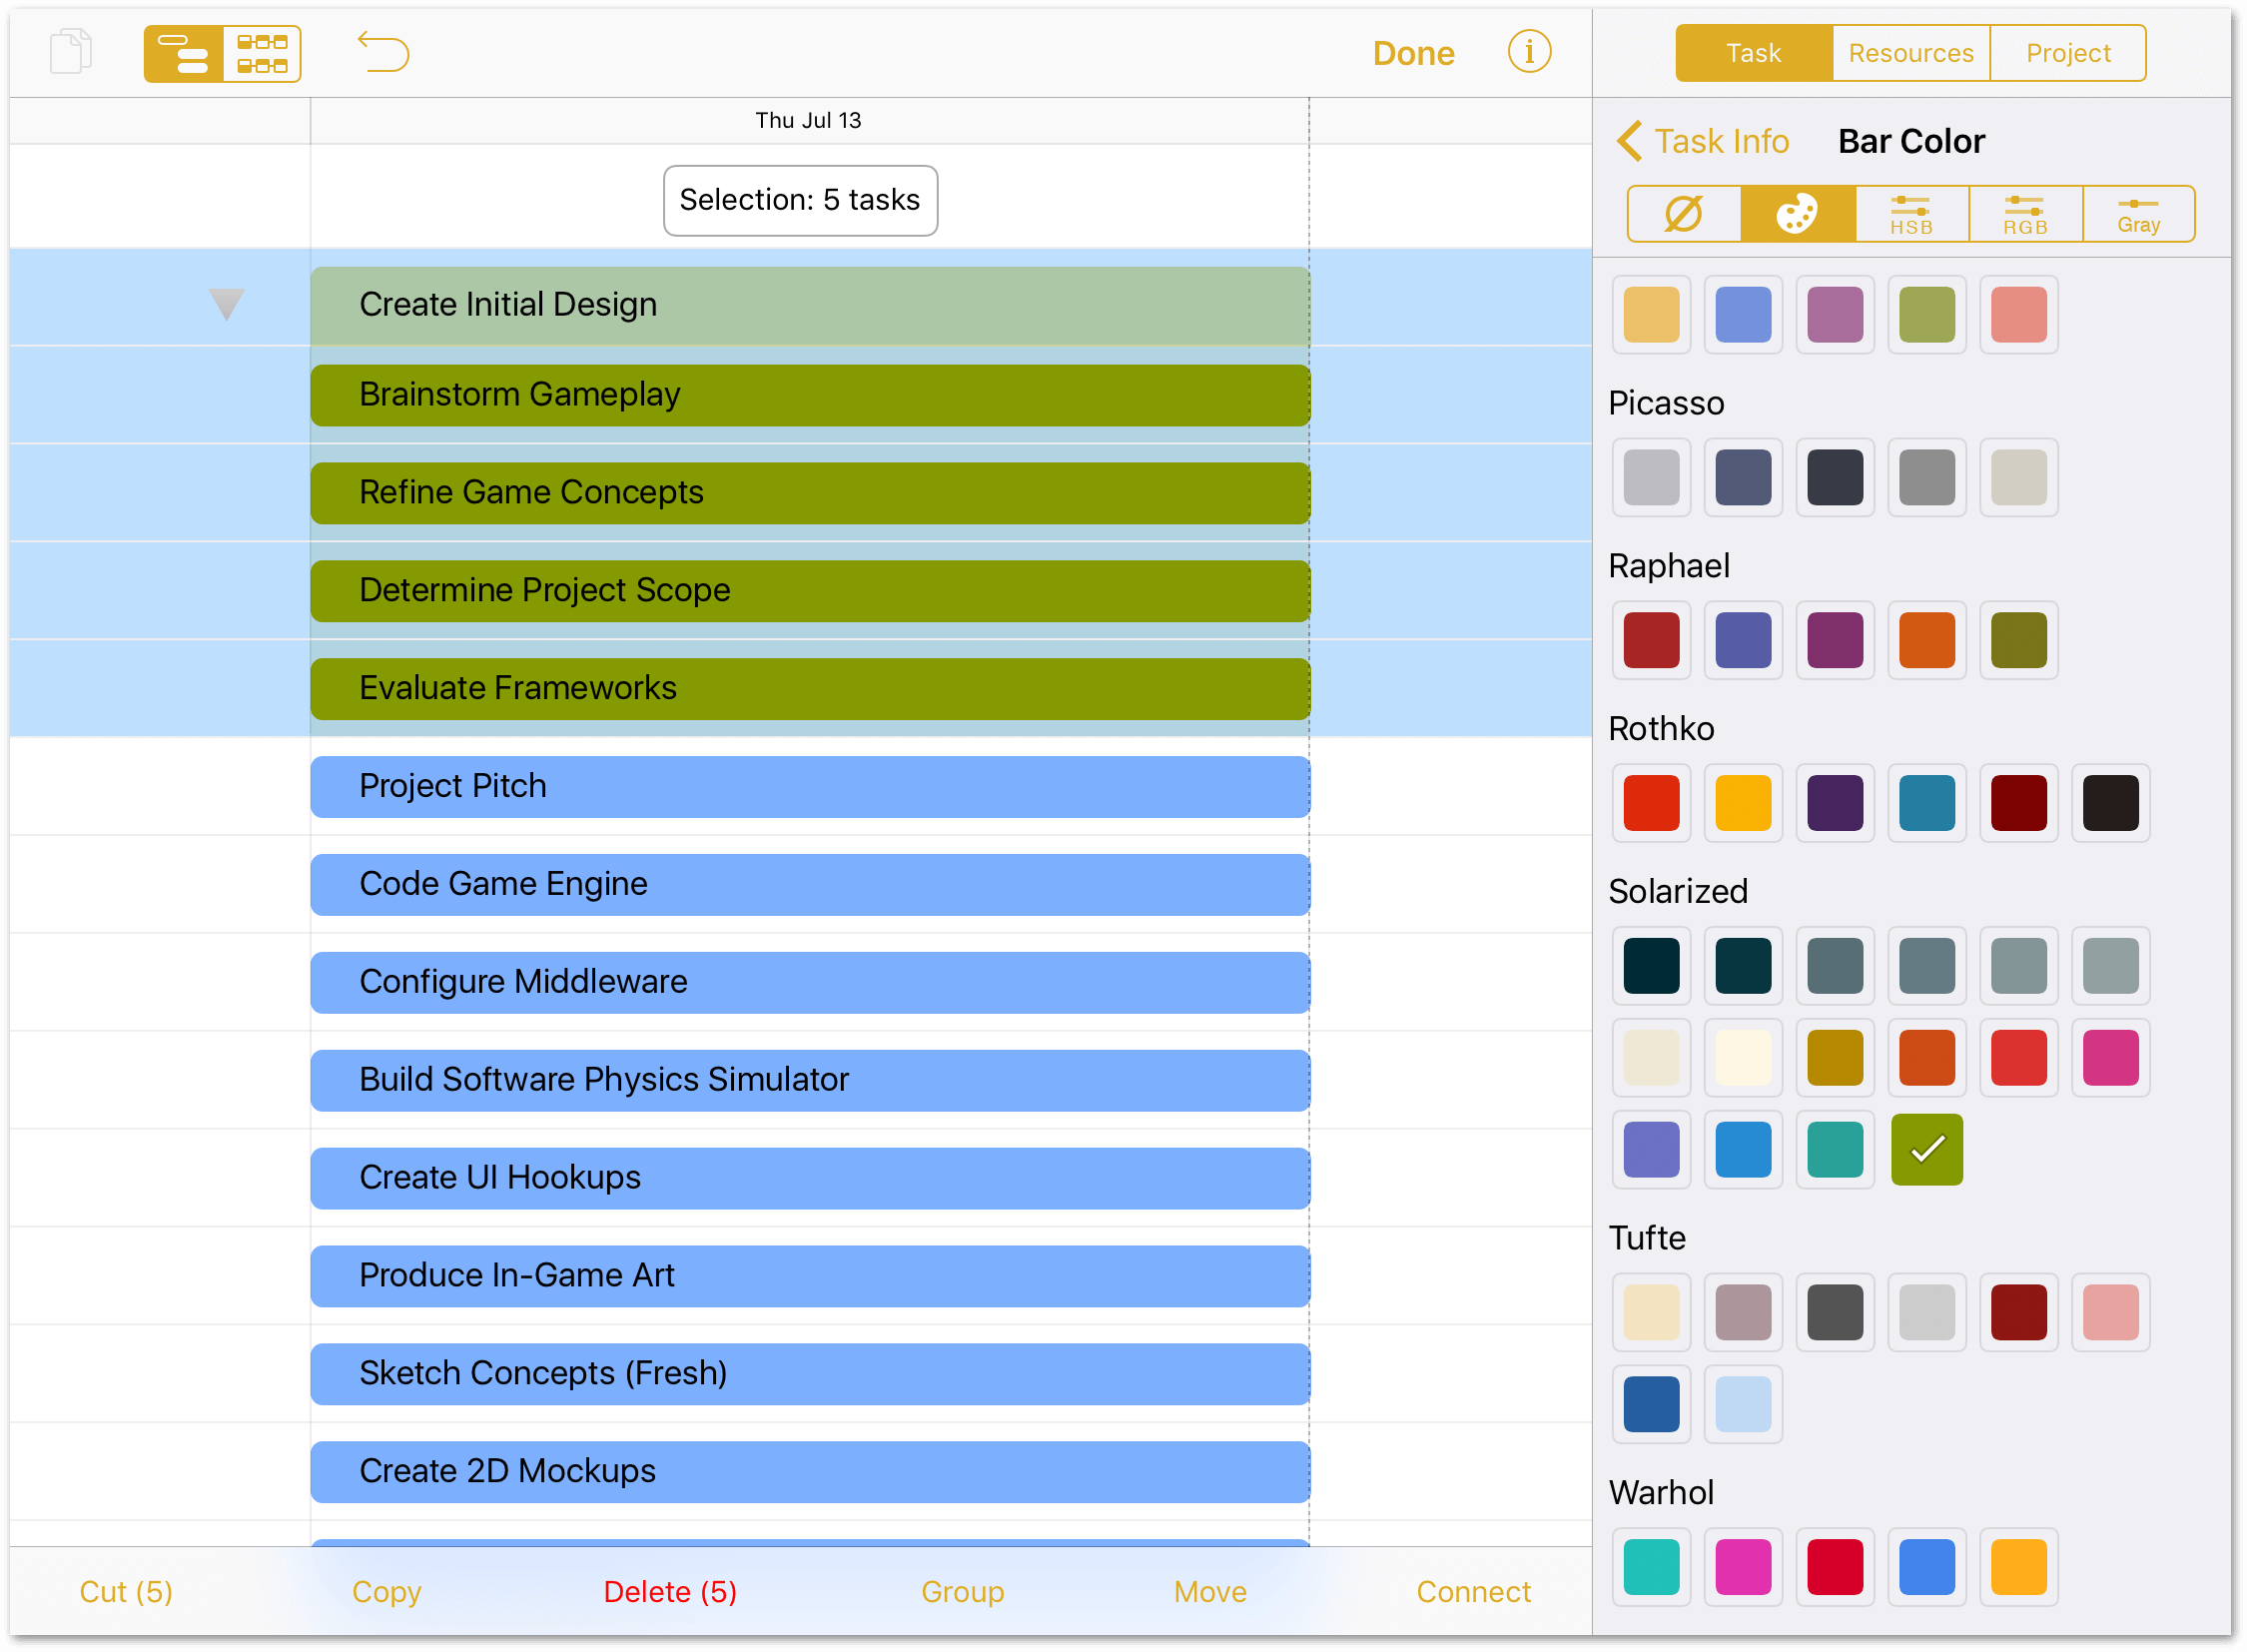
-
Tap Done in the toolbar when you have set the perfect color for your project’s first group.
Using the methods you’ve learned in Step 4, create three additional groups as follows:
- Code Game Engine
- Configure Middleware
- Build Software Physics Simulator
- Create UI Hookups
- Produce In-Game Art
- Sketch Concepts
- Create 2D Mockups
- Render Pixel Sprites
- Fleece Polygons
- Assure Quality
- Test Internally
- "Friends and Family" Beta
- Public Beta
Don’t do anything with Project Pitch, Combine Art and Code, Release Candidate 1 (RC1), or Game Release; those will get some special attention later on.
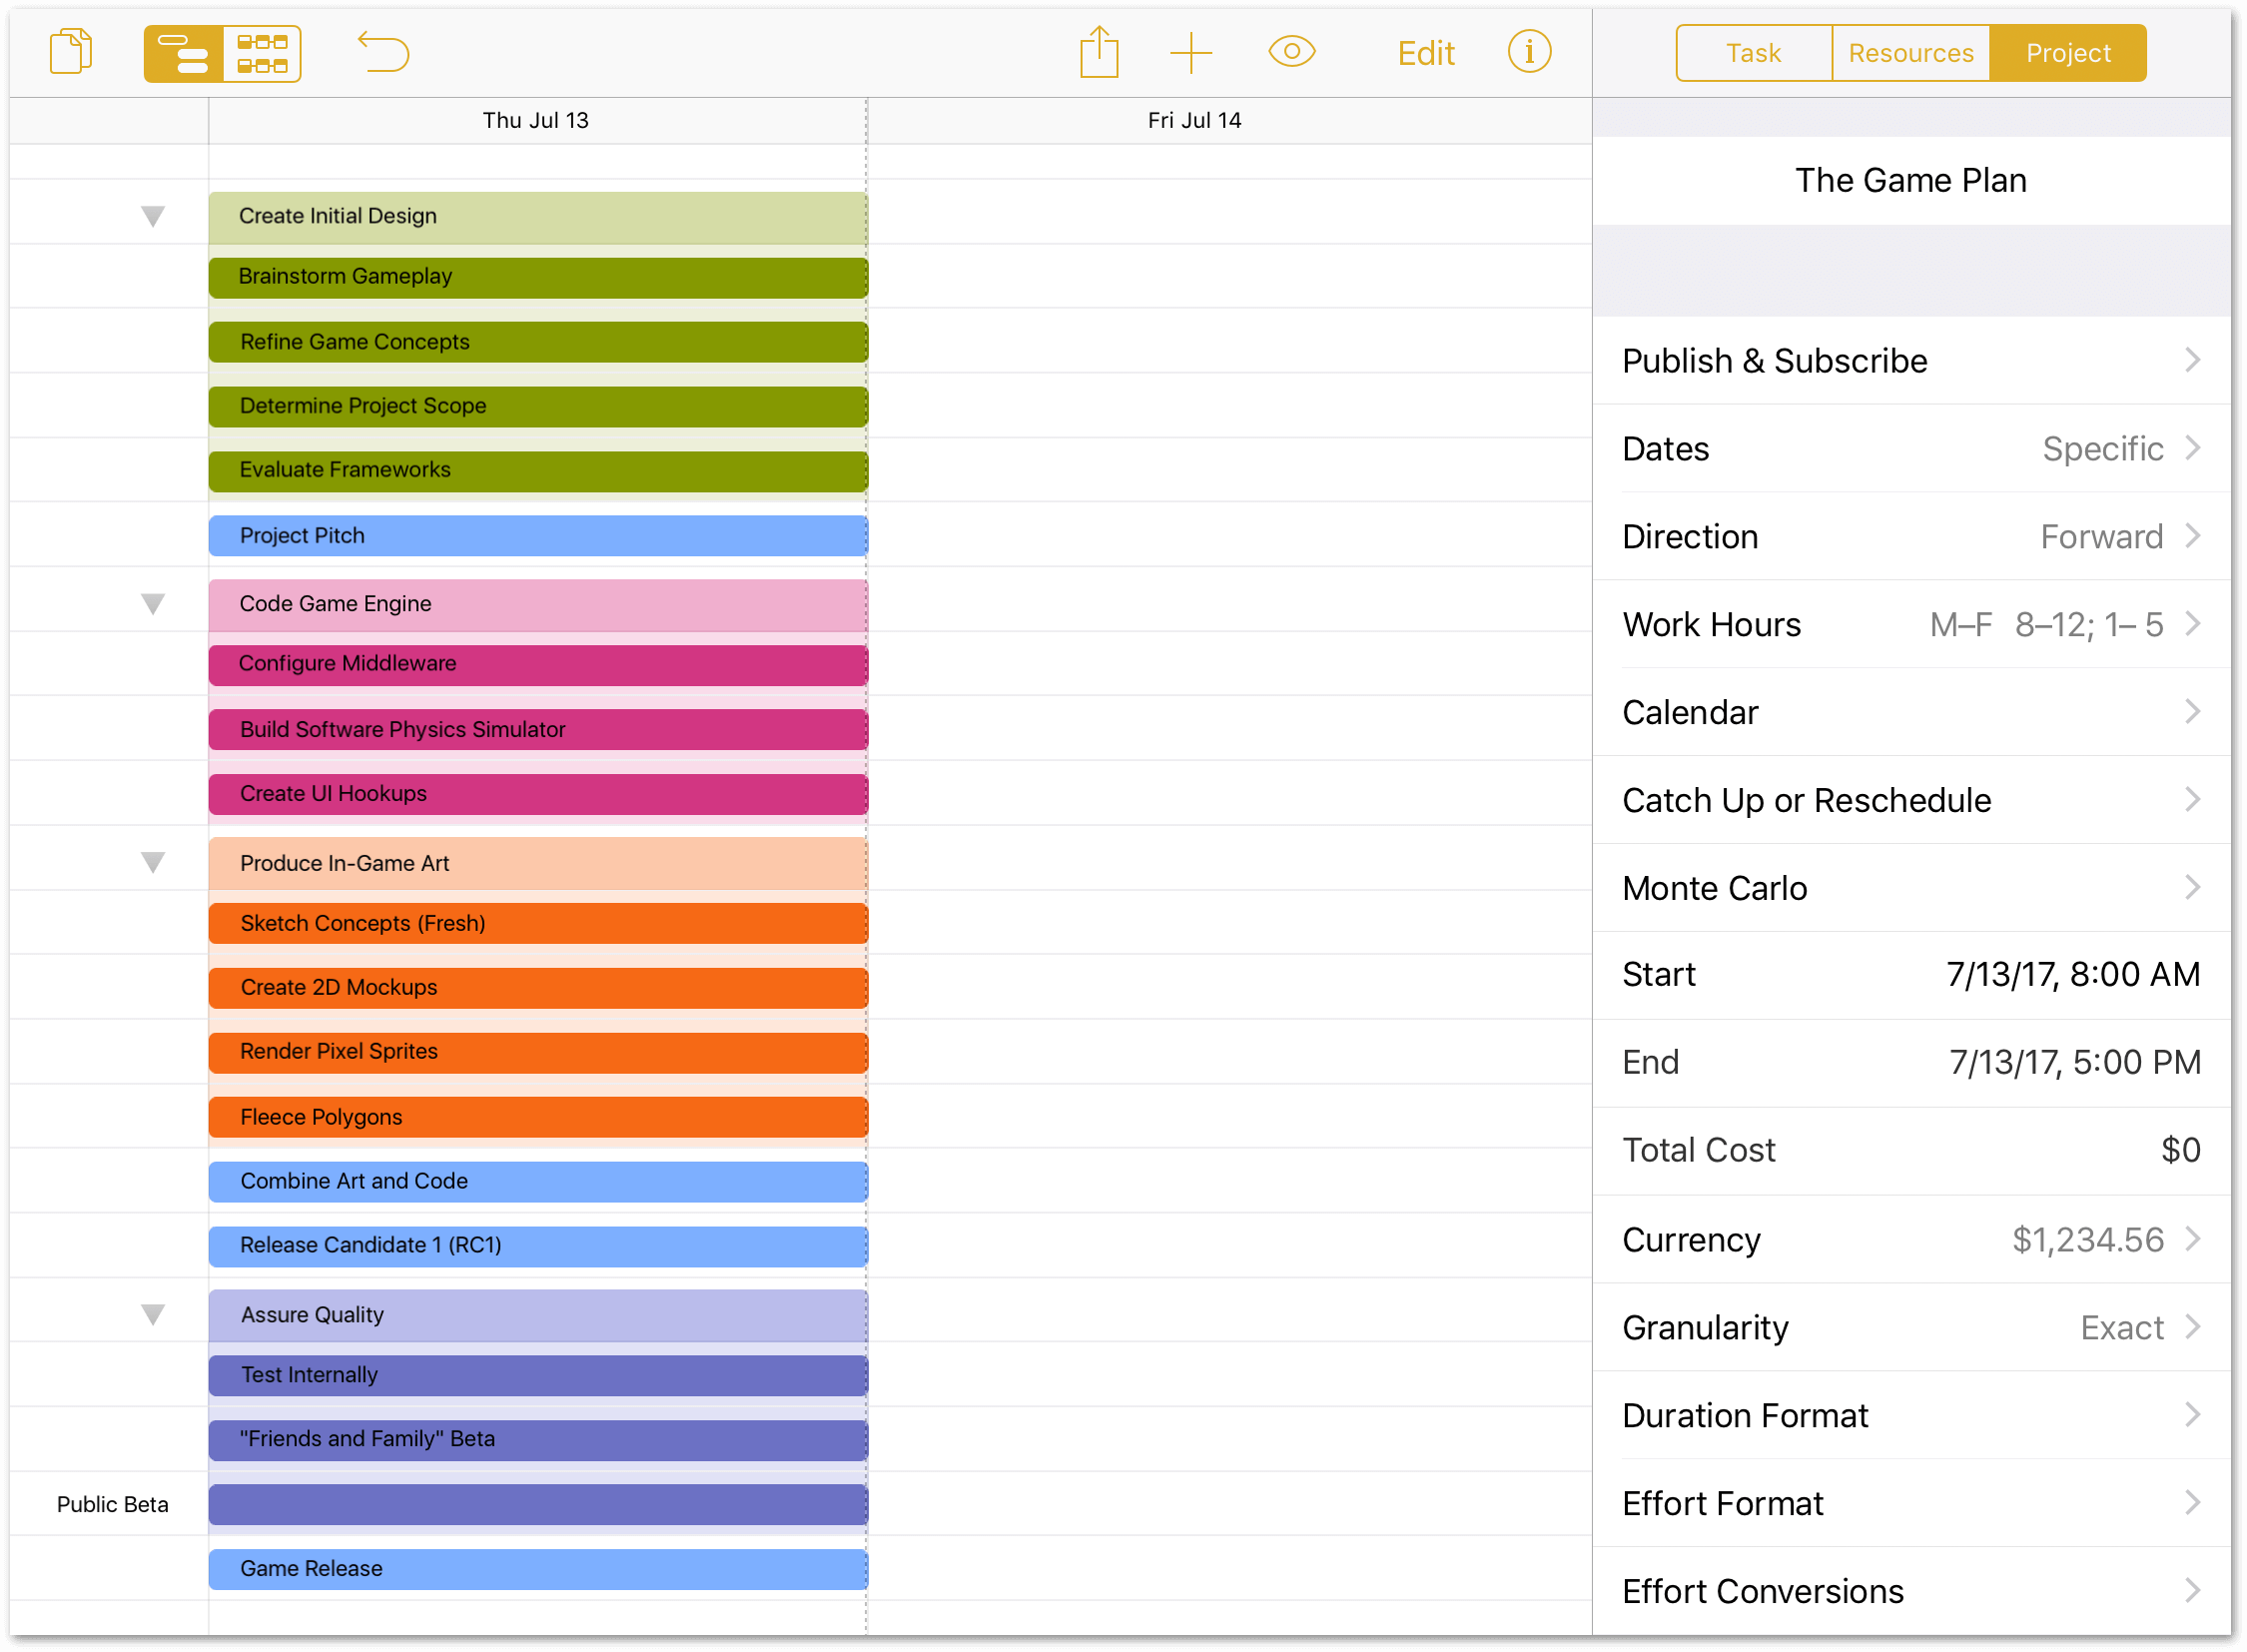
After you have created those groupings, your project should look similar to the following (your color choices may vary):
Step 5: Creating Milestones
Milestones are used in project management to denote specific events of importance. A milestone can be a specific event, such as giving a client presentation, and are often used as checkpoints along the project timeline.
There are two ways to get milestones into your project: you can insert a new milestone between existing tasks, or you can convert an existing task into a milestone. Let’s look at the former option first.
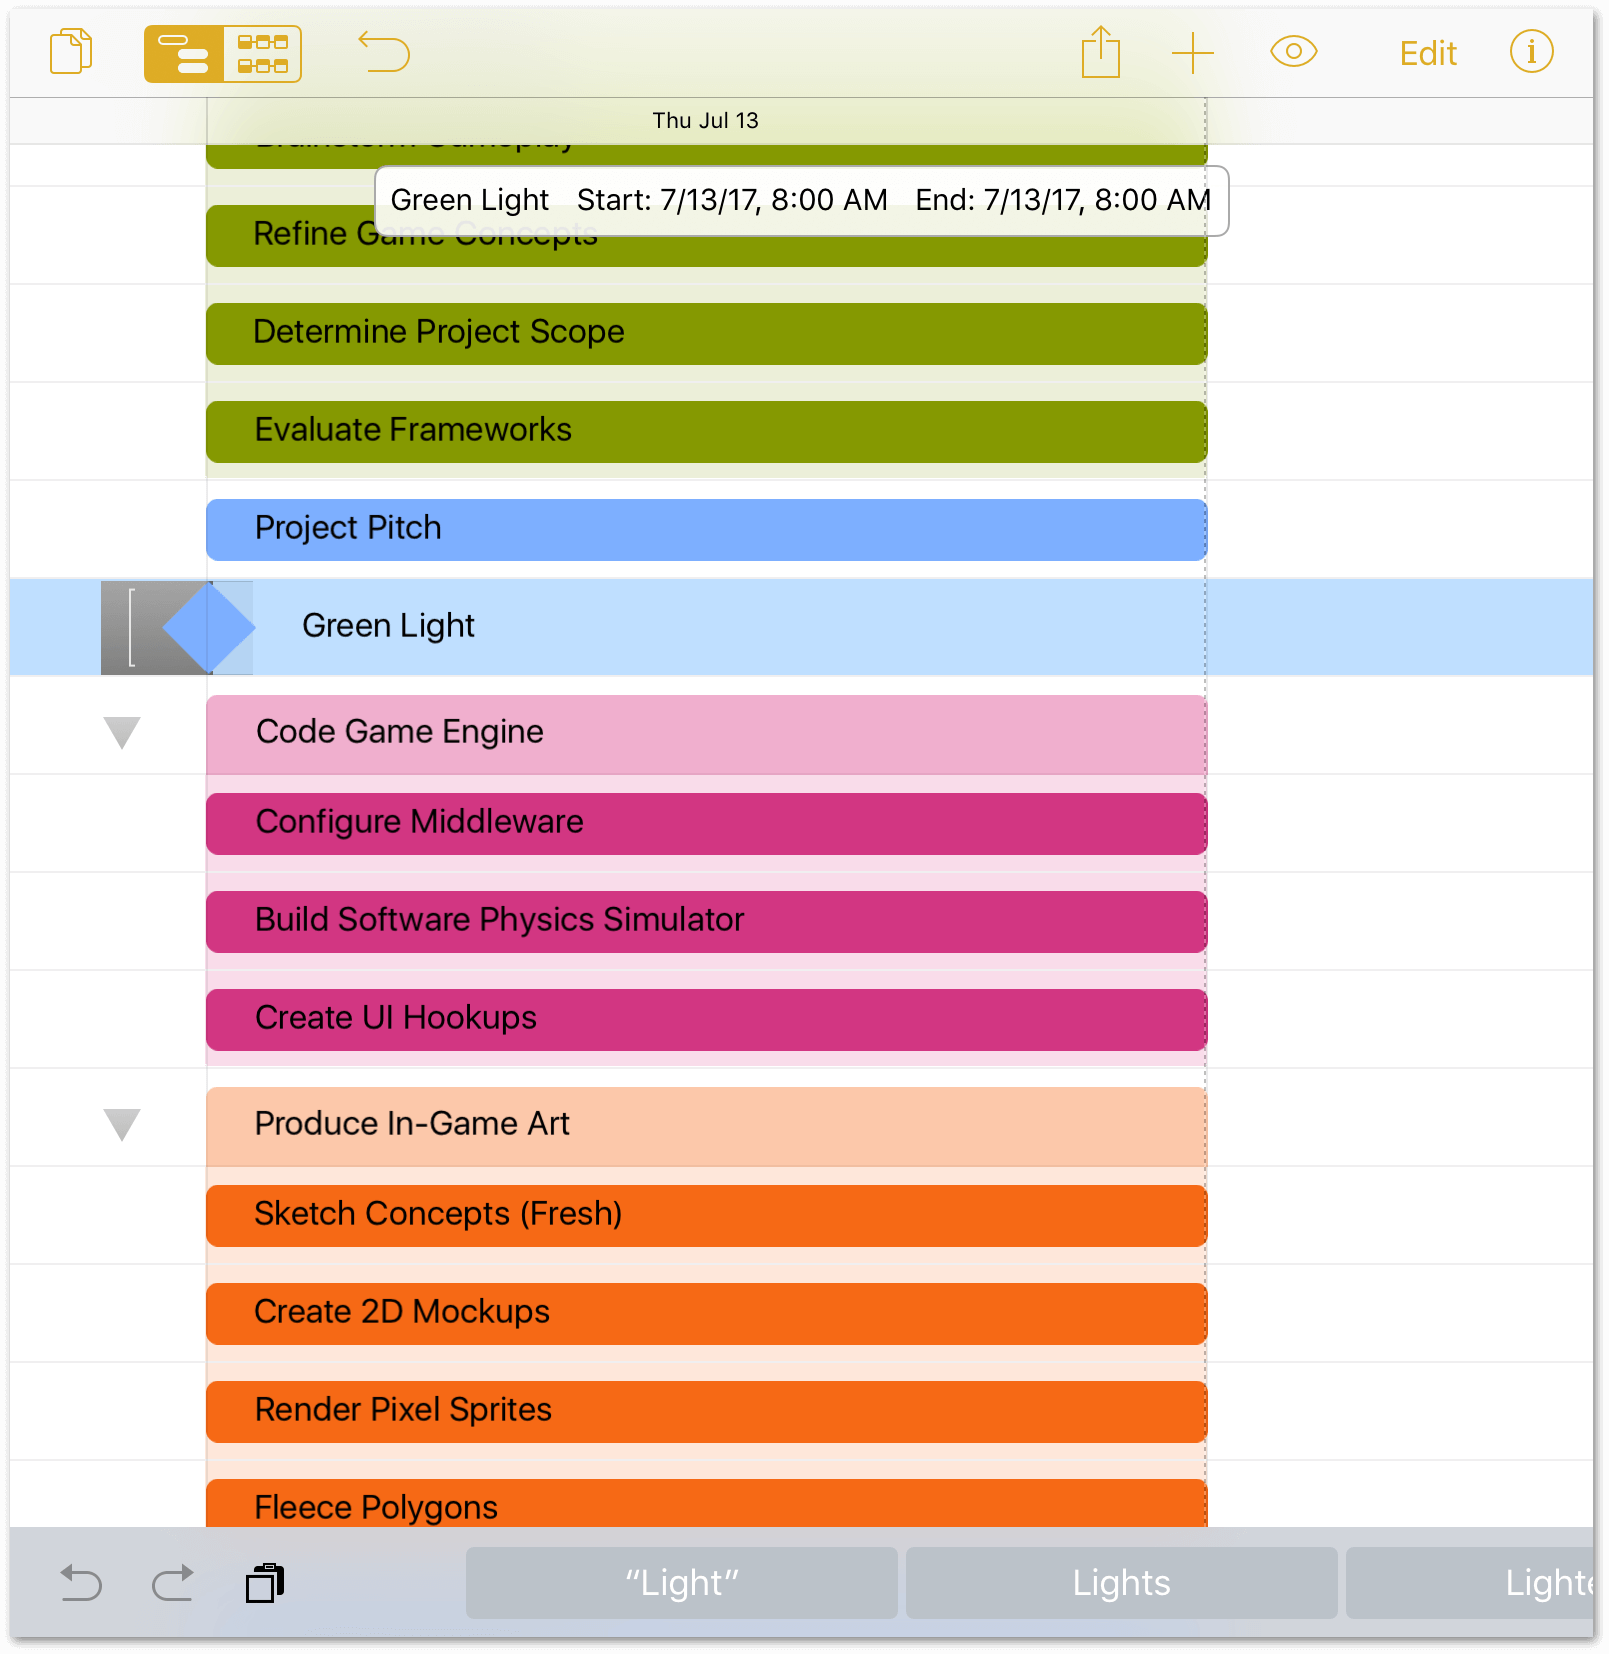
To insert a milestone in a project, do the following:
- Tap to select the Project Pitch task.
-
In the toolbar, touch and hold
, and then choose New Milestone from the popup menu that appears.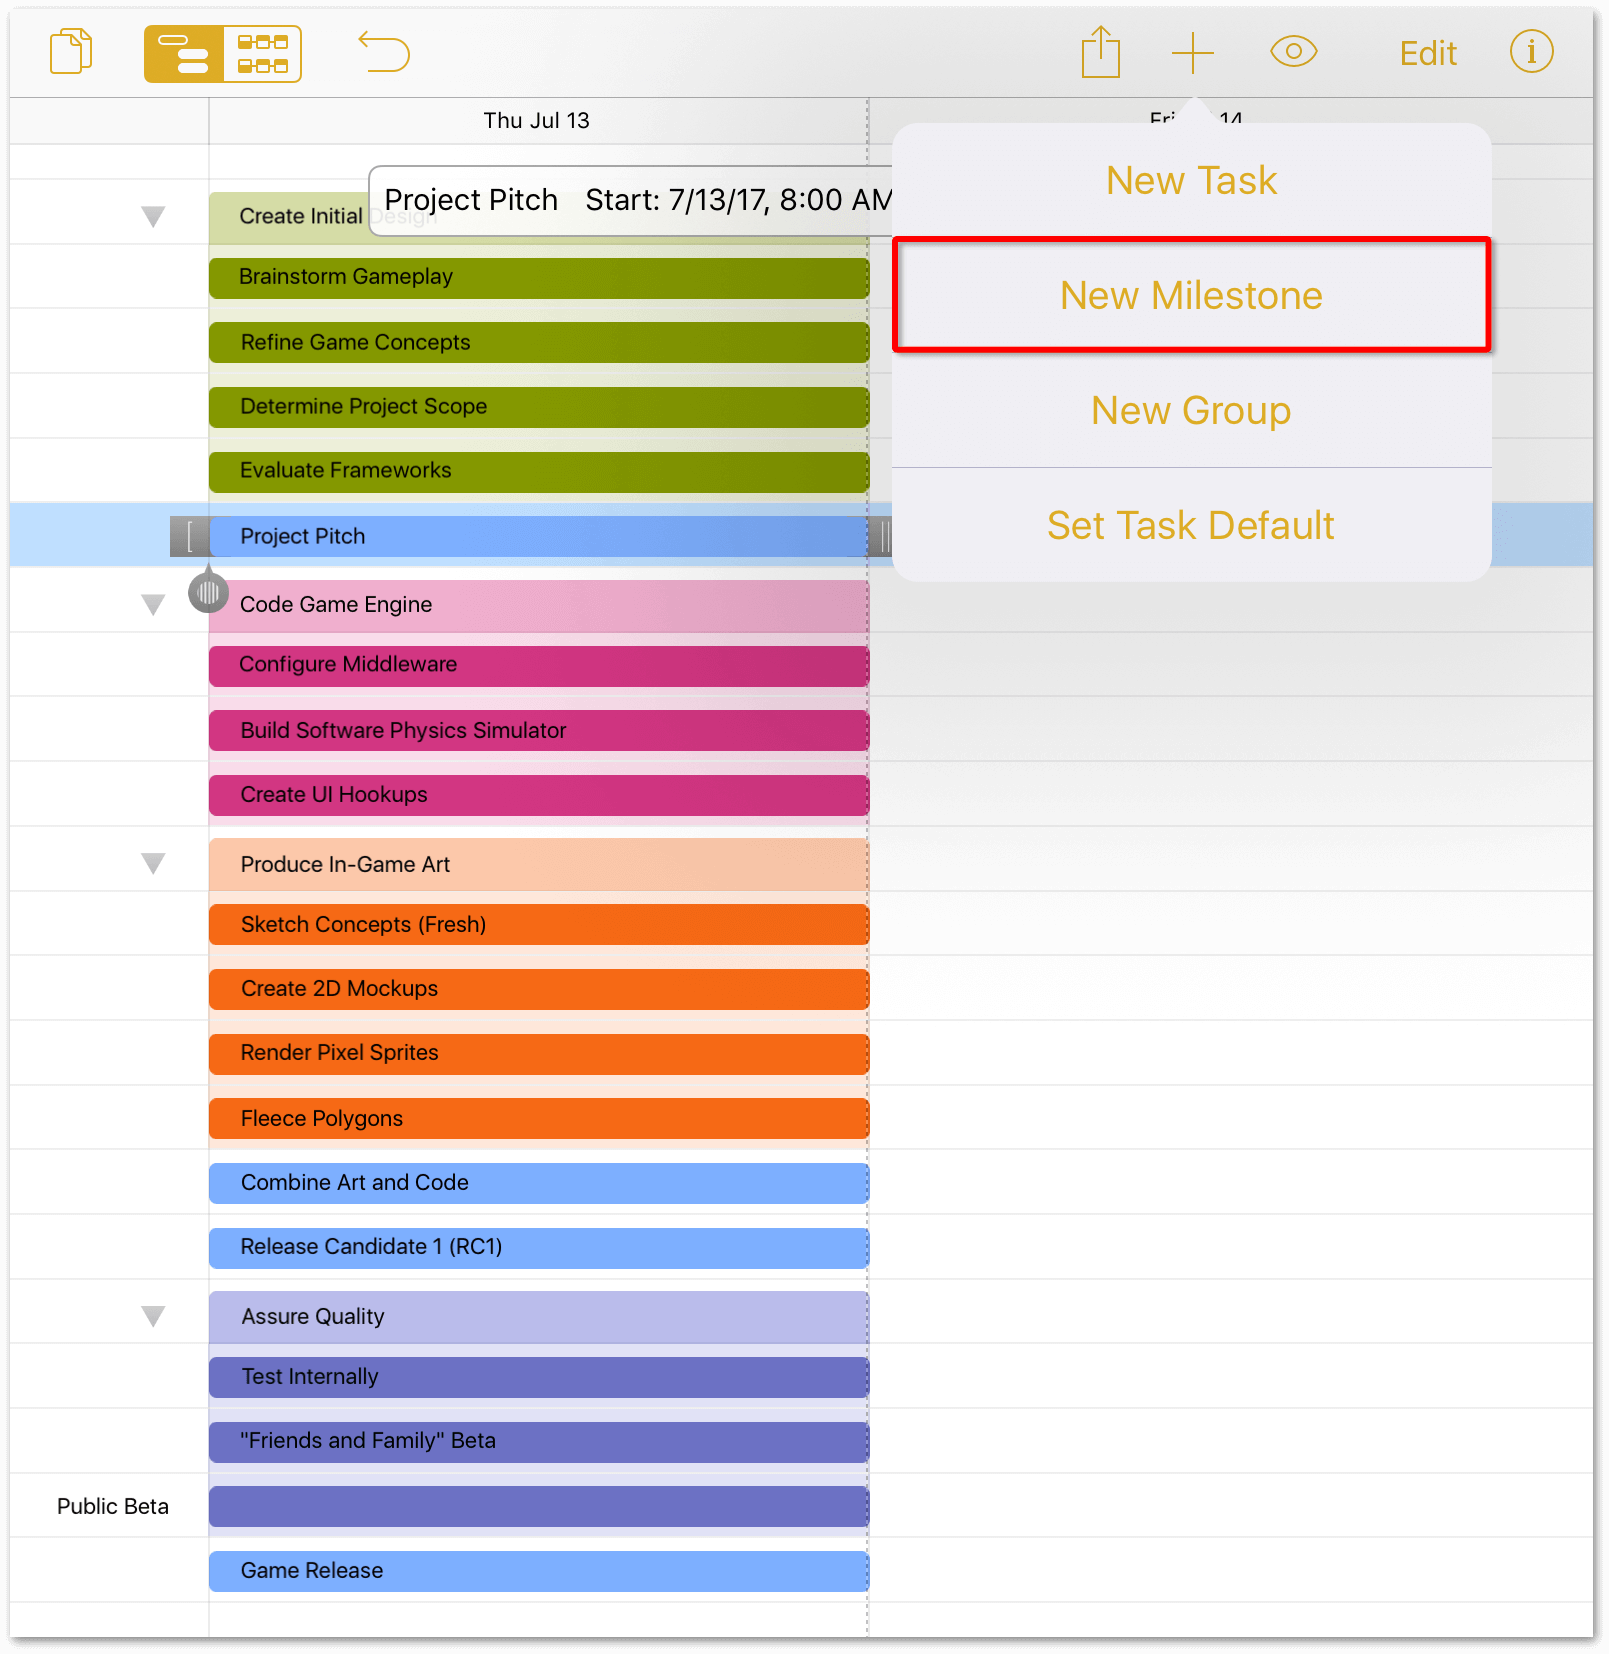
-
Enter a name for the milestone. In this case, name this milestone Green Light to denote that the project receives the go-ahead following the Project Pitch task.
You can also convert an existing task into a milestone, similar to how you earlier converted the Create Initial Design task into a group. There are two tasks that weren’t placed into groups earlier that are perfectly suited for turning into milestones, so let’s do that:
-
Tap to select the Release Candidate 1 (RC1) task:
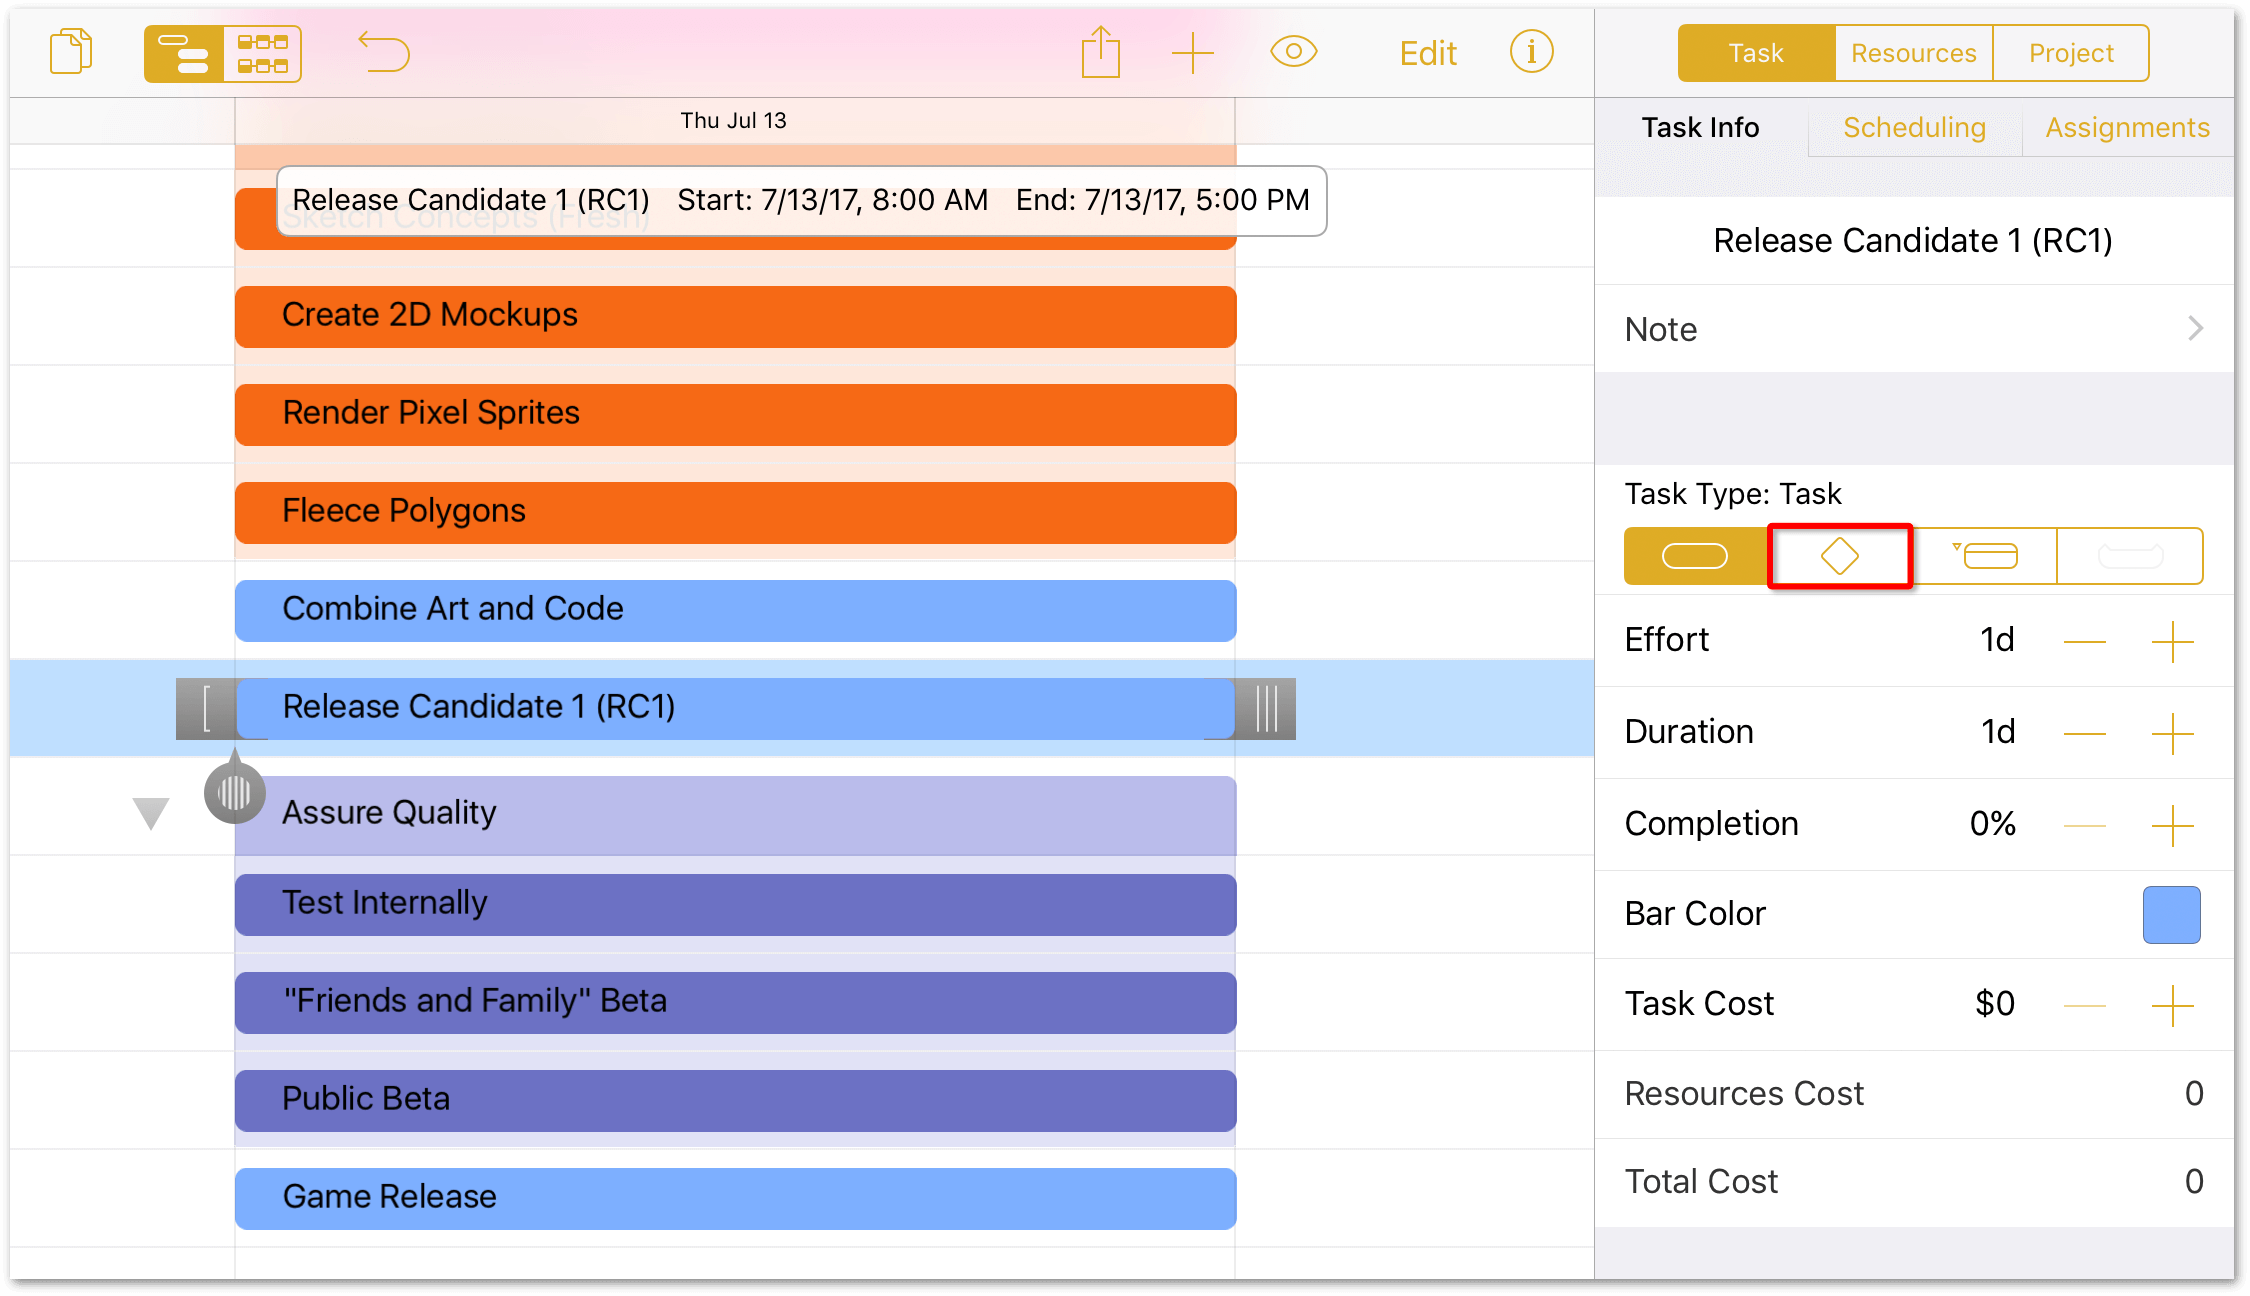
-
In the Task Info tab of the Task inspector, change the Task Type to a milestone by tapping the Milestone button:
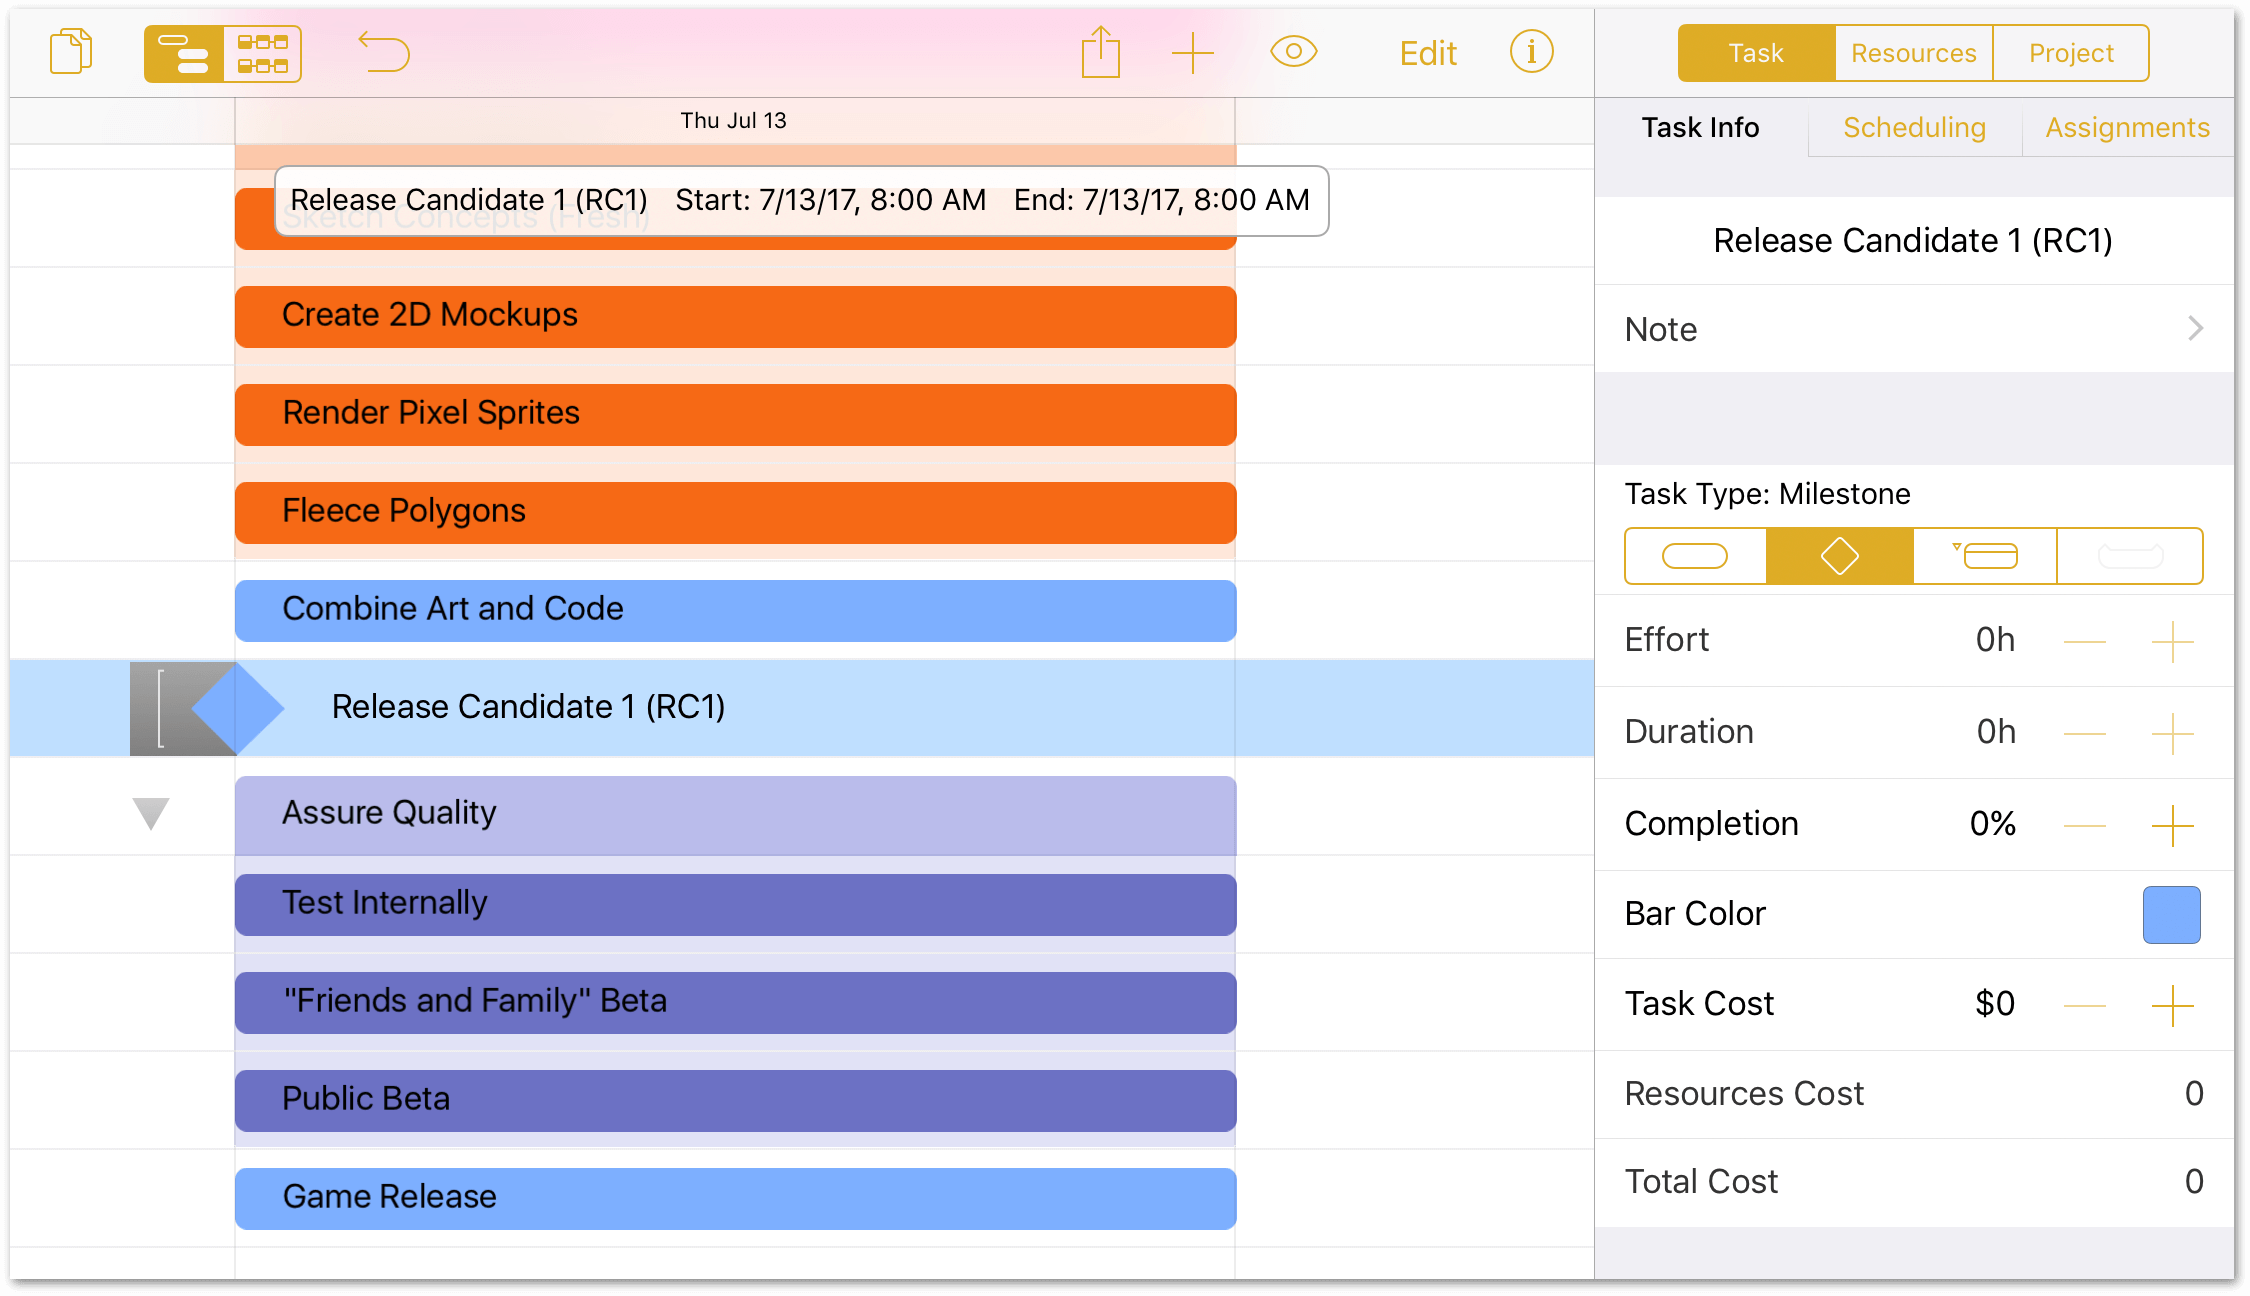
-
Repeat the previous two steps, and convert the Game Release task into a Milestone:
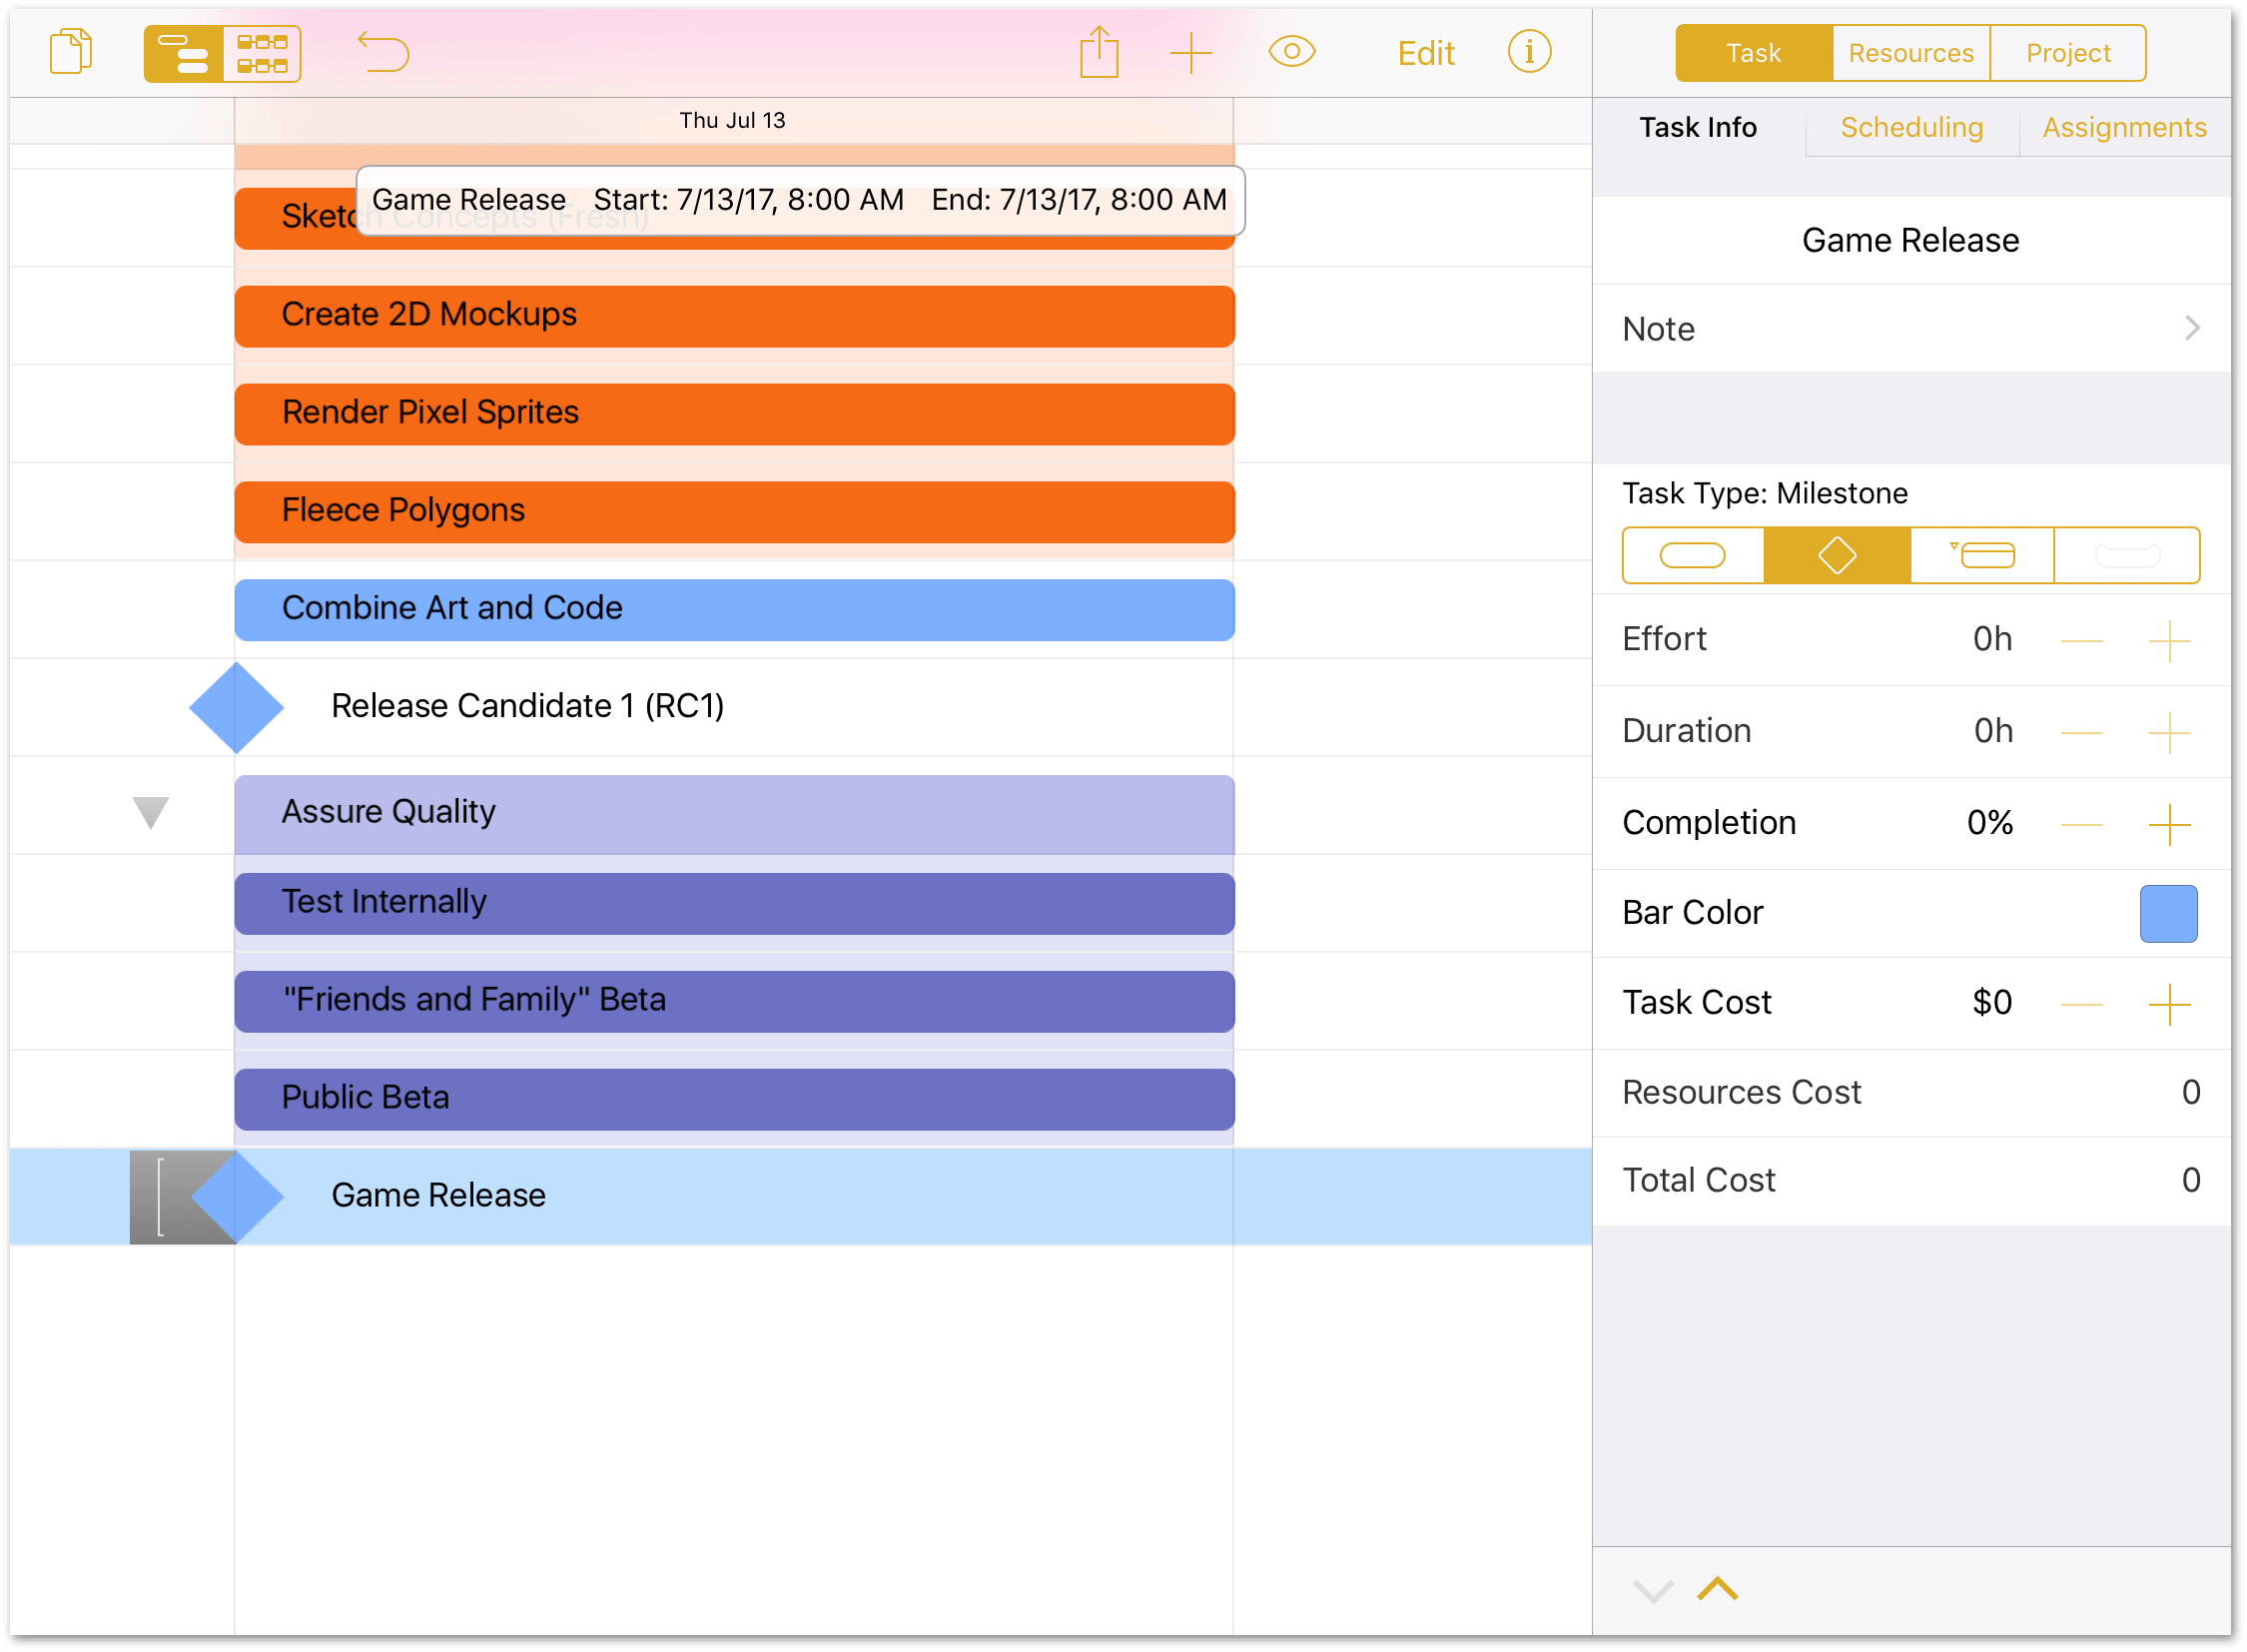
When you convert a task to a milestone, you’ll see that its Effort and Duration fields in the Task inspector have been set to 0h. Unlike the tasks assigned to a milestone, milestones themselves don’t take any time to complete—they are the culmination of the work that went into hitting that milestone.
Step 6: Setting Task Durations
With the tasks grouped and milestones set, you can now focus on detailing the amount of time required to accomplish each task.
When you initially entered the tasks for The Game Plan project, the Duration of each task was set to 1d, or one day. As with any project, some tasks will take less time than others, and some could span days or weeks depending on their complexity.
When you enter task durations, a special Duration Keyboard appears. This keyboard facilitates date and duration entry, so let’s take a moment to examine the keyboard before you embark on entering durations for all of the tasks.
Using the Duration Keyboard
When entering the duration in the Task inspector, you’ll notice that tapping the duration value brings up a special Duration Keyboard, with a row of buttons for selecting the following duration types:
- y for years
- mo for months
- w for weeks
- d for days
- h for hours
- m for minutes
- s for seconds

To use the number pad, do the following:
- Start by tapping clear; this clears any durations that may already exist for that task.
- In the top row, tap one of the buttons; for example, d if you need to specify the number of days a task should take.
- Then, tap the appropriate number.
If a task, such as the Refine Game Concepts task, has a mixed duration (1w 3d), do the following:
- Select the task.
- Tap the duration in the Task inspector to bring up the number pad.
- Tap clear.
- Tap w for weeks, and then press 1.
- Tap d for days, and then press 3.
- Tap done to close the number pad.
Use whichever method you prefer to extend the durations of the project’s tasks. However, please do give each a try, since there are huge benefits to using the numerical pad to enter a duration.
Enter Task Durations
Now that you know how to use the Duration Keyboard, let’s start by setting the duration of the Brainstorm Gameplay task to two days, rather than the default of one day:
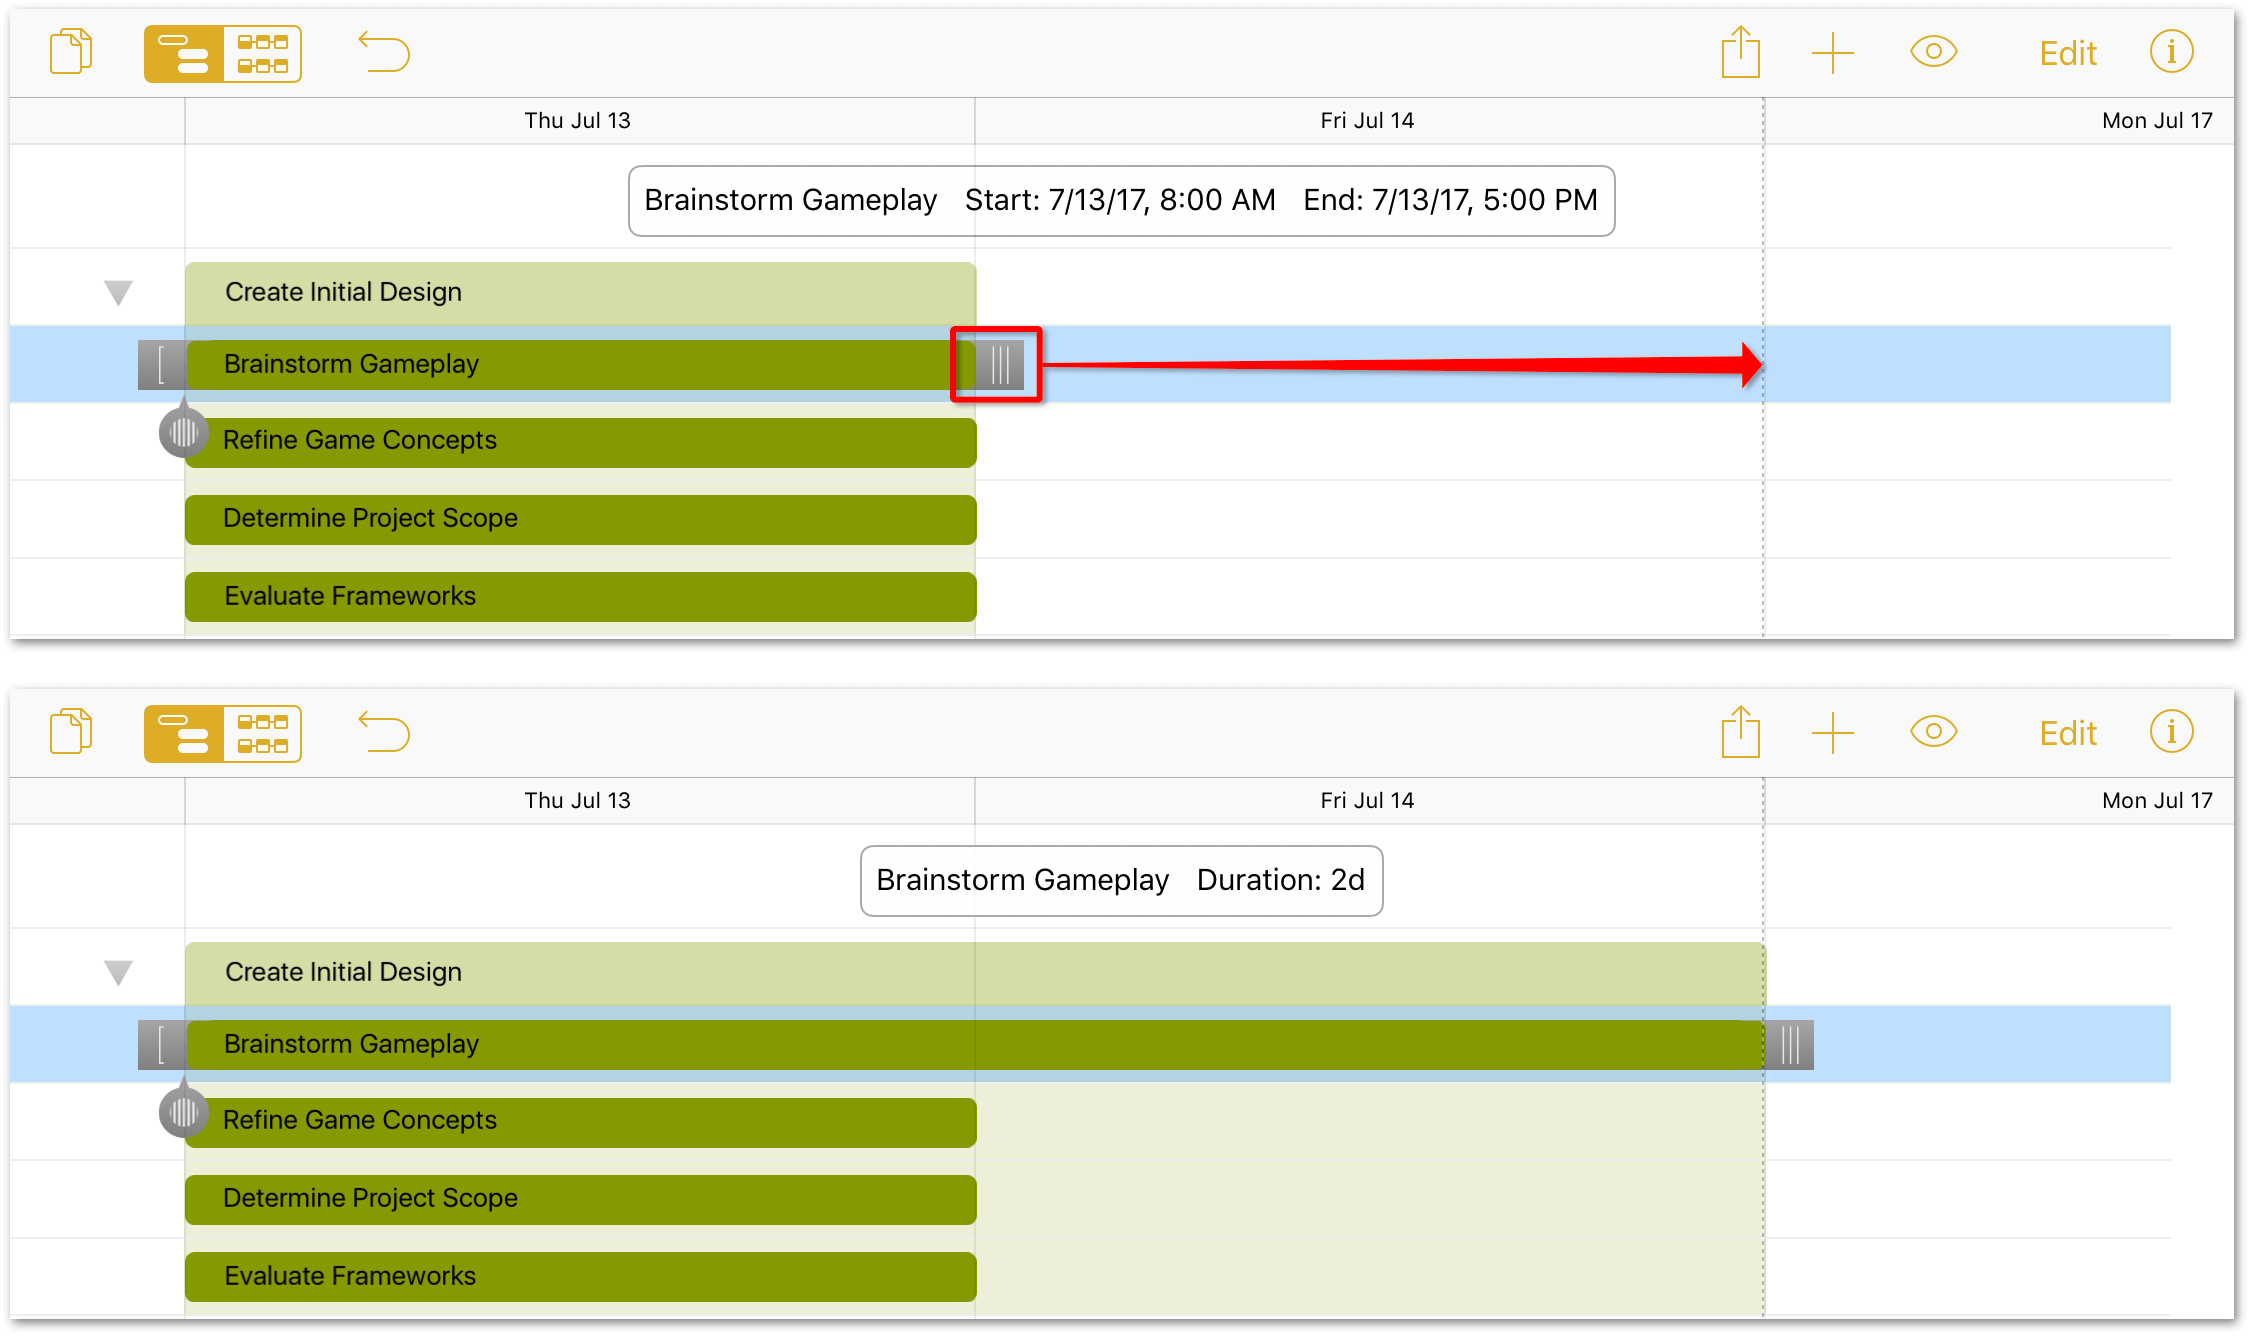
- Tap to select the Brainstorm Gameplay task:
-
Drag the task’s right handle to the right, stopping at the 2d duration.
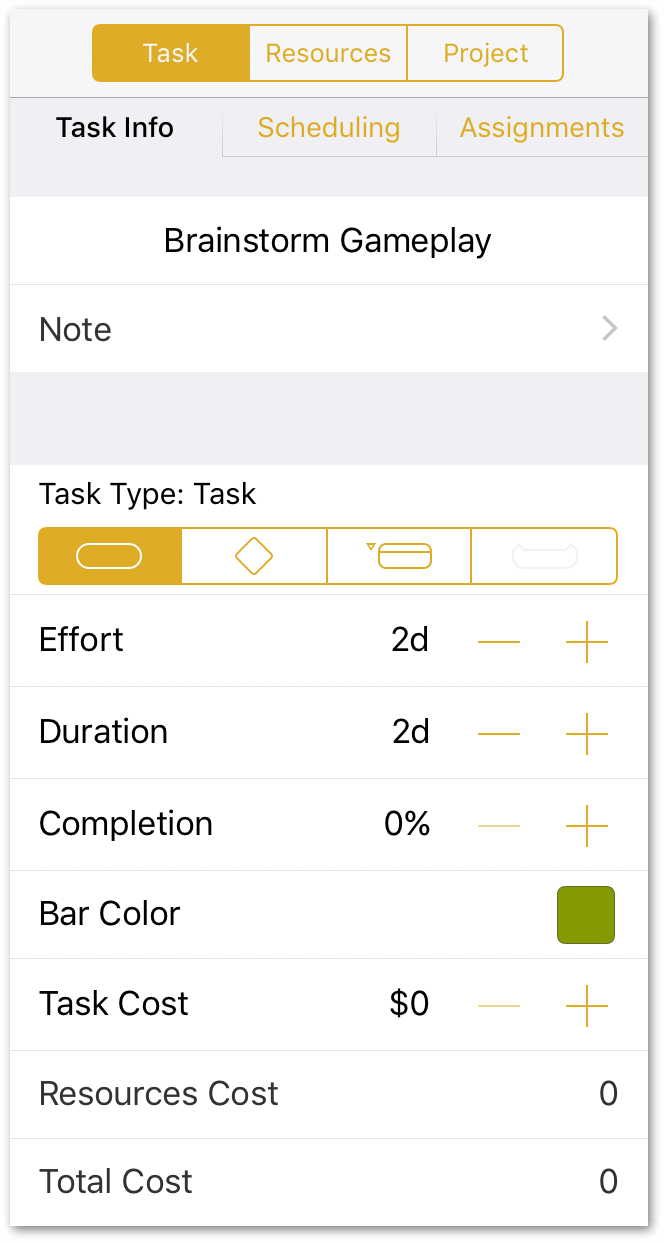
If you examine the task in the Task inspector, you’ll see that both the Effort and Duration are set to 2d:
Using either the drag method, or the Task inspector, set the Duration for the remaining tasks as follows:
- Refine Game Concepts: 1w 3d
- Determine Project Scope: 3d
- Evaluate Frameworks: 1w 2d
- Project Pitch: 1d
- Configure Middleware: 1w 3d
- Build Software Physics Simulator: 3w 3d
- Create UI Hookups: 2w
- Sketch Concepts (Fresh): 1w 3d
- Create 2D Mockups: 3w 3d
- Render Pixel Sprites: 2w
- Fleece Polygons: 1w 3d
- Combine Art and Code: 3w 3d
- Test Internally: 1w
- “Friends and Family” Beta: 1w
- Public Beta: 2w
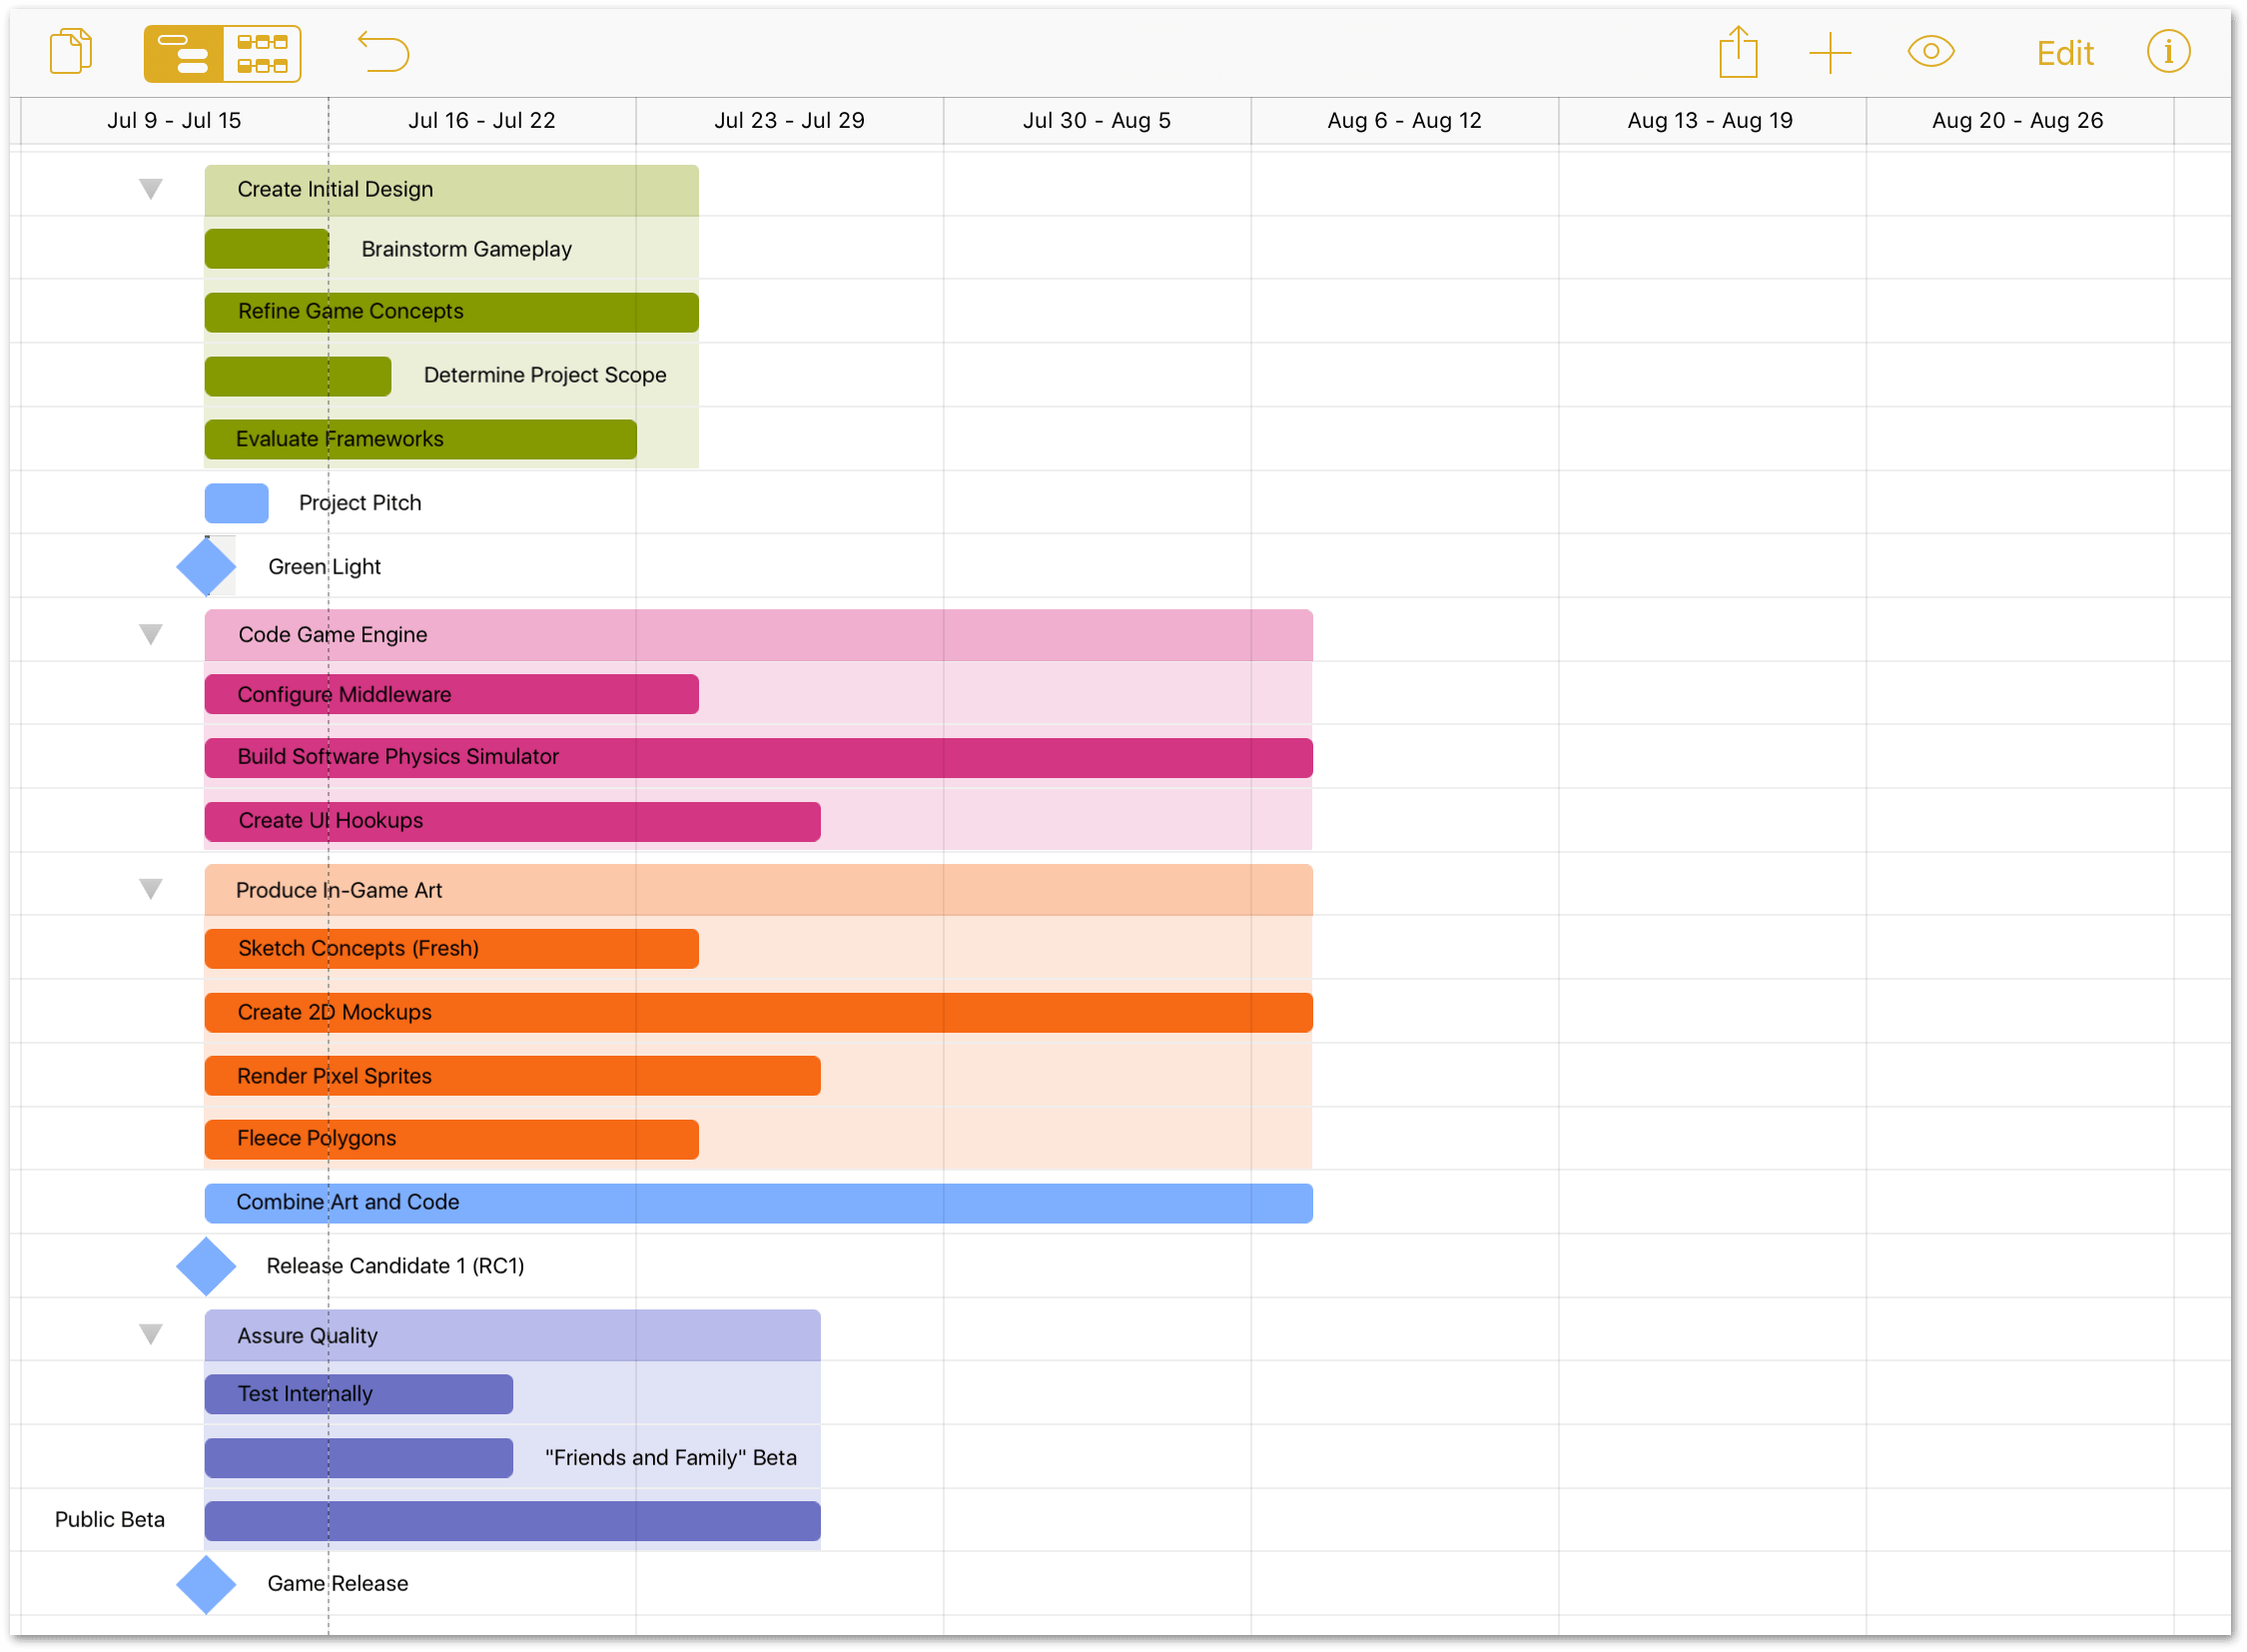
After you have finished setting the durations, your project should look similar to the following:
Step 7: Connecting Tasks with Dependency Lines
With the durations set for all of the tasks, one thing becomes exceptionally clear: your team cannot complete all of the tasks if they start at the same time. Even if you had all of the resources to do so, some parts of the project can’t even begin until others have been completed.
Thankfully, all of the pieces are now in place to establish task dependencies. There are four ways that dependencies can exist:
- Finish-Start dependencies are the most common; these tasks rely on a task to finish before the next can begin. For example, when Task A finishes, Task B can start.
- Start-Finish dependencies indicate that when Task A starts, Task B can finish.
- Start-Start dependencies indicate that when both Task A and Task B can start at the same time.
- Finish-Finish dependencies indicate that when Task A and Task B need to finish at the same time.
To set up a dependency between two tasks, do the following:
-
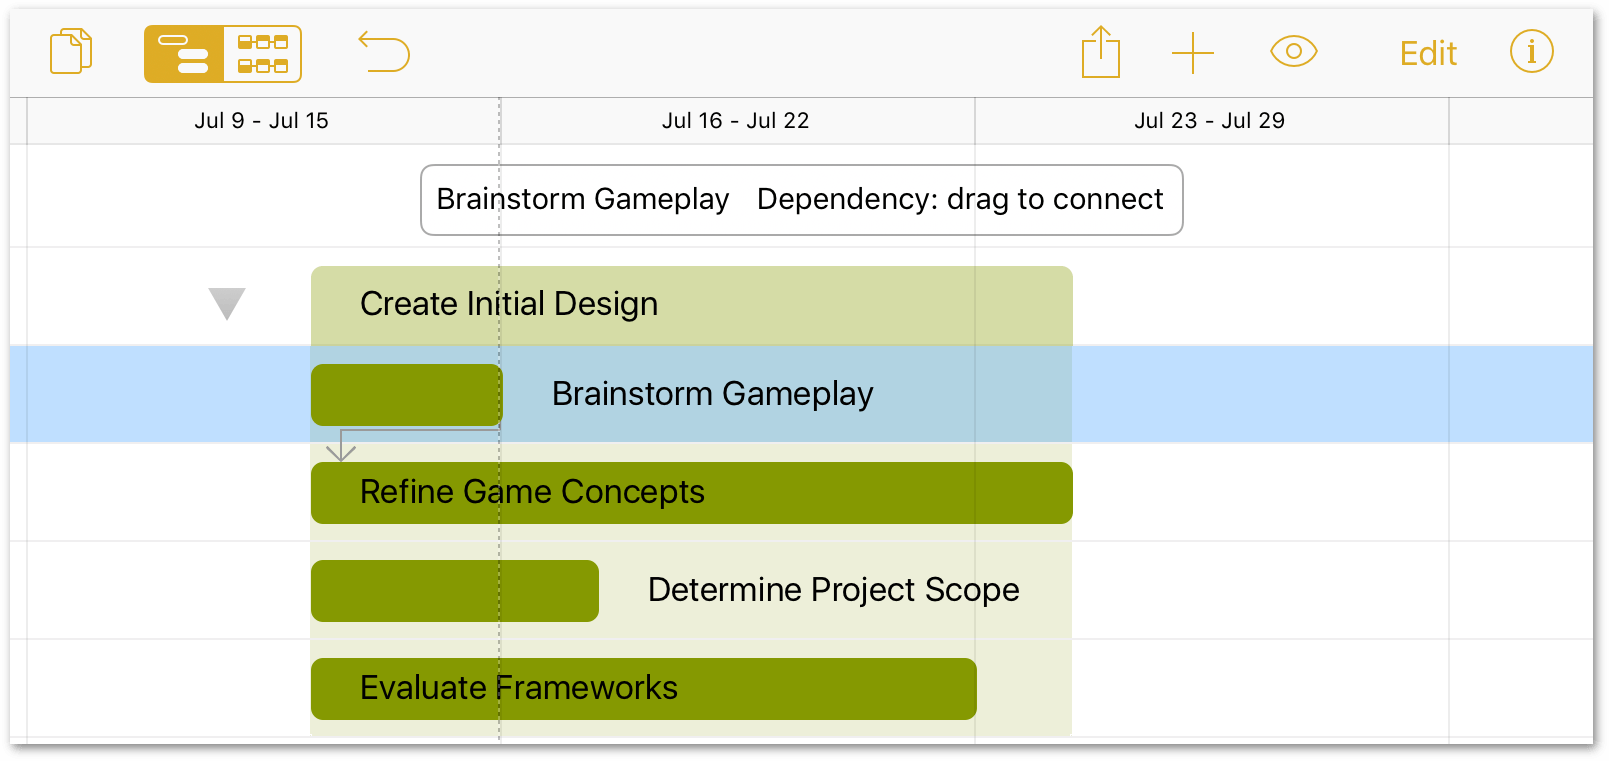
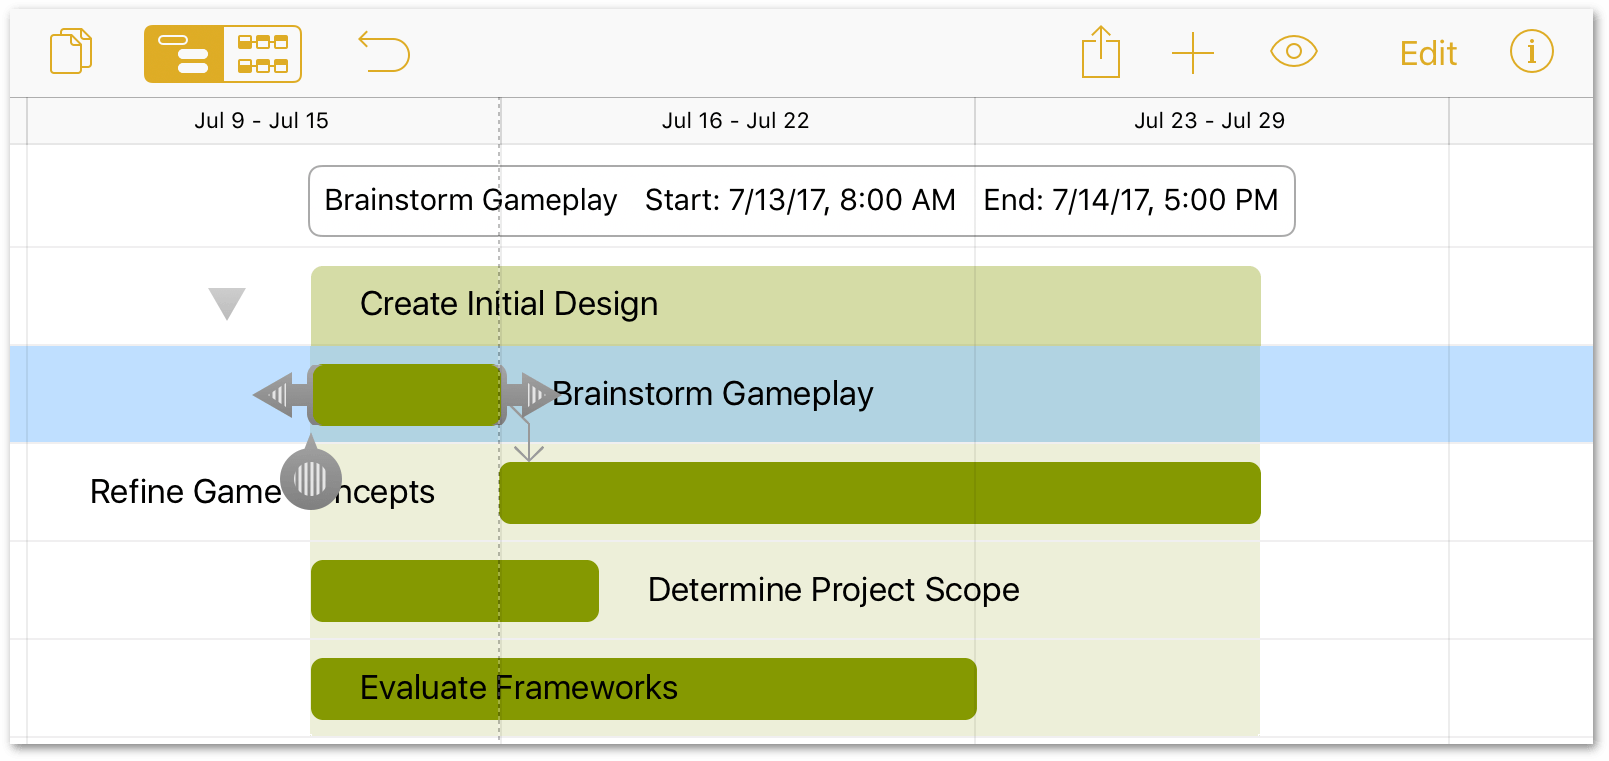
Tap to select the Brainstorm Gameplay task. When the task is selected, OmniPlan places dependency arrows at either side of the task bar:
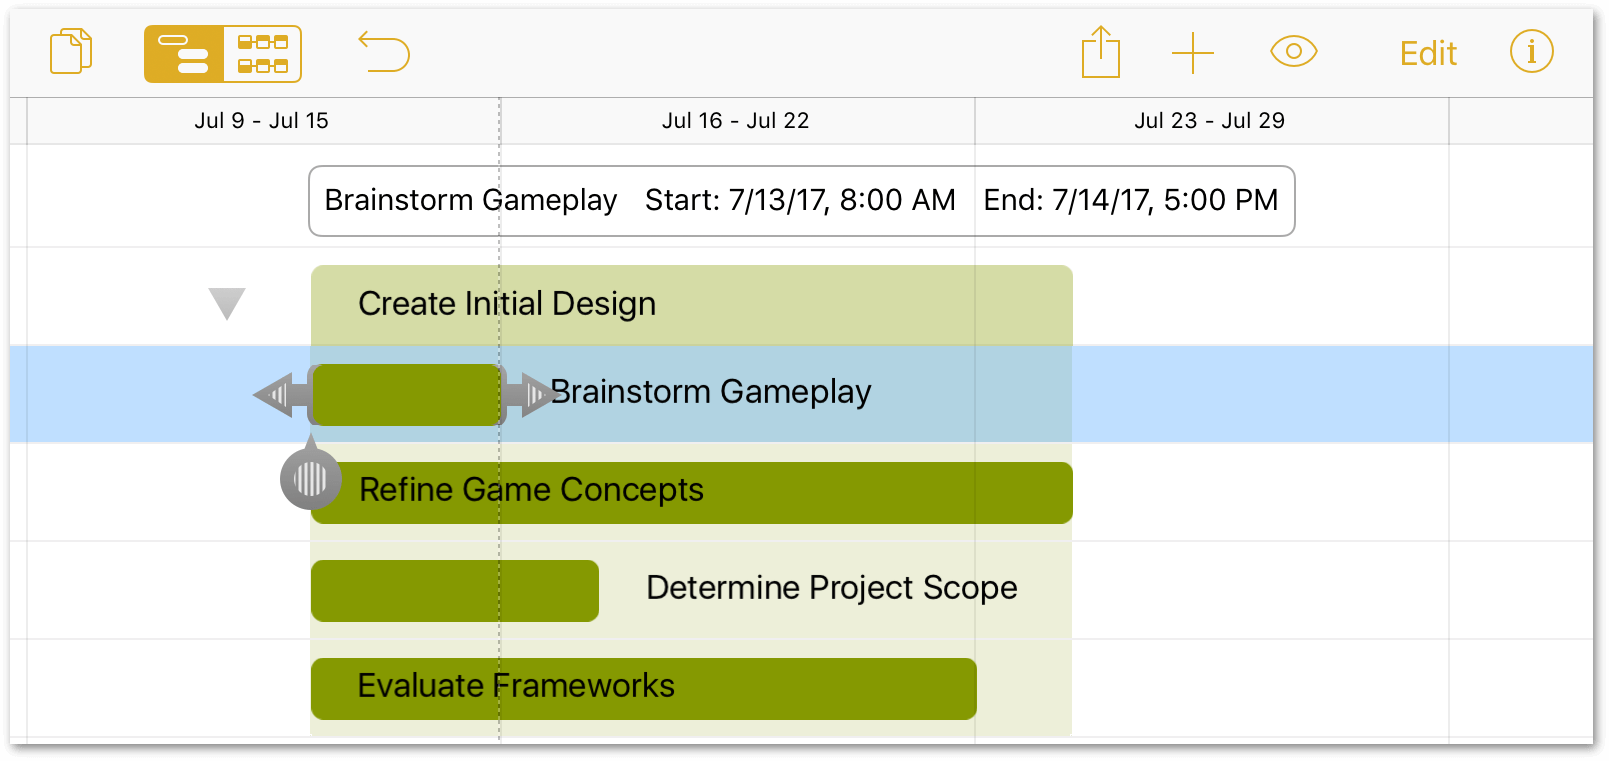
-
Drag the right task arrow to the beginning of the Refine Game Concepts task:
-
After dragging the dependency arrow, you’ll notice that Refine Game Concepts has shifted over in the timeline to indicate that its work cannot start until the work of the previous task (Brainstorm Gameplay) has finished:
Dragging the dependency arrow from the completion of one task to the beginning of another creates a Finish-Start dependency.
While in Edit mode, you can use the Connect/Disconnect button to add Finish-Start dependencies or remove dependencies between any number of selected tasks simultaneously.
Now, set up the remaining task dependencies as follows:
- Refine Game Concepts Finish-Start with Determine Project Scope
- Determine Project Scope Start-Start with Evaluate Frameworks
- Evaluate Frameworks Finish-Start with Project Pitch
- Project Pitch Finish-Start with Green Light milestone
- Green Light milestone Start-Start with Code Game Engine and Produce In-Game Art
- Configure Middleware Start-Start with Build Software Physics Simulator
- Build Software Physics Simulator Finish-Start with Create UI Hookups
- Sketch Concepts (Fresh) Finish-Start with Create 2D Mockups
- Create 2D Mockups Finish-Start with Render Pixel Sprites
- Render Pixel Sprites Start-Start with Fleece Polygons
- Code Game Engine and Produce In-Game Art Finish-Start with Combine Art and Code
- Combine Art and Code Finish-Start with Release Candidate 1 (RC1) milestone
- Release Candidate 1 (RC1) Start-Start with Assure Quality
- Test Internally Finish-Start with “Friends and Family” beta
- “Friends and Family” Beta Finish-Start with Public Beta
- Public Beta Finish-Start with Game Release milestone
Once all of the connections are made, your project should look similar to the following:
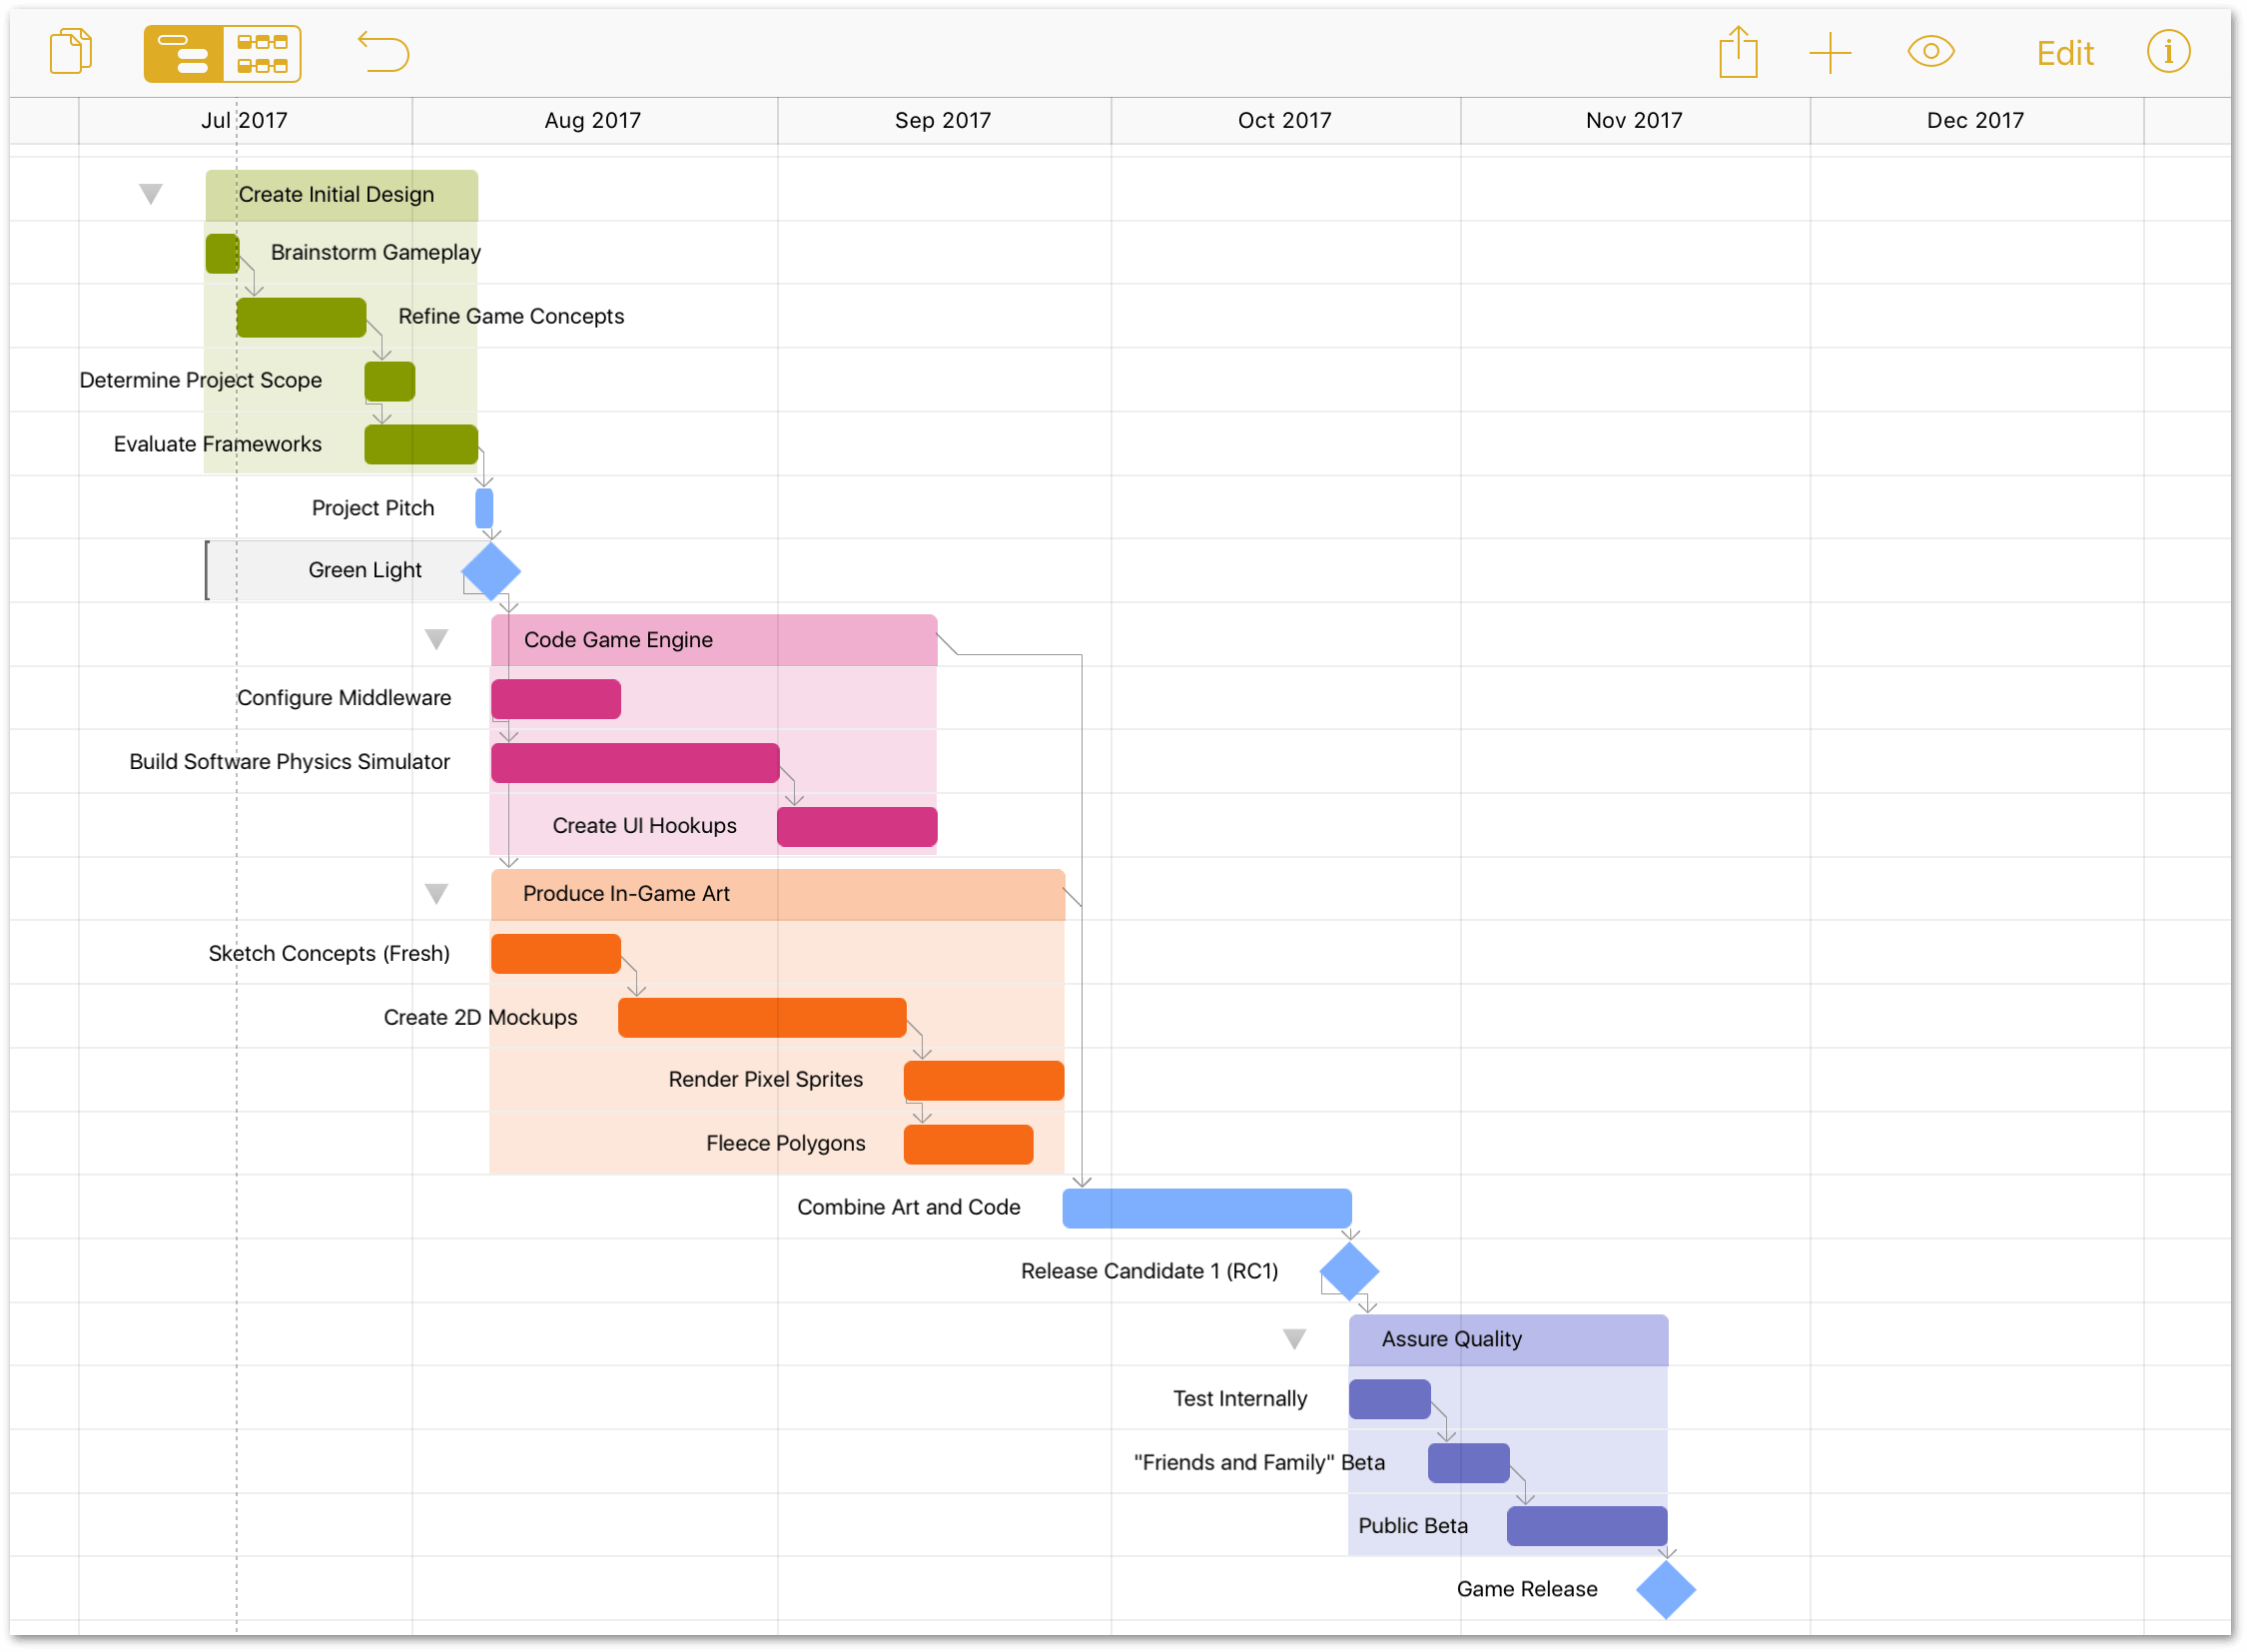
As you can see, the project is really starting to take shape. However, as the project manager, it’s not quite time to assign resources to the tasks. The next few steps take care of a little bit of project housekeeping.
Step 8: Creating Hammock Tasks
In the life of a project, there are certain tasks whose duration is dependent on both when the previous task ends and when the next task can start. These tasks, known as Hammock Tasks, are useful when your project faces a hard deadline.
Hammock tasks can help you decide which tasks can be compressed if the project is running behind schedule, or if there are any external factors that influence when parts of the project must happen.
Now that all of the tasks in The Game Plan project have their dependencies set, you can see (roughly) how long the project should take to hit the final milestone, Game Release. As it just so happens, the Game Release milestone falls a few weeks short of a major gaming conference, which gives the project a hard deadline for completion.
In reviewing the other parts of the project, the one task that seems the most flexible for converting into a Hammock task is the Public Beta. If additional time is needed for squashing bugs, the team can use some of the Public Beta time to do that work, while still ensuring the project releases on schedule.
In Step 7, the Game Release task received a Finish-to-Start prerequisite from the Public Beta task. However, the Game Release milestone needs to start when the Public Beta finishes. So, the first order of business is to remove the prerequisite from the Game Release task:
- Tap to select the Game Release milestone.
-
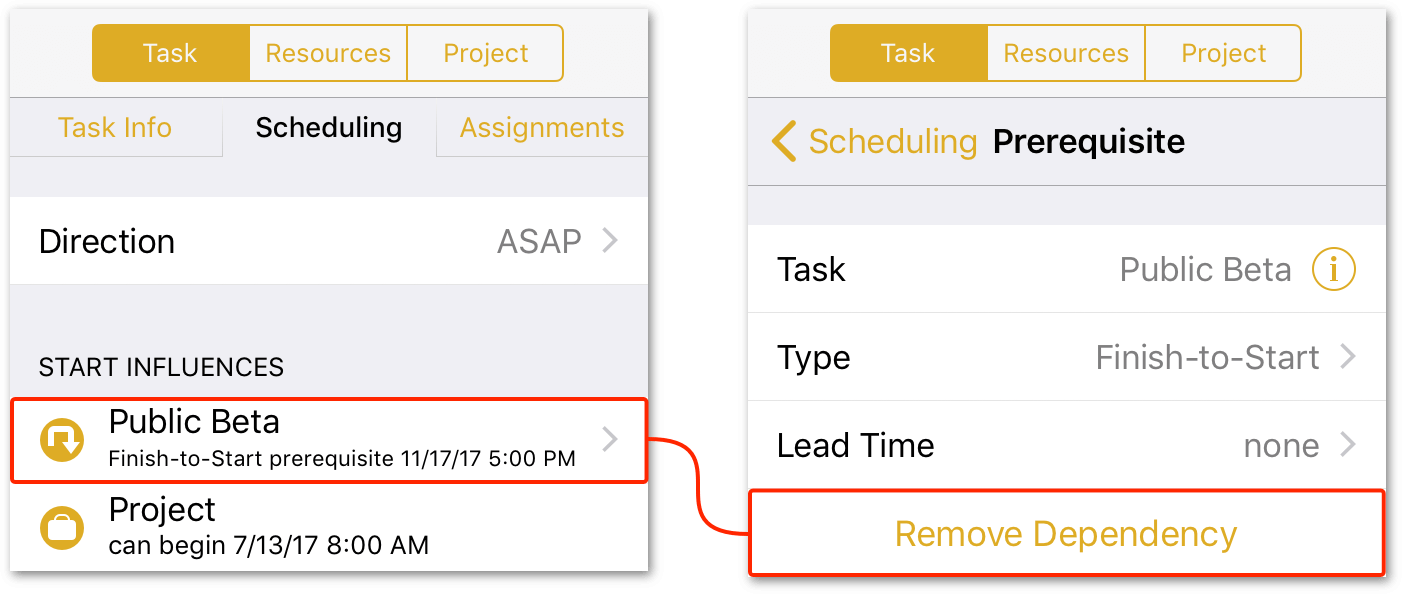
In the Scheduling tab of the Task inspector, tap the Public Beta prerequisite, and then tap Remove Dependency. This disassociates the Game Release milestone from the tasks in the Assure Quality group.
When you break the dependency between the Public Beta and Game Release tasks, you’ll notice that the Game Release milestone zips offscreen to the left. Don’t fret, the milestone is still there; you can tap
 along the left edge of the screen to be taken to the desired offscreen task:
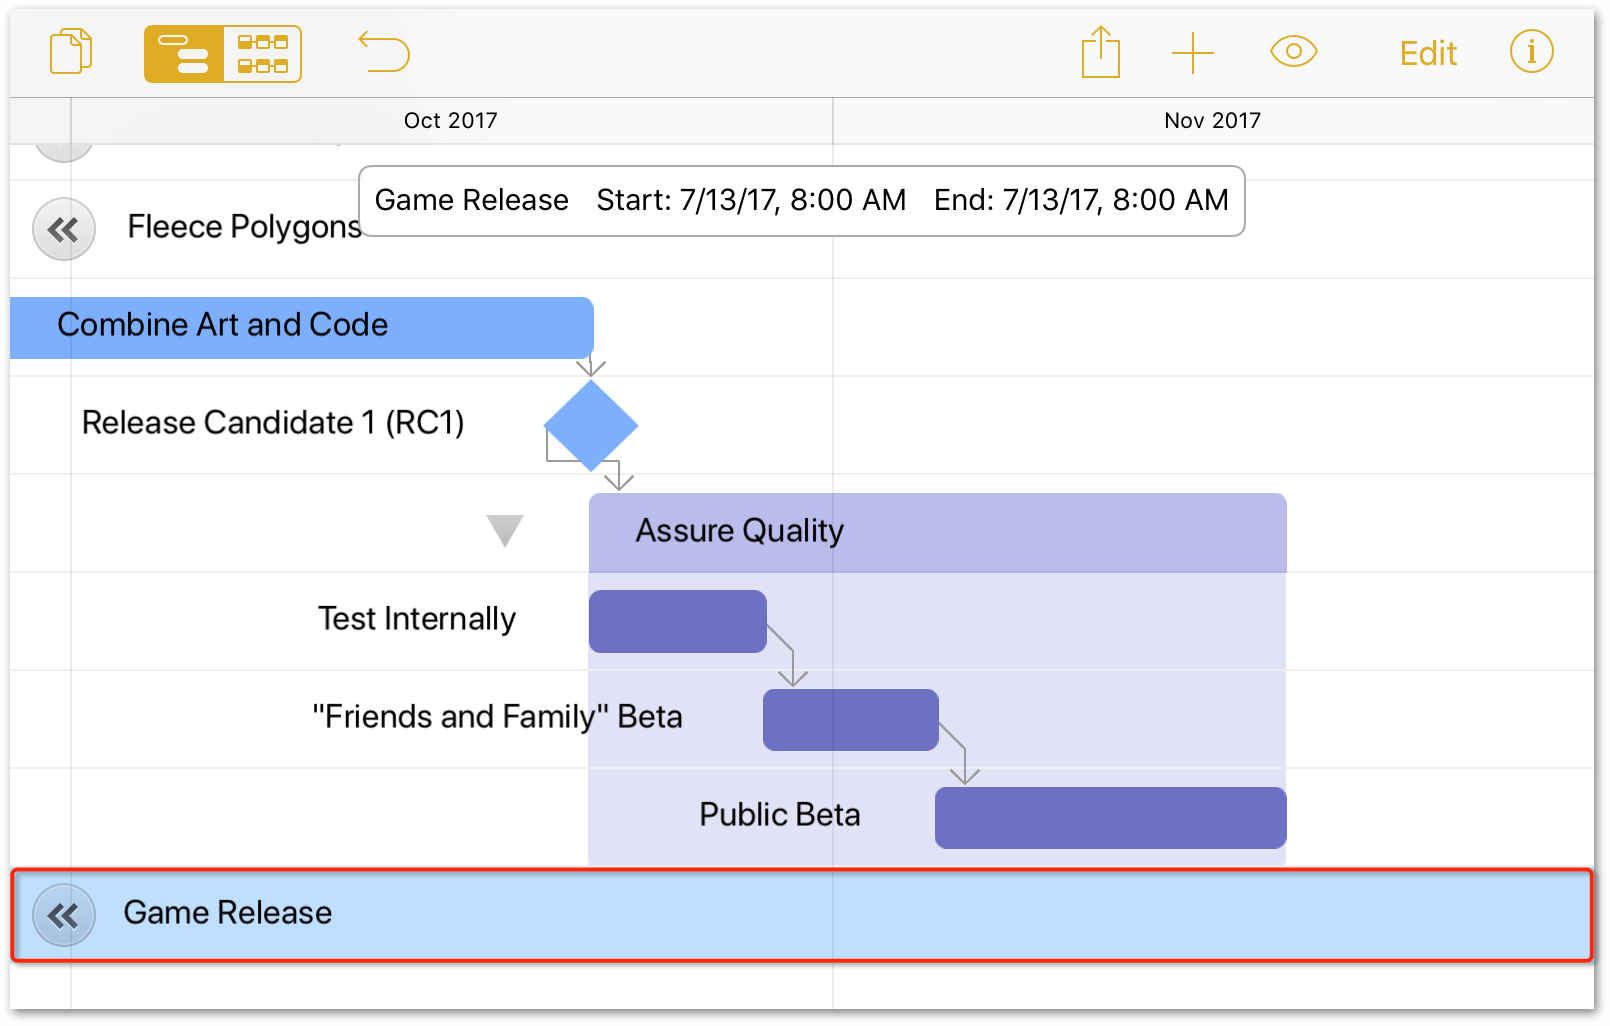
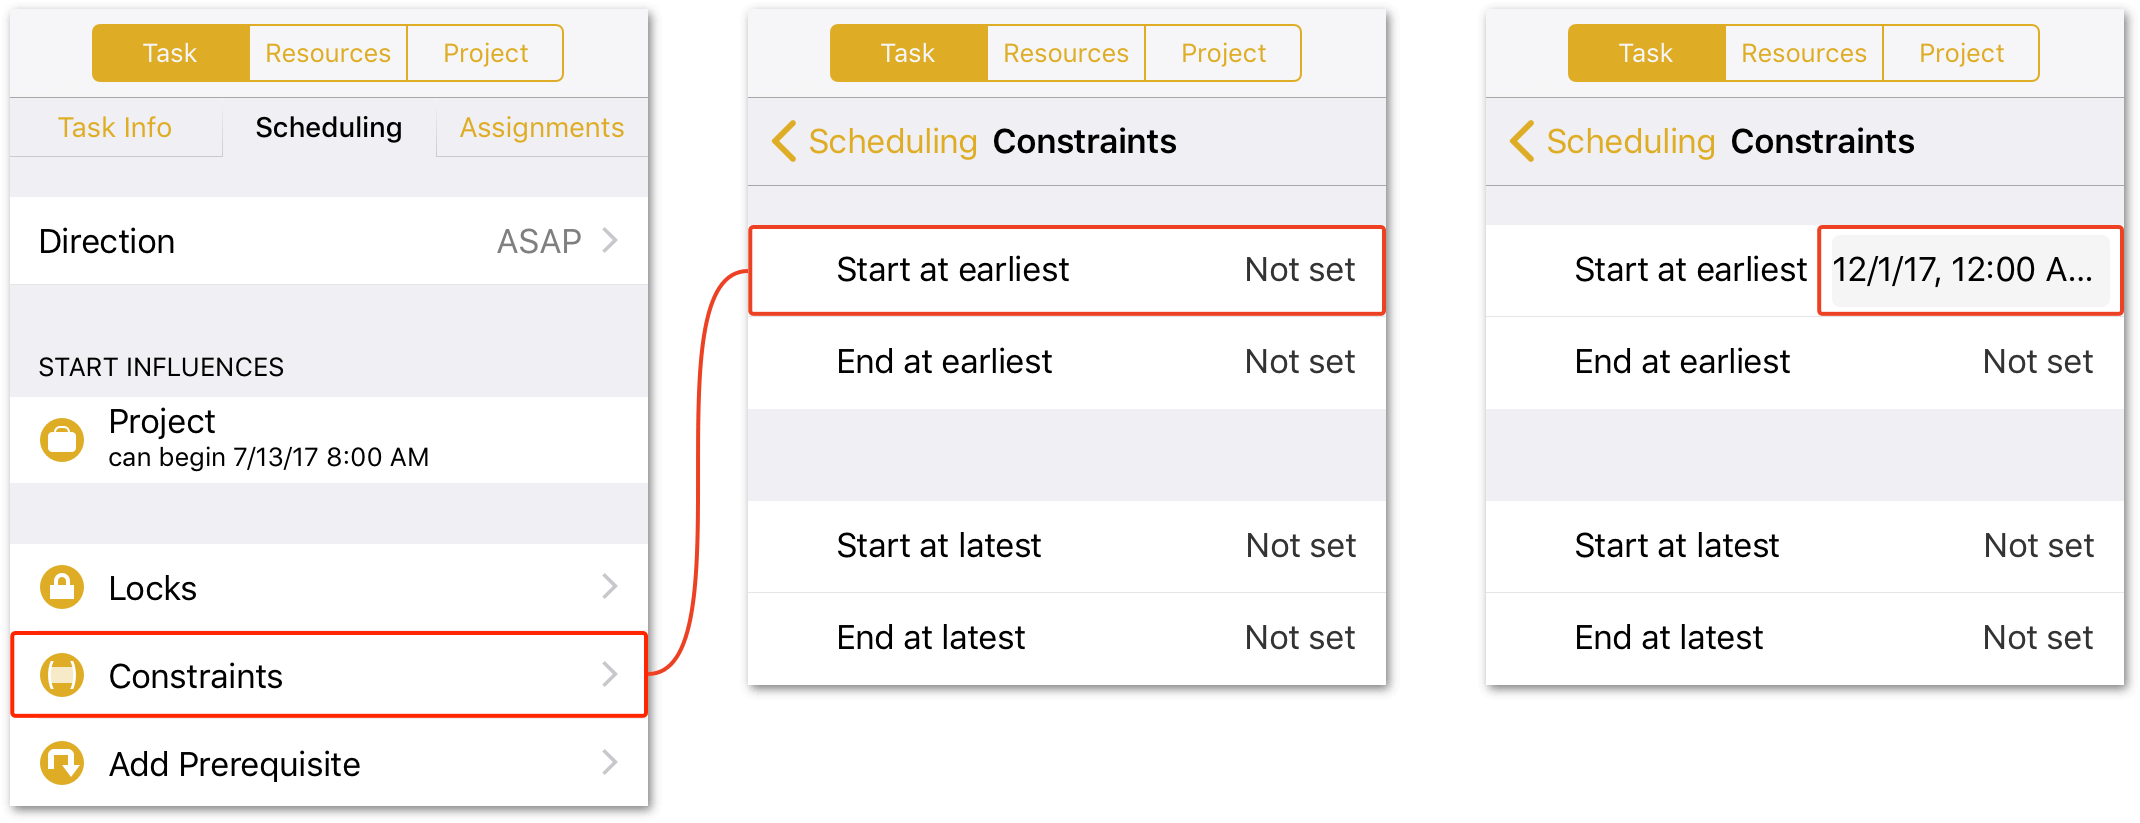
Next, you’ll need to set an implicit date for the Game Release.
-
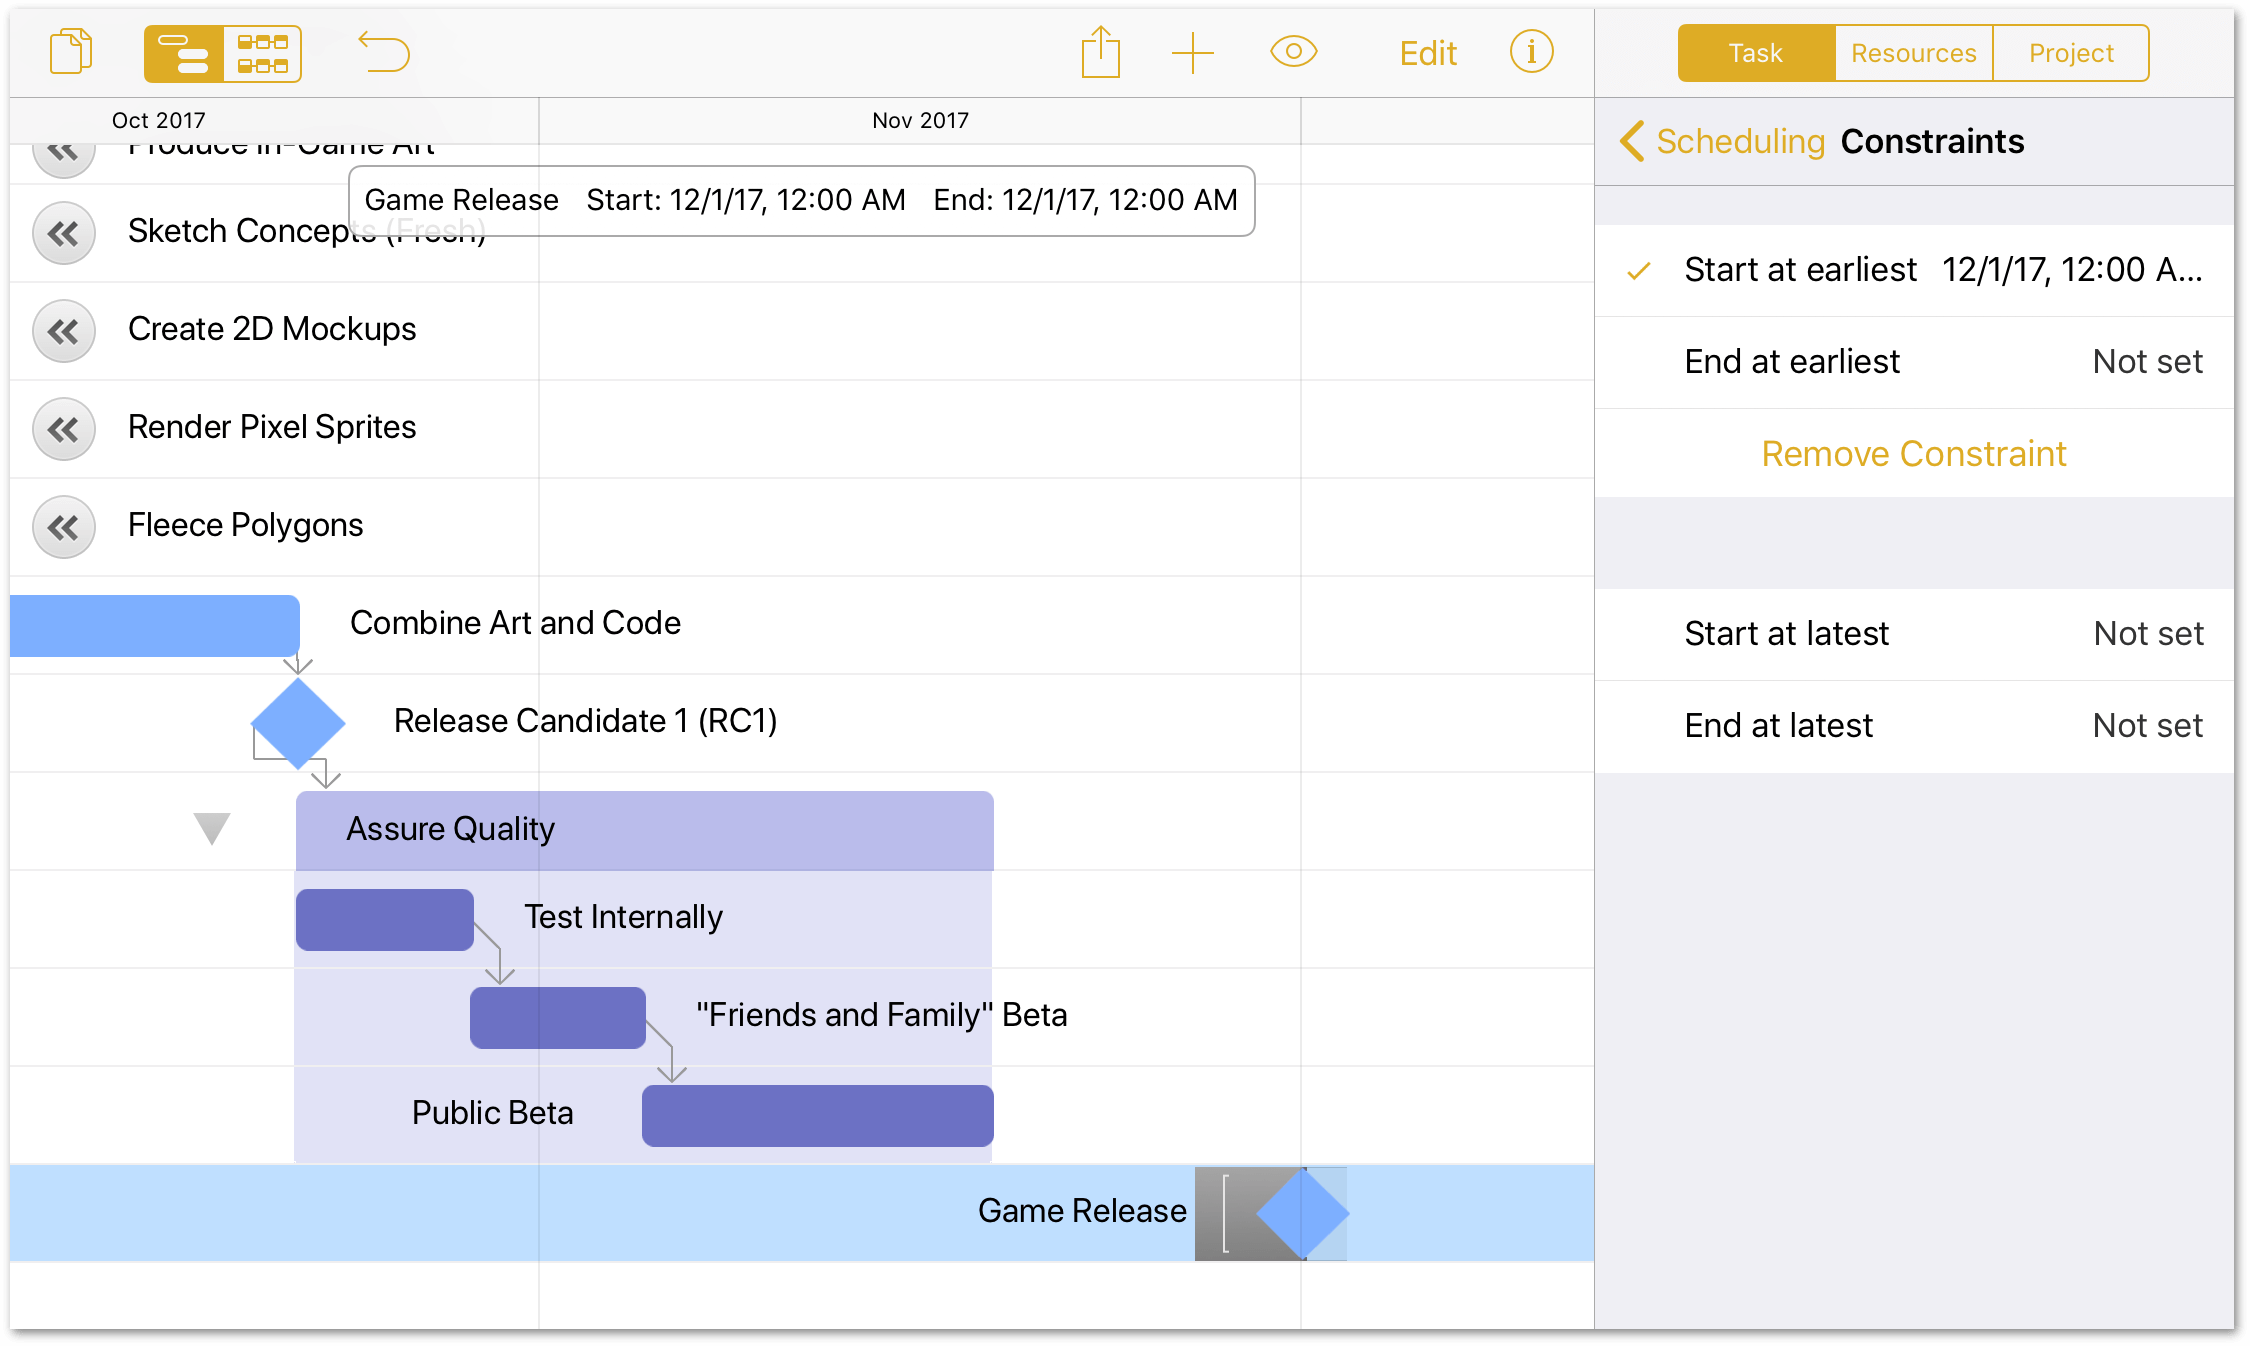
In the Scheduling tab of the Task inspector, tap Constraints, tap Start at earliest, and then enter a date that is a week or two out from when the Public Beta is currently scheduled to wrap up.
-
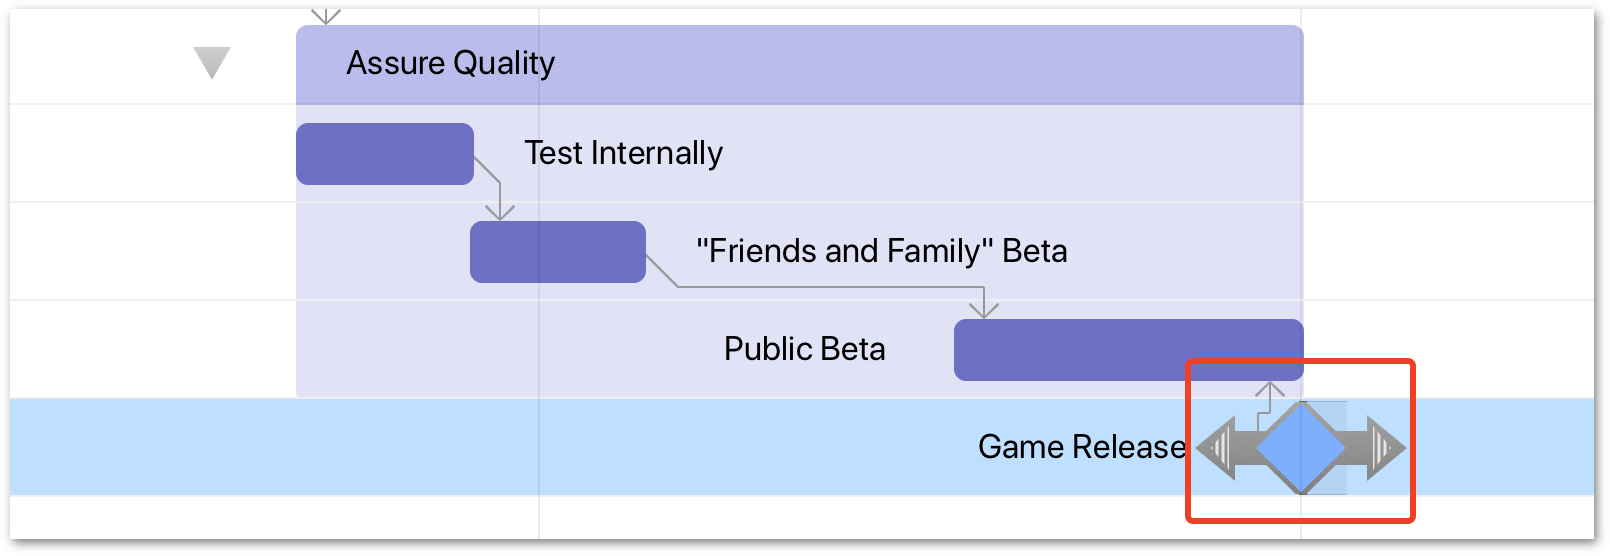
Drag the left dependency arrow from the Game Release milestone to the end of the Public Beta task:
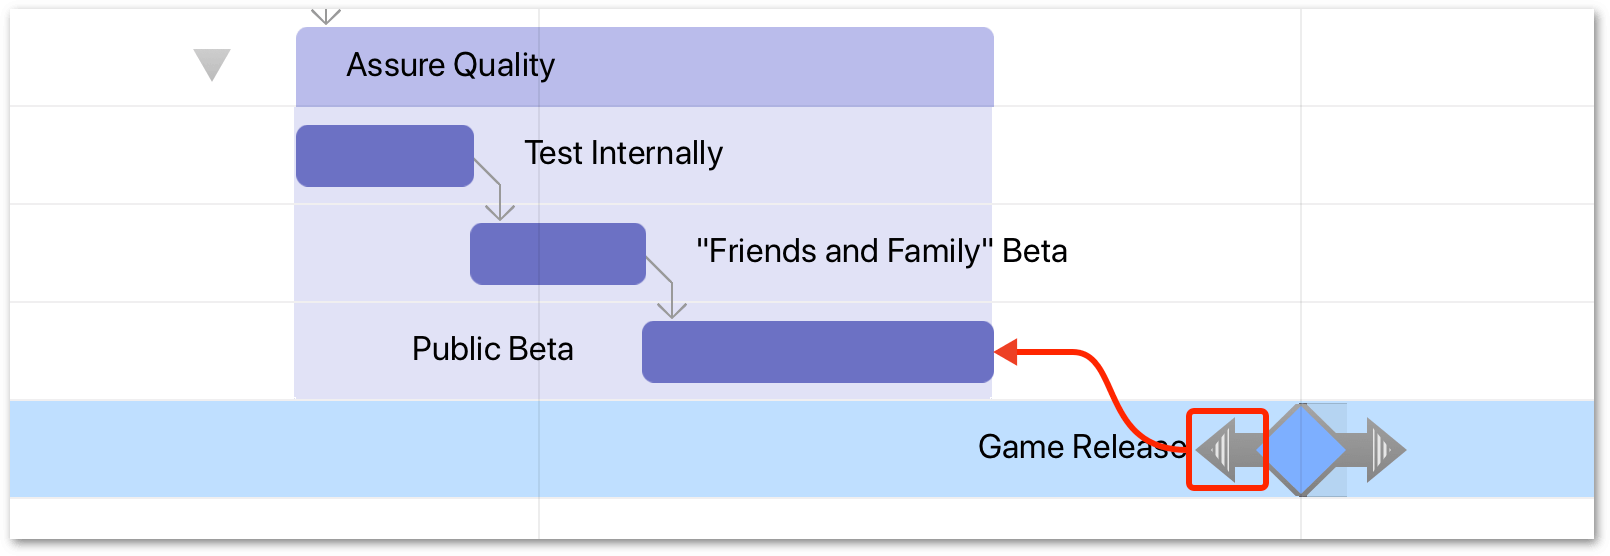
When you connect the Game Release milestone to the Public Beta task, notice that Public Beta slides over so it ends when Game Release starts:
-
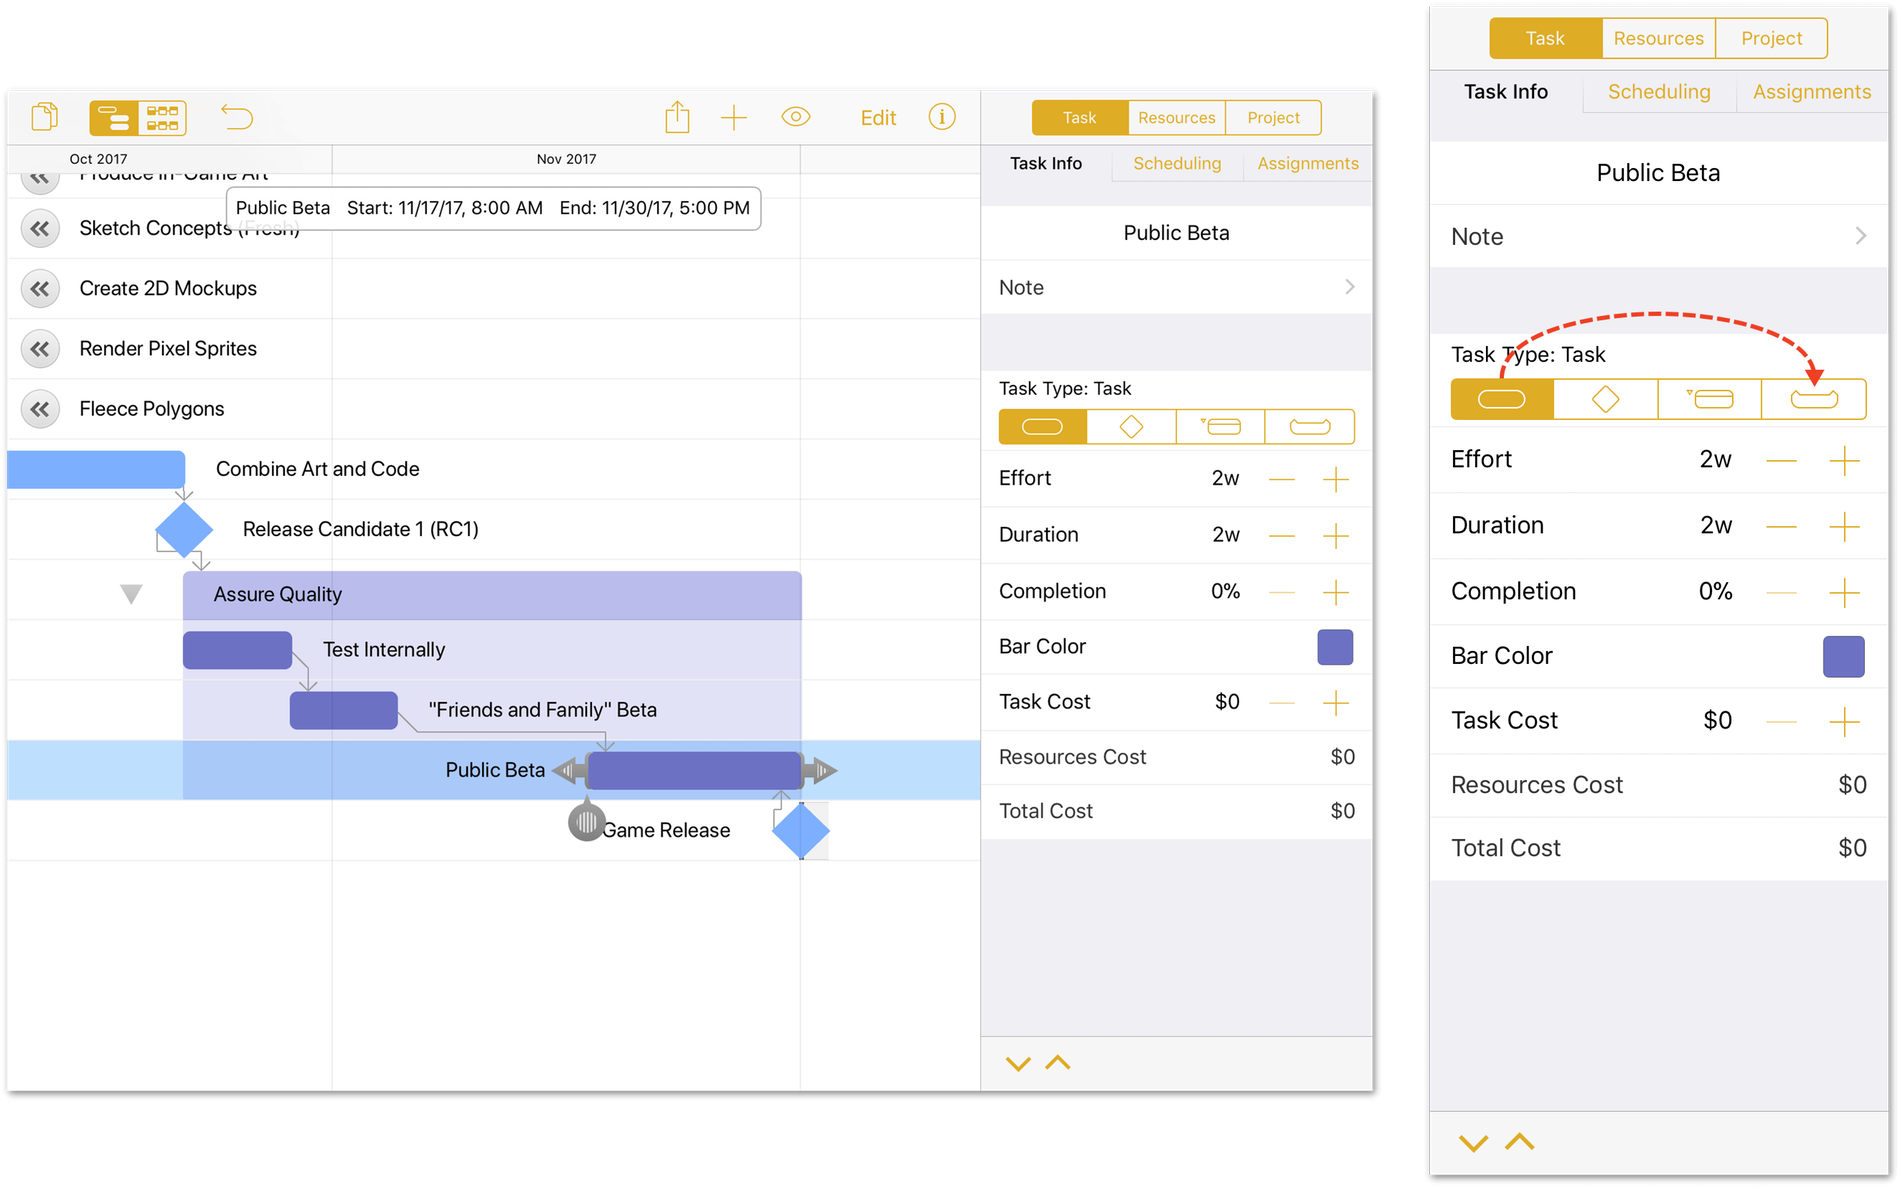
Finally, tap to select the Public Beta task, and then change its Task Type from Task to Hammock by tapping the Hammock task selector.
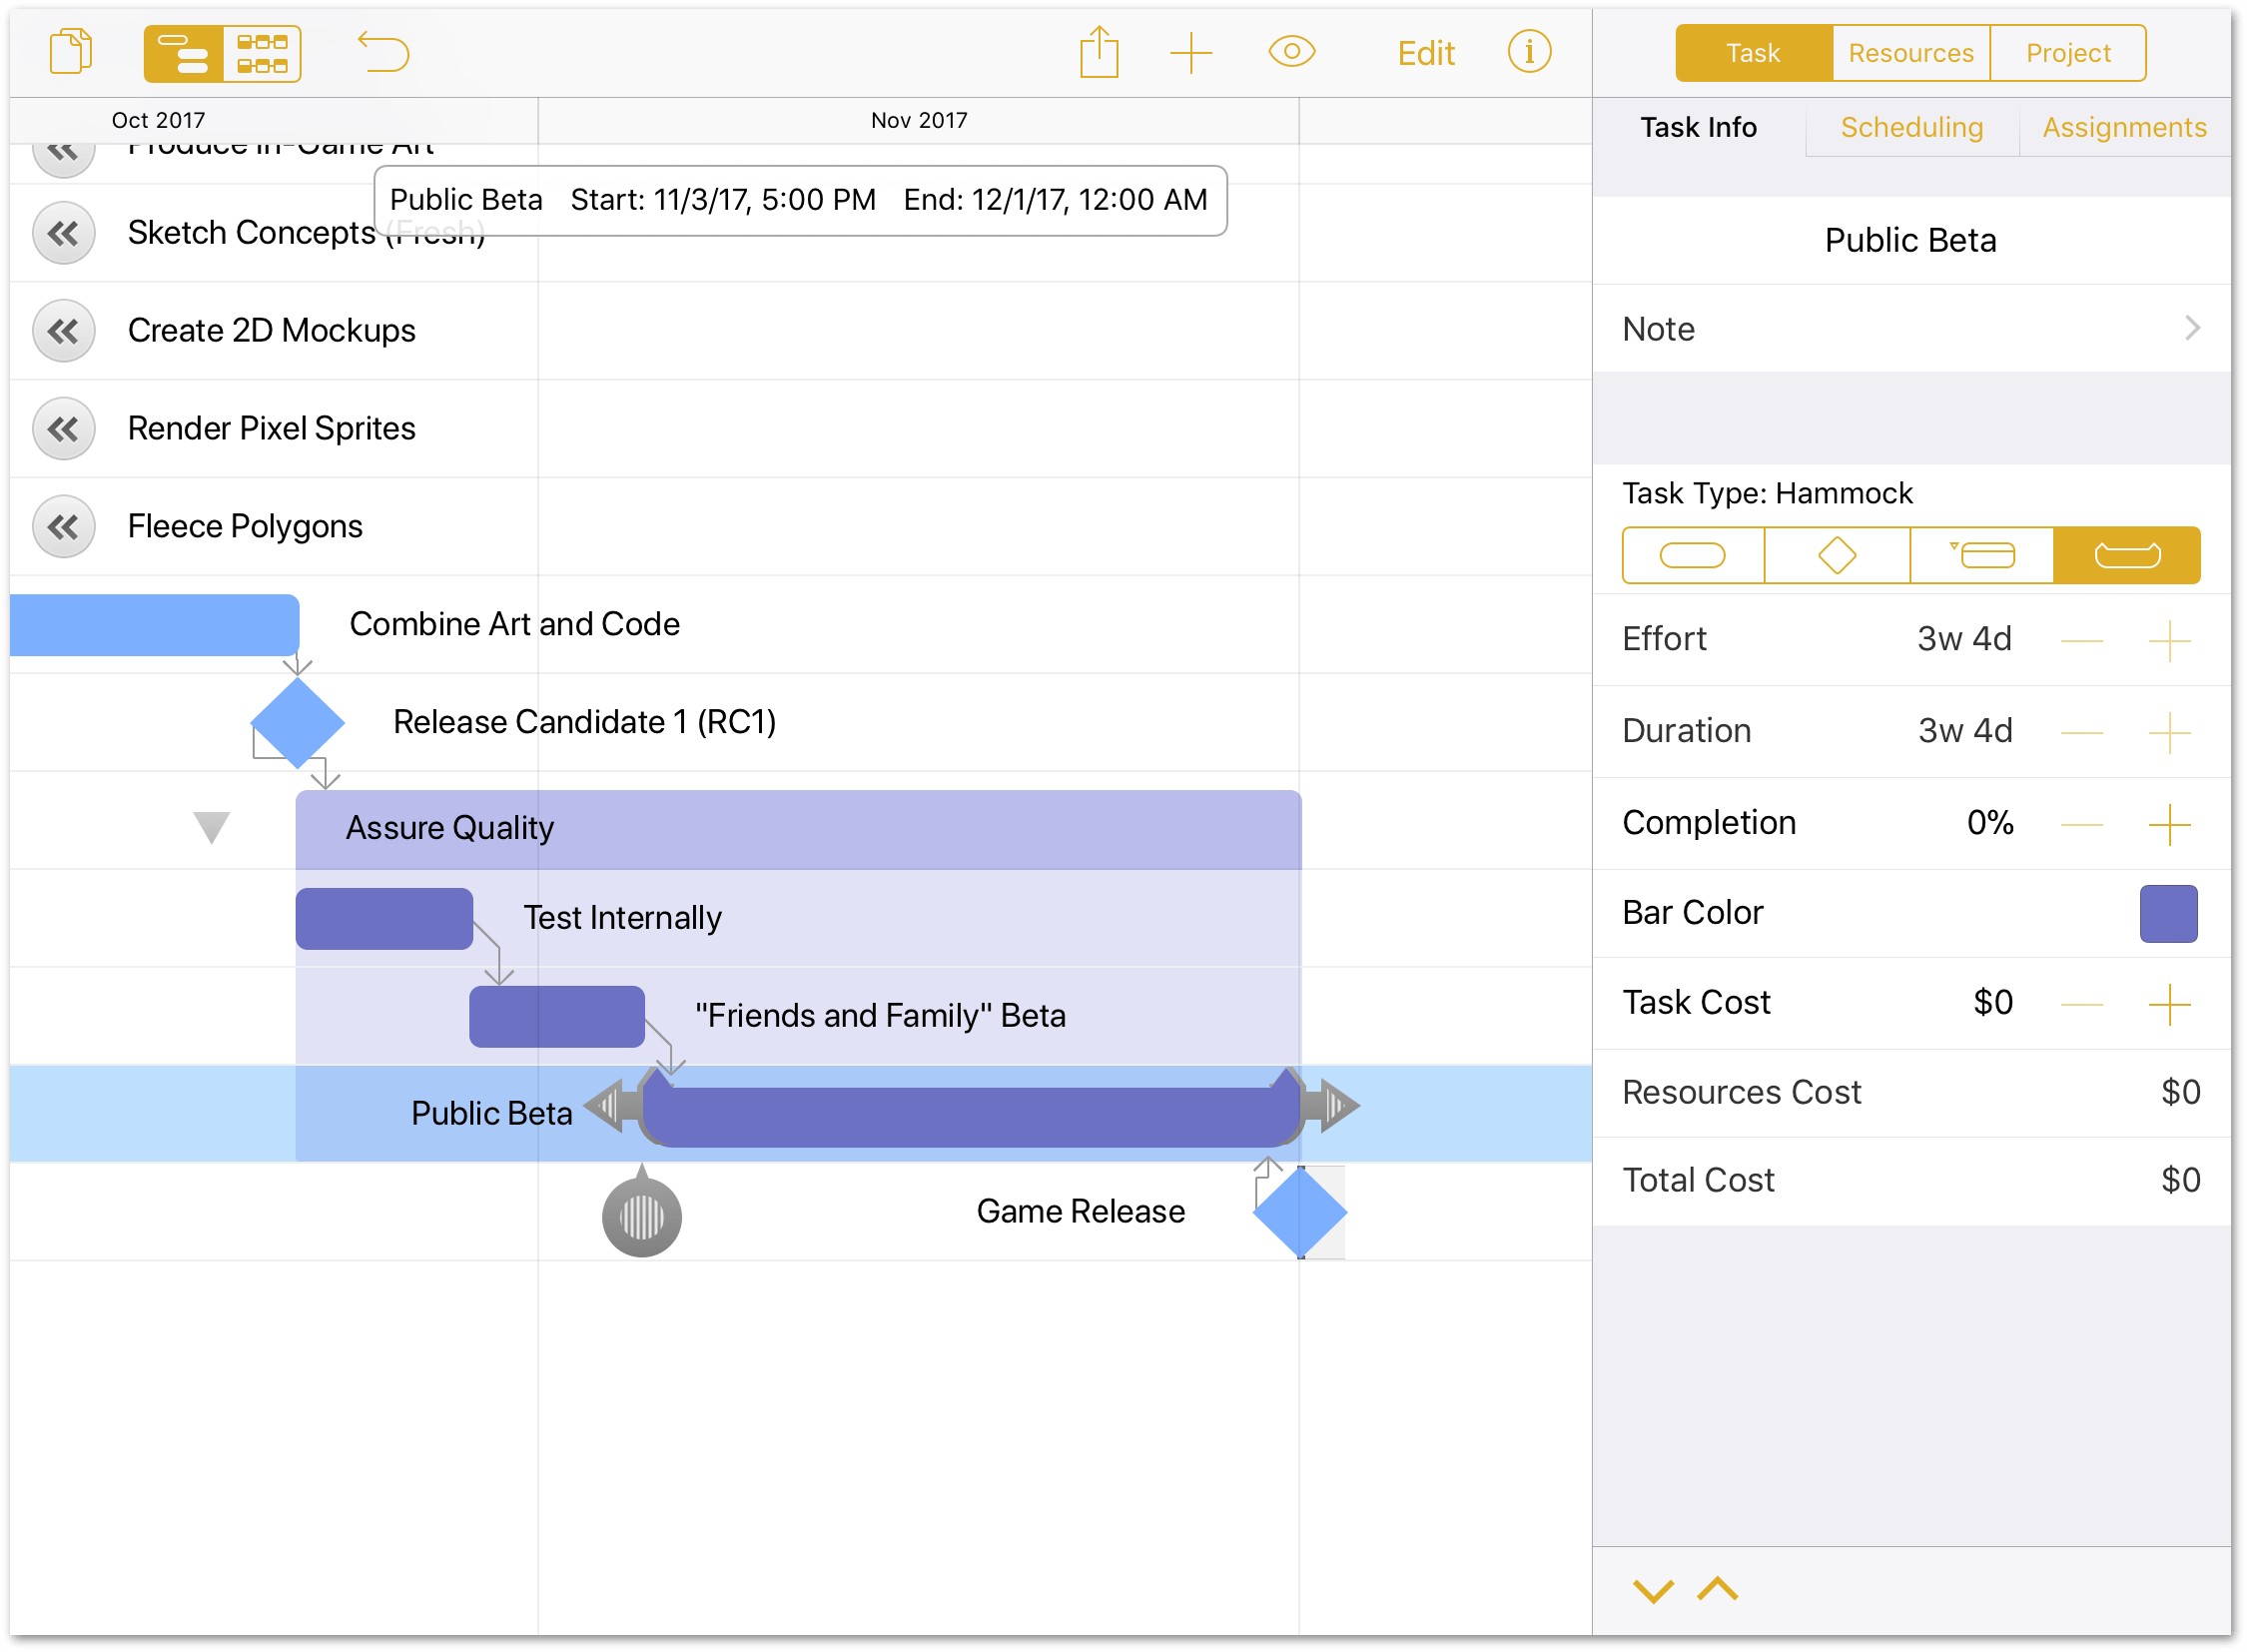
Depending on where you set the Start at earliest date for the Game Release milestone, the Public Beta Hammock task should stretch a bit to fill in the space between the "Friends and Family" Beta task and the Game Release milestone.
Step 9: Editing the Work Week
One thing that you may need to do as a project manager is to define the work week. For example, the typical 40-hour work week is Monday through Friday, from 8 a.m. to 5 p.m. each day, with an hour of unpaid lunch somewhere in between.
To define the work week for your company/project:
- Tap to open the Inspectors.
- Tap to select the Project inspector.
-
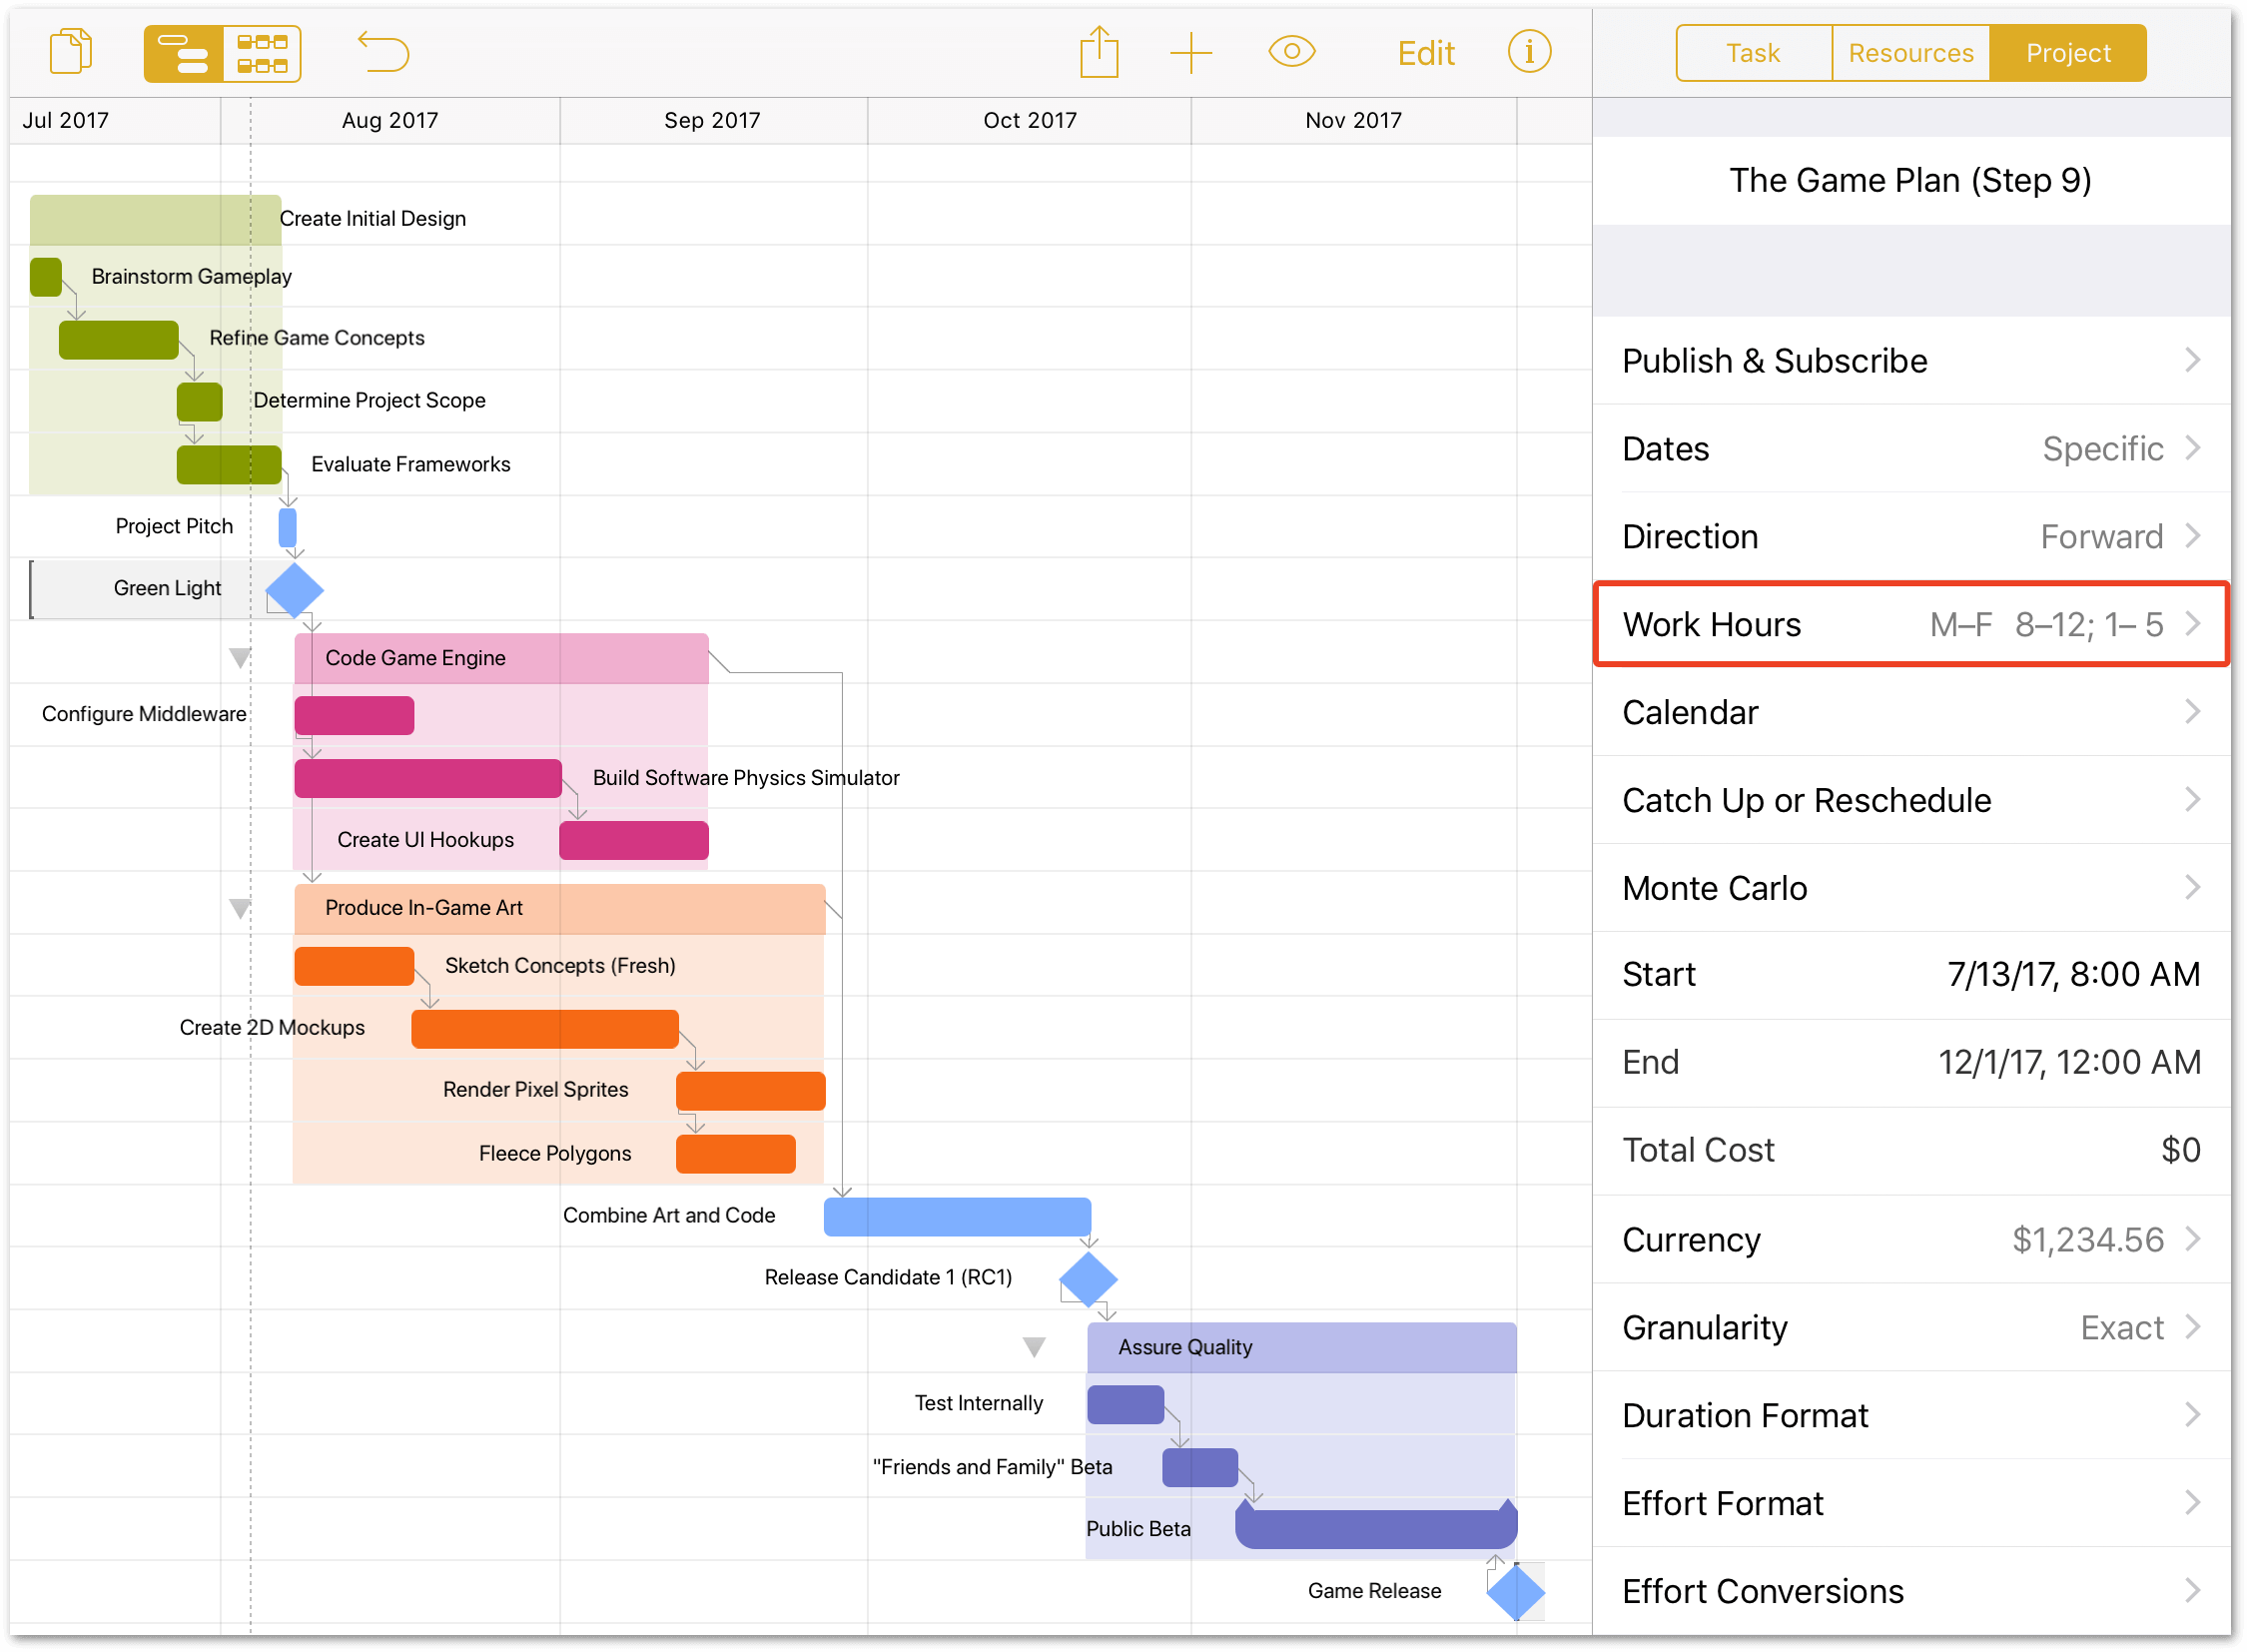
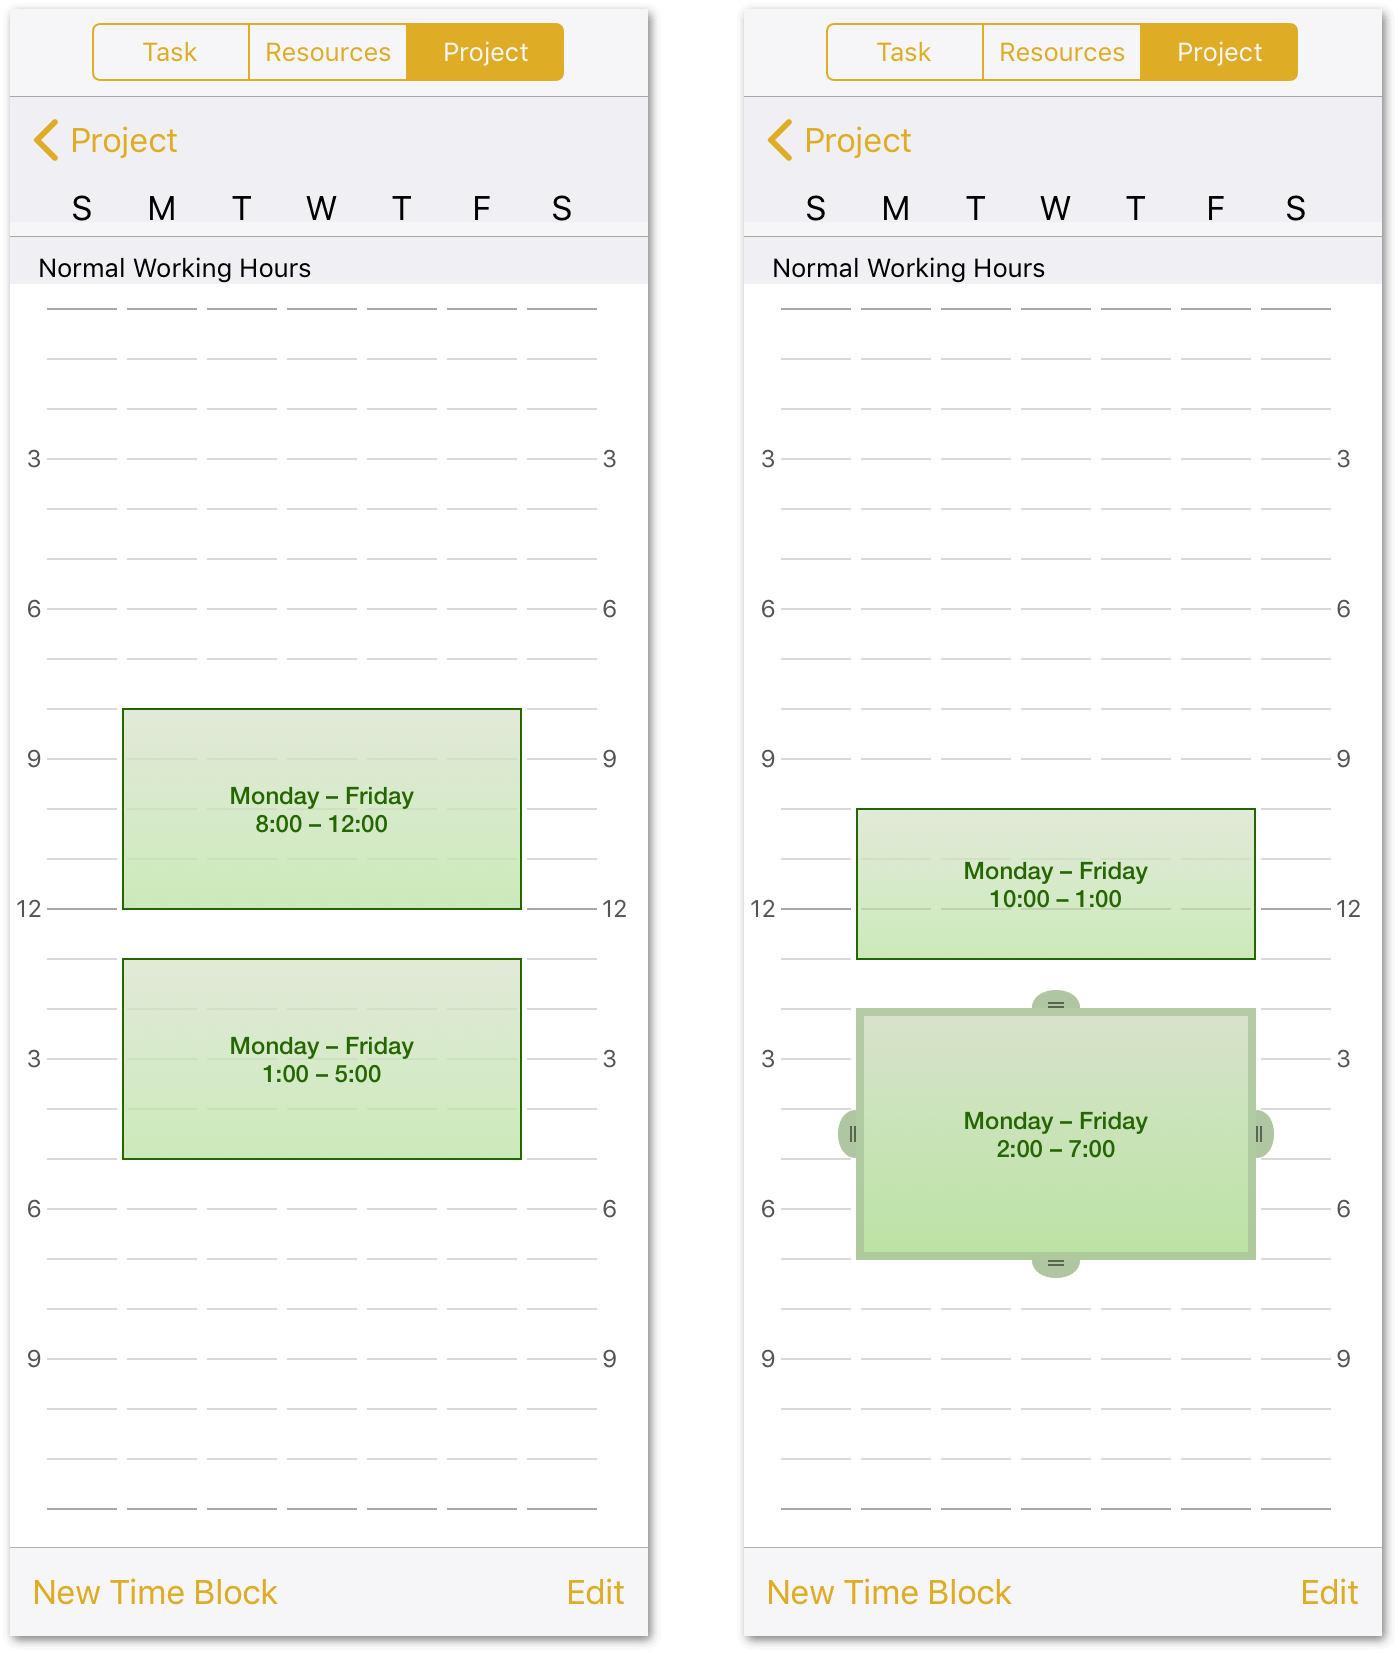
Tap Work Hours to view and adjust the Normal Working Hours for your company:
-
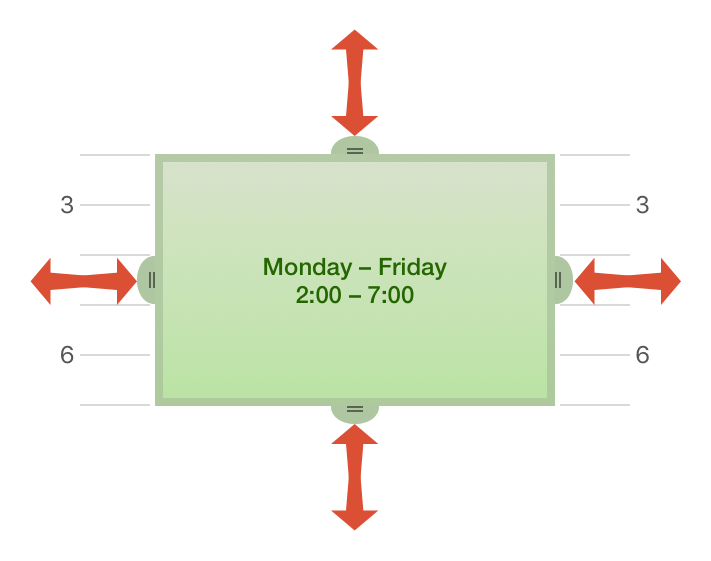
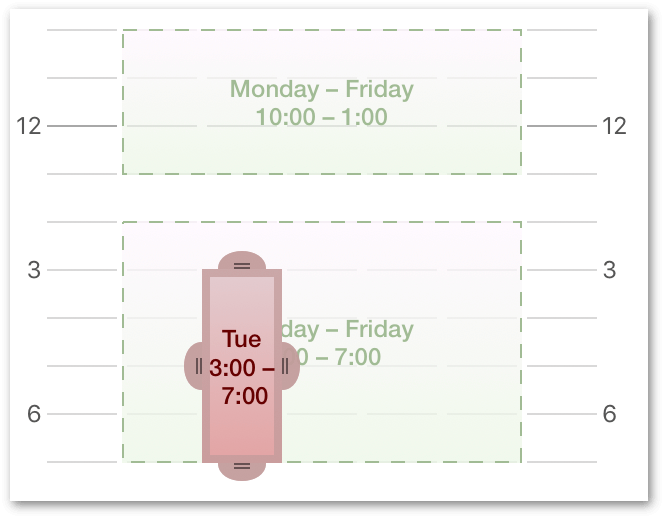
To accommodate the late nights that often fuel game development, your company starts a little later in the morning. Touch and hold one of the Time Blocks on the calendar to bring it to a new position, or drag one of the side handles to adjust the work hours.
Set the Normal Working Hours to 10:00 – 1:00, and 2:00 – 7:00, as shown here:
Working with Time Blocks
Dragging the left and right handles on a Time Block adjusts the days, while dragging the top and bottom handles adjusts the hours. This allows you to customize the Time Blocks that define the normal working hours for your company.
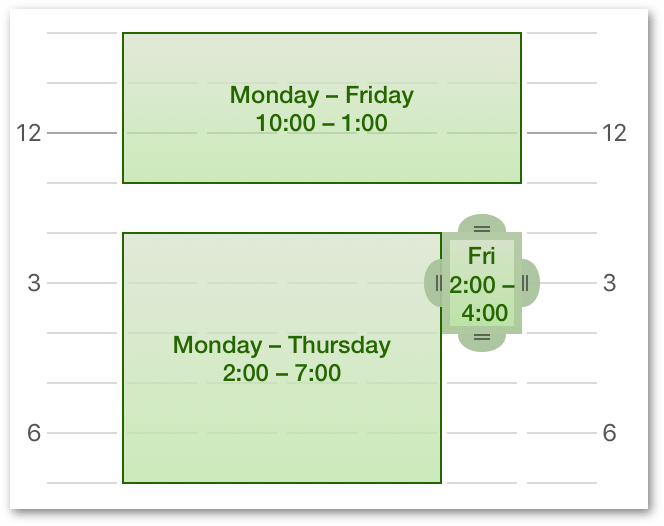
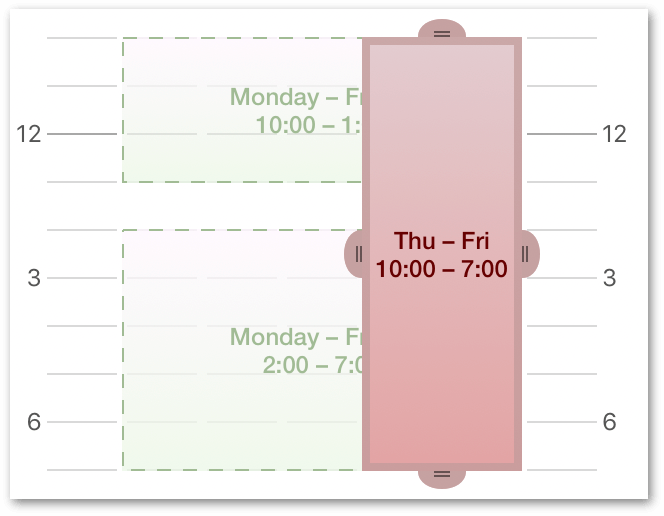
You can also add additional Time Blocks, for example, if you need to set different work hours for a particular day of the week. Tap New Time Block to add a new Time Block.
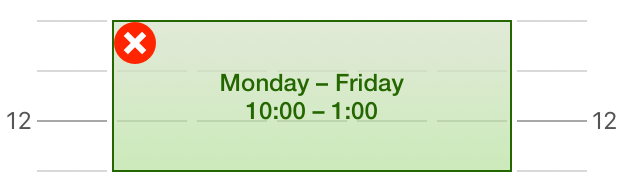
To delete a Time Block, tap Edit and then tap  .
.
Time Blocks make it easy for you to customize how your company, or your team, work on a daily basis.
Step 10: Setting Project Schedule Exceptions
Even the most accommodating work week will occasionally have days that are out of the ordinary. Whether it’s a national holiday, a team-wide training seminar, an industry expo or conference, or just a patch of bad weather that keeps folks out of the office, setting exceptions to the regular work schedule can be key to keeping a project on track.
In looking at the calendar, there are three holidays that fall during this particular project’s duration (Labor Day, Halloween, and U.S. Thanksgiving) that need to be factored into the schedule.
If you are working through this tutorial, the holidays you encounter will most assuredly be different than the ones noted here. The takeaway from this example, however, is to show the importance of how holidays and observances can affect a project’s timeline.
When setting up your own projects, be sure to examine the calendar for holidays, observances, and any other special events that could impact normal working hours.
To view and edit the project calendar, do the following:
- Tap to select the Project inspector.
-
Tap Calendar to view the project calendar:
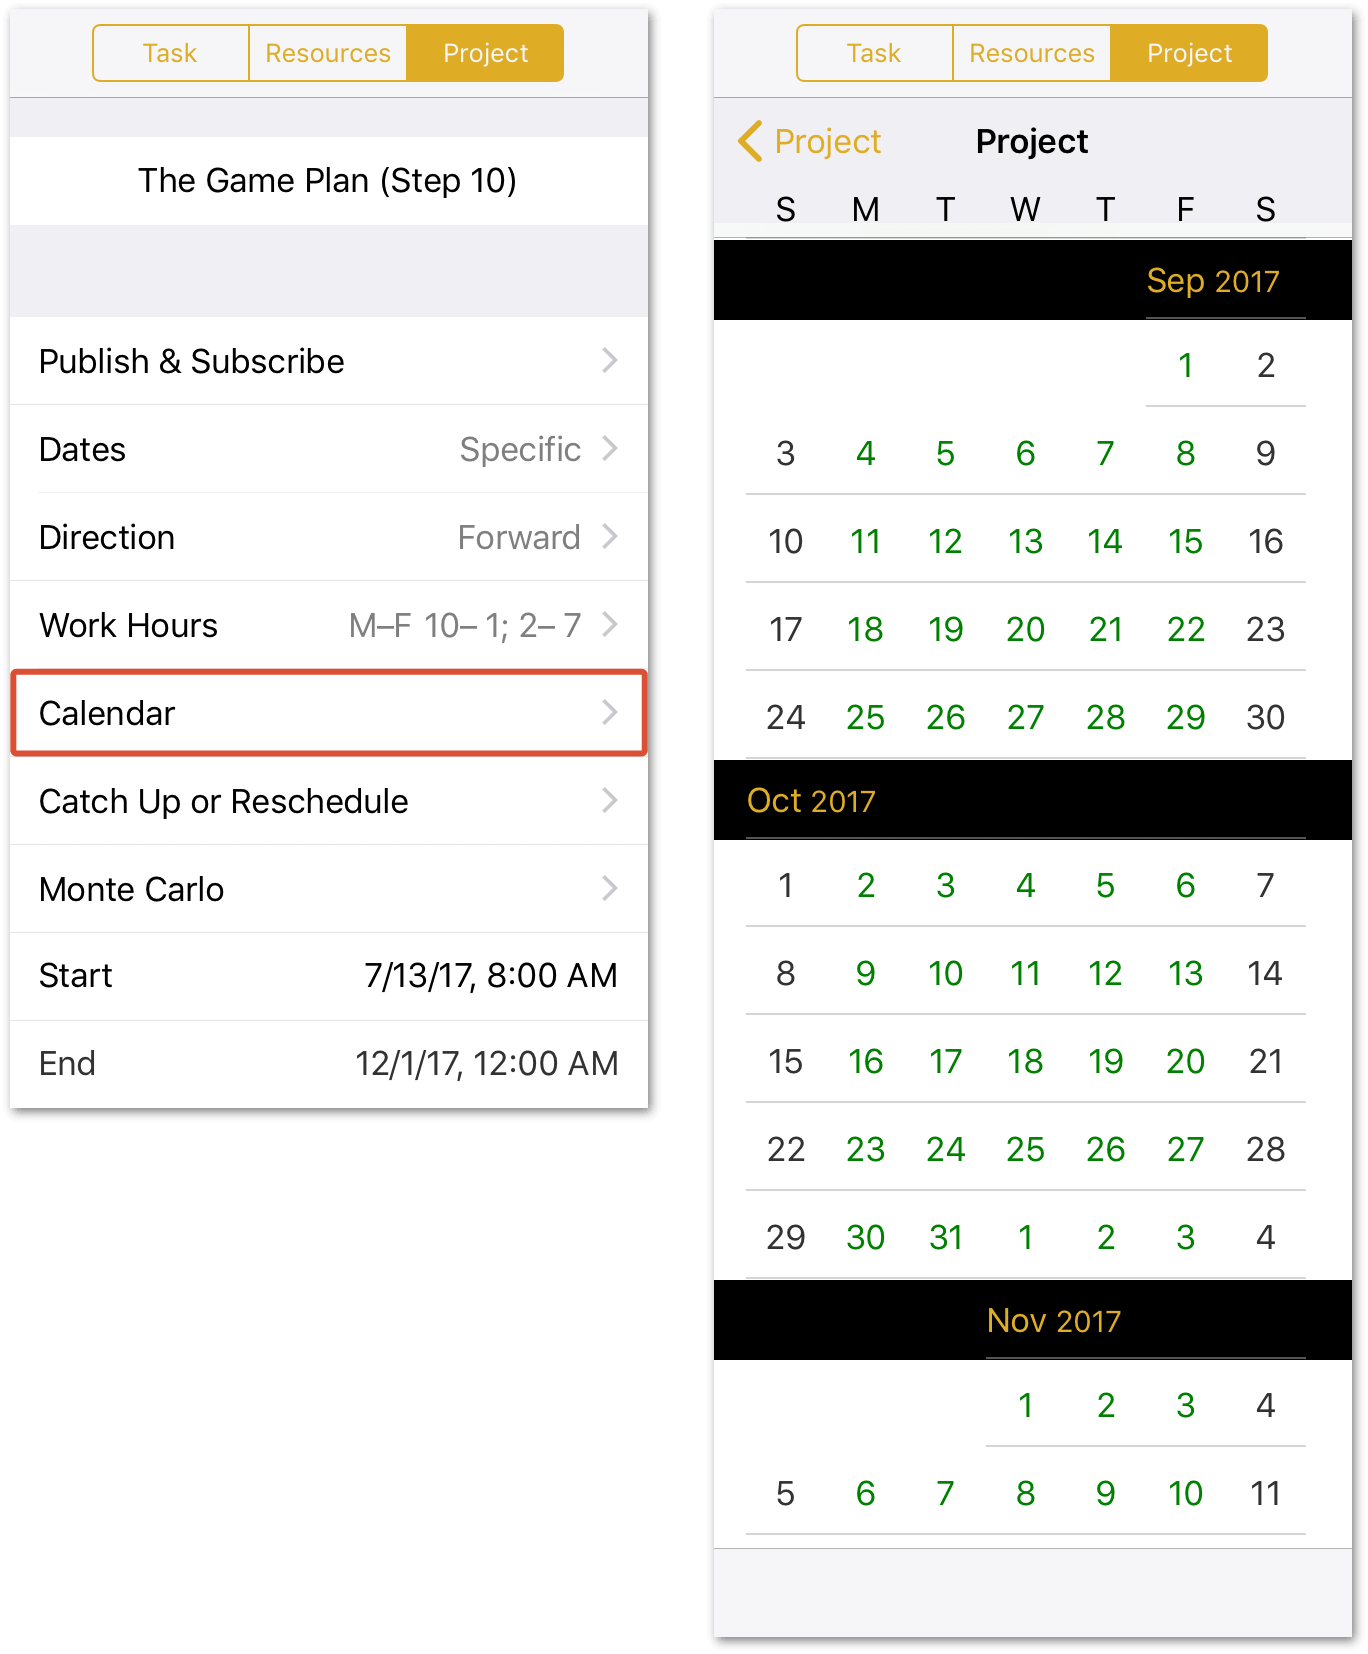
Dates on the calendar are color-coded as follows:
- Green dates indicate regular work days as defined by the Normal Working Hours set in the Step 9.
- Black dates indicate non-working days.
- Red dates indicate a working day that has been blocked as time off.
- Blue dates indicate days where overtime is permitted.
-
Swipe to scroll down to September, then tap the week of September 4th to access the exceptions calendar for that week:
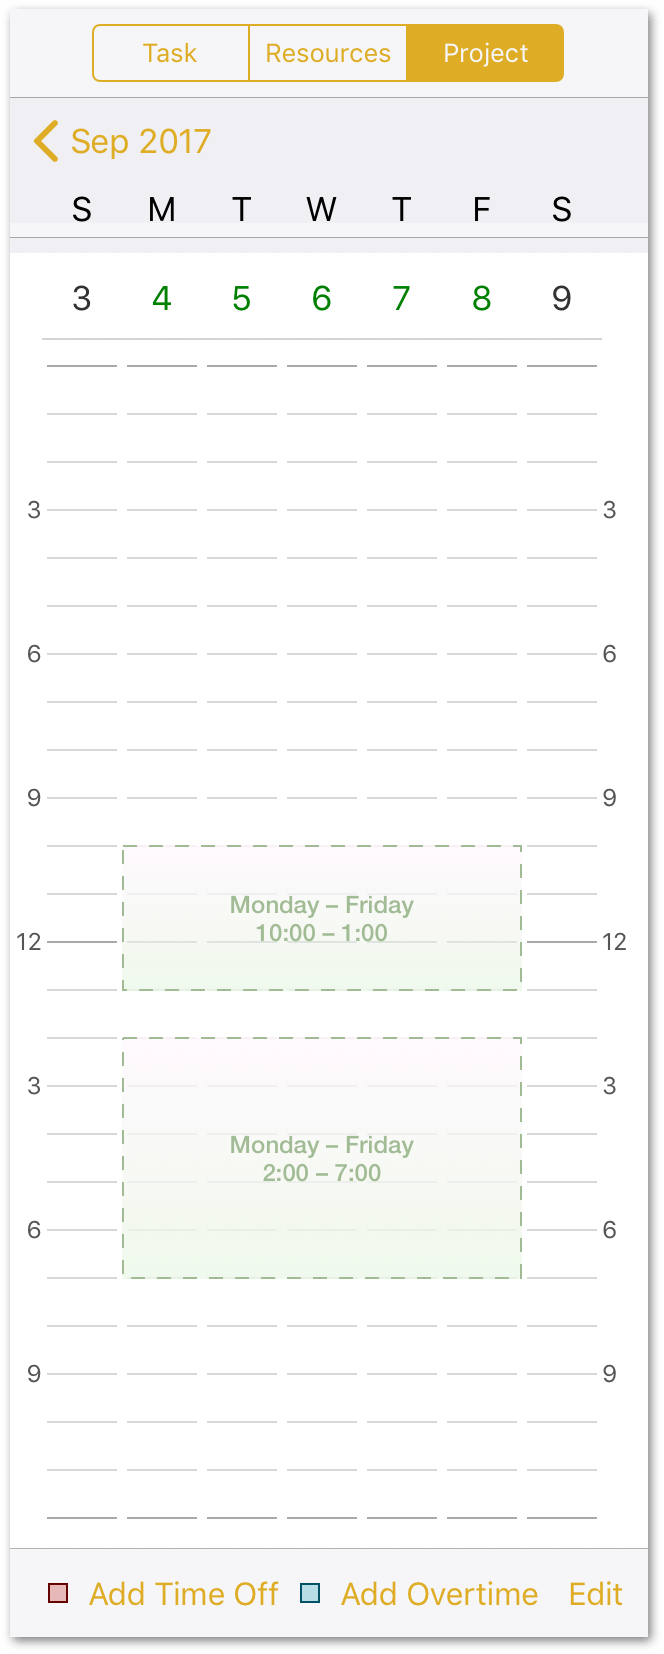
For quick navigation between individual weeks of the exceptions calendar, swipe left or right on the numerical date headers. It’s a secret tiny productivity boost—and every little bit helps!
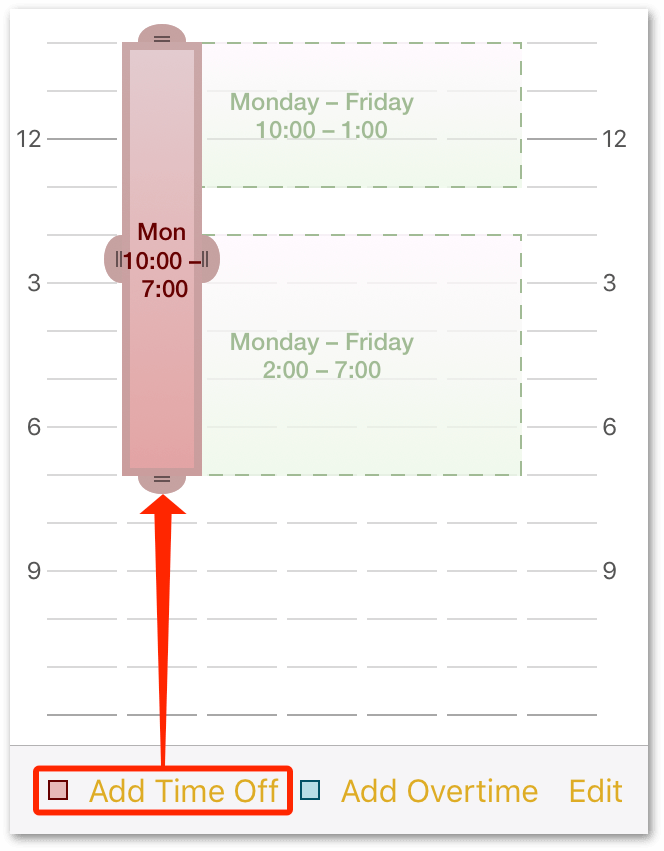
-
To block off Monday, September 4, tap Add Time Off at the bottom of the Calendar, and then drag the handles of the Time Block to fill in the normal working hours for Monday.
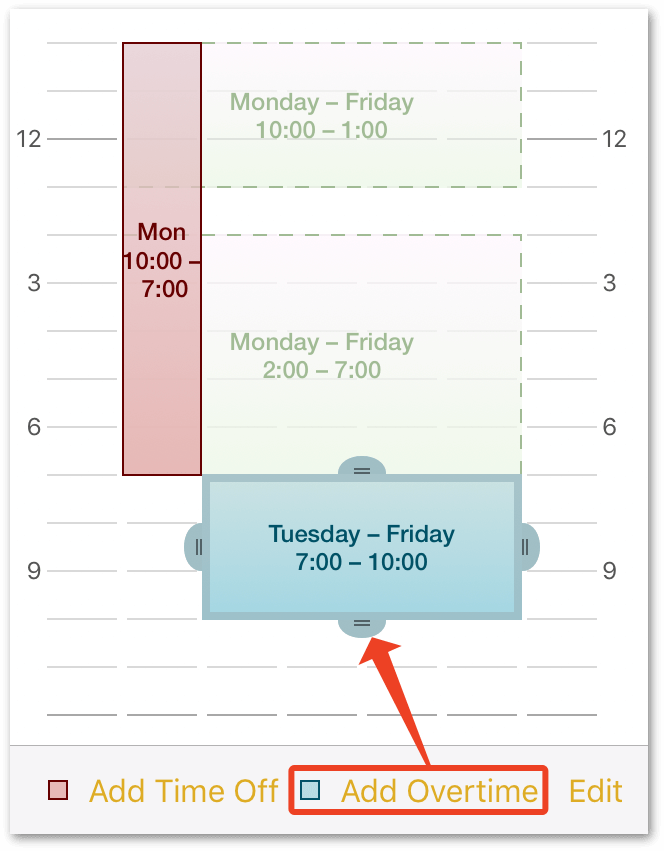
-
To compensate for the day off, you may want to pre-authorize overtime for the remainder of the week. Tap Add Overtime to add a Time Block for that, and adjust its size to span Tuesday through Friday from 7:00 to 10:00 p.m.
-
Using the same techniques, do the following:
- October 31: Add time off from 3:00 to 7:00 p.m. to permit staff to partake in the company’s annual Halloween festivities:
- November 23 and 24: Block these days off to cover U.S. Thanksgiving and the day after:
Viewing Non-Working Time in the Project Gantt
Non-working time—weekends, holidays, and the hours in between—are hidden from view in the project Gantt chart. If you ever want to see these hours or days along with your project, tap  in the toolbar to open the View menu:
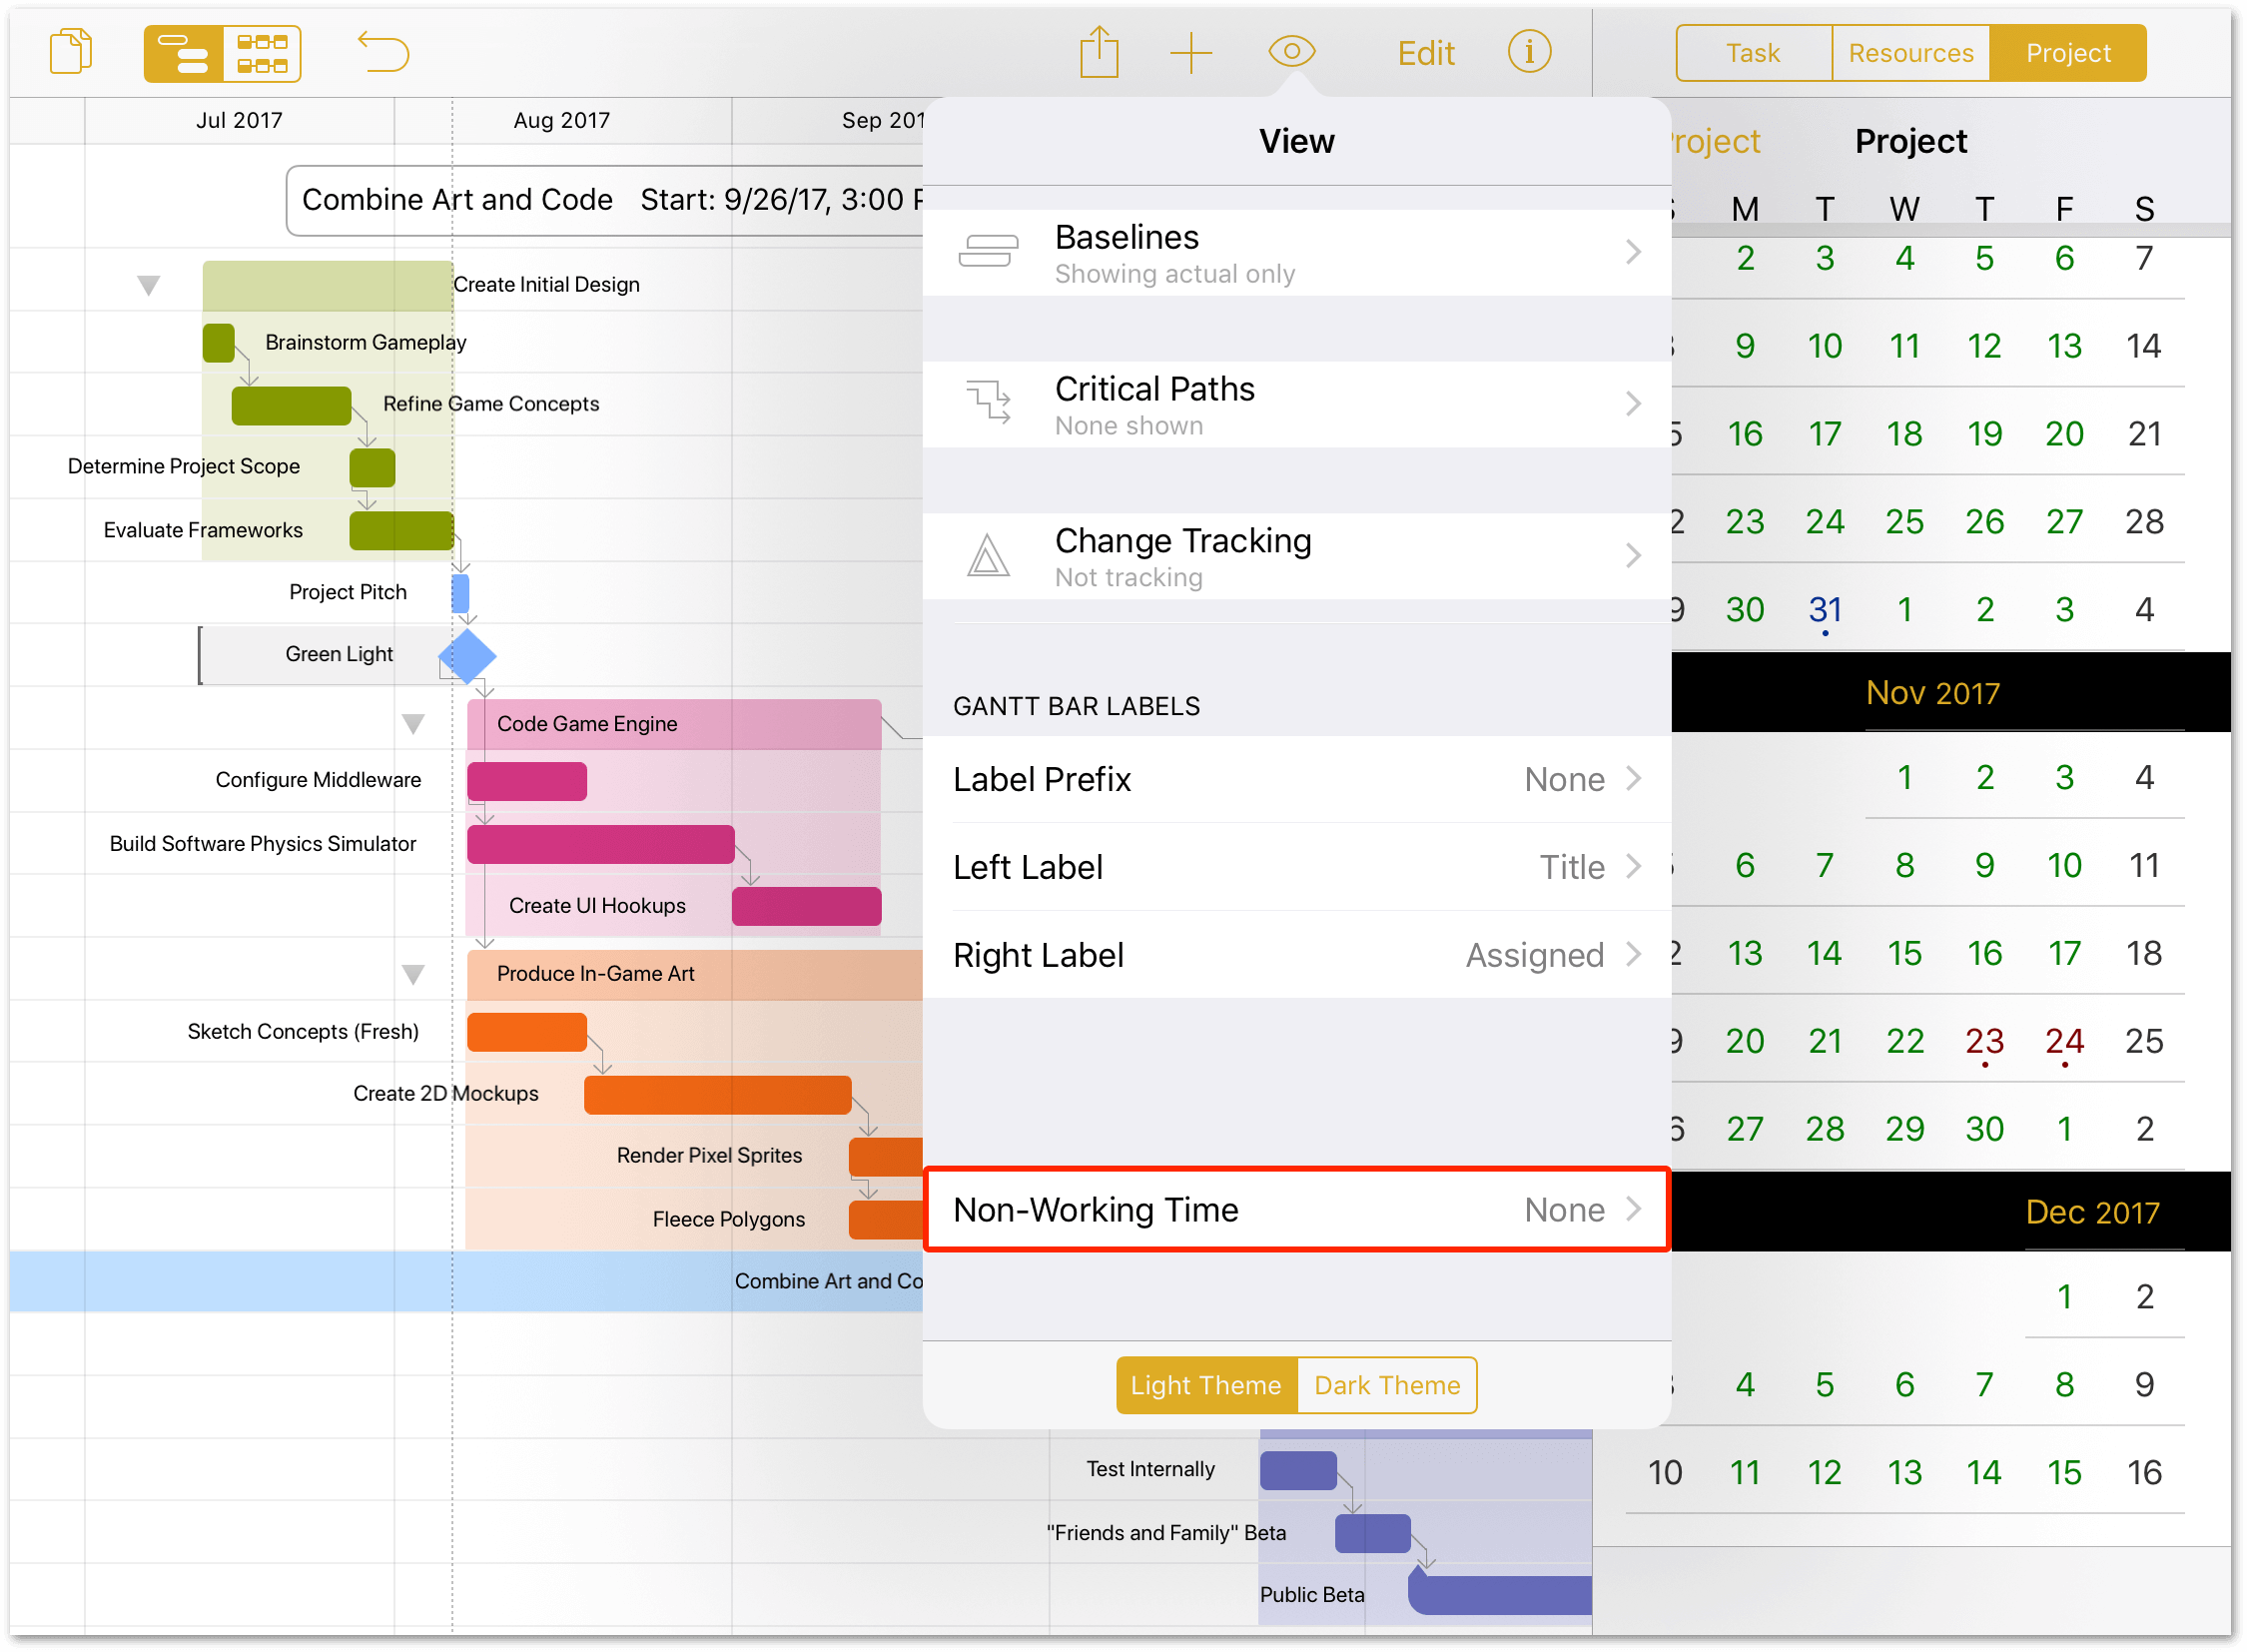
You can choose the default, None, or to view Holidays, Holidays & Weekends, or All Hours to display holidays, weekends, and the hours in between normal working hours. Non-work hours are displayed in the timeline as gray columns.
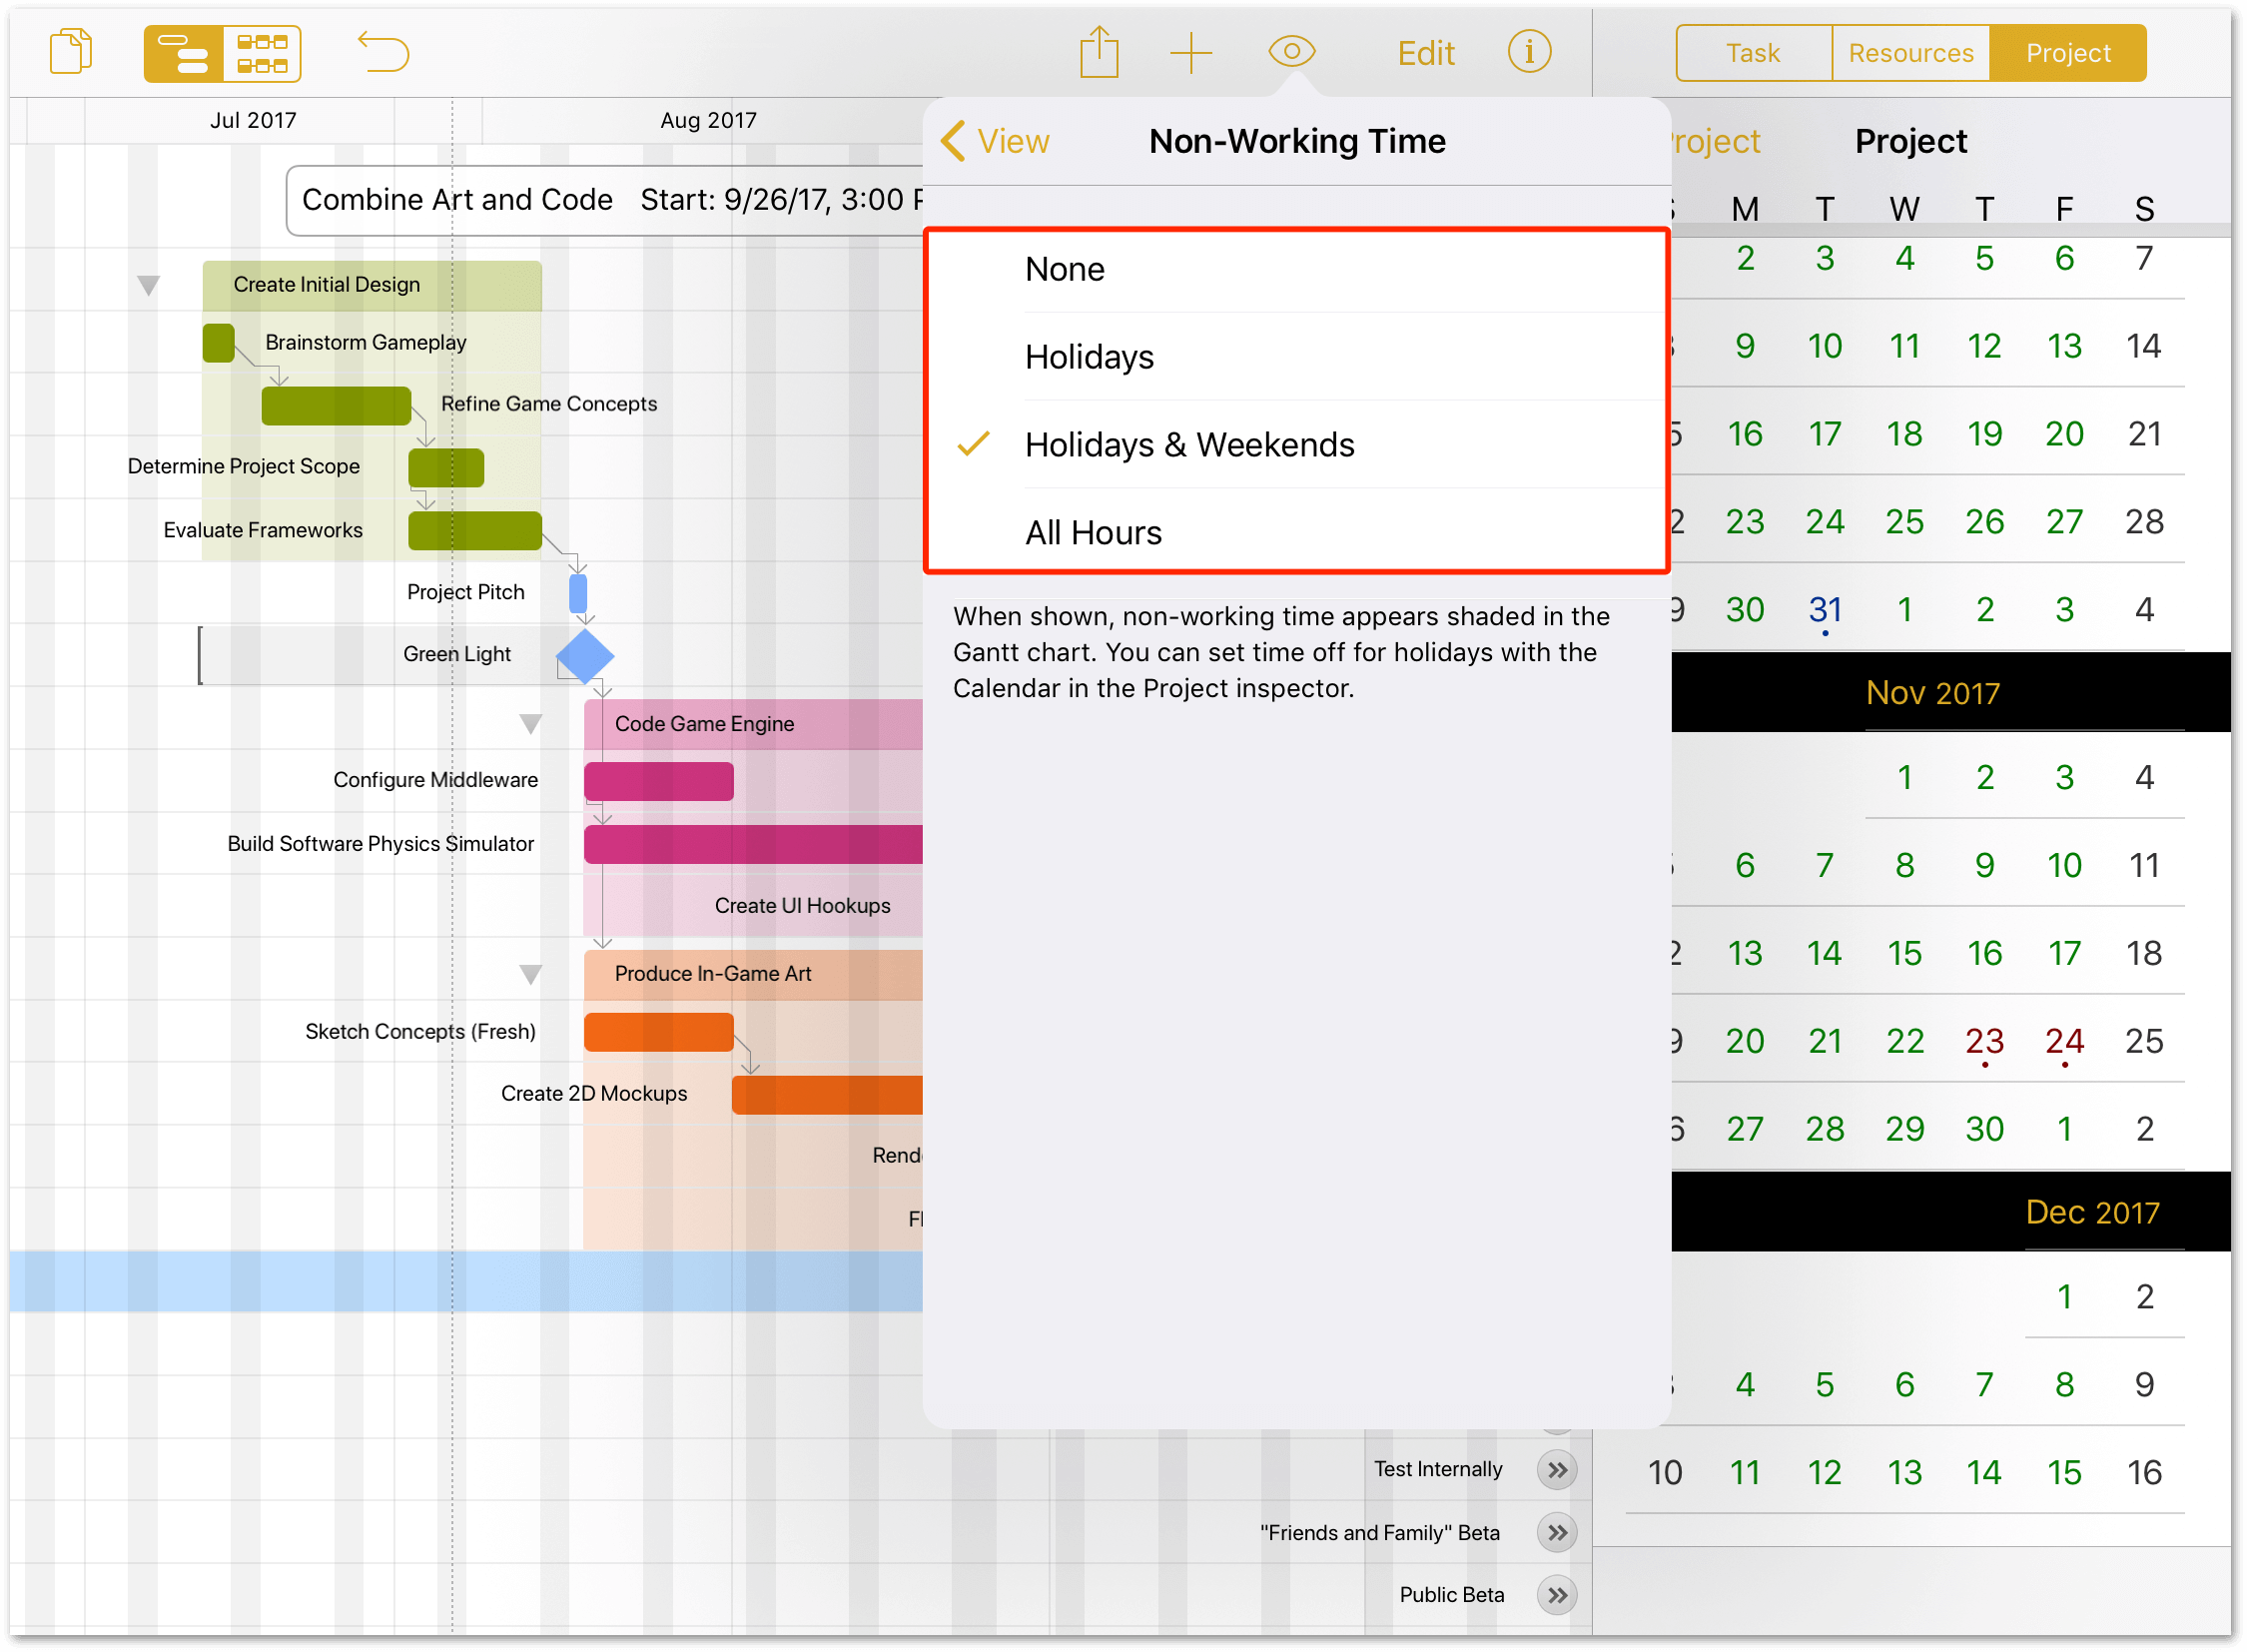
If you choose All Hours, all non-working hours during the span of the project receive a gray background. This includes, for example, an unpaid lunchtime (if specified), and the time between normal working hours.
Step 11: Creating Resources
Now it’s time to start adding the team members, equipment, and materials necessary to bring the project to fruition. Every person, piece of infrastructure, and raw ingredient that contributes to reaching the project’s goal is counted as a resource.
-
Start by tapping the Resources tab:
As you can see, the project already has one resource type assigned: Resource 1, a Staff member.
-
Tap Resource 1 to edit the resource’s details, including name, email address, resource type, and personal calendar:
For identification purposes, OmniPlan Pro uses the email address assigned to Staff resources as their unique identifier. If you are managing multiple projects in OmniPlan Pro, and trying to balance workloads and resources across those projects, be sure to verify that the email addresses you provide are unique.
Typically, this shouldn’t be a problem; just be careful about using group email addresses when, instead, you should use each person’s individual email address.
For this tutorial, you can use whatever names you’d like, or you can use the handy list of resources in the following table. Just be sure to specify a half-dozen people and one resource type as Equipment.
| Name | Resource Type |
|---|---|
| Henry Jonathan | Staff |
| Janet van Dyne | Staff |
| Anthony Edward Stark | Staff |
| Robert Bruce Banner | Staff |
| Thor Odinson | Staff |
| Richard Milhouse Jones | Staff |
| J.A.R.V.I.S (Render Farm) | Equipment |

You can remove or rearrange resources at any time by tapping Edit at the bottom of the Resources inspector.
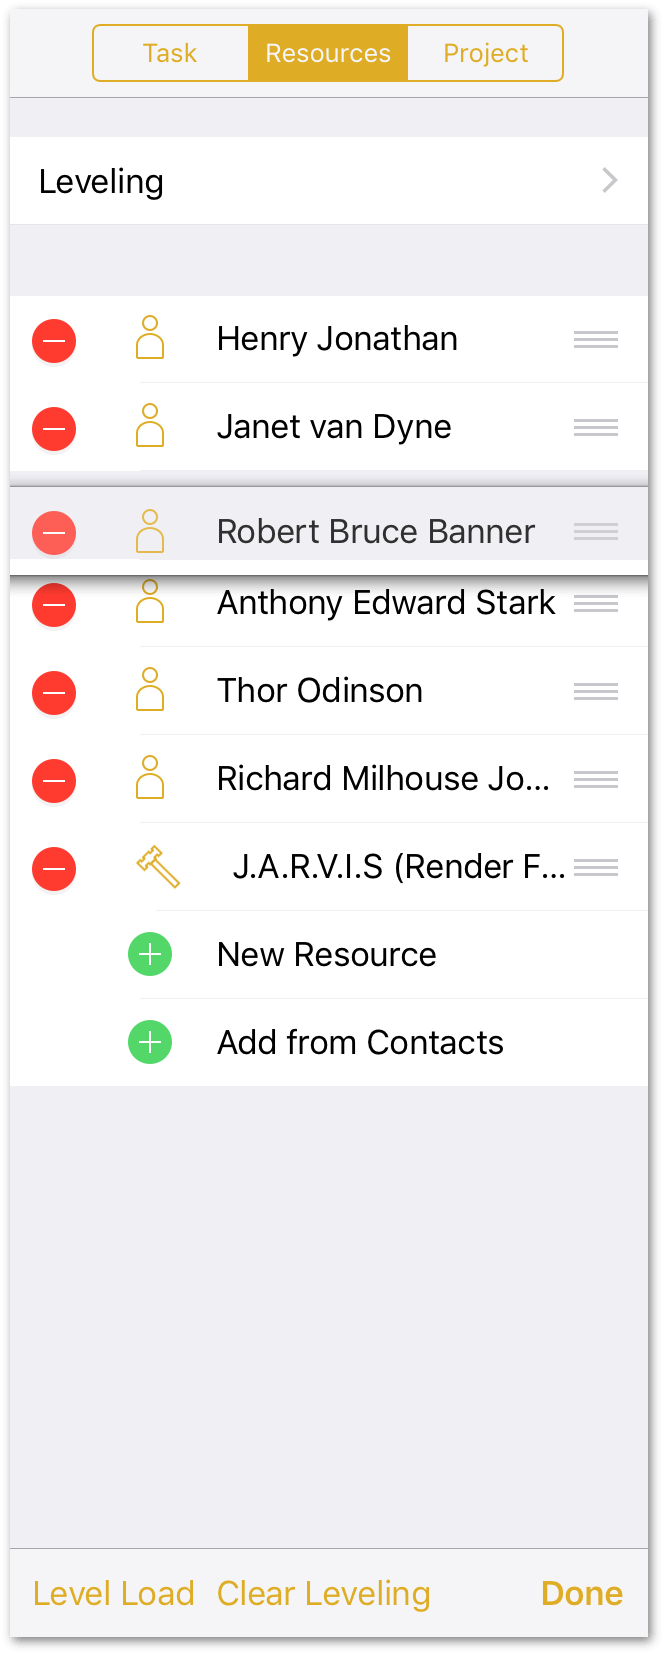
Drag on the handle at the right edge of a resource to move it up or down in the list, or tap the delete button at left to remove a resource. Tap Done when you’re finished rearranging or pruning the resources.
Step 12: Assigning Resources to Tasks
Now that you’ve added the resources necessary for The Game Plan, the next logical thing to do is assign those resources to the tasks.
To assign resources, tap to select the first task in the project (Brainstorm Gameplay), open the Task inspector, and then tap the Assignments tab:
However, before diving into making the assignments, let’s first examine the top part of the Assignments tab:
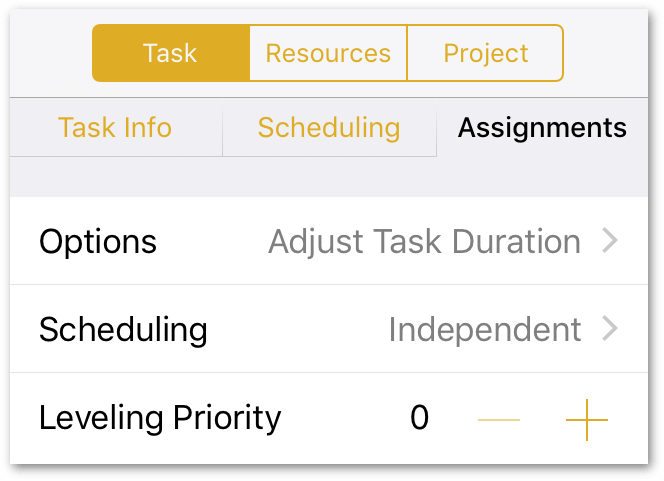
This section of the Assignments tab gives you the ability to adjust the behavior of tasks when resources are assigned, how tasks are treated for scheduling, and which tasks receive priority over others when leveling your project. The task Assignment behaviors include:
-
Options: Choose one of the following options:
- Adjust Task Duration: As resources are assigned, the task’s duration adjusts according to the amount of effort each resource contributes. For example, if you assign two people who are working 100% on a task that should take 2 days, the task’s duration is reduced to 1 day.
- Adjust Task Effort: As resources are assigned, the task’s duration remains fixed, and each person assigned to the task devotes all of their time (100% effort) to the task.
- Adjust Assigned Amounts: As resources are assigned, the task’s duration remains fixed, while the amount of effort each resource contributes is reduced. For example, if you assign two people to a task that should take 2 days, the task’s duration remains set at two days, and the effort contributed by each resource is adjusted to 50%. If you assign a third person to the task, each resource’s effort is reduced to 33%, and so on.
-
Scheduling: Choose between the following two choices:
- Independent: Assigned resources work independently on the task.
- Meeting: Assigned resources meet and work on the task at the same time. Resources need to be available for work on the assigned task.
-
Leveling Priority: Assign a numerical value to tasks that you want to have prioritized whenever you level the project. The lower the number, the higher priority the task receives.
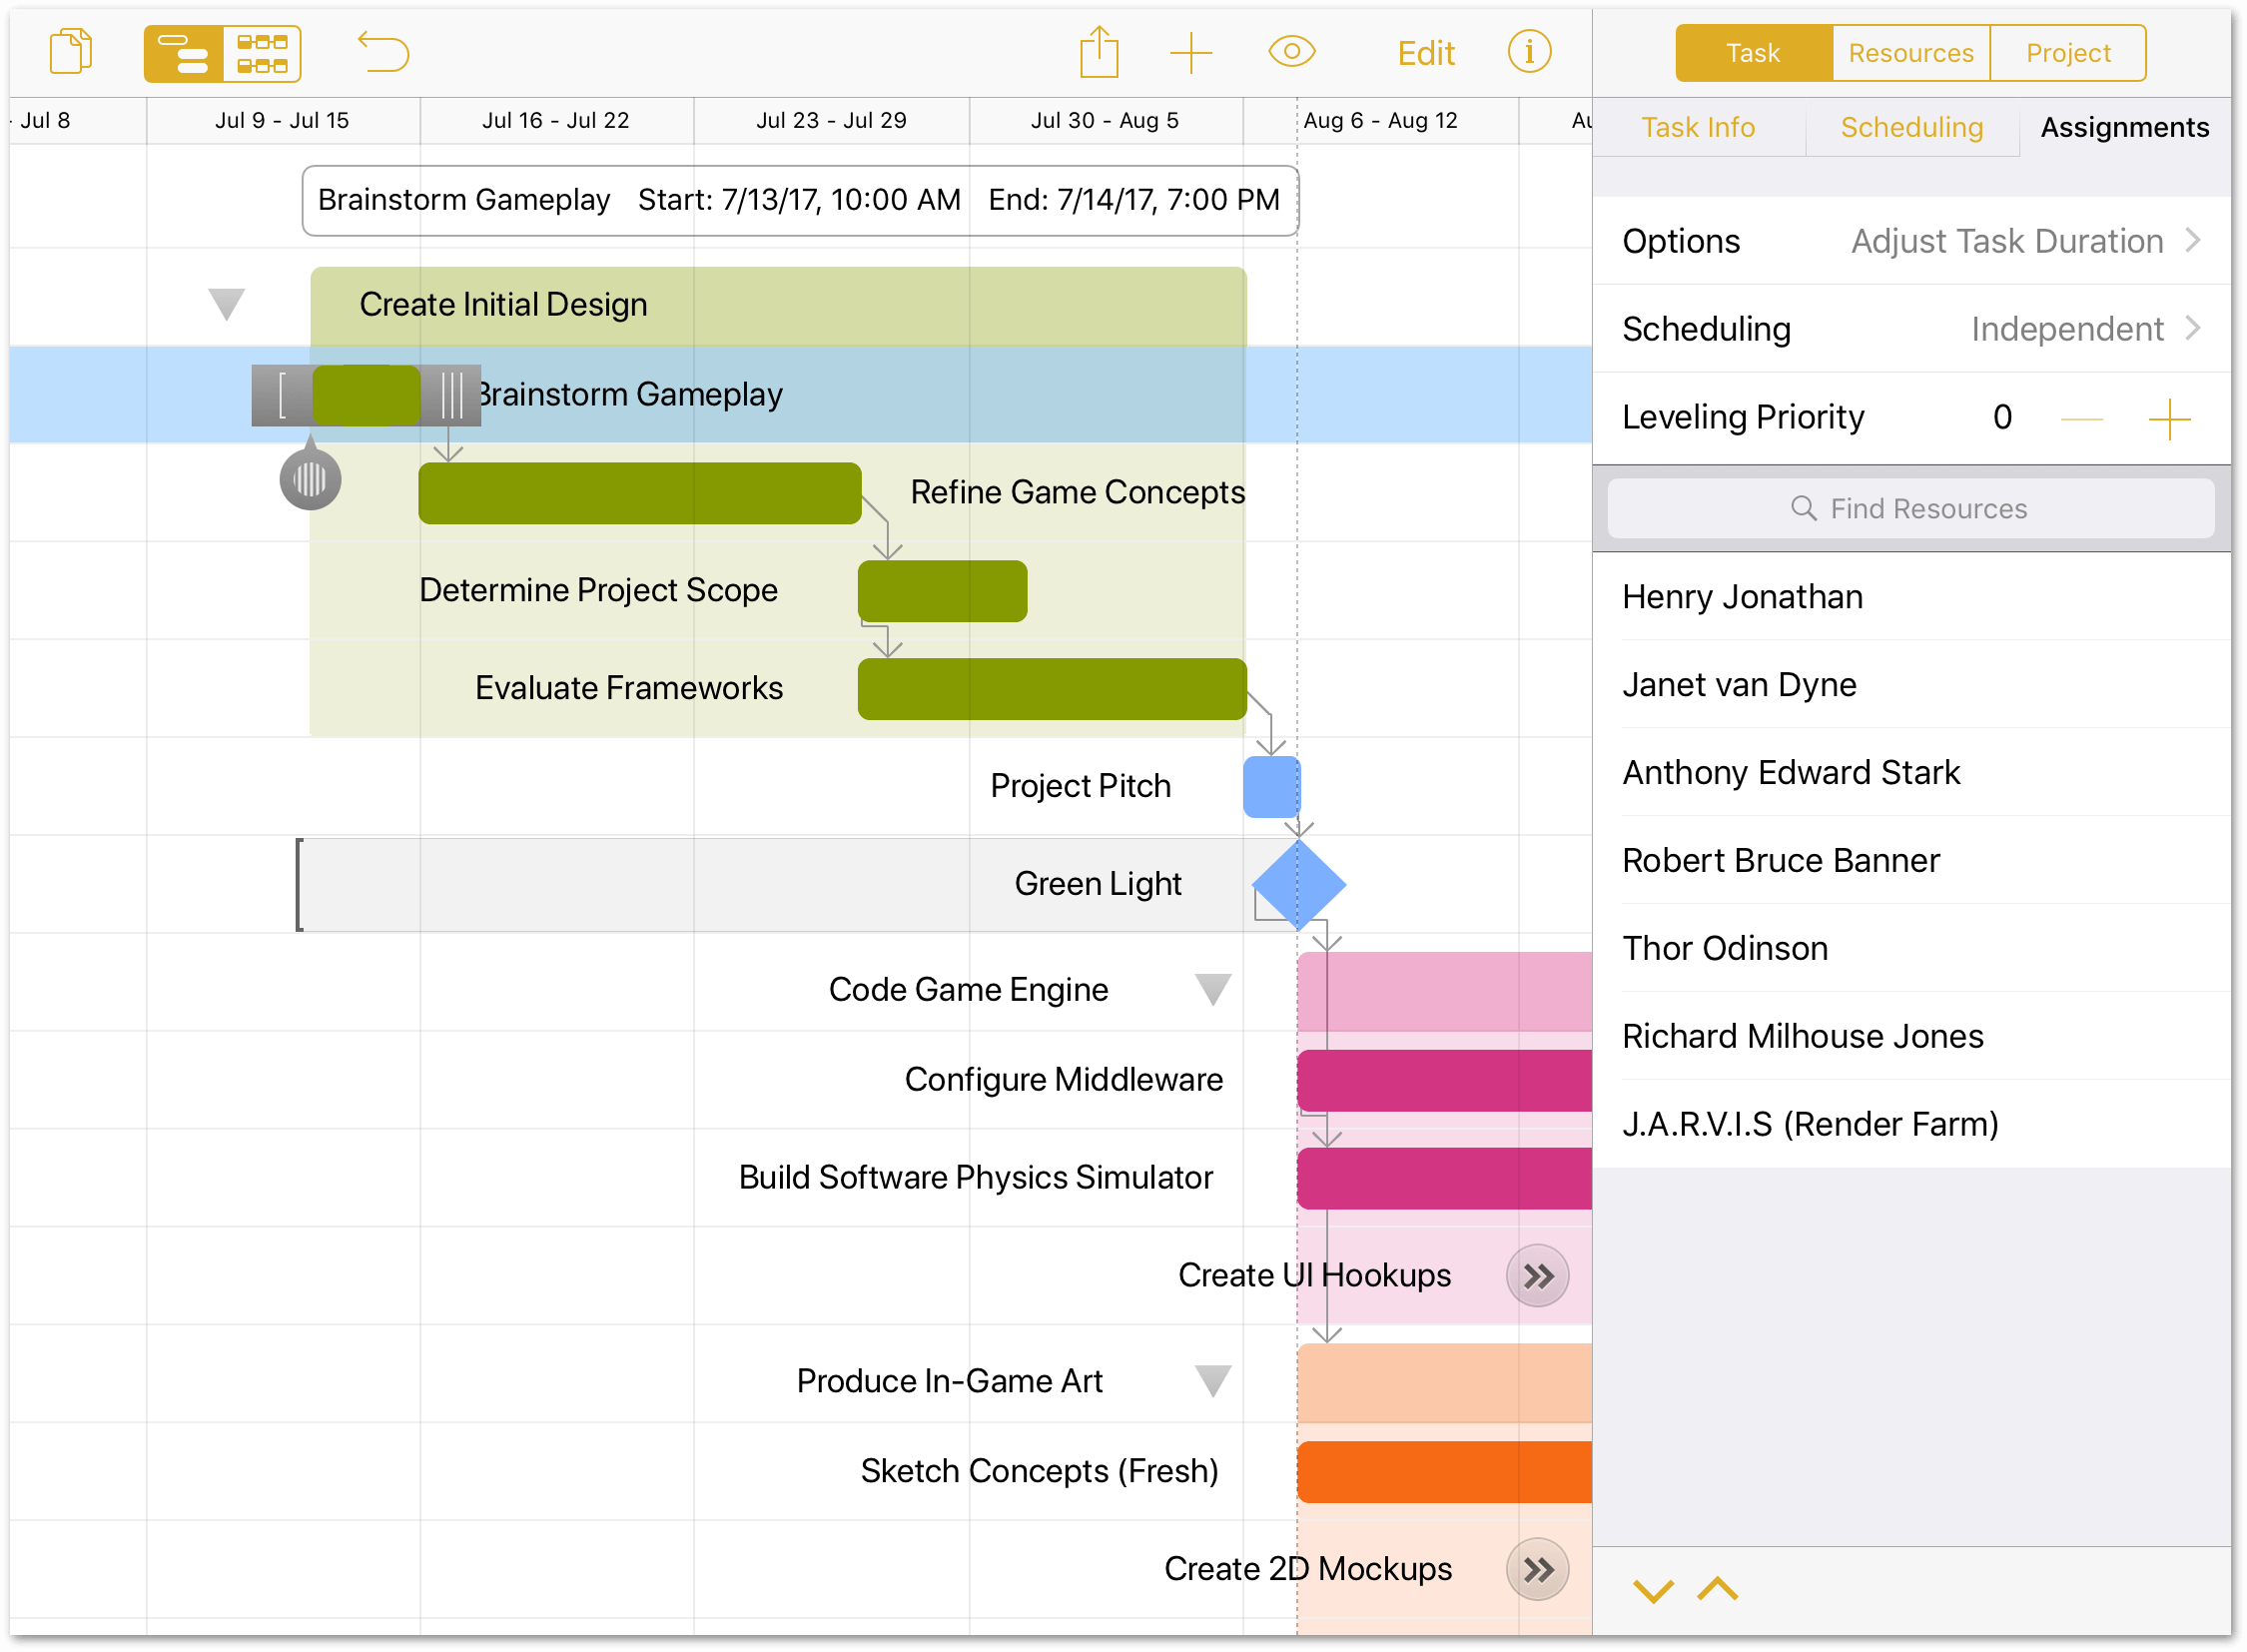
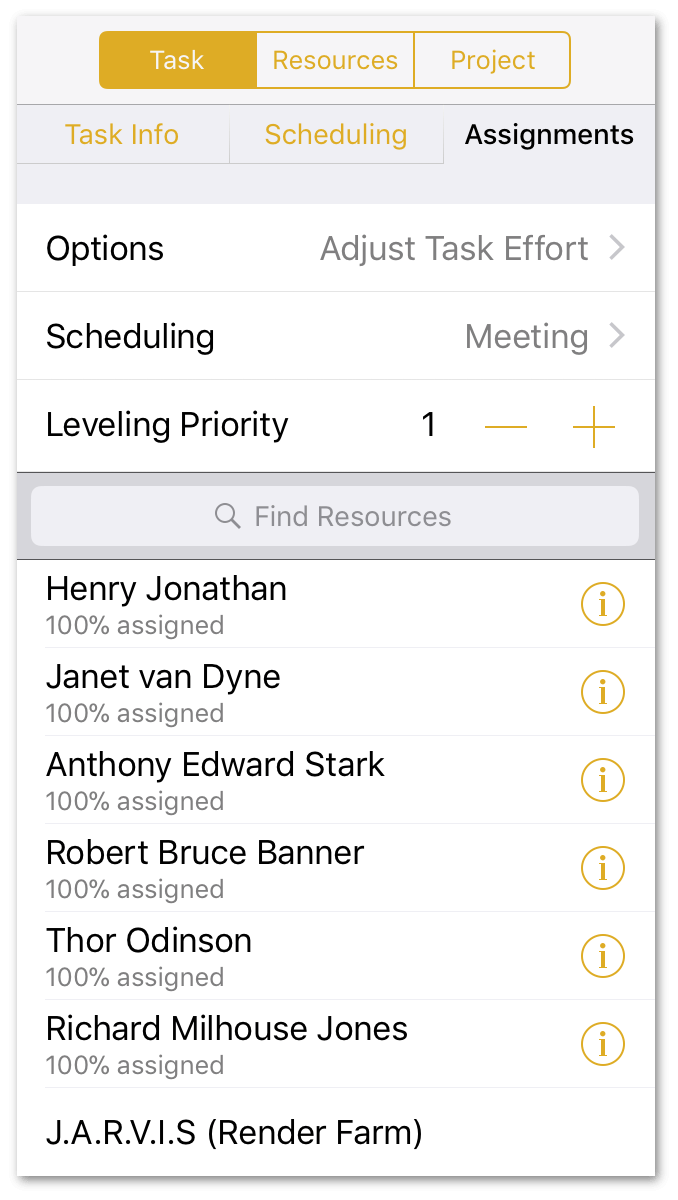
Now that you know how to adjust a task’s behavior, let’s return to the Brainstorm Gameplay task. This particular task requires everyone’s effort, where the team meets in the Conference Room of Extraordinary Size to whiteboard and hash out ideas.
In the Assignments tab, do the following:
- Set Options to Adjust Task Effort.
- Set Scheduling to Meeting.
- Set the Leveling Priority to 1, making this a high-priority task.
- Tap to select all available human resources (no equipment necessary).
When finished, here’s how the Assignments tab for the Brainstorm Gameplay task should appear:
Using similar methods, use the information in the following table to set task behaviors and assign resources:
| Task | Options | Scheduling | Priority | Resources |
|---|---|---|---|---|
| Refine Game Concepts | Adjust Task Effort | Meeting | 1 | Everyone |
| Determine Project Scope | Adjust Assigned Amounts | Meeting | 1 | Janet van Dyne, Robert Bruce Banner |
| Evaluate Frameworks | Adjust Assigned Amounts | Independent | 0 | Henry Jonathan, Anthony Edward Stark, Richard Milhouse Jones |
| Project Pitch | Adjust Task Effort | Meeting | 1 | Everyone |
| Green Light | Adjust Task Effort | Meeting | 1 | Janet van Dyne |
| Configure Middleware | Adjust Task Effort | Independent | 1 | Henry Jonathan, Richard Milhouse Jones |
| Build Software Physics Simulator | Adjust Task Duration | Independent | 1 | Anthony Edward Stark |
| Create UI Hookups | Adjust Assigned Amounts | Independent | 1 | Henry Jonathan, Richard Milhouse Jones, Anthony Edward Stark |
| Sketch Concepts (Fresh) | Adjust Task Effort | Independent | 1 | Thor Odinson, Robert Bruce Banner |
| Create 2D Mockups | Adjust Task Effort | Independent | 1 | Thor Odinson, Robert Bruce Banner |
| Render Pixel Sprites | Adjust Task Duration | Independent | 1 | J.A.R.V.I.S (Render Farm) |
| Fleece Polygons | Adjust Task Duration | Independent | 1 | Thor Odinson |
| Combine Art and Code | Adjust Assigned Amounts | Independent | 1 | Thor Odinson, Robert Bruce Banner, Janet van Dyne |
| Release Candidate 1 (RC1) | Adjust Task Duration | Independent | 1 | Janet van Dyne |
| Test Internally | Adjust Task Effort | Independent | 1 | Everyone |
| “Friends and Family” Beta | Adjust Task Effort | Independent | 2 | Everyone |
| Public Beta | Adjust Task Effort | Independent | 2 | Everyone |
| Game Release | Adjust Task Duration | Independent | 1 | Janet van Dyne |
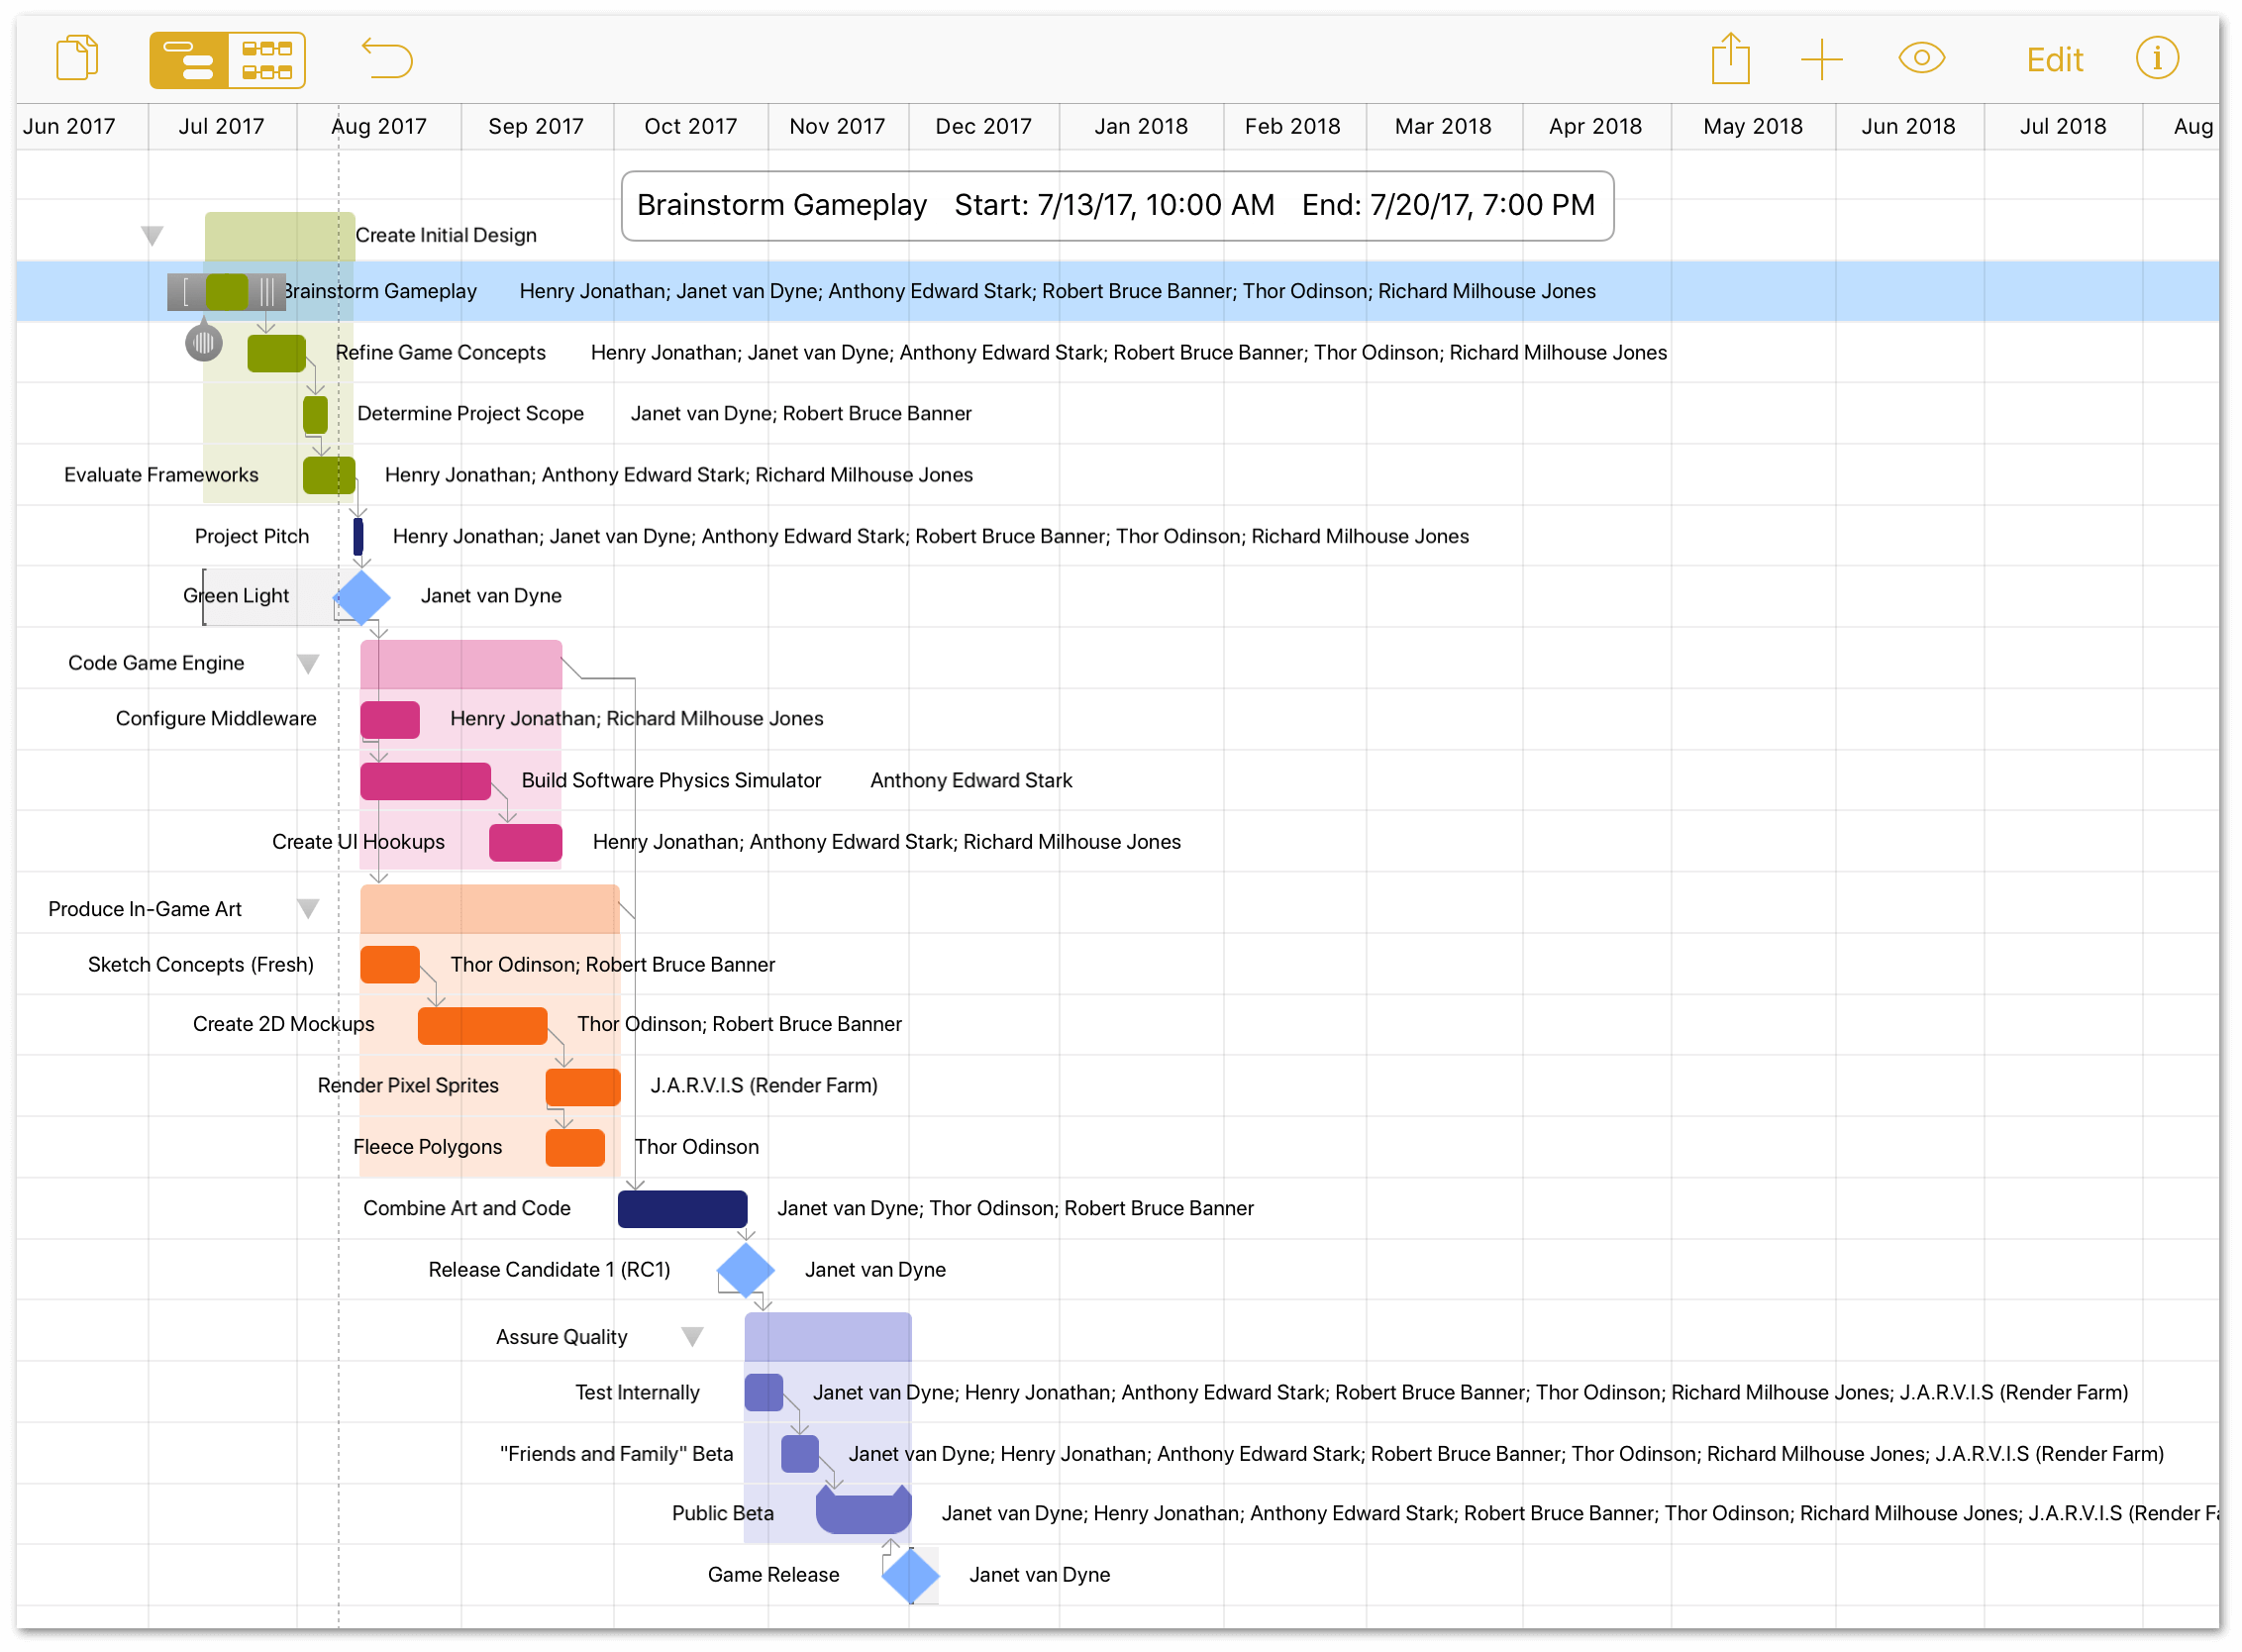
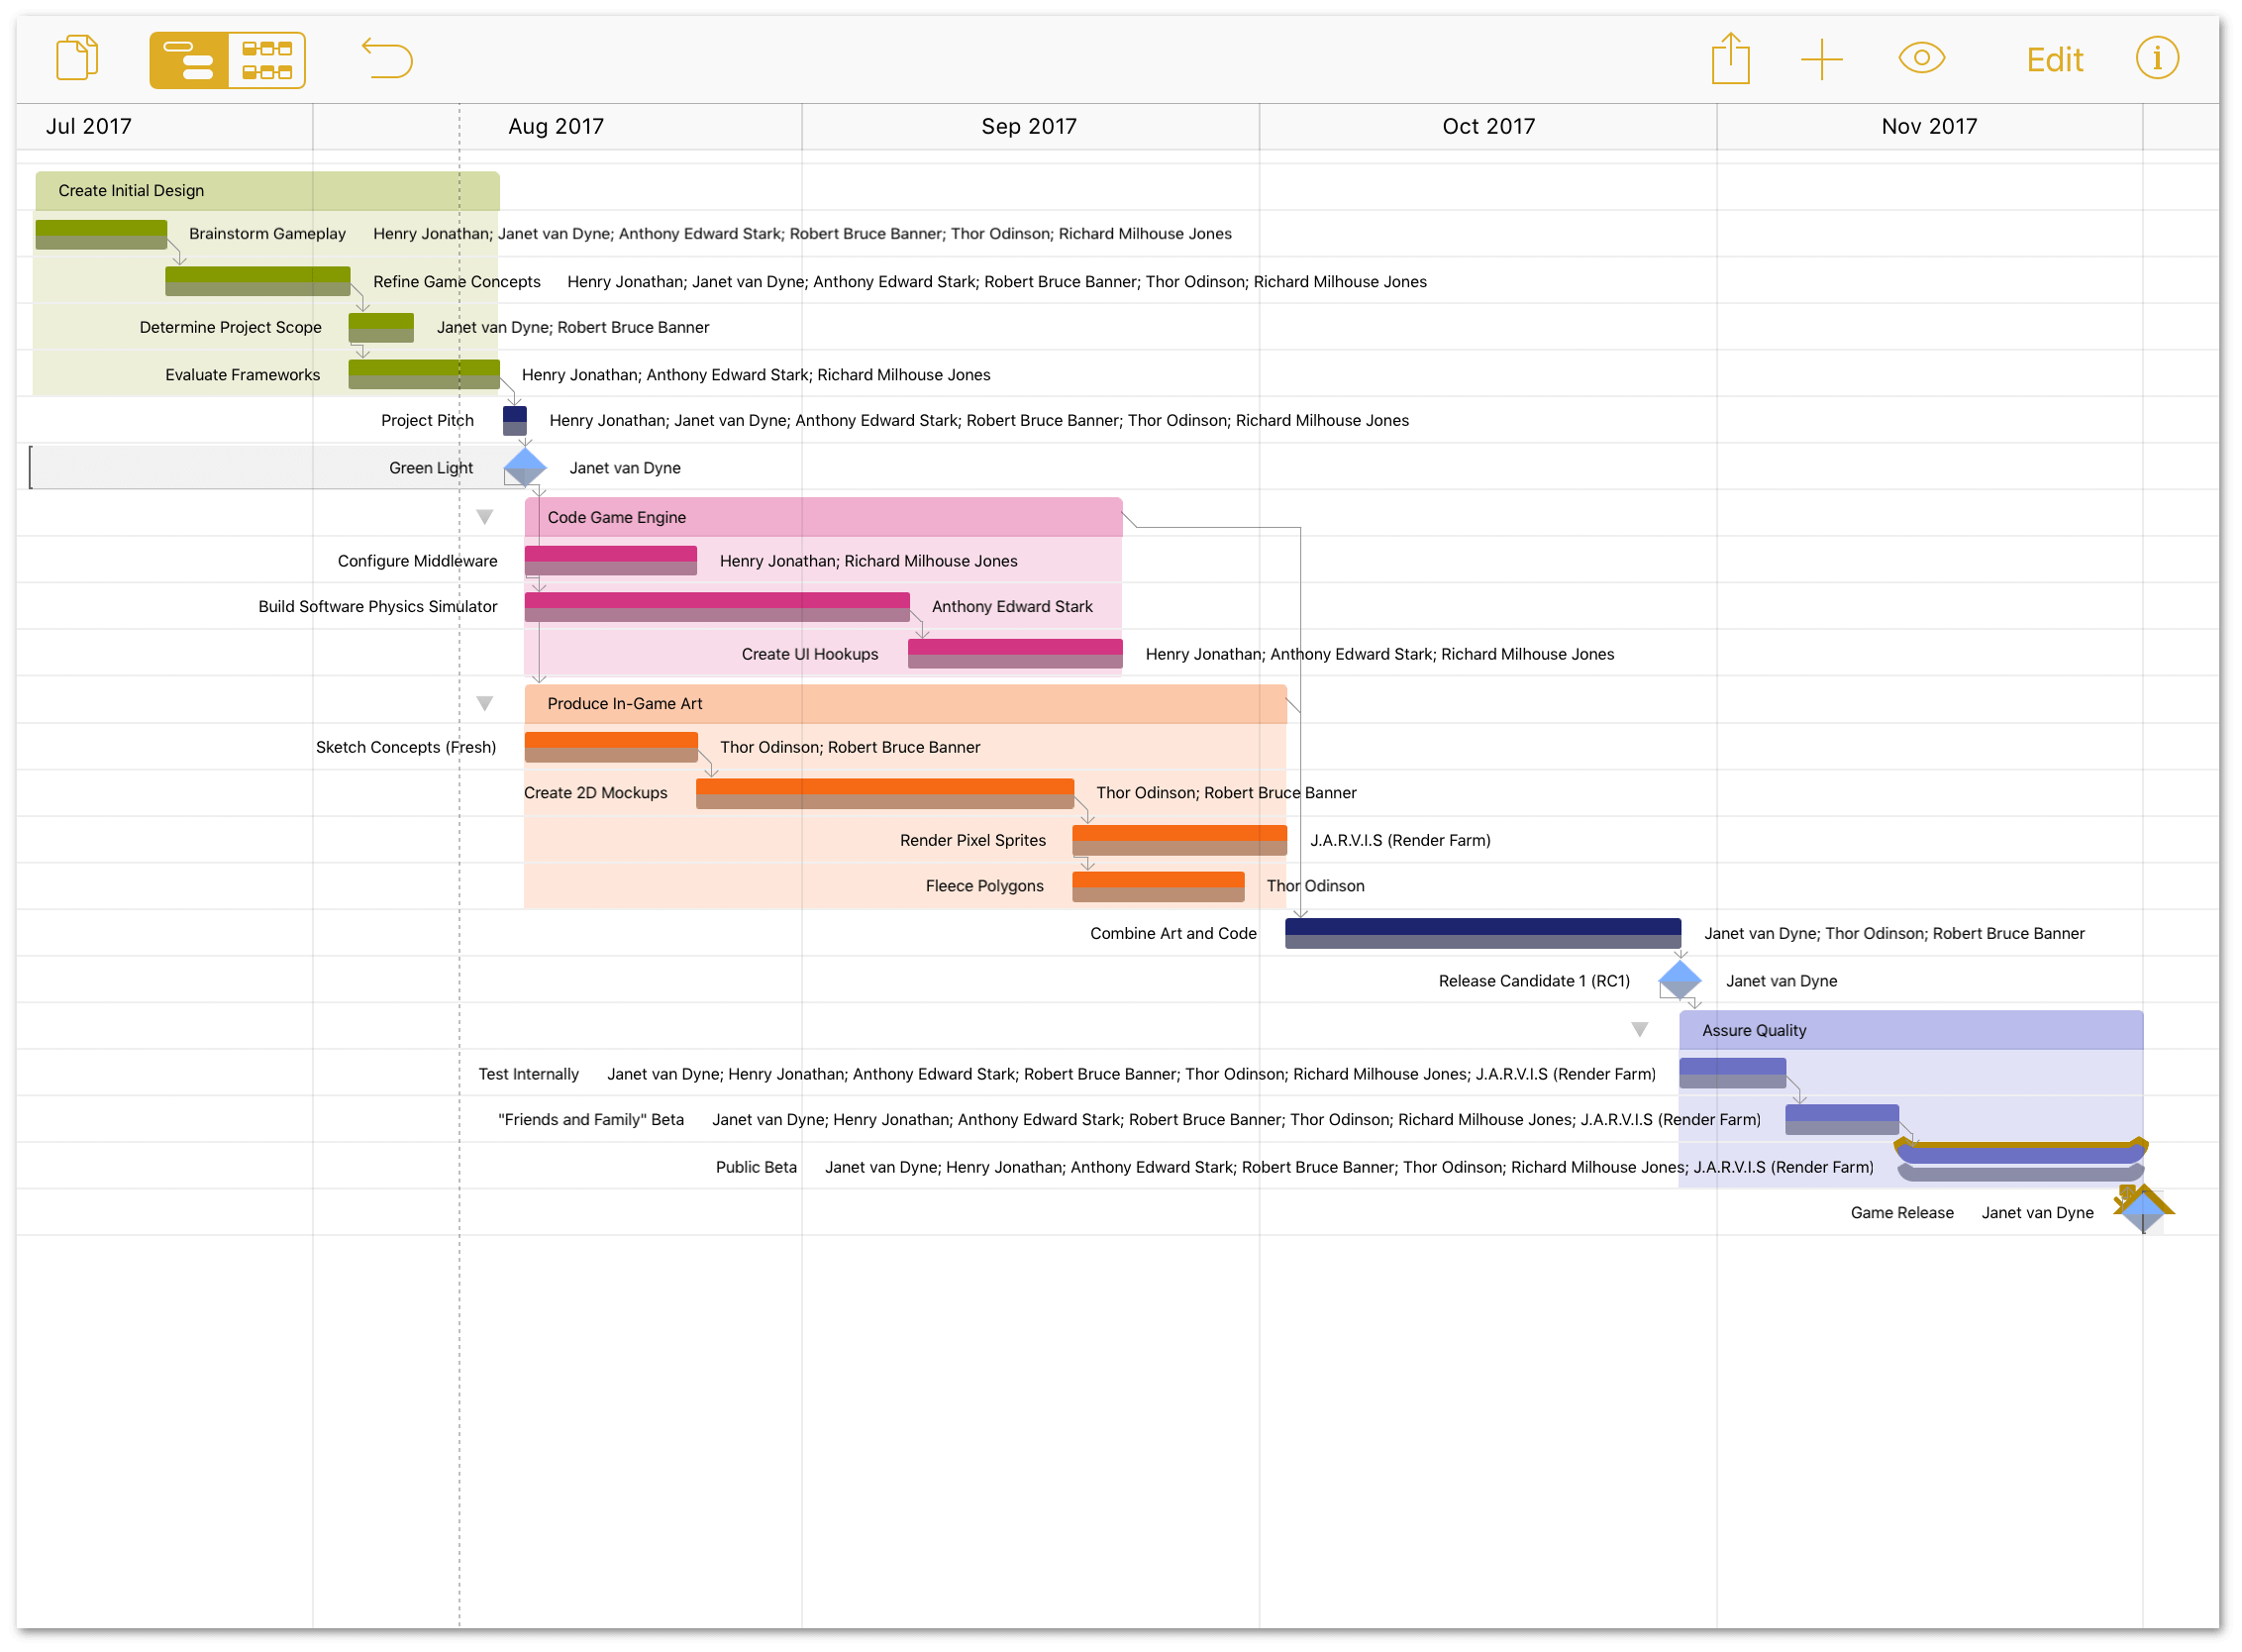
When you’ve finished assigning everyone to the project, it should look similar to the following:
Step 13: Setting Individual Schedule Exceptions
Individual staff members may have personalized work schedules, and they’ll almost certainly have individual needs for time off over the course of a project.
To display an employee’s normal schedule:
- Tap to choose the Resources inspector.
- Tap to select the employee whose schedule you need to adjust.
-
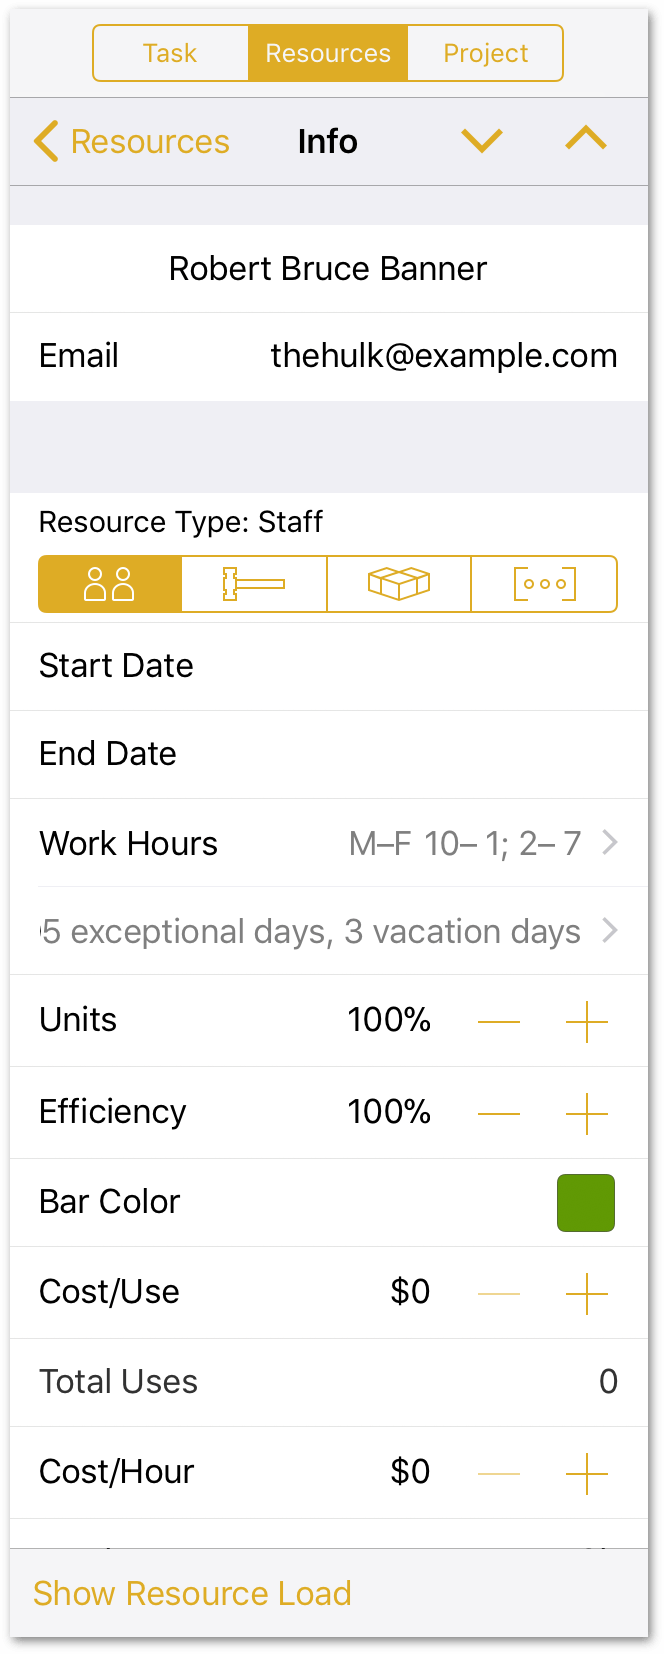
To adjust their Normal Working Hours, tap Work Hours, and then adjust their schedule accordingly:
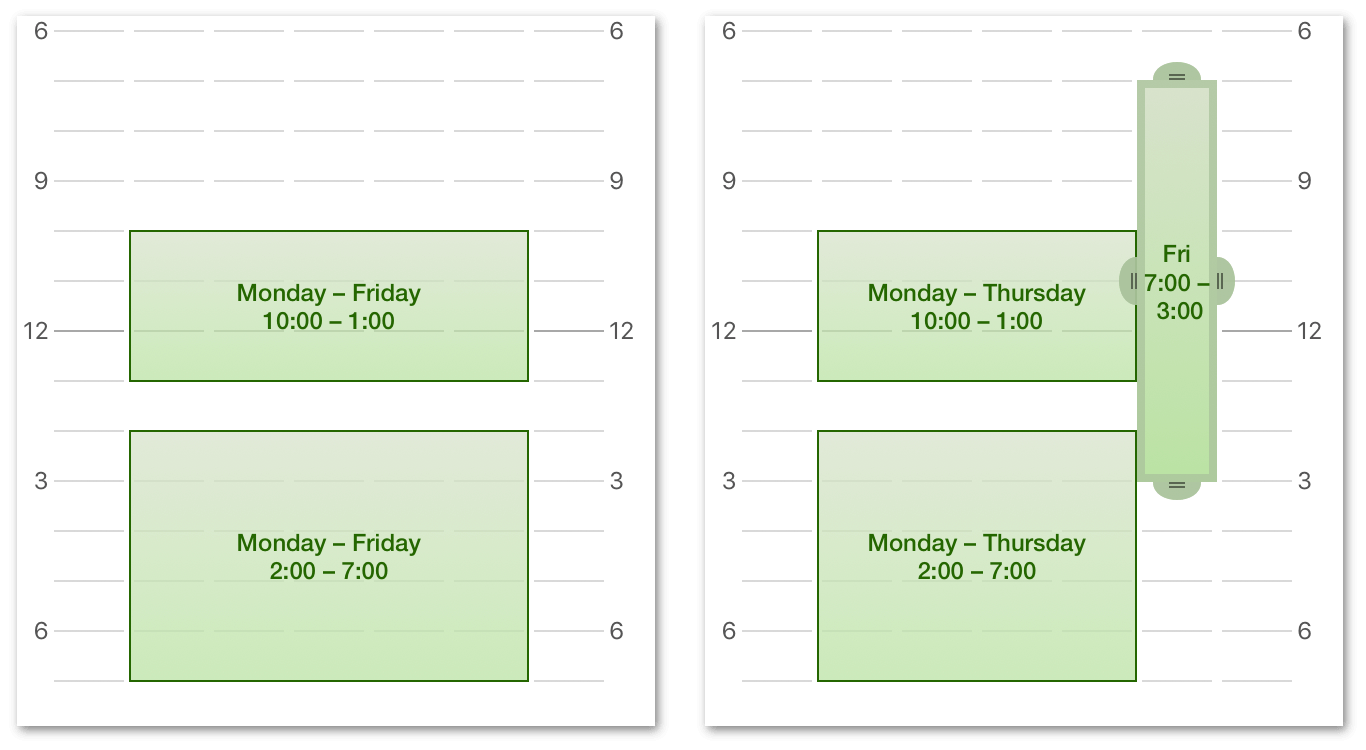
Here, Bruce’s Normal Working Hours have been changed so he can come in and leave earlier on Fridays.
-
To add time off, or to authorize overtime, tap the Calendar field, tap to select the date, and adjust their schedule accordingly:
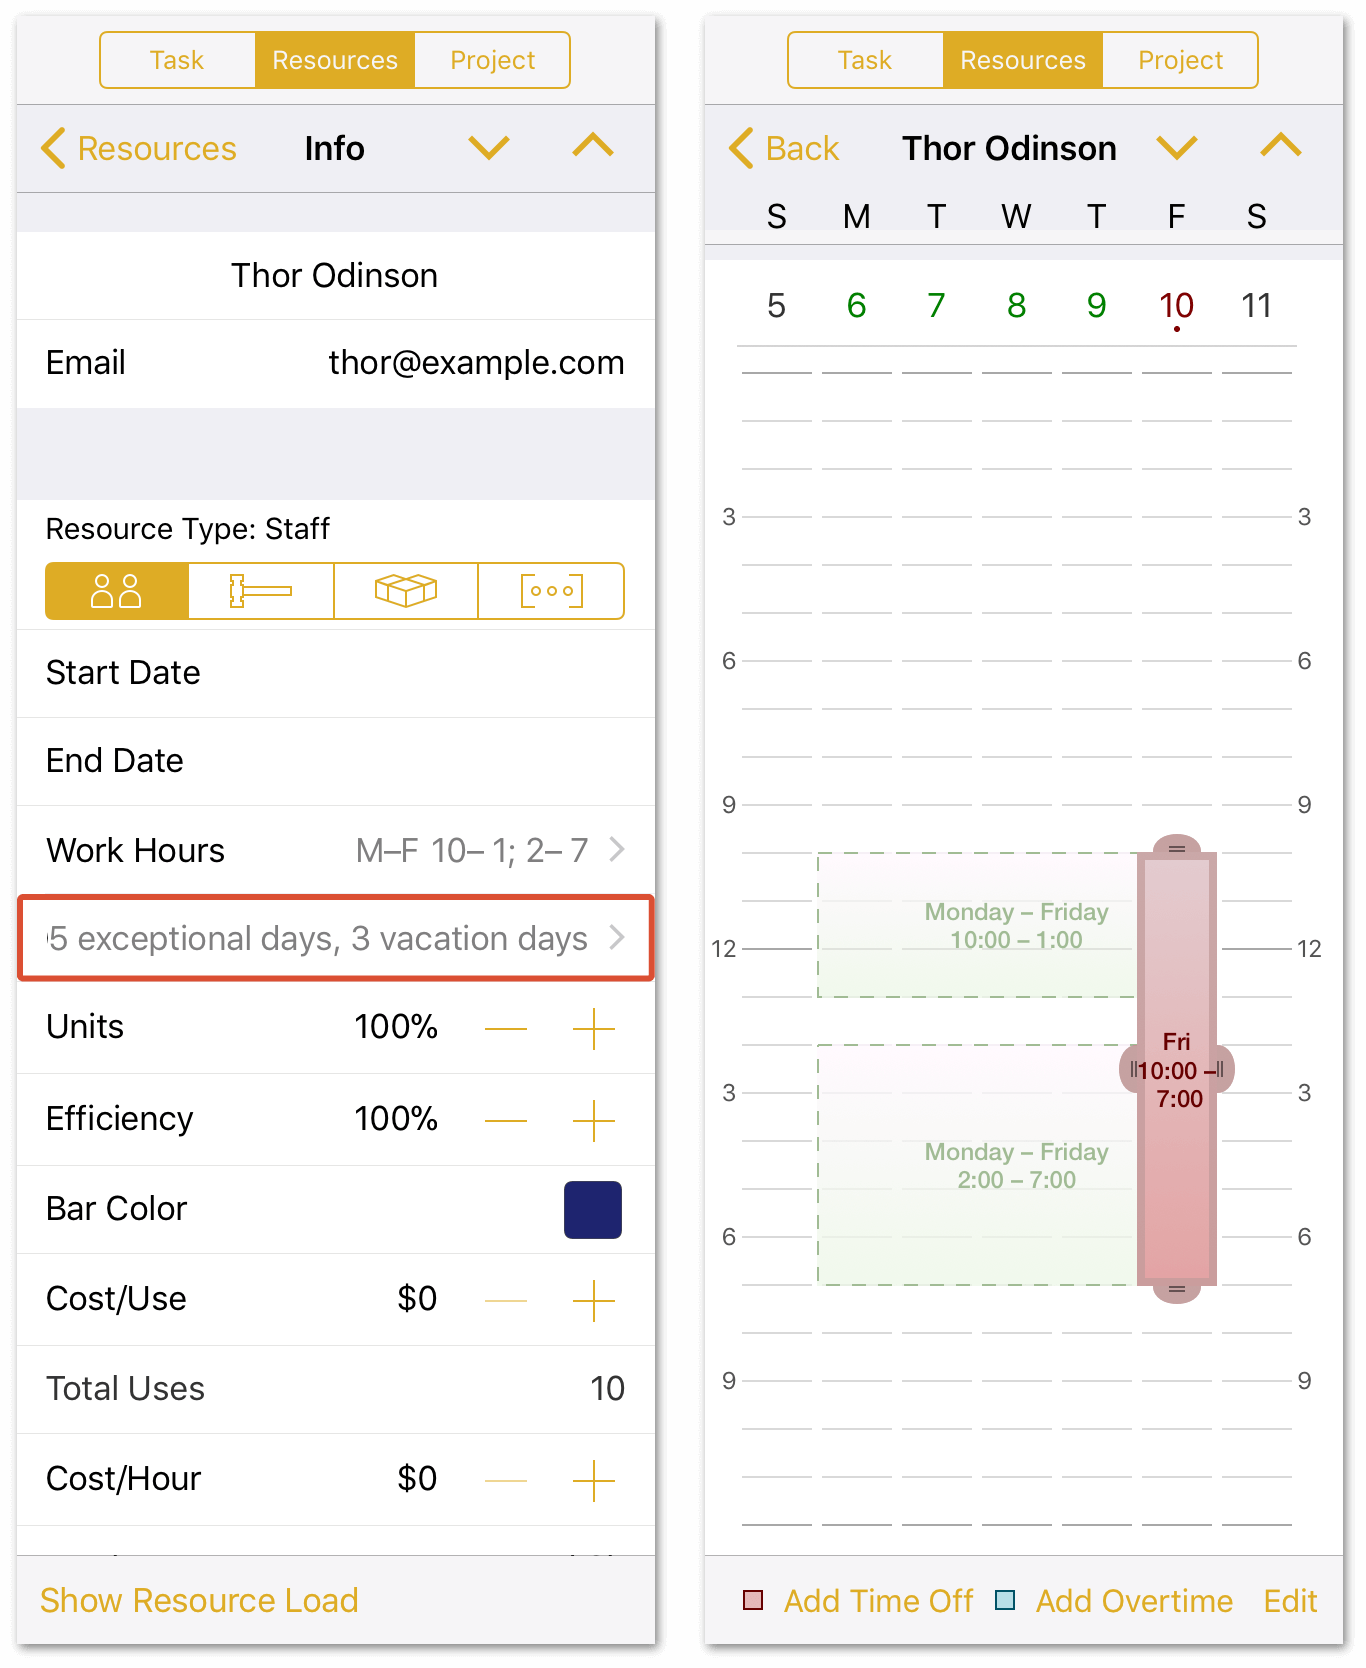
Here, Thor is scheduled to be out of the office on Friday, November 10 so he can make it back to Asgard in time for the Feast of the Einherjar.
Step 14: Assigning Costs to Tasks and Resources
Once a project gets started, tracking costs and expenses is a critical part of your role as project manager. As part of setting up the project and determining how much it will cost, you can assign costs to every resource used or acquired during the course of the project, including Staff, Equipment, and Materials.
Resources can be assigned both Cost per Hour and/or a Cost per Use in the Resources inspector. Miscellaneous costs not associated with a specific resource can instead be added to the task itself, as Task Cost in the Task inspector.
To get an idea of how much this project will cost, start by assigning an hourly rate to the team members:
- Tap to view the Resources inspector.
-
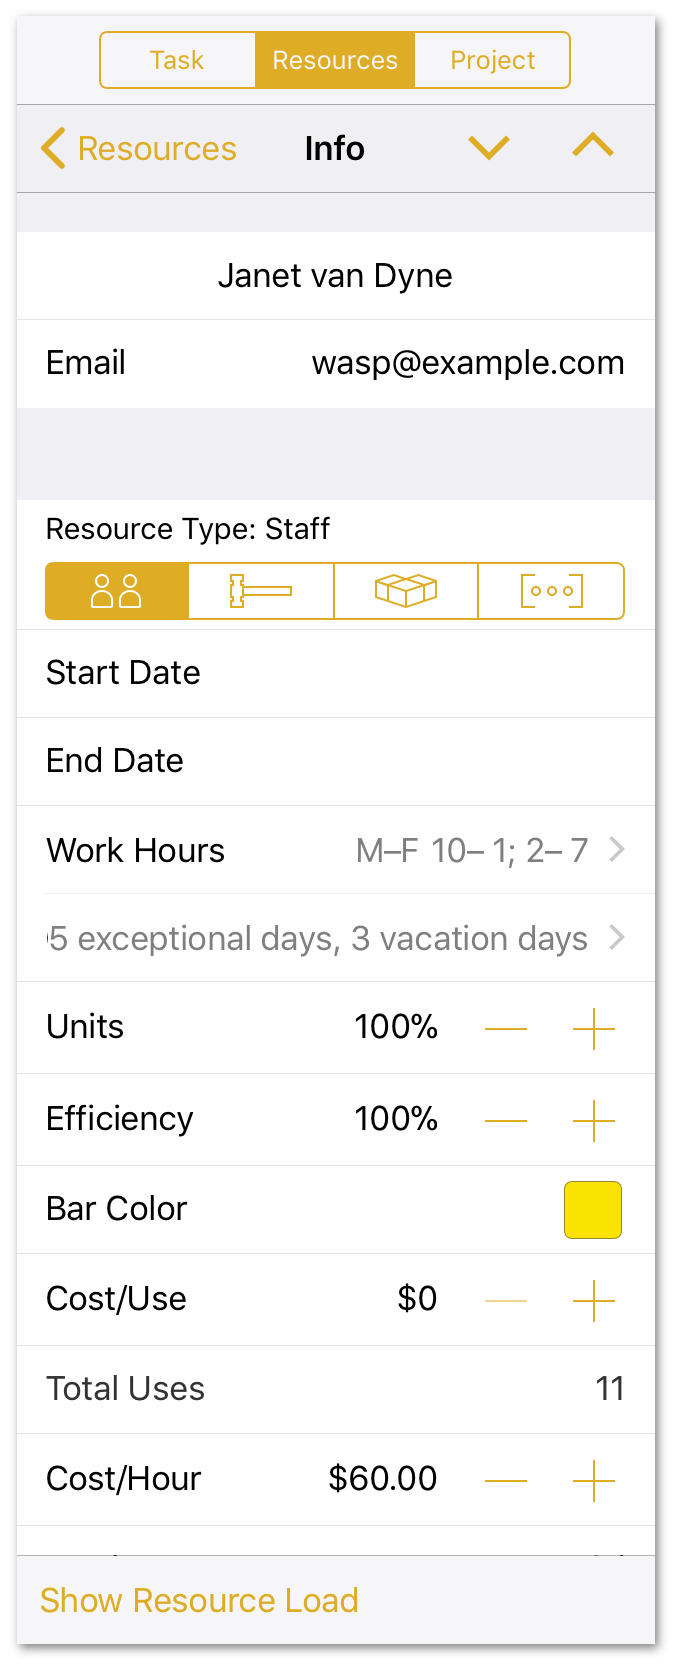
Tap to select individual team members, and assign a Cost/Hour for each as follows:
- Henry Jonathan ($42.00/hour)
- Janet van Dyne ($60.00/hour)
- Anthony Edward Stark ($50.00/hour)
- Robert Bruce Banner ($50.00/hour)
- Thor Odinson ($45.00/hour)
- Richard Milhouse Jones ($43.00/hour)
-
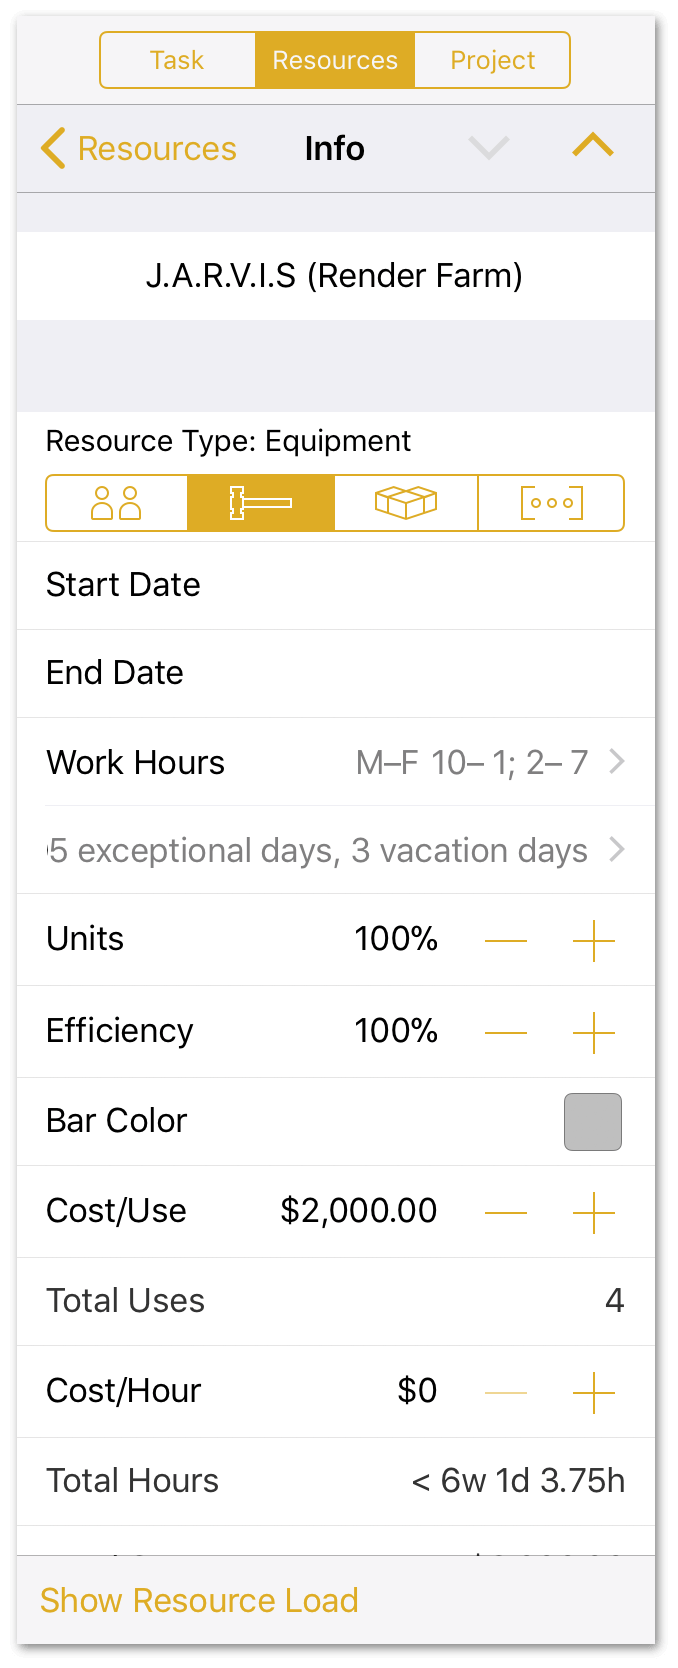
Still in the Resources inspector, tap to select J.A.R.V.I.S (Render Farm), and set the Cost/Use to $2000.00:
-
To add an additional expense to a task, do the following:
a. Tap to select Public Beta.
b. Tap to select the Task inspector.
c. Assign a Task Cost of $2,000.00 to cover bringing in a Social Media consultant to monitor and respond to customers during that time.
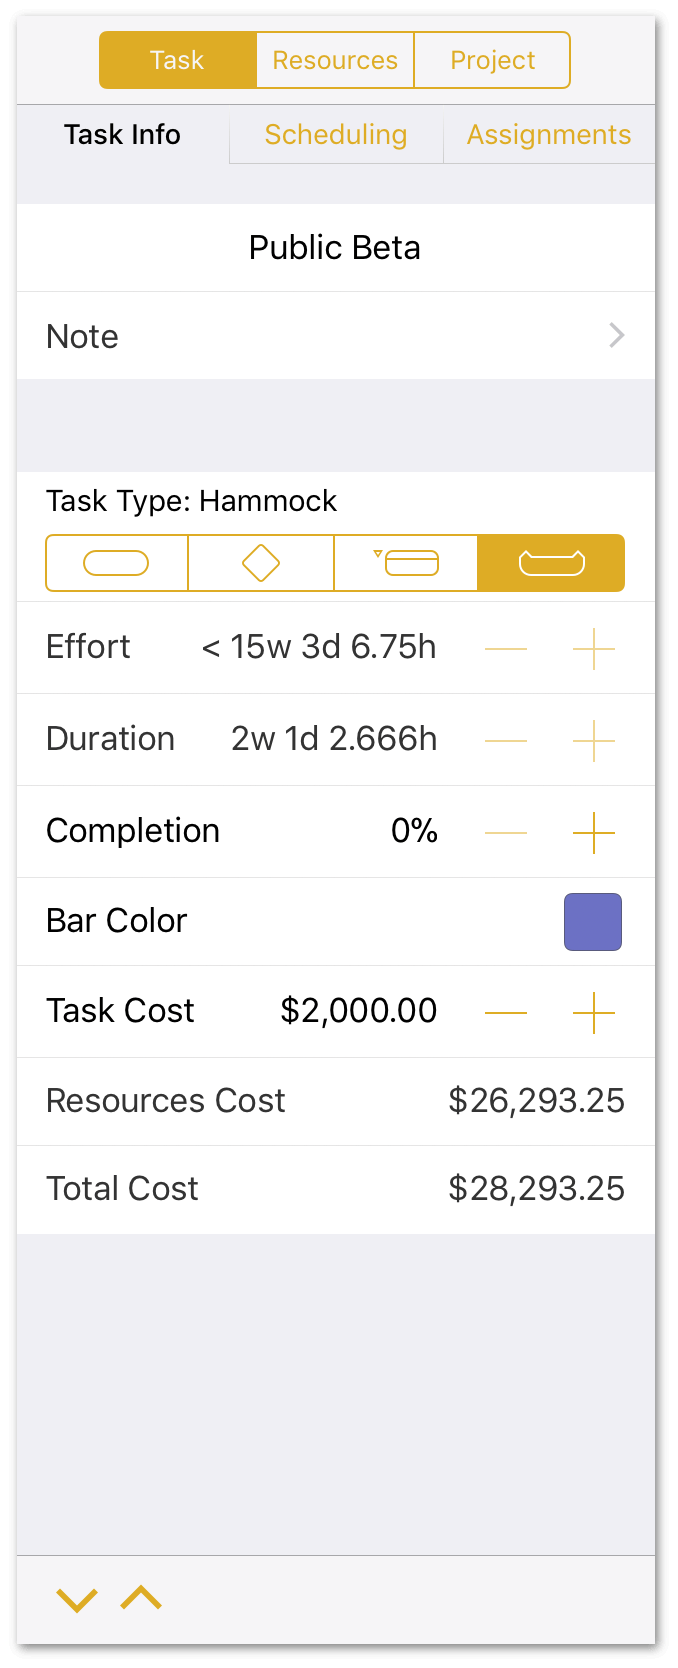
To see the overall cost of the project, tap to select the Project inspector and look at the Total Cost field. Knowing this in advance helps you to plan for additional costs, or it could force you to go back and reallocate resources if the project is over budget.
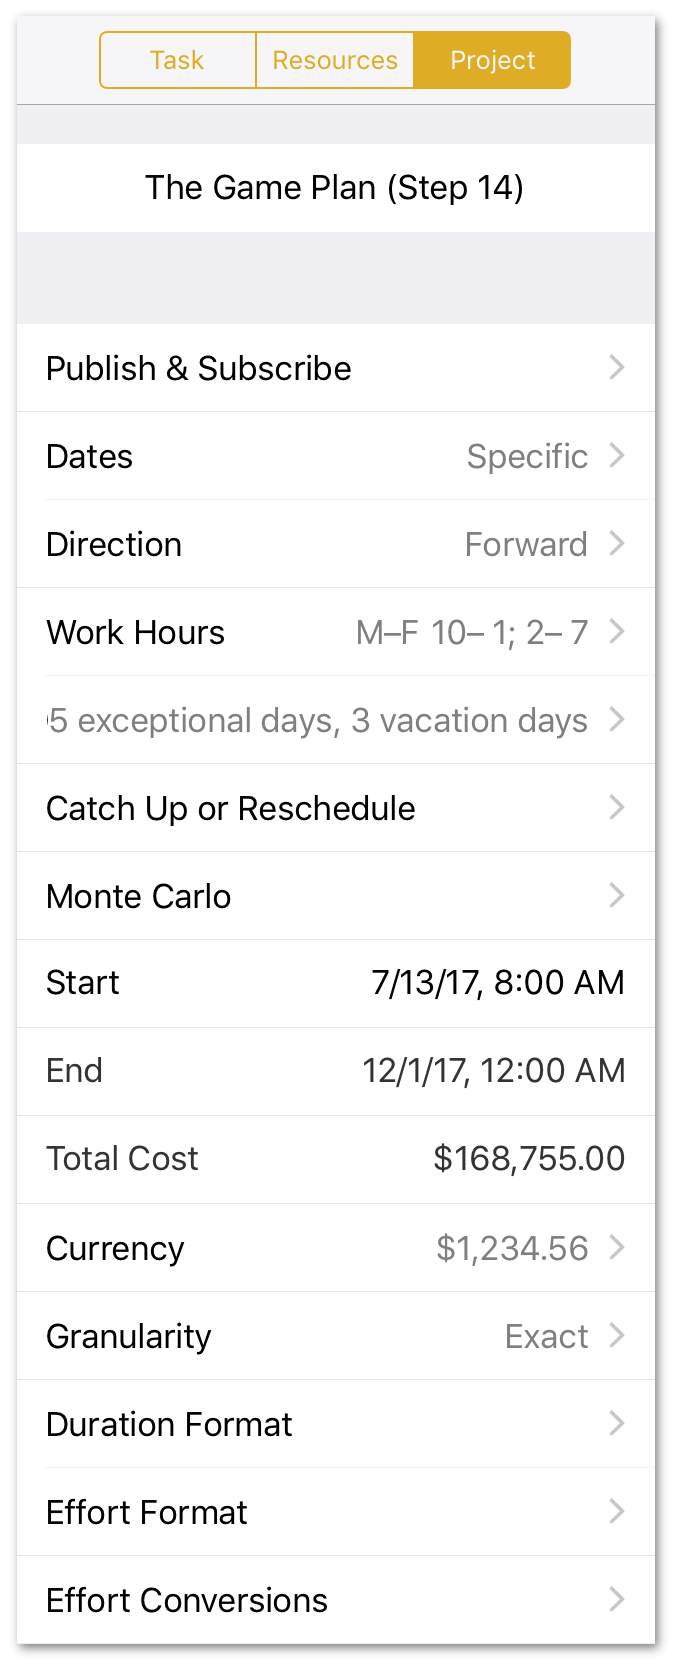
The Total Cost of the project, however, isn’t entirely accurate right now. This is because the Public Beta has been set up as a Hammock Task, which allows it to shrink or grow as the project progresses. You’ll want to keep a close eye on the Total Cost, as it will most certainly go down, as the duration of the Hammock Task shortens.
Step 15: Leveling the Project
After assigning team members and equipment to the tasks, you can ensure the team is at its most productive by Leveling the workload across resources and tasks.
It’s hard to overstate the power of leveling in OmniPlan. When you first level a project, you cross the line between human and machine—making the statement that you’ve added everything you know about the project to the plan, and now it’s time to see what OmniPlan can do to help get all those things done optimally. Automation happens, and everything moves to its most efficient place based on the model of the project you’ve described.
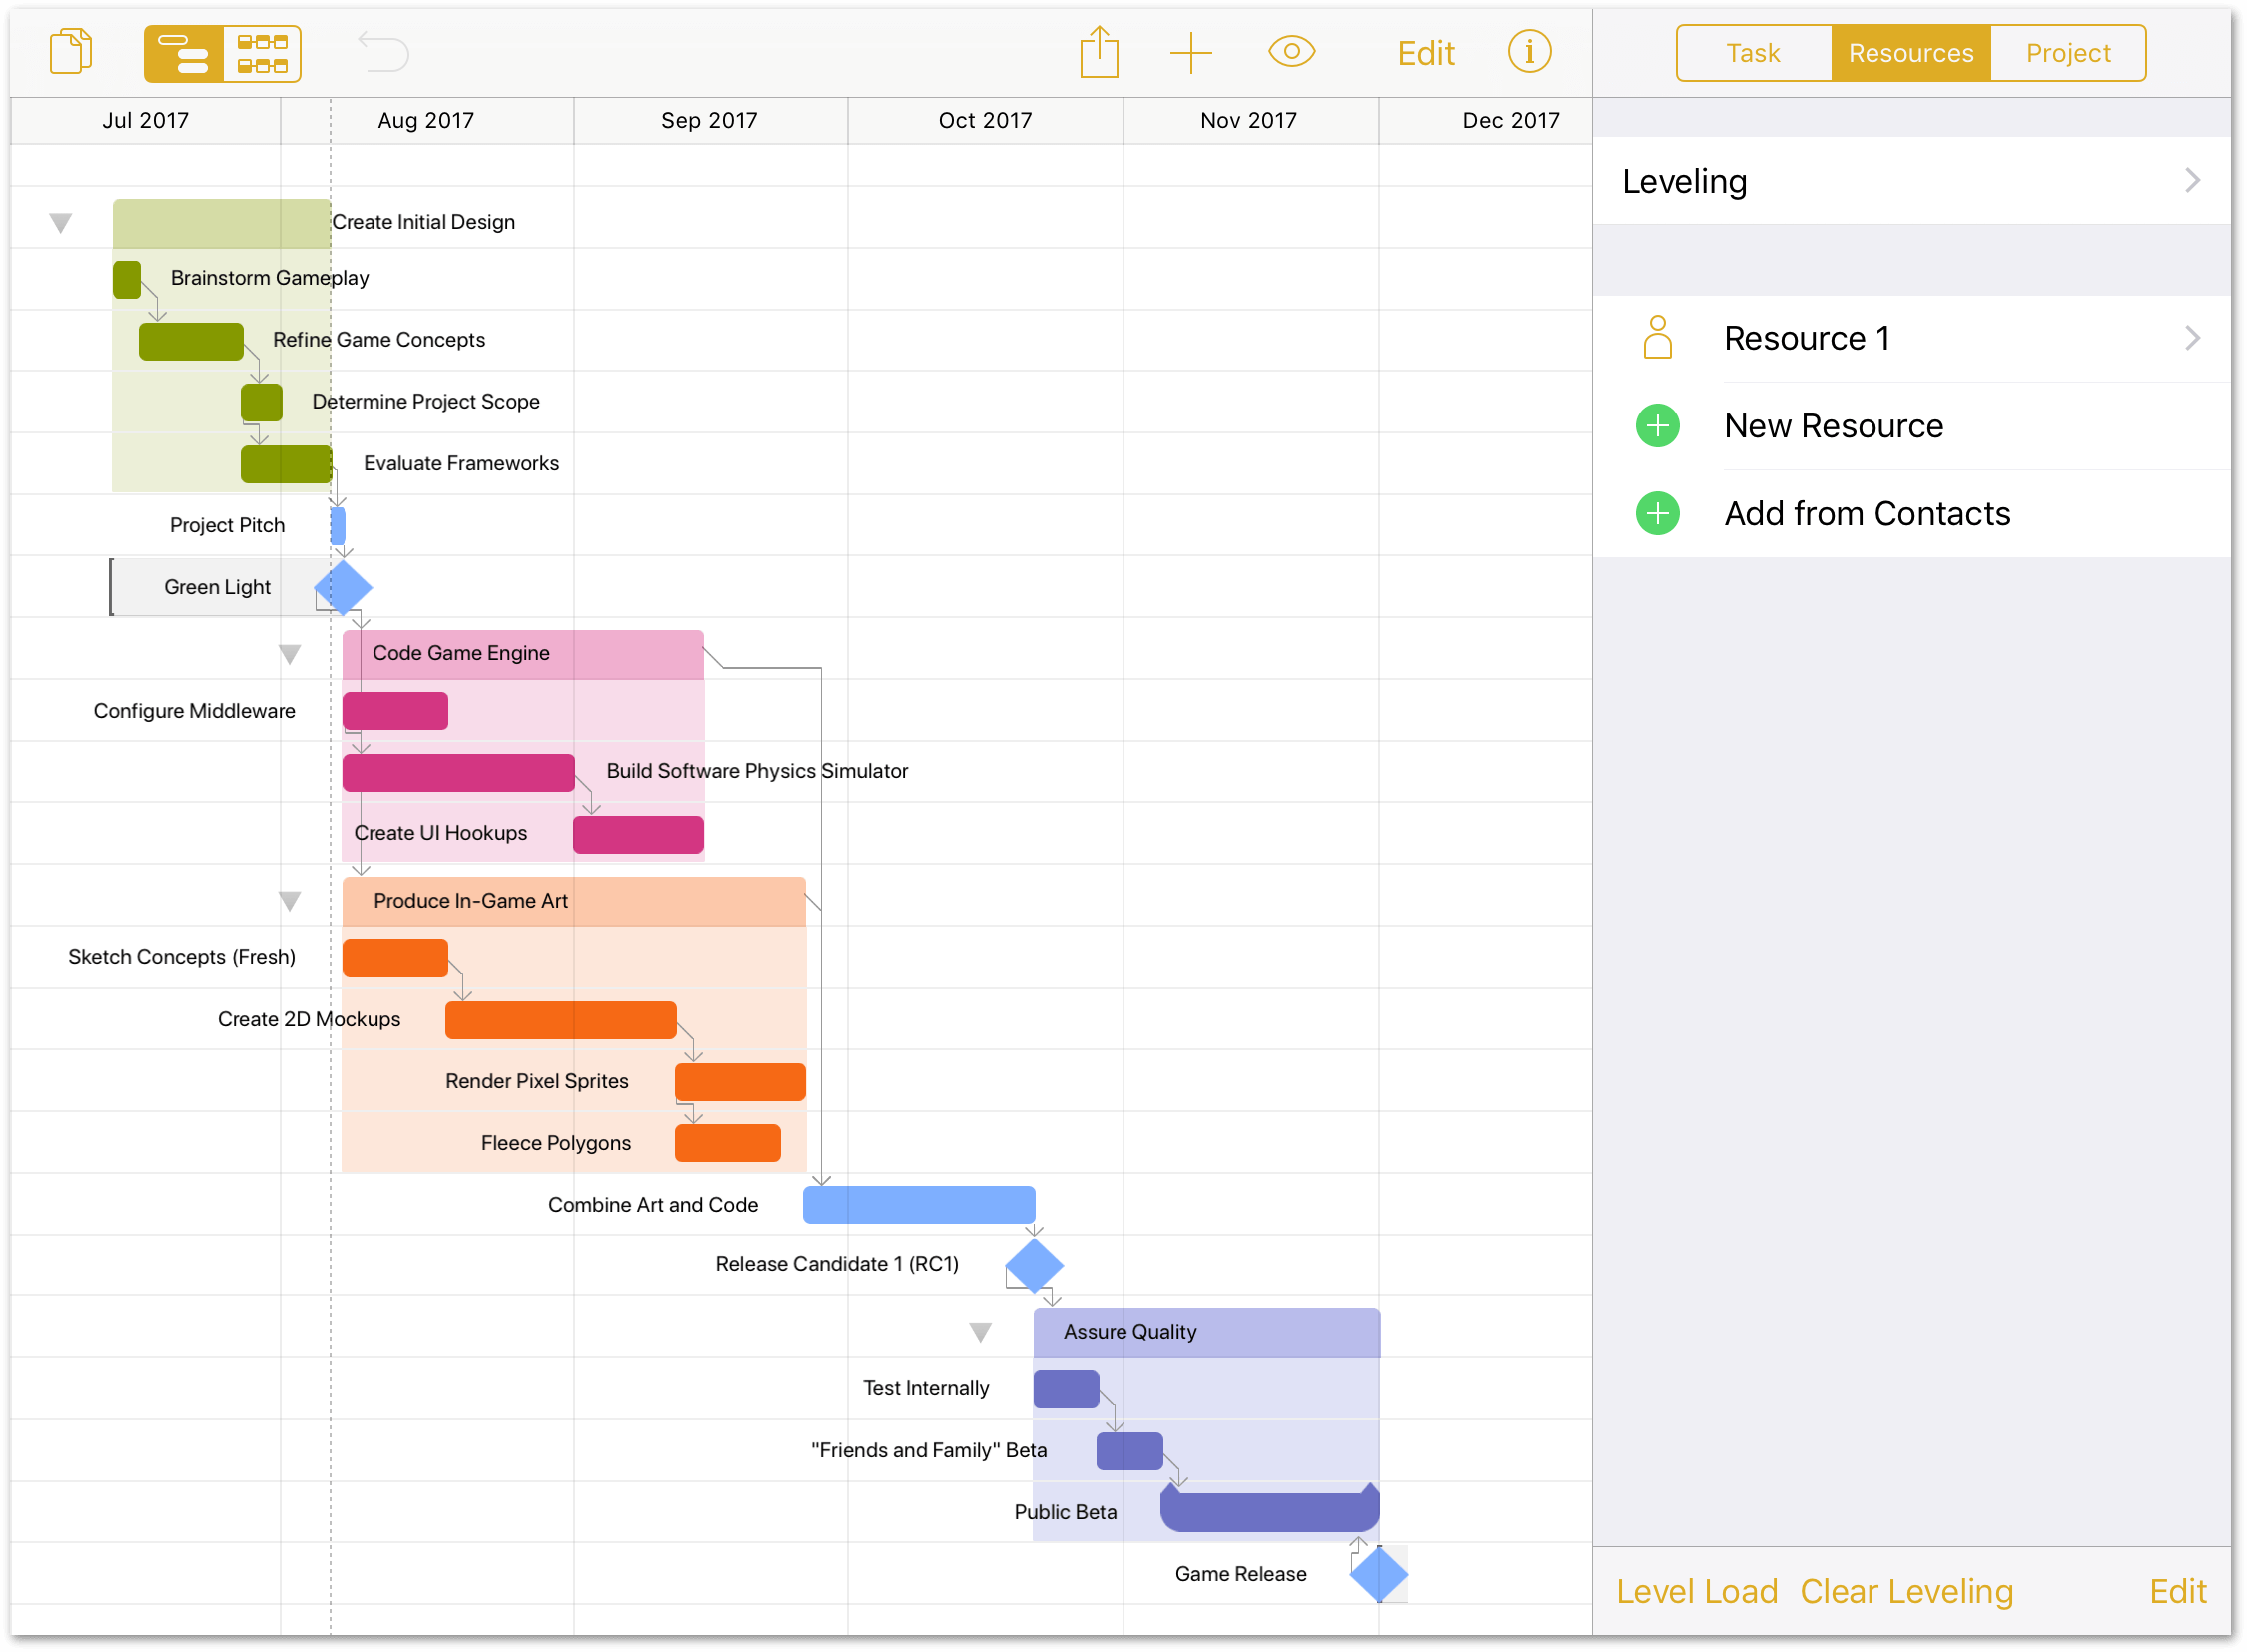
To level the resource workload for your project, do the following:
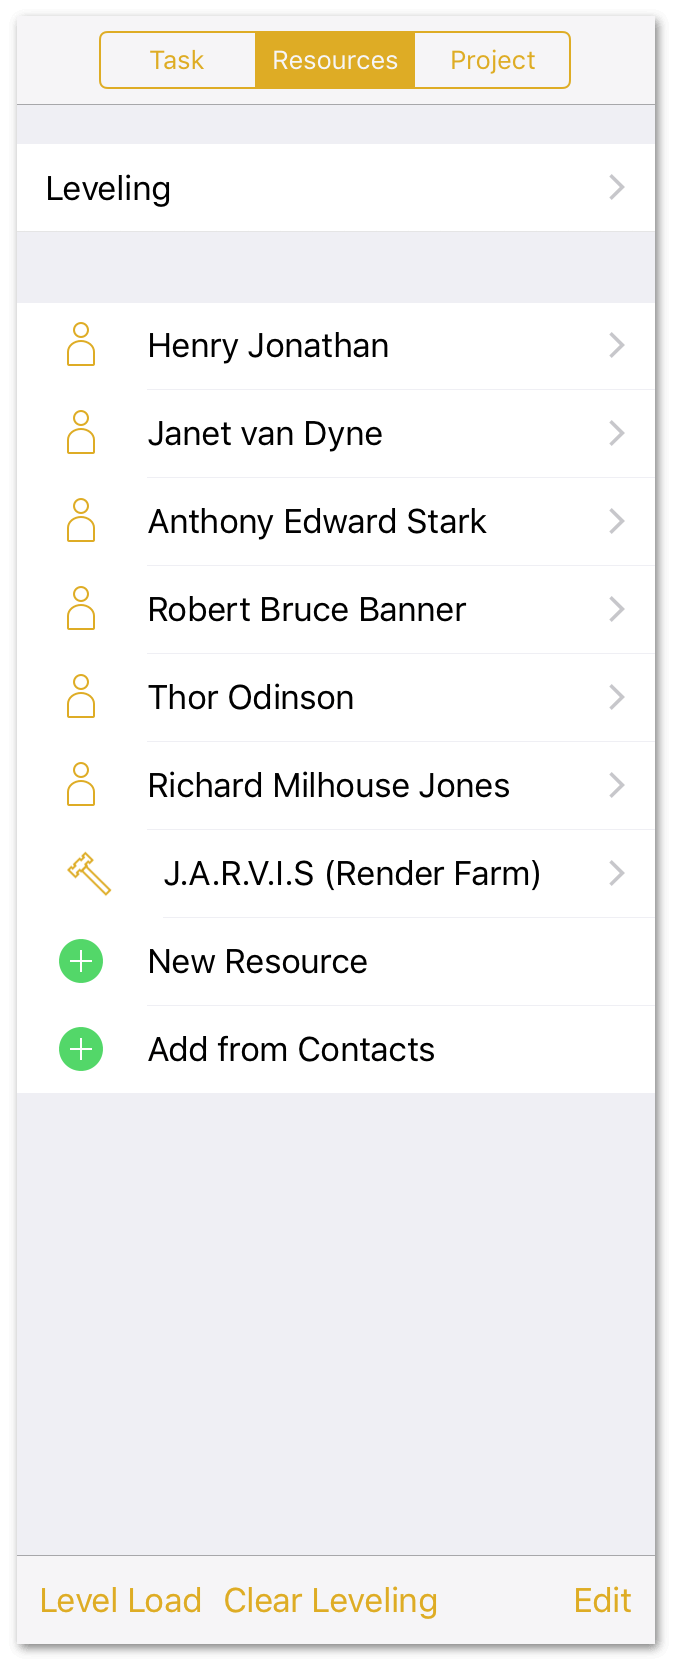
-
Tap to select the Resources inspector:
-
Tap Leveling at the top of the inspector and turn on Automatic Leveling and Constrain to Future; turn off Allow Splitting:
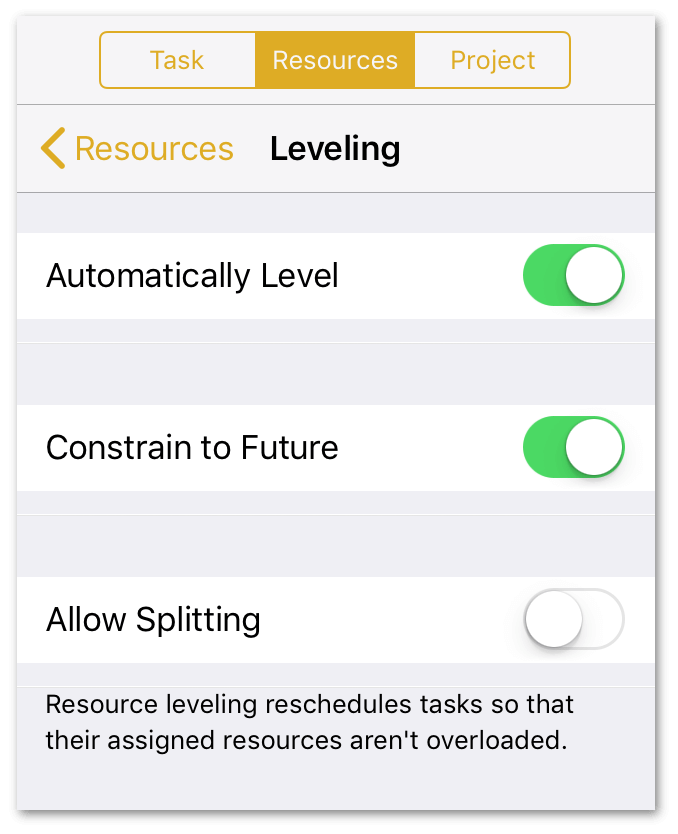
The Automatic Leveling option optimizes the resources in your project plan whenever a change is made.
Unless your staff is already in the optimal configuration you’ll see the tasks in the Gantt view shift to accommodate the most efficient use of their time.
If you tap on the Project inspector, you’ll notice that the Total Cost has already gone down slightly due to shrinkage in the Public Beta hammock task.
Step 16: Setting a Baseline
With tasks set and resources assigned and leveled, the project now reflects the best of all possible worlds—one where unforeseen hindrances don’t bog down progress. A world where optimistic estimates rule the day.
This is the world that is captured when a Baseline for progress is set. The Baseline is used to compare the project’s initial expectations against how the project is actually progressing. Setting the Baseline is important because, as the project manager, it enables you to adjust milestones and resource allocations to complete the project on time.
To set a Baseline, do the following:
-
In the toolbar, tap
to open the View menu: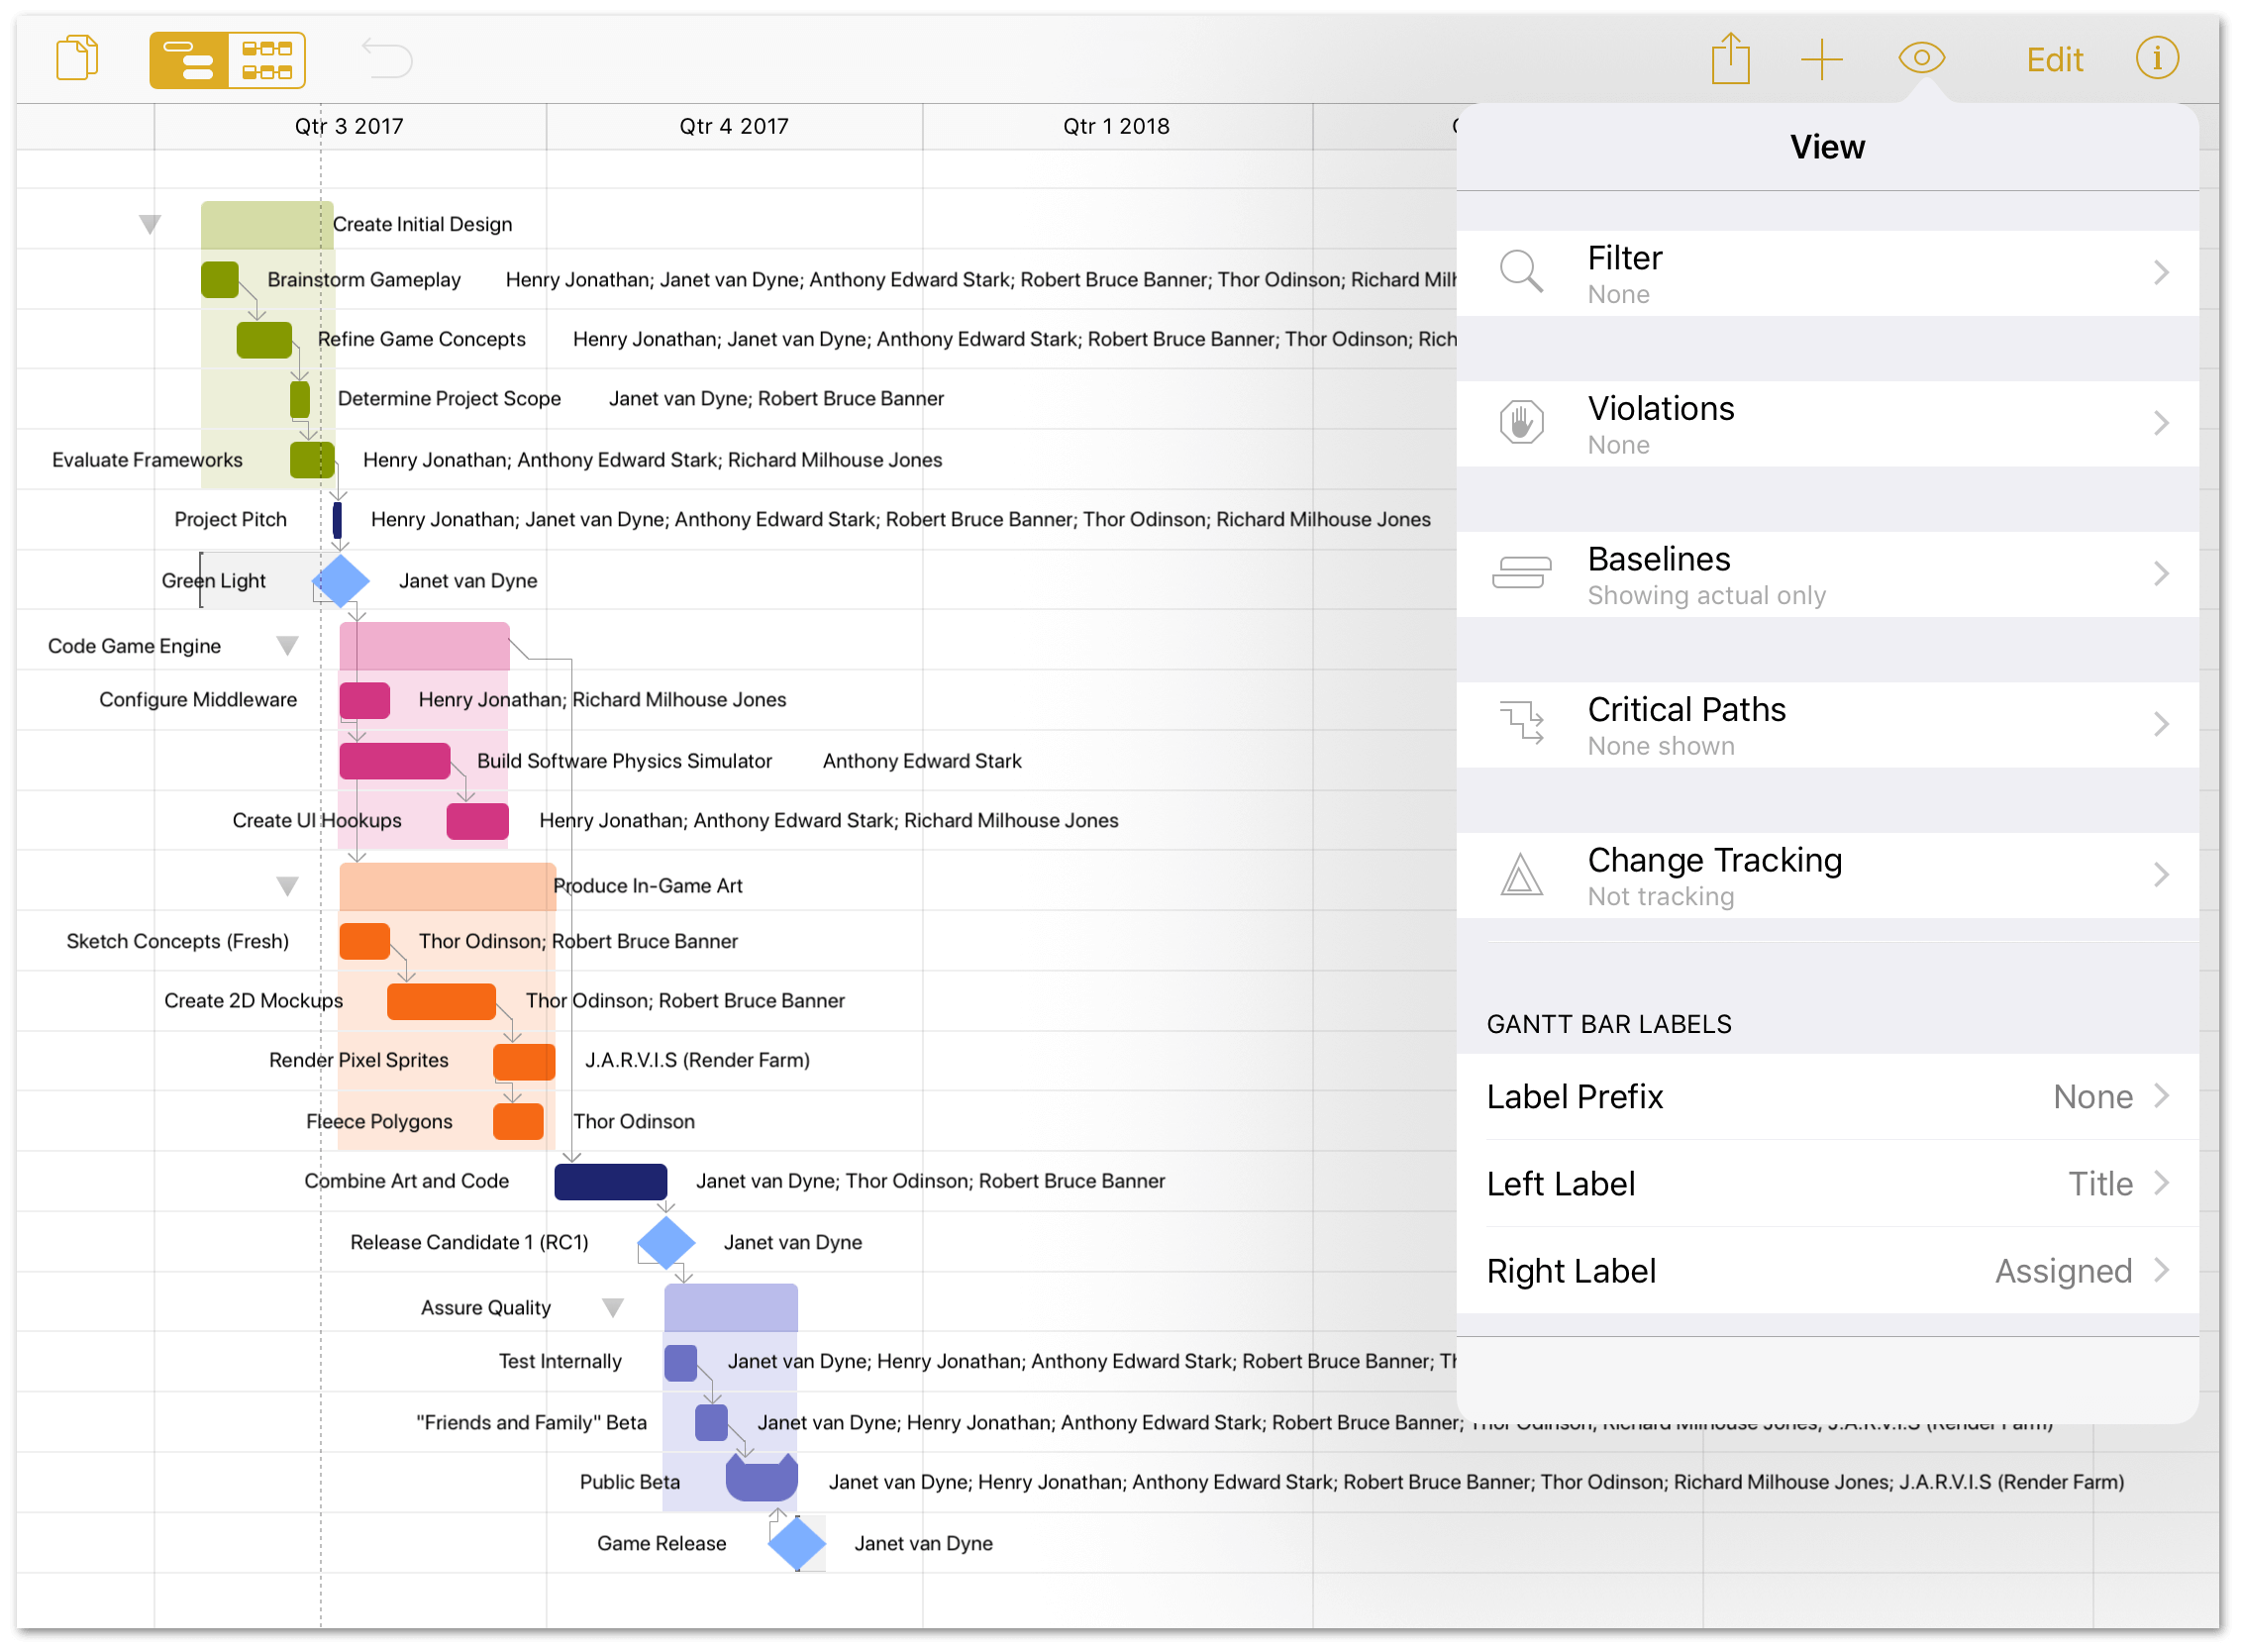
-
Tap Baselines.
-
Tap Set Baseline at the bottom of the View menu. This sets the name of the Baseline to the current date, but you can change this to anything you’d like (it doesn’t have to be a date).
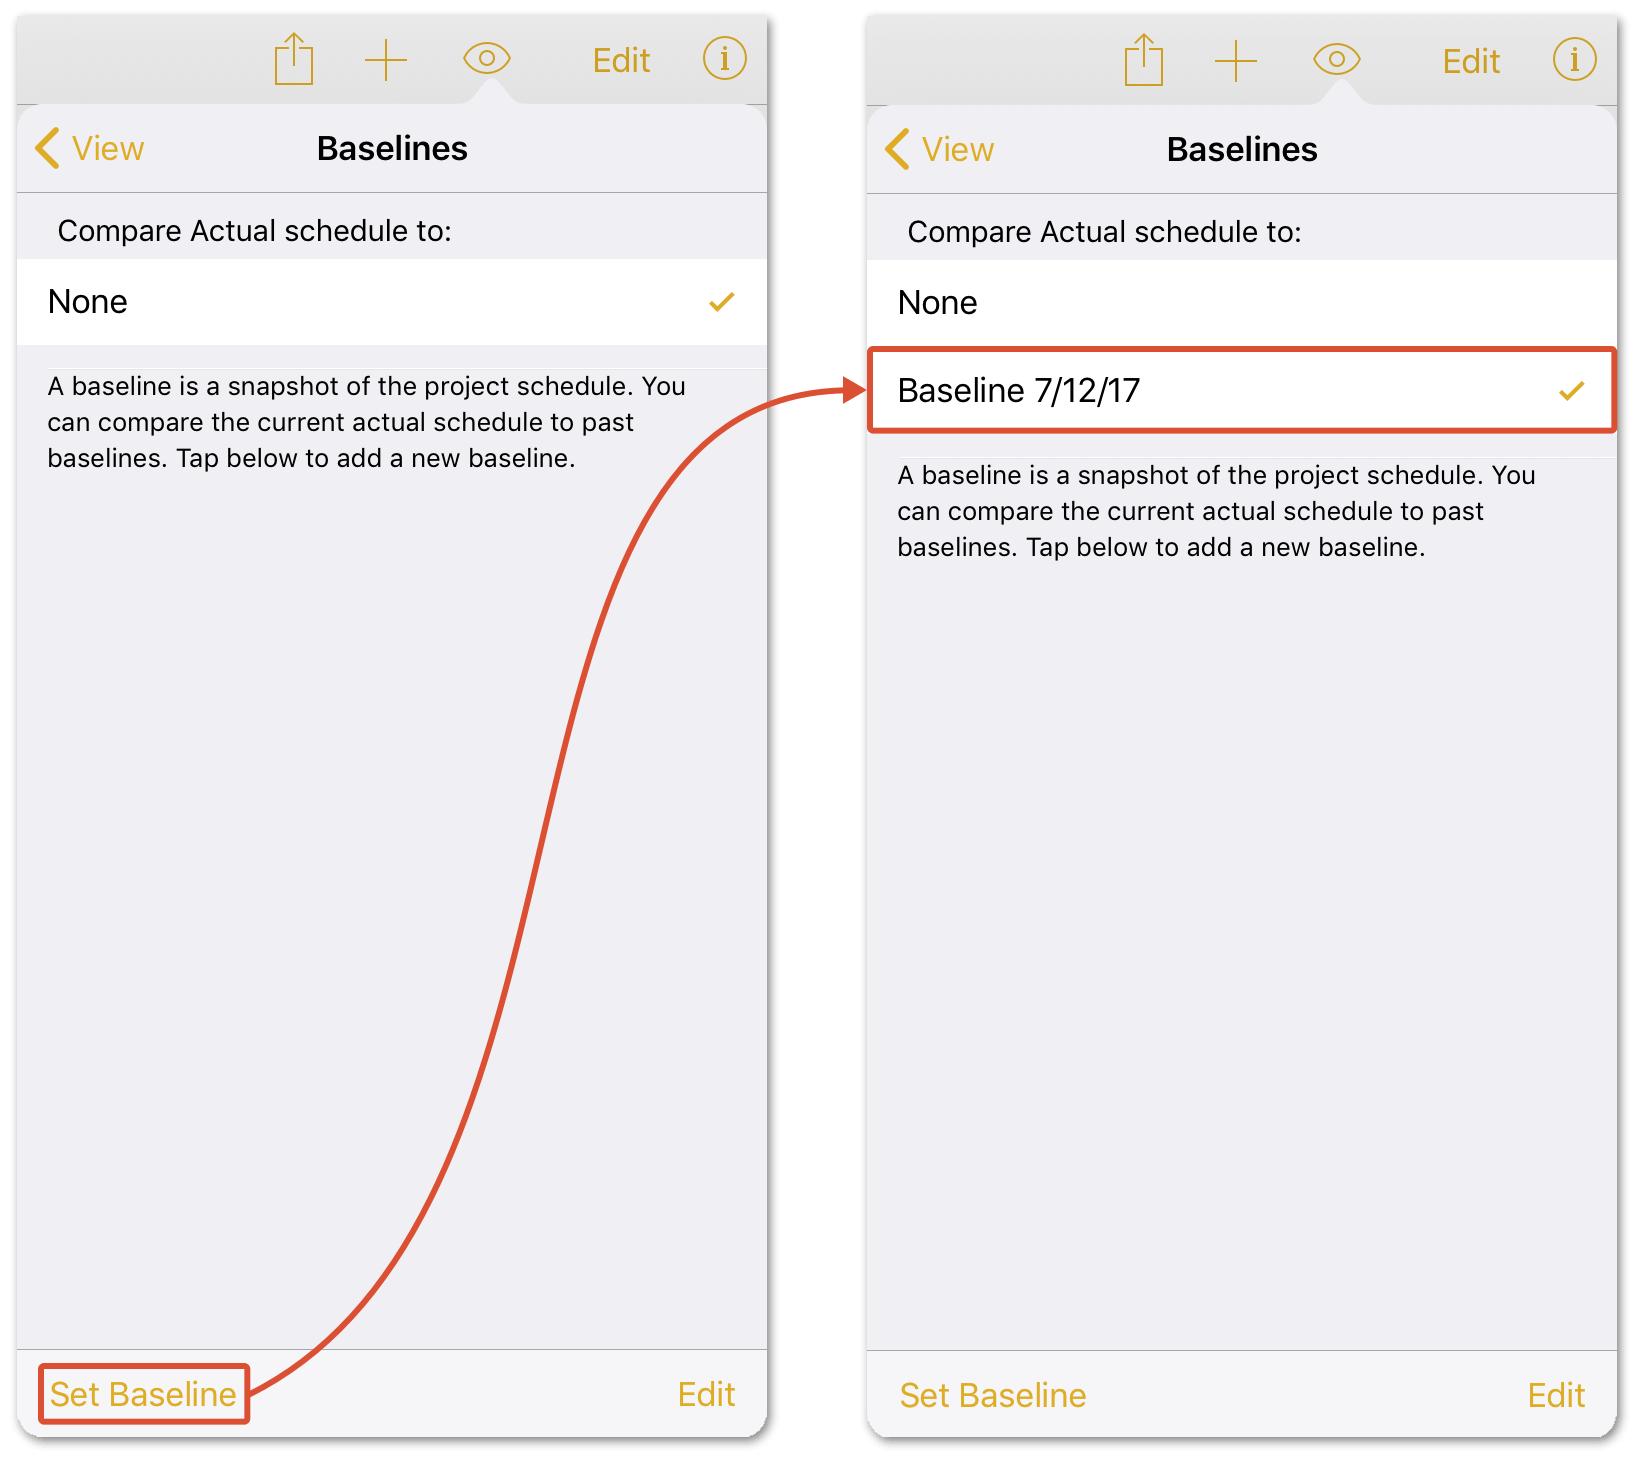
Your project can have more than one Baseline; simply add another by tapping Set Baseline at the bottom of the View menu. This allows you to compare how the project is progressing compared to the original timeline or against subsequent baselines.
What Comes Next?
The Game Plan project is now in its ideal form, right before the real work begins.
By laying out the project in OmniPlan, you should have a pretty good idea of what to expect. All of the tasks are in place, resources are assigned, you’ve set up the baseline, and you know how much all of this is going to cost. Well done!
Now comes the fun part of updating and managing the project along the way. The next chapter, Managing a Project, shows you how to use a variety of tools to see your project through to completion.