Using the Inspectors
So called because they offer tools to inspect your current selection, the inspectors in OmniPlan 3 have been redesigned with even more power, flexibility, and ease of use than ever before.
OmniPlan’s inspectors live in a sidebar on the right side of the main window. You can click and drag on the inspectors’ left edge to hide them, offering more screen space for the main view; drag in from the right side of the window to reveal them if they’re hidden. Choose Inspectors ▸ Show/Hide Inspectors (Shift-Command-I) works to do this as well.
When you select an item in one of OmniPlan’s views (typically a task in Task and Network View, a resource in Resource and Calendar View, or a style in Styles View), the app automatically switches to the inspector most relevant to the type of item selected. When nothing is selected the Project inspector is chosen by default, and edits made in other inspectors affect attributes of the project as a whole.
The Project Inspector
The Project inspector has information about the document as a whole. It’s split into three sections that each provide controls relevant to the structure and chronological flow of your project.
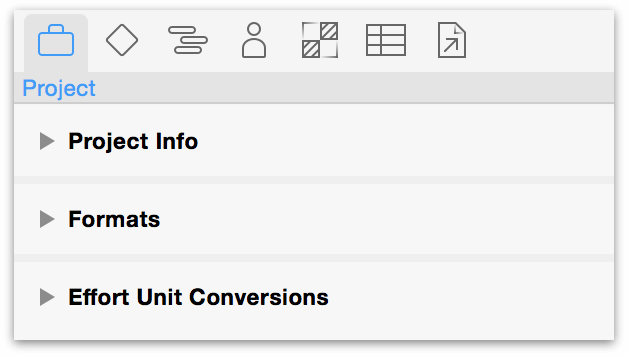
- Project Info — General info about the project as a whole, such as its title and if the project is scheduled from a start date or an end date. Also, home to the scheduling granularity setting.
- Formats — Configure your time and currency units.
- Effort Unit Conversions — Define the hours in a given work day, week, month, and year. Click Edit Work Week to go to Calendar View and make adjustments to your working hours.
Click the disclosure triangle next to each section to show or hide its contents.
Editing Project Information
The Project Info section of the Project inspector describes fundamental aspects of how your project is built out from the start. Deciding on these details is key to understanding the scope and schedule of your project.
Choosing Specific or Undetermined Project Dates
If you don’t know when the project will start or end, you can mark the start date undetermined in the Project Info section of the Project inspector. For the purposes of applying the work week, the project is assumed to start on the first day of the week. The normal work week for the project and for the individual resources is respected, but work schedule exceptions such as holidays are ignored.

In a project with an undetermined date, all dates are represented in the format T day, for the first day of the project, or T + x, where x is some time duration. For example, T+2w 1d means 2 weeks and 1 day after the start of the project.
When you change the start or end date of an existing project from an undetermined date to a real date, the project may shift as the new position of weekends, off-days, and other exceptions are taken into account.
Start and End Dates
If you know when the project is going to start or end, you can enter a date here. All of the working hours and work schedule exceptions as set up in the calendar view can then be applied properly, and real dates appear in the interface. When your project has a start date, the tasks are scheduled from that point on as soon as possible. When your project has an end date, they are scheduled from that date backwards, as late as possible. You can change a task’s dates and direction in the Task inspector.

Setting a project’s start or end date defines the project’s direction: whether the schedule is built forward from a start date, or backward from an end date. In the former case all tasks in the project are scheduled for completion as soon as possible (ASAP), while in the latter case all tasks are scheduled as late as possible (ALAP). Changing the direction of individual tasks is covered in Task inspector.
While tasks in most projects are scheduled for completion as soon as possible, it can be helpful to plan a project with a defined ship date from that date backward to help determine when work on it should begin.
Scheduling Granularity
You can use the Granularity control in the Project Info section of the Project inspector to have OmniPlan round every duration up to the nearest whole hour or day. This setting is not just for display purposes, but actually changes how exact OmniPlan is about scheduling tasks.
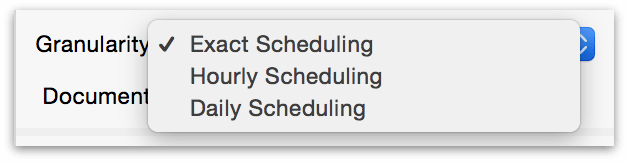
By default, OmniPlan uses Exact Scheduling: if you have a task with an effort of 58 minutes, starting at 8:00, then it is drawn exactly 58 minutes long on the Gantt chart, dependent tasks start at 8:58, leveling makes the resource begin working on the next task at 8:58, and so on. The start and end times of tasks are exact down to the second.
With Hourly Scheduling, start and end times happen at the next whole hour mark. A task starting at 8:00 with an effort of 58 minutes (or even 1 minute), ends at 9:00; successor and resource leveled tasks begin at 9:00, and so on.
With Daily Scheduling, start and end times are always pinned to the beginning or end of work days. The 58-minute task ends at the end of the day, successor- and resource-leveled tasks begin on the next day, and so on. The one exception to this rule, however, is if start times have been set before switching to daily granularity. In that case, the task would start at the specified time on its assigned day in the schedule.
Regardless of the granularity setting, OmniPlan doesn’t forget any of the values you enter. You can still specify task effort and resource units with any amount of precision, and OmniPlan stores those values in case you switch back to exact scheduling.
Quick Look Preview Settings
The final option in this part of the inspector is a switch that controls whether a Quick Look preview of your document is created when you save the project.

On most modern Macs this process won’t noticeably impact your use of the app, but if you encounter performance issues when saving, turning off Quick Look previews may improve the experience.
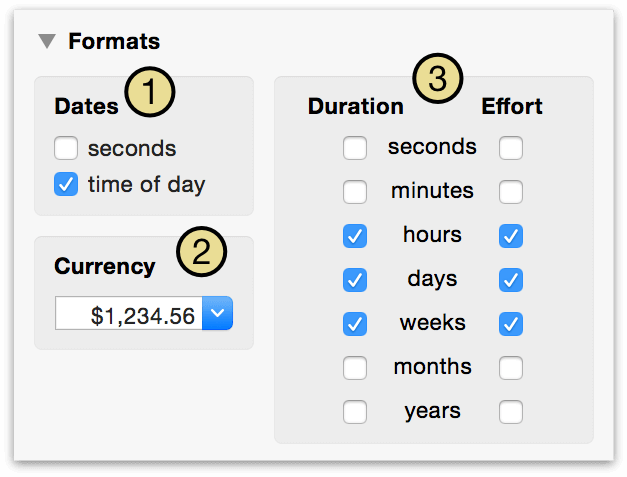
Choosing Time and Currency Formats
You can use the Formats section of the Project inspector to define how your project displays units of time and currency.
-
Use the Dates section to choose whether to include seconds, the time of day, or both in your displayed dates. Note that this doesn’t affect task scheduling or durations; just how dates are displayed in locations they appear across your project.
-
Choose a standard Currency format from the dropdown list, or just type the currency symbol of your choice and the field will auto-fill with the appropriate format.
-
Time units selected here are used to display durations and amounts of effort. You can plan in hours, days, or whatever works best for you.
Note that, in duration fields, if you enter a number without any units, OmniPlan assumes the smallest unit enabled here. Units of time (Duration and effort) are designated throughout OmniPlan with the following abbreviations:
- s = second
- m = minute
- h = hour
- d = day
- w = week
- mo = month
- y = year
If you want to go further than just customizing the display of durations, you can have OmniPlan schedule in whole hours or whole days with the scheduling granularity setting in Project Info. Note that the date headers in the Gantt chart and resource timelines can also be customized with the Display preferences.
If a value contains a unit of time that is too small to be displayed, you may see a rounded value. For example, if you have turned off the display of minutes in the Formats section of the Project inspector, and you have a task that starts at 9:00 and ends at 9:55, the value you see is < 1h. If you want to know the actual value, you can turn on the smaller units in Formats section, or just check the start and end times of the task. If you want to edit the value to conform to your units, you can just delete the greater-than or less-than sign and the value updates.
Setting Effort Unit Conversions
When you’re not using a standard 40 hour work week or eight hour work day, you can customize your project’s standard units of work-per-time using the Effort Unit Conversions section of the Project inspector.
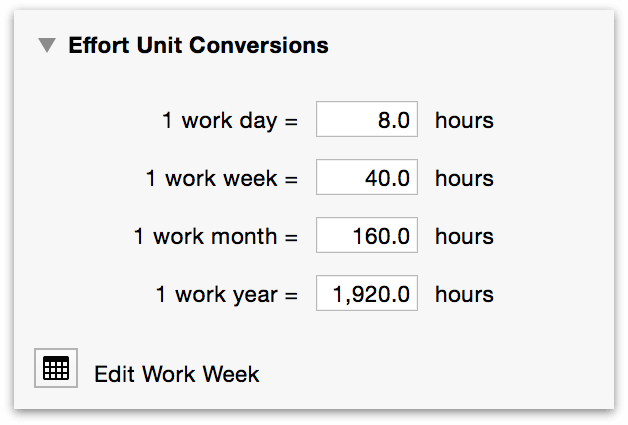
Your work day may be any number of hours. These conversion factors determine how to add up hours into the larger units.
Once you’ve decided on the unit conversions you want, you may find you need to edit the work week to correspond to the new values and ensure enough person-hours are scheduled. The Effort Unit Conversions section includes a handy link to Calendar View where you can do just that.
To reiterate: the effort conversion factors don’t change the working hours for the project, just the way durations are entered and displayed. To change working hours for the project, visit the Calendar View to edit the project’s Normal Work Week.
The Milestones Inspector
Manage milestones and the display of their critical paths with the Milestones inspector.
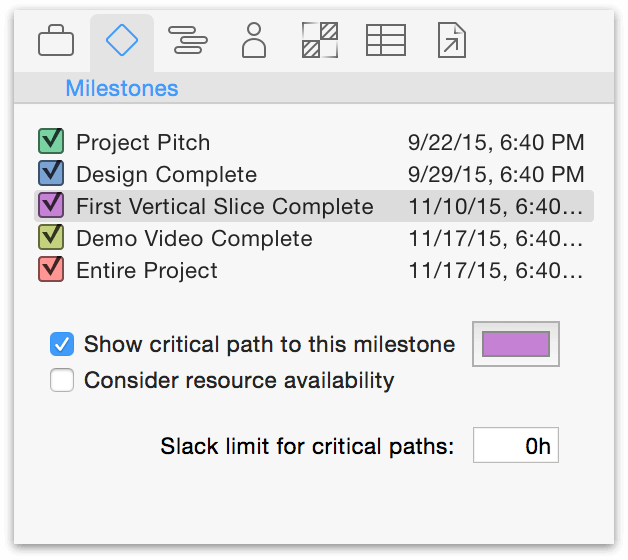
Use the check boxes next to each milestone to toggle display of its critical path in the Gantt chart and Network View. (You can also choose which critical paths to display from the drop-down menu off the Critical Path button in the toolbar.)
When you first choose to show the critical path to a given milestone OmniPlan will automatically assign a color to it; you can change the color by clicking the color selection swatch next to the Show critical path to this milestone switch.
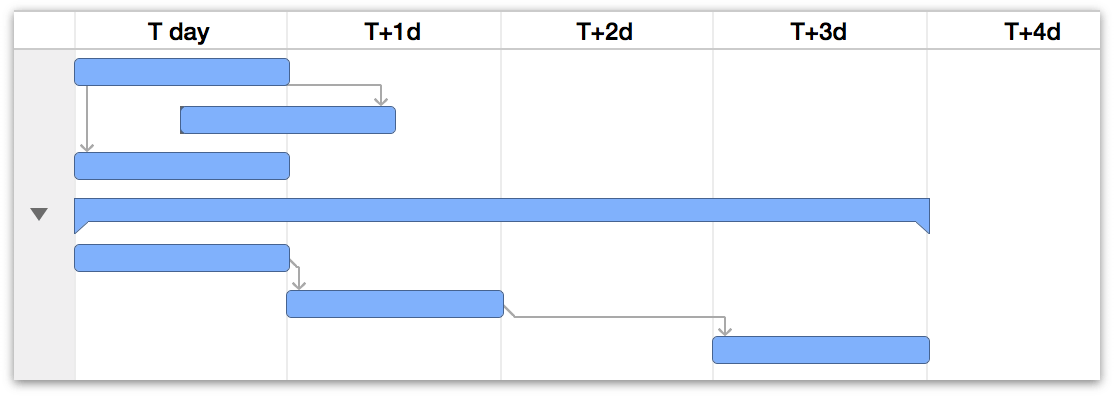
Choosing to Consider resource availability makes the display of critical paths take into account not only the dependencies between tasks and the slack limit, but also whether the necessary resources are available to complete tasks that are otherwise independent.
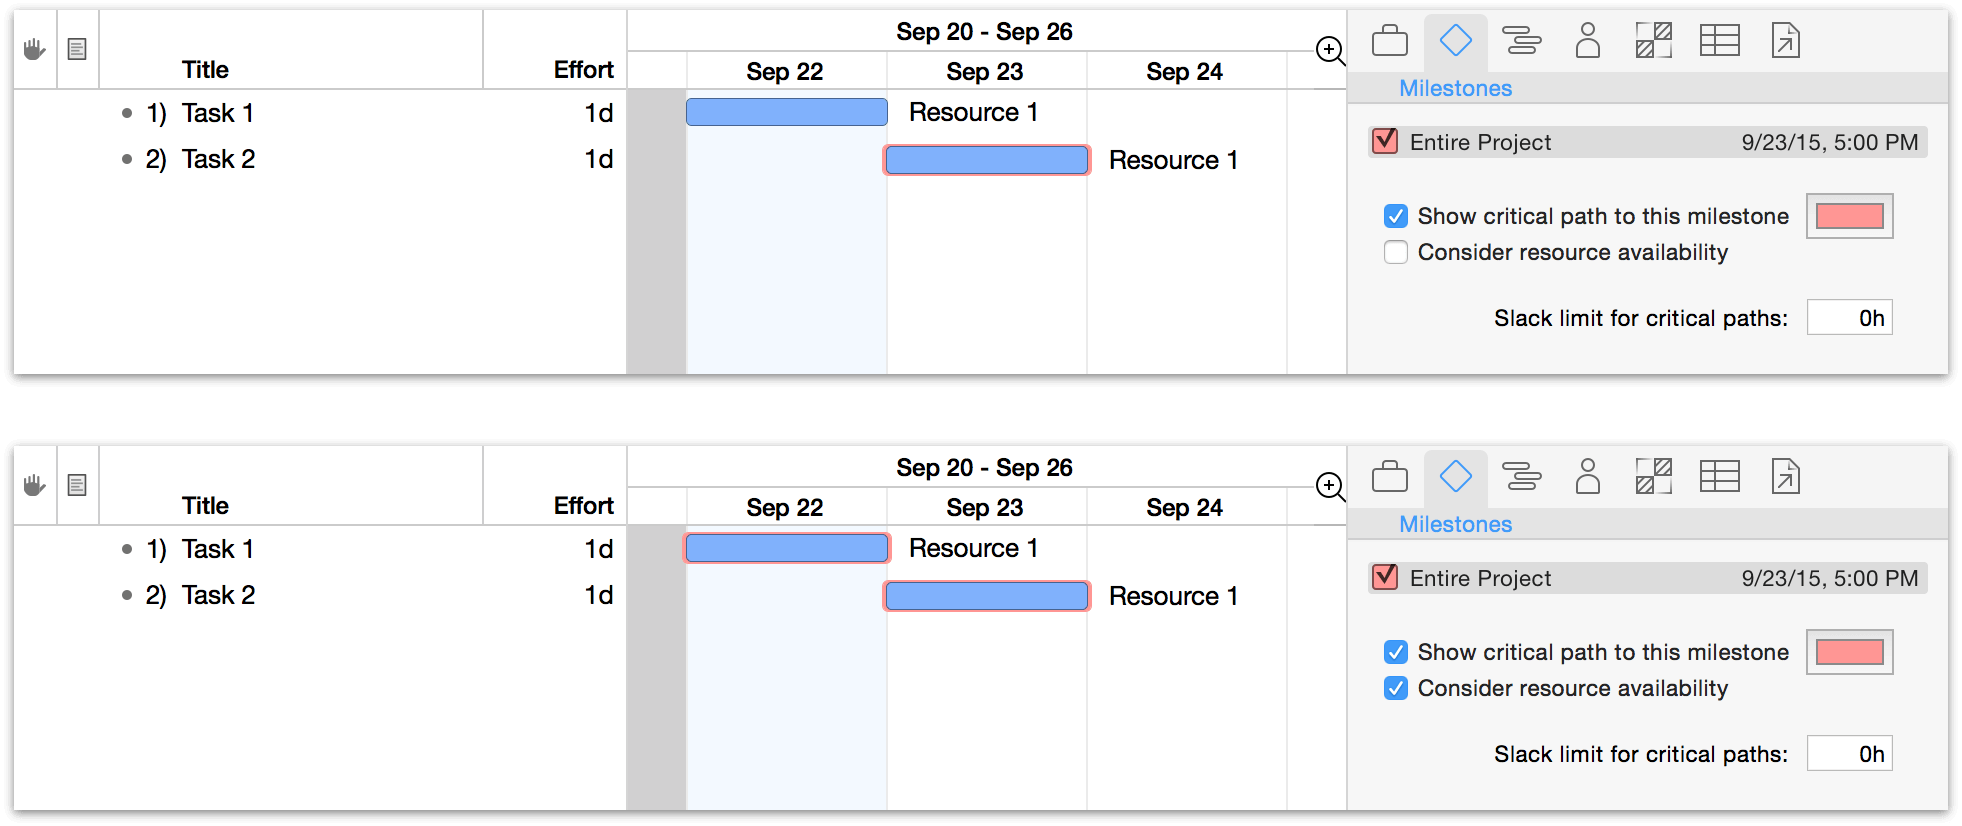
The clearest way to see how this works is to create a project with two independent tasks, and assign the same resource to both of them. Level the project, and you’ll see the second task move to follow the first. At this point, showing the critical path will only highlight the second task (1). Choosing to consider resource availability will highlight both (2), illustrating that while the second task doesn’t rely on the first to begin, it’s constrained by the resource required to complete it.
The slack limit for critical paths determines how closely a task can come to pushing a milestone back before it is considered part of the critical path. Increasing the time value here broadens the scope of critical paths to potentially include more tasks. In other words — the higher the value, the less comfortable a time cushion between tasks will feel.
The Task Inspector
The Task Inspector has information about any currently selected tasks (milestones, groups, and hammock tasks all count as tasks).
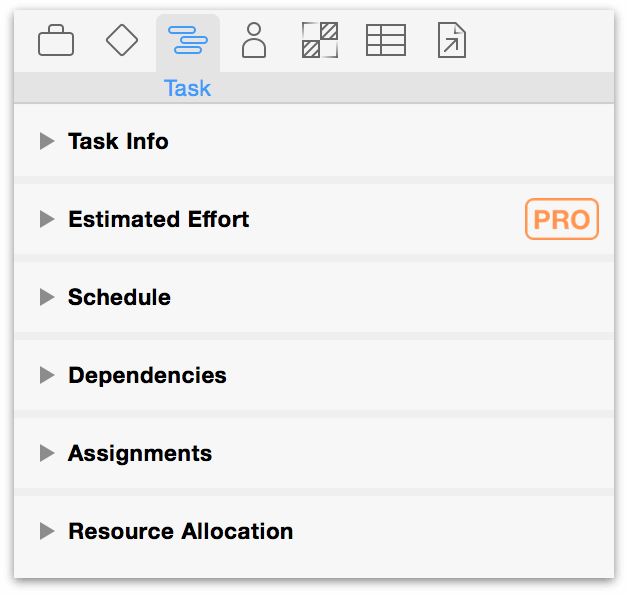
- Task Info — General info about the selected task, such as when it’s scheduled and how long it will take.
- Estimated Effort (PRO) — Used with the Simulations feature of OmniPlan Pro, manually configure estimations of effort here.
- Task Schedule — Info about the selected task’s schedule, like its start and end dates, and how it should be affected by leveling.
- Task Dependencies — A list of the dependencies this task is involved in.
- Task Assignments — A list of the resources assigned to this task.
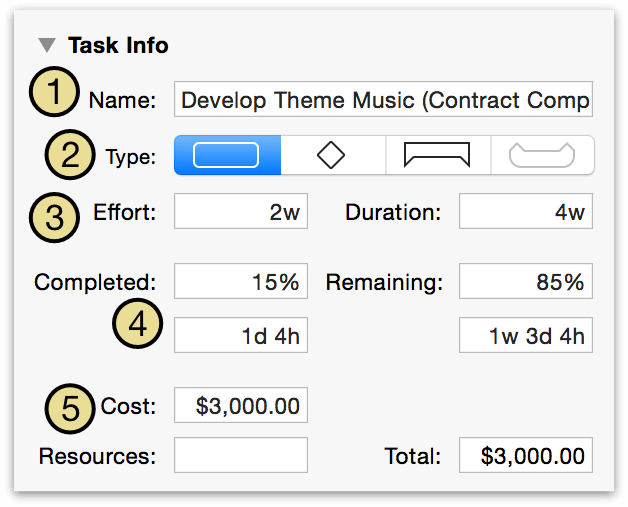
Editing Task Information
Key attributes that define the type and scope of a task can be edited using the Task Info section of the Task inspector.
-
The task Name is the same as the one that appears in the task outline.
-
You can change the Type from a normal task to a Milestone (a zero-length event which represents an important moment in the project’s life), a task Group (which can contain child tasks), or a Hammock Task (one whose duration varies based on the completion of the preceding task and the start of the task that follows).
-
Effort is how much total work it will take for this task to be complete. Duration is how much time it will take to get that work done. These can differ based on how many resources are assigned to the task, and the efficiency of the assigned resources. Note that if you enter a number without any units, OmniPlan assumes that you mean the smallest enabled unit in the Project inspector’s Formats section.
-
The amount Completed is a percentage of how far along the task is. This is also displayed as shading on the task bar in the Gantt chart. You can adjust this manually by dragging the slider or entering a time in the field.
-
The task Cost is how much money the task takes to complete. The resources are the per-use or per-hour costs of resources assigned to the task.
Estimating Task Effort (PRO)
The Effort Estimation feature of OmniPlan Pro works in tandem with Monte Carlo simulations to forecast the timeliness of milestone completion.
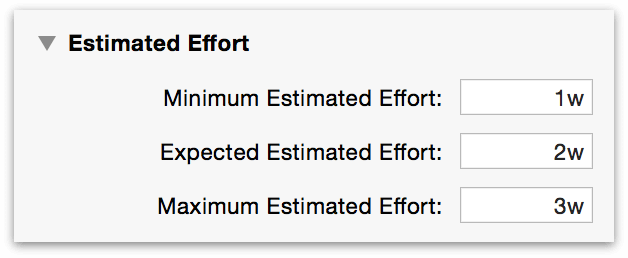
You can use the Simulations button in the toolbar to auto-estimate the effort required to complete any number of selected tasks. However, if you’d prefer fine-grained control over the range of effort used in completion scenarios, this section of the Task inspector provides fields for using any values you’d like.
In OmniPlan 3, values for Effort throughout the app (including the Effort column in the Task outline, the Effort field in the Task inspector, and others) are calculated based on the average of the three values in the estimated effort fields above. As long as the average remains equal to existing values elsewhere you won’t see them change (the Simulations automatic effort estimation feature is built to ensure this). However, manually changing the values here (or in the associated custom columns) will cause other effort values to change.
Scheduling Tasks
The Schedule section of the Task inspector describes where the task is positioned in time — both actually, and relative to the baseline — along with other temporal constraints and scheduling priorities.
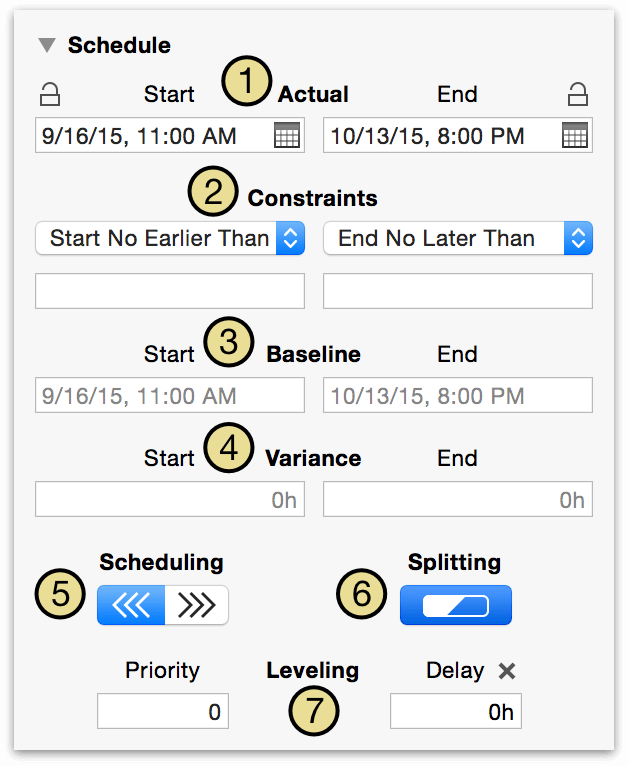
- The Actual start and end dates are when the task really happened during the execution of the project. These can be locked against accidental editing, changes from dependencies, and leveling.
- Constraints indicate the earliest a task may begin and the latest it may end. Select a date field below to show a calendar icon at its right; click it to summon a mini calendar you can use to choose a date and time for the constraint.
- The Baseline start and end dates indicate when the task is expected to start and end, according to the original plan. These appear once you use the Set Baseline command on a project.
- The Variance shows how much the actual dates differ from the baseline dates. This is calculated automatically; you don’t have to enter it yourself.
- Use Scheduling to choose whether the task is scheduled as soon as possible (ASAP) or as late as possible (ALAP).
- When leveling, if Splitting is allowed the task may be divided into multiple parts to maximize efficiency of resource use. Otherwise the task will be scheduled as a contiguous time span.
- Use the Leveling controls to set a priority for the task; this determines the order in which tasks are assigned resources when leveling. Delay is a value set automatically in the leveling process that notes how long a task has been postponed to wait for resource availability.
ASAP and ALAP scheduling can be set both for individual tasks and at the project level. This is also referred to as setting the direction of the task or project.
While tasks in most projects with defined start dates are scheduled to begin as soon as possible, individual tasks may benefit from ALAP scheduling when completing them later would be advantageous (some marketing work, for example, may benefit from a product being as fully developed as possible before it begins).
Describing Task Dependencies
Use the Dependencies section of the Task inspector to get an at-a-glance view of the selected task’s relationship with other tasks in the project, alter or remove dependencies on the fly, and add lead or lag time to related tasks.
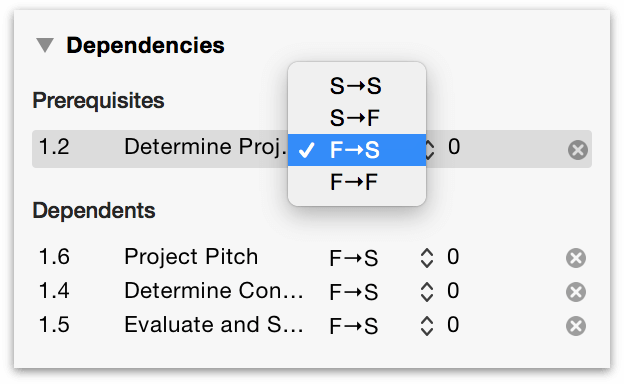
The Prerequisites section lists tasks that must be completed before the selected task can begin, while the Dependents section lists tasks that rely on the selected task to be completed before they can begin.
Use the popup menu in each task’s row to change the type of dependency between it and the selected task, or click the X to the right of the task to remove its relationship with the selected task entirely.
The column to the right of the dependency type popup menu lists the Lead Time for each prerequisite or dependent task. By default this is zero; double-click the number to add lead or lag (with a negative number) to the task. Lead time is calculated from the project’s work hours, unless an e (for Elapsed Time) is entered before the value; for example, 48eh.
Editing Resource Assignments
Use the Assignments section of the Task inspector to see what resources are assigned to the task, change the amount of effort a resource is contributing, remove existing resources from the task, and add new ones.
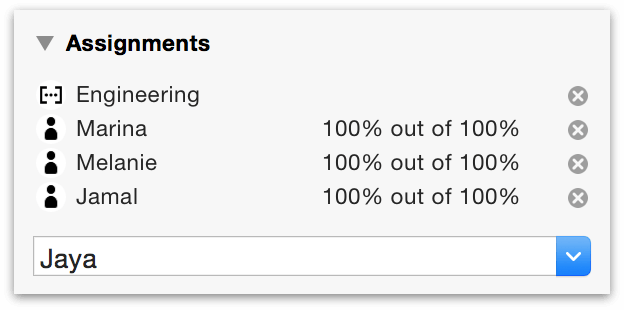
-
Double-clicking on an assigned resource name switches to Resource View with that resource selected in the Resource inspector.
-
Double-clicking on the X% out of X% field opens it for editing, which will change the percentage of the resource’s effort that’s devoted to the selected task.
-
Clicking the X next to the resource removes its task assignment.
-
Selecting a resource from the menu at the bottom adds it to the task at full effort.
If a resource that’s part of a resource group is assigned to a task, its group will be as well, but just as an informational marker; groups don’t have effort attributes, and can’t have their assignment directly removed. Resource groups shown in this way will disappear when all members’ assignments are removed from a given task.
Choosing How Resources are Allocated
When resources are being added to — or removed from — work on a task, the way the task is automatically rescheduled depends on the setting chosen in this section of the Task inspector.
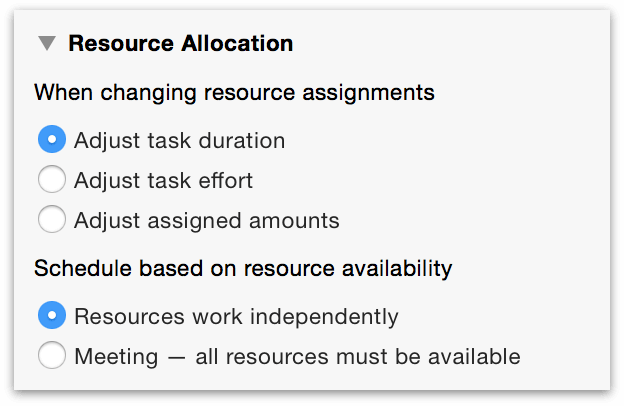
When changing resource assignments, the following options are available:
- Adjust task duration
- Adding new resources increases the effort available to complete them, and this option uses that effort to shorten the amount of time the task will take to complete. The opposite is also true, as removing a resource from the task will increase its duration.
- Adjust task effort
- Adding new resources keeps the duration the same, and adds the effort they contribute to the total required to complete the task — this represents pouring work into a fixed timeframe. Removing resources indicates that less effort is needed to complete the task in the same amount of time as originally planned.
- Adjust assigned amounts
-
With this option the duration and effort stay the same regardless of resource assignments. Instead, when new resources are added, the amount of effort asked of each resource is reduced evenly across the board (one resource contributes 100 percent, two resources contribute 50 percent each, and so on).
This section is also the place where the meeting task type can be chosen for the task. When a task is designated as a meeting, it will not be scheduled until all of the resources assigned to it are available — this is particularly useful for meetings, of course, but also any other task that requires the simultaneous attention of the team.
The Resource Inspector
The Resource inspector contains a summary of the properties of a selected resource, with fields for quickly editing them. See Working in Resource View for greater detail on how resource attributes are related to your project.
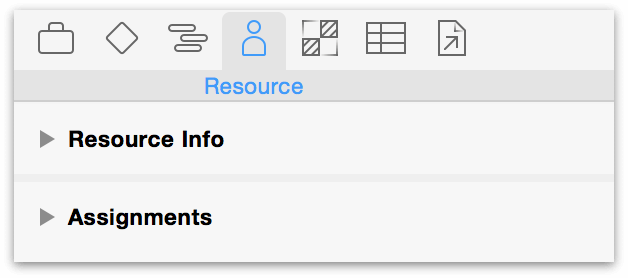
- Resource Info — General information about the selected resource, such as how much of it is available and how much it costs.
- Resource Assignments — A list of the tasks this resource is assigned to.
Editing Resource Information
The Resource Info section of the Resource inspector contains all of the vital details about a staff member, piece of equipment, or raw material used in completing your project.
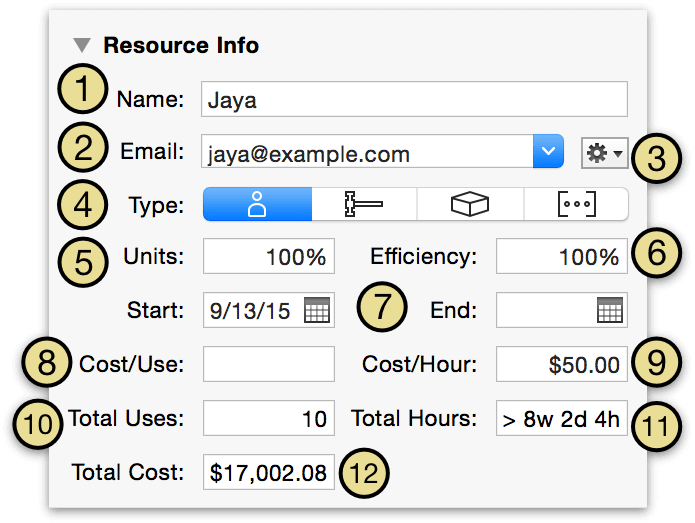
-
The resource Name is the same as the one that appears in the resource outline.
-
A staff resource can be assigned a unique Email address that serves as an identifier across projects. If the resource is associated with a macOS Contacts card, you can use the dropdown menu to pick which address to use.
-
Click the Gear button to associate this resource with a Contacts card, open the card in Contacts, or send an email.
-
The resource Type can be Staff, Tool, Material, or Group.
-
The amount of a tool or staff member’s time dedicated to the project (relative to their full time schedule) is expressed by the resource’s Units value.
For materials, Units describes the quantity of material used (based on the number of tasks the resource is assigned to) instead.
-
Efficiency represents the amount of effort-per-time a resource contributes to tasks to which it is assigned.
-
The Start and End dates determine for which dates the resource is available.
-
The Cost per Use is an amount of money for each time the resource is assigned to a task.
-
Cost per Hour is an amount of money for each hour of effort the resource is assigned.
-
Total Uses means the number of times this resource is assigned to a task.
-
Total Hours is the sum of the effort of all tasks the resource is assigned to.
-
Total Cost is the combined cost of all uses and all hours for this resource.
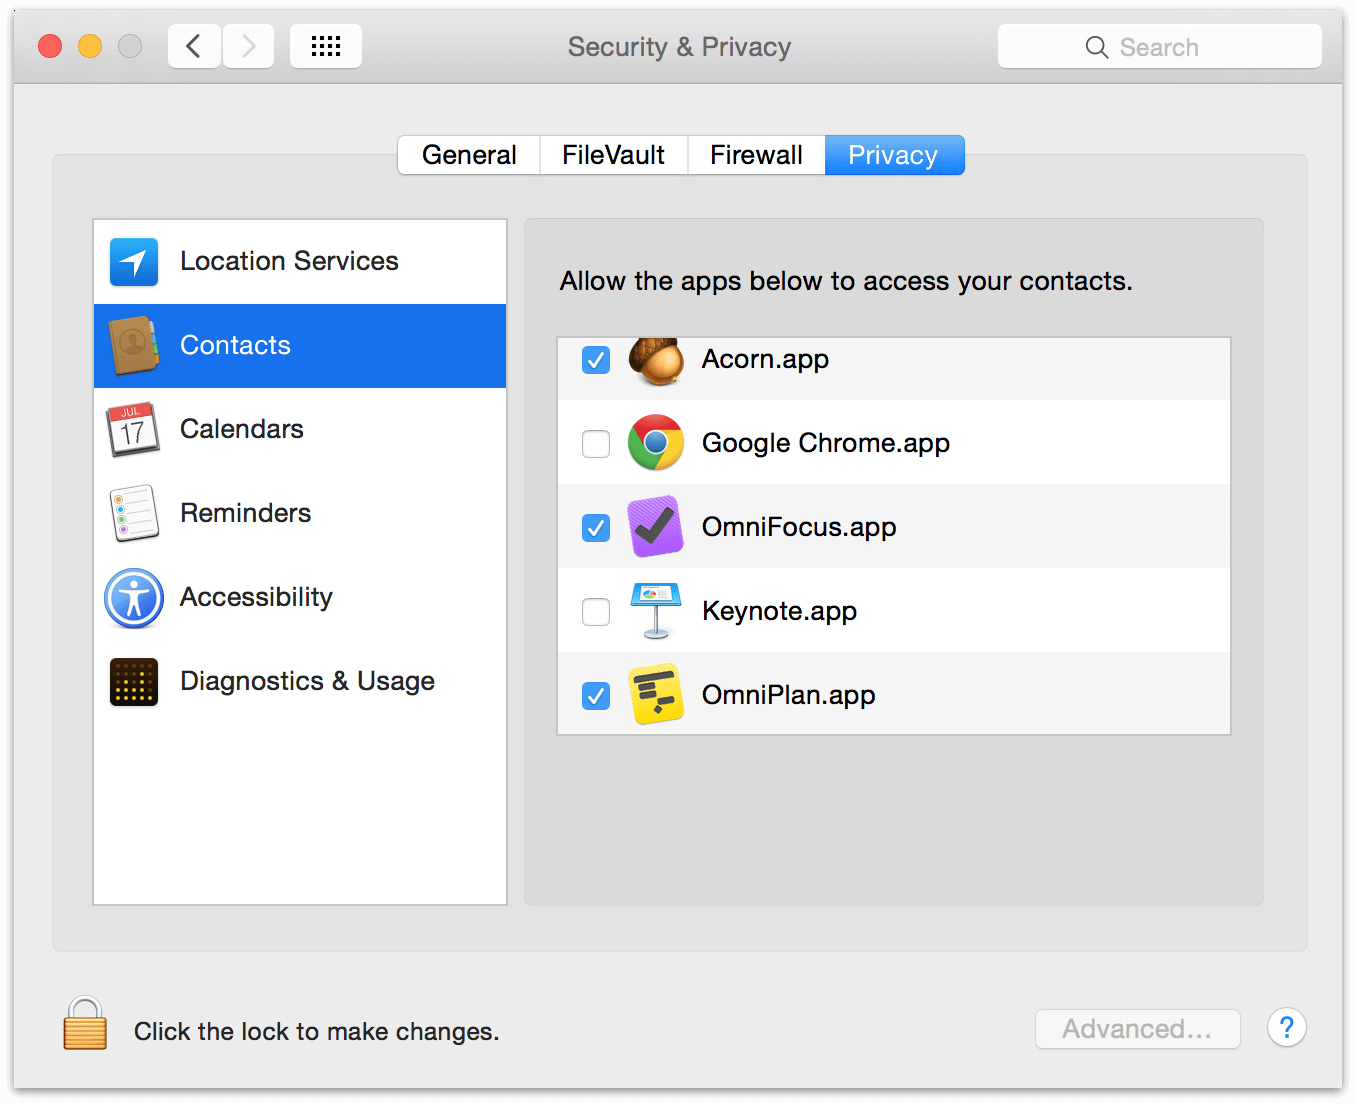
If you didn’t choose to grant OmniPlan access the first time you tried using the gear menu to interact with Contacts, you can grant it after the fact with Apple’s System Preferences ▸ Security & Privacy ▸ Privacy tab.
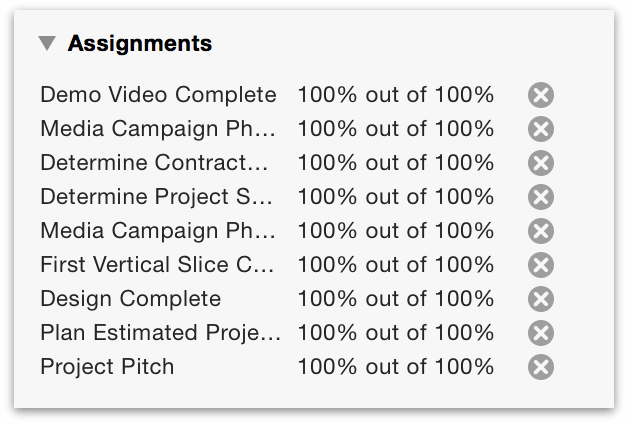
Reviewing Resource Assignments
Use the Assignments section of the Resource inspector to get a quick overview of all the tasks a particular resource is assigned to (or if multiple resources are selected, the intersection of their task assignments).
-
Double-clicking on an assigned task name switches to Task View with that task selected in the Task inspector.
-
Double-clicking on the X% out of X% field opens it for editing. The values here represent the percentage of the resource’s effort that is devoted to each task where the resource is assigned. The first of the two percentiles can be edited which will change the percentage of the resource’s effort that is devoted to the selected task.
-
Clicking the X next to the task removes it from the resource’s list of assignments.
The Styles Inspector
The Styles inspector is your window on the visual styles affecting the current selection, and provides tools for changing those styles on the fly. When you want to edit the appearance of a particular task or custom selection of items, this is a great way to quickly add some visual punch to your project; or if something’s looking a bit off, you’ll see what styles affect it and restore order with a mouse click.
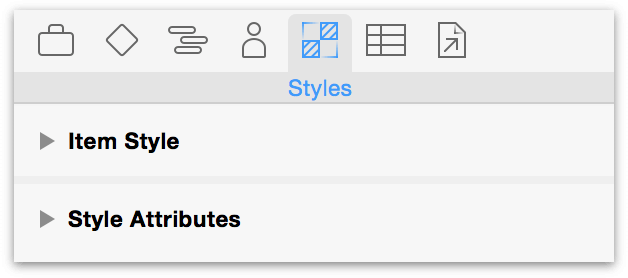
- Item Style — Tools for customizing the style of a selected task or resource on the fly, or assigning a named style to it.
- Style Attributes — A list of the styles currently applied to the selected item(s), and their sources.
If you’re setting up the visual theme of your entire project, the Styles inspector also acts as an editor when working in Styles View.
Applying Item Styles
You’ll use Styles View to apply styles to classes of items across your entire project, but if you’d like to apply a special named style to an individual item, select it and choose the style from the drop-down menu here. If you change that style later, those changes will update across all uses of the style in your project.
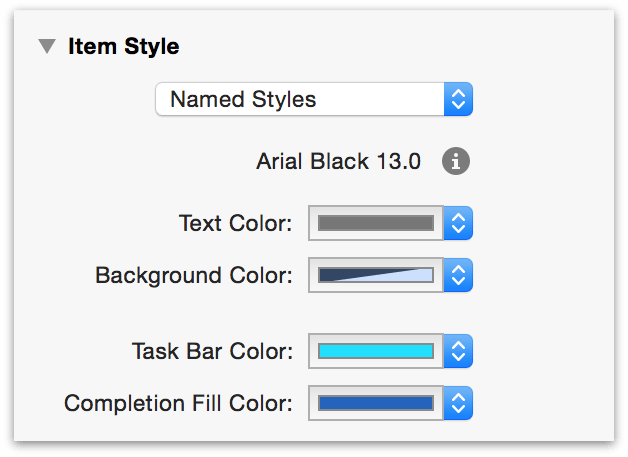
If you just want to apply a style to something without any special logic or updating, you can use the other controls in Item Styles to apply an ad-hoc style.
-
In the main window, select the items, or the part of a note, you want to style.
-
Use the controls in the Item Styles section of the Styles inspector to style the selected items.
Ad-hoc styles have higher precedence than any other type of style. If an item has an ad-hoc style applied to it, that style wins over any named styles or structural styles.
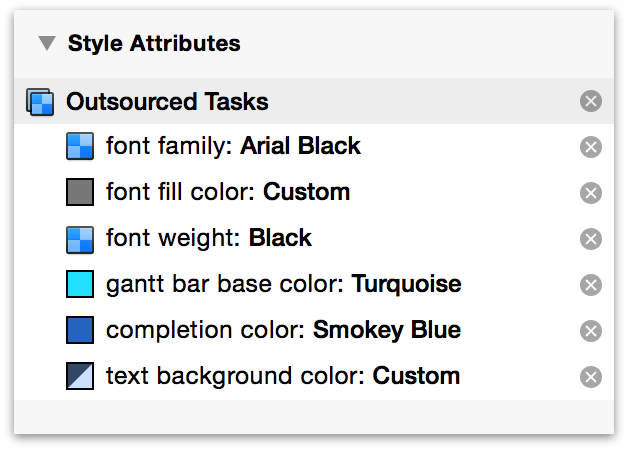
Reviewing Style Attributes
The Style Attributes section of the Styles inspector displays information about any custom text styles applied to the current selection, and allows styles to be copied (drag the style swatch from the inspector to an item in the current view) and removed (click the X to the right of the style in the inspector). It also indicates whether the style is applied to a class of items (such as Task Groups) or an individual item, and applies changes accordingly.
The Custom Data Inspector
Use the Custom Data inspector to keep your own information about the project or about individual tasks and resources. Select a task or resource to add custom data to it here; adding custom data with nothing selected will add it to the project as a whole.
Custom data is stored as key/value pairs. The Key is like a label for what type of information you are storing, and the Value is the information itself.

For example, here’s how you could keep track of staff members’ phone numbers:
- Select a staff resource in the resource outline, and open the Custom Data inspector.
- Click the plus button at the bottom of the inspector to create a new key/value pair.
- Name the key Phone Number.
- Enter a number as the value for the selected resource.
Now that you’ve created the key for this resource, every other resource has the same key, ready for you to enter a value.
You can show custom data as a column in the task and resource outlines, or as a label in the Gantt chart and resource timeline, by choosing View ▸ View Options (Command-J).
The Attachments Inspector
Use the Attachments inspector to keep references to files that are relevant to your project or to particular items in it. Select a task or resource to add an attachment to it; adding an attachment with nothing selected will add it to the project as a whole.
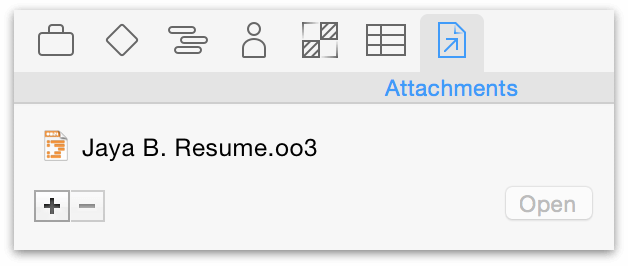
To link a file to an item in the task outline or resource outline:
- Click the item to select it.
- In the Attachments inspector, click the plus button below the attachment list, then choose a file in the dialog that appears. If you are showing the Attachments column in the outline, you could also click the arrow icon and choose Attach File from the pop-up menu, then choose a file. Or, easiest of all, just drag a file into the attachments list.
- The file appears in the inspector’s attachments list.
To attach a file to the project itself:
- Make sure nothing is selected in the main view.
- In the Attachments inspector, click the plus button below the attachment list, then choose a file in the dialog that appears. Or, just drag a file into the attachments list.
- The file appears in the inspector’s attachments list.
You can open an attached file by selecting it in the Attachments inspector and then clicking the Open button, or by choosing it from the pop-up menu in the Attachments column of an item’s row in the outline.
Every file attachment is a reference to the file elsewhere on your disk. If you move the files around, the references try to keep track of the new location. But if you are going to send a project to someone else, or otherwise move your project to another computer, the other files won’t automatically come along for the ride. In that case you should gather all of the attached files into one folder along with the OmniPlan file itself, and send the whole folder.
You can show attachments as a column in the task and resource outlines by choosing View ▸ View Options (Command-J), or by Control-clicking on the outline’s column header and choosing Attachments from the contextual menu.