Working in OmniPlan: A Tutorial
Welcome to the tutorial! Starting with a blank slate, we’ll build a project from the ground up to show all of the core features of OmniPlan in practical use.
For the purpose of this tutorial we’ll be looking at the development process of a game being put together by an independent team of intrepid designers, coders, and testers, following them from the planning phase through to the release of a demo video for the project.
Step 1: Creating a Project
To create a new project, choose File ▸ New (Command-N).

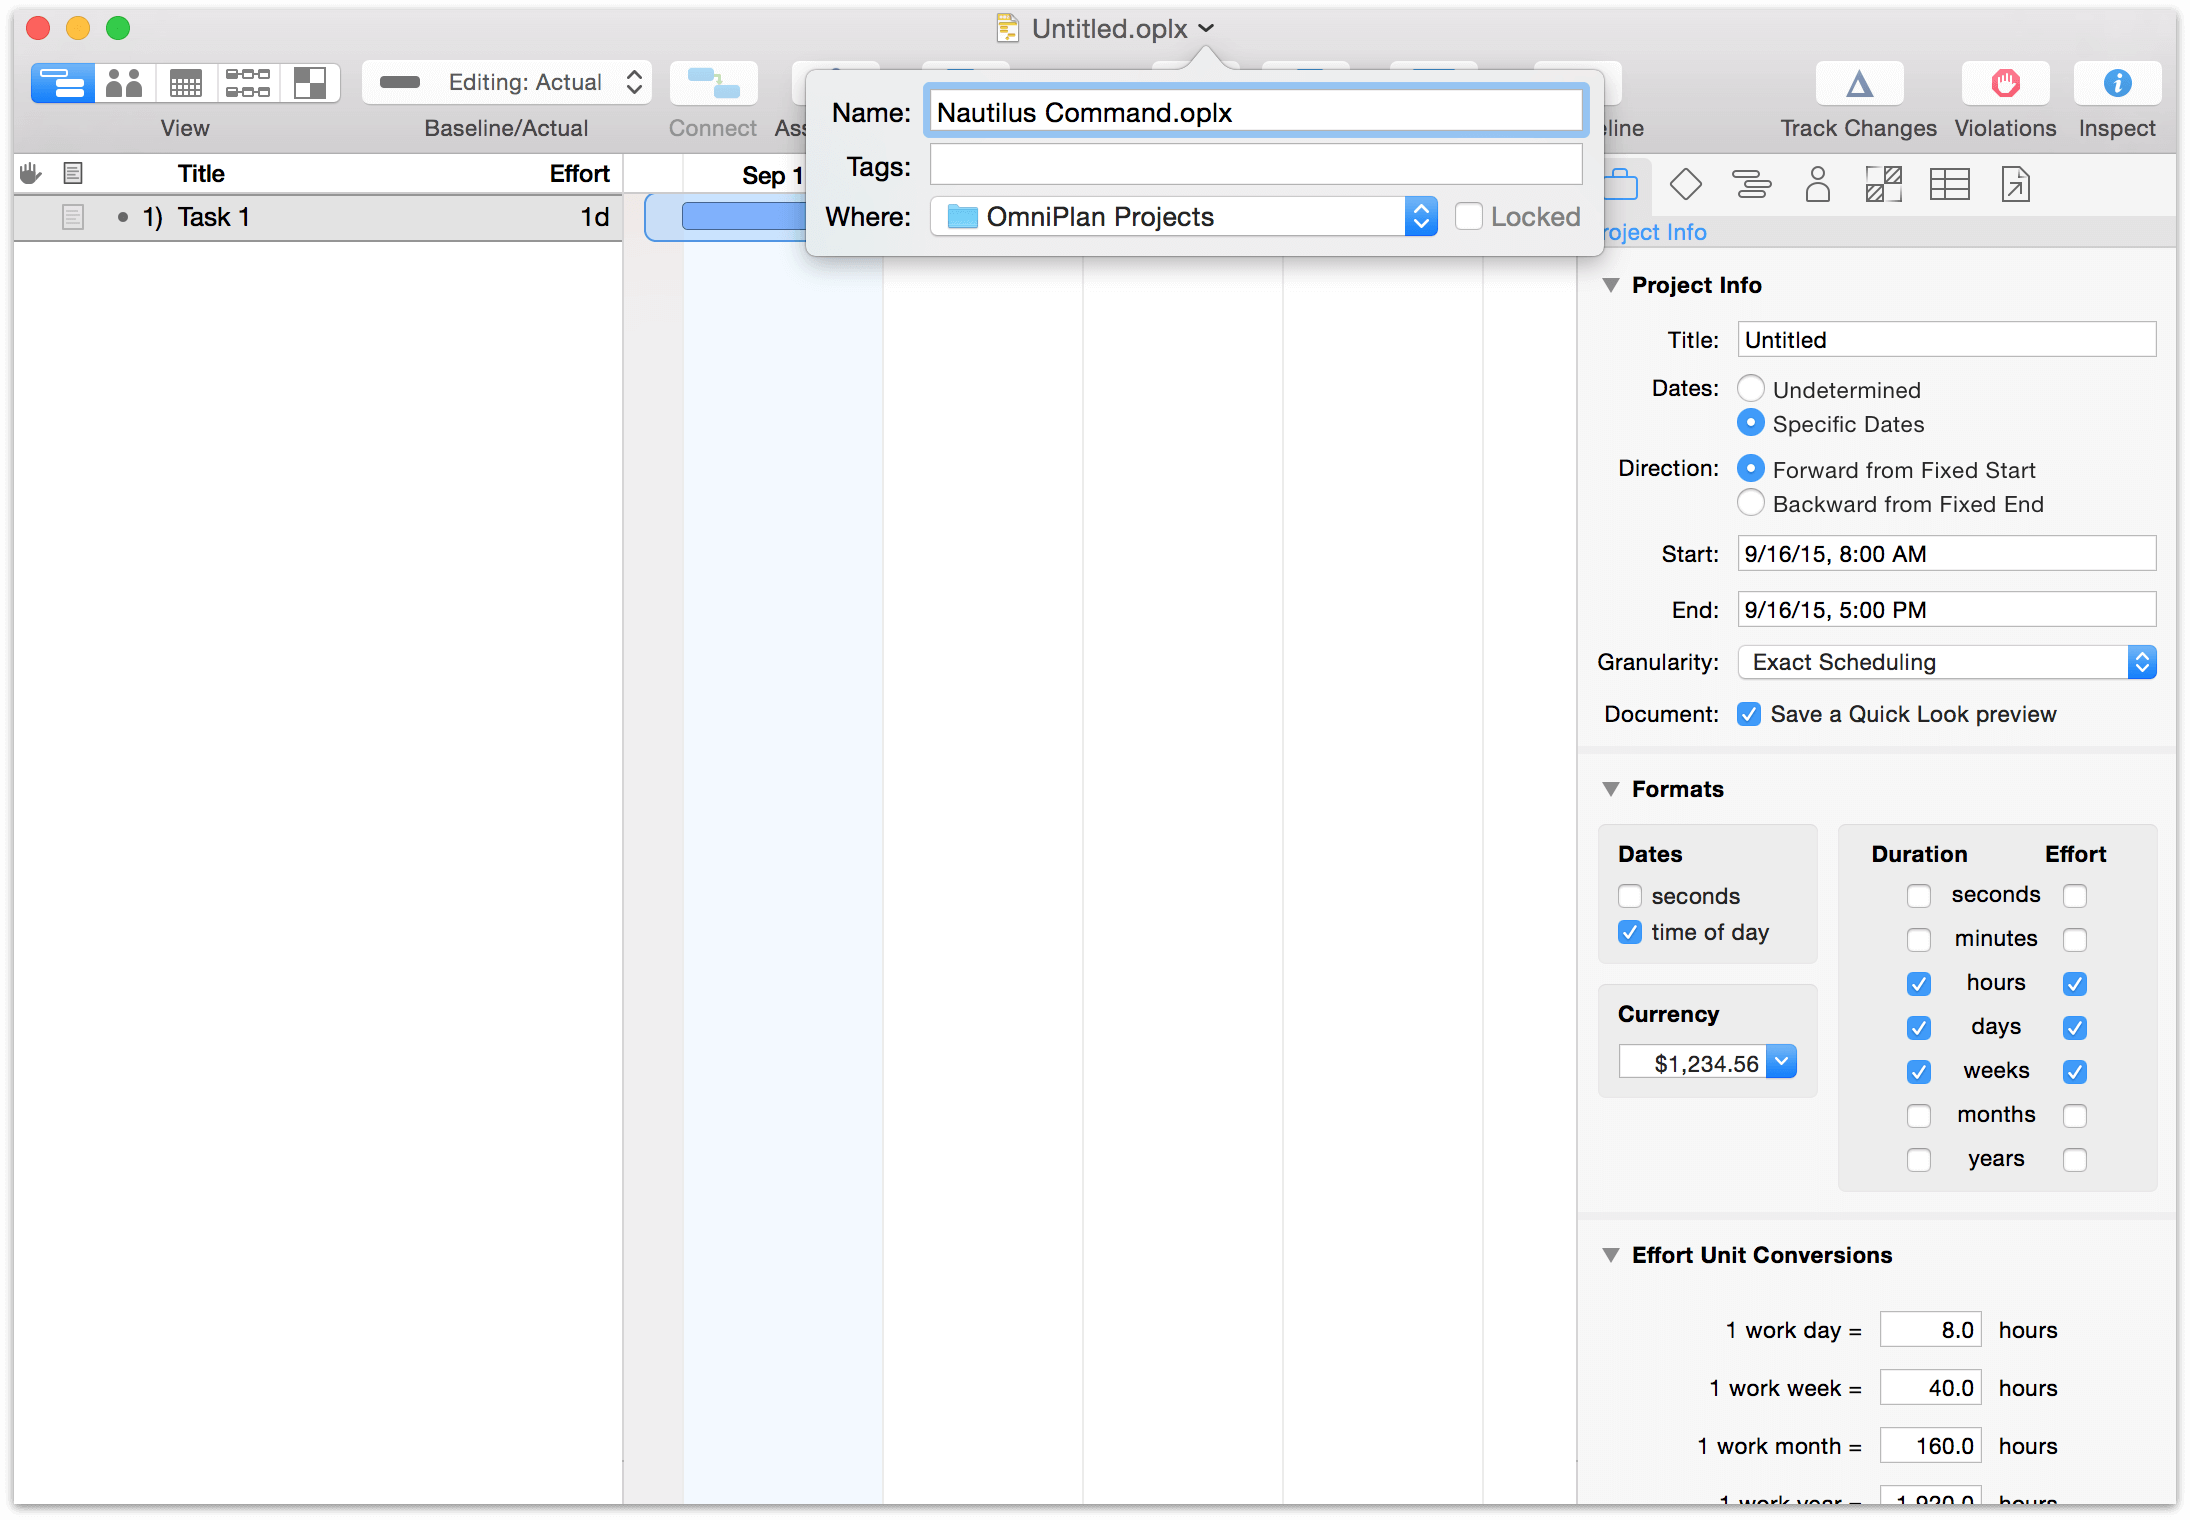
You get a fresh, untitled project document with one task. Save (Command-S) the file to a convenient location, and give it a name (we’ll call ours Nautilus Command, the code name for our upcoming game project).
Step 2: Choosing a Start or End Date
When setting out to build a project, one of the most important aspects is the timeframe. This, in turn, is dictated by any deadlines or start constraints that exist for the project.
In the case of our game development scheme, we don’t have a hard deadline for the project to be finished — we want it to be done when it’s ready (but as soon as reasonably possible). To indicate this, we’ll go to the Project inspector and set the start date as today.
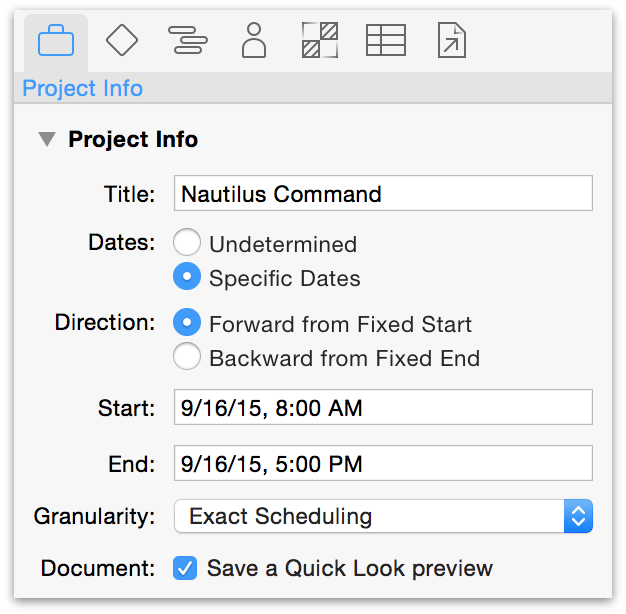
Conveniently, this is the default setting for any new project.
If you’re planning a project in the abstract without a fixed start or end date, you can change the dates from Specific to Undetermined until the timeframe is more set in stone. You’ll get dates that display as T+1d, T +2d... instead.
If you’re planning a project with a specific do-or-die deadline, you’ll want to switch the direction from forward to backward and put the deadline date in the End field. Tasks will be scheduled back from this date, filling in the time from project completion to the present.
If your project has already begun and you are using OmniPlan to describe its progress mid-stream, choose Project ▸ Set Current Editing Date to turn the clock back to when the project began. Continue with the tutorial until your tasks, resources, and their relationships are in place (through Step 12); then set the current editing date back to the present.
Step 3: Creating Milestones
Milestones are the anchor points in your project that mark important shifts in focus or unlocking a new phase of the project. Clarifying these will help break a dauntingly large project down into more manageable sections, and help dictate the tasks leading up to and following the milestone.
To create a milestone, choose Structure ▸ Add ▸ Milestone, or use the keyboard shortcut (Command-Shift-M).
Alternatively, click on the currently existing task (“Task 1”) to select it, then go to the Task inspector. You can change the task type from a regular task to a milestone in the Task Info section here.
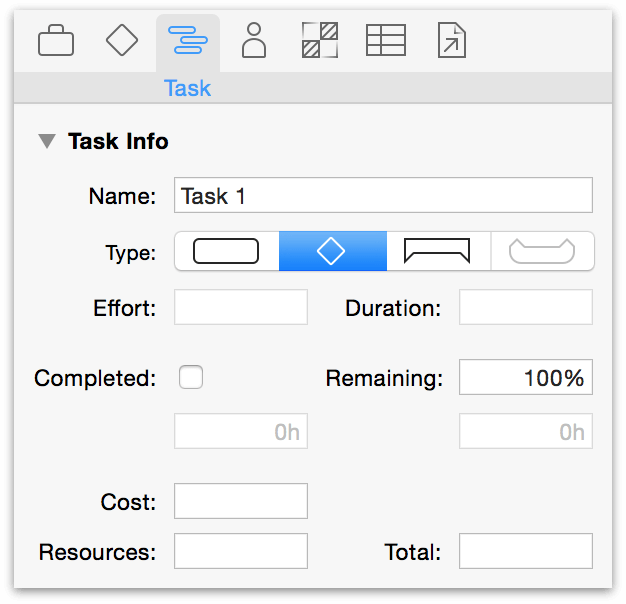
We’ll change the name of “Task 1” by clicking it in Task View or editing the name field in the Task inspector, create a few more milestones for our project, and then go on to reinforce our milestones with tasks.

Step 4: Creating Tasks
Create a task by pressing Return with a task selected, or choosing Structure ▸ Add ▸ Task. To add a task above the currently selected task, hold Shift before pressing Return.
A task is anything that needs to get done in order for the project to move toward completion. Each task has attributes such as start and end dates, a completion percentage, and resource assignments; these show up in the various columns of the task outline, and in the various sections of the Task inspector. Tasks can be grouped together, and a task can be dependent on other tasks.
For now, just create some tasks and name them. Select your first task and press the Return key once (or twice, depending on how your keyboard preferences are set) to create new tasks. If you still have a “Task 1” hanging around, you can just delete it or change its name. When you’re done, if your milestone is not the last item, click the bullet to its left and drag it down to the bottom of the list.
Each task in the outline corresponds to a bar on the Gantt chart.
New tasks appear below the currently selected item in the Gantt view, or at the bottom of the list if no tasks, milestones, or groups are selected.
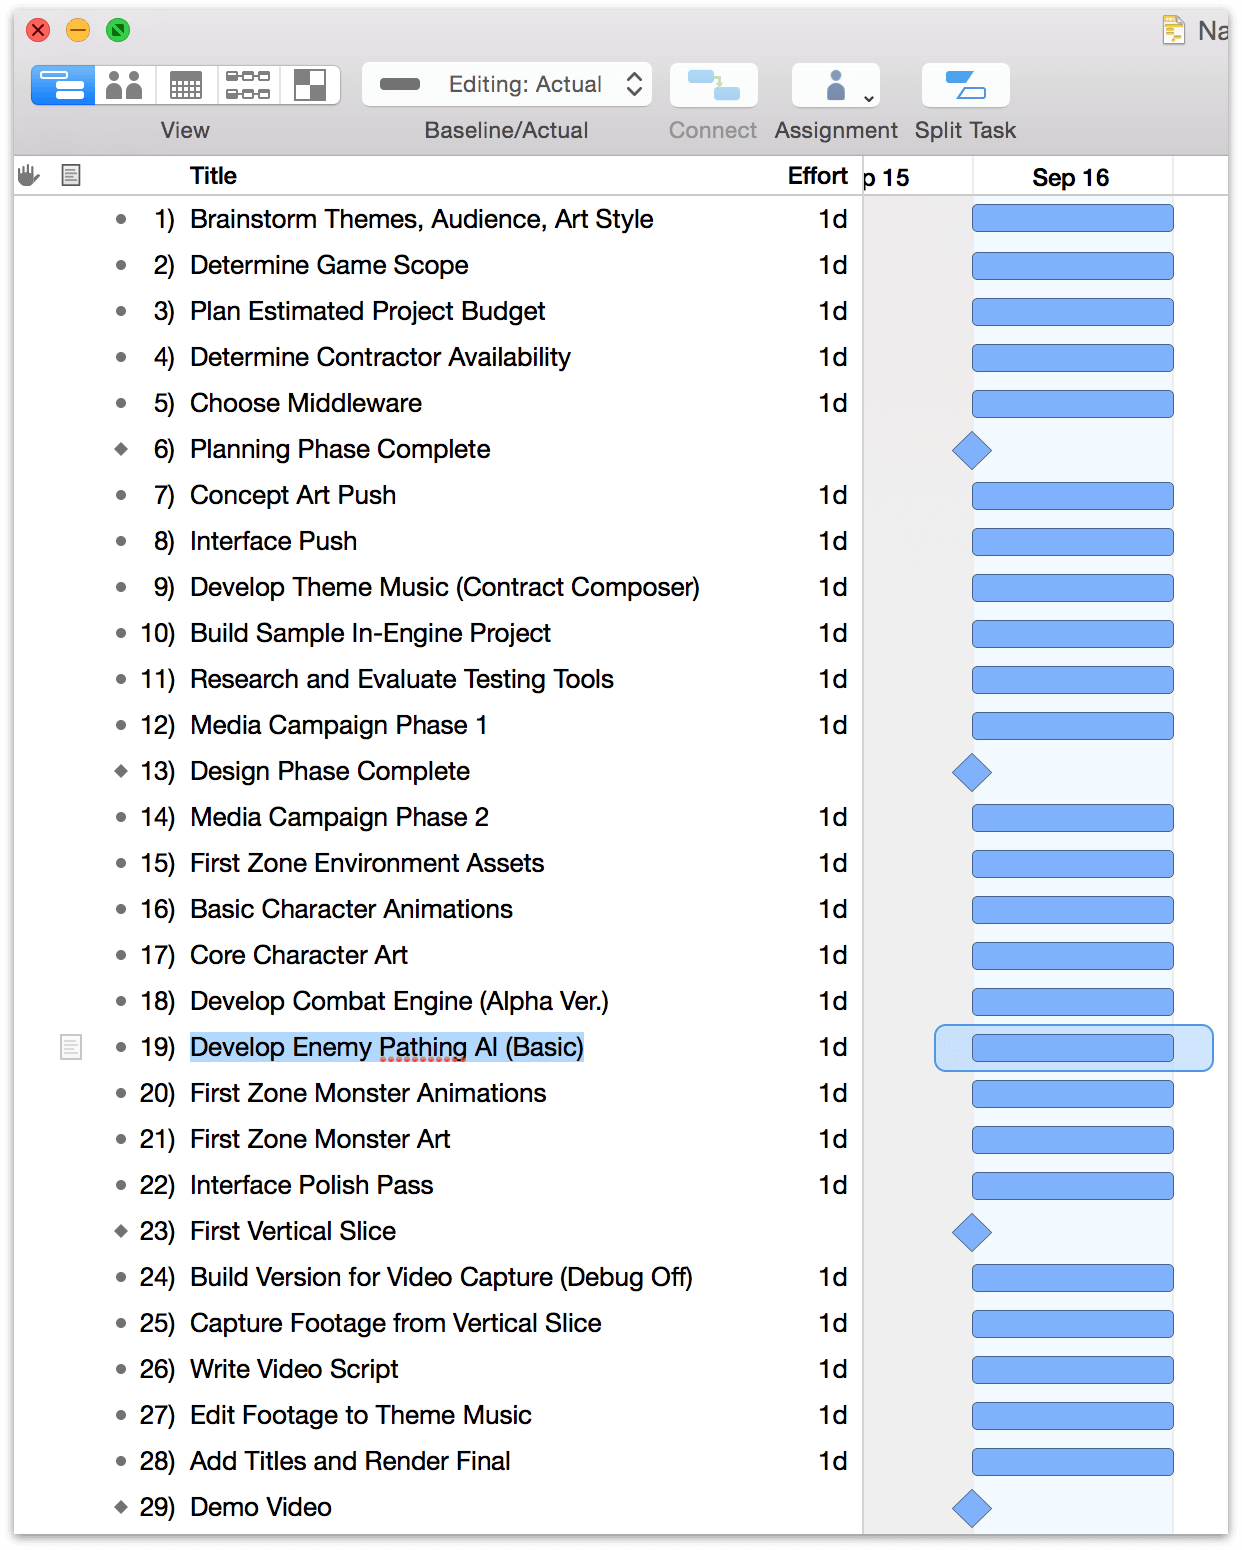
For our project we’ll create several tasks beneath each milestone that they’re related to.
As you create additional tasks, you’ll see that the task name listed in the outline alongside a few other default columns: Violations, Notes, and Effort. You can add details about each task by clicking the note icon next to its name. Effort represents the number of resource-hours needed to complete the task, while violations appear only when the logic of dependencies between tasks gets out of line.
Step 5: Editing the Work Week
Now that we’re starting to see the project come together, we’ll set tasks aside for the moment and start setting up the work schedule for our project.
Switch to Calendar View. By default, working hours are Monday through Friday from 8:00 to 5:00, with an hour-long break for lunch at noon, but you can move or resize the blocks to adjust the working hours for the project.
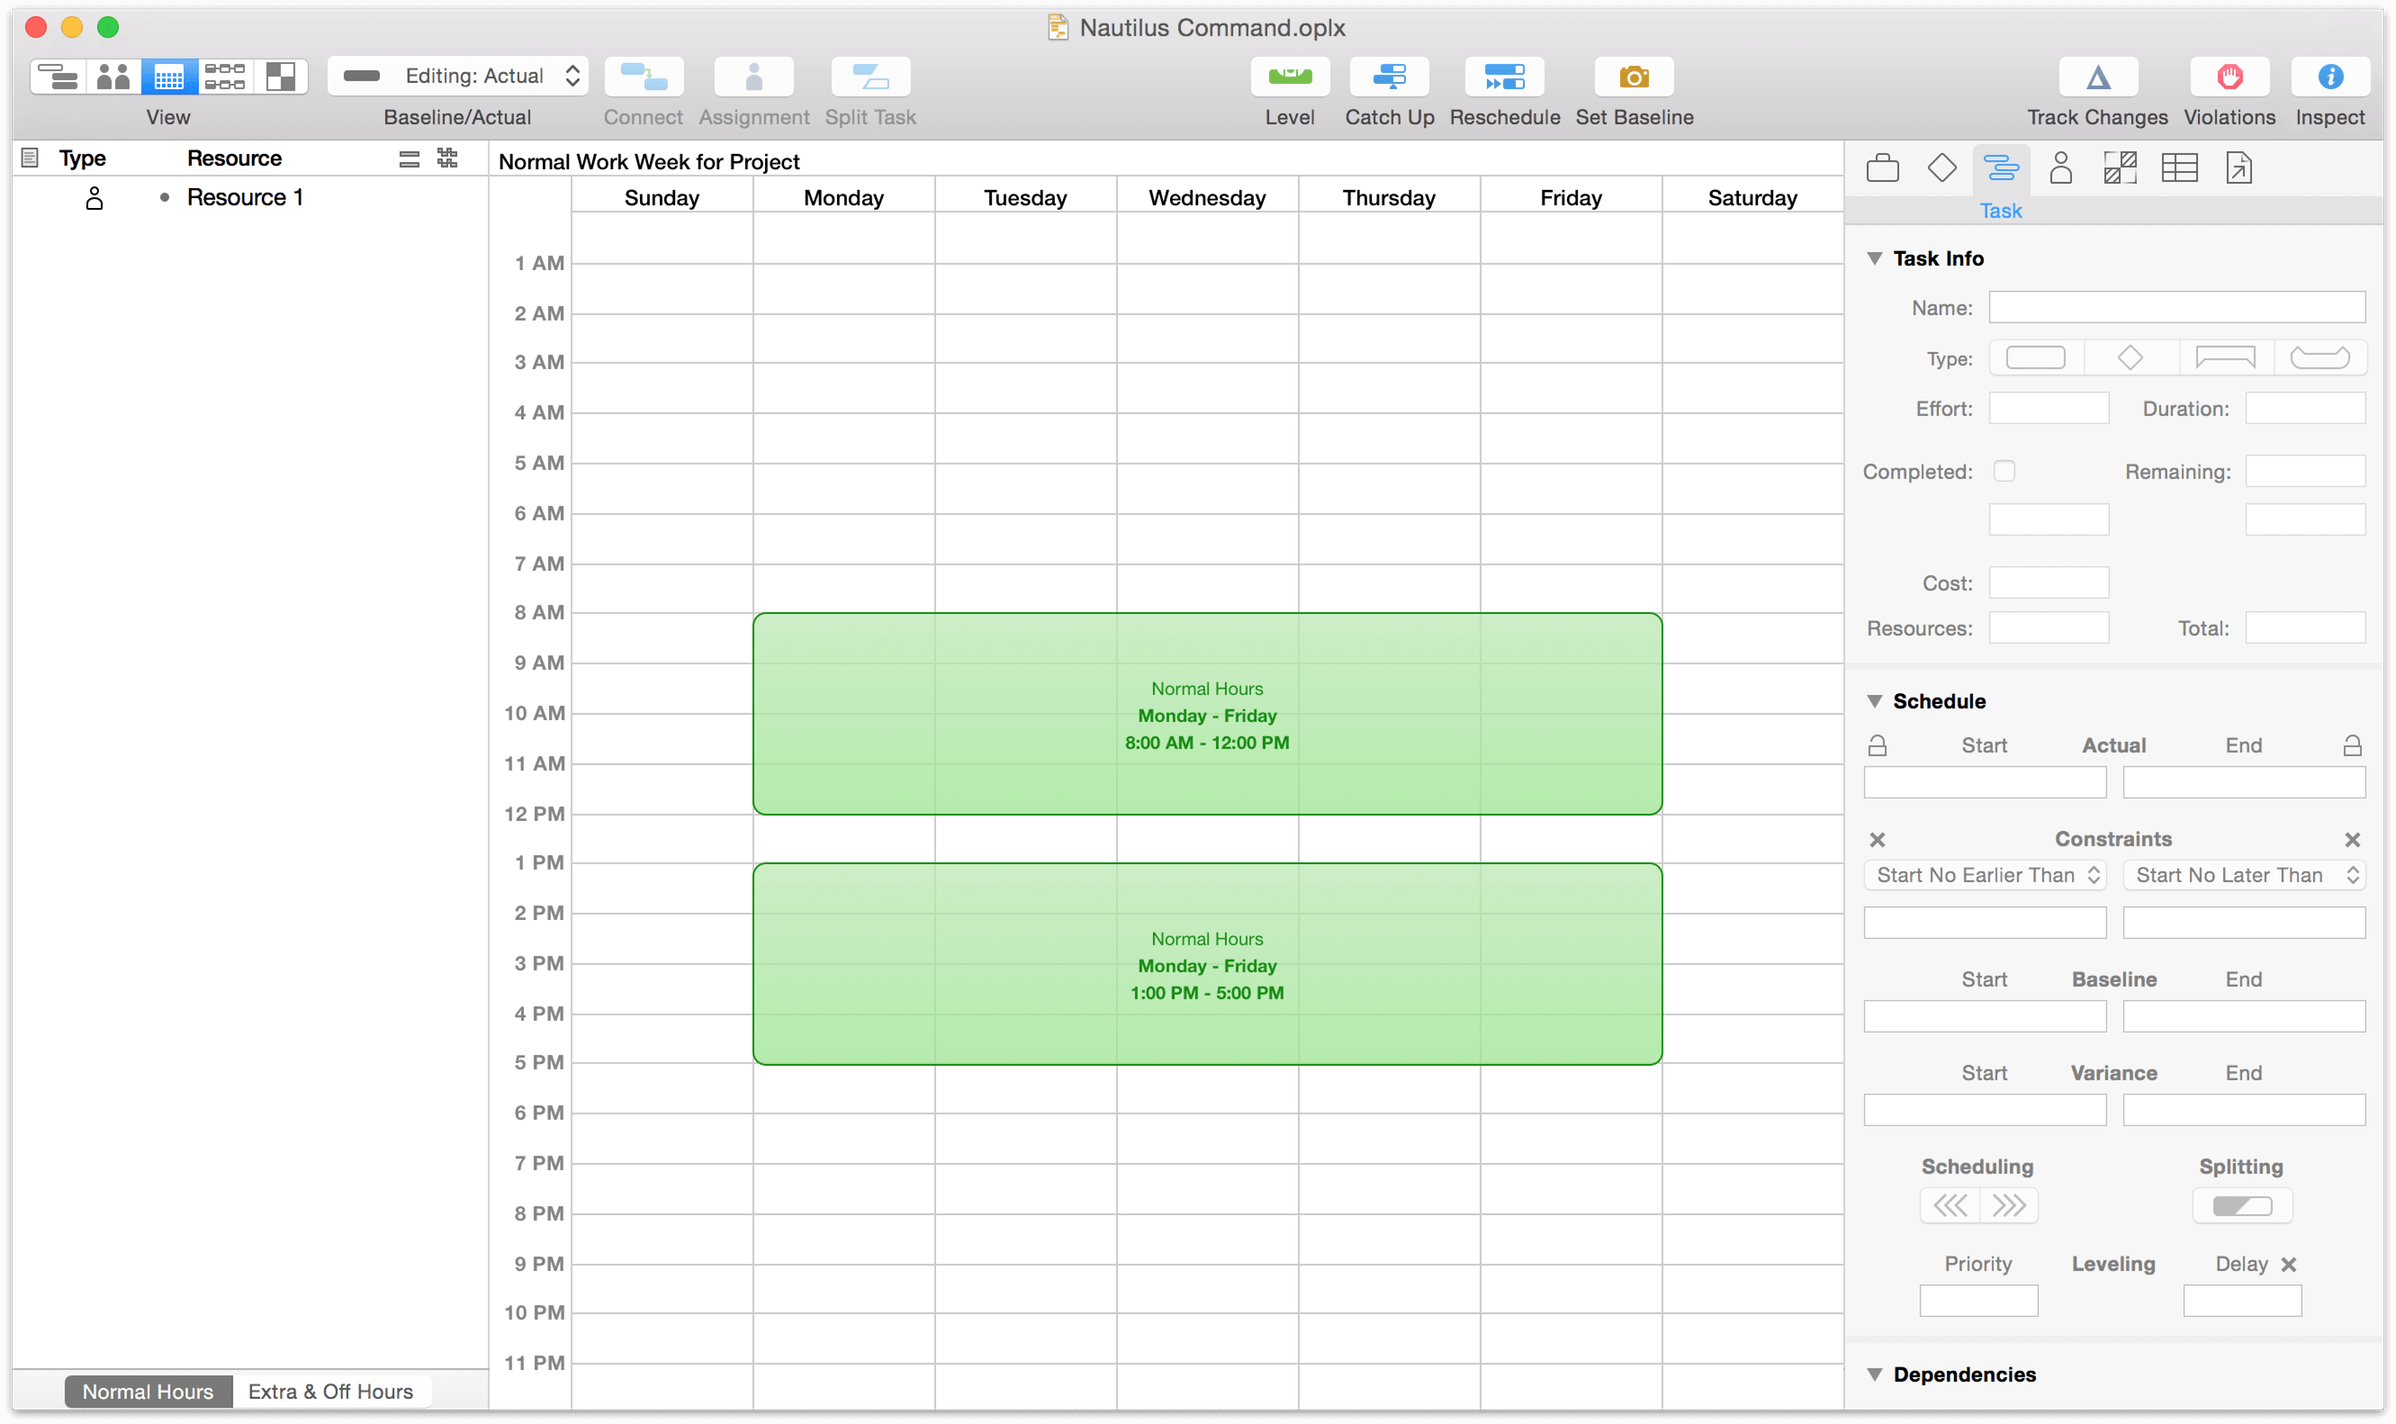
Drag a block to move it, or drag the edge of a block to resize it. Double-click and drag in an empty area to create a new block, or select a block and press the Delete key to get rid of it. The text inside each block updates to reflect the changes you make.
Since we’re working with a bunch of more nocturnal folks, let’s change the schedule to reflect that. Click and drag one of the time blocks on the calendar to bring it to a new position, or drag one of the edges to change the size of the block. We end up with a schedule that fits our needs:
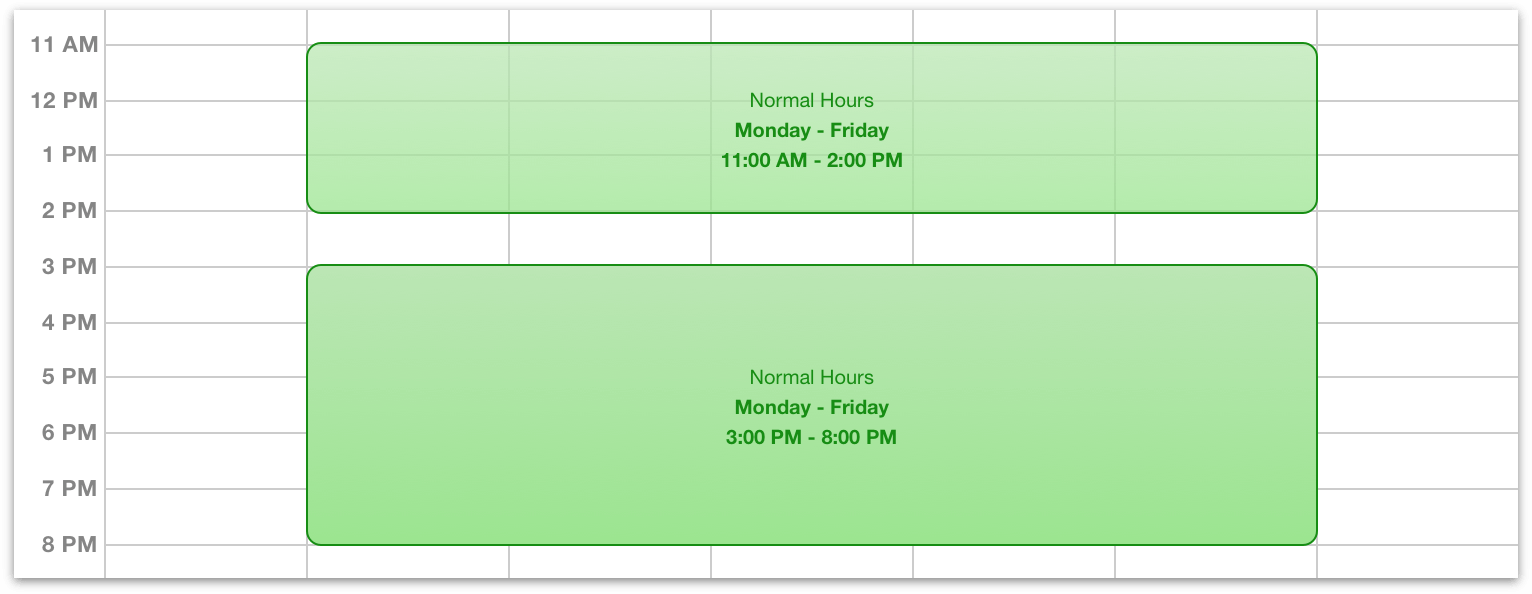
If your average work day isn’t 8 hours long (or your work week doesn’t add up to 40 hours), you should visit the Project inspector’s Effort Unit Coversions section and change the hours per day (or hours per week) setting, so that your task duration and effort calculations will make sense.
Step 6: Setting Schedule Exceptions
Even the most accommodating work week will occasionally have days that are out of the ordinary. Whether it’s a national holiday, a team-wide training seminar, an industry expo or conference, or just a patch of bad weather that keeps folks out of the office, setting exceptions to the regular work schedule can be key to keeping a project on track.
Still in calendar view, choose Extra & Off Hours from the toggle below the resource list. Here you can change the work hours for a specific week, to account for exceptions such as holidays or overtime.
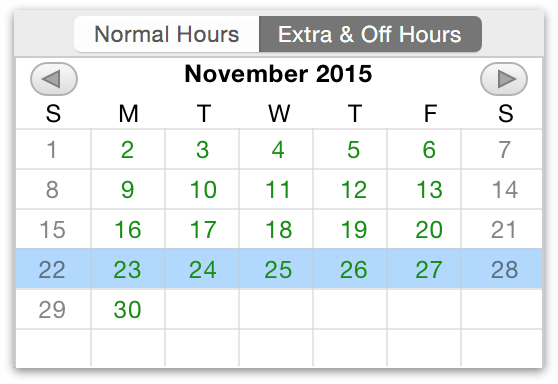
One that we know is in the future for our project is the upcoming Thanksgiving. We can add that to our schedule right now. Use the arrows bracketing the current month to navigate to November, then click on the week of Thanksgiving (the 26th) to access the exceptions calendar for that week.
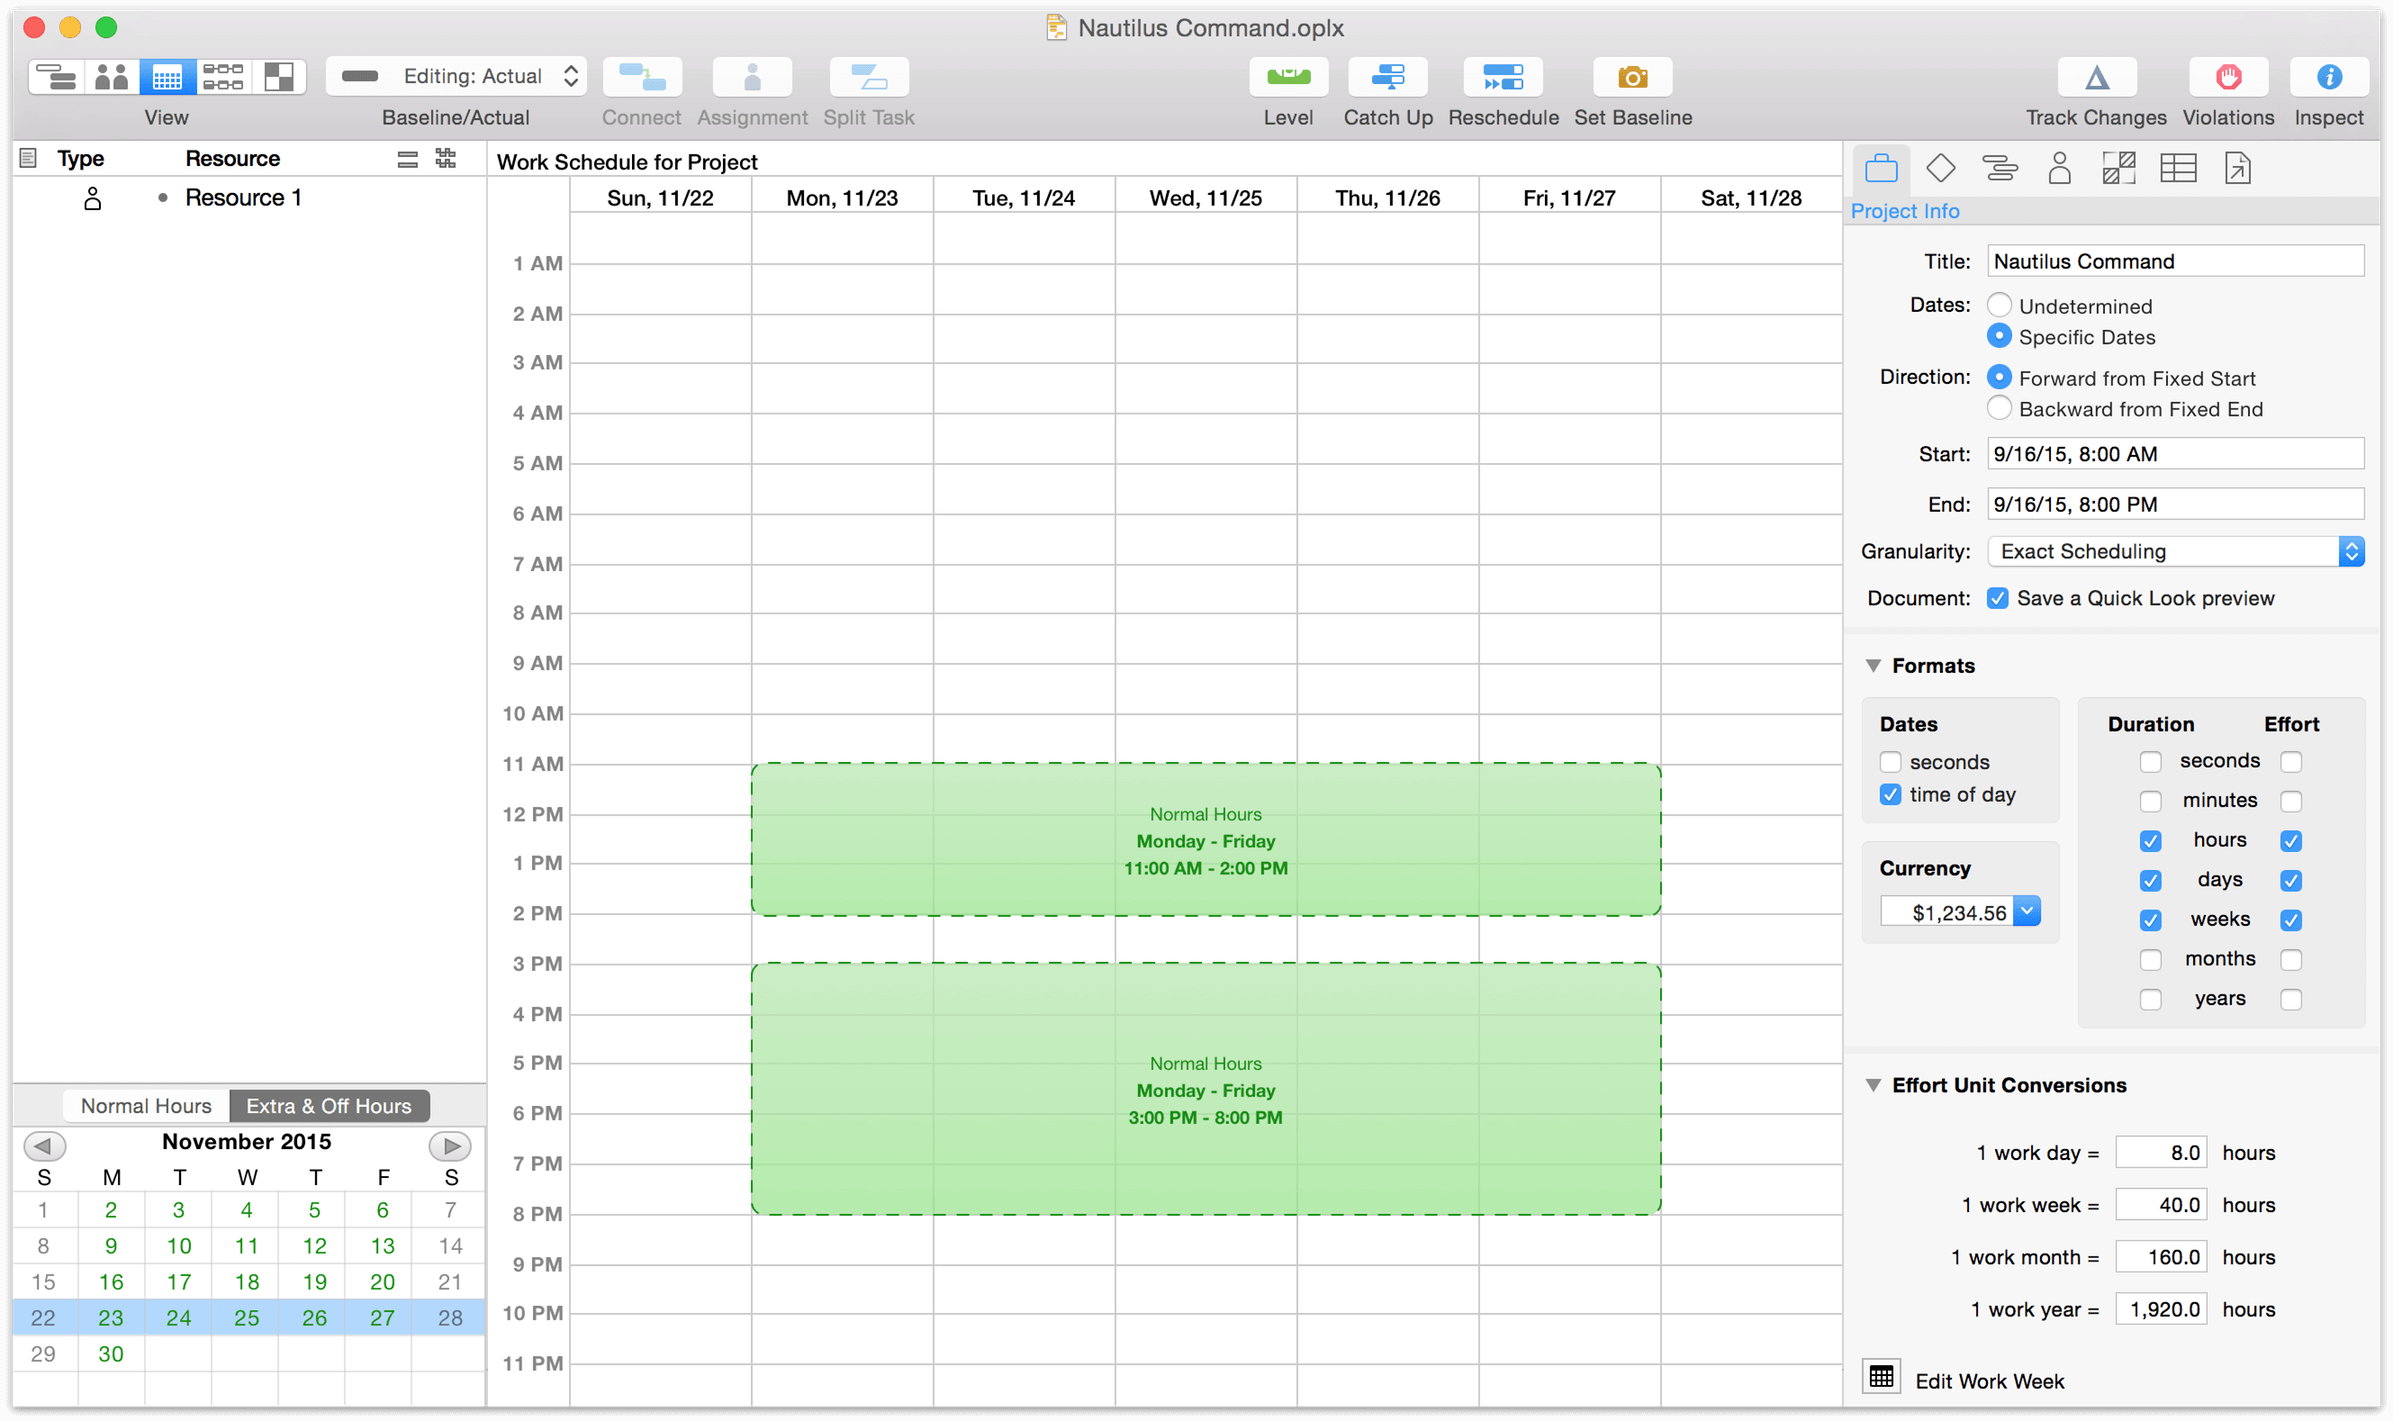
To quickly remove working time from the schedule, you can Shift-drag, creating a red box that marks normal working time as unavailable.
To add extra hours, double-click and drag to create a blue box which represents available hours apart from the normal working hours.
We know we want to take Thanksgiving and the following Friday off, but we can also predict that this week will be crunch mode for the team. We create a block of time that covers the 26th and 27th, and then replace that lost time with overtime hours earlier in the week.
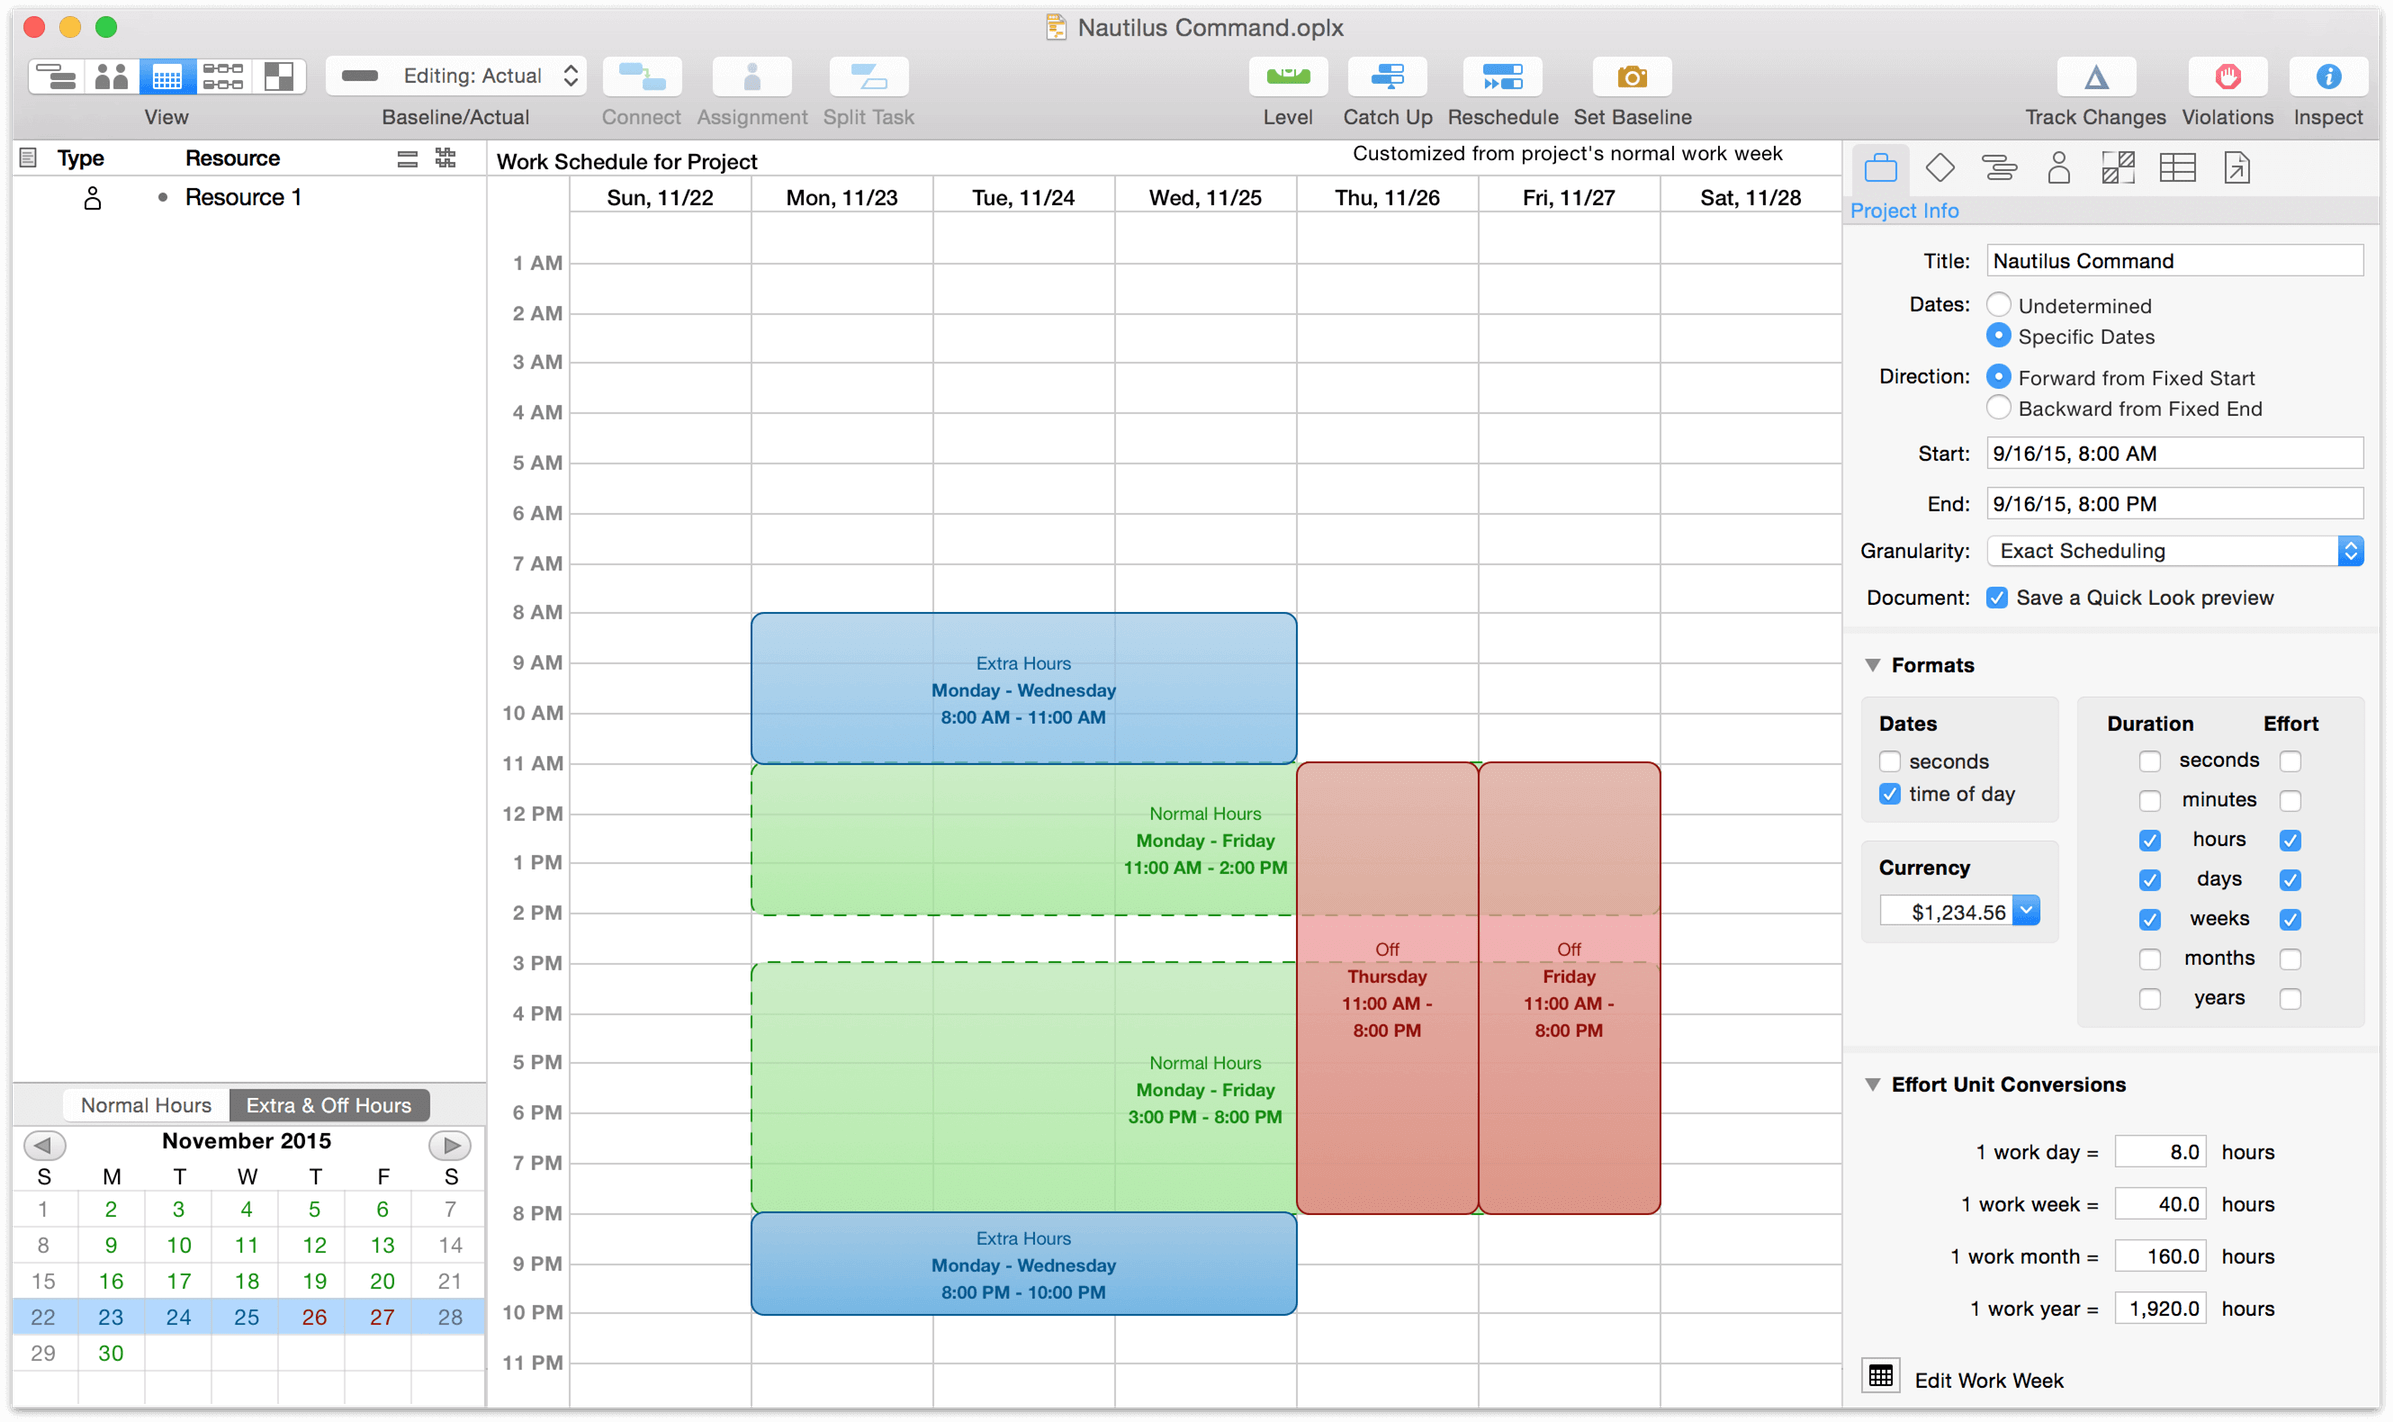
When making changes to the schedule for the whole project, be sure not to have any resources selected in the sidebar. Editing the calendar with a resource selected will change the schedule for that specific resource rather than the project as a whole (see Step 12: Setting Individual Schedule Exceptions for more on how to do this).
Step 7: Setting Task Durations
Now we can begin to scope out how long each task will take.
Use the view switcher to get back to task view. Each task takes a certain amount of time to complete. You can set a task’s duration by typing in the Duration column of the task outline, or by clicking and dragging the ridges on the right end of a bar in the Gantt chart. If you’re typing durations, you can use unit abbreviations like 2d (2 days), 1w (1 week), and so on.
The length of the bar in the Gantt chart represents the duration.

Step 8: Grouping Tasks
When tasks are closely related or interdependent it can be useful to put them in a group. Groups help organize a project conceptually, and also act as meta-tasks that can be linked via dependencies to other tasks or groups.

Select some tasks and choose Structure ▸ Group (Option-Command-L) to group them. Grouped tasks are indented in the outline, and represented by a parent task of the “group” type, which can be named like any other task.
With all of the tasks in the group selected, this would be a good time to add a bit of visual distinction to the group as well. Go to the Styles inspector and choose a color in the Task Bar Color section that will identify all of the tasks in the group.
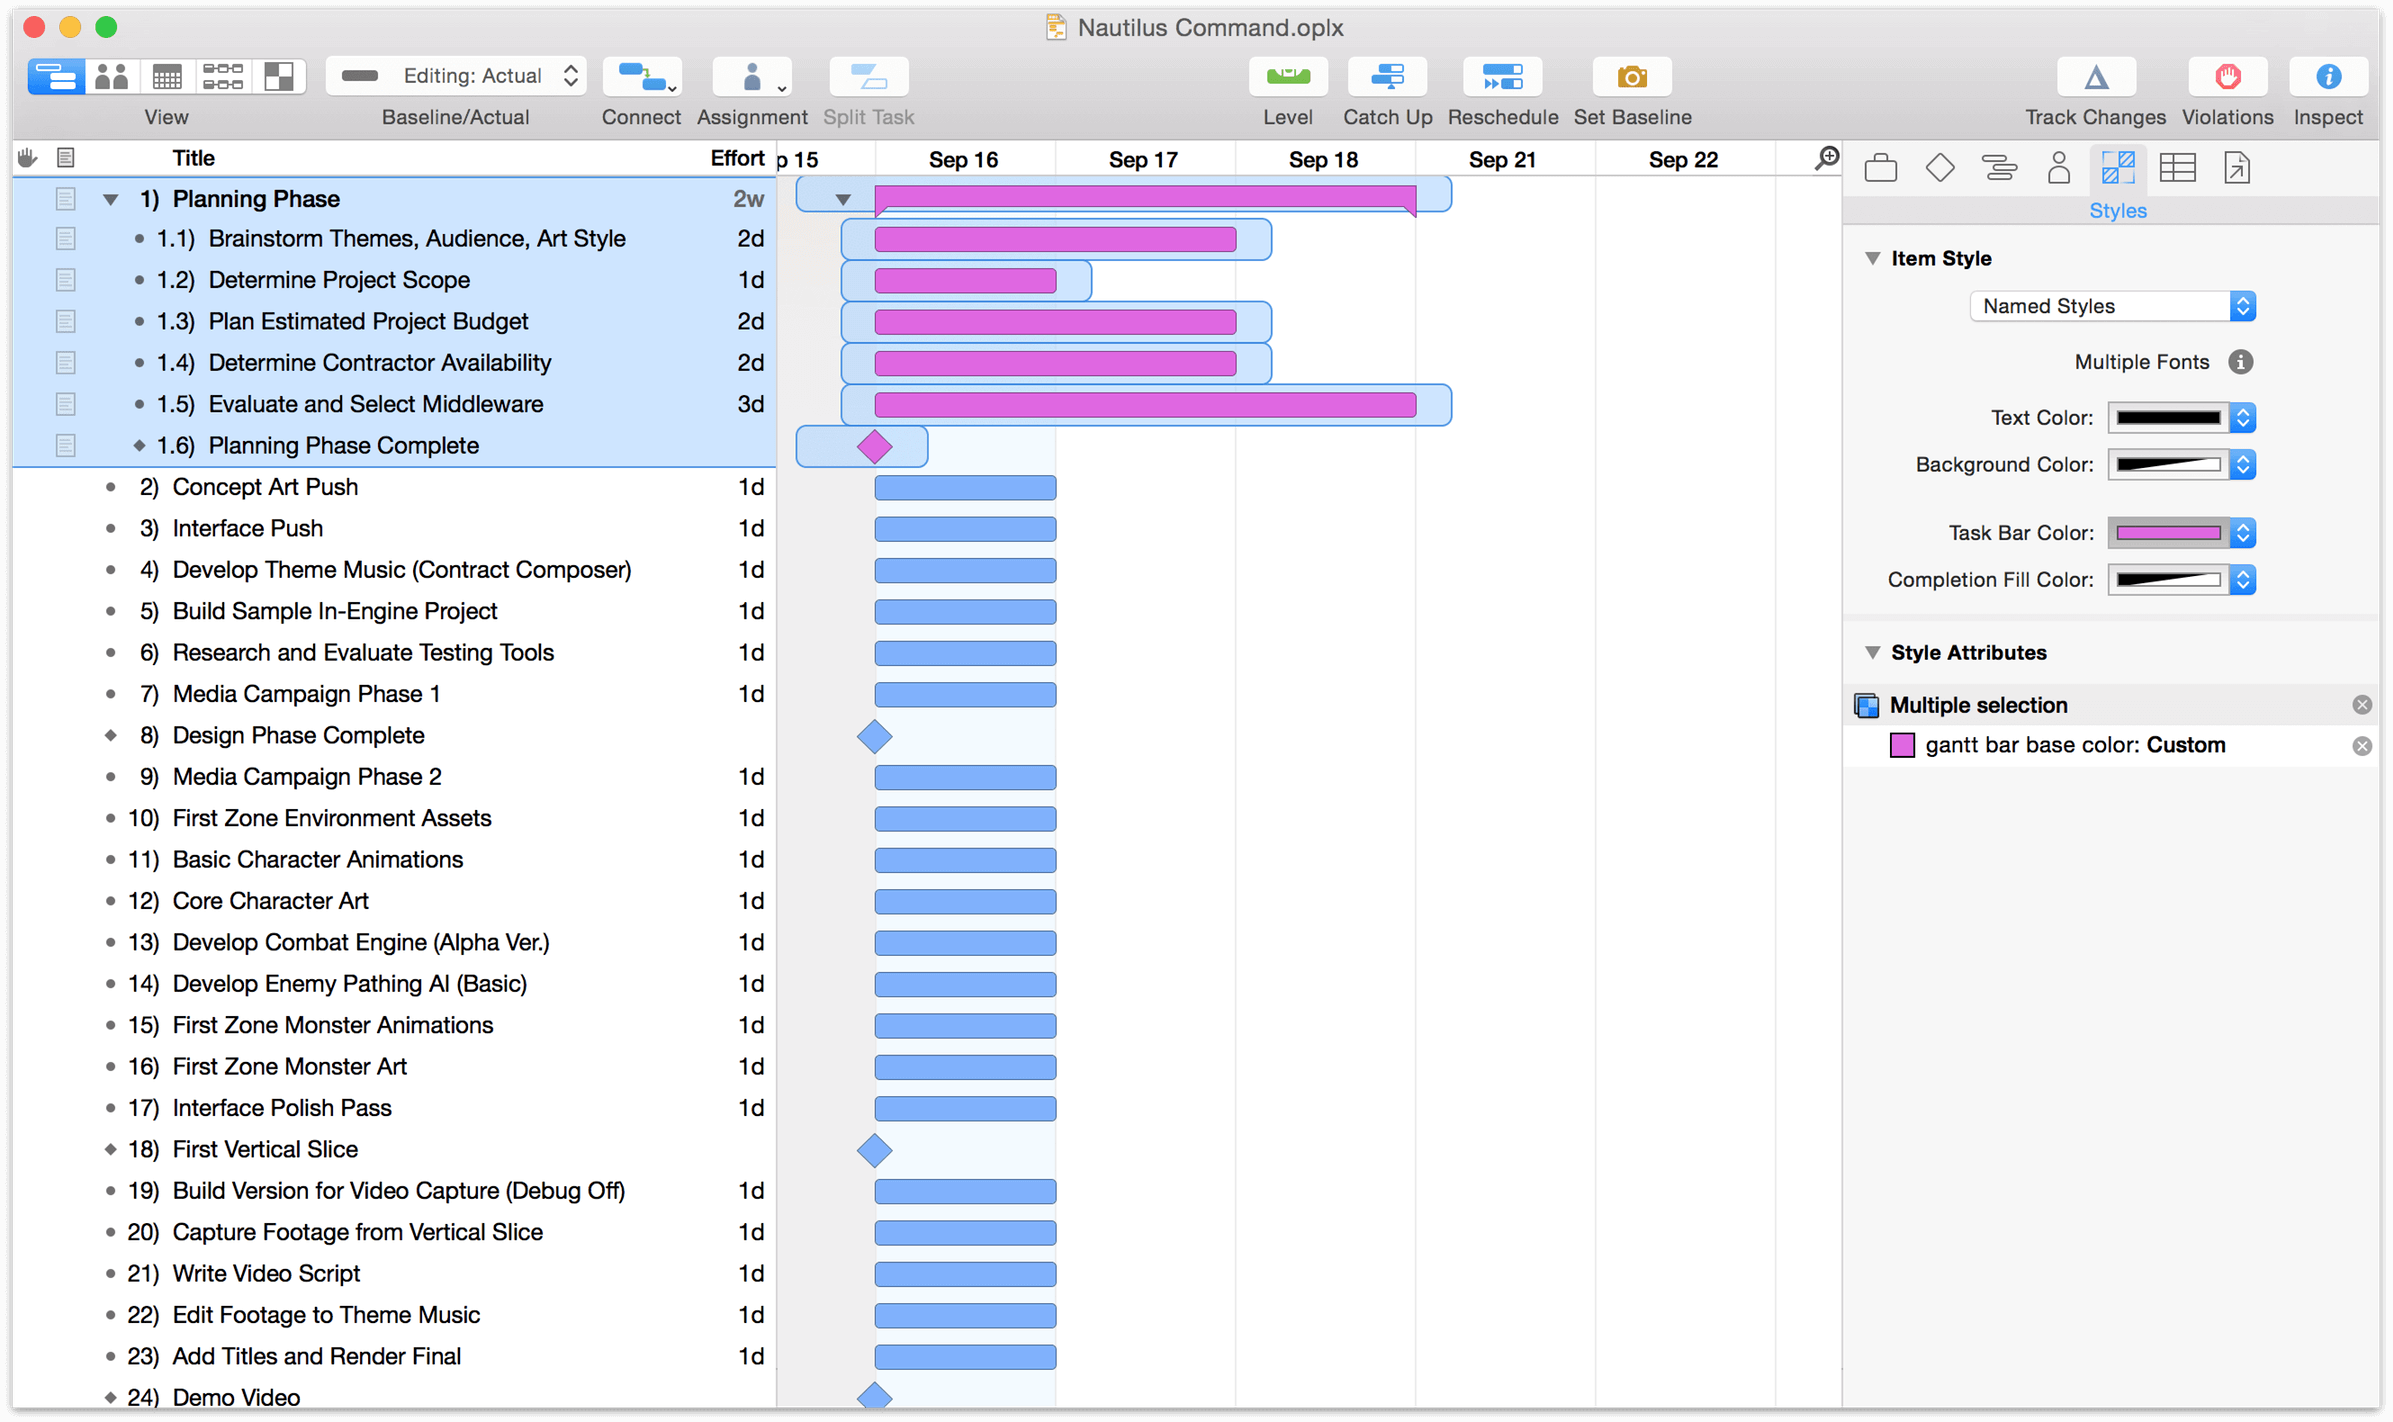
After organizing tasks and milestones into groups and estimating the time required to complete them, we’re starting to get a better picture of how our project will take shape. At this stage our Gantt chart looks something like this:
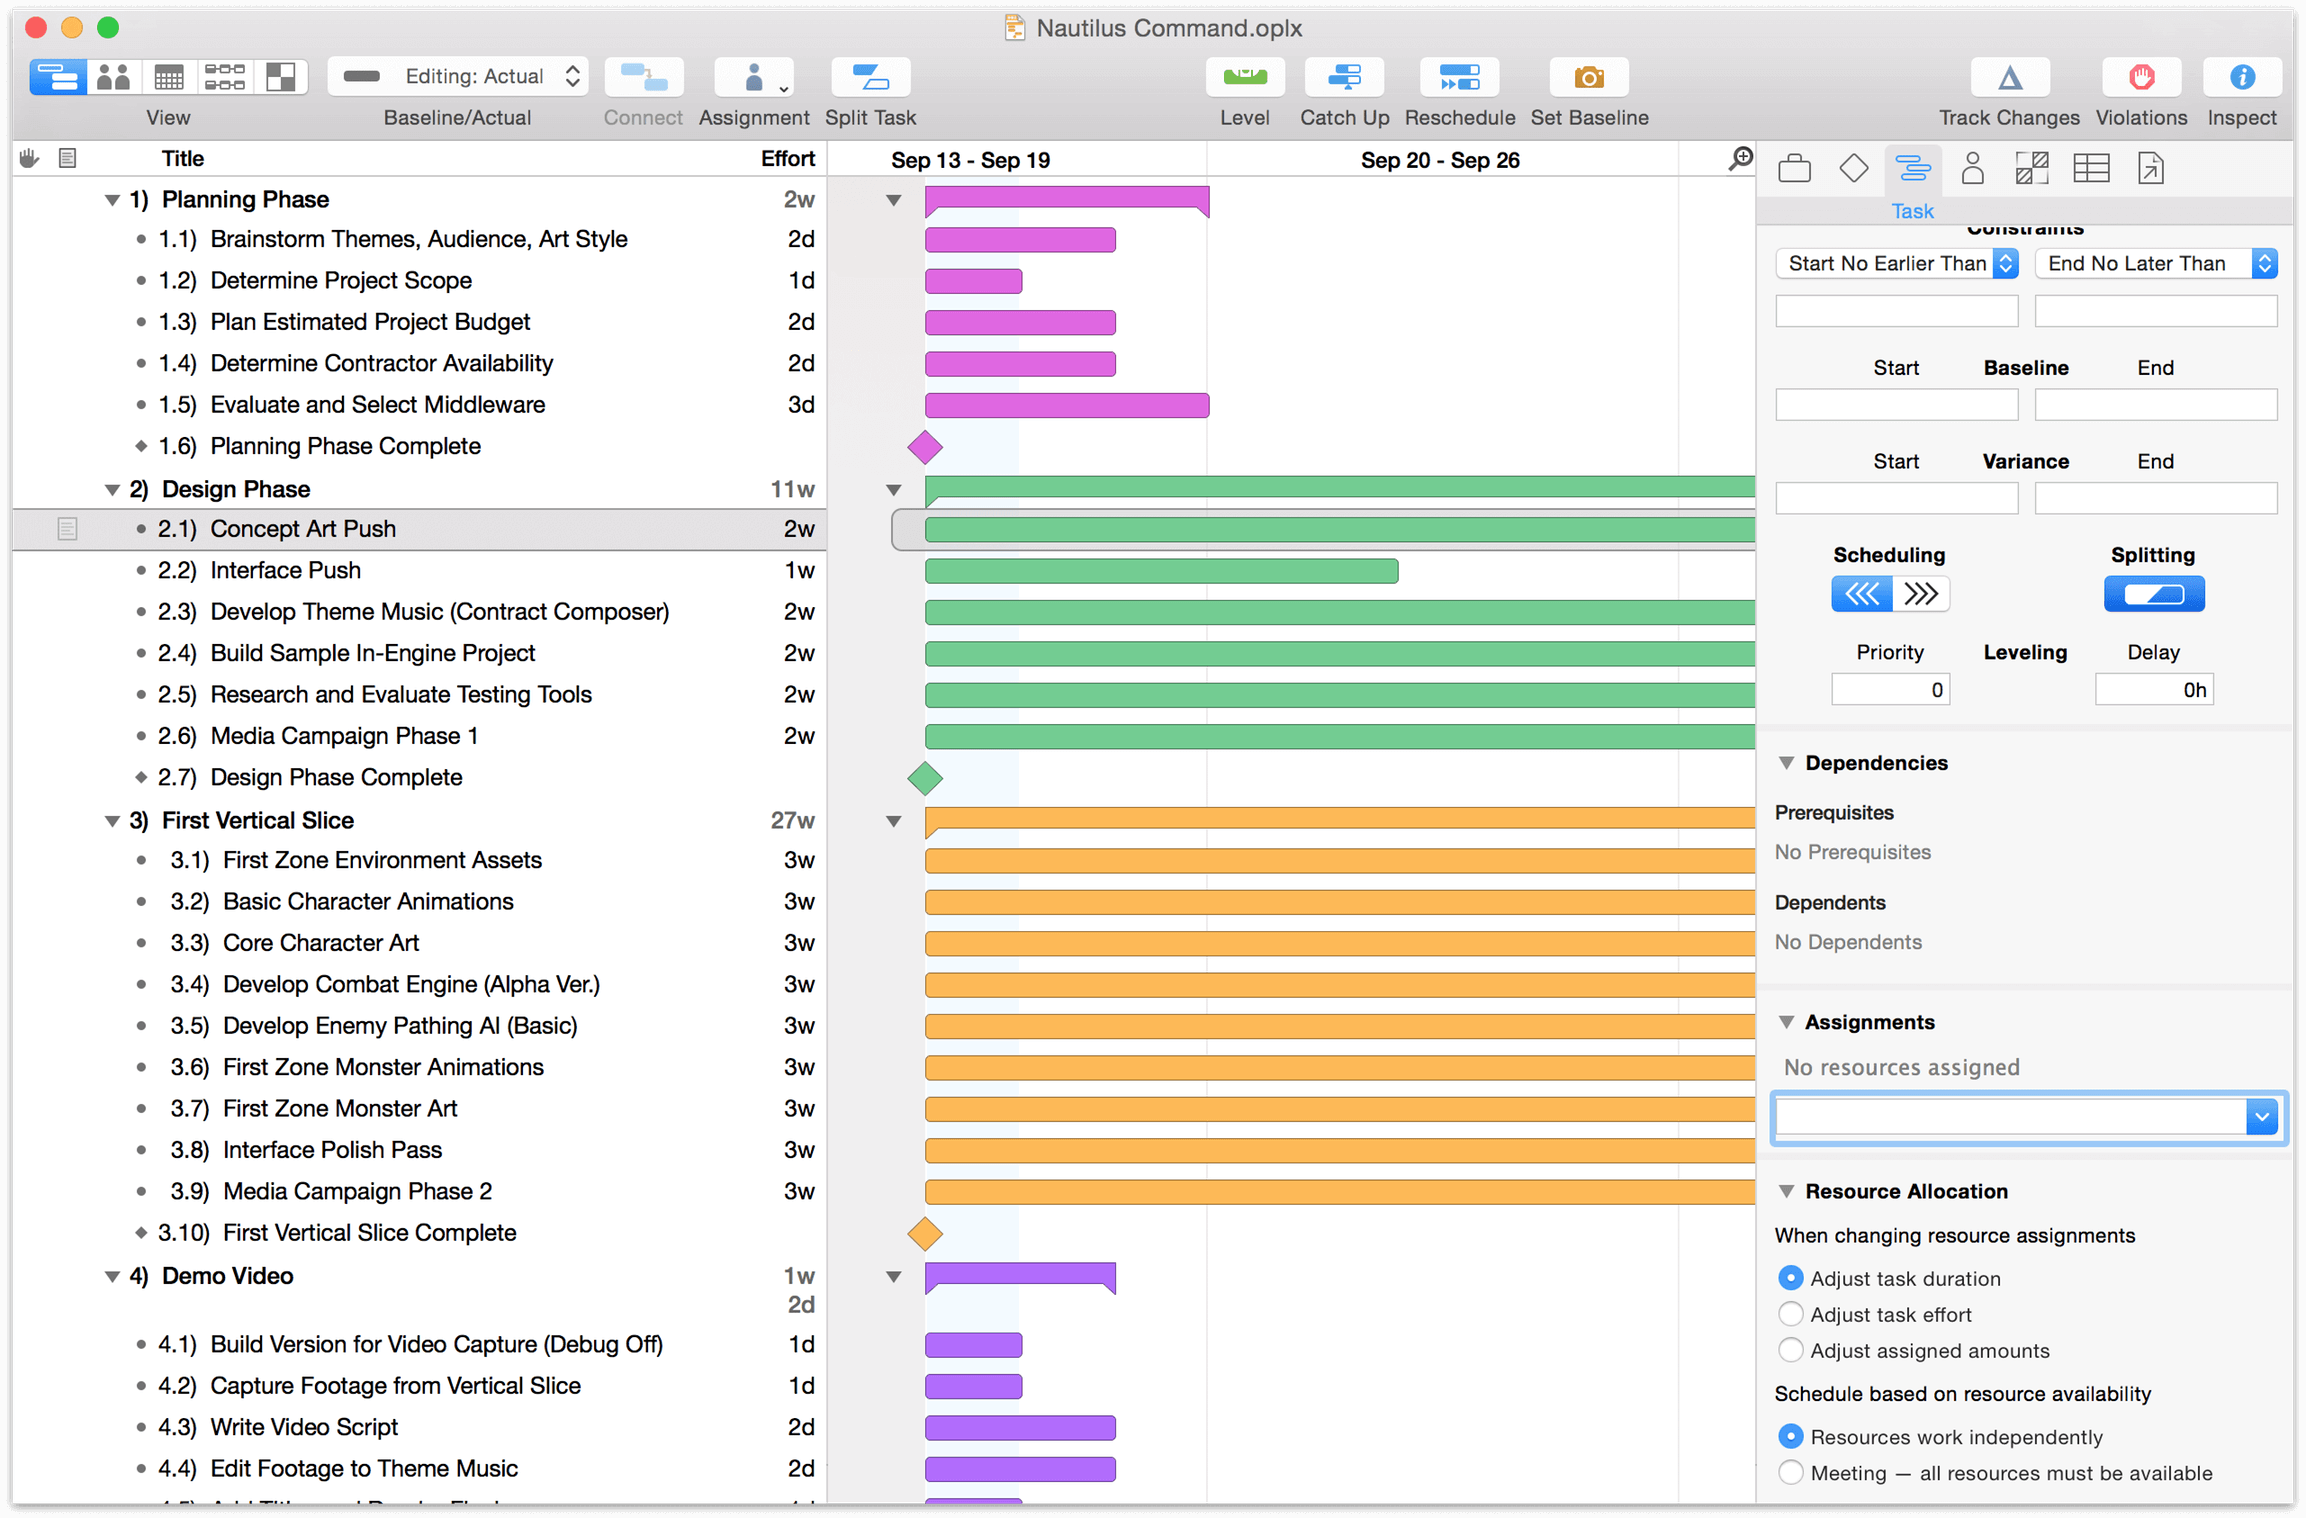
In the figure above, the scale of the Gantt chart has been changed from days to weeks to get a better idea of the relative durations assigned to tasks. To change the Gantt chart’s scale, Control-click on the date bar and choose a time unit, or drag left or right on the bar to make fine adjustments.
Step 9: Connecting Tasks with Dependency Lines
We can’t complete all of our tasks simultaneously! Even if we had the resources to do so, some parts of the project can’t happen until others are finished. Thankfully, the pieces are now in place to establish the ways that those tasks are dependent on the status of others. There are four ways that dependencies can exist:
- Finish ▸ Start dependencies are the most common type, indicating that when task A finishes, task B can start.
- Start ▸ Finish dependencies indicate that when task A starts, task B can finish.
- Start ▸ Start dependencies indicate that when task A starts, task B can also start.
- Finish ▸ Finish dependencies indicate that when task A finishes, task B can also finish.
Select two tasks which need to be connected, and click the Connection button in the toolbar. A Finish ▸ Start dependency line appears between the tasks, starting from the task which comes first in the outline. You can also draw dependencies right in the Gantt chart by clicking an arrow on the end of a selected task and dragging it to the beginning of the next.
The type of dependency is based on the start- and end-points of the arrow: dragging an arrow from the completion of one task to the beginning of another will create a finish ▸ start dependency, and so on.
As you connect tasks, they automatically reschedule to respect the dependencies.

Milestones, like other types of tasks, can be connected with dependency lines. If you find that your tasks don’t look like they’re as well positioned in the Gantt chart as their dependencies would indicate, you can click drag their rows to rearrange them vertically in the outline for a more natural flow.
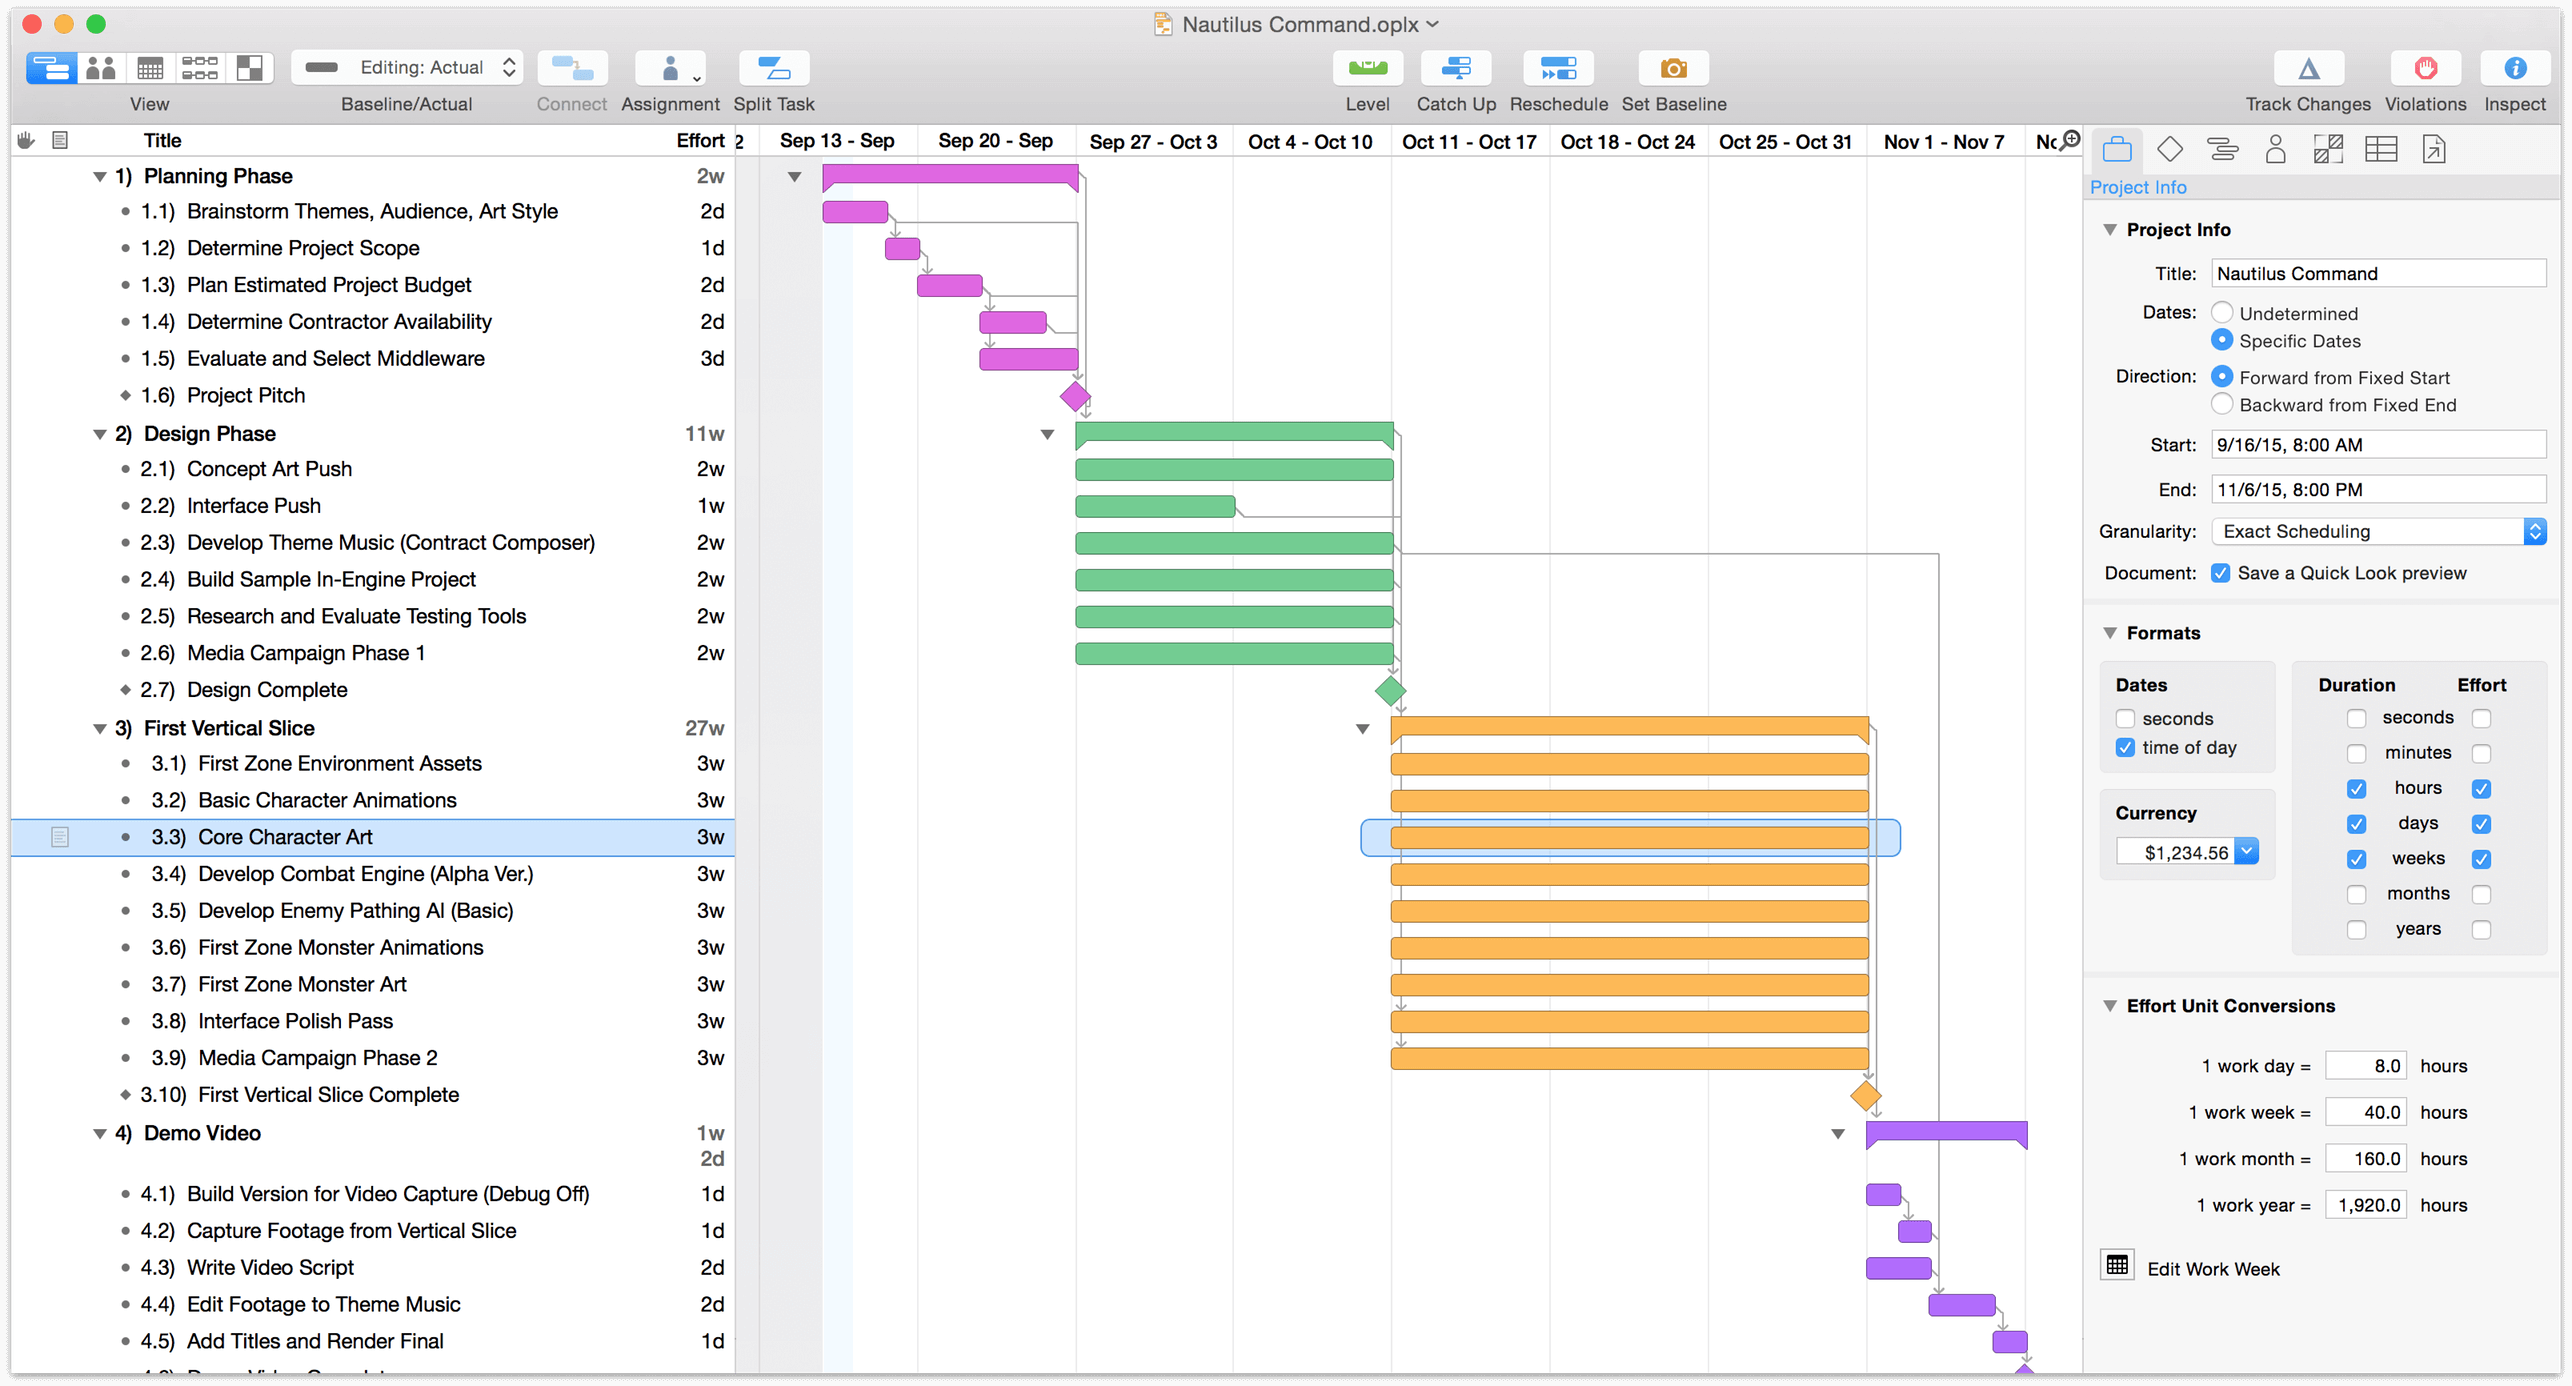
Remove dependencies by selecting all the relevant tasks and choosing Structure ▸ Disconnect Tasks (Control-Command-Minus) or Disconnect from the drop-down Connection toolbar button menu.
Step 10: Creating Resources
Now it’s time to start adding the team members, equipment and materials we’ll be using to bring the project to fruition. Every person, piece of infrastructure, and raw ingredient that contributes to reaching the project’s goal is counted as a resource, so let’s get started.
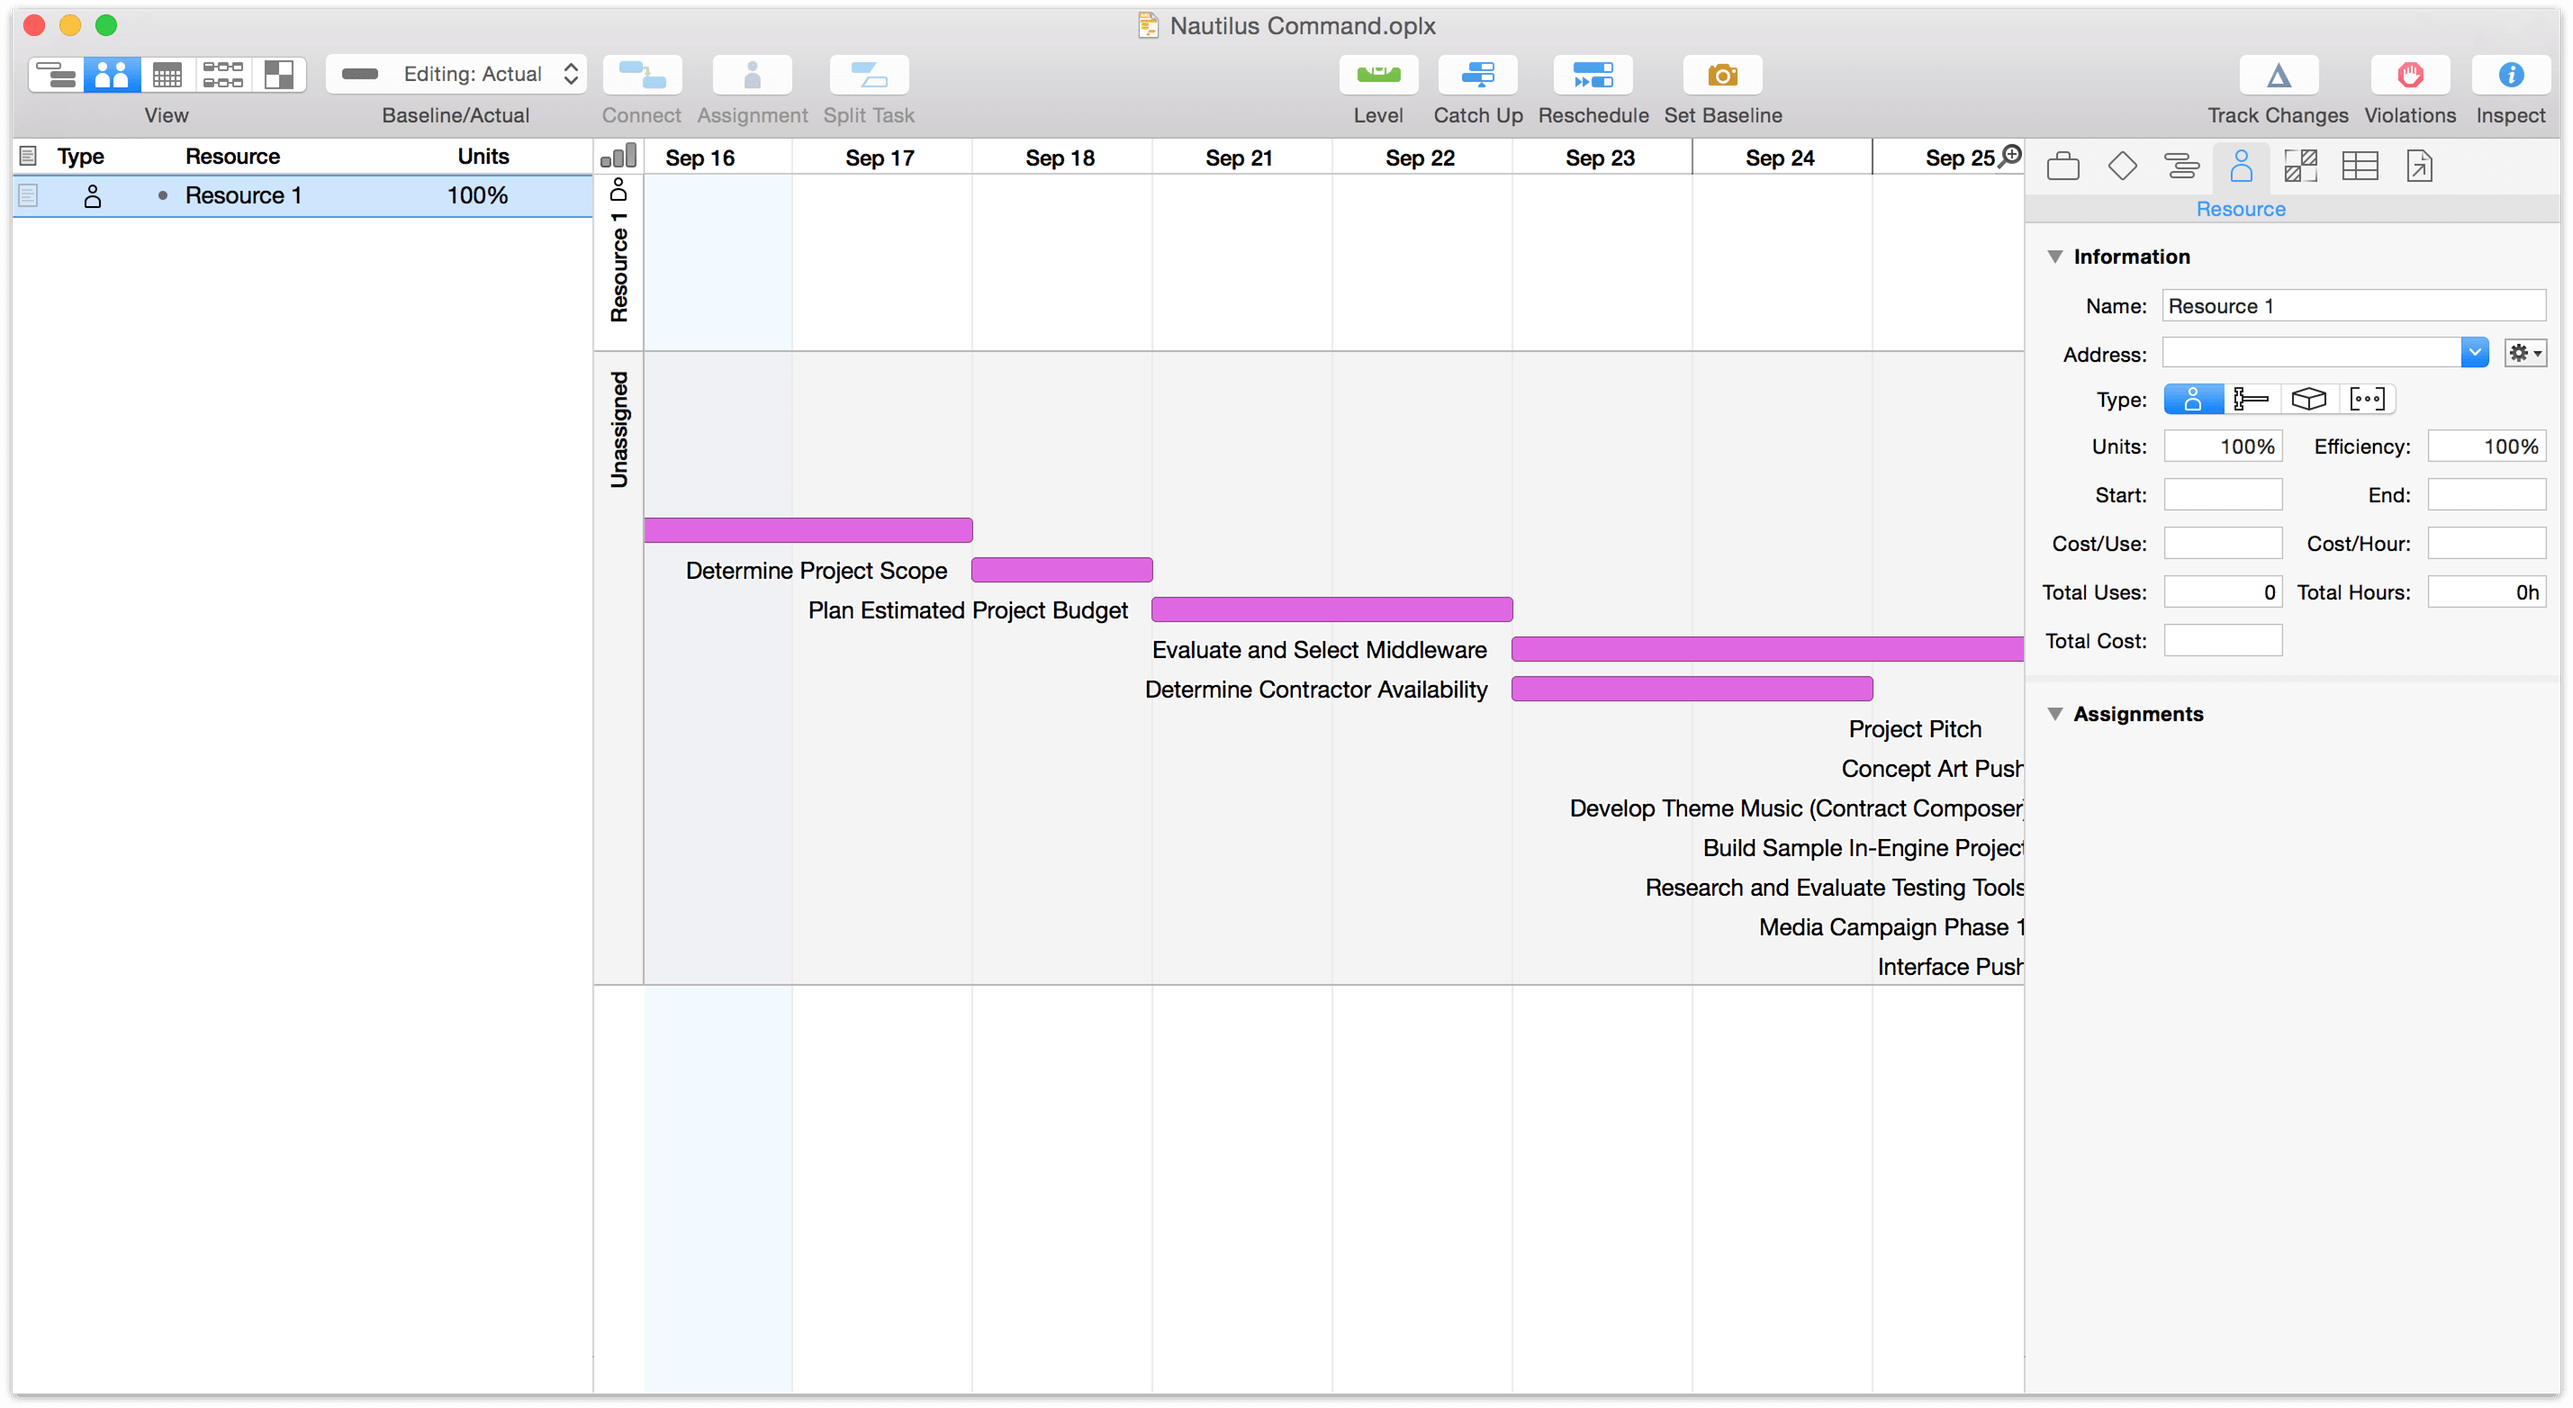
Creating resources works much like creating tasks. Switch to Resource View, which contains the resource outline. Create a few resources (as simple as pressing Return) and name them. Then click the Type icon for each one and choose whether it is Staff (a human team member), Equipment (a piece of gear), or Material (consumable goods). Like tasks, resources can also exist in hierarchical groups.
A timeline appears on the right side of the view for each resource you create, but it is empty until you assign the resource to some tasks.
As with the task outline, the resource outline contains a few default columns alongside the resource’s name and type (as mentioned above). Note offers a handy space for details on the resource (a staff member’s job title, for example), while Units represents the percentage of the resource available for work on this project.
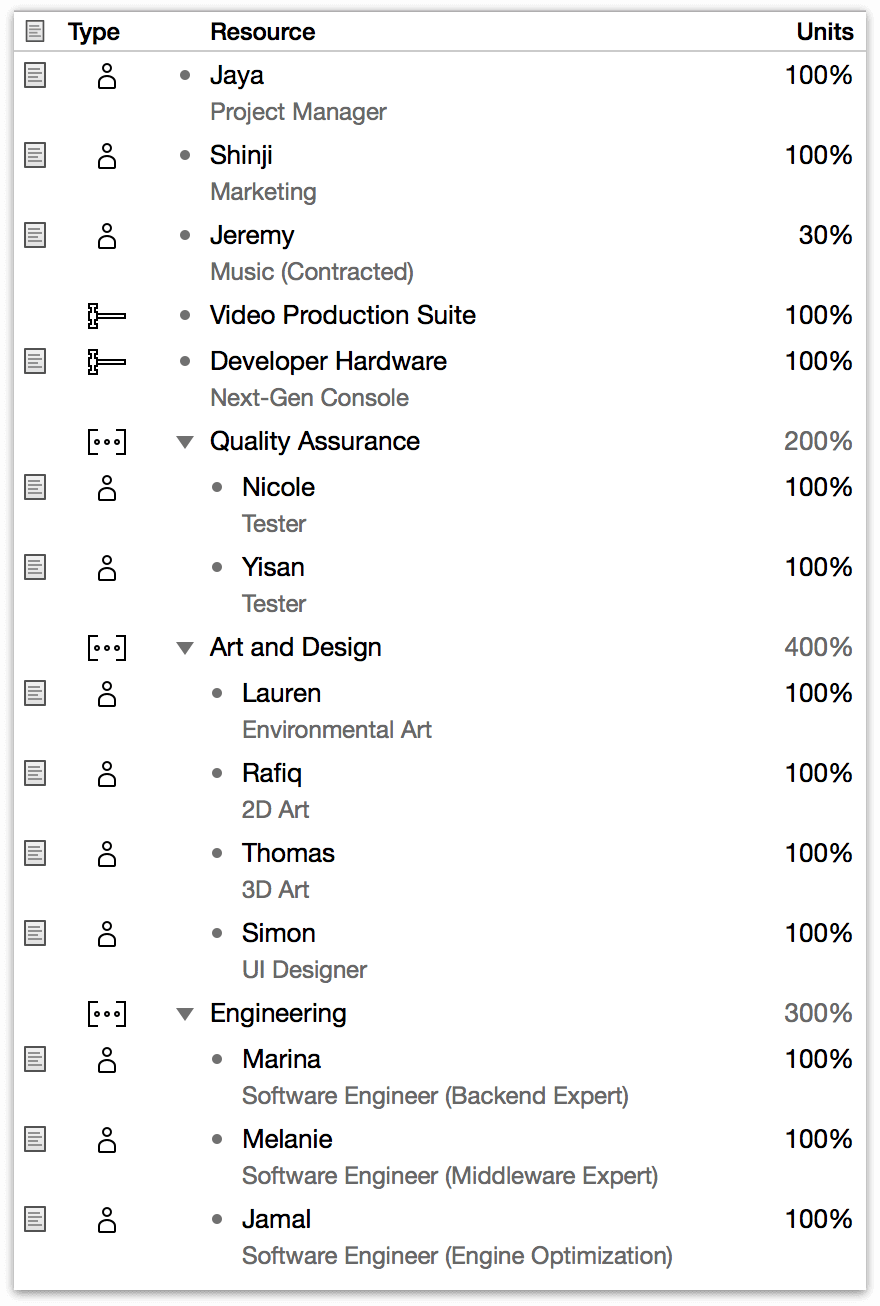
Along with adding notes to our resources, this is a good time to start considering costs. Adding the Cost/Hour and Cost/Use columns to the resource outline and entering relevant cost information (like a team member’s hourly wage) will help us start planning the budget of the project when it comes time to assign resources to tasks.
Another useful property of staff resources is email address, which can be set in the Information section of the Resource inspector. A staff member’s email address is used as their unique identifier across all projects they’re participating in, which is particularly important when balancing workloads across multiple projects or comparing projects with Dashboards in OmniPlan Pro.
Step 11: Assigning Resources
You can assign resources to tasks from Task View or from Resource View.
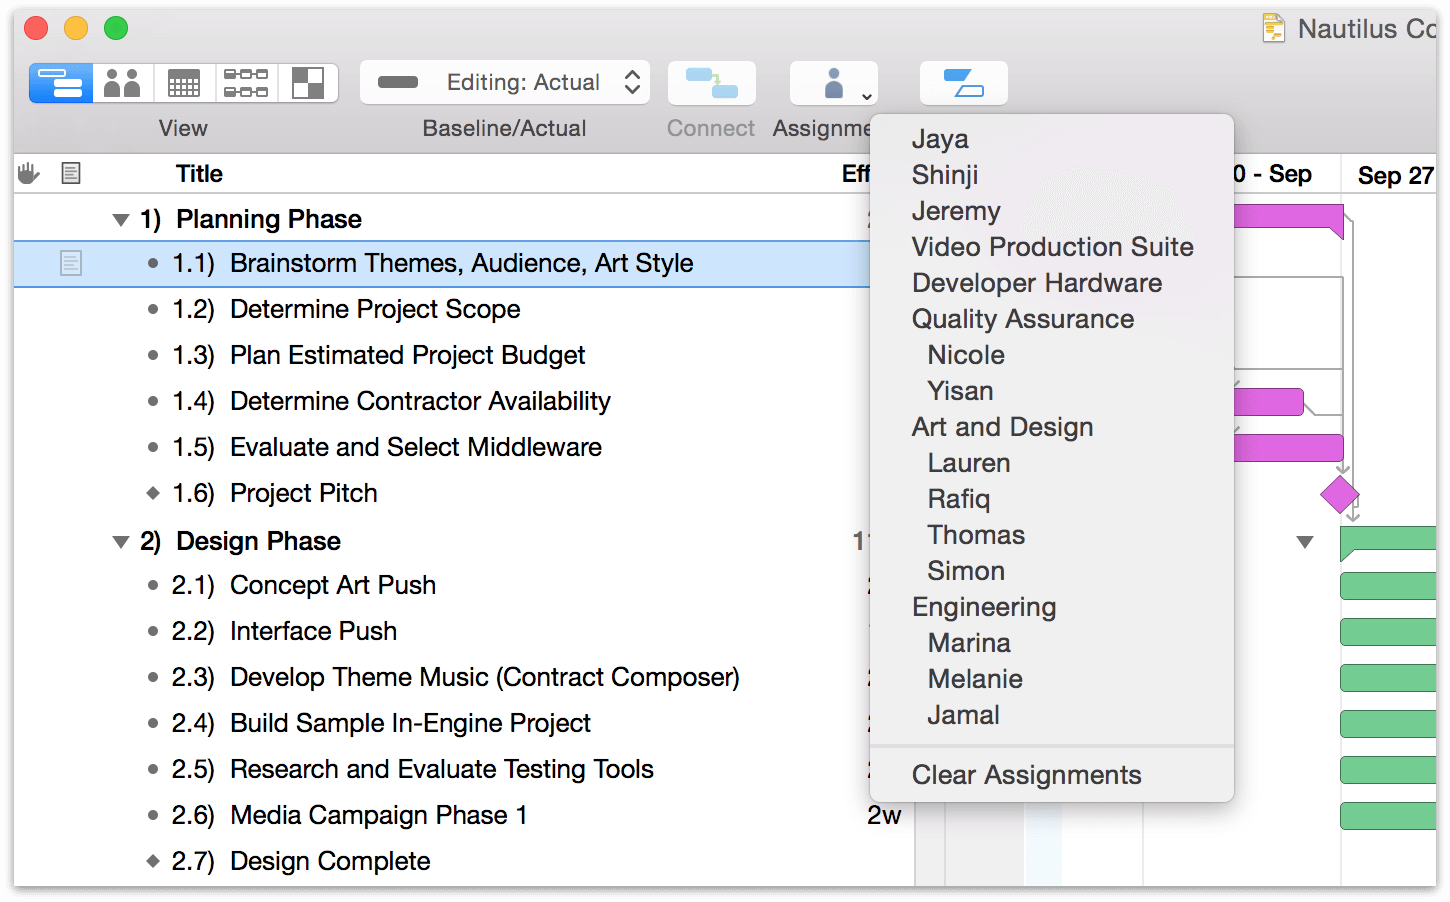
In Task View, you can select the task and then use the Assignments section of the Task inspector to select which resources should be assigned to it.
Or you can just pop open the menu on the Assignment button in the toolbar.
In resource view, you can assign a task by dragging it from the Unassigned timeline (or the sidebar) into a resource’s timeline.
When you begin assigning resources to tasks, you’ll notice some task durations visibly shift in the Gantt chart. This is because of duration’s relationship with effort. Effort is the number of resource-hours needed to complete the task, while duration is the amount of time the task actually requires given the resources assigned to it. With multiple staff members assigned full time to a task, its duration in real time will diminish from that originally allocated.
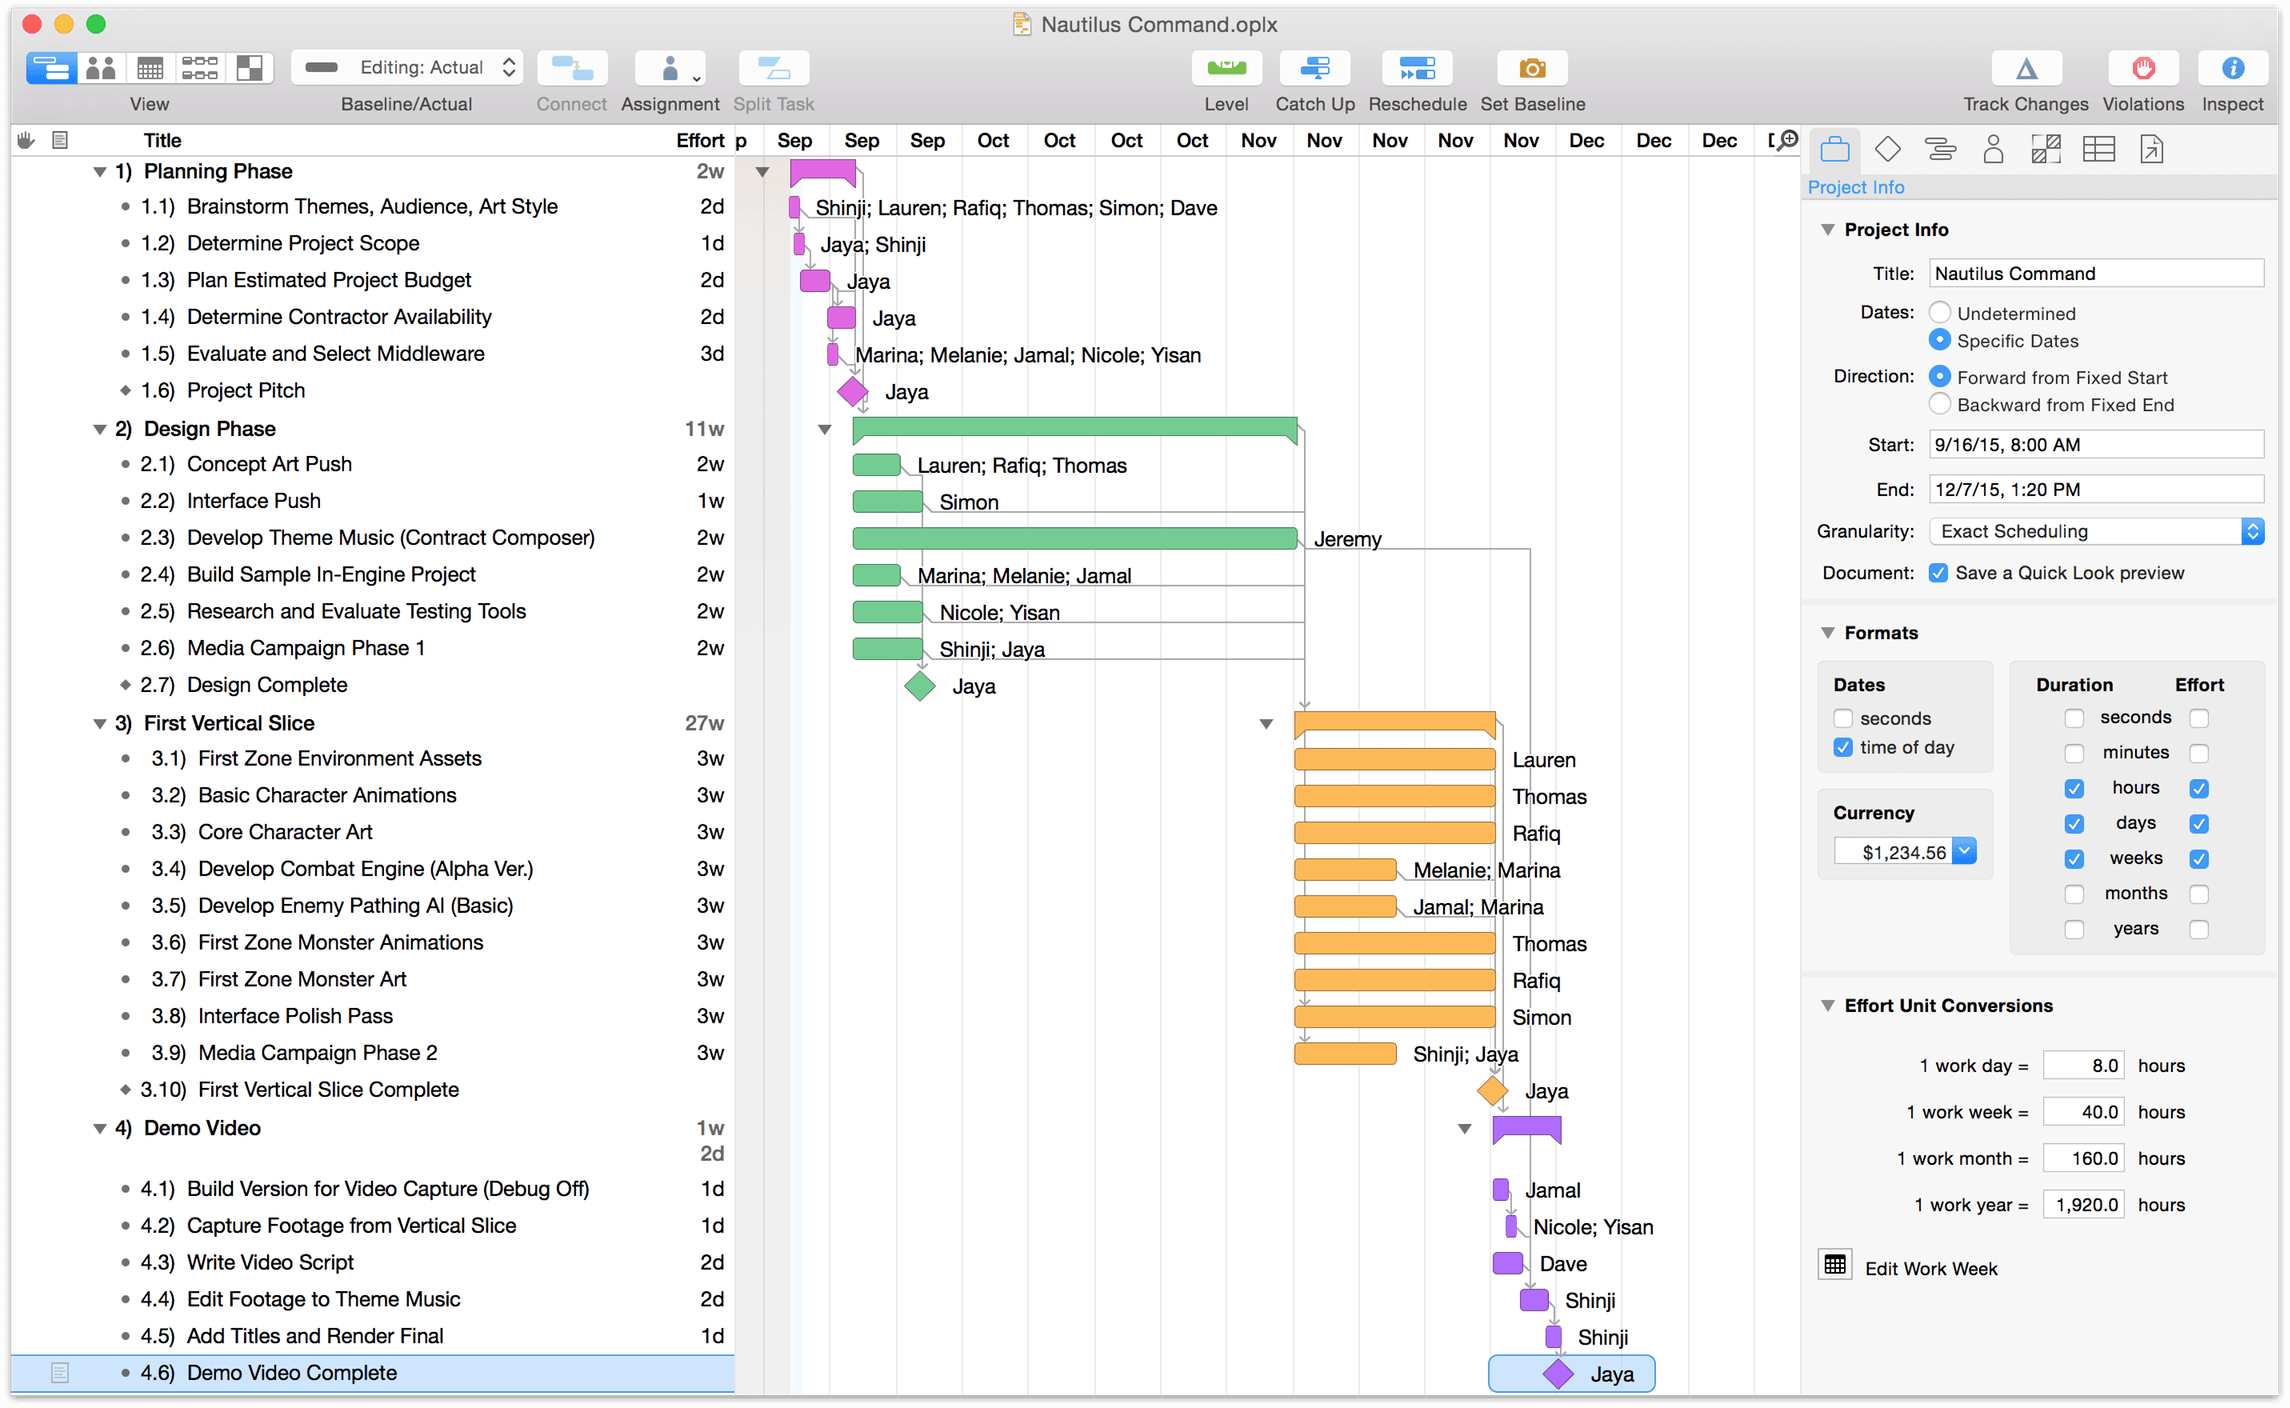
As we start building out our relationship of dependencies and resources, we can see a potential problem area: since our contract musician Jeremy has other projects on his plate, he can only contribute 30% of his time to our game. A task that should take two weeks turns to more than six. We’ll want to find a way to avoid this delay; we can ask him to start work earlier, or incentivize him to devote more of his time to our project.
Step 12: Setting Individual Schedule Exceptions
Individual staff members may have personalized work schedules, and they’ll almost certainly have individual needs for time off. In the calendar view, choose a resource in the sidebar and create a regular weekly schedule for the resource just as you did for the project as a whole; then choose Extra & Off Hours from the toggle below the resource list and repeat the process for exceptions.
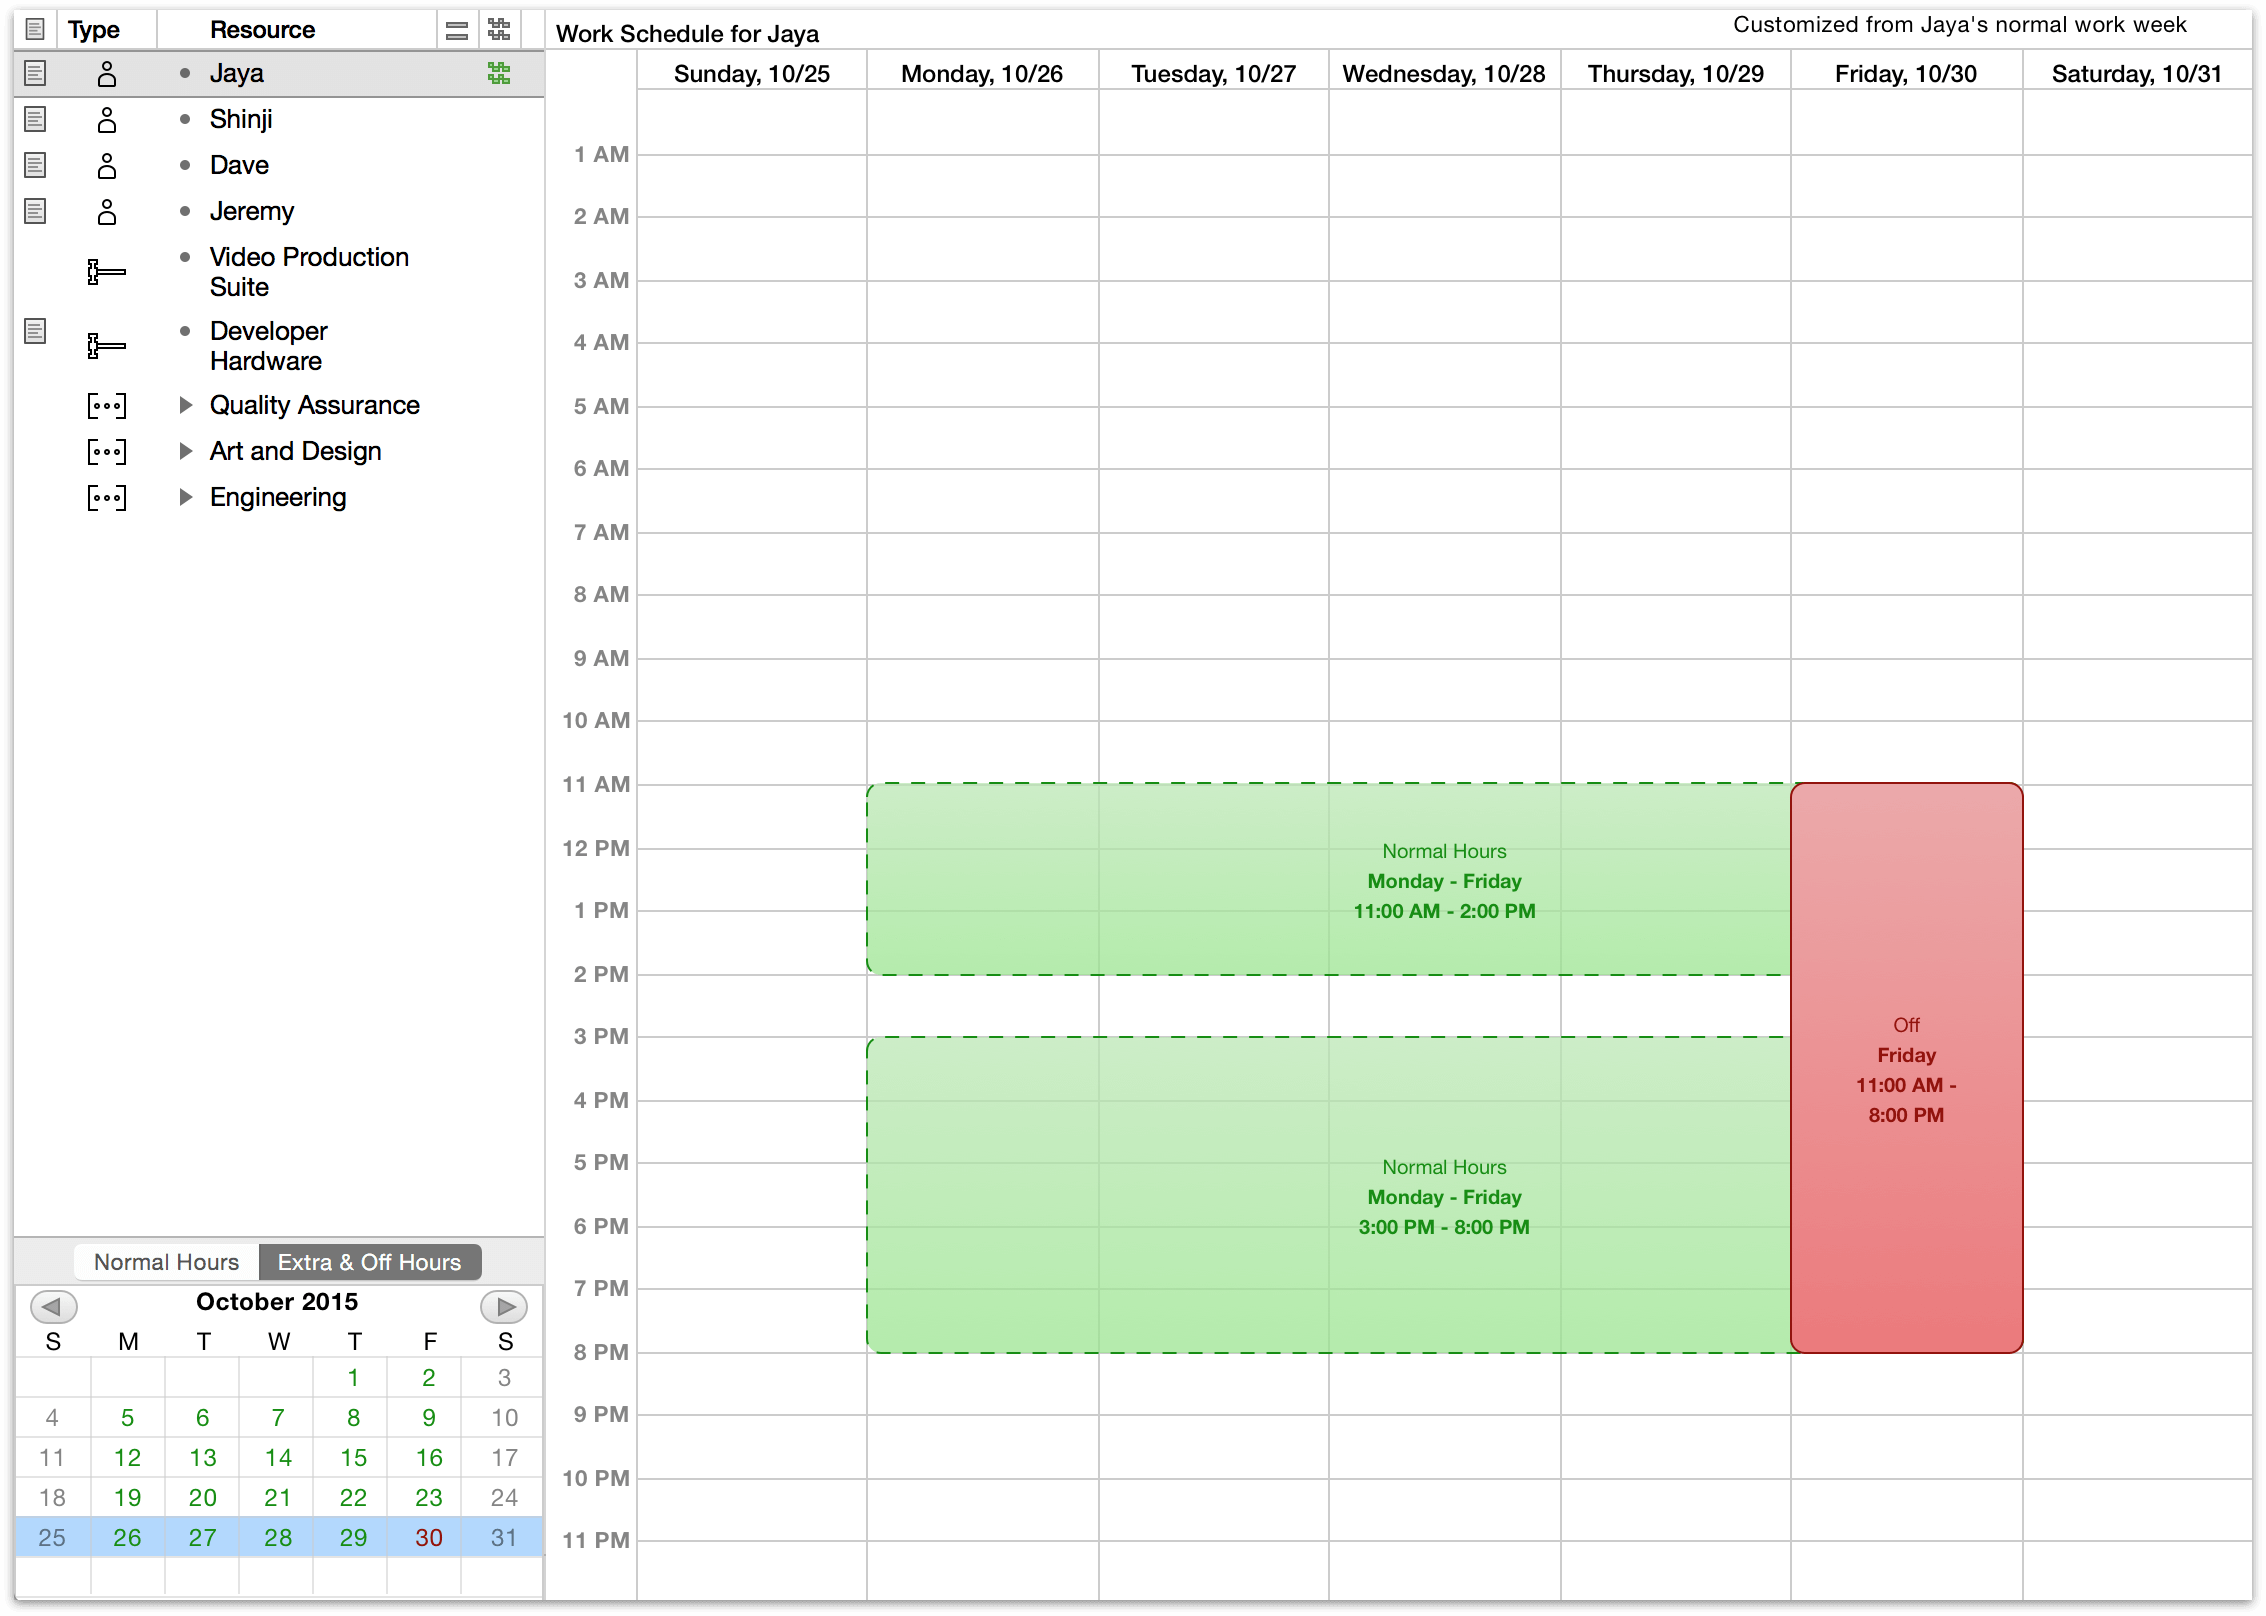
Here we’ve edited Jaya the Project Manager’s off hours to give her a free day to celebrate her anniversary.
Step 13: Leveling Resources
Once we have a calendar of working hours, a set of established tasks and milestones, and a team of people with the tools they need to complete them, OmniPlan can optimize the efficiency of work that’s happening through a process called leveling.
Resource leveling analyzes your project and figures out the most efficient way to arrange it, taking into account things like dependencies and the amount of resources available.
If you make some manual changes to the schedule, like rescheduling incomplete tasks, setting up dependencies, or changing resource assignments, you should then level the project again to make sure your resource usage is balanced out.
To level the resource workload for your project, choose Level in the toolbar or choose Project ▸ Level Resources (Shift-Command-L). The leveling dialog appears, with options to customize the leveling process; for now, leave these in the default configuration and click OK.
Unless your staff is already in the optimal configuration you’ll see the tasks in the Gantt view shift to accommodate the most efficient use of your resources’ time.
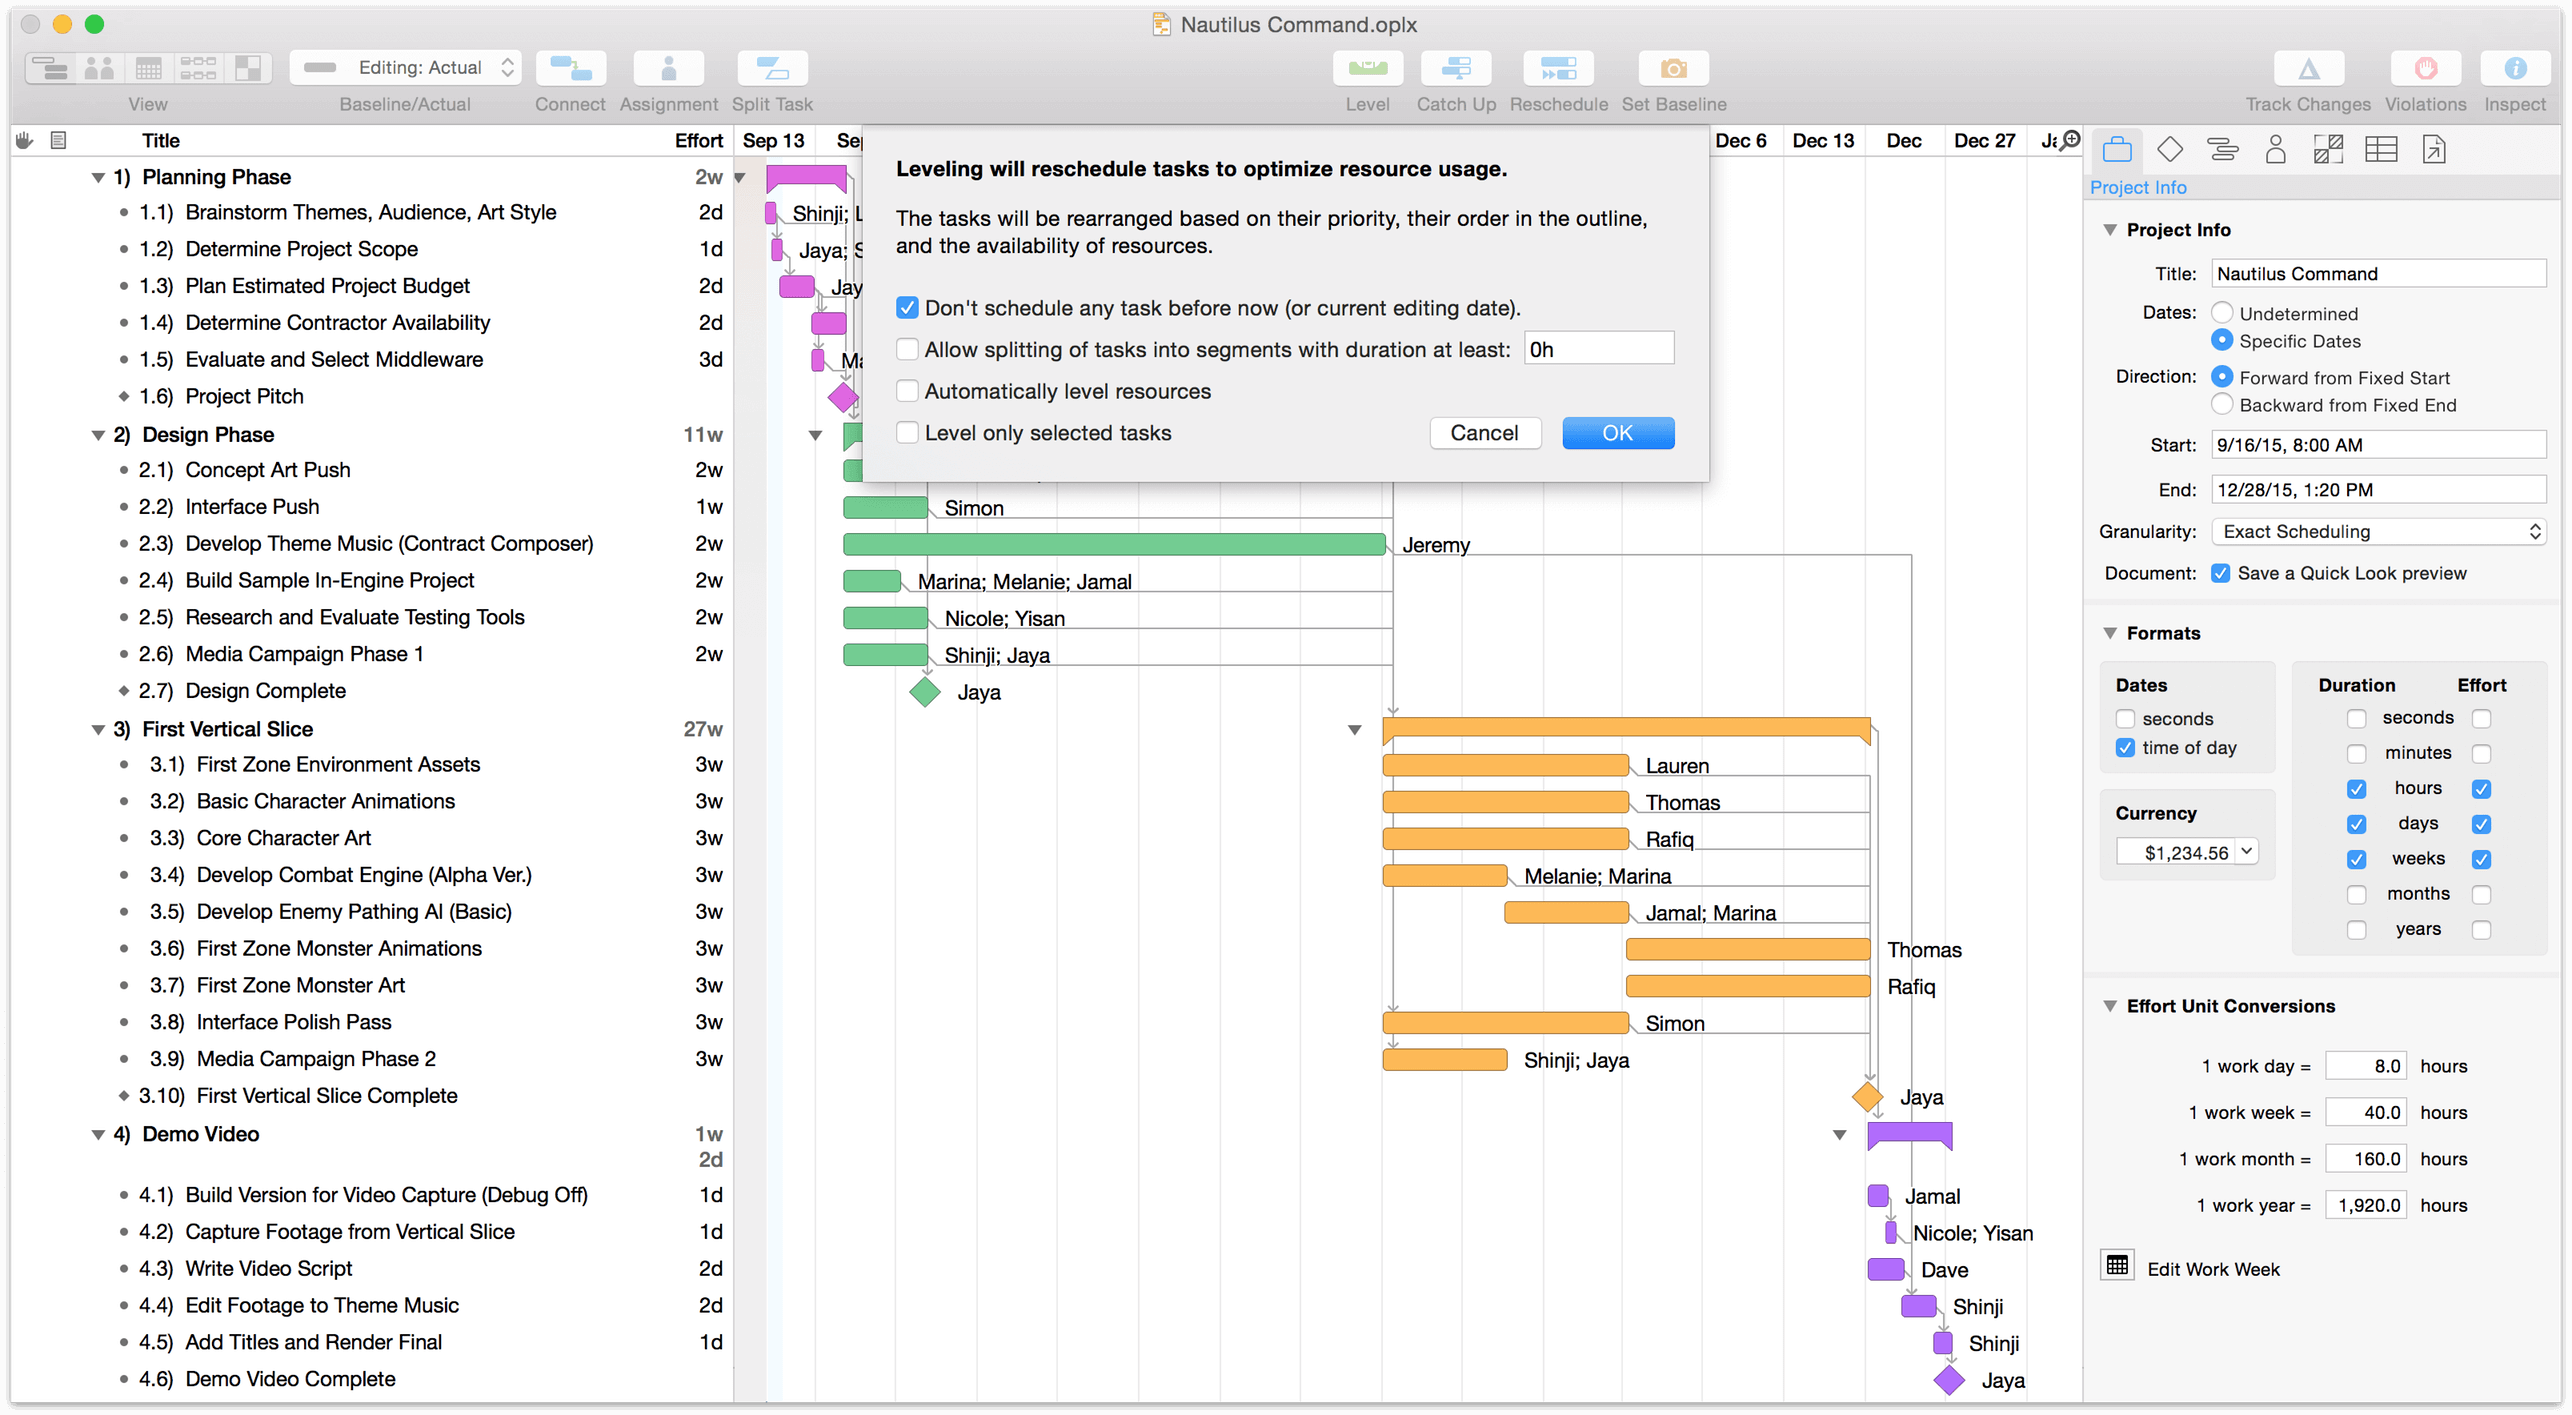
You can set OmniPlan to dynamically respond to updates in your project by automatically leveling resources every time you make a change. If you would prefer this, you can enable automatic leveling in the Project menu.
Step 14: Setting the Baseline
With tasks set and resources assigned and leveled, the state the project is in now may be a glimpse at its fate in the best of all possible worlds — one where unforeseen hindrances don’t bog down progress, and where optimistic estimations rule the day.
This is the world that is captured when we set a baseline for progress, a feature used to compare how the project is actually doing against initial expectations, so milestones and resource allocation can be adjusted accordingly.
When you have a schedule set up and leveled properly, and the project is ready to begin, choose Project ▸ Set Baseline. This copies the schedule you created into a baseline schedule. The baseline schedules remain unchanged as you update the actual schedule; as the project goes on you can keep track of how closely it is following the original plans.
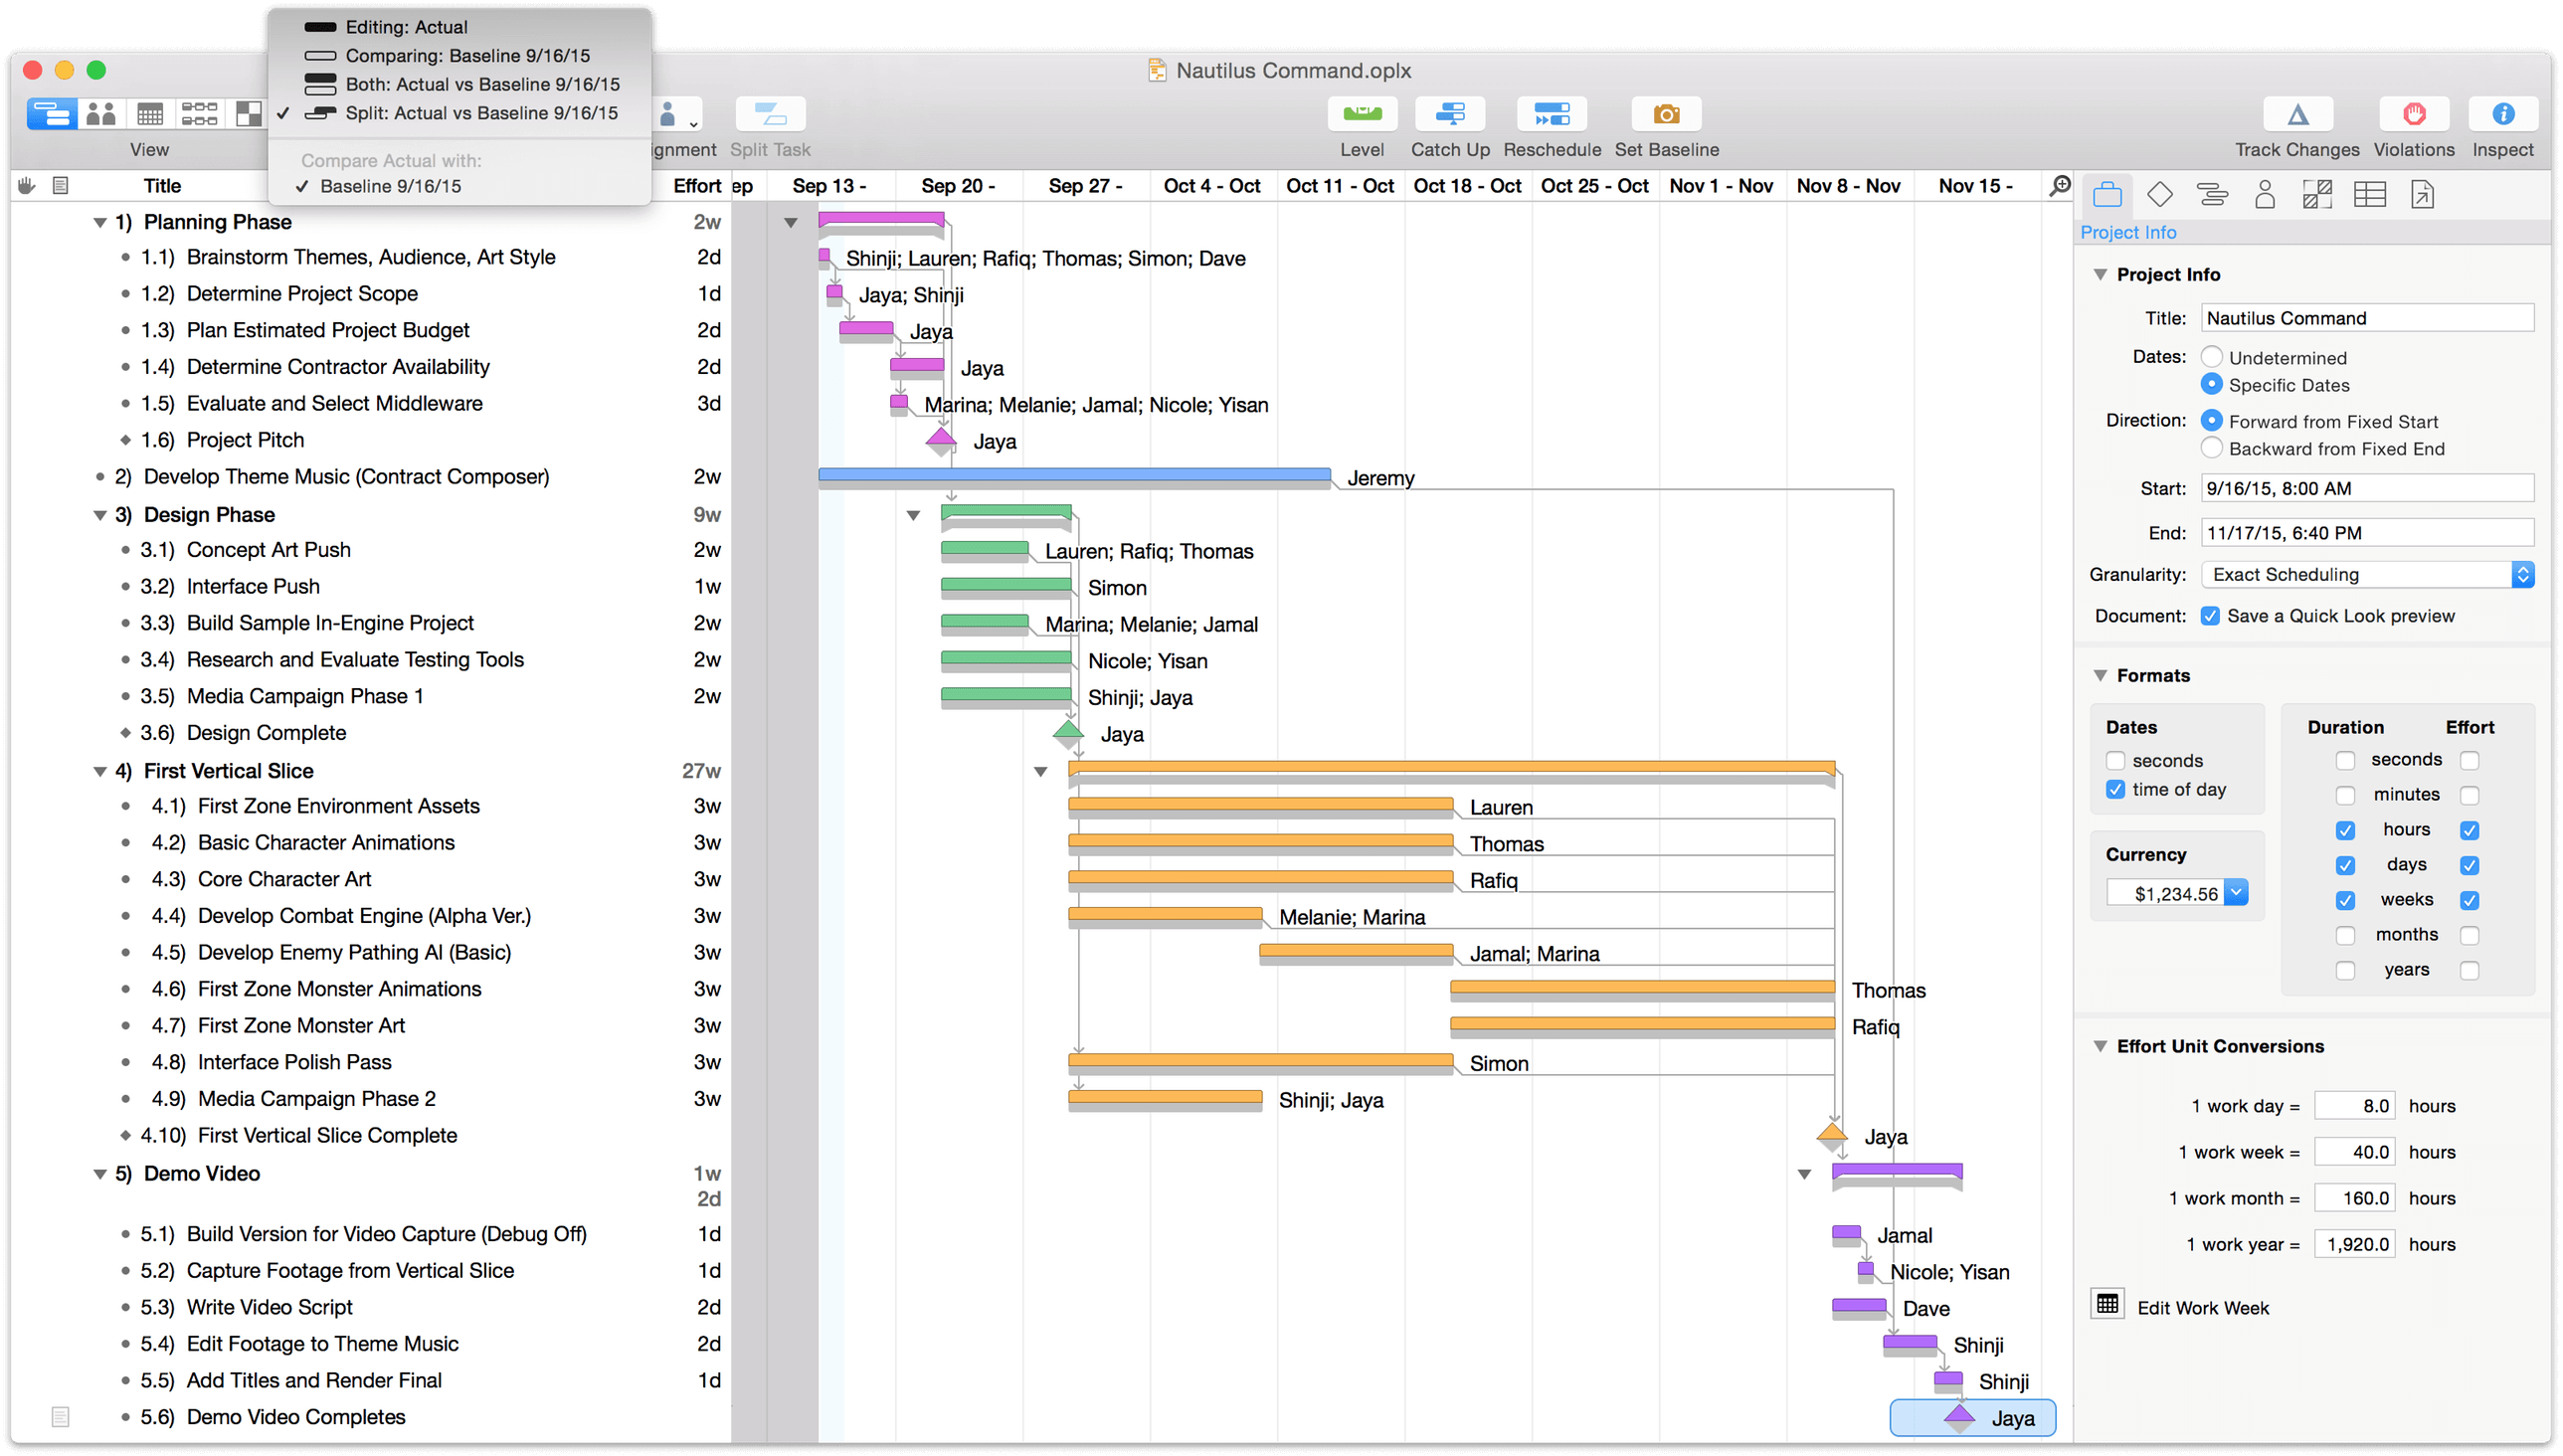
You can choose Split or Both from the Baseline/Actual menu on the toolbar to compare the baseline schedule to the actual schedule.
Step 15: Checking the Critical Path
Choose View ▸ Customize Toolbar to add the Critical Path button to your toolbar display.
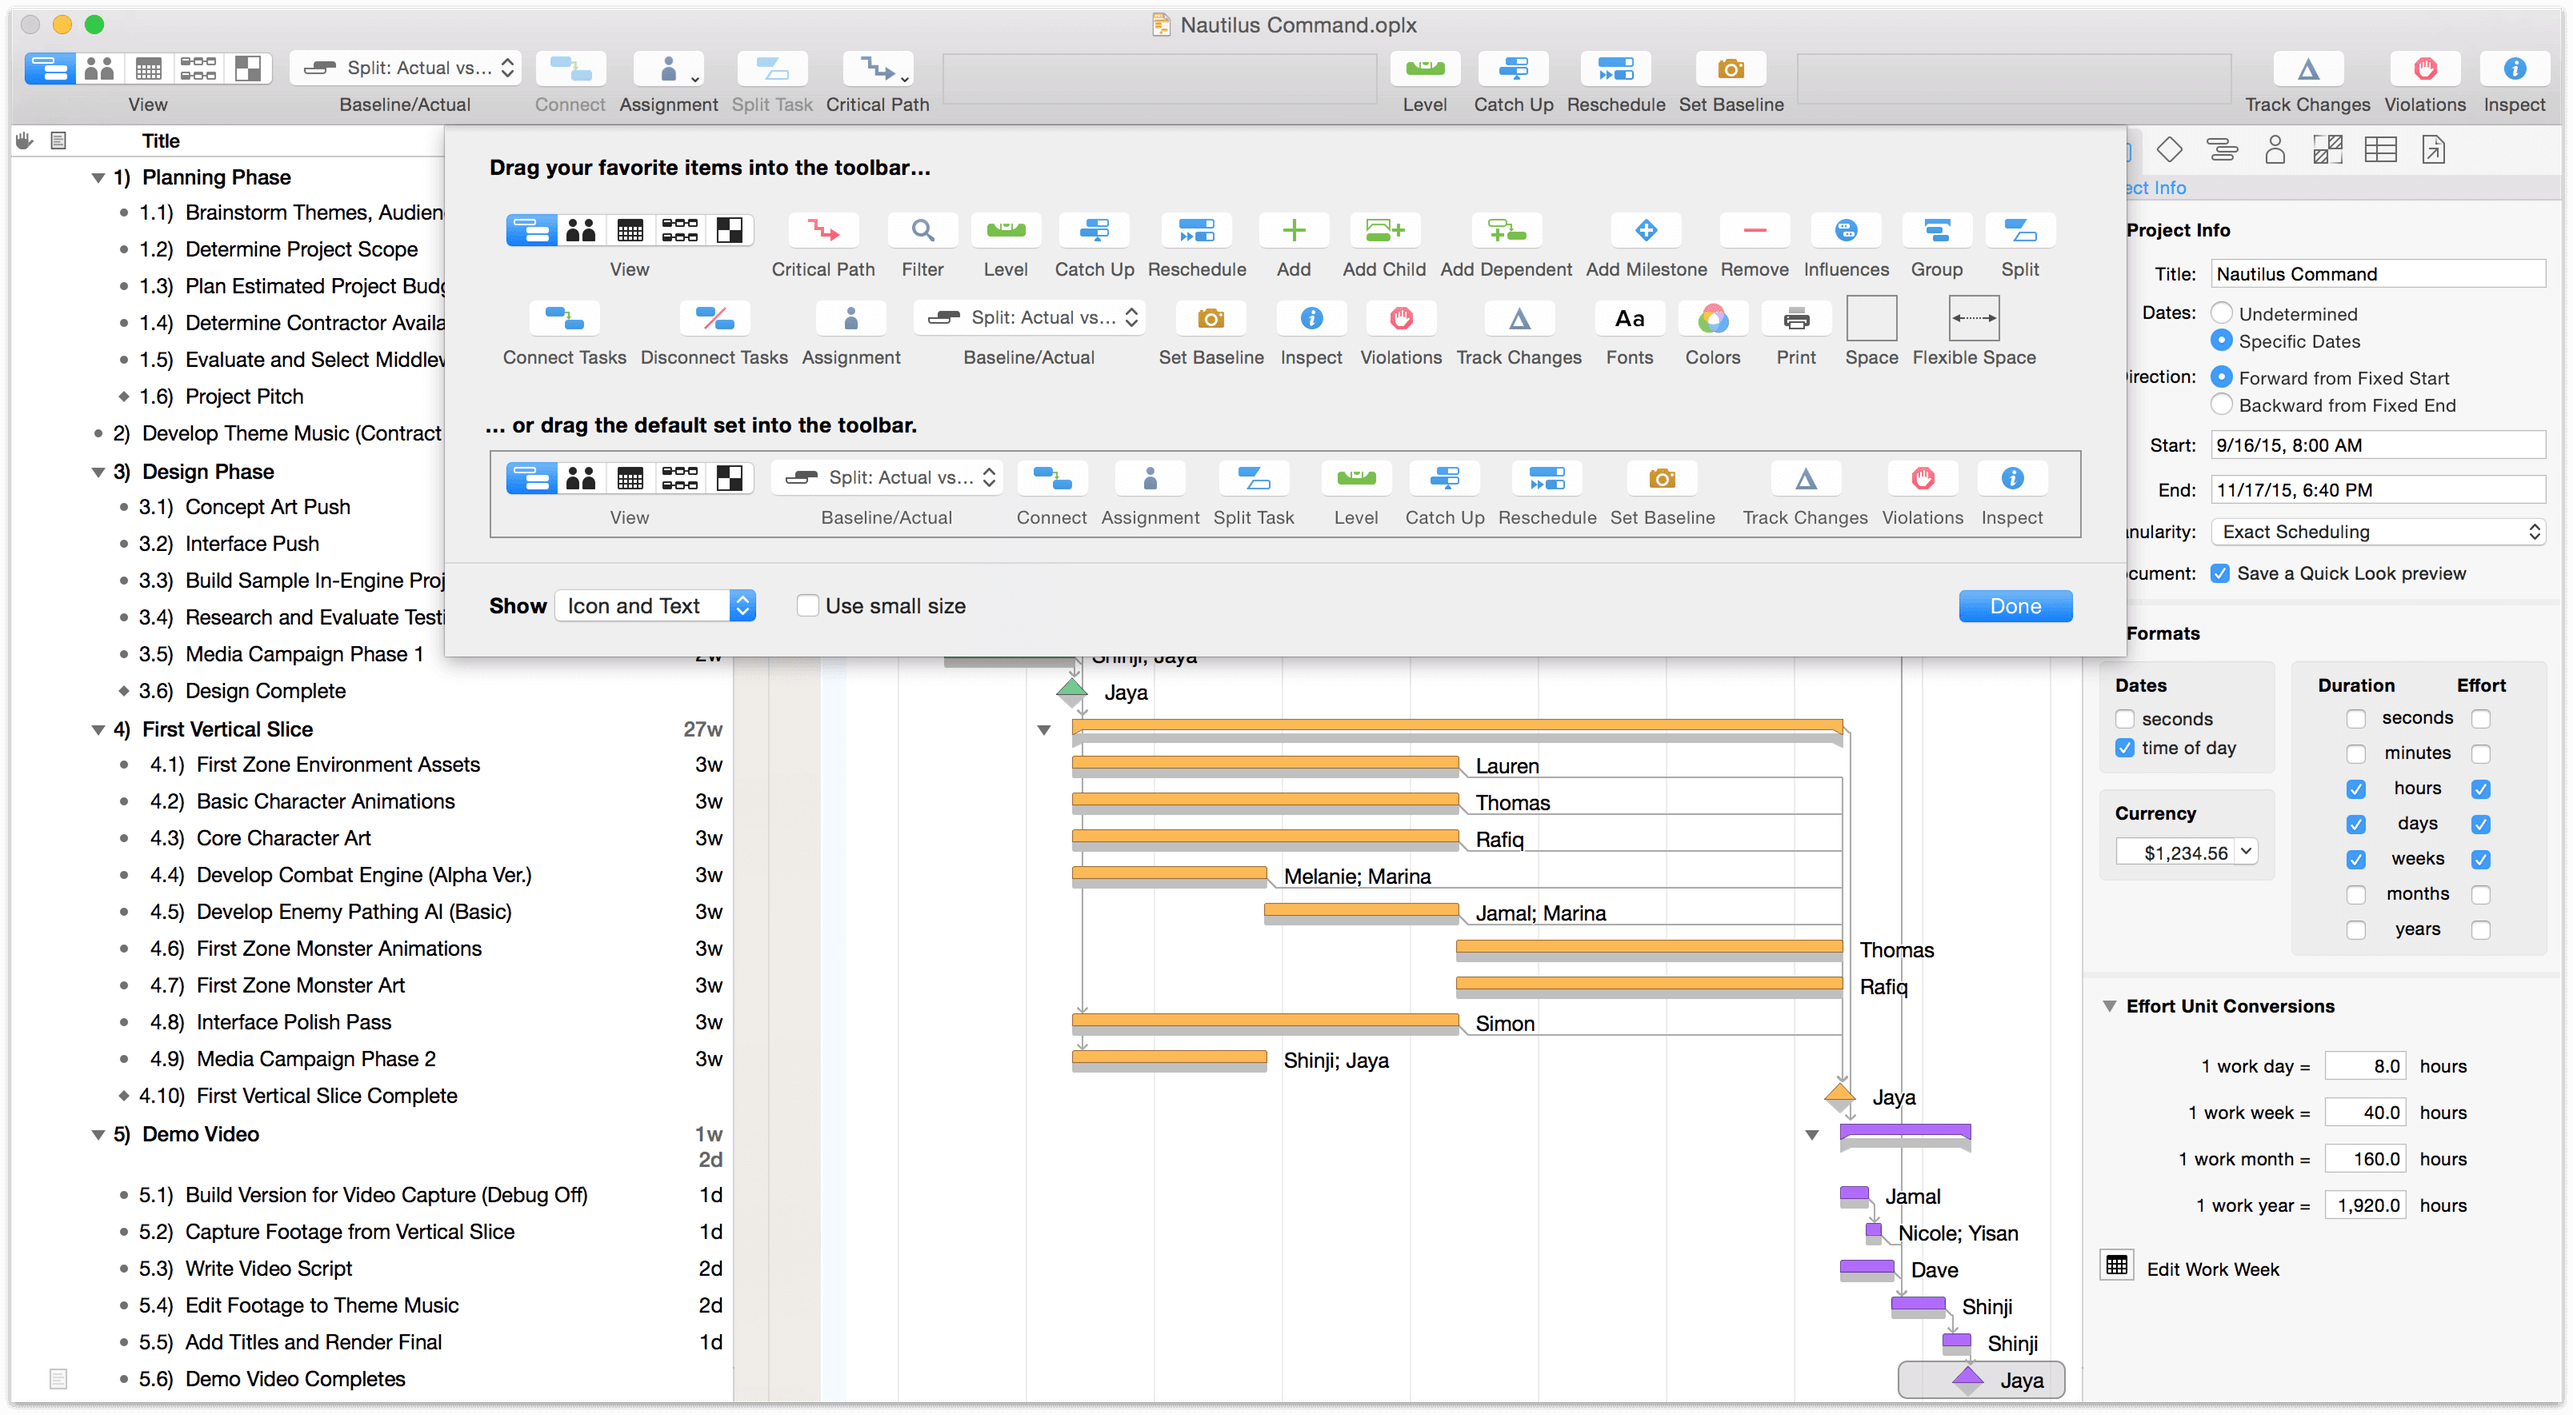
The Critical Path button in the toolbar highlights the series of tasks and dependencies which determine the project’s duration (critical paths can also be charted to specific milestones rather than the project as a whole). If any of the tasks on a critical path ends up taking more or less time than planned, then the duration of the project as a whole will change as well. Usually, these are the tasks you most need to make sure are on track.
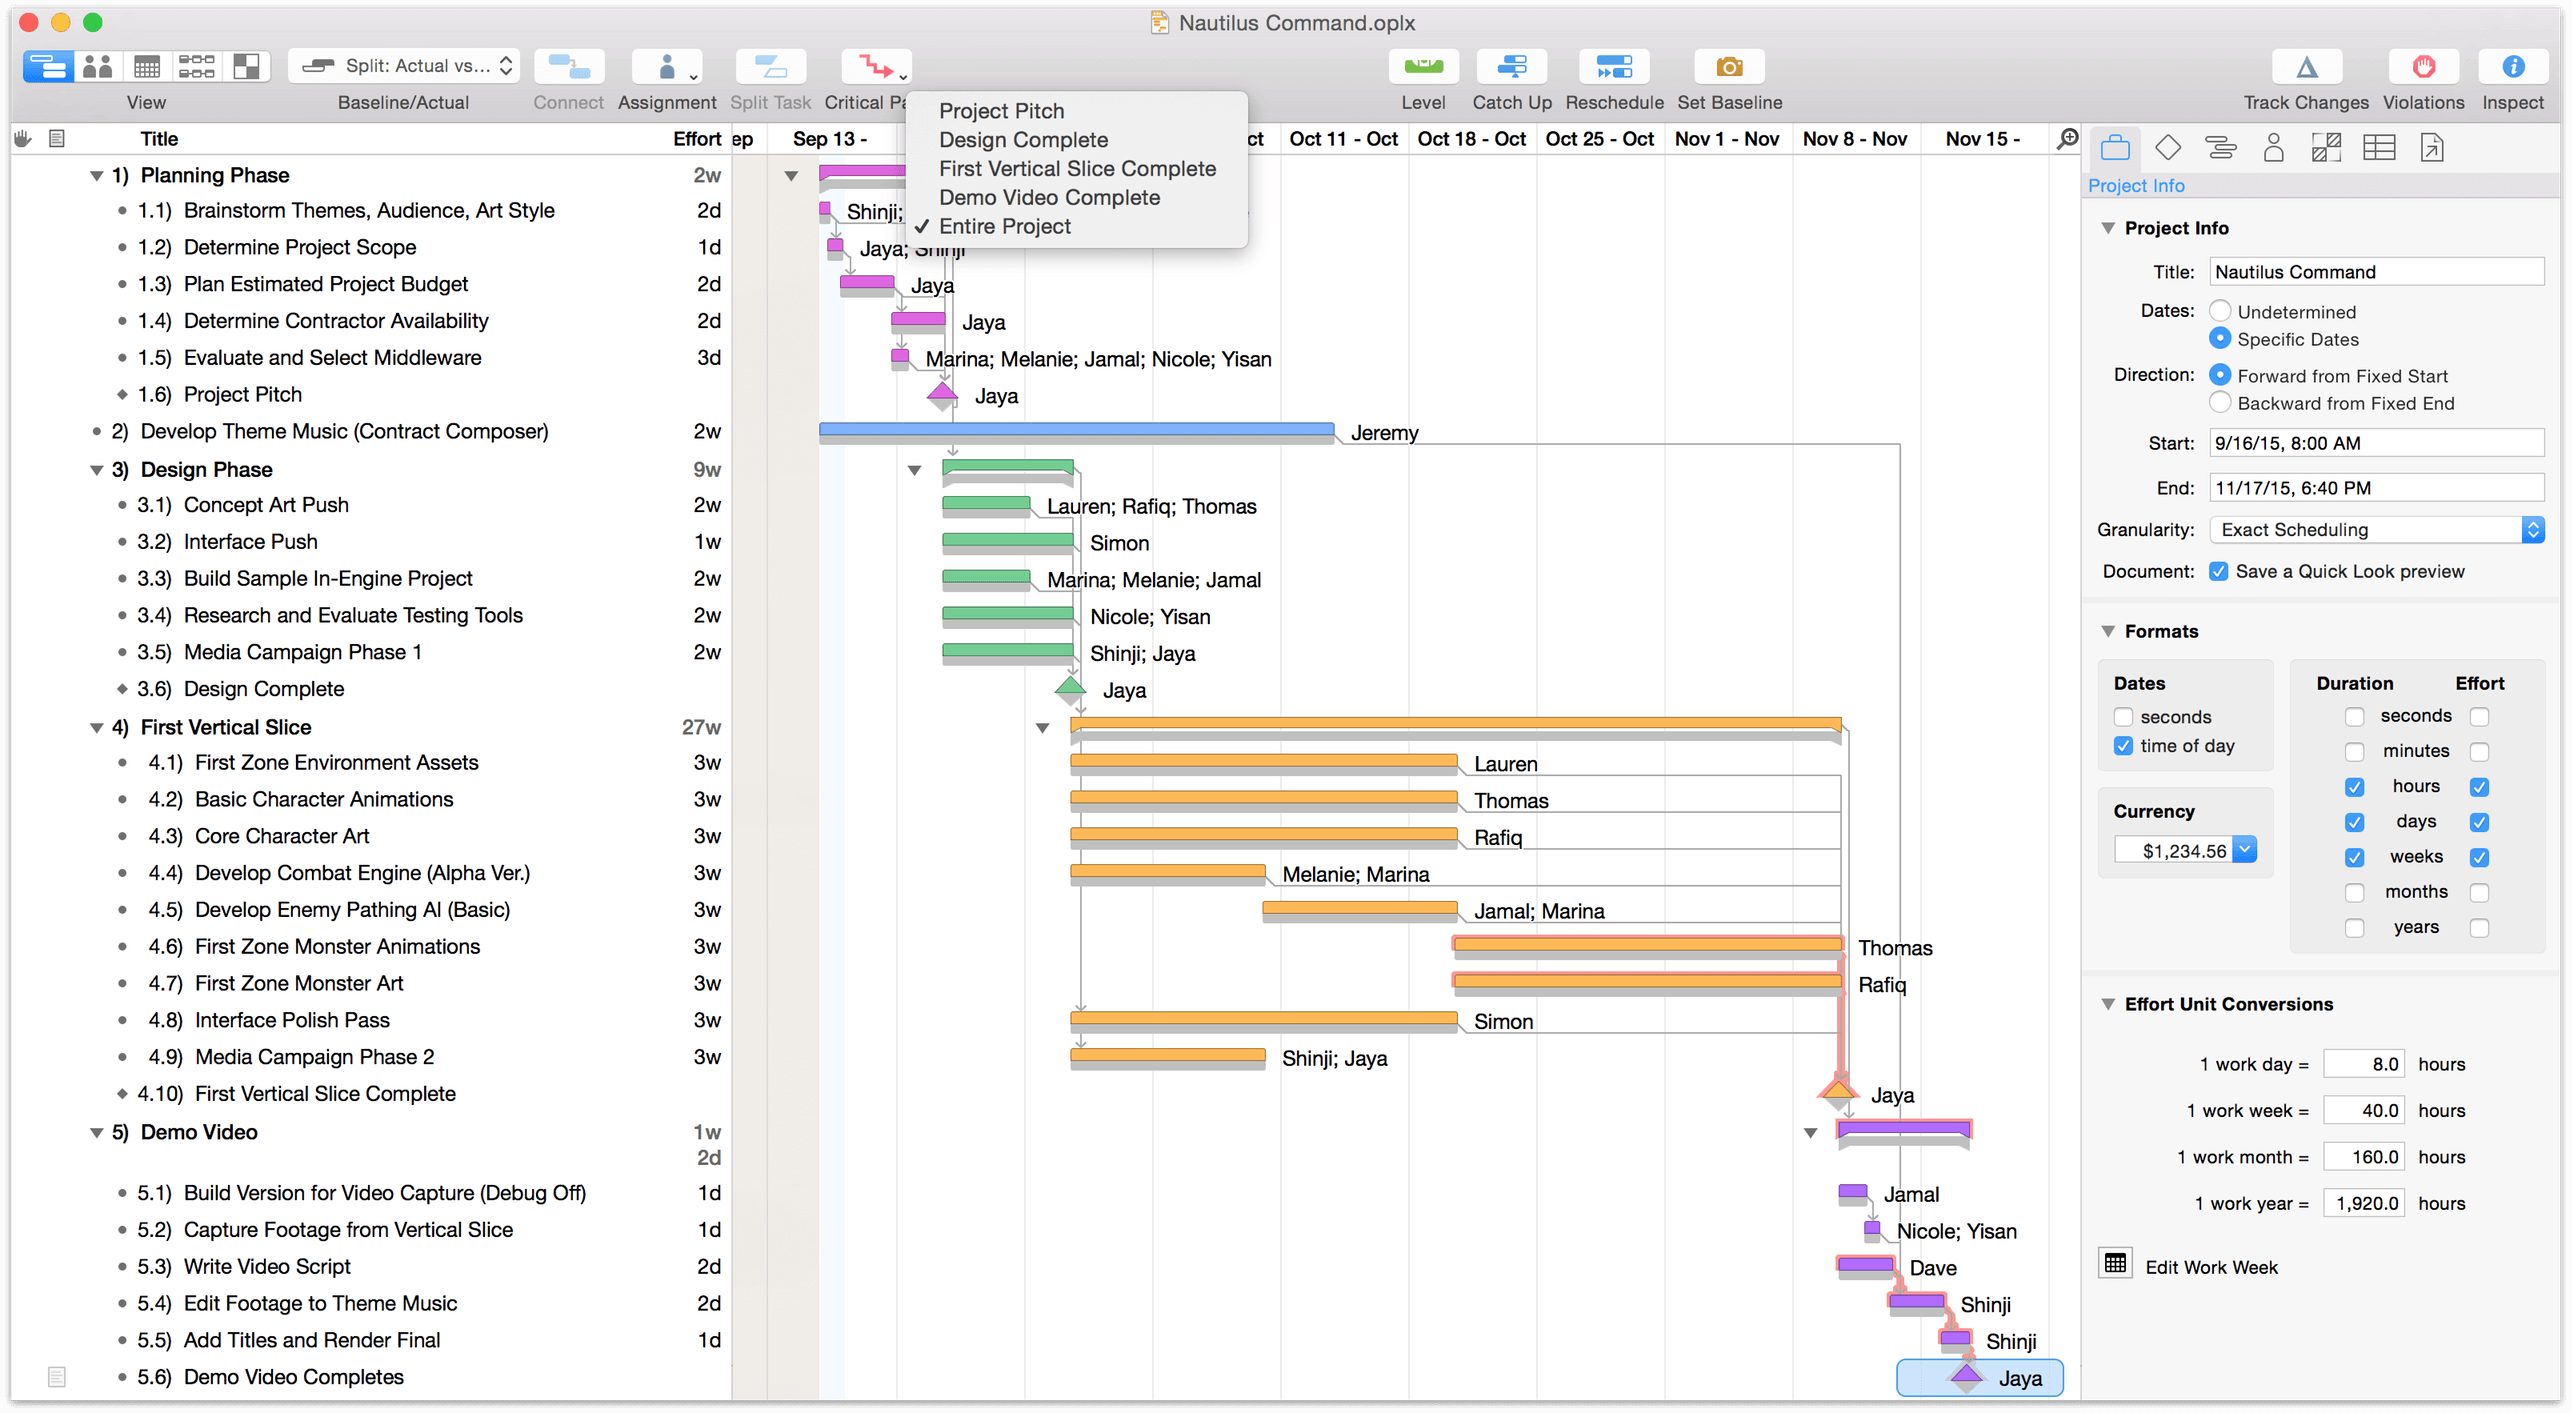
Most of the tasks in a simple linear project will be on the critical path, because they are almost all in one continuous chain. On the other hand, projects with multiple resources working in parallel (such as our example project here) often have some tasks that can suffer a delay without affecting the deadline.
Step 16: Updating Task Completion
As progress on the project continues, inevitably some tasks will be completed outside the timeframe initially projected. It’s a good idea to review the project in OmniPlan periodically and update it to reflect the new situation.
You can update progress of individual tasks by editing the percentages in the Completed column or the Task Info section of the Task inspector. Or, just drag the completion handle on a bar in the Gantt chart.

If everything is going as planned, you can click the Catch Up toolbar button to bring the completion percentage of every task (or just the selected tasks) to a selected date.
If you have tasks which were planned to be complete by now, but aren’t, you can click the Reschedule toolbar button to move them forward. Afterward, remember to level the project.
Step 17: Moving Forward
In a perfect world, progress through a project would involve nothing more than tracking task completion until the final milestone is reached. Reality seldom cooperates so neatly; thankfully, OmniPlan has tools to help adjust to anything fate has in store.
As you begin to adapt your new project to the realities of your work environment, several paths lie ahead to assist in making sure you reach that final milestone unscathed:
- Maintaining Your Project is a great next step, packed with tools for addressing common scenarios you’ll encounter.
- Reporting and Printing is another useful stop for when you’re accountable for presenting your project and progress to others.
- If your project is one among many you have to track, or there are other stakeholders assigned to update it, OmniPlan Pro’s Collaboration and Multi-Project Review are here to help.
When you have the time, continuing to develop your first project as you explore the rest of the manual is a great way to discover all of OmniPlan’s bits and pieces. And of course, we’re always here to help.
