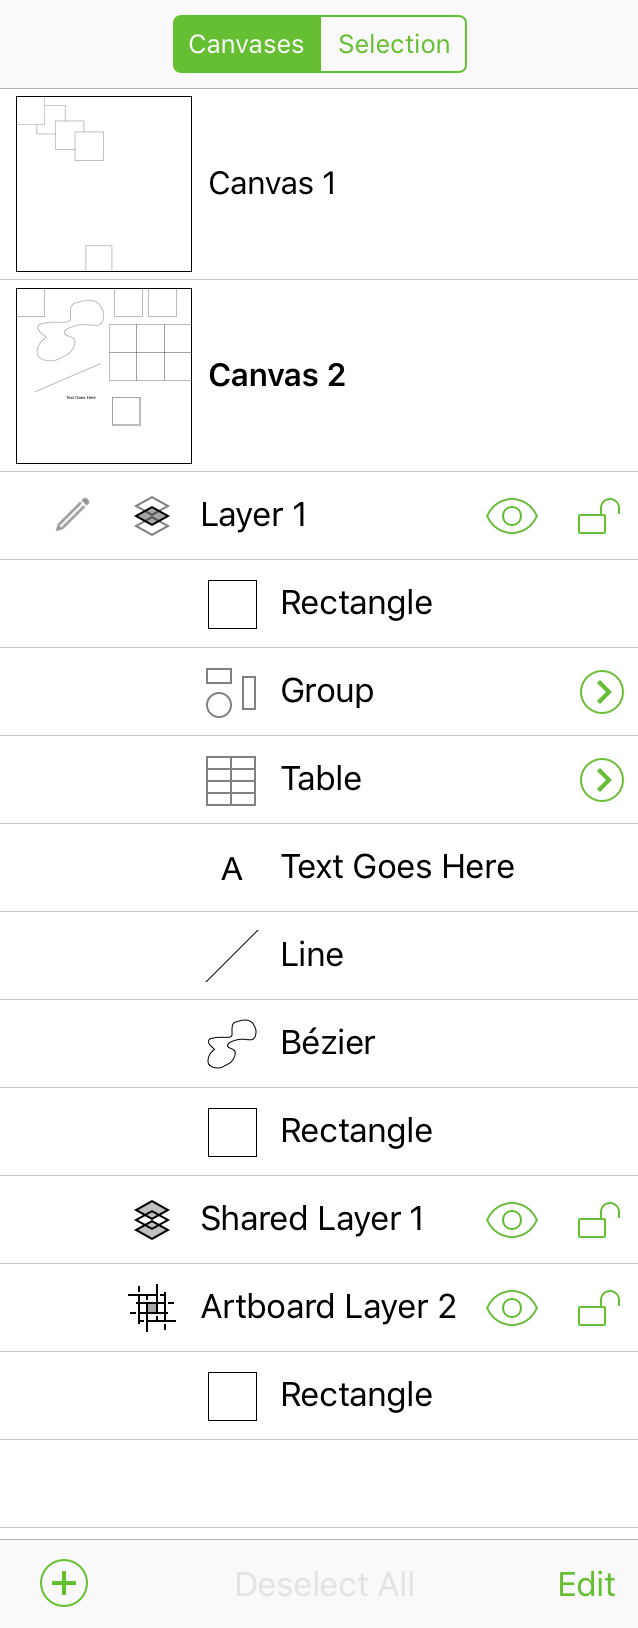
Navigation Sidebar
The Navigation Sidebar is split into two different views: Canvases, which lets you organize the objects, layers, and canvases in your document; and Selection, which lets you select text and objects in your document based on their unique style properties.
The Canvases Sidebar
Use the Canvases sidebar to manage and organize the components of your document. OmniGraffle documents can have multiple canvases with multiple layers, and with OmniGraffle Pro you can share layers—and the objects on them—with other canvases.
OmniGraffle documents have at least one canvas with one layer; you cannot have a canvas without a layer. To add a new canvas or layer to your document, tap  at the bottom of the sidebar, and then choose New Canvas or New Layer.
If you have OmniGraffle Pro, you can also add a New Artboard Layer or New Shared Layer to the canvas.
Layer Types 
The most basic type of layer in OmniGraffle is the Standard Layer, as denoted by  , appearing to the left of the layer name in the sidebar.

OmniGraffle Pro features these additional layer types:
Artboard Layer 

Used as a “container” to manage objects and define canvas areas for export. The objects on an Artboard Layer affect objects on the layers above.
Shared Layer 
Used to share objects between multiple canvases in a document.
Shared Artboard Layer 
An artboard layer that is shared with other canvases in the document. The objects on a Shared Artboard Layer affect objects on the layers above on all canvases.
Layer States
Layer states are defined by the following icons in the Sidebar:
| Icon | Description |
|---|---|
| This is the active layer. | |
| An object is selected on this layer. | |
| Denotes an object is selected on the current layer. | |
| Denotes that the selected layer cannot be written to because it is locked. To unlock the layer, tap |
|
| The layer is visible; tap to hide. | |
| The layer is hidden; tap to make visible. | |
| The layer is unlocked and may be written to; tap to lock. | |
| The layer is locked and cannot be written to; tap to unlock. |
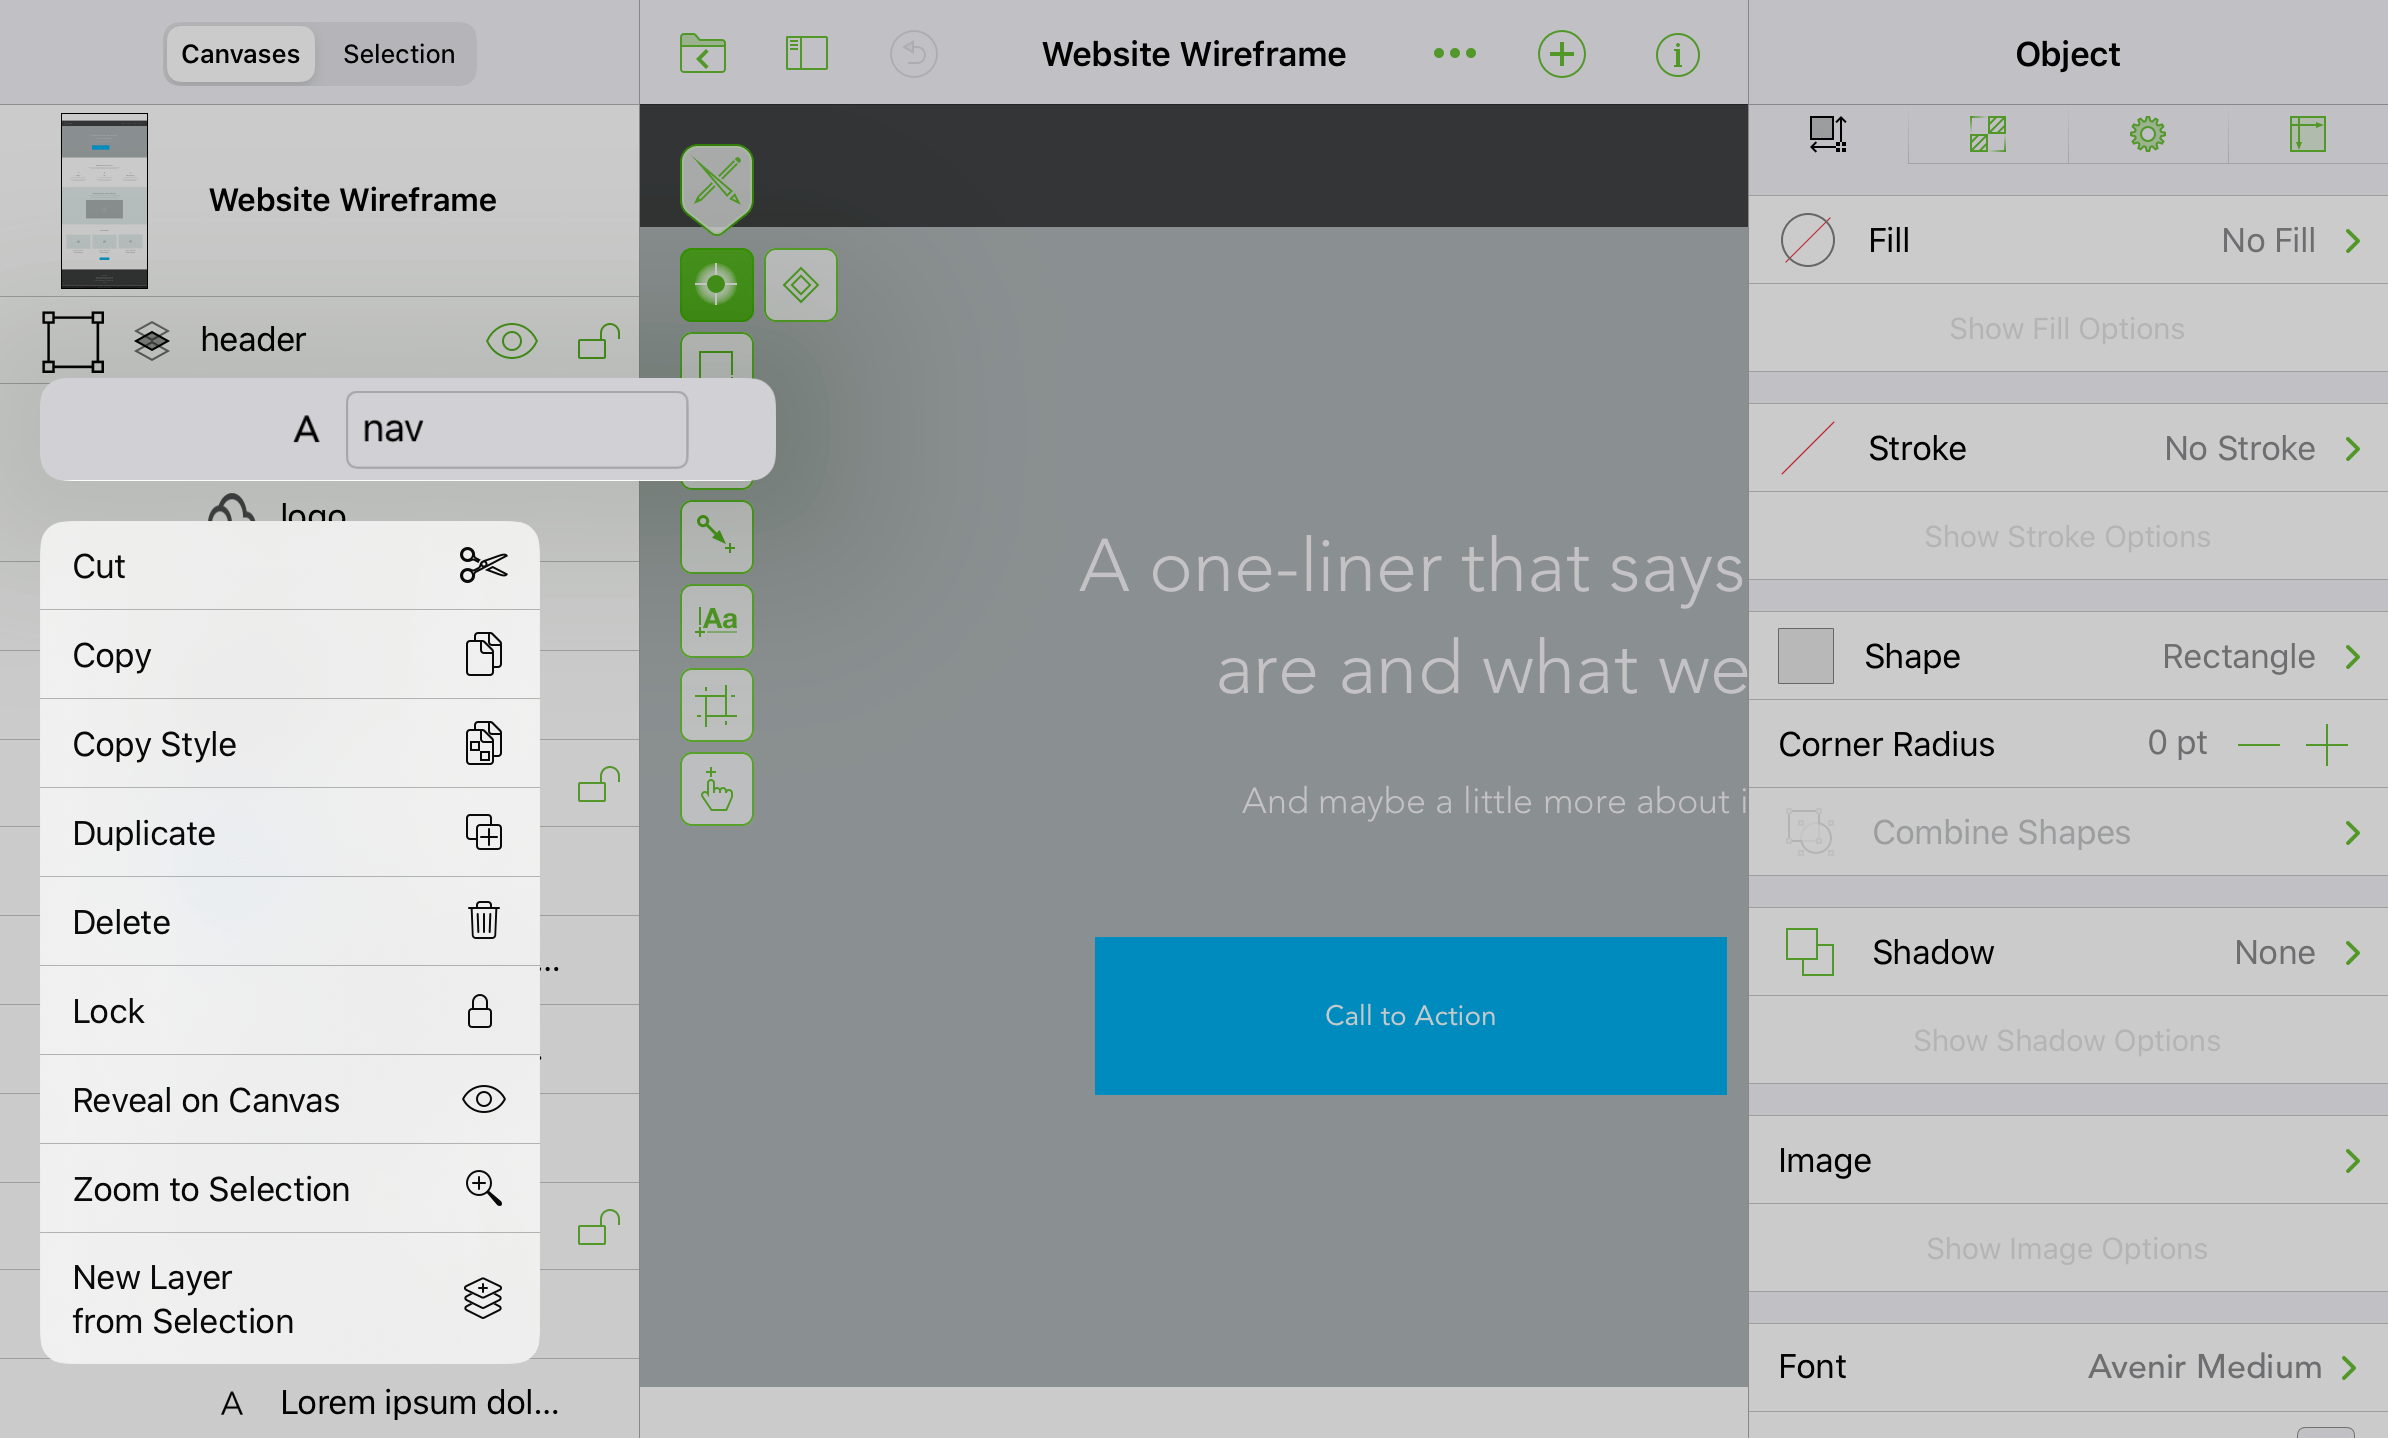
To reveal a layer’s contextual menu, touch and hold anywhere on the layer’s row in the navigation sidebar.
| Menu Item | Description |
|---|---|
| Cut | Removes the selected layer from the canvas and places it on the clipboard for pasting. |
| Copy | Copies the selected layer and makes it available on the clipboard for pasting. |
| Paste | Available if a layer has been copied to the clipboard; pastes the layer (and its contents) into the selected canvas. |
| Duplicate | Creates a duplicate of the selected layer, including any objects on that layer. |
| Delete | Removes the selected layer from the canvas. |
| Convert to Artboard Layer |
Converts the selected layer into an Artboard Layer; all objects on that layer become artboards. |
| Don’t Share With Other Canvases |
Available when the selected layer is a Shared Layer. Converts a Shared Layer into a Normal Layer (i.e., one that is not shared with other canvases). |
| Share With All Canvases |
Converts the selected layer into a Shared Layer; all objects on that layer are visible on other canvases in the document. |
Using Drag & Drop in the Sidebar
You can use drag and drop in the sidebar to rearrange objects on a layer, or even reorder layers and canvases within your document.
What’s more, you can drag objects, layers, and canvases out of OmniGraffle, enabling you to quickly export objects from the canvas and into other apps on iPad, including to the Files application. Regardless of what the receiving app accepts, an artboard will include the objects above it, and a layer includes the objects with a transparent background.
To use drag and drop in the sidebar:
- Touch and hold on the item you want to drag.
- Drag the item to where you want it to go.
- Remove your finger from the screen to drop the item in place.
Need to drag more than one item? OmniGraffle’s sidebar supports multiple drag and drop, and you can mix and match the items you drag. For example, you could tap to select a couple objects, a layer and its objects, and even another canvas with its layers and objects. Once you have selected the items you want to move in the sidebar or drag out of OmniGraffle, drag them to where you want them to go.
Edit Mode
Tapping Edit at the bottom of the sidebar enables Edit Mode, which allows you to move, delete, copy, or cut the objects, layers, and canvases in your document.
Tap to select items ( ) in the sidebar, and then use the options at the bottom of the sidebar to perform actions on your selection(s).
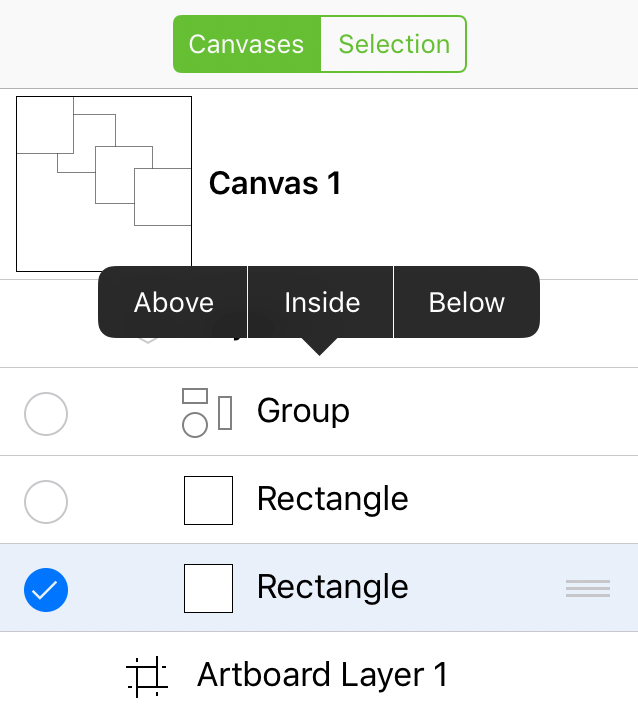
Move
Move the selected item(s) elsewhere in the document. When you tap Move, the bottom bar displays the text, Tap object destination. In the sidebar, tap an item to where you want to move the selection, and then choose Above, Below, or Inside if the move location is a Group or Table.
Delete
Deletes the selected item(s). You can tap Undo in the Document Toolbar to restore the item(s) to the document.
More...
Tapping More reveals a pop-up menu with options to Copy or Cut the selected item(s). The More menu gains the following options, depending on what is selected in the sidebar:
- If you have selected a canvas, a Duplicate option is available at the bottom of the pop-up menu.
- If you have selected two or more objects, a Group option is available at the bottom of the pop-up menu.
- If the item you have selected is a Group, an Ungroup option is available at the bottom of the pop-up menu.
Done
Tap Done when you are finished working in Edit Mode.
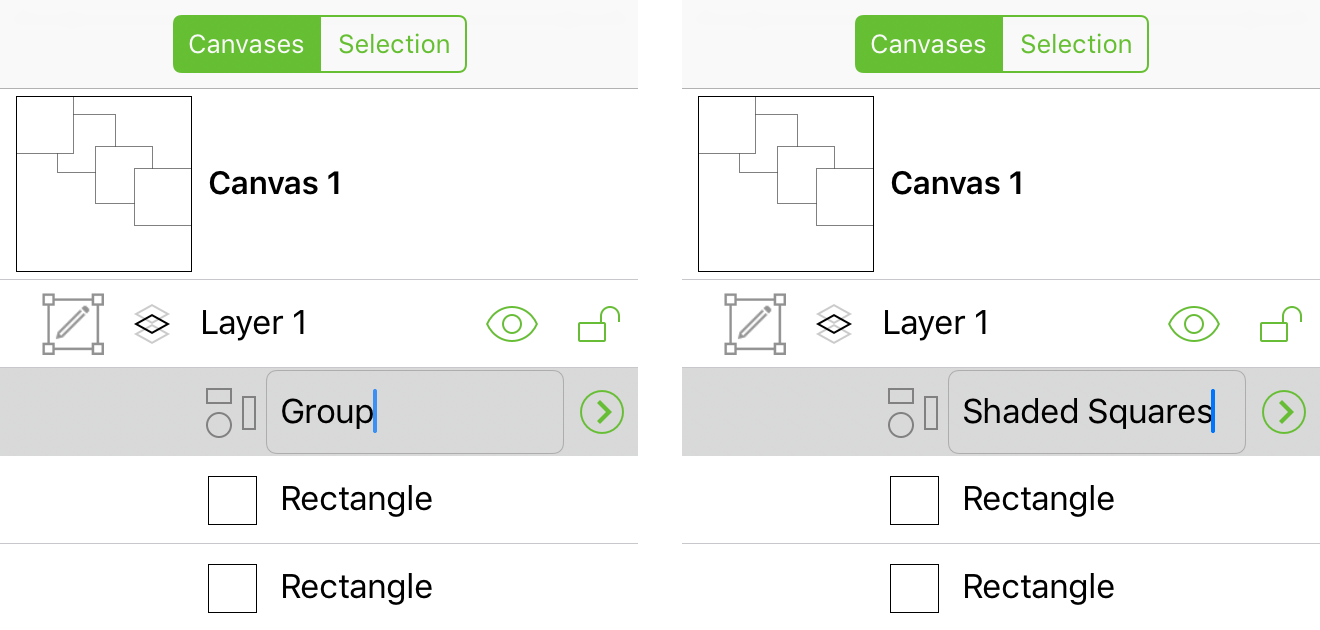
Renaming Canvases, Layers, and Objects
To rename canvases, layers, and objects in the Sidebar, tap the name twice to bring up the keyboard, enter a new name, and then tap Done.
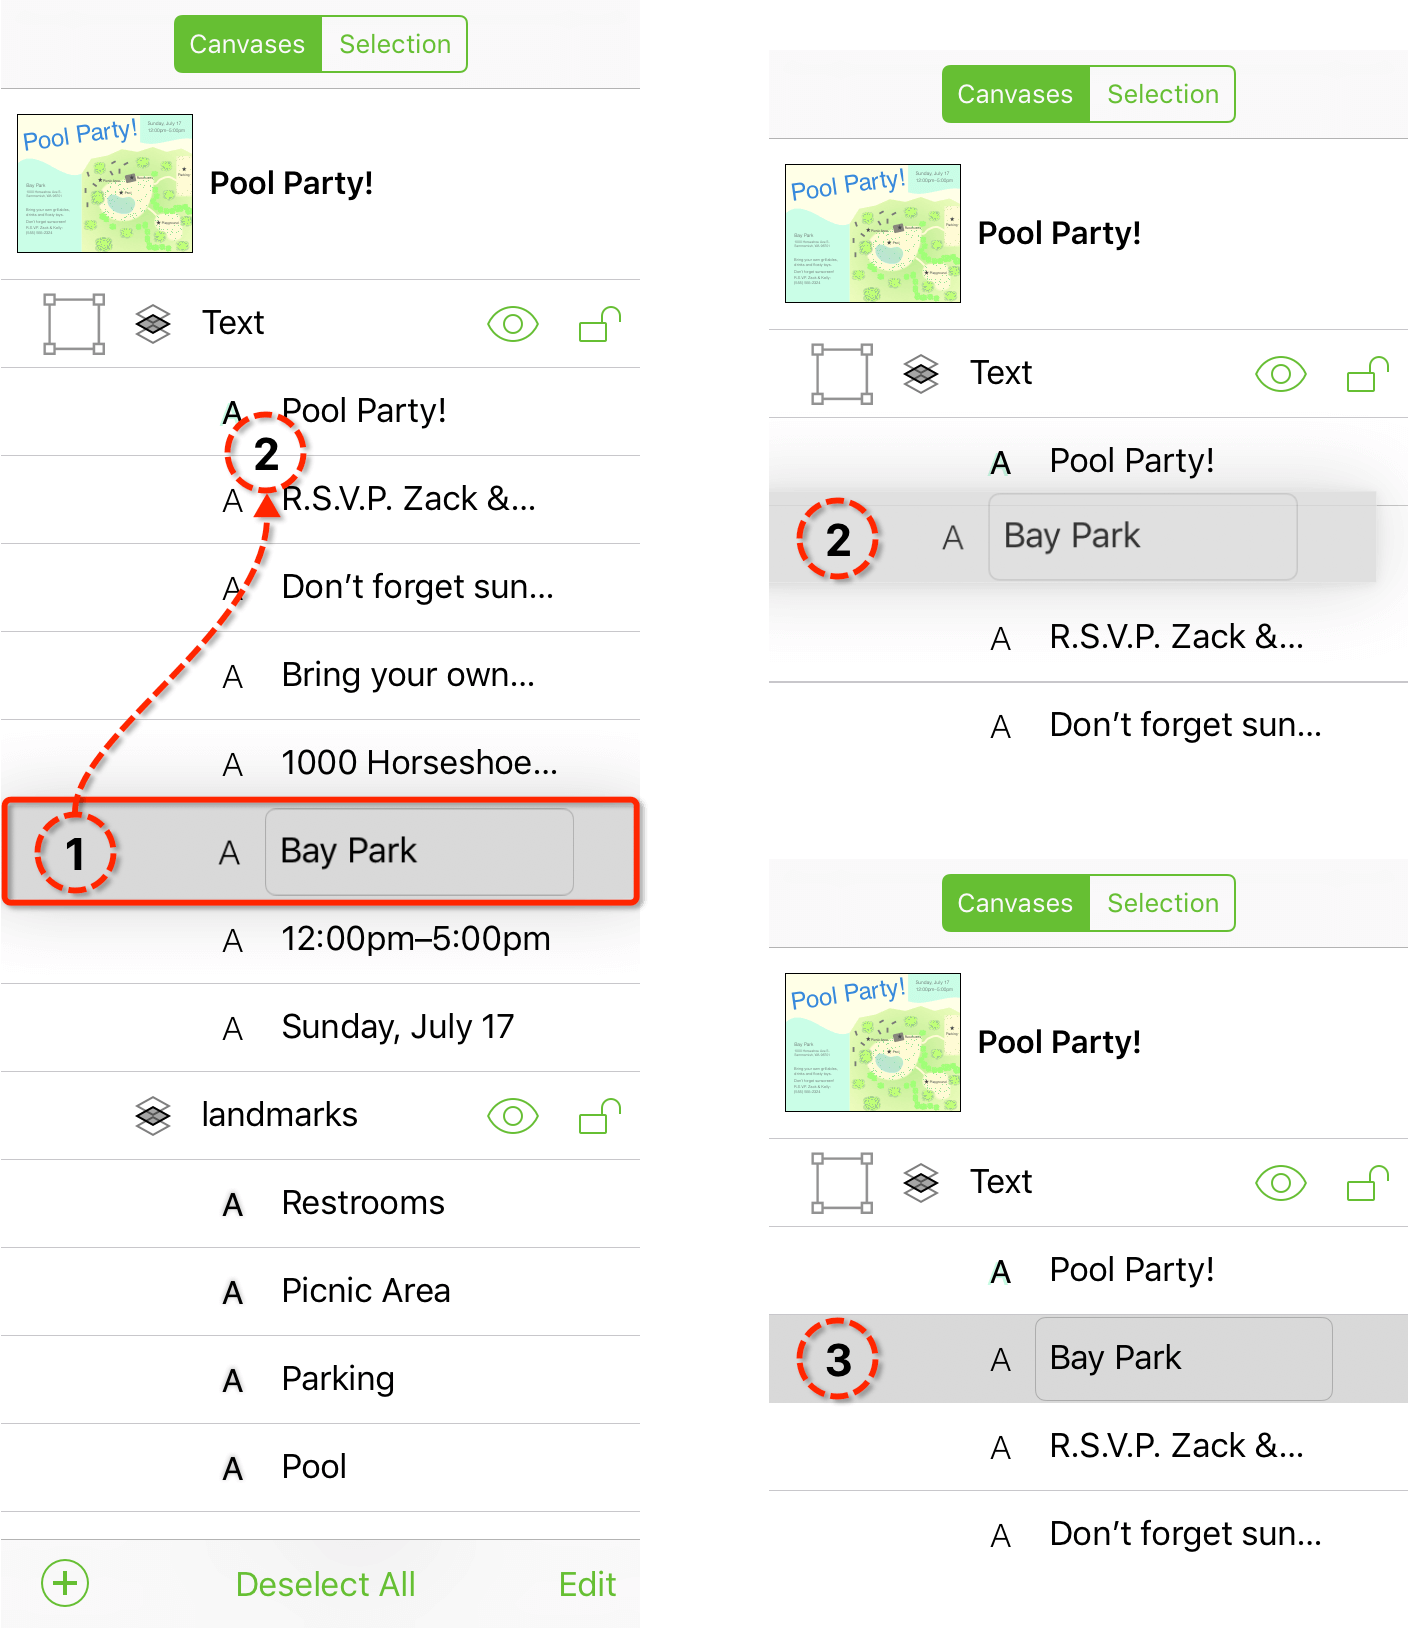
Objects in the Sidebar
When you tap an object in the sidebar, the selection receives a gray highlight in the sidebar, and the object is selected on the canvas.
Tap Deselect All at the bottom of the sidebar to deselect any selected items in the sidebar. To view the objects that make up a table or group, tap  .
.
To reveal an object’s contextual menu from the sidebar, touch and hold on the object until the menu appears.
| Menu Item | Description |
|---|---|
| Cut | Removes the selected object(s) from the canvas and places them on the clipboard for pasting. |
| Copy | Copies the selected object(s) and makes it available on the clipboard for pasting. |
| Paste | Available if something has been copied to the clipboard; pastes the contents of the clipboard at the tapped location. |
| Duplicate | Creates a duplicate of the selected layer, including any objects on that layer. |
| Copy Style | Copies the style of the selected object; the style properties are copied to the clipboard for pasting. |
| Paste Style | Available if the style properties of another object have been copied to the clipboard; pastes the style properties from the clipboard to the selected object(s). |
| Delete | Deletes the selected object(s). |
| Group | When two or more objects are selected, creates a group from those objects. |
| Ungroup | If a group or table is selected, the selection is ungrouped. |
| Zoom to Selection | Zooms in on the selected object(s), filling the canvas view with that object(s). |
| Scroll to Selection | Scrolls the canvas so that the selected object is centered within the canvas view. |
| Lock/Unlock | Locks or unlocks the selected object. |
| Reveal on Canvas | Shows the selected object on the canvas. |
| New Layer from Selection | Creates a new layer with the selected object(s). |
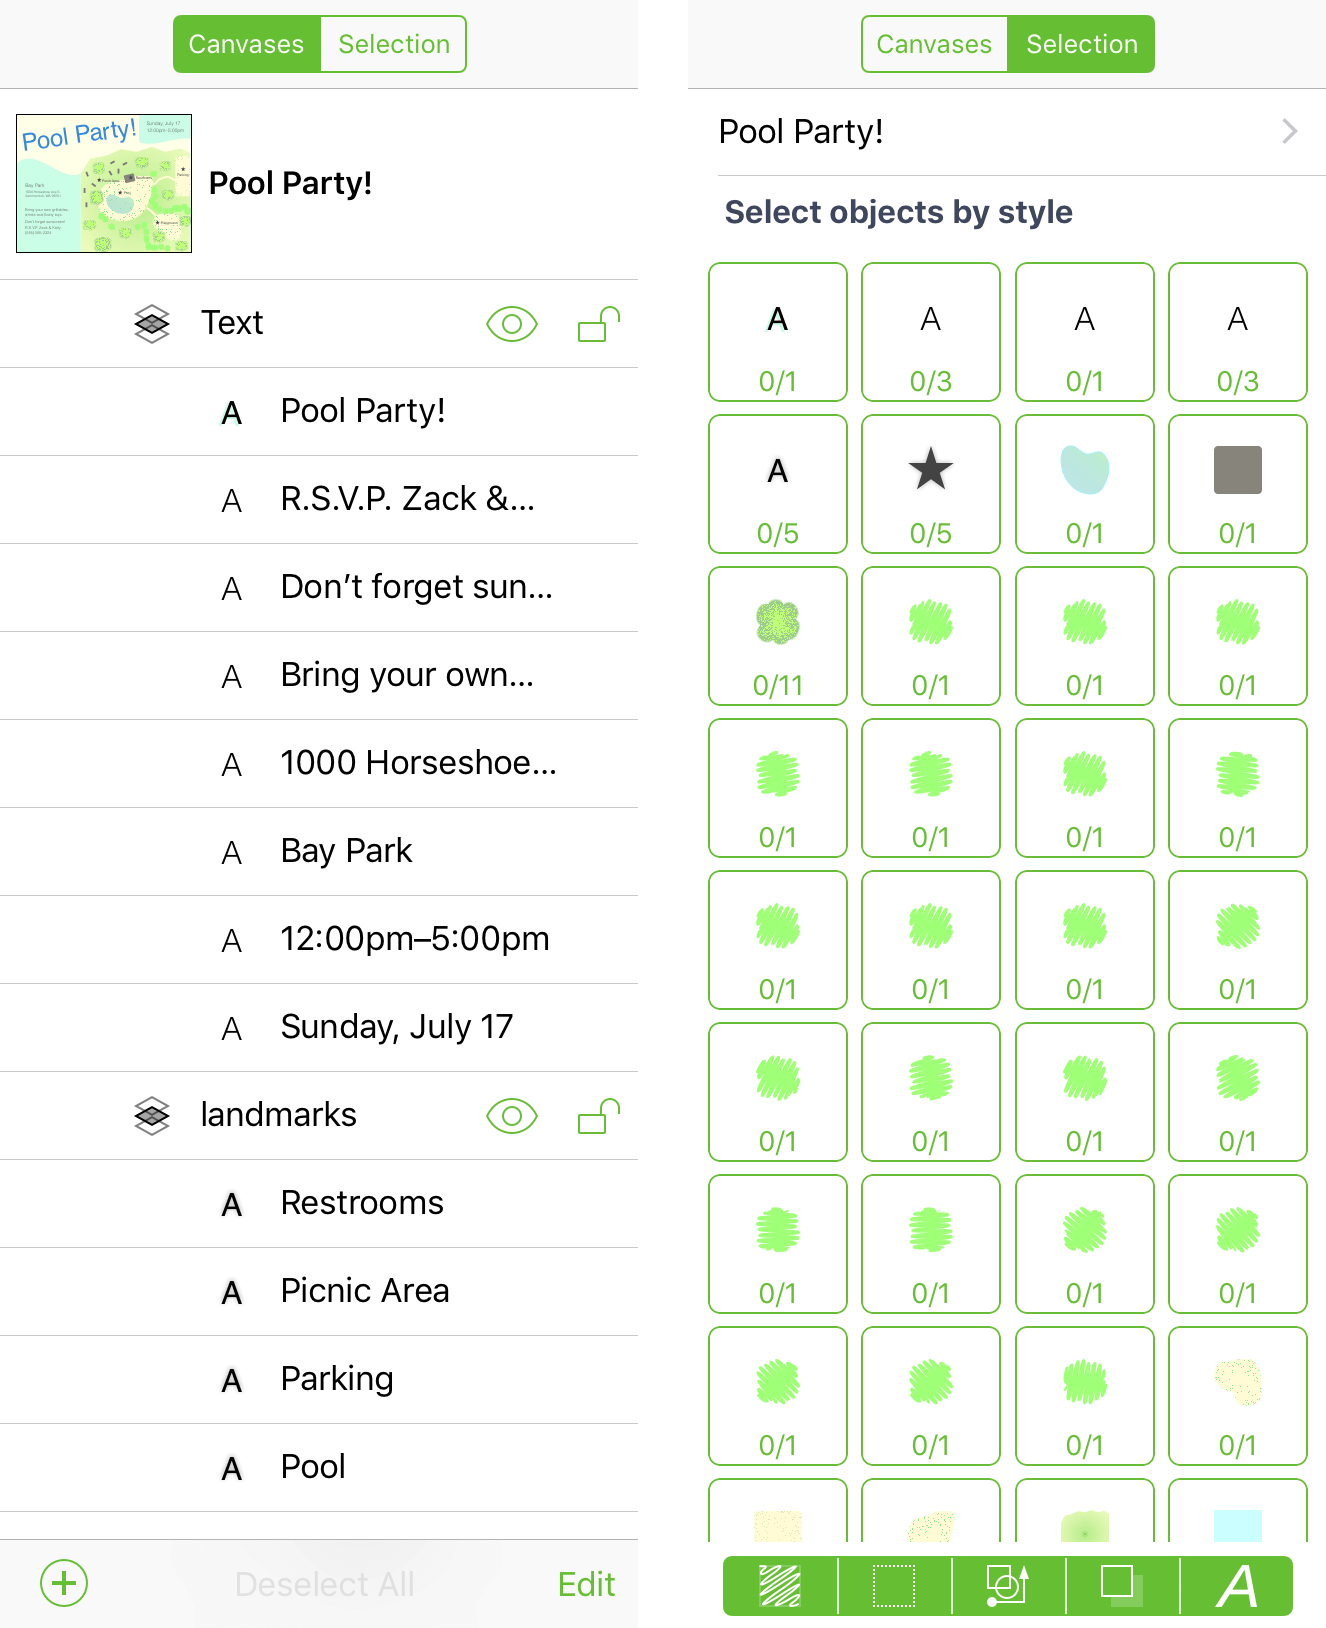
The Selection Sidebar
Use the Selection sidebar to view objects by their type and style properties.
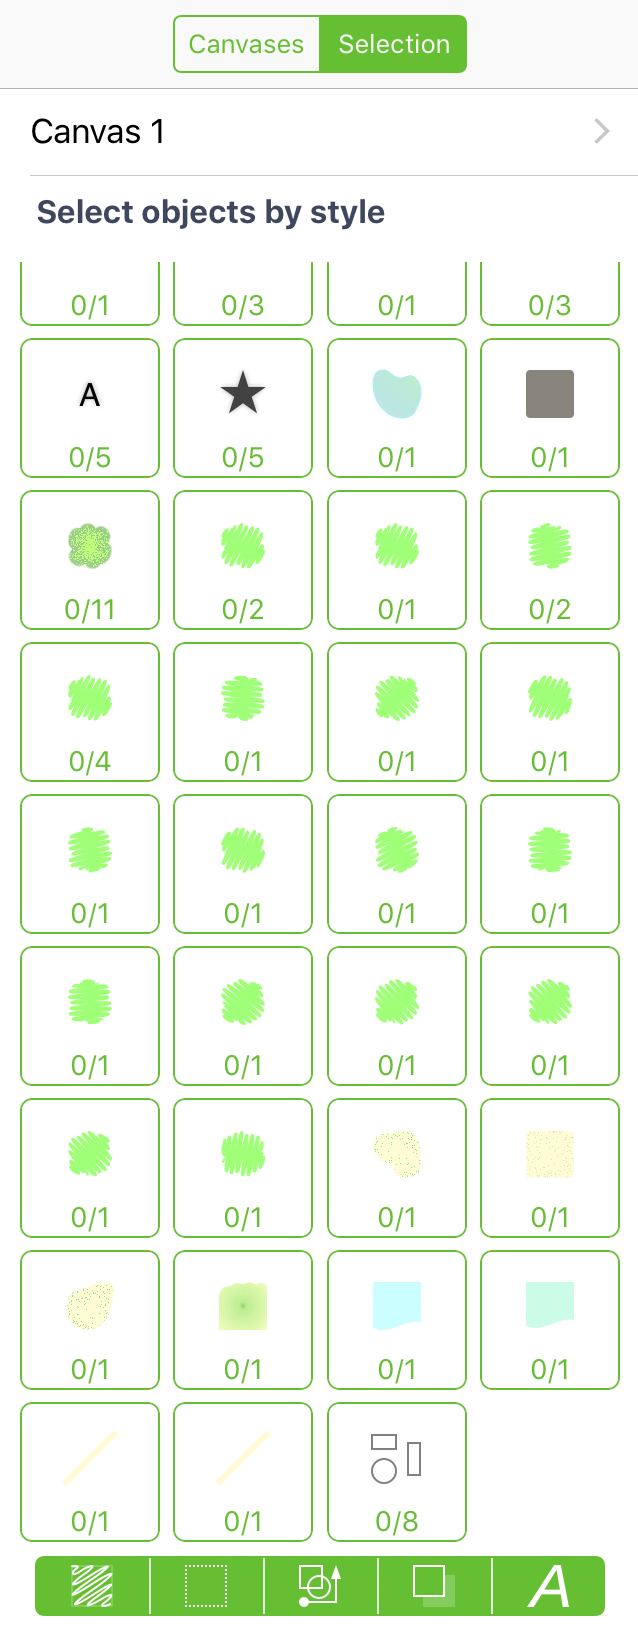
Objects in the document are filtered in the Selection sidebar by their styles, using the Style Filters along the bottom of the sidebar:

Use the Style Filters to choose which object styles are shown in the grid of Style Sets in the middle of the sidebar.
You can turn Style Filters on or off by tapping the filter buttons.
Fill Style 
Filters objects by their fill type and color.
Stroke Style 
Filters objects by their stroke type and color.
Shape and Line Styles 
Filters objects based on their shape type and line styles.
Shadow Style 
Filters objects based on their shadow properties.
Font Style 
Filters objects based on font and text alignment properties.
You can choose how objects are gathered in sets by selecting one or more Style Filters at the bottom of the sidebar. Objects with similar style properties are collected in a Style Set which, when tapped, selects those objects on the canvas.
Selecting a Style Set in the sidebar selects that set’s objects on the canvas, making it easy for you to collectively restyle those objects rather than one at a time.